
If you love air dry clay but you want pieces you’ll actually use every day, you’re in the right headspace. These practical air dry clay ideas are all about easy wins—cute, functional home decor that keeps your little life-clutter neatly contained.
Minimal Catch-All Trinket Dish

Achieve the high-end look of fired ceramic stoneware without the kiln using simple air dry clay. This minimal catch-all dish features organic, slightly imperfect edges and a faux-speckle finish that adds instant warmth and texture to any entryway table.
Detailed Instructions
Materials
- White air dry clay (Das or similar)
- Rolling pin
- Small bowl (for use as a mold)
- Plastic wrap
- Sponge
- Water cup
- Sandpaper (fine and medium grit)
- Acrylic paint white (titanium or warm white)
- Acrylic paint brown (burnt umber or similar)
- Old toothbrush or stiff bristle brush
- Matte finish sealant (spray or varnish)
Step 1: Shaping the Clay
-
Prepare your clay:
Cut off a generous chunk of white air dry clay. Knead it in your warm hands for about a minute until it becomes soft, pliable, and free of any internal cracks. -
Roll it out:
Place the clay on a smooth surface or canvas mat. Use your rolling pin to flatten the clay into a slab that is roughly 1/4 inch thick. Try to keep the thickness consistent across the entire piece. -
Cut the circle:
Find a bowl or round object slightly larger than your desired finished size. Place it upside down on the clay slab and use a craft knife or needle tool to trace and cut out a perfect circle. -
Prepare the mold:
Take the bowl you are using as a mold. To prevent sticking, line the inside of the bowl smoothly with plastic wrap, or lightly dust the outside if you prefer to drape the clay over it (slump mold technique). -
Form the shape:
Gently lift your clay circle and press it into the lined bowl. Focus on pressing the bottom flat first, then gently coax the sides up the walls of the bowl. Don’t worry if the top edge isn’t perfectly straight; that organic wave adds character. -
Refine the rim:
Dip your finger in a little water and run it along the top rim of the clay to smooth out any sharp cutting marks. Since the original image shows a thick, rounded lip, you might want to gently tap the edge down to blunt it slightly. -
Smooth the interior:
Use a slightly damp sponge to wipe the inside of the bowl. This removes fingerprints and creates that smooth, stone-like surface seen in the photo. -
Initial drying:
Let the clay sit in the mold for about 24 hours until it holds its shape on its own. It doesn’t need to be bone dry yet, just leather hard.
Splatter Control
Before speckling your actual dish, practice “flicking” the toothbrush on a piece of scrap paper first. This helps you gauge exactly how much pressure to use.
Step 2: Finishing and Texturing
-
Remove and dry:
Carefully pop the clay out of the mold and peel off the plastic wrap. Set the bowl on a wire rack to allow air to circulate underneath. Let it dry completely for another 24-48 hours until it turns chalky white. -
Sand for perfection:
Once fully dry, sand the entire piece. Start with medium grit to fix major bumps, then switch to fine grit for a silky finish. Pay special attention to the rim—I prefer to sand it in a circular motion to get that nice rounded edge. -
Base coat:
Paint the entire bowl, inside and out, with a warm white acrylic paint. This seals the clay slightly and provides a uniform background color. Let this coat dry completely. -
Prepare the speckle mix:
Put a pea-sized amount of brown acrylic paint on a palette. Add a few drops of water to thin it down until it has an inky, fluid consistency. -
Apply the speckles:
Dip an old toothbrush into the thinned brown paint. Hold the brush over the bowl and run your thumb across the bristles to flick tiny droplets onto the surface. Rotate the bowl as you go to ensure even coverage. -
Control the spray:
Aim for a mix of very fine mist and slightly larger dots, which happens naturally as the brush unloads. If you get a blob that’s too big, quickly dab it with a paper towel. -
Do the outside:
Once the inside is dry to the touch, flip the bowl over and repeat the speckling process on the exterior walls so the look is cohesive. -
Seal the piece:
After the paint is bone dry, apply two thin coats of a matte varnish or spray sealant. This protects the finish from chipping and allows you to wipe the bowl clean if it gets dusty.
Crack Repairs
If hairline cracks appear while drying, don’t panic. Mix a tiny bit of fresh clay with water to make a paste (slip) and fill the crack, then sand smooth once dry.
Now you have a stylish, functional piece of decor ready to keep your keys organized


Leaf-Imprint Ring Dish

Embrace organic shapes with this elegant leaf-style catchall created from speckled air-dry clay. The naturally curved edges and carved vein details give it a minimalist, handmade ceramic look without needing a kiln.
Step-by-Step Tutorial
Materials
- Stone-effect or white air-dry clay
- Rolling pin
- Parchment paper or canvas mat
- Real leaf (sturdy, with prominent veins for tracing shape)
- Small kitchen knife or clay needle tool
- Bowl (for drying/shaping)
- Fine-grit sandpaper (220 grit)
- Matte or satin acrylic varnish
- Small container of water
- Sponge or lint-free cloth
Step 1: Preparation and Shaping
-
Prepare your workspace:
Lay down your canvas mat or parchment paper to prevent sticking. This surface allows you to easily rotate your work without handling the clay directly. -
Roll the clay slab:
Take a handful of clay and knead it briefly to warm it up. Roll it out into an even slab, aiming for a consistent thickness of about 1/4 inch (6mm) to ensure durability. -
Cut the leaf shape:
Using a knife or needle tool, cut a classic ovate leaf shape freehand. It should be wider in the middle and taper to a point at both ends. You can lightly sketch it onto the clay surface first if you feel unsure. -
Smooth the edges:
Dip your finger in a little water and run it gently along the cut edges. This repairs any micro-tears from the cutting tool and creates that refined, professional rim seen in the photo.
Cracking Up?
If small cracks appear while drying, mix a tiny amount of fresh clay with water to make a paste (slip). Fill the cracks, smooth over, and let dry again.
Step 2: Detailing and Forming
-
Carve the center vein:
Using your needle tool or the back of a knife, draw a long, slightly curved line down the center of the shape, stopping just short of the tips. -
Add lateral veins:
Carve angled lines branching out from the center line. Keep your pressure light but firm to displace the clay slightly without cutting all the way through. -
Clean up the carving:
Your carving might create small burrs or crumbs of clay. Gently brush these away or smooth them down with a slightly damp finger so the lines remain clean and crisp. -
Create the curve:
Now, carefully lift the clay leaf. You want to give it a gentle, upward curve to hold jewelry. I usually drape it inside a shallow bowl or over a curved object, letting gravity help form natural sides. -
Refine the form:
While it sits in the drying mold, press gently in the center to ensure the bottom isn’t too rounded, or it will rock when finished. You want a subtle curve, not a deep bowl.
Step 3: Finishing Touches
-
Let it dry completely:
Place the dish in a safe spot away from direct heat. Let it air dry for at least 24-48 hours. The speckled clay will lighten significantly as the moisture evaporates. -
Sand the imperfections:
Once fully dry and hard, take your fine-grit sandpaper and very gently go over the rim. This removes any final sharp edges or unevenness from the initial cutting phase. -
Dust off debris:
Wipe the creative dust away with a dry brush or cloth. Ensure the carved grooves are free of sanding dust before sealing. -
Apply the first coat of varnish:
Using a soft brush, apply a thin layer of matte varnish. This seals the porous clay and brings out the contrast of the speckles. -
Seal the underside:
Once the top is touch-dry, flip the dish over and seal the bottom. This is crucial for preventing moisture absorption later on. -
Final coat:
Apply a second coat to the top surface for extra durability against metal rings and keys.
Make it Speckled
Can’t find stone-effect clay? Mix black pepper or used dried coffee grounds into standard white clay. Knead thoroughly for that organic, granite look.
Now you have a serene, nature-inspired spot to keep your favorite rings safe


Simple Ring Cone Holder
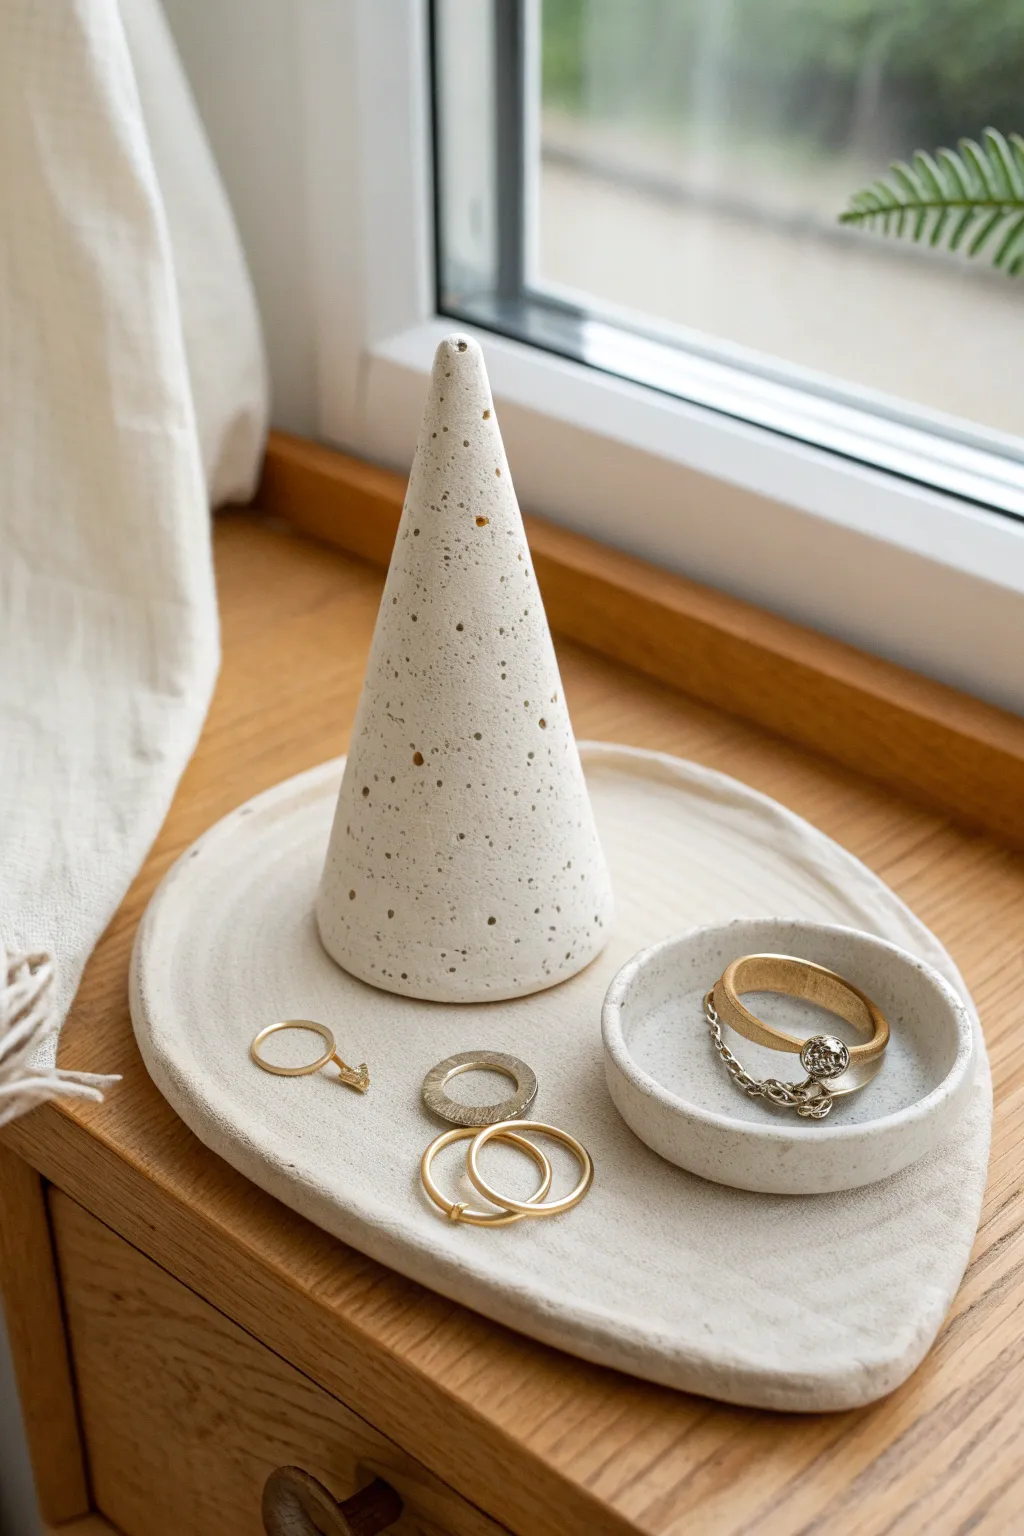
Elevate your dresser with this modern, minimalist jewelry display that mimics expensive terrazzo or speckled stoneware. This project combines a functional ring cone, a catch-all tray, and a petite bowl into a cohesive set perfect for organizing your daily accessories.
Step-by-Step
Materials
- White air dry clay (approx. 500g)
- Acrylic rolling pin
- Sharp craft knife or scalpel
- Cup of water
- Sponge or paintbrush
- Fine-grit sandpaper (220-400 grit)
- Acrylic paint (black/dark brown for speckles)
- Old toothbrush or stiff bristle brush
- Matte varnish or sealant
- Optional: Canvas cloth or parchment paper (work surface)
Step 1: The Ring Cone
-
Condition the clay:
Begin by grabbing a handful of clay and kneading it warmly in your hands to activate the fibers and make it pliable. -
Form the base shape:
Roll a ball of clay roughly the size of a golf ball, then place it on your work surface and begin rolling it back and forth. -
Create the taper:
As you roll, apply more pressure to one side of the cylinder to create a tapered cone shape. -
Flatten the bottom:
Stand the cone upright and firmly press it down onto your table to create a perfectly flat base so it won’t wobble. -
Smooth imperfections:
Dip your finger in a little water and gently run it over the cone to erase any fingerprints or seams, ensuring a sleek finish.
Stone Effect Tip
For added realism, mix dried coffee grounds or black pepper directly into the wet clay before sculpting. This creates internal texture rather than just surface paint.
Step 2: The Tray and Bowl
-
Roll out the slab:
Take a larger chunk of clay and roll it out until it is about 1/4 inch thick. I find using guide sticks on either side helps keep the thickness even. -
Cut the organic shape:
Using your craft knife, freehand cut a large, organic oval shape for the main tray. It doesn’t need to be perfect; the wabi-sabi look is part of the charm. -
Smooth the edges:
Dip your sponge in water and run it along the cut edge to round it off and remove any sharpness from the knife cut. -
Create the mini bowl:
Roll a smaller ball of clay, flatten it into a thick disc, and use your thumbs to gently pinch up the sides to form a small wall. -
Refine the bowl shape:
Place the small bowl onto the table and press the bottom flat inside, smoothing the interior walls with a wet fingertip. -
Let it dry:
Set all three pieces aside in a cool, dry place for at least 24-48 hours. Turn them over halfway through so the bottoms dry evenly.
Step 3: Texturing and Finishing
-
Sand for smoothness:
Once fully dry, use fine-grit sandpaper to buff away any bumps or rough edges on all three pieces. Wipe away the dust with a slightly damp cloth. -
Prepare the speckle mix:
Dilute a small amount of black or dark brown acrylic paint with water until it has an inky consistency. -
Apply the speckles:
Dip an old toothbrush into the paint mixture. Hold it over your clay pieces and run your thumb across the bristles to flick tiny splatters of paint onto the surface. -
Control the density:
Practice on a piece of paper first to get the splatter size right, then apply lightly for a minimal look or layer it for a denser stone effect. -
Seal the deal:
Wait for the paint speckles to dry completely, then apply two thin coats of matte varnish to protect your new jewelry holders from moisture and stains.
Cracking Issues?
If you see tiny cracks while drying, mix a small amount of clay with water to make a paste (slip) and fill them in immediately, then smooth over.
Arrange your favorite rings and chains on your new set and enjoy the calm, organized vibe it brings to your space


Soft-Edged Jewelry Tray
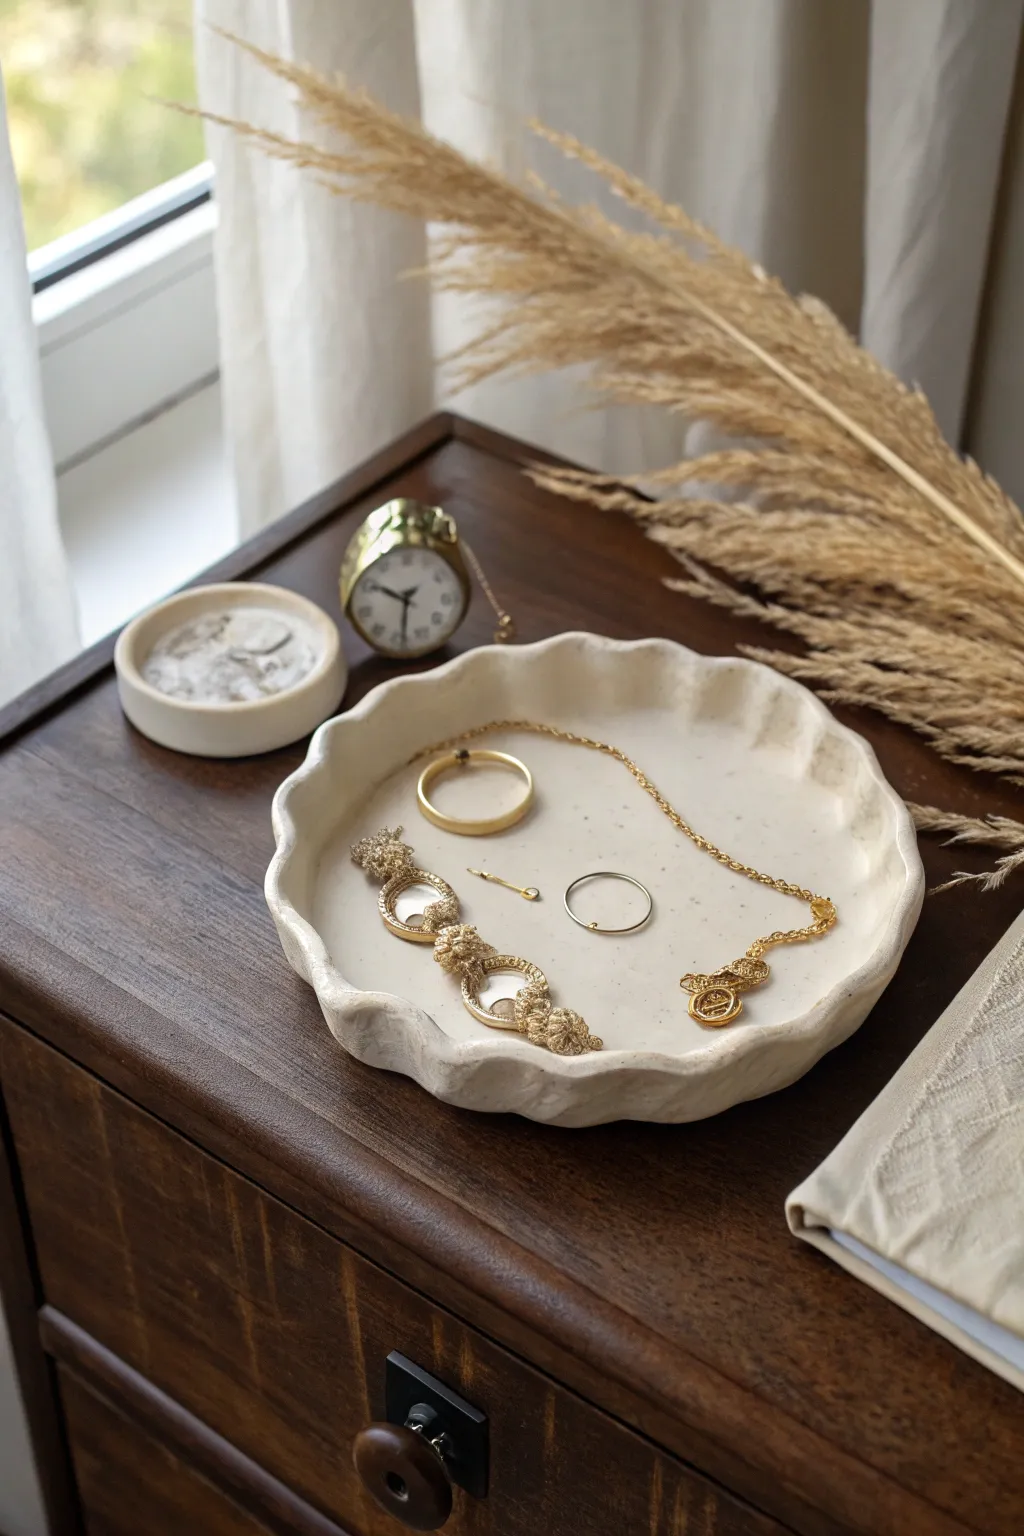
Embrace the effortless beauty of organic shapes with this ruffled jewelry tray, perfect for displaying your favorite gold pieces. Its soft, undulating edges and natural stone-like texture bring a sense of calm elegance to any nightstand or dresser.
Detailed Instructions
Materials
- White or cream air-dry clay (stone effect optional)
- Rolling pin
- Parchment paper or canvas mat
- Round bowl or plate (approx. 6-8 inches diameter) to use as a template
- Sharp craft knife or clay needle tool
- Small bowl of water
- Sponge or fine-grit sandpaper
- Acrylic matte varnish or sealant
- Soft paintbrush
Step 1: Shaping the Base
-
Condition the clay:
Start by taking a large handful of air-dry clay. Knead it thoroughly in your hands to warm it up and remove any air bubbles, ensuring the texture is smooth and pliable. -
Roll it out:
Place the clay on a sheet of parchment paper or a canvas mat to prevent sticking. Use your rolling pin to flatten the clay into an even slab, aiming for a thickness of about 1/4 inch (6mm) for durability. -
Cut the circle:
Place your round bowl or plate upside down onto the clay slab to serve as a cutting guide. Using your craft knife or needle tool, carefully trace around the edge of the bowl to cut out a perfect circle. -
Smooth the edges:
Lift away the excess clay. Dip your finger into a little water and gently run it along the cut rim of the circle to smooth out any sharp angles or rough texture left by the knife.
Keep it Organic
Don’t stress about perfect symmetry. The charm of this piece lies in its slight imperfections and relaxed, uneven wavy rim.
Step 2: Creating the Ruffles
-
Lift the edges:
Gently lift the edges of the clay circle upwards. You aren’t making a steep wall, but rather a shallow, sloping lip to keep jewelry contained. -
Form the waves:
Using your thumb and forefinger, gently pinch sections of the rim to create soft undulations. Push in with one finger while supporting the clay from the outside to create a rhythmic, wavy pattern. -
Refine the shape:
Work your way around the entire circumference. I like to make the waves slightly irregular—some wider, some tighter—to enhance the organic, handmade aesthetic shown in the photo. -
Smooth imperfections:
Check the interior surface for any fingernail marks or uneven spots. Use a slightly damp sponge to buff the inside surface until it looks silky smooth.
Speckled Stone Look
Mix dried tea leaves or cracked black pepper into your white clay before rolling to mimic the natural speckled texture seen in the image.
Step 3: Drying and Finishing
-
Slow drying:
Leave the tray on the parchment paper to dry. To prevent warping, place a light piece of plastic wrap loosely over the top for the first 12 hours to slow the drying process. -
Flip and dry:
After about 24 hours, when the top feels firm and leather-hard, carefully flip the tray over so the bottom can dry completely. Total drying time may take 24-48 hours depending on humidity. -
Sanding:
Once bone dry, use fine-grit sandpaper to gently smooth the rim and any rough patches on the bottom. Wipe away the dust with a barely damp cloth or dry brush. -
Sealing:
Apply a thin coat of matte acrylic varnish to the entire piece. This protects the clay from moisture and gives it a finished, professional look without making it too shiny. -
Second coat:
Let the first coat dry completely, then add a second layer of sealant for extra durability, especially if you plan to keep this in a humid bathroom environment.
Once sealed and dry, your tray is ready to organize your daily treasures with a touch of artisan style

What Really Happens Inside the Kiln
Learn how time and temperature work together inside the kiln to transform clay into durable ceramic.
Sectioned Desk Organizer Tray
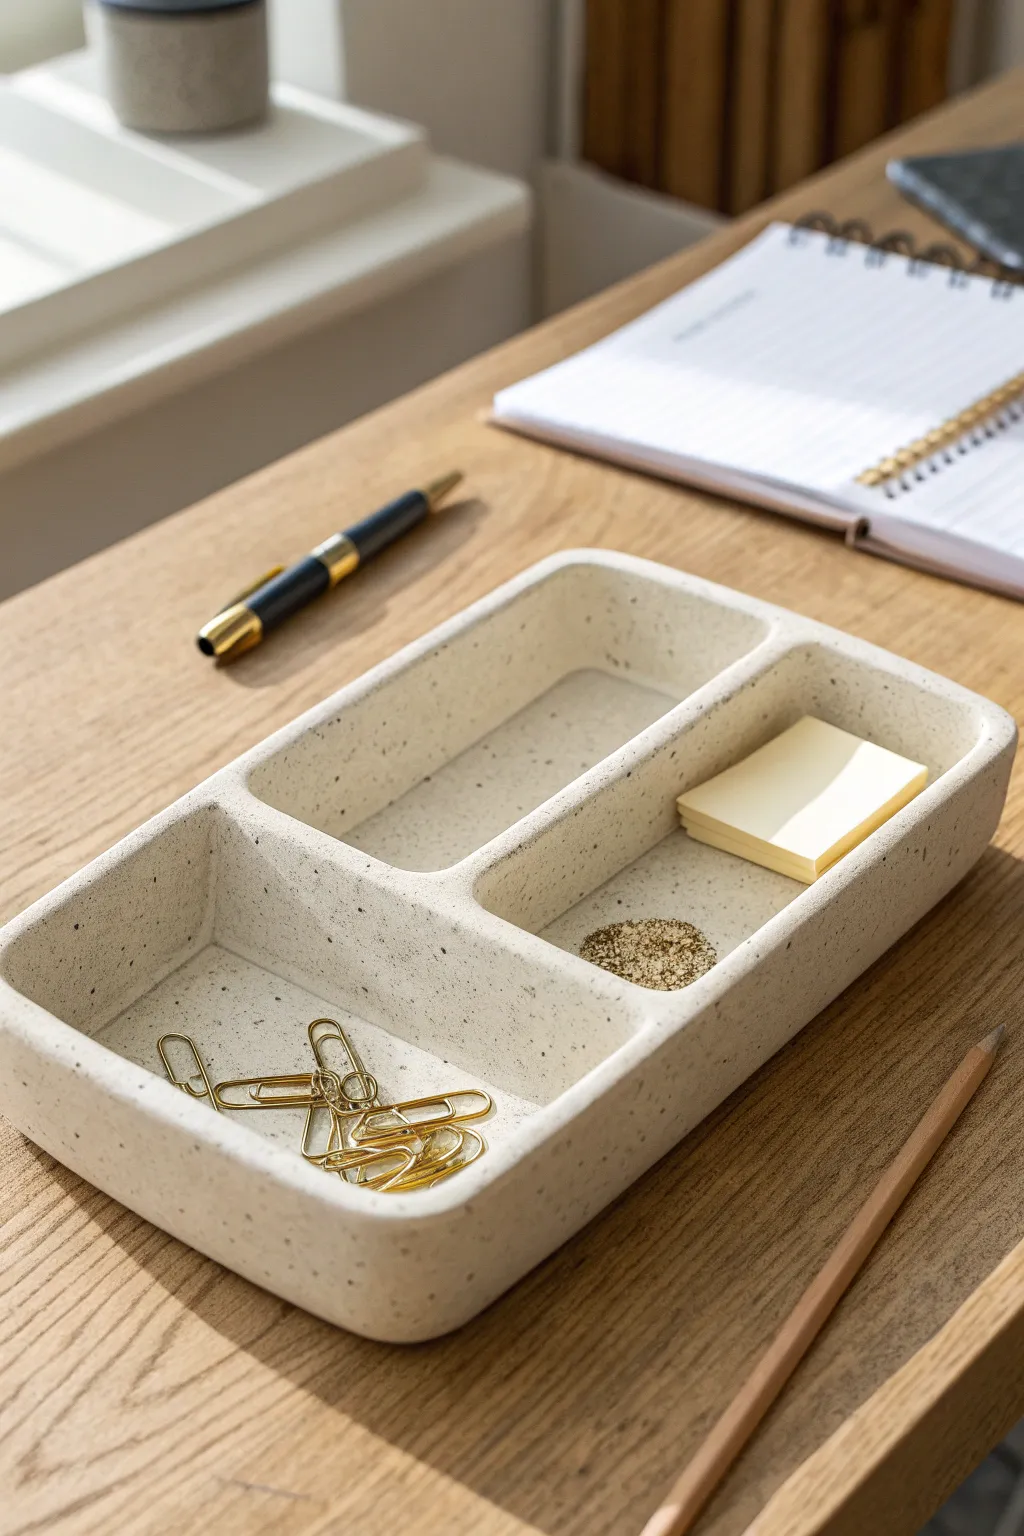
Elevate your workspace with this minimalist sectioned organizer that mimics the look of high-end terrazzo or granite. Using air dry clay and a simple slab-building technique, you can create a perfectly sized home for your scattered paperclips and sticky notes.
Step-by-Step Guide
Materials
- Air dry clay (white)
- Acrylic rolling pin
- Craft knife or clay cutter
- Ruler
- Small bowl of water
- Sandpaper (medium and fine grit)
- Acrylic paint (cream/off-white)
- Old toothbrush
- Brown or black acrylic paint (for speckles)
- Matte varnish or sealant
Step 1: Creating the Base and Walls
-
Roll the slab:
Begin by rolling out a large portion of your air dry clay on a clean, flat surface. Aim for a uniform thickness of about 1/4 inch to ensure the tray is sturdy but elegant. -
Cut the base:
Using your ruler and craft knife, measure and cut a large rectangle. For the tray shown, a size of approximately 5 inches by 8 inches works well, but feel free to adjust to fit your desk. -
Cut wall strips:
From the remaining rolled clay, cut long strips that will serve as the outer walls and inner dividers. These should be the same thickness as the base and about 1 inch tall. -
Attach outer walls:
Score the edges of your base rectangle and the bottom edge of your wall strips. Apply a little water or ‘slip’ (water mixed with clay) to the scored areas. -
Secure the perimeter:
Press the wall strips firmly onto the base to create the outer frame. Use your fingers or a modeling tool to smooth the seams on both the inside and outside so the clay looks like one solid piece.
Smooth Seams
Use a wet paintbrush to smooth the inside corners where your fingers can’t reach. It acts like a mini mop to blend the clay seams perfectly.
Step 2: Adding Dividers and Finishing
-
Measure the inserts:
Decide on your layout. The example features one long section on top and two smaller square sections below. Measure the interior space to cut your divider strips to the perfect length. -
Install dividers:
Score, slip, and attach the divider clay strips inside the frame. I find using a small flat tool helps to smooth into those tight corners where the dividers meet the walls. -
Soften edges:
Dip your finger in water and run it along the top rim of all the walls to round them off slightly. This prevents sharp edges once dried. -
Let it dry:
Allow the tray to dry completely. This usually takes 24-48 hours depending on humidity. Flip it over halfway through if possible to let the bottom breathe. -
Sand smooth:
Once bone dry, use sandpaper to buff away any fingerprints or uneven bumps. Start with medium grit and finish with fine grit for a professional surface.
Level Up
Before drying, press a texture mat or real leaves into the bottom of the tray sections for a subtle, embossed surprise when you lift your office supplies.
Step 3: Faux Stone Effect
-
Base coat:
Paint the entire tray with two coats of cream or off-white acrylic paint, letting it dry fully between layers. -
Prepare splatter paint:
Dilute a small mount of brown or black acrylic paint with water until it is quite fluid, almost ink-like. -
Apply speckles:
Dip an old toothbrush into the diluted paint. Hold it over the tray and run your thumb across the bristles to flick tiny speckles onto the surface. -
Vary density:
Add fewer speckles in some areas and more in others to create a natural stone appearance. Let the paint dry completely. -
Seal:
Finish by applying a coat of matte varnish. This protects the paint from scratching and gives the tray a finished, ceramic-like feel.
Your sophisticated desk organizer is now ready to bring order and style to your workday
Pencil Cup With Texture Bands
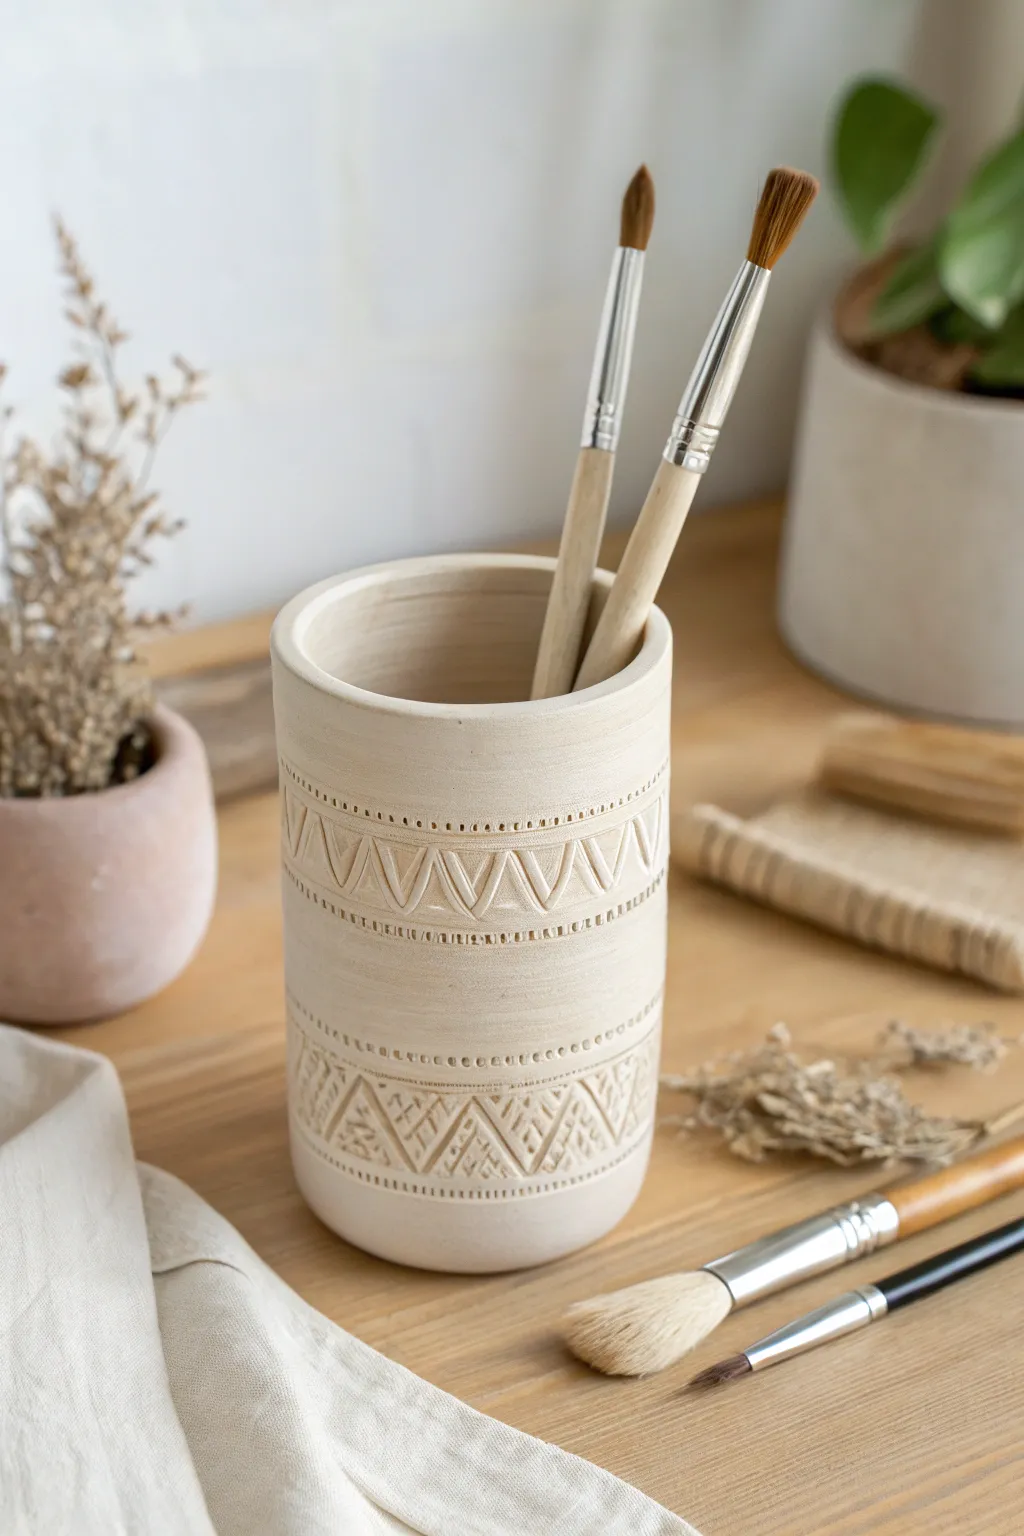
Transform simple air dry clay into a stunning, minimalist desk accessory that looks like high-end ceramic. This project features delicate geometric bands carved into a smooth cylinder, perfect for holding your favorite brushes or pens.
Step-by-Step
Materials
- Air dry clay (white or cream)
- Rolling pin
- Sturdy cylindrical mold (glass jar or cardboard tube)
- Parchment paper or cling film
- Craft knife
- Needle tool or toothpick
- Carving tools (small loops or V-gouges)
- Small sponge
- Water in a small bowl
- Sandpaper (fine grit)
- Matte sealant or varnish
Step 1: Forming the Cylinder
-
Prepare your workspace:
Lay down a sheet of parchment paper to protect your surface and prevent sticking. Knead a large ball of air dry clay until it feels pliable and warm in your hands. -
Roll the slab:
Using your rolling pin, flatten the clay into a long rectangular slab. Aim for an even thickness of about 1/4 inch (6mm) to ensure the cup is sturdy but sleek. -
Prep the mold:
Wrap your cylindrical mold (like a jar or tube) with parchment paper or cling film. This crucial step ensures the clay won’t fuse to the mold as it dries. -
Cut the clay:
Measure the height and circumference of your mold. Use a ruler and craft knife to cut a clean rectangle from your clay slab that precisely matches these dimensions, adding just a tiny bit of overlap for the seam. -
Wrap the cylinder:
Carefully lift the clay rectangle and wrap it around the prepared mold. Bring the two edges together. -
Seal the seam:
Score the touching edges (scratch them up a bit) and add a dab of water. Press them firmly together and smooth the seam with your finger until it disappears completely. -
Create the base:
Roll out a small separate piece of clay. Place your wrapped mold on top and trace around the bottom with a needle tool to cut a perfect circle for the base. -
Attach the base:
Score the edges of the base and the bottom rim of your cylinder. Add slip (water/clay paste), press the base into place, and blend the clay upwards into the walls so it’s seamless.
Cracks Appearing?
If small cracks form while drying, mix a tiny amount of fresh clay with water to make a paste. Fill the cracks, smooth over, and let dry again.
Step 2: Adding Texture & Finishing
-
Initial smoothing:
Dip a small sponge in water and run it over the entire surface of the cup to remove any fingerprints or roughness. Let the clay sit for about 30-60 minutes until it’s leather-hard—firm to the touch but not dry. -
Mark the bands:
Using a ruler or simply eyeing it, lightly scratch two pairs of horizontal parallel lines around the circumference. Create one band near the top third and one near the bottom third. These will guide your pattern. -
Define the borders:
Use a needle tool to press small, evenly spaced dots along the horizontal lines you just drew. This creates that charming beaded border effect seen in the photo. -
Carve the triangles:
In the space between your dotted borders, use a carving tool or needle to scratch in a repeating zigzag pattern. I like to go over the lines twice to make them deep and readable. -
Add inner details:
Inside each of the upward-pointing triangles you just carved, add smaller ‘V’ shapes or vertical notches to mimic the intricate texture in the example image. -
Texture the lower band:
Repeat the zigzag and interior detail process on the lower band of the cup. Try to align the points of the triangles with the band above for a cohesive look. -
Smooth the rim:
Check the top rim of the cup. If it feels sharp or uneven, dampen your finger and gently round it off for a professional finish. -
Slow drying:
Let the piece dry with the mold inside for at least 24 hours. Once the outside feels dry, carefully slide the mold out and let the inside dry for another 24-48 hours. -
Sanding:
Once bone dry, take your fine-grit sandpaper and gently buff away any remaining rough spots or sharp edges, being careful not to sand down your beautiful texture. -
Seal and protect:
Apply a coat of matte varnish or sealant. This protects the clay from moisture and gives it that finished ceramic appearance without making it too shiny.
Make It Glossy
For a glazed ceramic look, swap the matte varnish for a high-gloss acrylic sealer, or paint the inside a contrasting color like sage green or terracotta.
Place your finished textural masterpiece on your desk and enjoy the handmade charm every time you reach for a brush


The Complete Guide to Pottery Troubleshooting
Uncover the most common ceramic mistakes—from cracking clay to failed glazes—and learn how to fix them fast.
Phone Stand With a Clean Groove
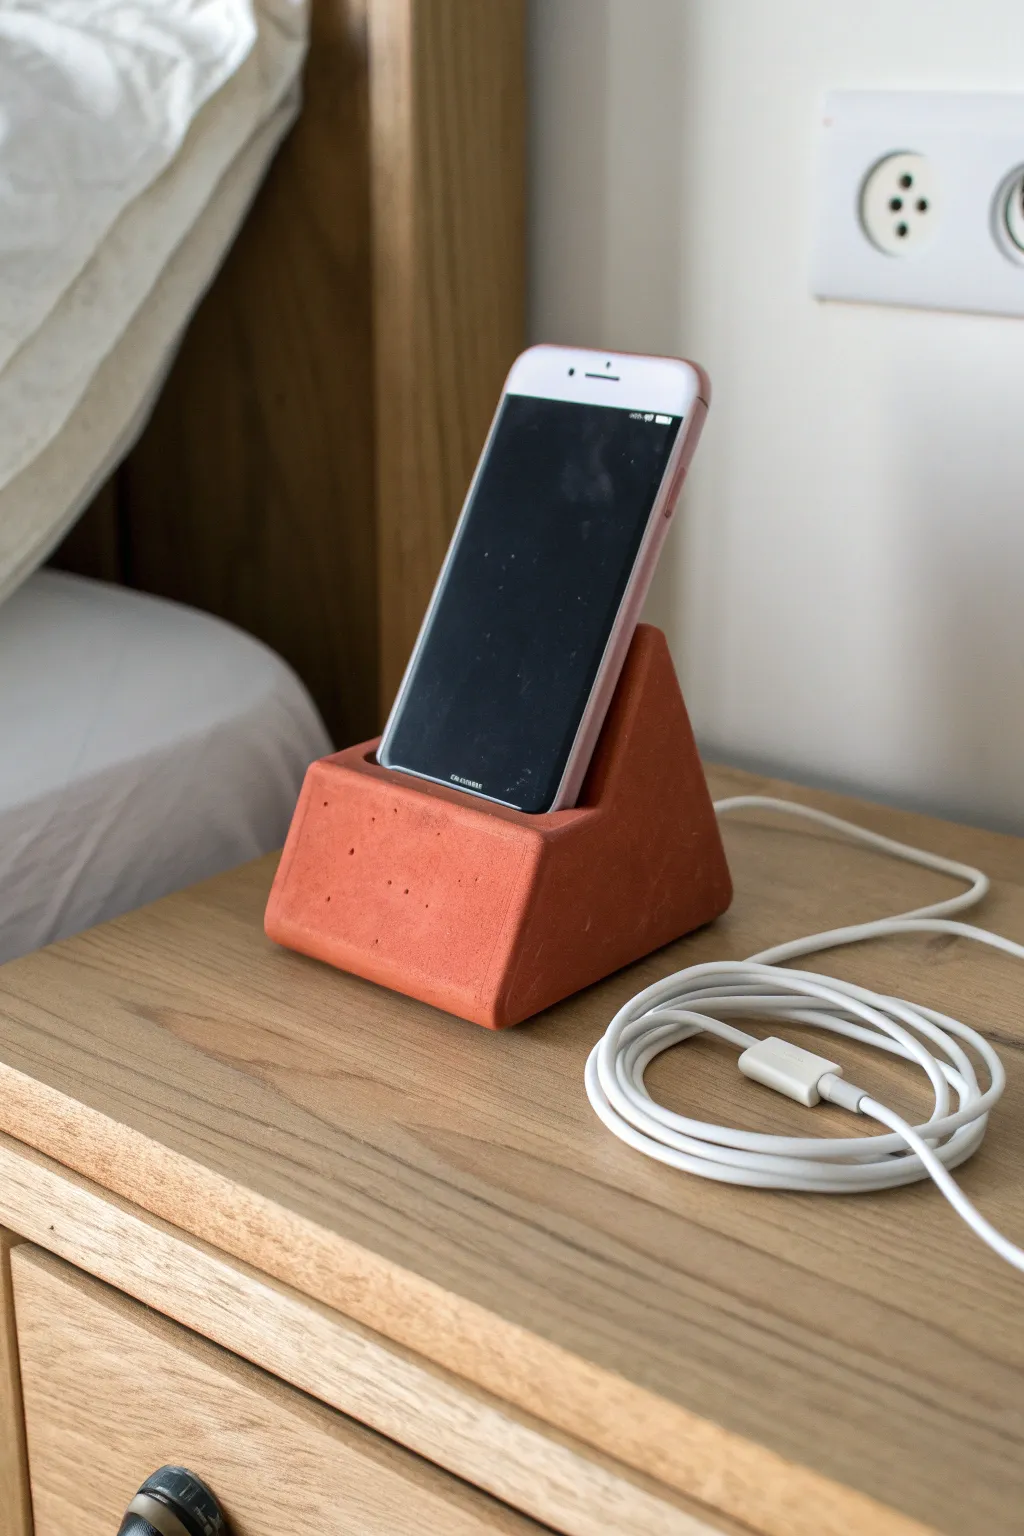
This minimalist phone stand combines a warm, terracotta hue with sharp geometric lines for a modern bedside or desk accessory. The sturdy triangular form holds your device securely at the perfect viewing angle, while the grooved design keeps things simple and functional.
Step-by-Step Tutorial
Materials
- Air dry clay (terracotta color or white)
- Ruler
- Sharp crafting knife or clay blade
- Rolling pin
- Sandpaper (fine and medium grit)
- Small bowl of water
- Acrylic paint (burnt orange/terracotta) – if using white clay
- Matte varnish or sealant
- Phone (for sizing reference)
Step 1: Shaping the Base Block
-
Condition the Clay:
Start by taking a substantial chunk of air dry clay. Knead it thoroughly in your hands to warm it up and remove any potential air bubbles, which helps prevent internal cracking later. -
Form a Rough Block:
Shape the kneaded clay into a rectangular brick shape. It needs to be wider than your phone and deep enough to provide stability. -
Define the Triangle:
Place the block on your work surface. Use your hands to gently push the top face into a slope, creating a right-angled wedge or a ramp shape. The back should be vertical, and the bottom should sit flat. -
Sharpen the Angles:
Use a rolling pin or a flat board to press against the sides and the sloped face. This ensures your ‘ramp’ has crisp, flat planes rather than rounded, organic edges. -
Slice the Sides:
To get perfectly straight sides, take your sharp blade or knife and slice off the uneven ends of the wedge. This reveals the clean profile of the clay.
Fixing Cracks
If small cracks appear during drying, fear not! Mix a tiny amount of fresh clay with water to make a paste (slip) and fill the cracks. Sand it smooth once dry.
Step 2: Creating the Groove
-
Mark the Slot:
Use your phone (or a ruler) to gently mark where the groove should go on the sloped face. It should be positioned low enough that the phone won’t tip over backward. -
Cut the First Line:
Using your knife, make a straight cut perpendicularly down into the slope. You want this to be vertical relative to the desk surface, not perpendicular to the slope. -
Widen the Channel:
Make a second cut parallel to the first, just a few millimeters away (slightly wider than your phone’s thickness). Remove the strip of clay between these cuts. -
Test the Fit:
Very gently test the fit with your phone. Since the clay shrinks when drying, make the slot slightly looser than necessary. -
Smooth the Inside:
Dip your finger or a small tool in water and run it through the groove to smooth out any rough clay debris from the cutting process.
Cord Management
Before drying, use a straw to punch a hole through the bottom of the groove out the back. This lets you thread a charging cable through for a tidy setup.
Step 3: Refining and Finishing
-
Initial Smoothing:
With a damp finger, go over the entire exterior surface. Smooth out any fingerprints or knife drag marks, paying special attention to the corners. -
Poke Texture (Optional):
If you want the faux-concrete look seen in the photo, use a needle tool or toothpick to add a few random, tiny pinholes on the front face. -
Slow Drying:
Place the stand in a cool, dry spot away from direct sunlight. Let it dry slowly for 24-48 hours. I like to flip it occasionally so the bottom dries evenly. -
Sanding:
Once fully cured and hard, use medium grit sandpaper to flatten the bottom and sharpen the geometric edges. Switch to fine grit for a smooth finish. -
Painting:
If you didn’t use terracotta-colored clay, mix burnt orange, a touch of red, and a little brown acrylic paint. Apply two even coats to achieve that warm, clay-pot look. -
Sealing:
Finish with a coat of matte varnish. This protects the phone stand from scratches and gives it a professional, finished appearance without being too shiny.
Place your phone in its new home and enjoy the satisfaction of a handmade, modern organization piece
Photo and Card Display Block
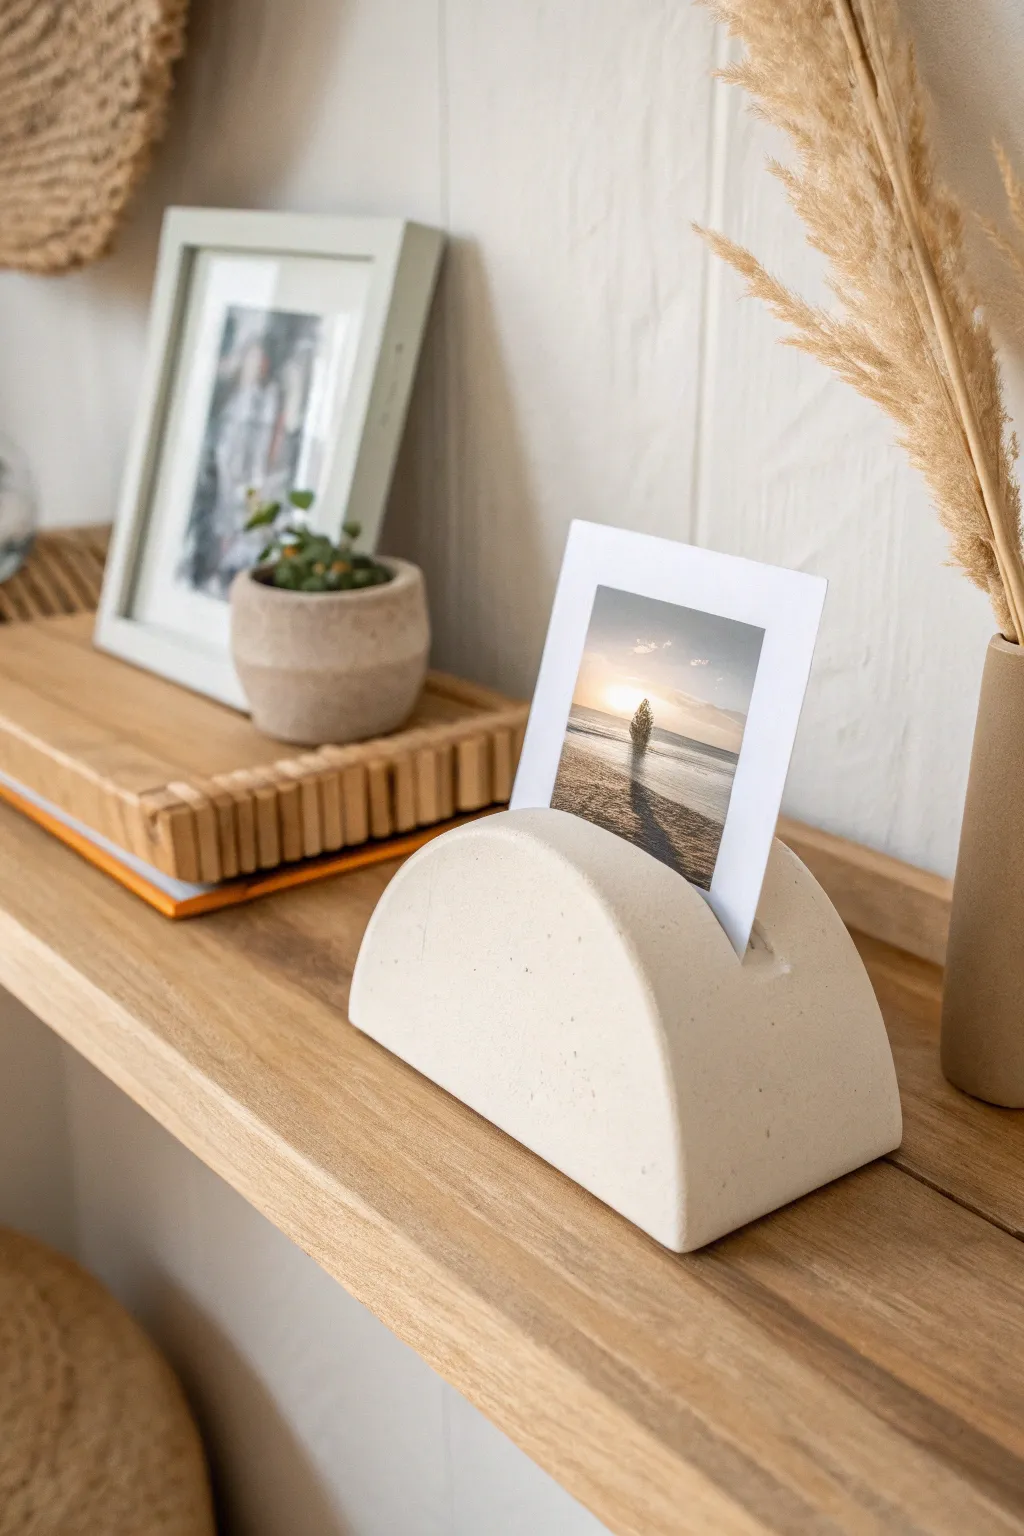
Showcase your favorite memories with this sleek and modern semi-circle photo block. Its smooth, stone-like finish brings an organic touch to any shelf, perfectly mimicking the look of poured concrete without the mess.
Step-by-Step
Materials
- White air dry clay (approx. 500g)
- Rolling pin
- Sharp craft knife or clay blade
- Round cookie cutter or bowl (approx. 4-5 inches diameter)
- Wide popsicle stick or sturdy cardstock
- Fine-grit sandpaper (220 and 400 grit)
- Small bowl of water
- Acrylic sealer (matte finish)
- Ruler
Step 1: Shaping the Base
-
Condition the clay:
Start by taking a substantial chunk of air dry clay and kneading it in your hands to warm it up. Work it until it feels pliable and smooth, removing any internal air pockets that could cause cracks later. -
Roll out a slab:
Place the clay on a clean, non-stick surface or a piece of parchment paper. Roll it out into a thick slab, aiming for a thickness of about 1.5 to 2 inches. You want it quite chunky so it can stand upright stably. -
Cut the circle:
Use a large round cookie cutter or place a bowl upside down on the clay as a guide. Cut straight down with your craft knife to create a perfect, thick cylinder. -
Create the semi-circle:
Using your ruler to find the center line, slice the clay circle directly in half. You now have two semi-circles; you can set one aside for a second holder or combine them if you need more thickness. -
Smooth the edges:
Dip your finger in a little water and run it along the cut edges. Gently round off the sharp corners just a tiny bit to give it that soft, stone-cast appearance seen in the photo.
Cracking Up?
If small surface cracks appear while drying, don’t panic. Make a paste of clay and water (slip) and fill the cracks, then sand smooth once dry.
Step 2: Creating the Slot
-
Mark the center:
Stand the semi-circle on its flat edge to ensure it sits level. Look down from the top of the curve and use a needle tool or light pencil mark to identify the exact center point for your photo slot. -
Press the slot indentation:
Take a wide popsicle stick or a doubled-up piece of heavy cardstock. Press it firmly into the center of the rounded top, pushing down about half an inch deep. -
Widen gently:
Wiggle the stick creating the slot back and forth very slightly. You want the opening to be just wide enough to hold a photo or postcard without bending it, but tight enough to keep it upright. -
Refine the opening:
Carefully remove the stick. If the clay dragged upwards, smooth those rough bits back down with a damp finger so the entry point is clean and neat. -
Initial drying phase:
Let the piece sit upright for about an hour to firm up slightly. I usually check it again at this point to make sure the slot hasn’t closed up as the clay settled.
Faux Stone Effect
For a speckled granite look, knead a pinch of black pepper or dried used coffee grounds into your white clay before rolling it out.
Step 3: Finishing Touches
-
Full drying:
Allow the clay to dry completely. Because of the thickness, this will take longer than usual—likely 48 to 72 hours. Turn it on its side occasionally to let air reach the bottom. -
Initial sanding:
Once bone dry, take your 220-grit sandpaper and sand the entire surface. Focus on the flat bottom to ensure no wobble, and smooth out the curved face. -
Fine polishing:
Switch to 400-grit sandpaper for a final polish. This step is crucial for achieving that faux-stone texture that looks satisfyingly smooth to the touch. -
Clean the slot:
Fold a small piece of sandpaper and slide it into the photo slot to remove any dried burrs or rough patches inside. -
Seal the piece:
Apply a thin coat of matte acrylic sealer to protect the clay from moisture and dust. The matte finish helps maintain the natural, concrete-like aesthetic.
Now you have a stylish spot to display your latest card or photo

TRACK YOUR CERAMIC JOURNEY
Capture glaze tests, firing details, and creative progress—all in one simple printable. Make your projects easier to repeat and improve.
Taper Candle Holder Pair
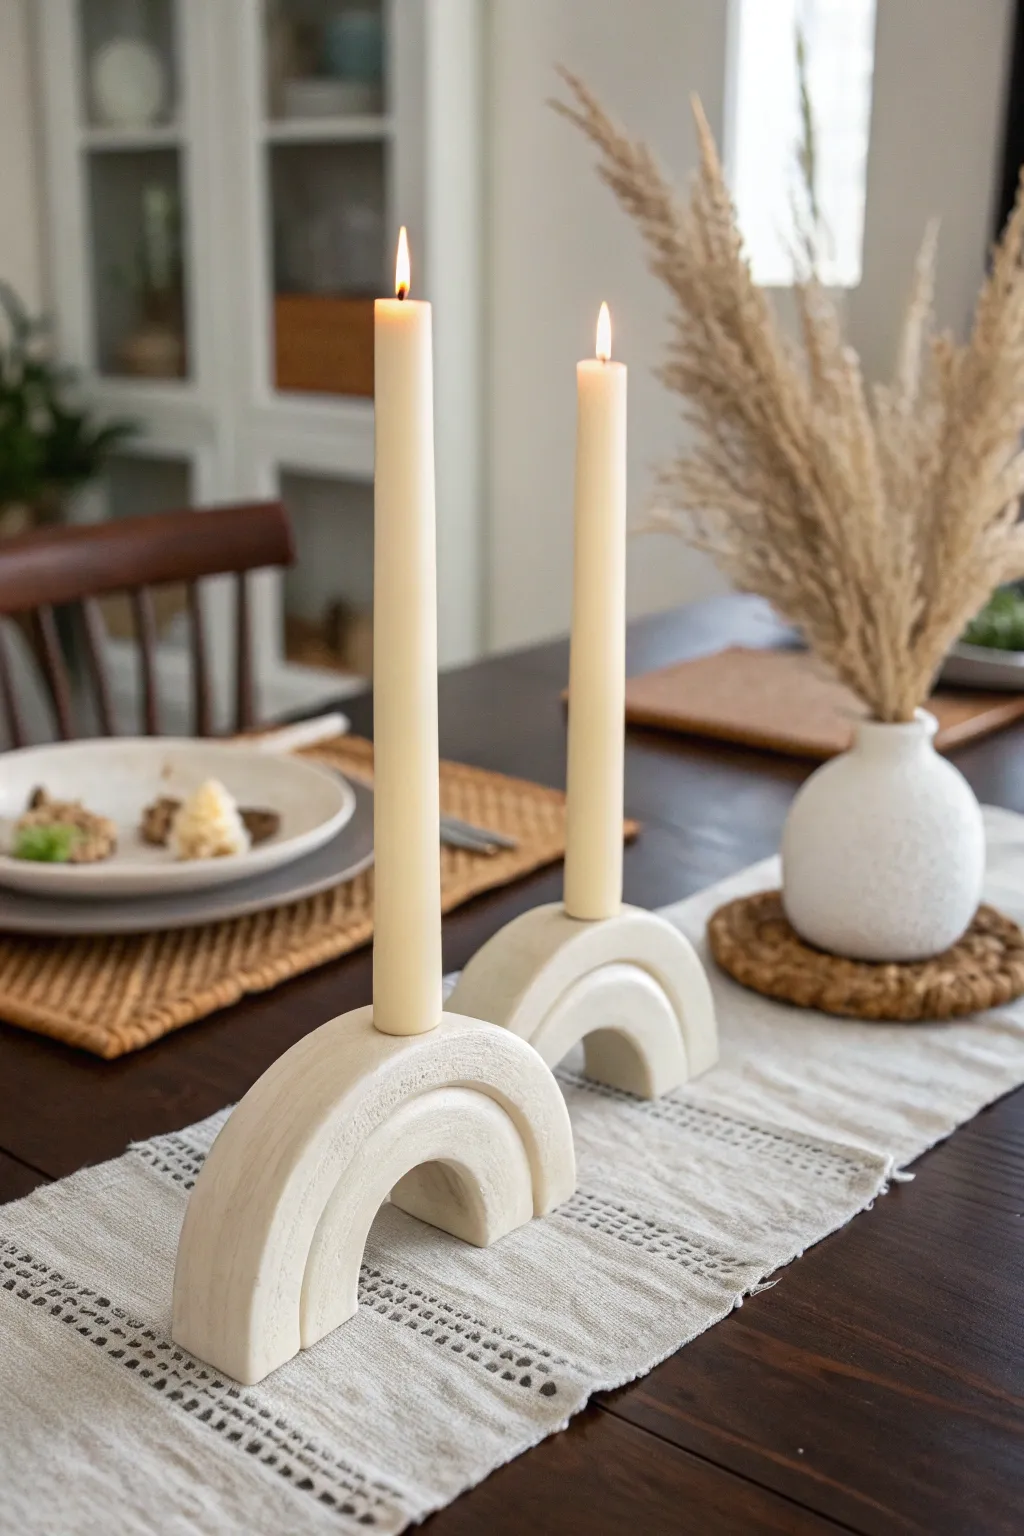
These minimalist, double-arch candle holders bring a touch of sculptural elegance to any dining table. With smooth curves and a soft, matte finish, they look high-end but are surprisingly simple to shape by hand using air-dry clay.
How-To Guide
Materials
- Air dry clay (white or cream)
- Rolling pin
- Sharp crafting knife or clay slicer
- Taper candle (for sizing)
- Small bowl of water
- Fine grit sandpaper
- Parchment paper or canvas mat
- Ruler
- Acrylic paint (cream or off-white)
- Baking soda (optional for texture)
- Matte sealant spray
Step 1: Shaping the Arches
-
Condition the clay:
Begin by taking a generous amount of air dry clay and kneading it in your hands until it becomes warm and pliable. This prevents cracking later on. -
Roll out a slab:
Place the clay on a sheet of parchment paper. Use your rolling pin to roll it out into a thick, even slab, approximately 3/4 inch to 1 inch thick. You want it sturdy enough to stand upright. -
Cut long strips:
Using your ruler as a guide, cut two long strips of equal width (about 1.5 inches wide). These will become the two arches that make up a single holder. -
Form the inner arch:
Take one strip and gently bend it into a tight ‘U’ shape to form the smaller, inner arch. Trim the bottom ends so they sit flat on your work surface. -
Form the outer arch:
Take the second strip and drape it over the first arch to measure the length needed. It should hug the inner arch snugly. Cut it to size and shape it into a larger ‘U’. -
Create the candle socket:
Roll a separate small ball of clay and flatten it slightly into a disc that matches the width of your arches. Press your taper candle into the center to create a deep indentation.
Step 2: Assembly and Refining
-
Score and slip:
Use your knife to scratch cross-hatch marks (scoring) on the top of the inner arch and the underside of the outer arch where they will touch. -
Join the arches:
Apply a little water to the scored areas and press the two arches together firmly. Smooth the seam with your finger or a clay tool so they look like one cohesive unit. -
Attach the candle socket:
Score the top center of your new double-arch shape and the bottom of your candle socket piece. Use water to join them, blending the clay downwards so the transition is seamless. -
Verify candle fit:
Gently twist your candle back into the socket to ensure it hasn’t warped during attachment. Remove the candle before the clay starts to harden. -
Smooth the surfaces:
Dip your finger in water and run it over the entire piece to smooth out any fingerprints, bumps, or sharp edges. I like to pay special attention to the bottom edges to ensure it sits perfectly flat. -
Let it dry:
Allow the holder to dry completely in a cool, dry place for at least 24-48 hours. Turn it occasionally to ensure even drying on all sides.
Structure Pro Tip
To keep the inner arch form perfect while drying, place a small cardboard tube or a balled-up piece of foil underneath the curve for support.
Step 3: Finishing Touches
-
Sand until smooth:
Once fully dry, use fine-grit sandpaper to buff away any remaining imperfections. Focus on the curves to get that sleek, professional look. -
Prepare textured paint:
Mix your cream acrylic paint with a teaspoon of baking soda. This creates a wonderful ceramic-like, matte texture. -
Apply the paint:
Paint the entire candle holder with your textured mixture. You may need two coats for full coverage, letting the first coat dry before applying the second. -
Seal the piece:
Finish with a light coat of matte sealant spray to protect your artwork from dust and moisture.
Level Up: Color Block
Make the inner arch a slightly darker shade of beige than the outer arch for a subtle, trendy two-tone look that highlights the geometry.
Now you have a stunning, modern centerpiece ready to light up your next dinner party
Soap Dish With Drain Ridges
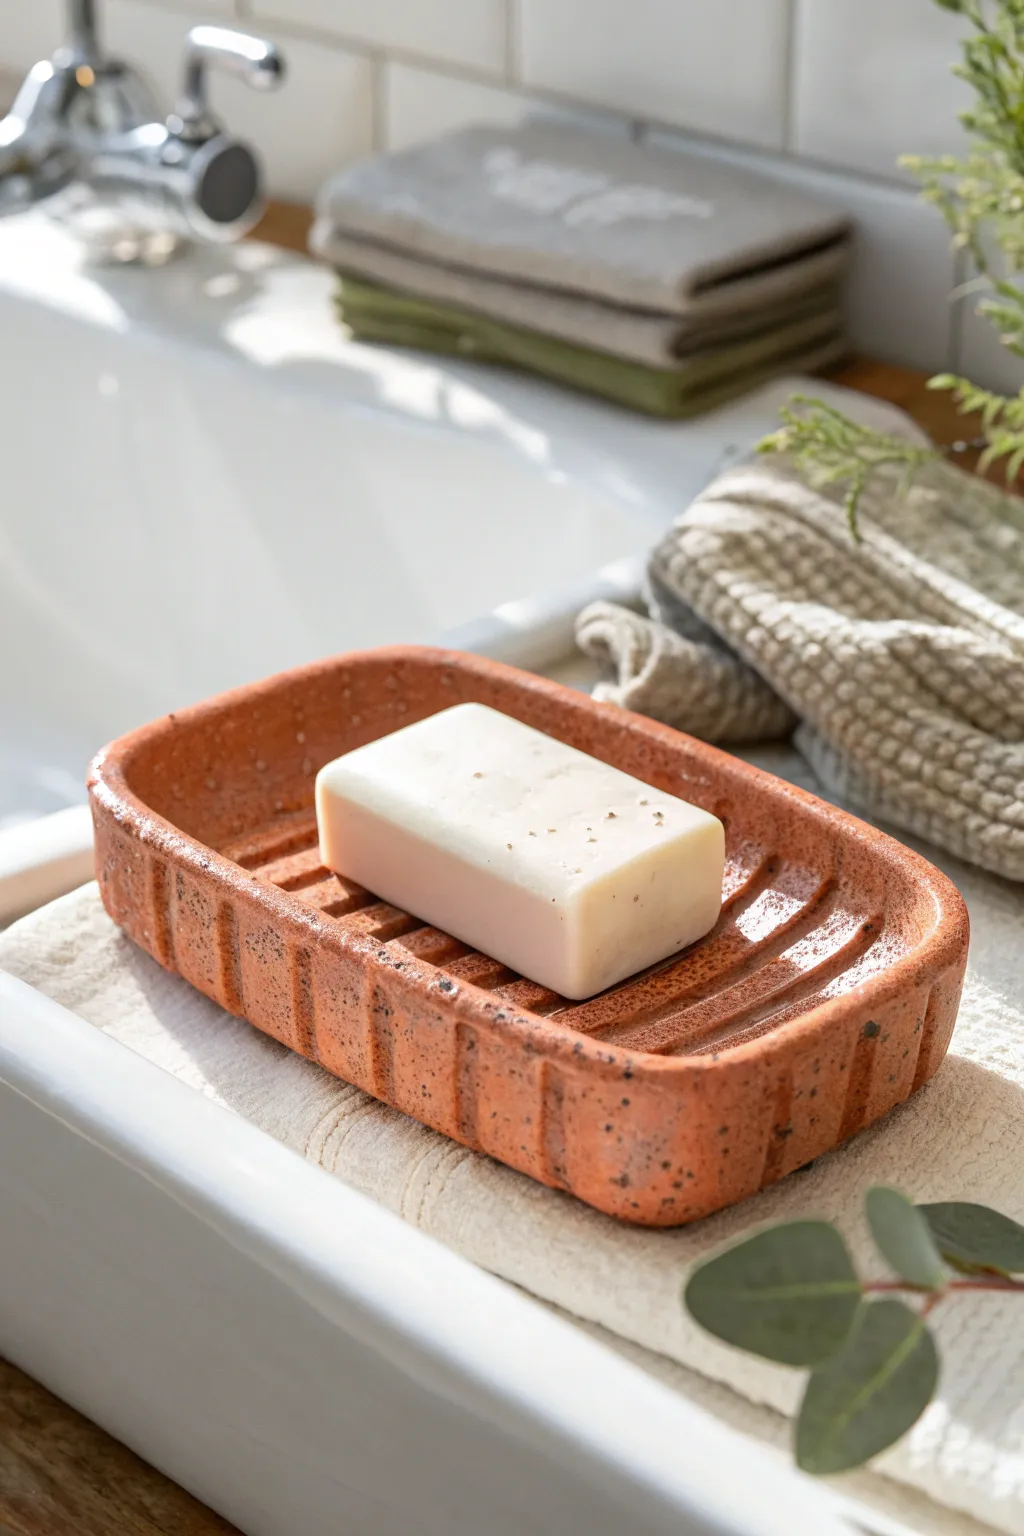
Bring a warm, earthy spa vibe to your bathroom with this rustic soap dish featuring practical drainage ridges. The speckled terracotta finish gives it a high-end ceramic look without needing a kiln, perfect for keeping your favorite soaps dry and lasting longer.
Step-by-Step Guide
Materials
- Air dry clay (white or terracotta colored)
- Rolling pin
- Two guide strips or wooden slats (approx. 1/4 inch thick)
- Rectangular template (card stock or paper, approx. 3×5 inches)
- Clay knife or craft blade
- Modeling tool or dull butter knife for ridges
- Small bowl of water
- Sponge
- Acrylic paints (burnt sienna, orange oxide, dark brown/black)
- Stiff bristle brush (e.g., old toothbrush)
- Matte or satin varnish/sealant (waterproof variety is essential)
Step 1: Shaping the Base
-
Prepare your workspace:
Lay down a canvas cloth or non-stick mat to work on. Take a generous handful of air dry clay and knead it until it’s pliable and smooth, working out any air bubbles. -
Roll out the slab:
Place your guide strips on either side of the clay. Use the rolling pin to roll the clay flat, resting the pin on the strips to ensure an even thickness of about 1/4 inch across the entire slab. -
Cut the rectangle:
Place your rectangular template on top of the smooth clay slab. Using your clay knife, cut straight down around the template to get clean, sharp edges. Remove the excess clay. -
Create the walls:
Roll a long coil of clay, roughly the thickness of a pencil. This will become the raised rim of your dish. -
Attach the rim:
Score the outer edges of your rectangular base and the underside of the coil with a needle tool or fork. Apply a little water or slip to the scored areas and press the coil firmly onto the edge of the base. -
Blend the seams:
Use your thumb or a modeling tool to smudge the clay from the coil down onto the base, both on the inside and outside, until the seam disappears completely. Smooth it over with a damp sponge.
Step 2: Adding Texture and Ridges
-
Mark the ridges:
Use a ruler to lightly mark even intervals along the long interior sides of the dish where your drainage ridges will go. Space them about half an inch apart. -
Impress or carve:
I like to use a rounded modeling tool or the handle of a paintbrush here. Press firmly into the clay floor of the dish to create deep, parallel grooves connecting your marks. These channels allow water to drain away from the soap. -
Detail the exterior:
Using the flat side of a knife or modeling tool, press vertical indentations into the outside walls of the dish. Space them to match the interior ridges, creating a cohesive, architectural look. -
Refine the shape:
Check that your walls are straight and corners are slightly rounded. Dip your finger in water and run it over all sharp edges, especially the top rim, to soften them for a finished feel. -
Dry properly:
Place the dish on a wire rack to ensure air circulates underneath. Let it dry for 24-48 hours, turning it occasionally so it dries evenly without warping.
Smooth Surface Secret
Before painting, lightly sand dry clay with fine-grit sandpaper (wear a mask!) to remove fingerprints and bumps for a truly professional ceramic finish.
Step 3: Painting and Finishing
-
Mix the base color:
Mix burnt sienna with a touch of orange oxide to create a warm, terracotta hue. If your clay was already terracotta colored, you can skip a heavy base coat or just do a light wash to even it out. -
Apply the base coat:
Paint the entire dish, ensuring you get into the deep grooves of the ridges. Two thin coats are better than one thick one to avoid brush strokes. -
Create the speckled effect:
Dilute a small amount of dark brown or black paint with water. Dip a stiff bristle brush or old toothbrush into it. -
Splatter paint:
Hold the brush over the dish and flick the bristles with your finger to spray tiny speckles across the surface. This mimics the look of natural grog found in fired ceramics. -
Seal for waterproofing:
This is crucial for a soap dish. Once the paint is fully dry, apply 2-3 coats of a high-quality waterproof varnish. Allow ample drying time between coats. -
Final cure:
Let the final coat of varnish cure for several days before exposing it to water to ensure the finish is durable and won’t get tacky.
Preventing Sag
If the clay base sags while drying, place a crumpled piece of paper towel underneath the center of the dish to support the floor until it firms up.
Now your bathroom sink has a stylish, custom upgrade that looks like it came straight from a pottery studio.
Toothbrush and Brush Cup
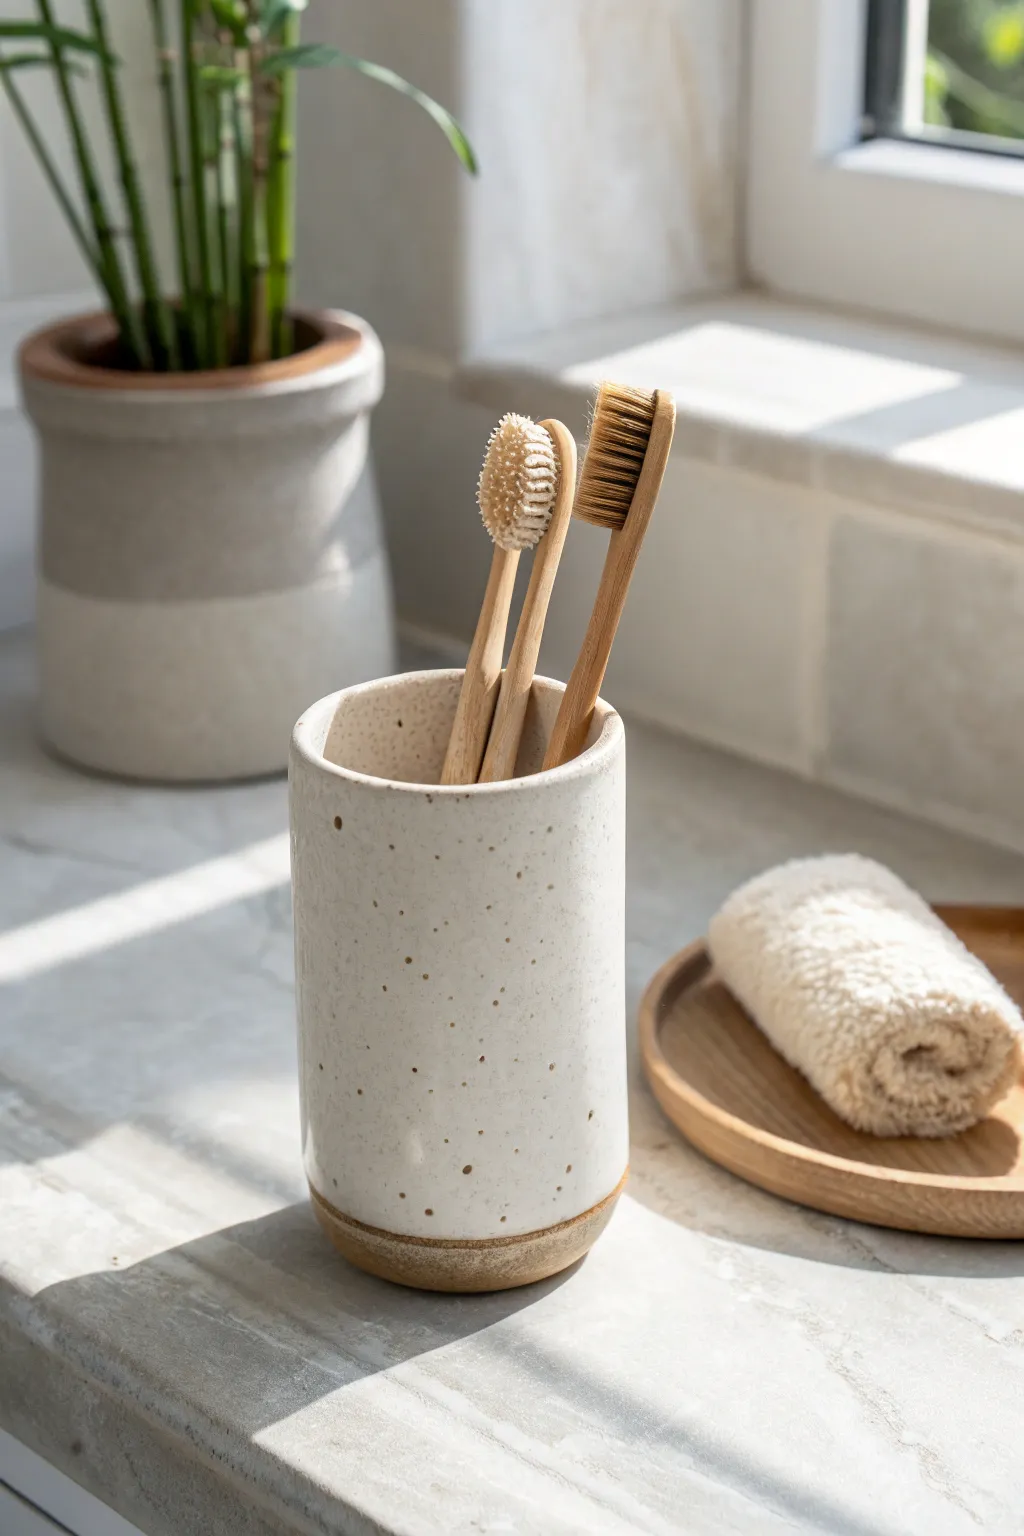
Bring a touch of organic minimalism to your bathroom with this sturdy, stone-effect toothbrush cup. Its dual-tone design combines a creamy, speckled upper body with a raw, textured base for a piece that looks authentically ceramic.
Step-by-Step
Materials
- White air dry clay (approx. 500g)
- Acrylic paint (burnt umber or dark brown)
- Acrylic paint (warm white or cream)
- Rolling pin
- Craft knife
- Empty cylindrical container or glass (to use as a mold)
- Sandpaper (fine grit)
- Old toothbrush or stiff bristle brush
- Water and sponge
- Clear waterproof varnish or sealant (essential for bathroom use)
Step 1: Forming the Cylinder
-
Prepare your clay:
Begin by kneading your white air dry clay until it is soft, pliable, and free of air bubbles. This conditioning step prevents cracking later. -
Roll the slab:
Roll the clay out into a long rectangular slab, aiming for a consistent thickness of about 1/4 inch (6mm) to ensure durability. -
Measure the circumference:
Take your cylindrical mold (a simple glass works well) and wrap a piece of paper around it to measure the circumference. Add a slight overlap allowance. -
Cut the clay:
Use the paper template and your craft knife to cut a clean rectangle from your clay slab. Keep the excess clay for the base. -
Form the wall:
Wrap the rectangular clay slab around your mold. Where the ends meet, score the edges with a knife and add a dab of water before pressing them together. -
Blend the seam:
Use your finger or a modelling tool to smooth the vertical seam until it disappears completely. I find a slightly damp finger works best here.
Splatter Control
Test your flicking technique on paper first. If the paint is too thick, the spots will be blobs; too thin, and they will run.
Step 2: Adding the Base and Texture
-
Create the base:
Place your clay-wrapped cylinder onto the remaining clay slab and cut around the bottom to create a perfect circle for the floor of the cup. -
Attach the base:
Score the bottom edge of the cylinder and the edge of the circle base. Add water and press them firmly together. -
Seal the join:
Use a tool to drag clay from the wall down onto the base, then smooth it over to ensure a water-tight seal. -
Define the earthy bottom:
Using a knife, lightly score a horizontal line about half an inch from the bottom. This will mark where the raw clay texture begins. -
Texture the base:
Below that line, gently tap the clay with a stiff brush or a crumpled ball of foil to give it a rough, stone-like texture. -
Smooth the body:
Dip a sponge in water and run it over the upper section of the cup to make it perfectly smooth, contrasting with the rough base. -
Remove mold:
Once the clay has stiffened slightly (usually after an hour), carefully slide the inner mold out so the inside can dry efficiently. -
Dry completely:
Allow the piece to air dry for 24-48 hours until it is bone dry and chalky to the touch.
Make it a Set
Create a matching soap dish by rolling a small oval slab and curving the edges upward, using the same speckled paint technique.
Step 3: Faux Ceramic Finish
-
Sand imperfections:
Gently sand the rim and vertical seam area with fine-grit sandpaper to remove any sharp edges or uneven spots. -
Paint the base:
Mix a watery wash of burnt umber acrylic paint. Brush this onto the textured base section, wiping away the excess immediately with a rag so the color settles only in the crevices. -
Paint the body:
Paint the smooth upper section with a warm white or cream acrylic paint. You may need two coats for full coverage. -
Create the speckles:
Dip an old toothbrush into thinned brown paint. Run your thumb across the bristles to flick tiny splatters of paint onto the white section. -
Waterproof sealing:
This step is crucial for bathroom items. Apply at least three coats of waterproof varnish to the entire piece, inside and out, allowing full drying between layers.
Now you have a stylish, custom organizer ready to hold your bamboo brushes
Planter Sleeve for a Nursery Pot
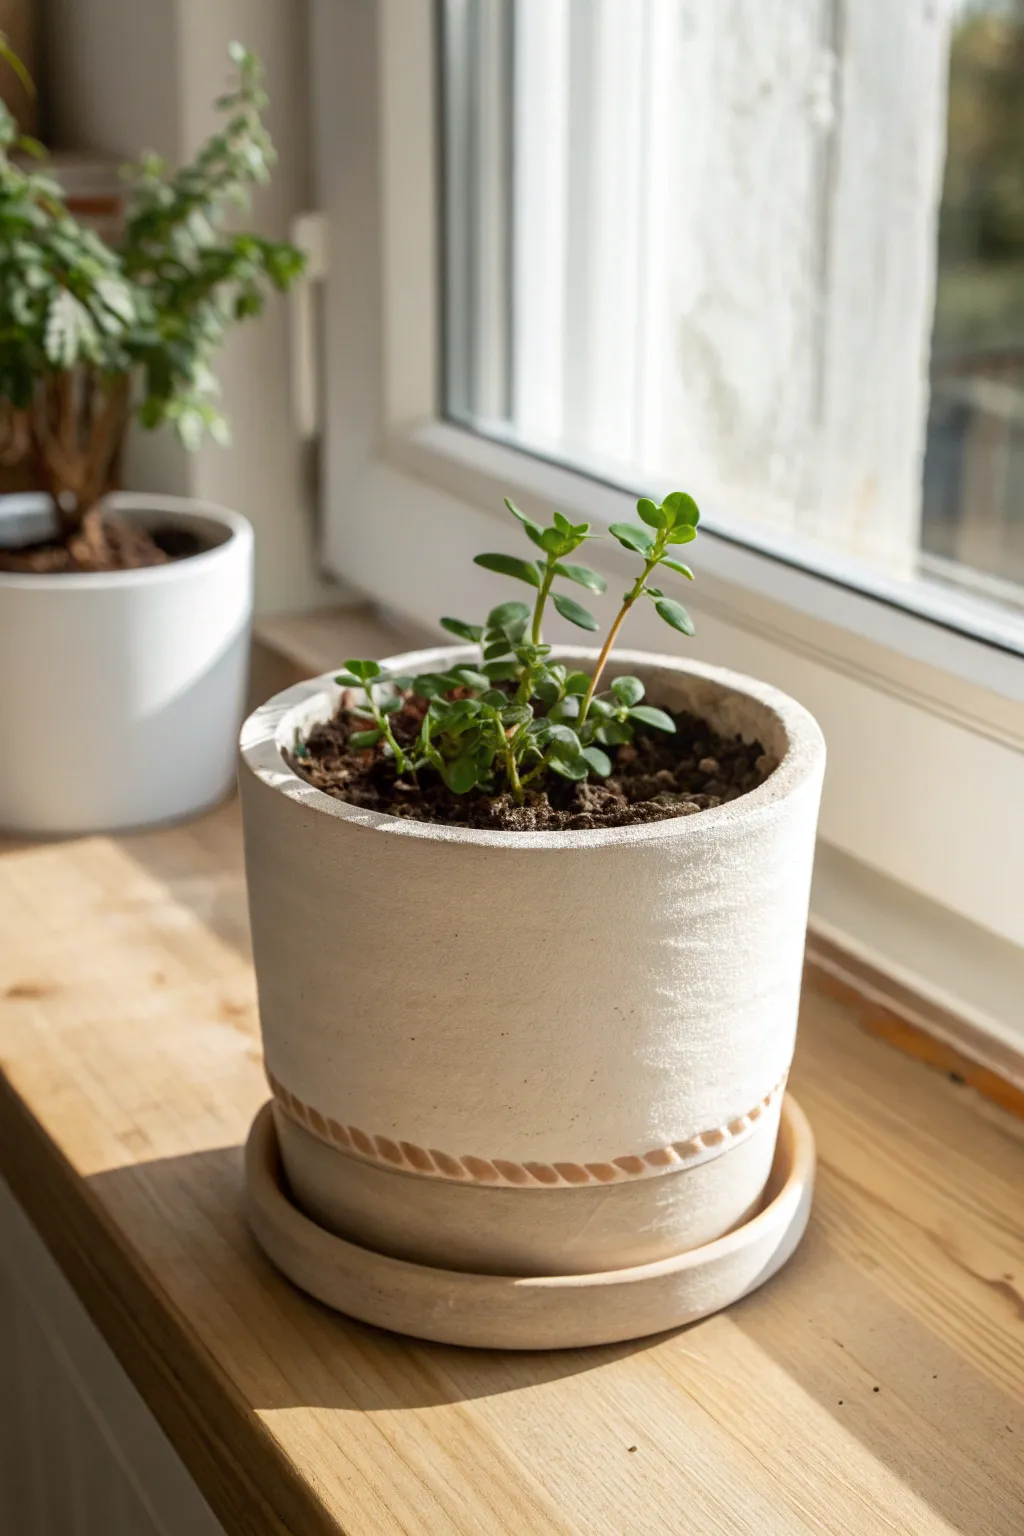
Transform a plain plastic nursery pot into a rustic, artisanal piece with this clever sleeve technique. The organic texture and braided detail give it a charming stoneware look without the need for a kiln.
Step-by-Step Tutorial
Materials
- Air dry clay (white or light grey)
- Plastic nursery pot (standard size)
- Rolling pin
- Clay knife or craft knife
- Rolling guides or wooden slats (approx. 5mm)
- Small cup of water
- Potter’s needle or toothpick
- Sponge
- Clear matte acrylic sealer
- Optional: Clay saucer for base
Step 1: Creating the Sleeve Base
-
Measure your pot:
Before touching any clay, measure the height and circumference of your plastic nursery pot. Add about an inch to the circumference measurement to ensure a loose, comfortable fit for the sleeve. -
Condition the clay:
Take a large chunk of air dry clay and knead it well with your hands. Warming it up makes it pliable and prevents cracks during rolling. -
Roll the slab:
Place your clay between two wooden slats or rolling guides to ensure even thickness. Roll it out into a long rectangle that matches your measurements—long enough to wrap around the pot and slightly taller than the rim. -
Add texture:
To achieve that rustic, stone-like surface seen in the image, lightly dab the clay slab with a textured sponge or even a crumpled ball of aluminum foil. Use a gentle touch so you don’t compromise the thickness. -
Cut to size:
Using a straight edge and your clay knife, trim the slab into a clean rectangle. Save the excess scraps; you will need them for the braided detail later. -
Form the cylinder:
Carefully lift the slab and wrap it around your nursery pot (using the pot as a form). Where the ends meet, overlap them slightly or butt them together, scoring both sides with a needle tool. -
Sealing the seam:
Apply a little water or slip to the scored edges and press firmly to join. Smooth the seam with your finger or a modelling tool so it becomes invisible. -
Refining the shape:
While the clay is still on the form, gently tap the bottom edge against the table to make sure it sits flat. I like to leave the top rim slightly imperfect for that handmade character. -
Remove the form:
Carefully slide the plastic nursery pot out. If the clay feels too floppy, let it sit for 15-20 minutes to firm up slightly before removing the support.
Step 2: Adding the Braided Detail
-
Roll small coils:
Take your scrap clay and roll out two long, thin snakes of equal thickness. They should be long enough to wrap around the entire circumference of your planter. -
Twist the coils:
Lay the two clay snakes side by side. Gently twist them together to create a loose rope effect. Try to keep the tightness of the twist consistent along the entire length. -
Position the braid:
Decide where you want the detail to sit. In the project image, it sits about an inch from the bottom. Mark this line lightly with your needle tool. -
Attach the detail:
Score the marked line on the pot and brush on a little water. Place the twisted rope onto the scored area, pressing gently to adhere without flattening the twist. -
Join the ends:
Where the rope ends meet, cut them diagonally and blend the clay together carefully so the ‘braid’ looks continuous. -
Create the saucer:
Roll a circular slab slightly larger than your pot’s base. Slightly curl up the edges to form a shallow saucer shape to catch drips.
Collapsing clay?
If your cylinder won’t hold its shape, wrap the plastic inner pot in cling film and leave it inside the clay sleeve as a support structure until the clay is leather hard.
Step 3: Finishing and Sealing
-
Slow drying:
Place your pot sleeve and saucer out of direct sunlight. Let them dry slowly for 24-48 hours. Turning the sleeve upside down halfway through helps the bottom dry evenly. -
Sanding:
Once bone dry, use fine-grit sandpaper to smooth out any sharp edges on the rim or the saucer, but leave the main surface texture alone. -
Applying sealer:
Coat the entire piece, inside and out, with a matte acrylic sealer. This won’t make it waterproof enough for direct planting, but it protects the sleeve from occasional splashes when watering the nursery pot inside.
Faux-stone Trick
Mix a small amount of used coffee grounds or sand into your white clay before rolling. This adds speckles and grit that mimics real stoneware instantly.
Place your nursery pot inside your new creation to instantly upgrade your windowsill garden
Earring Stand With Peg Holes
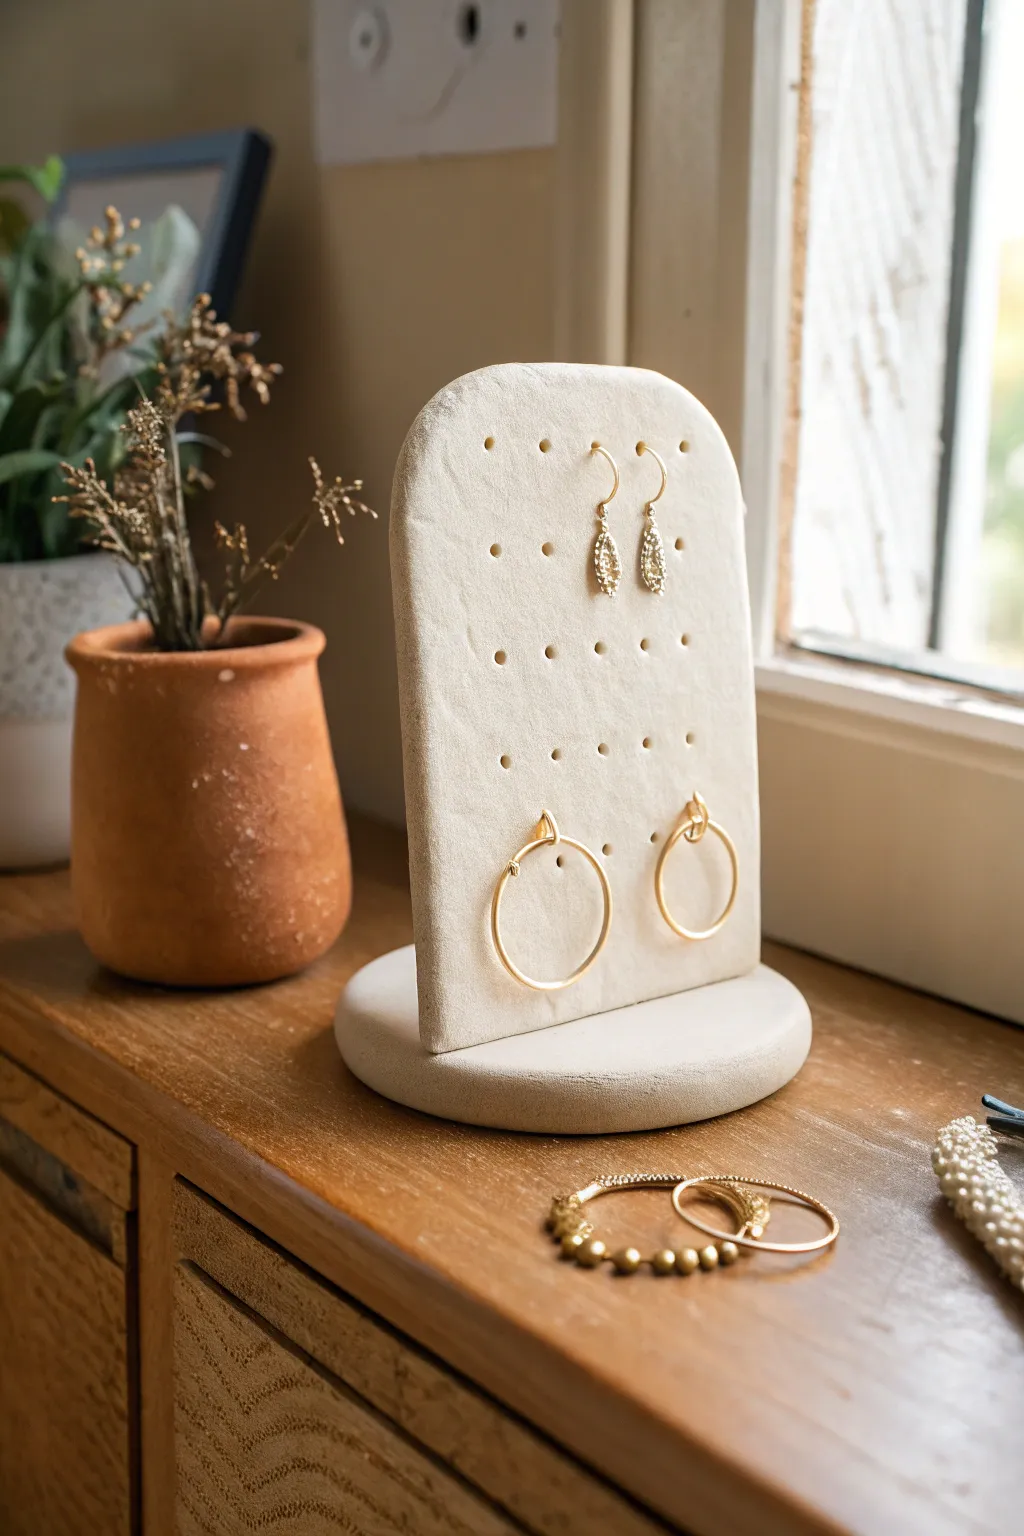
Give your favorite earrings the spotlight they deserve with this minimalist arched stand. Crafted to look like expensive stoneware, this two-piece project combines a sturdy circular base with a peg-board style upright for organized elegance.
Step-by-Step Tutorial
Materials
- White air dry clay (approx. 500g)
- Rolling pin
- Parchment paper or canvas mat
- Craft knife or clay cutter
- Circular cookie cutter (approx. 4-5 inches)
- Ruler
- Cardstock or paper (for arch template)
- Wooden skewer or toothpick
- Small bowl of water
- Fine grit sandpaper (220-400 grit)
- Clear matte varnish or sealant
Step 1: Planning and Cutting
-
Prepare your template:
Before touching the clay, draw a simple arch shape on cardstock that is roughly 4 inches wide and 6 inches tall. Cut this out to use as your guide. -
Condition the clay:
Take a large chunk of air dry clay and warm it up by kneading it in your hands until it feels pliable and smooth. This helps prevent cracks later on. -
Roll out the slab:
Roll your clay out onto a piece of parchment paper to a thickness of about 1/4 inch. Try to keep the thickness consistent so the stand remains stable. -
Cut the base:
Using your large circular cookie cutter, press firmly into the clay to create the round base. If you don’t have a cutter, trace around a bowl with your craft knife. -
Cut the arch:
Place your cardstock template onto the remaining rolled clay. Carefully trace around it with a sharp craft knife to cut out your upright piece. -
Smooth the edges:
Dip your finger in a little water and gently run it along all cut edges of both the base and the arch to soften any sharp corners.
Clean Hole Trick
Wait about an hour after piercing the initial holes, then run the skewer through again. The slightly firmer clay yields a much cleaner, less ragged hole.
Step 2: Adding Details and Assembly
-
Mark the grid:
Using a ruler and the very tip of your skewer, lightly mark a grid of dots on the arch piece where you want your earring holes to be. -
Create the holes:
pierced through the clay at your marked points using the wooden skewer. Wiggle the skewer slightly to ensure the holes are large enough for earring posts to fit through after shrinkage. -
Score the connection points:
I always score the clay for a stronger bond, so scratch cross-hatch marks into the center of the round base and the bottom edge of the arch piece. -
Add slip:
Mix a tiny bit of clay with water to make a paste (slip) and apply it to the scored areas. -
Join the pieces:
Press the arch firmly onto the center of the base. Use a small clay tool or your finger to smooth the seam where they meet, blending the clay downward to secure it. -
Reinforce the seam:
Roll a very thin snake of clay and wrap it around the base of the arch where it meets the circle. Smooth this completely into both surfaces for extra stability.
Speckled Stone Effect
Knead roughly ground black pepper or dried coffee grounds into your white clay before rolling. This mimics the look of natural ceramic or stoneware.
Step 3: Finishing
-
Prop it up:
Because the arch is heavy, place a small box or supportive object behind it while it dries to keep it standing perfectly straight. -
Slow drying:
Let the piece dry slowly away from direct sunlight for 24-48 hours. Turning it occasionally (if possible without breaking) helps it dry evenly. -
Sand for perfection:
Once bone dry, use fine-grit sandpaper to smooth out any fingerprints or rough edges on the rim of the arch and base. -
Seal the surface:
Apply a coat of clear matte varnish to protect the clay from moisture and give it a finished, professional look.
Now you have a chic, custom display ready to organize your jewelry collection in style
Flower Frog Insert for Easy Arrangements
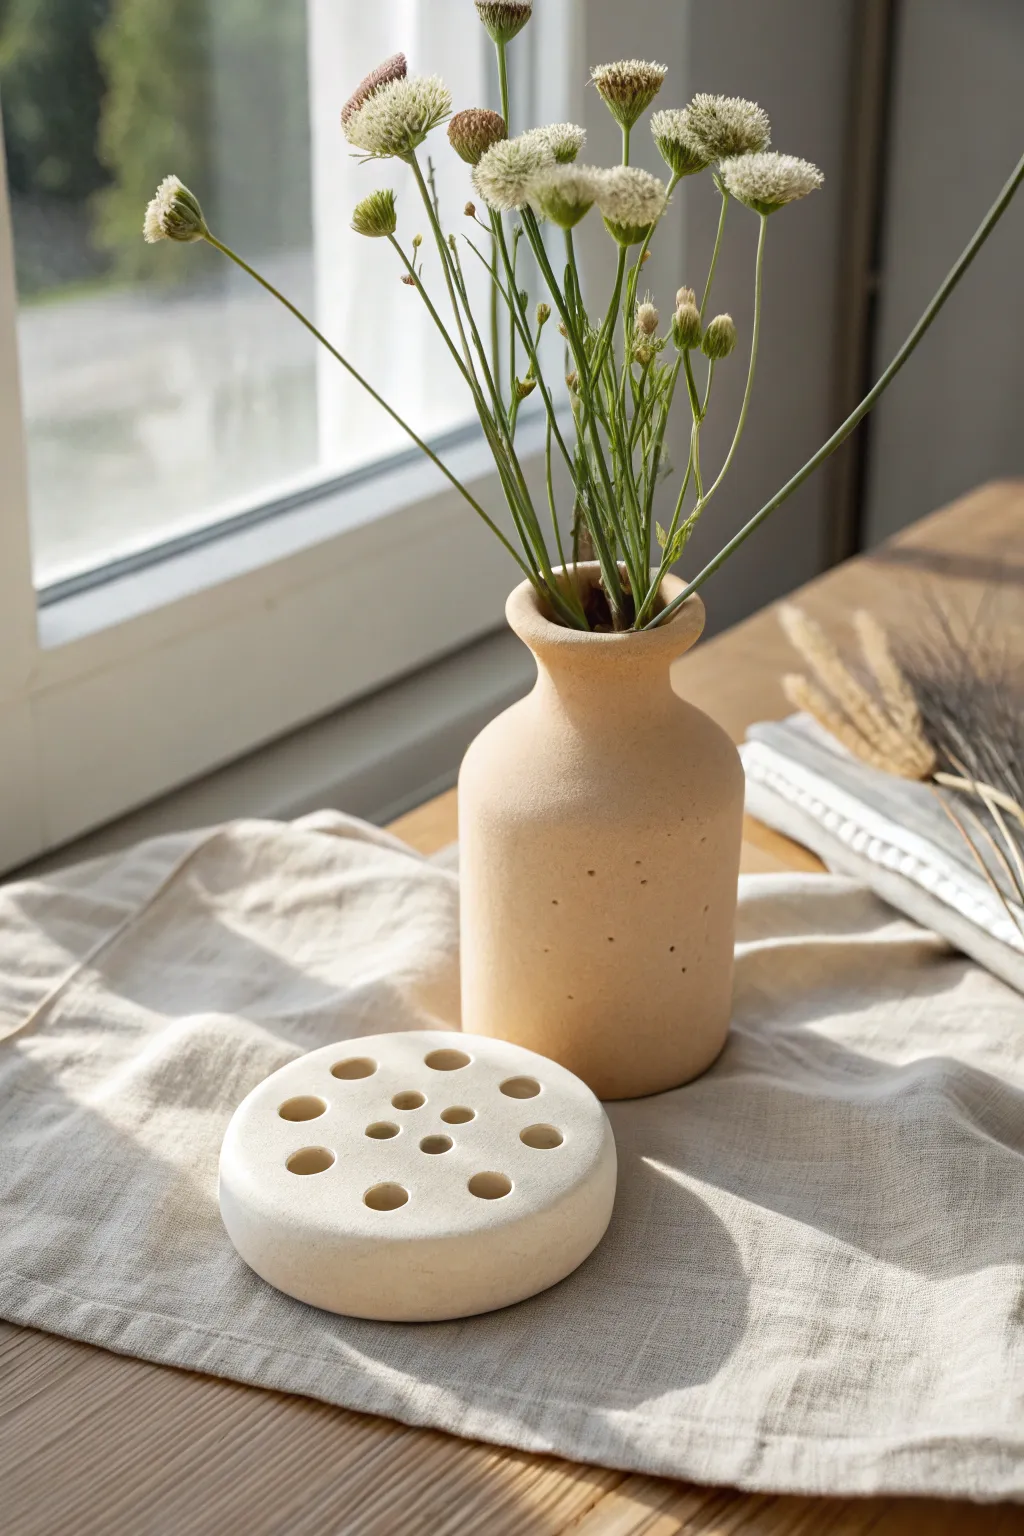
Transform a simple vase into a professional floral arrangement tool with this sleek, disc-shaped frog. Its clean, creamy white finish and organic perforations create the perfect structure for holding minimalist stems upright and evenly spaced.
Detailed Instructions
Materials
- White or natural air-dry clay (approx. 200g)
- Rolling pin
- Circle cutter or a round bowl (approx. 4-5 inches diameter)
- Sandpaper (fine grit)
- Small bowl of water
- Various sized straws or dowels (for punching holes)
- Sponge
- Vase (for size reference)
- Matte acrylic varnish (optional)
Step 1: Shaping the Base
-
Prepare the clay:
Start by taking a generous handful of air-dry clay and kneading it in your hands to warm it up. You want it pliable and free of air bubbles before you start working. -
Roll the slab:
Place the clay on a clean, flat surface. Using your rolling pin, roll it out into a thick slab. Aim for a uniform thickness of about 3/4 of an inch to 1 inch—it needs to be substantial enough to support flower stems. -
Measure your vase:
Check the mouth of the vase you intend to use. The disc should be slightly larger than the opening so it rests comfortably on top without slipping inside. -
Cut the circle:
Using a circle cutter or by tracing around a bowl that matches your desired size, press firmly into the clay slab to cut out a clean, perfect circle. -
Smooth the edges:
Dip your finger in a little water and run it along the cut edge of the circle. Smooth out any roughness or sharp corners, rounding the edge slightly for a softer, organic look like the one in the photo.
Clean Hole Technique
If the clay sticks inside your straw or cutting tool, dip the tool into cornstarch or a tiny bit of oil before punching each hole. This acts as a release agent for cleaner cuts.
Step 2: Creating the Grid
-
Plan the hole layout:
visualize a symmetrical pattern for your holes. The example uses a central hole surrounded by two concentric rings of perforations. -
Punch the center:
Take your largest straw or dowel and punch a hole directly in the center of the disc. Twist the tool gently as you push through to keep the hole clean. -
Create the inner ring:
Using a slightly smaller dowel, punch 4 to 6 evenly spaced holes around the center point. I like to mark the spots lightly before committing to the full punch to ensure spacing is even. -
Create the outer ring:
Switch to your largest tool again or keep consistent sizes, and punch a wider ring of holes near the perimeter. Leave about half an inch of solid clay at the very edge for structural integrity. -
Clean the exits:
Flip the disc over carefully. You’ll likely see clay pushed out from the punching process. Slice these excess bits off with a craft knife or smooth them back into the surface with a damp sponge. -
Refine the openings:
Dip your finger or a small brush in water and smooth the rim of each hole on the top surface. This prevents sharp edges that could damage delicate flower stems later.
Step 3: Finishing Touches
-
Initial drying:
Place the clay frog on a wire rack to ensure air circulates underneath. Let it dry for at least 24-48 hours. Turn it over occasionally to prevent warping. -
Sanding:
Once the piece is bone dry and turns a chalky white, take your fine-grit sandpaper and gently buff the entire surface. Focus on the outer rim and the areas between holes to get that ultra-smooth finish. -
Dusting off:
Wipe the piece down thoroughly with a slightly damp cloth or sponge to remove all the sanding dust. -
Sealing (Optional):
Since air-dry clay is not waterproof, you must seal this if it will sit near water or humidity. Apply 2-3 coats of a matte varnish or distinct waterproofing sealer designed for clay.
Textured Variation
Before punching holes, gently press a piece of linen fabric or a dried leaf into the wet clay surface. This leaves a subtle imprinted texture that adds rustic charm.
Now you have a custom floral tool that makes arranging dried grasses or wildflowers effortlessly elegant