If you love making clay donuts that look good enough to snack on, you’re in the right headspace. I’m sharing my favorite mini donut concepts—from classic sprinkles to wild “how is that clay?” finishes—so you can pick a style and run with it.
Classic Sprinkle Donuts
These delightful miniature donuts capture the classic bakery look with glossy pink frosting and tiny rainbow sprinkles. Perfect for beginners, this project results in a durable charm that can be added to necklaces, keychains, or zipper pulls.
Step-by-Step Guide
Materials
- Beige or tan polymer clay
- Translucent liquid polymer clay (Dulcimer or similar)
- Pink soft pastel chalks (or pink polymer clay)
- Polymer clay sprinkles (pre-made or homemade)
- Small eye pin or screw eye
- Gold jump ring
- Needle tool or toothpick
- Dotting tool (medium size)
- Soft paintbrush
- Glaze (UV resin or polyurethane varnish)
- Baking tile or parchment paper
- Oven
Step 1: Shaping the Dough
-
Condition the clay:
Start by kneading a small amount of beige polymer clay until it is soft and pliable. This warmth makes it easier to shape without cracking. -
Form the base:
Roll the clay into a smooth ball approximately the size of a coin, ensuring there are no visible seams or lines. -
Flatten slightly:
Gently press the ball down against your work surface to create a thick disc shape. Be careful not to flatten it too much; you want that fluffy donut height. -
Create the hole:
Use a medium-sized dotting tool or the back of a paintbrush to press directly into the center of the disc. -
Widen the center:
Gently wiggle the tool to widen the hole, flipping the donut over to do the same from the other side. This ensures the hole is uniform and smooth. -
Texture the dough:
Using a needle tool or an old toothbrush, gently tap the surface of the beige clay (avoiding the very center) to simulate a baked bread texture. -
Add shading:
Scrape a tiny bit of orange or light brown pastel chalk into a powder. Use a dry soft brush to lightly dust the edges of the donut for a ‘golden brown’ baked effect.
Glaze Control
Use a very fine brush for the glaze. If you accidentally get gloss on the ‘bread’ part, the realism is lost—real donuts are matte on the dough and shiny on the glaze.
Step 2: Frosting and Finishing
-
Mix the frosting:
In a small container or on a scrap of foil, mix a few drops of translucent liquid clay with shaved pink pastel chalk powder. Stir until you have an opaque, bubblegum pink icing consistency. -
Apply the icing:
Use a needle tool to carefully drip and spread the liquid clay mixture onto the top of your donut. -
Create drips:
Guide the liquid clay slightly over the edges in random spots to create natural-looking gravity drips, but ensure you don’t cover the baked texture entirely. -
Add sprinkles:
Using tweezers or your fingers, carefully place polymer clay sprinkles onto the wet frosting. Press them down very lightly so they embed into the liquid clay. -
Secure the hardware:
Cut an eye pin to size (about 5mm long) and insert it into the top of the donut. I usually add a tiny dab of liquid clay to the pin’s shaft for extra grip before inserting. -
Baking:
Place the charm on a baking tile and bake according to your polymer clay manufacturer’s instructions (typically 275°F/135°C for 15-30 minutes). -
Cooling:
Allow the donut to cool completely before handling. It will harden fully as it returns to room temperature. -
Glazing:
Brush a thin layer of gloss glaze or UV resin over the frosting area only. This makes the icing look wet and sugary while keeping the bread part matte. -
Assembly:
Once the glaze is dry or cured, use jewelry pliers to open a large gold jump ring. -
Final touch:
Loop the jump ring through the eye pin and close it securely to finish your charm.
Runny Icing?
If your liquid clay mixture is too runny and dripping off the donut too fast, let it sit for 10-15 minutes. The chalk powder will slowly thicken the liquid.
Now you have a sweet little charm ready to wear or gift


Pastel Cute Donuts
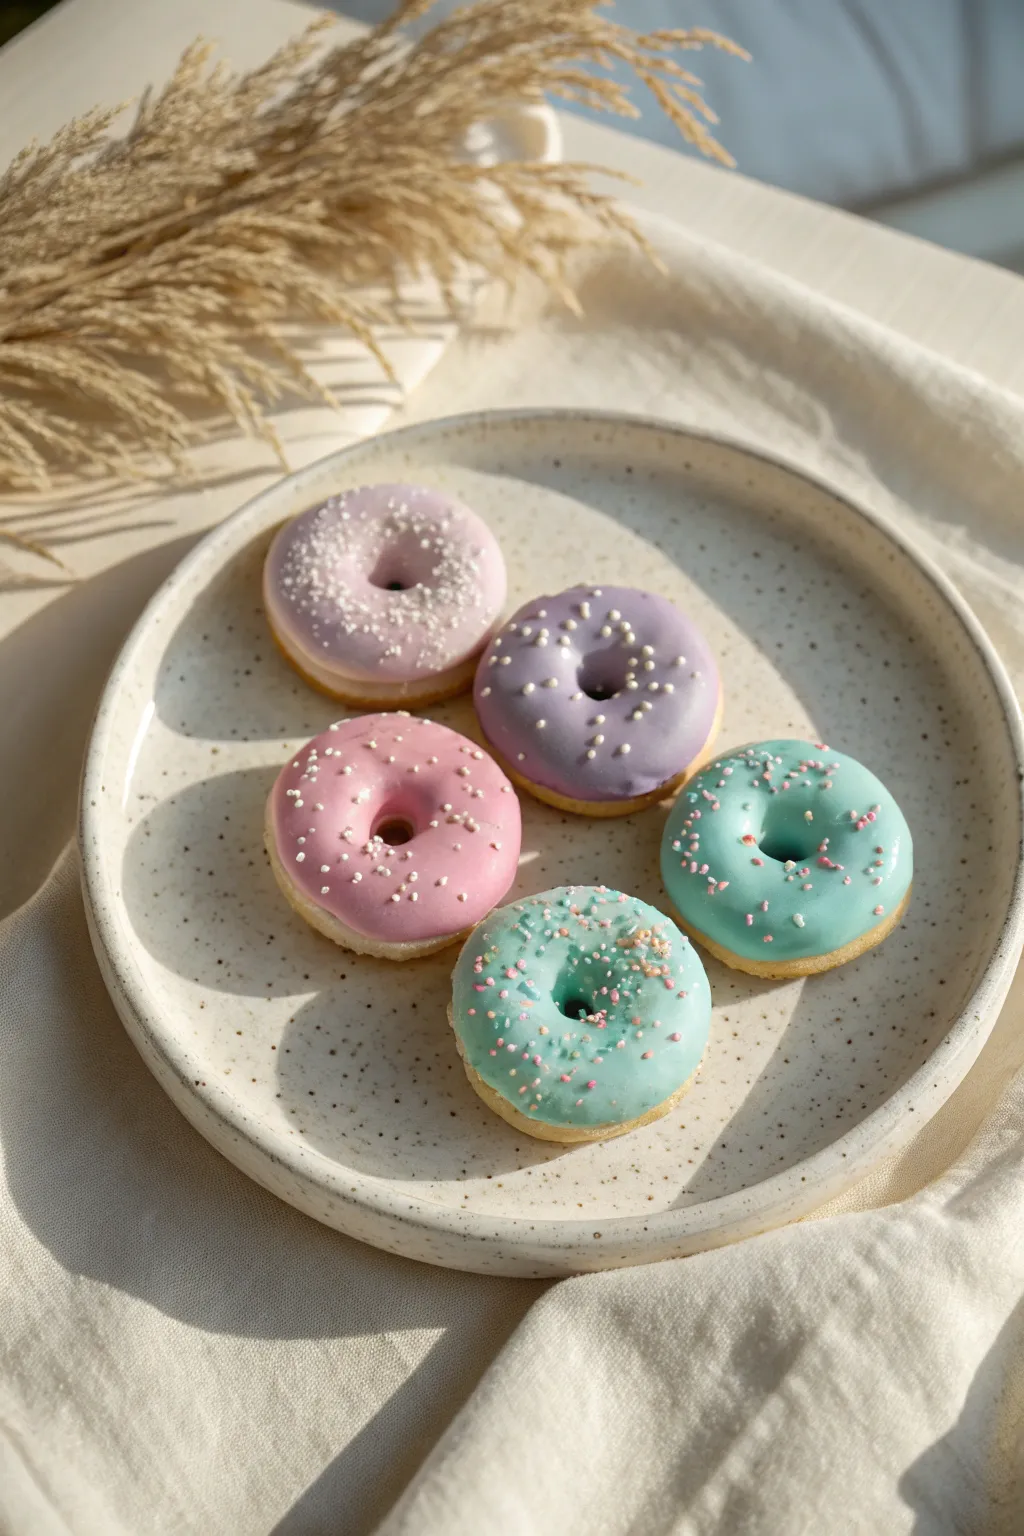
These adorable polymer clay donuts feature soft, dreamy pastel glazes and delicate sprinkles, making them perfect for jewelry charms or dollhouse miniatures. The realistic texture of the dough combined with the glossy icing creates a treat that looks almost good enough to eat.
Detailed Instructions
Materials
- Polymer clay (beige/tan for dough)
- Liquid polymer clay (translucent or white)
- Soft pastel chalks or acrylic paint (pink, purple, teal, white)
- UV resin or gloss varnish
- Toothbrush or texturing tool
- Small dotting tool or toothpick
- Hobby knife
- Rolling pin
- Small round cutters (approx. 1 inch and 0.25 inch)
Step 1: Shaping the Dough Base
-
Mix the dough color:
Start by conditioning your beige or tan polymer clay. If the color is too dark, mix in a little white or translucent clay to achieve a baked-goods ‘dough’ shade. -
Create the base form:
Roll the clay into a thick sheet, roughly 1/4 to 1/3 inch thick. Use your larger round cutter to punch out five circle shapes. -
Smooth the edges:
Gently press down on the sharp edges of the cut circles with your finger to round them off, giving them a puffy, risen look rather than a sharp cylinder shape. -
Punch the center:
Use the smaller cutter or a straw to remove the center hole. Inspect the shape and smooth out any distortion that happened during cutting. -
Add realistic texture:
Take a clean toothbrush or a texture tool and gently tap it all over the surface of the donut, focusing on the sides and bottom. Leave the very top slightly smoother as it will be covered in icing. -
Add the bake line:
With soft pastel chalks, brush a slightly darker golden-brown shade along the middle circumference of the donut (the equator) to simulate the ‘fried’ line where the dough cooks most. -
Pre-bake the bases:
Bake the donut bases according to your clay package instructions (usually 20 minutes at 275°F/130°C). Let them cool completely before icing.
Step 2: Creating the Pastel Icing
-
Prepare the liquid clay:
Pour a small amount of liquid polymer clay into three separate small containers or cups. -
Tint the icing:
Mix shaved pastel chalk or a tiny drop of acrylic paint into each cup. Aim for a soft lavender, a baby pink, and a muted teal. Add white if the colors become too vibrant; you want a creamy, opaque look. -
Check consistency:
Stir the mixtures until smooth. If the icing is too runny, let it sit for a few minutes; if it’s too thick, add a drop of clay softener. It should hold its shape but flow slightly.
Donut Pro-Tip
For ultra-realism, use a needle tool to gently separate the icing from the hole’s center, ensuring the glaze doesn’t just fill the gap but looks like it flowed over the edge into the middle.
Step 3: Decorating and Finishing
-
Apply the glaze:
Using a toothpick or a small tool, carefully scoop the colored liquid clay onto the top of a cooled donut base. -
Shape the drips:
Gently guide the icing toward the edges, letting it slightly pool or drip down the sides naturally, just like real glaze would. -
Repeat for all colors:
Create two teal, two pink (one slightly lighter), and one purple donut, varying the drip patterns for realism. -
Add sprinkles:
While the liquid clay is still wet, sprinkle on tiny polymer clay sprinkles. I like to make my own by pre-baking thin snakes of white clay and chopping them into tiny bits. -
Final bake:
Bake the donuts again for about 15-20 minutes to set the liquid clay icing. -
Varnish for shine:
Once fully cooled, apply a coat of UV resin or high-gloss varnish only to the icing part. This makes the glaze look sticky and sweet while keeping the dough matte. -
Cure the vanish:
Cure the resin under a UV lamp or let the varnish air dry completely before handling.
Level Up: Accessories
Before the final bake, insert a small eye pin into the side or top of the donut. Once baked and varnished, attach it to earring hooks or a charm bracelet for wearable art.
Enjoy displaying your collection of sweet, zero-calorie pastel treats


Donut Charms for Jewelry
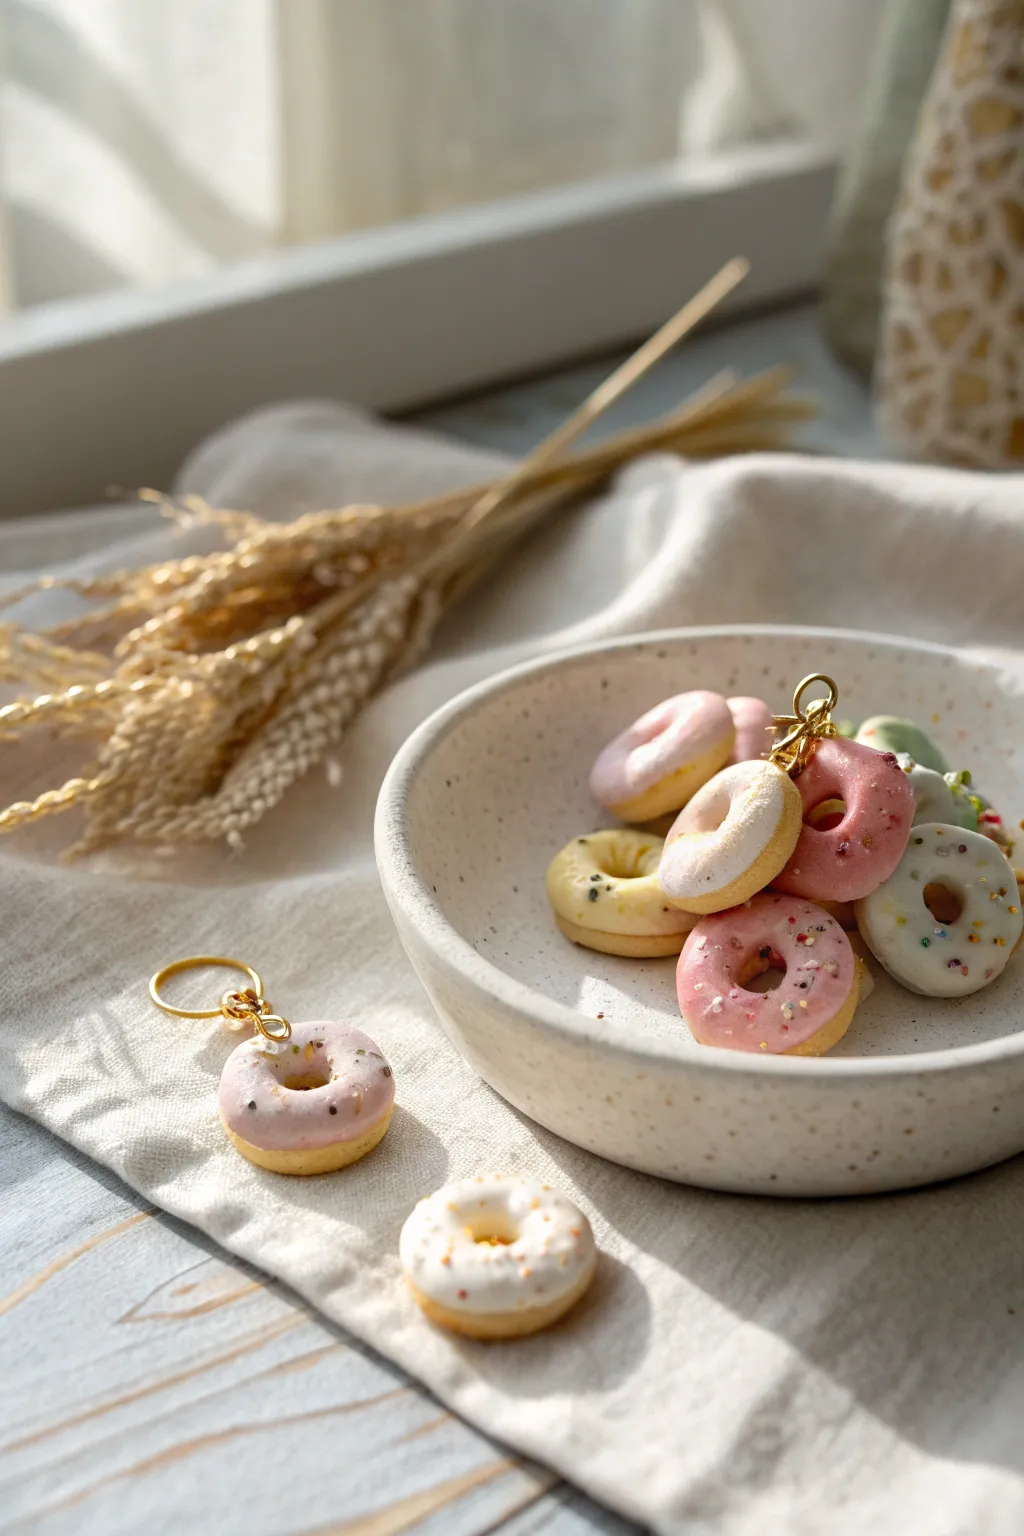
These delightful miniature donuts look good enough to eat but are designed to be sweet accessories for your keys or jewelry. With their realistic golden-brown bases and glossy, speckled icing, they make charming gifts or personal keepsakes.
Detailed Instructions
Materials
- Polymer clay (beige/tan, white, translucent, pastel pink, pastel yellow, light teal)
- Liquid polymer clay (translucent or white)
- Soft pastel chalks (orange, brown, yellow ochre)
- Small paintbrush (fluffy)
- Dotting tool or toothpick
- X-acto knife or clay blade
- Small circle cutters (two sizes: approx 1.5cm and 0.5cm)
- eye screws or headpins (gold)
- Needle nose pliers
- Gloss glaze or UV resin (optional for wet look)
- Fine sand or glitter (for sprinkles)
- Oven for baking
Step 1: Shaping the Dough
-
Mix the perfect dough color:
Start by conditioning your beige or tan polymer clay. If it looks too dark, mix in a little white and a tiny pinch of translucent clay to give it a realistic, bakery-fresh dough appearance. -
Roll and flatten:
Roll your conditioned clay into a sheet that is approximately 5mm to 7mm thick. You want the donuts to be chubby and substantial, not flat cookies. -
Cut the donut shapes:
Using your larger circle cutter, punch out rounds for the donut base. Then, use the smaller cutter (or a straw) to remove the center hole. -
Soften the edges:
Cut edges can look sharp and artificial, so gently tap and smooth the outer and inner edges with your fingertip to round them off, giving the dough a puffed look. -
Add texture:
Take a toothbrush or a ball of aluminum foil and gently tap the surface of the clay. This adds a subtle bread-like texture rather than leaving it perfectly smooth.
Pro Texture Tip
To mimic the ‘white ring’ seen on real fried donuts, keep the shading pastels away from the very center horizontal line of the donut side.
Step 2: Realistic Banking Shading
-
Prepare your pastels:
Scrape a little bit of yellow ochre, orange, and brown soft pastel chalk into fine powders on a piece of paper. -
Apply the ‘baked’ look:
Using a soft, fluffy brush, pick up some yellow ochre powder and dust the entire donut. Then, use the orange and brown lightly just on the edges and bottom where a donut would naturally brown in the fryer. -
Insert hardware:
If you plan to use these as charms, carefully screw a small gold eye screw into the top of the donut now, or insert a specialized clay hook.
Level Up: Scented Clay
Mix a tiny drop of vanilla or strawberry fragrance oil into the liquid clay icing for charms that smell as sweet as they look.
Step 3: Icing and Decorating
-
Create the frosting:
For the icing, mix liquid polymer clay with a tiny bit of your desired colored clay (pink, yellow, or white) in a small cup. Mix until it has the consistency of thick heavy cream. -
Apply the icing:
Carefully drizzle or spread the liquid clay mixture onto the top half of your donut using a toothpick or dotting tool. Let it drip naturally down the sides slightly, but control the flow so it doesn’t cover the bottom. -
Add sprinkles or zest:
While the liquid clay is wet, sprinkle on your toppings. You can use real cake sprinkles (just check they won’t melt), tiny bits of baked chopped clay, or fine sand for a sugary texture. -
Texture the toppings:
I prefer to gently press the sprinkles down with a tool so they look embedded in the glaze rather than just sitting precariously on top. -
Create a powdered sugar look:
For the plain donuts shown in the image, skip the liquid clay and instead pat white pastel dust heavily onto the top of the unbaked donut to mimic powdered sugar.
Step 4: Baking and Assembly
-
Bake the batch:
Place your donuts on a tile or baking sheet lined with parchment paper. Bake according to your polymer clay manufacturer’s instructions (usually around 275°F/130°C for 15-20 minutes). -
Cool down completely:
Let the donuts cool completely before handling. Polymer clay is fragile when hot and hardens as it cools. -
Secure the hardware:
Once cool, gently twist the eye screw to check its tightness. If it feels loose, unscrew it, add a drop of superglue, and screw it back in permanently. -
Optional glazing:
If you want a wet glaze look, apply a thin coat of gloss varnish or UV resin just over the colored icing part, avoiding the ‘bread’ areas. -
Attach the keychain:
Using needle-nose pliers, open a jump ring and attach your finished donut charm to the gold keychain hardware.
Clip your new bakery-fresh creations onto your bag and enjoy the sweet compliments coming your way


Tiny Donut Stud Earrings
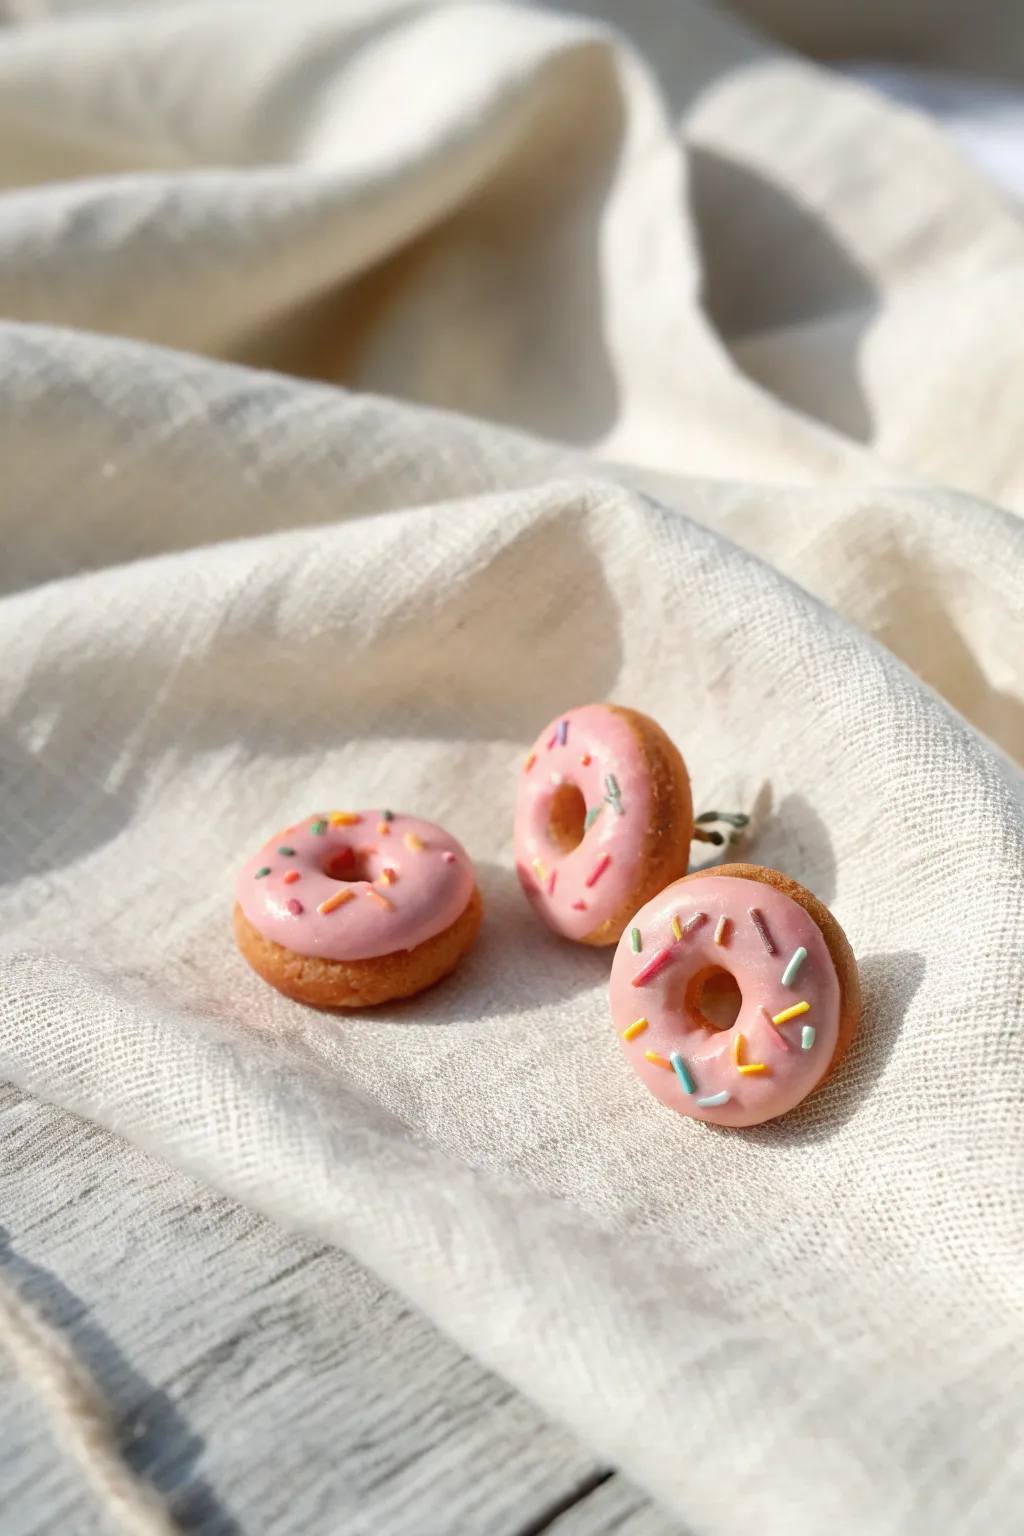
These miniature donut stud earrings are almost sweet enough to eat, featuring a classic golden-brown dough and glossy pink icing. With delicate pastel sprinkles, they are the perfect dainty accessory for dessert lovers.
Step-by-Step Guide
Materials
- Polymer clay (beige/tan, translucent, pale pink, white, blue, yellow)
- Liquid polymer clay (translucent)
- Soft artist pastels (yellow ochre, burnt umber)
- Small paintbrush
- Dotting tool or large ball tool
- Needle tool or toothpick
- Earring stud blanks (approx. 4mm post)
- Super glue or E6000
- Polymer clay glossy varnish (optional)
- Craft knife or tissue blade
Step 1: Shaping the Dough
-
Mix the dough color:
Start by conditioning a mix of beige polymer clay with a very small amount of white and translucent clay. This creates a realistic, slightly airy dough look rather than a flat plastic color. -
Form the base shapes:
Roll small balls of the dough mixture, about 6-7mm in diameter. Flatten them gently into thick discs using your fingertip to create the classic donut profile. -
Create the center hole:
Use a dotting tool or the back of a thin paintbrush to press a hole directly into the center of each disc. Widen the hole slightly by rotating the tool, smoothing the edges so they look baked and rounded, not sharp. -
Texture the surface:
For added realism, gently brush a clean toothbrush or a ball of aluminum foil over the surface of the clay. This mimics the microscopic air pockets found in fried dough.
Sticky Icing?
If your liquid clay icing is too runny and dripping off the donut entirely, let the mixture sit open to the air for 30 minutes to thicken, or add a tiny bit more solid clay.
Step 2: Baking Effect
-
Prepare the shading:
Scrape some yellow ochre and burnt umber chalk pastels into fine powder using a craft knife. -
Apply the ‘golden brown’ look:
Use a soft, dry paintbrush to dust the yellow ochre powder over the donuts. Concentrate heavier burnt umber shading around the edges and near the center hole to simulate where a real donut would brown the most during frying. -
First bake:
Bake the naked donuts according to your clay package instructions (usually 275°F/130°C for 15 minutes). Let them cool completely before icing.
Step 3: Icing and Sprinkles
-
Create the icing:
Mix liquid translucent clay with a small amount of pale pink solid clay. Mash and stir them together until you have a consistency like thick heavy cream or slightly melted frosting. -
Apply the glaze:
Using a needle tool or toothpick, carefully drip the pink mixture onto the top of the cooled donuts. Tease the liquid clay slightly down the sides to create organic drips, but don’t cover the entire sides. -
Make the sprinkles:
Roll extremely thin ‘snakes’ of white, blue, yellow, and extra pink solid clay. Bake these thin strands for just 5-10 minutes so they harden. Once cool, chop them into tiny bits with a blade. -
Decorate:
While the pink icing is still wet, use tweezers or a needle tool to place the chopped sprinkles onto the donuts. Press them in very lightly so they bond with the liquid clay. -
Final bake:
Bake the decorated donuts again for another 15-20 minutes to set the liquid clay frosting. Monitor the oven so the white sprinkles don’t scorch.
Scented Jewelry
Mix a tiny drop of vanilla or strawberry fragrance oil into the clay dough before baking. The scent will be subtle but delightful when you wear them
Step 4: Assembly
-
Add a glossy finish:
If you want a wet-look glaze, brush a thin layer of gloss varnish only over the pink icing parts, avoiding the textured dough areas. -
Prepare the posts:
Lightly sand the flat pad of your earring posts to create a rough surface for better adhesion. -
Fix the hardware:
Apply a dab of strong adhesive (like E6000 or super glue gel) to the back of the donut. Press the earring post firmly onto the back. -
Setting time:
Allow the glue to cure fully (usually 24 hours for maximum strength) before wearing your new accessories.
Wear your adorable mini donuts with pride and watch as people lean in to see the tiny details

The Complete Guide to Pottery Troubleshooting
Uncover the most common ceramic mistakes—from cracking clay to failed glazes—and learn how to fix them fast.
Donut Keychain Toppers
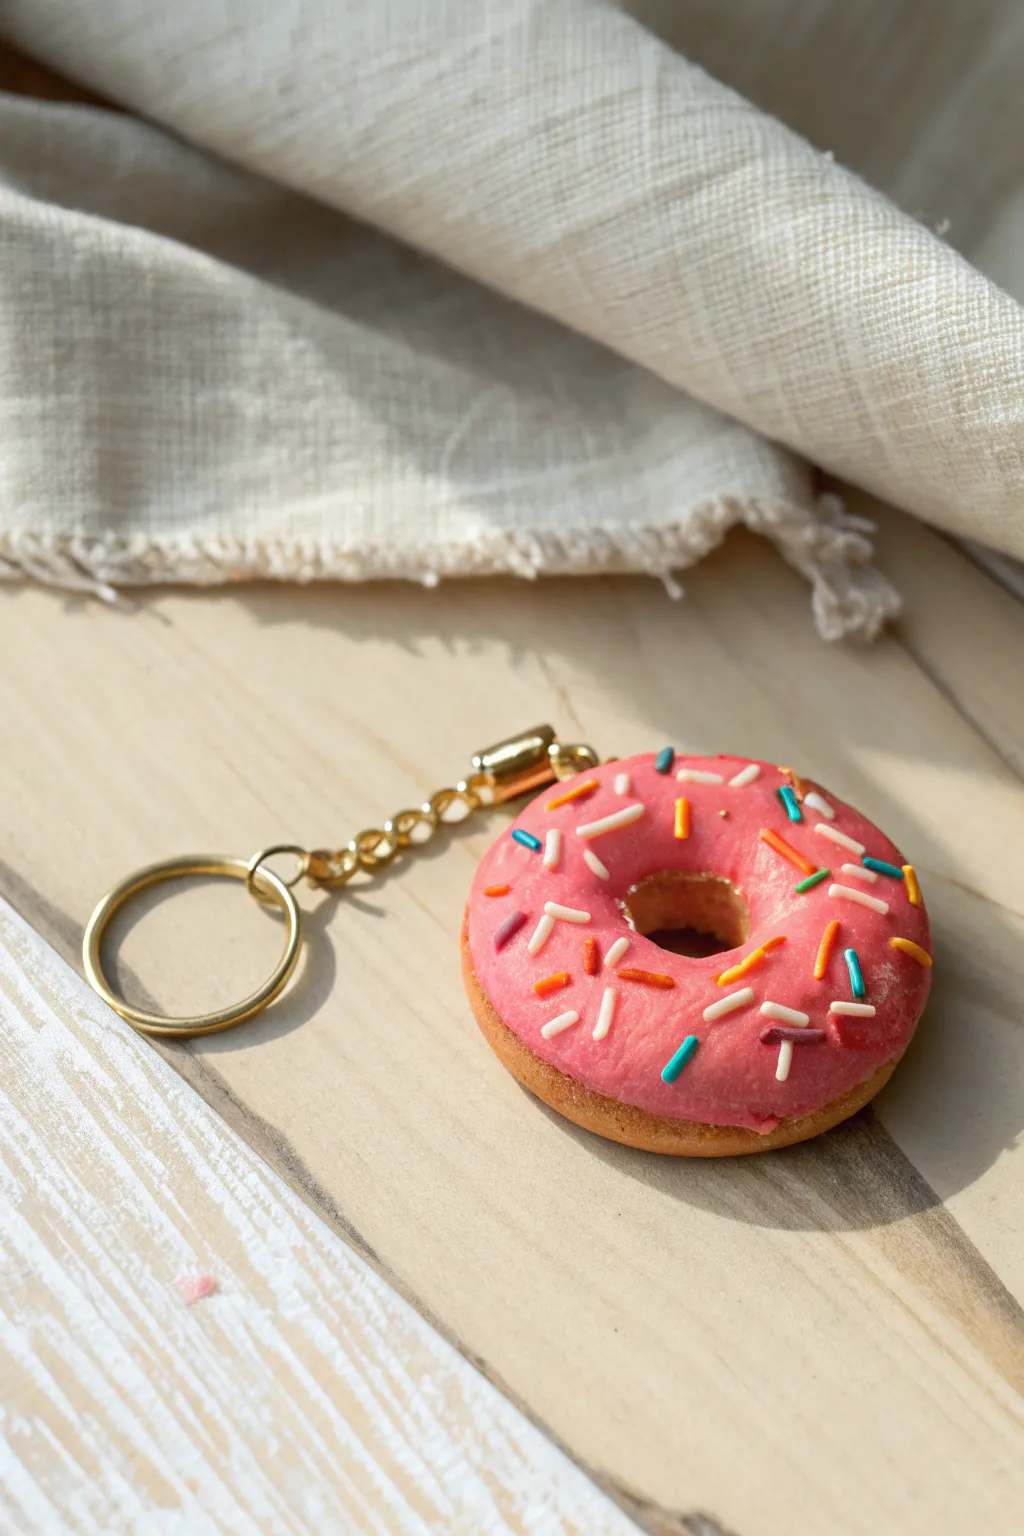
Create a sweet, zero-calorie treat for your keys with this realistic polymer clay donut. Featuring a golden-brown cake base, glossy pink icing, and colorful sprinkles, adding this charm brings a pop of whimsy to your daily carry.
Detailed Instructions
Materials
- Tan or beige polymer clay (dough color)
- Pink polymer clay (icing color)
- Assorted polymer clay scraps (for sprinkles: white, blue, yellow, red)
- Translucent liquid polymer clay (optional but recommended)
- Soft pastel chalks (orange, yellow, brown) for shading
- Paintbrush for chalk application
- Dotting tool or small ball stylus
- Gloss glaze or polyurethane varnish
- Gold screw eye pin
- Gold keychain ring with chain
- Needle tool or toothpick
- Oven for baking
Step 1: Shaping the Dough
-
Mix the perfect dough color:
Start by conditioning your tan clay until it is soft and pliable. If the color looks too flat, I like to mix in a tiny speck of translucent clay and just a hint of yellow to give it that realistic baked-good warmth. -
Form the base:
Roll the clay into a smooth ball regarding the size of a large marble, then gently flatten it into a thick disc shape. Don’t make it too thin; you want it to look fluffy. -
Create the center hole:
Use a tool handle or your finger to press an indentation into the center, but don’t punch all the way through yet. Flip the disc over and press from the other side until the hole opens up, ensuring the edges stay rounded. -
Texture the surface:
Take a toothbrush or a ball of aluminum foil and gently tap it over the tan surface to create a subtle baked texture, avoiding the very center hole area. -
Add baked shading:
Scrape some orange, yellow, and brown chalk pastels into fine powder. Use a soft dry brush to dust the edges and the top of the donut with the darker brown, leaving the middle (the ‘fry line’) lighter to mimic real frying.
Pro Tip: Realism
Use a darker brown pastel shading specifically on the bottom and outer rim of the donut. Real donuts darken most where they touch the hot oil.
Step 2: Icing and Toppings
-
Prepare the icing:
Roll out your pink clay very thinly. Alternatively, for a more realistic drip, mix the pink clay with liquid polymer clay until it reaches a sticky, frosting-like consistency. -
Apply the glaze layer:
If using solid clay, cut a wavy circle slightly smaller than your donut and drape it over the top, smoothing the edges down. If using liquid clay, smear it carefully onto the top half using a needle tool. -
Refine the hole:
Poke through the icing layer into the center hole you made earlier, smoothing the pink clay down into the hole so no tan clay shows on the top interior rim. -
Make the sprinkles:
Roll extremely thin snakes of white, blue, yellow, and red clay. Bake these snakes separately for 5 minutes just to harden them, then chop them into tiny bits with a blade. -
Add the sprinkles:
Press the tiny chopped sprinkles into the pink icing while it is still raw. Scatter them randomly, ensuring some overlap and different angles for a natural look. -
Insert hardware:
Screw the gold eye pin into the top edge of the donut. Remove it, add a tiny dab of liquid clay or strong glue to the threads, and screw it back in for a secure hold.
Level Up: Scented!
Before baking, mix a drop of vanilla or sweet dough essential oil into the tan clay. Your keychain will smell like a fresh bakery.
Step 3: Finishing Touches
-
Bake the charm:
Place your donut on a tile or parchment paper and bake according to your specific clay brand’s instructions (usually 275°F/135°C for 15-30 minutes). -
Cool and inspect:
Allow the piece to cool completely before handling so the clay fully cures and hardens. -
Glaze for shine:
Apply a coat of gloss glaze or polyurethane varnish specifically over the pink icing area. This makes the frosting look wet and sweet, while keeping the dough matte. -
Attach the keychain:
Once the glaze is dry, use pliers to open the jump ring on your gold keychain hardware and connect it to the eye pin on the donut. Close the ring securely.
Enjoy showing off your adorable, permanent pastry on your daily adventures
Galaxy Fantasy Donuts

Capture the mysteries of the universe in miniature form with these stunning galaxy-themed donuts. The deep, shimmering icing effect is achieved using translucent liquid clay and pearlescent pigments, creating a mesmerizing depth that looks almost edible.
Step-by-Step
Materials
- Beige polymer clay (for the dough)
- Translucent liquid polymer clay (Liquid Sculpey or Fimo Liquid)
- Chalk pastels (ochre, orange, light brown)
- Soft paintbrush for shading
- Pearlescent mica powders (deep blue, purple, teal, black)
- White polymer clay (tiny amount for stars)
- Small star cutter or X-acto knife
- Pointed detailing tool or toothpick
- High-gloss glaze or UV resin
- UV lamp (if using resin)
- Aluminum foil (for texturing)
Step 1: Shaping the Dough Base
-
Condition and Roll:
Begin by conditioning your beige polymer clay until it is soft and pliable. Roll it into a smooth ball, approximately 1.5 inches in diameter, ensuring there are no cracks on the surface. -
Form the Donut:
Gently flatten the ball slightly with your palm. Using your thumb or a rounded tool handle, press into the center to create a hole, smoothing the edges outward to form the classic ring shape. -
Add Texture:
Scrunch up a ball of aluminum foil and gently press it against the top half of the donut ring. Roll a toothbrush bristles over the ‘fried line’ area (the middle equator) to mimic the airy texture of cooked dough. -
Pre-Bake Shading:
Scrape some ochre and light brown chalk pastel into fine dust. Using a soft, dry brush, dust the top and bottom edges of the donut to simulate a golden-brown bake, leaving a pale line around the center.
Step 2: Creating the Galaxy Glaze
-
Mix the Base Colors:
Prepare three or four small separate containers or a palette. Pour liquid translucent clay into each. Mix a different color of mica powder into each pool: deep indigo, violet, teal, and a touch of black shimmer. -
Apply the Glaze:
Drizzle the deep indigo liquid clay over the top of your donut first. Don’t worry about coverage perfectly yet; let it flow naturally down the sides just slightly. -
Swirl the Colors:
While the base layer is wet, drop small amounts of the teal and violet liquid clay onto the indigo. Take a needle tool or toothpick and gently swirl them together to create a marbled, nebula-like effect without muddying the colors completely. -
Refine the Drips:
If the glaze looks too thick in one spot, guide it down the side to form a realistic drip. Ensure the ‘dough’ texture is still visible underneath at the bottom. -
Bake the Donut:
Carefully place the donut on a tile or parchment-lined tray. Bake according to your clay manufacturer’s instructions (usually 275°F/135°C for 15-20 minutes). Let it cool completely.
Starry Depth Pro-Tip
Mix fine silver glitter into the translucent liquid clay base before adding mica powders. This adds depth that looks like it’s suspended inside the glaze.
Step 3: Stars and Finishing Touches
-
Painting the Milky Way:
Once cool, use a very fine brush and thinned white acrylic paint or white liquid clay to flick tiny specks across the ‘galaxy’ surface to represent distant stars. -
Adding Larger Stars:
Roll out a paper-thin sheet of white polymer clay. Use a tiny star cutter or a sharp blade to cut out miniature stars also arrange them on the glaze. I prefer to use a tiny dot of liquid clay to adhere them securely. -
Adding the Shine:
Coat the entire glazed area (including the new stars) with a layer of UV resin or high-gloss varnish. This deepens the mica colors and gives that wet, sugary look. -
Curing the Shine:
If using UV resin, place under a UV lamp for 2-3 minutes until hard and tack-free. If using varnish, allow 24 hours to dry fully. -
Final Inspection:
Check for any sticky spots or dull areas. A second thin coat of gloss can sometimes enhance the illusion of deep space even further.
Level Up: Edible Illusion
Dust the finished, cured donut lightly with white pastel powder or cornstarch to simulate powdered sugar landing on the galaxy glaze.
Display your celestial creations on a miniature plate to leave your friends wondering if they are edible or art