
Middle school clay is my favorite kind of messy magic—big creativity, growing skills, and just enough chaos to keep it fun. Here are my go-to middle school clay ideas that feel totally doable in a classroom, but still leave plenty of room for personality.
Pinch Pot Creature Bowl
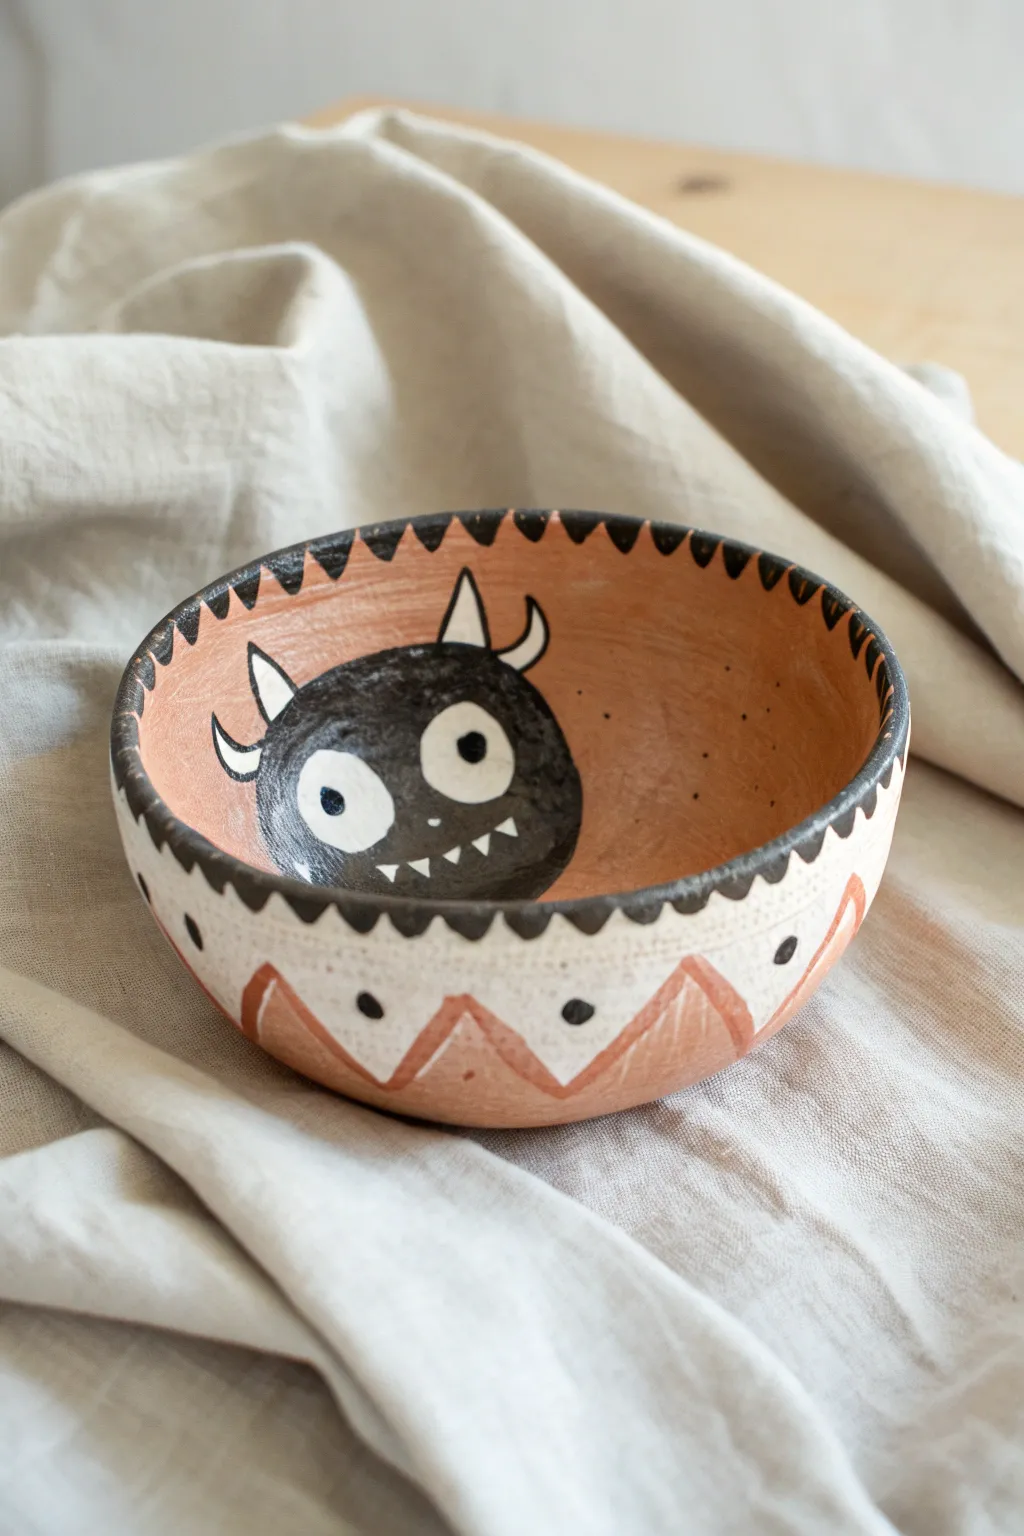
This whimsical little bowl features a delightful surprise resting at the bottom: a wide-eyed monster staring back at you. Using simple pinch pot techniques and scraffito decoration, you’ll create a charming vessel that mixes earthy terracotta tones with stark black and white contrasts.
Detailed Instructions
Materials
- Terracotta or red earthenware clay
- Underglaze (Black and White)
- Clear transparent glaze (food safe if using for food)
- Loop tool or spoon (for smoothing)
- Small paintbrush (for slip and underglaze)
- Needle tool or toothpick
- Sponge
- Fine grit sandpaper (optional, for bisque stage)
- Kiln access
Step 1: Forming the Bowl
-
Start with a sphere:
Begin with a ball of terracotta clay roughly the size of a tennis ball. Roll it in your palms until it is smooth and free of cracks. -
Open the pot:
Hold the ball in one hand and press your thumb into the center, stopping about a half-inch from the bottom to ensure the base remains sturdy. -
Pinch the walls:
Gently pinch the clay between your thumb and fingers, rotating the ball as you go. Work your way from the bottom up to the rim, aiming for an even thickness of about a quarter-inch throughout. -
Smooth the interior:
Use your thumb or a slightly damp sponge to smooth out any fingerprints inside the bowl. You want a nice, clean canvas for your monster painting later. -
Refine the rim:
Tap the rim gently on the table to level it, or use a damp sponge to round it off. I like to keep the rim slightly organic rather than perfectly sharp.
Clean Lines Pro-Tip
If your hand shakes while painting details, rest your pinky finger on the dry part of the bowl to stabilize your brush movement.
Step 2: Designing the Monster
-
Apply white slip or underglaze:
Once the clay is leather hard (stiff but still cool to the touch), paint a band of white underglaze around the exterior bottom half of the bowl. You don’t need to cover the very bottom or the interior yet. -
Paint the monster body:
Using black underglaze, paint a large, loose oval shape directly in the center of the bowl’s interior. This will be the monster’s face. -
Add the rim detail:
While the interior dries, use a small brush to paint a jagged zigzag pattern along the top rim using black underglaze. Let the points of the triangles extend slightly down the inside and outside walls. -
Detail the exterior:
On the white band you painted earlier on the outside, paint a loose zigzag line in terracotta-colored underglaze (or leave the raw clay exposed if you masked it off) and add small black dots between the zigzags for a tribal look. -
Add the eyes:
Once the black patch inside is dry to the touch, paint two large white circles for eyes. They don’t have to be perfect; slightly uneven circles add character. -
Define the horns:
Paint small white horns curving out from the top of the black monster shape. Adding a thin black outline later can help them pop if the clay background is too light. -
Create pupils and teeth:
Add small black dots inside the white eyes for pupils. Then, using a very fine brush or a toothpick dipped in white, add a jagged line of small triangles for the teeth at the bottom of the black oval.
Level Up: Texture
Before painting, use a needle tool to scratch the monster’s fur texture into the wet clay for a tactile 3D effect after glazing.
Step 3: Firing and Finishing
-
Bisque fire:
Allow the bowl to dry completely (bone dry). This usually takes a few days depending on humidity. Fire the piece in the kiln to cone 04 (or your clay’s specific bisque temperature). -
Clean the bisque:
Wipe the fired bowl with a damp sponge to remove any dust. This step is crucial because dust prevents glaze from sticking properly. -
Apply clear glaze:
Dip the entire bowl into a clear, transparent glaze, or brush it on evenly. Make sure the glaze is compatible with your clay body and underglazes. -
Clear the foot:
Wipe the very bottom (the foot) of the bowl clean with a sponge so it doesn’t stick to the kiln shelf during the final firing. -
Glaze fire:
Fire the bowl a second time to the temperature recommended for your clear glaze. This will seal the surface and make the colors vibrant.
Fill your new bowl with snacks or trinkets and enjoy the friendly creature peeking out from beneath


Coil Bowl With Texture Bands
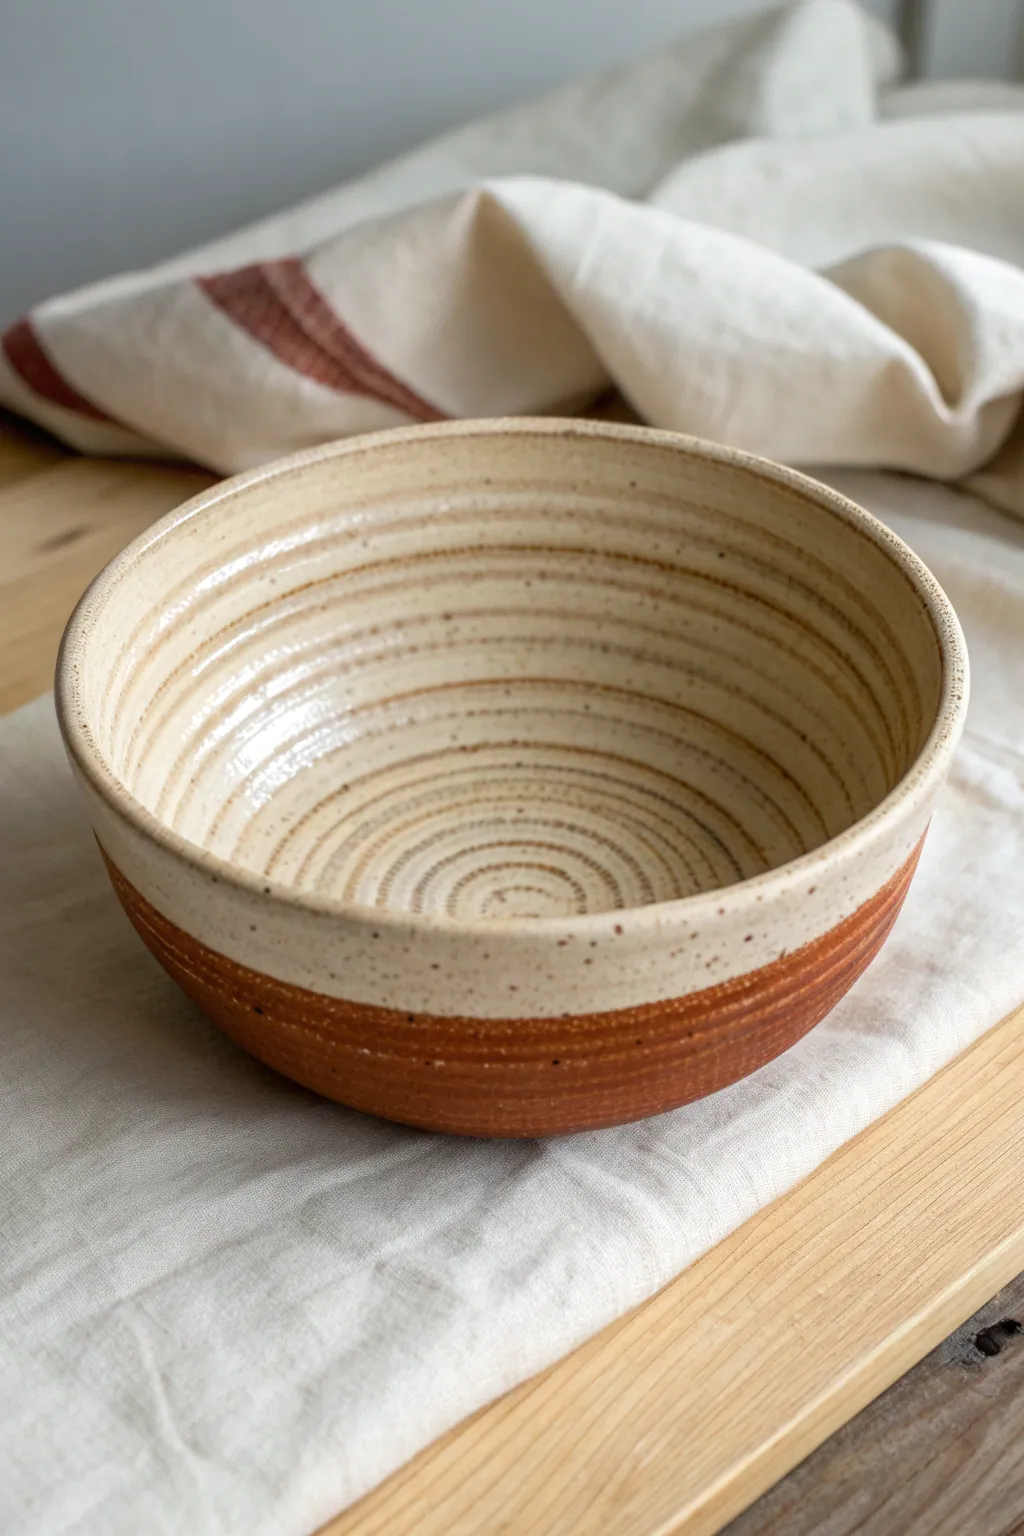
This project transforms simple clay coils into a stunning functional bowl with a mesmerizing interior spiral texture. By leaving the base natural and glazing the upper portion in a speckled cream, you achieve a warm, professional dipped look that highlights the clay’s earthy tones.
Step-by-Step Guide
Materials
- Stoneware clay (terracotta or reddish-brown body)
- Pottery wheel or banding wheel (for coil construction)
- Clay cutting wire
- Rib tool (smooth wood or metal)
- Needle tool
- Sponge
- Cream or oatmeal speckled glaze
- Small basin of water
- Kiln for firing
Step 1: Forming the Base
-
Wedge the clay:
Start by thoroughly wedging a grapefruit-sized ball of reddish-brown stoneware clay to remove air bubbles and ensure an even consistency. -
Center on the wheel:
Secure the clay ball onto the center of your wheel head. Using wet hands and steady pressure, cone the clay up and down until it is perfectly centered. -
Open the form:
Press your thumbs into the center to open the clay, creating the floor of the bowl. Aim for a gentle curve rather than a flat bottom to match the bowl’s rounded profile. -
Pull the walls:
Begin pulling the walls upward and outward. Use steady finger pressure to shape a wide, open curve. Keep the rim slightly thickened for durability.
Groove Depth
Make your internal spiral grooves slightly deeper than you think. Since glaze pools in recesses, deeper grooves ensure the spiral pattern remains visible after firing.
Step 2: Creating the Texture
-
Refine the curve:
Use a rib tool on the exterior to smooth the shape and support the wall as you make final adjustments to the curve. -
Add the spiral texture:
With the wheel spinning at a slow-to-medium speed, use your finger or a rounded sculpting tool inside the bowl. Start from the very center bottom. -
Trace the path:
Slowly drag your finger upward along the inner wall while the wheel turns. This creates a continuous, deep spiral groove from the floor all the way to the rim. -
Clean the rim:
Use a chamois or a small piece of damp sponge to gently smooth the very top edge of the rim, making sure it is comfortable to the touch. -
Undercut the foot:
Use a wooden knife tool to undercut the base of the bowl, creating a clean line where the bowl meets the wheel head. -
Wire off:
Pull a wire tool taut and slide it cleanly under the bowl to separate it from the wheel. Leave it on a bat to dry to leather-hard. -
Trim the foot:
Once leather-hard, flip the bowl over and center it. Trim a neat foot ring, removing excess weight from the bottom while refining the curve.
Step 3: Glazing and Finishing
-
Bisque fire:
Load the bone-dry bowl into the kiln for a bisque firing (typically Cone 04 or 06) to harden the clay for glazing. -
Clean the bisque:
Wipe the fired bowl with a damp sponge to remove any kiln dust, which helps the glaze adhere properly. -
Prepare the glaze:
Mix your cream or oatmeal speckled glaze thoroughly. I find that stirring well is crucial here to ensure the speckles are evenly distributed. -
Pour the interior:
Pour a generous amount of glaze inside the bowl. Roll it around to coat the entire interior surface, covering all those spiral grooves, then pour out the excess. -
Dip the exterior:
Hold the bowl by the foot (or use dipping tongs) and dip the exterior into the glaze bucket, stopping about halfway down the wall. This creates the sharp line between the glazed rim and raw base. -
Clean the definition line:
If the dip line is uneven, use a damp sponge to carefully wipe the glaze edge straight, ensuring a crisp transition. -
Final cleaning:
Ensure the foot ring and bottom are completely free of glaze to prevent sticking to the kiln shelf. -
Glaze fire:
Fire the bowl to the maturity temperature of your clay and glaze (often Cone 5 or 6 for stoneware). This will melt the glaze into that glossy, smooth finish.
Wax Resist Method
Instead of dipping carefully, paint liquid wax resist on the bottom half of the exterior. Then you can dip the whole bowl, and the wax will repel the glaze perfectly.
Your finished bowl will reveal a beautiful contrast between the smooth, speckled interior and the raw, earthy exterior texture


Slab-Built Trinket Dish
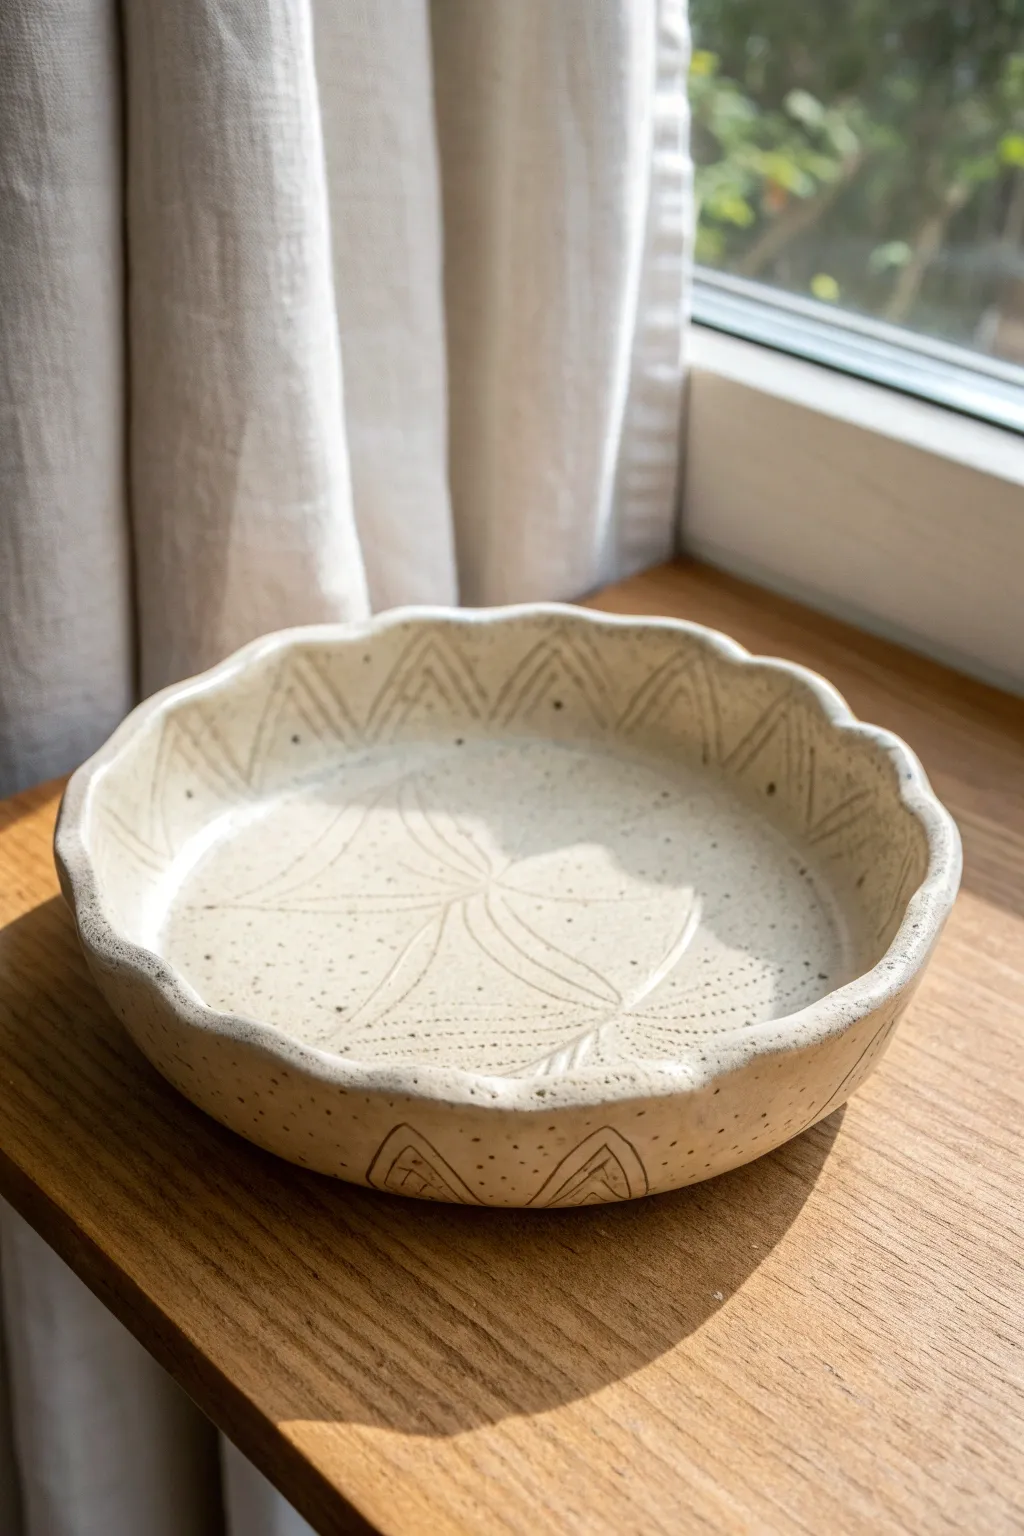
This charming trinket dish combines a soft, undulating rim with a geometric carved interior, perfect for holding jewelry or keys. The speckled clay body gives it a warm, organic feel that contrasts beautifully with the sharp lines of the surface decoration.
How-To Guide
Materials
- Speckled cone 5 or 6 stoneware clay
- Rolling pin
- Wooden guide strips or canvas
- Circular bisque hump mold or plaster mold (approx. 6-7 inches)
- Needle tool
- Fettling knife
- Loop tool or carving tool
- Sponge
- Clear glossy glaze
- Kiln
Step 1: Creating the Slab
-
Roll the clay:
Begin with a wedge of speckled clay about the size of a grapefruit. Place it on your canvas and use a rolling pin to flatten it out. -
Achieve even thickness:
Roll the clay until it is a uniform 1/4 inch thick. Using wooden guide strips on either side of your clay can help ensure the slab is perfectly even. -
Smooth the surface:
Take a soft rib tool or a slightly damp sponge and compress the surface of the slab on both sides to remove any canvas texture. -
Cut the circle:
Place a circular template or a plate (approx. 8 inches in diameter) gently on top of the slab. Trace around it with a needle tool to cut out your circle.
Slumping Rim?
If the clay is too wet, the wavy rim might flop down. Let the slab dry slightly on a flat board for 15-20 minutes before draping it over the mold.
Step 2: Forming the Shape
-
Apply to mold:
Carefully lift your clay circle and drape it over your hump mold. If you are using a household bowl as a mold, cover it with plastic wrap or newsprint first so the clay doesn’t stick. -
Establish the curve:
Gently press the clay down to conform to the shape of the mold, starting from the center and working your way out. -
Create the crimped rim:
To make the wavy edge, use your thumb and forefinger to pinch gentle undulations all around the rim. I like to space these about an inch apart for a relaxed look. -
Smooth the edge:
Run a damp sponge or your finger along the rim to round off any sharp edges created by the cutting tool. -
Initial drying:
Let the dish sit on the mold until it reaches a soft leather-hard stage. It needs to be firm enough to hold its shape when flipped over, but soft enough to carve.
Inlay Technique
After carving, brush black underglaze into the lines and wipe the surface clean with a sponge. This creates a bold ‘Mishima’ inlay effect.
Step 3: Decorating and Glazing
-
Map out the design:
Once leather-hard, remove the dish from the mold and flip it right-side up. Lightly sketch your design with a needle tool. The photo shows concentric triangles near the rim and a petal-like pattern in the center. -
Carve the interior:
Use a carving tool with a fine tip to deepen your sketched lines. Carve the triangles pointing inward from the rim first. -
Detail the center:
Carve the connecting curved lines in the center to create the flower motif. Add small punctuation dots inside the triangles using the blunt end of a drill bit or needle tool. -
Carve the exterior:
Don’t forget the outside! Turn the bowl over and repeat the triangle motif on the exterior wall near the base for continuity. -
Clean up burrs:
Wait until the clay is bone dry, then use a stiff brush or a slightly damp sponge to gently wipe away any little clay crumbs (burrs) left from carving. -
Bisque fire:
Load the bone-dry piece into the kiln and bisque fire it to cone 04. -
Glaze application:
Wipe the bisque-ware with a damp sponge to remove dust. Brush on 2-3 coats of a clear glossy glaze. This allows the speckles and the natural clay color to show through. -
Final wipe:
Use a sponge to wipe any glaze off the very bottom foot of the dish so it doesn’t fuse to the kiln shelf. -
Glaze fire:
Fire the piece a second time to cone 5 or 6 (depending on your clay body instructions) to finish the work.
Once fired, you will have a beautiful, durable dish ready to organize your treasures


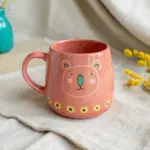
Face Cup or Mini Mug
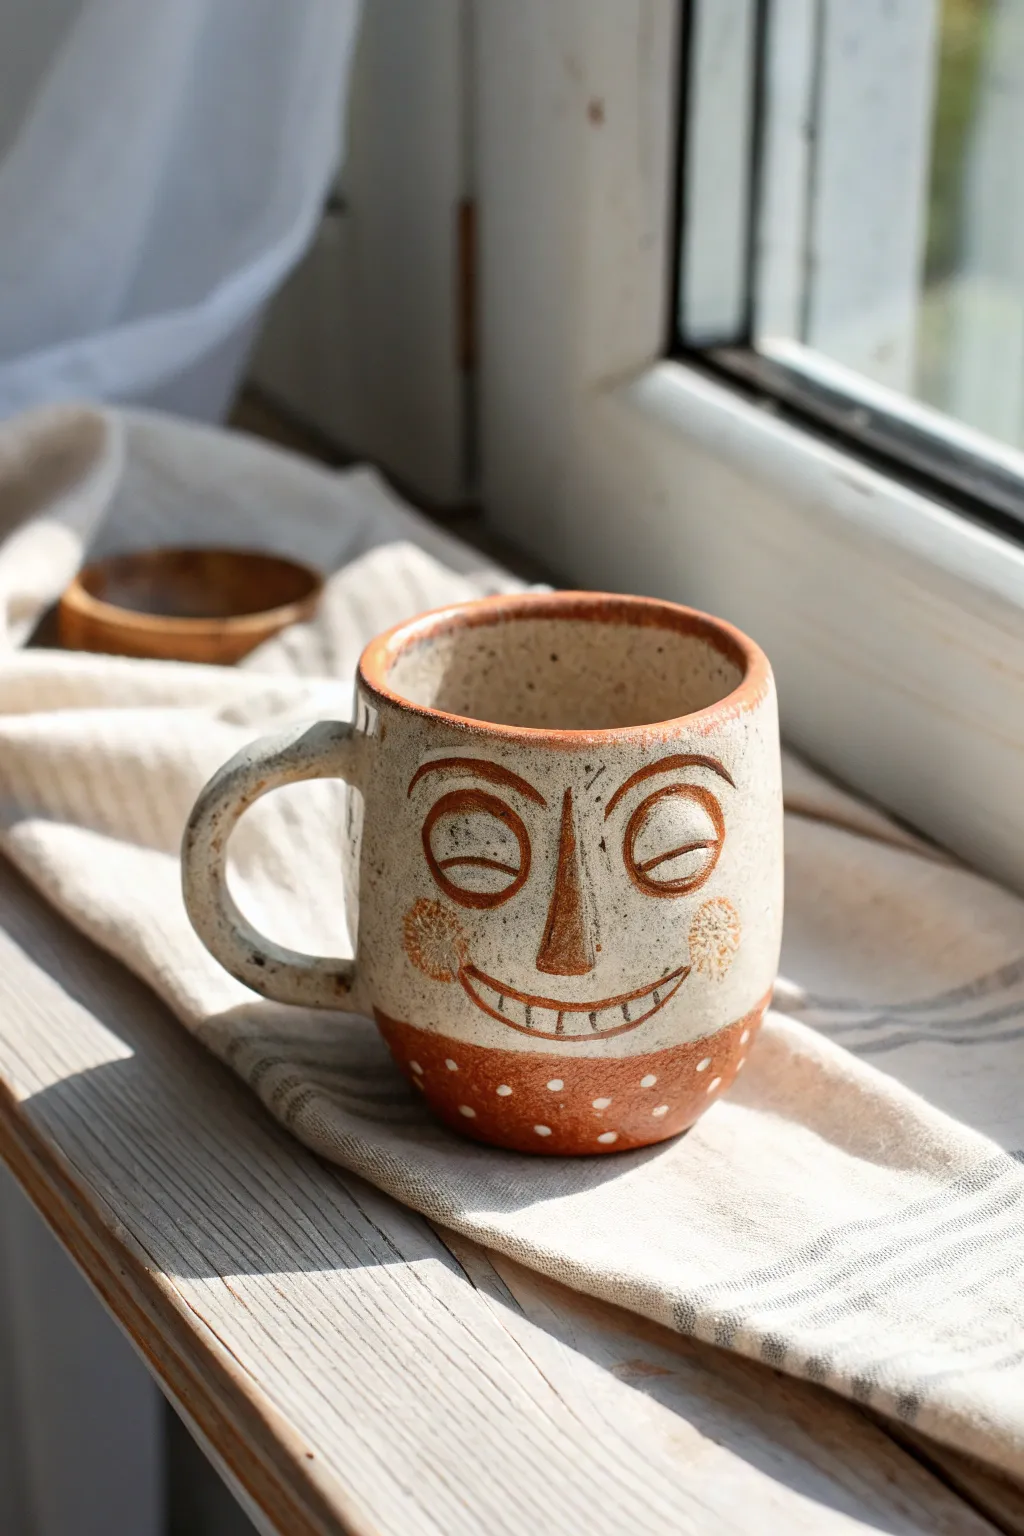
This charming project combines functional pottery with expressive character design, featuring a stylized face carved and painted onto a sturdy, hand-built mug. The speckled clay body and warm terracotta accents give it a cozy, rustic feel perfect for a morning hot cocoa.
Step-by-Step Guide
Materials
- Speckled stoneware clay (low to mid-fire)
- Pottery wheel or rolling pin and canvas (for slab building)
- Fettling knife
- Scoring tool or fork
- Slip (clay and water slurry)
- Loop tool for carving
- Small sponge
- Underglazes (Warm Terracotta/Red-Brown, White)
- Needle tool
- Small round paintbrush
- Clear food-safe glaze
Step 1: Forming the Mug Body
-
Create the Cylinder:
Begin by forming the main cylinder of the mug. You can do this by throwing a simple cylinder on the wheel with about 1 pound of clay, or you can roll out a standard slab (about 1/4 inch thick), cut a rectangle, and wrap it around a form to create a tube. -
Add a Base:
If hand-building, roll a small circle of clay for the base. Score and slip the bottom edge of your cylinder and the edge of the base, then press them firmly together to create a watertight seal. -
Smooth the Connection:
Use a wooden modeling tool or your finger to blend the seams on both the inside and outside. I like to run a barely damp sponge over the entire surface to erase any fingerprints before moving on. -
Refine the Shape:
Gently gently push the walls outward slightly from the inside to give the mug a subtle curve—it should be slightly wider at the bottom than the top, creating a stable, pot-bellied shape. -
Attach the Handle:
Pull a strap of clay or roll a coil for the handle. Score and slip the attachment points on the side of the mug, then press the handle on firmly. Smooth the joints so it looks like the handle grows out of the mug.
Clean Lines
For crisp lines around the eyes and mouth, let the clay dry to a firm leather-hard stage before carving. This prevents the tool from dragging and creating jagged crumbs.
Step 2: Sculpting the Expression
-
Map the Features:
Once the clay is leather hard (stiff but still cold to the touch), use a needle tool to lightly sketch the placement of the eyes, nose, and mouth. The eyes should be large semicircles, and the mouth a wide U-shape. -
Carve the Outlines:
Using a sharp needle tool or a fine sgraffito tool, carve deeply into the lines you sketched. Go over the eyebrow arches, the outline of the nose, and the large eyelids to define them clearly. -
Add Dimension:
For the nose, you can either carve away clay around it to make it stand out or attach a very small, thin triangle of clay using slip to build it up slightly. -
Detail the Smile:
Carve vertical lines inside the mouth shape to create teeth. Keep the lines somewhat uneven to maintain that charming, handmade folk-art aesthetic.
Dynamic Expressions
Swap the sleepy eyes for wide-open circles or change the smile to a surprised ‘O’ shape. Give each student a different emotion to create a full ‘mood’ set.
Step 3: Decorating and Glazing
-
Apply Base Underglaze:
Paint the bottom third of the mug with a warm terracotta or red-brown underglaze. Use a steady hand to create a clean line where the color meets the bare clay. -
Add Facial Color:
Use the same terracotta underglaze to paint circular rosy cheeks and fill in the eyelids. This helps tie the face into the bottom design. -
Dot Details:
Dip the back end of a paintbrush into white underglaze (or white slip). Dot a pattern along the terracotta band at the bottom and create textured dots on the rosy cheeks for a whimsical touch. -
Bisque Fire:
Allow the mug to dry completely—this usually takes a few days. Once bone dry, fire it in the kiln to cone 04 (or your clay’s bisque temperature). -
Clear Glaze:
After the bisque firing, dip or paint the entire mug with a clear, food-safe glaze. This will seal the clay and make the speckles in the stoneware pop. -
Final Fire:
Fire the mug a second time to the glaze temperature specific to your clay body (usually cone 5 or 6 for stoneware).
Enjoy sipping your favorite beverage from your new, friendly face mug

The Complete Guide to Pottery Troubleshooting
Uncover the most common ceramic mistakes—from cracking clay to failed glazes—and learn how to fix them fast.
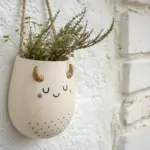
Animal Pinch Pot Planter
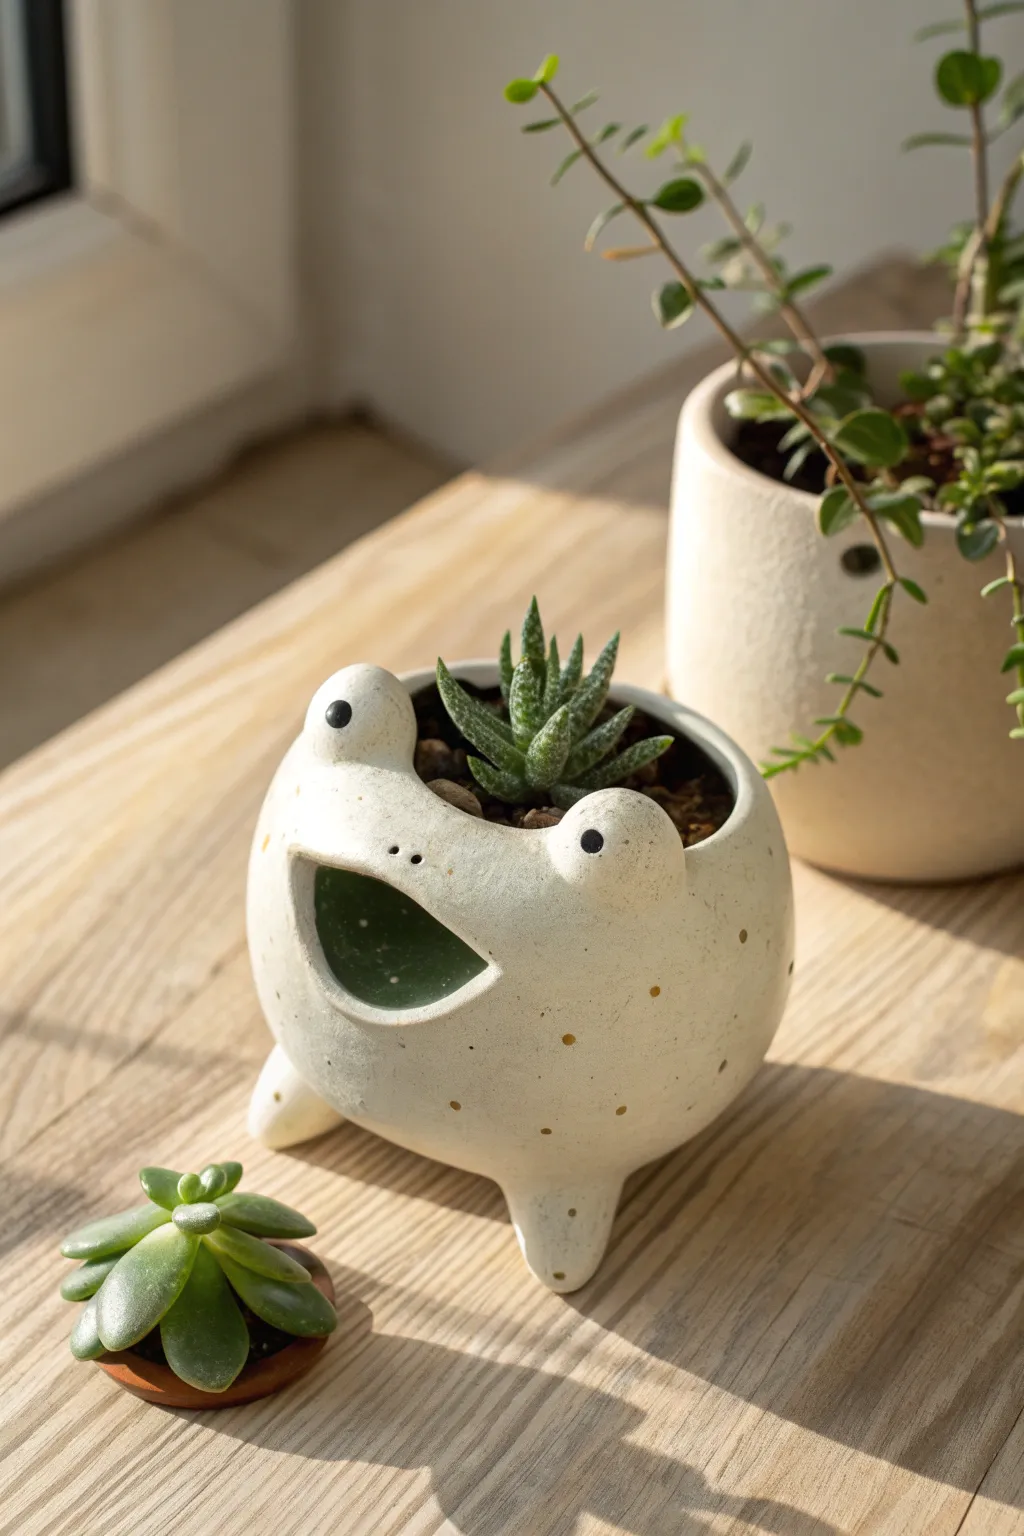
This charming little amphibian starts as a simple pinch pot but transforms into a delightful planter with plenty of personality. The wide, smiling mouth adds a whimsical touch while the speckled glaze gives it a refined, finished look perfect for holding small succulents.
How-To Guide
Materials
- White or light-colored clay (earthenware or stoneware)
- Pottery tools (needle tool, sponge, rib tool)
- Slip (clay mixed with water)
- Scoring tool or old fork
- Rolling pin
- White glaze (glossy or satin)
- Underglaze (black for eyes)
- Gold luster or gold paint (for spots)
- Small paintbrush
- Kiln (if using firing clay)
Step 1: Forming the Body
-
Create the base:
Start with a ball of clay roughly the size of a large orange. Hold it in one hand and push your thumb into the center, stopping about a half-inch from the bottom. -
Pinch the walls:
Slowly rotate the ball while pinching the clay between your thumb and fingers. Aim for an even thickness of about 1/4 inch all the way around. I find it helps to keep my fingers straight to avoid lumpy walls. -
Close the form:
Instead of leaving the top wide open like a bowl, gently curve the top edges inward as you pinch, creating a slightly enclosed sphere shape. This will be the frog’s body. -
Smooth the surface:
Use a rubber rib tool or a slightly damp sponge to smooth out any fingerprints or cracks on the outside of your sphere. A smooth canvas is key for that clean, speckled finish later.
Mouth drooping?
If the top lip sags while cutting the mouth, stuff the inside of the pot with a crumpled paper towel or newspaper to support the shape while it stiffens up.
Step 2: Adding Features
-
Cut the mouth:
Decide which side is the ‘front.’ Using a needle tool, carefully cut a wide, semi-circle shape for the mouth. It should be quite large—almost like a slice of watermelon removed from the front. -
Refine the opening:
Use a damp finger to smooth the cut edges of the mouth opening so they are rounded, not sharp. This opening also allows you to smooth the inside of the pot more easily. -
Make the eyes:
Roll two small balls of clay, about the size of marbles. These will be the protruding eyes. -
Attach the eyes:
Score (scratch) the top of the head and the bottom of the eye balls. Apply a dab of slip to the scored areas and press the eyes firmly onto the top rim, just above the corners of the mouth. -
Blend the seams:
Use a modeling tool or your finger to smooth the clay where the eyes meet the body, ensuring there are no visible seams and the attachment is strong. -
Create the feet:
Roll three small, slightly tapered cones of clay for the legs. You want them just tall enough to lift the belly off the table. -
Attach the feet:
Turn the pot upside down. Score and slip the locations for the feet—two near the front and one in the back for a tripod balance. Press the feet on and smooth the connections seamlessly. -
Poke a drainage hole:
While the pot is upside down, use a straw or a hole cutter to create a small drainage hole in the center of the bottom.
Glazing Pro-Tip
For the green inside shown in the photo, pour a small amount of green glaze inside the pot, swirl it around to coat the interior walls, and pour out the excess before glazing the outside white.
Step 3: Finishing Touches
-
Create the nostrils:
Use a small, round tool or the end of a paintbrush to gently press two tiny indentations between the eyes for nostrils. Don’t poke all the way through. -
Bisque fire:
Let the clay dry completely (bone dry) before loading it into the kiln for the first firing (bisque fire). -
Glaze application:
Once fired, dip or paint the entire frog in a creamy white, speckled, or matte white glaze. Wipe the bottom of the feet clean against a sponge so they don’t stick to the kiln shelf. -
Detailing the eyes:
Carefully paint a small black dot of underglaze or glaze on the center of each eye bump. -
Adding the gold spots:
If you are using a gold luster (which requires a third firing), apply small dots randomly around the body now. Alternatively, you can use gold acrylic paint for the spots after the final glaze firing is complete. -
Final Fire:
Fire the piece again according to your glaze instructions. Once cooled, plant your favorite succulent inside.
Place your new froggy friend on a sunny windowsill where he can show off his big smile
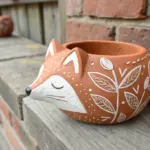
Hollow Form Choice Animal
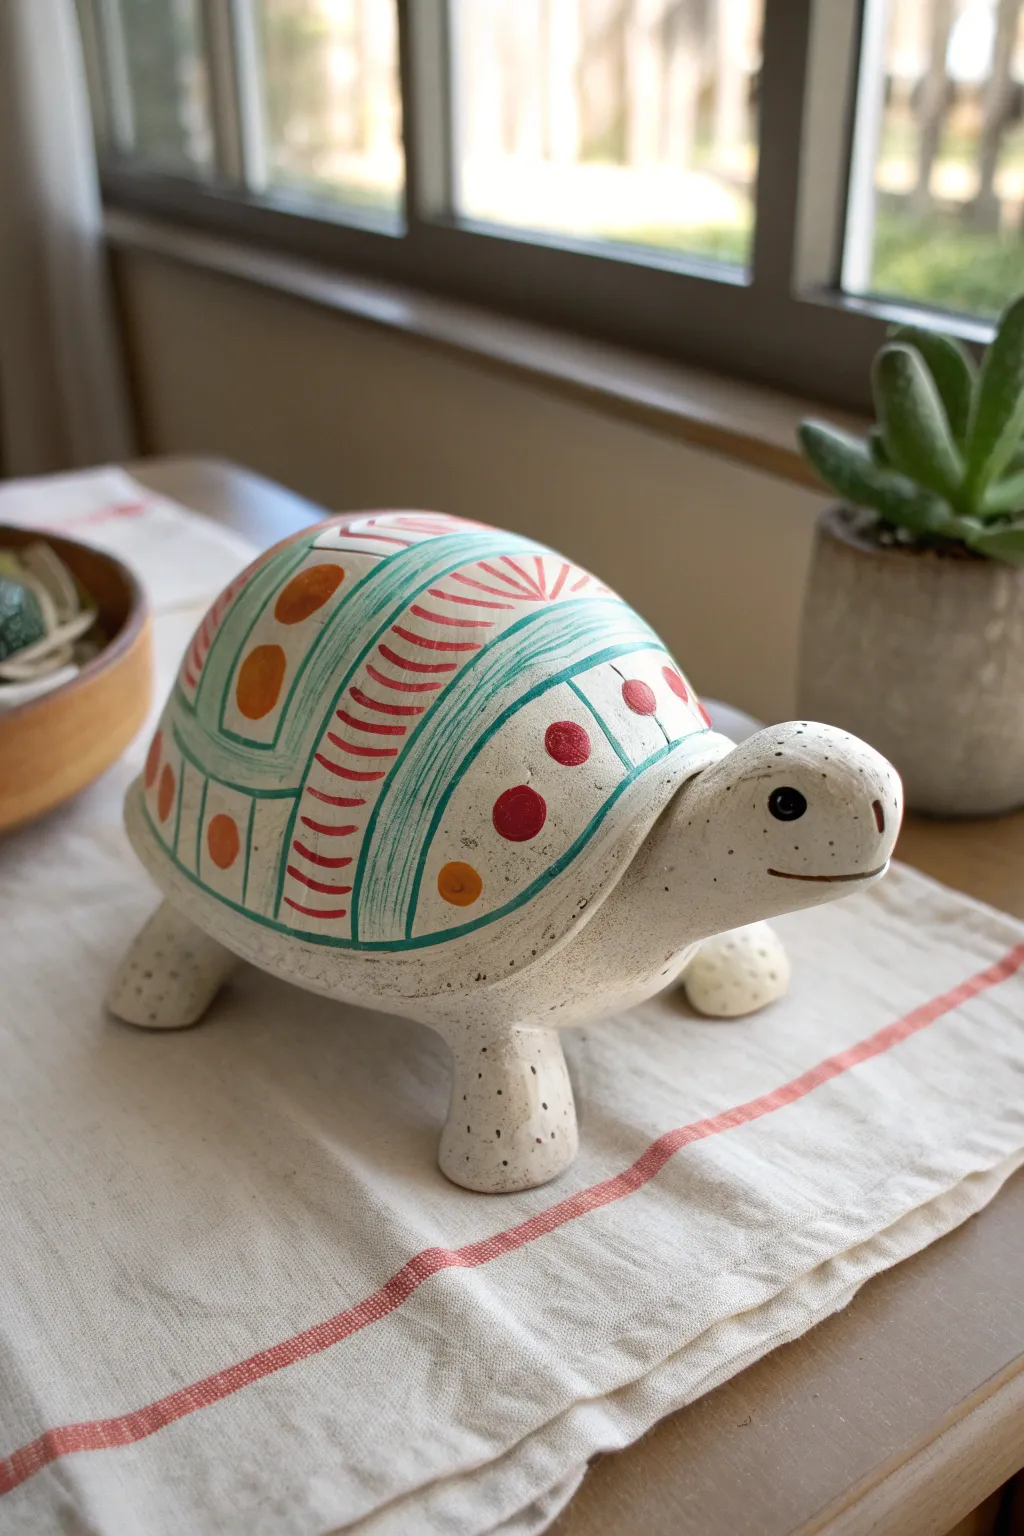
Sculpt a charming, sturdy turtle using basic hollow form techniques and bring it to life with vibrant underglaze patterns. This project combines simple construction methods with detailed surface decoration, resulting in a delightful creature with a smooth, speckled finish.
Step-by-Step
Materials
- Low-fire white earthenware clay (with fine grog)
- Needle tool
- Fettling knife
- Scoring tool or serrated rib
- Slip (clay mixed with water)
- Wooden modeling tool
- Underglazes (Red, Orange, Teal/Turquoise, Black)
- Clear glaze (matte or satin finish)
- Small round paintbrushes
- Sponge
Step 1: Forming the Body
-
Create the shell base:
Begin with a ball of clay roughly the size of a large orange. Create a pinch pot by pushing your thumb into the center and pinching the walls evenly until you have a deep, hemispherical bowl shape. This will be the turtle’s shell. -
Close the form (optional):
For a fully hollow form, roll a slab of clay about 1/4 inch thick. trace the rim of your pinch pot onto the slab, cut it out, and attach it to the bottom of the pot using the score and slip method. Alternatively, you can just leave the bottom open if you want a lighter piece, but closing it creates that rounded belly look. -
Smooth the shell:
Use a damp sponge or a flexible rib tool to smooth the outside of the shell dome. You want a nice, continuous curve without lumpy fingerprints. -
Form the head:
Roll a smaller ball of clay into a thick, elongated teardrop shape for the head and neck. The rounded end will be the face. -
Attach the head:
Score the surface of the shell where the neck will connect. Apply slip, then press the flat side of the neck firmly onto the shell. Use a wooden tool to blend the clay across the seam so it is seamless and strong. -
Sculpt the legs:
Roll four thick, stout coils of clay for the legs. They should be slightly flared at the bottom for stability. Score and slip them onto the underside of the body, ensuring the turtle stands level.
Air Escape Pro-Tip
If you completely close the hollow form in step 2, you MUST poke a tiny, hidden hole with a needle tool (usually in the belly) to let air escape, or it will explode in the kiln.
Step 2: Details & Decoration
-
Refine the face:
Use your thumb to gently smooth the face area. Use a needle tool or small stick to incise a horizontal line for the mouth, giving it a slight upward curve for a smile. Poke two small nostrils above the mouth. -
Add speckling:
If your clay body isn’t naturally speckled, you can create the texture seen in the image by flicking a toothbrush loaded with watered-down brown or black underglaze over the raw clay. -
Bisque fire:
Allow the clay to dry slowly to the bone-dry stage. Once dry, fire the piece in the kiln to cone 04 (bisque). -
Apply base color:
Wipe the bisque ware with a damp sponge to remove dust. The main body of this turtle is left the natural white of the clay, but you can apply a white underglaze if your clay is darker. -
Map out the pattern:
Lightly sketch your shell design with a pencil. Draw curved vertical bands dividing the shell into sections, mirroring the segmentation of a real turtle shell. -
Paint the teal bands:
Using a liner brush and teal underglaze, paint the thin double lines that separate the shell sections. Add the decorative hash marks or ‘fringe’ lines on the inside of these bands. -
Add red details:
Paint the curved red hatch marks within the central shell sections. Keep your brush strokes consistent to mimic the rhythmic pattern shown in the example. -
Paint the dots:
Using the back end of a paintbrush or a detailed dotting tool, apply the solid circles. Alternate between large red dots and smaller orange dots within the different open spaces of your design. -
Face details:
Paint the eyes solid black with a tiny white speck for a highlight. Add a thin line of brown or black wash to accentuate the mouth line. -
Glaze and final fire:
once the underglaze is dry, apply a coat of clear matte or satin glaze over the entire piece. Fire again to the appropriate temperature for your clay and glaze (usually cone 05 or 06).
Level Up: Rattle
Before sealing the body, wrap small clay balls in paper towel and put them inside. The paper burns away in the kiln, leaving loose ceramic beads that turn your sculpture into a rattle.
Display your cheerful turtle on a sunny shelf or use it as a heavy paperweight on your desk


What Really Happens Inside the Kiln
Learn how time and temperature work together inside the kiln to transform clay into durable ceramic.
Stamped Pattern Treasure Box
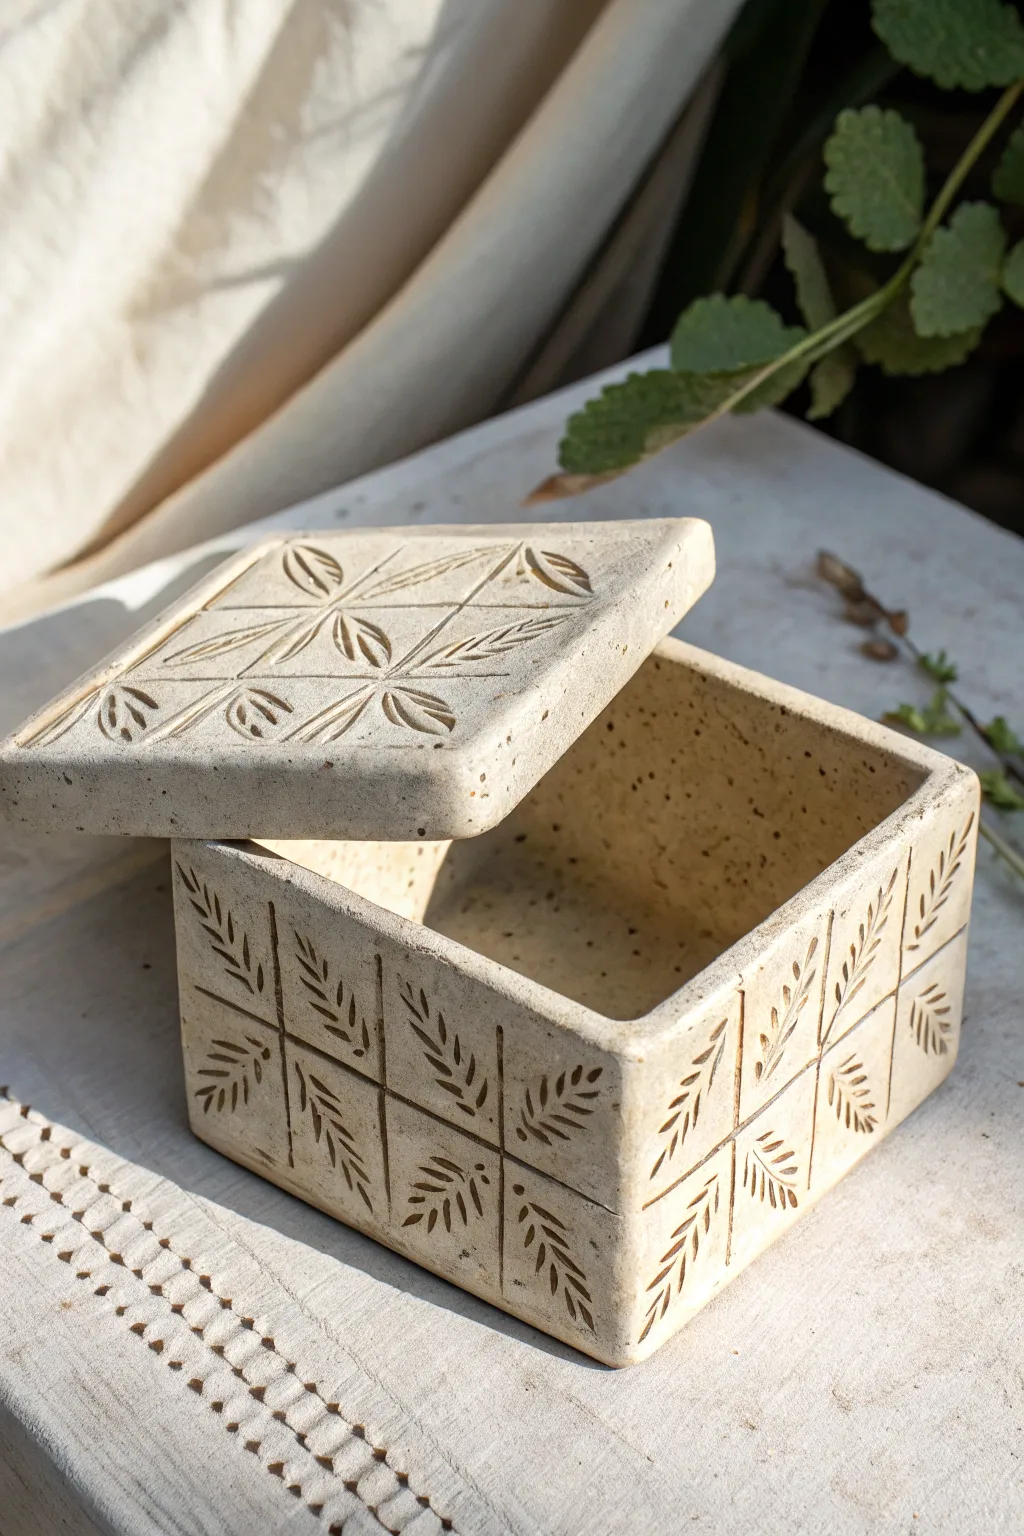
This rustic, nature-inspired treasure box features a lovely repeating leaf motif and a perfectly fitted lid. The textured, speckled stoneware gives it an ancient, carved-stone appearance that feels wonderful to hold.
Step-by-Step Guide
Materials
- Speckled stoneware clay (mid-fire)
- Rolling pin
- Two wooden guide slats (approx. 1/4 inch thick)
- Fettling knife or needle tool
- Ruler or square template
- Scoring tool or fork
- Slip (clay mixed with water)
- Carving tool or small loop tool (for the leaf design)
- Sponge
- Canvas or cloth work surface
Step 1: Preparing the Slabs
-
Roll the clay:
Start by wedging your clay to remove air bubbles. Place it on your canvas surface between two wooden guide slats. Roll the clay out into a large, even sheet; the slats will ensure the thickness is consistent, which is crucial for a sturdy box. -
Cut the components:
Using a ruler and needle tool, measure and cut out your pieces. You will need a square for the base (e.g., 4×4 inches), four rectangular side walls (e.g., 4×2.5 inches), and a slightly larger square for the lid to account for overhang. -
Stiffen the slabs:
Let your clay pieces sit out until they are ‘leather hard’. This means they are stiff enough to hold their shape without bending but still soft enough to join and carve. I like to flip them halfway through drying so they dry evenly.
Warped Walls?
If walls start bowing inward while building, stuff the box with crumpled newspaper or a soft sponge to support the shape while it stiffens up.
Step 2: Assembling the Box
-
Score and slip edges:
Take your base piece and one side wall. Use a serrated rib or needle tool to scratch up (score) the edges where they will touch. Apply a generous amount of slip to the scored areas. -
Attach the first wall:
Press the side wall firmly onto the base. Use a small coil of soft clay on the inside seam to reinforce the joint, smoothing it out with your finger or a modeling tool. -
Construct the box:
Continue attaching the remaining three walls, scoring and slipping every contact point. Ensure your corners are square. Once all four walls are up, smooth the outside seams so the joints disappear. -
Create the lid flange:
To keep the lid from sliding off, you need a flange. Roll a small coil or cut a smaller square slab that fits just inside the box opening. Score and slip this onto the underside of your lid piece.
Step 3: Pattern and Texture
-
Plan the grid:
Using a ruler, lightly scratch a grid pattern onto the exterior walls and the top of the lid. This grid will serve as the frame for your leaf designs. -
Carve the leaf veins:
Inside each grid square, use a small carving tool to incise a leaf shape. Start with a central stem line running diagonally or vertically, depending on your desired pattern. -
Detail the leaves:
Carve small, teardrop-shaped notches branching off the stem to create the leaves. Press deep enough to create shadow, but be careful not to puncture through the wall. -
Refine the lid design:
For the lid shown, draw a large ‘X’ to divide the square into four triangles, then carve fern-like patterns into each section. This variation adds visual interest while keeping the theme consistent. -
Clean up burrs:
Carving often leaves little crumbs of clay. Wait until the clay is bone dry to brush these away with a soft brush, or gently smooth them with a slightly damp sponge if the clay is still leather hard.
Clean Lines Pro Tip
Instead of carving, you can make a stamp from a scrap piece of bisqued clay or an eraser. Pressing a stamp creates identical leaves instantly.
Step 4: Finishing
-
Slow drying:
Place the lid on the box and loosely cover the entire piece with plastic. Let it dry very slowly over several days to prevent warping. -
Bisque fire:
Fire the piece in a kiln to bisque temperature (usually Cone 04). This renders the clay permanent but porous. -
Final look:
For the look in the photo, you can leave the outside unglazed to show off the raw stone texture. Alternatively, apply a clear matte glaze to the inside to make it functional.
Once fired, this durable little box makes a perfect home for jewelry or small keepsakes.
Sgraffito Pattern Cup
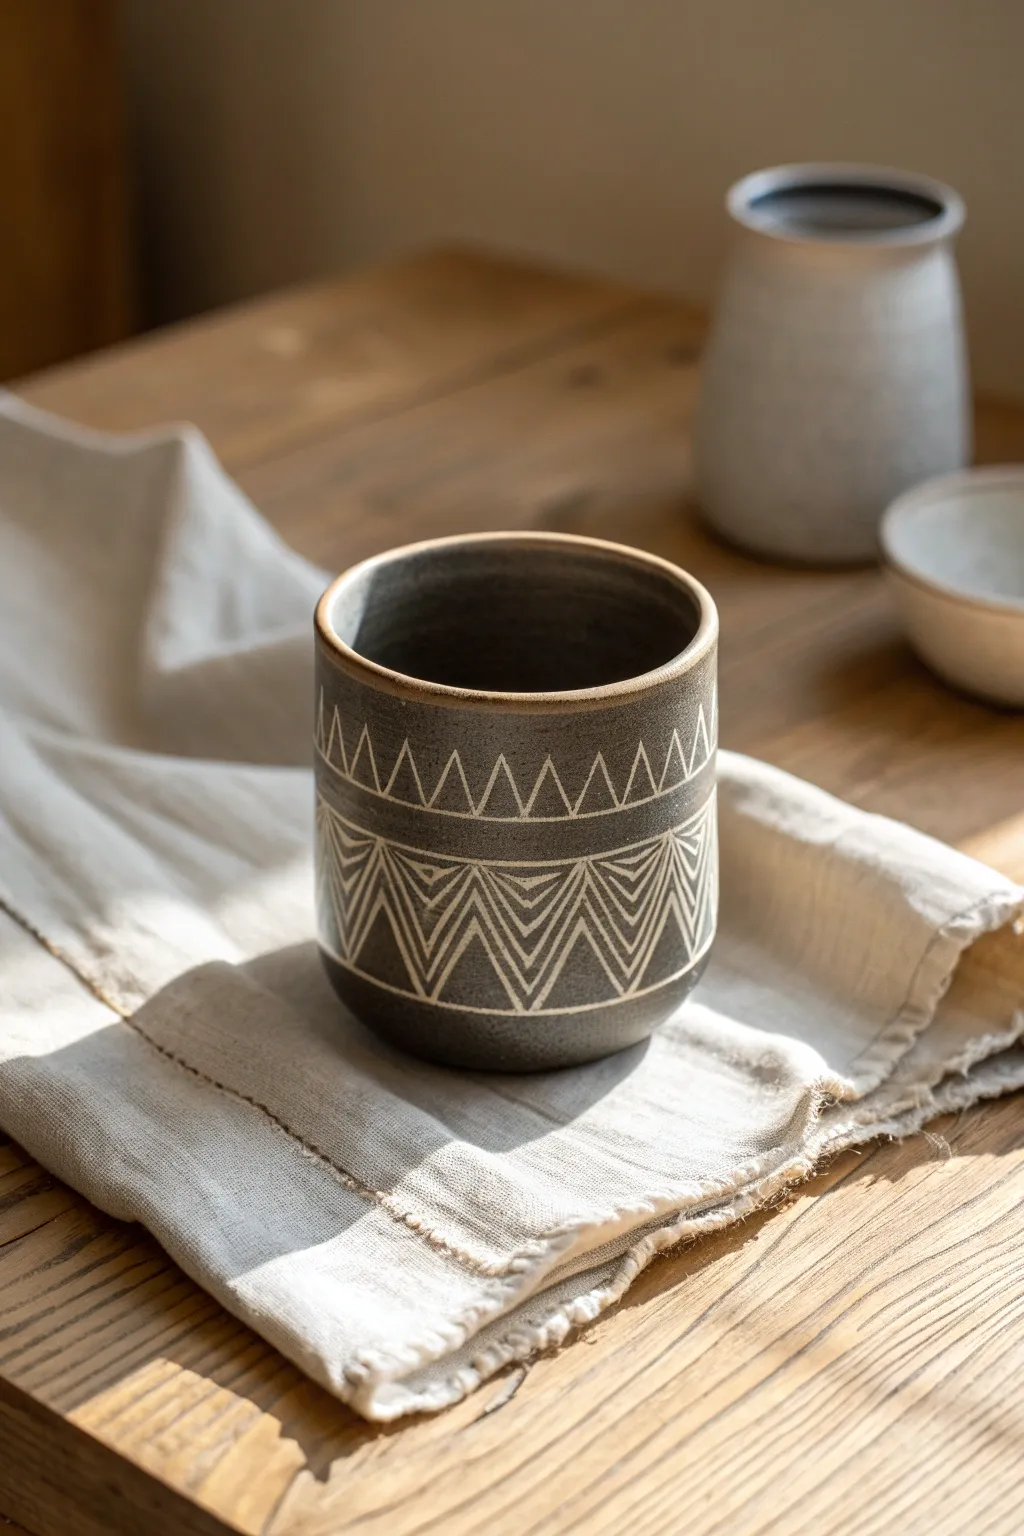
This project combines wheel-throwing with the ancient sgraffito technique to create a bold, graphic vessel. The striking contrast between the dark underglaze and the raw clay reveals a crisp geometric pattern that feels both modern and timeless.
Step-by-Step
Materials
- Stoneware clay body (buff or white)
- Black underglaze or black slip
- Pottery wheel
- Loop tools (for trimming)
- Small sgraffito loop tool or carving needle
- Soft fan brush
- Sponge
- Wire cutter
- Clear matte glaze
Step 1: Forming the Vessel
-
Throw a cylinder:
Begin by centering about 1-1.5 lbs of clay on the wheel. Open the form and pull the walls up to create a simple, straight-sided cylinder without a handle, aiming for a height of about 4-5 inches. -
Refine the shape:
Shape the vessel slightly so it has a gentle curve at the bottom, tapering just a tiny bit at the rim. Ensure the walls are even and compress the rim with a chamois or your finger for a smooth drinking edge. -
Wire off and dry:
Use your wire cutter to separate the pot from the bat. Set the piece aside until it reaches leather-hard consistency—this is crucial for clean carving later. -
Trim the foot:
Once leather-hard, flip the cup upside down on the wheel. Use a loop tool to trim away excess weight from the bottom and carve a clean, defined foot ring.
Step 2: Applying the Surface
-
Clean the surface:
Wipe the exterior of the cup gently with a damp sponge to remove any dust or clay burrs from trimming. -
Apply underglaze:
Using a soft fan brush, apply 2-3 even coats of black underglaze to the exterior of the cup. I like to rotate the pot on a banding wheel while brushing to ensure smooth, streak-free coverage. -
Monitor drying:
Allow the underglaze to dry until it is no longer tacky to the touch, but ensure the clay beneath hasn’t become bone dry. There is a sweet spot where the clay is firm but still carves like cold butter. -
Plan the spacing:
Lightly scratch horizontal guide lines around the circumference of the cup to separate your design bands. Create one band near the top rim and a wider band for the main pattern below it.
Keep it Sharp
For the crispest lines, sharpen your wire loop tool frequently or use a diamond-tip carving needle. Dull tools will drag the clay rather than slicing it.
Step 3: Carving the Design
-
Carve the top band:
Using your sgraffito tool, carve a continuous zigzag line within the top band. The goal is to scratch through the black layer to reveal the contrasting clay body underneath. -
Create the lower boundary:
Carve a straight horizontal line below the top zigzag band to define the start of the lower section. -
Establish the main triangles:
In the lower, wider band, carve large upside-down V-shapes (chevrons) spaced evenly around the cup. These will serve as the framework for the nested pattern. -
Fill with nested lines:
Inside each large chevron, carve smaller, parallel V-shapes, nesting them inside one another. Keep your spacing consistent to create the vibrating optical effect seen in the example. -
Add vertical dividers:
Between the large chevrons, carve a vertical line separating the repeating motifs if you want to break up the pattern, or simply let the zigzags flow continuously. -
Clean up crumbs:
As you carve, significant clay crumbs will appear. Do not brush them off with your hand, as this can smear the black underglaze into the white lines. Instead, use a large, fluffy, dry brush to whisk them away gently.
Smudged Lines?
If you accidentally smear black dust into your white white lines, don’t panic. Wait for the piece to be bone dry, then use a stiff brush to clean the grooves.
Step 4: Finishing
-
Bisque fire:
Once the cup is bone dry, load it into the kiln for a bisque firing (usually Cone 04 or 06) to permanentize the shape and the carving. -
Glaze the interior:
Pour a clear glaze or a liner glaze of your choice into the inside of the cup, swirl to coat, and pour out the excess. -
Glaze the exterior:
Dip the exterior into a clear matte glaze. A matte finish will reduce glare and make the carving work easier to see and enjoy. -
Final fire:
Fire the piece to the glaze temperature appropriate for your clay body (likely Cone 5/6 or Cone 10).
Once fired, fill your new tumbler with your favorite drink and admire the tactile quality of the carved surface

TRACK YOUR CERAMIC JOURNEY
Capture glaze tests, firing details, and creative progress—all in one simple printable. Make your projects easier to repeat and improve.
Clay Bead Keychain or Charm Strand
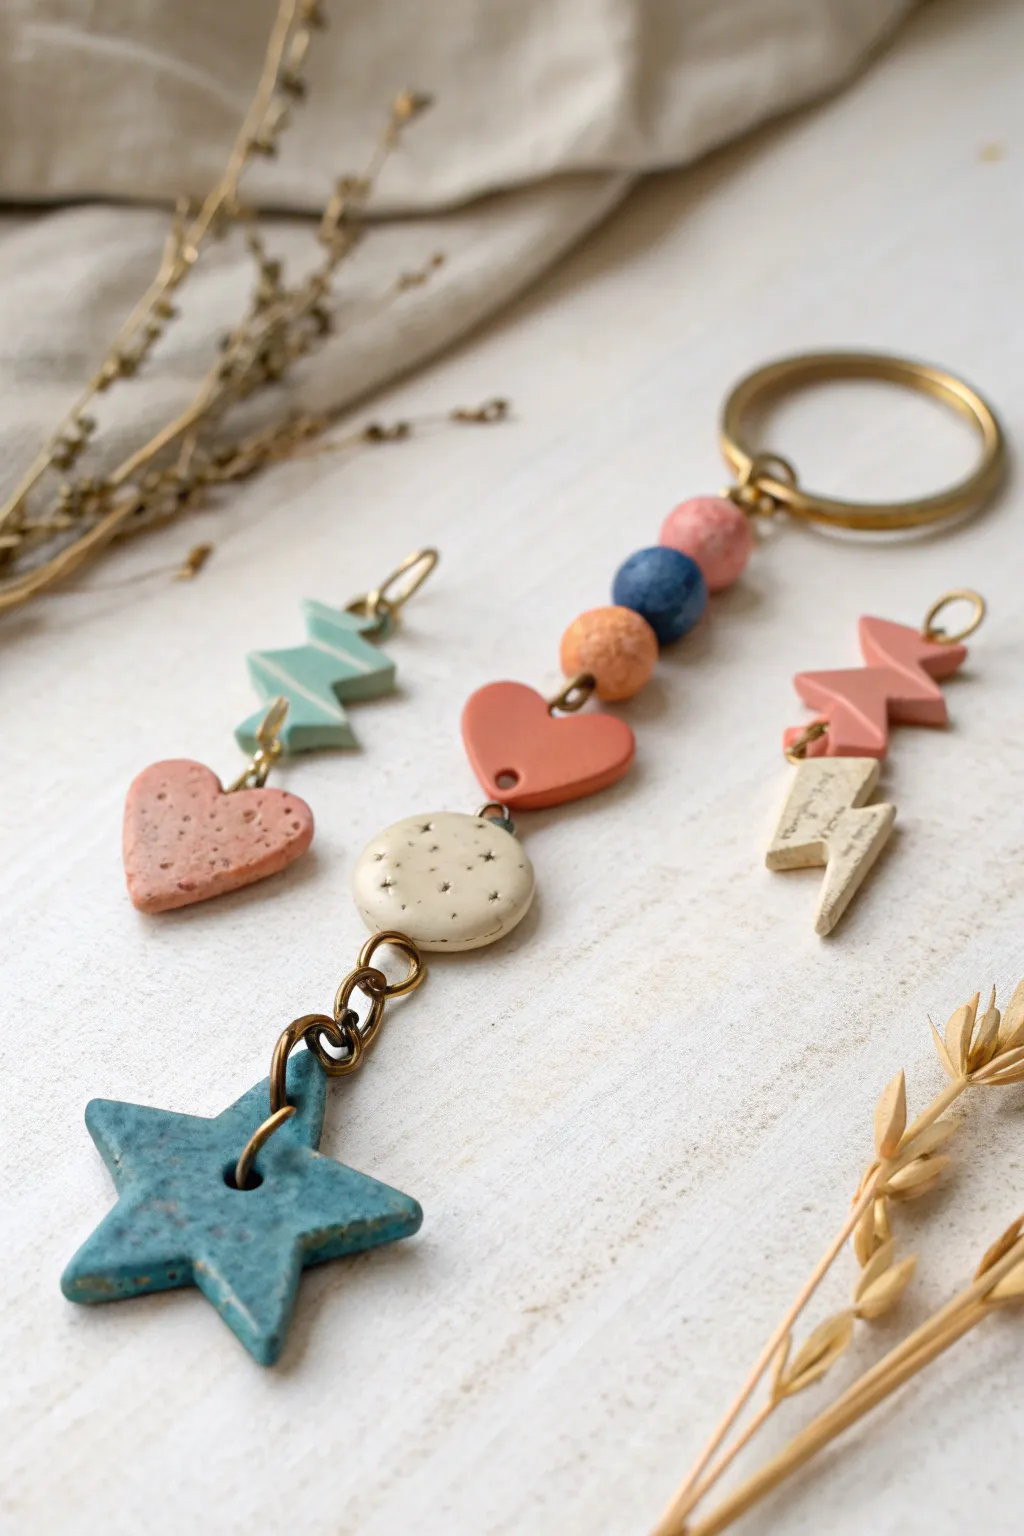
These trendy, earth-toned keychains are the perfect introduction to working with polymer clay. Featuring matte finishes and speckled textures, you’ll create stacked bead strands and playful dangling charms like stars and lightning bolts.
How-To Guide
Materials
- Polymer clay (terracotta, cream/white, teal, muted blue, pink)
- Dried spices (coarse black pepper or dried basil) for speckling
- Rolling pin or acrylic roller
- Clay cutters or X-Acto knife (star, heart, lightning bolt shapes)
- Toothpick or needle tool
- Baking sheet and parchment paper
- Oven
- Brass split keychain rings
- Brass jump rings (various sizes)
- Brass eye pins
- Jewelry pliers (round nose and flat nose)
- Sandpaper (fine grit, optional)
- Matte varnish (optional)
Step 1: Prepping and Shaping
-
Condition the clay:
Begin by kneading each color of polymer clay in your hands until it becomes soft and pliable. This conditioning step prevents cracking later on. -
Add texture:
To achieve the organic, speckled look seen in the cream and pink pieces, mix a tiny pinch of coarse black pepper or dried herbs into the clay as you knead it. This creates a faux-stone effect. -
Roll the beads:
For the round beads, pinch off dime-sized amounts of the pink, blue, and terracotta clay. Roll them between your palms until they form smooth, perfect spheres. -
Pierce the beads:
Gently push a toothpick or needle tool through the center of each bead to create a hole. Rotate the tool as you push to keep the bead from squashing. -
Roll out slabs:
For the flat charms, roll your clay out on a clean surface until it is about 1/4 inch thick. You want these to be sturdy, so don’t roll them too thin. -
Cut the shapes:
Use small cutters or a craft knife to cut out your shapes. You’ll need a large teal star, a terracotta heart, a cream circle, and accents like lightning bolts and smaller hearts. -
Create holes for hardware:
Using your needle tool, pierce holes near the top of your flat charms. For the large star, create a hole near one point; for connector pieces like the heart or circle, punch holes at both the top and bottom. -
Smooth edges:
Before baking, gently run your finger dipped in a little cornstarch or water around the edges of your cut shapes to smooth out any rough spots or fingerprints.
Fixing Fingerprints
If you notice fingerprints on your baked clay, don’t worry. Dip a Q-tip in acetone or nail polish remover and gently rub the surface to melt them away.
Step 2: Baking and Assembly
-
Bake the clay:
Arrange all your pieces on a parchment-lined baking sheet. Bake according to your specific clay package instructions—usually around 275°F (135°C) for 15-30 minutes. -
Cool down:
Allow the clay to cool completely on the baking sheet. It will be slightly soft when hot but hardens as it reaches room temperature. -
Assemble the bead strand:
Take a brass eye pin and thread on your round beads (pink, blue, orange). Trim the excess wire with cutters, leaving about 1cm, and use round-nose pliers to curl the end into a loop. -
Connect the flat charms:
Use jump rings to connect your flat pieces. Open a jump ring sideways with pliers, slide on the bottom of the bead strand and the top of the terracotta heart, then close it securely. -
Chain the elements:
Continue chaining downwards. Connect the heart to the cream circle, and finally, attach the large teal star at the very bottom using a slightly larger jump ring for movement. -
Create side charms:
For the smaller side clusters (like the lightning bolts), link two shapes together with a jump ring and attach them to a separate, smaller loop or clasp. -
Attach to keyring:
Finally, open the main loop of your brass split ring and slide on your main vertical strand. Add any smaller side charms next to it for a fuller, jingly effect.
Level Up: Texture
Before cutting your shapes, press a piece of coarse sandpaper or a clean sponge onto the clay surface to give it a realistic, grainy stone texture.
Clip your new handmade charm onto a backpack or set of keys to show off your custom creation
Mini Clay Wind Chime Pieces
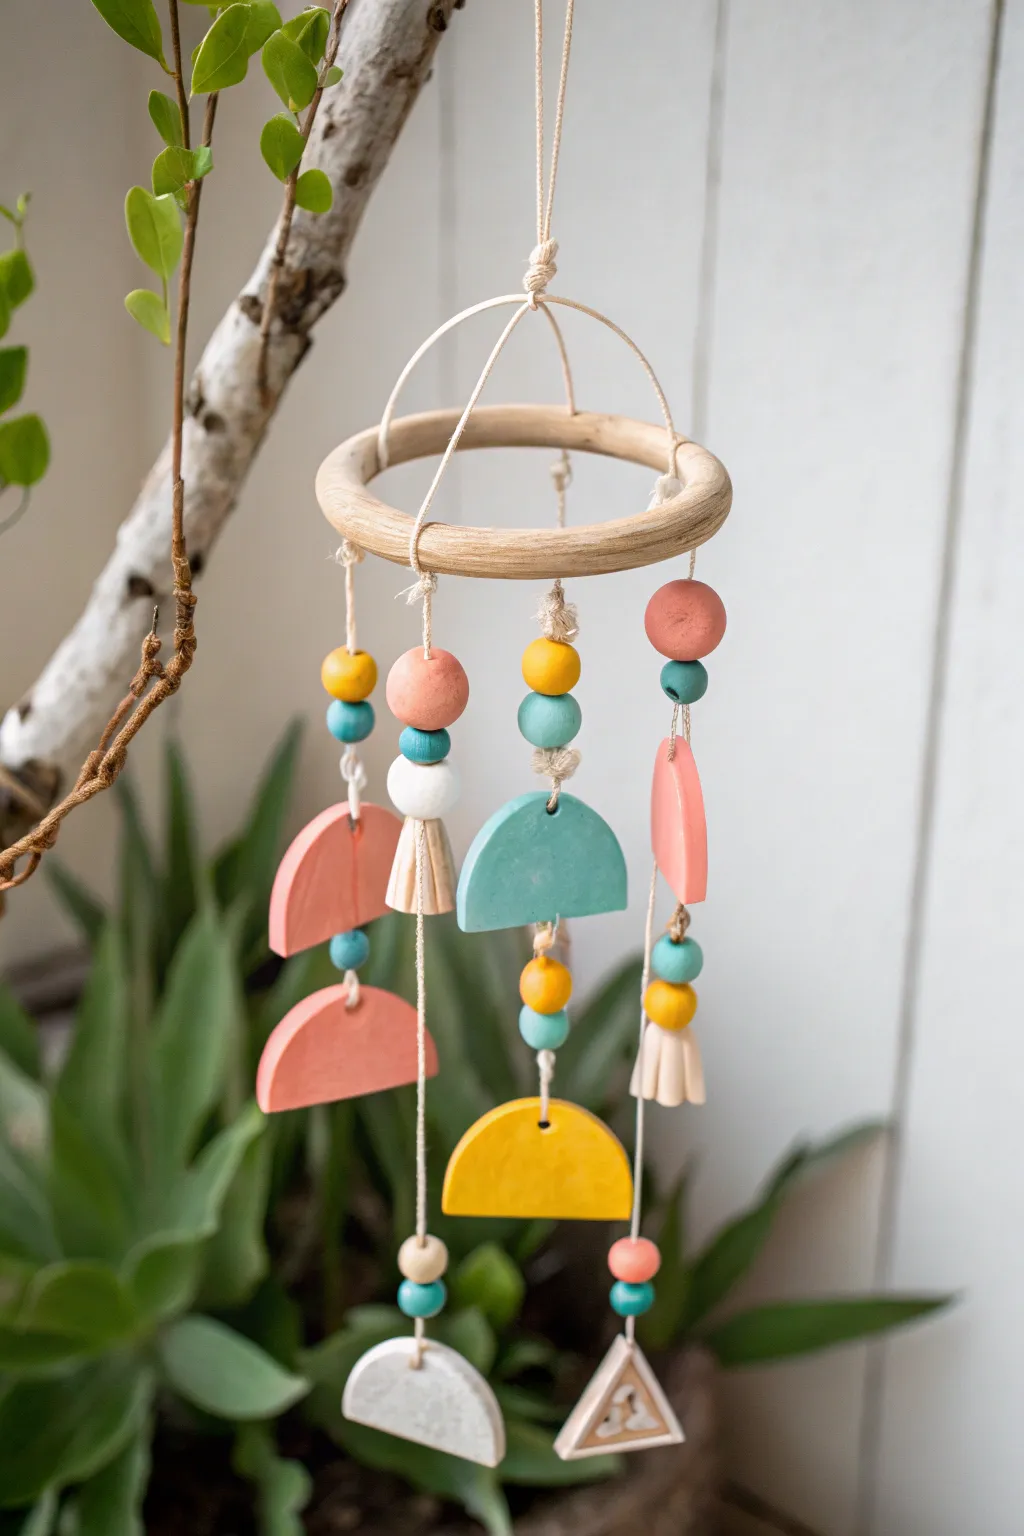
This charming, lightweight mobile combines soft geometric clay shapes with wooden textures for a natural, bohemian look. It features gentle arches, circles, and semicircles in soothing coral, teal, and mustard tones strung from a simple hoop.
Step-by-Step
Materials
- Air-dry clay or polymer clay (white)
- Acrylic paints (coral pink, teal/aqua, mustard yellow, white)
- Wooden embroidery hoop (inner ring only, 4-6 inches)
- Natural jute twine or cotton cord (thin)
- Wooden beads (assorted sizes)
- Rolling pin
- Circle cookie cutters or a glass
- Clay knife or butter knife
- Bamboo skewer or toothpick
- Sandpaper (fine grit)
- Tassel maker or piece of cardboard
Step 1: Shaping the Clay Pieces
-
Prepare the clay:
Begin by conditioning your clay until it is soft and pliable. Roll it out on a smooth surface to an even thickness of about 1/4 inch. -
Cut the base shapes:
Use various circle cutters to punch out several circles. You will need about 6-8 circles of roughly the same size to recreate this specific look. -
Create smooth semicircles:
To make the semicircles and arches, take your cut circles and slice them perfectly in half with your clay knife. For the ‘arch’ shapes, simply cut a smaller semicircle out of the straight edge of one of your halves. -
Form the spherical beads:
Don’t forget the handmade beads! Roll small scraps of clay between your palms to create spheres about the size of a marble. You’ll want about 10-12 of these. -
Make the holes:
Carefully poke holes through every piece using a bamboo skewer. For the flat shapes, wiggle the skewer near the top edge; for beads, pierce straight through the center. Make the holes slightly larger than you think necessary to accommodate the twine. -
Dry and refine:
Allow all pieces to dry completely according to package directions. Once hard, use fine-grit sandpaper to smooth out any rough edges or fingerprints.
Uneven Paint Coverage?
If the paint looks streaky, let the first coat dry completely before adding a second. White clay can sometimes absorb the first layer, so patience is key for solid color.
Step 2: Painting and Finishing
-
Apply base colors:
Select your palette of coral, teal, and mustard yellow. Paint the flat semicircles and arches in solid coats, ensuring you cover the edges as well. -
Detail the beads:
Paint your handmade clay beads in coordinating colors. Leave some beads white or create a speckled effect by flicking a toothbrush loaded with slightly watered-down paint over them. -
Seal the pieces:
For durability, apply a thin layer of matte varnish or Mod Podge over your painted pieces once they are fully dry. -
Prepare the hoop:
Take the inner ring of an embroidery hoop and tie four long strands of twine to the rim, spacing them equally apart. These will hold your clay strands. -
Make the hanger:
Tie two additional shorter pieces of twine across the top of the hoop, crossing in the middle, to create a hanging loop.
Step 3: Assembly
-
Create tassels:
Wrap twine around a small piece of cardboard 15-20 times, tie off the top, and cut the bottom loops to create small tassels. You can attach these to the bottom of your strands or use clay shapes as anchors. -
Start stringing:
Begin threading your pieces onto the four hanging strands. I find it easiest to work bottom-up, tying a knot below the bottom-most piece to hold it in place. -
Pattern the strands:
Alternate your shapes to create visual interest. Try a pattern like: tassel, bead, semicircle, bead, arch. Tie small knots in the twine where you want pieces to ‘float’ higher up the string. -
Secure to hoop:
Once your strands are beaded, double-check that they are hanging at staggered lengths for a cascading effect. Secure the knots tightly at the hoop ring. -
Trim and balance:
Trim any excess twine tails near the knots. Hold the mobile up by the top loop to ensure it balances evenly; if it tilts, adjust the spacing of the strings on the hoop.
Add Natural Elements
Mix in small pieces of driftwood, dried stair pods, or even small sea glass pieces with holes drilled in them to give the mobile an earthy, nature-inspired texture.
Hang your new mobile near a sunny window to enjoy the gentle movement of shapes and shadows
Tic-Tac-Toe Game Set
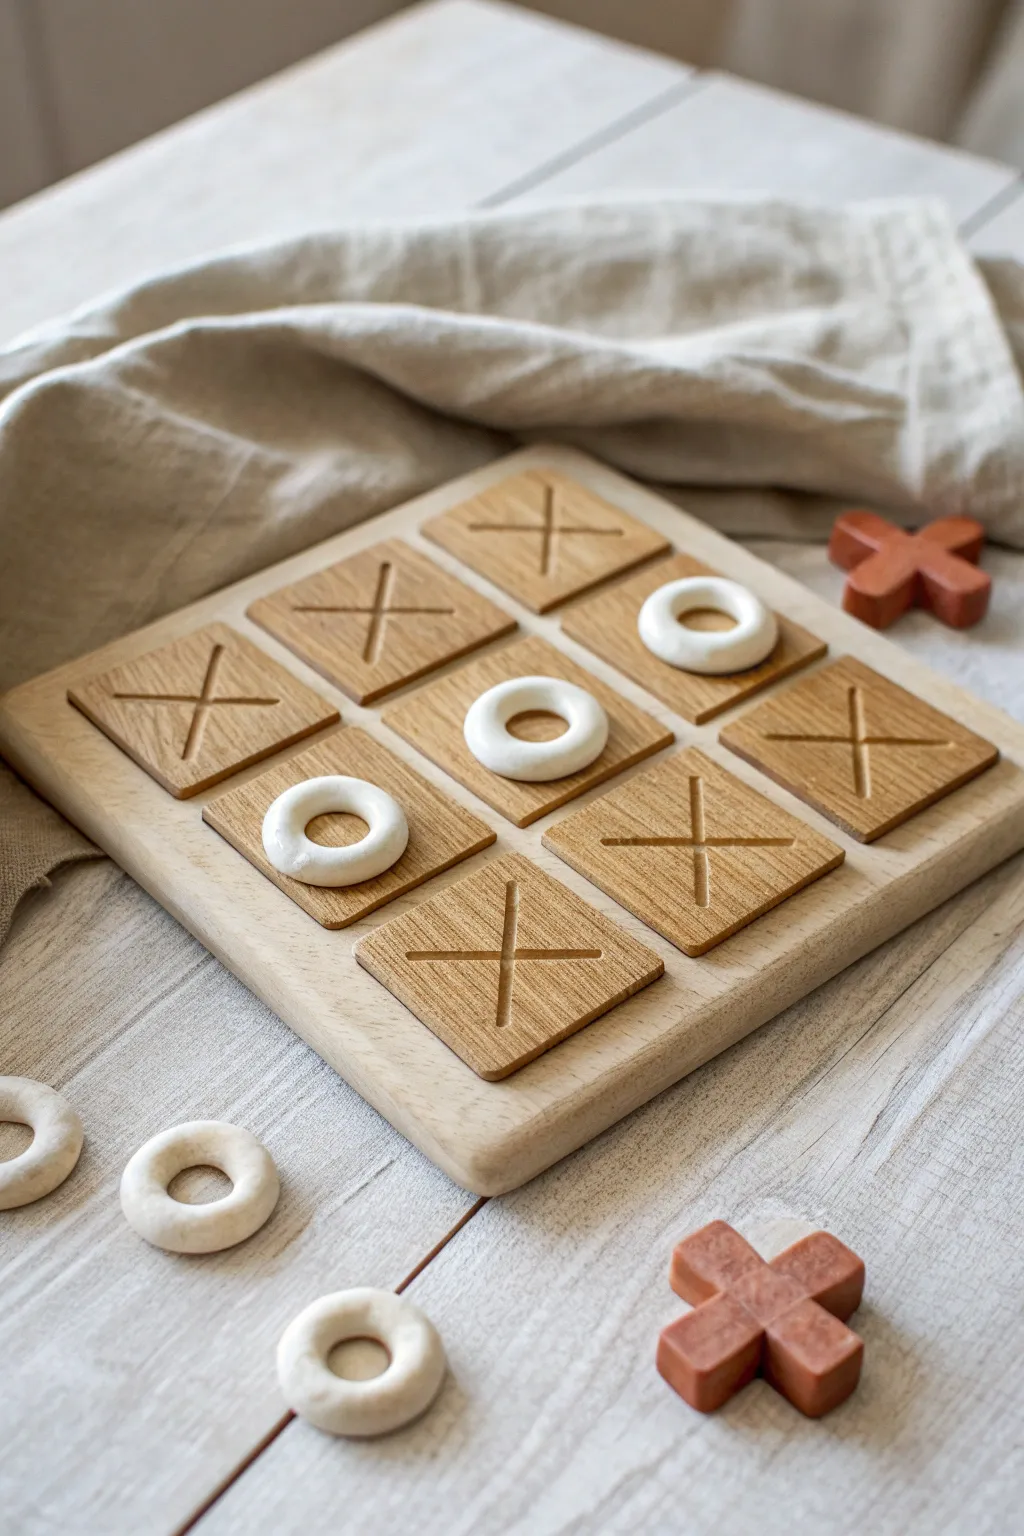
Elevate your game night with this sophisticated, tactile tic-tac-toe set that combines the warmth of wood with sleek clay game pieces. This project features a faux-wood clay board with carved details and contrasting minimalist tokens for a modern, handcrafted look.
How-To Guide
Materials
- Polymer clay (wood/tan color, white, and terracotta/red-brown)
- Square cookie cutter (approx. 2-3 inches)
- Rolling pin or pasta machine
- Ruler
- Clay knife or X-Acto blade
- Needle tool or toothpick
- Sandpaper (fine grit)
- Texture sponge or stiff brush (for wood grain effect)
- Small circle cutters (two sizes for the ‘O’ rings)
- Baking sheet and parchment paper
- Acrylic paint (optional for enhancing wood grain)
- Matte varnish
Step 1: Creating the Board Base
-
Condition the clay:
Start by thoroughly conditioning your wood-colored polymer clay until it is soft and pliable. If you want a more realistic wood look, you can mix a bit of translucent clay with tan and brown strands without fully blending them. -
Roll the main slab:
Roll out a large, thick square slab for the main board base, aiming for about 1/4 inch thickness. Use a ruler to cut it into a perfect square, roughly 7×7 or 8×8 inches depending on your desired size. -
Smooth the edges:
Gently run your finger along the cut edges of the square base to soften them slightly, removing any sharp corners or clay burrs.
Step 2: Crafting the Playing Tiles
-
Roll the tile sheet:
Roll out another sheet of the same wood-colored clay, slightly thinner than your base slab. This will be used for the nine individual grid squares. -
Texturing the clay:
Before cutting, gently drag a stiff brush or texture sponge across the surface in one direction to create subtle striations that mimic wood grain. -
Cut the squares:
Using your square cookie cutter or a ruler and knife, cut out nine identical squares. Ensure they are small enough to fit on your base board with a small gap between them. -
Carve the X design:
On each of the nine squares, use a clay knife or needle tool to gently carve a large ‘X’ into the surface. Don’t cut all the way through; simply create shallow grooves to simulate carved wood. -
Attach tiles to base:
Arrange the nine squares in a 3×3 grid on your main base slab. Press them down gently to bond the raw clay layers together, or use a tiny bit of liquid clay adhesive for extra security.
Clean Lines Pro-Tip
Chill your clay sheets in the fridge for 10 minutes before cutting the squares. Cold clay is firmer and distorts less under the knife, giving you perfectly crisp geometric edges.
Step 3: Making the Game Pieces
-
Form the ‘O’ rings:
Take your white clay and roll it into a thick sheet. Use a medium circle cutter to cut out a disc, then use a smaller circle cutter in the center to create a ring. -
Shape and smooth:
I like to use my fingers to round off the harsh cut edges of the rings, giving them a smooth, stone-like donut shape. Make five of these. -
Create the ‘X’ pieces:
Condition the terracotta or red-brown clay and roll it into a thick log. Cut two short segments of equal length. -
Assemble the crosses:
Notch the center of each log segment so they fit together like a Lincoln log, or simply press them together in a cross shape and blend the seam on the back. Make five ‘X’ pieces. -
Refine the X shape:
Gently pinch the ends of the cross arms to define the shape and ensure they stand flat. They should look chunky and substantial.
Warped Board?
If the large base board curls while baking, place a heavy book on top of it while it’s still warm (protected by parchment paper) and let it cool completely flat under the weight.
Step 4: Finishing
-
Bake the project:
Place the board and all loose game pieces on a parchment-lined baking sheet. Bake according to your polymer clay package instructions (usually 275°F for 15-30 minutes). -
Cool and sand:
Allow everything to cool completely. Once cool, use fine-grit sandpaper to smooth out any fingerprints or rough edges on the ‘O’ rings and ‘X’ pieces. -
Enhance the wood grain (Optional):
Mix a tiny amount of brown acrylic paint with water. Brush it over the board and tiles, letting it settle into the carved ‘X’ grooves and texture lines, then wipe away the excess immediately with a paper towel. -
Seal the set:
Apply a thin coat of matte varnish to the board to protect the surface and give it a finished, professional sheen without making it look like plastic.
Now you have a timeless, durable game set that looks great on a coffee table even when you aren’t playing
Relief Tile Story Square
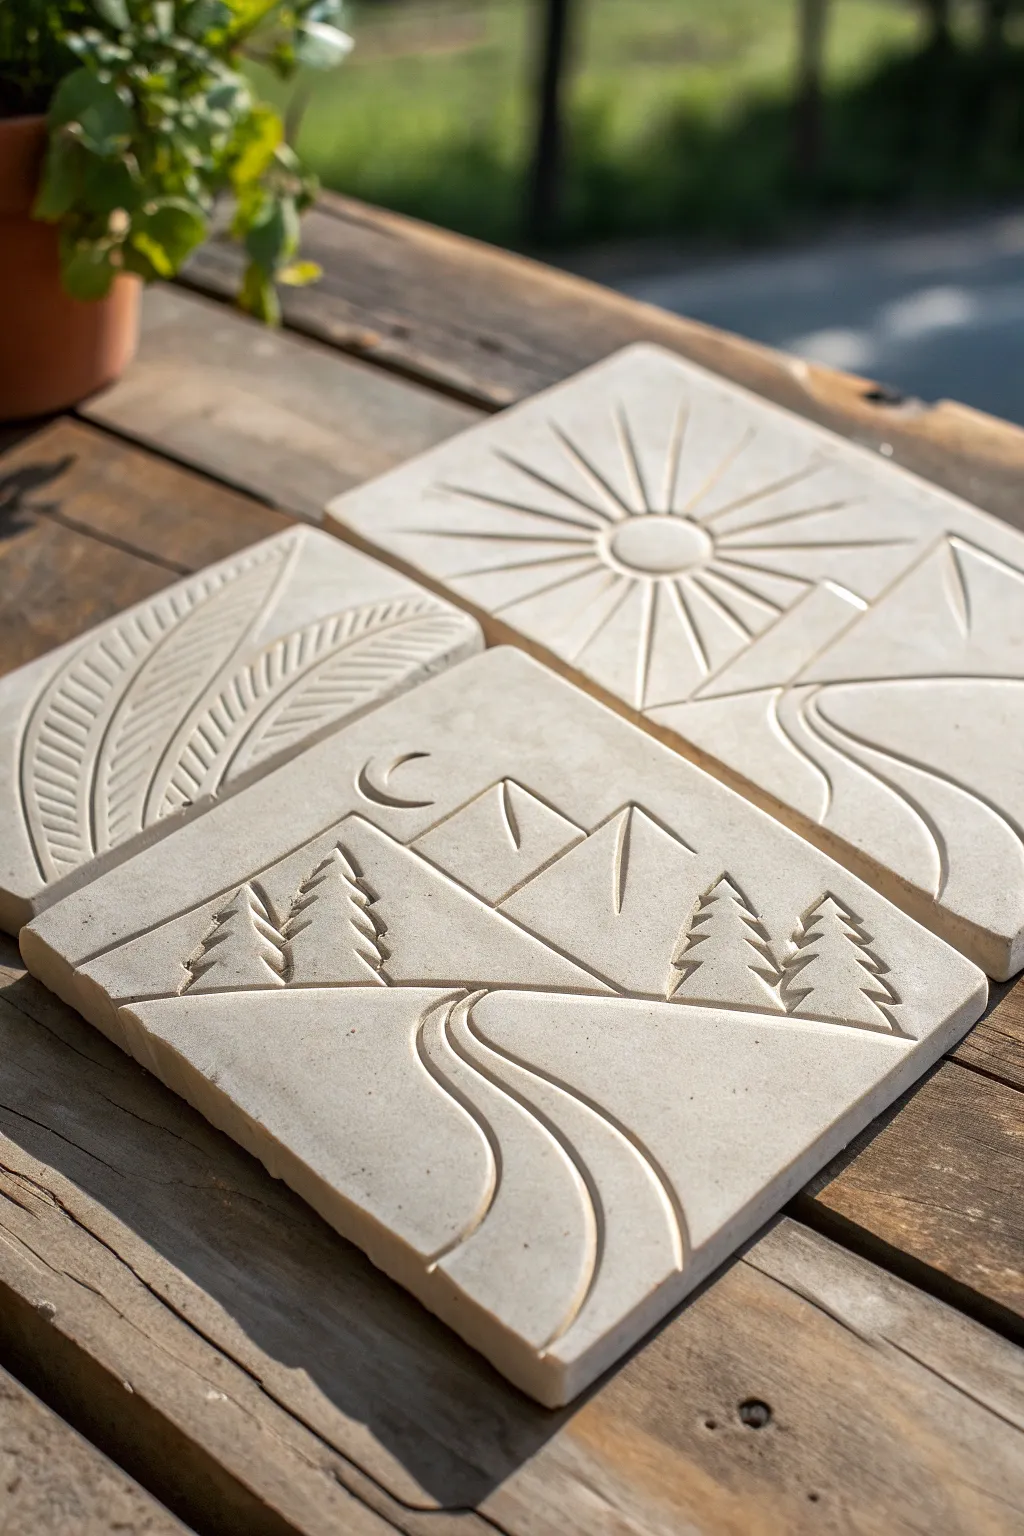
Create a stunning narrative triptych or a standalone landscape using the subtractive and additive methods of clay relief. These smooth, cream-colored tiles feature crisp, incised lines and raised elements that capture nature scenes like mountains, forests, and sunrises with a modern, graphical style.
Step-by-Step Tutorial
Materials
- Light-colored stoneware or earthenware clay (no grog or fine grog)
- Rolling pin
- Two 1/2-inch thick wooden guide strips (slats)
- Fettling knife
- Needle tool
- Loop tools (small and medium)
- Rib tool (rubber or metal)
- Ruler
- Sponge
- Cardboard or paper templates (optional)
- Canvas mat or wooden ware board
Step 1: Preparation & Slab Rolling
-
Wedge the clay:
Begin by wedging your clay thoroughly to remove air pockets and ensure an even consistency. A smooth clay body works best here to get those clean, sharp lines. -
Set up guides:
Place your canvas mat on a sturdy table. Position your two wooden guide strips parallel to each other, slightly wider than the width of your desired tiles. -
Roll the slab:
Place the clay between the wooden strips. Use the rolling pin to flatten the clay until the pin rests on the strips, ensuring a perfectly even thickness across the entire slab. -
Smooth the surface:
Before cutting, take a rubber or metal rib tool and compress the surface of the clay. Drag it gently across the slab to remove canvas texture and align the clay particles, creating a silky blank canvas. -
Cut the squares:
Use a ruler and a fettling knife to measure and cut three equal squares. 5×5 inches or 6×6 inches is a manageable size for middle schoolers.
Step 2: Design & Incising
-
Plan the composition:
Sketch your design on paper first. You can create a continuous story across three tiles or distinct nature scenes like the mountains and sunbursts shown. -
Transfer the design:
Lightly trace your design onto the leather-hard clay using a dull pencil or the very tip of a needle tool. Keep the pressure light so you can smooth out mistakes if needed. -
Carve the main lines:
Using a small loop tool or a specialized carving tool, carefully adhere to your traced lines. Carve out the clay to create deep, V-shaped or U-shaped grooves. These deep lines act as outlines for the mountains, sun rays, and pathways. -
Refine the edges:
As you carve, little crumbs (burrs) of clay will appear on the edges of your lines. Wait until the clay stiffens slightly, then brush them away or smooth them down with a damp finger to keep the graphic style sharp.
Warped Corners?
If tile corners start lifting while drying, place a small weight (like a bean bag) on the center or flip the tile over every few hours to ensure even airflow.
Step 3: Creating Depth & Texture
-
Recess background areas:
To make elements pop, like the mountains or the path, use a wider loop tool to gently shave away thin layers of clay in the negative spaces or background areas. -
Detail the trees:
For the pine trees, use a sharp needle tool or a small sculpting tool to create the jagged, triangular silhouette. Using short, angled strokes mimics the texture of branches. -
Carve the moon and sun:
For the sun or moon, you can either carve a deep outline or press a round object gently into the clay to create a perfect circle depression. -
Add movement:
For the sun rays or the flowing river path, ensure your carving tool moves in long, confident strokes. Hesitant stops and starts will make the lines look jagged.
Make It a Set
Before drying, use a straw to poke two holes in the top corners of each tile. After firing, tie them together vertically with leather cord for a hanging mobile.
Step 4: Finishing Touches
-
Clean with a sponge:
Once the carving is complete, take a very slightly damp sponge and wipe the surface. This softens any dangerously sharp edges without erasing your detail. -
Dry slowly:
Place the tiles on a piece of drywall or a wooden ware board. Cover them loosely with plastic for the first day to prevent the corners from curling up as they dry. -
Bisque fire:
Fire the tiles to cone 04 (or the temperature appropriate for your specific clay body). The pieces can be left unglazed to highlight the raw clay texture, or finished with a matte clear glaze.
Display your finished relief tiles on a shelf or tabletop easel to show off the deep shadows and crisp lines
Collaborative Clay Tile Mural
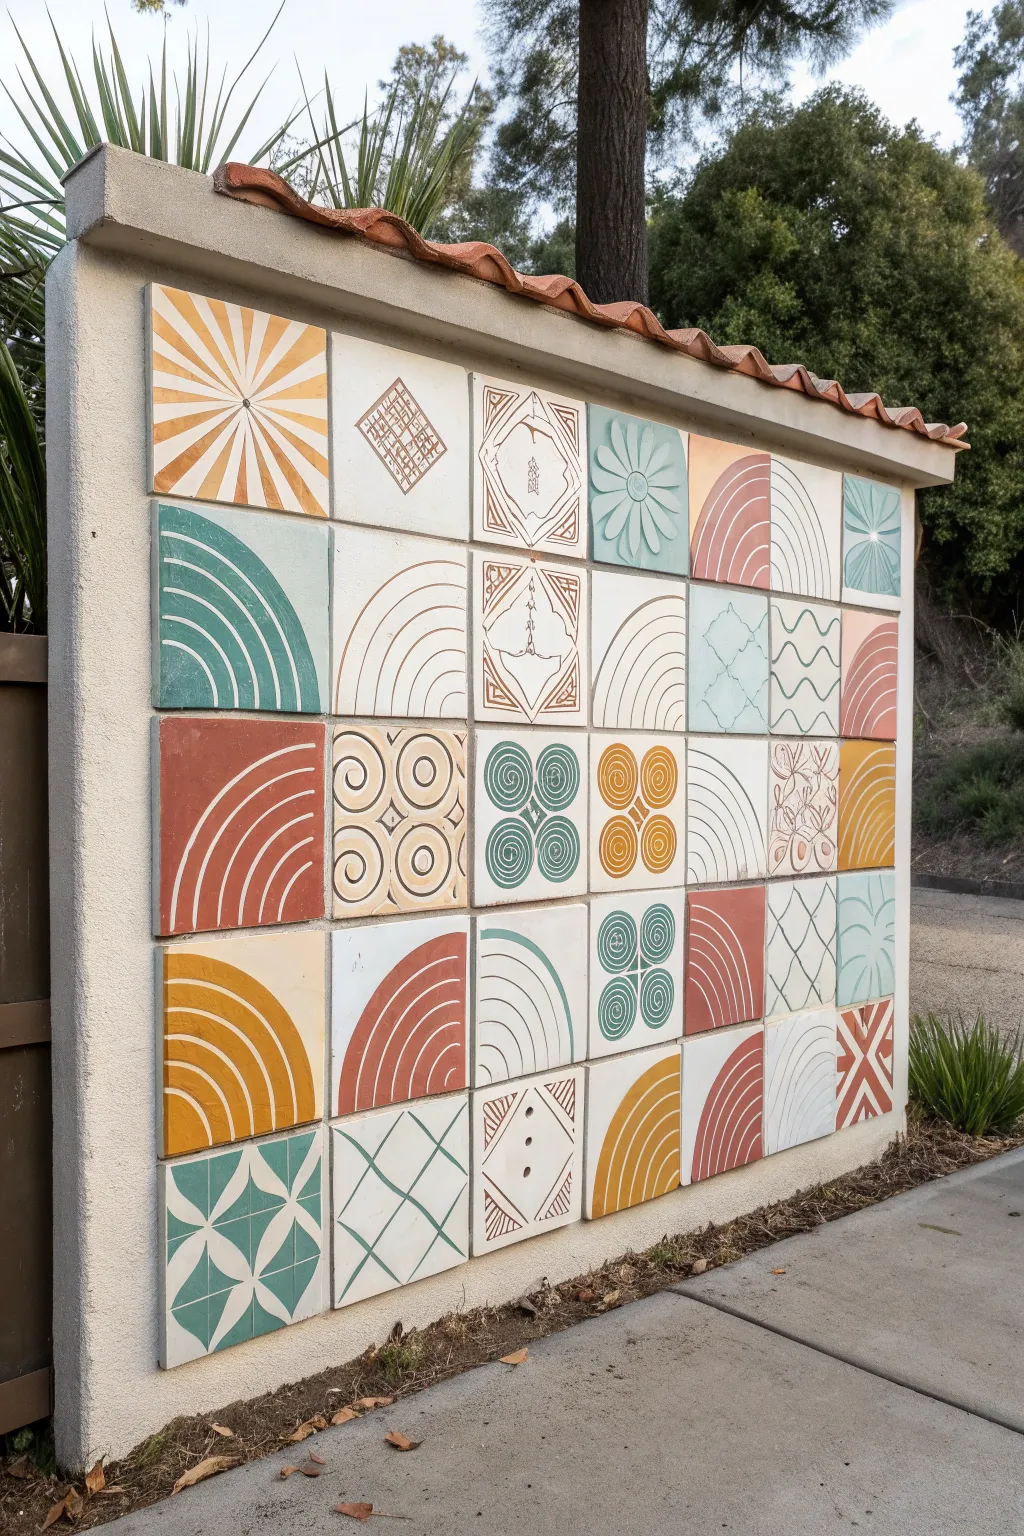
This stunning collaborative project brings together individual student creativity into a cohesive, large-scale masterpiece suitable for outdoor display. By combining relief techniques with a unified earthy color palette, simple square tiles transform into a striking geometric statement piece.
Step-by-Step
Materials
- Low-fire white earthenware clay (approx 1-2 lbs per student)
- Square tile cutters or templates (6×6 inch)
- Wooden rolling pins and guide strips (sacking sticks)
- Canvas mats or ware boards
- Assorted carving tools (loop tools, needle tools, fettling knives)
- Found objects for texturing (stamps, burlap, shells)
- Underglazes (Terracotta, Sage Green, Mustard Yellow, Cream)
- Clear transparent glaze
- Ceramic kiln
- Tile adhesive or thinset mortar
- Grout (sanded, off-white or light gray)
- Sponge and buckets
- Exterior wall or plywood backing board for installation
Step 1: Tile Formation & Design
-
Roll out the slabs:
Begin by wedging the clay thoroughly to remove air pockets. Roll out a consistent slab for each student using wooden guide strips on either side of the rolling pin. A thickness of about 3/8 to 1/2 inch is ideal for durability. -
Cut the shapes:
Place your 6×6 inch square template over the slab and cut around it using a fettling knife or needle tool. Remove excess clay, but keep the edges sharp and vertical. -
Smooth the canvas:
Using a slightly damp sponge or a rubber rib, smooth the surface of the clay tile to erase the texture of the canvas mat. Don’t forget to smooth the sharp edges slightly to prevent future chipping. -
Plan the patterns:
Ask students to sketch a geometric design. Encourage recurring themes like radiating lines, concentric circles, quarter-circle arches, and spirals. Simpler, bold designs often read better from a distance. -
Apply relief texture:
For designs that require texture (like the raised spirals or impressed grids), use modeling tools to carve into the clay. You can either carve away the background to leave a raised design (bas-relief) or press objects into the clay to create an impressed pattern. -
Drying duration:
Place the finished greenware tiles on a flat ware board. Cover them loosely with plastic for the first 24 hours to ensure slow, even drying, which prevents warping. uncover them and let them dry to bone dry state over several days. -
Bisque firing:
Once bone dry, load the kiln carefully. Fire the tiles to cone 04 (or the temperature specific to your clay body) to create durable bisque ware ready for glazing.
Step 2: Glazing & Decoration
-
Clean the bisque:
Wipe down every tile with a damp sponge. This removes kiln dust which can cause the glaze to crawl or not adhere properly. -
Select the palette:
Limit the color choices to ensure visual unity. I find that pre-mixing smaller cups of sage, mustard, rust, and white helps students stick to the agreed-upon aesthetic. -
Apply underglaze:
Paint the geometric sections carefully. For solid coverage, apply three even coats of underglaze, letting each coat dry slightly before adding the next. Use masking tape for crisp straight lines if needed. -
Clear coating:
Once the underglaze is dry, dip the tile or brush on a coat of clear transparent glaze. This will seal the clay and make the colors pop after the second firing. -
Glaze firing:
Stilt the tiles in the kiln if the bottom is glazed (though it’s best to leave the backs unglazed for adhesion). Fire to the recommended temperature for your glaze, usually cone 05 or 06.
Warp Prevention
To stop corners from curling up during drying, weigh down the corners of the tiles with small pieces of drywall or heavier wood scraps while they are leather hard.
Step 3: Installation
-
Layout design:
Lay all the fired tiles out on the floor. Rearrange them to find the best balance of colors and patterns. Take a photo of the final arrangement to use as a map. -
Prepare the surface:
Ensure your wall or backing board is clean and flat. If installing outdoors, ensure your backing is weather-proof. -
Adhere tiles:
Apply a layer of thinset mortar to the back of a tile using a notched trowel. Press it firmly onto the wall, giving it a little wiggle to set it. Use tile spacers to keep the gaps consistent. -
Grouting:
Allow the adhesive to cure for 24-48 hours. Mix your sanded grout and spread it over the tiles using a rubber float, pushing it deep into the gaps. -
Final clean:
Wipe away excess grout with a large, damp sponge. Rinse the sponge frequently. Once a haze forms, polish the tiles with a soft, dry cloth to reveal the shine.
Theme Variations
Instead of abstract geometry, assign each student a specific botanical element or local historical symbol to create a ‘quilt’ that tells a specific community story.
Now you have a permanent, weatherproof gallery of student artwork that brightens up the entire space
Cuneiform-Inspired Message Tablet
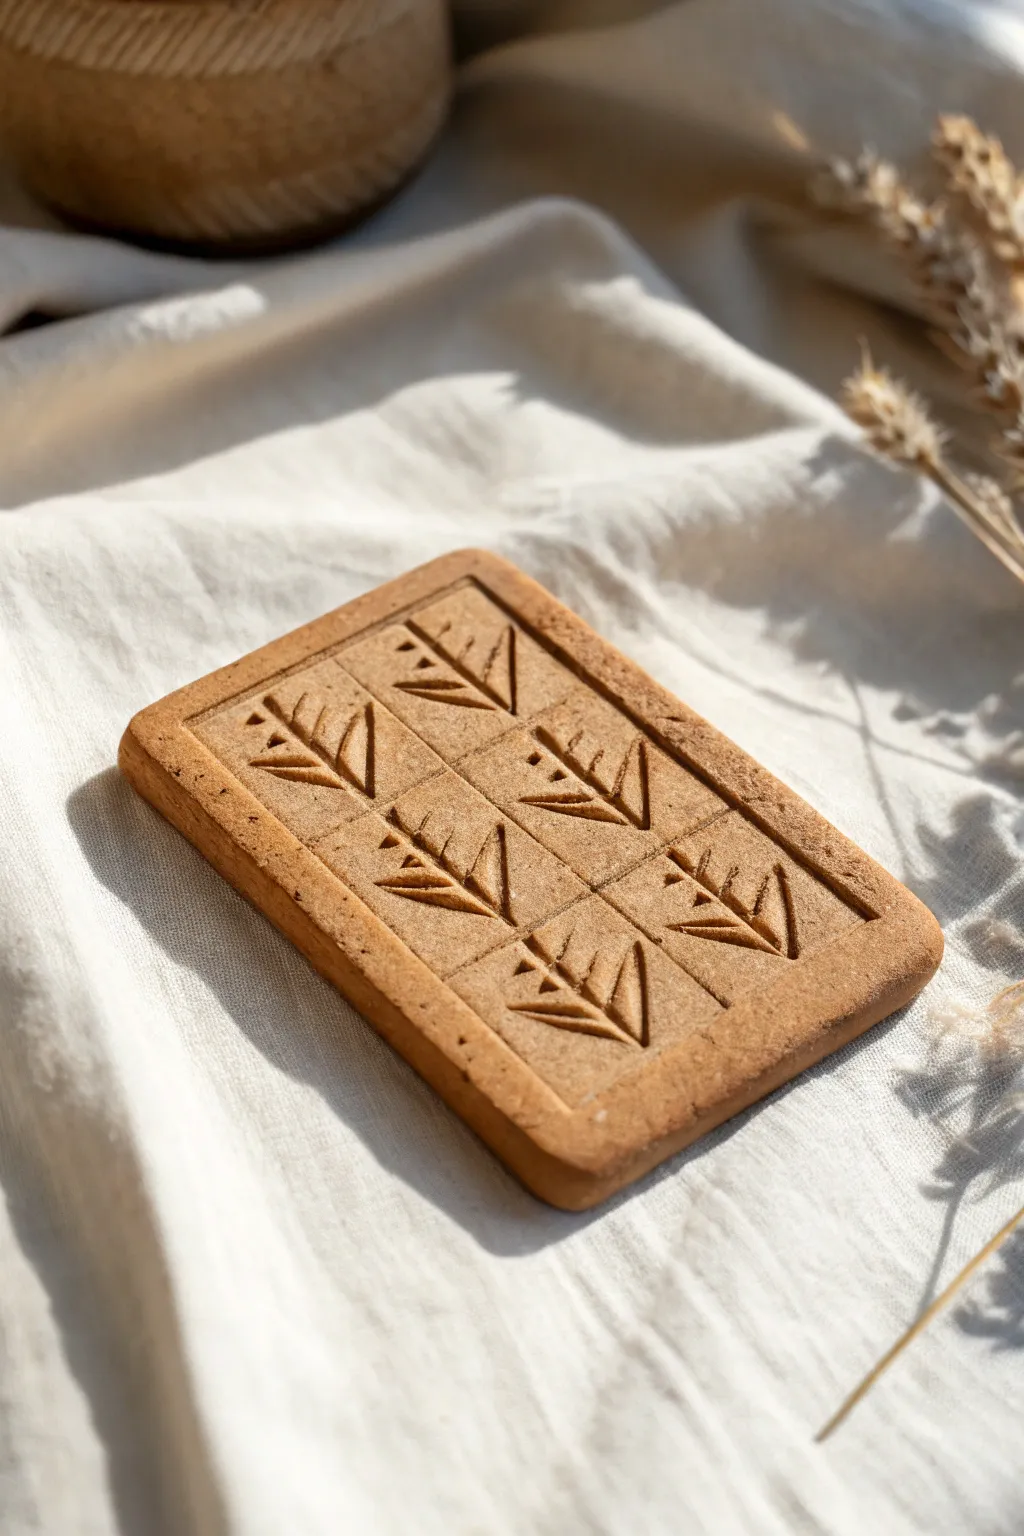
Transport yourself back in time with this sleek, minimalist clay slab featuring rune-like symbols pressed into a precise grid. The warm, toasted brown finish gives it the look of an artifact freshly unearthed from an archaeological dig, perfect for decoding secret messages.
Detailed Instructions
Materials
- Air-dry clay (terracotta or brown colored)
- Rolling pin
- Two wooden rulers or slats (1/4 inch thick)
- Ruler
- Butter knife or clay cutting tool
- Needle tool or toothpick
- Small carving tool or flathead screwdriver
- Sandpaper (fine grit)
- Water and sponge
Step 1: Preparing the Slab
-
Condition the clay:
Start by kneading a handful of brown air-dry clay until it is warm and pliable. If the clay feels stiff, add a drop of water, but keep it relatively firm so it holds sharp details. -
Set up guides:
Place your two wooden rulers or slats parallel to each other on your work surface. These will act as thickness guides to ensure your tablet is perfectly even. -
Roll the slab:
Place the ball of clay between the guides and use your rolling pin to flatten it. Roll until the pin rests on the wooden guides, creating a uniform slab about 1/4 inch thick. -
Cut the rectangle:
Use a ruler and a clay knife to cut a clean, sharp rectangle. A size of roughly 3 inches by 5 inches works well for this project. Save the excess clay for testing textures. -
Smooth the edges:
Dip your finger in a little water and run it along the cut edges to soften any sharp burrs, rounding the corners just slightly for a worn, historical look.
Sticky Situation?
If clay sticks to your rolling pin, lay a sheet of parchment paper or wax paper over the clay ball before rolling. This keeps the surface pristine and prevents tearing.
Step 2: Inscribing the Design
-
Mark the border:
Take your ruler and gently press it into the clay surface about 1/4 inch from the edge to create an indented border frame. Don’t press all the way through; just create a definition line. -
Create the grid:
Measure the interior space and lightly mark a center line vertically. Then, divide the height into three or four equal sections. -
Deepen the grid lines:
Once satisfied with the spacing, press the edge of the ruler firmly into the clay to create the permanent grid. I prefer to use the edge of a credit card here for shorter lines to avoid marking the border. -
Plan your symbols:
Sketch your simplified runic or cuneiform tree symbols on paper first. The design shown uses a vertical line with three angled branches on one side. -
Impress the vertical stems:
Use a flat-edged tool, like a small flathead screwdriver or the flat side of a carving tool, to press the main vertical line of the symbol into the center of each grid square. -
Add the branches:
Using the same tool, press three angled lines connecting to the left side of the vertical stem. Press deeply at the connection point and lift up as you move outward to create a tapered look. -
Add detail dots:
Use the point of a needle tool or a small blunt stick to press a tiny dot near the top branch of each symbol for extra decorative flair. -
Clean up crumbs:
If the carving process created any little clay crumbs (burrs), don’t brush them away yet as you might smear the design. Let the clay stiffen for about 30 minutes first.
Make It Ancient
Before the clay dries, gently blot the smooth areas with a crumpled ball of aluminum foil. This adds a subtle, pitted stone texture that makes the artifact look thousands of years old.
Step 3: Finishing Touches
-
Initial drying:
Allow the tablet to dry flat on a porous surface (like wood or cardboard) for 24-48 hours. Flip it over halfway through to prevent warping. -
Sand the surface:
Once fully bone dry, gently rub the surface with fine-grit sandpaper. This removes any final roughness and gives the piece that smooth, stone-like quality seen in the photo. -
Optional wash:
If you want to highlight the carvings, dilute a tiny bit of dark brown acrylic paint with water. Brush it over the tablet and immediately wipe the surface with a damp cloth, leaving pigment only in the grooves.
Display your finished tablet on a small stand or wrap it in cloth as a mysterious archaeological find