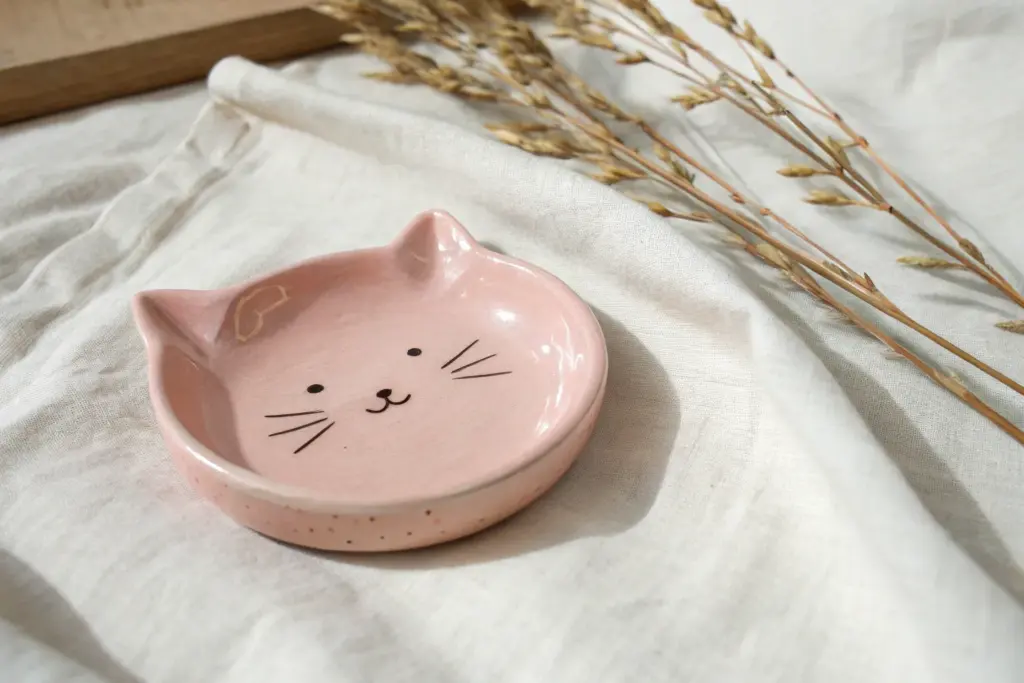
If you’re craving projects that are small, sweet, and actually useful, cute ceramic clay is where it’s at. These ideas are the kind of pieces I love seeing scattered around the studio—tiny, whimsical, and totally doable for a relaxed weekend session.
Mini Face Planters for Succulents
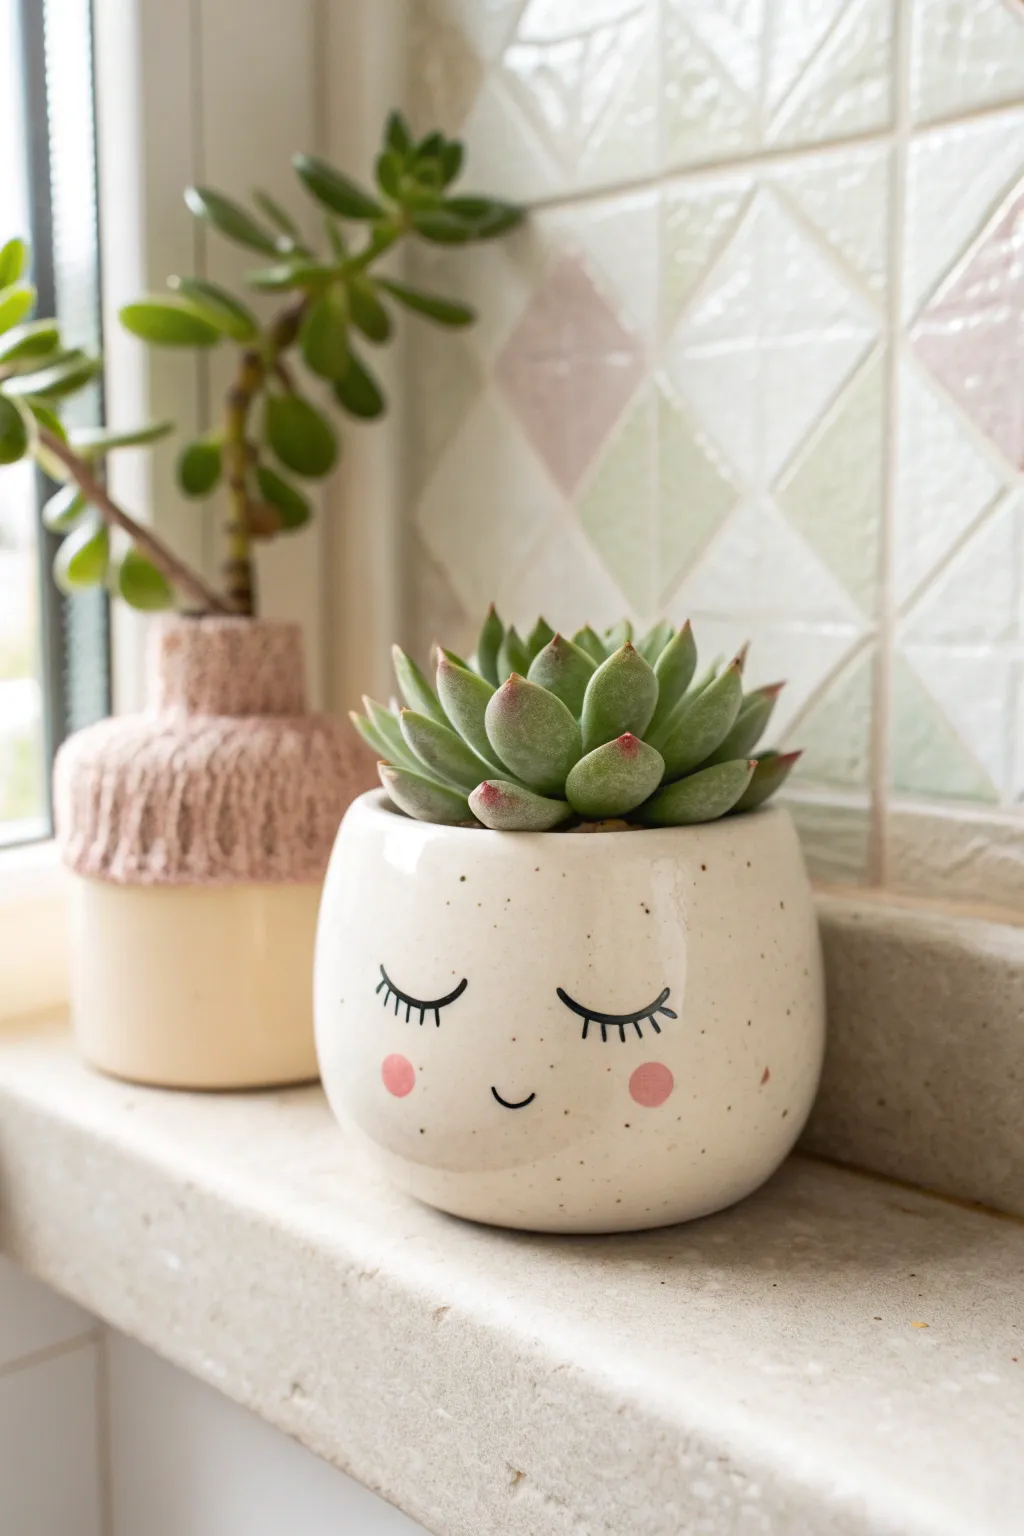
Bring a touch of serenity to your windowsill with this adorable hand-built ceramic planter. Featuring a minimalist sleeping face and a speckled glaze finish, it’s the perfect cozy home for your favorite Echeveria succulent.
How-To Guide
Materials
- White earthenware or stoneware clay
- Pottery wheel (optional) or rolling pin for slab building
- Needle tool
- Sponge
- Loop trimming tool
- Scoring tool or fork
- Slip (liquid clay)
- Speckled white glaze (or white glaze + speckle additive)
- Black underglaze pencil or fine liner brush with black underglaze
- Pink underglaze
- Small round paintbrush
- Clear transparent glaze (optional, depending on white glaze used)
- Kiln
Step 1: Forming the Pot
-
Prepare the Clay:
Start by wedging a softball-sized amount of white clay to remove air bubbles and ensure an even consistency. -
Shape the Body:
If using a wheel, throw a rounded, bowl-like shape that curves slightly inward at the rim. If hand-building, create two pinch pots and join them, or build a cylinder from a slab and gently belly it out from the inside. -
Refine the Rim:
Smooth the rim with a damp sponge or chamois leather. You want a soft, rounded edge rather than a sharp one to match the gentle aesthetic of the face. -
Trim the Base:
Once the clay is leather hard, trim away excess clay from the bottom to create a defined foot ring or a flat stable base. I find this stage crucial for reducing the weight of the pot. -
Smooth the Surface:
Use a metal rib or a damp sponge to smooth out any finger marks or texture on the exterior. The ‘face’ needs a clean, smooth canvas.
Uneven Cheeks?
If you struggle to paint perfect circles for cheeks, try using the eraser end of a pencil as a stamp. Dip it in underglaze and press gently for uniform dots.
Step 2: Adding the Details
-
Sketch the Face:
Lightly sketch the position of the eyes and mouth with a pencil. Don’t worry, the graphite will burn off in the kiln. -
Paint the Lashes:
Using a very fine brush dipped in black underglaze, or a black underglaze pencil, carefully draw two downward-curving arcs for the closed eyes. Add three short, distinct lashes to each arc. -
Add the Smile:
Paint a tiny, subtle ‘U’ shape for the mouth. Place it slightly lower than center to give the face a sweet, chubby appearance. -
Apply the Cheeks:
Dip a small round brush into pink underglaze. Dab two circular spots on either side of the smile. You might need two coats here to ensure the pink shows up brightly after firing. -
Bisque Fire:
Allow the pot to dry completely (bone dry) before loading it into the kiln for a bisque firing.
Step 3: Glazing and Finishing
-
Wax Resist (Optional):
If you are concerned about your underglaze smearing, you can apply a dab of wax resist over the face details, though usually, a careful dip is fine. -
Prepare the Glaze:
Stir your speckled white glaze thoroughly. The speckles tend to settle at the bottom, so mix well to ensure an even distribution on the pot. -
Dip the Pot:
In one smooth motion, dip the pot into the speckled glaze. Hold it for about three seconds and lift it out, shaking off the last drips gently. -
Clean the Foot:
Use a damp sponge to wipe any glaze off the very bottom of the pot so it doesn’t fuse to the kiln shelf. -
Glaze Fire:
Fire the piece again according to the temperature required by your specific clay and glaze combination. -
Planting:
Once cool, fill with cactus soil and nestle a green rosette succulent inside to complete the look of ‘hair’ for your planter.
Make it a Set
Create a trio of pots with different expressions: one winking, one surprised (small ‘o’ mouth), and one sleeping, to display together on a shelf.
Enjoy the peaceful vibe this little planter brings to your space


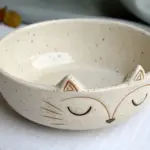
Pinch-Pot Critter Cups
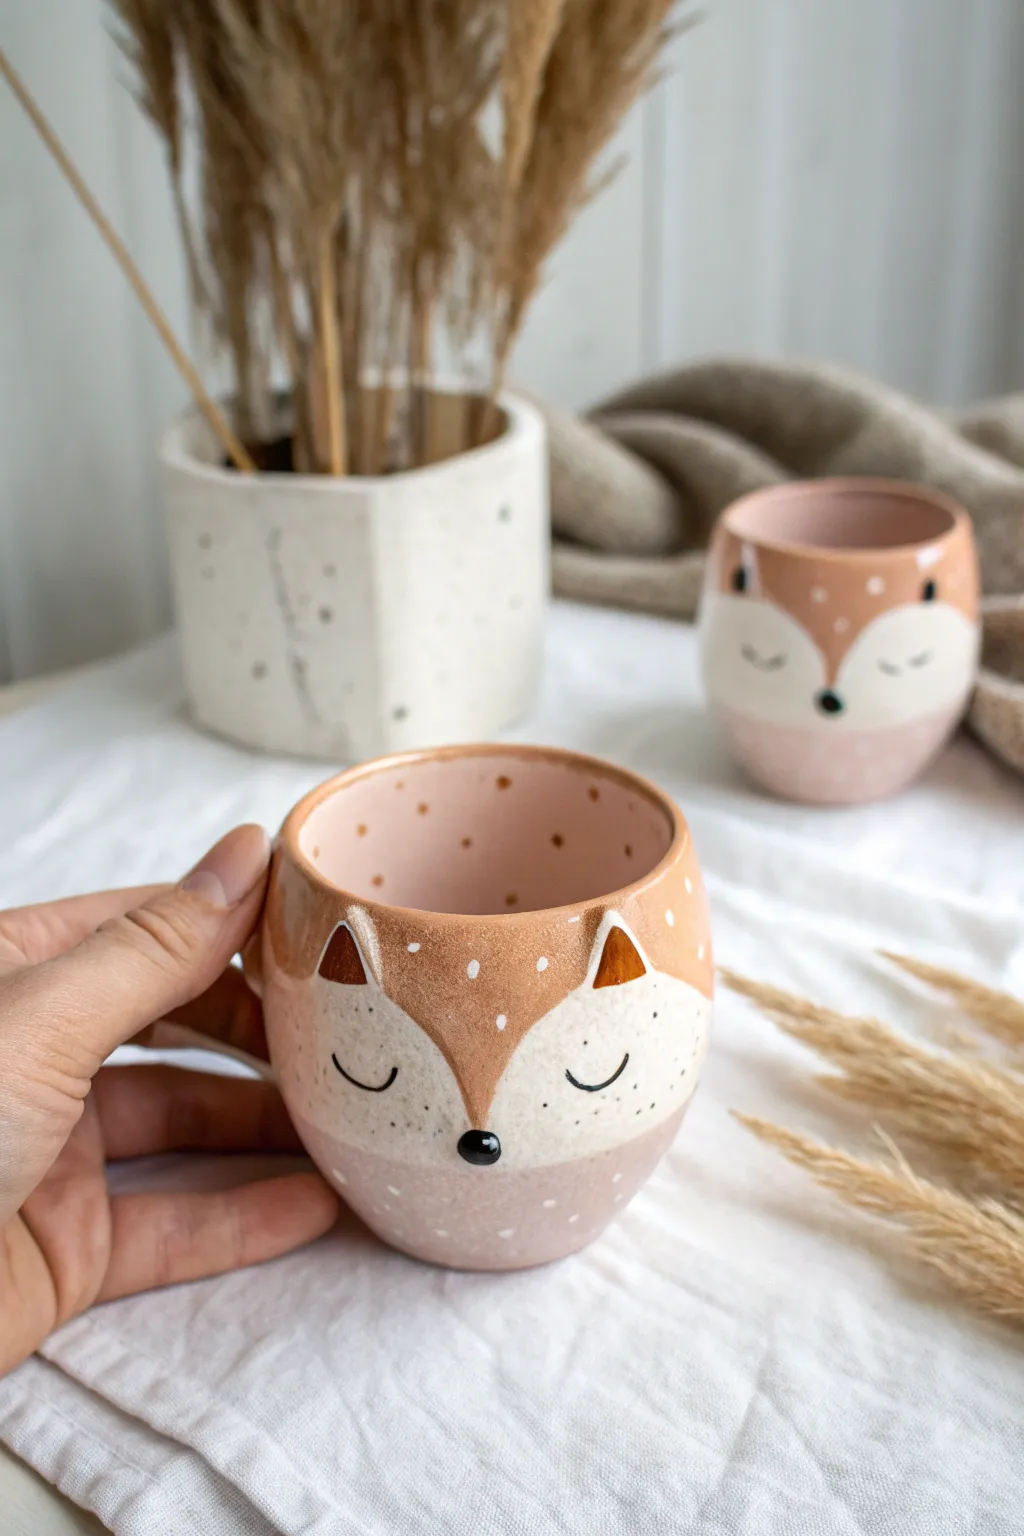
These adorable handle-free mugs feature a sleeping fox face with a charming speckled finish. Using simple pinch-pot techniques, you’ll create a cozy, rounded vessel that fits perfectly in your hands.
Detailed Instructions
Materials
- White stoneware clay or porcelain
- Pottery tools (sponge, needle tool, rib)
- Small bowl of water
- Slip (liquid clay)
- Underglazes: Light pink/blush, terracotta orange/brown, black, and white
- Clear food-safe glaze
- Fine-point detail brush
- Medium soft bristle brush
- Kiln access
Step 1: Forming the Cup Base
-
Wedge the clay:
Start with a ball of clay about the size of a large orange. Wedge it thoroughly to remove air bubbles, ensuring the clay is uniform and smooth. -
Open the pinch pot:
Hold the ball in one hand and press your thumb into the center, stopping about a half-inch from the bottom. Slowly pinch and rotate the clay between your thumb and fingers to open up the walls. -
Shape the walls:
Continue pinching upward, aiming for an even thickness of about 1/4 inch throughout. Gently curve the walls inward slightly at the top to create a rounded, enclosed shape rather than an open bowl. -
Create a flat bottom:
Tap the base of your pot gently on your work surface to create a stable, flat bottom so the cup won’t wobble. -
Smooth the surface:
Use a damp sponge or a flexible rib tool to smooth out finger marks on both the inside and outside. I like to spend extra time here to get a really professional finish.
Uneven Drying?
If the rim dries faster than the base, it can crack. Wrap the rim loosely with a strip of damp plastic or paper towel while the thicker bottom catches up.
Step 2: Adding Fox Features
-
Shape the ears:
Roll two small triangles of clay for the ears. They should be roughly equilateral triangles, about half an inch tall. -
Attach the ears:
Score the bottom of the ears and the attachment spots on the rim of the cup. Apply slip and press the ears firmly into place, blending the clay downward with a modeling tool to secure them seamlessy. -
Add the nose:
Roll a tiny, pea-sized ball of clay for the nose. Score and slip the center point of the cup’s lower half and attach the nose firmly. -
Bisque fire:
Let your cup dry slowly under plastic for at least a day, then uncover until bone dry. Fire it to bisque temperature (usually cone 04) according to your clay’s specifications.
Customize It
Turn this into a planter by poking a drainage hole in the bottom before drying, and skip the food-safe interior glaze for a matte finish.
Step 3: Painting and Glazing
-
Section the face:
Once bisque fired, lightly sketch the fox face outline with a pencil. Draw a shallow heart shape that dips down to the nose to separate the white cheeks from the orange forehead. -
Background color:
Paint the bottom half of the cup—below the face—with a soft blush pink underglaze. Extend this color inside the cup as well for a cohesive look. -
Paint the cheeks:
Fill in the cheek areas with white underglaze. You may need 2-3 coats to ensure it’s opaque against the stoneware. -
Paint the fur:
Apply the terracotta or warm brown underglaze to the ‘forehead’ area and the backs of the ears. Carefully paint around the white inner ear triangles. -
Detail the face:
Using a very fine liner brush and black underglaze, paint two small U-shapes for sleeping eyes and color the nose black. Add tiny dots or freckles on the cheeks if desired. -
Add speckles:
Dilute a small amount of white and brown underglaze with water. Flick the bristles of a toothbrush or stiff brush to create fine speckles over the painted areas. -
Apply clear glaze:
Once the underglaze is fully dry, dip the entire cup into a clear, food-safe glaze. Wipe the bottom foot clean with a sponge. -
Final firing:
Fire the cup a second time to the glaze temperature appropriate for your clay body (typically cone 5 or 6)
Enjoy sipping your warm drink from your new woodland friend


Frog Soap Dish With Toes
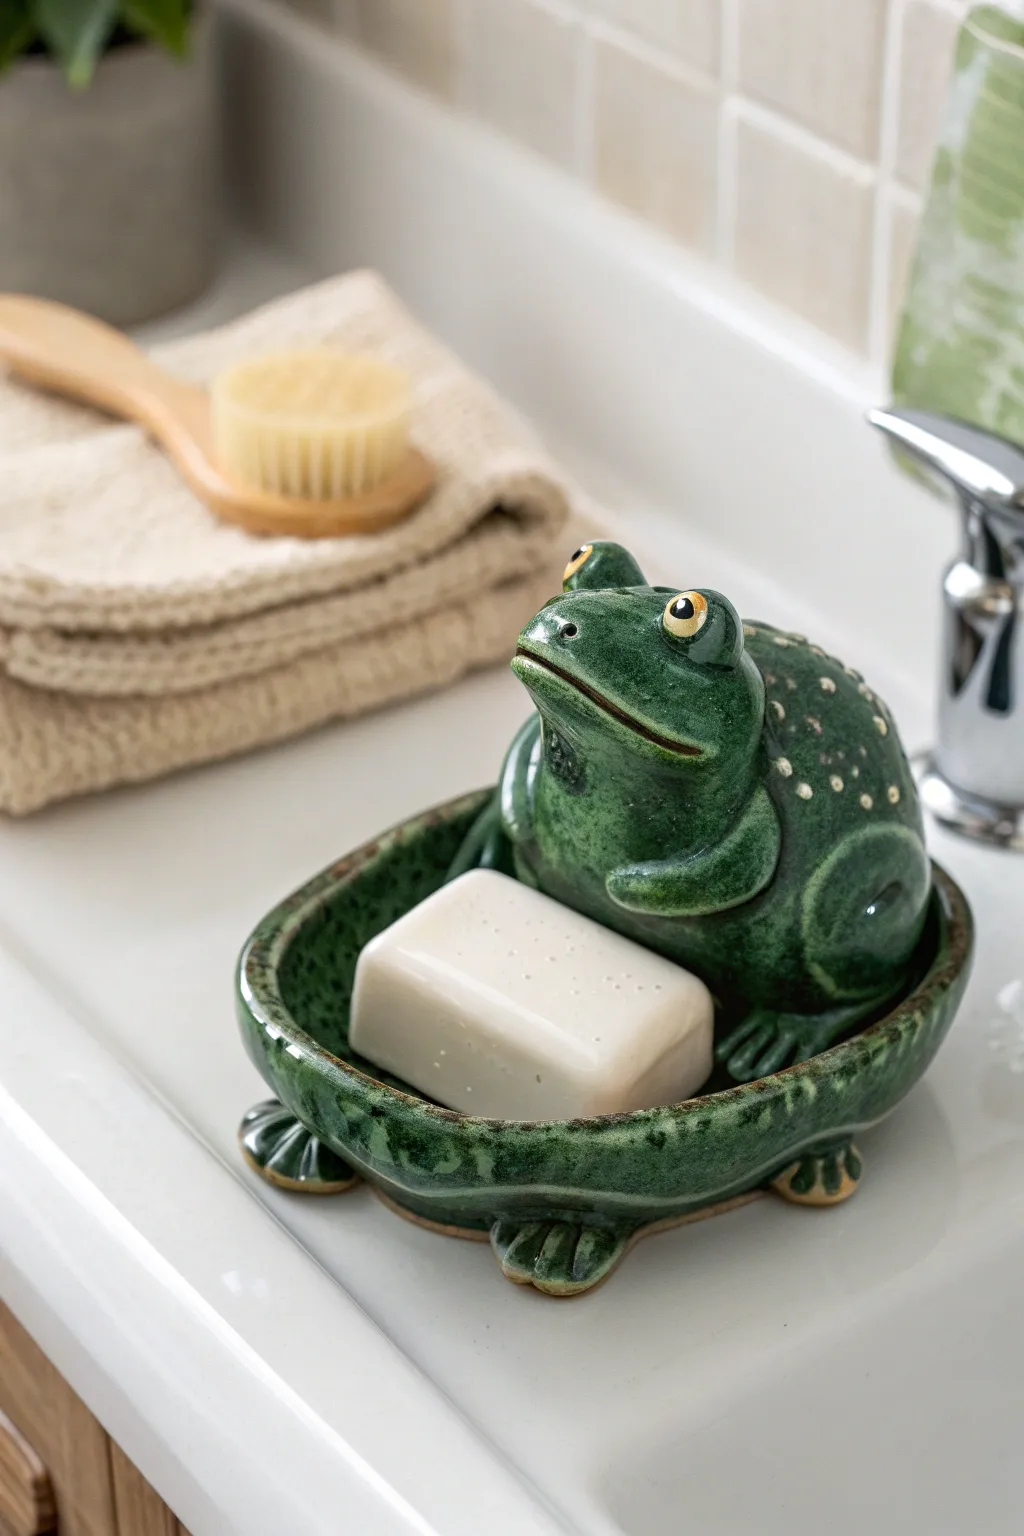
Bring a little pond magic to your bathroom sink with this charming, functional soap dish. Featuring a rotund frog perched on the rim and adorable sculpted toes, this piece is glazed in a stunningly deep, mossy green.
Step-by-Step Tutorial
Materials
- Stoneware clay (preferably a smooth white body)
- Rolling pin
- Oval template or cookie cutter (approx. 5×4 inches)
- Needle tool
- Scoring tool (or serrated kidney)
- Slip (clay and water mixture)
- Modeling tools (wood and rubber ribs)
- Sponge
- Deep moss green glaze (glossy)
- White or yellow underglaze (for eyes)
- Black underglaze (for pupils)
- Kiln
Step 1: Sculpting the Base
-
Roll the slab:
Start by rolling out a uniform slab of clay to about 1/4 inch thickness. Smooth it with a rib to remove canvas texture. -
Cut the oval shape:
Using your template or freehanding, cut out an oval shape for the main dish. This should be large enough to hold a standard bar of soap comfortably. -
Build the rim:
Roll a medium-thick coil of clay. Score and slip the outer edge of your oval base, then attach the coil to create the raised wall of the dish. -
Shape the dish walls:
Using your thumb and fingers, pinch the coil upwards to create height. Blend the coil seamlessly into the base on the inside and outside, ensuring there are no cracks. -
Smooth the form:
Use a damp sponge or a rubber rib to smooth the rim and walls. The rim should be rounded and soft, not sharp. -
Add the feet:
Roll four small balls of clay. Flatten one side of each slightly and attach them to the underside of the dish using the score and slip method. Press indentations into them to create the ‘toes’ seen in the photo.
Step 2: Creating the Frog Character
-
Form the body:
Roll a larger ball of clay for the frog’s body. Gently shape it so it sits naturally against the back curve of your dish rim. -
Attach the frog:
Heavily score both the spot on the rim and the bottom of the frog body. Apply slip generously and press the frog firmly into place, blending the clay at the contact points to ensure a permanent bond. -
Sculpt the legs:
Roll two thick, tapered coils for the hind legs. Attach these to the sides of the frog’s body, blending the upper thigh into the torso. Fold the bottom of the leg forward to form the foot. -
Add front arms:
Create two smaller coils for the front arms. Attach them so they look like they are resting on the frog’s belly, creating a contented pose. -
Detail the face:
Use a modeling tool to carve a wide, slightly curved mouth line. It should extend far back on the face to give that classic froggy grin. -
Add the eyes:
Roll two small balls for eyes and attach them to the top of the head. Use a small tool to sculpt eyelids around the top half of the spheres. -
Create texture:
Using a needle tool or small loop tool, gently poke or carve tiny irregularities and bumps onto the frog’s back to mimic warty skin texture.
Wobbly Dish?
If the dish rocks after attaching the feet, gently tap the whole piece down onto a flat board while the clay is still leather hard to level the feet perfectly.
Step 3: Finishing and Glazing
-
Bisque fire:
Allow the piece to dry slowly and completely under loose plastic to prevent cracking. Once bone dry, bisque fire it to cone 04 (or your clay’s specification). -
Apply base glaze:
Brush or dip the entire piece in a deep moss green glossy glaze. Ensure the glaze gets into the texture on the back but doesn’t pool too thickly. -
Detail the eyes:
Carefully wipe the green glaze off the round part of the eyes. Paint the whites with a dot of yellow or white underglaze, and add a tiny black pupil. -
Highlight the texture:
If you want the warts to stand out like the photo, you can gently wipe the green glaze off just the high points of the bumps before firing, letting the clay body show through slightly. -
Glaze fire:
Fire the piece again to the maturation temperature of your glaze (typically cone 5 or 6 for stoneware). Let it cool completely before removing from the kiln.
Go for Glow
Add drainage holes in the bottom if you want to use this for a sponge instead of soap, or glaze the interior a watery blue for a fun contrast.
Now you have a watchful little amphibian friend to keep your soap dry and your counter tidy


Cloud and Star Spoon Rests
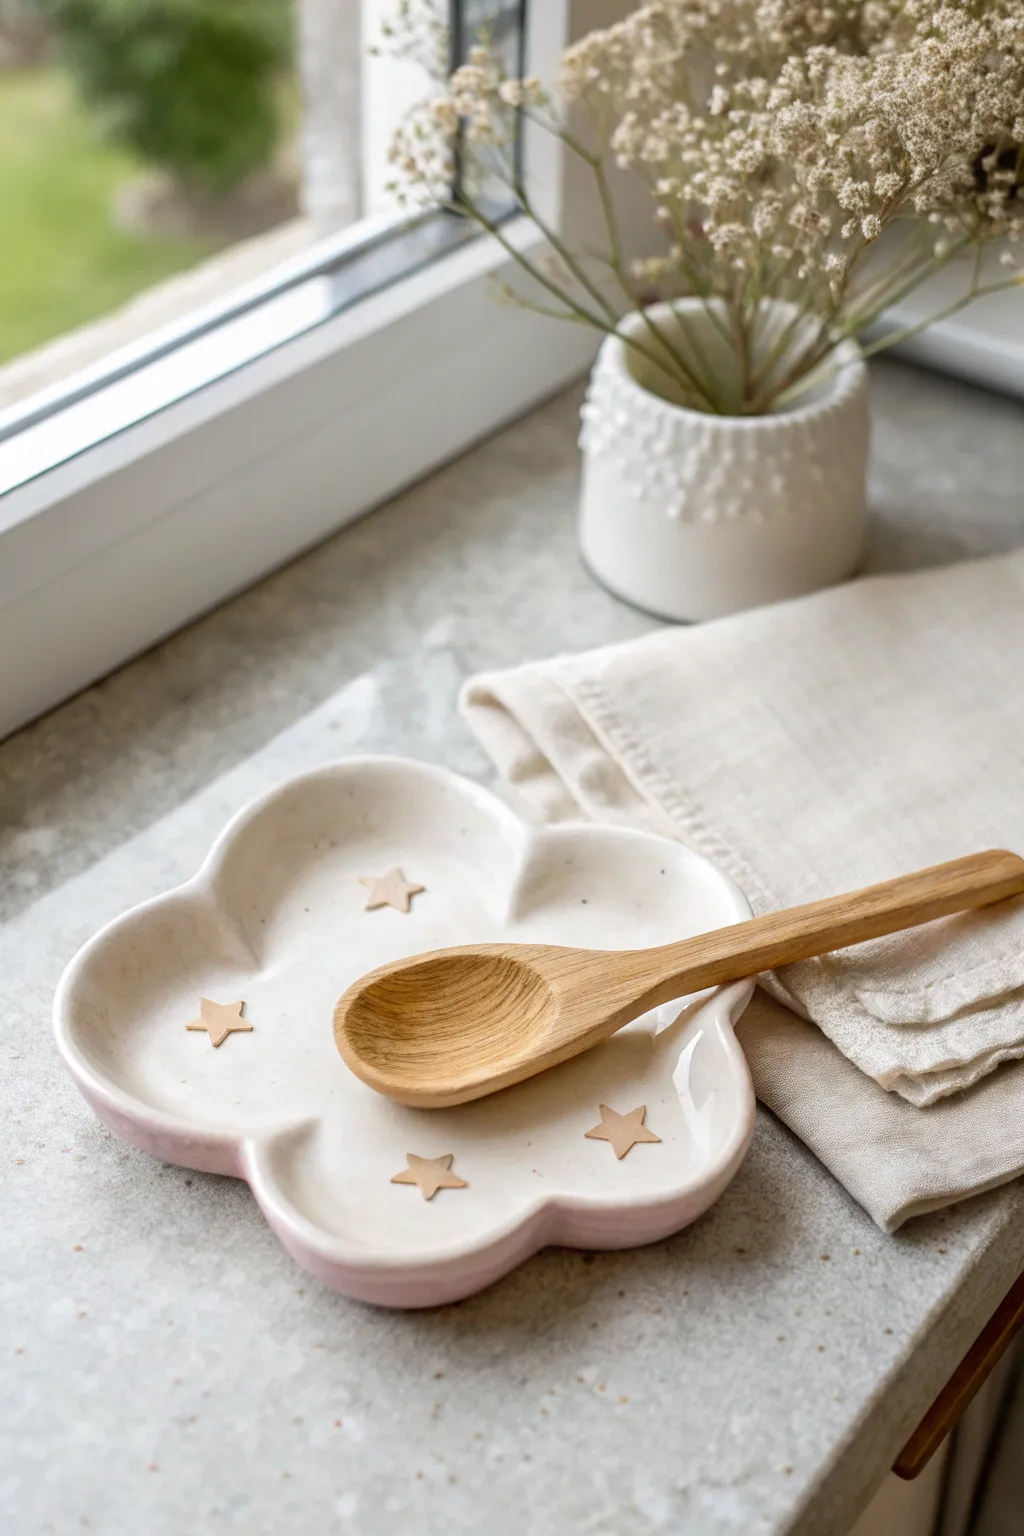
Make your kitchen cleanup a little dreamier with this charming, celestial-inspired spoon rest. Shaped like a soft cloud or flower with delicate star inlays, this hand-built ceramic piece is as functional as it is adorable.
Step-by-Step
Materials
- White earthenware or polymer clay
- Rolling pin
- Paper template (cloud/flower shape)
- Fettling knife or clay cutting tool
- Small star-shaped clay cutter or stamps
- Sponge and water
- Clear or white glossy glaze
- Pink underglaze or acrylic paint (optional for rim)
- Sandpaper (fine grit)
- Small paintbrush
Step 1: Shaping the Cloud
-
Prepare the Clay:
Start by kneading your clay until it is soft, pliable, and free of air bubbles. If using natural clay, wedging is crucial to prevent cracks during firing. -
Roll out the Slab:
Roll the clay out into an even slab, aiming for a thickness of about 1/4 inch (6mm). Using guide sticks on either side of your rolling pin can help keep the thickness uniform. -
Cut the Shape:
Place your cloud or scalloped flower template onto the slab. Using your fettling knife or cutting tool, trace around the template carefully to cut out the base shape. -
Smooth the Edges:
Dip your finger or a small sponge in a little water and run it along the cut edges to smooth out any sharpness or roughness. -
Lift the Rim:
Gently lift the edges of the cloud shape upwards with your fingertips to create a shallow bowl form. You want a rim that will contain spills but isn’t too steep. I like to support the curves with small pieces of foam or balled-up paper towel while it firms up.
Warped Rim Woes?
If the rim sags while drying, prop it up with small crumpled pieces of tissue or fabric scraps. Let it dry in this supported position until leather hard.
Step 2: Adding Celestial Details
-
Imprint or Cut Stars:
You have two options here: gently press small wooden star shapes into the clay for a relief effect, or use a tiny cutter to lightly imprint star outlines. -
Inlay or Accent:
If you want the visible raised star look shown, cut tiny thin stars from leftover clay scraps. Score and slip the back of these tiny stars and press them firmly onto the spoon rest surface. -
Final Smoothing:
Use a barely damp brush to clean up any slip that squeezed out from under your stars or to smooth the transition areas. -
Drying Time:
Let your piece dry slowly. Cover it loosely with plastic for the first day to prevent warping, especially around the lifted rim, then uncover to let it dry completely bone dry (usually 24-48 hours depending on humidity).
Step 3: Finishing and Glazing
-
Bisque Fire or Cure:
If using ceramic clay, fire to cone 04. If using polymer clay, bake according to the manufacturer’s instructions on the package. -
Sand Imperfections:
Once cooled, lightly sand any rough spots on the rim or bottom. Wipe away all dust with a damp sponge. -
Apply Rim Color:
For that soft pink edge seen in the photo, carefully paint a line of pink underglaze or acrylic paint along the very edge of the rim. -
Accent the Stars:
If you want the stars to stand out in a natural beige tone against a white background, apply a wax resist over the stars now, or simply wipe glaze off them in the next step. -
Glaze Application:
Apply 2-3 coats of a clear or speckle-white glossy glaze over the entire top surface. This seals the piece and makes it food-safe and easy to clean. -
Final Fire or Seal:
Fire the piece again to the glaze temperature (stick to cone 05/06 for earthenware). For polymer clay, apply a gloss varnish to seal.
Starry precision
Use a drinking straw to cut perfect small circles, then pinch the edges to form tiny stars if you don’t have a mini cutter small enough.
Enjoy using your new handmade spoon rest every time you cook

The Complete Guide to Pottery Troubleshooting
Uncover the most common ceramic mistakes—from cracking clay to failed glazes—and learn how to fix them fast.
Mushroom Tea Light Holders
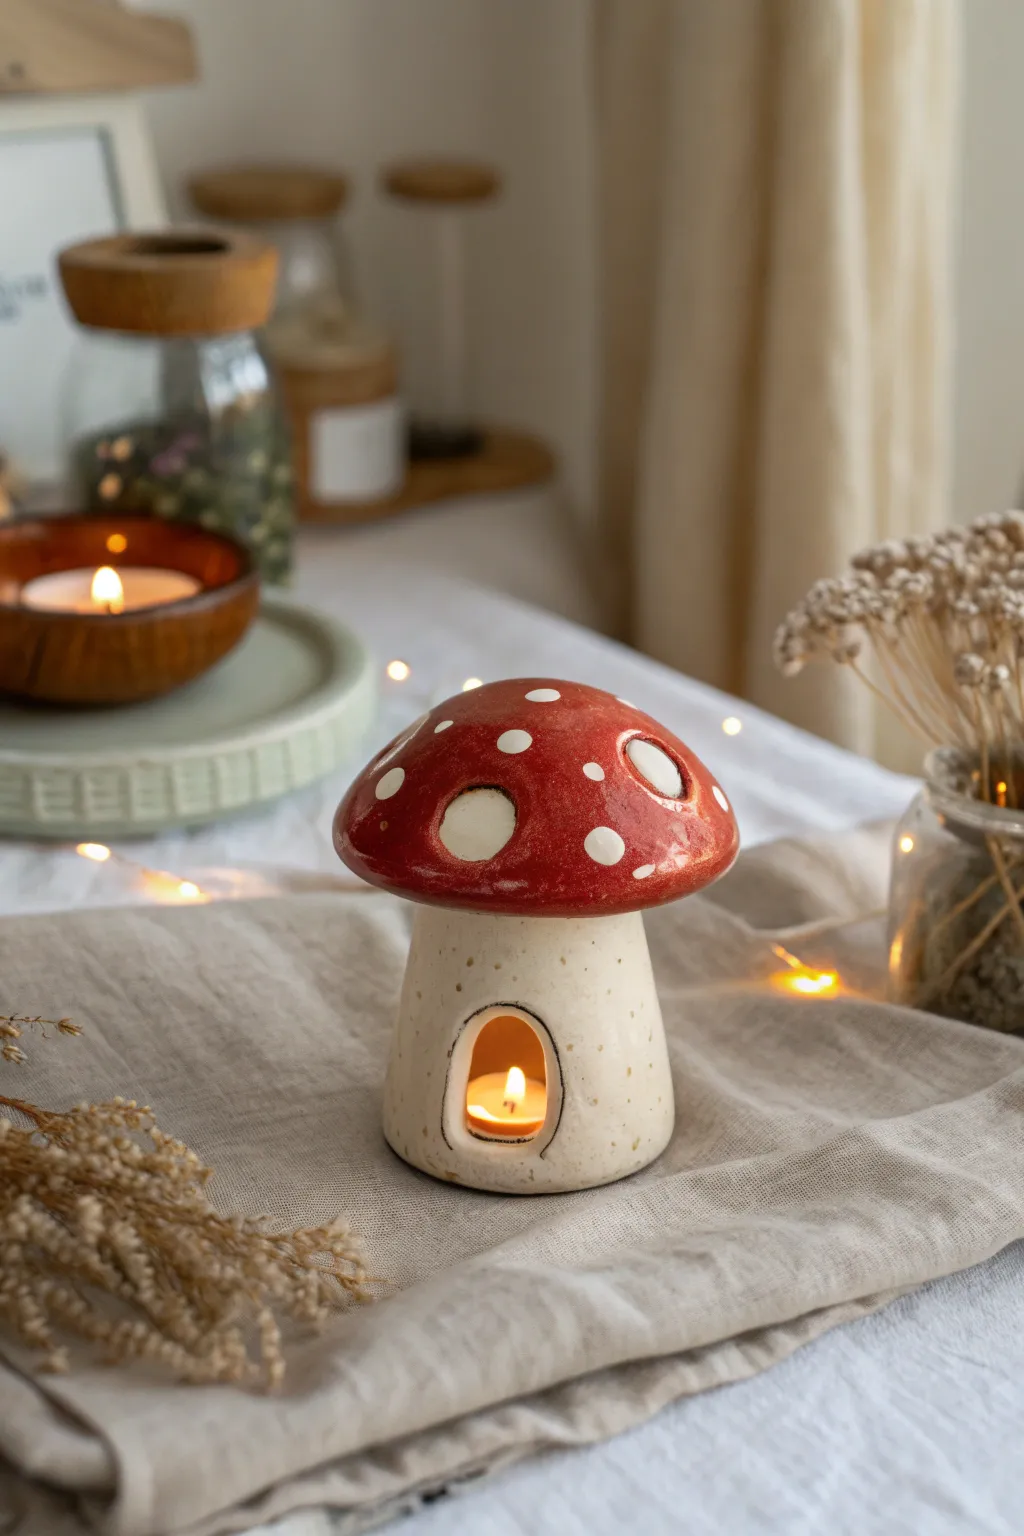
Bring a touch of forest magic into your home with this adorable ceramic mushroom tea light holder. Featuring a speckled creamy stalk and a classic red-and-white toadstool cap, the warm glow of a candle inside transforms it into a cozy little fairy dwelling.
Detailed Instructions
Materials
- White or speckled stoneware clay (low-fire or mid-fire)
- Rolling pin and guide sticks (approx. 1/4 inch thick)
- Fettling knife or needle tool
- Sponge
- Small bowl or sphere mold (for the cap shape)
- Cylindrical form or cardboard tube (for the stalk)
- Scoring tool (or an old toothbrush)
- Slip (clay mixed with water)
- Underglazes: Bright Red and White
- Clear transparent glaze
- Kiln access
Step 1: Forming the Stalk
-
Roll the slab:
Begin by wedging your clay to remove air bubbles, then roll out a slab to an even thickness of about 1/4 inch using your guide sticks. -
Cut the rectangle:
Measure the height you want for the mushroom stem (around 3-4 inches) and cut a rectangle long enough to wrap around your cylindrical form with a little overlap. -
Create the cylinder:
Wrap the clay rectangle loosely around your form. Where the edges overlap, cut through both layers at a 45-degree angle to create a seamless bevel joint. -
Score and slip:
Score both beveled edges with a serrated tool and apply a generous amount of slip. Press the edges together firmly to seal the seam. -
Smooth the seam:
Remove the form and gently work the clay on the inside and outside with a wooden rib or your thumb to make the seam invisible. -
Cut the doorway:
Choose the front of your stalk and use a sharp knife to cut a small arched doorway. Make sure create an opening large enough to easily slide a tea light in and out.
Clean Edges
After cutting the doorway, smooth the cut edges with a damp chamois or finger. Sharp raw edges can become very sharp after firing.
Step 2: Sculpting the Cap
-
Mold the cap shape:
Roll out a fresh slab of clay. Drape it over a small bowl or a sphere mold to create a domed shape. I prefer to cover the mold with plastic wrap first so the clay doesn’t stick. -
Trim the edges:
Trim the excess clay around the rim of the bowl to create a clean, round edge for your mushroom cap. Smooth the rim with a damp sponge. -
Create the vent holes:
This step is crucial for functionality: using a small circular cutter or the back of a paintbrush, punch 2-3 holes near the top of the cap. This allows heat from the candle to escape. -
Dry fit:
Once both pieces have stiffened to a leather-hard state, gently place the cap onto the stalk to ensure they fit together nicely. Do not attach them permanently; this design works best as a two-piece lid system.
Step 3: Decoration and Glazing
-
Bisque fire:
Allow your clay pieces to dry slowly and completely before firing them in the kiln for a bisque firing. -
Add the base color:
Once bisqued, paint the mushroom cap with 2-3 coats of bright red underglaze. Leave the stalk unpainted if you want the natural speckled clay to show, or apply a cream underglaze. -
Paint the dots:
Using a detailed round brush, paint large white circles onto the red cap. For a textured look like the photo, you can dab the glaze on thickly. -
Define the door:
Use a very thin brush with black or dark brown underglaze to outline the arched doorway, giving it a finished, illustrative look. -
Clear glaze application:
Dip or brush a coat of clear transparent glaze over the entire outside of the cap and stalk. Ensure the foot of the stalk is wiped clean. -
Final firing:
Fire the pieces again to the temperature required for your specific clay and glaze (usually Cone 5 or 6 for stoneware) to achieve that glossy, durable finish.
Cap Too Heavy?
If the cap is sagging on the mold, let the slab stiffen slightly on a flat board for 20 minutes before draping it over the form.
Place a tea light inside and watch your little ceramic home glow with warmth
Cute Toothbrush Holder Creature
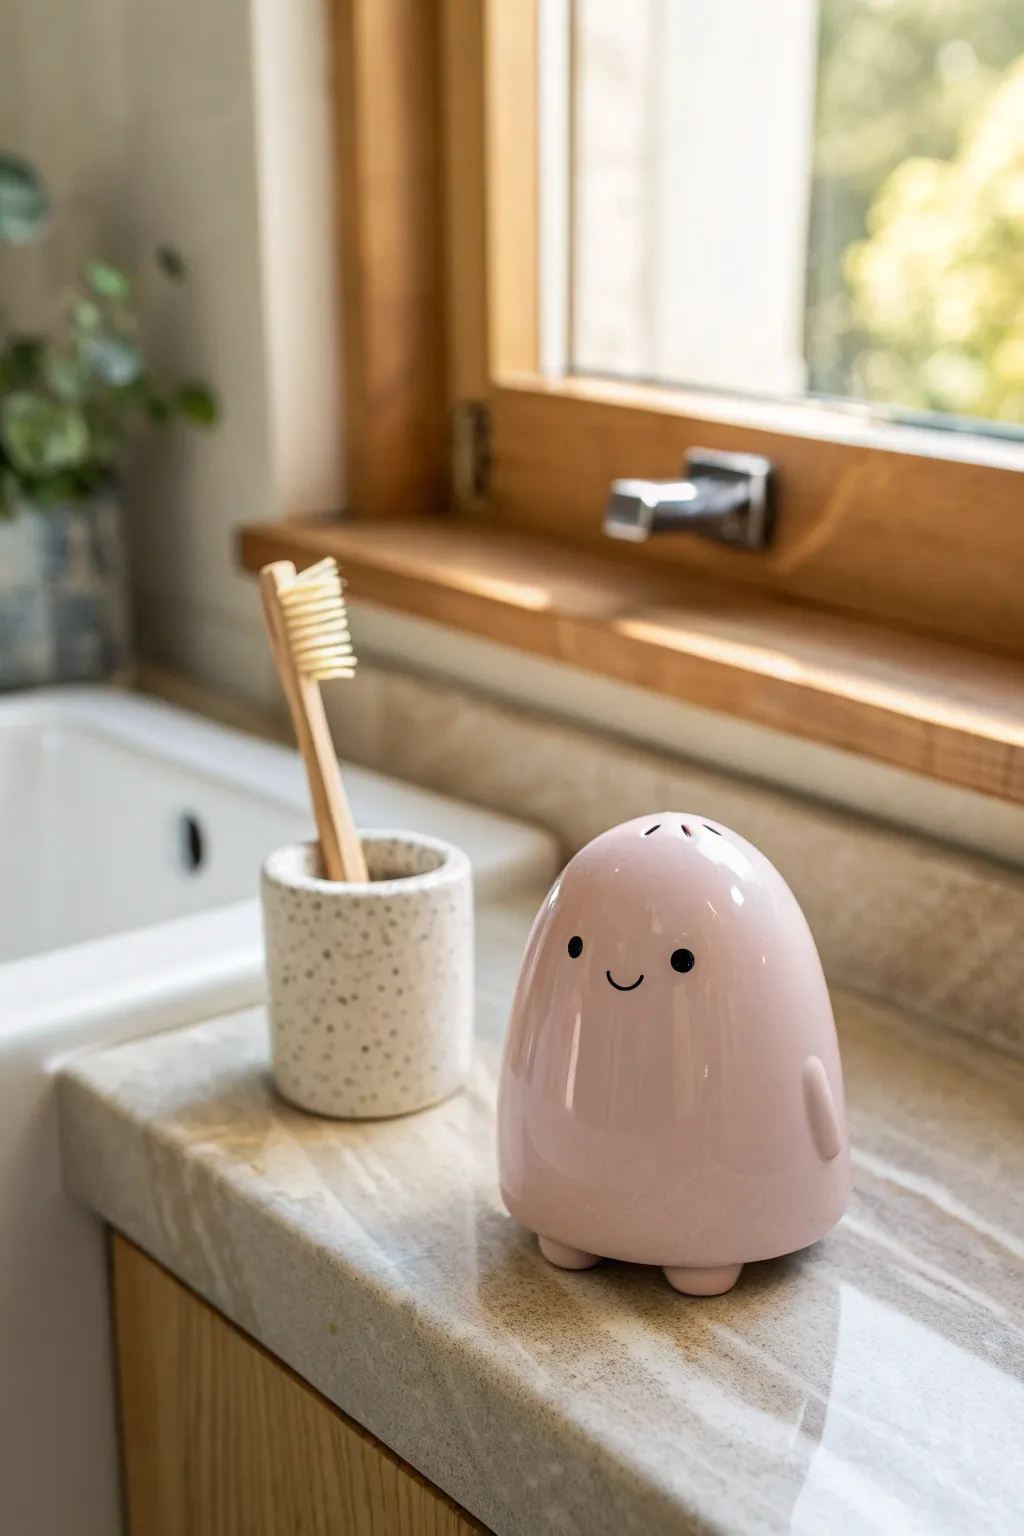
This adorable, glossy ceramic creature looks like a friendly little spirit ready to brighten up your bathroom counter. With its gentle curve, sweet minimalist face, and soft pink glaze, it’s the perfect beginner-friendly project to practice hand-building smooth forms.
Detailed Instructions
Materials
- White stoneware or earthenware clay
- Pottery wheel (optional) or rolling pin and slab mat
- Needle tool
- Rib tool (kidney shaped, soft)
- Small loop tool
- Sponge
- Underglaze (Black)
- Glossy Pink Glaze
- Clear Glaze (optional, if pink is an underglaze)
- Kiln
- Paintbrush (small detail brush)
Step 1: Forming the Body
-
Prepare the clay:
Start by wedging a softball-sized amount of white clay to remove any air bubbles. This ensures your little ghost won’t crack during firing. -
Shape the base form:
You can throw a closed form on the wheel that tapers at the top, or use the pinch pot method. For pinching, form a ball, press your thumb in, and work the walls up into a tall, rounded dome shape. -
Refine the curve:
This creature relies on a very smooth, continuous curve. Use a moist sponge and a rib tool to gently smooth the outside, ensuring the bottom is slightly wider than the top, creating a soft egg-like silhouette. -
Close the form (if pinching):
If you used pinch pots, you might need to join two bowls together or gently collar the top of a single pot until it closes completely. Smooth over the join so it’s invisible.
Uneven Glaze?
If your pink glaze looks streaky after brushing, try alternating the direction of your brush strokes with each coat (horizontal, then vertical) for a solid finish
Step 2: Adding Details
-
Add the feet:
Roll three small balls of clay, about the size of marbles. Score and slip the bottom of your ghost and attach these as little nubby feet so the creature stands slightly elevated. -
Create the arm nubs:
Form two small, flat tear-drop shapes. Score the sides of the body where arms should go, apply slip, and press these on. Blend the edges seamlessly so they look like they are protruding from beneath a sheet. -
Smooth everything:
I like to take a damp sponge and do a final pass over the entire piece. Remove any fingerprints or tool marks now, as the glossy glaze will highlight imperfections later. -
Ventilation:
Using your needle tool, poke 3-4 small holes in a decorative pattern at the very top of the head. This acts as a vent for hot air during firing and adds a cute detail.
Make it a Set
Make a slightly smaller version in a complementary color like mint green or baby blue to create a pair of bathroom storage guardians
Step 3: Painting & Glazing
-
Bisque fire:
Let the piece dry completely to the bone-dry stage. Fire it in the kiln to a bisque temperature (usually barely cone 04) to prepare it for glazing. -
Apply the base glaze:
Dip the entire piece into a bucket of glossy pastel pink glaze, or brush on 3 even coats if you are using commercial brushing glazes. Wipe the bottom of the feet clean with a sponge. -
Paint the face:
Using a tiny detail brush and black underglaze or glaze, carefully paint two small dots for eyes widely spaced apart. -
Add the smile:
Paint a very thin, small ‘u’ shape directly between and slightly below the eyes. Keep the expression minimal for maximum cuteness. -
Final cleaning:
Ensure no glaze is sticking to the very bottom of the feet nubs where they touch the kiln shelf. Double-check that the vent holes on top aren’t clogged with glaze. -
Glaze fire:
Place the creature back in the kiln for the glaze firing. Follow the temperature instructions specific to your pink glaze bottle.
Place your shiny new friend on a shelf and enjoy the whimsical charm it brings to your morning routine


What Really Happens Inside the Kiln
Learn how time and temperature work together inside the kiln to transform clay into durable ceramic.
Speckled Berry Bowls With Faces
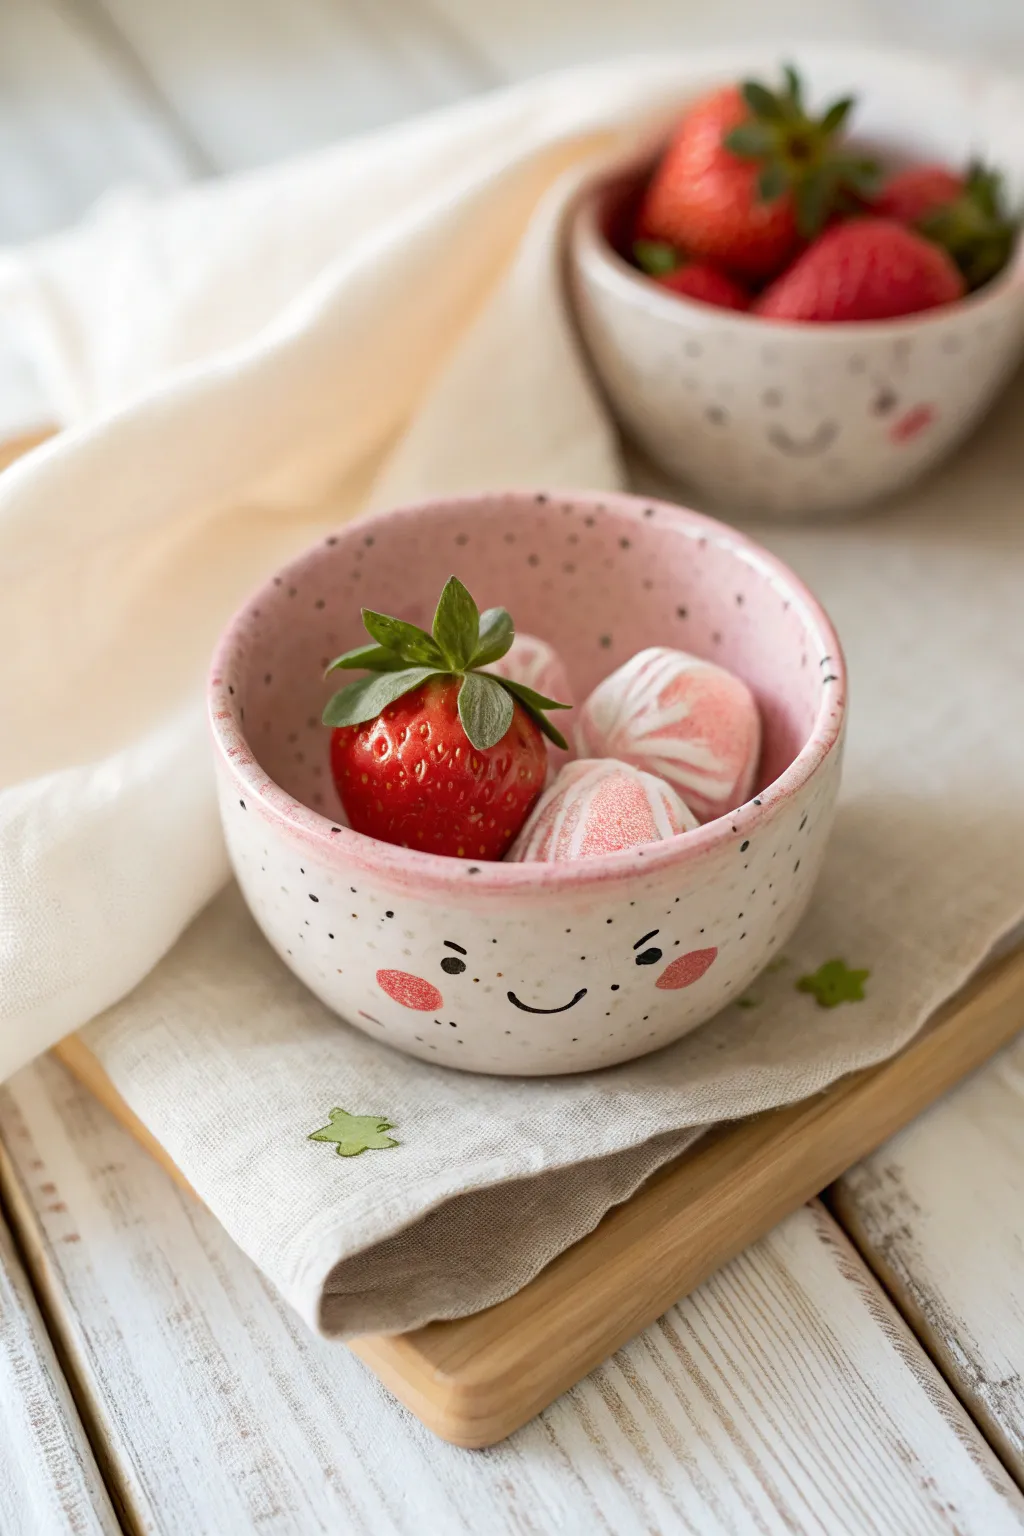
These adorable berry bowls bring a touch of whimsy to your snack time with their sweet painted faces and speckled finish. The combination of creamy white and soft pink glazes creates a cozy, handmade feel that perfectly compliments fresh fruit.
Step-by-Step Guide
Materials
- Speckled Stoneware Clay (e.g., Lagunitas or similar)
- Pottery wheel (or rolling pin for hand-building)
- Rib tool
- Trimming tools
- Sponge
- Underglaze pencil or fine black underglaze applicator
- Black underglaze
- Pink or Red underglaze (for cheeks)
- White dipping glaze (translucent or semi-opaque)
- Pink glaze (food safe)
- Fine detail brush
- Small round brush
Step 1: Forming the Bowl
-
Prepare the Clay:
Start by wedging a ball of speckled stoneware clay, about the size of a large orange. Ensure there are no air bubbles, as this specific clay body often shows texture beautifully when thrown. -
Center and Throw:
Center the clay on the wheel and open it up. Unlike a plate, you want to pull the walls upward to create a deep, rounded curve. I like to aim for a shape that tucks in just slightly at the rim. -
Refine the Shape:
Use a rib tool on the inside and outside to smooth the walls and compress the clay. This is crucial for speckled clay to ensure the grog is pushed in slightly for a smooth surface. -
Dry to Leather Hard:
Wire the bowl off the bat and let it dry slowly until it reaches a leather-hard state. It should be firm enough to handle without deforming but still cool to the touch. -
Trim the Foot:
Flip the bowl over and center it on the wheel again. Trim a neat foot ring, removing excess weight from the bottom so the bowl feels balanced in the hand.
Don’t Hide the Dots
Use a transparent or semi-transparent white glaze. An opaque white will completely cover the lovely natural clay speckles and your painted face details.
Step 2: Decorating the Face
-
Clean the Surface:
Wipe the exterior gently with a slightly damp sponge to remove any trimming dust. This creates a clean canvas for the facial features. -
Draft the Face:
Using a very light touch with a pencil, sketch the placement of the eyes and mouth. Position the face lower on the bowl’s curve to make it look ‘cuter’ and more childlike. -
Paint the Details:
Dip a fine detail brush into black underglaze. Carefully paint two small dots for eyes, adding tiny slanted eyebrows above each offering a sweet expression. -
Add the Smile:
Paint a simple, curved U-shape for the smile centered between the eyes. Keep the line weight consistent with the eyes for a cohesive look. -
Add Rosy Cheeks:
Load a small round brush with pink or red underglaze. Dab two soft oval shapes on either side of the smile. Don’t worry if they aren’t perfectly opaque; a little translucency looks like watercolor. -
Bisque Fire:
Once the underglaze is dry, load the bowl into the kiln for a bisque firing (usually Cone 04 or 06). This sets the underglaze permanently.
Berry Colander Twist
Before the first firing, use a hole cutter tool to punch holes in the bottom and sides based on a pattern. Now you have a functional matching berry strainer!
Step 3: Glazing and Finishing
-
Clean Bisqueware:
After the kiln cools, wipe the bisque bowl with a damp sponge to remove any dust that settled during firing, which prevents glaze defects. -
Apply Interior Glaze:
Pour pink food-safe glaze into the interior of the bowl. Swirl it around to coat the entire inside up to the rim, then pour the excess back out. -
Wipe the Rim:
Use a sponge to carefully clean any pink glaze that dribbled onto the top rim or the outside. You want a crisp transition. -
Glaze the Exterior:
Dip the exterior of the bowl into a translucent or semi-opaque white dipping glaze. This allows the natural speckles of the clay body to show through. -
Check the Face:
If your white glaze is very thick, you might gently rub the area over the face with your finger to thin the glaze layer slightly, ensuring the black underglaze remains visible. -
Glaze Fire:
Load the glazed bowl into the kiln for the final glaze firing (often Cone 5 or 6, depending on your clay and glaze). Ensure the foot is wiped clean of glaze. -
Final Polish:
Once fired and cooled, sand the unglazed foot ring with fine-grit sandpaper under running water to ensure it won’t scratch your table.
Fill your finished bowl with colorful fruits and enjoy the charming smile staring back at you
Hanging Cone Planters With Blush Tips
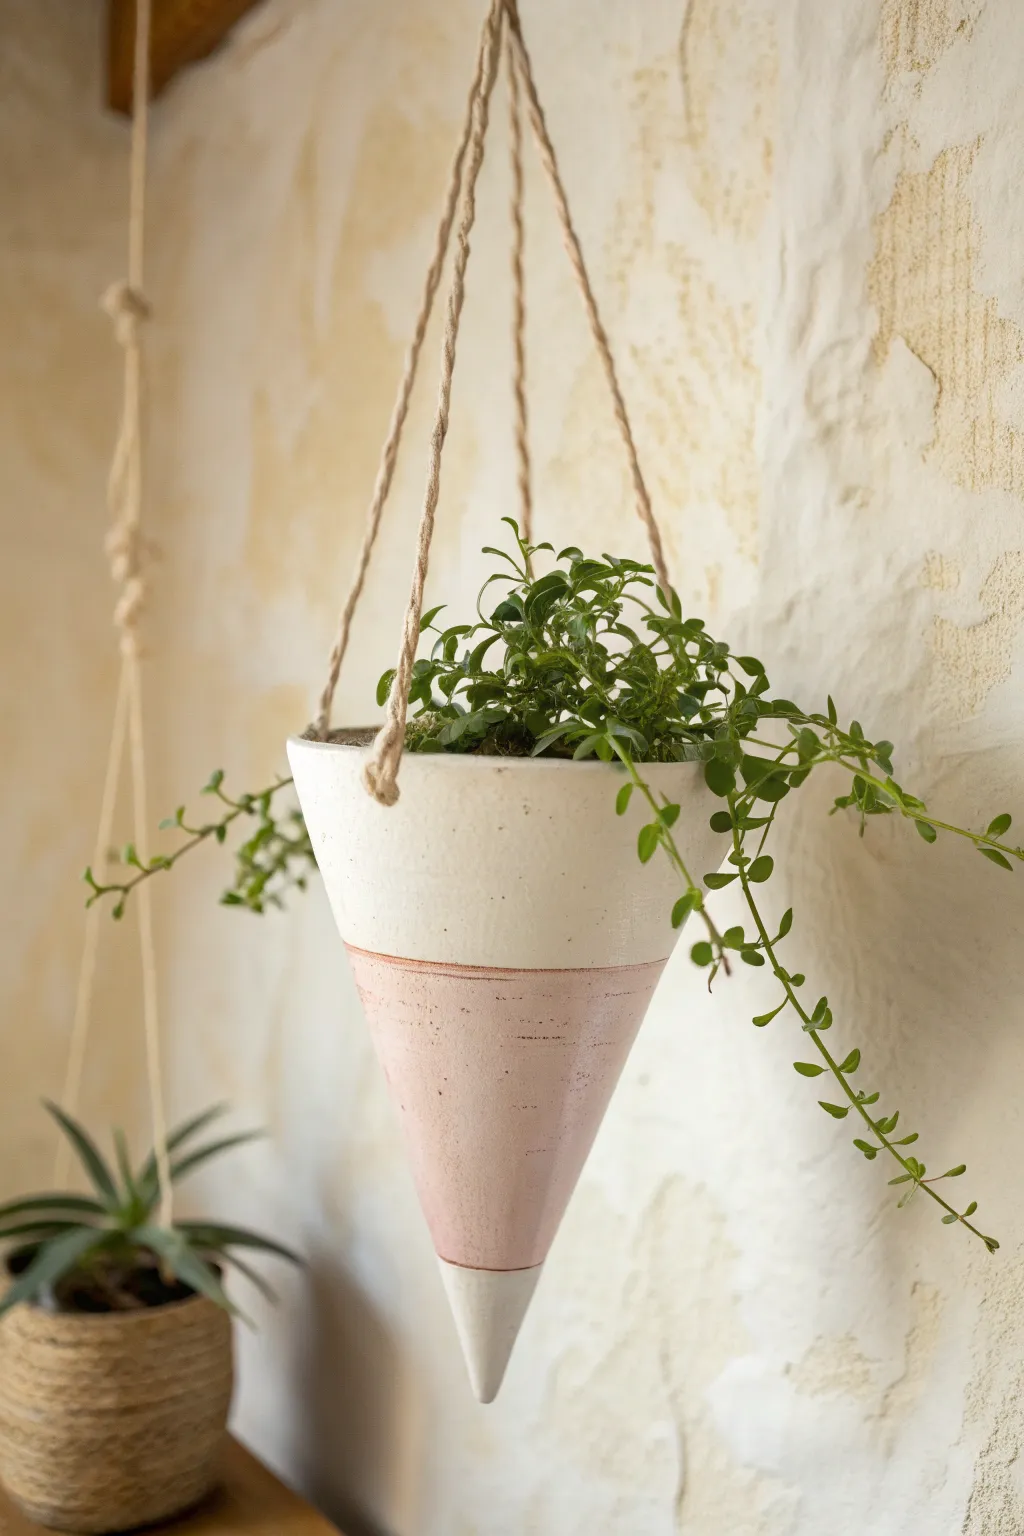
These elegant cone-shaped suspensions bring a touch of minimalist charm to any vertical space, featuring a soft gradient of textures and hues. The design balances raw, earthy twine with smooth white ceramic and a delicate band of blush pink for a modern, airy look.
Detailed Instructions
Materials
- White earthenware or stoneware clay
- Rolling pin
- Cardboard or stiff paper (for template)
- Needle tool or craft knife
- Slip and scoring tool (or fork)
- Sponge
- Small drill bit or hole punch tool
- White glaze
- Blush pink underglaze or glaze
- Masking tape or painter’s tape
- Kiln (or air-dry clay sealant if using non-fired clay)
- Rough jute twine or hemp cord
- Sandpaper (fine grit)
Step 1: Creating the Cone Form
-
Draft the template:
Begin by creating a paper template. Draw a quarter-circle on your cardboard or stiff paper; the straight edges will determine the height of your cone, so ensure they are 6-8 inches long. Cut this shape out to use as your guide. -
Roll the clay slab:
Roll your white clay out on a canvas or cloth surface to a uniform thickness, ideally around 1/4 inch. Smooth out any canvas textures with a rib or slightly damp sponge. -
Cut the shape:
Place your template onto the clay slab. Using a needle tool or a sharp craft knife, trace around the template and cut out the wedge shape cleanly. -
Score the edges:
Take the two straight edges of your wedge—these will be the seams of your cone. Score them thoroughly with a serrated tool or fork to rough up the surface. -
Join the seam:
Apply clay slip to the scored edges and bring them together to form the cone shape. I prefer to reach inside the cone to support the wall while pressing the seam firmly together from the outside. -
Reinforce the join:
Roll a very thin coil of clay and press it into the interior seam. Smear the clay smoothly across the join so the seam becomes invisible and the structure is reinforced. -
Refine the surface:
Use a damp sponge to smooth away the exterior seam line and round off the top rim. The point of the cone should be sealed; if there’s a tiny hole, pinch it closed and smooth it over. -
Pierce the hanging holes:
While the clay is leather-hard but not yet dry, use a hole punch or drill bit to make three evenly spaced holes about half an inch below the rim. Make sure they are large enough to fit your jute twine.
Seam Success
When joining the cone seam, use a wooden paddle to gently tap the outside. This compresses the clay particles for a stronger bond and helps round out any flat spots created during handling.
Step 2: Adding Color & Glazing
-
Bisque fire:
Allow the cone to dry fully until bone dry, then bisque fire it in the kiln according to your clay body’s specifications. -
Tape the boundaries:
Once fired and cooled, use masking tape to mask off the areas you want to keep white. Place one strip about 2 inches from the bottom tip, and another strip about 3 inches down from the rim to define the middle band. -
Apply the blush tone:
Brush three coats of blush pink glaze or underglaze onto the unmasked middle section. Allow each coat to dry briefly before applying the next for solid, opaque coverage. -
Remove tape and glaze white:
Carefully peel off the tape. Dip or brush the top section and the bottom tip with a clear or white gloss glaze. Be careful not to overlap the pink section too messily, though a slight organic overlap can look nice. -
Final smooth:
Check the holes to ensure no glaze has clogged them. If so, clean them out with a small tool before the final firing. -
Glaze fire:
Fire the piece again to the temperature required for your glazes.
Uneven Glaze Lines?
If your glaze bleeds under the tape, use an X-Acto knife to gently scrape away the excess dried glaze before firing. This sharpens the transition between color bands.
Step 3: Assembly
-
Cut the twine:
Cut three equal lengths of coarse jute twine, each about 24-30 inches long depending on how low you want the planter to hang. -
Knot the supports:
Thread one end of a twine piece through a hole from the outside in. Tie a large, secure knot on the inside of the cone so the twine cannot slip back through. -
Create the main suspension:
Gather the three loose ends of the twine at the top. Adjust them to ensure the planter hangs level, then tie them all together in one strong overhand knot or a loop for hanging. -
Ready for planting:
Fill your new cone with a small amount of soil and a trailing plant like the one shown, or use it for air plants if you opted not to add a drainage hole.
Hang your trio of cones near a sunny window and enjoy the gentle sway of greenery in your handmade vessel

TRACK YOUR CERAMIC JOURNEY
Capture glaze tests, firing details, and creative progress—all in one simple printable. Make your projects easier to repeat and improve.
Turtle Trinket Box
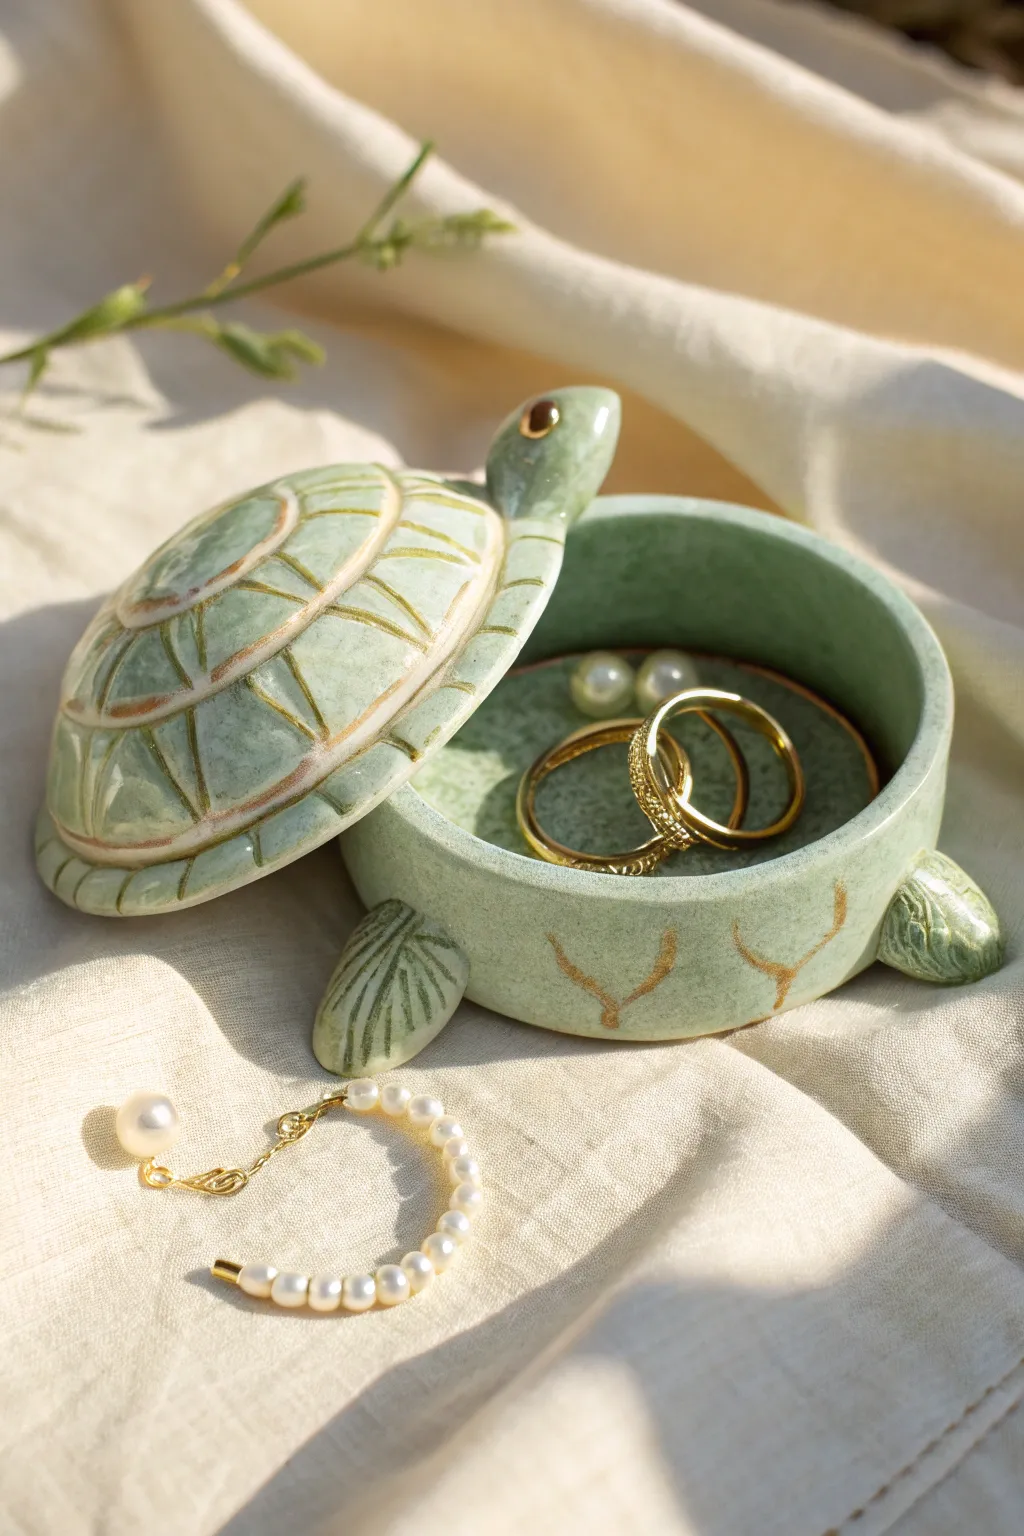
This adorable trinket box doubles as whimsical decor and secure storage for your most precious rings. With its removable shell lid and soft, speckled green glaze highlighted by delicate gold accents, it captures the gentle spirit of a sea turtle.
Step-by-Step Guide
Materials
- White or light-colored clay body (stoneware or earthenware)
- Pottery wheel (optional, can be hand-built)
- Throwing bats
- Rib tools (metal and rubber)
- Needle tool
- Scoring tool or fork
- Slip (clay mixed with water)
- Modeling tools (wooden knife, small rounded tools)
- Celadon glaze (sage or light green)
- Gold luster (overglaze)
- Small paintbrush for luster application
- Sponge
Step 1: Forming the Body and Shell
-
Shape the base:
Start with a ball of clay approx. 1 lb. You can either throw a low, wide cylinder on the wheel with a thick bottom, or hand-build a pinch pot and flatten the floor. Ensure the walls are vertical and about 2 inches high. -
Create the gallery:
If throwing, shape a gallery (a small internal ledge) on the rim of your cylinder; this will hold the lid in place. If hand-building, attach a small coil to the inner rim and smooth it down to create the ledge. -
Form the shell lid:
Throw or pinch a shallow bowl shape that fits exactly over the diameter of your base. Measure frequently using calipers to ensure a snug fit. -
Refine the lid curve:
Flip the leather-hard lid over. Gently trim or paddle the outside to create a smooth, domed ‘turtle shell’ curve. It should be highest in the center and slope gently to the edges.
Keep it Clean
Wax resist applied to the lid’s gallery and the base’s rim before glazing is the best way to ensure the lid doesn’t stick permanently during firing.
Step 2: Sculpting the Turtle Features
-
Model the appendages:
Roll out four small, thick ovals for the flippers and one tear-drop shape for the head. Slightly flatten the flippers and use a tool to press in ‘webbing’ or texture lines. -
Attach the head:
Score the clay on the front of the box base and the back of the tear-drop head. apply slip, and press firmly to attach. I like to angle the head slightly upward so the turtle looks attentive. -
Connect the flippers:
Repeat the scoring and slipping process for the four flippers, attaching them to the lower sides of the base. Support them with small wads of clay or foam if they sag while drying. -
Refine the seams:
Use a small wooden tool or your finger to smooth the clay where the appendages meet the body, ensuring a seamless transition and a strong bond.
Step 3: Detailing and Surface Decoration
-
Carve the shell pattern:
With the lid on the base or supported by foam, lightly sketch a geometric turtle shell pattern (hexagons or irregular plates) using a needle tool. Once satisfied, carve these lines deeper with a small loop tool or V-tip tool. -
Add body details:
Carve simple V-shaped or U-shaped scale patterns onto the sides of the base box to mimic skin texture, matching the style shown in the image. -
Create eyes:
Press a small hollow into each side of the head using a modeling tool, then insert a tiny ball of clay into the hollow to form the eye. Smooth the edges. -
Slow drying:
Loosely cover the entire piece with plastic to let it dry very slowly. This prevents the flippers from cracking away from the body. Once bone dry, bisque fire the piece.
Make it Shine
Add mother-of-pearl luster over the uncarved green sections of the shell during the final firing for an extra iridescent, oceanic shimmer.
Step 4: Glazing and Finishing
-
Apply base glaze:
Dip or brush a coat of celadon or semi-transparent sage green glaze over the entire piece. Wipe the foot of the base clean with a sponge. -
Clear the contact points:
Carefully wipe the glaze off the rim of the base and the underside of the lid where they touch to prevent them from fusing together in the kiln. -
Glaze fire:
Fire the piece to the temperature required by your specific clay and glaze (usually Cone 5 or 6 for stoneware). -
Apply gold luster:
Once cool, paint liquid gold luster into the carved grooves of the shell and the body details. Add a dot of gold to the eyes for a bit of sparkle. -
Final firing:
Place the piece back in the kiln for a low-fire luster firing (usually Cone 018) to set the gold permanently.
Now you have a charming little guardian for your jewelry that looks beautiful on any dresser
Moon Phase Trinket Dishes
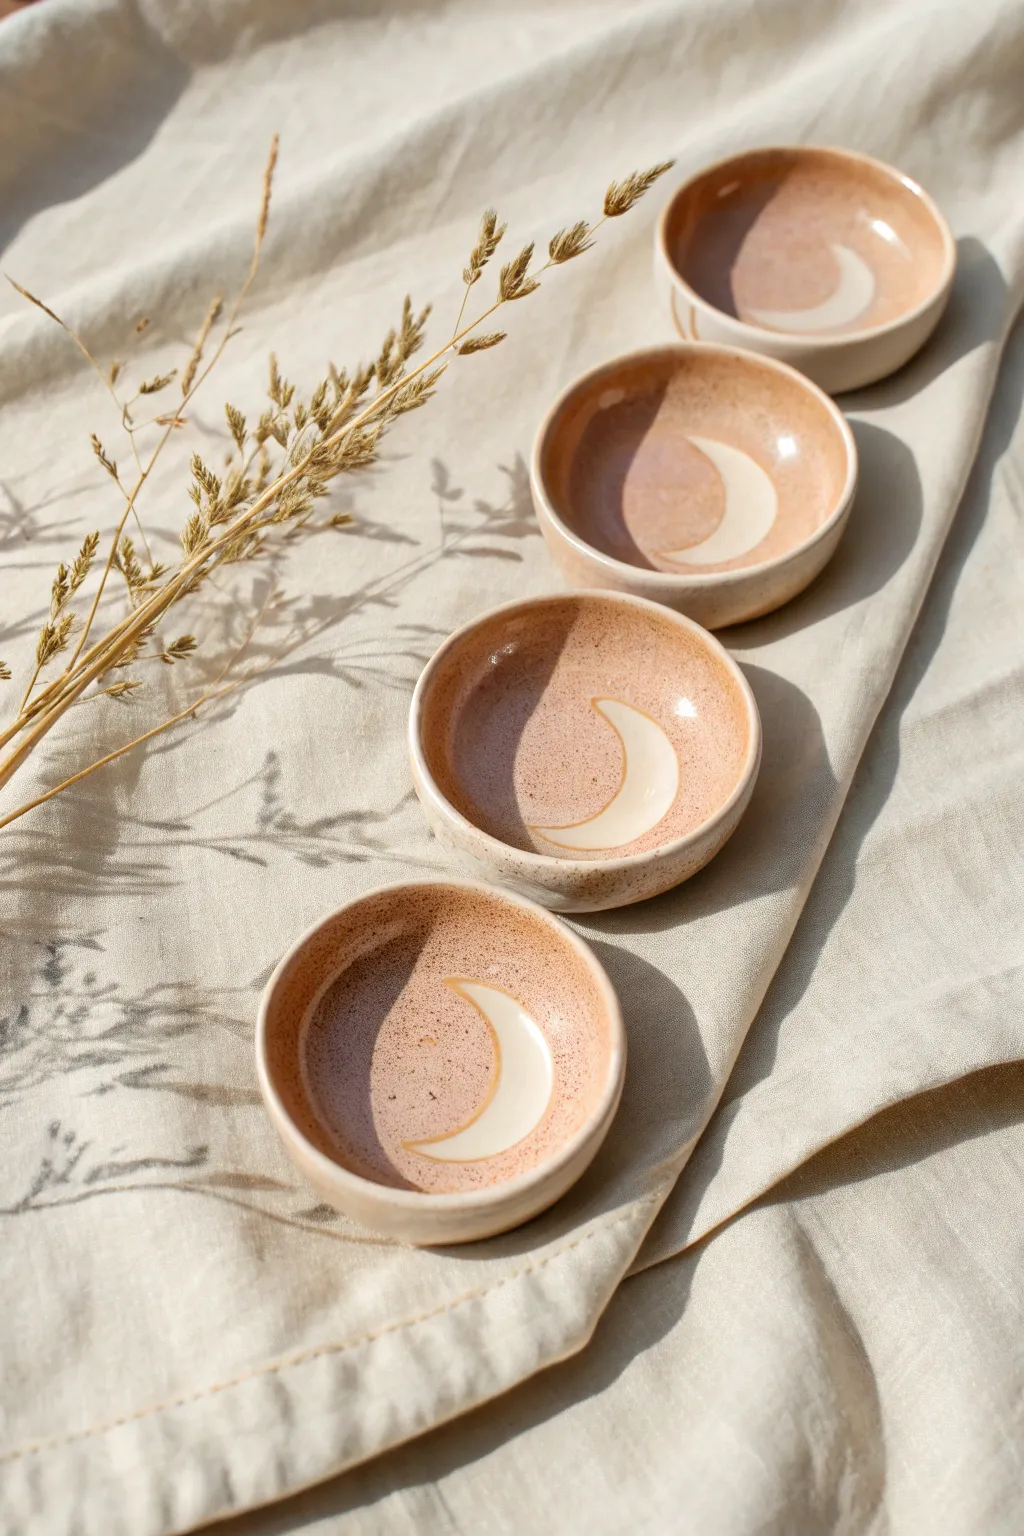
These enchanting trinket dishes feature a subtle, earthy aesthetic with a minimalist crescent moon design nestled at the bottom. Perfect for holding rings or crystals, their speckled glaze finish gives them a warm, handcrafted feel that looks beautiful on any bedside table.
Step-by-Step Tutorial
Materials
- White or speckled stoneware clay
- Rolling pin
- Canvas mat or cloth
- Circular cookie cutter (approx. 3-4 inches)
- Small sponge
- Rib tool
- Wax resist emulsion
- Small liner brush
- Shino or amber-colored glaze (translucent)
- Kiln (or access to a studio firing service)
- Needle tool
Step 1: Forming the Dishes
-
Prepare the clay:
Begin by wedging your stoneware clay thoroughly to remove any air bubbles, which ensures a smooth surface later on. -
Roll the slab:
Place your clay on a canvas mat and roll it out until it is an even thickness, aiming for about 1/4 inch thick. -
Cut the circles:
Using your circular cookie cutter, press firmly into the slab to cut out four identical circles. -
Smooth the edges:
Dip your finger in a little water and gently run it along the cut rim of each circle to round off the sharp edge left by the cutter. -
Shape the curve:
Take one clay circle and place it in the palm of your hand. Gently pinch and rotate the clay, pressing the center down with your thumb to create a shallow bowl shape. -
Refine the form:
You can also press the clay circle into a plaster hump mold or a small bowl covered in plastic wrap if you prefer a perfectly uniform curve. -
Clean the surface:
Use a damp sponge to wipe away any fingerprints or imperfections on the clay surface, making it as smooth as possible. -
Dry slowly:
Set the dishes aside to dry slowly to the leather-hard stage. Covering them loosely with plastic will prevent the rims from drying too fast.
Step 2: Applying the Design
-
Bisque fire:
Once bone dry, load your pieces into the kiln for a bisque firing (usually to Cone 04) to prepare them for glazing. -
Clean the bisque:
Wipe the fired bisque ware with a clean, damp sponge to remove any dust that might prevent the glaze from adhering. -
Sketch the moon:
Lightly sketch a crescent moon shape in the center of the dish using a regular pencil. The graphite will burn off in the kiln. -
Apply wax resist:
Dip a small liner brush into your wax resist. Carefully paint inside your pencil lines to fill in the crescent moon shape. -
Wait for drying:
Allow the wax resist to dry completely; it usually turns slightly darker or transparent when it’s ready. -
Glazing:
Pour a translucent amber or light shino glaze into the bowl, swirl it quickly to coat the interior, and pour the excess back out. I find pouring gives a more even coat than brushing. -
Wipe the resist:
Immediately take a damp sponge and gently wipe the area over the waxed moon. The glaze will wipe off the wax, revealing the raw clay shape underneath. -
Glaze the exterior:
Dip the exterior of the bowl into the glaze, or brush it on if preferred, stopping just before the bottom foot so it doesn’t stick to the kiln shelf. -
Final wipe:
Ensure the very bottom of the dish is completely clean of glaze. -
Glaze fire:
Load the kiln again and fire to the maturity temperature of your clay and glaze (often Cone 5 or 6 for stoneware).
Wax Resist Issues
If glaze sticks to your wax resist, your wax layer might be too thin. Try applying two coats of wax next time, letting the first one dry fully before adding the second.
Make it a Set
Instead of identical moons, paint different phases (wanning, waxing, full) on each dish to create a complete lunar cycle set for your vanity.
Enjoy arranging your new lunar dishes and filling them with your favorite tiny treasures
Divided Snack Plates With Faces
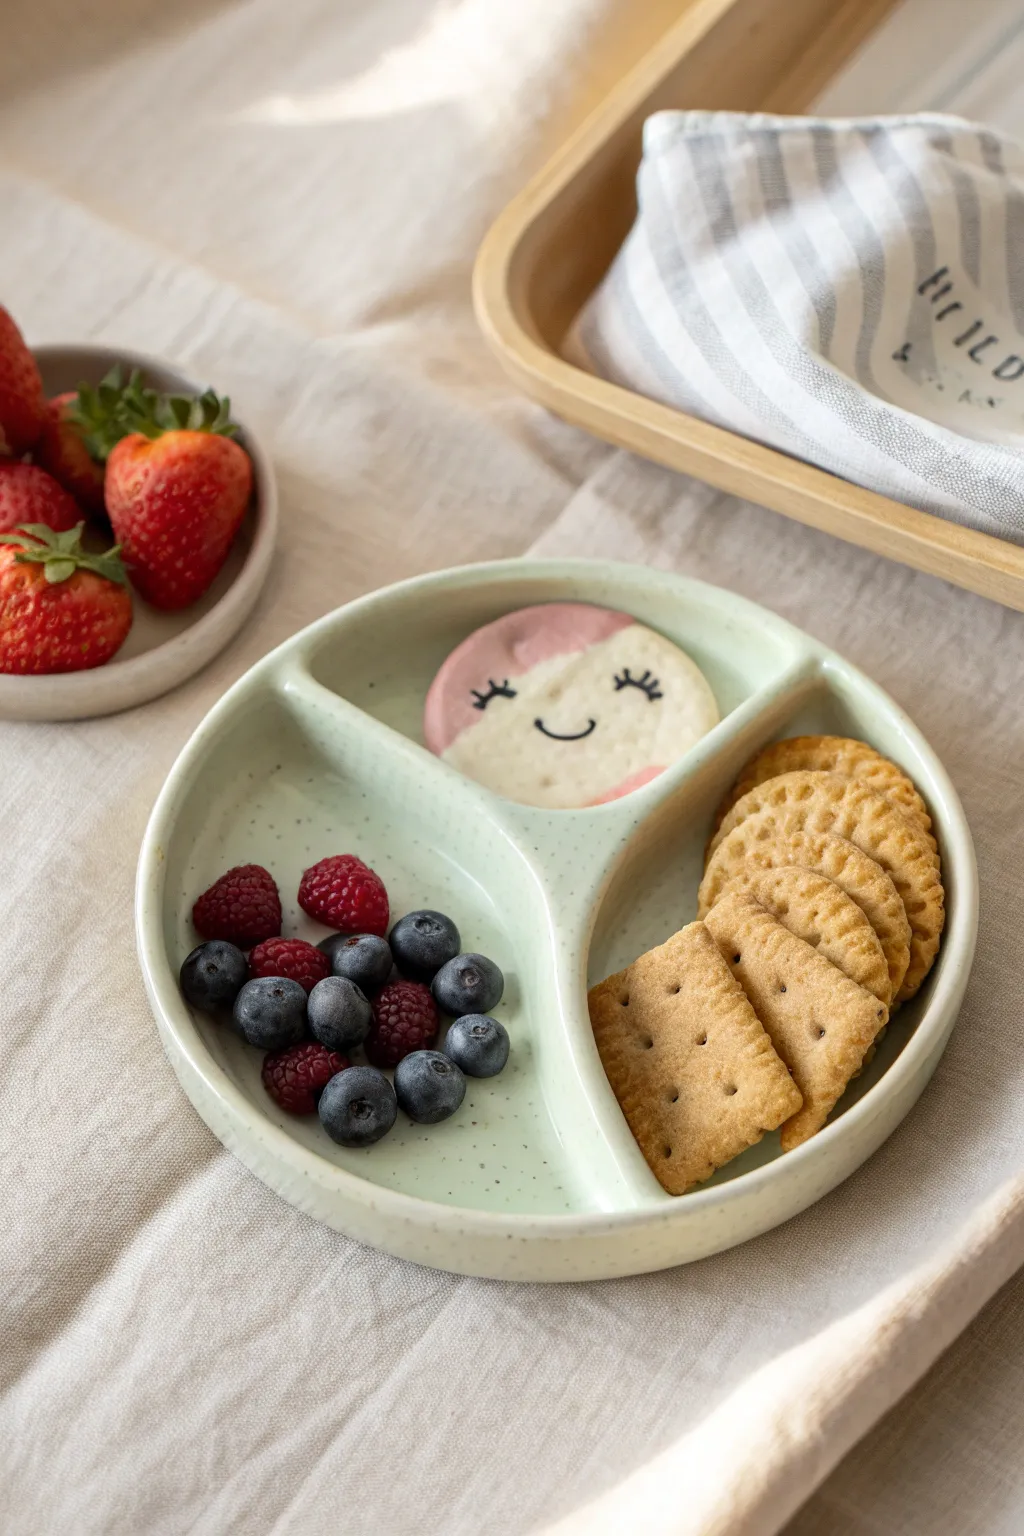
Make snack time delightful with this divided ceramic plate featuring a soft mint glaze and a charming speckled finish. The three-section design is perfect for separating treats, while the handmade quality adds warmth to your table setting.
Step-by-Step Guide
Materials
- Light-colored stoneware clay (white or buff)
- Slab roller or rolling pin with thickness guides (1/4 inch)
- Large circular template (paper or plastic)
- Needle tool or fettling knife
- Rib tool (rigid and flexible)
- Small sponge
- Coil of clay (for dividers)
- Scoring tool or serrated rib
- Slip (clay and water slurry)
- Speckled mint green food-safe glaze
- Clear glaze (optional)
- Kiln
Step 1: Forming the Base
-
Roll the slab:
Begin by rolling out your stoneware clay into a smooth, even slab that is approximately 1/4 inch thick. Ensure the surface is free of air bubbles by compressing it from multiple directions with a rib tool. -
Cut the circle:
Place your circular template onto the slab to define the size of your plate. Using a needle tool, cut cleanly around the perimeter, holding the tool vertical to create a straight edge. -
Create the rim:
To form the raised edge of the plate, you can either gently lift and pinch the edges of the slab upwards or attach a thick coil around the perimeter. For the look in the photo, attaching a coil that is seamlessly blended into the base provides the sturdiest wall. -
Smooth the exterior:
Use a damp sponge or your fingers to smooth the connection point between the rim and the base so no seam is visible. Round over the top lip of the rim for a comfortable, finished feel.
Step 2: Adding the Dividers
-
Make the divider coils:
Roll out a clay coil that matches the height and thickness of your outer rim. You will need enough length to create a ‘T’ or ‘Y’ shape depending on your preferred layout. -
Map out the sections:
Lightly trace where you want your dividers to go on the base of the plate. The classic bento style uses a horizontal line halfway across, dropping a vertical line from the center of that to the bottom rim. -
Score and slip:
Thoroughly score (scratch) the areas on the base where the dividers will sit, as well as the underside of your coils. Apply a generous amount of slip to these roughened areas. -
Attach the dividers:
Press the coils firmly into place. Using a modeling tool or your fingertip, drag clay from the coil down onto the base plate, and from the base up onto the coil, to knit them together. -
Shape the junctions:
Pay special attention to where the dividers meet the outer rim. I like to add a tiny extra bit of clay in these corners to create a smooth, curved transition rather than a sharp 90-degree angle, which makes cleaning easier later. -
Refine the surface:
Once the walls are built, use a damp sponge to smooth out all tool marks. Ensure the dividers are of equal height to the outer rim for a cohesive look.
Smooth Corners
Use the back of a small spoon or a ball stylus to smooth the inside corners where walls meet securely. This makes the finished plate much easier to wash later.
Step 3: Drying and Glazing
-
Dry slowly:
Because of the different drying rates of the flat base and the attached walls, dry this piece slowly under loose plastic for a few days before uncovering it completely. This prevents warping. -
Bisque fire:
Once bone dry, load the plate into the kiln for a bisque firing to prepare it for glazing. -
Inspect and clean:
After bisque firing, wipe the piece down with a damp sponge to remove any kiln dust. Check that your dividers remained securely attached. -
Apply the glaze:
Select a food-safe glaze that has iron flecks or speckles mixed in. Pour the glaze into the sections or dip the entire piece if you have a large enough bucket. Aim for an even coat. -
Check the rim:
If your glaze runs thin on edges, you might want to dab a little extra onto the very top of the rims to ensure good coverage and color depth. -
Wipe the foot:
Clean off any glaze from the bottom of the plate (the foot) so it doesn’t stick to the kiln shelf. -
Final fire:
Fire the plate to the temperature recommended by your clay and glaze manufacturer (typically cone 5 or 6 for stoneware).
Hidden Faces
Before the final firing, paint a cute face using underglaze directly onto the bottom of one of the plate sections so it’s revealed as the food is eaten.
Now you have a durable, custom piece of tableware ready for your next snack break