If you’re craving easy cute clay charms you can finish in a cozy afternoon, you’re in the right place. These ideas are all about simple shapes, sweet little faces, and that satisfying “I made a whole batch!” feeling.
Smiley Mini Donut Charms
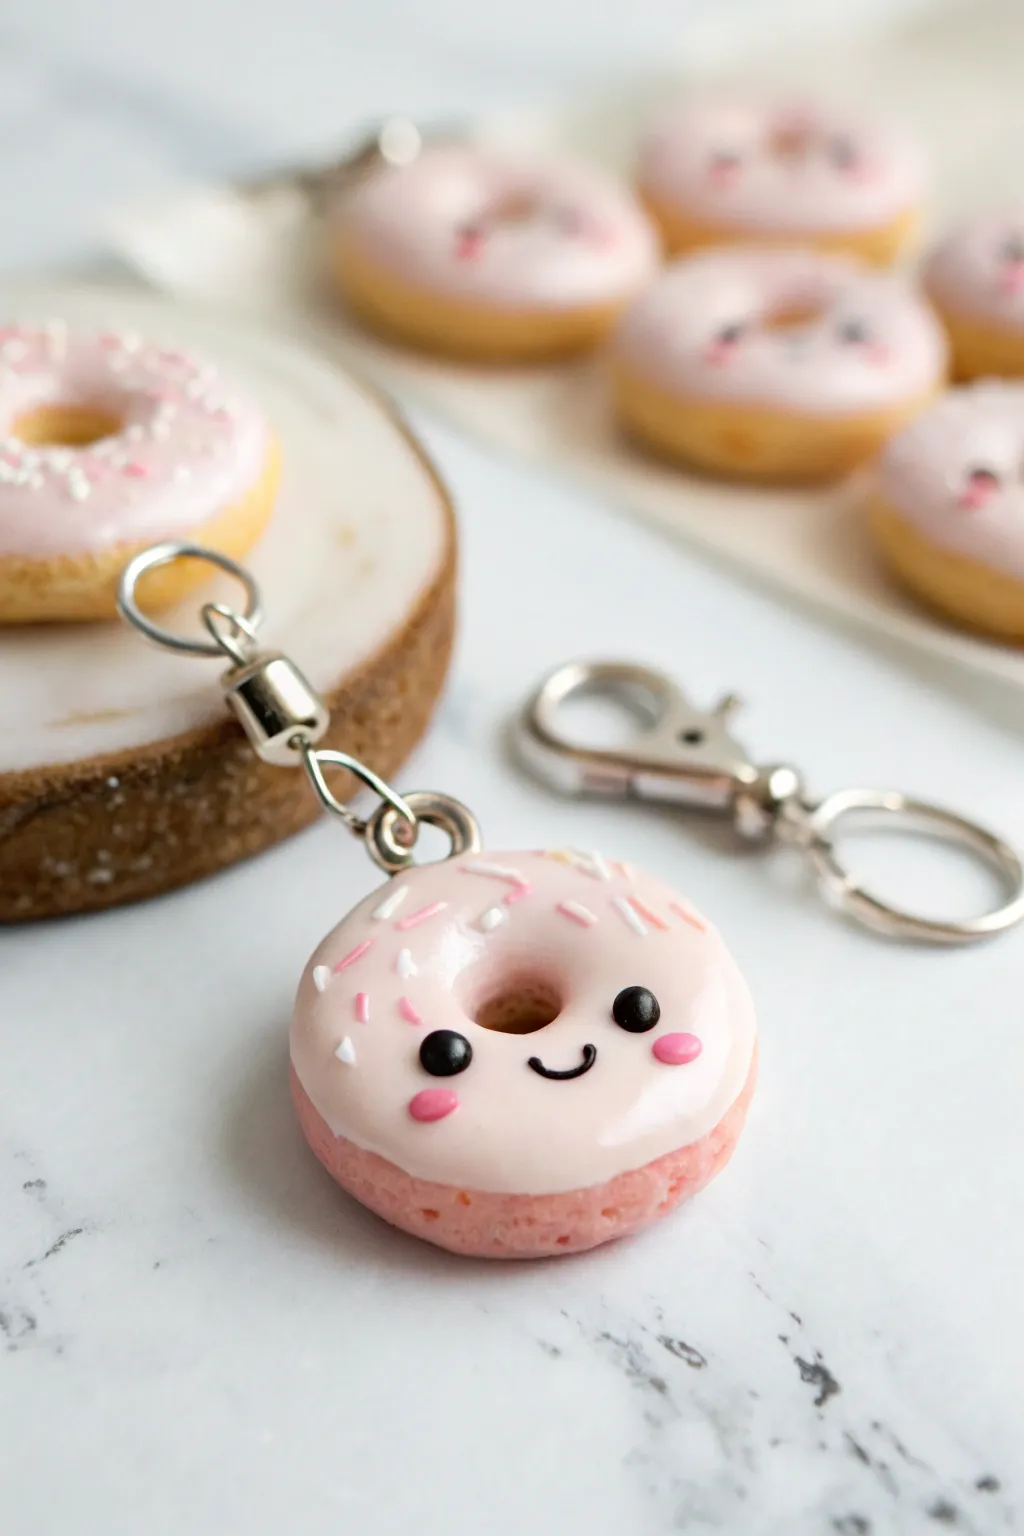
These adorable polymer clay donuts are the sweetest addition to your keychain collection, featuring a textured pink base and a glossy, smiling glaze. This beginner-friendly project teaches you how to create kawaii expressions and realistic icing effects.
How-To Guide
Materials
- Pink polymer clay (for base)
- Light pink or white polymer clay (for icing)
- Liquid polymer clay (Translucent)
- Black polymer clay (tiny amount)
- Hot pink polymer clay (tiny amount)
- Eye pin
- Keychain hardware (jump ring and lobster clasp)
- Dotting tools
- Needle tool or toothpick
- Gloss glaze or UV resin
- Small circle cutter
- Pastel chalks (optional for shading)
Step 1: Shaping the Donut Base
-
Condition the Caly:
Start by conditioning your base pink polymer clay until it is soft and pliable. Roll it into a smooth ball free of cracks. -
Form the Doughnut:
Gently flatten the ball into a thick disc shape about the size of a quarter. Round off the edges with your fingertips so it looks puffed and soft. -
Create the Hole:
Use a small circle cutter or the back of a paintbrush to punch a hole directly in the center of your disc. Smooth out the inner edges where the hole was made. -
Texture the Dough:
Take a needle tool or an old toothbrush and gently tap it all around the bottom half and sides of the donut to simulate a realistic baked cake texture.
Step 2: Adding the Icing
-
Mix the Icing:
In a small cup or on a tile, mix a small amount of light pink clay with liquid polymer clay until it reaches a frosting-like consistency. It should be thick enough to hold its shape but fluid enough to spread. -
Apply the Glaze:
Carefully spread your liquid clay mixture over the top surface of the donut. Let it unevenly drip slightly down the sides for a natural glazed look. -
Smoothing:
If there are any brush strokes, let the liquid clay settle for a few minutes; gravity will help smooth out the surface.
Clean Edges Pro Tip
Keep baby wipes or rubbing alcohol nearby to clean your hands between colors. Pink clay picks up dust easily, and clean hands ensure your icing stays pristine.
Step 3: Creating the Face
-
Make the Eyes:
Roll two extremely tiny balls of black clay. Place them onto the wet icing, spacing them out to leave room for the mouth. -
Embed the Eyes:
Gently press the black balls into the icing so they sit flush rather than protruding too much. -
Add the Mouth:
Roll a very thin snake of black clay. Cut a tiny ‘U’ shape and position it centrally between and slightly below the eyes to form a smile. -
Cheeky Details:
Roll two small balls of hot pink clay. Press them onto the cheeks, just outside the eyes, and flatten them gently. -
Sprinkle Time:
Roll a very thin snake of white clay and cut it into tiny rice-sized pieces. Drop these randomly onto the icing around the face, avoiding the features.
Scented Charm Level Up
Mix a tiny drop of vanilla or strawberry essential oil into the clay before baking. Your charm will smell as sweet as a real donut for weeks!
Step 4: Finishing Up
-
Insert Hardware:
Trim an eye pin to the right length and insert it into the top of the donut. I usually add a dab of liquid clay to the pin’s shaft for extra security before inserting. -
Bake:
Bake the charm according to your clay package instructions (typically 275°F or 130°C for 15-30 minutes). Let it cool completely. -
Glaze It:
Apply a coat of gloss glaze or UV resin over the icing area only to make it look wet and sugary. Cure or let dry. -
Assemble:
Use pliers to open a jump ring, attach your donut’s eye pin to the keychain hardware, and close the ring securely.
Attach your sweet new charm to your keys or bag and enjoy the smiles it brings


Cute Toast With Butter Charms
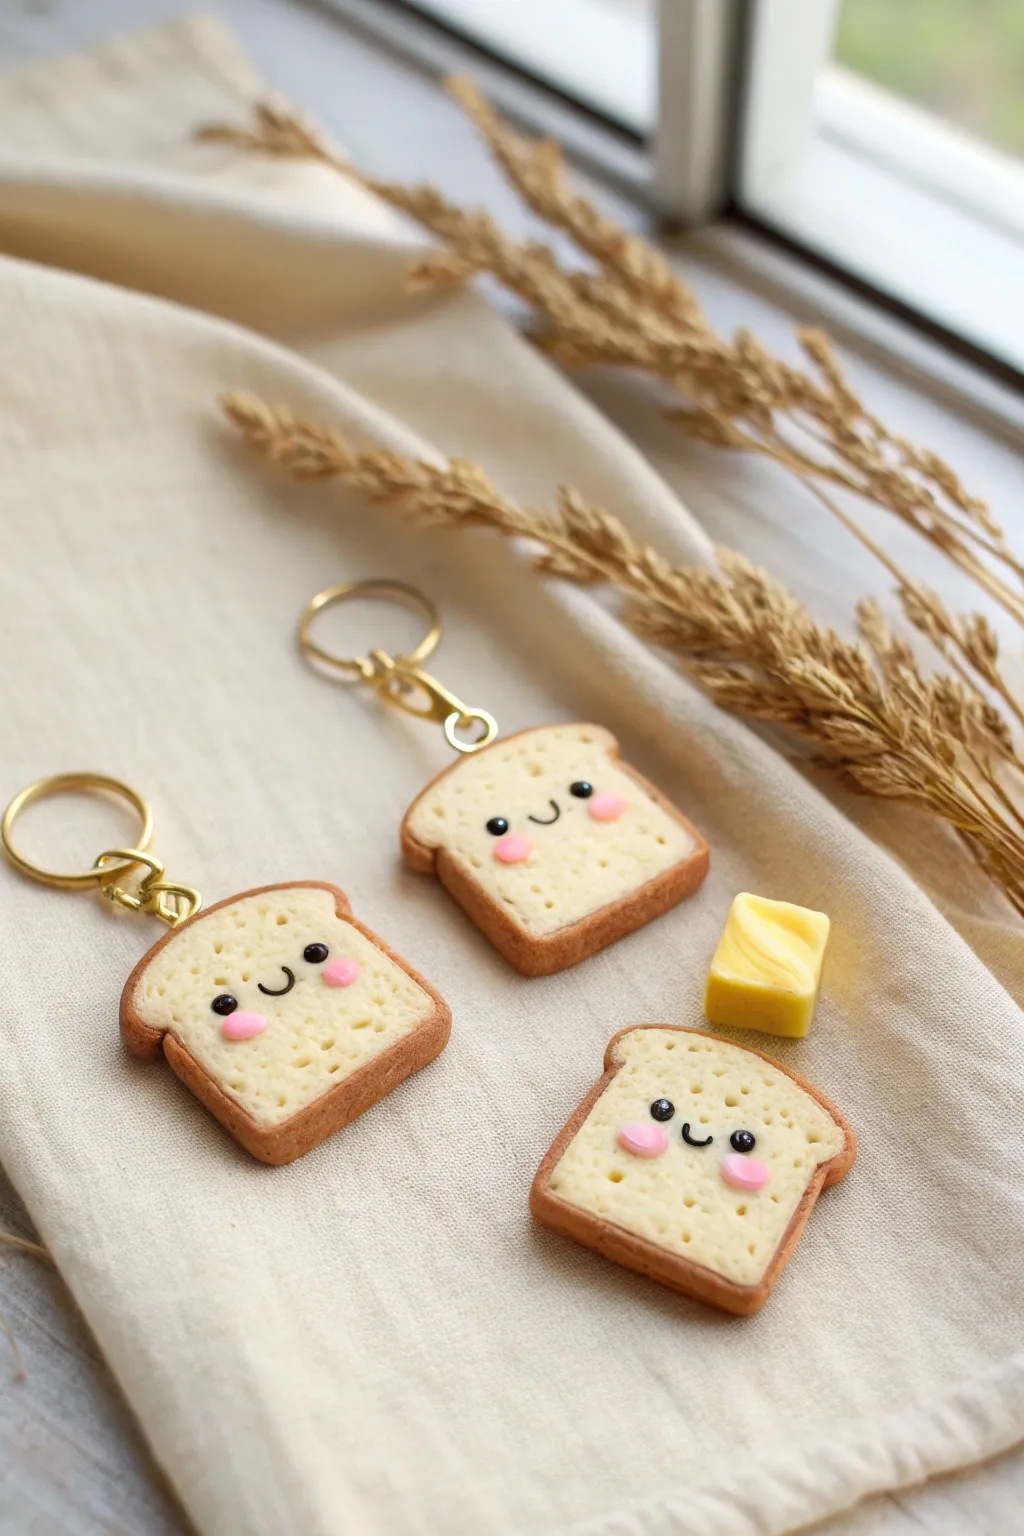
These adorable kawaii toast slices feature a fluffy white bread texture, perfectly browned crusts, and sweet smiling faces that are sure to brighten your day. Whether you turn them into keychains or magnets, this simple polymer clay project captures the cozy warmth of breakfast in a charming miniature form.
Step-by-Step Tutorial
Materials
- Polymer clay (translucent white, ecru or beige, brown, light yellow, black, pink)
- Small circle cutter or blade
- Soft pastel chalks (orange, golden yellow, burnt sienna)
- Needle tool or toothpick
- Toothbrush or balls of tin foil (for texturing)
- Eye pins or jump rings (optional)
- Gloss glaze (optional)
- Small paintbrush
- Dotting tool or ball stylus
Step 1: Shaping the Bread
-
Mix the bread color:
Start by mixing translucent white clay with a small amount of ecru or beige. You want a creamy, off-white color that looks like dough rather than stark white paper. The translucent clay adds a realistic depth. -
Form the base shape:
Roll your mixed clay into a smooth ball, then flatten it into a thick square sheet about 1/4 inch thick. Gently refine the square so the bottom is slightly narrower than the top to mimic a slice of bread. -
Create the crust:
Roll a thin snake of brown clay. The thickness should be consistent. Flatten it slightly with a rolling pin so it becomes a long, thin ribbon. -
Attach the crust:
Wrap this brown ribbon around the edge of your white bread shape. Trim any excess at the bottom and smooth the seam so it’s invisible. Press gently so the crust bonds with the inner bread. -
Shape the top:
Use your fingers to gently indent the top center of the slice, creating the signature ‘M’ shape of a loaf of bread. Soften the corners so they look baked and fluffy, not sharp.
Sticky Textures?
If your toothbrush gets stuck to the clay while texturing, dip the bristles in a tiny bit of cornstarch or baby powder before tapping. It acts as a release agent.
Step 2: Texturing and Toasting
-
Add bread texture:
Using a clean toothbrush or a crumpled ball of aluminum foil, tap firmly all over the white surface of the bread. Don’t be shy here; deep texture makes it look more realistic. -
Shade for a baked look:
Shave some orange and burnt sienna soft pastels into a powder. Using a dry, soft brush, dust the edges of the white bread where it meets the crust. This gradient mimics the toasting process. -
Create the butter pat:
Mix a tiny cube of light yellow clay. I like to swirl in a tiny bit of darker yellow or orange to make it look like melting butter, but don’t overmix—the streaks look great. -
Optional butter placement:
You can press this little butter square onto the toast now if you want it permanently attached, or serve it on the side like in the photo.
Step 3: Kawaii Details
-
Indent eye sockets:
Use a small ball stylus or dotting tool to make two small indents where the eyes will go. Placing them slightly wide apart increases the cuteness factor. -
Add the eyes:
Roll two minuscule balls of black clay. Use a needle tool to pick them up and press them gently into the sockets you just created. -
Create the smile:
Roll an incredibly thin thread of black clay. Cut a tiny ‘U’ shape and press it onto the face between the eyes with your needle tool. Alternatively, you can paint this on after baking. -
Apply blushing cheeks:
Take two small bits of pink clay, flatten them into ovals, and press them just below each eye. The slight 3D pop makes them extra sweet. -
Insert hardware:
If you are making these into keychains, insert an eye pin into the top center of the crust now. twisting the pin slightly as you insert it helps it grip the clay better. -
Bake carefully:
Bake your charms according to your clay package instructions. Usually, this is around 230°F to 265°F (110°C-130°C) for 15-30 minutes. Let them cool completely before handling.
Make it Melty
Mix liquid polymer clay with yellow pastel chalk to create realistic ‘melted butter’ that you can drip over one corner of the toast before baking.
Enjoy your fresh-baked batch of adorable charms


Tiny Pizza Slice Charms
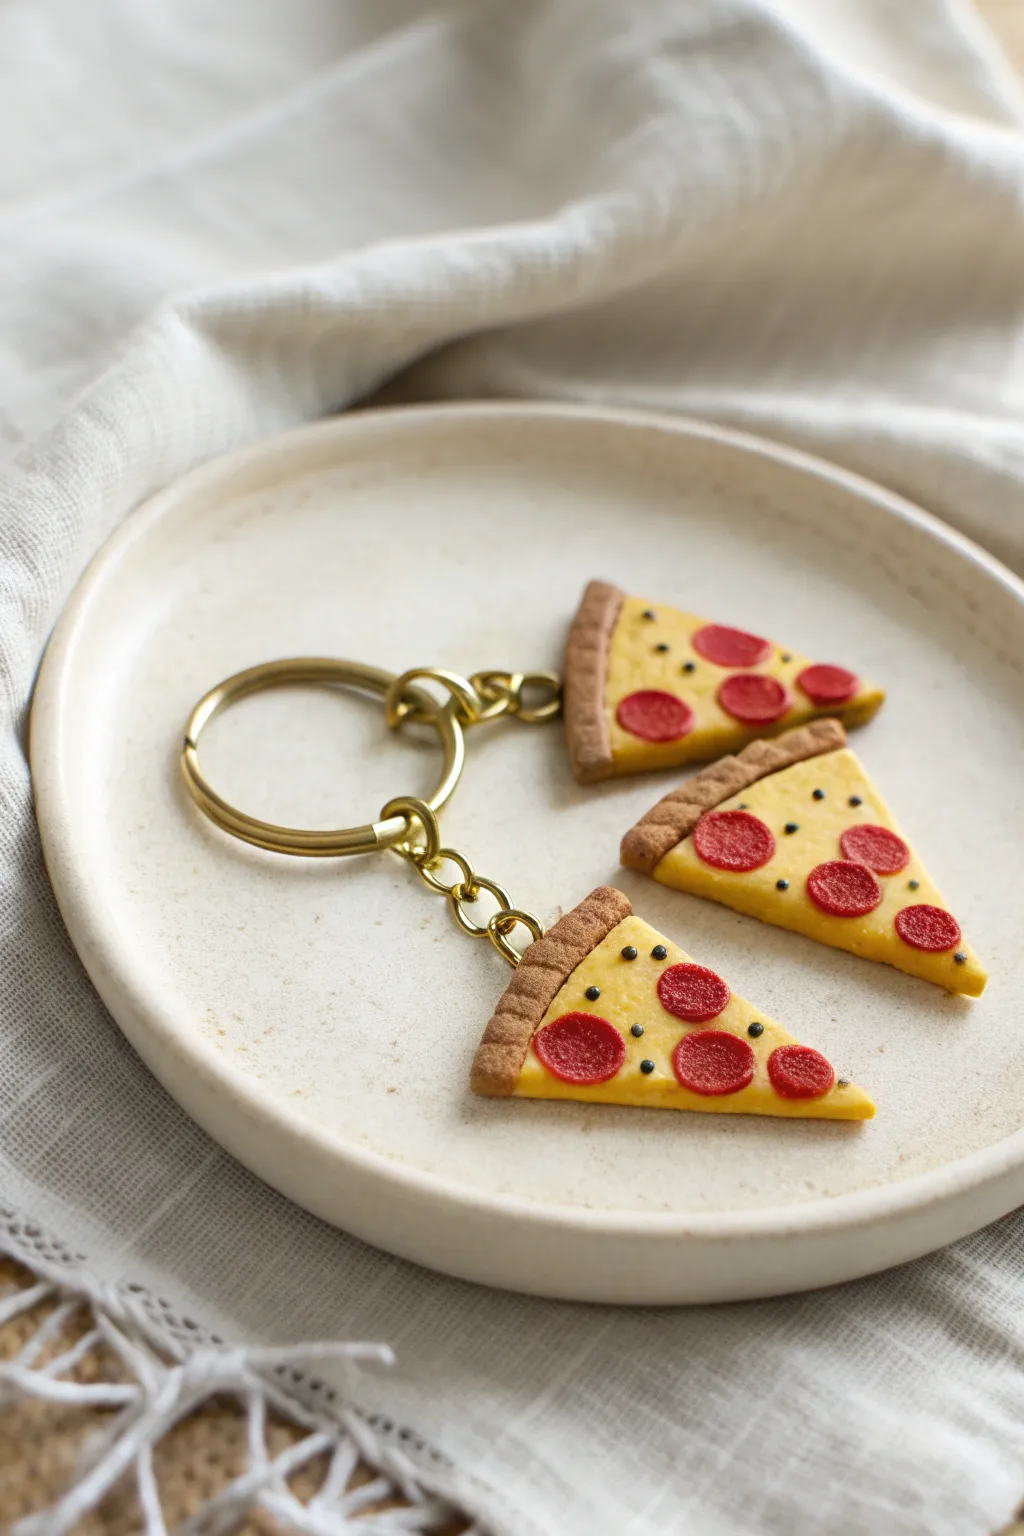
These miniature pizza slices are perfect for friendship keychains or cute jewelry, featuring a textured golden crust and realistic-looking toppings. The small details, like tiny herb flecks and raised pepperoni, make these clay creations nearly edible-looking.
Step-by-Step
Materials
- Polymer clay (dough/tan, yellow, red, black/green)
- Eye pins
- Gold keychain hardware and jump rings
- Needle tool or toothpick
- Toothbrush (for texturing)
- Small round cutter or straw
- Rolling pin
- Liquid clay (optional)
- Gloss glaze (optional)
- Baking sheet and oven
Step 1: Forming the Crust
-
Mix the dough color:
Start by conditioning your tan polymer clay. If it’s too dark, mix in a little white or translucent clay to achieve a realistic baked-dough shade. -
Shape the base:
Roll the clay into a log and cut three equal portions. Flatten each portion into a triangle shape, keeping it relatively thick to serve as a sturdy base. -
Create the crust rim:
Roll a small snake of tan clay and press it onto the short edge of your triangle. Blend the seam on the bottom side so it attaches firmly, but leave the top side distinct to look like a raised crust. -
Texturing:
Take a clean toothbrush and gently tap it all over the raised crust area. This stippling effect mimics the airy texture of baked bread perfectly. -
Add baked effects:
For extra realism, you can lightly brush the crust with a little soft pastel chalk in a darker brown shade using a dry paintbrush to simulate oven-browning.
Step 2: Adding Toppings
-
Spread the cheese:
Roll out a thin sheet of yellow clay. Cut a triangle slightly smaller than your base and press it onto the flat part of the pizza, right up against the crust. -
Rough up the cheese:
Use your needle tool to gently scratch and dimple the yellow clay. Melted cheese isn’t perfectly smooth, so this texture makes a big difference. -
Make the pepperoni:
Roll out red clay as thinly as possible. Use a very small round cutter (a drinking straw works great here) to punch out tiny circles. -
Place the pepperoni:
Arrange 3-5 pepperoni slices on each pizza wedge. Press them down firmly so they don’t fall off after baking. -
Pepperoni texture:
I like to take a needle tool and lightly dab the surface of each pepperoni slice to give it a rough, meaty texture rather than leaving it smooth. -
Add herbs:
Roll an infinitesimally thin snake of black or dark green clay. Slice off tiny specks with a razor blade and sprinkle them randomly over the cheese for ‘oregano’.
Pro Tip: Liquid Clay
For ultra-secure pepperoni, put a tiny dot of liquid clay or ‘Bake & Bond’ under each red circle before pressing it onto the cheese layer.
Step 3: Assembly & Finishing
-
Insert hardware:
Trim an eye pin to size so it doesn’t poke through the bottom. Insert it into the center of the thick crust edge. -
Secure the pin:
If the clay distorted while inserting the pin, gently reshape the crust and re-texture with the toothbrush to hide the entry point. -
Bake the charms:
Place your pizza slices on a baking sheet. Bake according to your brand of polymer clay instructions (usually around 275°F/135°C for 15-20 minutes). -
Cool and seal:
Let the pieces cool completely. If you want a greasy pizza look, brush a thin layer of gloss glaze over just the cheese and pepperoni, keeping the crust matte. -
Attach to keychain:
Open a gold jump ring using two pliers (twist sideways, don’t pull apart). Slide on the pizza charm and the keychain loop, then close the ring securely.
Level Up: Melty Cheese
Mix yellow clay with liquid clay to make a thick paste. Spread this ‘sauce’ on the base instead of solid clay for an incredibly realistic melted cheese effect.
Now you have a set of delicious-looking accessories ready to share with friends


Mini Sushi Roll Face Charms
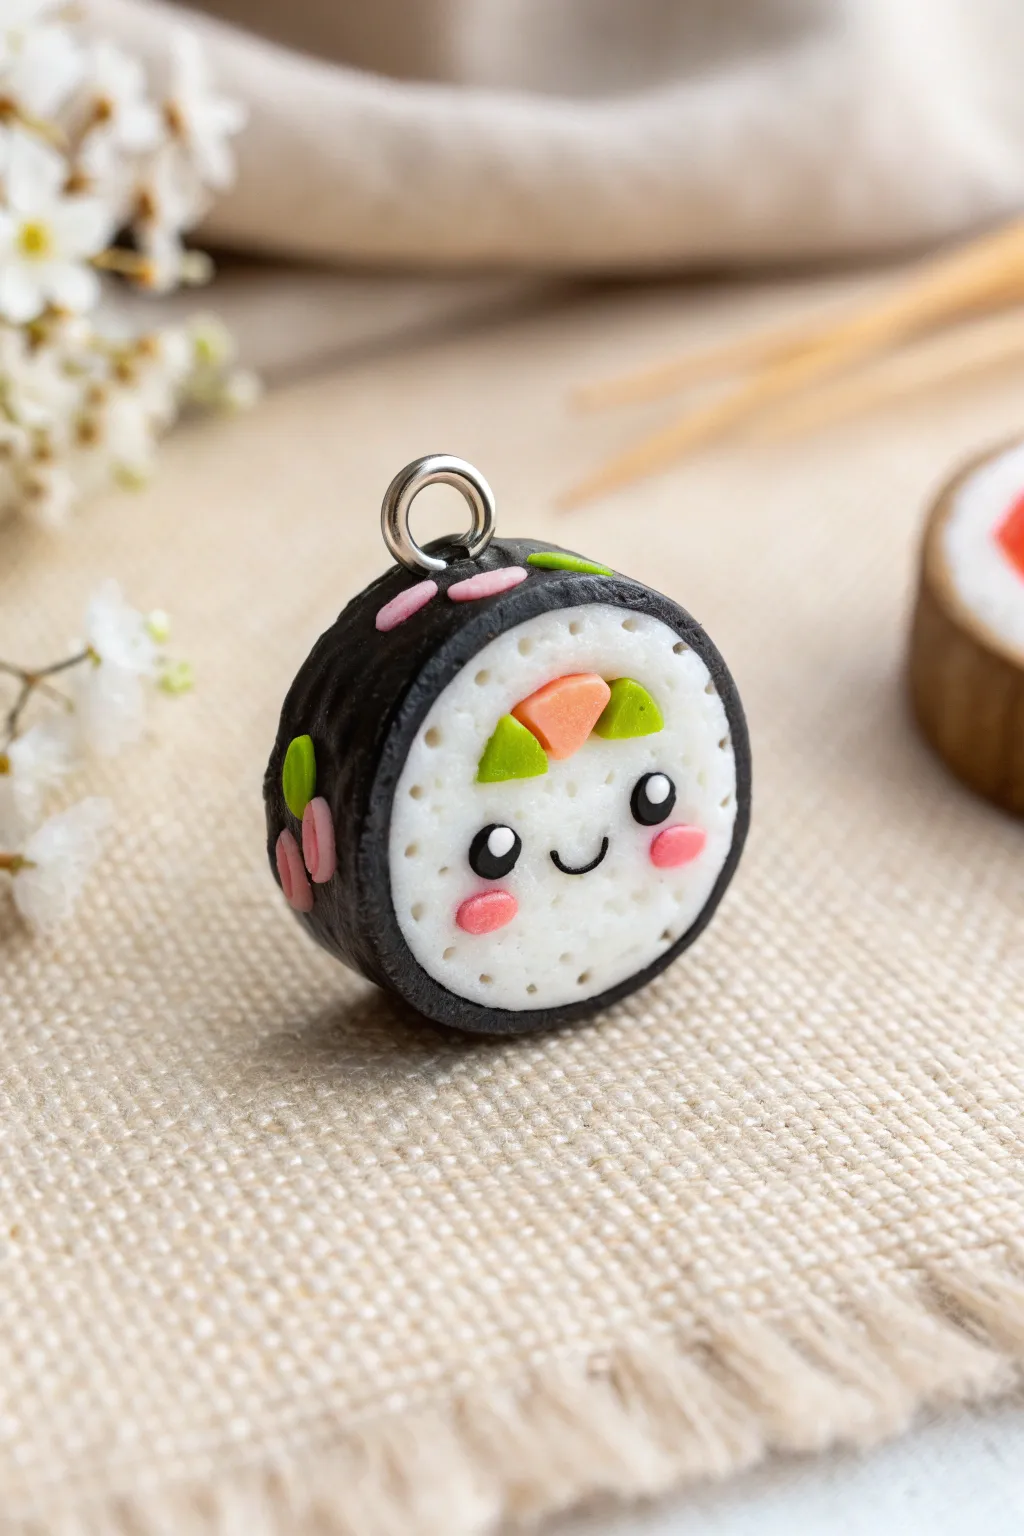
This adorable mini sushi roll takes the cuteness of kawaii style and wraps it in a tiny seaweed blanket. With its sweet smiling face and textured rice details, this polymer clay charm is perfect for keychains or stitch markers.
Step-by-Step Guide
Materials
- White polymer clay
- Black polymer clay
- Light orange or salmon-colored polymer clay
- Lime green polymer clay
- Pink polymer clay
- Translucent liquid clay (optional)
- Small metal eye pin or screw eye
- Needle tool or stiff toothbrush
- X-Acto knife or clay blade
- Rolling pin
- Black acrylic paint
- Fine detail paintbrush or dotting tool
- Gloss glaze (optional)
Step 1: Preparing the Filling
-
Shape the fish:
Start by taking a small amount of orange clay and forming it into a triangular prism shape. This will represent the salmon or fish in the center of your roll. -
Create the avocado:
Do the same with two small pieces of lime green clay, shaping them into slightly smaller triangular wedges. These will act as your avocado or cucumber slices. -
Assemble the core:
Press the orange piece and the two green pieces together so they form a compact, rough rectangular or triangular core. Don’t squash them too much; you just want them to stick together.
Rice Texture Tip
For faster texturing, bundle several sewing needles together with tape or use a stiff, old toothbrush to texture large areas of the white clay instantly.
Step 2: Adding the Rice and Nori
-
Form the rice ball:
Condition a ball of white clay about 1 inch in diameter. Flatten it slightly into a thick disk. -
Insert the filling:
Press your assembled vegetable and fish core into the center of the white disk. Reshape the white clay around it so the filling sits flush with the surface but is surrounded by white. -
Roll the seaweed:
Roll out a strip of black clay very thinly. It needs to be wide enough to cover the thickness of your rice roll and long enough to wrap around the circumference perfectly. -
Wrap the sushi:
Carefully wrap the black strip around the white cylinder. Trim any excess length with your blade and smooth the seam with your finger so it becomes invisible. -
Texture the rice:
Using a needle tool, gently poke small indentations all over the white front and back surfaces. This stippling effect mimics individual grains of rice and is crucial for realism.
Make it a Set
Make a friend for your roll! Create a tiny shrimp nigiri or a cube of tamago (egg) with similar faces to create a complete sushi bento box bracelet.
Step 3: Decorating and Details
-
Add surface confetti:
Create tiny, flat ovals from pink and green clay scraps. Press these gently onto the black outer wrapper in a random pattern to look like decorative sesame seeds or garnish. -
Create the eyes:
Roll two very tiny balls of black clay for the eyes. Press them onto the ‘rice’ surface, spacing them wider apart for a cuter look. -
Add eye highlights:
For that sparking kawaii look, place an extremely small dot of white clay in the upper right corner of each black eye. -
Paint the mouth:
Using a fine detail brush and black acrylic paint, carefully draw a small ‘U’ shape for the smile centered between the eyes. Alternatively, you can roll a tiny snake of black clay for the mouth. -
Blush the cheeks:
Flatten two small ovals of pink clay and press them onto the face, just below and slightly outside the eyes, to form rosy cheeks. -
Insert hardware:
Dip the end of your metal eye pin into a little liquid clay (or white glue) for extra grip, then screw or push it into the top center of the black wrapper.
Step 4: Baking and Finishing
-
Bake the charm:
Bake the piece according to your clay manufacturer’s instructions, typically at 275°F (135°C) for about 15-20 minutes depending on thickness. -
Cool down:
Let the charm cool completely before handling. It will be slightly soft when hot but hardens as it cools. -
Glaze (Optional):
If you want a wet, fresh look, apply a coat of gloss glaze over the eyes and the colored filling parts, leaving the rice matte for contrast.
Attach a jump ring to your finished sushi charm and enjoy your new savory accessory

The Complete Guide to Pottery Troubleshooting
Uncover the most common ceramic mistakes—from cracking clay to failed glazes—and learn how to fix them fast.
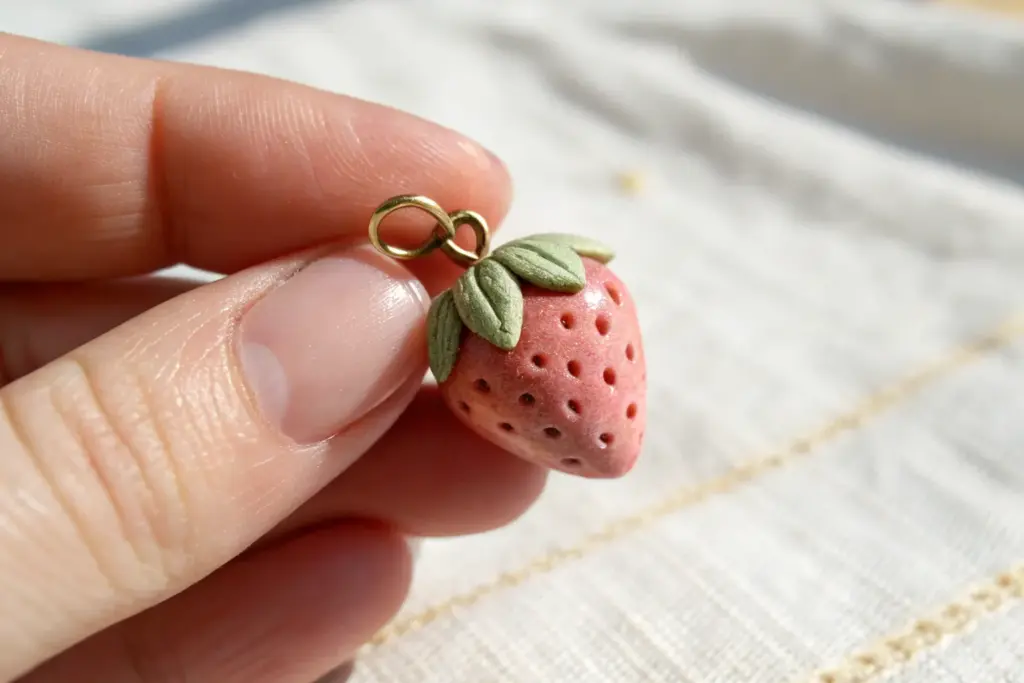
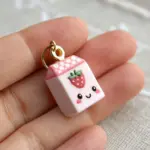
Strawberry Milk Carton Charms
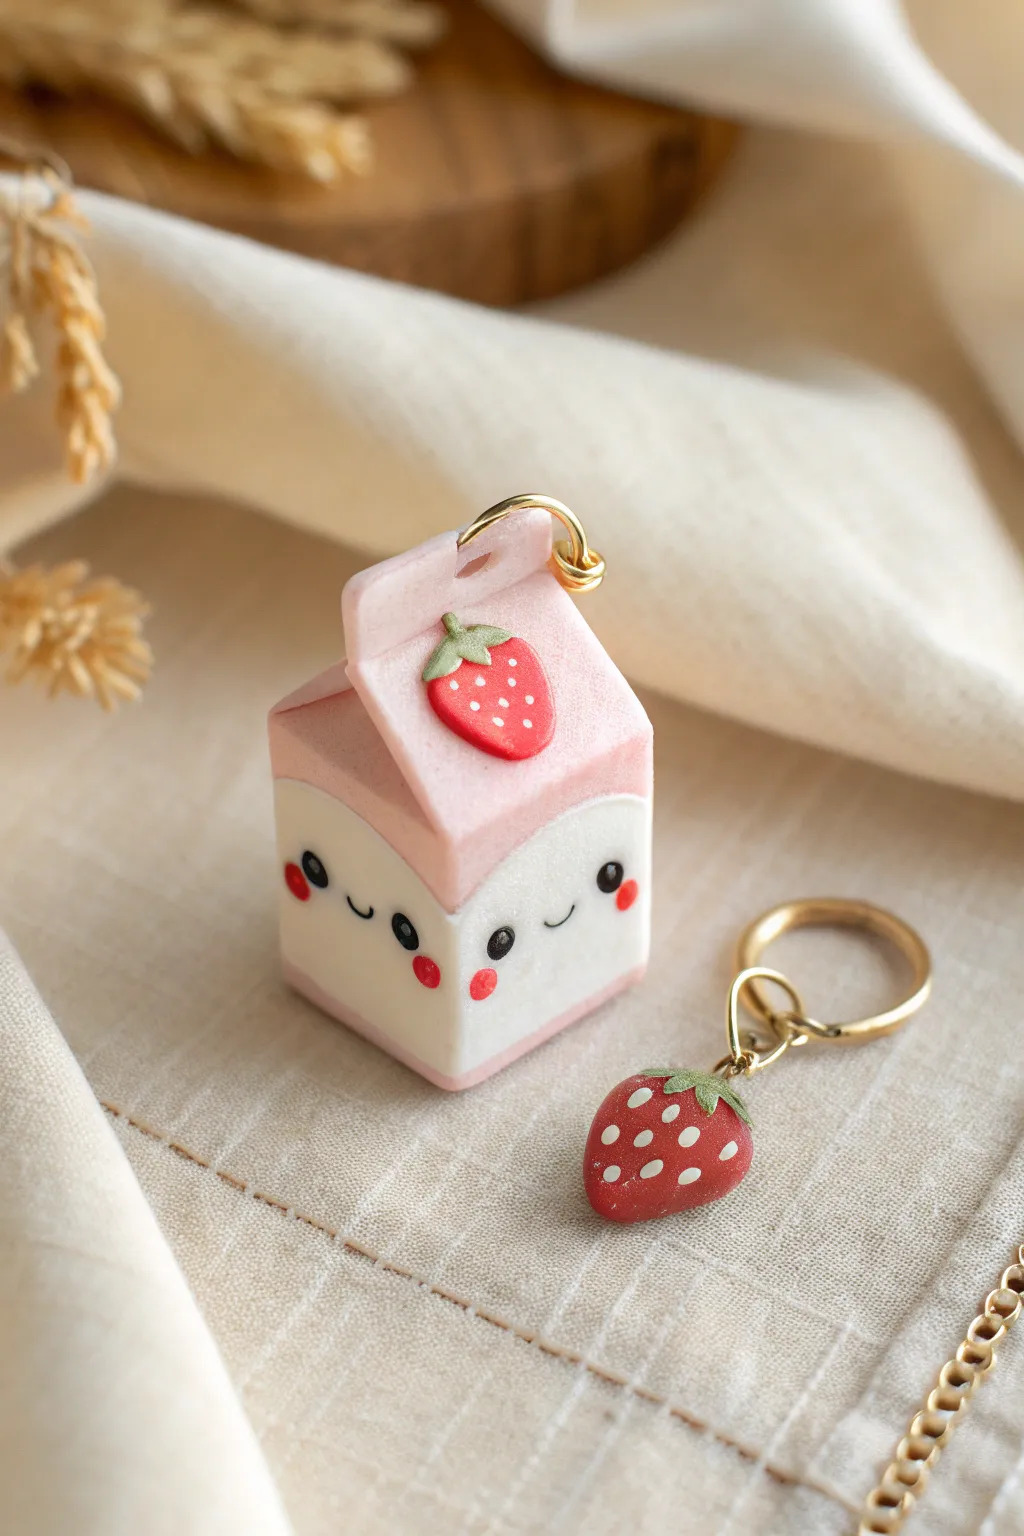
This adorable miniature milk carton brings a splash of sweetness to any keychain or bag zipper. With its pastel pink top, tiny strawberry detail, and blushing kawaii face, it captures the essence of cute culture perfectly.
Step-by-Step Tutorial
Materials
- White polymer clay
- Pastel pink polymer clay
- Red polymer clay
- Green polymer clay
- Black acrylic paint or clay for eyes
- Clay blade or craft knife
- Needle tool or dotting tool
- Gold screw eye pins
- Gold jump rings and keychain clasp
- Glaze or UV resin (optional for shine)
Step 1: Shaping the Carton Base
-
Form the white cube:
Start by conditioning a chunk of white clay until it’s soft and pliable. Roll it into a smooth ball, then gently press it against your work surface to flatten the sides, forming a rectangular block roughly 1 inch tall and 0.75 inches wide. -
Sharpen the edges:
Use your clay blade or a flat acrylic block to gently press against all four sides and the top and bottom. You want distinct, crisp corners to make it look like a real carton, not a rounded blob.
Step 2: Creating the Strawberry Top
-
Prepare the pink layer:
Roll out a small piece of pastel pink clay into a thick sheet, about 3mm thick. Cut a rectangle that matches the width of your white block. -
Shape the roof:
Place the pink rectangle on top of the white block. Gently pinch the top center of the pink clay to form a peaked roof shape, resembling the top of a milk carton. Smooth the seams where the pink meets the white so they bond well. -
Add the carton details:
Using your blade, make a light indentation horizontally across the pink peak to simulate the folded seal of the carton. Press one side of the peak slightly inward to create the spout shape.
Clean Clay Only
White clay picks up lint instantly. Before starting, wipe your hands and workspace with a baby wipe, and roll a piece of scrap clay in your hands to pick up hidden dust.
Step 3: Adding the Strawberry Motif
-
Form the strawberry base:
Take a tiny amount of red clay and roll it into a very small teardrop shape. Flatten it slightly against the front slanted face of the pink roof. -
Add leaves:
Use a microscopic amount of green clay to make three tiny teardrops. Arrange them at the top of the red berry to look like the calyx (leaves). -
Seed details:
With the very tip of a needle tool or an unbent paperclip, poke tiny, shallow holes into the red clay to mimic seeds. If you prefer, dot them with white paint after baking.
Texturizing Tip
For a powdery, soft look on the cheeks, use a dry paintbrush to dust a tiny bit of red chalk pastel onto the raw clay instead of using solid clay circles.
Step 4: The Kawaii Face
-
Position the eyes:
For the face, I like to use a dotting tool dipped in black acrylic paint after baking, but you can also press in tiny balls of black clay now. Place the eyes wide apart on the white section. -
Add the smile:
Roll an incredibly thin snake of black clay for the mouth, or simply paint a small ‘U’ shape between the eyes later. The smile should be tiny and centered. -
Rosy cheeks:
Press two small, flattened circles of red or pink clay just below and outside the eyes for that signature blushing look. Alternatively, paint these on later.
Step 5: Finishing Touches & Assembly
-
Insert hardware:
Screw a gold eye pin into the center of the pink ridge at the top of the carton. For extra security, remove it, add a dab of liquid clay or super glue to the threads, and screw it back in. -
Make the mini strawberry charm:
Create a second, larger 3D strawberry using red clay for the body and green for the top. Shape it like a plump cone and texture it with seed indentations. Insert an eye pin into the top of this berry as well. -
Bake carefully:
Bake your clay pieces according to the manufacturer’s instructions (usually 275°F/135°C for 15-30 minutes). Place them on a tile or parchment paper to prevent shiny spots. -
Cool and assemble:
Once fully cooled, attach the milk carton and the mini strawberry to a gold keychain ring using jump rings. Use two pairs of pliers to twist the jump rings open and closed securely. -
Optional glaze:
Brush a thin layer of gloss glaze or UV resin over the strawberry details or the entire carton to protect the paint and add a ceramic-like shine.
Now you have a sweet little accessory ready to brighten up your daily routine
Chubby Bear Head Charms
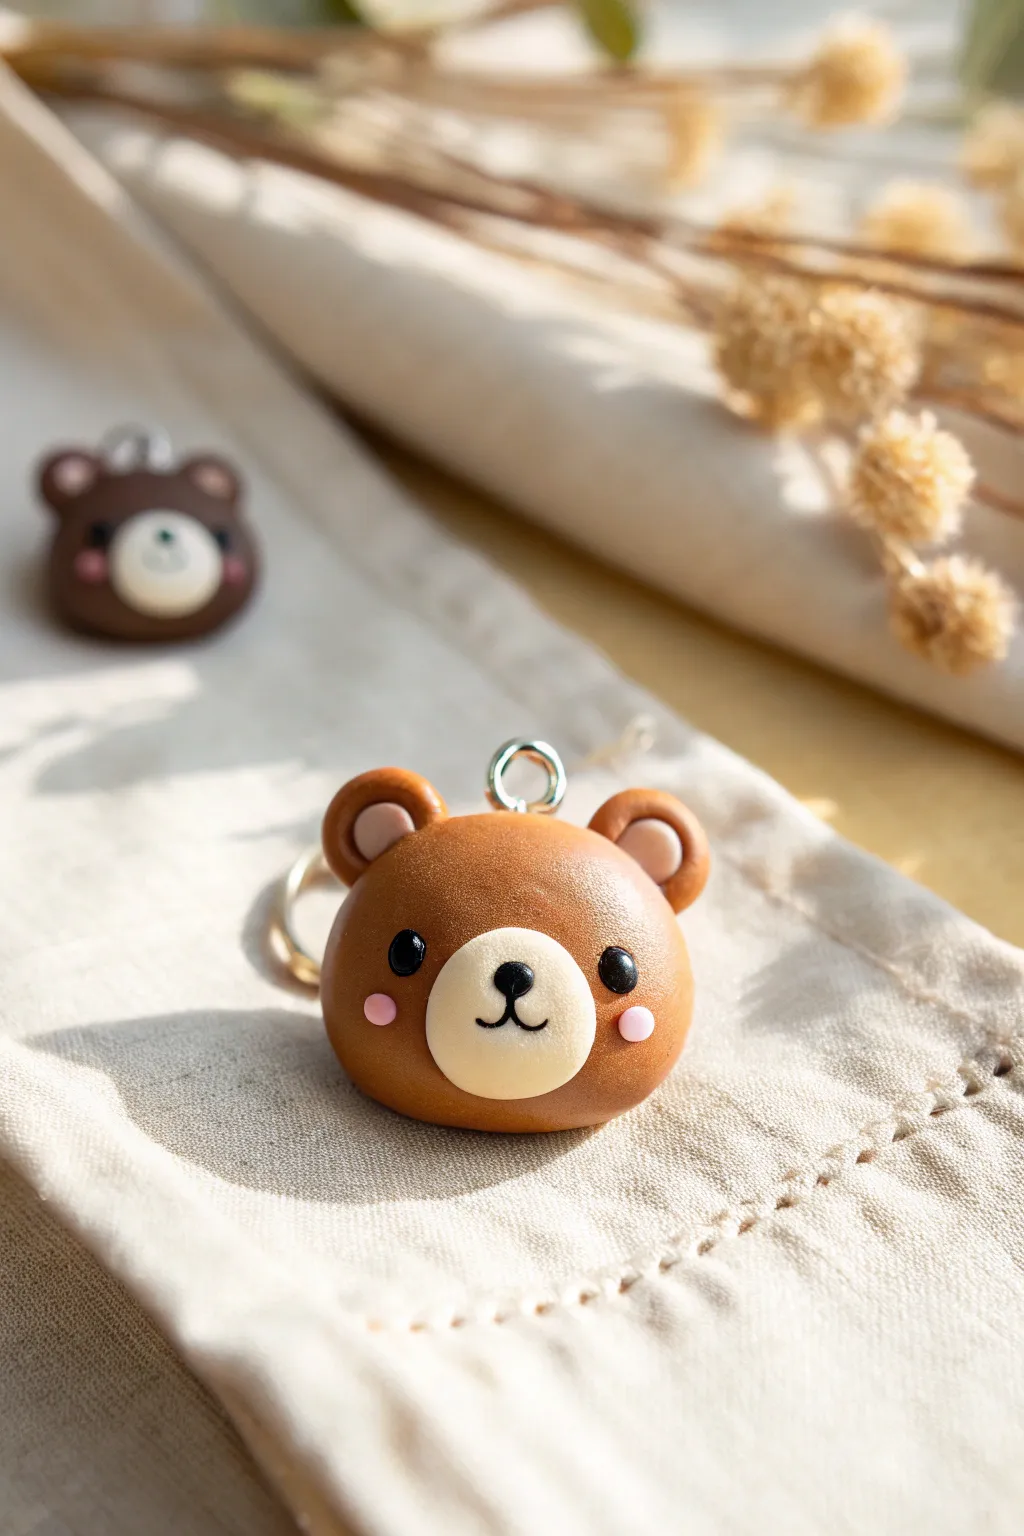
These adorable, round bear charms bring a touch of kawaii sweetness to any keychain or zipper pull. With their chubby cheeks and glossy eyes, they look almost like freshly baked buns, perfect for gifting or keeping for yourself.
Detailed Instructions
Materials
- Polymer clay (warm milk chocolate brown)
- Polymer clay (light cream/beige)
- Polymer clay (pale pink)
- Polymer clay (black)
- Dotting tools or ball stylus (various sizes)
- Needle tool or toothpick
- Small jump ring (silver or gold)
- Eye pin or screw eye pin
- Liquid polymer clay (optional, for adhesive)
- Gloss glaze (water-based polyurethane)
- Fine detail paintbrush
- Baking sheet and parchment paper
- Oven
Step 1: Shaping the Base
-
Condition the clay:
Start by kneading your brown clay thoroughly until it’s soft, pliable, and free of cracks. Warm hands make this much easier. -
Form the head:
Roll a smooth ball of brown clay about the size of a large grape or small walnut. Gently press it onto your work surface to flatten the bottom slightly so it sits stable, creating a chubby dome shape rather than a perfect sphere. -
Create the ears:
Roll two much smaller balls of brown clay for the ears. They should be identical in size. Place them on top of the head, spaced widely apart for that cute look. -
Blend the seams:
Use a silicone tool or your finger to gently blend the bottom seam of the ears into the head so they don’t pop off later. -
Add inner ear details:
Roll two tiny balls of the light cream clay. Press these flat against the center of the brown ears to create the inner ear sections. -
Indent the ears:
Take a large ball stylus and press into the center of the cream circles. I find this helps seat the clay and gives the ears a nice, dimensional cupped shape.
Fingerprint Fix
Before baking, brush the unbaked clay lightly with a deeper baby oil or cornstarch. This smooths out accidental fingerprints for a professional finish.
Step 2: Adding the Face
-
Make the snout:
Roll an oval of cream clay. Position it low on the face, right in the center between the cheeks. Press it down gently so it adheres but keeps a rounded profile. -
Pre-make the eyes:
Roll two small balls of black clay. Position them on either side of the top of the snout. Don’t press them in too hard yet; adjust them until the expression looks just right. -
Secure the eyes:
Once you are happy with the placement, press the black eyes firmly into the clay so they sit flush with the surface. -
Add the nose:
Roll a tiny, triangular piece of black clay with rounded corners. Place this near the top of the cream snout. -
Detail the mouth:
Roll a microscopically thin snake of black clay. Cut two tiny pieces and curve them to form the ‘w’ mouth shape beneath the nose. Alternatively, you can paint this on after baking if working with such tiny clay bits is frustrating. -
Pink cheeks:
Roll two small balls of pale pink clay. Flatten them onto the cheeks, slightly lower than the eyes, to give the bear a shy, blushing expression.
Step 3: Finishing Touches
-
Insert hardware:
Trim an eye pin to the right length. Dip the end in a tiny bit of liquid clay for extra grip and insert it centrally into the top of the head. -
Bake carefully:
Place your bear on parchment paper. Bake according to your clay manufacturer’s instructions—usually around 275°F (135°C) for 15-20 minutes depending on thickness. -
Cool down:
Let the piece cool completely inside the oven with the door open. This gradual cooling helps prevent cracks. -
Glaze the eyes:
Using a fine detail brush, apply a drop of gloss glaze only to the black eyes and the nose. This mimics the wet look of real eyes and makes the character pop. -
Add the jump ring:
Once the glaze is fully dry, use pliers to twist open a jump ring, thread it through the eye pin, and attach your keychain hardware.
Accessories
Give your bear personality by adding a tiny clay bow tie under the chin or a little flower near one ear before baking.
Your charming little bear is now ready to tag along on your adventures


What Really Happens Inside the Kiln
Learn how time and temperature work together inside the kiln to transform clay into durable ceramic.
Bubble Frog Charms
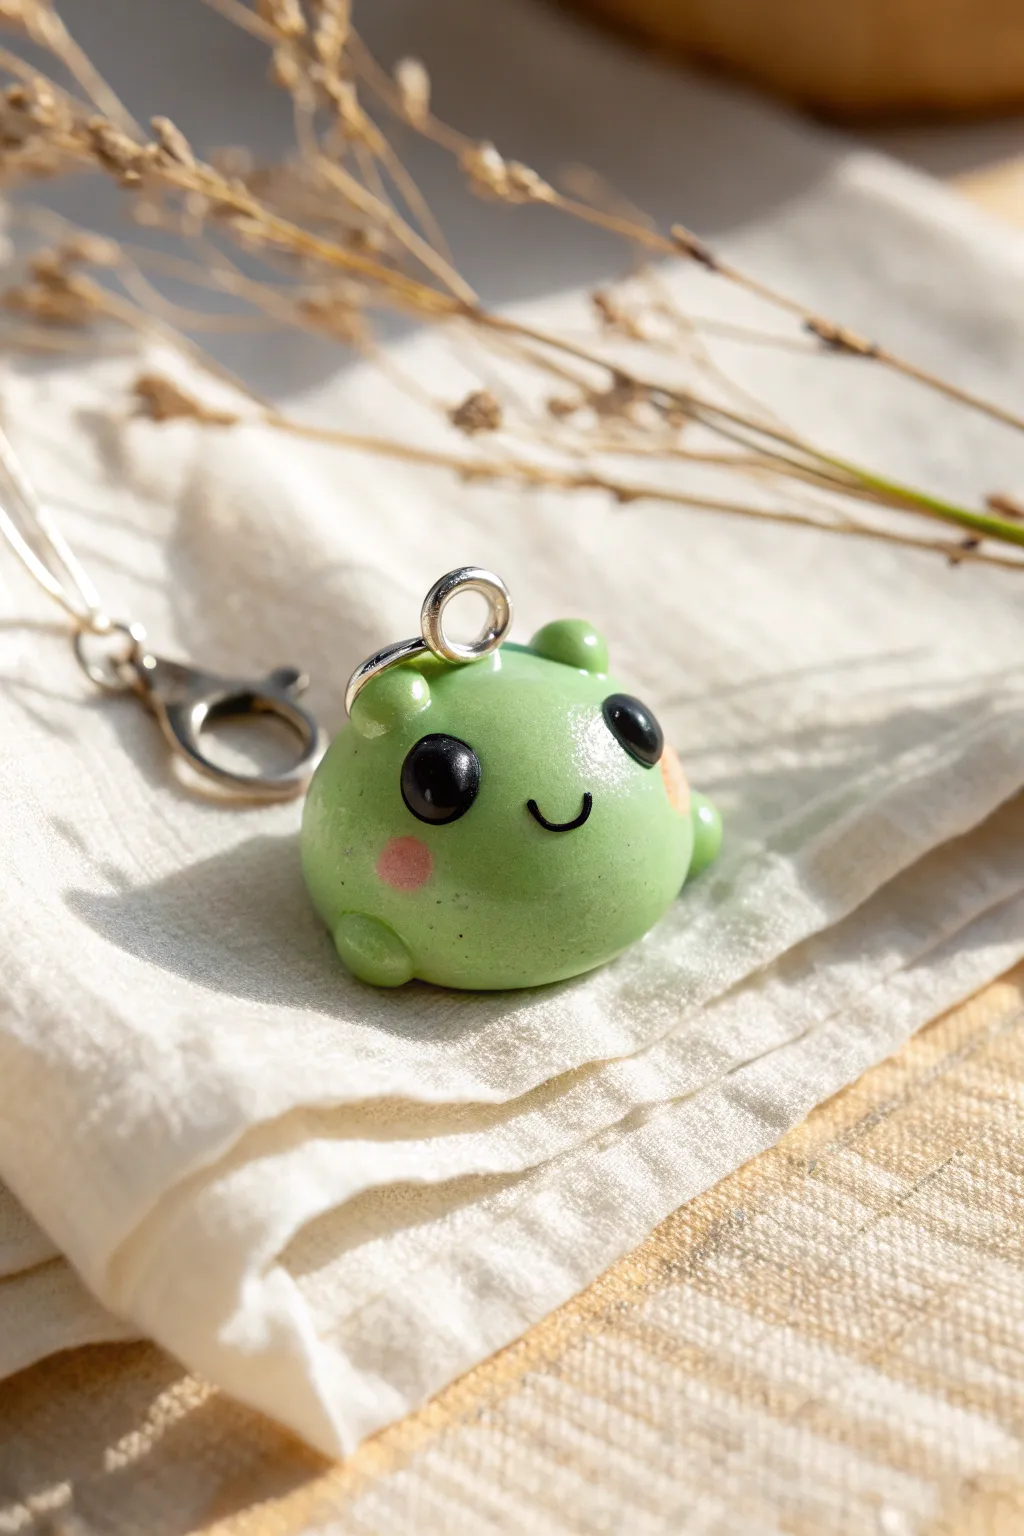
These adorable bubble frog charms are incredibly satisfying to make thanks to their simple spherical shape and expressive faces. The glossy resin finish gives them a polished, high-end look that’s perfect for keychains or stitch markers.
Step-by-Step
Materials
- Polymer clay (green, black, light pink)
- Gloss glaze (UV resin or polyurethane varnish)
- Eye pin or screw eye pin
- Silver jump ring
- Lobster clasp strap
- Dotting tools (variable sizes)
- Needle tool or toothpick
- UV lamp (if using resin)
- Small paintbrush
- Black acrylic paint (optional for mouth)
Step 1: Shaping the Base
-
Condition the clay:
Start by taking a chunk of green polymer clay and conditioning it in your hands until it becomes soft and pliable. This prevents cracks during baking. -
Form the body:
Roll the green clay into a smooth, perfect sphere about the size of a large marble or a grape. Gently tap the bottom against your work surface to create a slightly flat base so the frog sits upright. -
Create the eyes:
Pinch off two very small pieces of green clay and roll them into balls. Press these onto the top of the head, spacing them slightly apart to create the protruding eye sockets typical of frogs. -
Make the limbs:
Roll four tiny balls of green clay for the legs. Press two onto the bottom front of the body and two near the bottom back. Flatten them slightly to look like little nubs.
Fixing Fingerprints
Can’t get the surface smooth? Keep a small jar of cornstarch handy. Lightly dusting your fingertips prevents sticking and helps buff out pesky fingerprints before baking.
Step 2: Adding Details
-
Add the eye pupils:
Take tiny bits of black clay, roll them into spheres, and flatten them gently. Press these onto the front of the green eye sockets you created earlier. -
Apply blush:
Using a very small amount of light pink clay, create two thin, flat ovals. Press these onto the cheeks, just below the eyes, to give your frog a sweet expression. -
Secure the hardware:
Insert your eye pin into the top center of the head. I find it helps to add a tiny dab of liquid clay or bake-and-bond to the pin shaft to ensure it doesn’t pull out later. -
Create the smile:
Roll a microscopically thin snake of black clay and curve it into a smile between the cheeks. Alternatively, you can paint this on after baking for finer control. -
Check for lint:
Before baking, examine the clay closely. Use a cotton swab dipped in rubbing alcohol or baby oil to gently wipe away any dust or fingerprints.
Step 3: Finishing Touches
-
Bake the charm:
Bake strictly according to your clay manufacturer’s instructions (usually 275°F/135°C for 15-30 minutes). Let it cool completely before touching. -
Paint the sheen (optional):
If you want extra life in the eyes, use a toothpick to place a tiny dot of white acrylic paint on the black pupils for a ‘catchlight’. -
Apply glaze:
Coat the entire frog with UV resin or a high-gloss varnish. This protects the clay and gives it that wet, amphibian look shown in the photo. -
Cure the glaze:
If using UV resin, place under a UV lamp for 2-4 minutes until rock hard and non-tacky. If using varnish, allow it to air dry for several hours. -
Assembly:
Open a jump ring using two pairs of pliers (twist, don’t pull). Loop it through the eye pin on the frog and the connector of your lobster clasp strap. -
Close the ring:
Twist the jump ring closed securely so there is no gap for the charm to slip through.
Make It Sparkle
Mix fine iridescent glitter into your green clay before rolling the body, or mix it into your UV resin topcoat for a magical, shimmering galaxy frog effect.
Now you have a charming little amphibian friend ready to tag along on your bag or keys
Tiny Lucky Cat Charms
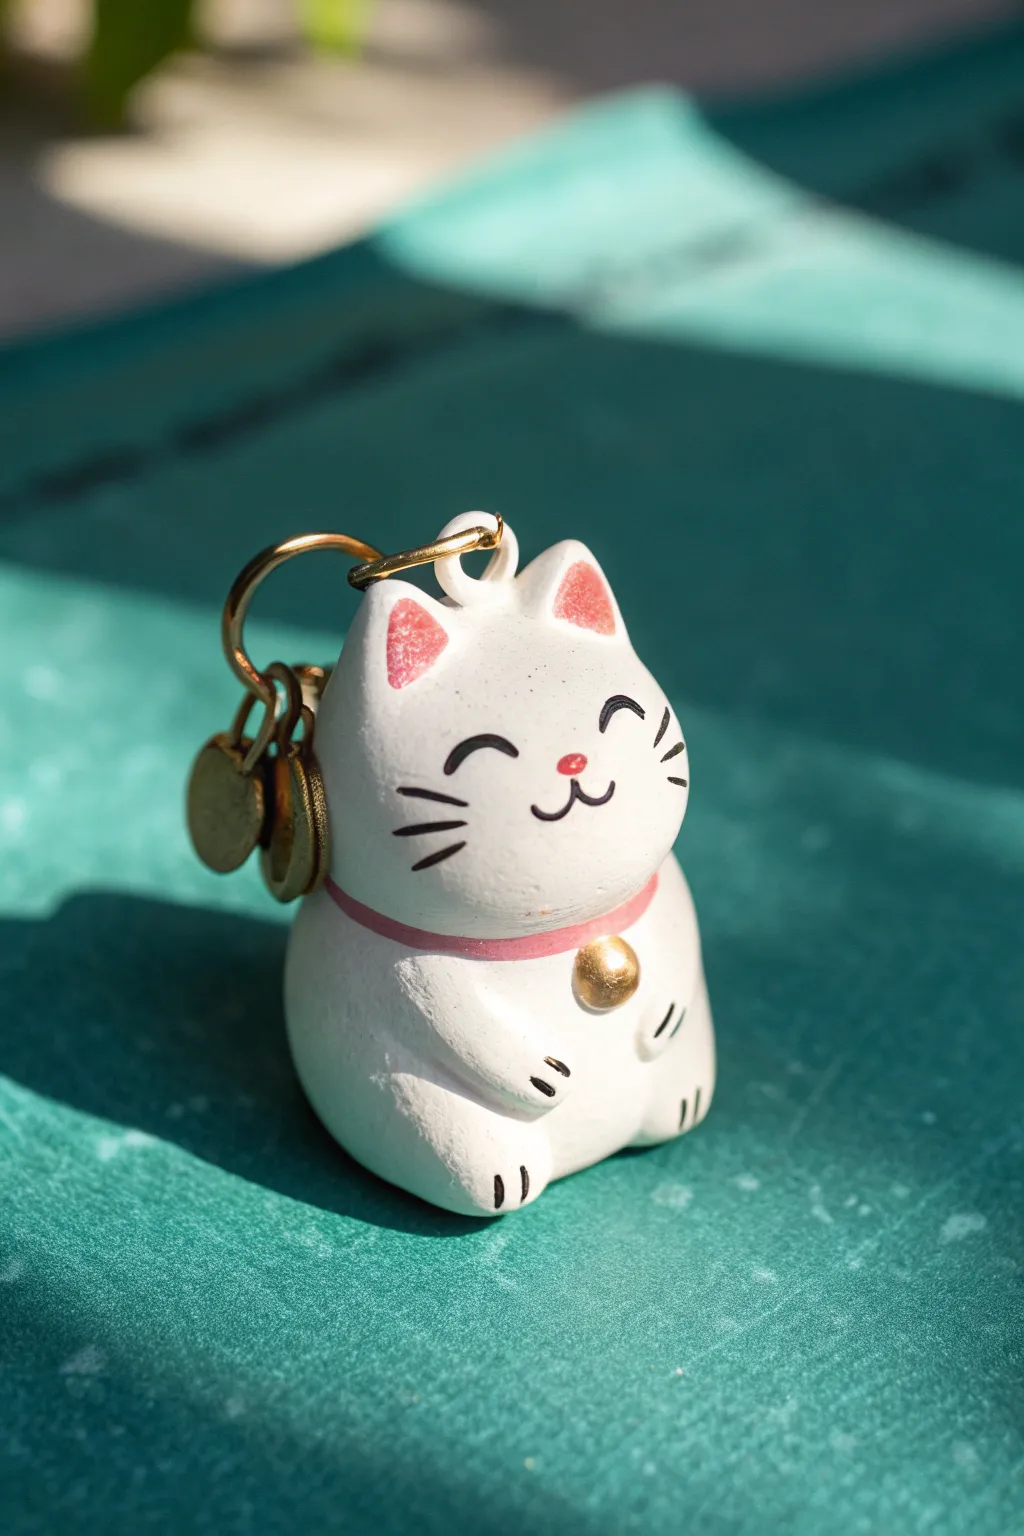
Bring a little fortune into your life with this adorable Maneki-neko inspired charm. With its serene expression and classic white finish, this tiny feline friend makes for a delightful keychain or a thoughtful handmade gift.
Step-by-Step Guide
Materials
- White polymer clay or air-dry clay
- Modeling tools (or toothpicks/needle tool)
- Small eye screw or wire loop
- Black fine-tip permanent marker or acrylic paint
- Pink and gold acrylic paint
- Fine detail paintbrush
- Gloss glaze or polyurethane varnish
- Gold jump rings and keychain hardware
- Small gold coin charms (optional)
- Sandpaper (fine grit)
Step 1: Sculpting the Base
-
Shape the body:
Start with a ball of white clay about the size of a large marble. Roll it until smooth, then gently flatten the bottom so it sits upright without rocking. Roughly shape it into a rounded gumdrop form. -
Form the ears:
Pinch the top two corners of the gumdrop shape gently to form triangular ears. Use your fingers to smooth the transition between the ears and the head so it looks like one solid piece. -
Refine the shape:
Smooth out any fingerprints by lightly buffing the clay with your finger. If you are using polymer clay, a tiny drop of baby oil can help smooth the surface perfectly. -
Add the paws:
Roll two very tiny snakes of white clay for the front paws. Press them onto the lower front of the body, angled slightly inward. Blending the top edges into the body ensures they don’t pop off later. -
Insert the hardware:
Before the clay hardens, insert a small eye screw into the very top of the head, centered between the ears. If using air-dry clay, add a dab of glue here for extra security. -
Curing or drying:
If using polymer clay, bake according to the package instructions (usually 275°F/135°C for 15-30 minutes). If using air-dry clay, usually I let it sit for at least 24 hours to ensure the core is fully dry.
Fixing Smudges
Accidentally smudged the face? If the white base is sealed or baked, wipe fresh mistake paint away with a damp Q-tip. If using marker, a little rubbing alcohol erases errors.
Step 2: Painting and Details
-
Sand for smoothness:
Once fully cured and cooled, check for any rough spots. Gently sand the surface with fine-grit sandpaper if needed to get that porcelain-like finish. -
Paint the collar:
Using a fine brush and pink acrylic paint, carefully draw a thin collar line around the neck area. You might need two coats to get a solid, opaque pink. -
Add the bell:
Dip the tip of a toothpick or a dotting tool into gold paint. Place a round dot right in the center of the pink collar line to create the bell. -
Color the ears:
Mix a tiny bit of pink paint with white to create a soft pastel shade, or use the original pink lightly. Paint the inner triangles of the ears. -
Draw the face:
Using a black fine-tip marker or a very thin brush with black paint, draw two curved arches for closed, happy eyes. Add a tiny nose and a small mouth below. -
Whisker details:
Draw three short whiskers on each cheek. Keep your hand steady and use quick, light strokes to keep lines thin. -
Body details:
Add small black dash marks on the paws to represent toes. These tiny details really bring the character to life. -
Seal the charm:
Apply a coat of gloss glaze over the entire piece. This not only protects the paint but gives the charm that polished, ceramic look. -
Assembly:
Once the glaze is dry, open a jump ring with pliers. Thread it through the eye screw on top of the cat’s head. -
Final touches:
Before closing the jump ring, slide on your keychain hardware and any extra gold coin charms you want to include for extra luck.
Textured Fur Effect
Before baking, use a stiff toothbrush to gently tap the surface of the clay. This creates a soft, fuzzy texture instead of the smooth ceramic look shown here.
Clip this lucky little guardian onto your bag and carry good fortune wherever you go

TRACK YOUR CERAMIC JOURNEY
Capture glaze tests, firing details, and creative progress—all in one simple printable. Make your projects easier to repeat and improve.
Pastel Heart Face Charms
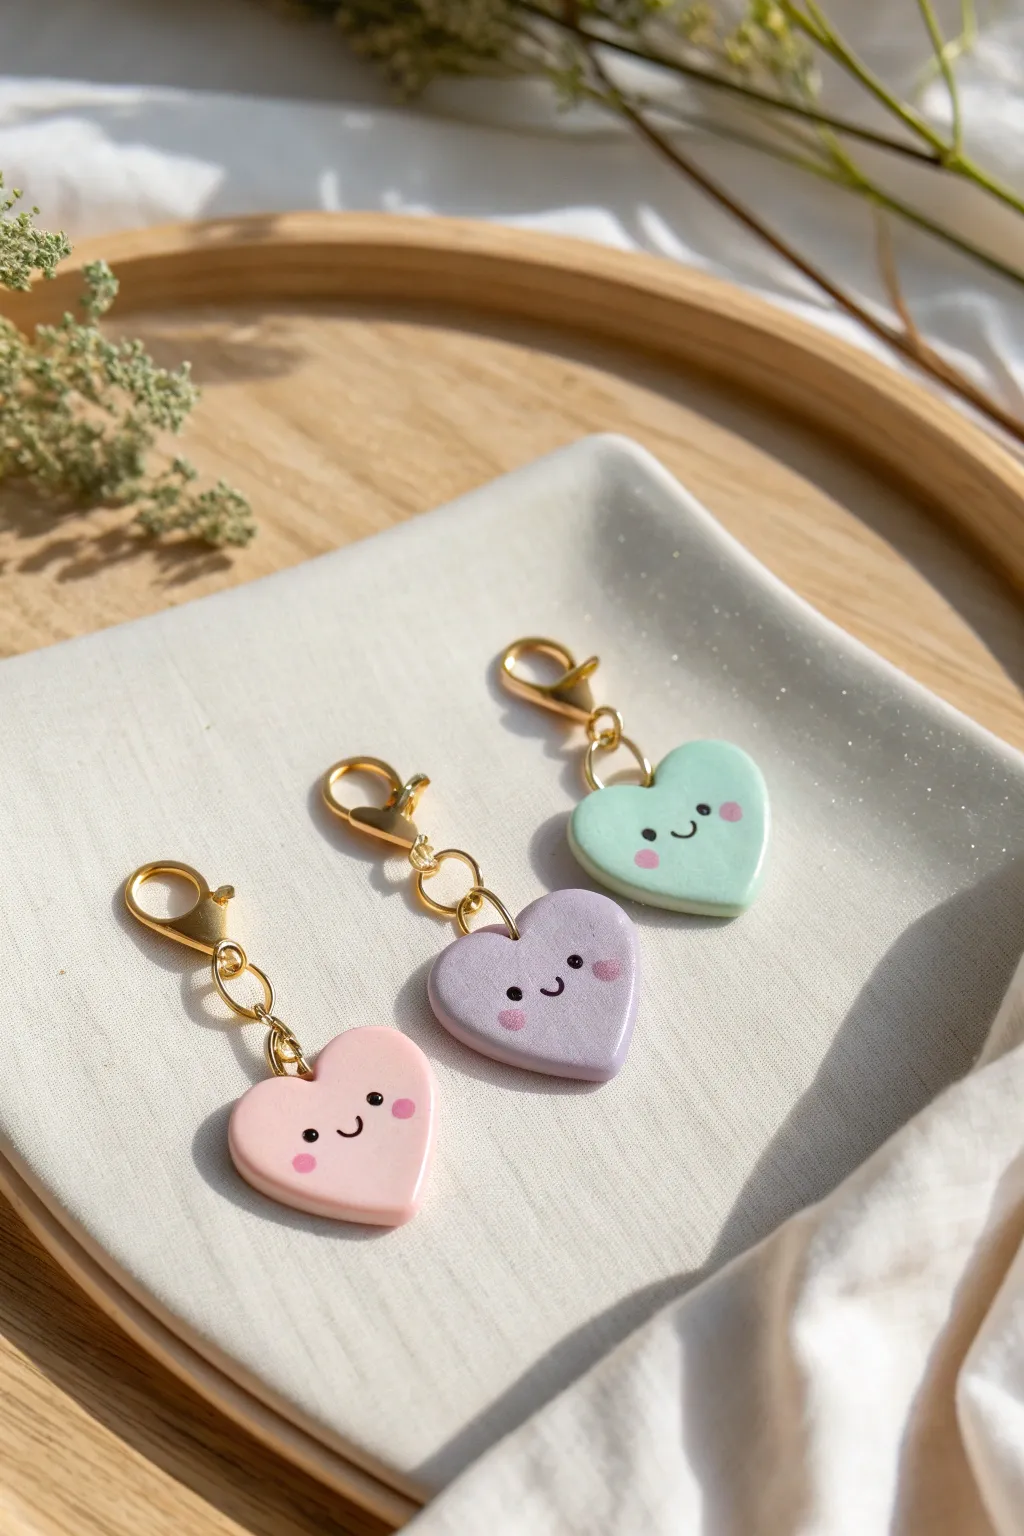
These adorable pastel heart charms feature sweet, smiling faces that instantly brighten any accessory. Made with polymer clay and finished with a glossy glaze, they are perfect for zipper pulls, stitch markers, or friendship gifts.
Step-by-Step Tutorial
Materials
- Polymer clay in pastel pink, lavender, and mint green
- Polymer clay in black and dark pink (for faces)
- Heart-shaped clay cutters (small or medium size)
- Acrylic rolling pin or pasta machine
- Gold screw eye pins (small)
- Gold jump rings (6mm)
- Gold lobster clasps
- Needle nose pliers
- Needle tool or dotting tool ball stylus
- Gloss glaze or UV resin (optional for shine)
- Oven for baking
Step 1: Shaping the Hearts
-
Condition the Clay:
Begin by thoroughly conditioning your pastel pink, lavender, and mint green clay until they are soft and pliable. This prevents cracks during baking. -
Roll Out Slabs:
Roll each color into a uniform sheet about 3mm to 4mm thick. Creating a slightly thicker slab ensures the charms feel substantial and hold the hardware securely. -
Cut Out Hearts:
Press your heart-shaped cutter firmly into the clay slab. Wiggle it slightly before lifting to get a clean cut, then gently push the clay heart out of the cutter. -
Smooth the Edges:
Use your fingertip to very gently smooth the raw edges of your hearts, softening any sharp lines left by the cutter for a professional, rounded look.
Fingerprint Fixer
Before baking, lightly brush your raw clay with a little bit of baby oil or cornstarch. This smooths out accidental fingerprints and dust specks.
Step 2: Adding the Details
-
Roll Tiny Eyes:
Take a microscopic amount of black clay and roll two extremely tiny balls for the eyes. Try to make them identical in size. -
Place the Eyes:
Using a needle tool or dotting tool, gently pick up the black balls and press them onto the heart face, spacing them widely apart for that cute ‘kawaii’ proportion. -
Create the Smile:
Roll a very thin, short snake of black clay. Curve it into a ‘U’ shape with your needle tool and press it gently into the center between the eyes. -
Add Cheeks:
Roll two tiny dots of darker pink or coral clay. Flatten them slightly and place them directly under the outer edge of each eye to create blushing cheeks. -
Secure the Face:
Once you are happy with the expression, gently tap the facial features with a flat finger to bond the clay together without squashing the shapes.
Level Up: Sparkle
Mix a tiny amount of iridescent glitter into your translucent glaze before applying it to give the hearts a subtle, magical shimmer.
Step 3: Assembly and Baking
-
Insert Hardware:
Screw a small gold eye pin into the center of the top curves of the heart. You may need to trim the screw slightly if it’s too long for your charm size. -
Bake the Charms:
Place your hearts on a ceramic tile or baking sheet lined with parchment paper. Bake according to your specific clay brand’s package instructions, usually around 275°F (135°C). -
Cool Down:
Allow the charms to cool completely in the oven or on a wire rack. They will be fragile while hot but harden as they cool. -
Secure the Pin:
If the eye pin feels loose after baking, unscrew it, add a tiny drop of super glue or E6000 to the threads, and screw it back in permanently.
Step 4: Finishing Touches
-
Glaze (Optional):
For a glass-like finish, brush on a coat of gloss glaze or apply a layer of UV resin and cure it under a UV lamp. -
Attach Jump Rings:
Using two pairs of pliers, twist open a jump ring (don’t pull it apart). Hook it through the eye pin on top of the heart. -
Add Clasp:
Before closing the jump ring, slide on the gold lobster clasp. -
Close and Secure:
Twist the jump ring closed so the ends meet perfectly flush. Only when the gap is invisible is your charm secure and ready to use.
Now you have a trio of friendly hearts ready to bring a smile to anyone’s day
Mini Star Sprinkle Charms
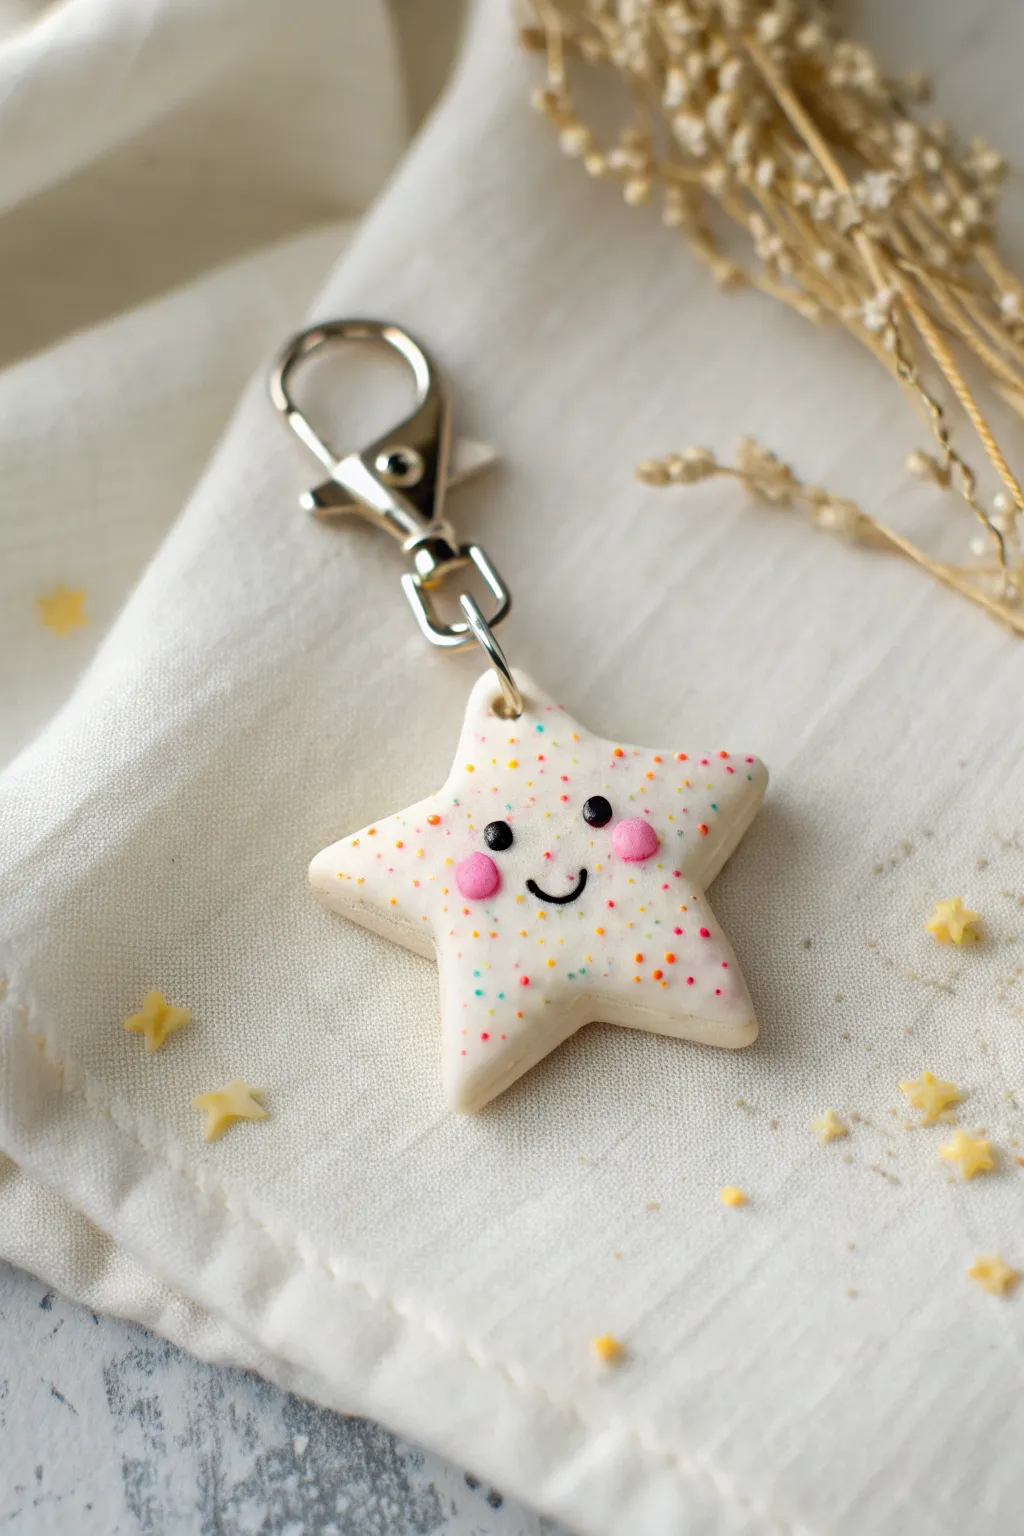
This adorable anthropomorphic star charm looks just like a frosted sugar cookie fresh from the oven, complete with tiny sprinkles and a sweet smile. It’s a perfect beginner-friendly project that turns simple clay into a charming accessory for your keys or bag.
How-To Guide
Materials
- White polymer clay (base)
- Translucent liquid polymer clay (frosting)
- White or cream polymer clay (for frosting mix)
- Black polymer clay (eyes/mouth)
- Pink polymer clay (cheeks)
- Soft pastels (various colors for sprinkles)
- Star-shaped cookie cutter (approx. 1.5 – 2 inches)
- Rolling pin or pasta machine
- Razor blade or craft knife
- Ball stylus tool
- Needle tool or toothpick
- Eye pin
- Lobster clasp keychain hardware
- Jump rings
- Jewelry pliers
- Gloss glaze (optional)
Step 1: Shaping the Base
-
Condition the clay:
Start by thoroughly conditioning your white polymer clay until it is soft and pliable. If you want a more realistic ‘baked cookie’ look, you can mix in a tiny pinhead amount of tan or yellow clay to warm up the white. -
Roll out the sheet:
Roll the clay out into a thick, even sheet. Aim for a thickness of about 4mm to 5mm; you want it chunky enough to look like a cookie and hold the eye pin securely. -
Cut the star:
Press your star-shaped cookie cutter firmly into the clay. Give it a little wiggle before lifting to ensure a clean cut. -
Soften the edges:
Gently tap the cut edges of the star with your finger or a flat tool to round them off slightly. This removal of sharp corners is key to achieving that soft, baked dough aesthetic.
Step 2: Frosting and Decorating
-
Create the frosting:
In a small container, mix a small amount of white clay with translucent liquid sculpey until you reach a consistency similar to thick icing or marshmallow fluff. -
Apply the frosting:
Spread a thin layer of your clay frosting mix over the top surface of the star. Leave a small rim of the base clay showing around the edges, just like a real dipped cookie. -
Texture the frosting:
Use a needle tool or toothpick to gently tap and stipple the surface of the frosting layer. This removes tool marks and gives it a realistic, sugary texture. -
Make the sprinkles:
Take a razor blade and shave tiny bits of colored soft pastels directly over the wet frosting. Alternatively, you can pre-bake tiny snakes of colored clay, chop them into ‘sprinkles,’ and press them into the frosting. -
Add the face:
Roll two tiny balls of black clay for the eyes and press them gently into the frosting. I like to place them slightly wide apart for extra cuteness. -
Create the cheeks:
Roll two slightly larger flattened ovals of pink clay. Place them just under and to the side of the eyes to create rosy cheeks. -
Form the smile:
Roll an extremely thin thread of black clay. Cut a small U-shape and carefully position it between the cheeks using a needle tool.
Texturing Tip
Before frosting, gently texture the sides of the star base with a toothbrush. This mimics the porous texture of a baked sugar cookie perfectly.
Step 3: Assembly and Baking
-
Insert hardware:
Trim an eye pin to an appropriate length (about 1cm). Dip the end in liquid clay for extra grip and insert it into the top point of the star. -
Bake the charm:
Place the star on a ceramic tile or baking sheet lined with parchment paper. Bake according to your brand of clay’s instructions—usually 275°F (135°C) for about 30 minutes. -
Cool down:
Allow the charm to cool completely inside the oven or on the counter. Do not handle it while hot, as the clay is still fragile. -
Glaze (Optional):
For a shiny finish, adhere a coat of water-based gloss glaze over the frosting area, avoiding the ‘cookie’ edges to keep the texture contrast. -
Attach the keychain:
Once fully cured and dry, use your pliers to open a jump ring. Loop it through the eye pin and the bottom loop of your lobster clasp keychain. -
Secure the ring:
Close the jump ring tightly, ensuring the ends meet flush so the charm doesn’t slip off.
Make It Sparkly
Mix a tiny pinch of extra-fine iridescent glitter into your liquid clay frosting mix. It adds a magical, sugary shimmer without needing glaze!
Now your happy little star is ready to twinkle on your backpack and brighten your day
Cloud And Rainbow Charms
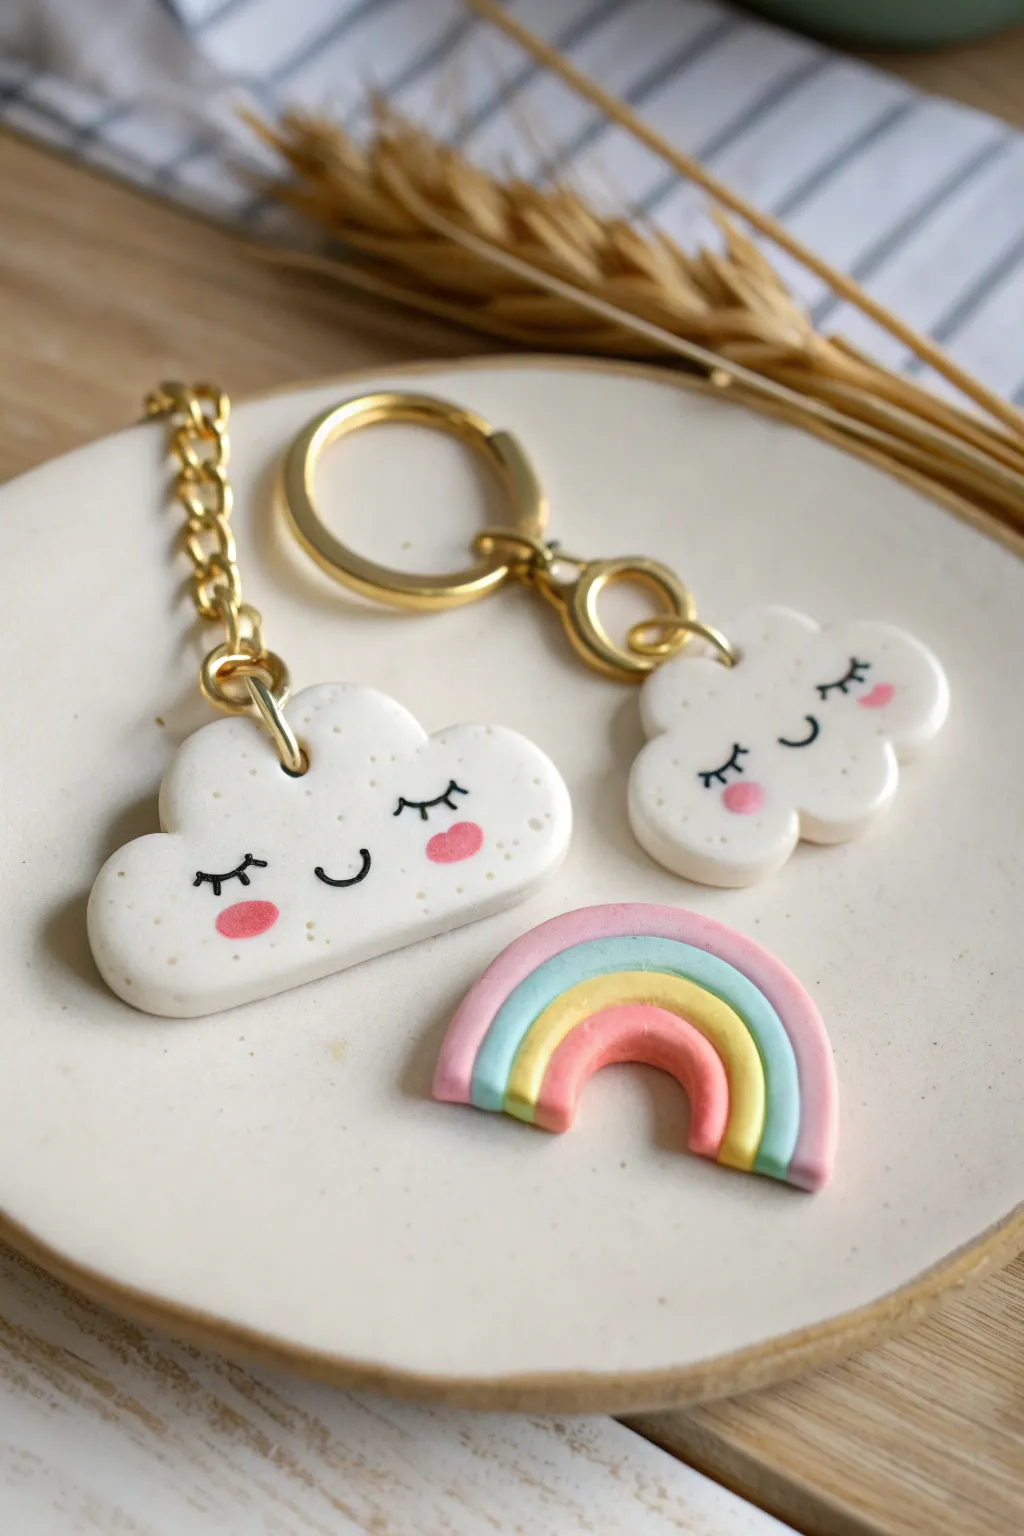
These adorable polymer clay charms feature sleepy, smiling clouds and a pastel rainbow, perfect for adding a touch of whimsy to your keys or bag. With their soft matte finish and sweet expressions, they make for a delightful beginner-friendly sculpting project.
Step-by-Step Guide
Materials
- White polymer clay
- Polymer clay in pastel pink, light blue, yellow, and peach
- Black acrylic paint
- Fine detail paintbrush or needle tool
- Pink chalk pastels or blush
- Rolling pin
- Cloud-shaped cookie cutter (optional)
- Eye pins (gold)
- Gold jump rings and keychains
- Sculpting tools (ball tool, needle tool)
- Gloss glaze (optional for rainbow)
Step 1: Sculpting the Clouds
-
Condition the white clay:
Start by kneading the white polymer clay until it is soft and pliable. This prevents cracks and makes it easier to shape. -
Create the shape:
Roll the clay into a flat sheet about 1/4 inch thick. Use a cloud-shaped cutter to punch out two shapes, or hand-sculpt them by combining small balls of clay and smoothing the seams until you have a fluffy cloud outline. -
Smooth the edges:
Gently tap the edges of your cloud with your finger to round them off, removing any sharp cut lines for a softer, puffier look. -
Add rosy cheeks:
Take a tiny amount of pink clay and roll it into very small, flat ovals. I generally prefer pressing these onto the cloud face before baking so they bond well to the raw white clay. -
Insert hardware:
Carefully push a gold eye pin into the top center of each cloud. If the pin is too long, trim it first so it doesn’t poke through the bottom.
Step 2: Creating the Rainbow
-
Prepare rainbow colors:
Condition small amounts of pink, light blue, yellow, and peach clay. -
Roll coils:
Roll each color into a thin, even snake (coil). Try to keep them all the same thickness for a neat finish. -
Stack the arch:
Curve the peach coil into a small arch. Place the yellow coil over it, followed by the blue, and finally the pink, pressing them gently together so they stick. -
Trim the ends:
Use a sharp blade to cut across the bottom of the rainbow legs, creating a flat, even base. -
Texture:
If you want a speckled look like the clouds, you can mix a tiny bit of black pepper or craft sand into your clay beforehand, though smooth pastels work beautifully too.
Dirty Clay Blues?
White clay picks up dust easily. Keep a pack of baby wipes nearby to clean your hands and tools before touching the white clay, and roll it on a clean surface.
Step 3: Finishing Touches
-
Bake the pieces:
Place your clouds and rainbow on a baking sheet lined with parchment paper. Bake according to your clay package instructions (usually 275°F for 15-30 minutes). -
Cool down:
Let the pieces cool completely before handling them, as warm polymer clay is fragile. -
Paint the faces:
Using a very fine detail brush and black acrylic paint, carefully draw the sleeping arched eyes with lashes and a small U-shaped smile on the clouds. -
Seal the paint:
Once the black paint is fully dry, you can lightly seal the painted area with a matte varnish to protect the expression from scratching off. -
Secure the hardware:
Gently pull gently on the eye pins; if they are loose, remove them, add a drop of super glue, and reinsert. Attach your gold jump rings and keychain findings to the eye pins to complete the charms.
Make it Sparkle
Brush a layer of UV resin or glossy glaze over the rainbow charm after baking to give it a glass-like shine that contrasts with the matte clouds.
Now you have a sweet set of handmade accessories ready to gift or keep
Kawaii Mushroom Cap Charms
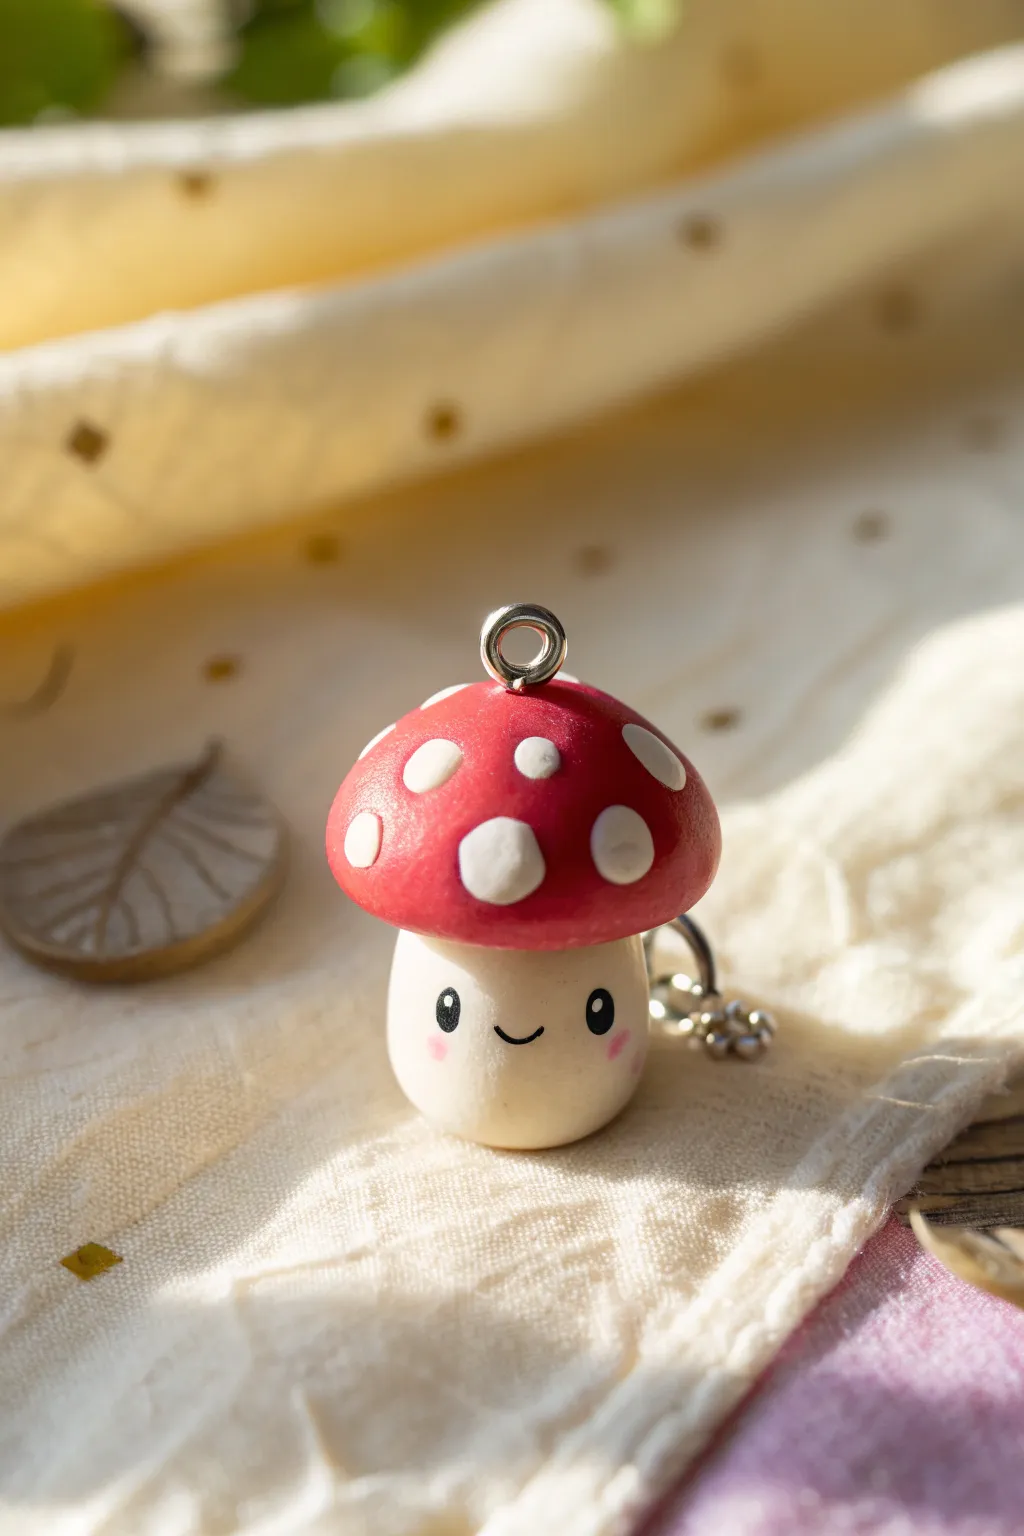
Embrace the cottagecore aesthetic with this adorable polymer clay mushroom charm featuring a classic red cap and a sweet kawaii face. Its small size and sturdy design make it perfect for keychains, earrings, or stitch markers.
Step-by-Step Tutorial
Materials
- Red polymer clay (e.g., Cherry Red or Crimson)
- White or beige polymer clay (stem and spots)
- Black acrylic paint or clay (for eyes/mouth)
- Pink soft pastel chalk or pink paint (for blush)
- Silver eye screw pin
- Ball stylus tool
- Detail paintbrush or needle tool
- Gloss glaze or UV resin (optional)
- Oven for baking
Step 1: Shaping the Base
-
Condition the white clay:
Start by taking a small amount of white or beige clay. Knead it thoroughly in your hands until it’s soft, warm, and pliable to prevent cracking later. -
Form the stem:
Roll the white clay into a smooth ball about the size of a large pea. Gently roll it into a short, stout cylinder, flattening the bottom slightly so it stands upright on your work surface. -
Round the top of the stem:
Softly round off the top edge of your cylinder with your finger. This creates a dome shape that will nestle perfectly into the underside of the mushroom cap. -
Prepare the red clay:
Condition a slightly larger piece of red clay. You want enough to create a cap that overhangs the stem comfortably without looking too heavy. -
Shape the mushroom cap:
Roll the red clay into a ball, then press it down onto your work surface to create a hemisphere (dome) shape. Smooth out any fingerprints. -
Indent the cap:
flip the red dome over. Use a ball tool or the end of a paintbrush handle to create a concave indentation in the center of the flat side. This is where the stem will connect.
Step 2: Adding Details & Assembly
-
Connect the pieces:
Place the white stem into the indentation of the red cap. Press them together firmly but gently to ensure a bond without squashing your shapes. -
Create the spots:
Roll tiny, varied sizes of white clay into little balls. Flatten them into thin discs between your fingers. -
Apply the spots:
Press the white discs randomly all over the red cap. Gently smooth the edges of the spots down so they look inlaid rather than just stuck on top. -
Insert the hardware:
Take your silver eye screw pin. Screw or push it gently into the very center top of the mushroom cap. Ensure it goes deep enough to be secure. -
Bake the charm:
Bake the assembled mushroom according to your clay manufacturer’s specific instructions (usually around 275°F/130°C for 15-30 minutes). Let it cool completely before painting.
Sticky Situation?
If your white clay picks up red lint or pigment, clean your hands and tools with a baby wipe or rubbing alcohol before shaping the stem.
Step 3: Painting the Face
-
Paint the eyes:
Using a very fine detail brush or a needle tool dipped in black acrylic paint, dab two small oval shapes onto the stem for eyes. Keep them low on the face for extra cuteness. -
Add the smile:
Paint a tiny, thin ‘U’ shape between the eyes for the mouth. Using a needle tool offers great control for these fine lines. -
Add eye highlights:
Once the black paint is dry, use a toothpick to add a minuscule dot of white paint to the top corner of each black eye. -
Apply rosy cheeks:
Scrape a little pink pastel chalk into a fine powder. Use a dry brush or cotton swab to gently dust pink ‘blush’ underneath the eyes. -
Seal the charm:
Finish by applying a coat of gloss glaze or UV resin, paying special attention to the painted areas to protect the face from scratching off.
Pro Tip: Liquid Clay
Add a tiny drop of liquid polymer clay (like Bake & Bond) into the cap indentation before attaching the stem for an unbreakable fusion.
Now you have a charming little companion ready to hang on your favorite bag
Cute Cactus Pot Charms
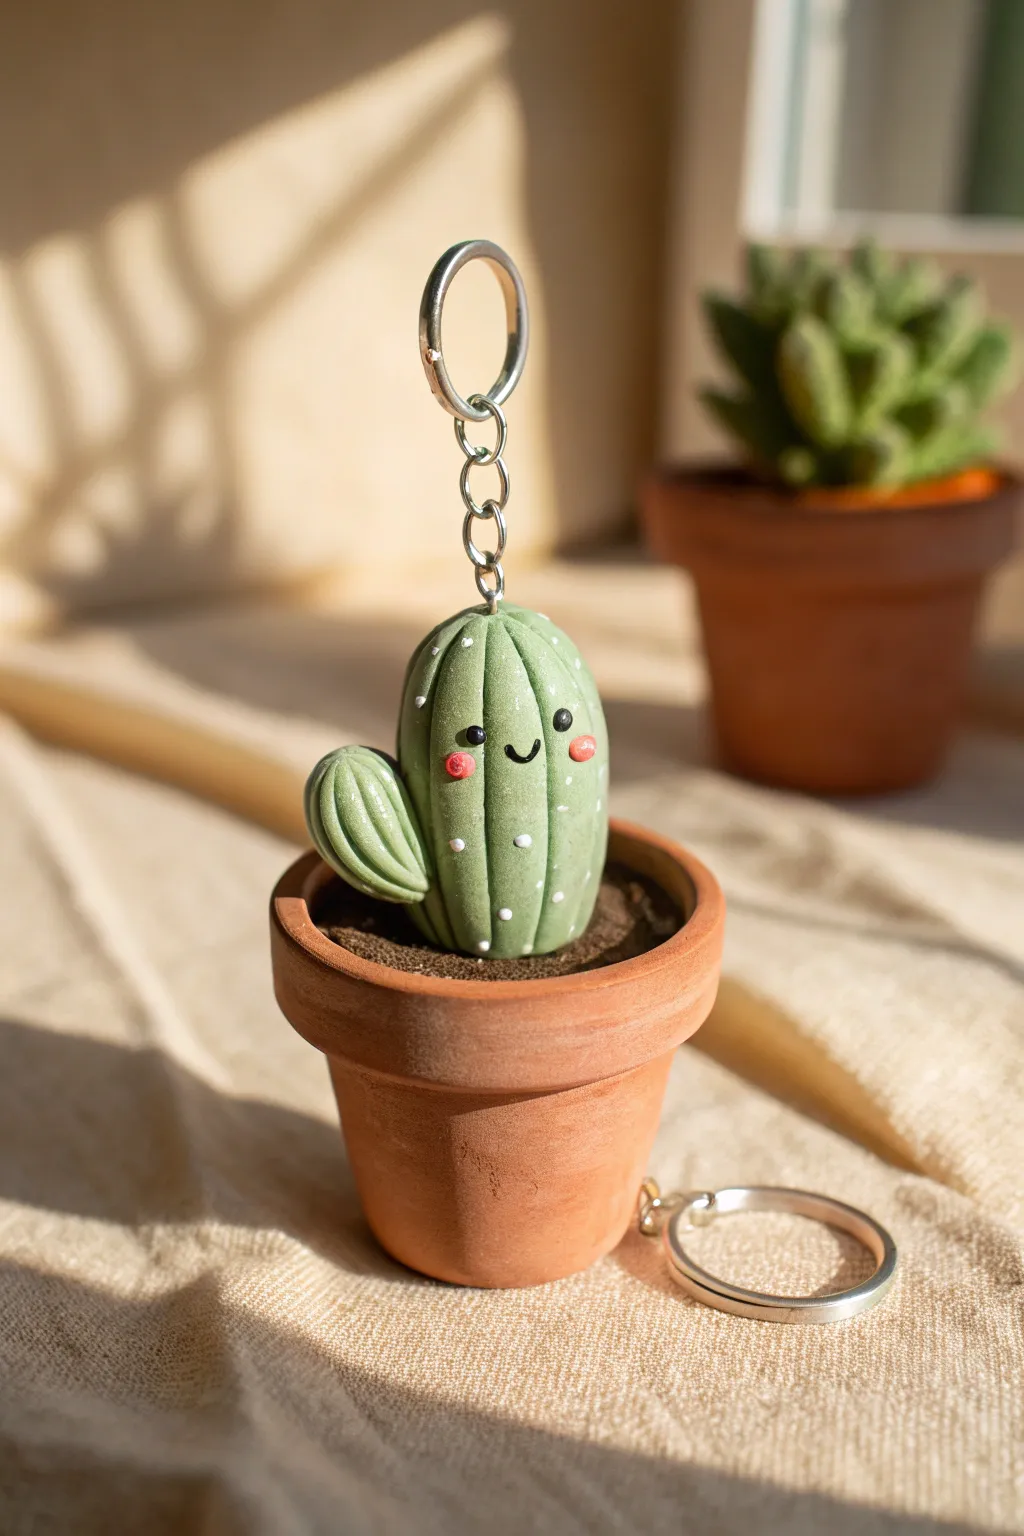
Bring a touch of desert cheer to your keys with this adorable sculpted cactus nesting in a tiny terracotta pot. The removable charm feature means you can keep your new prickly friend safe in its pot or take it on adventures.
How-To Guide
Materials
- Green polymer clay (sage or light olive shade)
- Black polymer clay
- Pink polymer clay
- White acrylic paint
- Fine detail paintbrush or toothpick
- Silver keychain findings (jump ring and chain)
- Eye pin
- Miniature terracotta pot (approx. 1-1.5 inch)
- Brown polymer clay (or dark brown acrylic paint and texture paste)
- Sculpting tool with a curved blade or needle tool
- Gloss glaze (optional)
- Strong craft glue (E6000 or similar)
Step 1: Sculpting the Cactus Body
-
Shape the main body:
Start by conditioning your green clay until it’s pliable. Roll a smooth ball roughly the size of a large marble, then gently elongate it into a pill shape that fits comfortably inside your miniature pot. -
Add the arm:
Take a smaller piece of green clay, about one-quarter the size of the main body. Roll it into a small teardrop shape and curve the narrower end slightly to create a classic cactus arm. -
Attach the limb:
Press the wider end of the arm against the side of the main body, blending the clay seams together with a sculpting tool or your finger so it becomes one solid piece. -
Create texture lines:
Using a needle tool or the back of a knife, gently press vertical indentations from the top to the bottom of the cactus. Repeat this around the entire circumference to mimic the ribs of a real cactus. -
Insert hardware:
Before baking, carefully push an eye pin into the very top center of the cactus. I like to add a tiny dab of liquid clay or bake-and-bond to the pin to ensure it stays secure.
Clean Clay Tip
Keep baby wipes or hand sanitizer nearby. Clean your hands thoroughly before switching to the green clay after handling black, or your cactus might look smudged.
Step 2: Adding the Cute Face
-
Form the eyes:
Roll two teeny-tiny balls of black clay. Press them onto the upper third of the cactus body, spacing them somewhat wide apart for a ‘kawaii’ look. -
Create the smile:
Roll a microscopically thin snake of black clay. Cut a tiny U-shape segment and gently press it into the clay between the eyes to form a happy smile. -
Add rosy cheeks:
Take two small bits of pink clay, flatten them into discs, and press them onto the cactus just below and to the outside of the eyes. -
Bake the charm:
Place your cactus on a tile or baking sheet. Bake according to your brand of clay’s instructions—usually around 275°F (135°C) for 15-20 minutes.
Step 3: Preparing the Pot
-
Fill with ‘soil’:
While the cactus cools, fill your miniature terracotta pot. You can fill the bottom with foil to save materials, then cover the top layer with dark brown polymer clay textured with a toothbrush to look like dirt. -
Create the socket:
Before the brown clay hardens or is baked, press the bottom of your baked cactus into the center to create a perfect indentation for it to sit in later. -
Bake or dry the soil:
If you used polymer clay for the dirt, bake the pot. If you used air-dry clay or texture paste, let it dry completely.
Blooming Variation
Add a tiny flower! Create a small yellow or red clay flower and attach it to the top of the cactus (near the eye pin) before baking for extra color.
Step 4: Final Details and Assembly
-
Paint the spines:
Once the cactus is fully cooled, dip a toothpick or fine brush into white acrylic paint. Dot small specks along the vertical ridge lines you created earlier to represent soft spines. -
Let paint dry:
Allow the white paint to dry completely. This usually takes only a few minutes since the dots are so small. -
Glaze (Optional):
If you want a shiny finish or extra protection for the paint, apply a thin coat of polymer clay gloss glaze to the cactus. -
Attach keychain hardware:
Using pliers, open a jump ring and loop it through the eye pin at the top of the cactus. Attach the keychain chain and close the jump ring securely. -
Final display:
Place your finished charm into the indentation in the pot. It makes a perfect desk accessory when not hanging on your bag.
Your little desert friend is now ready to brighten up your keychain or sit comfortably on your desk
Mini Fruit Slice Charms
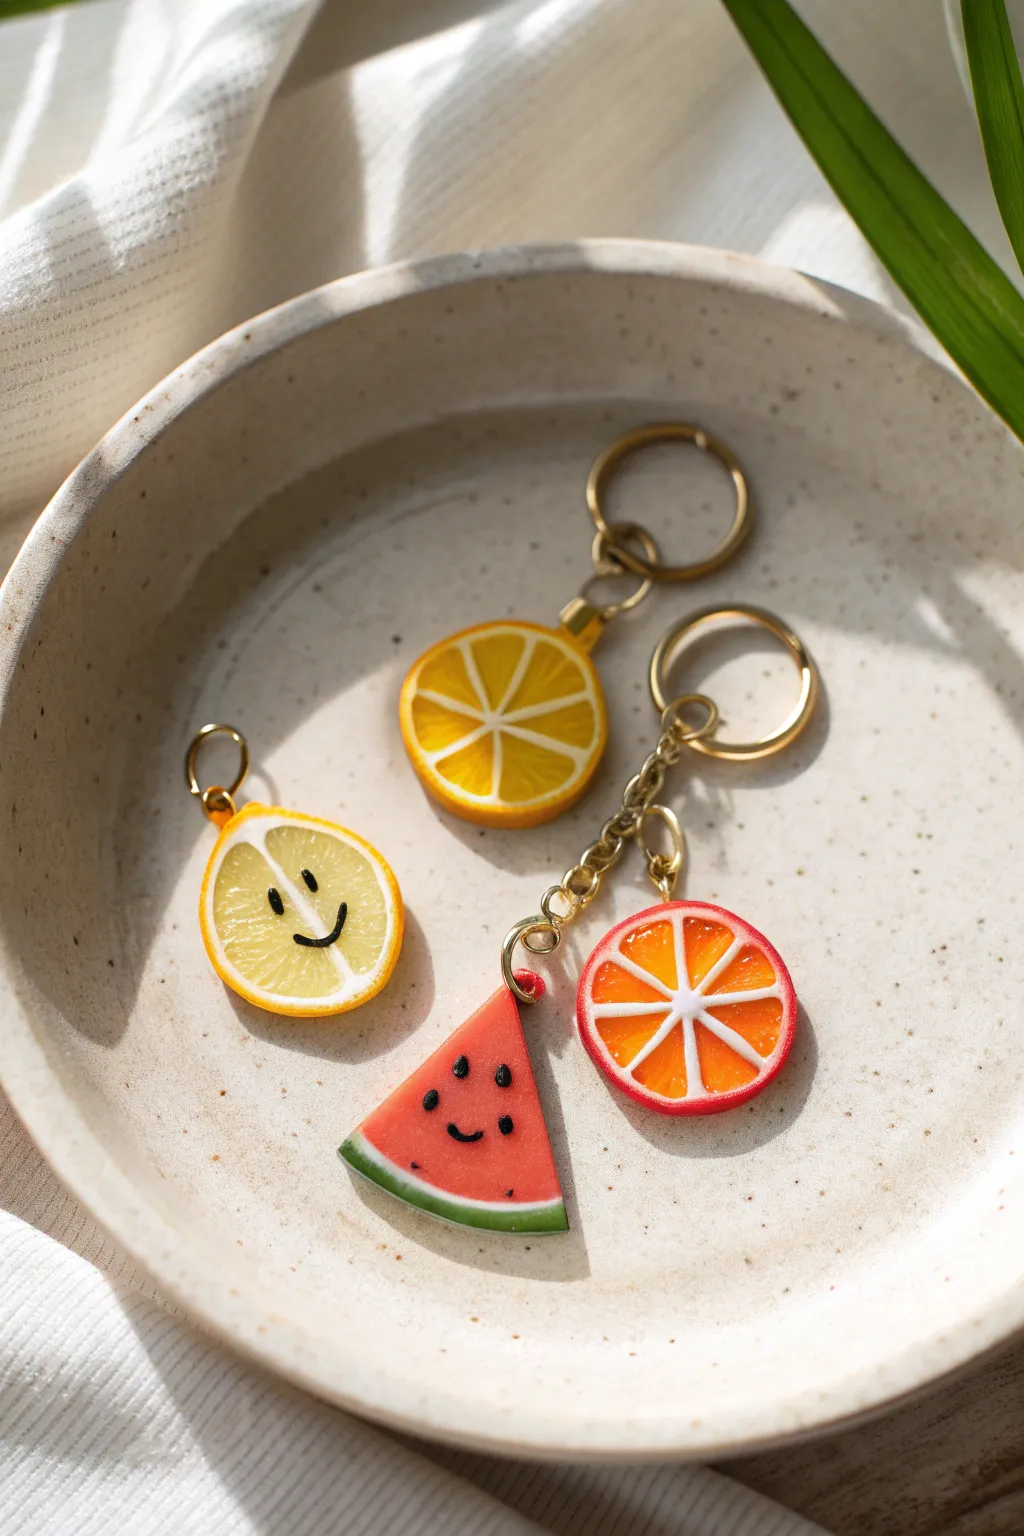
Brighten up your accessories with these adorable, glossy mini fruit slices made from polymer clay. This project combines classic cane-making techniques with sweet, hand-painted details to create charms that look good enough to squeeze.
Step-by-Step Tutorial
Materials
- Polymer clay (translucent, opaque white, yellow, orange, red, green)
- Liquid polymer clay (translucent)
- Acrylic craft paint (black and pink)
- UV resin or high-gloss polyurethane varnish
- UV lamp (if using resin)
- Clay roller or pasta machine
- Tissue blade or X-Acto knife
- Needle tool or toothpick
- Small eye pins and jump rings
- Gold keychain hardware and chain
- Fine detail paintbrush or dotting tool
- Sandpaper (fine grit)
Step 1: Preparing the Citrus Canes
-
Mix your colors:
Start by mixing translucent clay with small amounts of yellow, orange, and red clay respectively. The goal is a semi-transparent ‘jelly’ look for the fruit flesh. Keep some opaque white clay separate for the pith. -
Form the segments:
Roll your fruit-colored clay into a thick log. Roll a thin sheet of white clay. Wrap the fruit log in the white sheet, trim the excess, and smooth the seam. -
Create the wedge shape:
Pinch the wrapped log along one side to turn the cylinder into a teardrop or triangular prism shape. This forms a single fruit segment. -
Stretch and cut:
Gently stretch this long triangular cane until it is about 1/4 inch thick. Cut it into 8 equal lengths for the orange/grapefruit or 6-8 for the lemon. -
Assemble the wheel:
Arrange the triangular segments in a circle, points touching in the center. I like to place a tiny snake of white clay in the very center to help them adhere. -
Add the rind:
Roll a sheet of white clay and wrap the assembled circle to create the inner pith. Then, roll a sheet of yellow (for lemon) or orange (for orange) and wrap it again for the outer skin.
Sticky Situation?
To prevent distortion while slicing canes, roll the log on your work surface while slicing, rather than just pressing down. This keeps the circle round.
Step 2: Creating the Watermelon
-
Build the gradient:
Form a thick log of red clay. Wrap it in a thin sheet of white clay, then a final layer of dark green clay for the rind. -
Reduce to size:
Roll and stretch the watermelon log until it matches the diameter of your citrus canes.
Seed Detail
Before baking the watermelon, press tiny teardrop-shaped bits of black clay into the red flesh for realistic seeds instead of painting them.
Step 3: Slicing and Texturing
-
Slice the canes:
Once your canes are firm (pop them in the fridge for 15 minutes if they got soft), use your tissue blade to slice thin, even disks. -
Shape the pieces:
For the watermelon, cut a red disk in half or into thirds to make wedges. For the lemon, gently pinch the top of a yellow disk to create a teardrop shape. -
Add texture:
Use a needle tool or firmly pressed toothbrush to gently stipple the fruit flesh areas. This mimics the juicy texture of real fruit. -
Insert hardware:
Trim your eye pins shorter if needed. Insert an eye pin into the top of each charm (through the rind) before baking. Secure with a dab of liquid clay if the fit is loose. -
Bake firmly:
Bake the pieces according to your clay manufacturer’s instructions, usually around 275°F (135°C) for 15-20 minutes.
Step 4: Finishing Touches
-
Cool and smooth:
Let the charms cool completely. If there are any fingerprints, lightly sand them away with fine-grit sandpaper. -
Paint the faces:
Using a very fine brush or a toothpick, paint tiny black eyes and a smile onto the lemon and watermelon. Add tiny pink cheeks if desired for extra cuteness. -
Glaze for shine:
Apply a coat of UV resin to the front and back of the charms. Cure under a UV lamp for 2-3 minutes until hard and glossy. Alternatively, use polyurethane varnish and let dry for 24 hours. -
Assemble the keychain:
Using pliers, open a jump ring and attach your fruit charm to the keychain or chain segment. Close the ring securely.
Enjoy clipping your sweet, summery creations onto your bag or keys for a pop of freshness
Boba Cup Charms With Faces
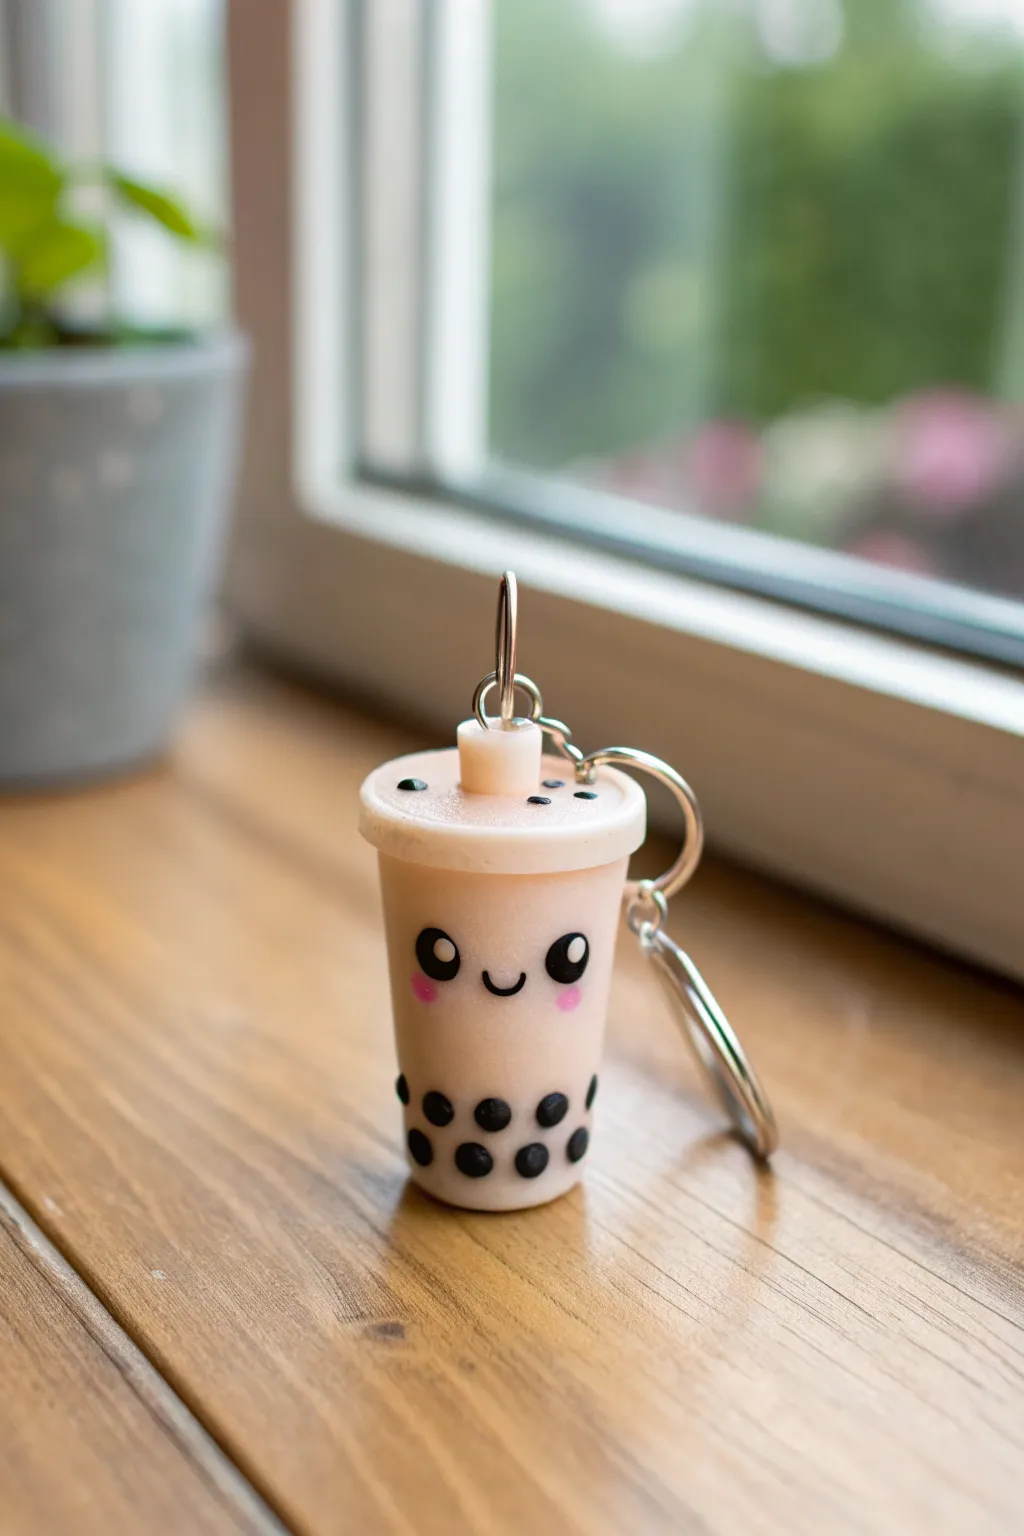
This adorable polymer clay boba cup charm captures the sweetness of your favorite drink in miniature form. With its cute smiling face and realistic-looking tapioca pearls, it makes a perfect keychain or gift for milk tea lovers.
Step-by-Step Guide
Materials
- Polymer clay (translucent white, beige/light peach, black)
- Black acrylic paint
- Pink acrylic paint
- Small dotting tool or toothpick
- Eye pin or screw eye
- Keyring hardware and jump rings
- Gloss glaze or UV resin
- Precision knife or clay blade
- Round clay cutter (small)
- Rolling pin
Step 1: Forming the Cup Base
-
Mix the color:
Begin by conditioning the beige or light peach clay until it’s soft and pliable. If you want a more realistic ‘milky’ look, try mixing a little translucent clay into your beige. -
Shape the cylinder:
Roll your mixed clay into a smooth cylinder. It should be slightly tapered, meaning the bottom is just a bit narrower than the top, mimicking a real plastic cup. -
Flatten the ends:
Gently press the top and bottom against your work surface to flatten them. Ensure the cup stands up straight on its own without wobbling. -
Add the rim:
Roll a small piece of the same beige clay into a thin sheet. Use a circular cutter slightly larger than the top of your cup to cut out a circle. Place this on top of the cylinder to create the sealed lid effect. -
Smooth the edges:
Carefully blend the underside of the lid rim just slightly so it looks attached but still retains that distinct lip of a cup lid.
Pearl Placement
Don’t just stick pearls on the surface; press them gently into the beige clay so they sit flush. This prevents them from popping off during use.
Step 2: Creating the Pearls and Straw
-
Make the boba pearls:
Take a very small amount of black polymer clay and roll it into a thin snake. Cut tiny, equal-sized segments from this snake. -
Roll spheres:
Roll each tiny grey-black segment into a perfect sphere between your fingers. -
Attach the lower pearls:
Press these black spheres gently onto the lower third of the cup. I like to stagger their placement so they look like they are settling at the bottom of the drink. -
Make the straw:
Roll a small piece of beige or white clay into a short, thick cylinder for the straw. It needs to be sturdy enough to hold the hardware. -
Attach the staw:
Press the straw firmly into the center of the lid. You can use a drop of liquid clay or translucent liquid sculpey for a stronger bond if you have it. -
Upper pearls:
Add three small flattened black dots on top of the lid around the straw to look like pearls floating at the surface.
Flavor Swap
Change the clay color to purple for taro milk tea, pink for strawberry, or green for matcha. You can even use translucent clay for a slushy tea look.
Step 3: Adding the Hardware
-
Insert the eye pin:
Trim an eye pin to the appropriate length—it should go through the straw and deep into the cup body. -
Secure the pin:
Push the eye pin straight down through the center of the straw until the loop rests flush against the clay. This structural support is crucial for a durable keychain.
Step 4: Baking and Face Details
-
Bake carefully:
Bake the charm according to your specific clay package instructions. Usually, this is around 275°F (130°C) for 15-20 minutes. Let it cool completely before painting. -
Paint the eyes:
Using a small dotting tool dipped in black acrylic paint, place two medium-sized dots on the upper half of the cup for eyes. -
Paint the smile:
Use a very fine brush or toothpick to draw a small ‘U’ shape between the eyes for the smile. -
Add highlights:
Once the black eyes are dry, use a toothpick to add a tiny white dot in the upper corner of each eye. This ‘sparkle’ brings the character to life. -
Add blush:
Apply two small dots of pink paint under the eyes for rosy cheeks. -
Glaze and finish:
After the paint is fully dry, coat the entire charm in a gloss glaze or UV resin. This protects the paint and gives it a plastic cup shine. Finally, attach your jump ring and keychain hardware to the eye pin.
Now you have a sweet little companion to keep your keys organized
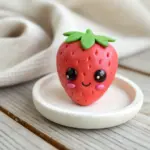
Mini Charm Sets In Matching Themes
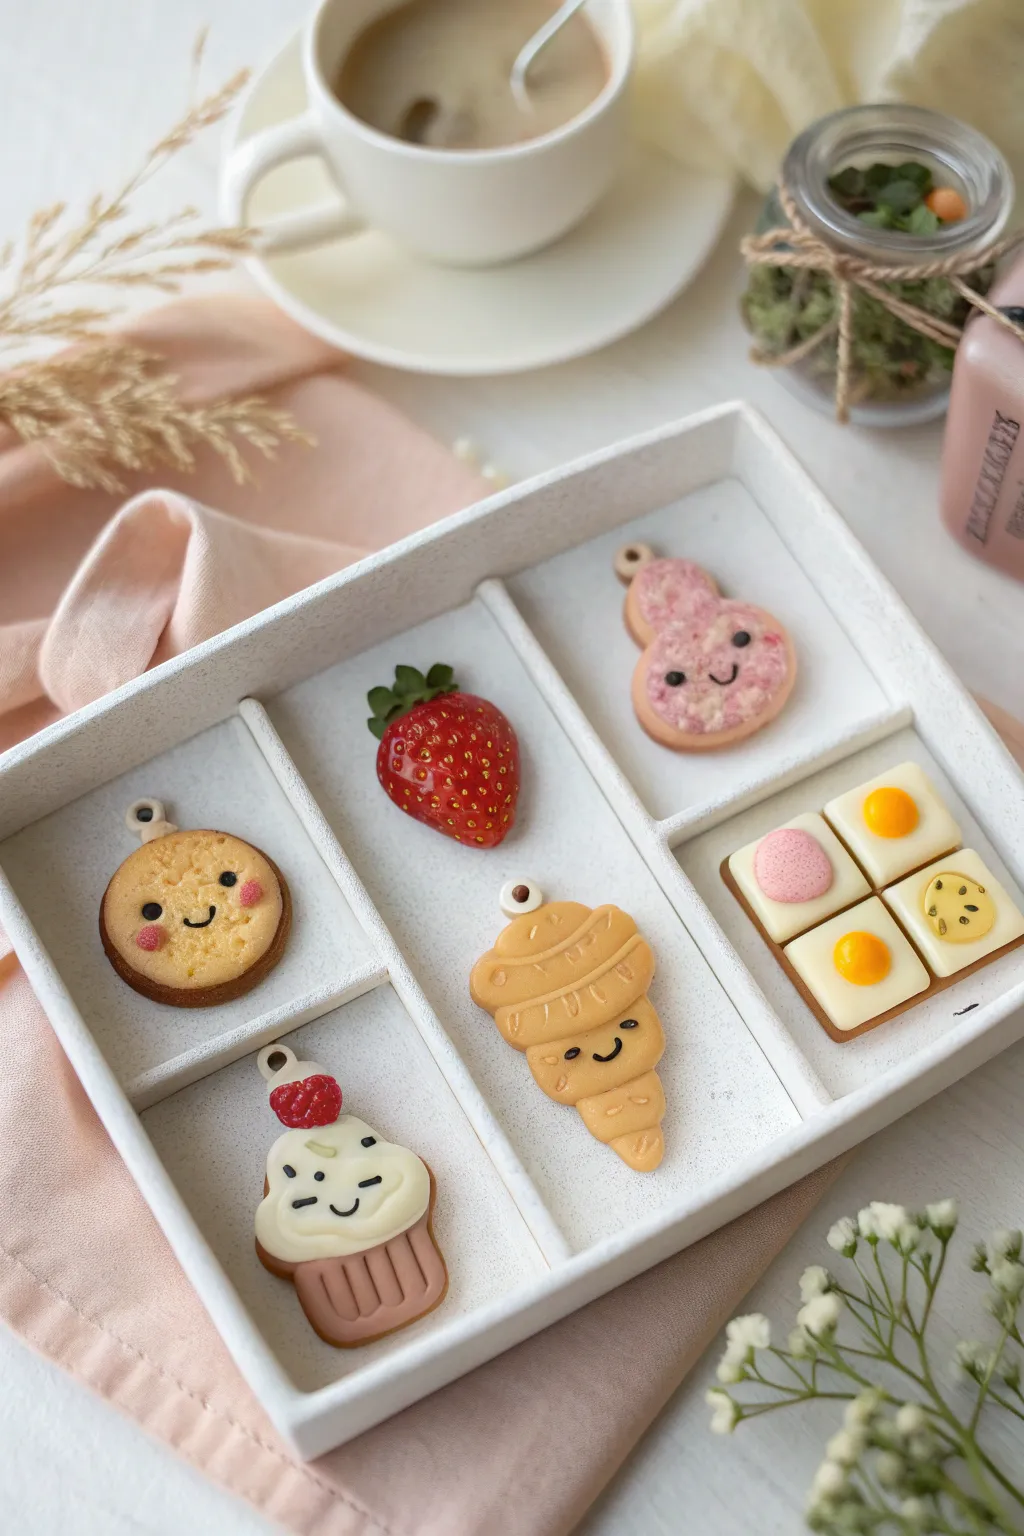
These adorable polymer clay miniatures mimic the look of a fun snack box, mixing realistic textures with kawaii faces. This project creates six distinct charms ranging from a hyper-realistic strawberry to a smiling croissant, all nestled in a simple white divider box.
Detailed Instructions
Materials
- Polymer clay (beige/tan, white, translucent, red, pink, yellow, green)
- Liquid polymer clay (Translucent Liquid Sculpey or FIMO liquid)
- Chalk pastels (orange, brown, red)
- Clay tools (needle tool, dotting tool, blade)
- Small eye pins or screw eyes
- Gloss varnish or UV resin
- Soft paintbrush for shading
- Texture tool (toothbrush or crumpled foil)
- White acrylic paint
Step 1: Preparation & Basic Faces
-
Mix your base dough color:
Start by mixing translucent clay with a small amount of beige and yellow to create a realistic ‘baked goods’ dough color. You want it to look slightly warm and golden. -
Form the round biscuit base:
Roll a small ball of your dough mix and flatten it into a thick disc for the round biscuit charm. Use a toothbrush to gently tap the surface, giving it a baked texture. -
Shape the croissant:
Create a teardrop shape with the dough color. Flatten slightly, then roll a thin snake of clay and wind it around the upper 2/3rds of the teardrop to mimic layers. Use a needle tool to press lines into the ‘layers’ for definition. -
Create the pink gourd shape:
Mix white clay with a tiny speck of red and translucent to get that soft pink. Shape it into a figure-8 or gourd shape, slightly flattening the bottom. -
Add classic kawaii faces:
For the biscuit, croissant, and pink charm, use a needle tool to indent two small eye sockets and a smile. Roll tiny snakes of black clay for the eyes and mouth, pressing them gently into the indents. Add tiny pink clay ovals for cheeks.
Realistic Texture Trick
For the biscuit and toast, press a piece of crumbled aluminum foil or rough sandpaper against the raw clay. This creates a realistic ‘crumb’ texture instantly.
Step 2: Detailed Sweets & Fruit
-
Sculpt the strawberry body:
Take red clay and form a plump strawberry shape. Using a dotting tool or needle, press many small indentations all over the surface for the seed pockets. -
Add strawberry details:
Fill the seed pockets with tiny specs of yellow clay or paint them after baking. Create a green calyx (stem) by cutting a small star shape from green clay and attaching receiving it to the top. -
Build the cupcake base:
Make a small cup shape from brown or pink clay for the liner. Use a blade to press vertical ridges around the sides. -
Pipe the cream:
Make a snake of white clay (softened with a drop of liquid clay or baby oil) and coil it on top of the cupcake base to look like whipped cream. Add a tiny red berry on top and a kawaii face on the cream swirl.
Sticky Situation?
If your white clay picks up dust or fingerprints, clean the raw clay gently with a q-tip dipped in rubbing alcohol or baby oil before baking.
Step 3: The Breakfast Toast Square
-
Create the toast base:
Roll out a sheet of tan clay and cut a perfect square. Indent a cross shape deeply to divide it into four quadrants, creating the look of four mini toast slices. -
Add savory toppings:
For the ‘eggs’, place a flat square of white clay in two quadrants, adding a small domed circle of yellow in the center. For the other quadrants, add a small pink circle (ham) and a yellow circle with tiny black specks (fruit slice).
Step 4: Shading & Finishing
-
Pre-bake shading:
Shave brown and orange chalk pastels into powder. Use a soft brush to dust the edges of the biscuit, croissant, and toast to give them a golden-brown, baked appearance. -
Insert hardware:
Carefully insert a small eye pin into the top of each charm. I find twisting it in slowly helps prevent distortion. -
Baking:
Bake all pieces according to your clay manufacturer’s instructions (usually 275°F/130°C for 15-30 minutes). Let them cool completely. -
Glazing technique:
For the strawberry, mix a little glaze with red paint or ink to make it juicy. For the egg yolks and fruit toppings, add a drop of clear UV resin or gloss varnish to make them shine. -
Final assembly:
If displaying in a box like the image, utilize thin strips of white foam board or cardstock to create custom dividers that fit your specific charm sizes perfectly.
Arrange your finished miniatures in their box or string them onto a bracelet to show off your collection