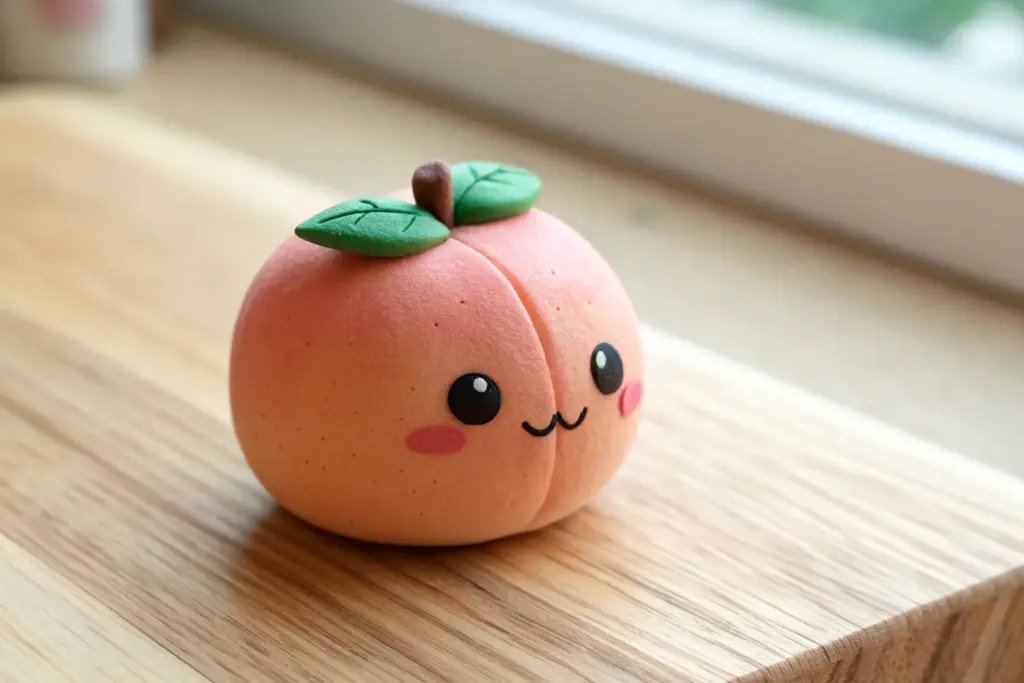
When I need a quick creative win, I grab a little clay and make something adorable before my coffee gets cold. These easy clay inspo ideas are built on simple shapes, beginner-friendly details, and that instant “I actually made this” joy.
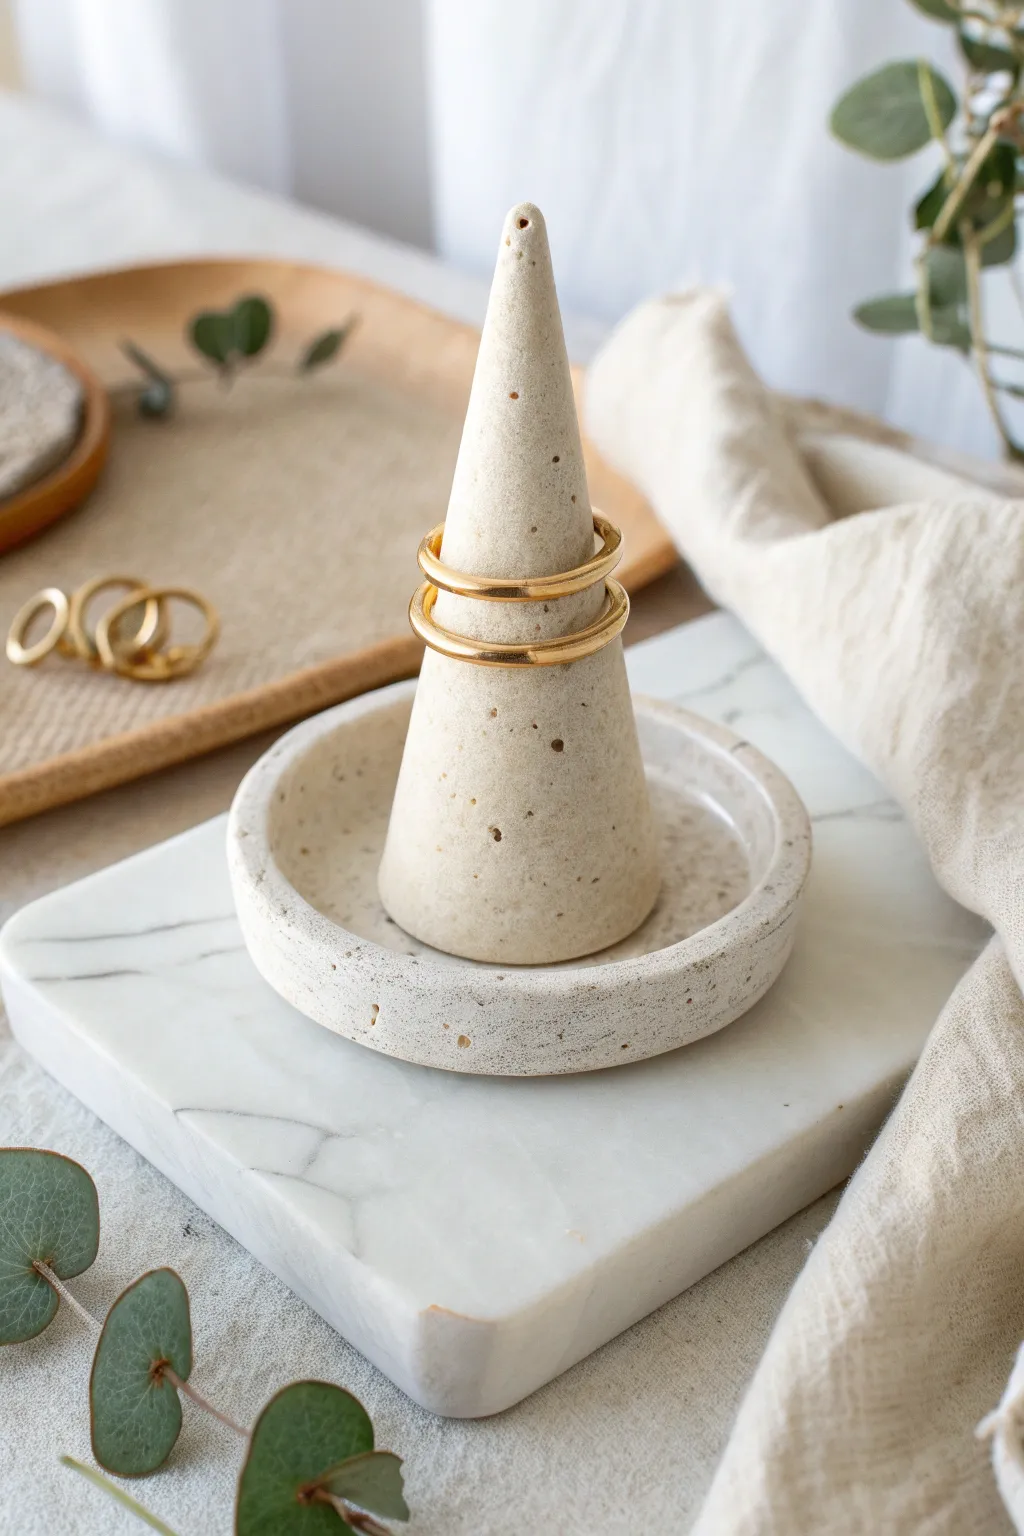
Pinch-Pot Trinket Dish
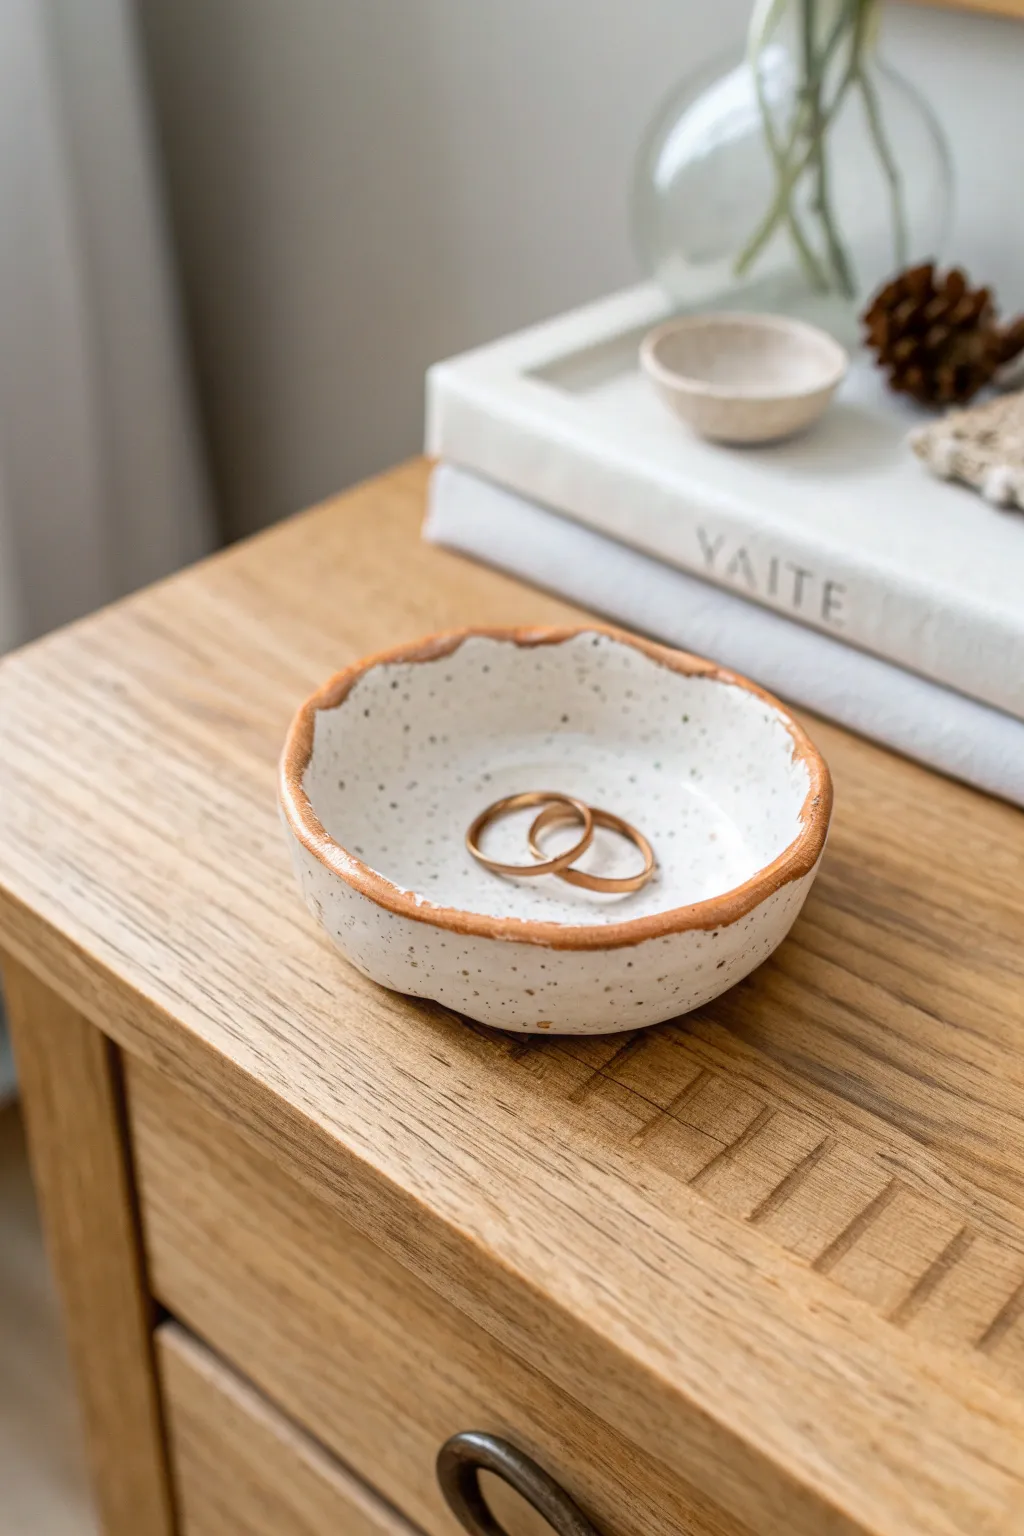
This charming, rustic trinket dish combines a natural speckled finish with a warm, amber-toned rim for a look that feels both organic and elevated. It is the perfect size for holding your everyday jewelry on a bedside table.
Detailed Instructions
Materials
- White polymer clay (plain)
- Black pepper or black embossing powder (for speckles)
- rolling pin
- Small round bowl or cutter (approx. 4 inches)
- Sponge or sandpaper
- Brown/Terracotta acrylic paint or glaze
- Small detail paintbrush
- Gloss varnish or resin (optional)
Step 1: Preparing the Clay
-
Condition the clay:
Start by warming up your white polymer clay in your hands. Knead it thoroughly until it creates a soft, pliable ball that won’t crack when flattened. -
Add texture:
To achieve that beautiful speckled stoneware look without buying special clay, sprinkle a pinch of coarse black pepper or black embossing powder onto your clay ball. -
Incorporate the speckles:
Fold the clay over the speckles and knead it again until the black dots are evenly distributed throughout the white material. -
Roll it out:
Use a rolling pin to flatten your clay ball into a slab. Aim for a thickness of about 1/4 inch so the dish feels substantial but not chunky.
Step 2: Shaping the form
-
Cut the circle:
Place your round cutter or a small bowl upside down onto the slab and cut out a perfect circle. Remove the excess clay scraps. -
Create the lip:
Gently curve the edges of the circle upward with your fingertips. I like to pinch the clay slightly between my thumb and forefinger to create a defined, vertical wall. -
Create the organic edge:
Instead of smoothing the rim perfectly flat, use your fingers to gently wobble the edge. Press down slightly in some spots and pull up in others to create that uneven, handmade aesthetic. -
Smooth the surfaces:
Dip your finger in a tiny bit of water (or baby oil for polymer clay) and run it over the inside and outside surfaces to remove any fingerprints. -
Bake or Dry:
Follow the instructions for your specific clay. If using polymer clay, bake it on a parchment-lined sheet at the recommended temperature. Let it cool completely before moving to the next step.
Uneven Rim Paint?
Don’t stress if your hand shakes! The beauty of this piece is the ‘wabi-sabi’ look. Intentional imperfections make it look more like hand-thrown pottery.
Step 3: Finishing touches
-
Sanding:
Once hardened, use a fine-grit sandpaper to buff away any sharp bits or rough patches, focusing on the bottom so it sits flat. -
painting the rim:
Dip a small detail brush into your terracotta or amber-brown paint. You want a color that mimics raw earthenware. -
Apply the uneven line:
Paint along the very top edge of the rim. Allow the brush to naturally wiggle slightly, and let the paint extend just a tiny bit down the inside and outside walls for a rustic feel. -
Seal the piece:
For a glossy ceramic look, apply a coat of gloss varnish or a thin layer of UV resin over the entire dish. -
Double coat the rim:
If you want the colored rim to look like a thick glaze, add a second layer of varnish specifically over the brown paint line. -
Final cure:
Allow the varnish or resin to fully cure according to the package directions before placing any jewelry inside.
Pro Tip: Pepper vs. Paint
Pepper works great for looks, but if you want to seal it perfectly, use black sand or embossing powder instead to avoid organic material degrading over time.
Your new speckle-clay dish is ready to keep your favorite rings safe and stylish


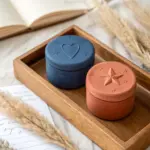
Tiny Heart Ring Dish
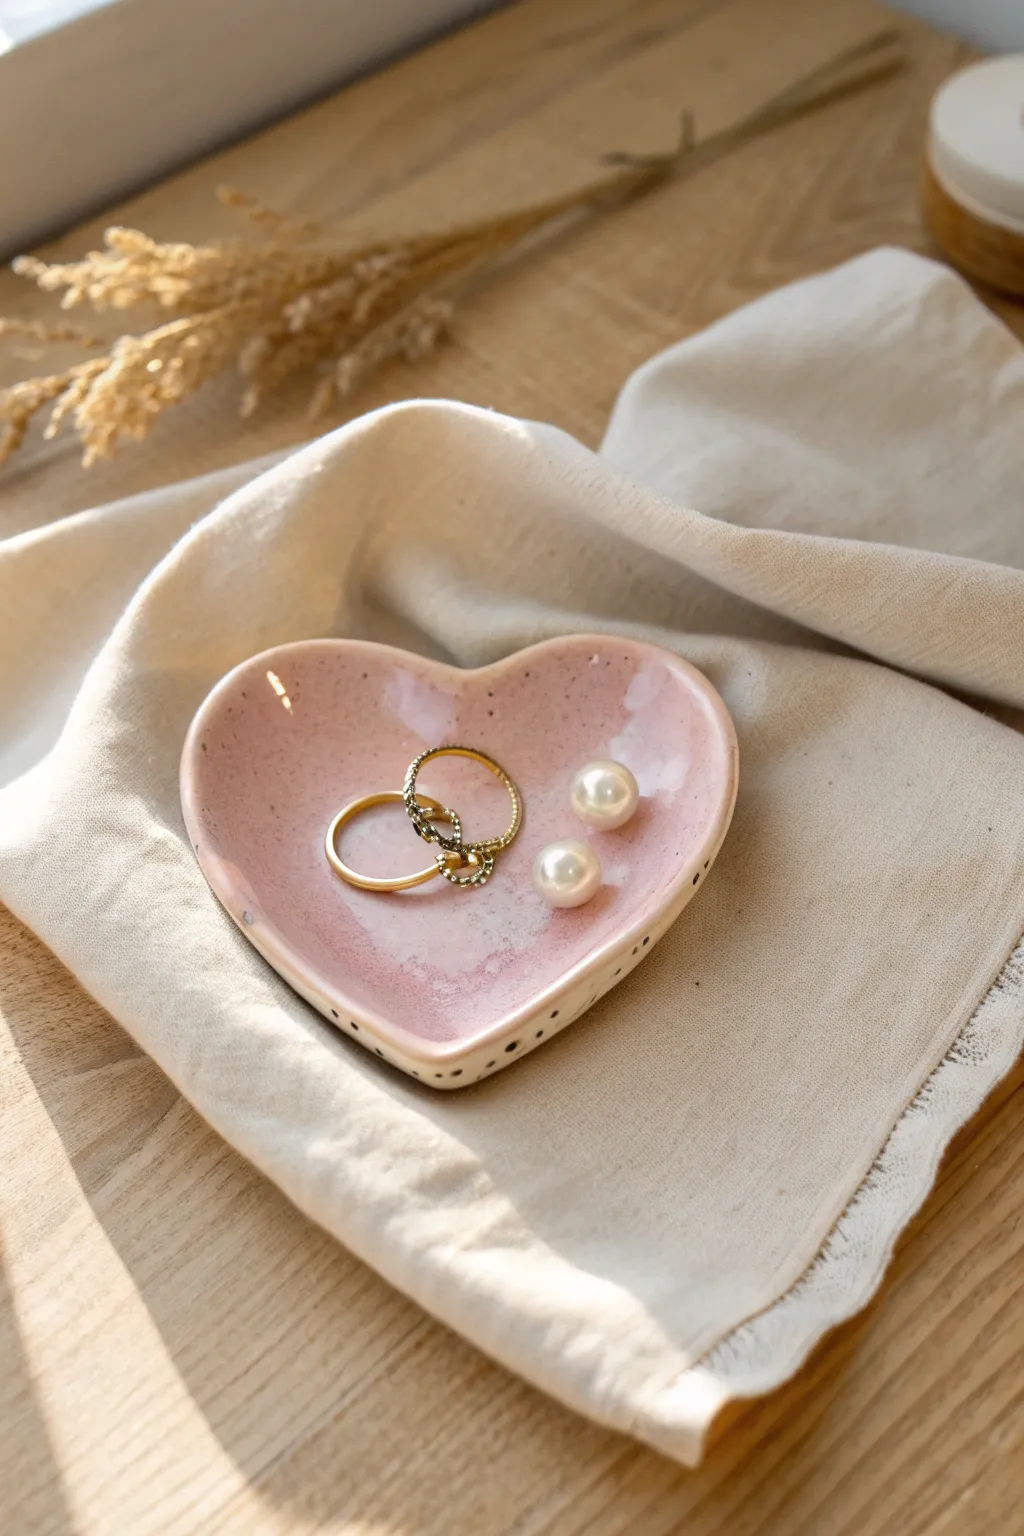
This adorable trinket dish combines a soft, blush-pink glaze with whimsical speckles to create the perfect home for your favorite rings and earrings. It’s a beginner-friendly project that feels high-end thanks to the clever glaze technique and organic, handmade rim.
How-To Guide
Materials
- Air-dry clay (white or light grey)
- Heart-shaped cookie cutter (approx. 3-4 inches wide)
- Rolling pin
- Parchment paper or canvas mat
- Small bowl of water
- Sponge
- Fine-grit sandpaper (220-400 grit)
- Acrylic paint (blush pink)
- Acrylic paint (black or dark brown)
- Small paintbrush
- Old toothbrush
- Glossy varnish or sealant (Mod Podge Gloss or polyurethane)
Step 1: Shaping the Clay
-
Prepare your workspace:
Lay down your parchment paper or canvas mat to prevent the clay from sticking to your table. Take a handful of air-dry clay and knead it briefly in your hands to warm it up and make it pliable. -
Roll the slab:
Using your rolling pin, roll the clay out into an even slab. Aim for a thickness of about 1/4 inch (6mm). If it’s too thin, the dish might be fragile; too thick, and it will look chunky. -
Cut the shape:
Press your heart-shaped cookie cutter firmly into the clay. If you don’t have a cutter, you can sketch a heart lightly with a needle tool and cut it out carefully with a craft knife. -
Soften the edges:
Once the heart is cut, remove the excess clay. Dip your finger in a little water and run it gently along the sharp cut edges to smooth and round them over. -
Create the curve:
Pick up the clay heart and gently pinch the edges upward to create a rim. I like to cradle the heart in my palm and press the center down with my thumb to give it a shallow bowl shape. -
Refine the form:
Place the dish back down. If the rim has warped, nudge it back into a symmetrical heart shape. Smooth out any fingerprints inside the dish using a barely damp sponge. -
Let it dry:
Set the dish aside in a cool, dry place. Let it dry completely for 24-48 hours. Flip it over halfway through the drying process to ensure the bottom dries evenly.
Fixing Cracks
If small cracks appear as the clay dries, don’t panic! Mix a tiny bit of fresh clay with water to make a paste (slip) and fill in the crack, then smooth it over.
Step 2: Sanding and Refining
-
Sand the surface:
Once fully dry, the clay will be hard and chalky. Use fine-grit sandpaper to gently buff away any rough spots on the rim or the bottom. Do this over a trash bin or outside to avoid dust. -
Wipe it down:
Use a slightly damp cloth or paper towel to wipe away all the sanding dust. The surface needs to be totally clean for the paint to adhere properly.
Step 3: Painting and Glazing
-
Mix your base color:
Squeeze out some blush pink acrylic paint. If the color is too vibrant, mix in a tiny drop of white or beige to achieve that soft, pottery-like pastel tone seen in the photo. -
Paint the interior:
Apply an even coat of the pink paint to the inside of the heart dish. Don’t worry about the outside rim just yet; focus on getting a smooth finish on the interior. -
Create the faux-ceramic rim:
For the outside edge, leave it unpainted if your clay is white, or paint it a creamy off-white color. This contrast mimics the look of glazed ceramic where the natural clay body shows through. -
Add the splatter effect:
Dilute a small amount of black or dark brown paint with water so it’s inky. Dip an old toothbrush into this mixture. -
Flick the specks:
Hold the toothbrush over the dish and run your thumb across the bristles to flick tiny specks of paint onto the pink surface. Test this on a piece of paper first to control the splatter size. -
Paint the rim dots:
Using a very fine detail brush or a toothpick, add small, deliberate black dots along the outer white rim of the dish to mimic the natural iron spots found in stoneware clay. -
Apply the gloss:
Once the paint is completely dry, apply a generous coat of high-gloss varnish. This is the secret step that transforms matte acrylic paint into a faux-ceramic glaze. -
Final dry:
Allows the varnish to cure according to the bottle instructions (usually 24 hours) before placing any jewelry inside.
Pro Tip: Drying Shape
To get a perfectly curved bottom without flat spots, let your clay heart dry resting inside a slightly larger spoon or a small rounded bowl lined with paper towel.
Now you have a charming, speckled jewelry dish that looks like it came straight from a boutique studio potter


Smiley Face Fridge Magnets
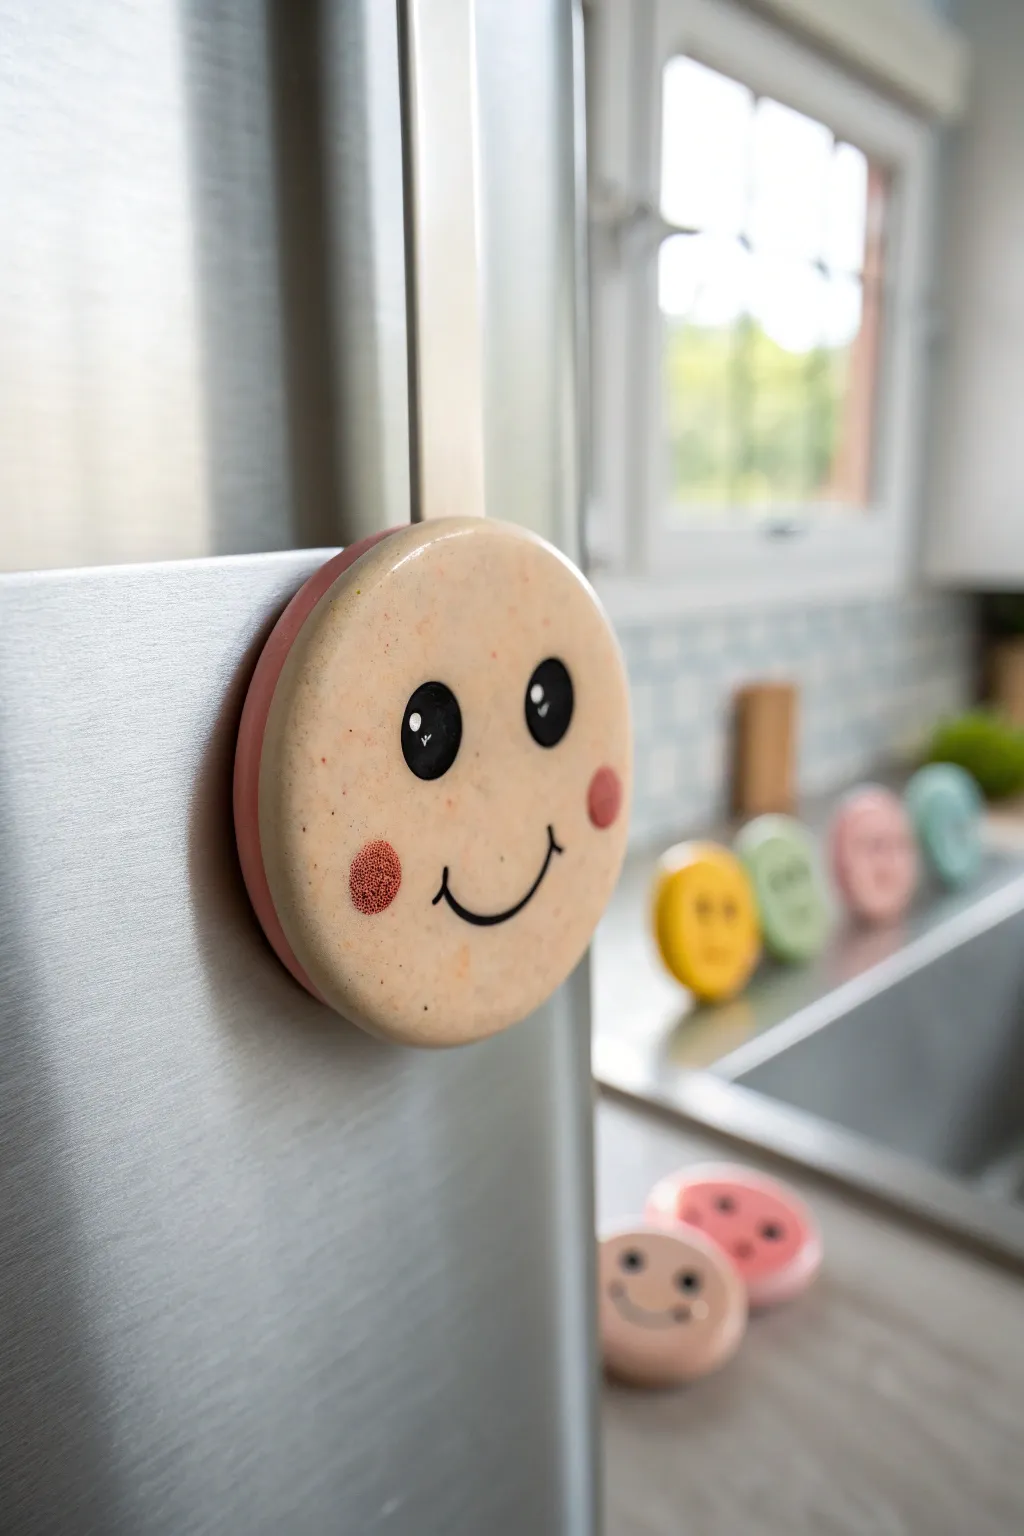
Bring a little joy to your kitchen with these chunky, cheerful magnets that look like smiling sugar cookies. The subtle two-tone design and stippled rosy cheeks give them a professional, finished look that’s surprisingly easy to achieve.
Detailed Instructions
Materials
- Polymer clay or air-dry clay (Cream/Beige and Dusty Pink)
- Circle cookie cutter (approx. 2-3 inches)
- Acrylic rolling pin
- Strong craft glue or E6000
- Round ceramic magnets
- Black acrylic paint
- White acrylic paint
- Fine detail paintbrush
- Small round sponge dobber or q-tip
- Matte finish varnish (optional)
- Sandpaper (fine grit)
Step 1: The Base Shape
-
Prepare the dough:
Begin by conditioning your beige or cream-colored clay until it is soft and pliable. If you want that speckled, stone-like texture seen in the photo, you can knead in a tiny pinch of black pepper or dried tea leaves. -
Roll out the face:
Roll the beige clay into a thick slab, aiming for about 1/4 inch thickness. Use depth guides if you have them to ensure it’s perfectly even. -
Cut the circles:
Press your circle cutter firmly into the clay to create the main face shape. Gently push it out of the cutter, smoothing the edges with your finger to remove any sharp ridges. -
Create the backing:
Now, roll out a slab of the dusty pink clay. This layer should be slightly thinner than the face layer, maybe 1/8 inch thick. -
Cut the back layer:
Use the same circle cutter to cut a matching pink circle. This will serve as the contrasting pop of color on the side profile. -
Join the layers:
stack the beige circle directly on top of the pink one. Press them together gently but firmly so they adhere without distorting the round shape. You can roll the edge on your work surface like a wheel to seal the seam. -
Dry or Bake:
Depending on your clay type, either set the rounds aside to air dry for 24-48 hours or bake them according to the package instructions. I prefer to bake on a piece of cardstock to prevent shiny spots on the back.
Clean Edges Pro Tip
To merge the two colored layers seamlessly, gently rub a tiny bit of baby oil or water (depending on clay type) along the seam with your finger before curing.
Step 2: Painting the Personality
-
Sand for smoothness:
Once fully cured and cool, lightly sand the front surface with fine-grit sandpaper if there are any fingerprints or bumps. -
Draft the face:
Use a pencil to very lightly sketch the placement of the eyes and mouth. The eyes should be wide-set and positioned slightly above the center line. -
Paint the eyes:
Using a fine detail brush and black acrylic paint, fill in the oval eye shapes. It may take two coats to get a solid, opaque black. -
Add the smile:
Carefully paint a thin, U-shaped line for the smile, adding tiny vertical ticks at the ends for that classic happy expression. -
Add the sparkle:
Dip the non-brush end of your paintbrush into white paint and dot a tiny reflection highlight into the upper right corner of each black eye. -
Create rosy cheeks:
Mix a small amount of red or pink paint. Taking a small sponge dobber or cotton swab, dab off most of the paint onto a paper towel until almost dry, then gently stipple round cheeks onto the face. The texture is key here. -
Seal the deal:
Protect your paint job with a layer of matte varnish once the face is completely dry. This keeps the clay looking natural rather than glossy. -
Attach the magnet:
Flip the face over and use a strong adhesive like E6000 to glue a round ceramic magnet to the center of the pink back.
Level Up: Emotions
Make a whole set with different expressions! Try a winking eye, a surprised ‘O’ mouth, or adding sculpted accessories like glasses or a tiny bow.
Now your fridge has a friendly new face to greet you every time you reach for a snack


Mini Frog Buddy Figurine
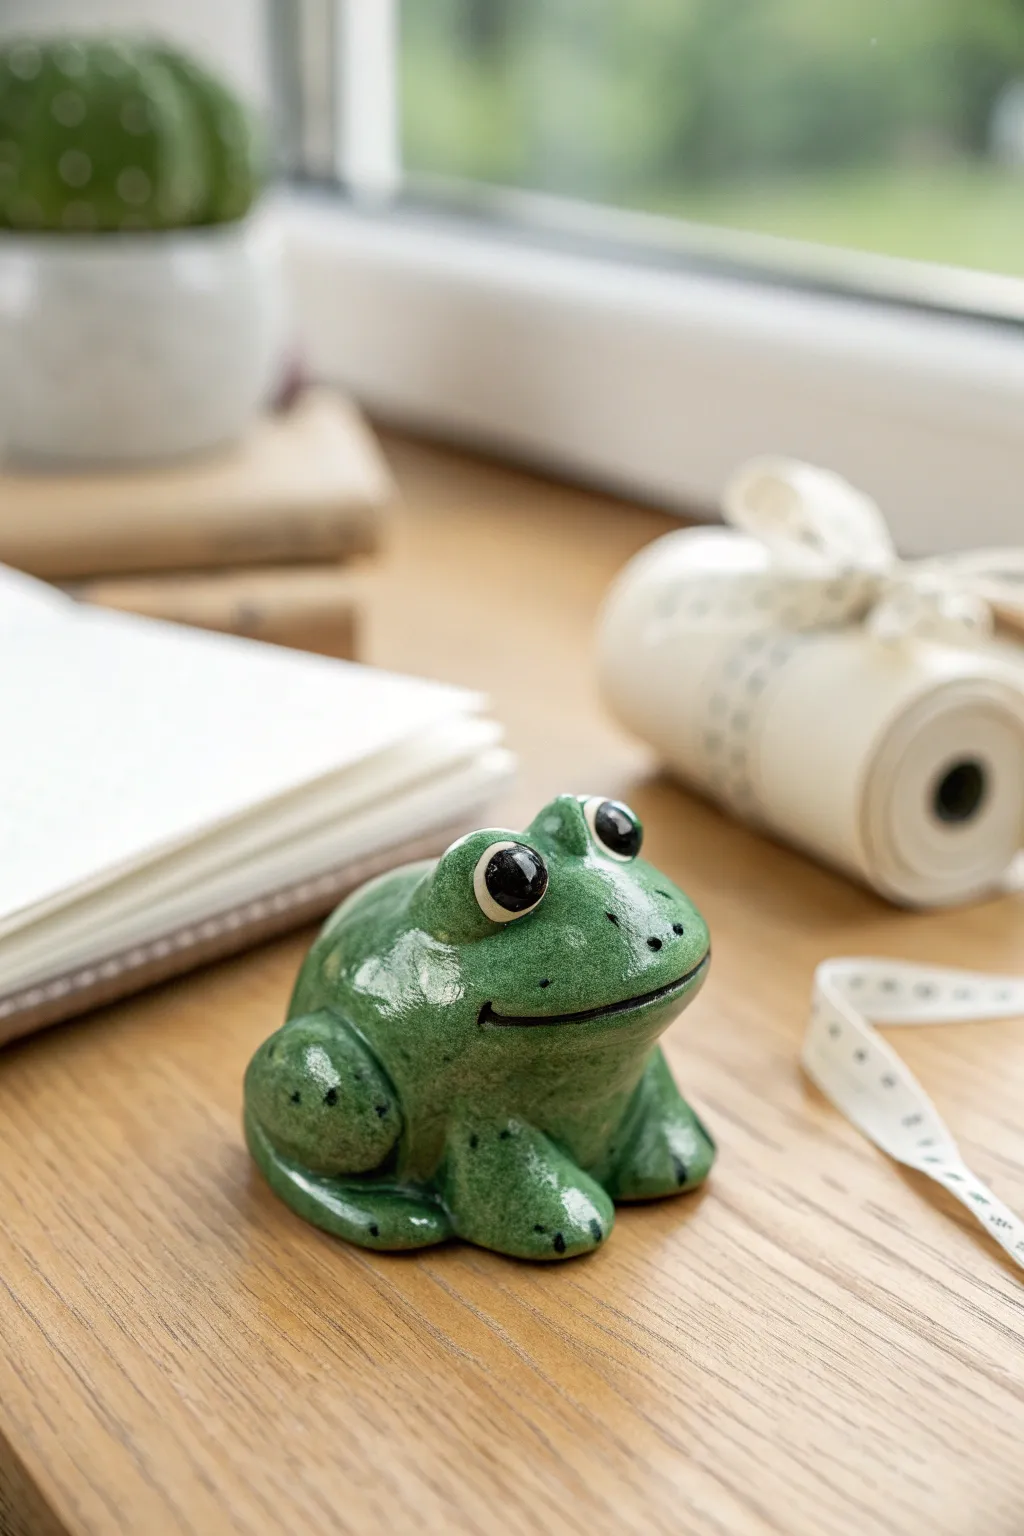
This adorable little amphibian brings a cheerful presence to any desk or shelf with his wide grin and shiny, speckled finish. Modeled with simple shapes and glazed to perfection, he captures the charming essence of a classic garden frog in miniature form.
How-To Guide
Materials
- Polymer clay (white or light grey) or air-dry clay
- Aluminum foil (for the core)
- Acrylic paints: Forest Green, Leaf Green, White, Black
- High-gloss varnish or resin
- Sculpting tools (ball styluses, needle tool)
- Paintbrushes (small detail brush, medium flat brush)
Step 1: Sculpting the Body
-
Form the Core:
Start by crumpling a small piece of aluminum foil into a rough egg shape. This saves clay and keeps the figurine lighter. -
Cover with Clay:
Roll out a sheet of your clay and wrap it fully around the foil core. Smooth the seams until you have a seamless, rounded lump that is slightly wider at the bottom. -
Add Back Legs:
Roll two medium-sized balls of clay. Flatten them slightly into ovals and attach them to the sides of the rear body. Blend the edges into the main body so they look like powerful haunches. -
Create Front Legs:
Roll two thick, short cylinders for the front legs. Attach them vertically under the ‘chest’ area, blending the top seams upward into the body. -
Shape the Feet:
Use a sculpting tool to gently press indentations into the ends of the front legs and back feet to suggest toes, keeping the look soft and rounded rather than sharp. -
Build the Eye Sockets:
Roll two small balls of clay and place them on top of the head area. Blend the bottom edges downward onto the head to create prominent, protruding eye mounds. -
Refining the Face:
Use a needle tool or a thin blade to carefully carve a wide, curved smile into the face. Smooth the edges of the cut with a damp finger or soft brush so it doesn’t look ragged. -
Final Smoothing:
Look over your frog for any fingerprints. Dip your finger in a little water (for air-dry clay) or baby oil (for polymer) and gently buff the surface until it’s perfectly smooth. Let dry or bake according to package instructions.
Cracks happen?
If air-dry clay cracks while drying, mix a tiny bit of fresh clay with water to make a paste (slip). Fill the crack, smooth it over, and let it dry again before painting.
Step 2: Painting & Finishing
-
Base Coat:
Once hardened and cooled, paint the entire frog with a light coat of white acrylic paint. This primer layer helps the green colors pop. -
Apply Main Green:
Mix your leaf green with a tiny touch of white for variety. Paint the entire body, applying two thin coats rather than one thick one for better coverage. -
Add Depth:
While the green is still slightly tacky, I like to take a slightly darker forest green and stipple it gently onto the back and leg creases to create natural shading. -
Paint the Eyes:
Paint the protruding eye mounds white first. Once dry, paint large, round black pupils in the center, leaving a rim of white around the outside. -
Highlight the Eyes:
Dip the very tip of a needle tool or toothpick into white paint and add a tiny dot to the upper corner of each black pupil. This brings the character to life. -
Define the Mouth:
Use your finest detail brush to trace the carved smile line with black paint, ensuring the grin is clearly visible. -
Add Speckles:
Dilute a small amount of black paint with water. Dip a stiff brush (or toothbrush) into it and flick tiny speckles over the back and legs of the frog for texture. Keep the face mostly clear. -
The Glossy Finish:
The secret to the ceramic look is the finish. Apply two thick coats of high-gloss varnish or a layer of UV resin over the entire piece. -
Verify the Dry:
Let the varnish cure completely in a dust-free area for at least 24 hours before handling your new desk buddy.
Make it functional
Before baking or drying, press a strong magnet into the bottom or slice a slot in the back to turn your frog into a cute photo holder.
Enjoy the company of your shiny new green friend on your windowsill or desk

The Complete Guide to Pottery Troubleshooting
Uncover the most common ceramic mistakes—from cracking clay to failed glazes—and learn how to fix them fast.
Axolotl Blob Charm
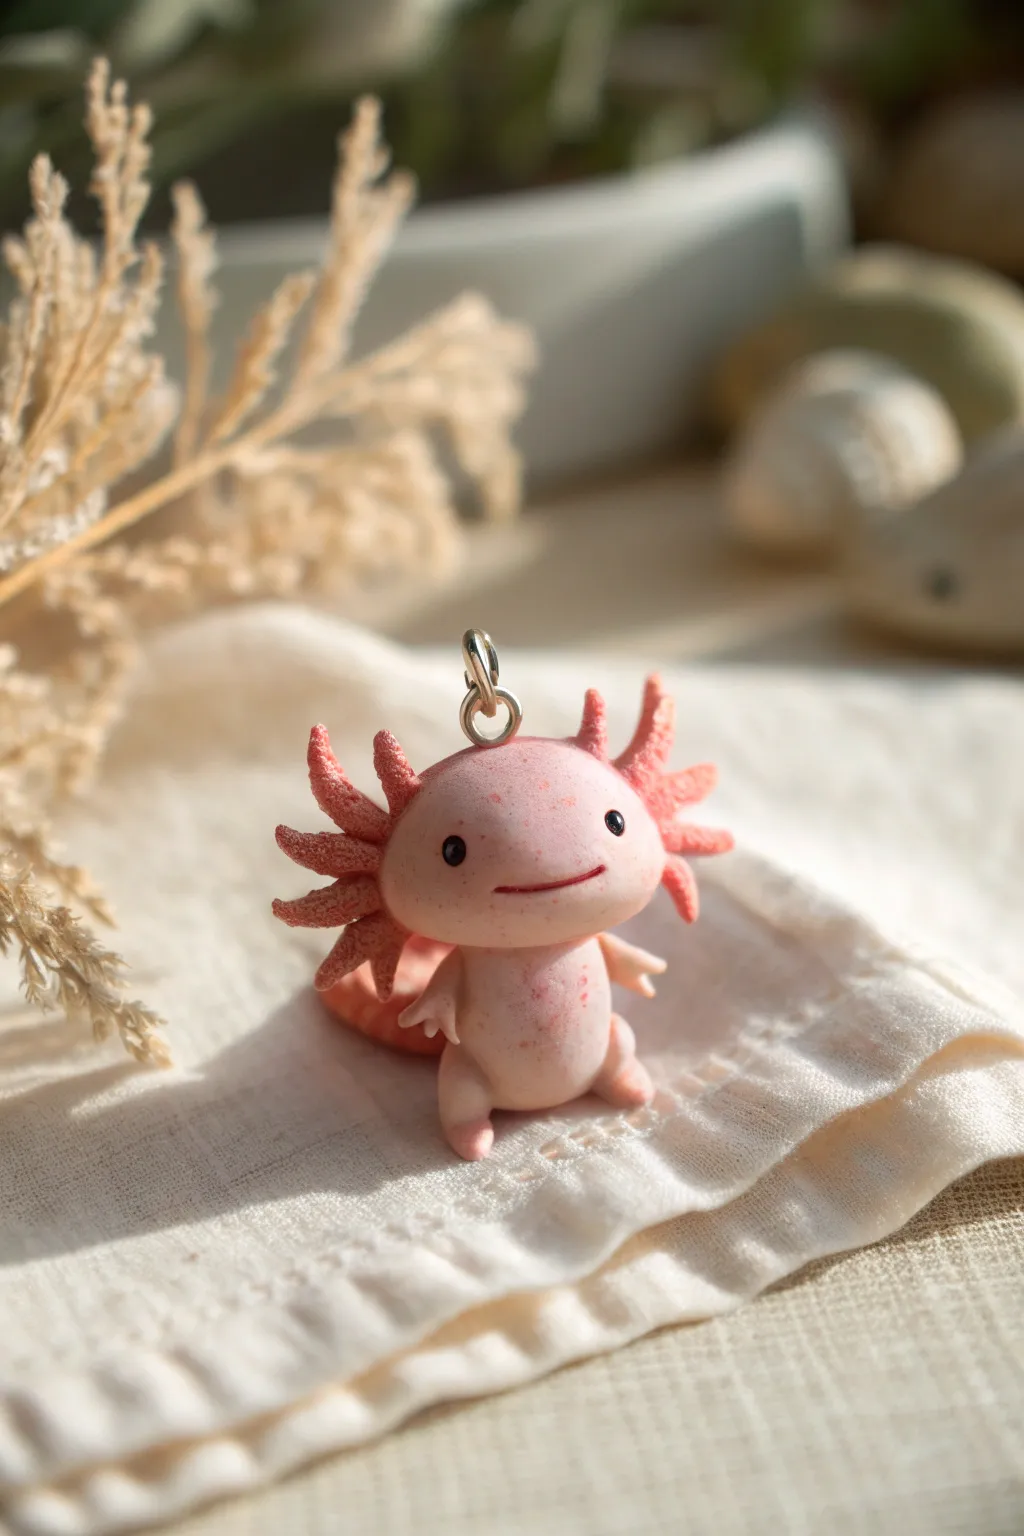
This adorable miniature axolotl charm captures the whimsical nature of the beloved aquatic salamander in durable polymer clay. With its speckled pink skin, tiny limbs, and feathery gills, it makes for a perfect necklace pendant or keychain companion.
Step-by-Step Guide
Materials
- Polymer clay (translucent white, baby pink, and darker pink/coral)
- Black glass beads or black clay for eyes
- Silver eye screw/eyepin
- Needle tool or toothpick
- Ball stylus tool
- Soft pastel chalks (red/pink) and a soft brush
- Gloss glaze (optional for eyes)
- Oven for baking
Step 1: Mixing & Shaping the Body
-
Create the custom color:
Start by mixing translucent white clay with a very small amount of baby pink. You want a semi-translucent, milky pink shade that mimics real axolotl skin rather than an opaque toy pink. -
Speckle the clay:
To get that realistic speckled texture shown in the photo, shave a tiny bit of dry red or dark pink pastel chalk into your clay mix. Knead it until tiny flecks appear throughout the dough without fully blending into a solid color. -
Form the head:
Roll a smooth ball of your custom clay, slightly flattening it into a rounded oval shape. This will be the oversized head, which gives the charm its cute ‘chibi’ look. -
Shape the body:
Roll a second, smaller teardrop shape for the body. Gently press the wider bottom of the teardrop onto a work surface to flatten it slightly so the figure can sit. -
Connect head and body:
Press the head firmly onto the narrow point of the body teardrop. You can insert a small piece of wire or a toothpick segment inside the neck area for extra stability if desired.
Loose Gills?
If the delicate gills keep falling off while you work, use a tiny dab of translucent liquid clay (like Bake & Bond) as an adhesive before baking.
Step 2: Adding Facial Features
-
Indent eye sockets:
Use a small ball stylus to press two shallow indentations on the face where the eyes will go. Space them widely apart for a sweeter expression. -
Insert the eyes:
Press two tiny spheres of black clay (or small black glass beads) into the sockets. If using clay, I find a tiny dot of liquid clay helps them stick securely. -
Carve the smile:
Using a needle tool or a thin blade, gently press a wide, shallow curve between the eyes to create a smile. Tilt the corners up slightly. -
Blush the face:
With a soft brush, dust a tiny amount of pink pastel powder underneath the eyes and inside the mouth crease to add depth and life.
Step 3: Crafting the Gills & Limbs
-
Prepare the gill stalks:
Roll out a thin snake of a slightly darker pink clay. Cut this into six small segments—three for each side of the head. -
Texture the gills:
Before attaching, use a needle tool to poke and rough up the surface of these segments to mimic the feathery texture of axolotl gills. -
Attach the gills:
Press three gill stalks onto the left side of the head and three on the right, curving them slightly upward. Blend the connection points smoothly into the head with a silicone tool. -
Form the arms:
Create two tiny sausage shapes from your main body color. Flatten the ends slightly and use a knife to cut tiny slits for fingers. -
Attach the limbs:
Press the arms onto the upper body. Add two small stumpy legs at the bottom base, ensuring the figure remains balanced and seated. -
Add the tail:
Roll a flattened, curved teardrop shape for the tail. Attach it to the lower back of the body, curling it around the side so it’s visible from the front.
Glow Up
Mix glow-in-the-dark powder into your translucent clay before starting. Your axolotl will look cute by day and bioluminescent by night
Step 4: Finishing Touches
-
Insert hardware:
Screw a silver eye screw into the top center of the head. To ensure it stays put, you can dip the screw’s threads in liquid clay or super glue before inserting. -
Final texture check:
Look over your piece for any fingerprints. Gently smooth them away with a drop of baby oil on your finger or a soft brush. -
Bake:
Bake the charm according to your clay manufacturer’s instructions (usually around 275°F/135°C for 15-30 minutes depending on thickness). -
Glaze:
Once cooled, apply a tiny drop of gloss glaze or UV resin specifically to the black eyes to make them look wet and shiny.
String your new little friend onto a cord or chain and enjoy carrying a bit of aquatic magic with you
Avocado Half With a Face
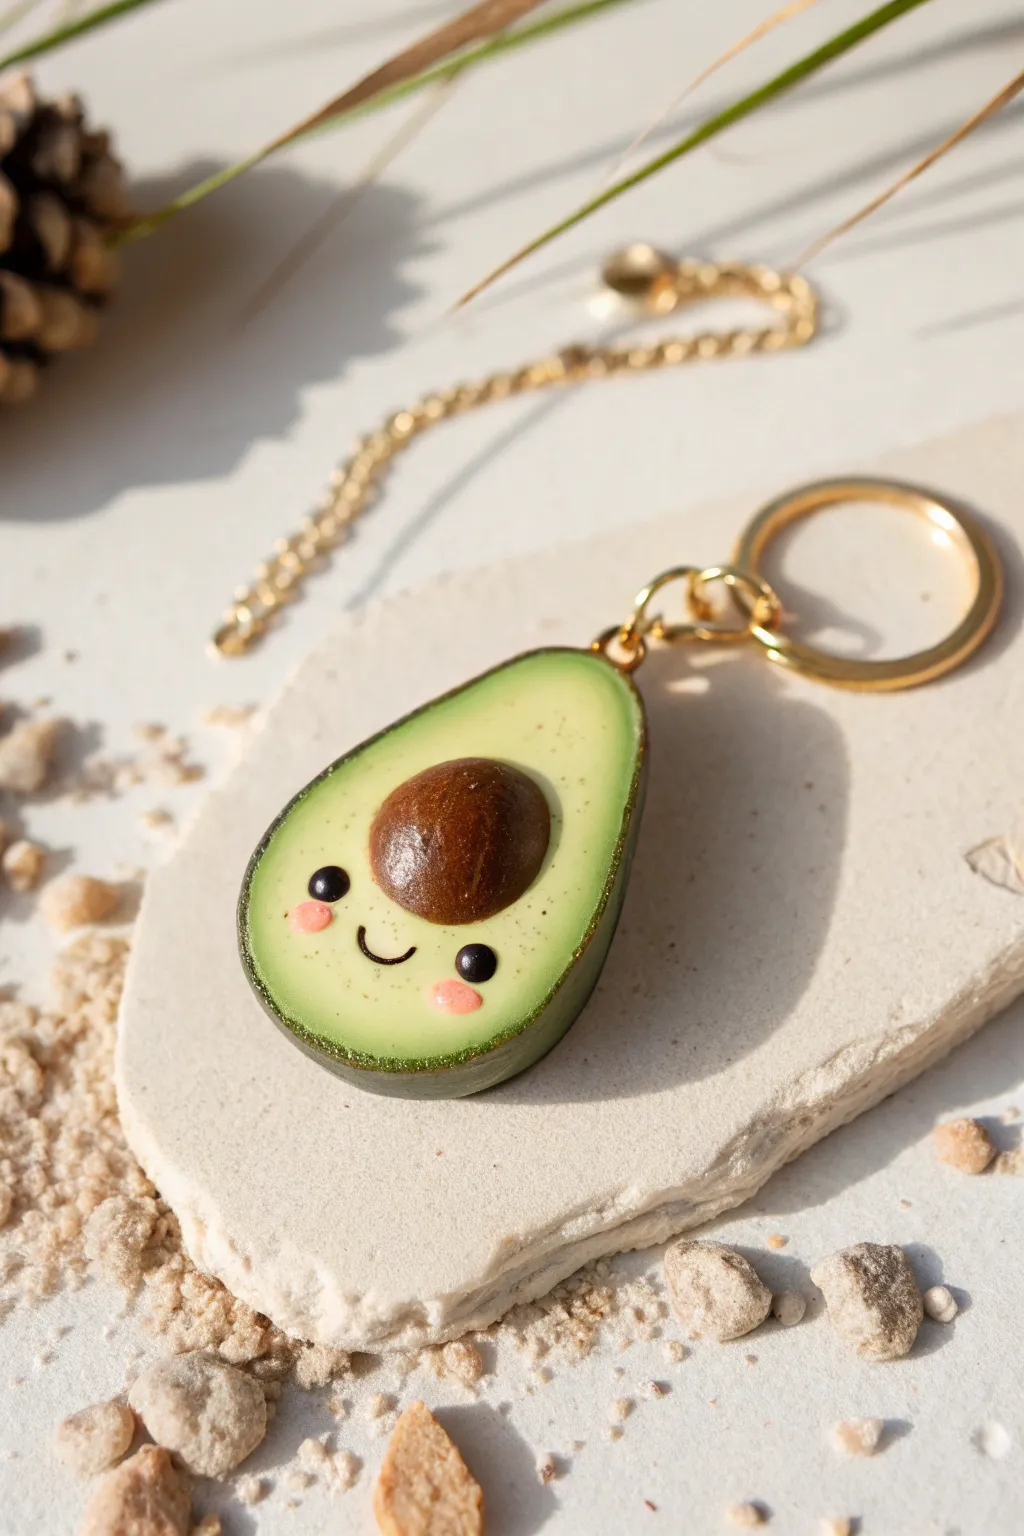
Transform a simple lump of clay into this adorable avocado half with a charming smile and realistic textures. This project combines smooth blending techniques with fun detailing to create a durable accessory that looks almost good enough to eat.
Step-by-Step Tutorial
Materials
- Polymer clay (dark green, light green, pale yellow-green, brown, black, pink)
- Clay roller or pasta machine
- Round cutter or craft knife
- Ball tool (stylus)
- Needle tool or stiff toothbrush
- Gold screw eye pin
- Gold keychain ring and jump ring
- Gloss glaze (UV resin or polyurethane)
- Oven for baking
Step 1: Creating the Avocado Base
-
Condition the clay:
Start by conditioning your light green and pale yellow-green clays until they are soft and pliable. This prevents cracks later on. -
Create a gradient blend:
Form a ‘Skinner blend’ or simple gradient by pressing a log of light green against a log of pale yellow-green. Roll and fold them together repeatedly until you have a smooth transition from green to yellow, mimicking the inside of a real avocado. -
Shape the body:
Take your blended clay and form a thick teardrop shape. Flatten the front face gently while keeping the back rounded and bulbous. -
Add the skin:
Roll out a thin sheet of dark green clay. Carefully wrap this around the curved back and sides of your teardrop shape, trimming any excess at the front edge so the skin looks like a thin rind. -
Texture the peel:
To make the skin look realistic, gently tap a stiff toothbrush or a texturing sponge against the dark green exterior. This creates that bumpy avocado skin texture.
Step 2: Adding the Pit and Face
-
Form the indention:
Use a large ball tool or your thumb to press a smooth, round hollow into the lower center of the yellow-green area where the pit will sit. -
Make the pit:
Roll a ball of brown clay that fits perfectly into your indentation. I prefer to make it bulge out slightly for a 3D effect. Texture it very lightly with a toothbrush for realism. -
Place the eyes:
For the face, use a small ball tool to make two tiny indents on either side of the pit area. Roll two tiny balls of black clay and press them into these sockets. -
Add the smile:
Roll an incredibly thin snake of black clay. Cut a tiny u-shaped segment and carefully place it between the eyes to form a smile, pressing it gently to bond. -
Apply blush cheeks:
Take the tiniest amount of pink clay, flatten it into two small ovals, and place them just under the eyes for that signature kawaii look.
Fixing Fingerprints
If you see fingerprints on the smooth avocado flesh before baking, lightly brush the surface with a little baby oil or clay softener to smooth them away instantly.
Step 3: Finishing Touches
-
Insert hardware:
Before baking, screw the eye pin into the top center of the avocado. Twist it in slowly to ensure it grips the clay securely. -
Bake the piece:
Bake the avocado according to your polymer clay package instructions (usually around 275°F/135°C for 15-30 minutes). Let it cool completely. -
Glaze details:
Apply a coat of gloss glaze or UV resin specifically to the brown pit and the black eyes. This makes them shine and stand out against the matte flesh. -
Add sparkle (optional):
If you want a little extra flair, you can lightly dust the green edge with a tiny bit of shimmer powder before the glaze dries. -
Assemble keychain:
Once the glaze is fully cured, use pliers to open a jump ring, attach your gold keychain loop to the eye pin, and close the ring securely.
BFF Keychains
Create a matching half! Make a second avocado without the pit—just the indentation. Now you have a pair of ‘best friend’ keychains that fit together like a puzzle.
Now clip your cheerful new avocado friend onto your keys or backpack and enjoy the smiles it brings


What Really Happens Inside the Kiln
Learn how time and temperature work together inside the kiln to transform clay into durable ceramic.
Strawberry Slice Charm
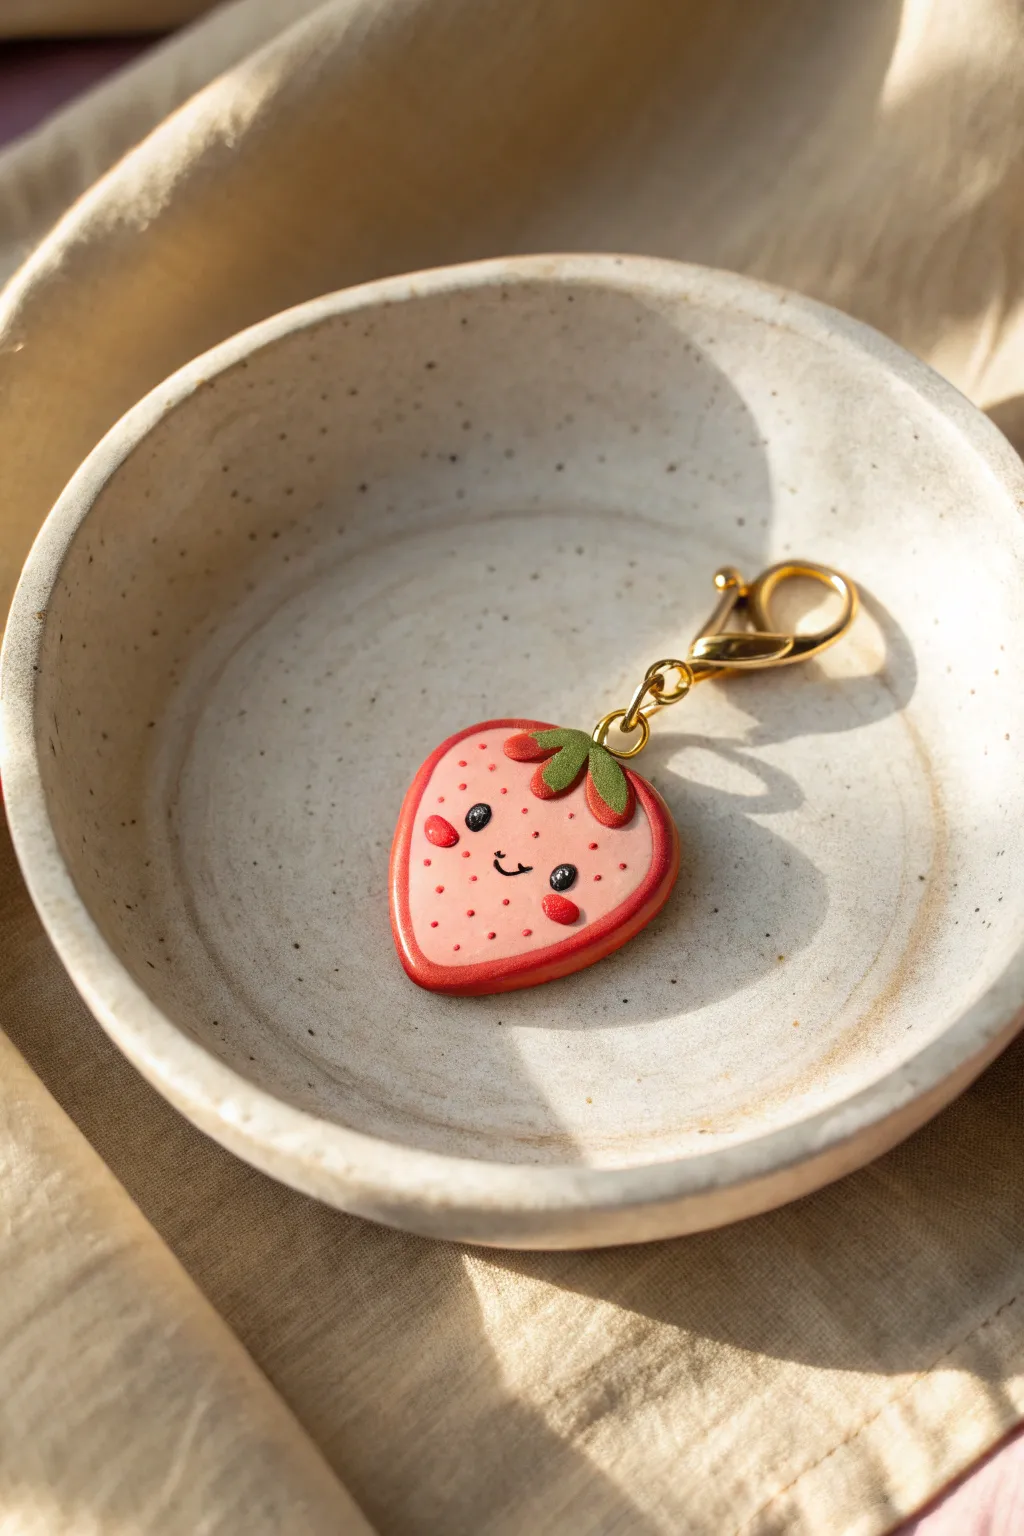
This adorable polymer clay charm captures the essence of a summer berry with a kawaii twist. Its friendly face and soft, rounded edges make it a perfect beginner project for jewelry or keychain crafting.
Step-by-Step
Materials
- Polymer clay (light pink, translucent white, red, green, black)
- Liquid polymer clay (optional, for connecting)
- Needle tool or toothpick
- Small ball stylus tool
- Rolling pin or pasta machine
- Small heart cutter (optional)
- Scalpel or craft knife
- Gold eye pin
- Gold lobster clasp and jump ring
- Glaze (glossy or satin)
- Oven for baking
Step 1: Creating the Base
-
Mix the perfect pink:
Start by mixing a small amount of translucent clay with your light pink clay. This gives the inner fruit flesh a realistic, slightly juicy look compared to the opaque rind. -
Shape the core:
Roll your mixed pink clay into a smooth ball about the size of a large marble, then flatten it gently into a thick teardrop shape. -
Flatten into a slice:
Using your palm or a small acrylic block, press the teardrop until it’s about 1/4 inch thick, keeping the rounded strawberry silhouette intact. -
Prepare the rind:
Condition a piece of red clay and roll it out into a long, thin snake. Flatten this snake into a ribbon that is the same width as the thickness of your pink slice. -
Wrap the berry:
Carefully wrap the red ribbon around the edge of your pink teardrop. Smooth the seam where the ends meet at the top, and gently blend the red onto the pink surface just a tiny bit to connect them securely.
Fingerprint Fix
Before baking, brush the surface lightly with a little baby oil or cornstarch to smooth out any accidental fingerprints left during sculpting.
Step 2: Adding Details
-
Texture the seeds:
Using a needle tool, poke shallow, tiny indentations scattered across the pink surface to mimic seed pockets. -
Add the seeds:
Take extremely tiny bits of the red clay—barely specks—and roll them into microscopic balls. Place one into each indentation you created. -
Create the leaves:
Roll out a small amount of green clay. You can use a tiny cutter or cut freehand three small teardrop shapes for the calyx (top leaves). -
Attach the greenery:
Position the green leaves at the top center of the strawberry, overlapping slightly. Press them down gently so they curve over the red rind. -
Prepare the eye sockets:
Use a medium-sized ball tool to press two indentations where you want the eyes to sit. This helps the eyes stay flush with the surface.
Step 3: Bringing it to Life
-
Make the eyes:
Roll two small balls of black clay. I usually make them slightly larger than the seeds for cuteness. Place them into the eye sockets. -
Add eye highlights:
Using the tiniest white clay speck or a dot of white acrylic paint (post-baking), add a highlight to the upper right of each black eye. -
Sculpt the mouth:
Roll a microscopically thin snake of black clay. Curve it into a sweet ‘U’ shape and press it gently between the eyes using the needle tool. -
Add rosy cheeks:
Create two small ovals of red clay and flatten them slightly. Place them just under and to the outside of the eyes. -
Insert hardware:
Trim a gold eye pin to the right length. Dip the end in a little liquid clay (or bake and bond) and insert it straight down through the center of the green leaves. -
Bake:
Bake the charm according to your clay manufacturer’s instructions. Usually, this is around 275°F (130°C) for 15-20 minutes.
Make it a Set
Create a matching pair of earrings by making two smaller versions, or create a ‘bitten’ version by using a scalloped cutter to remove a chunk from the side.
Step 4: Finishing
-
Cool down:
Allow the piece to cool completely before handling so it hardens fully. -
Glaze:
Apply a thin layer of gloss or satin glaze to seal the clay and give it a finished, ceramic-like sheen. -
Assemble:
Once the glaze is dry, use pliers to open a jump ring, attach your lobster clasp to the eye pin loop, and close it securely.
Now you have a charming little berry companion ready to brighten up your bag or keys
Simple Flower Coasters
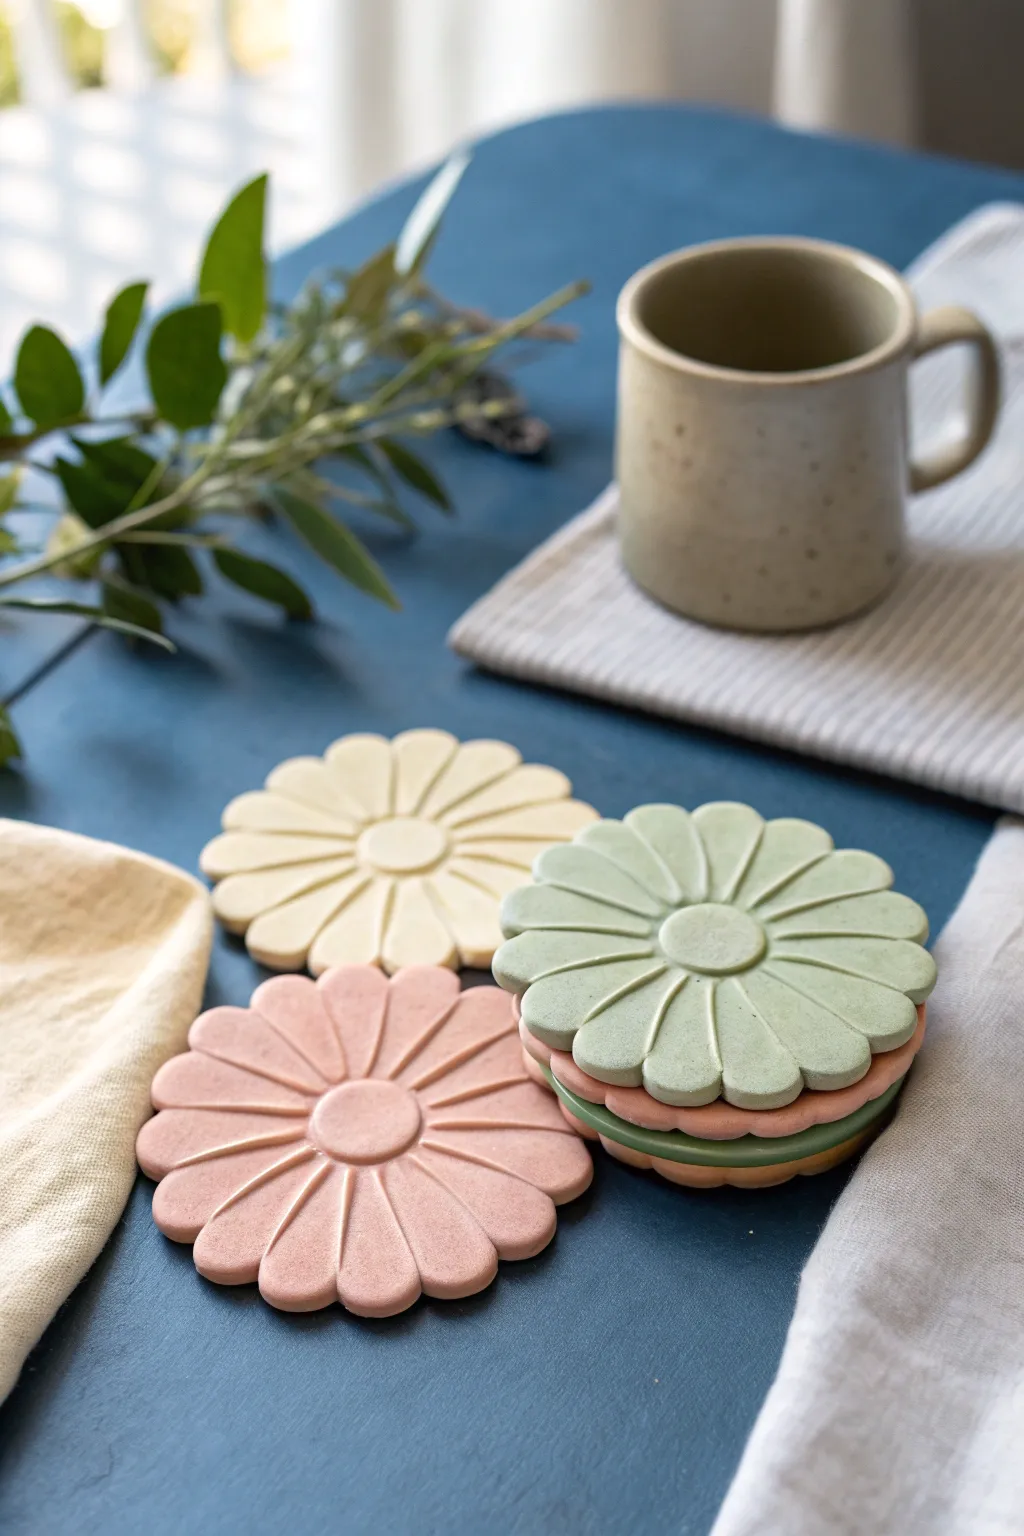
Bring the softness of a garden indoors with these charming, flower-shaped coasters. Their matte finish and muted pastel tones make them a sophisticated yet playful addition to any coffee table setup.
How-To Guide
Materials
- Air-dry clay or polymer clay (white)
- Acrylic paints (pastel pink, sage green, cream)
- Rolling pin
- Parchment paper or silicone mat
- Round cookie cutter (approx. 3.5 – 4 inch diameter)
- Small round cutter or bottle cap (approx. 1 inch diameter)
- Modeling tool or butter knife
- Fine-grit sandpaper
- Matte spray sealant or matte varnish
- Sponge or small paintbrush
Step 1: Preparation & Shaping
-
Condition the clay:
Start by taking a handful of clay and kneading it in your hands until it becomes soft, pliable, and free of cracks. If you are using polymer clay, this might take a few minutes to get right. -
Roll it out:
Place your clay onto a piece of parchment paper or a silicone mat to prevent sticking. Use your rolling pin to flatten the clay into an even slab, aiming for a thickness of about 1/4 inch so the coaster is sturdy. -
Cut the main circle:
Press your large round cookie cutter firmly into the clay to create the base shape. Peel away the excess clay from the outside, leaving just the perfect circle behind. -
Mark the center:
Take your smaller round cutter or a bottle cap and gently press it into the absolute center of the clay circle. Don’t cut all the way through; just make a clear indentation to mark the flower’s center.
Step 2: Sculpting the Flowers
-
Divide the petals:
Visualize the outer ring of the circle like a clock. Using a modeling tool or the back of a butter knife, gently mark lines radiating from the center circle to the outer edge to divide the clay into equal sections. -
Make the initial cuts:
Once you are happy with the spacing, press your tool deeper into the clay along those lines to create the separation between petals. I like to curb the edges slightly inward at the tips to soften the look. -
Shape the petal tips:
Use your fingers or a smoothing tool to round the outer edge of each petal section. You want to transform the original perfect circle edge into a scalloped, flower-like edge. -
Define the grooves:
Go back over the lines between the petals with a rounded tool to deepen the grooves, making the petals look puffy and distinct rather than just cut. -
Add the center detail:
Roll a small ball of clay, flatten it slightly, and press it firmly into the center indentation you made earlier. You can gently score the edges to help it adhere if using air-dry clay. -
Smooth everything out:
Dip your finger in a tiny bit of water (for air-dry clay) or baby oil (for polymer) and gently rub away any fingerprints or rough edges on the surface.
Warping Woes?
If air-dry clay curls up while drying, place a heavy book on top of it once it’s semi-dry (leather hard) to force it flat again.
Step 3: Finishing Touches
-
Let it dry or bake:
If using air-dry clay, leave the coasters in a cool, dry place for 24-48 hours, flipping them occasionally to prevent warping. If using polymer clay, bake according to the package instructions. -
Sand for perfection:
Once fully cured and cooled, take a piece of fine-grit sandpaper and gently buff the edges and surface. This removes any tiny burrs and gives that professional, smooth finish visible in the photo. -
Mix your colors:
Prepare your palette with pastel acrylics. You want a creamy off-white, a dusty rose pink, and a muted sage green. -
Apply the base coat:
Paint the entire coaster in your chosen color. Use a sponge for a texture-free application or a soft brush for smooth strokes. -
Apply a second coat:
Let the first layer dry completely, then add a second coat to ensure the color is opaque and vibrant. -
Seal the deal:
To protect your coasters from moisture, finish them with a matte spray sealant or varnish. Avoid glossy finishes if you want to maintain the soft, modern look of the inspiration image.
Speckled Effect
Flick a toothbrush dipped in diluted brown paint over the dry coasters before sealing to mimic a ceramic stoneware look.
Stack your new floral creations on the table and enjoy a lovely tea time with handmade charm

TRACK YOUR CERAMIC JOURNEY
Capture glaze tests, firing details, and creative progress—all in one simple printable. Make your projects easier to repeat and improve.
Leaf-Imprint Mini Dish
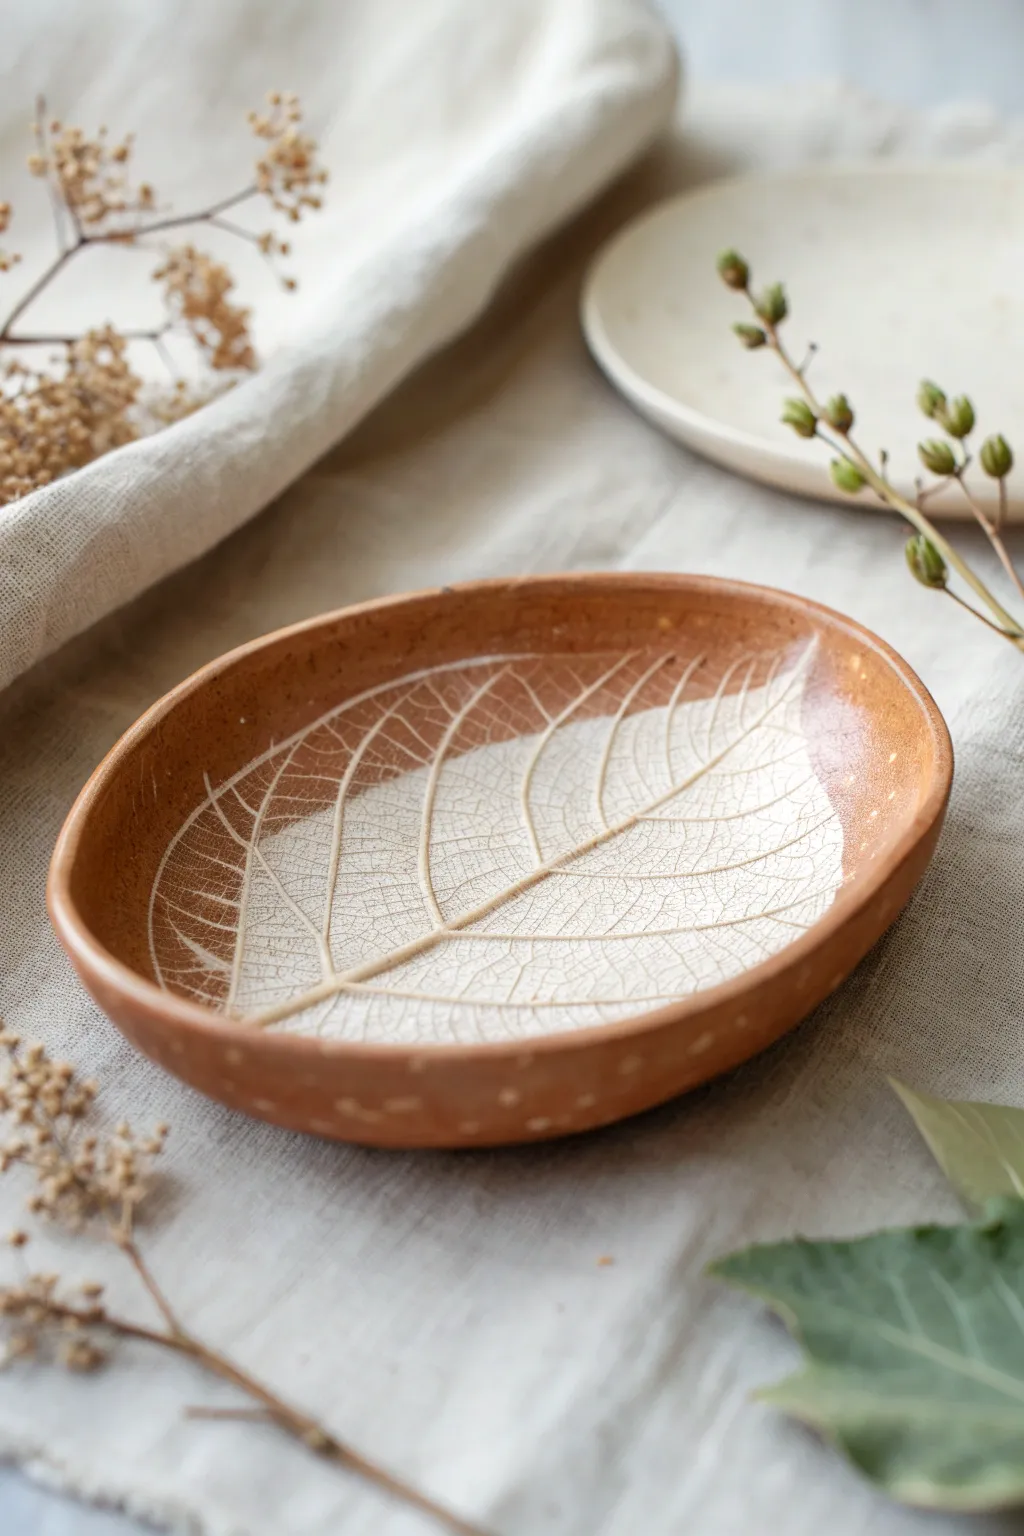
This rustic, charming dish captures the intricate veins of a real leaf, preserving nature’s details in warm terracotta clay. With its beautiful contrast between the raw clay body and the white-washed leaf impression, it makes a stunning jewelry holder or decorative accent piece.
Detailed Instructions
Materials
- Terracotta or reddish-brown air-dry clay (or kiln-fire stoneware)
- A fresh leaf with prominent veins (hydrangea, hosta, or grape leaves work well)
- Rolling pin
- Two wooden guide strips (approx. 1/4 inch thick)
- Fettling knife or needle tool
- Small bowl or sponge for shaping
- White acrylic paint or white slip (depending on clay type)
- Small paintbrush
- Damp sponge
- Matte spray varnish or glaze
Step 1: Preparing the Slab
-
Condition the clay:
Begin by wedging your terracotta clay thoroughly to remove air bubbles and ensure an even consistency. It should feel pliable and smooth to the touch. -
Set up guides:
Place your wooden guide strips on either side of your clay ball on a canvas or cloth work surface. These will help you roll a perfectly even slab. -
Roll the slab:
Using the rolling pin, roll the clay out until it is flush with the height of your guide strips, creating a uniform thickness of about 1/4 inch. -
Smooth the surface:
Take a slightly damp sponge or a rubber rib and gently smooth out the surface of the clay slab to remove any canvas texture or rolling marks.
Vein Definition Tip
If your leaf is soft, place a piece of paper over it before rolling. This prevents tearing and helps push the veins deeper without mushing.
Step 2: Creating the Impression
-
Position the leaf:
Select your leaf and place it vein-side down onto the center of the clay slab. The vein side usually has the most raised texture, which gives the crispest print. -
Embed the leaf:
Gently roll over the leaf with your rolling pin. Apply firm, even pressure to push the veins deep into the clay, but be careful not to make the slab too thin. -
Cut the shape:
Using the leaf itself as a visual guide but drawing slightly outside it, use your needle tool or knife to cut an oval shape around the imprint. -
Remove the leaf:
Use the tip of your needle tool to carefully lift the stem of the leaf and peel it away from the clay to reveal the intricate impression left behind.
Troubleshooting Cracks
If edges crack while drying, you likely added too much water while smoothing. Repair small cracks with a slurry of clay and vinegar before painting.
Step 3: Shaping and Finishing
-
Smooth the rim:
Dip your finger in a little water and run it along the cut edge of the oval to round it off and remove any sharp burrs or crumbs. -
Form the curve:
Carefully lift the clay slab and place it inside a shallow bowl lined with plastic wrap, or drape it over a curved form. Allow gravity to gently curve the sides upward. -
Drying time:
Let the dish dry completely in this position. If using air-dry clay, this may take 24-48 hours; turn it occasionally to ensure the bottom dries evenly. -
Apply the wash:
Once dry (and bisque fired if using kiln clay), dilute white acrylic paint or slip with water until it has a milky consistency. Brush this wash liberally over the entire leaf impression. -
Wipe back:
Before the paint fully dries, take a damp sponge and wipe across the surface. I like to do this fairly quickly so the white stays trapped in the deep veins but reveals the terracotta color on the high points. -
Detail the rim:
Use a very fine brush to add tiny white dots along the rim of the dish if desired, mimicking the speckled detail seen in the reference photo. -
Seal or glaze:
Finish by applying a matte varnish (for air-dry clay) or clear matte glaze (for kiln clay) to protect the surface and deepen the clay color.
Now you have a botanical keepsake that brings a touch of organic warmth to your home decor
Ring Cone Stand
Bring a touch of modern earthiness to your vanity with this simple yet elegant speckled clay ring cone set. The natural stone-like texture and creamy hue create the perfect neutral backdrop for displaying your favorite gold bands.
Step-by-Step
Materials
- Polymer clay (white or beige)
- Black pepper or dried coffee grounds (for speckling)
- Rolling pin or acrylic roller
- Clay knife or craft blade
- Round cookie cutter (approx. 3-4 inches)
- Circular object for inner tray indentation (like a jar lid)
- Fine-grit sandpaper (400 and 600 grit)
- Oven and baking sheet
- Parchment paper
- Matte finish varnish (optional)
Step 1: Preparing the Clay
-
Condition the Clay:
Begin by warming up your beige or white polymer clay in your hands until it becomes soft and pliable. This conditioning step is crucial to prevent cracks later on. -
Add Texture:
To achieve that organic, stone-like appearance, sprinkle a pinch of ground black pepper or very fine dried coffee grounds onto the flattened clay. -
Mix Thoroughly:
Fold the clay over the speckles and knead it repeatedly until the particles are evenly distributed throughout the entire batch. -
Divide the Batch:
Separate your mixed clay into two unequal portions: a larger piece (about 2/3) for the base tray and a smaller piece (about 1/3) for the cone itself.
Step 2: Forming the Ring Cone
-
Shape a cylinder:
Take the smaller portion of clay and roll it between your palms to form a smooth, thick cylinder or sausage shape. -
Create the taper:
I like to place the cylinder on my work surface and roll it back and forth while applying more pressure to one end, gradually forming a cone shape. -
Refine the height:
Stand the cone up and check the height. If it’s too short, gently pull and smooth the clay upward to elongate the tip, aiming for a slender, elegant point. -
Flatten the base:
Pick up the cone and tap the bottom firmly against your work surface to ensure it is perfectly flat and will stand upright without wobbling. -
Smooth the surface:
Run your finger lightly over the cone to remove any fingerprints, ensuring the taper is smooth and even from bottom to top.
Uneven Cone Tip?
If the tip of your cone keeps bending or looking droopy, try refrigerating the clay cone for 10 minutes before baking to firm it up perfectly.
Step 3: Creating the Tray Base
-
Roll the slab:
Take the larger portion of clay and use your rolling pin to create an even slab, approximately 1/4 inch thick so it feels substantial. -
Cut the circle:
Use your round cookie cutter to punch out a clean, perfect circle from the slab. -
Define the rim:
Find a smaller circular object, like a jar lid or a smaller cutter, and press it gently into the center of the clay circle—don’t cut through, just create an indentation to define the rim. -
raise the sides:
Gently pinch and push the clay upwards around the indentation line to create a raised lip for the tray. -
Smooth the edges:
Dip your finger in a tiny bit of water or baby oil and run it along the rim of the tray to soften any sharp edges left by the cutter.
Stone Effect Secret
Mix different colors of pepper (black and white) or sand into the clay for a more complex, realistic granite texture.
Step 4: Baking and Finishing
-
Prepare for baking:
Place both the cone and the tray on a baking sheet lined with parchment paper. Ensure they aren’t touching. -
Bake the clay:
Bake according to your polymer clay package instructions (usually around 275°F or 135°C for 15-30 minutes depending on thickness). -
Let it cool:
Allow the pieces to cool completely on the baking sheet to harden fully before handling them. -
Sand for smoothness:
Once cool, use fine-grit sandpaper to buff away any remaining fingerprints or rough spots on the bottom or rim. -
Clean up:
Wipe the pieces with a damp cloth to remove sanding dust, revealing the beautiful speckled pattern. -
Assemble:
Simply place the cone into the center of the tray; you can glue it permanently with superglue or leave it loose for a modular design.
Now you have a chic, custom organizer to keep your everyday jewelry safe and stylishly displayed
Photo or Card Holder Block
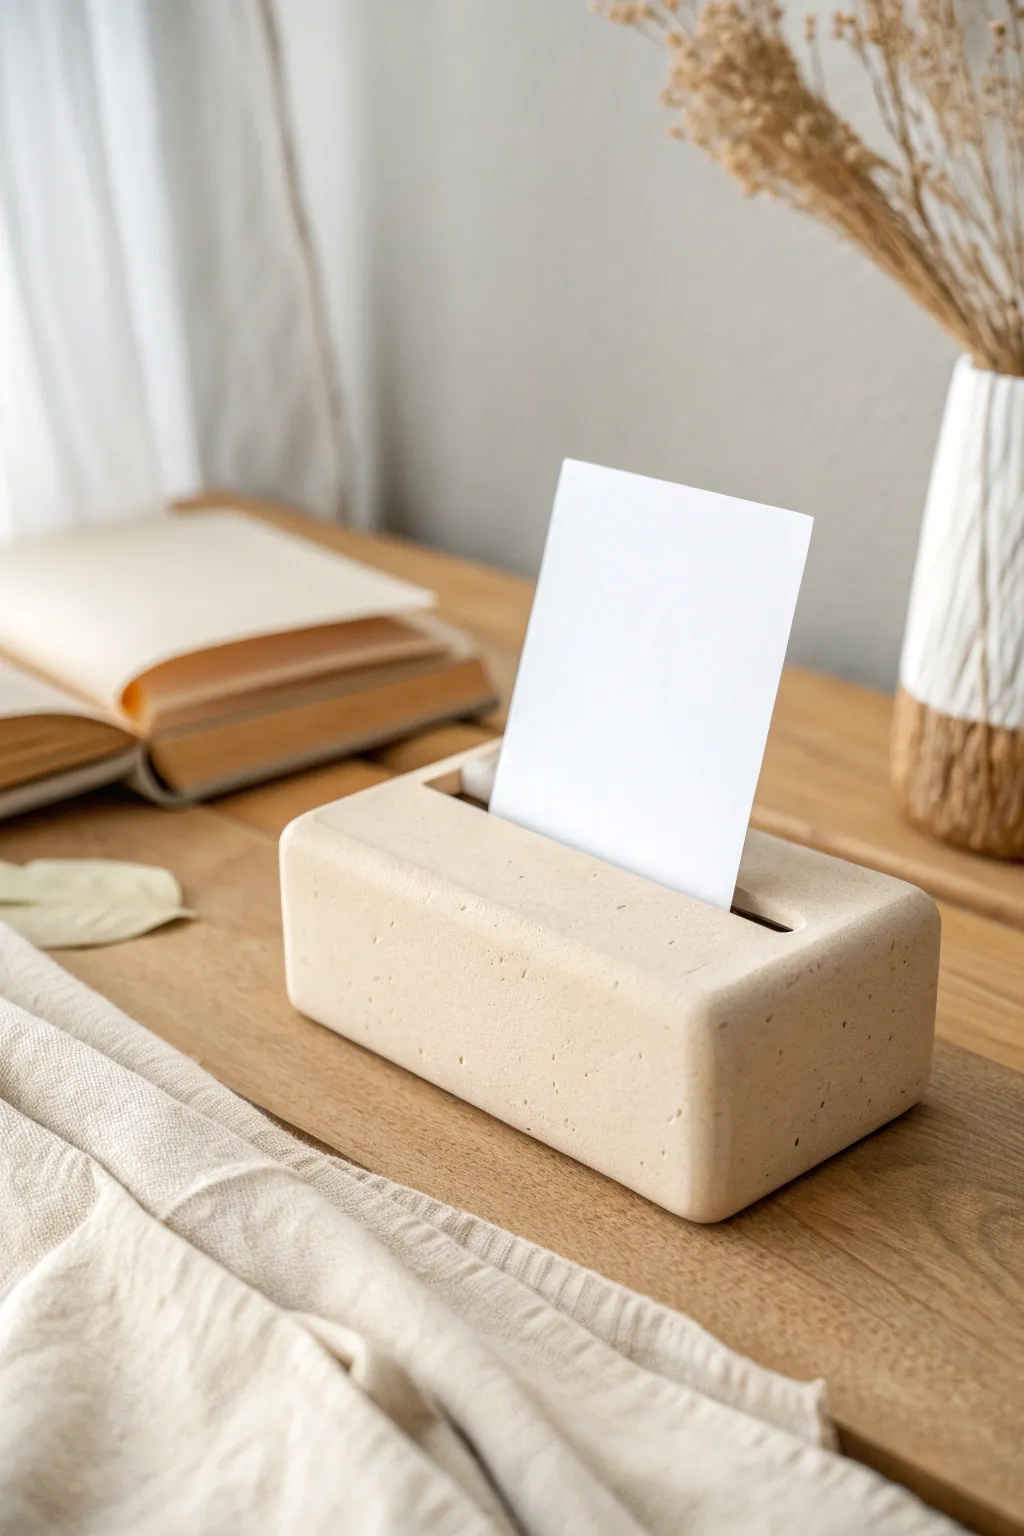
This sleek, rectangular block offers a modern way to display photos, postcards, or table numbers with understated elegance. Its smooth, stone-like texture and clean lines make it a versatile piece that complements almost any decor style.
Step-by-Step Guide
Materials
- Air-dry clay (white or cream)
- Dough scraper or clay blade
- Rolling pin
- Two wooden guide slats (approx. 1.5 inch thick) or similar height guides
- Metal ruler
- Craft knife
- Sandpaper (medium and fine grit)
- Water in a small cup
- Clay sponge or soft cloth
- Acrylic sealer (matte)
Step 1: Shaping the Base
-
Condition the clay:
Start by taking a substantial chunk of air-dry clay and kneading it in your hands. You want to warm it up until it’s pliable and free of air bubbles, which helps prevent cracks later. -
Form a rough log:
Shape the conditioned clay into a rough rectangular log shape using your hands. It doesn’t need to be perfect yet, just roughly the volume you want for the final block. -
Use guides for thickness:
Place your wooden guide slats on a flat work surface. Set the clay between them. These guides will ensure your block maintains a consistent, chunky height. -
Roll completely flat:
Using your rolling pin, roll across the top of the clay, resting the pin on the guides. Roll until the clay is perfectly level with the top of your slats. -
Cut the rectangle:
Using your metal ruler and a sharp clay blade or knife, cut the clay into a precise rectangle. The dimensions in the photo look to be approximately 6 inches wide by 3 inches deep. -
Refine the edges:
Don’t discard the scraps yet. Pick up the block gently and tap the sides against your work surface to square them up. Use your fingers to ensure the corners maintain a soft, slightly rounded look rather than being razor-sharp.
Step 2: Creating the Slot
-
Measure the center:
Locate the exact center of the block’s top face using your ruler. Mark a faint line where the card slot will go. -
Create the incision:
Press a metal ruler or a rigid card into the clay along your marked line. Rock it gently back and forth to widen the slot slightly so it can comfortably hold thick cardstock. -
Check the depth:
Ensure the slot goes down at least half an inch to provides stability for whatever you display, but be careful not to push all the way through to the bottom. -
Clean the slot edges:
I usually run a slightly damp finger or a clay tool along the rim of the slot to smooth out any clay that displaced upwards during the incision.
Clean Cuts
To prevent the clay from dragging when you cut the deep slot, coat your ruler or blade with a tiny bit of oil or lotion before pressing it down.
Step 3: Finishing Touches
-
Add texture (optional):
The example has a slight speckled, stone-like appearance. You can achieve this by gently pressing a coarse sponge onto the surface or sprinkling a tiny amount of sand/dried tea leaves onto the clay and lightly rolling it in before the final cut. -
Smooth with water:
Dip your sponge or finger in a little water and go over the entire exterior. Smooth out any fingerprints, tool marks, or uneven patches. -
Let it dry slowly:
Place the block in a cool, dry area away from direct sunlight. Because this piece is thick, let it dry for at least 48-72 hours. Rotate it occasionally to ensure even airflow. -
Sand for perfection:
Once fully cured and hard, use medium-grit sandpaper to level any bumps. Follow up with fine-grit sandpaper to get that buttery smooth finish seen in the inspiration photo. -
Round the corners:
Pay special attention to sanding the corners and edges to create a gentle bevel, softening the geometric look. -
Seal the piece:
Brush on a coat of matte acrylic sealer. This protects the clay from moisture and gives it a finished, professional quality.
Table Number Twist
For a wedding or event, paint the numbers directly onto the front face of the block using a fine-liner brush and gold paint.
Pop in your favorite photo or quote card and enjoy this stylish addition to your desk or shelf
Mini Face Planter
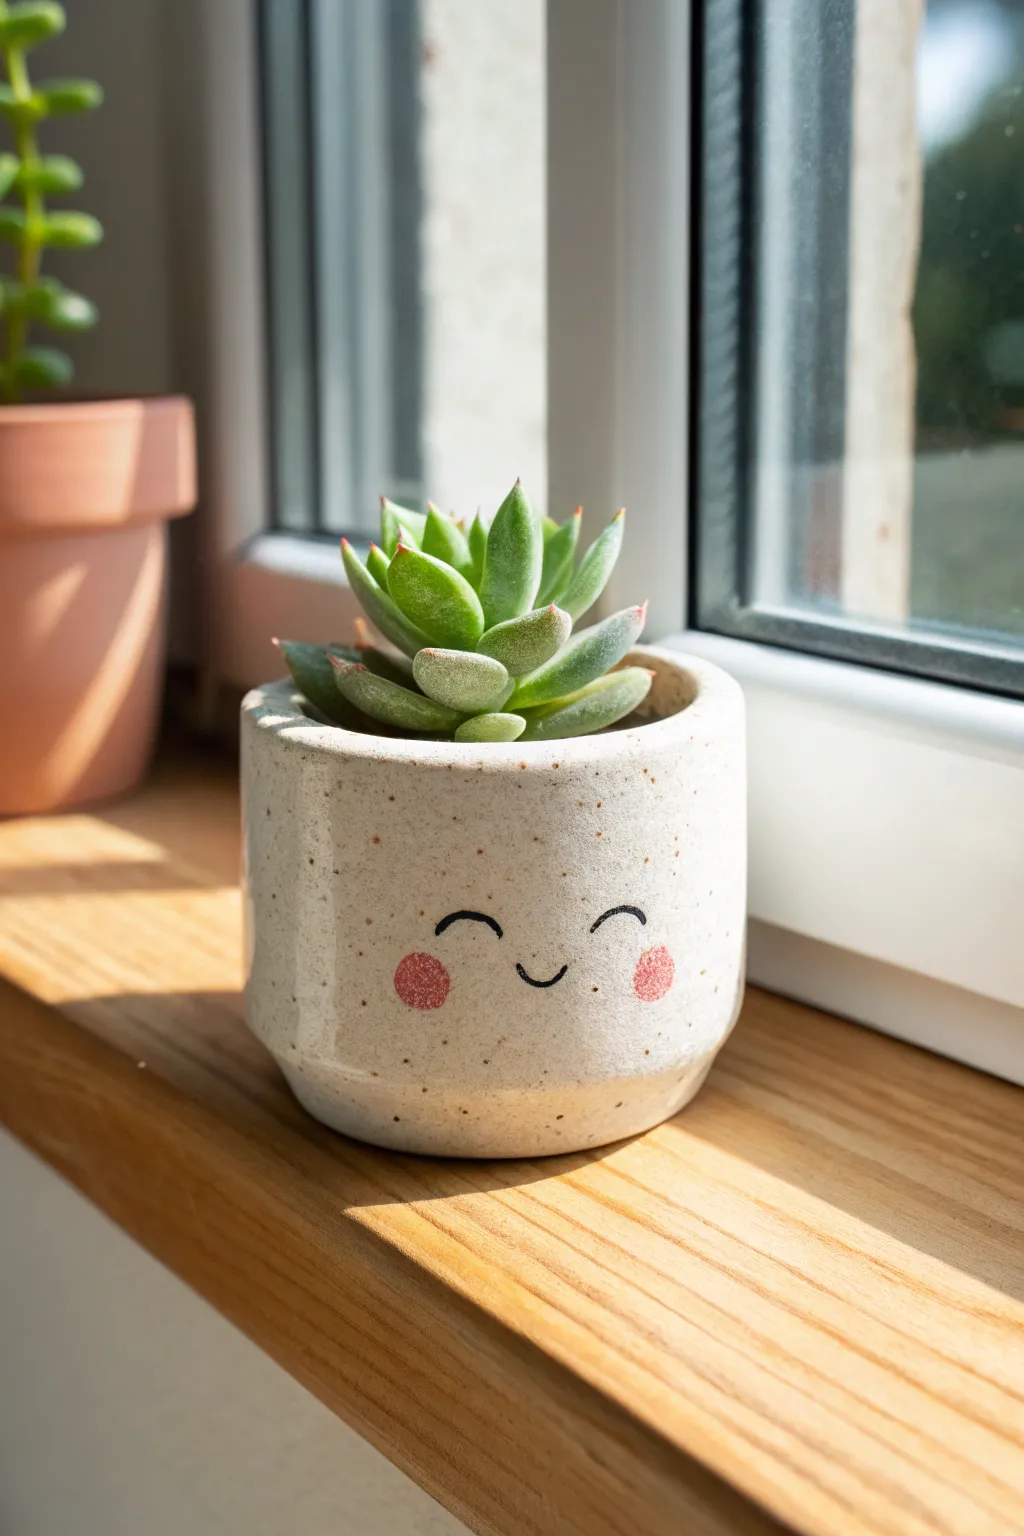
Bring a touch of cheer to your windowsill with this adorable miniature succulent planter featuring a sweet, smiling face. The speckled cream finish mimics high-end ceramic glaze, giving it a professional look with simple hand-building techniques.
Step-by-Step Tutorial
Materials
- White air-dry clay or polymer clay
- Rolling pin
- Ruler
- Craft knife or clay blade
- Small circular cookie cutter or a jar lid (approx. 3 inches)
- Small cup or cardboard tube (to use as a mold)
- Parchment paper
- Spice jar (for speckling)
- Sandpaper (fine grit)
- Acrylic paints: Black, Pink, Brown/Tan
- Old toothbrush
- Fine detail paintbrush (size 0 or 00)
- Round sponge dauber or cotton swab
- Matte varnish or sealant
Step 1: Shaping the Planter
-
Prepare your workspace:
Lay down a sheet of parchment paper to prevent sticking. Knead your clay until it is soft, pliable, and free of air bubbles, which helps prevent cracks later. -
Roll out the base:
Use your rolling pin to flatten a portion of clay to about 1/4 inch thickness. Use your circular cutter or jar lid to cut out a perfect circle for the bottom of the pot. -
Measure the wall:
Roll out a larger slab of clay, also to 1/4 inch thickness. You’ll need a long rectangular strip that is tall enough for your desired height (about 3 inches) and long enough to wrap around the circumference of your base. -
Cut the rectangle:
Using a ruler and craft knife, cut a clean rectangle strip. I find it helpful to wrap a piece of string around the base circle first to measure exactly how long this strip needs to be. -
Form the cylinder:
Wrap the rectangular strip around your cardboard tube or cup mold (covered in parchment paper so it doesn’t stick). Bring the two ends of the strip together. -
Seal the seam:
Score the edges where they meet (scratch them up a bit) and add a tiny bit of water or slip. Press them firmly together and smooth the seam with your finger or a modeling tool until it disappears. -
Attach the base:
Place the cylinder on top of your cut-out circle base. Score the bottom edge of the cylinder and the outer rim of the base. Press them together and smooth the clay upward from the base into the wall to create a seamless join. -
Create the heavy bottom:
Notice the pot in the photo has a slightly tapered, thicker bottom rim. Add a thin coil of clay around the very bottom exterior and smooth it upwards to create that subtle angled footing. -
Smooth and dry:
Dip your finger in water and smooth out any fingerprints or bumps. Let the clay dry completely according to the package instructions—usually 24 to 48 hours for air-dry clay.
Cracks in the Clay?
If small cracks appear while drying, mix a tiny bit of wet clay into a paste (slip) and fill the gaps. Smooth it over with a finger and let it dry again before sanding.
Step 2: Decorating the Pot
-
Sand for perfection:
Once fully dry, gently sand the rim and the seam area with fine-grit sandpaper to ensure a smooth, ceramic-like finish. Wipe away the dust with a barely damp cloth. -
Create the faux-speckle effect:
Mix a tiny amount of water with brown or tan acrylic paint. Dip an old toothbrush into the mixture, aim it at the pot, and run your thumb across the bristles to flick tiny speckles all over the white surface. -
Let speckles set:
Allow the speckled paint to dry completely. This step adds that lovely stoneware texture look without needing a kiln. -
Map out the face:
Lightly sketch the position of the eyes and smile with a pencil. aim for the center of the pot, keeping the features relatively small and close together for a cuter expression. -
Paint the eyes and mouth:
Using your finest detail brush and black acrylic paint, carefully trace over your pencil lines. Create two small arches for the happy closed eyes and a simple ‘U’ shape for the smile. -
Add the rosy cheeks:
Mix a soft coral-pink color. Dip a round sponge dauber or a cotton swab into the paint, blot off the excess on a paper towel, and gently press it onto the cheeks to create perfect circles. -
Seal the project:
Once all paint is dry, apply a coat of matte varnish inside and out. This protects the paint and makes the pot water-resistant (though still best for succulents that don’t need heavy watering).
Make it Functional
Before drying, use a straw to poke a drainage hole in the center of the base. Just make sure to use a saucer underneath when watering your plant
Pop in your favorite succulent and enjoy your cheerful handmade companion
Moon and Star Incense Rest
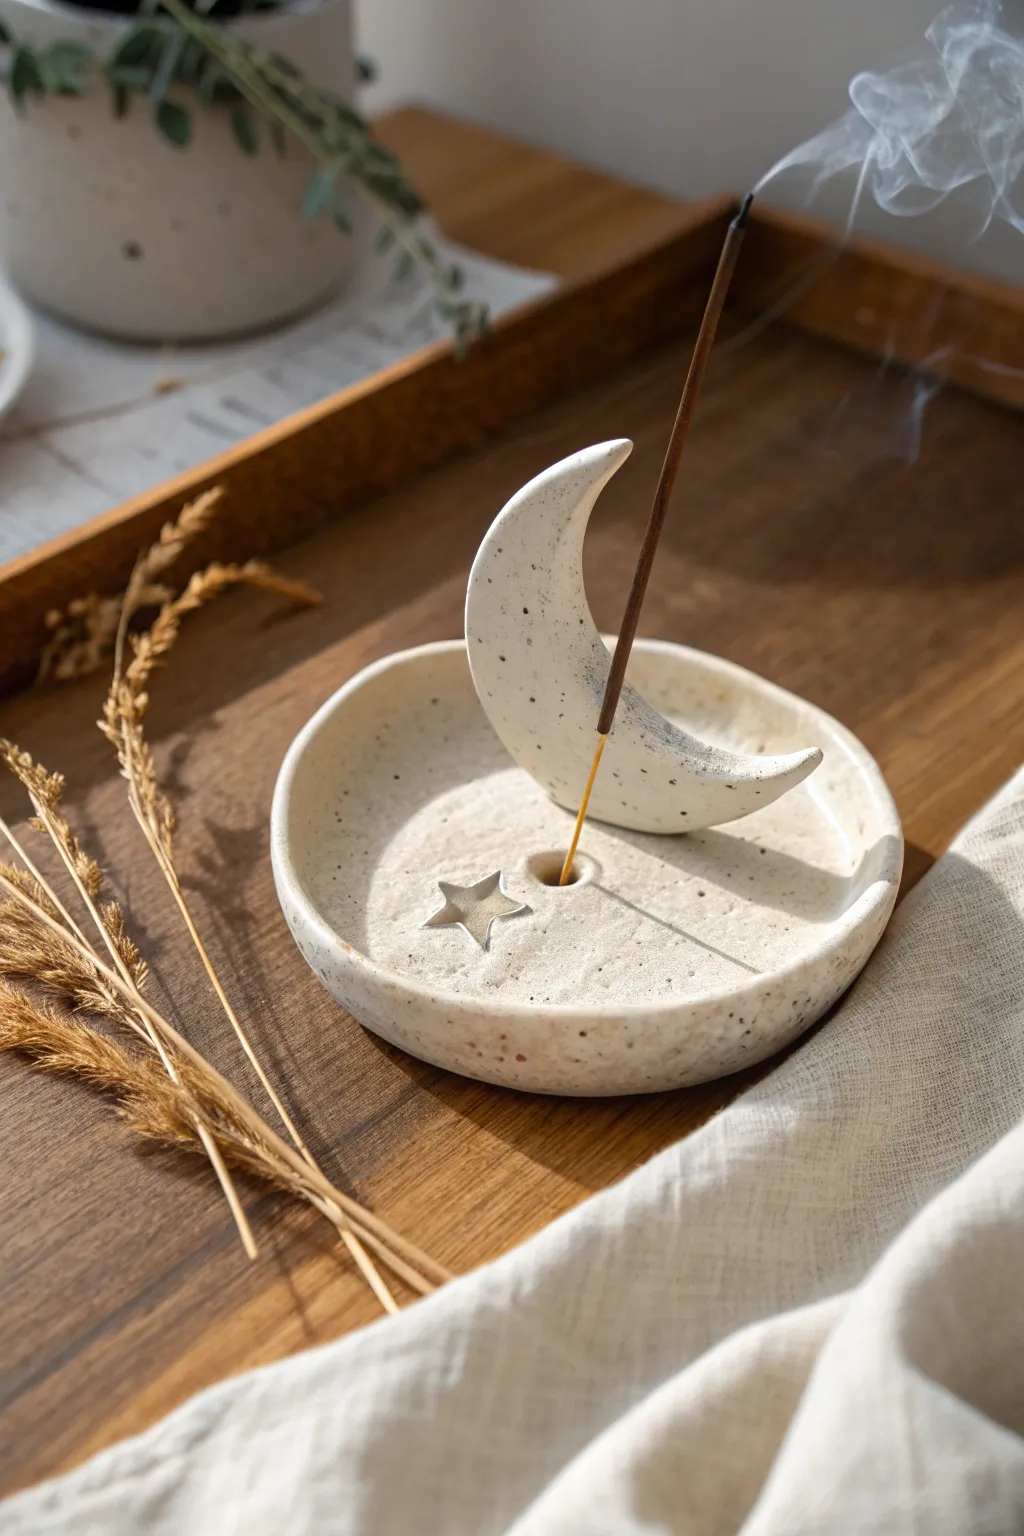
Bring a touch of cosmic calm to your space with this speckled cream clay incense holder featuring a standing crescent moon and a delicate star imprint. This functional piece of decor catches ash neatly while serving as a dreamy, minimalist sculpture.
Step-by-Step
Materials
- Polymer clay or air-dry clay (white or cream)
- Faux granite effects clay (like ‘Granitex’) or black ground pepper/dried tea leaves
- Rolling pin
- Circle cookie cutter (approx. 4-5 inches)
- Small star cookie cutter or craft knife
- X-Acto knife or clay blade
- Paper template for crescent shape
- Incense stick (for sizing)
- Small bowl or sponge (to support shape)
- Slip and score tool (or toothbrush and water/liquid clay)
- Sandpaper
Step 1: Preparing the Base
-
Condition and Mix:
Start by conditioning your clay until it is soft and pliable. To achieve that gorgeous speckled stone look if you aren’t using pre-mixed granite clay, knead in a small pinch of ground black pepper or dried tea leaves into your white clay. -
Roll Out the Slab:
Roll your clay out into an even slab, aiming for a thickness of about 1/4 inch. You want it substantial enough to hold the weight of the moon piece later. -
Cut the Base:
Use your large circle cookie cutter to punch out the main dish shape. If the edges are rough, dip your finger in a little water or baby oil and smooth them down gently. -
Form the Rim:
Gently curve the outer edges of the circle upward to create a shallow bowl shape. This lip is crucial for catching falling ash. -
Add the Star Accents:
Take your small star cutter and gently press it into the surface of the dish near the front. You can press lightly for an imprint or go deeper for a more defined relief. -
Create the Rest Hole:
While the clay is still flat, poke a hole near the center of the dish using your actual incense stick or a skewer. Wiggle it slightly to ensure the hole is large enough to accommodate the stick after the clay shrinks during drying/baking.
Clean Edges Trick
Use a smooth baby wipe to gently glide over the cut edges of your clay before baking. It removes crumbles and smooths sharper lines without distorting the shape.
Step 2: Crafting the Moon
-
Cut the Crescent:
Roll out another piece of clay, slightly thicker than the base (about 1/3 inch). Use a paper template or freehand a crescent moon shape with your X-Acto knife. -
Refine the Shape:
Smooth the cut edges of the moon with your fingertips. Ensure the bottom curve of the moon matches the curvature of the dish where you intend to place it. -
Check fit:
Do a dry fit by holding the moon upright on the base. The moon needs to be positioned behind the incense hole so the stick can lean against it.
Moon Keep Falling?
If the moon won’t stand, create a small ‘snake’ or coil of clay. Place it behind the moon at the base and blend it in to create a supportive invisible wedge.
Step 3: Assembly and Finishing
-
Score and Slip:
Rough up the bottom edge of the moon and the spot on the dish where it will sit. Apply a little water (for air-dry clay) or liquid clay adhesive (for polymer) to both surfaces. -
Attach the Moon:
Press the moon firmly onto the base. Use a modeling tool to smooth the seam where the two pieces meet, blending the clay so it looks like one continuous piece. -
Check the Angle:
Insert your incense stick into the hole again to test the angle. I like to make sure the stick leans naturally against the inner curve of the moon. -
Support While Drying:
The moon might want to flop over while wet. Prop it up against a small object, like a spice jar or a sponge, to keep it vertical while it sets. -
Cure:
Let your piece dry completely (24-48 hours for air-dry) or bake according to your polymer clay package instructions. -
Sand and Smooth:
Once fully cured, use fine-grit sandpaper to buff away any fingerprints or sharp edges on the rim or moon tips. -
Seal (Optional):
For easier cleaning of incense ash later, apply a matte varnish or sealant to the dish area.
Enjoy the peaceful atmosphere as the smoke curls around your handmade moon
Tiny Bead-Rim Trinket Bowl
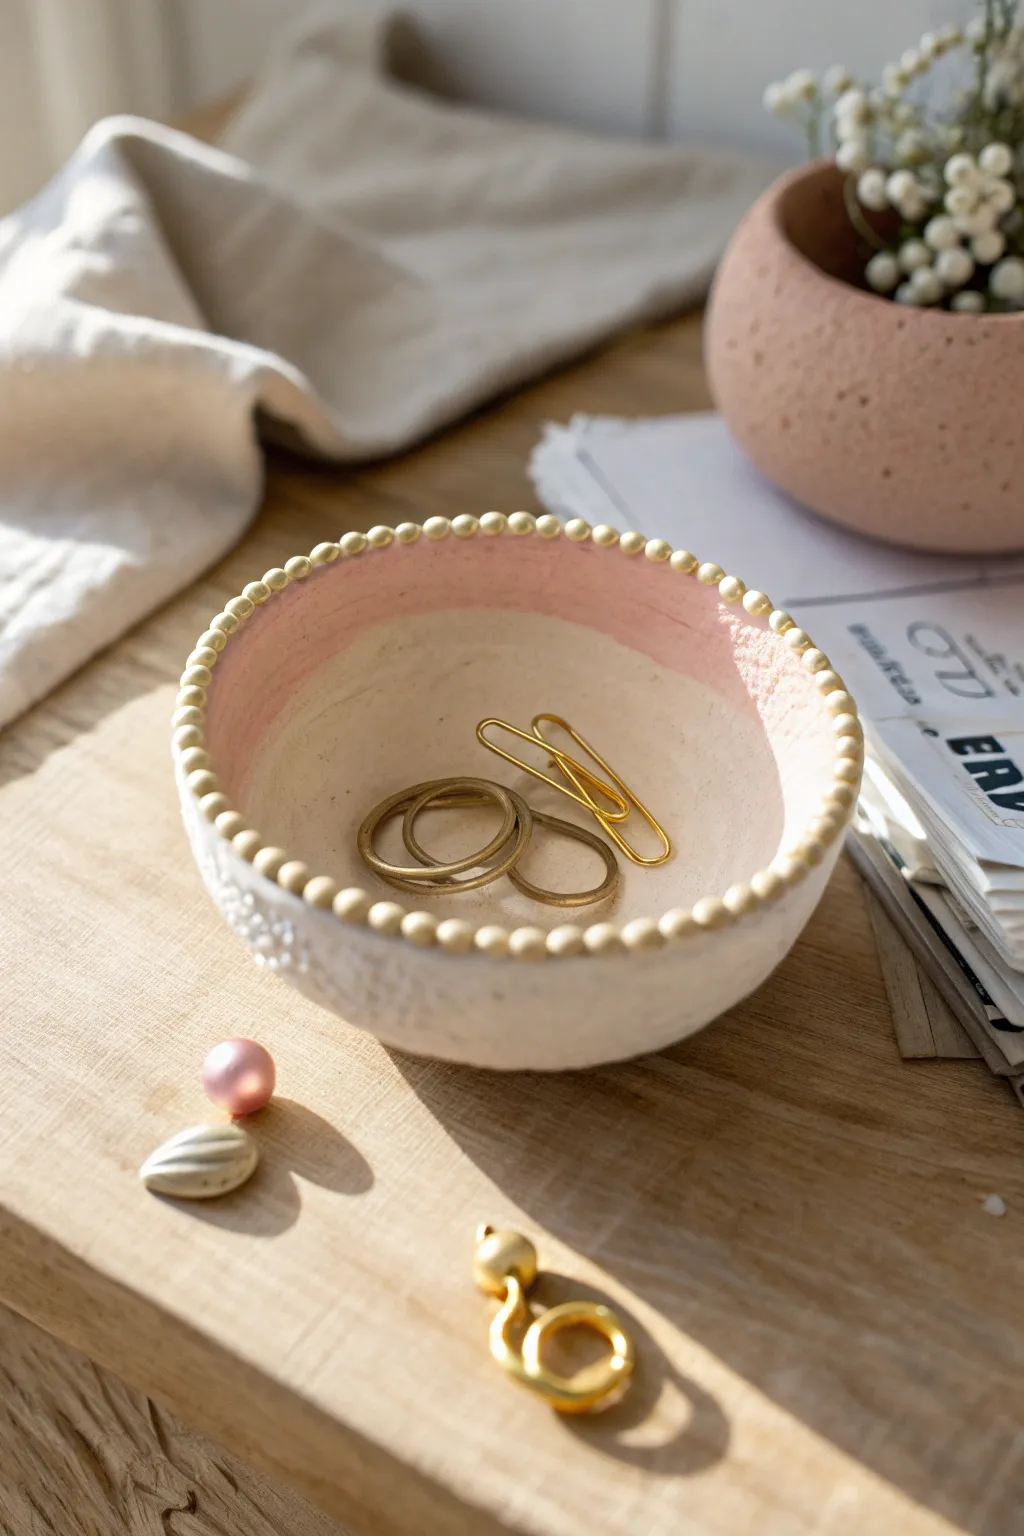
This charming little catch-all combines a rustic, hand-built clay texture with a delicate blush pink border and a halo of tiny gold beads. It’s the perfect size for organizing jewelry, paper clips, or the treasures you collect throughout your day.
Step-by-Step Guide
Materials
- Air-dry clay (white)
- Small rolling pin
- Small bowl or sphere (to use as a mold)
- Craft knife or clay cutter
- Small gold seed beads (glass or metal)
- Acrylic paint (blush pink)
- Acrylic paint (white or cream)
- Matte sealant or varnish
- Paintbrushes
- Sandpaper (fine grit)
- Water and sponge
Step 1: Shaping the Base
-
Prepare the Clay:
Start with a ball of air-dry clay roughly the size of a tennis ball. Knead it in your hands until it becomes soft, pliable, and free of cracks. -
Roll it Out:
On a flat surface, roll the clay out to an even thickness of about 1/4 inch. Lift and rotate the clay occasionally so it doesn’t stick to your work surface. -
Drape and Mold:
Gently drape your rolled slab over your chosen mold (a small upside-down bowl works perfectly) or press it into the inside of the bowl if you prefer that method. -
Trim the Excess:
Using a craft knife, carefully trim around the rim to create a clean, circular edge. Don’t worry if it isn’t machine-perfect; a little wave adds organic charm. -
Smooth the Edges:
Dip your finger in a little water and run it along the cut rim to smooth out any sharp angles or rough bits from the cutting process.
Step 2: Adding the Details
-
Embed the Beads:
While the clay is still wet and receptive, begin pressing your gold seed beads into the flat top edge of the rim. -
Spacing the Beads:
Place the beads one by one, keeping them close together to form a continuous chain. Press them in firmly enough that they are seated halfway into the clay. -
Secure the Fit:
I usually like to gently tap the top of the beads with a flat tool just to ensure they are all leveled and securely embedded. -
Initial Drying:
Let the bowl sit on the mold for about 2-3 hours until it holds its shape on its own. -
Remove and Dry:
Carefully remove the clay from the mold and set it upright to dry completely. This usually takes 24-48 hours depending on humidity.
Bead Security
For extra durability, you can remove the beads after the clay dries, add a dot of super glue to each indentation, and press them back in.
Step 3: Painting and Finishing
-
Refine the Surface:
Once fully dry, lightly sand the exterior and interior walls with fine-grit sandpaper to knock down any unwanted bumps, being careful not to scratch the beads. -
Base Coat:
Paint the entire interior and exterior with a white or cream acrylic paint to seal the clay color and provide a uniform background. -
Paint the Rim:
Using a flat brush, apply the blush pink paint to the upper interior section of the bowl, creating a band about an inch wide. -
Clean the Beads:
If any paint accidentally got on your gold beads, use a damp Q-tip or a toothpick to gently scrape it off before it fully cures. -
Seal the Project:
Finish by applying a coat of matte varnish over the painted clay areas to protect your work from moisture and chipping.
Uneven Rim?
If your rim looks crooked after cutting, place the bowl on a pottery wheel or lazy susan; hold a marker steady against it while spinning to mark a straight line.
Place your new creation on your dresser or desk to add a touch of handmade elegance to your space
Cute Pencil Cup With Ears
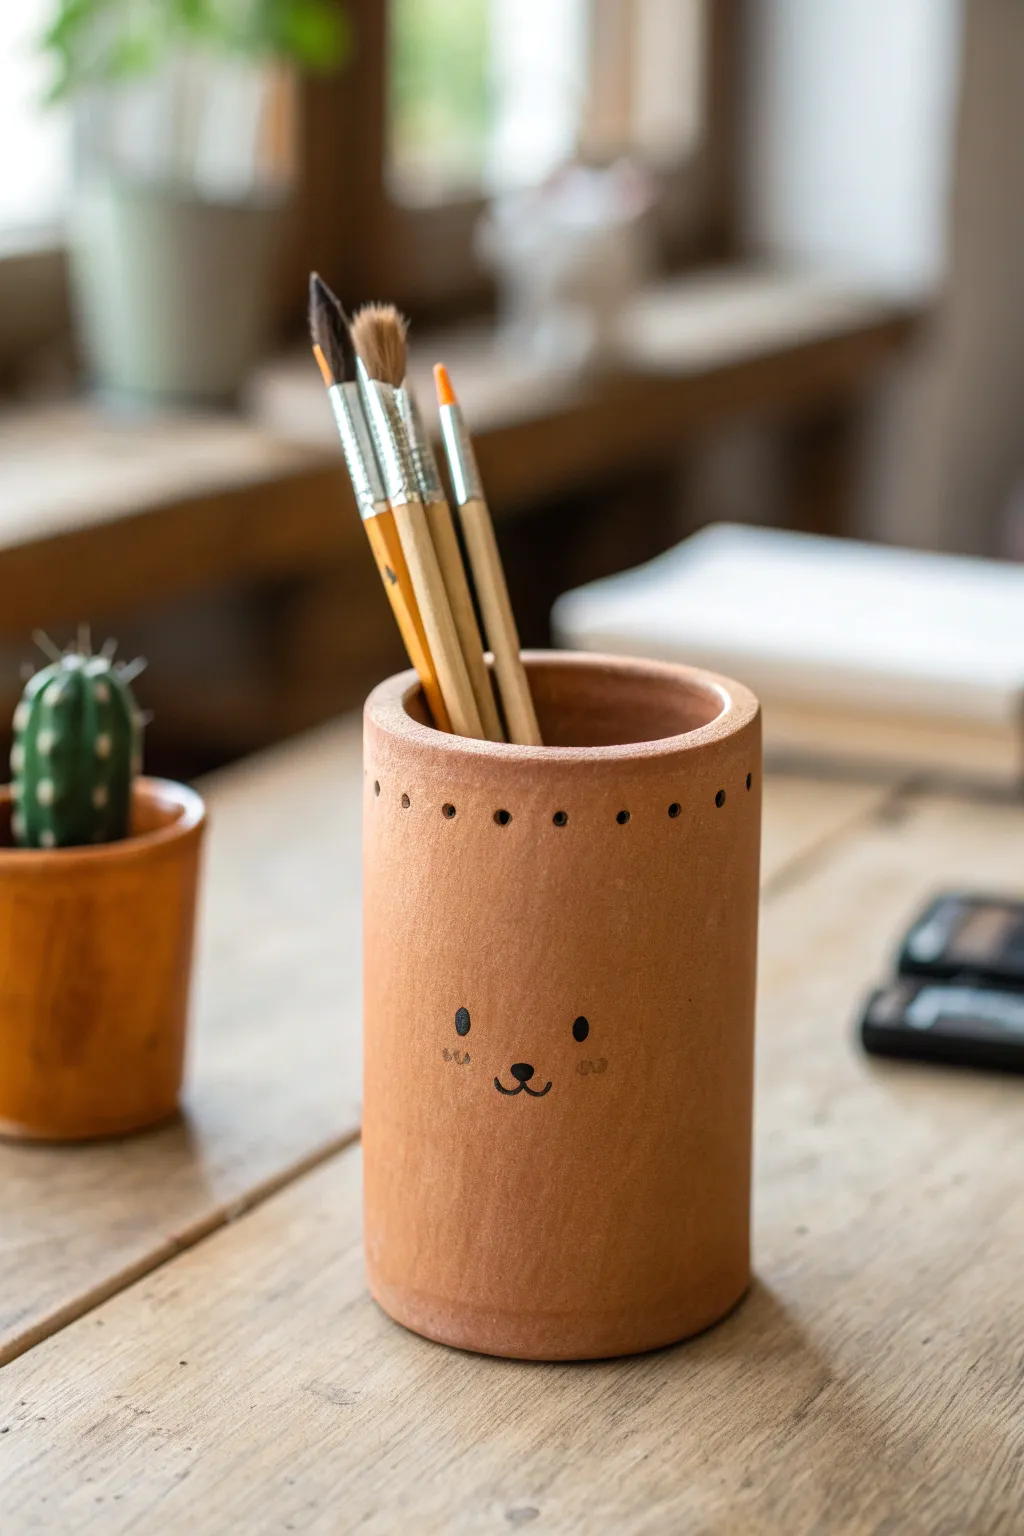
Bring a touch of cozy charm to your desk with this minimalistic terracotta pencil holder. Featuring a simple cylindrical shape and a sweet, hand-drawn face, it’s the perfect beginner project for working with earthenware or air-dry clay.
Step-by-Step Tutorial
Materials
- Terracotta air-dry clay (or kiln-fire clay if you have access)
- Rolling pin
- Ruler
- Craft knife or clay needle tool
- Slip (clay mixed with water) or vinegar
- Smooth work surface or canvas mat
- Small round piping tip or straw (for decorative holes)
- Fine-grit sandpaper
- Black acrylic paint or black permanent marker
- Small detail paintbrush (if using paint)
- Matte spray sealer (optional)
Step 1: Planning and Rolling
-
Determine size:
Decide how tall and wide you want your cup to be. A good standard size is about 4 inches tall with a 3-inch diameter. -
Create templates:
On a piece of paper, draw a rectangle for the body (circumference x height) and a circle for the base. Cut these out to use as guides. -
Prepare the clay:
Take a generous chunk of terracotta clay and knead it briefly to remove air bubbles and warm it up. -
Roll out the slab:
Roll the clay out into a long, even slab, aiming for a consistent thickness of about 1/4 inch. I find using wooden guide strips on either side helps keep the thickness perfectly even.
Step 2: Construction
-
Cut the shapes:
Place your paper templates onto the clay slab. Carefully trace and cut out your rectangular body piece and circular base using your craft knife. -
Score the edges:
Take your needle tool and scratch up (score) the short edges of the rectangle where they will join, as well as the outer edge of the circular base. -
Apply slip:
Dab a little slip or vinegar onto the scored areas to act as glue. -
Form the cylinder:
Gently curl the rectangle into a cylinder. Press the scored ends together firmly, blending the seam with your finger or a tool until it disappears. -
Attach the base:
Place the cylinder on top of the scored circular base. Blend the clay from the outside of the base up onto the cylinder wall to seal the bottom completely.
Cracking Seams?
If the seam starts to crack as it dries, dampen the area slightly with a wet paintbrush and smooth a tiny snake of fresh soft clay into the crack.
Step 3: Detailing and Financing
-
Smooth the surface:
Dip your finger in a tiny bit of water and rub it over the entire surface to smooth out any fingerprints or bumps. -
Add decorative perforations:
Using a small straw or the end of a piping tip, gently press a row of small, evenly spaced indentations around the very top rim. Don’t punch all the way through; just create a subtle texture. -
Let it dry:
Allow the clay to dry completely. For air-dry clay, this usually takes 24-48 hours depending on humidity. Rotate it occasionally for even drying. -
Sand for perfection:
Once bone dry, take fine-grit sandpaper and gently sand away any rough edges, especially around the top rim and the bottom seam. -
Draw the face:
Using a fine paintbrush with black acrylic paint, or a steady hand with a permanent marker, draw two small oval eyes and a tiny ‘w’ shape for the mouth. Add subtle blushing cheeks with dashed lines if desired. -
Seal the piece:
To protect the raw clay look and the painted face, finish with a light coat of matte spray sealer.
Ears Upgrade
Before drying, shape two small clay semi-circles. Score and attach them to the top rim to create actual 3D bear ears instead of just a face.
Pop in your favorite paintbrushes and enjoy your organized and adorable workspace
Terrazzo-Style Catch-All Dish
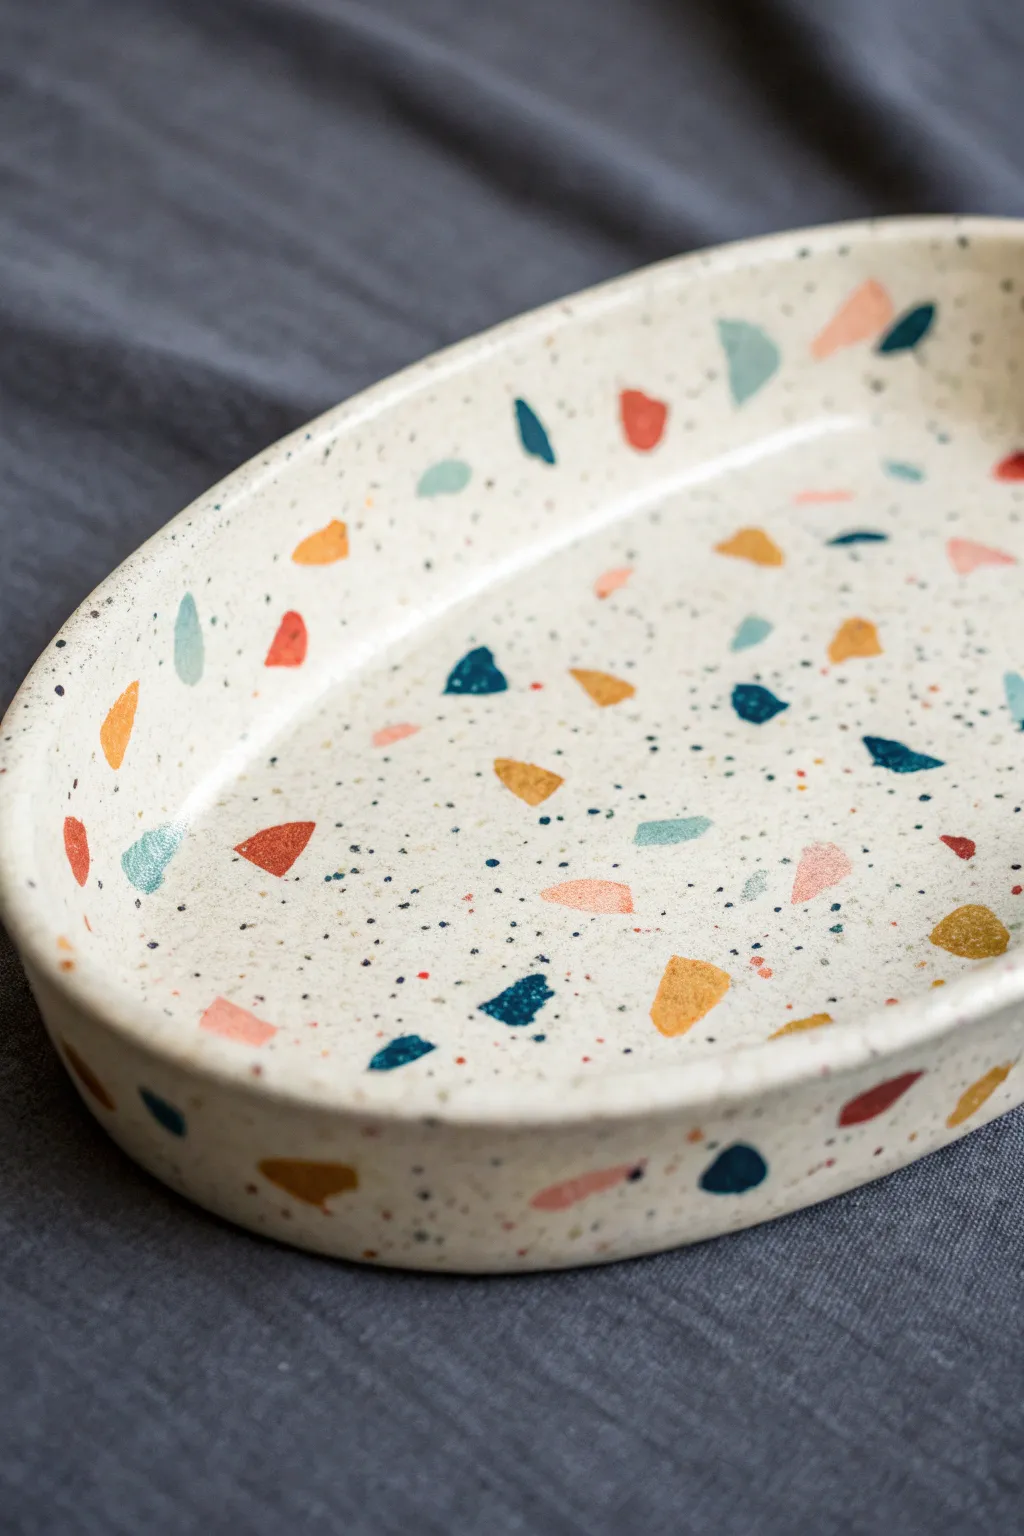
Bring the classic Italian terrazzo flooring aesthetic to your tabletop with this playful catch-all dish. The colorful, scattered mosaic chips set against a creamy, speckled base create a modern piece perfect for holding jewelry or keys.
Step-by-Step
Materials
- Polymer clay (white/cream for the base)
- Polymer clay (assorted colors: teal, navy, orange, rust, mustard yellow, light pink)
- Black pepper or faux granite clay inclusions (optional)
- Rolling pin or pasta machine
- Oval cutter or paper template and craft knife
- Small shape cutters or a sharp blade
- Parchment paper
- Oven-safe bowl or baking form (oval shape)
- Fine-grit sandpaper (400 to 1000 grit)
- Polymer clay varnish or matte glaze
Step 1: Preparing the Terrazzo Chips
-
Condition the colors:
Start by conditioning your small pieces of colored clay (teal, navy, orange, etc.) until they are soft and pliable. Roll each color out into a very thin sheet, roughly 1-2mm thick. -
Create the chips:
Using a sharp blade or ripped edges for a more organic look, cut the thin colored sheets into jagged, irregular triangles and trapezoids. Aim for variety in size, from tiny specks to chunks about the size of a fingernail. -
Pre-bake the chips (Optional):
For sharper edges that won’t smear during rolling, you can briefly bake these chips for 5-10 minutes. However, for this project, keeping them raw allows them to flatten seamlessly into the base.
Chips Smearing?
If your colored chips are smearing into streaks when you roll over them, your base clay is too soft or you’re pressing too hard. Try leaching the clay on paper first or popping it in the fridge.
Step 2: Forming the Base
-
Prepare the base clay:
Take a large block of white or cream clay. To mimic the speckled stone look in the photo, mix in a tiny pinch of ground black pepper or use pre-mixed ‘granite’ effect clay. -
Roll the slab:
Roll your base clay out into a smooth, even slab that is approximately 1/4 inch thick. Ensure it is large enough to accommodate your oval template. -
Apply the pattern:
Gently scatter your prepared colored chips onto the slab. Be random with your placement, letting some colors group together while leaving open negative space. -
Embed the design:
Cover the clay with a sheet of parchment paper. Roll over the surface firmly with your rolling pin to press the chips flush into the base clay so the surface becomes completely flat again.
Step 3: Shaping and Curving
-
Cut the oval:
Place your oval cutter or paper template onto the patterned slab. Cut out the main dish shape using a clean aesthetic cut with your craft knife. -
Smooth the edges:
Dip your finger in a little baby oil or water and gently run it along the cut rim to soften any sharp angles or drag marks from the blade. -
Form the curve:
Carefully lift your clay oval and place it inside your oven-safe bowl or draping form. Gently press it down so it takes the concave shape of the bowl. -
Refine the shape:
I like to check the edges one more time here to ensure the clay hasn’t warped unevenly while being transferred to the form.
Make it Shine
For a glass-like finish instead of matte stone, coat the finished baked piece in UV resin and cure it under a UV lamp. This adds durability and makes the colors incredibly vibrant.
Step 4: Baking and Finishing
-
Bake:
Bake the clay directly on the form according to the manufacturer’s package instructions (usually 275°F/135°C for 15-30 minutes per 1/4 inch of thickness). -
Cool down:
Let the piece cool completely inside the oven or on the counter before attempting to remove it from the form to prevent cracking. -
Sand for smoothness:
Once cool, wet-sand the piece under running water. Start with a lower grit to level any raised chips and move to higher grits for a buttery smooth finish. -
Clean up:
Wash off any sanding residue with mild soap and water, then dry the dish thoroughly with a lint-free cloth. -
Seal:
Apply a thin layer of matte varnish or glaze to protect the surface and make the colors pop, matching the soft sheen seen in the reference image.
Now you have a chic, custom-made vessel that looks like heavy stone but is light enough to move anywhere in your home
Two-Color Marbled Pendant
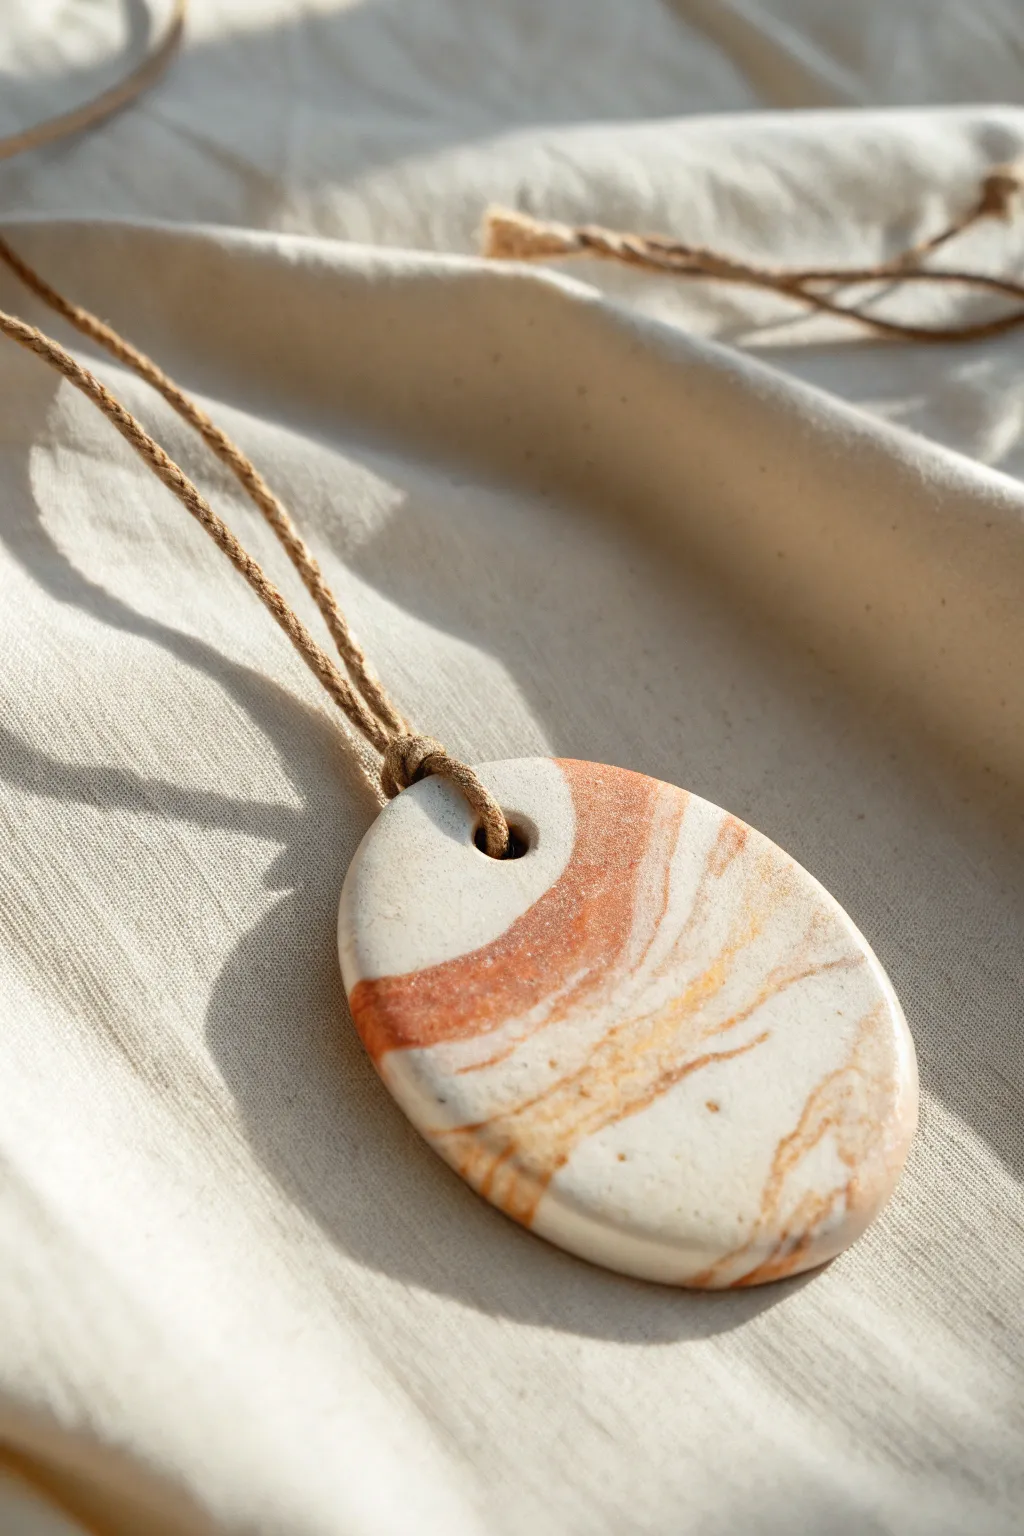
Capture the warmth of a desert landscape with this organic, marbled pendant that blends creamy whites with terracotta and amber hues. The swirling technique creates a unique, stone-like pattern, ensuring no two pieces are ever exactly the same.
Step-by-Step Guide
Materials
- White or translucent white polymer clay
- Terracotta or burnt orange polymer clay
- Mustard yellow or gold polymer clay
- Acrylic rolling pin
- Oval clay cutter (medium to large)
- Small round cutter or piercing tool (for the hole)
- Fine-grit sandpaper (400 to 1000 grit)
- Hemp cord or suede lace for stringing
- Baking sheet and parchment paper
- Ceramic tile (optional work surface)
Step 1: Prepping the Clay
-
Condition the white clay:
Begin by taking a generous amount of your white polymer clay and kneading it in your hands until it becomes soft, warm, and pliable. This will be your base color. -
Prepare accent colors:
Condition smaller amounts of the terracotta and mustard yellow clays separately. You’ll want roughly a 4:1 ratio of white to colored clay to keep the look bright and airy. -
Create snakes:
Roll each color into long, thin snakes. The white snake should be the thickest, while the colored snakes can be varying degrees of thinness.
Muddy Colors?
If your colors are blending into a single shade instead of distinct swirls, stop twisting sooner. Less manipulation keeps the color separation crisp.
Step 2: Marbling Technique
-
Twist the colors:
Line up your colored snakes alongside the white snake. Twist them together gently to form one large, candy-cane-like rope. -
Fold and roll:
Fold the twisted rope in half and roll it out again on your work surface to lengthen it. This begins the mixing process. -
Repeat the fold:
Fold and twist the clay 2-3 more times. Be careful not to over-mix; you want distinct ribbons of color, like strata in rock, rather than a muddy orange blend. -
Form a ball:
Roll the mixed clay into a smooth ball. Check the surface to see if you like the distribution of the veins. -
Flatten the slab:
Place the ball on your tile or work surface. Using the acrylic rolling pin, roll it out to a uniform thickness, about 1/4 inch (6mm). I find this thickness gives the pendant a nice, substantial feel.
Step 3: Shaping and Finishing
-
Select the best area:
Look at your rolled slab and identify the most interesting section of marbling. You’re looking for that sweeping curve of rust against the white. -
Cut the shape:
Press your oval cutter firmly into the chosen area. Wiggle it slightly to ensure a clean cut before lifting the cutter away. -
Smooth the edges:
Gently rub your fingertip over the cut edges to soften any sharpness or loose clay bits left by the cutter. -
Pierce the hole:
Use a small round cutter or a piercing tool to create a hole near the top of the oval. Make sure the hole is wide enough to accommodate your hemp cord. -
Bake the piece:
Place the pendant on a parchment-lined baking sheet. Bake according to your specific clay manufacturer’s instructions, usually around 275°F (135°C) for 30 minutes. -
Cool down:
Let the pendant cool completely on the baking sheet before handling it. The clay hardens fully as it cools. -
Sand for smoothness:
Dip your sandpaper in water and gently wet-sand the edges and surface to achieve a matte, stone-like texture. Rinse and dry. -
Add the cord:
Determine the desired length for your necklace. Cut a piece of hemp cord or suede lace. -
Tie the knot:
Thread the cord through the hole. Loop the cord back on itself and tie a simple overhand knot or a lark’s head knot right at the base of the pendant to secure it.
Stone Texture
After rolling out your slab, gently press a piece of coarse sandpaper or a stiff toothbrush onto the surface before baking to add realistic grit.
Wear your new earthy accessory as a perfect everyday piece that channels nature’s beauty
Mini Room Shelf Scene
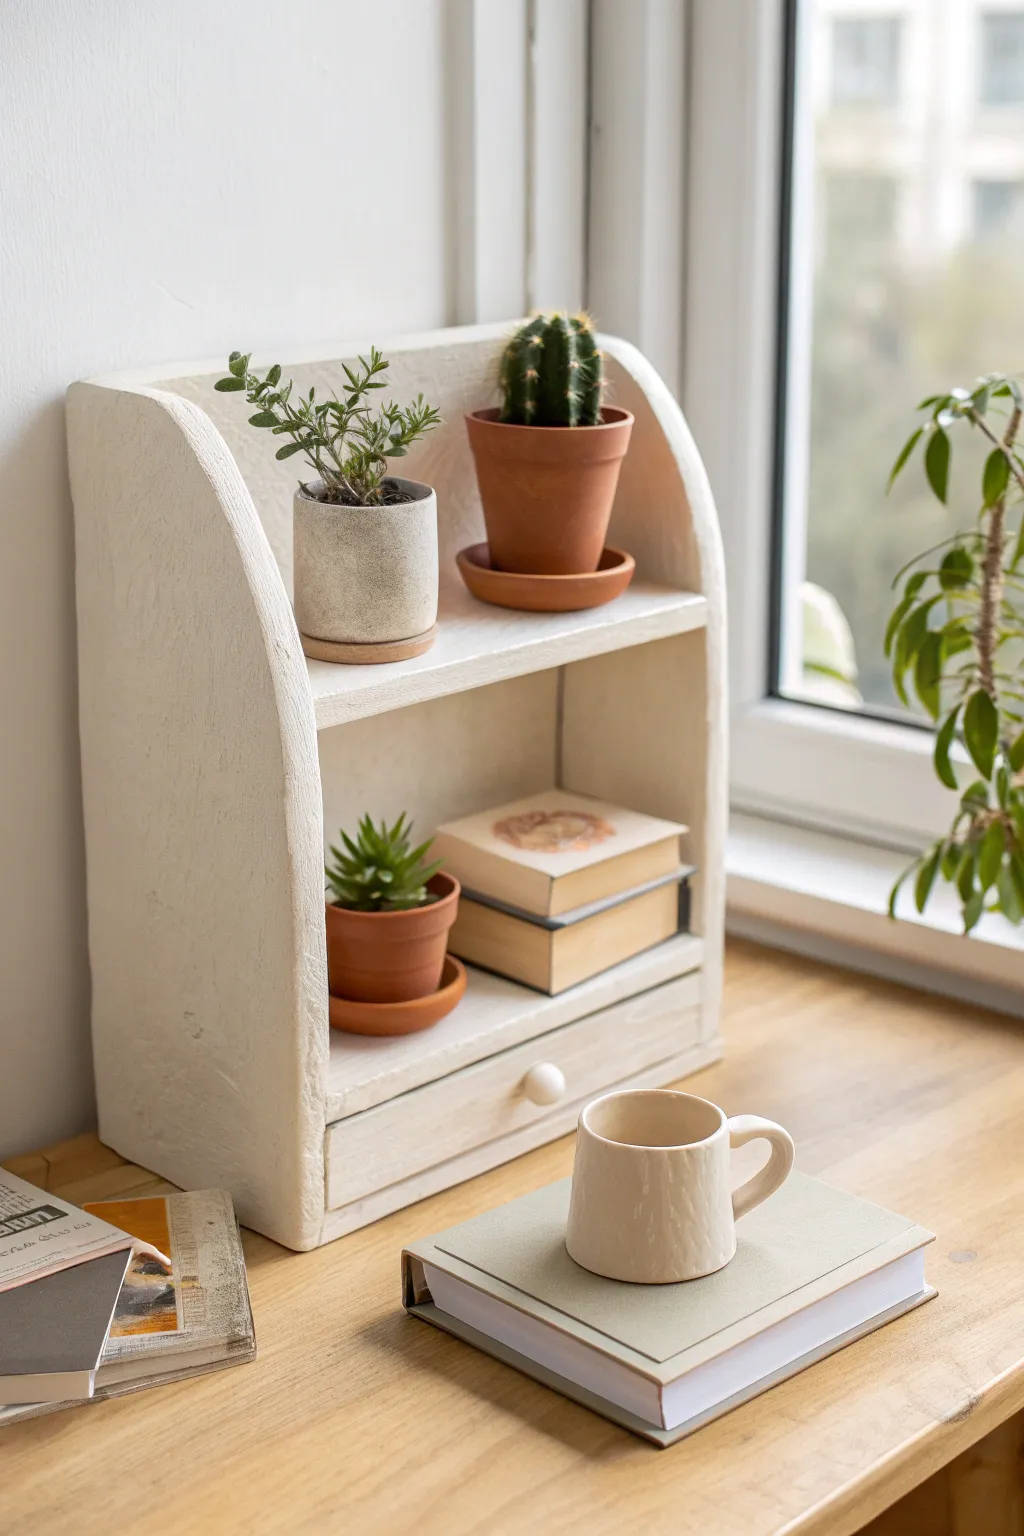
Recreate the charm of vintage furniture on a small scale with this adorable clay shelf unit. With its textured white finish and functional drawer, it makes a perfect display for mini succulents or trinkets.
Detailed Instructions
Materials
- Air-dry clay (white or light grey)
- Rolling pin
- Clay knife or craft blade
- Ruler
- Cardboard or foam board (for structural support)
- PVA glue or clay slip
- Sandpaper (medium and fine grit)
- White acrylic paint (matte finish)
- Paintbrush (flat shader)
- Small wooden round bead (for drawer knob)
- Texture tool (optional, like a toothbrush or crumpled foil)
Step 1: Base Structure & Panels
-
Prepare the core:
Begin by cutting a cardboard template to serve as a hidden armature. You’ll need a back panel, two curved side panels, and a bottom base. Assemble these with masking tape to create the basic shape. -
Roll the clay:
Roll out a large slab of air-dry clay to an even thickness of about 1/4 inch (6mm). Using guide rails or two magazines of equal height on either side can help keep it uniform. -
Cut side panels:
Place your cardboard side templates onto the clay slab and cut out two matching pieces. Use the knife to gently round off the top front corner to create that classic curved silhouette. -
Texture the surface:
Before assembly, lightly press a crumpled ball of aluminum foil or a stiff brush over the clay surface. This gives it a faint, woody texture rather than perfectly smooth plastic look.
Step 2: Assembly
-
Attach the sides:
Score the edges of the back clay panel and the side panels where they will meet. Apply a generous amount of clay slip or PVA glue. -
Join the pieces:
Press the sides firmly against the back panel. Reinforce the inner seams by rolling a thin ‘snake’ of clay and pressing it into the corner joints, smoothing it out with your finger or a modeling tool. -
Cut the shelves:
Measure the interior width of your unit. Cut two rectangular slabs of clay for the middle shelf and the shelf directly above the drawer. -
Install the shelves:
Insert the first shelf near the bottom, leaving enough space underneath for the drawer. Insert the second shelf midway up. Ensure they are level before securing them with slip and smoothing the contact points.
Shrinkage Warning
Air-dry clay shrinks as it dries! Make your drawer gap about 2mm wider than necessary. If the dried drawer is too loose, you can add layers of paint; if too tight, sand it down.
Step 3: The Drawer
-
Form the drawer box:
Create a small, open-topped box from clay slabs that fits loosely into the bottom opening. It needs to be slightly smaller than the gap to account for shrinkage and paint thickness. -
Create the drawer front:
Cut a rectangular face for the drawer that is slightly larger than the box itself, so it sits flush with the unit’s frame. Attach this to the front of your drawer box. -
Add the handle:
Take a tiny ball of clay or a small wooden bead and glue it to the center of the drawer front to act as a knob. -
Partial drying check:
Slide the drawer into the slot to ensure fit, but remove it immediately to dry separately. If you leave it in, it might fuse to the frame.
Level Up: Botanical Details
Before the clay dries, press real dried leaves or flower stems into the side panels to leave a fossil-like impression, then paint over them for a subtle, organic relief pattern.
Step 4: Finishing
-
Dry completely:
Allow the entire project to dry for at least 24-48 hours. Turn it occasionally so air reaches all sides and minimizes warping. -
Sand for imperfections:
Once fully hard, use sandpaper to smooth down any sharp edges or rough seams, but be careful not to remove all the attractive texture you added earlier. -
Base coat:
Apply a coat of white acrylic paint. Since the clay is absorbent, I sometimes like to water down the first coat slightly to help it soak into the texture. -
Top coat application:
Apply a second, thicker coat of white matte paint. Use uneven brush strokes to enhance the ‘shabby chic’ aesthetic. -
Distressing (optional):
For an aged look, very lightly sand the edges after painting to reveal a bit of the raw clay underneath, or dry-brush a tiny amount of grey paint on the corners.
Place your tiny masterpiece on your desk and fill it with miniature treasures