If you’re craving a sweet project to make with your favorite person, air dry clay couple ideas are basically my love language. These designs are simple enough for beginners, but still feel like real little keepsakes you’ll want to display forever.
Chibi Couple Figurines Holding Hands
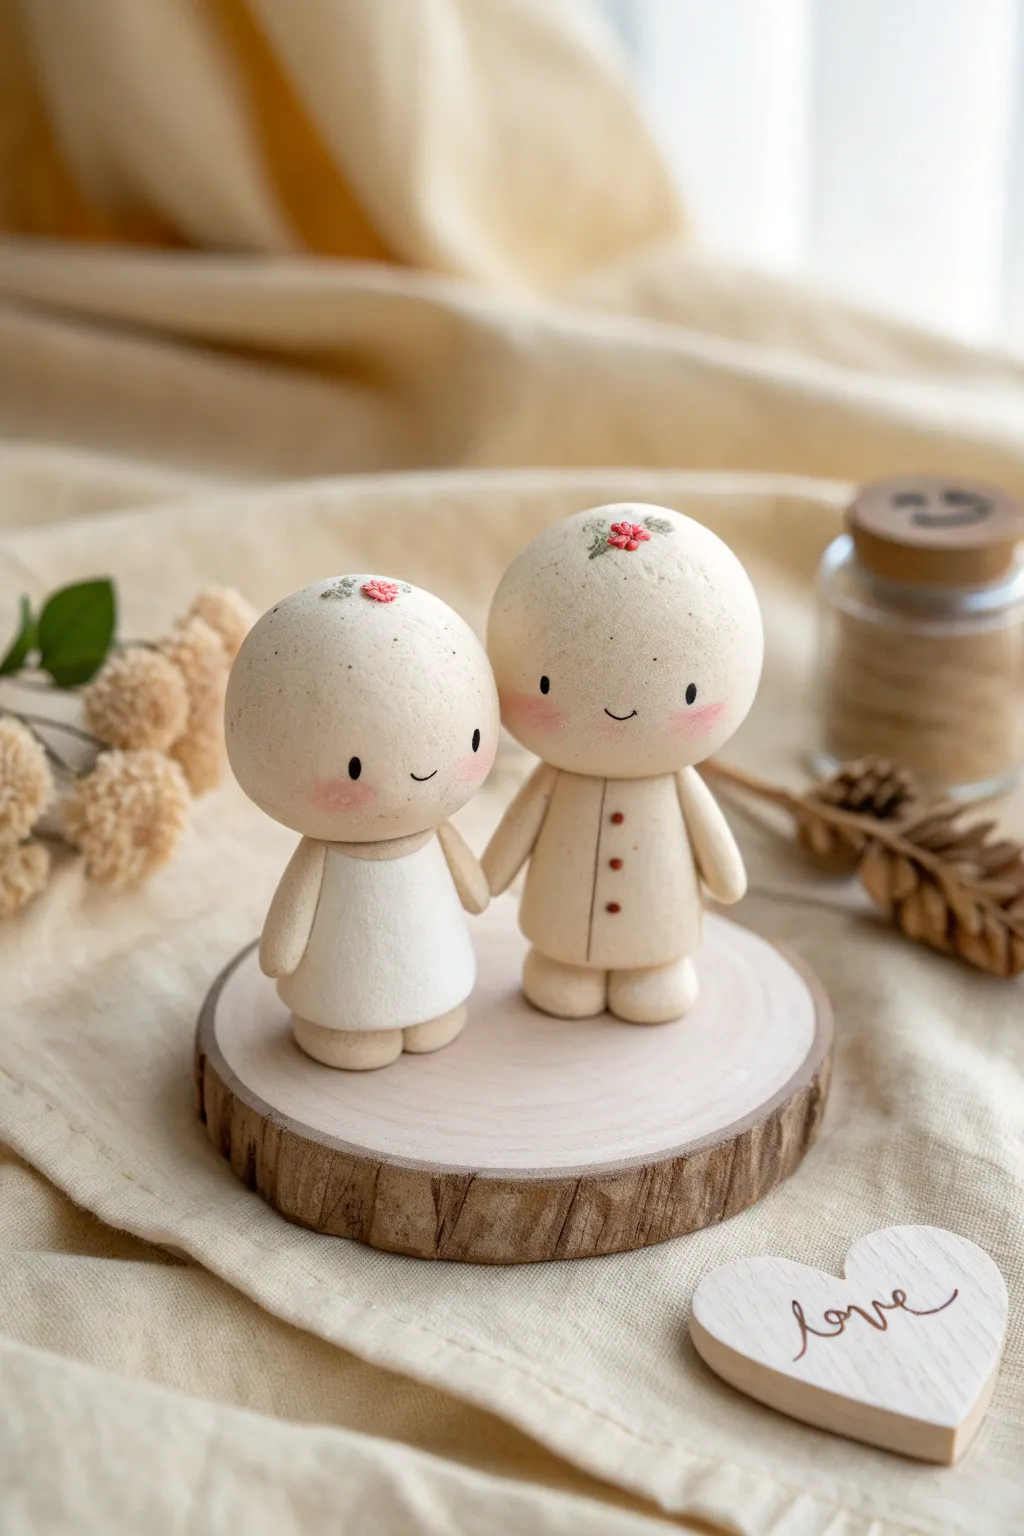
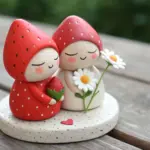
Create this heartwarming pair of minimalist chibi figurines that mimic the charm of light wood carvings using smooth air-dry clay. With their sweet, simple expressions and hand-in-hand pose, they make a perfect keepsake or a thoughtful gift for a loved one.
Detailed Instructions
Materials
- White or natural air-dry clay (smooth texture)
- Acrylic paints (ivory, beige, blush pink, brown, black)
- Fine-grit sandpaper or sanding sponge
- Small round brushes (size 0 and 2)
- Needle tool or toothpick
- Water cup and paper towels
- Rolling pin
- Strong craft glue or clay slip
- Matte spray varnish
Step 1: Shaping the Heads and Bodies
-
Form the basic head shapes:
Start with two equal portions of clay, rolling them into smooth, perfect spheres about the size of a golf ball. Gently flatten the bottom of each sphere slightly so they will be able to sit securely on the necks later. -
Texture the surface:
To mimic the porous texture of wood or stone seen in the photo, gently tap the surface of the wet clay with a crumpled piece of aluminum foil or a stiff paintbrush. You want a subtle, stippled effect, not deep gouges. -
Shape the dress body:
For the figure on the left, roll a cylinder of clay and taper it upwards into a gentle cone or bell shape for the dress. Flatten the base so it stands firmly. -
Shape the tunic body:
For the figure on the right, create a slightly taller, more cylindrical shape for the tunic. Use a needle tool to lightly scribe a vertical line down the center of the chest to represent a button placket. -
Create the feet:
Roll four tiny balls of clay for the feet. Flatten them slightly into ovals. Attach two beneath the tunic body so they peek out, and two beneath the dress body.
Cracks Appearing?
If hairline cracks appear while drying, mix a small amount of fresh clay with water to make a paste. Fill the cracks, smooth with a damp finger, and let dry again.
Step 2: Assembly and Details
-
Attach heads to bodies:
Score the connection points on the necks and the bottom of the heads. Apply a dab of water or clay slip, then press the heads firmly onto the bodies. Smooth the seam at the neck for a clean join. -
Form the arms:
Roll four small logs for arms that are proportionate to the bodies. Taper one end of each log slightly to act as the hand. -
Position the joined hands:
This is the crucial pose. Attach the inner arm of each figure so they reach toward the center. Mold the tiny hand nubs together so they appear to be holding hands, using a little slip to bond them securely. -
Attach outer arms:
Attach the remaining outer arms to the sides of the bodies, letting them rest naturally against the sides of the tunic and dress. -
Add floral details:
Roll incredibly tiny crumbs of clay to create the small floral accents on top of the heads. Press these gently onto the forehead/hairline area. -
Drying time:
Allow the figures to dry completely for at least 24-48 hours. I find that turning them upside down halfway through helps the bottoms dry evenly.
Make it a Keepsake
Before drying, use a needle tool to carve initials or a special date into the bottom of the wood slice base for a personalized anniversary gift.
Step 3: Painting and Finishing
-
Base coat:
Mix ivory with a tiny drop of brown to get a warm ‘bisque’ color. Paint the entire surface of both figures. You might need two thin coats for opaque coverage. -
Add speckling:
Dilute some brown paint with water. Dip an old toothbrush or stiff brush into it and run your thumb over the bristles to flick tiny speckles onto the figures, enhancing the natural stone look. -
Paint the dress:
Paint the dress portion of the left figure a creamy white. Keep the paint thin so the texture underneath still shows through. -
Paint the cheeks:
Using a very dry brush and soft pink paint, gently dab circular blush spots onto the cheeks. Build the color up slowly to avoid harsh edges. -
Face details:
Using your smallest brush and black paint, add two wide-set dots for eyes and a tiny curved line for the smile. Keep the features low on the face for that cute ‘chibi’ proportion. -
Final accents:
Paint the tiny buttons on the tunic with reddish-brown dots. Paint the floral accents on the heads with delicate touches of pink and green. -
Seal:
Once dry, spray the figures with a matte varnish to protect the paint and unify the finish without adding unrealistic shine.
Place your adorable couple on a small wood slice to complete the rustic, heartwarming display


Wedding or Anniversary Cake Topper Duo
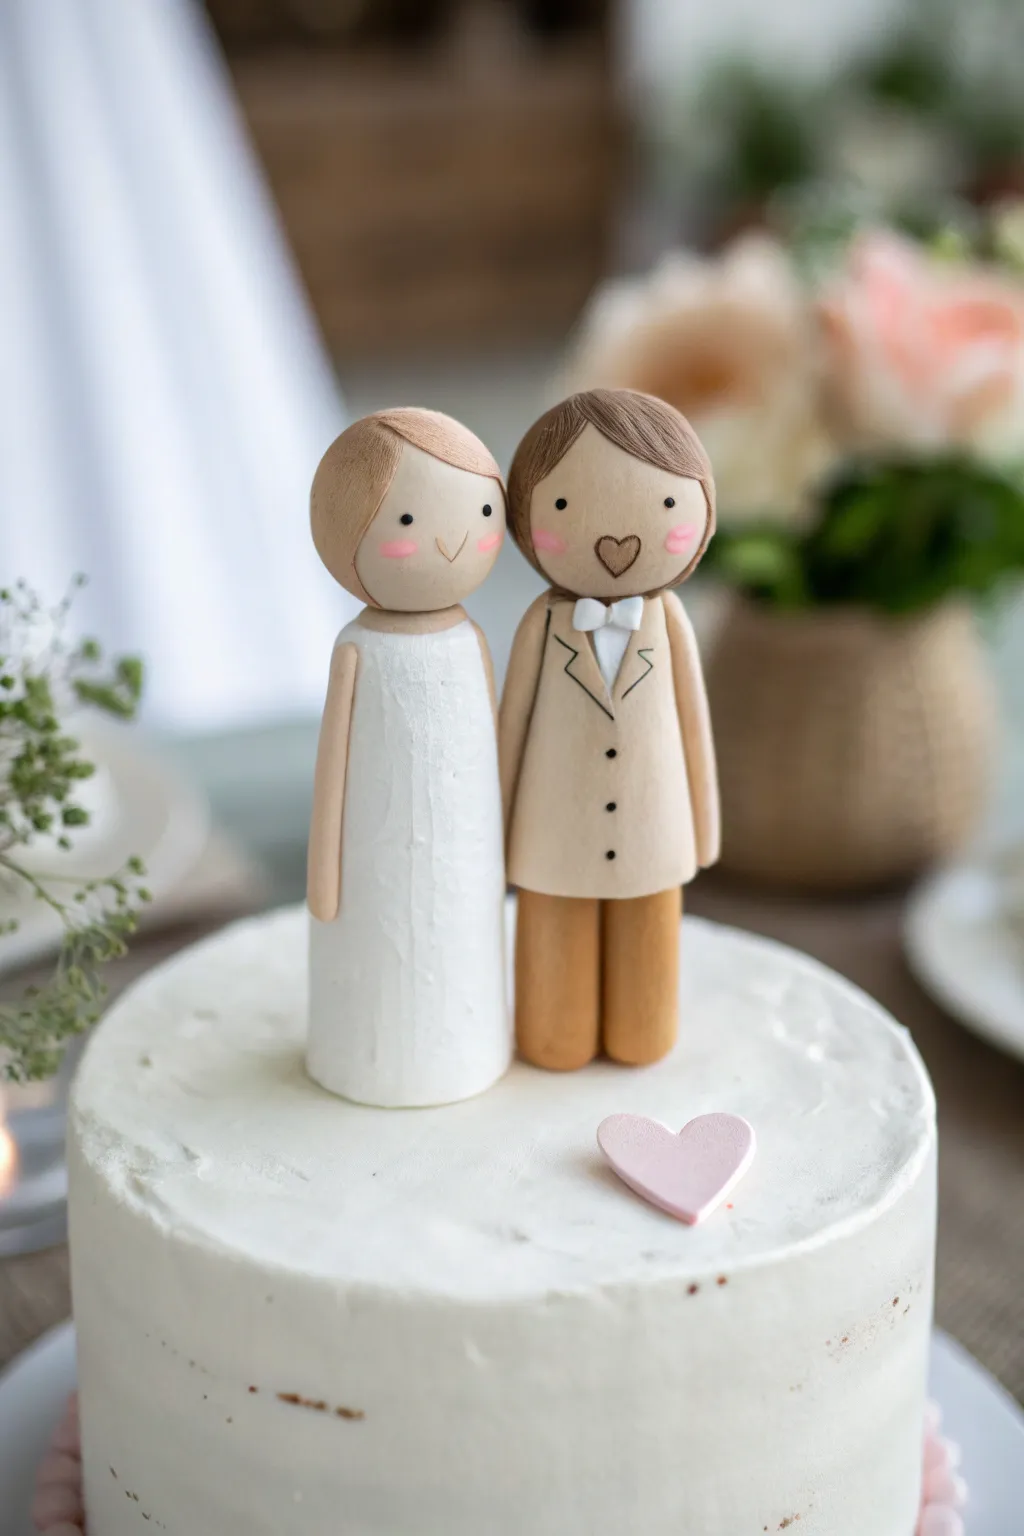
Create a charmingly simple wedding or anniversary keepsake that mimics the look of carved wood using accessible air dry clay. This duo features clean lines, sweet facial expressions, and a timeless aesthetic perfect for topping a celebration cake.
Step-by-Step Tutorial
Materials
- White air dry clay (high quality, smooth finish)
- Acrylic paints: Cream/Beige, White, Light Brown, Dark Brown, Pink
- Fine-grit sandpaper
- Modeling tools (or a craft knife and toothpick)
- Water cup and small brush for smoothing
- Fine detail paintbrushes
- Rolling pin
- Clear matte varnish or sealant
Step 1: Sculpting the Base Figures
-
Form the bodies:
Start with two equal portions of clay. Roll one into a tall, slightly tapered cylinder for the groom’s legs and torso base. Roll the second into a slightly wider, cone-like cylinder for the bride’s dress. -
Shape the heads:
Roll two smooth spheres for heads, ensuring they are proportionate to the bodies. Use a tiny dab of water or slip to attach them firmly to the neck area of each body piece. -
Create the legs:
For the groom figure, use a modeling tool to press a deep vertical indentation or cut a slit halfway up the cylinder to define the two separate trouser legs. -
Sculpt the arms:
Roll four thin snakes of clay for the arms. Attach two to the sides of the bride’s dress so they hang straight down. Do the same for the groom, ensuring the shoulders blend seamlessly into the torso. -
Refine the hair:
Add small, flat pieces of clay to the heads to sculpt the hair. For the bride, create a side-swept fringe look. I like to use a needle tool to gently scratch in hair strands for texture. -
Add the groom’s hair:
Mold a separate hair piece for the groom that covers the top and back of the head, using the same texturing technique to suggest a combed style. -
Initial smoothing:
Dip your finger in water and gently rub out any fingerprints or cracks. The surface should be as smooth as possible before drying.
Leaning Towers?
If figures start leaning while wet, insert a toothpick through the body into the head for an internal spine, or prop them against a heavy mug until the outer layer hardens.
Step 2: Adding Details and Drying
-
Sculpt the jacket:
Roll a very thin sheet of clay. Cut a rectangular piece to wrap around the groom’s torso for the jacket, leaving the front open. Add tiny triangular lapels. -
Add the bowtie:
Create two tiny triangles and a small center dot to form the bowtie, attaching it right at the groom’s neck area. -
Dry partially:
From experience, it’s best to let the figures sit for about an hour to firm up before doing final checks, ensuring they stand straight without leaning. -
Full drying:
Allow the figures to dry completely for 24-48 hours. Rotate them occasionally so the bottoms dry evenly.
Match the happy couple
Customize the features! Swap hair colors, add glasses with thin wire, or paint the groom’s suit to match the actual wedding colors for a truly personalized touch.
Step 3: Painting and Finishing
-
Sand for smoothness:
Once fully dry, use fine-grit sandpaper to gently buff away any remaining imperfections or bumps. -
Base skin tones:
Paint the faces and necks with a soft cream or beige tone. Keep the paint thin to avoid brushstrokes. -
Paint the attire:
Paint the bride’s dress a crisp white. For the groom, use a light beige for the jacket and a warm medium brown for the trousers. -
Detail the hair:
Use a light brown shade (slightly different from the trousers if possible) to paint the hair, highlighting the textured grooves you made earlier. -
Draw the faces:
Using your finest brush or a paint pen, add two tiny black dots for eyes on each figure. Paint small pink ovals for blushing cheeks. -
Add mouths and buttons:
Draw tiny ‘v’ shapes for smiles. For the groom, add a heart-shaped mouth if desired, and three tiny black dots for jacket buttons. -
Final sealing:
Isolate a small pink heart made of cardboard or dried clay to place on the cake separately. Seal the figures with a matte varnish to protect the paint.
Now you have a sweet, handmade keepsake to cherish long after the cake is cut


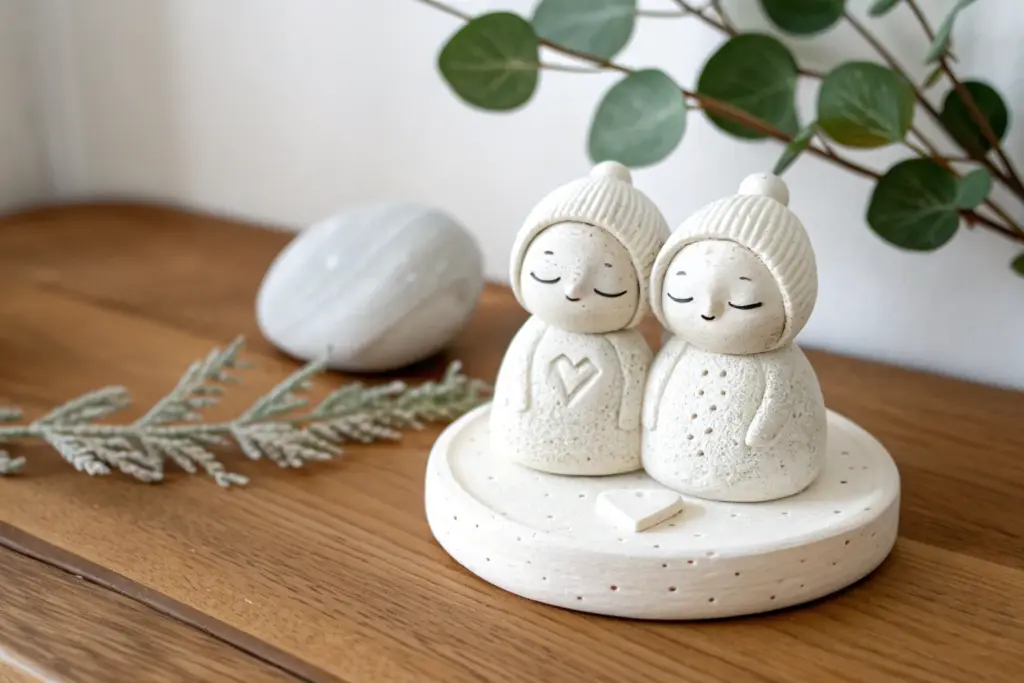
Hugging Pose Keepsake Statue

Capture the warmth of a loving hug with this minimalist air dry clay sculpture featuring contrasting textures. The finished piece combines the cozy detail of a knit sweater with sleek, modern lines, all mounted on a wooden base for a polished gallery look.
How-To Guide
Materials
- White air dry clay (e.g., DAS or Crayola)
- Wooden circular base
- Aluminum foil
- Floral wire or armature wire
- Needle tool or toothpick
- Rolling pin
- Clay sculpting tools (ribbon tool, smoothing tool)
- Water in a small cup
- Fine-grit sandpaper
- Acrylic sealer (matte)
- Strong craft glue (e.g., E6000)
Step 1: Building the Core Structure
-
Form the armature:
Twist two lengths of floral wire together to create a basic stick-figure skeleton with two legs and a spine. Make two of these, slightly bending one shorter than the other to represent the height difference. -
Create foil cores:
Crunch aluminum foil tightly around the wire skeletons to bulk out the bodies. Shape two balls of foil for the heads and attach them firmly to the top of the spines. -
Join the figures:
Position the foil figures so they are leaning into each other. Twist the leg wires together at the bottom to ensure they stand as a single stable unit. -
Base layer application:
Roll out a sheet of clay to about 1/4 inch thickness. Wrap this around your foil armatures, smoothing the seams with a little water on your finger to create a solid, unified base shape.
Stone effect trick
To get that speckled stone look, mix a pinch of used coffee grounds or black pepper into your white clay before sculpting.
Step 2: Sculpting the Bodies
-
Define the figures:
Add more clay to bulk out the individual forms. Keep the taller figure more cylindrical for the sweater, and shape the shorter figure with a slight curve to resemble a dress or coat. -
Separation line:
Use a needle tool or knife to deeply score the line where the two bodies meet, ensuring they look like two distinct people pressing close rather than one blob. -
Adding the heads:
Cover the foil head cores with smooth clay. Roll them into perfect spheres—I find lightly wetting my palms helps keep them crack-free—and blend the clay down into the neck area. -
Positioning the heads:
Nudge the heads so they touch gently at the forehead or cheek, emphasizing the intimacy of the pose. -
Smooth the shorter figure:
Use a sponge or wet finger to make the shorter figure completely smooth, removing any fingerprints or bumps.
Step 3: The Sweater Details
-
Creating the arms:
Roll two coils of clay for the arms. One should wrap around the shorter figure’s back (the sweater arm), and the smooth arm should reach up around the taller figure’s shoulder. -
Detailing the cuffs:
Flatten the end of the sweater arm slightly and use a needle tool to press vertical lines, mimicking a ribbed cuff. -
Sculpting the cable knit:
On the taller figure’s back and arm, use a needle tool to draw vertical columns. Within these columns, press small diagonal dashes that alternate direction to simulate a braided cable pattern. -
Adding texture variance:
Between the ‘cables,’ use the tip of a stiff brush or a crumpled ball of foil to press a subtle stony texture into the clay, contrasting with the smooth second figure. -
Refining the embrace:
Check the arm placement again. Ensure the smooth arm blends seamlessly into the smooth body, and the textured sweater arm sits distinctly on top.
Level up with color
Before sealing, apply a very watered-down brown acrylic wash over the sweater area, then wipe it off to darken just the crevices.
Step 4: Finishing Touches
-
Drying:
Let the sculpture dry slowly away from direct heat for 24-48 hours. Turn it occasionally if possible to ensure even airflow. -
Sanding:
Once fully cured, use fine-grit sandpaper to buff the smooth figure’s head and body until it feels polished and soft to the touch. -
Mounting:
Apply strong craft glue to the bottom of the dried clay figures and press them firmly onto the center of your wooden base. -
Sealing:
Brush a coat of matte acrylic sealer over the entire clay portion to protect it from moisture and give it a finished, professional sheen.
Place your finished hugging statue near a window to let the natural light highlight the beautiful sweater texture.


Head-to-Head Sitting Couple on a Bench
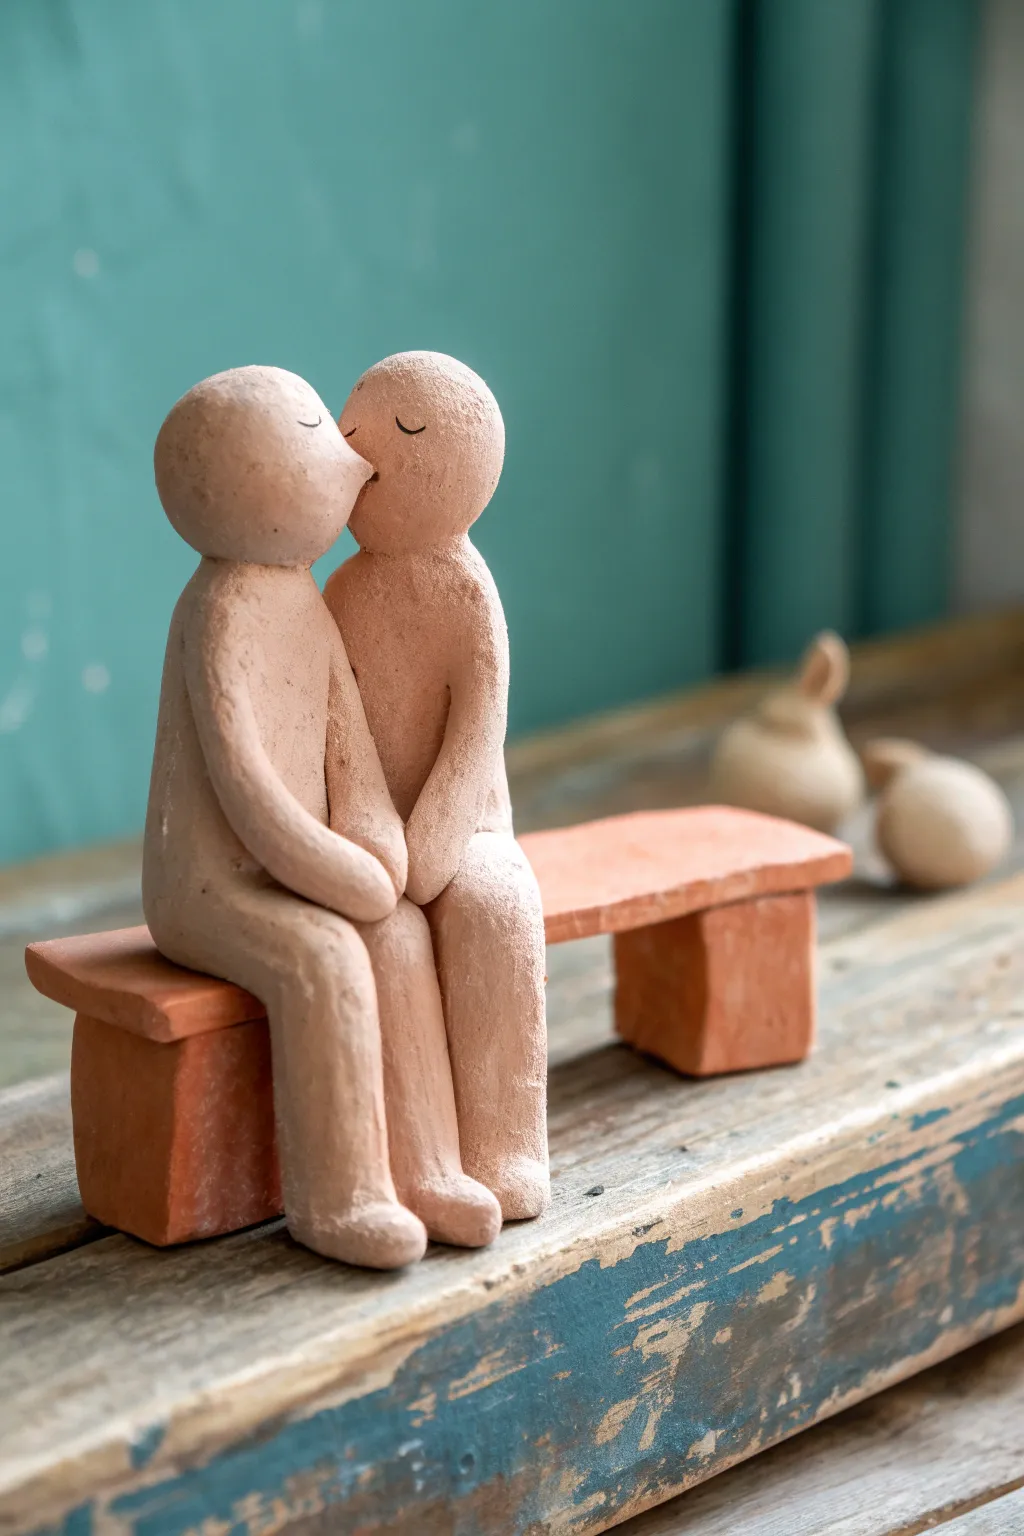
Capture a sweet moment of connection with this minimalist sculpture featuring two figures sharing a kiss on a rustic bench. The rough, earthy texture creates a warm, timeless feel perfect for a bookshelf or mantelpiece.
Step-by-Step Tutorial
Materials
- Terracotta-colored air dry clay (or white clay painted later)
- Clay cutting tool or old knife
- Small cup of water (for slip)
- Toothpick or needle tool
- Small sponge or brush for smoothing
- Rolling pin (optional)
- Fine-grit sandpaper (optional)
- Matte sealant spray
Step 1: Creating the Bench Base
-
Form the bench legs:
Start by cutting two equal rectangular blocks of clay, approximately 1 inch wide and 1.5 inches tall. These will serve as the sturdy supports for your bench. -
Shape the seat:
Roll out a flat slab of clay roughly 0.25 inches thick. Cut a rectangular strip long enough to bridge the two legs with a slight overhang on each side. -
Assemble the bench:
Score the tops of the leg blocks and the underside of the seat where they will connect using your needle tool. Dab a little water or slip on the scored areas and press the seat firmly onto the legs. -
Smooth the seams:
Use your finger or a damp tool to blend the clay where the legs meet the seat, ensuring a strong bond. You want the bench to look rustic, so don’t worry about perfectly sharp edges.
Keep it Rough
Don’t over-smooth the clay with water. The charm of this piece comes from the raw, slightly grainy texture that mimics carved stone or rough terracotta.
Step 2: Sculpting the Figures
-
Create the torsos:
Roll two cylinders of clay for the bodies. Each should be about 3 inches long. Round off the top end of each cylinder to prepare for the head attachment. -
Bend the sitting posture:
Gently bend each cylinder at the midpoint to create a 90-degree angle for the hips. Place them tentatively on the bench to ensure their legs dangle correctly and their feet touch the ground area. -
Form the legs and feet:
Extend the clay for the legs, keeping them simple and tubular. Slightly fatten the ends and bend them forward to suggest minimalist feet resting on the surface. -
Secure figures to the bench:
Once you are happy with the positioning, score the bottom of the figures and the top of the bench seat. Apply slip and press the figures down so they sit side-by-side, leaning slightly toward each other. -
Shape the heads:
Roll two spheres of clay, slightly smaller than a ping-pong ball. Since they will be kissing, I find it helpful to gently pinch the front of one sphere to create a slight protrusion for the ‘nose’ or face connection point. -
Attach the heads:
Score the tops of the torsos and the bottoms of the heads. Attach them firmly, blending the neck clay down into the shoulders so there isn’t a visible seam. -
Pose the connection:
Gently press the two heads together so the ‘noses’ or front faces touch. Turn the heads slightly inward to create that intimate, kissing angle shown in the reference.
Step 3: Details and Finishing
-
Add the arms:
Roll two thin snakes of clay for the outer arms. Attach one to the shoulder of the left figure and one to the right figure. -
Position the hands:
Curve the arms forward so the hands rest gently on their own laps or touch the other figure’s leg. Blend the clay at the shoulders smoothly into the main body. -
Create the facial features:
Using a needle tool or toothpick, gently press two small curved lines onto each face to represent closed, smiling eyes. Keep these simple and aligned with the tilt of the heads. -
Refine the texture:
If the clay has become too smooth from handling, lightly tap the surface with a stiff brush or a crumpled ball of foil to bring back that gritty, stone-like texture. -
Final drying:
Let the sculpture dry completely for 24-48 hours. Keep it away from direct heat sources to prevent cracking. -
Seal the piece:
Once fully dry, spray the entire sculpture with a matte clear coat to protect the clay while maintaining its natural, earthy appearance.
Make it Personal
Before the clay dries, gently etch initials or a special date small and subtle into the back of the bench or the underside of the base.
Place your finished couple on a sunny windowsill where the light can highlight the textures of your handcrafted sculpture

The Complete Guide to Pottery Troubleshooting
Uncover the most common ceramic mistakes—from cracking clay to failed glazes—and learn how to fix them fast.
Initials and Date Ornament Set
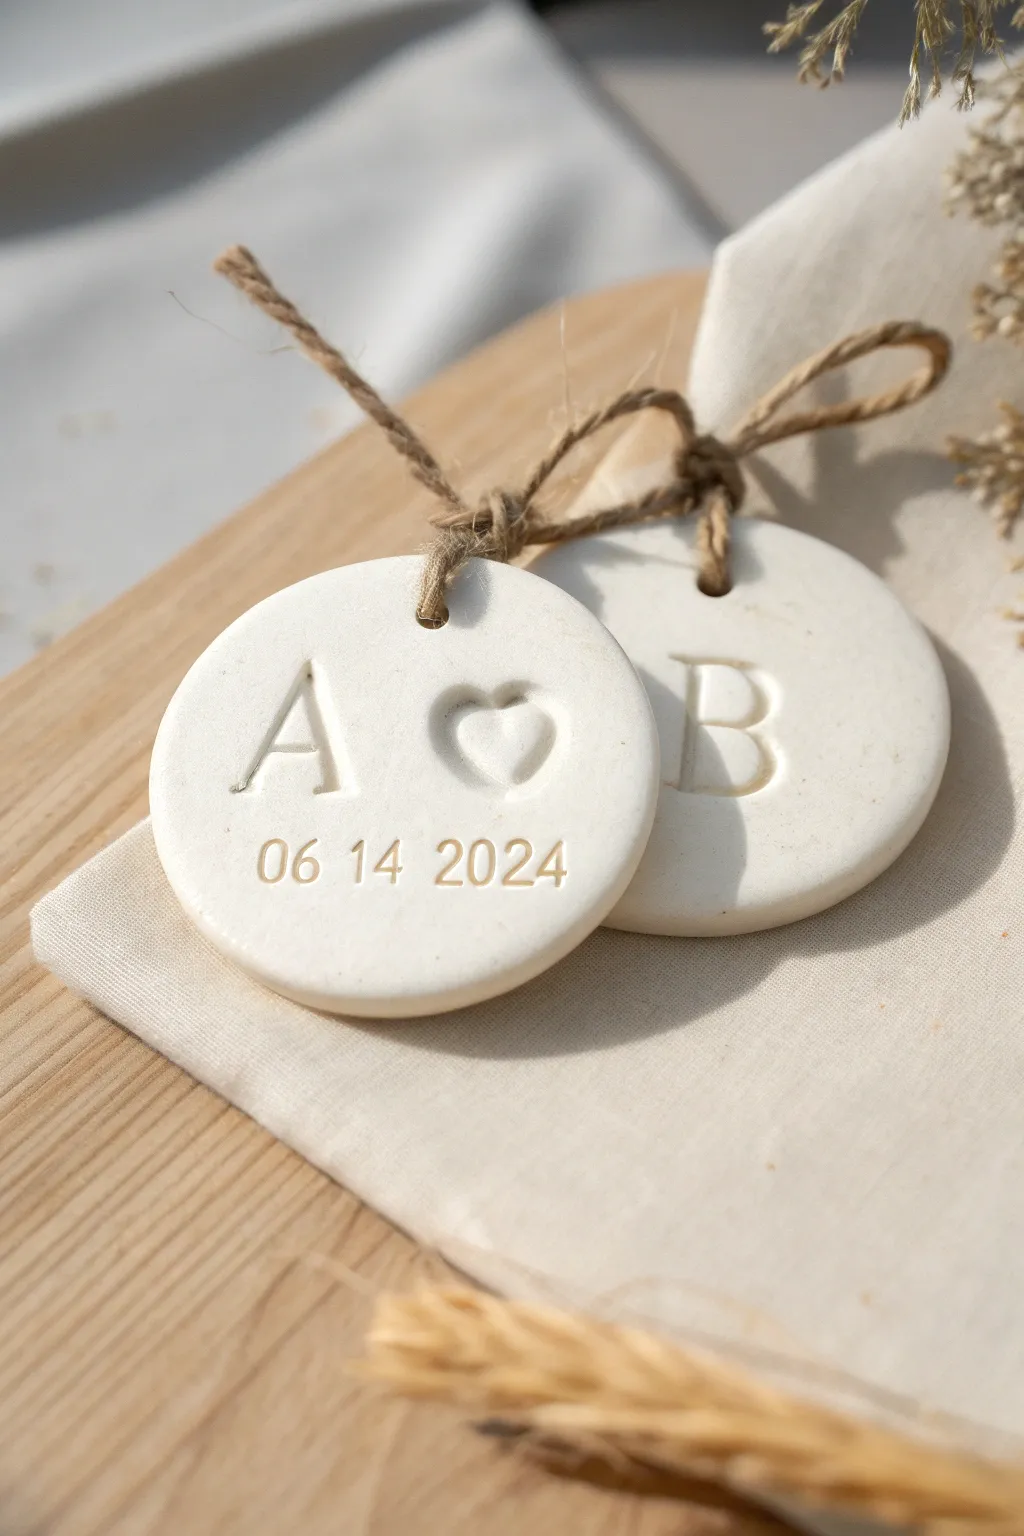
Capture a special moment in time with these elegant, minimalist clay ornaments featuring your initials and significant date. Their crisp white finish and rustic jute ties make them perfect for wedding favors, anniversary gifts, or a sweet addition to your home decor.
Step-by-Step
Materials
- White air dry clay
- Rolling pin (acrylic or wooden)
- Round cookie cutter (approx. 2.5 – 3 inches)
- Letter and number stamp set (serif font)
- Small heart stamp or tool
- Straw or small circular cutter (for hole punching)
- Fine grit sandpaper (220 and 400 grit)
- Bowl of water
- Jute twine
- Clear matte acrylic sealer (optional)
- Wax paper or canvas work mat
Step 1: Shaping the Discs
-
Condition the clay:
Begin by taking a handful of air dry clay and kneading it in your hands until it feels warm and pliable. This conditioning step reduces the chance of cracks forming later as it dries. -
Roll it out:
Place the clay on your work surface (using wax paper can prevent sticking). Roll the clay out to an even thickness, aiming for roughly 1/4 inch thick. If you roll it too thin, the ornaments might become brittle. -
Cut the shapes:
Press your round cookie cutter firmly into the clay to create two perfect circles. Gently wiggle the cutter slightly before lifting it to ensure a clean release. -
Smooth the edges:
Dip your finger into a small bowl of water and gently run it around the circumference of the cut circles to smooth down any rough or jagged edges left by the cutter. -
Create the hanging holes:
Use a drinking straw or a tiny clay cutter to punch a hole at the very top of each circle. Make sure the hole is centered and not too close to the edge, or the clay might snap when tied.
Crack Control
If small surface cracks appear while drying, don’t panic. Mix a tiny bit of fresh clay with water to make a paste (slip) and fill the crack, then sand smooth once dry.
Step 2: Stamping and Drying
-
Plan your stamping:
Before pressing into the clay, arrange your stamps on the table to verify the spacing. For the first ornament, you’ll need the first initial, a heart, and the second initial. -
stamp the first initial:
Press the ‘A’ stamp into the clay on the left side of the first disc. Apply firm, even pressure to get a crisp impression, but don’t push so hard that you distort the circle’s shape. -
Add the heart:
Position the heart stamp directly in the center and press down. If you don’t have a heart stamp, you can carefully carve a heart shape using a needle tool, though a stamp gives that clean, embossed look. -
Stamp the second initial:
Press the ‘B’ (or your partner’s initial) onto the second disc. For the main image style, place this letter centrally on the second disc, or create a matching pair by putting the second initial on the right side of the first disc. -
Add the date:
On the initial disc, centered below the letters, carefully stamp the date (06 14 2024). Aligning numbers can be tricky, so I suggest lightly resting the stamps on the surface first to check positioning before pressing down. -
Initial drying phase:
Place the finished discs on a flat surface lined with paper towel or a drying rack. Let them sit undisturbed for 24-48 hours. Flip them over halfway through the drying process to prevent curling.
Add Some Shine
After the clay is dry, carefully paint only the indented letters and numbers with gold paint or liquid gilding to make the text pop against the white background.
Step 3: Refining and Assembly
-
Sand for perfection:
Once the clay is completely bone dry and hard, take your 220 grit sandpaper and gently buff the edges and surface. This removes fingerprints and creates that professional, matte finish. -
Polish (optional):
For an even smoother feel, do a final quick pass with 400 grit sandpaper. Wipe away all white dust with a slightly damp cloth or a dry soft brush. -
Seal the clay:
To protect the pure white color from dirt and moisture, apply a thin coat of clear matte acrylic sealer. This is optional but highly recommended if these will be handled often. -
Prepare the twine:
Cut a length of jute twine, about 8-10 inches long. The rustic texture of the jute contrasts beautifully with the smooth white clay. -
Attach the twine:
Thread the twine through the hole in the first ornament. Tie a simple knot at the base near the clay, then tie the two ends into a bow or a loop, depending on how you plan to hang them. -
Tie the set together:
If gifting as a set, use a longer piece of twine to tie the two ornaments together loosely, creating a lovely bundle ready for gifting.
Now you have a timeless set of personalized keepsakes that celebrate your special date.
Matching Cat Couple Figurines
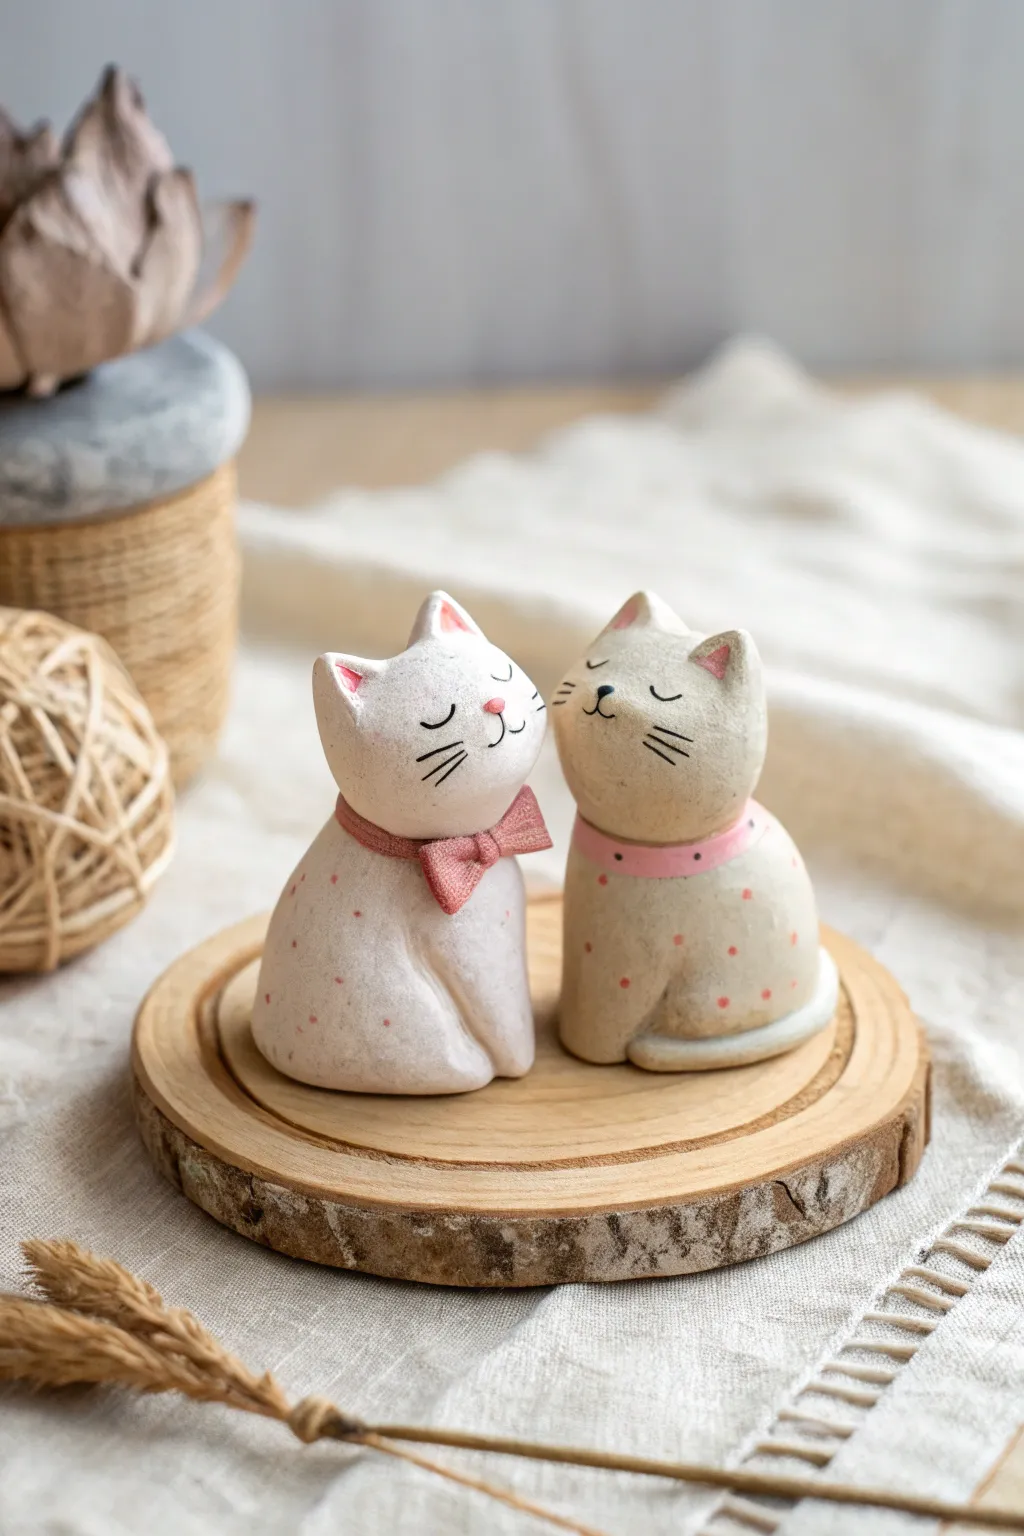
Create a charming duo of feline companions with this simple yet expressive air dry clay project. These minimalistic cat figurines feature smooth surfaces, delicate painted details, and a sweet connection that makes them perfect for a romantic gift or decor.
Detailed Instructions
Materials
- White or natural air dry clay
- Acrylic paints (white, beige/cream, light pink, black)
- Small fine-point paintbrush
- Needle tool or cocktail stick
- Small rolling pin
- Water cup and sponge
- Fine-grit sandpaper
- Matte or satin varnish/sealant
- Clay sculpting tools (smoothing tool)
Step 1: Shaping the Bodies
-
Form the base shapes:
Start with two equal lumps of clay, each about the size of a golf ball. Roll them into smooth spheres to remove cracks, then gently elongate them into rounded teardrop or pear shapes. Flatten the bottom of each so they stand securely. -
Define the heads:
Using your thumb and forefinger, gently pinch the upper third of the pear shape to define a neck area, but keep it subtle. The head should flow naturally into the body rather than looking like a separate ball stuck on top. -
Pinch the ears:
At the top of the head, pinch two small triangles to form the ears. Keep them somewhat short and soft-edged. Use a modeling tool or your finger to smooth the transition between the ears and the skull. -
Create the tails:
Roll a small snake of clay for each cat. Attach one end to the lower back of the body, wrapping the tail around the side toward the front paws. Blend the attachment point thoroughly with a smoothing tool and a dab of water. -
Add front legs:
Instead of attaching separate limbs, use a modeling tool to gently carve or depress a line down the center of the chest to suggest two front legs tucked together. This keeps the minimalist aesthetic intact. -
Construct the accessories:
For the white cat, mold a tiny bow tie shape and attach it just below the chin. For the beige cat, roll a very thin snake, flatten it slightly, and wrap it around the neck to create a collar. -
Smoothing:
Dip your finger in a little water and run it over the entire surface of both cats. Remove any fingerprints or tool marks to achieve a ceramic-like finish. Let the figures dry completely for 24-48 hours.
Step 2: Sanding and Painting
-
Refine the surface:
Once fully dry, gently sand the figurines with fine-grit sandpaper. Focus on any bumps or harsh edges on the ears and tails. Wipe away the dust with a slightly damp cloth. -
Base coat application:
Paint one cat entirely white. For the second cat, mix a drop of brown or yellow ochre into your white paint to create a warm creamy-beige tone. Apply two thin coats for opaque coverage, letting the first dry before adding the second. -
Detailing the ears:
Using a very small brush and light pink paint, gently fill in the inner triangle of the ears. Feather the edges slightly so it looks soft. -
Painting accessories:
Paint the bow tie on the white cat a dusty rose or coral pink. Use the same shade to paint the collar on the beige cat, ensuring the line is crisp. -
Adding texture:
Dip the non-brush end of your paintbrush or a toothpick into the pink paint. Carefully dot the bodies of both cats to create a subtle polka dot pattern. Keep the dots random but evenly spaced. -
Facial features:
Using your finest brush and black paint (or a fine-tip drawing pen), draw two curved lines for closed, happy eyes. Add a tiny pink nose and three sleek whiskers on each cheek. -
Finishing touches:
Add small black dots to the collar of the beige cat for extra detail. I like to double-check the whiskers here to make sure they are symmetric. -
Sealing:
Protect your work with a coat of matte or satin varnish. This will give the clay a professional, ceramic look and prevent the paint from chipping.
Smooth Surface Secret
Use a baby wipe instead of just water when smoothing the raw clay. The fibers help buff the surface to a porcelain-like finish without over-wetting the clay structure.
Unsteady Figures?
If the cats wobble or fall over while drying, their bottoms have rounded out. Gently press the base onto a flat surface and sand it perfectly flat once fully hardened.
Place these adorable felines side-by-side on a shelf or gift them to your favorite person as a sweet token of affection


What Really Happens Inside the Kiln
Learn how time and temperature work together inside the kiln to transform clay into durable ceramic.
Frog Couple on a Lily Pad Base

This adorable duo captures a tender moment between two smiling frogs perched comfortably on a textured lily pad. The gentle green tones and smooth, rounded forms make this an approachable project for clay enthusiasts looking to create a sweet keepsake or gift.
How-To Guide
Materials
- Air dry clay (white or pre-colored green)
- Acrylic paints (sage green, dark green, white, pastel pink, black)
- Clay sculpting tools (specifically a needle tool and a small rounded tool)
- Small bowl of water
- Rolling pin
- Fine grit sandpaper
- Paintbrushes (flat shader and fine detail)
- Clear varnish (glossy)
- Aluminum foil (for armature core)
Step 1: Sculpting the Base
-
Form the lily pad:
Begin by rolling out a ball of clay into a flat, uneven disc about 1/4 inch thick. It doesn’t need to be a perfect circle; a slightly organic shape works best for a lily pad. -
Add texture:
Using the side of a sculpting tool or your fingers, gently press and lift around the edges to create a slightly raised, wavy rim. This gives the pad dimension. -
Surface detailing:
Take a small ball of crumpled aluminum foil and lightly tap it over the surface of the lily pad to impart a subtle, natural texture rather than leaving it perfectly smooth.
Step 2: Creating the Frogs
-
Create the bodies:
Roll two balls of clay, one slightly larger than the other. Shape them into rounded pear forms, with the bottom being the widest part to ensure they sit stably on the base. -
Position the couple:
Place the two bodies side-by-side on the lily pad base. I like to press them gently together at the shoulders so they look like they are cuddling. Use a little water or slip (clay and water paste) to bond them to the base and each other. -
Sculpt the legs:
Roll four thick coils for the hind legs. Attach them to the sides of the bodies, blending the clay at the hip joint but leaving the thigh distinct. Curve the bottom of the coil forward to form the feet tucked under the body. -
Add front arms:
Roll two thinner coils for the arms appearing between the bodies. Blend these vertically along the front, making them look like the frogs vary slightly in posture. -
Define the faces:
Use a needle tool or a thin blade to carefully carve a wide, curved smile into each frog face. Ensure the line is deep enough to hold paint later. -
Form the eyes:
Roll four small balls of clay. Attach two to the top of each head. Smooth the connection points at the back of the eyes so they blend into the head seamlessly, but keep the front rounded and bulging.
Cracking Up?
If cracks appear while drying, mix a small amount of fresh clay with water to make a paste. Fill the cracks, smooth with a finger, and let dry again.
Step 3: Adding the Leaves
-
Shape the leaves:
Flatten two smaller pieces of clay into teardrop shapes. These will be the decorative leaves resting on the main pad. -
Carve veins:
Using a knife tool, score a central line down each leaf, followed by angled diagonal lines branching out to create the vein structure. -
Attach to base:
Secure these leaves onto the lily pad just in front of the frogs using a dab of water, pressing them down gently so they look like they are resting naturally.
Go Botanical
Add a tiny sculptured clay lotus flower or water lily in pink or yellow to the edge of the pad for an extra pop of color.
Step 4: Finishing Touches
-
Drying:
Allow the entire sculpture to dry completely. This usually takes 24-48 hours depending on humidity. Flip it carefully halfway through if the bottom of the base remains damp. -
Sanding:
Once fully dry, lightly sand any rough fingerprints or harsh ridges, especially around the frogs’ backs and heads, to get that smooth, stone-like finish. -
Base coat painting:
Paint the frogs a soft sage green. Simple block color works best here. Paint the lily pad base a slightly darker, earthier olive green to create contrast. -
Highlighting:
Mix a tiny amount of white into your green paint. Use a technique called dry-brushing to lightly dust the tops of the frogs’ heads, knees, and the leaf veins to accentuate the texture. -
Facial details:
Paint the eye bumps white. Once dry, add large black pupils. Dip a the end of a paintbrush handle into pink paint to stamp perfectly round rosy cheeks. -
Body markings:
Using a fine detail brush or a toothpick, add tiny pink dots scatter across the frogs’ backs and sides for a whimsical pattern. -
Sealing:
Finish with a coat of glossy varnish. This not only protects the paint but gives the frogs a permanent ‘wet’ look appropriate for amphibians.
Display your charming frog couple on a windowsill or shelf where they can bring a smile to your face every day.
Avocado Halves “Better Together” Duo
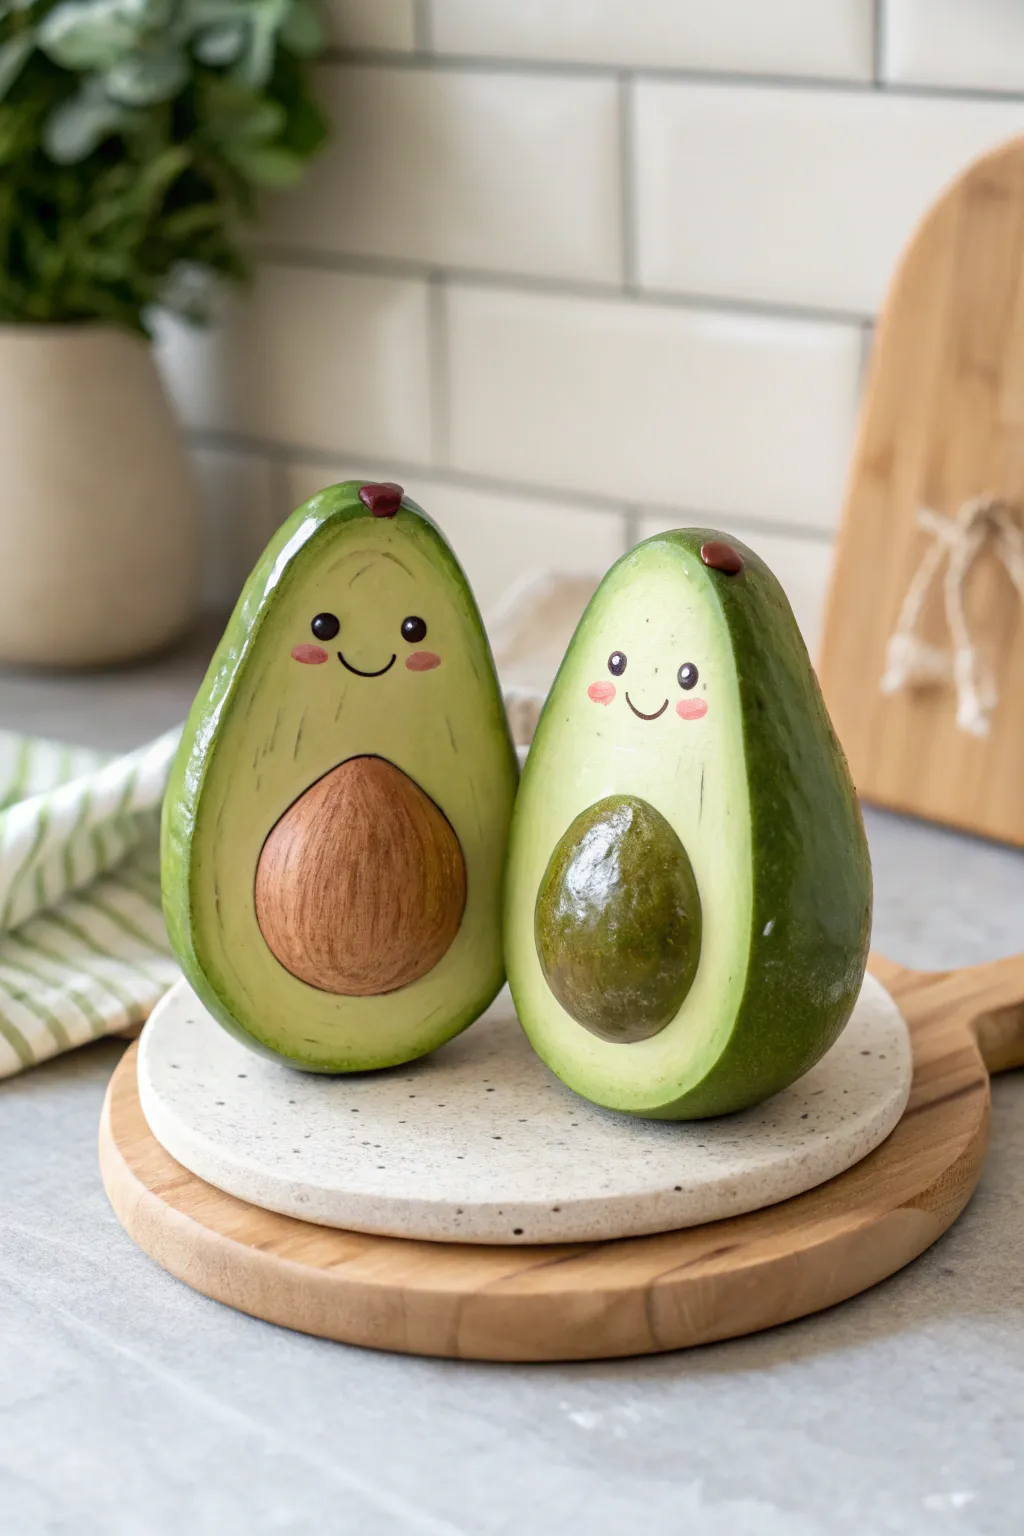
Celebrate how perfectly you fit together with this adorable set of avocado halves, complete with sunny smiles and rosy cheeks. One half holds the seed while the other has the matching pit, making them an ideal project for couples or best friends to craft side-by-side.
How-To Guide
Materials
- Air dry clay (white)
- Acrylic paints: Avocado green, dark forest green, yellow ochre, light beige, brown, black, pink
- Sculpting tools (needle tool, smoothing sponge)
- Aluminum foil (for armature)
- Fine grit sandpaper
- Gloss varnish or clear sealant
- Small paintbrushes (flat and fine liner)
- Water cup
Step 1: Forming the Base
-
Create foil cores:
Start by scrunching aluminum foil into two identical teardrop shapes. This saves clay and keeps your avocados lightweight. Aim for a height of about 3-4 inches. -
Cover with clay:
Roll out a slab of white air dry clay to about 1/4 inch thickness. Wrap the clay completely around your foil cores, smoothing the seams together with a bit of water until you have two smooth, pear-shaped forms. -
Flatten the faces:
Gently press the front of each teardrop against a flat surface to create the flat face where the avocado flesh will be painted. Keep the backs rounded. -
Sculpt the seed:
Roll a separate ball of clay for the seed. Press it firmly into the lower center of the first avocado half so it sticks out prominently. -
Create the hollow:
For the second avocado, press your thumb or a rounded tool into the lower center to create a concave indentation (the pit) that mirrors the size of the seed on its partner. -
Refine the stems:
Pinch a tiny bit of clay at the very top point of each avocado to suggest a small stem remnant. -
Smooth and dry:
Use a damp sponge to wipe away any fingerprints or cracks. Set the pieces aside to dry completely for 24-48 hours, flipping them occasionally for even airflow.
Step 2: Painting the Flesh and Skin
-
Sand imperfections:
Once fully dry, lightly sand any rough patches to ensure a smooth canvas for your paint. -
Base coat the flesh:
Mix yellow ochre with a generous amount of white and a tiny dot of green to create a pale, creamy lime color. Paint the entire flat front face of both avocados with this shade. -
Paint the gradient:
While the center is still slightly tacky, mix a brighter lime green. Paint the outer edges of the flat face, blending it inward toward the pale center to mimic the natural ripeness gradient of an avocado. -
Coat the skin:
Paint the rounded backs and sides with a dark forest green. Bring this dark color just over the front edge to create a thin rim of skin framing the pale flesh. -
Add texture:
Using a nearly dry brush with a lighter green, stipple tiny dots onto the dark skin area to give it that realistic bumpy avocado texture. -
Paint the seed:
Paint the protruding seed on the first half with a medium brown. Use darker brown vertical strokes to simulate wood grain texture. -
Detail the hollow:
Paint the indented pit on the second half using a mix of dark greens and browns to show depth and shadow where the seed would have been.
Clay Cracking?
If small cracks appear while drying, don’t panic. Mix a small amount of fresh clay with water to make a paste (slip) and fill the cracks, then smooth over.
Step 3: Adding Faces and Finish
-
Draft the faces:
Use a pencil to very lightly sketch the placement of the eyes and mouths. Position them high on the upper half of the avocado for maximum cuteness. -
Paint the eyes:
Using a fine liner brush and black paint, fill in two small circles for eyes on each fruit. Add tiny white dots near the top of the black circles for a sparkle effect. -
Draw the smiles:
Paint a thin, curved black line between the eyes for a simple smile. I like to make the second avocado’s smile slightly wonky for character. -
Apply blush:
Dip a rounded brush or Q-tip into pink paint. Dab off most of the paint on a paper towel, then gently stamp rosy cheeks just under the eyes. -
Seal the work:
Finish by applying a coat of gloss varnish. This makes the colors pop and gives the seed that freshly cut, shiny look.
Weighted Base Trick
Before sealing the clay, press a small, flat heavy washer into the bottom of the foil core so your avocados stand upright securely without tipping over.
Place your finished duo on a shelf or desk as a daily reminder that some things just belong together

TRACK YOUR CERAMIC JOURNEY
Capture glaze tests, firing details, and creative progress—all in one simple printable. Make your projects easier to repeat and improve.
Puzzle Piece Couple Magnets
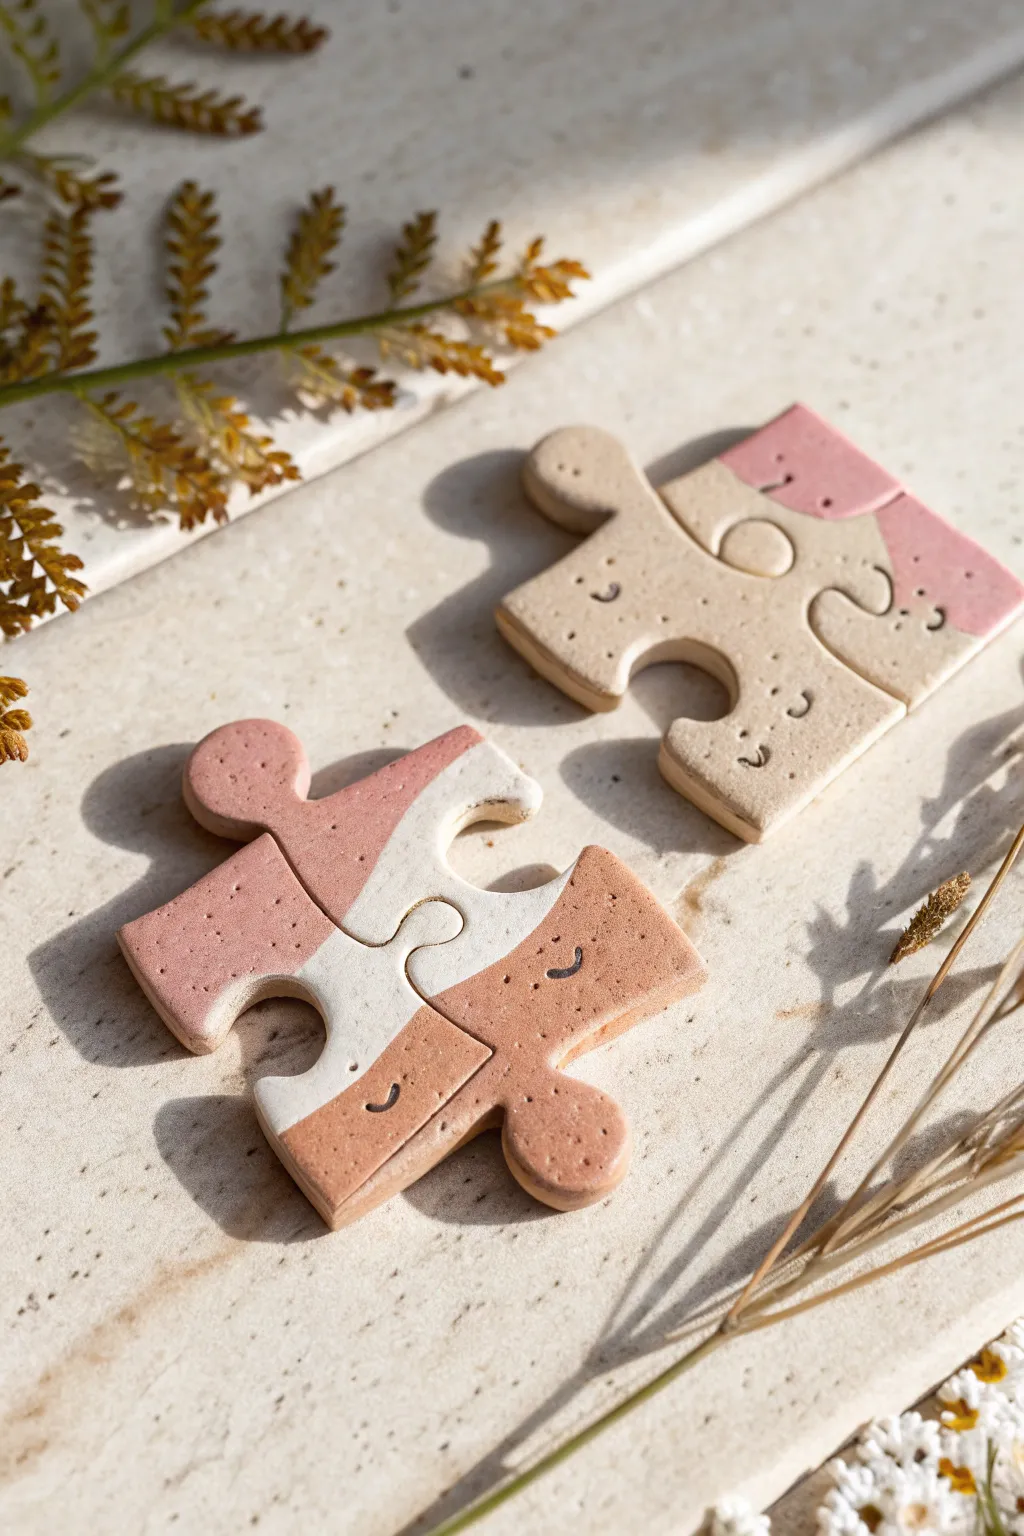
These adorable interlocking puzzle pieces are a sweet way to symbolize your connection with a loved one. Made from air dry clay and painted with soft, earthy tones, they feature charming little smiley faces and make for perfect fridge magnets or framed keepsakes.
Step-by-Step
Materials
- Air dry clay (white or natural)
- Acrylic paints (beige, dusty rose, terracotta, white)
- Black fine-liner pen or very fine paintbrush
- Rolling pin
- Sharp craft knife or x-acto knife
- Sandpaper (fine grit)
- Small magnets (optional)
- Strong craft glue (E6000 or similar)
- Matte varnish or sealant
- Paper and pencil (for template)
- Small bowl of water
- Paintbrushes (flat and fine detail)
Step 1: Shaping the Clay
-
Draft your template:
Start by drawing two interlocking puzzle pieces on a piece of paper. You can trace real puzzle pieces if you have a large floor puzzle, or just freehand a chunky shape about 3-4 inches wide. Cut these paper shapes out to use as stencils. -
Roll out the slab:
Take a handful of air dry clay and knead it briefly until it is pliable. Roll it out on a smooth surface to an even thickness of about 1/4 inch (6mm). -
Cut the shapes:
Place your paper templates onto the rolled clay. Using a sharp craft knife, carefully trace around the edges. I find that holding the knife vertical helps keep the edges crisp. -
Smooth the edges:
Dip your finger in a little bit of water and run it along the cut edges of the clay to smooth down any roughness or sharp corners. You want a soft, rounded finish similar to the photo. -
Test the fit:
Before the clay starts to dry, gently push the two pieces together to ensure they interlock properly. If the fit is too tight, trim a tiny sliver off the connecting knob.
Step 2: Drying and Refining
-
Let them dry:
Place your clay pieces on a wire rack or a piece of parchment paper. Let them dry for 24-48 hours. Flip them over halfway through the drying process so the underside dries evenly and prevents warping. -
Sand for perfection:
Once fully cured and hard, use fine-grit sandpaper to buff away any remaining uneven spots on the surface or edges. Wipe away the dust with a slightly damp cloth.
My clay curled up!
Curling happens if the top dries faster than the bottom. To fix, slightly dampen the concave side and place it under a heavy book overnight to flatten it back out.
Step 3: Painting the Design
-
Base coat the beige piece:
Take the first puzzle piece (the top right one in the image). Paint the majority of the surface with a creamy beige acrylic paint. Leave the bottom right corner unpainted or paint it a lighter shade if desired. -
Add the pink accent:
On that same beige piece, paint a soft, wavy section on the top right corner using a dusty rose pink. The line doesn’t need to be straight; a natural curve looks best. -
Paint the segmented piece:
For the second piece (bottom left), visualize three distinct diagonal sections. Paint the top left section in the dusty rose pink. -
Add the middle stripe:
Paint the central diagonal band in a creamy white or very pale beige. This section connects the knob to the main body. -
Finish with terracotta:
Paint the bottom right section and the protruding knob in a warm terracotta or rust color to complete the tri-color look. -
Create the speckles:
To mimic the ceramic look in the photo, dilute a tiny bit of brown paint with water. Dip a stiff brush (or toothbrush) into it and flick the bristles with your thumb to spray tiny speckles over the dried paint.
Make it a keychain
Before the clay dries, poke a small hole in the corner of each piece. Once finished, add jump rings and keychain hardware to carry your matching piece with you.
Step 4: Final Details
-
Draw the faces:
Once the paint is completely dry, use a fine black pen or a very thin brush with black paint to add the features. Draw small ‘u’ shapes for sleeping eyes and a tiny curve for a smile. Add these to different color sections for a playful look. -
Seal the work:
Apply a coat of matte varnish over the entire front and sides. This protects the paint and gives the pieces a finished, professional feel. -
Attach magnets:
If you want to use these on the fridge, glue small round magnets to the back of each piece using a strong adhesive like E6000.
Now you have a charming set of handmade puzzle pieces to share with your favorite person
Mini Living Room “Us” Vignette
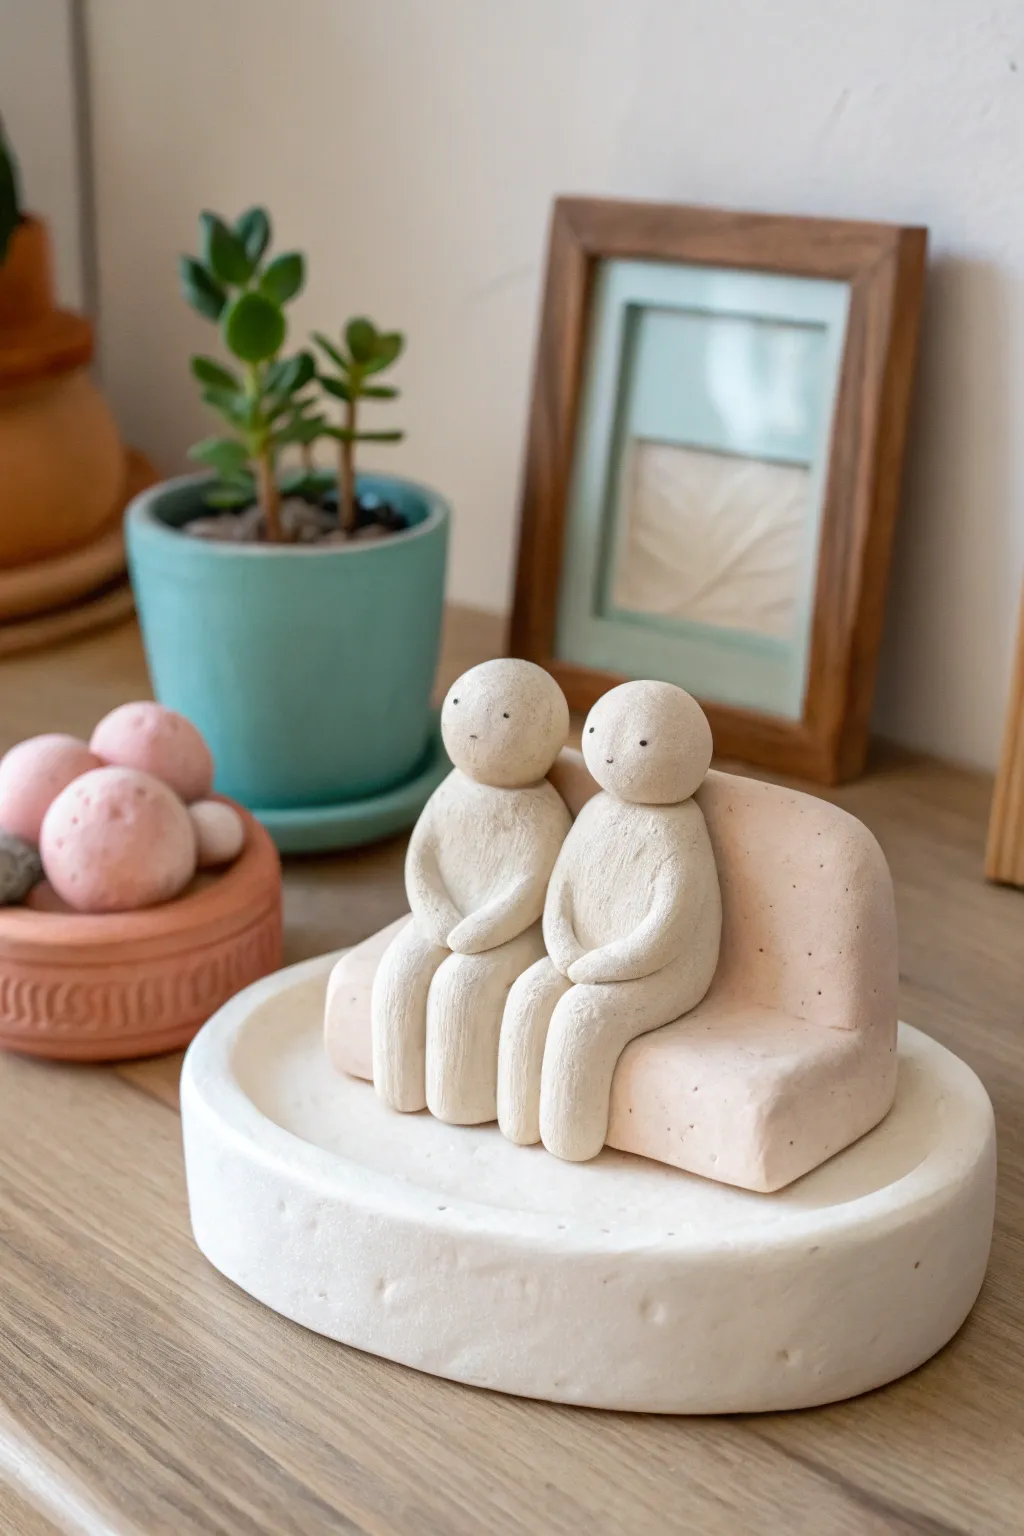
Capture a quiet moment of togetherness with this charming air-dry clay sculpture featuring two minimalist figures seated on a cozy sofa. The rough, matte texture and soft earth tones give it a modern, organic look perfect for shelf decor or a sentimental gift.
Step-by-Step
Materials
- White air-dry clay
- Rolling pin
- Clay sculpting tools or a toothpick
- Small cup of water
- Fine-grit sandpaper (200-400 grit)
- Acrylic paints (Cream, Pale Pink/Beige, Light Grey)
- Matte varnish or sealant
- Small paintbrush
- Needle tool or stiff wire
Step 1: Sculpting the Base
-
Form the main platform:
Start by taking a large chunk of clay and rolling it into a thick oval slab, about 3/4-inch tall. Keep the edges rounded and organic rather than sharp. -
Texture the surface:
Using a crumpled ball of aluminum foil or a toothbrush, gently tap the surface of the base to give it a stone-like texture. Poke a few shallow, random indentations for added visual interest. -
Shape the sofa seat:
Roll a smaller rectangle of clay for the sofa seat. It should be proportional to your base but leave ample room in the front. Smooth the edges with a wet finger. -
Create the sofa backrest:
Form a thicker, curved slab that is slightly wider than the seat. Attach this to the back of the seat piece using the score-and-slip method (scratch both surfaces and add water) to ensure a strong bond. -
Mount the sofa:
Score the bottom of the sofa and the top of the oval base. Press the sofa firmly onto the back half of the base, blending the seam slightly where they meet.
Cracks appeared?
Make a “slip” paste by mixing clay scraps with water until gooey. Fill the cracks with this paste, let it dry, then sand smooth.
Step 2: Creating the Couple
-
Form the bodies:
Roll two medium-sized teardrop shapes for the torsos. Flatten the bottom of each teardrop so they can sit securely on the sofa. -
Shape the legs:
For each figure, roll two small sausages of clay for legs. Attach them to the bottom front of the torsos, draping them over the edge of the sofa seat so they hang naturally. -
Add the heads:
Roll two perfect spheres for the heads. Attach them to the top of the tapered torsos using a small piece of wire or a toothpick inside for internal support. -
Sculpt the arms:
Roll thin snakes of clay for the arms. Position them so the hands rest gently in the laps. For this project, keeping the limbs merged closely to the body enhances stability and the minimalist style. -
Smooth the figures:
Use a damp brush or finger to smooth out any connection points between the arms, legs, and torso so the figure looks like one cohesive piece. -
Add facial details:
Using a needle tool or a very fine point, poke two tiny holes for eyes on each face. Keep them wide-set and low on the face for that cute, illustrative style.
Sculpting Pro Tip
Keep a wet wipe nearby to clean your hands often. Clean hands prevent dust and lint from getting embedded in the white clay.
Step 3: Finishing Touches
-
Slow drying:
Let the sculpture dry slowly away from direct sunlight for 24-48 hours. I like to loosely drape a plastic bag over it for the first night to prevent cracking. -
Sanding:
Once fully cured, gently sand any rough fingerprints or sharp edges on the base or figures to achieve a soft, matte finish. -
Paint the sofa:
Mix a very pale pink or beige acrylic paint. Carefully paint the sofa section, getting into the crevices behind the figures if you didn’t paint before assembly. -
Paint the figures:
Use a warm, off-white or cream color for the figures’ bodies and heads. Apply thin coats to avoid analyzing the texture. -
Dot the eyes:
Dip a toothpick into black paint and carefully re-dot the eye holes to make them pop. -
Seal the work:
Finish with a matte spray varnish to protect the clay while maintaining that natural, unglazed pottery aesthetic.
Place your finished vignette on a bookshelf or desk as a sweet reminder of connection
Constellation Couple Hanging Tiles
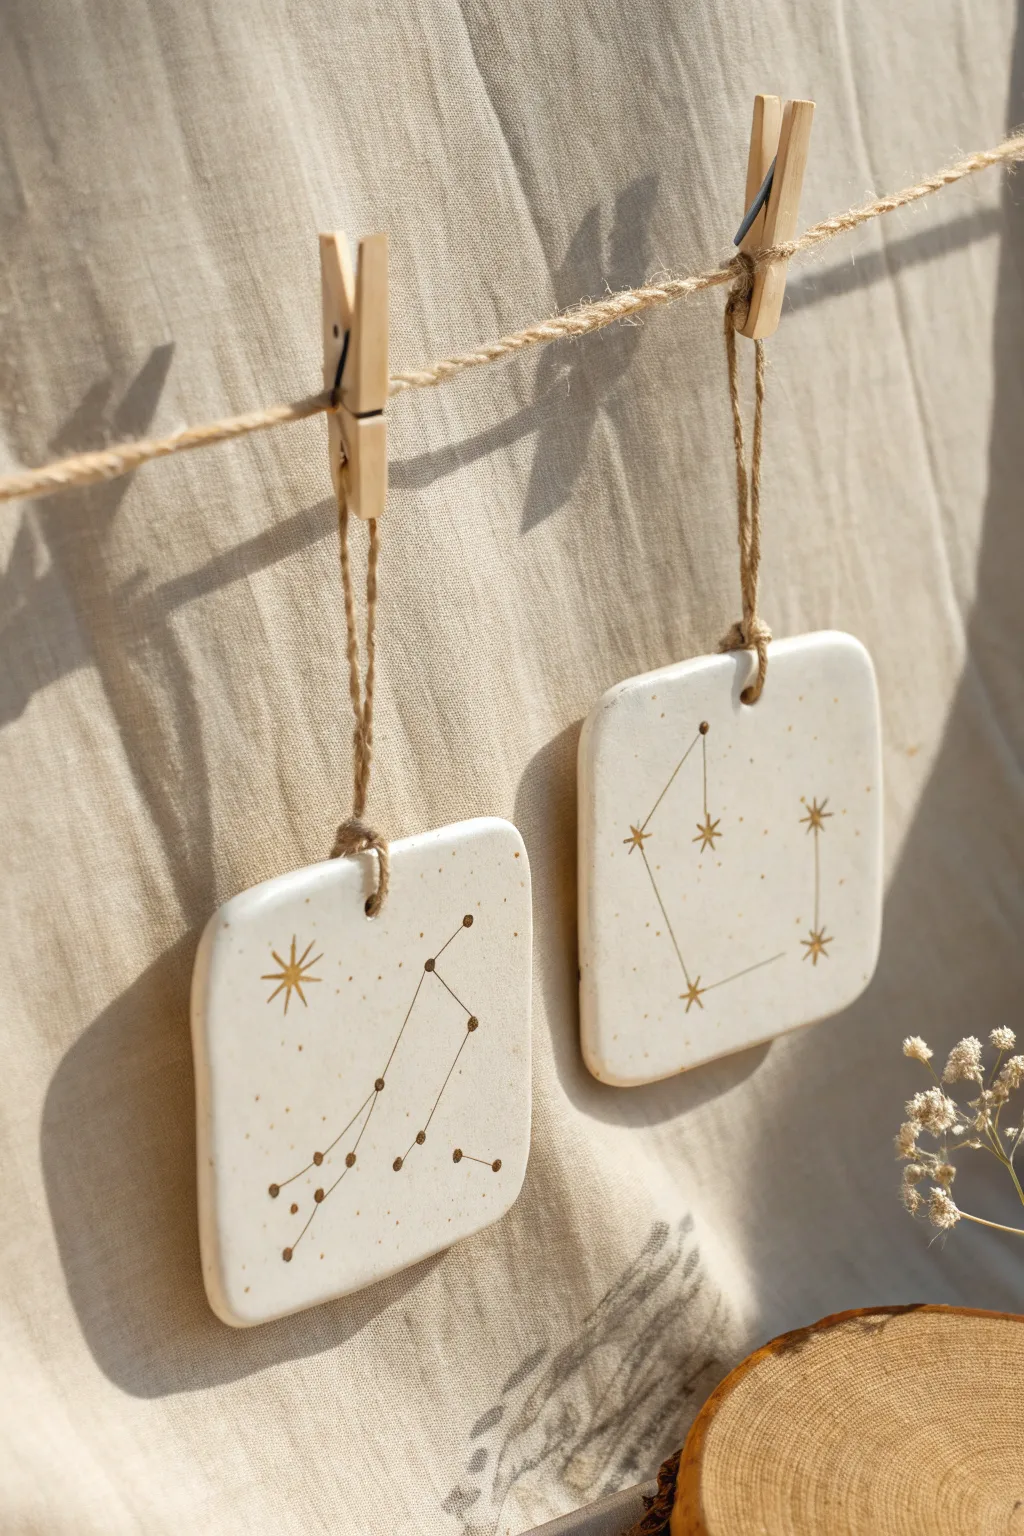
Immortalize your starry bond with these elegant hanging tiles, featuring your personal zodiac constellations in shimmering gold. The rustic, handcrafted edges and simple twine hangers give them an organic, minimalist charm perfect for any wall.
Step-by-Step Tutorial
Materials
- White or speckled air dry clay
- Rolling pin
- Square cookie cutter (or knife and ruler)
- Parchment paper or canvas working surface
- Straw or small circular tool
- Fine grit sandpaper
- Gold metallic paint pen or fine brush with gold acrylic paint
- Pencil (optional)
- Jute twine
- Bowl of water
- Sponge
Step 1: Shaping the Clay Canvas
-
Prepare the workspace:
Lay down your parchment paper or canvas to prevent sticking. Take a handful of air dry clay and knead it until it’s pliable and smooth, working out any air bubbles. -
Roll out the slab:
Use your rolling pin to flatten the clay into an even slab. Aim for a thickness of about 1/4 inch (6mm) to ensure the tiles are sturdy but not too heavy. -
Cut the shapes:
Press your square cookie cutter firmly into the clay to create two identical tiles. Alternatively, use a ruler and knife to cut two squares, approximately 3-4 inches wide. -
Soften the edges:
Dip your finger or a slightly damp sponge into water and gently run it along the cut edges of the squares. We want to round them off slightly to achieve that soft, handmade organic look rather than sharp, industrial corners. -
Create the hanging hole:
While the clay is still wet, take your straw or a small circular tool and punch a hole centered near the top edge of each tile. Make sure it’s not too close to the edge to prevent cracking. -
Let it dry:
Place your tiles on a flat surface to dry. Flip them over gently every few hours to urge the clay to dry evenly on both sides and prevent curling. This usually takes 24-48 hours depending on humidity.
Starry Speckles
To get the speckled look shown in the inspiration without buying special clay, flick a toothbrush loaded with watered-down brown paint over the dry white tiles before adding gold.
Step 2: Adding the Stars
-
Sand for smoothness:
Once bone dry, check the edges for any rough spots. Lightly sand them with fine-grit sandpaper until they feel smooth to the touch. Wipe away any dust with a dry cloth. -
Plan your constellation:
Look up the star patterns for your chosen zodiac signs. I find it helpful to lightly dot the main star positions onto the clay with a pencil first so I can adjust the spacing before committing to gold. -
Draw the main stars:
Using your gold paint pen or a fine brush, create small solid circles or tiny starburst shapes over your pencil marks to represent the major stars of the constellation. -
Connect the lines:
carefully draw thin, straight lines connecting the star points to form the recognizable constellation shape. A ruler can help here, but freehand lines add to the charm. -
Add celestial details:
Sprinkle the background with tiny random gold dots or miniature ‘plus sign’ stars to represent distant galaxies and fill the negative space around the main constellation. -
Dry the paint:
Allow the gold paint to dry completely. Since acrylics and paint pens dry quickly on porous clay, this should only take about 10-15 minutes.
Step 3: Assembly
-
Prepare the twine:
Cut two lengths of jute twine, each about 8-10 inches long. -
Create the loop:
Fold a piece of twine in half. Thread the folded loop end through the hole in the tile from front to back. -
Secure the knot:
Pass the loose ends of the twine through the loop you just pushed through the hole (a cow hitch knot) and pull tight. Alternatively, just thread it through and tie a simple knot at the top. -
Final adjustment:
Tie the loose ends together at your desired hanging length, trimming any excess twine for a neat finish.
Curling Corners?
If your tiles start warping while drying, place a heavy book on top of them once they are leather-hard (semi-dry) to force them to dry completely flat.
Hang these celestial tokens side-by-side to celebrate how your stars aligned
Decorative Couple Mug Set for a Shelf
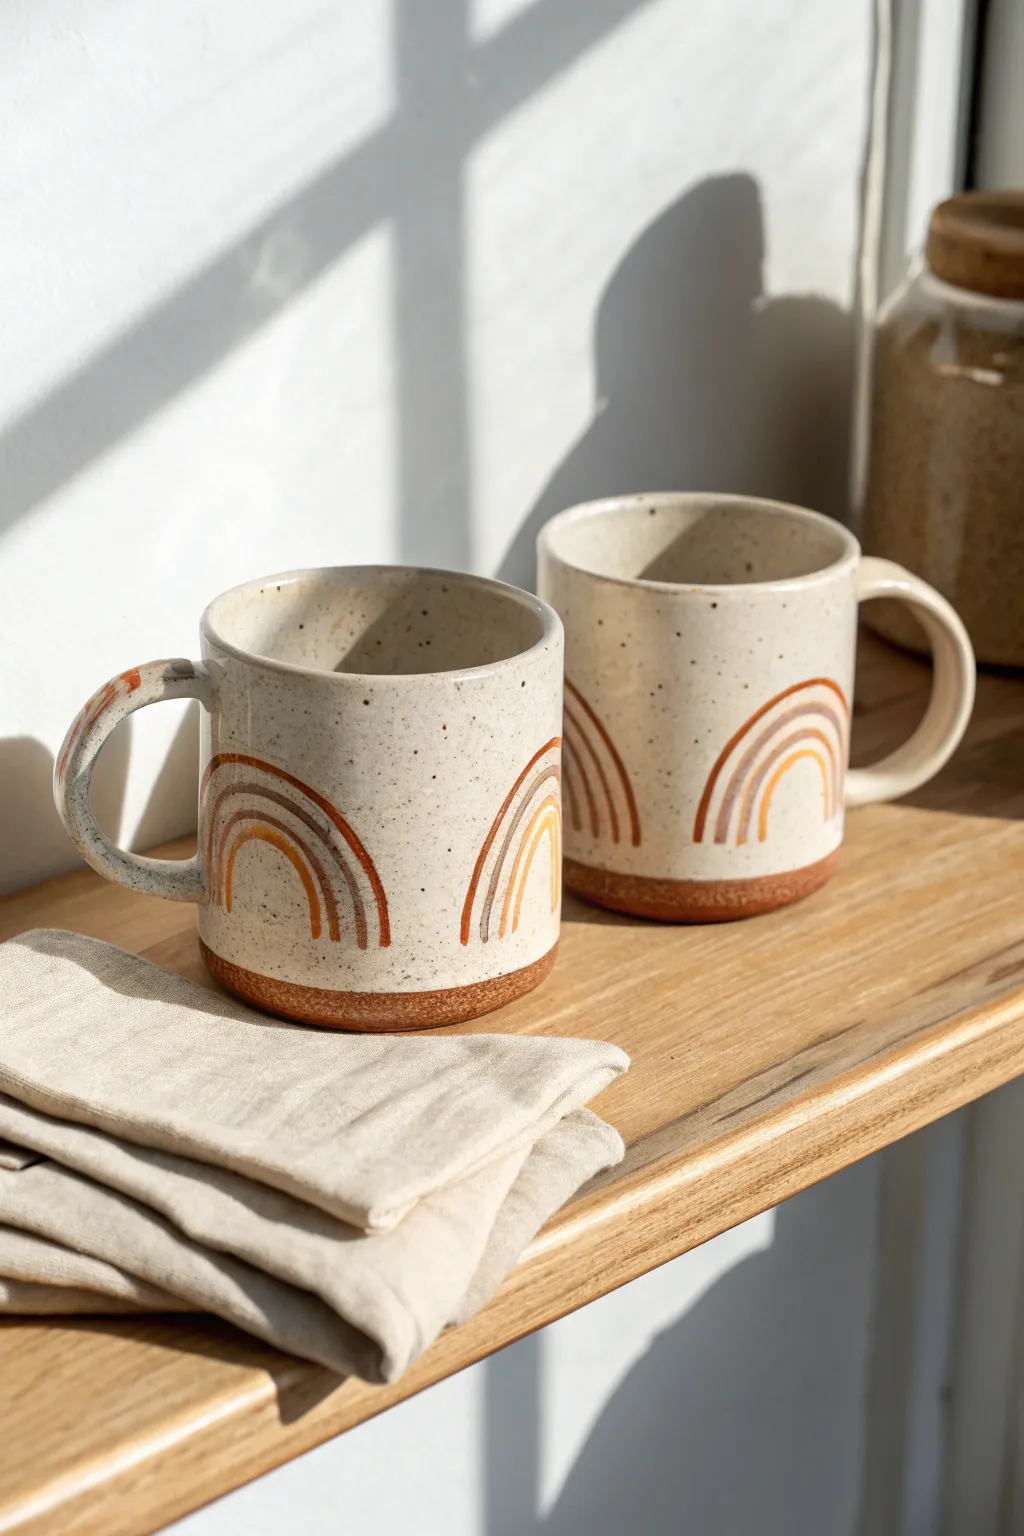
Create a cozy pair of decorative mugs featuring warm, earth-toned rainbow arches and a trendy speckled finish. These faux-ceramic beauties mimic wheel-thrown pottery with their raw clay bases and charmingly imperfect hand-painted details.
Step-by-Step Guide
Materials
- Air dry clay (white or off-white)
- Rolling pin
- Circle cutters (large for base)
- Small bowl or cylinder (to use as a mold)
- Clay knife or craft blade
- Sponge and water
- Slip (clay mixed with water)
- Acrylic paints (terracotta, mustard yellow, burnt orange, taupe, black/dark brown)
- Fine liner paintbrush
- Old toothbrush (for speckling)
- Gloss varnish or sealant
Step 1: Forming the Mug Body
-
Roll the clay slab:
Begin by conditioning your clay and rolling it out into a smooth, even slab about 1/4 inch thick. Ensure the surface is level to avoid lumpy walls later. -
Cut the base and walls:
Use a large circle cutter to cut out the base for your first mug. Then, cut a long rectangular strip from the slab—this should be tall enough for the mug’s height and long enough to wrap around your base. -
Assemble the cylinder:
Wrap the rectangular strip around the circle base. Score (scratch) and slip (apply water/clay paste) the bottom edge and the vertical seam where the walls meet to ensure a strong bond. -
Smooth the seams:
Use a damp sponge or your fingers to blend the clay at the seams until they disappear completely. I like to support the inside wall with my fingers while smoothing the outside to keep the shape. -
Add the handle:
Roll a coil of clay and shape it into a ‘C’ curve. Score and slip the attachment points on the mug body, then press the handle firmly into place, blending the clay at the joints for a seamless look. -
Repeat for the second mug:
Follow the same steps to build the second mug, trying to keep them roughly the same size for a matching set.
Step 2: Defining the Texture
-
Create the raw bottom effect:
Before the clay dries, use a tool or a stiff brush to slightly texture the bottom half-inch of the mug. This mimics the unglazed raw clay look seen on wheel-thrown pottery. -
Dry thoroughly:
Let the mugs air dry completely for 24-48 hours. Turn them occasionally to ensure even drying and prevent warping.
Waterproofing Warning
Remember, standard air dry clay is NOT food safe or waterproof even when sealed. Use these strictly as decorative pencil holders or shelf decor
Step 3: Painting the Design
-
Paint the base color:
Paint the upper portion of the mug (everything except that bottom texture strip) with an off-white or cream acrylic paint. You may need two coats for full opacity. -
Paint the bottom strip:
Paint the bottom textured rim with a terracotta or specifically mixed ‘clay’ color to enhance the faux-ceramic illusion. -
Outline the rainbows:
Using a very fine brush and a light hand, sketch the rainbow arches. Start with the outermost large arch in a dark rust color, bringing the ends all the way down to the ‘raw’ clay line. -
Fill in the arches:
Paint nesting arches inside your first one. Use alternating earth tones like mustard yellow, pale orange, and taupe. Don’t worry if the lines are slightly wobbly; it adds to the handmade charm. -
Add the speckles:
Dip an old toothbrush into diluted black or dark brown paint. Run your thumb over the bristles to flick tiny speckles onto the mug surface, concentrating on the white areas. -
Clean up stray splatter:
If any large speckles land directly on your rainbow design or the raw bottom where you don’t want them, quickly dab them away with a damp Q-tip.
Level Up: Faux Glaze
Use a clear UV resin for the final coat instead of varnish. It creates a thick, glass-like finish that looks identical to real fired ceramic glaze
Step 4: Finishing
-
Apply varnish:
Once the paint is fully dry, apply a high-gloss varnish to the painted ‘glazed’ areas (the white part and rainbows). Leave the bottom terracotta strip matte for contrast.
Now arrange your couple’s set on a shelf for an instant touch of artisanal warmth
Moon-and-Stars Couple Silhouette Plaque

Capture the magic of a moonlit embrace with this elegant relief plaque. Using layers of air-dry clay and rich acrylics, you will create a dimensional silhouette scene that feels both rustic and dreamy.
Detailed Instructions
Materials
- White air-dry clay
- Rolling pin
- Round cookie cutter (approx. 4-5 inches)
- Circle template or compass
- Craft knife or scalpel
- Clay carving tools or needle tool
- Water and slip (clay water paste)
- Fine sandpaper
- Acrylic paints: Navy blue, black, gold, and white
- Detail brushes
- Mod Podge or sealant
Step 1: The Base and Background
-
Roll the base:
Begin by wedging your white air-dry clay to remove air bubbles. Roll it out to a uniform thickness of about 1/4 inch. Use guides or rulers on either side if you have them to ensure an even surface. -
Cut the circle:
Press your large scalloped or plain round cookie cutter firmly into the clay. If you don’t have a scalloped cutter, a plain circle works beautifully too; you can manually impress small indentations around the rim with the back of a paintbrush for a similar effect. -
Define the inner circle:
Lightly trace a slightly smaller circle inside the rim using a smaller cutter or compass, leaving about a half-inch border. This guide shows where your painted background will go. -
Dry the base:
Place the clay circle on a flat surface lined with parchment paper. Let it dry for about 20 minutes just to firm up slightly before adding layers, which helps prevent warping.
Clean Lines Hack
Struggling to paint perfectly around the raised moon? Paint the moon first, let it dry, and cover it with liquid masking fluid. Peel it off after painting the blue sky.
Step 2: Creating the Relief Elements
-
Shape the moon:
Roll out a fresh, thinner piece of clay. Cut a large circle, then cut a smaller circle out of that one slightly off-center to create a crescent moon shape. -
Refine the crescent:
Use your fingers and a little water to smooth the sharp edges of the crescent. It should look soft and organic. While the clay is still damp, gently taper the top and bottom points. -
Attach the moon:
Score the back of the moon and the area on the base where it will sit. Apply a small amount of slip and press the moon gently onto the left side of your base. -
Add texture:
Using a needle tool, poke tiny, shallow holes into the moon’s surface to mimic craters. Don’t overdo it; just a few for character. -
Form the ground:
Add a very thin, uneven strip of clay at the bottom of the inner circle to serve as the hilly ground. Blend the bottom edge seamlessly into the base clay so it doesn’t look like a separate sticker. -
Full drying:
Allow the entire piece to dry completely, which usually takes 24-48 hours. Flip it occasionally to ensure even drying.
Step 3: Painting the Scene
-
Sand imperfections:
Once bone dry, use fine sandpaper to smooth the edges of the base and the surface of the moon if needed. Wipe away all dust with a slightly damp cloth or dry brush. -
Paint the night sky:
Mix a deep navy blue with a tiny touch of black. Carefully paint the inner circular area, painting right up to the edge of the moon and the ground. I like to use a small angled brush here for better control around the curves. -
Paint the moon:
Paint the crescent moon a creamy off-white. If your clay is already a nice white, you might just wash it with a very diluted brown paint to highlight the crater textures, then wipe it back. -
Create the silhouette:
Sketch the couple’s outline lightly with a pencil directly onto the dry blue paint. Using your finest detail brush and black acrylic, fill in the silhouette of the couple standing on the hill. Paint the ground strip black as well to match. -
Detail the ground:
With the very tip of your brush, flick tiny upward strokes from the black ground to suggest grass blades along the horizon line. -
Add the stars:
Using a gold paint pen or gold acrylic on a detail brush, add small stars. Draw some as five-point stars and others as simple tiny dots for distance. -
Seal the piece:
Finish with a coat of matte varnish over the painted areas to protect your work and unify the sheen.
3D Star Upgrade
Instead of just painting gold stars, cut tiny star shapes from thin rolled clay or use small star confetti glitters glued on for extra dimension.
Display your romantic celestial plaque on a small easel or attach a hook to the back for whimsical wall decor