Clay trends right now are all about tiny, cute, high-impact makes that feel totally doable, even on a busy weeknight. I’m seeing a huge pull toward mini desk buddies, simple shapes, and pieces that are both adorable and actually useful.
Marbled Ring Cones
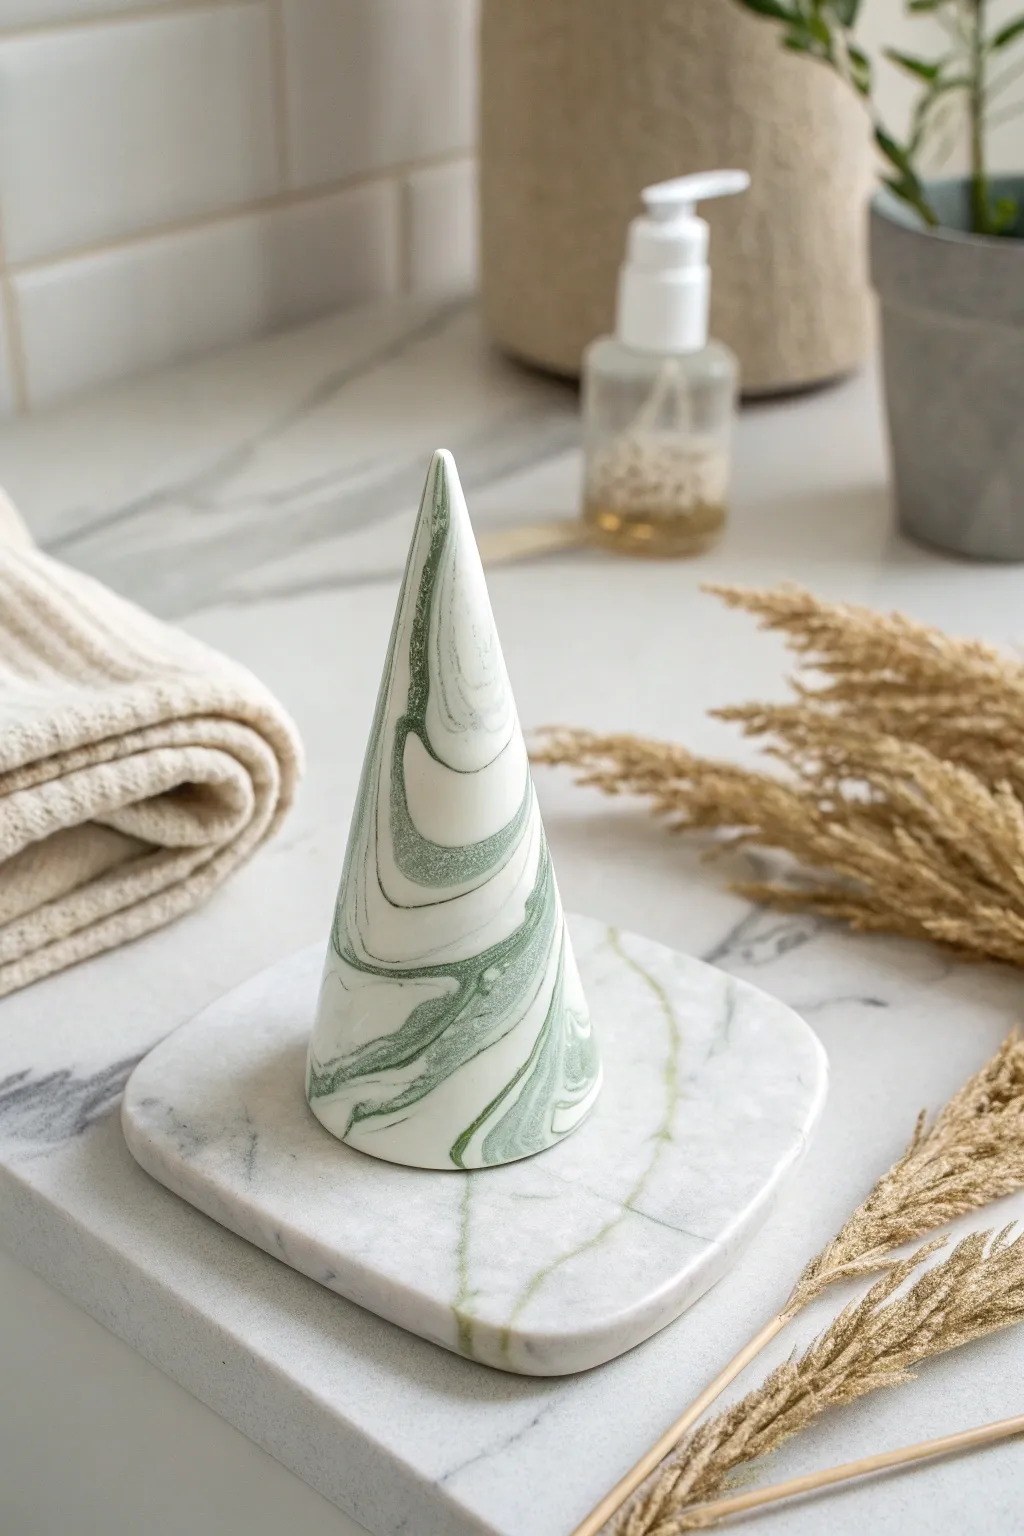
Elevate your vanity with this sophisticated ring cone featuring a serene white and sage green marble pattern. The organic swirls mimic natural stone, creating a functional piece of art that keeps your jewelry organized in style.
Step-by-Step Tutorial
Materials
- White polymer clay (approx. 2 oz)
- Sage green polymer clay (approx. 1 oz)
- Acrylic rolling pin or glass jar
- Tissue blade or sharp craft knife
- Small piece of cardstock or paper
- Ceramic tile or glass baking surface
- Fine-grit sandpaper (400, 600, and 1000 grit)
- Matte or glossy clay varnish (optional)
- Soft paintbrush
Step 1: Preparing the Clay
-
Condition the clay:
Begin by working the white polymer clay in your hands until it becomes soft, warm, and pliable. Repeat this process separately with the sage green clay to ensure both are ready for blending. -
Create logs:
Roll the conditioned white clay into a thick log, about 4 inches long. Roll the sage green clay into a thinner log of the same length. -
Combine colors:
Press the two logs together side-by-side and twist them around each other like a candy cane. This is the first step in creating your marble veins. -
Fold and roll:
Fold the twisted log in half and roll it out into a single log again. Repeat this twist, fold, and roll process 3-4 times. Be careful not to over-mix; you want distinct streaks of green, not a solid light green color.
Step 2: Shaping the Cone
-
Form a ball:
Once you are happy with the marbling, roll the clay into a smooth, tight sphere. Check for any air bubbles and smooth them out with your thumb. -
Start the cone shape:
Place the ball on your work surface. Using the palm of your hand, begin rolling just one side of the ball back and forth to elongate it into a teardrop shape. -
Refine the point:
Continue rolling heavily on one end, gradually lifting the wider base slightly off the table to focus pressure on the tip. I like to use a flat acrylic block to roll the tip for extra sharpness. -
Flatten the base:
Once you have a tall cone shape, gently tap the wide bottom against your work surface to create a flat, stable base. Ensure the cone stands straight without wobbling. -
Create the matching tray:
If you have leftover marbled clay, roll it out to about 1/4 inch thickness. Use a square cutter or your blade to cut a rounded soft square shape for the base tray shown in the photo.
Pro Tip: Marble Control
For thinner, more delicate veins like in the photo, roll your green clay snakes very thin before combining them with the white block.
Step 3: Baking and Finishing
-
smooth the surface:
Before baking, lightly brush the clay with a tiny amount of baby oil or cornstarch to smooth out any fingerprints. This saves sanding time later. -
Bake the project:
Place your cone and tray on a ceramic tile. Bake according to your clay package instructions (usually 275°F/135°C for 15-30 minutes per 1/4 inch of thickness). -
Cool down:
Allow the pieces to cool completely in the oven with the door slightly ajar. This gradual cooling helps prevent cracking. -
Wet sanding:
Dip your fine-grit sandpaper in water and gently sand the surface of the cone in circular motions. Start with 400 grit to remove blemishes, then move to 600 and 1000 for a polished feel. -
Buffing:
Vigorously rub the dry cone with a piece of denim or a soft cotton cloth. This burnishing step brings out a natural, stone-like sheen without needing glaze. -
Optional glaze:
If you prefer a high-gloss ceramic look, apply a thin coat of gloss varnish with a soft brush and let it dry completely.
Level Up: Gold Accents
After baking, paint the very tip of the cone or the rim of the base tray with liquid gold leaf for a luxe, modern touch.
Your stylish new accessory is ready to display your favorite rings.


Terrazzo Coaster Set

Bring the timeless elegance of Italian flooring to your coffee table with this accessible clay project. These sturdy, speckled coasters feature vibrant pops of yellow, teal, and terracotta embedded in a creamy white base for a sophisticated, modern finish.
Detailed Instructions
Materials
- White polymer clay (approx. 2oz per coaster)
- Small amounts of colored polymer clay (yellow, teal/blue, terracotta/red, black)
- Acrylic rolling pin
- Round cookie cutter (approx. 3.5 – 4 inches)
- Craft knife or clay blade
- Parchment paper or baking mat
- Fine-grit sandpaper (400 and 600 grit)
- UV resin or gloss varnish (optional for sealing)
- Oven (for baking)
- Rolling guides or playing cards (to ensure even thickness)
Step 1: Preparing the ‘Chips’
-
Condition the colored clay:
Start by taking small pinches of your colored clays—yellow, teal, terracotta, and black. Knit and condition them in your hands until they are soft and pliable. -
Flatten the colors:
Roll each color out into a very thin sheet. You want these to be almost paper-thin, as they will become the terrazzo chips. -
Create irregular shapes:
Using your craft knife or just tearing with your fingers, break the thin colored sheets into small, jagged fragments. Vary the sizes from tiny specks to slightly larger distinctive chunks. -
Set aside:
Keep your pile of colorful confetti separated by color for now so you can control the distribution later.
Clean Clay Tip
Keep flexible alcohol wipes nearby. Polymer clay picks up lint easily; wipe your hands and rolling pin often to keep the white base pristine.
Step 2: Forming the Base
-
Condition the white clay:
Take your large block of white clay and condition it thoroughly. This might take a few minutes since you need a larger volume. -
Roll the slab:
Roll the white clay out into a thick slab, approximately 1/4 inch thick. I find using rolling guides helps keep the thickness perfectly uniform across the whole slab. -
Initial distribution:
Gently scatter your colored clay chips onto the surface of the white slab. Aim for a random, organic pattern, leaving some white space between clusters. -
Embed the chips:
Pass your rolling pin over the slab once with light pressure to press the chips into the surface. -
Add depth:
Scatter a second layer of chips, perhaps using smaller pieces or different colors to fill gaps, and roll again. This layering creates a more realistic stone look. -
Final smooth:
Roll over the slab firmly one last time until the surface is completely smooth and the colored chips are flush with the white base.
Step 3: Cutting and Baking
-
Cut the shapes:
Press your round cookie cutter firmly into the patterned clay slab. Wiggle it slightly to ensure a clean cut, then lift the cutter. -
Remove excess:
Peel away the excess clay from around the circle. Save these scraps! You can mash them together to make a marbled coaster later. -
Smooth the edges:
Run your finger gently around the rim of the cut circle to soften any sharp ridges left by the cutter. -
Bake:
Transfer the coasters to a parchment-lined baking sheet. Bake according to your clay package instructions (usually 275°F for 15-30 minutes, depending on thickness). -
Cool down:
Allow the coasters to cool completely on the baking sheet to ensure they harden fully flat.
Level Up: Granite Effect
Mix a tiny pinch of black pepper or black glitter into your white base clay before rolling. This mimics the fine sediment found in real stone.
Step 4: Finishing Touches
-
Sand the surface:
Wet your fine-grit sandpaper and gently sand the top surface in circular motions. This removes fingerprints and reveals the crisp edges of your terrazzo chips. -
Rinse and dry:
Wash off any sanding dust with water and dry the coasters thoroughly with a lint-free towel. -
Seal (Optional):
For a glossy ‘polished stone’ look, apply a thin layer of UV resin or verify varnish. If you prefer the matte stone texture shown in the image, you can skip this step.
Stack your new set on the coffee table as a functional piece of handmade art


Mini Bud Vase Magnets
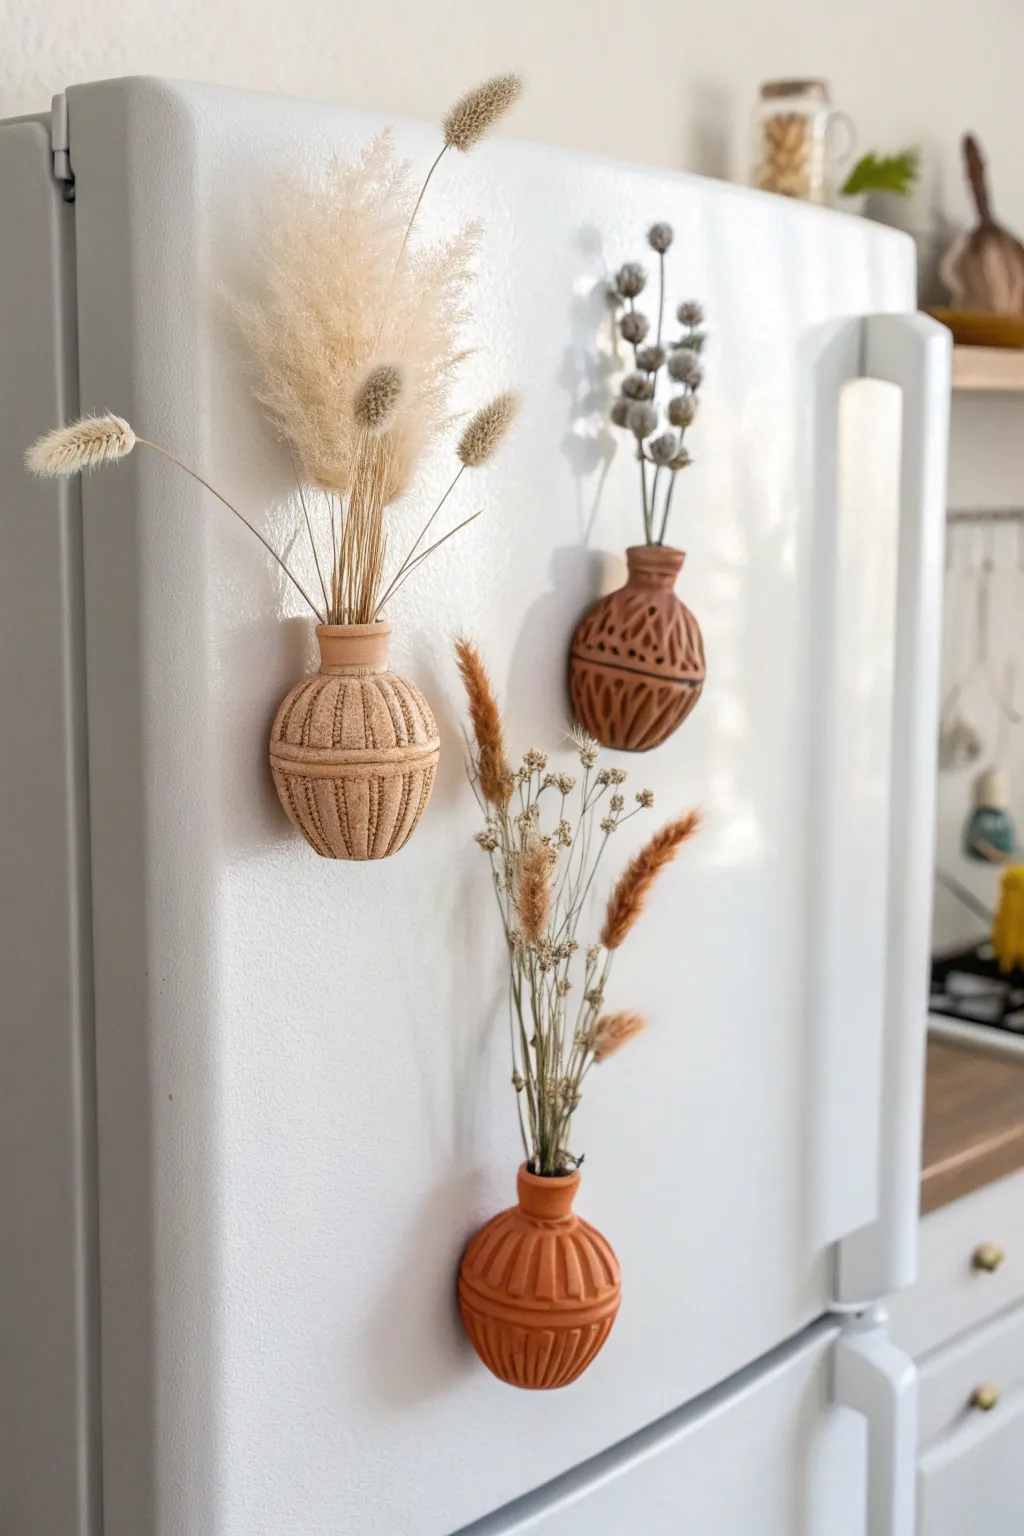
Bring a touch of organic charm to your kitchen with these adorable miniature bud vases that attach right to your fridge. Sculpted from clay and filled with dried florals, they create a tiny, floating garden that turns a plain appliance into an art display.
Detailed Instructions
Materials
- Oven-bake polymer clay (terracotta, beige, and dark brown colors)
- Small round neodymium magnets (strong hold)
- Clay sculpting tools (needle tool, ball stylus)
- Small rolling pin
- Parchment paper
- Super glue or E6000 adhesive
- Assorted dried flowers and grasses (bunny tails, baby’s breath)
- Toothpick or skewer
- Baking sheet
- Oven
Step 1: Shaping the Vase Base
-
Condition the Clay:
Begin by warming a small chunk of polymer clay in your hands until it becomes soft and pliable. Use about a walnut-sized amount for each vase. -
Form the Body:
Roll the clay into a smooth ball between your palms to remove any cracks. -
Flatten the Back:
Press the ball gently against your work surface to create a completely flat back. This ensures the magnet will sit flush against the fridge later. -
Shape the Form:
Gently pinch and mold the rounded front. You can leave it as a perfect circle for a globe vase or taper it slightly towards the top for a teardrop shape. -
Create the Neck:
Roll a much smaller snake of clay and form it into a ring. Place this ring on the top center of your base to create the vase neck, blending the seam slightly on the underside so it attaches firmly.
Step 2: Creating the Opening
-
Make the Hole:
Using the handle of a paintbrush or a thick skewer, press straight down into the neck of the vase. Don’t go all the way through the bottom; you just need a deep enough well to hold the dried flower stems. -
Widen the Interior:
Gently wiggle your tool in a circular motion to widen the opening slightly, ensuring it can accommodate a few stems.
Glue Not Holding?
If the magnet pops off the baked clay, try scoring the back of the clay and the magnet face with sandpaper before gluing to give the adhesive more grip.
Step 3: Adding Texture & Detail
-
Add Texture Lines:
For the ribbed look seen in the beige vase, use a needle tool or the edge of a credit card to press vertical lines into the bottom half of the sphere. -
Create Relief Patterns:
For the darker vase style, use a small ball stylus to impress geometric triangles or dots. I like to stabilize the vase with one hand while pressing the pattern to avoid deforming the shape. -
Refine the Edges:
Smooth out any rough fingerprints with a tiny drop of baby oil on your finger, rubbing very gently over the smooth areas. -
Prepare for Magnet:
Flip the vase over. Press your magnet slightly into the flat back to create a shallow indentation, then remove the magnet. This recession helps the glue hold better later.
Go Faux-Ceramic
Mix baking soda into acrylic paint and brush over the baked clay. This creates a convincing gritty, speckled ceramic texture without a kiln.
Step 4: Baking & Assembly
-
Bake the Clay:
Place your vases on a parchment-lined baking sheet. Bake according to your specific clay package instructions—usually around 275°F (135°C) for 15–30 minutes. -
Cool Down:
Allow the clay pieces to cool completely in the oven with the door cracked. This prevents cracking from sudden temperature changes. -
Attach the Magnet:
Place a dab of strong adhesive (E6000 is great here) into the indentation on the back. Press the magnet in and let it cure fully, usually for 24 hours. -
Arrange the Florals:
Trim your dried grasses and bunny tails to size. Since the vase is shallow, you might need to trim the stems quite short. -
Final Display:
Once the glue is cured, stick the magnet to your fridge and arrange your mini bouquet inside.
Enjoy styling your new vertical garden spots with different seasonal blooms throughout the year


Cute Toothbrush Holder Creatures
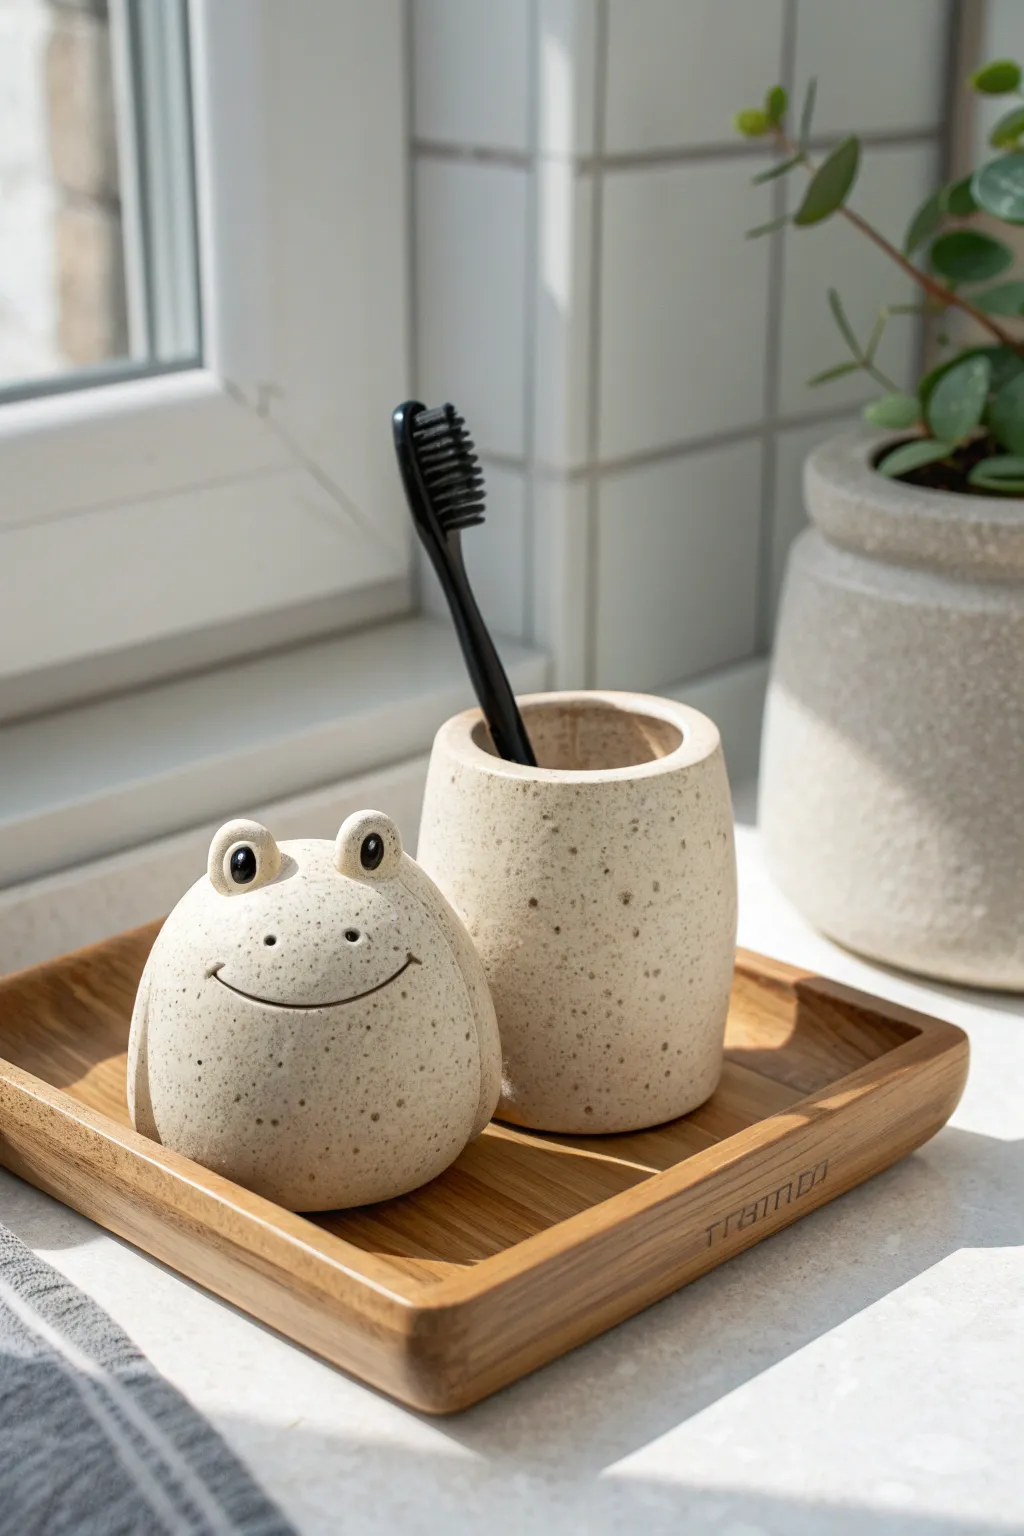
Bring some amphibian charm to your bathroom counter with this adorable minimalistic frog figurine and matching toothbrush cup. Using speckled clay gives these pieces a natural, stone-like texture that feels modern yet playful.
Step-by-Step Tutorial
Materials
- Speckled stoneware clay (white or light beige)
- Ceramics rolling pin
- Pin tool or needle tool
- Rib tool (kidney scraper)
- Black underglaze
- Fine detail paintbrush
- Clear transparent glaze (cone 5/6 or air-dry sealant)
- Slip (clay mixed with water)
- Scoring tool or old fork
- Sponge
Step 1: Prepping the Clay
-
Wedge the clay:
Start by thoroughly wedging your speckled stoneware clay. This removes air bubbles and ensures the clay particles are aligned, which is crucial for preventing cracks during firing. -
Divide your portions:
Separate the clay into two lumps: a larger one for the toothbrush cup (about the size of a grapefruit) and a slightly smaller sphere for the frog body.
Make those speckles pop
If using plain clay, knead in granular manganese or ilmenite sand before sculpting. This creates that trendy ‘cookies and cream’ speckled look after firing.
Step 2: Sculpting the Frog
-
Shape the body:
Take the smaller sphere and gently gently tap it on your work surface to create a flat base so it stands up on its own. Round out the top into a smooth dome shape by patting it with your palms. -
Form the eyes:
Pinch off two very small balls of clay for the eyes. Roll them until they are perfectly round. -
Attach the eyes:
Score the top of the frog’s head and the bottom of the eye balls. Apply a dab of slip to the scored areas and press the eyes firmly onto the head. Blend the seams at the back and sides of the eyes downward into the head for a seamless look. -
Refine the surface:
Use a damp sponge to smooth over the entire frog, softening any fingerprints or connection marks around the eyes. The shape should be very simple and rotund. -
Carve the arms:
Instead of adding separate arms, use a modeling tool to gently impress a vertical line on each side of the body, suggesting wings or tucked arms. This keeps the silhouette minimal. -
Add the smile:
Use your needle tool to carefully carve a wide, shallow ‘U’ shape for the smile. I find it helps to mark the endpoints first to ensure it’s centered.
Wobbly cup troubleshooting
Does your cup rock? Place a piece of sandpaper on a flat table and rub the dry (leather hard) base of the cup in a figure-8 motion until perfectly flat.
Step 3: Building the Toothbrush Cup
-
Begin the pinch pot:
Take your larger ball of clay and press your thumb deep into the center, leaving about a half-inch of thickness at the bottom. -
Pinch the walls:
Slowly rotate the ball in your hand while pinching the clay between your thumb and fingers. Work your way from the bottom up to create even walls. -
Shape the cylinder:
Aim for a slightly tapered cylinder shape—wider at the bottom and gently curving inward at the rim. Use a wooden paddle or flat surface to tap the bottom flat. -
Smooth the exterior:
Use a flexible rib tool to scrape the outside of the cup while rotating it. This compresses the clay and removes the lumpy ‘pinched’ texture, giving you that smooth, modern finish seen in the photo. -
Refine the rim:
Use a damp sponge or a piece of chamois leather to compress and smooth the rim of the cup so it is soft to the touch.
Step 4: Decoration & Finishing
-
Dry partially:
Let both pieces dry to a leather-hard state. They should be firm to the touch but still cool. -
Paint the details:
Using black underglaze and a fine brush, paint two solid black circles on the front of the eye bumps. Carefully paint a thin line inside the carved smile groove. -
Add highlights:
Once the black underglaze is dry, add a tiny dot of white underglaze (or leave a speck unpainted if you have precise hands) to the eyes for a ‘sparkle’ effect. -
Bisque fire:
Allow the pieces to dry completely (bone dry) before loading them into the kiln for a bisque fire (usually Cone 04). -
Glaze application:
Dip both the cup and the frog into a clear transparent glaze. This allows the natural speckles of the clay body to shine through while making the piece waterproof. -
Final firing:
Fire the pieces again to the maturity temperature of your clay (likely Cone 5 or 6). Once cooled, sand the bottoms if there are any rough spots.
Place your finished duo on a wooden tray for a spa-like setup that makes your morning routine friendlier

The Complete Guide to Pottery Troubleshooting
Uncover the most common ceramic mistakes—from cracking clay to failed glazes—and learn how to fix them fast.
Blob-Style Desk Buddy Animals
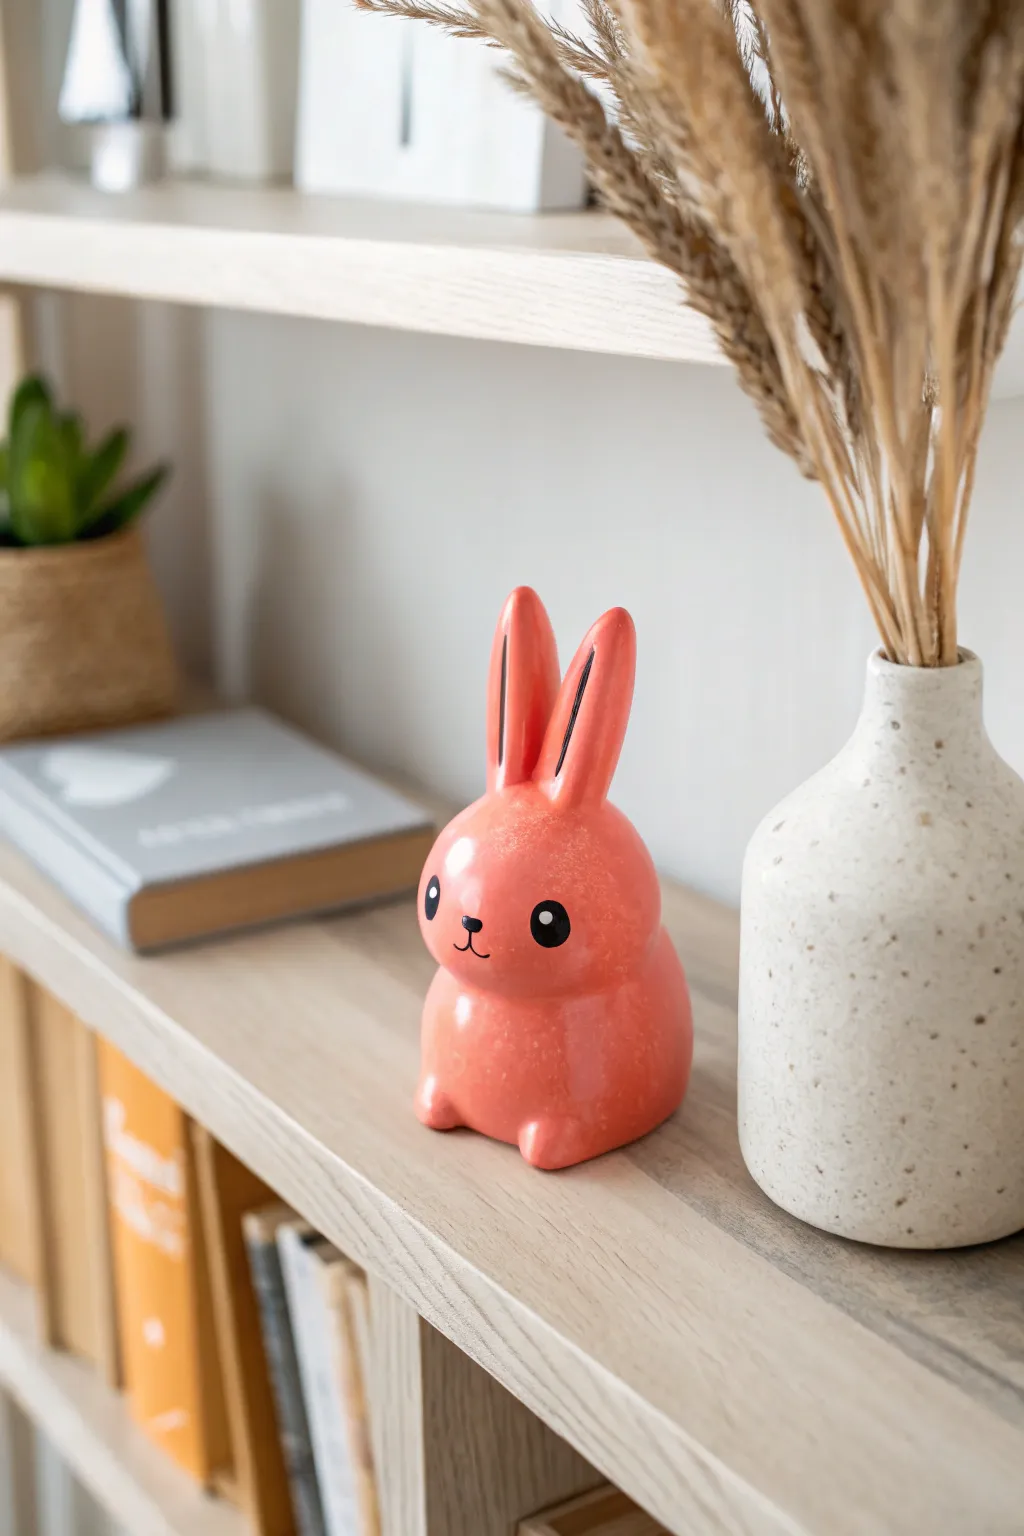
This adorable desk companion features a trendy, simplified blob shape with oversized ears that add instant character. Its smooth, rounded form and high-gloss coral finish make it a perfect modern accent for any bookshelf or workspace.
How-To Guide
Materials
- Air-dry clay (white) or polymer clay
- Aluminum foil (for armature)
- Acrylic paints (coral pink, white, black)
- High-gloss varnish or sealant (spray or brush-on)
- Sculpting tools (plastic modeling tool or butter knife)
- Sandpaper (fine grit, 320-400)
- Cup of water
- Fine detail paintbrush
- Medium flat paintbrush
- Rolling pin (optional)
Step 1: Sculpting the Base Form
-
Create the core:
Start by crumpling a small amount of aluminum foil into an egg shape. This saves clay and keeps the figurine lightweight. The foil ball should be about the size of a golf ball. -
Prepare the clay:
Condition your clay by kneading it until it’s warm and pliable. If using air-dry clay, keep your hands slightly damp to prevent cracking. -
Wrap the core:
Flatten a portion of clay and wrap it fully around the foil egg. Roll it gently between your palms to smooth out any seams until you have a perfect, seamless egg shape. -
Form the base:
Gently tap the bottom of the egg shape against your work surface. You want to create a flat bottom so the bunny sits securely without wobbling. -
Refine the shape:
Using your thumbs, slightly pinch the upper third of the egg to suggest a separation between the head and body, but keep it very subtle—the ‘blob’ aesthetic relies on a continuous, flowing line.
Cracks while drying?
If you see hairline cracks as the air-dry clay hardens, mix a small amount of clay with water to make a paste (slip) and fill them in, then sand smooth once dry.
Step 2: Adding Features & Details
-
Shape the ears:
Roll two equal cylinders of clay, about 1.5 inches long. Taper one end of each cylinder to a soft point to create the rabbit ear shape. -
Attach the ears:
Score the top of the head and the base of the ears with a tool (making small hatch marks). Add a dab of water (or liquid clay if using polymer) and press the ears firmly onto the head. -
Blend the seams:
Using a modeling tool or your finger, drag clay from the base of the ears down onto the head to smooth out the connection point. I find that smoothing this seam invisible is crucial for that modern, manufactured look. -
Detail the ears:
Use a rounded tool to gently press a shallow groove into the center of each ear, giving them dimension without making them too complex. -
Add tiny feet:
Roll two very small balls of clay. Attach them to the bottom front of the body to act as little paws, blending the top edges into the main body so they look like little nubs. -
Smooth everything:
Dip your finger in a little water and run it over the entire sculpture to remove fingerprints and bumps. Let the piece dry completely (24-48 hours for air-dry clay) or bake according to package directions.
Pro Tip: Weighted Base
To prevent it from tipping over easily, press a heavy washer or coin into the bottom of the clay base before it dries. Cover it with a thin layer of clay.
Step 3: Painting & Finishing
-
Sand for smoothness:
Once fully cured or dry, use fine-grit sandpaper to gently buff away any remaining imperfections. Wipe away the dust with a damp cloth. -
Base coat:
Mix a vibrant coral pink using your acrylics. Apply a base coat over the entire bunny. Let it dry, then apply a second or third coat until the color is completely opaque and solid. -
Paint the eyes:
Using a small detail brush and black paint, add two solid black circles for the eyes. Place them fairly wide apart on the ‘face’ area for maximum cuteness. -
Add facial details:
Paint a very small ‘Y’ shape or a tiny triangle with a vertical line for the nose and mouth centered between the eyes. Add thin black lines inside the ear grooves to emphasize the shape. -
Add highlights:
Dip the back end of your paintbrush (the handle) into white paint and dot a tiny reflection onto the upper right corner of each black eye. -
Gloss finish:
Once the paint is bone dry, apply two coats of high-gloss varnish. This mimics the ceramic look of the inspiration piece and protects your paint job.
Place your shiny new friend on a shelf near a plant for a delightful pop of color
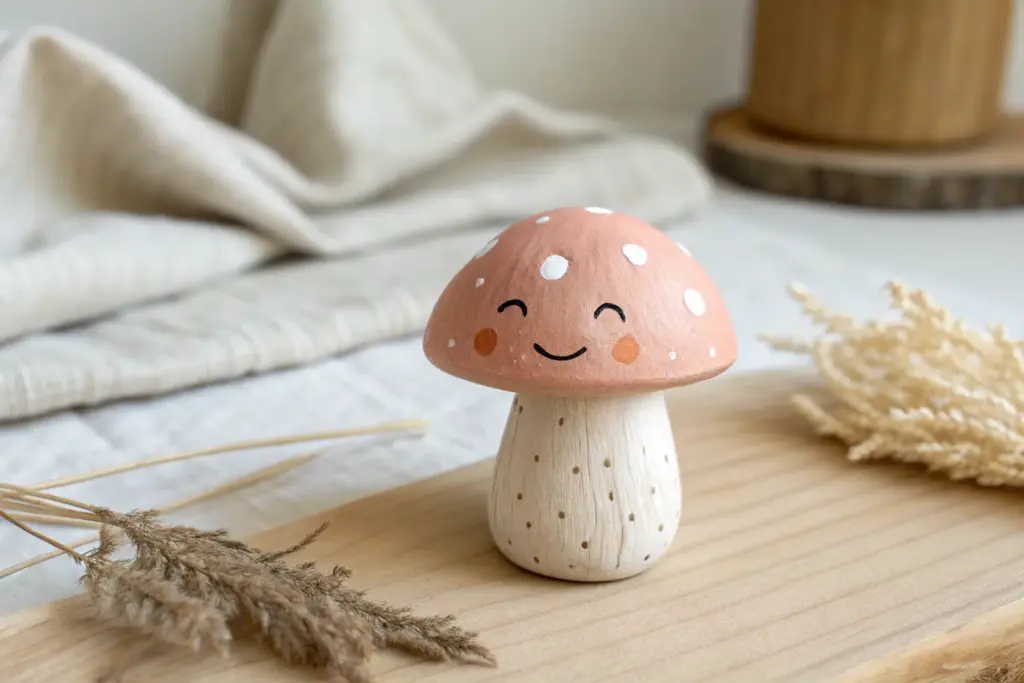
Cottagecore Mushroom Minis
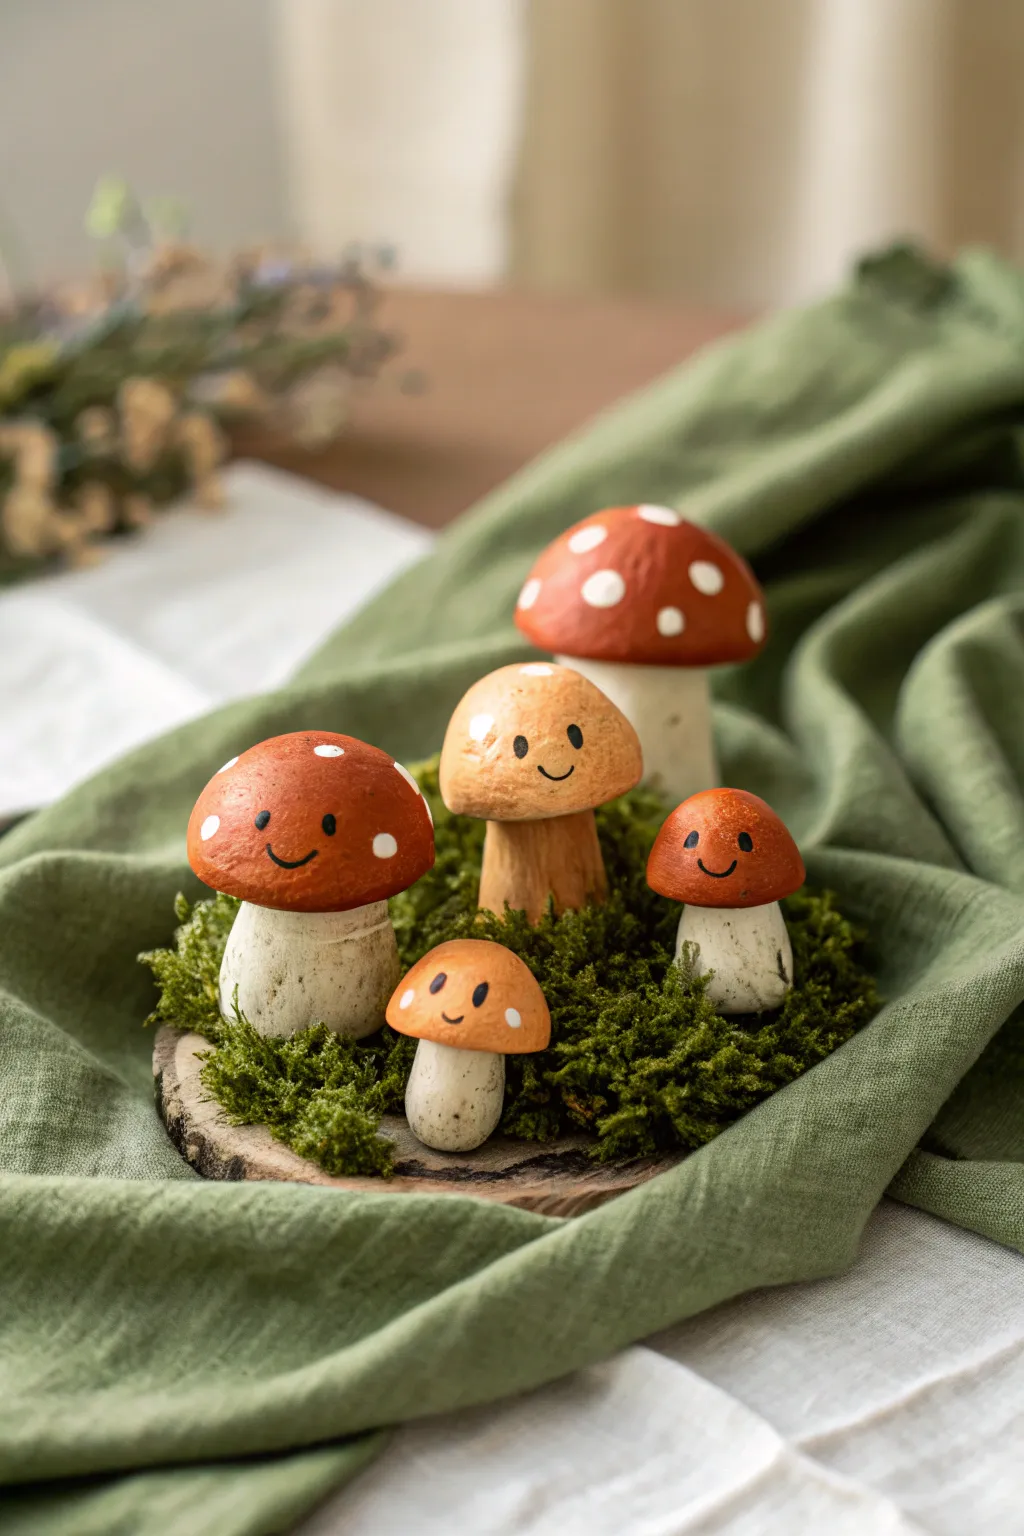
Bring a touch of enchantment to your home with this adorable family of smiling mushroom figurines. Crafted from clay and nestled on a mossy base, these miniatures capture the cozy, handcrafted essence of cottagecore decor perfectly.
Step-by-Step Guide
Materials
- Air-dry clay or polymer clay (white or beige)
- Acrylic paints (terracotta orange, warm red, creamy white, dark brown)
- Detail paintbrushes (fine tip and small flat)
- Small wooden slice or coaster for the base
- Preserved reindeer moss or faux moss
- Craft glue or hot glue gun
- Aluminum foil (for armatures)
- Sculpting tools or a toothpick
- Matte varnish or sealant
Step 1: Sculpting the Shapes
-
Form the Cores:
Start by crumpling small pieces of aluminum foil into rough mushroom cap and stem shapes. This saves clay and keeps the finished pieces lightweight. -
Base Coating:
Roll out your clay to about 1/8 inch thick. Wrap the clay around your foil stem armatures, smoothing the seams with a bit of water (for air-dry clay) or baby oil (for polymer). -
Shape the Stems:
Gently roll the clay-covered stems on your work surface to create a natural, slightly bulbous base. They shouldn’t be perfect cylinders; a little organic wobble adds character. -
Create the Caps:
Cover the foil cap armatures with clay. Smooth them into rounded domes, keeping the underside relatively flat where it will join the stem. -
Join the Parts:
Score the top of the stem and the underside of the cap with a needle tool or toothpick. Apply a dab of water or liquid clay bond, press them together firmly, and smooth the clay at the join so it’s seamless. -
Vary sizes:
Repeat this process to create five mushrooms of graduated sizes: one large ‘parent’, a medium one, and three smaller ‘children’. -
Dry or Bake:
Allow your mushrooms to dry fully according to package directions (24-48 hours for air-dry) or bake them if using polymer clay.
Cracks and Gaps?
If air-dry clay cracks while drying, mix a small amount of fresh clay with water to make a paste (slip) and fill in the cracks. Smooth it over with a wet finger and let it dry again.
Step 2: Painting the Personalities
-
Base Color – Stems:
Paint the stems with a creamy white acrylic. I like to mix in a tiny drop of brown to give it an earthy, unbleached look rather than a stark white. -
Texturing the Stems:
Once the base is dry, dilute some dark brown paint with water to make a wash. Brush it over the bottom third of the stems and quickly wipe most of it off with a paper towel to create a soil-stained effect. -
Painting the Caps:
Paint the caps in warm, autumn tones. Use a terracotta orange for the medium mushroom and the smallest one, and a deeper warm red for the others. You may need two coats for opaque coverage. -
Adding the Spots:
Dip the non-brush end of a paintbrush into creamy white paint. Dot random spots onto the caps of the red mushrooms. Leave the orange ones plain for variety. -
Painting the Faces:
Using your finest detail brush and black paint, add the faces. Paint two small oval eyes wide apart, followed by a simple ‘U’ shape between them for a smile. -
Varnishing:
Once the paint is completely dry, apply a coat of matte varnish to protect the paint and give the clay a finished, high-quality feel.
Step 3: Creating the Scene
-
Prepare the Base:
Take your wooden slice and clean off any dust. Arrange your dried mushrooms on the wood to find the cutest grouping before gluing. -
Attach the Mushrooms:
Apply a generous amount of strong craft glue or hot glue to the bottom of each mushroom stem and press them firmly onto the wood slice. -
Adding Moss:
Apply glue to the exposed wood surfaces around the mushroom bases. Press clumps of preserved moss into the glue, tucking it tightly against the stems to hide any gaps.
Add a Dew Drop
For a magical morning look, add a tiny drop of clear, UV resin or high-gloss dimensional glaze to one of the mushroom caps to simulate a permanent dew drop.
Now you have a charming little forest scene to brighten up your desk or bookshelf


What Really Happens Inside the Kiln
Learn how time and temperature work together inside the kiln to transform clay into durable ceramic.
Tiny Planter Pots With Faces
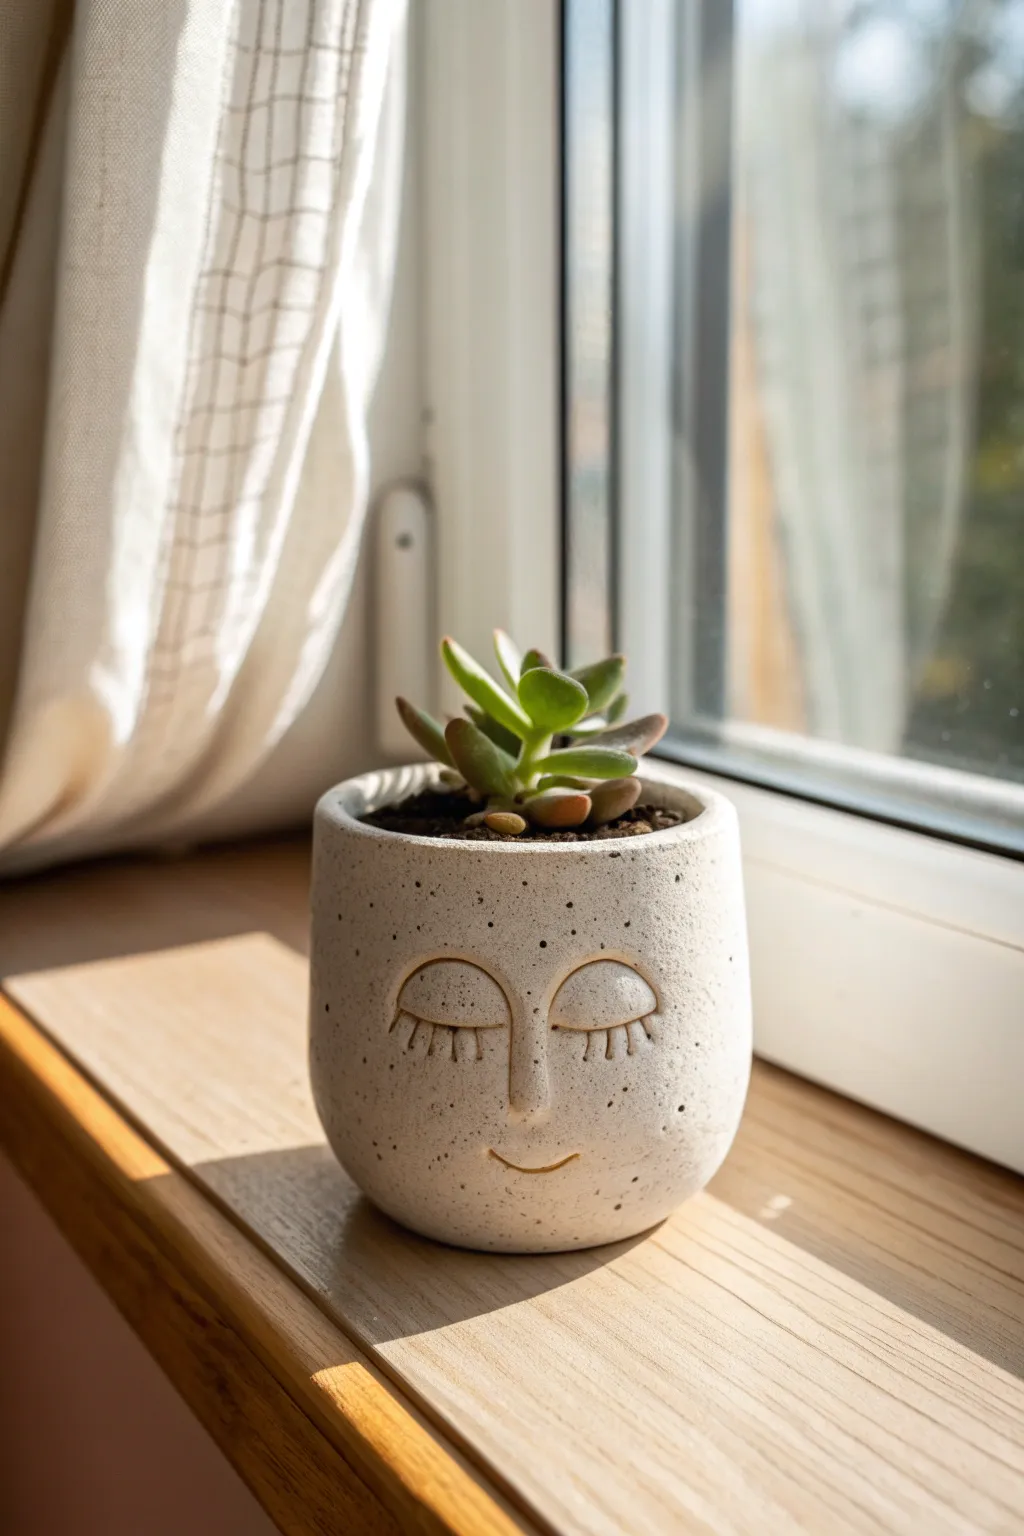
Bring a sense of calm to your windowsill with this adorable speckled clay planter featuring a serene, sleeping face. This project uses polymer or air-dry clay to create a smooth, minimalist vessel that adds personality to any tiny succulent collection.
Detailed Instructions
Materials
- White polymer clay or air-dry clay (approx. 250g)
- Black pepper or dried coffee grounds (for speckling)
- Rolling pin
- Circle cutter or a small bowl (approx. 4-inch diameter)
- Ruler
- Craft knife or scalpel
- Smoothing tool or sponge
- Small loop tool or a metal spoon
- Needle tool
- Water or liquid clay (for joining)
- Sandpaper (fine grit)
Step 1: Preparing the Clay Base
-
Create the Speckled Effect:
Begin by conditioning your white clay until it is soft and pliable. Flatten it out and sprinkle a small pinch of coarse black pepper or dried coffee grounds over the surface. Fold the clay over and knead repeatedly until the speckles are evenly distributed throughout the batch. -
Roll the Slab:
Roll your speckled clay out on a smooth surface to an even thickness of about 1/4 inch (6mm). Ensure the slab is long enough to wrap around your desired pot circumference. -
Cut the Base and Walls:
Use your circle cutter to create the base of the pot. Then, cut a rectangular strip from the remaining slab that matches the circumference of your base circle and stands about 3 inches tall.
Cracks Appearing?
If air-dry clay cracks while drying, mix a tiny bit of fresh clay with water to make a paste and fill the cracks. Let it dry again, then sand smooth.
Step 2: Assembling the Pot
-
Form the Cylinder:
Carefully lift the rectangular strip and wrap it around the circular base to form a cylinder. Bring the two short ends of the rectangle together. -
Join the Seams:
Score the edges where the clay meets with your needle tool and apply a little water (for chemical clay) or liquid clay (for polymer). Press the seam firmly together. -
Smooth the Join:
Use your smoothing tool or finger to blend the clay across the seam until the join is invisible. I find using a small vertical stroke motion helps knit the clay together best before smoothing horizontally. -
Attach the Base:
Flip the cylinder over and blend the walls into the circular base using the same scoring and smoothing technique. Ensure there are no gaps for water to leak through later. -
Refine the Shape:
Gently roll the pot on your work surface to ensure it is perfectly round. Gently tap the top rim to flatten and finish it.
Pro Tip: Weighted Base
Make the base circle slightly thicker than the walls. This creates a lower center of gravity, preventing your pot from tipping over once the plant is added.
Step 3: Sculpting the Features
-
Add the Nose:
Roll a small, elongated tear-drop shape of clay for the nose. Attach it to the center of the pot face using scoring and slip/liquid clay. Blend the edges smoothly into the pot so only the bridge and tip protrude naturally. -
Create the Eyes:
Roll two very thin coils of clay for the eyelids. Shape them into gentle downward curves (U-shapes) and attach them symmetrically on either side of the nose bridge. -
Detail the Lashes:
Using your needle tool, gently press vertical lines extending downward from the eyelid coils to create the impression of eyelashes. Keep the pressure light to avoid distorting the pot wall. -
Form the Smile:
Roll a tiny, thin coil for the mouth. Place it centered below the nose in a subtle upward curve. Use your smoothing tool to blend the ends of the smile into the pot surface for a soft expression. -
Final Surface Check:
Look over the pot for any fingerprints or uneven spots. Dip your finger or sponge in a tiny bit of water (or baby oil for polymer) and lightly buff the surface smooth.
Step 4: Finishing Touches
-
Curing or Drying:
If using polymer clay, bake according to the package instructions (usually 275°F/135°C for 15-30 minutes). If using air-dry clay, allow it to dry slowly away from direct heat for 24-48 hours. -
Sanding:
Once fully cured or dry, use fine-grit sandpaper to gently smooth the top rim and any rough patches on the bottom. Be careful around the raised facial features. -
Sealing (Optional):
If you used air-dry clay, seal the inside with a waterproof varnish to protect it from moisture. For polymer clay, the material is naturally water-resistant, but a matte varnish can provide a nice finish. -
Planting:
Fill your new pot with soil and nestle your favorite miniature succulent inside to complete the look.
Enjoy the peaceful vibe this little handmade planter brings to your favorite sunny corner
Stacked Candle Holder Shapes
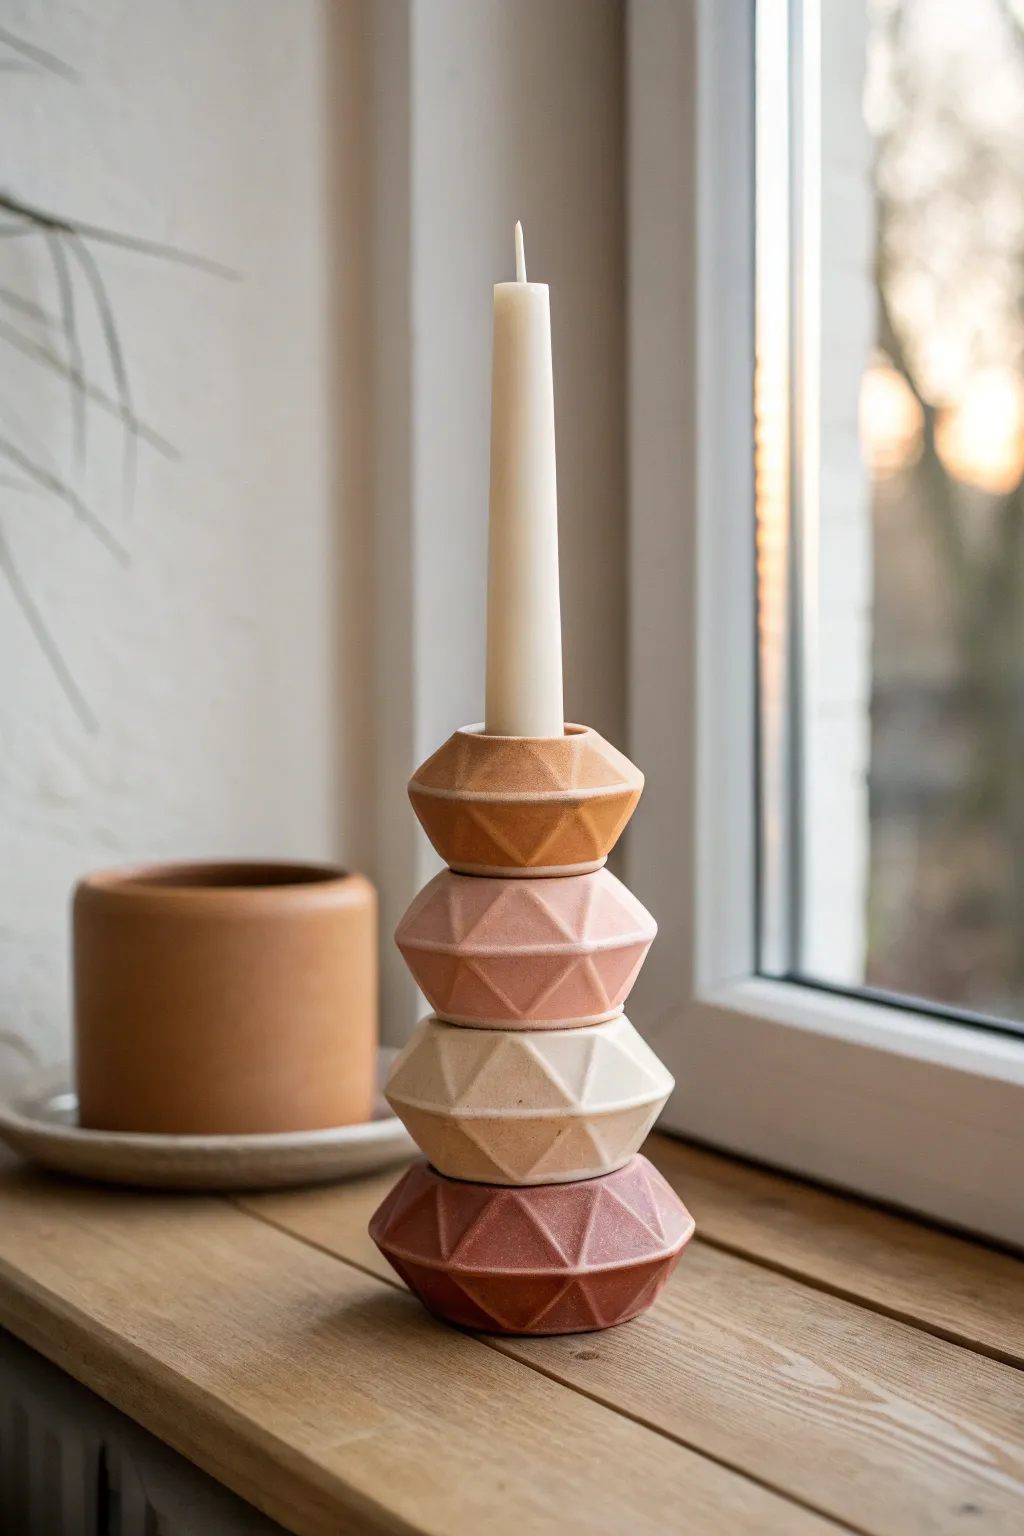
Embrace the sculptural beauty of geometric forms with this stacked candle holder project, featuring faceted gem-like shapes in a warm, earthy gradient. This modular design allows you to mix and match colors while creating a stunning, modern centerpiece for any windowsill.
Step-by-Step
Materials
- Polymer clay or air-dry clay (terracotta, pale pink, cream, dark rust)
- Acrylic rolling pin
- Sharp craft knife or tissue blade
- Taper candle (for sizing)
- Parchment paper or ceramic tile
- Liquid clay adhesive (if using polymer) or slip (if using air-dry)
- Fine-grit sandpaper (400-600 grit)
- Ruler
- Oven (for polymer clay) or drying rack
Step 1: Shaping the Geometric Gems
-
Prepare your clay:
Begin by conditioning four balls of clay in your chosen color palette—one distinct shade for each tier. Aim for each ball to be roughly 1.5 to 2 inches in diameter. -
Establish the basic form:
Take your bottom tier color (the darkest rust) and roll it into a smooth, thick disc. The edges should be rounded, resembling a flattened sphere or a thick wheel of cheese. -
Create the center hole:
Press your taper candle firmly into the center of the disc to create a socket. Wiggle it slightly to ensure the candle will fit easily later, then remove it. You want the hole to go about halfway through the height of the shape. -
Mark your facets:
Using a needle tool or the back of your knife, lightly score a guideline around the exact equator (middle) of the disc. Then, make small tick marks every 1/2 inch along the top and bottom edges primarily to guide your cuts. -
Cut the top facets:
Hold your blade at an angle, slicing from the top rim down to your equator line. Remove a triangular wedge of clay. Repeat this all around the top half to create angled facets. -
Cut the bottom facets:
Flip the shape over carefully. Repeat the slicing process on the bottom half, ensuring the points of the bottom triangles meet the points of the top triangles at the equator line to form diamond shapes. -
Refine the surface:
Gently smooth the sharpest ridges with your finger to soften the look, as seen in the reference image. The goal is a soft geometric look, not razor-sharp architectural edges.
Uneven Stack?
If tiers wobble, sand the top and bottom of each baked bead against a flat piece of sandpaper on a table to create perfectly flush contact points.
Step 2: Building the Middle and Top Tiers
-
Repeat for remaining tiers:
Repeat the faceting process for the cream, pale pink, and terracotta balls. I find it helpful to make the top tier slightly smaller in diameter than the base for better visual balance. -
Create connecting holes:
For the bottom three tiers only, the candle hole needs to go all the way through to allow for a central support rod if you choose, or simply to reduce weight. However, for this specific stack, simply ensure the top surfaces are flat enough to stack securely. -
Ensure fit:
Before baking or drying, stack your raw clay pieces gently to check alignment. The facets don’t need to line up perfectly—a little rotation adds organic charm. -
Check the candle socket:
Test your candle in the very top tier one last time. Clay can shrink slightly, so ensure the fit is loose enough to accommodate the candle after firing.
Stone Texture Trick
Before baking, gently press a piece of coarse sandpaper or a rough stone onto the clay facets to imprint a realistic, grainy stone texture.
Step 3: Assembly and Finishing
-
Bake or dry the components:
If using polymer clay, bake according to package directions (usually 275°F for 15-30 minutes per 1/4 inch thickness). If using air-dry clay, let them cure for 24-48 hours. -
Sand for texture:
Once fully cured, use fine-grit sandpaper to buff the surfaces. This removes fingerprints and enhances the matte, stone-like finish visible in the photo. -
Adhere the stack:
Apply a strong adhesive (like E6000 or heavy-duty super glue) between the layers. Press the cream tier onto the rust base, then the pink, then the terracotta top. -
Clean up overflow:
Immediately wipe away any glue that squeezes out from the seams using a damp cloth or a cotton bud. -
Final cure:
Allow the adhesive to set completely for several hours before inserting a lit candle.
Place your new sculptural candle holder near a window to let the natural light play off the geometric facets

TRACK YOUR CERAMIC JOURNEY
Capture glaze tests, firing details, and creative progress—all in one simple printable. Make your projects easier to repeat and improve.
Simple Incense Holders With Texture
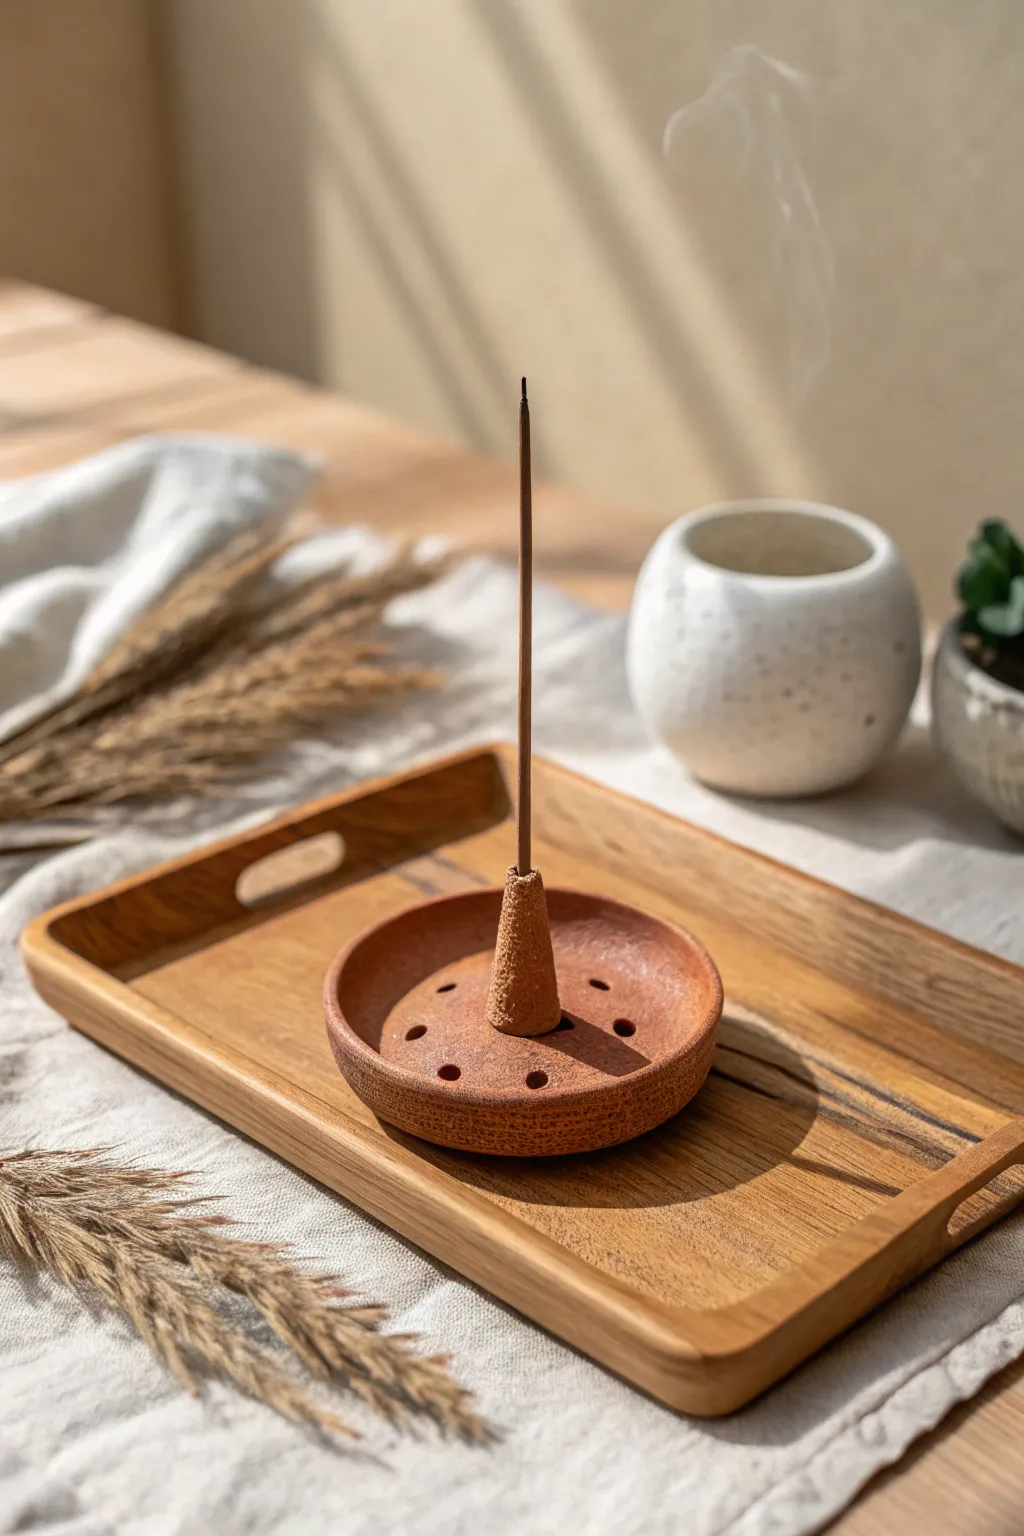
Embrace earthy vibes with this minimalist incense holder that combines a textured catch-dish with a functional central cone. Its perforated design and warm terracotta finish evoke a natural, organic feel perfect for grounding your space.
How-To Guide
Materials
- Terracotta-colored air-dry clay or polymer clay
- Rolling pin
- Circle cutter (approx. 4 inches) or a small bowl
- Sponge or textured fabric (burlap/coarse linen)
- Straw or small dowel (for poke holes)
- Wooden skewer or needle tool
- Small bowl or curved form (for drying shape)
- Water (for smoothing)
- Sandpaper (fine grit)
Step 1: Shaping the Base
-
Condition the clay:
Begin by taking a handful of your terracotta clay and kneading it thoroughly until it is soft, pliable, and free of air bubbles. If you’re using air-dry clay, keeping your hands slightly damp helps prevent cracking. -
Roll out the slab:
Place the clay on a flat working surface. Use your rolling pin to flatten it into an even slab, aiming for a thickness of about 1/4 inch. -
Add texture:
Before cutting your shape, gently press a dry sponge or a piece of coarse fabric (like the linen seen in the background) onto the clay surface to imprint a subtle, organic texture. -
Cut the circle:
Press your 4-inch circle cutter or an inverted bowl onto the textured slab to cut out a perfect circle. Remove the excess clay from around the edges. -
Form the rim:
Gently lift the edges of the circle with your fingers to create a shallow rim. You want it to look like a low bowl or saucer. -
Refine the shape:
Place the clay circle inside a slightly larger shallow bowl or on a curved form to help it hold that gentle concave shape while you work on the details. -
Smooth the edges:
Dip your finger in a little water and run it along the rim of the dish to smooth out any sharpness or cracks left by the cutter.
Natural Texture
For that distinctive pitted look in the image, gently tap the semi-dry clay with a stiff toothbrush or a ball of crumpled aluminum foil.
Step 2: Creating the Cone Holder
-
Form the cone:
Take a small ball of leftover clay and roll it into a cone shape. It should be wide enough at the base to be stable but taper elegantly toward the top. -
Texture the cone:
Roll the cone gently over your texturing tool (sponge or fabric) so it matches the aesthetic of the base bowl. -
Score and slip:
Use a needle tool to scratch cross-hatch marks on the bottom of the cone and the exact center of the bowl. Dab a drop of water (or liquid clay if using polymer) on the scored areas. -
Attach the cone:
Press the cone firmly into the center of the dish. Use a small modeling tool or your finger to smooth the seam where the cone meets the bowl so they look like one continuous piece. -
Create the incense hole:
Insert your incense stick (or a tool of slightly larger diameter) vertically into the tip of the cone. Wiggle it slightly to ensure the hole is deep enough to hold a stick securely.
Drifting Stick?
If the incense stick leans too much, the hole is too shallow. While the clay is still workable, re-insert the tool deeper to create a better anchor.
Step 3: Adding Details & Finishing
-
Punch decorative holes:
Take a drinking straw or a small wooden dowel and punch holes through the base of the dish, arranging them in a circle around the central cone. This creates the perforated look. -
Clean the holes:
If the punching tool left jagged edges, gently smooth the inside of the holes with a damp brush or your pinky finger. -
Final check:
Inspect the piece for any fingerprints or unintentional marks. I like to do a final pass with a damp sponge to enhance that pitted texture visible in the reference. -
Drying:
Let the piece dry completely according to your clay’s instructions. For air-dry clay, turn it over occasionally to ensure the bottom dries evenly. -
Sanding:
Once fully cured, use fine-grit sandpaper to gently smooth the rim or the top of the cone if they feel too rough.
Enjoy the calming atmosphere as the smoke drifts from your unique handcrafted holder
Funky Clay Wall Hanging Tiles
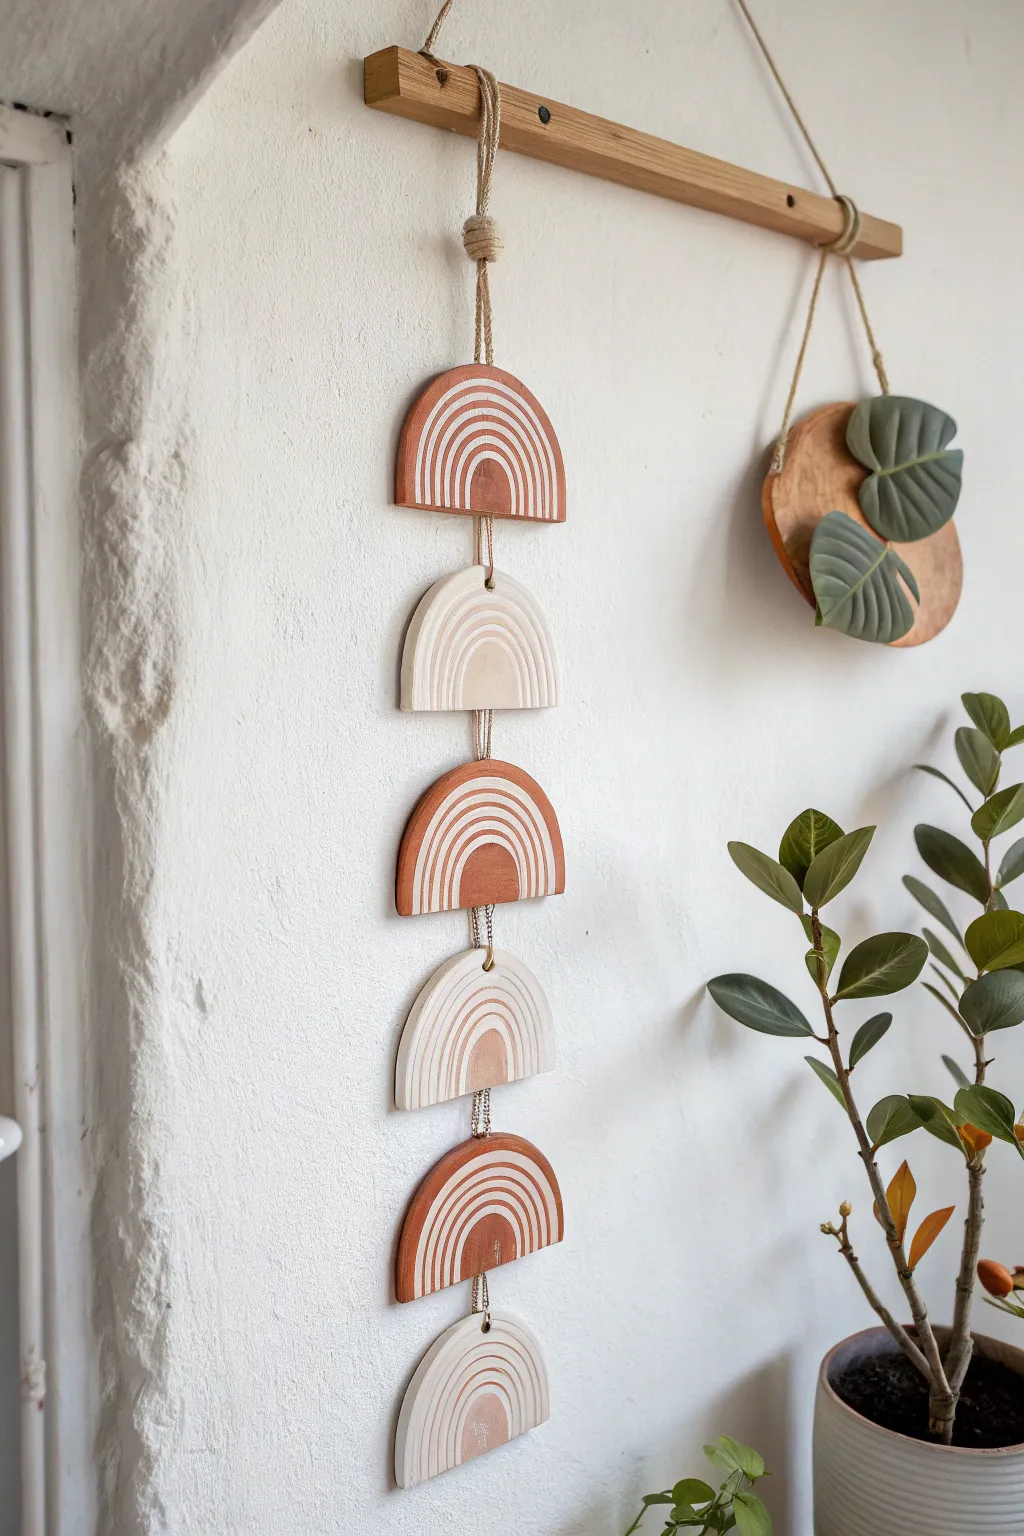
Embrace the earthy, textural beauty of this vertical wall hanging, featuring alternating terracotta and cream arches. This project combines simple geometric shapes with carved details for a stunning, modern boho accent piece perfect for narrow wall spaces.
Step-by-Step
Materials
- Terracotta air-dry clay (or polymer clay)
- White or beige air-dry clay
- Rolling pin
- Circle cutters (various sizes) or a round bowl template
- Carving tool or needle tool
- Sharp craft knife
- Straw or cocktail stick (for making holes)
- Jute twine or macrame cord
- Sandpaper (fine grit)
- Matte varnish (optional)
- Ruler
Step 1: Shaping the Clay
-
Prepare the workspace:
Lay down a canvas mat or parchment paper to prevent sticking. I find that taping the paper down keeps it from shifting while rolling. -
Roll the terracotta slabs:
Take a portion of the terracotta clay and knead it until soft. Roll it out to an even thickness of about 1/4 inch (6mm). -
Roll the white slabs:
Clean your roller thoroughly, then repeat the process with the white or beige clay, aiming for the exact same thickness. -
Cut the circles:
Use a large round cutter or trace around a bowl (approx. 4-5 inches diameter) to cut three circles from the terracotta clay and three from the white clay. -
Create semi-circles:
Use a ruler to find the exact center of each circle. Slice straight across with your craft knife to create two semi-circles per piece. You will need 3 terracotta semi-circles and 3 white semi-circles for the final design.
Step 2: Adding Detail & Finishing
-
Draft the arches:
Lightly sketch concentric arches onto the surface of each semi-circle using a pencil or a light touch with your needle tool to guide your carving. -
Carve the grooves:
Using a V-gouge or a loop carving tool, carefully carve out the sketched lines to create the white-striped effect on the terracotta and the textured effect on the white pieces. -
Create hanging holes:
This step requires precision. Use a straw or cocktail stick to poke a hole at the top center (curved edge) and bottom center (straight edge) of every piece, EXCEPT the bottom-most piece which only needs a top hole. -
Smooth the edges:
Dip your finger in a little water and run it along the cut edges of the clay to smooth out any roughness before drying. -
Dry the pieces:
Place your clay arches on a drying rack. If using air-dry clay, let them sit for 24-48 hours, flipping them occasionally to prevent warping. -
Sand for perfection:
Once fully cured, use fine-grit sandpaper to gently smooth the edges and surface. Wipe away dust with a slightly damp cloth.
Straight Edge Trick
To ensure your semi-cricle bottoms are perfectly straight, gently tap the cut edge against your table surface immediately after cutting to flatten any drag marks.
Step 3: Assembly
-
Plan the layout:
Arrange your dried pieces in a vertical line, alternating between terracotta and white arches. Ensure the carved patterns are facing up. -
Start tying at the bottom:
Cut a small length of jute twine. Thread it through the top hole of the very bottom white piece and the bottom hole of the terracotta piece above it. -
Secure the links:
Tie a secure knot behind the pieces so the clay shapes sit close together but can still move slightly. Trim the excess knot ends. -
Continue upward:
Repeat the tying process, moving up the chain—connecting the top of a lower piece to the bottom of the one above it—until all six pieces are linked. -
Add the main hanger:
Cut a longer piece of jute twine (about 12 inches). Thread it through the single top hole of the highest terracotta piece. -
Create the loop:
Bring the two ends of the top string together and tie a decorative knot or loop, allowing enough length to hang it from a hook or wooden dowel.
Add Color Depth
After drying, apply a thin white-wash paint inside the carved grooves of the terracotta pieces to make the arch design pop against the rust background.
Hang your new sculptural art in a bright spot to let the shadows play in the carved grooves
Batch-Made Board of Tiny “Tinies”

This delightful project transforms colorful polymer clay into a collection of miniature happy faces, stars, and buzzing bees. Perfect for jewelry making or tiny charms, these batch-made tinies have a smooth, matte finish and adorable hand-painted details.
Step-by-Step
Materials
- Polymer clay (dark blue, red, yellow, green, pink, beige, black, white)
- Small round clay cutter (approx. 1/2 inch)
- Small star clay cutter
- Acrylic rolling pin or clay machine
- Needle tool or toothpick
- Ball stylus tool
- Black acrylic paint
- Fine detail paintbrush (size 0 or 00)
- Parchment paper-lined baking sheet
- Oven (for baking clay)
- Glaze or varnish (optional)
Step 1: Prepping and Base Shapes
-
Condition the clay:
Start by kneading each color of polymer clay separately until it is soft, pliable, and free of cracks. Clean your hands or tools between colors to avoid staining, especially when switching to lighter shades. -
Roll out the sheets:
Roll out your conditioned clay into flat sheets of even thickness, approximately 3mm to 4mm thick. An acrylic roller works well, but using depth guides or a pasta machine ensures perfect uniformity. -
Cut the rounds:
For the blue galaxy cookies and red/beige faces, use your round cutter to punch out clean circles. Press firmly and wiggle slightly before lifting to get a clean edge. -
Cut the stars:
Repeat the cutting process with your star cutter on the yellow, green, and pink clay sheets. If the clay sticks to the cutter, dip the cutter in a little cornstarch first. -
Shape the bees:
For the bees, roll tiny balls of black and yellow clay. Flatten them slightly and stack them alternatively to create a striped oval body. Roll two tiny teardrops of white clay for wings and press them gently onto the back of the body.
Smudged Paint?
If you accidentally paint outside the lines, wait for the acrylic to dry slightly, then gently scrape the excess off with a wooden toothpick. It lifts right off the baked clay
Step 2: Adding Faces and Textures
-
Indent eye sockets:
Before baking, use a small ball stylus to gently press indentations where the eyes will go on the stars and smiley faces. This creates a guide for painting later and adds dimension. -
Mark smile lines:
Use a needle tool or the edge of a small spoon tool to impress a curved smile line into the soft clay. Press deep enough so the detail remains visible after baking. -
Texture the blue circles:
For the dark blue ‘galaxy’ pieces, use a needle tool to poke random small holes or indentations across the surface to mimic craters or distant stars. -
Add tiny yellow details:
Roll microscopic balls of yellow clay and gently press them into some of the indentations on the blue circles to create raised star details. -
Smooth the edges:
Before the clay goes into the oven, run your finger lightly over the edges of every piece to smooth out any sharpness or cutting burrs.
Turn Them Into Charms
Before baking, insert a small metal eye pin into the top of each shape. Bake with the pin inside to create instant pendants for necklaces or stitch markers
Step 3: Baking and Finishing
-
Arrange on baking sheet:
Place all your formed pieces on a baking sheet lined with parchment paper or a ceramic tile. Ensure they aren’t touching each other. -
Bake the batch:
Bake the clay according to the manufacturer’s instructions on your specific package of clay. Time and temperature vary by brand, but generally, it’s around 275°F (135°C) for 15-30 minutes. -
Cool completely:
Allow the pieces to cool completely on the baking sheet. I like to let them sit for an hour to ensure they harden fully before handling. -
Paint the eyes:
Dip your fine detail brush into black acrylic paint. Carefully dab a small dot of paint into the eye indentations you made earlier. -
Paint the smiles:
Using the very tip of your brush, trace the indented smile lines with black paint to make the expressions pop. -
Add white highlights:
Once the black eye paint is dry, use a sewing pin or the smallest dotting tool to add a tiny speck of white paint to the eyes for a ‘sparkle’ effect. -
Seal the pieces:
If desired, apply a thin coat of matte or satin varnish to protect the paint and give the pieces a finished professional look. Let dry completely.
Now you have a whole tray of cheerful miniature friends ready to brighten up any craft project