When I’m craving quick, satisfying projects, Halloween is my favorite excuse to make a whole army of tiny, not-too-scary cuties out of air-dry clay. Here are my go-to air clay Halloween ideas—from classic ghosts and pumpkins to a few playful twists that look amazing on a shelf or mantel.
Classic Sheet Ghost Figurines
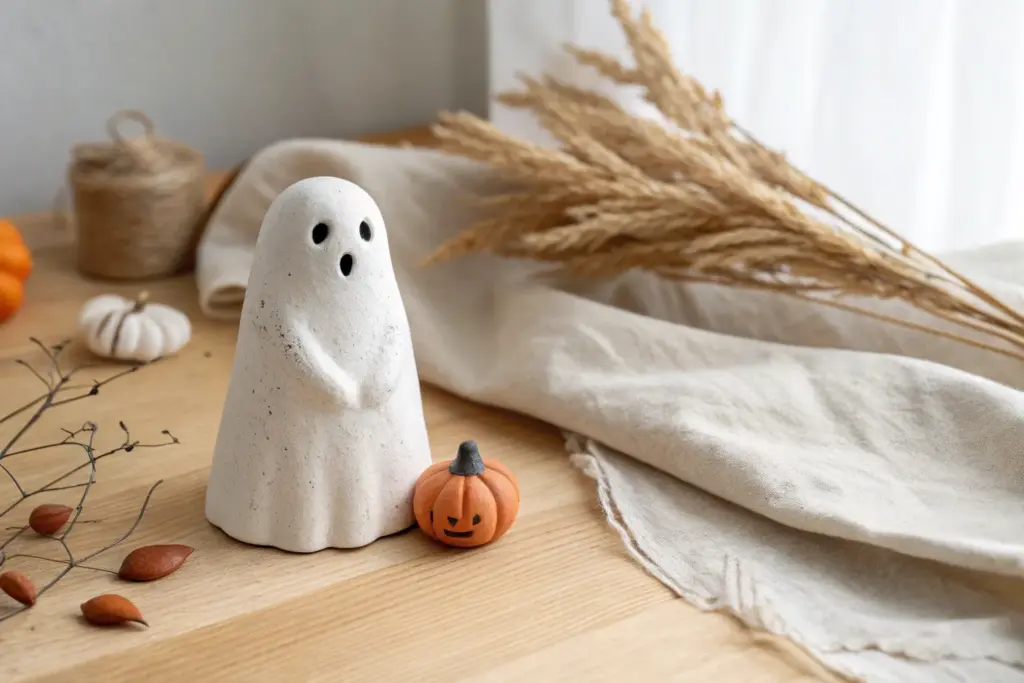
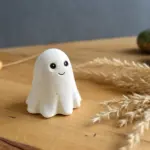
These charming, minimalist ghost figurines capture the classic look of a sheet thrown over a spirit, frozen in time with smooth white clay. The project features gentle, flowing folds and a friendly expression, making for a sophisticated yet undeniably cute Halloween decoration.
How-To Guide
Materials
- White air dry clay
- Rolling pin
- Aluminum foil
- Black acrylic paint
- Small round paintbrush or dotting tool
- Parchment paper or non-stick craft mat
- Clay knife or plastic cutting tool
- Cup of water
- Fine grit sandpaper (approx 220-400 grit)
Step 1: Creating the Armature
-
Form the core:
Begin by crumpling a piece of aluminum foil into a cone-like shape with a rounded top. This will be the support structure for your ghost and helps save on clay. -
Shape the base:
Ensure the bottom of your foil cone is flat so the ghost will stand upright on its own. Press it firmly against your work surface to stabilize it. -
Smoothen the foil:
Use your fingers to press down any sharp ridges or points on the foil. You want the armature to be relatively smooth so it supports the clay without creating bumps.
Smooth Surface Secret
Keep a small bowl of water nearby while sculpting. Frequently dipping a finger and smoothing the clay while wet prevents cracking and creates a pro finish.
Step 2: Draping the Ghost
-
Prepare the clay:
Take a generous handful of white air dry clay and knead it in your hands until it becomes soft, pliable, and free of cracks. -
Roll out the sheet:
Place the clay on parchment paper and use your rolling pin to create a smooth, even circle. Aim for a thickness of about 1/4 inch—too thin and it might crack; too thick and it won’t drape naturally. -
Initial draping:
Carefully lift your clay circle and center it over the foil armature. Let gravity do the initial work as the clay settles over the rounded top. -
Shape the head:
Gently gently smooth the clay over the dome of the foil to define the ghost’s head, ensuring there is no air trapped between the clay and the foil. -
Form the folds:
Using your fingers, gently pinch and guide the excess clay at the bottom into vertical folds. You want these to look like heavy fabric pooling on the floor. -
Refine the drape:
Give the bottom edge a wavy appearance by pushing the clay inward and outward in an alternating pattern. I find running a wet finger along this edge prevents micro-cracks. -
Smoothing the surface:
Dip your finger in a little water and glide it over the entire surface of the ghost to erase any fingerprints or imperfections. -
Drying process:
Allow the ghost to dry completely in a safe, dry area. Depending on humidity and thickness, this usually takes 24 to 48 hours. Rotate it occasionally for even drying.
Step 3: Finishing Touches
-
Sanding:
Once bone dry, take fine-grit sandpaper and lightly buff the surface. Focus on any rough spots or unevenness on the bottom hem to ensure a sleek, matte finish. -
Dusting off:
Wipe the figurine down with a slightly damp cloth or a dry brush to remove the sanding dust. -
Painting the eyes:
Using black acrylic paint and a small brush, paint two vertical ovals for the eyes. Position them midway down the head for a cute proportion. -
Adding the smile:
Paint a small, simple ‘u’ shape directly between and slightly below the eyes. Keep the line thin for a delicate, friendly expression. -
Final drying:
Let the paint dry completely before handling or displaying your new spectral friend.
Glow Up
Skip the foil armature and drape the clay over a removable cone object (covered in plastic wrap). Once dry, place an LED tea light underneath for a glowing ghost.
Set your finished ghost alongside some miniature pumpkins for a perfectly spooky vignette


Mini Jack-o’-Lantern Pumpkins

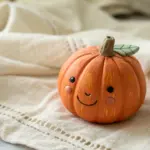
Create a charmingly spooky addition to your autumn decor with these textured mini pumpkins. Using air-dry clay, you’ll sculpt realistic ribs and a knobby stem before bringing the classic jack-o’-lantern face to life with acrylic paints.
Step-by-Step Tutorial
Materials
- Air-dry clay (white or terracotta)
- Acrylic paints (bright orange, burnt sienna, dark brown, olive green, black)
- Mod Podge or matte varnish
- Sculpting tools (needle tool, modeling tool)
- Small paintbrush (detail round)
- Medium paintbrush (flat)
- Aluminum foil
- Bowl of water
- Paper towels
Step 1: Shaping the Base
-
Create a foil core:
Start by scrunching a piece of aluminum foil into a tight ball slightly smaller than your desired pumpkin size. This saves clay and helps the pumpkin dry evenly. -
Cover with clay:
Flatten a piece of air-dry clay into a pancake and wrap it completely around the foil ball. Roll it in your palms until it is smooth and seamless. -
Form the pumpkin shape:
Gently press the ball down onto your work surface to flatten the bottom so it sits stable. Press your thumb slightly into the top to create the depression where the stem will sit.
Cracks Appearing?
If small cracks appear as the clay dries, mix a tiny amount of fresh clay with water to make a paste. Fill the cracks, smooth with a finger, and let resettle.
Step 2: Sculpting Details
-
Add the ribs:
Using a modeling tool or the handle of a paintbrush, press vertical indentations from the top center down to the bottom. Go all the way around the sphere to create the pumpkin’s distinctive segments. -
Softening the lines:
Dip your finger in a little water and smooth out the sharp ridges of the indentations. You want the segments to look puffy and organic, not like harsh slices. -
Texture the skin:
Take a toothbrush or a stiff bristle brush and gently embrace the surface. Tap it lightly all over the clay to give it a realistic, slightly pitted pumpkin skin texture. -
Form the stem:
Roll a small snake of clay into a teardrop shape. Twist it slightly to give it character, and flatten the wider base. -
Attach the stem:
Score the depression on top of the pumpkin and the bottom of the stem with a needle tool. Apply a dab of water or slip, press the stem in place, and smooth the clay seams so it looks like it grew there. -
Carve the face:
While the clay is still soft, use a needle tool or small knife to lightly outline your jack-o’-lantern face. Creating triangle eyes and a stitched smile works perfectly for this classic look. -
Deepen the features:
Gently press inwards on the eyes, nose, and mouth areas to create recessed shapes. You don’t need to cut all the way through; just create a distinct indentation for painting later. -
Dry thoroughly:
Set the pumpkin aside in a dry area. Depending on the brand and thickness, this may take 24-48 hours. Turn it occasionally to ensure the bottom dries too.
Pro Tip: Weighted Base
For a heavier feel that won’t tip over easily, wrap a small stone inside your foil core before adding the clay layer. It adds satisfying heft to the mini pumpkin.
Step 3: Painting and Finishing
-
Base coat:
Once fully dry, paint the entire pumpkin (minus the stem) with a base coat of bright orange acrylic paint. Let this layer dry completely. -
Add dimension:
Mix a little burnt sienna with water to create a thin wash. Brush this into the vertical crevices between the ribs and wipe away the excess on the high points with a paper towel to create shadows. -
Highlighting:
Dry brush a lighter orange or yellow mixture very lightly over the tops of the ribs to make the texture pop. -
Painting the stem:
Paint the stem with an olive green mixed with a touch of brown. I like to add a tiny bit of metallic gold or yellow to the very tip for a dried-out look. -
Fill the face:
Using your smallest detail brush and black acrylic paint, carefully fill in the recessed eyes, nose, and mouth. Paint the stitched smile line carefully. -
Clean up edges:
If any black paint strayed outside the lines reflectively, touch it up with the original orange color once the black is dry. -
Protective seal:
Finish by applying a coat of matte varnish or Mod Podge. This seals the clay and unifies the sheen of the different paints.
Enjoy arranging your new handmade patch on a mantle or tablescape to welcome the season


Pumpkin Tealight Holders (Battery Only)
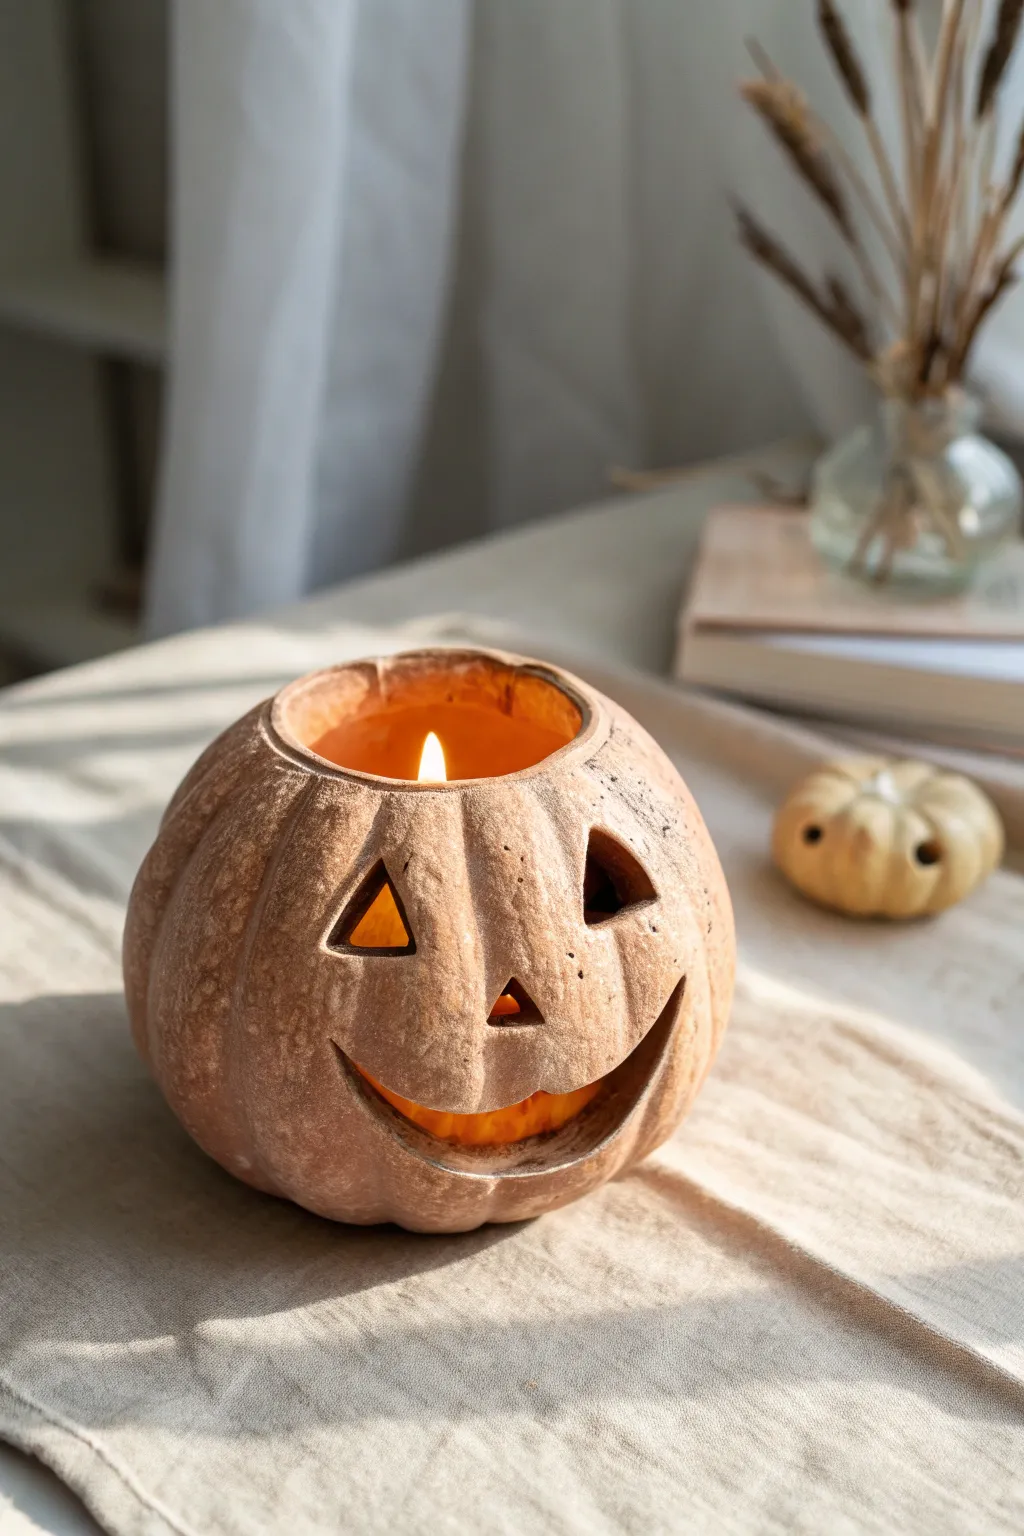
Create a cozy autumn atmosphere with this charming pumpkin tealight holder made from air-dry clay. Its warm, terracotta finish and classic carved face bring a rustic, handcrafted touch to your Halloween decor without the mess of a real pumpkin.
Step-by-Step
Materials
- Terracotta-colored air dry clay (approx. 500g)
- Small rolling pin
- Modeling tools (knife, needle tool)
- Small bowl or sphere (for molding shape)
- Plastic wrap
- Sponge
- Water
- Battery-operated tealight
- Fine-grit sandpaper
- Matte sealant (optional)
Step 1: Shaping the Base
-
Prepare the Clay:
Start by kneading your terracotta air dry clay until it is soft, pliable, and free of air bubbles. If it feels too dry, add a tiny drop of water to your hands. -
Form the Initial Ball:
Roll the clay into a smooth, solid ball roughly the size of a large grapefruit. Tap it gently on your work surface to create a flat bottom so it stands stable. -
Create the Hollow Center:
Using your thumbs, press into the center of the ball and pinch outwards to create a pinch pot. I prefer to work slowly in a spiral motion to keep the walls an even thickness of about 1/4 inch. -
Refine the Rim:
Smooth the top opening rim with a damp sponge. Ensure the opening is wide enough (at least 3 inches) to easily insert and remove your battery tealight later.
Step 2: Adding Pumpkin Details
-
Define the Ribs:
Use the side of a modeling tool or a wooden skewer to press vertical indentations (ribs) around the outside of the pot, running from the bottom to the rim. -
Soften the Grooves:
run a damp finger along the grooves you just made to soften the sharp edges, making the segments look puffed and organic like a real pumpkin. -
Texture the Surface:
Take a stiff bristle brush or a crumpled ball of aluminum foil and gently press it all over the exterior surface. This creates that realistic, slightly pitted pumpkin skin texture. -
Draft the Face:
Lightly sketch your jack-o’-lantern face onto the clay surface using a needle tool. Draw two triangles for eyes, a smaller triangle for the nose, and a wide, curved smile.
Fixing Cracks
Make a ‘slip’ paste by mixing small clay scraps with water. Use this to fill any hairline cracks that appear during drying, then smooth over.
Step 3: Carving and Finishing
-
Cut Out the Features:
Using a sharp clay knife or craft knife, carefully cut along your sketched lines. Remove the clay pieces for the eyes, nose, and mouth. -
Clean the Edges:
Dip a small brush in water and smooth out any rough crumbs or jagged bits inside the cut-out holes to make the features look neat. -
Check the Lid Area:
If you want a slightly sunken look for the top rim as seen in the photo, gently press the rim downwards slightly between the vertical ribs. -
Initial Drying:
Let the pumpkin sit to dry in a cool, dry place. Do not place it in direct sunlight, or it may crack. Rotate it occasionally. -
Sanding:
Once completely unrecognizable as wet clay (usually 24-48 hours), use fine-grit sandpaper to smooth any overly sharp spots on the rim or base. -
Dusting Off:
Wipe away all sanding dust with a slightly damp cloth or a dry brush to ensure the surface is clean. -
Enhancing the Color (Optional):
If your dried clay looks too chalky, you can dry-brush a tiny bit of orange or brown acrylic paint into the crevices to deepen the color. -
Sealing:
Apply a thin coat of matte varnish or sealant to protect the clay from humidity and give it a finished look. -
Final Test:
Once the sealant is dry, pop in your battery-operated tealight and watch the face glow warmly.
Spooky Shadows
Carefully angle your cuts inward slightly when carving the eyes. This creates more dramatic shadows when the internal light hits the edges.
Place your little pumpkin on a windowsill or mantle to enjoy the warm, flickering glow all season long


Ghost Tealight Covers (Battery Only)
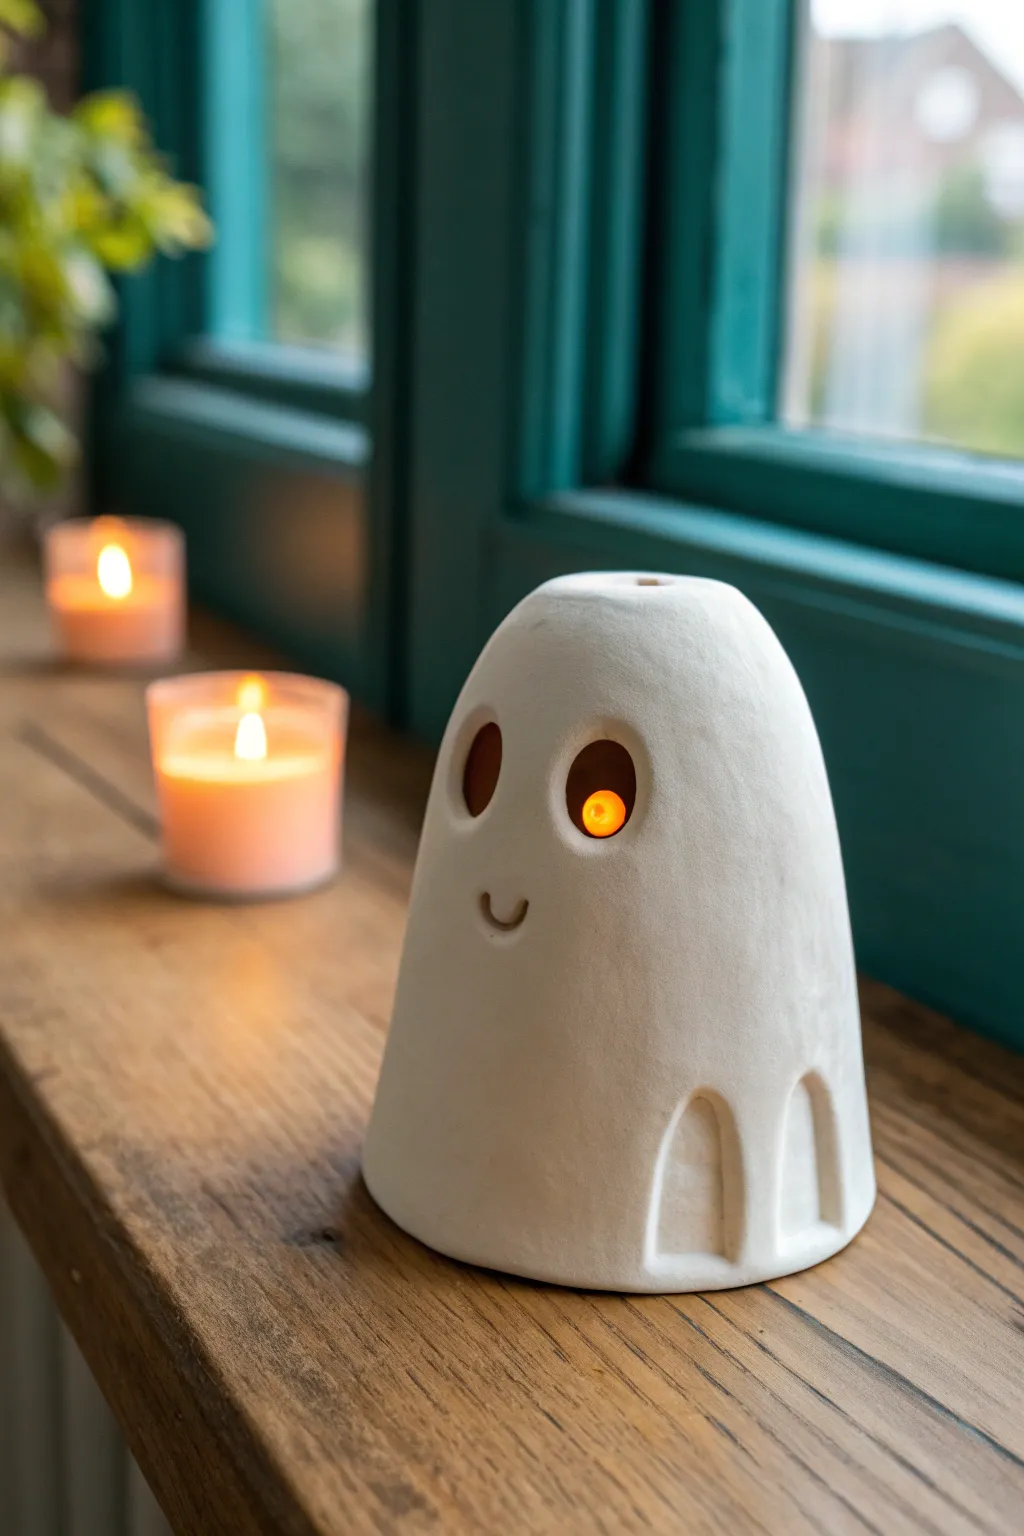
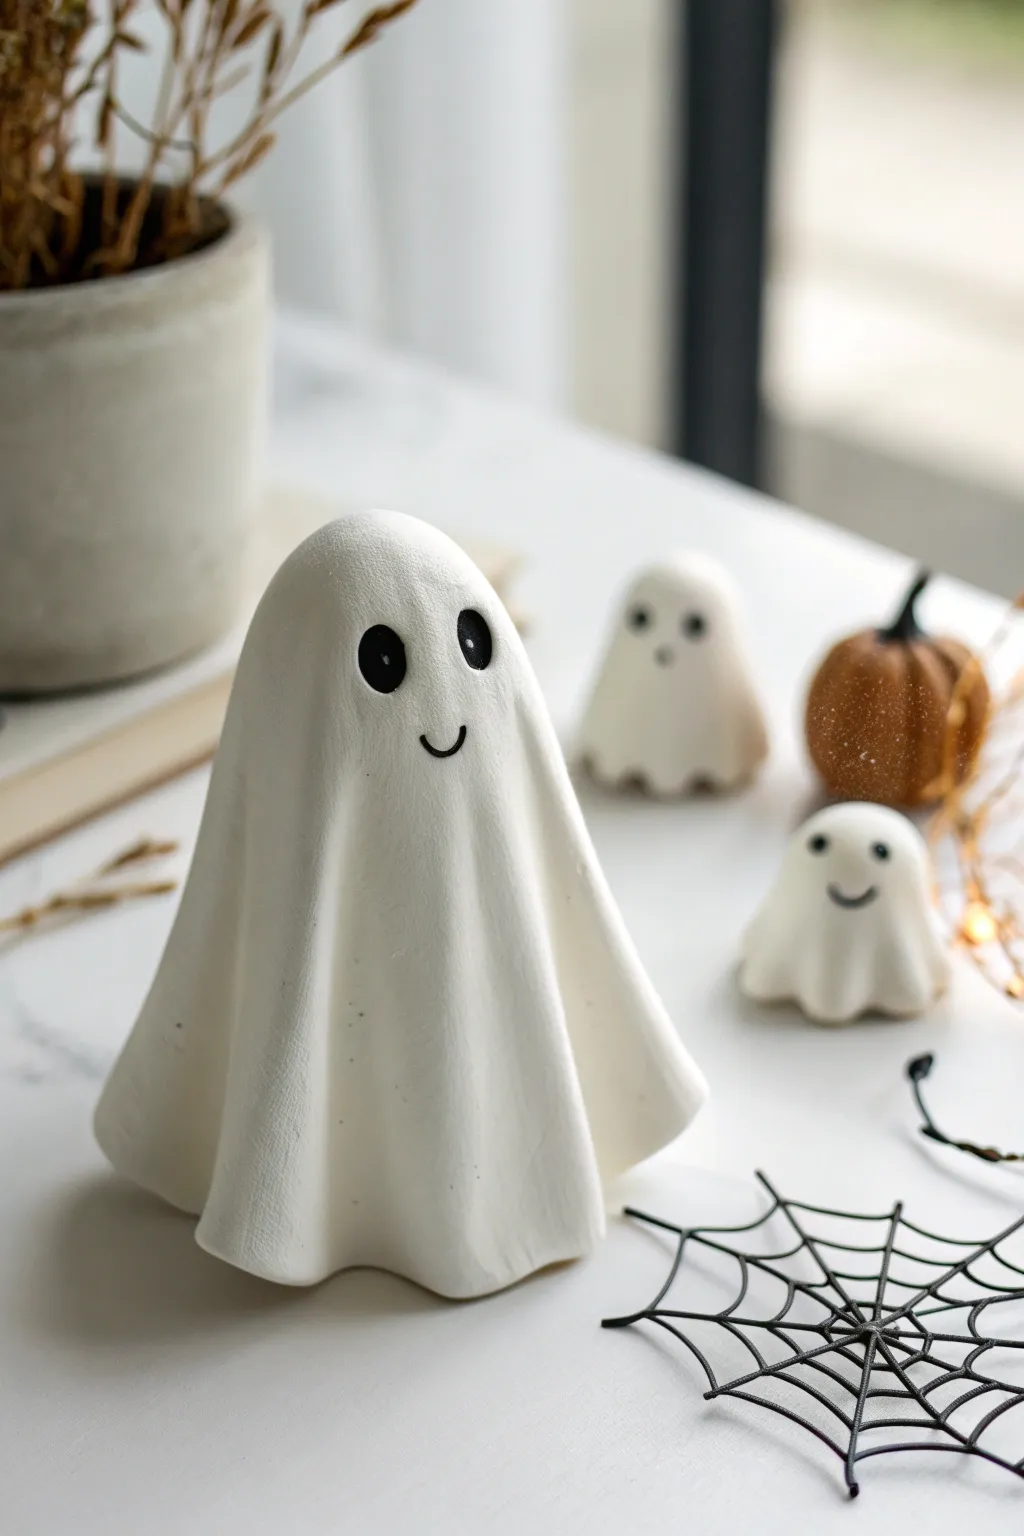
Create a charming, minimalist Halloween decoration with these friendly ghost tealight covers. Crafted from air dry clay, they feature a smooth, matte finish and a sweet little smile that glows warmly when placed over a battery-operated candle.
How-To Guide
Materials
- White smooth air dry clay
- Rolling pin
- Small non-stick craft mat or parchment paper
- Small bowl or cup (for forming)
- Tiny circular cutters or a straw
- Modeling tool or toothpick
- Fine-grit sandpaper (optional)
- Water in a small cup
- Sponge or soft brush
- Battery-operated tealights
Step 1: Shaping the Base
-
Prep the clay:
Take a handful of white air dry clay and knead it in your hands until it becomes pliable and warm. Rolling it into a smooth ball helps remove any initial cracks. -
Roll it out:
Place the ball on your craft mat or parchment paper. Use a rolling pin to flatten the clay into a circle about 1/4 inch thick. You want it substantial enough to stand up, but thin enough to look delicate. -
Form the ghost body:
Gently drape the rolled clay over a small, inverted cup or a specialized domed form. The object underneath determines the final shape, so choose something with a rounded bottom. -
Smooth the shape:
Using slightly damp fingers, smooth the clay downward against the form to create a nice dome shape. Gently gently press out any lumps. -
Trim the bottom:
Once you have the ghost shape you like, use a knife or a clay tool to trim the excess clay at the bottom so it sits flush heavily against the table.
Cracks Appearing?
If small cracks appear while drying, mix a tiny bit of fresh clay with water to make a paste (slip). Rub this into the crack with your finger to seal it seamlessly.
Step 2: Adding the Face and Details
-
Cut the eyes:
While the clay is still wet but stable on the form, use a straw or a small circular cutter to punch out two eye holes. Position them slightly higher up the dome. -
Refine the eye sockets:
Dip your finger in water and carefully smooth the edges of the cut eye holes so they aren’t sharp. -
Carve the smile:
Use a curved clay tool or just the cap of a pen pressed sideways to create a small, simple ‘U’ shape for the mouth. I prefer to press just deep enough to make a shadow, but you can cut all the way through if you prefer. -
Add the bottom pleats:
To mimic the look of a sheet, use a modeling tool to press vertical indentations near the bottom edge. In the image, these look like small arches or pleats. -
Smooth everything out:
Take a damp sponge and lightly wipe the entire surface of the ghost to remove fingerprints and ensure a matte, stone-like texture.
Step 3: Drying and Finishing
-
Initial drying:
Allow the clay to dry on the form for about 2-3 hours until it is firm enough to hold its own weight. -
Remove the form:
Carefully slide the clay ghost off the forming cup. If it sticks, gently wiggle it loose. -
Full dry time:
Set the ghost upright on a wire rack to allow airflow inside and out. Let it dry completely for 24-48 hours. It will turn a pure, chalky white when fully dry. -
Sanding:
Once bone dry, inspect the bottom edge and eye holes. Use fine-grit sandpaper to gently buff away any rough spots. -
Add the light:
Your ghost is ready. Place a battery-operated tealight on a surface and set the ghost over it to see the face glow.
Pro Tip: Smooth Release
Before draping your clay, wrap your forming cup in a layer of plastic wrap. This prevents the clay from sticking to the cup and makes removal effortless.
Enjoy the gentle, safe glow of your handmade ghost collection on a windowsill or shelf

The Complete Guide to Pottery Troubleshooting
Uncover the most common ceramic mistakes—from cracking clay to failed glazes—and learn how to fix them fast.
Tiny Ghosts Holding Pumpkins
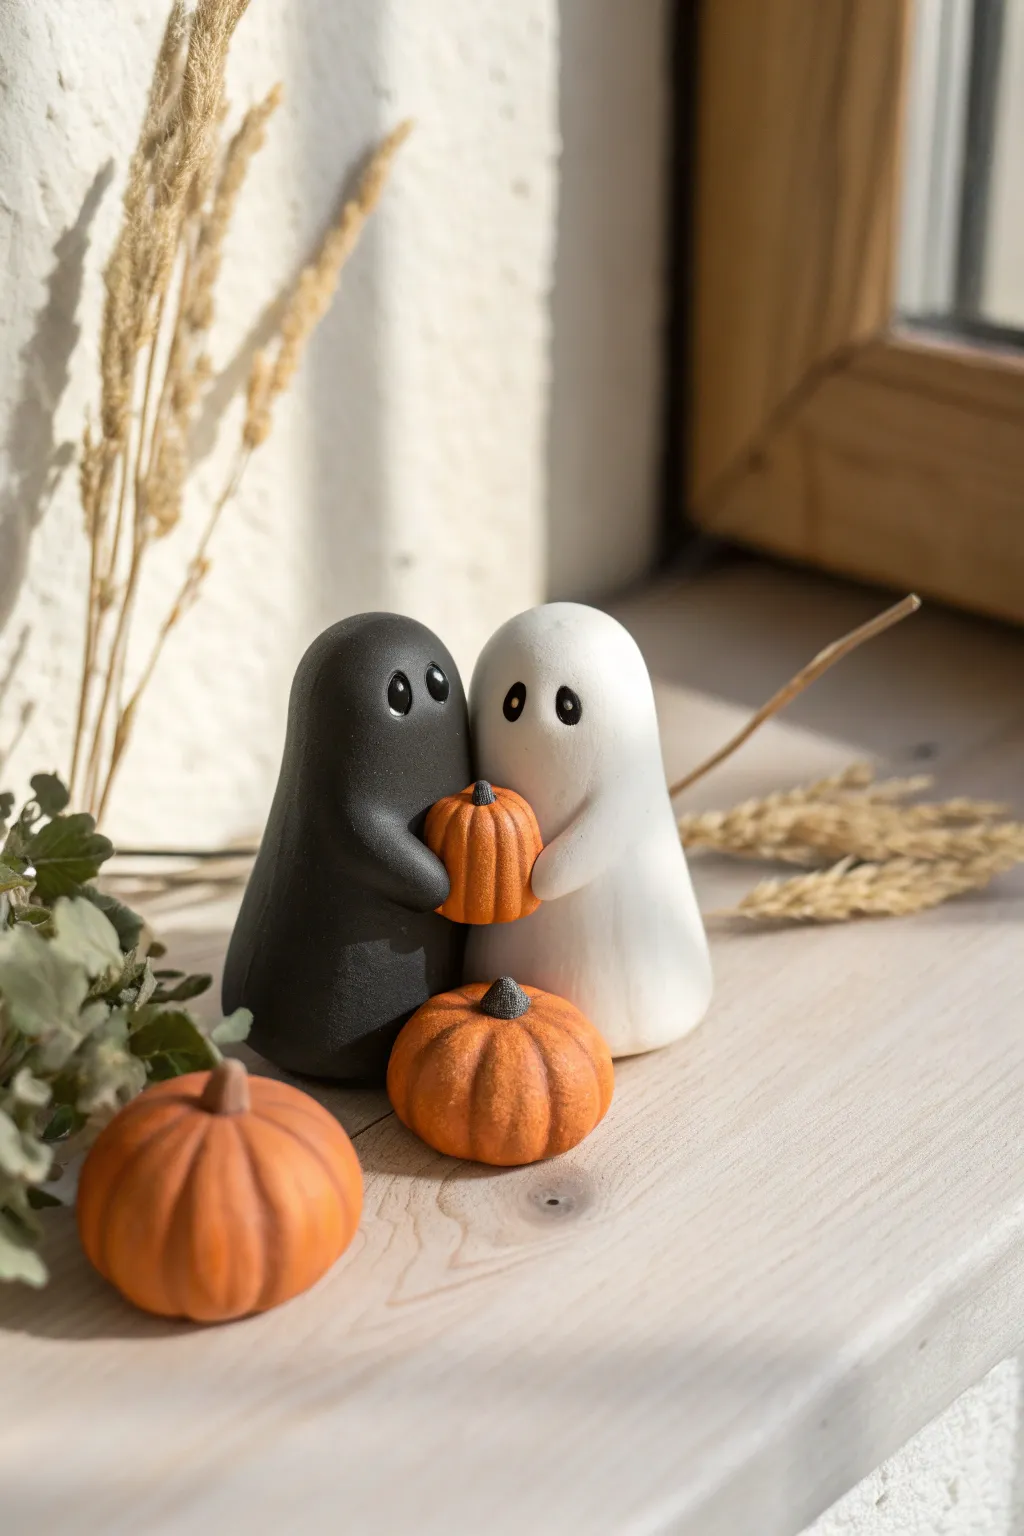
These adorable little specters are the perfect minimalist Halloween decoration, featuring a black ghost and a white ghost sharing a tiny pumpkin embrace. The smooth, matte finish gives them a high-quality ceramic look without needing a kiln.
Step-by-Step Guide
Materials
- White air-dry clay
- Black air-dry clay (or extra white clay + black acrylic paint)
- Orange acrylic paint
- Raw sienna or brown acrylic paint
- Dark green acrylic paint
- Glossy varnish (optional for eyes)
- Matte varnish spray
- Small ball stylus tool
- Needle tool or toothpick
- Water in a small cup
- Fine-grit sandpaper
Step 1: Sculpting the Shapes
-
Prepare the clay:
Knead a walnut-sized ball of white clay and a matching ball of black clay until they are warm and pliable. If you only have white clay for the black ghost, mix in black acrylic paint thoroughly until the color is solid throughout, or plan to paint it later. -
Form the bodies:
Roll both balls into smooth ovals, then gently flatten the bottoms against your work surface so they stand upright. Shape them into rounded elongated domes, slightly narrower at the top. -
Smooth the surface:
Dip your finger in a tiny bit of water and rub it over the clay to remove any fingerprints or cracks. The goal is a super smooth, stone-like finish. -
Create the eye sockets:
Using a small ball stylus, press two indentations into the ‘face’ area of each ghost. Place them slightly wide apart for a cute expression. -
Sculpt the pumpkins:
Roll three small balls of white clay for the pumpkins—make one slightly smaller to fit between the ghosts’ arms. Gently press them to be slightly squat. -
Add pumpkin ridges:
Take a needle tool or toothpick and press vertical lines around the sides of each pumpkin ball to create the ribbed texture. Press down a small indentation at the very top for the stem. -
Make the stems:
Roll tiny, rice-sized bits of clay for the stems and press them securely into the top indentation of each pumpkin using a drop of water as glue.
Cracks while drying?
Mix a tiny amount of fresh clay with water to make a paste (slip). Fill the crack with this paste, smooth it over with your finger, and let it dry again.
Step 2: Assembly and Refining
-
Position the ghosts:
Place the black and white ghosts side-by-side so their bodies are touching. Press them together gently so they adhere slightly. -
Attach the center pumpkin:
Place the smallest pumpkin directly between them at chest height. Use a dab of water or clay slip on the back of the pumpkin to secure it to their bodies. -
Create the arms:
Roll two small, thin logs of clay (one black, one white). Curve them around the front of the pumpkin to look like hugging arms. -
Blend the seams:
Using a clay tool or your finger with water, smooth the back of the arms into the main body so they look seamless, as if pulling out from the form rather than stuck on. -
Final smooth check:
Do one last check for fingerprints. I like to use a slightly damp brush to go over the entire surface before leaving it to dry. -
Drying time:
Let the sculpture dry completely for 24-48 hours. Turn the separate pumpkins over occasionally so the bottoms dry evenly.
Step 3: Painting and Finishing
-
Sand for perfection:
Once bone dry, use fine-grit sandpaper to gently buff away any remaining imperfections or bumps on the ghosts. -
Paint the pumpkins:
Paint the pumpkins vivid orange. For a realistic look, dry brush a little lighter orange on the ridges and use a darker wash in the grooves. -
Detail the stems:
Paint the tiny stems dark brown or dark green. -
Paint the eyes:
Use a small detail brush to fill the eye indentations with black paint on the white ghost. For the black ghost, you can leave the indentations as-is for a subtle shadow look, or use a glossy black paint inside them. -
Add highlights:
Dip the very tip of a toothpick into white paint and add a tiny reflection dot to the eyes of the white ghost. -
Seal the work:
Spray the entire piece with a matte varnish to protect the clay while keeping that soft, unglazed texture. -
Gloss the eyes:
For a final touch, carefully paint a layer of high-gloss varnish only on the eyes (and maybe the pumpkin stems) to make them pop against the matte bodies.
Pro Tip: Weighted Base
Before sealing the bottom of your ghosts, press a small, flat pebble or washer into the base while the clay is wet. This adds weight and stability.
Set your spooky couple on a windowsill or shelf to add a touch of charm to the season
Pastel Pumpkins With Gold Stems
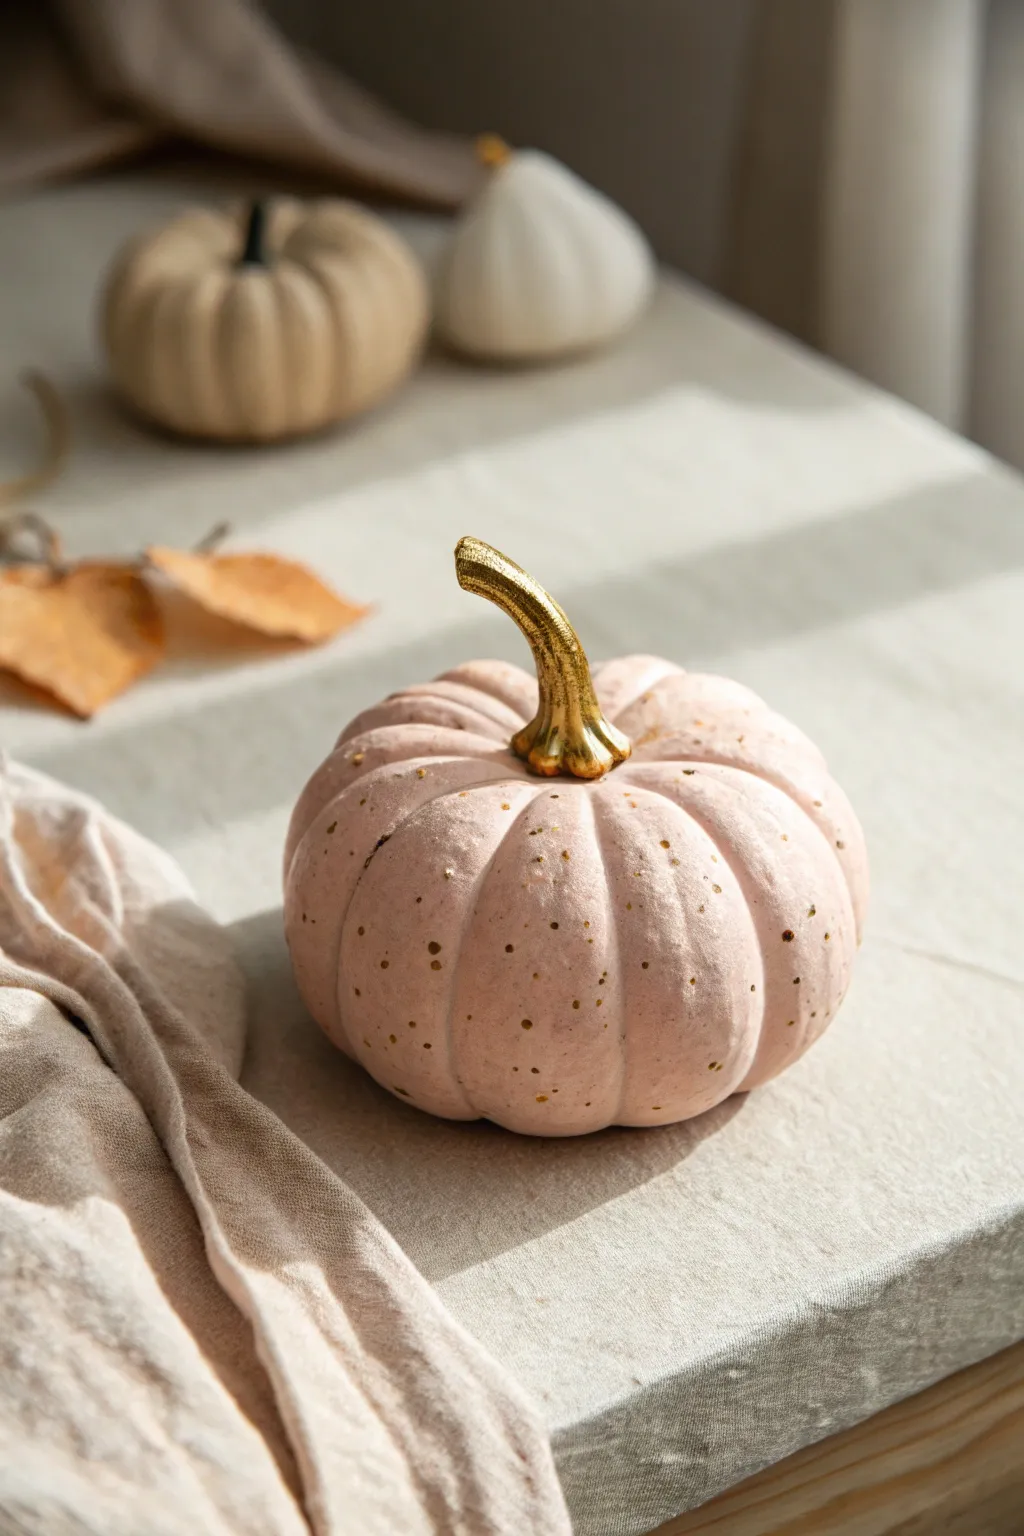
Elevate your fall decor with this sophisticated take on the classic gourd, featuring soft pastel tones and elegant gold accents. This air-dry clay project combines a smooth, matte finish with unexpected sparkle for a chic, modern centerpiece.
Step-by-Step
Materials
- White air-dry clay
- Acrylic paint (pastel pink or blush)
- Acrylic paint (metallic gold)
- Modeling tools or a dull butter knife
- Toothpick
- Small stiff-bristled brush (like a toothbrush)
- Fine detail paintbrush
- Water cup
- Wax paper or craft mat
Step 1: Sculpting the Base
-
Prepare the Clay:
Start with a ball of white air-dry clay about the size of a tennis ball. Knead it thoroughly for a minute or two to warm it up and ensure it creates a smooth surface without cracks. -
Form the Sphere:
Roll the clay between your palms to create a smooth, round sphere. Gently tap the bottom on your work surface to create a slightly flat base so the pumpkin sits without rolling. -
Create the Ribs:
Using a modeling tool or the back of a dull butter knife, press vertical lines into the side of the sphere, starting from the center top and going down to the bottom. Create about 8-10 sections. -
Shape the Segments:
Use your thumb to gently smooth and round out the clay between the indented lines. This enhances the plump, segmented look typical of pumpkins. -
Make the Stem Hole:
Press your thumb or a rounded tool into the very top center of the pumpkin to create a small depression where the stem will eventually sit.
Cracks Appearing?
If small fissures appear while drying, mix a tiny bit of fresh clay with water to make a paste (slip) and fill the cracks. Smooth with a wet finger.
Step 2: Adding the Stem
-
Roll a Coil:
Take a smaller piece of clay, roughly the size of a grape, and roll it into a thick coil that tapers slightly at one end. -
Attach and Texture:
Creating a good bond is crucial here, so score the bottom of the stem and the depression on the pumpkin with a toothpick, add a dab of water, and press the stem firmly into place. -
Blend the Seams:
Use a small modeling tool or your finger to smooth the clay from the base of the stem onto the pumpkin shoulders, ensuring it looks like it grew naturally from the fruit. -
Shape the Curve:
Gently bend the stem to one side to give it a whimsical, organic flow. Use a toothpick to scratch vertical grooves up and down the stem for realistic woody texture. -
Dry Completely:
Set the pumpkin aside on wax paper to dry fully. Depending on density and humidity, this usually takes 24-48 hours. Rotate it occasionally for even drying.
Step 3: Painting and Finishing
-
Base Coast Application:
Once fully hard, paint the entire body of the pumpkin with a soft pastel pink or blush acrylic paint. You may need two thin coats for full, opaque coverage. -
Gild the Stem:
Using a fine paintbrush, carefully apply metallic gold paint to the stem. Extend the gold just slightly onto the top of the pumpkin where the stem meets the fruit for a dipped effect. -
Prepare the Splatter:
Mix a small amount of gold paint with a drop or two of water. The consistency should be fluid, like heavy cream, so it flicks easily off a brush. -
Testing Consistency:
I always test my splatter on a scrap piece of paper first to make sure I’m getting fine dots rather than large globs. -
Create the Speckles:
Dip a stiff-bristled brush or old toothbrush into the thinned gold paint. Hold it near the pumpkin and run your thumb across the bristles to flick tiny gold specks onto the pink surface. -
Detailing:
If you want larger specific dots, use the tip of a toothpick dipped in gold to manually place a few accent spots. -
Final Seal (Optional):
If you plan to handle the pumpkin often, apply a matte spray varnish to protect the paint, though unvarnished clay has a lovely raw texture for table displays.
Smoother Splatters
For ultra-fine mist, tap the handle of your paint-loaded brush against another brush handle over the pumpkin instead of using your thumb.
Now you have a stunning, custom decor piece that captures the magic of autumn with a modern twist


What Really Happens Inside the Kiln
Learn how time and temperature work together inside the kiln to transform clay into durable ceramic.
Candy Corn Garland Tiles
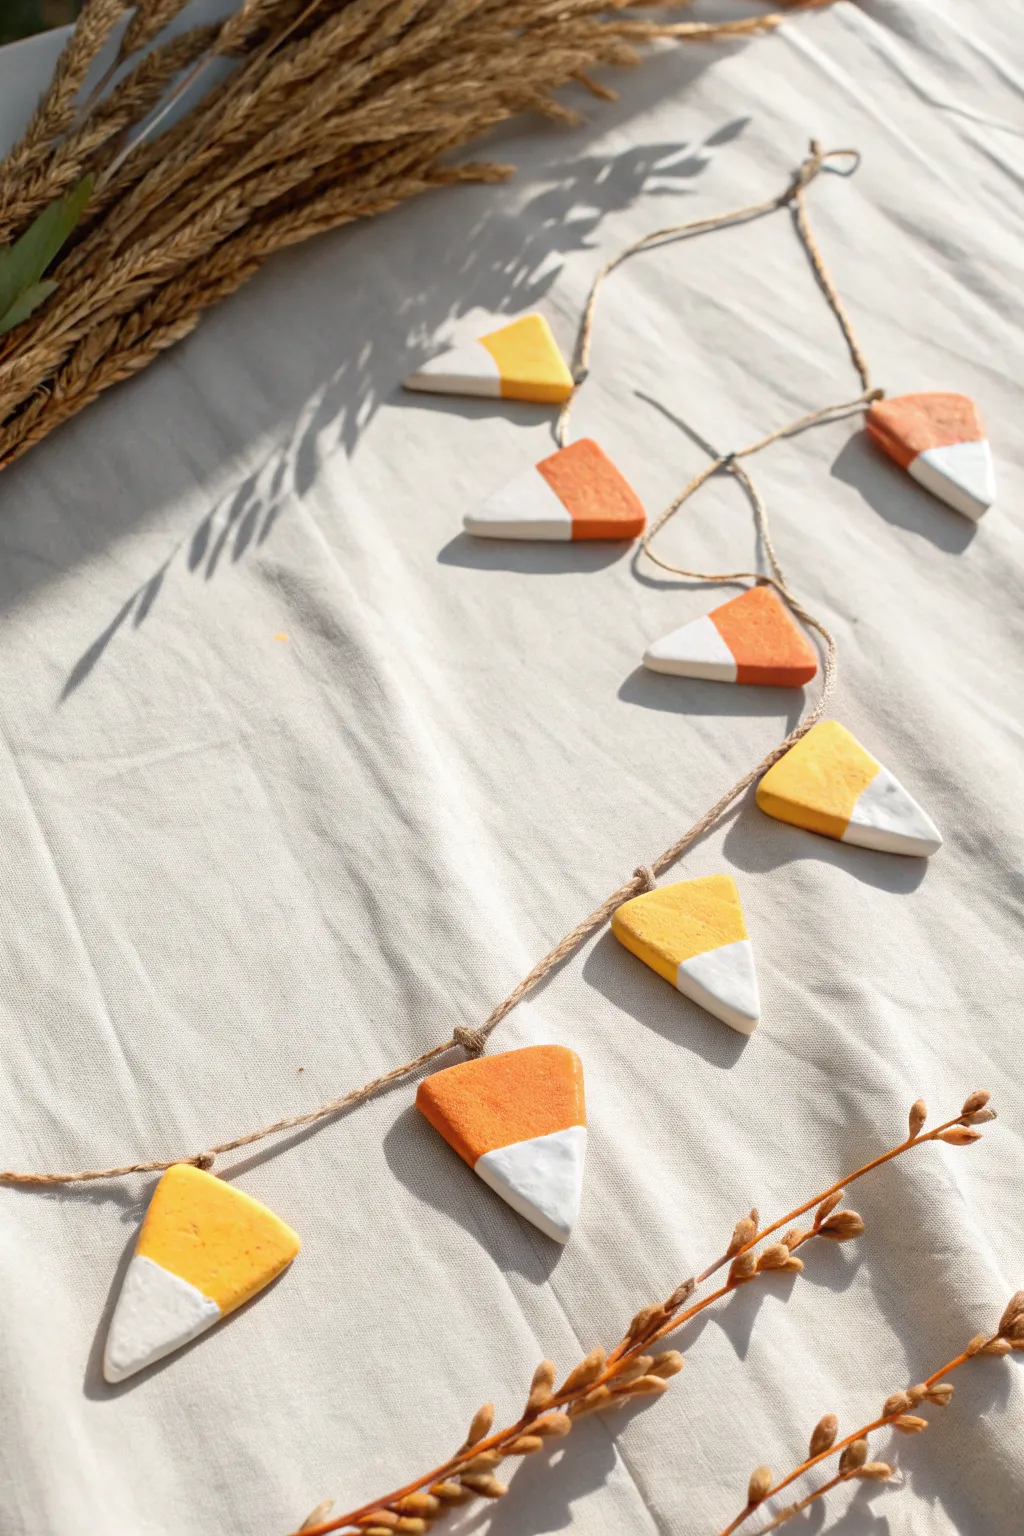
Bring a touch of sweet, nostalgic charm to your autumn decor with this handmade candy corn garland. Using air-dry clay, you’ll craft rustic triangular pennants painted in classic orange, yellow, and white hues strung on natural jute twine.
Detailed Instructions
Materials
- White air-dry clay
- Rolling pin
- Clay knife or craft knife
- Ruler
- Sandpaper (fine grit)
- Acrylic paint (Deep Orange, Golden Yellow, White)
- Small flat paintbrush
- Painter’s tape or masking tape
- Jute twine or hemp cord
- Toothpick or skewer
- Clear matte sealant (optional)
Step 1: Shaping the Clay
-
Roll the slab:
Begin by kneading your air-dry clay until it is soft and pliable. Roll it out on a smooth, non-stick surface until you have an even slab that is approximately 1/4 inch thick. -
Cut a master triangle:
Create a paper template for your candy corn shape—an isosceles triangle about 2-3 inches tall works best. Place this on the clay and cut around it to make your first tile. -
Cut the remaining tiles:
Use your first clay triangle or the paper template to cut out the rest of your bunting flags. Aim for an odd number, perhaps seven or nine, to create a balanced look when hanging. -
Smooth the edges:
Dip your finger in a little bit of water and run it along the cut edges of each triangle to smooth out any roughness or sharp corners left by the knife. -
Create hanging holes:
Using a toothpick or a skewer, poke a hole through the top two corners of each triangle. Ensure the holes are large enough for your jute twine to pass through easily. -
Wiggle for clearance:
Give the toothpick a gentle wiggle inside each hole to make sure the opening is clean and won’t close up as the clay shrinks during drying. -
Allow to dry:
Lay the triangles flat on a wire rack or parchment paper. Let them dry completely according to your clay package instructions, usually 24-48 hours depending on humidity.
Smooth Operator
To prevent your clay triangles from curling up at the corners while drying, flip them over every few hours during the first day so both sides dry evenly.
Step 2: Painting and Assembly
-
Sand imperfections:
Once fully dry, lightly sand the edges and surface with fine-grit sandpaper if there are any bumps or uneven textures. -
Tape the tip:
To get crisp lines, apply a piece of painter’s tape across the bottom third of the triangle, covering the section that will become the white tip. -
Tape the top:
Place another strip of tape across the top third of the triangle, covering the area where the holes are. -
Paint the middle:
Paint the exposed middle section with your deep orange acrylic paint. Apply two thin coats for solid coverage, letting the first coat dry before adding the second. -
Remove tape:
Carefully peel off the tape while the paint is still slightly tacky to reveal clean edges. -
Paint the bottom tip:
Use a steady hand or re-tape the orange section once dry to paint the bottom tip white. I find using a small angle brush helps cut a straight line without needing more tape. -
Paint the top section:
Paint the top section with golden yellow paint, carefully working around the holes you created earlier. -
Seal (Optional):
If you want to protect your garland for future years, apply a coat of clear matte sealant over the dried paint. -
Measure the twine:
Cut a length of jute twine roughly 4 to 5 feet long, leaving plenty of extra length on the ends for tying. -
String the tiles:
Thread the twine through the holes from the front to the back, and then back out to the front. This ‘sewing’ motion helps the tiles sit flat against the wall. -
Adjust spacing:
Slide the candy corn tiles along the twine until they are evenly spaced, leaving a few inches between each one.
Spooky Variation
Swap the traditional orange and yellow for shades of purple, green, and black to create a “witch’s brew” color palette, or paint simple ghost faces on white triangles.
Hang your new garland on a mantel or shelf to celebrate the season with handmade flair
Bat Wall Dots and Mini Plaques
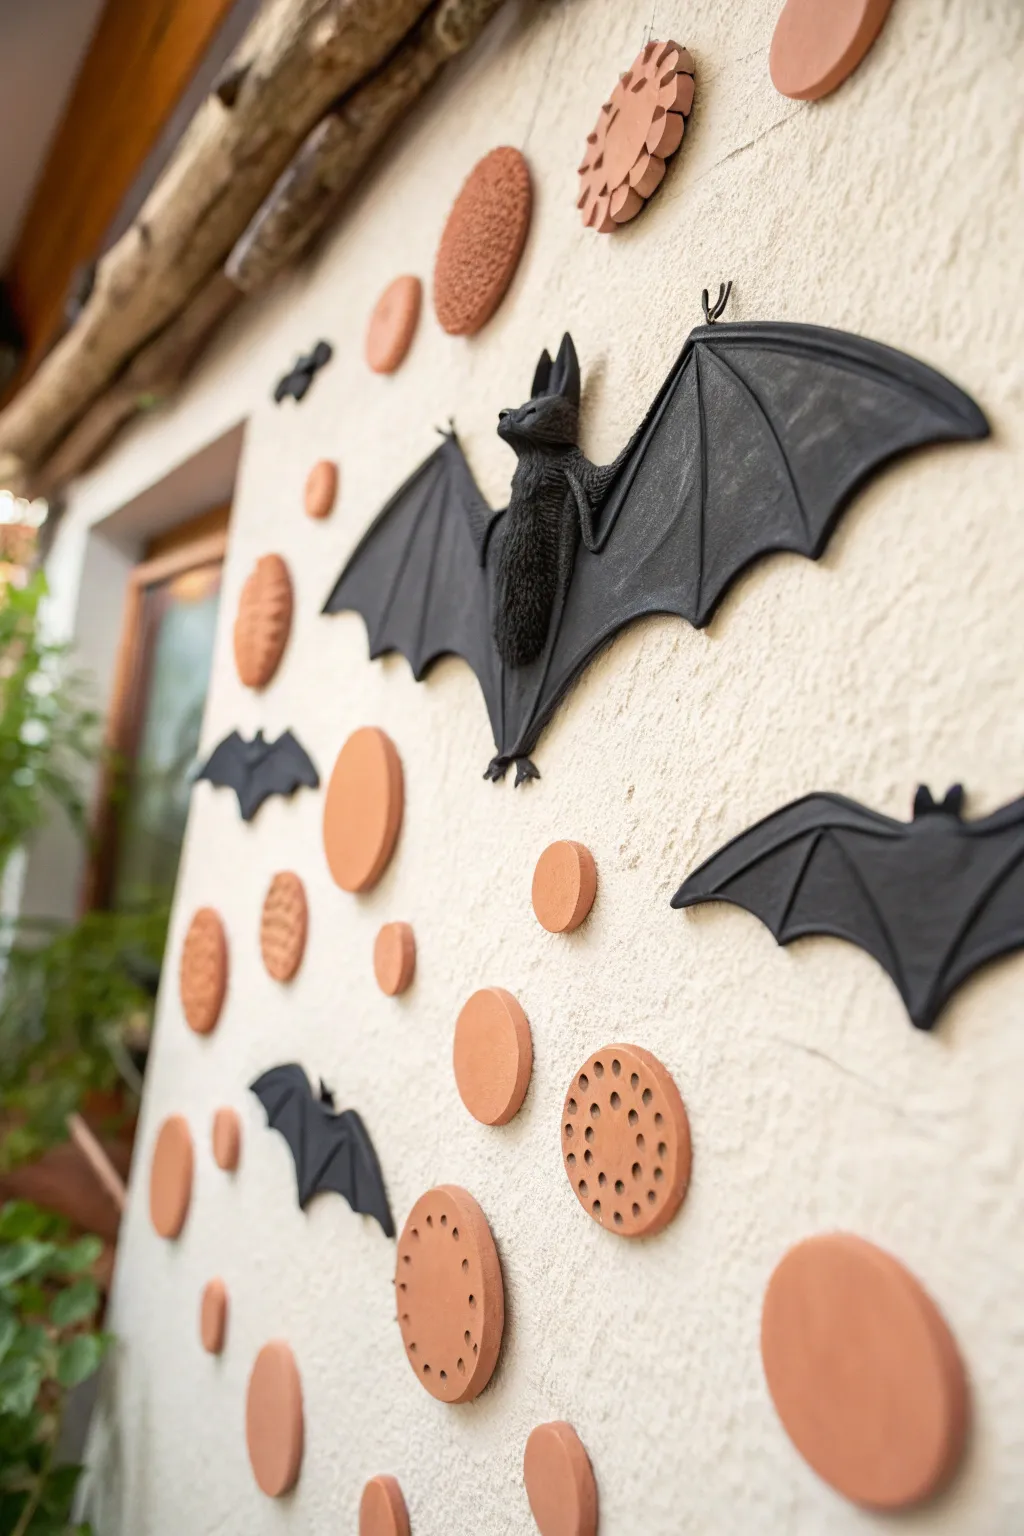
Transform a plain exterior or interior wall into a subtly spooky scene with these handcrafted clay bats and decorative terracotta dots. The mix of highly detailed 3D bats and simpler silhouettes creates a dynamic, swarming effect that feels both artistic and festive.
Step-by-Step
Materials
- Air dry clay (terracotta color)
- Air dry clay (black or grey, paintable)
- Acrylic paint (matte black)
- Small rolling pin
- Clay sculpting tools (needle tool, ball stylus)
- Texture tools (sponges, stamps, or rough fabric)
- Bat wing cookie cutter (optional)
- Craft knife
- Parchment paper
- Small stiff-bristled brush
- Fine-grit sandpaper
- Strong outdoor mounting tape or adhesive strips
Step 1: Creating the Terracotta Dots
-
Roll the base:
Begin by taking a chunk of terracotta-colored air clay. Knead it until pliable, then roll it out on parchment paper to an even thickness of about 1/4 inch. -
Cut the shapes:
Use various circle cutters or household items like jar lids and glasses to cut out circles of mismatched sizes. You’ll want a mix of large, medium, and small dots for a natural look. -
Add basic texture:
For the plain dots shown in the image, you can leave them smooth or gently tap the surface with your finger to remove perfect smoothness. For the textured ones, use a coarse sponge to press down firmly, creating a pitted, stone-like surface. -
Create patterned dots:
For the decorative dots, use a ball stylus tool to press a grid or circular pattern of deep divots into the clay. Alternatively, find a patterned object to stamp a raised design into the surface. -
Smooth the edges:
Dip your finger in a little water and run it around the circumference of each circle to smooth down any sharp cutting ridges.
Natural Texture
To get the pitted texture on the terracotta dots, press a crumpled ball of aluminum foil into the wet clay. It creates a perfect organic rock look.
Step 2: Sculpting the Bats
-
Make the silhouettes:
Roll out black clay about 1/4 inch thick. Sketch a simple bat outline with a needle tool or use a cookie cutter for uniformity. The silhouette bats should be mostly flat with minimal detail. -
Start the main bat:
For the large, detailed focal bat, form a thick oval of clay for the body and a smaller teardrop shape for the head. Press these together securely. -
Details on the body:
Use a stiff brush or a needle tool to create short, quick strokes all over the body clay, simulating the texture of fur. -
Form the ears:
Pinch two small triangles of clay and attach them to the top of the head. Use a small modeling tool to hollow out the insides for depth. -
Structure the wings:
Roll out two large, thin sheets of clay for the wings. Cut them into a scalloped wing shape. Before attaching, I like to use a modeling tool to press lines radiating from the body to the wing and tips, mimicking the bones. -
Attach wings to body:
Score (scratch) and add a dab of water to the sides of the body where the wings attach. Press the wings firmly onto the body, blending the clay at the seam so it is invisible. -
Add dimension:
Gently lift the wings and place small crumpled balls of foil or paper towels underneath them while they dry. This ensures they dry in a dynamic ‘flying’ pose rather than flat against the table.
Glow in the Dark
Paint the recessed dots or the bat eyes with glow-in-the-dark paint. They’ll look normal by day but create an eerie floating effect at night.
Step 3: Finishing and Mounting
-
Patience is key:
Allow all pieces to dry completely. This can take 24 to 48 hours depending on thickness. Flip them over halfway through the process to ensure the backs dry evenly. -
Sand imperfections:
Once fully hard, use fine-grit sandpaper to smooth out any rough edges on the bat silhouettes or the rims of the dots. -
Paint the bats:
Even if you used black clay, giving the bats a coat of matte black acrylic paint unifies the look and covers any clay residue or fingerprints. -
Seal the work:
If these are going outdoors or in a humid area, apply a clear matte spray sealant to protect the clay from moisture absorption. -
Plan the layout:
Lay your pieces out on the floor first to find a pleasing arrangement. Group the dots and bats loosely, letting them ‘flow’ diagonally across the space. -
Mount to wall:
Apply strong mounting tape or removable adhesive strips to the back of each piece. Press firmly onto the wall surface to secure your spooky installation.
Step back and admire your uniquely textured wall art that balances elegance with Halloween spirit

TRACK YOUR CERAMIC JOURNEY
Capture glaze tests, firing details, and creative progress—all in one simple printable. Make your projects easier to repeat and improve.
Witch Hat Ring Cones
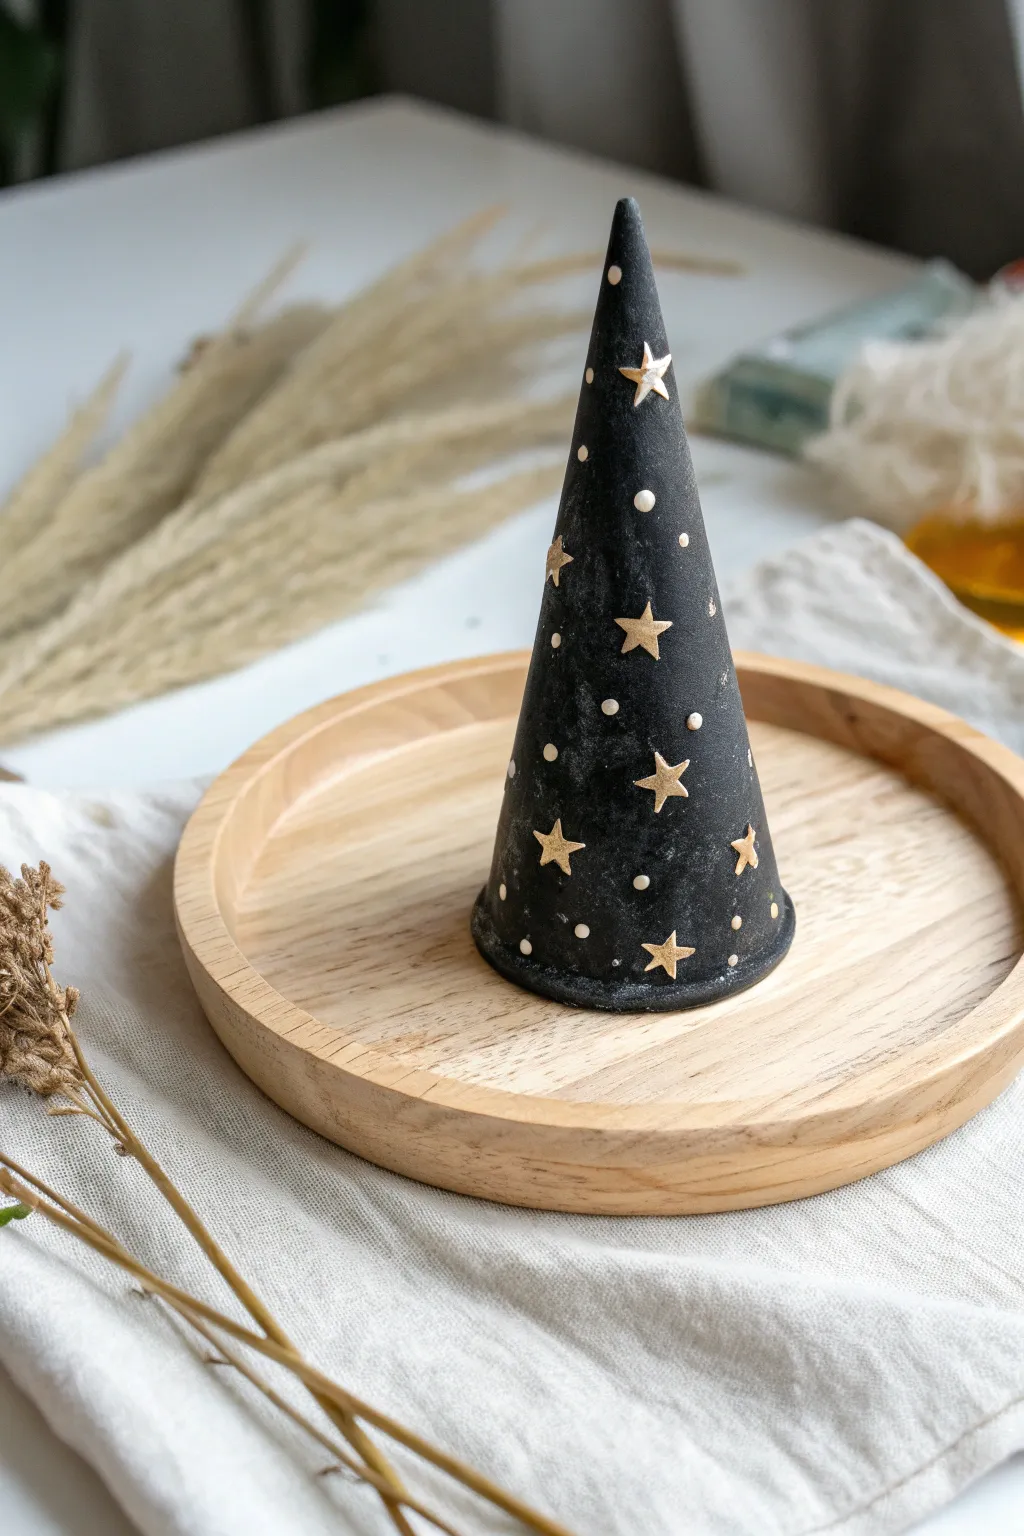
Transform a simple cone of air dry clay into a magical, night-sky inspired jewelry holder. This sleek black witch hat is adorned with metallic gold stars and tiny speckles, making it the perfect mystical accessory for your vanity.
Step-by-Step Tutorial
Materials
- Black air dry clay (or white clay painted black)
- Acrylic paint: Black (matte), Metallic Gold, White
- Rolling pin
- Craft knife or clay cutting tool
- Small paintbrush (fine tip)
- Dotting tool or toothpick
- Water cup
- Sandpaper (fine grit)
- Matte varnish or sealant
Step 1: Shaping the Cone
-
Condition the Clay:
Start by taking a handful of air dry clay and kneading it in your hands until it becomes soft, pliable, and free of cracks. If you are using black clay, this saves a painting step later, but white works perfectly too. -
Form the Base Shape:
Roll the clay into a smooth ball first to eliminate air bubbles, then begin rolling it back and forth on your work surface, applying more pressure to one side to create a tapered cone shape. -
Refine the Cone:
Stand the cone upright on your flat surface. Gently press the base down to flatten it so it stands stable. Use your fingers to smooth the sides upward, creating a sharp, defined point at the top. -
Smooth the Surface:
Dip your finger in a little water and run it over the clay to smooth out any fingerprints or bumps. You want the surface to be sleek and even like the photo. -
Create the Brim (Optional):
The cone in the image serves as the hat itself, but if you want a slight brim effect at the bottom, you can gently flare the very bottom edge outward with your thumb. For this specific look, keep the bottom edge crisp and clean. -
Check Stability:
Before setting it aside, give the cone a little nudge to ensure it doesn’t wobble. If the base isn’t perfectly flat, press it gently onto the table again. -
Let it Dry:
Allow the cone to dry completely for 24-48 hours. Drying time depends on the clay thickness and humidity. I like to rotate it occasionally so the bottom dries evenly.
Star Shape struggles?
If painting freehand stars is tricky, use a tiny star-shaped stamp or a stencil. Even a gold paint marker can offer more control than a brush for sharp points.
Step 2: Painting and Decoration
-
Sand Imperfections:
Once fully dry, take a fine grit sandpaper and lightly sand the surface to remove any rough texture or remaining bumps. -
Base Coat:
If you used white clay, paint the entire cone with two coats of matte black acrylic paint. Let the first coat dry completely before adding the second for opaque coverage. -
Draft the Stars:
Lightly mark where you want your stars to go with a pencil or white chalk. Looking at the reference, stagger them randomly around the cone rather than in straight lines. -
Paint the Stars:
Using your finest detail brush and metallic gold paint, carefully paint five-pointed stars over your marks. Start with a simple ‘V’ shape for the top point and extend the arms out. -
Refine the Star Shapes:
Go back over your stars to sharpen the points. The gold paint might need a second layer to really pop against the black background. -
Add Star Dots:
Dip a dotting tool or the head of a pin into the gold paint and add tiny gold dots randomly between the stars to mimic distant planets. -
Add White Accents:
Clean your dotting tool and dip it into white paint. Add slightly larger white dots scattered among the gold ones to create depth and variety in your starry sky pattern. -
Protect the Finish:
Once all paint is thoroughly dry, apply a thin layer of matte varnish. This protects the clay from moisture and gives the cone a finished, profressional look without making it too shiny.
Make it Shine
Embed tiny rhinestones or crystals into the wet clay instead of painted dots for real sparkle. Or, mix glitter into your varnish for a shimmery finish.
Your mystical ring cone is now ready to hold your treasures and add a touch of magic to your space
Black Cat Mini Figures
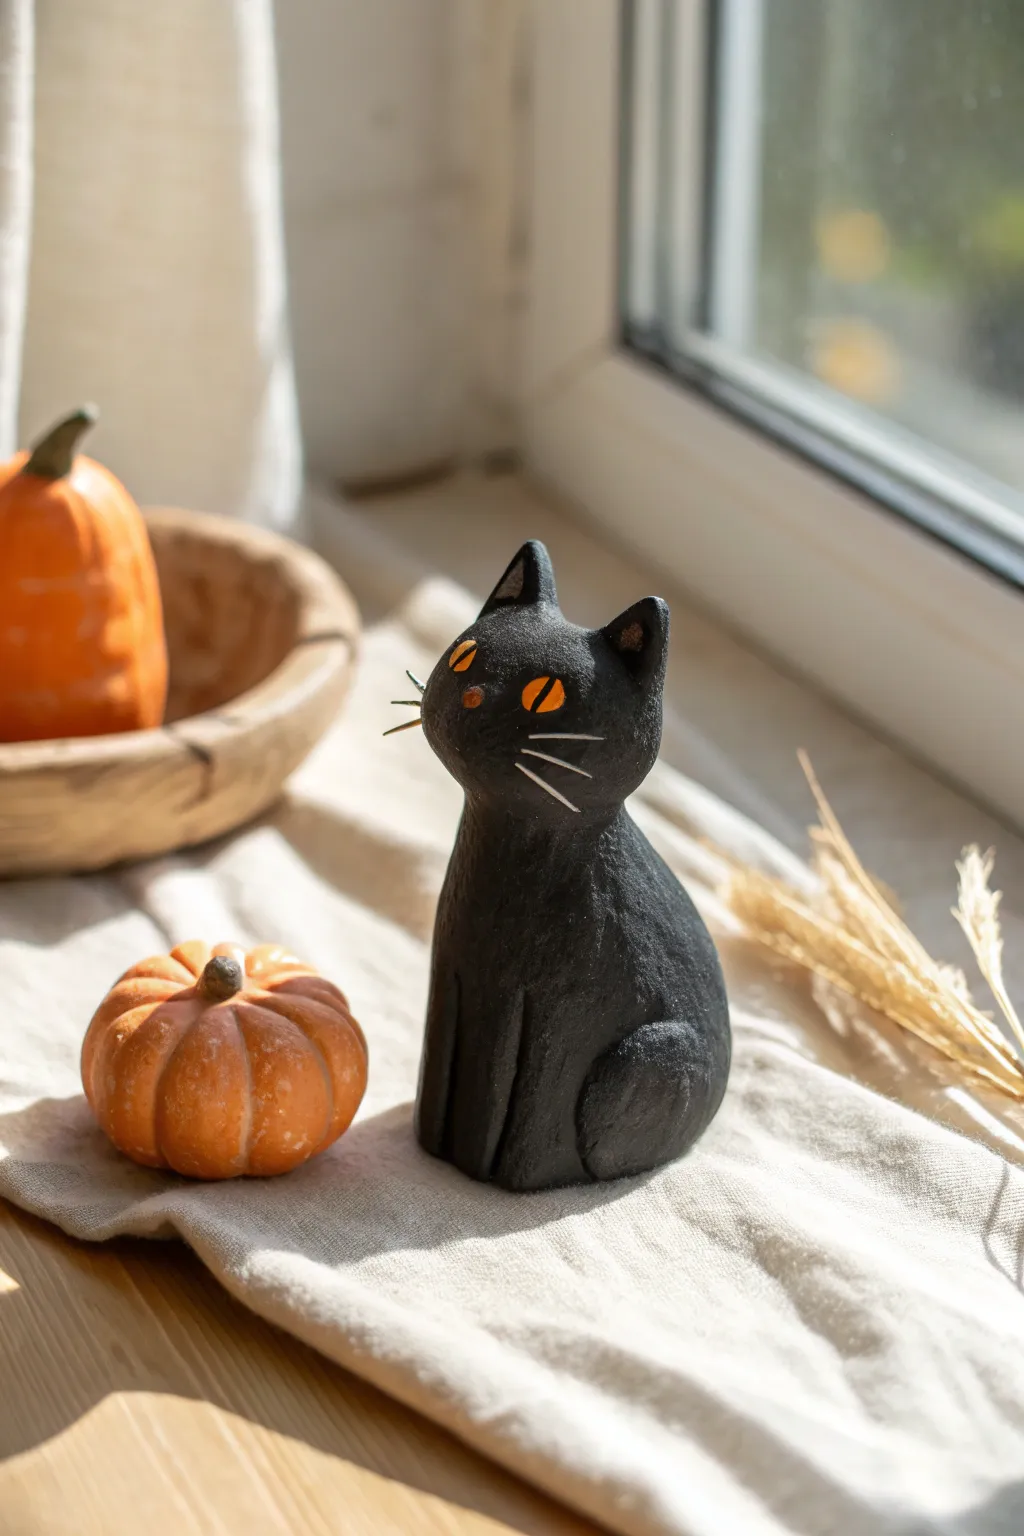
This charming, folk-art style black cat is the perfect subtle Halloween decoration for windowsills or mantles. With its bright orange eyes and simple whiskers, it captures a curious feline expression without being too scary.
Detailed Instructions
Materials
- Black air-dry clay (or white clay painted black)
- Acrylic paints: Orange, Black, White
- Fine detail paintbrush
- Modeling tools (or a toothpick)
- Water cup
- Matte sealant or varnish
Step 1: Sculpting the Body
-
Form the base:
Start by rolling a ball of clay roughly the size of a tangerine. Gently roll it against your work surface to elongate it into a teardrop or pear shape. -
Flatten the bottom:
Press the wider end of your pear shape onto the table to create a flat, stable base so your cat sits upright without wobbling. -
Define the neck:
About two-thirds of the way up the shape, gently pinch and smooth the clay to create a subtle narrowing, distinguishing the head from the body without separating them completely. -
Shape the head:
Smooth the top portion into a rounded dome shape. Use your thumb to softly flatten the front face area just a little, giving the cat a distinct profile.
Cracks Appearing?
If you see small cracks forming while drying, mix a tiny bit of fresh clay with water to make a paste and fill them in immediately.
Step 2: Adding Details
-
Make the ears:
Pinch two small triangles of clay from your leftover supply. Attach them to the top of the head using a tiny bit of water to bond the clay together. -
Blend the seams:
Use a modeling tool or your finger to smooth the base of the ears into the head so they look seamless and firmly attached. -
Create the front legs:
Roll a thin snake of clay and cut two equal lengths. Attach these vertically to the front of the chest, blending the top edges into the body to suggest front legs. -
Add the haunch:
Roll a small ball and flatten it slightly into a disc. Attach this to the lower side of the body to create the rounded look of a back leg or haunch in a sitting position. -
Sculpt the tail:
Roll a tapered coil for the tail. Wrap it gently around the base of the cat’s body, blending the starting point so it looks natural. -
Dry completely:
Set your cat aside in a dry, ventilated area. Air-dry clay can take 24-48 hours to fully cure depending on thickness.
Step 3: Painting & Finishing
-
Base coat:
If you used white clay, paint the entire figure with a matte black acrylic paint. You may need two coats for full, opaque coverage. -
Paint the eyes:
Using a fine detail brush, paint two slanted, almond-shaped eyes in bright orange. I find it helpful to mark the spots with a pencil first to ensure they are even. -
Detail the nose:
Add a tiny speck of pink or light brown paint just below the eyes for a cute nose. -
Pupils:
Once the orange paint is dry, careful paint thin vertical slits using black paint to create the pupils. -
Whiskers:
With your finest brush or a white paint pen, draw three delicate lines radiating from each cheek area for whiskers. -
Ear details:
Add a small touch of lighter grey or brown inside the ears to give them a little depth. -
Seal the work:
Finish by applying a matte varnish over the entire piece to protect the paint and give the clay a finished, professional look.
Texture Twist
Before the clay dries, gently dab the surface with a stiff toothbrush to give the cat a fuzzy, fur-like texture instead of being smooth.
Place your finished cat near a pumpkin or autumn leaves to complete the cozy scene
Skeleton Hand Trinket Dish
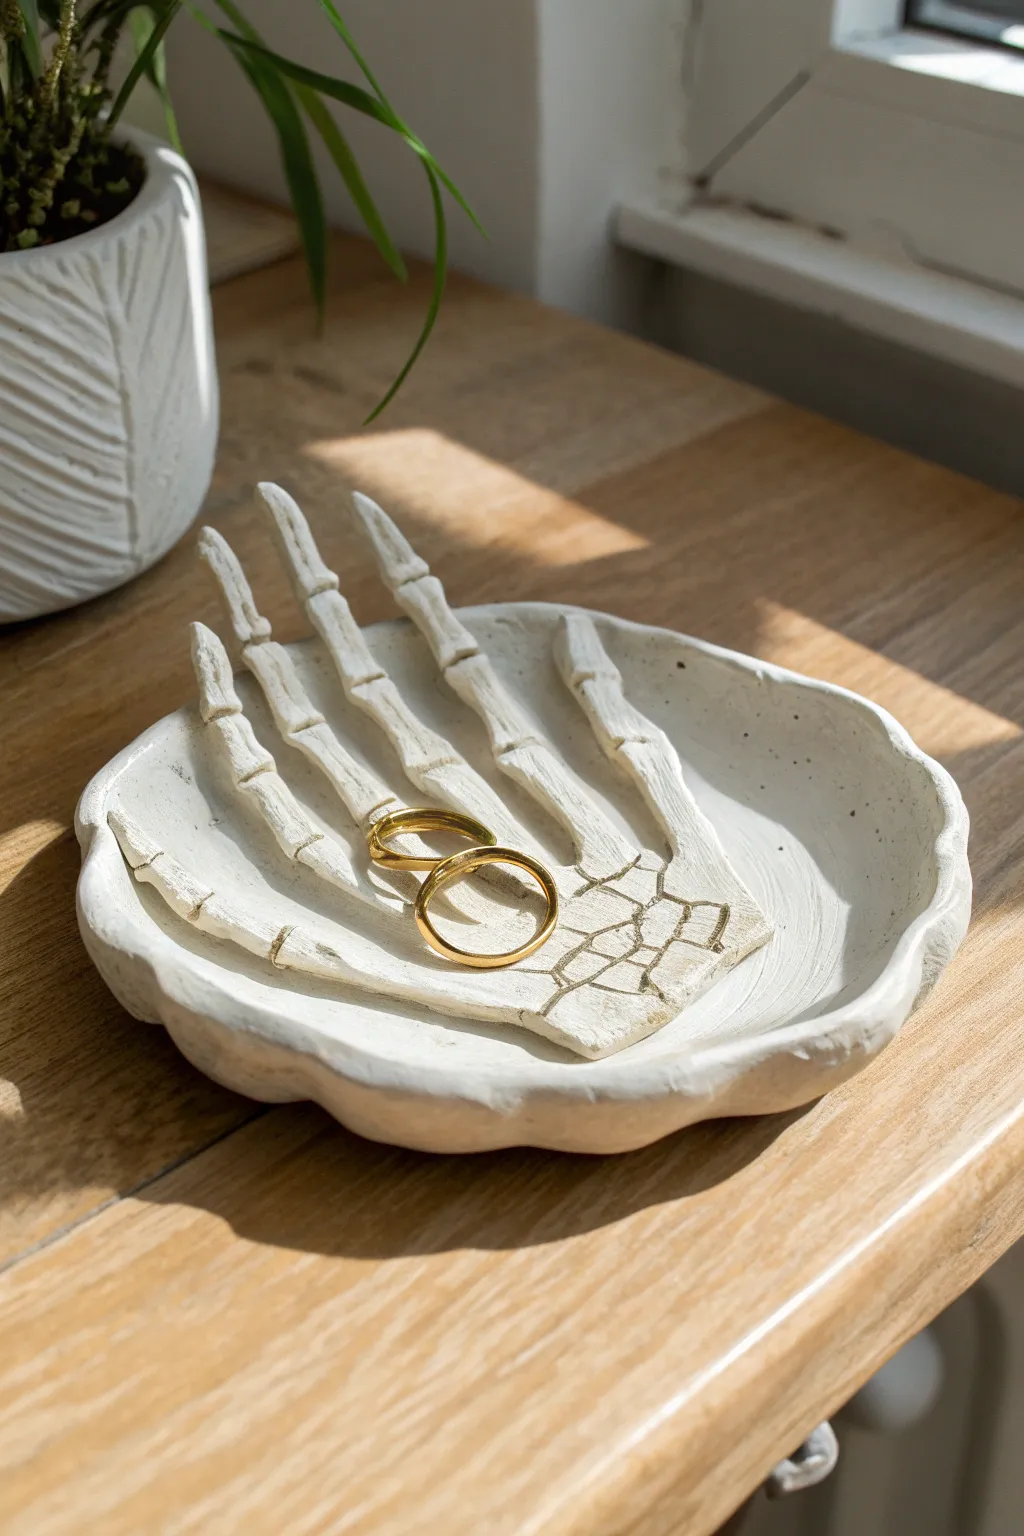
This elegant yet eerie jewelry holder combines functional decor with Halloween spirit, featuring a sculpted skeletal hand resting inside a shallow organic bowl. The matte white finish keeps it sophisticated enough for year-round display while perfectly cradling your favorite rings.
Step-by-Step Tutorial
Materials
- White polymer clay or high-quality air dry clay
- Rolling pin or smooth glass jar
- Precision craft knife or scalpel
- Needle sculpting tool or toothpick
- Small bowl (to use as a mold)
- Parchment paper or non-stick craft mat
- Sandpaper (fine grit)
- Water (for smoothing)
- Gold acrylic paint (optional for detailing)
- Small round paintbrush
- Clear matte varnish or sealant
Step 1: Sculpting the Base Dish
-
Condition the clay:
Begin by kneading a fist-sized ball of white clay in your hands until it becomes warm, pliable, and free of cracks. -
Roll the slab:
Place the clay on parchment paper and roll it out evenly to a thickness of about 1/4 inch (6mm). Aim for a generally circular shape, though it doesn’t need to be perfect. -
Form the organic edge:
By hand, gently pinch and lift the borders of your circle to create a raised rim. I like to keep this slightly uneven and wavy to give it a handmade, organic feel rather than a perfect factory look. -
Smooth the surface:
Dip your finger in a tiny bit of water and run it over the clay to smooth out any fingerprints or cracks on the dish’s surface.
Preventing Cracks
If you see cracks forming while drying, smooth a small amount of water-thinned clay (slip) into the fissure with your finger, then let dry slowly away from direct heat.
Step 2: Creating the Skeleton Hand
-
Draft the hand shape:
Roll out a second, smaller slab of clay to the same thickness. Lightly sketch a hand skeleton shape onto the clay surface using a toothpick or needle tool as a guide. -
Cut the silhouette:
Using your craft knife, carefully cut out the entire hand shape. Separate the fingers slightly so they look splayed and natural. -
Refine the bones:
Use your fingers to round off the sharp cut edges of the ‘bones’. Gently squeeze the clay at the joints (knuckles) to make them slightly wider than the phalanges. -
Add bone details:
Press horizontal indentations into the fingers at the joint locations using your needle tool or the back of a knife to distinguish the different bone segments. -
Carve the wrist:
On the palm/wrist area, lightly carve geometric shapes to represent the carpal bones. You don’t need anatomical perfection here; just the suggestion of clustered bones works well.
Gilded Touch
For a luxe look, paint the rim of the bowl or just the finger joints with metallic gold leaf paint. It adds a stunning contrast to the matte white bone.
Step 3: Assembly and Finishing
-
Attach the hand:
Score the back of the skeleton hand and the center of the dish with a needle tool (making cross-hatch scratches). Add a dab of water or liquid clay to act as glue. -
Positioning:
Press the hand firmly onto the center of the dish. You can curve the fingers slightly upwards to give the piece more dimension and make it better at holding rings. -
Final smoothing:
Do one last inspection for cracks or rough edges, smoothing them away with a damp finger or a soft brush. -
Drying:
Allow the piece to dry completely. For air dry clay, this usually takes 24-48 hours. Turn it over halfway through if possible to ensure the bottom dries evenly. -
Sanding:
Once fully cured, gently sand any sharp edges or rough spots on the rim and the finger tips for a professional finish. -
Highlighting (Optional):
To mimic the image’s subtle detail, you can lightly brush a very diluted wash of grey or beige paint into the carved wrist lines, then wipe the surface clean, leaving color only in the crevices. -
Sealing:
Apply two thin coats of clear matte varnish to protect the clay from moisture and stains, allowing the first coat to dry before adding the second.
Once sealed and dry, your skeletal creation is ready to haunt your vanity while keeping your treasures safe
Mini Skull Ring Dish

This minimalist skull ring dish combines eerie charm with practical storage for your favorite jewelry. Modeled from air-dry clay, it mimics the look of high-end unglazed porcelain or carved stone, making it a sophisticated addition to your Halloween decor or year-round vanity.
Step-by-Step
Materials
- White air-dry clay (smooth formula)
- Small bowl or saucer (for use as a mold)
- Aluminum foil
- Rolling pin
- Clay carving tools (needle tool, small loop tool)
- Knife or scalpel
- Small sponge
- Water cups
- Fine-grit sandpaper (220 and 400 grit)
- Watered-down black acrylic paint (optional for wash)
- Matte varnish or sealant
Step 1: Shaping the Base
-
Roll the clay:
Begin by conditioning a chunk of white air-dry clay until it is soft and pliable. Roll it out into a smooth slab about 1/4 inch thick, ensuring even thickness throughout. -
Cut the circle:
Place your small bowl or saucer upside down on the clay slab. Use your knife or needle tool to trace and cut out a perfect circle. -
Form the dish:
Lift the clay circle and gently press it into the inside of your bowl mold to create a curved shape. Smooth the edges with a damp finger to get rid of any sharp cuts.
Step 2: Sculpting the Skull
-
Create the armature:
Crumple a piece of aluminum foil into a tight ball, shaping it roughly like a slightly flattened egg. This will serve as the core of the skull to save clay and reduce weight. -
Cover with clay:
Roll out a thin sheet of clay and wrap it completely around the foil armature. Smooth the seams together with a bit of water until you have a seamless egg shape. -
Define the jaw:
Pinch the lower third of the shape to define where the jaw and cheekbones will be. Add two small balls of clay to the sides to build up the cheekbone structure. -
Hollow the eyes:
Use your thumbs or a large ball tool to press deep indentations where the eye sockets will go. They should be large and slightly teardrop-shaped, sloping downwards. -
Form the nose:
Press a small triangular indentation between the eyes. Use a needle tool to refine the nasal cavity shape, splitting it slightly at the bottom for realism. -
Sculpt the teeth:
Roll a very thin coil of clay and press it onto the jaw area. Use a knife tool to vertically score lines, creating individual teeth. Gently round off the top and bottom of each tooth for a natural look. -
Attach to the dish:
Score the bottom of the skull and the center of your clay dish (which is still in the mold). Apply a little water or slip (clay mixed with water) and press the skull firmly into the center of the dish. -
Integrate the seam:
Use a modeling tool to smooth the clay where the skull meets the dish, blending them so they look like one solid piece of stone.
Smooth Operator
Keep a small cup of water nearby while sculpting. Frequently dip your finger in and lightly rub the clay to erase hairline cracks immediately before they dry.
Step 3: Finishing Touches
-
Slow drying:
Let the project dry slowly away from direct sunlight or heat sources. This usually takes 24-48 hours. I find turning it occasionally helps it dry evenly. -
Remove from mold:
Once the exposed clay feels dry to the touch, carefully pop it out of the bowl mold. Continue letting it dry until it is completely white. -
Refining the surface:
Take 220 grit sandpaper and gently sand the entire surface to remove fingerprints and bumps. Follow up with 400 grit for a silky smooth finish. -
Clean up dust:
Wipe the entire piece down with a barely damp sponge or cloth to remove all sanding dust. -
Optional weathering:
To get the look in the photo, mix a tiny drop of black paint into a cup of water. Brush this wash over the skull, let it sit for a few seconds, and wipe it off with a paper towel. The dark pigment will stick in the crevices of the teeth and eyes. -
Seal the piece:
Finish by applying a coat of matte varnish. This seals the clay and protects it from scratches while maintaining that stone-like texture.
Glow Up
Before the clay dries, push tiny rhinestone gems into the eye sockets for a glam look, or paint the inside of the dish with gold leaf after sealing.
Place your new spooky creation on your dresser and handle it gently as it cures fully over the next week
Haunted House Luminary
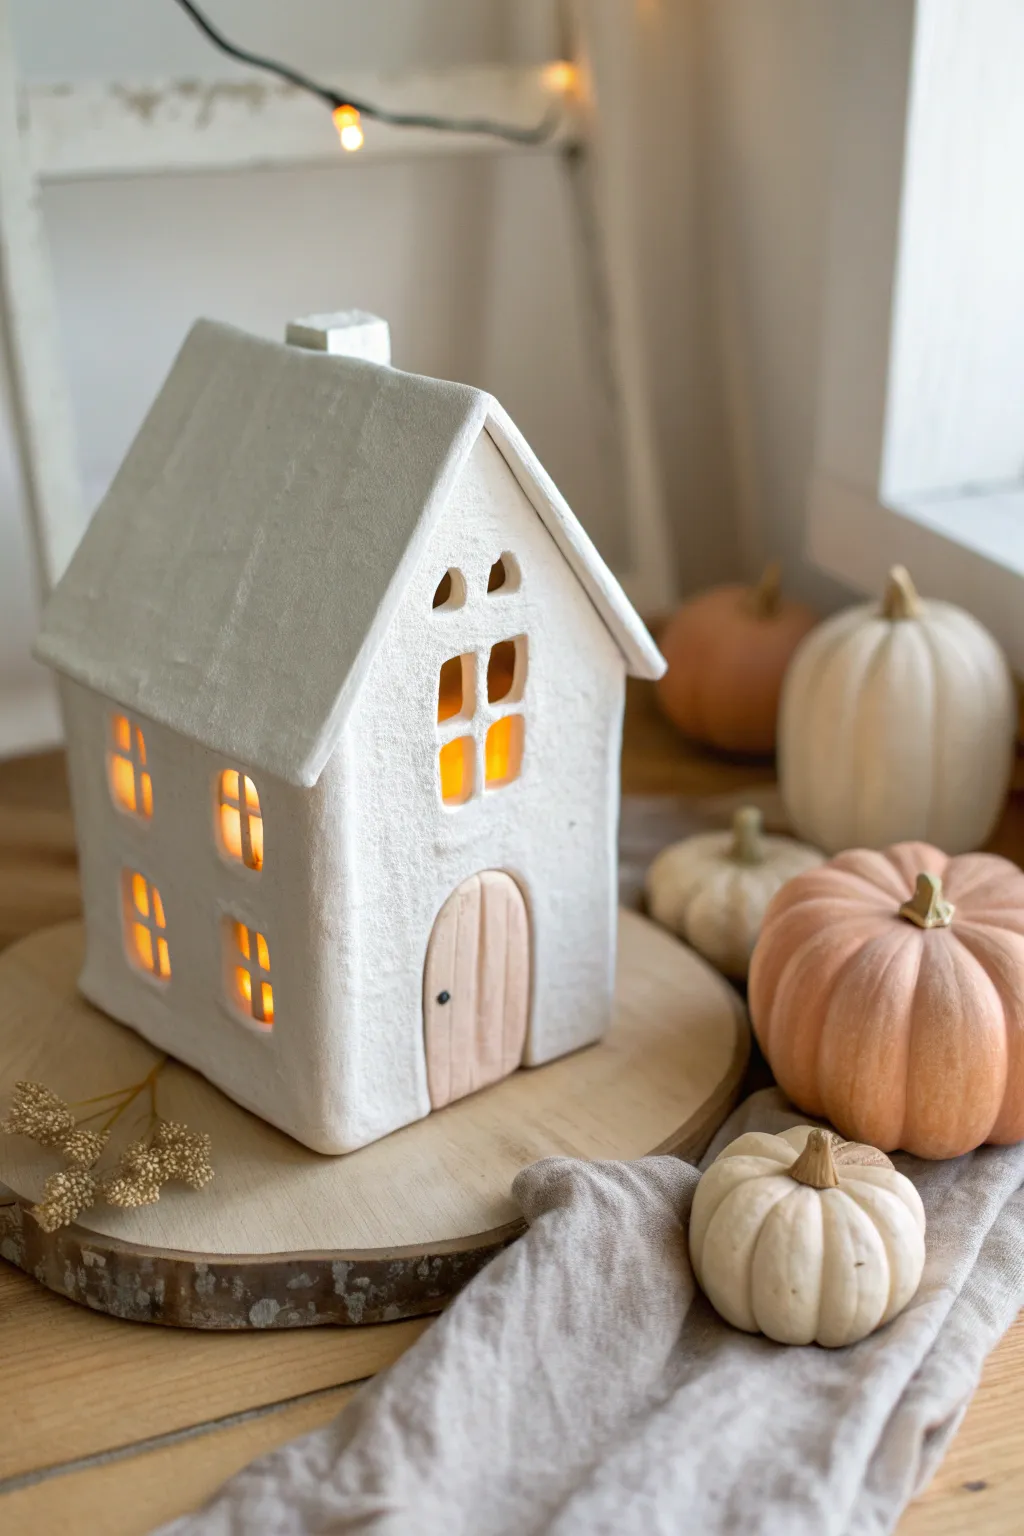
Transform simple air-dry clay into a charming, minimalist haunted house luminary that glows warmly from within. This project features a delightful textured white finish and arched windows that cast inviting shadows when lit.
How-To Guide
Materials
- White creative paperclay or air-dry clay (approx. 1-1.5 lbs)
- Rolling pin
- Parchment paper or craft mat
- Craft knife or scalpel (X-Acto)
- Ruler
- Cardboard or cardstock (for templates)
- Clay slip (clay mixed with water) or clay glue
- Small cup of water
- Sanding sponge or fine-grit sandpaper
- White acrylic paint (matte)
- Soft flat paintbrush
- Pale beige or wood-tone acrylic paint (for the door)
- Black fine-tip marker or tiny dot of black paint
Step 1: Planning and Cutting
-
Create templates:
Begin by sketching your house panels on cardstock. You’ll need two pointed pentagon shapes for the front and back walls (approx. 6 inches tall) and two rectangles for the side walls (approx. 4 inches tall). Cut these out to use as guides. -
Create roof templates:
Cut two rectangle templates for the roof panels. These should be wider than your side walls to create an overhang and long enough to meet at the peak. -
Roll the clay:
Roll out your air-dry clay on a piece of parchment paper to an even thickness of about 1/4 inch. If you want that lovely organic texture seen in the photo, don’t smooth it too perfectly. -
Cut the walls:
Place your wall templates onto the clay slab and cut around them cleanly using your craft knife. Remove the excess clay and set it aside. -
Add windows and door:
While the walls are flat, carefully cut out the window shapes. For the front, cut a larger arched window opening (creating a four-pane look) and smaller arched windows near the peak. Cut simple rectangular or arched windows for the sides. -
Form the door:
Cut an arched door shape from a separate piece of clay. Use your knife to gently score vertical lines into it to mimic wooden planks, then set it aside to dry flat.
Texture Trick
To get that rustic stucco look, gently pat the wet clay with a crumbled ball of aluminum foil before cutting your shapes. It adds instant stone-like dimension.
Step 2: Assembly and Structure
-
Initial drying:
Let the wall panels dry flat for about an hour until they are leather-hard. They should be stiff enough to stand up but still slightly flexible. -
Score and slip:
Score (scratch cross-hatch marks) the vertical edges of your walls where they will connect. Apply a generous amount of clay slip or clay glue to these roughened areas. -
Construct the box:
Stand the walls up and press the corners together to form the house box. Reinforce the inside seams by smoothing a small coil of fresh clay into the corners. -
Attach the roof:
Once the walls are stable, cut and attach your roof panels using the same score-and-slip method. Ensure the peak joins securely; you might need to prop the overhangs with crumpled paper towels while it dries. -
Add the chimney:
Form a small rectangular cube of clay for the chimney. Score the bottom and attach it to the roof slope, smoothing the join so it looks seamless.
Step 3: Finishing Touches
-
Full dry:
Allow the entire structure to dry completely. This usually takes 24-48 hours depending on humidity. The clay will turn from grey to white and feel chalky when done. -
Sand and smooth:
Gently sand any sharp or jagged edges, especially around the window cutouts and roof corners. I find a sanding sponge works best for getting into the window curves. -
Paint the house:
Apply a coat of matte white acrylic paint over the entire house. Dab the paint on with a sponge or stipple it with a brush to enhance the stucco-like texture. -
Paint the door:
Paint the separate door piece with a watered-down beige or pale wood-tone paint to give it a soft, natural look. -
Install the door:
Once the paint is dry, glue the door onto the front wall. Add a tiny black dot for the doorknob using a fine-tip marker. -
Light it up:
Place a battery-operated tea light or LED string lights underneath the house to create that warm, spooky glow through the windows.
Color Pop
Instead of white, paint the house charcoal grey or black, and line the inside of the windows with yellow tissue paper for a truly spooky haunted mansion vibe.
Enjoy the gentle flickering glow of your handmade house as the autumn evenngs grow darker
Tiny Tombstone Place Markers
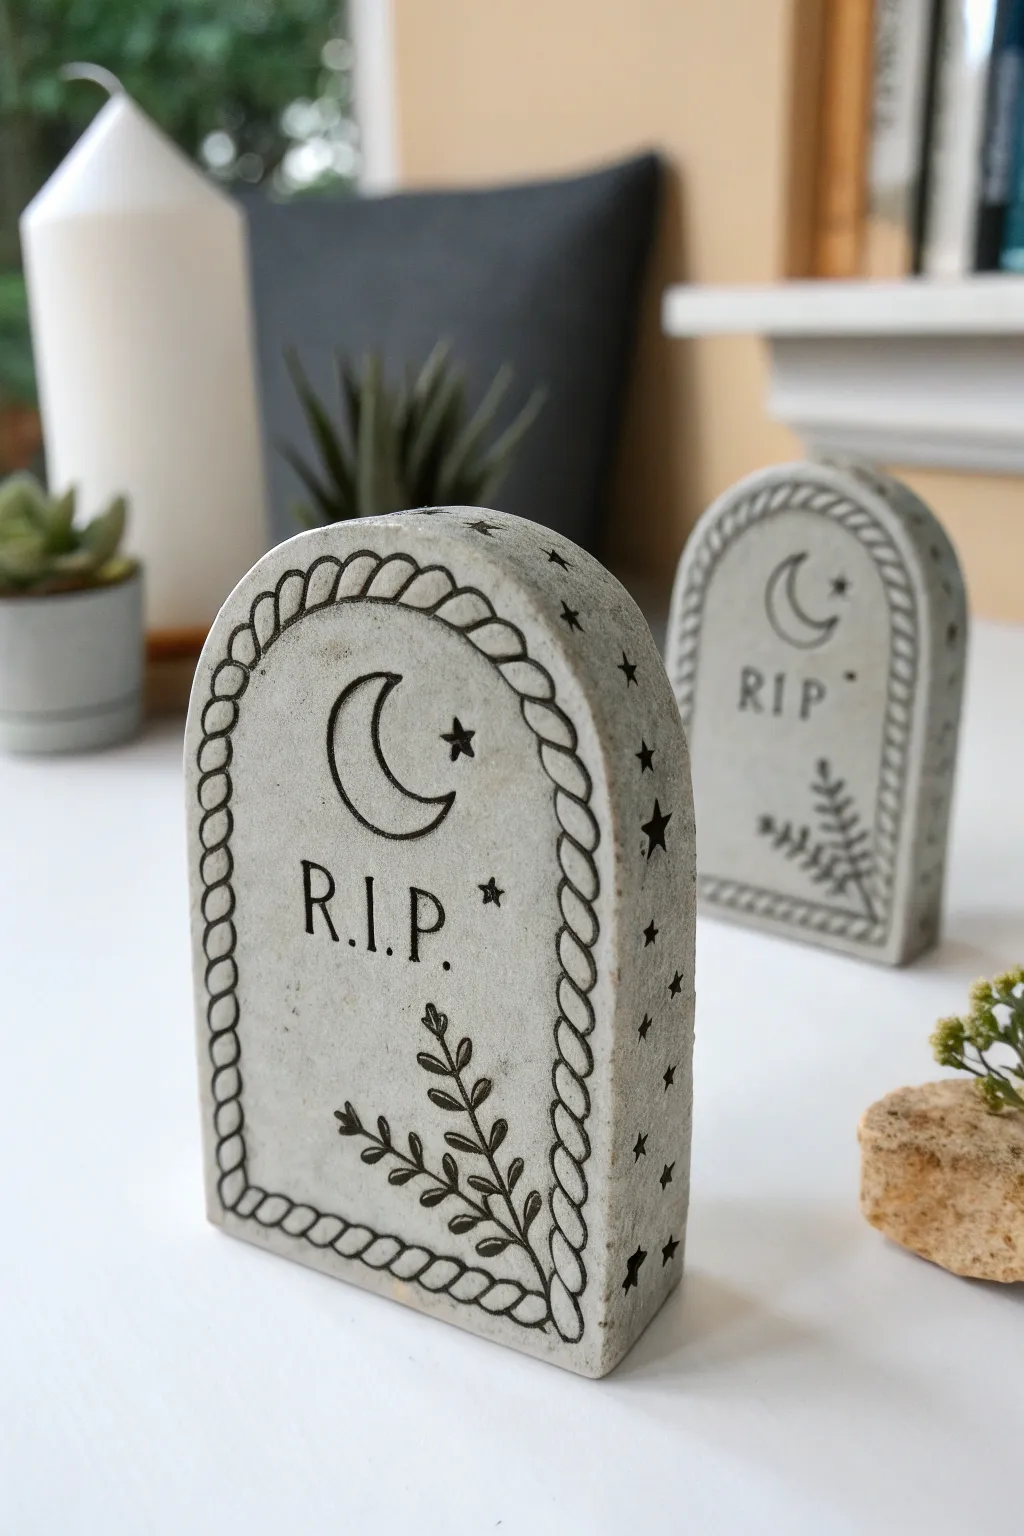
These miniature tombstones bring a touch of gothic charm to your Halloween table setting or mantle display. Crafted from air-dry clay, they feature crisp black line art and a faux-stone finish that belies their lightweight nature.
Step-by-Step Tutorial
Materials
- Light gray air-dry clay (or white clay mixed with a tiny drop of black paint)
- Rolling pin
- Arched cutter or template with craft knife
- Fine-grit sandpaper (around 220 or 400 grit)
- Fine-point black permanent marker or archival ink pen
- Pencil and eraser
- Small star-shaped stamps (optional)
- Matte sealant spray or varnish
Step 1: Shaping the Stones
-
Prepare the Clay:
Begin by conditioning your light gray air-dry clay. Knead it in your hands until it becomes soft, pliable, and free of cracks. If you are using white clay, this is the moment I like to knead in a speck of black acrylic paint to achieve that concrete-like hue. -
Roll Out:
Place the clay on a smooth, non-stick surface. Use your rolling pin to flatten the clay into an even slab. Aim for a thickness of about 3/4 inch (2 cm) so the tombstones are sturdy enough to stand upright on their own. -
Cut the Shape:
Press your arched cutter firmly into the clay slab. If you don’t have a specific cutter, create a simple paper template with a rounded top and straight sides, lay it on the clay, and carefully trace around it with a sharp craft knife. -
Smooth the Edges:
Dip your finger in a little water and gently run it along the cut edges of the fresh clay. This softens the sharp angles and removes any burrs left by the cutting tool. -
Add Side Detail:
While the clay is still soft, you can use a small star stamp to impress stars along the curved side edge of the tombstone, just like in the original design. Alternatively, use a toothpick to draw small stars. -
Check Stability:
Stand the tombstone up on your work surface to ensure the bottom is perfectly flat. If it wobbles, tap it gently on the table to flatten the base. -
Initial Drying:
Lay the pieces flat to dry. Flip them over every few hours to ensure even drying and prevent warping. Let them dry completely, which usually takes 24 to 48 hours depending on thickness and humidity.
Wobbly Tombstone?
If the base isn’t flat after drying, use coarse sandpaper to grind the bottom until it sits perfectly level on a flat surface.
Step 2: Refining and Drawing
-
Sand for Texture:
Once fully cured, the clay will be hard. Take your fine-grit sandpaper and lightly sand the front face. This not only smooths imperfections but also creates a slightly porous surface that grips ink better. -
Draft the Design:
Using a pencil with a light touch, sketch out the inner border. Leave a consistent margin around the edge—about 1/4 inch works well. -
Sketch the Icons:
Lightly draw a crescent moon near the top center and a small star next to it. Below that, center the letters ‘R.I.P.’ in a simple serif or sans-serif font. -
Add Botanical Elements:
Sketch a simple leafy branch curving up from the bottom right corner towards the center text. Keep the leaves simple ovals. -
Ink the rope Border:
Switch to your fine-point black marker. Follow your pencil guideline for the border, but instead of a straight line, draw a ‘rope’ pattern by making small diagonal hash marks or interconnected ‘S’ shapes. -
Outline Main Shapes:
Trace over your moon, star, and text pencil lines with steady, deliberate strokes. If the marker skips over the clay texture, go over the line a second time for solid opacity. -
Inking the Leaves:
Draw the central stem of your botanical branch first, then add the leaves. Don’t color them in completely; outline the leaves and add a single center vein line for a stylized look. -
Fill the Stars:
Go back to the stars on the face and the side edge. Color these in fully with black ink so they stand out as bold silhouettes. -
Clean Up:
Wait at least 15 minutes for the ink to dry completely. Gently erase any visible pencil marks, being careful not to smudge the fresh ink. -
Seal the piece:
Finish the project by applying a thin coat of matte spray varnish. This protects the clay from moisture and prevents the ink from fading over time.
Add an Aged Look
Dilute a drop of black paint in water and wash it over the hardened clay before inking. Wipe it off immediately to leave shadow in the pores.
Now you have a set of delightfully gloomy markers ready to haunt your home
Spiderweb Trinket Tray
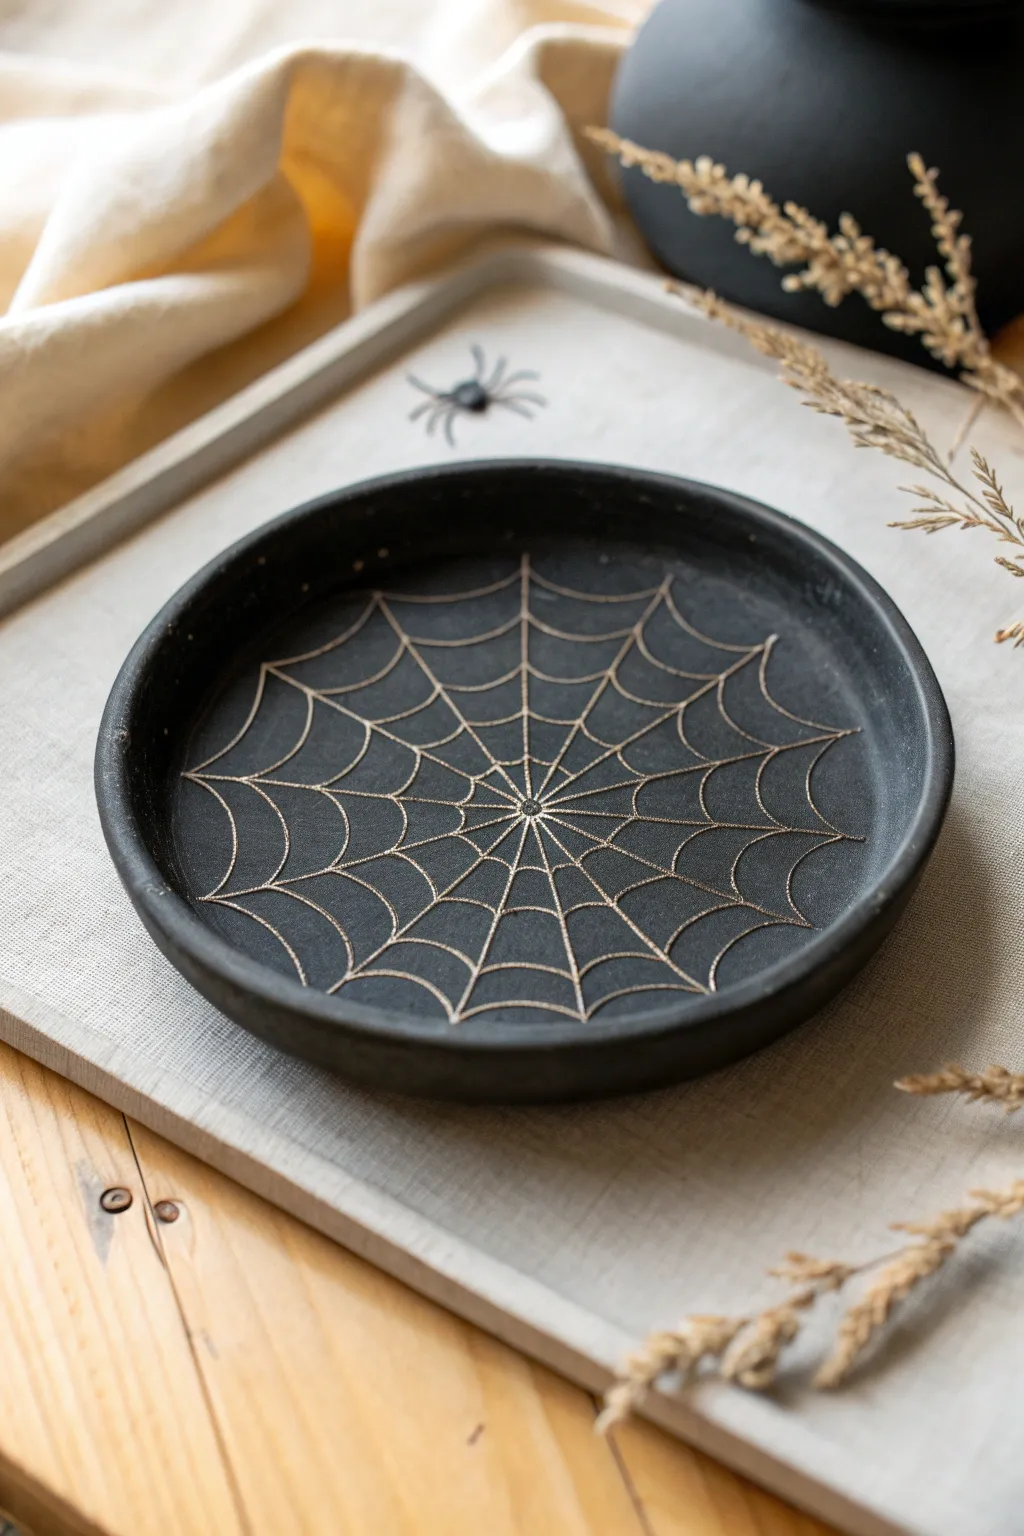
This elegant trinket tray combines minimalist design with festive flair, featuring a striking metallic spiderweb against matte black clay. It’s the perfect size for holding jewelry, keys, or simply adding a touch of witchy decor to your coffee table.
Step-by-Step
Materials
- Air-dry clay (white or grey)
- Acrylic rolling pin
- Rolling guides or wooden slats (approx. 1/4 inch thick)
- Circle cutter or a bowl to trace around (approx. 5-6 inches)
- Craft knife
- Small bowl of water
- Sponge or fingers for smoothing
- Fine grit sandpaper
- Matte black acrylic paint
- Flat paintbrush
- Gold or bronze metallic gel pen or ultra-fine paint marker
- Ruler
- Matte varnish or sealant (optional)
Step 1: Shaping the Clay Base
-
Condition the clay:
Begin by taking a generous handful of air-dry clay. Knead it in your hands for a minute or two until it is pliable, warm, and free of any cracks. -
Roll it out:
Place the clay on a smooth work surface or silicone mat. Using rolling guides on either side to ensure even thickness, roll the clay out until it is a uniform slab, roughly 1/4 inch thick. -
Cut the circle:
Place your circle cutter or an overturned bowl onto the clay slab. Press down firmly or trace around the bowl with a craft knife to create a perfect circle. -
Form the rim:
Instead of attaching a separate coil, gently pinch the edges of the circle upwards to create a raised rim. Work your way around the circumference slowly, using your thumb on the inside and fingers on the outside to shape a smooth, vertical wall about 1/2 inch high. -
Smooth the surfaces:
Dip your finger or a small sponge into water—just a tiny amount—and run it over the rim and the interior base. Smooth out any fingerprints, cracks, or uneven textures. I like to spend extra time here because a smooth surface mimics that ceramic look perfectly. -
Let it dry:
Place the tray in a dry, safe spot. Allow it to air dry completely for 24-48 hours. Flip it over halfway through the drying process to ensure the bottom dries evenly.
Step 2: Painting and Detailing
-
Sand imperfections:
Once the clay is fully dry and hard, take a piece of fine-grit sandpaper and gently sand the rim and any rough spots on the surface. Wipe away all clay dust with a damp cloth or dry brush. -
Apply base coat:
Load a flat paintbrush with matte black acrylic paint. Apply an even layer over the entire tray—inside, outside, and bottom. Let this layer dry fully. -
Second coat:
Apply a second coat of black paint to ensure opaque, solid coverage. Check for any streaky areas and touch them up. Allow the paint to cure completely before moving to the design. -
Mark the center:
Find the approximate center of your tray. You can make a tiny, barely visible dot with a pencil to guide your web design. -
Draw radial lines:
Using your gold metallic gel pen or extra-fine paint marker, draw straight lines radiating from the center dot out to the rim. Imagine a clock face and draw lines at 12, 6, 3, and 9, then fill in the spaces between them with two more lines each. -
Start the webbing:
Beginning near the center, draw scalloped or curved lines connecting the radial spokes. These little swoop shapes create the classic spiderweb look. Create a small ring of these swoops close to the center. -
Expand the web:
Move outward about half an inch and draw another ring of connecting swoops, following the curve of the first ring. Continue this process, spacing the rings evenly until you reach the edge of the tray base. -
Clean up edges:
If any lines look faint, carefully go over them a second time with the metallic pen to make the gold pop against the black background. -
Seal the tray:
To protect your paint job and the metallic ink, apply a thin layer of matte varnish or spray sealant. This step is optional but recommended if you plan to use the tray for keys or coins.
Use a Steady Hand
Rest your hand on a book or block next to the tray while drawing. This elevates your wrist and gives you better control for steady, straight lines.
Creepy Crawler Addition
Before the black paint dries, glue a small plastic spider to the rim or edge of the web, then paint over it in black for a subtle, embossed 3D effect.
Place your finished tray on a side table to catch your jewelry and admire your handiwork
Potion Bottle Bud Vases
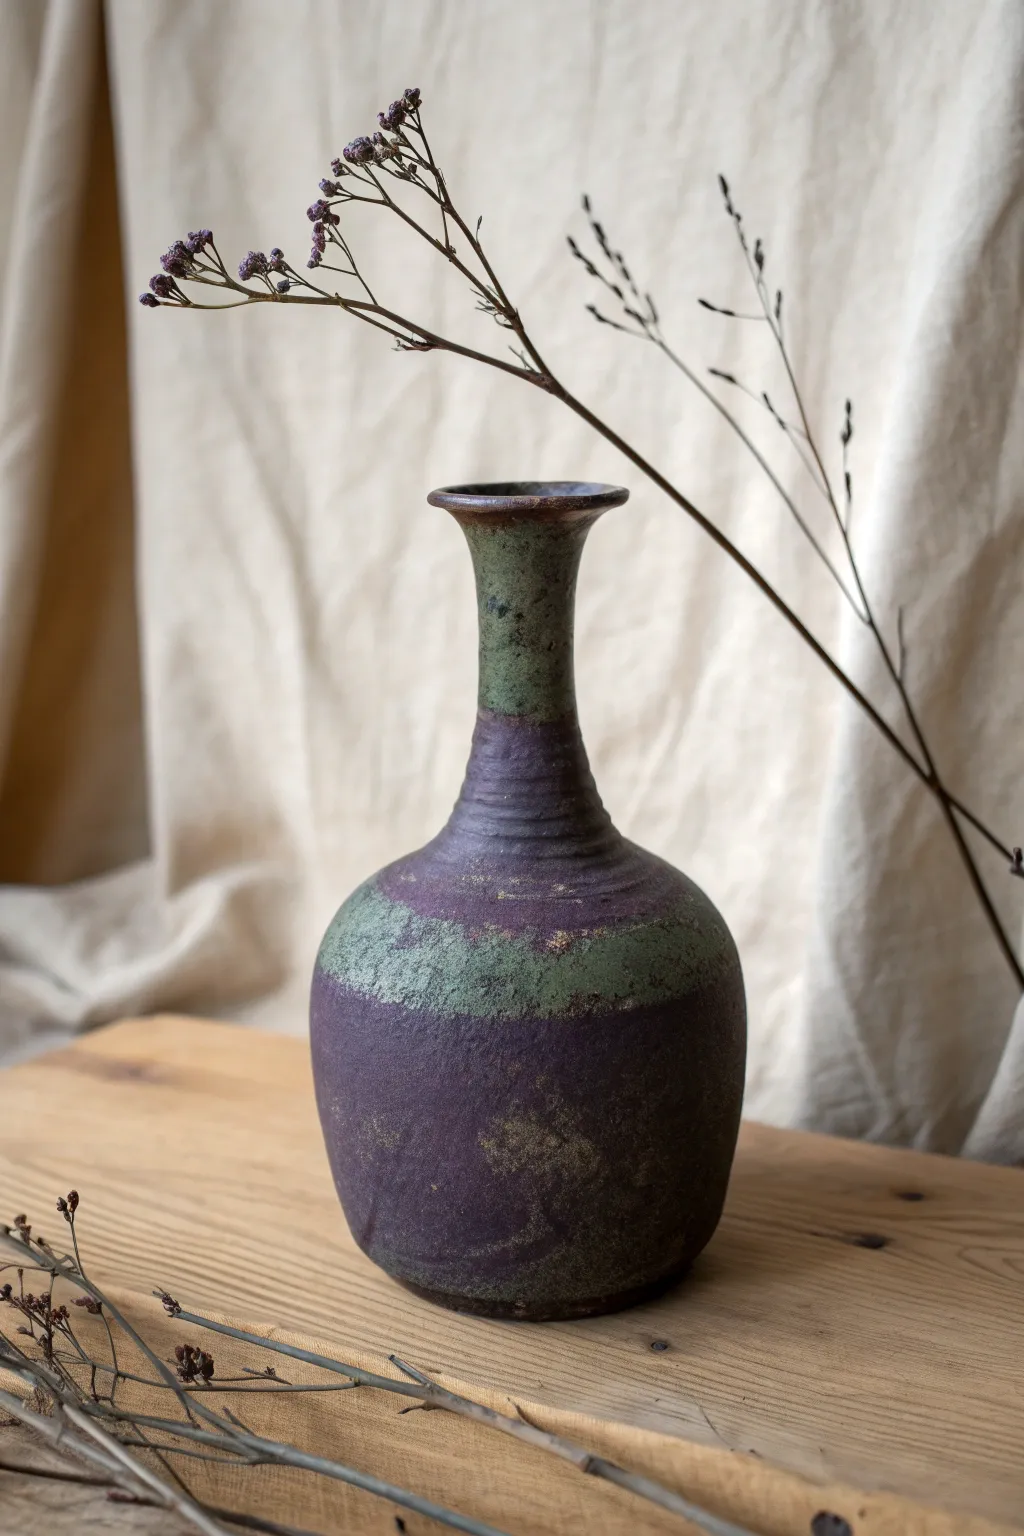
Transform simple air-dry clay into an artifact that looks centuries old with this weathered potion bottle project. The unique finish combines deep eggplant purples with oxidized green textures to create a vessel perfect for a witch’s apothecary shelf.
Step-by-Step Tutorial
Materials
- Air-dry clay (stone or grey color preferred)
- Small glass bottle or bud vase (as an armature)
- Acrylic paints (dark purple, black, mossy green, metallic bronze)
- Texture sponge or crumpled foil
- Water spray bottle
- Rolling pin
- Sandpaper (fine grit)
- Matte varnish
Step 1: Sculpting the Form
-
Prepare the armature:
Start with a clean, dry glass bottle that mimics the general shape you want—narrow neck and rounder bottom works best. This acts as a support so your clay doesn’t collapse. -
Sheet rolling:
Roll out a slab of air-dry clay to about 1/4 inch thickness. I find it helpful to roll it out on a textured mat or fabric if you want a rougher starting surface, though smooth is fine too. -
Wrap the base:
Cut a rectangle large enough to wrap around the bottom bulbous part of your bottle. Wrap the clay around, pressing the seam firmly together. -
Shape the bottom:
Fold the excess clay at the bottom underneath the bottle and smooth it out to create a stable, flat base. Use a bit of water on your finger to blend the seams until they vanish. -
Wrap the neck:
Roll a smaller rectangle for the neck of the bottle. Wrap it around the glass neck, slightly overlapping with the clay from the base section. -
Blend the transition:
This is crucial for that seamless pottery look: dampen your thumb and drag the clay from the neck section down into the body section until they become one continuous surface. -
Create the flared rim:
Add a small coil of clay to the very top rim. Pinch and flare it outwards slightly to create a classic trumpet-shaped mouth, smoothing it into the neck interior. -
Add surface texture:
Before the clay dries, gently blot the surface with a coarse sponge or crumpled aluminum foil. This creates the pitted, ancient stone texture visible in the reference photo.
Crack Control
If hairline cracks appear while drying, don’t panic. Mix a tiny bit of fresh clay with water to make a paste (slip) and fill them in before painting.
Step 2: Painting and Finishing
-
Base coat:
Once fully dry (usually 24-48 hours), paint the entire bottle in a deep, dark purple mixed with a touch of black. This provides a shadowy undertone. -
Sponge texturing:
Mix a mossy, sage green paint. Dip a dry sponge into the paint, dab off the excess on a paper towel, and lightly stipple this color onto the neck and across the middle band of the belly. -
Create the bands:
To mimic the distinct banding in the image, concentrate your green sponging in horizontal stripes, leaving the deep purple exposed in between. -
Distressing:
Use a piece of fine-grit sandpaper to gently scuff away some of the green paint, revealing the dark purple and clay texture underneath. This creates a worn, chipped effect. -
Antique wash:
Water down some black or dark brown acrylic paint until it’s very runny. Brush this over the entire vase and immediately wipe it off with a rag. The dark pigment will stay in the textured pits. -
Bronze highlights:
For a subtle magical shimmer, use your finger to rub a tiny amount of metallic bronze paint onto the raised areas of texture, especially near the bottom. -
Dusty finish:
If the colors look too bright, dry brush a very light grey or beige over the green sections to make them look like oxidized copper or dusty stone. -
Seal the magic:
Protect your potion bottle with a coat of matte varnish. Avoid glossy finishes, as they will ruin the illusion of ancient stone.
Ancient Labels
Create a paper label, burn the edges, and tea-stain it. Write ‘Nightshade’ or ‘Hemlock’ in ink and glue it on for extra authenticity.
Place your finished vessel on a mantle with dried botanicals for a hauntingly beautiful display
Eyeball Magnets or Pins
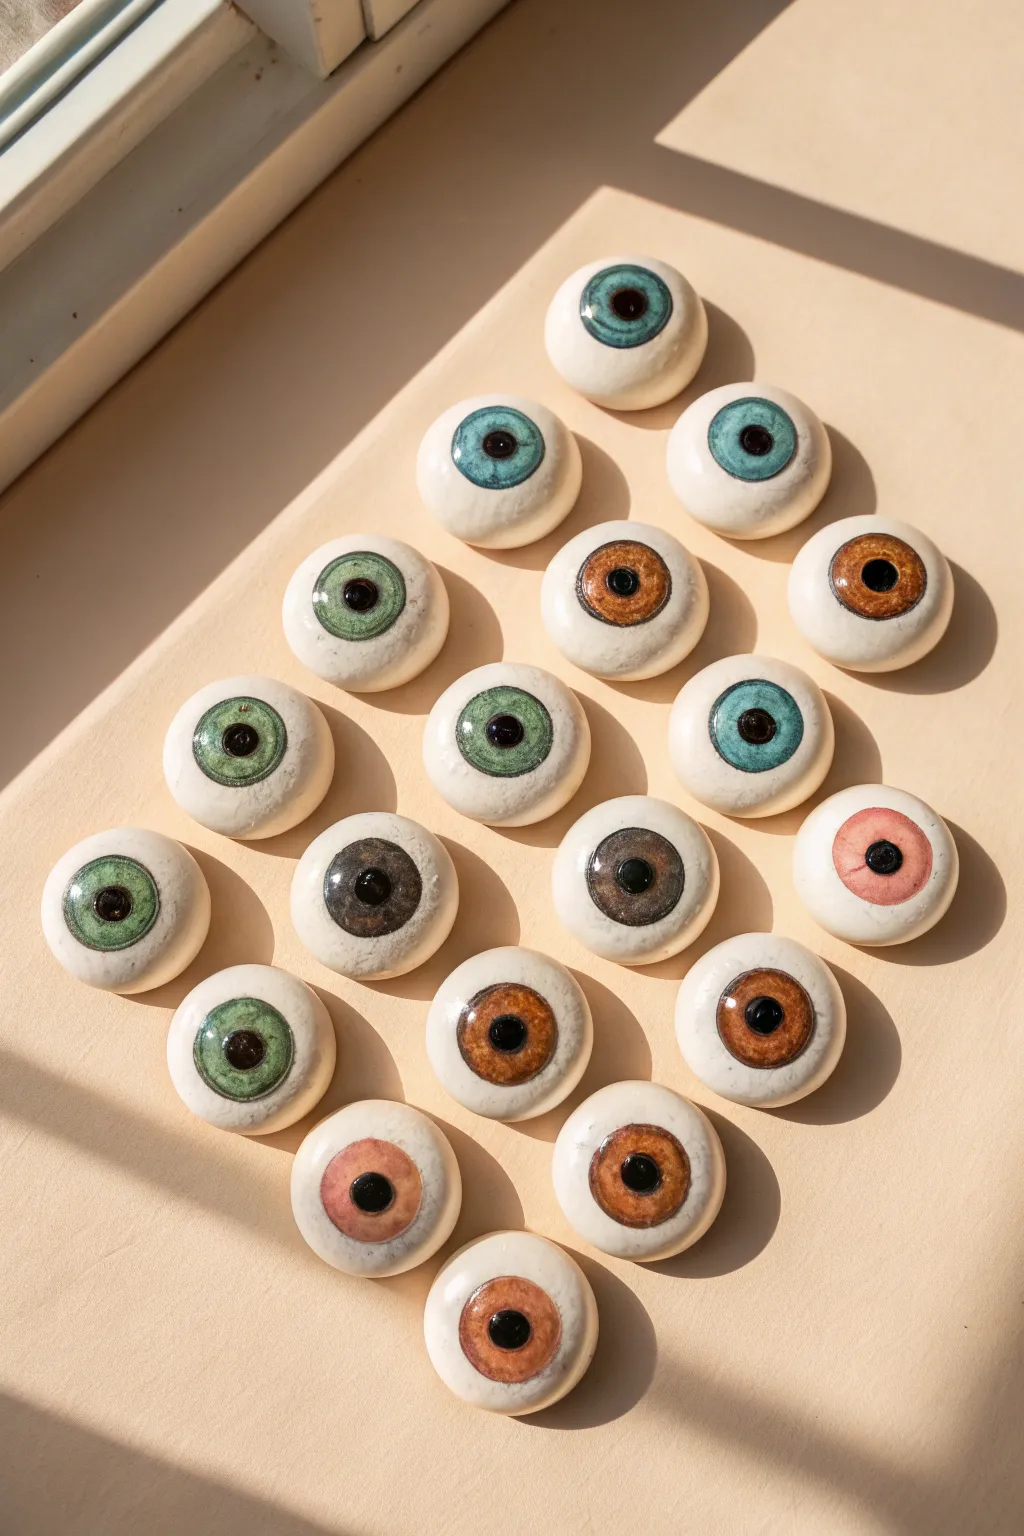
These delightfully spooky yet sophisticated eyeball magnets bring a touch of eerie charm to your fridge or jacket lapel. With their smooth, glossy finish and realistic iris details, they look like high-end ceramics but are easily crafted from air-dry clay.
How-To Guide
Materials
- White smooth air-dry clay
- Acrylic paints (white, black, plus iris colors like blue, green, brown, hazel)
- Fine detail paintbrush
- Small round sponge applicator or dotting tool
- Glossy varnish or UV resin
- Sandpaper (fine grit)
- Small round magnets or pin backs
- Superglue or heavy-duty craft glue
- Cup of water
- Palette or paper plate
Step 1: Shaping the Base
-
Portion the clay:
Pinch off small pieces of air-dry clay, aiming for chunks roughly the size of a large gumdrop or a small walnut. -
Roll spheres:
Roll each piece between your palms to create a smooth, tight ball. Work out any cracks or seams with a little water on your finger. -
Flatten slightly:
Place the sphere on your work surface and press down gently with your palm. You want a domed shape that is flat on the bottom, resembling a thick button. -
Smooth the edges:
Run a wet finger around the bottom edge where the clay meets the table to ensure a smooth transition and remove any jagged bits. -
Dry thoroughly:
Let the shapes dry completely for 24-48 hours. I stick them on a wire rack so air circulates underneath, speeding up the process.
Cracks in the clay?
If small cracks appear while drying, don’t restart. Simply mix a tiny bit of fresh clay with water to make a paste and fill the crack, then sand smooth once dry.
Step 2: Refining and Painting
-
Sand the surface:
Once bone dry, lightly sand the tops of the domes with fine-grit sandpaper to remove any fingerprints or imperfections. -
Wipe clean:
Use a slightly damp cloth or paper towel to remove all clay dust before painting. -
Paint the base:
Apply a coat of white acrylic paint to the entire dome. Let it dry, then add a second coat for opaque, porcelain-like coverage. -
Outline the iris:
Using a very fine brush or a circle template, lightly paint a colored circle in the center of the dome for the iris base. -
Add iris details:
Mix a slightly darker shade of your iris color. Paint lines radiating from the center outward to mimic the fibrous texture of an eye. -
Create the pupil:
Dip a dotting tool or the back end of a paintbrush into black paint. Press it firmly into the exact center of the iris to create a perfect black pupil. -
Layer the color:
For more depth, add a very thin wash of a third color (like gold or rust) near the pupil boundary. This makes the eye look more organic. -
Dry the paint:
Allow the paint layers to dry completely before sealing, otherwise the colors might smear.
Make them bloodshot
Before the final gloss coat, take a red fine-tip pen or a brush with very watered-down red paint and add tiny, squiggly veins creeping in from the white edges.
Step 3: Finishing Touches
-
Seal for shine:
Apply a thick coat of high-gloss varnish or clear UV resin over the entire painted surface. This mimics that wet, vitreous look of a real eye. -
Check for bubbles:
If using resin or heavy varnish, watch for air bubbles and pop them gently with a pin before the finish sets. -
Let it cure:
Allow the sealant to cure fully according to the manufacturer’s instructions. Do not touch the surface while it’s tacky. -
Attach hardware:
Flip the dry eyes over. Apply a dab of strong glue to the flat back of each piece. -
Secure the backing:
Press a magnet or pin back firmly into the glue. Let it set undisturbed for several hours to ensure a permanent bond.
Now you have a collection of unsettlingly realistic eyes to watch over your kitchen or outfit
Coffin-Shaped Jewelry Tray
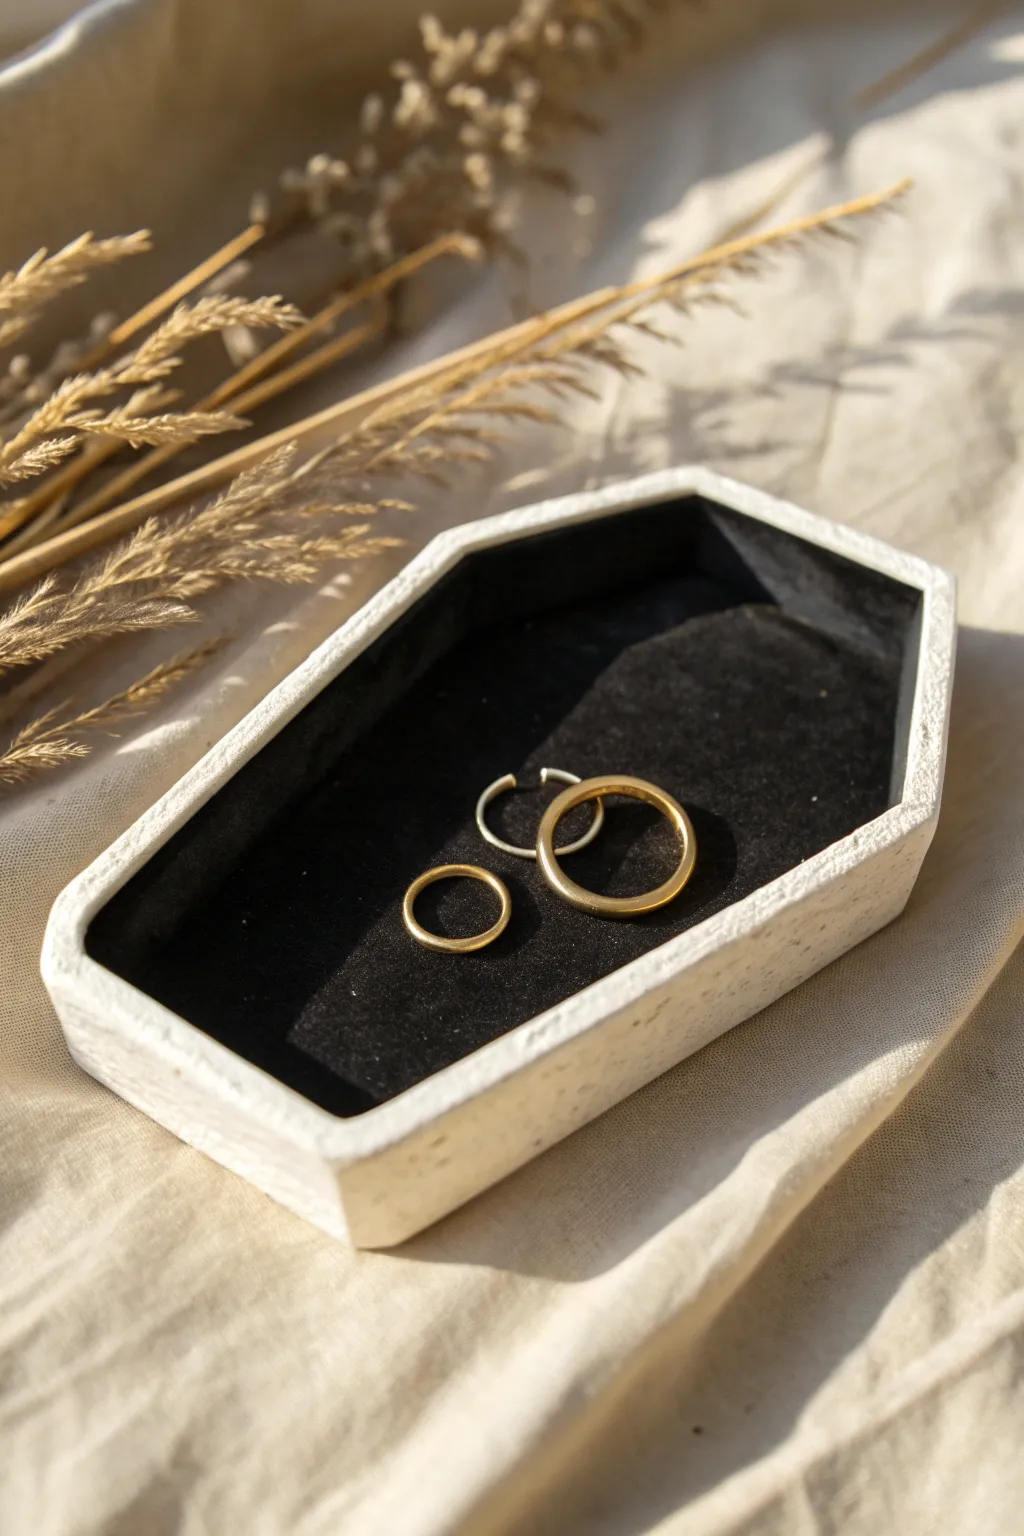
Embrace the Halloween spirit year-round with this minimalist coffin-shaped jewelry tray made from stone-effect air dry clay. Its crisp white angles and plush black velvet interior create the perfect resting place for your favorite rings and small treasures.
Step-by-Step
Materials
- White or stone-effect air dry clay
- Rolling pin
- Craft knife or clay cutting tool
- Ruler
- Paper and pencil (for template)
- Small bowl of water
- Sandpaper (fine grit)
- Black adhesive felt or velvet sheet
- Clear matte varnish (optional)
Step 1: Planning and Base
-
Draft your template:
Start by drawing a classic coffin shape on a piece of paper. You want a stretched hexagon: a wide top edge, two short angled sides going out, two long sides going down, and a bottom point. Aim for about 4-5 inches in length. -
Refine the symmetry:
Cut out your paper shape, fold it in half vertically to ensure both sides are perfectly symmetrical, and trim any uneven edges before unfolding. -
Condition the clay:
Take a handful of air dry clay and knead it well in your hands until it becomes pliable and warm. If you are using stone-effect clay, mixing it well ensures the speckles are evenly distributed. -
Roll the slab:
Roll the clay out on a smooth surface to an even thickness of about 1/4 inch. If you want a uniform thickness, place two rulers or wooden slats on either side of the clay to guide your rolling pin. -
Cut the base:
Place your paper template onto the rolled clay. Use your craft knife to trace around the template carefully, cutting out the coffin-shaped base. Set the excess clay aside for the walls.
Clean Cuts
Make your cuts significantly cleaner by letting the rolled clay slab sit for 10-15 minutes before cutting. Slightly firmer clay drags less under the knife.
Step 2: Building the Walls
-
Prepare wall strips:
Gather the excess clay and roll it out again into long strips. You want these strips to be roughly the same thickness as your base, perhaps slightly thinner, and about 3/4 inch tall. -
Measure the sides:
Use your ruler to measure the length of each side of your coffin base. Cut your clay strips into segments that match these lengths. -
Score the edges:
With a needle tool or your knife, make small hash marks (scoring) all along the outer edge of your base piece and one long edge of each wall strip. -
Apply slip:
Dab a little water onto the scored areas to create a sticky ‘slip’. This acts as the glue that bonds your clay pieces together securely. -
Attach the first strip:
Press the first wall strip onto the base. I usually start with one of the long side pieces to establish the structure. -
Connect the corners:
Continue adding the wall strips around the perimeter. Where two wall pieces meet at a corner, score and slip those vertical edges as well. -
Blend the seams:
Use your finger or a modeling tool to smooth the clay where the walls meet the base, blending the seam until it disappears on both the inside and outside. Do the same for the vertical corner seams.
Gothic Glam
Before the clay dries, gently press a lace ribbon into the exterior walls to leave a subtle, spooky texture, then paint the debossed pattern with gold after drying.
Step 3: Refining and Finish
-
Sharpen the angles:
Once the walls are blended, use your fingers to gently pinch and reshape the corners to ensure the coffin shape remains distinct and sharp. -
Smooth the surfaces:
Dip your finger in a tiny bit of water and run it over the top rim and sides to smooth out any fingerprints or rough textures. -
Let it dry:
Place the tray in a safe spot to dry for 24-48 hours. Turn it over gently halfway through the drying process to ensure the bottom dries evenly. -
Sand for perfection:
Once fully dry, use fine-grit sandpaper to gently buff away any sharp edges or uneven spots on the rim and exterior. -
Trace the liner:
Take your original paper template and trim it down slightly—about 1/8 inch on all sides. Trace this smaller shape onto the backing of your black adhesive felt. -
Insert the lining:
Cut out the felt shape. Peel off the backing and carefully press it into the bottom of the tray, smoothing it from the center outward to avoid bubbles.
Now you have a hauntingly beautiful handcrafted piece to display your jewelry collection
Cute Stitched Monster Heads
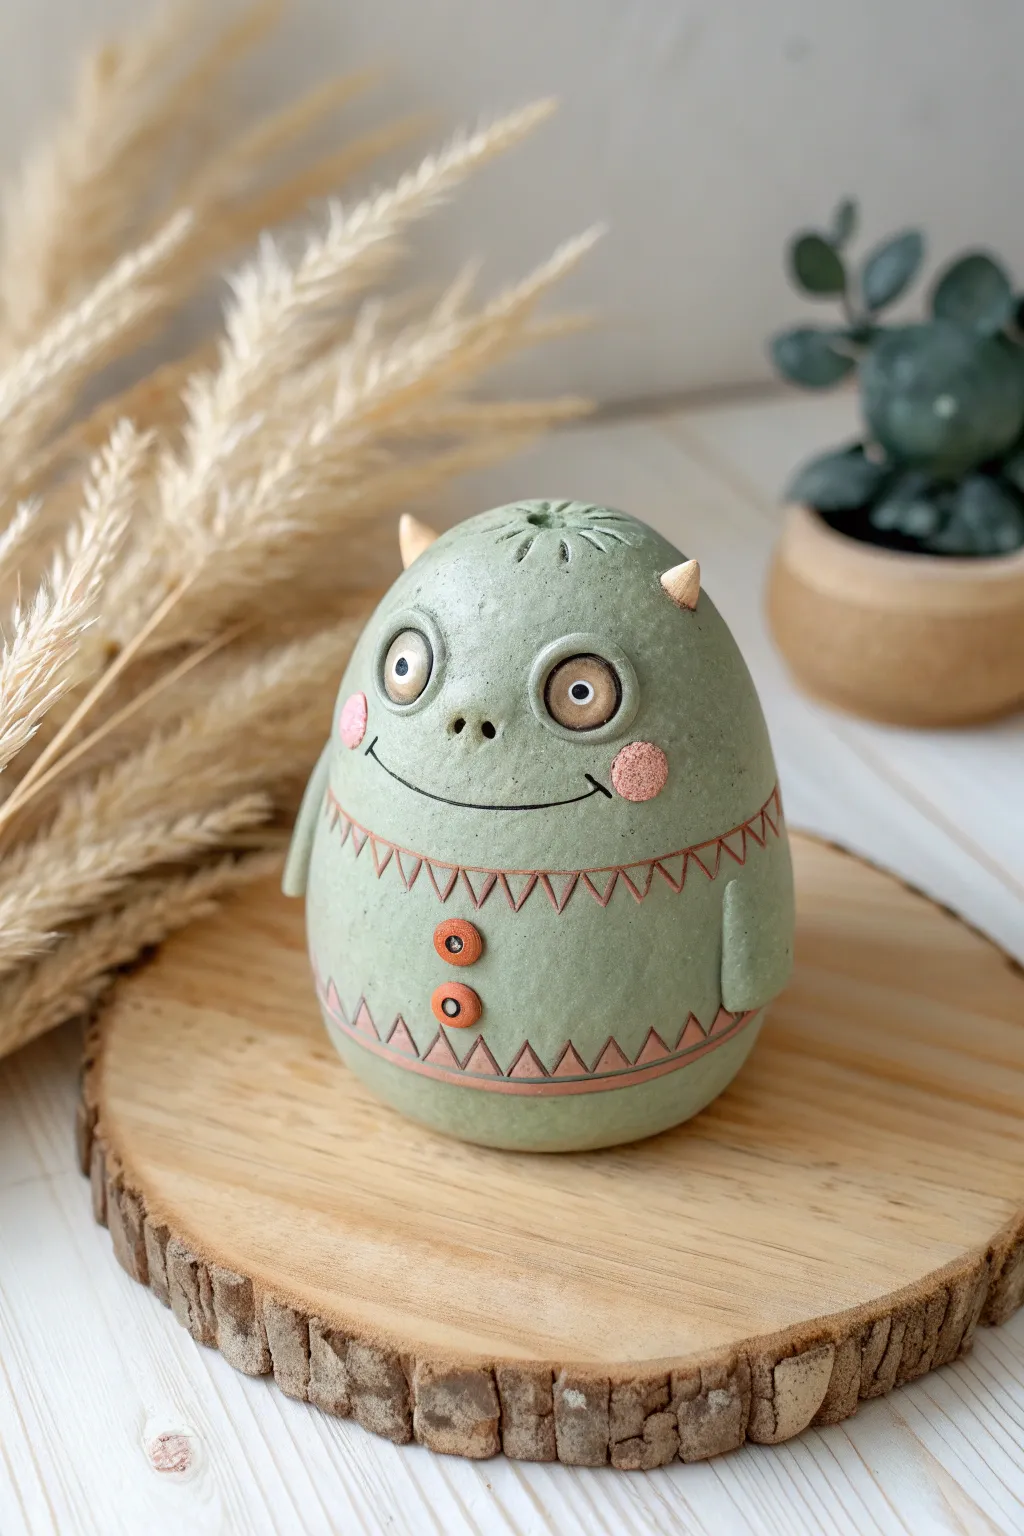
This adorable, egg-shaped monster brings a touch of mild spookiness with its gentle sage green hue and friendly stitched smile. With tiny horns, rosy cheeks, and decorative geometric patterns, it’s the perfect cute-meets-creepy decoration for a subtle Halloween vibe.
Step-by-Step Tutorial
Materials
- Air-dry clay (white or grey)
- Acrylic paints (sage green, pink, burnt orange, black, white, cream)
- Black fine-liner pen or thin paintbrush
- Clay sculpting tools (needle tool, smoothing sponge)
- Water cup
- Matte varnish or sealant
- Small round brushes
- Aluminum foil (for armature core, optional)
Step 1: Sculpting the Body
-
Form the base:
Start by conditioning a large lump of air-dry clay in your hands until it’s pliable. Roll it into a smooth ball, then gently taper the top half to create a distinct egg shape. If you want to save clay, you can crunch up a ball of aluminum foil first and wrap the clay around it. -
Smooth the surface:
The charm of this piece relies on a smooth, pebble-like finish. Dip your finger or a sponge in a little water and gently rub the surface to remove any fingerprints or cracks. Ensure the bottom is flattened slightly so it stands upright securely. -
Add the arms:
Roll two small, elongated teardrops of clay for the arms. Attach them to the sides of the body, just below the midpoint. Blend the clay at the shoulder attachment point seamlessly into the body using a modeling tool, but leave the hands slightly raised. -
Create the horns:
Roll two tiny cones of clay. Score the spots on top of the head where you want them, add a dab of water, and press the horns in place. Smooth the seam where the horn meets the head so they look like they’re growing naturally. -
Detail the head:
Check the very top of the head; use a needle tool to scratch a small, star-like texture or tuft of hair right in the center between the horns.
Stone Texture Trick
Mix baking soda or fine sand into your green base paint. This adds a gritty, realistic stone texture instantly without needing difficult painting techniques.
Step 2: Facial Features & Details
-
Form the eyes:
Roll two medium-sized balls of clay and flatten them into thick discs. Press these firmly onto the upper face area to form slightly bulging eyes. Use a small tool to poke a pupil indentation in the center of each. -
Make the nose:
Between the eyes but slightly lower, use a small ball tool or the end of a paintbrush handle to press two nostrils directly into the main clay body. -
Sculpt the buttons:
Roll two tiny balls of clay, flatten them into discs, and attach them vertically on the belly. Use a needle tool to poke two tiny buttonholes into each disc. -
Refine and dry:
Give the entire piece one last look for smoothness. Let the monster dry completely for 24-48 hours. I prefer to turn it upside down halfway through drying to ensure the base hardens evenly.
Cracked Clay?
If small cracks appear while drying, don’t panic. Mix a tiny bit of fresh clay with water to make a paste (slip) and fill the cracks, then sand smooth once dry.
Step 3: Painting & Decoration
-
Base coat:
Paint the entire body (avoiding the horns and buttons if you have a steady hand, or just paint over them) with a sage green acrylic paint. Apply two thin coats for opaque coverage. -
Add texture:
To mimic the stone-like look in the photo, dip an old toothbrush into slightly watered-down dark grey or brown paint. Use your thumb to flick a fine mist of speckles over the green body. -
Paint the details:
Paint the horns and the belly buttons with a warm, burnt orange or terracotta color. Use a soft cream or off-white for the whites of the bulging eyes. -
Add pupils and cheeks:
Once the eye white is dry, paint a black dot in the center, followed by a tiny white highlight dot for life. Dab soft pink circles on the cheeks using your fingertip or a sponge dobber for a diffused look. -
Draw the mouth:
Using a very fine liner brush and black paint, or a waterproof black pen, draw a wide, curved smile connecting the rosy cheeks. Add tiny perpendicular hatch marks at the corners of the mouth. -
Geometric patterns:
With a thin brush and reddish-brown paint, carefully paint the zigzag ‘stitch’ patterns across the chest and near the bottom hem. Keep the lines triangular and consistent. -
Varnish:
Finish by applying a coat of matte varnish to protect your paint job and give the monster a unified, finished ceramic look.
Place your little monster near a potted plant or on a shelf to watch over your room with its goofy grin
Glow-in-the-Dark Ghost Pebbles
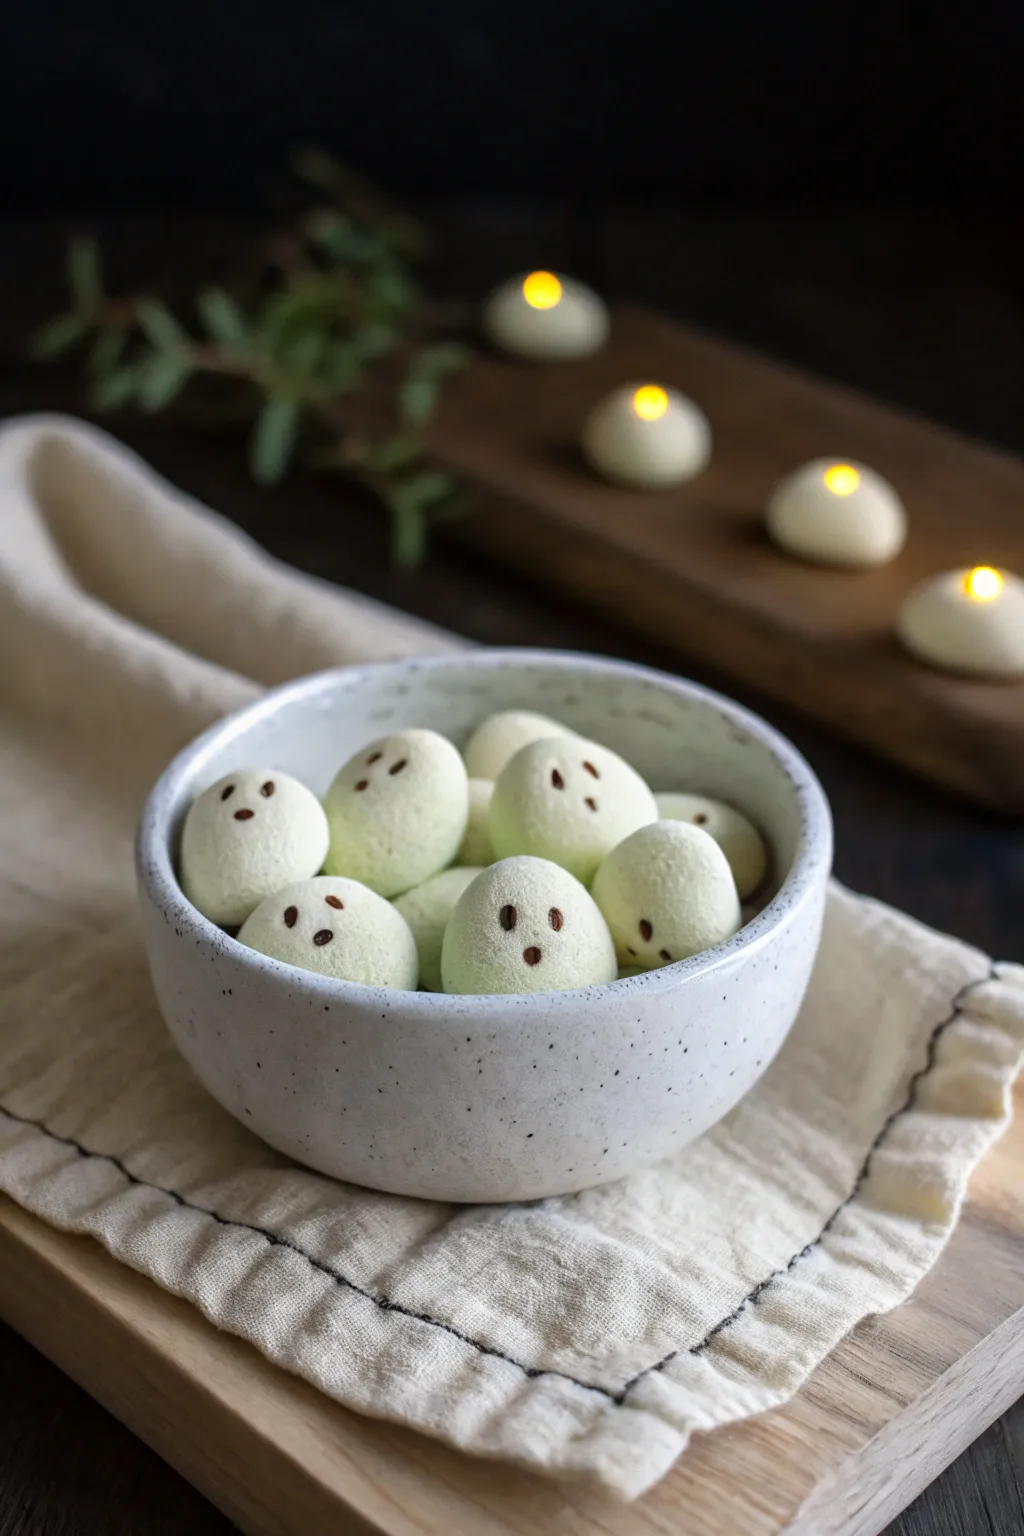
These charming little specters look like smooth river stones by day but reveal their spooky secret when the lights go down. Using glow-in-the-dark air dry clay, you can craft a bowlful of eerie friends perfect for minimalist Halloween decor.
Step-by-Step
Materials
- White air dry clay
- Glow-in-the-Dark powder or acrylic paint (green tint)
- Small fine-point paintbrush or dotting tool
- Brown or black acrylic paint
- Rolling pin (optional)
- Small bowl with water
- Fine-grit sandpaper (optional)
- Matte sealant spray
Step 1: Preparing the Clay
-
Mix the Glow Agent:
If your air dry clay isn’t pre-mixed with glow powder, you’ll need to create your own blend. Take a large handful of white clay and create a well in the center. -
Knead Thoroughly:
Pour a generous amount of glow powder or a few drops of glow paint into the well. Fold the clay over and knead it repeatedly until the color is consistent. The clay should take on a very faint, pale green spectral tint. -
Portion the Dough:
Pinch off small pieces of clay, roughly the size of a walnut or large grape. Aim for slight variety in size to make the collection look natural.
Smoother Stones
Keep a damp sponge nearby while shaping. Wiping the clay surface constantly prevents micro-cracks and gives that eroded river-rock texture.
Step 2: Shaping the Pebbles
-
Roll spheres:
Roll each piece of clay between your palms to form a smooth ball. -
Create the Pebble Shape:
Gently press the ball onto your work surface to flatten the bottom. Use your thumb and index finger to gently squeeze the top, creating an egg-like or rounded stone shape. -
Smooth Imperfections:
Dip your finger in a little water and run it over the surface of the clay to smooth out any cracks or fingerprints. I find this step crucial for that polished, stone-like finish. -
Check Stability:
Tap the bottom of each ghost pebble on the table to ensure it sits flat and won’t roll over once dry. -
Dry Completely:
Let the stones air dry for 24 to 48 hours. Turn them over halfway through the drying process so the bottoms harden evenly.
Secret Lights
Shape the clay around a battery-operated tea light (keeping the switch accessible at the bottom) so the ghosts actually light up from within.
Step 3: Adding the Faces
-
Sand (Optional):
Once fully dry, if there are any rough spots, give them a quick rub with fine-grit sandpaper for a super smooth texture. -
Mix Face Paint:
Prepare a small amount of dark brown or black acrylic paint. You want the consistency to be thick enough to hold a shape but fluid enough to dot easily. -
Paint the Eyes:
Using a fine-point brush or the end of a dotting tool, carefully place two small oval dots near the top center of the pebble for eyes. Slant them slightly for a sad or spooky expression. -
Add the Mouth:
Place a third, slightly larger oval dot below the eyes for the howling mouth. This creates the classic ‘O’ ghost face. -
Vary Expressions:
Experiment with the spacing of the dots on different pebbles. Putting eyes closer together or the mouth further down changes their personality. -
Seal the Ghosts:
Once the face paint is dry, take the pebbles to a well-ventilated area and apply a light coat of matte sealant spray. This protects the clay and seals in the glow powder. -
Charge the Glow:
Place your finished bowl of ghosts under a bright lamp or in direct sunlight for at least 30 minutes before turning off the lights to see them shine.
Arranged in a bowl or scattered across a table runner, these little spirits add a perfect touch of ghostly whimsy to your home