Whenever I’m hunting for clay craft ideas images, I’m really looking for that instant “oh, I can totally make that” spark—clear photos, simple shapes, and cute finishes. Here are my favorite image-ready clay projects, starting with the classics and drifting into the fun, unexpected stuff once you’ve warmed up.
Trinket Dish Flat-Lay Image
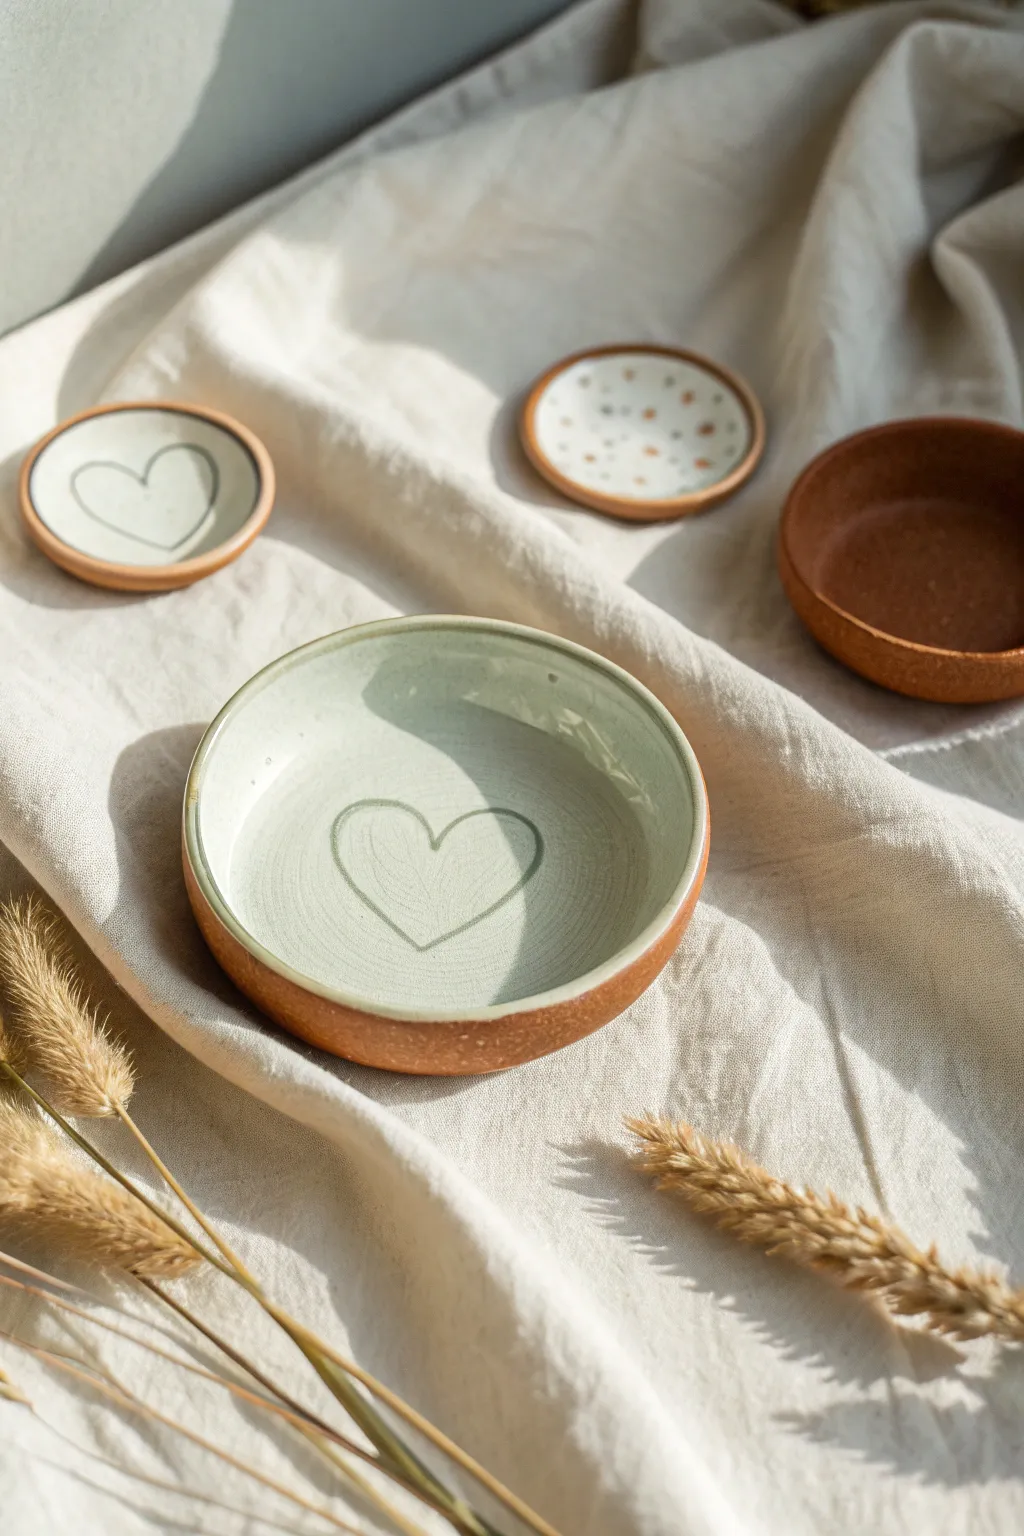
These simple, rustic clay dishes feature charming hand-painted hearts and a raw terracotta edge that adds natural warmth to your dresser or table. They are perfect for holding rings, earrings, or just acting as a sweet piece of handmade decor.
Step-by-Step Tutorial
Materials
- Air-dry clay (terra cotta color) or earthenware clay if you have kiln access
- Rolling pin
- Circle cookie cutters (various sizes)
- Small bowl or sponge (for shaping)
- Cream or off-white acrylic paint (or underglaze)
- Grey or sage green acrylic paint (or underglaze)
- Fine detail paintbrush
- Medium flat paintbrush
- Matte or satin varnish (finish/sealer)
- Water and sandpaper
Step 1: Shaping the Clay
-
Condition the Clay:
Start by taking a handful of clay and kneading it in your hands until it becomes soft, pliable, and free of air bubbles. This ensures your dish won’t crack during drying. -
Roll it Out:
Place the clay on a smooth surface or canvas mat. Use a rolling pin to flatten it into an even slab, aiming for a thickness of about 1/4 inch (approx. 5-6mm). -
Cut the Circles:
Press your circle cutter firmly into the clay slab to cut out your base shape. If you don’t have a cutter, you can trace a bowl rim with a needle tool. -
Smooth the Edges:
Dip your finger in a little bit of water and run it gently along the cut edge of the circle. This smooths out any harsh lines or burrs left by the cutter. -
Create the Rim:
Gently pinch the edges of the circle upward to create a slight lip. You can also press the clay circle into a shallow bowl to help it hold a curved shape while it dries. -
Let it Dry:
Set your dishes aside in a safe, dry place. Allow them to air dry completely for 24-48 hours, turning them over occasionally to ensure the bottom dries evenly.
Step 2: Sanding and Painting
-
Sand for Smoothness:
Once bone dry, use fine-grit sandpaper to gently smooth the surface, paying special attention to the rim. Wipe away any clay dust with a slightly damp cloth. -
Paint the Interior Base:
Using your medium flat brush, apply the cream or off-white paint to the inside of the dish. I prefer to leave a small rim of the raw terracotta exposed at the very top edge for contrast. -
Second Coat:
Let the first layer dry completely, then apply a second coat of cream paint to ensure opaque coverage where the clay color doesn’t show through. -
Draft the Heart:
If you are nervous about freehanding, use a pencil to lightly sketch the heart shape in the center of the painted area. -
Paint the Outline:
With a fine detail brush and your grey or sage green paint, carefully trace over your heart sketch. Keep the line weight relatively thin and organic. -
Add Variations:
For variety, you can create smaller dishes with different patterns, like the speckled dish in the background. Simply use the tip of your brush to dot the surface randomly.
Cracks appeared?
If small hairline cracks appear while drying, mix a tiny bit of water with fresh clay to make a paste (slip) and fill the cracks, then sand smooth once dry.
Step 3: Finishing Touches
-
Dry the Detail Work:
Allow all the painted details to dry completely. This prevents smudging when you apply the final sealer. -
Clean the Exterior:
If any paint smudged onto the raw exterior during the process, sand it off gently now or wipe it with a damp cloth. -
Seal the Dish:
Apply a coat of matte or satin varnish over the entire dish, including the unpainted terracotta areas. This protects the clay from moisture and gives it a finished look. -
Final Cure:
Let the varnish cure according to the manufacturer’s instructions before placing any jewelry inside.
Pro Tip: Glossy Finish
For a ceramic-like look without a kiln, use a glossy varnish or resin for the final coat on the painted interior only.
Enjoy arranging your beautiful handmade dishes to organize your small treasures


Leaf-Imprint Bowl Close-Up Image
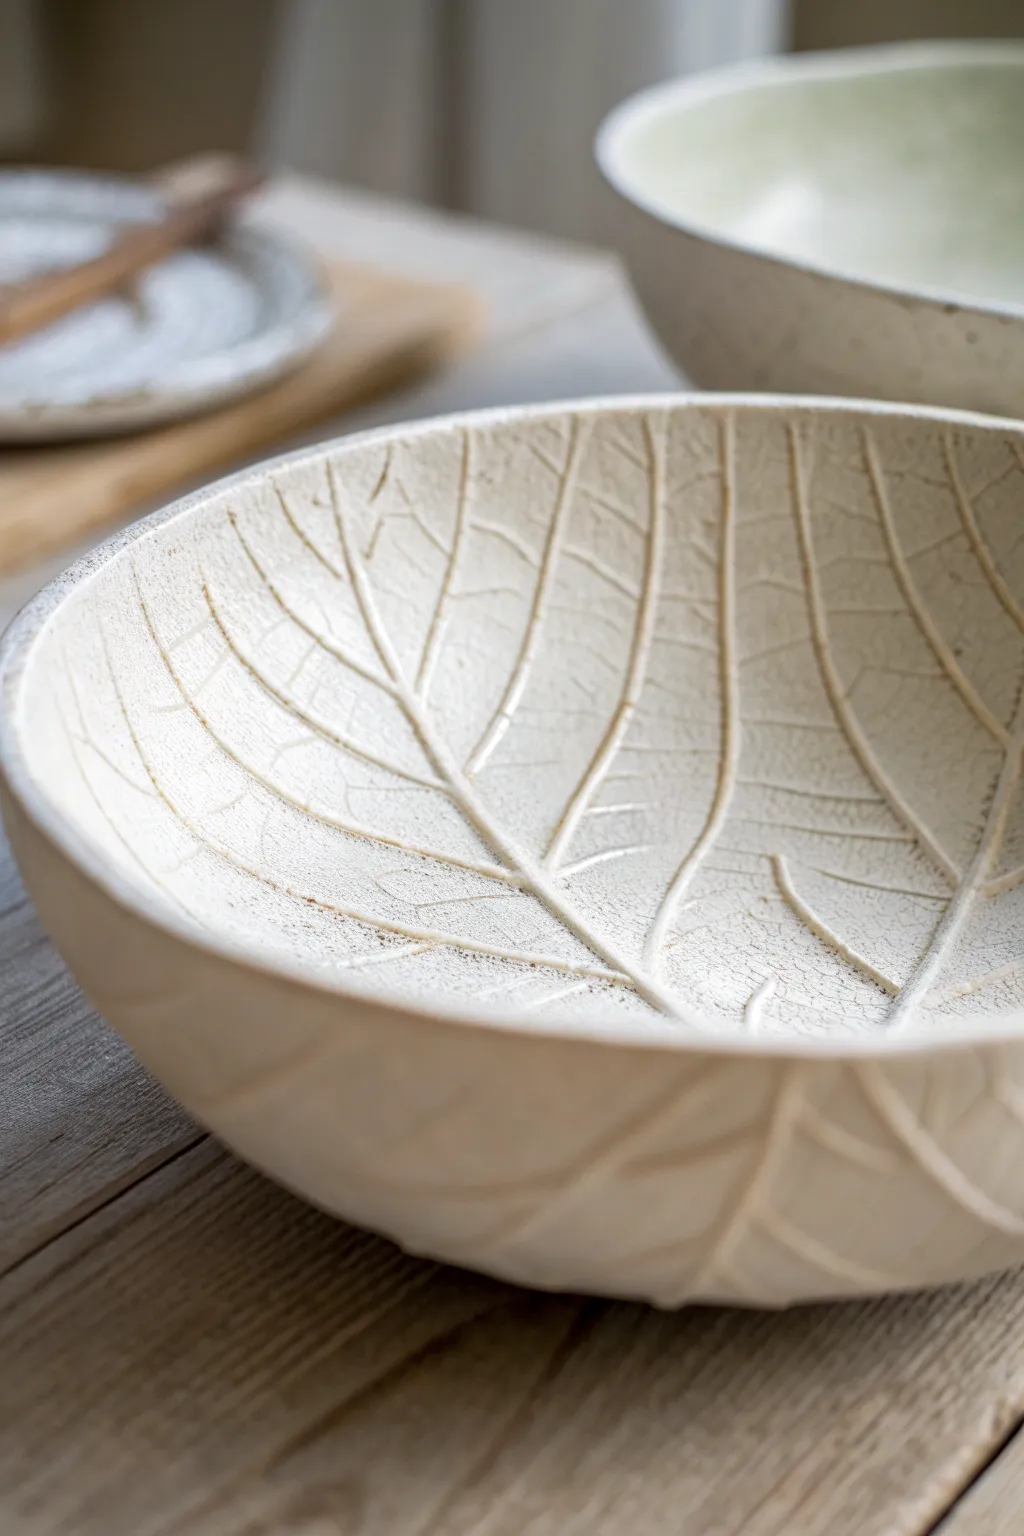
Capture the intricate beauty of nature with this organic leaf-imprint bowl, featuring deep vein reliefs that texture both the interior and exterior. The finished piece showcases a creamy, antique-style glaze that highlights every detail of the botanical structure.
Detailed Instructions
Materials
- Light stoneware or white air-dry clay
- Large, deeply veined leaf (e.g., cabbage, rhubarb, or hosta)
- Rolling pin
- Canvas mat or slab roller
- Fettling knife or needle tool
- Deep bowl for use as a slump mold
- Plastic wrap or cheesecloth
- Sponge
- Rib tool
- Cream or off-white reactive glaze
- Kiln (if using stoneware)
Step 1: Preparing the Slab
-
Roll the clay:
Begin by wedging your clay to remove air bubbles, then roll it out into a smooth, even slab about 1/4 to 3/8 inch thick. Ensure the slab is large enough to accommodate your chosen leaf with room to spare. -
Smooth the surface:
Use a rib tool to compress the clay slab on both sides, removing any canvas texture and creating a pristine surface for the impression. -
Position the leaf:
Place your chosen leaf vein-side down onto the clay slab. The vein side usually has the most prominent texture, which creates the deep relief seen in the image. -
Make the impression:
Using your rolling pin, roll firmly over the leaf once or twice. Avoid rolling back and forth repeatedly, as this can cause a double image; commit to confident, steady pressure. -
Check the transfer:
Carefully lift a corner of the leaf to check the depth of the impression. If the veins aren’t deep enough, replace the leaf precisely and roll again with slightly more force. -
Cut the shape:
With the leaf still in place or just after removing it, use a needle tool or fettling knife to cut around the edge of the leaf shape, or cut a simple circle that encompasses the vein pattern.
Vein Definition Tip
If your leaf is flat, use a modeling tool to deepen the main central vein manually after rolling. This adds structural realism and drama.
Step 2: Shaping the Bowl
-
Prepare the mold:
Select a bowl to use as a slump mold. Line the inside of this bowl with plastic wrap or cheesecloth to prevent sticking and to ease removal later. -
Slump the clay:
Carefully lift your textured clay slab and place it inside the mold, texture side facing up. Gently press it down into the curve of the bowl. -
Reinforce the exterior texture:
As you press the clay into the mold, you might lose some texture on the underside (the outside of your final bowl). If desired, use a sculpting tool to re-carve or emphasize the ‘veins’ on the exterior surface to match the photo. -
Refine the rim:
Once the clay is settled, go around the rim with a damp sponge to smooth any sharp edges left by the knife, giving it that soft, handmade look. -
Dry slowly:
Let the bowl dry in the mold until it is leather hard. This prevents warping. I prefer to cover it loosely with plastic for the first day to ensure even drying.
Level Up: Oxide Wash
Apply an iron oxide wash before glazing and wipe it back. The dark oxide will stay in the cracks, making the leaf veins pop with contrast.
Step 3: Finishing and Glazing
-
Bisque fire:
Once bone dry, remove the bowl from the mold and fire it in the kiln to the appropriate bisque temperature for your clay body. -
Clean surface:
Wipe the bisqued bowl with a damp sponge to remove any dust that might interfere with glaze adhesion. -
Apply glaze:
Pour a creamy, off-white glaze into the bowl, swirl to coat the interior, and pour out the excess. Dip or brush the exterior with the same glaze. -
Highlight the texture:
For the antique look in the photo, ensure the glaze pools slightly in the deep vein recesses, or wipe back the high points gently with a sponge before firing to reveal the clay body beneath. -
Final firing:
Fire the piece again to your glaze maturity temperature. Allow the kiln to cool completely before removing your stunning nature-inspired bowl.
Place your finished bowl on a wooden table to enjoy the interplay of light and shadow across its textured surface


Pinch Pot Mini Bowl Image Set
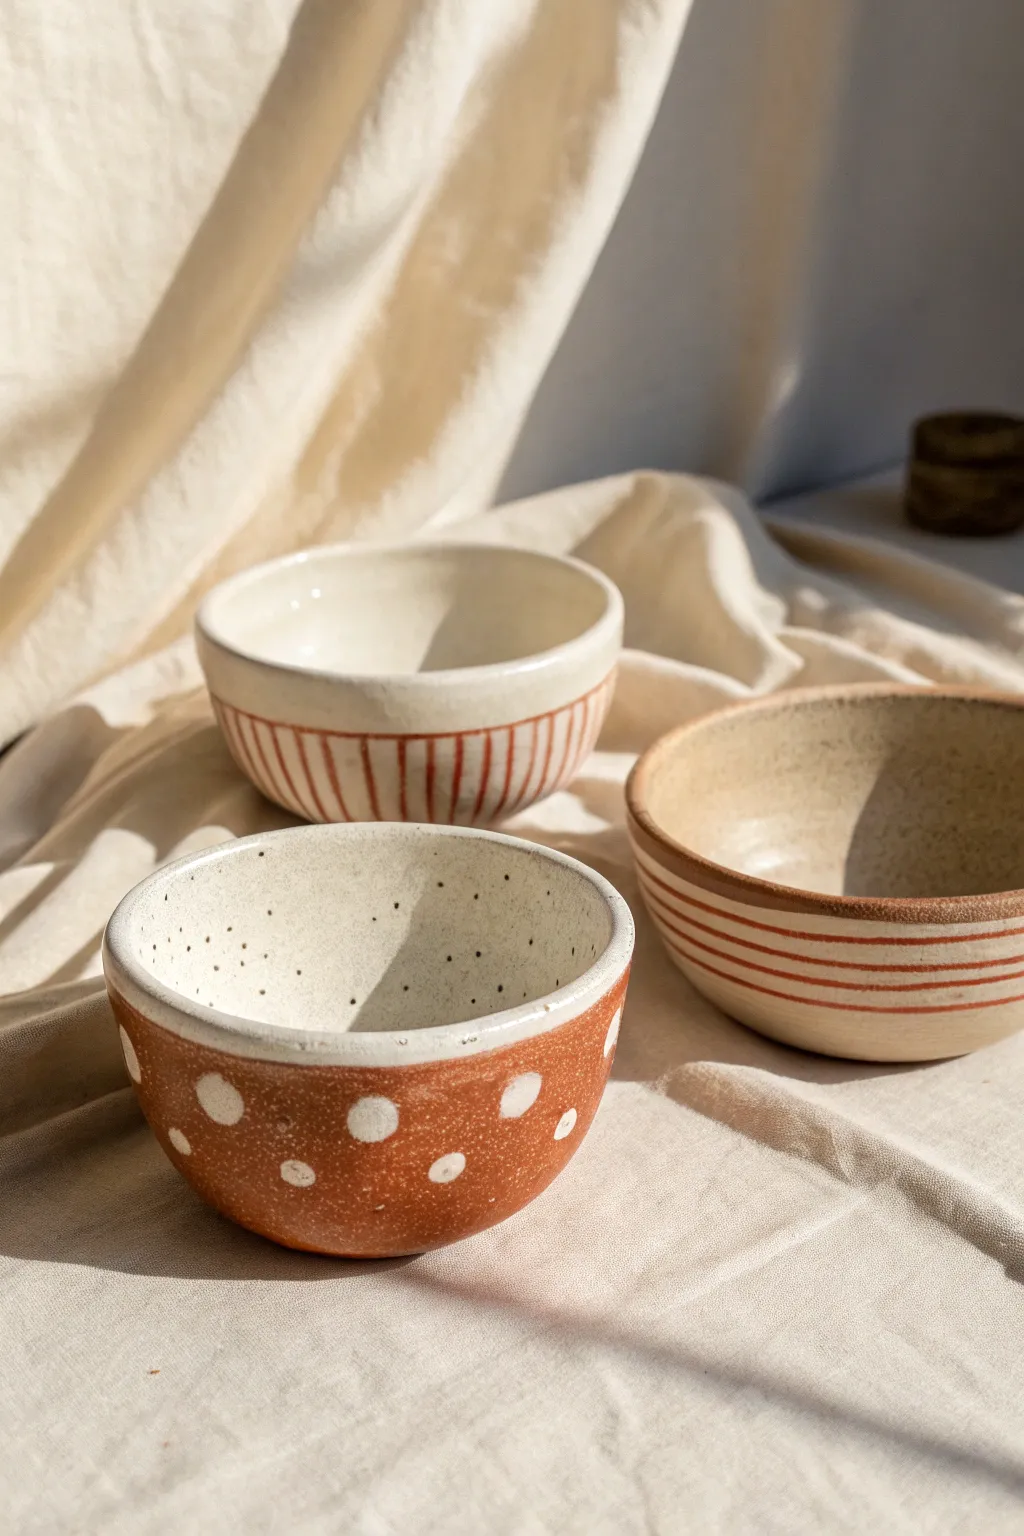
Create a charming set of three hand-built ceramic bowls featuring earthy tones and simple geometric patterns. This project explores the timeless pinch pot technique, finished with raw clay textures and contrasting white glaze for a modern, artisanal look.
Step-by-Step
Materials
- Red stoneware clay (or terra cotta)
- White stoneware clay (optional, for variation)
- Pottery sponge
- Pin tool or needle tool
- Wooden modeling tool
- Rib tool (metal or rubber)
- White underglaze or white slip
- Clear transparent glaze
- Medium paintbrush
- Bowl of water
- Kiln access
Step 1: Forming the Pinch Pots
-
Prepare the clay:
Begin by wedging your red stoneware clay thoroughly to remove air bubbles. Separate the clay into three equal balls, each roughly the size of a tennis ball or slightly smaller. -
Start the opening:
Hold one clay ball in your non-dominant palm. Gently press your thumb into the center, stopping about a half-inch from the bottom—you don’t want to poke through. -
Pinch the walls:
Rotate the ball slowly while rhythmically pinching the clay between your thumb (inside) and fingers (outside). Start at the base and work your way up toward the rim. -
Refine the shape:
Continue thinning the walls until they are even, aiming for about 1/4 inch thickness. For the polka-dot bowl, create a slightly more upright, U-shaped curve. -
Shape the other bowls:
Repeat the pinching process for the second and third bowls. To match the image, flare the rim of the second bowl slightly wider, and keep the third bowl deep and rounded. -
Smooth the surfaces:
Use a damp sponge or your fingers to smooth out any deep fingerprints or cracking on the rims. I find that running a rubber rib over the exterior creates that lovely, professional matte finish. -
Flatten the bottoms:
Gently tap the base of each bowl on your work surface to create a flat, stable foot so they don’t rock.
Fixing Cracks
If small cracks appear on the rim while pinching, compress the clay immediately with a damp sponge. If the clay is too dry, mist it slightly before smoothing
Step 2: Decorating and Glazing
-
Dry to leather hard:
Allow the bowls to dry until they are ‘leather hard’—firm enough to handle without warping but still cool to the touch. -
Apply base color (Polka Dot Bowl):
For the front bowl, leave the raw red clay exposed on the outside. Paint the interior completely with white underglaze, bringing it just over the rim. -
Add the dots:
Dip a round paintbrush into white underglaze. Dab large, confident dots onto the raw exterior clay. You may need two coats for opacity. -
Glaze the Striped Bowl (Vertical):
For the back bowl, paint the entire upper half (inside and out) with white underglaze, leaving the bottom raw red clay. Let it dry. -
Carve vertical stripes:
Using a loop tool or pin tool, carve vertical lines through the white underglaze to reveal the red clay beneath around the base section. -
Glaze the Striped Bowl (Horizontal):
For the third bowl, keep the exterior raw clay. Paint the interior white. Using a small brush, carefully paint thin, horizontal white bands around the lower exterior. -
Add speckles (optional):
To mimic the speckled effect inside the polka-dot bowl, flick a stiff-bristled toothbrush loaded with watered-down black underglaze or iron oxide into the interior. -
Bisque fire:
Once fully bone dry, load the pieces into the kiln for a bisque firing (usually Cone 04 or 06). -
Clear glaze application:
After the bisque fire, wipe the pots with a damp sponge to remove dust. Dip the entire piece (or brush on) a clear transparent glaze over the decorated areas to seal them. -
Wipe the feet:
Thoroughly sponge off any glaze from the bottom of the bowls where they will touch the kiln shelf to prevent sticking. -
Final firing:
Fire the bowls again at the glaze temperature recommended for your specific clay body (e.g., Cone 5 or 6).
Wax Resist Method
For sharper stripes, apply wax resist stripes over the raw clay, then dip the whole pot in white slip. Peel or burn off the wax to reveal crisp clay lines
Now you have a trio of custom bowls ready for your morning snacks or trinkets


Slab Coaster Stack Image
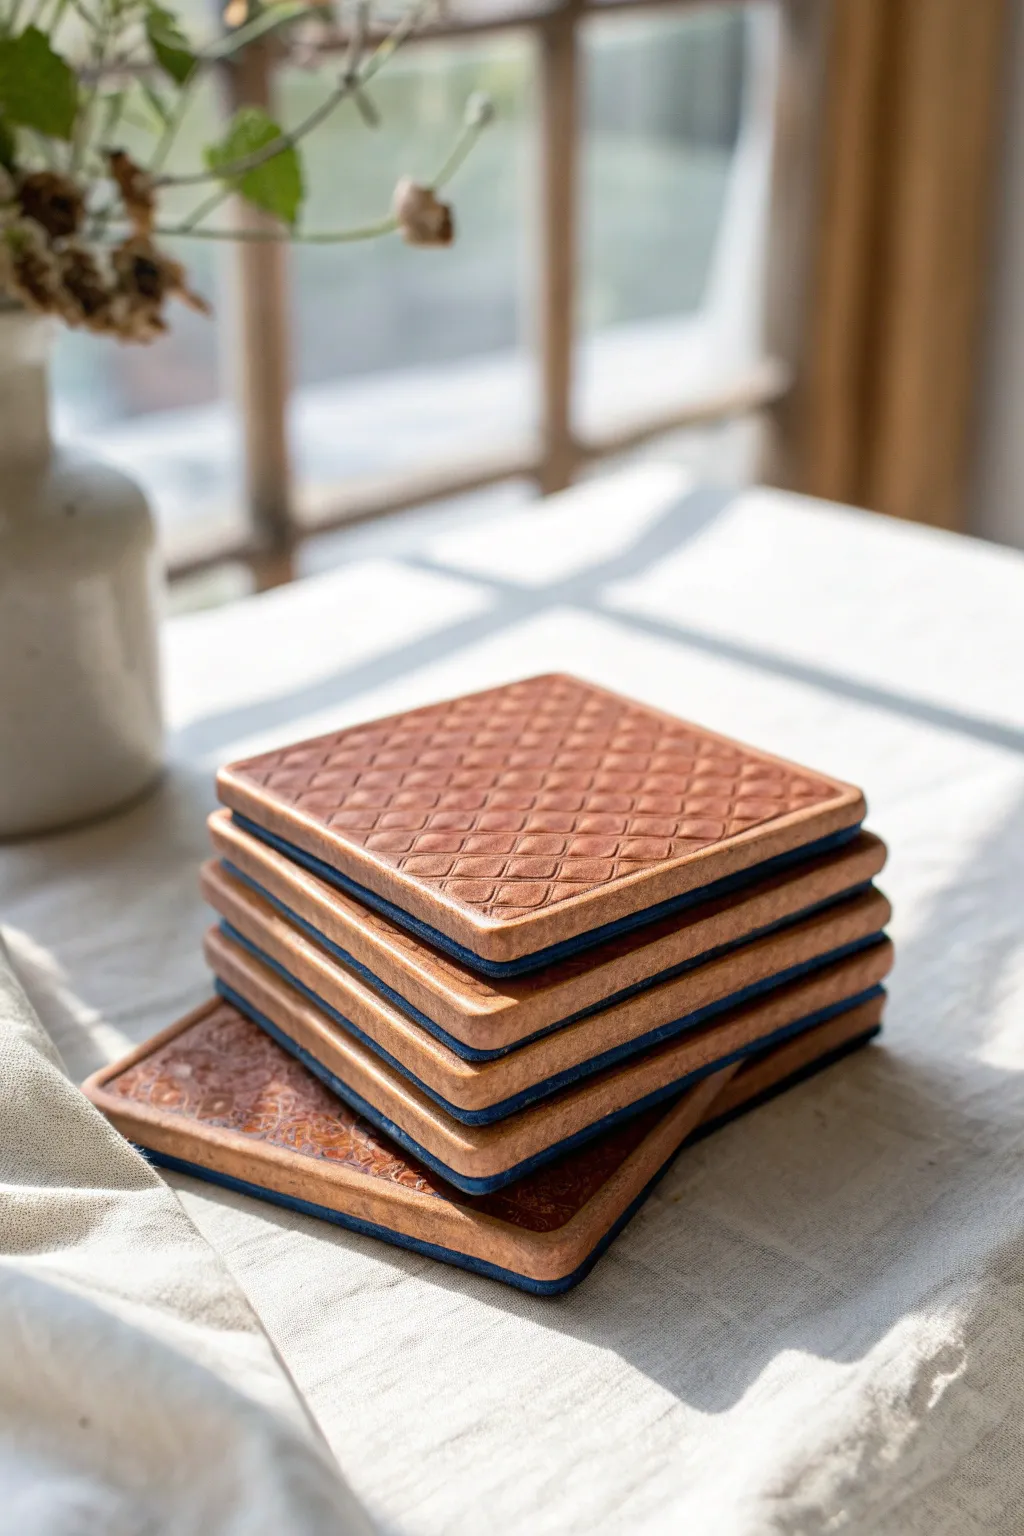
These sophisticated square coasters mimic the warm look of quilted leather but are actually crafted from durable polymer or air-dry clay. Each piece features a textured top surface layered over a contrasting blue base, creating a sturdy and stylish addition to your coffee table.
Step-by-Step Tutorial
Materials
- Terracotta or saddle brown polymer clay
- Deep navy blue polymer clay
- Rolling pin or clay machine
- Square cookie cutter (approx. 3.5 inches)
- Ruler or straight edge
- Pointed sculpting tool or dull knife
- Texture sheet (diamond/quilted pattern) OR a ruler for manual embossing
- Liquid clay adhesive (e.g., Bake and Bond)
- Cornstarch (for release)
- Fine grit sandpaper
- Matte varnish (optional)
Step 1: Preparing the Slabs
-
Condition the brown clay:
Start by warming up your terracotta or saddle brown clay in your hands. Knead it thoroughly until it’s soft and pliable, which prevents cracking later. -
Roll the top layer:
Roll out the brown clay into an even slab, approximately 3mm thick. If you have a pasta machine designated for clay, use a medium setting for consistent thickness. -
Condition the blue clay:
Repeat the conditioning process with your navy blue clay. This will form the sturdy base of your coasters. -
Roll the bottom layer:
Roll the blue clay into a slab of the same thickness as the brown layer. Consistency is key here so the coasters sit flat.
Uneven Clay Layers?
If your layers seem to slide apart while cutting, refrigerate the bonded slab for 15 minutes before using the cutter. The firmer clay holds its shape better.
Step 2: Texturing and Cutting
-
Apply the diamond texture:
Dust the brown clay slab lightly with cornstarch. Press your diamond pattern texture sheet firmly into the clay. If you don’t have a sheet, use a ruler to gently press diagonal lines in one direction, then cross them in the other direction to create the quilted look. -
Join the layers:
Apply a very thin layer of liquid clay adhesive to the blue slab. Carefully place the textured brown slab on top of the blue one, ensuring no air bubbles are trapped between them. -
Bond the slab:
Gently gently roll over the combined slab just enough to seal them together without flattening out your beautiful diamond texture. -
Cut the squares:
Using your square cutter, press straight down into the layered clay to cut out your coaster shapes. If the clay sticks, dip the cutter in cornstarch first. -
Softening the edges:
Lift the squares away from the scrap clay. Use your finger to gently rub the cut edges, softening the sharpness just slightly to give it a more finished, leather-like appearance. -
Create the border detail:
Using a dull tool or the back of a knife, press a straight line about 3mm inside the perimeter of the brown layer to simulate a stitched border.
Step 3: Baking and Finishing
-
Prepare for baking:
Place your raw coasters on a ceramic tile or a baking sheet lined with parchment paper. Ensure they are perfectly flat. -
Cover the clay:
I prefer to tent a piece of foil over the coasters to protect the colors from scorching, especially since the brown needs to look like leather, not burnt toast. -
Bake the batch:
Bake according to your specific clay brand’s instructions (usually around 275°F/135°C for 30 minutes per 1/4 inch of thickness). Let them cool completely in the oven. -
Sand the edges:
Once cool, use fine-grit sandpaper to smooth out any rough spots on the sides, revealing the crisp line between the brown and blue layers. -
Seal the surface:
Apply a thin coat of matte varnish to the top and sides. This protects the ‘leather’ finish from moisture or drink condensation.
Add Realistic Patina
Before baking, brush a tiny bit of dark brown acrylic paint into the texture grooves and wipe the surface clean to create an aged, vintage leather effect.
Stack your set on a side table to enjoy functional art that looks surprisingly like high-end leather work

The Complete Guide to Pottery Troubleshooting
Uncover the most common ceramic mistakes—from cracking clay to failed glazes—and learn how to fix them fast.
Cute Clay Magnet Grid Image
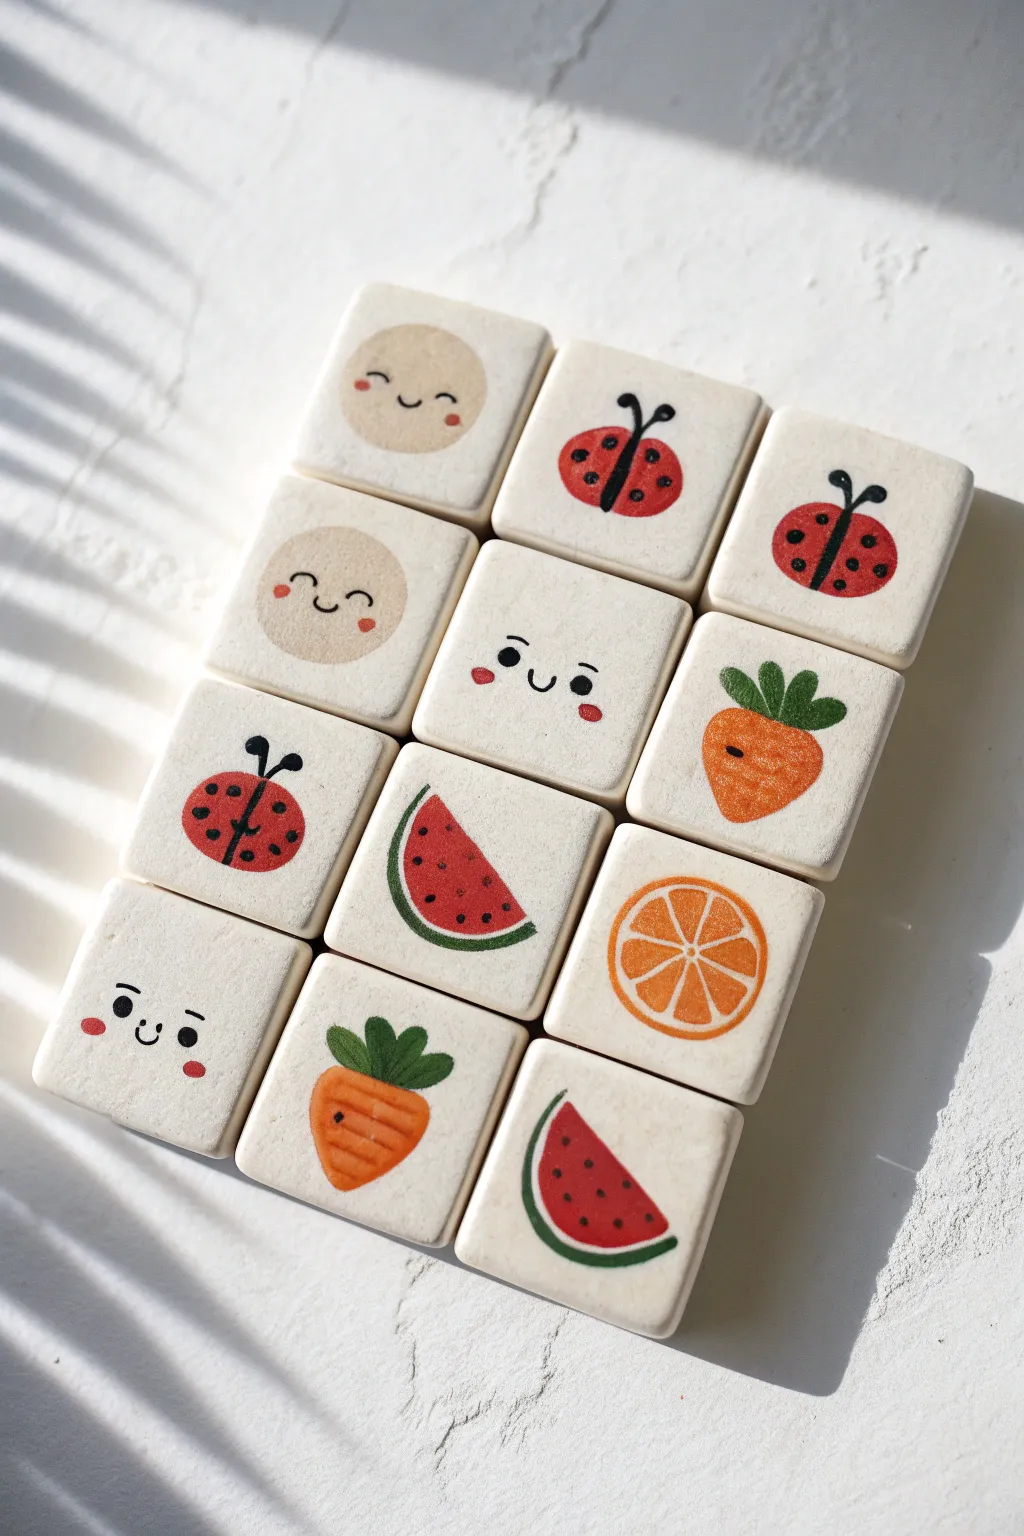
These charming clay squares feature a delightful mix of hand-painted fruits, friendly faces, and little ladybugs. With their smooth finish and cheerful illustrations, they make perfect magnets, game pieces, or decorative accents for a nursery.
Step-by-Step Guide
Materials
- White air-dry clay or polymer clay (white)
- Square cookie cutter (approx. 1.5 – 2 inches)
- Rolling pin
- Sandpaper (fine grit)
- Acrylic paints (red, orange, green, black, beige)
- Fine detail paintbrushes (size 0 and 00)
- Black fine-tip permanent marker or paint pen
- Matte varnish or sealant
- Parchment paper
Step 1: Shaping the Tiles
-
Condition the clay:
Start by taking a generous amount of your white clay and kneading it in your hands until it becomes warm, soft, and pliable. This prevents cracks later on. -
Roll it out:
Roll the clay out on a sheet of parchment paper to an even thickness of about 1/4 inch. Try to keep the surface as smooth as possible. -
Cut squares:
Use your square cookie cutter to stamp out 12 shapes. If you don’t have a cutter, measure and cut a grid using a craft knife and a ruler. -
Soften edges:
Gently tap the cut edges with your finger to round them off slightly. You want the tiles to look soft and friendly, not sharp. -
Dry completely:
Let the tiles dry according to your clay’s instructions. For air-dry clay, leave them for 24-48 hours, flipping them occasionally to ensure even drying. -
Sand for smoothness:
Once fully cured, use fine-grit sandpaper to buff the surface and edges. This step is crucial for getting that professional, clean canvas for your painting.
Step 2: Painting the Designs
-
Paint the beige faces:
Mix a very pale beige or leave the clay raw if you used a natural tone. Paint three simple circles slightly off-center on three of the tiles for the moon-like faces. -
Create the fruit bases:
Paint triangular wedges for the watermelon on two tiles, an orange circle for the citrus slice, and orange triangular shapes with rounded tops for the carrots. -
Add ladybug bodies:
Using bright red paint, create round or slightly oval shapes on three tiles. Let this base layer of color dry completely before adding any details. -
Add simple face details:
For the square tiles that are just faces, use a tiny amount of pink paint to dab on rosy cheeks. Let those dry. -
Detailing with black:
Using a very fine brush or a black paint pen, add the ‘U’ shaped smiles and small eyes to the faces. Keep the lines thin and delicate. -
Finish the ladybugs:
Draw a black line down the center of the red spots. Add a small semi-circle head at the top, antennas, and small black dots on the wings. -
Detail the fruits:
Paint the rinds on the watermelon with dark green. Add green leafy tops to the carrots. For the orange slice, use white or pale yellow to paint the internal segments. -
Add final textures:
Use your finest brush or pen to add watermelon seeds, carrot ridges, and any remaining facial expressions. I find a paint pen offers more control here than a brush.
Smooth Surface Secret
Before drying, dip your finger in a tiny bit of water (for air-dry clay) and gently rub the surface in circles. This creates a porcelain-like finish without sanding.
Step 3: Finishing Touches
-
Check your work:
Look over all the tiles for any smudges or uneven lines. You can gently scrape away mistakes with a craft knife or paint over them with white. -
Seal the tiles:
Apply a thin coat of matte varnish to protect the paint. A matte finish looks best for this soft, illustrative style, whereas gloss might look too plastic.
Game Night Upgrade
Make a second identical set of tiles to turn your art project into a fully functional, handmade memory matching game for kids.
Once dry, glue magnets to the back or simply display your grid for a touch of handmade happiness on any surface
Minimal Bud Vase Shelf Image
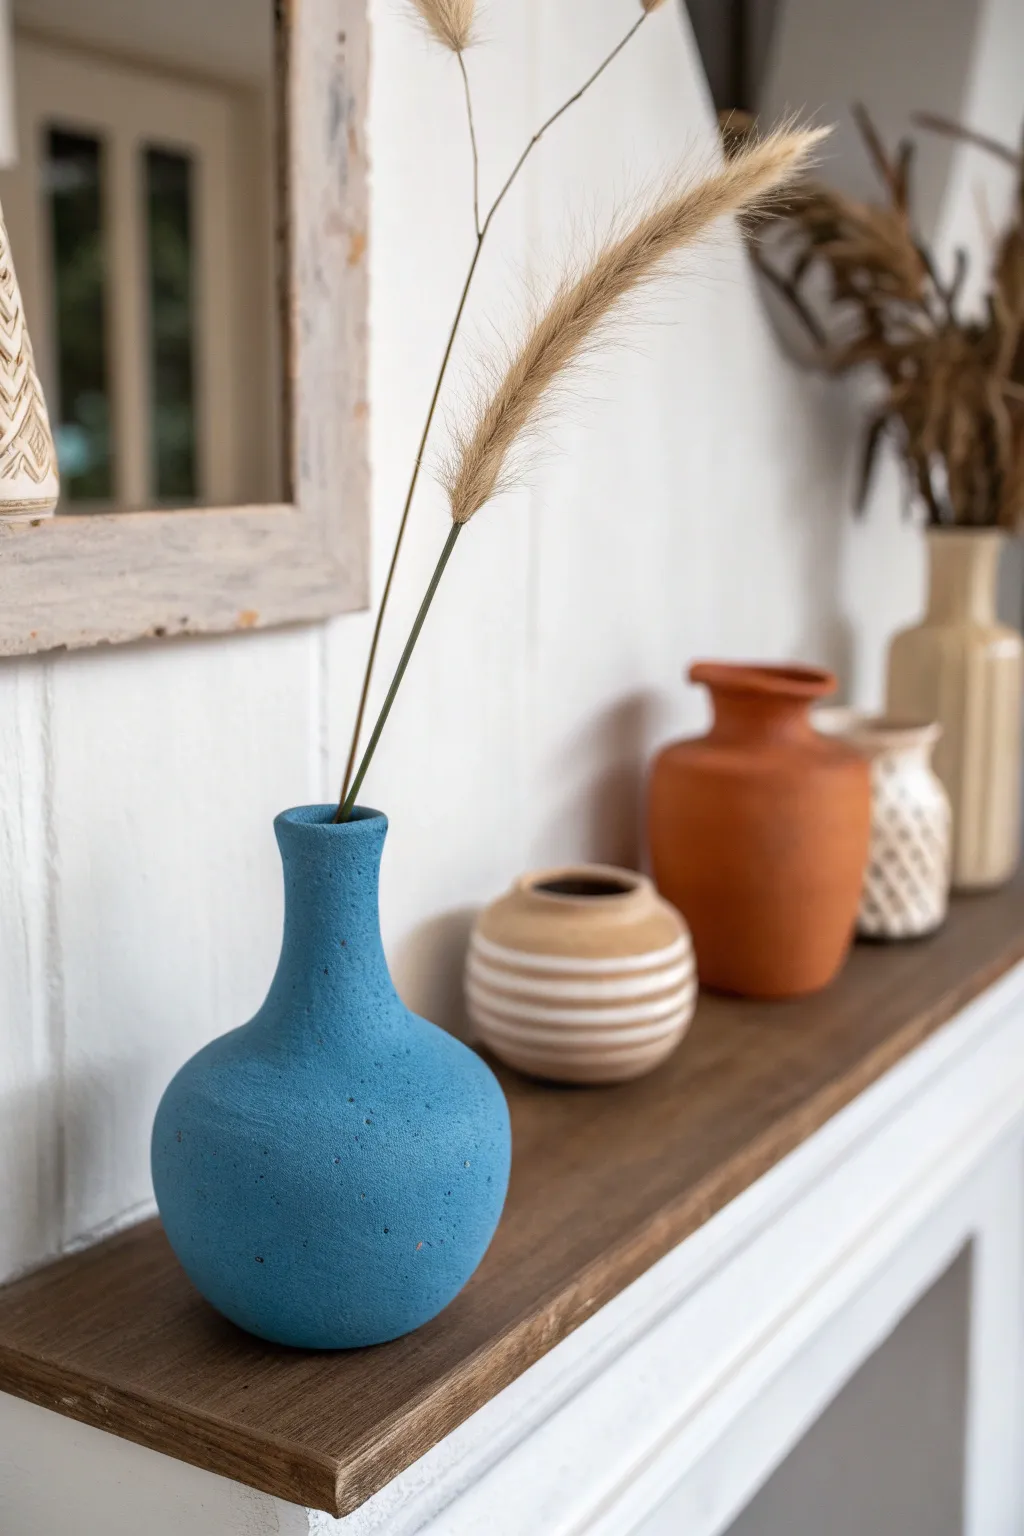
Learn how to transform simple glass or thrifted bottles into stunning faux-ceramic decor elements. This tutorial focuses on recreating the striking textured blue bud vase and its companion pieces for a cohesive, minimalist shelf styling.
Step-by-Step Tutorial
Materials
- Glass bud vase or small bottle (for the blue vase base)
- Small round glass jar or vase (for the striped vase base)
- Acrylic paint (Matte Electric Blue, Terra Cotta, Warm Beige, White)
- Baking soda or baking powder
- Matte mod podge or matte sealant spray
- Paint brushes (medium flat brush and small detail brush)
- Mixing cups or palette
- Sandpaper (fine grit)
- Dried bunny tails or pampas grass for styling
Step 1: Preparation & Texture Mixing
-
Clean the Vessels:
Begin by thoroughly washing your glass vessels with warm soapy water to remove any dust or grease. Dry them completely with a lint-free cloth. -
Sand for Adhesion:
Lightly scuff the sleek glass surfaces with fine-grit sandpaper. This creates a better ‘tooth’ for the paint to grip onto, preventing peeling later on. -
Mix the Texture Medium:
In a mixing cup, pour your vibrant blue acrylic paint. Gradually add baking soda in a 1:1 ratio. The goal is a fluffy, mousse-like consistency that holds its shape but is still spreadable. -
Consistency Check:
If the mixture is too clumpy, add a drop of water or more paint. If it’s too runny, sprinkle in more baking soda. I find a slightly thicker paste creates that authentic stone-like look.
Paint Cracking?
If the texture paste cracks while drying, your layer was likely too thick. Simply brush a thin layer of plain paint over the cracks to fill and seal them.
Step 2: Creating the Blue Vase
-
Base Layer Application:
Using a flat brush, apply the blue texture mixture to your tall bud vase. Use horizontal strokes around the neck and vertical dabbing motions on the bulbous bottom to build texture. -
Adding Depth:
While the first coat is still tacky, stipple the paint with the tip of your brush. This creates the pitted, porous look seen in the reference image. -
Dry and Repeat:
Let this layer dry for about 30-45 minutes. Apply a second coat if you can still see glass showing through, focusing on any bald spots. -
Create Faux Imperfections:
To mimic the speckled look of raw clay, dip an old toothbrush into a tiny bit of watered-down grey or black paint and gently flick it over the dried blue surface. Keep this very subtle.
Pro Tip: Color Depth
Mix a tiny drop of dark grey into your blue paint before adding baking soda. It dulls the plastic brightness of acrylics for a more natural, earthy clay hue.
Step 3: Creating the Striped Vessel
-
Base Coat:
Mix a warm beige paint with a smaller amount of baking soda (about 2 parts paint to 1 part soda) for a smoother, yet matte finish. Paint the entire small round vessel and let it dry. -
Mapping the Stripes:
Once the base is bone dry, use a pencil to lightly mark where your horizontal white stripes will go. Imperfection is key here for a handmade aesthetic. -
Painting Stripes:
Using a small detail brush and plain white matte acrylic (no baking soda needed here), carefully paint the horizontal bands. Rotate the vase slowly as you work. -
Softening Edges:
If the lines look too sharp, gently tap them with your finger before the paint fully dries to blur the edges slightly into the textured base.
Step 4: Finishing Touches
-
Creating the Terra Cotta Look:
For the background vase, mix burnt orange paint with baking soda. Apply it thickly, smoothing it out with your finger rather than a brush for a traditional earthenware feel. -
Seal the Projects:
Once all vases are completely dry (I suggest waiting overnight), apply a coat of matte Mod Podge or spray gently with a matte sealant to protect the texture. -
Insert Botanicals:
Select two or three stems of dried bunny tail grass. Trim the stems to varying lengths so they stagger naturally when placed in the blue bud vase. -
Clean Up the Rims:
Check the mouth of each vase. If paint got inside the rim where it shouldn’t be, use a damp cloth wrapped around your finger to wipe the inner edge clean for a professional finish. -
Final Arrangement:
Place your new textured blue vase in the foreground, with the terra cotta and striped vessels grouped behind it on a wooden shelf to complete the scene.
Enjoy styling your shelf with these custom, high-end looking pieces that bring warmth and texture to your space


What Really Happens Inside the Kiln
Learn how time and temperature work together inside the kiln to transform clay into durable ceramic.
Textured Frame Photo Prop Image
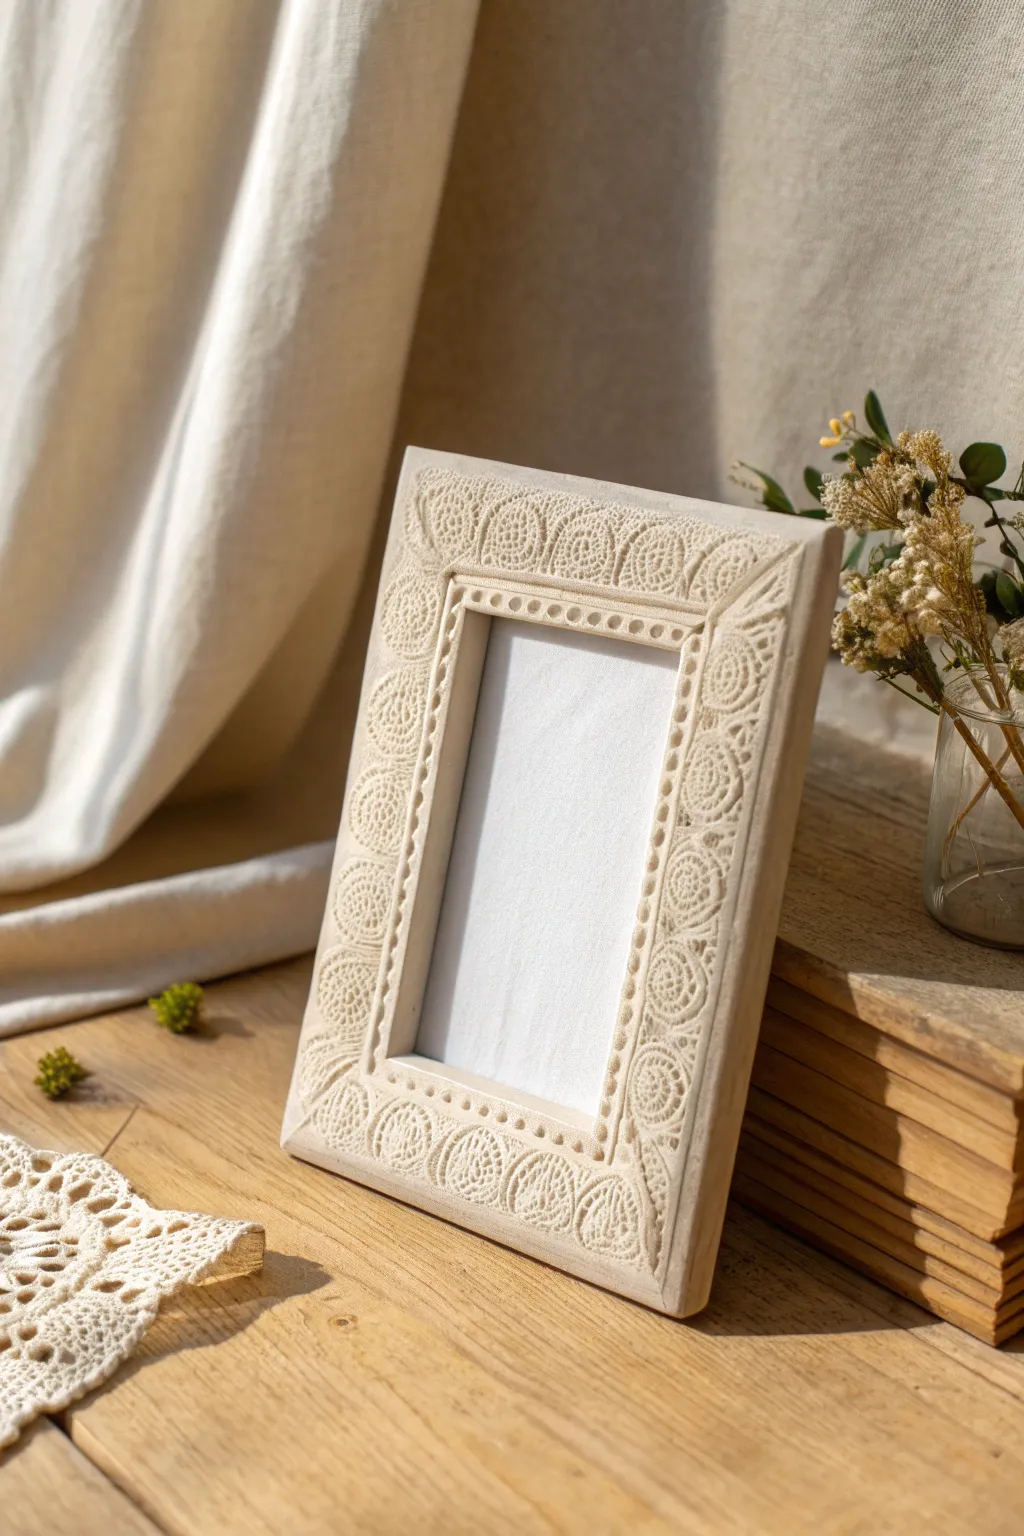
Transform a plain wooden frame into a vintage-inspired masterpiece using air-dry clay and the intricate patterns of crochet lace. This project captures a soft, romantic aesthetic with tactile detailing that makes any photo feel like a treasured heirloom.
Step-by-Step Guide
Materials
- White or cream air-dry clay (approx. 500g)
- Wide, flat wooden picture frame (unfinished is best)
- Vintage crochet lace ribbon or doily (heavy texture is key)
- Rolling pin
- PVA glue or heavy-duty craft glue
- Craft knife or clay trimming tool
- Small dotting tool or blunt toothpick
- Sandpaper (fine grit)
- Small bowl of water
- Clear matte varnish or sealant spray
Step 1: Preparation & Base Layer
-
Prep the frame:
Remove the glass and backing from your wooden frame. If the frame is varnished, give it a light sanding so the glue and clay adhere better. Wipe away any dust with a damp cloth. -
Condition the clay:
Knead your air-dry clay until it is soft, warm, and pliable. This prevents cracking later. I like to keep a damp sponge nearby to moisten my fingers if the clay starts feeling too dry. -
Roll out the slab:
Roll the clay out on a smooth, non-stick surface until it’s about 3-4mm thick. Ensure the slab is large enough to cover at least one side of the frame, or do it in sections if working with a very large frame. -
Apply adhesive:
Brush a generous, even layer of PVA glue onto the front face of the wooden frame. Don’t let it pool, but ensure total coverage.
Step 2: Creating the Texture
-
Lay the clay:
Carefully lift your clay sheet and lay it over the glued frame surface. Press it down gently with your palms to remove air bubbles, but try not to distort the thickness. -
Impress the lace:
Place your crochet lace or doily over the clay on the frame. Using the rolling pin, roll firmly over the lace to press the pattern deep into the soft clay. You want a distinct, deep impression. -
Reveal the pattern:
Slowly peel back the lace to reveal the beautiful textured design. If any areas look faint, you can carefully re-lay the lace and press specifically on those spots with your thumb. -
Trim the edges:
Use a sharp craft knife to trim the excess clay flush with the outer and inner edges of the frame. Hold the blade vertical for a clean, professional cut. -
Smooth the sides:
Dip your finger in a little water and run it along the cut edges (both inner and outer) to smooth out any roughness from the knife cut. You want the clay to transition seamlessly to the wood edge.
Pattern Precision
Dust your lace doily with a tiny bit of cornstarch before pressing it into the clay. This acts as a release agent and ensures the fabric doesn’t stick and ruin the crisp details.
Step 3: Detailing & Finishing
-
Create the border:
Roll a very thin snake -
Attach the border:
Apply a tiny amount of water or slip (clay mixed with water) to the inner rectangle of the frame face. Lay the thin clay snake around this inner perimeter to create a raised border. -
Add dotted details:
Using a small dotting tool or the blunt end of a toothpick, press small indentations into the raised border snake at even intervals. This mimics the beaded look seen in the inspiration image. -
Check corners:
If you want the diagonal ‘mitered’ look in the corners, use your knife to gently score a diagonal line from the inner corner to the outer corner, pressing slightly to separate the pattern visually. -
Dry properly:
Lay the frame flat to dry in a cool, dry place away from direct sunlight. Drying too fast can cause warping. Let it sit for at least 24-48 hours until completely hard and white. -
Sand imperfections:
Once fully dry, check the edges again. If they feel sharp or rough, very gently sand them with fine-grit sandpaper. -
Seal the work:
To protect against moisture and dust, spray the finished frame with a clear matte sealant. This preserves the raw, natural look of the clay while making it more durable.
Vintage Wash
After sealing, apply a diluted brown acrylic wash and wipe it back immediately. The dark paint will settle into the impressed lace crevices, making the texture pop significantly.
Place your favorite photo inside and admire the timeless elegance you’ve added to your decor
Color-Block Candle Holder Image

Create a stunning, modern sculpted centerpiece using simple geometric forms and a calming, earthy color palette. This architectural candle holder features stacked cylinders and rounded shapes in contrasting terracotta, slate blue, and beige tones.
Detailed Instructions
Materials
- Polymer clay or air-dry clay (terra cotta, slate blue, and beige)
- Acrylic rolling pin
- Clay blades or craft knife
- Circle cutters (various sizes)
- Sandpaper (fine grit)
- Strong craft glue or liquid clay
- Standard taper candle (for sizing)
- Acrylic paints (if using white clay)
- Matte varnish (optional)
Step 1: Creating the Base Components
-
Prepare the lowest tier:
Start by conditioning a large portion of slate blue clay until it is soft and pliable. Roll it into a thick slab, approximately 3/4 inch high. Use your largest circle cutter to punch out a disk for the very bottom of the stack. -
Form the second tier:
Take your terracotta-colored clay and form a cylinder of equal diameter to the blue base but slightly taller. You can achieve this by stacking two thick cutouts together and smoothing the seam with your thumb or a clay tool. -
Add the beige accent:
Roll out a thin sheet of beige or granite-effect clay. Cut a circle the same diameter as your terracotta cylinder and gently press it onto the top of the terracotta piece to create a color-blocked cap. -
Smooth the edges:
Before moving on, take a moment to roll the sides of your cylindrical pieces on your work surface to ensure they are perfectly round and the seams between colors are flush.
Wobbly Stack?
If your tower leans, your cut ends aren’t perfectly flat. Gently rub the bottom of each hardened section against sandpaper on a flat table until level.
Step 2: Sculpting the Middle Section
-
Shape the rounded bead:
Roll a ball of terracotta clay and gently flatten it into a thick, rounded disk, similar to a squashed sphere or a large bead. This will sit in the center of the stack. -
Create the hourglass connection:
Using slate blue clay, form a shape that resembles an hourglass or two truncated cones joined at the narrow points. I find it easiest to make two separate cone shapes and join them together. -
Test the fit:
Temporarily stack your blue hourglass shape on top of the rounded terracotta bead to ensure the proportions look balanced. The hourglass should flare out to meet the width of the upper tier.
Pro Tip: Seamless Color
To keep lighter clays (like the beige caps) clean, wash your hands thoroughly or use baby wipes when switching from dark colors like the rust or blue.
Step 3: Forming the Top Holder
-
Construct the main upper cylinder:
Create another thick cylinder using the terracotta clay, matching the width of the lower section. Ensure the sides are vertical and straight. -
Apply the top cap:
Just like the lower section, roll out a thin layer of beige clay, cut a circle, and press it firmly onto the top of this upper terracotta cylinder. -
Create the candle socket:
Take your actual taper candle and press it gently into the center of the beige top to create an indentation. Wiggle it slightly to ensure the hole is wide enough, then remove the candle. -
Deepen the socket:
Use a specialized clay tool or the handle of a paintbrush to carefully deepen the hole you just made, ensuring it is deep enough to hold the candle securely upright.
Step 4: Assembly and Finishing
-
Check vertical alignment:
Do a dry run of your full stack: Blue base, terracotta mid-section, rounded bead, blue hourglass, and finally the top terracotta cylinder. Look from all sides to ensure it isn’t leaning. -
Insert structural support (optional):
For extra stability, especially with air-dry clay, you can insert a wooden skewer or wire through the center of all pieces while the clay is still wet. -
Join the pieces:
If using polymer clay, apply a thin layer of liquid clay between each tier. If using air-dry clay, score the surfaces and add a dab of slip or glue before pressing them together. -
Bake or dry:
Follow the manufacturer’s instructions to cure your piece. Polymer clay usually bakes at 275°F (130°C), while air-dry clay will need 24-48 hours to fully harden. -
Sand for perfection:
Once fully cured and cooled, use fine-grit sandpaper to smooth out any fingerprints or rough edges on the sides of the cylinders. -
Final wipe down:
Wipe the sculpture with a slightly damp cloth to remove sanding dust. The matte finish is part of the charm, so no glossy varnish is needed unless you prefer it.
Place your favorite taper candle inside and enjoy the sculptural beauty of your new handmade decor piece

TRACK YOUR CERAMIC JOURNEY
Capture glaze tests, firing details, and creative progress—all in one simple printable. Make your projects easier to repeat and improve.
Hanging Cone Planter Image
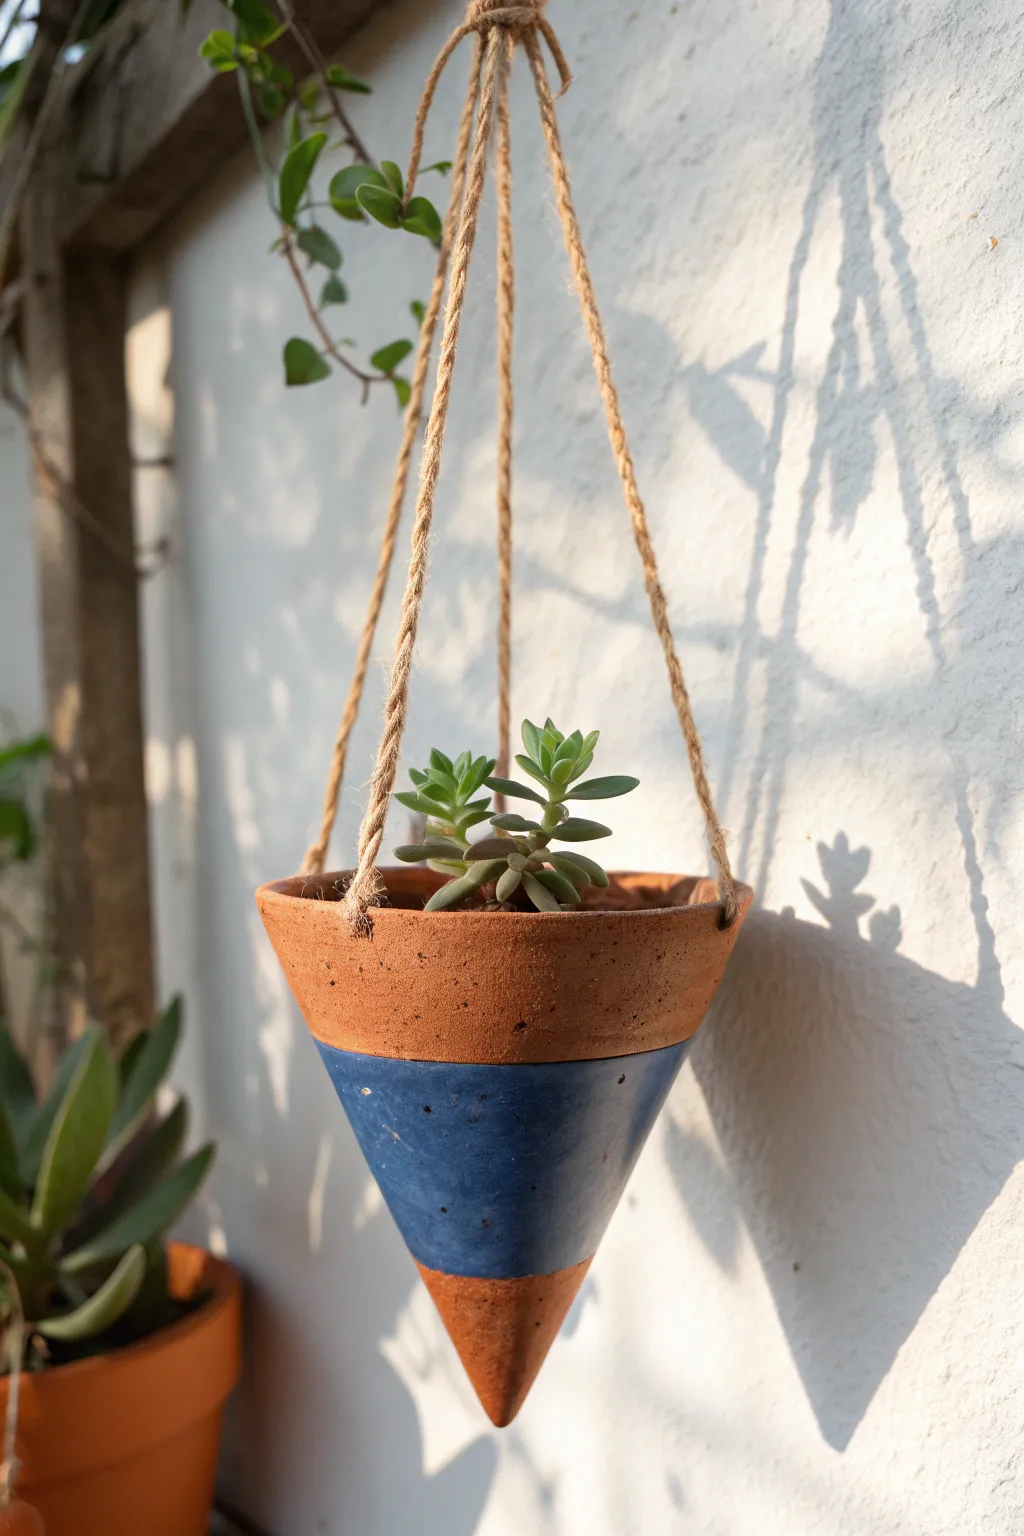
Embrace a minimalist aesthetic with this striking cone-shaped planter featuring a bold color block design. The natural terracotta texture combined with a deep blue accent creates a modern look perfect for trailing succulents.
How-To Guide
Materials
- Air-dry clay (terracotta color) or oven-bake clay
- Rolling pin
- Cone form (stiff cardstock or plastic cone)
- Clay knife or craft blade
- Water and sponge for smoothing
- Drinking straw or small circular cutter
- Acrylic paint (Deep Navy Blue)
- Painter’s tape
- Sponge brush or flat synthetic brush
- Matte spray varnish/sealant
- Jute twine or macramé cord
- Small succulent and potting mix
Step 1: Creating the Cone Form
-
Prepare your template:
Start by creating a sturdy mould for your clay. Roll a piece of stiff cardstock into a tight cone shape about 6-7 inches tall. Tape it securely along the seam so it holds its shape. -
Protect the form:
Wrap your cardstock cone in parchment paper or cling film. This crucial step prevents the clay from sticking to the paper as it dries. -
Roll the clay:
Take a large handful of terracotta-colored clay and knead it until soft. Roll it out on a flat surface to an even thickness of about 1/4 inch. -
Wrap the clay:
Lay your prepared cone form onto the clay slab. Gently roll the cone over the clay, wrapping the slab around the form. Use your knife to trim away excess clay, creating a single seam where the edges meet. -
Seal the seam:
Score (scratch) both edges of the seam and add a tiny bit of water (slip). Press the edges together firmly and smooth over the join with your finger or a modelling tool until the seam is invisible.
Step 2: Refining and Drying
-
Trim the rim:
Stand the cone upside down (point up) or hold it steady. Use your knife to cut a clean, straight line around the wide opening to create an even rim. -
Smooth surfaces:
Dip a sponge in water and gently wipe the entire exterior of the cone. This removes fingerprints and creates that professional, smooth finish visible in the photo. -
Create hanging holes:
Using a drinking straw or small circular cutter, punch three or four holes evenly spaced around the rim, about half an inch down from the top edge. -
Initial drying:
Allow the clay to dry while still on the form for at least 24 hours to help it hold its shape. Support it upright in a tall jar if needed. -
Final drying:
Once stiff, gently slide the cardboard form out. Let the clay dry completely for another 24-48 hours (or bake according to package instructions) until it is light in color and hard.
Uneven Color Coverage?
Terracotta absorbs paint quickly. Priming the painted area with a layer of white acrylic or gesso first will make your blue pop and require fewer coats.
Step 3: Painting and Assembly
-
Masking off:
To achieve the crisp line shown in the image, apply painter’s tape horizontally around the cone. Place one strip about 2 inches from the top rim, and another strip about 2 inches from the bottom point. -
Applying color:
Using a sponge brush, dab deep blue acrylic paint into the center section between the tape lines. I find dabbing rather than stroking prevents paint from bleeding under the tape. -
Remove tape:
Peel off the tape while the paint is still slightly tacky to ensure a sharp, clean edge. -
Speckling (Optional):
For added texture, you can flick a toothbrush with slightly diluted black or white paint over the blue section to create a subtle speckled effect. -
Sealing:
Spray the entire planter, inside and out, with a matte varnish. This seals the clay and protects the paint from water damage. -
Attach suspension:
Cut three equal lengths of jute twine. Thread one end through each hole from the outside in and tie a large knot on the inside to secure it. -
Gather and hang:
Bring all three strings together at the top, ensuring the planter hangs level. Tie them into a strong overhand knot to create the hanging loop.
Level Up: Texture Play
Before the clay dries, press a piece of lace or burlap into the unpainted top section. This adds a beautiful embossed tactile contrast to the smooth painted band.
Now you have a stylish, mid-century modern inspired home for your favorite little plant
Marbled Swirl Tray Image
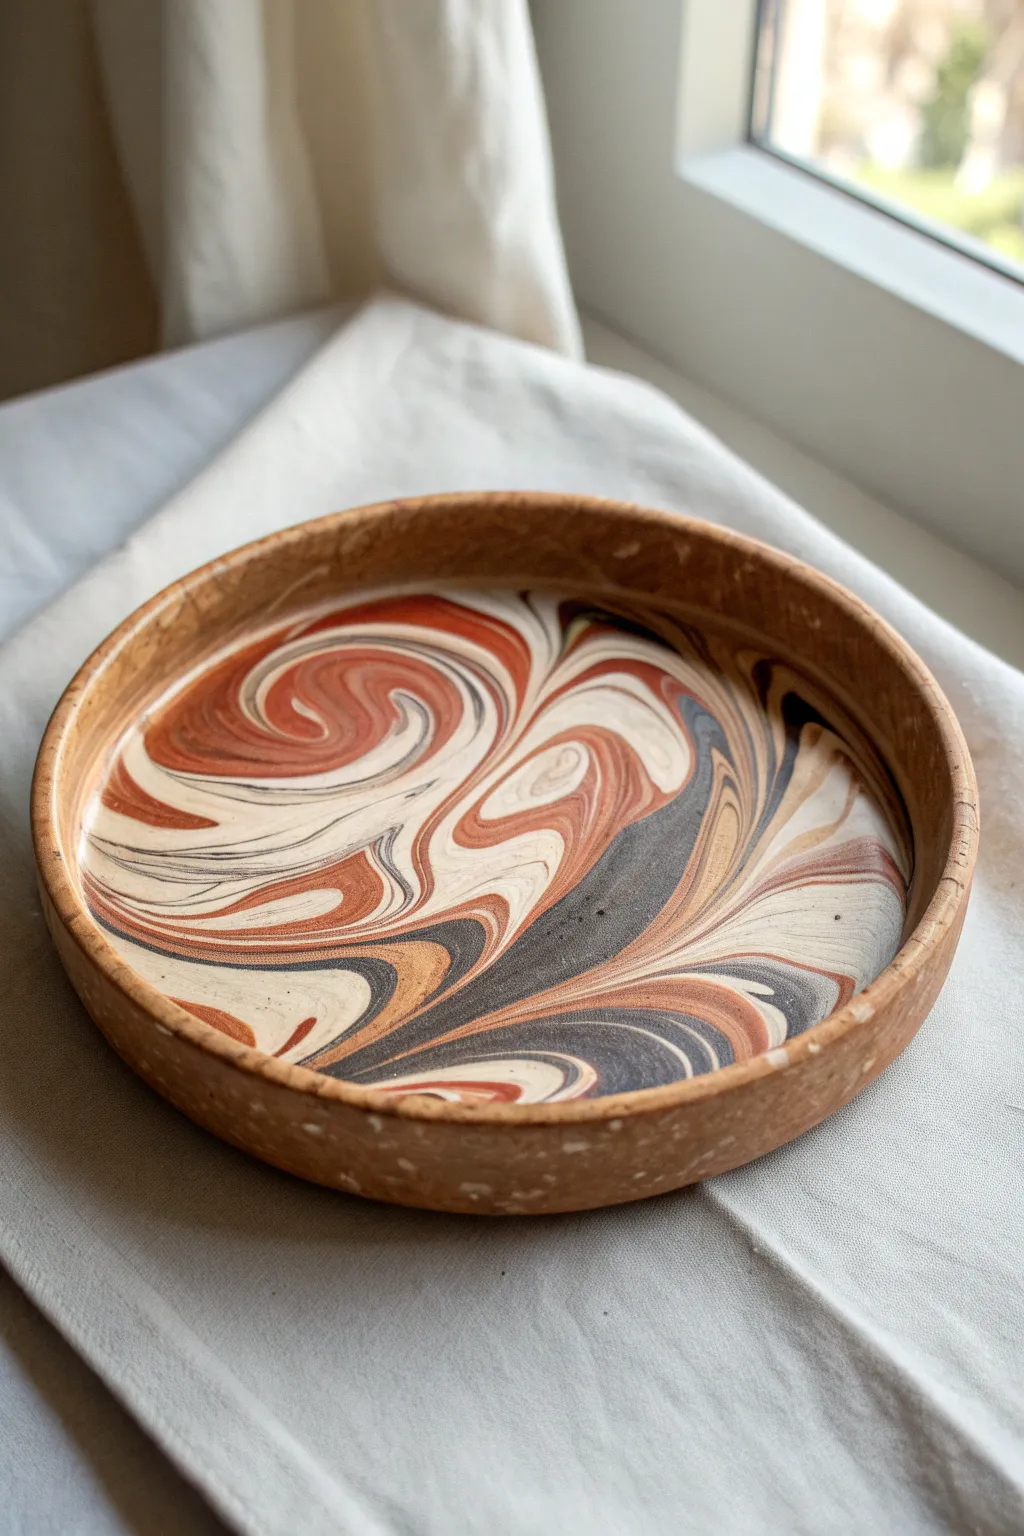
This stunning catch-all tray combines the warmth of earthy terracotta tones with mesmerizing, fluid patterns. Using polymer or air-dry clay, you’ll create a sophisticated marbled effect that mimics high-end stoneware pottery.
Detailed Instructions
Materials
- Polymer clay or air-dry clay (Terracotta/Red-Brown, White/Cream, Black/Dark Grey, Tan)
- Acrylic roller
- Circle cutter or sharp craft knife
- Round bowl or plate (to use as a mold)
- Sandpaper (fine grit)
- Gloss glaze or varnish
- Soft paintbrush
- Ceramic tile or glass work surface
Step 1: Preparing the Clay
-
Condition the clay:
Start by kneading each color of clay separately until it is soft and pliable. This step is crucial prevents cracking later on. -
Form the logs:
Roll each color into a long, thin snake or log. The terracotta log should be slightly thicker if you want it to be the dominant color. -
Combine the colors:
Gather your snakes of clay and twist them together into one large rope. Fold the rope in half and twist again. -
Create the marble effect:
Keep twisting, folding, and rolling the clay until you see fine streaks of color. Be careful not to over-mix, or the colors will turn muddy instead of distinct swirls. -
Compress into a ball:
Once you are happy with the color distribution, roll the twisted rope into a smooth, tight ball.
Step 2: Shaping the Tray
-
Roll out the slab:
Place the ball on your work surface and use your acrylic roller to flatten it. Roll from the center outwards, rotating the clay frequently to keep a circular shape. -
Check thickness:
Aim for a uniform thickness of about 1/4 inch. If the slab is too thin, the tray might be fragile; too thick, and it will look chunky. -
Cut the circle:
Place your bowl or a template over the rolled clay slab. Use your craft knife to cut heavily around the edge for a perfect circle. -
Create the rim:
Roll a separate, long snake of the terracotta-colored clay (or a marbled mix if preferred) to serve as the raised rim. -
Attach the rim:
Score the outer edge of your base circle and the bottom of your rim snake. Apply a tiny amount of water or liquid clay (depending on your clay type) and press the rim firmly onto the base. -
Blend the seams:
I always take extra time here to smooth the clay where the rim meets the base using a modeling tool or your finger, ensuring there is no visible seam on the inside or outside.
Clean Cuts
Wipe your craft knife with a little baby oil or water before cutting. This prevents the blade from dragging and distorting your perfect marble pattern.
Step 3: Finishing Touches
-
Texture the exterior (optional):
To mimic the speckled stoneware look in the photo, you can gently press coarse sand or salt into the exterior rim before baking, or lightly stipple it with a toothbrush. -
Refine the shape:
Place your clay circle inside a curved bowl to help it hold a slight concave shape while it cures. -
Cure or dry:
If using polymer clay, bake according to the package instructions. If using air-dry clay, let it sit undisturbed for 24-48 hours until fully hard. -
Sand the edges:
Once fully cured and cooled, use fine-grit sandpaper to smooth out any rough spots on the rim or bottom. -
Seal the piece:
Apply a coat of gloss glaze or varnish to the interior to make the marble pattern pop and protect the surface. Leave the outside matte for that rustic contrast.
Muddy Colors?
If your colors are blending into a single brown shade, stop mixing immediately. You likely over-kneaded. Twist less on your next attempt for distinct lines.
Place your finished tray on a coffee table or vanity to hold your favorite trinkets