When I’m planning kindergarten clay time, I always aim for projects that feel playful, colorful, and totally doable with little hands. These ideas lean hard into simple shapes and fine motor skills, so your kids get a finished piece they’ll be genuinely proud of.
Pinch Pot Nests With Tiny Birds

These charming little bird nests introduce the classic pinch pot technique in a way that feels organic and sweet. With earthy terracotta tones and a splash of bright blue, this project combines simple pottery skills with tactile collage materials for a lovely springtime display.
Step-by-Step Guide
Materials
- Terracotta air-dry clay (or polymer clay)
- Blue acrylic paint or light blue air-dry clay
- Small black beads (for eyes)
- Dried grass, hay, or shredded raffia
- Pointed sculpting tool or toothpick
- Water in a small cup
- Sponge or paper towels
- Paintbrush (if painting)
Step 1: Shaping the Nest Bowl
-
Roll a sphere:
Start with a chunk of terracotta clay about the size of a tangerine. Roll it between your palms until you have a smooth, round ball without major cracks. -
Start the pinch:
Hold the ball in one hand and gently push your thumb into the center, going about halfway down. Don’t push all the way through the bottom. -
Form the walls:
With your thumb still inside, gently pinch the clay between your thumb and fingers while rotating the ball in your palm. Press evenly to thin out the walls. -
Widen the bowl:
Continue pinching and turning until you have a shallow bowl shape. The walls should be roughly 1/4 inch thick to ensure they are sturdy enough for kindergarten hands. -
Texture the rim:
Instead of smoothing the rim perfectly, tap it lightly with your fingers to leave it slightly uneven and rustic, mimicking a natural mud nest. -
Rough the exterior:
Take a sculpting tool or just a rough stone and gently scratch or dab the outside of the bowl to give it an earthy, matte texture rather than a polished shine.
Keeping Damp
Keep a small bowl of water nearby. If the clay starts cracking while pinching the pot walls, dip a finger in water and smooth over the cracks immediately to keep the structure strong.
Step 2: Creating the Little Birds
-
Form the bodies:
Take two smaller pieces of clay—one terracotta and one blue (or use terracotta for both and paint later). Roll them into smooth egg shapes about the size of a large grape. -
Flatten the base:
Tap the wider end of the egg shape gently on the table so the bird can stand up on its own without rolling over. -
Add the eyes:
While the clay is still soft, press two tiny black beads into the upper part of the tapered end to create eyes. Push them in deep enough so they stay put when the clay dries. -
Scratch feather details:
Using a toothpick or sharp tool, gently scratch messy zig-zag lines or cross-hatching across the lower ‘belly’ of the bird to suggest fluffy down feathers. -
Dry the pieces:
Set the bowl and the birds aside to dry completely according to your clay package instructions. This usually takes 24 hours for air-dry clay.
Natural Speckles
Mix a tiny pinch of used coffee grounds or sand into the clay before helping the children roll their bird shapes. This adds a realistic, speckled eggshell texture to the creatures.
Step 3: Assembly
-
Paint (Optional):
If you used only terracotta clay, now is the time to paint one of your birds a bright robin’s egg blue. Let the paint dry completely before handling. -
Prepare the nesting material:
Take a handful of dried grass, hay, or shredded raffia. Twist it into a loose circle that fits inside your clay bowl. -
Fill the bowl:
Place the grass ring into the dried clay bowl, pressing it down slightly to create a cozy depression in the center. -
Place the birds:
Nestle your two clay birds into the grass side-by-side, angling them slightly toward each other for a friendly look.
Display these little nests on a windowsill where the natural light can highlight the earthy textures


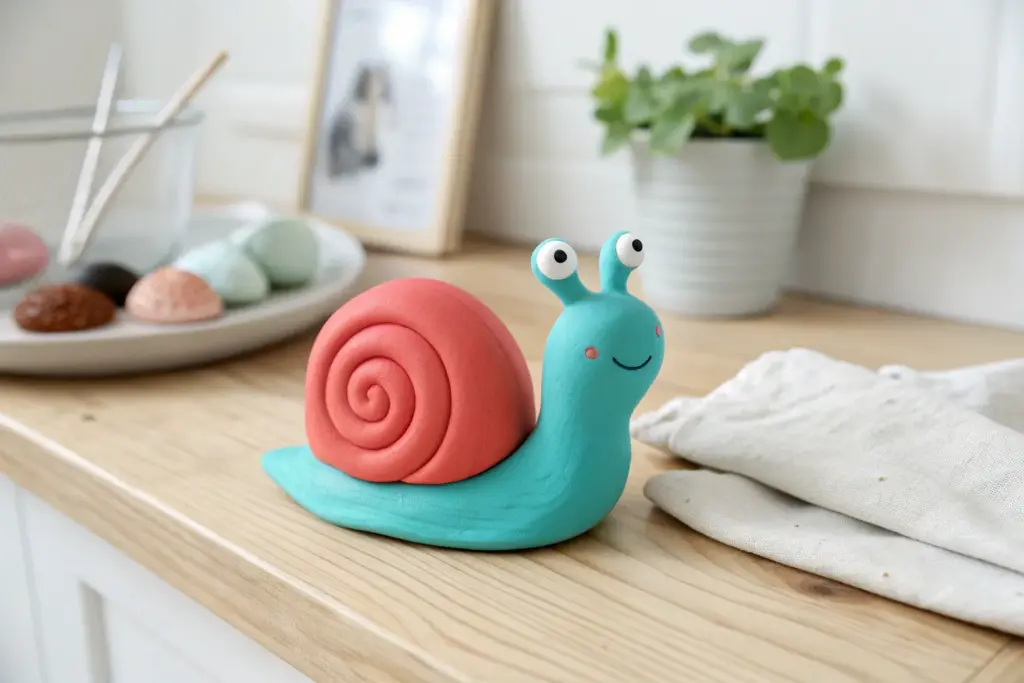
Coil Snakes With Texture Patterns
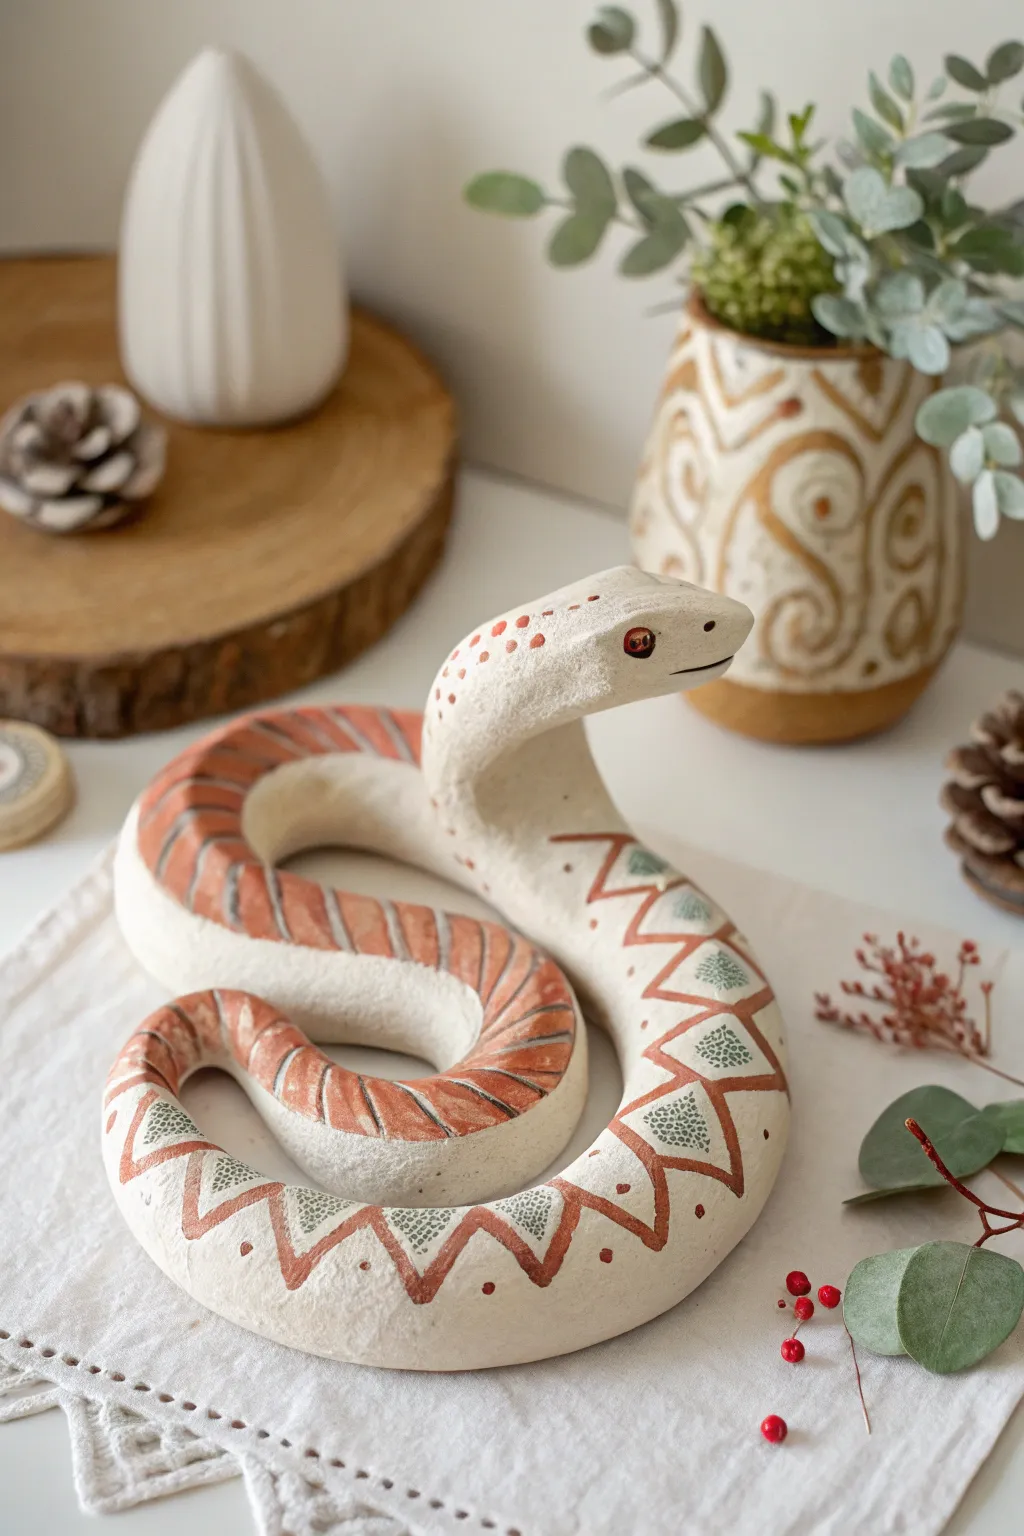
Go beyond the basic playdough worm with this sophisticated take on a classic kindergarten project. This coiled snake features a smooth finish and beautiful geometric patterns painted in earthy terracotta and sage tones, making it lovely enough to display on a shelf.
Detailed Instructions
Materials
- Air-dry clay (white or light grey)
- Acrylic paints (terracotta/rust orange, sage green, dark brown/black, off-white)
- Fine-grit sandpaper
- Small flat brush
- Fine detail brush or toothpick
- Cup of water
- Rolling surface or mat
Step 1: Sculpting the Form
-
Condition the clay:
Start with a grapefruit-sized ball of air-dry clay. Knead it in your hands until it feels warm, pliable, and free of cracks. -
Roll the coil:
Place the clay on your table and roll it back and forth with opened palms to create a long, thick snake. Aim for a coil that is about 1 inch thick and roughly 18-20 inches long. -
Taper the tail:
Focus your rolling on one end of the coil to gently taper it down to a narrower point for the tail, keeping the other end thick for the head. -
Form the head:
On the thick end, gently flatten the clay slightly to widen it, then pinch the sides to create a diamond-shaped viper head. Smooth out any transition lines with a wet finger. -
Coil the body:
Starting with the tail, wind the snake into a loose spiral. Lay the coils flat on the table, looping back and forth in an ‘S’ shape rather than a tight cinnamon roll, so the body looks relaxed. -
Raise the head:
Lift the head section so it rests on top of the mid-section of the body. Prop it up slightly if needed with a crumpled piece of paper towel until it can hold its own weight. -
Smoothing:
Dip your finger in water and run it over the entire surface to smooth out fingerprints and cracks. Let the sculpture dry completely (usually 24-48 hours depending on humidity).
Cracking Up?
If cracks appear while drying, don’t restart. Mix a tiny bit of fresh clay with water to make a paste (slip) and fill the cracks, then smooth it over.
Step 2: Refining and Painting
-
Sand the surface:
Once fully dry, lightly sand the snake with fine-grit sandpaper to remove any rough texture or bumps. Wipe away the dust with a slightly damp cloth. -
Base coat:
Apply a coat of off-white acrylic paint to the entire snake to create an even, matte canvas. I like to let this dry briefly before checking if a second coat is needed to hide the raw clay color. -
Paint the dorsal stripe:
Using the terracotta paint and a flat brush, paint a series of bold, diagonal stripes along the upper ‘neck’ portion of the snake, just behind the head. -
Create the triangle pattern:
Moving down the body, switch to painting a zigzag line that creates a row of connected open triangles along the snake’s spine. -
Fill the triangles:
Inside every other triangle along the back, paint a smaller, inverted triangle using the sage green paint. Use a detail brush for sharp corners. -
Add dotted details:
Inside the green triangles, use a toothpick or very fine brush to stipple tiny off-white or dark dots for texture. Add terracotta dots on the top of the head for extra detail. -
Detail the head:
Paint a small oval eye using black or dark brown paint, adding a tiny red or orange rim around it if you have a steady hand. Use a thin line to define the mouth slit. -
Decorative accents:
Add small dots along the lower flanks of the snake, mirroring the rhythm of the zigzag pattern above. -
Seal (optional):
If you want a glossy finish or extra durability, apply a layer of matte or satin varnish over the painted snake once the acrylics act totally dry.
Rattle Snake Twist
Before the tail dries, hollow out the very tip and place a small dried bean or bead inside, then seal it shut. It will rattle when shaken.
Now you have a charming, artisan-style reptile to guard your desk or bookshelf


Easy Clay Turtles With Patterned Shells
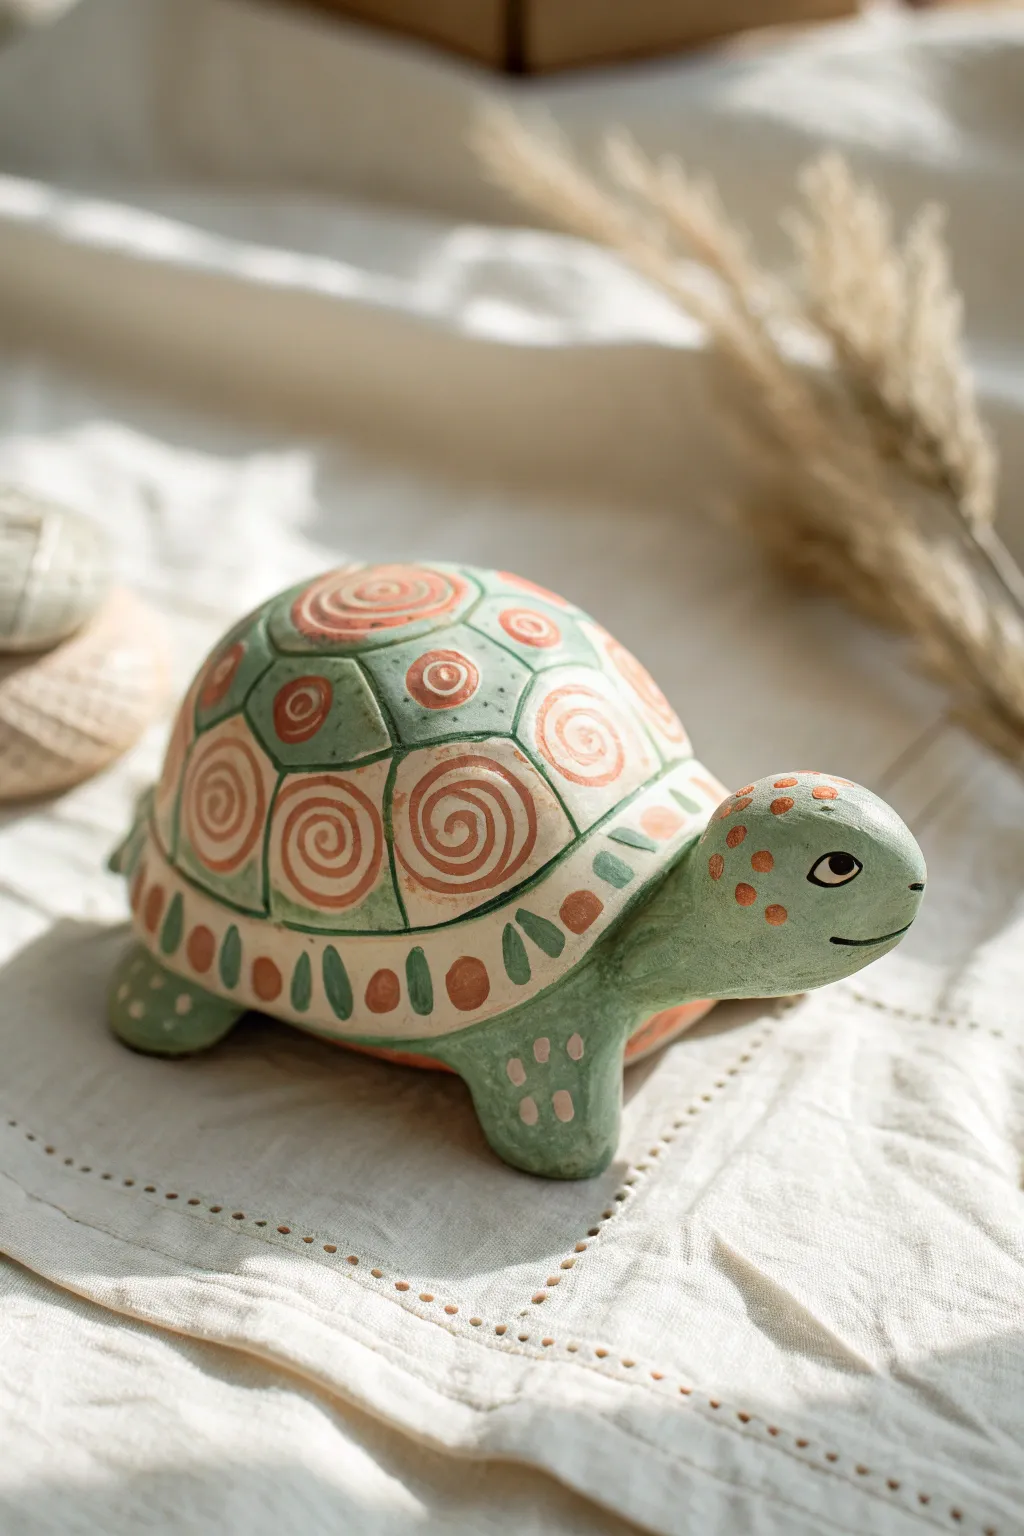
Create a charming desk companion with this stylized turtle project, featuring a delightful spiral-patterned shell and gentle character details. The muted green and terracotta color palette gives it a timeless, earthy feel that looks fantastic on any shelf.
Step-by-Step
Materials
- Air-dry clay (white or light grey)
- Acrylic paints (sage green, terracotta orange, off-white/cream, black)
- Clay sculpting tools (needle tool, small loop tool)
- Small rolling pin
- Paintbrushes (detail round brush and small flat brush)
- Cup of water
- Palette or small plate for mixing
- Matte sealant or varnish (optional)
Step 1: Sculpting the Base Form
-
Form the shell:
Start with a ball of clay about the size of a tennis ball. Gently flatten the bottom against your work surface while keeping a nice dusty dome shape on top for the shell. -
Create the head:
Roll a smaller ball of clay into a thick teardrop shape. Attach the wider end to the front of the shell, blending the clay seams together until smooth to ensure a strong bond. -
Shape the legs:
Roll four small cylinders of clay for the legs. Slightly flatten the bottoms so the turtle stands stably. Attach two near the front and two near the back, blending the seams carefully underneath. -
Smooth the surface:
Dip your finger in a little bit of water and rub it over the entire sculpture to remove any cracks or fingerprints. This is crucial for a clean painting surface later. -
Carve the shell segments:
Using a needle tool, lightly sketch the pattern onto the shell. Draw a central row of rounded shapes, then surround them with a ring of similar shapes to create the classic tortoise-shell grid. -
Add texture and dry:
Carve small circles or spiral motifs lightly into each shell segment if you want a guide for painting, though painting them freehand works too. Let the sculpture dry completely (usually 24-48 hours depending on humidity).
Smooth Seaming
When attaching legs or heads, ‘score’ (scratch) both surfaces and add a dab of water (slip) before pressing them together for a permanent bond.
Step 2: Applying the Base Colors
-
Base coat the shell:
Mix a creamy off-white color. Paint the entire shell dome first, getting into the carved grooves. You might need two layers for solid coverage. -
Paint the body:
Mix a soft sage green. Paint the head, legs, and the very bottom rim of the shell. I prefer using a slightly watered-down first coat to help the paint seep into the clay texture. -
Detail the shell segments:
Using the same sage green, carefully paint only the background areas of the shell segments, leaving large circles of the cream base color showing in the center of each segment. -
Outline the segments:
Use a very fine brush and the sage green (or a slightly darker green) to paint thin lines between the shell segments, defining the grid pattern clearly.
Step 3: Adding Patterns & Details
-
Paint the spirals:
In the center of your cream circles on the shell, use terracotta orange paint to create spiral designs. Start from the center and swirl outward. -
Add circular accents:
For the smaller segments along the top ridge, paint simple terracotta rings or solid dots instead of spirals to add variety to the pattern. -
Decorate the rim:
Along the bottom edge of the shell (the rim), paint alternating small ovals of sage green and terracotta orange to create a decorative border. -
Detail the face:
Using the terracotta paint, dab small polka dots onto the top of the turtle’s head and on the front legs. Keep them clustered on top like freckles. -
Paint the eye:
With a fine detail brush and black paint, carefully add the eye shape. Paint a small white highlight dot once the black is dry to bring the character to life. -
Draw the mouth:
Paint a simple, thin black line for a gentle smile. Keep it subtle and curved slightly upward. -
Seal the work:
Once all paint is thoroughly dry, apply a matte varnish to protect your artwork and uneven the sheen of the different paint colors.
Make it a Bank!
Before the clay dries, carefully cut a coin slot in the top of the shell and hollow out the underside to turn this art project into a functional piggy bank.
Now you have a sturdy little friend ready to brighten up your desk space


Ladybug Pebble Bugs on Leaf Bases
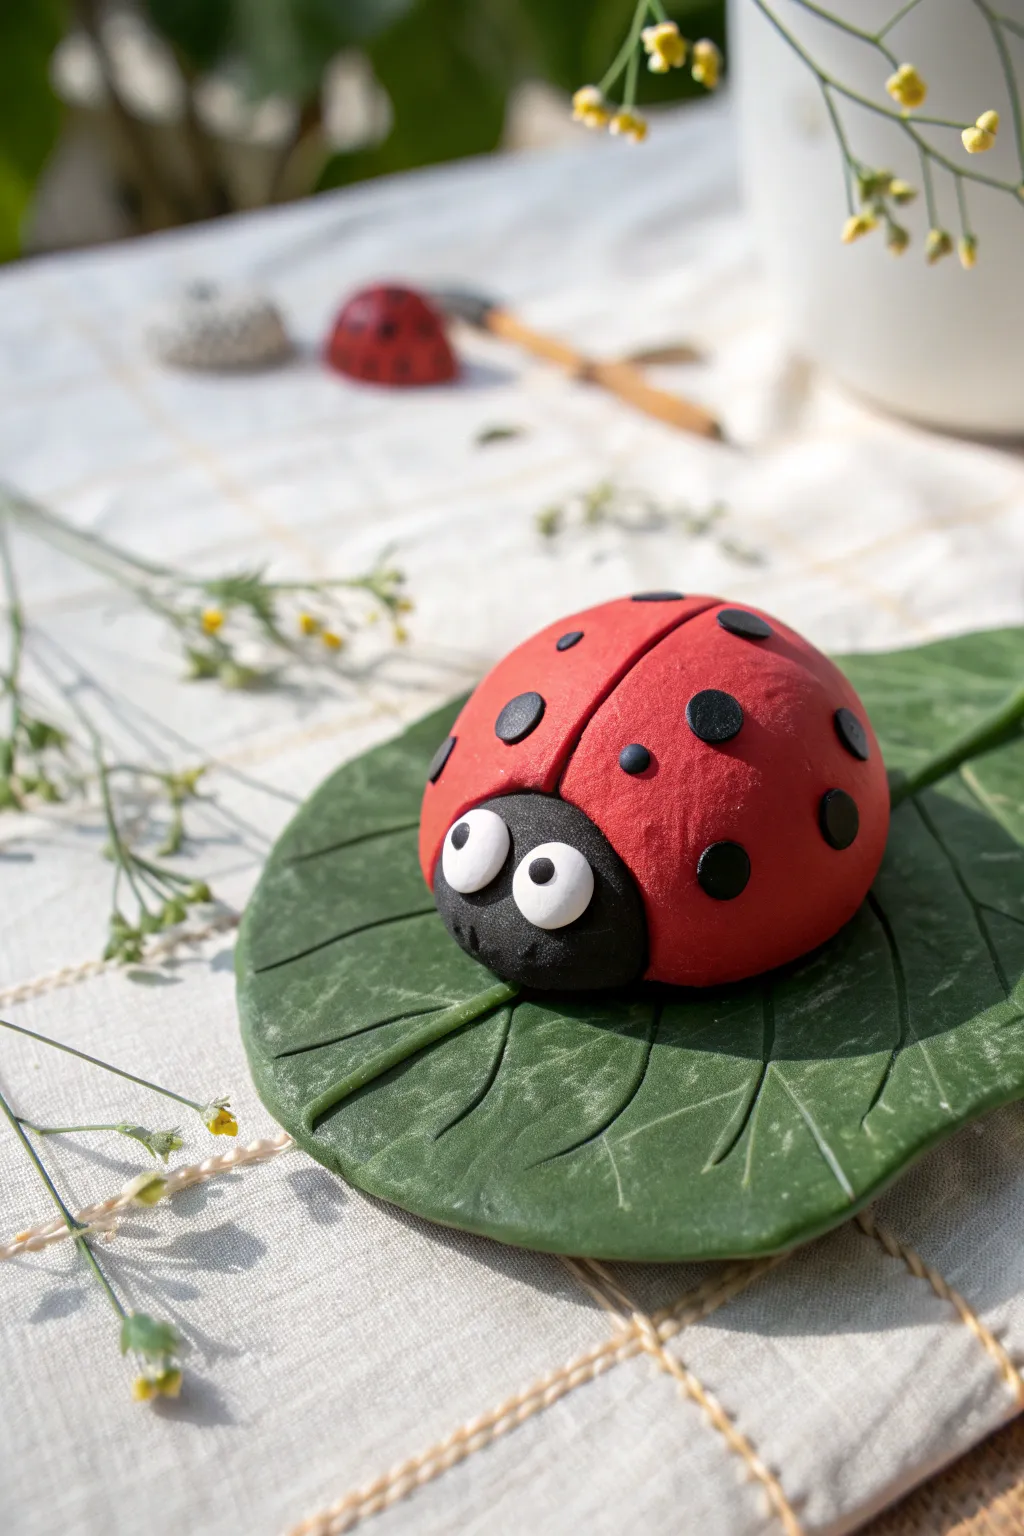
These charming little ladybugs are resting comfortably on their own custom-made leaves, creating a perfect garden scene. With bright red bodies and oversized cartoon eyes, this project is wonderful for practicing simple shapes and textures.
Detailed Instructions
Materials
- Red air-dry clay or modeling dough
- Black air-dry clay or modeling dough
- White air-dry clay or modeling dough
- Green air-dry clay or modeling dough
- Clay sculpting tools (plastic knife, small rolling pin)
- Small round cutter or cap (optional, for dots)
- Toothpick or skewer
- Parchment paper (work surface)
Step 1: Sculpting the Leaf Base
-
Mix and flatten:
Begin by taking a generous amount of green clay. Roll it into a smooth ball in your palms to remove cracks, then gently flatten it onto your parchment paper until it’s about 1/4 inch thick. -
Shape the leaf:
Use your fingers to pinch one side of the flattened circle slightly to creating a teardrop or classic leaf shape. You can keep the edges organic and slightly uneven for a natural look. -
Add texture:
Using a plastic knife tool or a toothpick, gently press a central vein running down the middle of the leaf. Don’t cut all the way through; just make an indentation. -
Detail the veins:
Branching out from that center line, press smaller diagonal veins onto the surface. This texture really brings the leaf to life.
Fixing Cracks
If you see cracks forming as you shape the red dome, dip your finger in a tiny bit of water and rub the clay gently to smooth it back together before it dries.
Step 2: Creating the Ladybug Body
-
Form the main dome:
Take a large piece of red clay and roll it into a smooth sphere. Gently press the bottom against your work surface to flatten it creating a dome shape. -
Create the wings:
Use your plastic knife tool to press a deep groove straight down the center of the red dome, starting from the back and stopping just before the front edge. This separates the wings. -
Shape the head:
Roll a smaller ball of black clay. Flatten one side slightly so it fits snugly against the front of the red body. -
Attach the head:
Press the black piece firmly onto the front of the red body. If the clay is dry, you might need a tiny dab of water or slip to make it stick.
Step 3: Adding Personality and Details
-
Make the spots:
Roll several very tiny balls of black clay. Flatten them between your fingers into thin discs to create the ladybug’s signature spots. -
Apply the spots:
Press the black discs gently onto the red wings. I like to stagger them so they look random, placing some near the center line and some near the edges. -
Form the eyes:
Roll two small balls of white clay for the eyes. These should be fairly prominent for that cute cartoon look. -
Make pupils:
Add tiny black clay dots to the center of each white eye ball. -
Attach the face:
Press the completed eyes onto the black head piece. Placing them close together gives the bug a focused, friendly expression. -
Final assembly:
Carefully lift your finished ladybug and place it onto the center of your textured green leaf base. Press down gently to secure it. -
Refining touches:
If you want, use a toothpick to gently poke tiny indentations near the mouth area of the black head for extra detail. -
Drying:
Set the finished piece aside in a safe spot to air dry completely, which usually takes 24-48 hours depending on the thickness of the leaf.
Shiny Finish
Once the clay is totally dry, brush a coat of clear drying craft glue or Mod Podge over the red wings to give the ladybug a bright, glossy beetle-shell shine.
Once dry, these cheerful bugs make fantastic paperweights or garden decorations on a windowsill

The Complete Guide to Pottery Troubleshooting
Uncover the most common ceramic mistakes—from cracking clay to failed glazes—and learn how to fix them fast.
Caterpillar Counting Friends

Create a cheerful, colorful companion that stretches across the table with its delightful spectrum of soft hues. This clay project is perfect for practicing color mixing and rolling simple shapes, resulting in a smooth, matte-finished friend that brightens any room.
How-To Guide
Materials
- Air-dry clay (white)
- Acrylic paints (various pastel colors: pink, purple, blue, green, yellow, orange)
- Fine-grit sandpaper
- Two short lengths of wire or stiff string (for antennae)
- Small black beads or black paint (for tips of antennae)
- Fine detail paintbrush
- Water cup
- Rolling tool or smooth surface
- Strong craft glue or clay adhesive
- Toothpicks (optional, for internal structure)
Step 1: Preparing the Clay Spheres
-
Portioning the Clay:
Begin by pulling off a chunk of white air-dry clay roughly the size of a golf ball for the head. Then, pull off about 12-15 slightly smaller pieces for the body segments. Keeping them consistent creates a uniform look. -
Rolling the Shapes:
Take the head piece and roll it firmly between your palms until it creates a perfectly smooth sphere. Repeat this process for every single body segment. If the clay feels dry, dip your finger in water to smooth cracks. -
Sorting and Drying:
Line up all your rolled spheres on a flat surface to see how long your caterpillar will be. Let these spheres dry completely according to your clay package instructions; turning them occasionally helps them dry evenly.
Step 2: Adding the Color
-
Sanding for Smoothness:
Once dry, gently rub each sphere with fine-grit sandpaper if you notice any bumps or flat spots. Wipe away the dust with a slightly damp cloth. -
Mixing Pastel Shades:
Prepare your palette by mixing white paint with tiny drops of your bolder colors to create a soft, pastel gradient. You’ll want a spectrum ranging from pinks and purples to blues, greens, yellows, and warm oranges. -
Painting the Body Segments:
Paint each body sphere a different solid pastel color. For a rainbow effect, paint one pink, one purple, one blue, one teal, one green, one yellow, and so on until all segments are covered. -
Natural Head Color:
For the head sphere, mix a very pale cream or off-white color and paint the entire surface evenly. Let all the painted pieces dry fully before handling them.
Sphere Stability
If the clay balls won’t stay glued together, insert a toothpick piece between each sphere as a connector pin, adding glue to both ends for a permanent bond.
Step 3: Assembly and Details
-
Connecting the Parts:
Apply a strong dot of craft glue to the back of the head sphere and press the first body segment (the pink one) against it. Hold it for 30 seconds to set. -
Building the Chain:
Continue gluing each colored sphere to the next, following your rainbow gradient. You can arrange them in a slight ‘S’ curve to make the caterpillar look like it’s crawling. -
Painting the Face:
Using your smallest detail brush and black paint, carefully dab two small dots for eyes. Add a tiny, thin U-shape for a smile centered below the eyes. -
Adding Cheeks:
Dip the back end of your paintbrush (the wooden handle) into pink paint and gently stamp a blush spot onto each cheek area. -
Preparing Antennae:
Cut two short pieces of wire, about one inch long each. Glue a tiny bead to one end of each wire, or simply dip the tip in thick paint to create a bulb. -
Attaching Antennae:
Poke two small holes into the top of the head using a needle or pin. Put a dab of glue on the bottom of your wire antennae and insert them into the holes.
Texture Twist
Before the clay dries, gently press a piece of rough fabric or burlap onto the body segments to give the caterpillar a cozy, fabric-like texture.
Place your long, colorful friend on a shelf or windowsill to enjoy its cheerful company every day
Sun, Clouds, and Rain Weather Tile
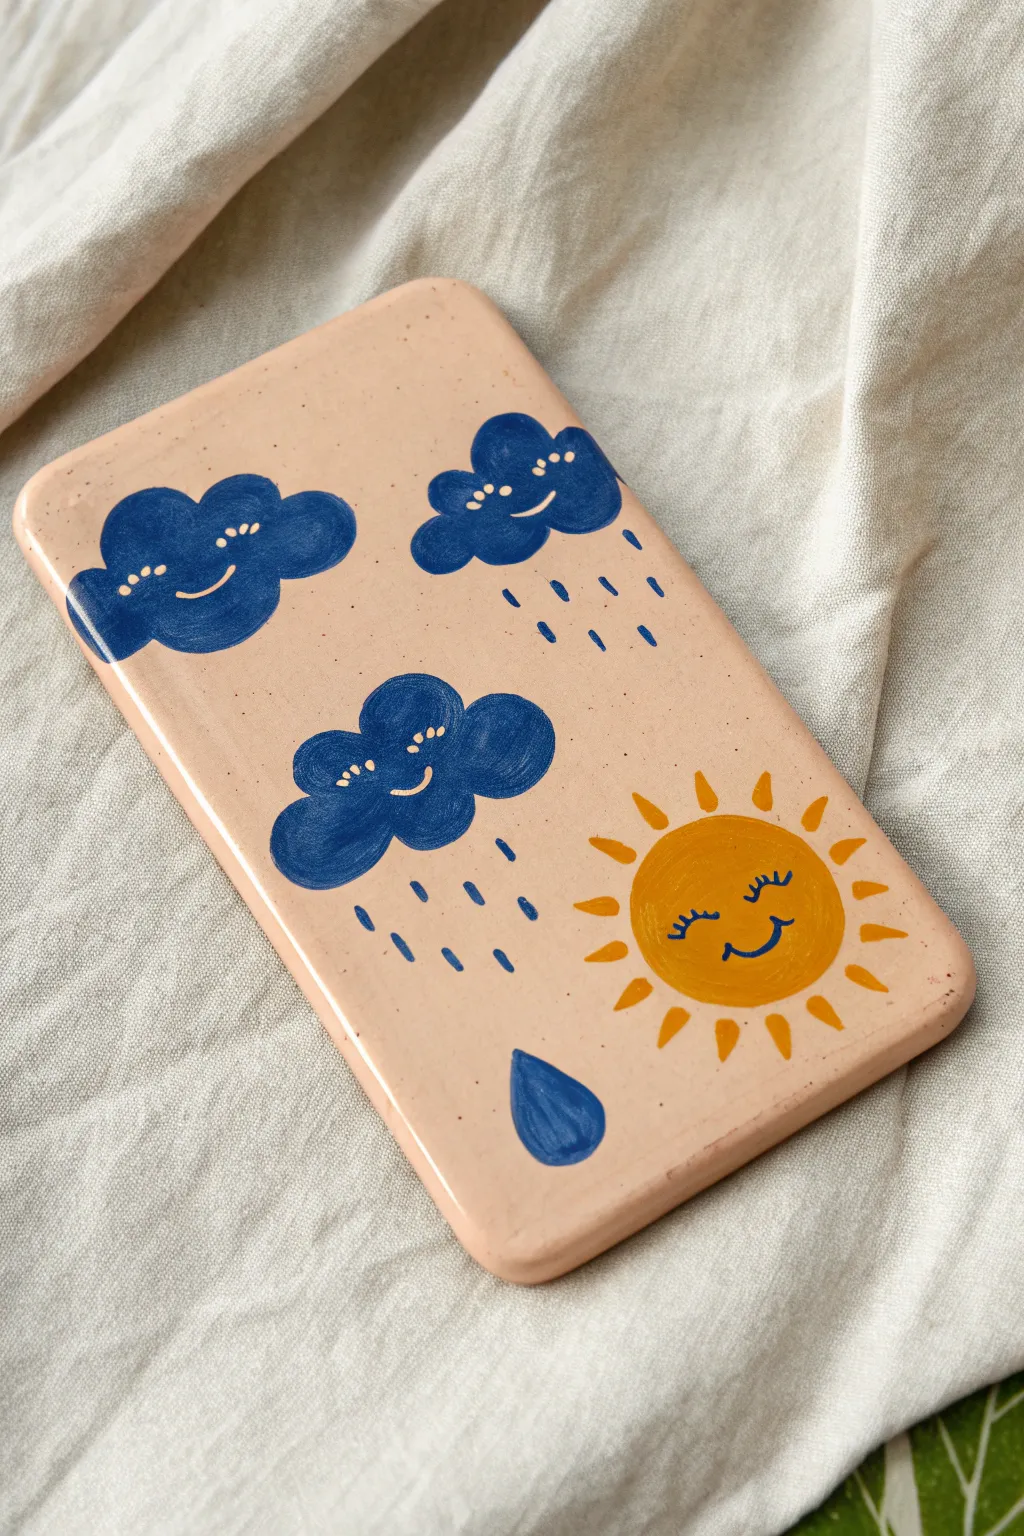
Capture the changing weather on a delightful rectangular clay slab that doubles as cute decor. This project features smiling clouds, falling rain, and a cheerful sun painted onto a soft, peach-colored background.
Detailed Instructions
Materials
- Air-dry clay (white or terracotta)
- Rolling pin
- Clay knife or craft stick
- Sandpaper (fine grit)
- Acrylic paints (peach/skin tone, navy blue, golden yellow)
- Small round paintbrushes
- Fine-point white paint marker or white acrylic paint
- Matte or glossy varnish (optional)
- Small bowl of water
Step 1: Shaping the Tile
-
Roll out the clay:
Begin with a ball of air-dry clay about the size of a tennis ball. On a smooth surface, roll it out evenly until it is approximately a quarter-inch thick. -
Cut the rectangle:
Use a clay knife or a ruler edge to cut a clean rectangle, roughly the size of a smartphone (about 3 by 6 inches). Don’t worry if the edges aren’t perfect yet. -
Soften the corners:
Gently press down on the four sharp corners with your finger to round them off. This gives the tile a friendlier, softer appearance. -
Smooth the surface:
Dip your finger in a little water and run it over the surface and edges of the clay to smooth out any cracks or bumps. -
Dry thoroughly:
Let the tile sit in a dry spot for 24 to 48 hours. Flip it over halfway through the drying process to ensure both sides dry evenly and to prevent warping. -
Sand it smooth:
Once fully hard, use fine-grit sandpaper to buff away any remaining rough spots or sharp edges, wiping away the dust with a damp cloth afterward.
Step 2: Painting the Base
-
Mix the background color:
Mix a small amount of orange, white, and a tiny drop of brown to create a warm, peach-skin tone. You want a pastel shade that allows the darker weather elements to pop. -
Apply the base coat:
Paint the entire front surface and sides of the tile with your peach mixture. I find that applying two thin coats gives a much smoother finish than one thick gloppy one. -
Let the base dry:
Allow the peach paint to dry completely to the touch before starting on the details to prevent colors from muddying.
Smooth Surface Trick
If you don’t have sandpaper, you can burnish the clay before it dries. Rub the raw clay gently with the back of a spoon to compress the grain and make it silky smooth.
Step 3: Adding Weather Details
-
Paint the cloud shapes:
Using navy blue paint and a small round brush, paint three fluffy cloud shapes. Place two clouds near the top and one slightly lower on the left. -
Add rain drops:
Underneath the clouds, paint small vertical dashes using the same navy blue. Vary the length of the strokes for a more playful look. -
Paint a large raindrop:
Near the bottom center, paint a larger, single tear-drop shape in blue to represent a heavy splash of rain. -
Create the sun:
In the lower right area, paint a solid circle using golden yellow acrylic paint. -
Add sun rays:
Paint short lines radiating outward from the yellow circle to create the sun’s rays. -
Draw the faces:
Once the shapes are dry, use navy blue paint (or a fine marker) to draw a smiling face with closed eyelashes on the sun. -
Detail the clouds:
For the clouds, use a very fine brush with white paint or a paint pen to add small dots for cheeks and curved lines for smiling mouths and closed eyes. -
Highlight the raindrop:
Add a few faint, lighter blue or white streaks inside the large raindrop to give it a wet, reflective look. -
Seal the artwork:
Finish by applying a coat of clear varnish to protect the paint and give your weather tile a professional sheen.
Make it Functional
Before the clay dries, poke two small holes at the top corners. Once finished, thread a piece of twine or ribbon through so you can hang your weather chart on the wall.
This charming tile brings a forecast of creativity to any room it decorates


What Really Happens Inside the Kiln
Learn how time and temperature work together inside the kiln to transform clay into durable ceramic.
Rainbow Arc With Puffy Cloud Ends
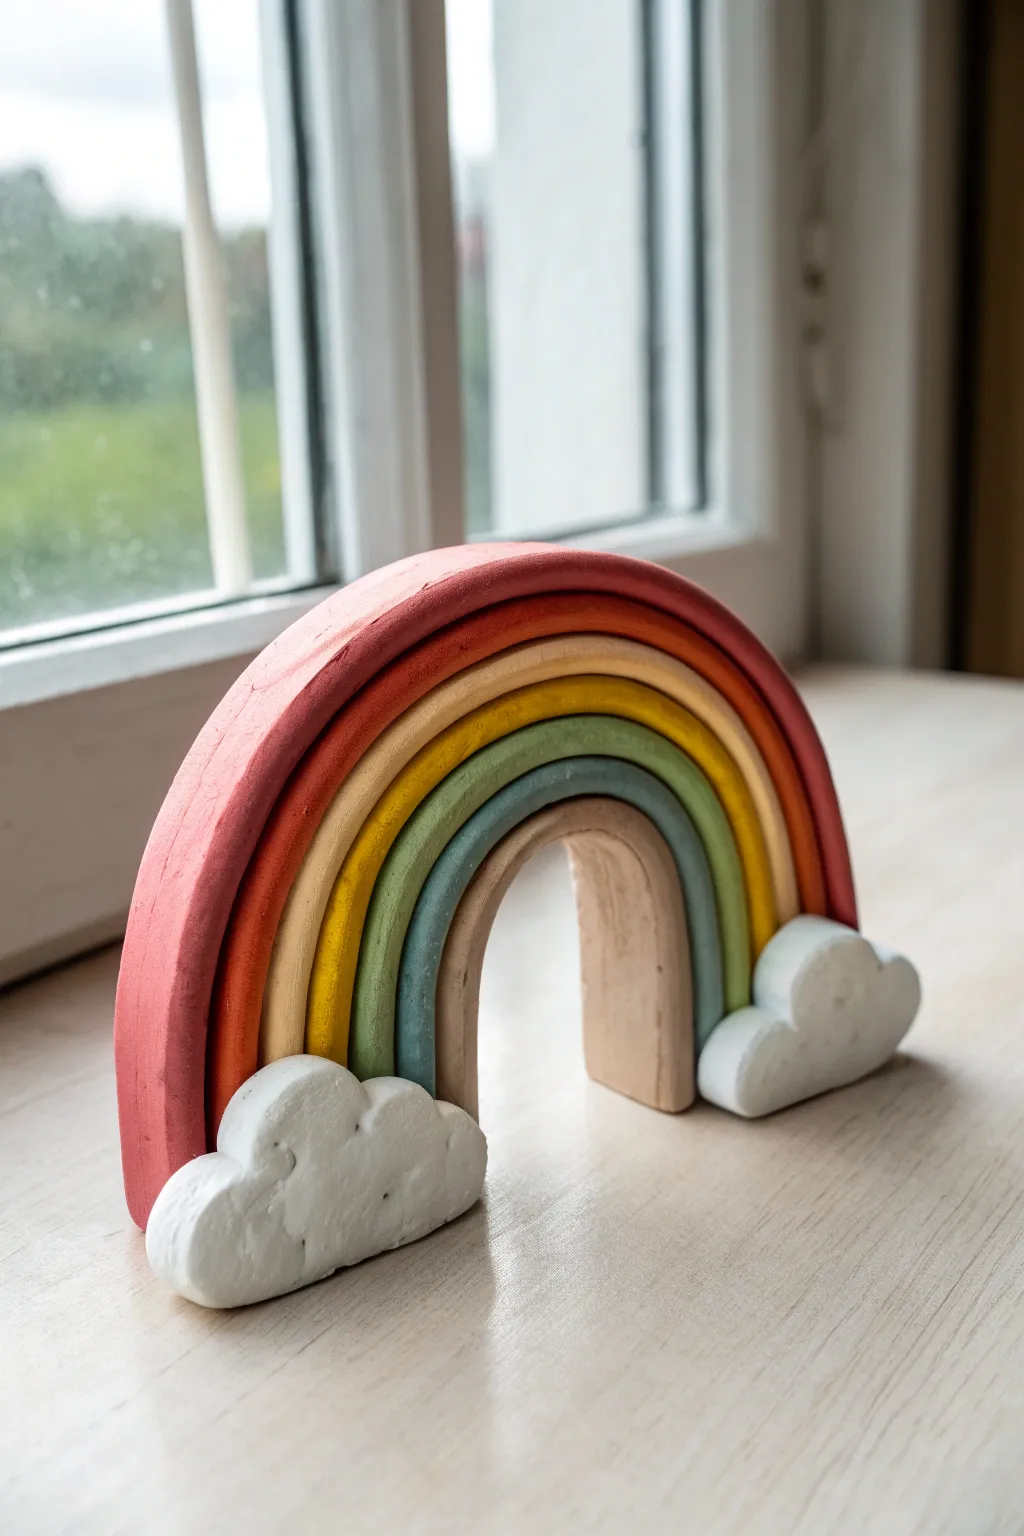
Bring a little color to any windowsill with this charming freestanding rainbow sculpture. Featuring layers of muted, earthy tones nestled into fluffy white cloud bases, it’s a sturdy and sweet decoration that’s surprisingly simple to build.
Step-by-Step Tutorial
Materials
- Air-dry modeling clay (white)
- Acrylic paints (muted red, terra cotta, mustard yellow, sage green, dusty blue, beige)
- Rolling pin
- Clay cutting tool or butter knife
- Small bowl of water (for smoothing)
- Fine-grit sandpaper
- Paintbrushes (flat and detail)
- Gloss or matte varnish (optional)
Step 1: Shaping the Arcs
-
Prepare the workspace:
Lay down a smooth mat or parchment paper to prevent sticking. Since we are making a nesting rainbow, having a clean, flat surface is crucial. -
Roll the first slab:
Take a large chunk of white air-dry clay and roll it out into a thick, even slab, approximately 1/2 inch to 3/4 inch thick. Uniform thickness is key for stability. -
Cut the largest arc:
Using a cutting tool, slice a long, rectangular strip from your slab. Bend this strip gently into a ‘U’ shape to form your largest outer arch. Stand it up to ensure it holds its shape. -
Form the inner layers:
Roll out more strips of the same thickness. It works best to build continuously inward; take your next strip and curve it snugly inside the first arch to measure the length, then trim the excess. -
Repeat until full:
Continue cutting and fitting strips until you have about 6 or 7 nesting layers. The smallest, central arch should be quite tight. -
Smooth the edges:
Dip your finger in a little water and run it along the cut edges of each arc to round them off slightly. This removes sharp corners and gives it that finished, organic look. -
Separate for drying:
Carefully separate the arches so they aren’t touching. If they dry together, they will stick. Lay them flat on their sides to prevent warping during the drying phase. -
Sculpt the clouds:
Take two balls of clay and flatten them slightly into thick, oblong shapes. Use your thumbs to press indentations where the rainbow legs will sit, ensuring the fit is snug. -
Add fluffy texture:
Use a modeling tool or the back of a paintbrush to press little divots and curves into the cloud surfaces, mimicking a puffy, billowy texture. -
Allow to dry:
Let all pieces dry completely for at least 24-48 hours. I like to flip the pieces over halfway through so the bottom sides get air exposure.
Fixing the Wobbles
If your arches dried slightly warped and don’t sit flat, tape a sheet of sandpaper to a table and gently rub the bottom of the arch back and forth until even.
Step 2: Painting and Assembly
-
Sand imperfections:
Once bone dry, gently sand any rough patches or sharp edges with fine-grit sandpaper. Wipe away the dust with a barely damp cloth. -
Mix your palette:
Prepare your acrylics. To achieve the look in the photo, mix your bright primary colors with a tiny dot of brown or black to desaturate them into earthy tones (muted red, terra cotta, mustard, sage, slate blue, beige). -
Paint the outer arch:
Start with the largest arch using your muted red. Paint the front, back, and top edge, keeping your strokes smooth. -
Paint remaining layers:
Work your way inward, painting each arch a different color. The photo features a gradient from warm reds to cool blues and finally a neutral beige. -
Paint the clouds:
Paint the two cloud bases a solid, opaque white. You may need two coats here to cover the raw clay color completely. -
Dry and assemble:
Let the paint dry fully. Once dry, stack your arches back together. You can glue them for a permanent sculpture or leave them loose. -
Attach the clouds:
Place the stack of rainbow legs into the designated slots in your cloud bases. If you want it permanently fixed, apply a generous amount of craft glue or sturdy epoxy to the connection points. -
Seal the work:
Finish with a coat of matte varnish to protect the paint and give the clay a unified sheen.
Use A Template
Draw your rainbow arcs on paper first and cut them out. Use these paper patterns as stencils on your clay slab to ensure every strip is perfectly sized.
Place your finished rainbow near a window and enjoy the cheerful vibe it brings to the room
Pretend Play Pizza Slice Set
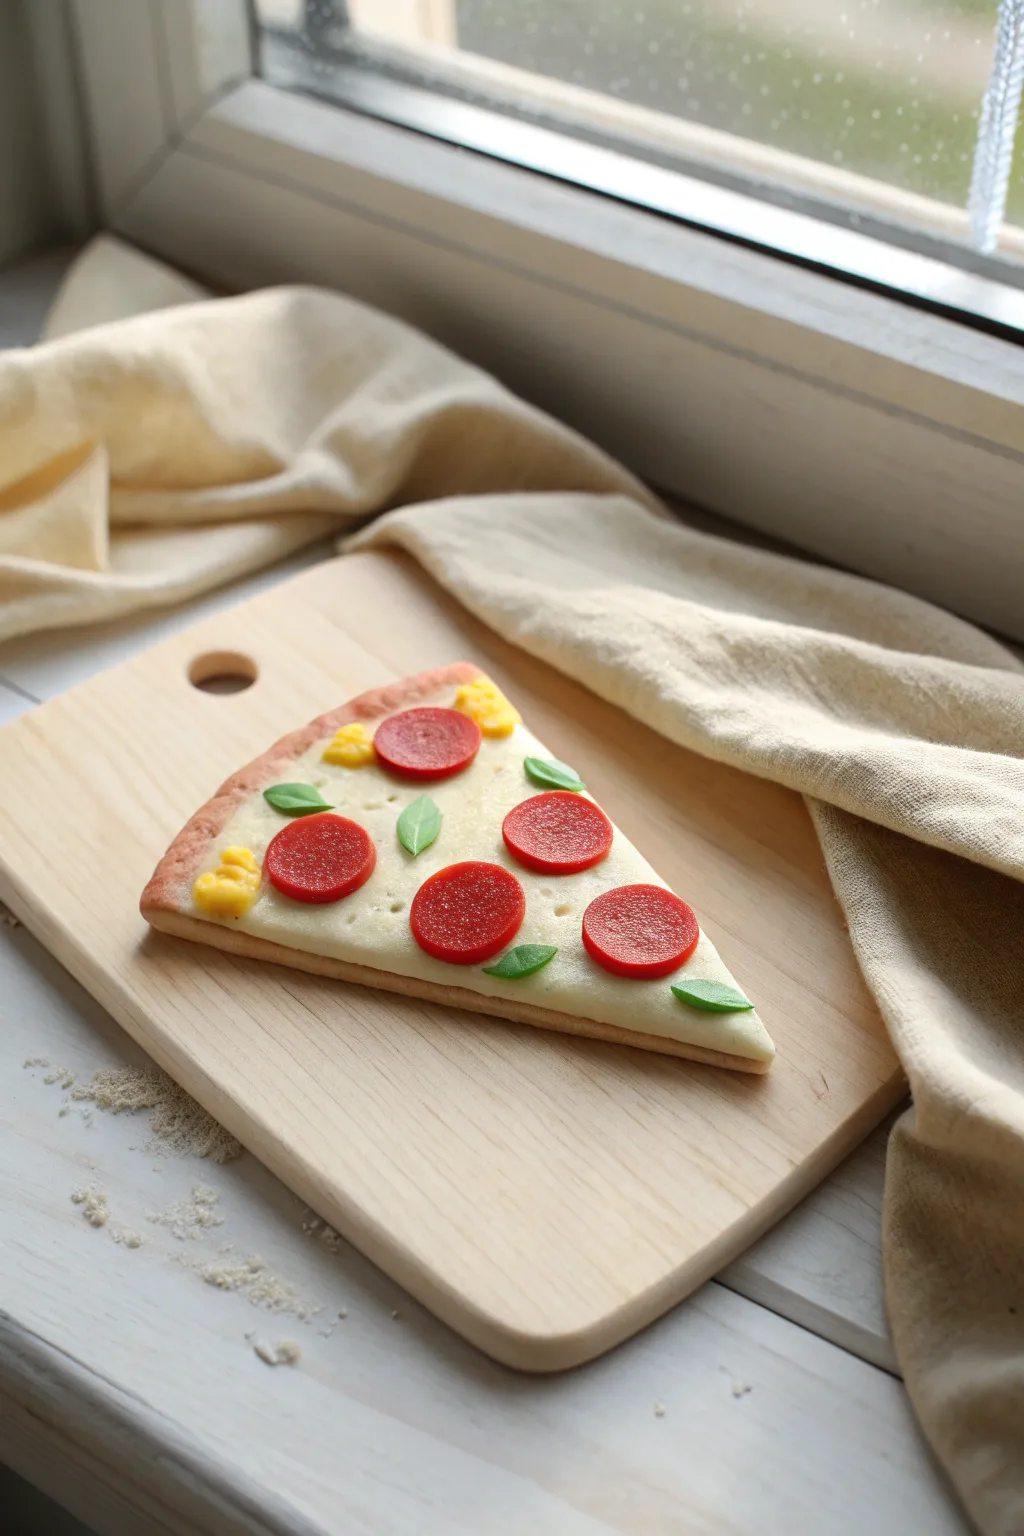
Create a deliciously realistic pizza slice that looks good enough to eat but is perfect for pretend play. This project combines simple shapes with layering techniques to build a textured, colorful slice complete with melty cheese and vibrant toppings.
Step-by-Step
Materials
- Beige or tan modeling clay (crust)
- White or cream modeling clay (cheese)
- Red clay (pepperoni)
- Green clay (basil/spinach)
- Yellow clay (pineapple/cheese chunks)
- Rolling pin
- Plastic knife or clay cutting tool
- Toothbrush or texture tool
- Dotting tool or toothpick
Step 1: Forming the Base
-
Prepare the crust color:
Start by conditioning a ball of beige or tan clay until it is soft and pliable. If your clay is too dark, you can mix in a little white to get that perfect baked-dough shade. -
Shape the triangle:
Flatten the ball onto your work surface and use your fingers or a rolling pin to smooth it out. Use your cutting tool to trim the clay into a classic isosceles triangle shape, about the size of your palm. -
Build the crust rim:
Take the excess beige clay you trimmed off and roll it into a snake or log. Attach this to the short edge of your triangle, blending the seam underneath so it looks like a puffy crust edge. -
Add texture:
Use an old toothbrush or a stiff brush to gently tap the surface of the crust rim. This gives it a baked, bready texture rather than looking like smooth plastic.
Chef’s Secret
Mix a tiny speck of translucent clay into your red pepperoni mix. When baked, it mimics the slightly greasy, semi-transparent look of real cured meat slices.
Step 2: Applying the Cheese
-
Roll out the cheese layer:
Take your white or cream clay and roll it out very thinly. You want this layer to look like melted cheese, so it doesn’t need to be perfectly even. -
Cut the cheese shape:
Lay the cream clay over your beige triangle. Trim the edges so it fits neatly inside the crust rim, leaving a little bit of the beige base visible on the pointy sides. -
Soften the edges:
Use your finger to gently smudge the edges of the cream clay downward. This mimics the look of sauce and cheese melding together and dripping slightly over the sides. -
Add surface detail:
Use a dotting tool or a toothpick to poke very shallow, random indentations across the white surface. Real melted cheese isn’t perfectly flat, so these little dimples add realism.
Flavor Variations
Make a whole menu! Use black clay for olives, brown strips for mushrooms, or pale pink squares for ham to create a custom pizza parlor set.
Step 3: Creating the Toppings
-
Make the pepperoni:
Roll out a small amount of red clay until it is quite thin. Use a small circular cutter (like a straw or marker cap) to punch out 5 or 6 circles. -
Texture the meat:
Gently tap the surface of each red circle with your toothbrush before placing them. I find this subtle texture makes the pepperoni look much more authentic. -
Place the pepperoni:
Arrange the red slices on top of the cheese layer. Press them down firmly so they look like they have sunk into the melted cheese. -
Add greenery:
Take tiny pinches of green clay and flatten them into teardrop leaf shapes. Use a toothpick to draw a single line down the center of each for a vein, then place them randomly between the pepperoni. -
Add cheese chunks:
Roll tiny bits of yellow clay into rough, uneven balls or cubes. Press these onto the slice near the crust or in empty spaces to represent cheddar chunks or pineapple.
Step 4: Final Touches
-
Bake or dry:
If using polymer clay, bake according to the package instructions. If using air-dry clay, set it aside in a safe spot for 24-48 hours until fully hardened. -
Optional shading:
Once dry, you can brush a tiny bit of orange or brown pastel dust onto the crust using a dry paintbrush to give it a ‘golden brown’ toasted look.
Now you have a permanently perfect slice of pizza ready for your next kitchen play session

TRACK YOUR CERAMIC JOURNEY
Capture glaze tests, firing details, and creative progress—all in one simple printable. Make your projects easier to repeat and improve.
Mini Fruits Made From Balls and Snakes

Transform simple clay shapes into a vibrant, healthy harvest with this delightful fruit bowl project. Using basic techniques like rolling balls and coils, you can create a realistic assortment of bananas, apples, grapes, and more that look good enough to eat.
Step-by-Step Guide
Materials
- Air-dry clay or polymer clay (in yellow, red, green, purple, blue, and orange)
- Small sculpting tools or plastic knife
- Wooden toothpicks or real fruit stems (optional)
- A small bowl (for display)
- Black marker or tiny beads (for details)
Step 1: Shaping the Bananas
-
Roll the coils:
Start with a chunk of bright yellow clay. Divide it into three or four equal pieces and roll them out into thick snake shapes, slightly tapering the ends. -
Curve and connect:
Gently bend each yellow coil to create the classic banana curve. Gather the top stems together and pinch them securely into a single bunch. -
Add the tips:
Take a tiny bit of brown or green clay (or use a marker later) to create the small darkened spot at the bottom tip of each banana. -
Create the stem:
Mold a small piece of dark brown clay onto the top where the bananas join to form the main stem connection.
Natural Stems
Instead of clay stems, try pressing real dried stems from apples or grapes into your clay balls before they dry for an incredibly realistic look.
Step 2: Creating Round Fruits
-
Roll the apples:
Take a large piece of red or green clay and roll it between your palms until it forms a smooth, perfect sphere. -
Indent the top:
Use your pinky finger or a rounded tool to press a gentle dent into the top center of the ball where the stem will go. -
Add a stem:
Roll a tiny, thin snake of brown clay for the stem and press it into the indentation you just made. -
Make the citrus:
For oranges or grapefruits, roll orange or pink clay into balls and gently texture the surface by tapping it lightly with a toothbrush or piece of sandpaper. -
Shape the peaches:
Roll a peach-colored ball and use the side of a toothpick to press a subtle vertical groove down one side to mimic the fruit’s seam.
Texture Time
Before the clay dries, gently roll your orange and yellow fruits over a piece of sandpaper. This instantly mimics the porous skin of citrus fruit.
Step 3: Grapes and Berries
-
Prepare the grapes:
Roll many small balls of red or purple clay. Try to keep them relatively similar in size, though slight variation looks natural. -
Build the bunch:
Start pressing the small balls together in a pyramid shape. You can use a tiny dab of water or slip to help them stick if the clay is dry. -
Add the vine:
Roll a thin brown coil and attach it to the top of your grape cluster to act as the main woody stem. -
Mix your colors:
For a varied look, I like to mix a few green grapes in with the purple ones, or create a separate bunch entirely.
Step 4: Finishing Touches
-
Smooth the surfaces:
Check all your fruits for fingerprints. Gently rub them away with a barely damp fingertip to ensure a professional finish. -
Add fine details:
Use a toothpick to poke tiny holes where stems or blossom ends would be on blueberries or mangosteens. -
Dry properly:
Place your finished fruits on a piece of parchment paper to dry completely. Rotate them occasionally so they don’t develop flat spots. -
Arrange the bowl:
Once hardened, pile your beautiful clay harvest into a small bowl, placing larger fruits like bananas at the bottom and smaller berries on top.
Now you have a colorful centerpiece ready for display on a play kitchen table or shelf
Texture Taco Fold-Over Surprise
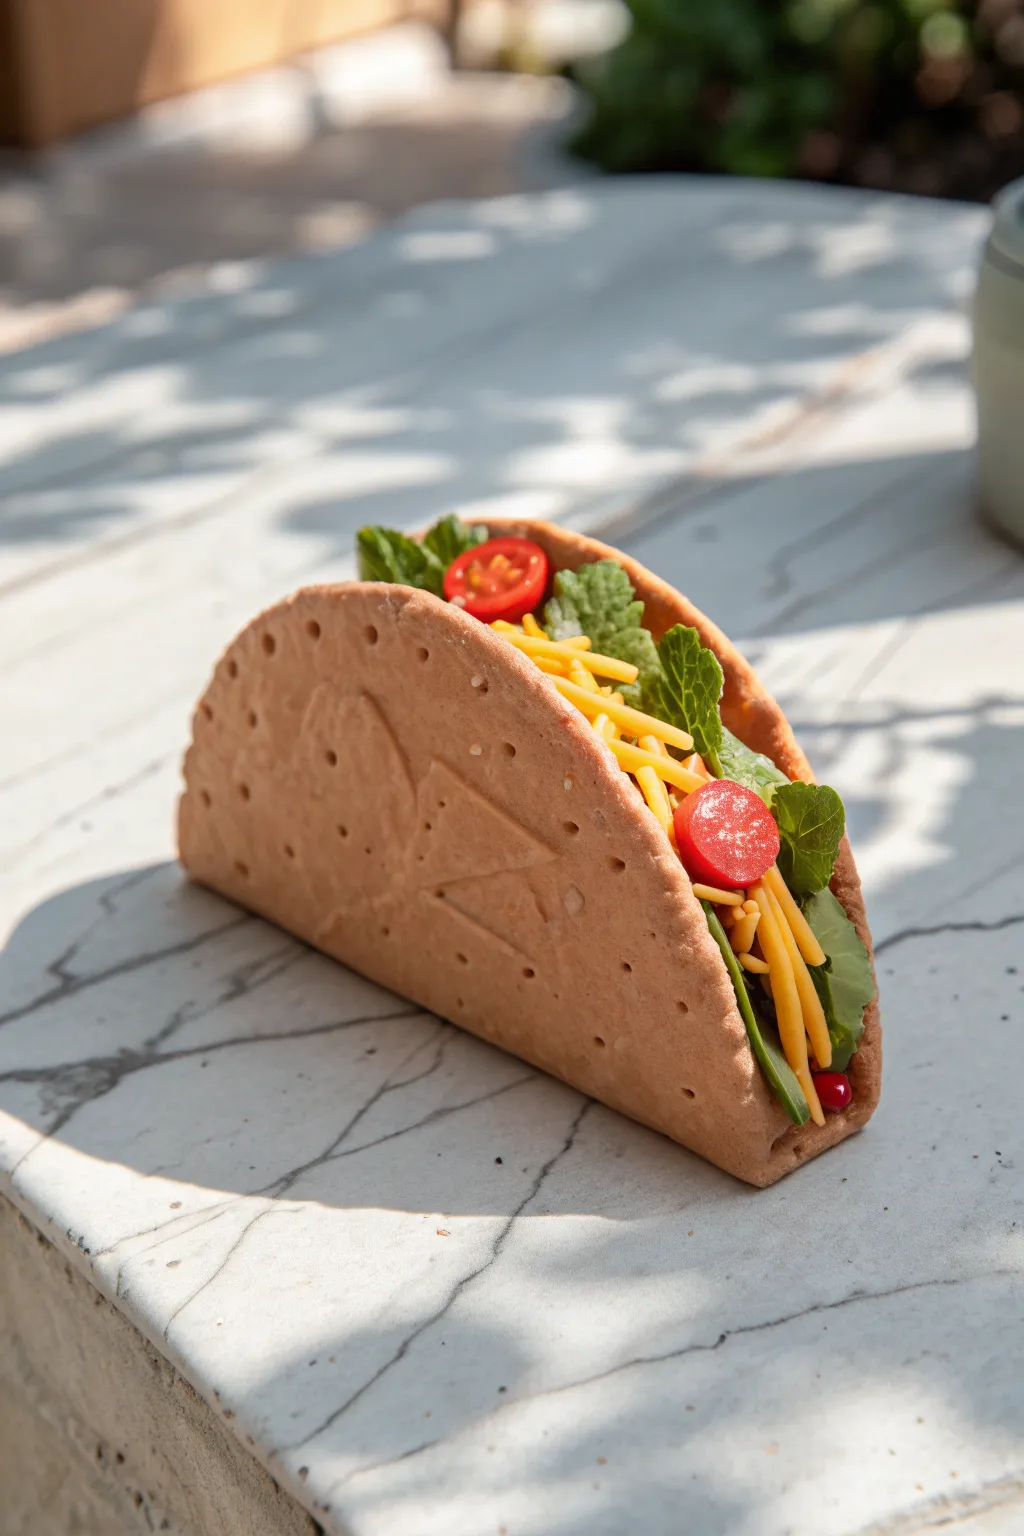
Transform simple clay into a delightfully realistic-looking taco complete with vibrant fillings and a textured shell. This project is perfect for kindergarteners to practice folding, pinching, and assembling food shapes that look good enough to eat but are just for play.
Detailed Instructions
Materials
- Beige or tan modeling clay (air-dry or polymer)
- Green modeling clay
- Yellow modeling clay
- Red modeling clay
- Rolling pin
- Toothpick or skewer
- Round cookie cutter (approx. 4-5 inches)
- Plastic knife or clay tool
- Small star-shaped stamp or cookie cutter (optional)
Step 1: Crafting the Shell
-
Prepare the dough:
Start by kneading a generous ball of beige or tan clay until it is soft and pliable. If the clay feels too stiff, warm it up in your hands for a minute. -
Roll it out:
Use a rolling pin to flatten the ball into a pancake about 1/4 inch thick. Aim for an even thickness so the shell holds its shape later. -
Cut the circle:
Press the large round cookie cutter firmly into the flattened clay to create a perfect circle. Peel away the excess clay from the edges. -
Add the texture:
Before folding, use a toothpick to poke small, random holes all over the surface of the circle. This mimics the bubbles and corn texture found on real taco shells. -
Stamp a design:
If you have a small star stamp or cutter, gently press a design into the center of the circle for a personalized touch, like the star shape seen in the example.
Step 2: Creating the Fillings
-
Make the lettuce:
Pinch off several small pieces of green clay. Flatten them between your fingers into thin, irregular leaf shapes. Ruffle the edges slightly to make them look like leafy greens. -
Slice the tomatoes:
Roll a small ball of red clay into a short, thick log. Use the plastic knife to slice ‘coins’ from the log. I like to then press a tiny indent in the center of each slice to look like seeds. -
Shred the cheese:
Take a chunk of yellow clay and roll it into a very long, thin snake on the table. Use the plastic knife to chop the snake into small segments about an inch long. -
Create variation:
For extra realism, make some cheese strands slightly thicker and others thinner. Gather them into a loose pile so they are ready to be sprinkled in.
Cracking Shell?
If the clay creates cracks at the fold, rub a tiny drop of water over the fissure to smooth it out again before it dries completely.
Step 3: Assembly
-
Arrange the greens:
Lay the textured tortilla flat on your work surface. Place the green lettuce leaves across the center line, letting the ruffled edges poke out past the circle’s edge. -
Add the toppings:
Scatter your yellow cheese shreds and red tomato slices on top of the lettuce bed. Don’t worry about being too neat; messy toppings look more authentic. -
The first fold:
Carefully lift one side of the circle and bring it up towards the middle. Support the clay from the back so it doesn’t crack. -
Close the taco:
Bring the other side up so both sides are vertical, creating a ‘U’ shape. Gently pinch the bottom fold to help it hold its new shape. -
Secure the shape:
Press the fillings gently down into the fold to help prop the shell open slightly. This ensures the taco stands up rather than flopping closed. -
Final touches:
Inspect the open side. If any cheese needs adjusting, use a toothpick to nudge the shreds into a appetizing arrangement that spills out just a little.
Make it a Meal
Use brown or black clay to create tiny ‘ground beef’ crumbles or beans to bury underneath the cheese layer for hidden texture depth.
Now you have a delicious-looking taco sculpture ready for the pretend kitchen.
Butterfly Wings With Stamped Patterns
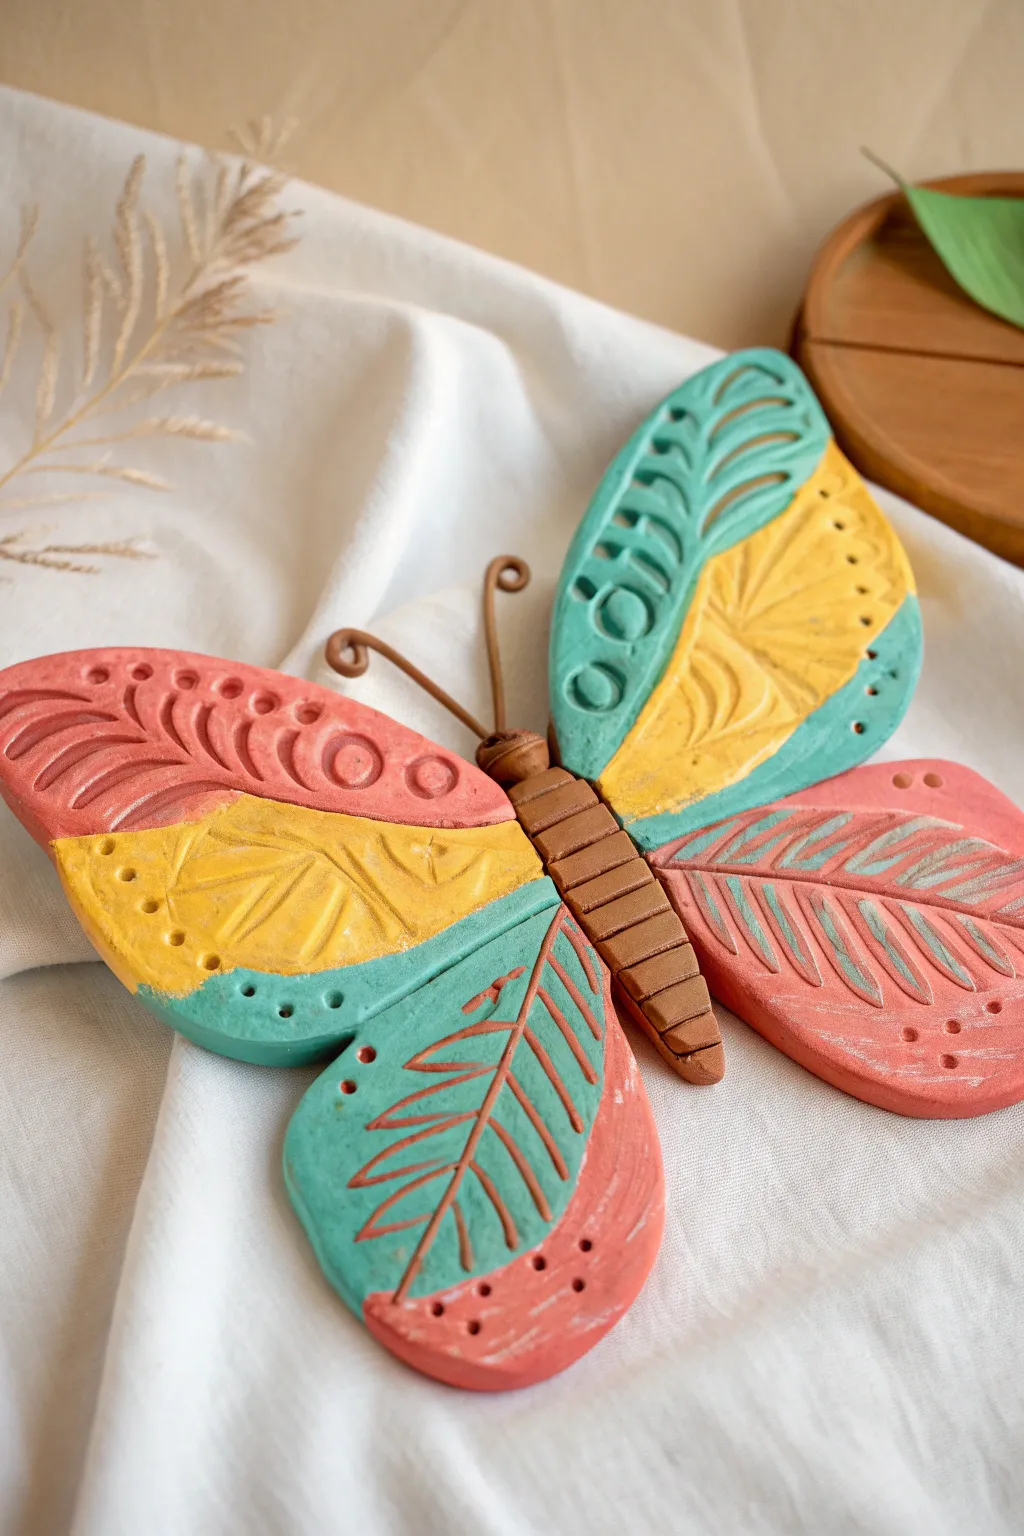
This charming clay butterfly combines bold geometric sections with delicate nature-inspired textures. It’s a wonderful project for practicing patterns, featuring segmented wings in coral, teal, and mustard yellow that come together to form a beautiful garden friend.
How-To Guide
Materials
- Air-dry clay (white or pre-colored)
- Acrylic paints (coral/terracotta, teal/turquoise, mustard yellow, dark brown)
- Rolling pin
- Clay cutting tool or plastic knife
- Modelling tools (needle tool, small ball tool)
- Leaf stamps or actual leaves for texture
- Wire for antennae
- Paintbrushes (small and medium flat brushes)
- Water cup
Step 1: Shaping the Wings
-
Prepare the clay:
Start by kneading your air-dry clay until it is soft and pliable. If you are using white clay, you will paint it later; if using colored clay, mix your tones now to match the coral, turquoise, and yellow hues. -
Roll the slabs:
Roll the clay out into an even slab, roughly 1/4 inch thick. Avoid making it too thin, as the wings need some structure to hold the stamped patterns without cracking. -
Cut the upper wing shapes:
Use a plastic knife or clay cutter to cut out two large, teardrop-like shapes for the upper wings. These should be wider at the top and taper slightly toward the body. -
Cut the lower wing shapes:
Cut two slightly smaller, more rounded shapes for the lower wings. Place all four wing pieces together on your work surface to check the symmetry and size before adding texture.
Stamp Sorter
Look around for household items to use as texture stamps! Pen caps create perfect circles, screws make industrial lines, and lace pressed into clay leaves beautiful intricate patterns.
Step 2: Body Construction
-
Form the body base:
Roll a separate piece of clay into a long sausage shape for the butterfly’s body. It should be long enough to connect the upper and lower wings. -
Add segmentation:
Using a blunt tool or the back of a knife, gently press horizontal lines across the body to create a segmented, worm-like appearance. -
Create the head:
Roll a small ball of clay and attach it to the top of the body for the head. You can score the clay surfaces slightly with a needle tool and add a drop of water to help them stick securely. -
Insert antennae:
Cut two short pieces of brown wire. Curl one end of each piece into a spiral, then insert the straight ends into the top of the clay head.
Step 3: Designing the Patterns
-
Section off the wings:
Using a modelling tool, lightly crave curved lines on the wings to divide them into distinct color zones. Look at the reference image: the top wings have two sections, and the bottom wings have two. -
Stamp the leaf veins:
In the coral and teal sections, use a needle tool or a small leaf stamp to press vein patterns into the clay. I often just draw a central line and angle small dashes off it to mimic a fern leaf. -
Add spiral details:
For the upper teal section, press a spiral tool or shape small clay coils and press them flat into the wing surface to create swirling relief patterns. -
Create sunburst textures:
In the yellow sections, use a crisp tool to draw radiating lines patterns, fanning out like sun rays or flower petals. -
Dot the edges:
Take a small ball tool or the end of a paintbrush handle and press rows of small dots along the outer edges of the wings for a finishing decorative touch.
Make it a Mobile
Before drying, poke a small hole through the top of the head. Once finished, thread fishing line through it to hang your butterfly in a window or create a mobile.
Step 4: Assembly and Painting
-
Assemble the parts:
Gently press the four wing pieces against the central body. Smooth the clay slightly at the connection points on the underside to ensure they bond well as they dry. -
Dry completely:
Let the butterfly sit undisturbed for at least 24 hours. Drying time depends on thicknes, so be patient to prevent cracking. -
Block in base colors:
Once dry, paint the specific sections. Use terracotta or coral for the leaf-patterned zones, bright teal for the spirals and lower accents, and mustard yellow for the central sunburst areas. -
Paint the body:
Paint the central body and head a solid warm brown. Be careful not to get brown paint on the colorful wings. -
Highlight the textures:
After the base coats are dry, use a technique called dry-brushing. Dip a dry brush into a tiny amount of lighter paint (like white or pale yellow) and lightly sweep it over the raised textures to make the patterns pop.
Now you have a permanently colorful insect that captures the beauty of nature without flying away
Friendly Monster Face Plaques

This cheerful pink monster plaque is full of personality, featuring a wide toothy grin, teal horns, and spiraled cheeks. It’s a fantastic project for learning how to layer clay shapes to create a dimensional, textured face.
Detailed Instructions
Materials
- Air-dry clay (white)
- Acrylic paints (pastel pink, teal/turquoise, yellow, white, black, dark red)
- Sculpting tools (needle tool, small loop tool)
- Rolling pin
- Small cup of water
- Fine-grit sandpaper (optional)
- Clear matte varnish
- Paintbrushes (small round and flat)
- Wooden board or placemat for working
Step 1: Shaping the Base
-
Roll the foundation:
Start with a large ball of white air-dry clay. Roll it out into a smooth, oval slab about a quarter-inch thick to serve as the monster’s face. -
Smooth the edges:
Dip your finger in a little water and run it along the outside edge of the oval to smooth out any cracks or rough spots from rolling.
Seamless Joining
Always “score and slip” when attaching clay parts! Scratch both surfaces with a tool, add a drop of water, and press together firmly so pieces don’t fall off.
Step 2: Adding Facial Features
-
Form the eyes:
Roll two medium-sized balls of clay and flatten them slightly into discs. Attach these securely to the upper half of the face using a little water as ‘glue’ (scoring the back helps). -
Sculpt the nose:
Create a teardrop shape for the nose. Flatten the wider end slightly and attach it vertically in the center of the face. Use a round tool to poke two deep nostrils at the bottom. -
Create the mouth:
Roll a long, thin snake of clay. Curve it into a wide ‘U’ shape for the smile and press it onto the lower face. Flatten the inside area of the ‘U’ to create a space for the teeth. -
Add the teeth:
Inside the flattened mouth area, press in small, rectangular bits of clay to form a row of teeth, or simply carve vertical lines into the white clay to suggest individual teeth. -
Shape the horns:
Roll two tapered cones for horns. Gentle curve them outwards and attach them to the very top corners of the head, blending the seam where the clay meets. -
Add cheek details:
Make two small, flat circles for the cheeks. Gently press a spiral pattern into them using a needle tool or toothpick.
Step 3: Texturing & Final Touches
-
Create decoration:
Roll several small, leaf-shaped pieces of clay. Attach them around the border of the face like sun rays—three at the top, and several around the bottom chin area. -
Refine the brows:
Roll a thin snake of clay and shape it into a unibrow that dips in the center. Attach this directly above the eyes for an expressive look. -
General texture:
Using a tool or a stiff bristled brush, gently tap or stipple the main pink face area to give it a slightly pitted, organic texture, being careful not to mess up your add-on shapes. -
Dry completely:
Let the sculpture dry for at least 24-48 hours. I find turning it over halfway through helps the back dry evenly.
Make it a Wall Hanging
Before the clay dries, poke two holes near the top horns or embed a bent paperclip into the back. Once dry, you can thread a ribbon through to hang it up.
Step 4: Painting the Monster
-
Base coat:
Paint the entire main face area with a soft pastel pink. You may need two coats for opaque coverage. -
Paint the teal accents:
Use a teal or turquoise paint for the unibrow, the nose, the lips (border of the mouth), and the main body of the horns. -
Add yellow details:
Paint the decorative leaf shapes, the eyelids (top half of the eye discs), and thin stripes on the teal horns with a bright yellow. -
Detail the eyes:
Paint the lower half of the eye discs white. Once dry, add a large black pupil in the center. Add a tiny white dot to the black pupil for a ‘sparkle’ effect. -
Cheeks and teeth:
Paint the spiral cheeks a dark rose or red. Paint the teeth white, carefully outlining them with a thin brown or black line to separate them. -
Final dots:
Using the back end of a paintbrush, dot small teal spots all over the pink face for a freckled texture. -
Seal:
Finish with a coat of clear matte varnish to protect the paint and give it a unified finish.
Hang your friendly monster on the wall to add a pop of color and joy to the room
Alphabet and Shape Stamping Tiles
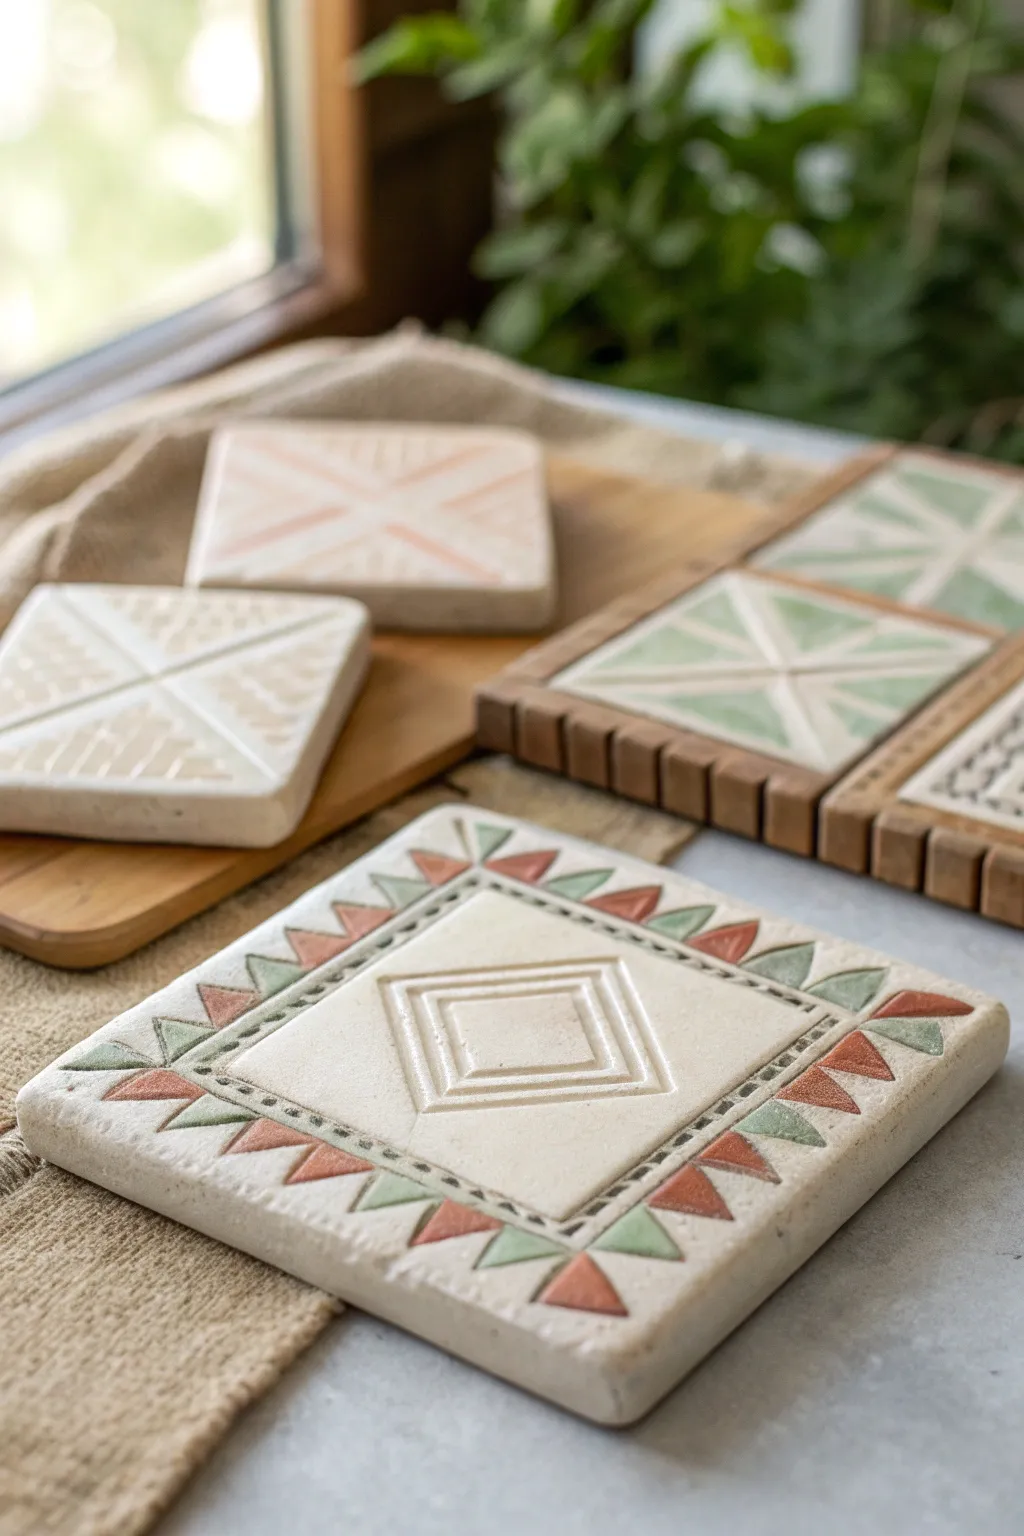
These substantial, textured tiles combine simple geometric shapes with earthy tones for a strikingly modern look. They serve as a wonderful tactile project for young artists to explore patterns, stamping, and three-dimensional form.
Step-by-Step Guide
Materials
- Air-dry clay (white or light grey)
- Rolling pin
- Square cookie cutter (approx. 4-5 inches) or a knife and ruler
- Wooden sculpting tools or distinctively shaped household items (old keys, LEGO bricks, textured fabric)
- Alphabet or shape stamps (optional)
- Acrylic paints (terracotta, sage green, off-white)
- Small detail paintbrushes
- Sandpaper (fine grit)
- Matte varnish or sealant (optional)
Step 1: Shaping the Base
-
Prepare the Clay:
Begin with a generous handful of air-dry clay. Knead it thoroughly in your hands until it becomes soft, pliable, and free of air bubbles, which helps prevent cracks later. -
Roll the Slab:
Place the clay on a flat working surface or a piece of canvas to prevent sticking. Use the rolling pin to flatten the clay into a slab that is roughly 1/2 inch thick, keeping the thickness consistent. -
Cut the Square:
Press your square cutter firmly into the clay slab. If you don’t have a large enough cutter, measure a square with a ruler and carefully cut along the lines using a plastic knife or clay tool. -
Smooth the Edges:
Dip your finger in a tiny bit of water and run it along the cut edges of the square to soften any sharpness and create a smooth, finished perimeter.
Clean Lines Trick
Use a straight edge (like an old credit card) to press lines into the clay instead of dragging a tool. This creates crisp, clean channels without messy crumbs.
Step 2: Designing the Pattern
-
Mark the Center:
Lightly find the center of your square. You can do this by gently pressing a small dot in the middle, or by lightly dragging a tool from corner to corner to make an ‘X’ guide. -
Create the Central Diamond:
Using a carving tool or a ruler edge, press a diamond shape into the center of the tile. Press firmly enough to make a deep indentation but be careful not to cut all the way through. -
Add Inner Detail:
Inside your main diamond, carve or stamp smaller concentric diamonds or squares. I like to use a flat-head screwdriver or a straight-edge clay tool to stamp these straight lines rather than dragging the tool. -
Border Patterning:
Around the outer edge of the central design, press a series of repeating shapes. The image shows triangles pointing outward, which you can make by pressing the corner of a square block or a triangle stamp into the clay. -
Texture the Border:
Between the central motif and the triangle border, add a line of small textured dots or dashes using a toothpick or the end of a paintbrush handle to define the zones.
Make Coasters
Glue a square of cork or felt to the bottom of your dry, finished tile to turn this art project into a functional, scratch-free drink coaster.
Step 3: Finishing and Coloring
-
Let it Dry:
Place the tile on a wire rack or a piece of parchment paper. Allow it to air dry for 24-48 hours. Turn it over halfway through the process to ensure the bottom dries evenly and doesn’t warp. -
Sand Imperfections:
Once the tile is bone dry, take fine-grit sandpaper and gently rub away any rough burrs on the edges or surface. -
Select Your Palette:
Mix your acrylic paints to achieve earthy tones—soft sage greens, deeper terracottas, and warm creams work beautifully together for this aesthetic. -
Paint the Details:
Using a fine detail brush, paint inside the stamped shapes (like the border triangles). Leave the main surface area unpainted or give it a light wash of cream to embrace the natural clay look. -
Highlight the Grooves:
If you want the central lines to pop, you can run a very diluted wash of darker paint into the grooves and wipe the surface clean with a damp cloth, leaving the color only in the recesses. -
Seal the Work:
Apply a coat of matte varnish or sealant to protect the paint and give the tile a professional, finished sheen.
Display your collection of tiles together on a shelf or use them as unique trivets for a creative home accent
Season Tree Dot-Leaf Relief Board
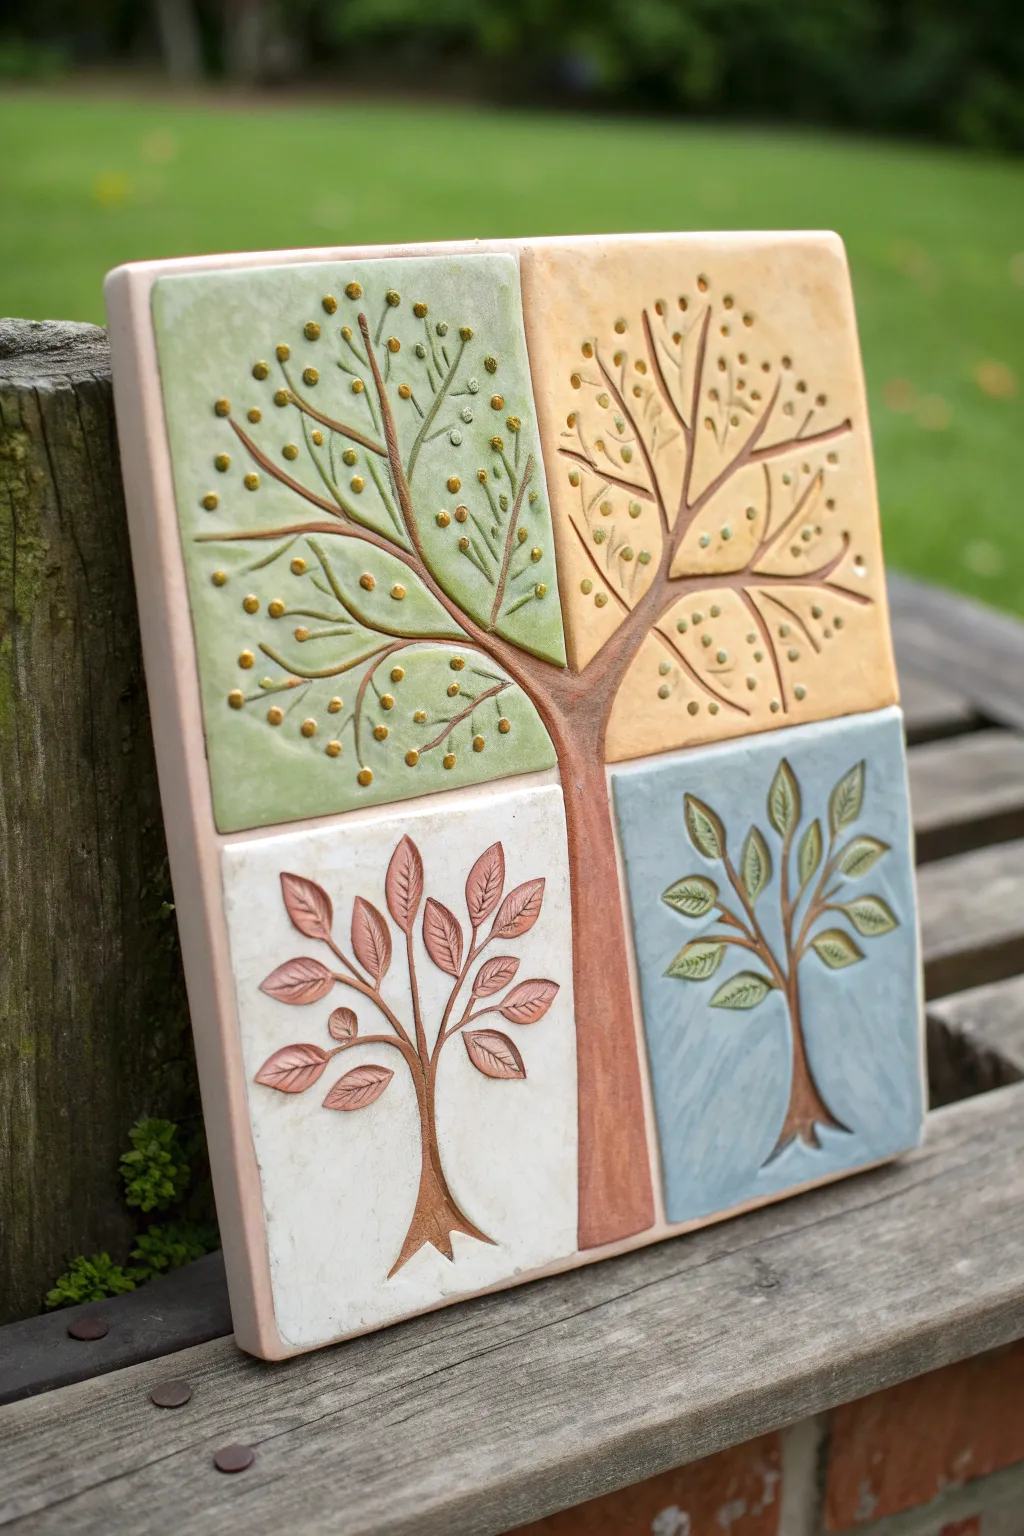
This beautiful ceramic-style plaque captures the changing seasons in a single, harmonious tree design. By dividing the composition into four distinct quadrants, you’ll create a textured story of nature’s cycle using simple carving and relief techniques.
Step-by-Step Guide
Materials
- Air-dry clay or polymer clay (white or light terracotta)
- Roller or rolling pin
- Square clay cutter or knife
- Ruler
- Clay carving tools (needle tool, small loop tool)
- Acrylic paints (sage green, warm yellow, light blue, white, brown)
- Small round paintbrush
- Stylus tool or blunt pencil for dotting
- Clear varnish (matte or satin)
Step 1: Base Preparation
-
Roll the slab:
Begin by rolling out your clay on a flat surface to a uniform thickness of about 1/4 inch. Ensure it is smooth and free of air bubbles. -
Cut the square:
Use a ruler and a clay knife to cut a perfect square, roughly 6×6 inches. Clean up the edges with a slightly damp finger to smooth any roughness. -
Mark the quadrants:
Lightly score a cross into the clay to divide the square into four equal quadrants. Don’t cut all the way through; these lines create the separation between your seasons.
Step 2: Sculpting the Tree
-
Form the trunk:
Roll a coil of clay to create the central tree trunk. Place it vertically in the center, overlapping the intersection of the quadrants slightly, and press it gently to adhere. -
Branch out (Top Left & Top Right):
In the upper two quadrants, score branch shapes directly into the flat clay surface using a needle tool. Create a network of lines radiating upward and outward from the central trunk area. -
Sculpt the saplings (Bottom Left & Bottom Right):
For the bottom quadrants, sculpt two smaller, independent tree shapes. Press small flattened teardrop shapes of clay onto the surface to build the trunks and branches, giving them a slightly raised 3D effect compared to the top. -
Refine the main trunk:
Blend the edges of the central applied trunk into the background clay so it looks like it emerges naturally. You can use a modeling tool to smooth the seams.
Clay Cracking?
If small cracks appear while drying, mix a tiny amount of fresh clay with water to make a paste perfectly suited for filling gaps
Step 3: Adding Seasonal Details
-
Spring texture (Top Left):
In the top-left quadrant, use a stylus tool or a small blunt point to press dozens of tiny dots around the branches. These represent fresh buds or small leaves. -
Autumn texture (Top Right):
Mirror the technique in the top-right quadrant, but make the dots slightly larger or more spaced out to suggest falling leaves or fuller canopy texture. -
Summer leaves (Bottom Left):
Create distinct leaf shapes for the bottom-left tree. Roll tiny balls of clay, flatten them into ovals, and press them onto the branches. Use a needle tool to score a center vein in each leaf. -
Winter leaves (Bottom Right):
Repeat the leaf process for the bottom-right tree but arrange them differently, perhaps sparser or with a slightly sharper shape. Score veins deeply for extra definition.
Texture Twist
Instead of painting the background, gently press a textured fabric like burlap onto the wet clay quadrants before sculpting the tree
Step 4: Painting and Finishing
-
Base coating:
Once the clay is fully dry (this may take 24-48 hours for air-dry clay), paint the background of each quadrant. Use sage green for top-left, warm yellow-ochre for top-right, white for bottom-left, and light blue for bottom-right. -
Painting the wood:
Paint the central trunk and the branch lines in a medium brown. I find using a very fine liner brush helps keep the branch lines crisp without messing up the background colors. -
Detailing the leaves:
Paint the embossed leaves in the bottom quadrants. Use copper or reddish-brown tones for the white quadrant (autumn/winter feel) and green tones for the blue quadrant. -
Highlighting dots:
Dip a toothpick or small dotting tool in gold or light yellow paint and carefully dab the indented dots in the top two quadrants to make them pop. -
Sealing:
Finish with a coat of matte or satin varnish to protect the paint and give the piece a unified, professional ceramic look.
Display your seasonal tile on a small easel or add a hook to the back to hang it on the wall