When you want something cute, aesthetic, and actually easy, clay is basically the best friend you didn’t know you needed. I’m sharing my go-to beginner ideas that use simple shapes, sweet little details, and that satisfying “I made this” vibe.
Mini Trinket Dish With a Sweet Face
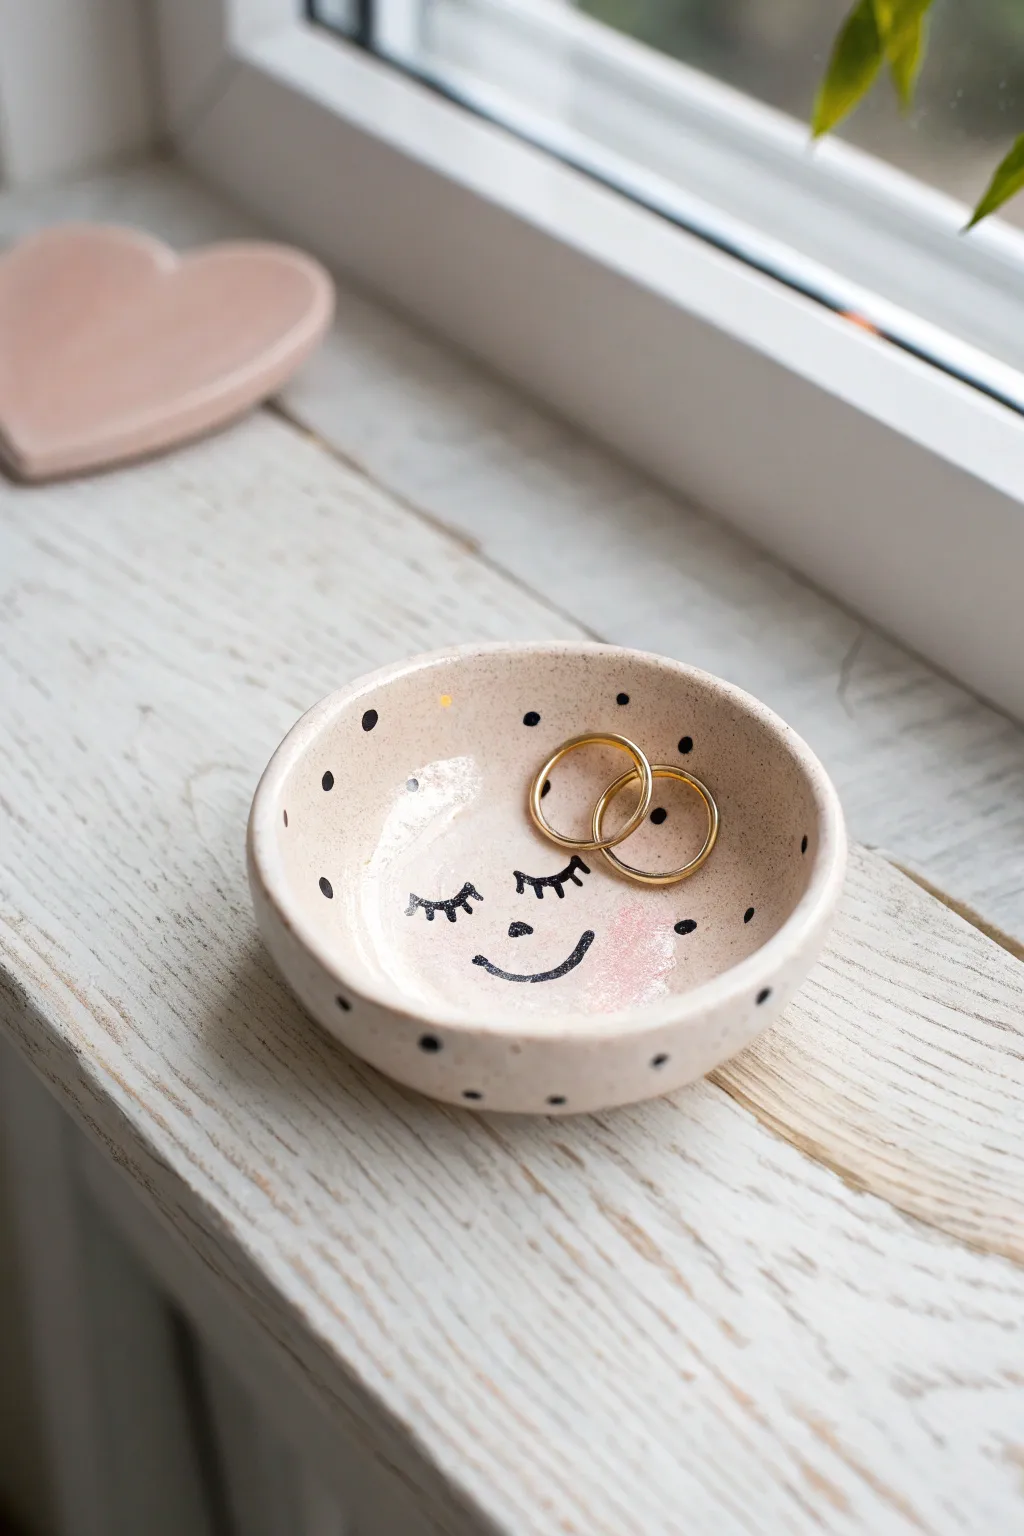
This adorable mini trinket dish brings a touch of whimsy to your bedside table with its gentle smile and classic polka dots. Perfect for holding everyday rings or delicate studs, this simple clay project captures a charming, handmade aesthetic.
Step-by-Step Tutorial
Materials
- Air-dry clay (white or cream)
- Small rolling pin
- Round cookie cutter or drinking glass (approx. 3-4 inches wide)
- Small bowl or sponge (for shaping)
- Fine-grit sandpaper
- Acrylic paints (black and pale pink)
- Fine detail paintbrush (size 0 or 00)
- Toothpick or dotting tool
- Gloss varnish or sealant
- Water cup
Step 1: Shaping the Clay Base
-
Preparing the clay:
Begin with a ball of air-dry clay roughly the size of a golf ball. Knead it in your hands until it is warm, pliable, and free of cracks. -
Rolling it out:
Roll the clay flat on a clean surface to an even thickness of about 1/4 inch. If the clay sticks, you can lay down a sheet of parchment paper first. -
Cutting the circle:
Press your round cookie cutter or the rim of a glass firmly into the clay to cut out a perfect circle. Remove the excess clay from around the edges. -
Creating the curve:
Gently lift the clay circle and place it into a slightly larger bowl to help it hold a curved shape, or simply cup it in your palm and gently press the center down with your thumbs to raise the edges. -
Smoothing:
Dip your finger in a tiny bit of water and run it along the rim of the dish to smooth out any rough cutting edges or cracks that formed during shaping. -
Drying:
Set the dish aside in a safe, dry place. Allow it to air dry completely for 24-48 hours, flipping it occasionally to ensure both sides dry evenly.
Smooth Surface Secret
Use a slightly damp sponge to smooth the clay while wet instead of your finger. It eliminates drag marks and creates a professional finish.
Step 2: Painting the Details
-
Sanding:
Once bone dry, lightly buff the surface with fine-grit sandpaper to remove any fingerprints or bumps. Wipe away the dust with a barely damp cloth. -
Base coat (optional):
If you want a specific background color, paint the entire dish now. For the look in the photo, leaving the natural cream clay or doing a sheer wash of beige works perfectly. -
Adding the cheeks:
Mix a very watery pale pink wash. Using your brush or even a fingertip, gently dab two soft, round spots in the lower center of the bowl for blushing cheeks. -
Painting the face:
Using a fine detail brush and black acrylic paint, carefully draw two closed eyelids with little lashes just above the pink cheeks. Add a small ‘U’ shape between the cheeks for the smile. -
Adding the dots:
Dip the non-brush end of a paintbrush, a toothpick, or a dotting tool into black paint. Gently dot the paint randomly around the inner rim and sides of the dish to create the polka dot pattern. -
Drying the paint:
Let the paint dry completely. This usually takes about 15-20 minutes since the details are small.
Golden Glamour
For a luxe upgrade, paint the rim of the dish with liquid gold leaf or metallic gold acrylic paint after the black dots have dried.
Step 3: Finishing Touches
-
Sealing:
Apply a coat of gloss varnish over the entire top surface of the dish. I prefer a high-gloss finish to give it that ceramic-glazed look. -
Final cure:
Allow the varnish to cure according to the bottle instructions before placing any jewelry inside.
Your charming little dish is now ready to keep your favorite rings safe and sound


Cute Ring Cone With Tiny Blush Cheeks
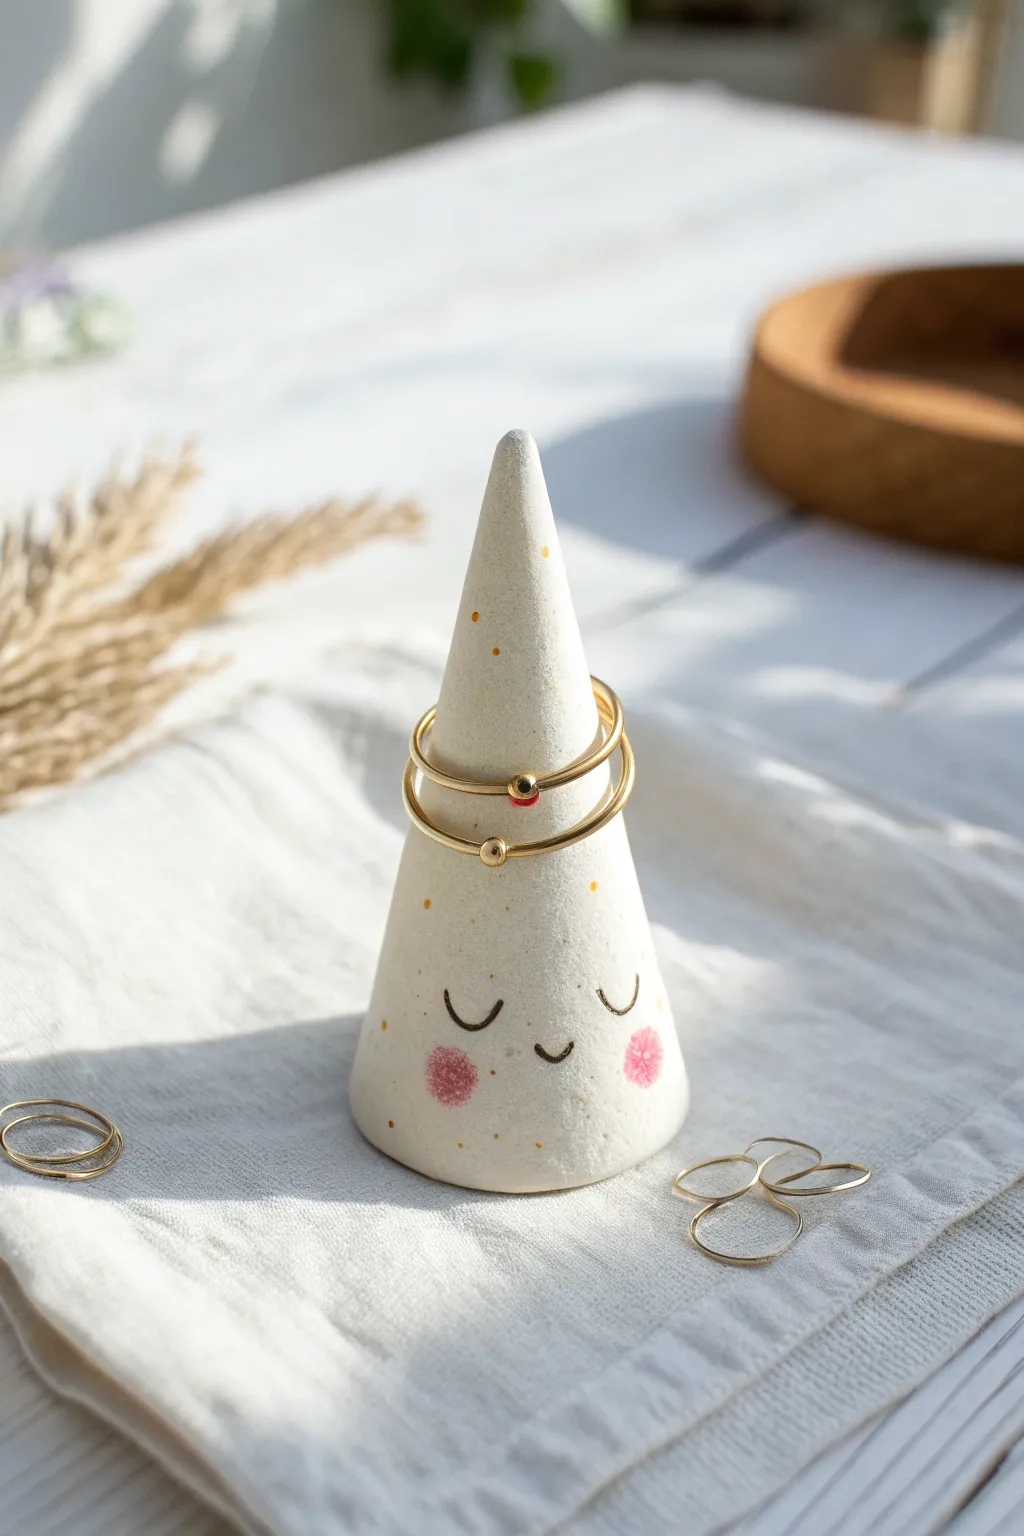
This adorable ring holder features a blushing little face that brings a touch of whimsy to your vanity or bedside table. Crafted from simple white clay with delicate gold details, it’s the perfect minimalist yet sweet spot to keep your favorite rings safe.
Step-by-Step Guide
Materials
- White polymer clay or air-dry clay (granite effect optional)
- Acrylic rolling pin
- Essential modeling tools or a craft knife
- Fine grit sandpaper (400-600 grit)
- Black fine-point permanent marker or acrylic paint
- Pink chalk pastel or pink acrylic paint
- Gold acrylic paint
- Small paintbrush (detail size)
- Q-tip or small soft brush for blush
- Matte varnish or sealant
Step 1: Shaping the Cone
-
Condition the clay:
Start by taking a golf-ball-sized amount of white clay. Knead it thoroughly in your hands until it becomes warm, pliable, and free of any cracks. If you want that speckled stone look shown in the photo, you can mix in tiny flecks of black pepper or dried tea leaves, or use ‘granite’ effect polymer clay. -
Roll a smooth ball:
Roll the clay between your palms to form a perfect sphere. Try to eliminate any seams or fold lines at this stage, as they become harder to fix later. -
Form the cone shape:
Place the ball on your work surface. Using the heel of your hand or a flat tool, gently roll one side of the ball back and forth while applying slightly more pressure to one end. This will naturally elongate the clay into a teardrop or cone shape. -
Refine the height:
Stand the cone upright. Tap the base gently against the table to flatten it so it stands securely without wobbling. Use your fingers to smooth the sides upward, refining the point at the top. It should be about 3-4 inches tall. -
Smooth the surface:
Inspect the cone for fingerprints. I like to dip my finger in a tiny bit of water (for air-dry clay) or baby oil (for polymer clay) and gently glide over the surface to make it pristine and smooth.
Step 2: Drying and Refining
-
Dry or bake the clay:
Follow the instructions for your specific clay type. If baking polymer clay, create a small tent of foil over it to prevent scorching the tip. If using air-dry clay, let it sit for 24-48 hours until completely hard and white. -
Sand for perfection:
Once fully cured or dry, use fine-grit sandpaper to buff out any remaining imperfections. Focus on the base to ensure it sits perfectly flat. -
Wipe clean:
Use a slightly damp cloth or paper towel to remove all sanding dust. The surface needs to be completely clean for the decoration to adhere properly.
Smooth Operator
Work on a piece of parchment paper or a ceramic tile. This allows you to rotate the project without touching the cone itself, preventing accidental fingerprints.
Step 3: Adding the Personality
-
Draw the sleepy eyes:
Using a fine-point black permanent marker or a very fine brush with black acrylic paint, carefully draw two ‘u’ shapes for the closed, sleeping eyes about a third of the way up from the bottom. -
Add a tiny smile:
Place a small, subtle curve right between and slightly below the eyes for the mouth. Keep the lines thin and delicate for that sweet aesthetic. -
Create the blushing cheeks:
To get that soft, diffused look seen in the image, scrape a little pink chalk pastel into a powder. Pick up the powder with a Q-tip or dry soft brush and gently dab it in circular motions onto the cheeks. Alternatively, use a very dry brush technique with pink acrylic paint. -
Add gold speckles:
Dip a small brush into gold acrylic paint. You can either paint tiny individual dots randomly over the cone or flick the bristles to create a splattered effect. Focus more dots near the top and fade them out as you go down.
Wobbly Base?
If your dried cone rocks slightly, tape a sheet of sandpaper to a flat table. rubbing the base of the cone against it in a figure-8 motion until it sits flushing flat.
Step 4: Finishing Touches
-
Seal the artwork:
To protect the delicate face and gold details, apply a coat of matte varnish. This will keep the clay looking natural while preventing the marker or pastel from smudging over time. -
Let it cure:
Allow the varnish to dry completely according to the manufacturer’s instructions before sliding your first ring onto the cone.
Your charming little ring holder is now ready to keep your jewelry safe and add a smile to your daily routine


Tiny Ghost Figurines You Can Batch Make
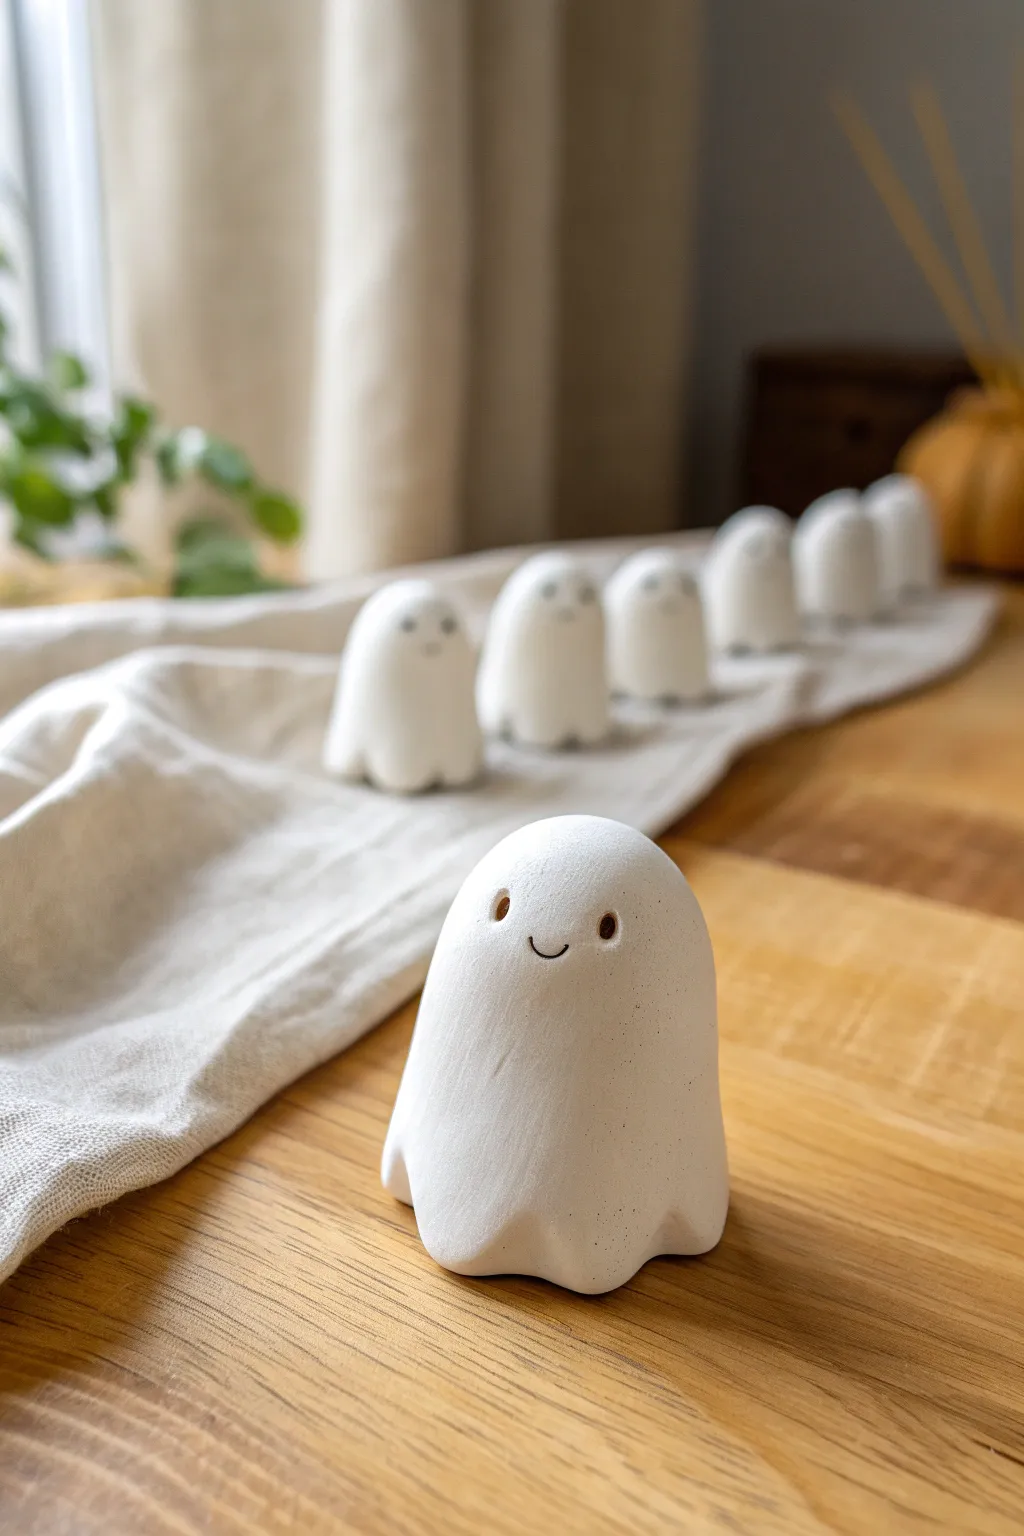
These adorable, smooth-finished ghost figurines are the perfect blend of spooky and sweet for your seasonal decor. Their minimal design makes them incredibly approachable for beginners, while the batch-making process means you can create a whole haunting in a single afternoon.
How-To Guide
Materials
- Air-dry white clay (or polymer clay)
- Small rolling pin
- Modeling tool with a ball end (small)
- Needle tool or toothpick
- Fine-grit sandpaper (400-600 grit)
- Black acrylic paint
- Fine detail brush (00 or 000 size)
- Matte varnish or sealant (optional)
- Small cup of water (for smoothing)
- Parchment paper or silicone mat
Step 1: Shaping the Bodies
-
Segment the clay:
Start by cutting your clay block into equal-sized portions. For the ghosts shown here, aim for balls of clay roughly the size of a walnut or a ping-pong ball. -
Create a smooth sphere:
Roll one portion of clay briskly between your palms. The goal is to eliminate any cracks or fold lines completely before you start shaping. -
Form the basic dome:
Gently press the sphere onto your work surface to flatten the bottom. Use your thumbs to elongate the top slightly, creating a smooth, rounded dome shape rather than a pointy cone. -
Pinch the hem:
At the very bottom edge of your dome, use your thumb and forefinger to gently pinch the clay outwards. This creates the ‘skirt’ of the ghost sheet. -
Create the folds:
To make the wavy hem, press the handle of your paintbrush or a modeling tool vertically against the pinched bottom edge at regular intervals to create indentations. -
Smooth the surface:
Dip your finger in a tiny bit of water and rub it over the entire surface of the ghost. You want a seamless, stone-like finish, so take your time smoothing out fingerprints. -
Repeat for the batch:
Repeat this process for your remaining clay balls. I like to vary the height and width slightly so each ghost has its own personality when arranged in a row.
Smooth Operator
Work with clean hands and keep baby wipes nearby. Dust or lint gets trapped in white clay easily, so frequent hand cleaning keeps your ghosts pristine.
Step 2: Adding Details
-
Mark the eye placement:
Before committing to the holes, lightly mark where you want the eyes to go with a needle tool. Placing them wider apart often results in a cuter, more ‘kawaii’ expression. -
Indent the eyes:
Using a small ball-end tool, press gently into your marked spots to create small, clean divots. Don’t go all the way through; just create a shallow socket. -
Etch the smile:
With a needle tool or toothpick, carefully etch a tiny, upward-curved line between the eyes. Keep the stroke light at first, then go over it once more to deepen the line. -
Refine the features:
If the clay displaced around the smile or eyes, stroke it gently with a damp finger to smooth it back down without erasing the details.
Glowing Spirits
Make the ghosts hollow by forming them over a larger ball tool or thumb. Once dry, place them over battery-operated tea lights for a glowing effect.
Step 3: Finishing Touches
-
Let them dry:
Place your ghosts on parchment paper and let them air dry completely. This usually takes 24-48 hours depending on humidity; flip them occasionally so the bottom dries evenly. -
Sand for perfection:
Once fully dry, take your fine-grit sandpaper and gently buff the surface. Focus on the bottom rim and any rough spots to achieve that matte, porcelain-like texture. -
Paint the eyes:
Using a fine detail brush, drop a small amount of black acrylic paint into the eye sockets you created earlier. It’s easier to dab the paint in rather than brush it. -
Paint the smile:
Very carefully trace the etched smile with the black paint. If you have a steadier hand with a pen, a fine-tip archival ink pen works wonderfully here too. -
Seal the set:
To protect your work, apply a thin coat of matte varnish. Avoid glossy finishes if you want to maintain the natural, aesthetic clay look shown in the photo.
Arrange your little phantom family on a mantle or shelf to enjoy their cheerful, haunting presence


Mushroom Trinket Jar With a Rounded Cap Lid
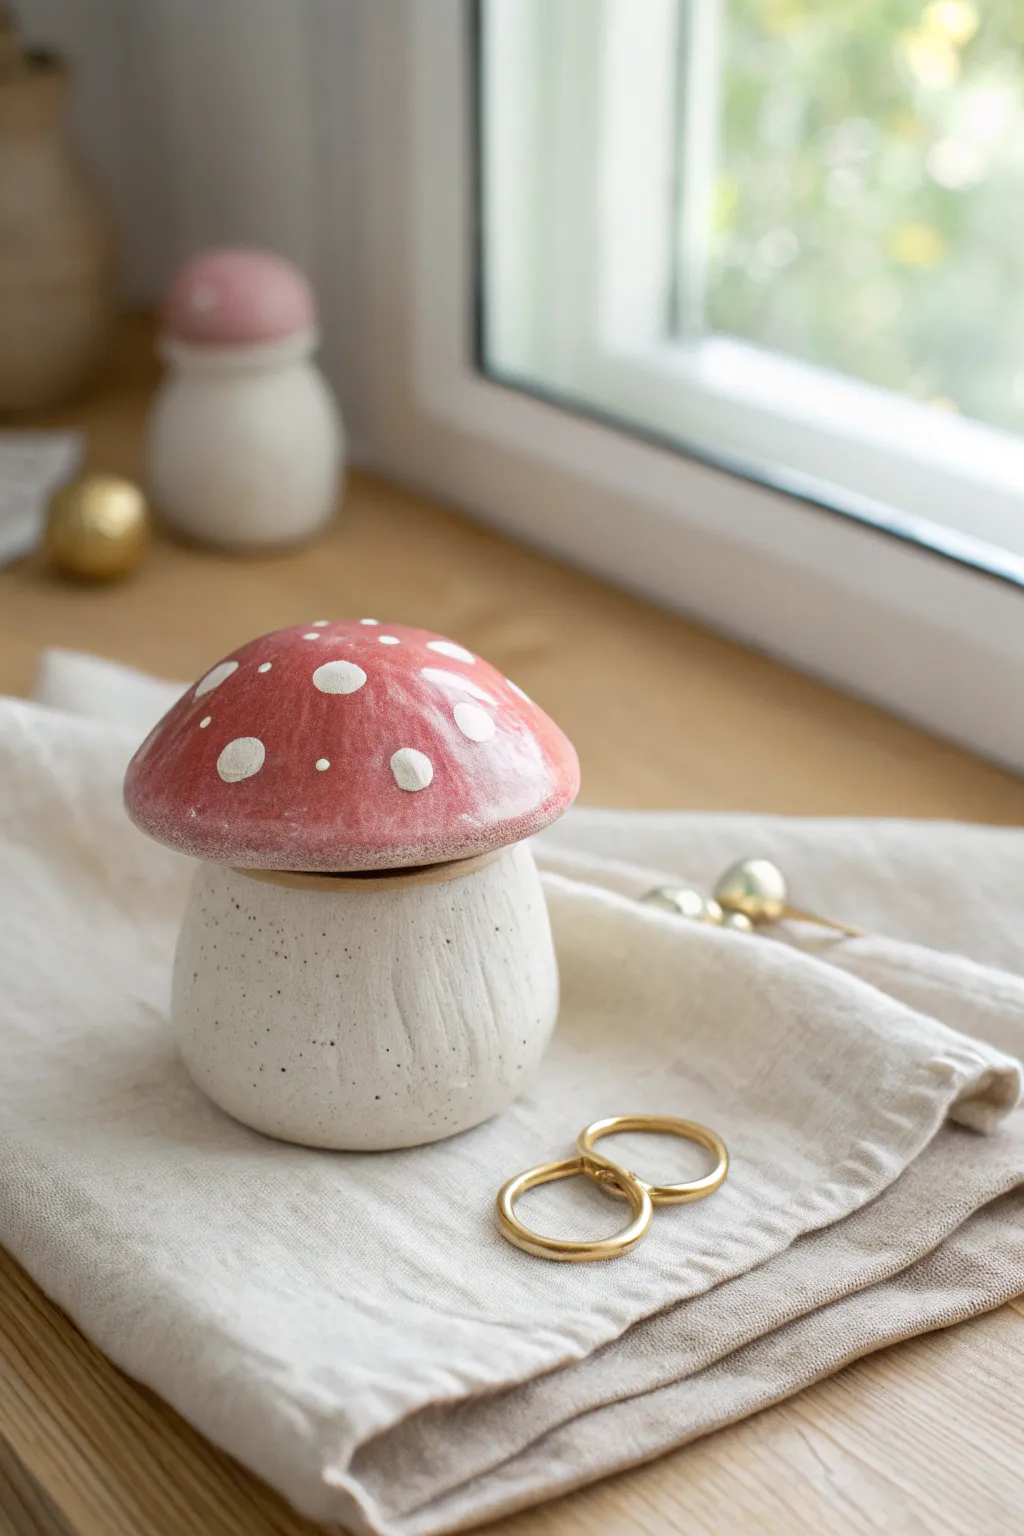
Bring a touch of cottagecore charm to your vanity with this delightful ceramic mushroom jar. Featuring a textured, speckled stem and a glossy, polka-dotted cap, this functional piece is perfect for hiding away your favorite rings and small treasures.
Step-by-Step
Materials
- White stoneware or polymer clay (oven-bake)
- Speckled clay (or black speckle additive)
- Underglaze (rose pink and white)
- Clear glossy glaze
- Basic clay tools (needle tool, sponge, rib)
- Pottery wheel (optional) or rolling pin for slab building
- Small paintbrush
- Kiln (if using stoneware) or home oven (if using polymer)
Step 1: Shaping the Base
-
Prepare the speckled clay:
Start by wedging your white clay mixed with speckles to ensure it’s free of air bubbles. If you don’t have pre-speckled clay, knead in a small amount of black speckle additive or dried coffee grounds for a similar organic look. -
Form the pinch pot:
Create a ball of clay roughly the size of a tangerine. Push your thumb into the center and gently pinch the walls upward and outward to form a rounded, cup-like shape. This will be the stem of your mushroom. -
Refine the shape:
You want the base to be slightly bulbous at the bottom and taper gently towards the top. Use a rib tool or your fingers to smooth the exterior, but don’t over-polish; the hand-formed look adds character. -
Create texture:
Using a serrated kidney tool or simply dragging a stiff brush vertically up the sides, add subtle vertical striations. This mimics the fibrous texture of a real mushroom stem. I prefer to keep these faint for a softer aesthetic. -
Level the rim:
Ensure the top opening is perfectly circular and flat so the lid will sit securely. You can invert the pot onto a clean table and gently rotate it to level the rim.
Uneven Lid?
If the lid wobbles after firing, apply a dab of grinding paste to the rim of the base. Place the lid on top and rotate it back and forth to grind the two surfaces until they sit flush.
Step 2: Sculpting the Cap
-
Form the lid slab:
Roll out a slab of plain white clay (or speckled, if you prefer) to about 1/4 inch thickness. Cut a circle that is approximately 1 inch wider than the opening of your base jar. -
Shape the dome:
Gently cup the clay circle over a smooth, rounded stone or a small bowl covered in plastic wrap to create a shallow dome shape. Smooth the edges so they are rounded and soft, like a button mushroom. -
Add the flange:
Roll a small coil of clay. Score and slip the underside of your dome lid, then attach the coil in a circle that fits just *inside* the rim of your base jar. This flange prevents the lid from sliding off. -
Test the fit:
Once the flange is attached but still workable, gently place the lid onto the base to ensure a snug fit. Make minor adjustments to the coil if needed, then let both pieces dry to leather hard.
Step 3: Decoration and Glazing
-
Apply base color:
Paint the top surface of the mushroom cap with 2-3 coats of a soft, rose-pink underglaze. Leave the underside and the stem unpainted to show off the natural speckled clay body. -
Paint the spots:
Using a small detail brush or the end of a paintbrush handle, dot on circles of white underglaze over the pink. Vary the sizes of the dots—some large, some tiny—for a more organic, distinctively toadstool look. -
Bisque fire:
If using ceramic clay, fire the pieces in a kiln to bisque temperature (usually Cone 04). If using polymer clay, bake according to package instructions now and skip the glazing steps. -
Glaze application:
Dip or brush a clear, glossy glaze over the entire pink cap to make it shine like a wet mushroom. For the base, use a matte clear glaze or leave it unglazed on the outside if the clay is fully vitrified, to maintain that tactile stone feel. -
Final firing:
Fire the ceramic pieces a final time to the maturity temperature of your clay (e.g., Cone 6). Ensure the lid is not on the base during firing, or they will fuse together.
Make it Magical
Before the final glaze firing, use real gold luster on the white spots or the very rim of the cap. It adds a luxurious, fairy-tale finish to your trinket jar.
Now fill your adorable new mushroom jar with rings or tiny keepsakes and enjoy the woodland vibe it brings to your space

The Complete Guide to Pottery Troubleshooting
Uncover the most common ceramic mistakes—from cracking clay to failed glazes—and learn how to fix them fast.
Cat Paw Pinch Bowl in Soft Pastels
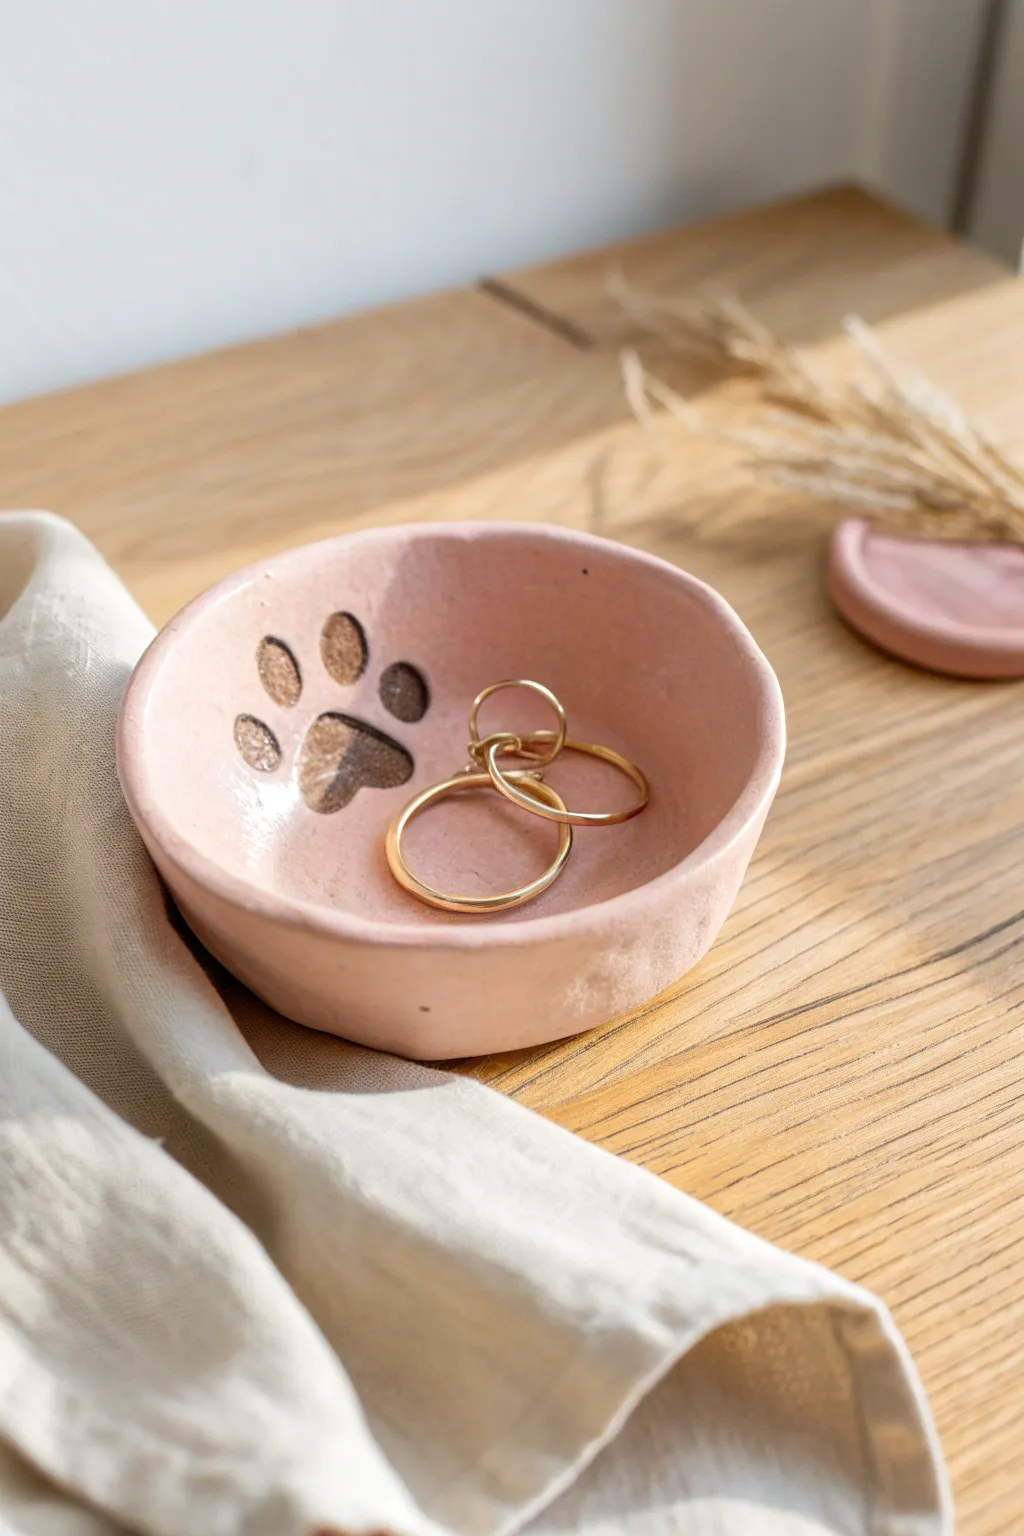
Keep your favorite rings safe in this adorable, cat-approved accessory. This soft pink clay bowl features a charming recessed paw print design, blending minimal aesthetics with pet-lover personality.
Detailed Instructions
Materials
- Air-dry clay (white)
- Acrylic paint (pastel pink, dark brown/bronze)
- Gloss varnish or sealant
- Small paintbrush
- Water cup
- Sandpaper (fine grit)
- Sponge
Step 1: Shaping the Clay
-
Prepare the Clay:
Start by taking a lump of air-dry clay about the size of a golf ball. Knead it in your hands for a minute to warm it up and make it pliable, which helps prevent cracking later on. -
Form a Sphere:
Roll the clay between your palms until you have a smooth, even ball. Try to smooth out any major creases or fold lines now. -
Begin the Pinch Pot:
Hold the ball in one hand and gently press your thumb into the center, stopping before you push through the bottom. This creates the initial opening. -
Shape the Walls:
Using your thumb and fingers, gently pinch the clay walls, rotating the ball as you go. Work from the bottom up to ensure an even thickness all around the rim. -
Flatten the Base:
Once you are happy with the width of your bowl, tap the bottom gently against your table surface. This creates a flat base so the dish won’t wobble. -
Smooth the Edges:
Dip your finger in a tiny bit of water and run it along the rim and the inside of the bowl to smooth out fingerprints. Don’t worry about perfection; a slightly organic shape adds to the charm.
Step 2: Adding the Design
-
Stamp the Main Pad:
To create the paw print, use the rounded end of a paintbrush handle or your pinky finger. Press firmly into the center-bottom of the bowl to make the large main pad indentation. -
Add the Toe Beans:
Using a slightly smaller tool, like the back end of a thinner brush or a cotton swab, press four smaller indentations in an arc above the main pad to create the toes. -
Refine the Edges:
Use a damp brush to gently smooth the edges of your indentations so they look soft and pillowy rather than sharp. -
Let it Dry:
Set your bowl aside in a dry, room-temperature spot. Let it cure completely for 24 to 48 hours until the clay turns hard and opaque white.
Cracks happen!
If small cracks appear while drying, mix a tiny bit of fresh clay with water to make a paste (slip). Fill the cracks, smooth it over, and let it dry again.
Step 3: Painting and Finishing
-
Sand for Smoothness:
Once fully dry, lightly sand the rim and outside of the bowl with fine-grit sandpaper to remove any rough texture. -
Apply Base Color:
Mix a soft pastel pink acrylic paint. Cover the entire bowl—inside, outside, and bottom—with an even coat. I usually do two thin coats for better coverage. -
Paint the Paw Print:
Using a fine-tip brush, carefully fill in the recessed paw print areas with a dark brown or bronze metallic paint. This contrast makes the design pop. -
Seal the piece:
After the paint is completely dry, apply a coat of gloss varnish or sealant over the entire dish. This protects the clay from moisture and gives it a finished ceramic look.
Make it Luxe
Use liquid gold leaf paint for the paw print instead of brown acrylic. The metallic shine looks incredible against the matte pink clay.
Now you have a sweet little spot to keep your treasures safe
Smiley Face Magnets for Instant Cute Decor
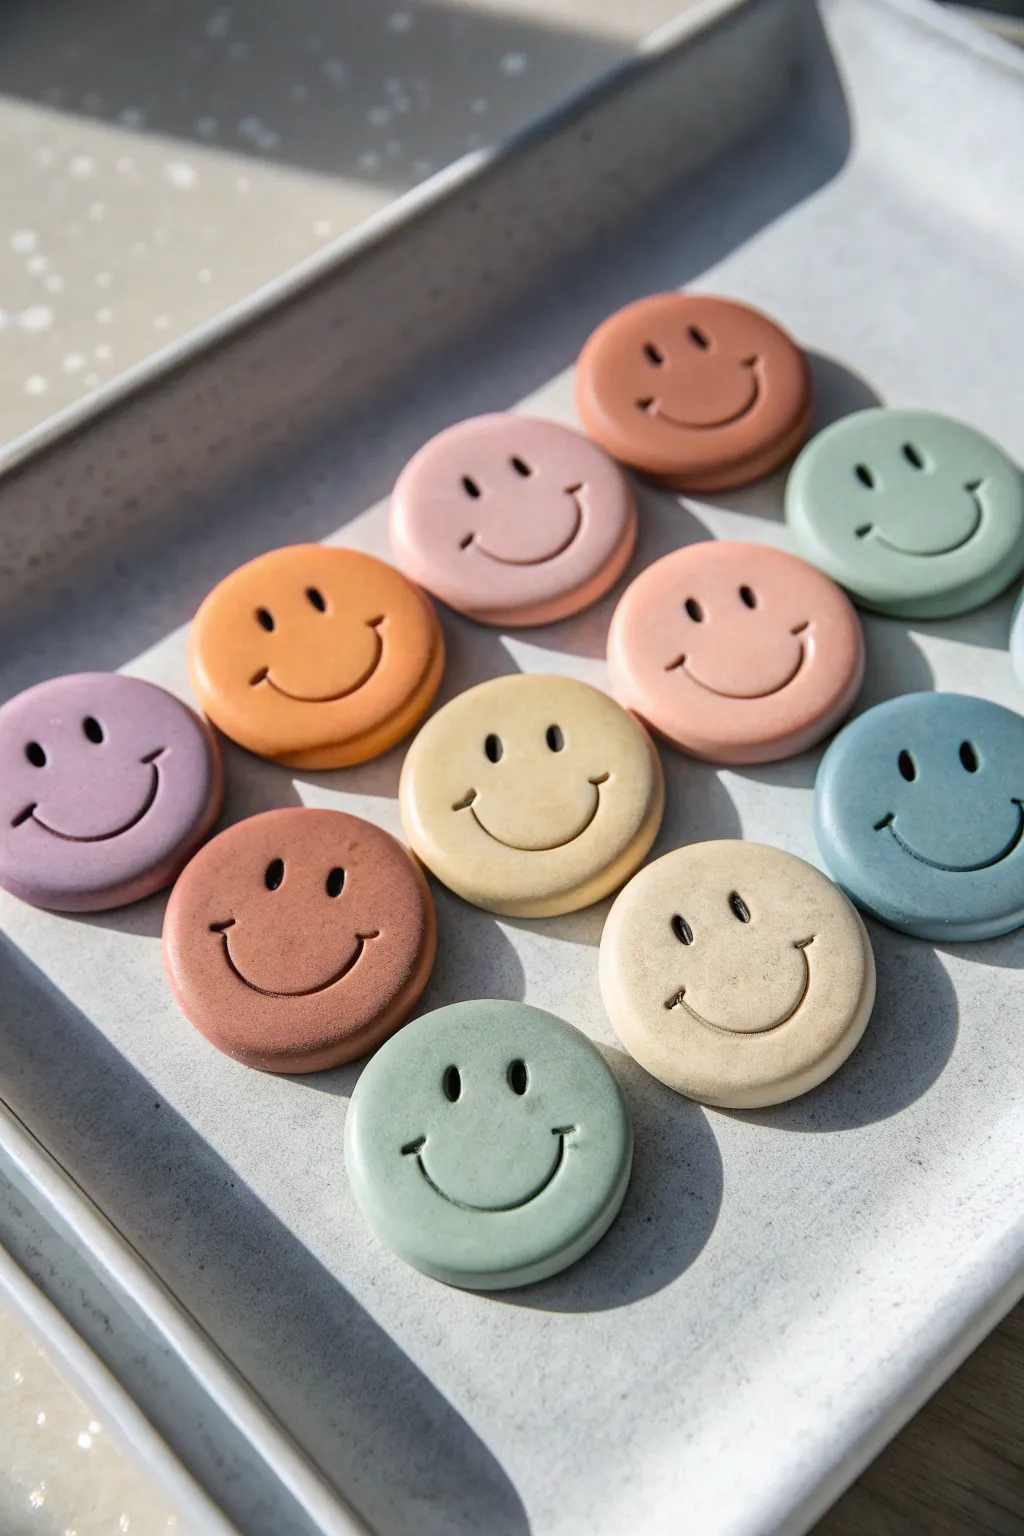
Brighten up your fridge or magnetic board with these charmingly simple smiley face magnets. With their matte finish and soft, muted palette of sage, terra cotta, and mustard, they add a dose of trending aesthetic joy to any space without feeling childish.
Step-by-Step Tutorial
Materials
- Polymer clay (muted pastel colors: sage green, blush pink, light blue, mustard yellow, terra cotta, lavender)
- Acrylic rolling pin
- Small circle cutter (approx. 1.5 inch diameter)
- Dotting tool or a small rounded stick (for eyes)
- Small U-shaped clay cutter or a drinking straw piece
- Parchment paper or ceramic tile
- Strong craft magnets (neodymium recommended)
- Superglue or heavy-duty craft glue
- Oven (if using polymer clay)
Step 1: Prepping and Shaping
-
Condition the clay:
Start by taking small portions of your different clay colors. Knead each piece in your hands until it becomes warm, soft, and pliable. This conditioning step is crucial to prevent cracks later. -
Create custom shades:
If your clay colors seem too bright or saturated, mix in a tiny amount of white or beige clay to tone them down into the milky, matte pastels seen in the photo. -
Roll it out:
Place a ball of clay on a piece of parchment paper or a smooth ceramic tile. Use your acrylic roller to flatten the clay into a slab that is roughly 1/4 inch thick. You want them substantial, not paper-thin. -
Cut the circles:
Press your circle cutter firmly into the clay slab. Give it a tiny wiggle before lifting to ensure a clean cut. -
Smooth the edges:
Lift the excess clay away. Gently run a fingertip around the circumference of each circle to soften the sharp edge left by the cutter, giving it that smooth, rounded finish.
Step 2: Adding the Faces
-
Make the eyes:
Take your dotting tool or the rounded end of a paintbrush. Press two vertical oval impressions into the upper half of the circle. Press straight down and rock slightly to get a clean indentation. -
Refine the eye shape:
The eyes in the inspiration image are slightly elongated ovals rather than perfect circles. You can achieve this by dragging the tool downward just a millimeter as you press. -
Create the smile:
For the mouth, you have two options. You can use a small U-shaped cutter if you have one. If not, take a plastic drinking straw and cut it in half lengthwise to create a makeshift curved tool. -
Impress the smile:
Position your smile tool centrally below the eyes. Press firmly but gently. If using a makeshift tool, be careful not to press too deep or cut all the way through the clay. -
Add character:
To get the little ‘cheek’ dimples at the ends of the smile, use a smaller dotting tool to deepen the very ends of the curved line slightly. -
Final smooth:
Check the surface for any fingerprints. I find that lightly dusting a fingertip with cornstarch and brushing it over the surface removes prints without distorting the features.
Clean Cuts Pro-Tip
Before cutting your circles, place a sheet of plastic wrap over the clay. Press the cutter through the plastic. This creates naturally beveled, rounded edges so you don’t have to smooth them manually.
Step 3: Baking and Assembly
-
Bake the pieces:
Arrange your clay faces on a parchment-lined baking sheet. Bake according to your clay manufacturer’s instructions—usually around 275°F (135°C) for 15-30 minutes, depending on thickness. -
Cool down:
Let the pieces cool completely on the baking tray. Do not try to move them while they are hot, as polymer clay is slightly flexible until fully cooled and hardened. -
Sand for matte finish:
If your clay looks shiny after baking, you can lightly buff the surface with very fine-grit sandpaper (around 1000 grit) to achieve that soft, matte stone-like texture. -
Clean dust:
Wipe away any sanding dust with a slightly damp cloth or a baby wipe. -
glue the magnet:
Flip the smiley faces over. Place a drop of strong superglue or heavy-duty craft adhesive in the center of the back. -
Attach and set:
Press a magnet into the glue and hold it for 10-15 seconds to ensure an initial bond. Let them cure for usually 24 hours (check your glue instructions) before sticking them to the fridge.
Level Up: Speckled Look
Mix in ground black pepper or dried used coffee grounds into your clay before rolling. This creates a trendy ‘faux stone’ or terrazzo effect that matches the matte aesthetic perfectly.
Now your space has a touch of cheer that is both playful and perfectly stylish


What Really Happens Inside the Kiln
Learn how time and temperature work together inside the kiln to transform clay into durable ceramic.
Aesthetic Flower Coasters With Simple Petals
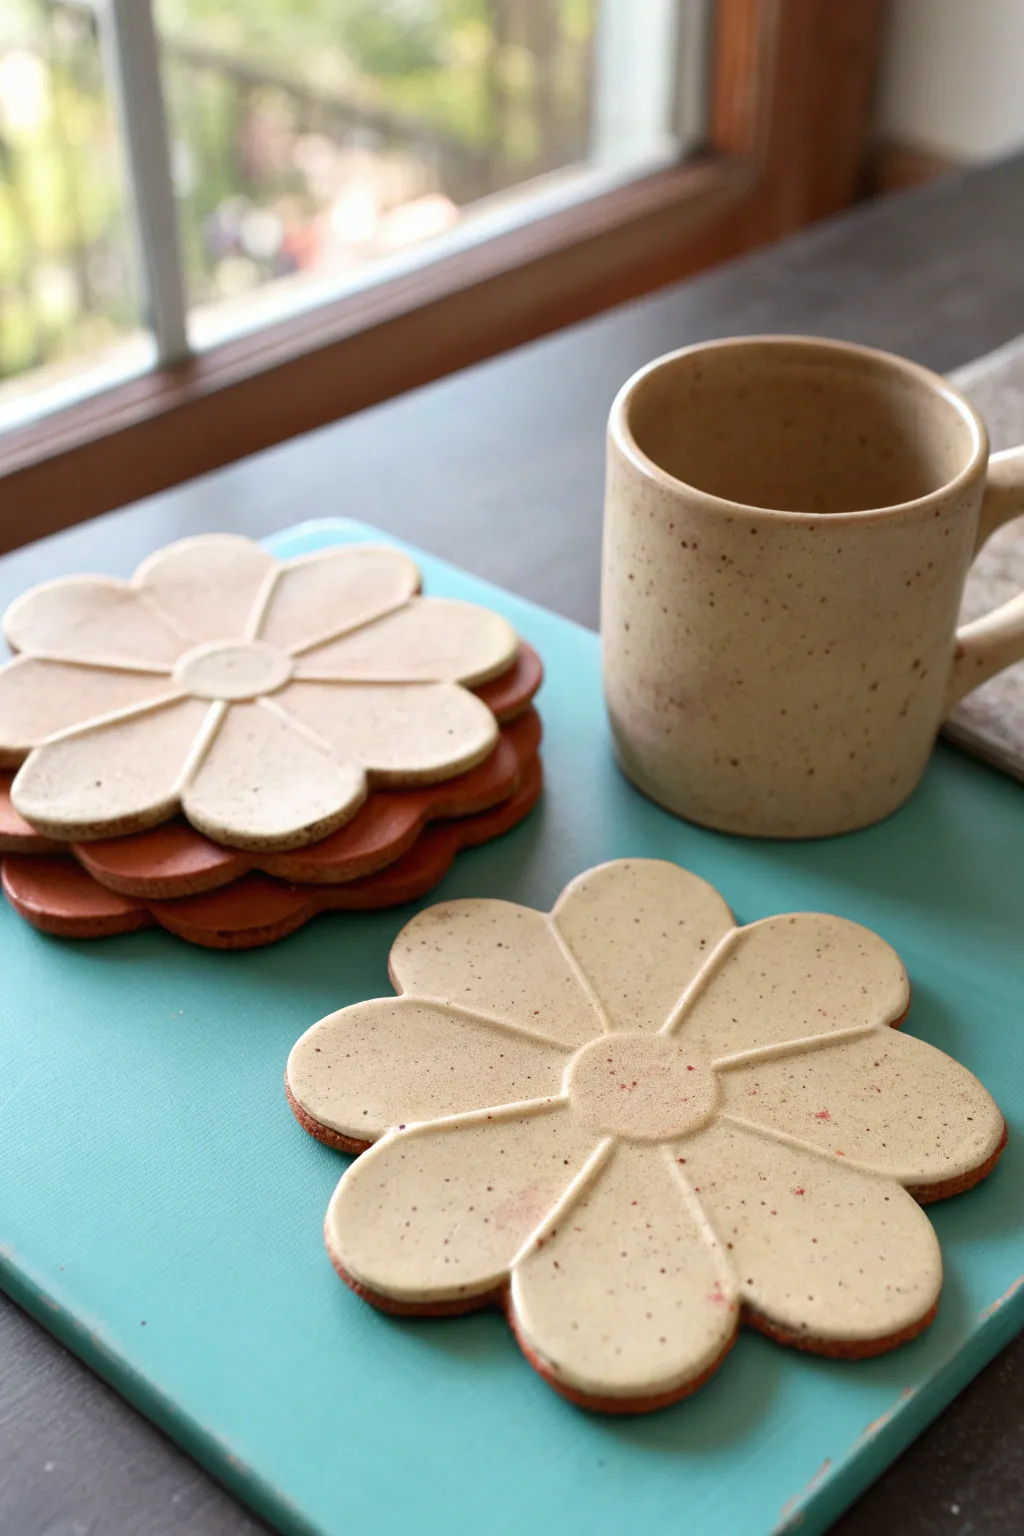
Bring the charm of spring to your coffee table with these delightful flower-shaped coasters that resemble oversized daisy cookies. The speckled cream finish paired with the warm terracotta clay base creates a cozy, artisanal aesthetic that looks professionally made but is surprisingly simple to achieve at home.
Detailed Instructions
Materials
- Terracotta-colored polymer clay or air-dry clay
- Speckled cream polymer clay (like ‘Granite’ or ‘Sand’) or air-dry clay with speckles mixed in
- Rolling pin
- Flower-shaped cookie cutter (approx. 4 inches wide)
- Clean work surface or silicone mat
- Modeling tool with a blunt edge (or a butter knife)
- Small round cutter or bottle cap (approx. 1 inch)
- Oven (for polymer clay) or drying space (for air-dry)
- Fine-grit sandpaper (optional)
- Matte or satin varnish (optional for sealing)
Step 1: Prepping the Clay Base
-
Condition the base clay:
Begin by taking your terracotta-colored clay and kneading it thoroughly in your hands until it becomes soft, pliable, and warm. This prevents cracking later on. -
Roll the slab:
Place the conditioned clay on your work surface or mat. using the rolling pin, roll it out into an even slab that is approximately 1/4 inch thick. Try to keep the thickness consistent for a level coaster. -
Cut the flower shape:
Press your large flower-shaped cookie cutter firmly into the rolled slab. Wiggle it slightly to ensure a clean cut, then lift the excess clay away. Remove the flower shape and set it aside; this will be the bottom layer of your ‘sandwich’ or the unglazed underside look.
Sticky Situation?
If your clay sticks to the table or rolling pin, lightly dust your surface (and tools) with cornstarch or baby powder before rolling. It acts like flour for dough.
Step 2: Creating the Speckled Top
-
Prepare the speckled clay:
Now, take your speckled cream clay. Knead it just as you did the base color until it is soft and workable. -
Roll the top layer:
Roll this speckled clay out into a slab. For this top layer, you want it slightly thinner than the base, perhaps around 1/8 inch thick, so the coaster doesn’t become too heavy. -
Cut the second flower:
Using the same flower cutter, punch out a matching shape from the speckled clay. -
Combine the layers:
Carefully align the speckled flower directly on top of the terracotta flower. Press them together gently. I like to lightly roll over the top with the rolling pin—just enough to bond the layers without distorting the shape.
Step 3: Adding Details
-
Define the center:
Take your small round cutter or a bottle cap and gently press it into the absolute center of the flower. Don’t cut all the way through; simply make a clear indentation to define the flower’s pistil. -
Mark the petals:
Using your blunt modeling tool or the back of a knife, find the junction where two petals meet at the outer edge. -
Create the petal lines:
Draw a straight line from that outer junction inward toward the center circle. Press deep enough to create a groove but not cut through. Repeat this for every petal gap to create distinct separation. -
Smooth the edges:
Run your finger along the outer rim of the petals to smooth any harsh cutting lines and ensure the terracotta layer peeks through nicely on the sides.
Make It Glossy
Swap the matte varnish for a high-gloss glaze or UV resin on top. This simulates the look of kiln-fired ceramics and makes the speckled colors pop vibrantly.
Step 4: Finishing Up
-
Bake or dry:
If using polymer clay, place your coasters on a baking sheet lined with parchment paper. Bake according to your clay package instructions (usually around 275°F for 15-30 minutes). If using air-dry clay, leave them in a dry spot for 24-48 hours. -
Cool down:
Let the coasters cool completely inside the oven or on the counter to prevent thermal shock cracking. -
Sand imperfections:
Once fully cured or dry, inspect the edges. If there are any sharp bits or fingerprints, lightly buff them away with fine-grit sandpaper. -
Seal the surface:
Since these are coasters, applying a coat of matte or satin varnish is a smart move to protect them from moisture and coffee stains.
Stack your new set of coasters on the table and enjoy a warm drink in style
Tiny Fruit Charms With Minimalist Details
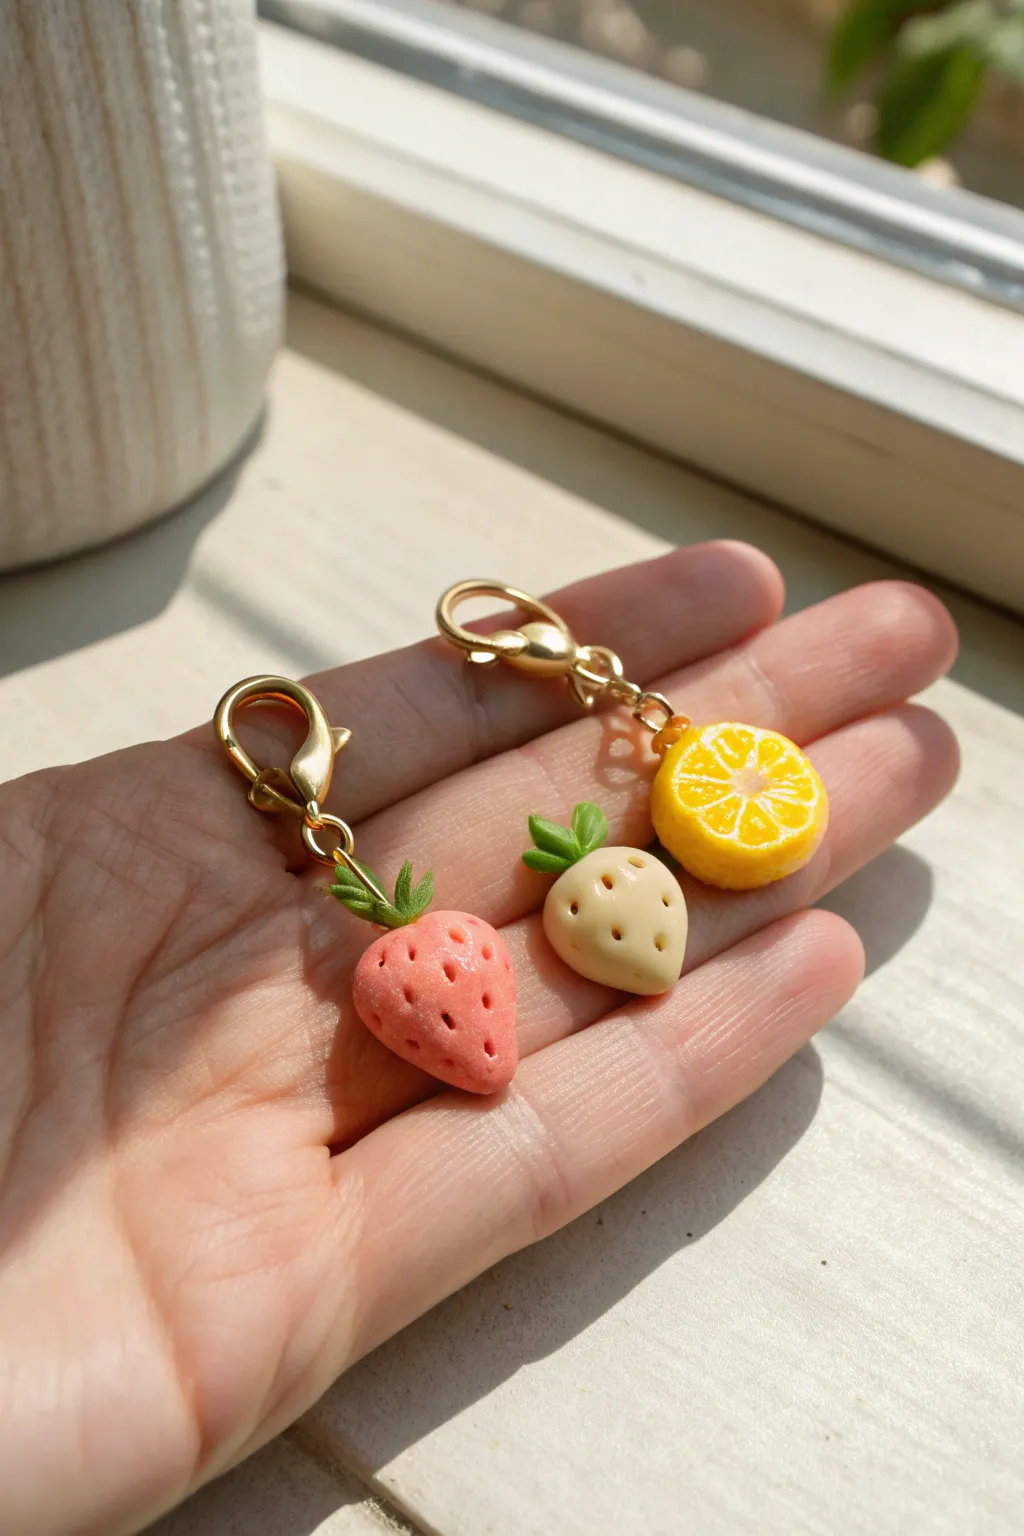
These adorable fruit charms capture the sweetness of strawberries and citrus slices in miniature form. With their soft matte finish and delicate texturing, they make perfect additions to a keychain, planner charm, or zipper pull.
Step-by-Step
Materials
- Polymer clay (pink, pale beige/white, translucent yellow, white, green)
- Eye pins (gold tone)
- Lobster clasp keychain fixtures
- Jump rings
- Needle tool or toothpick
- Dotting tool (small)
- Needle nose pliers
- Oven for baking
- Liquid clay or bake and bond (optional)
- Glaze (glossy for lemon, matte for berries – optional)
Step 1: Shaping the Berries
-
Condition the pink clay:
Start by warming a small pea-sized amount of pink polymer clay in your hands until it is soft and pliable. -
Form the strawberry base:
Roll the clay into a smooth ball, then gently taper one end to create a soft cone or teardrop shape. Flatten the top slightly where the leaves will sit. -
Create the white berry:
Repeat the previous steps using pale beige or off-white clay to create the second, lighter-colored berry charm. -
Add texture:
Using a needle tool or a very small dotting tool, gently press tiny indentations all over the surface of both berries to mimic seed pockets. Don’t press too deep; just enough to catch the light.
Seed Depth Trick
When making the strawberry seeds, press slightly upward with your needle tool rather than straight in. This creates a more realistic teardrop-shaped seed pocket.
Step 2: Crafting the Lemon Slice
-
Prepare the citrus cane colors:
Mix a small amount of translucent clay with yellow to get a juicy, realistic lemon flesh tone. Condition some opaque white clay for the pith and rind. -
Make the segments:
Roll the yellow mix into a log. Wrap a very thin sheet of white clay around it. Cut this log into 6-8 equal triangular wedges. -
Assemble the cane:
Arrange the wedges into a circle, placing a thin snake of white clay in the center. -
Add the rind:
Wrap the entire circle in a sheet of white clay, followed by a final sheet of bright yellow opaque clay for the zest. Reduce the cane by rolling it gently until it’s the diameter you want for your charm. -
Slice the charm:
Use a sharp tissue blade to cut a thick slice from your cane. I usually aim for about 3-4mm thickness so it’s sturdy. -
Texture the flesh:
Use your needle tool to rough up the translucent yellow segments slightly, giving them a juicy, fibrous texture.
Step 3: Adding Details and Hardware
-
Make the leaves:
Take tiny bits of green clay and shape them into small teardrops. Press them flat. -
Attach leaves:
Press 3-4 leaves onto the top flat part of each strawberry. You can use a dab of liquid clay here to ensure they stick well. -
Insert eye pins:
Trim your eye pins to an appropriate length (about half the length of the charm). Dip the end in liquid clay and push it straight down into the center top of each fruit. -
Bake:
Bake the pieces according to your polymer clay manufacturer’s instructions (usually 275°F/135°C for 15-30 minutes). -
Cool down:
Let the charms cool completely before handling them, as the clay is fragile when hot.
Sweet Scents
Mix a tiny drop of essential oil (like lemon or strawberry) into the clay during the conditioning phase for scratch-and-sniff style scented charms.
Step 4: Assembly
-
Open jump rings:
Use two pairs of pliers to twist open a jump ring. Never pull them apart; always twist sideways. -
Connect to clasp:
Slide the eye pin loop of your strawberry onto the jump ring, then add your lobster clasp. Close the jump ring securely. -
Grouping charms:
For the clustered look in the photo, attach the lemon slice and white berry to a single larger jump ring or a short chain before attaching to the main clasp. -
Final touches:
Optionally, brush a little gloss varnish over the juicy part of the lemon slice to make it shine.
Clip these sweet little fruits onto your bag or keys for a daily dose of summer sunshine

TRACK YOUR CERAMIC JOURNEY
Capture glaze tests, firing details, and creative progress—all in one simple printable. Make your projects easier to repeat and improve.
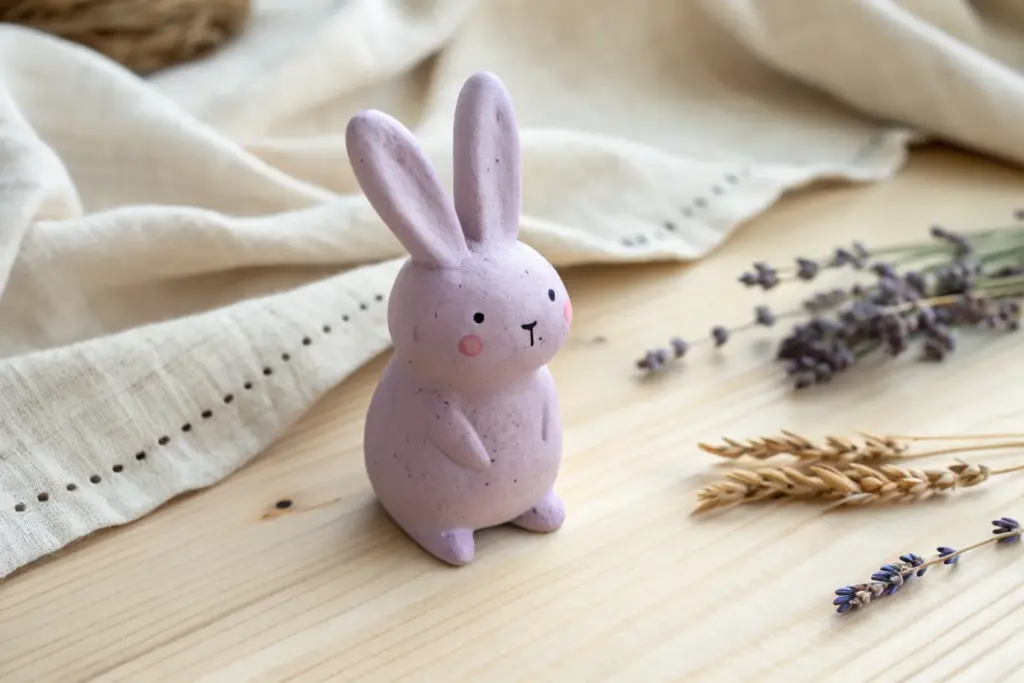
Easy Animal Buddy Charms From Basic Shapes
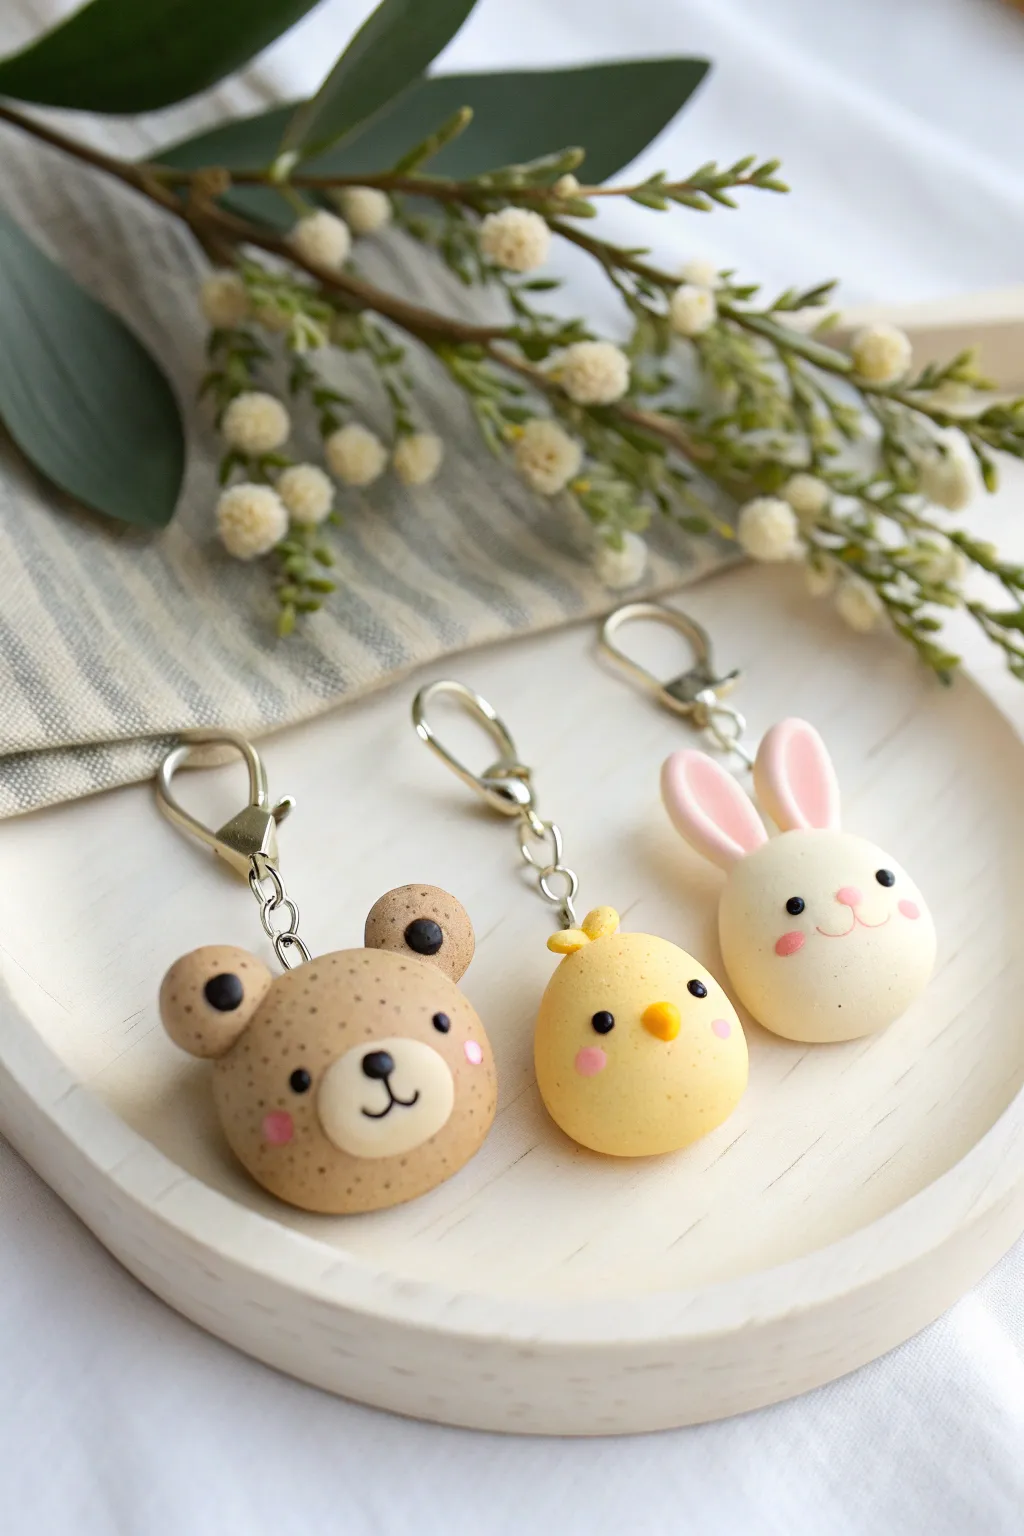
Create this adorable set of animal charms that resemble sweet, rounded macarons or cookies. These minimalist designs rely on simple spheres and flattened shapes, making them perfect for beginners looking for a cute and achievable project.
How-To Guide
Materials
- Polymer clay (Tan with speckles, pale yellow, white, light pink, black, orange/gold)
- Small eye pins or screw eyes (silver)
- Keychains with lobster clasps
- Ball stylus tool or toothpick
- Pliers (round nose and flat nose)
- Oven (for baking according to clay instructions)
- Optional: Glaze or matte varnish
- Soft brush for blush (or pink pastel chalk)
Step 1: Shaping the Base Bodies
-
Prepare the clay:
Start by conditioning your clay. For the bear, use a speckled tan or light brown clay. For the chick, use pale yellow. For the bunny, use white clay. Knead each color until soft and pliable. -
Form the main shapes:
Roll a medium-sized ball of clay for each animal head. Press them down gently onto your work surface to flatten the bottoms slightly, creating a rounded dome shape rather than a perfect sphere. aim for about 1 inch in diameter. -
Smooth the surfaces:
Before adding details, check for fingerprints. Lightly brush your finger over the domes to smooth out any imperfections.
Clean Clay Tip
White clay attracts dust like a magnet! Keep wet wipes nearby and clean your hands and tools thoroughly between colors, especially before starting the white bunny.
Step 2: Creating the Bear Charm
-
Add the ears:
Roll two small balls of the speckled tan clay. Press them gently onto the top left and right sides of the bear’s head. Use a ball tool to make an indentation in the center of each ear. -
Make the snout:
Take a small amount of lighter cream or plain tan clay (slightly lighter than the body) and flatten it into a small oval. Place this on the lower center of the face. -
Add facial features:
Roll three tiny balls of black clay. Place two for the eyes and one on the snout for the nose. Roll a very thin snake of black clay to form the mouth lines coming down from the nose. -
Add the blush:
Using a tiny amount of pink clay flattened very thin, or a dab of pink pastel dust, add rosy cheeks just below the eyes.
Step 3: Creating the Chick Charm
-
Form the crest:
Take a tiny bit of yellow clay and shape it into a small tuft or three tiny teardrops. Attach this to the very top center of the yellow head. -
Create the beak:
Roll a small piece of orange or gold clay into a cone shape. Press it into the center of the face so it points outward slightly. -
Place the eyes:
Roll two small black balls for eyes. I find placing them slightly wider apart gives the chick a cuter, more innocent expression. -
Finish with cheeks:
Apply pink cheeks just under the eyes using the same method as the bear.
Texture Technique
To make them look like baked cookies, use a toothbrush to gently texture the surface of the clay before baking, avoiding the smooth facial features.
Step 4: Creating the Bunny Charm
-
Shape the ears:
Roll two white tear-drop shapes, slightly elongated. Flatten them gently. Take smaller pieces of pink clay, shape them identically but smaller, and press them into the center of the white ears. -
Attach the ears:
Press the bottom of the ears onto the top of the white head. Ensure they are attached securely by blending the clay slightly at the seam with a tool if necessary. -
Add the face:
Add two black beads of clay for eyes. Place a tiny pink triangle or oval for the nose. Use a needle tool or very thin black clay snakes to create the mouth details. -
Apply finishing touches:
Add the signature pink cheeks to match the other two friends.
Step 5: Assembly and Baking
-
Insert hardware:
Take your screw eye pins. If the pin is long, trim it. Dip the end in a tiny bit of liquid clay or bake-and-bond glue for extra security, then screw it into the top center of each charm. -
Bake the charms:
Place the three charms on a tile or baking sheet. Bake according to your specific polymer clay’s package directions (usually around 275°F/135°C for 15-30 minutes depending on thickness). -
Cool down:
Let the charms cool completely before handling. They are fragile while warm. -
Attach the keychain:
Use pliers to open the jump ring on your keychain clasp. Loop it through the eye pin on the charm and close the ring securely.
Now you have a trio of sweet, minimal animal buddies ready to hang on your bag or keys
Cloud Incense Holder With a Calm, Cozy Vibe
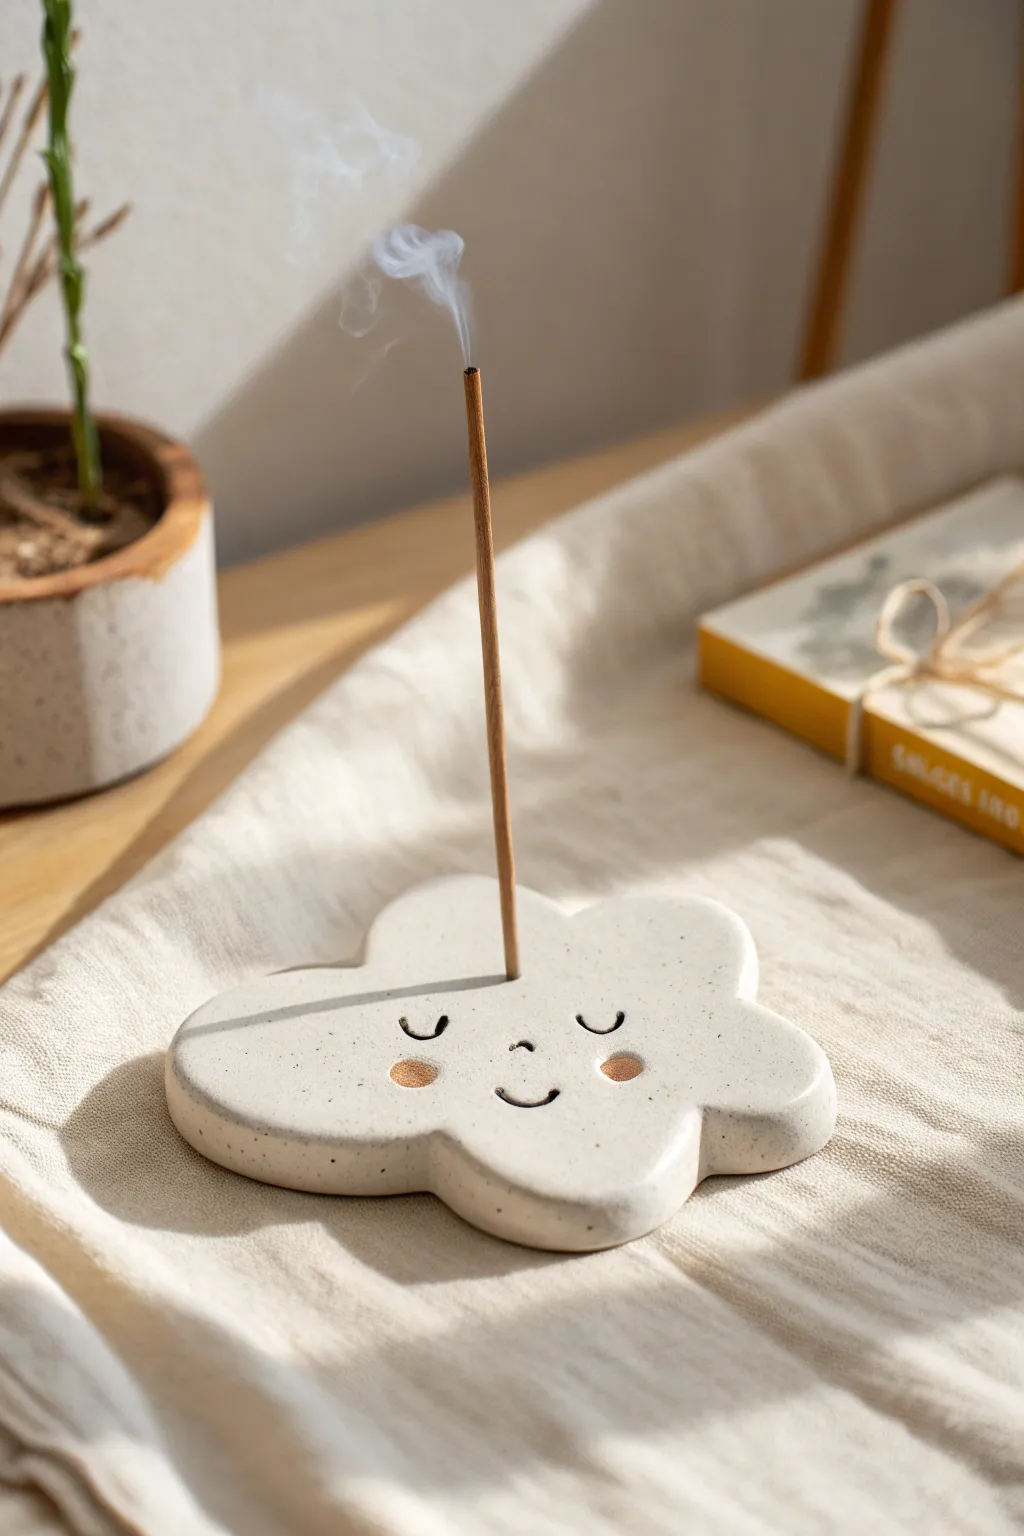
Bring a sense of calm to your space with this adorable cloud-shaped incense holder, featuring a sweet, sleepy face and a gentle speckled finish. It’s the perfect starter project for working with clay and makes a lovely handmade gift for creating cozy vibes.
Detailed Instructions
Materials
- Air-dry clay (white or cream)
- Rolling pin
- Cloud cookie cutter (approx. 3-4 inches) or print-out template
- Craft knife or scalpel
- Incense stick (for sizing)
- Small bowl of water
- Fine-grit sandpaper
- Acrylic paints (black, soft pink/terracotta)
- Fine detail paintbrush or toothpick
- Matte varnish or sealant (optional)
- Brown/black speckle paint or an old toothbrush (optional)
Step 1: Shaping the Cloud Base
-
Prepare the clay:
Start by taking a handful of air-dry clay and kneading it in your hands until it feels soft, pliable, and free of any large air bubbles. -
Roll it out:
Place the clay on a clean, flat surface or a craft mat. Use your rolling pin to flatten the clay into an even slab, aiming for a thickness of about 1/4 to 1/2 inch so it’s sturdy. -
Cut the shape:
If you have a cloud cookie cutter, press it firmly into the slab. If you’re freestyling or using a paper template, lightly trace the cloud outline with a needle tool and then carefully cut along the lines with your craft knife. -
Smooth the edges:
Dip your finger into a little bit of water and run it along the cut edges of the cloud. This softens the sharp cuts into gentle, rounded curves which gives the piece that polished, professional look. -
Create the holder hole:
Take an actual incense stick—I find this works better than guessing with a tool—and press the non-burning end into the center of the cloud. -
check the angle:
Ensure the stick stands relatively straight or at a very slight angle. Wiggle it gently to make the hole just a hair larger than the stick to account for shrinkage as the clay dries. -
Initial refinement:
Check the surface for any fingerprints or dents. Lightly smooth them out with a tiny bit of water before setting the piece aside.
Step 2: Drying and Sanding
-
Let it dry:
Place your clay cloud on a wire rack or a piece of parchment paper. Let it dry completely for 24-48 hours, flipping it over halfway through to ensure the bottom dries evenly. -
Check for dryness:
The clay should feel room temperature to the touch, not cold. If it’s cold, it still holds moisture. -
Sand the surface:
Once fully dry, take fine-grit sandpaper and gently buff the edges and the top surface. You want to remove any rough texture so it feels like smooth stone. -
Clean dust:
Wipe the piece down with a slightly damp cloth or a dry soft brush to remove all the sanding dust before painting.
Hole Shrinkage Blues
Since air-dry clay shrinks by about 10-15% when drying, make the incense hole slightly larger than your stick. If it dries too tight, carefully twist a small drill bit by hand to widen it.
Step 3: Painting the Details
-
Add speckles (optional):
To mimic the stone-like texture in the photo, dip an old toothbrush into watered-down brown or grey paint and flick fine speckles over the white surface. Let this dry briefly. -
Draft the face:
Use a pencil to very lightly sketch the placement of the sleepy eyes and the little smile to make sure they are symmetrical. -
Paint the eyes:
Using a very fine detail brush or a toothpick dipped in black acrylic paint, trace over your pencil lines to create two small ‘U’ shapes for closed eyes. -
Paint the smile:
Add a tiny, centered ‘U’ shape below the eyes for the smile. Keep the lines thin and delicate. -
Add the cheeks:
Dip a round paintbrush handle or a q-tip into soft pink or terracotta paint. Press it gently onto the clay just below the eyes to create perfect circular rosy cheeks. -
Seal the piece:
Once the paint is completely dry, apply a coat of matte varnish. This protects the paint and makes the holder easier to wipe clean of ash later.
Smoother Surfaces
For a silky finish without heavy sanding, try burnishing the clay when it’s ‘leather hard’ (semi-dry). Rub the surface gently with the back of a spoon to compress the clay particles.
Now you have a serene little spot for your favorite scents to drift away from.
Photo Holder With a Cute Blob Base
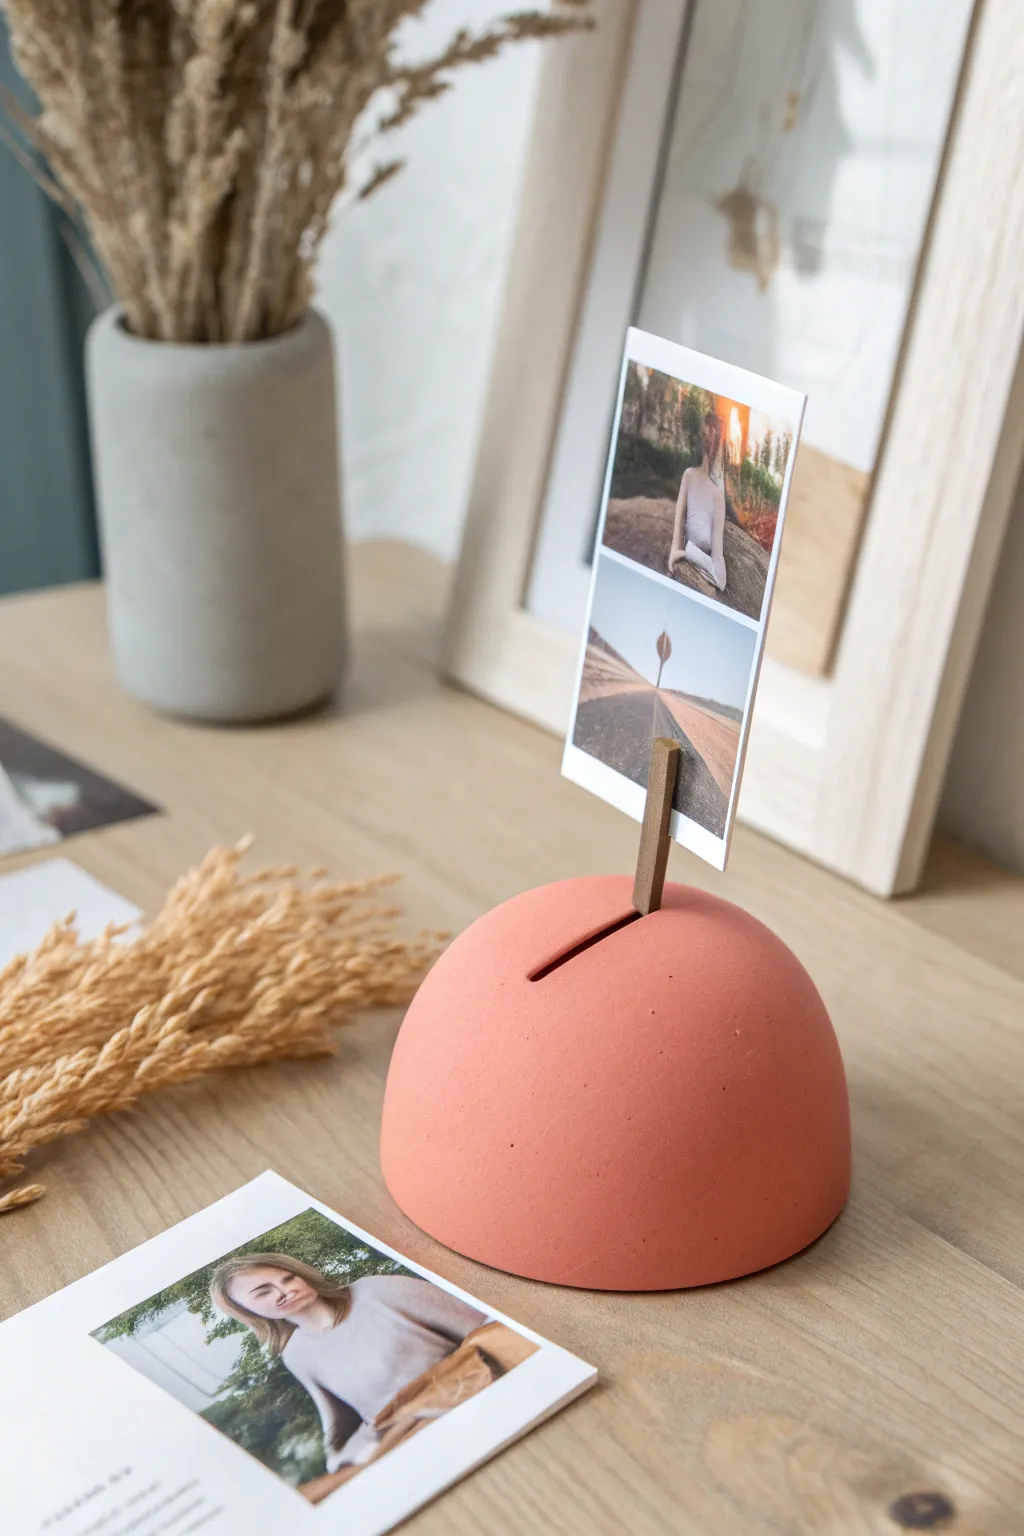
This minimalist photo holder combines a soft, earthy aesthetic with modern functionality. Its smooth, hemisphere shape and warm terracotta pink hue make it a perfect desk accessory for displaying your favorite polaroids or postcards.
Step-by-Step Guide
Materials
- Air-dry clay or polymer clay (white)
- Acrylic paint (burnt sienna, white, and a touch of red)
- Small square wooden dowel or a craft stick (approx. 4-5mm thick)
- Fine-grit sandpaper
- Small craft saw or sturdy craft knife
- Rolling pin (optional)
- Clear matte sealant spray
- Strong craft glue (e.g., E6000 or wood glue)
Step 1: Shaping the Base
-
Prepare the Clay:
Start by taking a generous handful of white air-dry clay. Knead it thoroughly in your hands to warm it up and remove any air bubbles, ensuring a smooth consistency. -
Form a Ball:
Roll the clay between your palms or against a clean work surface to create a perfect sphere. Aim for a ball about the size of a tangerine or a tennis ball. -
Create the Hemisphere:
Place the sphere onto your work surface and gently press down flat. Alternatively, I like to slice the bottom third off with a wire clay cutter to get a perfectly flat base immediately. -
Smooth the Dome:
Using a slightly damp finger or a sponge, smooth out the surface of the dome. Pay special attention to the transition where the dome meets the table to ensure the edge is neat. -
Create the Insertion Hole:
Take your wooden dowel and press it vertically into the exact center of the dome’s top. Push it about 1 inch deep to create the socket for the holder, then wiggle it slightly to widen the hole just a fraction before removing it. -
Let it Dry:
Allow the clay dome to dry completely according to package instructions. This usually takes 24-48 hours. Turn it on its side occasionally so the bottom dries evenly.
Cracking Clay?
If small cracks appear as the clay dries, mix a tiny bit of fresh clay with water to make a paste (slip) and fill them in before sanding.
Step 2: Preparing the Holder
-
Cut the Wooden Post:
Measure a 2.5 to 3-inch section of your square wooden dowel. Cut this piece using your craft saw. -
Create the Photo Slot:
On one end of the wooden stick, carefully saw a slit straight down the middle, going about 0.5 to 0.75 inches deep. This will be where the photo sits. -
Sand the Wood:
Use fine-grit sandpaper to smooth any rough edges from your sawing, especially around the top slit so it doesn’t scratch your photos.
Pro Tip: Weighted Base
To make the holder more stable for larger photos, embed a small, flat stone or a heavy washer into the bottom of the clay while molding the initial sphere.
Step 3: Finishing Up
-
Sand the Clay:
Once the clay base is bone dry, sand the entire surface lightly. This removes fingerprints and creates that matte, stone-like texture visible in the photo. -
Mix the Color:
Mix your acrylics to match the terracotta pink shade. Combine a large amount of white with a dollop of burnt sienna and a tiny drop of red. Test the color on a scrap paper first. -
Apply Base Coat:
Paint the entire dome with your mixed color. Use a soft, wide brush to avoid heavy stroke marks. -
Stipple for Texture:
While the second coat is wet, you can lightly stipple the surface with a dry sponge or stiff brush to mimic a concrete or earthenware texture. -
Insert the Wood:
Apply a small drop of strong craft glue into the hole on top of the dome. Insert the non-slotted end of your wooden stick firmly into place. -
Check Alignment:
Before the glue sets, look at the project from all angles to ensure the stick is standing perfectly straight up. -
Seal the Project:
Ideally, spray the clay base with a clear matte sealant. This protects the paint from chipping and keeps dust off the porous texture.
Place it on your desk or shelf to give your memories a beautiful new home
Mini Bud Vase Magnets for Tiny Flowers
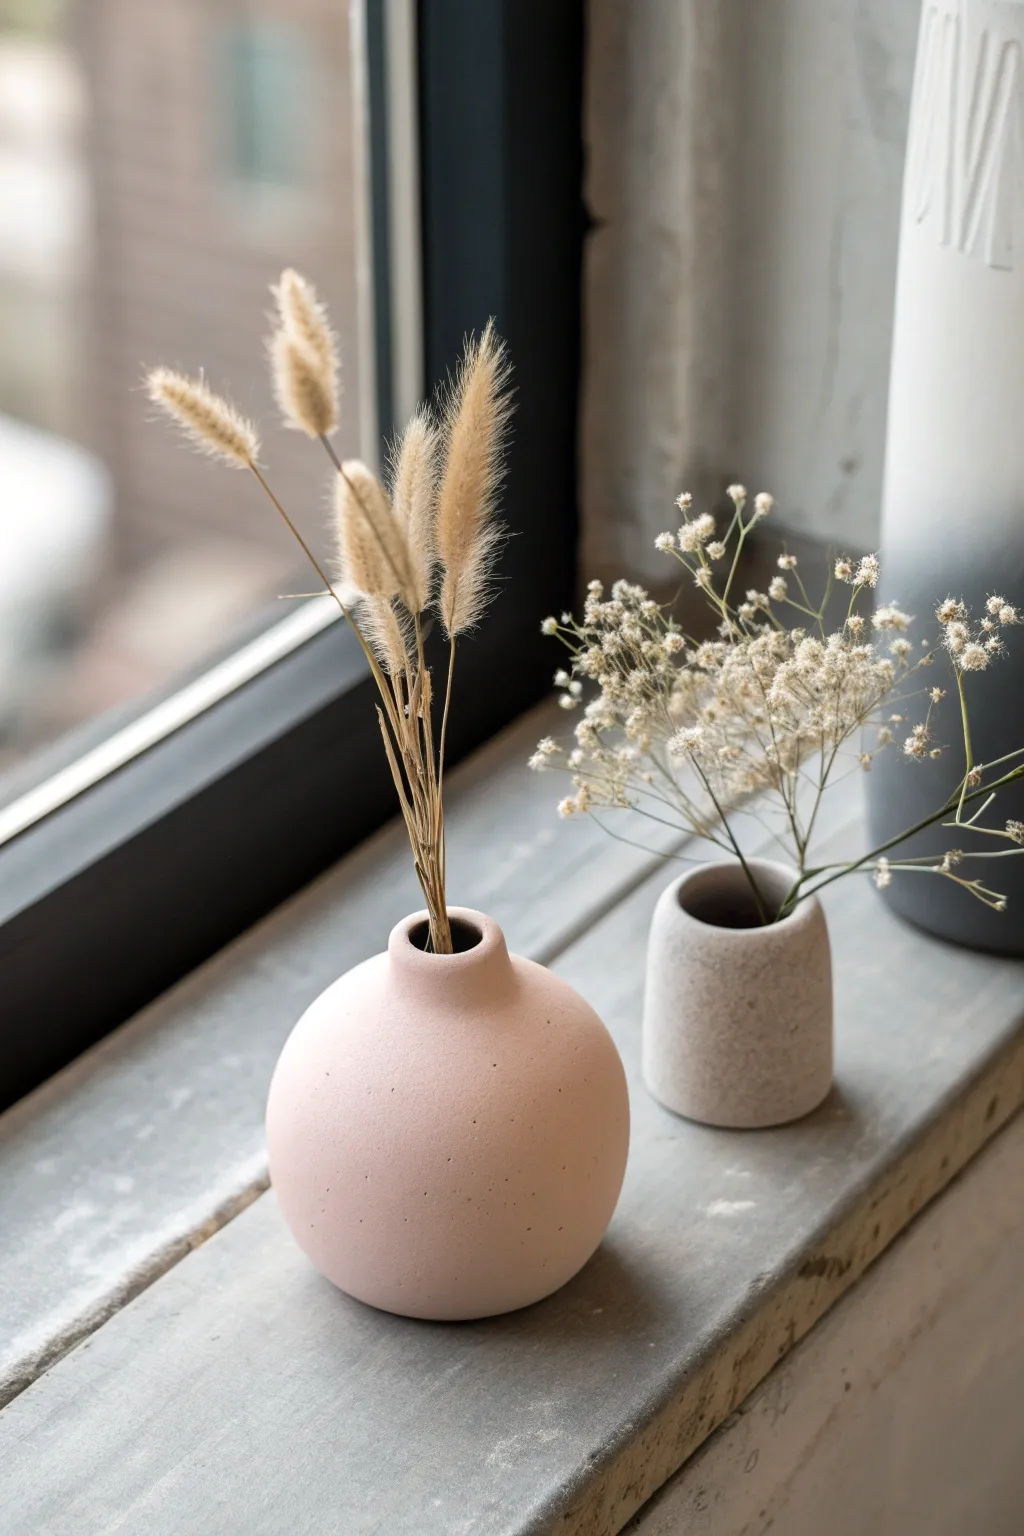
Create a serene vignette for your windowsill with these modern, matte-finish bud vases perfect for dried florals. This project focuses on achieving smooth, geometric forms with a natural, speckled clay texture that looks effortlessly chic.
Step-by-Step Tutorial
Materials
- Air-dry clay (white and terracotta or peach)
- Fine-grit sandpaper
- Small cup of water
- Acrylic rolling pin
- Needle tool or toothpick
- Sponge
- Matte acrylic varnish (optional)
- Dried bunny tails and baby’s breath
Step 1: Shaping the Spherical Vase
-
Mix your color:
Start by kneading a chunk of white air-dry clay with a very small amount of terracotta-colored clay. The goal is a soft, pale peachy-pink tone. -
Form a ball:
Roll the clay firmly between your palms to create a smooth sphere about the size of a tennis ball. Ensure there are no major cracks or seams visible on the surface. -
Flatten the base:
Gently tap the bottom of the sphere against your work surface. You want a flat spot just large enough so the vase stands stable, without losing its overall round shape. -
Open the neck:
Use your thumb or the handle of a paintbrush to press a hole into the center of the top. Go deep enough for flower stems, but don’t puncture the bottom. -
Refine the opening:
Take a small snake of clay and wrap it around the opening to build up a slight neck. I like to blend this downwards with a damp finger so it transitions seamlessly into the sphere. -
Smooth the surface:
Dip your finger in water and smooth out any fingerprints. For that speckled look, you can gently press coarse sand or dried coffee grounds into the surface now, or just leave the natural clay texture.
Pro Tip: Speckled Texture
Mix black pepper or used coffee grounds into wet clay before shaping. When sanded later, these specs reappear as a beautiful faux-stone texture.
Step 2: Crafting the Cylindrical Vase
-
Prepare the clay:
Take a smaller amount of white clay (or grey for a concrete look). Knead it until pliable. -
Roll a cylinder:
Shape the clay into a thick log. Tap both ends on the table to flatten them, creating a clean cylinder shape. -
Create the hollow:
Use a tool to bore a hole down the center. Since this vase is smaller, be careful not to make the walls too thin. -
Softening edges:
Gently rub the top rim with a wet finger to round off the sharp edges. The look should be soft and organic, not mechanically perfect.
Step 3: Finishing Touches
-
Let them dry:
Place both vases in a cool, dry spot away from direct sunlight. Let them dry for at least 24–48 hours until they are hard and lighter in color. -
Sanding:
Once fully dry, take your fine-grit sandpaper and gently buff the surface. This removes any final bumps and enhances that matte, stone-like finish. -
Dusting off:
Wipe away all the clay dust with a slightly damp sponge or cloth. -
Sealing (Optional):
If you want to protect the finish, apply a coat of ultra-matte varnish. Avoid glossy sealers to maintain the raw aesthetic seen in the photo. -
Styling:
Trim your dried bunny tails and baby’s breath stems to size. Arrange them simply—don’t overcrowd these tiny vessels.
Troubleshooting: Cracking
If small cracks appear while drying, don’t panic. Mix a tiny bit of fresh clay with water to make a paste (slip) and fill the cracks, then sand smooth once dry.
Enjoy the quiet beauty these little handmade pieces bring to your favorite corner
Bubbly Coasters With a Soft, Pop Texture
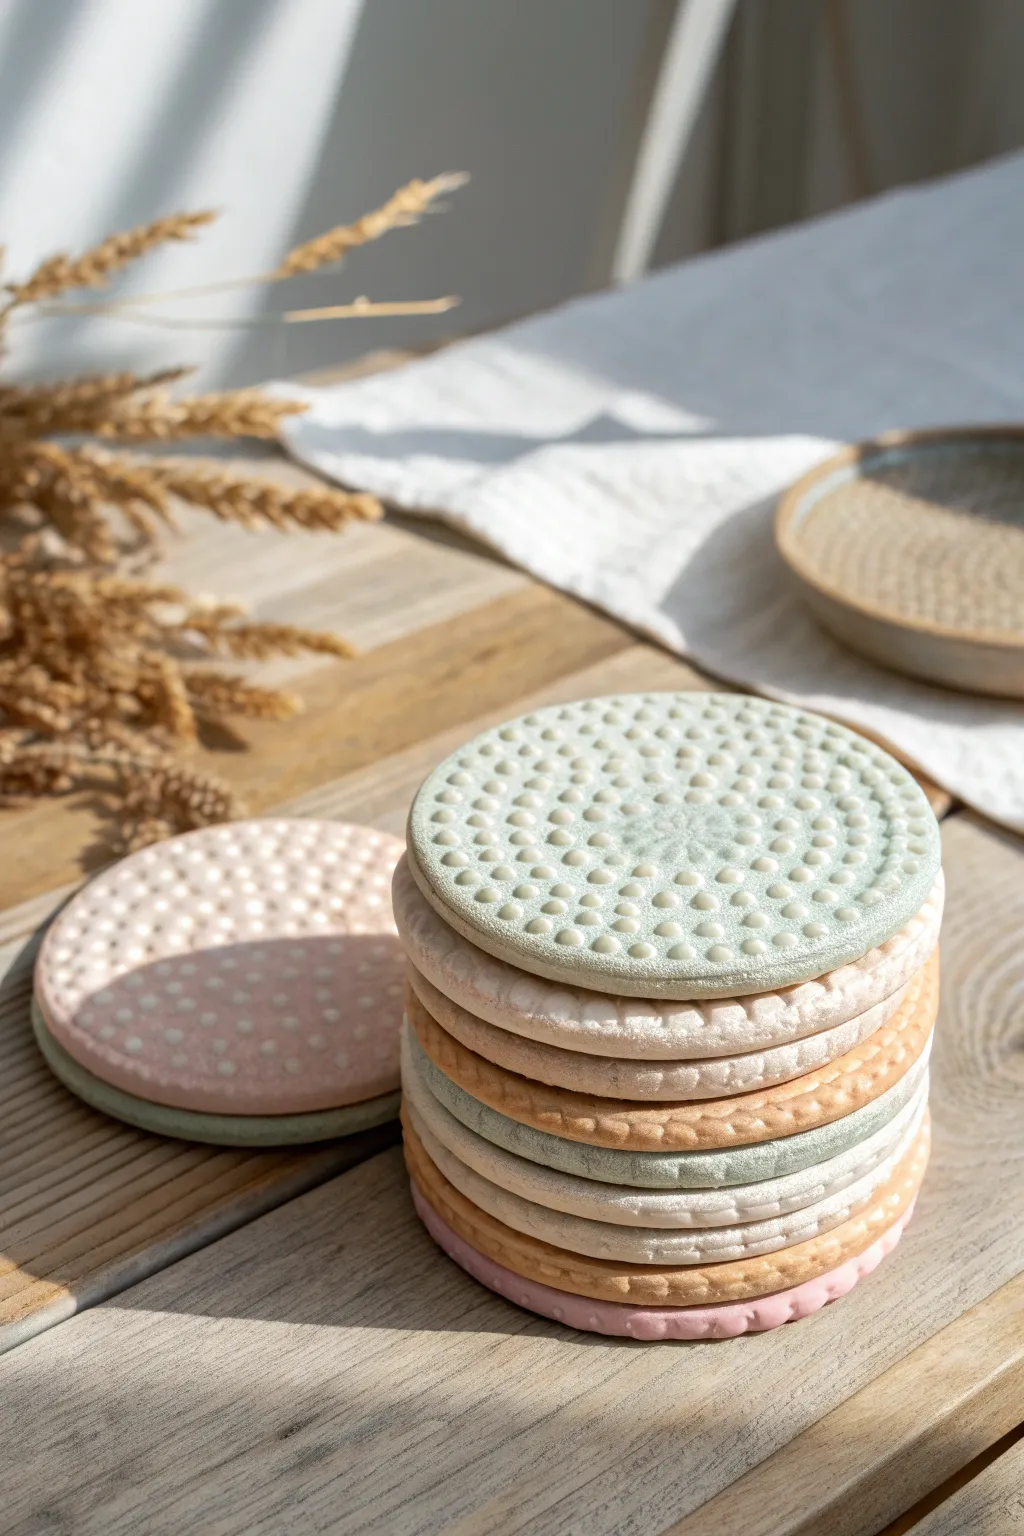
These charming coasters feature a delightful bubbly texture that looks almost soft enough to squeeze, adding a touch of sensory fun to your table setting. Using air-dry clay and soft pastel tones, you’ll create a stackable set that balances modern aesthetics with a playful, tactile surface.
How-To Guide
Materials
- Air-dry clay (white)
- Acrylic paints (sage green, dusty pink, cream, light peach)
- Rolling pin
- Circle cookie cutter (approx. 3.5 – 4 inches)
- Small round tool (like the end of a paintbrush, dotting tool, or a cleaned pen cap)
- Fine-grit sandpaper
- Matte spray sealant or matte Mod Podge
- Small flat paintbrush
- Wax paper or craft mat
- Water cup
Step 1: Shaping the Base
-
Condition the clay:
Start by taking a generous amount of air-dry clay and kneading it in your hands until it becomes warm, soft, and pliable. -
Roll out the slab:
Place the clay on a sheet of wax paper or a craft mat. Use your rolling pin to flatten it into an even slab, aiming for a thickness of about 1/4 inch to ensure the coasters are sturdy. -
Cut the circles:
Press your large circle cookie cutter firmly into the clay to cut out your coaster shapes. Create as many as you need for your set, peeling away the excess clay. -
Smooth the edges:
Dip your finger in a little bit of water and run it gently along the cut edge of each circle to remove any sharpness or roughness left by the cutter.
Consistent Bumps
When making raised bubbles, roll a long ‘snake’ of clay first and cut equal small segments before rolling them into balls. This ensures every bubble is the exact same size.
Step 2: Creating the Bubbly Texture
-
Mark the center:
Find the rough center of your first coaster. This doesn’t have to be mathematically perfect, but it helps guide your pattern. -
Select your tool:
Choose a small round tool to create the indents. Using the back end of a paintbrush works perfectly for the size of bubbles shown in the photo. -
Press the pattern:
Starting from the center and working your way out in concentric circles, press the tool gently into the clay to create small, uniform dimples. Don’t press all the way through; just create a clear indentation. -
Form the bubbles:
Alternatively, if you want positive relief (bumps instead of holes) like the green coaster on top, roll tiny spheres of clay between your fingers. They should be very small, like peppercorns. -
Attach the clay bubbles:
Score the surface lightly where the bubbles will go. Apply a tiny dab of water or liquid clay (slip) to the spot, then press the small sphere gently onto the coaster surface, flattening it slightly so it adheres well. -
Repeat the pattern:
Continue adding texture until the entire top surface is covered in a satisfying grid or spiral of dots. -
Refine the border:
For the fluted edges seen on the stacked coasters, use the side of your tool to gently indent the vertical edge of the circle at regular intervals.
Step 3: Drying and Finishing
-
Initial drying:
Let the coasters sit on a flat surface away from direct heat. To prevent curling, I find it helpful to flip them over gently once the top feels touch-dry, usually after 12 hours. -
Sanding:
Once completely dry (24-48 hours), use fine-grit sandpaper to smooth out any rough spots on the rim or bottom. Be gentle with the textured top. -
Painting the base:
Mix your acrylics to achieve muted, aesthetic tones like sage green or dusty pink. Paint the entire coaster in your chosen base color. -
Highlighting the texture:
To make the bubbles ‘pop’ visually, mix a lighter shade of your base color (add more white). Use a fine brush to dab this lighter color just onto the tops of the raised bumps. -
Adding contrast:
If you made indented holes instead of bumps, you can do a ‘white wash’ by watering down white paint, brushing it over the surface, and wiping the top clean, leaving white paint settled in the dimples. -
Sealing:
Apply a coat of matte spray sealant or matte Mod Podge. This protects the clay from moisture—essential for a coaster—without making it look plastic or shiny.
Two-Tone Effect
Paint the coaster a dark base color first, let it dry, then dry-brush a lighter pastel over the raised texture. This emphasizes the 3D relief.
Stack your finished coasters on the coffee table to enjoy their calming colors and unique handmade texture
Cute Desk Organizer With Rounded Compartments
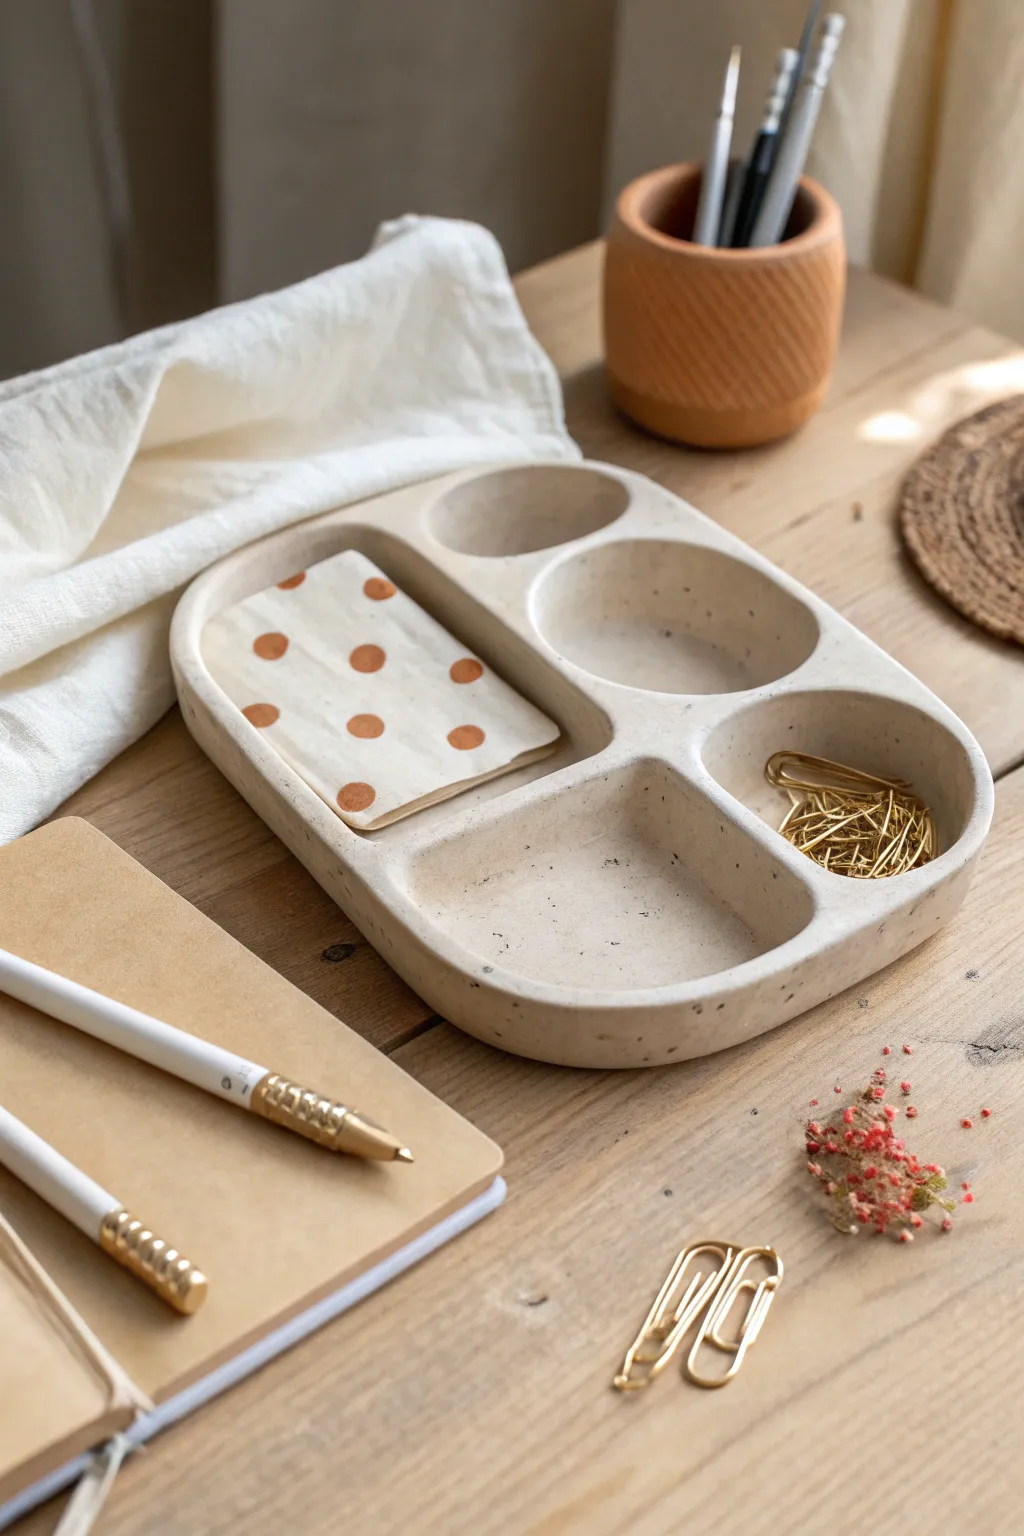
This aesthetic desk tray combines soft curves with a minimal, speckled finish for a piece that looks straight out of a boutique. With its custom compartments, it’s perfect for corralling paperclips, erasers, and other tiny treasures that tend to wander.
Step-by-Step Tutorial
Materials
- Air-dry clay (white or cream)
- Acrylic rolling pin
- Clay knife or craft blade
- Bowl of water
- Sponge
- Fine-grit sandpaper (220-400 grit)
- Acrylic paint (cream, white, brown/black)
- Old toothbrush
- Matte varnish or sealant
- Various round objects (cookie cutters or lids) for templates
- Rolling guides or wooden slats (approx. 1/4 inch thick)
Step 1: Shaping the Base
-
Prepare the Clay:
Start by kneading a generous chunk of air-dry clay until it’s warm, pliable, and free of air bubbles. This conditioning step prevents cracking later on. -
Roll the Slab:
Place your clay between two rolling guides to ensure an even thickness. Roll it out into a large, smooth slab about 1/4 inch thick. -
Cut the Outer Shape:
Use a rounded rectangular template or freehand a rectangle with very soft, curved corners. Cut the shape out cleanly with your clay knife. -
Smooth the Edges:
Dip your finger in a little water and run it along the cut edge of the base to smooth out any harshness or loose bits of clay.
Step 2: Building the Walls
-
Create Coils:
Roll out several long, even snakes of clay slightly thinner than a pencil. These will form the outer walls and inner dividers. -
Build the Perimeter:
Score the outer edge of your base (make little scratches) and dampen it. Lay a coil around the entire perimeter, pressing it gently into the base. -
Blend the Seams:
Using a modeling tool or your finger, drag the clay from the coil down onto the base on the inside and outside. This ‘knitting’ process creates a seamless transition. -
Refine the Wall Height:
Repeat with a second coil if you want higher walls, blending thoroughly. Aim for a height of about 3/4 of an inch.
Cracks Appearing?
If tiny cracks appear while drying, don’t panic. Mix a ‘slurry’ of clay and water into a thick paste and fill the cracks, then sand smooth once dry.
Step 3: Forming Compartments
-
Map the Layout:
Lightly sketch your desired compartments into the base floor with a needle tool. The design shown uses a vertical divider and a horizontal one, intersected by curves. -
Add Straight Dividers:
Cut straight sections of clay coil to fit your sketched lines. Score, slip, and attach these dividers just like you did the outer walls. -
Create Circular Sections:
For the rounded compartments, form a coil into a partial circle or ‘C’ shape. Attach these to the existing walls to create the curved nooks. -
Smooth Everything:
This is crucial: take a damp sponge and extensively smooth every join, corner, and surface. I find spending extra time here saves a lot of sanding later. -
Dry Slowly:
Set the tray aside in a cool, dry place away from direct sunlight. Let it dry for at least 24-48 hours, flipping it occasionally so the bottom dries evenly.
Smoother Walls
Dip a flat paintbrush in water (instead of your finger) to smooth hard-to-reach corners inside the small compartments.
Step 4: Finishing Touches
-
Sand to Perfection:
Once fully dry and chalky white, use fine-grit sandpaper to remove any bumps. Pay special attention to the rim to ensure it feels soft to the touch. -
Base Coat:
Paint the entire piece with a coat of cream or off-white acrylic paint. This creates a uniform canvas even if your clay had discoloration. -
Create the Speckles:
Dilute a tiny amount of dark brown or black paint with water. Dip an old toothbrush into it, and flick the bristles with your thumb to spray fine speckles over the tray. -
Protect the Surface:
Allow the paint to dry completely. Finish with two thin coats of matte varnish to seal the clay and protect it from scratches or moisture.
Enjoy styling your new organizer and watching your desk clutter disappear into beauty
Tiny Calendar Block With a Frog Friend Theme

Brighten your desk every day with this adorable wooden block calendar featuring a charming frog friend. This functional desktop accessory combines the warmth of natural wood with playful hand-painted details for a truly aesthetic and useful craft.
Detailed Instructions
Materials
- Unfinished wooden block calendar set (base, 2 cubes, 3 rectangular bars)
- Acrylic paints (terracotta/peach, sage green, light green, black, white)
- Fine point black liner pen or permanent marker (0.5mm)
- Small flat brush
- Fine detail brush (00 or 000 size)
- matte varnish or sealant
- Pencil and eraser
- Ruler
Step 1: Planning and Base Coating
-
Prepare the wood:
Begin by lightly sanding your wooden calendar pieces if they feel rough to the touch. Wipe away any dust with a barely damp cloth so your paint adheres smoothly. -
Paint the cubes:
Mix a warm terracotta or peach tone using orange, brown, and plenty of white. Paint all faces of the two large number cubes with this color. You’ll likely need two coats for opaque coverage, letting the first coat dry completely before adding the second. -
Paint the month bars:
For the rectangular bars meant for months, paint them a creamy off-white color. A tiny drop of yellow or brown in your white paint will warm it up so it isn’t too stark against the peach cubes. Set everything aside to dry for at least 30 minutes.
Clean Lines Hack
If you struggle painting straight numbers, print your desired font on paper, rub graphite on the back, and trace it onto the wood block for a perfect guide.
Step 2: Painting the Frog Design
-
Sketch the outline:
On one face of the left-hand cube, lightly sketch your frog character with a pencil. Draw a rounded oval body and a wider head shape. Don’t press too hard, or you’ll dent the wood. -
Block in the green:
Using your sage green paint and a small detail brush, fill in the frog’s head and body shape. Avoid the belly area for now. I find it easiest to outline the shape with paint first, then fill in the middle. -
Add the belly detail:
Mix a very light green by adding white to your sage green. Paint a small oval on the frog’s tummy area. This creates a cute contrast and adds dimension. -
Paint the eyes:
Using pure white paint, add two large circles on top of the head for eyes. Let the green paint dry fully before doing this to prevent the colors from muddying. -
Outline the character:
Once the paint is bone dry, use your fine black liner pen to outline the entire frog, including the separate head and body sections. Add lines across the belly for texture. -
Add facial features:
Draw pupils inside the white eye circles, glancing slightly to the side for unparalleled cuteness. Draw a simple line for the mouth and two tiny dots for nostrils.
Marker Bleeding?
If your black pen bleeds into the wood grain or paint, apply a thin layer of clear matte sealer BEFORE doing the line work to create a barrier.
Step 3: Adding Numbers and Text
-
Draft the numbers:
On the other faces of your cubes, lightly pencil in your numbers. Standard perpetual calendar numbering requires: Cube 1 gets 0, 1, 2, 3, 4, 5. Cube 2 gets 0, 1, 2, 6, 7, 8 (the 6 doubles as a 9). -
Paint the prominent numbers:
Using black acrylic paint and a steady hand (or a thick black marker), fill in the large numbers. The font style here is slightly serif and hand-drawn; keep the lines dark and bold. -
Add texture dots:
Using the tip of your fine liner pen, add tiny clusters of dots around the frog and the numbers. This stippling effect adds a lovely illustrative quality and fills the empty space. -
Letter the months:
On the cream rectangular bars, write your month names or abbreviations. The example uses a playful, slightly uneven handwritten font.
Step 4: Finishing Up
-
Stain the holder:
If your wooden base is unfinished, apply an amber or teak wood stain to darken it, giving it a rich, finished look. Wipe off excess stain with a rag and let it dry. -
Seal the project:
Protect your hard work by applying a coat of matte varnish over all the painted surfaces. This prevents the paint from chipping when you change the date daily. -
Assembly:
Once the varnish is dry, place your month bar into the slot, stack your frog cube and number cube on top, and admire your new desk companion.
Enjoy flipping your blocks every morning as a small, mindful start to your day
Simple Candle Holder With a Cute Character Twist
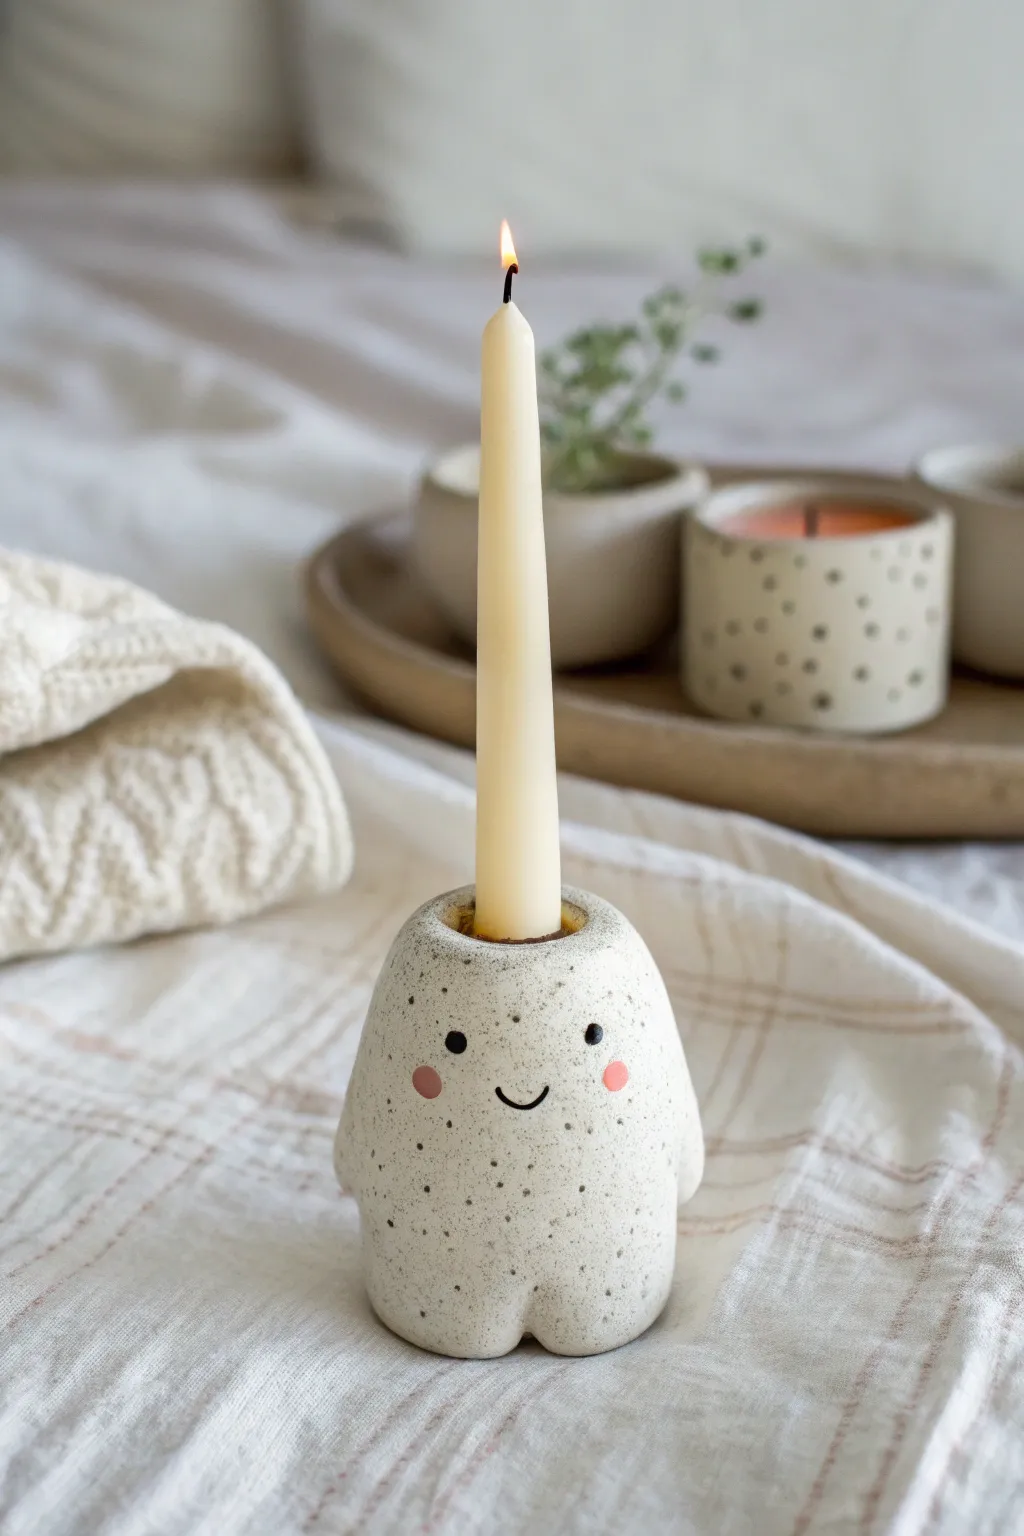
Bring a warm, whimsical glow to your space with this adorable character candle holder. Its speckled finish and sweet, simple face make it a charming companion for cozy evenings.
Step-by-Step
Materials
- White air-dry clay or polymer clay
- Taper candle (for sizing)
- Black acrylic paint
- Pink acrylic paint
- Medium grit sandpaper
- Fine grit sandpaper
- Speckled paint (optional) or old toothbrush and brown paint
- Fine detail paintbrush
- Matte or satin varnish
- Rolling pin
- Small bowl of water (for smoothing)
Step 1: Shaping the Character
-
Prepare the clay:
Start by conditioning a fist-sized ball of white clay until it is soft, pliable, and free of cracks. If using air-dry clay, keep your hands slightly damp. -
Form the main body:
Roll the clay into a smooth cylinder, then gently tap the bottom on your work surface to flatten it. Use your palms to round off the top, creating a soft, dome-like shape. -
Create the candle well:
Take your taper candle and gently press the base into the center of the dome to create an indentation. Wiggle it slightly to ensure the hole is just a tiny bit wider than the candle to account for shrinkage. -
Refine the hole:
Remove the candle and use a damp finger or a clay tool to smooth the inside of the hole, ensuring the walls are even and deep enough to hold the candle upright securely. -
Shape the little legs:
At the bottom front of the cylinder, use a modeling tool or your finger to press a small vertical indentation in the center, creating the illusion of two little feet standing together. -
Add the arm nubs:
Pinch the sides of the body very gently to pull out two small, rounded nubs for arms. Keep them subtle and integrated into the main shape for that minimalist look. -
Smooth the surface:
Dip your finger in water (for air-dry) or baby oil (for polymer) and run it over the entire piece to remove fingerprints and smooth out any bumps. -
Dry or bake:
If using polymer clay, bake according to package instructions. For air-dry clay, let it dry for 24-48 hours until completely hard and white.
Step 2: Decorating and Finishing
-
Sand for perfection:
Once fully cured or dry, use medium grit sandpaper to level the bottom so it sits perfectly flat. Then, go over the body with fine grit sandpaper for a silky smooth texture. -
Create the speckled effect:
To mimic the ceramic look shown, load an old toothbrush with diluted brown or grey acrylic paint. Run your thumb over the bristles to flick tiny speckles onto the clay. -
Let speckles dry:
Wait about 15 minutes for the splatter effect to dry completely before touching the surface, or you risk smudging the pattern. -
Paint the eyes:
Using your smallest detail brush and black paint, dot two small circles for eyes. Place them relatively wide apart to enhance the cute factor. -
Add the smile:
Paint a tiny, shallow ‘U’ shape between the eyes for the smile. I find it helpful to practice this stroke on a scrap piece of paper first to get the curve just right. -
Add rosy cheeks:
Dip the back end of a paintbrush into pink paint and stamp two circles onto the cheeks, just outside and slightly below the eyes. -
Seal the piece:
Apply a coat of matte or satin varnish to protect the paint and give the clay a finished, ceramic-like quality. -
Final test:
Once the varnish is dry, insert your taper candle. If the fit is too tight due to paint layers, gently sand the inside of the hole.
Wobbly Candle?
If the hole is too wide after drying, drip a small amount of melted wax into the bottom of the holder before inserting the candle to help secure it in place.
Pro Tip: Seamless Look
When smoothing air-dry clay, use a slightly damp sponge rather than just fingers. It erases fingerprints instantly and creates a professional, pottery-wheel finish.
Enjoy the cozy ambiance created by your new little friend
Fairy Garden Mushroom House for Soft Whimsy
Transport your space to a magical woodland with this charming clay mushroom house, featuring a textured stalk, a vibrant spotted cap, and intricate door details. It sits atop a mossy base, creating a complete miniature scene perfect for a desk or shelf.
Step-by-Step Tutorial
Materials
- Air-dry clay or polymer clay (white)
- Wooden circular base (approx. 4-5 inches)
- Acrylic paints (Red, white, brown, black, grey)
- Aluminum foil (for armature)
- Sculpting tools (needle tool, ball stylus)
- Texture tool or toothbrush
- Craft moss (preserved or artificial)
- Tacky glue or strong craft glue
- Grey cardstock or thin foam (for paving stones)
- Matte varnish (optional)
Step 1: Building the Core Structure
-
Create the foil armature:
To save clay and reduce weight, scrunch a piece of aluminum foil into a shape resembling a fat cylinder for the stalk. Create a separate, flattened dome shape for the cap out of foil. -
Cover the stalk:
Roll out a sheet of white clay to about 1/4 inch thickness. Wrap this around your foil cylinder, smoothing the seams together with a bit of water or slip until they disappear. -
Shape the cap:
Cover the foil dome with another sheet of rolled clay. Smooth it down, curling the edges underneath slightly to create a nice lip for the mushroom cap. Place it onto the stalk to check the fit, but don’t attach it permanently just yet.
Uneven Clay Surface?
If your clay looks lumpy, dip your finger in a tiny bit of water (or baby oil for polymer clay) and gently buff the surface in circular motions before the clay hardens.
Step 2: Sculpting the Details
-
Texture the stalk:
Using a needle tool or a stiff brush, drag vertical lines down the white stalk to simulate the fibrous texture of a mushroom stem. Vary the pressure to make it look organic. -
Form the door:
Roll a small oval of clay and flatten it. Use a knife tool to score vertical wood grain lines. Press a tiny ball of clay on the side for a doorknob. -
Add the door frame:
Roll a thin snake of clay and flatten it slightly. Border the door with this strip. Use a needle tool to press horizontal lines around the frame, making it look like individual stones. -
Create the window:
Fashion a small arched window similar to the door. Add a tiny cross of clay in the center for the windowpane mullions and give it a stone border just like the door. -
Attach features:
Score the back of your door and window pieces, apply a touch of water or liquid clay, and press them firmly onto the stalk. Secure the cap on top of the stalk now, blending the clay where they meet underneath. -
Add the spots:
Roll several small, irregular flattened circles of clay. Press these onto the mushroom cap. I like to make them slightly raised rather than completely flat for better dimension.
Add a Glow
Hollow out the stalk entirely and cut out the window panes before baking. Place a small battery-operated LED tea light underneath to make the windows glow at night.
Step 3: Painting and Finishing
-
Base coat the cap:
Once the clay is fully dry (follow package instructions), paint the cap a deep, warm red. Be careful to paint around the white spots, or simply paint over them and re-whiten them later. -
Paint the stalk:
Mix a very watery wash of brown and grey acrylics. Brush this over the textured stalk and immediately wipe most of it off with a paper towel. This antiquing technique leaves dark paint in the crevices. -
Detail the woodwork:
Paint the door and window frames light brown. Use a darker brown for the door itself, and paint the window panes black or dark blue to suggest depth. -
Highlight the stones:
Paint the stone borders around the door and window a beige or light grey color. A little dry brushing with white here helps them pop. -
Refine the spots:
Paint the raised spots on the cap a creamy white. Add tiny white speckles across the red paint for a magical, starry texture.
Step 4: Assembling the Scene
-
Prepare the stepping stones:
Cut small, irregular shapes from grey cardstock or foam. You can also form these from leftover clay scraps. -
Mount the house:
Glue the finished mushroom house securely to the center of your wooden base. -
Lay the path:
Glue your grey stepping stones leading from the edge of the base up to the front door. -
Add the greenery:
Apply generous amounts of craft glue to the rest of the wooden base. Press clumps of preserved moss into the glue, surrounding the house and the stone path. -
Final touches:
Check for any loose moss or bare spots. A final spray of matte varnish can protect the paint, though it’s optional if this will stay indoors.
Place your little cottage on a sunny shelf and enjoy the dash of woodland magic it brings to your room
Miniature Room Shadowbox With Cozy Clay Details
Create your own tiny sanctuary with this charming shadowbox diorama that captures the cozy essence of a boho living room. Using polymer clay and a simple wooden frame, you’ll craft minute details like a textured sofa and miniature pottery that bring this miniature world to life.
Step-by-Step
Materials
- Deep wooden shadowbox frame (approx. 6×6 inches)
- White or cream polymer clay (for sofa and vases)
- Terracotta or brown polymer clay (for pots and details)
- Green polymer clay (semitranslucent ideal for bottle)
- Balsa wood or popsicle sticks (for table and shelves)
- Fabric scraps (cotton or linen for rug and pillows)
- White acrylic paint
- Wood stain or watered-down brown acrylic paint
- Super glue or tacky glue
- Sculpting tools (needle tool, ball stylus)
- Sandpaper
- Wire cutters
- Dried florals or tiny twigs
Step 1: Preparing the Room Base
-
Prep the frame:
Begin with a deep wooden shadowbox. If the back panel isn’t already white, paint the interior back wall with white acrylic paint. Apply two coats for a clean, plastered wall look. -
Add texture:
To mimic the look of textured drywall seen in the photo, dab the wet white paint with a crumpled paper towel or a stiff stippling brush before it dries completely.
Step 2: Sculpting the Furniture
-
Form the sofa base:
Using beige or cream polymer clay, shape a rounded rectangular block for the seat cushion and a curved, taller piece for the backrest and arms. -
Texture the fabric:
Before the clay hardens, press a piece of real linen or canvas onto the surface of the clay. This imitates the fabric weave on the miniature upholstery. -
Make the sofa legs:
Create four tiny tapered cylinders from brown clay or cut small dowel pieces. Press them gently into the bottom of the sofa to ensure they fit, but bake them separately or glue them on later for stability. -
Create throw pillows:
Shape two small squares of clay. For the patterned pillow, you can either use a tiny cane slice technique or paint the pattern with acrylics after baking. I like to use a needle tool to create tiny indentations on the solid pillow to look like seams. -
Build the side table:
Cut a circle from balsa wood for the tabletop and three thin dowels for legs. Stain them a warm oak color. Glue the legs to the tabletop in a tripod formation.
Sticky Fingerprints?
If your clay furniture has fingerprints, brush it lightly with a little baby oil or cornstarch before baking. This smoothes the surface and helps achieve that soft, matte fabric look.
Step 3: Crafting the Decor
-
Sculpt the pottery collection:
Using tiny amounts of brown, terracotta, and green clay, form miniature vases and bowls. Vary the shapes creating some tall bottles and some squat bowls. -
Add shelf details:
Roll a minuscule texture onto the pots using a toothpick or toothbrush. For the green bottle, translucent clay gives a realistic glass effect. -
Make the coffee cup:
Shape a tiny white bowl and fill it with a drop of brown liquid clay or brown paint mixed with gloss varnish to simulate coffee. -
Bake all clay items:
Arrange all your clay pieces (sofa, pillows, pottery) on a tile and bake according to your clay package instructions (usually 275°F for 15-30 minutes).
Level Up: Lighting
Make your room glow by drilling a tiny hole in the top corner of the box. Thread a single warm-white LED fairy light through to create a cozy overhead lamp or ambient sunlight effect.
Step 4: Assembly & Finishing
-
Construct the shelves:
Cut two small strips of balsa wood about 1.5 inches long. Stain them to match the side table. Glue them horizontally to the back wall of the shadowbox, spacing them slightly apart. -
Create the rug:
Cut a rectangle of fabric slightly larger than the sofa. Use white paint to create striped patterns on it. Fray the edges by pulling horizontal threads loose. -
Make the wall art:
Cut a tiny rectangle of wood or cardstock for a frame. Draw a simple leaf or abstract shape on a piece of paper, glue it inside the frame, and mount it to the wall. -
Place the furniture:
Glue the rug down first, then secure the sofa on top. Position the side table next to the sofa. Place the tiny coffee cup on the table. -
Style the shelves:
Carefully glue your baked pottery pieces onto the shelves using tweezers for precision. -
Final flourish:
Place a tiny dried flower sprig into a small vase and set it on top of the frame for an extra touch of life that breaks the fourth wall.
Now you have a peaceful miniature corner to display on your bookshelf or desk