Nothing beats a low-stress clay day with kids and a table full of cute little faces. These kawaii air dry clay ideas stick to simple shapes, bright colors, and that extra-sweet chibi style that always turns out adorable.
Chubby Kawaii Cat Minis
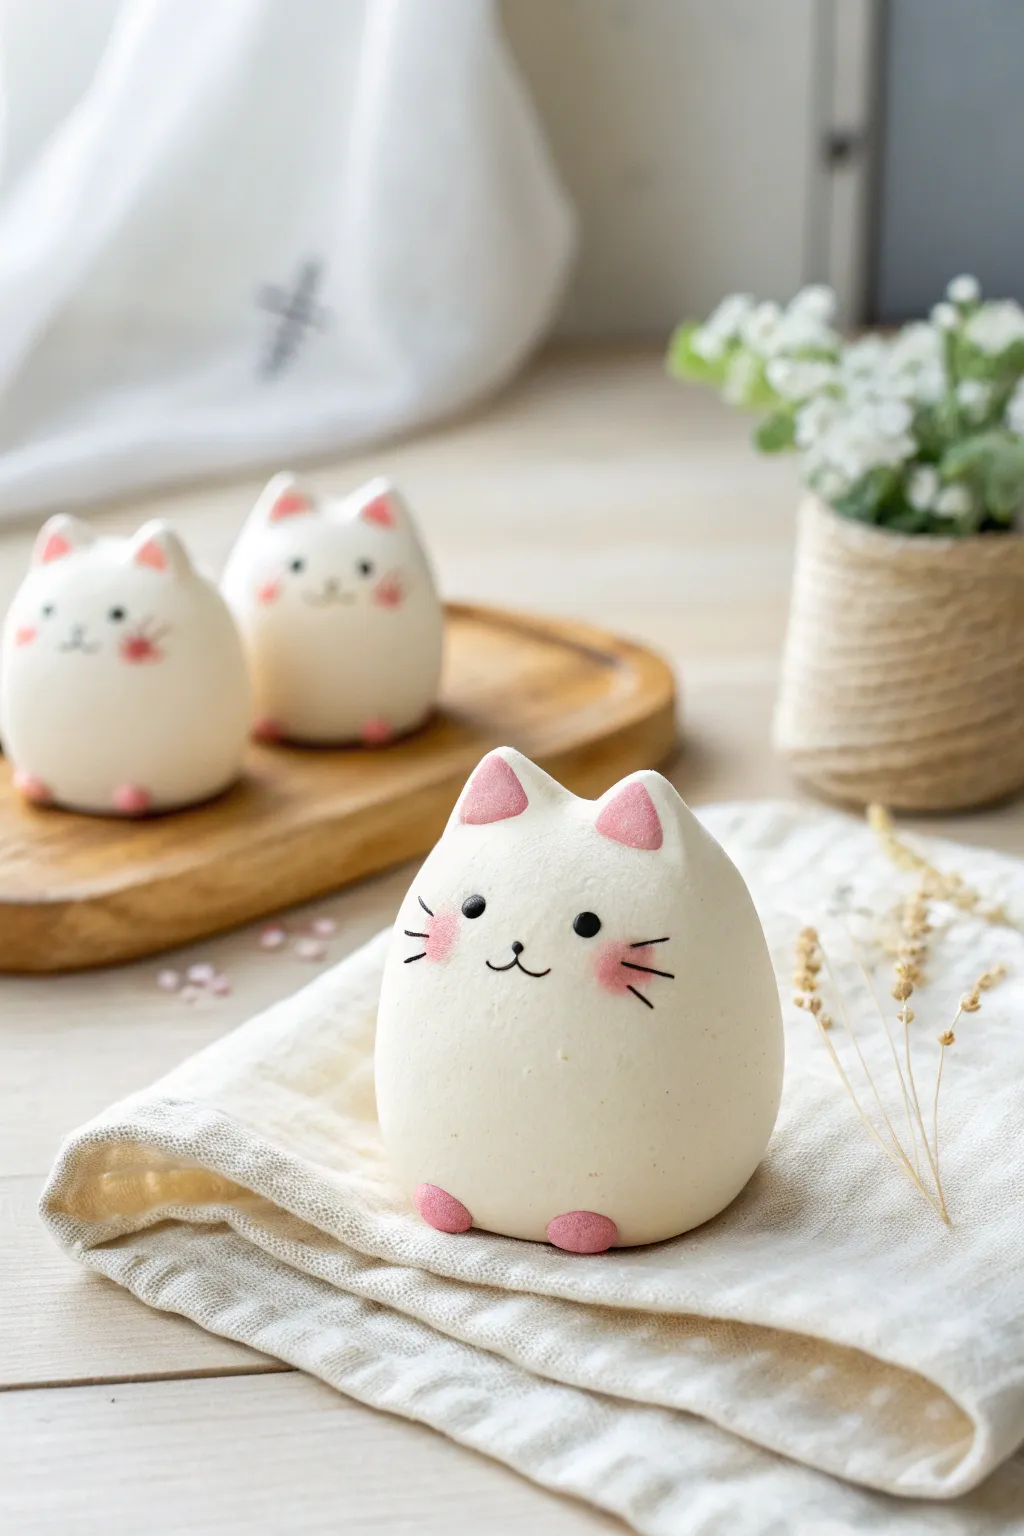
These adorable white cat figurines are famous for their perfectly round, egg-like shape and minimalist faces. With their soft pink ears and tiny paws, they make the sweetest desk companions or handmade gifts.
Step-by-Step
Materials
- White polymer clay or air dry clay (smooth texture)
- Pink clay (or pink acrylic paint)
- Black acrylic paint
- Fine detail paintbrush (000 size)
- Small dotting tool or toothpick
- Clay sculpting tools (specifically a smoothing tool)
- Matte sealant or varnish (optional)
Step 1: Shaping the Base
-
Roll the body:
Start with a generous ball of white clay. Roll it firmly between your palms to remove any cracks, then shape it into a smooth, slightly tapered egg shape. The bottom should be wider than the top to give it that chubby look. -
Flatten the base:
Gently tap the bottom of your egg shape onto your work surface. This creates a stable base so your kitty doesn’t roll away, while keeping the rest of the body round and puffy. -
Smooth the surface:
Inspect the body for any fingerprints or lint. Use a tiny bit of water on your finger (for air dry clay) or baby oil (for polymer clay) to create a flawless, matte finish.
Smooth Operator
For a seamless finish, dip your finger in water and gently rub the clay surface before it dries. This removes fingerprints and creates that soft, marshmallow-like texture.
Step 2: Ears and Paws
-
Form the ears:
pinch off two small, engaging pieces of white clay. Roll them into balls and then pinch one side to form soft, rounded triangles. -
Add pink centers:
Take extremely small pieces of pink clay. Flatten them into smaller triangles and carefully press them into the center of your white ear pieces. If you don’t have pink clay, you can paint this part later. -
Attach the ears:
Place the ears on top of the head, spacing them slightly apart. Blend the back seam of the ears into the head using a clay tool so they look like one seamless piece, not just stuck on. -
Make the paws:
Roll two tiny, pea-sized balls of pink clay (or white clay if you plan to paint). These will be the feet. -
Attach the feet:
Position the feet at the very bottom front of the body. Press them on gently so they flatten slightly against the body curve, peeking out just barely.
Step 3: Kawaii Details
-
Dry or bake:
If using polymer clay, bake according to the package instructions. If using air dry clay, let the figure dry completely (usually 24-48 hours) before painting to prevent the clay from softening. -
Paint the eyes:
Dip a small dotting tool or the non-brush end of your paintbrush into black acrylic paint. Stamp two wide-set eyes onto the face. I find placing them slightly lower on the face makes them cuter. -
Draw the mouth:
Using your finest detail brush and black paint, draw a tiny, shallow ‘w’ shape between the eyes for the nose and mouth. Keep the lines very thin for a delicate look. -
Add whiskers:
With the same thin brush, paint two or three short, horizontal whiskers on each cheek. Use a light touch so the lines taper off at the ends. -
Blush the cheeks:
Mix a very small amount of pink paint with water to make a glaze, or use pink chalk pastel dust. Gently dab this onto the cheeks right over the whisker area for a rosy glow. -
Seal the work:
Once the paint is fully dry, apply a coat of matte varnish. This protects the paint and gives the clay a professional, finished porcelain look.
Accessory Time
Make a tiny red bow tie or a yellow bell out of clay and attach it under the mouth before drying. It adds a pop of color and personality to your cat.
Now you have a trio of calm, chubby kittens ready to decorate your space


Blob Bear Desk Buddies
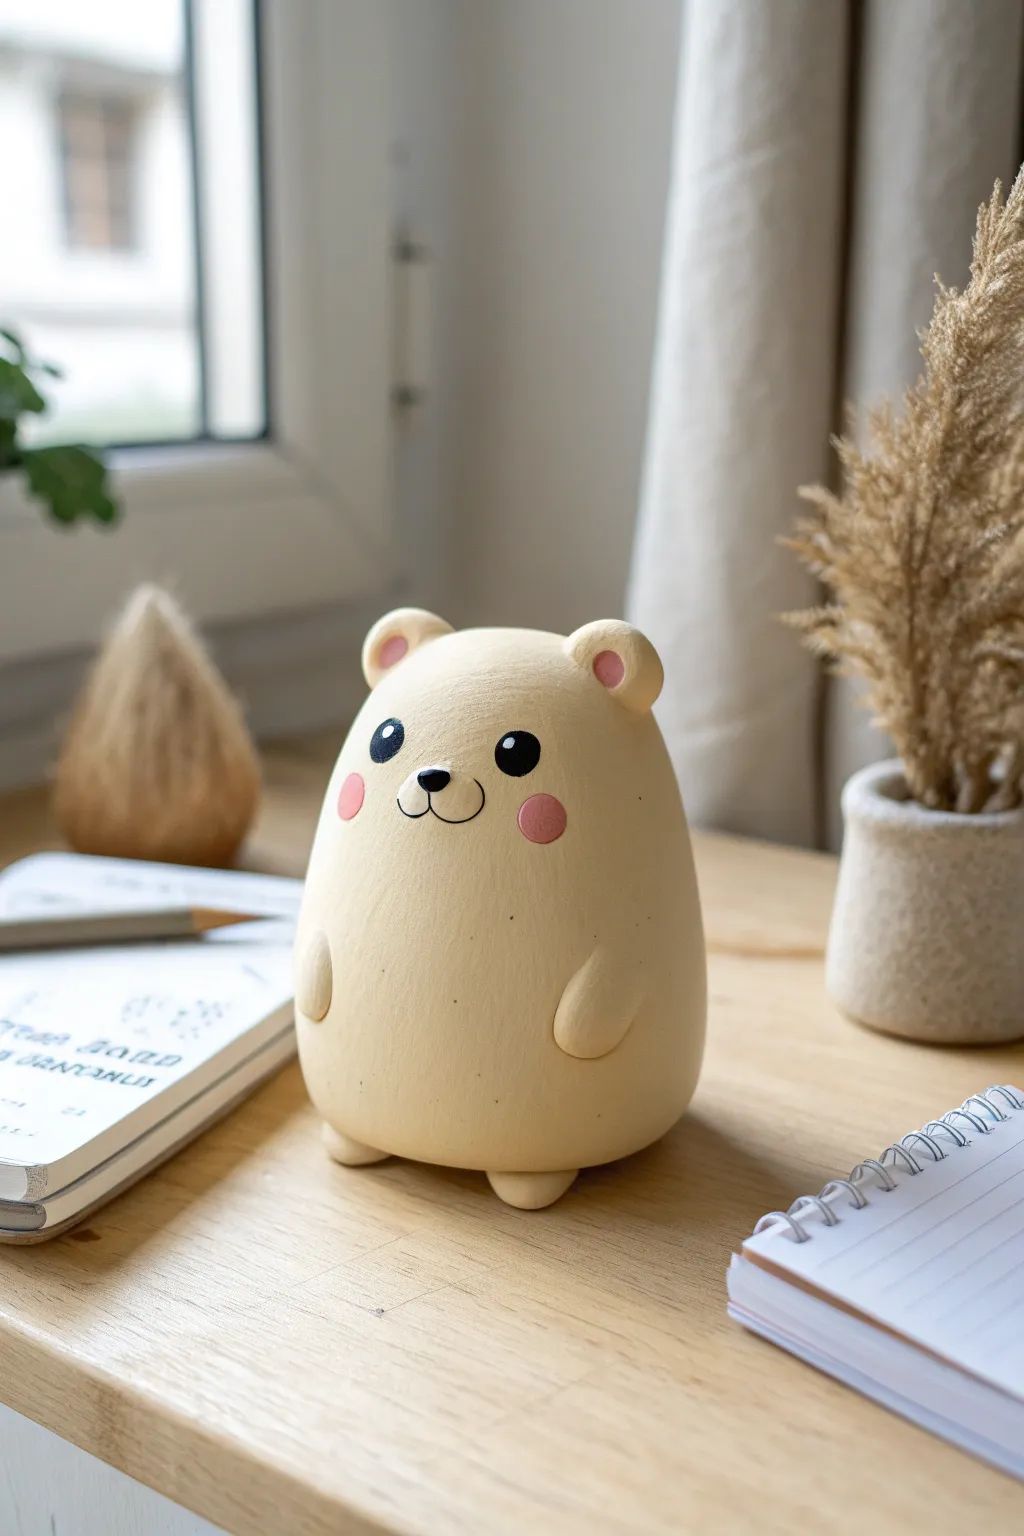
These adorable desk companions are the perfect first project for working with air dry clay thanks to their forgiving, blob-like shape. With its creamy matte finish and sweet hand-painted face, this little bear brings a calming, kawaii presence to any study space.
Step-by-Step Guide
Materials
- White or cream-colored air dry clay
- Acrylic paints (black, pink, and pale yellow/beige)
- Small paintbrush
- Fine-grit sandpaper (optional)
- Cup of water
- Toothpick or sculpting tool
- Matte sealant or varnish
Step 1: Sculpting the Base Shape
-
Condition the clay:
Start by taking a handful of clay and kneading it thoroughly until it’s warm and pliable. This prevents cracks later on. -
Form the main body:
Roll the clay into a smooth ball, then gently roll it on your table into a slightly elongated egg shape. The bottom needs to be wider than the top to give it that stable ‘blob’ look. -
Flatten the base:
Create the flat base by tapping the bottom of your egg shape against the desk. Make sure it stands up straight on its own without wobbling. -
Smooth the surface:
Dip your finger in a tiny bit of water and rub it over the clay to erase any fingerprints or creases, aiming for a porcelain-smooth finish.
Step 2: Adding the Details
-
Shape the ears:
Roll two tiny, pea-sized balls of clay. Gently flatten them slightly to look like bear ears. -
Attach the ears:
Score (scratch) the top of the head where the ears will go, add a drop of water, and press the ears on. Blend the seam at the back of the ear downward into the head so they don’t fall off. -
Make the arms:
Roll two small sausage shapes for arms. These should be quite stubby and curve slightly inward. -
Attach the arms:
Attach the arms to the sides of the body using the score-and-slip method (scratching and wetting), positioning them low on the belly for cuteness. -
Form the feet:
Create two small flattened ovals for the feet. Place them under the front of the body so they just barely peek out. -
Create the snout:
Instead of adding clay, gently press your thumb into the face area very lightly to create a subtle indentation where the eyes will go, leaving a slight bump for the muzzle area. -
Dry thoroughly:
Let your bear dry completely for 24-48 hours. I like to rotate it occasionally to ensure the bottom dries evenly.
Cracks appeared?
Don’t panic! Mix a tiny bit of fresh clay with water to make a paste (slip). Fill the cracks with this paste, smooth it over with your finger, and let it dry again.
Step 3: Painting and Finishing
-
Sand for smoothness:
Once bone dry, use fine-grit sandpaper to gently buff away any rough textures or bumps. Wipe away the dust with a dry cloth. -
Base coat:
Paint the entire bear with a mixture of white and a tiny dot of yellow/brown acrylic paint to achieve that soft, creamy beige color shown in the photo. You may need two thin coats. -
Paint the eyes:
Using a very fine brush or even a toothpick dipped in black paint, dab on two round, solid black circles for eyes. -
Add eye highlights:
Once the black is dry, add a tiny white dot to the top right of each eye. This ‘sparkle’ brings the character to life. -
Draw the face features:
Paint a small, rounded triangular nose between the eyes in black. Draw a thin ‘W’ shape extending from the nose for the mouth. -
Blush the cheeks:
Mix a soft pink color. Paint two circles on the cheeks and fill in the inner parts of the ears with the same shade. -
Seal the project:
Finish by applying a coat of clear matte varnish. This protects the paint and gives the bear a professional, finished look.
Customize it
Make a whole forest family by changing the ear shapes. Pointy ears make a cat, long ears create a bunny, and fold-down ears turn it into a puppy.
Place your new little friend on your desk to keep you company while you work or study


Tiny Smiling Frog Friends
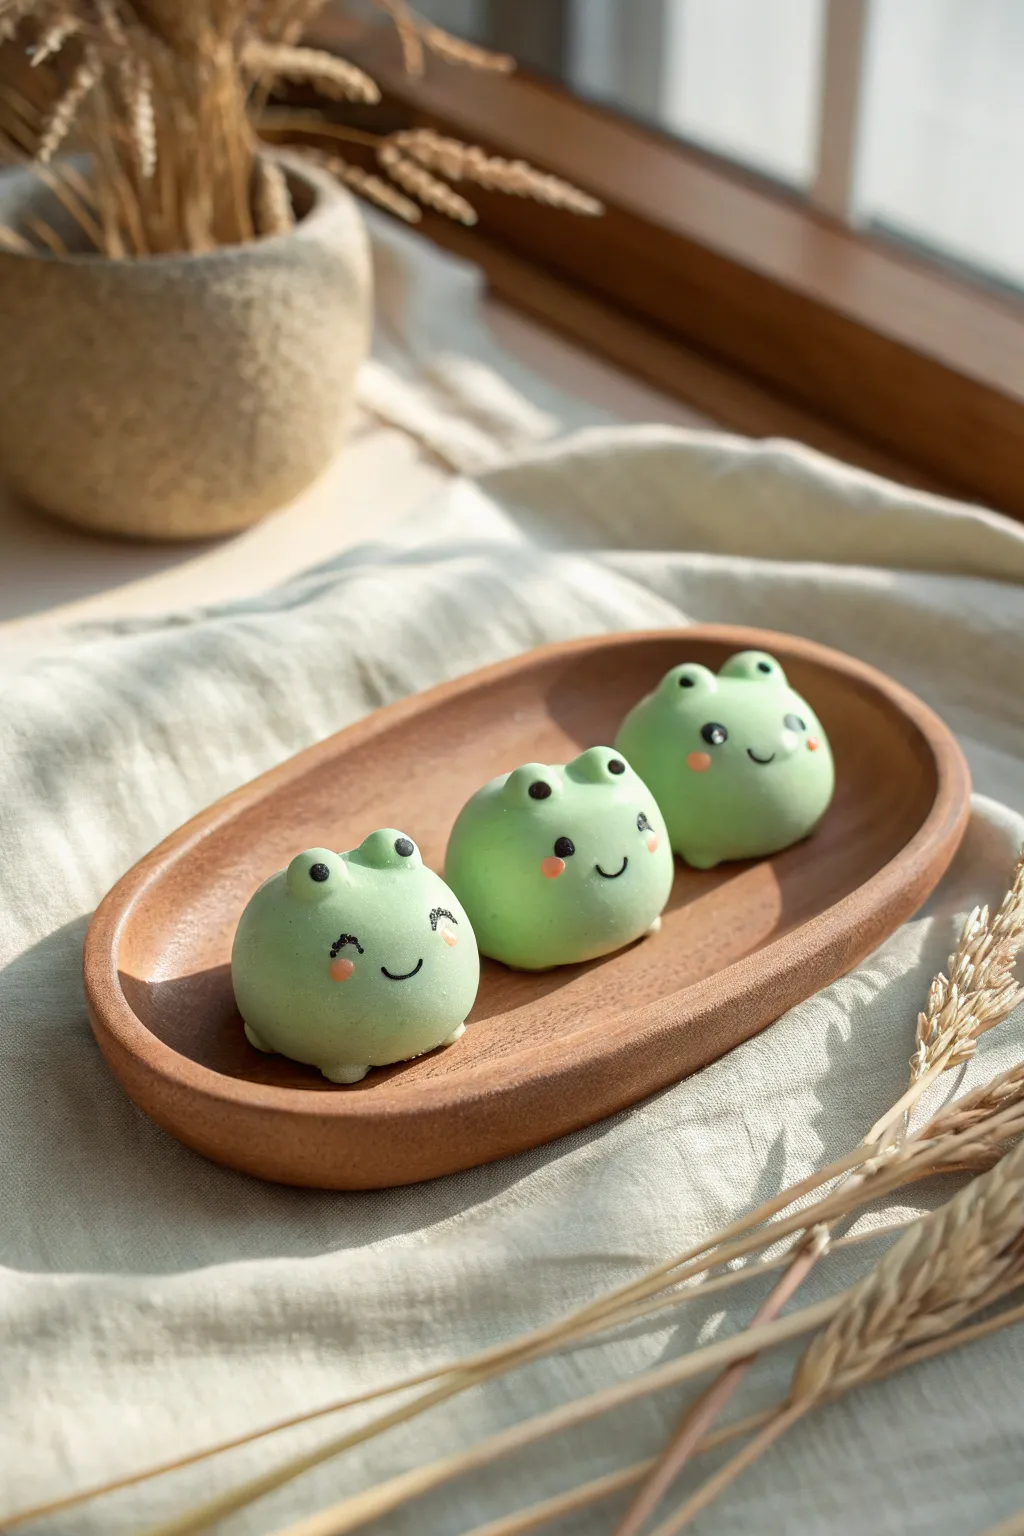
Create a cheerful set of three rotund frog friends that are guaranteed to bring a smile to anyone’s face. These smooth, mint-green buddies feature simple kawaii expressions and sit perfectly on a desk or shelf as charming little companions.
Step-by-Step Tutorial
Materials
- White air dry clay
- Light green acrylic paint (or green clay)
- Black acrylic paint or fine tip marker
- Pink acrylic paint or soft pastel dust
- Small dotting tool or toothpick
- Detail paintbrush
- Rolling pin (optional)
- Gloss varnish (optional)
Step 1: Shaping the Bodies
-
Prepare the Color:
Start by mixing a small amount of light green acrylic paint into your white air dry clay. Knead it thoroughly until the color is a consistent, pastel mint shade throughout. -
Divide the Clay:
Separate your green clay into three equal portions. I find that rolling them into quick balls first helps to gauge if they are the same size. -
Roll Smooth Spheres:
Take one portion and roll it between your palms to create a smooth, seamless sphere. Aim for a shape that is slightly flattened at the bottom so it sits stable without rolling away. -
Form the Base Shape:
Gently press the sphere onto your work surface to flatten the base. The body should look like a soft, rounded bun. -
Repeat for Friends:
Repeat the rolling and flattening process for the remaining two pieces of clay so you have three identical body shapes.
Cracks Appearing?
If you see hairline cracks while drying, mix a tiny bit of fresh clay with water to make a paste. Smooth this ‘slip’ into the cracks with your finger.
Step 2: Adding Froggy Features
-
Make the Eye Sockets:
Pinch off two very tiny pieces of green clay for each frog. Roll these into small balls to create the iconic protruding frog eyes. -
Attach the Eyes:
Apply a tiny dab of water to the top of the head as glue. Press the two small balls firmly onto the top of the body, spacing them somewhat wide apart for that cute look. -
Blend the Seams:
Use a modeling tool or your finger dipped in a little water to smooth the clay where the eyes meet the head. This makes the eyes look like part of the body rather than stuck on top. -
Create Tiny Feet:
Roll four extremely small, grain-sized balls of green clay for each frog. Gently press two onto the front bottom edge of the body to act as little nubby feet. -
Smooth the Feet:
Just like with the eyes, gently blend the clay of the feet upward into the body so they are securely attached. -
Let it Dry:
Set your three frogs aside in a safe, dry place. Allow them to dry completely for 24 to 48 hours, depending on the humidity and clay brand.
Super Smooth Finish
Before drying, brush a tiny amount of water over the entire clay surface. This removes fingerprints and creates that flawless, porcelain-like texture.
Step 3: Bringing them to Life
-
Paint the Eye Details:
Once dry, use a fine detail brush or a black paint pen to draw solid black circles on the protruding eye bumps. -
Add the Highlights:
Dip a toothpick or small dotting tool into white paint. Add a tiny white dot to the upper corner of each black eye for a sparkling reflection. -
Draw the Smile:
Carefully paint a small, thin curve between the eyes using black paint or a fine liner pen. Keep the line steady and simple. -
Apply Cheeks:
Dip a Q-tip or a dry brush into pink paint (or pink pastel dust) and gently dab it onto the cheeks just below the eyes for a rosy glow. -
Seal the Project:
Finish by applying a coat of matte or gloss varnish to protect your new friends and give them a finished, ceramic-like look.
Arrange your trio on a small saucer or tray to enjoy their cheerful company


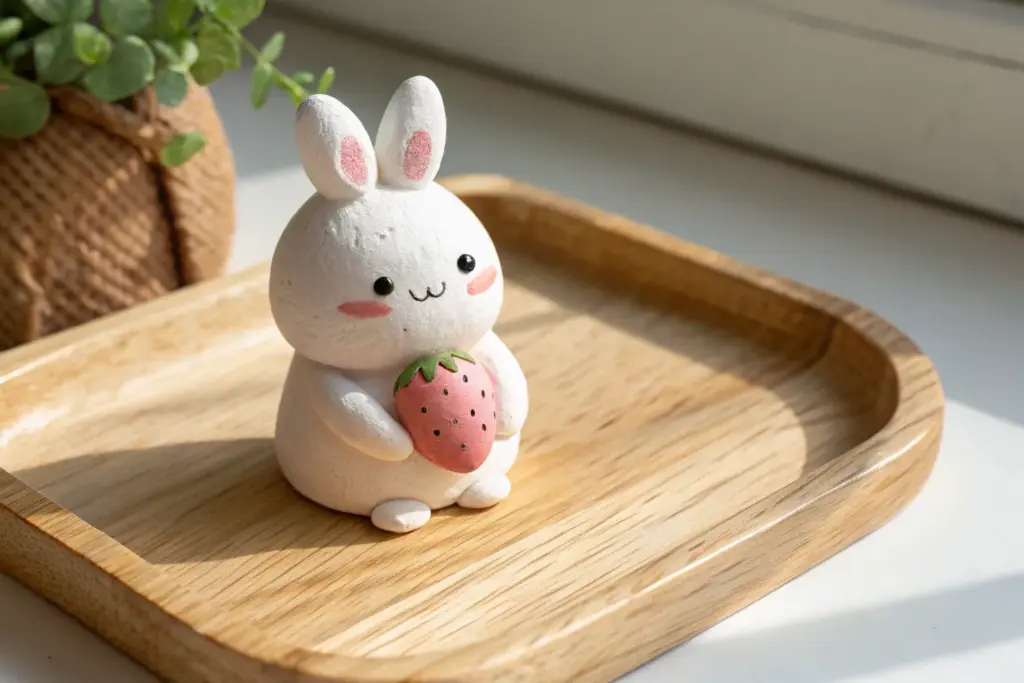
Kawaii Bunny Charms
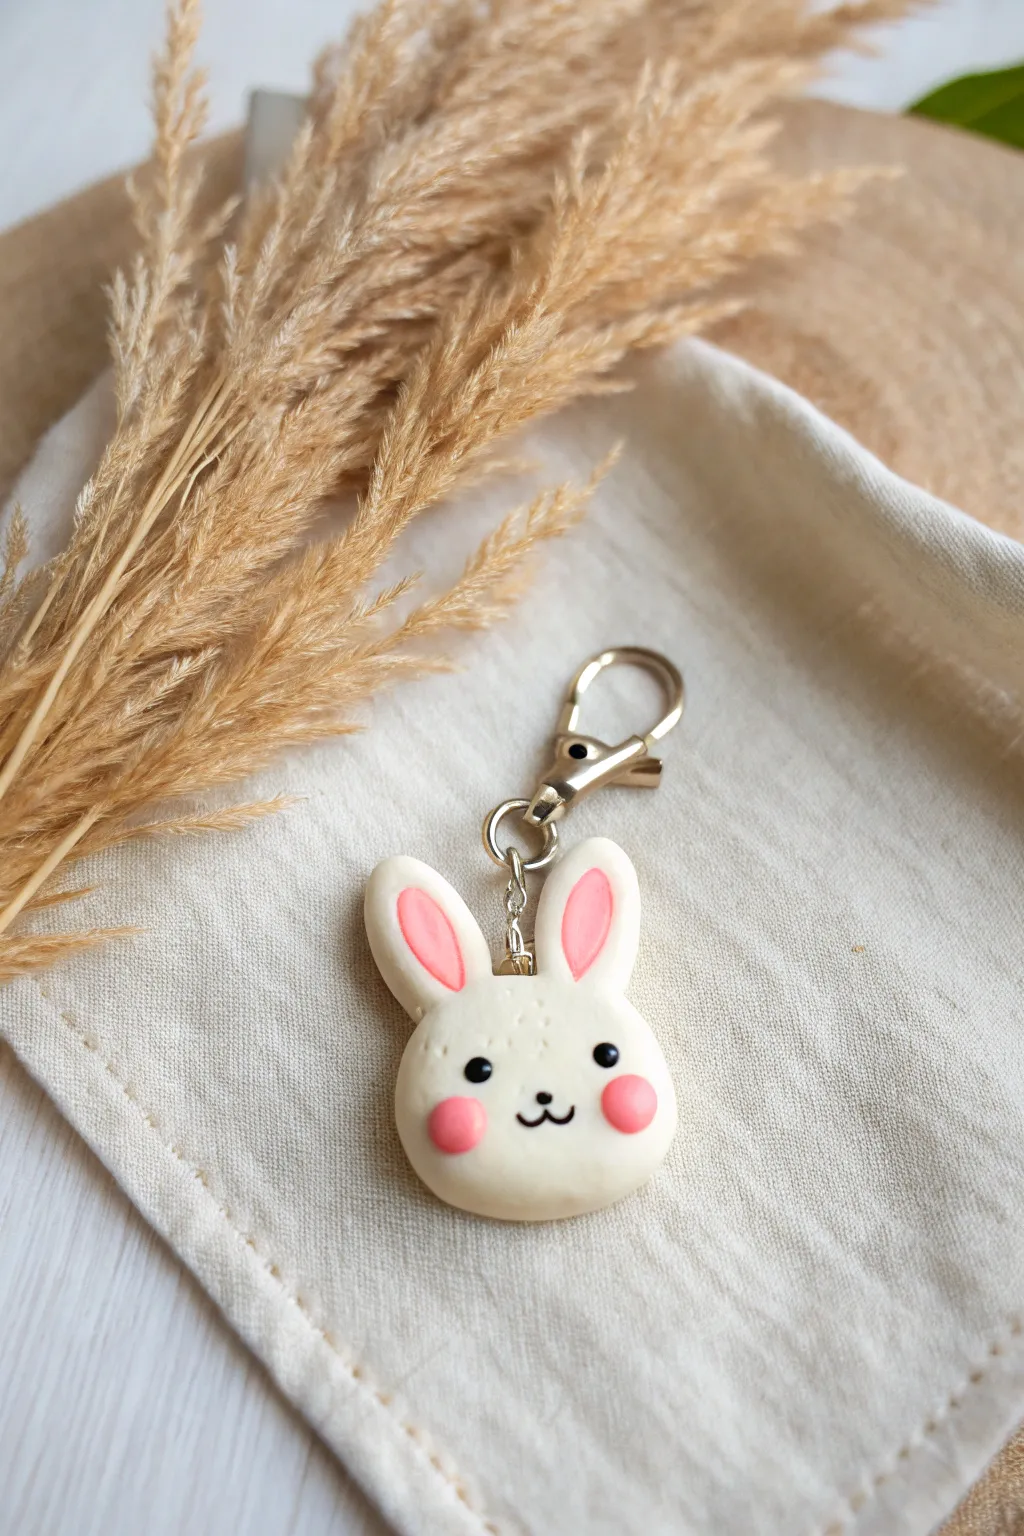
This adorable bunny charm captures the essence of kawaii design with its sweet expression and soft, rounded features. Perfect for clipping onto a backpack or pencil case, this simple air dry clay project results in a smooth, high-quality accessory.
Step-by-Step
Materials
- White, pink, and black air dry clay (or polymer clay)
- Small metal screw eye or eye pin
- Keychain clasp hardware (gold or silver)
- Jump ring
- Pliers
- Plastic rolling pin
- Small dotting tool or toothpick
- Gloss varnish or clear sealant (optional)
- Clay sculpting or modeling tools
Step 1: Shaping the Base
-
Create the head:
Start with a chunk of white clay about the size of a walnut. Roll it between your palms until it forms a smooth, crack-free sphere. -
Flatten slightly:
Gently press the sphere onto your work surface with your palm to flatten it into a thick, rounded disc shape; you don’t want it paper-thin, aim for about 1/4 inch thickness for durability. -
Form the ears:
Pinch off two smaller, equal-sized pieces of white clay. Roll them into small sausages that taper slightly at the top. -
Attach the ears:
Press the ears onto the top of the head piece. Use a modeling tool to blend the clay at the seam where the ears meet the head so they don’t pop off later. -
Add the inner ear details:
Take two very tiny pieces of pink clay and roll them into thin ovals. Press these into the center of each white ear to create the soft pink interior.
Step 2: Adding the Face
-
Create the eyes:
Roll two miniscule balls of black clay. Position them wide apart on the face to achieve that classic kawaii look and press them in gently so they sit flush. -
Add blush cheeks:
Using pink clay, create two small flattened circles slightly larger than the eyes. Place these directly under the eyes on the outer edge of the face. -
Make the mouth:
Roll a very thin ‘snake’ of black clay. Shape it into a tiny ‘W’ or ‘3’ shape on your work surface first, then carefully transfer it to the center of the face using a needle tool. -
Add detail dots:
Using a needle tool or toothpick, gently press three small indentations into the white clay on the forehead area for extra texture. -
Secure the hardware:
While the clay is still wet, screw the metal eye pin into the top center of the head, right between the ears. I sometimes add a dot of glue to the screw threads before inserting for extra hold.
Seamless Smoothness
Before drying, dip your finger in a tiny bit of water and rub it over the white clay to smooth out any fingerprints or tiny cracks.
Step 3: Finishing Touches
-
Let it dry:
Place your bunny on a piece of parchment paper and let it air dry completely. This usually takes 24 to 48 hours depending on humidity. -
Seal (optional):
Once fully dry, brush on a coat of gloss varnish to protect the clay and give it a shiny, finished ceramic look. -
Attach the keychain:
Use pliers to open a jump ring. Loop it through the eye pin on the bunny’s head and the bottom of your keychain clasp. -
Close the loop:
Use the pliers to firmly close the jump ring, ensuring there is no gap where the charm could slip out.
Make it Sparkle
Mix a tiny amount of fine glitter into the white clay before rolling the head to give your bunny a magical, shimmering finish.
Your new bunny friend is ready to accompany you on all your daily adventures

The Complete Guide to Pottery Troubleshooting
Uncover the most common ceramic mistakes—from cracking clay to failed glazes—and learn how to fix them fast.
Chubby Dino Buddies
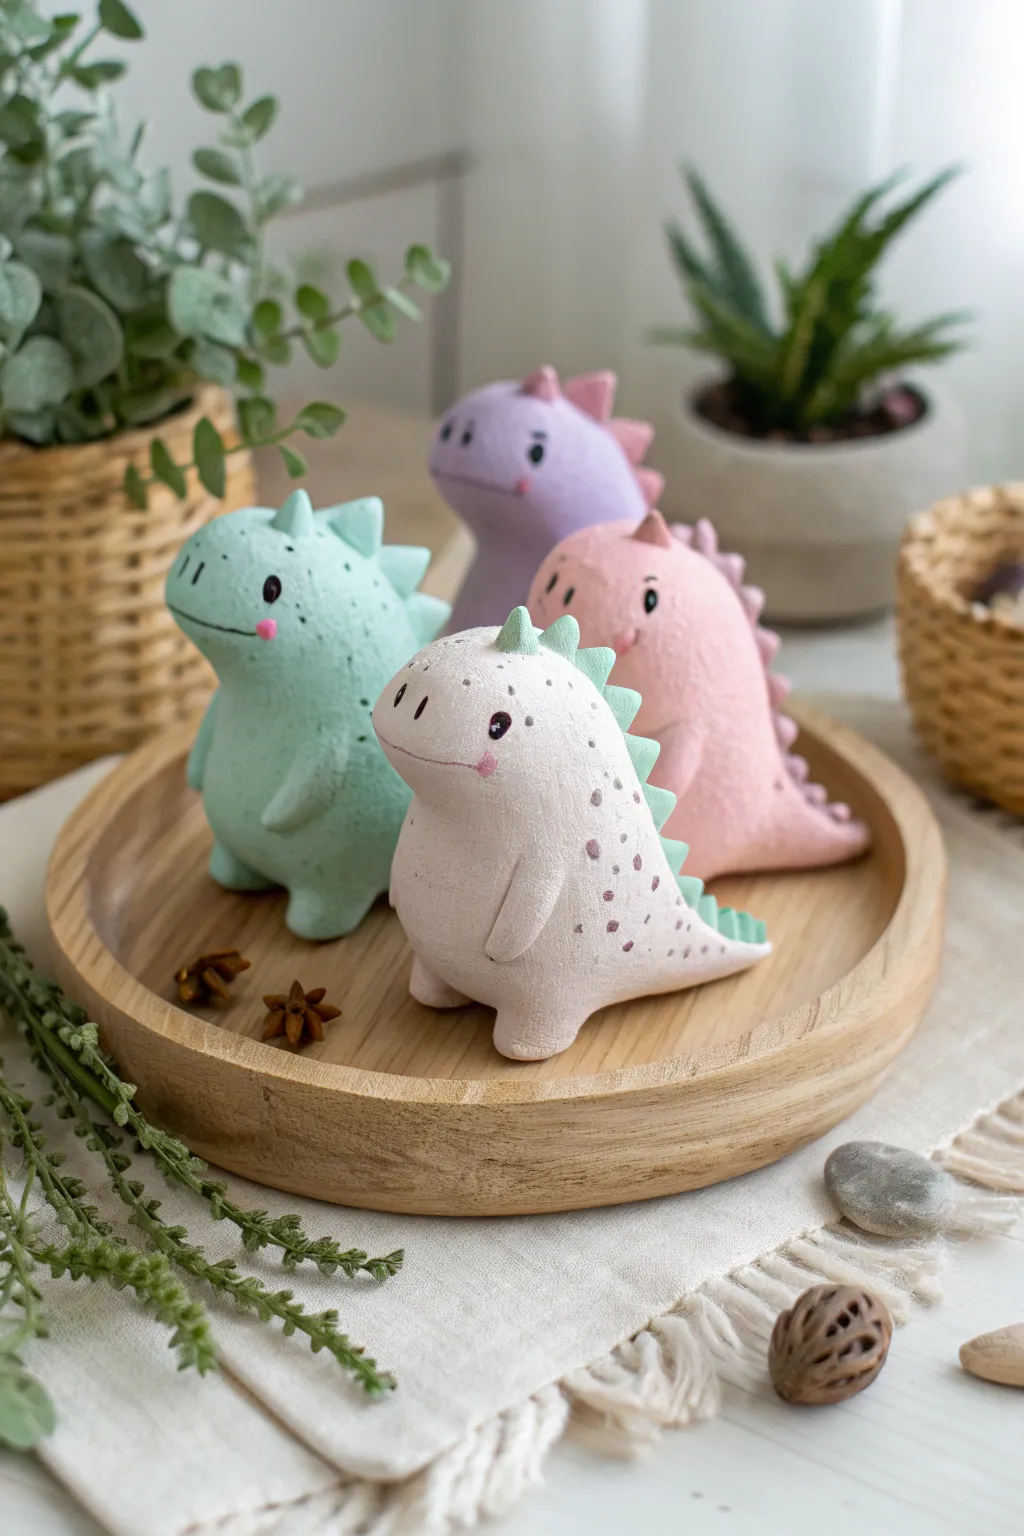
These delightfully roly-poly dinosaurs are perfect for beginners, featuring simple shapes and irresistibly cute faces. Their soft pastel colors and speckled details give them a gentle, whimsical charm that looks great sitting on a desk or shelf.
Step-by-Step Guide
Materials
- Air dry clay (white)
- Acrylic paints (pastel mint, pale pink, lavender, cream, black)
- Basic sculpting tools (or a plastic knife/toothpick)
- Small paintbrush
- Water cup
- Toothbrush (for texturing)
- Parchment paper or craft mat
Step 1: Shaping the Bodies
-
Create the base:
Start with a golf-ball-sized amount of white air dry clay. Roll it into a smooth, crack-free ball in your palms. -
Form the torso:
Gently roll the ball into a fat pear or droplet shape. The wider bottom will be the belly and legs, while the slightly tapered top will become the head area. -
Define the head:
Instead of a separate head, simply use your thumb to gently press and incline the narrower top part slightly forward, creating a seamless snout. -
Make the legs:
At the base of your pear shape, pinch out two small, stubby mounds for the legs. Flatten the bottom so the dino stands straight without tipping over. -
Add the arms:
Roll two tiny, rice-sized pieces of clay. Press them onto the sides of the tummy, blending the top edge specifically so the arms look like they are resting naturally. -
Create the tail:
Roll a small cone of clay. Attach the wider end to the dinosaur’s lower back, blending the seam thoroughly with a little water so it doesn’t fall off later. -
Texture:
Before the clay hardens, gently tap a clean, dry toothbrush all over the surface. This gives the dinosaur a matte, stone-like texture instead of a shiny, smooth finish.
Cracks appearing?
If small cracks form while drying, mix a tiny bit of fresh clay with water to make a paste (slip) and fill the cracks, then smooth over.
Step 2: Spikes & drying
-
Prepare the spikes:
Roll out a tiny snake of clay or create several very small triangles. The method depends on the look you want, but individual triangles usually look cleaner. -
Attach the spine:
Using a tiny dab of water as glue, press the triangles in a row starting from the top of the head down to the tail. -
Smooth the connections:
Use a sculpting tool or toothpick to gently blend the base of each spike into the body so they secure firmly. -
Dry completely:
Let your dinos sit undisturbed on parchment paper for at least 24-48 hours. I prefer to turn them over gently halfway through so the bottom dries evenly.
Step 3: Painting
-
Base coat:
Once fully dry, paint each dinosaur a solid pastel color. You might need two coats for opaque coverage, especially with lighter colors like cream or mint. -
Accent the spikes:
Paint the spikes a contrasting color. For the cream dino, try mint spikes; for the pink dino, try slightly darker pink or purple spikes. -
Add speckles:
For the spotted dino, dip a toothbrush or stiff brush in thinned-down paint and flick it (or carefully dab small dots) across the back. -
Face details:
Use a very fine brush or a black paint pen to draw two small dots for eyes widely spaced apart. -
Blush and mouth:
Add a tiny curved line for a smile if you wish, and dab two soft pink circles under the eyes for rosy cheeks. -
Highlight:
Add a microscopic dot of white paint inside the black eye dots to make them look alive and sparkly.
Make it a set
Create a prehistoric scene by making clay eggs or a tiny volcano to sit alongside your new dinosaur friends.
Now you have a whole herd of adorable prehistoric friends to keep you company on your desk
Smiling Cloud and Star Set
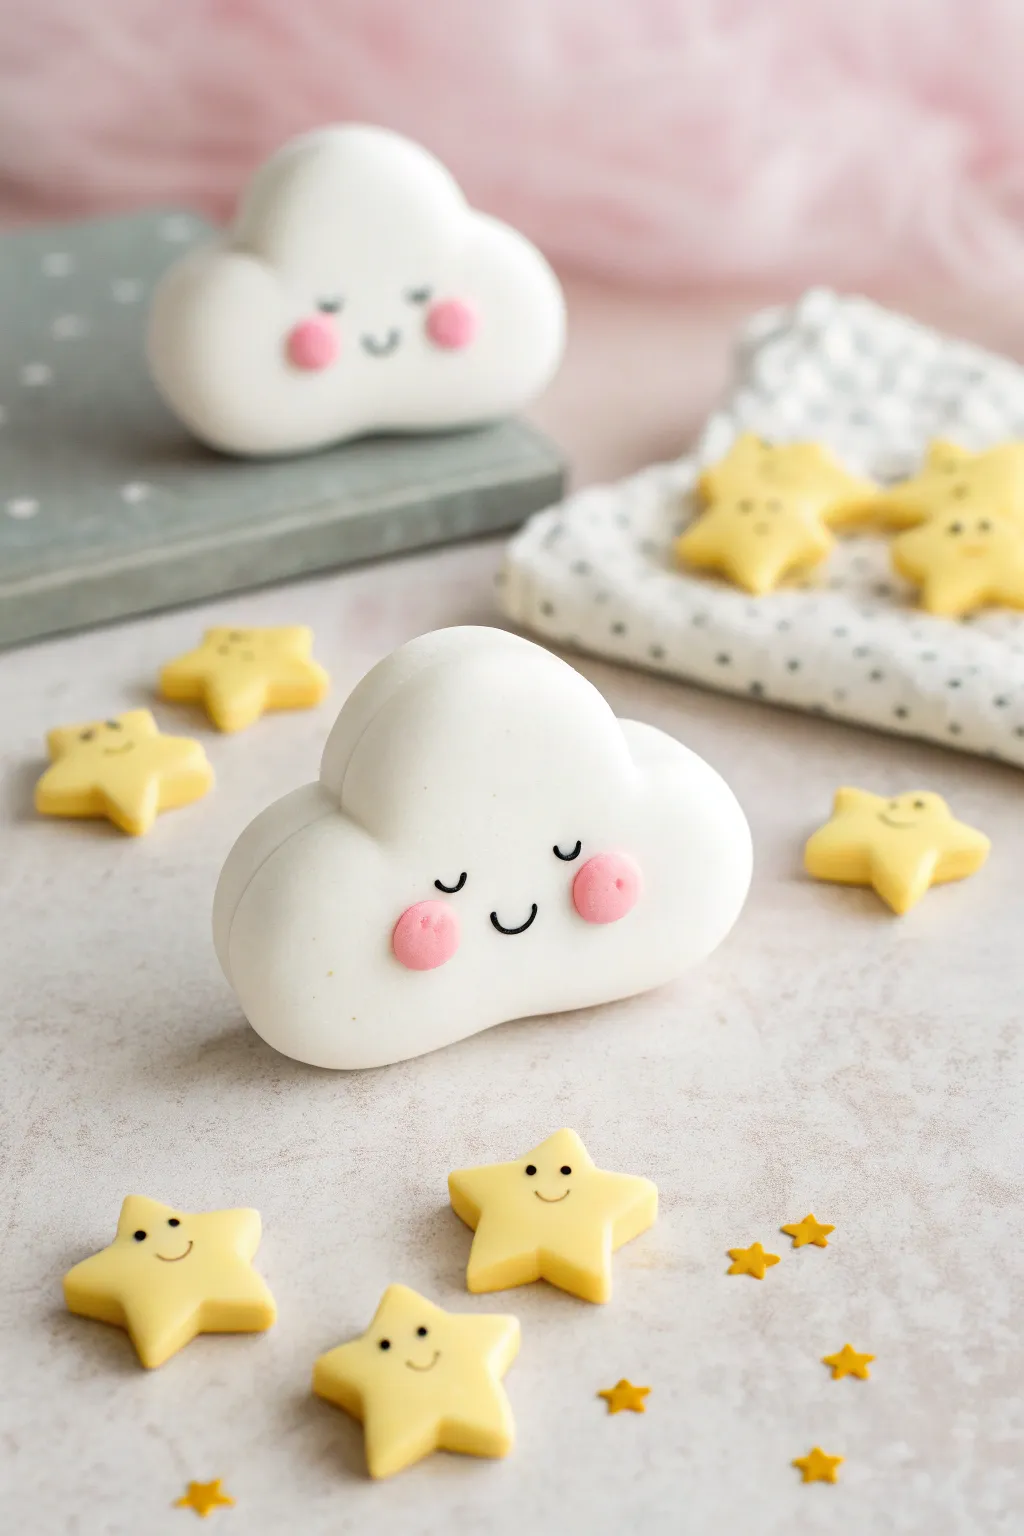
Bring a little piece of the sky down to your desk with this adorable smiling cloud and his happy star companions. These smooth, puffy shapes are perfect for beginners and make a darling decoration for a bedroom shelf.
Step-by-Step
Materials
- White air dry clay (smooth formula)
- Yellow air dry clay (pastel or butter yellow)
- Pink air dry clay (or white mixed with a drop of red)
- Black acrylic paint or fine-tip permanent marker
- Rolling pin (acrylic or wooden)
- Small cloud cookie cutter (optional)
- Small star cookie cutter
- Modeling tools (ball tool and needle tool)
- Water in a small cup
- Parchment paper or silicone mat
Step 1: Shaping the Happy Cloud
-
Prepare the white clay:
Start by taking a generous amount of white air dry clay. Knead it in your hands until it is warm, soft, and pliable to prevent cracking later. -
Form the main shape:
Roll the clay into a smooth ball, then gently flatten it into a thick, oval-shaped pancake. It should be quite plump, roughly 1 inch thick, to give it that puffy cloud look. -
Create the cloud bumps:
Using your fingers, gently press inward at the top and sides of the oval to create indentations. This divides the clay into three distinct ‘puffs’—one large central one and two smaller side ones. -
Smooth the edges:
Dip your finger in a tiny bit of water and rub it along the rounded edges of your cloud. You want the transition between the bumps to be soft and seamless, not sharp. -
Refine the base:
Tap the bottom of the cloud gently against your work surface. This flattens the base slightly so your cloud can stand up on its own when finished. -
Make the rosy cheeks:
Take two tiny pinches of pink clay and roll them into small balls. Flatten them slightly into discs for the cheeks. -
Attach the cheeks:
Press the pink discs onto the lower half of the cloud face, spacing them apart to leave room for the mouth. Use a dot of water as glue if the clay feels dry.
Cracks Appearing?
If small cracks appear while smoothing, dip your finger in water and rub the area in a circular motion to ‘paste’ the crack shut before it dries.
Step 2: Creating the Star Squad
-
Roll out yellow clay:
Clean your hands to avoid color transfer, then knead the yellow clay. Roll it out on your mat until it is about 1/2 inch thick. -
Cut the star shapes:
Use a small star cookie cutter to punch out several star shapes. If you don’t have a cutter, you can hand-shape five points from a small ball of clay. -
Soften the points:
Freshly cut clay can have sharp edges. Gently tap down the points and sides of each star with your fingertip to make them look soft and rounded like marshmallows. -
Add dimension:
I keep the center of the stars slightly thicker than the tips to give them a nice, 3D pillowy effect.
Step 3: Bringing Faces to Life
-
Initial drying phase:
Let your cloud and stars sit for about an hour so the surface hardens slightly. This makes drawing the fine details much easier without denting the clay. -
Draw the cloud’s eyes:
Using a fine-tip black marker or a thin brush with black paint, draw two small ‘U’ shapes for sleeping eyes just above the pink cheeks. -
Add the cloud’s smile:
Draw a small, simple curve right between the cheeks for a sweet little smile. -
Give faces to the stars:
Give each star a personality! Draw two tiny dots for eyes and a small curved smile on the upper point of each star. -
Final dry time:
Allow all pieces to dry completely for 24-48 hours. Turn them over halfway through so the bottoms dry evenly too.
Make it Shine
Once fully dry, coat your cloud and stars with a glossy acrylic varnish or clear nail polish to make them look like shiny ceramic figurines.
Now you have a serene little weather set to brighten up any rainy day


What Really Happens Inside the Kiln
Learn how time and temperature work together inside the kiln to transform clay into durable ceramic.
Friendly Ghost Figurines
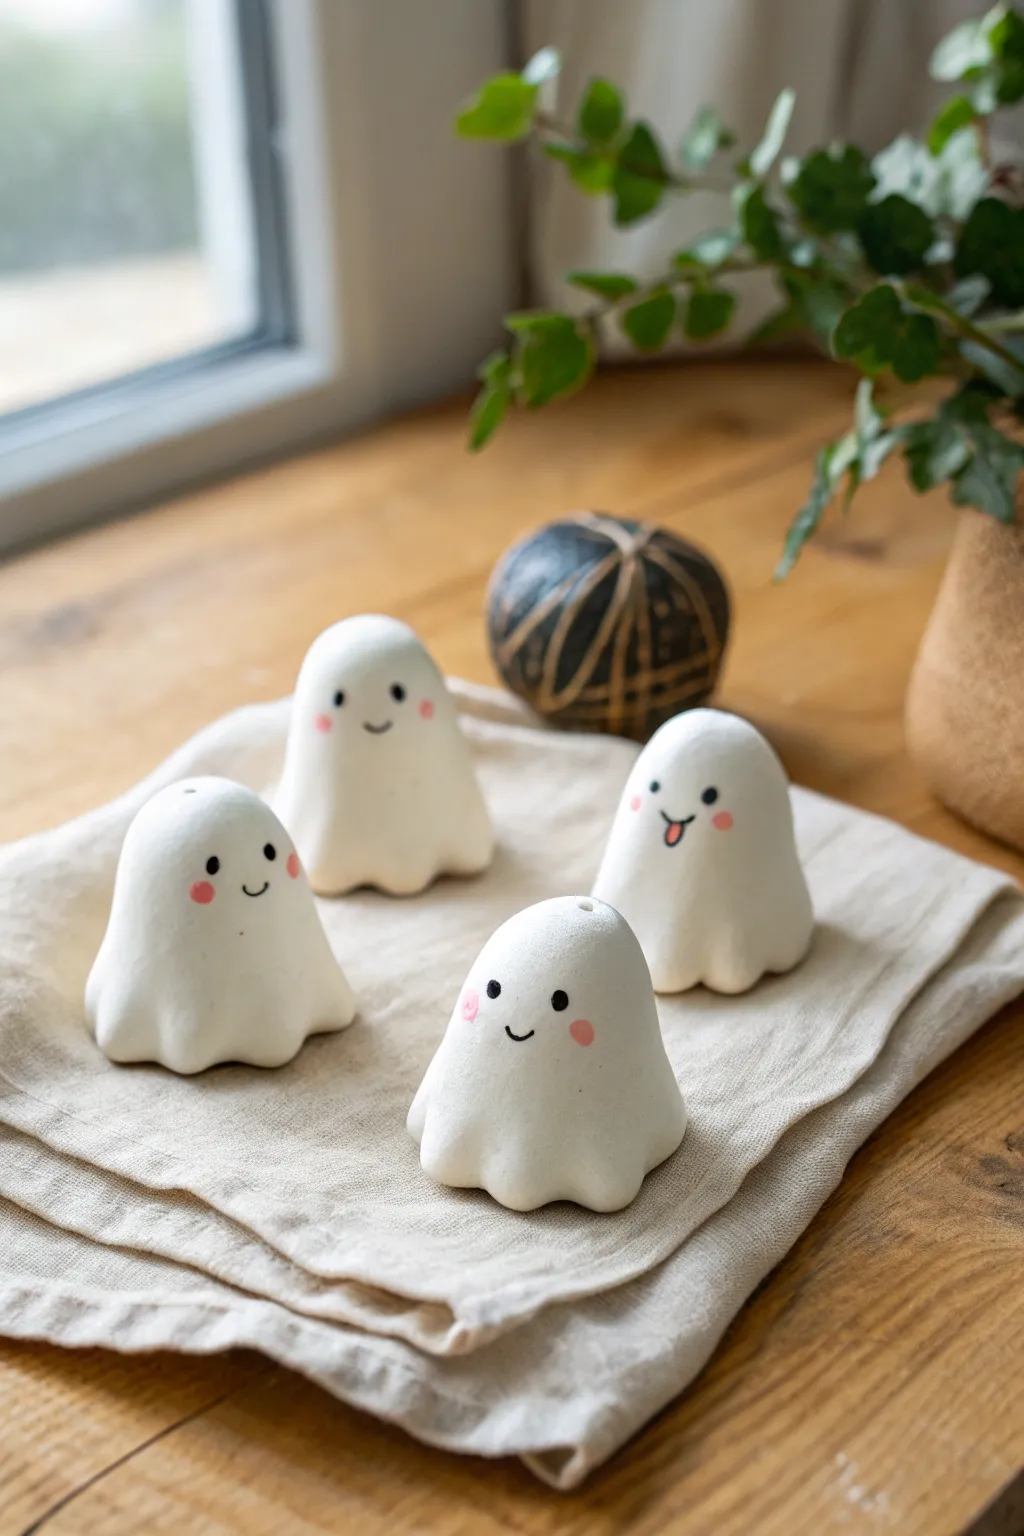
These adorable, thumb-sized ghost figurines are the perfect introduction to modeling with clay, featuring smooth curves and sweet, minimalist expressions. With their matte finish and rosy cheeks, they make for charming Halloween decor or a cute year-round desk companion.
Step-by-Step Tutorial
Materials
- White smooth air-dry clay
- Small rolling pin
- Wooden sculpting tool or toothpick
- Fine-grit sandpaper
- Black acrylic paint or fine-tip permanent marker
- Pink acrylic paint or pink marker
- Very fine detail paintbrush (round)
- Matte varnish or sealant
Step 1: Shaping the Bodies
-
Portion the clay:
Start by taking a chunk of white air-dry clay roughly the size of a golf ball or slightly smaller. Working with the clay in your hands, knead it briefly until it is warm and pliable to prevent cracking later. -
Roll a smooth ball:
Roll the clay between your palms to create a perfectly smooth sphere. Aim to eliminate any visible seams or wrinkles at this stage, as they become harder to fix once you start shaping. -
Form the ghost shape:
Gently press the bottom of the sphere onto your work surface to flatten the base. Simultaneously, use your fingers to taper the top slightly, creating a rounded dome or gumdrop shape rather than a perfect cone. -
Pinch the hem:
Focus on the bottom edge where the clay meets the table. Using your thumb and forefinger, gently pinch the very bottom rim to flare it out slightly, creating the appearance of a hanging sheet or skirt. -
Create the flowing folds:
To give the ghosts their floaty look, use your finger or the side of a sculpting tool to gently press indentations upward into the flared bottom edge. This creates soft waves around the base. -
Smooth the surface:
Dip your finger in a tiny bit of water and run it over the entire surface of the ghost. This will erase your fingerprints and smooth out any tiny imperfections in the clay.
Step 2: Refining and Drying
-
Let them dry:
Place your figurines on a piece of parchment paper or a wire rack. Allow them to dry completely for at least 24-48 hours. I find that turning them upside down halfway through helps the bottom dry thoroughly. -
Sand for perfection:
Once fully dry and hard, take a piece of fine-grit sandpaper and very gently buff the surface. Focus on any bumps or rough spots around the bottom edge to achieve that ceramic-like porcelain finish. -
Dust off debris:
Use a dry, soft brush or a tack cloth to wipe away all the white dust created by sanding. You need a clean surface for the paint to adhere properly.
Smooth Operator
Keep a small bowl of water nearby while sculpting. Regularly dipping a finger and smoothing the clay prevents cracks effectively.
Step 3: Painting the Faces
-
Dot the eyes:
Using a fine-tip paintbrush dipped in black acrylic paint (or a marker), carefully place two small dots for eyes wide apart on the upper half of the face. To keep it kawaii, ensure the eyes are level with each other. -
Add the mouth:
Paint a tiny curved line for a smile between the eyes. For variety, you can create a small ‘u’ shape for an open mouth or add a tiny pink tongue sticking out on one of them. -
Apply rosy cheeks:
Dip barely the tip of a clean brush (or a q-tip) into pink paint. Dab off most of the paint on a paper towel first, then gently press small pink circles right next to or slightly below the eyes. -
Seal the work:
Once the face paint is completely dry, apply a coat of matte varnish over the entire figurine. This protects the clay from moisture and gives it a finished, professional look without making it too shiny.
Cracks happen!
If a crack appears while drying, mix a tiny bit of fresh clay with water to make a paste (slip) and fill the crack, then sand smooth once dry.
Now you have a sweet little spectral squad ready to haunt your shelves with cuteness
Kawaii Fruit With Tiny Faces
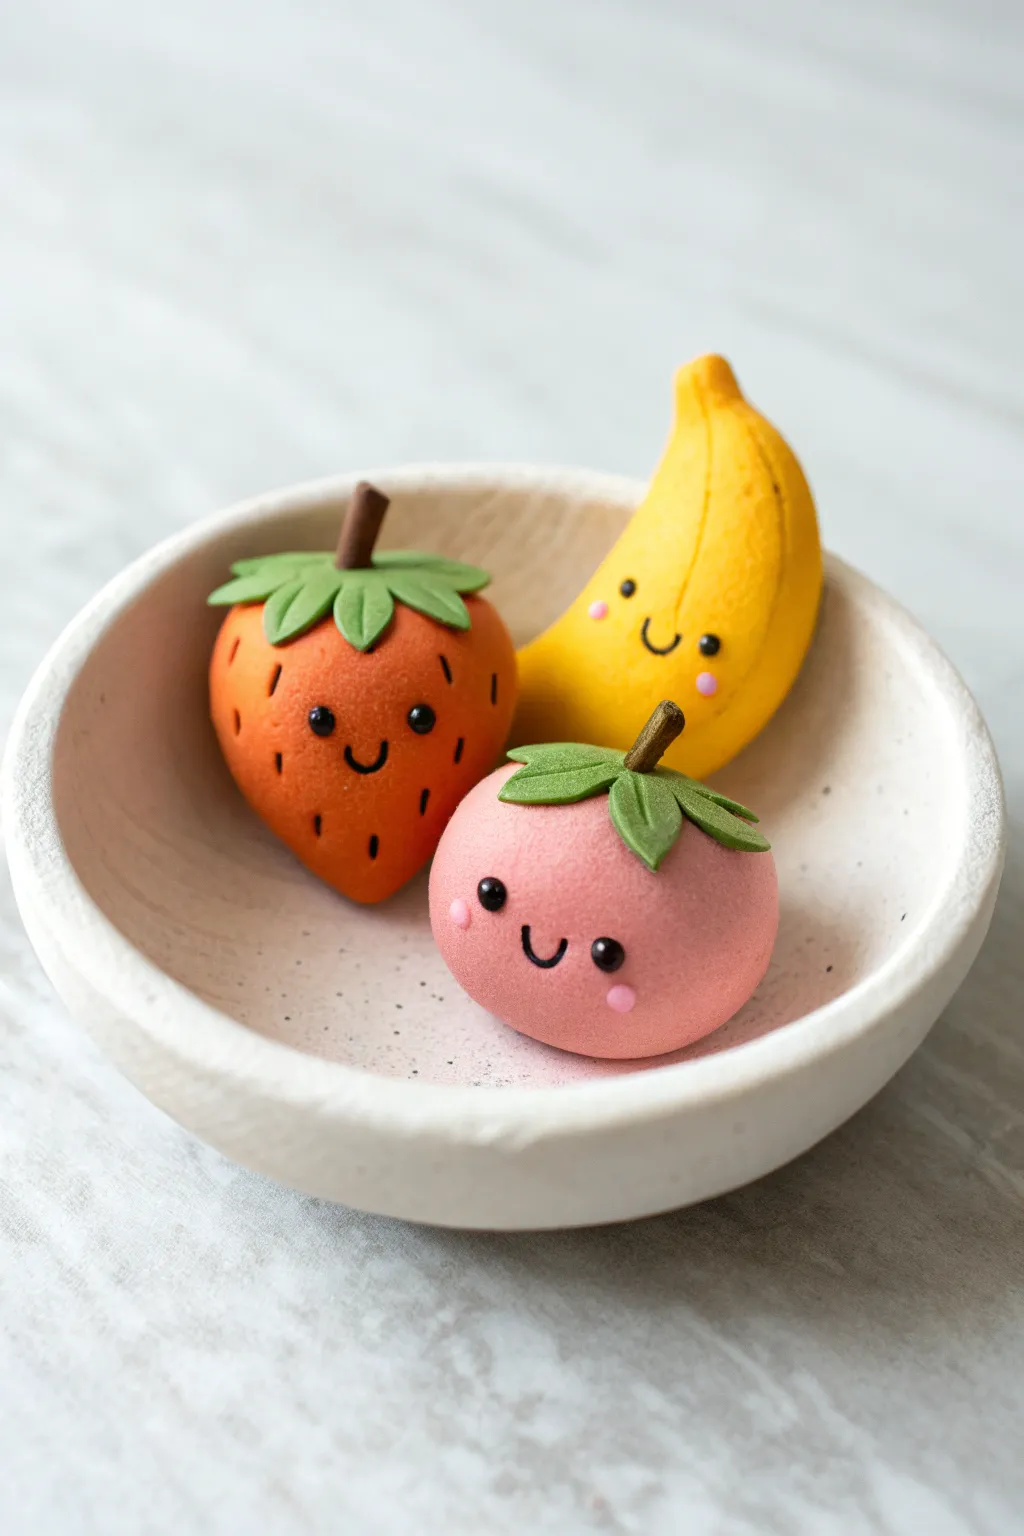
Brighten up your desk with this adorable fruit salad trio featuring a strawberry, banana, and peach. These smooth, matte-finished clay figures nestled in a simple bowl are surprisingly easy to sculpt using basic shapes and air dry clay.
Step-by-Step
Materials
- White or pre-colored air dry clay (red, yellow, pink, green, brown)
- Acrylic paints (if using white clay) in red, yellow, pink, green, brown, black
- Rolling pin
- Modeling tools (or toothpicks/plastic knife)
- Black fine-liner marker or thin black paint
- Small ball tool or end of a paintbrush
- White or cream air dry clay (for the bowl)
- Matte varnish (optional)
Step 1: Sculpting the Fruit Shapes
-
Form the strawberry base:
Start with a ball of red or orange-red clay about the size of a walnut. Gently roll one end between your palms to taper it into a rounded cone shape, flattening the top slightly where the leaves will go. -
Shape the banana:
Take a piece of yellow clay and roll it into a thick sausage. Curve the shape gently into a crescent moon, pinching the top end into a stem and tapering the bottom end slightly. -
Create the peach:
Roll a ball of soft pink clay until it is perfectly smooth. Gently press it onto your work surface just enough so it sits flat without rolling away, but keep the overall shape very round. -
Add texture:
For the strawberry, use a needle tool or toothpick to press tiny indentations all over the surface to mimic seeds. I find it looks best if you keep the face area smooth.
Smooth Operator
Before drying, gently rub a tiny bit of water or baby oil over the clay with your finger to remove fingerprints and get that professional matte finish.
Step 2: Adding Leaves and Stems
-
Prepare the leaves:
Roll out a thin sheet of green clay. You will need two distinct leaf styles: a classic jagged calyx for the strawberry and a smoother, multi-leaf top for the peach. -
Cut the strawberry leaves:
Cut a five-pointed star shape or individual small triangles from the green clay. Press them firmly onto the flat top of your strawberry. -
Attach the strawberry stem:
Roll a tiny cylinder of brown clay and attach it to the center of the green leaves on the strawberry. -
Assemble the peach top:
Cut three or four teardrop-shaped leaves from green clay. Arrange them on top of the pink ball so they radiate outward, adding a small brown stem in the center similar to the strawberry. -
detail the banana stem:
Take a tiny bit of yellow-brown or green clay and blend it onto the tip of the banana stem for a realistic ripening look, or simply paint it later.
Step 3: Creating the Bowl
-
Form the bowl base:
Roll a larger ball of cream or white clay. Push your thumbs into the center and pinch around the edges to create a simple, shallow bowl shape large enough to hold all three fruits. -
Refine the surface:
Dip your finger in a little water to smooth out any cracks on the bowl’s rim. Let it dry completely alongside your fruit figures.
Fruity Magnets
Embed a small round magnet into the back of each fruit while the clay is still wet to turn these into adorable fridge decorations.
Step 4: The Tiny Kawaii Faces
-
Wait for drying:
Ensure the clay surfaces are dry to the touch so your paint or marker doesn’t bleed into the clay. -
Space the eyes:
Using a small ball tool dipped in black paint (or a black marker), place two widely spaced dots on each fruit. The wide spacing is key to the ‘kawaii’ look. -
Draw the smiles:
drawing a tiny ‘u’ shape right between the eyes using a super-fine liner brush or marker. Keep the smile small and centered. -
Add rosy cheeks:
dab the smallest amount of pink paint underneath each eye using a toothpick or dotting tool. This instantly adds character. -
Highlight the eyes:
Once the black eyes are dry, add a microscopic dot of white paint to the top corner of each black eye for a sparkle effect. -
Add extra details:
For the strawberry, you can use a fine black pen to draw tiny vertical lines inside the indentations you made earlier, emphasizing the seeds. -
Final assembly:
Place your finished fruit friends into the dried clay bowl.
Arrange your little fruit family in their bowl and enjoy the sweetness they bring to your space

TRACK YOUR CERAMIC JOURNEY
Capture glaze tests, firing details, and creative progress—all in one simple printable. Make your projects easier to repeat and improve.
Kawaii Donut and Cookie Charms
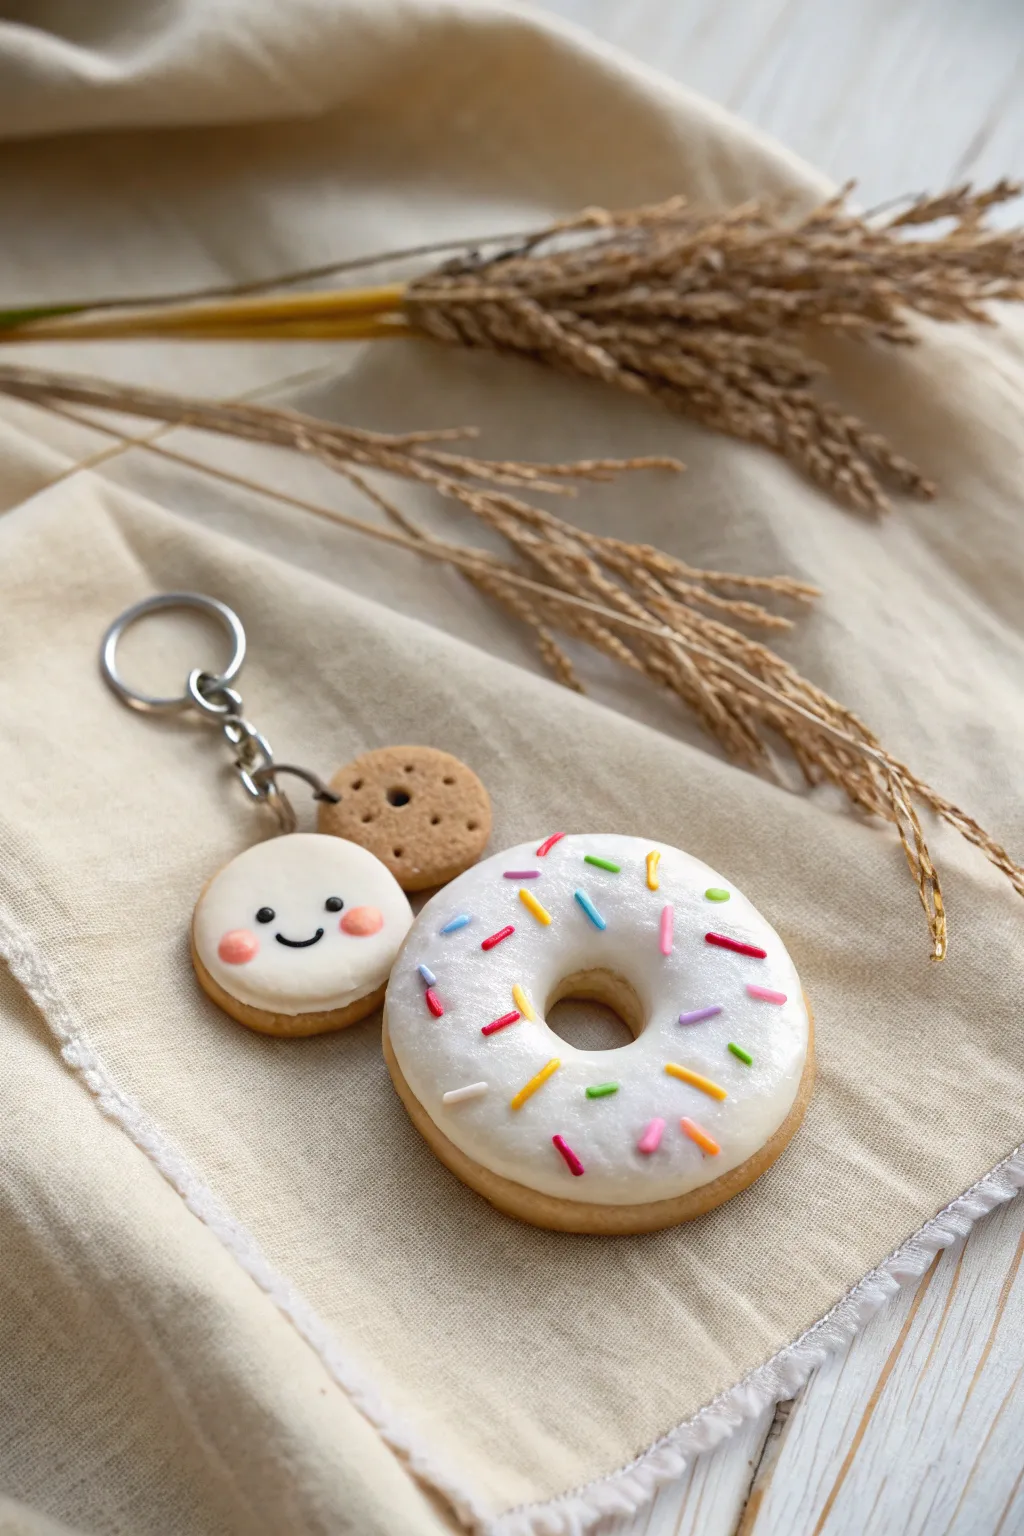
This adorable keychain brings together a trio of tiny bakery favorites: a sprinkle-topped donut, a happy smiley cookie, and a bite-sized biscuit. The glossy finish gives them a realistic, freshly-glazed look that’s irresistible to touch.
Step-by-Step Tutorial
Materials
- Air dry clay (white and beige/tan)
- Acrylic paints (brown, pink, black, yellow, blue, red)
- Glossy varnish or UV resin
- Rolling pin
- Small round cookie cutters (various sizes)
- Toothpick or needle tool
- Real toothbrush (for texture)
- Keychain hardware with jump rings
- Eye screws (small)
- Small paintbrush
Step 1: Shaping the Donut Base
-
Mix the dough color:
Start by mixing a small amount of yellow and brown paint into white air dry clay to create a light, golden-baked dough color. Knead it thoroughly until the color is uniform. -
Form the ring:
Roll a ball of the tan clay and flatten it slightly into a thick disc. It should be chubby, not flat like a pancake. -
Punch the hole:
Use the back of a paintbrush or a small round tool to punch a hole directly in the center. Spin the tool gently to widen the hole and smooth out the inner edges so they look baked, not torn. -
Add texture:
Gently tap a clean toothbrush over the surface of the donut (avoiding the very center where the ‘fry line’ would be) to simulate a realistic cake texture.
Step 2: Creating the Cookies
-
Cut the smiley cookie:
Roll out a sheet of the same tan clay. Use a small round cutter to punch out a circle for the base of the smiley face cookie. -
Create the white filling:
Roll out white clay slightly thinner than the base. Cut a circle of the same size and place it directly on top of the tan base, smoothing the edges slightly so they look connected like icing on a cookie. -
Make the mini biscuit:
Roll a tiny ball of tan clay and flatten it. Use a needle tool or toothpick to poke a pattern of dots on the surface to mimic a classic shortbread or digestive biscuit. -
Insert hardware:
While the clay is still wet, carefully screw a small eye screw into the top edge of each of the three pieces (donut, smiley cookie, and mini biscuit). If necessary, add a dab of glue for security.
Hardware Help
If the eye screws fall out after drying, remove them, add a drop of super glue or E6000 into the hole, and screw them back in for a permanent hold.
Step 3: Decorating and Glazing
-
Glaze the donut:
Mix white clay with water (or use white dimensional fabric paint/puffy paint) to create a thick ‘icing’ paste. Spread this irregularly over the top of the donut, letting it look like it melted naturally. -
Add sprinkles:
Roll incredibly thin snakes of clay in various colors (pink, blue, yellow, red). Let them dry slightly, then cut them into tiny segments. Press these ‘sprinkles’ into the wet white icing on the donut. -
Paint the face:
Once the white cookie icing is dry, use a fine-tip brush or a dotting tool with black paint to add two wide-set eyes and a simple u-shaped smile. -
Apply blush:
Mix a soft pink paint and dab small oval cheeks onto the smiley face right next to the mouth for that signature kawaii look. -
Shading:
Use soft pastels or watered-down brown paint to gently brush the edges of the tan cookie parts. This gives them a ‘golden brown’ baked appearance. -
Seal everything:
Coat the white icing of the donut and the white face of the cookie with a high-gloss varnish or UV resin. Leave the tan biscuit parts matte for textural contrast. -
Final assembly:
Once fully dry and cured, use jump rings to attach all three charms to your main keychain ring.
Level Up: Scented Clay
Knead a drop of vanilla or strawberry essential oil into the clay before shaping. Your charms will smell like a real bakery for weeks.
Clip these sweet accessories onto your backpack or keys to carry a little cheer wherever you go
Ice Cream Cone Characters
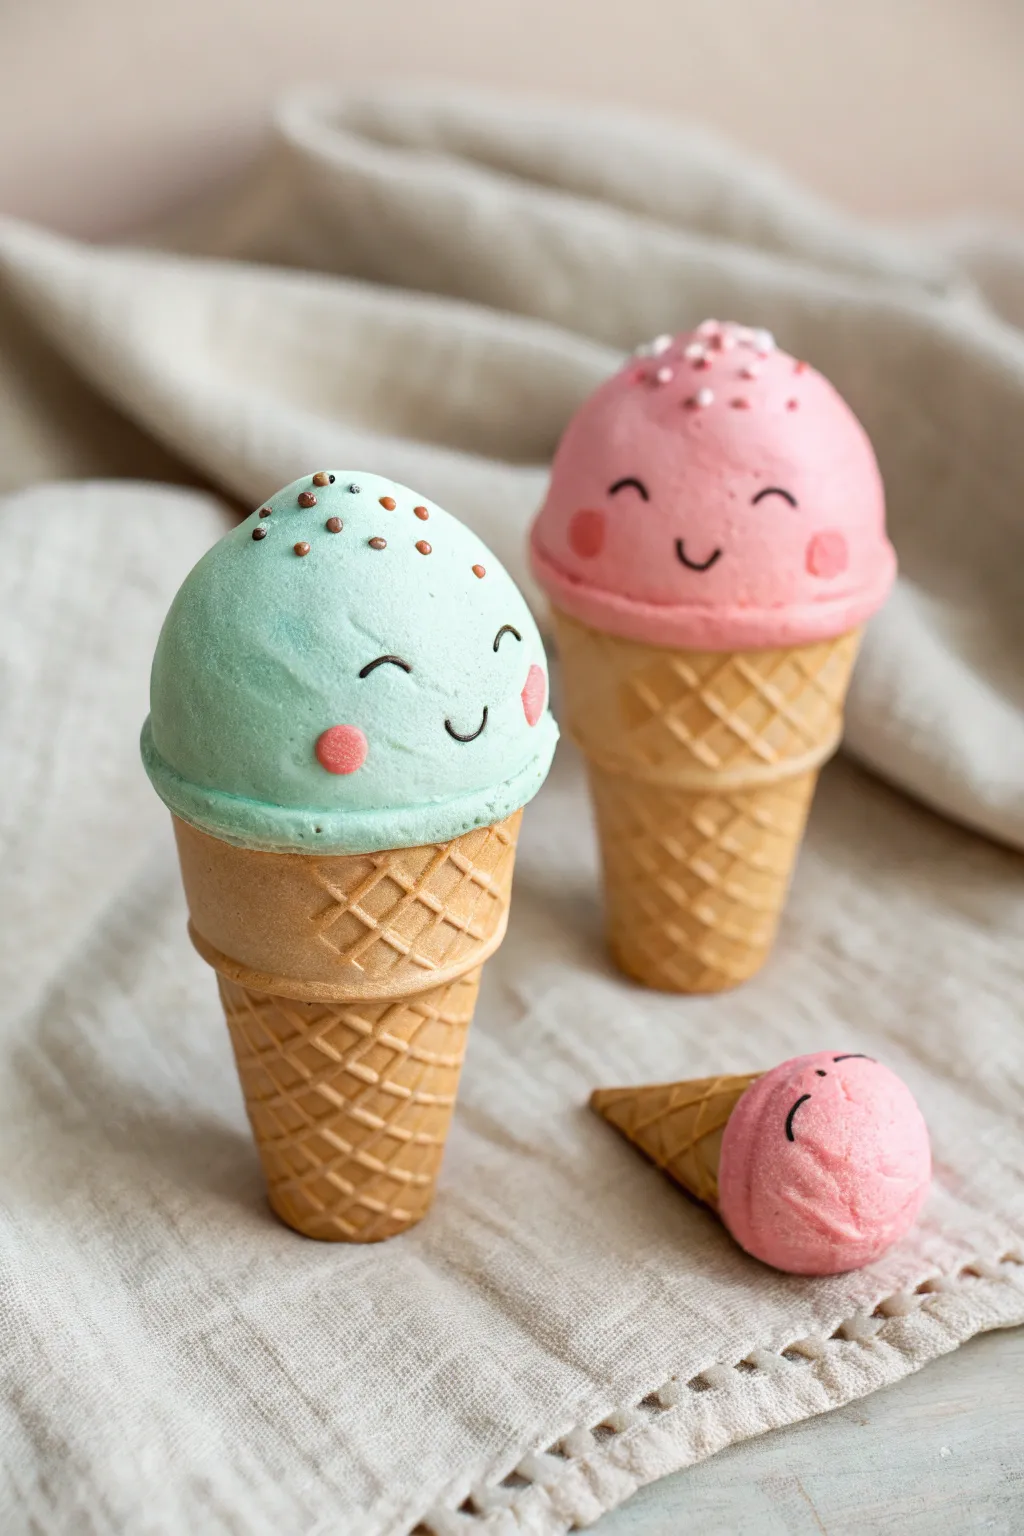
These adorable ice cream characters bring a scoop of happiness to any shelf with their soft pastel colors and charming winking faces. They feature textured waffle cones and perfectly round scoops topped with sprinkles, making them a delightful beginner project for kawaii fans.
Detailed Instructions
Materials
- Air dry clay (white, beige/tan)
- Acrylic paints (mint green, baby pink, black, dark pink, brown)
- Clay sculpting tools (needle tool, small ball tool)
- Old toothbrush or stiff bristle brush
- Rolling pin
- Ruler or straight edge
- Craft glue or water (for joining clay)
- Fine detail paintbrush
Step 1: Sculpting the Waffle Cone
-
Mix Cone Color:
Start by mixing a small amount of beige or light brown paint into white air dry clay. Knead it thoroughly until you have a uniform, warm tan color reminiscent of a baked waffle cone. -
Roll Flat:
Roll out your tan clay into a flat sheet, about 1/8 inch thick. It doesn’t need to be huge, just enough to cut your cone shapes. -
Create Waffle Texture:
Before cutting the shape, use a ruler or straight edge to gently press diagonal lines into the flat clay. Rotate the clay and press lines in the opposite direction to create a diamond ‘waffle’ grid pattern. -
Cut and Shape:
Cut a triangular wedge shape from the textured clay. Gently roll this wedge into a cone shape, overlapping the edges slightly. Use a dab of water to smooth the seam so it holds together. -
Solidify the Core:
To help the cone keep its shape while drying, you can stuff the inside lightly with a crumpled ball of aluminum foil or extra scrap clay. -
Add the Cuff:
For the double-stacked look on the larger cones, create a second, simpler ring or smaller cone section and attach it to the top of your main cone base. Smooth the join with a tool.
Cone Collapse?
If your cone sags while building, insert a crumpled cone of aluminum foil inside. It acts as an armature to support the heavy clay scoop while it dries.
Step 2: Forming the Kawaii Scoops
-
Tint the Clay:
Prepare your ice cream colors. Mix mint green paint into one ball of white clay and baby pink into another. Keep kneading until the color is solid and streak-free. -
Roll the Spheres:
Roll the colored clay into smooth, perfect spheres. Ensure they are sized appropriately to sit slightly wider than the opening of your cones. -
Create the ‘Feet’:
To mimic real scooped ice cream, flatten the bottom of the sphere slightly and pinch the edges outward to create a ruffled ‘skirt’ where the ice cream meets the cone. -
Texture the Scoop:
Take an old toothbrush and gently tap it all over the surface of the round dome. This creates a realistic, airy ice cream texture rather than leaving it perfectly smooth. -
Attach to Cone:
Apply a little craft glue or water to the top rim of your waffle cone. Press the textured scoop firmly onto the cone. -
Add the Ridge:
Roll a thin snake of matching colored clay (pink or green) and wrap it around the base of the scoop where it meets the cone. Flatten it slightly and texture it with the toothbrush to blend it in effortlessly.
Make it a Charm
Before the scoop dries, screw a small eye hook into the top center. Once hard, add a jump ring and chain to turn your creation into a cute necklace or keychain.
Step 3: Adding Faces & Details
-
Sculpt Cheeks:
Take tiny pinched amounts of bright pink clay (or paint white clay pink) and attach two small, flat circles to the face area for rosy cheeks. -
Sprinkle Time:
Roll extremely tiny threads of brown or dark pink clay. Cut them into microscopic bits and gently press them onto the top of the head for sprinkles. -
Let it Dry:
Allow your characters to dry completely. This usually takes 24-48 hours depending on the brand of clay and humidity. -
Paint the Faces:
Using your finest detail brush and black acrylic paint, carefully paint two curved arches for happy, squinting eyes. I find resting my pinky on the table helps steady my hand for these fine lines. -
Final Expressions:
Paint a tiny ‘U’ shape between the eyes for the smile. Vary the expressions—maybe one is winking or has a wider grin.
Now you have a trio of frozen friends that will stay sweet forever without ever melting.
Mini Sushi and Rice Ball Pals
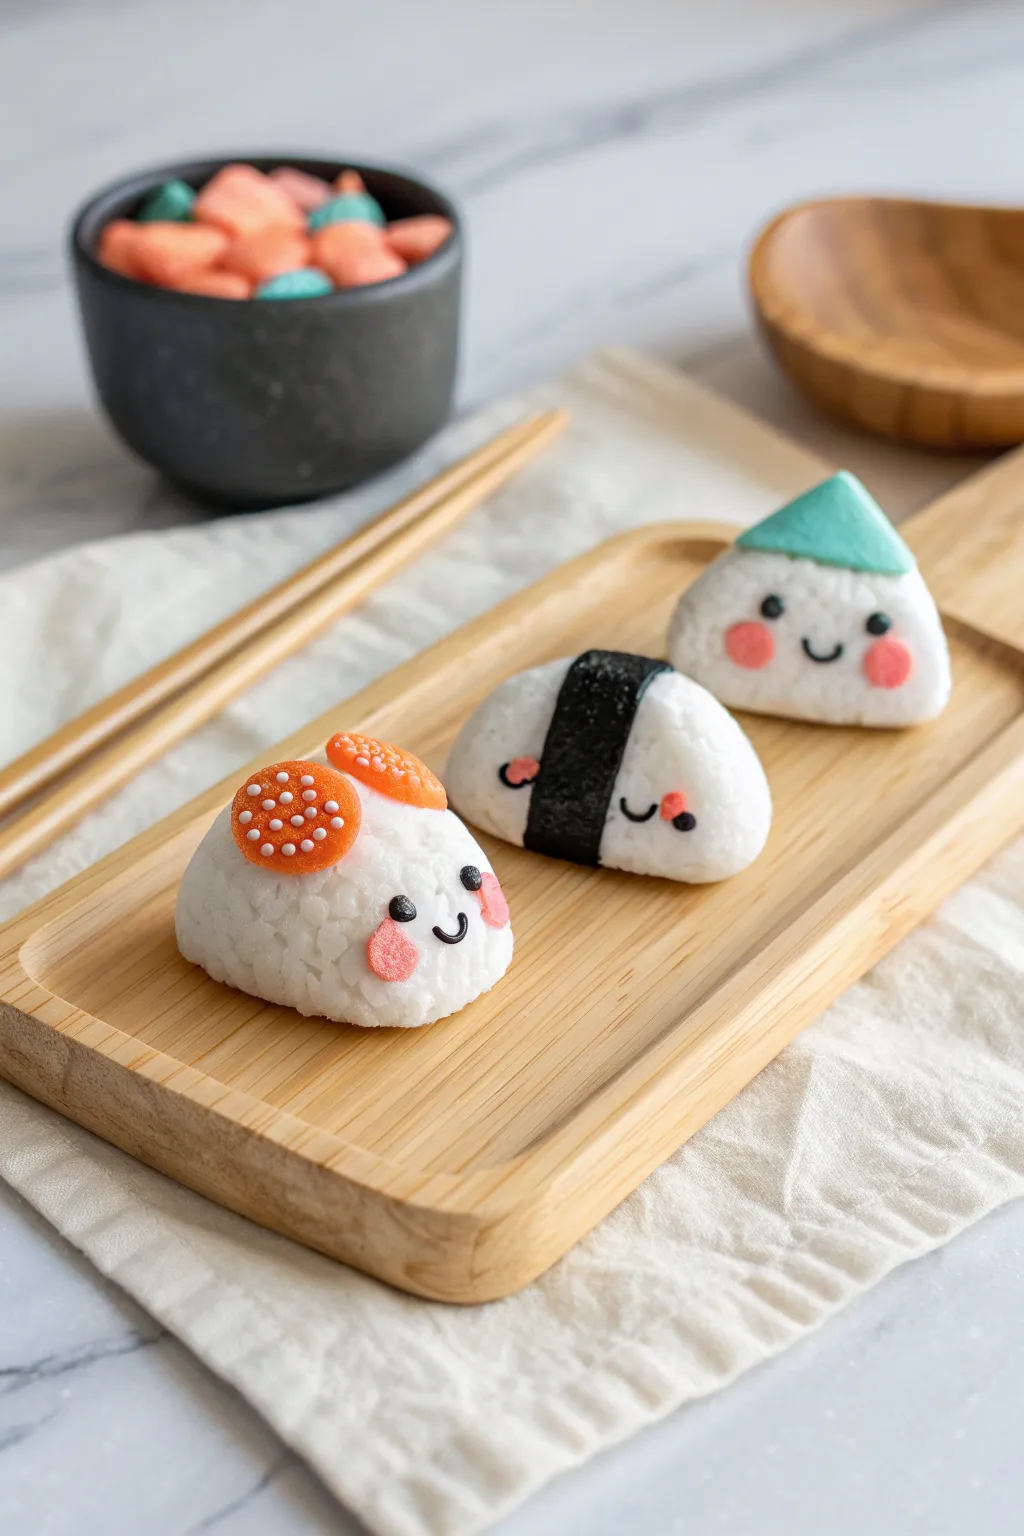
Transform simple white clay into an adorable trio of Japanese snacks with sweet, blushing faces. These textured rice balls and sushi friends are perfect for play kitchens or just displaying on your desk for a daily smile.
Step-by-Step Tutorial
Materials
- White air-dry clay (foam clay recommended for texture)
- Acrylic paints (orange, black, teal/mint green, pink)
- Clay sculpting tools (needle tool or toothpick)
- Small round piping tip or straw
- Rolling pin
- Old toothbrush or stiff bristle brush
- Matte mod podge or varnish (optional)
- Fine detail paintbrush
Step 1: Shaping the Rice Bases
-
Form the nigiri:
Start by taking a medium ball of white clay and shaping it into an oval. Flatten the bottom gently on your work surface and round off the top to create a classic sushi rice mound shape. -
Create the round onigiri:
Roll a slightly smaller ball of white clay. Press it down just enough so it sits flat without rolling away, but keep the overall shape quite spherical and chubby. -
Sculpt the triangle onigiri:
Take a third portion of clay and roll a ball, then flatten it slightly. Use your fingers to pinch three glossy corners, creating a soft-edged triangle shape just like a traditional rice ball. -
Add rice texture:
This step makes a huge difference. Take an old toothbrush or a stiff bristle brush and gently tap it all over the surface of each white shape. This creates a realistic, bumpy rice grain texture.
Cracking Up?
If you see cracks forming as the clay dries, smooth a tiny bit of water over the crack with your finger. For deep cracks, fill them with a fresh smear of soft clay.
Step 2: Adding Colorful Toppings
-
Make the roe topping:
Mix a small amount of white clay with orange paint (or use pre-colored clay). Flatten two small discs. Using a needle tool or toothpick, poke many tiny holes into the top to mimic the texture of fish roe. -
Attach the roe:
Press the two orange discs onto the top of your round rice ball, positioning them slightly towards the back like little ears or buns. -
Create the nori strip:
Color a piece of clay black. Roll it out into a thin, flat strip using a rolling pin. Trim the edges with a knife to make a clean rectangle. -
Wrap the sushi:
Drape the black strip over the center of your oval nigiri shape. Press it down gently so it hugs the sides, reinforcing the ‘sushi’ look. -
Form the green hat:
Tint a small piece of clay with teal or mint green paint. Shape it into a small, flat triangle that perfectly matches the top peak of your triangular onigiri. -
Attach the hat:
Place the green triangle on top of the white triangle base. Smooth the seam slightly with your finger so it looks like a wrapper or a decorative cap.
Texture Trick
For the most realistic rice texture, let the clay sit for about 10 minutes after shaping before texturing. If it’s too wet, the brush marks will just smooth back out.
Step 3: Bringing Them to Life
-
Mix face colors:
Prepare a tiny amount of black clay for the eyes and mouth. You can also paint these features on later, but adding clay gives a nice 3D effect. -
Add the eyes:
Roll infinitely small balls of black clay. Press two onto the front of each rice ball. Place them somewhat wide apart for maximum cuteness. -
Shape the mouths:
Roll extremely thin snakes of black clay. Curve them into ‘U’ shapes for smiles. I like to make the round one smirk slightly to the side for personality. -
Applying the mouths:
carefully press the tiny black smiles onto the faces between the eyes. Use a needle tool to help position them without squishing the clay. -
Rosy cheeks:
Mix a soft pink clay or paint. Create small, flat ovals or circles and press them onto the cheeks of each character, just under the eyes. -
Final drying:
Let your sushi trio dry completely for at least 24 hours. The thicker parts will take the longest to cure.
Now you have a trio of food friends ready for imaginary feasts
Kawaii Pancake Stack With Syrup
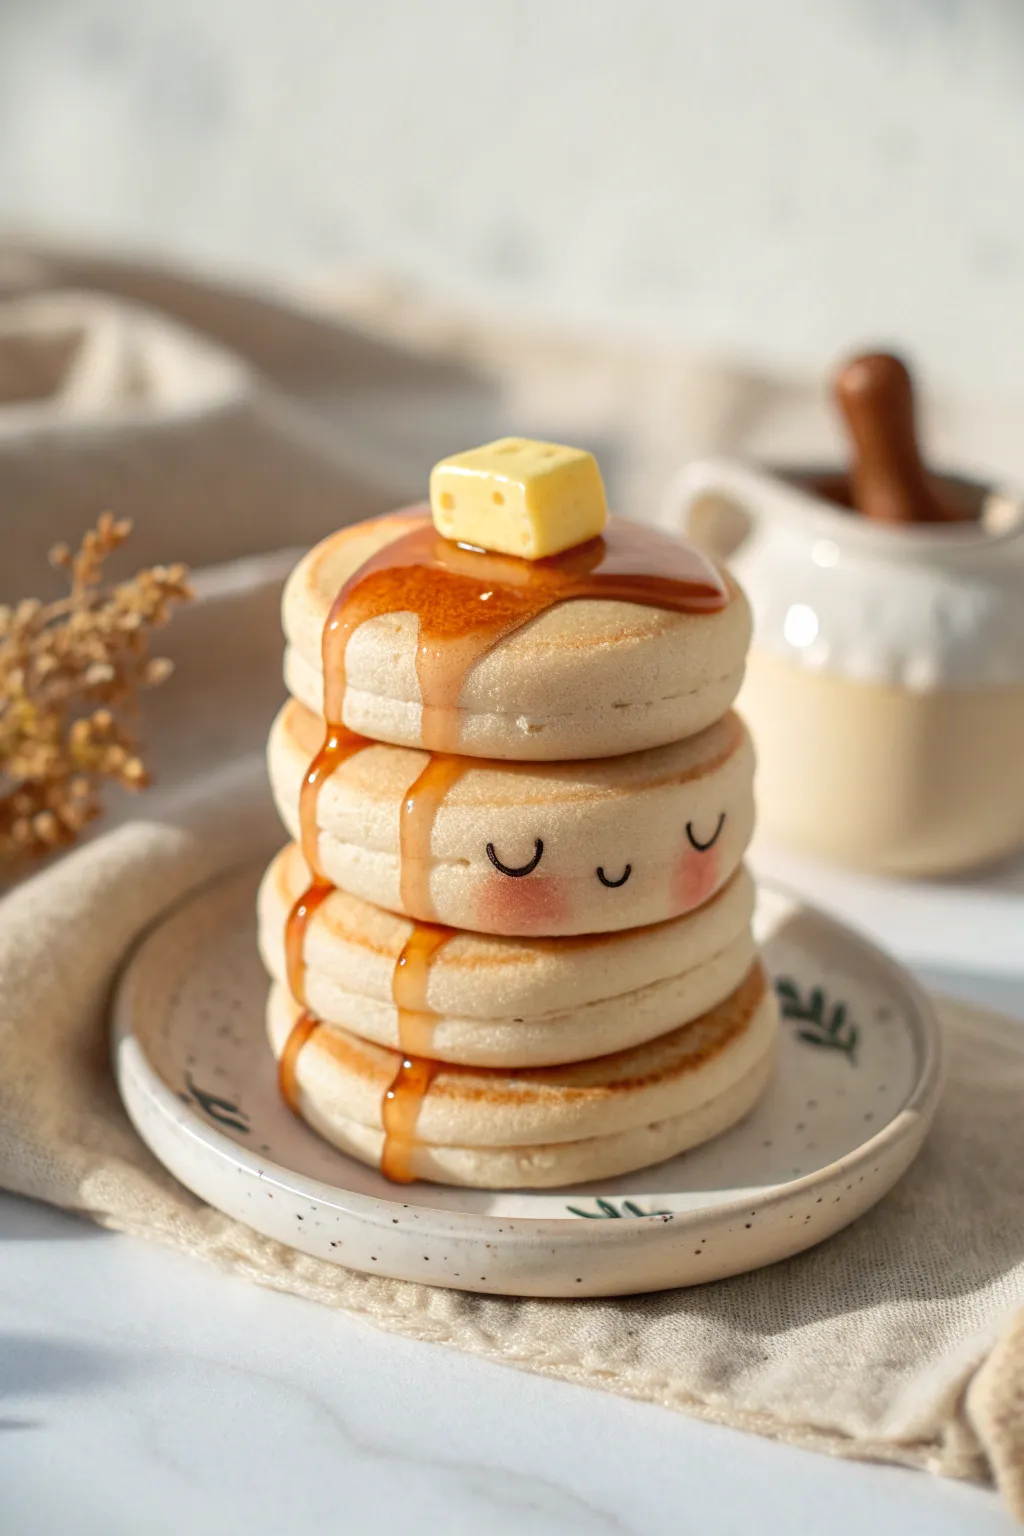
Create a breakfast treat that looks good enough to eat with this adorable air dry clay pancake stack. Featuring fluffy layers, a glossy syrup drizzle, and a charming little face, this project is the perfect introduction to making realistic faux food.
How-To Guide
Materials
- White air dry clay
- Acrylic paints (honey yellow, warm brown, burnt umber, white, black, light pink)
- Glossy varnish or UV resin
- Rolling pin
- Round cookie cutter (approx. 2-inch diameter)
- Old toothbrush or stiff bristle brush
- Paintbrushes (flat brush and fine detail brush)
- Sandpaper (fine grit)
- Craft glue or clay slip
- Soft pastel chalks (optional, for shading)
Step 1: Shaping the Pancakes
-
Color the clay:
Start by mixing a very small amount of honey yellow and a tiny touch of warm brown acrylic paint into a large ball of white air dry clay. You want a pale, raw batter color, not a cooked color yet. -
Roll out the dough:
Roll your colored clay out until it is about 1/2 inch thick. These ‘soufflé’ style pancakes need to be quite thick to look fluffy. -
Cut the shapes:
Use your round cookie cutter to punch out four identical circles. If the edges are too sharp, gently tap them with your finger to round them off slightly. -
Texture the sides:
Take an old toothbrush and firmly tap it all around the vertical sides of each pancake disc. This mimics the airy texture of a fluffy sponge cake. -
Prepare the butter:
Mix a little more yellow into a small piece of leftover clay to create a butter color. Shape this into a small, slightly melted cube by softening the corners.
Step 2: Assembly & Shading
-
Stack and glue:
Stack your four pancakes on top of each other. Apply a small dab of craft glue or water between layers to secure them, but don’t press down too hard or you’ll lose the height. -
Adjust the stack:
While the glue is wet, gently nudge the pancakes so they aren’t perfectly aligned. A slightly imperfect stack looks much more natural and playful. -
Let it dry:
Allow the stack to dry completely. For a shape this thick, I suggest waiting 24-48 hours to ensure the center is solid. -
Shade the cooked areas:
Using a dry brush technique or soft pastel chalks, gently dust the top and bottom edges of each pancake with a warm golden-brown color. This creates that perfect golden-fried look. -
Add blush:
On the second pancake from the top, use a soft brush to dab two circles of light pink paint or pastel dust for the rosy cheeks. -
Paint the face:
Using your finest detail brush and black acrylic paint, carefully draw two U-shapes for closed, happy eyes and a small U-shape for the smile between the pink cheeks.
Fixing “Fake” Texture
If the toothbrush texture looks too sharp or spiky, gently dab the surface with a damp finger or sponge to soften the peaks back into a spongy look.
Step 3: The Syrup Finish
-
Create the syrup mixture:
Mix glossy varnish (or UV resin) with a drop of burnt umber and clear orange paint. It should be translucent but rich in color, like maple syrup. -
Position the butter:
Glue your clay butter square to the center of the top pancake. -
The first drizzle:
Carefully pour or brush a pool of your syrup mixture onto the top pancake, letting it pool around the butter. -
Create the drips:
Using a toothpick or small tool, guide the syrup over the edge so it runs down the sides. Create uneven drips—some long, some short—stopping just before they hit the plate on the bottom layer. -
Add a final coat:
Once the syrup is dry (or cured if using resin), the rest of the clay will look matte in comparison. You can leave it for contrast or add a very light matte varnish to protect the clay parts.
Berry Toppings
Make tiny blueberries or strawberry slices out of clay and glue them onto the plate or top of the stack before adding your syrup layer.
Display your sweet creation on a miniature plate to complete the illusion
Mini Milk Carton Characters
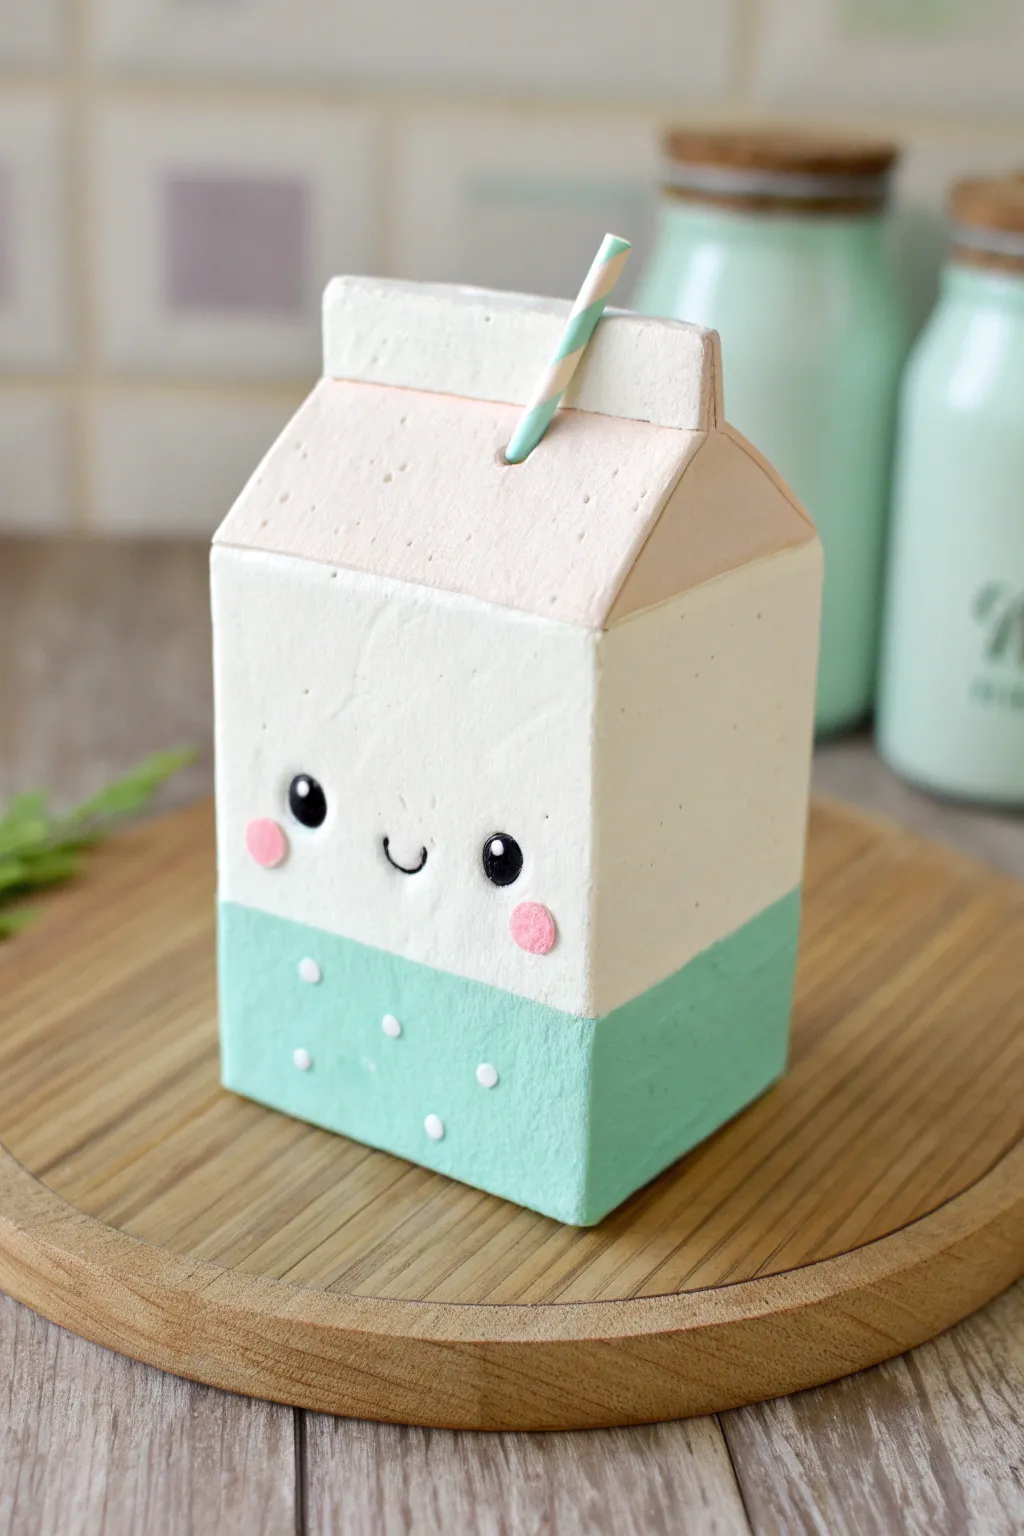
This adorable mini milk carton brings a touch of sweetness to any desk or shelf with its soft pastel colors and charming smile. The blocky shape is surprisingly easy to sculpt, making it a perfect project for beginners wanting to practice clean lines and simple textures.
Detailed Instructions
Materials
- White air dry clay
- Rolling pin
- Clay cutting tool or craft knife
- Ruler
- Acrylic paints (Mint Green, Black, Pink, White)
- Fine detail paintbrush
- Flat shader paintbrush
- Toothpick or needle tool
- Small piece of paper straw (striped)
Step 1: Sculpting the Base Form
-
Prepare the Clay:
Start by conditioning a substantial chunk of white air dry clay until it is smooth and pliable. You want to eliminate any cracks before shaping. -
Shape a Block:
Form the clay into a tall rectangular prism. You can do this by gently tapping the sides of the clay ball against your work surface to flatten them. -
Sharpen the Edges:
Use a ruler or a flat tool to press against the sides, ensuring the walls are straight and the corners are relatively sharp. The body should look like a square column. -
Create the Roof Slant:
Pinch the top two parallel edges of your block gently towards the center to create the slanted ‘roof’ characteristic of a milk carton. -
Form the Top Ridge:
Flatten the very top ridge where the two slanted sides meet so it stands up vertically, about half a centimeter high. -
Add Side Creases:
On the triangular sides of the top, use your thumb to press a gentle indentation inward, mimicking how a cardboard carton folds. -
Insert the Straw:
Cut a small segment of a paper straw (about 2 inches long). Push it gently into the slanted roof of the clay while it’s still wet to create the hole, then remove it for drying. -
Dry Completely:
Let the sculpture dry for 24-48 hours. I find that rotating it occasionally helps it dry evenly without warping.
Cracking Up?
If small cracks appear as the clay dries, mix a tiny bit of fresh clay with water to make a paste (slip) and smooth it over the cracks with your finger.
Step 2: Painting and Details
-
Base Coat (Optional):
If your clay dried off-white, you might want to paint the entire piece with a layer of white acrylic paint for a crisp finish. -
Mark the Color Line:
Lightly trace a horizontal line around the bottom third of the carton using a pencil. This will guide your mint green section. -
Paint the Bottom:
Using a flat brush, carefully paint the bottom section with mint green acrylic paint. You may need two coats for opaque coverage. -
Add Polka Dots:
Dip the back end of a paintbrush into white paint and dot it onto the green section to create a random polka dot pattern. -
Paint the Top Details:
Mix a very pale pink or peach color and paint the slanted roof section, leaving the vertical ridge white. -
Add the Face:
Using a fine detail brush or a dotting tool, paint two small black circles for eyes in the center of the white section. -
Create the Smile:
With the very tip of your finest brush or a black fine-liner pen, draw a tiny ‘U’ shape between the eyes for the mouth. -
Rosy Cheeks:
Cut two tiny circles from pink felt or simply paint small pink circles underneath the eyes for a blushing look. -
Final Assembly:
Once all paint is dry, add a dab of strongest glue to the end of your paper straw and re-insert it into the hole you made earlier.
Make It functional
Before drying, use a large marker to create a deep hole in the center instead of a solid block. Now you have a pencil holder for your real desk supplies.
Now you have a sweet little dairy friend to keep you company while you work or study
Kawaii Mushroom Sprout Friends
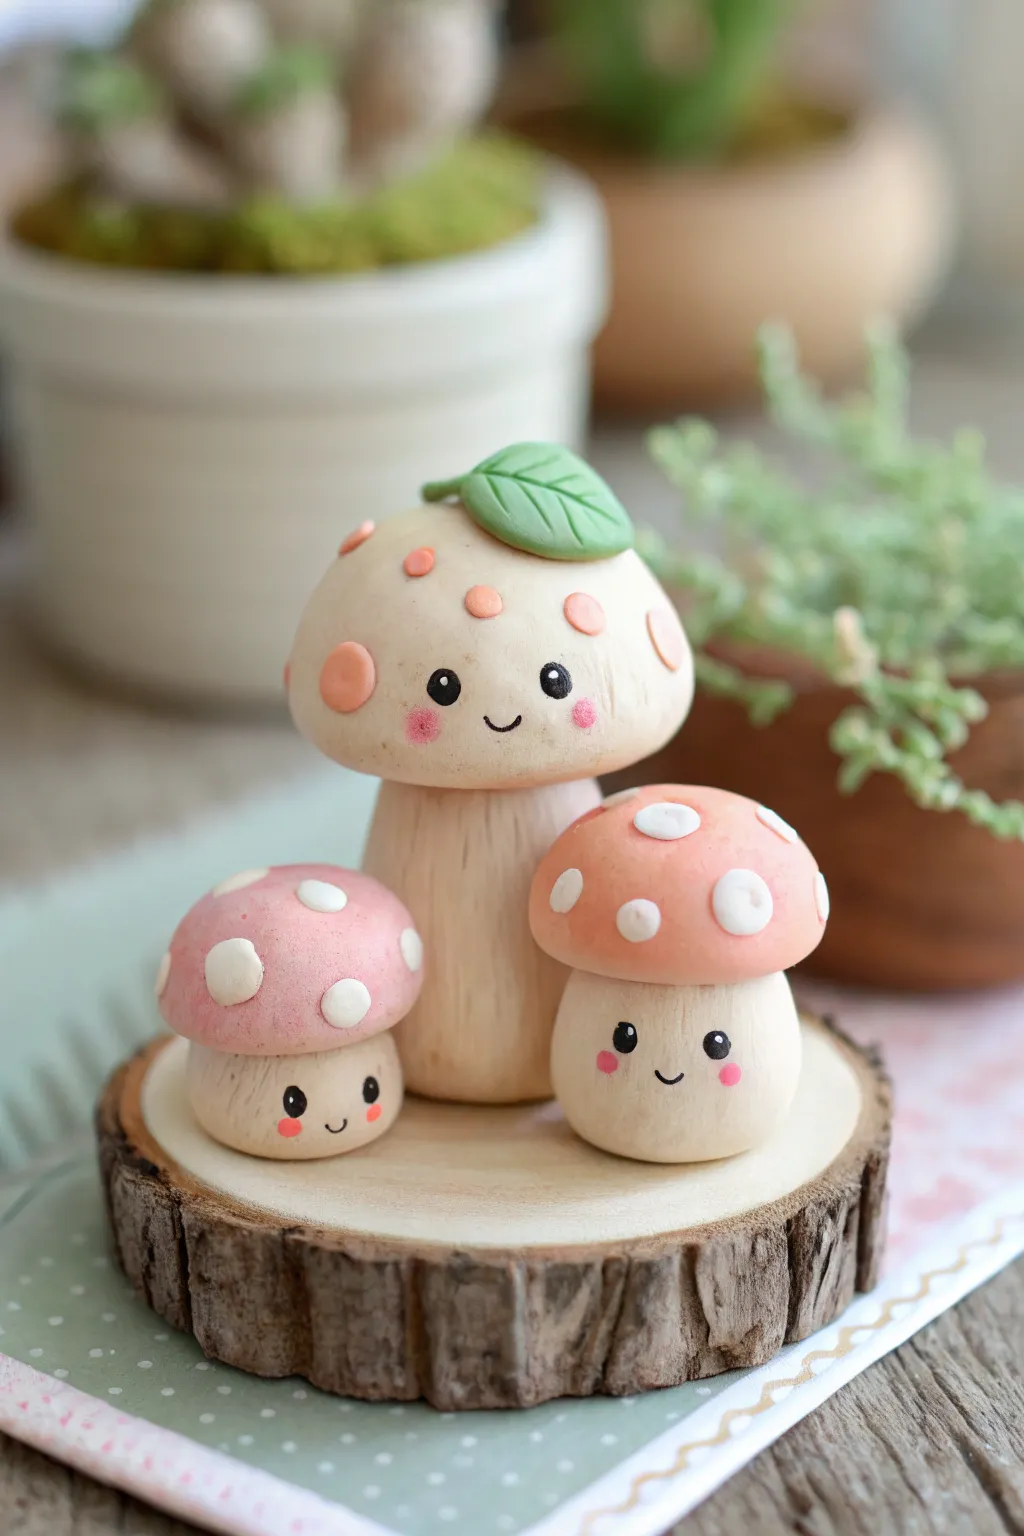
Create a charming little family of fungi with this easy air-dry clay project. These smiling mushroom sprouts feature soft pastel caps and adorable faces, making them perfect desk companions or tiny shelf decorations.
Step-by-Step
Materials
- White air-dry clay
- Acrylic paints (beige, peachy-pink, white, black, moss green)
- Small rolling pin
- Modeling tools (or toothpicks/plastic knife)
- Small detail paintbrush
- Ball stylus tool
- Water in a small cup
- Small wood slice base (optional)
- Sandpaper (fine grit)
- Matte varnish or sealant
Step 1: Sculpting the Large Mushroom
-
Form the Stem:
Start with a medium ball of clay and roll it into a thick cylinder. Gently taper the top so it’s slightly narrower than the base to create a sturdy stalk for the largest mushroom. -
Texture the Stalk:
Take a plastic knife or a needle tool and lightly score vertical lines up and down the stem. This subtle texture mimics real mushroom stalks and adds a nice organic touch. -
Shape the Cap:
Roll a slightly larger ball of clay and flatten the bottom against your palm to create a dome shape. Gently curve the edges downward to form the mushroom cap. -
Add the Sprout:
Shape a tiny pinch of clay into a small leaf. Press a line down the center for the vein, then attach it to the very top of the mushroom cap using a dab of water to secure it. -
Attach Cap to Stem:
Score the top of the stem and the underside of the cap (scratch hatching marks). Apply a little water slip and press the pieces together firmly, smoothing the seam if necessary.
Smooth Operator
Before drying, dip your finger in a little water and gently rub the clay surface. This acts like ‘liquid sandpaper’ to remove fingerprints and bumps.
Step 2: Creating the Smaller Pair
-
Form Small Stems:
Roll two smaller balls of clay into short, stout cylinders. These will be the bodies for the little side mushrooms. Keep them smooth and rounded like marshmallows. -
Shape Small Caps:
Create two small dome shapes, slightly wider than the stems you just made. These will sit lower on the stalk, like classic button mushrooms. -
Assemble the Little Ones:
Secure the small caps onto their respective stems using the scratch-and-slip method. Ensure they are centered and balanced so they can stand on their own. -
Drying Time:
Set all three mushrooms aside to dry completely. Depending on your humidity and clay brand, this usually takes 24-48 hours. Rotate them occasionally so the bottoms dry evenly.
Step 3: Painting and Details
-
Base Coat:
Paint the large mushroom cap a soft, creamy beige. For the two smaller caps, mix a lovely salmon-pink color. Paint the stems and the large mushroom’s sprout with white or very pale beige. -
Adding Spots:
Once the base coats are dry, add the polka dots. Use the salmon-pink paint for spots on the large beige cap. For the small pink caps, paint the spots pure white. -
Painting the Sprout:
Carefully paint the leaf on top of the large mushroom with a soft sage or moss green color. -
Drawing the Eyes:
Using a very fine detail brush or a black paint pen, draw small black circles for eyes on the stems (for the small ones) or the cap (for the big one). Add tiny white highlights inside the eyes for life. -
Sweet Smiles:
Paint a tiny, thin ‘u’ shape between the eyes for a smile. I find using a toothpick dipped in black paint gives me more control than a brush for this delicate line. -
Rosy Cheeks:
Dilute a tiny bit of pink paint with water or use a dry brush technique to dab soft, rosy cheeks right under the eyes of each mushroom friend.
Cracked Clay?
If small cracks appear as the mushrooms dry, mix a tiny bit of fresh clay with water to make a paste and fill the cracks, then sand smooth once dry.
Step 4: Final Assembly
-
Seal the Work:
Apply a coat of matte varnish to protect your paint job. This keeps that soft, natural clay look while preventing the paint from chipping. -
Create the Display:
Arrange your trio on a small wood slice. You can glue them down for a permanent display or keep them loose to rearrange them whenever you like.
Now you have a trio of forest friends ready to brighten up any corner of your room
Kawaii Flower Face Pins
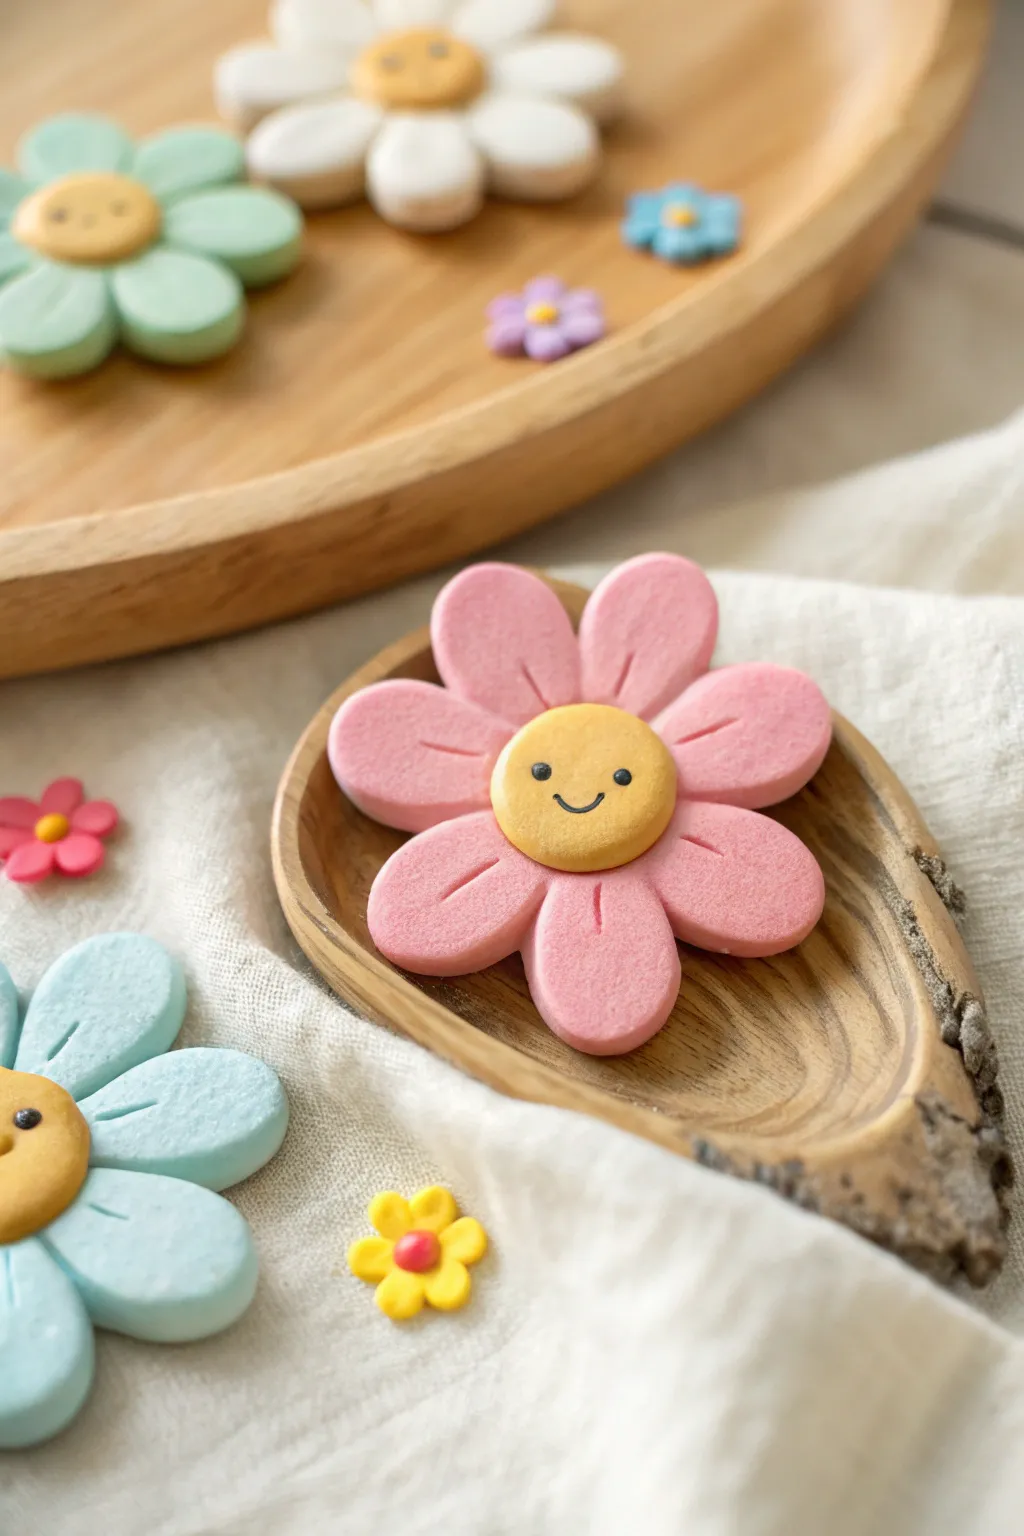
These adorable smiley-face daisies are the perfect introduction to working with air-dry clay. With their soft matte finish and cheerful expressions, they make sweet little gifts or backpack pins that are sure to brighten anyone’s day.
Step-by-Step Tutorial
Materials
- Lightweight air-dry clay (pink, yellow, light blue, white)
- Clay sculpting tools (or a toothpick)
- Black acrylic paint or extra-fine black marker
- Rolling pin
- Small teardrop cutter (optional)
- Strong craft glue
- Pin backings
- Matte sealant spray (optional)
Step 1: Shaping the Petals
-
Prepare the pink clay:
Start by taking a chunk of pink air-dry clay and kneading it until it is soft, pliable, and free of cracks. -
Make equal portions:
Divide the pink clay into seven or eight small, equal-sized balls. Try to make them about the size of a large pea or small marble. -
Form the teardrops:
Roll each ball between your palms to smooth it, then pinch one end slightly to create a chubby teardrop shape. -
Flatten gently:
Press each teardrop down gently onto your work surface using your thumb. You want them to be flat but still have a nice, pillowy thickness—about 1/4 inch thick is ideal. -
Detail the center:
Using a clay tool or the side of a toothpick, press a gentle indentation down the center of each petal. Start from the wide outer edge and stop about halfway down toward the pointed end.
Pro Tip: Consistent Thickness
Use two craft sticks or playing cards as depth guides on either side of your clay when flattening petals to ensure they are all exactly the same height.
Step 2: Creating the Face
-
Mix the yellow center:
Take a piece of yellow clay slightly larger than your petal balls. Roll it into a perfect sphere. -
Flatten the center:
Press the yellow ball flat into a disc. It should be large enough to overlap the inner tips of all your petals. -
Arrange the flower:
Arrange your pink petals in a circle with the pointed ends touching in the middle. Place the yellow disc directly on top of the center point where all petals meet. -
Secure the bond:
Gently press the yellow center down so it adheres to the pink petals underneath. If the clay feels dry, I usually dab a tiny bit of water on the back of the yellow piece first to act as glue.
Step 3: Adding the Expression
-
Initial drying:
Let the flower sit for about 15-20 minutes. It doesn’t need to be fully hard, but drying the surface slightly prevents the marker from bleeding or the clay from denting. -
Draw the eyes:
Using a fine-tip black marker or a dotting tool dipped in black paint, place two small, wide-set dots on the yellow center for the eyes. -
Add the smile:
carefully draw a small, U-shaped smile right between and slightly below the eyes. -
Full cure time:
Allow the entire flower to dry completely according to your clay package’s instructions looking for a full 24 hours usually yields the best strength. -
Seal it up:
Once fully dry, you can spray a light coat of matte sealant over the flower to protect the face and clay texture. -
Attach the pin:
Flip the hardened flower over and use strong craft glue to attach a metal pin backing to the center.
Troubleshooting: Cracking Clay
If you see tiny hairline cracks forming while shaping, your clay is too dry. Dip your finger in water and smooth it over the crack immediately to seal it.
Once the pin backing is secure, your cheerful daisy is ready to be worn on a denim jacket or school bag
Kawaii Rainbow With Puffy Clouds
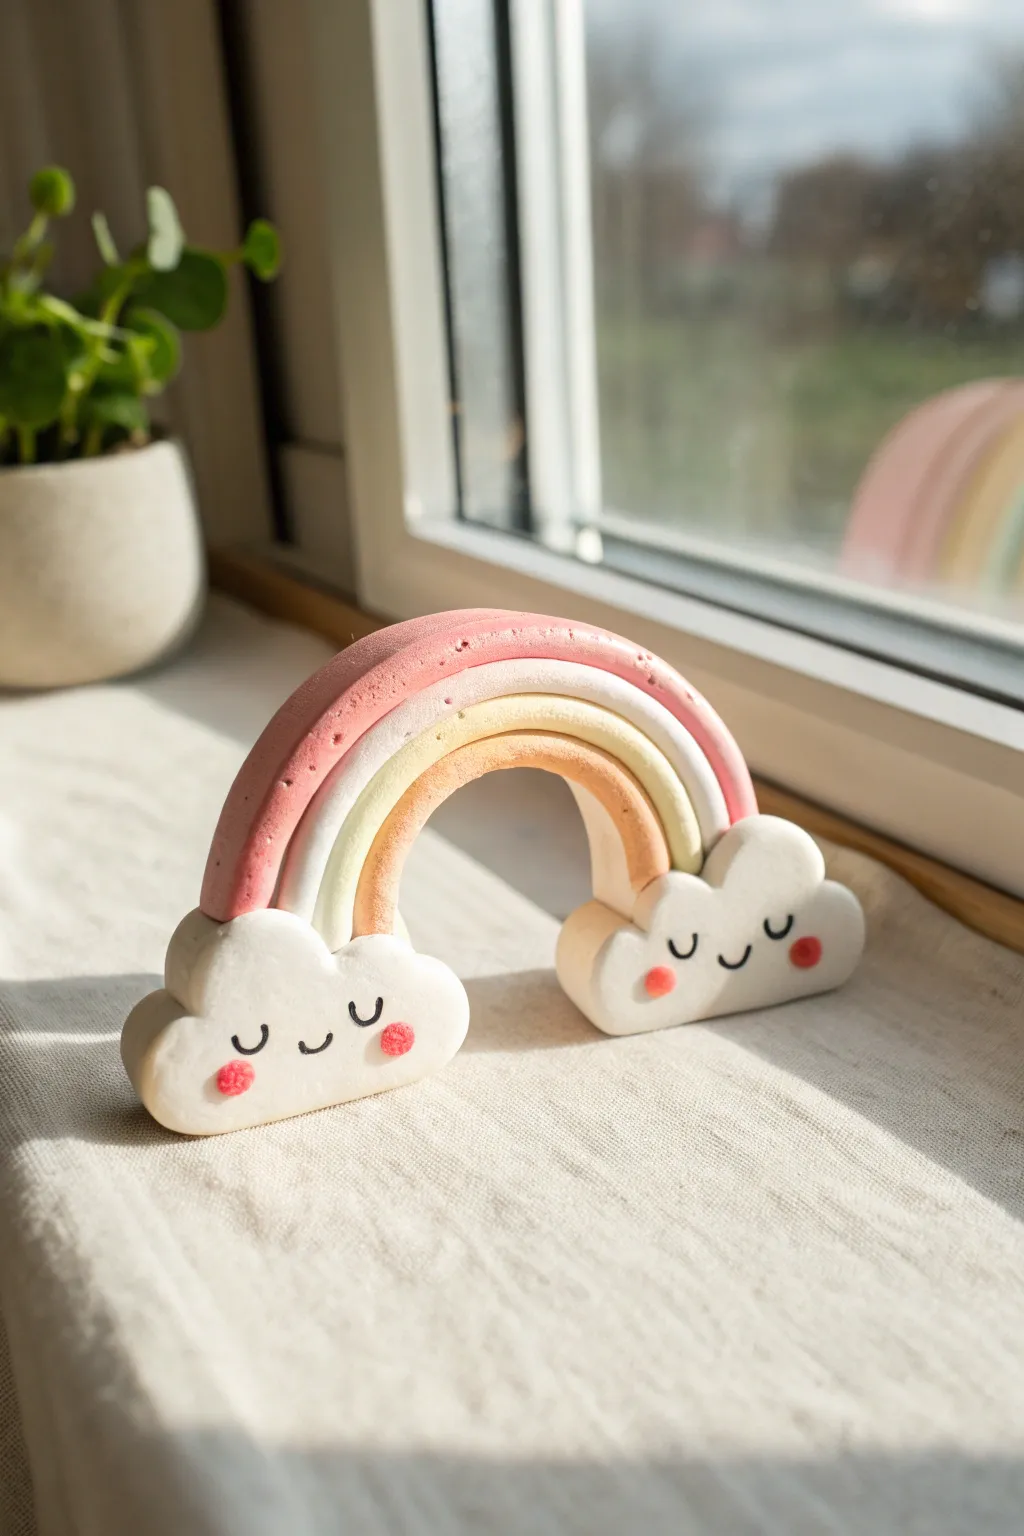
Brighten up any windowsill with this adorable pastel rainbow arching between two happy little clouds. The soft, matte finish of air dry clay gives it a marshmallow-like texture that’s perfectly kawaii.
Detailed Instructions
Materials
- White marshmallow-style or lightweight air dry clay
- Air dry clay in pastel pink, yellow, and orange (or acrylic paints to color white clay)
- Black acrylic paint or a fine-tip permanent marker
- Pink acrylic paint or a pink marker
- Small rolling pin
- Clay knife or plastic cutting tool
- Water for smoothing
- Dotting tool or toothpick
Step 1: Forming the Rainbow Arches
-
Prepare your colors:
If you don’t have pre-colored clay, take three balls of white clay and knead in a small drop of acrylic paint into each one until you have soft pastel shades of pink, yellow, and orange. -
Roll the first snake:
Take the pastel pink clay and roll it into a long, even snake on a clean surface. It should be about half an inch thick. -
Create the middle layer:
Repeat the process with the pastel yellow clay, rolling it slightly shorter but keeping the same thickness as the pink strand. -
Roll the inner arch:
Roll out the pastel orange clay for the smallest arch. It helps to lay them next to each other as you work to check the sizing. -
Assembling the rainbow:
Curve the orange snake into a ‘U’ shape. Gently press the yellow snake over it, followed by the pink snake on top. Use a tiny bit of water between the layers to help them stick together without smashing the round shape. -
Trim the ends:
Once your three arches are stacked and stuck together, use your clay knife to cut the bottom ends straight across so the rainbow stands flush.
Cracking Clay?
If you see small cracks forming as the rainbow dries, dip your finger in water and smooth a tiny bit of fresh clay into the gap to patch it instantly.
Step 2: Creating the Cloud Bases
-
Shape the cloud bulk:
Take two generous chunks of white clay. Roll them into smooth balls, then flatten them slightly into thick oval shapes. -
Add puffy details:
To make them look like clouds, pinch and pull softly at the edges to create rounded bumps, or attach very small balls of clay to the perimeter and blend the seams smooth with your finger. -
Check the fit:
Before attaching anything, stand your rainbow up and place a cloud on each side to ensure they are big enough to support the arch. -
Attach the rainbow:
Press the flat, cut ends of your rainbow firmly into the tops of the white clouds. You might need to make a small indentation in the clouds first to seat the rainbow securely. -
Secure the seam:
I like to take a tiny bit of water or liquid clay (slip) and smooth the joint where the rainbow meets the cloud so it doesn’t wobble later.
Make it Sparkle
Before the white cloud clay dries, brush on a tiny amount of iridescent glitter powder. It gives the clouds a magical, shimmer effect in the sunlight.
Step 3: Adding the Kawaii Faces
-
Let it dry completely:
Wait for the clay to fully harden. Since these are thick pieces, it might take 24-48 hours depending on your humidity. -
Paint the eyes:
Using a very fine brush with black paint or a marker, draw two small ‘U’ shapes for sleeping eyes on each cloud face. -
Add a smile:
Paint a tiny, simple curve between the eyes for a happy little mouth. -
Create rosy cheeks:
Dip a dotting tool or the non-brush end of a paintbrush into pink paint and stamp two round circles onto the cheeks of each cloud.
Now you have a sweet little sculpture to bring good vibes to your desk or shelf
Kawaii Pencil Topper Monsters
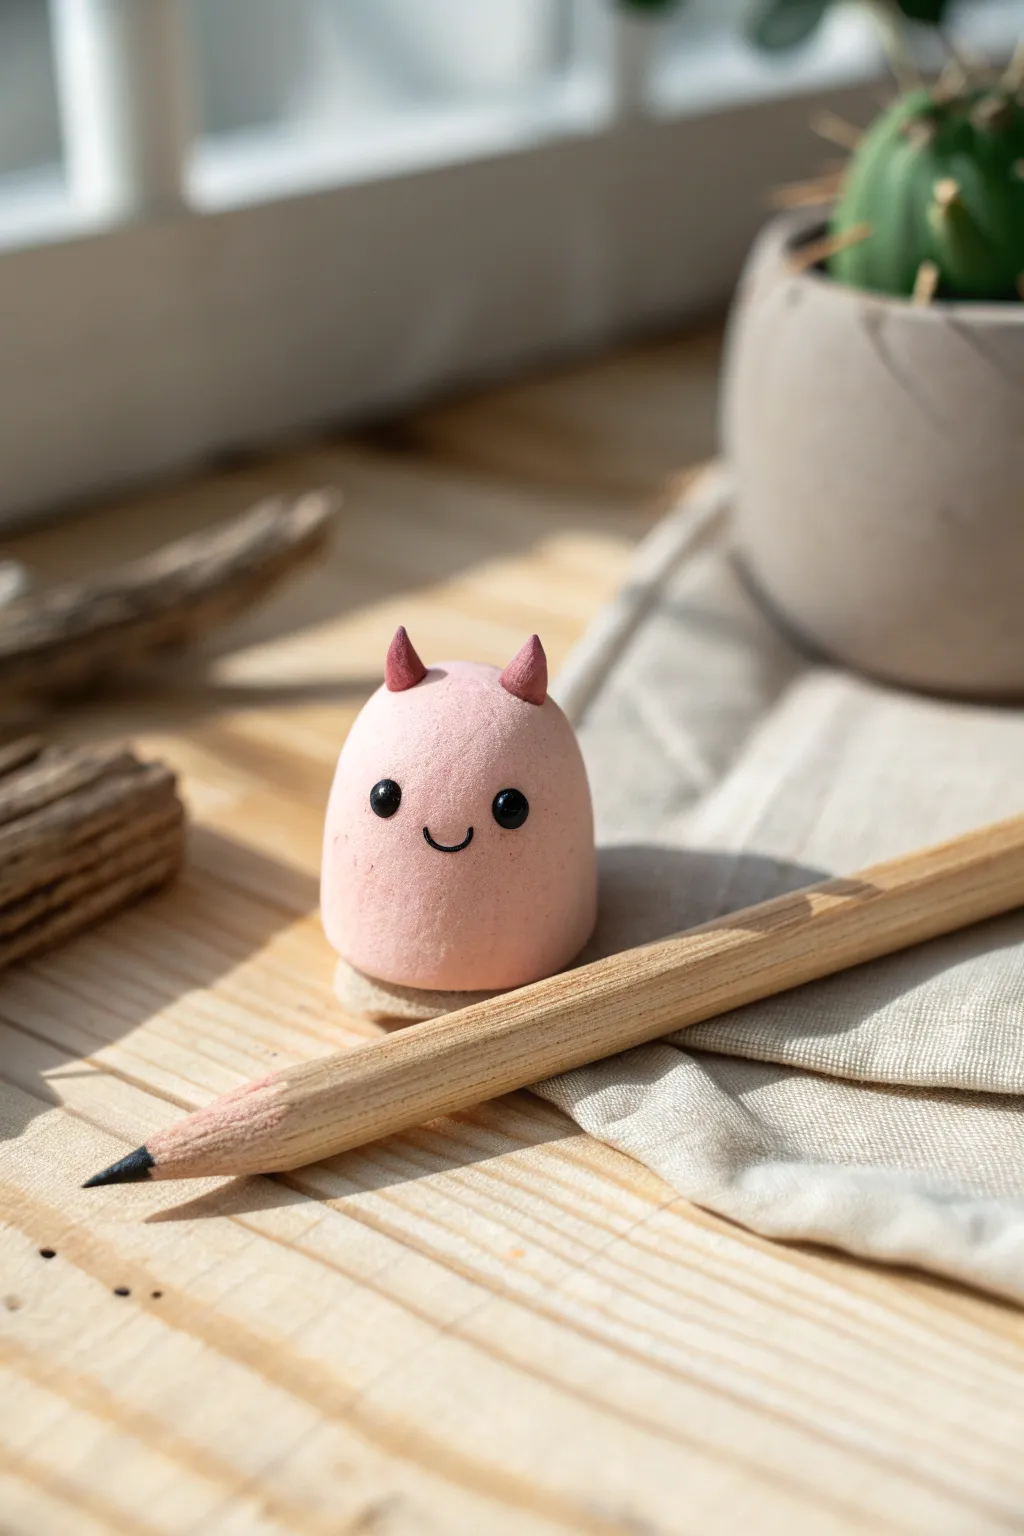
This adorable little desk companion is sure to bring a smile to your face while you work or study. With its soft pink color, tiny devil horns, and sweet expression, it’s the perfect beginner-friendly project to practice simple shapes.
Step-by-Step Tutorial
Materials
- Pink air dry clay (soft pastel shade)
- Darker pink or red air dry clay (small amount for horns)
- Black acrylic paint or black clay
- Fine tip black marker or detail brush
- Pencil (for sizing)
- Small ball tool or toothpick
- Water (for smoothing)
- Clear matte varnish (optional)
Step 1: Shaping the Body
-
Condition the Clay:
Start by taking a walnut-sized amount of your light pink clay. Knead it thoroughly in your hands until it becomes warm, soft, and pliable, which prevents cracks later. -
Roll a Sphere:
Roll the pink clay between your palms to create a perfectly smooth ball. Check for any seams or lines and smooth them out with a dab of water if needed. -
Create the Dome Shape:
Place the ball on your work surface and gently press down to flatten the bottom. Use your fingers to shape the top into a rounded dome, creating a gumdrop silhouette. -
Check Stability:
Make sure the figure sits flat and stable on the table without wobbling. If it’s unsteady, press the base a little firmly against the table surface.
Step 2: Adding the Horns
-
Prepare the Horn Clay:
Take a tiny amount of the darker pink clay. Divide it into two equal, pea-sized portions to ensure symmetrical horns. -
Shape the Cones:
Roll each small piece into a ball, then apply more pressure on one side to taper it into a small, pointy cone shape. -
Position the Horns:
Decide where you want the horns to sit on top of the head. I find placing them slightly wide apart gives a cuter look. -
Attach the Horns:
Press the base of each cone onto the head. Use a small tool or your finger to gently blend the clay at the seam so the horns don’t fall off once dry.
Smooth Seams
To merge the horns seamlessly, create a tiny ‘slip’ by mixing a pinch of clay with water into a paste. Paint this glue onto the connection point before attaching.
Step 3: Creating the Face
-
Mark Eye Placement:
Use a toothpick to make two very faint guide dots where the eyes will go. Keeping them low on the face enhances the kawaii aesthetic. -
Make the Eyes:
Roll two miniscule balls of black clay. If using paint instead, wait for the clay to dry first. Press the black clay gently into your guide spots. -
Flatten the Eyes:
Gently tap the black clay so it sits flush with the face rather than sticking out too much. -
Draw the Smile:
If the clay is wet, use a curved tool to impress a smile. If dry, use your fine tip marker to draw a small, U-shaped mouth right between the eyes.
Cracking Clay?
If you see hairline cracks appearing while the clay dries, smooth a tiny amount of water over the crack immediately to seal it back up.
Step 4: Finishing Touches
-
Base Texture:
If you want the textured base shown in the image, attach a small flattened disc of beige clay to the bottom, leaving the edges rough. -
Smoothing Check:
Look over your little monster for any fingerprints. Dip your finger in water and gently rub them away for a professional finish. -
Drying:
Let your figure dry completely in a cool, dry place for 24-48 hours. Turn it over occasionally so the bottom dries evenly.
Now you have a charming little monster to keep your desk company
Mini Kawaii Pet Houses
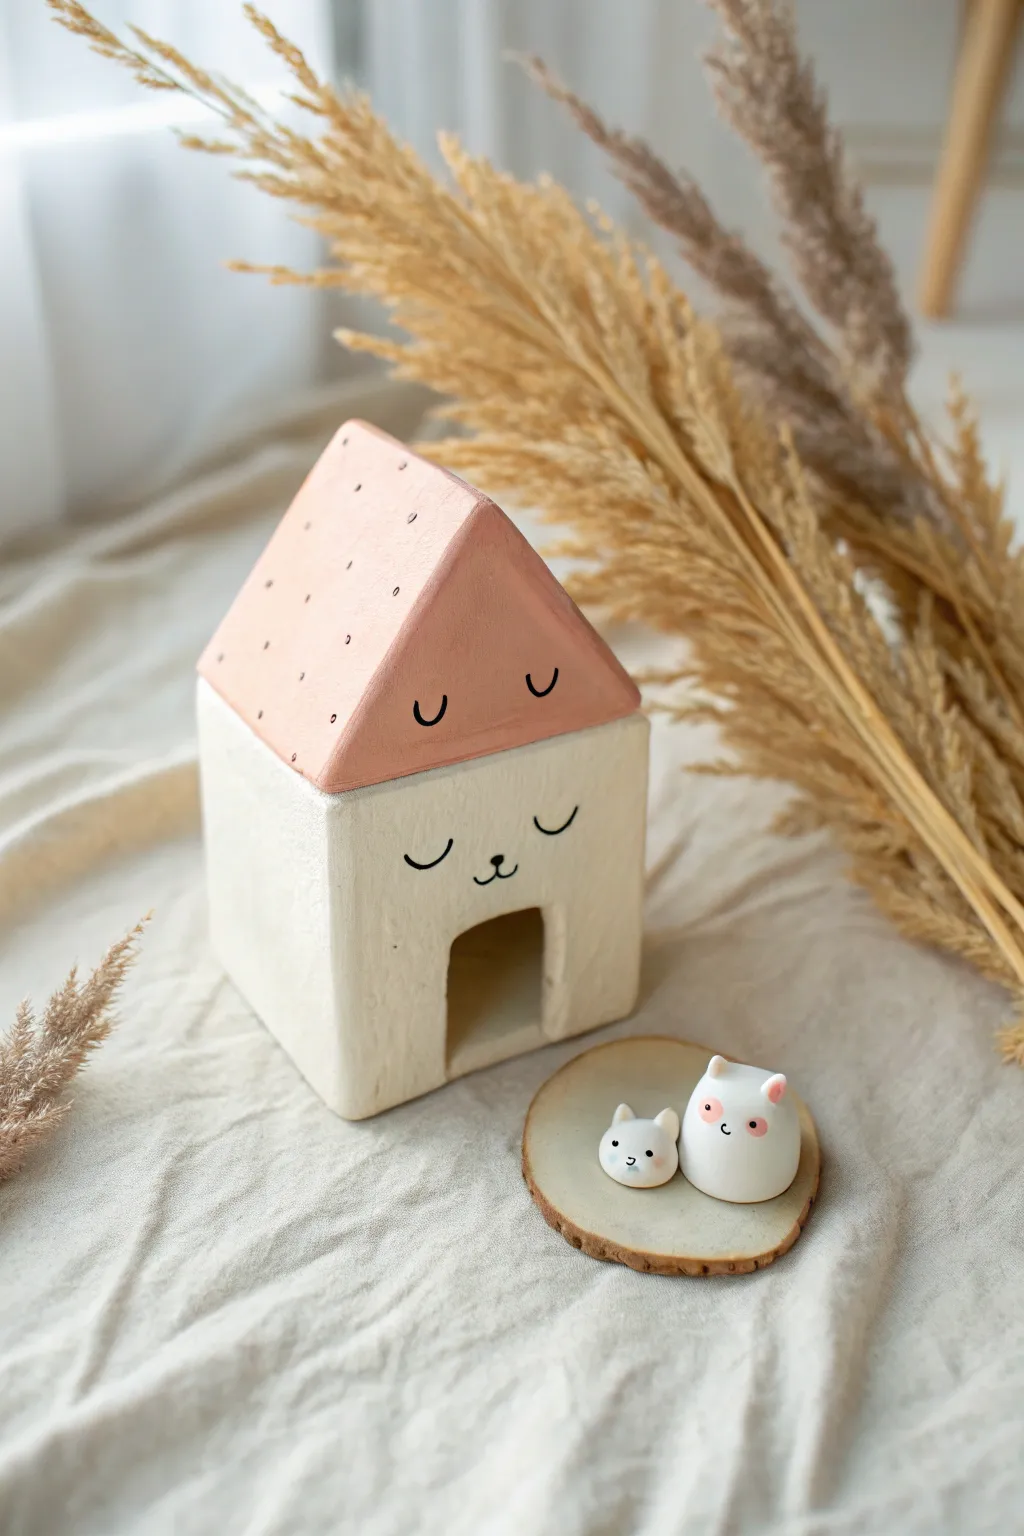
Create a peaceful sanctuary for two tiny clay critters with this adorable house tutorial. The soft pink roof and sleepy facial expression make this a perfect decorative piece for a desk or shelf.
Step-by-Step
Materials
- White cosmetic-grade air dry clay
- Rolling pin
- Clay knife or plastic cutting tool
- Acrylic paints (Soft pink, black, white)
- Fine detail paintbrush (size 0 or 00)
- Small wooden slice (for display)
- Water cup and smoothing sponge
- Ruler
- Sandpaper (fine grit)
Step 1: Building the House Base
-
Roll the clay:
Start by taking a large handful of white air dry clay. Roll it out into a smooth slab that is roughly 1/4 inch thick. Try to keep the thickness consistent so the walls dry evenly. -
Cut the walls:
Using a ruler and your clay knife, cut out four squares for the walls. You will need two squares that are perfect squares (for the sides) and two rectangles that are slightly taller (for the front and back). -
Shape the peaks:
On the two taller rectangular pieces, cut the top edge into a triangle point. This will form the gable where the roof sits. Ensure both peaks are symmetrical. -
Create the doorway:
On one of the peaked wall pieces, cut a small arched doorway at the bottom center. Use a little water on your finger to smooth the raw edges of the arch so it looks inviting. -
Assemble the structure:
Score the edges of your walls (scratch them up a bit) and add a dab of water to act as glue. Press the four walls together to form the house box. Use your finger or a tool to blend the seams on the outside until they disappear. -
Add the roof panels:
Roll out two more slabs of clay for the roof. Measure them against your assembled house to ensure they are long enough to overhang slightly. Attach them to the peaked walls, smoothing the top seam where they meet.
Cracking Up?
If you see cracks forming as the clay dries, mix a tiny bit of fresh clay with water to make a paste (slip). Fill the cracks with this paste and smooth it over with your finger.
Step 2: Refining and Drying
-
Smooth everything out:
Dip your sponge or finger in water and gently rub the entire surface of the house. You want to remove any fingerprints or cracks. I like to spend extra time here because a smooth surface is easier to paint later. -
Create the critters:
While the house sets, roll two small balls of white clay. Shape them into rounded gumdrop shapes. Pinch tiny triangles for ears on top of their heads. -
Dry completely:
Place your house and critters in a safe, dry spot. Depending on your humidity, this could take 24 to 48 hours. Don’t rush this part, or the paint might crack. -
Sand imperfections:
Once fully dry and hard, use fine-grit sandpaper to gently buff away any rough bumps or sharp corners on the house.
Make it a Village
Create a whole neighborhood by making houses in different heights and painting the roofs different pastel colors like mint green or baby blue.
Step 3: Painting and Details
-
Paint the roof:
Mix a soft, muted pink acrylic paint. Carefully paint only the roof section of the house. You might need two coats for opaque coverage. Let it dry between layers. -
Draw roof details:
Using a very fine brush or a black paint pen, add small dots scattered across the pink roof for texture. Paint two “U” shapes directly on the front pink gable to represent sleeping eyes. -
Paint the house face:
On the white wall below the roof, paint two larger sleepy eyes and a tiny nose and mouth. The expression should look peaceful and symmetrical. -
Detail the critters:
Paint tiny pink spots for cheeks on the larger critter. Use black paint to add simple dots for eyes and tiny mouths on both figures. -
Final assembly:
Place your tiny critters on the small wooden slice, creating a little ‘front yard’ for the house, or tuck them inside the doorway if they fit.
Enjoy your charming little clay scene on a sunny windowsill
Kawaii Surprise Box Figurines
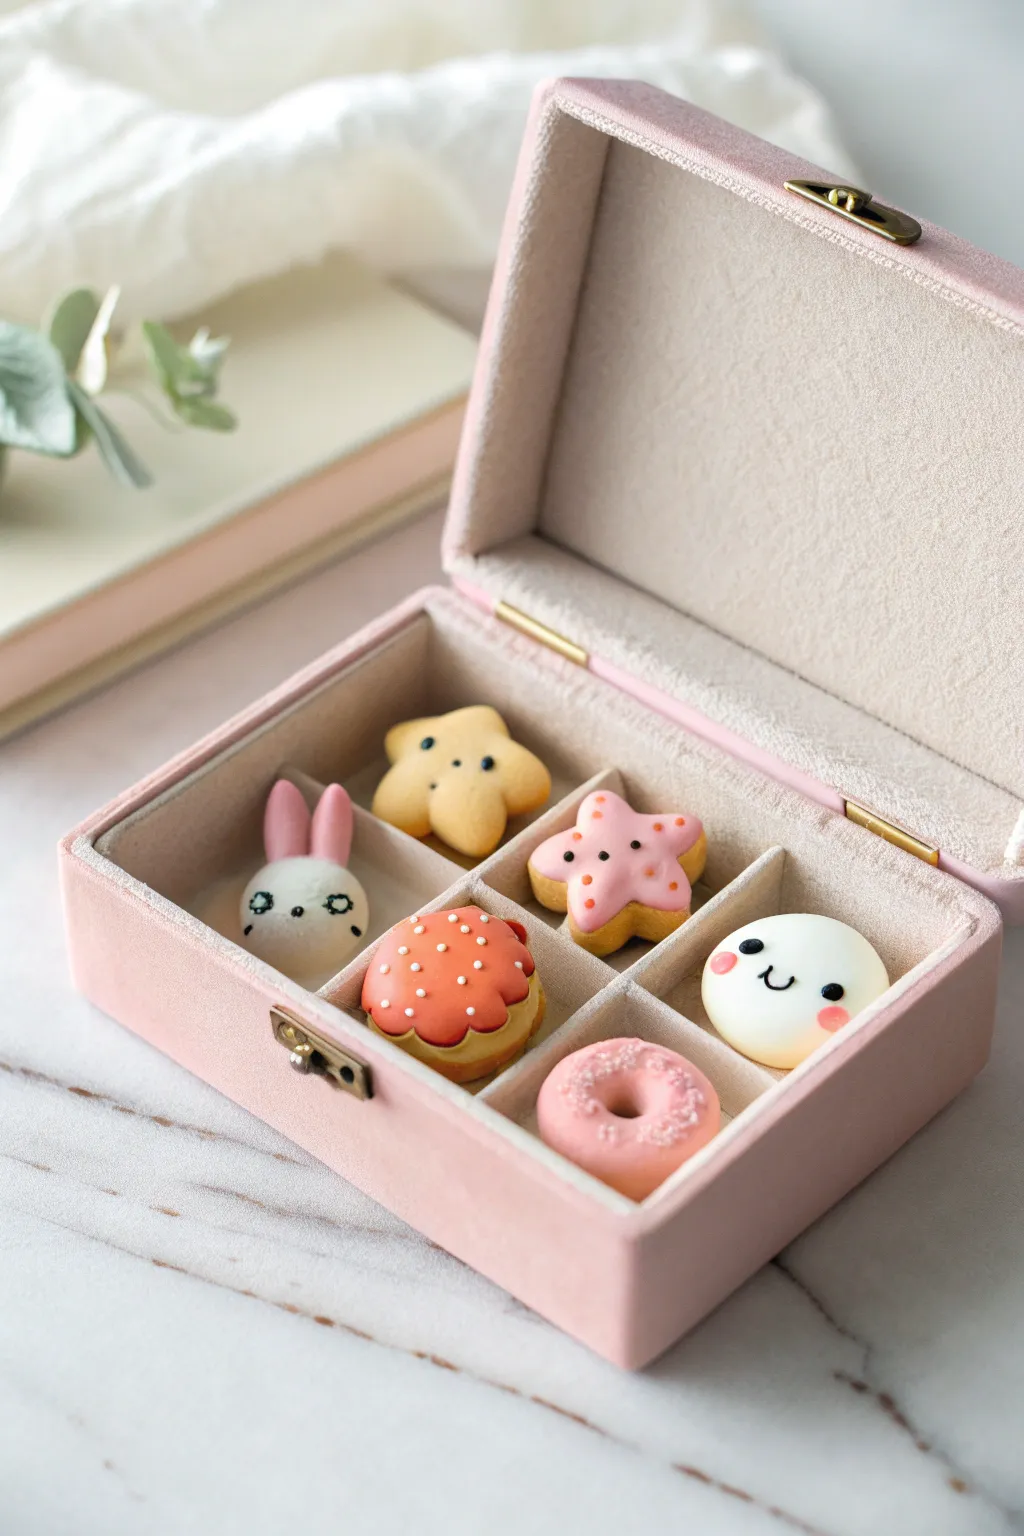
Transform a simple jewelry box into a delightful display case with these tiny kawaii figurines. This project combines six distinct adorable shapes—from a blushing bunny to a sprinkled donut—perfect for practicing precise miniature sculpting.
Step-by-Step Tutorial
Materials
- Air dry clay (white)
- Acrylic paints (pink, pastel yellow, orange, black, white)
- Fine-point paintbrush or dotting tool
- Glossy varnish or clear nail polish
- Small pink jewelry box with compartments
- Modeling tools (ball tool, needle tool)
- Toothpick
- Gorilla glue or strong craft glue (optional for securing)
Step 1: The Doughy Duo: Smiley & Bunny
-
Form the base shapes:
Roll two smooth balls of white clay, roughly the size of a large marble, ensuring they fit comfortably into the box compartments. -
Sculpt the bunny ears:
For the bunny, roll two small teardrop shapes from white clay and flatten them slightly. Press them gently onto the top of one head, smoothing the seam with a little water. -
Paint facial details:
Once the clay is touch-dry, use a fine brush to paint pink insides on the bunny ears and two rosy cheeks on both figures. Add simple black eyes and mouths; give the bunny wide, starry eyes for extra cuteness.
Step 2: Sweet Treats: Donut & Mushroom
-
Create the donut base:
Mix a tiny amount of pink paint into white clay to create a pastel pink shade. Roll a ball, flatten it into a thick disc, and use the back of a paintbrush to poke a hole through the center. -
Texture the donut:
While the clay is still wet, gently tap the surface with a tool or toothbrush to mimic a baked texture, then sprinkle tiny bits of white ‘clay sprinkles’ on top. -
Shape the mushroom cap:
Roll a ball of clay and flatten the bottom to create a dome. Paint the top sections orange, leaving a scalloped edge exposed at the bottom to look like the stem or cream filling. -
Add mushroom spots:
Using a dotting tool or toothpick dipped in white paint, meticulously add tiny white dots all over the orange cap for that classic toadstool look.
Cracking Clay?
If your clay cracks while drying, mix a tiny bit of fresh clay with water to make a paste and fill in the gaps. Smooth it over with a wet finger.
Step 3: Starry Sky: Yellow & Pink Stars
-
Mold the star shapes:
Form two thick star shapes. I find it easiest to roll a ball, flatten it, and then pinch out five points with my fingers rather than using a cutter for a puffier look. -
Color the stars:
Paint one star a soft yellow and the other a dusty pink. Let the base coats dry completely before adding details. -
Detail the pink star:
On the pink star, paint five small black dots in a circle at the center, then add little orange freckles or sprinkles on the arms. -
Add faces:
Give the yellow star little black eyes and blush marks to match the other characters in the set.
Make it a Necklace
Before the clay hardens, insert a small metal eye pin into the top of the characters. Once dry, thread a chain through to turn the charms into jewelry.
Step 4: Finishing Touches
-
Seal the figures:
Apply a coat of glossy varnish to the donut and mushroom to make them look glazed. Keep the bunny and stars matte or use a satin finish for a soft texture. -
Arrange the display:
Place each dried figurine into its own compartment in the pink jewelry box. You can glue them down if you want a permanent display, or leave them loose for play.
Close the lid on your tiny collection and enjoy the surprise every time you open it