When I’m craving a project that feels relaxing and instantly satisfying, I reach for soft clay—it’s lightweight, forgiving, and perfect for cute little wins. Here are some of my favorite soft clay art ideas that keep the shapes simple and the results seriously adorable.
Soft Clay Bunny Buddy Figurine
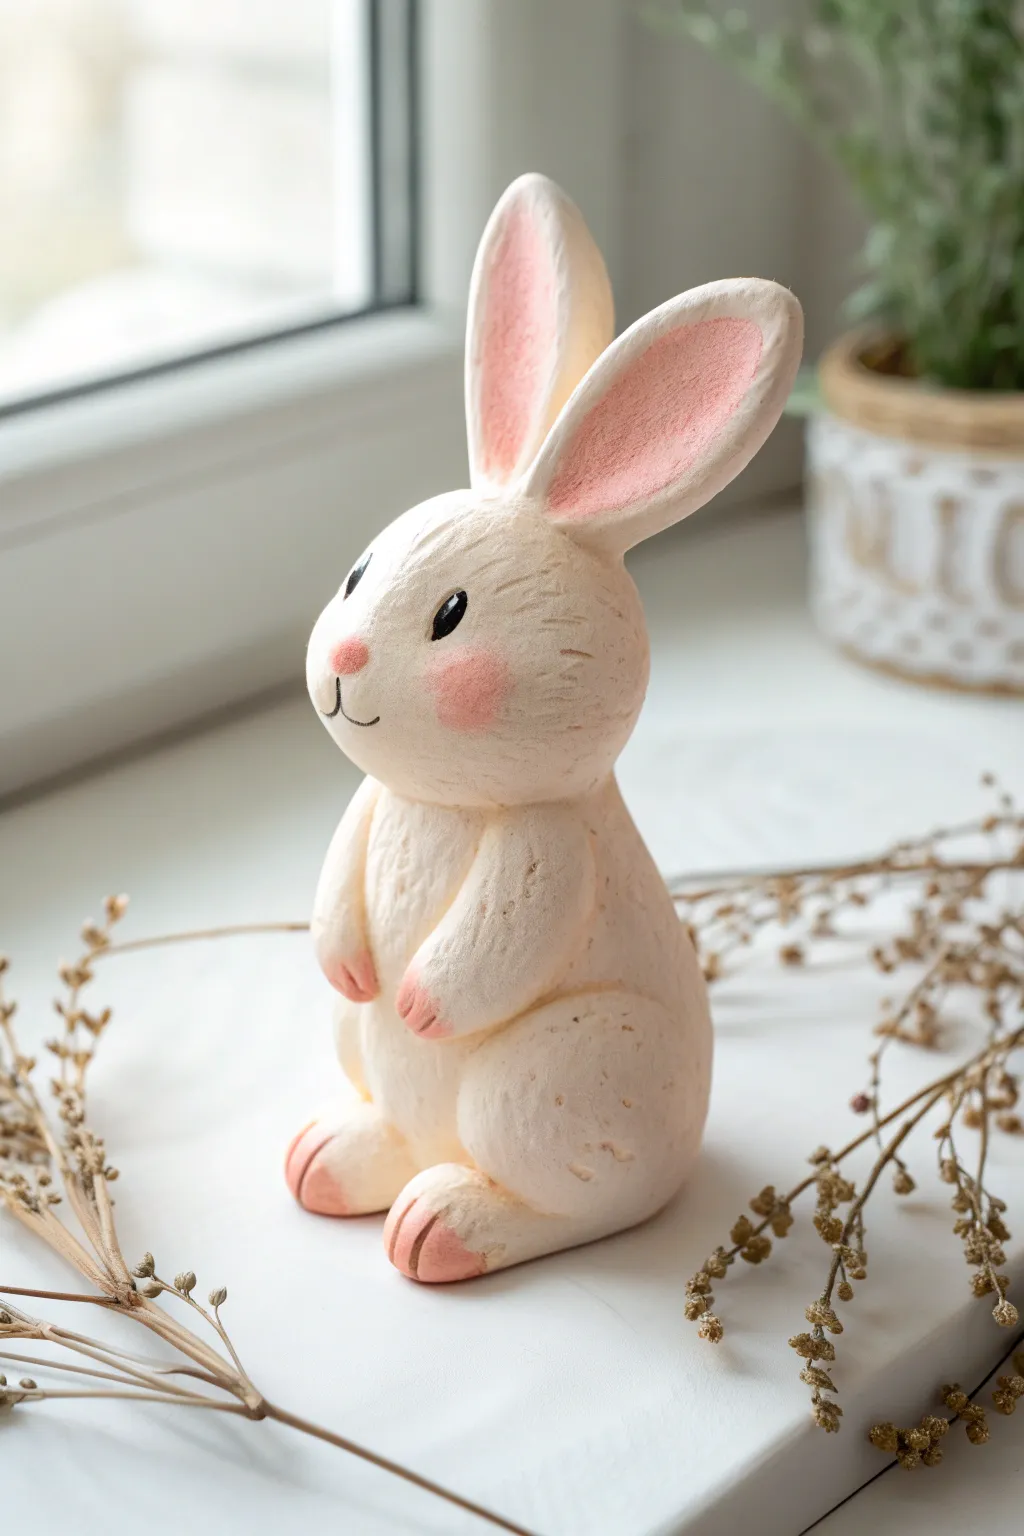
Create this charming, upright bunny figurine that brings a touch of woodland magic to any shelf or window sill. With its soft, textured finish and delicate pink accents, this project perfectly captures the gentle nature of handcrafted clay art.
Step-by-Step Guide
Materials
- White air-dry clay or soft polymer clay (white)
- Acrylic paints: soft pink, black, white
- Sculpting tools: needle tool, ball stylus tool
- Small paintbrush (fine tip)
- Soft cosmetic sponge or blush brush
- Water cup (for smoothing)
- Aluminum foil (optional, for armature)
- Matte varnish (optional)
Step 1: Shaping the Base Form
-
Form the body:
Start with a handful of conditioned white clay. Roll it into a smooth, slightly elongated pear shape. This will serve as the main body and tummy of the bunny. Flatten the bottom gently on your work surface so it stands upright securely. -
Create the head:
Roll a second, slightly smaller ball of clay for the head. Shape it into a soft oval, slightly wider at the bottom to give the bunny chubby cheeks. -
Attach head to body:
Score the top of the body and the bottom of the head with a needle tool to rough up the surfaces. Add a tiny dab of water (or liquid clay if using polymer) and press the head firmly onto the body. Smooth the seam with your finger or a clay tool until the neck transition looks natural. -
Sculpt the legs:
Roll two thick, short logs of clay for the hind legs. Press these against the lower sides of the body, blending the clay at the back so they look integrated rather than just stuck on. The front should remain rounded to suggest the haunch. -
Form the feet:
Shape two smaller ovals for the feet and attach them to the bottom of the hind legs, pointing forward. Use a tool to press three small indentations into the toes for paw details. -
Add the arms:
Roll two smaller sausage shapes for the front paws. Attach them to the upper chest area, curving them slightly inward as if the bunny is holding its tummy. Blend the shoulders into the main body.
Step 2: Ears and Facial Features
-
Make the ears:
Roll two long teardrop shapes for the ears. Flatten them gently with your thumb. Use a sculpting tool or your finger to create a long, shallow depression down the center of each ear. -
Attach the ears:
Score and attach the ears to the top of the head. I like to tilt them slightly backward or to the side to give the bunny a curious expression. Blend the base of the ears smoothly into the skull. -
Refine the face:
Using a small ball tool, press eye sockets gently into the face. Add a tiny triangle of clay for the nose. -
Texturing:
Take a needle tool or a stiff bristled brush and gently scratch short, directional lines all over the body, head, and ears to mimic soft fur. Leave the inside of the ears and the nose smooth.
Cracking Clay?
If you notice small cracks while air-drying, mix a tiny bit of fresh clay with water to make a paste and fill them in immediately before painting.
Step 3: Painting and Finishing
-
Dry properly:
Allow the clay to dry completely according to package instructions (air dry usually takes 24-48 hours; bake polymer clay as directed). -
Paint the ears:
Dilute a small amount of soft pink acrylic paint. Carefully paint the inside depression of the ears. -
Detail the paws and nose:
Use the same soft pink to paint the little nose and the tips of the front paws and toes. Keep the application light and feathery. -
Add the blush:
For the rosy cheeks, use a very dry brush or a small sponge with a tiny amount of pink paint. Dab excess paint onto a paper towel first, then gently stipple color onto the cheeks for a soft, airbrushed look. -
Paint the eyes:
Paint the eyes solid black. Once dry, add a tiny white dot to the upper corner of each eye to create a lifelike glint. -
Draw the mouth:
Use a very fine liner brush or a fine-tip black marker to draw a simple anchor shape beneath the nose for the mouth. -
Seal (optional):
If desired, coat the finished piece with a matte varnish to protect the paint and give the clay a finished, professional porcelain look.
Texturing Tip
Running a crumpled ball of aluminum foil over the wet clay surface creates a lovely, organic fur texture instantly without tedious scratching.
Place your little bunny on a windowsill or desk to enjoy its cheerful company


Soft Clay Teddy Bear Mini

Create a charming, minimalist teddy bear figurine with a smooth, matte finish perfect for desk decor or gifting. This project uses basic soft clay shapes to build a character full of warmth and personality.
Step-by-Step Tutorial
Materials
- Light brown or beige soft air-dry clay (or polymer clay)
- Small amount of dark brown clay (for nose)
- Black acrylic paint or black clay (for eyes)
- Modelling tools (ball tool, needle tool)
- Toothpick or wire for internal support
- Gloss varnish (optional for eyes)
- Small marble coaster (optional for display)
Step 1: Sculpting the Head
-
Base Shape:
Start by conditioning a sphere of beige clay about the size of a walnut. Roll it between your palms until it is perfectly smooth and free of cracks. -
Refining the Face:
Gently press the sphere slightly to flatten the bottom so it can rest on the body later. Keep the overall shape mostly round. -
Ear Placement:
Roll two small pea-sized balls of the same beige clay. Flatten them slightly into thick discs. -
Attaching Ears:
Press the discs onto the top sides of the head. Use a modelling tool or your thumb to smooth the seam at the back of the ear blending it into the head. -
Ear Details:
Use a small ball tool to create round indentations inside each ear to give them depth. -
Adding the Snout:
Create a small, flattened oval of beige clay and press it onto the lower center of the face for the snout area. Smooth the edges so it transitions seamlessly. -
Facial Features:
Take a tiny speck of dark brown clay and roll it into a triangle with rounded corners. Press this onto the top center of the snout for the nose. -
Defining the Mouth:
Use a needle tool or the edge of a clay knife to gently impress a vertical line down from the nose, splitting into an inverted ‘V’ shape for the mouth. -
Creating the Eyes:
Use a small ball tool to make two indentations for the eyes. Insert tiny balls of black clay into these sockets, or wait until dry to paint them with black points.
Step 2: Building the Body
-
Torso Shape:
Roll a slightly larger sphere of beige clay for the body. Shape it into a pear form—wider at the bottom and slightly narrower at the top. -
Adding texture:
If you want the speckled look seen in the photo, you can gently tap the surface with a stiff toothbrush, or knead in some vanilla bean specks if using an edible medium. -
Belly Button:
Press a small hole into the center of the belly using a small ball tool to create a cute navel indentation. -
Forming Legs:
Roll two medium balls of beige clay for the legs. Shape them into short, thick logs rounded at one end. -
Attaching Legs:
Press the legs against the bottom sides of the body so the bear looks like it is sitting with feet pointing forward. -
Forming Arms:
Roll two elongated teardrop shapes for the arms. They should be slightly smaller than the legs. -
Attaching Arms:
Attach the arms to the sides of the shoulders, letting them rest naturally against the sides of the belly. -
Assembly:
Insert a half-length toothpick into the top of the body for stability. Place the head onto the toothpick and press down gently to secure the head to the neck area. -
Final Touches:
Check the balance to ensure the bear sits upright without tipping. Smooth any fingerprints lightly with a drop of water.
Cracking Clay?
If you see tiny cracks forming while rolling, dip your finger in water (or baby oil for polymer clay) and smooth them out immediately before shaping further.
Texture Trick
To mimic the porous, cookie-like texture shown here, gently press a piece of coarse sandpaper or a dry sponge over the entire surface before the clay hardens.
Place your little bear on a shelf or desk where its friendly face can brighten your day


Soft Clay Panda With Tiny Bamboo
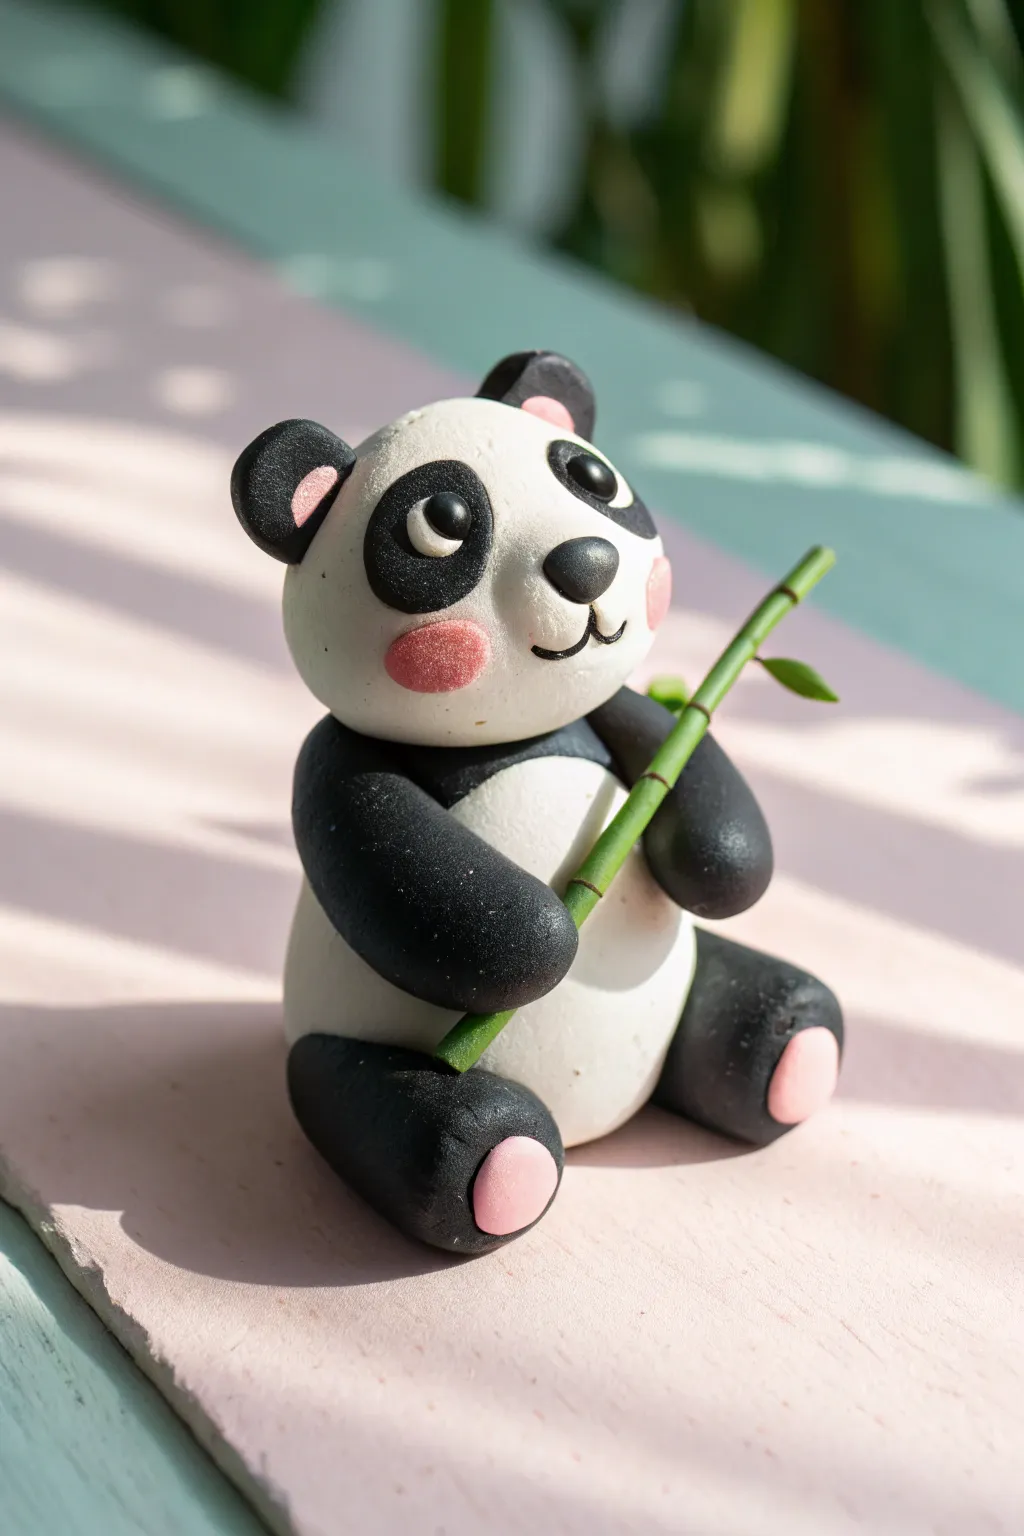
Sculpt an adorable desk companion with this sweet sitting panda project. Featuring blushing cheeks and a delicately crafted bamboo stalk, this soft clay figurine brings a gentle touch of nature to your workspace.
How-To Guide
Materials
- White soft clay (air-dry or polymer)
- Black soft clay
- Green soft clay
- Pink soft clay
- Clay sculpting tools (needle tool, ball tool)
- Clean work surface or mat
- Optional: Clear acrylic varnish
Step 1: Sculpting the Body
-
Shape the torso:
Begin with a ball of white clay roughly the size of a walnut. Roll it into a smooth sphere, then slightly flatten the bottom so it sits securely without rolling away. -
Form the head:
Roll a second piece of white clay, slightly smaller than the body. Gently press it onto the top of the body piece. You can use a small dab of water or liquid clay to help them bond if the clay feels too dry. -
Create the legs:
Take two pieces of black clay and roll them into short, thick logs for the hind legs. Attach them to the lower sides of the white body, pressing firmly to blend the seam at the back. -
Add the arms:
Roll two slightly longer, thinner logs of black clay for the arms. Attach these near the ‘neck’ area where the head meets the body, angling them forward so the paws will eventually hold the bamboo.
Clean Smudges
White clay picks up lint and dye easily. If black clay smudges onto the white body, wipe it away gently with a cotton swab dipped in rubbing alcohol before baking or drying.
Step 2: Adding Facial Features
-
Make the eye patches:
Flatten two small balls of black clay into tear-drop shapes. Place them diagonally on the face, with the narrower ends pointing slightly downward towards the nose area. -
Insert the ears:
Create two small semi-circles of black clay. Press a tiny indentation into the center of each, fill it with a speck of pink clay, and attach these to the top of the head. -
Sculpt the nose:
Roll a small, triangular piece of black clay with rounded corners. Place this centrally on the face, just below the eye line. -
Draw the mouth:
Using a needle tool or a fine blade, carefully impress a small anchor shape or a ‘w’ shape directly under the nose to create a smiling mouth. -
Add the eyes:
Roll two tiny balls of white clay and place them onto the black eye patches. Finish by adding minute black pupils to the center of the white dots for a lively gaze. -
Apply blush:
Take two very small amounts of pink clay and flatten them into thin ovals. Press these gently onto the cheeks, just below the eye patches, smoothing the edges so they look like a natural flush.
Step 3: Paws and Bamboo
-
Detail the feet:
Flatten two distinct circles of pink clay. Press these onto the bottom of the black hind legs to create the main paw pads. -
Prepare the bamboo stalk:
Roll a thin snake of green clay. Cut it to a length that fits nicely in the panda’s grip. -
Texture the bamboo:
Using a dull knife or tool, gently press horizontal lines down the length of the green stalk to mimic bamboo segments. -
Add leaves:
Pinch off tiny bits of green clay and shape them into pointed ovals. Attach one or two to the top or side of the stalk for foliage. -
Assembly:
Carefully slide the bamboo stalk between the panda’s black arm paws. Gently squeeze the paws around the stalk to secure it in place.
Textured Fur Effect
Before the clay hardens, tap the white areas gently with a clean toothbrush or stiff bristle brush to create a realistic, fuzzy fur texture.
Let your panda dry or bake according to your clay’s specific instructions, and enjoy your charming new friend


Soft Clay Octopus With Curly Tentacles
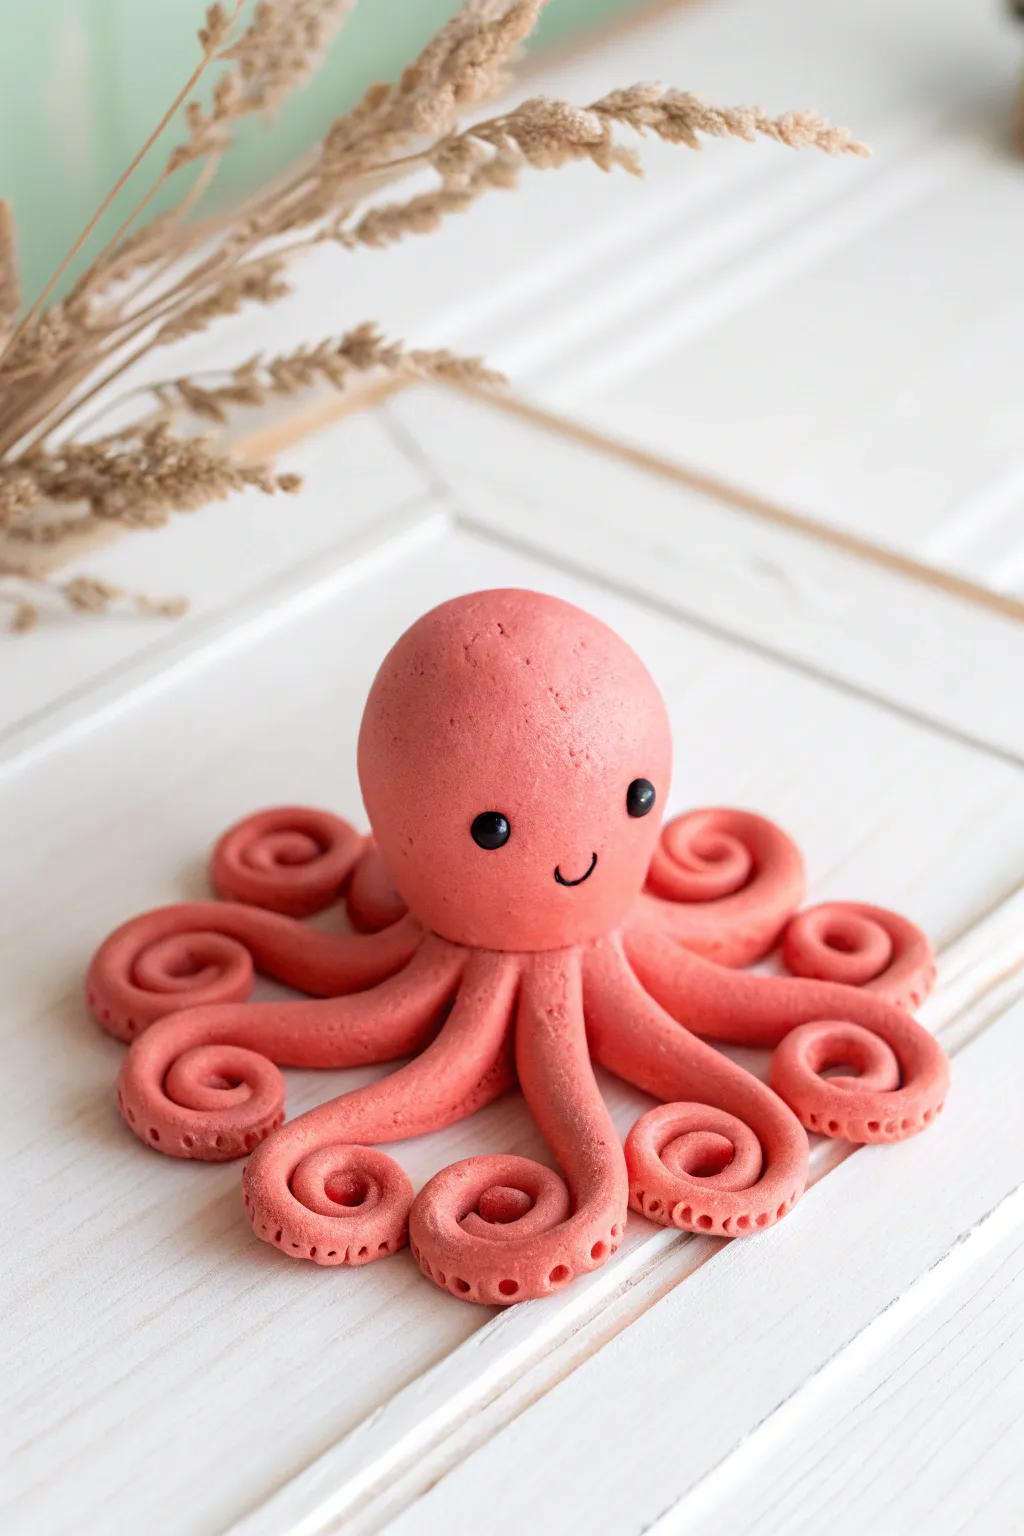
Create this charming sea creature with its signature spiraled legs and a friendly smile. Using soft clay, you’ll sculpt a perfectly rosy octopus that is as fun to make as it is to display.
Detailed Instructions
Materials
- Pink soft clay (or air-dry clay mixed with pink paint)
- Black clay (very small amount)
- Clay sculpting tools (specifically a small dotting tool)
- Smooth work surface/mat
- Optional: Rolling pin
Step 1: Sculpting the Head
-
Prepare the clay:
Begin by conditioning your pink clay. Make sure it is warm and pliable by kneading it thoroughly in your hands until it feels smooth and soft. -
Form the main shape:
Take a large portion of the clay and roll it into a neat ball. This will become the octopus’s head. -
Refine the silhouette:
Gently shape the ball into a slightly elongated egg shape, keeping the bottom somewhat wider than the top to give it a classic bulbous octopus look. -
Create the face:
Roll two tiny bead-sized balls of black clay for the eyes. Gently press them into the center of the face, spacing them apart for a cute expression. -
Add the smile:
For the mouth, roll a microscopic snake of black clay. Curve it into a tiny ‘U’ shape and press it carefully below and between the eyes. Alternatively, you can use a sculpting tool to indent a smile.
Pro Tip: Seamless Join
To ensure the head doesn’t fall off later, insert a small piece of toothpick or wire into the center of the tentacle base before placing the head on top.
Step 2: Creating the Tentacles
-
Divide the clay:
Using the remaining pink clay, separate it into eight equal-sized portions. -
Roll the logs:
Roll each portion into a long, tapered log or snake shape. One end should be slightly thicker (to attach to the body) and the other end should taper to a thinner point. -
Start the spiral:
Take the tapered tip of one tentacle and gently roll it inward towards the thicker end to create a tight, snail-shell-like curl. -
Repeat the process:
Continue curling all eight tentacles in the same manner. Ensure the spirals are roughly the same size for symmetry. -
Add texture:
Flip each curled tentacle over. Using your small dotting tool, press a row of indentations along the underside of the tentacle to mimic suction cups.
Level Up: Tie-Dye Look
Mix a small amount of white clay into your pink clay but don’t blend fully. Stop when it’s marbled to give your octopus natural-looking skin patterns.
Step 3: Assembly & Finishing
-
Arrange the base:
Place the eight curled tentacles in a circle on your work mat. The thicker ends should all meet in the center, touching each other to form a star-like shape. -
Merge the legs:
Where the thick ends meet in the middle, gently smudge the clay together to create a solid base platform for the head to sit on. -
Attach the head:
Place the sculpted head directly onto the center of the tentacle ring. I find pressing down gently while slightly wiggling it helps create a strong bond without glue. -
Blend the seams:
Use a smoothing tool or your finger to gently blend the clay where the neck meets the tentacles, ensuring the head looks like it is naturally growing out of the legs. -
Adjust the pose:
Before the clay sets, adjust the curls of the tentacles so they spread out nicely and curve upwards slightly at the ends. -
Check the texture:
If handling the octopus smoothed out the clay too much, you can lightly tap the surface with a piece of sandpaper or a textured sponge to give it a matte, skin-like finish. -
Let it cure:
Allow your creation to dry or bake according to your specific clay manufacturer’s instructions.
Once dry, this adorable curly-legged friend is ready to sit on your desk or shelf to keep you company

The Complete Guide to Pottery Troubleshooting
Uncover the most common ceramic mistakes—from cracking clay to failed glazes—and learn how to fix them fast.
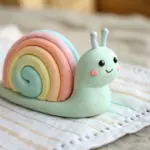
Soft Clay Caterpillar Color Stack
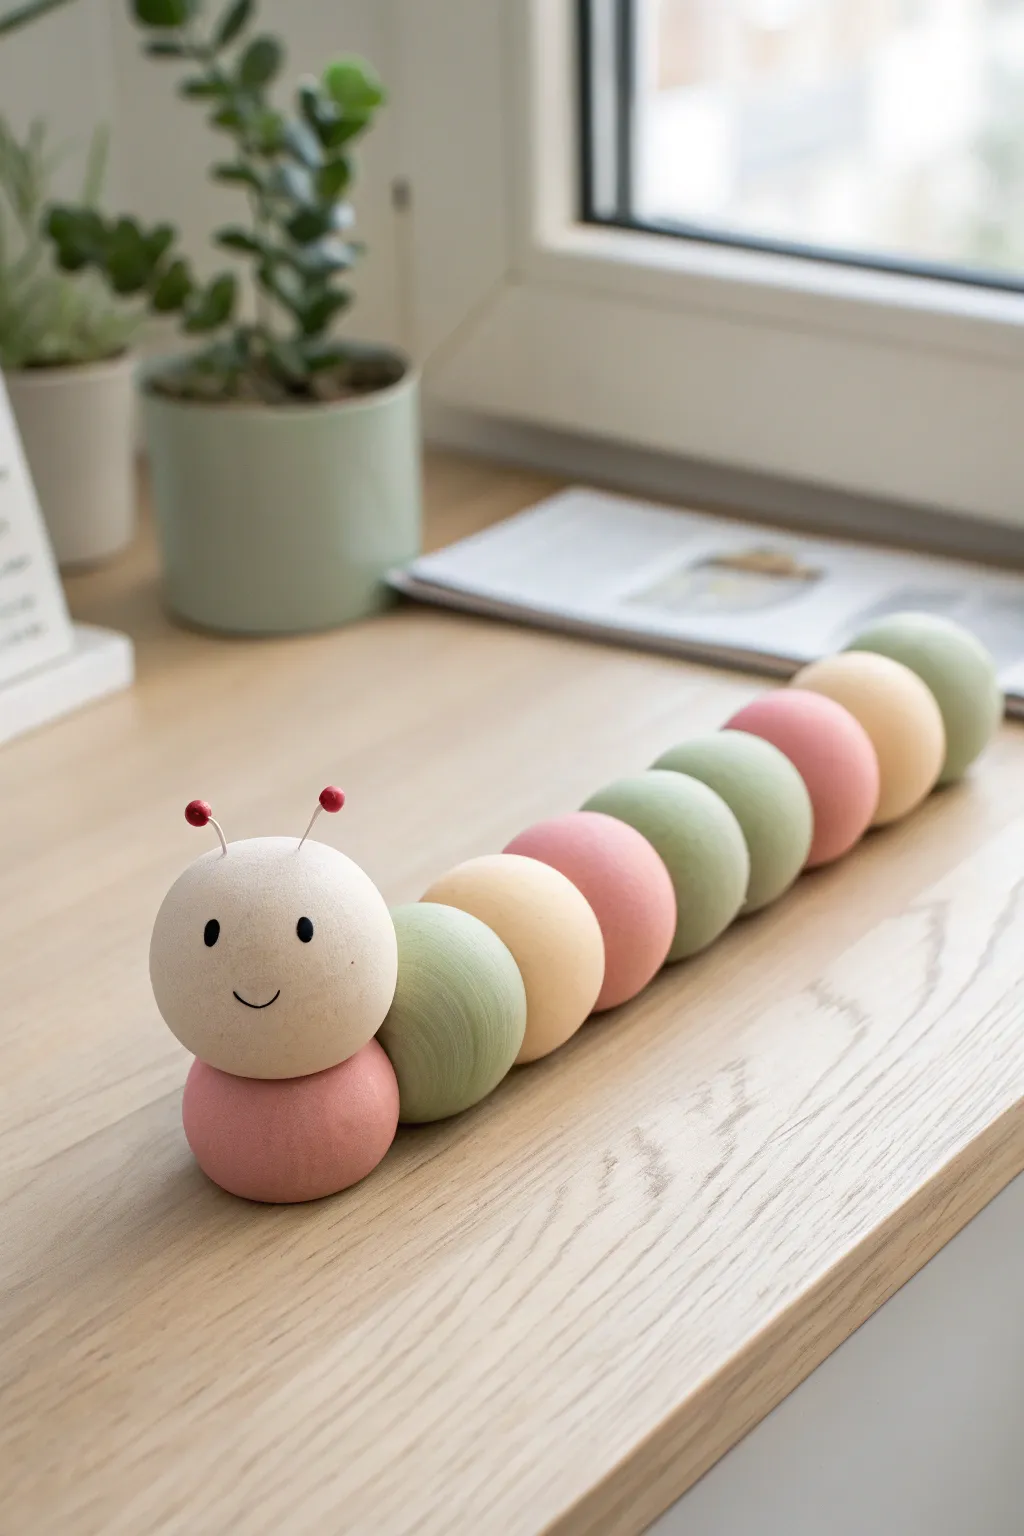
This charming, smiling caterpillar brings a touch of softness to any desk or shelf with its gentle pastel palette and smooth, rounded forms. By stacking and joining simple clay spheres, you’ll create a friendly little companion that looks surprisingly polished.
Step-by-Step Guide
Materials
- Soft air-dry clay or polymer clay (white base)
- Acrylic paints (pastel pink, sage green, pale yellow/cream)
- Black acrylic paint or fine-tip marker
- Wire or stiff jewelry pins (for antennae)
- Small red beads or clay bits (antennae tips)
- Clay sculpting tools or a toothpick
- Strong craft glue or liquid clay (if using polymer)
- Rolling surface
- Matte sealant spray
Step 1: Color Mixing & Sphere Prep
-
Prepare your palette:
If you are using white clay, separate it into four main portions. You will need to tint these portions into your desired pastel shades: a dusty rose, a sage green, a cream or pale yellow, and leave one portion white for custom mixing if needed. -
Knead in color:
Takes each portion of clay and knead in a small amount of acrylic paint to achieve the soft pastel tones seen in the image. Keep the colors muted and earthy rather than neon bright. -
Portion the body segments:
Break off pieces of clay to form the body segments. You will need about 10-11 spheres total. Make one sphere slightly larger and white/cream for the head. -
Roll the spheres:
Roll each piece of clay between your palms to create perfectly smooth balls. I like to dampen my hands slightly with water when working with air-dry clay to eliminate surface cracks. -
Create the heavy base:
Select a pink clay sphere to serve as the neck/base piece. Gently press it onto your work surface to flatten the bottom slightly so the finished sculpture won’t roll over.
Cracking Clay?
If you see tiny fissures forming as the spheres dry, smooth a tiny bit of water (or ‘slip’ for ceramics) over the crack with your finger immediately to heal it.
Step 2: Assembly
-
Arrange the pattern:
Plan your color sequence before gluing. A good pattern follows the image: Head -> Pink (neck) -> Green -> Yellow -> Pink -> Green -> Green -> Pink -> Yellow -> Green. -
Join the head and neck:
Attach the white head sphere on top of the flattened pink base sphere. Use a dab of strong glue or scratch the joining surfaces (scoring) to ensure a tight bond. -
Build the body line:
Begin attaching the remaining spheres in a line behind the pink base piece. Instead of perfectly straight, add a subtle S-curve or gentle wiggle to the line to make the movement look natural. -
Secure the connections:
Press the spheres firmly against each other. For extra stability, you can insert a small piece of toothpick or wire between segments as an internal skeleton. -
Check the profile:
Look at the caterpillar from the side. Ensure the spheres are touching near their centers so the height remains consistent along the back.
Texture Twist
Before the clay dries, gently press a piece of linen fabric against the spheres to give them a subtle, woven texture instead of a completely smooth finish.
Step 3: Details & Finishing
-
Construct antennae:
Cut two short lengths of thin wire (about 1 inch long). Glue tiny red clay balls or red beads onto one end of each wire. -
Insert antennae:
Poke two small holes at the top of the head sphere using a needle tool. Dip the bare ends of your antennae wires in glue and insert them into the holes. -
Paint the eyes:
Using a very fine brush and black paint, or a fine-tip marker, draw two small, vertical oval eyes spaced widely apart on the face. -
Add the smile:
Draw a tiny, simple ‘u’ shape between the eyes for the mouth. Keep the line thin and delicate to maintain the cute aesthetic. -
Final drying:
Allow the entire structure to dry completely according to your clay’s package instructions. Air dry clay may take 24-48 hours depending on thickness. -
Seal the surface:
Once fully dry, spray the caterpillar with a matte sealant. This protects the paint and gives the clay that smooth, finished pottery look seen in the photo.
Place your new segmented friend on a windowsill or desk to add a spot of cheer to your day
Soft Clay Mushroom Pair
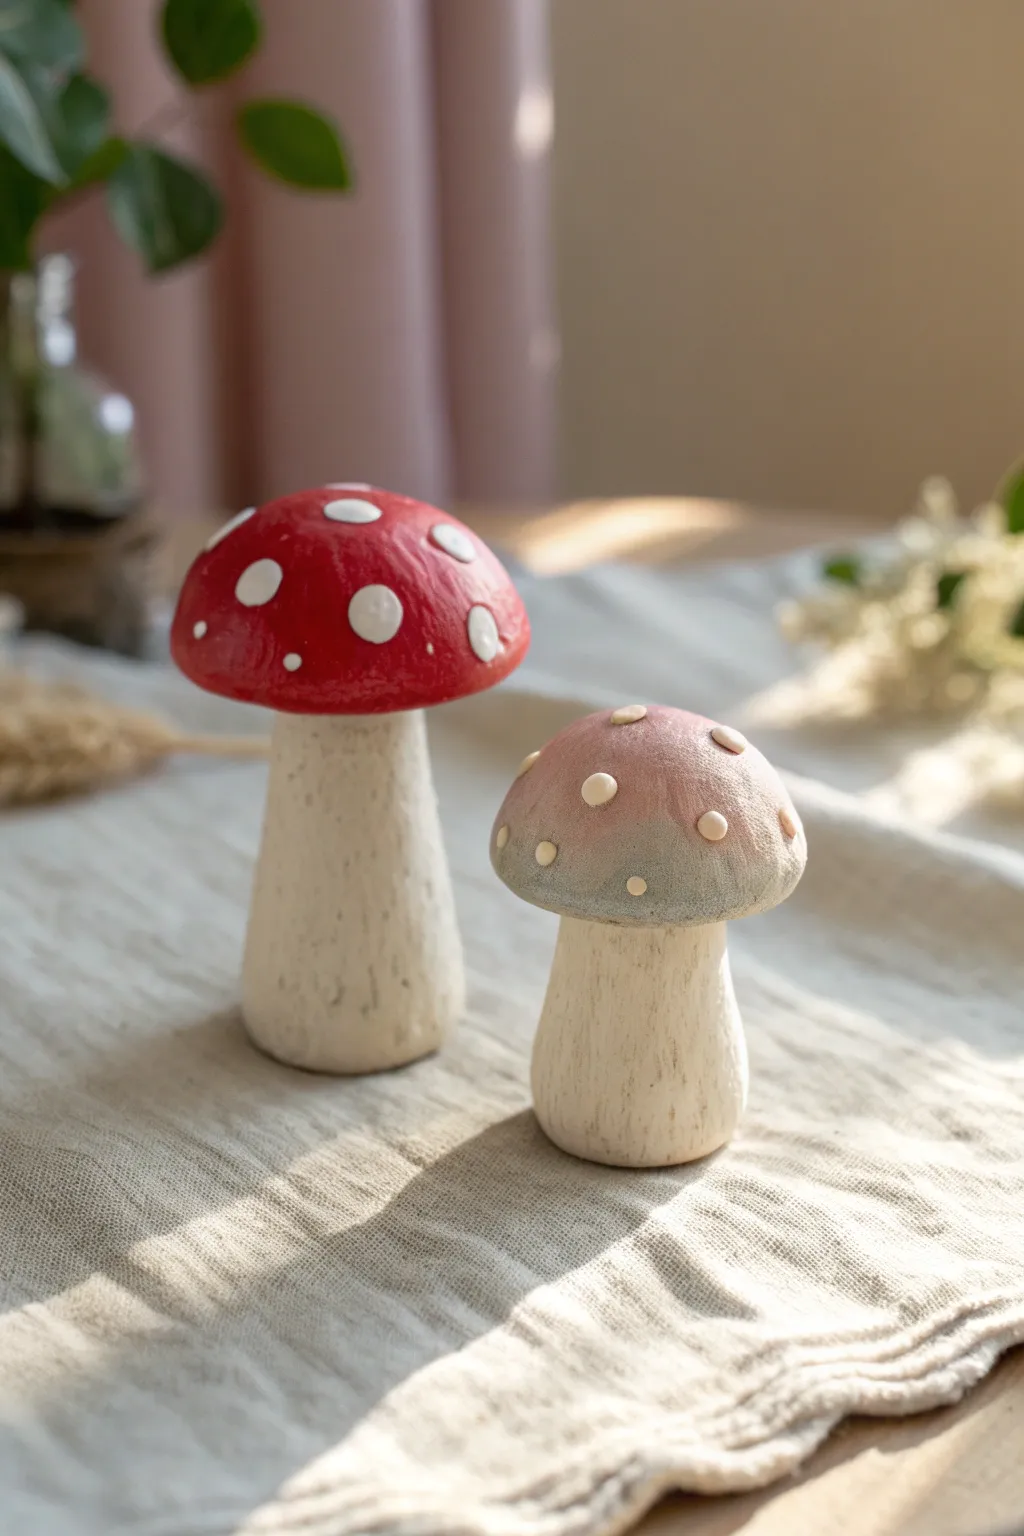
Bring a touch of fairy-tale charm to your home with these handcrafted soft clay mushrooms. This project features two distinct styles: a classic tall toadstool with a vibrant red cap and a stout, dreamy friend boasting a soft pastel gradient.
Step-by-Step Tutorial
Materials
- White soft air-dry clay or polymer clay
- Acrylic paints (Red, Titanium White, Dusty Pink, Slate Grey, Beige)
- Small foam sponge or blending tool
- Fine-grit sandpaper
- Sculpting tools (needle tool and rounded smoothing tool)
- Texture brush (stiff bristle) or an old toothbrush
- Matte varnish or sealant
- Rolling pin
- Aluminum foil (for armatures)
- Small detail paintbrush
Step 1: Forming the Stems
-
Create the core:
Begin by crumpling small pieces of aluminum foil into tight cone shapes. Make one taller and narrower for the red mushroom, and one shorter and wider for the pastel mushroom. This saves clay and reduces drying time. -
Wrap the stems:
Roll out a sheet of white clay to about 1/4 inch thickness. Wrap this layer completely around your foil cones, smoothing the seams together with your fingers and a little water if needed. -
Shape the base:
Tap the bottom of each stem firmly against your work surface to create a flat, stable base so your mushrooms won’t wobble later. -
Add vertical texture:
Using a needle tool or an old stiff toothbrush, drag vertical lines up and down the stems. Don’t be too neat—rough, organic lines mimic the natural texture of mushroom stalks perfectly. -
Smooth the neck:
Slightly taper the top of the stem where the cap will sit. I like to smooth this area specifically so the cap bonds cleanly.
Weighted Base Trick
To prevent tipping, press a small metal washer or coin inside the base of your clay stem before sealing it up. This lowers the center of gravity.
Step 2: Sculpting the Caps
-
Shape the red cap:
Roll a ball of clay and shape it into a classic dome. Use your thumb to create an indentation underneath where it will fit onto the tall stem. It should look like a hollowed-out bowl. -
Shape the pastel cap:
Create a second, flatter dome for the shorter mushroom. This one is less rounded and more button-like. Again, create a fitting socket underneath. -
Attach edges:
Score the top of the stems and the underside of the caps. Add a dab of water or liquid clay (if using polymer) and press the caps firmly onto the stems. -
Blend the seams:
On the underside, gently smooth the clay from the cap down onto the stem so they become one solid unit. You can leave a slight overhang on the red mushroom for a realistic look. -
Final texture check:
Give the caps a very light sanding with a soft brush or your finger to ensure they are smooth for painting, while ensuring the stems retain their rustic grooves.
Cracking Clay?
If you see hairline cracks as the air-dry clay cures, mix a tiny bit of fresh clay with water to make a paste and fill them in before painting.
Step 3: Adding Color & Detail
-
Base coat the stems:
Paint the stems with an off-white or cream color. Let the paint sink into the textured grooves you created earlier to accentuate the depth. -
Wash the texture:
Mix a tiny amount of diluted beige or soft brown paint and brush it over the stems, then immediately wipe most of it off with a paper towel. This ‘antiquing’ method highlights the vertical lines. -
Paint the red cap:
Apply two coats of bright red acrylic paint to the taller mushroom cap, ensuring even coverage. Let the first coat dry completely before adding the second for maximum opacity. -
Create the gradient:
For the shorter mushroom, sponge a dusty pink color onto the top center. While wet, sponge a slate grey or blue-grey color around the rim. -
Blend the gradient:
Use a clean, slightly damp sponge to tap gently where the pink and grey meet, creating a soft, misty transition between the colors. -
Add the spots:
Roll tiny, varied sizes of white clay into flat little discs. Press these onto the red cap. For the pastel cap, use smaller bits of beige clay for a subtle, raised effect. -
Seal the work:
Finish by applying a matte varnish over the entire piece. This protects the paint and gives the clay a lovely, finished ceramic feel without being overly shiny.
Place your finished mushroom pair on a shelf or windowsill to enjoy a little piece of nature indoors


What Really Happens Inside the Kiln
Learn how time and temperature work together inside the kiln to transform clay into durable ceramic.
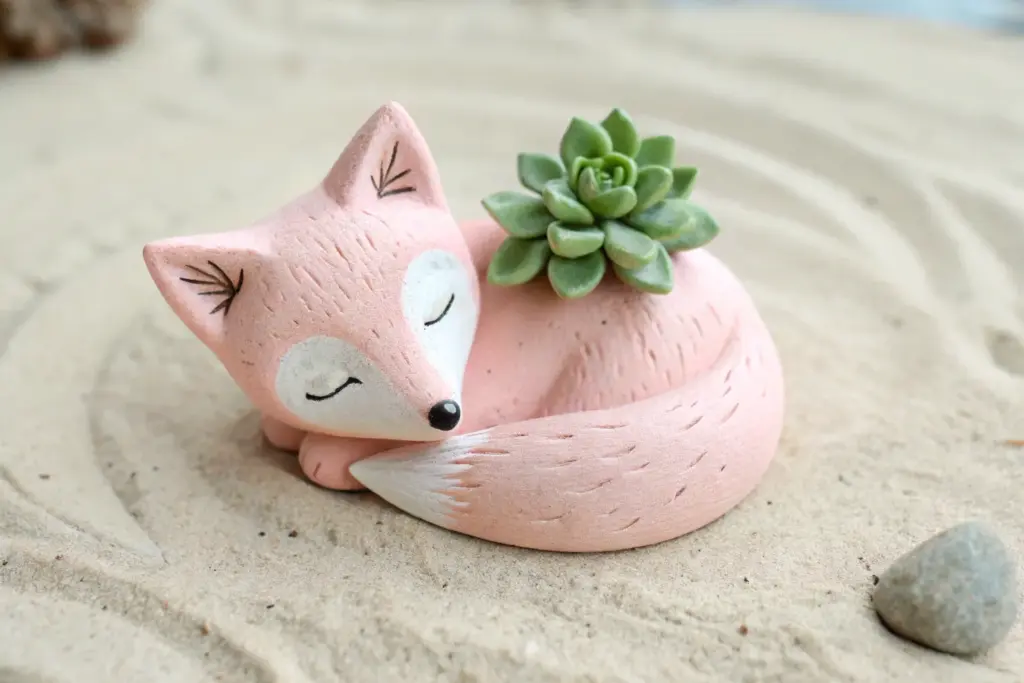
Soft Clay Mini Succulent Pot
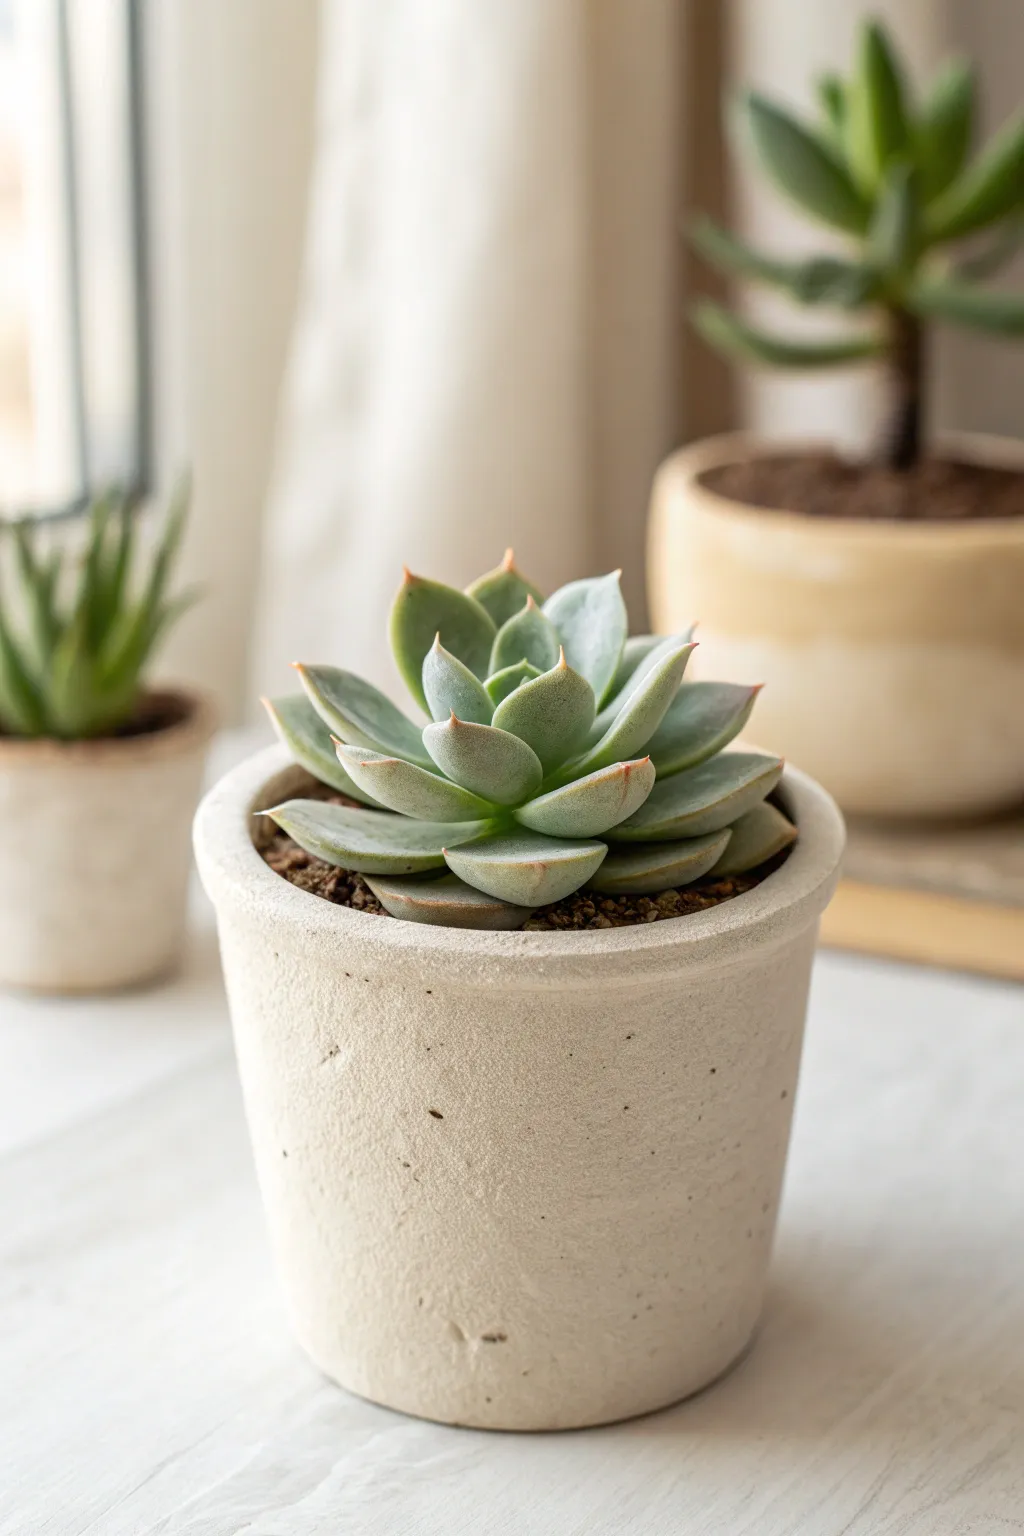
Bring the calming vibe of a desert garden indoors without ever needing to water it. This project guides you through sculpting a hyper-realistic, velvety Echeveria succulent and crafting a convincingly textured stone-look pot using soft air-dry clay.
Step-by-Step
Materials
- White or beige soft air-dry clay (lightweight/polymer type preferred)
- Acrylic paints (Mint green, dark green, muted purple, burnt sienna, cream)
- Small rolling pin
- Teardrop-shaped cutter (small and medium) or craft knife
- Ball tool or rounded end of a paintbrush
- Old toothbrush or coarse sponge (for texturing)
- Fine-grit sandpaper
- Brown floral tape or brown clay scraps (for soil)
- Matte varnish spray
Step 1: Sculpting the Stone-Effect Pot
-
Form the base shape:
Start with a golf-ball-sized amount of beige clay. Roll it into a smooth ball, then flatten the bottom against your work surface to create a stable base. -
Hollow out the vessel:
Using your thumb, gently press into the center of the ball while rotating it. Pinch the walls upwards to create a simple cylindrical cup shape, keeping the rim slightly thick and rounded. -
Refine the silhouette:
Roll the sides of the pot gently on your table to straighten them. You want a classic, simple planter shape—slightly tapered at the bottom is fine, but vertical walls work best for this look. -
Add stone texture:
This is the crucial step for realism. Take an old toothbrush or a dry coarse sponge and stipple the entire outer surface of the wet clay. Press firmly enough to leave little pits and pockmarks. -
Create weather marks:
Use a needle tool or toothpick to add a few larger imperfections or tiny ‘cracks’ near the rim and base to mimic aged concrete. Let the pot dry completely, usually overnight.
Step 2: Creating the Succulent Leaves
-
Mix your leaf color:
Take a fresh batch of white clay. Knead in a very small amount of mint green and a tiny dot of teal acrylic paint. You want a very pale, muted seafoam color, not a bright green. -
Prepare the clay sheet:
Roll out your colored clay until it is about 3mm thick. Try to keep the thickness consistent for uniform leaves. -
Cut the leaf shapes:
Using a teardrop cutter or your craft knife, cut out about 15-20 leaves. You’ll need three sizes: small (for the center), medium, and large (for the outer ring). -
Thin the edges:
Place a leaf on your palm. Gently press and roll a ball tool along the edges to thin them out creating a delicate look, but leave the center of the leaf slightly plump. -
Curve the leaves:
Gently pinch the pointed tip of each leaf to sharpen it. Then, press your thumb into the center of the leaf to give it a slight concave, spoon-like curve. -
Blushing the tips:
Before assembling, use a soft brush to dust a tiny amount of muted purple or pink pastel chalk (or very dry acrylic paint) onto just the very sharp tips of the leaves. This mimics sun-stress.
Pro Tip: The Chalk Trick
Brush cornstarch or baby powder on your clay leaves before assembly. This creates that natural, dusty “farina” coating real succulents have.
Step 3: Assembly and Finishing
-
Prepare the ‘soil’:
Fill your dried clay pot with brown clay scraps or a ball of dark clay. Keep the surface rough and textured to look like potting mix. It should sit just below the rim. -
Start the succulent center:
Take three of your smallest leaves and pinch them together at the base so they stand upright, facing each other to form a tight bud. -
Add the middle rows:
Press the base of this bud into the center of your ‘soil.’ Begin attaching the medium leaves around the bud, slightly overlapping each one and angling them open more than the center. -
Place outer leaves:
Attach the largest leaves in a final ring near the soil line. These should lay almost flat but curve upward at the tips, creating that classic rosette shape. -
Simulate dirt texture:
Brush a little brown paint or dedicated ‘texture paste’ around the base of the plant where it meets the soil to hide any connection points and add realism. -
Final matte coat:
Once the succulent clay is dry, spray the entire piece with a matte varnish. This removes any plasticky shine and unifies the texture of the ‘stone’ pot.
Troubleshooting: Floppy Leaves
If your leaves droop during assembly, the clay is too soft. Let the cut leaves air dry for 10-15 minutes to firm up before attaching them.
Place your everlasting succulent on a sunny shelf and enjoy the greenery without the gardening work
Soft Clay Tulip Bouquet Charm
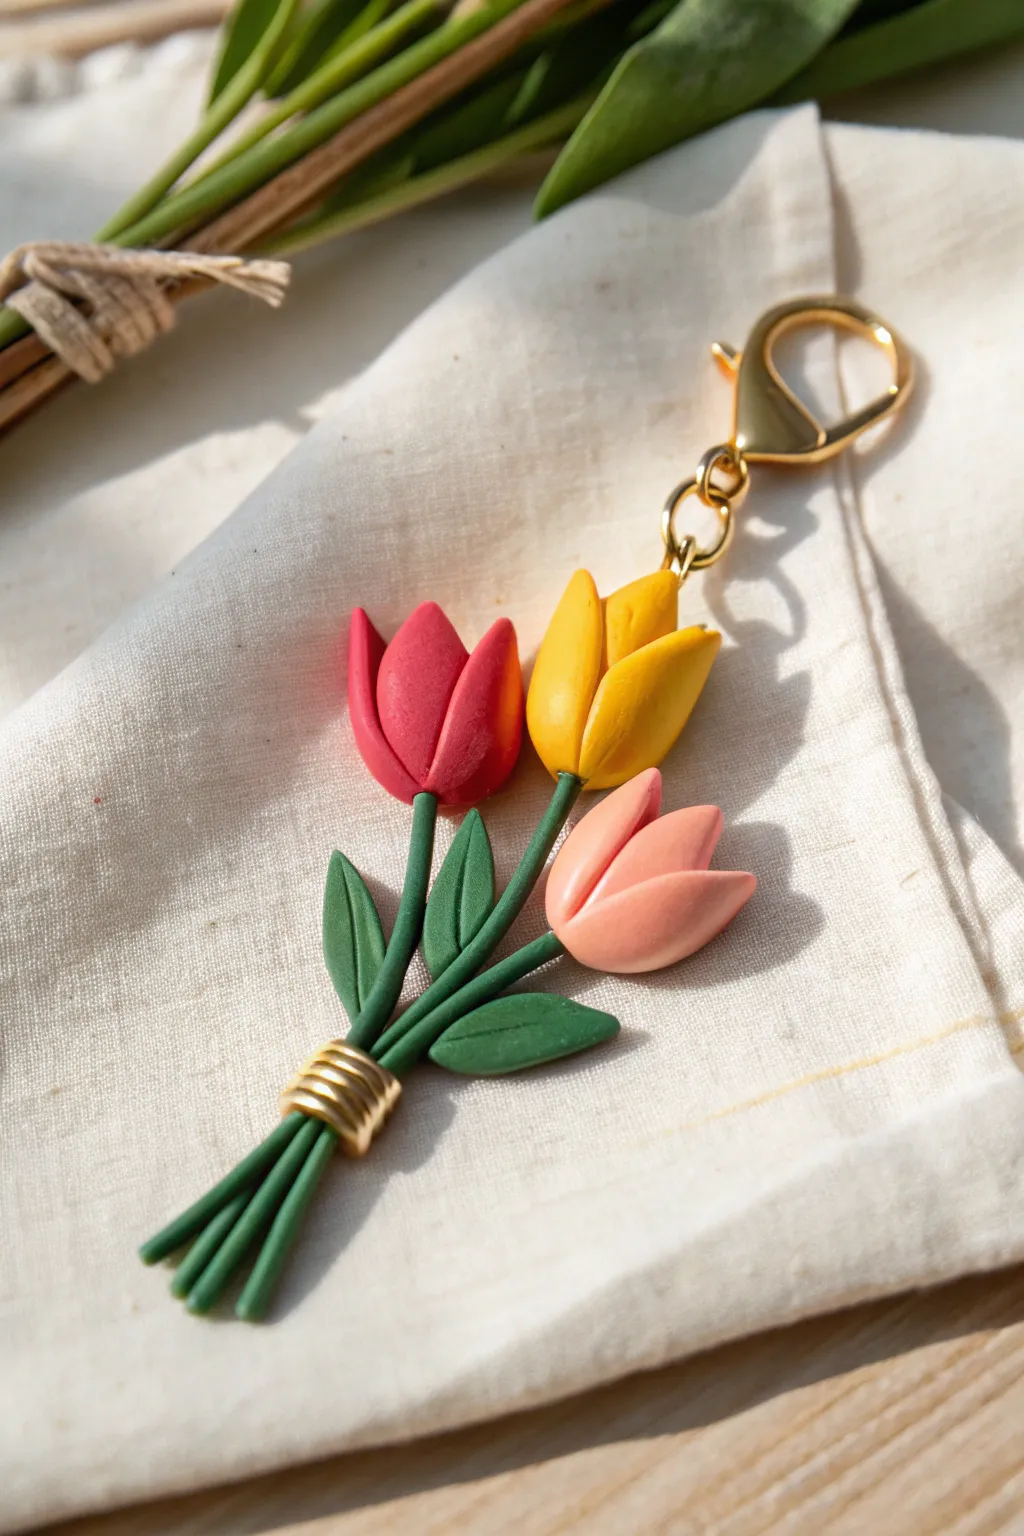
Capture the beauty of a fresh spring bouquet in miniature form with this delightful tulip charm. Featuring three sculpted blooms in vibrant red, yellow, and peach, tied with gold wire, this accessory adds a touch of floral elegance to any bag or keychain.
Detailed Instructions
Materials
- Polymer clay or air-dry clay (Red, Yellow, Peach/Pink, Green)
- Gold craft wire (approx. 24 gauge)
- Gold jewelry jump rings (small)
- Gold lobster clasp keychain finding
- Sculpting tools (needle tool, small ball tool)
- Clay blade or craft knife
- Wire cutters
- Pliers (flat nose and round nose)
- Rolling pin or pasta machine (optional)
- Oven (if using polymer clay) or drying rack
Step 1: Creating the Stems and Leaves
-
Roll the stems:
Begin by conditioning your green clay until soft. Roll out three thin, even snakes of green clay, roughly 1.5 inches long each. These will be your tulip stems. -
Cut to size:
Trim the stems so they are uniform in length, but keep them separate for now. I find it easier to attach the blooms to loose stems before bundling. -
Shape the leaves:
create small teardrop shapes from the green clay. Flatten them gently with your finger to form leaves. You’ll need about 4-5 leaves of slightly varying sizes. -
Add leaf details:
Using a needle tool or the back of a craft knife, gently impress a central vein down the middle of each leaf for a realistic texture. -
Attach leaves:
Press the base of the leaves onto the lower third of the stems. Angle them slightly outward as if they are naturally growing.
Step 2: Sculpting the Tulip Blooms
-
Form the buds:
Roll three small balls of clay—one red, one yellow, and one peach. Pinch one end of each ball slightly to create an elongated egg shape. -
Carve the petals:
With a needle tool or thin blade, make a deep vertical indentation at the top center of each bud, extending about halfway down. This creates the separation between the two main petals. -
Refine the shape:
Gently press the sides of the cut inward to smooth the edges, making the petals look soft and rounded rather than sharp. -
Attach blooms to stems:
Carefully press the bottom of each flower head onto the top of a prepared green stem. Blend the clay slightly at the connection point with a tool to ensure a secure bond.
Loose Wire?
If the wire wrap feels loose after baking, add a tiny drop of superglue to the back of the coil to permanently secure it to the clay stems.
Step 3: Assembly and Finishing
-
Bundle the bouquet:
Arrange the three flowers so the blooms fan out slightly—place the yellow one slightly higher in the center, with the red and peach flanking it. -
Secure the stems:
Press the bottom of the stems together tightly where they meet. The clay should stick to itself; if it’s dry, a tiny dab of liquid clay or water helps. -
Add the wire tie:
Take a piece of gold wire and wrap it tightly around the bundled stems, just below the leaves. Wrap it 4-5 times to create a metallic ‘ribbon’ effect. -
Prepare for hanging:
Before baking or drying, insert a jump ring directly into the clay between the flower heads, or form a small loop with the end of your wire wrap at the back of the bouquet. -
Cure the clay:
Bake the piece according to your polymer clay package instructions (usually around 275°F/135°C for 15-30 minutes) or let it air dry completely if using air-dry clay. -
Attach hardware:
Once cool and hard, use your pliers to attach the lobster clasp to the jump ring or wire loop you created. -
Trim excess stems:
If the bottom of the stems look uneven after handling, you can carefully sand them smooth or trim slightly with a sharp blade.
Add Sparkle
Brush a tiny amount of mica powder or pearlescent eyeshadow onto the petals before baking to give the flowers a shimmering, dewy finish.
Now you have a permanent bouquet that will stay fresh and cheerful all year round

TRACK YOUR CERAMIC JOURNEY
Capture glaze tests, firing details, and creative progress—all in one simple printable. Make your projects easier to repeat and improve.
Soft Clay Flower Coasters

Brighten up your coffee table with these charming, daisy-inspired coasters in soft, muted tones. Their matte finish and embossed petal details give them a modern yet handmade feel perfect for spring decor.
How-To Guide
Materials
- Polymer clay (in muted pink, sage green, cream, and terracotta)
- Acrylic roller or rolling pin
- Parchment paper or clay work mat
- Large round cookie cutter (approx. 3.5-4 inches)
- Small round cutter (approx. 0.75-1 inch)
- Sculpting tool with a blunt, curved edge (or a plastic knife)
- Needle tool
- Fine-grit sandpaper (optional)
- Matte varnish or sealant (heat-resistant recommended)
Step 1: Preparing the Base
-
Condition the Clay:
Start by warming the polymer clay in your hands to condition it. Knead and fold until it becomes soft, pliable, and free of cracks. -
Roll it Out:
Place the clay between two sheets of parchment paper or directly on your work mat. Use your acrylic roller to flatten the clay into an even slab, aiming for a thickness of about 1/4 inch (6mm) to ensure durability for a coaster. -
Cut the Main Shape:
Using your large round cookie cutter, punch out a perfect circle from the rolled clay. This will form the outer boundary of your flower. -
Smooth the Edges:
Gently run your finger around the cut edge of the circle to soften any sharp ridges left by the cutter.
Step 2: Sculpting the Flower Design
-
Mark the Center:
Take the small round cutter and gently press it into the exact center of your clay circle. Do not cut all the way through; just make a clear indentation to mark the flower’s pistil. -
Outline the Petals:
Using a needle tool, very lightly sketch radial lines from the central circle to the outer edge to divide the clay into equal sections. Aim for roughly 12-16 petals. -
Define Petal Separation:
With your blunt sculpting tool, press firmly along your sketch lines to create deep grooves between the petals. These grooves give the visual effect of separate petals without cutting them apart. -
Rounding the Petal Tips:
Use the small round cutter again, but this time use just a section of its curve to press into the outer rim of each petal section. This creates that scalloped ‘daisy’ edge along the perimeter. -
Cleaning up the Edges:
Take a moment to smooth any clay bits that pushed out when you scalloped the edges. I find a silicone smoothing tool works wonders here, or just a wet fingertip. -
Adding Center Detail:
Roll a small ball of clay (same color), flatten it slightly into a disc, and press it firmly onto the center indentation you made earlier to create a raised flower center. -
Final Texture Check:
Use your sculpting tool to redefine the central vein of each petal if the lines softened during handling. A gentle press radiating from the center creates a lovely dimension.
Uneven Thickness?
If you struggle to roll an even slab, place two stacks of playing cards or craft sticks on either side of your clay. Roll your pin over them to act as depth guides.
Step 3: Baking and Finishing
-
Prepare for Baking:
Transfer your shaped coasters onto a baking sheet lined with parchment paper or a ceramic tile. -
Bake:
Bake the clay according to the manufacturer’s instructions on the package. Usually, this is around 275°F (135°C) for 15-30 minutes depending on thickness. -
Cool Down:
Allow the coasters to cool completely on a flat surface. Don’t rush this step, as warm clay can still be fragile. -
Sand Imperfections:
Once cool, inspect the edges. If there are any rough spots or fingerprints, lightly buff them away using fine-grit sandpaper. -
Seal the Surface:
Apply a thin layer of matte varnish to protect the clay from moisture and stains. Since these are coasters, a heat-resistant sealer is a smart choice to prevent mug rings.
Two-Tone Twist
For a pop of contrast, make the center circle a different color than the petals. Just press a contrasting flattened ball into the center indent before baking.
Now you have a bouquet of durable, handmade blooms to protect your tables in style
Soft Clay Scalloped Trinket Dish
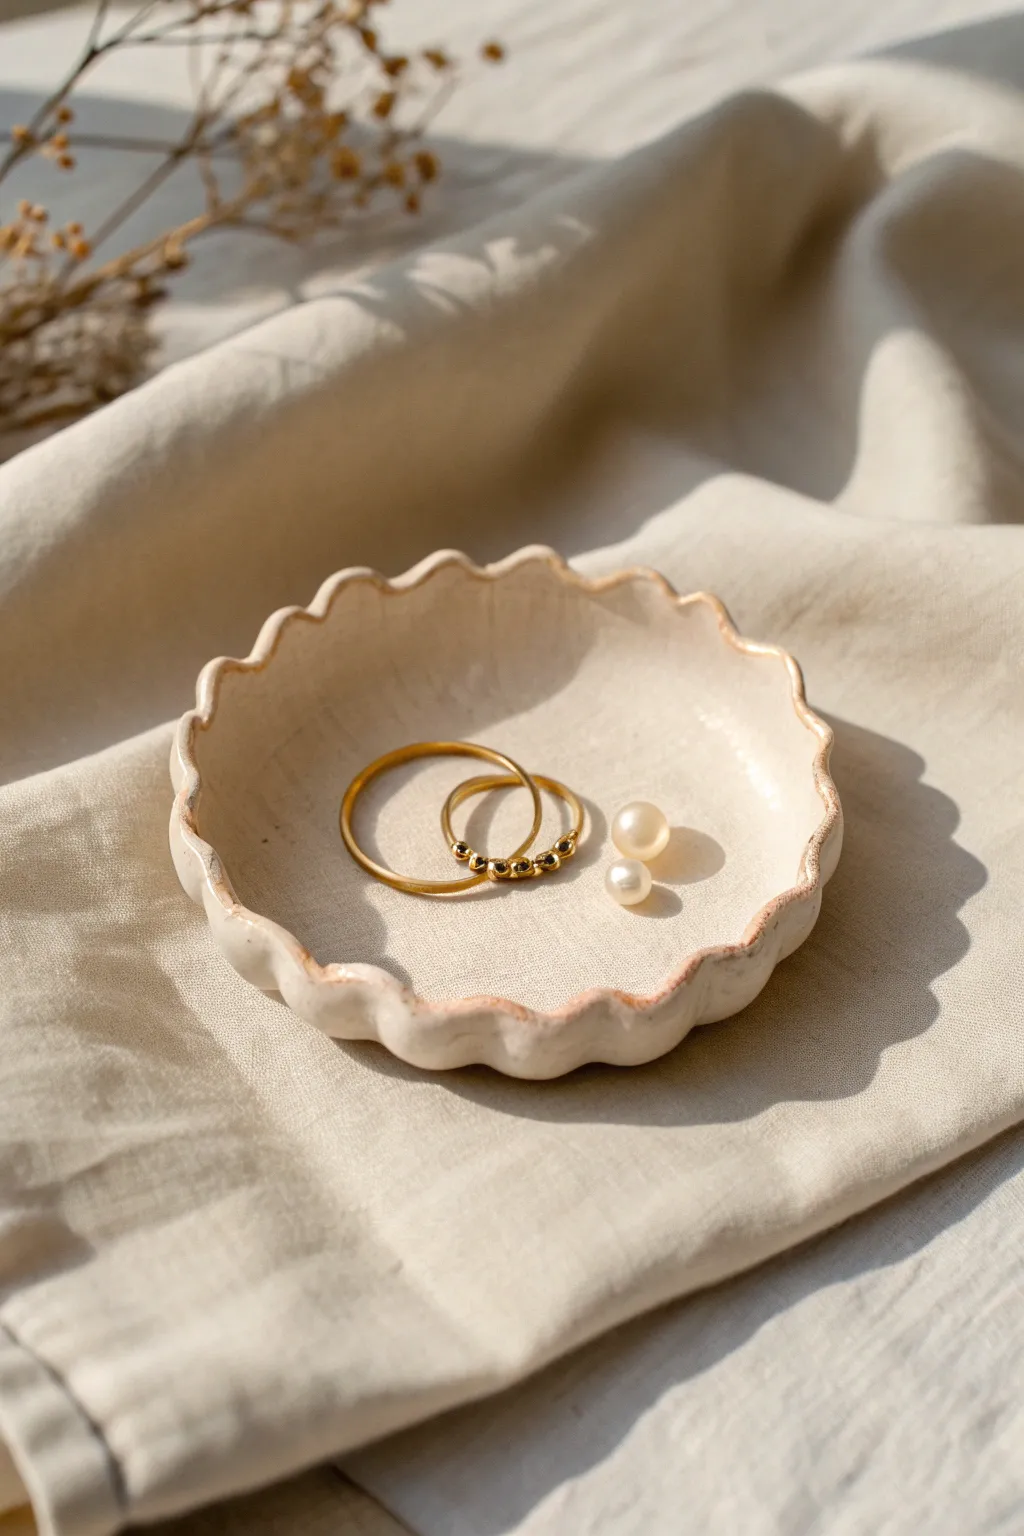
Create this organically shaped trinket dish with a charming, ruffled edge perfect for holding your favorite rings. The subtle glazed finish and delicate rim give it a professional yet handmade pottery feel.
Step-by-Step
Materials
- White air-dry clay or polymer clay
- Rolling pin or acrylic roller
- Circle cutter or a round bowl (approx. 4-5 inches diameter)
- Craft knife or needle tool
- Small bowl or sphere mold (for shaping)
- Small sponge
- Water
- Fine-grit sandpaper
- Clear high-gloss varnish or resin
- Soft brush for sealing
Step 1: Shaping the Base
-
Prepare the Clay:
Begin by conditioning a handful of white clay in your hands until it becomes soft, pliable, and free of cracks. -
Roll it Out:
Using your rolling pin, flatten the clay into an even slab. Aim for a thickness of about 1/4 inch (5-6mm) to ensure the dish is sturdy but elegant. -
Cut the Circle:
Place your circle cutter or a round bowl upside down onto the slab. Press down firmly or trace around the bowl with a craft knife to cut out a perfect circle. -
Smooth the Edges:
Dip your finger in a tiny bit of water and run it along the cut edge of the circle to soften any sharp corners left by the cutting tool.
Cracking Edges?
If the rim cracks while pinching, your clay is too dry. Dip your fingers in water and smooth the cracks immediately, or knead a drop of water into the raw clay.
Step 2: Creating the Scallops
-
Initial Pinching:
Gently lift the edges of the circle upward slightly. Using your thumb and forefinger, make small, evenly spaced pinches around the entire rim. -
Refine the Waves:
To get that distinct scalloped look, use the handle of a paintbrush or your pinky finger to press down between each pinched section, creating a rhythmic wave pattern. -
Add Form:
Carefully transfer your clay circle onto a small upturned bowl or lay it inside a larger curved bowl to give it a concave, dish-like shape. Gravity will help it settle. -
Smooth the Surface:
While it is resting on the mold, take a damp sponge and very gently stroke the inside surface to remove any fingerprints or tool marks. -
Define the Rim:
I like to go back over the scallops one last time while it’s on the mold, gently accentuating the high and low points to ensure they look intentional and organic.
Step 3: Finishing Touches
-
Let it Dry:
Allow the dish to dry completely in a cool, dry place. For air-dry clay, this usually takes 24-48 hours depending on humidity; flip it halfway through for even drying. -
Sand for Perfection:
Once fully cured, use fine-grit sandpaper to buff away any rough spots, focusing especially on the scalloped rim to make it buttery smooth. -
Clean Up Dust:
Wipe the entire piece with a barely damp cloth or a dry brush to remove all sanding dust before applying any finish. -
Apply Sealer:
Apply a coat of clear high-gloss varnish. This mimics the look of a fired ceramic glaze and protects the clay. -
Second Coat:
Let the first layer dry according to the manufacturer’s instructions, then apply a second thin coat for extra durability and shine. -
Optional Rim Detail:
If you want to highlight the organic shape, you can lightly sponge a darker wash or gold paint just onto the very edge of the rim before the final seal dries completely.
Gilded Edge
For a luxe upgrade, paint the rim with liquid gold leaf after the clay is dry but before varnishing. This highlights the scalloped texture beautifully.
Place your new dish on your dresser and enjoy the elegant home needed for your daily jewelry pieces
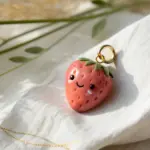
Soft Clay Strawberry Charm Set
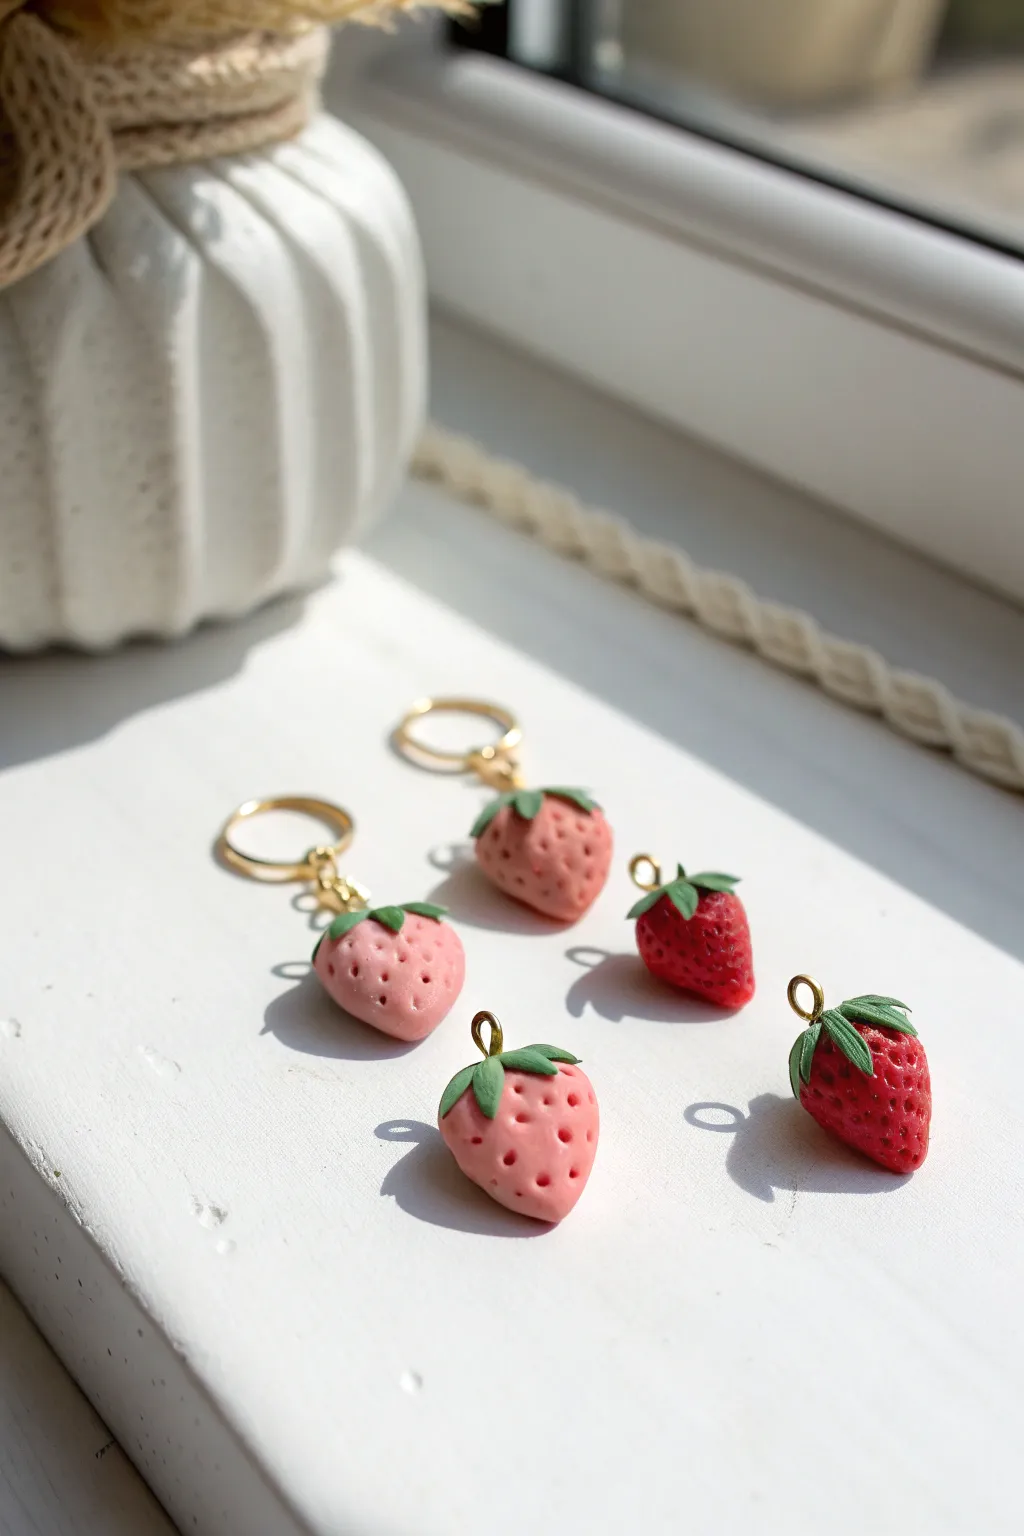
Capture the essence of summer with these delightful, realistic strawberry charms made from soft polymer clay. The set features both unripe pink and ripe red berries, perfect for creating custom jewelry or keychains.
Step-by-Step Guide
Materials
- Polymer clay in light pink, deep red, and moss green
- Liquid clay or bake and bond
- Needle tool or toothpick
- Gold screw-eye pins or bails
- Small jump rings and earring hoops (optional)
- Pliers
- Gloss glaze or polyurethane varnish (water-based)
- Soft brush for glazing
- Aluminum foil for texturing (optional)
- Oven for baking
Step 1: Forming the Strawberry Base
-
Prepare the Clay:
Begin by conditioning your pink and red polymer clays separately until they are soft and pliable. If the pink is too bright, mix in a tiny amount of white or beige to achieve that pastel, unripe look. -
Shape the Berries:
Roll small balls of clay, approximately 1-1.5 cm in diameter. Gently taper one end of each ball by rolling it between your fingers to create a teardrop or rounded cone shape. -
Refine the Form:
Flatten the top (the wider end) slightly against your work surface so it isn’t perfectly round. This provides a natural base for the leaves. -
Add Texture (Optional):
For a hyper-realistic touch, gently roll a crumpled ball of aluminum foil over the surface of the clay to give it a subtle, organic skin texture before adding seeds.
Step 2: Creating the Seeds and Leaves
-
Seed Indentations:
Using a needle tool, poke small, shallow holes all over the strawberry body. Angle the tool slightly upward as you press in to create a teardrop-shaped divot rather than a perfect circle. -
Prepare the Leaves:
Condition the moss green clay. Roll it out into a very thin sheet. You can use a pasta machine on a thin setting or a rolling pin. -
Cut the Calyx:
Use a small star cutter or cut freehand triangles to make the leafy top (calyx). You need about 5-6 small, pointed leaves per strawberry. -
Attach the Leaves:
Apply a tiny dot of liquid clay to the flat top of your strawberry. Place the green star shape on top, centering it. -
Shape the Greenery:
Gently press the leaves down onto the berry’s shoulders. Use your needle tool to drag fine lines from the center of the leaf outward to simulate veins. -
Curl the Tips:
I like to carefully lift the very tips of one or two leaves slightly upward so they don’t look plastered down, adding a bit of life to the piece.
Fingerprint Fix
If you see fingerprints on the clay before baking, lightly brush the surface with a little baby oil or cornstarch to smooth them out without losing shape.
Step 3: Hardware and Finishing
-
Insert Hardware:
Take your gold screw-eye pins. Dip the threaded end into a little liquid clay (this acts as glue) and screw it firmly into the center of the green leaves at the top. -
Baking:
Arrange the strawberries on a baking tray or ceramic tile. Bake according to your specific brand of clay’s instructions—usually around 275°F (130°C) for 15-20 minutes. -
Cooling:
Allow the pieces to cool completely inside the oven or on a wire rack. Do not touch them while hot, as the clay is fragile until fully cooled and cured. -
Glazing:
Apply a thin coat of water-based gloss glaze to the red/pink berry part only, avoiding the leaves. This makes them look juicy and fresh. -
Assembly:
Once the glaze is dry, use pliers to open your jump rings. Thread them through the eye pins and attach them to earring hoops or keychain findings. -
Final Check:
Ensure all jump rings are closed tightly so your new charms stay secure.
Seed Detail Upgrade
Before baking, roll tiny specks of yellow or beige clay and press them into the seed indentations for an extra pop of realistic color contrast.
Enjoy wearing your fresh batch of handmade summer fruit jewelry
Soft Clay Smiley Face Magnets
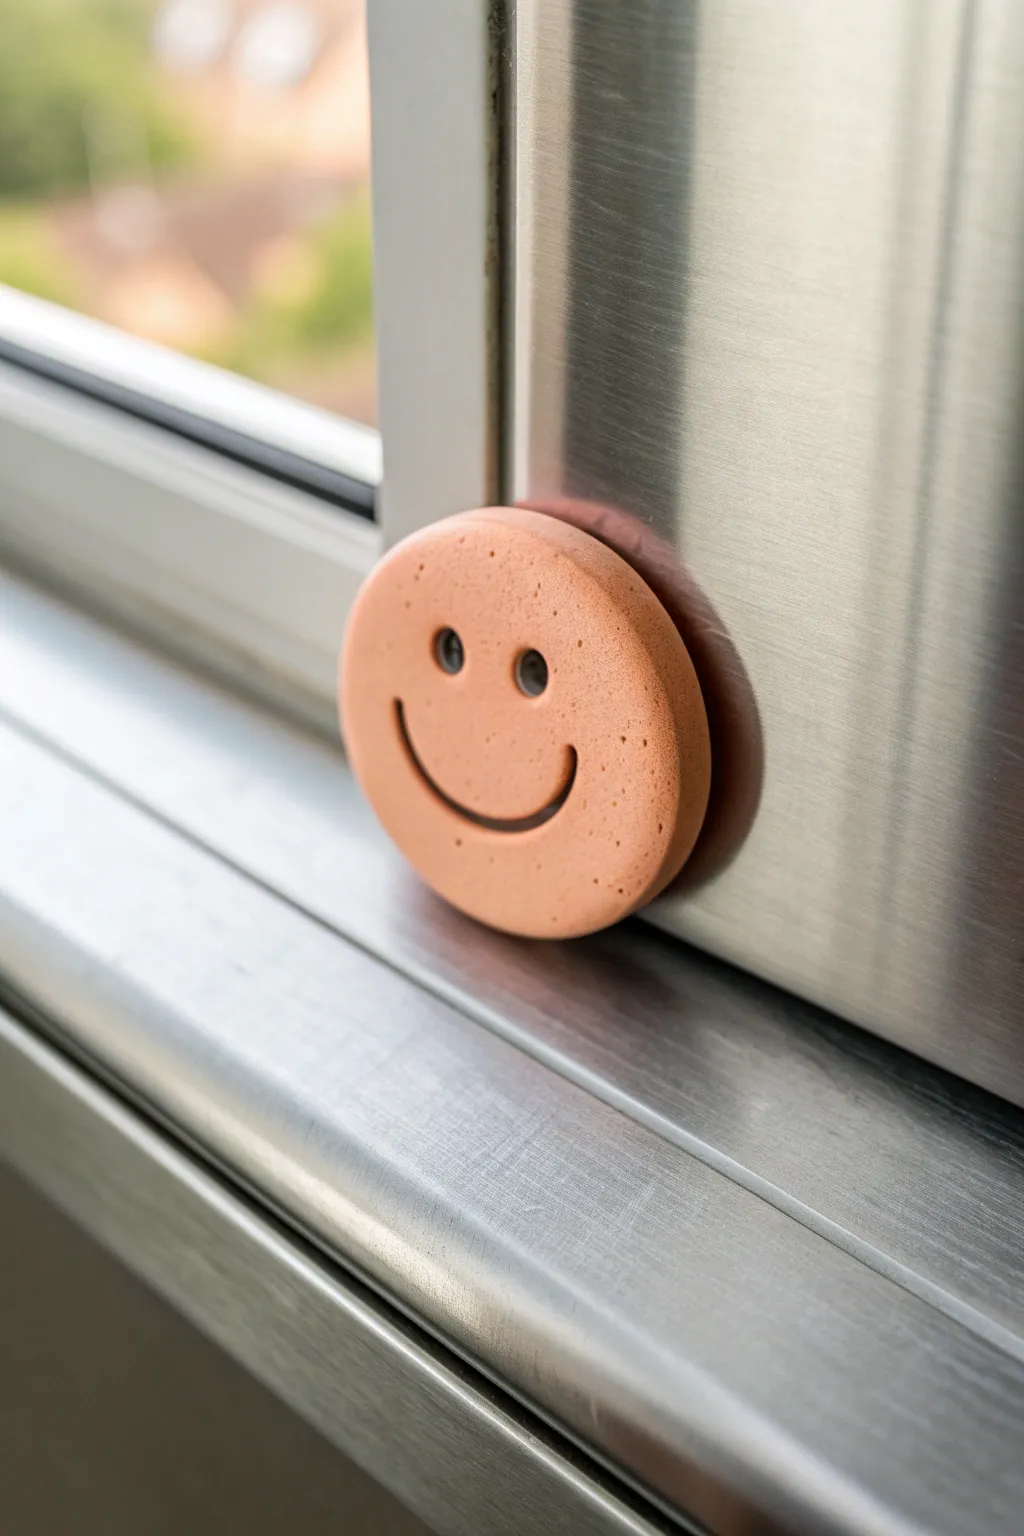
Brighten up your appliance surfaces with these delightfully simple, matte-finish smiley magnets. This project uses soft air-dry or polymer clay to create a clean, minimalist cheerful face in a warm peach tone.
How-To Guide
Materials
- Soft air-dry clay or polymer clay (peach/skin-tone)
- Small circular cookie cutter (approx. 1.5 – 2 inches)
- Rolling pin or smooth acrylic roller
- Small dotting tool or end of a paintbrush
- Curved clay tool or a plastic spoon edge
- Strong craft magnet or adhesive magnetic sheet
- Superglue or heavy-duty craft adhesive
- Fine-grit sandpaper (optional)
- Parchment paper or non-stick mat
Step 1: Prepping and Shaping
-
Condition the clay:
Start with a golf-ball-sized amount of your peach-colored clay. Knead it thoroughly in your hands until it becomes warm, pliable, and free of any air bubbles. -
Roll it out:
Place the clay onto a piece of parchment paper or a non-stick mat. Using your rolling pin, flatten the clay to an even thickness of about 1/4 inch (6mm). You want it substantial enough to hold the magnet but not too heavy. -
Cut the circle:
Take your circular cutter and press firmly into the clay. Give it a tiny wiggle before lifting to ensure a clean cut. -
Remove excess:
Peel away the extra clay from around your circle. If the edges of your circle look a bit rough from the cutter, gently smooth them with a fingertip dipped in a tiny bit of water.
Smooth Operator
Before cutting your circle, lay a piece of plastic cling wrap over the clay. When you cut through the plastic, it creates lovely soft, rounded edges instead of sharp ones.
Step 2: Adding the Expression
-
Mark the eyes:
Visualize the face placement first. Using a small dotting tool or the back end of a narrow paintbrush handle, press straight down into the upper third of the circle to create two neat, round indentations for the eyes. -
Deepen the sockets:
Don’t just poke the surface; press deep enough that shadows will naturally form in the holes, which gives the face its character. -
Create the smile:
For that perfect crescent smile, use a curved clay tool. If you don’t have one, the edge of a plastic spoon works wonderfully. Press the edge gently into the clay below the eyes. -
Refine the mouth:
Rock the curved tool slightly back and forth to widen the smile line just a fraction. This ensures the smile remains visible even after the clay shrinks slightly during drying. -
Add texture:
To mimic the slightly organic, matte look in the photo, take a clean toothbrush or a crumpled ball of aluminum foil and very lightly tap the surface of the clay. This removes the plastic shine.
Step 3: Finishing Up
-
Dry or bake:
If using air-dry clay, leave it on a flat surface for 24-48 hours, flipping halfway through. If using polymer clay, bake according to the manufacturer’s package instructions. -
Cool down:
Ensure the piece is completely cool and dry before moving to the next step. I prefer to let baked pieces sit for an hour to regain their full strength. -
Sand edges (optional):
Check the back edge of your circle. If there is a sharp lip from the cutter, lightly sand it down with fine-grit sandpaper for a professional finish. -
Prepare the magnet:
Select a magnet strong enough to hold the weight of the clay. If using a ceramic disc magnet, scuff the side you will glue with sandpaper to help the adhesive grip better. -
Attach the magnet:
Apply a dab of superglue or strong craft adhesive to the center of the back of your clay face. -
Press and hold:
Press the magnet firmly into the glue. Hold it there for 30 seconds to ensure an initial bond, then let it cure undisturbed for as long as the glue instructions recommend.
Level Up: Color Pop
Before baking or drying, use dry pastels or blush to dust pink rosy cheeks onto the clay for an adorable kawaii effect.
Pop your new cheerful creation onto the fridge or a metal frame to add a subtle smile to your day
Soft Clay Animal Paperclip Toppers
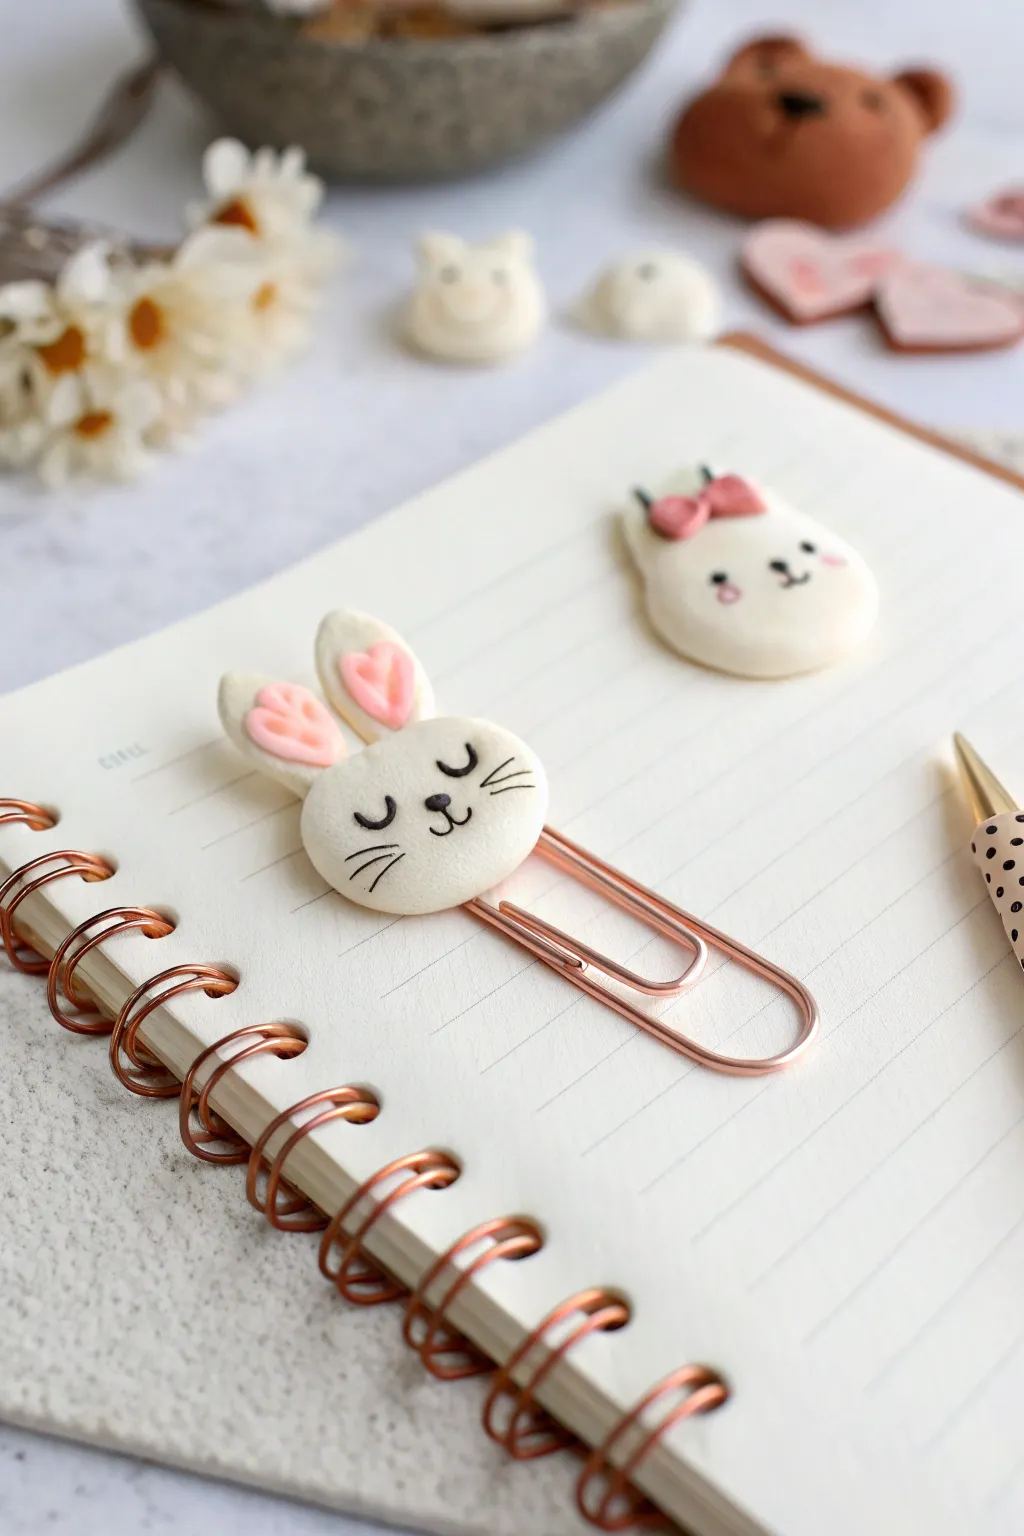
Transform boring office supplies into adorable desk companions with this simple soft clay project. This tutorial guides you through sculpting a sleepy bunny face onto a paperclip, complete with delicate pink details and painted whiskers.
Step-by-Step Guide
Materials
- White air-dry clay or polymer clay
- Pink air-dry clay or polymer clay
- Jumbo or standard metal paperclip (rose gold is pictured)
- Black acrylic paint or fine-tip permanent marker
- Fine detail paintbrush (00 size)
- Strong craft glue (e.g., E6000) if using air-dry clay
- Ball stylus tool
- Needle tool or toothpick
- Rolling pin (optional)
- Clean work surface (silicone mat or parchment paper)
Step 1: Base Construction
-
Prepare the Clay:
Condition a marble-sized amount of white clay by kneading it until it is soft and free of cracks. Divide a small portion off for ears later. -
Form the Head Shape:
Roll the larger portion of white clay into a smooth ball. -
Flatten and Shape:
Gently press the ball down with your palm or a flat tool to create a thick disc shape, about 1 inch in diameter. Smooth the edges with your finger to keep them rounded. -
Attach the Paperclip:
If using bakeable clay, press the paperclip gently into the back of your disc, then cover the embedded metal with a thin patch of extra clay to secure it. If using air-dry clay, allow the head to dry first, then glue the paperclip to the back securely.
Clean Clay Pro-Tip
Keep baby wipes nearby. White clay picks up dust and lint instantly. Wipe your hands and tools before handling the white clay to keep your bunny perfectly pristine.
Step 2: Sculpting the Ears
-
Shape the Outer Ears:
Take two small pea-sized pieces of white clay and roll them into teardrop shapes. -
Flatten the Ears:
Gently flatten the teardrops so they look like long bunny ears. -
Create the Inner Ear Detail:
Roll two tiny pieces of pink clay into very thin teardrop shapes, slightly smaller than the white ones. -
Assemble the Ears:
Press the pink teardrops onto the center of the white flattened teardrops. -
Attach to Head:
Place the ears at the top of the head disc. Blend the clay seams at the back with a modeling tool or your finger to ensure they stick firmly.
Level Up: Accessories
Make a tiny clay bow using the pink clay and attach it near an ear, or create a matching bear friend using brown clay for a complete woodland set.
Step 3: Adding the Face
-
Draw the Face Layout:
If you are nervous about painting directly, I like to use a needle tool to very lightly scratch the outline of the eyes and nose before applying paint. -
Paint the Sleepy Eyes:
Using your finest brush and black paint, or a marker, draw two downward-curving ‘U’ shapes for closed eyes. -
Add Eyelashes:
Carefully add one or two tiny flicks at the outer corner of each eye to represent lashes. -
Create the Nose:
Draw or paint a tiny upright oval or heart shape in the center of the face for the nose. -
Draw the Mouth:
Connect a small ‘w’ shape directly beneath the nose to give the bunny a little smile. -
Paint Whiskers:
With a very steady hand, draw three thin, short lines radiating from each cheek area. -
Add Cheek Color (Optional):
For a rosy glow, you can dry-brush a tiny amount of pink pastel powder or diluted pink paint onto the cheeks. -
Final Drying/Baking:
If using polymer clay, bake according to the package instructions (usually 275°F for 15-30 mins). If using air-dry clay, let it sit undisturbed for 24-48 hours until completely hard. -
Seal the Project:
Once fully dry or cool, apply a thin coat of matte varnish to protect the paint from chipping during daily use.
Now you have a charming custom clip to brighten up your planner or notebook pages
Soft Clay Photo and Card Stand
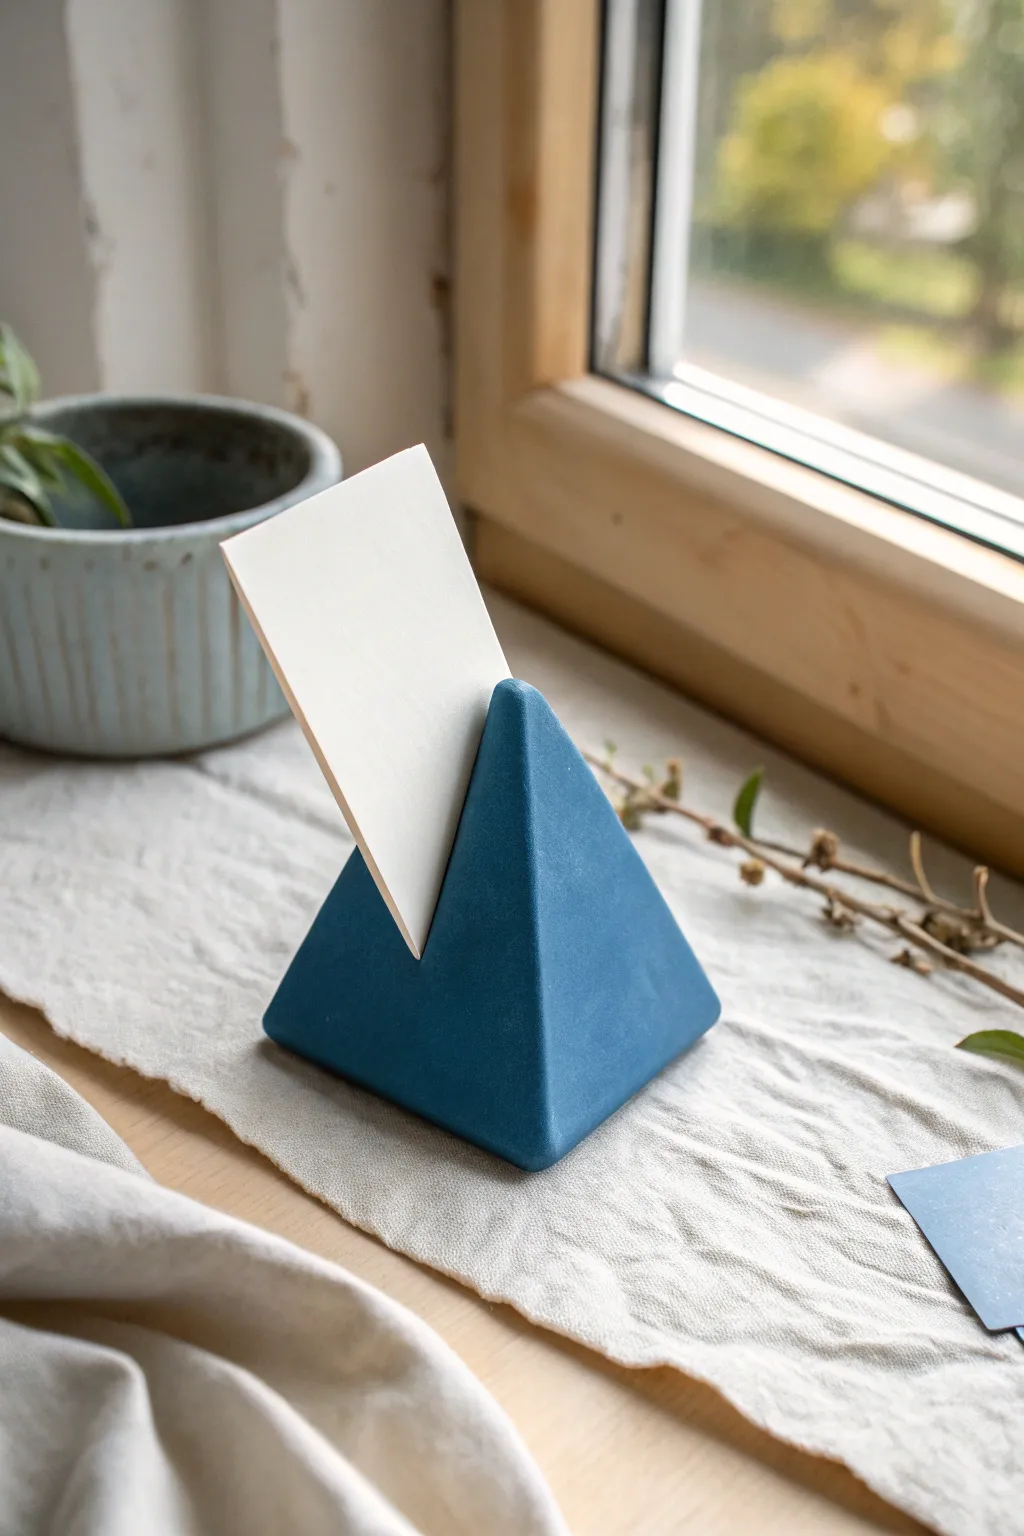
Embrace minimalism with this sleek, pyramid-shaped card stand crafted from soft clay. Its deep indigo hue and sharp geometric lines make it a modern functional sculpture for your desk or windowsill.
Step-by-Step Tutorial
Materials
- Air-dry clay or polymer clay (white)
- Deep blue acrylic paint (indigo or navy)
- Matte finish varnish or sealant
- Rolling pin
- Sharp crafting knife or blade
- Ruler
- Fine-grit sandpaper (400-600 grit)
- Small paintbrush
- Thin metal ruler or credit card (for creating slot)
Step 1: Shaping the Base
-
Condition the Clay:
Begin by taking a handful of your chosen clay and kneading it thoroughly until it becomes soft, pliable, and free of cracks. -
Form a Ball:
Roll the clay between your palms to create a smooth, dense sphere about the size of a tangerine. -
Create the Initial Shape:
Place the ball on your work surface and gently press it down to flatten the bottom, creating a sturdy base. -
Pinch the Peak:
Using your thumb and forefingers, gently pinch and pull the top of the clay mound upwards to start forming a cone shape. -
Refine the Sides:
Use a flat tool or a ruler to press against the sides of the cone, transforming the round shape into a four-sided pyramid. I find pressing alternating sides helps keep it symmetrical. -
Flatten the Faces:
Continue pressing and smoothing the four sides with your flat tool until the walls are straight and the edges become sharper. -
Check Stability:
Tap the base firmly on the table once more to ensure it sits perfectly flat and won’t wobble.
Clean Edges Trick
To get super sharp corners, let the clay dry to a ‘leather hard’ state (firm but not brittle) before doing a final shave with your sharp blade.
Step 2: Creating the Mechanism
-
Mark the Slot:
Using your knife, lightly score a line across the very top tip of the pyramid where you want the card to sit. -
Cut the Slot:
Carefully press a thin metal ruler or the blade of your knife straight down into the tip to create a deep slit. Wiggle it slightly to widen it just enough for cardstock. -
Smooth the Opening:
Use a damp finger to gently smooth the clay around the opening of the slit so it doesn’t look ragged. -
Final Shaping:
Re-check the pyramid’s sharp edges, as handling the tip might have distorted the sides slightly. Press them flat again if needed. -
Dry Completely:
Set the pyramid aside in a cool, dry place. Allow it to cure fully according to the package instructions (usually 24-48 hours for air-dry clay).
Stone Effect
Mix a tiny amount of baking soda into your blue paint or use a textured spray paint to give the pyramid a faux concrete or stone finish.
Step 3: Finishing Touches
-
Sand for Perfection:
Once bone dry, use fine-grit sandpaper to gently buff the flat sides and sharpness the corners. This removes any fingerprints or uneven textures. -
Clean the Dust:
Wipe the entire piece down with a barely damp cloth or a soft brush to remove all sanding dust before painting. -
Apply First Coat:
Paint the entire pyramid with your deep blue acrylic paint. Use long, smooth strokes to avoid brush marks. -
Layering Color:
Let the first coat dry, then apply a second layer to achieve that rich, opaque indigo finish seen in the photo. -
Paint the Slot:
Don’t forget to carefully dab a little paint inside the top slot so no white clay shows through when it’s empty. -
Seal the Work:
Finish by applying a coat of matte varnish. This protects the paint and gives it that velvety, soft-touch look.
Place your favorite photo or a daily affirmation card in the slot to complete your modern display
Soft Clay Desk Organizer Tray
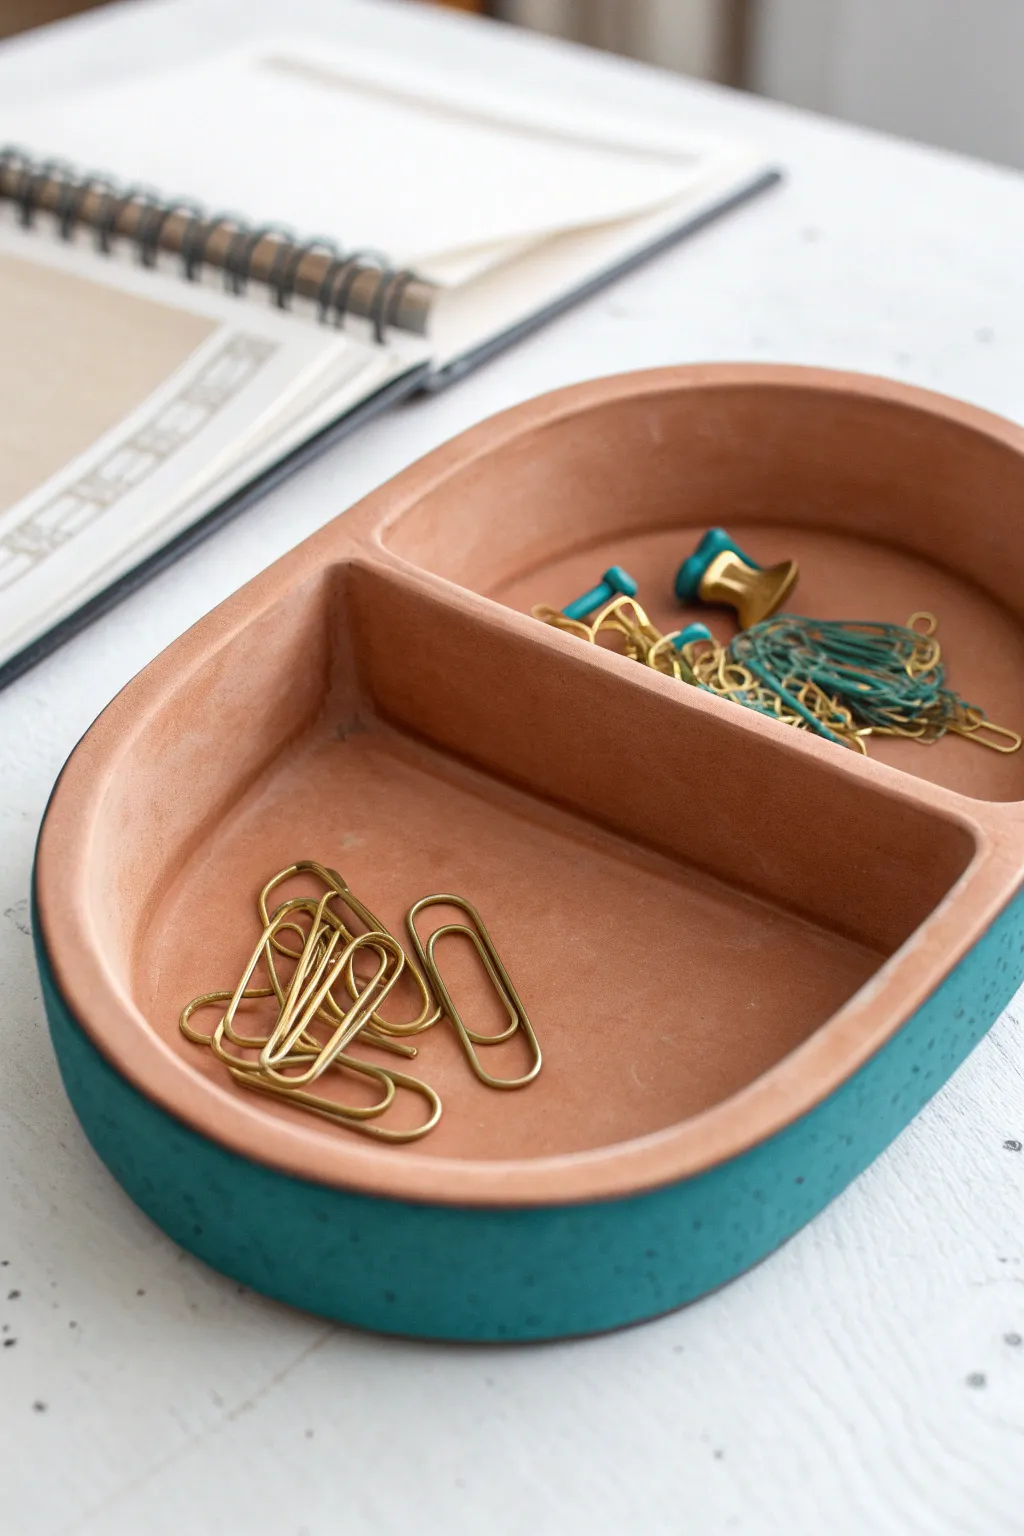
Bring a touch of modern earthiness to your workspace with this dual-compartment organizer. The natural terracotta finish contrasts beautifully with the speckled teal base, creating a functional piece that feels both grounded and playful.
Detailed Instructions
Materials
- Terracotta-colored air dry clay or polymer clay
- Rolling pin
- Oval cookie cutter or template
- Clay knife or craft blade
- Small bowl of water (for smoothing)
- Teal acrylic paint
- Black acrylic paint (for speckles)
- Old toothbrush
- Painters tape
- Fine grit sandpaper
- Matte varnish or sealant
Step 1: Shaping the Base and Walls
-
Roll the base:
Begin by conditioning your clay until it is soft and pliable. Roll out a slab to approximately 1/4 inch thickness. Use an oval cutter or a paper template to cut out the main base shape. -
Create the walls:
Roll a long snake of clay and flatten it into a long, rectangular strip for the exterior wall. Ensure the height is consistent, about 1 inch tall. Cut a separate, shorter strip for the center divider. -
Attach the wall:
Place the long strip along the edge of your oval base. If you are using air dry clay, score both surfaces (scratch hatch marks) and add a little water to create a slip before pressing them together. -
Blend the seams:
Use a clay tool or your finger to smooth the clay where the wall meets the base, both on the inside and outside. I find that wetting my finger slightly helps create a seamless transition. -
Insert the divider:
Place your shorter strip across the center of the oval to create two compartments. Score the contact points and blend the seams thoroughly into the outer walls and the floor of the tray.
Step 2: Refining and Finishing
-
Smooth the edges:
Check the top rim of the tray. If it’s uneven, trim it gently with your blade. Use a damp sponge or finger to round over the sharp edges for a softer, molded look. -
Dry or bake:
If using air dry clay, let it sit in a cool, dry place for 24-48 hours. If using polymer clay, bake according to the package instructions. Allow the piece to cool completely. -
Sand for perfection:
Once fully cured, use fine-grit sandpaper to buff away any fingerprints or bumps. Focus on the rim and the outside curve. -
Tape the design:
Apply painters tape around the exterior wall of the tray. Position the tape so that only the bottom half-inch of the outside wall is exposed. -
Paint the base:
Apply two coats of teal acrylic paint to the exposed bottom section. Let the first coat dry completely before adding the second for solid coverage. -
Add the speckles:
Water down a tiny amount of black acrylic paint. Dip an old toothbrush into the mixture, aim it at the teal section, and flick the bristles with your thumb to create a fine spray of speckles. -
Reveal and seal:
Carefully peel off the tape while the paint is still slightly tacky to ensure a crisp line. Once fully dry, coat the entire tray with a matte varnish to protect the clay and paint.
Cracking Clay?
If small cracks appear as your air dry clay dries, mix a tiny bit of fresh clay with water to make a paste and fill them in before sanding.
Super Smooth Finish
Use a little bit of baby oil on your fingertip to smooth out polymer clay before baking; it eliminates fingerprints almost instantly.
Your stylish new tray is now ready to keep your desk organized and looking sharp
Soft Clay Marbled Jewelry Pendants
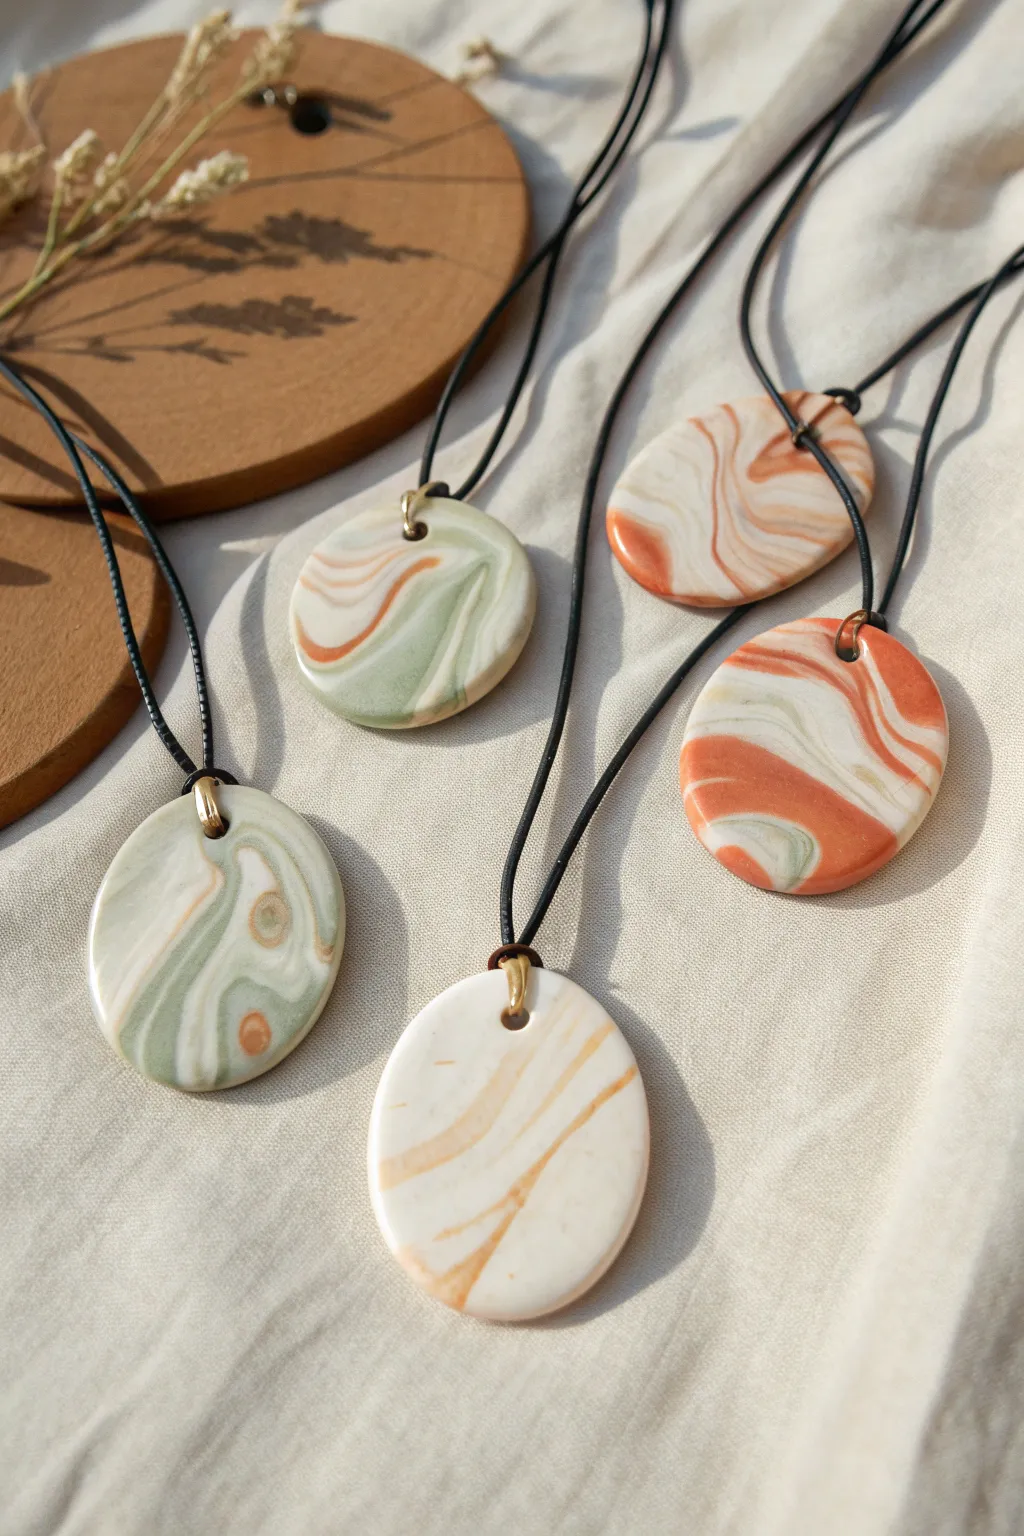
Capture the organic beauty of swirling sandstone and shoreline pebbles with these elegant marbled pendants. Using a simple soft clay technique, you can create one-of-a-kind jewelry pieces featuring soothing blends of terracotta, sage green, and cream.
Step-by-Step Tutorial
Materials
- Polymer clay (white, terracotta/burnt orange, sage green, light beige)
- Clay roller or rolling pin
- Circle and oval clay cutters (approx. 1.5 – 2 inches)
- Jump rings (gold or brass finish)
- Black jewelry cord or leather string
- Jewelry pliers
- Gloss varnish or UV resin (optional for shine)
- Small paintbrush (if varnishing)
- Toothpick or small drill bit
- Baking sheet and parchment paper
- Clay slicing blade
Step 1: Color Preparation
-
Condition the clay:
Begin by thoroughly kneading each block of polymer clay until it is soft and pliable. This warmth helps prevent cracking later on. -
Create logs:
Roll each color—white, terracotta, sage green, and beige—into separate snake-like logs, roughly 4 inches long and 1/4 inch thick. -
Combine the colors:
Twist the four colored logs together into one large rope. Fold the rope in half and twist it again to begin the mixing process.
Step 2: Marbling Technique
-
Roll and fold:
Roll the combined twist into a long smooth log again. Fold it, twist it, and roll it once more. Repeat this 3-4 times, but be careful not to over-mix, or the distinct colors will turn muddy. -
Form a ball:
Once you see nice striations, roll the log into a tight ball. I like to inspect the surface here to ensure there are no trapped air bubbles. -
Flatten the slab:
Using your acrylic roller or rolling pin, flatten the ball into a sheet approximately 1/4 inch thick. Roll in different directions to stretch the marble pattern organically. -
Select your pattern:
Look closely at your clay sheet to find the specific areas where the marbling looks most pleasing to you.
Clean Cuts Pro Tip
Before pressing your cutter into the clay, cover the clay sheet with a piece of plastic wrap. Cutting through the plastic creates beautifully rounded, domed edges instead of sharp ones.
Step 3: Cutting and Shaping
-
Cut the shapes:
Press your circle or oval cutters firmly into the chosen areas of the clay sheet to create your pendant shapes. -
Smooth the edges:
Gently lift the cut shapes. Use your finger, lightly dipped in a bit of baby oil or cornstarch if sticky, to smooth any rough edges left by the cutter. -
Pierce the hole:
Use a toothpick to carefully poke a hole near the top edge of each pendant for the jump ring. Wiggle it slightly to ensure the hole is wide enough.
Add Golden Veins
For a luxe touch, press bits of gold leaf onto the clay slab before the final rolling step. The gold will fragment and embed into the clay, looking like natural mineral veins.
Step 4: Baking and Finishing
-
Bake the pendants:
Place the pieces on a parchment-lined baking sheet. Bake according to your brand of polymer clay instructions (usually around 275°F for 15-30 minutes). -
Cool down:
Allow the pendants to cool completely before determining if you want to sand any remaining rough spots. -
Add shine:
For that glossy, polished stone look seen in the photo, apply a thin coat of gloss varnish or UV resin to the surface and let it cure or dry. -
Attach hardware:
Using two pairs of jewelry pliers, twist open a jump ring, thread it through the hole in the pendant, and close it securely. -
String the necklace:
Thread your black cord through the jump ring and tie a sliding knot or add a clasp to finish your necklace.
Enjoy wearing your sophisticated wearable art that looks like polished river stones
Soft Clay Terrazzo-Style Coaster Tiles
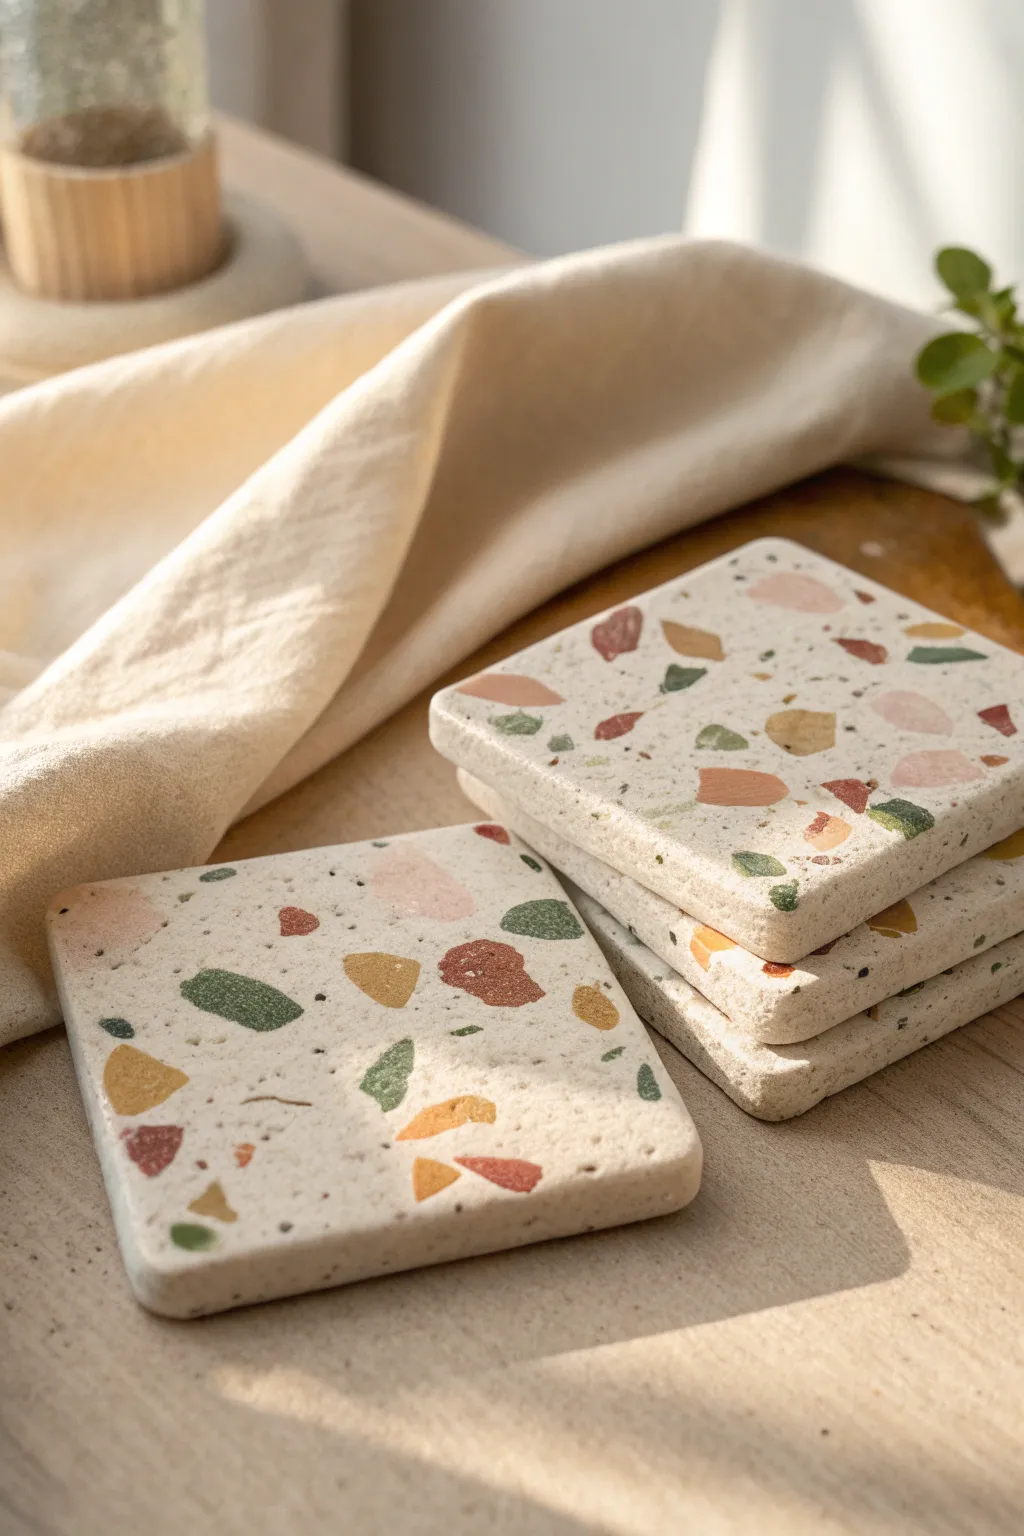
Bring a trendy touch of artisanal charm to your coffee table with these easy-to-make faux terrazzo coasters. By embedding colorful clay chips into a creamy white base, you can achieve that polished stone look without the heavy lifting of concrete pouring.
How-To Guide
Materials
- White polymer clay (for the base, approx. 2oz per coaster)
- Small amounts of colored polymer clay (mustard yellow, terracotta, sage green, blush pink)
- Acrylic rolling pin or clay machine
- Square cookie cutter (approx. 3.5 – 4 inches) or craft knife and ruler
- Parchment paper or a ceramic tile work surface
- Sanding paper (wet/dry, various grits from 400 to 1000)
- Oven (for baking) and baking sheet
- Clay glaze or sealant (optional, matte finish)
Step 1: Preparing the Chips
-
Roll out colors:
Start by conditioning your colored clays until soft. Roll each color—mustard, terracotta, sage, and blush—into thin, flat sheets, about 1-2mm thick. -
Bake the sheets:
To get crisp chips that don’t smear, partially bake these thin colored sheets according to the package instructions, but primarily just for 5-10 minutes so they harden enough to cut. -
Cool and crumble:
Let the sheets cool completely. Once cool, break them apart by hand into small, irregular shards. Aim for variety in size, from tiny specks to larger triangles.
Smudged Colors?
If your colored chips are smearing into the white base during rolling, your chips weren’t baked enough initially. Ensure the colored sheets are fully hard before breaking them.
Step 2: Creating the Base
-
Condition the white clay:
Take your white polymer clay and condition it thoroughly until it is pliable and warm. This is crucial for preventing cracks later. -
Mix in the chips:
Flatten the white clay slightly and sprinkle a generous amount of your pre-baked colored chips onto it. Fold the clay over and knead gently to distribute the chips throughout the block. -
Roll the slab:
Place the mixed clay between two sheets of parchment paper. Roll it out into a thick slab, approximately 1/4 inch thick. I find rolling guides help keep the thickness even. -
Add surface chips:
If the surface looks too plain, press extra colored chips directly onto the top of the slab to ensure the terrazzo pattern is visible. -
Smooth the surface:
Gently roll over the slab again with the rolling pin to embed those surface chips so they are flush with the white base.
Step 3: Shaping and Refining
-
Cut the shapes:
Using your square cutter or a sharp blade and ruler, cut out your coaster shapes. Wiggle the cutter slightly to ensure clean edges before lifting. -
Soften edges:
Dip your finger in a tiny bit of baby oil or cornstarch and gently rub the cut edges to round them slightly. This removes the harsh ‘cut’ look and mimics real stone. -
Final bake:
Place the raw coasters on a parchment-lined baking sheet. Bake for the full duration recommended by your clay manufacturer (usually 30 mins at 275°F/130°C for this thickness). -
Cool down:
Allow the coasters to cool completely inside the oven with the door cracked, or on a wire rack. Don’t rush this, as polymer clay hardens fully as it cools.
Level Up: Cork Backing
Cut a square of adhesive cork sheet slightly smaller than your coaster and attach it to the bottom. This adds a professional feel and protects wooden tabletops.
Step 4: Polishing
-
Wet sanding:
Once cool, place a sheet of 400-grit sandpaper flat on a surface and wet it. Rub the coaster face-down in circular motions to reveal the sharp edges of the colored chips. -
Refine the finish:
Repeat the sanding process with increasingly finer grits (600, then 1000) until the surface is buttery smooth and the colors pop clearly against the white background. -
Clean up:
Wash the coasters with water to remove any sanding dust and dry them with a lint-free cloth. -
Seal (Optional):
If you want extra protection against coffee stains, apply a thin layer of matte varnish/sealer designed for polymer clay.
Now you have a stunning set of modern coasters ready to catch drips in style
Soft Clay Shell Diorama Scene
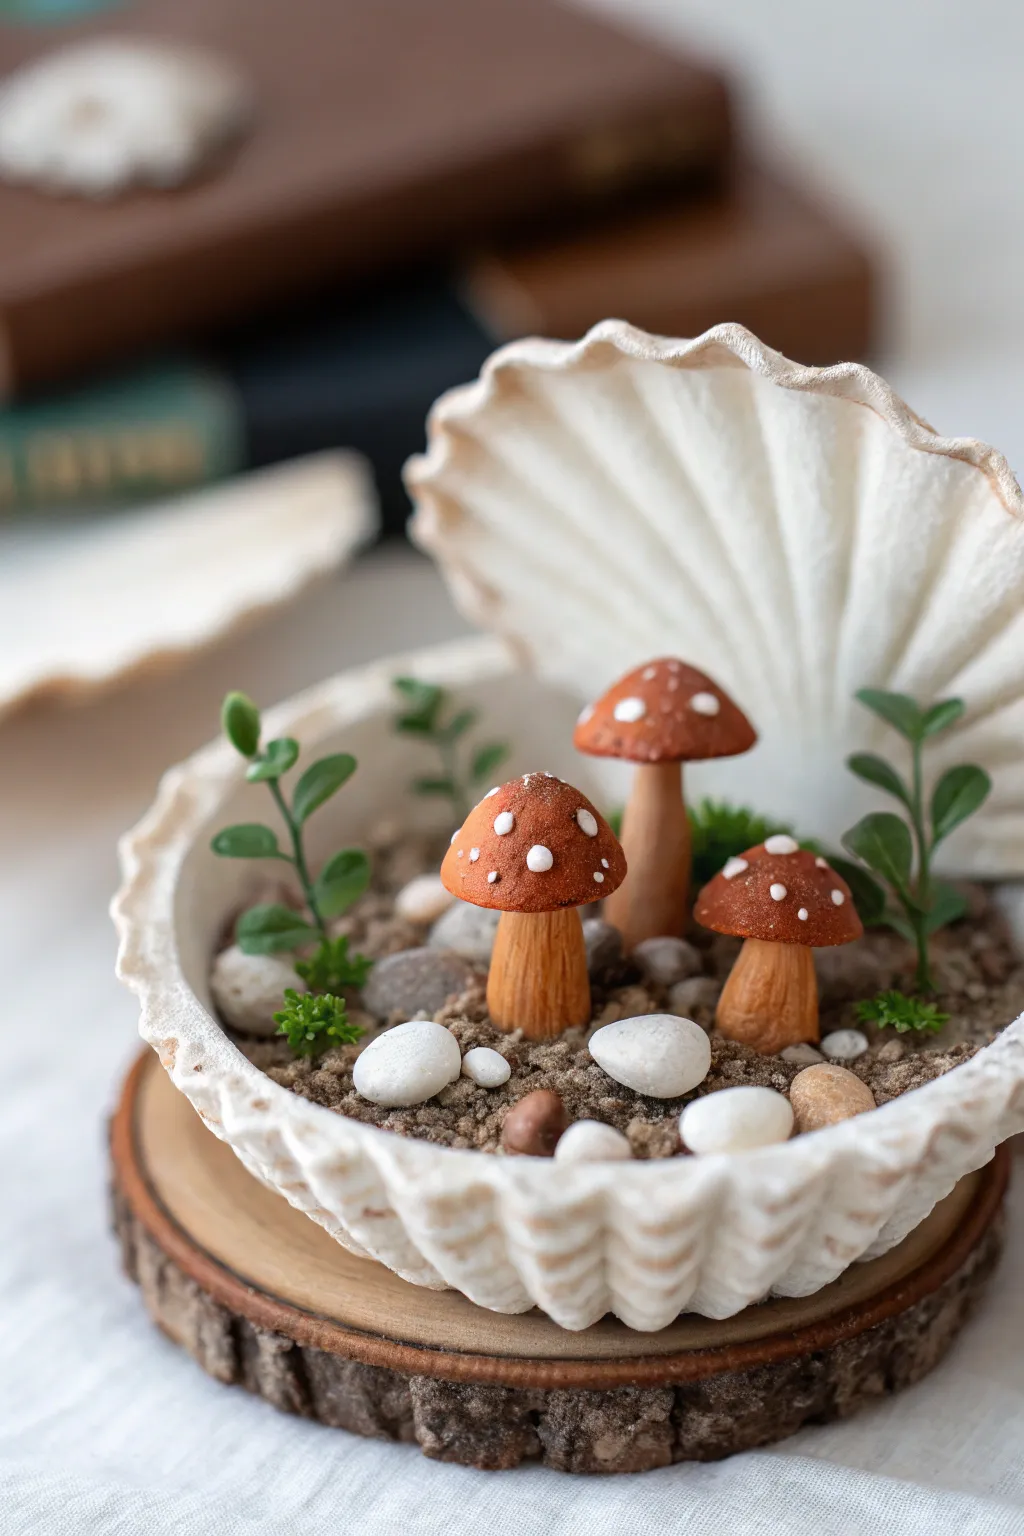
Transform a simple scallop shell into a magical miniature forest floor with this charming diorama. Using soft clay, you’ll sculpt delicate mushrooms and leafy greens to nestle inside a realistic pocket-sized world.
Detailed Instructions
Materials
- White polymer clay or soft air-dry clay
- Large hinged scallop shell (real or crafted)
- Acrylic paints (burnt sienna, burnt umber, cream, white, sap green)
- Fine grit sandpaper
- Fine-tipped paintbrush and dotting tool
- Craft glue or strong super glue
- Fine decorative sand or dried coffee grounds
- Small pebbles or aquarium gravel
- Sculpting tools (needle tool, small ball tool)
- Small wood slice for the base
Step 1: Sculpting the Mushrooms
-
Form the stems:
Begin by conditioning your clay until it is soft and pliable. Roll three small balls of clay and elongate them into tapered cylinders to form the mushroom stems, making one slightly taller than the others. -
Add stem texture:
Use a needle tool to gently scratch vertical lines up and down the stems. I find this creates a lovely bark-like texture that holds paint beautifully later. -
Shape the caps:
Roll three smaller balls of clay and flatten them slightly into domes. Press your thumb gently into the underside to create a curved cup shape where the stem will attach. -
Assemble the fungi:
Attach the caps to the stems securely. If using polymer clay, blend the clay at the join slightly; for air-dry clay, use a tiny dab of water or slip. -
Create tiny leaves:
Roll tiny snakes of clay for plant stems and pinch extremely small teardrop shapes for leaves. Attach these leaves to the clay stems to create two small sprigs of greenery. -
Curing or Drying:
Bake your clay pieces according to the package instructions if using polymer clay, or let them air dry completely for 24 hours.
Unsteady Mushrooms?
If your mushrooms keep falling over while the glue sets, prop them up with extra bits of poster tack or masking tape until the adhesive is fully cured.
Step 2: Painting the Details
-
Base coat the stems:
Paint the stems with a wash of cream and burnt umber. Wipe away excess paint with a paper towel so the darker color stays in the vertical grooves you sculpted. -
Paint the caps:
Coat the mushroom caps in a rich burnt sienna or rust color. You may need two thin coats to get a solid, opaque coverage. -
Add the spots:
Dip a fine dotting tool or the tip of a toothpick into white acrylic paint. Carefully apply tiny, irregular dots to the tops of the mushroom caps. -
Paint the greenery:
Paint the clay leafy sprigs with sap green. Adding a tiny touch of yellow to the tips can make them look sun-kissed and more realistic.
Step 3: Assembling the Scene
-
Prepare the shell base:
Apply a generous layer of craft glue to the bottom interior of your scallop shell. While the glue is wet, position your mushrooms and clay plants where you want them. -
Anchor with stones:
Place larger pebbles around the base of the mushroom stems. This helps support them while the glue dries and adds visual weight to the composition. -
Add the ground:
Pour fine sand or dried coffee grounds over the remaining exposed glue to create the dirt effect. Gently tap off any excess that doesn’t stick. -
Detail with final pebbles:
Glue a few tiny white stones on top of the sand layer for contrast. I always check the balance here to ensure the scene doesn’t look too cluttered. -
Mount the shell:
Finally, use strong glue to attach the bottom of the scallop shell to a rustic wood slice to ensure it stands upright and stable on your shelf.
Glow Up Idea
Mix glow-in-the-dark powder into your white paint for the spots. Your little mushroom forest will softly illuminate when the lights go out.
Place your completed miniature on a bookshelf or desk to enjoy a tiny joyful view of nature every day
Soft Clay Puffy Texture Sampler Board
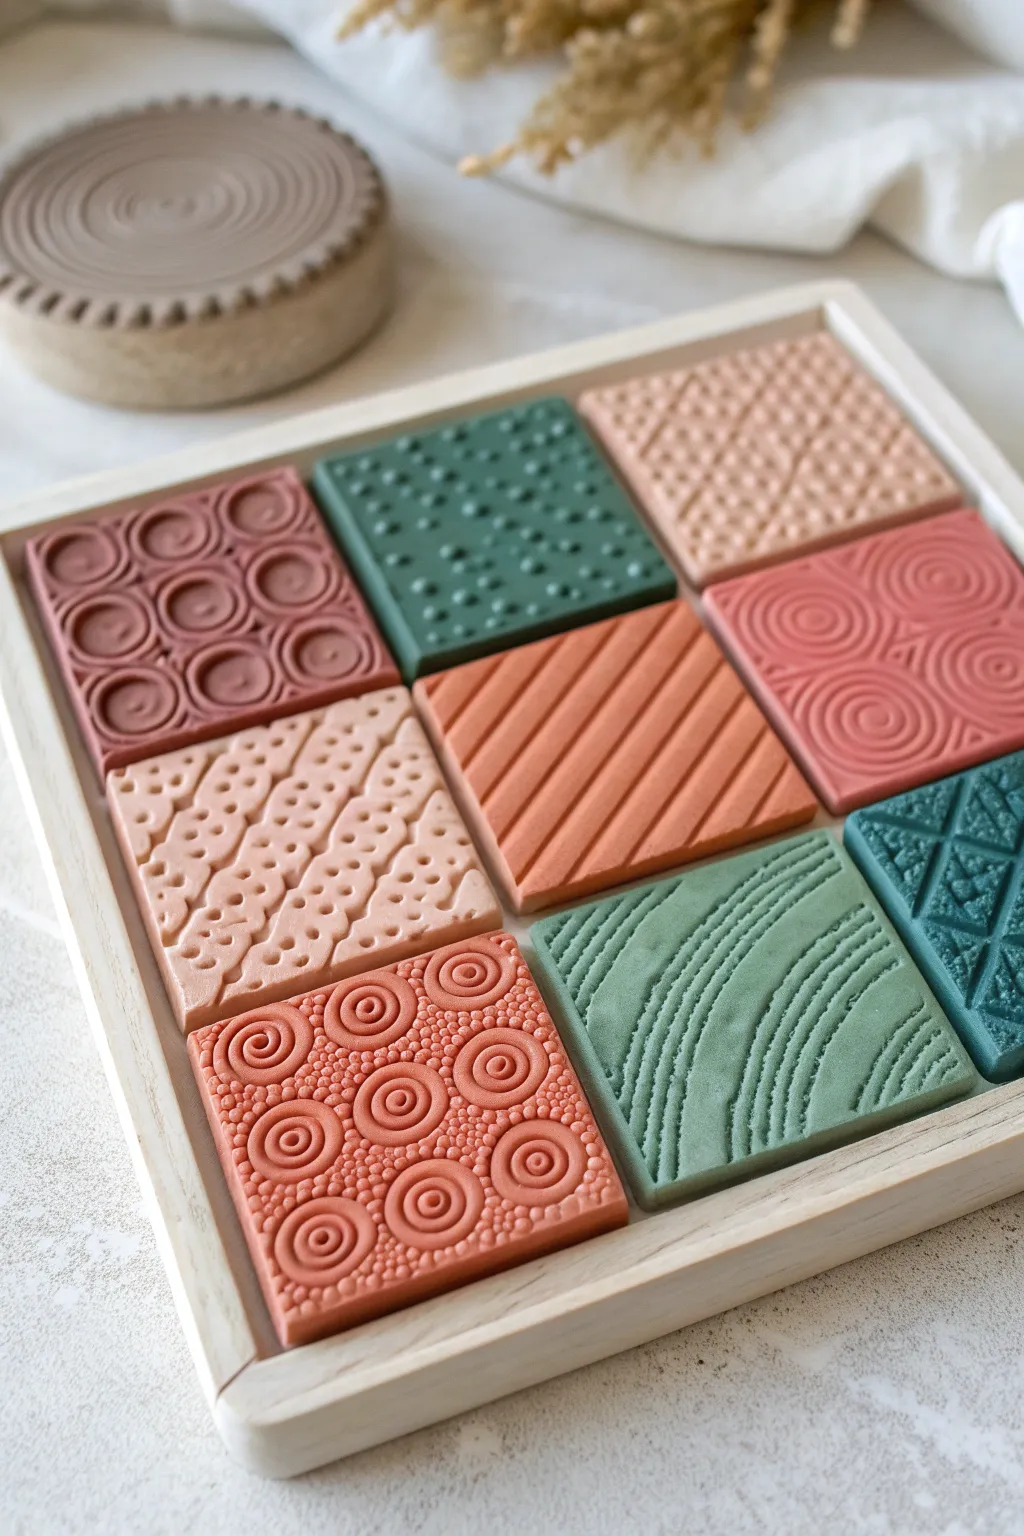
Create a captivating tactile display with these colorful, textured clay squares arranged in a simple wooden frame. This sampler board showcases a variety of satisfying patterns and muted earth tones, making it a perfect sensory tool or a modern art piece for your shelf.
How-To Guide
Materials
- Air-dry soft clay (foam clay or soft polymer clay)
- Acrylic paints (muted rust, sage green, terracotta, blush pink, beige, teal)
- Square wooden tray or shadow box frame (approx. 8×8 inches)
- Rolling pin
- Square cookie cutter (sized to fit 3×3 in your tray)
- Texture tools: circle stamps, comb tool, forks, burlap fabric, dotting tools
- Sandpaper (fine grit)
- Craft glue or strong double-sided tape
- Ruler
Step 1: Preparing the Clay Base
-
Color Mixing:
Begin by dividing your white soft clay into nine equal portions. Knead different acrylic paint colors into each ball of clay to create your palette of muted earth tones. Aim for a mix of warm terracotta, cool sage greens, and soft beiges. -
Conditioning:
Knead each colored ball thoroughly until the pigment is fully incorporated and the clay feels pliable and warm. This prevents cracks from forming later. -
Rolling:
Take your first colored ball and roll it out on a non-stick surface to a uniform thickness of about 1/4 inch (6mm). Ensure the surface is smooth and free of air bubbles. -
Cutting:
Use your square cookie cutter to stamp out a precise shape. If you don’t have a cutter, measure a square template with paper and carefully cut around it with a craft knife.
Step 2: Texturing the Tiles
-
Concentric Circles:
For the rust-colored tile, use circle cutters or bottle caps of varying sizes. Press them gently into the clay to create raised ring patterns without cutting all the way through. -
Dot Patterns:
On a sage green square, take a dotting tool or the end of a paintbrush. Press randomly or in a grid to create an indented polka-dot texture. -
Diagonal Lines:
Using a blunt knife or a ruler edge, press diagonal lines across an orange-toned square. Keep the pressure even so the lines are consistent in depth. -
Wavy Combs:
For the textured green tile, use a texture comb or a fork. Drag it in curved, swooping motions to create organic, wave-like ridges. -
Intricate Imprints:
For the highly detailed beige tile, press a piece of lace, a textured button, or a patterned rolling pin firmly into the clay surface carefully, then peel it back to reveal the design. -
Geometric Stamp:
On the dark teal square, use a geometric stamp or carve triangular patterns manually with a needle tool to create a deeper relief effect. -
Swirl Stamps:
For the pink tile, use a spiral stamp to create repeated swirl motifs. I like to rotate the stamp slightly with each press to make the pattern feel dynamic.
Fixing Warp
If your clay squares curl up closer to the edges while drying, place a heavy book on top of them (with parchment paper in between) during the final few hours of the drying process to flatten them out.
Step 3: Assembly & Finishing
-
Drying:
Lay all nine finished squares on a flat surface lined with parchment paper. Let them air dry completely for 24-48 hours, flipping them occasionally to prevent warping. -
Sanding Edges:
Once fully dry, inspect the edges of your squares. Use fine-grit sandpaper to gently smooth down any rough burrs or sharp corners left by the cutter. -
Dry Fitting:
Place the dried squares into your wooden tray to test the arrangement. Play with the color composition until the balance feels right—try separating similar colors. -
Gluing:
Apply a dab of craft glue or a strip of strong double-sided tape to the back of each square. Press them firmly into place within the tray. -
Final Seal:
Optionally, brush a thin layer of matte varnish over the clay tiles if you want to protect the surface from dust and handling.
Try Scents
Knead a drop of essential oil like lavender or citrus into the soft clay before shaping. This turns your texture board into a multi-sensory experience that smells amazing when handled.
Enjoy the satisfying look and feel of your handmade geometric art piece