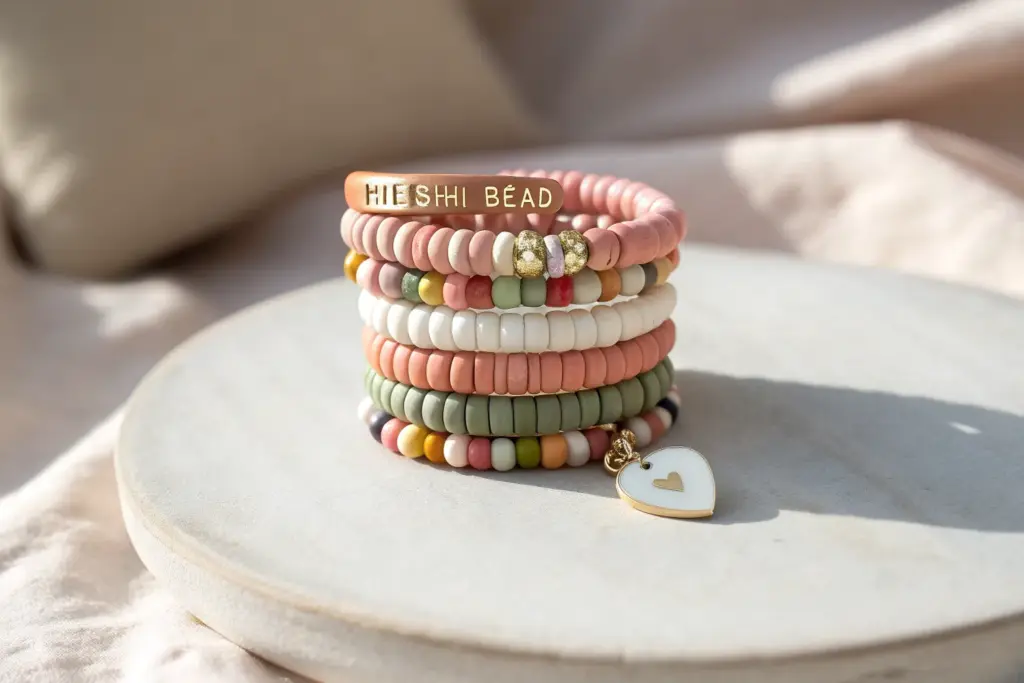
If you’ve got a bowl of polymer clay heishi beads and a little time, you’re basically minutes away from the cutest bracelet stack ever. Here are my favorite cute clay bracelet ideas I keep coming back to when I want something colorful, personal, and totally wearable.
Preppy Color-Block Segments
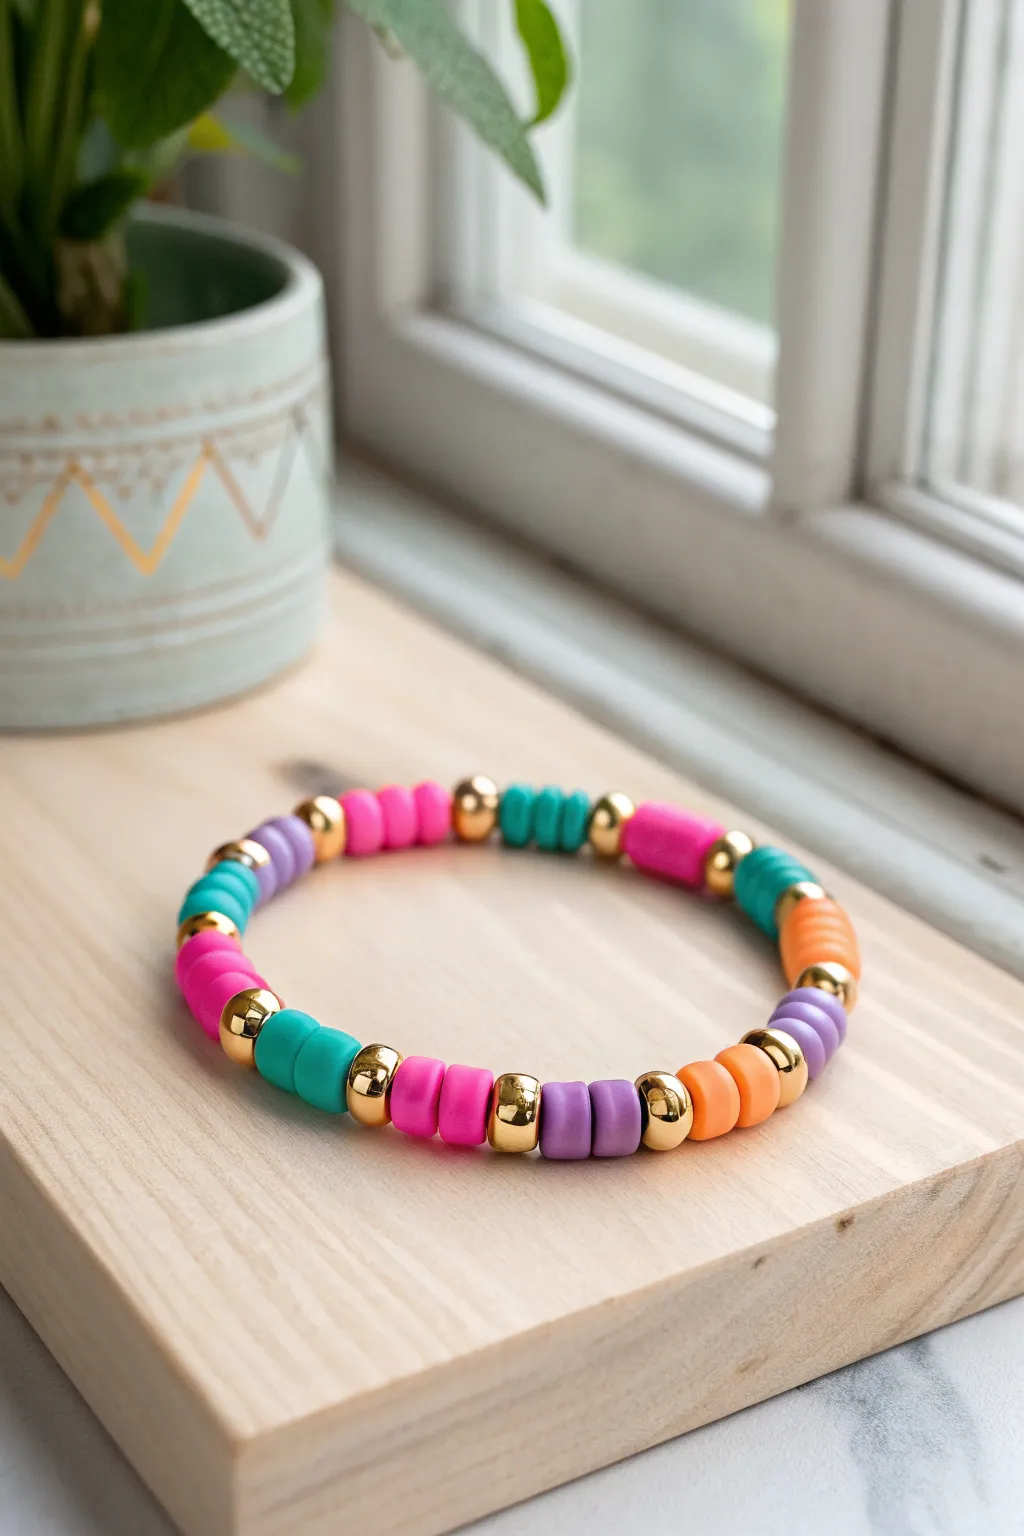
Brighten up your wrist stack with this trendy color-blocked design that alternates vibrant polymer clay discs with shining gold accents. The chunky gold spacer beads give this simple elastic bracelet a weighted, high-end feel that looks great solo or layered.
How-To Guide
Materials
- Polymer clay heishi beads (hot pink, purple, teal, orange)
- 6mm or 8mm gold round spacer beads (large hole)
- 0.8mm clear elastic stretch cord
- Jewelry glue or clear nail polish
- Scissors
- Bead stopper or tape
Step 1: Preparation & Planning
-
Measure your wrist:
Wrap the elastic cord loosely around your wrist to find a comfortable fit. Add about 3-4 inches of extra length to allow room for tying the knots later. -
Cut the cord:
Snip the elastic cord to your measured length using your scissors. -
Secure the end:
Place a bead stopper or simply a piece of tape on one end of the cord. This prevents your beads from sliding right off as you work. -
Sort your palette:
Before you start stringing, organize your heishi beads by color. You will need pairs of each color: hot pink, purple, teal, and orange.
Step 2: Creating the Segments
-
Start with gold:
Thread a single large gold round spacer bead onto the elastic first. This will act as the anchor and divider for your first color segment. -
Add first color block:
Thread on two purple heishi clay beads. The design relies on short segments, so stick to just two discs per color block to match the photo. -
Insert a divider:
Slide on another large gold spacer bead immediately after the two purple beads. -
Switch to orange:
Add your next color segment by threading two orange heishi beads, followed by another gold spacer. -
Continue the pattern:
Next, add two teal beads, then a gold spacer. I like to double-check my pattern here to ensure the color sequence flows nicely. -
Complete the sequence:
Finish the main sequence with two hot pink beads followed by a gold spacer. -
Repeat until full:
Repeat this pattern (Purple, Gold, Orange, Gold, Teal, Gold, Pink, Gold) until the bracelet wraps comfortably around your wrist. The specific order doesn’t matter as much as keeping the ‘two beads, one spacer’ rhythm.
Knot Slipping?
If your elastic is slippery, try a surgeon’s knot instead of a square knot. Loop the cord through twice on the first pass before pulling tight for extra grip.
Step 3: Finishing Touches
-
Check the fit:
Wrap the unfinished strand around your wrist one last time. It should sit comfortably without pinching your skin or dropping too low on your hand. -
Pre-stretch the cord:
Gently give the two ends of the elastic a few tugs. Pre-stretching helps prevent the bracelet from loosening up after you wear it for the first time. -
Tie the knot:
Remove the tape or bead stopper. Tie a standard square knot (right over left, left over right). Pull it tight. -
Double knot:
Tie a second square knot on top of the first one to ensure security. -
Glue the knot:
Apply a tiny dot of jewelry glue or clear nail polish directly onto the knot. Let this dry completely before moving on. -
Hide the knot:
If possible, gently tug the elastic so the knot slides inside the hole of one of the large gold beads to conceal it. -
Trim excess:
Carefully trim the excess elastic tails with scissors, getting close to the knot but being careful not to snip the knot itself.
Pattern Precision
For a symmetrical look, try to end your pattern with a color segment rather than a gold bead, so when you tie it, two gold beads don’t end up touching.
Slip on your new colorful accessory and enjoy the pop of prep school style it brings to your outfit


Name or Initial Centerpiece
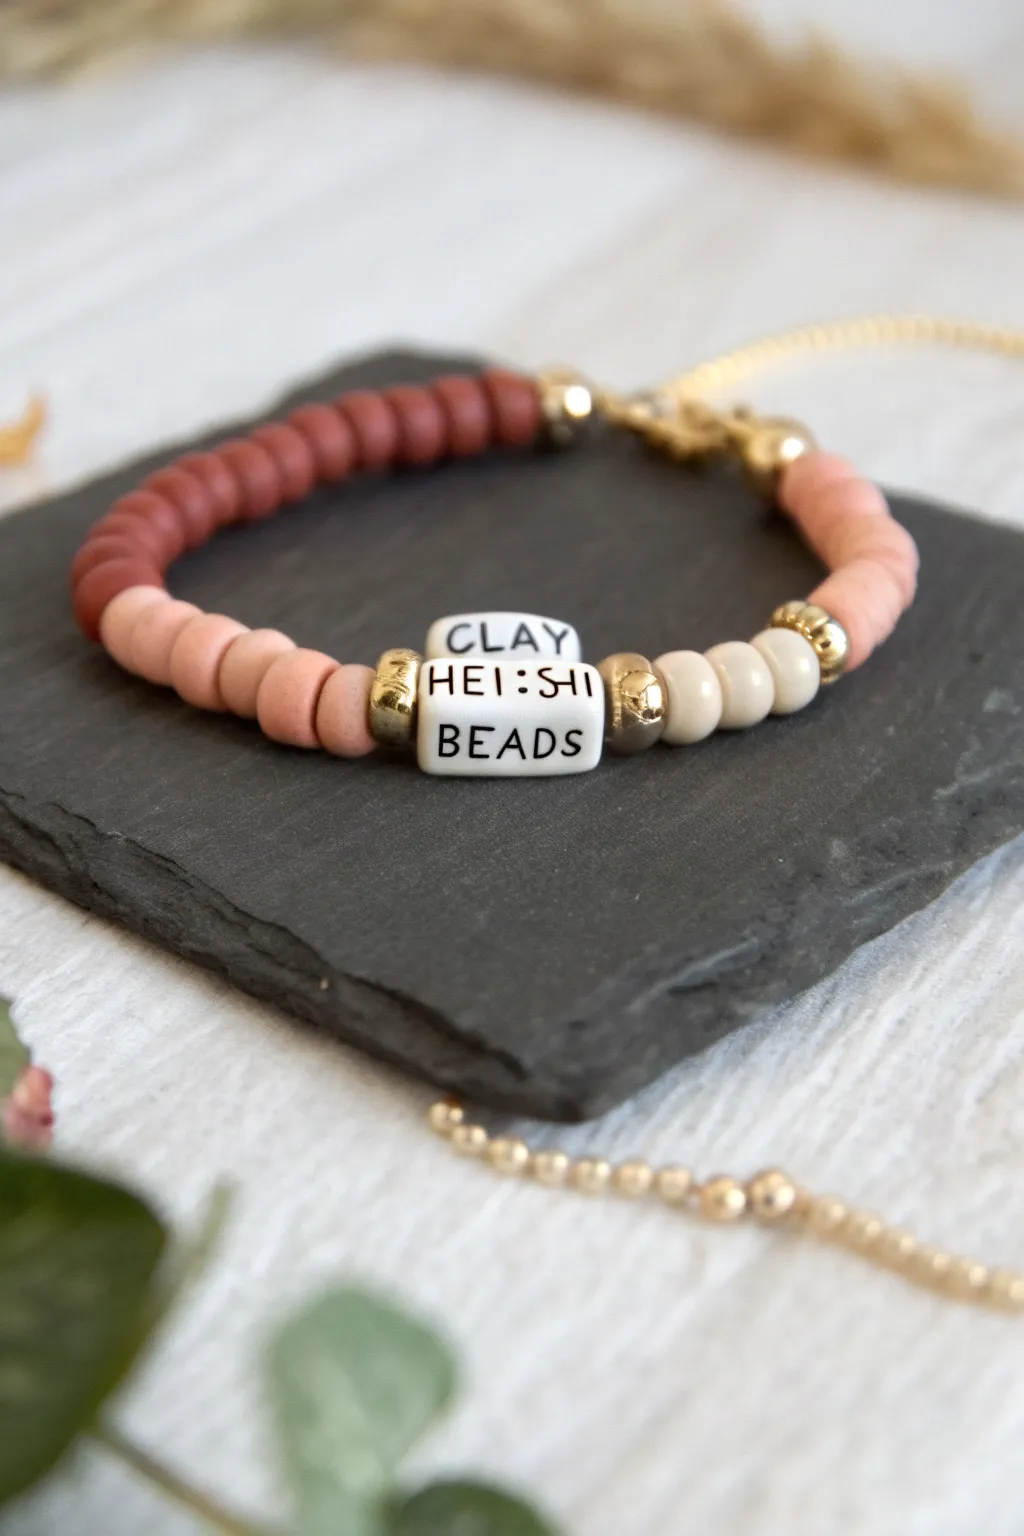
Capture a trendy boho aesthetic with this custom heishi bead bracelet designed around a stacked letter centerpiece. The warm gradient of terracotta, peach, and cream clay beads is perfectly accented by textured gold spacers for a polished, boutique look.
Step-by-Step Tutorial
Materials
- Polymer clay heishi beads (6mm or 4mm) in dark terracotta
- Polymer clay heishi beads in peach
- Polymer clay heishi beads in cream/off-white
- White oval letter beads (spelling CLAY HEISHI BEADS or desired phrase)
- Gold textured rondelle spacer beads (6mm)
- Strong elastic cord (0.8mm clear)
- Small gold crimp bead covers (optional)
- Jewelry glue (e.g., G-S Hypo Cement)
- Scissors
Step 1: Planning and Prep
-
Measure your wrist:
Wrap a piece of string around your wrist to find your comfortable size, then add about 1/2 inch to that measurement for a fit that isn’t too tight. -
Cut the cord:
Cut a piece of elastic cord about 10-12 inches long. Having this extra length makes tying the final knot significantly easier than working with a short tail. -
Pre-stretch the elastic:
I always give the elastic a few firm tugs before stringing anything. This pre-stretching prevents the bracelet from drooping or loosening immediately after you wear it. -
Layout the design:
Arrange your beads on a bead board or a towel to visualize the gradient. For this design, you’ll want a sequence of dark terracotta, transitioning to peach, then the centerpiece, then cream, and finally looping back to dark terracotta.
Step 2: Stringing the Centerpiece
-
Secure the end:
Place a piece of tape or a bead stopper on one end of your elastic cord to prevent beads from sliding off while you work. -
Start the center stack:
Thread on one gold textured spacer bead. This will act as the shiny bookend for your message. -
Add first message bead:
Thread your letter beads. Notice the stacking effect in the photo? To achieve this, thread your middle word first if doing a single line, or arrange them horizontally. -
Replicate the stacked look:
If you want the exact stacked look shown (where ‘CLAY’ sits atop ‘HEISHI’), you would typically need a multi-strand separator or just string them linearly for a standard single-strand version. For this tutorial, we will string them linearly: ‘CLAY HEISHI BEADS’. -
Finish the center:
After your last letter bead is on, thread a second gold textured spacer bead to close the focal section.
Knot Security
Use a surgeon’s knot (looping through twice) and pull tight! Let the glue dry fully before trimming the tails—cutting too early is the #1 reason bracelets pop.
Step 3: Creating the Ombré Effect
-
String the cream side:
On the right side of the centerpiece, string about 5-6 cream-colored heishi beads. -
Transition to peach:
Follow the cream beads with a small gold spacer bead to separate the color block, then add approximately 10-12 peach heishi beads. -
Switch to the other side:
Move to the left side of your centerpiece (remove the tape/stopper temporarily if needed, or simply thread from the other end if you centered your work). -
String peach on left:
Mirror the pattern by adding a short run of about 5-6 peach beads immediately next to the left gold spacer. -
Begin the dark terracotta:
Add the main run of dark terracotta beads. Continue adding these until the bracelet reaches your desired total length. -
Check the fit:
Wrap the unfinished strand around your wrist to verify the size. Add or remove terracotta beads from the back section as needed for a perfect fit.
Creative Spark
Make a matching set! Create two companion bracelets using just the solid heishi colors (one full terracotta, one full peach) to wear as a stacked trio.
Step 4: Finishing Touches
-
Tie the knot:
Tie a surgeon’s knot (which is like a standard overhand knot, but you loop the elastic through twice before pulling tight) to secure the ends. -
Secure with glue:
Dab a tiny drop of jewelry glue directly onto the knot. This is crucial for preventing the slippery elastic from coming undone. -
Hide the knot:
If hole size permits, gently pull the knot inside one of the adjacent clay or gold beads to hide it from view. -
Trim excess:
Once the glue is dry (give it a few minutes), use sharp scissors to trim the excess cord tails close to the bead.
Slip on your colorful new accessory and enjoy the custom pop of personality on your wrist


Smiley Face Pop Bead
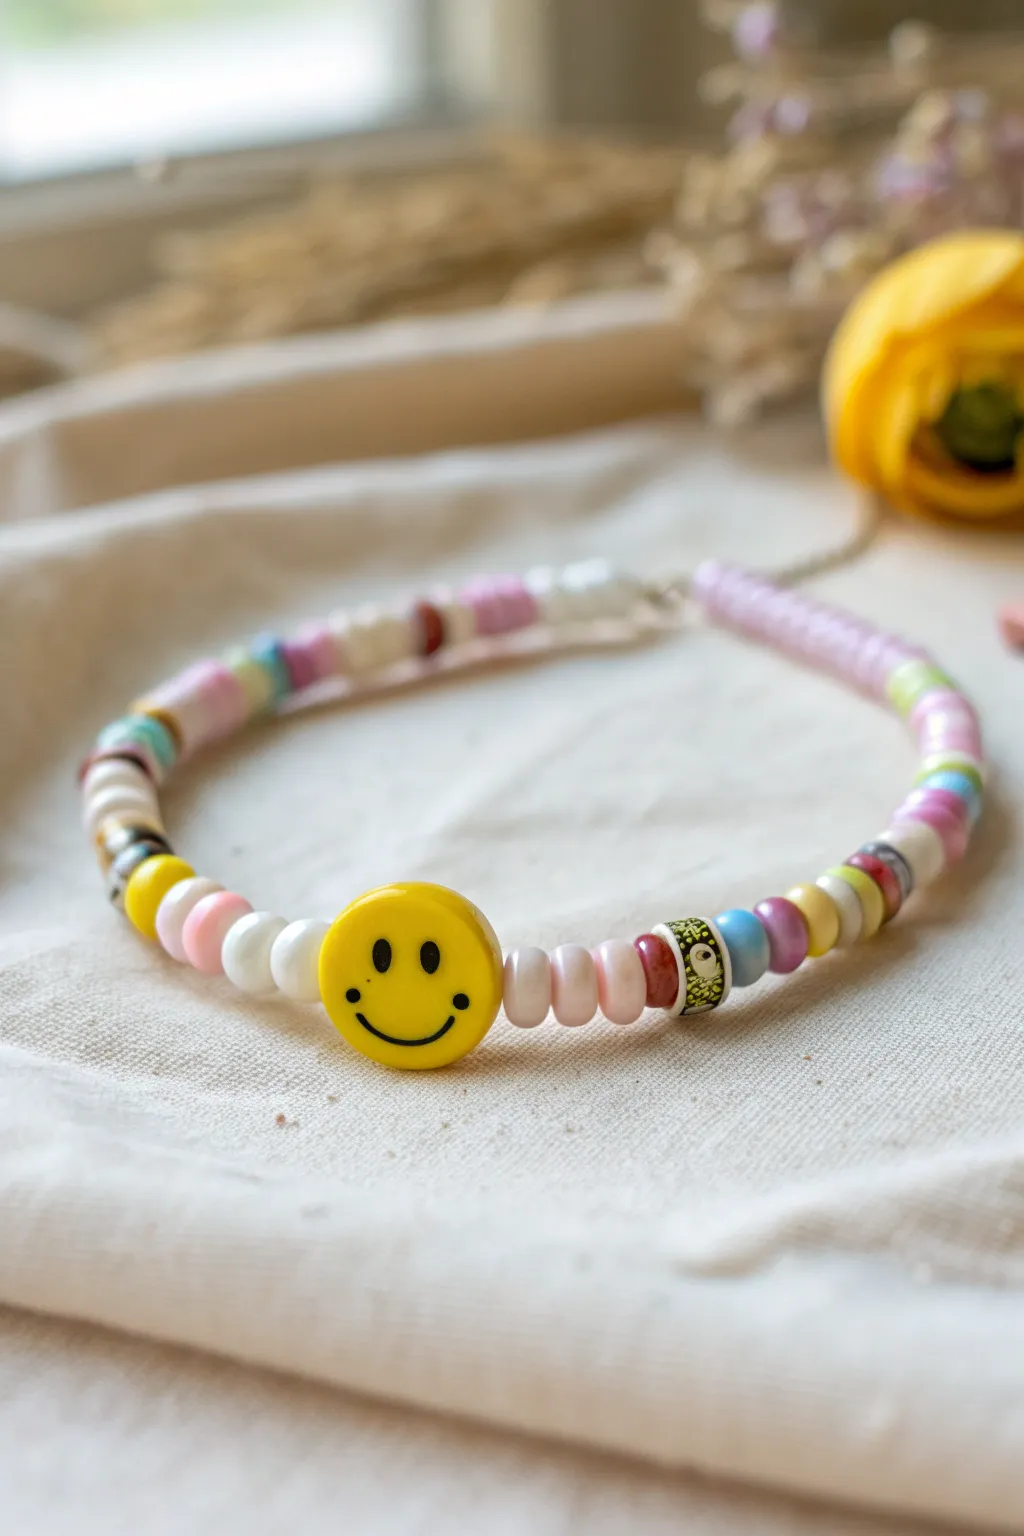
Add a cheerful pop to your wrist stack with this fun, playful beaded bracelet featuring a classic yellow smiley face. Combining colorful polymer clay heishi beads, patterned accents, and a central focal piece, this project is a quick and satisfying way to embrace the kidcore aesthetic.
How-To Guide
Materials
- Polymer clay heishi beads (pink, white, blue, yellow, purple)
- One large yellow smiley face bead (acrylic or clay)
- Patterned accent beads (e.g., yin-yang, tie-dye)
- Round spacer beads (white, pearl, or gold)
- Elastic beading cord (0.8mm or 1mm)
- Jewelry glue or clear nail polish
- Scissors
- Tape or bead stopper
Step 1: Planning and Setup
-
Measure the cord:
Cut a piece of elastic cord about 10-12 inches long. This generous length gives you plenty of room to knot it securely later without beads sliding off. -
Secure the end:
Attach a piece of tape or a bead stopper to one end of your cord. This simple step saves you from the frustration of beads slipping off while you work. -
Plan your pattern:
Lay out your beads on a bead board or a soft towel. I find this helps visualize the color rhythm before stringing. Place your smiley face bead in the center and arrange the colored heishi beads radiating outwards.
Step 2: Creating the Focal Section
-
String the smiley face:
Thread your elastic through the central yellow smiley face bead. Slide it down to the middle of your working area (though it doesn’t need to be perfectly centered yet). -
Add flanking beads:
On the right side of the smiley face, add three or four pale pink heishi beads followed by a round white pearlescent bead. -
Mirror the left side:
Repeat the exact same pattern on the left side of the smiley face: three pink heishi beads and one white round bead. -
Continue the pattern right:
On the right strand again, add a patterned bead—like the black and green yin-yang bead shown—followed by a few blue and purple disc beads. -
Continue the pattern left:
Add a contrasting sequence on the left. You don’t have to be perfectly symmetrical; try adding a yellow cylindrical bead and a mix of multicolor discs.
Knot Securely
Tighten your knot slowly and evenly. Pulling too fast can snap the elastic or create a bulky knot that won’t hide well inside a bead.
Step 3: Filling the Strand
-
Build the length:
Continue adding beads to both ends of the string. Alternate between sections of solid colors (like a run of 5 pink beads) and mixed ‘confetti’ sections. -
Incorporate varied shapes:
Intermittently place a round bead or a slightly larger cylindrical bead to break up the texture of the flat heishi discs. This adds visual interest and a more organic feel. -
Check the fit:
Periodically wrap the strand around your wrist. You want the beads to touch comfortably without stretching the elastic. Aim for a total beaded length of about 6.5 to 7 inches for an average wrist.
Theme Variations
Swap the smiley for a letter bead initial, or use fruit-shaped polymer clay beads (like strawberries or lemons) for a summery vibe.
Step 4: Finishing Touches
-
Pre-stretch the cord:
Once all beads are strung, hold both ends of the cord and give it a gentle tug. This pre-stretching prevents the bracelet from becoming loose immediately after you wear it. -
Tie the knot:
Remove the tape or stopper. Tie a simple overhand knot, bringing the beads close together. Follow this with a surgeon’s knot (looping the cord through twice) for extra security. -
Secure with glue:
Dab a tiny drop of jewelry glue or clear nail polish onto the knot. Let it dry for a few minutes to ensure it won’t slip undone. -
Hide the knot:
If one of your beads has a larger hole (like the smiley face or a side bead), gently tug the elastic so the knot slides inside that bead, hiding it from view. -
Trim excess cord:
Use your scissors to trim the remaining cord tails close to the knot, being careful not to cut the knot itself.
Now slip on your happy new accessory and enjoy the burst of color it brings to your day


Cute Fruit Slice Accents
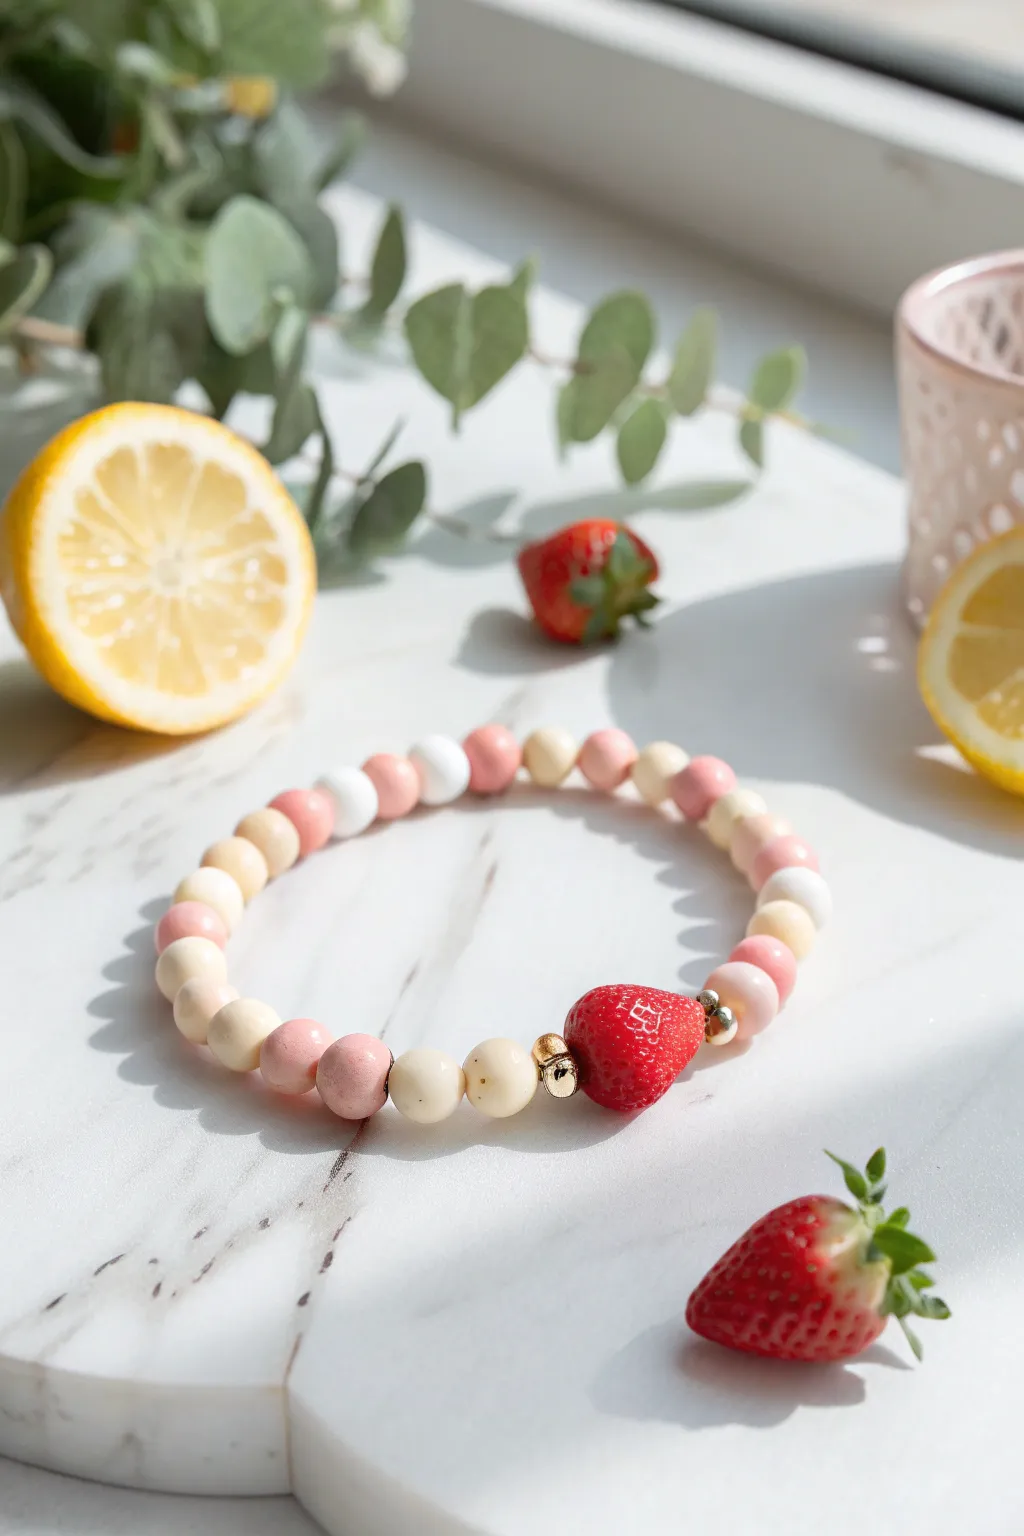
Capture the essence of a summer picnic with this delightful beaded bracelet featuring a realistic 3D strawberry focal point. The soft palette of cream, white, and coral pink beads creates a strawberries-and-cream aesthetic that is both playful and chic.
Step-by-Step Tutorial
Materials
- Polymer clay (translucent red, green, white, pale yellow, coral/salmon pink)
- Acrylic rolling pin or clay machine
- Bead piercing pins or toothpicks
- Needle tool or detailing tool
- Gloss glaze or UV resin
- Elastic jewelry cord (0.7mm or 0.8mm)
- 2 small gold spacer beads (round or faceted)
- Jewelry glue (e.g., E6000 or Hypo Cement)
- Scissors
- Sandpaper (fine grit, optional)
- Baking sheet and parchment paper
- Oven
Step 1: Sculpting the Strawberry
-
Mix the red base:
Start by conditioning your translucent red clay. Mix in a tiny pinch of white clay to make it slightly opaque but still juicy-looking. Roll a piece about the size of a marble into a ball. -
Shape the berry:
Gently pinch the bottom of the ball to form a rounded cone shape, mimicking a real strawberry. Flatten the top surface slightly where the leaves will sit. -
Create the texture:
Using a needle tool, gently poke small indentations all over the surface of the red cone to create the seed texture. Don’t go too deep; just mark the surface. -
Add the leaves:
Roll a very small amount of green clay flat. Cut out a tiny star shape or several small teardrops. Press these onto the flat top of the strawberry, curling the tips slightly for realism. -
Pierce the bead:
Carefully insert your bead piercing pin horizontally through the top third of the strawberry. Keep checking from all angles to ensure the hole is straight and doesn’t distort the shape.
Step 2: Creating the Round Beads
-
Mix bead colors:
Prepare three colors of clay: pure white, a creamy pale yellow (mix yellow with lots of white), and a soft coral/salmon pink. -
Portion the clay:
Roll each color into a uniform log or snake. Cut equal segments from each log to ensure your finished beads are roughly the same size, aiming for about 8-10mm diameter. -
Roll the beads:
Roll each cut segment between your palms to create smooth, round spheres. You’ll need about 6-8 beads of each color depending on your wrist size. -
Pierce the rounds:
Using your bead pin, pierce a hole through the center of each round bead. Rotate the pin gently as you push through to avoid squashing the sphere. -
Bake the batch:
Arrange the strawberry focal bead and all round beads on a parchment-lined baking sheet. Bake according to your polymer clay package instructions (typically 275°F/135°C for 15-30 minutes). -
Cool and finish:
Allow the beads to cool completely. If there are any fingerprints, lightly buff them with fine-grit sandpaper. Apply a coat of gloss glaze to the strawberry bead to give it a wet, fresh look.
Sticky Situation?
If your bead hole closes up during baking, don’t force a needle through. Use a small hand drill or a heated needle tool to gently re-open the channel without cracking the clay.
Step 3: Assembly
-
Measure the cord:
Cut a length of elastic cord about 10-12 inches long. Pre-stretch the elastic by pulling it firmly a few times; this prevents the bracelet from loosening later. -
Thread the focal point:
Start by threading the strawberry bead onto the center of the cord. -
Add gold accents:
Slide one gold spacer bead on immediately after the strawberry, and another one on the other side. These frame the fruit and add a touch of sparkle. -
Pattern the beads:
Begin stringing your handmade clay beads on either side of the center. Use a pattern like: pink, white, cream, pink, white, cream. Try to keep the arrangement symmetrical. -
Check fit:
Wrap the strand around your wrist to check the size. Add or remove beads as necessary until it fits comfortably without gaps. -
Tie the knot:
Tie the ends of the elastic together using a surgeon’s knot (right over left twice, then left over right). Pull tight to secure. -
Secure and trim:
Place a tiny drop of jewelry glue on the knot. Let it dry for a moment, then trim the excess cord ends close to the knot (but not too close!). Ideally, hide the knot inside the hole of a neighboring bead.
Level Up: Seeds!
For ultra-realism, before baking, press tiny yellow seed beads or minuscule balls of yellow clay into the indentations of your strawberry focal bead.
Now slip on your sweet new accessory and enjoy the fresh, fruity vibes all year round

The Complete Guide to Pottery Troubleshooting
Uncover the most common ceramic mistakes—from cracking clay to failed glazes—and learn how to fix them fast.
Soft Pastel Ombre Fade
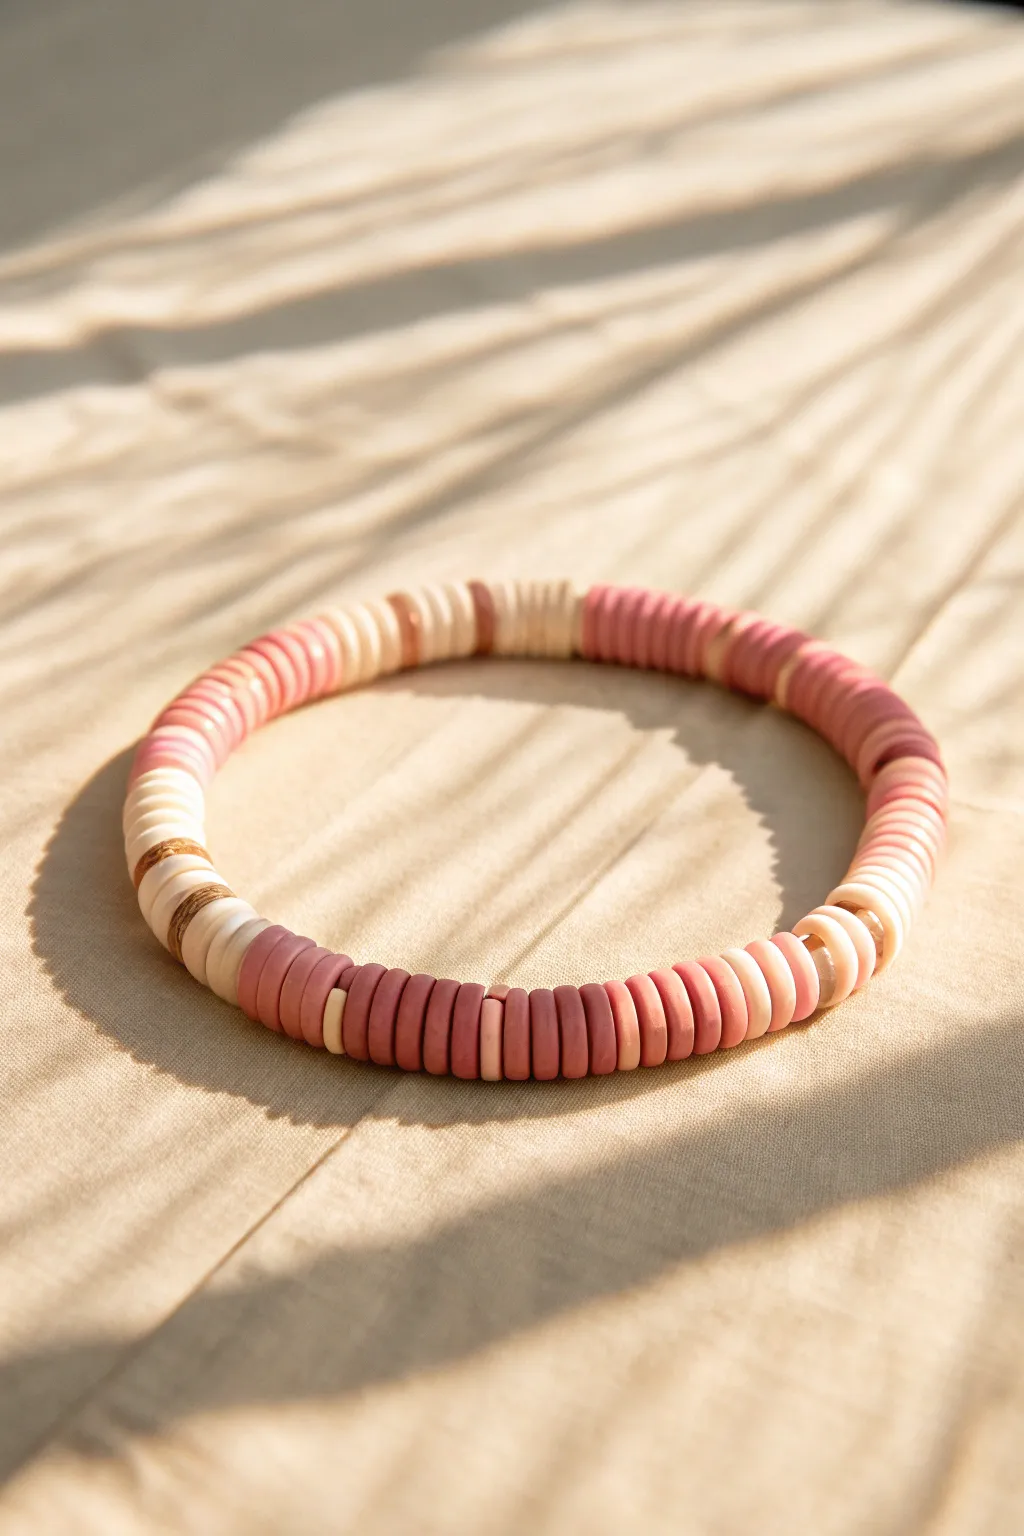
This elegant bracelet captures the warmth of a sunset with its blend of earthy pinks, soft creams, and subtle wood textures. The flat disc beads create a satisfyingly smooth surface that feels modern yet handcrafted.
Step-by-Step Guide
Materials
- Polymer clay in dusty rose, blush pink, white, and translucent beige
- Textured brown polymer clay (or faux wood clay)
- Stretch elastic cord (0.8mm or 1mm)
- Clay extruder with a small circle disc (optional but helpful)
- Tissue blade or sharp craft knife
- Needle tool or toothpick
- Ruler
- Baking sheet with parchment paper
- Super glue or jewelry cement
Step 1: Mixing and Rolling
-
Condition the clay:
Start by warming up each color of polymer clay in your hands. Knead them until they are soft and pliable to prevent cracking later. -
Create custom shades:
To achieve the ombre look, mix a little white into your dusty rose to create a mid-tone blush. I find blending sizes like a pea-sized amount of white with a marble-sized amount of rose gives a lovely transition shade. -
Roll out strands:
Roll each color into a long, thin snake. Aim for a diameter of about 4-6mm, depending on how chunky you want your beads. -
Ensure uniformity:
For perfectly even snakes, use a clay extruder if you have one. If rolling by hand, use a flat acrylic block to roll them back and forth for consistent thickness.
Clean Slices Trick
Dust your blade with a tiny bit of cornstarch before slicing. This prevents the clay from sticking to the metal and dragging, ensuring crisp, flat disc shapes.
Step 2: Slicing the Discs
-
Chill the clay:
Place your rolled clay snakes in the refrigerator for about 10-15 minutes. This firms them up and prevents them from squishing into ovals when you slice them. -
Slice the beads:
Use your tissue blade to cut thin, even slices from the snakes. Try to keep the thickness consistent, around 1-2mm per slice. -
Pierce holes:
Take your needle tool or a toothpick and carefully poke a hole through the center of each disc. Rotate the tool gently as you push through to keep the hole round. -
Create wood accents:
For the faux wood beads, slice them slightly thicker or texture the edges gently with a toothbrush before piercing to give them a rustic feel. -
Smooth the edges:
Gently tap the edges of each raw bead with your finger to smooth out any sharp angles or distortions from cutting.
Step 3: Baking and Assembly
-
Prepare for baking:
Arrange your raw beads on a baking sheet lined with parchment paper. Ensure they aren’t touching to prevent them from fusing together. -
Bake carefully:
Bake according to your clay package instructions (usually around 275°F or 130°C). Keep a close eye on light colors so they don’t scorch or yellow. -
Cool down:
Let the beads cool completely on the tray. They harden fully as they cool. -
Plan your pattern:
Lay out your beads on a table. Create sections of solid color (like the dusty rose section) followed by mixed sections where cream and blush alternate unpredictably. -
Adjust the design:
Break up the color blocks by inserting one or two contrasting wood-tone or white beads to mimic the random, organic feel seen in the reference image. -
String the beads:
Cut a piece of elastic cord about 10 inches long. Thread your beads onto the cord following your laid-out design. -
Check the fit:
Wrap the strand around your wrist to check the size. Add or remove beads until it sits comfortably without digging in.
Fixing Wonky Shapes
If your beads flattened during piercing, re-shape them gently with your fingers before baking. You can also sand edges after baking for a perfect circle.
Step 4: Finishing Touches
-
Tie the knot:
Tie a secure surgeon’s knot (right over left, left over right, and loop through an extra time). Pull the elastic tight to secure. -
Secure with glue:
Add a tiny drop of super glue or jewelry cement to the knot for extra security. Let it dry completely before handling. -
Hide the knot:
Trim the excess cord close to the knot, then gently pull the cord so the knot slides inside the hole of a neighboring bead to hide it.
Enjoy styling your new bracelet stack with cozy knits or summer linens for a chic, textural accent
Creamy Neutrals With Gold Spacers
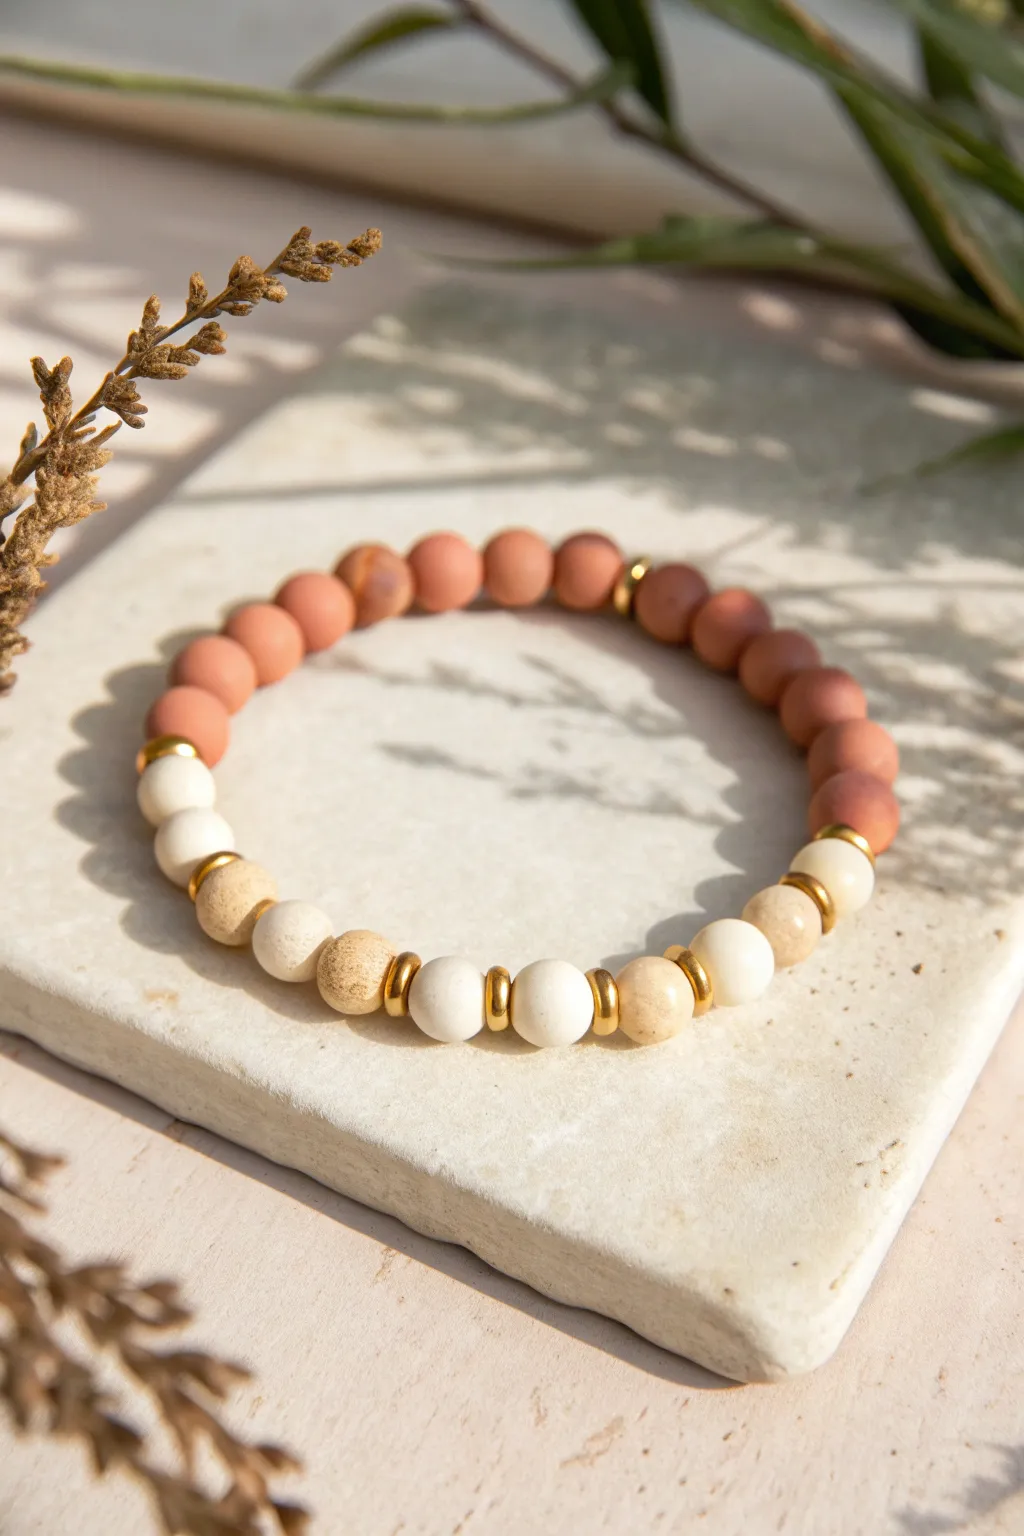
Embrace the warmth of nature with this stunning polymer clay bead bracelet, featuring a gradient of terracotta and sand tones offset by crisp white. The addition of gold heishi spacers adds just the right touch of sophistication, making this piece perfect for stacking or wearing as a subtle statement.
Step-by-Step Tutorial
Materials
- Polymer clay in ‘Terracotta’ (or burnt orange)
- Polymer clay in ‘Warm Beige’ or ‘Sand’ (with speckles if possible)
- Polymer clay in ‘Cream’ or ‘White’
- Granite-texture clay or fine black pepper (for creating speckles)
- Gold plated heishi spacer beads (flat discs, approx. 4-6mm)
- Elastic stretch cord (0.7mm or 0.8mm)
- Bead roller tool (optional, for perfectly round beads)
- Needle tool or toothpick
- Super glue or jewelry cement
- Scissors
Step 1: Preparing the Clay Beads
-
Condition the terracotta clay:
Start by warming up your terracotta-colored polymer clay in your hands until it becomes soft and pliable. -
Roll the terracotta spheres:
Pinch off small pieces of clay and roll them between your palms to create approximately 16-18 round beads, aiming for about 8mm in diameter. -
Prepare the speckled beige:
Mix a small amount of granite-texture clay (or a dash of black pepper) into your beige clay to create a natural, stony look. -
Form the beige beads:
Roll out 4 beads from this speckled beige mixture. These should match the size of your terracotta beads. -
Create the white accents:
Condition your white or cream clay and roll 5 smooth, clean beads, ensuring they are identical in size to the others. -
Make the bead holes:
Using a needle tool or toothpick, carefully verify the center of each bead and pierce a hole straight through. -
Refine the shape:
Gently roll the bead between your fingers again after piercing to fix any distortion caused by the needle. -
Bake the beads:
Arrange all your clay beads on a baking sheet or tile and bake according to the manufacturer’s instructions (usually 275°F/135°C for 15-30 minutes). -
Cool down:
Allow the beads to cool completely before handling them, as warm clay is still fragile.
Smooth Rolling
To avoid fingerprints on your beads, roll them on a glossy tile using an acrylic block or clear CD case instead of your palms.
Step 2: Assembling the Design
-
Cut the cord:
Cut a piece of elastic cord about 10 inches long to give yourself plenty of room to tie knots later. -
Pre-stretch the elastic:
Give the elastic cord a few firm tugs; I find this crucial step helps prevent the bracelet from sagging after you wear it a few times. -
Start with the focal section:
Begin threading by sliding on the white and beige beads in an alternating pattern: white, gold spacer, beige, gold spacer, white. -
Continue the pattern:
Repeat the alternating sequence until you have threaded all the white and beige beads, separating each clay bead with a gold spacer. -
Transition to terracotta:
After the final light-colored bead, add a gold spacer and then begin threading your terracotta beads. -
Thread the main color:
String on all the terracotta beads in a continuous row. Notice how the image doesn’t use spacers between these darker beads for a block-color effect. -
Check the fit:
Wrap the unfinished strand around your wrist to check the size. If it’s too loose, remove one terracotta bead; if too tight, add another. -
Tie the knot:
Bring the two ends of the elastic together and tie a surgeon’s knot (looping the cord through twice before pulling tight). -
Secure the bond:
Place a tiny dab of super glue or jewelry cement directly onto the knot to ensure it never slips. -
Hide the knot:
Once the glue is dry, trim the excess cord and gently pull the knot inside the hole of the nearest bead to conceal it.
Stone Effect
Mix dried tea leaves or crafting sand into your beige clay for an even more organic, textured stone appearance.
Slip on your new creation and enjoy the grounded, stylish vibe it adds to your daily outfit


What Really Happens Inside the Kiln
Learn how time and temperature work together inside the kiln to transform clay into durable ceramic.
Pink and Red Sweetheart Mix
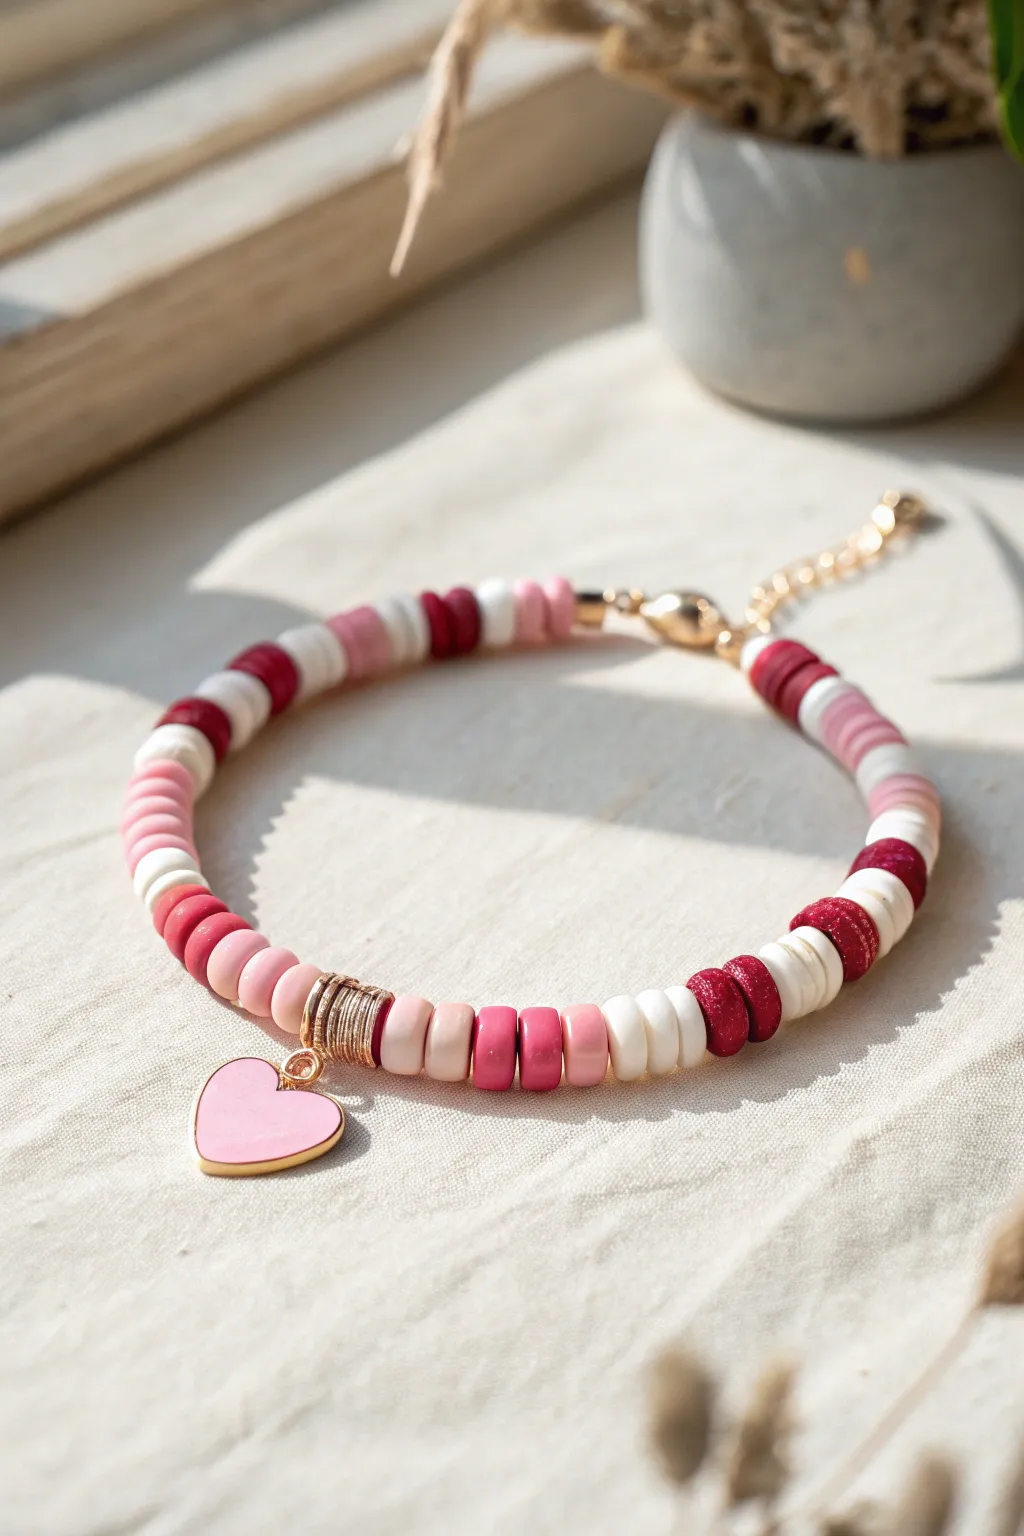
Capture the essence of sweet romance with this delightful beaded bracelet. Featuring a pattern of deep reds, soft pinks, and crisp whites accented by a gold heart charm, this accessory is the perfect handmade gift for yourself or a loved one.
Step-by-Step
Materials
- Polymer clay heishi beads (6mm or similar): deep red, bright red, soft pink, coral pink, and white
- Gold heart charm with pink enamel inlay
- Gold jump ring (4-6mm)
- Gold spacer beads or wire coil accents (optional but recommended)
- Strong elastic cord (0.8mm) or beading wire with crimps and clasp
- Jewelry pliers (flat nose and round nose)
- Scissors or wire cutters
- Beading needle (optional for elastic)
- Lobster clasp and extension chain (if using wire method)
Step 1: Preparation and Pattern Planning
-
Measure your wrist:
Wrap a measuring tape loosely around your wrist to determine the desired length. Add about half an inch to ensure a comfortable fit once the chunky beads are added. -
Cut the cord:
Cut a piece of elastic cord or beading wire about 10-12 inches long. Having this extra length makes it much easier to tie knots or crimp the ends later without struggling. -
Secure the end:
If you are using beading wire, attach one half of your clasp using a crimp bead and crimping pliers now. If using elastic, simply tape one end to your table or attach a bead stopper to prevent beads from sliding off. -
Establish the color palette:
Pour out small piles of your heishi beads: deep maroon, classic red, bubblegum pink, pale peach/coral, and white. Seeing them all together helps visualize the mix.
Weird gaps appearing?
Make sure your knot or crimp is tight enough. If using heishi beads, they can sometimes sit unevenly if the cord is too loose, so keep tension consistent while securing.
Step 2: Stringing the Beads
-
Start the pattern:
Begin threading your beads. The specific pattern shown here relies on blocks of color. Start with 3-4 deep red beads followed by 3-4 white beads. -
Add variance:
Continue adding blocks of color, but vary the order slightly to keep it organic yet structured. Try a sequence like: Red, White, Pink, Coral, Red. -
Check the halfway point:
String beads until you have reached exactly half of your desired total length. It is crucial to stop right in the center to place the focal point. -
Add the center accents:
Slide on a decorative gold spacer or a small coil of gold wire. This adds a professional metallic touch that frames the charm beautifully. -
Attach the charm:
Use your pliers to open a jump ring and attach the pink enamel heart charm to the center of the cord. Alternatively, if the charm has a built-in loop large enough, slide it directly onto the cord. -
Balance the design:
Slide on a second gold spacer or wire coil on the other side of the charm to create symmetry.
Level Up: Gold Flakes
Mix in occasional gold-plated heishi discs between the colored sections. This subtle shimmer ties the beads together with the gold heart charm perfectly.
Step 3: Completing the Assembly
-
Finish the beadwork:
Resume your color-blocking pattern on the second half of the bracelet. Try to mirror the general color flow from the first half, though it doesn’t need to be perfectly identical. -
Verify the fit:
Wrap the unfinished strand around your wrist. The ends should meet comfortably without stretching the elastic or pulling tight. Add or remove a few beads if necessary. -
Prepare for closure:
If using elastic, prestretch the cord slightly by pulling gently on both ends. This prevents the bracelet from sagging after you wear it for the first time. -
Tie the knot (Elastic method):
Tie a surgeon’s knot (right over left, left over right twice) and pull it very tight. I find adding a tiny dab of jewelry glue or clear nail polish on the knot ensures it never slips. -
Attach hardware (Wire method):
If using beading wire, slide on a crimp bead and the second half of your clasp or extension chain. Thread the wire back through the crimp bead and flatten it securely with pliers. -
Hide the ends:
Snip off the excess tail of the cord or wire. If possible, tuck the knot or crimp bead inside the hole of the adjacent heishi bead for a seamless look. -
Test the strength:
Give the bracelet a gentle tug to ensure everything is secure before wearing it out.
Enjoy wearing your lovely new accessory that adds a pop of romance to any outfit
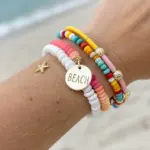
Beachy Seafoam and Shell Charm

Capture the essence of a tranquil beach day with this charming beaded bracelet featuring polymer clay and wood accents. The soft seafoam greens, creamy whites, and natural wood tones come together perfectly, anchored by a shining gold shell charm for a touch of coastal elegance.
Step-by-Step Guide
Materials
- Polymer clay in seafoam green
- Polymer clay in white or cream
- Natural wood beads (round, approx. 8-10mm)
- Gold shell charm
- Gold jump rings (4mm and 6mm)
- Small gold spacer beads or seed beads
- Elastic beading cord (0.8mm or 1mm)
- Beading needle (optional but helpful)
- Super glue or jewelry cement
- Pliers (chain nose and round nose)
- Scissors
Step 1: Crafting the Clay Beads
-
Condition the clay:
Start by warming up your seafoam green and white polymer clay in your hands until it becomes soft and pliable. This conditioning step prevents cracks later on. -
Roll spheres:
Pinch off small pieces of the seafoam green clay and roll them between your palms to create smooth, even spheres. Aim for a size that matches your wood beads, roughly 8-10mm in diameter. -
Create white accents:
Repeat the rolling process with the white clay. You’ll need fewer of these, as they serve as occasional accent beads. -
Shape the focal discs:
Take two small balls of white clay and flatten them slightly into thick disc or rondelle shapes. These will be used to frame the gold spacers later. -
Pierce the beads:
Using a toothpick or a bead piercing tool, carefully create a hole through the center of each clay sphere and disc. I like to rotate the tool gently as I push through to avoid distorting the shape. -
Bake the clay:
Arrange your raw beads on a baking sheet or tile. Bake them according to the manufacturer’s instructions on your clay package (usually around 275°F/135°C for 15-30 minutes). Let them cool completely before handling.
Uneven Clay Beads?
If your hand-rolled beads aren’t perfectly round, gently roll the raw clay under a flat acrylic block or cd case on your work surface for uniform spheres.
Step 2: Assembling the Bracelet
-
Prepare the elastic:
Cut a piece of elastic cord about 10-12 inches long. This gives you plenty of extra room for tying knots without struggling. -
Pre-stretch the cord:
Give the elastic a few firm tugs. Pre-stretching is crucial because it prevents the bracelet from loosening up and sagging after the first time you wear it. -
Start stringing:
Begin threading your beads onto the cord. Start with the main body pattern: alternate the seafoam green clay beads with the natural wood beads. -
Insert variation:
Break up the pattern occasionally by adding a white clay bead or grouping two wood beads together for organic variety. -
Create the focal section:
When you reach the center point, thread one of your flattened white clay discs, followed by a series of small gold spacer beads (vertical stack), and then the second white disc. -
Check the fit:
Wrap the unfinished strand around your wrist to check the size. Add or remove beads until it sits comfortably—remembering that the knot will take up a tiny bit of space. -
Prepare the charm:
Use your pliers to open a gold jump ring. Slide the shell charm onto the ring. Locate a spot on the bracelet where you want the charm to hang—usually near the focal section or opposite it. -
Attach the charm:
Depending on your preference, you can slide the jump ring directly over the elastic cord between two beads, or attach it to a smaller closed ring threaded onto the cord. Close the jump ring securely.
Bead Rolling Trick
Wear latex or nitrile gloves while rolling your clay. This prevents fingerprints from transferring onto the smooth surface of your beads.
Step 3: Finishing and Securing
-
Tie the knot:
Bring the two ends of the elastic together. Tie a surgeon’s knot (loop left over right twice, then right over left) and pull tight. -
Secure with glue:
Apply a tiny dab of super glue or jewelry cement directly onto the knot. Be careful not to get glue on the visible parts of the beads. -
Hide the knot:
While the glue is still slightly tacky, pull the elastic firmly so the knot slips inside the hole of a neighboring wood or clay bead. -
Trim excess:
Once the glue is fully dry, use sharp scissors to trim the excess elastic cord as close to the bead hole as possible.
Enjoy wearing your new coastal-inspired accessory on your next sunny day out

TRACK YOUR CERAMIC JOURNEY
Capture glaze tests, firing details, and creative progress—all in one simple printable. Make your projects easier to repeat and improve.
Daisy Spacers and Sunny Colors
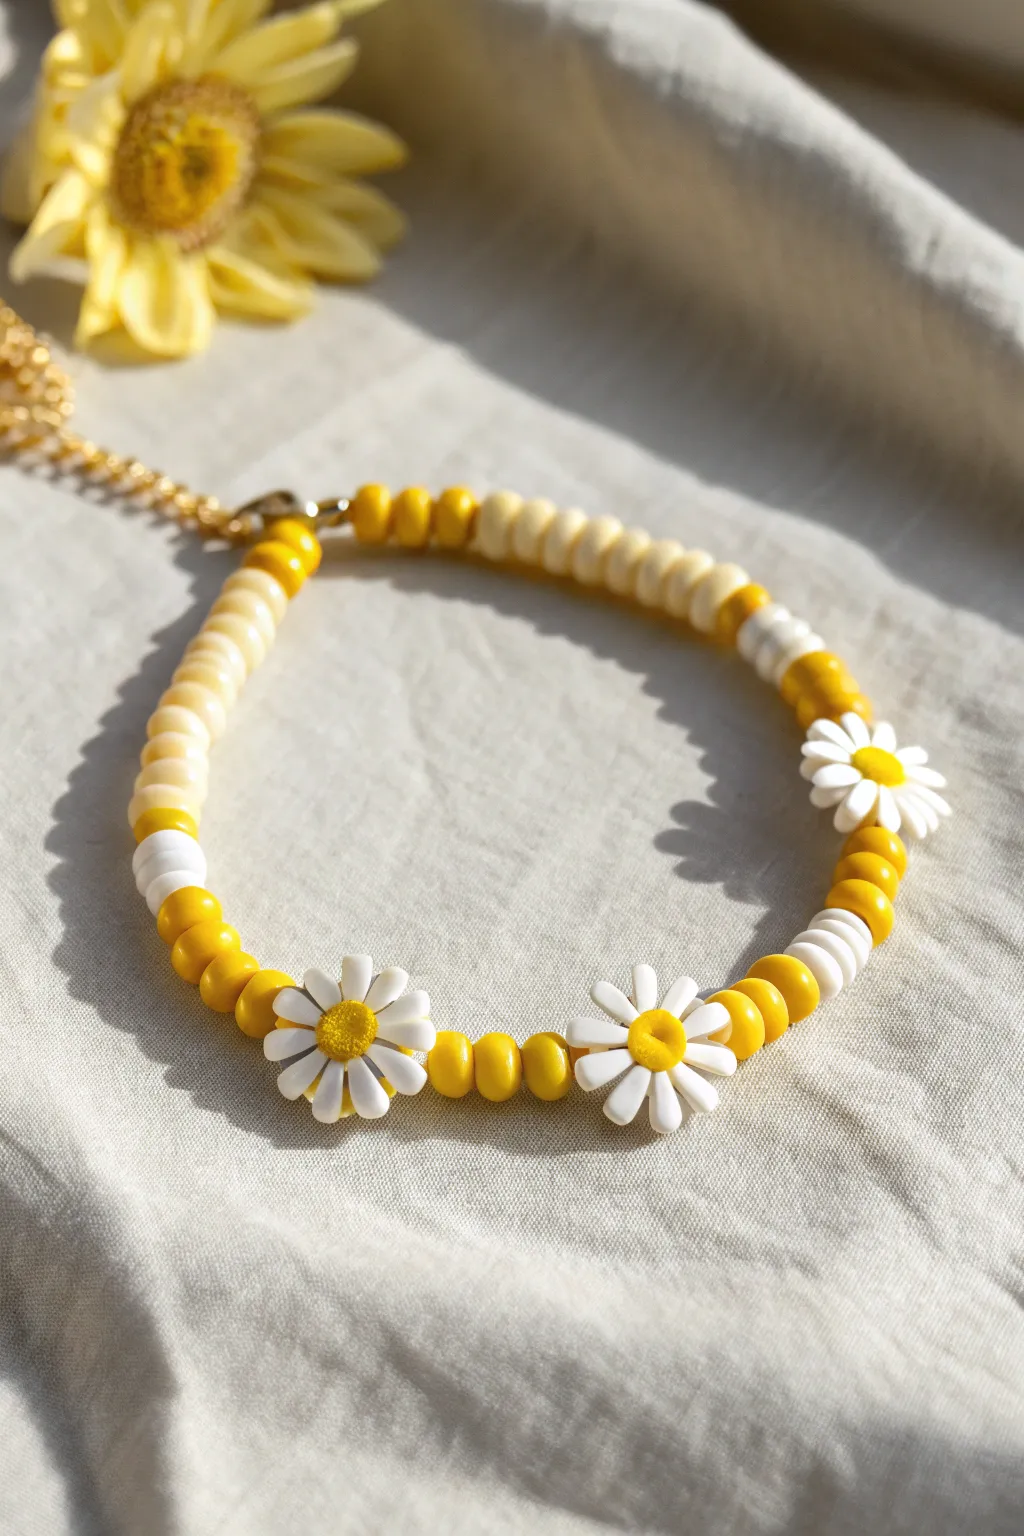
Brighten your jewelry collection with this cheerful bracelet that combines the warmth of yellow beads with the charm of polymer clay daisies. The alternating textures between smooth round beads, flat spacers, and floral accents create a delightful, summery accessory perfect for everyday wear.
Step-by-Step Tutorial
Materials
- White elastic string (0.8mm or 1mm)
- 3 Polymer clay daisy beads (yellow center, white petals)
- 6mm Opaque yellow round beads (approx. 20-30)
- 4mm Cream or light beige flat disc spacer beads (heishi style)
- 4mm White flat disc spacer beads (heishi style)
- Gold tone crimp beads
- Gold tone jump rings (4mm)
- Gold tone lobster clasp
- Gold tone extender chain (optional)
- Jewelry pliers (chain nose and flat nose)
- Scissors
Step 1: Preparation and Planning
-
Measure your wrist:
Wrap a piece of string around your wrist to find your comfortable size, then add about an inch to account for the beads’ bulk. Cut a length of elastic cord about 6 inches longer than this measurement to give yourself plenty of room for tying knots later. -
Sort your beads:
Lay out your beads on a bead mat or towel. This keeps round beads from rolling away and helps you visualize the pattern before you start stringing. -
Secure the end:
Tape one end of your elastic cord to your work surface or attach a stopper clip. This prevents beads from sliding off while you diligently work on the design.
Loose Flowers?
If your daisy beads keep spinning upside down, the elastic might be too thin for the bead hole. Try using a slightly thicker cord or stringing two strands of thinner elastic through the center.
Step 2: Stringing the Core Pattern
-
Start the sequence:
Looking at the clasp end shown on the left of the image, begin by threading on one gold crimp bead (we will use this later for finishing) followed by about 1-2 inches of the cream/beige heishi spacer beads. Create a solid block of this neutral color. -
Transition to yellow:
Add a single white flat spacer bead, followed by one 6mm yellow round bead, then another white flat spacer. -
Build the first yellow section:
String approximately 4 to 5 yellow round beads. This creates the first sunny block of color leading up to the main floral feature.
Step 3: Adding the Daisy Trio
-
Add the first daisy:
Thread your first polymer clay daisy bead onto the elastic. Ensure the hole runs horizontally through the flower so it sits flat against the wrist. -
Create the spacer section:
Between the daisies, add a separator pattern: string three yellow round beads. This small gap allows each flower to stand out without bunching up. -
Place the second daisy:
Slide on the second daisy bead. I always check at this point to make sure the petals aren’t chipped and the yellow center is facing the same direction as the first. -
Finish the floral center:
Add another set of three yellow round beads, followed by the third and final daisy bead.
Level Up: Petal Power
Customize the look by painting small white dots onto the yellow round beads with acrylic paint to mimic pollen, or swap the yellow rounds for varied yellow shades to create an ombré effect.
Step 4: Completing the Loop
-
Mirror the pattern:
After the last flower, mirror the section you created earlier. String 4 to 5 yellow round beads. -
Add the transition detail:
Add one whiter flat spacer, one yellow round bead, and another white spacer. -
Finish with neutrals:
String the remaining length with the cream/beige heishi beads until you reach the desired total length for your bracelet. -
Add the final crimp:
Slide on your second gold crimp bead.
Step 5: Finishing Touches
-
Open the jump rings:
Use your two pairs of pliers to twist open two gold jump rings. Remember to twist the ends away from each other (front to back) rather than pulling them apart, which weakens the metal. -
Loop and crimp:
Thread the elastic end back through the crimp bead to create a small loop. Place one open jump ring into this loop, then use your flat nose pliers to squash the crimp bead firmly, securing the loop. -
Attach the hardware:
Attach the lobster clasp to the jump ring on one side and close the ring. Repeat the crimping process on the other end of the bracelet, attaching the extender chain to that jump ring. -
Secure knots:
For extra security, tie a surgeon’s knot with the elastic tails against the crimp beads before trimming. Add a tiny dab of jewelry glue to the knot if desired. -
Trim excess:
Carefully trim away any excess elastic string, being careful not to cut your main knot.
Slip on your new sunny accessory and enjoy the handmade floral vibes all year round
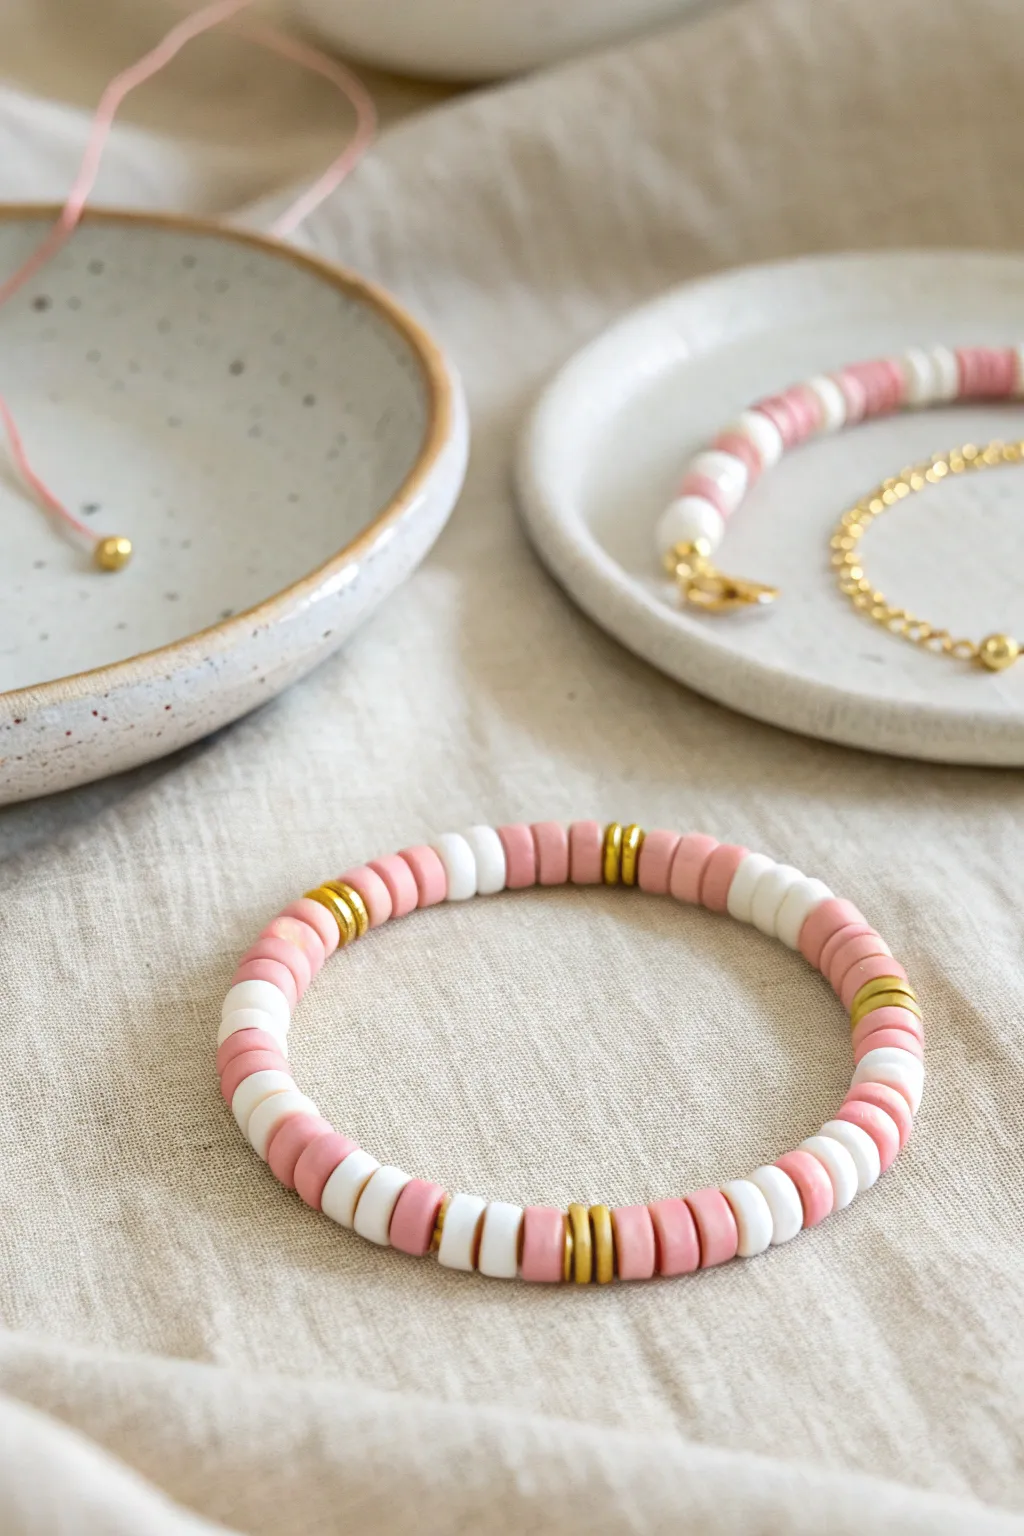
Mini Checkerboard Pattern
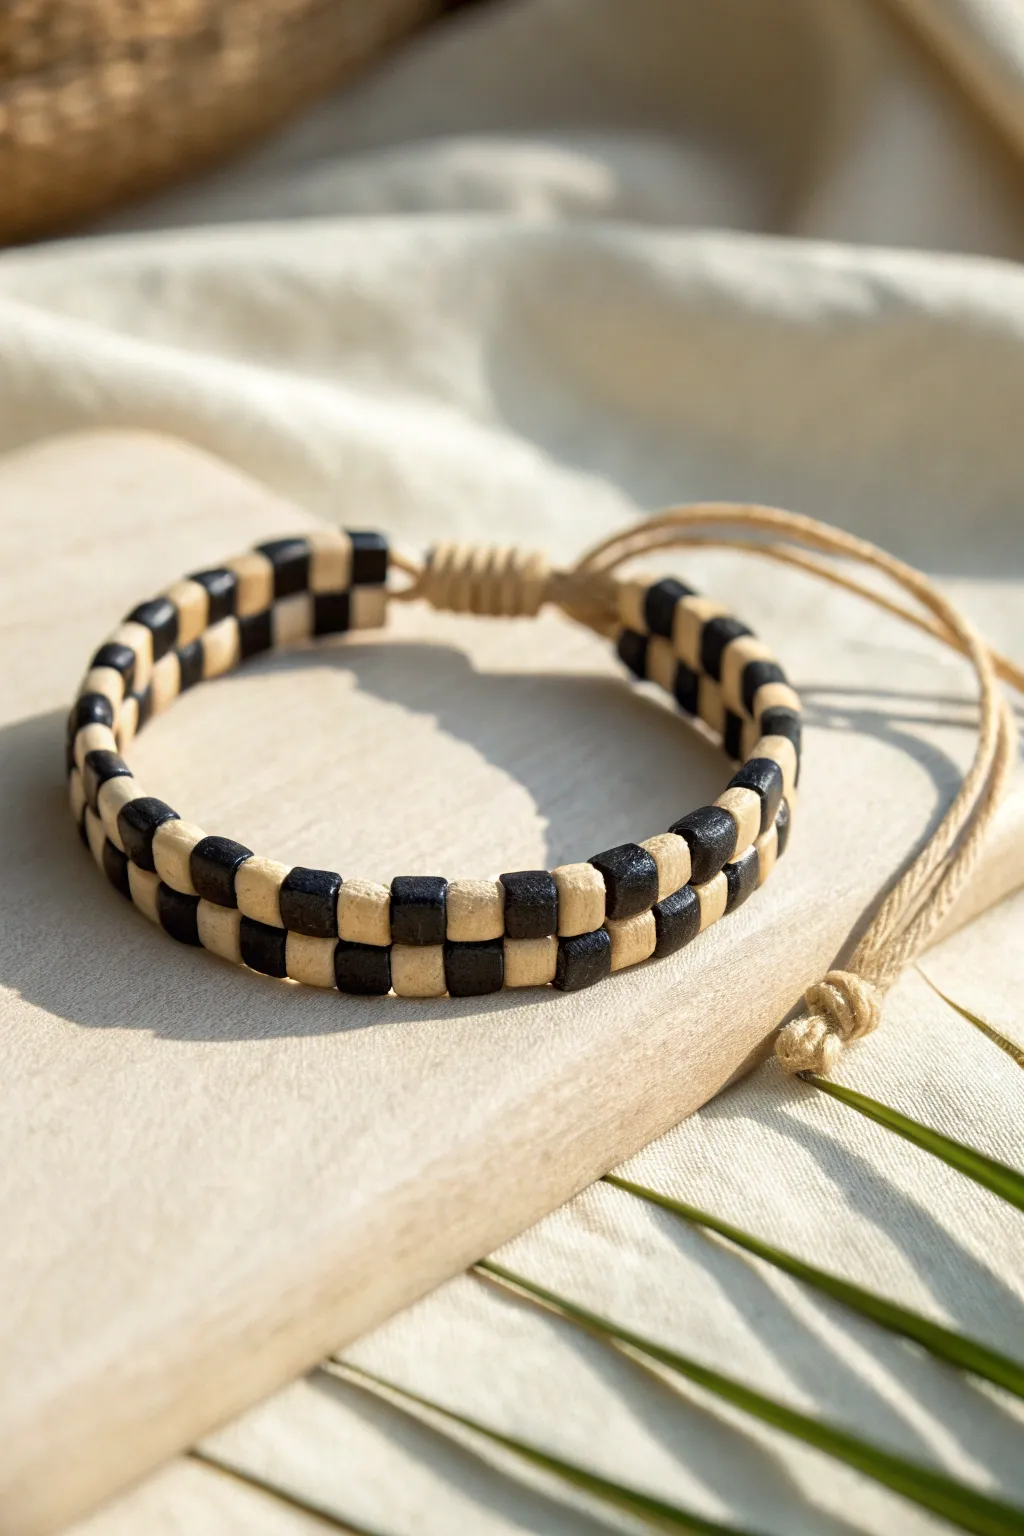
Bring a touch of modern minimalism to your wrist with this two-strand bracelet featuring a classic checkerboard pattern. The contrast between the sleek black and natural beige clay beads creates a timeless look that pairs perfectly with casual outfits.
How-To Guide
Materials
- Polymer clay (black and beige/tan)
- Clay blade or craft knife
- Rolling pin or pasta machine
- Bead piercing pin or thick needle
- Two long strands of waxed cord (beige/tan)
- Ruler
- Sandpaper (optional)
- Oven for baking
Step 1: Creating the Clay Canes
-
Condition the Clay:
Start by warming up your black and beige polymer clay in your hands until it becomes soft and pliable, ensuring there are no air bubbles trapped inside. -
Roll into Logs:
Roll both colors into square logs that are roughly the same thickness. I like to aim for about 5-6mm thick to keep the beads dainty but sturdy. -
Slice and Stack:
Using your clay blade, slice the square logs into equal lengths, creating small individual cubes. -
Pierce the Beads:
Gently pierce each cube through the center with your bead pin. To prevent the cube from squishing, twist the pin as you push it through rather than just pressing directly. -
Bake the Beads:
Arrange your beads on a baking sheet and bake according to your clay manufacturer’s instructions, usually around 275°F (135°C) for 15-30 minutes.
Step 2: Assembling the Pattern
-
Prepare the Cords:
Cut two long pieces of waxed cord, each about 20 inches long. Fold them in half to create a loop at one end if you prefer a loop closure, or keep them single for a sliding knot. -
Start the Knot:
Tie a simple overhand knot with both cords together, leaving enough tail for the closure later. This knot acts as the stopper for your beads. -
Thread Row One:
On the first cord, thread a beige bead followed by a black bead. Continue alternating colors until you reach your desired length, ending with the opposite color you started with. -
Thread Row Two:
On the second cord, start with a black bead first, then beige. This offset is crucial to create the checkerboard effect when the strands sit next to each other. -
Check Alignment:
Lay the two strands side-by-side on your work surface to ensure the colors alternate vertically as well as horizontally. -
Secure the End:
Bring both cords together at the end of the beadwork and tie another secure overhand knot flush against the last beads to lock them in place.
Uneven Cubes?
If your hand-cut cubes are irregular, use a square clay extruder disc instead. It creates a perfectly uniform square log that you just need to slice into segments.
Step 3: Finishing Touches
-
Create the Sliding Knot:
Overlap the tail ends of your bracelet. Cut a separate shorter piece of cord (about 6 inches) to create the sliding closure. -
Tie Macrame Knots:
Using the short cord, tie a series of square knots (macrame style) around the overlapped tail cords. around 5-6 knots usually provide a good grip. -
Trim and Seal:
Trim the excess ends of your sliding knot cord and carefully melt the tips with a lighter or use a dab of superglue to prevent fraying. -
Added Detail:
Tie small stopper knots at the very ends of the pull cords so they don’t slip through the sliding mechanism.
Level Up: Texture
Before baking, gently press a piece of sandpaper or a textured sponge against the bead surfaces to give them a stone-like, matte finish that feels more organic.
Enjoy wearing your stylish new accessory that looks complicated but came together bead by bead
Confetti Sprinkle Color Mix
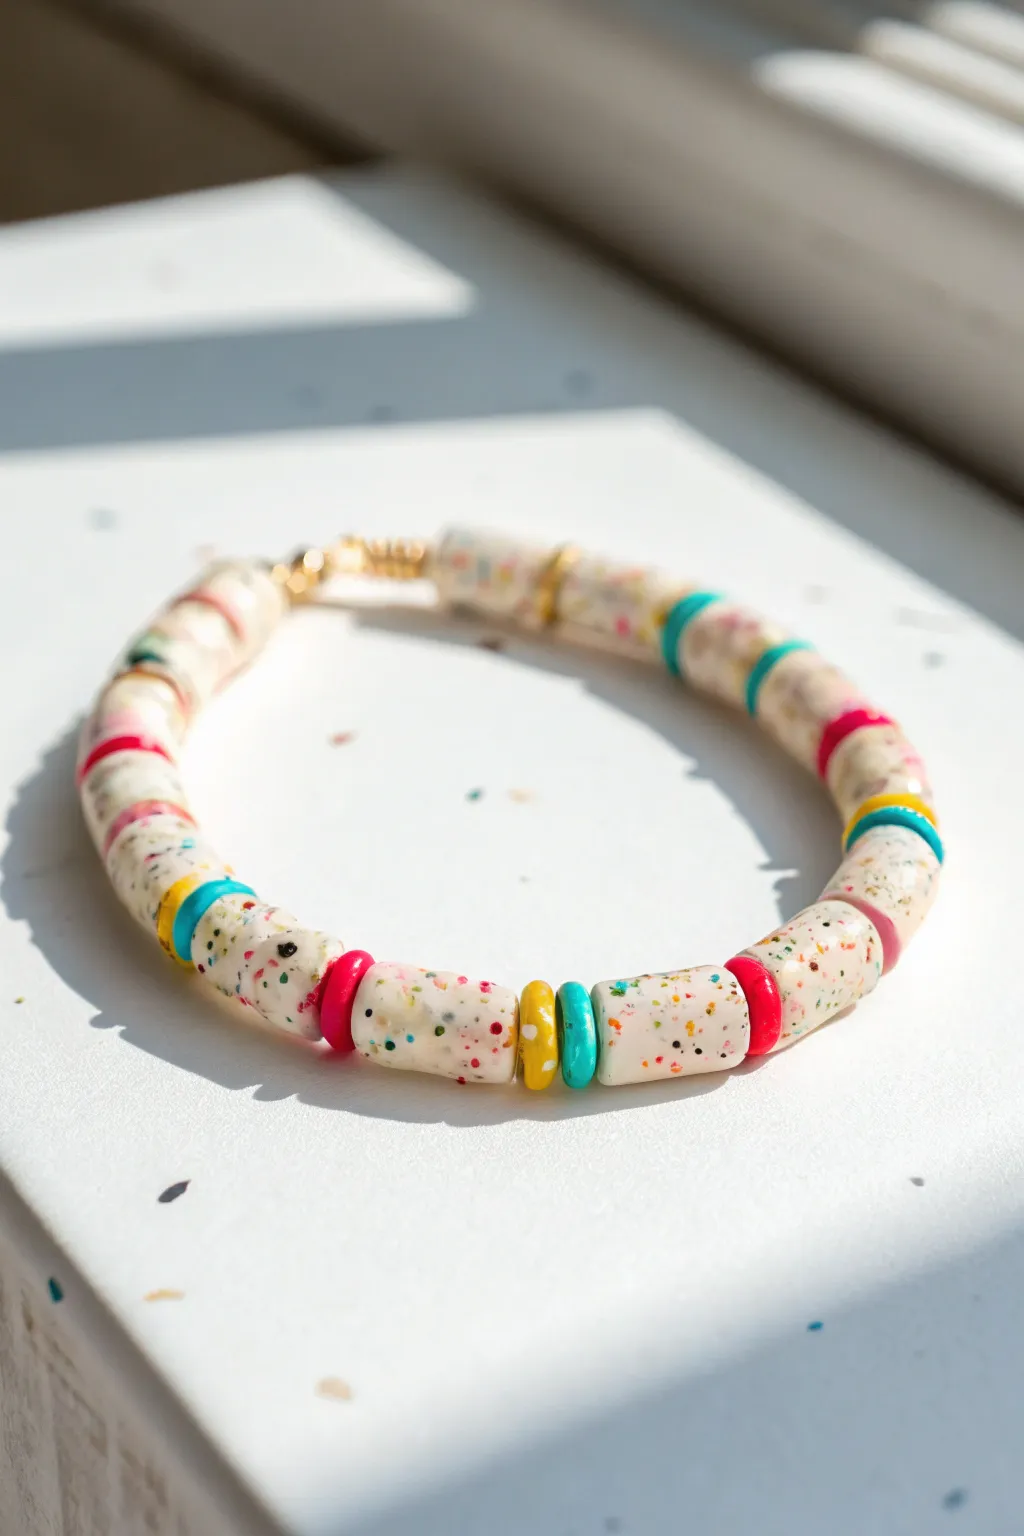
This cheerful bracelet captures the joy of a birthday cake with its speckled white tube beads reminiscent of confetti frosting. Paired with bright pops of solid colors, it makes for a playful accessory perfect for adding a bit of sweetness to your day.
Step-by-Step
Materials
- White polymer clay (e.g., Fimo or Sculpey)
- Assorted polymer clay scraps (pink, yellow, blue, teal, green, orange)
- Acrylic rolling pin or clay machine
- Tissue blade or X-Acto knife
- Thick needle tool or bead piercing pins
- Baking sheet and parchment paper
- Sandpaper (400 and 800 grit)
- Elastic beading cord (0.8mm)
- Jewelry glue (GS Hypo Cement)
- Gold tone crimp bead cover (optional)
- Glaze or varnish (glossy – optional)
Step 1: Making the Confetti Canes
-
Prepare the Base:
Start by conditioning your white polymer clay until it is soft and pliable. Roll it into a thick log, about 1 inch in diameter. -
Create the Sprinkles:
Take tiny amounts of your colored clay scraps. Roll them into very thin snakes, no thicker than a toothpick. Bake these thin snakes for about 5-10 minutes just so they harden slightly; this makes them easier to chop. -
Chop the Colors:
Once the thin colored snakes are cool, use your tissue blade to chop them into tiny, random bits. These will be your confetti sprinkles. -
Mix the Clay:
Scatter the chopped colored bits onto your conditioned white clay. Fold the white clay over the sprinkles and knead gently to distribute them. Don’t over-knead, or the colors might smear into the white instead of remaining distinct specks.
Step 2: Forming the Beads
-
Roll the Tube:
Roll your speckled white clay into a long, even snake that is approximately 8-10mm thick. Try to keep the thickness consistent along the entire length. -
Cut to Size:
Using your blade, cut the snake into equal segments. For the look in the photo, aim for segments about 12-15mm long. I find using a ruler as a guide helps keep them uniform. -
Pierce the Holes:
Gently twist a needle tool through the center of each cylinder to create the bead hole. Rotate the bead as you push to avoid flattening the shape. -
Make the Spacer Beads:
Roll out small sheets of solid pink, yellow, and turquoise clay. Use a small round cutter or a straw to punch out small circles. -
Pierce Spacers:
Poke a hole in the center of each colored disk. You will need pairs of colors (e.g., one pink, one yellow) to recreate the pattern seen in the image. -
Smooth the Edges:
Before baking, gently tap the ends of your tube beads with your finger to soften any sharp cutting lines.
Smeary Sprinkles?
If your colored specks are smearing into the white clay, your clay is too warm or soft. Let the chopped bits sit in the fridge for 10 minutes before mixing into the white base.
Step 3: Baking and Finishing
-
Bake:
arrange all your beads on parchment paper or a bead rack. Bake according to your clay manufacturer’s instructions (usually 275°F/130°C for 15-30 minutes). -
Cool and Sand:
Allow the beads to cool completely. If there are any fingerprints, lightly wet-sand them with fine-grit sandpaper for a smooth finish. -
Glaze (Optional):
If you want that ceramic-like shine shown in the photo, apply a thin coat of gloss varnish to the confetti beads and let them dry. -
Layout Design:
Arrange your beads on a layout board. The pattern in the image is: one long confetti bead, followed by two or three colored spacers, then another confetti bead. Mix up the spacer colors for variety. -
Stringing:
Cut a piece of elastic cord about 10 inches long. Pre-stretch the elastic by pulling on it a few times to prevent sagging later. -
Thread Beads:
String your beads onto the elastic in your chosen pattern. -
Tie the Knot:
Tie a surgeon’s knot (right over left, left over right twice). Pull tight to secure the bracelet. -
Secure and Hide:
Add a dab of jewelry glue to the knot. If the hole of a confetti bead is large enough, pull the knot inside to hide it. Alternatively, cover the knot with a gold crimp cover for a professional finish.
Pro Tip: Hole Perfection
To prevent the exit hole from blowing out or distorting, push the needle halfway through one side, then flip the bead and push it through the other side to meet in the middle.
Slip on your new custom accessory and enjoy the fun splash of color it adds to your wrist
Tiny Heart Bead Focal
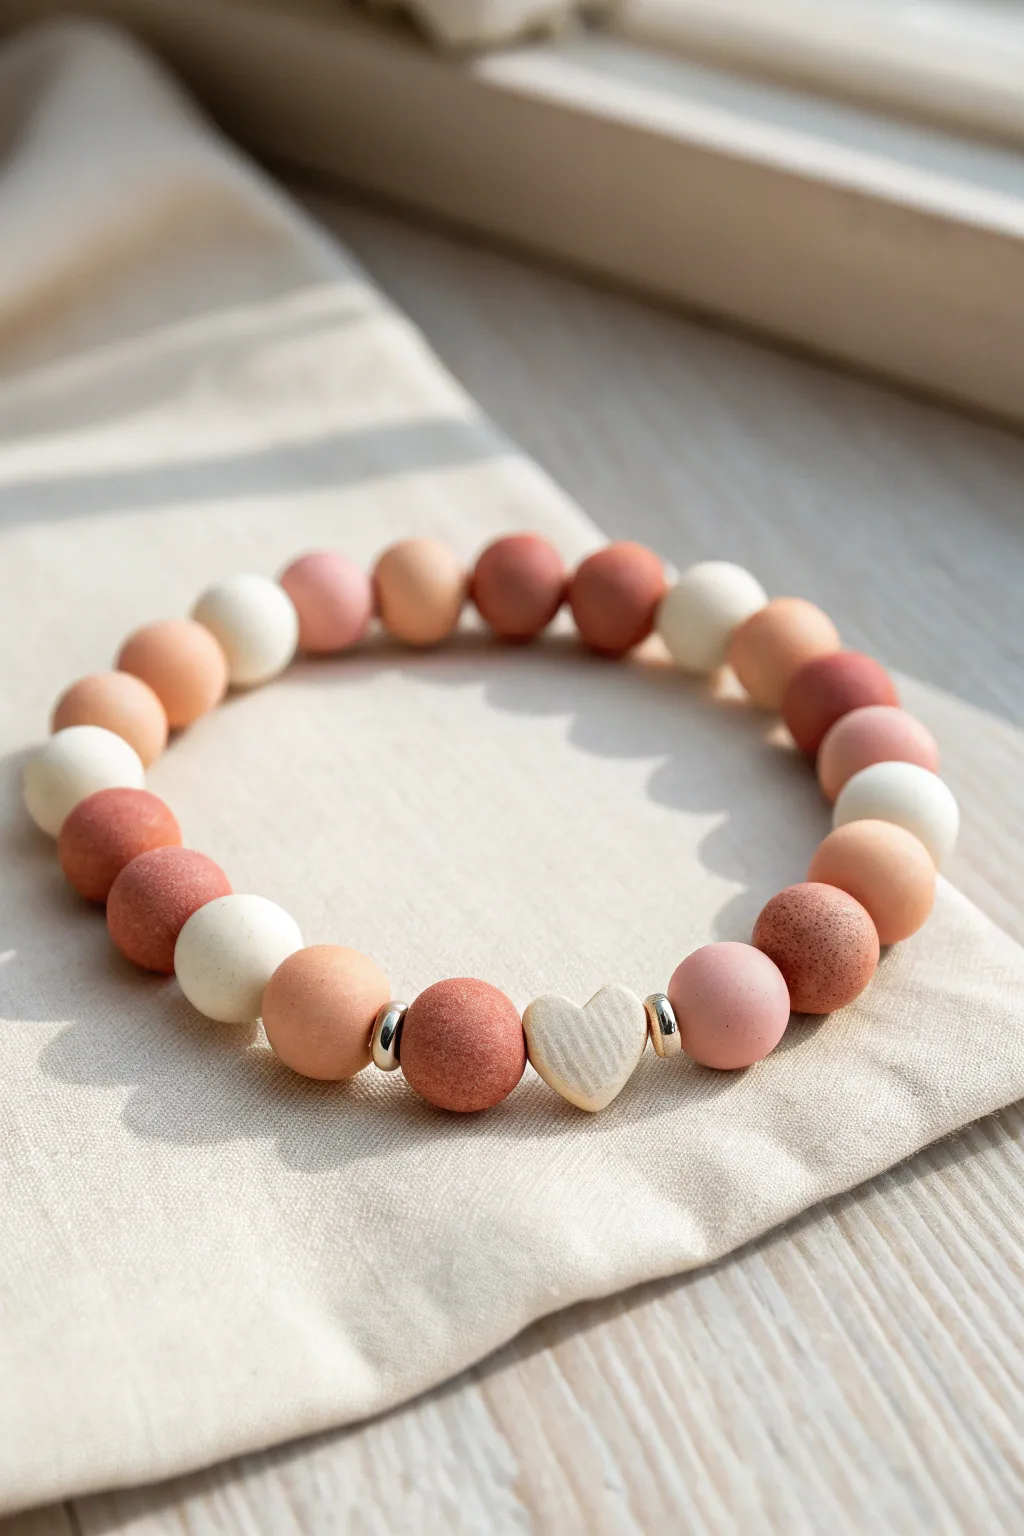
This charming bracelet combines the warmth of terracotta and peach with the softness of cream in a simple, elegant design. The star of the show is a tiny, handcrafted white heart bead nestled between metallic accents, creating a perfect focal point for everyday wear.
Step-by-Step Tutorial
Materials
- Polymer clay (terracotta, peach, white/cream, beige)
- Elastic cord (0.8mm or 1mm)
- Two small metal spacer beads (gold or silver)
- Bead piercing tool or toothpick
- Small heart-shaped cutter (optional) or craft knife
- Ceramic tile or baking sheet
- Oven
- Fine-grit sandpaper (400-600 grit)
- Super glue or jewelry cement
Step 1: Creating the Clay Palette
-
Condition the Clay:
Begin by kneading each color of polymer clay separately until it is soft and malleable. Warm hands help this process significantly. -
Mix Custom Shades:
To achieve the varied earthy look, mix small amounts of terracotta with white to create lighter peach tones. Leave some terracotta pure for the darker beads. You want a gradient ranging from deep rust to pale cream. -
Portion the Clay:
Pinch off small, equal-sized pieces of clay for your round beads. A size of about 8-10mm diameter works well for this delicate style.
Step 2: Forming the Beads
-
Roll Spheres:
Roll each piece of clay between your palms to form smooth, round spheres. I like to check that they are relatively uniform in size, though slight variations add to the organic handmade feel. -
Texture the Beads (Optional):
The beads in the image have a lovely matte, stone-like texture. You can achieve this by gently rolling the raw clay beads on a piece of coarse sandpaper or dabbing them with a toothbrush before baking. -
Sculpt the Heart Focal:
Take a small piece of the cream or white clay. Shape it into a slightly flattened heart. You can hand-mold this by forming a teardrop and pressing a dent into the top, or use a tiny cutter. -
Smooth the Edges:
Gently tap the edges of your heart bead to round them off so it sits comfortably against the wrist. -
Pierce the Holes:
Using your piercing tool, carefully create a hole through the center of each round bead. For the heart bead, pierce it horizontally through the widest part.
Clean Piercing Tip
To avoid squishing your raw beads, let them sit in the fridge for 10 minutes before piercing. The firmer clay holds its shape much better against the tool.
Step 3: Baking and Finishing
-
Bake the Beads:
Arrange your beads on a ceramic tile or baking sheet. Bake according to the manufacturer’s instructions for your specific brand of clay (usually 275°F/135°C for 15-30 minutes). -
Cool Down:
Allow the beads to cool completely in the oven before handling them to prevent cracking. -
Sanding for Matte Effect:
Once cool, lightly sand the surface of each bead with fine-grit sandpaper. This removes fingerprints and enhances the soft, matte finish seen in the example.
Sticky Clay Problems?
If the clay is sticking to your hands and leaving fingerprints, dust your palms lightly with cornstarch before rolling. It washes off easily after baking.
Step 4: Assembly
-
Cut the Cord:
Cut a length of elastic cord about 10 inches long. This gives you plenty of extra room for tying knots. -
Pre-stretch the Elastic:
Give the elastic cord a few firm tugs. This pre-stretching step prevents the bracelet from loosening up after the first few wears. -
String the Focal Section:
Start by threading one metal spacer bead, then the white heart bead, followed by the second metal spacer bead. Center them on the cord. -
Add Round Beads:
Thread the round clay beads onto both sides of the focal section. Alternate your colors randomly—mix the terracotta, peach, and cream beads to create a balanced, natural pattern. -
Check fit:
Wrap the strand around your wrist to check the size. Add or remove round beads until it fits comfortably. -
Tie the Knot:
Tie a surgeon’s knot (right over left, left over right, loop through twice) to secure the bracelet tightly. -
Secure and Trim:
Add a tiny drop of super glue to the knot. Let it dry for a distinct moment, then trim the excess cord ends carefully, tucking the knot inside a bead hole if possible.
Slip this bracelet on to add a touch of earthy warmth to any outfit
Candy Stripe Sections
This trendy stretch bracelet combines soft matte textures with metallic shine for a sophisticated yet playful accessory. The interspersed gold spacers break up the pink and white clay discs, creating an elegant rhythm that looks great stacked or solo.
Step-by-Step Guide
Materials
- Pink polymer clay heishi beads (flat disc beads, approx. 6mm)
- White polymer clay heishi beads (flat disc beads, approx. 6mm)
- Gold disc spacer beads (heishi style)
- Elastic stretch cord (0.8mm or 1mm thickness)
- Super glue or jewelry cement
- Scissors
- Tape or a bead stopper clip
Step 1: Planning & Preparation
-
Measure your wrist:
Before cutting any string, wrap the elastic cord gently around your wrist to find a comfortable fit, then add about 3-4 inches of extra length on each side to make tying the knot easier later. -
Secure the end:
Attach a piece of tape or a bead stopper to one end of your cut elastic cord. This prevents your beads from sliding right off while you are stringing them, which is a frustration I definitely like to avoid. -
Sort your beads:
Pour out a small amount of your pink, white, and gold beads onto a soft surface or bead mat. This keeps them from rolling away and makes it easier to grab the color you need quickly. -
Establish the pattern:
Observe the pattern in the reference image: it’s primarily segments of pink, separated by small sections of white and gold. A common sequence here is: 5-6 pink beads, 1 white, 1 pink, 1 white, followed by a new pink segment. The gold accents appear sporadically, often in pairs.
Step 2: Stringing the Beads
-
Start the main color block:
Begin by threading on about 5 to 6 pink clay beads. These flat discs nestle together perfectly, so make sure they are facing the same way if they have a slight curve, though usually they are uniform. -
Add a gold accent:
Slide on two gold disc spacer beads. These metallic accents add a flash of luxury to the matte clay. Follow this immediately with another block of 4 pink beads. -
Create a candy stripe section:
Now, switch up the rhythm. Thread on one white bead, followed by one pink bead, then another white bead. This creates a little striped interruption in the solid color. -
Resume the pink block:
Add another solid section of about 8 pink beads. Varying the length of these solid sections slightly gives the bracelet an organic, handmade feel rather than a machine-perfect pattern. -
Insert a second gold detail:
Add two more gold spacers. This time, try sandwiching a small section of white beads nearby, perhaps doing: 2 pink, 1 white, 2 gold, 1 white, 2 pink. -
Continue the pattern:
Keep repeating these motifs—solid pink blocks, ‘candy stripe’ interruptions of alternating colors, and double gold spacers—until the beaded length covers your wrist comfortably without stretching the cord.
Knot Security
Use a flexible jewelry glue like G-S Hypo Cement meant for elastic. Avoid rigid super glues that can make the elastic brittle and snap over time.
Step 3: Finishing the Bracelet
-
Check the fit:
Wrap the beaded strand around your wrist to check the size. Ideally, the ends should touch without gaps, but it shouldn’t be squeezing your skin. Remove or add a few beads as necessary. -
Pre-stretch the cord:
Before tying, give the ends of the elastic a gentle tug. This ‘pre-stretching’ helps prevent the bracelet from sagging or loosening up after the first time you wear it. -
Tie the first knot:
Remove the tape or stopper. Bring the two ends together and tie a simple overhand knot. Pull it tight, ensuring no gaps are left between the beads. -
Secure with a surgeon’s knot:
Tie a second knot, but this time loop the end through twice before pulling tight (this is a surgeon’s knot). This adds extra security and prevents slipping. -
Apply adhesive:
Place a tiny drop of super glue or jewelry cement directly onto the knot. Be careful not to get glue on the beads themselves, just the cord. -
Hide the knot:
While the glue is still wet, you can try to slide adjacent beads over the knot to hide it. If the hole of the bead is large enough, the knot will disappear inside. -
Trim the excess:
Once the glue is fully dry (wait a few minutes), use sharp scissors to trim the excess elastic tails close to the knot.
Switch It Up
Create a matching stack by making a second bracelet that inverts the colors: use white beads as the main color blocks and pink for the accents.
Slip your new creation onto your wrist and enjoy the custom pop of color you just made
Birth Color and Initial Combo
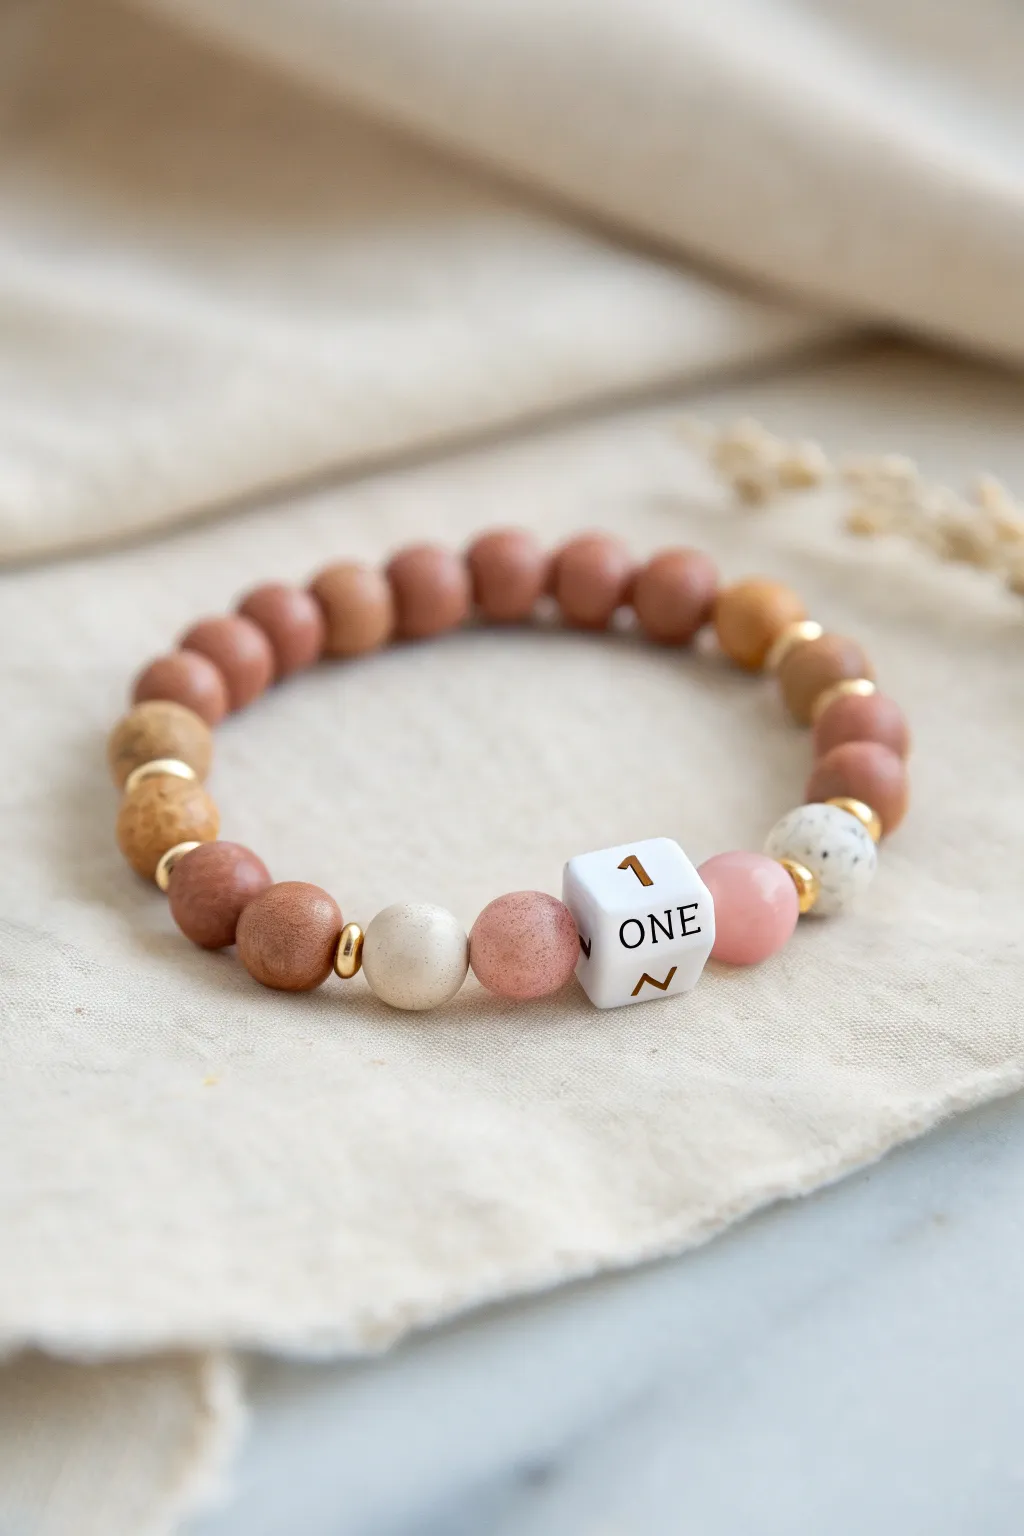
Celebrate a little one’s first big milestone with this charming, earth-toned beaded bracelet featuring a playful alphabet cube. The mix of warm wood textures, gold accents, and soft focal beads creates a keepsake that is as stylish as it is sentimental.
Step-by-Step Tutorial
Materials
- Stretch cord (0.8mm or 1mm clear elastic)
- Round wooden beads (approx. 8-10mm) in a warm reddish-brown matte finish
- Round wooden beads (approx. 8-10mm) in a lighter tan or unfinished wood look
- One white polymere or ceramic cube bead with ‘ONE’ lettering and gold number ‘1’ detail
- Gold spacer beads (heishi or small round metal beads)
- One speckled white round bead (clay or stone) approx. 10mm
- Two speckled pink/terra cotta round beads (clay or stone) approx. 10mm
- One solid pink round bead (clay or gemstone) approx. 10mm
- One cream/white round bead (clay or wood) approx. 10mm
- Scissors
- Jewelry glue or clear nail polish
- Bead stopper or tape
Step 1: Planning and Stringing
-
Prepare your workspace:
Cut a piece of stretch cord about 10-12 inches long. This generous length makes tying the final knot much easier. Attach a bead stopper or a piece of tape to one end to prevent beads from sliding off while you design. -
Layout the focal section:
Before stringing anything, lay out your beads on a soft surface or bead mat. Center your design around the ‘ONE’ cube bead. This will act as the anchor for the rest of the pattern. -
Create the left focal side:
To the left of where the cube will go, place one round pink/terra cotta speckled bead. Follow this with a round cream bead, and then a gold spacer bead. -
Create the right focal side:
To the right of the cube position, place the solid pink round bead. Next to that, place a gold spacer bead, followed by the white speckled bead. -
Begin stringing:
Pick up the cream bead first and slide it onto the cord, followed by the pink speckled bead. -
Add the centerpiece:
Now slide on the ‘ONE’ cube bead. Ensure the text is facing the direction you want to read it when worn. -
Finish the focal arrangement:
Slide on the solid pink bead. Then add a gold spacer, followed by the white speckled bead. -
Check your spacing:
Hold the cord up briefly to make sure the focal cluster sits nicely together. The gold spacer adds just enough separation to let the special beads shine.
Step 2: Completing the Band
-
Start the wooden section:
Add a gold spacer bead next to the white speckled bead you just strung. This transitions the design into the main bracelet band. -
Add the first wood accent:
String one of the lighter tan wooden beads next to the spacer. Follow it immediately with another gold spacer to mirror the other side. -
Add texture on the other side:
Go to the other end of your string (remove the tape momentarily if needed, or simply work from one direction if you prefer) and place a gold spacer next to the cream bead, followed by a reddish-brown wooden bead, then another gold spacer. -
Fill in the back:
String the remaining reddish-brown matte wooden beads until you reach the desired bracelet length. For an average adult wrist, this is usually about 7 inches total, but adjust accordingly. -
Pre-stretch the cord:
This is a crucial step often skipped. Gently pull on both ends of the elastic cord several times. I like to do this to remove the initial slack, which prevents the bracelet from stretching out permanently later. -
Check the fit:
Wrap the unfinished strand around your wrist to verify the size. Add or remove wooden beads if it feels too loose or too tight. -
Tie the knot:
Tie a surgeon’s knot (right over left, left over right, and loop through an extra time). Pull the elastic tight so the beads nestle closely together. -
Secure and hide:
Add a tiny dab of jewelry glue to the knot. Let it dry for a moment, then trim the excess cord ends close to the knot. If the hole of a neighboring wooden bead is large enough, gently tug the knot inside to hide it.
Loosey Goosey?
If your knot slips, try coating the cord tips with clear nail polish before tying. The slight tackiness helps the slick elastic grip itself better.
Pro Tip: Bead Board
Use a flocked bead board to lay out your design. The U-shaped channels show exactly how the bracelet will curve properly before you start stringing.
Now you have a sweet, personalized accessory ready to be worn or gifted for a memorable occasion
Night Sky Glow Mix
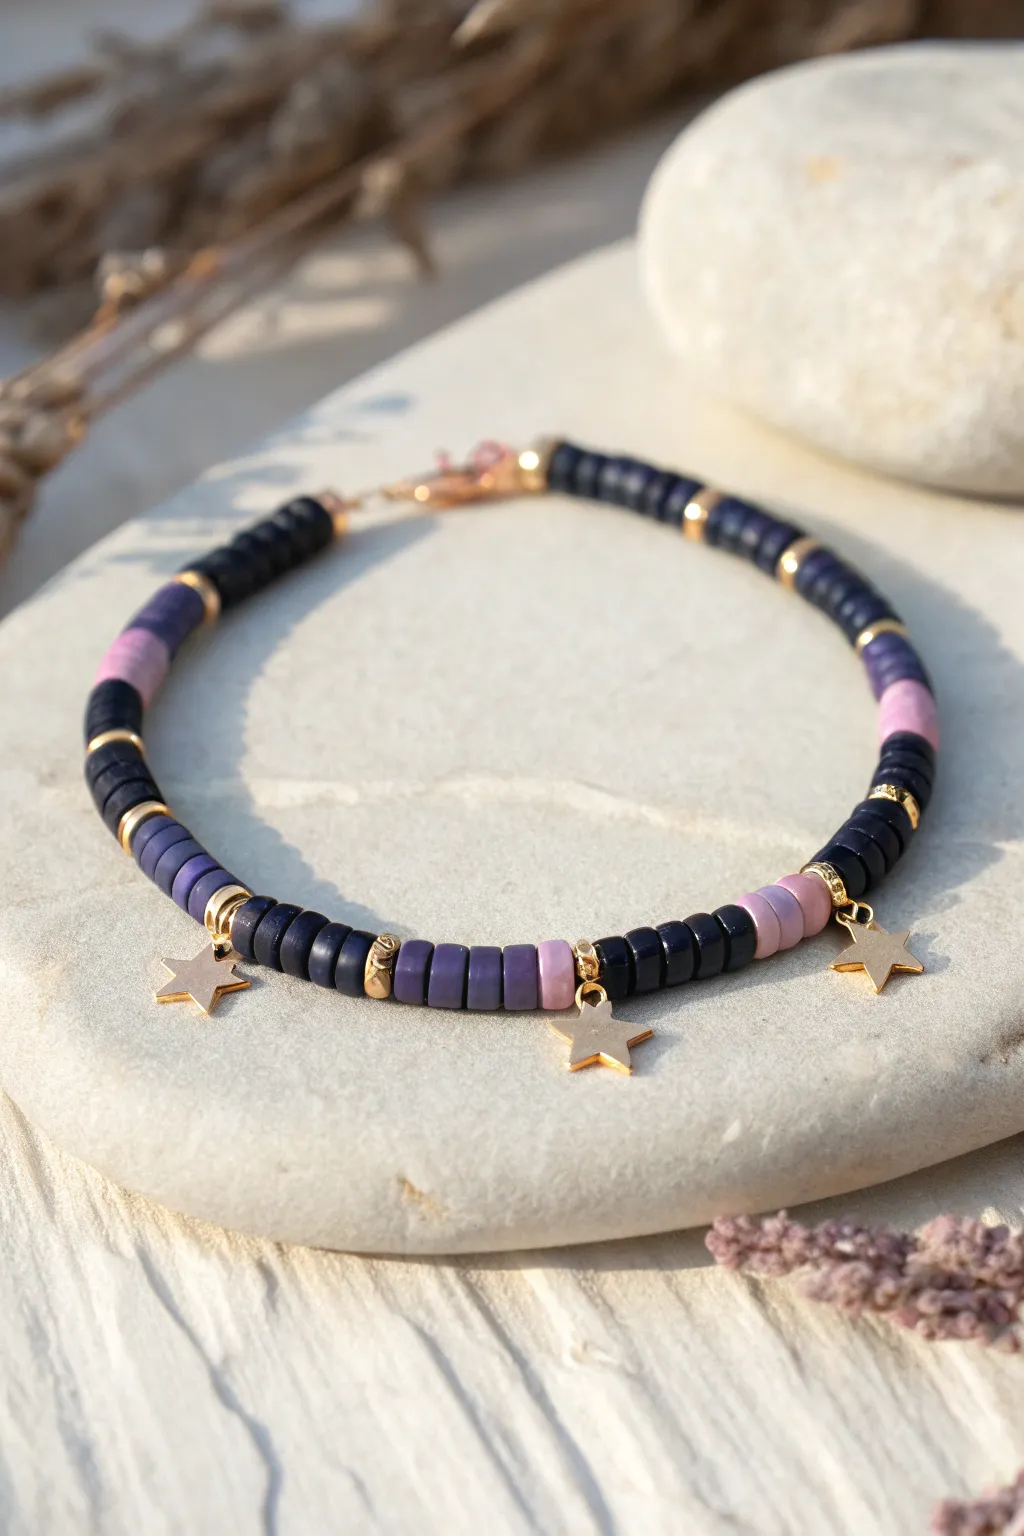
Capture the magic of a twilight sky with this celestial-themed Heishi bead bracelet. Featuring deep navy hues transition into soft purples and pinks, accented by golden starlight charms, it’s a dreamy accessory perfect for stargazers.
Step-by-Step Guide
Materials
- Polymer clay Heishi disk beads (6mm) in: Navy Blue, Dark Purple, Lavender/Light Pink
- Gold tone flat disk spacer beads (4mm or 5mm)
- 3 Gold tone star charms with jump rings
- Gold tone crimp beads
- Gold tone lobster clasp and jump ring for closure
- Elastic beading cord (0.8mm) or beading wire
- Jewelry pliers (flat nose)
- Scissors or wire cutters
- Bead stopper or tape
Step 1: Planning the Pattern
-
Measure your wrist:
Wrap a piece of string around your wrist to find your comfortable size, adding about half an inch for ease. Cut your elastic cord to this length plus an extra 4-5 inches for tying knots. -
Secure the end:
Attach a bead stopper or a piece of tape to one end of your cord to prevent beads from sliding off while you work. -
Visualize the sequence:
Lay out your beads on a design board or towel. The pattern relies on color blocking: segments of dark navy are separated by smaller sections of purple and pink, with gold accents marking the transitions.
Step 2: Stringing the Beads
-
Start with Navy:
Begin by feeding about 10-12 navy blue disk beads onto the cord. This will form the main dark background of the ‘night sky’. -
Add a gold spacer:
Slide on a single gold flat disk spacer. These act as little glimmers of light between the color shifts. -
Transition to Purple:
Add a small section of roughly 4-5 dark purple beads. The slight variation in color mimics the gradient of a sunset. -
Insert the first charm:
Slide on a gold spacer, then the jump ring attached to your first gold star charm. I always double-check that the jump ring is closed tightly with pliers before adding it. -
Complete the first charm section:
Follow the star charm immediately with another gold spacer to frame it perfectly. -
Add the Pink accent:
Thread on 3-4 light pink or lavender beads. This lighter color helps the gold charm pop against the darker beads. -
Return to Navy:
Add another gold spacer, then switch back to the main navy blue color. String a longer segment of navy beads, perhaps 15-20 beads, to separate the star clusters. -
Repeat the pattern:
Create the second focal point by adding a bold section of 4-5 purple beads, a gold spacer, and then the second star charm section. -
Finish the sequence:
Continue alternating the long navy sections with the colorful charm sections until you have used all three stars and reached your desired length.
Loose Charms?
If your star charms don’t hang straight, use two small gold spacer beads on either side of the jump ring instead of one. This creates a wider gap, allowing the charm to dangle freely.
Step 3: Finishing Touches
-
Check the fit:
Carefully wrap the unfinished bracelet around your wrist to ensure the size is correct and the stars sit where you want them. -
Add crimp beads:
Slide a crimp bead onto both ends of the cord. If you are using elastic, you can skip to knotting, but crimps add a professional finish for wire. -
Attach the clasp:
Thread one end of the cord through the loop of the lobster clasp. Loop it back through the crimp bead. -
Secure the crimp:
Use your flat nose pliers to squash the crimp bead flat, securing the wire tightly around the clasp loop. -
Close the loop:
On the other end, repeat the process with a jump ring instead of a clasp, ensuring the bracelet can close securely. -
Trim excess:
Snip off the excess tail of the cord or wire close to the crimp bead using your scissors or cutters.
Galaxy Gradient
Make it more dynamic by mixing speckled clay beads or glittery beads into the navy sections to look like distant stars in the night sky.
Now you have a piece of the night sky to wear on your wrist
Cute Charm Cluster Drop
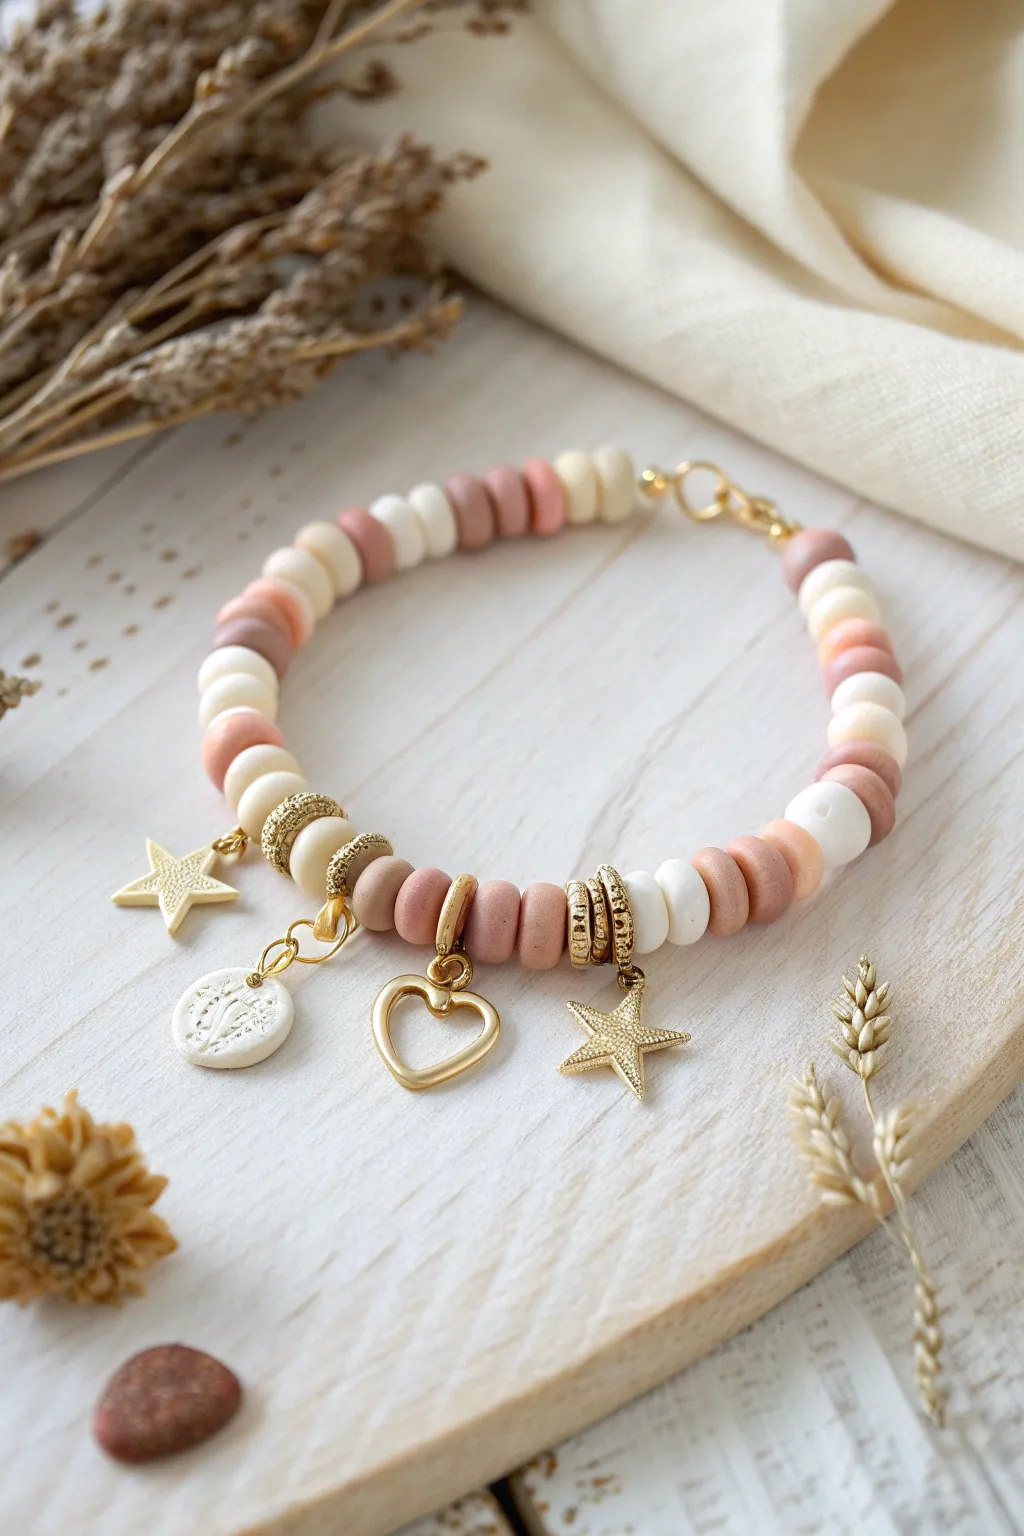
Capture the warmth of a sandy beach with this delightful clay bead bracelet featuring a cluster of playful charms. The combination of soft terracotta, cream, and beige clay discs with gold accents creates a sophisticated yet boho-chic accessory perfect for stacking.
Step-by-Step Tutorial
Materials
- Polymer clay in White, Beige/Tan, and Terracotta/Dusty Rose
- Gold-plated star charm
- Gold-plated open heart charm
- Gold-plated starfish charm
- Gold spacer beads (textured or rhinestone rondelles)
- Gold jump rings (4mm and 6mm)
- Gold lobster clasp and extender chain
- Beading wire or strong elastic cord
- Crimp beads (if using wire)
- Small circle cutter (approx. 6mm)
- Needle tool or bead reamer
- Jewelry pliers (chain nose and round nose)
- Clay roller or pasta machine
- Texture stamp (botanical or abstract)
- Oven for baking
Step 1: Creating the Clay Heishi Beads
-
Condition the clay:
Begin by thoroughly kneading your white, beige, and terracotta polymer clays separately until they are soft and pliable. This prevents cracks during baking. -
Roll out sheets:
Roll each color into a flat, even sheet, approximately 2-3mm thick. If you have a pasta machine, use a medium setting to ensure consistent thickness across all your beads. -
Cut the discs:
Use your small 6mm circle cutter to punch out many small discs from each color sheet. You will need roughly 40-50 beads total, depending on your wrist size. -
Pierce the holes:
Gently poke a hole through the exact center of each raw clay disc using a needle tool. I find that twisting the tool slightly as you push helps keep the circle shape from deforming. -
Bake the batch:
Arrange the beads on a parchment-lined baking sheet and bake according to the manufacturer’s instructions (usually 275°F/135°C for 15-30 minutes). Let them cool completely before handling.
Smooth Edges Pro-Tip
After baking, if your clay beads have rough edges, string them tightly together on a skewer and sand the whole column with fine-grit sandpaper.
Step 2: Crafting the Clay Charm
-
Form the charm base:
Roll a small ball of white clay and flatten it slightly to create a thick disc, slightly larger than your beads (about 10-12mm). -
Add texture:
Press a botanical or abstract texture stamp gently into the surface of the white disc to create an imprinted design. -
Attach the hardware:
Insert a jump ring directly into the top of the clay disc before baking, or poke a large enough hole to thread one through later. Bake this charm along with your beads.
Step 3: Assembly
-
Prepare the string:
Cut a length of beading wire or elastic cord about 10 inches long to give yourself plenty of room to work. -
Start the pattern:
Begin threading your cooled clay beads. An alternating pattern works best; try 3-4 beads of one color, followed by 1-2 of another to create a random, organic look. -
Add the first charms:
Once you have about 2 inches of beads, slide on a gold spacer bead, followed by a jump ring holding your gold star charm. -
Create the center cluster:
Continue adding a few clay beads, then add a gold spacer followed by the white clay charm. Repeat this process for the heart charm and the starfish charm, spacing them out with small sections of clay beads. -
Finish the bead strand:
Continue threading the rest of your clay beads in your alternating color pattern until the bracelet reaches your desired length (usually 6.5 to 7 inches). -
Secure the ends:
If using wire, thread a crimp bead onto one end, loop the wire through a jump ring attached to your clasp, and thread it back through the crimp bead. Flatten the crimp bead with pliers to secure it. -
Attach the closure:
Repeat the crimping process on the other end, attaching a jump ring or extender chain so the clasp has something to latch onto. -
Final check:
Trim any excess wire close to the crimp beads and ensure all jump rings on your charms are closed tightly so nothing slips off.
Charm Positioning
If charms bunch up too much, adding two gold spacer beads between the charm jump rings helps them lay flat against the wrist without tangling.
Now you have a stunning, beach-ready accessory that looks professionally made and adds a personalized touch to any outfit
Matte Clay and Pearl Spacers
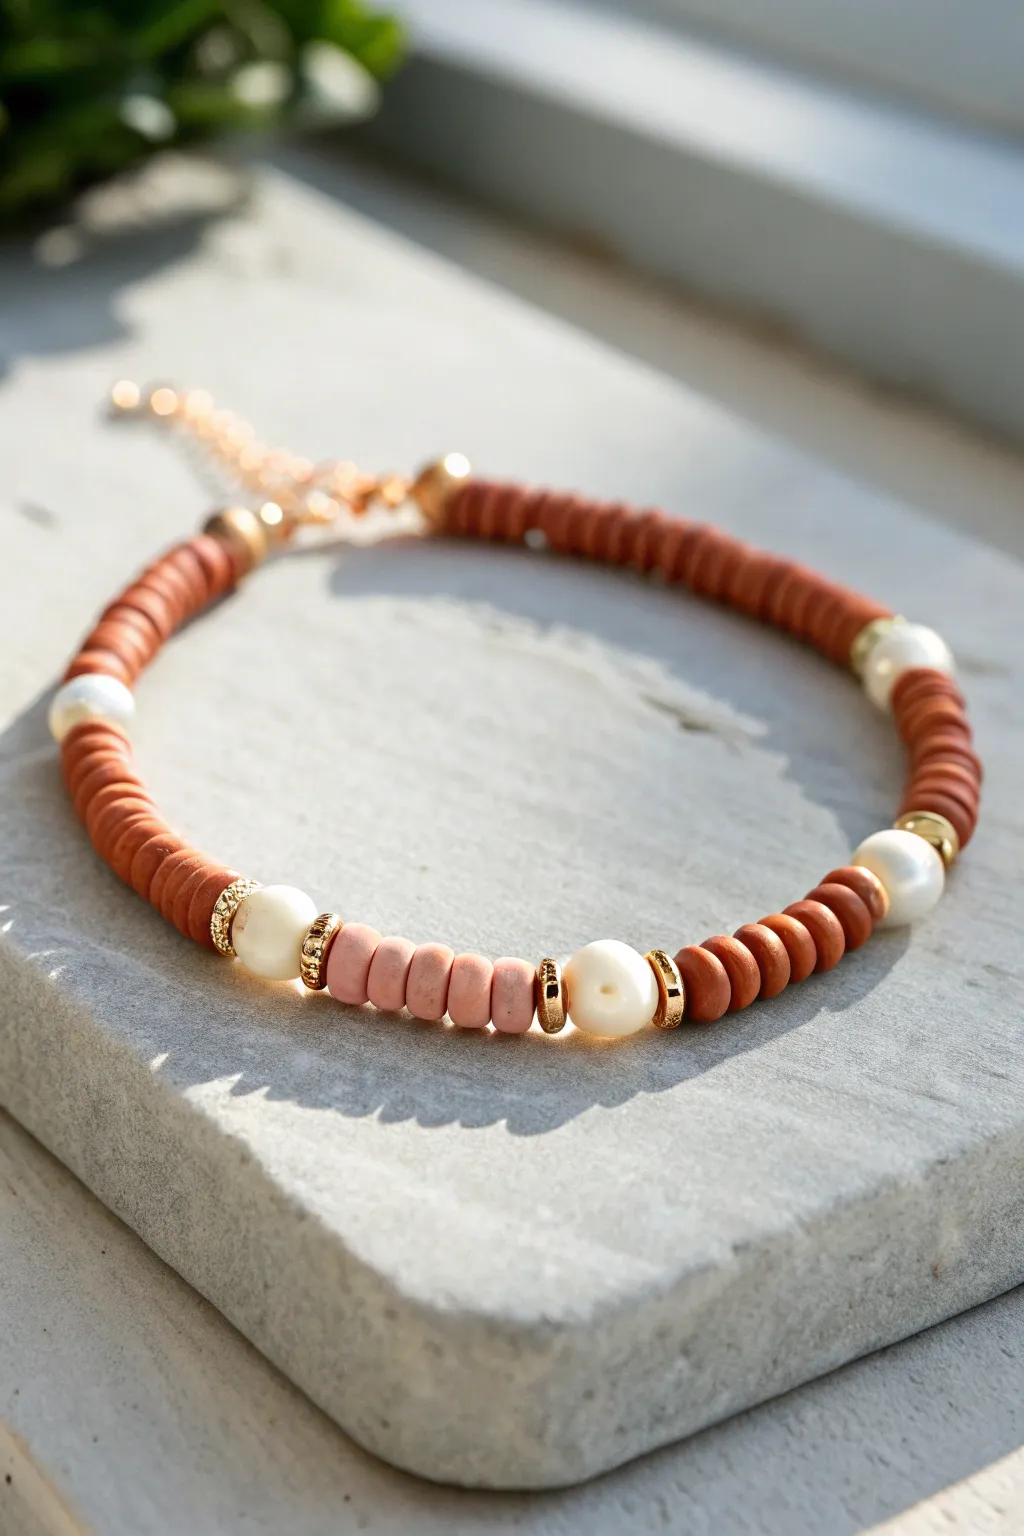
This sophisticated design blends the earthy warmth of terracotta-colored clay discs with the classic elegance of freshwater pearls. The matte finish of the clay contrasts beautifully with the luster of the pearls and gold spacers, creating a versatile piece that works for both casual and dressy occasions.
How-To Guide
Materials
- Matte terracotta polymer clay disc beads (Heishi beads, approx. 4-6mm)
- Light pink/coral polymer clay disc beads (approx. 4-6mm)
- Freshwater pearls (irregular round shape, similar diameter to the discs)
- Gold tone textured spacer beads (flat rondelle shape)
- Gold tone crimp beads (2)
- Gold tone crimp covers (2)
- Gold tone wire guardians (2)
- 0.6mm (0.019-0.024 inch) flexible beading wire
- Gold tone lobster clasp
- Gold tone extension chain
- Small gold jump rings
- Flat nose pliers
- Crimping pliers or chain nose pliers
- Wire cutters
Step 1: Preparation and Design
-
Measure your wrist:
Wrap a flexible measuring tape around your wrist to find your size, then add about 1/2 to 1 inch for comfort. Cut a length of beading wire about 3 inches longer than this measurement to allow room for finishing the ends. -
Secure the first end:
Thread a crimp bead onto one end of your wire, followed by a wire guardian. Loop the wire back through the crimp bead. Hook your lobster clasp or a jump ring onto the wire guardian before pulling the wire tight. -
Crimp firmly:
Using your crimping pliers, flatten the crimp bead securely on the wire strands. I verify the hold by giving it a gentle tug. -
Cover the crimp:
Place a gold crimp cover over the flattened crimp bead. Gently use pliers to close the cover until it looks like a round gold bead.
Uneven Tension?
If the bracelet feels stiff or kinks, you likely crimped it too tightly. Leave a 1-2mm gap of exposed wire before the final crimp to let beads drape naturally.
Step 2: Stringing the Pattern
-
Start with the main color:
Begin stringing a long section of your terracotta clay disc beads. This section will form the back and sides of the bracelet, wrapping around the wrist. -
Add the first highlight:
Slide on a single gold textured spacer, followed by a freshwater pearl, and another gold spacer. This creates a framed look for the pearl. -
Create a bridge:
Add a small section of terracotta beads (about 6-8 discs) to separate the pearl stations. -
Build the focal point:
String another gold textured spacer, then a freshwater pearl, then a gold spacer. -
Insert the contrast color:
Now, thread on 4 to 5 of the lighter pink/coral clay beads. This subtle color shift adds a lovely visual softness to the center of the design. -
Complete the focal section:
Finish the central motif symmetrically by adding a gold spacer, a third freshwater pearl, and a final gold spacer. -
Finish the sequence:
Add another bridge section of 6-8 terracotta beads, followed by one more pearl assembly (gold spacer, pearl, gold spacer). -
Close the loop:
Fill the rest of the wire with terracotta beads until you reach your desired total length.
Texture Twist
Swap the smooth clay discs for faceted gemstone rondelles in the center section to add sparkle that contrasts with the matte clay texture.
Step 3: Finishing Touches
-
Prepare the final end:
Thread a crimp bead and a wire guardian onto the remaining wire end. Loop the wire back through the crimp bead. -
Attach the extension chain:
Before crimping, ensure the loop of your extension chain is caught in the wire guardian (or use a jump ring later). -
Tighten the slack:
Pull the wire snug so there are no large gaps between beads using pliers, but leave a tiny bit of wiggle room so the bracelet remains flexible and doesn’t become stiff. -
Secure the crimp:
Flatten the final crimp bead with your pliers and trim off the excess wire tail close to the bead. -
Add the final cover:
Place and close the second crimp cover over the crimp bead for a polished finish. -
Check connections:
Ensure all jump rings are closed tightly so your clasp and chain stay secure.
Enjoy styling your new bracelet solo or stacked with other textures for a bohemian look
Coordinated Micro-Mismatch Stack Set
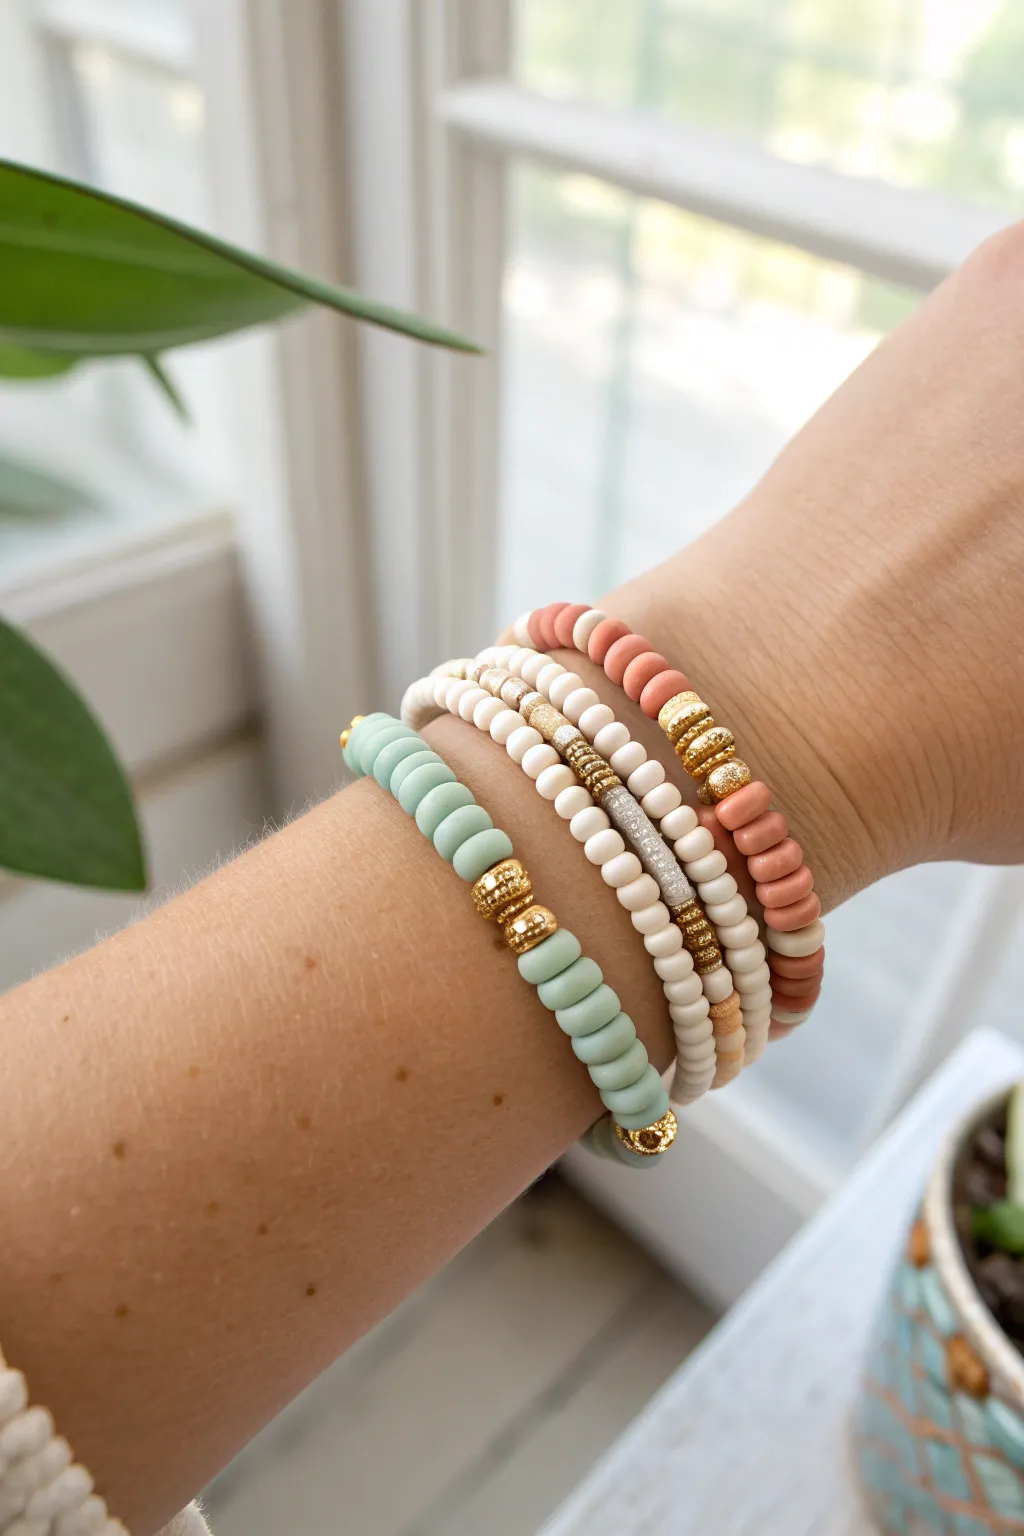
Embrace the effortless charm of mismatched yet coordinated accessories with this four-piece bracelet stack. By combining matte heishi beads in soft sage and terracotta with gold accents and natural wood textures, you’ll create a sophisticated set that feels both curated and casual.
Step-by-Step Tutorial
Materials
- Matte heishi clay beads (6mm or 8mm) in mint/sage green
- Matte heishi clay beads (6mm or 8mm) in terracotta/coral
- Small round wooden or bone beads (cream/white)
- Strong elastic display cord (0.8mm or 1mm)
- Gold spacer beads (various textures: faceted, smooth round, and ring)
- Silver or pewter focal tube bead (textured)
- Small gold accent beads (2mm-3mm)
- Jewelry glue or clear nail polish
- Scissors
Step 1: Mint & Gold Focal Bracelet
-
Prepare the Cord:
Cut a piece of elastic cord about 10-12 inches long. Pre-stretch it by pulling firmly on both ends several times; this prevents the bracelet from stretching out permanently later. -
Start the Pattern:
Begin stringing your mint green heishi beads. Thread about 2.5 inches of just the green beads onto the cord to form the first side. -
Add the Gold Center:
Slide on a textured gold spacer bead, followed by a slightly larger smooth gold drum bead, and then another textured gold spacer. This trio acts as the focal point. -
Finish the Strand:
Continue stringing the mint green heishi beads until the strand measures your desired wrist size (standard is usually 6.5 to 7 inches). -
Secure the Knot:
Tie a surgeon’s knot (right over left, left over right twice) and pull tight. Add a tiny dab of jewelry glue to the knot before trimming the excess cord.
Knot Security Tip
Hide your knot inside a large-hole metal bead if possible. If not, position the knot between two clay beads, as they are flexible and can help conceal the connection point.
Step 2: The Cream & Mixed Metals Strand
-
Base Beading:
Cutting a new length of cord, start stringing the small cream-colored round wooden beads. These should be smaller than your heishi beads for texture contrast. -
Create the Metallics Section:
Once you hit the halfway point, thread on a small gold spacer, followed by a long, silver textured tube bead. -
Add Gold Accents:
After the silver tube, add three small gold ring spacers and then one more round gold bead to balance the mixed metals look. -
Complete the Circle:
Finish the rest of the length with the cream wooden beads and tie off securely using the same knotting method as before.
Stiff Bracelets?
If your bracelet feels stiff and doesn’t drape well, you’ve strung the beads too tightly. Leave a tiny gap (about 1mm) of bare cord before knotting to allow the beads to roll.
Step 3: The Terracotta & Gold Bracelet
-
String the Clay Beads:
Using the terracotta or coral-colored heishi beads, string a solid length of beads that covers about 3/4 of your wrist size. -
Insert Gold Detail:
Instead of a single focal point, break up the pattern subtly. Thread on two textured gold ring spacers. -
Add the Center Gold Bead:
Place a larger, faceted gold bead in the center of the metal section. -
Finish the Pattern:
Add two more textured gold ring spacers to mirror the other side, then finish filling the strand with terracotta beads until it meets the first end. -
Tie and Hide:
Knot the bracelet securely. If the hole of one of your clay beads is large enough, try to tuck the knot inside it for a seamless finish.
Step 4: The Textured Spacer Bracelet
-
Create the Bead Mix:
For this final bracelet, you will alternate between the cream wooden beads and very small, flat gold spacers or tiny seed beads. -
Stringing the Pattern:
Thread three cream beads, then one tiny gold spacer. Repeat this ‘3-to-1’ pattern for the entire length of the bracelet. -
Check the Fit:
Wrap this strand around your wrist alongside the other three to ensure the sizing matches perfectly before tying it off. -
Final Secure:
Tie your final knot, apply glue, let it dry for a few minutes, and trim the tails close to the knot.
Slip on your new stack and enjoy the satisfying clatter of your handmade jewelry