Sometimes the quickest way to fall in love with a plain clay piece is to give it a little paint and see it instantly come to life. These easy clay painting ideas are my go-tos when you want something beginner-friendly that still looks polished and totally gift-worthy.
Classic Polka Dot Pop
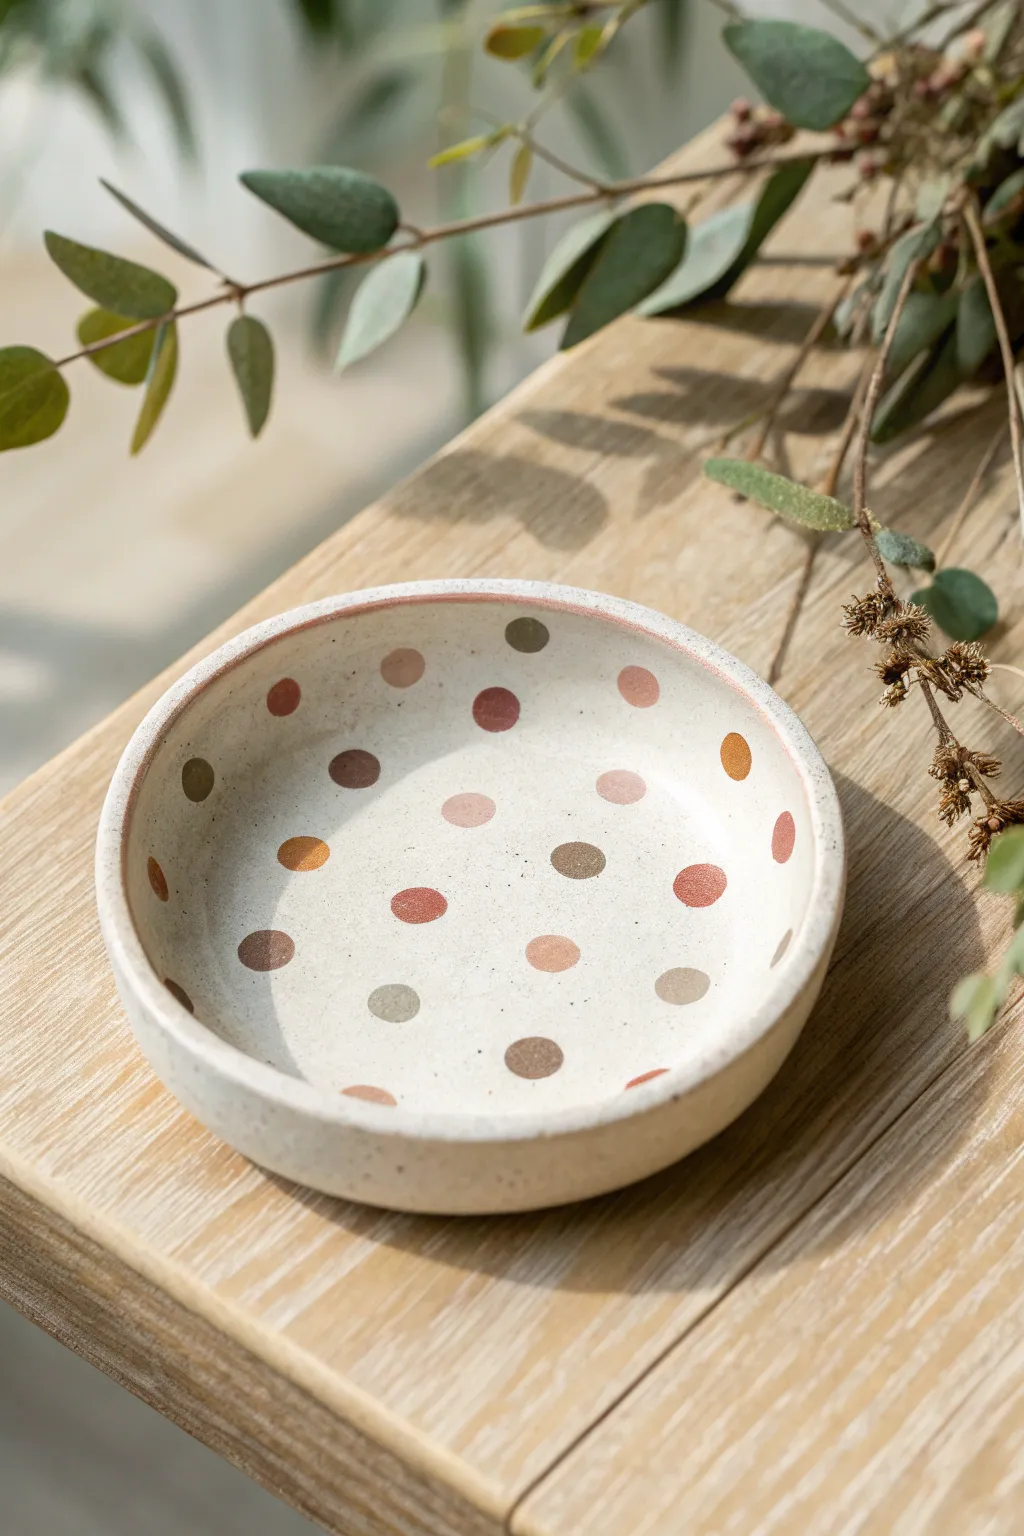
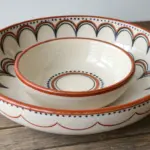
Embrace the charm of simplicity with this wonderfully retro-inspired shallow dish. The playful polka dots in earthy, muted tones pop beautifully against a speckled cream background, creating a piece that feels both modern and handmade.
Step-by-Step
Materials
- Air-dry clay or kiln-fire stoneware clay
- Rolling pin
- Circle template or bowl (for tracing)
- Fettling knife or craft knife
- Sponge
- Speckled cream glaze or acrylic paint (cream + brown speckles)
- Small round sponge dobbers or round paintbrushes
- Acrylic paints or underglazes (Terracotta, Olive Green, Mustard, Dusty Pink)
- Clear varnish or transparent glaze
- Sandpaper
Step 1: Forming the Dish
-
Roll out the slab:
Start by taking a generous ball of clay and rolling it out on a flat surface or canvas mat. Aim for a consistent thickness of about 1/4 inch to ensure durability. -
Cut the circle:
Place your circle template or an existing bowl face down on the clay slab. Use your knife to trace around the edge, cutting out a clean, perfect circle. -
Shape the rim:
Gently lift the edges of the circle upwards to create a shallow wall. You can pinch the edges slightly or use a slump mold (placing the clay inside a bowl) to help it hold a curved shape. -
Smooth the edges:
Dip a sponge in a little water and run it along the rim of the dish. This softens any sharp cuts and gives the piece a professional, finished look. -
Initial drying:
Let the dish dry completely. If using air-dry clay, this takes 24–48 hours; turn it over occasionally so the bottom dries evenly. If firing, complete your bisque fire now.
Pro Tip: Perfect Circles
Use the back end of a drill bit or a pencil eraser dipped in paint to stamp uniform dots without needing a steady hand for brushing.
Step 2: Creating the Speckled Base
-
Sand imperfections:
Once fully dry, lightly sand any rough spots on the surface or rim. Wipe away the dust with a barely damp cloth. -
Apply base color:
Paint the entire dish, inside and out, with a cream-colored base paint. You may need two coats for opaque coverage. -
Add the speckles:
To mimic the stoneware look, load a toothbrush with watered-down light brown paint. Run your thumb over the bristles to flick tiny specks across the surface. Practice on paper first to control the splatter size. -
Let the base set:
Allow the speckled cream base to dry completely before moving on to the pattern. This prevents the colors from muddying.
Step 3: Painting the Polka Dots
-
Prepare your palette:
Mix your spot colors. You want earthy, muted tones rather than bright primaries. Mix a little grey or brown into pinks and yellows to achieve that sophisticated pottery look. -
Plan the spacing:
visualize where your dots will go. A random but balanced scattering works best—avoid perfect rows to keep it organic. -
Paint the first color:
Using a round sponge dobber or a round brush, apply your first color (e.g., Terracotta). Stamp or paint circles randomly around the interior and up the sides. -
Add remaining colors:
Clean your tool and repeat with the Olive Green, Mustard, and Dusty Pink paints. I like to overlap the rim slightly with a few dots for added visual interest. -
Detail and Refine:
Check the edges of your circles. If any look uneven, use a fine detail brush to round them out carefully. -
Seal the piece:
Once all paint is bonedry to the touch, apply a coat of gloss varnish or clear glaze. This protects the paint and gives it that fired-ceramic shine.
Troubleshooting: Smudgy Dots
If dots are smearing, your paint is too wet or thick. dab the applicator on a paper towel before hitting the clay to remove excess pigment.
Place your new trinket dish on a wooden table to admire how the earthy tones complement natural textures

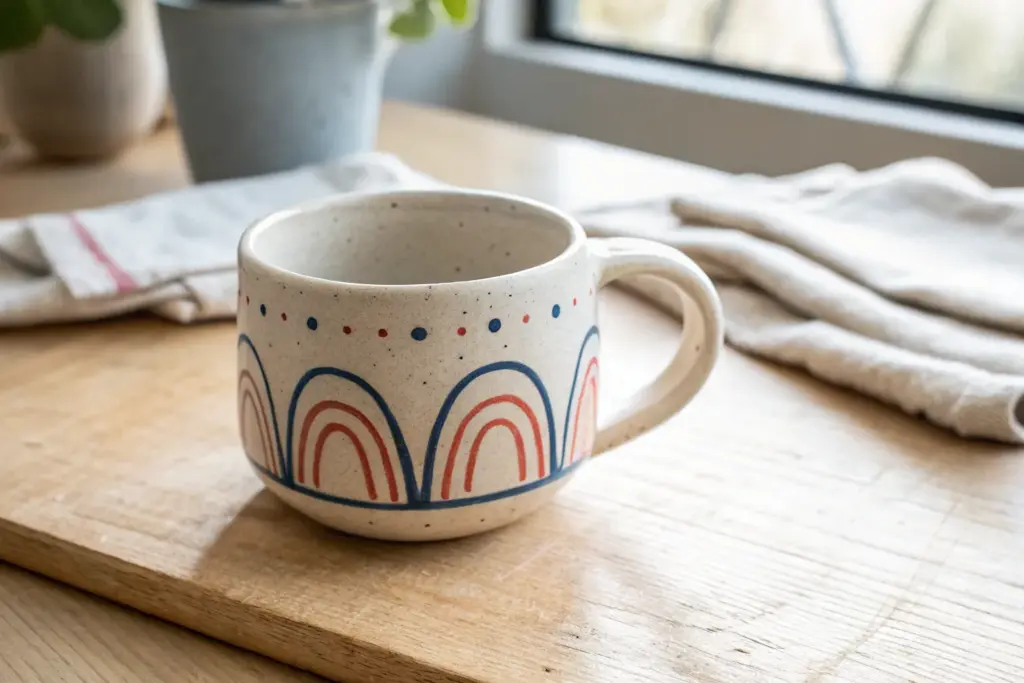
Easy Stripes With Tape
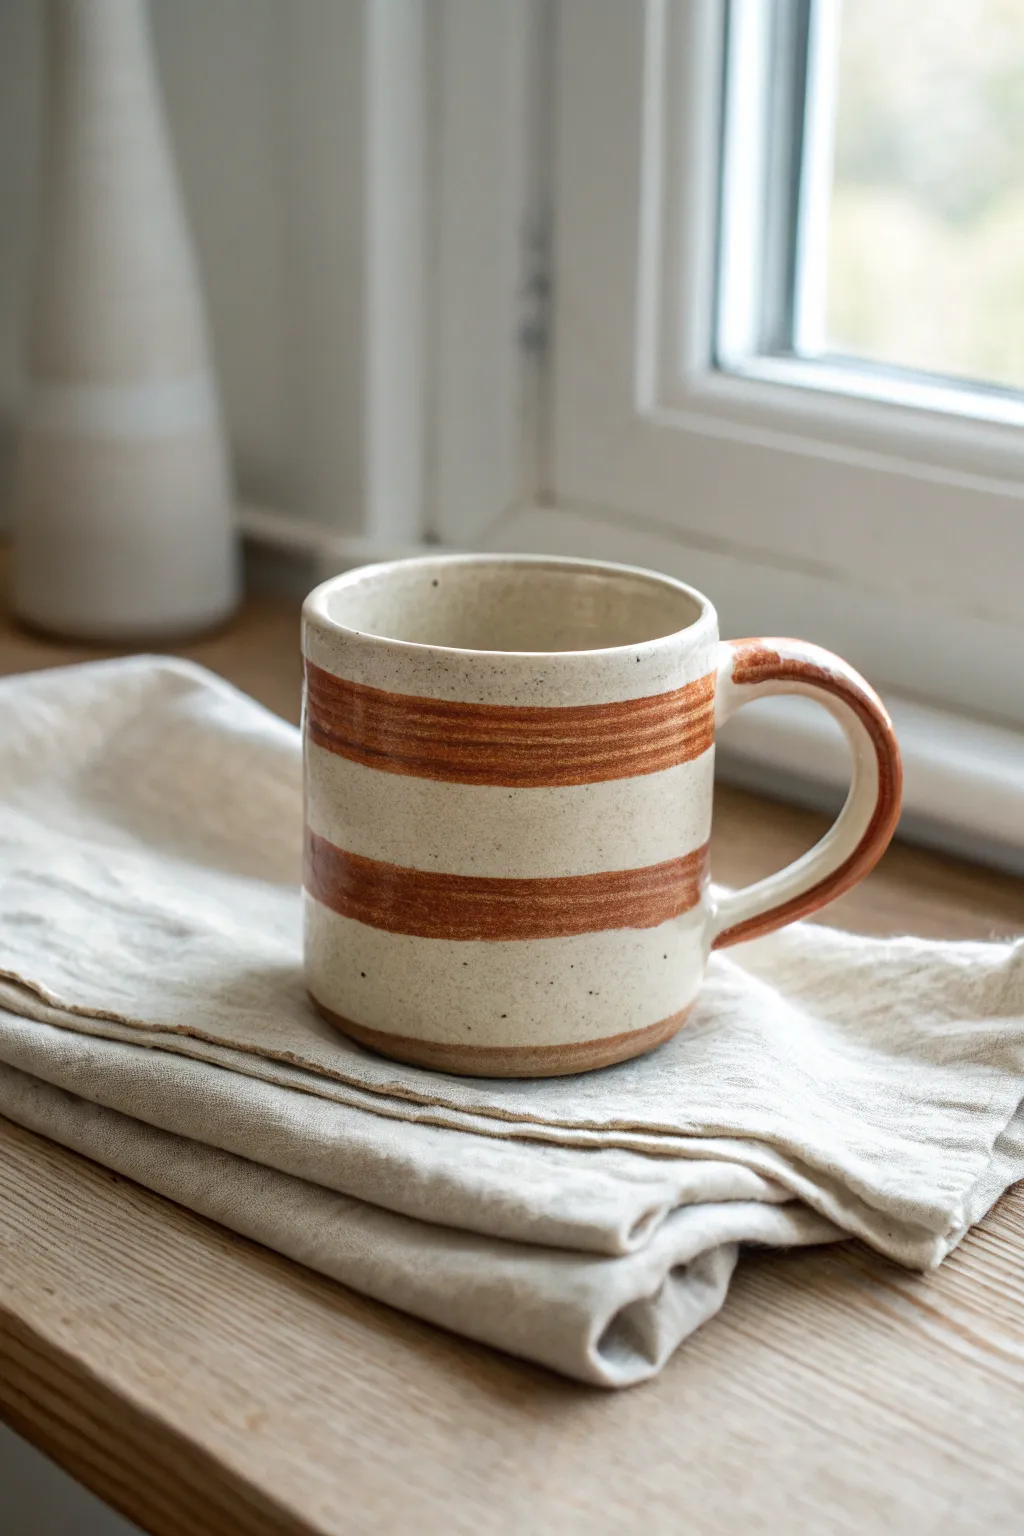
Bring earthy charm to your morning coffee with this simple striped mug project. By using masking tape as a resist, you’ll create crisp yet organic lines in a warm, rust-colored glaze that perfectly complements a speckled clay body.
Step-by-Step Tutorial
Materials
- Bisque-fired ceramic mug (preferably speckled clay)
- Painter’s tape or masking tape (1/2 inch width)
- Rust or terracotta colored ceramic underglaze
- Clear dipping or brushing glaze (food safe)
- Soft fan brush
- Medium flat brush
- Damp sponge
- Scissors
- Clean water
Step 1: Preparation and Taping
-
Clean the Bisque:
Start by wiping down your bisque-fired mug with a slightly damp sponge. This removes any dust or oils from handling that might prevent the glaze from adhering properly. -
Plan Your Spacing:
Visualize where you want your stripes to sit. For this design, we are aiming for two main stripes on the body and color on the rim and handle. -
Apply the First Tape Line:
Place a strip of masking tape horizontally around totality of the mug, about an inch down get form the rim. Keep the tape taut as you circle the mug to ensure a straight line. -
Apply the Second Tape Line:
Place a second strip of tape parallel to the first one, leaving a gap of about 3/4 of an inch between them. This gap will become your top reddish stripe. -
Create the Bottom Stripe:
Apply a third strip of tape further down the mug, creating another gap below the previous taped section. Press the edges of all tape strips down firmly with your fingernail to prevent paint bleeding. -
Mask the Bottom Edge:
Add a final strip of tape near the very bottom if you want to leave a raw clay or unpainted band at the foot of the mug.
Bleeding Lines?
If paint bleeds under the tape, it wasn’t pressed down enough. Wait for the paint to dry fully, then gently scratch the excess away with a wooden toothpick for clean edges.
Step 2: Painting the Design
-
Mix the Underglaze:
Shake your rust-colored underglaze thoroughly. Pour a small amount onto a palette or saucer so it’s easy to access. -
Paint the Exposed Bands:
Using your medium flat brush, apply the rust underglaze to the exposed ceramic bands between the tape. Don’t worry if you get paint on the tape; that’s what it’s there for. -
Layering for Opacity:
Let the first coat dry until it loses its sheen, then apply a second coat to ensure a rich, opaque color. I usually find three thin coats work better than one thick one. -
Detail the Rim:
Carefully paint the very top rim of the mug. Use the flat side of your brush to drag the color slightly down the inside and outside edges for a hand-finished look. -
Paint the Handle:
Coat the handle with the same rust underglaze. You can choose to paint the entire handle or leave the underside bare for contrast. -
Remove the Tape:
Once the underglaze is dry to the touch but not bone dry, gently peel off the masking tape. Pulling at a 45-degree angle helps keep the lines crisp. -
Clean Up Edges:
If any glaze seeped under the tape, use a damp stiff brush or a specialized clean-up tool to gently scrape or wipe away the excess.
Go Geometric
Instead of horizontal bands, cut your tape into thin strips and apply them in a crisscross or diagonal pattern to create dynamic geometric shapes.
Step 3: Finishing Touches
-
Clear Glazing:
Once the underglaze is completely dry, dip the entire mug into a clear, food-safe dipping glaze. Alternatively, brush on three even coats of clear brushing glaze. -
Check the Foot:
Use a sponge to wipe any glaze off the very bottom foot of the mug so it doesn’t stick to the kiln shelf during firing. -
Fire the Piece:
Load the mug into the kiln and fire it to the temperature recommended by your clay and glaze manufacturer (usually Cone 5 or 6 for stoneware).
Enjoy sipping your favorite hot beverage from your beautiful, hand-striped creation


Modern Color-Block Bands
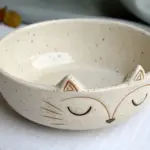
Capture the warmth of modern rustic design with this banded bowl project, featuring natural clay tones offset by striking stripes of terracotta and deep indigo. The result is a cozy, functional piece that highlights the beauty of exposed stoneware speckled with simple geometric glazing.
Step-by-Step
Materials
- Bisque-fired ceramic bowl (wheel-thrown or hand-built)
- Masking tape 1 inch width (or painter’s tape)
- Terracotta or rust-colored ceramic glaze
- Deep indigo or navy blue ceramic glaze
- Clear transparent glaze (for the interior)
- Wide flat brush (approx. 1 inch)
- Small flat brush
- Sponge
- Clean water
- Pencil
Step 1: Preparation & Masking
-
Clean the surface:
Before you begin, wipe down your bisque-fired bowl with a damp sponge to remove any kiln dust or oils from your hands. This ensures the glaze adheres properly. -
Mark the bands:
Place your bowl on a banding wheel if you have one. Hold a pencil steady against the side at a fixed height and gently spin the wheel to create a light guide line about 2 inches from the rim. -
Create the second line:
Make a second pencil line about 1.5 inches below the first one. This middle section between the lines will remain unglazed on the outside to show off the raw clay speckle. -
Apply the tape:
Carefully apply masking tape over the middle section you just marked out. Press the edges of the tape down firmly with your fingernail or a tool to prevent glaze from bleeding underneath.
Step 2: Glazing the Exterior
-
Mix the terracotta glaze:
Stir your terracotta or rust-colored glaze thoroughly. It should have the consistency of heavy cream. -
Paint the bottom band:
Using the wide flat brush, apply the terracotta glaze to the bottom section of the bowl, below your taped area. Use long, smooth horizontal strokes. -
Paint the top band:
Now apply the same terracotta glaze to the top band, painting from the top edge of the tape up to the rim of the bowl. -
Apply second coat:
Let the first coat dry until it loses its sheen (usually a few minutes). Apply a second coat to both terracotta sections to ensure rich, opaque color coverage. -
Add the vertical accent:
Once the terracotta sections are dry to the touch, mix your deep indigo glaze. Locate a spot on the exterior where you want the vertical accent. -
Paint the blue block:
Using a smaller flat brush, paint a vertical rectangular block of indigo glaze that starts at the rim and extends down into the bowl’s interior. On the outside, it should overlap the top terracotta band slightly.
Crisp Line Secret
Burnish the edges of your masking tape with the back of a spoon before painting. This extra pressure seals the tape completely, preventing fuzzy edges.
Step 3: Interior Glazing & Finishing
-
Glaze the interior:
Pour clear transparent glaze into the inside of the bowl. Roll the bowl around to coat the entire interior surface evenly, then pour out the excess glaze. -
Clean the rim:
If any clear glaze dripped onto your freshly painted exterior rim, wipe it away carefully with a damp sponge. -
Remove the tape:
I prefer to remove the tape once the glaze is dry to the touch but not dusty. Peel it away slowly at a 45-degree angle to reveal the crisp raw clay band beneath. -
Clean up lines:
If the glaze bled slightly under the tape, use a clean, stiff brush dipped in water or a dedicated cleanup tool to gently scrape or wipe the edge straight. -
Check the foot:
Wipe the very bottom (foot) of the bowl with a wet sponge to ensure no glaze is left there, otherwise it will fuse to the kiln shelf. -
Final dry:
Allow the piece to dry completely for at least 24 hours before firing. -
Kiln firing:
Fire the bowl in a kiln according to the specific cone temperature recommended on your glaze bottles (typically Cone 5 or 6 for stoneware).
Texture Play
Try using a matte glaze for the colored bands and a glossy clear glaze for the interior. The contrast in finishes makes the piece tactile and exciting.
Now you have a stunning, modern bowl ready for your morning cereal or as a beautiful display piece


Half-Dipped Two-Tone Look
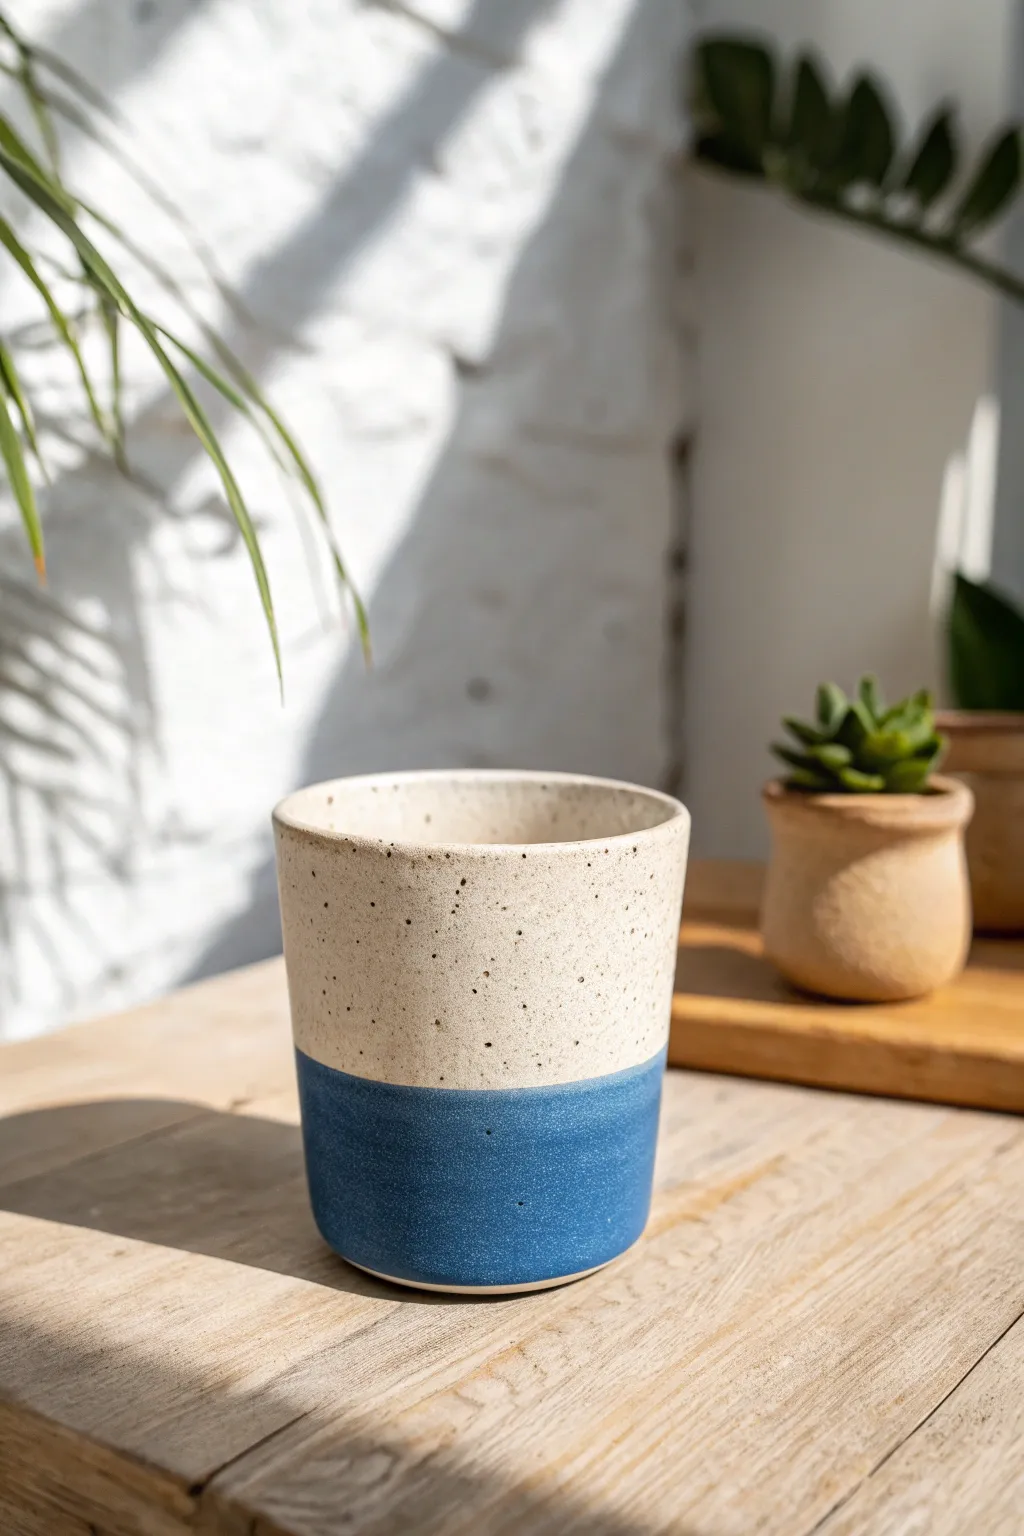
Embrace the beauty of contrast with this two-tone ceramic beaker that combines raw, speckled clay with a rich, matte blue glaze. The clean horizontal line creates a modern dipped effect that feels both rustic and refined.
Step-by-Step Guide
Materials
- Speckled stoneware clay (pyrite or iron flecked)
- Matte royal blue dipping glaze
- Pottery wheel (or slab roller for hand-building)
- Wooden rib tool
- Sponge
- Cutting wire
- Loop trimming tool
- Masking tape (optional, for masking edges)
- Kiln (bisque and glaze firing capabilities)
Step 1: Shaping the Vessel
-
Prepare the Clay:
Begin by thoroughly wedging about 1 pound of speckled stoneware clay to remove air bubbles and ensure an even consistency. -
Center and Open:
Secure the clay on the wheel head and center it. Open the form down to the base, leaving about 1/4 inch thickness for the bottom. -
Pull the Walls:
Pull the walls upward into a simple cylinder shape. Aim for straight vertical sides, avoiding significant curving in or out to maintain the modern beaker profile. -
Refine the Lip:
Compress the rim gently with a sponge or chamois to round it off, making it comfortable for drinking. -
Clean the Surface:
While the wheel rotates slowly, use a wooden rib on the exterior to scrape away excess slurry and smooth the surface so the clay’s natural speckles are visible. -
Cut and Dry:
Wire the pot off the wheel and set it aside until it reaches a leather-hard state.
Straight Lines Made Easy
Struggling to get a perfectly straight dip by hand? Apply a strip of masking tape around the circumference before dipping, then peel it off immediately after.
Step 2: Trimming and Bisque Firing
-
Trim the Base:
Place the leather-hard cup upside down on the wheel. Use a loop tool to trim the bottom, creating a slight foot ring or a clean, flat base depending on your preference. -
Final Smoothing:
Run a damp sponge lightly over the entire piece to remove any trimming burrs or sharp edges. -
Dry Completely:
Allow the cup to dry slowly until it is bone dry. Uneven drying can cause warping, so cover it loosely with plastic if necessary. -
Bisque Fire:
Load the bone-dry piece into the kiln for a bisque firing (typically Cone 04 or 06) to harden it for glazing.
Step 3: The Dipping Technique
-
Prep the Surface:
Wipe the bisque-fired cup with a clean, damp sponge to remove any dust that might prevent the glaze from adhering properly. -
Mix the Glaze:
Stir your matte blue dipping glaze thoroughly. You want a creamy consistency without lumps. -
Check the Interior:
For functionality, pour a clear or white food-safe liner glaze inside the cup, pour out the excess, and let the interior dry before working on the outside. -
The Dip:
Hold the cup upside down by the foot. Lower it vertically into the blue glaze until the liquid reaches about one-third up the side of the cup. -
Lift and Drain:
Lift the cup straight up out of the glaze and hold it upside down for a few seconds to let the last drips fall off. -
Clean the Line:
Once the glaze has set for a moment, check the dipped line. If it’s uneven, you can very carefully wipe it with a damp sponge, though a confident initial dip is best. -
Wipe the Bottom:
Flip the cup over and clean the very bottom of the foot completely so it doesn’t stick to the kiln shelf. -
Final Fire:
Place the cup in the kiln for the glaze firing (likely Cone 5/6 or Cone 10, depending on your clay body and glaze instructions).
Uneven Glaze Coat?
If the glaze looks too thick or runny, check its specific gravity (water content). Add water sparingly if it’s too thick, or let it settle and remove water if too thin.
Once cooled, your cup is ready for coffee, showcasing the lovely interaction between raw earth and vibrant color

The Complete Guide to Pottery Troubleshooting
Uncover the most common ceramic mistakes—from cracking clay to failed glazes—and learn how to fix them fast.
Tiny Hearts And Star Doodles
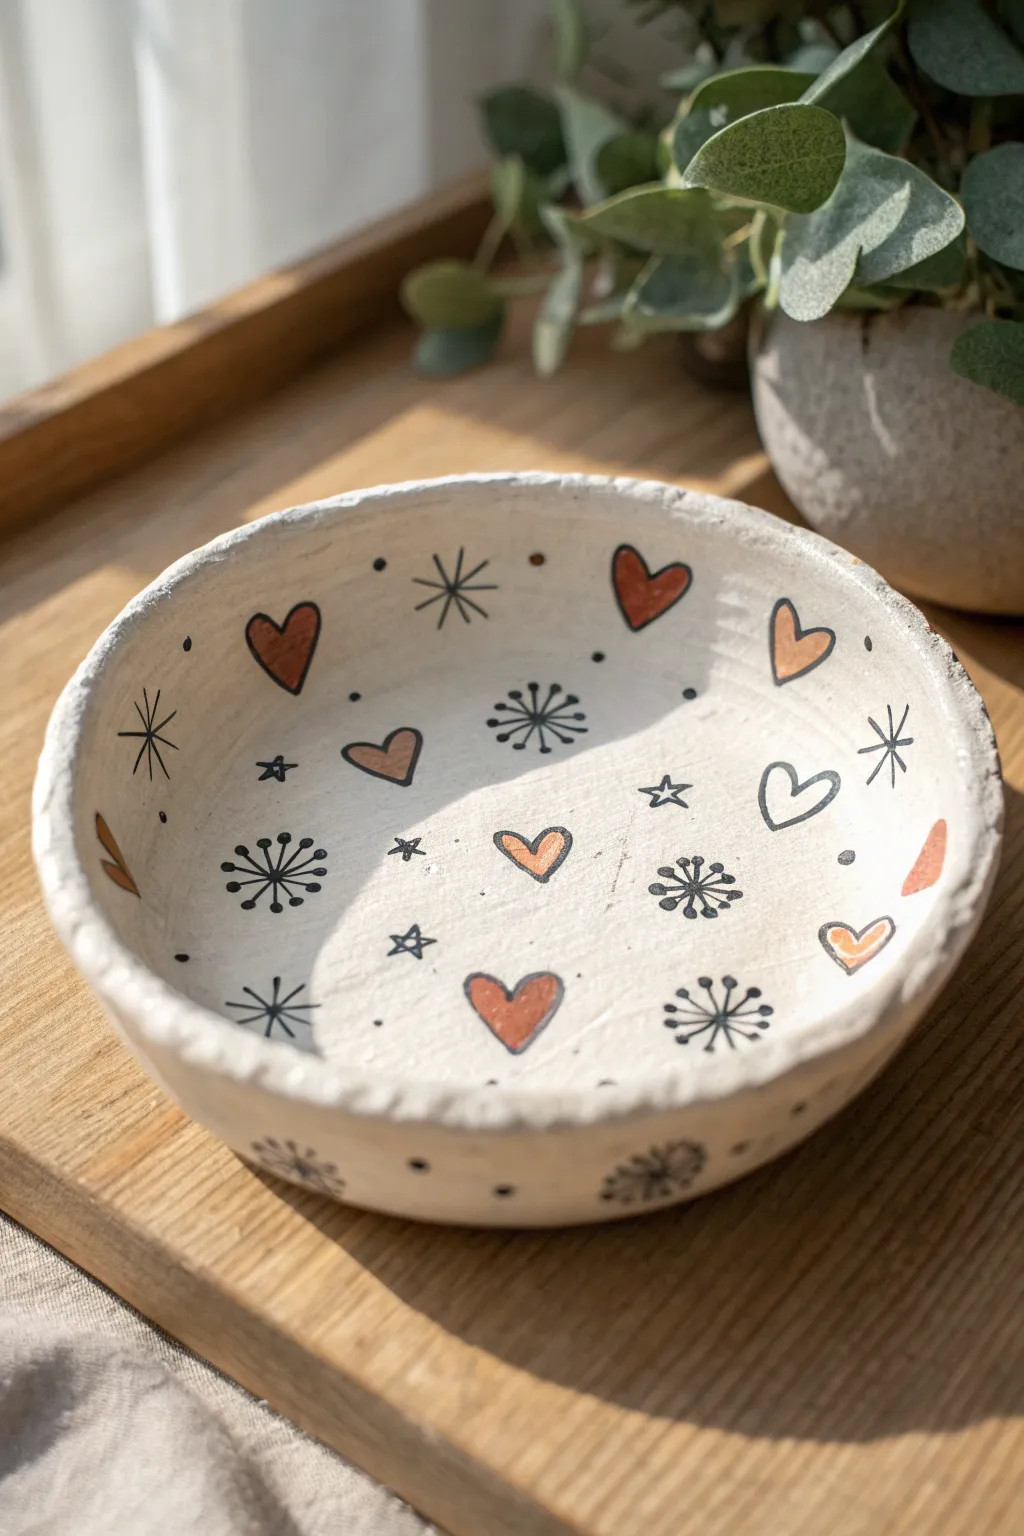
This charming, handmade bowl combines rustic texture with sweet, simple doodles for a cozy aesthetic. The white clay background makes the terracotta hearts and whimsical black stars pop, creating the perfect spot to hold jewelry or keys.
How-To Guide
Materials
- Air-dry clay (white)
- Acrylic rolling pin
- Small bowl (to use as a mold)
- Plastic wrap
- Sandpaper (fine grit)
- White acrylic paint (matte)
- Terracotta or burnt orange acrylic paint
- Black fine-tip paint pen or permanent marker
- Small detail paintbrush
- Clear matte varnish or sealant
- Cup of water
- Sponge
Step 1: Sculpting the Bowl
-
Prepare the workspace:
Lay down a non-stick mat or parchment paper. Take a fist-sized ball of white air-dry clay and knead it until it is soft and pliable. -
Roll the slab:
Use your acrylic rolling pin to flatten the clay into a circle about 1/4 inch thick. Aim for an even thickness, but don’t worry about perfect edges. -
Prepare the mold:
Take a small kitchen bowl that has the shape you want. Invert it or line the inside with plastic wrap to prevent sticking. -
Shape the clay:
Drape your clay slab over the inverted bowl (or press it inside), gently smoothing it to take on the curve. I find using a damp sponge helps smooth out any large fingerprints. -
Create the rustic rim:
Instead of cutting a perfect circle, pinch the rim gently with your fingers to create a soft, slightly undulating edge. It should feel organic and handmade. -
Let it dry:
Allow the clay to dry completely according to package instructions. This usually takes 24-48 hours. Remove it from the mold halfway through to let the other side breathe. -
Smooth the surface:
Once fully dry and hard, lightly sand any rough patches on the interior surface with fine-grit sandpaper. Wipe away the dust with a damp cloth.
Step 2: Painting the Design
-
Base coat:
Paint the entire bowl (inside and out) with a coat of matte white acrylic paint. This creates a uniform canvas for your doodles. Let it dry. -
Paint the hearts:
Using your small detail brush and terracotta paint, randomly scatter small hearts around the interior walls and base. Keep them loose and varying slightly in angle. -
Add outline hearts:
Mix it up by drawing a few open heart outlines with a black paint pen, leaving the inside the white color of the bowl. -
Outline the painted hearts:
Once the terracotta paint is dry, use the black paint pen to loosely outline some (but not all) of the colored hearts for a sketchy look. -
Draw large starbursts:
Draw several ‘dandelion’ style starbursts using the black pen. Draw a central dot, then radiate straight lines outward with small dots on the ends. -
Add geometric stars:
Fill in larger gaps with simple eight-point asterisks. Draw a plus sign, then an ‘X’ through the middle. -
Fill with mini stars:
Draw tiny five-point outline stars in the remaining negative spaces. -
Add texture dots:
finish the pattern by placing single black dots randomly throughout the design to balance the composition. -
Seal the project:
Once the ink is completely dry, apply a layer of clear matte varnish to protect your artwork and give the bowl a finished feel.
Smudged Ink?
If your paint pen bleeds on the clay texture, apply a very thin layer of clear matte sealer *before* drawing the black lines to create a smoother surface.
Add a Golden Touch
For a bit of elegance, paint the uneven rim with metallic gold leaf paint. This contrasts beautifully with the rustic black and orange doodles.
Now you have a sweet, custom catch-all dish ready to brighten up your side table
Simple Monogram Centerpiece
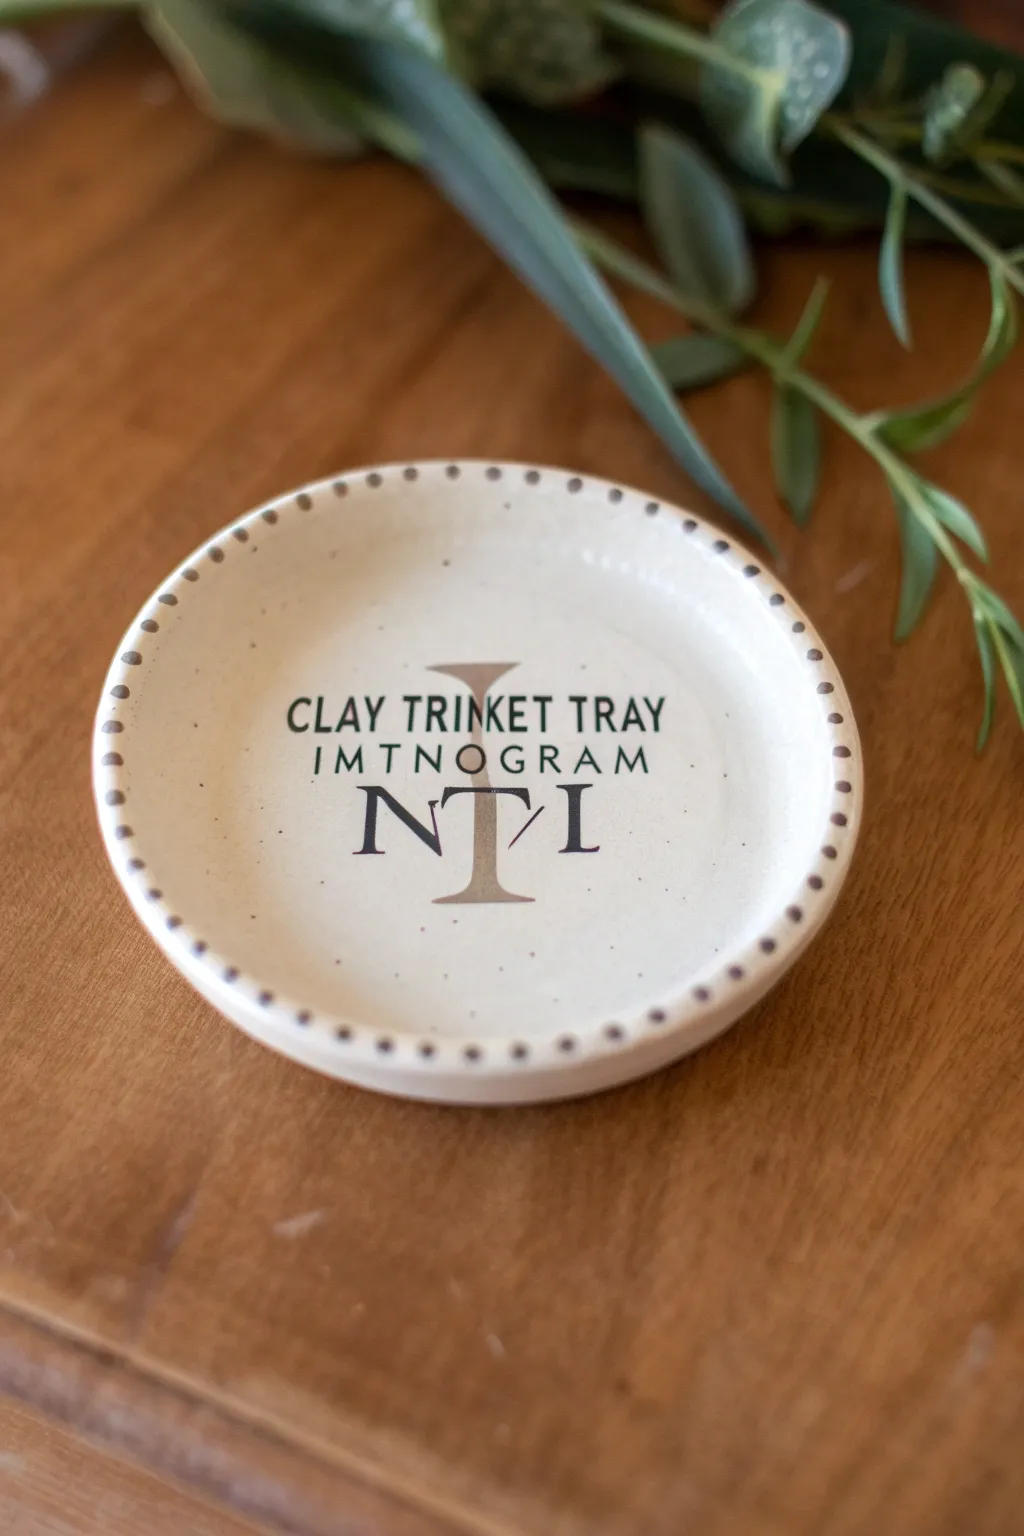
Create a personalized catch-all dish that mimics the look of high-end speckled pottery without needing a kiln. This elegant tray features a simple dot border and classic typography, making it a perfect handmade gift or bedside accessory.
Step-by-Step Guide
Materials
- Air-dry clay (white or cream)
- Acrylic rolling pin
- Small round bowl or plate (for a template)
- Craft knife or clay tool
- Small bowl or sandpaper (for shaping)
- Acrylic paints (cream/off-white, dark green, brown/taupe)
- Letter stencils or fine-tip paint pens (black and metallic bronze)
- Old toothbrush (for speckling)
- Fine detail paintbrush
- Glossy varnish or sealant
Step 1: Shaping the Clay Base
-
Condition the Clay:
Begin by taking a handful of air-dry clay and kneading it in your hands until it becomes soft, pliable, and free of cracks. -
Roll it Out:
Use your acrylic rolling pin to flatten the clay into a smooth sheet, aiming for an even thickness of about 1/4 inch. -
Cut the Circle:
Place your bowl or plate template onto the rolled clay and trace around it with a craft knife to cut out a perfect circle. -
Create the Lip:
Gently curve the edges of the circle upward to create a shallow rim. You can place the clay circle inside a slightly larger bowl to help it hold this curved shape while it dries. -
Smooth the Edges:
Dip your finger in a little water and run it along the rim to smooth out any rough cuts or potential cracks. -
Dry Completely:
Allow the clay to dry fully according to package instructions, usually 24-48 hours. I like to flip it over halfway through to ensure the bottom dries evenly.
Uneven Dots?
If your rim dots are inconsistent, use a cotton swab with a tiny bit of water to erase the wet paint and try again, or mark spacing with a pencil first.
Step 2: Creating the Cream Finish
-
Sand for Smoothness:
Once solid, use fine-grit sandpaper to gently buff away any bumps or uneven spots on the surface and rim. -
Base Coat:
Paint the entire tray, front and back, with a cream or off-white acrylic paint. You may need two coats for full opaque coverage. -
Add the Speckles:
To get that ceramic look, dip an old toothbrush into slightly watered-down brown paint. Run your thumb over the bristles to flick tiny specks onto the tray. Practice on paper first to control the spray.
Gold Leaf Accents
For a luxe upgrade, apply gold leaf to the rim dots instead of paint, or use liquid gold leaf on the large central initial for extra shimmer.
Step 3: Adding the Monogram Details
-
Plan the Layout:
Lightly sketch your design in pencil first. Draw the central monogram large, and place any smaller text horizontally across the middle. -
Paint the Center Monogram:
Using a fine detail brush and taupe or metallic bronze paint, carefully fill in the large background initial (like the ‘I’ shape seen here). -
Overlay the Text:
Use a fine-tip black paint pen or a very steady hand with dark green paint to add the overlaid text. Stencils can be very helpful here for crisp lettering like ‘TRINKET TRAY’. -
Add Side Initials:
Paint the flanking initials (the ‘N’ and ‘I’) in a dark, contrasting color like black or deep forest green, ensuring they sit visually on top of the background shape.
Step 4: Finishing Touches
-
Paint the Dot Border:
Dip the non-brush end of a paintbrush into brown or taupe paint. Dot it evenly around the top edge of the rim to create the decorative border. -
Seal the Project:
Once all paint is completely dry, apply a coat of glossy varnish. This protects the paint and gives the tray a convincing ceramic shine.
Now you have a sophisticated accent piece ready to hold your favorite jewelry or keys


What Really Happens Inside the Kiln
Learn how time and temperature work together inside the kiln to transform clay into durable ceramic.
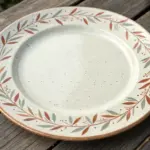
Sunny Citrus Slice Motifs
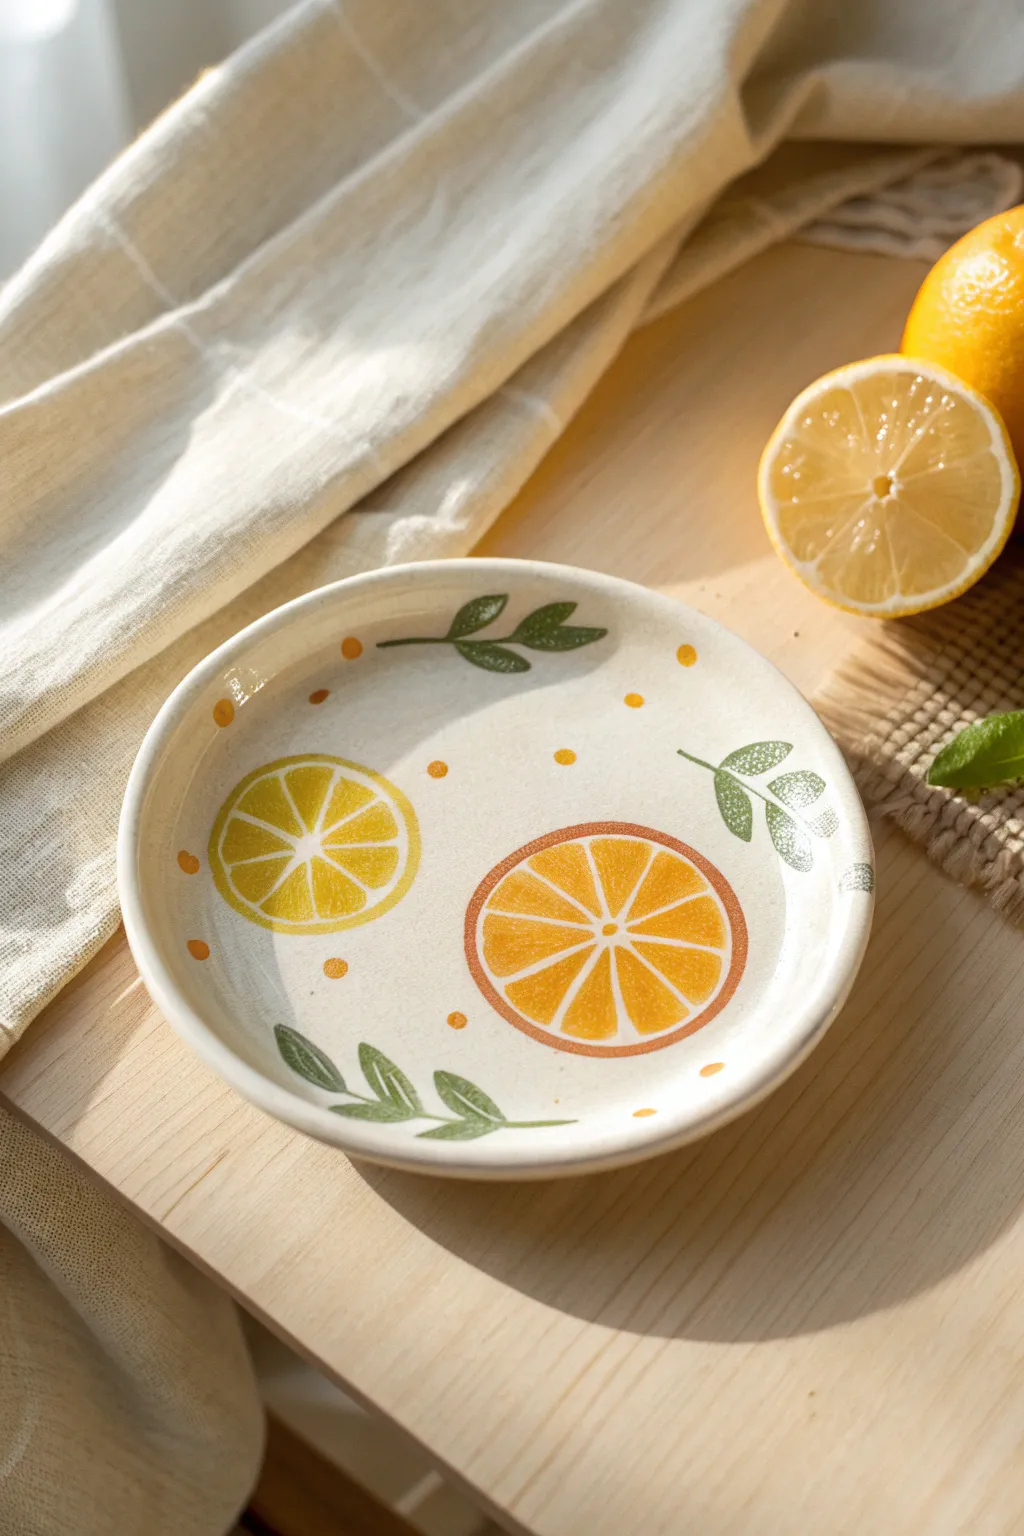
Bring a splash of sunshine to your table with this delightfully rustic ceramic plate featuring hand-painted citrus slices. The design combines cheerful brights with earthy greens for a look that feels fresh, organic, and perfectly imperfect.
How-To Guide
Materials
- Bisqued ceramic small plate or shallow bowl (cream or white clay body preferred)
- Underglazes: Lemon Yellow, Bright Orange, Deep Orange (terracotta), Forest Green, Sage Green
- Clear dipping or brush-on glaze
- Small round tip paintbrush (size 2 or 4)
- Fine liner brush (size 0 or 00)
- Pencil for sketching
- Clean water container and palette
Step 1: Planning and Sketching
-
Surface Preparation:
Begin by wiping down your bisqued plate with a slightly damp sponge. This removes any kiln dust or oils from your hands that might resist the underglaze application. -
Rough Layout:
Using a regular pencil, lightly sketch the placement of your main elements. Draw two large circles for the citrus slices—one slightly larger for the orange and a smaller one for the lemon—spaced apart in the center. -
Adding Details:
Lightly mark where the three leafy sprigs will go around the perimeter. Don’t worry about erasing mistakes; graphite burns off completely in the kiln, so feel free to adjust your composition until it feels balanced.
Clean Lines Pro Tip
For the crisp white lines inside the citrus slices, using a ‘sgraffito’ tool to scratch away the colored underglaze often looks cleaner and sharper than trying to paint fine white lines on top.
Step 2: Painting the Citrus Slices
-
Yellow Base:
Load your round brush with Lemon Yellow underglaze. Paint the smaller circle, filling it in completely with a smooth, even coat. You may need two coats for opacity. -
Orange Base:
Clean your brush and switch to Bright Orange. Paint the larger circle completely. I like to let this dry briefly until the shine disappears before adding the next layer. -
Rind Definition:
Once the base circles are dry to the touch, mix a tiny bit of Deep Orange with your Bright Orange. Use the fine liner brush to outline the orange slice, creating the peel. -
Lemon Rind:
Similarly, use a slightly darker yellow or mix a tiny dot of brown into your yellow to outline the lemon slice with the fine liner brush. -
Creating Segments:
This is the trick for the white pith: You can either paint white underglaze on top, or—if your clay body is light enough—use a damp, clean brush to gently wipe away lines of paint in a ‘spoke’ pattern, revealing the clay underneath. -
Refining segments:
If you are painting the white lines, use your finest liner brush and white underglaze to draw an asterisk shape in the center of each fruit, separating the fruit into triangular segments.
Step 3: Leafy Accents & Finishing Touches
-
Stem Structure:
Using the Forest Green underglaze and your liner brush, paint thin, curving stems for the three foliage sprigs situated near the rim of the plate. -
Painting Leaves:
Switch to the round brush. Press down and lift up as you stroke to create the leaf shapes coming off the stems. Alternating between Forest Green and Sage Green adds lovely depth. -
Leaf Veins:
Once the green leaves are dry, take a sharp tool or a toothpick and gently scratch through the paint to create the vein lines (sgraffito technique), revealing the lighter clay body beneath. -
Polka Dots:
Dip the non-brush end (the handle) of your paintbrush into the Deep Orange or Yellow underglaze. Dot it randomly around the empty white space of the plate to versatile confetti-like accents. -
Rim Detail:
For a finished look, run a very damp sponge around the very edge of the rim to clean off any stray marks, or paint a thin coordinating line if you prefer a framed look.
Texture Upgrade
Before painting, press real lemon or orange leaves into the soft clay slab to impress actual texture, then paint the glaze into the depressions for realistic fossil-like impressions.
Step 4: Glazing and Firing
-
Drying Time:
Allow the underglaze design to dry completely, preferably overnight. The moisture should be fully evaporated so the design doesn’t smear during glazing. -
Clear Coat Application:
Apply a clear glaze over the entire piece. If brushing, apply 2-3 coats in alternating directions. If dipping, submerge quickly and shake off excess drips. -
Final Fire:
Fire the plate in the kiln according to the specific temperature instructions of your clay and glaze (usually Cone 5 or 6 for stoneware).
Now you have a refreshing piece of functional art ready for your morning toast
Simple Strawberry Icons
Bring the freshness of summer to your table with this charming hand-painted clay design. Simple red berry silhouettes and delicate green leaves create a playful pattern that looks especially sweet on creamy, speckled clay surfaces.
Step-by-Step
Materials
- Air-dry clay or fired ceramic bisque plate
- Cream or off-white acrylic paint (if starting with plain clay)
- Red acrylic paint (bright scarlet)
- Forest green acrylic paint
- White acrylic paint or paint pen
- Medium round brush
- Fine detail liner brush
- Toothbrush (for speckling)
- Brown acrylic paint (watered down)
- Glossy varnish or sealant
Step 1: Base Preparation
-
Clean surface:
Ensure your clay plate is completely dry and free of dust. If you are using air-dry clay, sand down any rough edges lightly for a smoother painting surface. -
Base coat:
Apply an even coat of cream or off-white acrylic paint to the entire top surface of the plate. You want a warm, natural background that mimics stoneware. -
Create speckles:
Mix a tiny amount of brown paint with water until it’s very thin. Dip an old toothbrush into this mixture. -
Splatter application:
Run your thumb across the bristles to flick tiny brown droplets onto the still-wet or dry cream base. This creates that authentic ceramic ‘speckled’ look seen in the photo. -
Dry completely:
Let this base layer dry fully before moving on to the strawberries. If the base is wet, your red berries might turn pink.
Step 2: Painting the Strawberries
-
Plan placement:
Visualize a random, scattered pattern. Notice how some strawberries are fully visible while others ‘fall off’ the edge of the rim. -
Paint berry shapes:
Using your medium round brush and bright red paint, create soft, rounded triangular shapes. They shouldn’t be perfect geometric triangles; give them a slightly chubby, organic curve. -
Vary orientation:
Paint the berries facing different directions. Have some pointing up toward the center, some sideways, and some angled down. This makes the pattern feel lively. -
Add rim details:
For the berries near the edge, paint only partial shapes, as if the pattern continues off the plate. This is a key trick to making it look like printed fabric or professional ceramic transfers. -
Let red dry:
Allow the red paint to dry to the touch so the subsequent green and white details sit crisply on top without blending.
Natural Variation
Don’t make every strawberry the exact same size or shape. Subtle differences in the silhouette make the plate look more handcrafted and charming.
Step 3: Leaves and Seeds
-
Paint the calyx:
Switch to your fine liner brush and forest green paint. At the broad top of each red berry, paint 3 to 4 small, simple strokes fanning out for the leaves. -
Leaf style:
Keep the leaves loose and illustrative—just quick dashes of green are enough to suggest the foliage. -
Add seeds:
Using the very tip of your finest brush or a white paint pen, add tiny white specks onto the red bodies of the strawberries. -
Seed spacing:
Don’t overfill the berries. A few scattered white dots—about 5 to 7 per berry—look more elegant than a dense grid. -
Finishing touches:
Look at the rim of the plate. I like to add tiny red dots around the very edge to frame the design, spacing them about an inch apart. -
Seal the work:
Once all paint is perfectly dry, apply a generous coat of glossy varnish. This mimics the shine of glazed pottery and protects your artwork.
Speckle Splatters
If your toothbrush splatters are too big, dab them gently with a paper towel immediately. Test the flicking motion on a piece of scrap paper first.
Enjoy using your cheerful new decor piece or gifting it to a friend who loves summer fruit

TRACK YOUR CERAMIC JOURNEY
Capture glaze tests, firing details, and creative progress—all in one simple printable. Make your projects easier to repeat and improve.
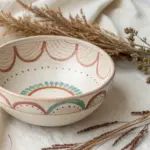
One-Stroke Leafy Branches
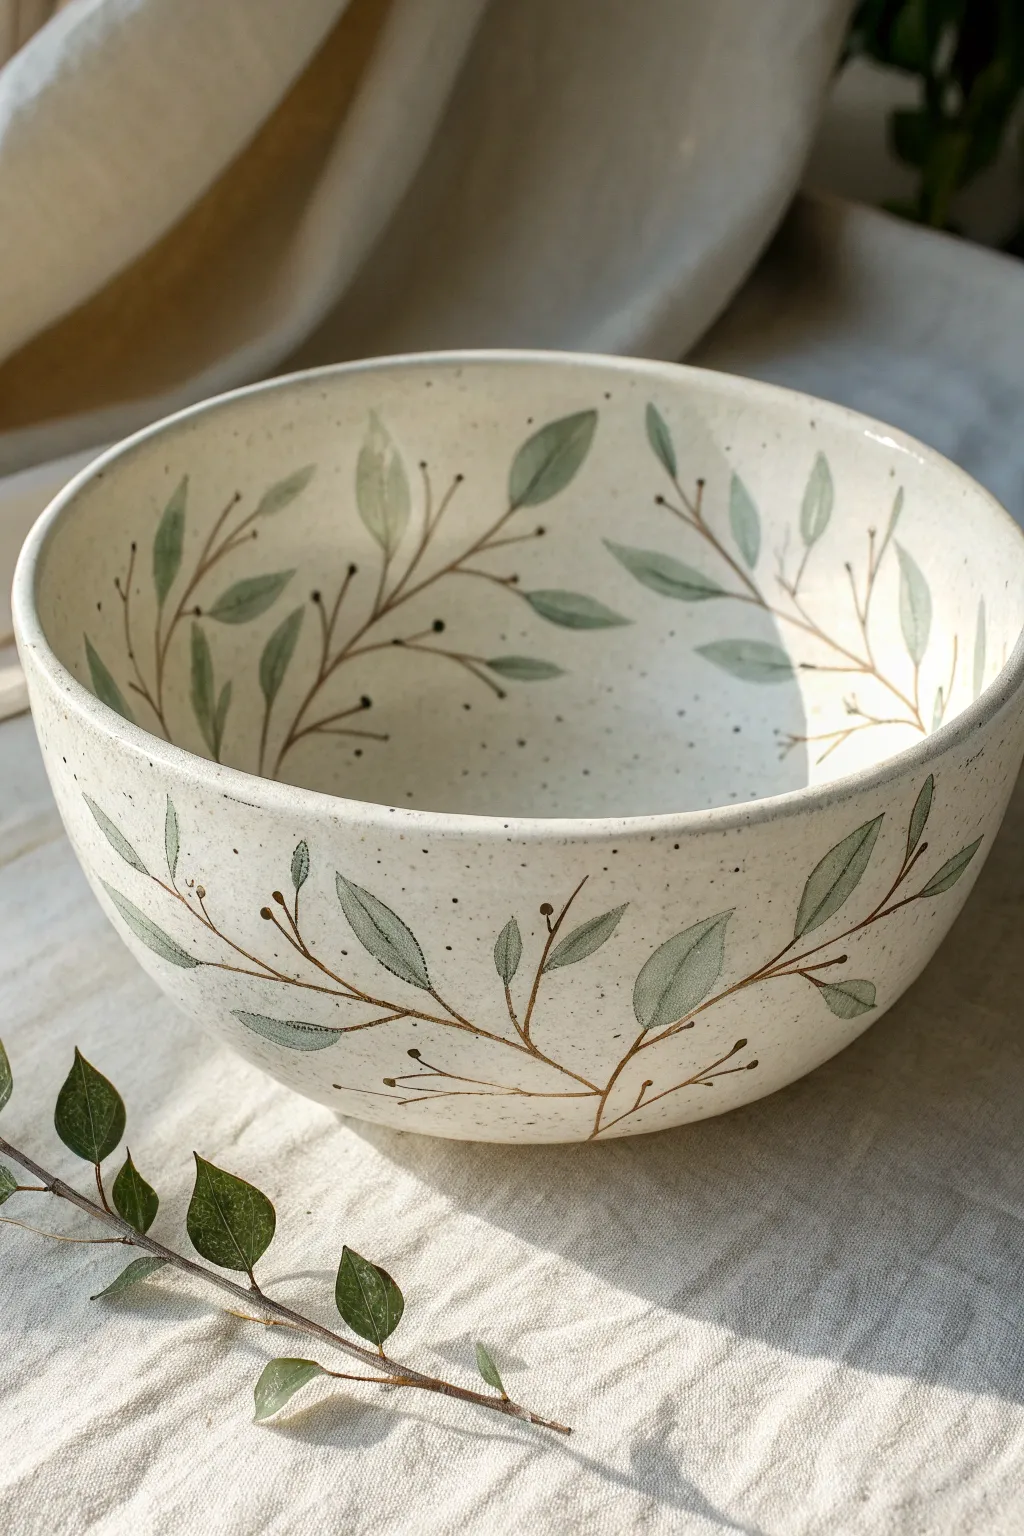
Transform a plain ceramic piece into nature-inspired decor with these delicate, free-flowing leafy vines. The combination of gentle greens and fine brown stems creates an organic, airy look that feels sophisticated yet achievable.
Step-by-Step Tutorial
Materials
- Bisque-fired ceramic bowl (speckled clay body preferred)
- Underglaze (Dark Brown or Mocha)
- Underglaze (Sage Green or watercolor-style green ceramic paint)
- Fine liner brush (size 0 or 00)
- Small round brush (size 2)
- Clear transparent glaze
- Water container and sponge
- Pencil (optional for sketching)
Step 1: Preparation & Planning
-
Prepare the surface:
Begin by wiping down your bisque-fired bowl with a damp sponge. This is crucial as it removes any kiln dust or oils from your hands that might repel the underglaze. -
Visualize the flow:
Look at the bowl’s curve. You want your vines to wrap naturally around the form, sweeping from the base upwards toward the rim. Don’t aim for perfect spacing; organic growth is irregular. -
Light sketching (optional):
If you’re nervous about freehanding, use a regular pencil to lightly trace the main stem lines. The graphite will burn off completely in the kiln, so don’t worry about marks.
Step 2: Painting the Vines
-
Load the liner brush:
Dilute your dark brown underglaze slightly with a drop of water until it has an ink-like consistency. Load your fine liner brush fully. -
Paint the main stems:
Start near the bottom of the bowl and drag the brush upward in long, sweeping S-curves. Vary your pressure: press slightly harder at the base and lift off to a whisper at the tip for a tapered end. -
Add secondary branches:
From your main stems, pull out smaller, thinner branch lines. Ensure these connect smoothly to the main line, angling them upwards like a real plant reaching for sunlight. -
Create tiny offshoots:
Add very short, fine lines where you plan to place leaves or berries later. These act as the ‘petioles’ connecting the leaf to the branch.
Fixing Smudges
Make a mistake with the brown line? Don’t rub it! Let it dry completely, then gently scratch it off with a toothpick or a stiff clean brush. Wiping wet underglaze just forces pigment into the clay pores.
Step 3: Adding Foliage
-
Mix the green wash:
Prepare your sage green underglaze. I prefer to water this down significantly, almost like a watercolor wash, to achieve that translucent, soft look seen in the photo. -
The press-and-lift technique:
Using your size 2 round brush, load it with the watery green mix. Touch the tip to the branch, press down to widen the bristles (creating the belly of the leaf), and lift up as you pull away to form a point. -
Vary leaf saturation:
Don’t reload your brush for every single leaf. Let some be pigmented and others be faint and watery. This mimics light filtering through a canopy. -
Inside and out:
Paint leaves on both the exterior and interior of the bowl. For the interior, ensure the vines appear to ‘crawl’ up the sides rather than just sitting flat. -
Add the berry details:
Switch back to your fine liner brush and the brown underglaze. Add tiny dots at the tips of some smaller branches to represent buds or berries.
Pro Tip: Flow State
To get smooth, non-jittery branch lines, exhale slowly as you pull the brush across the clay. Using your whole arm rather than just your wrist helps create elegant, confident curves.
Step 4: Finishing Touches
-
Refine the connections:
Check where the green leaves meet the brown stems. If there’s a gap, use the finer brush to extend the stem slightly into the leaf base. -
Dry completely:
Allow the underglaze to dry until chalky to the touch. This usually takes about 20-30 minutes depending on humidity. -
Apply clear glaze:
Dip or brush a clear transparent glaze over the entire piece. If brushing, use a fan brush and dab gently over the painted areas first so you don’t smear the design. -
Clean the foot:
Wipe the bottom foot ring of the bowl completely clean of glaze with a sponge to prevent it from sticking to the kiln shelf. -
Final firing:
Fire the piece according to your clay and glaze specifications (usually Cone 5 or 6 for stoneware).
Once fired, you’ll have a stunning, food-safe bowl that celebrates the quiet beauty of wild foliage
Black-And-White Checkerboard
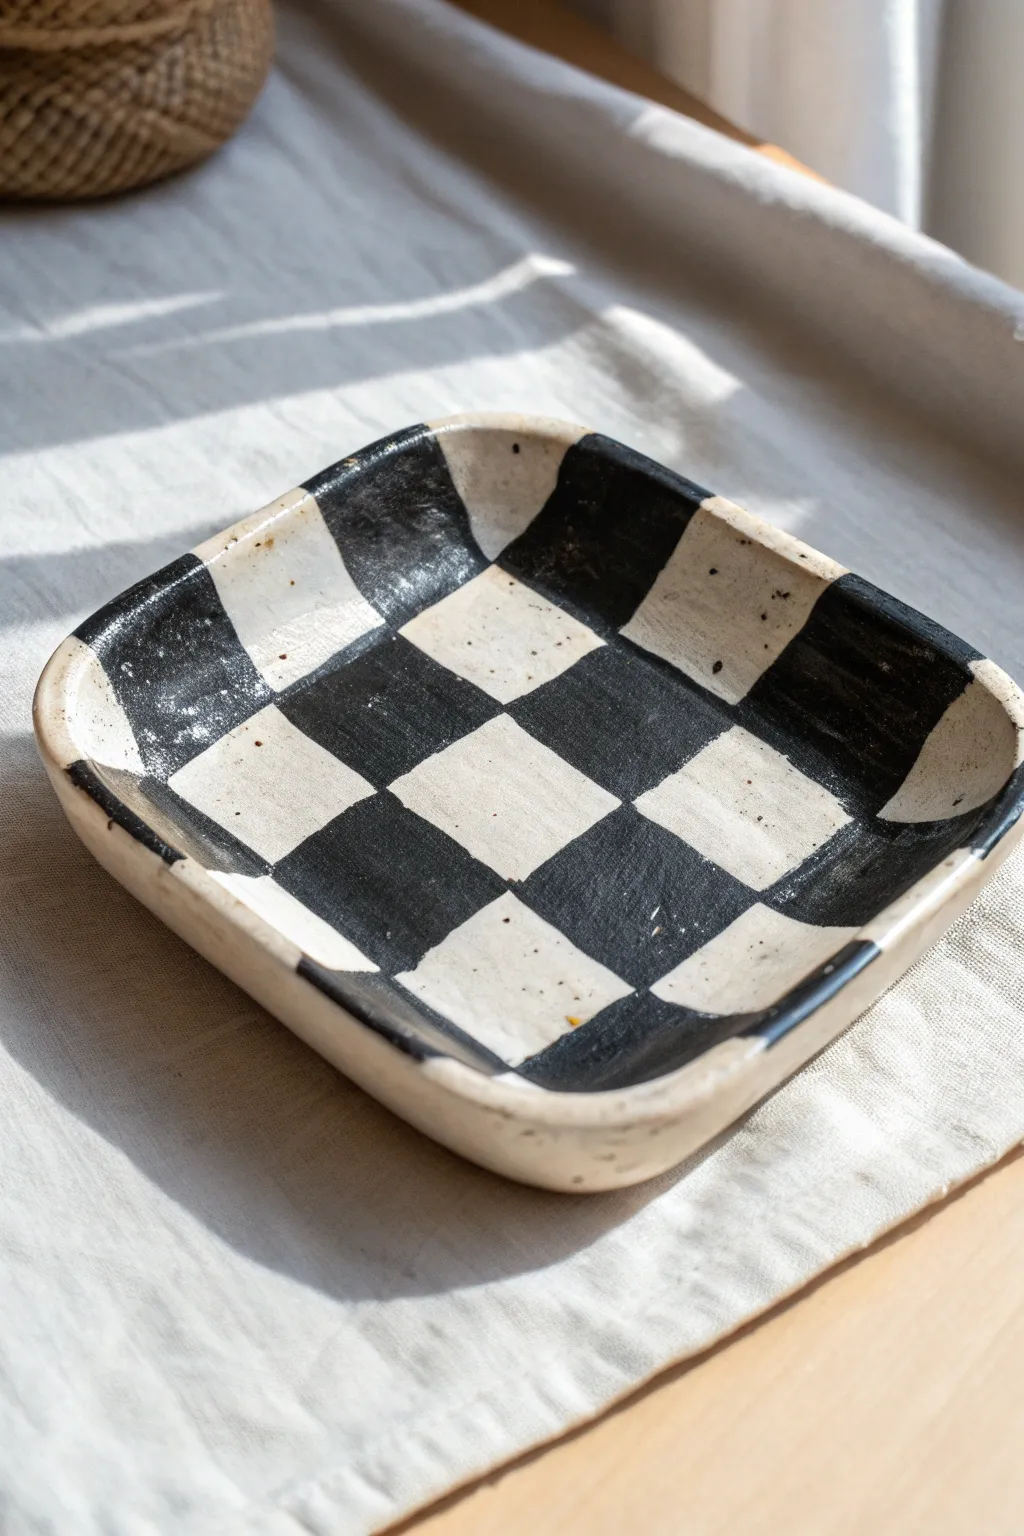
Embrace the imperfect charm of handmade ceramics with this trendy black-and-white checkerboard dish. The organic shape paired with a bold graphic pattern creates a striking piece perfect for holding jewelry or simply admiring.
Detailed Instructions
Materials
- Air-dry clay (white) or polymer clay
- Rolling pin
- Craft knife or clay tool
- Small bowl (for a mold) or cling wrap
- Sandpaper (fine grit)
- Pencil
- Black acrylic paint
- Small flat paintbrush
- Fine detail brush
- Clear gloss varnish or sealant
- Ruler (optional)
- Water cup and paper towels
Step 1: Shaping the Clay Base
-
Prepare the Clay:
Start by taking a handful of white air-dry clay and kneading it in your hands until it becomes soft, warm, and pliable. This conditioning step prevents cracks later on. -
Roll it Out:
Place the clay on a smooth surface or canvas mat. Use your rolling pin to flatten it into an even slab, aiming for a thickness of about 1/4 inch. -
Cut the Square:
Using a craft knife, cut out a rough square shape. Don’t worry about perfect straight lines; slightly organic, rounded corners add to the handmade aesthetic shown in the photo. -
Form the Dish Shape:
Lift the clay slab and gently pinch up the edges to create a rim. Alternatively, drape the clay slab inside a shallow bowl lined with cling wrap to help it hold a curved shape while drying. -
Smooth the Edges:
Dip your finger in a tiny bit of water and run it along the rim and the surface to smooth out any harsh cuts or fingerprints. -
Dry Completely:
Set the dish aside to dry. Depending on your clay type and humidity, this usually takes 24 to 48 hours. It must be bone dry before painting.
Clean Lines Hack
Make a mistake? Wait for the black paint to dry completely, then gently scrape the excess off the unpainted clay areas carefully using the edge of your craft knife.
Step 2: Prepping and Patterning
-
Sand for Smoothness:
Once fully dry, lightly sand any rough spots on the rim or surface with fine-grit sandpaper. Wipe away all dust with a slightly damp tack cloth. -
Sketch the Grid:
Using a pencil, very lightly draw a grid on the inside of the dish. I prefer to freehand this part to keep the lines fluid, but you can use a flexible ruler if you want more precision. -
Mark the Black Squares:
To avoid confusion while painting, place a tiny ‘x’ or a small dot in the squares that will be painted black. It’s surprisingly easy to lose track of the pattern once you start!
Add Some Color
Instead of classic black and white, try a muted sage green or a terracotta orange for the checks to give the piece a softer, earthy vibe.
Step 3: Painting the Checks
-
Outline First:
Load your fine detail brush with black acrylic paint. Carefully outline the edges of your first ‘x’ marked square. This creates a barrier so you can fill it in faster. -
Fill in the Squares:
Switch to a small flat brush to fill in the center of the square you just outlined. Apply the paint somewhat thickly to get that opaque, bold look. -
Work in Sections:
Continue outlining and filling the marked squares one by one. Try to work from the center outwards to avoid smudging wet paint with your hand. -
Paint the Rim:
Extend the pattern over the lip of the dish. If a black square hits the edge, wrap the black paint right over the top of the rim for a finished look. -
Refine the Lines:
Once the first coat is dry, go back in with your fine brush to touch up any wobbly edges or add a second coat to the black squares if the clay is showing through. -
Clean Up White Squares:
If you accidentally smudged black into a white square, let it dry completely, then paint over the mistake with white acrylic paint (or leave the natural clay color if it usually cleans up well).
Step 4: Finishing Touches
-
Let Paint Cure:
Allow the acrylic paint to dry fully for at least an hour or two. -
Apply Sealer:
Brush on a coat of clear gloss varnish. This will seal the porous clay, protect your paint job, and give it the ceramic-like sheen seen in the example.
Now you have a stylish, functional piece of art ready to display on your bedside table or coffee table
Confetti Splatter Speckles
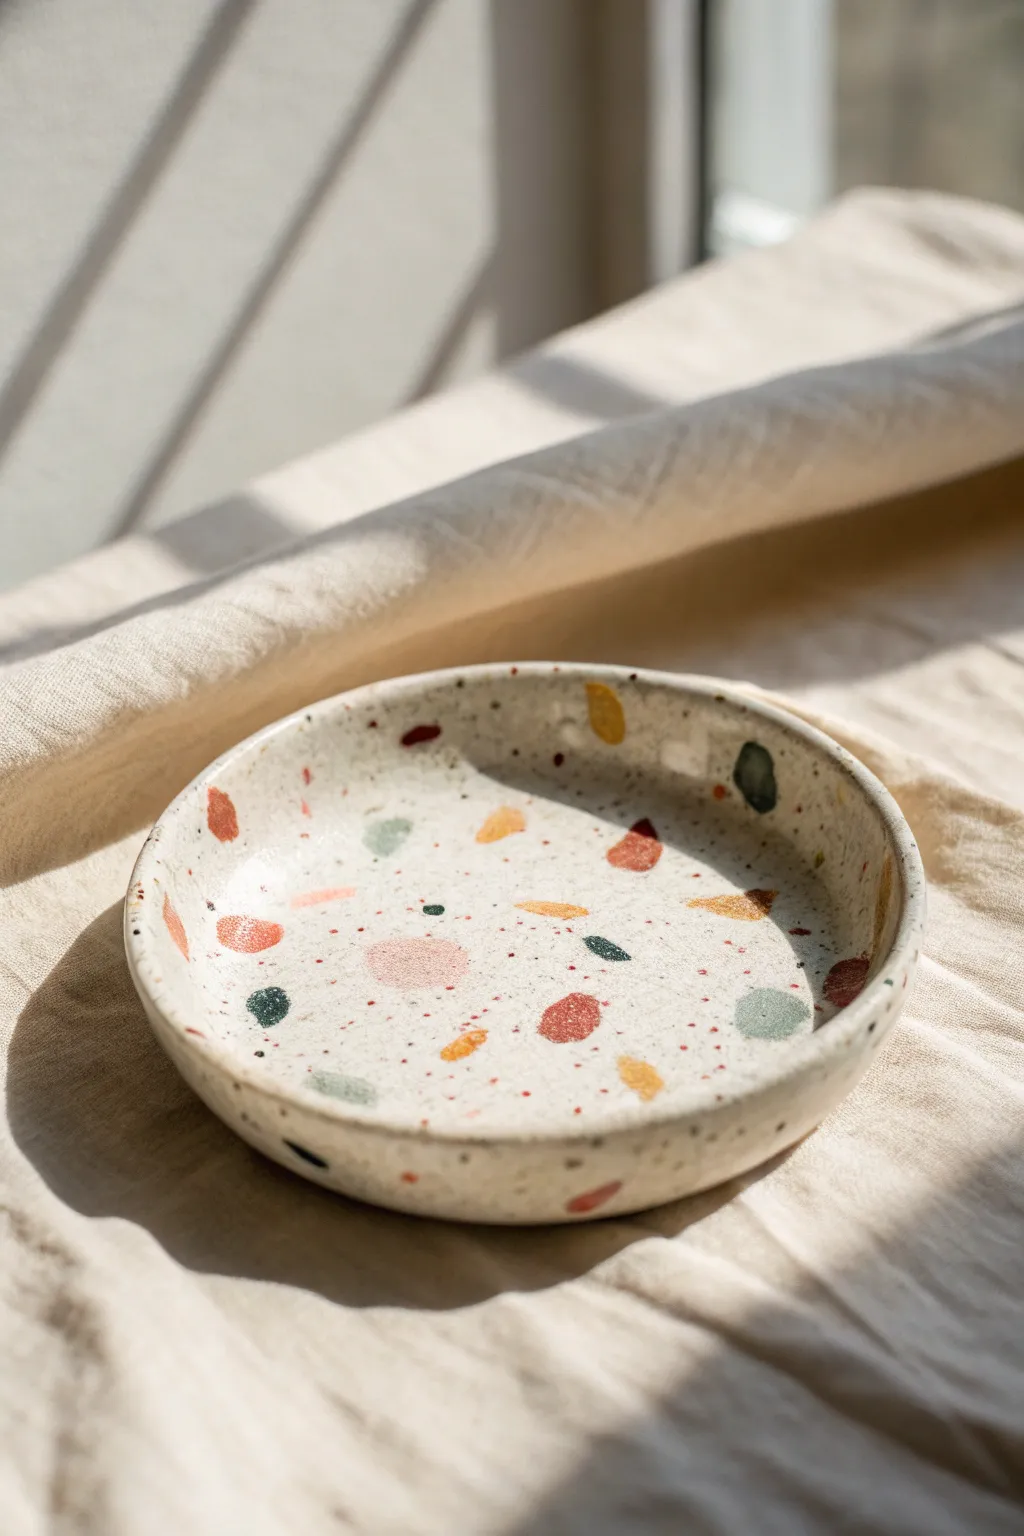
Transform a plain ceramic or air-dry clay bowl into a chic statement piece with this playful terrazzo-inspired design. The look combines a creamy speckled base with organic, scattered shapes in earthy tones for a modern, matte finish.
Step-by-Step
Materials
- Shallow clay bowl (bisque ware or hardened air-dry clay)
- Acrylic paints (Cream, Rust, Mustard, Sage Green, Dark Teal, Pale Pink)
- Black or dark brown acrylic paint (for speckling)
- Medium flat brush
- Small round detail brush (size 2 or 4)
- Old toothbrush
- Palette or paper plate
- Matte spray sealant or brush-on varnish
- Cardboard box (for splatter containment)
Step 1: Base Coat Application
-
Prepare your surface:
Wipe down your clay bowl with a slightly damp cloth to remove any dust or debris. Ensure it is completely dry before beginning. -
Mix the base color:
Squeeze out a generous amount of cream acrylic paint. I like to add a tiny drop of brown to warm it up slightly, aiming for an unbleached linen tone. -
Apply the first layer:
Using the medium flat brush, coat the entire inside and rim of the bowl. Use long, smooth strokes to minimize brush marks. -
Let it dry:
Allow the first coat to dry completely, which usually takes about 15-20 minutes depending on humidity. -
Apply a second coat:
Add a second layer of the cream base to ensure full opacity, covering any streaks from the first pass.
Blob Control
If you accidentally create a huge splatter blob, don’t wipe it! Let it dry, coat it with the cream base paint, and then paint a new confetti shape over it.
Step 2: Creating the Confetti Pattern
-
Prepare your palette:
Dispense thumbnail-sized amounts of your accent colors: rust, mustard, sage green, dark teal, and pale pink. -
Start with the largest shapes:
Dip your small round brush into the rust color. Paint irregular, organic blobs randomly around the bowl’s interior. -
Vary the placement:
Ensure some shapes sit isolated in the center while others hug the sides or spill over the rim. -
Add mustard accents:
Clean your brush and switch to mustard yellow. Paint similar organic shapes, keeping them spaced out from the rust ones. -
Introduce cool tones:
Using the dark teal, add smaller, more pebble-like shapes. These darker spots add depth and contrast. -
Fill with soft colors:
Use the sage green and pale pink to fill in empty spaces. I try to vary the sizes here, making some tiny like seeds and others larger like petals. -
Refine the shapes:
Look at the composition. If a shape looks too perfect or round, dab the edges to make it look more like a broken stone shard.
Texture Twist
Mix a pinch of baking soda into your accent paints creates a gritty texture that looks and feels like real stone terrazzo.
Step 3: Speckling and Sealing
-
Prepare the splatter paint:
Mix a small amount of black or dark brown paint with a few drops of water until it has an inky, fluid consistency. -
Load the toothbrush:
Dip the bristles of an old toothbrush into this watery mixture. Test it on a piece of scrap paper first. -
Splatter the bowl:
Hold the toothbrush over the bowl inside a cardboard box. Run your thumb across the bristles to flick tiny specks of paint over the entire surface. -
Check density:
Aim for a fine mist of speckles rather than large blobs. Rotate the bowl as you work for even coverage. -
Add colored speckles (optional):
Repeat the splatter process with the rust color for added dimension, cleaning the toothbrush thoroughly first. -
Final dry time:
Let the entire project sit for at least an hour to ensure the thickest parts of the confetti shapes are dry. -
Seal the work:
Finish with a coat of matte spray sealant to protect the paint and give it that authentic ceramic feel.
Enjoy using your trendy new dish for holding keys or jewelry
Soft Ombre Gradient Fade
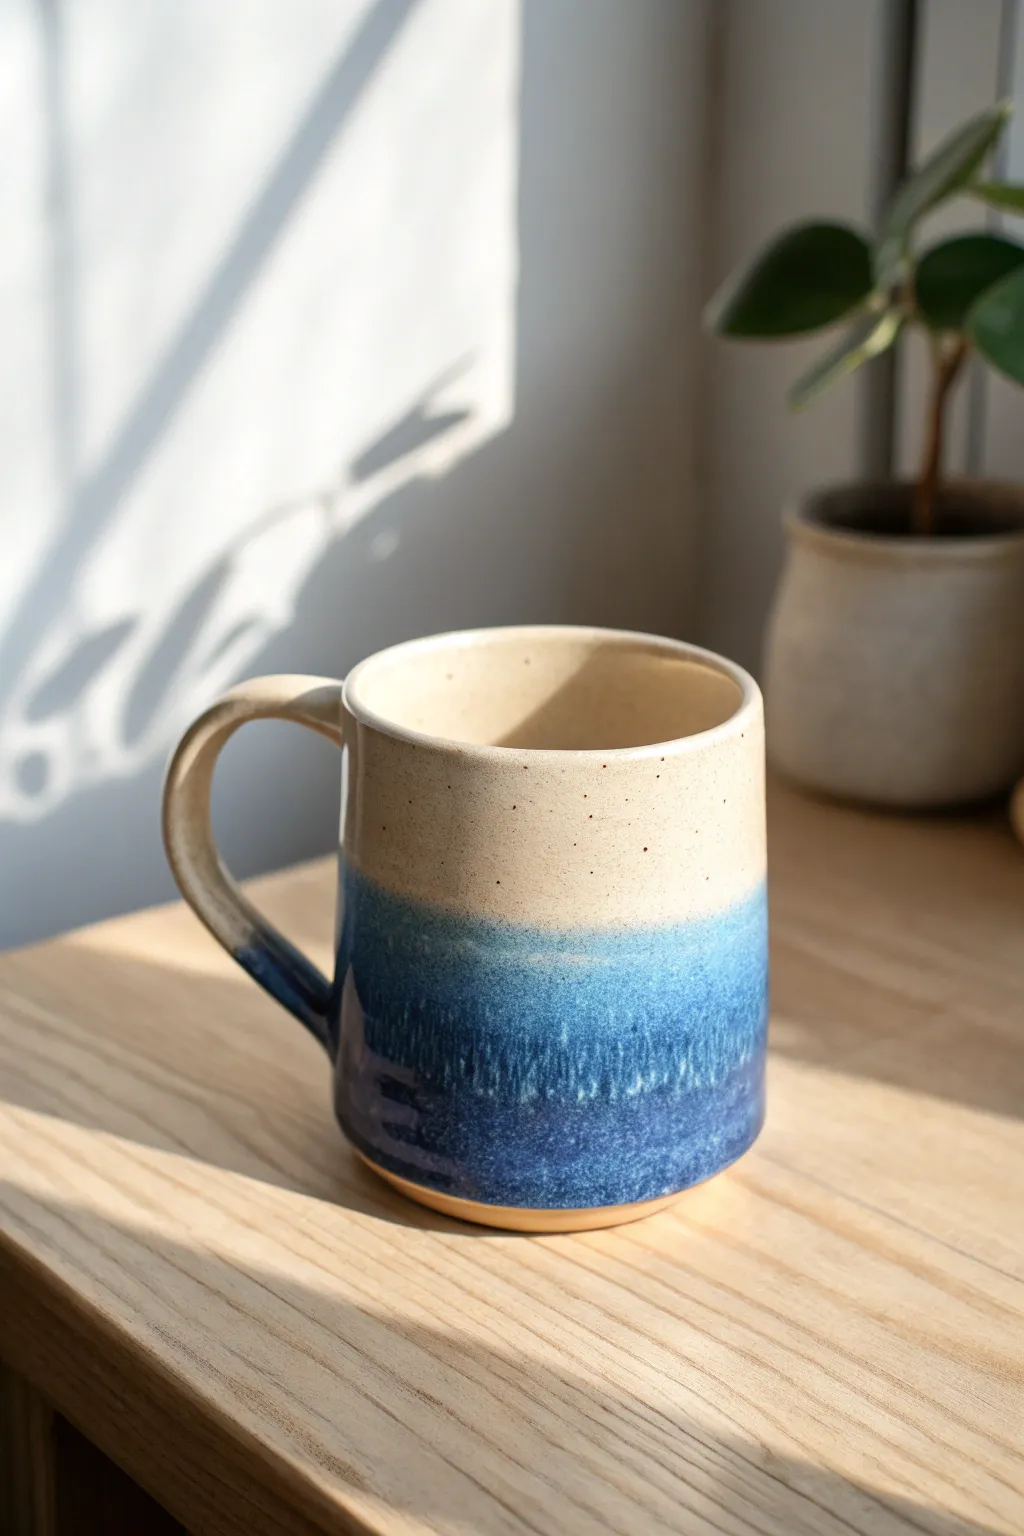
Capture the serene beauty of where the sky meets the sea with this stunning two-tone ombre mug. The soft transition from speckled cream to deep indigo creates a modern, calming aesthetic perfect for your morning coffee.
Step-by-Step Guide
Materials
- Bisque-fired ceramic mug (wheel-thrown or slip-cast)
- Cream or oatmeal speckled glaze
- Deep indigo or ocean blue glaze
- Wide fan brush
- Soft round brush
- Sponge
- Clean water
- Wax resist (optional)
- Glaze tongs (if dipping)
Step 1: Preparation & Base Coat
-
Clean surface:
Begin by wiping down your bisque-fired mug with a damp sponge. This removes any kiln dust or oils from handling that might prevent the glaze from adhering properly. -
Wax the foot:
Apply a ring of wax resist to the very bottom foot of the mug. This saves you from having to wipe glaze off the bottom later and protects your kiln shelves. -
Mix your glazes:
Stir your cream speckled glaze thoroughly. You want the speckles distinguished and evenly suspended throughout the mixture so they show up in the final firing. -
Apply the interior:
Pour the cream glaze inside the mug, roll it around to coat every surface, and pour the excess back into your container. Wipe the rim immediately if any drips occurred. -
Coat the top exterior:
Using a wide fan brush or by dipping, apply the cream speckled glaze to the top two-thirds of the mug’s exterior. Don’t worry about a straight line at the bottom yet. -
Dry the first layer:
Let this cream layer dry until it’s chalky and cool to the touch but no longer wet. This prevents the colors from muddying too much in the next steps.
Glaze Melting Tip
Glazes run downward when hot! End your heavy blue application about 1/4 inch higher than where you want it to settle to prevent sticking to the shelf.
Step 2: Creating the Ombre Fade
-
Apply the base blue:
dip the bottom third of the mug into your deep indigo blue glaze. Hold it there for about 3 seconds to get a nice opacity. -
Initial overlap:
While the blue is still wet, use a soft round brush loaded with a small amount of blue glaze to brush upward slightly into the cream section. -
Feather the transition:
I like to take a clean, slightly damp fan brush and gently sweep horizontally across the line where the two colors meet. This blurs the hard edge. -
Add depth:
Dip just the bottom inch of the mug into the blue glaze a second time. This creates a darker, more saturated base that anchors the gradient. -
Refine the handle:
Paint the handle carefully. Use the cream glaze on the top curve and blend the blue glaze onto the bottom attachment point to match the ombre line on the body. -
Check the interior:
Inspect the inside rim. If any blue glaze splashed inside, gently scrape it away with a fettling knife or wipe it clean so the interior remains pure cream. -
Clean the foot ring:
Even with wax resist, give the bottom foot a quick wipe with a sponge to ensure absolutely no glaze touches the surface that will sit on the kiln shelf.
Step 3: Firing
-
Final drying:
Allow the mug to dry completely, preferably overnight. The clay should feel room temperature, not cool. -
Load the kiln:
Place the mug in the kiln, ensuring it doesn’t touch other pieces. The ombre effect relies on the glazes melting and moving slightly. -
Fire to temperature:
Fire the mug according to your clay and glaze specifications (typically Cone 5 or 6 for stoneware). A slow cooling cycle often helps the speckles pop.
Level Up: Texture
Before the first firing (on leather hard clay), carve shallow vertical grooves on the bottom half. The blue glaze will break over the texture for extra depth.
Once cooled, fill with your favorite warm drink and enjoy the handmade warmth of your new gradient mug
Easy Animal Print Accents
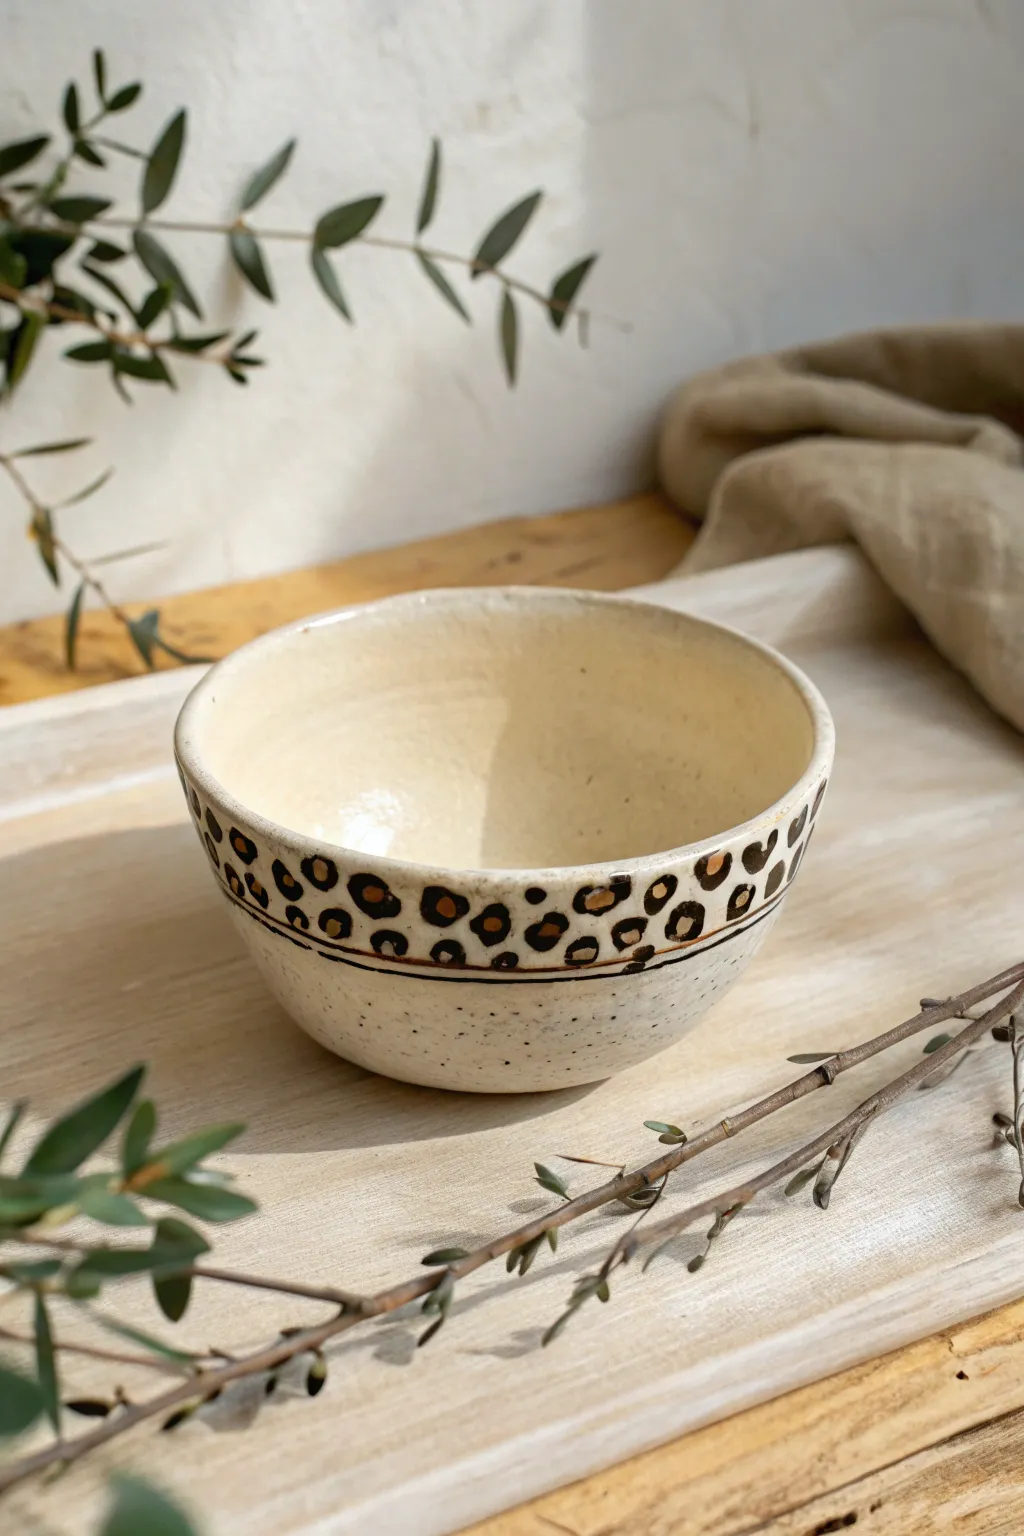
Transform a simple ceramic bowl into a wild statement piece with this easy leopard print accent technique. The combination of a creamy speckled base and bold animal print creates a modern, sophisticated look that is deceptively simple to achieve.
Detailed Instructions
Materials
- Bisque-fired ceramic bowl
- Cream or off-white underglaze
- Black underglaze
- Tan or caramel underglaze
- Clear dipping glaze (food safe)
- Small round detail brush (size 0 or 1)
- Medium flat brush
- Old toothbrush (for splattering)
- Water cup
- Sponge
Step 1: Base Coat Application
-
Clean the bisque:
Before you start painting, wipe down your bisque-fired bowl with a damp sponge. This removes any dust that could prevent the glaze from adhering properly. -
Apply the cream base:
Using a medium flat brush, apply a smooth coat of cream or off-white underglaze to the entire exterior and interior of the bowl. -
Layer for opacity:
Let the first coat dry until it’s chalky to the touch, then apply a second and third coat to ensure solid, opaque coverage without brushstrokes. -
Create the splatter effect:
Mix a tiny amount of water into your black underglaze to thin it slightly. Dip an old toothbrush into the mixture. -
Flick the speckles:
Hold the toothbrush near the bottom half of the bowl and run your thumb across the bristles to flick fine speckles onto the surface. Aim for a gradient effect, with more speckles at the base and fewer moving up.
Step 2: Painting the Leopard Band
-
Plan the band placement:
Visualize a band running horizontally around the middle of the bowl. You can lightly mark this area with a pencil if you need a guide, as the graphite will burn off in the kiln. -
Paint the spots:
Using your tan or caramel underglaze and a small detail brush, paint small, irregular oval shapes within your chosen band area. Scatter them randomly; they don’t need to be perfect circles. -
Let spots dry:
Wait a few minutes for the tan spots to dry completely before moving to the next step to avoid muddying the colors. -
Outline the spots:
Dip your fine detail brush into the black underglaze. Paint two or three uneven, C-shaped or bracket-like strokes around the edges of each tan spot. Don’t close the circle completely. -
Fill the gaps:
Add small solid black irregular dots in the empty spaces between the larger leopard spots to create a dense, realistic pattern. -
Add the borders:
Using the tip of your detail brush and steady pressure, paint a thin horizontal line above and below your leopard print band to frame it neatly.
Natural Variation
Make your leopard spots different sizes and shapes. Real animal fur is irregular, so uniform polka dots will look too artificial.
Step 3: Finishing Touches
-
Dry completely:
Allow all your underglaze work to dry fully. The moisture should evaporate completely, leaving the surface chalky and dry. -
Clear glaze application:
Dip the entire bowl into a clear food-safe glaze. Ensure you have a good pair of glazing tongs to hold the bowl securely while dipping. -
Clean the foot:
Wipe the bottom foot of the bowl clean with a wet sponge to prevent it from sticking to the kiln shelf during firing. -
Final firing:
Fire the piece in the kiln according to the specific temperature instructions for your clear glaze and clay body.
Smudged Lines?
If you smudge a black line, let it dry completely, then gently scratch the mistake off with a pin tool or craft knife before reglazing.
Enjoy using your stylish new bowl for your morning cereal or as a chic decorative catch-all
Smiley Face Mini Plates
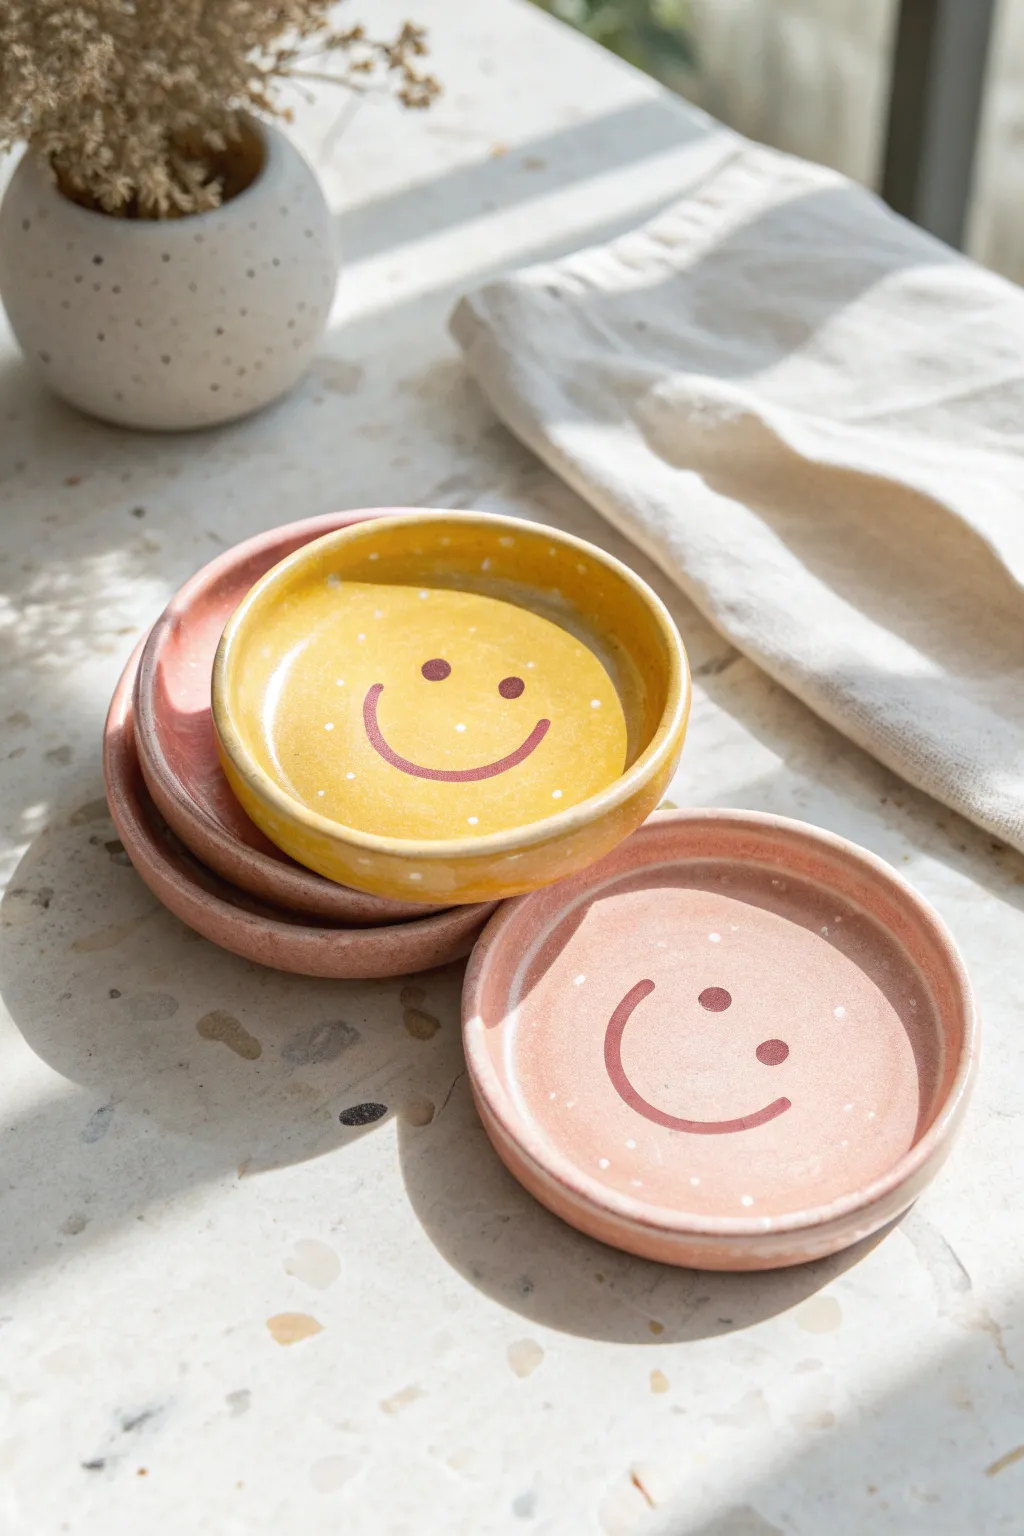
These cheerful mini plates bring a dose of sunshine to your dresser or desk with their warm glaze and simple happy faces. Perfect for holding rings or small treasures, this project combines easy hand-building techniques with a speckled, professional-looking finish.
Step-by-Step
Materials
- Air-dry clay (white or terra cotta)
- Standard acrylic paints (Mustard Yellow, Terracotta Pink, Dark Red/Brown)
- White acrylic paint (for speckles)
- Glossy varnish or sealant (Mod Podge or spray acrylic)
- Rolling pin
- Circle cookie cutter or a round bowl/cup to trace
- Sandpaper (fine grit)
- Small sponge
- Fine detail paintbrush
- Old toothbrush (for splatter technique)
- Bowl of water
Step 1: Sculpting the Base
-
Prepare the clay:
Cut a chunk of your air-dry clay and knead it in your hands until it becomes warm and pliable. If it feels too dry or starts cracking, dip your fingers in water and work the moisture in. -
Roll it out:
Using a rolling pin, flatten the clay to an even thickness of about 1/4 inch. I like to continuously rotate the clay while rolling to ensure it doesn’t stick to the table. -
Cut the circles:
Press your large circle cookie cutter (or trace around a wide-mouth cup) into the clay to create perfect discs. Remove the excess clay from around the edges. -
Lift the edges:
Gently pinch the outer rim of each circle and curve it upwards just slightly to create a lip. This transforms the flat disc into a tiny shallow bowl. -
Smooth the surfaces:
Dip your finger in a little water and run it along the rim and the inside surface to smooth out any fingerprints or cracks. The smoother it is now, the better the paint will look later. -
Let it dry completely:
Set the dishes aside in a dry, ventilated area. Allow them to cure for at least 24 to 48 hours until they are hard and lighter in color. -
Sand for perfection:
Once fully dry, take a piece of fine-grit sandpaper and gently buff the edges and surface. Wipe away the dust with a barely damp cloth.
Step 2: Painting and Finishing
-
Apply the base color:
Mix a warm mustard yellow or a soft terracotta pink. Paint the entire surface of the dish, including the bottom and sides. -
Add a second coat:
Let the first layer dry to the touch, then apply a second coat to ensure the color is opaque and solid. -
Draft the face:
It helps to lightly sketch the smiley face placement with a pencil before committing to paint. A simple, wide ‘U’ shape and two dots works best. -
Paint the features:
Using a dark reddish-brown paint and your finest detail brush, carefully paint over your pencil lines. Keep the pressure light to get a clean, curved smile line. -
Create the speckles:
Dilute a small drop of white paint with water so it’s runny. Dip an old toothbrush into this mixture. -
Splatter effect:
Point the toothbrush bristles toward the dish and run your thumb across them to flick tiny white specks over the surface. Do this sparingly for a subtle texture. -
Dry thoroughly:
Allow all the paint layers to dry completely, preferably for a few hours. -
Seal the deal:
Apply a coat of glossy varnish or sealant. This not only protects the paint but mimics the shiny look of fired ceramic glaze.
Smooth Rim Secret
Use a damp makeup sponge instead of your finger to smooth the wet clay rim. It creates an incredibly even, professional finish without leaving prints.
Mix & Match Sets
Create a matching set by swapping the colors—paint the base yellow with a pink smile, or use a dark charcoal base with a white smile for high contrast.
Now you have a charming set of handmade dishes ready to brighten up any corner of your home
Night-Sky Galaxy Wash
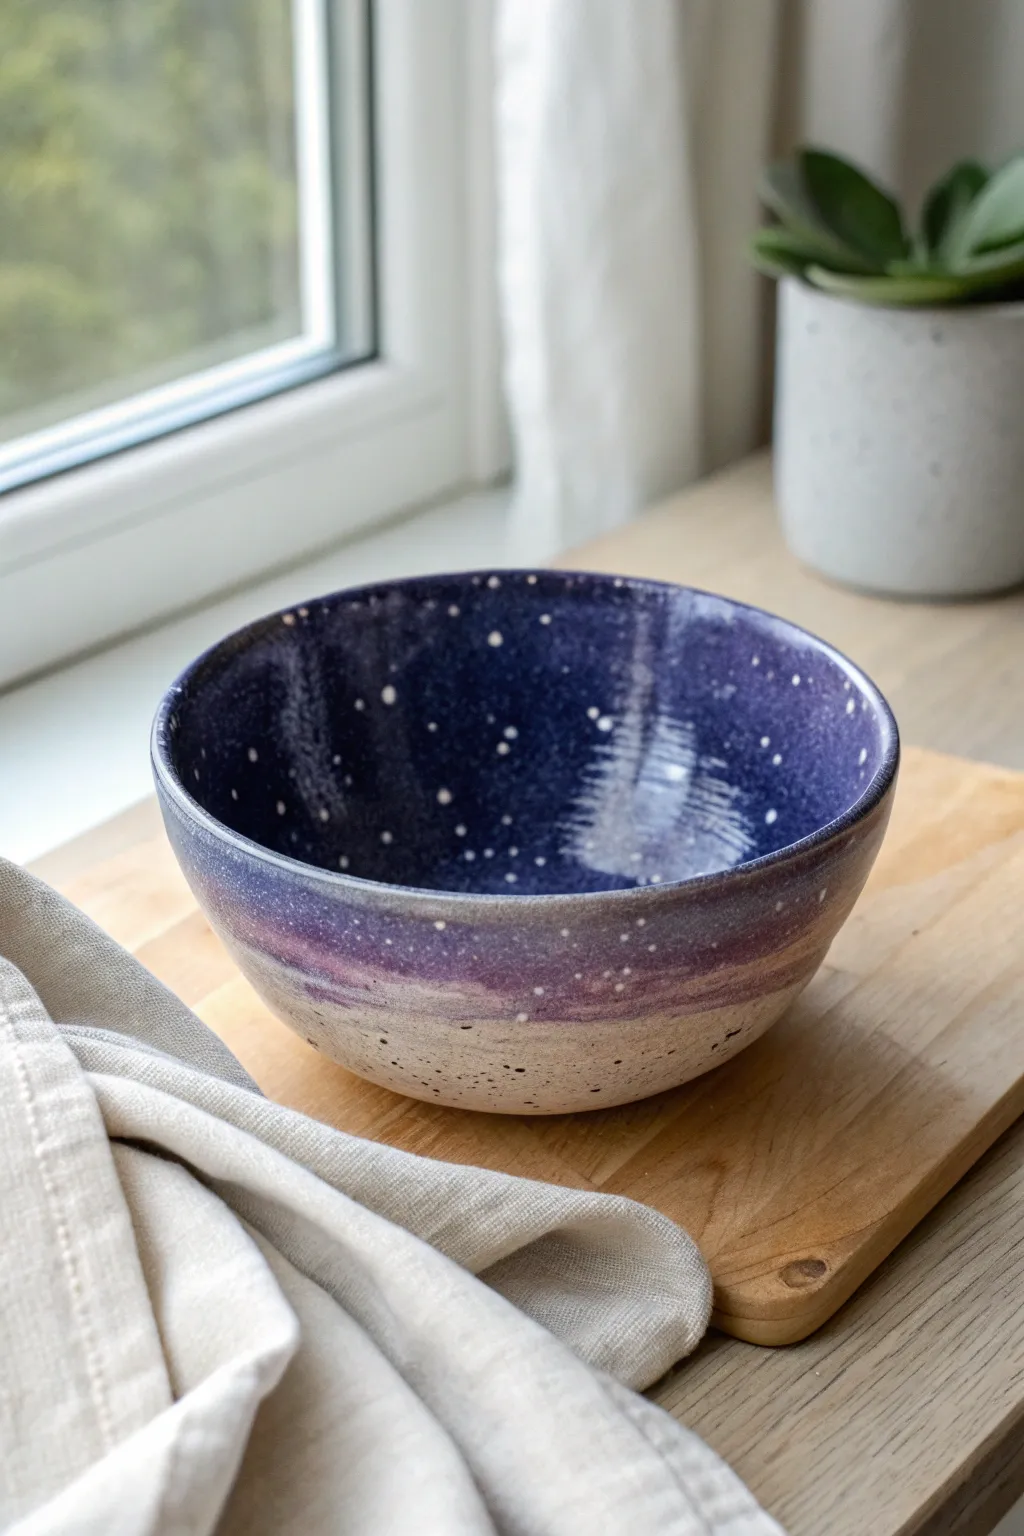
Transform a plain bisque bowl into a piece of the night sky with this stunning galaxy wash technique. Using layers of deep indigo and violet glazes, topped with a constellation of splatter, you’ll create a functional piece of art that feels infinite.
Detailed Instructions
Materials
- bisque ceramic bowl (cone 6 stoneware preferred)
- Deep indigo or navy blue ceramic underglaze
- Violet or deep purple ceramic underglaze
- White underglaze (for stars)
- Clear dipping or brush-on glaze
- Large soft fan brush
- Medium round brush
- Old toothbrush or stiff bristle brush
- Sponge
- Water container
- Pottery wheel or banding wheel (optional but helpful)
Step 1: Interior Galaxy Base
-
Clean the bisque:
Before painting, wipe down your entire bisque bowl with a slightly damp sponge. This removes any dust that could prevent the glaze from adhering properly. -
Load the indigo:
Pour a generous amount of deep indigo underglaze onto your palette. Load up a large fan brush so it’s fully saturated but not dripping. -
Coat the interior:
Apply the indigo underglaze to the entire inside of the bowl. Use long, smooth strokes starting from the center and pulling up towards the rim to ensure even coverage. -
Apply second coat:
Let the first coat dry until it loses its sheen. Apply a second coat of indigo to the interior to ensure a solid, opaque dark background for your stars.
Step 2: Exterior Gradient
-
Paint the upper rim:
Using the same indigo underglaze, paint a band about 1-2 inches wide around the top exterior rim of the bowl. This connects the inside color to the outside. -
Add the violet transition:
Switch to your violet or purple underglaze. Paint a band directly below the indigo rim, allowing the wet edges to touch. -
Blend the gradient:
While both bands are still slightly damp, use a wet brush to gently blend the line where the indigo and violet meet, creating a soft, hazy transition. -
Create the wash:
Dilute a small amount of violet underglaze with water to create a thin wash. Paint this below the solid violet band, letting it fade out irregularly into the raw clay color at the bottom. -
Leave the base raw:
To achieve the look in the photo, leave the bottom third of the bowl unpainted. The natural speckles of the clay body add a lovely earthy contrast.
Uneven Splatter?
If your stars look like streaks instead of dots, your paint is likely too watery. Thicken the mixture with more underglaze, or move the brush closer to the surface.
Step 3: Starry Splatter
-
Prepare white splatter:
Mix a small amount of white underglaze with a drop or two of water. You want a consistency similar to heavy cream so it flicks easily but stays opaque. -
Test run:
I always test the splatter on a piece of paper first. The distance and speed of your flick determine the size of the ‘stars’. -
Splatter the interior:
Aim your toothbrush or stiff brush into the bowl. Run your thumb across the bristles to flick a spray of white dots onto the dark indigo interior. Vary the density to create ‘milky way’ clusters. -
Splatter the exterior:
Continue the splatter effect on the outside of the bowl. Let the white dots land on the purple gradient and even drift down onto the unpainted raw clay section at the bottom. -
Add major stars:
Use a fine detail brush or the end of a paintbrush handle to manually place a few larger, distinct white dots among the spray for visual interest.
Cosmic Depth
Layer a sheer coat of glitter glaze or a translucent pearlescent wash over the indigo interior before the clear coat for a subtle, shimmering galaxy effect.
Step 4: Finishing & Firing
-
Let it dry completely:
Allow the underglaze design to dry fully, ideally overnight. The surface should feel room temperature and chalky to the touch. -
Clear glaze application:
Apply a coat of clear glaze over the entire piece (except the bottom foot ring). This will seal the underglaze and make the colors pop and become glossy. -
Clean the foot:
Use a sponge to meticulously wipe any glaze off the very bottom foot of the bowl so it doesn’t stick to the kiln shelf during firing. -
Fire the piece:
Fire the bowl in a kiln according to your clay and glaze specifications (typically cone 6 for stoneware). This final step vitrifies the clay and melts the glaze into glass.
Once fired, you’ll have a durable piece of pottery that captures the magic of a clear night sky in your hands
Scratch-Back Sgraffito Details
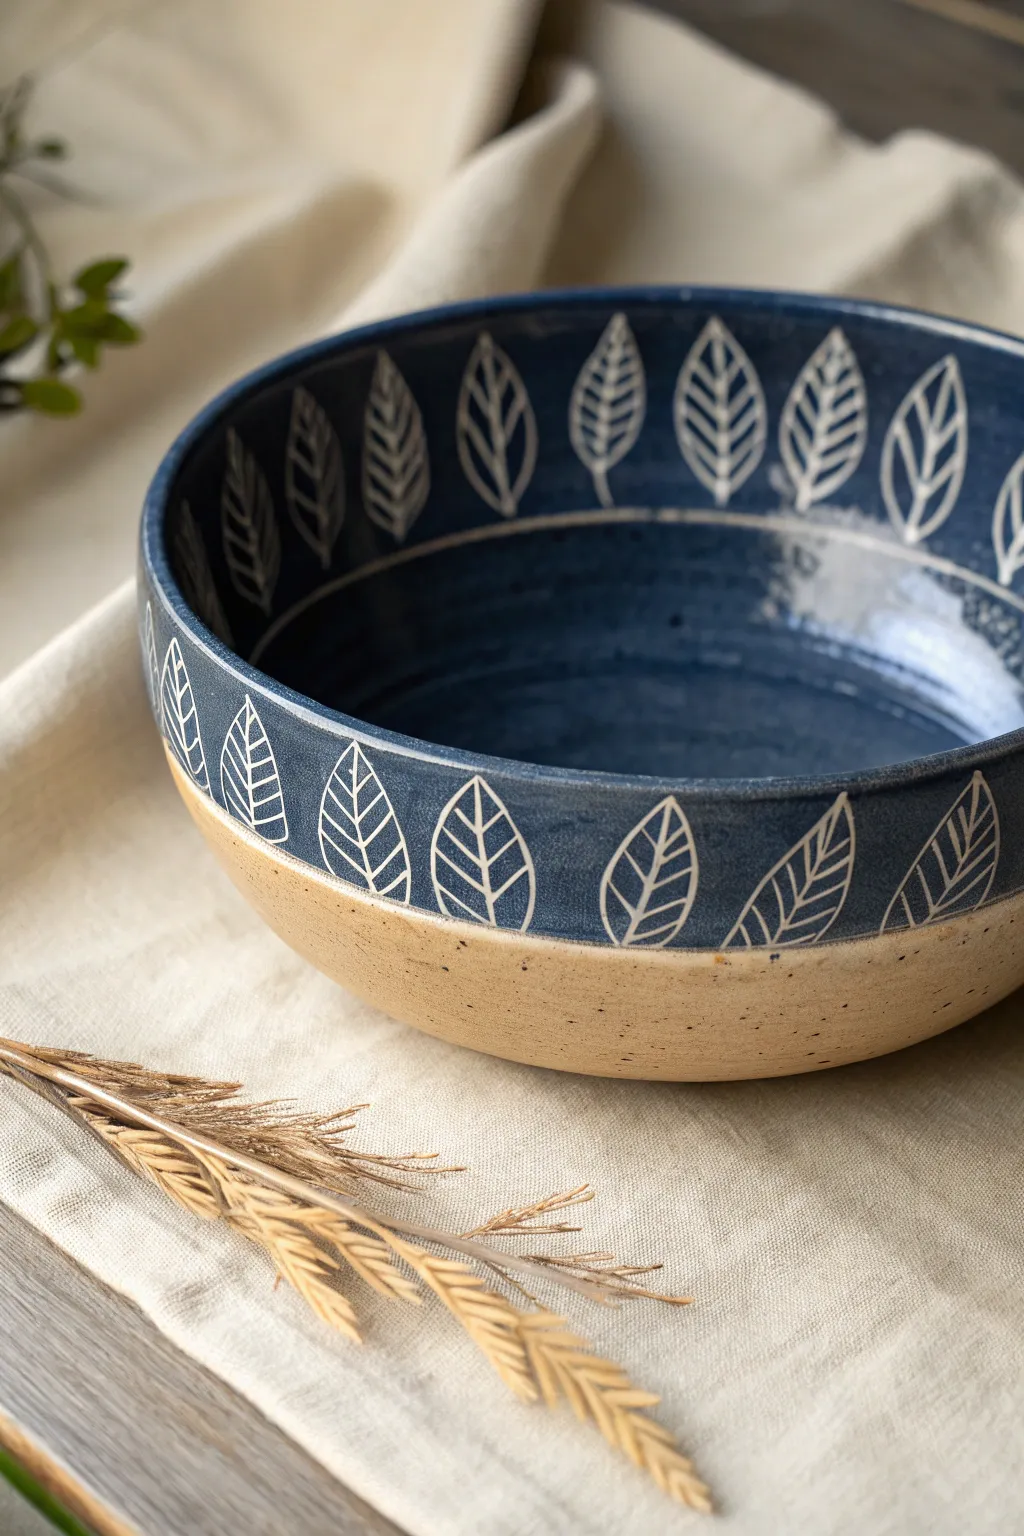
Embrace the contrast of deep indigo against earthy clay with this classic sgraffito project. By scratching through a layer of underglaze, you’ll reveal the raw clay body underneath in a repeating leaf motif that rings both the inside and outside of your vessel.
Step-by-Step Guide
Materials
- Bisqueware or leather-hard clay bowl (speckled clay recommended)
- Deep indigo or navy blue underglaze
- Soft fan brush
- Medium flat shader brush
- Sgraffito tool or small loop tool
- Needle tool
- Banding wheel (lazy Susan)
- Damp sponge
- Clear transparent glaze
- Pencil
Step 1: Preparation & Underglazing
-
Prepare your surface:
Start with a leather-hard clay bowl. If your clay is too dry, the scratching stage will be chippy; if it’s too wet, the lines will be mushy. Wipe the surface gently with a damp sponge to remove any dust. -
Mark the glaze line:
Place your bowl on a banding wheel. Hold a needle tool steady against the side of the bowl about one-third of the way up from the base. Spin the wheel to create a light, consistent guide line around the circumference. -
Apply the first coat:
Using a soft fan brush, apply a smooth layer of indigo underglaze inside the entire bowl and on the exterior down to your guide line. -
Wait for the sheen to fade:
Let the first coat dry until the wet sheen disappears and the surface looks matte. This usually takes about 10-15 minutes depending on humidity. -
Layer up opacity:
Apply a second and third coat of underglaze, allowing drying time between each. You want a solid, opaque blue field so the clay color pops through clearly later. -
Final drying check:
Allow the final coat to dry to the touch. It shouldn’t be tacky, but the clay underneath should still have some moisture (leather-hard is ideal).
Step 2: Carving the Design
-
Sketch the leaf shapes:
Lightly sketch your leaf outlines directly onto the dry underglaze with a pencil. Don’t worry about mistakes; the pencil graphite will burn off in the kiln. Aim for evenly spaced, almond-shaped leaves. -
Carve the exterior outlines:
Using a sharp sgraffito tool or a small loop tool, carve along your pencil lines on the exterior band. Apply enough pressure to cut through the blue layer and reveal the tan clay, but try not to gouge too deep. -
Add the central veins:
Carve a single vertical line down the center of each leaf, starting from the base and stopping just short of the tip. -
Detail the ribs:
Scratch diagonal lines branching off the center vein. Keep these strokes light and confident to mimic the delicate structure of a leaf. -
Repeat on the interior:
Move to the inside rim of the bowl. Carve a matching row of leaves. I find it helpful to stand up while doing this to get a better angle on the inner curve. -
Define the borders:
Use your needle tool or sgraffito tool to carve a thin horizontal line connecting the bases of the leaves on the exterior, creating a clean border. -
Create the inner ring:
Inside the bowl, carve a horizontal ring just below the leaves. This visually separates the patterned rim from the solid blue basin.
Clean Lines Tip
Work from the top of the leaf down to the base for the veins. Pulling the tool toward you usually offers more control than pushing it away.
Step 3: Finishing Touches
-
Clean up the crumbs:
Carving creates little ‘burrs’ of clay. Do not brush them away with your hand, or you might smear blue dust onto the raw clay. Instead, use a large, dry, soft fluffy brush to gently sweep the crumbs away. -
Bisque fire:
Fire the bowl to bisque temperature (usually cone 04 or 06) to set the underglaze and harden the clay. -
Clear glaze application:
Dip or brush a clear transparent glaze over the entire piece. This will make the raw clay section shine and deepen that navy blue to a rich, glossy finish. -
Final firing:
Fire the piece again to your clay body’s maturity temperature (e.g., cone 5/6 for stoneware).
Level Up: Texture
Instead of leaving the bottom raw clay section smooth, stamp a subtle texture into the clay before it dries for extra tactile contrast.
Now you have a stunning, food-safe bowl that celebrates the beauty of hand-carved details