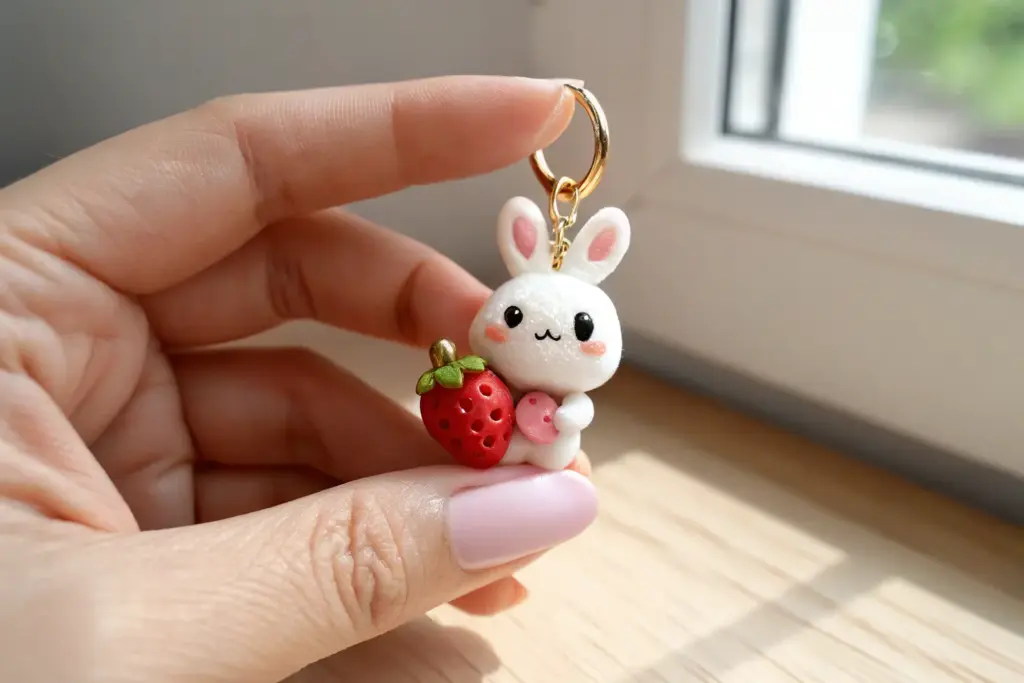
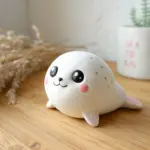
If you’re in the mood to make something tiny, sweet, and totally giftable, cute clay charms are the happiest little project. I’m sharing my go-to kawaii clay ideas that look adorable in a batch and feel super doable, even if you’re still getting comfy with polymer clay or air dry clay.
Smiley Bubble Tea Cup Charms
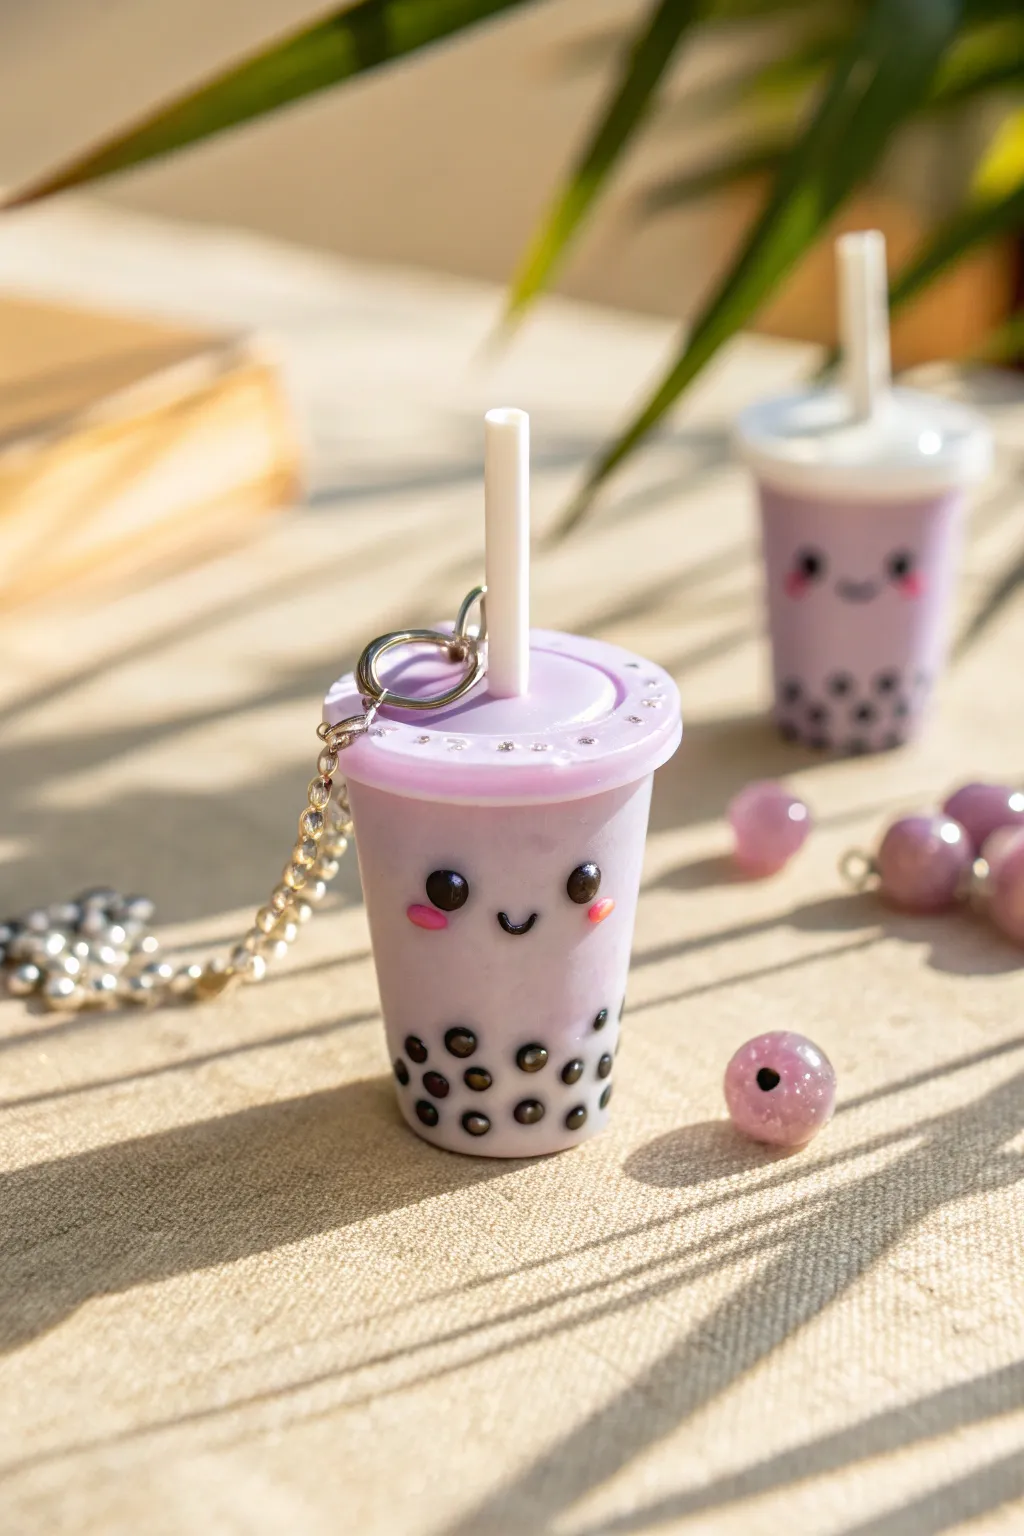
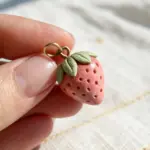
Capture the sweetness of your favorite drink with this adorable polymer clay bubble tea charm. Featuring a pastel purple cup, a cheerful little face, and tiny boba pearls at the bottom, this project is perfect for adding a pop of cuteness to your keychain or bag.
Detailed Instructions
Materials
- Polymer clay (light purple/lavender)
- Polymer clay (white)
- Polymer clay (black)
- Polymer clay (pink)
- Translucent liquid polymer clay (optional but recommended)
- Headpin or eye pin
- Keychain hardware and jump rings
- Rolling pin or clay machine
- Small circle cutter
- Dotting tool or toothpick
- X-acto knife or clay blade
- Gloss glaze or UV resin (for finish)
Step 1: Shaping the Cup Base
-
Mix the perfect purple:
Start by conditioning your light purple polymer clay until it is soft and pliable. If your purple is too dark, mix in a generous amount of white clay to achieve that soft, pastel lavender milkshake shade shown in the photo. -
Form the cylinder:
Roll a smooth ball of the purple clay and then shape it into a cylinder. Gently taper the bottom so it is slightly narrower than the top, mimicking the shape of a classic plastic exciting cup. -
Flatten the ends:
Stand the cylinder up on your work surface and press it down gently to flatten the bottom. Ensure the top is also flat and level to accept the lid later. -
Create the boba pearls:
Roll tiny spheres of black clay. They should be very small, resembling the tapioca pearls found in bubble tea. -
Attach the pearls:
Press the tiny black spheres onto the lower third of your cup. Arrange them randomly but densely to look like they have settled at the bottom of the drink. Gently press them flat so they are embedded into the purple surface rather than sticking out too much.
Step 2: Sculpting the Face
-
Position the eyes:
Roll two slightly larger balls of black clay for the eyes. Place them on the upper middle section of the cup, spacing them apart to create a cute, wide-eyed look. -
Add a smile:
Roll a very thin snake of black clay. Cut a tiny u-shape segment and place it centered between the eyes for the smile. I find using a needle tool helps to smudge the ends slightly into the purple clay so it doesn’t fall off. -
Add blush cheeks:
Take two tiny amounts of pink clay and flatten them into ovals. Place these directly under the eyes to give the cup a blushing, happy expression. -
Add eye highlights:
For that extra spark of life, add a microscopic dot of white clay to the top corner of each black eye.
Clean Clay Tip
Keep that white straw pristine! Always clean your hands or wear gloves when switching from dark clays (like the black boba) to light clays to avoid smudges.
Step 3: Creating the Lid and Straw
-
Make the lid base:
Roll out a sheet of the same purple clay. Cut a circle that is slightly larger than the top of your cup cylinder. -
Detail the lid:
Add a smaller circle of purple clay on top of the first one to create a tiered lid effect. You can use a dotting tool to make small indentations around the rim for texture. -
Form the straw:
Roll a small log of white clay. Ensure it is thick enough to hold its shape but proportionate to the cup. Cut it to your desired length. -
Assemble the top:
Press the white straw into the center of the lid. If you want it secure, you can use a dab of liquid clay or TLS (Translucent Liquid Sculpey) as an adhesive. -
Attach lid to cup:
Place the assembled lid onto your cup base. Smooth the seam gently underneath the rim if necessary, or just press firmly to bond the raw clays together.
Add Sparkle
Before baking, brush a tiny amount of pearlescent mica powder over the purple cup or mix clear glitter into the clay for a magical, shimmering ‘galaxy drink’ effect.
Step 4: Finishing Touches
-
Insert hardware:
Insert an eye pin or headpin down through the center of the straw and into the body of the cup. Trim the pin if it goes through the bottom, or bend the top into a loop if using a straight wire. -
Bake:
Bake your charm according to the manufacturer’s instructions for your specific brand of clay (usually 275°F/135°C for 15-30 minutes). Let it cool completely. -
Glaze:
For a glossy, plastic-cup look, coat the entire piece (except the straw, if you prefer it matte) with a gloss glaze or UV resin. Cure or dry as directed. -
Attach keychain:
Once the finish is dry, open a jump ring and attach your chain and keyring hardware to the eye pin loop.
Attach this sweet charm to your backpack and enjoy your everlasting bubble tea


Tiny Donut and Pastry Charms
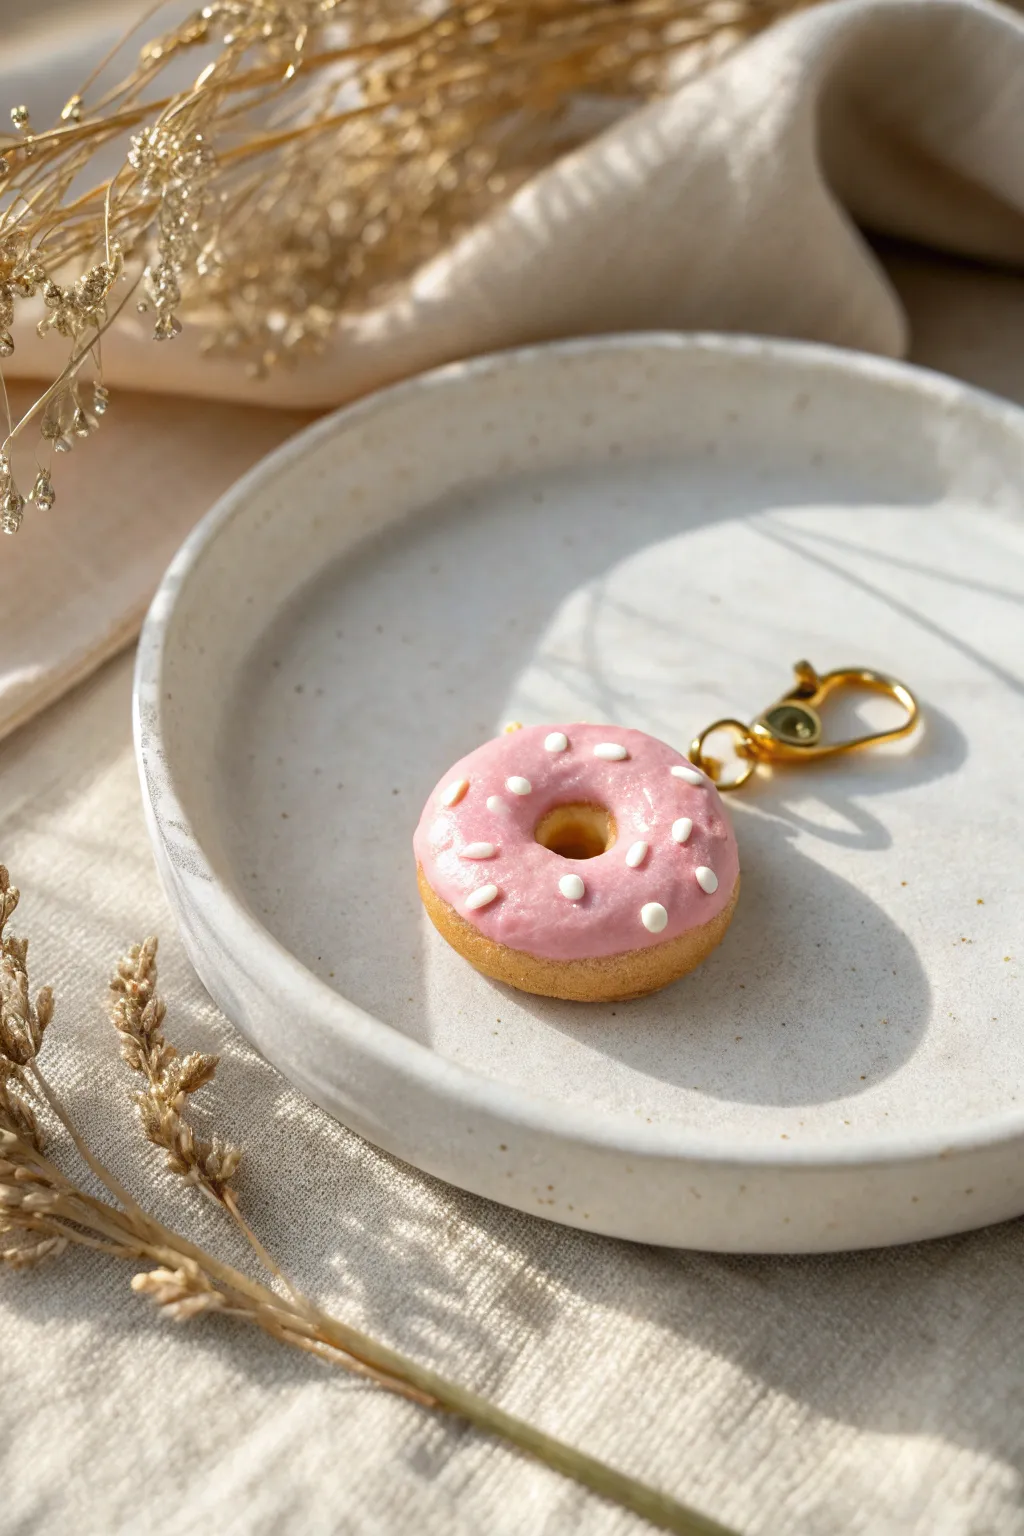
Capture the sweetness of your favorite pastry with this ultra-realistic tiny donut charm. Perfect for keychains or stitch markers, this project features a perfectly baked golden dough base topped with glossy pink icing and delicate white sprinkles.
Step-by-Step Guide
Materials
- Tan/beige polymer clay (for the dough)
- Pink polymer clay (for the icing)
- White liquid polymer clay (or white clay rolled thin)
- Translucent liquid polymer clay (optional, for gloss)
- Chalk pastels (orange, brown, yellow ochre)
- Soft paintbrush
- Small dotting tool or toothpick
- Eye pin or screw eye
- Gold lobster clasp keychain hardware
- Needle nose pliers
- Oven or toaster oven dedicated to crafts
Step 1: Shaping the Dough Base
-
Condition the beige clay:
Start by warming up a small ball of tan or beige polymer clay in your hands until it becomes soft and pliable. This prevents cracks from forming later. -
Form the basic shape:
Roll the clay into a smooth sphere about the size of a large marble, then gently flatten it between your thumb and forefinger to create a thick disc shape. -
Round the edges:
Use your fingers to smooth and round the edges of the disc so it doesn’t look like a hockey puck; you want a puffy, organic pastry shape. -
Create the center hole:
Take a large dotting tool or the handle of a small paintbrush and press it through the center of the disc to punch a hole. Wiggle it slightly to widen the opening.
Step 2: Developing the Texture
-
Add bread texture:
Using an old toothbrush or a stiff-bristled brush, gently tap the entire surface of the clay donut. This creates a realistic, airy sponge texture. -
Prepare the shading dust:
Scrape a little bit of yellow ochre, orange, and brown chalk pastel into separate piles of dust using a craft knife. -
Apply the ‘baked’ look:
Dip a soft, dry paintbrush into the yellow ochre dust first and brush it over the donut. Follow with light touches of orange and brown around the edges to mimic golden-brown baking marks. -
Add the texturing line:
With a thin needle tool or toothpick, lightly trace a faint line around the very middle of the donut’s side. This represents the lighter ‘fry line’ often seen on real donuts.
Sticky Situation?
If the clay gets too soft and sticky to handle, pop it in the fridge for 10 minutes. The slight chill firmness the clay back up, making it much easier to texture without squishing the shape.
Step 3: Icing and Decoration
-
Create the icing:
Condition a small piece of pink clay and flatten it extremely thin. You can use a rolling pin or simply press it flat with your fingers. -
Shape the icing drip:
Tear or cut the edges of the pink clay in a wavy, irregular pattern. It shouldn’t be a perfect circle; uneven edges look more like naturally dripped glaze. -
Apply the icing layer:
Gently drape the pink clay over the top of your textured donut, smoothing the wavy edges down the sides. Poke a hole through the center to match the donut hole. -
Texture the icing:
Lightly tap the pink icing with your finger to remove any fingerprints, but keep it smoother than the bread part. -
Create the sprinkles:
Roll a snake of white clay as thin as a thread. Cut tiny, rice-grain-sized pieces from this strand. -
Place the sprinkles:
Using a needle tool or toothpick, pick up the tiny white bits and press them gently into the pink icing in a random scatter pattern.
Glazing Pro Tip
Mix a tiny drop of liquid clay into your solid pink clay until it becomes a thick paste ‘frosting.’ Apply this with a toothpick instead of a solid sheet for an even more realistic drip effect.
Step 4: Finishing Touches
-
Insert the hardware:
Trim an eye pin to about 1cm long. Dip the end in a tiny bit of liquid clay (or bake-and-bond) and insert it securely into the top of the donut. -
Bake the charm:
Bake the donut according to your clay manufacturer’s instructions (usually 275°F/130°C for 15-30 minutes). Let it cool completely. -
Add optional gloss:
If you want the icing to look wet and sugary, brush a thin layer of gloss glaze or translucent liquid clay over just the pink part and cure again if necessary. -
Attach the keychain:
Using needle nose pliers, open the jump ring on your gold lobster clasp, loop it through the eye pin on the donut, and close it tight.
Now you have a sweet little accessory ready to clip onto your bag or keys

Pastel Macaron Stack Charms
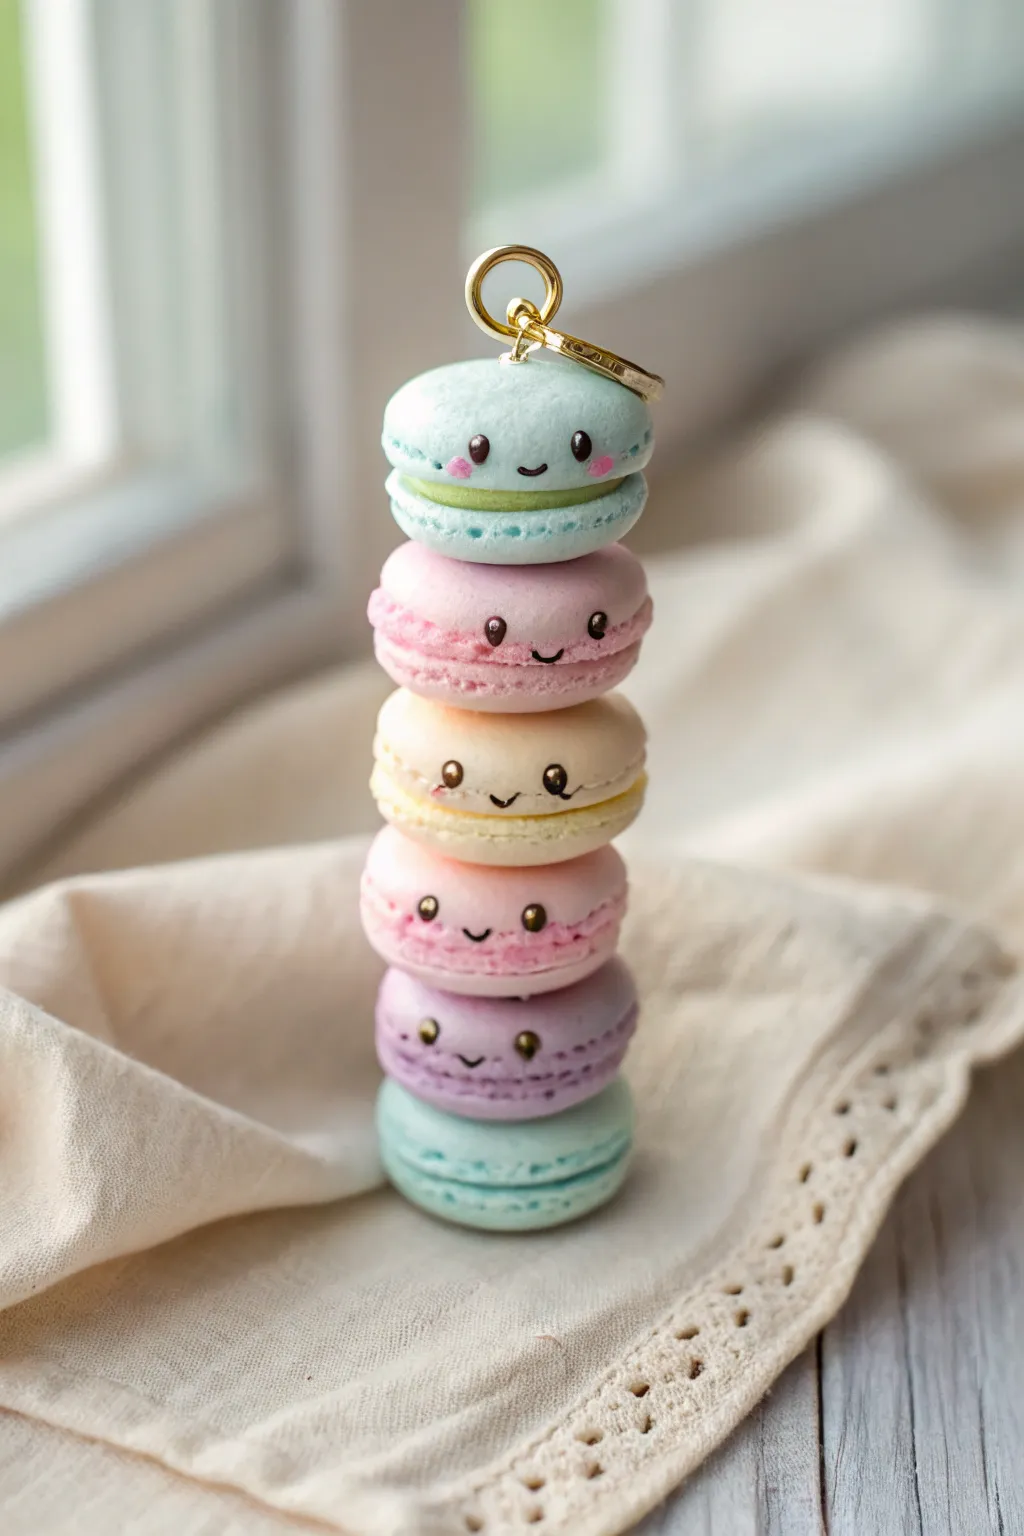
Create an irresistibly sweet stack of pastel treats that will brighten up any bag or keyring. This polymer clay project features six miniature macarons in a gradient of soft colors, each with its own tiny, smiling personality.
How-To Guide
Materials
- Polymer clay in pastel colors: baby blue, light pink, cream/yellow, lavender, mint green
- Translucent liquid clay (TLS) or Bake & Bond
- Soft artist pastels (chalk pastels) for shading
- Small ball tool or dotting tool
- Needle tool or toothpick
- Black acrylic paint
- Small detail paintbrush (size 000)
- Eye pin or screw eye
- Gold split ring and keychain hardware
- Gloss glaze (polyurethane or resin)
- Rolling pin or pasta machine
- Small round cutter (approx. 2cm diameter)
Step 1: Shaping the Macaron Shells
-
Prepare your palette:
Begin by conditioning your polymer clay until it is soft and pliable. You will need six different pastel shades: blue, pink, cream, darker pink, purple, and mint. If you don’t have premade pastels, mix white clay with a tiny dot of standard colors. -
Cut the bases:
Roll out your first color (let’s start with the top blue one) to a thickness of about 4-5mm. Use your small round cutter to punch out two identical circles. Repeat this for all six colors to create 12 circles total. -
Round the domes:
Gently smooth the top edge of each circle with your fingertip to create a nice, domed shape typical of a macaron shell using a light circular motion. -
Texture the feet:
Use a needle tool or toothpick to create the textured ‘feet’ of the macaron. Tease the clay at the very bottom edge of the dome, pulling and swirling small bits of clay downward to create a crumbly look.
Texture Pro Tip
Cover the smooth dome with plastic wrap before texturing. This protects the top from fingerprints while you work on the messy ‘feet’ area at the bottom.
Step 2: Filling and Assembly
-
make the cream filling:
Roll out white clay very thinly (about 2mm). Cut out a circle slightly smaller than your macaron shells for each macaron color. -
Sandwich the layers:
Place a white filling circle on the flat side of a bottom shell, then place the matching top shell over it. Press gently to secure them without squashing the texture. -
Prepare for stacking:
Once all six individual macarons are assembled, organize them in your desired color order. The image shows: blue, pink, cream, dark pink, purple, mint. -
Add adhesive:
Apply a thin layer of liquid clay or Bake & Bond to the top center of the bottom macaron (mint). Place the purple one on top. I find a slight twisting motion helps them grip better. -
Secure the stack:
Continue stacking all six macarons, using liquid clay between each layer to ensure a permanent bond after baking. -
Insert hardware:
Take a long eye pin or screw eye. If using an eye pin, trim it so it goes through at least the top two macarons. Coat the shaft in liquid clay and insert it centrally into the top blue macaron.
Level Up: Flavored Scents
Mix a tiny drop of vanilla or berry scented oil into the unbaked clay. Your charm won’t just look sweet, it will smell like a real bakery treat too.
Step 3: Bringing them to Life
-
Pre-bake shading:
Before adding faces, scrape a little pink chalk pastel into powder. Use a soft brush to apply tiny circles of ‘blush’ onto the cheeks of each macaron. -
Baking:
Bake the stack according to your clay manufacturer’s instructions. A lower flexible temperature for a longer time is often safer for thick stacks to prevent burning. -
Cooling down:
Allow the piece to cool completely. The clay must be room temperature before painting to prevent the paint from drying too fast or looking streaky. -
Painting the eyes:
Using a tiny dotting tool or the back of a toothpick dipped in black acrylic paint, dab two small eyes onto each macaron. Space them widely for that cute kawaii look. -
Adding smiles:
Switch to your finest detail brush (000 size). Paint a tiny, thin ‘u’ shape between the eyes for the mouth. Keep the lines delicate. -
The highlights:
Once the black paint is fully dry, dip a needle tip into white paint and add a tiny sparkle dot to the upper corner of each eye.
Step 4: Finishing Touches
-
Glazing:
Apply a coat of semi-gloss or matte glaze to protect the paint. Avoid high gloss if you want it to look realistic like a cookie, though a light sheen is nice. -
Attach keychain:
Open a jump ring or split ring using pliers and attach your gold keychain hardware to the eye pin at the top.
Hang this adorable tower of sweets on your favorite bag and enjoy the smiles it brings


Fruit Slice Face Charms
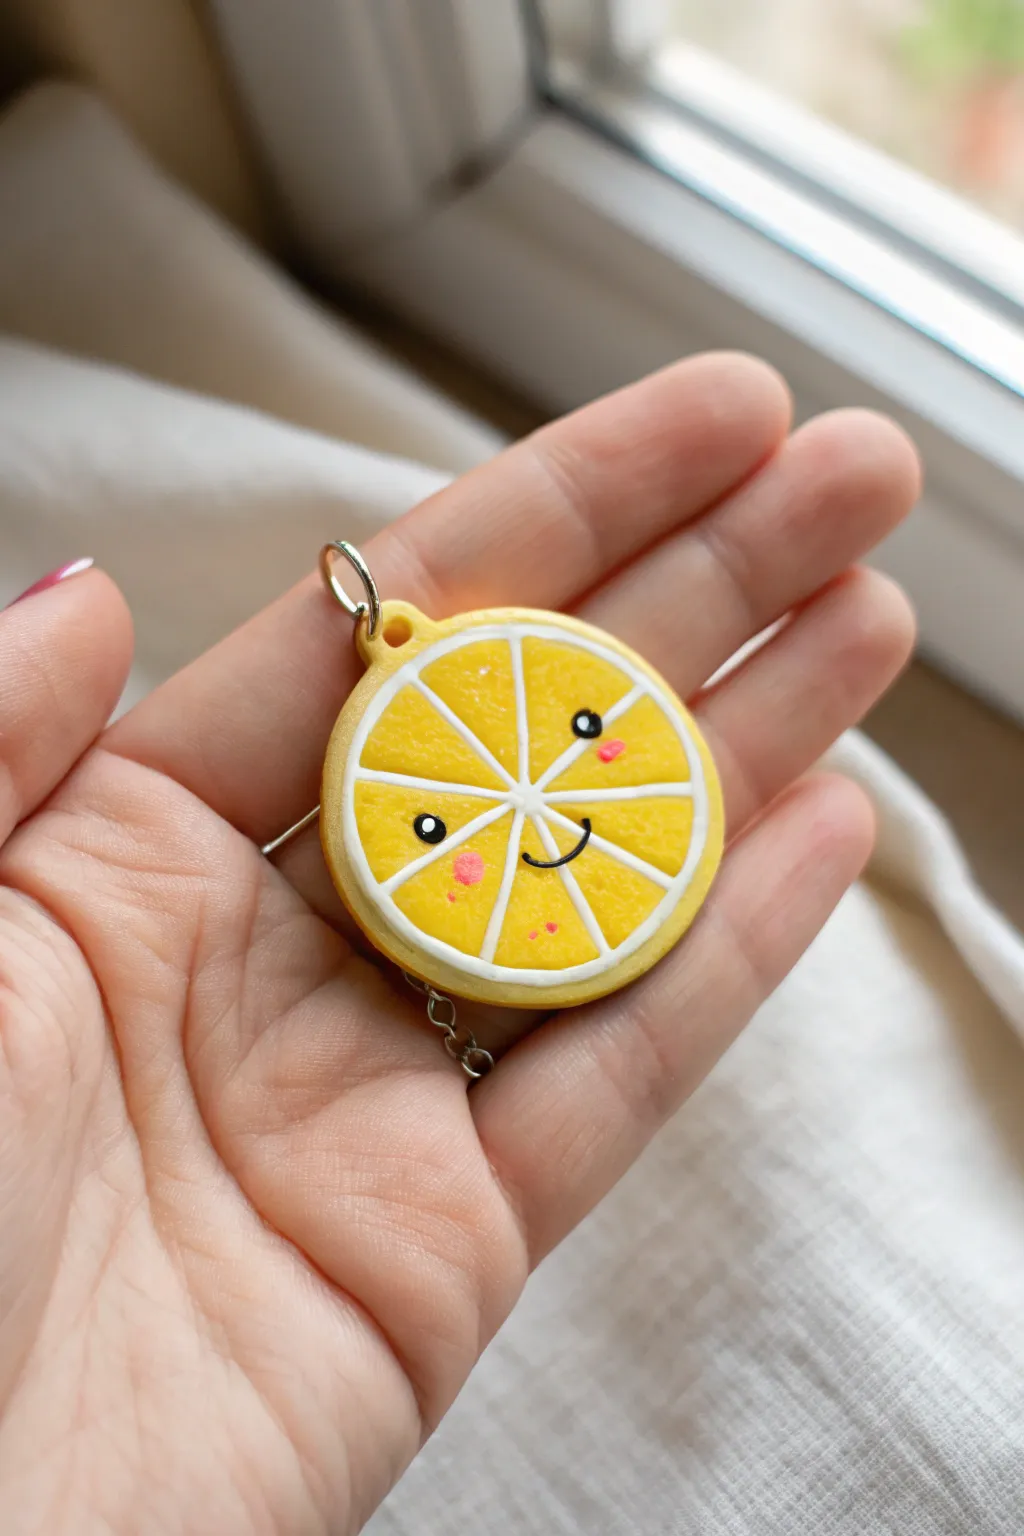
Brighten up your accessories with this adorable polymer clay lemon slice charm. Featuring a cheerful kawaii face and textured citrus details, this little fruit wedge is sure to bring a smile to anyone who sees it.
Step-by-Step Guide
Materials
- Polymer clay (Bright yellow, lighter pastel yellow, and white)
- Black acrylic paint
- Pink acrylic paint
- Fine detail paintbrush or dotting tool
- Rolling pin or clay machine
- Round cutter (approx. 1.5 inches)
- X-Acto knife or clay blade
- Needle tool or toothbrush (for texturing)
- Eye pin or jump ring
- Gloss glaze (optional)
Step 1: Creating the Citrus Segments
-
Condition the clay:
Start by thoroughly conditioning your bright yellow clay until it is soft and malleable. Do the same with a smaller amount of the lighter pastel yellow if you want a subtle gradient, though plain yellow works perfectly too. -
Form the base:
Roll the yellow clay into a thick slab, roughly 1/4 inch thick. Use your round cutter to punch out a perfect circle. -
Create the segments:
Take a small amount of white clay and roll it into very thin ‘snakes’ or strings. These will become the pith lines separating the fruit segments. -
Place the dividers:
Lay one white string vertically across the center of your yellow circle, and another horizontally to create a cross. Add two diagonal lines to create eight equal pie-slice sections. -
Embed the lines:
Gently gently press the white lines into the yellow clay with your fingertip or a roller so they are flush with the surface, not sitting on top of it.
Step 2: Adding the Rind and Texture
-
Wrap the rind:
Roll a slightly thicker snake of white clay. Wrap this around the entire circumference of your lemon slice to create the inner pith layer. -
Add the yellow skin:
Roll a flat strip of yellow clay, slightly wider than the height of your slice. Wrap this over the white layer to form the outer lemon skin, trimming any excess length and smoothing the seam. -
Add texture:
Using a needle tool or an old toothbrush, gently tap the yellow fruit segments (inside the white lines) to create a pitted, juicy texture. Avoid texturing the white lines or the outer rind. -
Insert hardware:
If you’re making this into a charm, insert a screw eye pin into the top of the rind now. I find adding a dab of liquid clay or bake-and-bond on the threads helps secure it permanently.
Clean Lines Tip
To keep your white pith lines crisp, pop the unbaked clay in the fridge for 10 minutes before slicing or texturing. Cold clay distorts less when handled.
Step 3: Baking and Decorating
-
Bake the piece:
Place your charm on a tile or parchment-lined baking sheet. Bake according to your specific clay brand’s instructions (usually around 275°F/130°C for 15-30 minutes). -
Cool down:
Let the clay cool completely before painting. Painting on warm clay can make the acrylics gummy and hard to manage. -
Paint the eyes:
Using a very fine dotting tool or the back of a pin dipped in black acrylic paint, place two small dots for eyes on the upper half of the slice. -
Add the smile:
With an ultra-fine liner brush, paint a small, curved ‘U’ shape between the eyes for the mouth. Add a tiny tick mark at one end for a jaunty smirk. -
Add highlights:
Once the black paint is dry, add a microscopic dot of white paint to the top right of each eye. This ‘catchlight’ brings the character to life. -
Blush the cheeks:
Dip a toothpick or small dotting tool into pink paint. Add a cluster of 3-4 tiny dots under each eye to create a speckled blush effect. -
Seal the charm:
Finish by applying a coat of gloss glaze or UV resin over the entire piece to protect the paint and give it a wet, fruity shine.
Fixing Smudges
If you smudge black paint on the face, don’t panic. Let it dry completely, then gently scrape it off with an X-Acto knife or paint over it with a mix of yellow.
This sunny little charm is now ready to be attached to a keychain, necklace, or bracelet to add a pop of zest to your day

The Complete Guide to Pottery Troubleshooting
Uncover the most common ceramic mistakes—from cracking clay to failed glazes—and learn how to fix them fast.
Chubby Kitty and Puppy Charms

These delightfully chubby charms capture the sweetness of a puppy and a kitten in a soft, matte finish that almost looks like a sugar cookie. Perfect for beginners, this project uses simple shapes and minimal tools to create adorable accessories for your keys or bag.
Step-by-Step Tutorial
Materials
- Polymer clay (white, beige/tan, dark brown, pink)
- Ball tool or dotting tool
- Eye pin or screw eye hook
- Keychain rings and jump rings
- Needle tool or toothpick
- Soft pastel chalks (browns) and a soft brush
- Liquid clay (TLS) or strong craft glue
- Oven for baking (if using polymer clay)
Step 1: Shaping the Bases
-
Condition the clay:
Start by warming up your white clay (for the puppy) and beige clay (for the kitty) in your hands until soft and pliable. -
Form the head shape:
Roll each color into a smooth sphere about 1 inch in diameter. Once round, gently press it down onto your work surface to flatten the bottom slightly, creating a dome or bun shape. -
Create the kitty ears:
For the beige kitty, shape two small triangles of the same beige clay. Soften the points slightly so they aren’t too sharp. -
Attach kitty ears:
Press the triangles onto the top of the beige dome. Use your finger or a smoothing tool to blend the seam where the ear meets the head so it looks like one solid piece. -
Create puppy ears:
For the puppy, take dark brown clay and form two teardrop shapes. Flatten them significantly so they look like floppy flaps. -
Attach puppy ears:
Press the flattened teardrops onto the sides of the white dome, curving them slightly downward to hug the curve of the ‘face’. -
Insert hardware:
Take your screw eye hook or eye pin. Dip the tip into a tiny bit of liquid clay or glue for extra security, then screw or push it into the very center top of each head.
Sticky Situation?
If fingerprints are ruining your smooth dome shape, lightly dust your fingertips with cornstarch before handling the clay. It buffs off easily after baking.
Step 2: Adding Faces & Details
-
Make the eyes:
Roll tiny balls of dark brown clay for the eyes. Carefully press them onto the face, flattening them flush with the surface. -
Add the noses:
Roll even smaller bits of brown clay into rounded triangles. Place these centrally between and slightly below the eyes. -
Sculpt the mouths:
Roll a microscopic ‘snake’ of brown clay. Cut it into two tiny curved pieces to form the ‘w’ mouth shape for the kitty and puppy, pressing them gently underneath the nose. -
Add puppy details:
For the puppy, use a needle tool to lightly scratch three tiny lines at the very top of the head to simulate tufts of fur. -
Add rosy cheeks:
Flatten two tiny circles of pink clay and press them onto the cheeks of both animals. This adds that essential kawaii character. -
Texture the surface:
To get that matte, cookie-like texture seen in the photo, take a clean toothbrush or a ball of aluminum foil and very gently tap it all over the surface of the clay, avoiding the eyes and nose. -
Shade with pastels:
Scrape a little brown soft pastel into a powder. Using a soft dry brush, lightly dust the edges of the ears and the top of the head to give it a baked, toasted look.
Make it a Set
Make smaller versions to use as zipper pulls, or create a matching ‘food bowl’ charm using colored clay and tiny clay ‘kibble’ balls to hang alongside.
Step 3: Baking & Assembly
-
Bake the charms:
Place your charms on a baking sheet or tile. Bake according to your polymer clay manufacturer’s instructions (usually around 275°F for 15-30 minutes). -
Cool down:
I like to let the pieces cool completely inside the oven with the door cracked open to prevent any thermal shock cracking. -
Attach keychain hardware:
Once cool, use pliers to open a jump ring. Loop it through the eye pin on the charm and connect it to your keychain ring. -
Close the loop:
Securely close the jump ring with your pliers, ensuring there are no gaps where the charm could slip off.
Now you have a set of sweet, durable pals to keep your keys company wherever you go
Froggy Friends in Tiny Hats
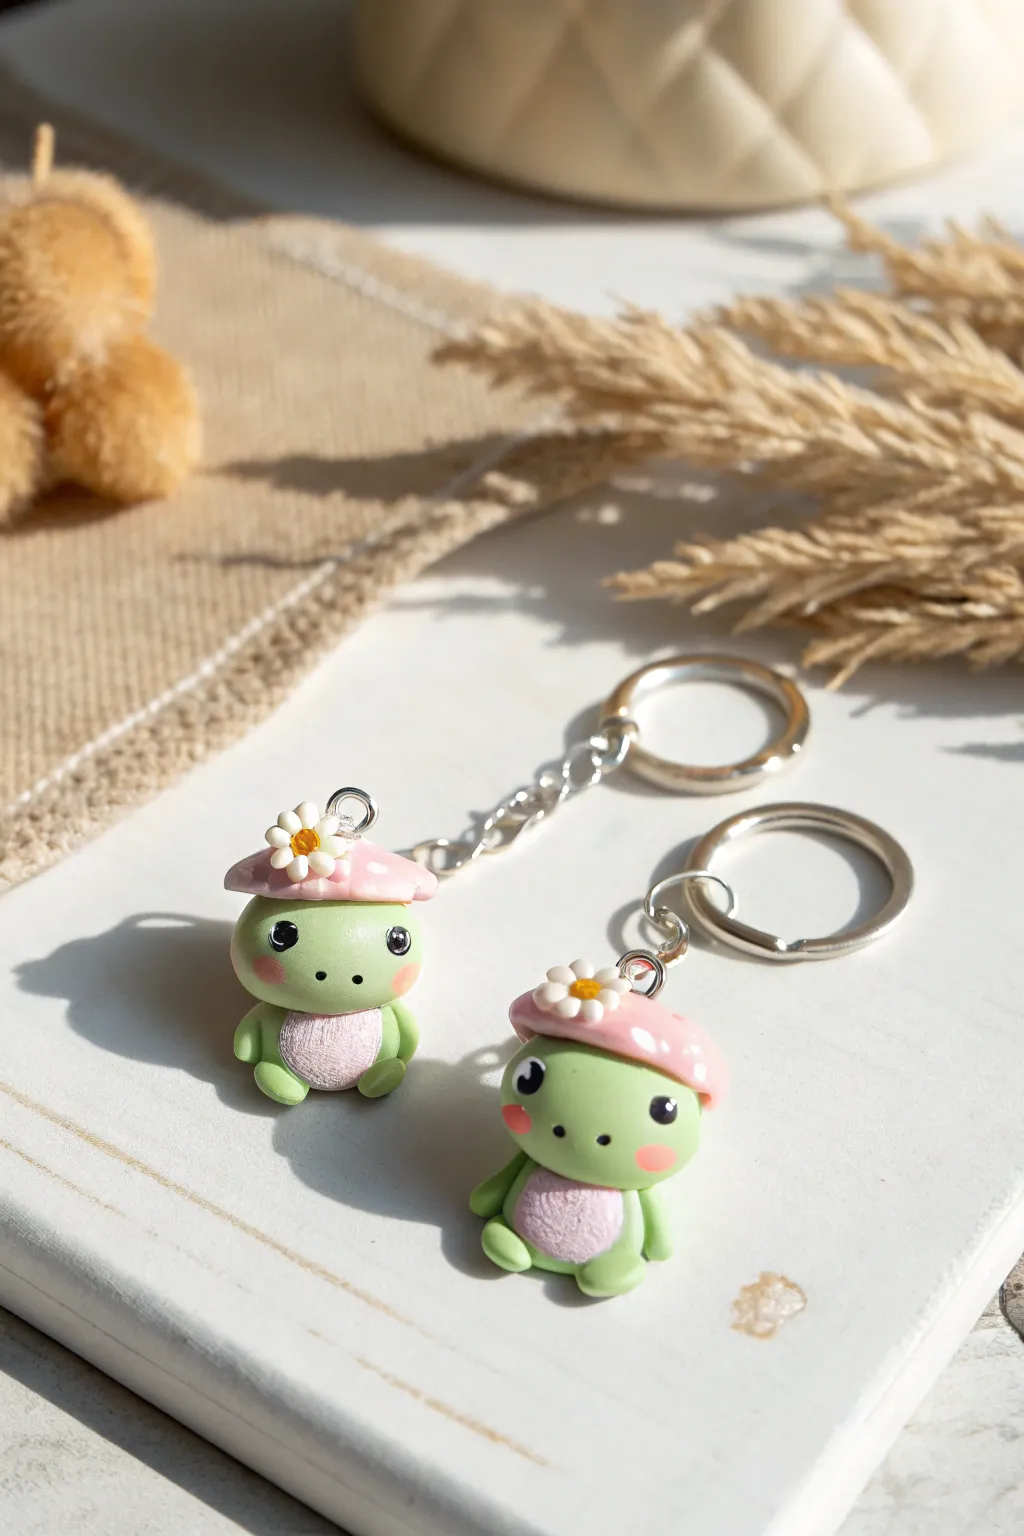
These adorable little amphibians are ready to hop right onto your keyring with their sweet pink bellies and flower-topped hats. This polymer clay project results in a durable, charming accessory perfect for gifting or keeping for yourself.
How-To Guide
Materials
- Polymer clay (light green, pastel pink, white, yellow)
- Black acrylic paint
- Ball tool or dotting tools (various sizes)
- Clay knife or blade
- Needle tool
- Eye screw pins (silver)
- Jump rings and keychain hardware
- Gloss glaze or UV resin (optional for shine)
- Fine detail paintbrush
- Oven for baking
Step 1: Sculpting the Body
-
Form the Base:
Start by conditioning your light green clay until it is soft and pliable. Roll a smooth ball approximately 1 inch in diameter for the main body and head; since these frogs are chibi-style, the head and body are one continuous rounded shape. -
Shape the Legs:
Roll two small, pea-sized balls of green clay for the legs. Gently press them onto the bottom sides of the large body sphere, flattening slightly so the frog sits stably. -
Add Tiny Arms:
Create two smaller sausage shapes from the green clay for the arms. Press these vertically onto the front sides of the body, just above the legs, blending the top seam slightly if needed. -
Create the Belly:
Roll a small ball of pastel pink clay and flatten it into a thin oval disc. Gently press this onto the center of the frog’s stomach area. I like using a toothbrush or stiff brush to texturize this pink patch slightly for a fuzzy look. -
Rosy Cheeks:
Take two minuscule bits of pink clay and flatten them into tiny circles. Place them high on the face area, spaced widely apart, to create blush marks.
Step 2: Crafting the Mushroom Hat
-
Shape the Cap:
Roll a ball of pink clay slightly smaller than the frog’s head. Flatten the bottom and gently dome the top to create a classic mushroom cap shape. -
Texture the Cap:
Using a small ball tool or the rounded end of a paintbrush, gently indent random spots on the pink cap to create little craters for texture. -
Make the Daisy:
Roll five tiny balls of white clay. Press them together in a circle on top of the mushroom hat, flattening them slightly with a dotting tool to form petals. -
Finish the Flower:
Place a tiny yellow ball of clay in the center of your white petals and press down to secure the flower center. -
Attach the Hat:
Gently press the finished mushroom cap onto the top of the frog’s head. Ensure it adheres well by giving it a firm but careful wiggle.
Fingerprint Fix
Use a cotton swab dipped in a tiny bit of rubbing alcohol or baby oil to gently smooth out fingerprints on raw clay before baking.
Step 3: Details & Assembly
-
Add Hardware:
Insert a silver eye screw pin into the very top of the mushroom hat. If the clay is tough, you can pre-poke a hole with a needle tool. -
Bake:
Bake the frog according to your clay package instructions (usually around 275°F or 130°C for 15-30 minutes). Let it cool completely before handling. -
Paint the Eyes:
Use a fine detail brush or a dotting tool dipped in black acrylic paint to create two wide-set eyes between the rosy cheeks. -
Add Eye Highlights:
Once the black paint is dry, use a toothpick to add a tiny white dot to the upper corner of each eye for that sparkling, lively look. -
Paint the Nostrils:
Using the very tip of a needle tool or the finest brush, add two microscopic dots of black paint for the nostrils. -
Seal:
Apply a coat of gloss glaze or UV resin over the eyes to make them shine, and optionally over the mushroom cap for a ceramic look. -
Final Assembly:
Open a jump ring using pliers, loop it through the eye screw on the frog’s head, and attach your keychain hardware before closing the ring securely.
Secure the Pin
Dip the screw eye in a little liquid clay (like Bake & Bond) or superglue before inserting it into the raw clay for a permanent hold after baking.
Now you have a charming little pocket companion ready for your next adventure


What Really Happens Inside the Kiln
Learn how time and temperature work together inside the kiln to transform clay into durable ceramic.
Mini Mushroom Buddy Charms
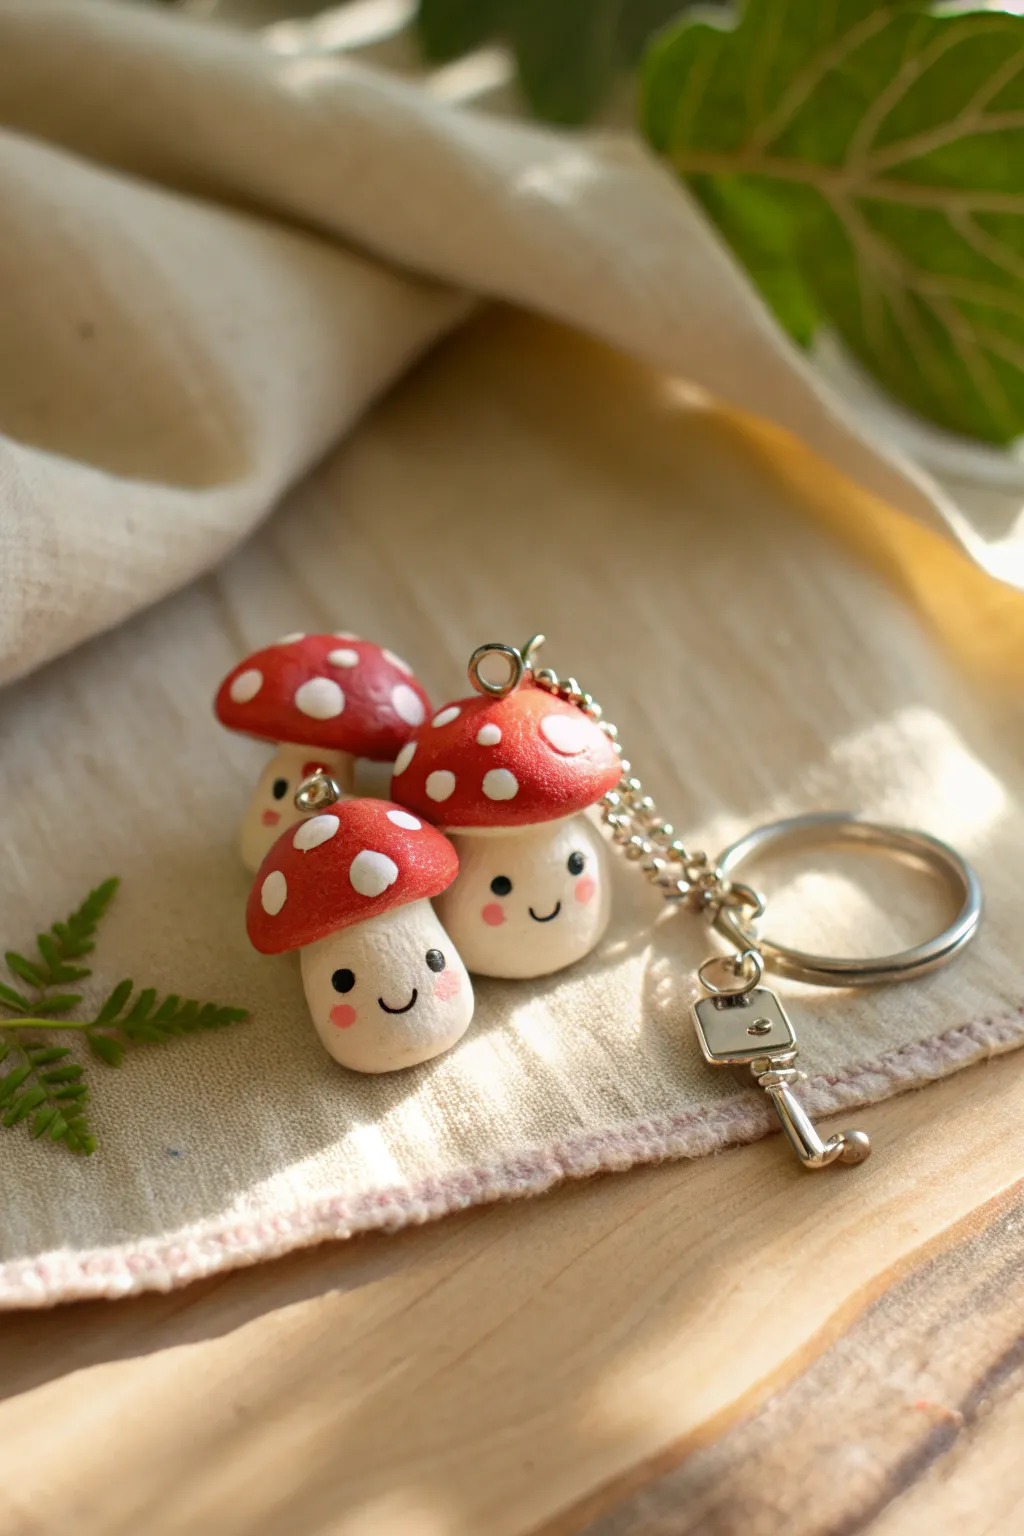
Create your own little forest friends with this adorable polymer clay charm project. These smiling mushrooms, bunched together on a single keychain, feature classic red caps and sweet kawaii expressions that are sure to brighten your day.
Step-by-Step Tutorial
Materials
- Polymer clay in beige, red, and white
- Small eye pins (silver)
- Black acrylic paint
- Pink soft pastel chalk or pink acrylic paint
- Dotting tools or toothpicks
- Fine detail paintbrush
- Gloss glaze (polyurethane or UV resin)
- Super glue (optional)
- Keychain ring with chain
- Jump rings
- Jewelry pliers
- Sculpting tools (needle tool, small blade)
Step 1: Shaping the Mushrooms
-
Prepare the stalks:
Start by conditioning your beige clay until it’s soft and pliable. Roll three small balls of varying sizes: one medium for the main mushroom, and two slightly smaller ones for the side companions. -
Form the base shapes:
Roll each beige ball into a short, chubby cylinder. Gently taper the top end slightly so the cap will sit nicely, and flatten the bottom just enough so they can stand upright while you work. -
Create the caps:
Condition the red clay. Roll three balls corresponding to the stalk sizes. Flatten them gently into thick discs, then use your thumb to press the center underneath, creating a domed mushroom cap shape. -
Attach caps to stalks:
Place a red cap onto each beige stalk. I like to gently rotate the cap as I press down to ensure a secure bond without squishing the stalk. You can add a speck of liquid clay between the parts for extra strength. -
Insert eye pins:
Trim your eye pins if the stems are too long. Depending on how you want them to hang, push an eye pin straight down through the center of the red cap into the stalk of each mushroom.
Fingerprint Fix
If you see fingerprints on the raw clay, lightly brush the surface with a little baby oil or cornstarch before baking to smooth them out perfectly.
Step 2: Details & Baking
-
Add the spots:
Take tiny pinches of white clay and roll them into very small spheres. Press these randomly all over the red caps to create the classic toadstool spots. Flatten them flush against the red clay. -
Secure the trio:
This step is optional but recommended for the clustered look: gently press the three mushrooms together at their bases before baking so they fuse into a single unit, or bake them separately to hang individually. -
Bake carefully:
Place your mushrooms on a baking tile or parchment paper. Bake according to your brand of clay’s instructions (usually around 275°F/130°C for 15-30 minutes). Let them cool completely before handling.
Forest Vibes
Sculpt tiny green leaves or add a small metal leaf charm to the keychain cluster to enhance the woodland aesthetic.
Step 3: Painting & Assembly
-
Paint the eyes:
Using a very fine dotting tool or a toothpick dipped in black acrylic paint, dab two small dots for eyes on each stalk, positioning them somewhat low for a cute look. -
Draw the mouths:
With an ultra-fine detail brush or the very tip of a needle tool dipped in black paint, carefully draw a tiny ‘U’ shape between the eyes for a smile. -
Add rosy cheeks:
Scrape a little pink pastel chalk into a powder. Use a dry brush or cotton swab to gently dust pink circles right under the eyes. Alternatively, dab tiny dots of diluted pink paint. -
Glaze for shine:
Once the paint is fully dry, apply a coat of gloss glaze or UV resin over the entire charm. This protects the painted details and gives the mushrooms their ceramic-like finish. -
Secure the pins:
If any eye pins feel loose after baking, pull them out, add a drop of super glue to the stem, and reinsert them immediately. -
Attach jump rings:
Using two pairs of pliers, twist open a jump ring (don’t pull it apart). Loop it through the eye pin of a mushroom. -
Connect to chain:
Loop the open jump ring onto the last link of your keychain chain. Close the jump ring securely. Repeat for all three mushrooms if you baked them separately, clustering them on the same chain link.
Enjoy carrying your little forest family with you wherever you go
Cloud, Star, and Moon Face Charms
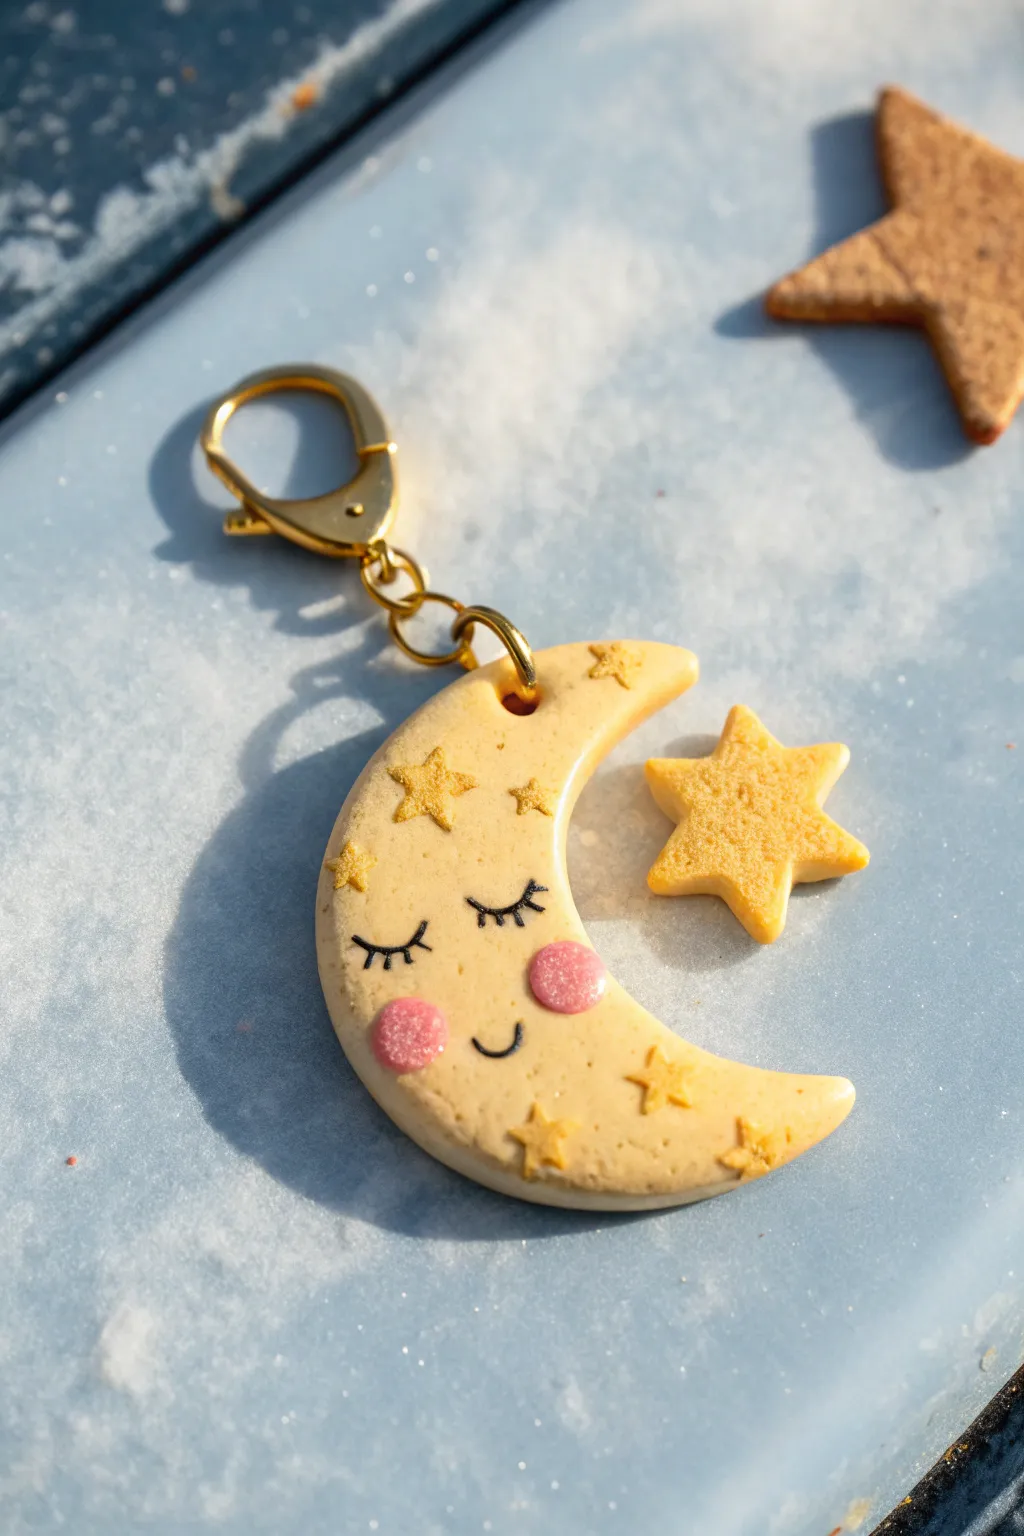
Capture the magic of a starry night with this adorable sleepy moon keychain. With its soft buttery yellow tone, rosy cheeks, and sparkling golden accents, this charm looks almost good enough to eat—like a sugar cookie made of clay.
Step-by-Step Guide
Materials
- Polymer clay (light yellow/cream, pink, translucent)
- Small star-shaped clay cutters (tiny and medium sizes)
- Round clay cutter (medium)
- Knife tool or crafting scalpel
- Rolling pin or pasta machine
- Eye pin or screw eye pin
- Gold acrylic paint or gold mica powder
- Fine detail paintbrush
- Black acrylic paint
- Dotting tool or ball stylus
- Gloss glaze or UV resin (optional)
- Jump rings and keychain clasp
- Jewelry pliers
Step 1: Shaping the Base
-
Mix the perfect shade:
Start by mixing white polymer clay with a very small amount of yellow and ochre to achieve a soft, cookie-dough cream color. Condition the clay until it is warm and pliable. -
Roll it out:
Roll your conditioned clay into a slab approximately 4-5mm thick. Simply keep it thick enough to be sturdy but not too heavy for a keychain. -
Cut the moon shape:
Use your medium round cutter to punch a circle. Then, shift the cutter slightly off-center and cut into the circle again to create a crescent moon shape. Save the excess clay. -
Smooth the edges:
Gently tap the cut edges with your finger to round them off slightly, removing that sharp ‘cut’ look and making it resemble a soft baked cookie. -
Create the mini star:
Re-roll a scrap of the same cream clay. Use a medium star cutter to punch out a separate star charm that will hang alongside the moon.
Sticky Cutters?
If your clay is sticking inside the tiny star cutters, dip the cutter into cornstarch or water before pressing it into the clay for a clean release.
Step 2: Adding Details
-
Embellish the surface:
Roll out a very thin sheet of the same yellow clay. Use your tiniest star cutter to punch out 5-6 miniature stars. -
Attach the tiny stars:
Gently press these tiny stars onto the surface of the moon chaotically. If they don’t stick well, a tiny dab of liquid clay acts as perfect glue. -
Texture the stars:
Using a needle tool or an unwashed toothbrush, lightly tap the surface of the tiny stars and the separate star charm to give them a sugary, textured appearance. -
Add rosy cheeks:
Mix a tiny bit of pink clay with translucent clay for a soft look. Roll two small balls, flatten them into discs, and press them onto the moon’s ‘face’ area. -
Secure the hardware:
Insert an eye pin into the top horn of the crescent moon. Carefully twist it in so it grips the clay well without distorting the shape.
Step 3: Finishing Touches
-
Bake the clay:
Place your moon and star charms on a ceramic tile or baking sheet. Bake according to your brand of polymer clay’s instructions (usually 230°F – 275°F for 15-30 minutes). -
Cool down:
Let the pieces cool completely before handling. I usually leave them inside the oven with the door open to cool gradually. -
Paint the face:
Using a very fine detail brush and black acrylic paint, carefully draw two curved lines for closed sleeping eyes with three eyelashes on each. -
Add a smile:
Paint a small, sweet U-shape between the cheeks for the mouth. -
Gild the stars:
Using gold paint or mixed gold mica powder, carefully paint over the tiny raised stars on the moon and the separate star charm to make them shine. -
Seal (Optional):
If you want extra durability, coat the front with a thin layer of UV resin or water-based polyurethane varnish. -
Assemble the keychain:
Using pliers, open a jump ring and attach the moon charm to the keychain clasp. Add the separate star charm on its own jump ring, perhaps dangling it slightly lower for movement.
Glittery Cheeks
Mix a pinch of fine iridescent glitter into the pink clay for the cheeks before attaching them. It adds a magical shimmer without needing paint.
Now you have a dreamy accessory to accompany your keys or adorn your favorite bag

TRACK YOUR CERAMIC JOURNEY
Capture glaze tests, firing details, and creative progress—all in one simple printable. Make your projects easier to repeat and improve.
Mini Heart Locket Message Charms
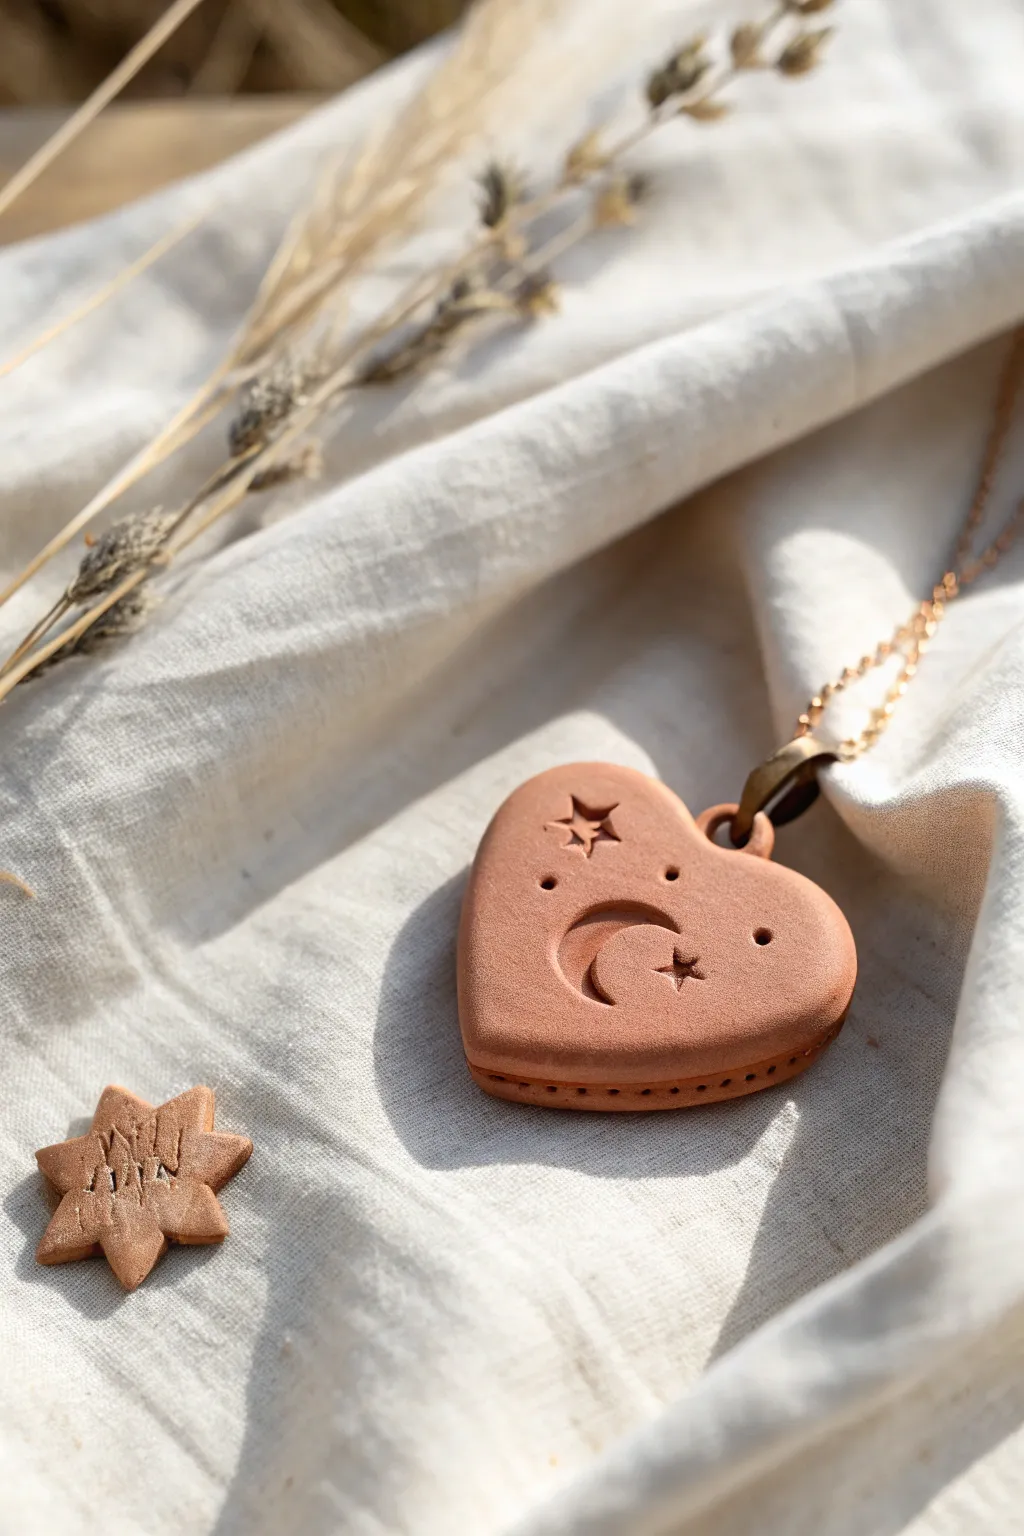
Create a wearable secret keeper with this charming heart-shaped locket style charm. Modeled from warm, terracotta-toned clay, this piece features whimsical stamped details and mimics the look of a macaron or sandwich cookie, perfect for hiding a tiny message inside.
Step-by-Step
Materials
- Terracotta-colored polymer clay (e.g., Fimo or Sculpey)
- Heart-shaped cookie cutter (approx. 1.5 – 2 inches)
- Acrylic rolling pin
- Small moon and star fondant stamps or metal punches
- Needle tool or toothpick
- Small eye hook (bronze or antique brass finish)
- Jump ring and necklace chain
- Oven for baking
- Ceramic tile or baking sheet
- Sandpaper (optional)
Step 1: Shaping the Base
-
Condition the Clay:
Start by taking a chunk of your terracotta polymer clay and warming it in your hands. Knead it thoroughly until it is soft, pliable, and free of any air bubbles or cracks. -
Roll it Out:
Place the clay on your ceramic tile or smooth work surface. Use the acrylic rolling pin to roll it into a slab that is roughly 1/4 inch thick. You want it relatively thick since this will form one half of the ‘locket’. -
Cut the Hearts:
Press your heart-shaped cutter firmly into the clay to create two identical heart shapes. Lift away the excess clay, leaving your two clean hearts on the work surface. -
Smooth the Edges:
Gently run your finger along the cut edges of both hearts to soften the sharpness left by the cutter, giving it a more finished, ceramic look.
Step 2: Detailing and Assembly
-
Plan the Front:
Choose one of the clay hearts to be the front face of your pendant. Lightly visualize where you want your moon and stars to go. -
Stamp the Moon:
Press your crescent moon stamp into the center of the heart. Apply firm, even pressure to get a clean impression, but don’t push all the way through the clay. -
Add Starry Accents:
Using a small star stamp, press a star shape above the moon and perhaps a tiny one inside the curve of the crescent. If you don’t have stamps, I sometimes carefully carve these shapes freehand with a needle tool. -
Create Texture:
Use the tip of a needle tool to press tiny decorative dots around the celestial shapes, adding a bit of whimsical texture to the surface. -
Prepare the ‘Sandwich’:
Take the second heart (the back piece). If you want this to be a permanent hollow locket, you can gently press a small indentation in the center of the back piece to hold a folded paper, or simply leave it flat to sandwich them together solid. -
Insert the Hardware:
Screw the small eye hook into the top center of the back heart piece. Ensure it goes deep enough to be secure but doesn’t poke out the front or back. -
Join the Halves:
Place the decorated front heart directly on top of the back heart. Line up the edges perfectly. -
Texture the Seam:
To mimic the look in the photo and hide the join line, take your needle tool and poke a row of evenly spaced horizontal holes along the seam where the two hearts meet. This creates a stitched or cookie-like effect.
Sticky Stamps?
If your stamps are sticking to the raw clay and ruining the design, dust the stamp face lightly with cornstarch or dip it in water before pressing it down.
Step 3: Baking and Finishing
-
Bake:
Place your clay charm on a baking sheet or tile. Bake according to the manufacturer’s specific instructions for your brand of clay (usually around 230°F – 275°F for 15-30 minutes). -
Cool Down:
Allow the charm to cool completely in the oven with the door slightly ajar. Sudden temperature changes can sometimes cause cracking. -
Sanding (Optional):
If there are any rough fingerprints or sharp edges after baking, lightly sand them away with fine-grit wet/dry sandpaper under running water. -
Attach Chain:
Open a jump ring using pliers, loop it through the eye pin at the top of your heart, and attach it to your necklace chain. Close the jump ring securely.
Natural Stone Look
After baking, wipe a diluted brown acrylic paint wash over the charm and immediately wipe it off with a damp cloth. Paint stays in the crevices for an antique look.
Now you have a sweet, earthy keepsake to wear close to your heart or gift to a friend
Shaker Charms With Floating Sprinkles
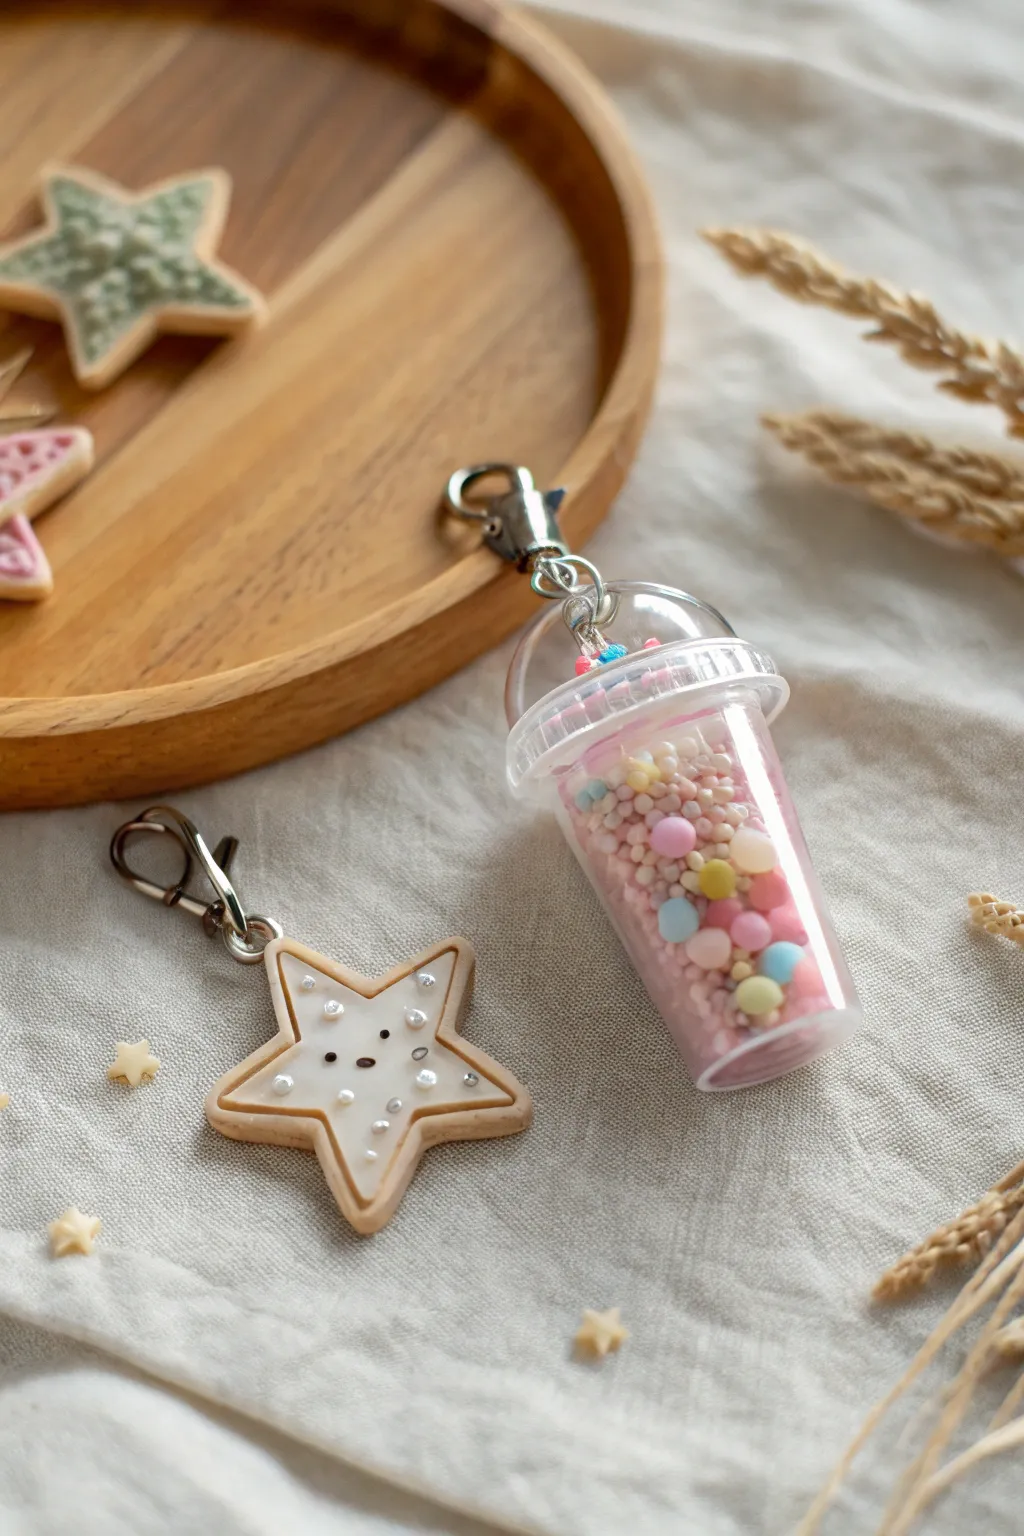
Create this adorable pair of charms featuring a realistic iced star cookie and a bubbly mini shaker drink. The translucent shaker cup filled with pastel beads perfectly complements the sweet, smiling face on the cookie for a cohesive kawaii aesthetic.
Detailed Instructions
Materials
- Light tan polymer clay (cookie dough color)
- White liquid polymer clay (or white soft clay mixed with TLS)
- Miniature plastic frappuccino/slushie cup with dome lid (shaker mold base)
- UV resin (hard type)
- Two lobster clasp keychains with jump rings
- Pastel colored micro beads or caviar beads (pink, blue, yellow, white)
- Tiny silver star or pearl embellishments
- Black acrylic paint or clay for details
- UV lamp
- Needle tool or toothpick
- Star cookie cutter (approx. 1 inch)
- Sandpaper or nail file (optional)
- Soft pastel chalks in orange/brown for shading
- Small paintbrush
Step 1: Baking the Star Cookie Base
-
Condition the Clay:
Start by conditioning your light tan polymer clay until it is soft and pliable. Roll it out to a thickness of about 4-5mm to give it a nice, chunky cookie feel. -
Cut the Shape:
Use your star-shaped cutter to punch out the base form. If the edges are too sharp, gently tap them with your finger to round them slightly, mimicking a baked good. -
Texture the Edges:
Take a toothbrush or a ball of aluminum foil and gently press it along the sides and edges of the star. This creates that realistic, crumbly baked texture. -
Shade for Realism:
Shave a little orange and brown soft pastel chalk into a powder. Use a soft brush to lightly dust the edges and points of the star to give it a ‘golden brown’ baked appearance. -
Insert Hardware:
Insert a small metal eye pin into the top point of the star before baking. Make sure it goes in deep enough to be secure. -
Initial Bake:
Bake the cookie base according to your clay manufacturer’s instructions (usually 275°F/135°C for 15-30 minutes). Let it cool completely.
Texturing Tip
For ultra-realistic cookie texture, gently press a clean piece of sandpaper against the raw clay surface before baking. It creates a finer grain than a toothbrush.
Step 2: Decorating the Cookie
-
Apply the Icing:
Once cool, carefully spread a layer of white liquid polymer clay (or softened white clay) onto the surface. Leave a small rim of the tan cookie showing around the edges. -
Paint the Face:
Before curing the icing, use a needle tool to drag tiny amounts of black liquid clay or paint to form two eyes and a mouth. Alternatively, press tiny black clay balls into the wet icing. -
Add Sprinkles:
Gently place tiny silver pearls or micro beads into the wet white layer. Add two tiny pink chalk circles for cheeks if desired. -
Final Cure:
Bake the piece again for about 10-15 minutes to set the icing and decorations. If you used UV resin for the icing instead of clay, cure it under your UV lamp for 2-3 minutes.
Make it Liquid
Fill the shaker cup with baby oil or distilled water before sealing to make the beads float slowly inside. Seal the hole with UV resin carefully!
Step 3: Assembling the Shaker Cup
-
Prepare the Cup:
Take your miniature plastic cup base. Ensure the inside is clean and free of dust. -
Fill the Shaker:
Pour a generous mix of pastel micro beads and larger round sprinkles into the cup. Fill it about halfway so there is still room for movement. -
Seal the Lid:
Apply a thin rim of UV resin to the top edge of the cup. Place the dome lid on top, pressing firmly to ensure a tight seal. -
Cure the Seal:
Hold the lid in place and cure under the UV lamp for 60 seconds. Check for any gaps and add a tiny bit more resin if needed to prevent leaks. -
Decorate the Top:
I prefer to add a small blob of pink clay or thick pink-tinted resin inside the dome before sealing to look like a drink topping, or you can glue tiny gems on top of the lid near the loop.
Step 4: Final Assembly
-
Attach Hardware:
Use your pliers to open the jump rings. Attach a lobster clasp to the eye pin on the star cookie. -
Connect the Shaker:
Thread a jump ring through the loop on the shaker cup lid (or drill a small hole if one isn’t present) and attach the second lobster clasp. -
Quality Check:
Give the shaker a gentle shake to ensure the beads move freely and the seal is tight. Check that the cookie’s eye pin is secure.
Clip these sweet charms onto your bag or keys for an instant dose of sugary cuteness
Milk Carton and Snack Box Charms
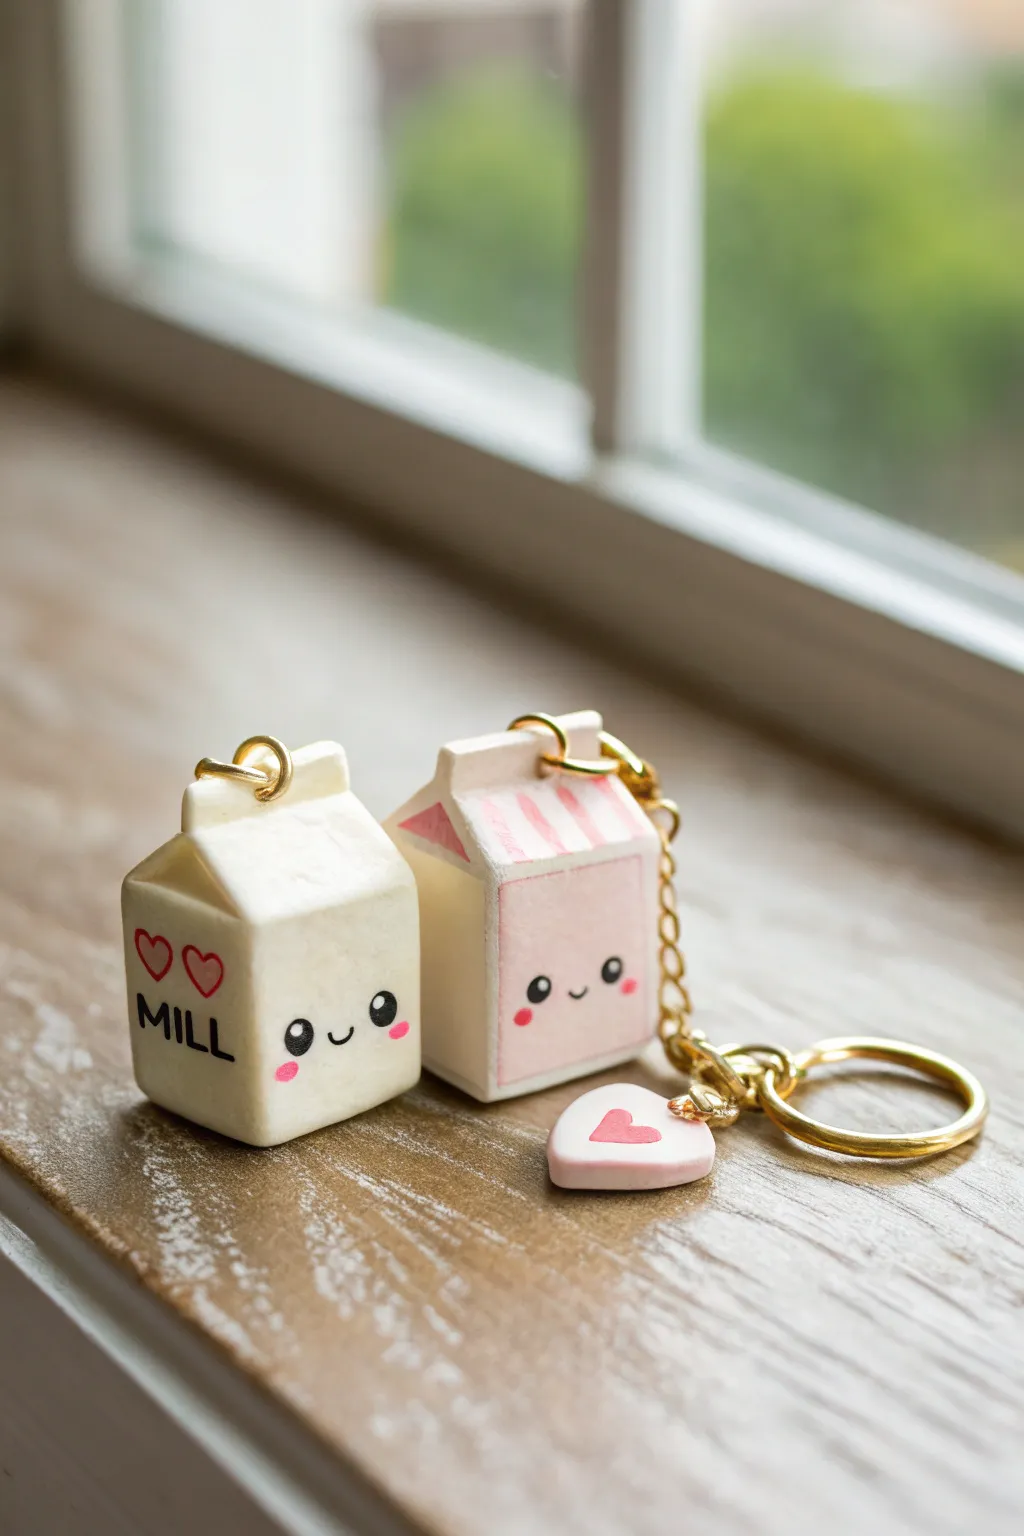
These adorable miniature milk cartons are the perfect introduction to polymer clay sculpting. With one showcasing a classic dairy look and the other a sweet strawberry variation, this matching set makes for charming keychains or friendship gifts.
Step-by-Step Tutorial
Materials
- White polymer clay
- Pink polymer clay (pastel shade)
- Black acrylic paint
- Pink acrylic paint (bright)
- Red acrylic paint
- Fine detail paintbrush (000 size)
- Dotting tool or toothpick
- Craft blade or X-Acto knife
- Headpins or screw eye pins (gold)
- Jump rings and keychain hardware
- Glaze or polyurethane varnish (glossy)
- Sandpaper (fine grit, optional)
- Rolling pin or pasta machine
Step 1: Shaping the Cartons
-
Prep the clay:
Begin by conditioning your white polymer clay until it is soft and pliable. If the clay is too stiff, warm it in your hands or add a drop of clay softener. -
Form the base block:
Roll the white clay into a smooth ball, then gently press and shape it into a rectangular block. Aim for a shape that is roughly 1 inch tall and 0.75 inches wide. -
Create the roof pitch:
Pinch the top third of the rectangle to form the triangular roof shape. Use your fingers to flatten the two sloped sides while keeping the front and back vertical. -
Refine the edges:
Place the carton on your work surface and use a flat blade to gently tap against the sides. This ensures your corners are crisp and the bottom is perfectly flat for standing. -
Add the top ridge:
Pinch the very top horizontal edge of the roof to create a thin fin. This mimics the sealed part of a real milk carton. You can use a blade to trim the top edge straight if it looks uneven. -
Repeat for the pink carton:
Repeat the previous steps to create a second carton. You can make this one entirely white (to be painted later) or mix a small amount of pink clay into white for a base pastel color.
Step 2: Details & Baking
-
Strawberry stripes:
For the pink carton, roll out a very thin sheet of pink clay. Cut a square for the front face and thin strips for the roof. -
Apply the overlay:
Gently press the pink square onto the front face of one carton. Lay the thin pink strips vertically across the roof section to create the striped awning effect. -
Make the heart charm:
With leftover white clay, form a tiny, flat heart shape. It should be small enough to dangle alongside the carton without overpowering it. -
Insert hardware:
Carefully insert a gold screw eye pin or headpin into the center of the top ridge on both cartons and the heart charm. Make sure the loop is facing the direction you want the charm to hang. -
Bake:
Bake the pieces according to your clay manufacturer’s instructions, usually around 275°F (135°C) for 15-20 minutes depending on thickness. Let them cool completely before painting.
Clean Clay Tip
White clay picks up dust easily! Clean your hands and work surface with a baby wipe before starting, and keep a piece of scrap clay to lint-roll your hands periodically.
Step 3: Painting & Assembly
-
Paint the text:
Using black acrylic paint and your finest brush, carefully write ‘MILL’ or ‘MILK’ on the side of the white carton. Keep the letters blocky and uneven for a handmade look. -
Add red hearts:
Dip a toothpick into red paint and stamp two small hearts above the text. Use the drag technique—dot the paint and drag downward slightly to form the V shape. -
Draw the faces:
Using a dotting tool dipped in black paint, place two eyes low on the front face of each carton. Use a tiny brush to add a small ‘u’ shape between them for a smile. -
Add blush cheeks:
I always find this step brings them to life. Dip a clean toothpick into bright pink paint and add tiny oval cheeks just below and to the side of the eyes. -
Heart charm detail:
Paint a single red heart in the center of the small white clay heart charm you baked earlier. -
Seal:
Once the paint is fully dry, coat the charms with a glossy polyurethane varnish. This protects the acrylic paint and gives the charms a finished, ceramic-like shine. -
Final assembly:
Open a gold jump ring using pliers. Slide on the milk carton, the heart charm, and the keychain ring, then close the jump ring securely.
Flavor Variations
Try making a chocolate milk version using light brown clay, or a banana milk version with pale yellow clay and tiny painted banana graphics on the side.
Clip these sweet cartons onto your bag or keys and enjoy your new miniature dairy duo
Ice Cream Cone Drip Charms
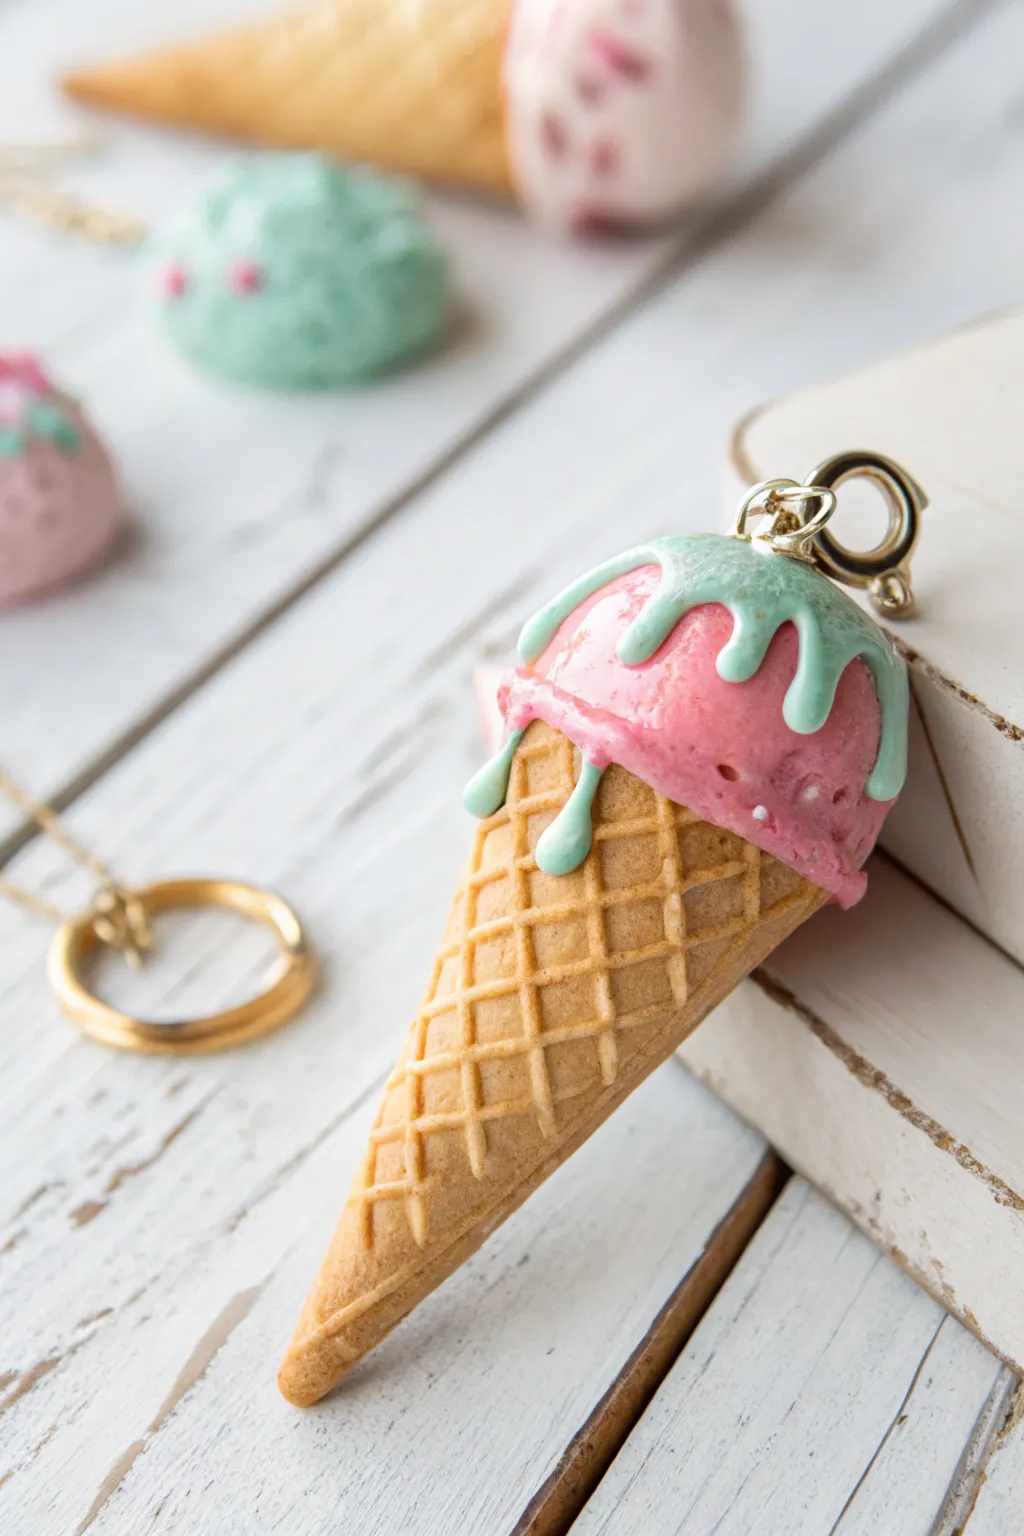
Learn to sculpt a delightfully realistic ice cream cone charm perfect for necklaces or keychains. This project combines texturing techniques for the waffle cone with liquid clay effects for a sweet, melting finish.
Detailed Instructions
Materials
- Polymer clay: Tan/Ochre (waffle cone)
- Polymer clay: Pink (ice cream)
- Liquid polymer clay: White
- Chalk pastels: Green and dark brown
- Texture sheet or fine mesh (grid pattern)
- Needle tool or toothpick
- Ball tool
- Small eye pin or screw eye
- Jump ring
- Parchment paper
- Oven for baking
Step 1: Sculpting the Cone
-
Mix the cone color:
Start by mixing translucent clay with a small amount of tan or ochre clay. You want a color that looks like baked dough but isn’t too opaque. -
Roll out the slab:
Roll your clay into a thin, even sheet, approximately 2mm thick. -
Texture the waffle pattern:
Press a grid-patterned texture sheet or a piece of clean plastic mesh firmly into the clay slab to create the classic waffle indents. -
Shade the waffle:
Before cutting, scrape some dark golden-brown chalk pastel into a powder. Lightly brush this over the textured clay to highlight the grid lines, making it look baked. -
Cut the cone shape:
Use a craft knife to cut a small triangle from the textured slab. The wide end will be the top of your cone. -
Form the cone:
Gently roll the triangle onto itself to form a cone shape. Overlap the edges slightly at the back and gently press inside to seal the seam without crushing the texture.
Sticky Situation?
If liquid clay is too runny, let it sit on a piece of paper for 10 mins to leach out oils. If too thick, add a drop of clay softener.
Step 2: Adding the Ice Cream
-
Create the scoop base:
Roll a ball of pink clay that is slightly larger than the opening of your cone. -
Texture the ice cream:
Use a toothbrush or a crumpled ball of aluminum foil to texture the surface of the pink ball, giving it a realistic, aerated ice cream look. -
Create the ‘feet’:
Use a needle tool to drag small bits of clay downward around the bottom edge of the ball to create a ruffled ‘skirt’ where the ice cream meets the cone. -
Assemble the parts:
Press the pink scoop firmly onto the top of your waffle cone. Smooth the connection slightly underneath so they bond well. -
Insert the hardware:
Trim a screw eye or eye pin to the right length and insert it into the center top of the ice cream scoop.
Step 3: The Melting Drip & Finishing
-
Prepare the mint glaze:
Mix white liquid polymer clay with a scraping of green chalk pastel (or a tiny drop of green alcohol ink) until you get a smooth, pastel mint color. -
Apply the drip:
Using a needle tool, carefully drip the green liquid clay onto the top of the pink scoop. Allow gravity to help pull the drips down the sides. -
Refine the drips:
Guide the drips so they vary in length—some stopping on the pink scoop, some flowing down onto the waffle cone for a natural look. -
Clean the hardware:
I always use a wet brush to wipe away any liquid clay that accidentally got onto the metal eye pin so it stays clean. -
Final Bake:
Bake the charm according to your clay manufacturer’s instructions, typically around 275°F (130°C) for 15-20 minutes. -
Cool and assemble:
Let the charm cool completely before handling. Open a jump ring with pliers and attach it to the eye pin to finish the piece.
Sprinkle It On
Before baking the liquid drip layer, add polymer clay ‘sprinkles’ or microbeads for extra texture and a pop of rainbow color.
Enjoy wearing your sweet new accessory or gifting it to a friend who loves dessert
Mini Bento Lunch Charm Sets
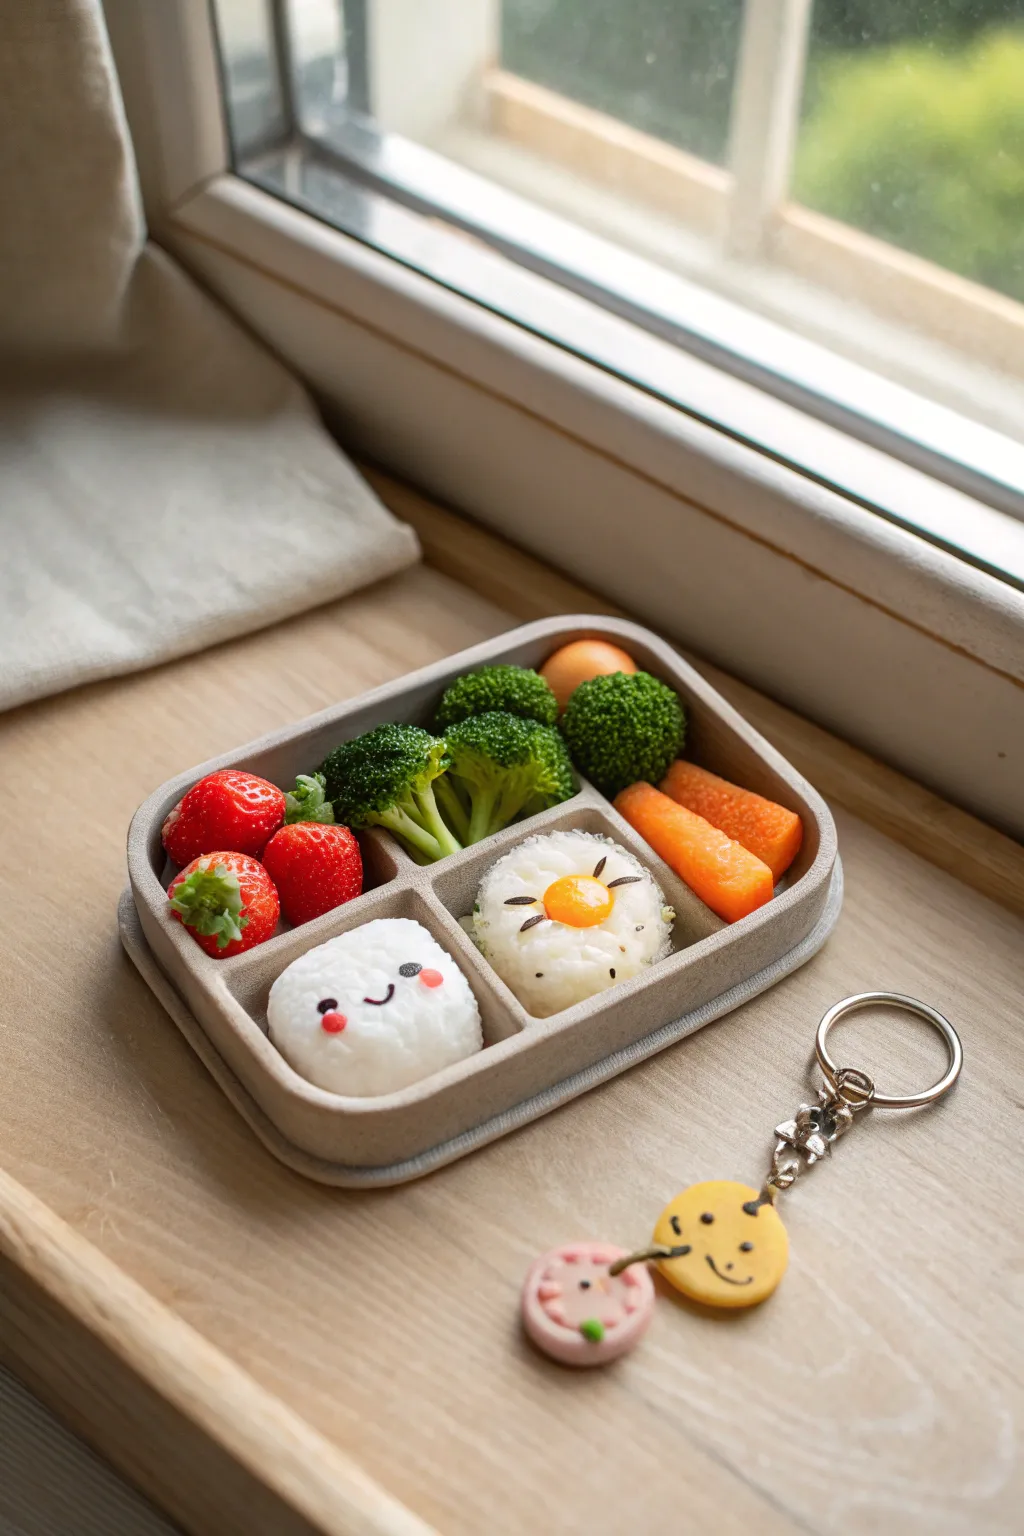
This adorable miniature bento box captures the essence of a kawaii lunch with realistic texture and vibrant colors. Featuring tiny onigiri, strawberries, and broccoli, this polymer clay charm is a delightful challenge for detail-oriented crafters.
Step-by-Step Tutorial
Materials
- Polymer clay (white, red, green, orange, beige/light grey for the box)
- Liquid polymer clay (Fimo liquid or TLS)
- Chalk pastels (brown, orange, yellow)
- Needle tool or toothpick
- Toothbrush or crumpled foil (for texturing)
- Dotting tools
- Black acrylic paint or clay strings for faces
- Gloss glaze or UV resin
- Small square cookie cutter (optional)
- Blade or craft knife
- Keychain hardware (optional)
Step 1: Sculpting the Bento Box
-
Base shape:
Start by conditioning the beige or light grey clay for the container. Roll it into a thick slab about 5mm thick. Use a small square or rectangular cutter to stamp the base, or cut manually with your blade. -
Creating the walls:
Roll out a long, thin snake of the same clay color. Flatten it slightly into a strip. Wrap this strip around the perimeter of your base to form the walls, smoothing the seams on the outside and inside so it looks like one solid piece. -
Dividing the sections:
Cut shorter strips of the wall clay to create dividers. Place a vertical divider down the middle, then a horizontal one on the left side to create the layout shown: a large right section and two smaller left sections.
Fixing Soft Walls
If your box walls sag while working, pre-bake the empty box for 10 minutes to harden it before filling with the food pieces. This keeps the shape crisp.
Step 2: Creating the Food Fillings
-
Fluffy white rice:
For the onigiri, take white clay and shape two rounded triangles. To get that realistic rice texture, I gently tap the surface with a clean toothbrush or a ball of crumpled foil. Don’t press too hard, just enough to roughen the surface. -
Cute faces:
For the left onigiri, add tiny black clay seeds for eyes and a small curved mouth. Add two tiny pink clay dots for cheeks. For the right onigiri, add an ‘egg yolk’ (yellow clay circle) on top and similar facial details. -
Textured broccoli:
Mix green clay to get a fresh broccoli shade. Roll tiny stalks, then create the florets by bunching tiny crumbs of green clay together. Press these crumbs onto the stalks using a needle tool for a tightly packed vegetable look. -
Vibrant carrots:
Roll orange clay into small logs. Slice them into baton shapes. Use your needle tool to add very faint texture lines or create a slightly uneven organic surface. -
Juicy strawberries:
Shape tiny cones from red clay. Use a needle tool to poke shallow holes all over for seeds. Add a little cap of green clay leaves on top.
Level Up: Bento Lid
Create a matching lid using translucent clay mixed with a tiny bit of the box color. It creates a semi-transparent ‘plastic’ cover effect for your charm.
Step 3: Assembly and Finishing
-
Pre-baking assembly:
Carefully place all your components into the bento box compartments. Put the broccoli and carrots in the large right section, strawberries in the top left, and the rice balls in the bottom sections. -
Adding dimension:
Shave some brown and orange chalk pastel into a fine dust. Use a soft brush to gently dust the edges of the carrots and the top of the egg yolk to simulate a cooked or roasted effect. -
Baking:
Bake the piece according to your clay manufacturer’s instructions (usually 275°F/130°C for 15-30 minutes). Let it cool completely before handling. -
The glossy touch:
Apply a thin coat of UV resin or localized gloss glaze specifically to the egg yolk, the strawberries, and the cut surfaces of the carrots to make them look moist and fresh. -
Final hardware:
If turning this into a keychain like the photo, attach a jump ring to the corner (this is best done by drilling a tiny hole after baking or inserting an eye pin before baking).
Now you have a tiny, permanent lunch that looks good enough to eat but will last forever
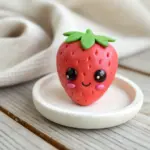
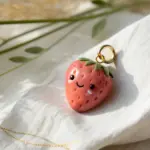
Tiny Charm Clusters for Zippers and Bags
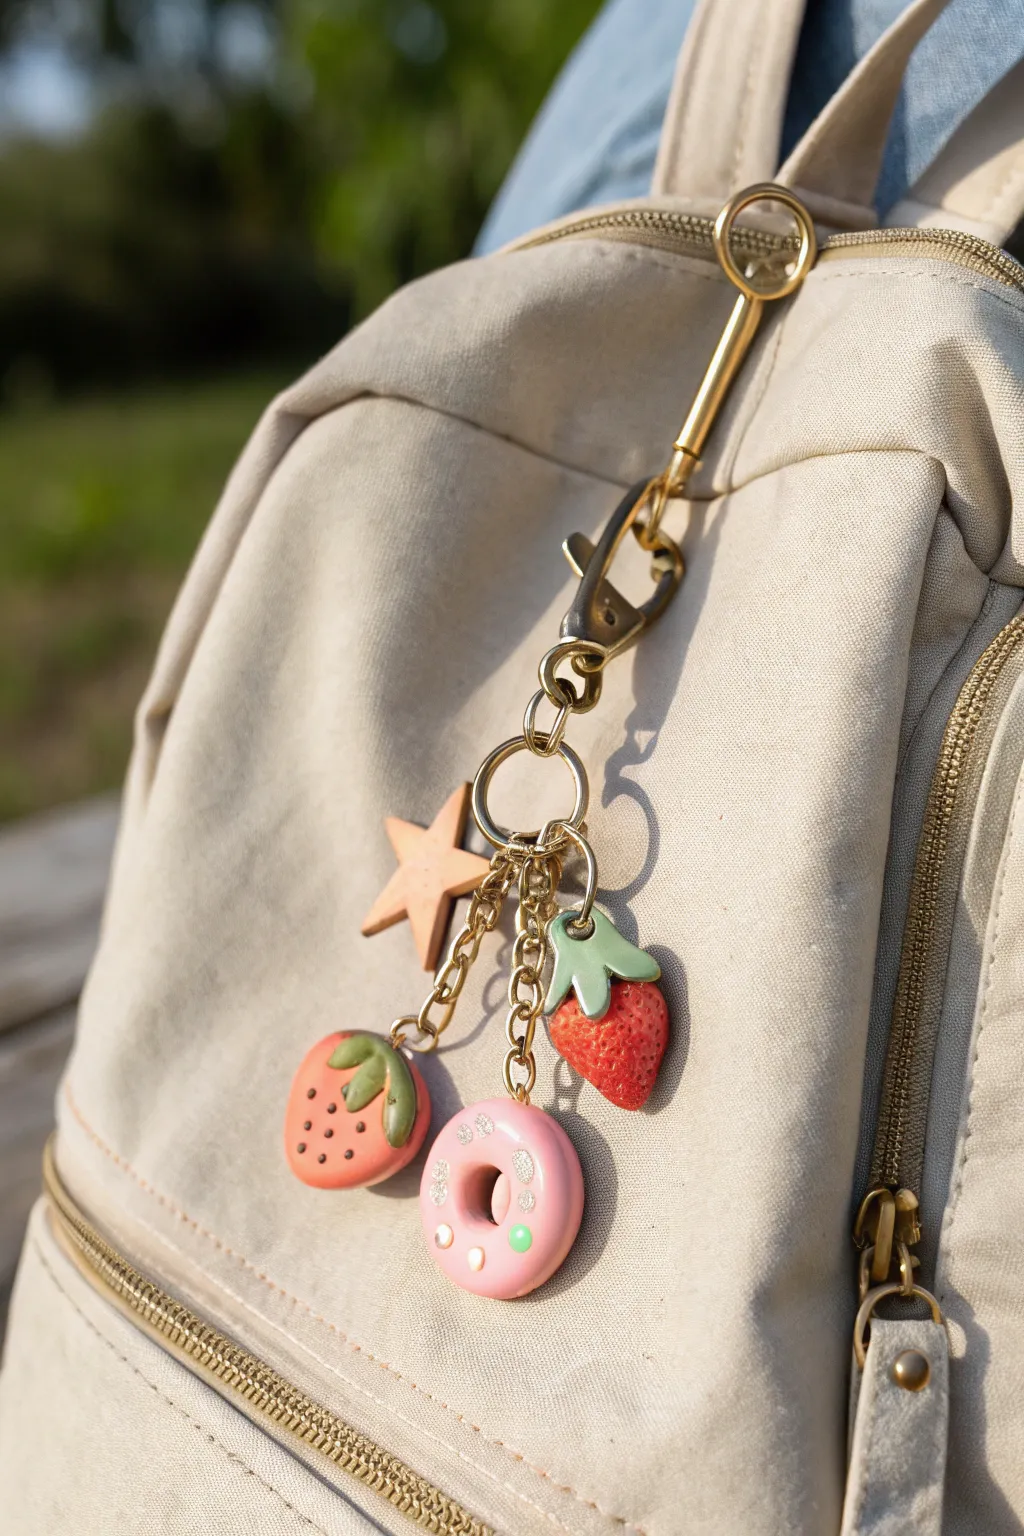
Add a sprinkle of personality to your zipper pulls or bags with this delightful assortment of polymer clay charms. This project combines different textures—from a glossy, stylized strawberry to a realistically pitted fruit and a sprinkled donut—for a playful, cohesive accessory.
Step-by-Step Guide
Materials
- Polymer clay in beige, red, green, and pink
- Liquid polymer clay (translucent)
- Tan pastel chalk
- Gold screw-eye pins (tiny)
- Gold finish keychain hardware with jump rings and chain
- Needle tool or toothpick
- Dotting tool
- Small paintbrush
- Gloss glaze (optional)
- Sandpaper or texture sponge
Step 1: Sculpting the Strawberries
-
Form the cartoon strawberry base:
Start with a small ball of red clay, about the size of a marble. Gently pinch and roll one end to create a rounded cone shape, flattening it slightly so it looks a bit chubby and playful. -
Add cartoon seeds:
Instead of poking holes, we want painted-on style seeds. Use a tiny brush with brown acrylic paint or a fine-tip permanent marker to make small, triangular dots scattered across the surface. -
Create the cartoon leaves:
Roll out a small snake of leaf-green clay. Cut three small segments, flatten them into teardrops, and press them onto the top of your strawberry. Use a needle tool to drag a center vein down each leaf. -
Sculpt the realistic strawberry:
Repeat the cone shape with red clay, but keep this one more dimensional. To create the realistic texture, gently press the side of a needle tool into the clay repeatedly all over the surface, creating little divots. -
Add realistic leaf cap:
For this one, use a slightly darker green clay. Cut a tiny star shape using a cutter or knife. Place it on top and gently curve the leaf tips upward so they look like they were just picked.
Texturing Tip
To make the realistic strawberry look fuzzy and authentic before adding seeds, roll the unbaked clay cone gently over a piece of medium-grit sandpaper or a clean toothbrush.
Step 2: Making the Donut and Star
-
Shape the donut ring:
Roll pink clay into a thick snake and join the ends to form a ring. Smooth the seam completely with your finger until it’s invisible. If you want a ‘bitten’ look, you can gently texture the clay, but a smooth ring works perfectly for this style. -
Decorate the donut:
For the white ‘icing’ dots or sprinkles, take tiny bits of white clay and roll them into microscopic balls. Press them gently onto the pink ring. Alternatively, use white puffy paint after baking. -
Cut the star charm:
Roll out a sheet of beige or light tan clay to about 4mm thickness. Use a small star cutter to punch out your shape. Ensure the points are not too sharp, as they can be fragile. -
Shade the star:
To give the star a toasted, cookie-like appearance, scrape some tan pastel chalk into a powder. Use a soft brush to dust the edges and points of the star, creating a baked gradient effect.
Step 3: Assembly and Finishing
-
Insert hardware:
Carefully screw a tiny gold eye pin into the top center of each unbaked charm. Use a twisting motion rather than pushing straight in to distract the clay less. -
Bake the charms:
Arrange all pieces on a baking tile or sheet lined with parchment paper. Bake according to your specific polymer clay package instructions (usually 275°F/135°C for 15-30 minutes depending on thickness). -
Secure the pins:
Once cooled, gently test the eye pins. If any are loose, remove them, add a drop of super glue to the shank, and screw them back in for a permanent hold. -
Glaze the realistic fruit:
For that juicy look, apply a coat of gloss glaze specifically to the realistic textured strawberry. Keep the star matte for contrast. -
Attach to chain:
Using two pairs of pliers, open the jump rings on your keychain meant. Attach each charm to a different link of the chain at varying heights so they cluster together nicely without tangling constantly.
Make It Sparkle
Mix a pinch of ultrafine iridescent glitter into the glaze for the donut. It gives a sugary, frosted look that catches the light beautifully when hanging from a bag.
Now clip your personalized cluster onto your favorite backpack for an instant style upgrade
Smiling Succulent Pot Charms
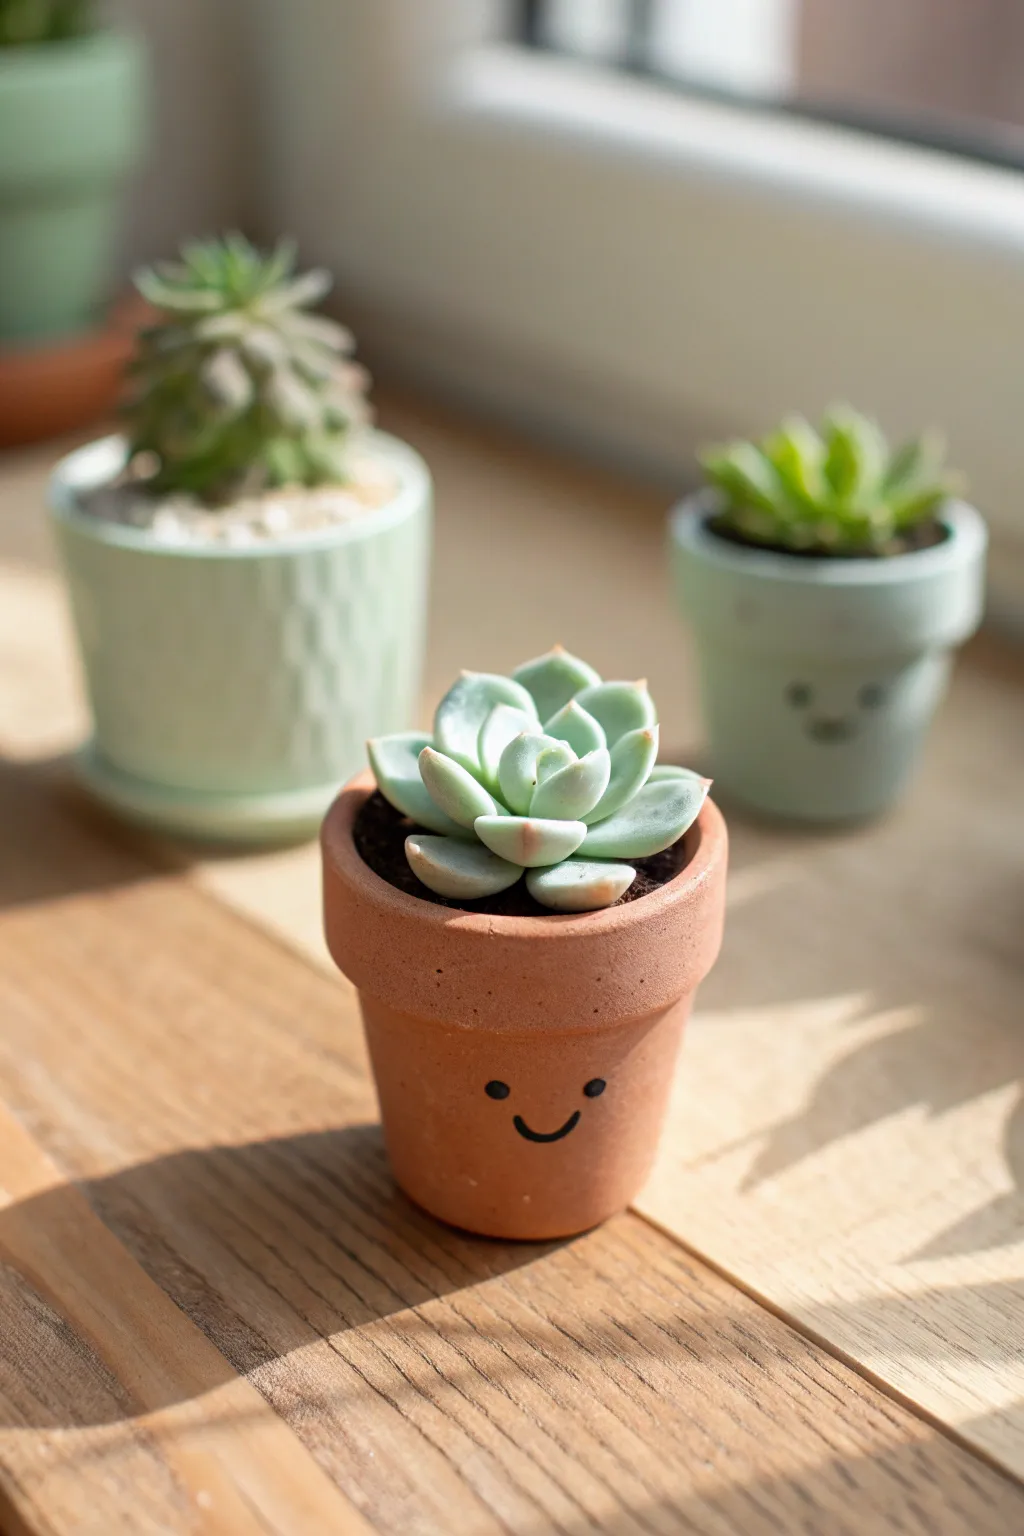
Transform tiny terracotta vessels into cheerful companions for your desk or windowsill. This beginner-friendly project adds a touch of personality to your succulent collection with just a few simple strokes and a lot of charm.
Step-by-Step Tutorial
Materials
- Small terracotta pots (2-3 inch diameter)
- Black acrylic paint or black paint marker (fine tip)
- Small succulent plants (e.g., Echeveria, Haworthia)
- Succulent potting soil (cactus mix)
- Small decorative pebbles or gravel (optional)
- Matte spray sealer (optional)
- Clean rag or paper towel
- Rubbing alcohol
- Small paintbrush (if using bottle paint)
Step 1: Prepping the Pot
-
Select your vessel:
Choose a small terracotta pot that is free of large cracks or chips. The beauty of this project relies on the classic orange-clay look, so make sure the surface is relatively uniform. -
Clean surface:
Wipe the exterior of the pot down thoroughly with a damp rag. Dust and clay residue can prevent the paint from adhering properly. -
Degrease for adhesion:
For the best long-term results, give the specific area where you plan to draw the face a quick wipe with rubbing alcohol to remove any oils. Let it dry completely.
Step 2: Painting the Face
-
Plan spacing:
Visualize where the face fits best. Aim for the center of the pot’s body, leaving enough room below the rim so the face doesn’t look cramped. -
Draft lightly:
If you’re nervous about freehanding, use a pencil to very lightly mark two dots for eyes and a small curve for the mouth. Keep the marks faint so they don’t show through later. -
Paint the left eye:
Using your black paint marker or a fine brush dipped in black acrylic, create a small, solid circle for the left eye. I prefer a slightly smaller dot for a cuter, ‘kawaii’ aesthetic. -
Paint the right eye:
Create the matching eye on the right side. Space them somewhat widely apart to enhance the cheerful, innocent expression. -
Add the smile:
Draw a small, U-shaped curve centered perfectly between and slightly below the eyes. Keep the line weight consistent with the eyes for a balanced look. -
Clean up edges:
If your circle isn’t perfectly round, carefully widen it just a bit to smooth out any wobbly edges while the paint is still wet. -
Let it dry:
Allow the paint to dry completely. Acrylics on terracotta dry fast, usually within 15-20 minutes.
Paint Bleeding?
Terracotta is porous and can sometimes absorb paint too fast, causing fuzzy edges. If this happens, dab a tiny bit of clear craft glue on the area first to seal the clay pores, let dry, then paint over it.
Step 3: Planting and Finishing
-
Seal the design:
Once the paint is bone dry, apply a light coat of matte spray sealer if you plan to keep the pot outdoors or water it frequently. This prevents the face from flaking over time. -
Add base soil:
Fill the bottom third of your pot with succulent-specific potting soil. This gritty mix ensures proper drainage which is vital for these plants. -
Position the plant:
Gently remove your succulent from its nursery container, massage the roots slightly to loosen them, and place it into the pot. -
Fill the gaps:
Spoon more soil around the sides of the root ball, pressing down gently with your thumb or a chopstick to secure the plant in place. -
Level the surface:
Ensure the soil level is just below the rim of the pot so water doesn’t spill over when you irrigate. -
Brush off debris:
Use a soft, dry paintbrush to sweep any stray soil particles off the succulent leaves and the painted face. -
Water appropriately:
Give the plant a very small sip of water to settle the soil, being careful not to soak the painted exterior immediately.
Pro Tip: Expression Guide
Play with eye placement! Placing eyes lower on the pot creates a ‘cuter’ baby-like face, while placing them higher tends to look more mature. Wide-set eyes are generally the most charming.
Now you have a happy little plant friend ready to brighten up your favorite sunny corner
Glow-In-The-Dark Night Sky Charms
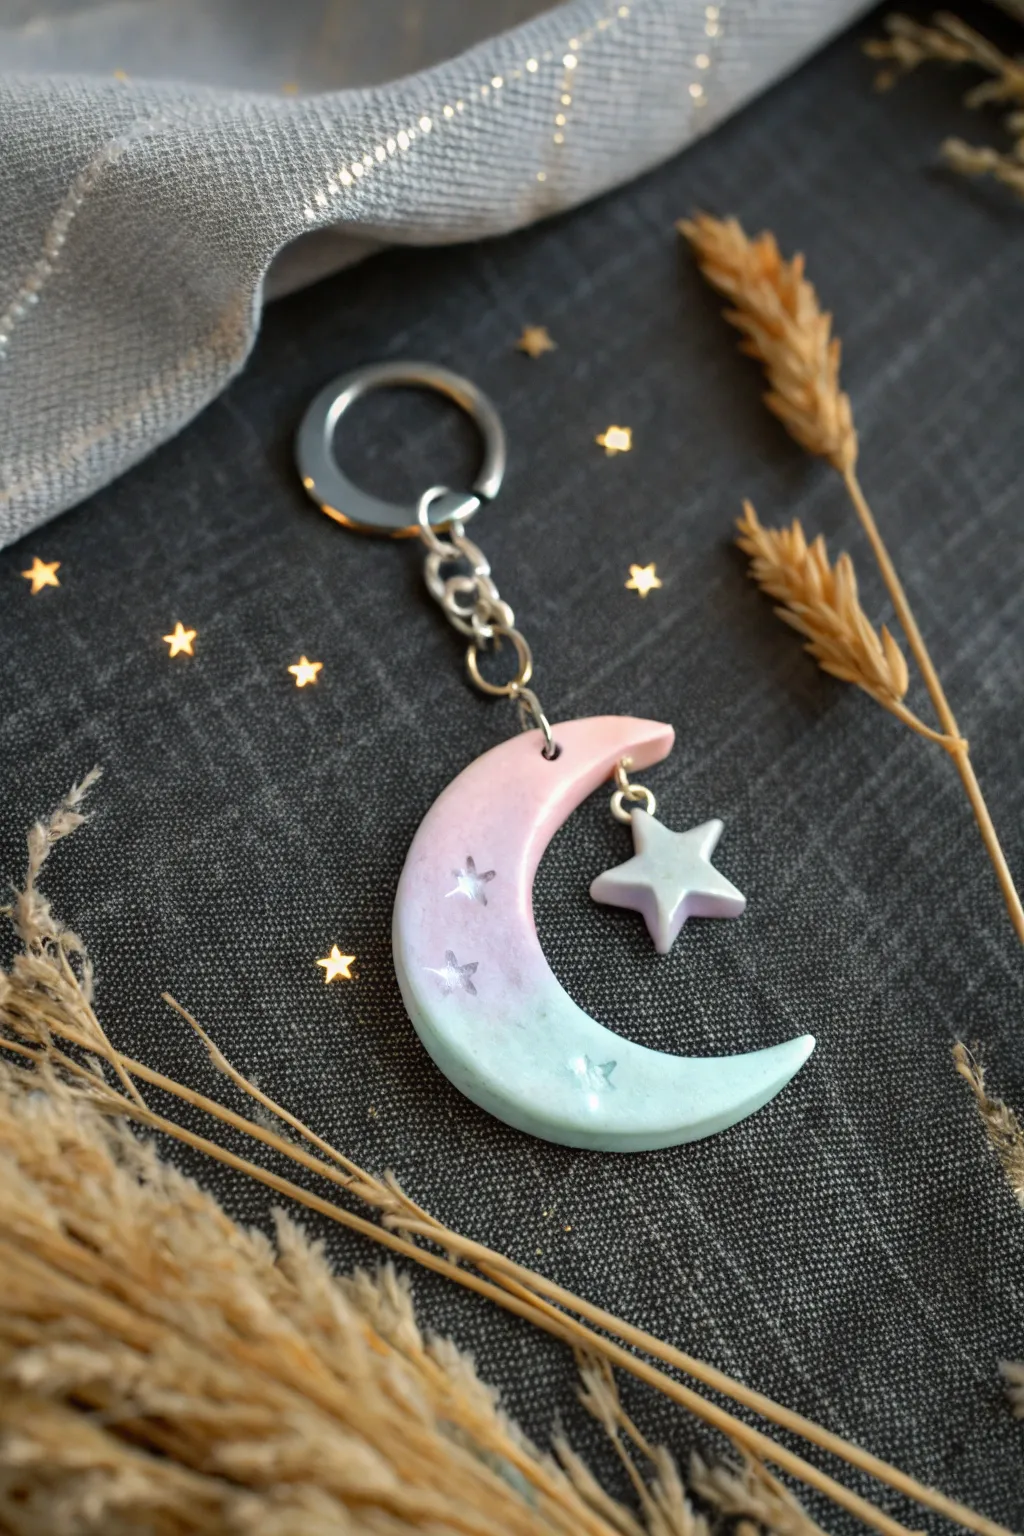
Capture the dreamy magic of a twilight sky with this soft, pastel gradient keychain featuring a crescent moon and dangling star. The blend of gentle pink and mint green creates a soothing aesthetic, highlighted by suspended glitter stars that catch the light.
Step-by-Step Guide
Materials
- Polymer clay (pale pink, mint green, and white)
- Glow-in-the-dark polymer clay (optional)
- Small crescent moon and star clay cutters
- Chunky star-shaped glitter or confetti
- Rolling pin or pasta machine
- Hand drill or pin vibe
- UV resin and UV lamp (or polyurethane gloss varnish)
- Small paintbrush
- Jump rings (small and large)
- Keychain hardware with chain
- Fine grit sandpaper (optional)
- Jewelry pliers
Step 1: Prepping and Mixing the Gradient
-
Condition the clay:
Start by kneading your pale pink and mint green polymer clay separately until they are soft and pliable. If you want the glow-in-the-dark effect, mix a portion of glow clay into both colors now. -
Create the blend:
Roll each color into a thick log. Join them side-by-side and flatten them slightly. pass this sheet through your pasta machine or roll it out by hand. -
Achieve the ombre effect:
Fold the sheet in half (color to same color) and roll it out again. Repeat this fold-and-roll process about 10-15 times until the line between the pink and green blurs into a smooth, seamless gradient. -
Final thickness:
Once you are happy with the blend, roll the sheet out to a final thickness of approximately 4mm or 5mm so it’s sturdy enough for a keychain.
Smooth Gradients
For the smoothest ombre blend, always fold your clay sheet in the same direction—bottom to top—keeping the colors aligned on their respective sides.
Step 2: Cutting and Decorating
-
Cut the shapes:
Position your crescent moon cutter over the gradient to capture the transition from pink to green. Press down firmly and remove. Use a small star cutter on the remaining clay or a separate piece of white/glow clay. -
Smooth the edges:
Gently run your finger around the raw edges of the cut shapes to soften any sharp corners or clay burrs left by the cutter. -
Embed the stars:
Take your chunky star glitter pieces and gently press them into the soft clay surface of the moon. I find using a needle tool or tweezers helps position them precisely without denting the clay. -
Secure the glitter:
Ensure the glitter is pressed flush with the surface or slightly below it; if it sticks out, it might snag later. -
Pierce holes:
Using a needle tool, poke a hole at the top tip of the moon for the main chain. Poke a second hole on the inner curve of the moon to hang the star charm. Poke a hole in the top of the star charm as well.
Add Extra Sparkle
Before adding the resin layer, mix a tiny pinch of holographic micro-glitter into the resin itself. It mimics the shimmer of distant galaxies.
Step 3: Baking and Finishing
-
Bake the charms:
Place your pieces on a ceramic tile or baking sheet lined with parchment paper. Bake according to your polymer clay package instructions (usually 275°F/135°C for 15-30 minutes). -
Cool down:
Allow the clay to cool completely inside the oven or on a cooling rack before handling to prevent cracking. -
Resin coating:
Place the cooled charms on a silicone mat. Apply a thin, even layer of UV resin over the front surface, covering the embedded glitter stars. This seals them in and adds a beautiful glass-like shine. -
Cure the resin:
Place the pieces under a UV lamp for 2-3 minutes until the surface is hard and tack-free. Repeat on the back side if desired. -
Drill cleanup:
If resin filled your pre-made holes, use a small hand drill to carefully clear them out.
Step 4: Assembly
-
Attach the star:
Open a small jump ring using two pairs of flat-nose pliers (twist side-to-side, never pull apart). Thread it through the star charm and the inner hole of the moon, then close it securely. -
Connect the keychain:
Open a larger jump ring and thread it through the top hole of the moon. Attach the keychain hardware chain before closing the ring tightly. -
Final check:
Wiggle the jump rings slightly to ensure the closures are flush and nothing will slip off during use.
Clip your new celestial accessory onto a bag or keys and enjoy a piece of the night sky wherever you go