If you’re craving a quick, satisfying project, cute polymer clay keychains are the sweet spot: small, sturdy, and endlessly customizable. I love how you can go super simple with a tiny charm or go all-in with layered details and still end up with something practical for your keys or bag.
Chibi Cat Face Charm

This adorable polymer clay charm captures the sweet innocence of a cat with a simple rounded face and expressive eyes. The soft cream base and gentle pink accents give it a warm, inviting look perfect for brightening up your keys or backpack.
Detailed Instructions
Materials
- Polymer clay in cream/warm white, black, and light pink
- Gold tone keychain hardware (split ring and chain)
- Eye pin or screw eye pin
- Rolling pin or acrylic roller
- Circle cutter (approx. 1.5 inches)
- Small dotting tool or ball stylus
- Needle tool or toothpick
- Acrylic paint (white) for highlights
- Fine detail paintbrush
- Gloss glaze or UV resin (optional)
- Oven for baking
Step 1: Shaping the Base
-
Condition the clay:
Start by thoroughly conditioning your cream-colored polymer clay until it is soft and pliable. This prevents cracking later on. -
Roll and cut:
Roll out a sheet of the cream clay to a thickness of about 1/4 inch. It needs to be thick enough to hold the hardware securely. -
Cut the circle:
Use your circle cutter to punch out a clean round shape. Gently smooth the edges with your finger to round off the sharp cut line, creating a soft, bun-like appearance. -
Form the ears:
Take two small balls of cream clay and shape them into triangles. Attach these to the top of the circle, blending the seams on the back so they are strongly connected. -
Add ear details:
Roll two tiny balls of pink clay and flatten them into smaller triangles. Press these into the center of the cream ears to create the inner ear detail.
Step 2: Creating the Face
-
Position the eyes:
Roll two balls of black clay and flatten them into ovals. Place them widely spaced on the face, slightly below the horizontal center line for that cute ‘chibi’ proportion. -
Add the nose:
Take a tiny amount of pink clay and roll a small ball. Press it gently right in the center between the eyes to form a petite button nose. -
Sculpt the mouth:
Using a very small snake of black clay or dark brown clay, form an anchor shape or a ‘w’ shape for the mouth. Carefully adhere it beneath the nose. Alternatively, you can paint this on after baking. -
Apply blush cheeks:
Roll two slightly larger balls of pink clay and flatten them into circles. Place these under the eyes to give the cat rosy cheeks. I like to texture these slightly with a toothbrush to simulate a soft, flushed look. -
Whisker details:
Roll extremely thin threads of reddish-brown or black clay. Cut six short lengths and place three on each cheek, pressing them gently so they bond with the base. -
Forehead markings:
Add three tiny pink teardrop shapes or simple dots to the forehead area between the ears for a subtle patterned detail. -
Eyebrows:
Place two tiny, thin curves of black clay above the eyes to give the cat a gentle, surprised expression.
Clean Clay Tip
Keep baby wipes or hand sanitizer nearby. Clean your hands thoroughly before handling the white clay to avoid transferring lint or dark pigments to the immaculate face.
Step 3: Finishing Touches
-
Insert hardware:
Insert an eye pin or screw eye into the top center of the head, between the ears. You can add a drop of liquid clay or bake-and-bond to the pin for extra security. -
Bake:
Bake the piece according to your clay manufacturer’s instructions. Usually, this is around 275°F (135°C) for 15-30 minutes, depending on thickness. -
Cool down:
Allow the charm to cool completely before handling. It will be slightly soft when hot but hardens as it cools. -
Paint highlights:
Once cool, use a fine detail brush and white acrylic paint to add the sparkle to the eyes. Paint a larger white circle at the top right and a tiny dot at the bottom left of each black eye. -
Seal (Optional):
To protect the paint and give it a finished look, brush a coat of gloss glaze over the eyes, or coat the entire piece in a matte varnish. -
Assemble:
Use pliers to open the jump ring on your keychain hardware and attach it securely to the eye pin on your charm.
Calico Customization
Make a calico cat by adding patchy overlays. Before adding facial features, press thin, irregular patches of orange and black clay onto the cream base and roll flat.
Now you have a sweet feline friend to guard your keys and bring a smile to your face every time you head out the door


Kawaii Bunny With Blush Cheeks
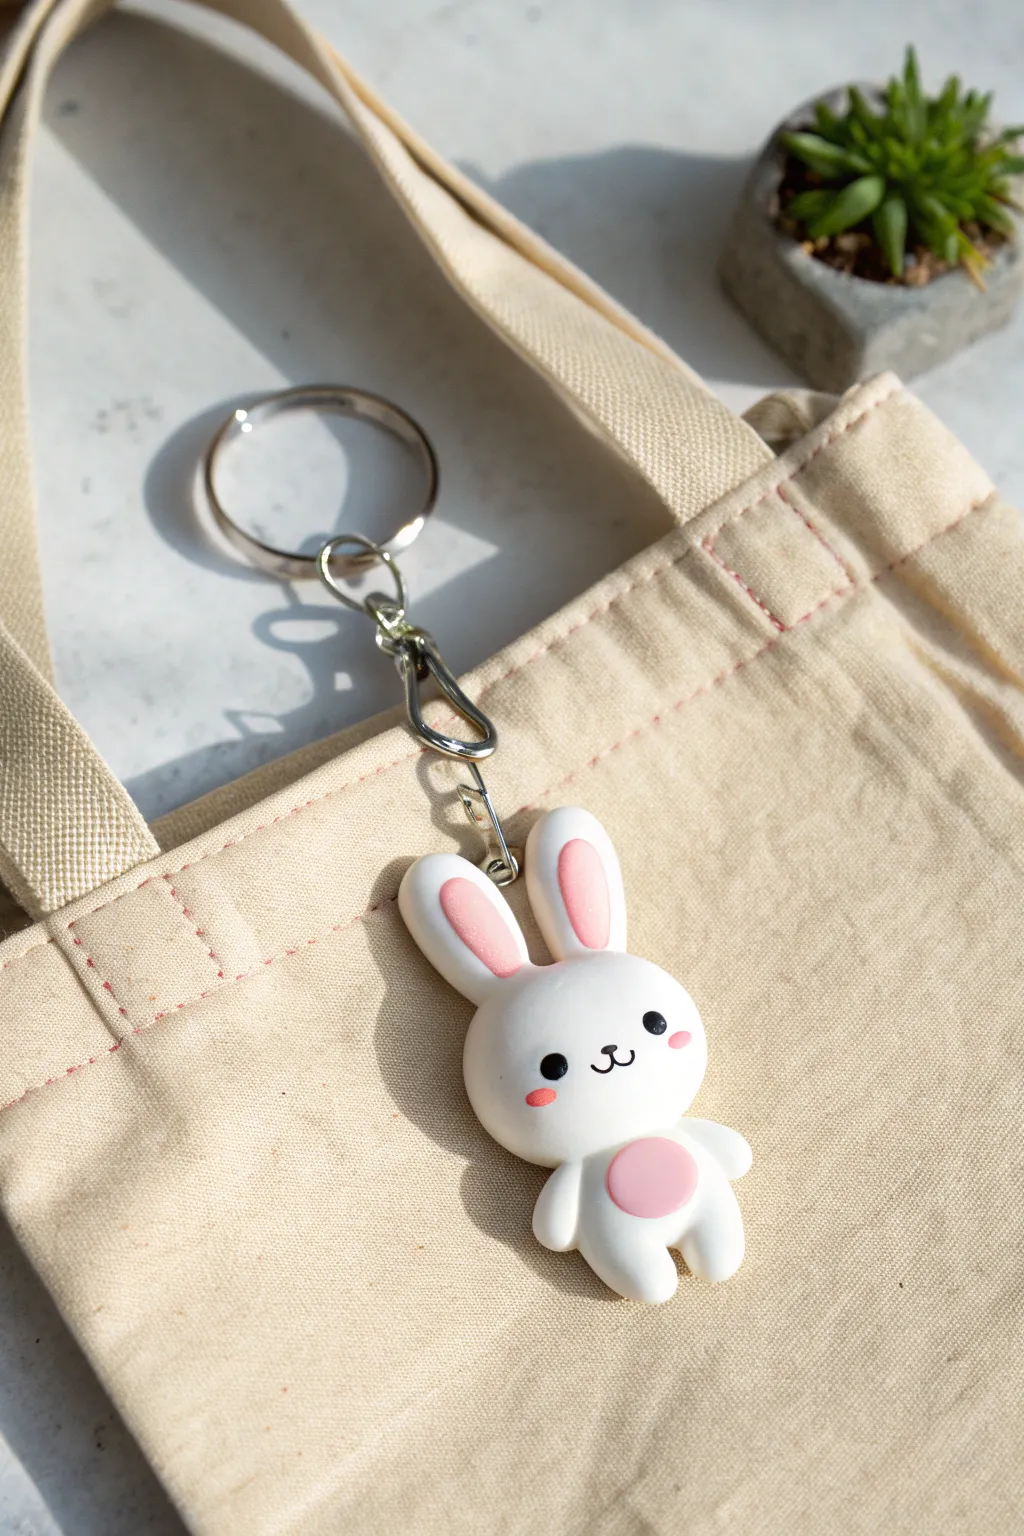
This adorable little bunny features a smooth white finish, pink accents, and a classic sweet expression that defines the kawaii style. Its simple shapes make it a perfect beginner project for mastering clean joins and facial details.
Step-by-Step
Materials
- White polymer clay
- Soft pink polymer clay
- Black polymer clay
- Headpin or eye screw
- Keychain hardware (jump ring and keyring)
- Dotting tools or ball stylus
- Needle tool or toothpick
- Rolling pin or acrylic roller
- Craft knife
- Oven for baking polymer clay
- Glaze or varnish (optional)
Step 1: Shaping the Head
-
Condition the clay:
Start by kneading your white clay thoroughly until it is soft and conditioned. This prevents cracks during baking. -
Form the main sphere:
Roll a smooth ball of white clay about the size of a walnut to form the bunny’s head. Gently flatten the back slightly if you want it to lie flat, or keep it round. -
Create the ear bases:
Roll two smaller white logs, slightly tapered at the top, to form the bunny ears. They should be roughly half the height of the head. -
Flatten the ears:
Gently press down on the ear logs to flatten them. Use your thumb or a smoothing tool to round off the tips. -
Add the pink inner ears:
Take a tiny amount of pink clay and roll two small teardrop shapes. Flatten them and press them into the center of the white ears. -
Attach the ears:
Press the ears firmly onto the top of the head. I like to use a silicone blending tool to smooth the seam where the ears meet the head so they look seamless.
Step 2: Body & Limbs
-
Form the torso:
Roll a smaller ball of white clay for the body. It should be slightly smaller than the head, shaped almost like a squat brilliant gumdrop. -
Attach head to body:
Press the head gently onto the body. Check the balance to make sure the head isn’t tilting too far forward or backward. -
Make the limbs:
Roll two tiny white logs for arms and two thicker nubs for legs. -
Attach arm and legs:
Press the legs onto the bottom of the body, spacing them slightly apart. Attach the arms to the sides of the body, pointing downwards. -
Add the belly patch:
Roll a small ball of pink clay, flatten it into a perfect circle, and press it onto the center of the bunny’s tummy.
Clean Clay Tip
White clay picks up dust instantly! Keep a pack of baby wipes or rubbing alcohol nearby to clean your hands and tools before touching the white clay.
Step 3: Face & Hardware
-
Make the eyes:
Roll two minuscule balls of black clay. Position them wide apart on the face and press them flat gently to secure them. -
Create the mouth:
Roll an incredibly thin snake of black clay. Cut two tiny curved pieces and join them to form a ‘w’ shape, or carefully paint this on after baking if the clay is too fiddly. -
Add the blush:
Take two tiny specks of pink clay—smaller than the eyes—and press them onto the cheeks, just below and outside the eyes. -
Insert the hardware:
Carefully screw an eye screw or push a headpin into the top center of the head between the ears. Twist it slightly to help grip the raw clay. -
Bake the charm:
Bake according to your clay manufacturer’s instructions (usually around 275°F/135°C for 15-30 minutes). Let it cool completely. -
Assemble keychain:
Once cool, attach your jump ring and keychain hardware to the eye pin using pliers.
Texture Play
Instead of smooth clay, use an old toothbrush to gently tap the surface of the unbaked bunny. This creates a soft, flocked ‘fur’ texture.
Now your charming bunny is ready to tag along on all your daily adventures

Tiny Frog Sitting Pose
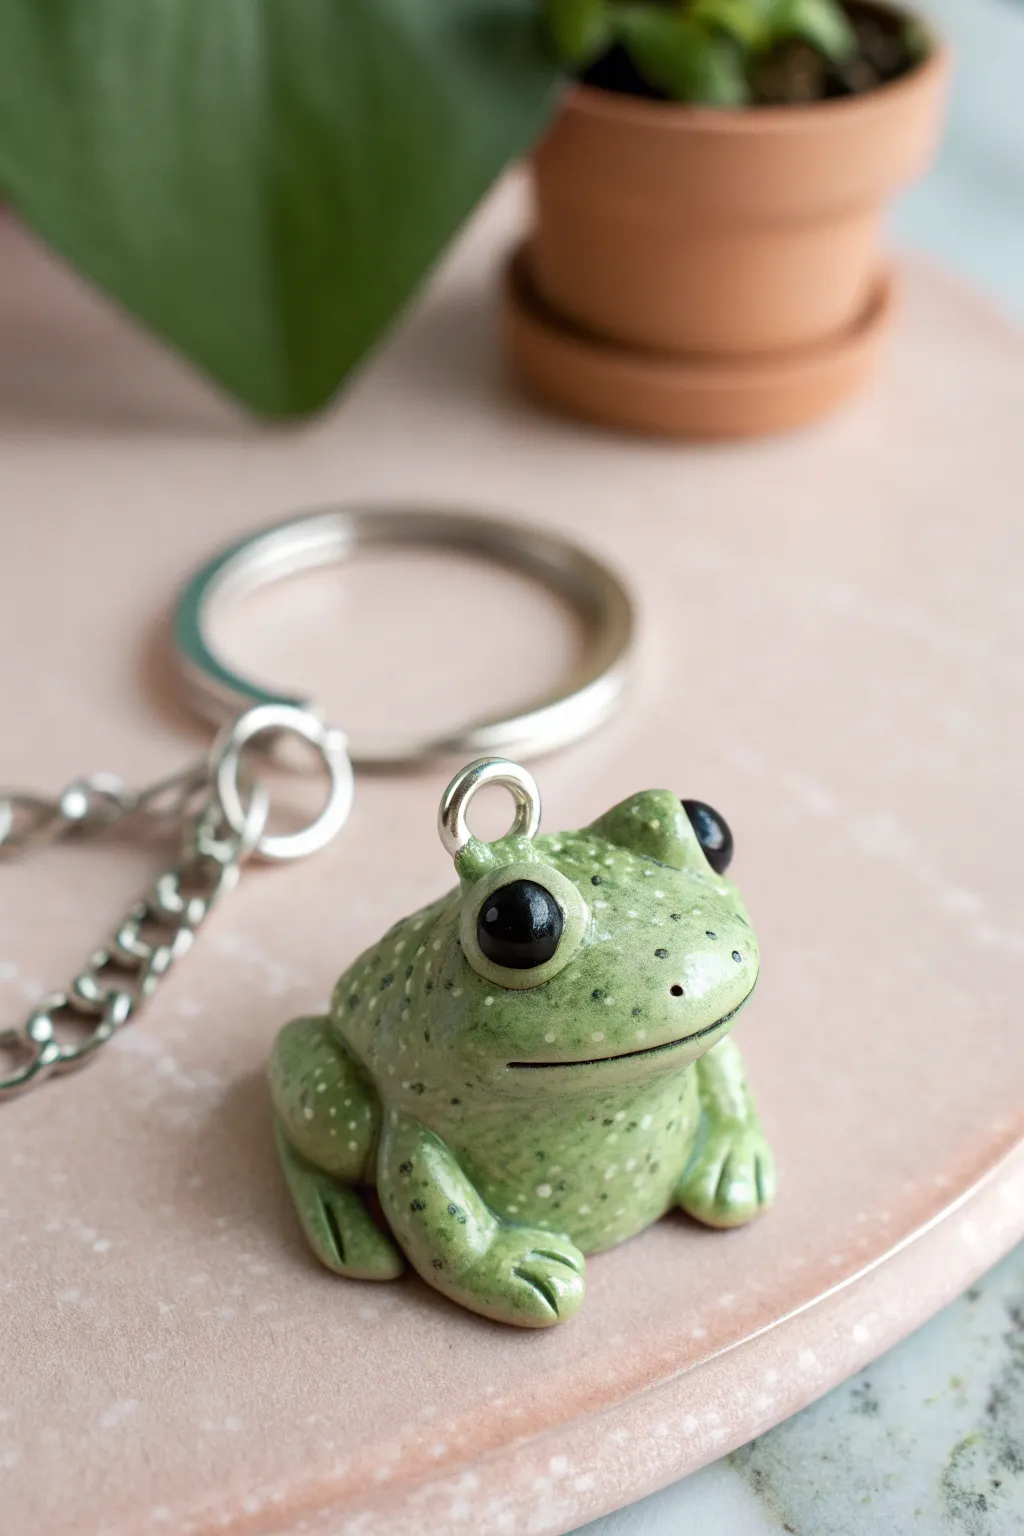
This adorable polymer clay frog keychain charms with its speckles and oversized, innocent eyes. The slightly textured finish and glossy gaze make this little amphibian a delightful companion for your keys or backpack.
Step-by-Step Guide
Materials
- Polymer clay (Moss Green, Light Green, White, Black)
- Acrylic paints (Black, Dark Green, White)
- Dotting tool or toothpick
- Eye pin or screw eye
- Keychain hardware (jump ring and split ring)
- Sculpting tools (needle tool, small ball tool)
- Clear gloss glaze or UV resin
- Soft paintbrush
- Toothbrush (for texturing)
Step 1: Sculpting the Body
-
Mix the Base Color:
Start by mixing moss green with a tiny amount of white clay to create a soft, natural frog green. You want a color that feels earthy but lively. -
Form the Torso:
Roll a medium-sized ball of your green clay mixture into a rounded teardrop shape. Flatten the bottom slightly so the frog sits stably on your work surface; this will be the main body. -
Create the Back Legs:
Roll two smaller balls of green clay into thick logs. Bend them gently into a ‘V’ shape to mimic folded frog legs. -
Attach the Thighs:
Press the folded legs onto the sides of the body towards the back. Blend the upper seam into the body using a sculpting tool so it looks like one continuous piece of clay. -
Shape the Front Legs:
Roll two smaller logs for the forearms. Attach these to the front of the chest area, angling them slightly outward to support the frog’s sitting pose. -
Detail the Toes:
Use a needle tool or a small knife to gently press indentations into the ends of all four limbs, creating distinct toes. I like to round the tips slightly with my finger for a softer look. -
Add Texture:
To mimic real frog skin, gently tap a clean toothbrush over the back and top of the head. This subtle stippling adds depth and realism to the surface.
Texturing Tip
If you don’t have a toothbrush for texture, a ball of crumpled aluminum foil rolled over the raw clay creates a perfect bumpy skin effect.
Step 2: Face and Hardware
-
Form Eye Sockets:
Use a large ball tool to press two significant indentations on the top of the head where the eyes will go. You want these to be quite prominent. -
Create the Eyes:
Roll two balls of black clay that fit snugly into your sockets. Press them in firmly—they should bulge out slightly, giving that classic buggy-eyed frog expression. -
Shape the Eyelids:
Roll two tiny snakes of green clay. Wrap them over the top of the black eyes to create eyelids, blending the clay onto the head so it looks integrated. -
Carve the Mouth:
Use a needle tool or a thin blade to cut a wide, slightly curved smile across the face. Make the cut deep enough to be visible after baking. -
Insert the Hardware:
Insert your eye pin or screw eye into the top center of the frog’s head. You may want to add a dab of liquid clay or Bake & Bond to the shaft for extra security. -
Bake the Piece:
Bake the frog according to your clay manufacturer’s instructions (usually 275°F/135°C for 15-30 minutes per 1/4 inch thickness). Let it cool completely.
Try This Twist
Make it a dart frog! Instead of green speckles, create a bright blue or red body and paint bold black patterns on the back.
Step 3: Painting and Finishing
-
Add Speckles:
Using a very fine brush or a toothpick, gently splatter or dot a mix of diluted white and light green paint across the frog’s back and sides for that speckled texture. -
Deepen the Texture:
Add tiny, intentional dots of dark green paint randomly among the lighter speckles to create contrast and mimic warts. -
Highlight the Eyes:
Once the speckles are dry, seal the black eyes with a thick layer of high-gloss glaze or UV resin. This makes them look wet and alive. -
Seal the Body:
Apply a matte or satin varnish over the green skin areas to protect the paint without making the frog look unnaturally shiny like plastic. -
Assemble the Keychain:
Once all glazes are fully cured, attach your jump ring and keychain hardware to the eye pin using pliers.
Now your charming little green friend is ready to hop onto your keys and keep you company all day

Mini Penguin With Scarf
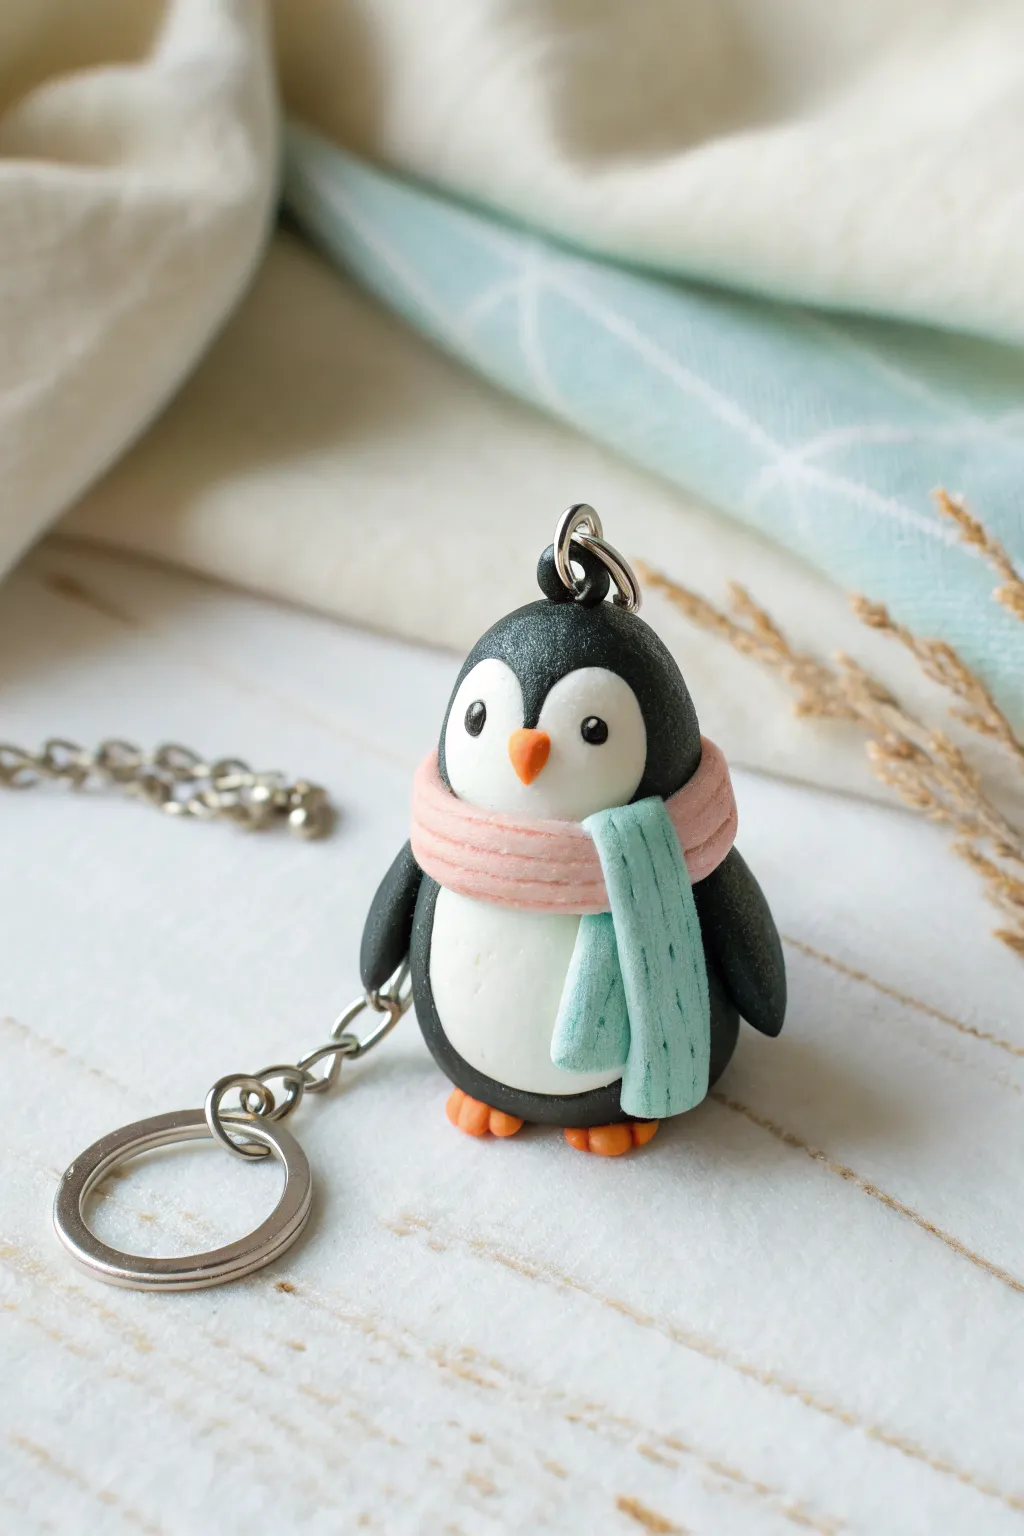
This adorable polymer clay penguin is bundled up for the cold and ready to keep your keys company. With its charming pastel scarf and rosy cheeks, this project is a perfect beginner-friendly introduction to sculpting small, durable charms.
Step-by-Step Tutorial
Materials
- Polymer clay (black, white, orange, pastel pink, pastel mint green)
- Dotting tools or ball stylus tool
- Keyring hardware with screw eye pin
- Super glue or strong craft adhesive
- Gloss glaze (optional)
- Small blade or clay knife
- Needle tool
- Oven for baking
Step 1: Shaping the Body
-
Prepare the Base:
Start by conditioning a chunk of black clay until it’s soft and pliable. Roll it into a smooth ball, then gently taper the top half to create an egg shape. This will be the penguin’s main body. -
Flatten the Bottom:
Tap the wider bottom of your egg shape against your work surface. This creates a flat base so the penguin can sit upright without rolling away. -
Add the Hook:
If you are baking your eye pin directly into the clay, insert the screw eye pin into the very top center of the head now. If you plan to glue it later, make a pilot hole with a needle tool.
Step 2: Creating the Face & Belly
-
Make the Belly:
Condition a smaller piece of white clay and roll it into a ball. Flatten it into an oval shape with your fingers or a roller. -
Attach the Belly:
Press the white oval onto the front lower half of the black body. Smoothing the edges gently can help it seamlessly attach without leaving fingerprints. -
Form the Face Mask:
Create a heart-like shape from white clay by flattening a small ball and indenting the top center. The bottom of the heart should be rounded, not pointed. -
Position the Features:
Place this white heart shape onto the face area, slightly overlapping the top of the belly patch. -
Add Eyes:
Use a small ball tool to make two tiny indents in the white face mask. Press tiny balls of black clay into these sockets for eyes, then add microscopic specks of white clay for that cute ‘sparkle’ reflection. -
Sculpt the Beak:
Roll a tiny amount of orange clay into a cone. Attach it between the eyes, pointing slightly downward.
Clean Clay Tip
White clay picks up everything! Wipe your hands and work surface thoroughly with baby wipes or rubbing alcohol before handling the white parts to keep your penguin pristine.
Step 3: Wings and Feet
-
Shape the Wings:
Create two teardrop shapes from black clay. These should be flattened slightly but keep some volume. -
Attach Wings:
Press the wings onto the sides of the body. I like to curve distinct tips slightly outward to give the penguin a bit of movement. -
Make the Feet:
Roll two small balls of orange clay and flatten them into ovals. Use your knife tool to press two small lines into the front of each to create toes. -
Attach Feet:
Place the feet under the front of the body, just peeking out from beneath the white belly.
Winter Wear
Customize your penguin by adding a tiny matching beanie hat with a pom-pom in the same colors as the scarf.
Step 4: The Scarf Accessory
-
Mix Scarf Colors:
For the scarf, prepare your pastel pink and mint green clay. Roll the pink clay into a long, thin snake. -
Wrap the Neck:
Flatten the pink snake slightly to look like a strip of fabric. Wrap it around the penguin’s neck, covering the seam where the white belly meets the black neck. -
Add Scarf Texture:
Use a needle tool to gently etch horizontal lines across the pink scarf loop to mimic a knit texture. -
Create Green Tails:
Make two small, flattened strips of mint green clay. Use your knife to fringe the bottom edges. -
Layer the Scarf:
Attach the green strips so they hang down over the belly from the pink neck loop. Add texture lines to these strips as well to match the knit look.
Step 5: Baking and Assembly
-
Bake:
Bake the penguin according to your clay manufacturer’s instructions (usually around 275°F/130°C for 15-30 minutes). Let it cool completely. -
Secure Hardware:
If you didn’t bake the pin in, unscrew it now, add a dab of super glue to the threads, and screw it back tightly into the pilot hole. -
Glaze:
For extra durability and shine, apply a thin coat of gloss glaze to the eyes and beak, or the entire figure if you prefer a shiny finish. -
Attach Chain:
Use pliers to seek open the jump ring on your keychain hardware and loop it through the eye pin, closing it securely.
Attach this chilly little friend to your backpack or keys and enjoy your handmade accessory

The Complete Guide to Pottery Troubleshooting
Uncover the most common ceramic mistakes—from cracking clay to failed glazes—and learn how to fix them fast.
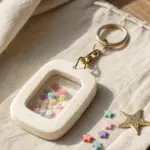
Smiling Cloud With Rainbow Drops
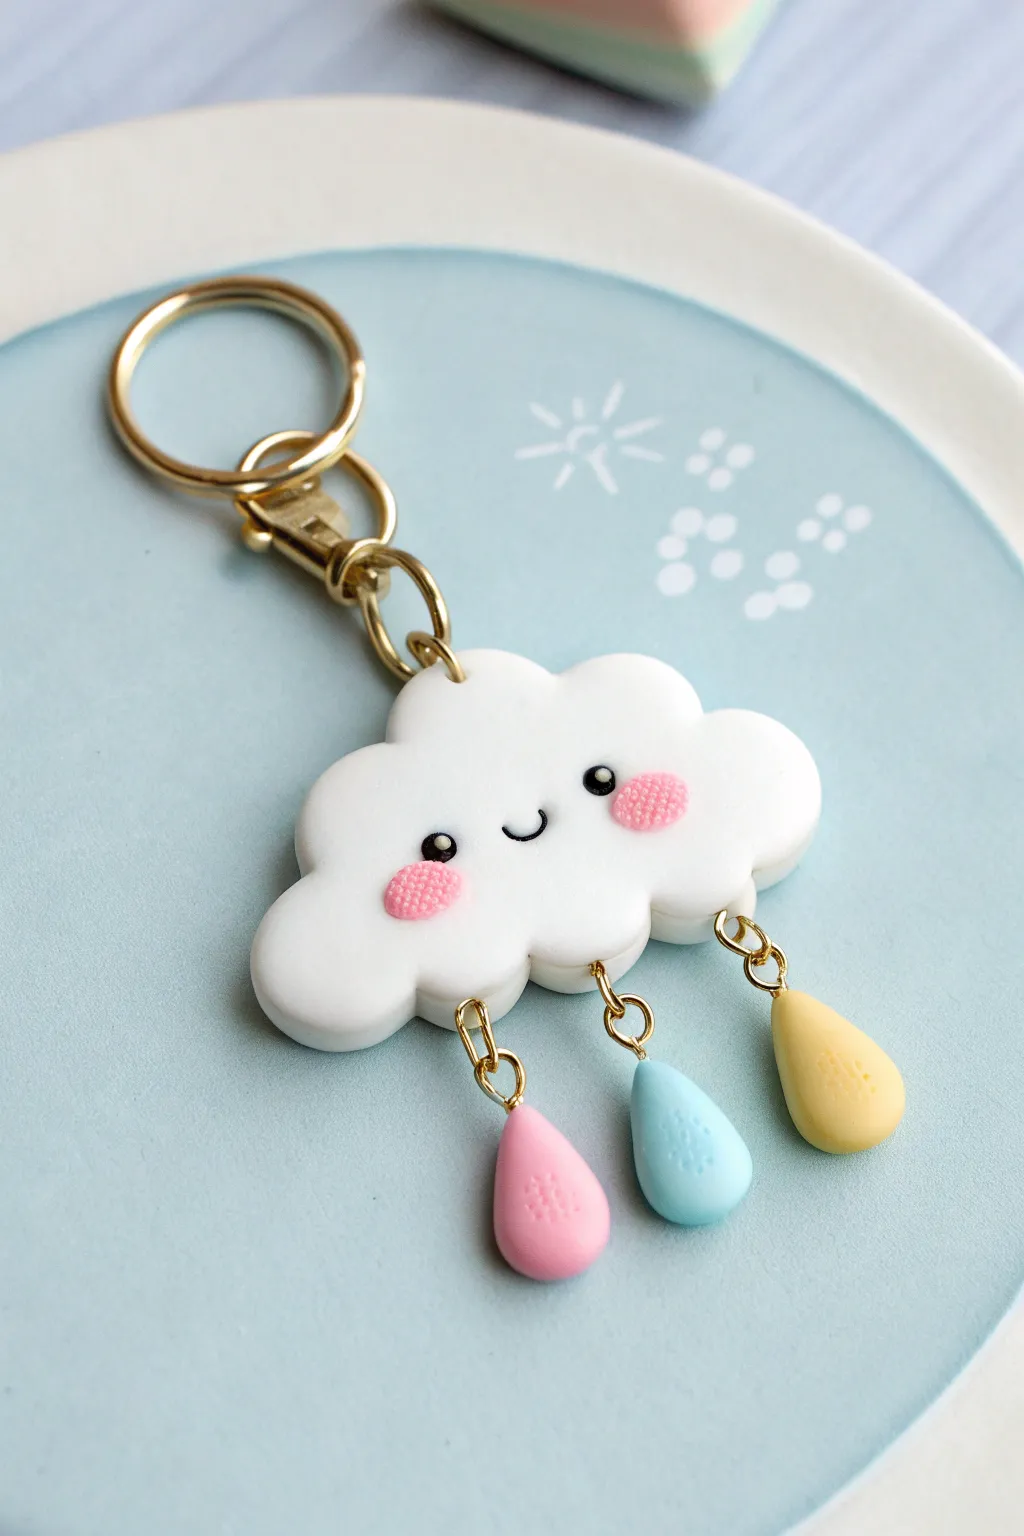
Brighten up your keys or backpack with this adorable smiling cloud charm. Featuring a fluffy white cloud body and three sweet pastel raindrops dangling below, this polymer clay project is sure to bring sunshine to any rainy day.
Step-by-Step Guide
Materials
- White polymer clay
- Pastel pink polymer clay
- Pastel blue polymer clay
- Pastel yellow polymer clay
- Black polymer clay
- Dotting tool or ball stylus
- Needle tool
- Eye pins (gold)
- Jump rings (gold)
- Keychain hardware (gold clasp and ring)
- Rolling pin or pasta machine
- Cloud shaped cutter (optional, or cut by hand)
- Pliers
- Gloss glaze (optional)
Step 1: Shaping the Cloud
-
Condition the Clay:
Begin by thoroughly conditioning your white polymer clay until it is soft and pliable. Roll it out into a smooth slab that is approximately 1/4 inch thick so it’s sturdy enough for a keychain. -
Cut the Shape:
Use a cloud-shaped cutter to punch out your main form. If you don’t have a cutter, lightly sketch a cloud shape onto the clay using a needle tool and carefully cut it out with a craft knife. -
Soften the Edges:
Gently rub your finger along the cut edges of the cloud to round them off. This removes sharp angles and gives the cloud that soft, puffy look shown in the photo. -
Insert Hardware Loops:
Take three small gold eye pins and trim them if the stems are too long. Carefully push them into the bottom edge of the cloud, spacing them evenly apart for the raindrops. I find adding a tiny dab of liquid clay (‘Bake and Bond’) on the pin helps secure it. -
Add the Top Loop:
Insert a larger gold eye pin into the exact center of the top edge of the cloud. This will connect to your main keychain hardware later.
Keeping White Clean
White clay attracts dust like a magnet! Keep a pack of baby wipes nearby and vigorously clean your hands and work surface before touching the white clay.
Step 2: Adding the Face
-
Create the Cheeks:
Take a tiny amount of pastel pink clay and roll two small, equal-sized balls. Press these onto the cloud face, flattening them slightly to create rosy cheeks. -
Texture the Cheeks:
Using a needle tool or a very fine dotting tool, gently stipple the surface of the pink cheeks to give them a textured, fabric-like appearance. -
Form the Eyes:
Roll two minuscule balls of black clay. Press them gently onto the face just inside the pink cheeks. Ensure they are evenly spaced for a cute, wide-set look. -
Add Highlights:
For that extra sparkle, take the tiniest speck of white clay possible and place it on the upper right side of each black eye pupil. -
Make the Smile:
Roll a very thin snake of black clay. Cut a tiny U-shape segment and gently press it into the center of the face between the eyes to create a happy little smile.
Step 3: Crafting the Raindrops
-
Shape the Drops:
Condition your pink, blue, and yellow clays. From each color, form a teardrop shape—rounded at the bottom and tapered to a point at the top. Keep them slightly chunky. -
Add Texture:
Using your dotting tool, you can add a subtle stippled texture to the front of the raindrops or leave them smooth depending on your preference. -
Insert Eye Pins:
Insert a small eye pin into the top point of each teardrop. Again, a bit of liquid clay on the metal helps ensure they don’t pull out after baking. -
Baking:
Arrange the cloud and individual raindrops on a baking tile or parchment paper. Bake according to your clay manufacturer’s instructions (usually around 275°F or 130°C for 15-30 minutes).
Make it Sparkle
Brush a light coat of UV resin or glossy glaze over the raindrops and the cloud’s eyes after baking. This makes the colors pop and adds durability.
Step 4: Assembly
-
Cool Down:
Allow all pieces to cool completely before handling. Polymer clay is strongest once it has returned to room temperature. -
Connect the Raindrops:
Using pliers, open a small gold jump ring. Thread it through the eye pin on the pink raindrop and the corresponding loop on the left side of the cloud. Close the ring securely. Repeat for the blue (middle) and yellow (right) drops. -
Attach Keychain:
Open the jump ring attached to your main keychain clasp. Loop it through the top eye pin on your cloud and close it tight with your pliers.
Your adorable weather-themed accessory is now ready to tag along on all your daily adventures
Donut With Sprinkles Charm
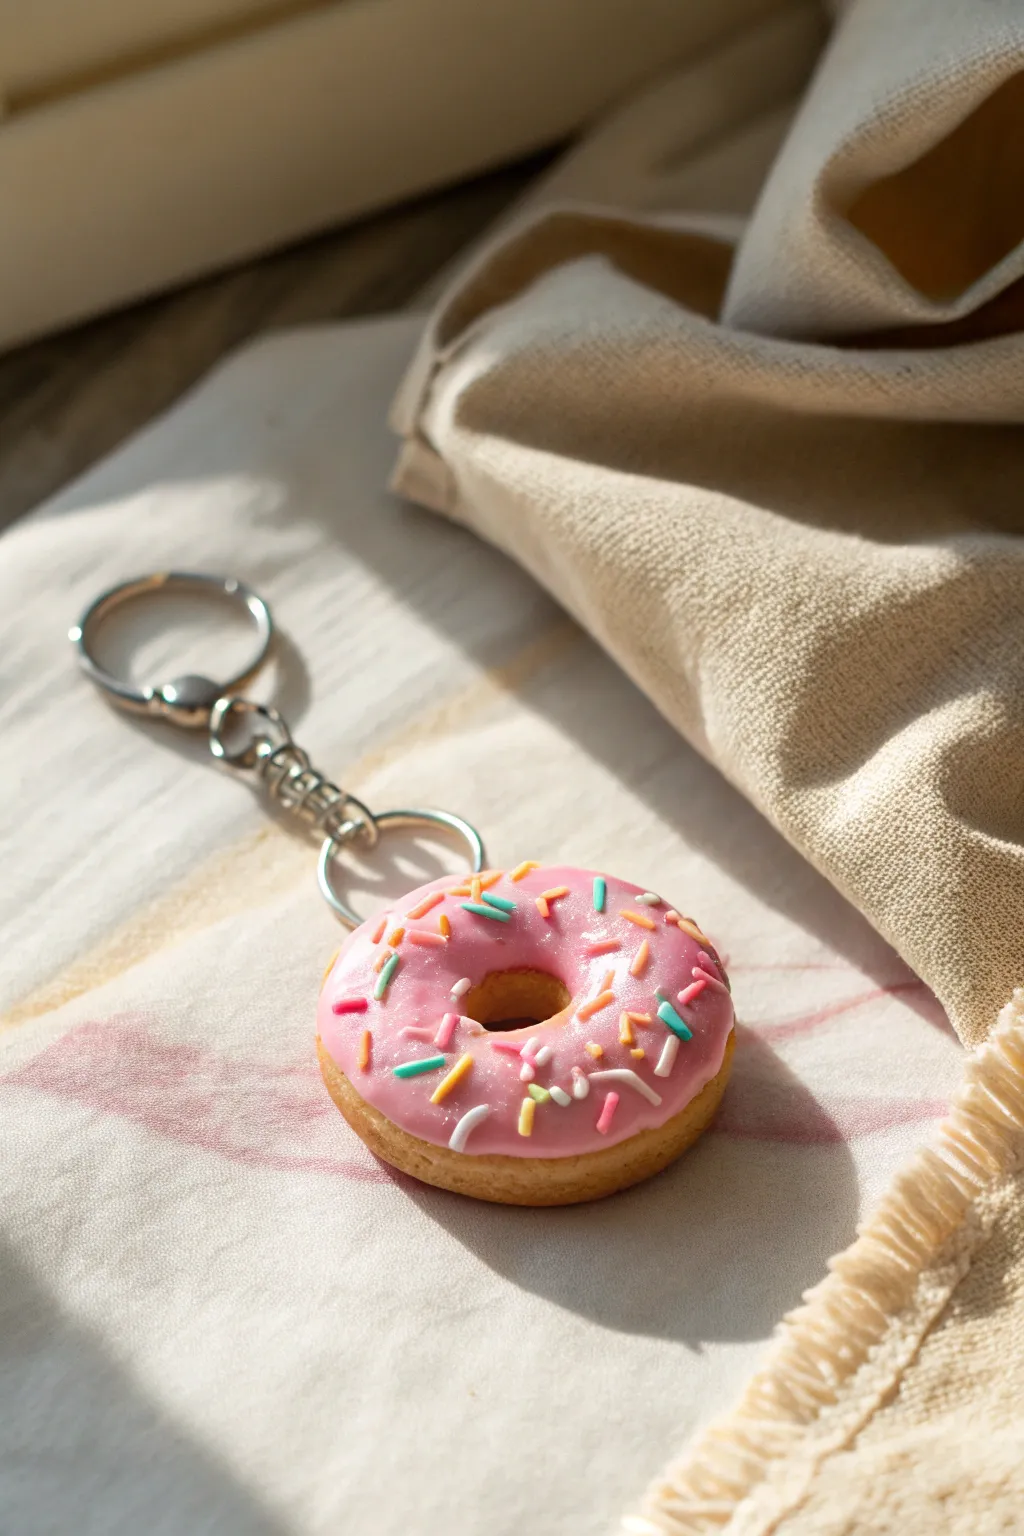
Capture the sweetness of a bakery favorite with this adorable polymer clay donut keychain. The glossy pink frosting and tiny, hand-rolled sprinkles create a realistic miniature treat that looks good enough to eat.
Detailed Instructions
Materials
- Polymer clay (beige/tan, pink, white, blue, yellow)
- Liquid polymer clay (translucent or white)
- Keychain hardware with jump ring
- Pointed sculpting tool or toothpick
- Old toothbrush or sandpaper (for texturing)
- Soft pastel chalks in orange and brown
- Paintbrush
- Gloss glaze or UV resin
- Eye pin
- Craft knife
Step 1: Shaping the Base
-
Mix the dough color:
Start by conditioning your beige or tan polymer clay until it is soft and pliable. If the color feels too dark, mix in a little white clay to achieve a light, raw dough shade. -
Form the donut shape:
Roll the clay into a smooth ball, approximately 1 inch in diameter, then gently flatten it into a thick disc shape. Round off the edges with your fingers so it looks puffy rather than sharp. -
Create the center hole:
Use the handle of a paintbrush or a large dotting tool to push a hole through the center of the disc. Gently widen the hole by rotating the tool, smoothing the inner edges as you go. -
Texture the dough:
Take an old toothbrush or a piece of texturing sandpaper and gently tap it all over the surface of the donut. This creates a realistic baked texture, removing any fingerprints. -
Add shading:
Scrape some orange and brown soft pastel chalk into a fine powder. Use a soft paintbrush to dust the powder lightly over the textured clay, focusing on the edges for a golden-brown baked look.
Frosting Fix
If your frosting is too runny and dripping off, let the mixture sit for 15 minutes before applying, or add a tiny bit more solid clay to thicken it up.
Step 2: Frosting and Sprinkles
-
Prepare the frosting:
Mix pink polymer clay with liquid polymer clay in a small bowl or on a tile. Continue mixing and adding liquid clay until you reach a consistency similar to thick frosting or cake batter. -
Apply the frosting:
Using a toothpick or small tool, carefully spread the pink mixture onto the top of your donut. Tease the mixture down the sides slightly in random spots to mimic natural drips. -
Refine the frosting edge:
Clean up the inner hole area if any frosting dripped too far. The frosting should look thick and rounded, sitting naturally on top of the ‘baked’ dough. -
Make the sprinkles:
Roll out extremely thin snakes of white, blue, pink, and yellow clay. Bake these thin strands for just 3-5 minutes so they harden, then chop them into tiny bits with a craft knife. -
Decorate the donut:
While the pink frosting is still wet and unbaked, sprinkle your chopped clay bits over the top. Gently press them down with a finger so they embed securely into the frosting. -
Insert the hardware:
Trim an eye pin to size and insert it into the side or top of the donut, depending on how you want it to hang. I usually wiggle it slightly to ensure the clay grips the wire.
Step 3: Finishing Touches
-
Final Bake:
Bake the entire donut according to your clay manufacturer’s instructions, typically around 275°F (130°C) for 15-20 minutes. Let it cool completely before handling. -
Secure the pin:
Once cool, gently tug slightly on the eye pin. If it feels loose, pull it out, add a dab of super glue, and reinsert it immediately. -
Add the shine:
Coat only the pink frosting area with a gloss glaze or UV resin. Cure or dry thoroughly to give the icing that sticky, sweet, wet look. -
Attach the keychain:
Use pliers to open the jump ring on your keychain hardware. Loop it through the eye pin on the donut and close the ring securely.
Scented Treat
Mix a tiny drop of vanilla or strawberry fragrance oil into the clay dough before baking to make your keychain smell just like a real bakery treat!
Now you have a perpetual sweet treat to brighten up your keys or backpack


What Really Happens Inside the Kiln
Learn how time and temperature work together inside the kiln to transform clay into durable ceramic.
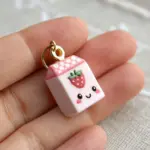
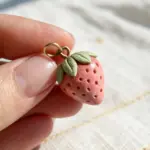
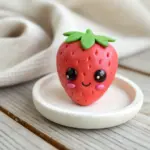
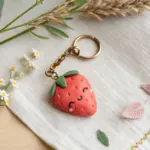
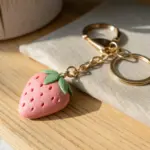
Strawberry With Cute Face
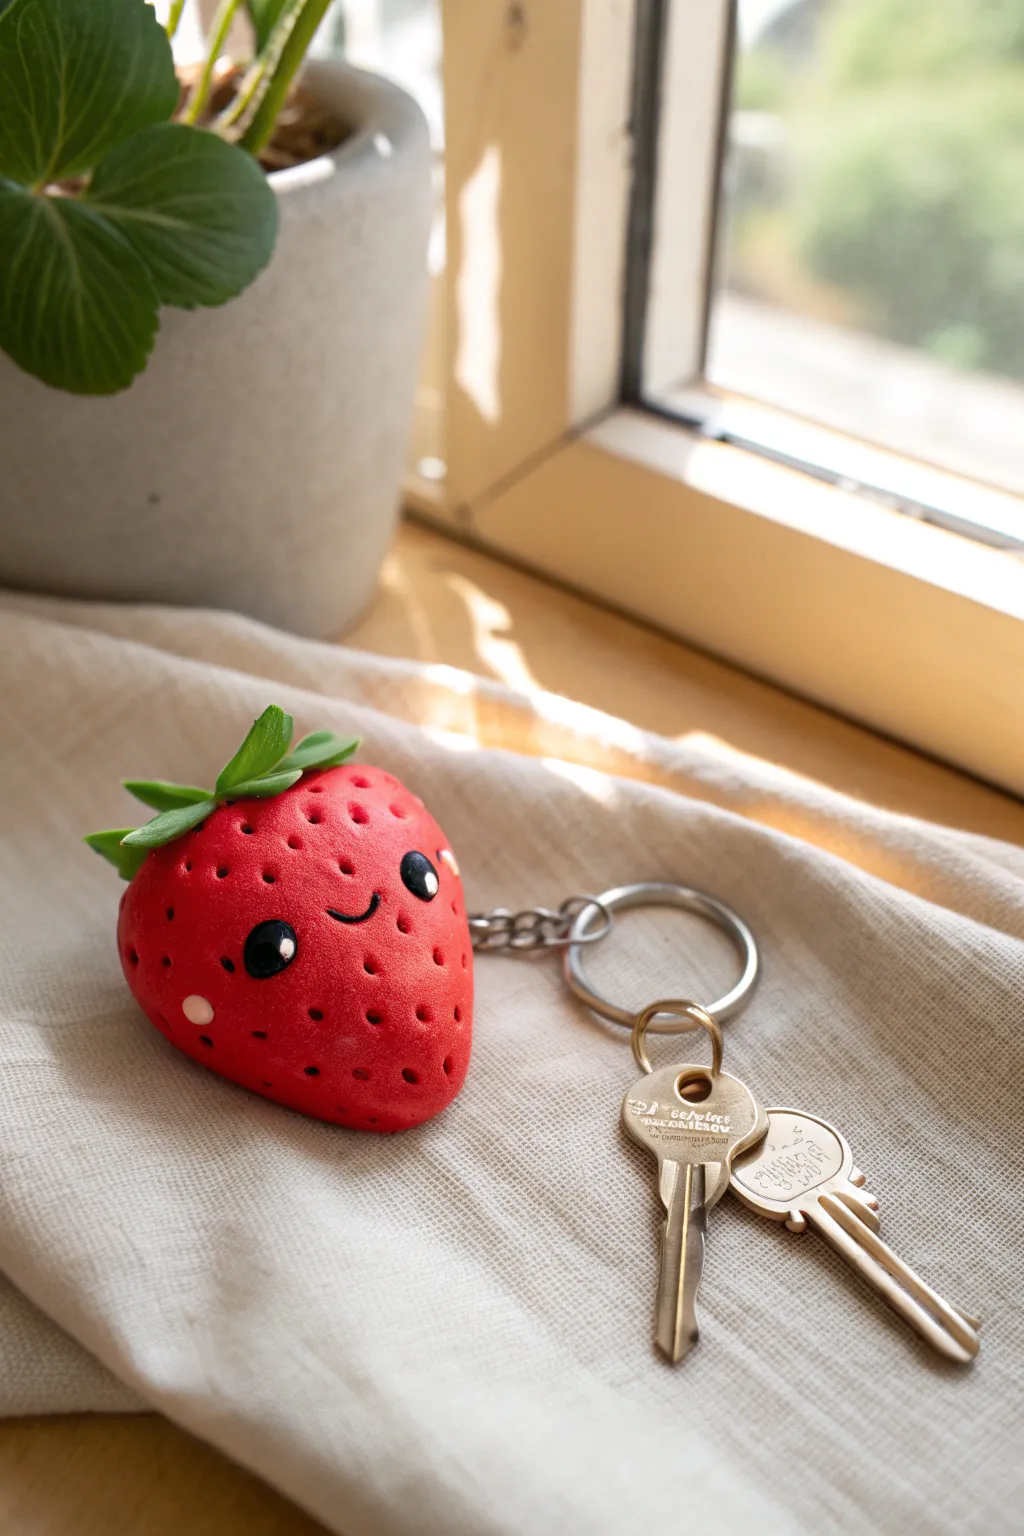
This adorable strawberry keychain brings a pop of summer fun to your everyday carry with its vibrant red color and charming little smile. Perfect for beginners, this polymer clay project results in a sturdy, cheerful accessory that looks almost good enough to eat.
Step-by-Step
Materials
- Polymer clay (Bright Red, Leaf Green, Black, White, Soft Pink)
- Eye pin (silver or gold tone)
- Keychain ring and jump ring
- Ball stylus tool (small)
- Needle tool or toothpick
- Clay blade or craft knife
- Rolling pin (acrylic or glass)
- Oven for baking
- Gloss glaze (optional)
Step 1: Shaping the Berry Body
-
Condition the red clay:
Start by taking a chunk of bright red polymer clay and kneading it in your hands until it becomes soft, pliable, and warm. -
Form the basic shape:
Roll the conditioned clay into a smooth ball about the size of a large walnut. -
Taper the strawberry:
Gently roll one end of the ball between your palms to create a subtle teardrop shape, flattening the wider top slightly so it isn’t perfectly round. -
Flatten the back:
Press the strawberry shape gently onto your work surface to flatten the back side slightly; this ensures it sits comfortably against your keys or bag without rolling around.
Fingerprint Fix
Before baking, lightly brush the clay with a tiny amount of baby oil or cornstarch to smooth away any accidental fingerprints.
Step 2: Adding Texture and Hardware
-
Create the seed texture:
Using a needle tool or a very small ball stylus, press tiny indentations all over the red surface to mimic strawberry seeds, spacing them somewhat evenly but keeping it organic. -
Insert the hardware:
Take a metal eye pin and trim it if it’s too long. Push the straight end directly into the center of the top (the wider end) of your strawberry. -
Secure the pin:
I like to add a tiny dab of liquid clay or Bake & Bond to the pin shaft before inserting it to ensure it never pulls out after baking.
Choco-Dipped Variant
Make the strawberry unique by dipping the bottom third in ‘chocolate’ (thick brown liquid clay) and adding polymer sprinkles before baking.
Step 3: Creating the Leafy Top
-
Roll out green clay:
Condition a small amount of leaf green clay and roll it flat with your roller to about 2mm thickness. -
Cut the leaves:
Using your craft knife, cut out a star-like shape with 5 or 6 points to represent the calmer. Alternatively, shape individual small teardrops of green clay. -
Attach the leaves:
Thread the green shape over the eye pin loop and press it onto the top of the strawberry. -
Add detail to greens:
Use your needle tool to press a central line down each leaf to look like a vein, and gently curl the tips upward for a bouncy, realistic effect.
Step 4: Bringing the Face to Life
-
Make the eye sockets:
Use a medium-sized ball tool to press two indentations into the front of the strawberry face where you want the eyes to sit. -
Insert the eyes:
Roll two tiny balls of black clay and press them gently into the sockets you just made. -
Add the sparkle:
Roll extremely tiny specks of white clay and place one on the upper right side of each black eye to create a ‘sparkle’ highlight. -
Create the smile:
Roll a very thin ‘snake’ of black clay and cut a tiny U-shape section. Press this gently between the eyes. -
Add rosy cheeks:
Take two small flattened circles of soft pink clay and press them onto the cheeks, just below and to the outside of the eyes.
Step 5: Baking and Assembly
-
Bake the piece:
Place your strawberry on a tile or baking sheet and bake according to your specific clay brand’s instructions (usually 275°F/130°C for roughly 30 minutes). -
Cool down:
Let the piece cool completely inside the oven or on a rack before handling it, as warm clay is fragile. -
Glaze (Optional):
For extra durability and shine, brush a thin layer of gloss glaze over the strawberry body and leaves. -
Attach ring:
Use pliers to open a jump ring, loop it through the eye pin on your strawberry and your keychain ring, and close it securely.
Enjoy carrying your sweet new friend around on all your daily adventures
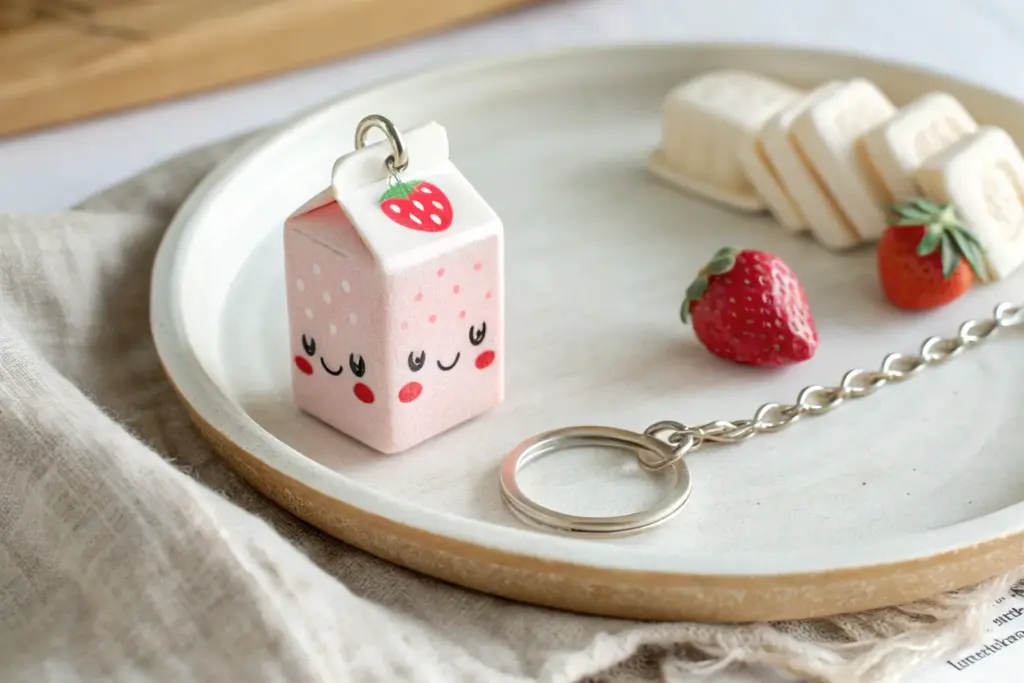
Boba Cup With Mini Straw
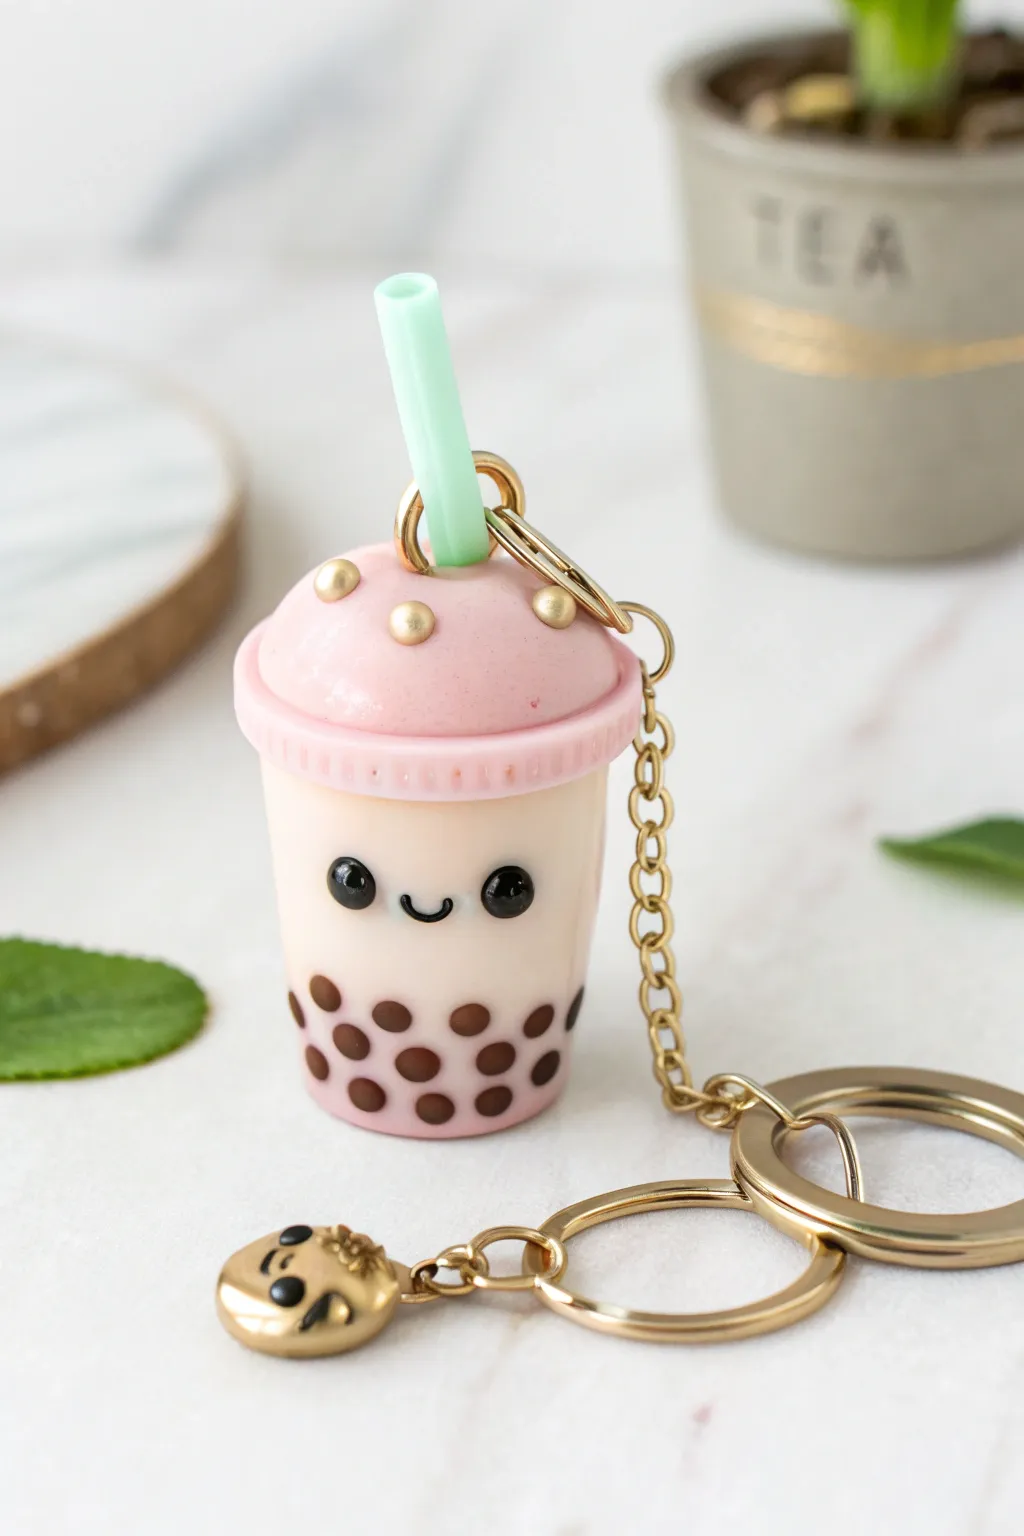
Capture the sweetness of your favorite drink with this adorable polymer clay boba tea keychain. With its happy little face, floating tapioca pearls, and pastel pink lid, this charm adds a refreshing pop of cuteness to any bag or set of keys.
Step-by-Step Tutorial
Materials
- Polymer clay (translucent white/beige, pastel pink, mint green, dark brown, black)
- Liquid polymer clay (translucent)
- Gold acrylic paint or gold microbeads
- Gloss glaze or UV resin
- Headpin or eye pin
- Gold keychain hardware and jump rings
- Small gold charm (optional, like a cookie)
- Needle tool or dotting tool
- Clay blade
- Small circular cutter (optional)
- Oven
- Fine-grit sandpaper (optional)
- Super glue
Step 1: Creating the Cup & Boba
-
Mix the perfect tea color:
Start by mixing translucent clay with a tiny amount of white and barely a touch of brown or orange. You want a creamy, milky tea color that isn’t fully opaque, which gives it a realistic liquid look. -
Form the cup base:
Roll your tea-colored clay into a smooth cylinder. Taper slightly towards the bottom so it resembles a classic plastic takeout cup. -
Roll the tapioca pearls:
Take your dark brown clay and roll out a very thin snake. Cut tiny, equal-sized bits and roll each one into a small sphere to create the boba pearls. -
Attach the lower pearls:
Press these dark brown spheres gently onto the bottom third of your cup cylinder. Flatten them just slightly so they look like they are pressing against the plastic. -
Add the smile:
Roll extremely thin ropes of black clay for the mouth and two small balls for eyes. Press them onto the center of the cup. Add tiny white dots to the eyes for a ‘kawaii’ sparkle.
Step 2: Lid & Straw Details
-
Whittle the straw:
Roll a small snake of mint green clay. Insert a thin wire or needle tool down the center to make it hollow, cut it to length, and slice the top at an angle. -
Form the dome lid:
Roll a ball of pastel pink clay. Flatten the bottom and smooth it into a dome shape that matches the diameter of your cup. -
Create the lid rim:
Roll a flat strip of pink clay. Wrap this around the base of your pink dome to create the distinct rim of a plastic lid. -
Texture the rim:
Use a dull knife or needle tool to gently indent vertical lines all around the pink strip you just attached, mimicking the grip ridges found on real cup lids. -
Insert hardware and straw:
Poke a hole in the center of the lid for the straw. Insert the mint straw. Push a gold eye pin or headpin firmly into the top of the lid, slightly off-center. -
Decorate the lid:
Make tiny indentations on the pink dome and press gold microbeads into the clay for decoration. Alternatively, roll tiny balls of clay to paint gold later. -
Secure the lid:
Gently press the finished pink lid onto the top of your tea-colored cup base, smoothing the seam underneath the rim so they adhere together.
Fixing Fingerprints
Before baking, lightly brush the clay with a little baby oil or cornstarch. This smoothes out stray fingerprints and dust without altering the shape.
Step 3: Baking & Assembly
-
Bake the charm:
Place your assembled cup on a baking tile. Bake according to your clay manufacturer’s instructions, usually around 275°F (130°C) for 15-20 minutes. -
Cool and inspect:
Let the piece cool completely inside the oven to prevent cracking. Once cool, check that the eye pin is secure; if it’s loose, pull it out, add a dab of super glue, and reinsert. -
Paint details:
If you used clay balls instead of beads on the lid, carefully paint them with metallic gold acrylic paint using a fine detail brush. -
Glaze for shine:
Apply a coat of gloss glaze or UV resin over the entire piece. I find that resin gives the best ‘plastic cup’ shine and durability. -
Cure the finish:
If using resin, cure under a UV lamp. If using glaze, let it air dry completely in a dust-free environment. -
Attach the hardware:
Using pliers, open a jump ring and attach your gold keychain loop to the eye pin on the cup. -
Add the extra charm:
Connect a second jump ring to the chain and attach the small gold cookie charm for that extra bit of personality seen in the photo.
Make It Shaker
Hollow out the cup before baking and fill it with baby oil and resin beads for a real liquid shaker effect, capping it with UV resin.
Now you have a sweet little tea companion to brighten up your daily travels

TRACK YOUR CERAMIC JOURNEY
Capture glaze tests, firing details, and creative progress—all in one simple printable. Make your projects easier to repeat and improve.
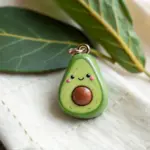
Avocado Half With Pit Smile
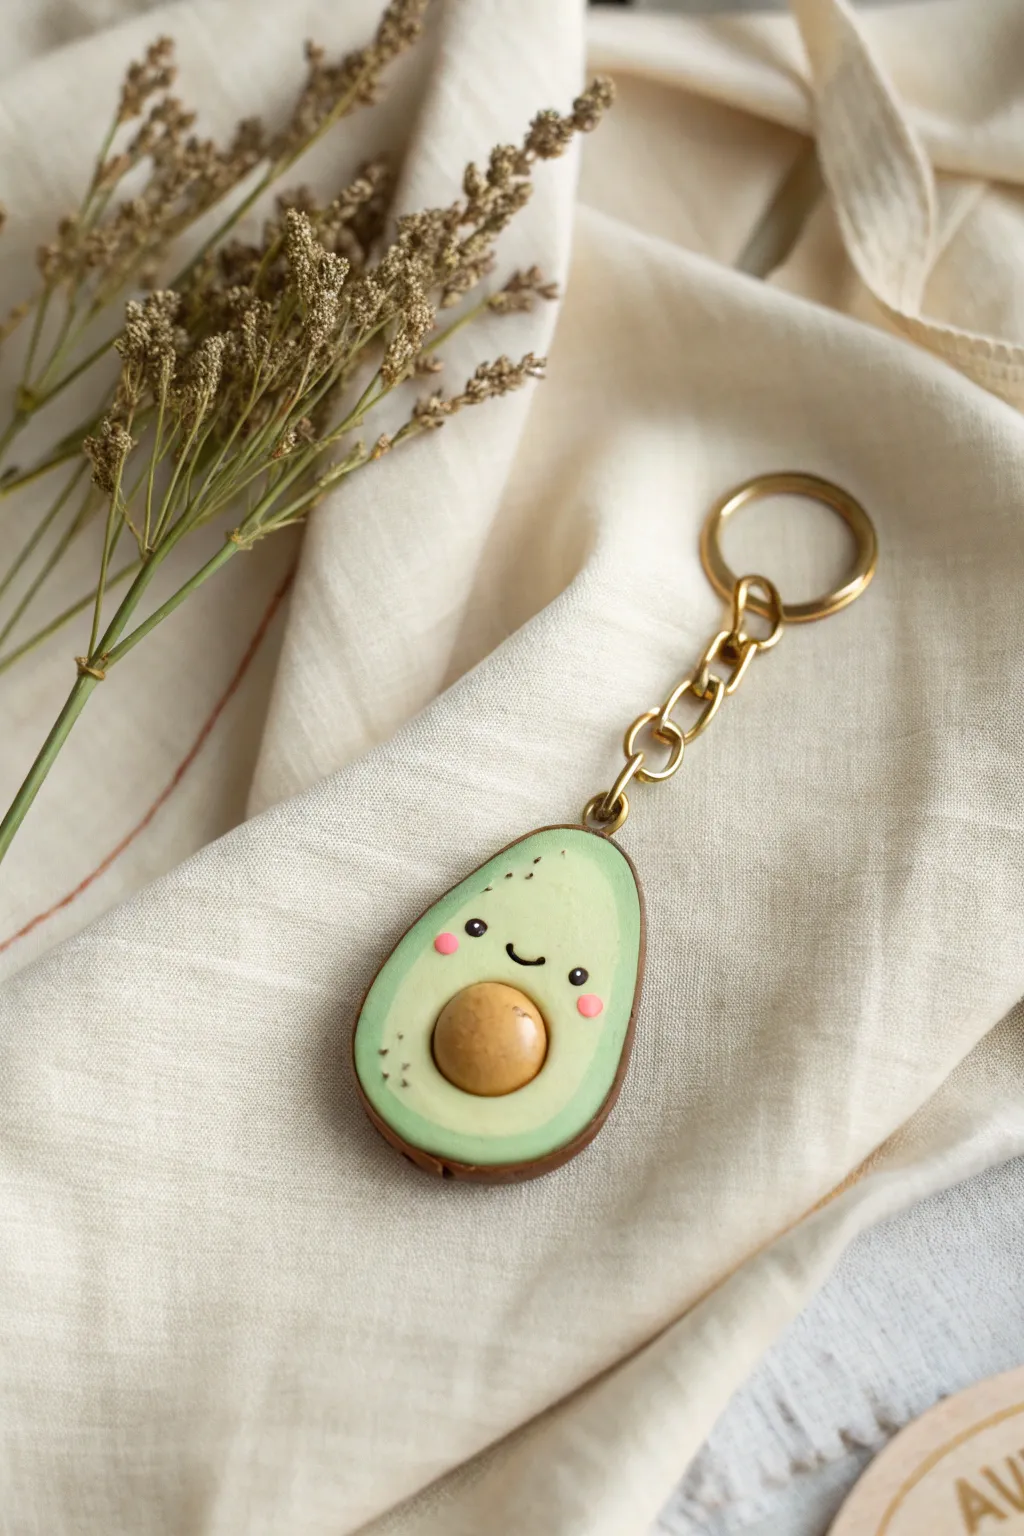
This adorable avocado half is ready to hang out on your keys with its charming little smile and realistic seed. The project features soft shading for dimension and a sweet, kawaii face that brings the fruit to life.
How-To Guide
Materials
- Polymer clay in light green (flesh), dark green (skin), light brown (seed), and dark brown (backing)
- Black and pink polymer clay (for face features) or acrylic paint
- Rolling pin or pasta machine
- Circle cutter (small)
- Needle tool
- Soft pastel chalks (dark green, brown)
- Paintbrush or Q-tip
- Ball stylus tool
- Keychain hardware (jump ring and chain)
- Eye pin
- Gloss glaze (optional)
- Liquid polymer clay (optional)
Step 1: Shaping the Base
-
Condition the clay:
Start by thoroughly conditioning your light green clay until it is soft and pliable. This ensures there are no cracks when you shape it. -
Form the avocado shape:
Roll the light green clay into a smooth ball, then pinch and pull the top slightly to form a teardrop shape. Flatten it gently with your palm so it’s about 1/4 inch thick. -
Create the seed indentation:
Using a ball tool or your thumb, gently press into the wider bottom part of the teardrop to create a shallow hollow where the pit will sit. -
Texture the flesh:
For a realistic touch, take a stiff toothbrush or a texturing tool and lightly tap the surface of the light green clay to give it a subtle avocado texture. -
Prepare the backing:
Roll out a thin sheet of dark brown clay. Place your light green avocado shape on top of it and carefully cut around the edge with a craft knife to create the skin backing. -
Smooth the edges:
Gently press the dark brown backing against the light green flesh, blending the seam slightly with your finger so they adhere well without losing the skin definition.
Dirty Clay Blues?
Light clay picks up lint easily. Keep a scrap piece of white clay nearby to roll in your hands before handling the light green color to remove dust.
Step 2: Adding the Details
-
Make the pit:
Roll a ball of light brown clay that fits snugly into the indentation you made earlier. Press it in securely. I like to use a tiny drop of liquid clay here to ensure it bonds permanently. -
Shade the pit:
Scrape a little brown pastel chalk into dust. Use a small dry brush to dust the edges of the pit, giving it a rounder, roasted look. -
Shade the flesh:
Using a darker green pastel chalk, lightly shade the outer edges of the light green flesh where it meets the skin. This creates a gradient that mimics a real ripe avocado. -
Create eye sockets:
Use a small ball stylus to make two tiny indentations on the upper part of the avocado flesh for the eyes. This helps the clay eyes sit flush. -
Add the eyes:
Roll two minuscule balls of black clay and place them into the sockets. Press them down gently to flatten them. -
Add the cheeks:
Roll two tiny ovals of pink clay and place them just below and to the outside of the eyes. Flatten them for a sweet blush effect. -
Form the smile:
Roll an incredibly thin snake of black clay. Cut a tiny U-shape and carefully position it between the eyes using a needle tool. -
Add eye highlights:
For that spark of life, place a microscopic dot of white clay or white paint in the upper corner of each black eye.
Step 3: Assembly and Baking
-
Insert the eye pin:
Trim an eye pin to the right length (about half an inch). Push it straight down into the top center of the avocado. The loop should sit flush against the top edge. -
Secure the pin:
Gently pinch the clay around the pin stem to close any gaps ensuring it won’t pull out later. -
Bake the piece:
Place your avocado on a ceramic tile or baking sheet lined with parchment paper. Bake according to your polymer clay package instructions (usually around 275°F or 130°C for 15-30 minutes). -
Cool and glaze:
Let the piece cool completely. If you want protection or shine, apply a thin layer of polyurethane gloss varnish to the eyes and the pit. -
Attach hardware:
Open a jump ring with pliers, loop it through the eye pin, and attach your keychain clasp. Close the jump ring securely.
Pastel Power
Apply your pastel shading before baking! The heat helps set the powder into the raw clay so it doesn’t rub off later.
Your cheerful avocado is now ready to tag along on all your daily adventures.
Tiny Turtle Shell Charm
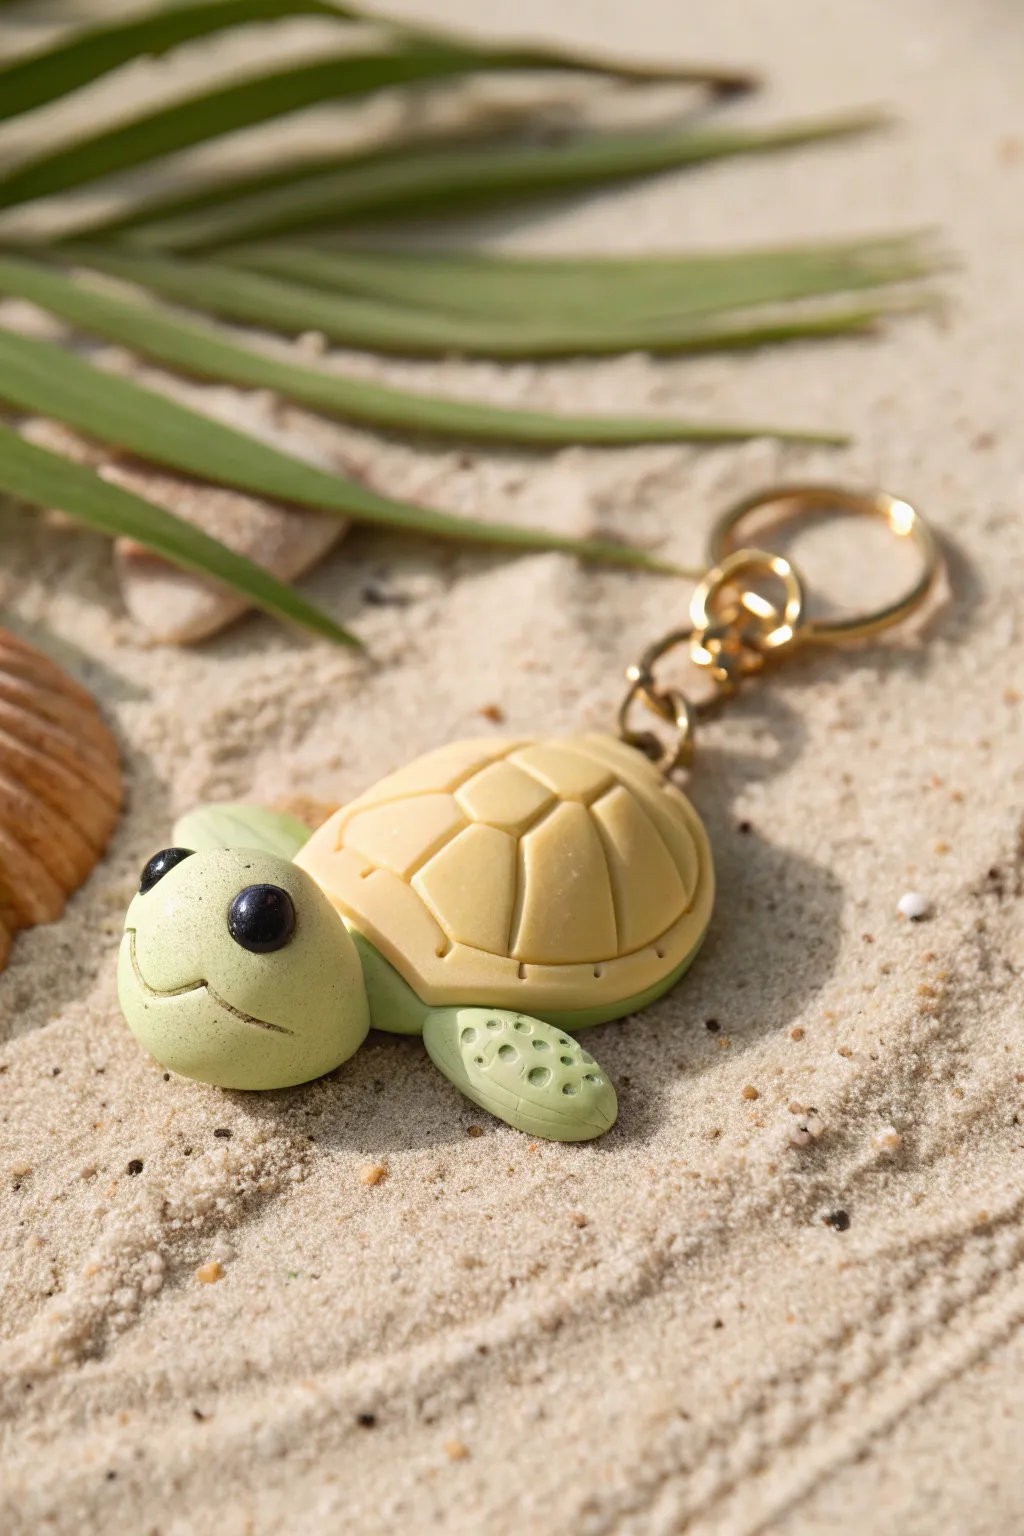
This adorable keychain features a cheerful sea turtle with a segmented shell and a sweet smile, perfect for reminding you of sunny beach days. The soft pastel tones and durable polymer clay make it a charming everyday accessory.
Step-by-Step
Materials
- Polymer clay in light pea green
- Polymer clay in pale butter yellow or cream
- Small amount of black polymer clay (or black beads)
- Small amount of white polymer clay
- Clay sculpting tools (needle tool, ball stylus)
- Eye pin or screw eye fixture
- Gold keychain hardware with jump rings
- Gloss glaze (optional)
- Small texturing tool or toothpick
- Baking sheet and parchment paper
Step 1: Sculpting the Body
-
Condition the Clay:
Begin by conditioning the light pea green clay until it is soft and pliable. Roll a medium-sized ball for the head and a slightly larger, flattened oval for the main body base. -
Shape the Head:
Refine the head shape into a smooth, slightly rounded teardrop. Gently flatten the wider end where the face will be. -
Attach Head to Body:
Press the narrower end of the head firmly onto the front of the flattened body base. Smooth the seam underneath with a sculpting tool to ensure a strong bond. -
Create the Flippers:
Roll four smaller balls of green clay. Flatten each into a teardrop or paddle shape to form the flippers. -
Detail the Flippers:
Use a small ball stylus or a blunt toothpick to press tiny indentations onto the top surface of each flipper, mimicking the texture of turtle skin. -
Assemble the Body:
Attach two flippers near the front (shoulders) and two near the back of the body base. Press them upwards slightly so they look like they are supporting the shell.
Secure That Pin
Add a dab of liquid polymer clay or Bake & Bond to the shaft of the eye pin before inserting it. This creates an unbreakable anchor once baked.
Step 2: Creating the Shell
-
Form the Shell Shape:
Condition the pale yellow clay. Roll it into a ball and then press it down onto a work surface to create a domed shape that fits perfectly over the green body base. -
Draw the Outline:
Using a needle tool, lightly sketch a rim around the bottom edge of the dome. Then, draw a hexagon in the very center of the shell. -
Carve the Segments:
Draw lines extending from the corners of the central hexagon down to the rim edge. Deepen these lines with your tool to create distinct, puffed segments. -
Attach the Shell:
Place the yellow shell onto the green body base, covering the attachment points of the flippers. Press down gently to secure it without squashing the dome. -
Add Shell Texture:
If desired, prick small dots along the rim of the shell for added detail, giving it a more finished look.
Step 3: Face and Hardware
-
Insert the Eye Pin:
Trim an eye pin to size. Insert it deeply into the top of the shell near the head, or horizontally through the shell’s top rim if preferred, ensuring the loop is accessible. -
Make the Eyes:
Roll two small balls of black clay. Press them onto the sides of the head. Add a microscopic dot of white clay to each eye for a reflective highlight. -
Carve the Smile:
Use a needle tool or small blade to carve a wide, curved smile into the face. I find curving the ends upward slightly gives it extra personality. -
Bake the Clay:
Preheat your oven according to the clay manufacturer’s instructions. Place the turtle on parchment paper and bake for the recommended time (usually 15-30 minutes). -
Cool Down:
Let the piece cool completely before handling. This hardens the clay fully. -
Attach Hardware:
Open a jump ring with pliers, loop it through the eye pin on the turtle and the gold keychain ring, then close it securely.
Natural Texture
Gently press a piece of sandpaper or a rough sponge over the green clay parts before baking to give the turtle’s skin a realistic, organic matte texture.
Now you have a sturdy little sea creature ready to guard your keys or attach to a backpack zipper
Bee With Puffy Stripes
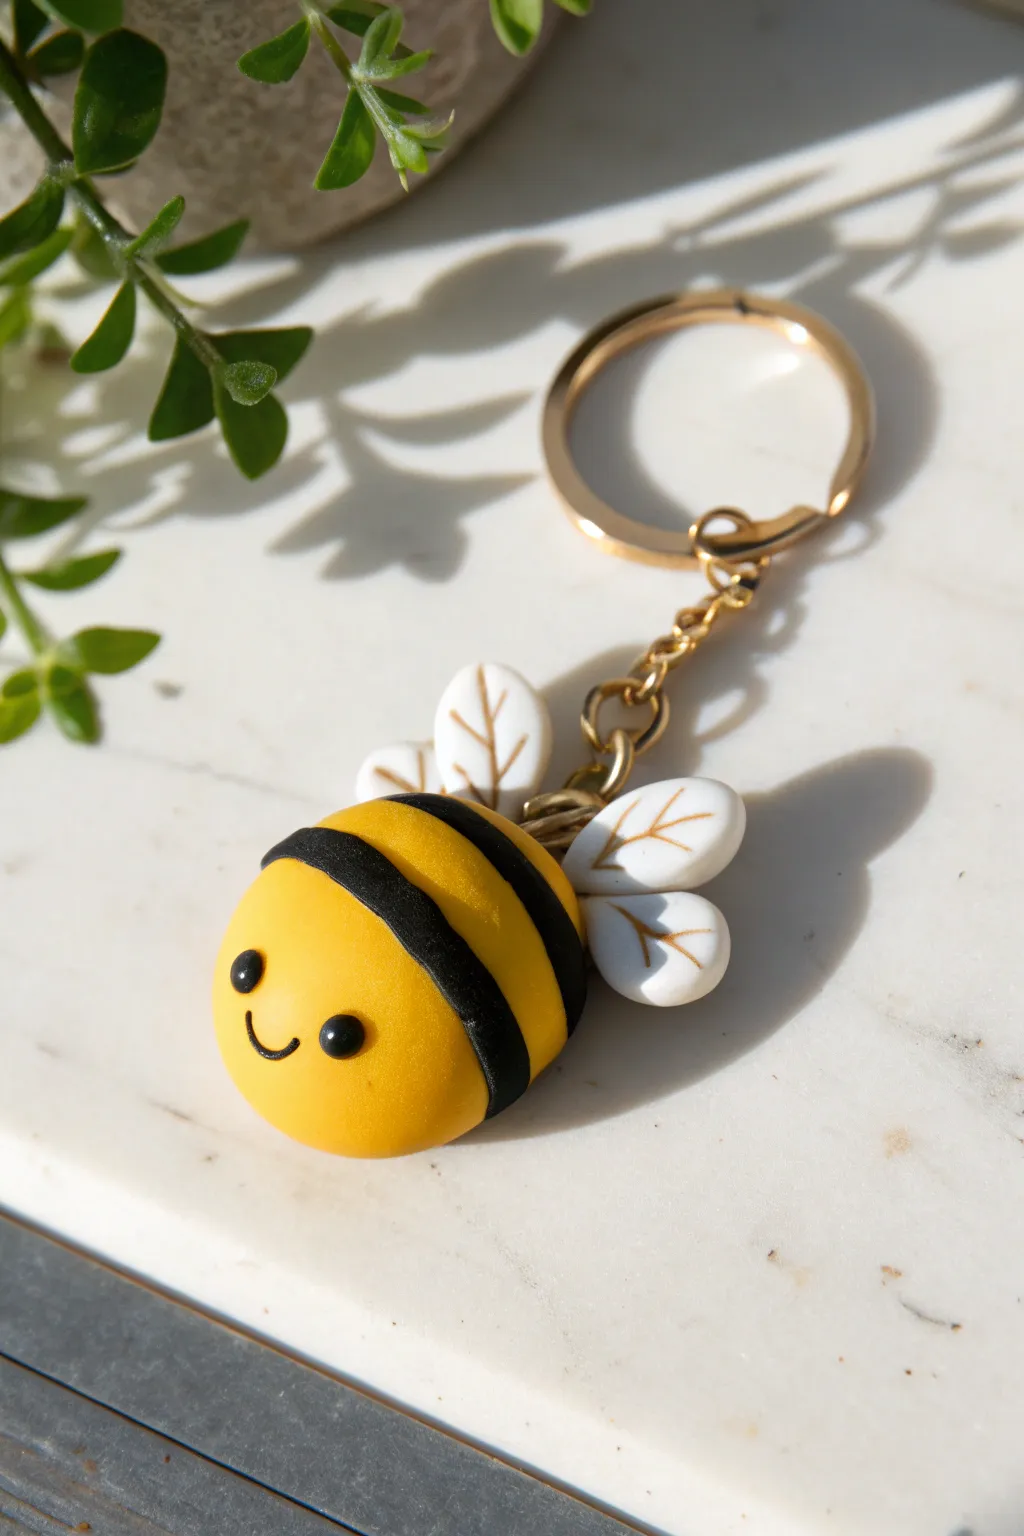
This ridiculously cheerful bee keychain features a plump, rounded body and distinctive raised black stripes that give it a wonderful tactile quality. With its gold-painted wing details and sweet little smile, it’s a perfect accessory to brighten up your keys or bag.
Detailed Instructions
Materials
- Polymer clay (Yellow, Black, White)
- Gold acrylic paint or gold leaf pen
- Fine detail paintbrush
- Gold keychain hardware (ring and chain)
- Eye pin or screw eye
- Needle tool or toothpick
- Dotting tool (small ball stylus)
- Black clay cutter or craft knife
- Gloss glaze (optional)
- Oven
Step 1: Shaping the Bee Buddy
-
Prepare the Body:
Start by conditioning a chunk of yellow polymer clay until it is soft and pliable. Roll it into a smooth ball about the size of a large grape or a bouncy ball. -
Shape the Oval:
Gently press and roll the ball between your palms to elongate it slightly into a stout oval shape. You want it to look chubby, so don’t make it too thin. -
Smooth Imperfections:
Inspect the surface for any fingerprints or lint. Use your finger to buff them away gently so you have a clean canvas for the stripes.
Dirty Yellow Clay?
Yellow clay shows dirt easily. Clean your hands and work surface thoroughly with baby wipes or rubbing alcohol before shaping the yellow body to keep it bright and spotless.
Step 2: Adding the Signature Stripes
-
Roll the Black Clay:
Condition a piece of black polymer clay and roll it out into a thin, even sheet. I find a pasta machine works best for consistent thickness, but a rolling pin works too. -
Cut the Strips:
Use a craft knife or blade to cut two long, narrow strips of black clay. These should be about 3-4mm wide. -
Apply First Stripe:
Place the first black strip around the middle of the yellow body. Gently press it down to adhere, ensuring the ends meet on the underside. -
Trim and Smooth:
Trim any excess black clay where the ends meet and blend the seam slightly with a modeling tool or your fingertip. -
Apply Second Stripe:
Place the second black strip slightly behind the first one, leaving a yellow gap in between. Repeat the trimming and smoothing process on the bottom. -
Puff the Stripes:
Here is the key to the ‘puffy’ look: gently press down on the edges of the black stripes with a silicone tool or your finger to make the center of the stripe look slightly raised and rounded.
Pro Tip: Secure the Eyes
Add a tiny drop of liquid polymer clay or ‘Bake & Bond’ into the eye sockets before placing the black balls. This acts as glue and ensures the eyes won’t pop out after baking.
Step 3: Wings and Details
-
Create Wing Teardrops:
Take white polymer clay and roll four small balls—two slightly larger for the top wings, and two smaller for the bottom wings. -
Flatten and Shape:
Flatten the balls into teardrop shapes. The larger ones will be the primary wings, and the smaller ones will nestle underneath. -
Attach the Wings:
Press the pointed ends of the wings onto the back of the bee, just behind the second black stripe. Arrange them so they flare out slightly. -
Add Wing Veins:
Using a needle tool, carefully press leaf-like vein patterns into each white wing. Don’t cut all the way through; just create an indentation.
Step 4: Face and Hardware
-
Make Eye Sockets:
Use a ball stylus to make two small indentations on the front yellow section where the eyes will go. -
Insert Eyes:
Roll two tiny specks of black clay into balls and press them firmly into the eye sockets you just created. -
Create the Smile:
Roll an extremely thin thread of black clay. Curve a tiny piece of it into a ‘U’ shape and press it onto the face between the eyes to make a smile. -
Insert Hardware:
Insert a screw eye or eye pin into the top center of the bee, right behind the first black stripe. Ensure it goes in deep enough to be secure. -
Bake:
Bake the piece according to your clay manufacturer’s instructions (usually 275°F/135°C for 15-30 minutes). Let it cool completely.
Step 5: Finishing Touches
-
Gold Details:
Once cool, use a fine detail brush and gold acrylic paint (or a gold marker) to carefully fill in the indented vein lines on the wings. -
Wipe Excess:
If paint gets on the surface of the wing, quickly wipe it away with a damp paper towel or baby wipe, leaving paint only in the grooves. -
Assemble Keychain:
Use pliers to open the jump ring on your gold keychain hardware and attach it to the eye pin on the bee.
Now you have an adorable, chubby bee companion ready to buzz along on all your adventures
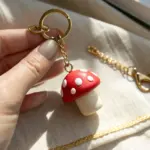
Mini Mushroom With Polka Dots
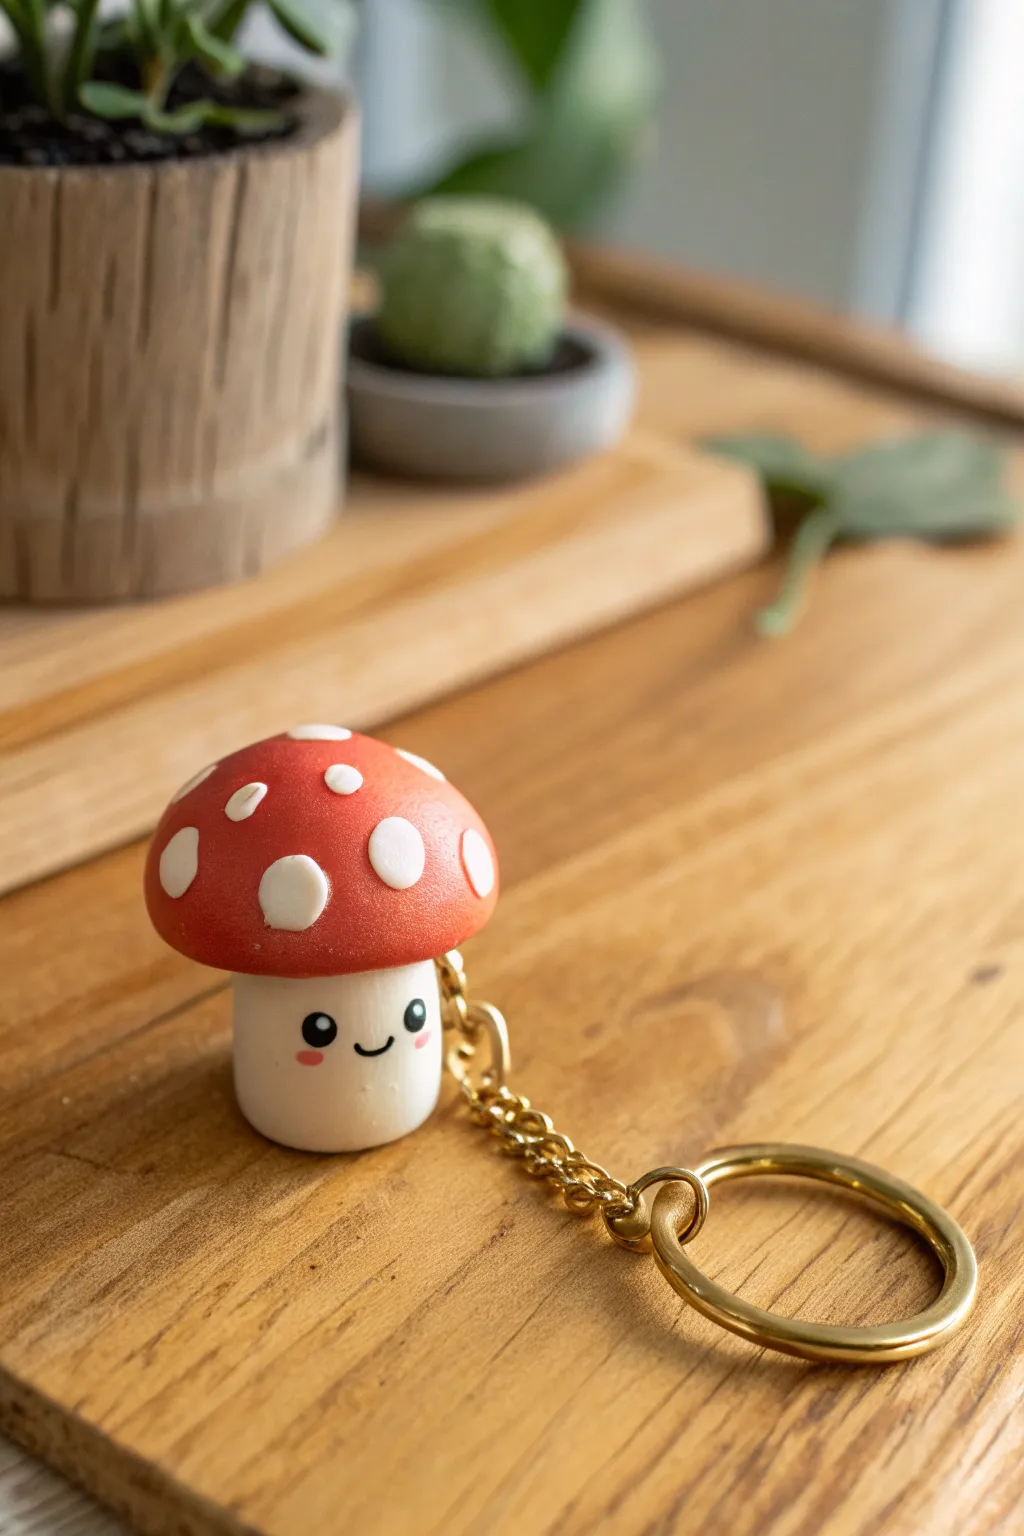
This adorable mini mushroom keychain brings a touch of forest magic to your daily routine with its bright red cap and sweet, smiling face. It’s a perfect beginner-friendly project that combines simple shapes with kawaii details for a charming result.
Step-by-Step Guide
Materials
- Red polymer clay
- White or translucent white polymer clay
- Black acrylic paint
- Pink acrylic paint or chalk pastel
- Tiny dotting tool or toothpick
- Eye screw pin (gold)
- Jump ring and keychain finding (gold)
- Pliers (round nose and flat nose)
- Glaze or varnish (optional but recommended)
Step 1: Shaping the base
-
Condition the clay:
Start by warming up your white clay in your hands until it is soft and malleable. This prevents cracks later on. -
Form the stem:
Roll a small ball of white clay, roughly the size of a marble. Gently press two sides to elongate it into a thick, stout cylinder. Flatten both the top and the bottom against your work surface so it can stand upright on its own. -
Prepare the cap color:
Take a slightly larger amount of red clay and condition it thoroughly until smooth. -
Shape the cap:
Roll the red clay into a sphere, then gently press it down onto a flat surface to create a dome shape. You want the bottom to remain flat but the top to be perfectly rounded. -
Attach cap to stem:
Place the red dome on top of your white cylinder. Press down gently to secure them together without squishing the shapes. If the clay isn’t sticking, a tiny dab of liquid clay or bake-and-bond can act as glue.
Fixing Fingerprints
If you notice fingerprints on your clay before baking, lightly brush the surface with a little baby oil or cornstarch to smooth them away instantly.
Step 2: Adding Details
-
Make the dots:
Roll very tiny specks of white clay into balls. You will need about roughly 6-8 of varying sizes. -
Apply the polka dots:
Press the tiny white balls onto the red cap. Flatten them gently with your fingertip so they look like painted spots rather than bumps. I like to space them somewhat irregularly for a more organic look. -
Insert hardware:
Take your metal eye screw pin. Gently twist it into the center of the red cap. Ensure it goes deep enough to be secure but not so deep that it pokes through the white stem. -
Bake carefully:
Bake your mushroom according to the instructions on your specific brand of polymer clay. Usually, this is around 230°F – 275°F for 15-30 minutes. -
Cool down:
Let the piece cool completely before handling. Polymer clay is fragile when hot.
Glow Up Idea
Use glow-in-the-dark polymer clay for the white polka dots and stem. Your mushroom will look cute by day and magically luminous at night.
Step 3: Painting the Face & Assembly
-
Paint the eyes:
Dip a fine dotting tool or the tip of a toothpick into black acrylic paint. Dab two small dots on the upper half of the white stem for the eyes. -
Add eye highlights:
Once the black paint is barely dry, use a sewing needle or a very sharp toothpick to add a tiny speck of white paint to the top corner of each black eye. -
Draw the mouth:
Using a very fine detail brush or a fine-tip permanent marker, draw a small ‘U’ shape between and slightly below the eyes for a smile. -
Apply blush:
Dip a cotton swab or small brush into pink paint (or shaved pink pastel dust) and create soft, rosy cheeks right next to the mouth. -
Seal the piece:
Apply a coat of satin or matte glaze to protect the paint and give the clay a professional finish. -
Attach the chain:
Use pliers to open a jump ring. Loop it through the eye screw on top of the mushroom and connect it to your gold keychain finding. -
Secure the hardware:
Close the jump ring tightly with your pliers, ensuring there are no gaps where the chain could slip out.
Now you have a charming little pocket companion ready to guard your keys
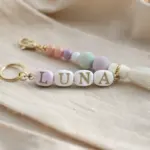
Initial Letter With Tiny Daisies
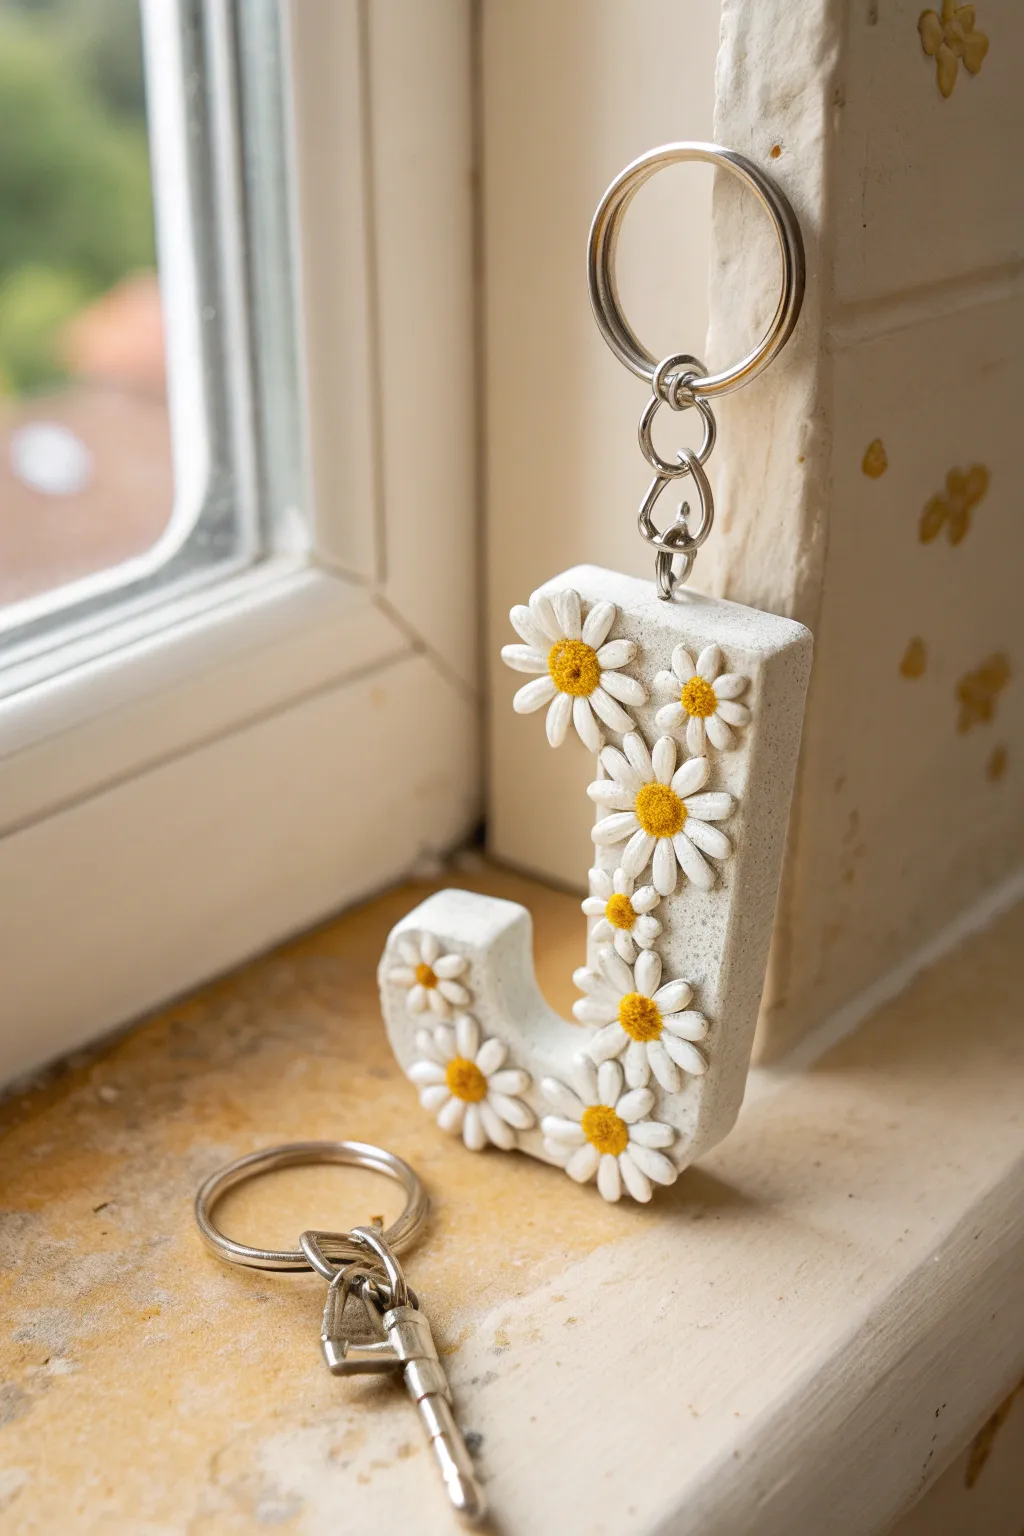
Create a personalized touch for your keys with this charming monogram keychain, featuring a stone-effect base and delicate relief flowers. The cheerful white daisies with their sunny yellow centers add a classic cottagecore vibe to a simple initial.
How-To Guide
Materials
- White or granite-effect polymer clay
- Yellow polymer clay
- Translucent liquid polymer clay (optional)
- Small daisy silicone mold (or tools for sculpting by hand)
- Letter cookie cutter (or printed template and craft knife)
- Eye pin or screw eye
- Jump rings
- Keychain hardware (split ring and chain)
- Needle tool or toothpick
- Small ball tool
- Sandpaper (various grits)
- Gloss or matte varnish (optional)
Step 1: Shaping the Base
-
Prepare the Clay:
Condition your white or granite-effect polymer clay until it is soft and pliable. If you want that specific speckled stone look shown in the image but only have white clay, mix in a tiny pinch of black pepper or black embossing powder. -
Roll the Slab:
Roll out the clay to a substantial thickness, approximately 5mm to 7mm. A thicker slab ensures the keychain is durable enough for daily use. -
Cut the Letter:
Press your letter cookie cutter firmly into the slab. If using a paper template, place it on the clay and carefully trace around it with a sharp craft knife or scalpel to get clean, vertical edges. -
Smooth the Edges:
Gently rub the cut edges with your finger or a little cornstarch to soften any sharp corners left by the cutter. This makes the finished piece feel nicer to hold. -
Insert the Attachment Point:
While the clay is still raw, insert a screw eye or eye pin into the top center of the letter. To ensure it stays put, I like to dip the end in a drop of liquid clay or super glue before pushing it in.
Step 2: Creating the Daisies
-
Mix Flower Colors:
Clean your hands thoroughly to keep the white clay pristine. You will need plain white clay for the petals and a bright yellow for the centers. -
Form Petes (Mold Method):
If using a silicone mold, press a tiny ball of white clay into the flower cavity. Flex the mold to pop out the shape. You will need roughly 8-12 flowers depending on your letter size. -
Form Petals (Hand Sculpting):
To sculpt by hand, roll tiny teardrop shapes of white clay. Flatten them slightly and use a needle tool to press an indentation down the center of each petal, creating texture. -
Assemble the Flowers:
Arrange five or six petals in a circle. Press them gently together at the center point so they adhere to one another. -
Add the Centers:
Roll tiny spheres of yellow clay. Place one in the center of each flower and press down gently with a small ball tool or the smooth end of a paintbrush handle to bond it. -
Texture the Centers:
Use a needle tool to stipple the yellow center, giving it that fuzzy, pollen-like texture characteristic of real daisies.
Dirty Clay Disaster?
White clay picks up dust easily. Keep a scrap piece of ‘garbage clay’ nearby; roll it in your hands occasionally to pick up lint before touching your white project.
Step 3: Assembly and Finishing
-
Arrange the Layout:
Place your flowers onto the raw clay letter. Start with the largest flowers at the widest points of the letter and fill in gaps with smaller blossoms. -
Secure the Blooms:
Press each flower gently onto the base. If the base has dried out slightly, use a tiny dab of liquid polymer clay as ‘glue’ to ensure they bond permanently during baking. -
Overlap for Effect:
Don’t be afraid to let some petals hang slightly over the edge of the letter or overlap each other; this creates a lovely organic, natural look. -
Baking:
Bake the piece according to your specific brand of clay’s instructions (usually around 275°F/130°C for 15-30 minutes per 1/4 inch thickness). Use an oven thermometer to ensure accuracy. -
Cooling:
Let the piece cool completely in the oven or on the baking sheet. Polymer clay is strongest once it has returned to room temperature. -
Reinforce Hardware:
Once cool, check the eye screw. If it feels loose, unscrew it, add a drop of super glue or two-part epoxy, and screw it back in tightly. -
Final Polish:
Optional: Lightly sand any rough spots on the back or sides of the letter. You can also add a matte varnish to protect the white clay from getting dirty. -
Attach Keyring:
Use pliers to open a jump ring, insert it through the eye pin, attach your keychain ring, and close the jump ring securely.
Make It Sparkle
After baking, paint a thin layer of UV resin or gloss varnish exclusively on the yellow centers. It makes them look like dewy nectar and adds contrast.
Now you have a sweet, flowery accessory ready to organize your keys or gift to a friend
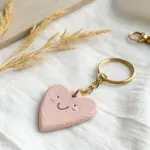
Two-Piece Best Friends Charms
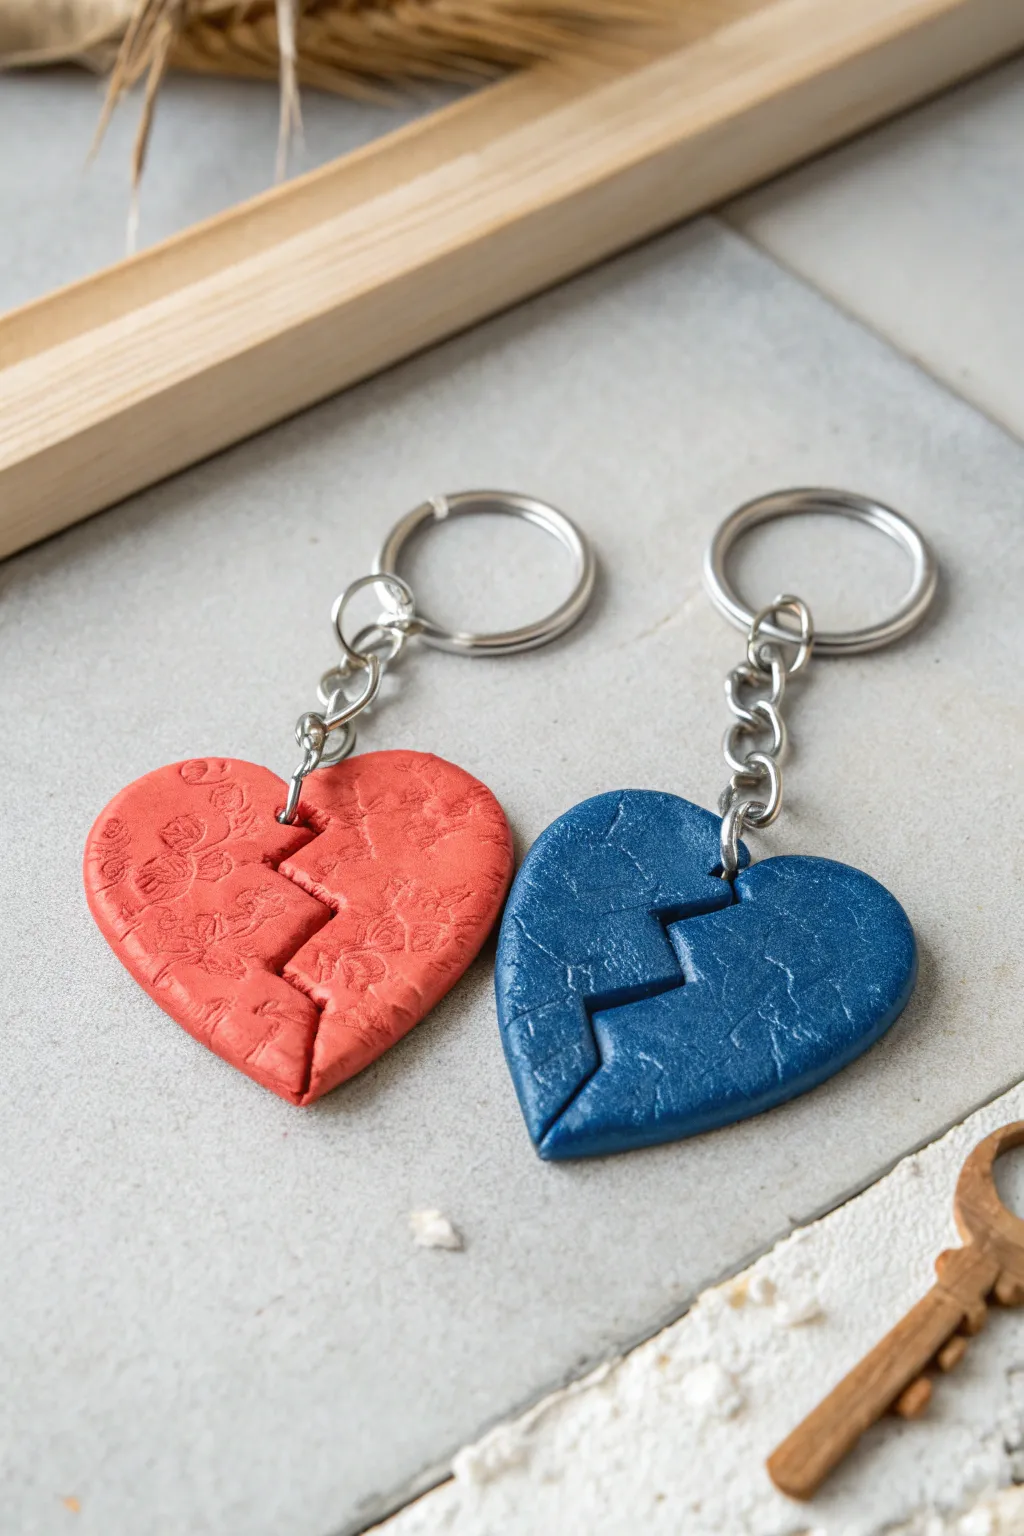
Celebrate your connection with these complementary clay charms that fit perfectly together when united but stand strong on their own. One half features a warm red with delicate floral embossing, while the other showcases a cool blue with a rugged stone texture, symbolizing how differences make a friendship complete.
Step-by-Step Guide
Materials
- Polymer clay (Red and Dark Blue)
- Acrylic roller or pasta machine
- Heart-shaped clay cutter (medium size)
- Flexible tissue blade or craft knife
- Texture sheet or rubber stamp (floral pattern)
- Crumpled aluminum foil or stiff manufacturing sponge
- Mica powder (pearl or white)
- Small jump rings (4-6mm)
- Keychains with chain attachments
- Needle tool or small drill bit
- Gloss glaze (optional)
Step 1: Shaping the Base
-
Condition the Clay:
Start by thoroughly conditioning your red and blue clay separately until they are soft, pliable, and free of cracks. Warm clay is much easier to texture without tearing. -
Roll the Sheets:
Roll both colors out into slabs of equal thickness, aiming for roughly 5mm (1/4 inch). You want them substantial enough to be durable keychains but not too heavy. -
Cut the Hearts:
Use your heart-shaped cutter to punch out one red heart and one blue heart. If you don’t have a cutter, trace a paper template and cut carefully with your blade. -
Create the Split:
Lay the two hearts side-by-side. Using your flexible blade, make a zig-zag or jagged cut down the center of each heart to create the ‘broken’ effect. Try to make the cuts similar so they look like they belong to the same style, though they don’t need to match perfectly.
Step 2: Texturing and Detailing
-
Emboss the Red Half:
Take the red heart halves. Lightly mist your floral texture sheet with water to prevent sticking, then press it firmly into the clay. Alternatively, gently roll over the clay with a textured rolling pin. -
Texture the Blue Half:
For the blue heart, use a ball of crumpled aluminum foil. Press it repeatedly into the surface to create a natural, stone-like pitted texture. Pay attention to the edges to ensure the texture wraps around slightly. -
Add Shimmer:
To highlight the textures, dip your finger or a soft brush into a tiny amount of pearl mica powder. Gently rub it over the raised surfaces of both hearts. This will catch the light and make the floral pattern pop. -
Making the Hole:
Use a needle tool to pierce a hole near the top outer curve of each heart half. Make the hole slightly larger than you think you need, as it can shrink slightly during baking. Ensure it’s not too close to the edge to prevent breakage.
Uneven Split?
If the jagged cuts don’t fit well, stack the two untextured clay slabs, cut the zig-zag line through BOTH at once, and then separate the colors.
Step 3: Finishing Up
-
Bake:
Place your pieces on a ceramic tile or baking sheet lined with parchment paper. Bake according to the manufacturer’s instructions for your specific brand of clay (usually 275°F/130°C for 15-30 minutes). -
Cool Down:
Allow the pieces to cool completely in the oven with the door slightly ajar. I find this helps prevents thermal shock and makes the clay stronger. -
Optional Glaze:
If you want a clearer finish or extra protection for the mica powder, apply a thin layer of water-based gloss glaze to the front and back. Let it dry fully. -
Attach Hardware:
Open a jump ring by twisting it sideways with pliers (never pull it apart). Thread it through the hole in the clay. -
Connect the Keychain:
Loop the end of the keychain chain onto the open jump ring, then twist the ring closed securely. -
Final Check:
Give the hardware a gentle tug to ensure everything is secure before gifting one half to your best friend.
Personal Touch
Before baking, use small letter stamps to impress your initials into the back of each charm for a hidden personalized detail.
Give one half to your favorite person and keep the other as a reminder of your bond
Mini “Lucky” Pocket Charm With Tiny Details
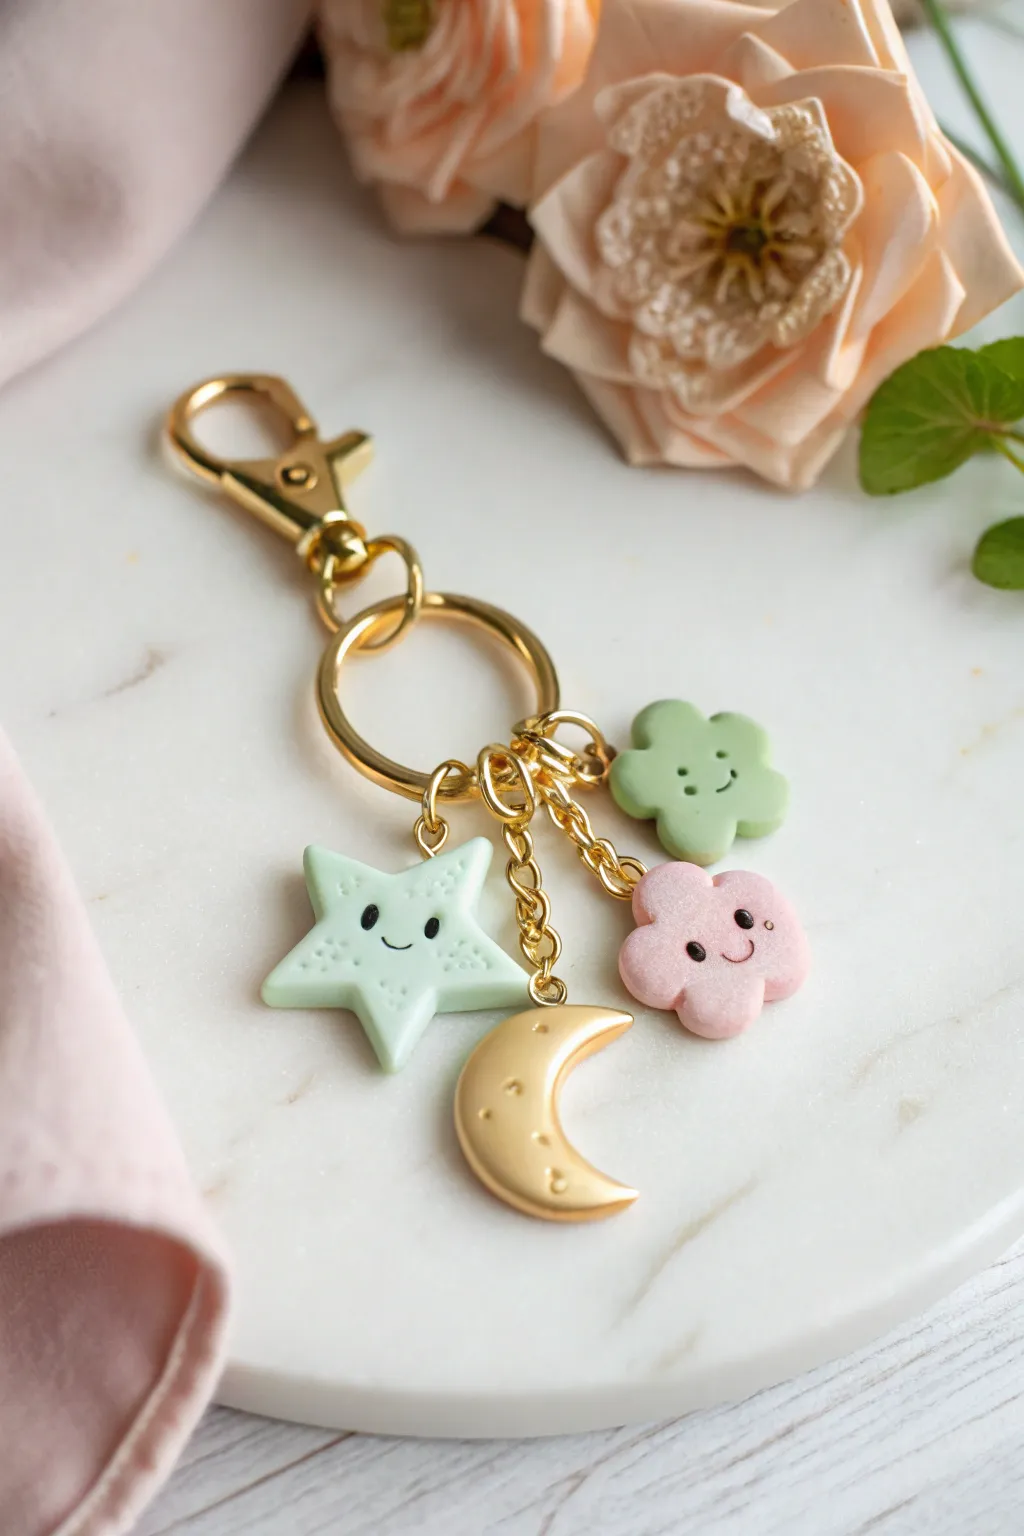
Carry a pocketful of luck with this adorable celestial keychain featuring sweet-faced sky icons. With their soft pastel tones and tiny, happy expressions, these charms add a gentle pop of kawaii magic to your keys or bag.
Step-by-Step
Materials
- Polymer clay in pastel mint green, pastel pink, and black
- Gold polymer clay or metallic gold acrylic paint
- Gloss glaze (UV resin or polyurethane varnish)
- Gold tone keychain hardware (swivel clasp + large jump ring)
- Small gold jump rings (4-6mm)
- Small gold jewelry chain
- Clay sculpting tools (needle tool, small ball tool)
- X-acto knife or clay blade
- Small star and flower cookie cutters (approx. 1 inch)
- Eye pins (gold tone)
Step 1: Shaping the Charms
-
Condition the Clay:
Begin by kneading your pastel mint green and pastel pink clays separately until they are soft and pliable. This ensures a smooth finish without cracks. Roll each color out to a thickness of about 1/4 inch (6mm). -
Cut the Shapes:
Using your small cookie cutters, punch out a star shape and a flower shape from the mint green clay. Next, cut a small cloud shape from the pink clay; if you don’t have a cutter for this, roll three small balls of clay together and flatten them gently into a fluffy cloud form. -
Create the Moon:
Mold a small crescent moon shape using gold polymer clay. If you don’t have gold clay, you can shape it from scrap clay now and paint it gold after baking. Use a small ball tool to press tiny decorative divots or ‘craters’ into the surface for texture. -
Soften the Edges:
Gently tap the edges of all your clay shapes with your fingertip to round them off. Sharp, cookie-cutter edges can look harsh, so smoothing them creates that soft, puffy aesthetic we want. -
Insert Hardware:
carefully insert a gold eye pin into the top of each clay shape. I find it helpful to add a tiny dab of liquid clay or Bake & Bond to the pin shaft before insertion to ensure it stays secure after baking.
Clean Clay Tip
Baby wipes are essential! Wipe your hands and tools between handling the pink and green clays. Pastel colors show dust easily, so work on a clean, white tile.
Step 2: Adding the Faces and Details
-
Sculpt Eye Sockets:
Use a small ball stylus to gently press two indentations into the star, flower, and cloud shapes where the eyes will sit. This helps the tiny black clay pieces set flush against the face. -
Placement of Eyes:
Roll extremely tiny balls of black polymer clay. Place them into the indentations you made. For the cloud charm, try pressing the clay flat to make winking or smiling eyes if you prefer a different look. -
Carve the Smiles:
Using a needle tool or the edge of a small straw, gently imprint a curved smile between the eyes on each pastel charm. Keep the curve shallow for a sweet, subtle expression. -
Texture the Star:
Take your needle tool and gently prick small dots onto the surface of the green star charm, focusing on the points. This stippling effect adds a lovely tactile finish. -
Bake the Clay:
Arrange your charms on a parchment-lined baking sheet or a ceramic tile. Bake according to your specific brand of polymer clay instructions (usually around 275°F/135°C for 15-30 minutes). Let them cool completely before handling.
Step 3: Assembly and Finishing
-
Paint the Crescent (Optional):
If you used scrap clay for the moon instead of gold clay, paint it now with two coats of metallic gold acrylic paint. Allow it to dry fully. -
Seal the Charms:
Apply a thin layer of gloss glaze or UV resin to the front of each charm. This protects the faces and gives them a professional, polished shine. Cure under a UV lamp or let air dry according to your product. -
Prepare the Chain:
Cut three small lengths of gold jewelry chain. Vary the lengths slightly (e.g., 0.5 inch, 0.75 inch, 1 inch) so the charms will hang at different heights and stick out less. -
Attach Charms to Chain:
Using small jump rings and two pairs of pliers, attach the eye pin of the star, cloud, and flower charms to the ends of your three chain pieces. -
Connect to Main Ring:
Open the large jump ring attached to your main keychain clasp. Slide on the three chains holding the pastel charms. -
Final Assembly:
Attach the gold moon charm directly to the large jump ring using a smaller jump ring, without an extra length of chain. This keeps it close to the top as an accent piece. -
Secure Everything:
Close the large jump ring tightly with pliers, ensuring the gap is completely flush so no chains slip out. Give the keychain a shake to make sure everything jingles nicely and is secure.
Level Up: Sparkle
Before baking, lightly brush pearl ex powder or white mica powder over the charms. It gives the matte clay a subtle, iridescent shimmer that catches the light.
Now you have a charming set of accessories ready to brighten up your daily routine