Clay spoons are one of my favorite little projects because they’re quick, useful, and basically a tiny canvas for texture and color. If you’ve got even a small scrap of clay, you can turn it into a handmade spoon that feels totally one-of-a-kind.
Classic Slab-Built Spoon
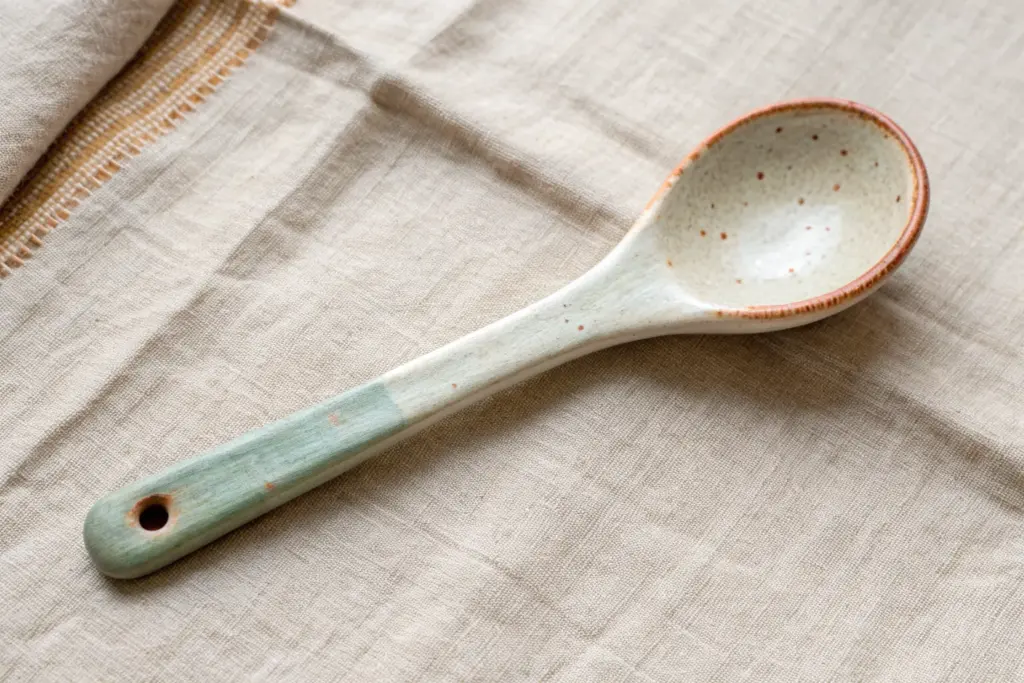
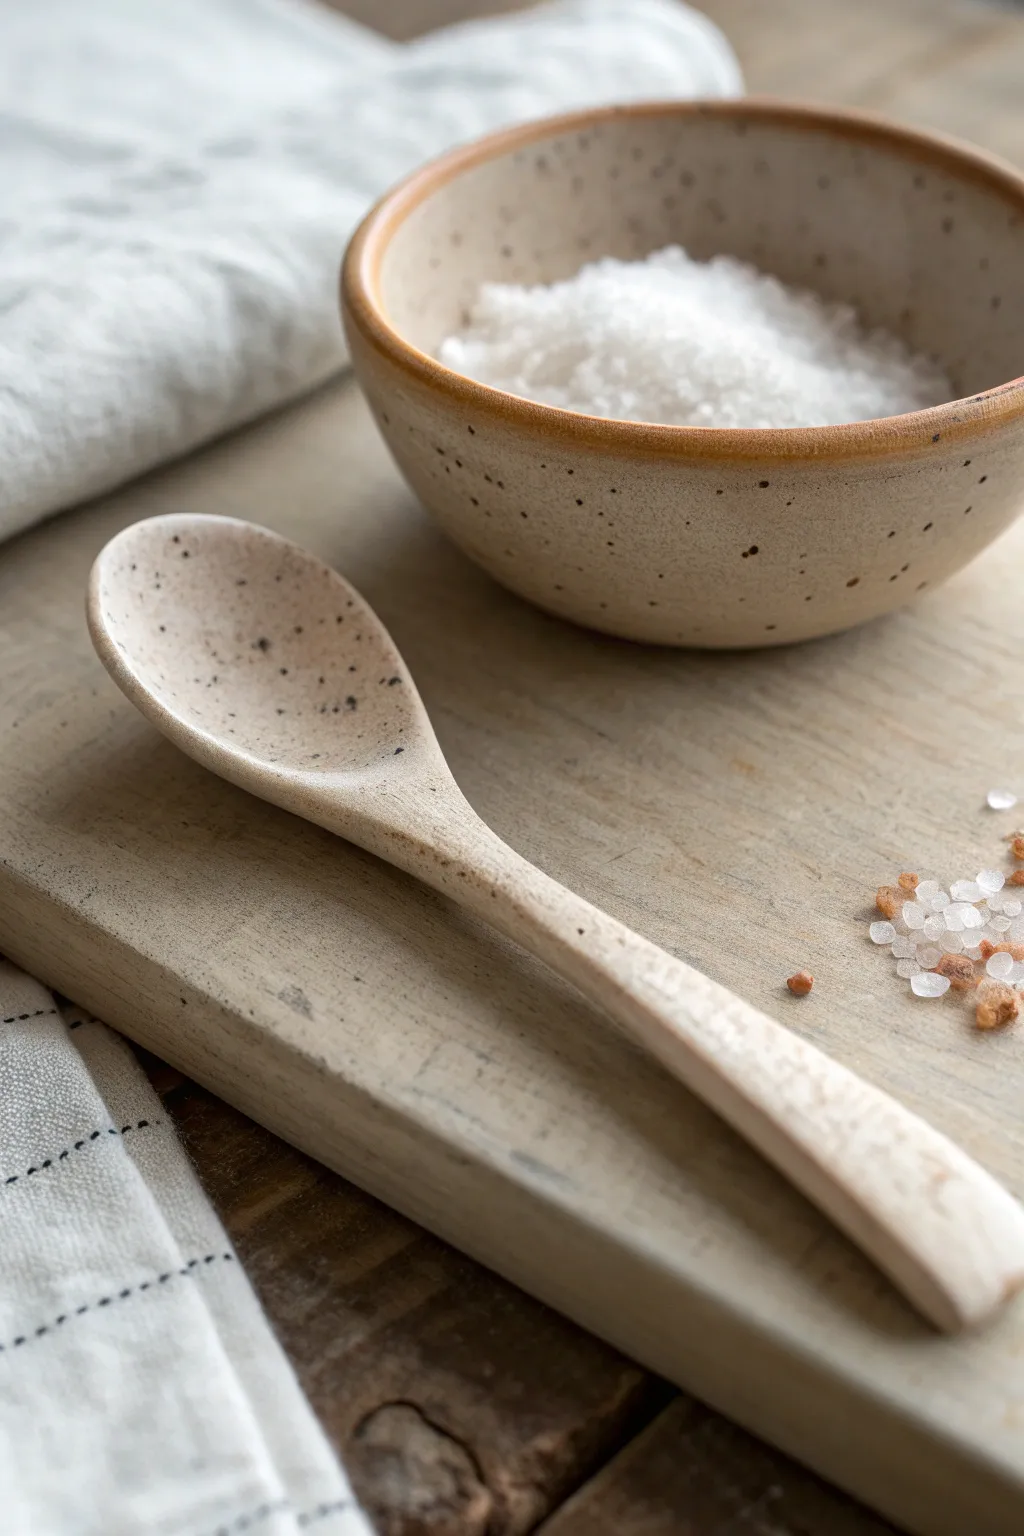
This project captures the minimal beauty of a long-handled ceramic spoon finished with a milky, speckled glaze. Its organic shape and gentle curves make it perfect for serving salts, heavy creams, or simply displaying as a piece of functional art.
How-To Guide
Materials
- White stoneware or porcelain clay body
- Rolling pin
- Canvas/fabric mat (for rolling)
- Paper template (spoon shape)
- Fettling knife or needle tool
- Wooden spoon (as a mold)
- Sponge
- Rib tool (soft silicone or rubber)
- Speckled white glaze (cone 5/6)
- Drill bit or hole cutter (small)
Step 1: Designing and Shaping
-
Create your template:
Sketch a long, slender spoon shape on cardstock. Aim for a handle about 6-8 inches long and a bowl that is roughly oval or egg-shaped. Cut this out to use as your guide. -
Roll the slab:
Roll out a portion of your white stoneware clay to an even thickness of about 1/4 inch. Keep it consistent so the handle doesn’t become weak. -
Compress the clay:
Run a soft rib tool firmly over the slab on both sides. This compresses the clay particles, reducing the chance of warping later, and creates a beautifully smooth surface. -
Cut the form:
Place your paper template onto the slab. Using a needle tool or fettling knife, carefully trace and cut out the spoon shape. Remove the excess clay. -
Smooth the edges:
With a slightly damp sponge or your fingertip, gently soften the sharp cut edges of the clay. You want a rounded, seamless look, not sharp corners.
Step 2: Forming the Curves
-
Shape the bowl:
To give the spoon its concave bowl, gently press the wide end of your clay cutout into the bowl of a wooden spoon or a small plaster mold. Press from the center outward to avoid thinning the bottom too much. -
Refine the transition:
Pay distinct attention to the neck where the bowl meets the handle. Smooth this area carefully with your thumb to ensure it is structurally sound and comfortable to hold. -
Curve the handle:
Instead of leaving the handle perfectly flat, lay it over a cylindrical object like a rolling pin or a dowel while it dries slightly. This adds a subtle arch that looks elegant and makes it easier to pick up. -
Add the hanging detail:
At the very tip of the handle, use a small hole cutter or a drill bit (twisted by hand) to create a neat hole. This adds a professional touch and allows the spoon to be hung.
Warping Woes?
If the handle twists while drying, weight it down gently with a small sandbag during the leather-hard stage to keep it aligned.
Step 3: Drying and Glazing
-
Slow drying:
Place the spoon on a board to dry. I prefer to cover it loosely with plastic for the first day to ensure the handle and bowl dry at the same rate, preventing cracks. -
Bisque fire:
Once bone dry, fire the spoon in your kiln to a bisque temperature (usually Cone 04). Ensure it is supported so the shape doesn’t slump. -
Clean the bisque:
Wipe the fired spoon with a damp sponge to remove any kiln dust. This ensures the glaze adheres perfectly. -
Apply the glaze:
Dip the spoon into a speckled white stoneware glaze. If dipping isn’t possible, brush on 3 smooth coats, allowing each to dry in between. -
Check the foot:
Wipe away any glaze from the underside of the spoon where it will touch the kiln shelf. Alternatively, use a stilt to fire it so the entire spoon can be glazed. -
Glaze fire:
Fire the spoon to the maturity temperature of your clay and glaze (typically Cone 5 or 6). Let the kiln cool completely before removing your new utensil.
Spoon Support
Prop the handle up with a small piece of foam or crumpled paper while the bowl dries in the mold to maintain the arch without stress.
Once cooled, your durable, speckled spoon is ready to bring a touch of handmade charm to your kitchen counter


Template-Molded Spoon Shape
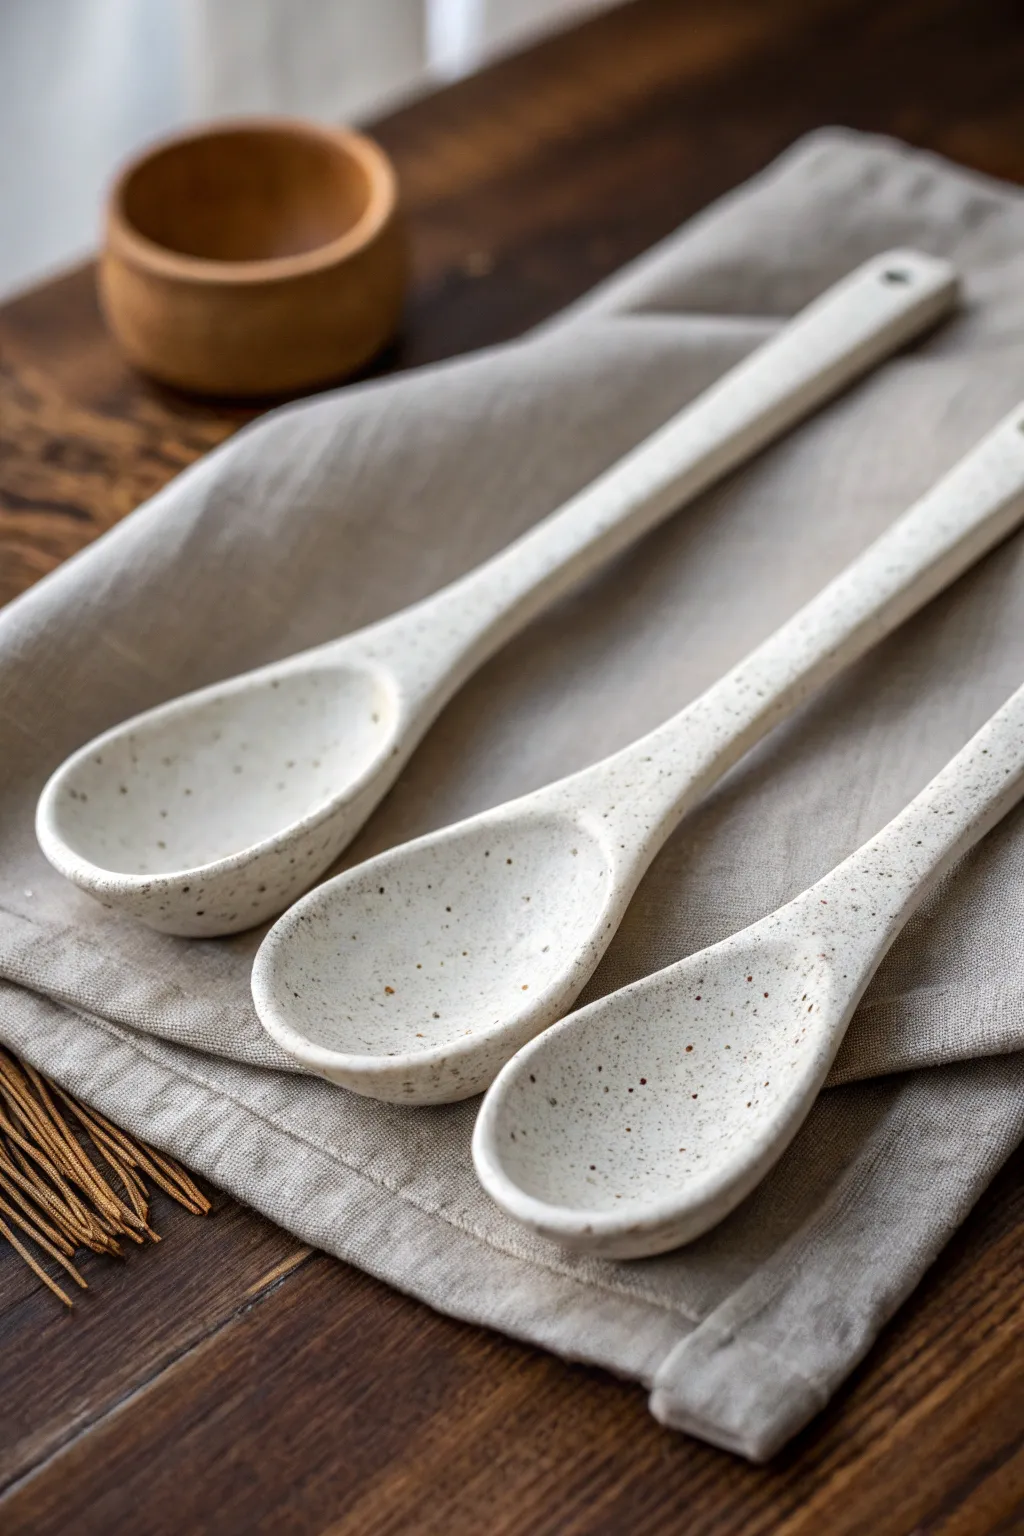
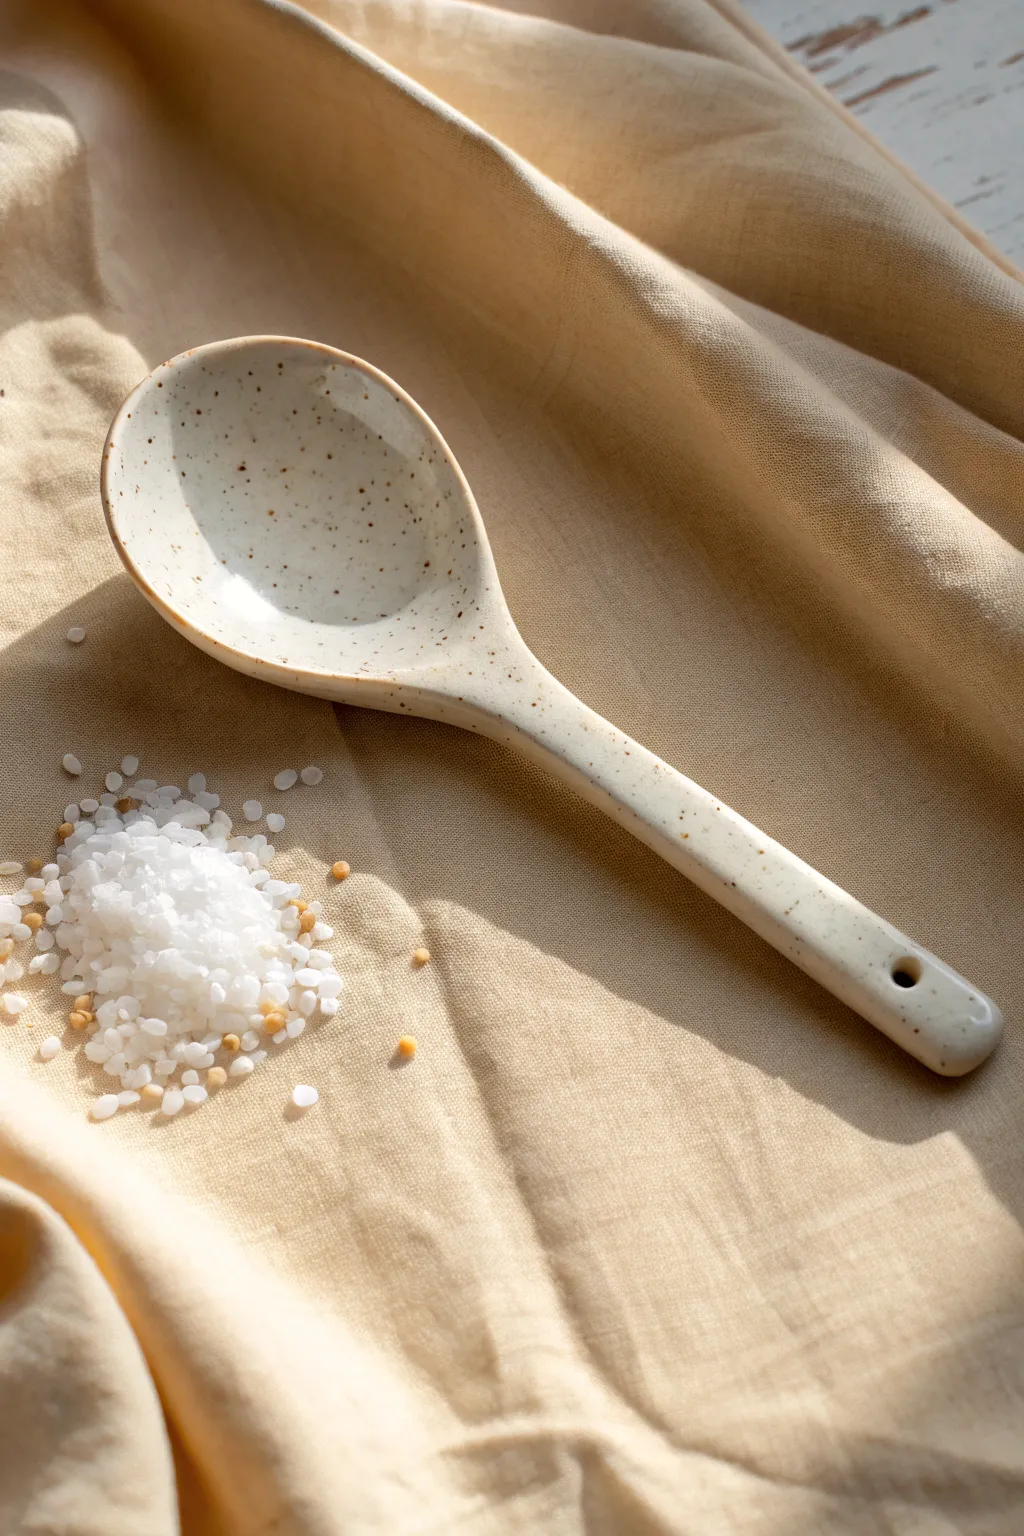
These elegant, minimalist spoons feature a soft cream finish with natural speckling that evokes a rustic farmhouse charm. By using a simple template technique, you can achieve a uniform shape while retaining the handcrafted warmth of ceramic artistry.
Detailed Instructions
Materials
- Speckled buff stoneware clay (or white clay with grog)
- Rolling pin
- Canvas mat or slab roller
- Paper or cardstock (for template)
- Needle tool
- Sponge
- Rib tool (wooden or silicone)
- Wooden spoon (to use as a mold) or a spoon mold
- Semolina or cornstarch (release agent)
- Clear matte or satin food-safe glaze
- Kiln
Step 1: Preparation & Shaping
-
Draft the template:
Begin by sketching your ideal spoon shape onto a piece of cardstock. Aim for a long, slender handle and a gently tapered oval bowl, similar to the image. Cut this shape out carefully with scissors. -
Roll the slab:
Wedge your clay thoroughly to remove air bubbles. Roll it out into a consistent slab about 1/4 inch thick. I find using guide sticks on either side helps keep the thickness perfectly even. -
Compress the clay:
Take a rib tool and firmly compress the clay surface in multiple directions. This aligns the clay particles, reducing the chance of warping later, and creates a smooth canvas for the speckled texture. -
Cut the shapes:
Place your cardstock template onto the clay slab. Holding a needle tool vertically, trace around the template to cut out the spoon blank. Repeat for as many spoons as you wish to make. -
Smooth the edges:
Lift the clay blank gently. Use a damp sponge or your finger to round over the sharp, cut edges of the handle and bowl area. This makes the finished spoon comfortable to hold and prevents chipping.
Step 2: Forming the Curves
-
Prepare the mold:
Select a wooden cooking spoon with a bowl shape you like, or use a plaster press mold. Lightly dust the back of the wooden spoon (or the inside of your mold) with cornstarch or semolina to prevent sticking. -
Press the bowl:
Gently press the bowl section of your clay blank onto the convex back of the wooden spoon helper or into your mold. Use your thumbs to gently establish the concave curve, smoothing from the center outward. -
Shape the handle:
While the bowl is supported, lay the handle flat. You can leave it perfectly straight or introduce a very slight, elegant curve where the handle meets the bowl for better ergonomics. -
Add holes (optional):
See the small hole at the top of the handle in the image? If you want to hang these later, use a small straw or hole punch tool to remove a clean circle of clay at the very tip of the handle. -
Initial drying:
Let the clay leather-harden slightly while still resting on the mold or support. This ensures the spoon holds its cupped shape before you move it to a drying rack.
Clean Lines Pro-Tip
After cutting the clay, let the spoon blanks sit for 10 minutes before moving them. This slight drying makes them firmer and prevents the long handles from stretching out of shape when you lift them.
Step 3: Finishing & Glazing
-
Refine the surface:
Once leather hard, remove the spoon from the support. Inspect the back of the bowl and smooth out any marks left by the molding process using a sponge or flexible rib. -
Bisque fire:
Allow the spoons to dry completely—this usually takes a few days. They are fragile at the bone-dry stage. Fire them in the kiln to cone 04 (or your clay body’s bisque temperature). -
Wipe down:
After the spoons cool from the bisque firing, wipe them with a damp sponge to remove any dust, which could prevent the glaze from adhering properly. -
Apply glaze:
Dip the spoons into a clear matte or satin glaze. If you used a speckled clay body, the specks will show through wonderfully. If your clay is plain white, choose a ‘speckled white’ glaze instead. -
Wipe the foot:
Carefully wipe the glaze off the very bottom point of the spoon bowl where it will touch the kiln shelf, or use a stilt to prop it up during firing. -
Final firing:
Fire the spoons again to the maturity temperature of your clay and glaze (often cone 5 or 6 for stoneware). Ensure they don’t touch each other in the kiln.
Warping Woes?
If handles warp during drying, place a small weight (like a beanbag) gently on the handle section while the spoon dries, or dry them very slowly under loose plastic sheeting.
Once cooled, your durable ceramic spoons are ready to serve up soups or stir sauces with artisanal flair


Pinch-Style Mini Salt Spoon
This rustic, speckled spoon perfectly mimics the look of stoneware pottery but can be easily crafted at home. With its gentle curves and natural finish, it makes a charming companion for a salt pig or sugar bowl.
Step-by-Step Guide
Materials
- Polymer clay (granite or stone effect)
- Small rolling pin or acrylic roller
- Precision craft knife
- Fine-grit sandpaper (400 and 600 grit)
- Small ball tool or rounded measuring spoon
- Baking sheet
- Oven (for curing)
- Matte spray varnish (optional)
Step 1: Shaping the Form
-
Condition the polymer clay:
Start by warming a small amount of granite-effect polymer clay in your hands until it becomes pliable and soft. Kneading it thoroughly prevents cracks later on. -
Roll a basic coil:
Roll the clay into a smooth log about 4 inches long. Taper one end slightly; this will become the handle, while the thicker end becomes the spoon bowl. -
Create the spoon pre-form:
Gently press the thicker end of your coil between your thumb and forefinger to flatten it into a rough oval paddle shape. Keep the handle end rounder but slightly flattened for grip. -
Define the shape:
Use your craft knife to trim the edges of the paddle if they are uneven, aiming for a nice, symmetrical oval shape that transitions smoothly into the handle. -
Form the bowl:
Cradle the paddle shape in your palm. Press a small ball tool or the back of a metal measuring spoon into the center of the paddle. Gently rotate it to deepen the hollow without making the walls too thin. -
Refine the edges:
Use your fingertips to smooth the rim of the spoon bowl. You want a soft, rounded lip rather than a sharp cut edge. A little water on your finger can help smooth out fingerprints. -
Adjust the handle curve:
Lay the spoon on your work surface. Gently lift the handle and give it a slight, graceful arch so it will sit nicely on a table without tipping.
Clay Too Soft?
If your clay feels sticky or mushy and won’t hold the spoon shape, place it in the fridge for 10 minutes. Cooling it down firms it up, making detailed shaping much easier.
Step 2: Refining and Baking
-
Smooth the surface:
Look closely for any stray fingernail marks or uneven bumps. Stroke the clay gently to blur these imperfections. I like to use a tiny bit of baby oil to get a really glass-smooth finish before baking. -
Support the shape:
Prop the spoon handle up on a small wad of foil or scrap clay on your baking sheet. This ensures the curve you created stays in place while it cures. -
Bake the spoon:
Place the spoon in a preheated oven according to your clay manufacturer’s instructions (usually around 275°F or 130°C for 15-30 minutes). -
Cool down completely:
Allow the spoon to cool fully inside the oven with the door cracked, or on a wire rack. Don’t handle it while hot, as the clay is fragile until fully cool.
Pro Tip: Texture
To enhance the ‘pottery’ look, gently dab the unbaked surface with an old toothbrush. This adds a subtle, realistic ceramic grit texture that catches light beautifully.
Step 3: Finishing Touches
-
Initial sanding:
Once cool, use 400-grit sandpaper to gently buff the edges and handle. Dip the sandpaper in water to keep dust down and create a smoother finish. -
Final polishing:
Switch to 600-grit sandpaper for a final polish. The goal isn’t to remove material, but to give the faux-stone surface a soft, professional sheen. -
Clean the piece:
Wash the spoon with mild soap and water to remove any sanding residue. Dry it thoroughly with a lint-free cloth. -
Seal the surface:
While the stone clay looks great raw, a light coat of matte spray varnish will protect it from oils and dirt. Apply a thin, even layer and let dry. -
Final inspection:
Check your spoon for any rough spots you might have missed. If perfectly smooth, it is ready to be paired with your favorite sea salt.
Now you have a bespoke, artisan-style spoon ready to elevate your kitchen counter setup


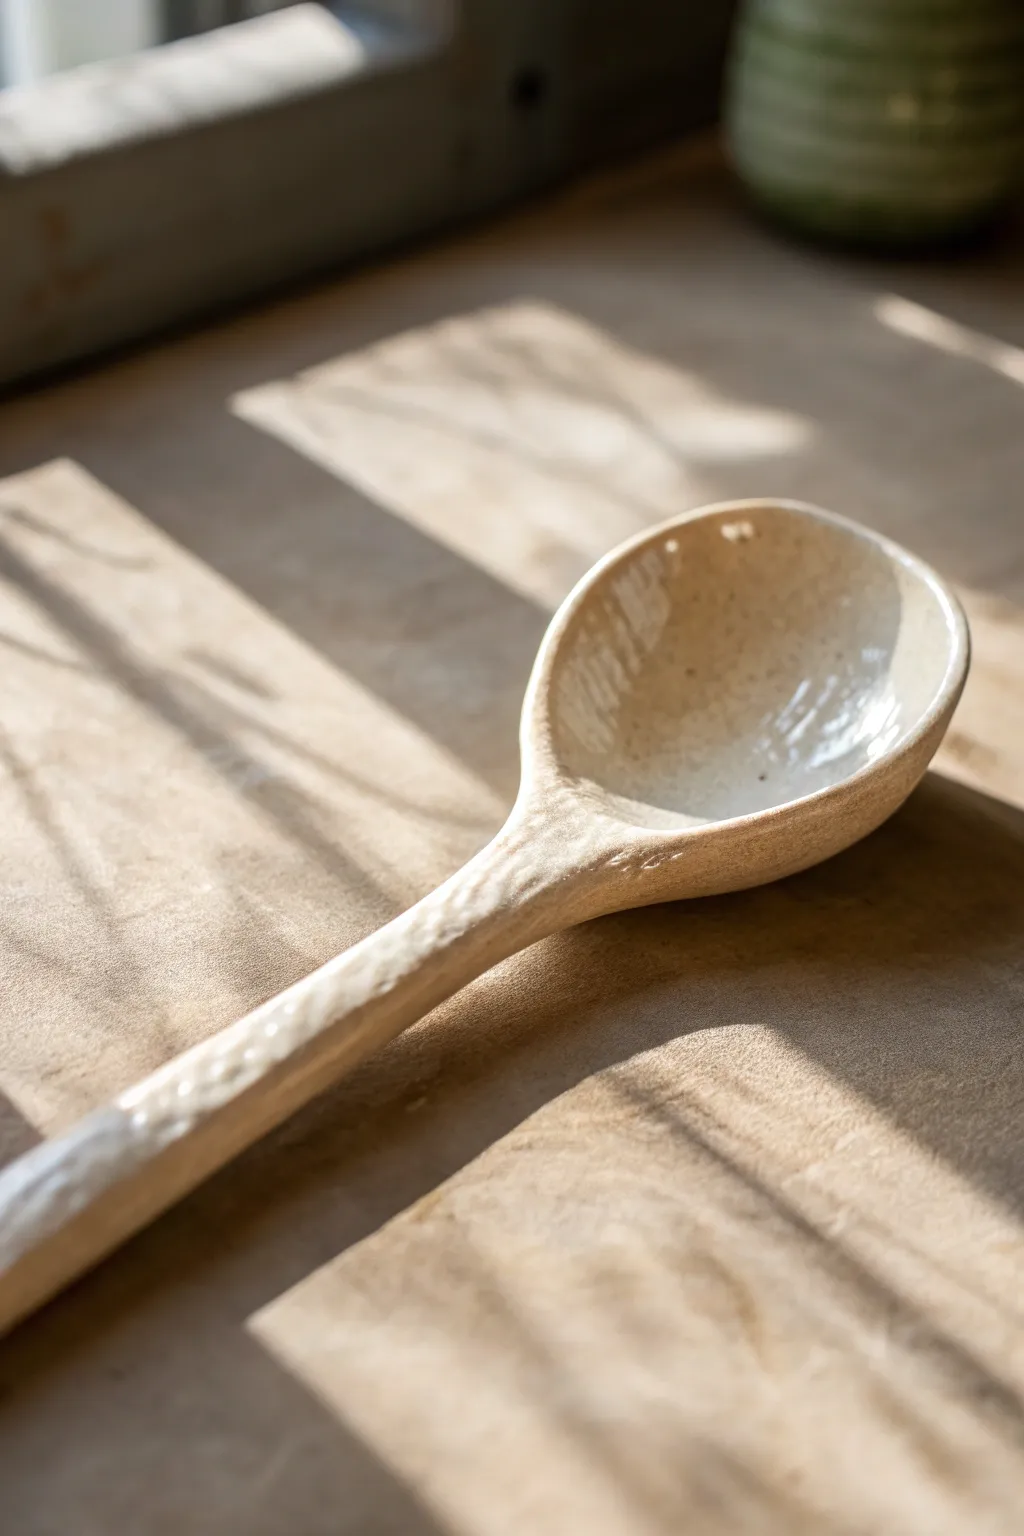
Coffee Scoop With Deep Bowl
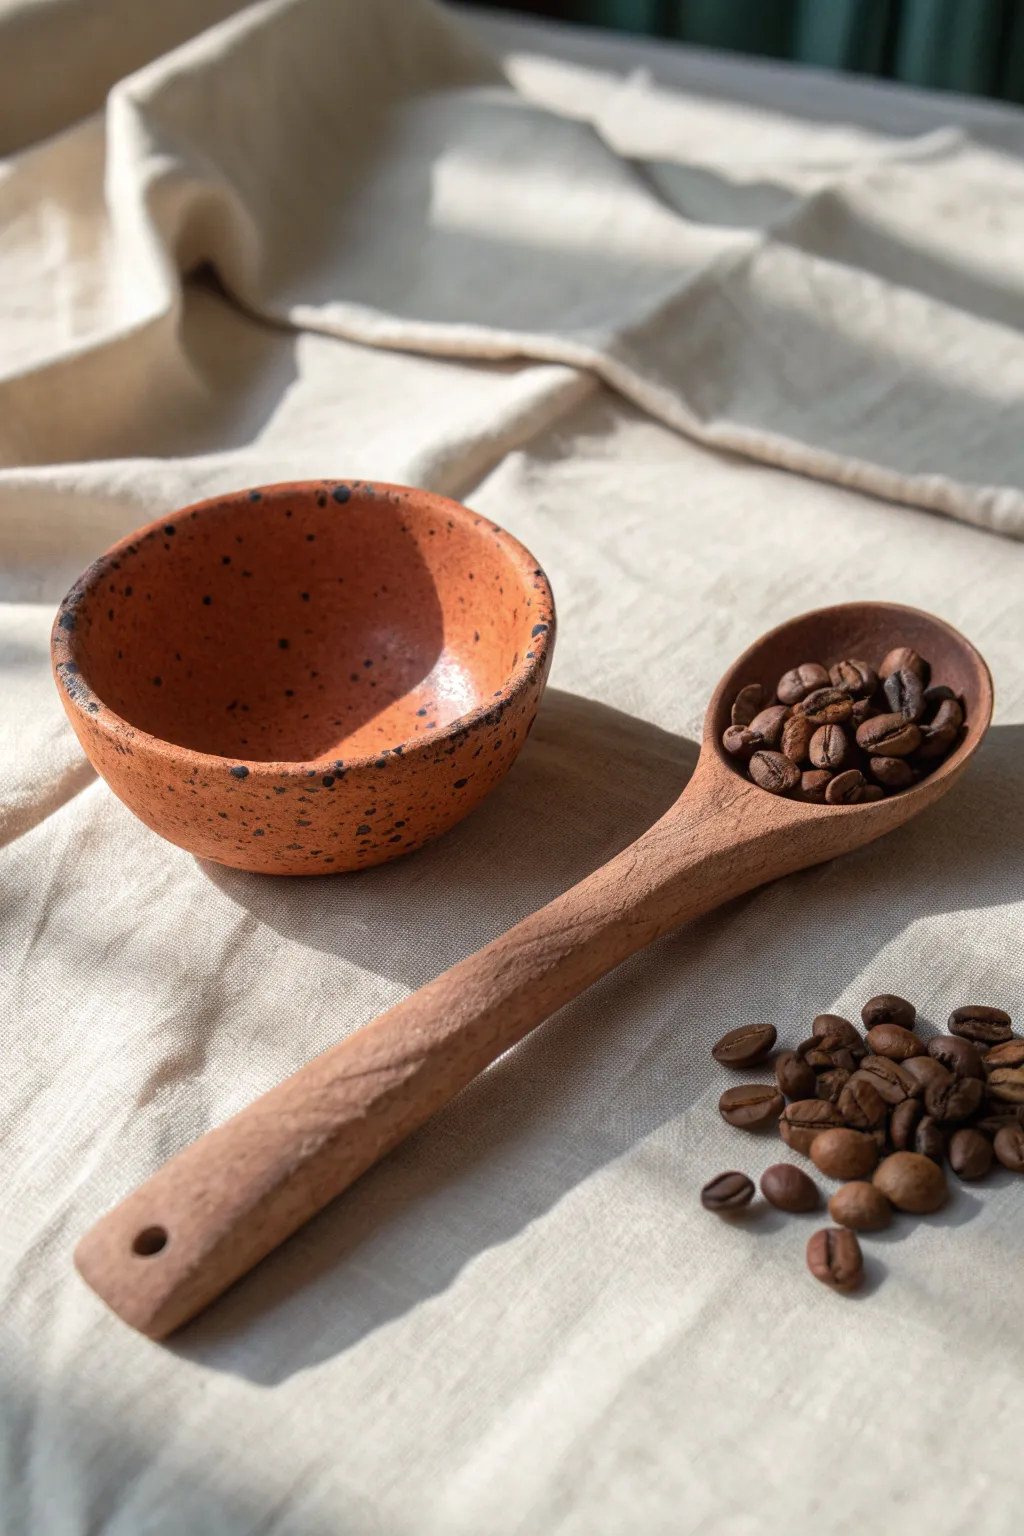
This deep-bowled coffee scoop celebrates the raw, earthy beauty of terra cotta clay with a speckled glazed finish. Its organic shape and textured handle make your morning coffee ritual feel grounded and handmade.
How-To Guide
Materials
- Red stoneware or terra cotta clay
- Rolling pin
- Canvas mat or slab roller
- Needle tool
- Loop tool (small)
- Wooden modeling tool
- Sponge
- Clear glaze (cone 5/6 or suitable for your clay)
- Iron oxide wash or black underglaze (for speckles)
- Stiff bristle brush (e.g., toothbrush)
- Kiln
Step 1: Shaping the Scoop
-
Prepare the clay:
Begin with a ball of red stoneware clay about the size of a plum. Wedge it thoroughly to remove any air bubbles, ensuring a consistent texture throughout. -
Form the pinch pot:
Hold the ball in one hand and press your thumb into the center. Gently pinch the walls while rotating the clay to form a small, deep bowl shape. This will become the scoop head. -
Smooth the bowl:
Use a damp sponge to smooth out any heavy fingerprint marks on the inside and outside of the bowl, but leave some slight irregularity to maintain the organic look seen in the photo. -
Shape the handle:
Roll a coil of clay slightly thicker than a pencil and about 5-6 inches long. Flatten it gently with your thumb or a rolling pin so it has a comfortable, ergonomic profile. -
Create the hole:
Use the back of a needle tool or a small straw to punch a clean hole near the end of the handle for hanging. -
Attach the pieces:
Score the attachment point on both the bowl and the handle using a needle tool. Apply a dab of slip (clay mixed with water) to the scored areas. -
Blend the seam:
Press the pieces firmly together. use a wooden modeling tool to drag clay across the seam, blending the handle seamlessly into the bowl until the joint is invisible. -
Refine the surface:
Allow the clay to dry to a ‘leather hard’ state. Once firm, use a damp sponge to smooth the connections and the rim of the bowl.
Step 2: Texturing and Firing
-
Carve texture:
I like to take a loop tool at this stage and gently carve shallow, irregular facets along the handle. This mimics the wooden-spoon texture shown in the reference image. -
Bisque fire:
Let the spoon dry completely (this usually takes 2-3 days). Fire it in the kiln to a bisque temperature (usually cone 04). -
Prepare the speckles:
Mix a small amount of black underglaze or iron oxide wash with water until it’s quite fluid. -
Apply speckles:
Dip a stiff bristle brush or toothbrush into the dark mixture. Hold it over the spoon and flick the bristles with your thumb to splatter fine dots across the surface. -
Glaze the interior:
The interior of the bowl needs to be food-safe and smooth. Pour a clear glaze into the bowl, swirl it to coat, and pour out the excess. -
Glaze the exterior:
For the matte exterior look shown, you can either leave the raw clay (if fully vitrified) or apply a very thin matte clear glaze over the speckles. -
Final cleaning:
Wipe the very bottom or resting point of the spoon with a damp sponge to ensure no glaze touches the kiln shelf. -
Glaze fire:
Place the spoon back in the kiln and fire to the maturity temperature of your clay and glaze (typically cone 5 or 6 for stoneware).
Cracked Seams?
If the handle separates during drying, your clay was likely too dry when joining. Re-score aggressively, use vinegar on the joint, and wrap tightly in plastic for 24 hours to equalize moisture.
Matching Set
Make a larger pinch pot using the same clay body to create the matching bowl. Use the same splatter technique so they function as a cohesive breakfast set.
Now you have a durable, custom scoop that adds warmth to your kitchen counter

The Complete Guide to Pottery Troubleshooting
Uncover the most common ceramic mistakes—from cracking clay to failed glazes—and learn how to fix them fast.
Long-Handled Stirring Spoon
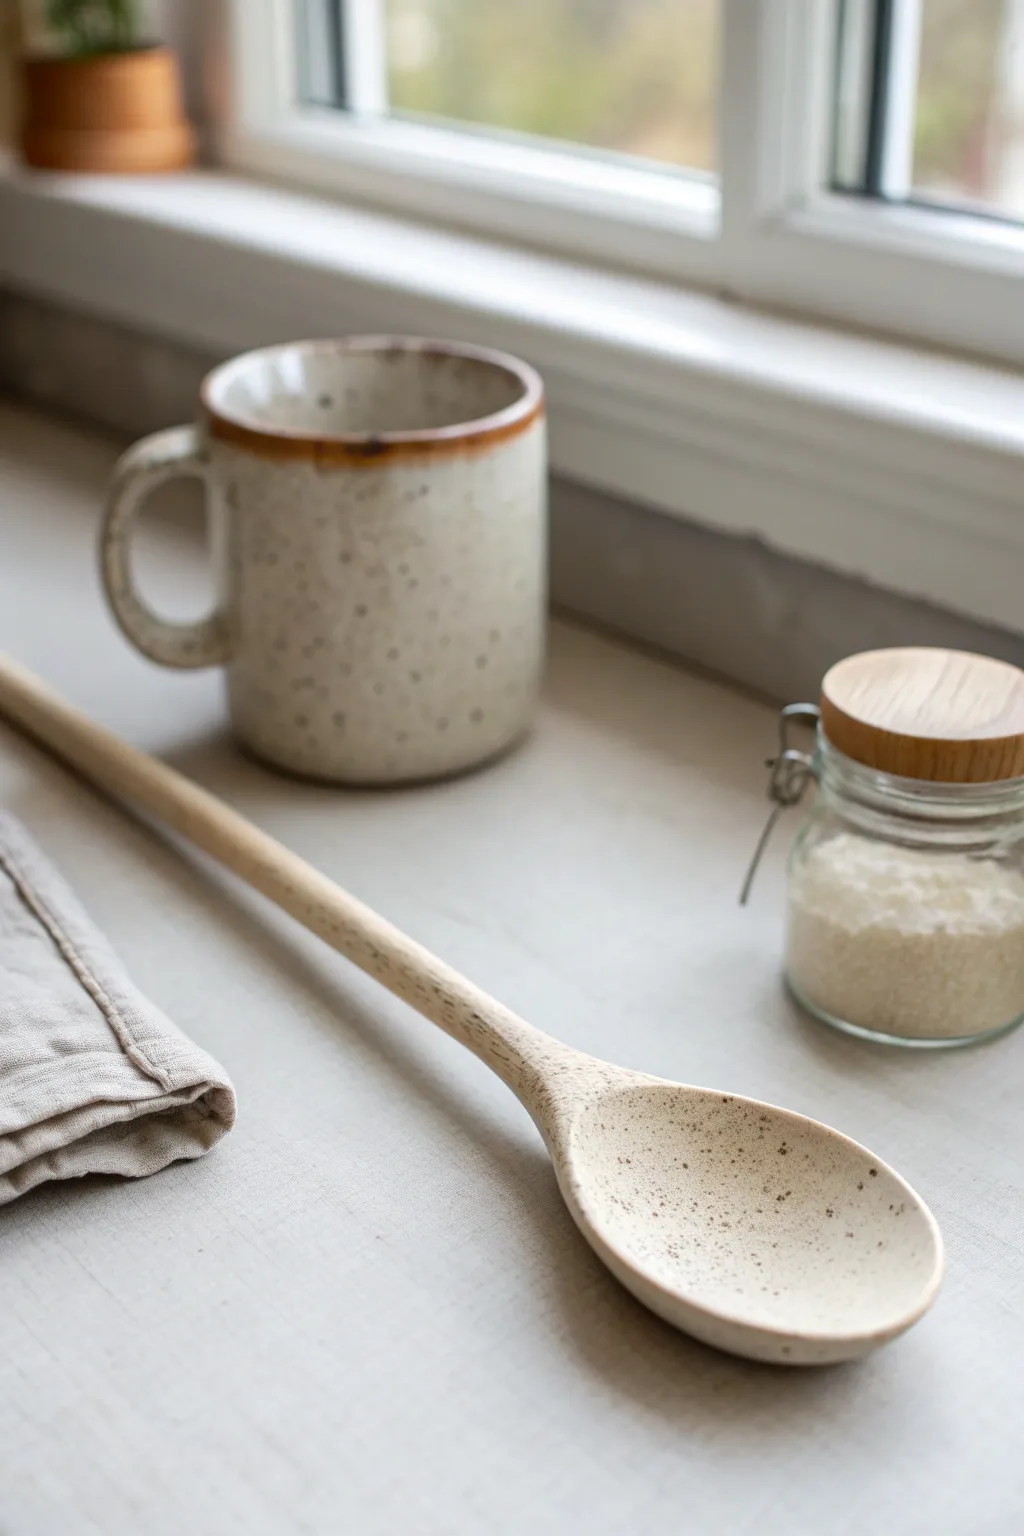
Craft a sleek and functional long-handled spoon perfect for stirring tall pitchers or deep pots. This project features a minimalist creamy glaze with iron-rich speckles, giving it a cozy, modern farmhouse aesthetic.
Step-by-Step Tutorial
Materials
- Speckled stoneware clay (white or buff with grog/speckles)
- Pottery tools (needle tool, rib tool, wire cutter)
- Wooden spoon template (cardstock)
- Rolling pin and guide strips (1/4 inch)
- Loop tool or spoon carving tool
- Sponge and water
- Cream or transparent matte glaze (food safe)
- Kiln (if using stoneware)
Step 1: Shaping the Form
-
Roll the Slab:
Start by wedging your speckled clay to remove air bubbles. Using your rolling pin and guide strips, roll out a long, even slab of clay about 1/4 inch to 3/8 inch thick. Make sure it’s long enough for the extended handle. -
Cut the Outline:
Place your cardstock template onto the slab. Using a needle tool held vertically, trace around the shape to cut out the basic spoon profile. Remove the excess clay. -
Refine the Handle:
Gently pick up the blank. Typically, slab-built handles are flat, so use your fingers to round the edges. I find it helpful to pinch the handle lightly to create a more cylindrical, comfortable grip. -
Create the Bowl:
For the spoon head, gently press your thumb into the center to start forming the concave scoop. Support the clay from underneath so you don’t push straight through. -
Carve the Depth:
Once the basic hollow is established, use a loop tool to carefully remove ribbons of clay from the bowl area until you reach your desired depth. Leave the walls slightly thicker than the handle for durability. -
Smooth the Transition:
Smooth the area where the handle meets the bowl. This neck is a weak point, so compress the clay here firmly with your fingers or a rib tool to ensure a strong bond.
Step 2: Refining and Drying
-
Dry to Leather Hard:
Set the spoon aside on a ware board until it reaches a leather-hard state. It should be firm enough to handle without bending but still cool to the touch. -
Refine the Shape:
Now that it’s firm, use a damp sponge or a soft rib to smooth out any sharp edges on the handle and the rim of the bowl. Round over any squared-off spots from the initial cutting. -
The Backside Curve:
Flip the spoon over and gently shape the back of the bowl. You want a smooth, convex curve that feels pleasant in the hand. A surform tool can help remove bulk if needed. -
Final Smoothing:
Go over the entire piece with a barely damp sponge. This is crucial for revealing the natural speckles in the clay body before firing. -
Bone Dry:
Allow the spoon to dry completely to the bone-dry stage. This is delicate work, so drying slowly under loose plastic can prevent the long handle from warping. -
Bisque Fire:
Fire the piece in your kiln to cone 04 (or your clay’s specific bisque temperature).
Warping Worries?
Long handles warp easily during drying. Dry the spoon horizontally on a slat of wood or foam, or prop the handle up slightly so air circulates evenly around it.
Step 3: Glazing and Finishing
-
Clean the Bisque:
Wipe the fired spoon with a damp sponge to remove any kiln dust. This ensures the glaze adheres properly without crawling. -
Prepare the Glaze:
Stir your cream or transparent matte glaze thoroughly. If you are using a non-speckled clay, you might mix in some granular ilmenite or iron oxide sand into the glaze to mimic the speckles seen in the image. -
Dip or Brush:
Hold the very end of the handle and dip the spoon bowl-first into the glaze. Alternatively, brush on 2-3 even coats, letting each dry in between. -
Wipe the Foot:
If you plan to fire the spoon lying flat, you must wipe the glaze off the entire back side where it touches the kiln shelf. Alternatively, use a stilt to support the handle. -
Glaze Fire:
Fire the spoon to the maturity temperature of your clay and glaze (typically Cone 5 or 6 for stoneware). Let the kiln cool naturally before opening. -
Sand the Bottom:
Once cool, check the unglazed portion. Use wet-dry sandpaper or a diamond sanding pad to polish the unglazed clay until it is buttery smooth to the touch.
Custom Dipped Effect
For a two-tone look like the mug in the background, only glaze the spoon bowl and half the handle, leaving the top raw clay for a textural contrast.
Enjoy using your beautiful new spoon for your morning coffee or baking rituals
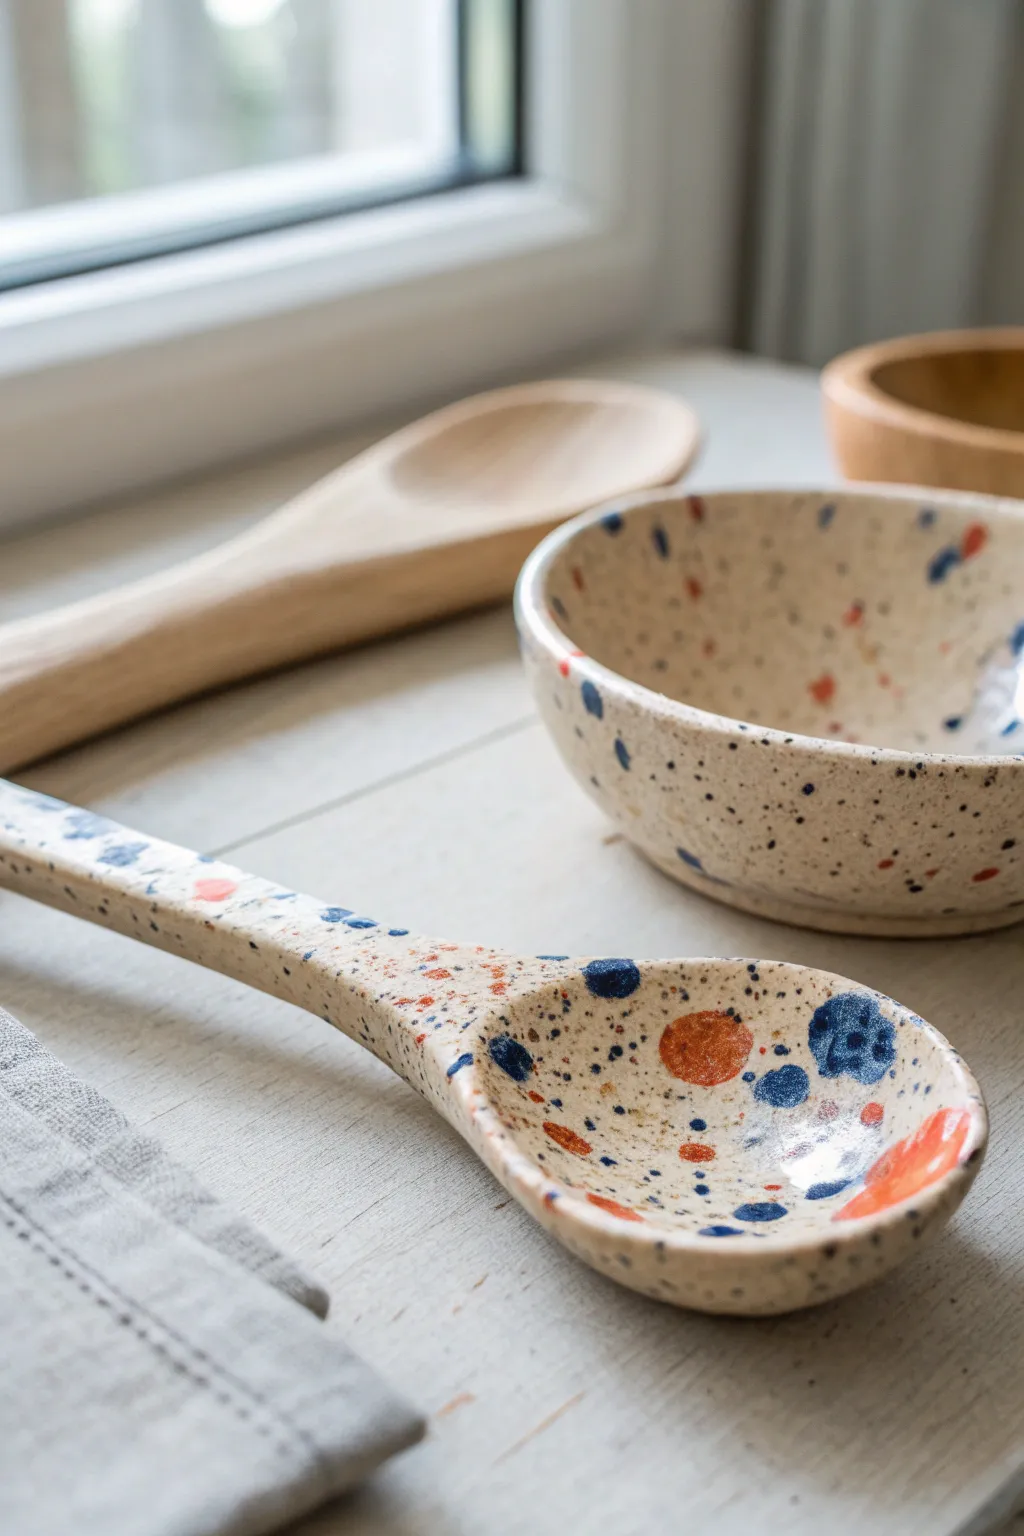
Set of Mix-and-Match Glaze Spoons
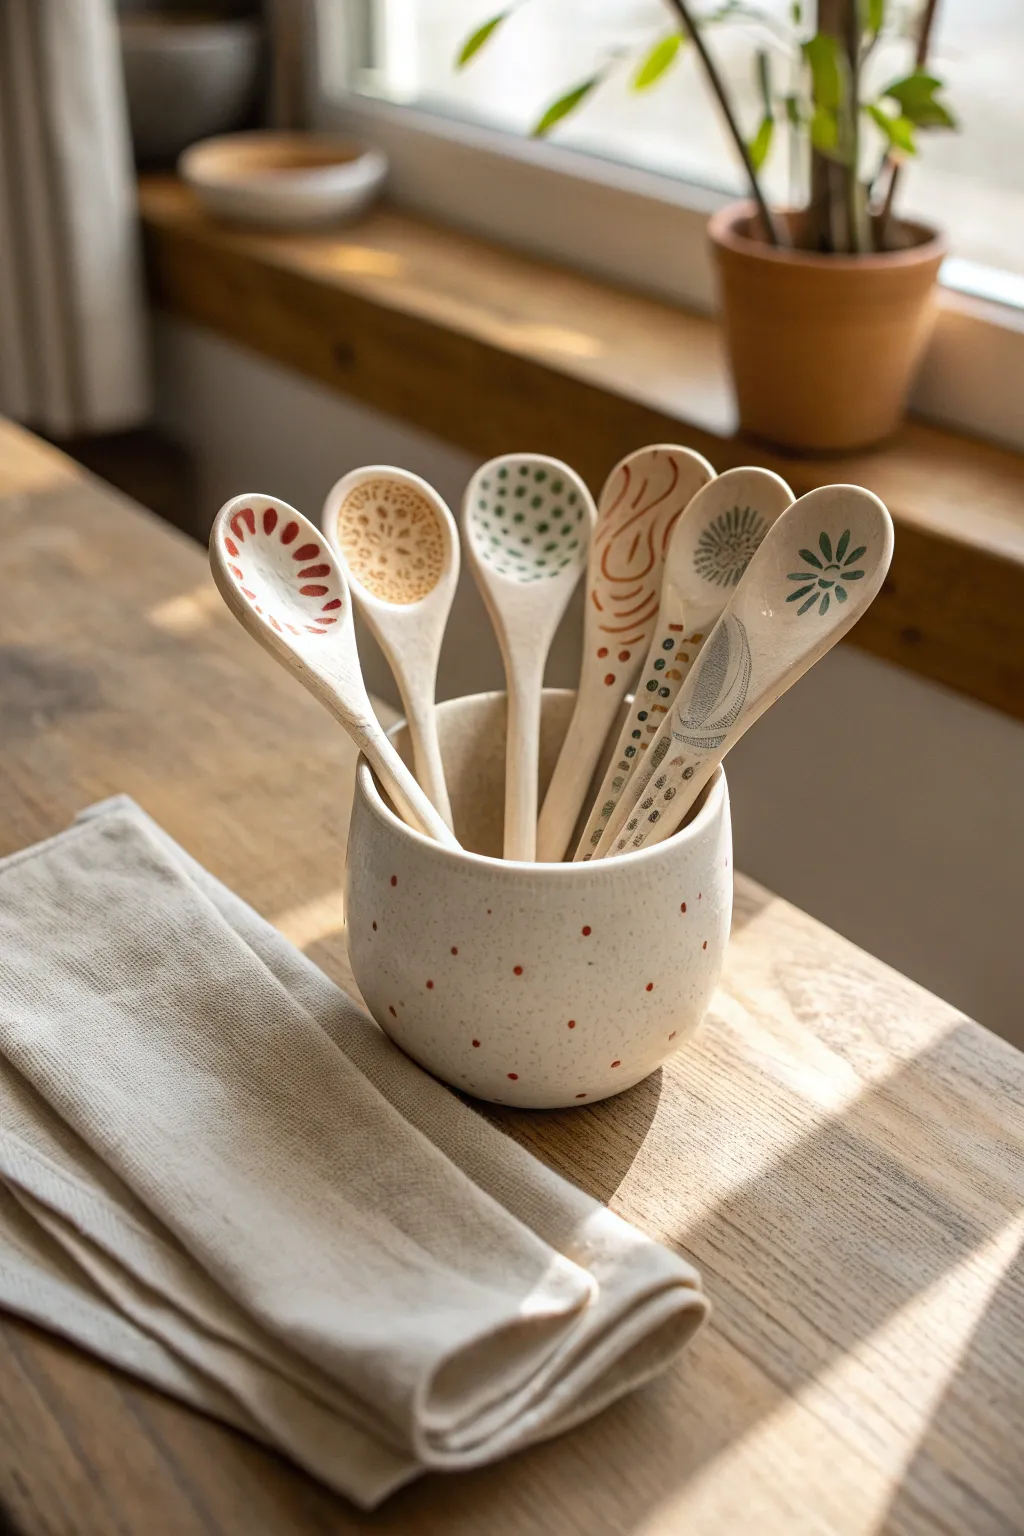
Bring an earthy, artisanal touch to your kitchen with this collection of hand-formed clay spoons. Featuring a mix of geometric dots, organic swirls, and stylized florals, this project balances rustic textures with delicate painted details.
Detailed Instructions
Materials
- Light-colored stoneware or earthenware clay (cone 5/6 recommended)
- Pottery tools (needle tool, rib, sponge)
- Rolling pin and guide sticks (approx. 1/4 inch)
- Small wooden spoon or plaster mold (for forming the bowl)
- Underglazes (terracotta, sage green, dark teal, mustard yellow)
- Detail brushes (liner brush and small round brush)
- Clear matte glaze
- Kiln access
Step 1: Shaping the Clay
-
Preparation:
Begin by wedging your clay thoroughly to remove air bubbles. Roll it out into a slab that is roughly 1/4 inch thick, using guide sticks to ensure an even surface. -
Cutting the blanks:
Using a needle tool, freehand cut the basic spoon shapes. You’ll want a long, slender handle that widens into a rounded oval at the top. Cut out about 6-8 shapes so you have extras to experiment with. -
Smoothing edges:
Once cut, take a damp sponge and gently run it along the sharp cut edges of each spoon to round them off. This prevents sharpness after firing. -
Forming the bowl:
To create the scoop, gently press the rounded end of your clay blank onto a plaster mold or the back of a wooden spoon. Using your thumb, smooth the clay into a concave shape, being careful not to make the walls too thin. -
Refining the handle:
While the bowl is supported, gently pinch and roll the handle between your fingers to round it out. It should feel comfortable and organic, not perfectly cylindrical. -
Drying to leather hard:
Lay the spoons on a ware board. I usually prop the handles up on a small coil of clay or foam so they dry straight and don’t warp. Let them dry until leather hard.
Stilt Alternative
If you don’t have stilts, leave the back of the spoon bowl unglazed. You can still glaze the handle and the inside of the scoop for functionality.
Step 2: Painting the Patterns
-
Planning the designs:
Sketch out your six distinct patterns on paper first. Aim for a mix: one with radiating lines, one with a central flower, one with random dots, and one with swirls. -
The red radiant spoon:
For the first spoon, use terracotta underglaze. Paint small, teardrop-shaped dashes around the rim of the bowl, pointing inward towards the center like sun rays. -
The detailed rosette:
For the second design, use a mustard or light brown underglaze. Paint a dense circle of tiny dots in the center, surrounded by a ring of petal-like loops. The goal is a lace-like effect. -
Green polka dots:
Dip a small round brush or the back end of a paintbrush into sage green underglaze. Dot the entire inner surface of the third spoon bowl evenly. -
Organic swirls:
Using a liner brush and terracotta underglaze, paint loose, free-flowing curved lines on the fourth spoon. Let the lines echo the curve of the spoon bowl. -
The floral centerpiece:
On the fifth spoon, paint a dark teal flower slightly off-center. Create eight simple petals radiating from a hollow center. -
Handle details:
Don’t forget the handles. On the remaining spoons, add small horizontal dashes or running vine patterns down the neck to tie the set together.
Step 3: Firing and Glazing
-
Bisque fire:
Once the underglaze is completely dry and the clay is bone dry (room temperature to the touch), bisque fire the spoons to cone 04. -
Washing:
After the kiln cools, briefly wipe the bisque-ware with a damp sponge to remove any dust that might resist the glaze. -
Glaze application:
Dip each spoon into a clear matte glaze. A matte finish preserves that soft, earthy look seen in the photo better than a high gloss. -
Stilting:
Since spoons are glazed on all sides, you must place them on stilts in the kiln so they don’t fuse to the shelf. -
Final fire:
Glaze fire to the appropriate temperature for your clay body (likely cone 5 or 6). Once cooled, sand down any sharp stilt marks on the back.
Mismatched Magic
Try using a different clay body, like a speckled buff clay, for half the spoons. The natural speckles will add texture behind your painted designs.
Display your finished spoons in a small ceramic cup or tie them together with twine as a charming handmade gift


What Really Happens Inside the Kiln
Learn how time and temperature work together inside the kiln to transform clay into durable ceramic.
Stamped Pattern Handle
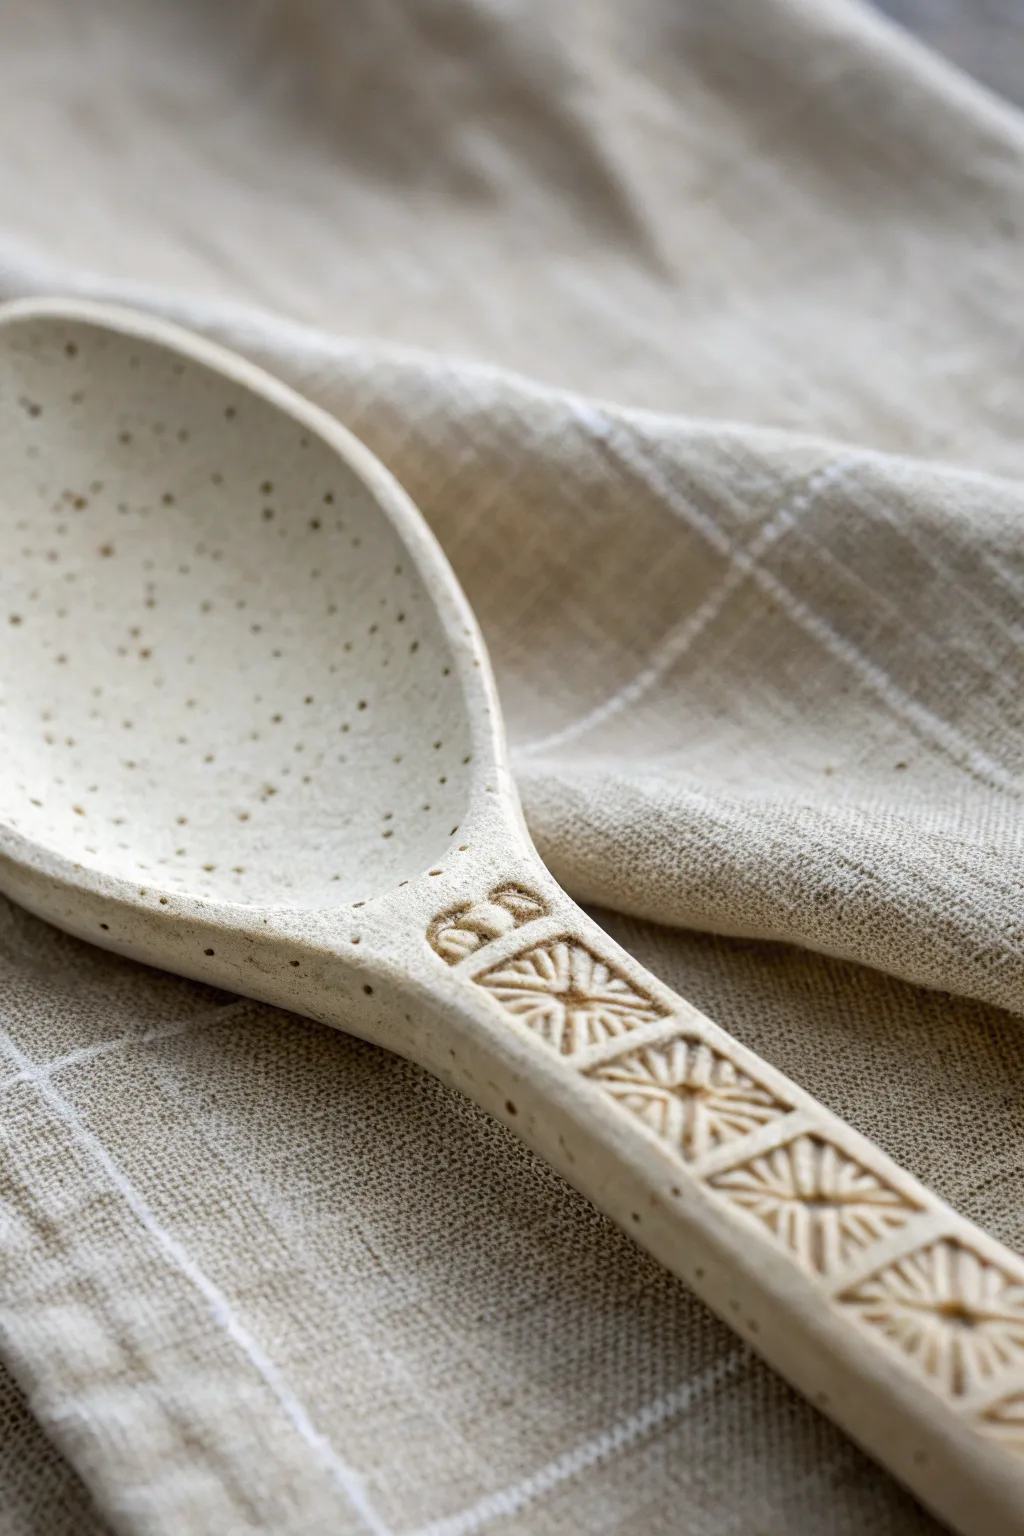
This project combines the rustic charm of speckled stoneware with precise, geometric detailing for a functional piece of art. The focus is on the handle, where a repeating stamped motif transforms a simple kitchen tool into a bespoke treasure.
Step-by-Step
Materials
- Speckled clay body (stoneware recommended)
- Wooden spoon template (or freehand sketch)
- Rolling pin
- Fettling knife or needle tool
- Modeling tools (ribs, sponge)
- Geometric texture stamp (starburst or square floral)
- Small spherical tool (or back of a paintbrush)
- Sandpaper or green scrubby
- Clear matte or satin food-safe glaze
Step 1: Shaping the Form
-
Preparation:
Begin by wedging your speckled clay thoroughly to remove air bubbles and ensure an even consistency. This is crucial for structural integrity. -
Rolling the slab:
Roll out a slab of clay to an even thickness of approximately 1/4 inch. I find that using guide sticks helps keep the thickness perfectly uniform. -
Cutting the outline:
Place your spoon template onto the clay slab. Using a needle tool or fettling knife, carefully trace and cut out the basic spoon shape. -
Refining edges:
Smooth the cut edges immediately with a damp sponge or finger to remove any sharp burrs or crumbs of clay. -
Forming the bowl:
Gently press the bowl portion of the cutout into a shallow mold or use your thumbs to pinch and deepen the spoon’s bowl, supporting it with your palm underneath to create a gentle curve.
Stamp Stuck?
If your stamp is sticking to the fresh clay, dust the stamp face lightly with cornstarch or wait for the clay to firm up slightly before pressing.
Step 2: Detailing the Handle
-
Planning the pattern:
Lay the spoon flat on a work surface. Measure or visualize where your stamped pattern will sit on the handle to ensure it is centered. -
Stamping the motif:
Press your geometric square stamp firmly into the handle clay. Apply even pressure so the impression is deep and crisp, repeating the design down the length of the handle. -
Correcting distortion:
Stamping often spreads the clay slightly. Use a straight edge or ruler to gently push the sides of the handle back into a straight line if they have bulged out. -
Adding texture dots:
Between the main stamped square and the spoon bowl, use a small spherical tool to press two or three small decorative indentations as a transition element. -
Drying setup:
Prop the handle up slightly if you want a curve, or leave it flat. Allow the clay to dry slowly to the leather-hard stage.
Step 3: Refining and Finishing
-
Smoothing:
Once leather-hard, use a smooth kidney rib or a damp sponge to refine the back of the spoon and the edges of the bowl. -
Bisque fire:
Allow the spoon to dry completely to the bone-dry stage, then load it into the kiln for a bisque firing according to your clay body’s specifications. -
Sanding:
After bisque firing, lightly sand any rough spots, particularly around the rim of the bowl and the handle edges, using wet-dry sandpaper to avoid dust. -
Glazing:
Apply a clear matte or satin food-safe glaze. Since the clay is already speckled and beautiful, a clear coat will highlight the natural texture without hiding it. -
Glaze wiping:
Ensure the glaze pools slightly in the stamped recesses to emphasize depth, but wipe the bottom where it touches the kiln shelf completely clean. -
Final fire:
Fire the spoon again to the glaze temperature appropriate for your stoneware clay.
Natural Speckles
For this exact look, choose a stoneware clay body labeled ‘Speckled Buff’ or similar. The specks appear naturally during firing.
Once cooled, your custom spoon is ready to serve or display with quiet sophistication
Carved Line Texture Handle
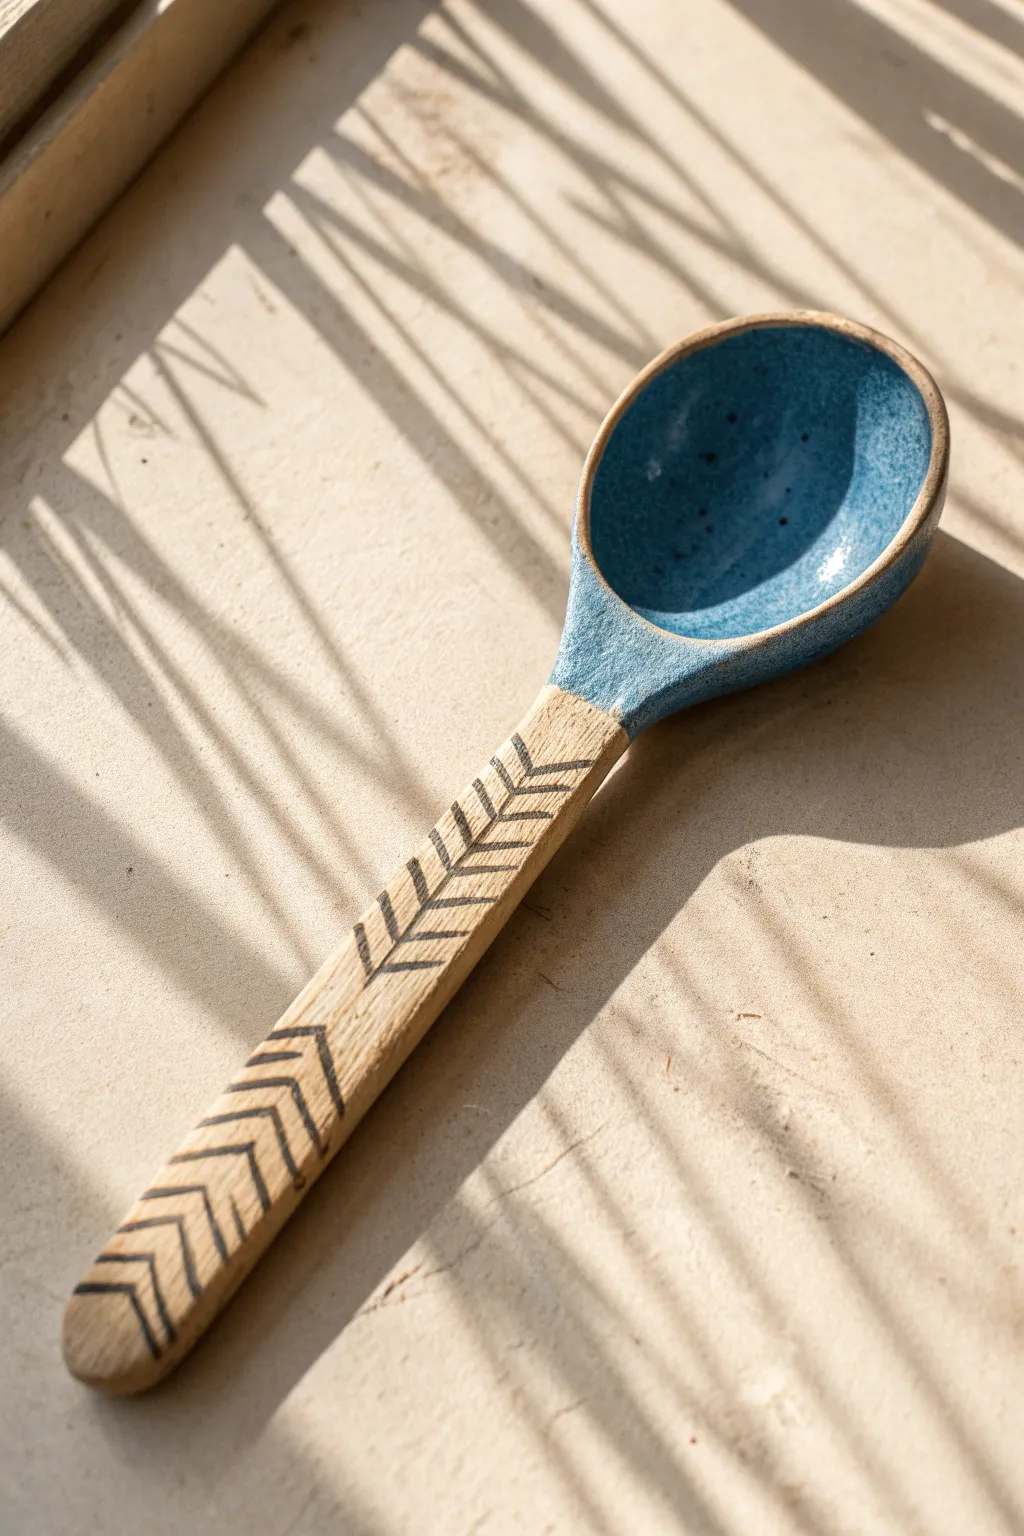
This rustic yet modern spoon combines a speckled blue glaze with the raw, earthy beauty of unglazed stoneware. The handle features a carved chevron pattern that mimics a feather or wheat stalk, accentuated with a dark inlay for striking contrast.
Step-by-Step Tutorial
Materials
- Stoneware clay (buff or speckled)
- Pottery tools (rib, needle tool, sponge)
- Sgraffito tool or small loop tool
- Speckled blue glaze
- Black underglaze or dark slip
- Wax resist
- Kiln
- Clear matte sealer (optional for handle)
Step 1: Forming the Spoon
-
Pinch the bowl:
Start with a golf-ball-sized piece of stoneware clay. Press your thumb into the center and gently pinch around the edges to form a shallow, organic bowl shape. -
Roll the handle:
Roll a separate coil of clay for the handle, about the thickness of a thick marker. Taper one end slightly where it will join the bowl. -
Join the pieces:
Score and slip both the attachment point on the bowl and the tapered end of the handle. Firmly press them together. -
Refine the connection:
Smear the clay across the seam with your thumb to create a secure bond, then smooth it out with a damp sponge so the transition is seamless. -
Shape while soft:
While the clay is still plastic, gently curve the handle or adjust the bowl’s depth to your liking. Lay it flat to dry until it reaches a leather-hard state.
Clean Lines Tip
When wiping back the underglaze inlay, wipe diagonally across the carved lines rather than parallel to them. This prevents the sponge from scooping the color out of the grooves.
Step 2: Carving and Decoration
-
Draft the pattern:
Once leather-hard, lightly sketch a central line down the handle using a needle tool. Then, mark angled lines branching off it to create the chevron ‘V’ shapes. -
Carve the relief:
Using a small loop tool or V-tip sgraffito tool, carve out the sketched lines. I find shallow but distinct grooves hold the inlay best. -
Apply the inlay:
Brush black underglaze or dark slip into the carved grooves. Don’t worry about being messy; let the excess spill onto the surface. -
Clean the surface:
Once the underglaze is touch-dry, use a slightly damp sponge or metal rib to scrape away the excess surface color, leaving the dark pigment only inside the carved lines. -
Bisque fire:
Allow the spoon to dry completely (bone dry) before loading it into the kiln for the bisque firing.
Troubleshooting: Cracking
Spoon handles often crack at the neck while drying. Dry your spoon slowly under a loose sheet of plastic to equalize humidity between the thin bowl and the thicker handle.
Step 3: Glazing and Finishing
-
Wax the handle:
Apply wax resist carefully to the entire handle, stopping exactly where the bowl begins. This keeps the handle raw and textured. -
Coat the bowl:
Dip the spoon bowl into a speckled blue glaze. If you prefer brushing, apply 2-3 even coats to ensure full coverage. -
Wipe the back:
If firing directly on a kiln shelf, carefully wipe the glaze off the very bottom of the spoon bowl or use a stilt. -
Glaze fire:
Fire the spoon again to your clay body’s maturity temperature (likely Cone 5 or 6 for stoneware). -
Sand the raw clay:
After firing, the unglazed handle might feel slightly rough. Use fine-grit sandpaper (wet-sanding is best to avoid dust) to smooth the raw clay handle for a comfortable grip.
Now you have a functional piece of art that feels as good in the hand as it looks on the table

TRACK YOUR CERAMIC JOURNEY
Capture glaze tests, firing details, and creative progress—all in one simple printable. Make your projects easier to repeat and improve.
Dotted Grip Handle
Embrace the tactile beauty of hand-built pottery with this charming spoon project featuring a distinctive dotted grip. The organic texture not only looks artistic but provides a functional, non-slip surface that feels wonderful in the hand.
Step-by-Step Guide
Materials
- Stoneware clay (smooth or slightly groggy light body)
- Small wooden modeling tool or needle tool
- Wooden spoon (for shaping)
- Sponge
- Bowl of water
- Rolling pin
- Canvas mat or wooden board
- Pottery wire cutter
- Clear or matte white glaze
- Kiln access
Step 1: Shaping the Form
-
Prepare the clay:
Cut a manageable piece of stoneware clay and wedge it thoroughly to remove air bubbles. You want a piece roughly the size of a lemon. -
Roll out a coil:
Roll the clay on your canvas into a thick coil, leaving one end significantly bulbous. This larger end will become the spoon’s bowl. -
Flatten the handle:
Gently flatten the thinner part of the coil to create the handle stem. Don’t make it too thin, as it needs to support the weight of the spoon head. -
Form the bowl:
Using your thumb, press into the center of the bulbous end to begin opening up the bowl shape. Rotate the clay in your palm as you pinch the walls to an even thickness. -
Refine the curve:
Smooth the inside of the spoon bowl with a slightly damp sponge. You can use the back of a wooden kitchen spoon to help shape the curve perfectly. -
Connect handle and bowl:
Ensure the transition from the bowl to the handle is smooth and reinforced. I like to run my thumb along this neck area to compress the clay, preventing future cracks. -
Smooth the surface:
Go over the entire spoon with a damp sponge or a rubber rib to remove fingerprints and create a blank canvas for your texture.
Step 2: Adding the Dotted Texture
-
Plan the pattern:
The texture on this spoon is densest at the handle and fades out as it reaches the bowl. Visualize this gradient before you start pressing. -
Create the tool:
Find a tool with a small, round tip. The end of a small paintbrush, a needle tool with a blunt end, or a wooden skewer works well. -
Texture the handle base:
Start at the very end of the handle. Press your tool into the clay to create small divots. Pack these indentations close together for a highly textured grip. -
Work up the stem:
Continue creating rows of dots moving up the handle. As you move upward, stagger the dots slightly so they aren’t in perfect grid lines, giving it an organic look. -
Fade into the bowl:
As you reach the neck where the handle meets the bowl, space the dots further apart. Allow a few stray dots to wander onto the back or rim of the spoon bowl. -
Pierce the handle (optional):
If you want to hang the spoon, use a straw or a hole cutter to punch a clean hole through the very end of the handle. -
Clean the burrs:
Let the clay leather-harden slightly. Once firm, gently rub your finger over the dots to knock down any sharp clay burrs raised during the texturing.
Too Many Cracks?
If tiny cracks appear around the dots while pressing, your clay is too dry. Use a mister to dampen it slightly, or dip your tool in water occasionally.
Step 3: Firing and Glazing
-
First drying:
Allow the spoon to dry slowly under a loose plastic sheet for a day to prevent warping, then let it dry completely in open air. -
Bisque fire:
Fire the spoon to bisque temperature (usually cone 04 or 06) to prepare it for glazing. -
Apply glaze:
Dip the spoon into a clear or semi-opaque white glaze. A glaze that breaks over texture is ideal, as it will pool in the dots and highlight the pattern. -
Wipe the foot:
If firing the spoon flat, ensure the bottom contact points are wiped clean of glaze so it doesn’t stick to the kiln shelf. -
Final firing:
Fire to the maturation temperature of your specific clay and glaze combination.
Color Wash Effect
Before glazing, rub an iron oxide wash into the dots and wipe the surface clean. This darkens the pits, making the texture pop under a clear glaze.
Your finished spoon will serve as a beautiful, tactile addition to your kitchen collection
Two-Tone Dip-Glaze Spoon

This charming ceramic spoon combines the raw, earthy texture of speckled stoneware with a sleek, glossy white glaze for a modern rustic finish. The design features a short, ergonomic handle and a generous, deep bowl, perfect for serving dips or enjoying a hearty soup.
Detailed Instructions
Materials
- Speckled stoneware clay (mid-fire or high-fire)
- Pottery tools (rib, needle tool, sponge)
- Rolling pin
- Guide sticks or slats (approx. 1/4 inch thick)
- Spoon template (cardstock or paper)
- Bisque mold or a rounded object (like a lightbulb or small balloon) for shaping
- Glossy white glaze (food safe)
- Wax resist (emulsion)
- Small paintbrush
- Kiln access
Step 1: Shaping the Form
-
Roll the slab:
Begin by wedging your speckled clay to remove air bubbles, then roll it out into a smooth slab. Use 1/4 inch guide sticks on either side of your rolling pin to ensure an even thickness throughout the piece. -
Cut the outline:
Place your spoon template onto the slab. Using a needle tool, carefully trace and cut around the shape. Based on the reference, you want a wide, teardrop-shaped bowl that tapers into a short, stubby handle. -
Refine the edges:
Once cut, the edges will be sharp and square. Wet your fingers slightly or use a damp sponge to round over these edges, smoothing away any burrs or crumbs of clay. -
Form the bowl:
Gently press the wider end of your clay cutout into a bisque mold or over a rounded form to create the deep curve of the spoon bowl. A pounce bag made of sand or even a smooth stone works well here. -
Shape the unique handle:
This spoon has a distinctive handle that curves upward. While the bowl is supported, gently pinch and lift the handle section, creating a slight vertical integration with the back of the bowl rather than a long flat stick. -
Slow drying:
Cover the spoon loosely with plastic to let it dry slowly to the leather-hard stage. This prevents warping, which is common in flatware.
Step 2: Refining & Bisque
-
Refine the surface:
Once leather-hard, use a slightly damp sponge to wipe down the entire spoon. This exposes the ‘speckles’ (grog) in the clay body and ensures a super smooth surface for eating. -
Check the connection:
Inspect the transition point where the handle meets the bowl. I find that compressing this area deeply with a rib tool adds necessary strength to prevent cracking during firing. -
Bisque fire:
Allow the spoon to become bone dry, then load it into the kiln for a bisque fire (typically Cone 04 or 06, depending on your clay).
Warping Woes?
Since spoons are prone to warping, drying is critical. Dry them very slowly under plastic, or weigh down the handle slightly with a small sandbag during the leather-hard phase.
Step 3: Glazing & Final Fire
-
Clean the bisque:
After the kiln cools, wipe the bisque-fired spoon with a damp sponge to remove any dust that might resist the glaze. -
Apply wax resist:
To achieve the specific look in the photo, paint a layer of wax resist on the very tip of the handle (the ‘dipped’ look) and possibly the underside if you plan to fire it sitting directly on the shelf. The reference shows a raw clay accent on the tip. -
Pour or dip glaze:
Mix your glossy white glaze thoroughly. Dip the bowl of the spoon into the glaze, stopping where the handle begins, or pour the glaze inside the bowl and swirl it to coat just the interior, leaving the outside raw for contrast. -
Create the two-tone effect:
The image shows a distinct unglazed patch on the handle/rim. Carefully wipe away any glaze from that specific section with a clean sponge, or trust your wax resist line to keep that area bare, revealing the beautiful toasted clay color. -
Clean the foot:
Ensure absolutely no glaze remains on the bottom surface where the spoon will rest on the kiln shelf. Wipe it clean immediately. -
Glaze fire:
Load the spoon into the kiln for the final glaze firing (often Cone 5 or 6 for stoneware). Ensure it is supported well so it doesn’t slump. -
Final polish:
Once fired and cooled, use high-grit sandpaper (wet/dry type) to sand the unglazed clay portions under running water. This makes the raw clay feel buttery smooth against the hand.
Make a Set
Vary the sizes slightly to create a nesting set of serving spoons. You can also mix up the raw clay section placement—try leaving just the rim unglazed for a different look.
Now you have a stunning, food-safe spoon ready for your next dinner party
Raw Clay and Glazed Bowl Contrast
This project celebrates the beautiful duality of ceramic finishes by contrasting a raw, textured handle with a smooth, glossy bowl. The result is a tactile serving piece that feels earthy in the hand but remains food-safe and functional where it matters most.
Step-by-Step Guide
Materials
- Speckled stoneware clay (mid-fire)
- Wooden modeling tool or paddle
- Loop tool for carving
- Sponge
- Clear glossy glaze (food safe)
- Wax resist or masking tape
- Kiln (or access to local firing service)
- Small bowl of water
- Scoring tool or needle tool
Step 1: Forming the Rough Shape
-
Prepare the clay:
Start with a ball of speckled stoneware clay roughly the size of a lemon. Ensure it is well-wedged to remove any air bubbles. -
Pinch the handle:
Elongate one side of the ball by gently squeezing and rolling it between your palms to form a thick coil. -
Form the bowl:
Leave a rounded knob at the end of your coil. Press your thumb into the center of this knob to begin opening up the bowl shape. -
Refine the walls:
Gently pinch the walls of the spoon bowl between your thumb and forefinger, rotating as you go to ensure even thickness. -
Shape the transition:
Smooth the area where the handle meets the bowl so the neck is strong but not overly bulky.
Cracked Handle?
Handles crack if they dry faster than the bowl. Wrap the handle tightly in plastic while leaving the bowl exposed for the first few hours of drying.
Step 2: Adding Texture and Detail
-
Paddle the handle:
Wait until the clay is slightly firm (leather hard). Use a wooden paddle or flat tool to gently beat the handle, creating flat facets and a hammered look. -
Refine the rim:
Run a damp sponge or your finger along the rim of the spoon bowl to round off any sharp edges. -
Carve the interior:
If the bowl feels too heavy, you can use a loop tool to carefully carve out excess clay from the inside, making the walls thinner. -
Smooth the interior:
Use a slightly damp sponge to perfectly smooth the inside of the bowl, erasing any tool marks or fingerprints. -
Dry slowly:
Place the spoon on a ware board. Cover it loosely with plastic to let it dry slowly, which prevents the long handle from warping.
Step 3: Bisque and Glazing
-
Bisque fire:
Once bone dry, fire the spoon in a kiln to a bisque temperature (usually cone 04 or 06). -
Clean the bisque:
Wipe the fired spoon with a damp sponge to remove any kiln dust before glazing. -
Apply wax resist:
Apply wax resist carefully to the handle and the exterior underside of the bowl. -
Refine the resist line:
Ensure you have a clean, intentional line where the wax stops, just at the rim of the bowl. -
Dip or brush glaze:
Dip the bowl portion into your clear glossy glaze. I like to hold it by the handle and dip just the scoop to get an even coating. -
Wipe back drips:
Immediately use a sponge to wipe away any glaze beads that settled on the waxed handle area. -
Glaze fire:
Fire the piece again to the maturation temperature of your specific clay and glaze (typically cone 5/6). -
Sand the handle:
After firing, use fine-grit sandpaper (wet/dry paper works best with a little water) to smooth the unglazed handle so it feels soft to the touch.
Make it a Set
Create a trio of spoons in different sizes—a tiny salt scoop, a medium sugar spoon, and a large serving ladle—all with matching textured handles.
Now you have a stunning custom utensil ready for your next dinner party
Speckled and Splatter Glaze Spoon
Embrace the imperfect beauty of hand-built pottery with this charming speckled spoon project. Using a simple creamy base glaze highlighted by vibrant blue and orange splatters, you’ll create a functional piece of art that looks right at home on any farmhouse table.
How-To Guide
Materials
- White stoneware or porcelain clay body
- Rolling pin
- Wooden guide strips (1/4 inch thick)
- Needle tool
- Rib tool (smooth wood or rubber)
- Spoon template (cardstock) or existing large spoon to trace
- Large sponge for smoothing
- Small bowl or slump mold (optional)
- Cream/Oatmeal dipping glaze (matte or satin finish)
- Underglaze or glaze in Cobalt Blue and Burnt Orange
- Stiff bristle brush (e.g., a toothbrush or stiff fan brush)
- Kiln access
Step 1: Shaping the Clay Body
-
Roll the slab:
Begin by wedging your white stoneware clay thoroughly to remove air pockets. Place the clay between two 1/4 inch wooden guide strips and roll it out into a smooth, even slab. -
Trace and cut:
Lay your cardstock template or an existing large serving spoon gently onto the slab. Using your needle tool held vertically, trace around the shape to cut out the spoon silhouette. -
Refine the edges:
Once the shape is cut, peel away the excess clay. Run a slightly damp sponge along the raw edges to soften the sharp angles left by the needle tool, creating a comfortable, rounded detailed rim. -
Form the bowl:
Gently press the bowl part of the clay cutout into a slump mold or simply use your thumbs to pinch and deepen the spoon’s basin. I like to work from the center outward to keep the walls even. -
Shape the handle:
While supporting the bowl, gently curve the handle. Depending on your preference, you can leave it flat for a modern look or slightly curve the edges upward for a more traditional feel. -
Compress and smooth:
Use a soft rib tool to compress the surface of the clay, removing any canvas texture or fingerprints. This step is crucial for preventing warping during the firing process. -
Slow drying:
Place your spoon on a ware board, possibly supporting the handle with a small piece of sponge or foam so it keeps its shape. Let it dry slowly under loose plastic until bone dry. -
Bisque fire:
Load the bone-dry spoon into the kiln and bisque fire it to cone 04 (or your clay body’s specific recommendation) to prepare it for glazing.
Splatter Control
If your splatters are turning into streaks, your brush is likely too wet. Shake off excess glaze before flicking, or dab the brush on a paper towel first.
Step 2: Glazing and Splatter Technique
-
Clean the bisque:
Wipe the fired spoon with a damp sponge to remove any kiln dust. This ensures the glaze adheres properly to the ceramic surface. -
Apply the base coat:
Dip the entire spoon into a bucket of Cream or Oatmeal glaze. Ensure the coat is even; if you don’t have enough glaze to dip, brush on three even coats, letting each dry to the touch in between. -
Prepare the splatter:
Pour a small amount of Cobalt Blue and Burnt Orange glaze (or underglaze) into separate shallow dishes. If the glaze is very thick, water it down slightly until it has the consistency of heavy cream. -
Test your flick:
Dip a stiff-bristled brush or toothbrush into the blue glaze. Before aiming at the spoon, practice flicking the bristles with your thumb over a scrap piece of paper to control the droplet size. -
Apply the blue dots:
Hold the brush about 6-8 inches away from the spoon and flick the blue glaze. Aim for a random distribution, allowing some spots to be larger and others tiny. -
Add orange accents:
Repeat the process with the orange glaze. Layering the orange over the dried blue splatter creates depth, so don’t worry if a few dots overlap. -
Clean the foot:
Since this spoon will likely be fired on stilts or a shelf, ensure no glaze is on the very bottom resting points if you aren’t using stilts. Wipe away any drips. -
Glaze fire:
Place the spoon in the kiln for the final glaze firing (typically cone 5 or 6 for stoneware). Ensure it is supported correctly so the handle doesn’t slump in the heat.
Go Matching
Don’t stop at one spoon! Use the same splatter technique on a thrown bowl or mug to create a cohesive breakfast set perfect for gifting.
Now you have a beautifully bespoke utensil ready for serving or display.
Marbled Polymer Clay Spoon
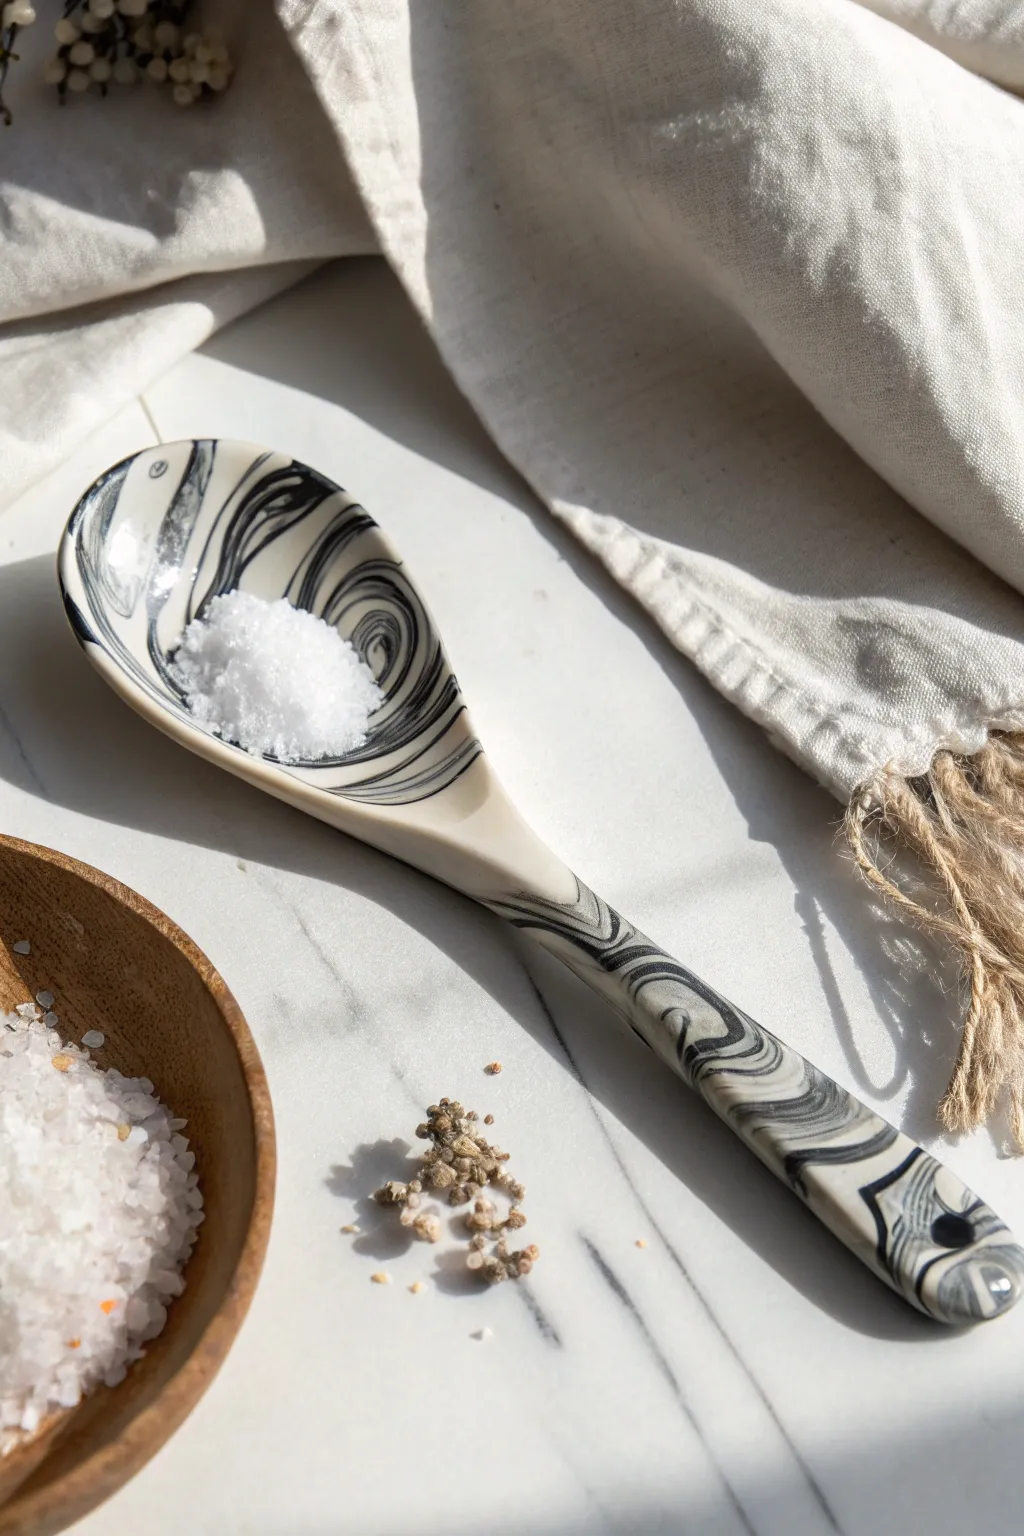
Achieve a sophisticated, modern aesthetic with this striking marbled spoon project. By swirling contrasting black and white polymer clay, you’ll create a functional piece of art that mimics the look of high-end stone or ceramic.
Detailed Instructions
Materials
- White polymer clay (2 oz)
- Black polymer clay (1 oz)
- Acrylic rolling pin or clay machine
- Sharp clay blade or craft knife
- Metal spoon (to use as a form)
- Cornstarch or baby powder (as a release agent)
- Fine-grit sandpaper (400, 600, and 1000 grit)
- Glossy polymer clay varnish or glaze
- Soft brush
- Oven
Step 1: Prepping and Mixing the Clay
-
Condition the clay:
Start by kneading the white and black clay blocks separately until they are soft, pliable, and warm to the touch. Proper conditioning prevents cracking later. -
Create clay logs:
Roll the white clay into a thick log, about 4 inches long. Roll the black clay into a significantly thinner snake, about the same length as the white log. -
Combine the colors:
Lay the thin black snake lengthwise onto the thick white log. Twist the two together tightly like a candy cane. -
Begin the marbling process:
Fold the twisted log in half and roll it out again into a smooth log. Repeat this twist-fold-roll process about 3 to 4 times. Be careful not to over-mix, or the colors will turn gray instead of remaining distinct.
Muddy colors?
If your black and white match turns gray, you mixed too much. Stop twisting sooner next time. The distinct lines come from stopping before the colors fully blend.
Step 2: Shaping the Spoon
-
Flatten the slab:
Roll your marbled log into a ball, then use your acrylic roller to flatten it into a slab about 1/4 inch thick. You want to see distinct swirls of black running through the white. -
Cut the basic shape:
Lay your metal spoon onto the clay slab to use as a template. Using your clay blade or craft knife, trace around the spoon shape, leaving a little extra margin. -
Refine the edges:
Lift the clay cutout and smooth the rough edges with your fingertips. Gently round off the handle and the bowl area so it looks organic and polished. -
Prepare the form:
I like to lightly dust the back of the metal spoon with cornstarch to ensure the clay doesn’t stick during baking. -
Mold the spoon:
Gently press your clay cutout onto the back (convex side) of the metal spoon. Ensure the clay hugs the curve of the bowl and straightens along the handle. -
Add detail (optional):
If you want the handle to have a cylindrical shape like the photo, gently roll the handle portion between your fingers while it rests on the metal form to round it out.
Food Safety
Polymer clay is strictly for decorative use or dry goods (like scooping salt). Do not use it for hot foods, liquids, or putting it in your mouth.
Step 3: Baking and Finishing
-
Bake the piece:
Place the metal spoon with the clay on it onto a baking sheet. Bake according to your polymer clay package instructions (usually 275°F for 15-30 minutes). -
Cool down:
Allow the spoon to cool completely in the oven or on a wire rack before attempting to pop the clay off the metal form. -
Sand for smoothness:
Once cool, wet-sand the edges and surface starting with 400 grit sandpaper, moving to 600, and finishing with 1000 grit for a silky smooth feel. -
Clean the surface:
Wash the spoon with a little water and dish soap to remove any sanding dust and residue. Dry it thoroughly. -
Apply the glaze:
Using a soft brush, apply a thin, even coat of glossy polymer clay varnish. This brings out the depth of the black marbling and mimics a ceramic finish. -
Final cure:
Let the glaze dry completely according to the bottle’s instructions, sometimes requiring a second quick bake or air drying time, before using.
Place your finished spoon next to a small bowl of sea salt for a chic countertop display
Terrazzo Chip Spoon Surface
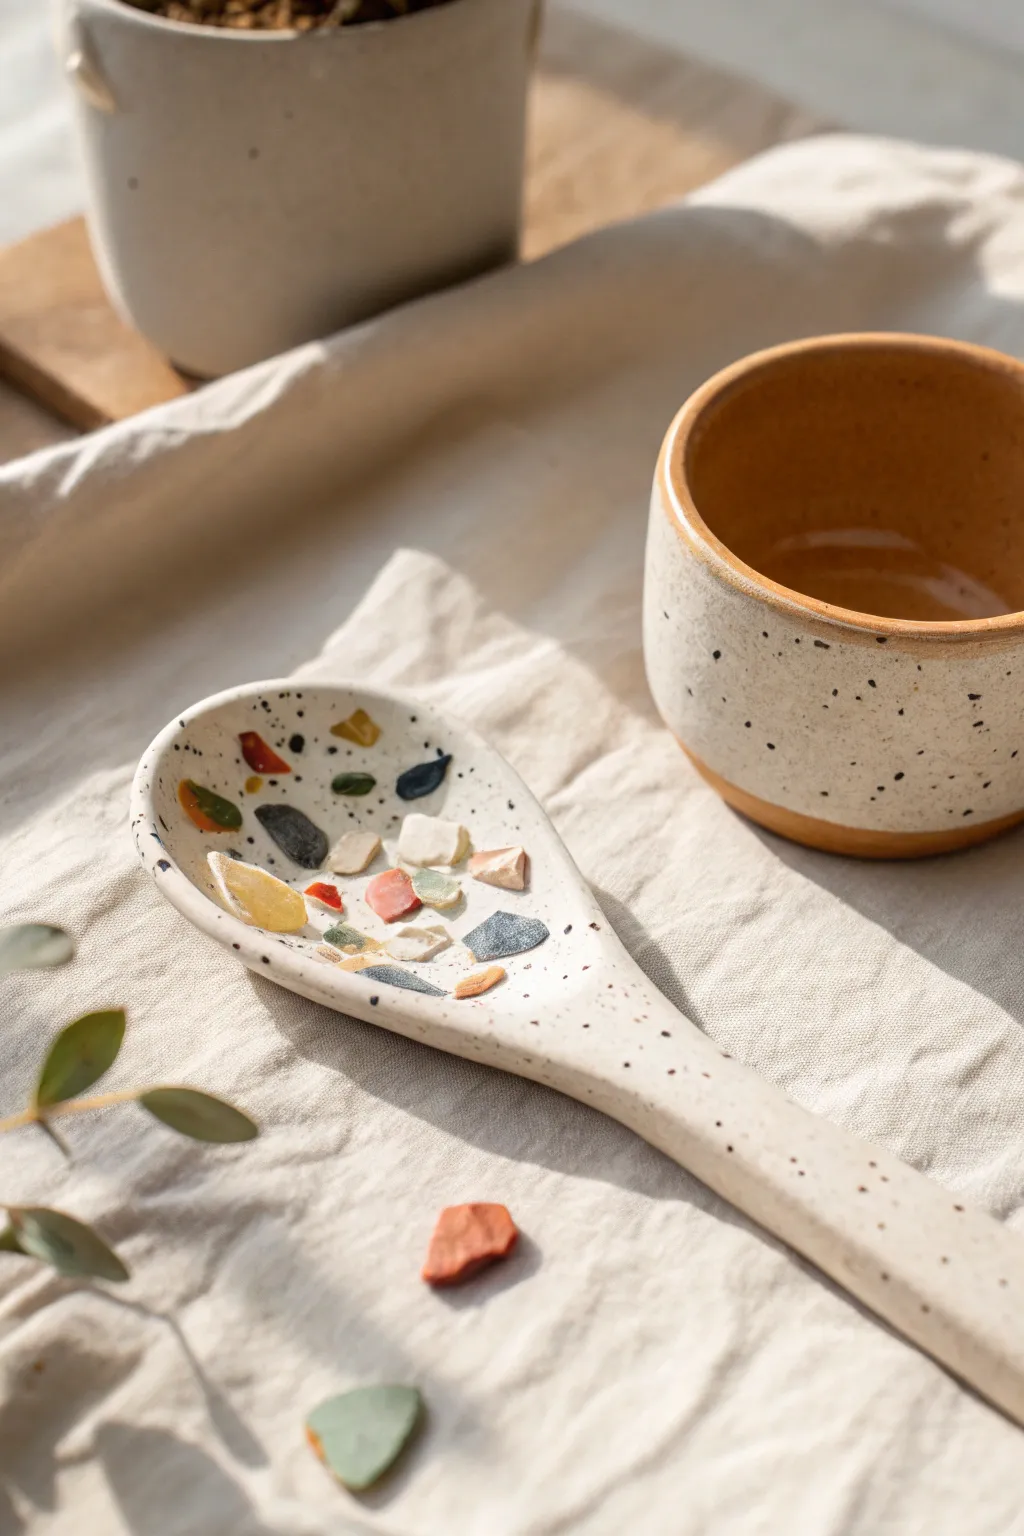
This project embraces the charming imperfection of terrazzo by embedding colorful clay fragments into a minimalist white spoon. The result is a functional piece of art with a delightful speckled texture and a modern, earthy aesthetic.
Step-by-Step Guide
Materials
- White polymer clay or air-dry clay
- Small amounts of colored clay (mustard, terracotta, teal, navy, grey)
- Black acrylic paint
- Old toothbrush or stiff bristle brush
- Rolling pin or smooth glass jar
- Clay knife or craft blade
- Fine-grit sandpaper (400-600 grit)
- Gloss or matte varnish (food-safe if intended for food use)
- Small bowl or spoon mold (optional)
- Sponge
Step 1: Preparing the Terrazzo Chips
-
Roll Colored Sheets:
Begin by rolling out your small pieces of colored clay into very thin, flat sheets, aiming for a thickness of about 1-2mm to keep the chips delicate. -
Bake or Dry Chips:
If using polymer clay, bake these thin sheets according to the package instructions until hard. If using air-dry clay, let them dry completely until brittle. -
Create Fragments:
Once the colored sheets are hardened, break them apart into small, angular shards of varying sizes using your fingers or a craft knife. -
Sort the Pieces:
Separate the chips into piles. You want a mix of tiny specks and slightly larger statement pieces, similar to the variety seen in real stone terrazzo.
Uneven Surface?
If the chips are protruding too much after baking, sand deeply with a coarse grit first, then move to fine grit to polish. This levels the field perfectly.
Step 2: Forming the Spoon Base
-
Condition the White Clay:
Take a substantial amount of white clay and knead it thoroughly until it is soft, pliable, and free of air bubbles. -
Initial Shaping:
Roll the white clay into a sausage shape, making one end significantly bulbous for the spoon’s bowl and the other end tapered for the handle. -
Flatten the Form:
Gently press down on the bulbous end to flatten it into a thick disc, and roll the handle section to your desired thickness. -
Refine the Silhouette:
Use your fingers to smooth out the transition between the handle and the bowl, ensuring the neck of the spoon is thick enough to support weight.
Step 3: Embedding the Design
-
Place the Chips:
Press your prepared colored chips onto the top surface of the soft white spoon, arranging them in a random, pleasing pattern. -
Secure the Fragments:
Use your rolling pin to gently roll over the chips, pressing them flush into the white clay base so the surface feels unified. -
Shape the Bowl:
Provide the spoon with its concave shape by gently pressing the bowl section into a curved object, like the back of a measuring spoon or a small bowl. -
Smooth the Edges:
Run a damp finger along the rim of the spoon to soften any sharp angles created during the shaping or chip-embedding process. -
Create the Speckles:
Dilute a small drop of black acrylic paint with water until it is runny. -
Splatter Technique:
Dip an old toothbrush into the black wash, aim it at the spoon, and run your thumb across the bristles to flick tiny black specks across the surface. -
Curing Process:
Bake your polymer clay spoon according to the manufacturer’s temperature guidelines, or allow air-dry clay to sit for 24-48 hours until fully rigid.
Color Coordination
To elevate the look, mix tiny amounts of shimmer mica powder into your colored clay chips for a sophisticated, subtle sparkle that catches the light.
Step 4: Finishing Touches
-
Sanding:
Once cured and cool, wet-sand the surface gently with fine-grit sandpaper to reveal the sharp edges of the colored chips and ensure the surface is perfectly smooth. -
Wipe Down:
Use a damp sponge or cloth to remove all sanding dust and residue from the spoon. -
Seal the piece:
Apply a coat of varnish to protect the clay and make the colors pop. I prefer a matte finish to mimic the look of natural stone.
Now you have a stunning, bespoke utensil that captures the timeless elegance of terrazzo stone
Whimsical Animal Topper Spoon
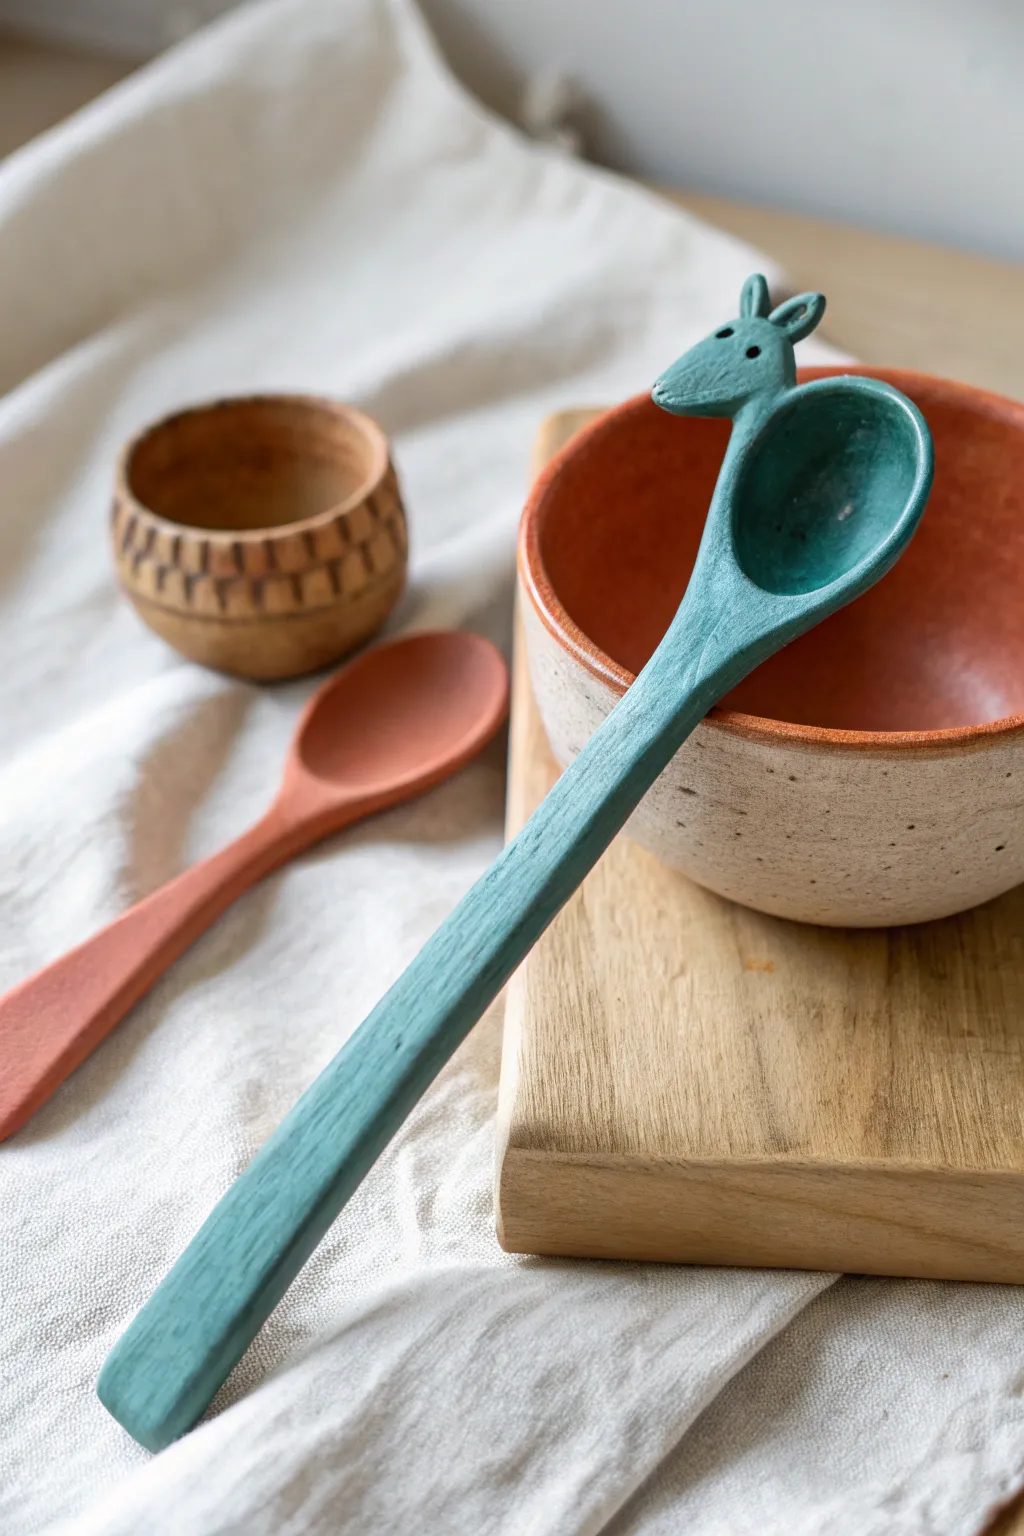
Add a touch of playful charm to your kitchen with this handcrafted ceramic spoon featuring a delightful animal topper. The smooth teal finish and kangaroo-inspired design make it a functional piece of art perfect for stirring or serving.
Step-by-Step
Materials
- Earthenware or stoneware clay (white or light colored)
- Teal underglaze or matte glaze (food safe)
- Clear transparent glaze (if using underglaze)
- Rolling pin
- Two wooden guide strips (approx. 5-7mm thick)
- Needle tool
- Wooden modeling tool
- Small sponge
- Score and slip tool (or serrated rib)
- Spoon template (cardboard)
- Kiln access
Step 1: Shaping the Spoon Body
-
Preparation:
Begin by wedging your clay to remove air bubbles and ensure a consistent texture. Place the clay between two wooden guide strips and roll it out into a slab that is roughly 5mm to 7mm thick. -
Cutting the Outline:
Sketch a long, rectangular shape on the slab for the handle, widening at the bottom for the spoon bowl. Use your cardboard template if you made one, and cut around the shape with a needle tool. -
Forming the Bowl:
Gently press your thumb into the wider end of the cutout to create the concave spoon bowl. Smooth the edges with a slightly damp sponge to remove sharpness without thinning the rim too much. -
Refining the Handle:
Smooth along the length of the handle with your damp fingers or a soft rib. You want the handle to be straight and sturdy, not too thin, as it needs to support the animal topper later.
Head Keep Falling Off?
Focus on the ‘score and slip’ stage. Don’t just stick it on; really scratch up the surfaces and blend the clay across the seam until the join line disappears completely.
Step 2: Sculpting the Animal Topper
-
Creating the Head Base:
Take a small ball of leftover clay, roughly the size of a large marble. Gently pinch and pull one side to elongate it into a snout shape, resembling a kangaroo or deer profile. -
Checking Proportions:
Hold the head up to the top of your spoon handle to check the size. I usually aim for the head to be slightly wider than the handle for visual balance. -
Adding Ears:
Create two small, pointed teardrop shapes from tiny bits of clay. Attach these to the top of the head using a small amount of slip, blending the clay downwards so they become one solid piece. -
Attaching the Head:
Score the top end of the spoon handle and the underside of the animal head. Apply slip to both scored areas and press firmly to attach. Use a wooden modeling tool to drag clay across the seam, fully blending the neck into the handle. -
Defining Features:
Use the tip of your needle tool or a small wooden stick to poke two holes for eyes. You can gently press into the snout to suggest a mouth line if desired, but keep details minimal for this stylized look. -
Final Smoothing:
Check the entire piece for rough spots. Run a damp sponge over the seams and edges one last time, ensuring the connection between the head and handle is seamless and strong.
Pro Tip: Texture
Before the clay dries, gently rub the surface with a piece of canvas or rough cloth. This adds a subtle, organic texture that looks beautiful under matte glazes.
Step 3: Drying and Glazing
-
Safe Drying:
Place the spoon on a board to dry. To prevent warping, I like to place a light weight (like a small bean bag) on the handle or flip it carefully as it dries. Let it dry slowly until bone dry. -
Bisque Fire:
Once completely dry, fire the spoon in the kiln to a bisque temperature (usually cone 04 or 06). This hardens the clay and prepares it for glazing. -
Applying Color:
Wipe the bisque spoon with a damp sponge to remove dust. Apply 2-3 coats of your teal underglaze or matte glaze. If using a dipping glaze, dip once and shake off excess drips. -
Cleaning the Foot:
If you plan to fire the spoon resting on a kiln shelf, carefully wipe the glaze off the back contact points. Alternatively, use a bead rack to support the spoon during firing so you can glaze the entire surface. -
Glaze Fire:
Fire the spoon again to the temperature recommended by your glaze manufacturer (often cone 5 or 6 for stoneware). Allow the kiln to cool completely before removing your finished piece.
Now you have a charming, custom utensil ready to bring a smile to your daily cooking routine
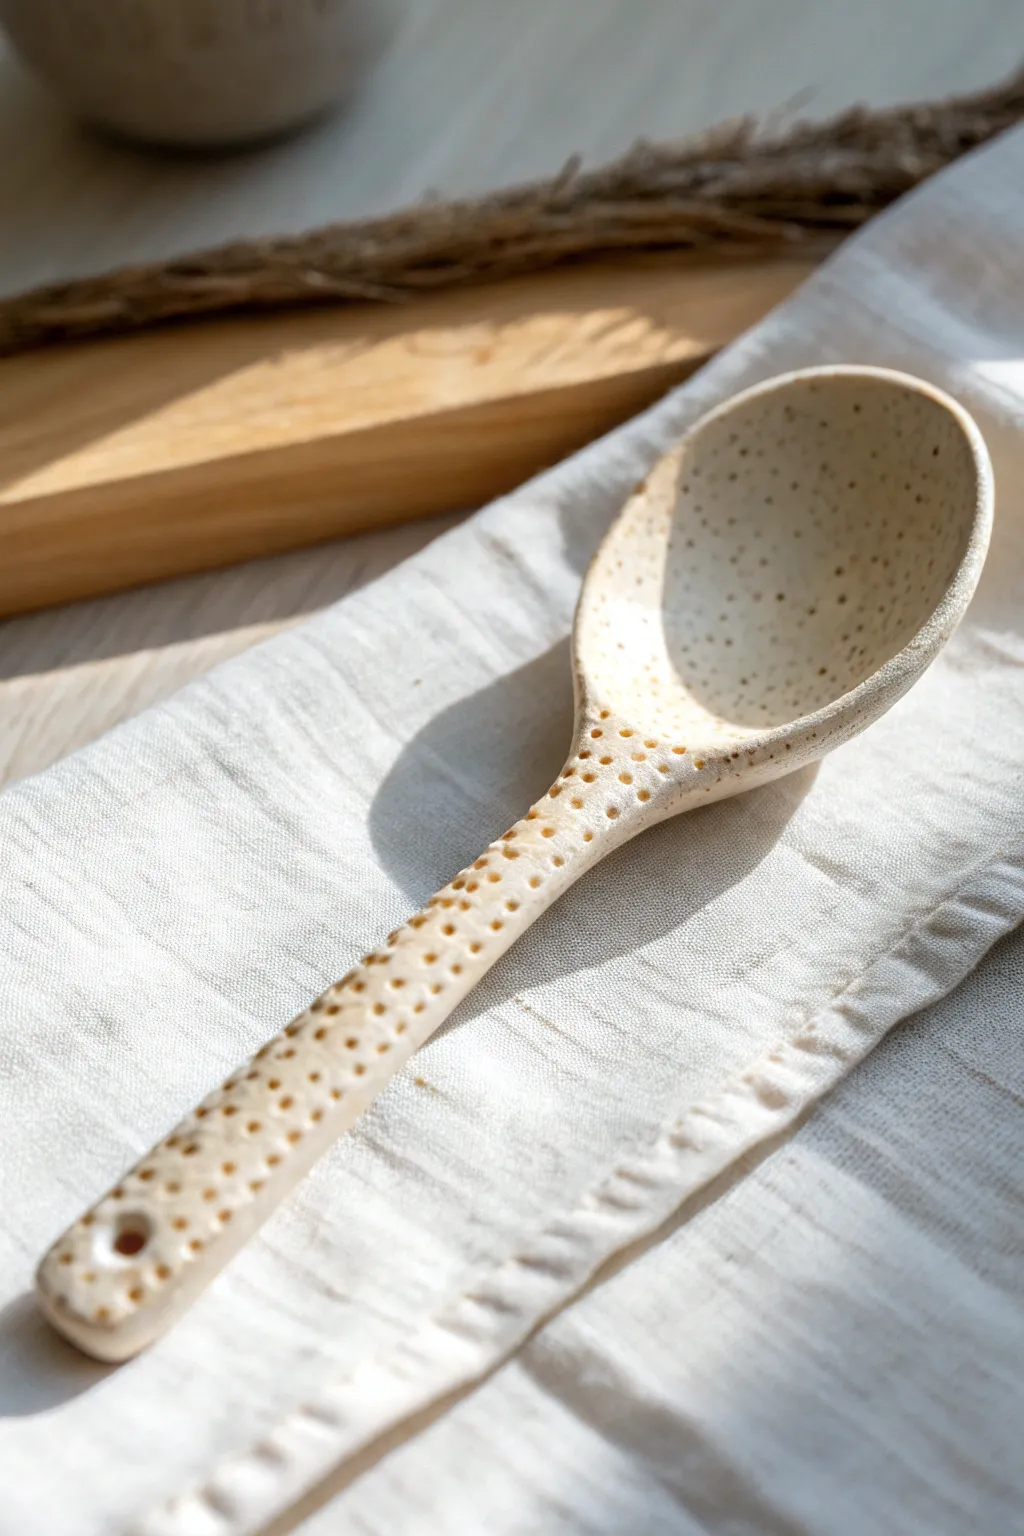
Pierced Spoon for Loose Tea or Herbs
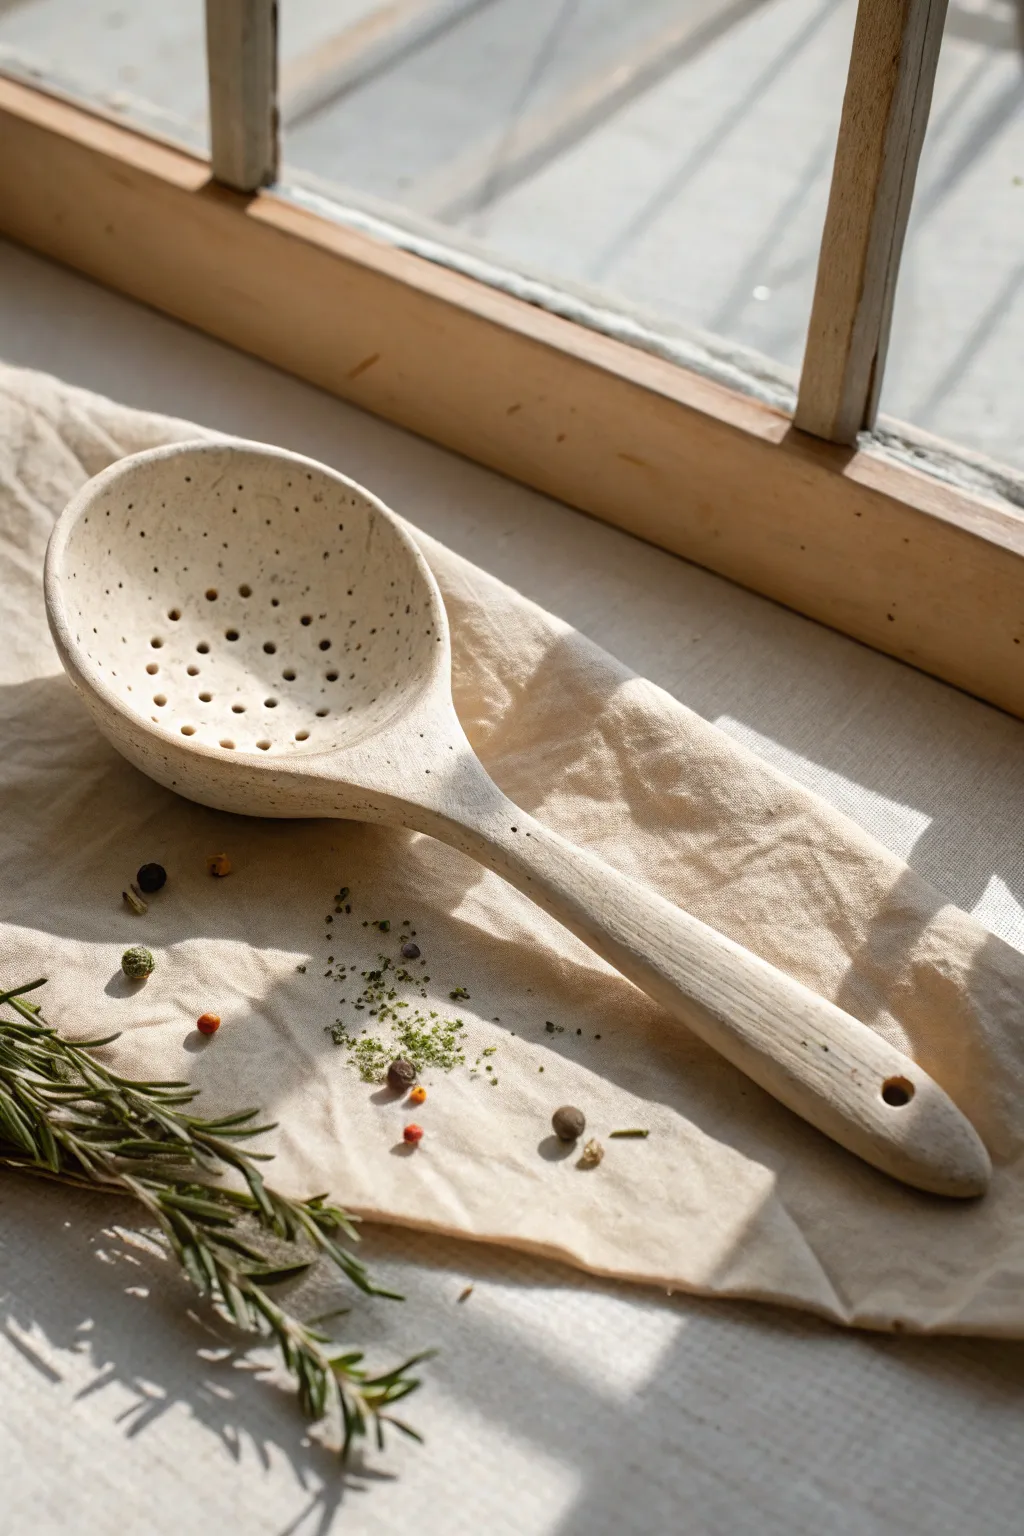
This charming, hand-built strainer spoon features a natural speckled clay body and a gently curved handle, perfect for sifting loose leaf tea or fishing fresh herbs from a simmering pot. Its organic, matte finish gives it a timeless, farmhouse appeal that highlights the beauty of raw ceramic materials.
How-To Guide
Materials
- Speckled stoneware clay (mid-fire)
- Rolling pin
- Wooden guide strips (approx. 1/4 inch thick)
- Needle tool
- Small kidney rib (flexible)
- Sponge
- Small drill bit or hole cutter tool (approx. 3mm diameter)
- Wooden spoon (for use as a mold)
- Cornstarch or canvas cloth (to prevent sticking)
- Modeling tool or smooth pebble
- Matte white or clear glaze (food safe)
Step 1: Shaping the Bowl
-
Prepare the Clay:
Begin with a ball of speckled stoneware clay about the size of a golf ball. Wedge it thoroughly to remove air bubbles, ensuring the clay is consistent and workable. -
Flatten the Slab:
Using your rolling pin and guide strips, roll the clay out into a small, even slab. You want a thickness of about 1/4 inch to ensure the spoon is durable but not clunky. -
Cut the Basic Shape:
With your needle tool, lightly sketch a teardrop or oval shape onto the slab for the spoon’s bowl. Once satisfied with the size, cut through the clay along your line. -
Create the Curve:
Take a wooden kitchen spoon and lightly dust the back of its bowl with cornstarch. Gently drape your clay cutout over the back of the wooden spoon to form the concave shape. Press gently from the center outward to smooth it down. -
Refine the Edges:
While the clay is still supported by the wooden spoon form, use a slightly damp sponge to smooth the cut edges, rounding them off so they aren’t sharp or boxy.
Clean Cuts Pro-Tip
When punching the strainer holes, twist the tool slightly as you push through and pull back. This twisting motion cuts the clay cleanly rather than dragging it, reducing cleanup time later.
Step 2: Crafting the Handle
-
Roll a Coil:
Take another piece of clay and roll it into a thick coil for the handle. Taper it slightly so it is wider at the base where it will attach to the bowl and narrower at the tip. -
Flatten and Shape:
Gently flatten the coil with your palm or a small roller. It should be comfortable to hold, so test the grip width. -
Attach to Bowl:
Score the back of the spoon bowl and the wider end of the handle using your needle tool. Apply a dab of slip/water to both scored areas. -
Blend the Joint:
Press the pieces together firmly. Use a modeling tool or your thumb to drag clay across the seam, blending the two parts until the join is invisible. I find supporting the bowl in my palm helps prevent warping during this step. -
Pierce the Handle:
Use your hole cutter to create a single hanging hole at the very tip of the handle. Smooth the edges of this hole with a damp fingertip.
Prevent Cracking
If the joint between the handle and bowl starts to crack while drying, wrap the connection point tightly with a strip of damp plastic to slow down the drying process in that specific area.
Step 3: Detailing & Finishing
-
Pierce the Bowl:
Once the clay is leather-hard (firm but cool to the touch), use a small drill bit or hole cutter to press a pattern of holes into the bowl. Start from the center and spiral outward. -
Clean the Holes:
Let the spoon dry a bit more, then gently brush away the little burrs or clay crumbs created by the hole punching. A dry paintbrush works perfectly for this. -
Final Smooth:
Run a barely damp sponge over the entire surface one last time to ensure the speckled texture is clean and the surface is smooth against the lips. -
Bisque Fire:
Place the spoon in the kiln for a bisque firing according to your clay body’s specifications (usually Cone 04). -
Glazing:
Dip or brush a thin layer of matte white or clear glaze over the spoon. Ensure the glaze doesn’t clog the small strainer holes; blow through them gently if needed. -
Glaze Fire:
Fire the piece a second time to the glaze temperature (likely Cone 5 or 6 for stoneware). Ensure the bowl is supported or stilted so it doesn’t warp in the high heat.
Once fired, thread a piece of twine through the handle loop and enjoy using your custom strainer for your morning brew