If you’ve been dreaming of making a clay mug that feels totally you, you don’t need fancy skills to get there. These easy mug design ideas are the exact kind of simple, satisfying projects I lean on when I want something cute, doable, and clearly handmade.
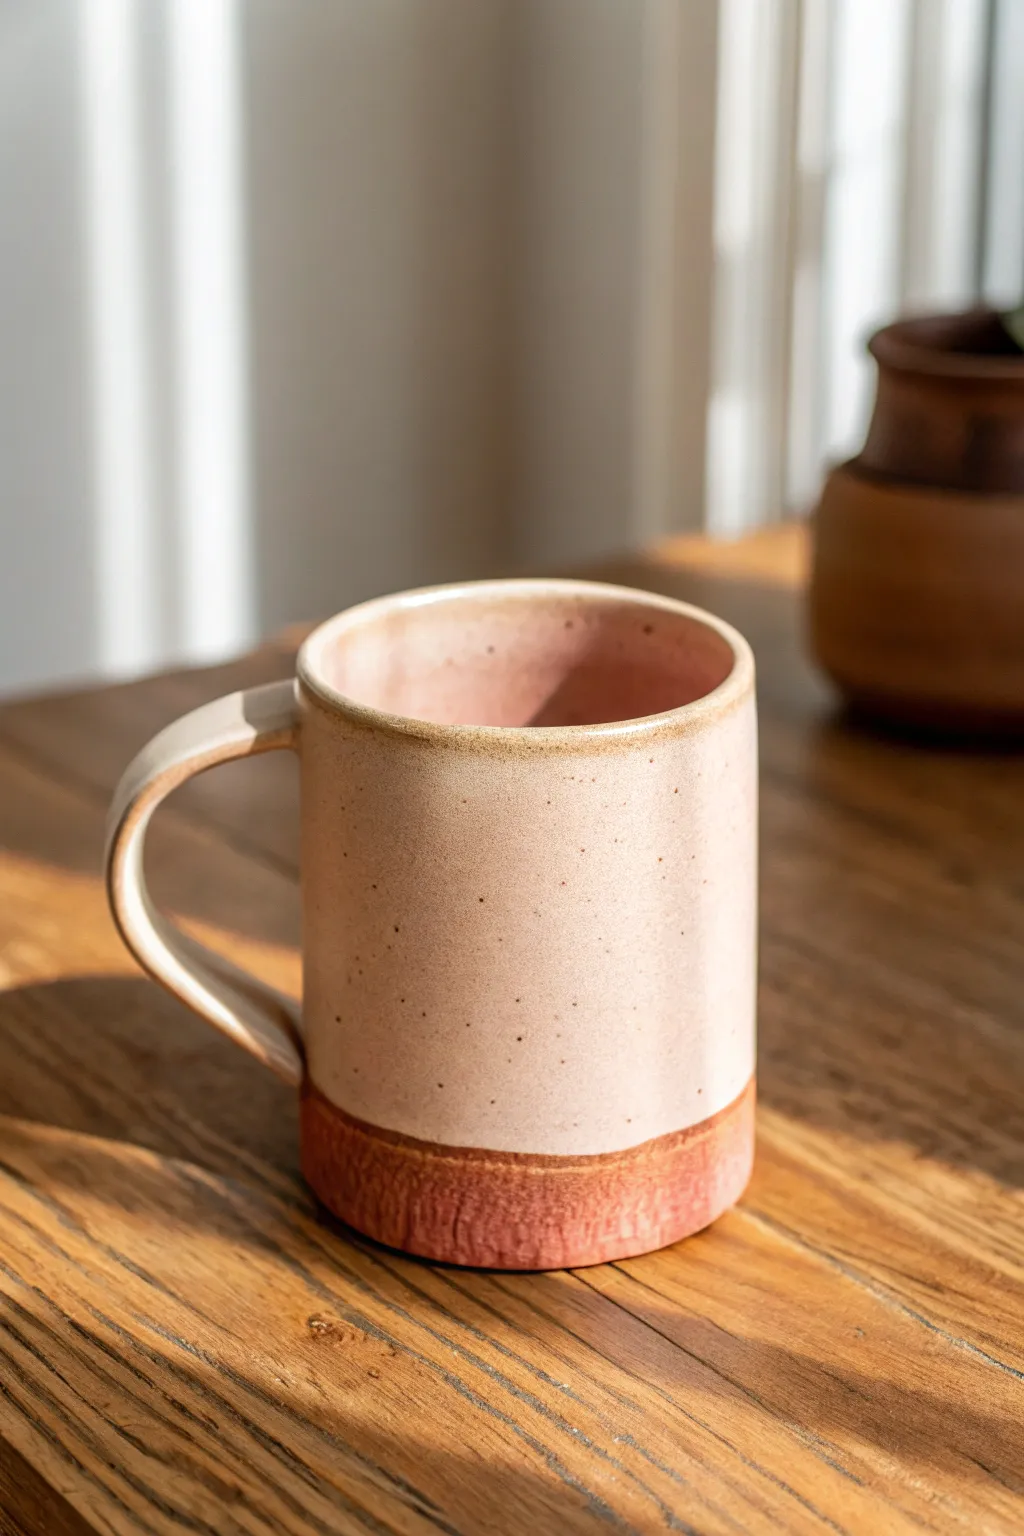
Classic Two-Tone Dip Look
Embrace the beauty of raw clay with this beginner-friendly ceramic project that contrasts earthy textures with smooth, speckled finishes. This classic dip-glaze design highlights the natural warmth of the clay body while providing a clean, functional drinking surface.
Step-by-Step
Materials
- Stoneware clay (speckled or red body recommended)
- Pottery wheel or hand-building tools (rolling pin, slab guide)
- Needle tool
- Rib tool (metal or wood)
- Sponge
- Wire cutter
- Trimming tools
- Creamy white dipping glaze (food safe)
- Wax resist or masking tape
- Kiln access
Step 1: Forming the Body
-
Prepare the Clay:
Begin by wedging about 1 to 1.5 pounds of clay thoroughly to remove air bubbles. This ensures your walls will be even and prevents explosions in the kiln later. -
Center and Open:
If throwing on a wheel, center your clay and open it up. Aim for a flat interior bottom about 3 inches wide. If hand-building, roll a slab and cut a rectangular body and a circular base. -
Pull the Cylinder:
Pull the walls up into a straight cylinder shape. I prefer to keep the walls relatively vertical with just a slight widening at the rim for comfortable drinking. -
Refine the Shape:
Use a rib tool on the outside while supporting the inside with your hand to smooth the surface and remove throwing lines if you want that clean, modern look. -
Smooth the Rim:
Use a small piece of chamois leather or a damp sponge to compress and round the rim. A smooth rim is crucial for a pleasant sipping experience.
Uneven Dip Line?
If your hand shakes during the dip, use automotive detailing tape instead of wax for a razor-sharp division line. Peel it off carefully once the glaze is dry but before firing.
Step 2: Adding the Handle
-
Pull a Handle:
From a small lug of clay, pull a strip for the handle. Use plenty of water to keep the clay smooth. The handle should be slightly thicker at the top attachment point. -
Shape the Curve:
Curve the pulled handle into a ‘ear’ shape and set it aside to stiffen slightly until it holds its form but is still pliable. -
Attach the Handle:
Score the attachment points on both the mug body and handle ends. Apply slip and press the handle firmly onto the mug body, blending the clay seams until invisible. -
Dry Slowly:
Cover the mug loosely with plastic to let it dry slowly to the leather-hard stage. This prevents the handle from cracking due to uneven drying rates.
Level Up: Texture Contrast
Before bisque firing, gently sand the bottom third of the raw clay with a scouring pad. This heightens the contrast between the rough base and the silky smooth glazed top.
Step 3: Trimming and Bisque
-
Trim the Foot:
Once leather hard, flip the mug over and trim the bottom. Create a distinct foot ring or a flat bottom, cleaning up any excess weight from the base. -
Refine Surface:
Before the first firing, use a damp sponge to smooth any rough spots on the exterior, especially where the raw clay will be exposed later. -
Bone Dry:
Allow the mug to dry completely until it feels room temperature to the touch, which indicates all physical water has evaporated. -
Bisque Fire:
Load the bone-dry mug into the kiln for a bisque firing (usually around Cone 04 or 06). This hardens the clay and prepares it for glazing.
Step 4: Glazing Technique
-
Clean the Bisque:
Wipe the bisque-fired mug with a damp sponge to remove any dust. Dust can prevent glaze from adhering properly. -
Wax the Line:
Use wax resist to create a clean line around the bottom third of the mug. I like to stabilize my hand on a banding wheel whilst spinning it to get a perfectly straight horizon line. -
Protect the Bottom:
Ensure the entire bottom section (including the underside) is coated in wax resist. This keeps the raw clay texture we want to preserve. -
Mix the Glaze:
Stir your creamy white glaze thoroughly. If you want speckles and your clay body isn’t speckled, choose a glaze with iron speckles included. -
The Dip:
Hold the mug by the bottom (waxed area) and dip it upside down into the glaze bucket. Submerge it fully up to the handle, ensuring the glaze covers the interior and the top two-thirds of the exterior. -
Clean Up Drips:
Immediately shake off excess glaze gently. Once the glaze dries to a powdery touch, wipe away any stray droplets that landed on the waxed raw clay section. -
Glaze Fire:
Fire the mug again to the maturation temperature of your specific clay and glaze (typically Cone 5 or 6 for stoneware).
Once cooled, your mug is ready to bring a touch of handmade warmth to your morning coffee routine.


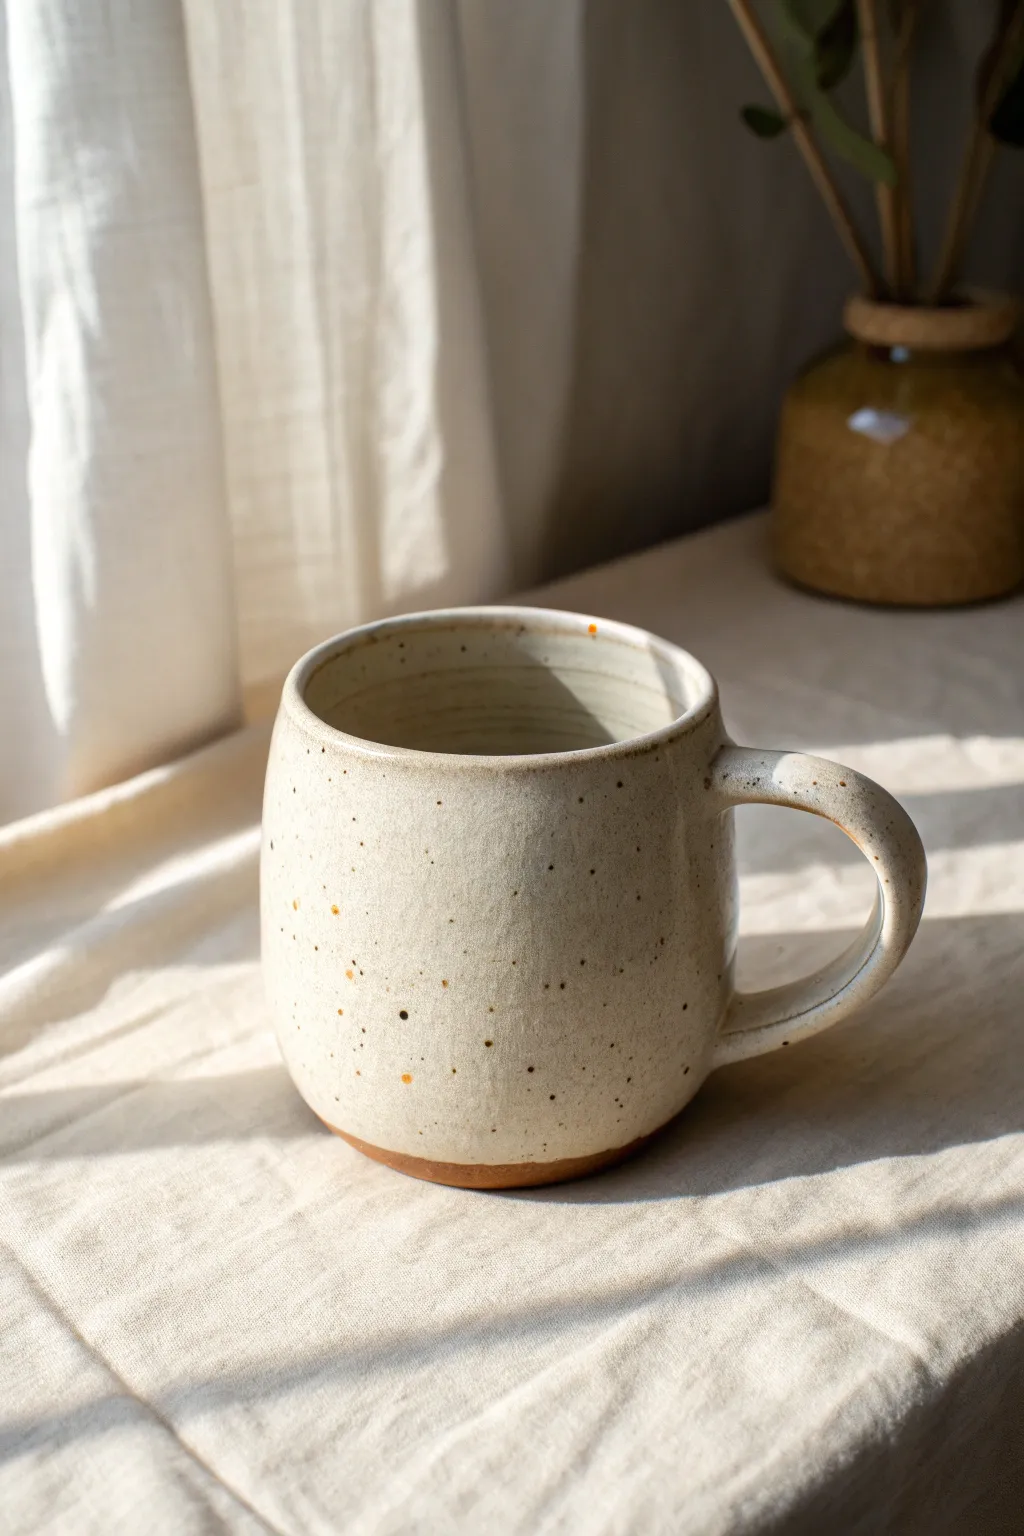
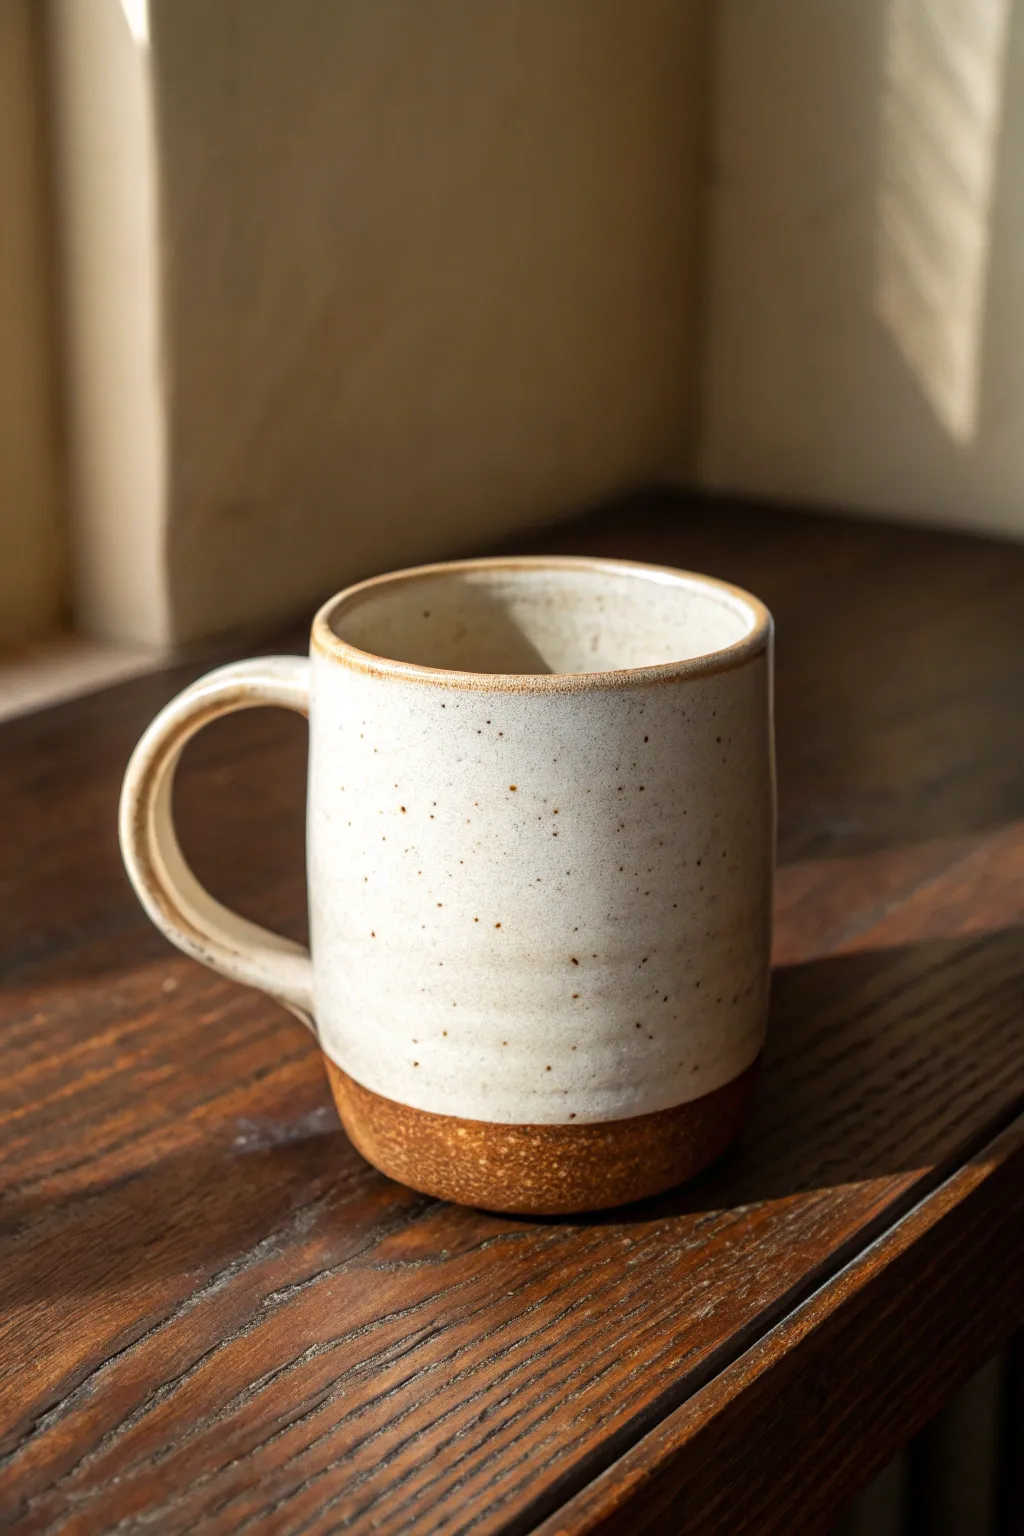
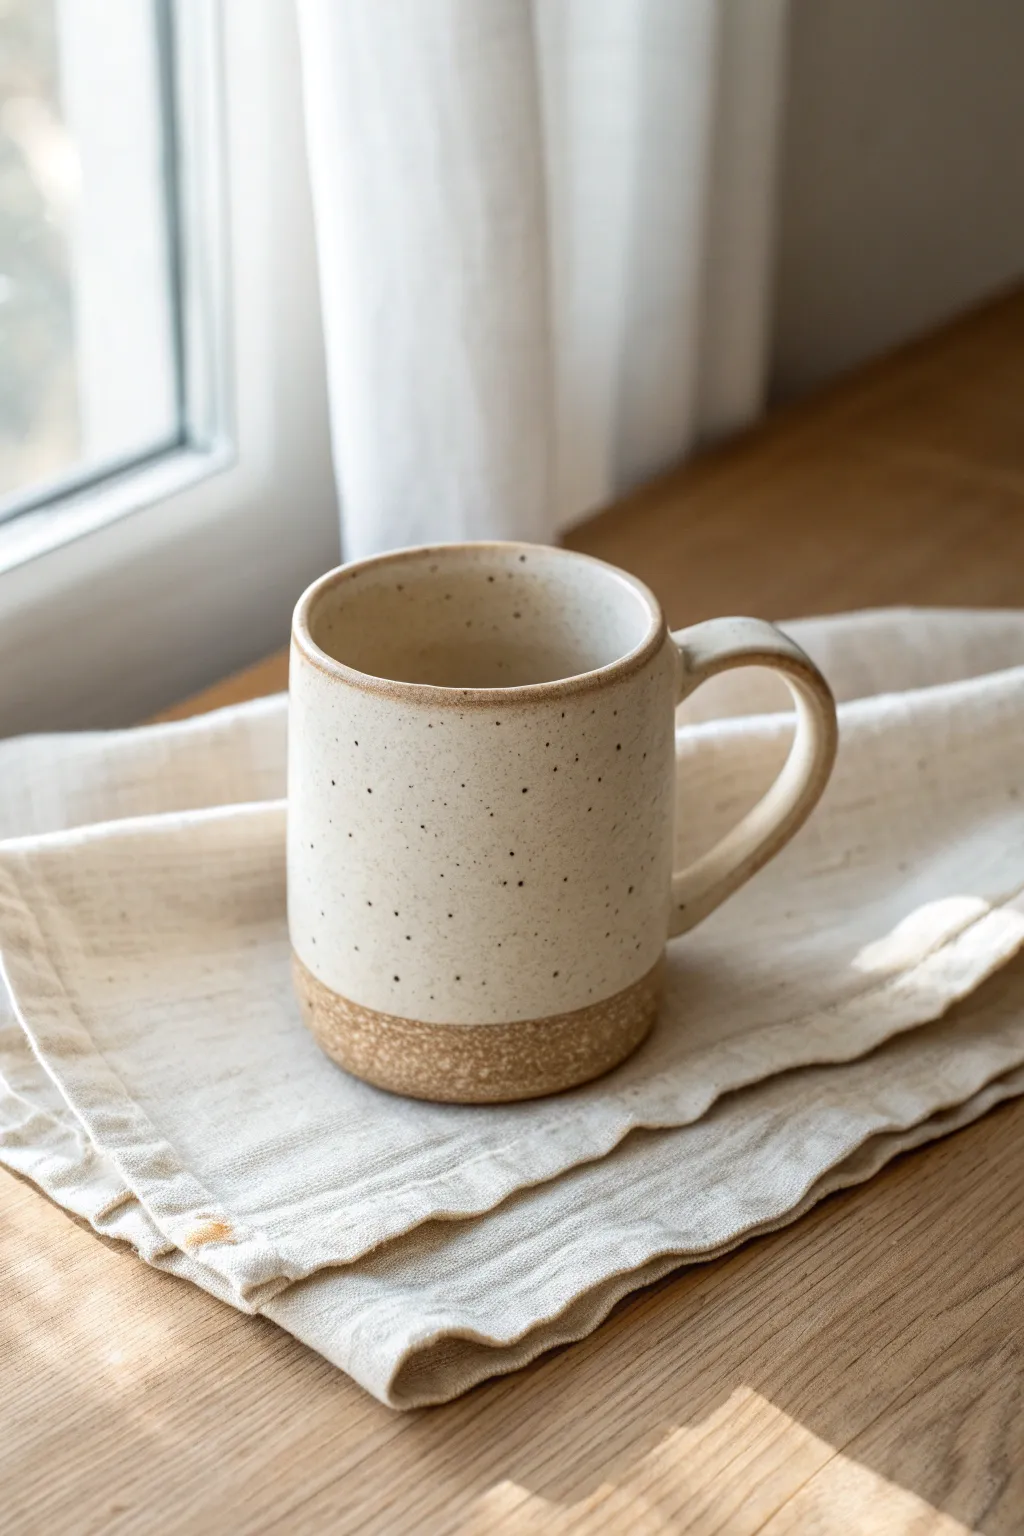
Simple Speckled Surface
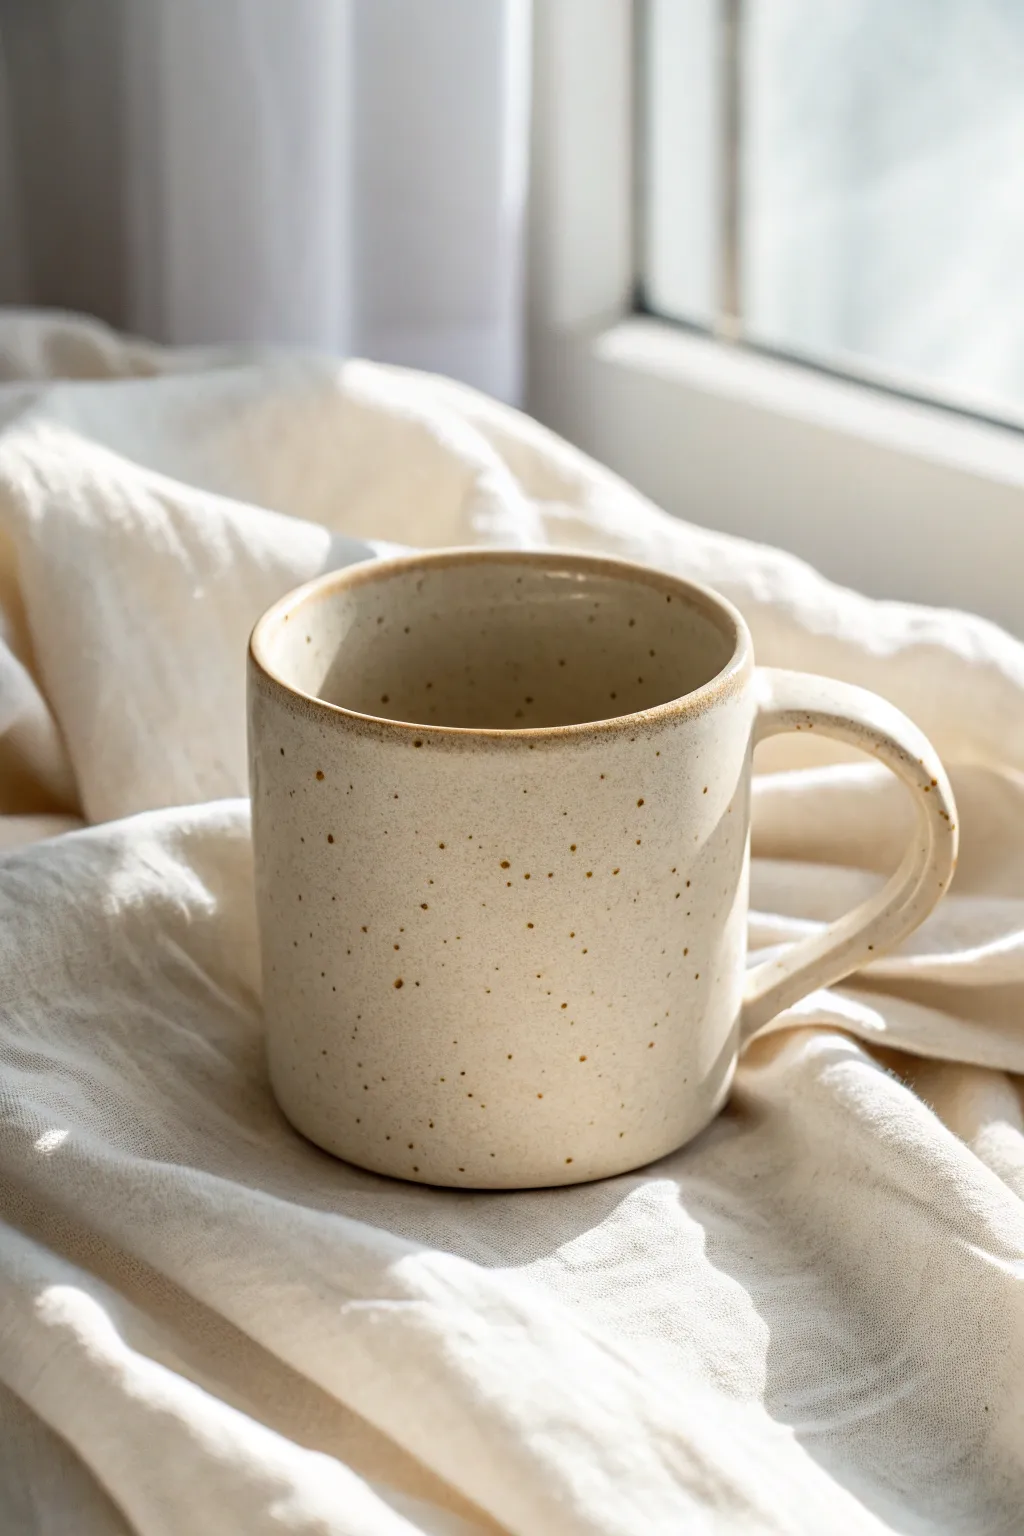
Embrace the beauty of minimalism with this easy-to-make speckled mug that feels right at home in a cozy, sunlit kitchen. The charm lies in the clay body itself, allowing simple iron speckles to shine through a creamy white glaze for a timeless, rustic finish.
Step-by-Step Guide
Materials
- Speckled stoneware clay (e.g., buff with iron spots)
- Pottery wheel (or rolling pin for hand-building)
- Rib tool (metal or wood)
- Wire cutter
- Sponge
- Trimming tools
- Fetling knife or needle tool
- Transparent or semi-opaque creamy white glaze
- Base white glaze (optional)
- Iron oxide wash (optional, if clay isn’t pre-speckled)
Step 1: Forming the Body
-
Prepare the Clay:
Start with about 1 to 1.5 pounds of speckled stoneware clay. Wedge it thoroughly to remove air bubbles and ensure the iron speckles are distributed evenly throughout the mass. -
Center and Open:
If throwing on the wheel, center your clay ball firmly. Open the center, leaving about 1/4 inch thickness for the floor of the mug. -
Pull the Walls:
Pull the walls up into a straight cylinder. Aim for a height of about 4-5 inches, maintaining an even thickness as you rise. I like to keep the rim slightly thicker for comfortable sipping. -
Smooth the Surface:
Use a metal or wooden rib on the exterior while the wheel spins slowly. This compresses the clay and removes throwing lines, creating that smooth, modern canvas for the speckles. -
Define the Rim:
Gently compress the rim with a piece of chamois leather or a damp sponge to round it off perfectly. -
Cut and Dry:
Wire the mug off the bat and set it aside until it reaches leather-hard consistency (firm enough to handle without deforming).
Glaze Too Thick?
If the white glaze is too opaque, the speckles won’t show. Test your glaze thickness on a tile first. You want a thickness that resembles heavy cream, not yogurt.
Step 2: Handling and Trimming
-
Trim the Foot:
Once leather hard, center the mug upside down on the wheel. Trim away excess weight from the bottom and carve a clean, flat bottom or a small foot ring. -
Pull a Handle:
Take a separate lug of the same clay. With wet hands, pull a carrot-shaped handle that is roughly 1/2 inch wide. Curve it gently and let it stiffen slightly. -
Attach the Handle:
Score the attachment points on both the mug body and the handle ends. Apply slip and press the handle firmly into place, creating a ‘C’ or slightly elongated ear shape. -
Reinforce Connections:
Smooth the clay where the handle meets the body. Use a small wooden tool to ensure there are no cracks and the transition is seamless. -
Slow Drying:
Cover the mug loosely with plastic to dry slowly. This prevents the handle from drying faster than the body, which can cause cracking. -
Bisque Fire:
Once bone dry, fire the piece in the kiln to a bisque temperature (usually cone 04 or 06).
Add a Texture Pop
Before the clay dries, leave the lower half of the mug unglazed or carve fine vertical lines into the base to create a tactile contrast against the smooth rim.
Step 3: Glazing and Finishing
-
Clean the Bisque:
Wipe the bisqued mug with a damp sponge to remove any dust that might interfere with glaze adhesion. -
Check Speckle Visibility:
If you couldn’t find pre-speckled clay, this is the time to splatter a very watered-down iron oxide wash onto the bare bisque using an old toothbrush. -
Glaze Interior:
Pour a creamy white glaze inside the mug, swirl it to coat the entire interior, and pour out the excess. -
Dip the Exterior:
Hold the mug by the foot and dip the exterior straight down into the same glaze. A single dip is usually best to keep the coat thin enough so the speckles burn through. -
Rim Detail:
If your glaze breaks (thins) easily over edges, the rim will naturally darken. If not, carefully wipe a tiny amount of the glaze off the rim with a sponge to reveal the clay body’s natural toasted color. -
Wipe the Foot:
Thoroughly wipe all glaze off the bottom of the mug to prevent it from sticking to the kiln shelf. -
Final Firing:
Glaze fire to the maturity of your clay (likely cone 5 or 6). This high heat will cause the iron spots to bloom through the white glaze.
Once the kiln cools, pour yourself a warm drink and enjoy the simple, handmade texture of your new favorite mug


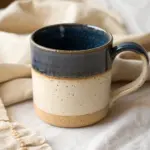
Thumbprint Band Texture
Recreate the charm of a cozy morning with this wheel-thrown mug, featuring a comforting rounded belly and a stunning speckled cream glaze. The subtle, organic shape paired with a natural clay foot gives this piece a timeless, handmade appeal perfect for your favorite hot drink.
Detailed Instructions
Materials
- Speckled buff stoneware clay (or white stoneware with added grog/speckles)
- Pottery wheel
- Throwing tools (sponge, rib, needle tool, wire cutter)
- Trimming tools
- Cream or oatmeal matte glaze
- Wax resist (optional)
- Kiln
Step 1: Throwing the Form
-
Center the clay:
Start with a ball of well-wedged speckled stoneware clay (about 1-1.25 lbs). Slam it onto the wheel head and center it using firm pressure and water to ensure it spins perfectly smooth. -
Open the vessel:
Press your thumbs into the center to open the clay, leaving about a half-inch thick floor for trimming later. Compress the floor with a sponge or wooden rib to prevent cracking. -
Pull the walls:
Slowly pull the walls upward into a cylinder shape. Aim for even thickness from bottom to top, keeping the rim slightly thicker for stability. -
Belly the form:
Using a rib on the outside and your hand on the inside, gently push the clay outward from the inside to create a rounded, bulbous bottom. I like to do this gradually over a few passes to maintain structural integrity. -
Collar the rim:
As you round out the bottom, slightly collar (squeeze in) the upper section to create a gentle inward slope toward the rim. This helps trap heat in your finished mug. -
Refine the surface:
Run a flexible metal or rubber rib up the exterior while the wheel spins slowly to remove throwing lines and smooth the surface texture. -
Cut underneath:
Use a wooden knife tool to trim away excess clay at the base while it’s still attached to the wheel, creating a slight undercut. Then, wire the pot off the bat.
Step 2: Trimming and Handle
-
Dry to leather hard:
Allow the mug body to dry until it is leather hard—firm enough to handle without deforming, but soft enough to carve. -
Trim the foot:
Invert the mug on the wheel and center it. Use trimming tools to carve away excess weight from the bottom, defining a clean foot ring. Leave roughly 1/4 inch of the raw clay exposed at the bottom for that distinct two-tone look. -
Pull a handle:
Take a small nugget of fresh clay. Using plenty of water, pull a strap of clay downwards until it is the desired thickness and length for your handle. Curve it and let it stiffen slightly. -
Attach the handle:
Score (scratch) and slip (apply clay slurry) the mug body and handle attachment points. Press the handle firmly onto the mug, smoothing the seams with a damp sponge or modeling tool. -
Shape the curve:
Adjust the curve of the handle so it mimics the rounded profile of the mug body, ensuring there is enough space for fingers.
Natural Speckles
If your clay isn’t naturally speckled, add a pinch of granular ilmenite or manganese to your white clay body during wedging to get those lovely dark spots.
Step 3: Finishing and Glazing
-
Bisque fire:
Once bone dry, load the mug into the kiln for a bisque firing (usually Cone 04 or 06) to prepare it for glazing. -
Wax the foot:
Apply wax resist to the bottom foot ring and slightly up the side wall (about 1/4 inch) to create the bare clay line seen in the image. -
Glaze application:
Dip the mug into a speckled cream or oatmeal matte glaze. Hold it upside down for a few seconds to let excess glaze drip off, then quickly flip it right-side up to smooth the drip. -
Clean the edges:
Use a damp sponge to wipe away any glaze droplets that may have beaded up on the waxed area to ensure a crisp line. -
Glaze fire:
Load the glazed mug into the kiln for the final firing (typically Cone 5 or 6 depending on your clay body). Allow the kiln to cool completely before opening. -
Sand the bottom:
After firing, use high-grit sandpaper to briefly smooth the unglazed foot ring so it won’t scratch table surfaces.
Handle Cracks?
If hairline cracks appear where the handle meets the mug, dry the piece more slowly under plastic wrapping to equalize the moisture content.
Now you have a beautifully simple mug ready to hold your morning coffee or tea


Easy Slab-Wrapped Cylinder
Capture the warmth of a morning coffee with this approachable slab-built mug project. By leaving the textured base unglazed, you create a beautiful contrast against the smooth, speckled cream finish of the upper body.
Step-by-Step Tutorial
Materials
- Stoneware clay (red or brown firing body)
- Rolling pin
- Canvas board or mat
- Needle tool or fettling knife
- Scoring tool (or serrated rib)
- Slip (clay and water slurry)
- Cylindrical form (like a PVC pipe or rolling pin) for shaping
- Wooden modeling tool
- Sponge
- Speckled cream or ‘oatmeal’ glaze
Step 1: Creating the Slab Body
-
Roll the Slab:
Begin by rolling out a medium-sized ball of stoneware clay on your canvas. Aim for an even thickness of about 1/4 inch. If you want that consistent professional look, use guide sticks on either side of your rolling pin. -
Texture the Base (Optional):
To replicate the rough texture seen at the bottom of the reference mug, gently press a piece of coarse fabric or sandpaper into the bottom inch of your slab before cutting. -
Measure and Cut:
Cut a rectangle from your slab. A standard mug size is roughly 10-11 inches long and 4-5 inches tall, but you can adjust this based on how large you want your coffee vessel to be. -
Bevel the Edges:
On the shorter sides of your rectangle, cut 45-degree angles in opposite directions. This allows the clay to overlap seamlessly without creating a thick lump at the seam.
Straight Cylinder Tip
When wrapping your slab, wrap it around a rigid object like a PVC pipe or a rolling pin covered in newspaper. This guarantees a perfectly round cylinder before you attach the base.
Step 2: Forming the Cylinder
-
Score and Slip:
Rough up the beveled edges using your scoring tool and apply a generous amount of slip. This acts as the glue for your ceramic piece. -
Wrap and Join:
Wrap the clay rectangle around your cylindrical form or simply curl it by hand to create a tube. Press the scored edges together firmly. -
Smooth the Seam:
Support the wall from the inside with one hand while using a wooden tool or rib on the outside to blend the seam until it is invisible. I like to smooth vertically, then horizontally, to ensure a strong bond.
Fixing Cracks
If small cracks appear at the seam while bending the slab, your clay might be too dry. Mist it lightly with water, wrap it in plastic for 20 minutes, then smooth the crack with a rib.
Step 3: Attaching the Bottom
-
Cut the Floor:
Roll out a small piece of slab for the floor. Place your cylinder on top of it and trace around the base with a needle tool. -
Join Base to Body:
Score and slip both the bottom ring of the cylinder and the edge of the circular floor piece. Press the cylinder onto the base. -
Seal the Connection:
Use a wooden tool to smudge the clay from the base up onto the wall to seal the joint. Smooth this area with a damp sponge to clean up the transition.
Step 4: Handle and Finishing
-
Pull or Cut a Strap:
Cut a strip of clay for the handle, about 3/4 inch wide. Smooth the edges with a damp sponge to make it comfortable to hold. -
Shape the Curve:
Bend the strip into a ‘C’ or ear shape. Hold it up to the cylinder to check proportions; it should look balanced and offer enough room for your fingers. -
Attach the Handle:
Score and slip the attachment points on both the mug and the handle ends. Press firmly to attach, blending the clay where it meets the mug body for a seamless look. -
Refine the Rim:
Run a piece of plastic or soft leather (chamois) over the drinking rim to compress the clay and make it ultra-smooth for lips. -
Bisque and Glaze:
After slow drying and bisque firing, apply wax resist to the bottom inch of the mug to keep that raw clay texture exposed. -
Apply Glaze:
Dip or brush your speckled cream glaze onto the interior and the upper exterior of the mug. Wipe away any drips that cross the wax line for a crisp finish. -
Final Fire:
Fire the mug to the temperature required by your specific clay and glaze combination.
Enjoy your morning routine even more with this handmade addition to your cupboard

The Complete Guide to Pottery Troubleshooting
Uncover the most common ceramic mistakes—from cracking clay to failed glazes—and learn how to fix them fast.
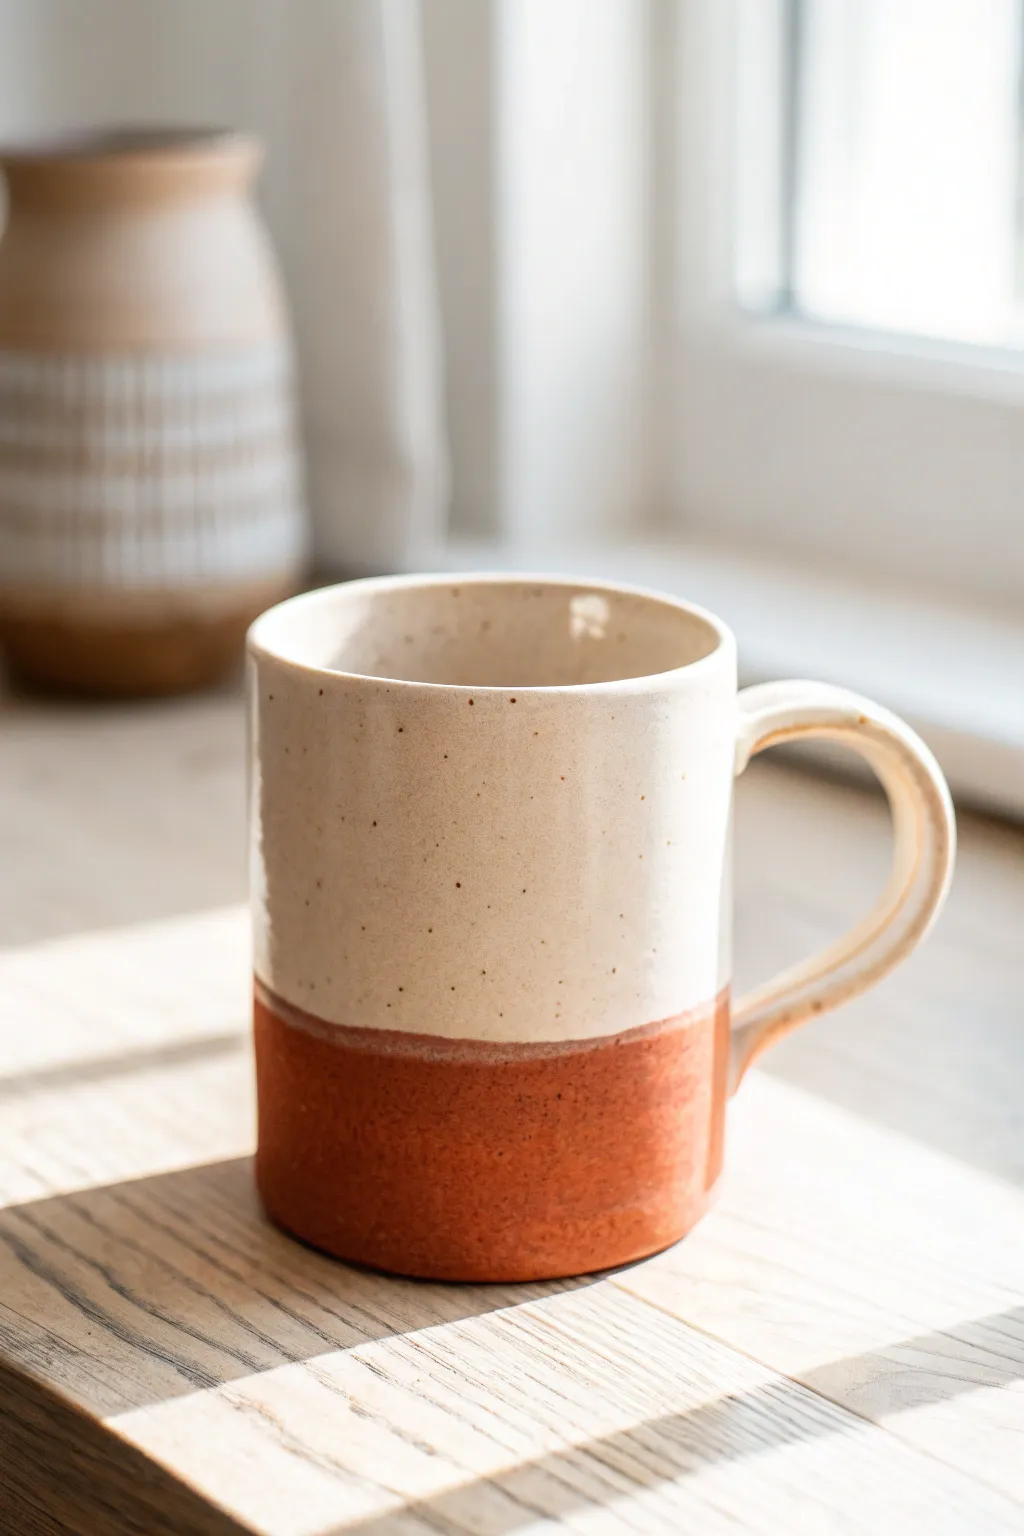
Soft Rounded Rim Upgrade
Create a cozy, rustic favorite with this two-tone mug project featuring a comforting rounded rim. The finished piece combines the raw texture of exposed clay at the base with a smooth, speckled cream glaze that hugs the top perfectly.
Detailed Instructions
Materials
- Stoneware clay (red or brown firing)
- Pottery wheel
- Throwing tools (sponge, wire, rib)
- Trimming tools
- Sponge or chamois strip
- Speckled cream or white slip/glaze
- Wax resist
- Glaze brush
Step 1: Throwing and Shaping
-
Center the Clay:
Begin by firmly wedging your stoneware clay to remove air bubbles. Place a 1-lb ball on the wheel, secure it, and center it using steady pressure and water until it spins without wobbling. -
Open the Form:
Push your thumbs into the center of the spinning clay to create the floor. Pull the opening outwards until the floor is about 3 inches wide, compressing it afterward to prevent cracking. -
Pull the Cylinder:
Slowly pull the walls upward using even pressure between your inside and outside fingers. Aim for a consistent thickness of about 1/4 inch, keeping the cylinder mostly straight with just a slight inward curve. -
Create the Soft Rim:
Here is the key to this design: instead of leaving the rim sharp or square, gently press a damp sponge or a strip of chamois over the lip while the wheel spins slowly. This rounds it over perfectly for that upgraded feel.
Slumping Handle?
If your handle sags after attaching, it was likely too wet. Prop it up with a small piece of foam or crumpled newspaper under the curve while it dries to leather hard.
Step 2: Handle and Trimming
-
Let it firm up:
Allow the cylinder to dry to a leather-hard state. It should be firm enough to handle without deforming but still cool to the touch. -
Trim the Base:
Invert the mug onto the wheel head. Use a trimming tool to refine the bottom curve, creating a slight undercut which gives the mug visual lift. Keep the bottom edge clean for the exposed clay look. -
Pull a Handle:
Use a small lump of fresh clay to pull a strap handle. Use plenty of water and pull downward until you have a smooth, tapered strip that matches the mug’s wall thickness. -
Curve the Handle:
Let the handle stiffen slightly for 15 minutes, then curve it into a ‘C’ or ear shape. I like to hold it up to the mug body to check the proportions before committing. -
Attach the Handle:
Score the attachment points on both the mug and handle, apply slip, and press firmly together. Smooth the joints with a damp finger or tool until seamless.
Pro Tip: Comfort Grip
When attaching the handle, flatten the top connection point slightly with your thumb. This creates a dedicated ‘thumb rest’ that makes heavier mugs much easier to hold.
Step 3: Glazing and Finishing
-
Bisque Fire:
Once the mug is bone dry, fire it in the kiln to a bisque temperature (usually cone 04) to prepare it for glazing. -
Apply Wax Resist:
Paint a line of wax resist around the bottom quarter of the mug. This ensures the glaze line stays crisp and the raw clay base remains exposed. -
Prepare the Glaze:
Stir your speckled cream glaze thoroughly. If the speckles settle at the bottom, the final effect won’t be as consistent. -
Dip the Mug:
Using tongs or your hand inside the mug, dip the piece straight down into the glaze bucket, stopping right where the wax resist begins. Hold for 3-5 seconds and lift straight out. -
Clean the Drips:
Once the glaze is dry to the touch, use a damp sponge to wipe any stray glaze droplets off the wax resist area and the very bottom of the foot. -
Glaze Fire:
Place the mug in the kiln and fire to the maturity of your clay and glaze (typically cone 5 or 6 for stoneware). The heat will melt the glaze into that glossy, speckled finish. -
Sand the Bottom:
After the kiln cools and you remove the mug, check the exposed clay bottom. If it feels rough, give it a quick sand with fine-grit sandpaper to protect your table surfaces.
Enjoy your morning coffee in a mug that feels classic and handmade all at once
Strap Handle With Thumb Rest

This rustic, cozy mug features a smooth, speckled clay body with a wide, comfortable strap handle that invites you to hold it. The minimalist design lets the natural beauty of the clay shine through, enhanced by subtle throwing rings and a clean, cylindrical silhouette.
How-To Guide
Materials
- Speckled stoneware clay (approx. 1 lb)
- Pottery wheel
- Throwing sponge
- Wire cutter
- Wooden rib tool
- Metal rib tool
- Needle tool
- Fettling knife
- Scoring tool (or serrated rib)
- Slip (clay slurry)
- Wooden modeling tool
- Clear or matte white glaze
Step 1: Throwing the Body
-
Center the clay:
Start with a well-wedged ball of speckled stoneware clay. Slam it onto the center of your wheel head and use wet hands to coning up and down until the clay feels perfectly centered and stable. -
Open the form:
Press your thumbs into the center of the mound to open it, leaving about a half-inch of thickness at the bottom for the floor. Compress the floor firmly with a sponge or your fingertips to prevent future S-cracks. -
Pull the walls:
Begin pulling the walls up into a cylinder. Aim for an even thickness from bottom to top. For this specific shape, you want a slightly rounded bottom that transitions into straight vertical walls, avoiding too much outward flare. -
Add texture:
Instead of smoothing the walls completely, leave subtle throwing lines visible on the exterior surface. You can accentuate these slightly by holding a soft rib or your finger against the spinning clay as you pull up. -
Refine the rim:
Use a chamois or a wet sponge to compress and round the rim. This step is crucial for drinking comfort; ensuring it’s smooth now means less sanding later. -
Undercut and wire off:
Use a wooden modeling tool to undercut the base, removing excess clay and creating a slight shadow line at the bottom. Slide your wire cutter underneath the pot to release it, then carefully move it to a ware board to stiffen to leather-hard.
Handle Cracks?
If hairline cracks appear at the join as it dries, wrap the entire mug tightly in plastic for 24 hours to rehydrate slightly, then compress the crack with a tool and slow down drying again.
Step 2: Creating the Strap Handle
-
Pull the strap:
Take a lug of clay and wet your hand. Pull a long, flat strip of clay rather than a round coil. Use your thumb and forefinger to flatten the clay as you pull it downward, creating a ‘strap’ profile that is wider than it is thick. -
Shape the curve:
Once the strap is the desired thickness (around 1/4 inch), cut it free and lay it on your work surface. Gently curve it into a ‘C’ shape or a question mark shape and let it set up until it holds its form without flopping. -
Cut to size:
Hold the handle up to your leather-hard mug to gauge proportions. Slice the ends of the handle at an angle with your fettling knife so they stand flush against the mug’s wall.
Step 3: Attachment and Finishing
-
Score the surfaces:
Mark where the handle will attach to the mug body. Thoroughly score (scratch) these areas on the mug and both ends of the handle using your scoring tool. -
Apply slip and attach:
dab a generous amount of slip onto the scored areas. Press the handle firmly onto the mug, starting with the top attachment point. Support the wall from the inside of the mug to prevent warping. -
Refine the connection:
Use a wooden tool or your finger to smooth the seam where the handle meets the mug. I like to blend a little extra clay from the handle onto the body to ensure a seamless visual transition. -
create the thumb rest:
While the handle is still slightly pliable, press your thumb gently into the top curve of the handle where it meets the mug. This creates a subtle depression that acts as a natural resting spot for the user’s thumb. -
Check alignment:
Hold the mug at arm’s length and look at it from all angles to ensure the handle is straight vertically. Adjust gently if needed before the clay dries further. -
Slow drying:
Cover the mug loosely with plastic to let it dry showly. Handles dry faster than bodies, so slow drying helps prevent cracking at the attachment points. -
Bisque fire:
Once bone dry, fire the mug to bisque temperature (usually cone 04 or 06) in your kiln. -
Glaze application:
Dip the bisqued mug into a clear or semi-transparent white glaze. This will seal the surface while allowing the natural speckles of the clay body to remain the star of the show. Be sure to wipe the foot clean. -
Final firing:
Load the kiln again for the glaze firing (typically cone 5 or 6 for stoneware). Follow your specific clay and glaze manufacturer’s firing schedule for best results.
Pro Tip: Comfort Test
Before the handle is fully dry, mime taking a sip. If the handle feels awkward, adjust the curve immediately. It’s built for use, not just for looks.
Enjoy your morning coffee in a mug that feels as good as it looks


What Really Happens Inside the Kiln
Learn how time and temperature work together inside the kiln to transform clay into durable ceramic.
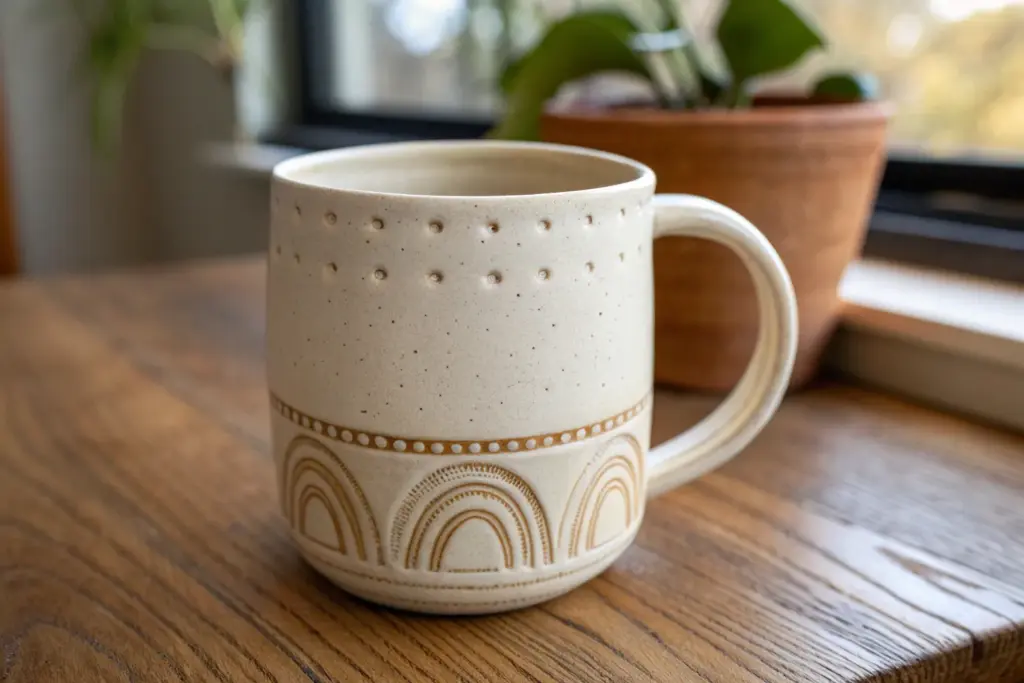
Stamped Geometric Wrap
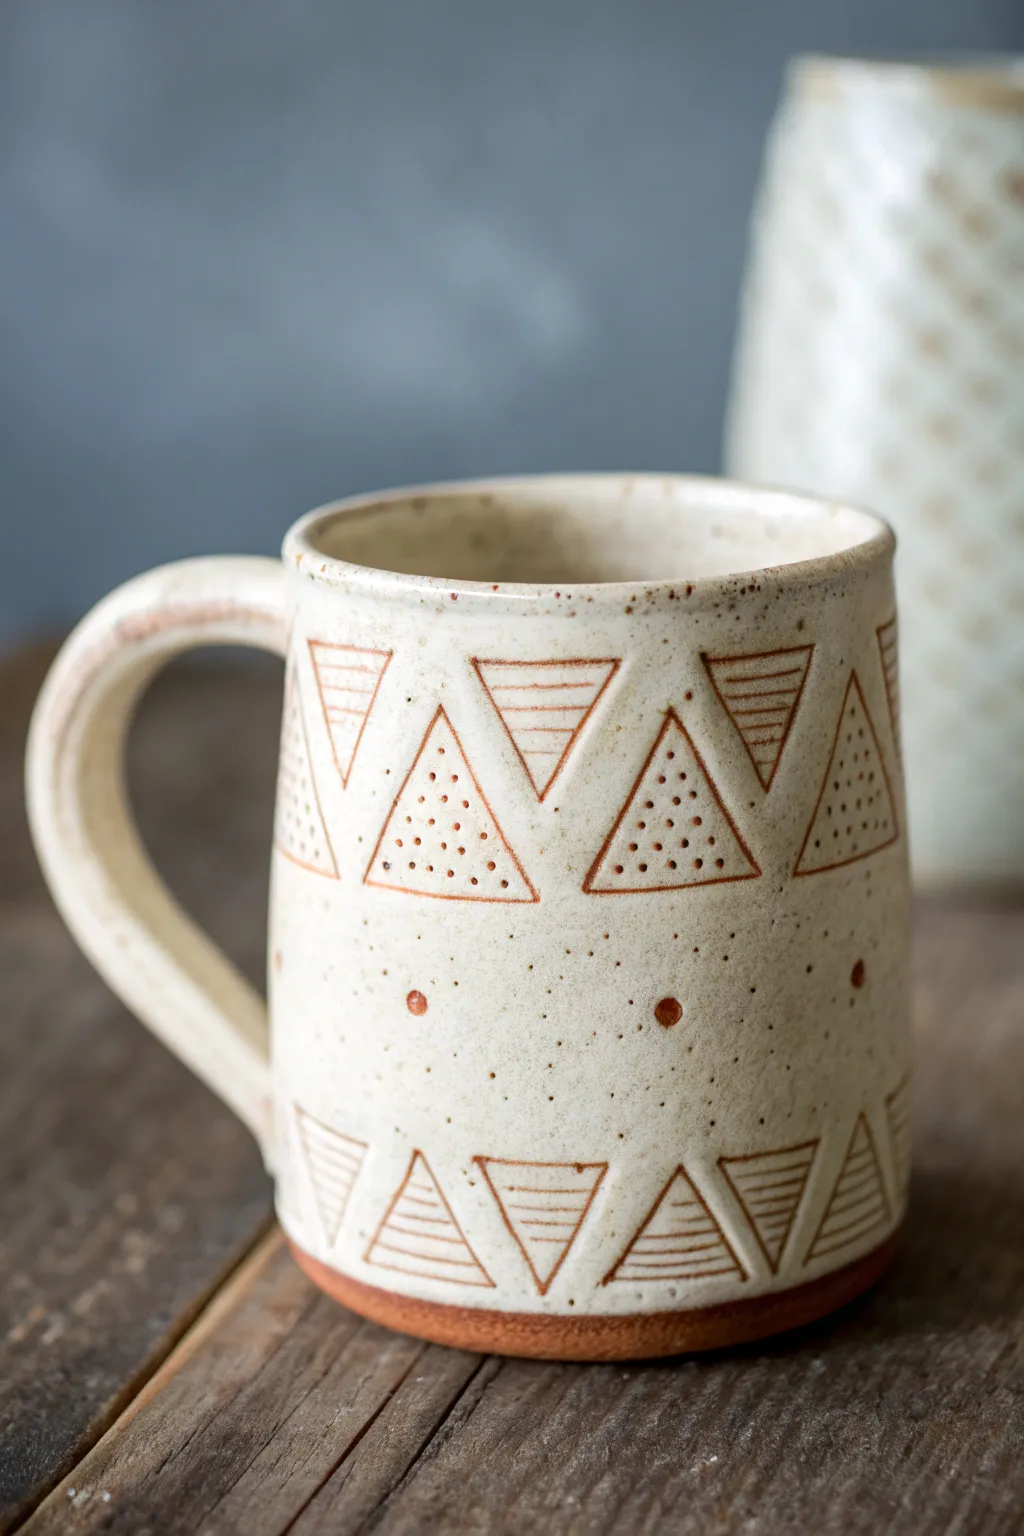
Embrace the rustic charm of hand-built pottery with this earthy, geometric mug design. Featuring repeating triangular motifs and delicate dotted accents on a speckled clay body, this project balances precise lines with organic warmth.
Step-by-Step
Materials
- Speckled stoneware clay (mid-fire)
- Rolling pin and canvas board
- Bisque cylinder mold or rolling tube
- Needle tool or fettling knife
- Scoring tool (serrated rib)
- Slip (clay mixed with water)
- Ruler
- Triangle clear stamp or carving tool
- Small drill bit or needle tool (for dots)
- Matte white glaze
- Wax resist
- Small sponge
- Iron oxide wash or underglaze pencil (rust color)
Step 1: Forming the Cylinder
-
Roll the slab:
Begin by rolling out your speckled clay on a canvas board until it is an even 1/4-inch thickness. Compress the slab on both sides with a rubber rib to smooth the surface and align the clay particles. -
Cut to size:
Using a ruler and fettling knife, cut a long rectangle that matches the circumference of your desired mug size plus a little overlap, and height. A standard size is roughly 12 inches by 4.5 inches. -
Texture preparation:
Before assembling, smooth out any canvas texture from the clay surface with a damp sponge so your geometric carving will be crisp. Let the slab stiffen slightly to soft leather-hard. -
Form the cylinder:
Wrap the slab around your cylinder mold or simply curl it into a tube shape. Bevel the short ends at 45-degree angles to create a seamless overlap join. -
Join the seam:
Score the beveled edges aggressively and apply slip. Press the ends together firmly. I like to use a wooden roller tool inside the mug against my hand to really seal that seam invisible.
Smudged Lines?
If your oxide smears too much when wiping back, your sponge is too wet. Wring it out thoroughly and use quick, light swipes to clean the surface.
Step 2: Attaching Floor & Handle
-
Cut the base:
Roll a small separate piece of slab for the floor. Place your cylinder on top, trace around it with a needle tool, and cut out the circle. -
Attach the bottom:
Score and slip both the bottom edge of the cylinder and the edge of the circle base. Press them together, smoothing the clay upward from the base onto the wall to secure it. -
Pull a handle:
Pull a strap of clay for the handle, tapering it slightly. Shape it into a ‘?’ curve and let it stiffen until it holds its shape without drooping. -
Attach handle:
Score and slip the attachment points on both the mug and handle. Press firmly to attach, blending the clay seamlessly at the joints with a modeling tool.
Make It Pop
Try inlaying a colored underglaze into the triangles instead of oxide wash. A deep teal or mustard yellow in the recessed lines adds a modern twist.
Step 3: Carving the Design
-
Divide the space:
Using a ruler, lightly mark two horizontal bands where your triangle rows will go—one near the rim and one near the base. Keep the middle section open for the dotted pattern. -
Outline triangles:
With a needle tool, lightly sketch a row of alternating triangles (pointing up and pointing down) within your top and bottom bands. Aim for consistent spacing, but remember handmade imperfections add character. -
Carve the lines:
Deepen your sketched lines using a carving tool. For the texture shown, fill every other triangle with horizontal hatched lines. Leave the alternating triangles empty for now. -
Add dotted details:
Inside the empty triangles, use a small drill bit or blunt needle tool to press rows of small holes. Create a pyramid pattern of dots that mirrors the triangle shape. -
Central accents:
In the negative space between the two triangle bands, press single, larger circular indentations at regular intervals around the mug’s waist. Surround these with a very light scattering of tiny pin-pricks for texture.
Step 4: Glazing & Finishing
-
Bisque fire:
Allow the mug to dry slowly and completely. Bisque fire it to Cone 04 (or your clay body’s specifications). -
Apply oxide wash:
Mix iron oxide with water and brush it into all the carved lines and dots. Wipe the surface back with a damp sponge, leaving the dark rust color trapped only in the recessed textures. -
Wax the foot:
Apply a band of wax resist to the bottom 1/4 inch of the mug, leaving the raw clay exposed like the example image. This creates that lovely toasted contrast. -
Glaze dip:
Dip the entire mug into a matte white or cream glaze. The oxide wash will burn through the glaze during firing, revealing the geometric pattern. -
Final fire:
Glaze fire the piece to maturity (Cone 5 or 6). The unglazed foot will turn a warm terracotta or brown, grounding the design.
Once cooled, your mug is ready for a warm beverage and a moment of appreciation for your handiwork
Lace-Pressed Texture Panel
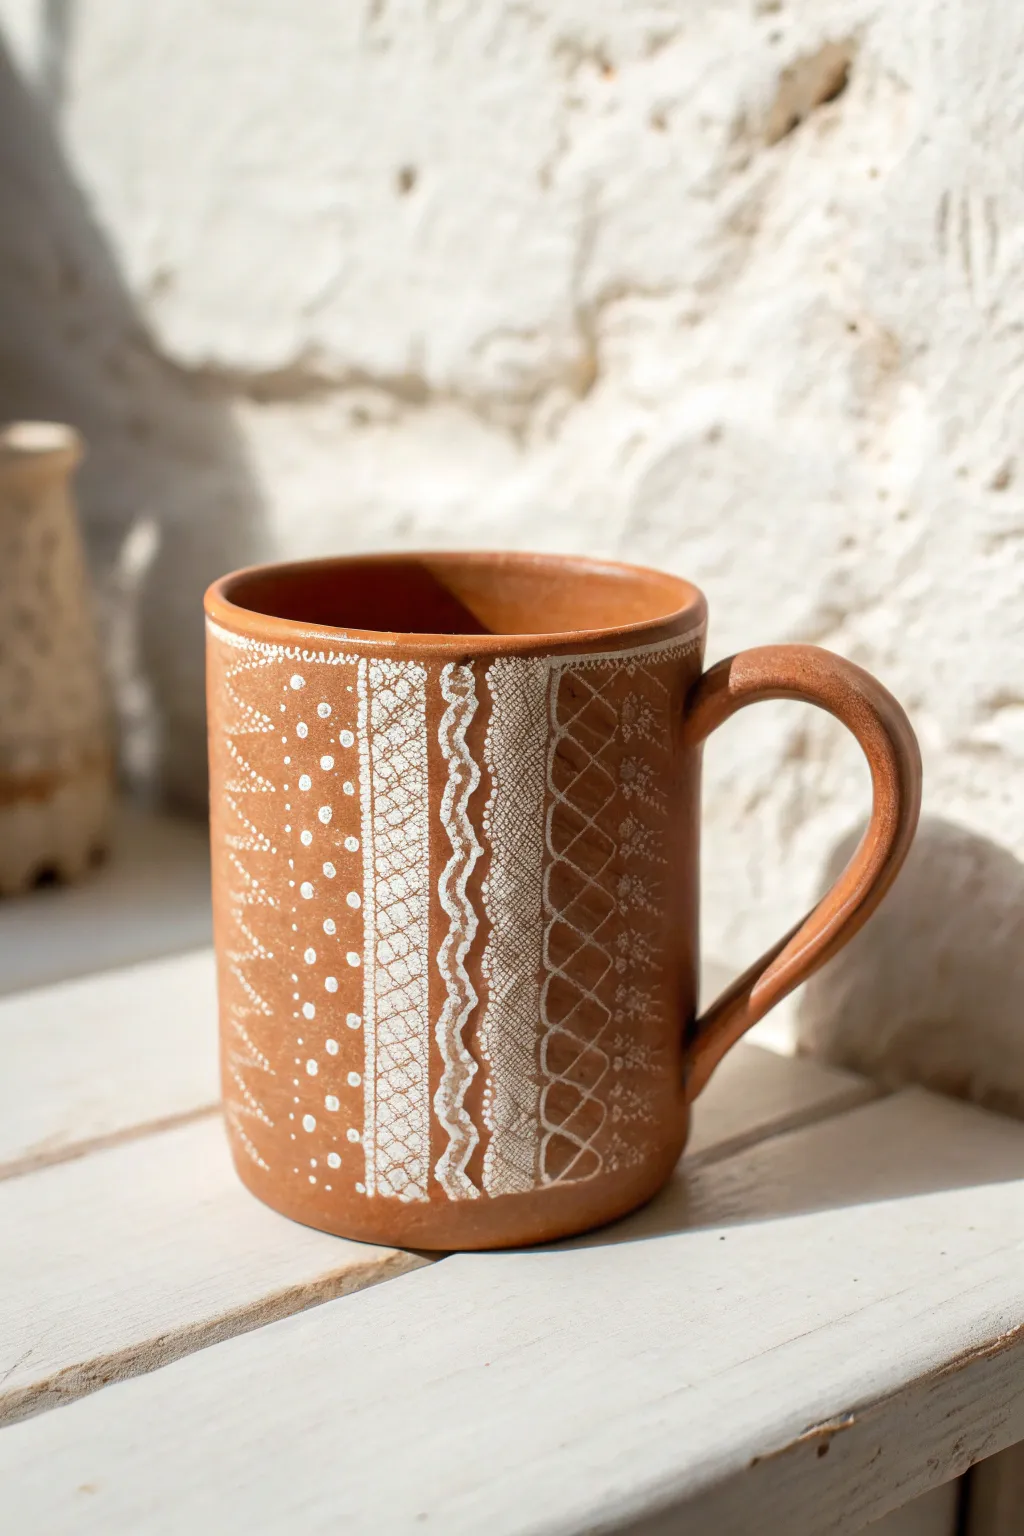
Transform a plain terracotta mug into a textured masterpiece with this delicate, vintage-inspired design. By combining vertical banding with various lace-like marking techniques, you’ll create a piece that feels both rustic and intricate.
Step-by-Step Tutorial
Materials
- Bisque-fired red clay mug (terracotta or similar)
- White underglaze or white slip
- Small flat synthetic brush
- Fine-point detail brush (liner brush)
- Slip trailer bottle with fine metal tip (optional)
- Pency or soft charcoal
- Measuring tape
- Clear transparent glaze
- Sponge
Step 1: Planning and Layout
-
Clean surface:
Begin by wiping down your bisque mug with a slightly damp sponge to remove any dust or oils that might resist the underglaze. -
Measure bands:
Using a measuring tape and a soft pencil or charcoal, mark vertical lines around the exterior of the mug. Space them unevenly to create bands of different widths—some wide for complex patterns, some narrow for simple separators. -
Sketch the zones:
Lightly sketch in the general motifs for each vertical section directly onto the bisque. Don’t worry about perfection; pencil marks will burn off in the kiln. Plan for a mix of geometric zig-zags, dots, and lace-like grids.
Pro Tip: Slip Trailing
For truly raised texture that you can feel, use a slip trailer bottle instead of a brush for the dots and wavy lines. It creates a beautiful tactile 3D effect.
Step 2: Painting the Base Textures
-
Prepare the underglaze:
Ensure your white underglaze is the consistency of heavy cream. If it’s too thick, the intricate lines might clump; too thin, and they won’t show up clearly against the red clay. -
The diamond grid:
For the lace-texture panel, use your details brush to paint a fine cross-hatch or diamond grid pattern. Keep the lines very thin to mimic the threads of actual lace. -
Stippling effect:
In the panel next to the grid, I like to use a stippling motion. tap the tip of your brush repeatedly to create a dense field of tiny dots that resembles a textured fabric surface. -
Wavy ribbon:
Paint a confident, wavy vertical line separating two panels. To make it look like a ribbon, add a second wavy line parallel to the first, then fill the space between them with small perpendicular dashes.
Step 3: Adding Fine Details
-
Zig-zag borders:
On the far left panel, paint a column of sharp zig-zags. Keep the peaks and valleys aligned vertically. Add small dots inside the triangles formed by the zig-zags for extra detail. -
The scalloped edge:
Paint a vertical line with small semi-circles (scallops) attached to one side. This mimics the decorative edge often found on lace trim. -
Overlaying white:
Go back to your cross-hatch grid panel. Once the first layer is dry, carefully dab tiny dots of white at the intersections of the lines to create a ‘knotted’ lace look. -
Top rim definition:
Using a steady hand or a banding wheel, paint a thin, solid white line just below the rim of the mug to frame all your vertical panels nicely. -
large dots:
Use the back end of your paintbrush handle to stamp larger, perfect circles in the wider, simpler panels. This varying scale adds visual interest.
Troubleshooting: Smudged Lines
If you smudge a line while painting, don’t wipe it wet! Let it dry completely, then gently scrape the mistake away with an X-Acto knife or needle tool.
Step 4: Finishing and Firing
-
Check opacity:
Look over your design. If the red clay shows through too much on the solid white lines, carefully apply a second coat of underglaze to those specific areas. -
Clean up:
If you made any stray marks, gently scratch them off with a needle tool or a stiff clean brush once the underglaze is bone dry. -
Bisque fire (optional):
If you are using underglaze on greenware, you would bisque fire now. Since we are working on bisque, this step is skipped, but ensure the underglaze is completely dry before glazing. -
Glazing:
Dip or brush a clear, transparent glaze over the entire mug. A glossy finish works best to make the white pop against the terracotta. -
Final fire:
Fire the mug to the temperature appropriate for your specific clay body and clear glaze (usually cone 04 or cone 6).
Your finished mug will have a charming, hand-stitched appearance that brings warmth to your morning coffee

TRACK YOUR CERAMIC JOURNEY
Capture glaze tests, firing details, and creative progress—all in one simple printable. Make your projects easier to repeat and improve.
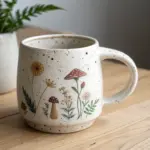
Leaf Impression Band

This project combines delicate line work with satisfying texture to create a nature-inspired vessel perfect for your morning tea. Using speckled clay enhances the organic feel, spotting beautifully through a translucent honey-colored glaze.
How-To Guide
Materials
- Speckled stoneware clay (mid-fire)
- Pottery wheel or slab roller/rolling pin
- Pin tool or needle tool
- Carving tool (small loop or sgraffito tool)
- Small wooden sculpting tool (for basket weave)
- Sponge
- Rib tool (metal or rubber)
- Scoring tool or serrated rib
- Slip
- Transparent honey or amber celadon glaze
- Kiln
Step 1: Forming the Base Vessel
-
Prepare the clay:
Begin by wedging about 1 to 1.5 pounds of speckled stoneware clay to remove air bubbles and ensure consistency. -
Throw the cylinder:
Center your clay on the wheel and open it up. Pull the walls to create a cylinder that is slightly wider at the bottom and tapers gently inward toward the rim. Aim for a height of about 4-5 inches. -
Shape the profile:
Using a rib tool, smooth the outside walls and refine the shape. You want a distinct transition near the bottom third where the mug curves inward slightly, creating a designated area for the basketweave texture later. -
Refine the rim:
Compress the rim with a piece of chamois or your sponge to ensure it is smooth and pleasant to drink from. -
Dry to leather hard:
Cut the mug off the bat and let it dry slowly until it reaches a leather-hard state. It should be firm enough to handle without deforming but soft enough to carve.
Step 2: Carving the Design
-
Trim the foot:
Place the mug back on the wheel (or use a banding wheel) to trim the bottom. Create a clean foot ring that elevates the form slightly. -
Define the sections:
Using your needle tool, lightly etch two horizontal guidelines around the mug: one about an inch from the bottom and another just below the rim area, framing where your leaves will go. -
Sketch the leaves:
Lightly scratch in the outline of simple, pointed oval leaf shapes between your guidelines. I like to freehand these to keep them looking natural, rather than using a stencil. -
Carve the leaf outlines:
Use a small carving tool or sharp stylus to deepen the outlines of the leaves. Press firmly enough to create a distinct groove that the glaze can pool in. -
Add leaf veins:
draw a central vertical line down each leaf, then add diagonal veins branching off from the center. Keep the lines crisp and clean. -
Create the basket band:
Focus on the bottom inch of the mug. Use a small wooden tool to press repetitive “V” or woven shapes into the clay. Alternating the direction of your impressions creates a braided or faux-basketweave effect. -
Smooth the burrs:
Once the carving is done, gently run a finger or a slightly damp sponge over the textured areas to knock off any sharp little crumbs of clay without erasing your details.
Clean Lines Tip
Don’t sponge the carving immediately. Wait until the mug is bone dry, then use a stiff brush or non-abrasive pad to dust off crumbs for crisper lines.
Step 3: Handle & Finishing
-
Pull a handle:
Pull a strap of clay for the handle, tapering it slightly. Shape it into a curve that mimics an ear or a half-heart shape. -
Attach the handle:
Score the attachment points on the mug and the handle ends. Apply slip and press the handle firmly onto the mug body, blending the seams smoothly with your thumb or a modeling tool. -
Bisque fire:
Allow the mug to dry completely to the bone-dry stage. Load it into the kiln for a bisque firing (usually roughly cone 04/06). -
Glaze application:
Dip or brush your transparent honey/amber glaze over the entire piece. Avoid thick opaque glazes, as they will hide your intricate carving work. -
Final wipe:
Wipe the foot ring clean with a damp sponge to prevent it from sticking to the kiln shelf. -
Glaze fire:
Fire the mug to the maturity temperature of your clay body (likely cone 5 or 6 for stoneware).
Texture variation
Instead of carving, try pressing actual leaves into soft clay for the top section, then use the carving tool only for the bottom woven band.
Once cooled, your mug is ready to add a touch of earthiness to your favorite hot beverage routine
Easy Sgraffito Line Art
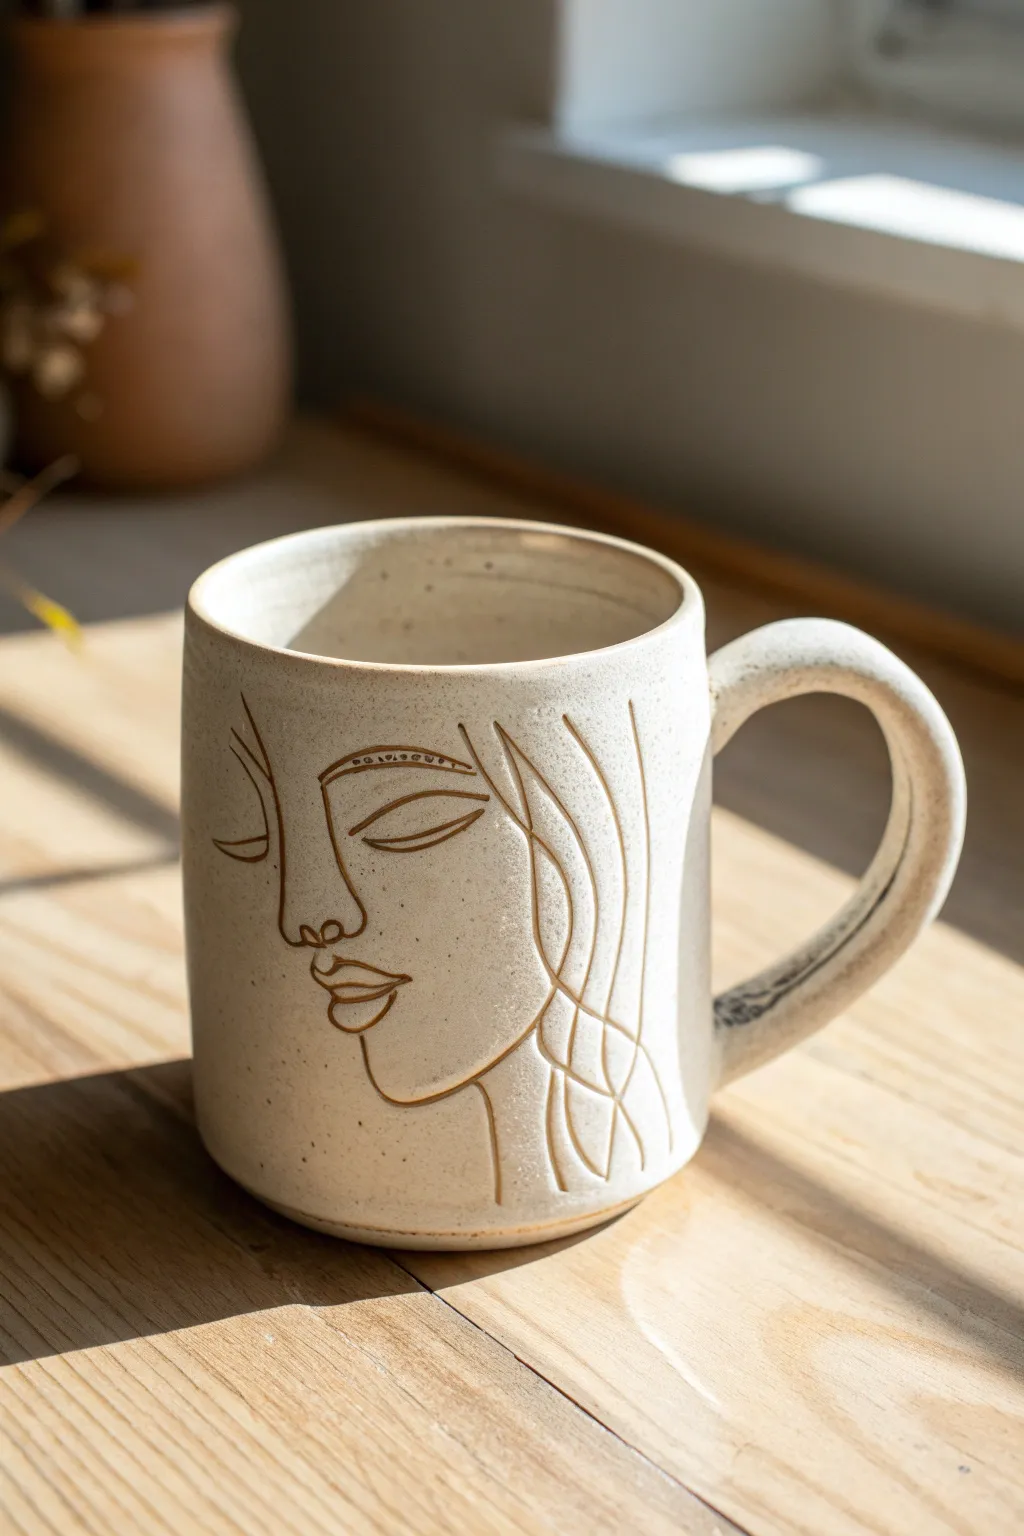
Capture a serene moment with this elegant pottery project that uses simple line work to create a striking portrait. By carving into a speckled clay body, you’ll produce a tactile, modern mug that feels as lovely as it looks.
Step-by-Step Guide
Materials
- Speckled Stoneware Clay (e.g., Laguna Speckled Buff)
- Pottery Wheel (or slab building tools if hand-building)
- Needle Tool
- Sponge
- Wire Clay Cutter
- Rib Tool (wood or metal)
- Small Loop Tool or Ball Stylus (for carving)
- Clear or White Transparent Glaze
- Kiln
- Soft Paintbrush
Step 1: Forming the Mug
-
Prepare the Clay:
Start by wedging about 1 to 1.5 lbs of speckled stoneware clay. Thorough wedging is crucial to distribute the grog and remove air bubbles, ensuring your throwing process is smooth. -
Throw the Cylinder:
Center your clay on the wheel and open it up. Pull the walls up to form a straight-sided cylinder, aiming for a consistent thickness of about 1/4 inch. I find keeping the rim slightly thicker helps prevent warping later. -
Shape the Body:
Once you have your height, gently shape the mug. The example has a very classic, straight profile with a subtle curve at the bottom. Use a metal rib to smooth the outside and remove throwing lines, creating a blank canvas for your art. -
Form the Handle:
Pull a strap handle from a separate piece of wedged clay. Aim for a comfortable C-shape curve. Let it stiffen slightly on a board until it can hold its shape without drooping. -
Attach the Handle:
Score and slip the contact points on both the mug body and the handle. Press the handle firmly onto the mug, smoothing the seams with your finger or a tool. Ensure the loop is large enough for a comfortable grip. -
Dry to Leather Hard:
Cover the mug loosely with plastic and let it dry slowly to a leather-hard state. This is the perfect consistency for carving—firm enough to hold detail without deformation, but soft enough to cut cleanly.
Clean Lines Pro Tip
For the crispest carved lines, dampen your sponge slightly and smooth the area right before carving. This reduces dragging and keeps the edges of your incision sharp.
Step 2: Carving the Design
-
Sketch the Outline:
Before carving deep, lightly sketch your face design onto the clay surface using a needle tool or a dull pencil. Start with the profile of the nose and lips, then extend the lines for the closed eye and jawline. -
Refine the Hair:
Draw flowing, organic lines extending back from the face to represent hair. These lines should curve naturally around the round form of the mug, adding movement to the static object. -
Carve the Main Lines:
Using a small loop tool or a ball stylus, retrace your sketched lines with firm, confident pressure. You want to incise the clay clearly so the lines will be visible after glazing. -
Clean Up Burrs:
Carving often creates small crumbs or burrs of clay along the edges of your lines. Wait until the mug is bone dry, then gently brush these away with a soft brush or rub them off with a finger. Don’t do this while it’s wet, or you’ll just smudge the clay back into the grooves. -
Add Decorative Details:
For added texture, consider making small dots or tiny dashes along the eyebrow line or within the hair strands, just like the subtle detailing on the eyebrow in the reference image.
Level Up: Sgraffito
Before carving, paint a layer of black or dark blue underglaze over the leather-hard clay. When you carve through it, the contrasting clay color will reveal itself boldly.
Step 3: Glazing and Firing
-
Bisque Fire:
Load your bone-dry mug into the kiln and fire it to a bisque temperature (usually cone 04 or 06). This hardens the piece and prepares it for glazing. -
Enhance the Lines (Optional):
If you really want the lines to pop, you can brush a dark underglaze or a wash (iron oxide works well) into the carved grooves, then wipe the surface clean with a damp sponge, leaving color only in the recesses. -
Apply Glaze:
Dip the mug into a satin matte white or clear glaze. Because you’re using speckled clay, a semi-transparent white glaze is ideal—it allows the natural speckles of the clay body to show through while sealing the surface. -
Check the Foot:
Wipe the bottom of the mug (the foot ring) completely clean of glaze with a damp sponge. This prevents the mug from fusing to your kiln shelf during the final firing. -
Glaze Fire:
Fire the mug to the maturity temperature of your clay and glaze (often cone 5 or 6 for stoneware). Once the kiln cools, unload your new favorite mug.
Enjoy your morning coffee in a piece of art that is uniquely yours
Dots, Dashes, and Brush Marks
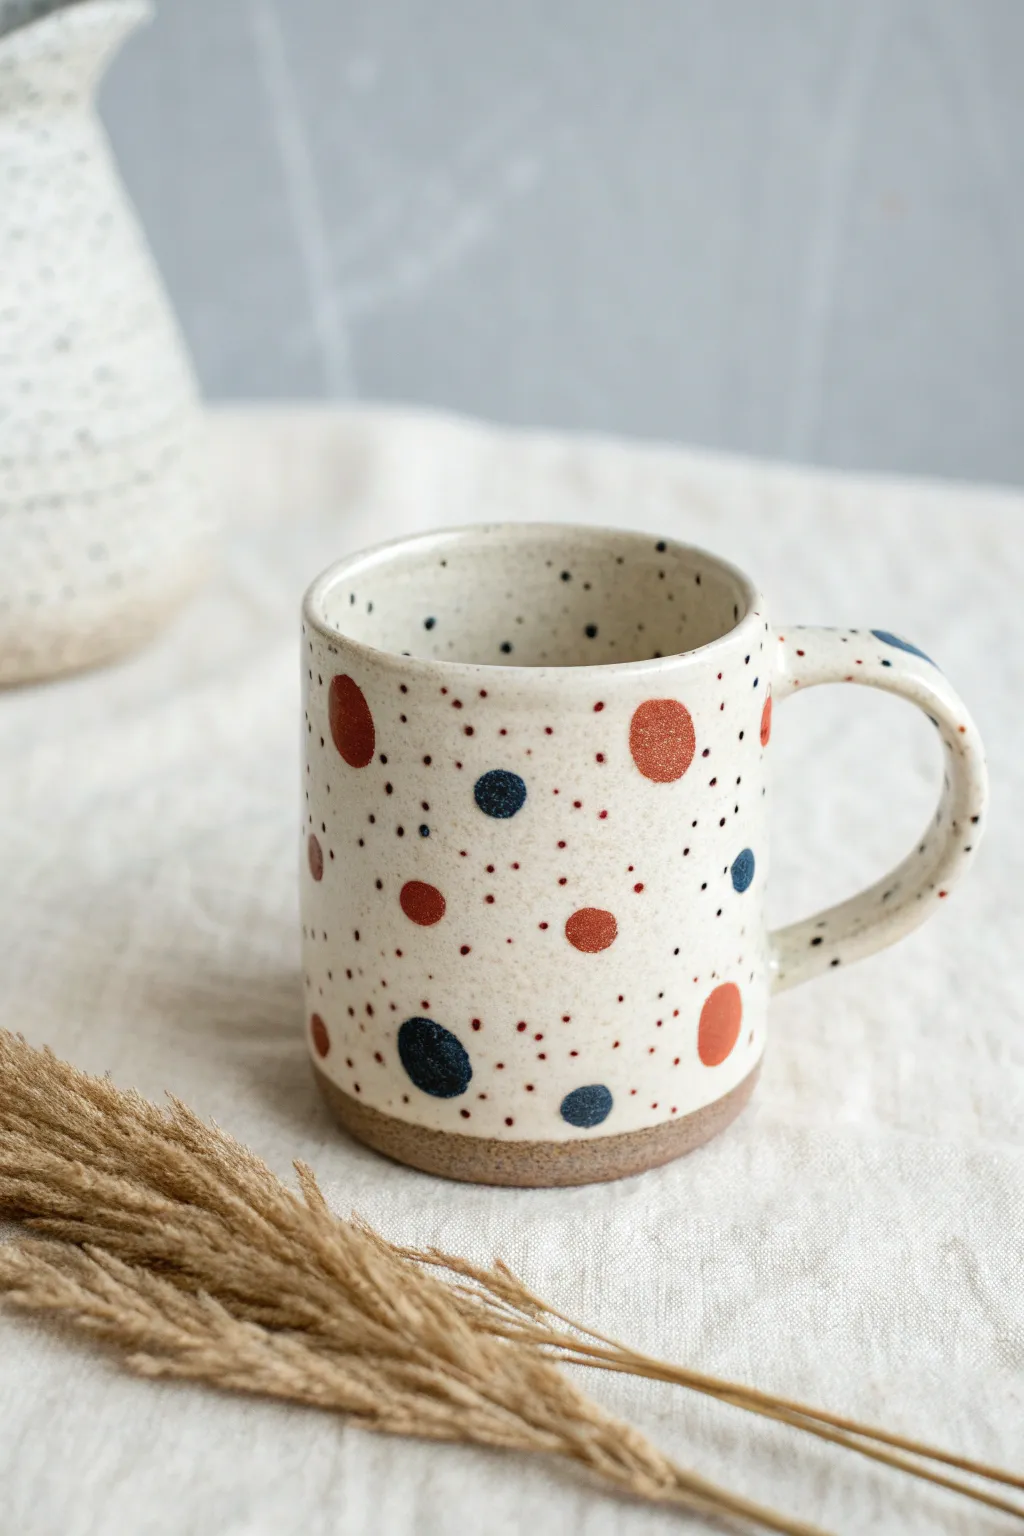
Embrace the playful charm of this handmade ceramic mug, featuring organic polka dots in warm rust and deep navy tones. The design relies on random placement and varied sizes to create a casual, scattered confetti effect against a creamy, speckled background.
Step-by-Step
Materials
- Stoneware clay (speckled or buff)
- Pottery wheel or slab roller
- Rib tool
- Needle tool
- Sponge
- Cutting wire
- Creamy white dipping glaze
- Underglaze (Rust/Terracotta)
- Underglaze (Navy Blue)
- Small round brushes (various sizes)
- Stiff bristle brush (e.g., toothbrush)
- Clear glaze (optional)
Step 1: Forming the Mug Body
-
Prepare the Clay:
Wedge about 1 pound of stoneware clay thoroughly to remove air bubbles. This project works beautifully with a speckled clay body, which adds natural texture to the final glaze. -
Throw the Cylinder:
Center your clay on the wheel and open it up. Pull the walls into a simple, straight-sided cylinder or a slightly rounded mug shape, leaving the rim smooth and even. -
Refine the Shape:
Use a rib tool to compress the walls and smooth out any throwing lines if you prefer a cleaner canvas for your dots. Trim the excess clay at the base. -
Dry to Leather Hard:
Cut the mug from the bat with a wire tool and set it aside until it reaches soft leather hard stage—firm enough to handle without warping.
Smudged Dots?
If underglaze smears on the base glaze, wait for it to dry completely, then gently scrape the mistake off with an X-Acto knife rather than wiping.
Step 2: Adding the Handle & Trimming
-
Trim the Foot:
Flip the mug over and trim the bottom. Create a distinct foot ring or a flat bottom, but leave the very bottom millimeter or two un-trimmed if you want that raw clay aesthetic shown in the photo. -
Pull a Handle:
Pull a strap of clay for the handle. Allow it to stiffen into an arch shape on a table so it holds its curve. -
Attach the Handle:
Score the mug body and the handle attachment points. Apply slip and press the handle firmly onto the mug. Smooth the seams with your thumb or a modeling tool for a seamless connection. -
Bisque Fire:
Allow the mug to dry completely (bone dry). Fire it in the kiln to a bisque temperature (usually Cone 04) to prepare it for glazing.
Step 3: Glazing and Decoration
-
Wax the Foot:
Apply wax resist to the bottom half-inch of the mug. This exposes the raw, toasted clay at the base, creating the distinct two-tone look seen in the example. -
Apply Base Glaze:
Dip the entire mug (holding it by the foot) into a creamy white or oatmeal speckle glaze. Shake off excess drips and let it dry until it’s powdery to the touch. -
Paint Large Rust Dots:
Using a medium round brush and rust-colored underglaze (or overglaze, depending on your materials), paint random circles. I like to keep these slightly imperfect to maintain the hand-painted feel. -
Paint Navy Dots:
Switch to a clean brush and add fewer, smaller navy blue dots in the spaces between the rust ones. Aim for an unbalanced, organic distribution rather than a grid. -
Add Tiny Details:
Use a very fine detail brush to add tiny specks of both colors. These should look like little crumbs or seeds scattered among the bigger dots. -
Splatter Effect:
Load a stiff toothbrush with a small amount of thinned rust underglaze. Run your thumb over the bristles to flick tiny speckles onto the mug surface for extra texture. -
Clean Up:
Check the wax line at the bottom. If any glaze or underglaze has dripped onto the raw clay area, wipe it away cleanly with a damp sponge. -
Final Firing:
Place the mug in the glaze kiln and fire to the maturity temperature of your clay and glaze (often Cone 5 or 6). This melts the glaze and fuses the decoration permanently.
Texture Twist
Instead of painting dots, use a small loop tool to carve shallow dimples into the leather-hard clay, then fill those divots with glaze later.
Once cooled, your mug is ready for a warm beverage and a cozy morning
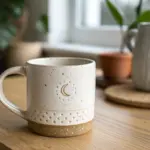
One Big Simple Motif
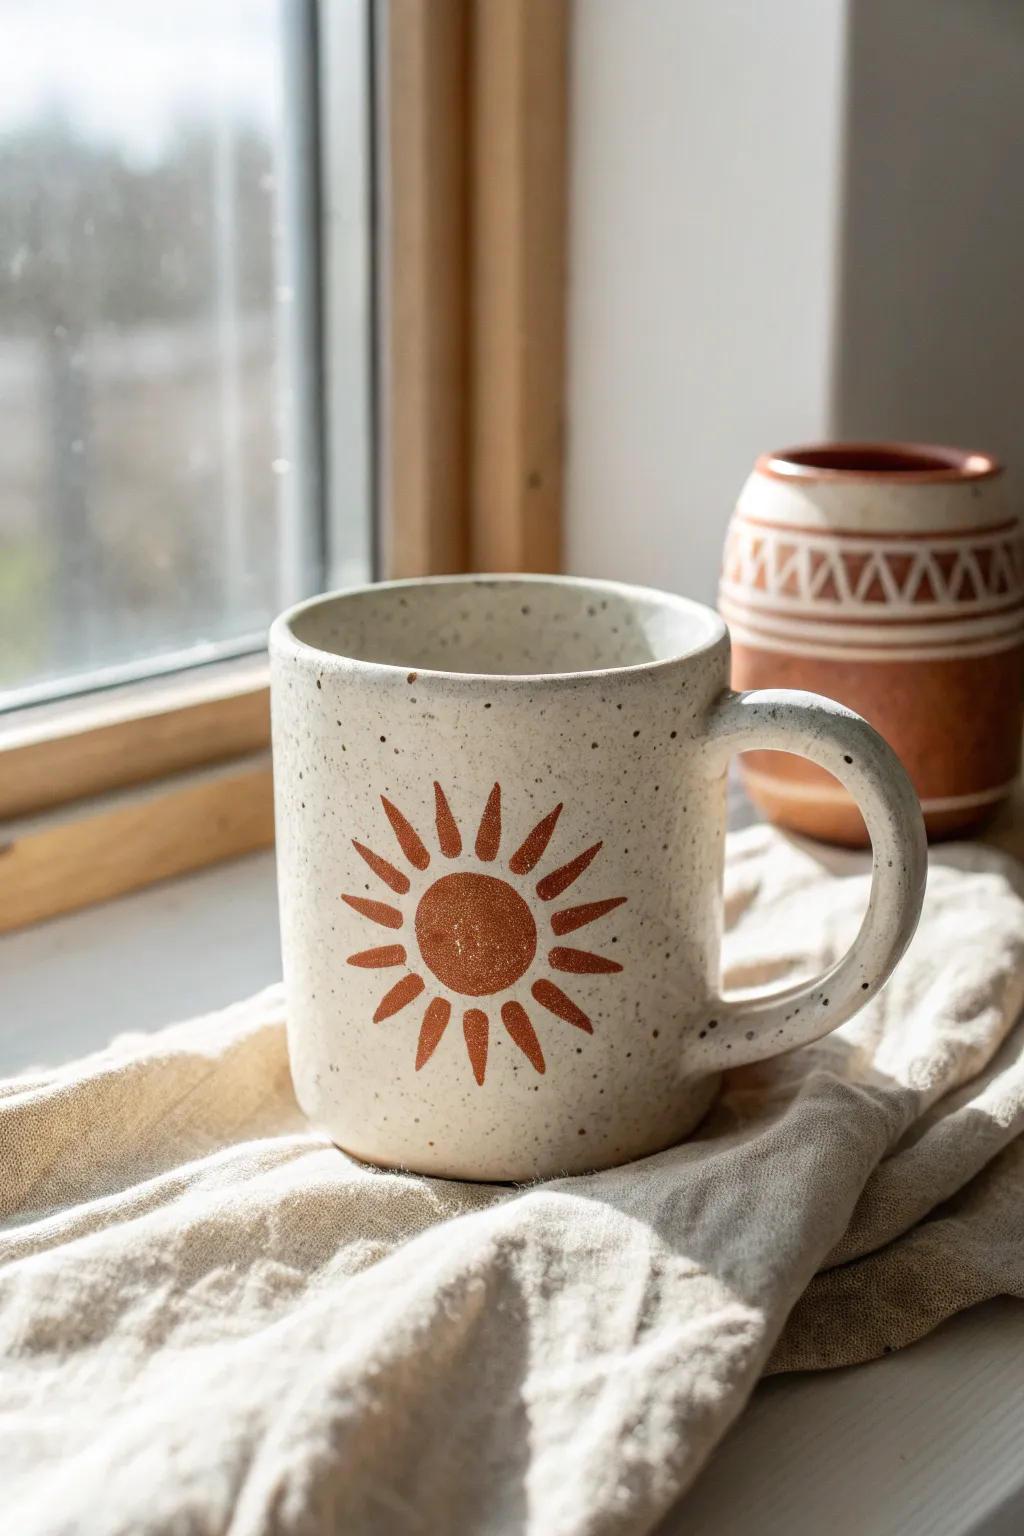
Embrace the warmth of nature with this minimalist ceramic mug featuring a single, bold sun motif. The design relies on the beautiful contrast between a rustic, speckled clay body and a warm, terracotta-colored underglaze to create a piece that feels both modern and timeless.
Step-by-Step Guide
Materials
- Speckled stoneware clay body (cone 5/6)
- Pottery wheel or rolling pin/slab roller (for hand-building)
- Needle tool
- Rib tool (kidney)
- Sponge
- Trim tool
- Terracotta or rust-colored underglaze
- Small round paintbrush (soft bristles)
- Clear or transparent matte glaze
- Kiln access
Step 1: Forming the Mug Body
-
Prepare the Clay:
Begin by thoroughly wedging about 1 to 1.5 pounds of speckled stoneware clay to remove air bubbles and ensure consistency. -
Create the Cylinder:
Whether throwing on the wheel or hand-building with a slab, form a simple, straight-walled cylinder. Aim for a height of about 4-5 inches and a width of 3.5 inches. -
Refine the Shape:
Use a rib tool to smooth the exterior walls, removing throwing rings or uneven texture. This clean canvas is crucial for the simple motif. -
Shape the Rim:
Chamois or sponge the rim to be slightly rounded and comfortable for drinking. It shouldn’t be too sharp. -
Pull a Handle:
Pull a handle from a small nugget of clay, keeping it medium thickness. A simple c-shape or ear-shape works best for this rustic look. -
Attach Handle:
Score and slip the contact points on both the mug body and handle. Attach firmly, blending the clay seams until invisible. Let the mug dry to leather-hard.
Step 2: Painting the Motif
-
Plan placement:
Identify the ‘face’ of the mug, usually opposite or slightly offset from the handle. Lightly trace a circle with a tool if you need a guide, but freehand often looks more organic. -
Paint the Central Orb:
Using a soft round brush loaded with terracotta underglaze, paint a solid circle about 1.5 inches in diameter in the center of the wall. -
Add First Rays:
Paint four primary rays extending from the circle at 12, 3, 6, and 9 o’clock. Use a teardrop shape—thinner near the circle and slightly wider at the tip. -
Fill the Gaps:
Add smaller rays between the cardinal points. I like to vary the length slightly to enhance the hand-painted feel. -
Second Coat:
Once the first layer is dry to the touch, apply a second coat of underglaze to the sun. This ensures the color remains opaque after firing. -
Clean Up:
If any underglaze smudged, gently scratch it off with a needle tool or wipe carefully with a barely damp sponge corner.
Smudged Edges?
If your underglaze bleeds during glazing, try bisque firing slightly higher next time, or ensure the clear glaze is applied quickly without over-brushing the painted area.
Step 3: Finishing
-
Bisque Fire:
Allow the mug to bone dry completely before loading it into the kiln for a bisque firing (usually cone 04). -
Apply Clear Glaze:
Dip or brush a clear glaze over the entire mug. A matte or satin finish is ideal here as it softens the look and lets the speckles show through without high glare. -
Wipe the Foot:
Use a wet sponge to thoroughly clean any glaze off the bottom foot of the mug so it doesn’t fuse to the kiln shelf. -
Glaze Fire:
Fire the mug to the maturity temperature of your clay body (likely cone 5 or 6). Let the kiln cool naturally before unloading.
Level Up: Wax Resist
Apply wax resist over your painted sun before dipping in a tinted semi-transparent glaze. The sun remains matte and raw while the rest gets glossy color.
Now you have a cozy vessel perfect for catching the morning light with your coffee
Raised Heart Appliqué
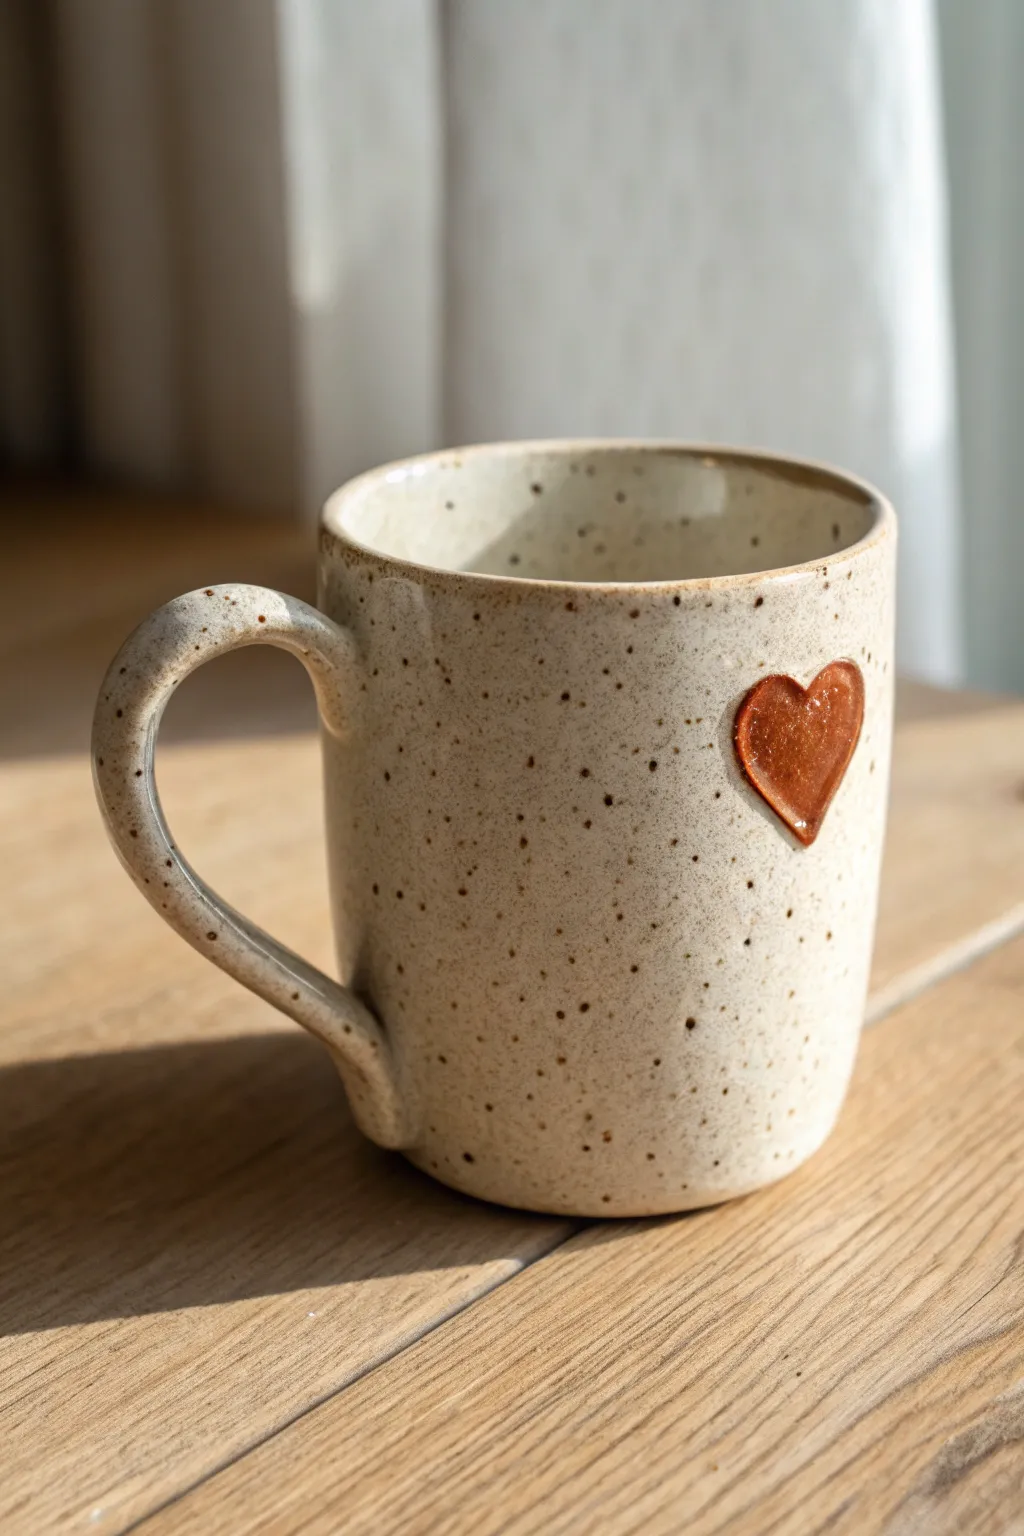
This charming project features a minimalist aesthetic with a soft, speckled cream glaze and a single, striking raised heart detail. The combination of the smooth clay body and the glossy, dimensional appliqué creates a lovely tactile experience for your morning coffee.
Detailed Instructions
Materials
- Stoneware clay (speckled or buff)
- Small heart-shaped cookie cutter (approx. 1 inch)
- Pottery rib (metal or wood)
- Scoring tool or needle tool
- Slip (clay mixed with water)
- Sponge
- Cream/White speckled glaze
- Warm reddish-brown or amber glaze
- Small glaze brushes
- Fettling knife
- Rolling pin
- Canvas board or slab mat
Step 1: Forming the Mug Body
-
Prepare your clay:
Begin with a ball of stoneware clay about the size of a grapefruit. If you plan to throw on the wheel, wedge it thoroughly to remove air bubbles. For hand-building, roll out a consistent slab about 1/4 inch thick. -
Construct the cylinder:
Create your basic cylinder shape. If throwing, pull walls to an even height of about 3.5 inches, keeping the rim slightly tapered. If slab building, cut a rectangle, score and slip the edges, and join them to form a cylinder, adding a circular base. -
Refine the surface:
Once the basic shape is formed, use a rib tool to smooth the exterior walls. This removes throwing lines or canvas texture, creating a blank canvas for your design. -
Shape the handle:
Pull a strap handle or roll a coil, flattening it slightly. Shape it into a ‘C’ or ear shape that comfortably fits two or three fingers. -
Attach the handle:
Score the attachment points on both the mug body and the handle ends. Apply slip generously and press firmly to attach. Smooth the joints with a damp sponge so they look seamless.
Clean Connection Tip
When attaching the heart, use a soft rubber rib to gently compress the applique onto the curve of the mug. This ensures a tight seal without blending away the raised edges.
Step 2: Creating the Appliqué
-
Roll a mini slab:
Take a small scrap of your remaining clay and roll it out very thin—slightly thinner than the mug walls, perhaps 1/8 to 3/16 inch thick. -
Cut the heart:
Use your small heart cutter to punch out a clean shape. If you don’t have a cutter, I sometimes just hand-cut this with a needle tool for a more organic, rustic look. -
Clean the edges:
Gently smooth the sharp cut edges of the fresh clay heart with your fingertip so it looks soft and pillowy rather than sharp. -
Score the placement area:
Decide where you want the heart. A little off-center from the handle usually looks best. Lightly score this area on the leather-hard mug. -
Score the heart back:
Scratch the back of your clay heart thoroughly. This small piece needs good adhesion to pop off during firing. -
Attach the heart:
Apply a dab of slip to the mug and press the heart onto the scored area. Use gentle pressure from the center outward to push out any trapped air. -
Clean up:
Wipe away any excess slip that squeezed out around the edges using a slightly damp brush. The connection should look clean.
Texture Twist
Before cutting out the heart shape, press a piece of lace or burlap into the small clay slab. This adds a subtle imprinted texture to the heart that glaze will break beautifully over.
Step 3: Glazing and Finishing
-
Bisque fire:
Allow the mug to dry slowly and completely. Once bone dry, bisque fire it according to your clay body’s specifications (usually Cone 04 or 06). -
Wax resist (optional):
If you want to be very precise, paint a layer of wax resist carefully over the raised heart shape. This prevents the base glaze from sticking to it. -
Dip the base coat:
Dip the entire mug into your cream speckled glaze. Hold it by the foot or use glazing tongs. Let the excess drip off and allow it to dry to the touch. -
Clean the heart:
If you used wax, wipe any bead of glaze off the heart. If you didn’t strictly wax, just use a damp sponge to wipe the cream glaze completely off the raised heart surface. -
Glaze the heart:
Using a small detail brush, carefully paint the raised heart with your warm amber or reddish-brown glaze. Apply 2-3 coats for a rich, glossy finish. -
Inspect the rim:
Check the rim of the mug to ensure the glaze breaks nicely over the edge, similar to the photo. You can wipe it back slightly if the glaze is too thick. -
Final fire:
Glaze fire the piece to the maturity temperature of your clay and glaze (often Cone 5 or 6 for stoneware). Ensure the mug doesn’t touch other pieces in the kiln.
Once cooled, you’ll have a beautifully tactile mug ready for cozy drinks
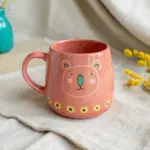
Mini Flower Button Appliqués
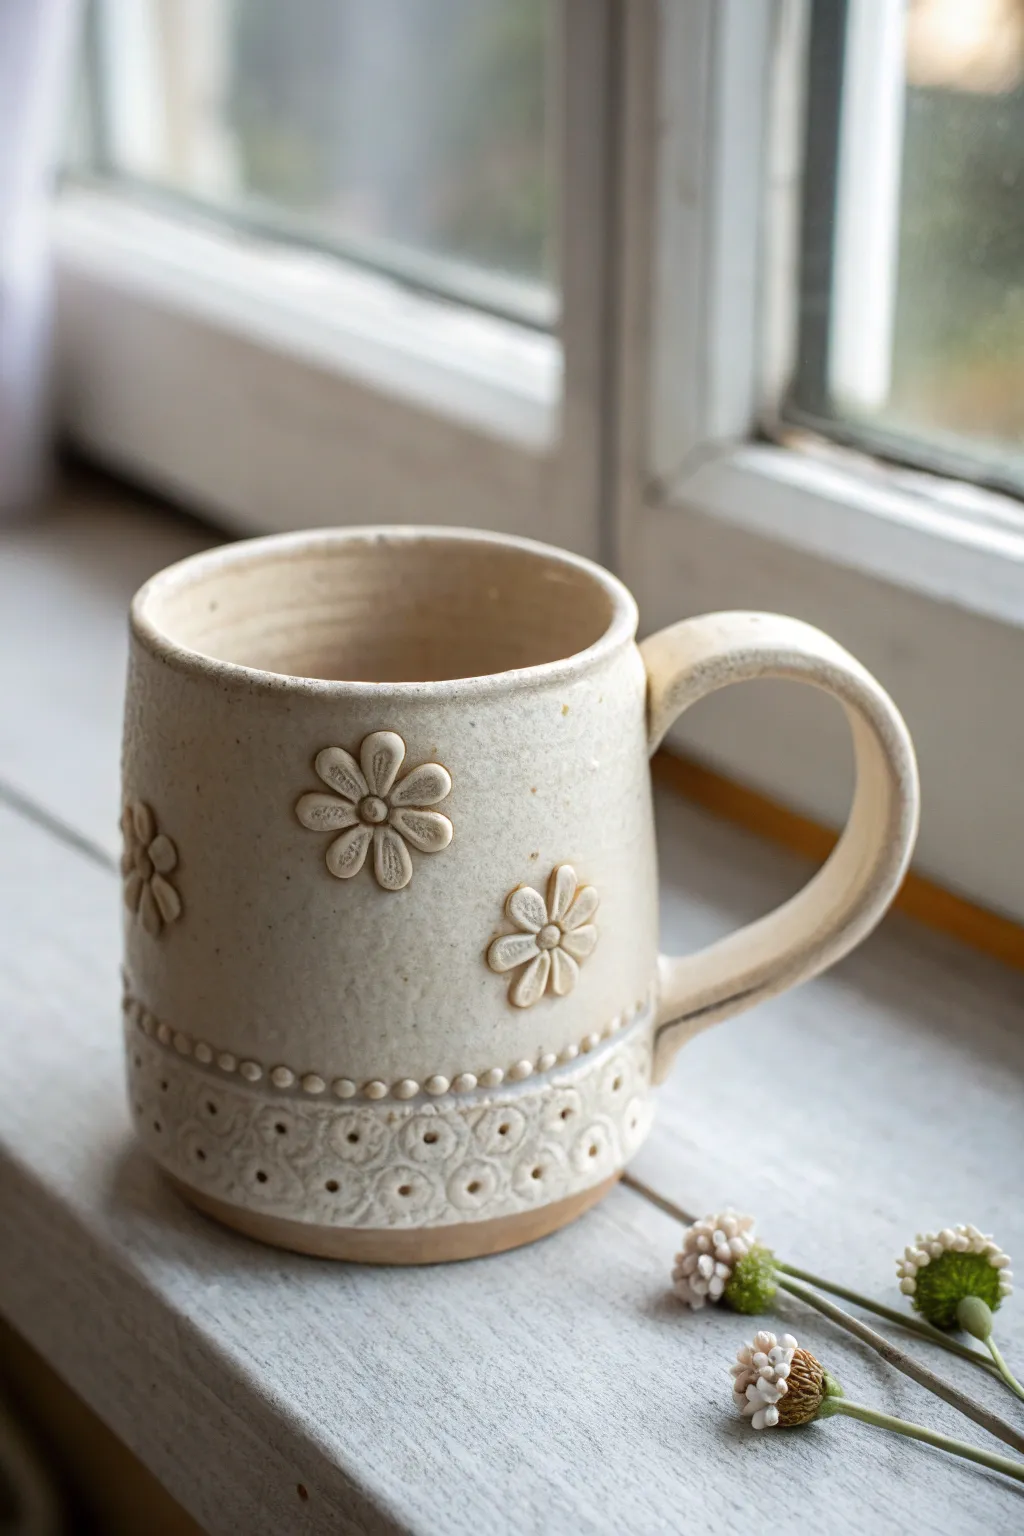
This charming speckled mug brings a touch of nature to your morning routine with its sweet, button-like floral appliqués and textured geometric base. The raw, unglazed rim at the bottom contrasts beautifully with the warm, oatmeal semi-matte glaze for a cozy, handmade feel.
Step-by-Step Guide
Materials
- Stoneware clay (speckled or buff)
- Small flower fondant cutter or plunger cutter (approx. 1 inch)
- Small circle cutter or piping tip (for flower centers)
- Pottery wheel (or rolling pin for hand-building)
- Needle tool
- Loop trimming tool
- Scoring tool or serrated rib
- Slip (clay and water slurry)
- Small sponge
- Pattern roller or stamp (geometric/circular motif)
- Wooden modeling tool
- Oatmeal or satin white glaze
Step 1: Forming the Base Mug
-
Throw the cylinder:
Begin by wedging your clay to remove air bubbles. Center the clay on the wheel and throw a straight-sided cylinder, slightly wider at the base than the rim, aiming for walls about 1/4 inch thick. I like to leave the bottom slightly thicker to allow for trimming later. -
Define the texture zone:
While the wheel is spinning slowly, use a wooden rib or tool to create a slight indentation or definition line about 1.5 inches up from the bottom. This marks where your textured band will go. -
Add the textured band:
Ideally, while the clay is leather hard (if wheel throwing) or soft leather hard (if hand-building), press a patterned roller or stamp gently around the bottom section. Alternatively, create the dotted texture manually by pressing the end of a small dowel or straw into the clay in repeating rows. -
Refine the rim:
Smooth the lip of the mug with a chamois or a piece of plastic to ensure it is rounded and comfortable for drinking. -
Attach the handle:
Pull a strap handle from a lug of clay. Allow it to firm up slightly, then cut to size. Score and slip the attachment points on the mug and handle, press firmly to attach, and smooth the join with a damp sponge.
Cracking Petals?
If flowers crack off during drying, your appliqué clay was likely too dry compared to the mug body. Keep everything under plastic to equalize moisture.
Step 2: Creating and Attaching Appliqués
-
Roll out clay slab:
Roll a small amount of clay into a thin slab, approximately 1/8 inch thick. It’s crucial this clay is the same moisture content as your mug body to prevent cracking. -
Cut the flowers:
Use your small flower plunger cutter to stamp out several flower shapes. If you don’t have a specific cutter, you can hand-cut petals or use a tiny cookie cutter. -
Add button centers:
Use a small circle cutter (or the back of a piping tip) to gently imprint a circle in the center of each flower. Don’t cut all the way through; just create definition. -
Plan placement:
Hold the flowers up to the mug to visualize your spacing. A random scatter pattern often looks more organic and pleasing than a rigid grid. -
Score the mug:
At each spot where a flower will go, gently score the surface of the mug body with your needle tool or serrated rib. -
Score the flowers:
Carefully score the back of each tiny flower appliqué. Be gentle so you don’t distort the petal shape. -
Apply slip:
Dab a small amount of slip onto the scored area of the mug. -
Attach the flowers:
Press the flower firmly onto the slipped area. Use a rounded tool or your finger to press specifically in the center ‘button’ area to secure it without squashing the petals. -
Create the belt detail:
Roll tiny balls of clay (about the size of peppercorns) to create the beaded row above the textured section. Score, slip, and attach them in a line, pressing slightly to flatten them into little domes.
Make It Colorful
Before the final glaze dip, paint the flower petals with underglaze in pastel pinks or yellows for a vintage painted look.
Step 3: Finishing and Glazing
-
Clean up:
Once the appliqués are leather hard, use a clean, slightly damp brush to wipe away any excess slip that oozed out from behind the flowers. -
Bisque fire:
Allow the mug to dry completely (slowly is better to handle the added thickness of the appliqués), then bisque fire to cone 04. -
Wax the bottom:
Apply wax resist to the bottom foot of the mug and up the side about 1/4 inch to expose the raw clay at the base. -
Glaze application:
Dip the mug into an oatmeal or creamy semi-matte glaze. Ensure the glaze isn’t too thick, or it might obscure the delicate texture of the flowers and the bottom band. -
Glaze firing:
Fire the mug to maturity (likely cone 6, depending on your clay and glaze choice). The glaze should break over the edges of the flowers, highlighting the design.
Once fired, fill your new favorite mug with tea and enjoy the tactile comfort of the handmade textures.
Simple Rainbow Arch Appliqué
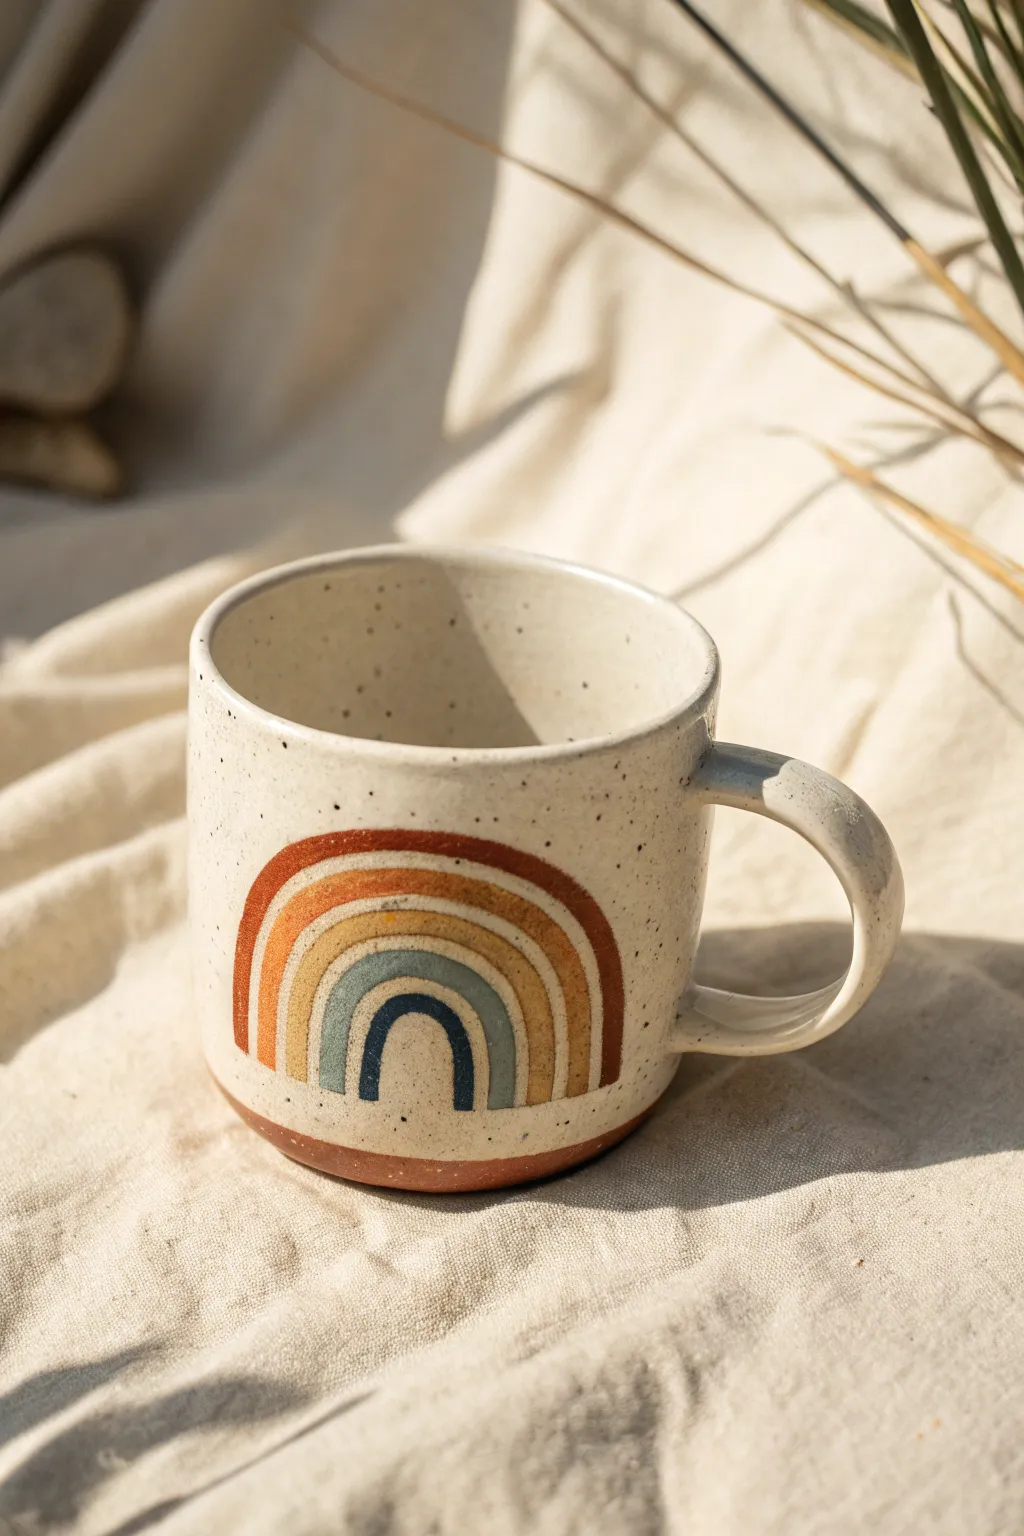
Embrace warm, earthy tones with this cozy ceramic project featuring a hand-painted rainbow arch. The speckled clay body and exposed raw base give this mug a rustic, artisanal charm perfect for your morning coffee ritual.
Step-by-Step Tutorial
Materials
- Speckled stonewear clay body (cone 5-6 recommended)
- Pottery wheel or slab building tools (rolling pin, guide sticks)
- Kidney rib and trimming tools
- Sponge
- Underglazes in: burnt orange/rust, mustard yellow, light blue, and navy blue
- Small flat shader brush or fine round brush
- Wax resist
- Clear transparent glaze (cone 5-6)
- Kiln access
Step 1: Forming the Mug Body
-
Prepare the Clay:
Start by wedging your speckled stoneware clay thoroughly to remove air bubbles. This specific look relies heavily on using a clay body that already has speckles (often manganese or grog) mixed in. -
Construct the Cylinder:
Throw a simple cylinder on the wheel, aiming for straight walls with a slight outward curve at the rim. Alternatively, if hand-building, roll out a slab and form a clean cylinder using a template. -
Shape the Rim:
Use a chamois or a wet sponge to compress and round the rim, ensuring it’s comfortable for drinking. -
Define the Foot:
Create a slight indentation near the bottom to demarcate where the glaze will stop and the raw clay base will begin. This visual separation is key to the design. -
Attach the Handle:
Pull or extrude a simple strap handle. Use the score and slip method to attach it securely to the side, ensuring the loop is large enough for a comfortable grip. -
Initial Drying:
Let the mug dry slowly to a leather-hard state. It should be firm enough to handle without deforming but still cool to the touch.
Smudged Lines?
If underglaze colors bleed into each other while painting, let the first color dry completely (until it looks chalky) before painting the neighboring arch.
Step 2: Applying the Design
-
Sketch the Outline:
Lightly trace the outline of your rainbow arch onto the leather-hard clay using a needle tool or pencil. Don’t press too hard; you just need a faint guide. The arch should be centered opposite the handle. -
Paint the Outer Arch:
Using your rust or burnt orange underglaze, paint the outermost arch. I prefer using a steady hand and a flat shader brush to keep the edges crisp. -
Add the Middle Layers:
Paint the next arch in a warm mustard yellow immediately inside the first one. Follow this with a thin strip of light, dusty blue. -
Paint the Center:
Finish the design with the smallest, innermost arch in a deep navy blue. -
Clean Up Edges:
If any lines look wobbly, use a damp, clean brush or a needle tool to gently scratch away excess underglaze to sharpen the separation between colors. -
Bisque Fire:
Allow the mug to dry completely to the bone-dry stage, then load it into the kiln for a bisque firing (usually cone 04).
Carved Texture
For a tactile finish, use a loop tool to gently carve out the clay between the rainbow stripes before painting. This creates grooves that the clear glaze can pool into.
Step 3: Glazing and Finishing
-
Clean the Bisqueware:
Wipe the fired mug with a damp sponge to remove any kiln dust, which can cause glaze defects. -
Wax the Base:
Apply wax resist to the bottom half-inch of the mug (the ‘foot’ area) and the underside. This ensures the raw speckled clay remains exposed after the final firing. -
Apply Clear Glaze:
Dip the entire mug into a clear transparent glaze. The wax resist will repel the glaze from the bottom, keeping that area matte and textured. -
Wipe the Foot:
Even with wax, double-check the bottom edge. Use a sponge to wipe away any droplets of glaze adhering to the waxed area. -
Final Firing:
Fire the mug to the maturity temperature of your clay and glaze (typically cone 5 or 6). This will melt the clear glaze, revealing the speckles and permanently setting the rainbow colors.
The exposed clay base combined with the glossy finish creates a beautiful contrast you can enjoy every morning
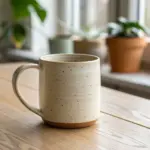
Wavy Rim or Scalloped Top
This project features a cozy, minimalist mug made from a beautiful speckled stoneware clay. The design highlights the raw beauty of the material by leaving the bottom section unglazed, creating a delightful textural contrast against the smooth, creamy upper body.
How-To Guide
Materials
- Speckled stoneware clay (mid-fire, cone 5-6)
- Pottery wheel
- Throwing tools (sponge, wire cutter, rib, needle tool)
- Trimming tools
- Loop tool for handle
- Serrated rib or scoring tool
- Slip
- Cream or oatmeal matte glaze (semi-opaque)
- Wax resist (liquid)
- Small brush for wax
- Kiln
Step 1: Throwing the Form
-
Prepare the Clay:
Ideally, wedge about 1 to 1.5 lbs of speckled stoneware clay to remove any air bubbles. Pat it into a ball before throwing it firmly onto the center of your wheel head. -
Center and Open:
Using plenty of water, center the clay. Press your thumbs into the middle to open the well, leaving about a 1/4 to 3/8 inch thickness for the floor. Compress the floor with a flat rib to prevent S-cracks later. -
Pull the Walls:
Slowly pull the walls up into a cylinder. Aim for straight, vertical sides rather than a tapered or bell shape. Keep the walls even, roughly 1/4 inch thick from bottom to top. -
Refine the Shape:
Use a metal or wooden rib on the outside while supporting the inside with your hand to smooth the surface and remove throwing lines. This mug relies on clean, simple lines, so take your time here. -
Address the Rim:
Chamois or lightly compress the rim with your fingers to ensure it’s rounded and pleasant to drink from. A slightly thickened rim adds visual durability. -
Undercut and Wire Off:
Use a wooden knife tool to trim excess clay from the base while the wheel spins. Slide your wire tool underneath to cut the mug free, then carefully transfer it to a ware board to dry to leather-hard.
Clean Lines
Use a specialized ‘wazing’ brush or even a steady hand with a latex-based resist to get that super sharp transition line. A banding wheel is your best friend here.
Step 2: Trimming and Handle
-
Trim the Base:
Once leather-hard, center the mug upside down on the wheel. Trim the bottom to create a flat, stable foot. Define the line where the wall meets the floor clearly, as this will be a visual feature of the unglazed section. -
Pull a Handle:
Start with a carrot-shaped lug of clay. Wet your hand and pull a strap that is slightly flattened but still substantial. I prefer to pull handles directly off the pot for a seamless look, but pulling separately and attaching works just as well. -
Shape the Handle:
Bend the pulled strap into a ‘C’ or ear shape. Allow it to stiffen slightly on a board until it holds its curve but is still flexible. -
Attach the Handle:
Score the mug wall and the attachment points of the handle. Apply slip and press the handle firmly onto the mug. The top attachment should be just below the rim, and the bottom about midway or slightly lower on the body. -
Clean Up:
Smooth the seams where the handle meets the body using a damp sponge or your finger. Ensure there are no sharp edges or cracks.
Dripping Glaze?
If glaze runs onto the raw clay area during firing, your application might be too thick. Thin your glaze slightly with water or dip for a shorter duration.
Step 3: Glazing and Firing
-
Bisque Fire:
Allow the mug to dry completely (bone dry). Fire it in the kiln to a bisque temperature (usually cone 04 or 06). -
Wax Resist Method:
This is crucial for the design. Dip a brush in liquid wax resist and carefully paint the bottom 3/4 inch to 1 inch of the mug’s exterior. Include the entire bottom foot. -
Create a Clean Line:
Ensure the top edge of your wax line is straight and even all the way around. Using a banding wheel can help you keep your hand steady while rotating the mug. -
Apply Glaze:
Stir your cream or oatmeal matte glaze thoroughly. Hold the mug by the foot (the waxed area) and perform a quick dip into the glaze bucket, submerging it up to the rim. Alternatively, pour glaze inside, swirl and dump, then dip the outside. -
Wipe Away Excess:
The wax should resist the glaze, causing it to bead up. Use a damp sponge to immediately wipe any stray beads of glaze off the waxed bottom section. The line between glazed and unglazed clay should be crisp. -
Final Fire:
Load the mug into the kiln. Fire to the maturity temperature of your clay and glaze (typically cone 5 or 6). The heat will melt the glaze and allow the iron speckles in the clay to bleed through the creamy finish.
Enjoy your morning coffee in a mug that perfectly balances rustic texture with modern simplicity
Easy Faceted Mug Shape
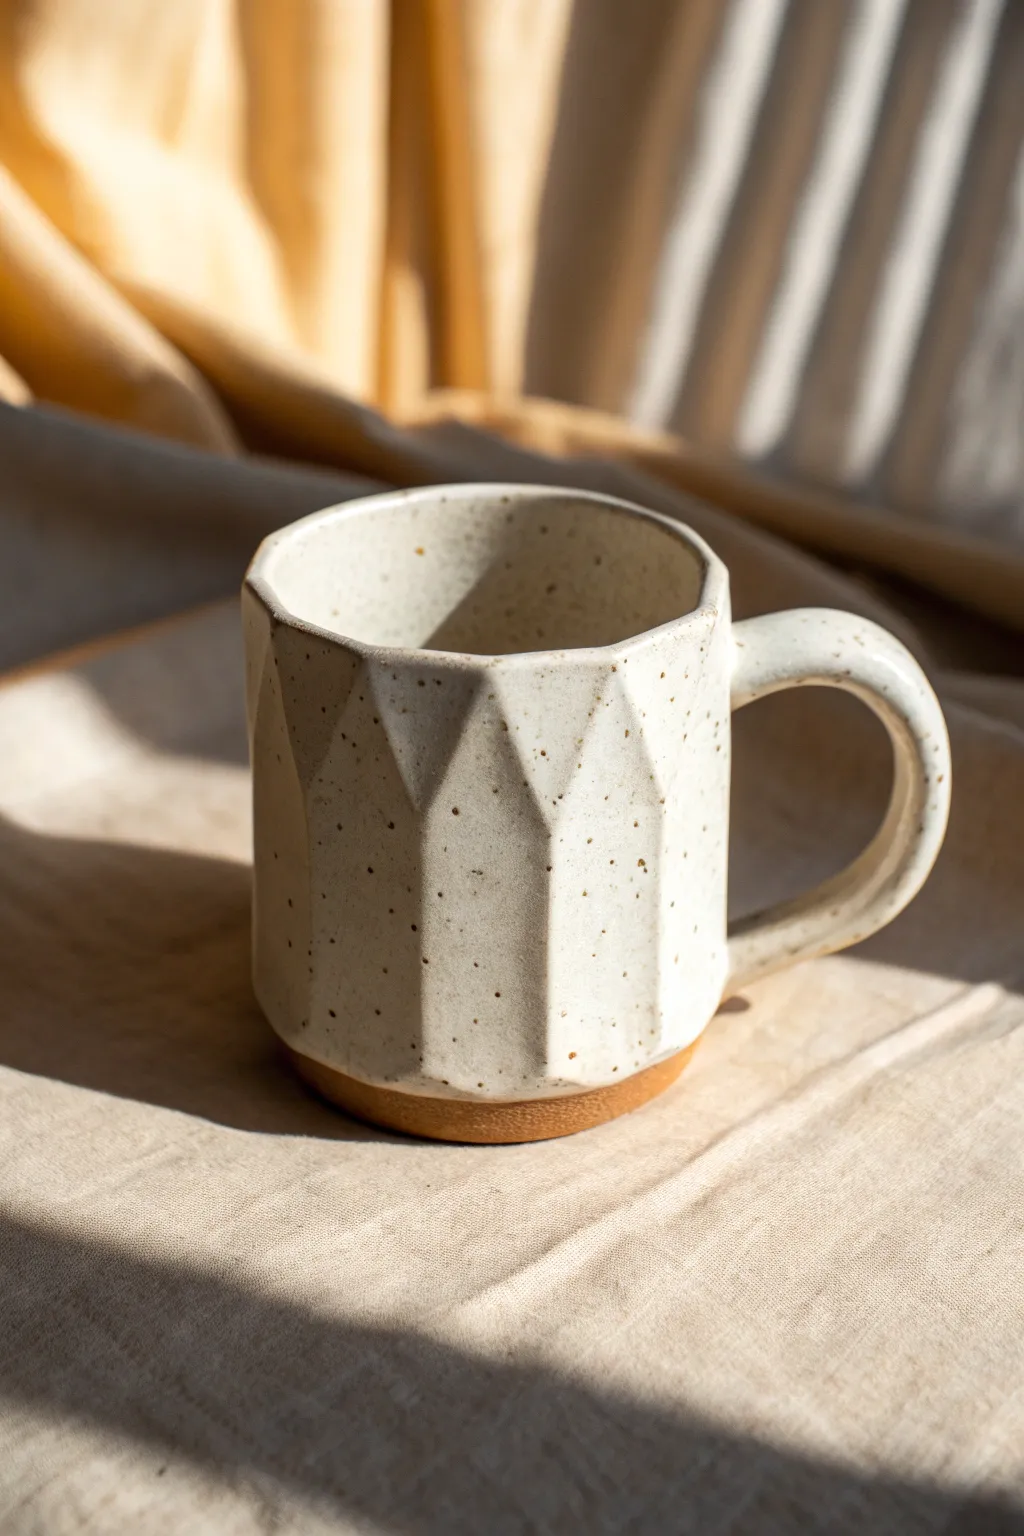
Embrace the beauty of sharp angles and rustic finishes with this faceted mug project. The distinctive geometric pattern is carved into the leather-hard clay, creating a stunning interplay of light and shadow highlighted by a classic speckled glaze.
Step-by-Step
Materials
- Stoneware clay (smooth or with grog)
- Fettling knife or cheese cutter
- Surform tool or rasp
- Rib tool (metal or rubber)
- Sponge
- Speckled white glaze
- Rolling pin or slab roller (optional)
- Scoring tool
- Slip
- Wire cutter
Step 1: Forming the Cylinder
-
Prepare the clay:
Begin by wedging about 1 to 1.5 pounds of clay thoroughly to remove air bubbles. This ensures your walls will have uniform strength for carving later. -
Throw or build a cylinder:
On the potter’s wheel, throw a sturdy cylinder with vertical walls. Aim for walls that are slightly thicker than usual—about 1/2 inch—to allow room for carving away material without breaking through. -
Alternative: Slab build:
If hand-building, roll a slab to 1/2 inch thickness, cut a rectangle, and form it into a tube, carefully scoring and slipping the seam. Attach a circular base. -
Refine the rim:
Smooth and round the rim with a piece of chamois or a sponge. This will be the only part of the upper exterior left uncarved, so make sure it feels comfortable to the lips now. -
Wait for leather hard:
The most crucial step is patience. Allow the cylinder to dry slowly until it reaches a leather-hard state. It should be firm enough to handle without deforming but soft enough to slice easily.
Uneven Walls?
If you slice through the wall while carving, patch it immediately with soft clay, score, and slip. Smooth it out inside, and adjust your cutting angle to be shallower.
Step 2: Carving the Facets
-
Map out the pattern:
Lightly visualize where your cuts will go. The design features a band of vertical cuts on the lower half that angle upward into triangular peaks. -
Slice the lower facets:
Using a sharp fettling knife or wire cheese cutter, make vertical downward slices starting from the middle of the mug’s height down to just above the foot. I like to keep the knife angle consistent for a uniform look. -
Create the upper triangles:
Make angled cuts that meet the top points of your vertical slices. You are essentially shaving off triangles of clay to create that jagged, geometric mountain-range line around the upper third. -
Clean the edges:
Once all primary facets are cut, you might see sharp burrs. Gently run a damp finger along the sharpest ridges to soften them slightly without losing the geometric definition. -
Trim the foot:
If thrown on the wheel, trim the bottom to create a neat foot ring. Leave roughly 1/4 inch of uncarved space at the very bottom to act as a visual anchor.
Sharpen the Angles
For crisper facets, use a cheese cutter wire instead of a knife. The wire creates flat, perfectly planar cuts that catch the light better than knife marks.
Step 3: Handle & Finishing
-
Pull a handle:
Pull or roll a coil for the handle. For this modern design, a simple C-shape or ear-shape works best. Keep the cross-section oval for comfort. -
Attach the handle:
Score the mug body and the handle endpoints aggressively. Apply slip and press the handle firmly onto the uncarved band near the top rim and a lower point on the body. -
Smooth connections:
Use a small modeling tool or your fingers to smooth the connection points so the handle looks seamless. Wipe away any excess slip immediately. -
Bisque fire:
Let the mug dry completely to the bone-dry stage. Load it into the kiln for a bisque firing.
Step 4: Glazing
-
Wax the base:
Apply wax resist to the bottom inch of the mug, covering the foot and the very bottom edge of the faceted area. This creates the ‘dipped’ look where the raw clay shows. -
Apply speckled glaze:
Dip the mug into a speckled white glaze. Hold it upside down and submerge it until the glaze meets your wax line. Shake gently to remove drips. -
Clean up:
Use a damp sponge to wipe any glaze beads off the waxed area to ensure a crisp line between the white glaze and the raw clay. -
Final fire:
Fire the mug to maturity (likely cone 6 or cone 10, depending on your clay body). The heat will bring out the iron speckles in the glaze.
Enjoy your morning coffee knowing the unique shape in your hands is entirely your own creation
Marbled Clay Swirl Body
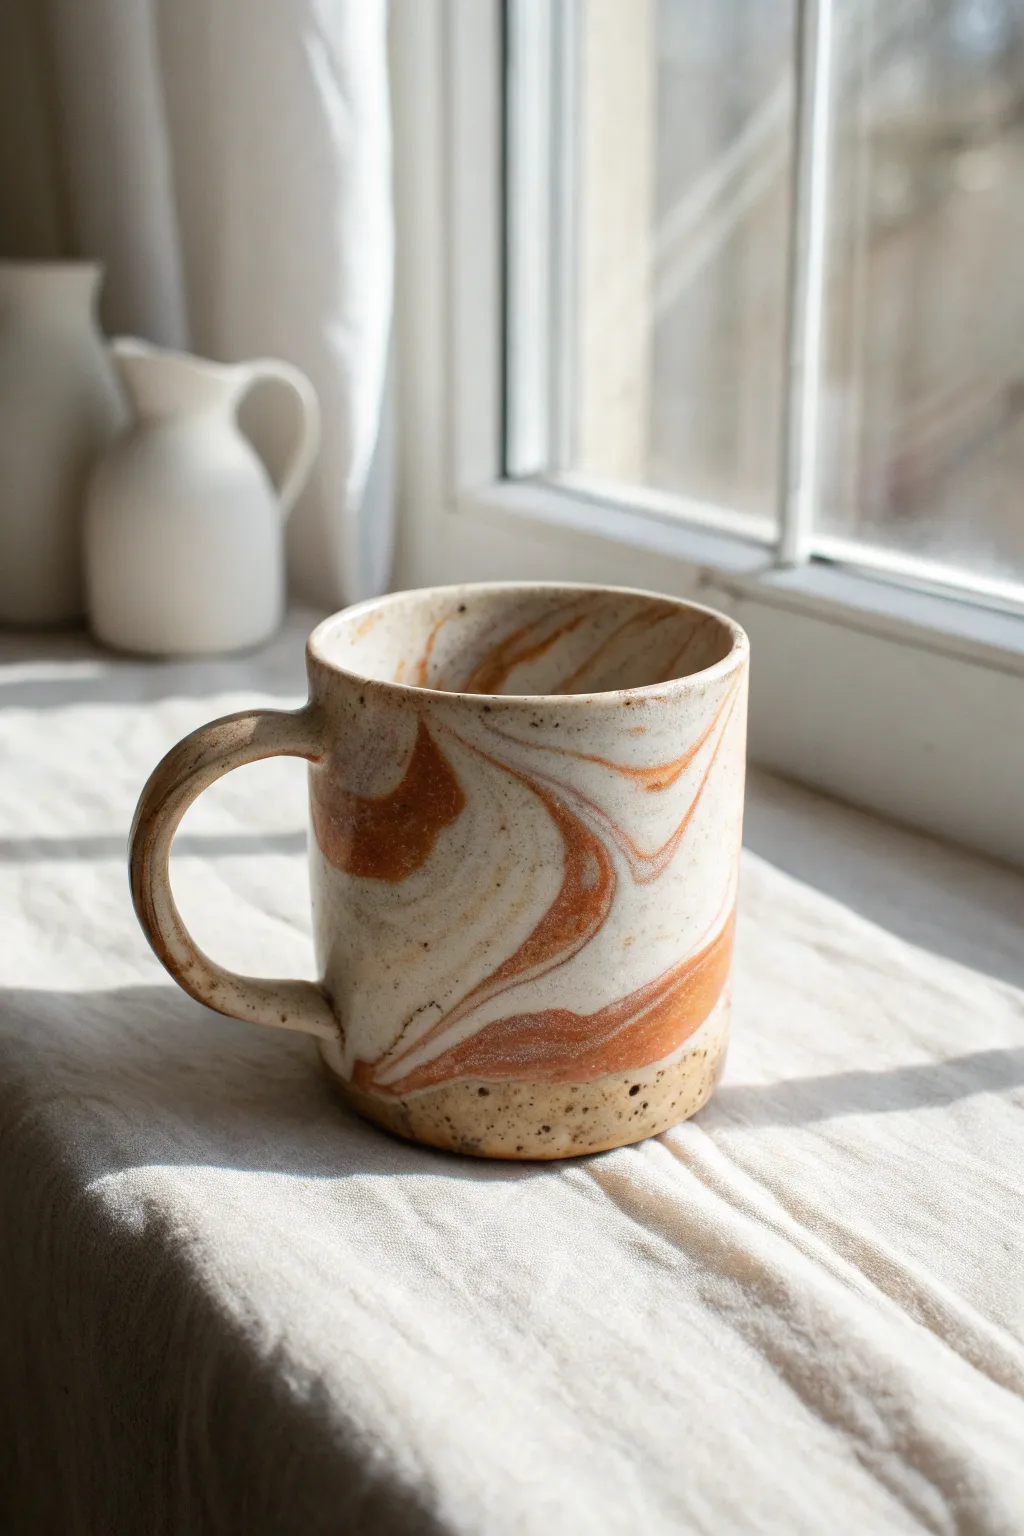
Capture the organic beauty of sedimentary rock with this marbled clay mug, featuring warm terracotta tones swirled through a creamy speckle base. This wheel-thrown project relies on mixing two different clay bodies to create natural, distinct ribbons of color without needing complex glazing.
Step-by-Step Tutorial
Materials
- White stoneware clay with speckles (approx. 1 lb)
- Red clay or Terracotta clay (approx. 0.25 lb)
- Potter’s wheel
- Wire cutter
- Rib tool (wood and metal)
- Needle tool
- Loop trimming tool
- Sponge
- Bucket of water
- Clear glaze (transparent)
- Small kiln
Step 1: Preparation & Wedging
-
Portion the clay:
Cut a one-pound block of your white speckled stoneware and a smaller, quarter-pound piece of reddish terracotta clay. The ratio should be roughly 4:1 white. I find this balance keeps the mug looking bright while making the swirls pop. -
Layer the clays:
Roll both clays into thick sausage shapes. Slice the red clay lengthwise into thinner strips. -
Stack and sandwich:
Sandwich the red clay strips between layers of the white clay log, pressing them firmly together to remove trapped air. -
Gentle wedging:
Wedge the combined lump very briefly. Do not over-wedge, or the colors will blend into a solid pinkish mud instead of distinct marbles. Five to seven turns is usually enough to adhere the clays without destroying the pattern. -
Form the ball:
Pat the clay into a round ball, being careful to keep the surface smooth and free of folds.
Step 2: Throwing the Form
-
Center the clay:
Slam the ball onto the center of your wheel head. Using plenty of water, center the clay. You will already begin to see the spiral patterns emerging as the wheel spins. -
Open the vessel:
Press your thumbs into the center to open the floor, pulling outward to establish the base width of your mug (about 3.5 inches). -
Compress the floor:
Use a sponge or wooden rib to compress the floor flat. This structure is crucial to prevent S-cracks during drying. -
Pull the walls – first pass:
Begin your first pull, bringing the clay up slowly. Keep your pressure consistent but gentle; the different clay bodies may have slightly different shrinkage rates or textures, so go slow. -
Refine the height:
Continue pulling the walls until you reach a height of about 4-5 inches. Aim for a straight cylinder shape. -
Shape the finish:
Use a metal rib on the exterior while pushing gently from the inside to create a slight curve if desired. The metal rib also scrapes away the clay slurry (slip) on the surface, revealing the sharp contrast of the marble pattern underneath. -
Smooth the rim:
Use a chamois or your sponge to smooth and round the drinking rim. -
Cut off:
Run a wire cutter under the base and set the cylinder aside to dry to a leather-hard state.
Muddy colors?
If your colors turn into a solid pink or grey, you over-wedged. Next time, stop wedging as soon as the clays just barely stick together. The throwing process mixes them further.
Step 3: Trimming & Handle
-
Pull a handle:
Take a separate small scrap of your marbled clay mix. Pull a traditional handle, using plenty of water to elongate it into a smooth curve. Let it stiffen slightly on a ware board. -
Trim the foot:
Place your leather-hard mug upside down on the wheel. Use a loop tool to trim away excess weight from the bottom, creating a clean foot ring. This also reveals the marbling on the bottom of the mug. -
Score and slip:
Score the attachment points on both the mug body and the handle endpoints. Apply a dab of clay slip. -
Attach the handle:
Press the handle firmly onto the mug body. Use a small wooden tool or your finger to smooth the seams completely so the handle looks like it grew out of the mug. -
Final drying:
Cover the mug loosely with plastic to let the handle and body dry slowly and evenly, preventing cracks.
Make it textural
Leave the lower inch of the mug unglazed. The raw, toasted clay adds a lovely tactile grit that contrasts beautifully with the smooth, glazed lip.
Step 4: Firing & Glazing
-
Bisque fire:
Once bone dry, fire the mug in a kiln to cone 04 (or your clay’s specific bisque temperature). -
Apply clear glaze:
Dip the entire mug quickly into a transparent clear glaze. Do not use an opaque glaze, or you will lose all your beautiful marble work. -
Final wipe:
Wipe the foot ring clean with a damp sponge so it doesn’t stick to the kiln shelf. -
Glaze fire:
Fire the mug a second time to the maturation temperature of your stoneware clay (typically cone 5 or 6).
Enjoy your morning coffee while admiring the unique geological patterns you created by hand