Ceramic clay boxes are one of my favorite projects because they’re equal parts practical and playful. Once you get the basic slab-built box shape down, the lid becomes your little stage for texture, color, and tiny sculpture.
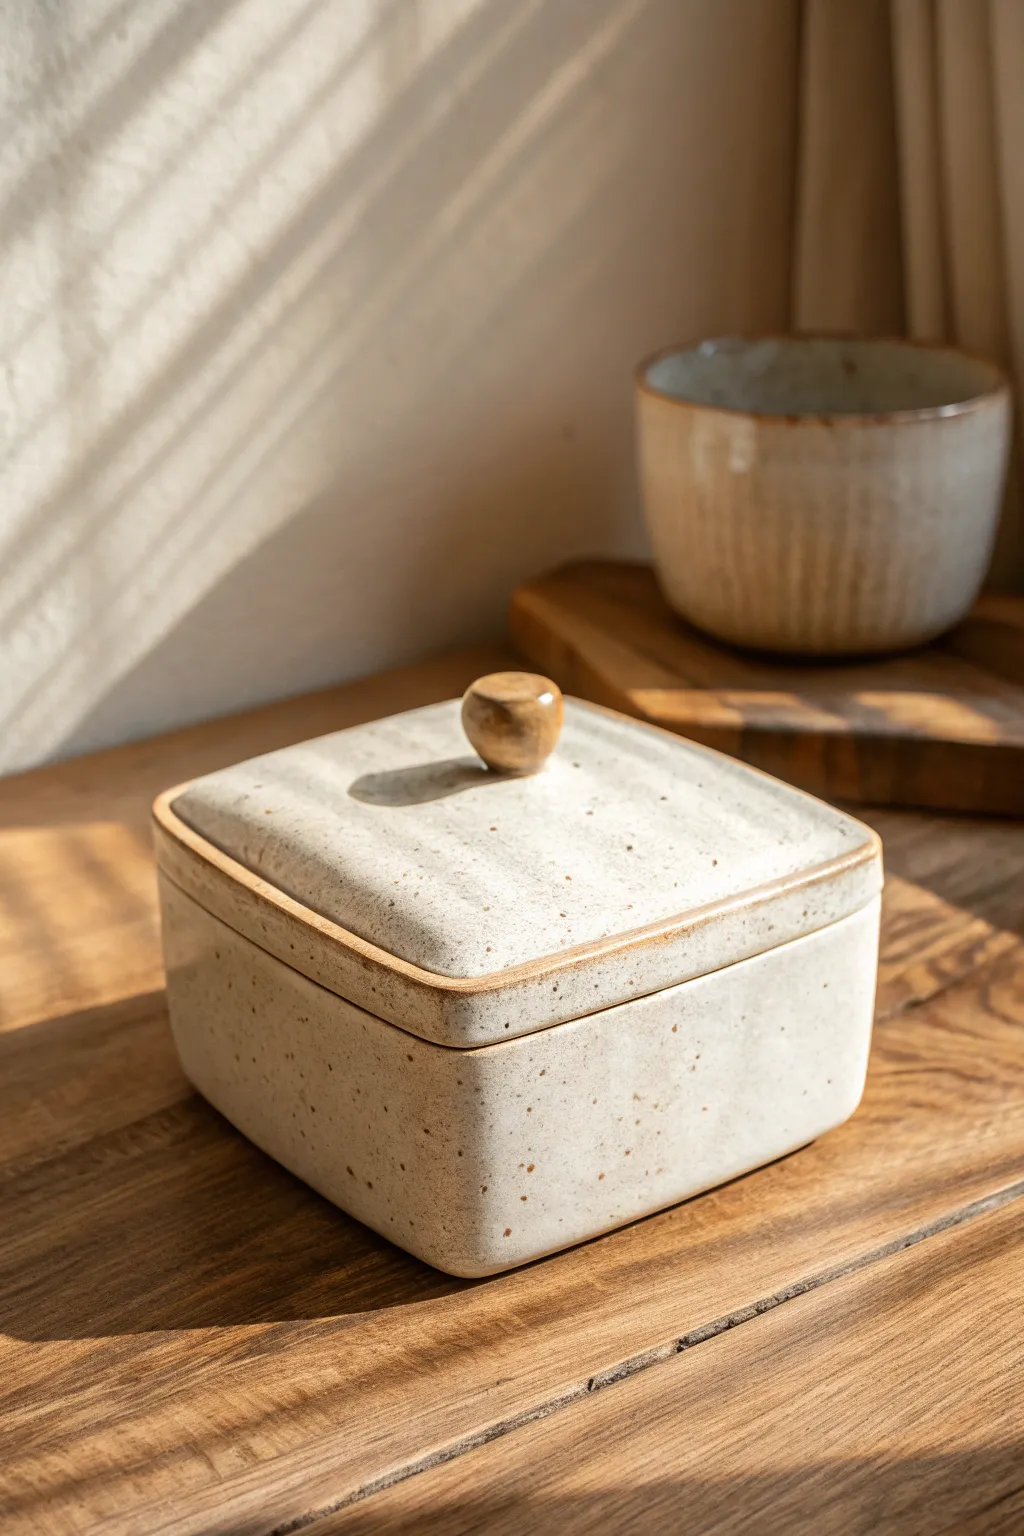
Classic Slab-Built Lidded Cube
This elegant lidded box combines clean, geometric lines with a soft, creamy glaze for a piece that feels both modern and rustic. The exposed seams and subtle finial on top add character to what begins as a simple slab-built cube.
Step-by-Step Guide
Materials
- Stoneware clay (buff or white)
- Rolling pin with guide strips (approx. 1/4 inch)
- Fettling knife
- Ruler
- Scoring tool (or serrated rib)
- Slip (clay and water mixture)
- Paddle tool
- Sponge
- Creamy white glaze (opaque)
- Iron oxide wash (optional for edges)
- Small trimming tool
Step 1: Creating the Cube Body
-
Roll the Slabs:
Begin by rolling out a generous amount of clay into a large, even slab about 1/4 inch thick. Compress the clay with a rib on both sides to align the particles and prevent warping later. -
Cut the Base:
Using your ruler and fettling knife, measure and cut a perfect 4-inch by 4-inch square for the base. Set this aside on a small ware board. -
Cut the Wall Panels:
Cut four rectangular panels for the walls. These should be 4 inches wide and about 4.5 inches tall. I like to cut them all at once from a long strip to ensure the height is identical. -
Dry to Leather Hard:
Let all your pieces stiffen up until they are leather hard. They need to be firm enough to stand up without slumping but soft enough to join. -
Miter the Edges:
For crisp corners, miter the vertical edges of your wall pieces at a 45-degree angle. You can also miter the bottom edges if you prefer, or simply rest them on top of the base slab. -
Score and Slip:
Deeply score all the joining surfaces—the edges of the base and the sides of the wall panels. Aply a generous amount of slip to these rough areas. -
Assemble the Walls:
Attach the first wall to the base, pressing firmly. Add the second wall, ensuring the corner seam is tight. Continue until all four walls are attached, cleaning up excess slip as you go. -
Reinforce the Inside:
Roll tiny coils of soft clay and press them into the interior seams. Smooth these out with your finger or a modeling tool to strengthen the joints. -
Paddle the Shape:
Once the box is assembled, use a wooden paddle to gently tap the outside walls. This sharpens the corners and ensures the sides are perfectly straight.
Step 2: Fabricating the Lid and Finishing
-
Measure the Opening:
Measure the top opening of your assembled box exactly. Cut a new slab square that is slightly larger (about 1/4 inch overhang) than the box opening. -
Add a Flange:
Flip the lid slab over. Measure the *inner* dimensions of your box opening. Score and slip a small square of clay slab or thick coils onto the underside of the lid to act as a flange, preventing the lid from sliding off. -
Shape the Top Surface:
With the lid on the box, gently press or paddle the center of the lid to give it a very subtle dome shape if desired, or keep it flat for a starker look. -
Form the Knob:
Roll a small ball of clay and flatten it slightly to create a button shape. Score the center of the lid and the bottom of the knob, then attach it securely. -
Refine the Edges:
Use a damp sponge to smooth all sharp edges on the box rim and the lid. You want the clay to look soft, not jagged. -
Bisque Fire:
Allow the piece to dry slowly under plastic to prevent corner cracking. Once bone dry, bisque fire the box and lid. -
Glazing Strategy:
Apply the creamy white glaze to the entire piece. If you want the rim effect seen in the photo, wipe the glaze back slightly on the sharp edges with a damp sponge to let the clay body peek through. -
Optional Oxide:
For a more pronounced rim, paint a very thin line of iron oxide wash along the edges of the lid and the top rim of the box before applying the main glaze. -
Final Fire:
Stilt the lid or wax the contact points carefully so they don’t fuse shut. Fire to the maturity temperature of your clay and glaze.
Warped Walls?
If walls bow inward while drying, stuff the box gently with crumpled newspaper or foam to hold the shape until leather hard.
Clean Lines
Use a rasp or Surform tool on the leather-hard clay to sharpen 90-degree corners before sponge smoothing.
The result is a sturdy, functional vessel perfect for storing tea or small treasures

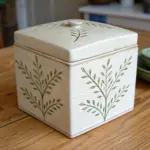
Rectangular Keepsake Box With Fitted Lid

This project produces a clean, minimalist rectangular keepsake box using a slab-building technique perfect for intermediate potters. The charm lies in the speckled stoneware clay body and the precise fitted lid, creating a functional piece that feels both modern and handmade.
Step-by-Step
Materials
- Speckled stoneware clay (mid-fire)
- Rolling pin
- Canvas work surface or slab mat
- Rectangle paper templates (bottom/lid and sides)
- Fettling knife or needle tool
- Scoring tool (serrated rib)
- Slip (made from the same clay body)
- Wooden paddle
- Sponge
- Clear or translucent satin glaze
- Ruler or square tool
- Plastic wrap for slow drying
Step 1: Slab Preparation
-
Roll the clay:
Begin by wedging your speckled stoneware clay to remove air bubbles, then roll it out into a large, even slab. Aim for a thickness of about 1/4 inch (6mm) to ensure stability without excessive weight. -
Compress the slab:
Use a flexible rib tool to compress the clay on both sides. This aligns the clay particles, reducing the chance of warping later, and creates a smooth canvas for the speckles to shine. -
Cut the components:
Using your paper templates, cut out your pieces: one bottom rectangle, one lid rectangle (slightly larger to account for the flange), two long side walls, and two short side walls. I prefer to cut the lid and bottom from the same section of the slab for consistent shrinkage. -
Leather hard stage:
Let the cut pieces sit until they reach a soft leather-hard state. They need to be stiff enough to stand up without sagging, but soft enough to join securely.
Dry Together
Always dry and fire the lid ON the box. This ensures they warp and shrink in unison, maintaining a perfect fit through the kiln process.
Step 2: Box Assembly
-
Miter the edges:
For a seamless corner, cut the vertical edges of your side walls at a 45-degree angle. This allows them to join flush without overlapping, creating a cleaner exterior line. -
Score and slip the base:
Score the perimeter of the bottom slab and the bottom edge of all four wall pieces. Apply a generous amount of slip to the scored areas. -
Attach the walls:
Place the walls onto the base. Press them firmly into the base and against each other at the corners. Wipe away excess slip immediately to keep the surface clean. -
Reinforce the interior:
Roll a very thin coil of soft clay and press it into the interior seams where the walls meet the floor and each other. Blend this coil smooth with a modeling tool to strengthen the joints. -
Paddle into shape:
Gently tap the exterior walls with a wooden paddle. This helps square up the form, ensures the walls are perfectly vertical, and tightens the corner joints.
Customize the Handle
Instead of a plain flat top, add a geometric knob or a leather strap handle attached post-firing through small holes for a mixed-media look.
Step 3: Lid Construction
-
Measure for the flange:
Measure the *inner* dimensions of your assembled box opening. You need to create a flange (a downward-facing inner rim) on the lid that fits inside this opening. -
Create the flange strips:
Cut strips of clay about 1/2 inch wide. Assemble these into a rectangle that matches your inner box measurements, slightly inset from the edge of your lid slab. -
Attach flange to lid:
Score and slip the underside of the lid slab and the top of your flange strips. Press them together firmly. The flange should sit inside the box walls when the lid is placed on top. -
Refine the fit:
Once the lid is assembled, test the fit gently on the box. If it’s too tight, shave down the flange with a rasp or knife. Aim for a slightly loose fit, as the lid may shrink differently during firing.
Step 4: Finishing
-
Smooth the edges:
Using a slightly damp sponge, round over any sharp edges on the box rim and the lid corners. This softens the look and makes the glaze break beautifully over the edges. -
Slow drying:
Place the lid on the box, separating them with a thin strip of paper or plastic to prevent sticking. Wrap the entire piece loosely in plastic to dry very slowly over several days to prevent warping. -
Bisque fire:
Once bone dry, bisque fire the piece to Cone 04 (or your clay’s specific bisque temperature). -
External bottom waxing:
Apply wax resist to the very bottom of the box and the unglazed ‘foot’ area visible in the photo (the bottom 1/8th inch of the side walls). -
Glazing:
Dip or brush a clear or translucent satin glaze over the entire piece (except the waxed foot). This transparency is crucial to let the natural clay speckles show through. -
Final wipe:
Use a clean sponge to wipe back any glaze that dripped onto the waxed bottom edge to ensure a clean line where the clay meets the kiln shelf.
Once fired, you will have a durable, speckled ceramic box ready to safeguard your small treasures or serve as a minimalist butter dish

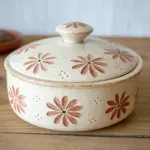
Stamp-Textured Box With Smooth Lid
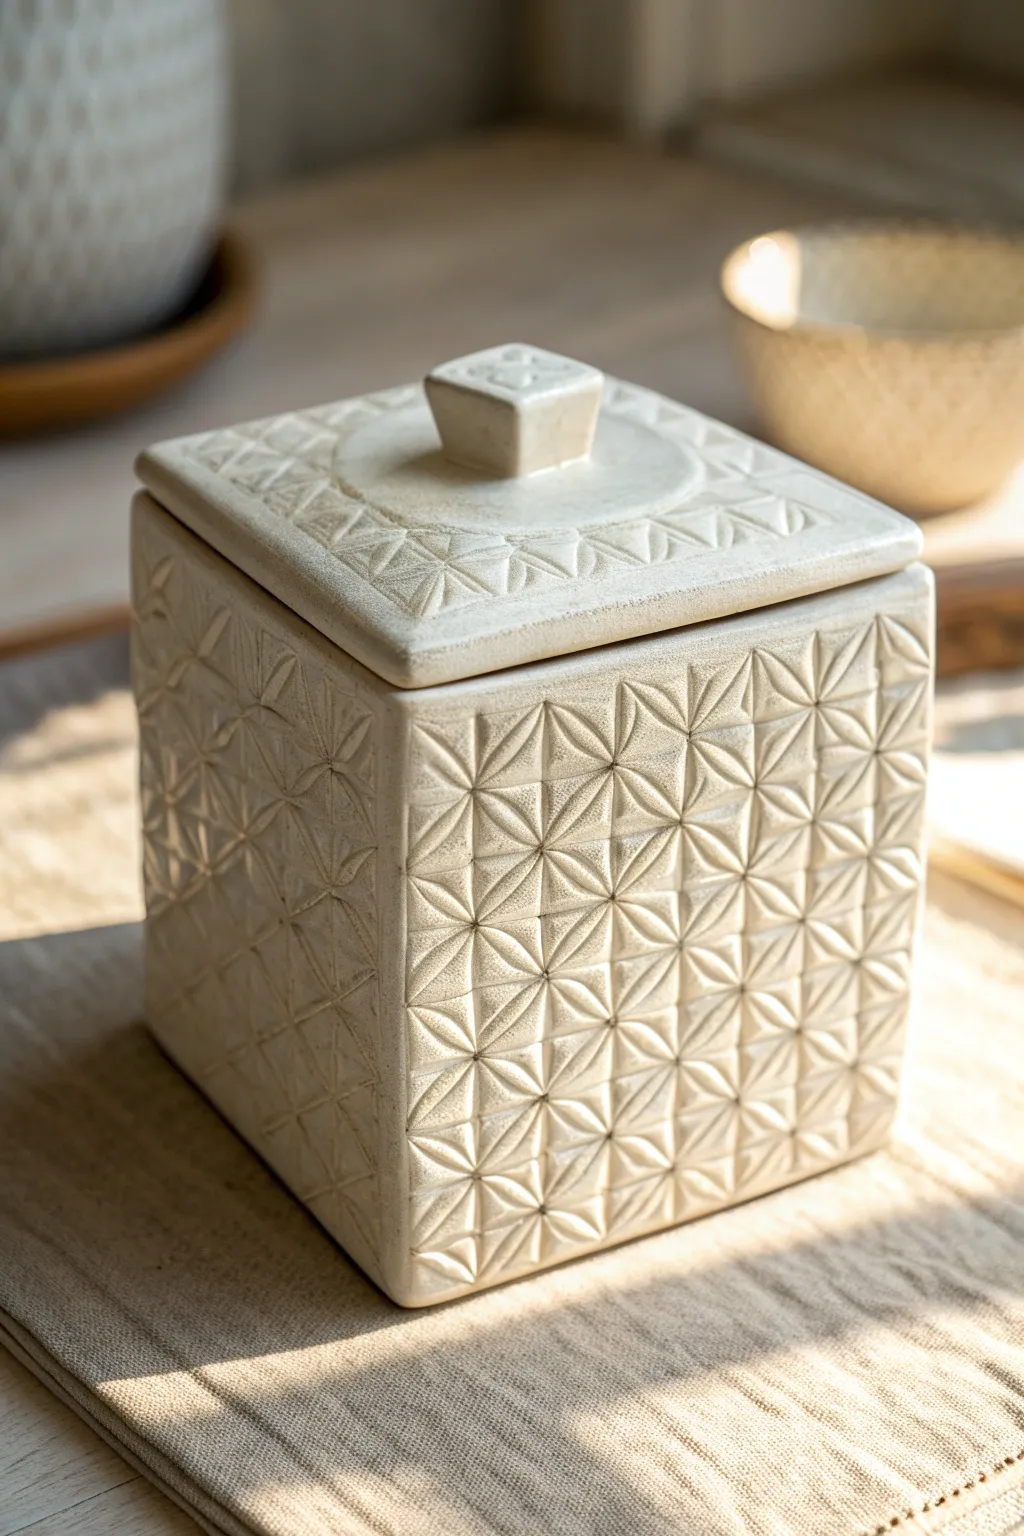
This elegant ceramic box features a striking stamped geometric pattern that contrasts beautifully with a soft, creamy glaze. Its precise square form and custom-fitted lid make it a functional piece of art perfect for storing tea or small treasures.
Step-by-Step Guide
Materials
- White stoneware or porcelain clay body
- Rolling pin and guide strips (approx. 1/4 inch thickness)
- Geometric texture stamp (asanoha or starburst pattern)
- Ruler and needle tool
- Flat craft knife or fettling knife
- Slip and scoring tool
- Square cookie cutter (small, for the knob)
- Sponge and water
- Creamy white satin-matte glaze
- Kiln
Step 1: Creating the Textured Slabs
-
Roll out the clay:
Begin by rolling out a medium-sized slab of white stoneware clay. Use guide strips to ensure an even thickness of about 1/4 inch, which provides enough depth for stamping without making the walls too heavy. -
Check moisture level:
Before stamping, let the slab firm up slightly to a soft leather-hard state. I find that if the clay is too sticky, the stamp pulls at the surface; if it’s too dry, the texture won’t register deeply enough. -
Apply the texture:
Press your geometric texture stamp firmly into the clay slab. If you are using a smaller stamp, align the edges carefully to create a seamless repeating pattern across the entire surface. -
Measure the walls:
Using a ruler, measure and cut four identical square or rectangular panels for the box walls ensuring the pattern aligns nicely. Cut a plain, untextured square for the base.
Step 2: Assembling the Box
-
Bevel the edges:
Cut 45-degree angles (miters) on the vertical edges of your four wall panels. This ensures a sharp, clean corner where the pattern wraps around continuously. -
Score and slip:
Rough up the beveled edges and the perimeter of the base with a scoring tool. Apply clay slip generously to these areas to act as glue. -
Construct the walls:
Attach the first wall to the base, pressing firmly. Add the subsequent walls, joining the beveled corners together. Use a small coil of clay on the interior seams to reinforce the structure. -
Refine the corners:
Gently paddle the outside corners with a wooden spoon or paddle to sharpen the square shape and ensure the joints are tight. Be careful not to flatten your beautiful texture.
Warped Walls?
If your straight walls start bowing inward during drying, place a rigid object (like a piece of floral foam wrapped in paper) inside the box to support the shape as it hardens.
Step 3: Fabricating the Lid
-
Cut the lid slab:
Roll a new slab for the lid. Cut a square slightly larger than your box opening to create an overhanging rim. -
Create the geometric frame:
Cut four strips of textured clay (using the same pattern as the walls) and attach them flat onto the top perimeter of the lid, creating a ‘framed’ look similar to the photo. -
Add the gallery:
Flip the lid over. Roll a small coil or cut a square strip of clay and attach it to the underside of the lid. This ‘gallery’ should fit just inside the box opening to keep the lid from sliding off. -
Form the knob:
Use a small square cutter or knife to shape a block of clay for the handle. You can stamp the top of the knob for a cohesive detail, then score and slip it into the center of the lid.
Sharper Texture
Dust your texture stamp lightly with cornstarch before pressing it into the clay. This acts as a release agent, preventing sticking and ensuring a crisp, clean impression every time.
Step 4: Finishing and Glazing
-
Slow drying:
Loosely cover the box with plastic to allow it to dry slowly. This is crucial for square boxes to prevent warping. -
Bisque fire:
Once bone dry, fire the piece to cone 04 (or your clay’s specific bisque temperature). -
Glaze application:
Dip or brush on a creamy white satin-matte glaze. This finish is ideal because it breaks over the texture, pooling slightly in the recesses to highlight the geometric design. -
Wipe the foot:
Clean any glaze off the bottom of the box and the contact point of the lid to prevent them from sticking to the kiln shelf. -
Final firing:
Glaze fire the piece to maturity (typically Cone 5 or 6 for stoneware). Let the kiln cool completely before removing your new ceramic canister.
Now you have a stunning, textured vessel ready to hold your favorite items or serve as a centerpiece


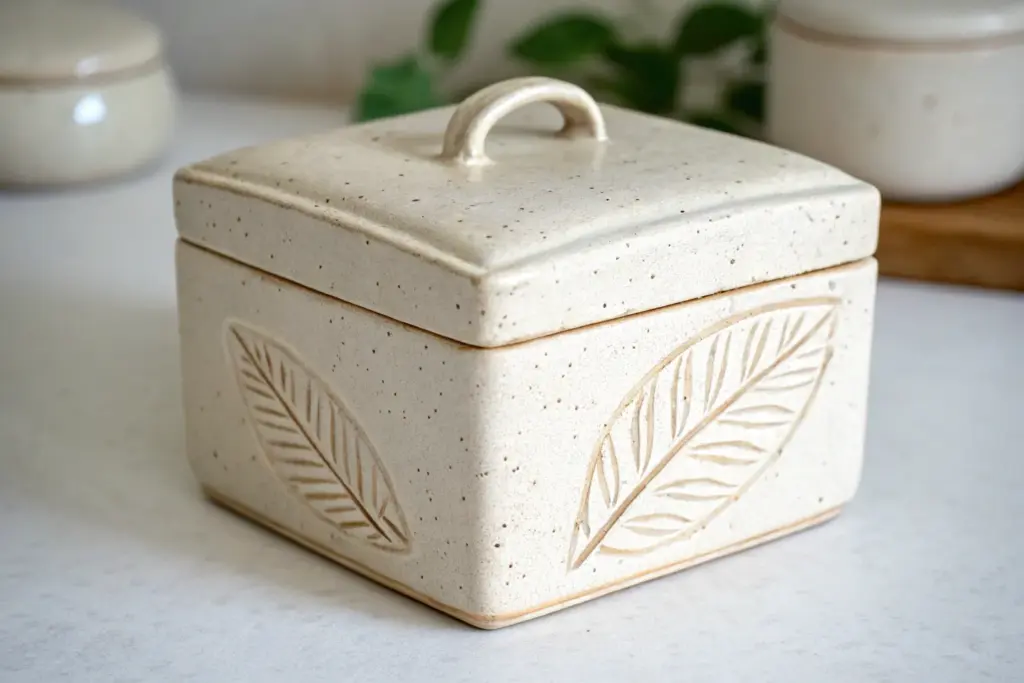
Carved Sgraffito Pattern Box
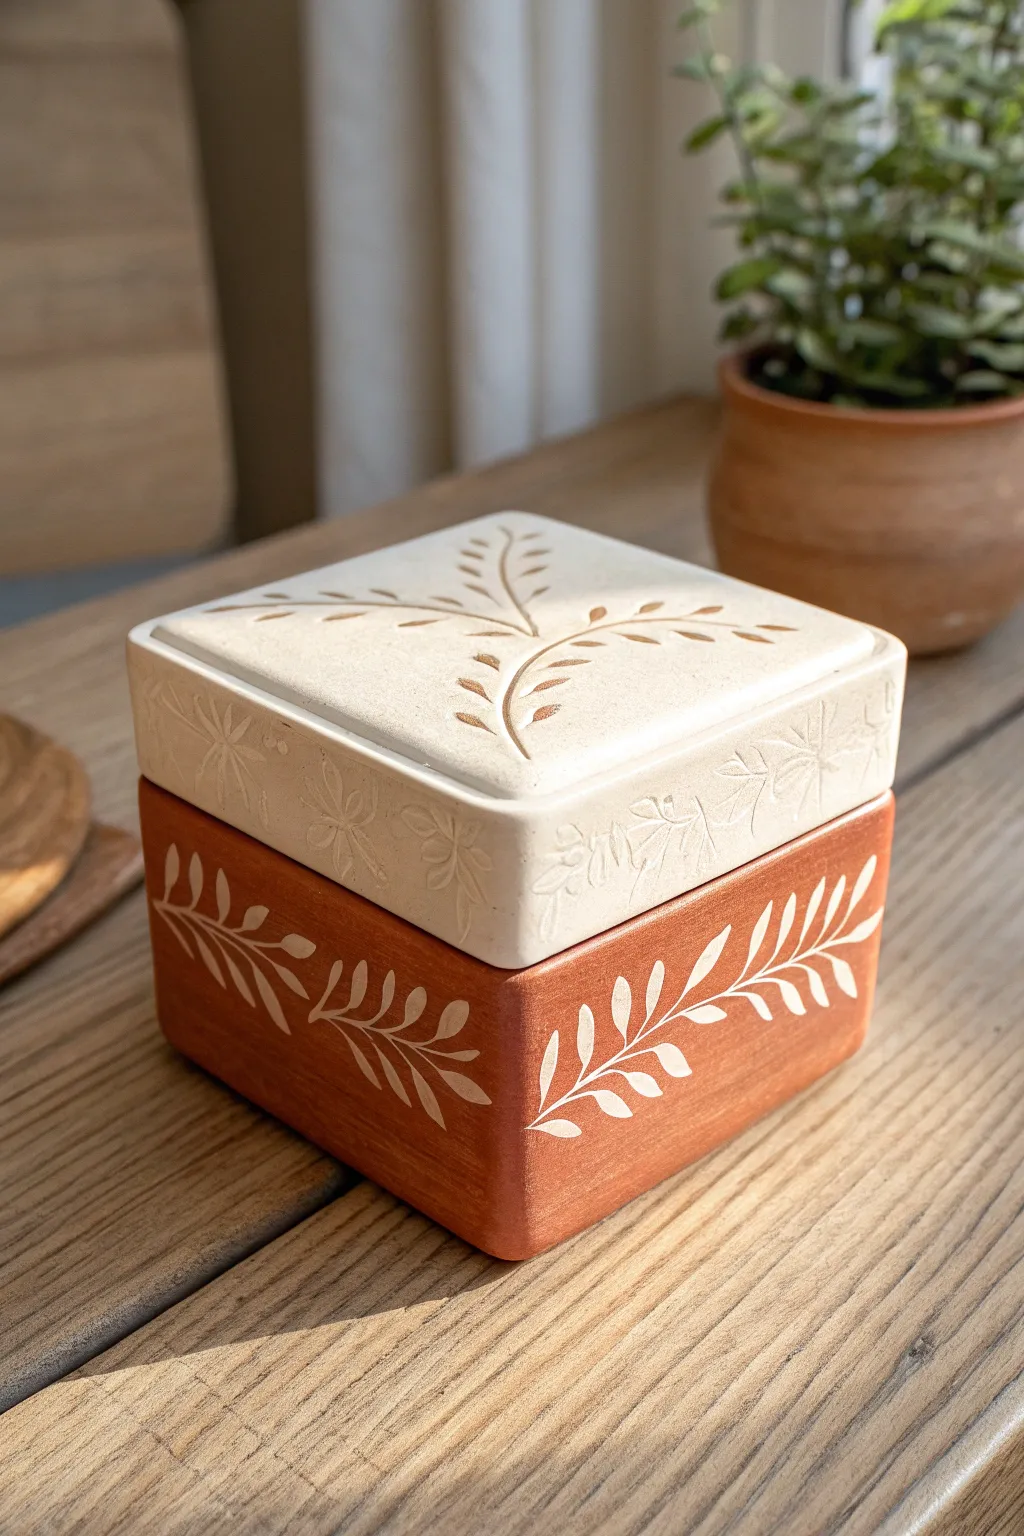
Create a stunning two-tone lidded box that balances rustic warmth with delicate botanical details. This project utilizes contrasting clay bodies and carving techniques to achieve a crisp, nature-inspired design that feels both modern and timeless.
How-To Guide
Materials
- Red earthenware or terracotta clay (approx. 2 lbs)
- White stoneware or porcelain clay (approx. 1.5 lbs)
- Square slump mold or wooden template
- Rolling pin with thickness guides (1/4 inch)
- Fettling knife
- Scoring tool and slip
- Loop tools for trimming
- Small v-tip carving tool or sgraffito tool
- Flexible rib (rubber or metal)
- Sponge
- Clear matte glaze
Step 1: Slab Construction
-
Roll the Slabs:
Begin by rolling out your red clay for the base and the white clay for the lid. Use 1/4 inch depth guides to ensure even thickness for both. Compress the slabs on both sides with a flexible rib to align the clay particles and prevent warping. -
Cut the Base Pieces:
Using a square template (approx. 5×5 inches), cut one square for the floor from the red clay. Then, measure and cut four rectangular strips for the walls, ensuring they are tall enough for your desired box depth. -
Assemble the Base:
Score and slip the edges of the red clay base and the wall strips. Join the walls to the base and to each other, reinforcing the interior seams with a thin coil of clay. Smooth the coil down for a seamless joint. -
Construct the Lid:
Cut a square from the white clay slab that is slightly larger than your box base to account for shrinkage or overhang. Cut four shallow walls for the lid’s rim. -
Finish the Lid Assembly:
Score and slip the white clay pieces together to form the lid. Ensure the inner dimensions of the lid’s rim fit snugly but not too tightly over the red base. I recommend checking the fit with a piece of paper in between to prevent sticking. -
Refine the Form:
Once both pieces are leather-hard, use a paddle or flat board to square up the walls. Smooth any sharp edges or corners with a damp sponge for that soft, rounded look seen in the photo.
Step 2: Carving the Design
-
Sketch the Pattern:
Lightly sketch your vine and leaf pattern onto the leather-hard clay using a dull pencil or needle tool. Plan for a continuous vine that wraps around the red base and a central sprawling branch on the white lid. -
Carve the Base:
On the red base, use your carving tool to remove the negative space around the leaves, or simply carve the outline deeply. The goal is to expose the texture and create a relief effect where the leaves stand out. -
Detailing the Lid:
For the white lid, carve the stems and leaves gently. The white clay offers a smooth surface, so keep your lines clean. You can carve a shallow recess for the leaves to create shadows. -
Apply Contrast (Optional):
If you want the white pattern on the lid to have more contrast, you can inlay a small amount of red slip into the carved lines (mishima technique) and scrape away the excess, or leave it as a textural relief. -
Carve the Lid Rim:
Don’t forget the side of the white lid. Carve faint floral or starburst patterns along the vertical edge of the lid to add visual texture to the transition area. -
Clean Up Burrs:
Allow the box to dry slightly more, then use a stiff brush or a dry sponge to gently knock off any clay crumbs or sharp burrs created during carving.
Warped Walls?
If walls bow inward while drying, place a foam block or crumpled newspaper inside the box to support the shape until it reaches leather-hard stage.
Step 3: Firing and Glazing
-
Bisque Fire:
Once bone dry, fire the piece to bisque temperature (usually cone 04). Place the lid on the box during firing to help them warp together if any movement occurs. -
Apply Glaze:
Dip or brush a clear matte glaze over the entire piece. A matte finish preserves the earthy, tactile quality of the terracotta and the softness of the white clay. -
Wipe the Foot:
Clean the bottom of the box thoroughly with a wet sponge to ensure no glaze touches the kiln shelf. -
Final Fire:
Fire to the maturity temperature of your clay bodies (likely Cone 5 or 6). Allow the kiln to cool completely before removing your finished box.
Add a Flange
Creating a gallery or flange on the red base walls will help the lid sit more securely and prevent it from sliding off if the box is tipped.
Now you have a functional piece of art ready to hold your treasures or sit beautifully on a shelf

The Complete Guide to Pottery Troubleshooting
Uncover the most common ceramic mistakes—from cracking clay to failed glazes—and learn how to fix them fast.
Appliqué Relief Motif Box
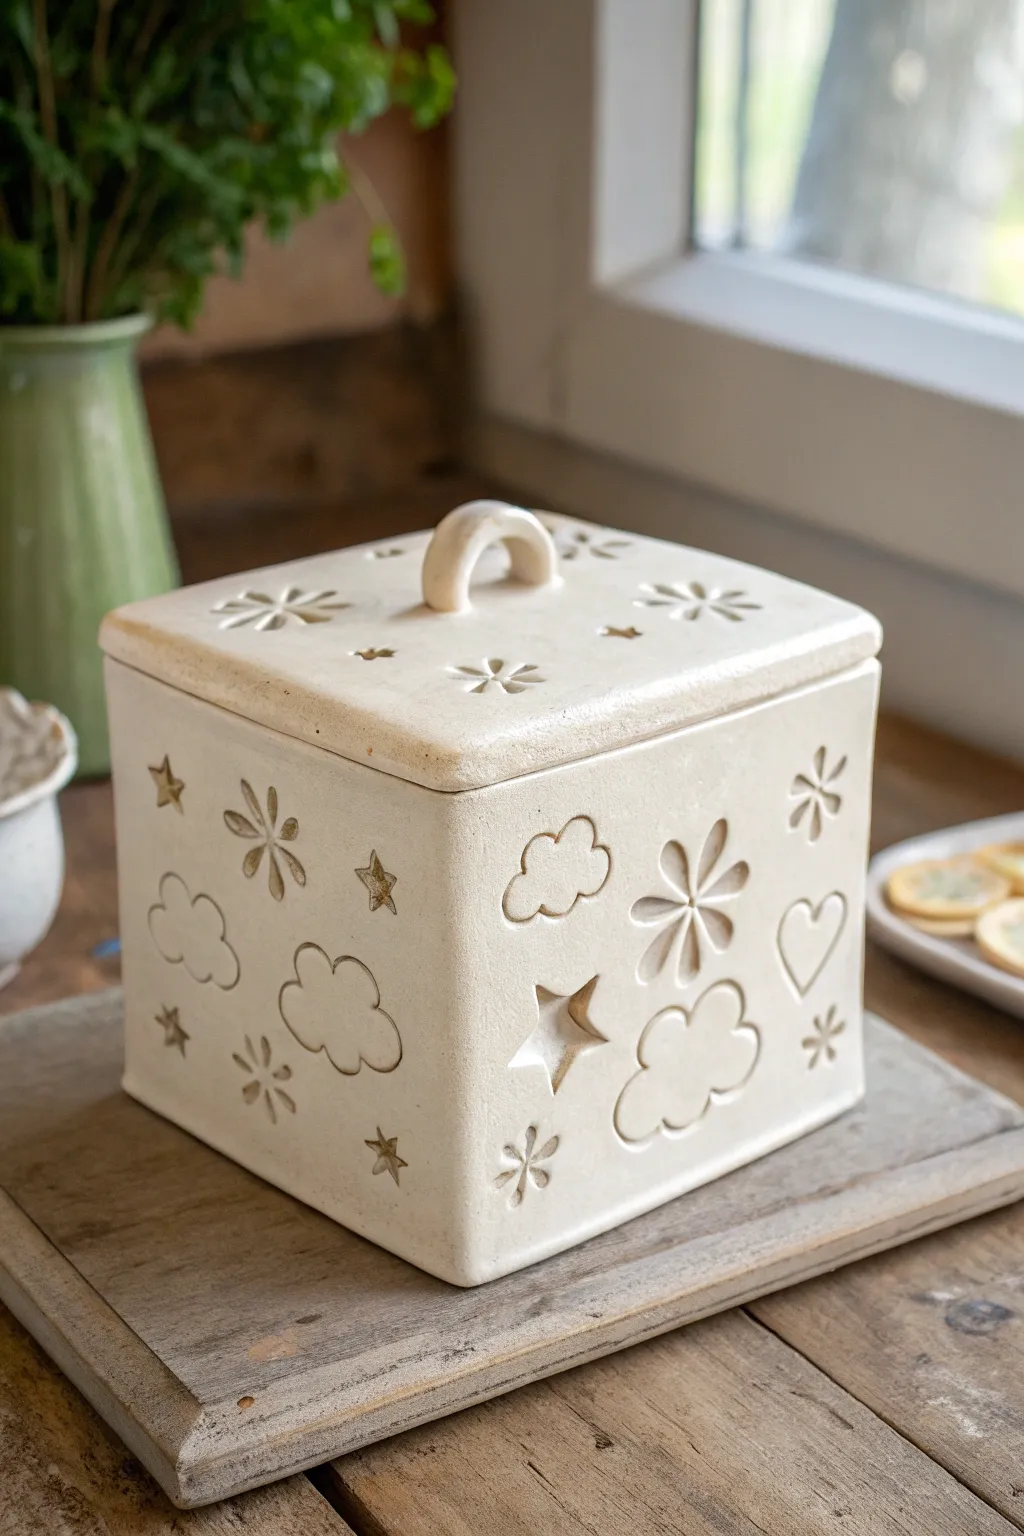
Embrace a dreamy aesthetic with this handcrafted ceramic slab box, featuring delicate cutout motifs of clouds, stars, and flowers. The soft cream glaze and charming loop handle make it a perfect keepsake container that feels both rustic and refined.
Step-by-Step Tutorial
Materials
- Stoneware clay body (smooth, light-colored)
- Rolling pin
- Slab roller (optional)
- Canvas working surface
- Needle tool
- Fettling knife
- Miter cutting tool (optional)
- Scoring tool or serrated rib
- Slip (clay mixed with water)
- Small cookie cutters (clouds, stars, flowers, hearts)
- Clean sponge
- Satin white or cream dipping glaze
Step 1: Slab Preparation
-
Roll the clay:
Begin by rolling out your clay into a large, even slab approximately 1/4 inch thick. Compress the clay on both sides with a rib to align the particles and prevent warping later. -
Template cutting:
Create paper templates for a square box. You will need four identical side walls (e.g., 5×5 inches), one base square (slightly smaller to fit inside), and a lid square (slightly larger for overhang). -
Cut the shapes:
Lay your templates onto the leather-hard slab. Using a needle tool or fettling knife, cut out your six main pieces. For cleaner corners, I like to let the slab stiffen just slightly before cutting. -
Bevel the edges:
For the strongest join on the side walls, cut the vertical edges at a 45-degree angle. This allows the corners to meet flush without exposing end grain.
Step 2: Box Assembly
-
Score and slip:
Aggressively score the beveled edges of your walls and apply a generous amount of slip. Do the same for the edges of the base piece. -
Construct the walls:
Stand up the four walls, pressing the beveled corners together firmly. Ensure the box is perfectly square by checking the interior angles. -
Attach the base:
Flip the box walls gently or lower the floor into the box structure (depending on your measuring method) and secure it with slip. Use a coil of clay along the inside seams to reinforce the joints. -
Level the lid:
Place your lid slab on top to check the fit. If you want a gallery (a rim to keep the lid in place), attach small strips of clay to the underside of the lid, inset slightly from the edge.
Warping Walls?
If walls start bowing inward during assembly, place a temporary support (like a rigid foam block wrapped in newspaper) inside the box until the clay stiffens.
Step 3: Adding the Motifs
-
Plan the design:
Lightly sketch where you want your sky motifs to go. Aim for a random, scattered pattern rather than perfect straight lines. -
Impress the details:
Using small cookie cutters or stamps, firmly press cloud, star, flower, and heart shapes into the clay walls. Do not cut all the way through for every shape; leave some as deep impressions for texture. -
Piercing accents:
Select a few motifs, perhaps the centers of flowers or specific stars, and cut all the way through the clay wall to allow light to pass through. -
Decorate the lid:
Repeat the stamping process on the lid surface, ensuring a mix of decorative impressions and small pierced details like the flower centers shown in the image. -
Clean the edges:
Once the clay is leather hard, go back with a damp sponge or fine tool to smooth any burrs or rough crumbs created by the stamps.
Make it Shine
Turn this into a luminary! Pierce more shapes all the way through the walls, place a tealight inside, and watch the stars and clouds glow when the room is dark.
Step 4: Finishing Touches
-
Shape the handle:
Roll a small coil of clay and curve it into an arch. Flatten the ends slightly to create attachment points. -
Attach handle:
Score and slip the center of the lid and the ends of your arch. Press the handle firmly into place and smooth the seams so it looks like it grew out of the lid. -
Bisque fire:
Allow the box to dry slowly under plastic to prevent warping. Once bone dry, bisque fire the piece to Cone 04 (or your clay’s specification). -
Glazing:
Dip the entire piece into a satin cream or soft white glaze. Allow the glaze to pool slightly in the impressed motifs to highlight the relief texture. -
Final fire:
Clean the bottom of the box of any glaze and fire to the final maturity temperature of your clay body.
Fill your finished box with cookies or trinkets to enjoy the handmade charm on your shelf
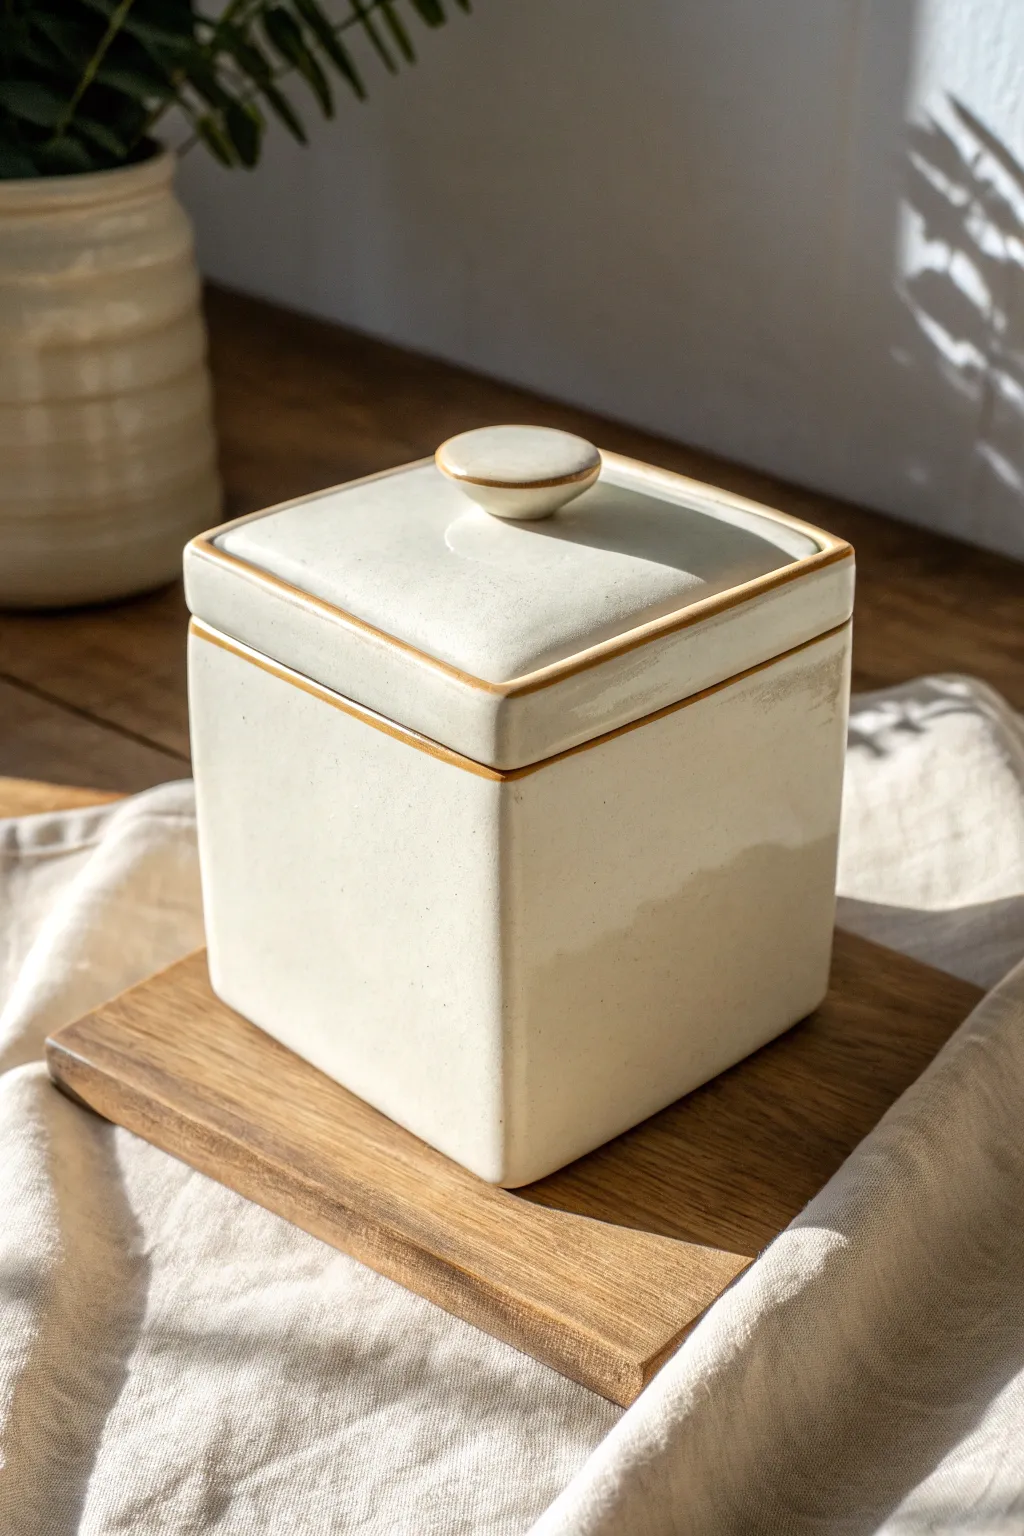
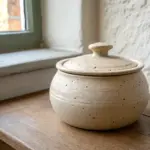
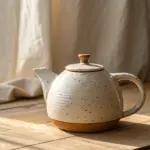
Knob Handle Lid in a Simple Dome
This charming ceramic box features a soft, creamy glaze with natural speckling and a gently domed lid that adds elegance to its simple square form. The design relies on clean slab-building techniques and a contrasting rim to create a timeless piece perfect for storing jewelry or trinkets.
How-To Guide
Materials
- Speckled stoneware clay
- Rolling pin
- Canvas mat or slab roller
- Sharp fettling knife
- Ruler or square templates
- Scoring tool or serrated rib
- Slip (made from the same clay)
- Wooden paddle
- Soft sponge
- Surform tool (cheese grater style)
- Small round wooden knob (or create one from clay)
- Strong epoxy (if using wooden knob)
- Creamy matte white glaze
Step 1: Creating the Box Base
-
Roll the Slabs:
Begin by rolling out a slab of speckled stoneware clay to a uniform thickness of about 1/4 inch. If you are rolling by hand, use wooden thickness strips to ensure the slab is perfectly even. -
Cut the Components:
Using a ruler or a paper template, cut 5 distinctive pieces: one square for the base (e.g., 4×4 inches) and four rectangular strips for the walls. The wall height is your choice, but 3 inches creates a nice proportion. -
Bevel the Edges:
To create seamless 90-degree corners, cut the vertical edges of your wall pieces at a 45-degree angle. This miter joint gives the box a sharp, professional look compared to simple butt joints. -
Score and Slip:
Thoroughly score the beveled edges and the perimeter of the base slab. Apply a generous amount of slip to the scored areas. This ‘glue’ is crucial for structural integrity during firing. -
Assemble the Walls:
Stand the walls up on the base, pressing the beveled corners together firmly. I like to use a small coil of soft clay on the inside seams to reinforce them, smoothing it out with a modeling tool. -
Paddle into Shape:
Once assembled, gently tap the outside of the box with a wooden paddle. This compresses the joints and ensures the walls are perfectly straight and the box is truly square.
Smooth Seams
Use a damp chamois strip to compress the lip of the box. This creates a highly professional, smooth finish that feels great to the touch.
Step 2: Forming the Domed Lid
-
Cut the Lid Slab:
Cut a square slab roughly 1/2 inch larger than your box opening. This extra width allows for the doming process and the eventual overhang. -
Create the Check-off Flange:
There are two ways to seat the lid: add a gallery shelf inside the box rim, or add a flange to the underside of the lid. For this look, roll a thin coil and attach it to the underside of your lid slab, measuring carefully so it fits snugly inside the box opening. -
Shape the Curve:
Place the lid (flange side down) onto a foam cushion or a bunched-up towel. Gently press into the center and smooth the top with a flexible rib to create a subtle, pillowed dome shape. -
Refine the Edges:
Once the lid is leather hard, use a surform tool or sponge to round off the sharp corners of the lid’s perimeter, matching the softness of the box walls.
Texture Twist
Before assembling slabs, roll lace or burlap into the clay surface. The glaze will break beautifully over the texture, enhancing the speckles.
Step 3: The Knob Handle and Finishing
-
Prepare the Knob Site:
Locate the exact center of the domed lid. If you are attaching a clay knob, score and slip the area. If using a wooden knob later, simply ensure the spot is smooth and flat. -
Attach Knob (Clay Method):
If making a clay knob, roll a small ball of clay, flatten the bottom slightly, and attach it firmly. Smooth the transition area so it looks seamless. -
Dry Slowly:
Place the lid on the box to dry together. Cover loosely with plastic for the first day to equalize moisture and prevent warping. -
Bisque Fire:
Once bone dry, fire the piece to bisque temperature (usually cone 04) to prepare it for glazing. -
Wax Resist:
Apply wax resist to the rim of the box and the corresponding edge of the lid. This creates the exposed clay line seen in the image. -
Glaze Application:
Dip or brush your creamy matte white glaze over the box and lid. The wax will repel the glaze on the rims. Wipe away any stray droplets with a damp sponge. -
High Fire:
Fire the piece to maturity (Cone 5, 6, or 10 depending on your clay). Ensure the lid is not on the box during glaze firing unless you used wax resist perfectly to prevent fusing. -
Attach Wooden Knob (Wood Method):
If you opted for the mixed-media look, sand the center spot lightly after the final firing and attach your wooden knob using a strong two-part epoxy glue.
Enjoy using your new handcrafted box to organize your treasures on a desk or vanity


What Really Happens Inside the Kiln
Learn how time and temperature work together inside the kiln to transform clay into durable ceramic.
Flower Handle Lid Topper
This charming ceramic project combines a soft, speckled cream finish with a delightful pop of color in the form of a sculpted flower handle. The rounded square form feels modern yet organic, making it a perfect vessel for jewelry or small trinkets.
Detailed Instructions
Materials
- Speckled cream clay body (stoneware or earthenware)
- Peacock green underglaze or slip
- Terracotta or light pink underglaze
- Clear transparent glaze (cone appropriate for your clay)
- Rolling pin and guide sticks (approx. 0.5 cm thick)
- Square template (paper or cardboard, approx. 10x10cm)
- Fettling knife or precision blade
- Scoring tool and slip
- Modeling tool with a rounded tip
- Sponge and water
- Soft bristle brush
Step 1: Constructing the Box Body
-
Roll out slabs:
Begin by wedging your speckled clay to remove air bubbles. Roll out a consistent slab using guide sticks to ensure an even thickness of about 0.5 cm. -
Cut the components:
Using your square template, cut out two squares for the top and bottom. Then, cut a long rectangular strip for the walls; the length should be the perimeter of your square plus a little extra for joining, and the height as desired for the box depth. -
Form the walls:
Stand the long strip on its edge on top of the bottom square base. Shape it to follow the square perimeter, gently curving the corners rather than making sharp angles to achieve that soft, pillowy look. -
Join the seams:
Score and slip the contact points where the wall meets the base and where the wall strip ends meet each other. Press firmly to join, then smudge the clay across the seams to seal them permanently. -
Refine the shape:
Use a paddle or flat wooden tool to gently tap the walls straight. Smooth the outer and inner seams with a damp sponge or a clay rib until invisible. -
Create the gallery (flange):
Roll a thin coil of clay and attach it to the interior rim of the box wall, positioned slightly below the top edge. This creates a shelf for the lid to sit on securely.
Step 2: Creating the Lid and Flower
-
Prepare the lid slab:
Take the second square slab you cut earlier. Test the fit against your box base; it should be flush with the outer walls. Refine the edges to match the rounded corners of the base. -
Dome the lid:
Place the lid slab on a piece of soft foam or a folded towel. Gently press from the center outwards with a rib or your thumb to create a very subtle domed curve, which prevents warping and looks elegant. -
Cut flower petals:
Roll a small, thinner piece of clay. Use a small teardrop cutter or a knife to cut out roughly 10-12 petal shapes. They should be flat and slightly elongated. -
Assemble the flower:
Score the center of the lid. Arrange the petals in a radial pattern, overlapping them slightly if needed. I like to press gently on the inner end of each petal to adhere it to the lid. -
Add texture:
Use a modeling tool to press a central vein or indentation down the middle of each petal. This adds dimension and mimics the look of the reference image. -
Form the center:
Roll a small ball of clay and flatten it slightly into a thick disk. Score the center of the flower arrangement and press this disk securely into the middle. -
Create the center dimple:
Press the rounded end of a paintbrush handle or tool directly into the middle of the flower center to create a donut-like shape.
Warped Lid Woes?
If the lid rocks after firing, use a circular motion to grind it against a piece of wet sandpaper on a flat surface until it sits flush.
Step 3: Glazing and Finishing
-
Bisque fire:
Allow the piece to dry slowly under plastic to prevent warping, especially the lid. Once bone dry, bisque fire to the appropriate cone (usually Cone 04). -
Apply underglaze colors:
Paint the petals carefully with the peacock green underglaze. Use a steady hand to keep the edges crisp. Paint the center disk with the terracotta/pink underglaze. -
Wipe back (optional):
If you want a more rustic look, you can gently wide the underglaze back a tiny bit to reveal the speckled clay on the high points of the texture. -
Clear glaze application:
Dip or brush the entire box and lid with a clear, transparent glaze. Ensure the gallery (where the lid sits) is wiped clean of glaze to prevent the lid fusing to the box during firing. -
Final firing:
Glaze fire the piece to the maturity temperature of your clay body.
Dry Fit Check
Dry the lid ON the box. Placing a small piece of paper towel between them prevents sticking while drying, ensuring they shrink together perfectly.
Once cooled from the kiln, your ceramic box is ready to bloom on your vanity or desk.
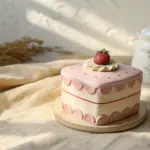
Donut Handle With Drippy “Icing” Sides
This charming ceramic box features a unique donut-style handle and a dreamy, drippy glaze effect that mimics cake icing. The combination of soft mint and blush pink creates a sweet, confectionary aesthetic perfect for storing small treasures or kitchen treats.
Step-by-Step
Materials
- Stoneware clay (smooth white body recommended)
- Rolling pin and guide sticks (approx. 1/4 inch thick)
- Square template (paper or cardstock)
- Needle tool
- Scoring tool and slip
- Sponge
- Clay knife or fettling knife
- Modeling tool for smoothing
- Underglazes: Blush Pink, Mint Green
- Glazes: White/Clear base, High-viscosity White for drips
- Small paintbrush
- Kiln
Step 1: Constructing the Box Body
-
Prepare your slabs:
Start by rolling out your clay to an even thickness of about 1/4 inch using guide sticks. You want a smooth, consistent slab to ensure the walls of your box don’t warp during drying. -
Cut the components:
Using a square template (e.g., 4×4 inches), cut out five identical squares: one for the base and four for the walls. Cut an additional square slightly larger for the lid to account for overhang, plus a smaller inner square to keep the lid in place. -
Dry to leather hard:
Let your cut slabs sit until they reach a ‘leather hard’ state. They should be firm enough to hold their shape when stood up, but still soft enough to join. This is crucial for a crisp square shape. -
Bevel the edges:
For clean corners, cut the vertical edges of your wall pieces and the edges of the base at a 45-degree angle. This miter joint creates a stronger bond and a sharper corner than a simple butt joint. -
Score and slip:
Aggressively score the beveled edges and apply a generous amount of slip. Press the walls onto the base and against each other, ensuring a tight seal. -
Reinforce the seams:
Roll a very thin coil of clay and press it into the interior seams of the box. Smooth this coil down with a modeling tool or your finger to reinforce the joints. -
Smooth the exterior:
Use a rib tool or a slightly damp sponge to smooth the outside corners and faces. Check that the box is perfectly square.
Gravity is Your Friend
For natural-looking drips, apply the white glaze heavy at the top and let gravity pull it down. Don’t paint the drip shapes manually; let the fluid movement do the work.
Step 2: Creating the Lid & Handle
-
Assemble the lid:
Take your larger lid square and attach the smaller locking square to its center underside using the score and slip method. Ensure the smaller square fits loosely inside the box rim. -
Form the donut handle:
Roll a short, thick coil of clay and form it into a ring or ‘donut’ shape. Smooth the join so it looks seamless. I usually flatten the bottom of the ring slightly so it sits securely. -
Attach the handle:
Score the center of the lid top and the bottom of your ring handle. Apply slip and press the handle firmly into place. Use a small tool to blend the clay at the attachment point for strength. -
Final drying:
Place the lid on the box (separated by a piece of paper towel to prevent sticking) and let the entire piece dry slowly under plastic to prevent warping. Once bone dry, bisque fire the piece.
Step 3: Glazing the Drippy Effect
-
Apply base colors:
Sponge off any dust from your bisque ware. Brush three coats of blush pink glaze on the bottom half of the box sides. Then, brush three coats of mint green glaze on the upper half, blending slightly where they meet if desired. -
Glaze the lid:
Coat the entire lid and the donut handle in a glossy creamy white glaze. You can leave small speckles of raw clay if using a speckled clay body for texture. -
Create the drip mixture:
Use a thick, opaque white glaze. If your standard glaze is too runny, you might need a specific ‘mayco flux’ or a heavy gloss glaze intended for layering. -
Apply the icing drips:
Using a loaded brush, apply a very heavy band of the thick white glaze along the top rim of the box walls (over the green). Allow the glaze to pool and physically run down the sides. You can encourage drips by dabbing extra glaze at intervals. -
Clean the foot:
Ensure no glaze is on the very bottom of the box or the rim where the lid sits. Wipe these areas clean with a damp sponge. -
Glaze firing:
Fire the piece to the temperature required by your specific glaze combination (usually Cone 5 or 6). Ensure the drips don’t run all the way to the kiln shelf.
Texture Twist
Before the clay dries, gently press a varied texture (like canvas or linen) into the pink section to give the bottom half a tactile contrast to the smooth, drippy top.
Open the kiln to reveal your sweet, candy-colored creation ready for use