Kids and clay are basically the perfect match—squishy, colorful, and full of “look what I made!” moments. These DIY clay projects are all about simple shapes, playful characters, and little treasures kids can actually finish and feel proud of.
Classic Pinch Pot Animals
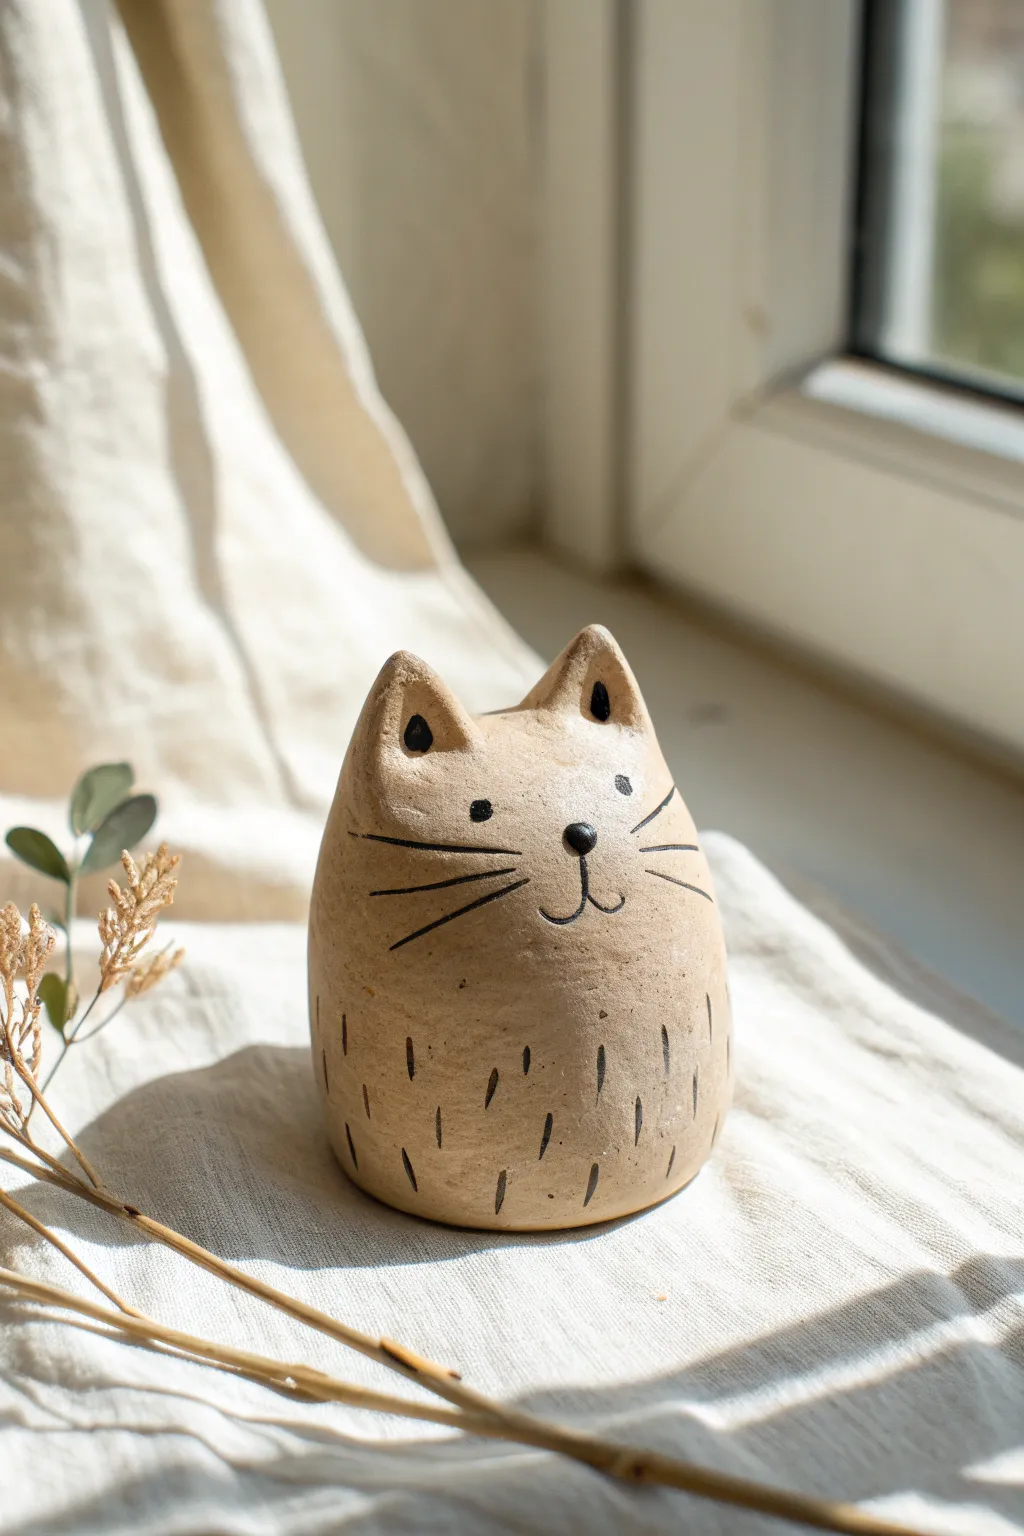
This charming little cat starts life as a simple ball of clay and transforms into a piece of distinct, minimalist decor. With its smooth curves and simple black dash details, it proves that sometimes the simplest designs are the most striking.
Step-by-Step Tutorial
Materials
- Air-dry clay (stone, buff, or light brown color)
- Water in a small cup
- Sponge or smoothing tool
- Needle tool or toothpick
- Black acrylic paint
- Fine detail paintbrush (size 0 or 00)
- Small rolling pin (optional)
- Matte sealant or varnish
Step 1: Shaping the Base
-
Start with a sphere:
Begin by rolling a fist-sized amount of clay into a smooth, tight ball. Work out any major cracks or seams with your thumbs. -
Form the pinch pot:
Insert your thumb into the center of the ball and gently pinch the walls while rotating the clay. Aim for a teardrop or egg-like shape rather than a wide bowl, keeping the walls relatively thick. -
Close the form:
Unlike a traditional cup-shaped pinch pot, gather the clay at the opening and gently close it up to create a hollow, sealed egg shape. This will be the body and head combined. -
Flatten the bottom:
Tap the wider end of your egg shape gently against your work surface. This creates a stable flat base so your cat stands upright without wobbling. -
Smooth the surface:
Dip your finger or a sponge in a tiny bit of water and rub it over the entire surface. You want to remove fingerprints and create that sleek, modern finish seen in the photo.
Step 2: Sculpting the Features
-
Pinch the ears:
At the narrower top of the shape, use your index finger and thumb to pinch up two distinct triangles directly from the body clay. Do not attach separate pieces; pulling them from the main form makes them stronger. -
Refine ear shape:
Use your moistened finger to smooth the transition between the ears and the head. I like to gently press the front of each ear slightly to create a subtle concave curve. -
Check symmetry:
Look at the figure from the front and top. Adjust the ears so they are roughly the same height and distance apart. -
Final smooth:
Give the entire piece one last pass with a barely-damp sponge to ensure the clay is perfectly smooth before it starts to dry. -
Dry completely:
Let the clay sit for 24-48 hours. It must be bone dry and hard to the touch before you add any paint.
Fixing Cracks
If hairline cracks appear while drying, mix a tiny bit of fresh clay with water to make a paste (slip). Rub this into the crack, smooth it over, and let it dry again.
Step 3: Painting the Details
-
Prepare your paint:
Put a small amount of black acrylic paint on your palette. You want a creamy consistency—add a drop of water if it seems too thick, as this helps with fine lines. -
Draw the nose:
Using your fine brush, paint a small, inverted triangle or rounded heart shape in the center of the face for the nose. -
Add the mouth:
Paint a thin vertical line anchoring down from the nose, curving outward on both sides to create a standard ‘W’ mouth shape. -
Paint the eyes:
Add two small, solid black circles for eyes spaced widely apart, sitting level with the top of the nose. -
Detail the ears:
Paint the insides of the triangular ears black, leaving a thin border of bare clay around the rim. -
Add whiskers:
Paint three long, thin lines on each cheek. Keep your hand steady and lift the brush at the end of the stroke to taper the line. -
Create texture:
Using the very tip of your brush, make small vertical hash marks all around the lower half of the body. Vary their lengths slightly to mimic stylized fur. -
Seal the piece:
Once the black paint is completely dry, apply a coat of matte varnish to protect your new friend.
Use a Marker
If you don’t feel steady with a paintbrush, skip the acrylics and use a fine-tip permanent black marker or paint pen. It gives you way more control over the tiny dashes!
Place your finished cat on a windowsill where the light can catch its simple, friendly curves


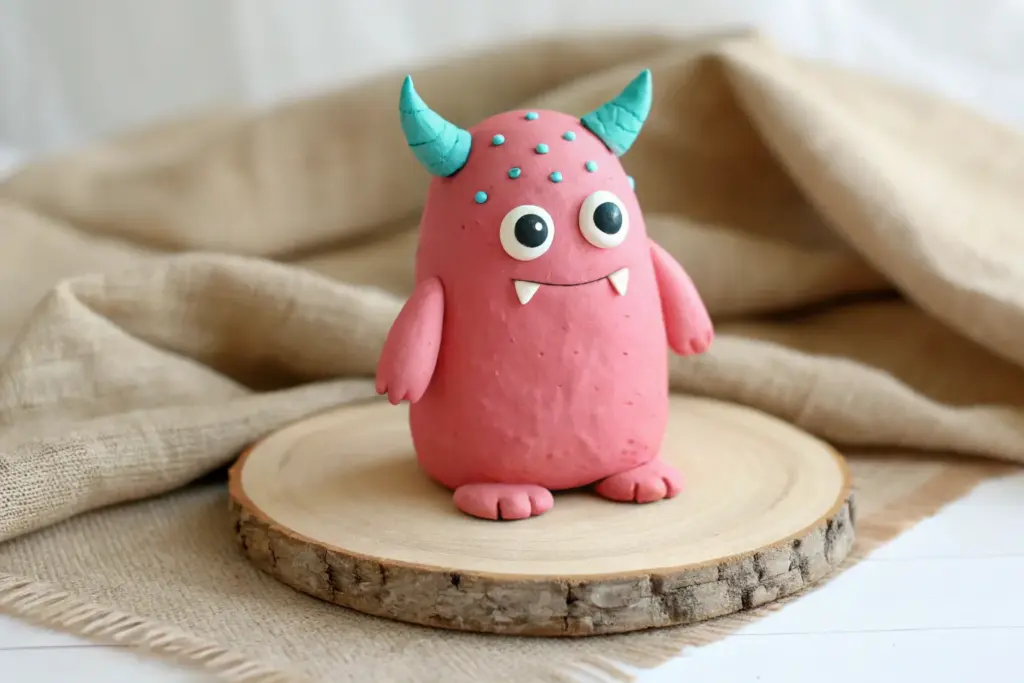
Silly Clay Monsters With Big Eyes
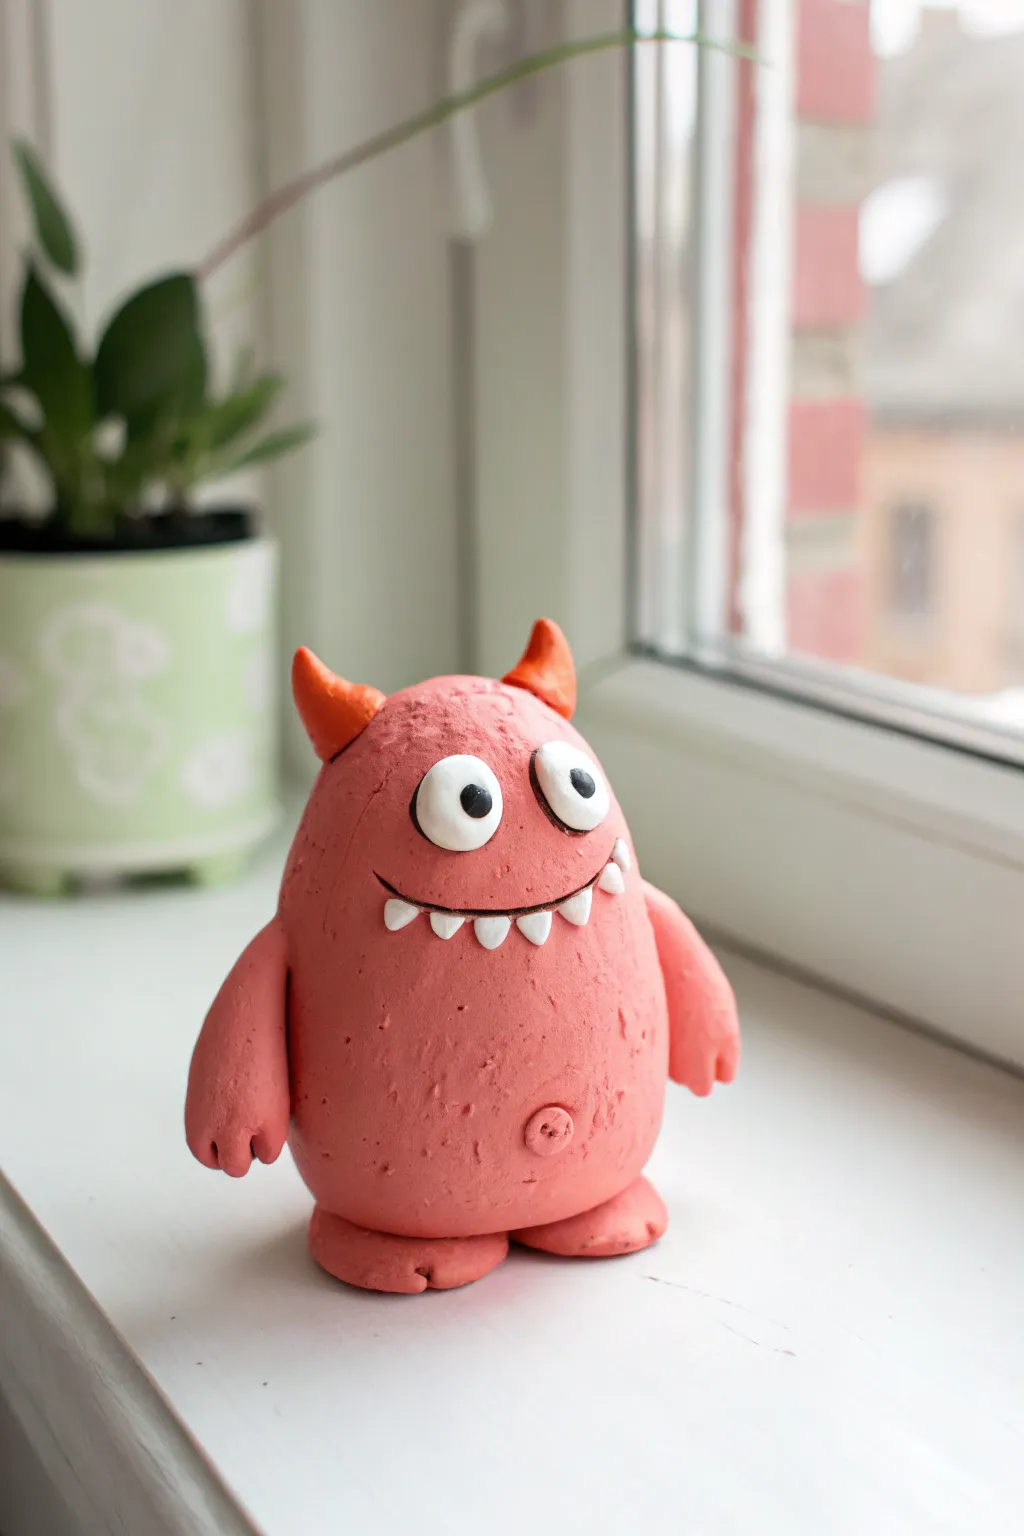
This goofy little friend is full of personality, featuring a lovable, pot-bellied shape and comically oversized eyes. With his bright orange horns and silly toothy grin, he makes for a delightful desk companion that is surprisingly easy to sculpt.
Step-by-Step Guide
Materials
- Pink air-dry clay (or polymer clay)
- White clay
- Orange clay
- Black clay
- Small rolling pin
- Plastic knife or clay sculpting tool
- Toothpick or needle tool
- Small ball tool (optional)
- Water (for smoothing if using air-dry clay)
Step 1: Shaping the Base Body
-
Roll the main form:
Start with a large chunk of pink clay and roll it into a smooth ball between your palms to remove any cracks. -
Create the egg shape:
Gently shape the ball into a tall, rounded egg or gumdrop shape. The bottom should be slightly wider to give him a cute, chubby belly look. -
Flatten the base:
Tap the bottom of your egg shape on your work surface so the monster stands up straight on its own without wobbling. -
Make the feet:
Roll two small, flattened ovals of pink clay. Position them side-by-side underneath the body so they poke out slightly like cartoon feet. -
Blend the feet:
Use your thumb or a modeling tool to smooth the clay where the feet meet the body, ensuring they are securely attached.
Smooth Seams
Work a tiny drop of water (for air-dry clay) or baby oil (for polymer) into seams to make joints invisible and strong.
Step 2: Arms and Texture
-
Form the arms:
Roll two sausage shapes of pink clay, tapering them slightly at one end where the hand will be. -
Add fingers:
Use a small knife tool to cut two tiny notches into the wider end of each arm to create three simple fingers. -
Attach the arms:
Press the arms onto the sides of the body. I like to let them hang loosely downwards for a relaxed, friendly posture. -
Add a belly button:
Take a tiny ball of pink clay, press it into the lower center of the belly, and use a toothpick to poke two little holes in it like a button. -
Create texture:
Using an old toothbrush or a ball of crumpled foil, gently pat the entire surface of the pink body to give it a rough, organic skin texture.
Monster Fur
Before drying, use scissors to make tiny snips all over the body. This creates a shaggy fur effect instead of skin.
Step 3: The Big Expressive Face
-
Make the mouth slit:
Use a knife tool to slice a long, curved smile deeply into the face area. Gently pull the clay apart slightly to open the mouth. -
Insert the teeth:
Roll several tiny, white teardrop shapes. Use a toothpick to press these little triangles onto the bottom lip of the mouth slit, pointing upward. -
Form the eyes:
Roll two relatively large balls of white clay. Flatten them slightly and press them onto the upper face, making sure they touch each other in the middle. -
Add pupils:
Roll two tiny black balls for pupils. Press them onto the white eyeballs; placing them slightly cross-eyed or loopy adds extra character. -
Outline the eyes:
Roll extremely thin snakes of black clay and wrap them around the base of the white eyes to make them pop.
Step 4: Horns and Finishing Touches
-
Shape the horns:
Grab your orange clay and roll two small cones, curving the tips slightly so they look sharp but playful. -
Attach the horns:
Press the horns onto the top of the head, spacing them out evenly above the eyes. -
Smooth connections:
Use a small tool to blend the base of the orange horns into the pink head so they look like they are growing out naturally. -
Final check:
Look over your monster for any fingerprints that need smoothing or texture that needs refreshing. -
Dry or bake:
If using polymer clay, bake according to package instructions. For air-dry clay, leave him in a safe spot for 24-48 hours to harden completely.
Place your new goofy monster on a windowsill where he can keep an eye on things


Animal Face Magnets
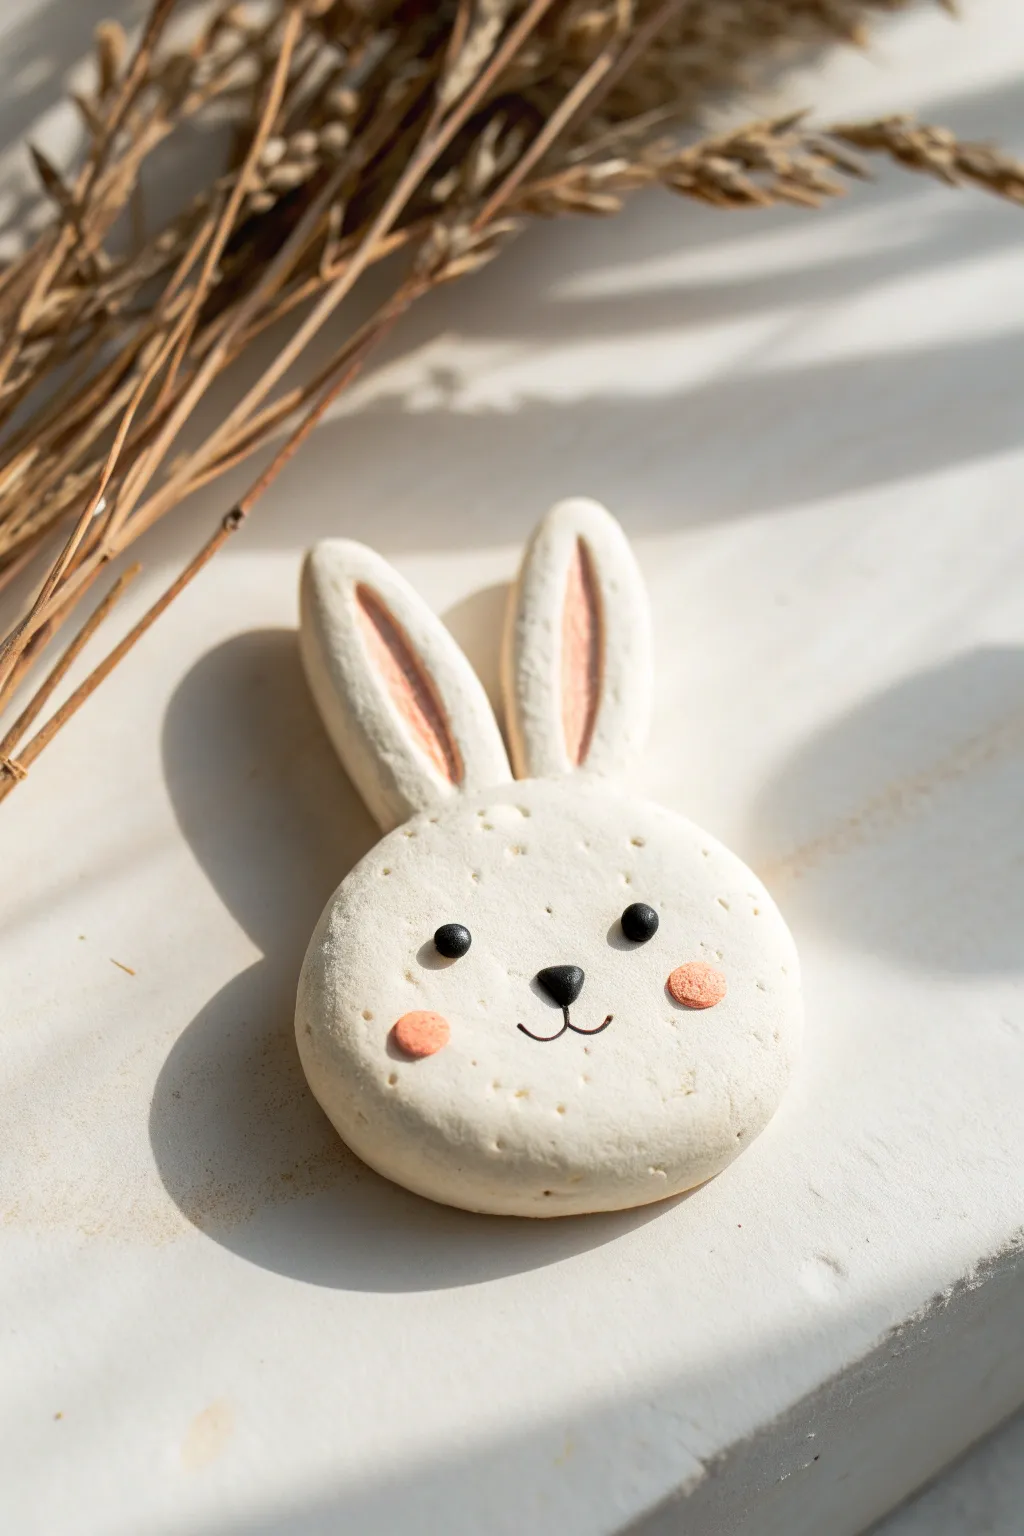
This adorable bunny magnet features a soft, textured finish that looks just like a frosted cookie or ceramic piece. With its simple round face and cute pink details, it’s a perfect beginner project that adds a touch of sweetness to any fridge or locker.
Step-by-Step
Materials
- White polymer clay (or air-dry clay)
- Black polymer clay
- Pink soft pastel chalk (or pink clay)
- Small round magnet
- Strong craft glue (e.g., E6000)
- Rolling pin
- Round cookie cutter (approx. 2 inches)
- Small craft knife or clay tool
- Sandpaper or a stiff bristle brush (for texturing)
- Small brush (for pastel)
- Needle tool or toothpick
Step 1: Shaping the Base
-
Condition the Clay:
Start by kneading your white clay until it is soft and pliable. This prevents cracks later on. -
Roll the Face:
Roll a ball of white clay about the size of a walnut, then flatten it gently with your palm or a rolling pin until it’s a thick disk, about 1/4 inch thick. -
Refine the Shape:
Use your round cookie cutter to get a perfect circle, or reshape the edges with your fingers to make it slightly oval for a more natural look. Smooth out any fingerprints. -
Create the Ears:
Roll two smaller logs of white clay and taper them at one end. Flatten them slightly to create long, bunny ear shapes. -
Attach the Ears:
Press the wider bottom of each ear firmly against the top of the round head. Use a clay tool or your finger to blend the seams on the back so they are securely attached. -
Add Texture:
To get that speckled, stone-like look, gently tap the surface of the clay with a stiff bristle brush or a piece of coarse sandpaper. Don’t press too hard; you just want surface indentation.
Sticky Situation?
If your white clay is getting dirty from your hands, keep a pack of baby wipes nearby. Clean your hands and tools often to keep that bunny bright white.
Step 2: Adding Details
-
Create Inner Ears:
Take your pink pastel chalk and scrape a little onto a piece of paper to make dust. If you don’t have pastels, a tiny smear of pink clay works too. -
Scent the Ears:
Using a small, dry brush, pick up the pink chalk dust and gently brush it into the center of the ear indentations to create a soft, rosy gradient. -
Make the Cheeks:
Roll two tiny, flat discs of white or very light clay. Apply the same pink chalk dust to these discs, or press tiny balls of pink clay onto the face. -
Attach Cheeks:
Press the pink cheeks onto the lower half of the face, spacing them wide apart. -
Form the Eyes:
Roll two minuscule balls of black clay. Press them onto the face slightly above the cheeks to form the eyes. -
Add the Nose:
Make a small, inverted triangle out of black clay with rounded corners. Place it right in the center between the eyes. -
Draw the Mouth:
Using a very thin needle tool or toothpick, gently etch a ‘J’ shape curving left and a backwards ‘J’ shape curving right starting from the bottom of the nose to make the smile. -
Highlighting (Optional):
If you want extra detail, create tiny indentations or freckles on the white face using a needle tool, just like in the reference image.
Pro Tip: Seamless Ears
To ensure ears don’t snap off later, insert a small piece of wire or half a toothpick inside the ear and head connection before baking for internal reinforcement.
Step 3: Finishing Up
-
Bake or Dry:
If using polymer clay, bake according to the package instructions (usually 275°F/135°C for 15-30 minutes). If using air-dry clay, let it sit for 24-48 hours. -
Attach Magnet:
Once fully cooled or hardened, flip the bunny over. Apply a dab of strong craft glue to the back. -
Secure the Back:
Press your round magnet firmly into the glue and let it cure completely before sticking it to the fridge.
Now your charming little bunny is ready to hold up your grocery lists or favorite photos with a smile


Fruit Slice Coasters
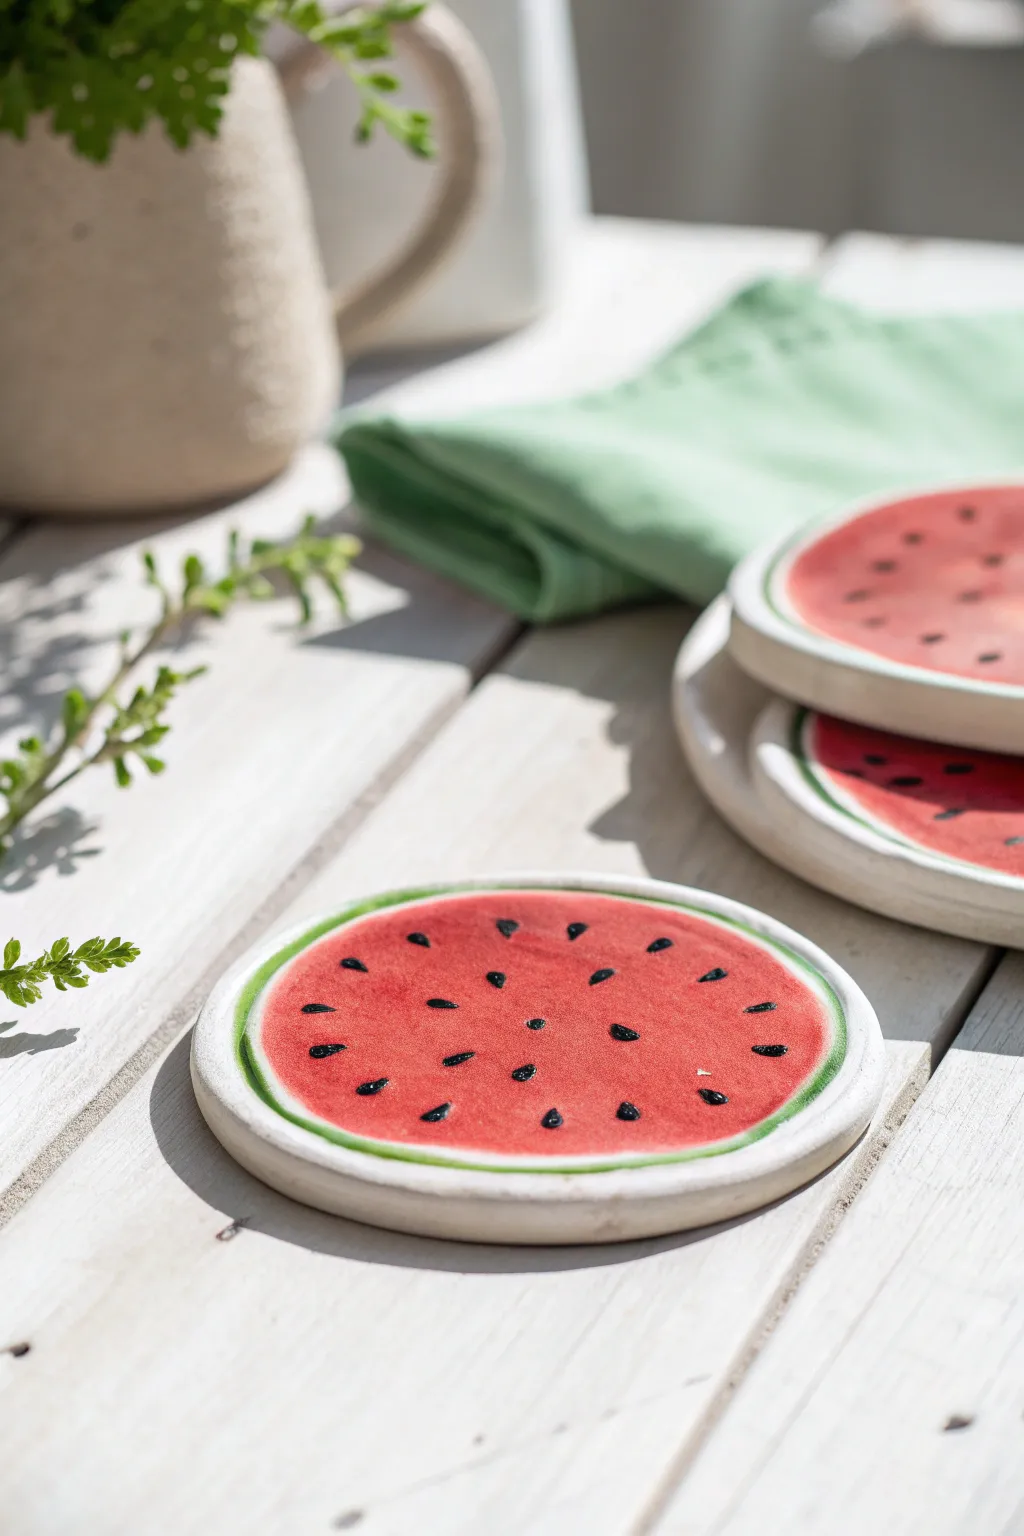
Bring a fresh splash of summer to your table with these delightful watermelon slice coasters that look good enough to eat. With their distinct textured rind and vibrant red centers, these clay creations are a fun and functional project perfect for a sunny afternoon of crafting.
Detailed Instructions
Materials
- White air-dry clay or polymer clay
- Rolling pin
- Large circle cookie cutter (approx. 3-4 inches) or a bowl to trace
- Small craft knife or clay tool
- Fine-grit sandpaper
- Acrylic paints: Bright red, white, dark green, black
- Flat paintbrushes (large and small)
- Detail paintbrush or toothpick
- Clear acrylic sealer or varnish (glossy or matte)
Step 1: Shaping the Base
-
Prepare your clay:
Start by kneading your white clay until it is soft, pliable, and free of air bubbles, which helps prevent cracks later. -
Roll it out:
Use your rolling pin to flatten the clay into a smooth sheet. Aim for an even thickness of about 1/4 inch so the coasters feel substantial and durable. -
Cut the circles:
Press your large circle cutter firmly into the clay to create perfect rounds. If you don’t have a cutter, place a mug or small bowl upside down on the clay and trace around it with a clay tool. -
Smooth the edges:
Dip your finger in a little water and run it gently along the cut edge of the circle to smooth out any roughness or loose bits of clay. -
Create the rim:
To mimic the rind’s texture seen in the photo, use your thumb to gently press down just inside the outer edge, creating a very slight raised lip around the perimeter. -
Let it dry:
Place your clay circles on a flat surface lined with parchment paper. Allow them to dry completely according to your clay package’s instructions, flipping them halfway through to ensure even drying.
Pro Tip: Prevent Curling
As air-dry clay loses moisture, edges can curl up. Place a heavy book on top of your coasters while they are halfway dry to keep them perfectly flat.
Step 2: Painting the Design
-
Sand for smoothness:
Once fully dry, lightly buff the surface and edges with fine-grit sandpaper to remove any imperfections. -
Paint the base white:
Apply a coat of white acrylic paint over the entire top surface. This acts as a primer and ensures your red and green colors will pop. -
Add the juicy center:
Using a bright red paint, fill in the center circle, leaving a rim of white about 1/4 inch wide around the edge unpainted. -
Paint the rind:
Carefully paint the very outer edge of the raised rim with dark green paint. You can feather this slightly inward, but keep a distinct white band separating the red fruit from the green skin. -
Blend the transition:
For a realistic look, mix a tiny bit of white into your green paint to create a pale green, and lightly brush it where the white rim meets the green edge. -
Create the seeds:
Dip a fine detail brush or the tip of a toothpick into black paint. Press gently onto the red area to create teardrop-shaped seeds. -
Arrange the seeds:
I like to arrange the seeds in a loose circular pattern radiating from the center, rather than scattering them randomly, just like a real slice. -
Seal the deal:
Once all paint layers are completely dry, apply a coat of clear acrylic sealer. This protects your artwork from moisture and gives the fruit a fresh, juicy sheen.
Troubleshooting: Cracking Paint
If your paint cracks after drying, you may have applied it too thickly. Use multiple thin layers instead of one thick glob for a smoother finish.
Now you have a refreshing set of coasters ready to brighten up your patio table or kitchen counter

The Complete Guide to Pottery Troubleshooting
Uncover the most common ceramic mistakes—from cracking clay to failed glazes—and learn how to fix them fast.
Name Initial Keychains
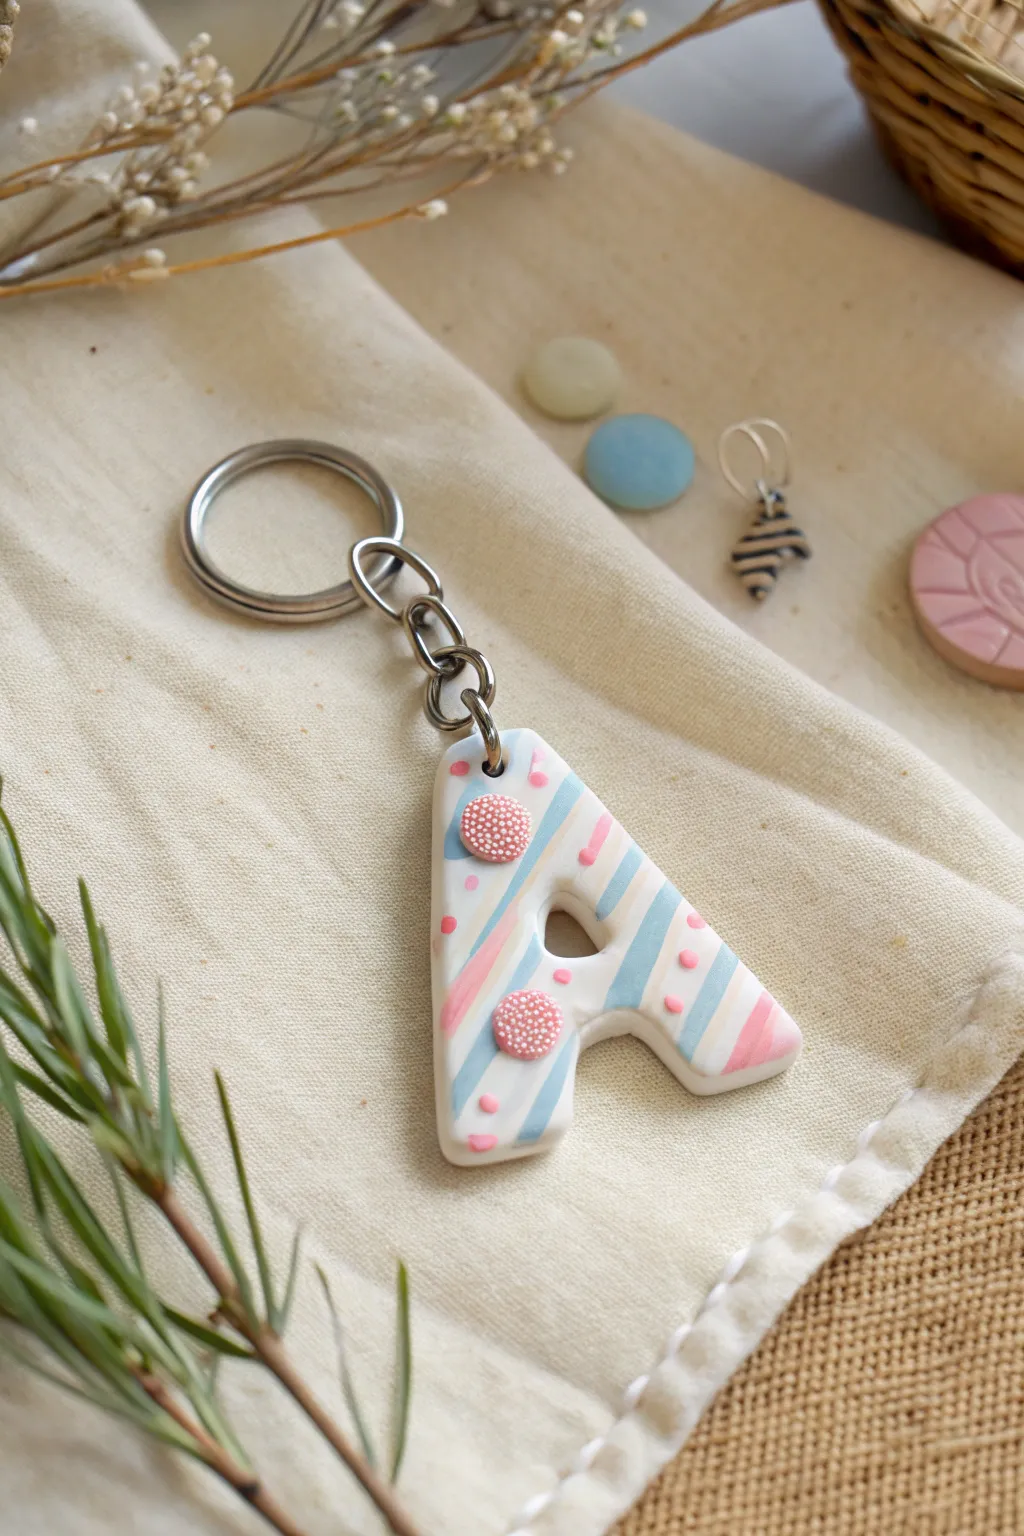
Turn a simple block of clay into a personalized accessory with this delightful candy-striped initial keychain. Featuring soft pastel colors, fun polka dots, and textured buttons, this letter ‘A’ design looks good enough to eat but is sturdy enough for any backpack.
Step-by-Step Guide
Materials
- White polymer clay (main base)
- Pastel blue polymer clay
- Pastel pink polymer clay
- Rolling pin or pasta machine
- Clay knife or craft blade
- Letter template (printout of your initial)
- Small round piping tip or straw (for buttons)
- Needle tool or toothpick
- Jump ring and keychain hardware
- Pliers
- Oven and baking sheet
Step 1: Shaping the Base
-
Prepare the workspace:
Start by cleaning your work surface thoroughly to prevent dust or lint from sticking to the white clay. -
Condition the white clay:
Knead a chunk of white polymer clay until it’s soft and pliable, then roll it out into a smooth slab about 1/4 inch thick. -
Cut the letter shape:
Place your paper letter template on top of the clay slab. Use your craft knife to carefully trace around the outline, cutting straight down to get crisp edges. -
Smooth the edges:
Lift the letter carefully. Dip your fingertip in a tiny bit of water or baby oil and gently rub the raw edges to smooth out any cutting marks. -
Add the hardware hole:
Use a toothpick or a small straw to poke a hole at the top of the letter for the jump ring. Make sure it isn’t too close to the edge to prevent tearing.
Step 2: Creating the Striped Pattern
-
Roll out colors:
Roll out very thin sheets of the pastel pink and pastel blue clay. I like to make these as thin as possible so they blend well later and don’t bulk up the letter. -
Cut decorative strips:
Slice the colored clay sheets into narrow strips of varying widths. Don’t worry about being perfectly straight; a little variation adds character. -
Apply the stripes:
Lay the colored strips diagonally across your white clay letter. Leave spaces of white showing between them to create the striped pattern seen in the key chain. -
Trim excess clay:
Using your craft knife, carefully trim away the ends of the colored strips that hang over the edge of the letter shape. -
Blend the surface:
Gently roll over the entire letter with your rolling pin. Apply just enough pressure to embed the colored strips into the white base so the surface feels smooth and unified.
Clean Lines Only
If your colored clay strips look smudged after handling, wipe the surface very gently with a cotton sway dipped in rubbing alcohol before baking.
Step 3: Adding Details
-
Make textured buttons:
Cut two small circles from pink clay using a straw or small cutter. Use a needle tool to poke many tiny dots into the surface of these circles to simulate a rough, fabric-like texture. -
Attach the buttons:
Press the textured pink circles onto the letter ‘A’ as decorative accents. Place one near the top left and one on the lower leg. -
Create confetti dots:
Roll tiny balls of pink clay between your fingers and squash them flat onto the empty white spaces of the letter for extra ‘confetti’ detail. -
Final inspection:
Check the jump ring hole again to make sure the rolling process didn’t close it up. Re-poke it if necessary.
Glossy Finish
For a glassy, professional look like store-bought charms, coat the baked and cooled letter with a layer of UV resin or polymer clay gloss glaze.
Step 4: Baking and Assembly
-
Bake the piece:
Place your letter on a baking sheet lined with parchment paper. Bake according to the temperature and time instructions on your specific brand of polymer clay packaging. -
Cool down:
Allow the clay to cool completely on the tray before handling. It creates a stronger bond and prevents warping. -
Attach the ring:
Use pliers to twist open a metal jump ring sideways. Thread it through the hole in your clay letter. -
Connect the chain:
Add the keychain hardware onto the open jump ring, then use your pliers to twist the ring back into a closed circle.
Attach your new custom initial to your school bag or keys and enjoy showing off your handiwork
Thumbprint Heart Keepsakes
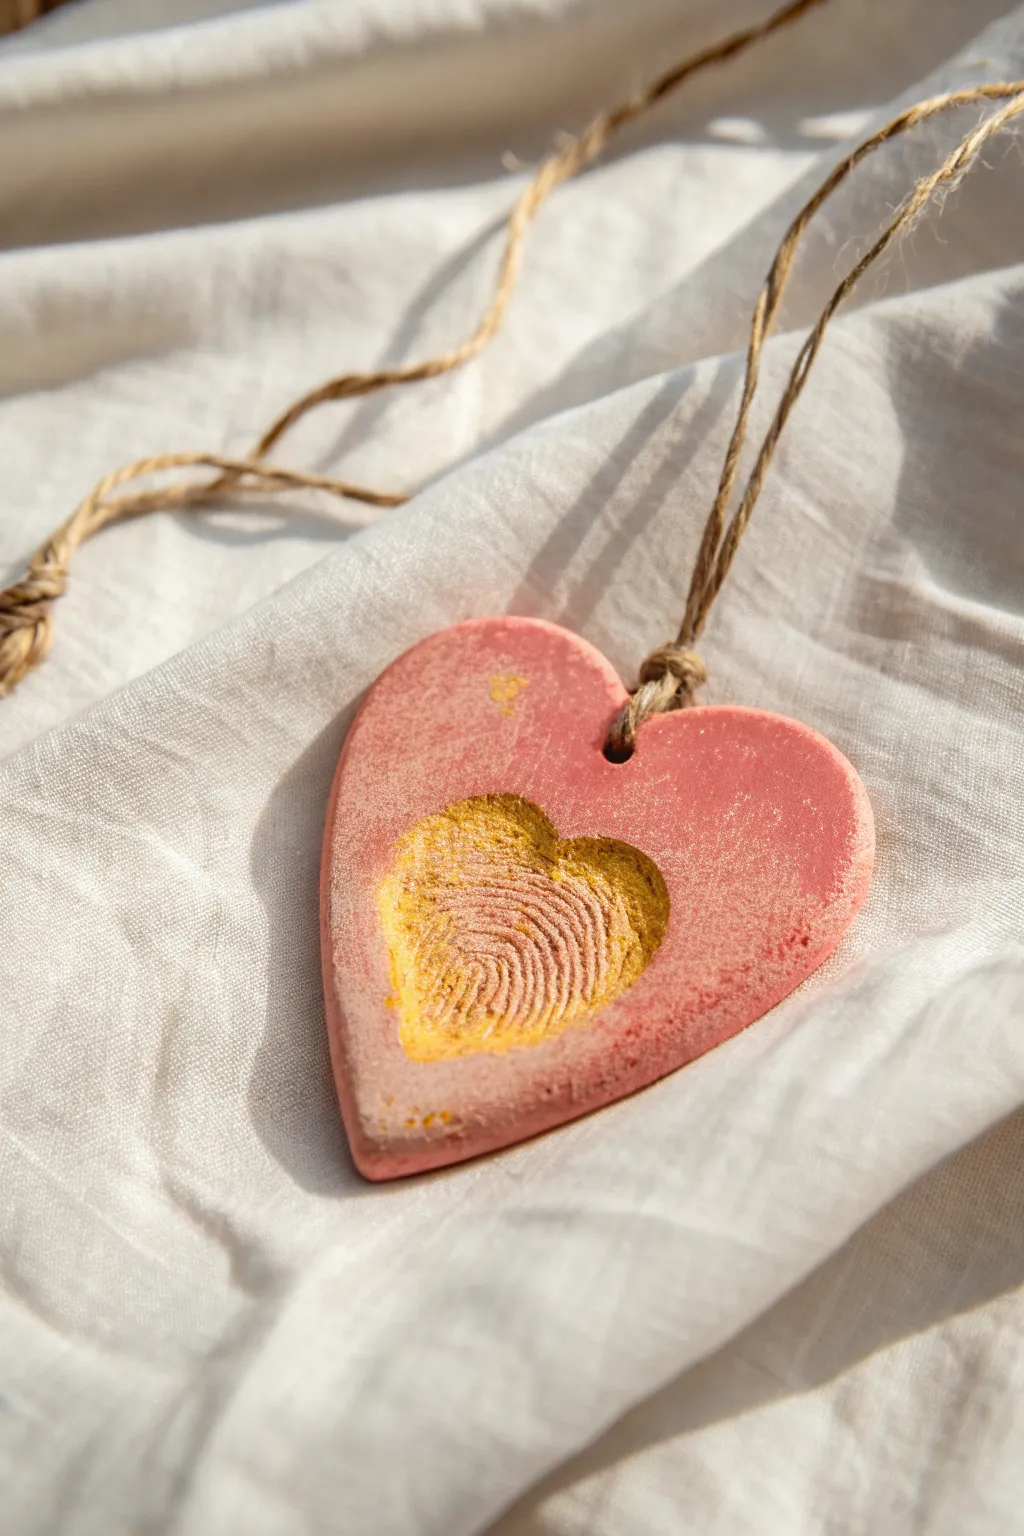
Capture a moment in time with this rustic yet elegant clay pendant that transforms a simple fingerprint into a golden heart. The dusty rose finish and natural twine hanger make it a charming textured keepsake perfect for gifting.
Step-by-Step Tutorial
Materials
- Air-dry clay or polymer clay (white or terracotta)
- Heart-shaped cookie cutter (medium size)
- Rolling pin
- Parchment paper
- Acrylic paint (dusty rose/pink)
- Metallic gold acrylic paint
- A small, stiff paintbrush
- A fine-point paintbrush
- Balsa wood stick or straw (for the hole)
- Jute twine or hemp cord
- Fine-grit sandpaper
- Matte varnish (optional)
Step 1: Shaping the Clay
-
Prepare the Clay:
Begin by kneading your clay until it is soft, pliable, and free of air bubbles. If you are using air-dry clay, keep your hands slightly damp to prevent cracking. -
Roll it Out:
Place the clay on a sheet of parchment paper. Roll it out evenly to a thickness of about 1/4 inch (6mm). You want it substantial enough to be sturdy but not too heavy. -
Cut the Heart:
Firmly press your heart-shaped cookie cutter into the clay. Wiggle it slightly to ensure a clean cut before lifting it away. Remove the excess clay from around the heart. -
Smooth the Edges:
Dip your finger in a little water (for air-dry clay) or baby oil (for polymer) and gently run it along the cut edges of the heart to soften any sharpness or ragged bits. -
Create the Thumbprint:
This is the most crucial step. Have the child press their thumb firmly into the center of the heart at an angle to create the left lobe of an inner heart shape. Then, overlap slightly and press again with the same thumb angled correctly to form the right lobe, creating a complete heart indentation.
Clearer Prints
If the clay is too sticky, the fingerprint ridges won’t show clearly. Let the clay sit for 5-10 minutes to firm up slightly before pressing the thumb into it.
Step 2: Refining and Drying
-
Punch the Hole:
Using a straw or a small wooden dowel, press a hole through the top right lobe of the main heart. Ensure the hole is large enough for your twine to pass through later, keeping in mind clay shrinks slightly as it dries. -
Check the Texture:
Before drying, check that the fingerprint ridges are distinct. If they look smudged, you can smooth the center and try the impression again. -
Let it Cure:
If using air-dry clay, leave the heart on a flat surface in a draft-free area for 24-48 hours, flipping it halfway through. If using polymer clay, bake according to the manufacturer’s package instructions on a parchment-lined tray. -
Sand Imperfections:
Once fully cured and hard, use fine-grit sandpaper to verify the edges are smooth. I like to give the surface a very light sanding to help the paint adhere better.
Step 3: Painting and Finishing
-
Base Coat Application:
Paint the entire heart, front and back, with the dusty rose acrylic paint. You may need two thin coats for full opacity. -
Dry Brush Effect:
Create the weathered texture seen in the photo. Load a stiff brush with a slightly lighter shade of pink or white, wipe almost all the paint off on a paper towel, and lightly scuff it over the dried rose base. -
Highlight the Fingerprint:
Dip a fine-point brush into the metallic gold paint. Carefully fill in the recessed fingerprint heart. -
Enhance the Details:
Don’t just paint the bottom of the crater; gently brush the gold over the ridges of the print and slightly up onto the rim of the indentation to make the texture pop. -
Add Golden Accents:
Using the dry-brush technique again with the gold paint, very lightly dust a few random spots on the rest of the pink surface for a cohesive, shimmering look. -
Seal (Optional):
To protect the paint from chipping, apply a thin layer of matte varnish over the entire piece. Avoid glossy finishes as this project looks best with a matte, rustic aesthetic. -
String the Pendant:
Cut a length of jute twine or hemp cord (about 12 inches). Fold it in half to create a loop. -
Secure the Knot:
Feed the folded loop end through the hole from front to back. Pull the loose ends through the loop and tighten to create a lark’s head knot securely against the clay.
Cracked edges?
If small cracks appear while drying, mix a tiny bit of fresh clay with water to make a paste (slip) and fill the cracks. Smooth over with a finger and let dry again.
Hang this lovely textured heart in a window or on the wall to cherish that tiny print forever


What Really Happens Inside the Kiln
Learn how time and temperature work together inside the kiln to transform clay into durable ceramic.
Stamp-And-Texture Tiles
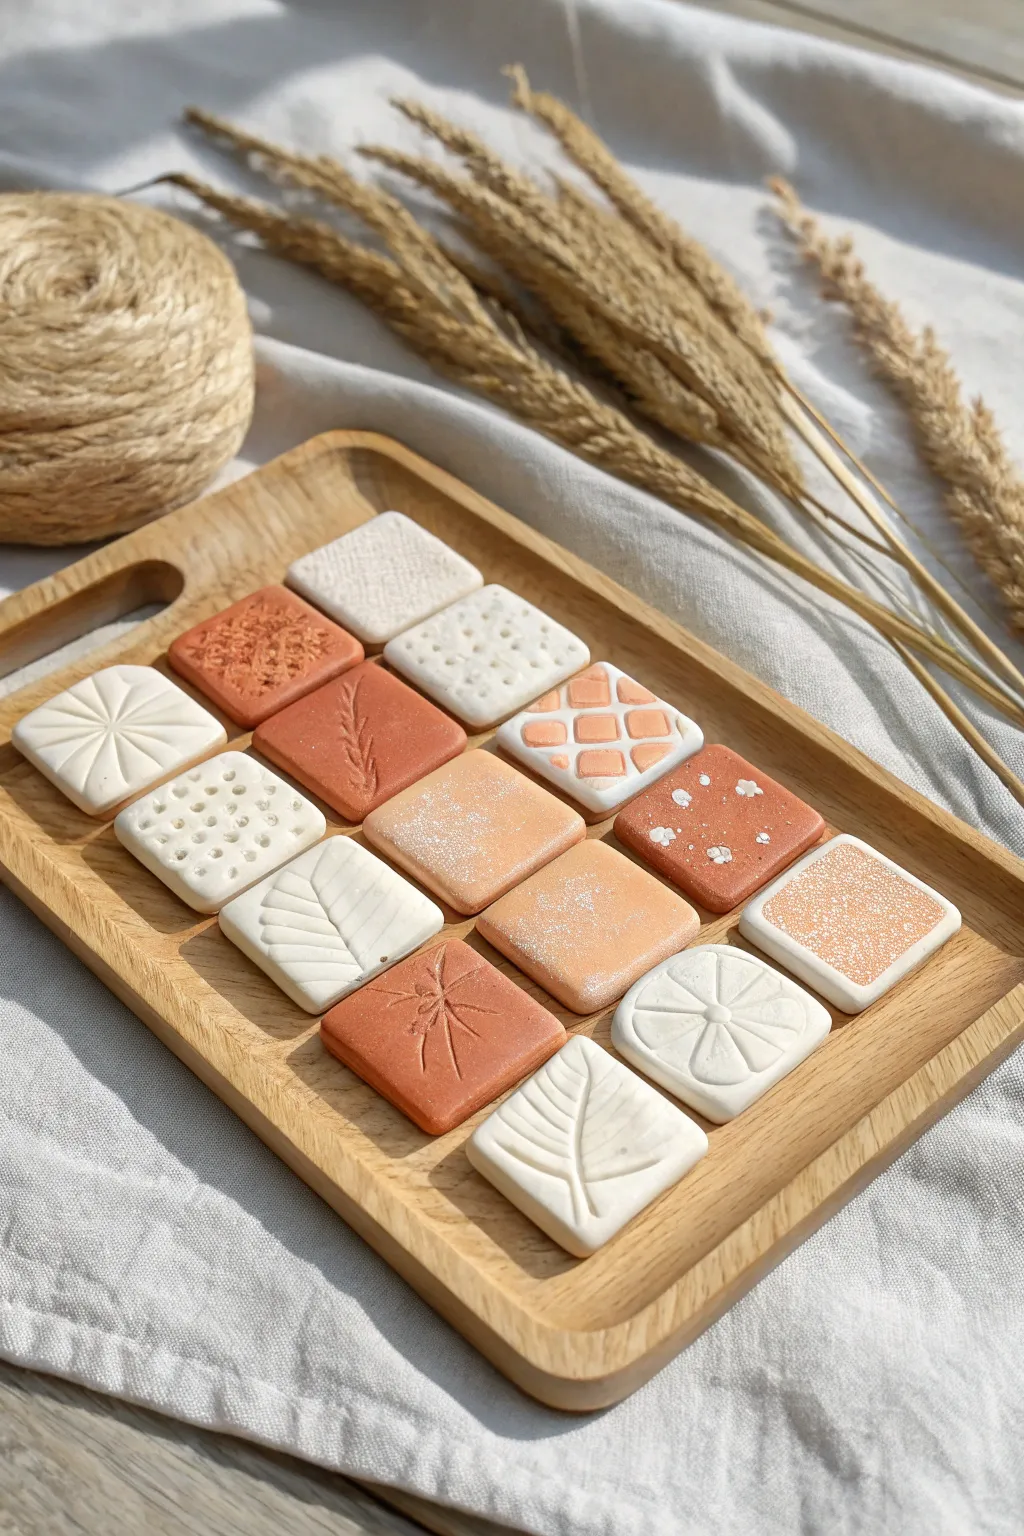
These charming little square tiles turn simple clay play into an exploration of texture and pattern. By using everyday objects as stamps, you can create a collection of natural, earthy designs that look lovely displayed together on a tray.
How-To Guide
Materials
- Air-dry clay (white and terracotta/orange colors)
- Rolling pin
- Square cookie cutter (approx. 1.5 – 2 inches)
- Parchment paper or non-stick craft mat
- Texture tools: dried grass/wheat, burlap, lace, toothpicks
- Leaf stamps or actual small sturdy leaves
- Acrylic paint (white)
- Fine glitter (white or silver)
- Fine-grit sandpaper
- Small detail paintbrush
- Spray sealant (matte finish)
Step 1: Preparing the Clay Base
-
Prepare your workspace:
Lay down a sheet of parchment paper or a non-stick craft mat to protect your table and prevent the clay from sticking. -
Condition the clay:
Take a handful of white air-dry clay and knead it until it’s soft and pliable. Repeat this process with the terracotta-colored clay separately so the colors don’t accidentally mix yet. -
Create a marbled effect (optional):
For a few tiles, twist a small rope of white clay with a small rope of orange clay before rolling to create a soft, peachy marbled look found in some of the tiles. -
Roll out the slab:
Roll your clay out to an even thickness, roughly 1/4 inch thick. I like to use guide sticks on either side of the rolling pin to ensure every tile is perfectly level. -
Cut the shapes:
Using your square cookie cutter, press firmly into the clay slab to cut out multiple squares. You’ll want about 16 tiles for a full grid display. -
Smooth the edges:
Gently tap the cut edges of each square with your finger to soften any sharp corners or clay burrs left by the cutter.
Fixing Cracks
If small cracks appear while drying, don’t panic. Mix a tiny bit of fresh clay with water to make a paste (slip) and smooth it over the crack.
Step 2: Adding Texture and Design
-
Imprint natural textures:
Take a piece of dried wheat or a strong leaf stem. Press it gently but firmly into the center of a terracotta tile to leave a botanical impression. -
Create geometric patterns:
Use the side of a credit card or a clay knife to gently indent grid lines into a white tile without cutting all the way through. -
Stipple details:
On a fresh square, use the dull end of a toothpick or a small dowel to poke a repeated pattern of dots. Vary the depth for visual interest. -
Stamp fabric textures:
Press a scrap of burlap, lace, or a textured towel onto the surface of a clay square and peel it back to reveal a subtle, woven surface design. -
Emboss radial designs:
Use a specialized clay stamp or the cap of a marker to press a flower or sunburst shape into the center of a few reserved white tiles.
Make Them Magnets
Once fully dry and sealed, hot glue a strong round magnet to the back of each tile. They make a beautiful, cohesive set for the refrigerator.
Step 3: Finishing Touches
-
Allow to dry:
Place all your textured tiles on a flat wire rack. Let them dry completely for 24-48 hours, flipping them halfway through to prevent curling. -
Sand for smoothness:
Once fully rigid, gently rub the edges with fine-grit sandpaper to achieve a professional, stone-like finish. -
Highlight with paint:
Dip a small brush in white acrylic paint. Carefully fill in the recessed lines of your geometric patterns or leaf veins to make the design pop. -
Add a touch of sparkle:
For the ‘sugar-coated’ look seen on some tiles, brush a very thin layer of glue over the surface and sprinkle fine white glitter or sand over the top. -
Seal the work:
Spray a light coat of matte sealant over the tiles. This protects the clay from humidity and keeps the glitter in place without making them look like plastic.
Arrange your finished tiles on a small wooden serving tray to admire your handiwork
Clay Flower Coasters
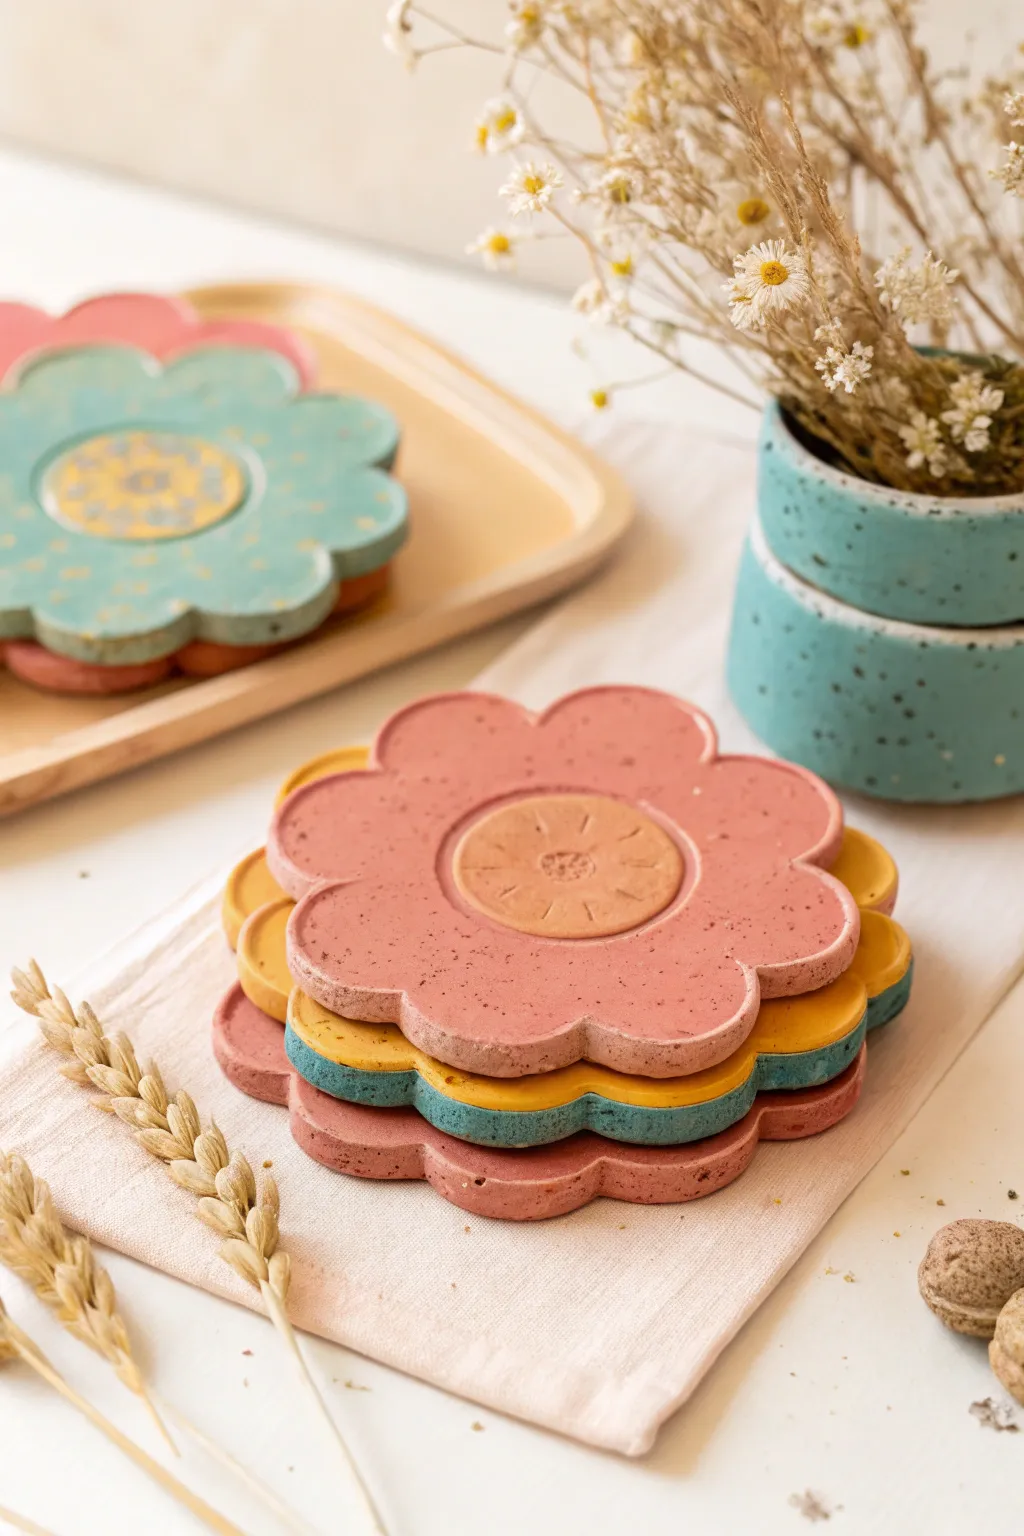
Bring a touch of eternal spring to your table with these delightful flower-shaped coasters. Featuring a trendy speckled finish and sweet embossed details, they stack beautifully to create a colorful garden accent.
Step-by-Step Tutorial
Materials
- Polymer clay (colors: dusty rose, teal, mustard yellow, sage green)
- Faux granite or speckled clay (or black pepper to mix in)
- Rolling pin
- Large flower cookie cutter (approx. 4 inches)
- Small round cookie cutter (approx. 1.5 inches)
- Modeling tool or toothpick
- Parchment paper
- Baking sheet
- Sandpaper (fine grit)
- Matte varnish (optional)
Step 1: Preparing the Clay
-
Mix Your Base:
Start by conditioning your primary clay colors. If you don’t have pre-speckled clay, knead a small amount of granite-effect clay into your solid colors. Alternatively, I like to sprinkle in coarse ground black pepper for an organic, speckled look. -
Roll It Out:
Place your conditioned clay between two sheets of parchment paper to prevent sticking. Roll the clay out into an even slab, aiming for a thickness of about 1/4 inch so the coasters feel substantial.
Pepper Hack
No fancy granite clay? Kneading in actual coarse black pepper or dried used coffee grounds creates incredible realistic speckles for free.
Step 2: Cutting and Embossing
-
Cut the Flower Shape:
Press your large flower-shaped cutter firmly into the rolled clay slab. Wiggle it slightly to ensure a clean cut before lifting the cutter away. -
Create the Center:
Take a contrasting color of clay (like using yellow for a pink flower) and roll it out slightly thinner. -
Cut the Insert:
Use the small round cutter to cut a circle from this contrasting color. -
Emboss the Center:
Gently press the small contrasting circle into the center of your large flower shape. Use the rolling pin lightly over the top to fuse them together without distorting the shape. -
Add Details:
Use a modeling tool or a toothpick to gently press radiating lines into the center circle, creating a citrus segment or wheel pattern. Adding a small dot in the very center gives it a finished look.
Scented Surprise
Mix a few drops of essential oil (like lemon or lavender) into the clay before baking for coasters that release a faint scent when warm mugs sit on them.
Step 3: Baking and Finishing
-
Smooth the Edges:
Dip your finger in a little bit of water (or baby oil for polymer clay) and run it along the cut edges to smooth out any roughness before baking. -
Bake:
Transfer the parchment paper with your flowers onto a baking sheet. Bake according to your clay package instructions—usually around 275°F (135°C) for 15-30 minutes depending on thickness. -
Cool Down:
Allow the coasters to cool completely on a flat surface. Weigh them down with a heavy book while cooling if you notice any slight curling. -
Sand for Smoothness:
Once fully cool, use fine-grit sandpaper to buff the edges and surface lightly. This exposes the speckles more clearly and gives the piece a professional matte feel. -
Seal:
If these will be used with cold drinks that “sweat,” apply a thin coat of matte varnish to protect the clay from moisture stains.
Stack your finished creation on the coffee table for a permanent bloom that’s as functional as it is beautiful

TRACK YOUR CERAMIC JOURNEY
Capture glaze tests, firing details, and creative progress—all in one simple printable. Make your projects easier to repeat and improve.
Mini Dino Fossil Impressions
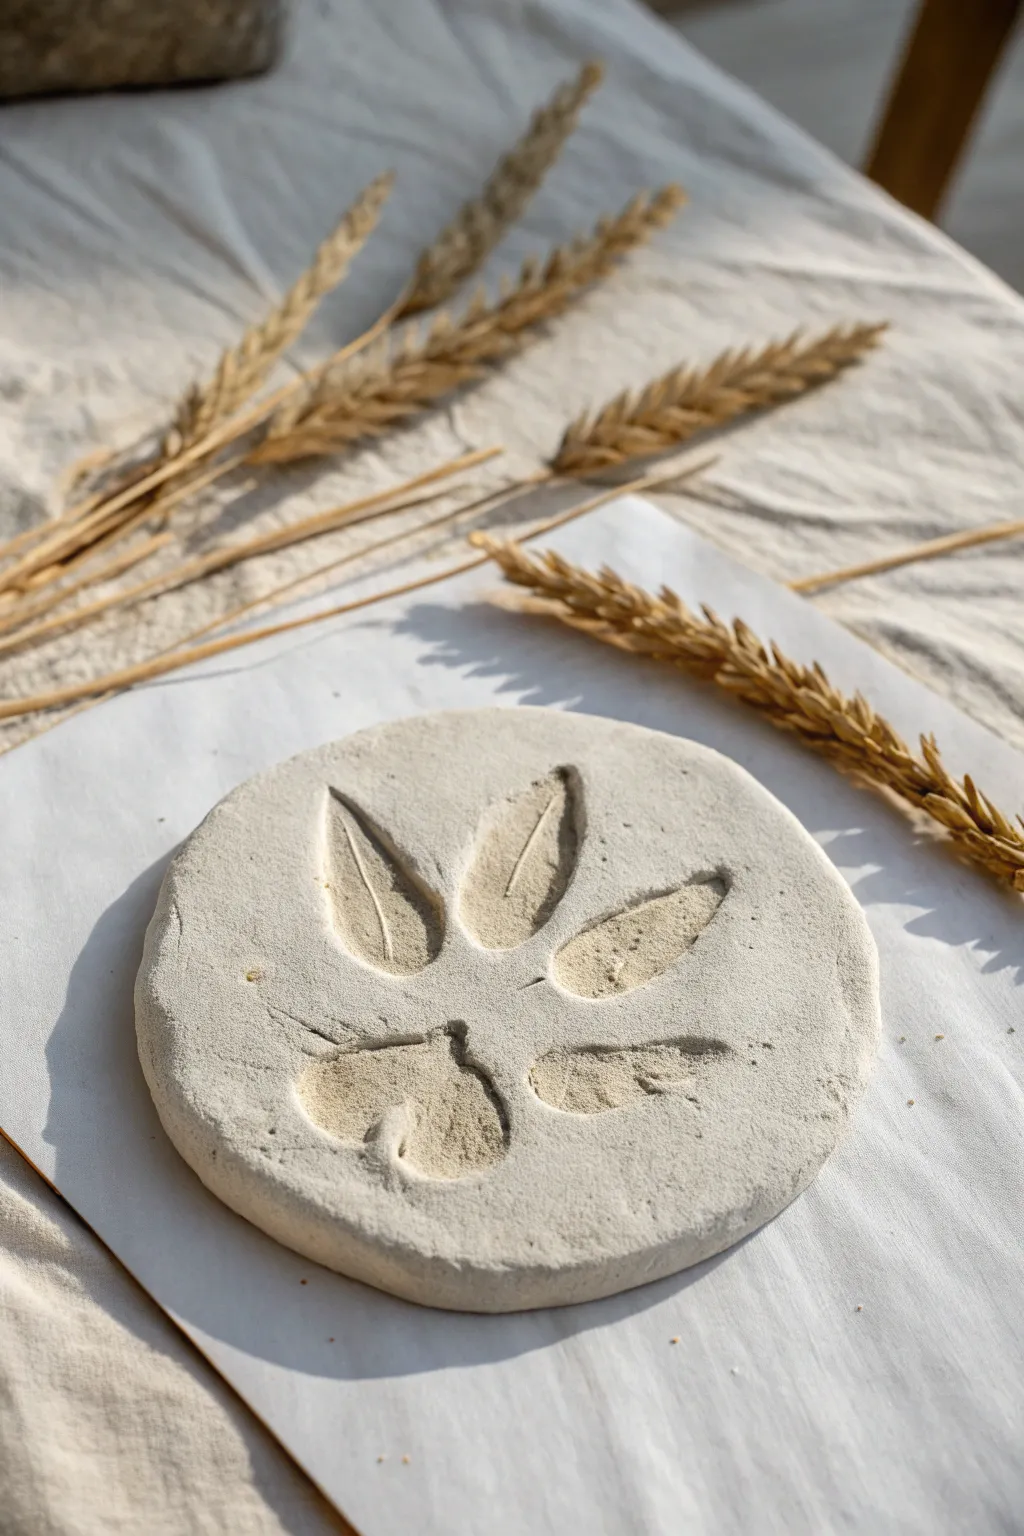
This rustic and charming project captures the delicate details of nature in a simple round of air-dry clay. By arranging small leaves into a creative pattern, you can simulate a playful fossil or paw print that doubles as earthy decor.
How-To Guide
Materials
- White or light grey air-dry clay
- Rolling pin
- Circle cutter (or a large cup/bowl)
- Small dried leaves (approx. 4-5 narrow ones, plus a wider one)
- Wheat stalks (for texture, optional)
- Parchment paper or non-stick craft mat
- Tweezers (optional, for placement)
Step 1: Preparation and Base
-
Prepare your workspace:
Lay down a sheet of parchment paper or a non-stick craft mat. This prevents the clay from sticking to your table and makes it easy to move the project later without distorting its shape. -
Condition the clay:
Take a handful of air-dry clay and knead it in your hands for a minute or two. The goal is to make it warm, pliable, and free of air bubbles or cracks before you start rolling. -
Form a ball:
Roll your conditioned clay into a smooth ball between your palms. If you notice any distinct creases, smooth them out with a dab of water on your finger. -
Flatten the clay:
Place the ball in the center of your parchment paper. Using the palm of your hand, gently press it down to start flattening it into a thick pancake shape. -
Roll to thickness:
Use your rolling pin to roll the clay out evenly. Aim for a thickness of about 1/4 inch to 1/2 inch. You want it sturdy enough to hold the impression without curling too much as it dries. -
Cut the circle:
Place your circle cutter or the rim of a large glass over the rolled clay. Press down firmly to cut a clean circle, then carefully peel away the excess clay from the outside edge. -
Smooth the edges:
Dip your finger in a tiny bit of water and run it lightly around the cut edge of the circle. This softens the sharp cut line and gives the piece a more finished, stone-like appearance.
Stuck Leaf Help
Leaf stuck? Wait 30 mins for the clay to dry slightly. As the clay shrinks a tiny bit, the leaf often pops loose or becomes easier to peel.
Step 2: Creating the Impressions
-
Plan your design:
Before pressing anything into the clay, lay your chosen leaves gently on top to test the layout. For the look in the photo, arrange four narrow leaves in a fan shape at the top and one wider leaf at the bottom to mimic a paw print. -
Position the first leaf:
Starting with the center-most upper leaf, place it vein-side down onto the clay. I find that the vein side usually creates a deeper, more defined texture. -
Press gently:
Use your finger or the rolling pin to gently press the leaf into the clay surface. You want it flush with the surface but not buried too deep. -
Add the side leaves:
Position the remaining narrow leaves on either side of the center one, radiating outward slightly. Press each one down firmly to ensure the stem and tip make contact. -
Place the ‘palm’ leaf:
Take your wider, possibly heart-shaped leaf and place it at the bottom center of the arrangement. This anchors the design and completes the paw-print illusion. -
Roll over the arrangement:
Once all leaves are in place, take your rolling pin and do one single, firm pass over the entire design. This ensures an even impression depth across all the botanical elements. -
Remove the botanicals:
Carefully lift the edge of each leaf using your fingernail or tweezers. Peel them away slowly to reveal the intricate imprint left behind in the clay. -
Check for debris:
If any small pieces of leaf broke off and stuck in the clay, use your tweezers or a needle tool to gently pick them out without marring the impression.
Ancient Art
For a darker fossil look, mix coffee grounds into your clay before rolling, or do a light brown acrylic wash over the dried piece.
Step 3: Finishing Up
-
Final smoothing:
Inspect the surface one last time. If the removal process created any rough ridges around the indentation, lightly tap them down with a smooth fingertip. -
Drying setup:
Leave the clay on the parchment paper to dry in a cool, dry place. Avoid direct sunlight which can cause cracking. -
Flip halfway through:
After about 24 hours, carefully flip the disk over so the bottom can dry evenly. This helps prevent the edges from curling upward.
Once fully dry, you will have a beautiful botanical keepsake ready to display on a shelf or use as a unique coaster
Space Rockets Kids Can Build
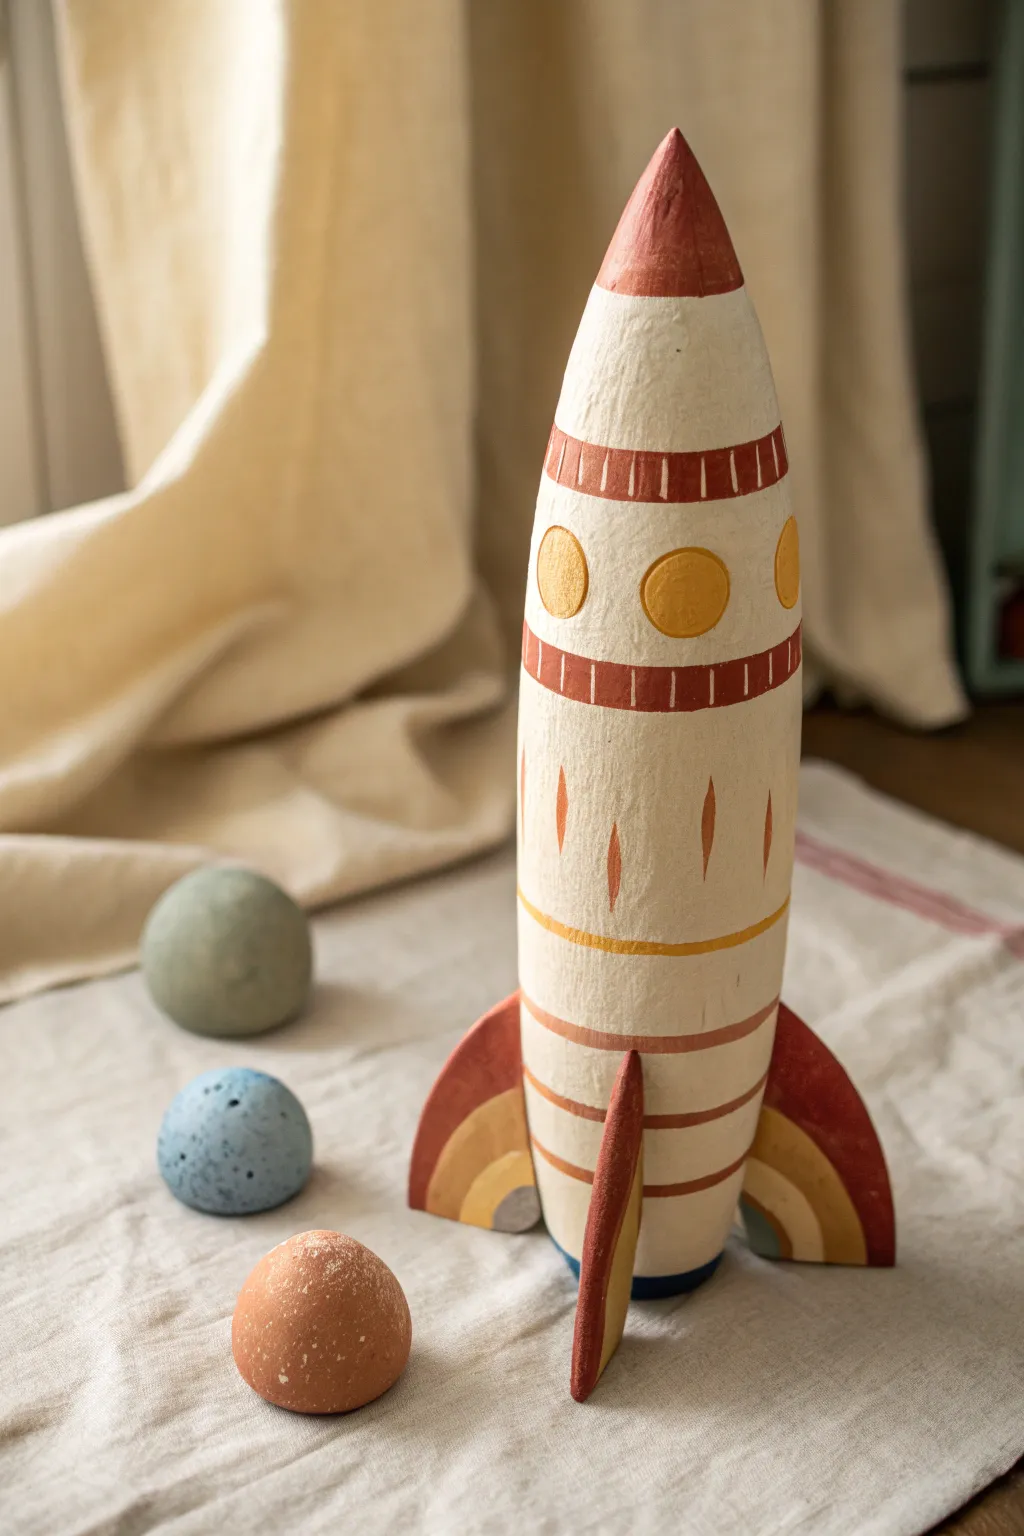
Blast off into creativity with this charming, vintage-style rocket ship made entirely from air-dry clay. Its warm, earthy color palette and simple geometric shapes make it a timeless piece of decor for a child’s shelves.
Step-by-Step
Materials
- Air-dry clay (white or natural)
- Acrylic paints (cream/off-white, terracotta red, mustard yellow, dark teal/grey)
- Paintbrushes (flat shader and fine liner)
- Water cup and paper towels
- Rolling pin
- Clay sculpting tools or a butter knife
- Cardboard (for fin templates, optional)
- Fine-grit sandpaper
- Matte varnish (optional)
Step 1: Shaping the Fuselage
-
Form the main body:
Start with a large chunk of clay, kneading it until soft. Roll it into a thick cylinder between your hands, approximately 10-12 inches tall, tapering slightly towards the top. -
Create the nose cone:
Gently pinch and smooth the top of the cylinder to form a pointed, conical nose. Step back occasionally to ensure the rocket is symmetrical. -
Smooth the surface:
Dip your fingers in a little water and run them over the clay to smooth out bumps or cracks. I like to spend a little extra time here to get a really professional finish before drying. -
Flatten the base:
Tap the bottom of the rocket firmly onto your work surface to create a flat, stable base so it stands upright on its own.
Cracks happen!
If small cracks appear as the clay dries, don’t panic. Mix a tiny bit of fresh clay with water to make a paste and fill the cracks, then smooth over.
Step 2: Adding Fins and Planets
-
Roll out clay for fins:
Roll a smaller piece of clay flat, about 1/4 inch thick. Use a knife to cut out three identical fin shapes—they should look like quarter-circles or shark fins. -
Attach the fins:
Score (scratch) the back edge of each fin and the spot on the rocket where they will attach. Apply a dab of water or slip (clay and water mix) and press them firmly onto the lower body. -
Blend the seams:
Use a sculpting tool or your finger to smooth the clay where the fins meet the body, ensuring a strong bond so they don’t pop off later. -
Sculpt the planets:
Roll three small balls of leftover clay to create the accompanying planets shown in the image. Keep them roughly golf-ball sized. -
Let it dry completely:
Set the rocket and planets in a safe, dry place. Depending on humidity and thickness, this can take 24 to 48 hours to fully harden.
Smoother striping
For cleaner paint lines on the rocket body, you can wrap a rubber band around the sculpture to use as a painting guide before committing with the brush.
Step 3: Painting the Details
-
Base coat:
Paint the entire rocket body with a creamy off-white acrylic paint. You may need two coats for opaque coverage. -
Paint the nose cone:
Paint the very tip of the rocket with a muted terracotta red. Create a clean line where the red meets the cream body. -
Add decorative bands:
Using the terracotta paint, add two horizontal bands around the upper portion of the rocket. Inside these bands, paint small vertical tick marks using the cream base color for a tribal pattern look. -
Paint the portholes:
Mix a mustard yellow tone and paint three circular portholes between the decorative red bands. -
Create vertical accents:
Paint small, elongated diamond shapes or dashes in terracotta red around the middle section of the rocket body. -
Stripe the lower body:
From the middle downwards, paint thin horizontal rings in alternating mustard yellow and terracotta. Keep the lines hand-painted and organic rather than perfectly straight. -
Detail the fins:
Paint the fins solid terracotta red. Once dry, add a mustard yellow arch on the inside face of each fin. -
Color the planets:
Paint your clay spheres in solid, earthy tones like slate blue, terracotta, and soft grey to complement the rocket. -
Seal the project:
Once all paint is bone dry, apply a layer of matte varnish to protect your masterpiece from dust and handling.
Display your fleet on a shelf or windowsill for a touch of interplanetary charm
Easy Clay Jewelry Charms
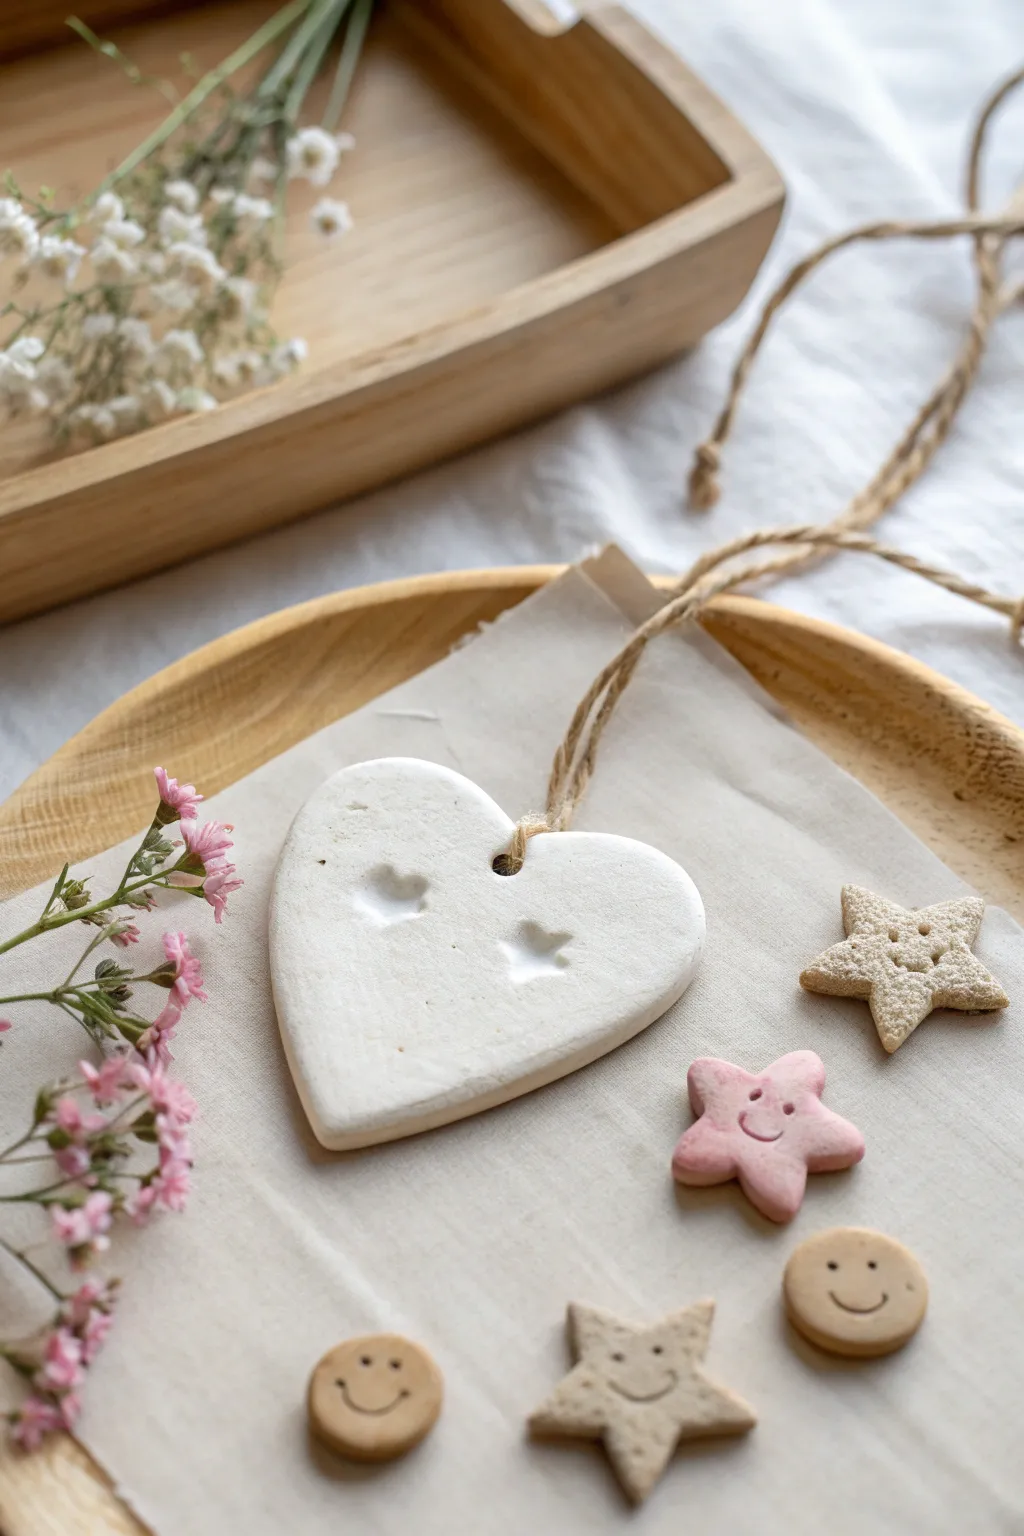
Create a collection of adorable clay charms featuring a large rustic heart pendant and cheerful miniature smileys. This project uses simple air-dry or polymer clay to make tangible keepsakes perfect for necklaces or decorative accents.
How-To Guide
Materials
- White air-dry clay or polymer clay
- Rolling pin
- Parchment paper or craft mat
- Heart-shaped cookie cutter (medium/large)
- Small star-shaped cookie cutter (mini)
- Small circle cutter (or a bottle cap)
- Texture tool or toothpick
- Straw or skewer (for poking holes)
- Jute twine or ribbon
- Optional: Pink acrylic paint or colored clay
- Sandpaper (fine grit)
Step 1: Prepping and Rolling
-
Prepare your workspace:
Lay down a sheet of parchment paper over a flat surface. This prevents the clay from sticking and makes it easier to lift your delicate shapes later. -
Condition the clay:
Take a handful of white clay and knead it in your hands until it feels soft, warm, and pliable. If you want to make the pink star shown in the photo, mix a tiny drop of pink paint or a bit of red clay into a small portion of white clay now. -
Roll it out:
Use your rolling pin to flatten the white clay into an even slab. Aim for a thickness of about 1/4 inch (6mm) so the heart pendant feels substantial but not too heavy.
Cracking Clay?
If using air-dry clay, cracks often specific drying too fast. Keep them away from direct heat or sunlight. Fix minor cracks by smoothing a water-clay slurry over them.
Step 2: Shaping the Heart Pendant
-
Cut the heart:
Press your medium or large heart cutter firmly into the white clay slab. Give it a little wiggle to ensure a clean cut, then lift the cutter and peel away the excess clay. -
Smooth the edges:
Dip your finger in a little bit of water (if using air-dry clay) and gently run it along the cut edges of the heart to smooth out any roughness. -
Add star impressions:
Take your mini star cutter or a small star-shaped stamp. Gently press it into the surface of the heart to create indented star shapes, but do not push all the way through the clay. -
Create the hanging hole:
Use a straw or a skewer to poke a hole near the top center of the heart (at the ‘V’ dip). Make sure the hole is wide enough for your twine to pass through later.
Step 3: Creating Mini Smileys
-
Roll thinner clay:
Roll out your remaining white, tan, or pink clay slightly thinner than the heart, perhaps around 1/8 inch (3mm). -
Cut small shapes:
Use small star cutters and circle cutters (or bottle caps) to punch out several miniature shapes. -
Add the eyes:
Take a toothpick or a small dotting tool. Poke two tiny holes into each shape to create the eyes. I find poking straight down and pulling straight up keeps the holes clean. -
Carve the smile:
Use the edge of a spoon, a straw cut in half, or a clay carving tool to press a curved smile shape underneath the eyes. -
Texture the stars (optional):
For the rustic look seen on the tan star, take a stiff-bristled toothbrush or a ball of aluminum foil and tap it gently over the surface to create a stone-like texture.
Make it Scented
Knead a drop of essential oil into the air-dry clay before rolling. Or, for finished terracotta keepsakes, add a drop of oil to the back—the porous clay acts as a diffuser.
Step 4: Finishing Up
-
Let them dry:
Arrange all your pieces on a clean sheet of parchment paper. If using air-dry clay, let them sit for 24-48 hours, flipping them halfway through. If using polymer clay, bake according to the package instructions. -
Sand for perfection:
Once fully dry and hard, inspect the edges. Use a piece of fine-grit sandpaper to gently buff away any sharp bits or uneven areas. -
Add the hanger:
Cut a length of jute twine. Fold it in half to create a loop, thread the folded end through the hole in the heart, and pull the loose tails through the loop to secure it with a lark’s head knot.
Now you have a charming set of handmade accessories ready to be worn or gifted to a friend
Story Stones With Clay Characters
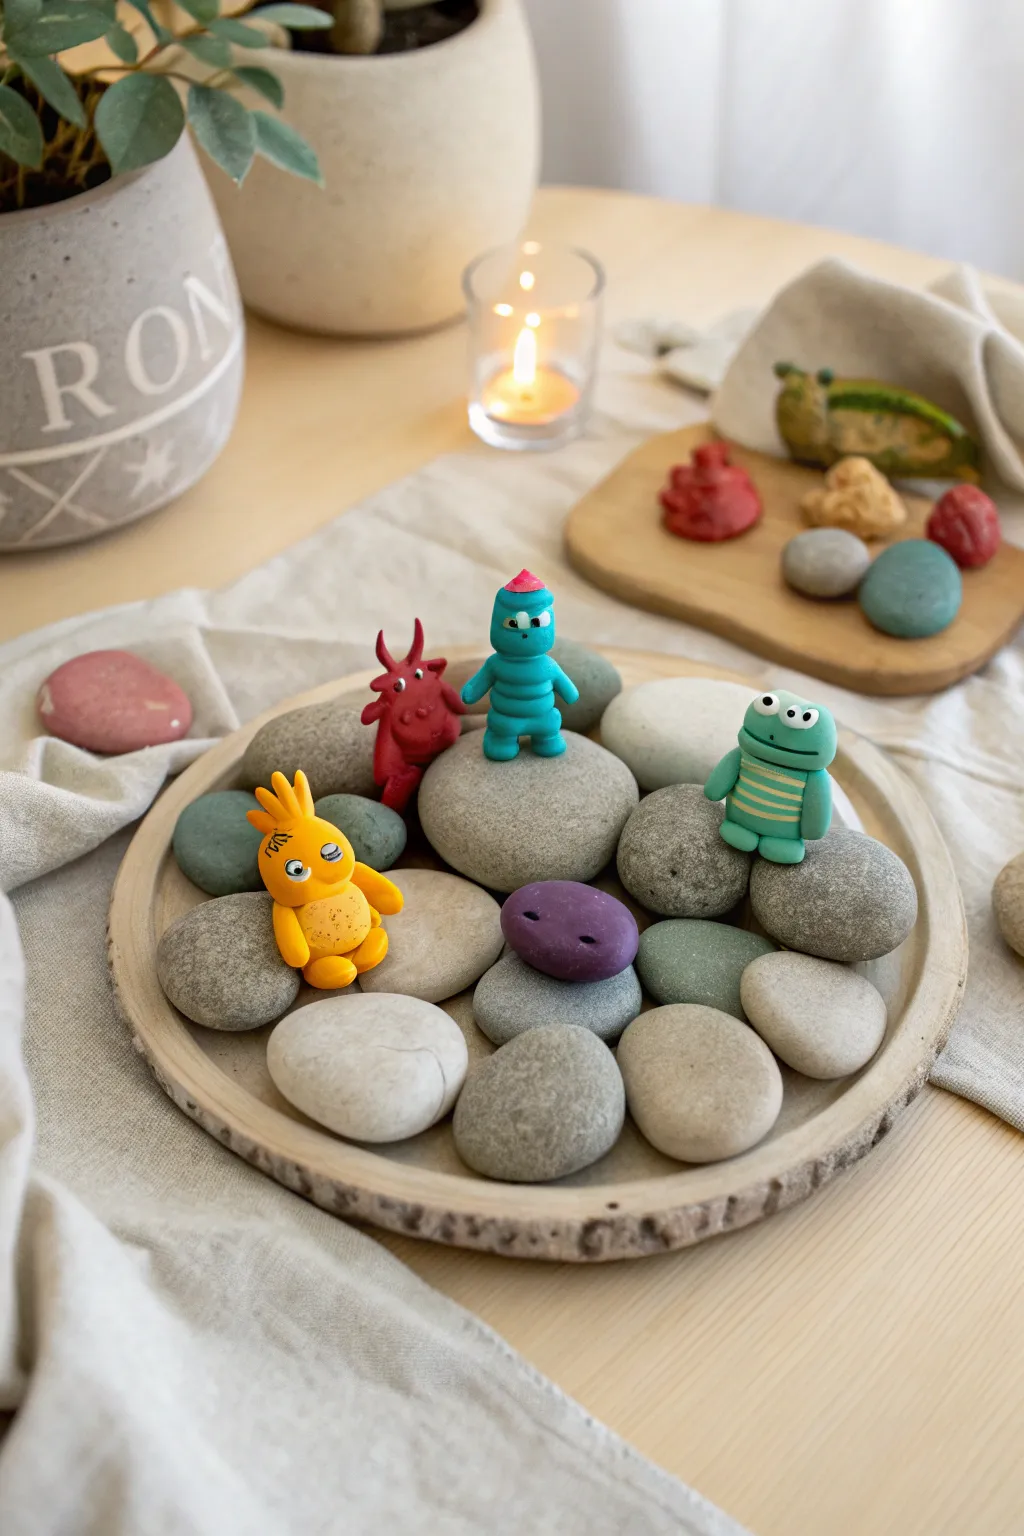
Bring bedtime stories to life with these adorable, miniature clay characters designed to perch perfectly on smooth river rocks. This project combines the fun of sculpting with the tactile nature of stone play, creating an interactive storytelling set that kids will adore.
How-To Guide
Materials
- Polymer clay (yellow, red, light blue, teal green, purple, white, black, pink)
- Smooth river stones (various sizes, clean and dry)
- Clay sculpting tools (needle tool, small ball stylus)
- Baking sheet and parchment paper
- Oven (for baking polymer clay)
- Strong craft glue (optional, for permanent attachment)
- Wooden tray or slice (for display)
Step 1: Sculpting the Yellow Bird
-
Form the body:
Start by rolling a medium-sized ball of yellow clay for the torso and a slightly smaller one for the head. Gently press them together to form a pear-like shape. -
Add the limbs:
Roll two small sausage shapes for legs and attach them to the bottom front so the bird sits. Add two small balls for feet. Create wing shapes by flattening teardrops of clay and pressing them to the sides. -
Create the face:
Top the head with three small spikes of yellow clay for hair. Add two white circles for eyes with tiny black dots for pupils. Use a needle tool to etch lively eyebrows and a beak.
Step 2: Crafting the Blue Alien
-
Build the segmented body:
Roll four or five spheres of light blue clay, graduating from larger at the bottom to smaller at the top. Stack them to create a ribbed, robot-like body. -
Shape the head:
Roll a smooth cylinder for the head and attach it to the top of the stack. Give it a tiny pink hat by shaping a small cone and placing it squarely on top. -
Detail features:
Add two small snakes of clay for arms. For the face, press in two white eye circles with black pupils and use a tool to indents a simple, straight mouth expression.
Sticky Situation?
If the raw clay isn’t sticking together well, use a tiny dab of liquid polymer clay or ‘Bake & Bond’ between the parts before baking to ensure they don’t fall apart later.
Step 3: Making the Green Frog
-
Shape the base:
Create a stout, rounded rectangle from teal green clay. This will serve as both the head and body combined. -
Stripe the belly:
Roll very thin threads of yellow or beige clay. Gently press them horizontally across the frog’s belly area to create stripes. -
Add limbs and eyes:
Attach two simple cylinder arms to the sides. Use a ball tool to press two indentations on top of the head, then place two white balls inside for protruding frog eyes.
Add Sparkle
Mix a tiny amount of mica powder or glitter into the clay before sculpting for a magical, shimmering effect that catches the light on your story stones.
Step 4: Forming the Red Devil & Purple Pebble
-
Sculpt the devil:
Mold red clay into a round, chubby body shape with small pointed ears or horns. Add tiny arms and stick legs so it can stand or sit. -
Make the pebble critter:
Flatten a piece of purple clay into an oval, stone-like shape. Use a needle tool to poke two simple holes for eyes to make it look like a sleepy rock monster.
Step 5: Baking and Assembly
-
Prepare for baking:
Place all your finished characters on a baking sheet lined with parchment paper. I like to double-check that no limbs have drooped before they go heavily into the heat. -
Bake the clay:
Bake according to your specific polymer clay package instructions (usually around 275°F or 135°C for 15-30 minutes). Let them cool completely. -
Secure to stones:
Once cool, arrange your characters on the river stones. You can leave them loose for open-ended play or use a dab of strong glue to permanently fix them to their rocky bases. -
Set the scene:
Arrange the stones on a wooden tray or charger plate to create a little community for your new friends.
Now you have a charming cast of characters ready for their next big adventure on the play mat