If you’ve been craving easy, good-looking clay home decor ideas, you’re in the right headspace—cozy, creative, and totally doable. I pulled together my favorite projects that work beautifully with air-dry clay or polymer clay, so you can style your space with pieces that feel truly handmade.
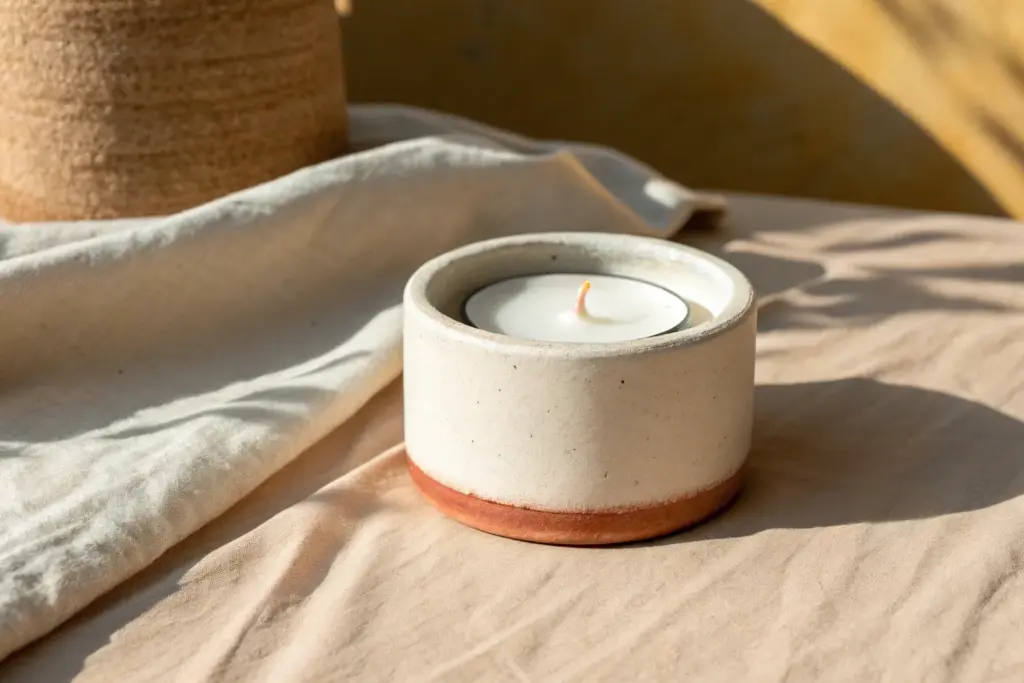
Classic Trinket Dish Catchall
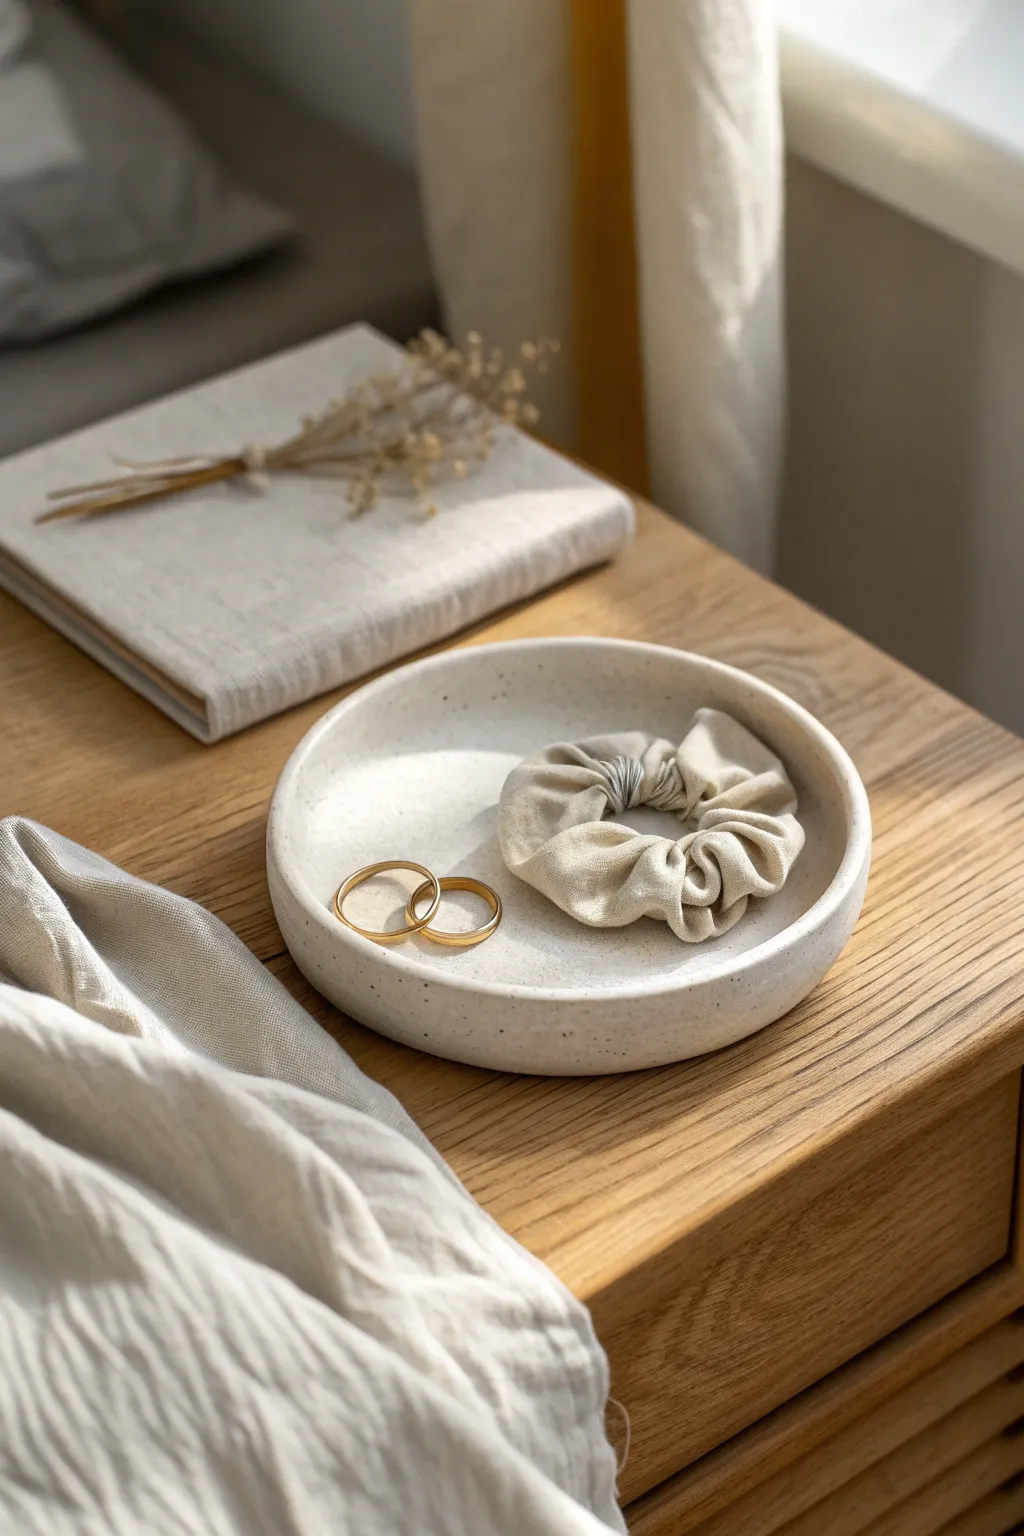
This minimalist catchall offers a serene spot for your daily essentials, featuring a creamy, stone-like texture that mimics high-end ceramic finishes. Its shallow walls and subtle speckling create an understated elegance perfect for holding delicate jewelry or soft accessories.
Step-by-Step Tutorial
Materials
- Air-dry clay (white)
- Acrylic paint (warm cream/off-white)
- Acrylic paint (dark brown or black)
- Sandpaper (fine grit)
- Rolling pin
- Active rolling guides or two wooden ruler sticks (approx. 1/4 inch thick)
- Circular template (like a bowl or small plate, approx. 5-6 inches)
- Clay knife or craft blade
- Small sponge
- Old toothbrush
- Water in a small cup
- Matte varnish or sealant
Step 1: Shaping the Base
-
Prepare the Clay:
Begin by taking a generous handful of white air-dry clay. Knead it in your hands for several minutes to warm it up and remove any air bubbles, ensuring the texture becomes smooth and pliable. -
Roll out the Slab:
Place your clay on a flat working surface. Position your rolling guides or rulers on either side of the clay ball to ensure an even thickness. Roll the clay out into a smooth slab that is roughly 1/4 inch thick. -
Cut the Circle:
Lay your circular template gently on top of the rolled slab. Using a clay knife or craft blade held vertically, trace around the template to cut out a perfect circle. Peel away the excess clay and set it aside for future projects. -
Smooth the Edges:
Dip your finger lightly in water and run it along the cut edge of the circle. This smooths out any harsh drag marks from the knife and rounds off the sharp corners slightly.
Stone Effect
Mix a tiny pinch of clean sand or baking soda into your cream paint before applying. This adds a physical grit that makes the faux-stone finish feel incredibly realistic.
Step 2: Forming the Walls
-
Create the Lip:
To form the raised edge, you don’t need to add a separate coil. Instead, gently curve the outer half-inch of the circle upward. Use your thumb on the inside and fingers on the outside to pinch and lift the clay, creating a shallow wall. -
Define the Undercut:
Refine the shape by pressing slightly at the internal base of the wall, ensuring the transition from the flat bottom to the lifted side is gradual but distinct. The wall should stand about 1/2 inch to 3/4 inch high. -
Level the Rim:
Place the dish on a flat surface and look at it from eye level. Tap gently on the rim with a flat object or your fingers to ensure the height is even all the way around. I find rotation helps spotting uneven areas here. -
Final Smoothing:
Use a barely damp sponge to wipe the entire surface of the dish. This eliminates fingerprints and tiny imperfections. Be careful not to use too much water, as this can weaken the clay.
Step 3: Finishing and Painting
-
Dry Completely:
Allow the dish to dry in a cool, dry place for 24 to 48 hours. Flip it occasionally to ensure the bottom center dries evenly and doesn’t warp. -
Sand for Texture:
Once fully dry and hard, use fine-grit sandpaper to buff the entire piece. Focus on the rim to make it soft to the touch. It doesn’t need to be glass-smooth; a little texture mimics the stone look. -
Apply Base Color:
Mix a warm cream acrylic paint. Apply two thin coats to the entire dish, allowing the first coat to dry before applying the second. This creates that soft, milky porcelain appearance. -
Create the Speckles:
Dilute a tiny amount of dark brown or black paint with water until it’s very fluid. Dip an old toothbrush into this mixture. -
Splatter Effect:
Hold the toothbrush over the dish and run your thumb across the bristles to flick tiny droplets of paint onto the surface. Practice on a paper towel first to control the size of the speckles. -
Seal the Dish:
After the paint is bone dry, apply a matte varnish. This protects the paint from chipping and gives the dish a finished, professional quality without making it overly shiny.
Rim Upgrade
Paint the very top edge of the rim with liquid gold leaf or metallic gold paint for a touch of luxury that contrasts beautifully with the rustic speckles.
Place your new dish on your nightstand to keep your favorite trinkets safe and stylishly displayed


Minimal Clay Coasters With Texture
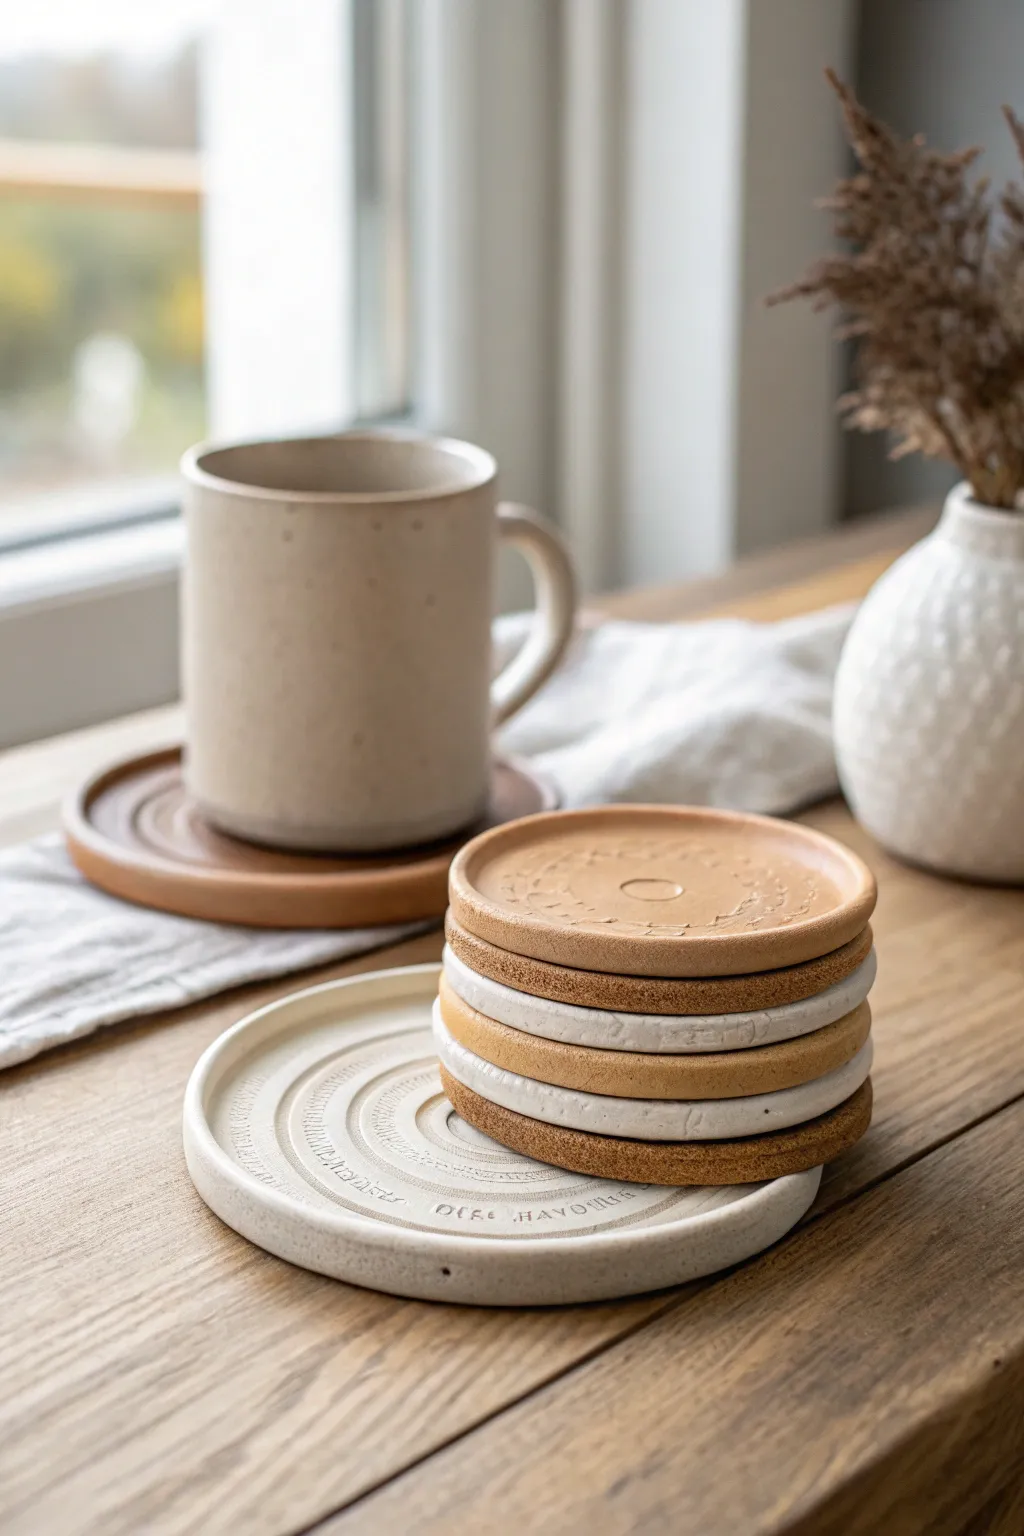
Bring a touch of minimalist charm to your coffee table with this stackable set of textured clay coasters. Combining warm earthen tones with subtle stamped patterns creates a functional piece of art that feels both modern and grounded.
Detailed Instructions
Materials
- Air-dry clay (terracotta and white/stone colors)
- Rolling pin
- Circle cutters (various sizes: approx. 3.5″ and 5″)
- Texture tools (stamps, letter set, lace, or textured fabrics)
- Fine-grit sandpaper
- Sponge and water bowl
- Matte acrylic varnish or clay sealant
- Potter’s needle tool or toothpick
- Canvas mat or parchment paper (for rolling)
Step 1: Preparing and Shaping
-
Condition the Clay:
Begin by kneading your air-dry clay until it is soft and warm. For the stacked look in the photo, you will want a mix of colors, so prepare both terracotta and white or light grey clay separately. I like to marble a small amount of white into the terracotta for a natural, stony look. -
Roll Out the Slab:
Place the clay on your canvas mat or parchment paper. Using the rolling pin, roll the clay out to an even thickness of about 1/4 inch (6mm). Try to keep the pressure consistent so the coasters dry flat and even. -
Cut the Base Tray:
Using your largest circle cutter (about 5-6 inches), press firmly into the rolled slab to create the larger base tray shown at the bottom of the stack. Remove the excess clay from around the edges. -
Cut the Coasters:
Roll out more clay (alternating colors for variety) and use the smaller 3.5-inch cutter to create 4-6 individual coasters. These will form the stack that sits on top of the base tray.
Warping Woes?
If coasters curl up while drying, flip them over every few hours. You can also place a lightweight book on top of them (once they are leather-hard) to force them flat.
Step 2: Adding Texture and Detail
-
Smooth the Edges:
Dip your finger or a small sponge into water and gently run it around the cut edges of your circles. This rounds off sharp angles and ensures a professional finish before you add texture. -
Create the Rim on the Base:
For the large base tray, you need a slightly raised rim. You can achieve this by gently pinching the outer ¼ inch of the circle upwards, or by scoring the edge and attaching a thin clay coil, smoothing it down until seamless. -
Stamp Concentric Circles:
To recreate the ridged look on the base tray, place the entire tray on a potter’s wheel (if available), or simply center a slightly smaller plate or bowl on top of the damp clay and press lightly to imprint a perfect ring. Repeat with smaller objects to create concentric circles. -
Add Decorative Text:
Using a small letter stamp set, press a meaningful phrase or random letters into the clay surface. In the image, the text follows the curve of the coaster. To do this, lightly trace a guideline with a needle tool before stamping, then smooth the line away. -
Imprint Center Designs:
On the smaller coasters, vary the textures. For some, press a small geometric stamp or a textured button directly into the center. For others, use the needle tool to lightly scratch rustic hatch marks around the perimeter. -
Stack Check:
Before drying, gently stack the damp coasters (separated by small pieces of parchment paper so they don’t stick) to ensure they sit flat against each other. Adjust any warping now while the clay is malleable.
Step 3: Finishing Touches
-
Slow Drying:
Place all pieces on a flat board to dry. Cover them loosely with a plastic bag for the first 24 hours to prevent cracking from drying too quickly. After a day, remove the plastic and let them air dry completely for another 24-48 hours. -
Sanding:
Once bone dry, take your fine-grit sandpaper and lightly buff the rims and surfaces. Focus on any rough spots created during the stamping process. Wipe away the dust with a barely damp cloth. -
Sealing the Clay:
This is crucial for coasters. Apply a thin coat of matte water-resistant sealant or varnish. Let it dry, then apply a second coat. This ensures that condensation from cold mugs won’t turn your clay back into mud. -
Final Assembly:
Arrange your finished, sealed coasters in an alternating color stack on top of the large base tray to complete the aesthetic.
Make it cork-bottomed
Glue thin circles of cork sheet to the bottom of each coaster. This prevents scratching your table and adds a professional, non-slip feel to the stack.
Now you have a stunning, handmade set of coasters ready to protect your surfaces in style


Small Planters for Succulents
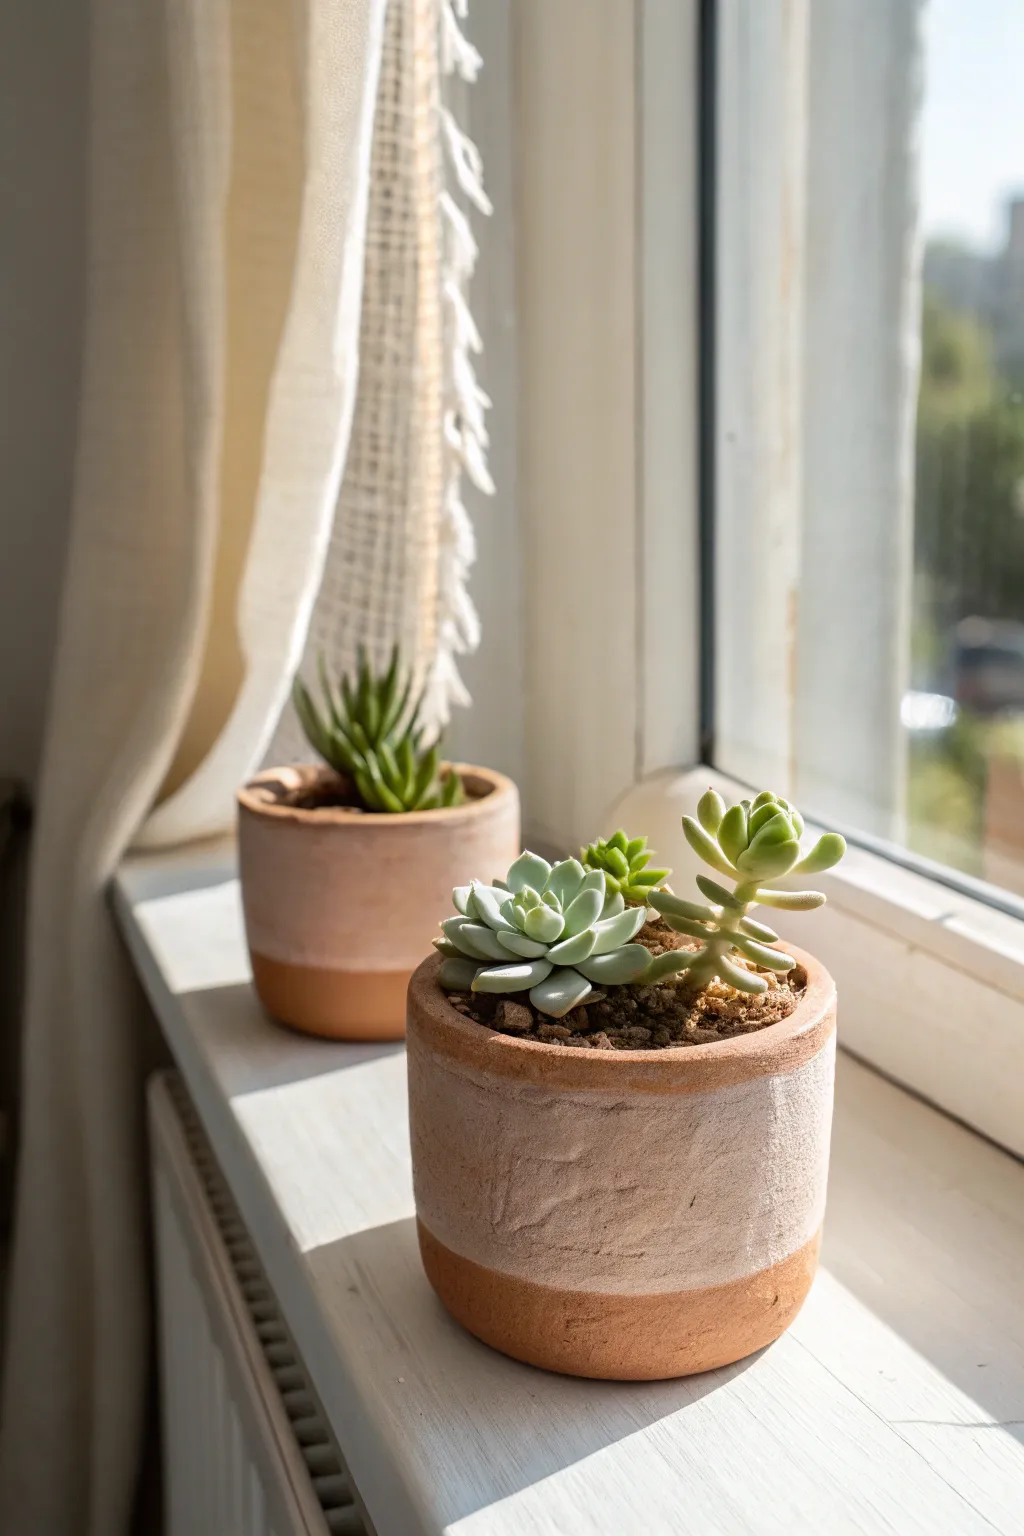
Bring earthy charm to your windowsill with these textured, two-tone succulent planters. This project transforms standard terracotta into a bespoke decor piece using a simple resist technique and textured paint application to achieve that lovely weathered look.
How-To Guide
Materials
- Small terracotta pots (clean and dry)
- Painter’s tape or masking tape
- White or cream chalk paint (or matte acrylic)
- Baking soda (to add texture)
- Small mixing bowl
- Medium-sized flat paintbrush
- Paper towel or rag
- Clear matte sealer spray (optional)
- Succulent potting mix
- Small succulents
Step 1: Preparation
-
Clean surface:
Begin by wiping down your terracotta pots with a damp cloth to remove any dust or debris. Let them dry completely, as moisture will prevent the tape from sticking properly. -
Apply the resist line:
Decide where you want your color shift to happen. Aim for the bottom third of the pot to remain natural. -
Tape placement:
Wrap a strip of painter’s tape horizontally around the pot at that level. Press the top edge of the tape down firmly with your fingernail to ensure a crisp line later.
Natural Aging Trick
Rub a little damp garden soil over the dried white paint, then wipe it off creates an instant ‘antique’ brownish tint in the crevices.
Step 2: Creating the Mixture
-
Pour the paint:
Pour a small amount of white or cream chalk paint into your mixing bowl. -
Add texture:
Stir in a teaspoon of baking soda. This is the secret ingredient that gives the paint that gritty, stone-like texture seen in the photo. -
Adjust consistency:
Mix until you have a thick paste, similar to fluffy frosting. If it’s too runny, add a pinch more baking soda; if it’s too stiff, add a drop of water.
Paint Peeling Off?
Terracotta is porous. Start with a very thin primer coat of watered-down acrylic paint to seal the surface before adding the thick texture layer.
Step 3: Painting & Finishing
-
First coat application:
Using your flat brush, apply the paint mixture to the top section of the pot, painting right over the tape edge. -
Stippling technique:
Instead of smooth strokes, dab the brush straight up and down (stipple) to enhance the rough, concrete-like texture. -
Partial drying:
Let the first coat dry for about 10-15 minutes until it is tacky but not fully set. -
Second coat:
Apply a second, thinner layer if you want more coverage, continuing the stippling motion to build up dimension. -
Distressing (optional):
I prefer to take a dry paper towel and verify lightly blot areas of the wet paint to lift a tiny bit of color, revealing hints of the clay underneath for an aged look. -
Remove the tape:
While the paint is still slightly damp (don’t wait for it to be bone dry), carefully peel away the painter’s tape. -
Clean the edge:
If any paint bled under the tape, use a damp Q-tip or fingernail to gently scrape it away for a clean line. -
Curing:
Allow the pots to dry completely, ideally overnight, so the baking soda mixture hardens fully.
Step 4: Planting
-
Add drainage:
Place a small shard of broken pottery or a mesh screen over the drainage hole to keep soil in. -
Fill with soil:
Fill the pot about halfway with specific succulent potting mix, which drains better than standard soil. -
Arrange plants:
Gently nestle your succulents into the soil. For the multi-plant look, group a rosette type with a taller distinct variety. -
Top dressing:
Add a final layer of soil around the roots and press down gently to secure the plants.
Enjoy the calm, natural vibe these little pots bring to your favorite sunny corner


Simple Bud Vase for Single Stems
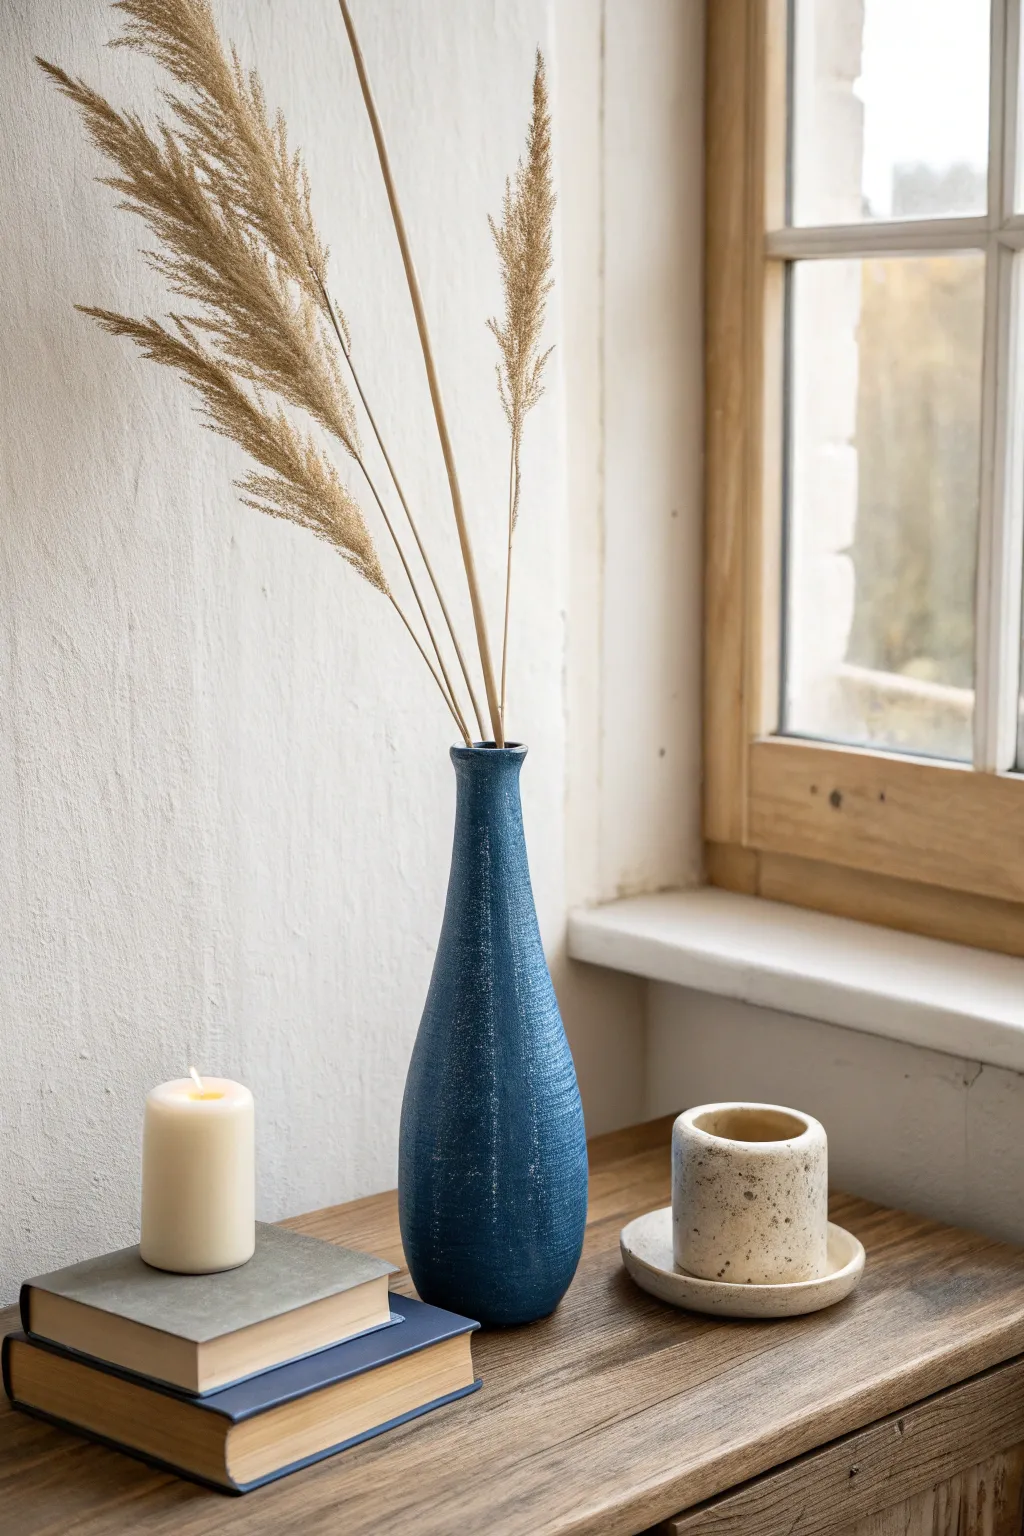
Create a striking focal point with this elegant, slender bud vase that mimics the look of high-end artisan pottery. The deep midnight blue finish and intentionally rough texture give it a sophisticated, organic feel perfect for holding dried pampas grass or single stems.
Step-by-Step Guide
Materials
- Air-dry clay (grey or white, approx. 1kg)
- Rolling pin
- Cutting tool or craft knife
- Slip (clay mixed with water)
- Sponge
- Coarse sandpaper (60 or 80 grit)
- Acrylic paint (Deep Navy Blue or Midnight Blue)
- White or light grey acrylic paint (for dry brushing)
- Matte spray varnish
- PVC pipe or cardboard tube (approx. 1-1.5 inch diameter) for support
- Cling film or plastic wrap
- Paintbrushes (flat brush and stiff bristle brush)
Step 1: Forming the Base Structure
-
Prepare the Mold:
Begin by wrapping your PVC pipe or cardboard tube in plastic wrap. This tube will act as an internal support to ensure your vase stays perfectly straight while forming the neck. Make sure the plastic is smooth to prevent deep creases inside the clay. -
Roll the Slab:
Roll out your air-dry clay on a flat surface to a thickness of about 1/4 inch (6mm). You want a consistent thickness to prevent cracking during the drying phase. -
Cut the Shape:
Cut a rectangular piece of clay tall enough for the neck of the vase, and a separate portion for the bulbous bottom. Unlike a simple cylinder, we are building this in two sections to get that teardrop shape. -
Form the Neck:
Wrap the rectangular clay slab around the covered tube to create the long, slender neck. Score the edges where they meet, apply a little slip, and press firmly to join. Smooth the seam with your finger or a tool until it disappears.
Step 2: Building the Body
-
Create the Pinch Pot Base:
Take a large ball of clay and form a pinch pot for the base. Push your thumb into the center and pinch the walls upwards, aiming for a rounded, organic bulb shape that is slightly wider at the bottom. -
Join the Sections:
Score the bottom rim of your neck cylinder and the top opening of your pinch pot base. Apply slip generously to both scored areas. -
Blend the Seams:
Place the neck onto the base. Using a modeling tool or your thumb, drag clay from the base up onto the neck, and clay from the neck down onto the base. I find using a little water on my finger helps blend this transition smoothly until it looks like one continuous piece. -
Add Texture:
While the clay is still damp but sturdy, use a rough sponge or even a crumpled ball of aluminum foil to gently press texture into the surface. Unlike smooth pottery, we want this surface to feel pitted and organic. -
Form the Rim:
Refine the top opening. You can slightly flare it out or keep it straight, but ensure the rim is thick and substantial, not razor-sharp. -
Initial Drying:
Let the vase sit with the internal tube support for about 2-3 hours until the clay is leather-hard. Then, carefully twist and remove the tube so the interior can dry. -
Full Cure:
Allow the vase to dry completely for 24-48 hours. Turn it occasionally to ensure even airflow.
Seamless Joining
When blending the neck to the base, add a thin ‘coil’ or snake of clay around the seam. Smear this coil completely flat to reinforce the joint and prevent cracking.
Step 3: Finishing and Painting
-
Sand for Imperfection:
Once bone dry, take your coarse sandpaper and scuff the surface vigorously. You aren’t trying to make it smooth; you are trying to enhance the vertical scratchy texture seen in the photo. -
Base Coat Application:
Apply two coats of the deep navy blue acrylic paint. Use a stiffer brush to really work the pigment into all the little pits and texture marks you created. -
Create Depth:
Mix a tiny amount of black into your blue for a second, patchy layer. Dab this randomly around the base and lower section to create a subtle gradient effect. -
Dry Brushing Technique:
Dip a dry stiff-bristled brush into a very small amount of white or light grey paint. Wipe most of it off on a paper towel until the brush is almost clean. -
Highlight the Texture:
Lightly sweep the dry brush horizontally and vertically across the vase. The light paint will catch only on the raised textures, revealing the ‘stone-like’ finish against the dark navy background. -
Seal the Project:
Finish with a coat of matte spray varnish. This protects the paint and unifies the sheen without making it look plastic or glossy.
Stone Effect
Mix a tablespoon of baking soda into your blue acrylic paint. This creates a gritty, stone-like paste that adds incredible physical texture when painted on.
Place your favorite dried reeds inside and enjoy the serene, handcrafted vibe this piece brings to your space

The Complete Guide to Pottery Troubleshooting
Uncover the most common ceramic mistakes—from cracking clay to failed glazes—and learn how to fix them fast.
Arch Taper Candle Holders
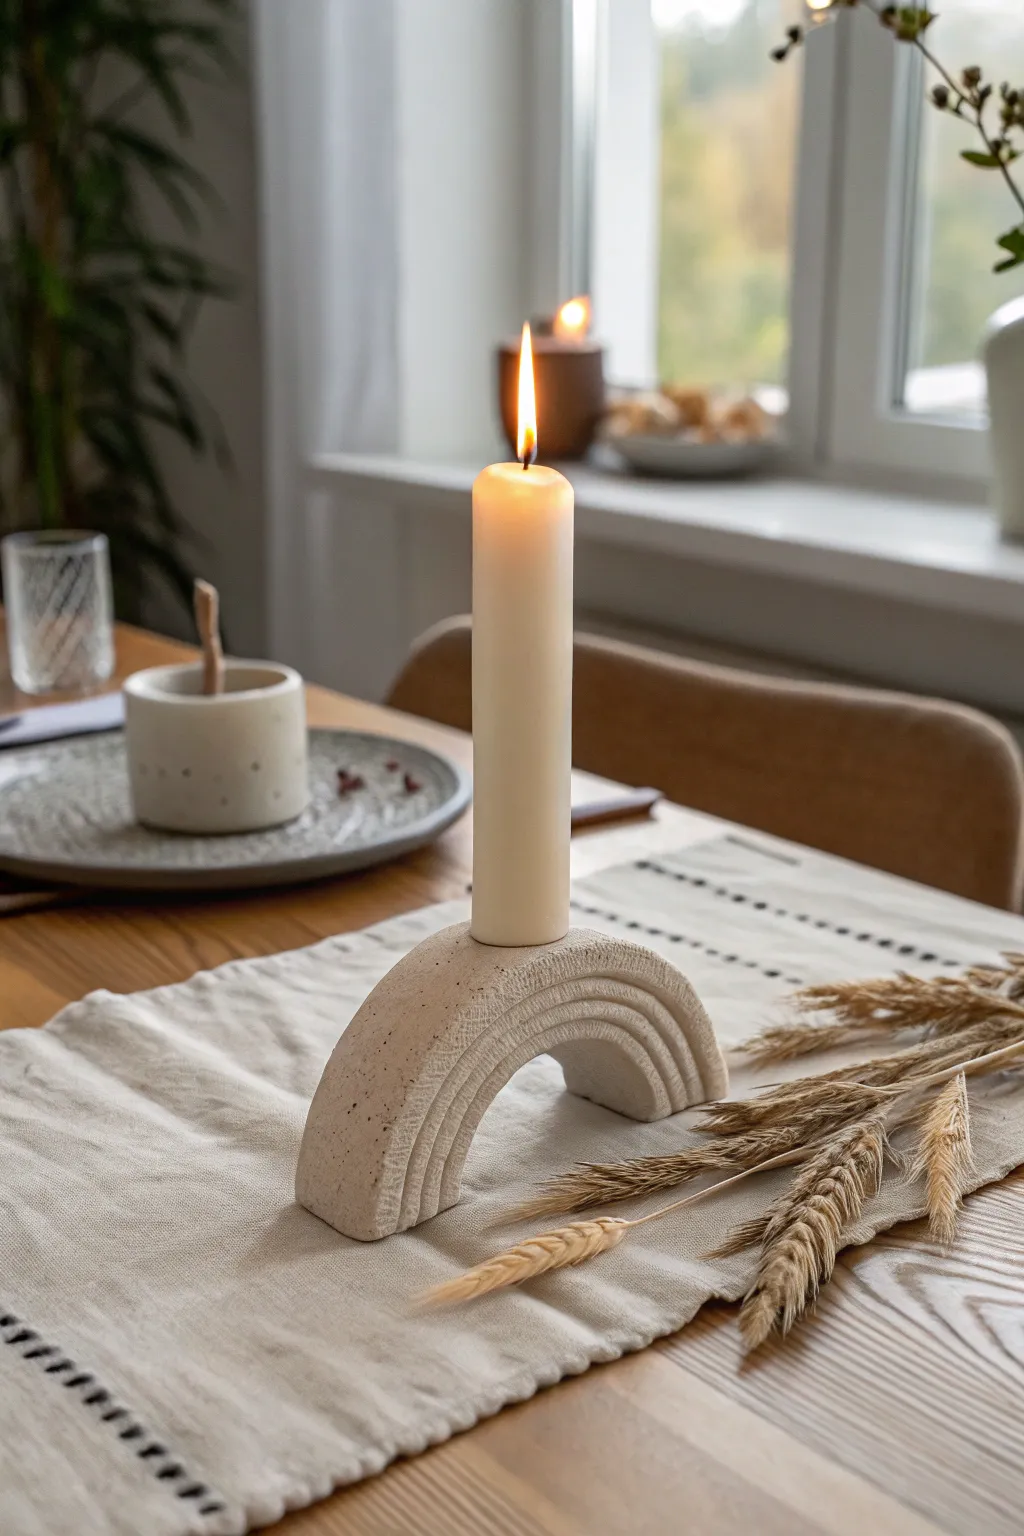
Embrace organic shapes and clean lines with this stunning arched candle holder that doubles as a sculptural centerpiece. Its speckled, stone-like texture brings a grounded, natural warmth to any table setting, perfectly framing a single taper candle.
How-To Guide
Materials
- Speckled stoneware clay or ‘granite’ polymer clay
- Rolling pin
- Sharp clay blade or knife
- Cardboard or stiff paper (for template)
- Parchment paper
- Metal taper candle cup insert (standard size)
- Small bowl or water for smoothing
- Rib tool or old credit card
- Modeling tool or toothpick
- Sanding sponge (fine grit)
Step 1: Shaping the Arch
-
Prepare your template:
Begin by sketching a simple rainbow-style arch on a piece of cardboard. The base should be wide enough to be stable, about 5-6 inches, with a height of roughly 3-4 inches. Cut this shape out to use as your guide. -
Condition the clay:
Take a substantial block of your speckled clay and knead it until it’s pliable and warm. If using polymer clay, this conditioning step is crucial to prevent cracking later. -
Roll out the slab:
Place your clay on parchment paper and roll it into a thick slab. Aim for a thickness of at least 1 inch (2.5 cm). You want this piece to be chunky and substantial to hold the weight of a candle. -
Cut the basic shape:
Lay your cardboard template over the rolled slab. Using your sharp clay blade, cut straight down around the perimeter to create a clean, blocky arch shape. -
Refine the edges:
Remove the excess clay. dampen your finger slightly and run it along the cut edges to soften any sharp corners, but try to keep the overall silhouette somewhat geometric and boxy.
Weighted Stability
If using lightweight polymer clay, embed a small heavy washer or crumpled foil ball inside the base of each ‘leg’ before baking to prevent tipping.
Step 2: Adding Detail & Function
-
Prepare the insert approach:
Decide exactly where the candle will sit at the very top center of the arch. Gently press your metal candle cup insert into the soft clay just enough to leave an impression of its diameter. -
Hollow the socket:
Use a loop tool or a small spoon to carefully scoop out clay within that circle mark. Test the fit frequently with your metal insert until it sits flush with the top surface. -
Secure the cup:
Once the fit is snug, you can either bake/fire the piece with the insert inside (check your clay’s instructions first) or glue it in after finishing. I prefer creating a very tight fit so glue isn’t always necessary. -
Carve the ridges:
To create the structured rainbow look, use a modeling tool or a dull knife to score deep, parallel lines following the curve of the arch on the front face. Create distinct ‘bands’ rather than just scratching the surface. -
Deepen the grooves:
Go back over your scored lines with a slightly wider tool to widen the channels. This creates shadows that emphasize the architectural shape. -
Texture the surface:
If your clay isn’t naturally speckled, you can gently press coarse sand or dried coffee grounds into the surface now. If using stone-effect clay, lightly brush over it with a stiff brush to enhance the matte texture.
Step 3: Finishing Touches
-
Smooth the back:
Turn the piece over carefully. Use a rib tool or credit card to ensure the back is perfectly flat and smooth, erasing any fingerprints from handling. -
Level the base:
Stand the arch up on a flat surface. Press down firmly but gently to ensure the two feet are perfectly level so the candle won’t wobble. -
Cure or Fire:
Bake your piece according to the manufacturer’s directions (for polymer clay) or let it bone dry before kiln firing (for ceramic clay). Slow cooling prevents thermal shock. -
Sand for perfection:
Once fully cured and cooled, use a fine-grit sanding sponge under running water (if polymer/cured) or dry (if bisque) to buff away any sharp burrs or uneven spots on the bottom. -
Final assembly:
Insert your metal candle cup permanently if you haven’t already. Place a taper candle inside to verify it stands straight and true.
Create a Set
Make a matching trio by varying the heights of the arches. Create one tall, narrow arch and one shorter, wider arch to display alongside this one.
Place your new architectural candle holder on a linen runner and enjoy the cozy glow
Tea Light Holders That Glow
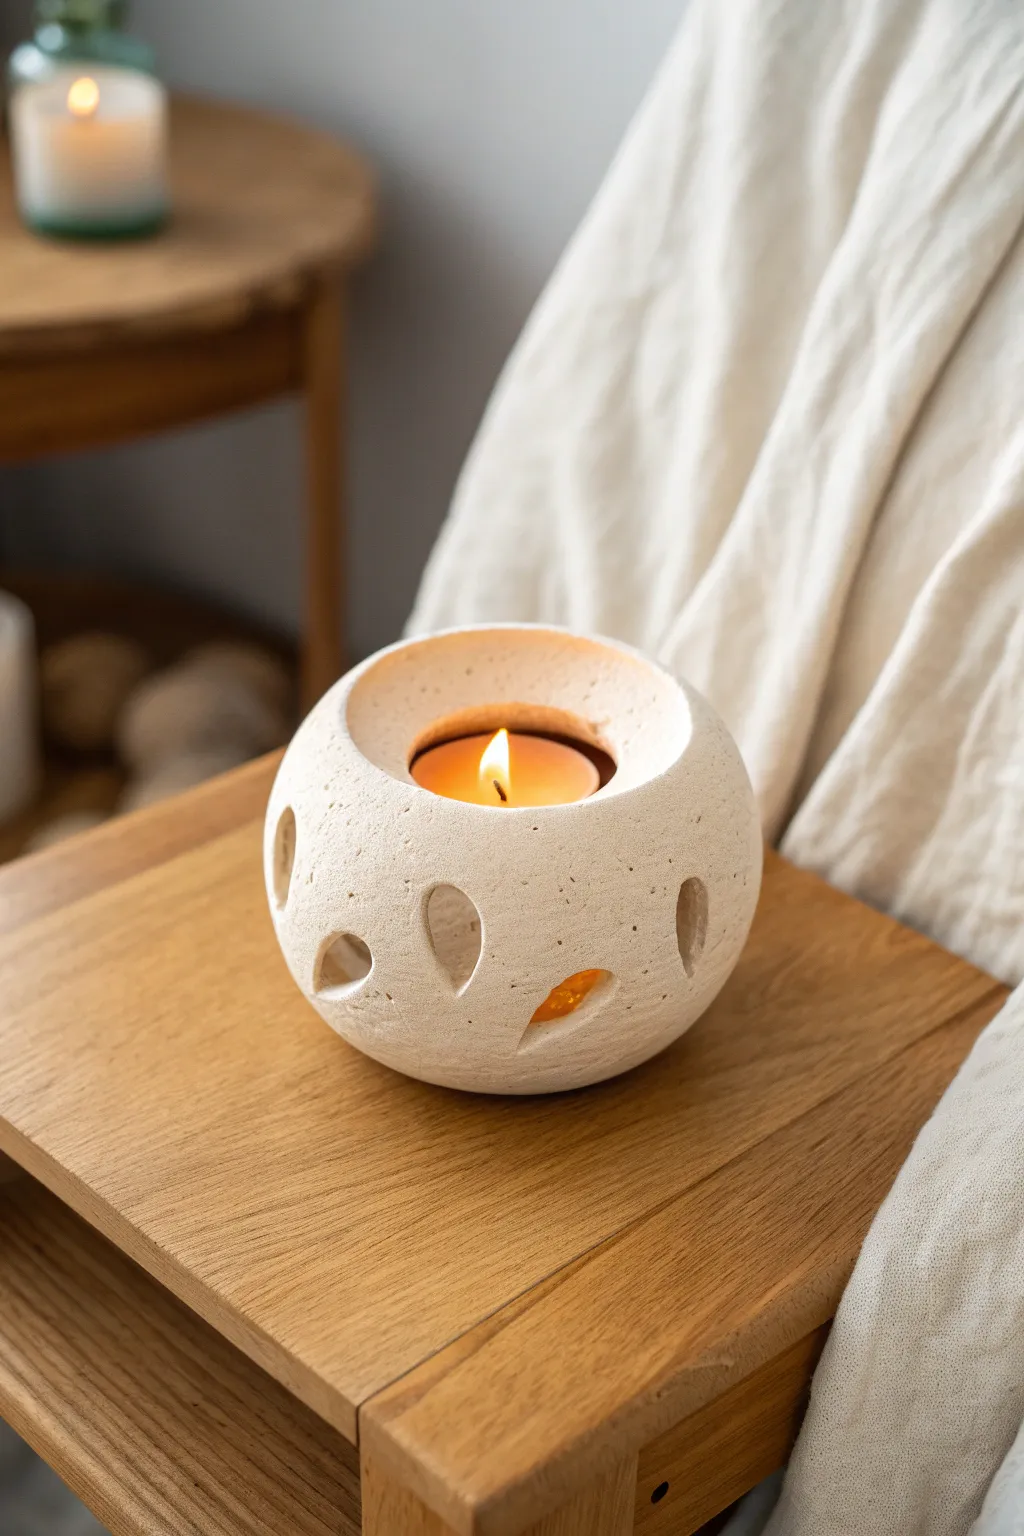
Achieve the look of carved sandstone with this textured spherical tea light holder. The warm beige tone and graceful teardrop cutouts create a cozy, dappled light pattern perfect for relaxing evenings.
Step-by-Step
Materials
- Air-dry clay (white or natural stone color)
- Small balloon (water balloon size)
- Course sandpaper or a stiff bristle brush
- Rolling pin
- Small craft knife or clay cutting tool
- Small bowl or cup (to hold the balloon)
- Cup of water
- Sponge
- Sandstone texture spray paint or diluted beige acrylic paint
Step 1: Forming the Sphere
-
Balloon prep:
Inflate a small balloon to the size of a large orange or grapefruit. Tie it off securely. -
Rolling the clay:
Roll out a slab of air-dry clay to approximately 1/4 inch thickness. You want it sturdy enough to hold its shape but not too heavy. -
Draping the form:
Place the balloon knot-side down in a small bowl to keep it stable. Gently drape the clay slab over the balloon, smoothing it down the sides with your palms. -
Sealing the bottom:
Continue molding the clay until it covers most of the balloon, leaving an opening at the top (which is currently facing down in the bowl). Trim excess clay at the bottom where the knot is, but leave a hole large enough to remove the balloon later. -
Creating the top opening:
Flip the balloon over carefully. Use a round cutter or freehand a circle at the very top of the sphere to create the main opening for the candle. Smooth the rim with a wet finger. -
Initial texture:
Before the clay dries, gently pat the entire surface with a stiff bristle brush or a crumpled ball of aluminum foil. This creates that pitted, stone-like surface seen in the photo.
Slumping Clay?
If the clay slides down the balloon while working, it’s too wet or heavy. Let the rolled slab sit on the table for 15 minutes to firm up before draping it over the mold.
Step 2: Carving the Details
-
Partial drying:
Let the clay sit for about an hour. It needs to be ‘leather hard’—firm enough to cut without collapsing, but soft enough to slice easily. I find this stage critical for clean cuts. -
Marking the pattern:
Lightly trace teardrop shapes around the equator of the sphere using a needle tool or toothpick. Vary the angles slightly for an organic look. -
Cutting the teardrops:
Using a sharp craft knife, carefully cut out the teardrop shapes. Support the clay wall from the inside with your finger while cutting to prevent denting the sphere. -
Smoothing edges:
Dip a finger or a small sponge in water and smooth the raw edges of your cutouts. This softens the look and removes any sharp clay burs.
Step 3: Finishing Touches
-
Full dry:
Allow the piece to dry completely. This usually takes 24-48 hours depending on humidity. Don’t rush this, or cracks might appear. -
Removing the balloon:
Once fully dry, pop the balloon and peel it away from the inside of the sphere. -
Sanding:
Use coarse sandpaper to gently rough up any areas that look too smooth, enhancing the stone effect. -
Applying color:
If your clay isn’t already the desired beige, apply a wash of diluted beige acrylic paint. Wipe it back with a cloth so paint remains in the textures but stains the high points lightly. -
Internal glow:
For safety and easier cleaning, place your tea light inside a small glass votive cup before setting it into the clay sphere.
Faux Stone Finish
Mix a teaspoon of baking soda into your beige acrylic paint before applying. The baking soda adds a gritty, realistic texture that mimics real sandstone perfectly.
Now you have a serene, handcrafted accent piece ready to light up your space


What Really Happens Inside the Kiln
Learn how time and temperature work together inside the kiln to transform clay into durable ceramic.
Boho Rainbow Wall Decor
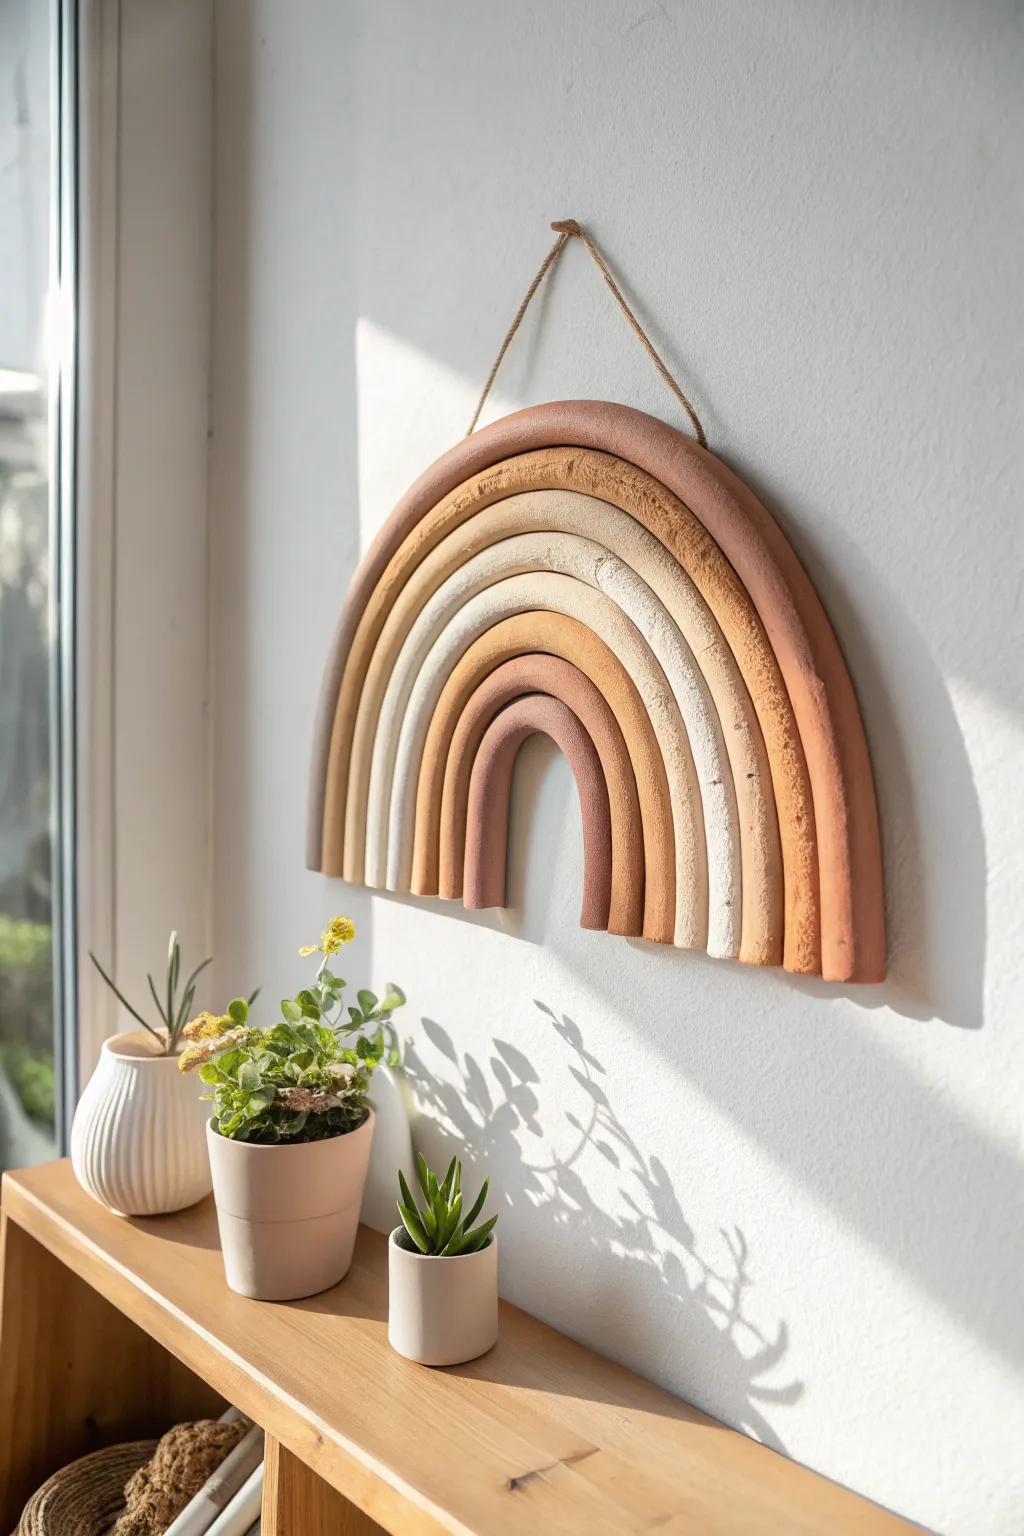
Embrace warm, nature-inspired minimalism with this stunning clay rainbow wall hanging. Featuring layered arches in graduated sizes and a palette of terracotta, ochre, soft beige, and rusty pink, this piece adds sophisticated texture to any sunny corner.
Detailed Instructions
Materials
- Air-dry clay (terra cotta and white varieties)
- Acrylic paints (terracotta, mustard yellow, beige, warm brown, dusty pink)
- Rolling pin
- Sharp craft knife or clay cutter
- Sandpaper (fine grit)
- Jute twine or string
- Strong craft glue (E6000 or a strong tacky glue)
- Small paintbrush
- Parchment paper or silicone mat
- Ruler
- Bowl of water and sponge
Step 1: Shaping the Clay Arches
-
Prepare your workspace:
Lay down parchment paper or a silicone mat to prevent sticking. This also makes moving the drying pieces much easier later on. -
Roll the first snake:
Grab a large chunk of clay and roll it between your palms, then onto the table, creating a long, even snake. This will be your outermost arch, so aim for a thickness of about 3/4 inch. -
Form the base arch:
Curve the clay snake into an arch shape on your mat. Before cutting, measure the width to ensure it matches your desired final size. I find a 10-12 inch width works well for a statement piece. -
Create the subsequent arches:
Repeat the rolling process for the remaining internal arches. Create 5 or 6 more snakes, nesting them inside the previous one as you go to ensure a snug fit. -
Trim the ends:
once all arches are nestled together, take a ruler and lay it across the bottom legs of the rainbow. Use your sharp craft knife to slice straight across all the legs simultaneously for a perfectly flat bottom edge. -
Add texture (optional):
If you want that slightly weathered look seen in the photo, lightly tap a toothbrush or crumpled foil against the wet clay surface. -
Separate for drying:
Carefully separate the arches just slightly so they don’t fuse together while drying. Leave them on a flat surface to air dry for 24-48 hours, flipping them halfway through.
Tip: Smooth Snakes
To prevent air bubbles and lumpy snakes, knead your clay thoroughly before rolling. If the clay cracks while bending, dampen your fingers slightly to smooth them out immediately.
Step 2: Painting and Finishing
-
Sand imperfections:
Once the clay is fully hard and bone dry, use fine-grit sandpaper to gently smooth out any cracks or sharp edges on the back and sides. -
Mix your palette:
Prepare your acrylic paints. The goal is an ombre or varied earthy effect. Mix burnt sienna, unbleached titanium, and yellow oxide to create varying shades of terracotta, ochre, and sand. -
Paint the outer arch:
Start with the largest arch. Paint it using a deep terracotta or rusty brown shade to frame the piece. -
Paint the middle layers:
Work inward, alternating lighter shades. Use a mustard yellow for the second arch, followed by a sandy beige or cream color for the texture-heavy third arch. -
Paint the inner arches:
Continue painting deeply pigment colors like warm brown or tan, finishing with a dusty pink or mauve for the smallest central arch. -
Create a weathered effect:
To mimic the stone-like texture in the image, you can lightly dab a dry brush with a lighter color over the darker painted textured arches. -
Seal (optional):
If you want extra protection, apply a matte varnish. Avoid glossy finishes to keep the natural, earthy aesthetic.
Troubleshooting: Cracking
If slight cracks appear during drying, don’t panic. Mix a tiny bit of fresh wet clay with water to make a paste (slip) and fill in the cracks, then sand smooth once dry.
Step 3: Assembly
-
Glue the structure:
Flip the arches face down, re-nesting them tightly. Apply a strong glue between the seams on the backside or use a scrap piece of felt/cardboard glued across the back to hold them all together. -
Attach the hanger:
Cut a length of jute twine. Glue the ends securely to the back of the rainbow, ensuring the glue creates a strong bond to support the weight. -
Final cure:
Let the glue cure completely (usually another 24 hours) before lifting the piece by the string.
Now you have a beautiful, organic piece of art ready to bring warmth to your walls
Sun and Moon Hanging Mobile
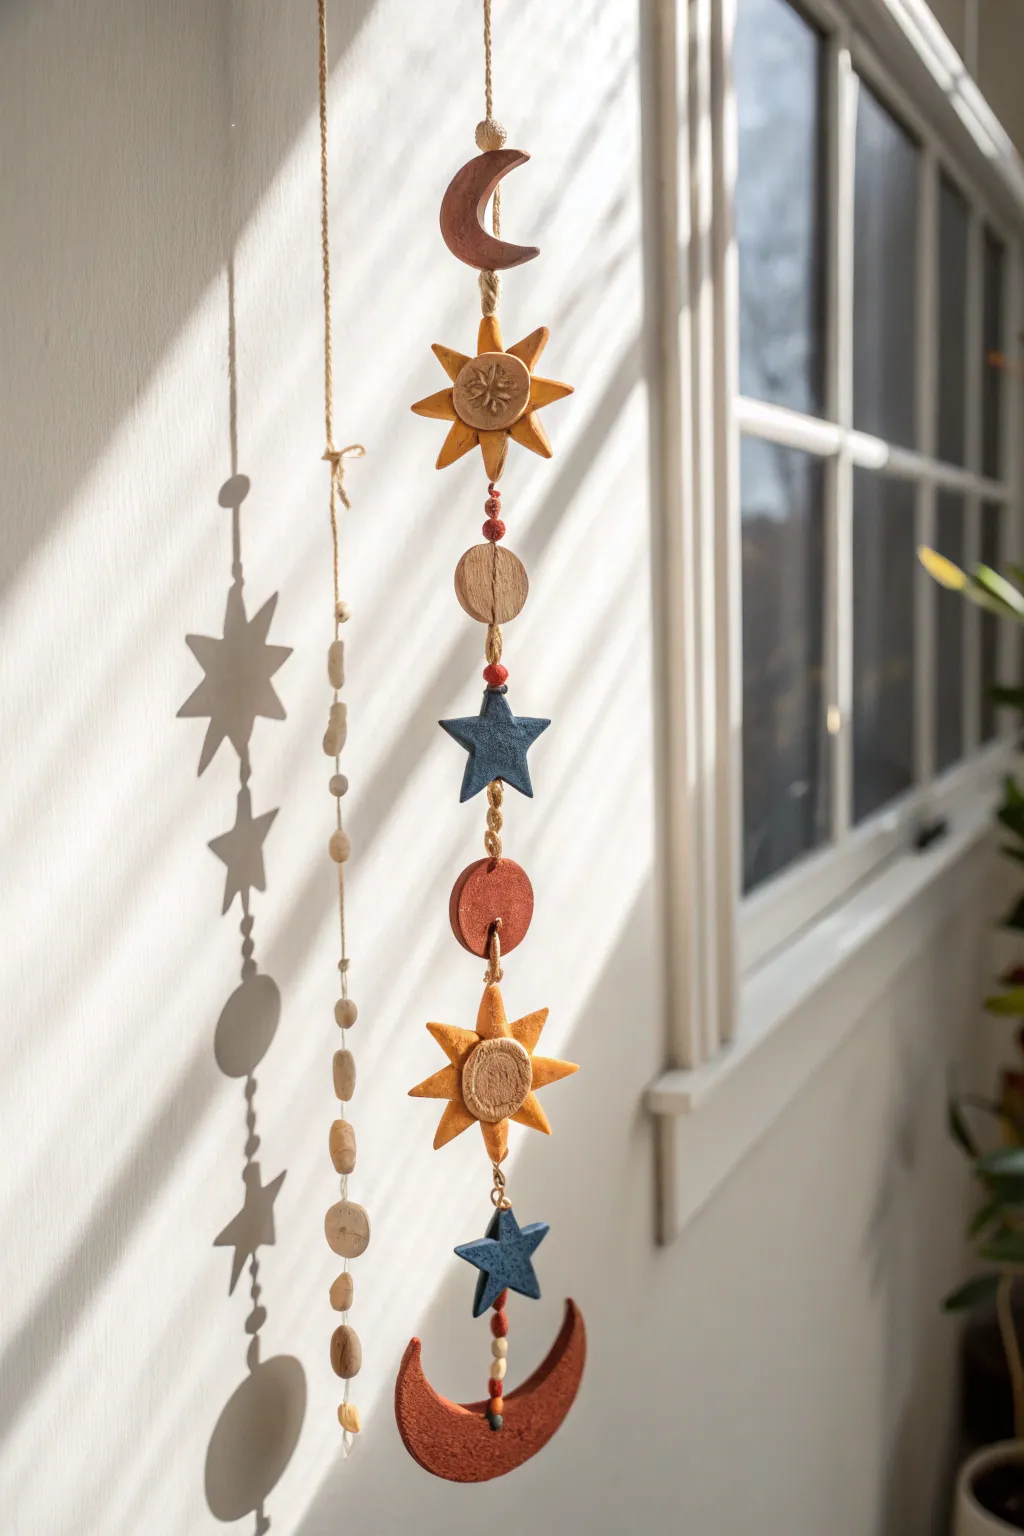
Bring a touch of cosmic charm to your window or wall with this rustic sun and moon hanging mobile. Crafted from air-dry or polymer clay, this vertical garland alternates between warm, earthy suns and deep blue stars, creating a beautiful interplay of light and shadow.
Step-by-Step Guide
Materials
- Air-dry clay or polymer clay (white or terracotta)
- Acrylic paints (terracotta/copper, mustard yellow, navy blue, beige/tan)
- Jute twine or hemp cord
- Rolling pin
- Clay sculpting tools (or a toothpick)
- Cookie cutters (star, circle) or paper templates
- Small paintbrush
- Wooden beads (optional)
- Small eye pins or a needle for poking holes
- Sandpaper
Step 1: Shaping the Elements
-
Prepare your clay:
Begin by conditioning your clay until it is pliable and smooth. Roll it out on a flat surface to an even thickness of about 1/4 inch. -
Cut the sun shapes:
For the suns, you’ll need two main pieces. Cut a larger circle for the rays and a smaller circle for the face. Gently pinch and pull the edges of the larger circle outward to create eight triangular sun rays. -
Texture the sun centers:
Take the smaller circle and press a simple snowflake or starburst pattern into the center using a sculpting tool or toothpick. Attach this to the center of your sun ray piece using a dab of water or slip (liquid clay) to secure it. -
Form the stars:
Use a star-shaped cookie cutter or cut freehand to create two five-pointed stars. Smooth the edges with your finger so they aren’t too sharp. -
Create the moons:
Cut out two crescent moon shapes. You’ll want one for the very top and a larger, heavier one for the bottom anchor piece to help the mobile hang straight. -
Add connecting discs:
Cut out two simple circle discs. For one of them, I like to create a slightly organic, imperfect edge to match the rustic feel of the suns. -
Pierce holes for hanging:
Before the clay dries, use a needle or toothpick to poke holes completely through each piece. You will need vertical top-to-bottom holes for the middle pieces (stars, discs, suns) and a single vertical hole for the top and bottom moons.
Cracked Clay?
If small cracks appear while drying, mix a tiny bit of fresh clay with water to make a paste and fill the cracks, then smooth over with a damp finger.
Step 2: Painting and Finishing
-
Dry the pieces:
Let your clay shapes fully harder according to the package instructions. If using air-dry clay, wait 24-48 hours; if using polymer, bake as directed. -
Sand the edges:
Once fully cured, gently sand any rough edges or bumps to give the pieces a finished, professional look. -
Paint the moons:
Paint both crescent moons with a rich terracotta or rust-colored acrylic paint. You may need two coats for opaque coverage. -
Paint the suns:
For the sun rays, paint them a warm mustard yellow. Paint the textured center circles a soft beige or tan to create a nice contrast. -
Paint the stars:
Cover the stars in a deep navy blue paint. This cool tone balances the warmth of the suns and moons perfectly. -
Paint the discs:
Paint one disc firmly with the terracotta color and the other with a natural wood or beige tone. -
Seal the pieces:
Apply a matte varnish or sealant to protect the paint and give the clay a unified finish.
Step 3: Assembly
-
Prepare the cord:
Cut a long length of jute twine, leaving plenty of extra at the top for a hanging loop. -
Start from the bottom:
Tie a secure knot at the end of your twine and thread on the large bottom moon so it cradles the knot. -
Add decorative spacers:
Thread a small wooden bead or tie a distinctive red knot about an inch above the moon to act as a spacer. -
String the elements:
Continue threading your pieces in this order: blue star, sun, terracotta disc, blue star, beige disc, and finally the second sun. -
Secure vertically:
Between each clay piece, tie a knot or add a small bead to keep the elements spaced apart evenly so they don’t slide down onto each other. -
Attach the top moon:
Tie the smaller top moon at the very top of the stack, ensuring the curve faces the opposite direction of the bottom moon for visual balance.
Make It Sparkle
Mix a small amount of gold mica powder or metallic paint into your varnish for a subtle, shimmering galaxy effect on the blue stars.
Hang your new creation near a window to watch the shadows dance across the room as the sun moves through the sky

TRACK YOUR CERAMIC JOURNEY
Capture glaze tests, firing details, and creative progress—all in one simple printable. Make your projects easier to repeat and improve.
Modern Photo or Card Holders
Bring a touch of organic minimalism to your desk with this sculptural rainbow photo holder. Its speckled, stone-like texture and gentle curves make it the perfect understated stand for your favorite postcards or instant photos.
How-To Guide
Materials
- Polymer clay (white or beige)
- Black pepper or dried coffee grounds (for speckling)
- Clean rolling pin or acrylic roller
- Sharp craft knife or tissue blade
- Ruler
- Baking sheet
- Parchment paper
- Oven
- Fine-grit sandpaper (400-600 grit)
- Matte spray sealant (optional)
Step 1: Preparing the Mixture
-
Condition the Clay:
Start by warming up your beige or white polymer clay in your hands. Knead it thoroughly until it is soft, pliable, and free of any cracks. -
Add Texture:
Flatten the clay slightly and sprinkle a small amount of coarse black pepper or dried coffee grounds onto the surface. This creates the faux-stone look seen in the photo. -
Fold and Mix:
Fold the clay over the speckles and knead again. Continue folding and kneading until the darker particles are evenly distributed throughout the entire block.
Step 2: Creating the Arches & Assembly
-
Roll the Snakes:
Divide your clay into four equal portions. Roll each portion on your work surface to create four long, uniform snakes or ropes. -
Check Thickness:
Ensure all four ropes are approximately the same thickness, roughly 1/2 inch to 3/4 inch thick. This uniformity is key for a clean, modern aesthetic. -
Form the First Arch:
Take the shortest rope and bend it into a tight ‘U’ shape to form the smallest, innermost arch. -
Square the Edges:
Gently press the front and back of the arch against your work surface to flatten the faces slightly, giving the coil a more rectangular, blocky profile rather than a perfect circle. -
Layer the Arches:
Take the next rope, curve it over the first arch, and gently press them together so they adhere. Repeat this process for the third and fourth ropes, building outward. -
Secure the Seams:
Run your finger gently along the seams where the arches touch to ensure a good bond, but be careful not to smudge the distinct layered look. -
Trim the Base:
Once all four arches are connected, use your sharp tissue blade or craft knife to slice straight across the bottom legs. This creates a perfectly flat base so the sculpture stands upright. -
Add Surface Detail:
To mimic the porous texture in the image, take a stiff-bristled toothbrush or a needle tool and gently poke random, tiny holes across the surface of the clay.
Uneven Arches?
If gaps appear between your arches while stacking, apply a tiny dab of liquid sculpey or bake-and-bond gel between the coils before pressing them together for a flawless seam.
Step 3: Baking and Finishing
-
Prepare for Baking:
Place your rainbow upright on a baking sheet lined with parchment paper. Check one last time that it stands stable and straight. -
Bake:
Bake the clay according to the manufacturer’s package instructions. Usually, this is around 275°F (135°C) for 15-30 minutes, depending on the brand. -
Cool Down:
Remove the piece from the oven and let it cool completely before handling. I like to leave it on the tray so it doesn’t warp while still warm. -
Create the Slot:
Since this projects serves as a card holder, you can simply lean a card against it as shown, but if you want a dedicated holder, you could have sliced a thin slit in the top arch before baking. For this style, we leave it solid. -
Sand the Edges:
Once cool, use fine-grit sandpaper to smooth out any rough spots on the bottom or back of the rainbow. -
Seal (Optional):
If you want to protect the finish, spray a light coat of matte sealant over the piece, preserving that natural, stony appearance.
Level Up: Color Gradient
Mix varying amounts of white clay into your beige base for each rope. This creates an ombre effect, getting lighter (or darker) as the rainbow builds outward.
Now you have a serene, handcrafted piece ready to display your favorite memories on your desk
Frame Upgrade With Clay Details
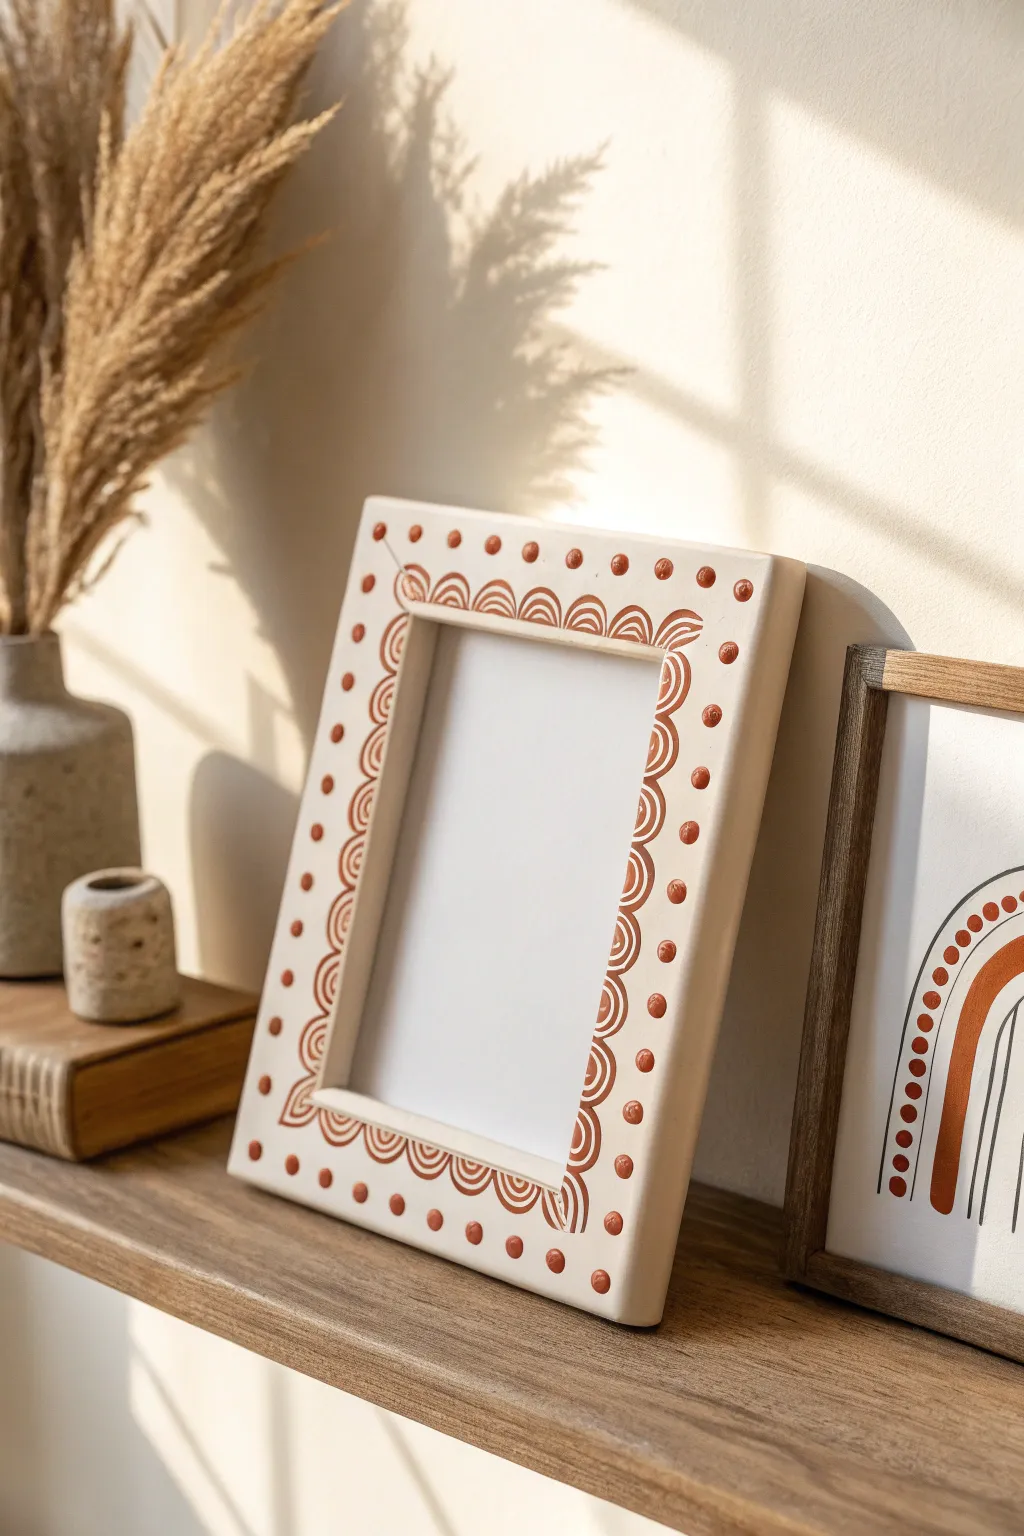
Transform a plain, flat picture frame into a textured piece of art using air-dry clay and simple painting techniques. This project combines raised clay dots with a hand-painted terracotta scallop pattern for a warm, organic look that perfectly suits a bohemian aesthetic.
Step-by-Step Tutorial
Materials
- Wide, flat wooden picture frame (unfinished or sanded)
- Air-dry clay (white or natural)
- Terracotta or rust-colored acrylic paint
- Cream or off-white acrylic paint
- Fine detail paintbrush
- Small flat paintbrush
- Strong craft glue or wood glue
- Sandpaper (fine grit)
- Matte varnish or sealant
- Small bowl of water
- Palette or paper plate
Step 1: Prepping and Base Coating
-
Prepare the frame:
Begin by removing the glass and backing from your picture frame. If the frame has a glossy finish, give it a quick scuff with fine-grit sandpaper to help the paint and clay adhere better. Wipe away any dust with a damp cloth. -
Apply base color:
Paint the entire front and sides of the frame with your cream or off-white acrylic paint using the flat brush. You want a solid, opaque background, so apply two or three thin coats rather than one thick one. -
Let it dry completely:
Allow the paint to dry fully between coats and before moving on to the clay steps. This prevents the moisture from the clay from reactivating the paint.
Keep Clay Moist
Keep a damp paper towel over your main lump of clay while you work. This prevents the unused clay from drying out and cracking while you are rolling your individual dots.
Step 2: Creating the Clay Dots
-
Roll clay balls:
Pinch off small amounts of air-dry clay and roll them into tiny balls about the size of a pea. Try to keep them as consistent in size as possible, though slight variations add to the handmade charm. -
Plan placement:
Before gluing, lay the clay balls along the outer perimeter of the frame to check your spacing. Aim for roughly half an inch between each dot, ensuring they are evenly spaced from corner to corner. -
Glue the dots:
Pick up one ball at a time, apply a small dab of strong craft glue to the bottom, and press it firmly onto the frame. Press just hard enough to flatten the bottom slightly for better adhesion without squashing the dome shape. -
Smooth imperfections:
If any clay balls develop small cracks while drying, I find that dipping a finger in water and gently smoothing the surface works wonders before the clay hardens completely. -
Dry the clay:
Let the frame sit undisturbed until the clay dots are completely hard and dry. This usually takes overnight, depending on the humidity and brand of clay used.
Try a Texture Paint
Mix baking soda into your terracotta paint for the scallops. This creates a gritty, ceramic-like texture that makes the painted details look like real raised clay.
Step 3: Painting the Details
-
Paint the dots:
Using your fine detail brush and the terracotta paint, carefully paint each dried clay dot. Take your time to cover the sides of the dots without getting paint on the cream background frame. -
Draft the scallop design:
For the inner detail, lightly sketch a scallop or half-circle pattern around the inner opening of the frame with a pencil. This acts as a guide for your painting. -
Paint the scallops:
Load your fine brush with terracotta paint. Paint the outlined scallops, creating a series of connecting arches. The line should be moderately thick to stand out against the cream base. -
Add inner arches:
Inside each painted scallop arch, paint two or three progressively smaller arches. These don’t need to be geometrically perfect; a loose, hand-painted look is desirable here. -
Fill the corners:
Pay special attention to the corners where the scallop patterns meet. You may need to adjust the size of the arches slightly or add a small stylized leaf shape to bridge the gap gracefully. -
Add texture marks (optional):
For extra detail, you can add tiny tick marks or dots between the arches using the very tip of your brush, mimicking the look of carved pottery.
Step 4: Finishing Up
-
Seal the frame:
Once all paint is completely dry, apply a coat of matte varnish over the entire frame. This protects the clay dots from chipping and makes the frame easier to dust later. -
Reassemble:
Clean the glass thoroughly, then place it, your artwork, and the backing board back into the frame. Secure the clips to hold everything in place.
Now you have a custom, textured frame that adds a beautiful artisanal touch to your photo display
Vanity Tray and Bathroom Set
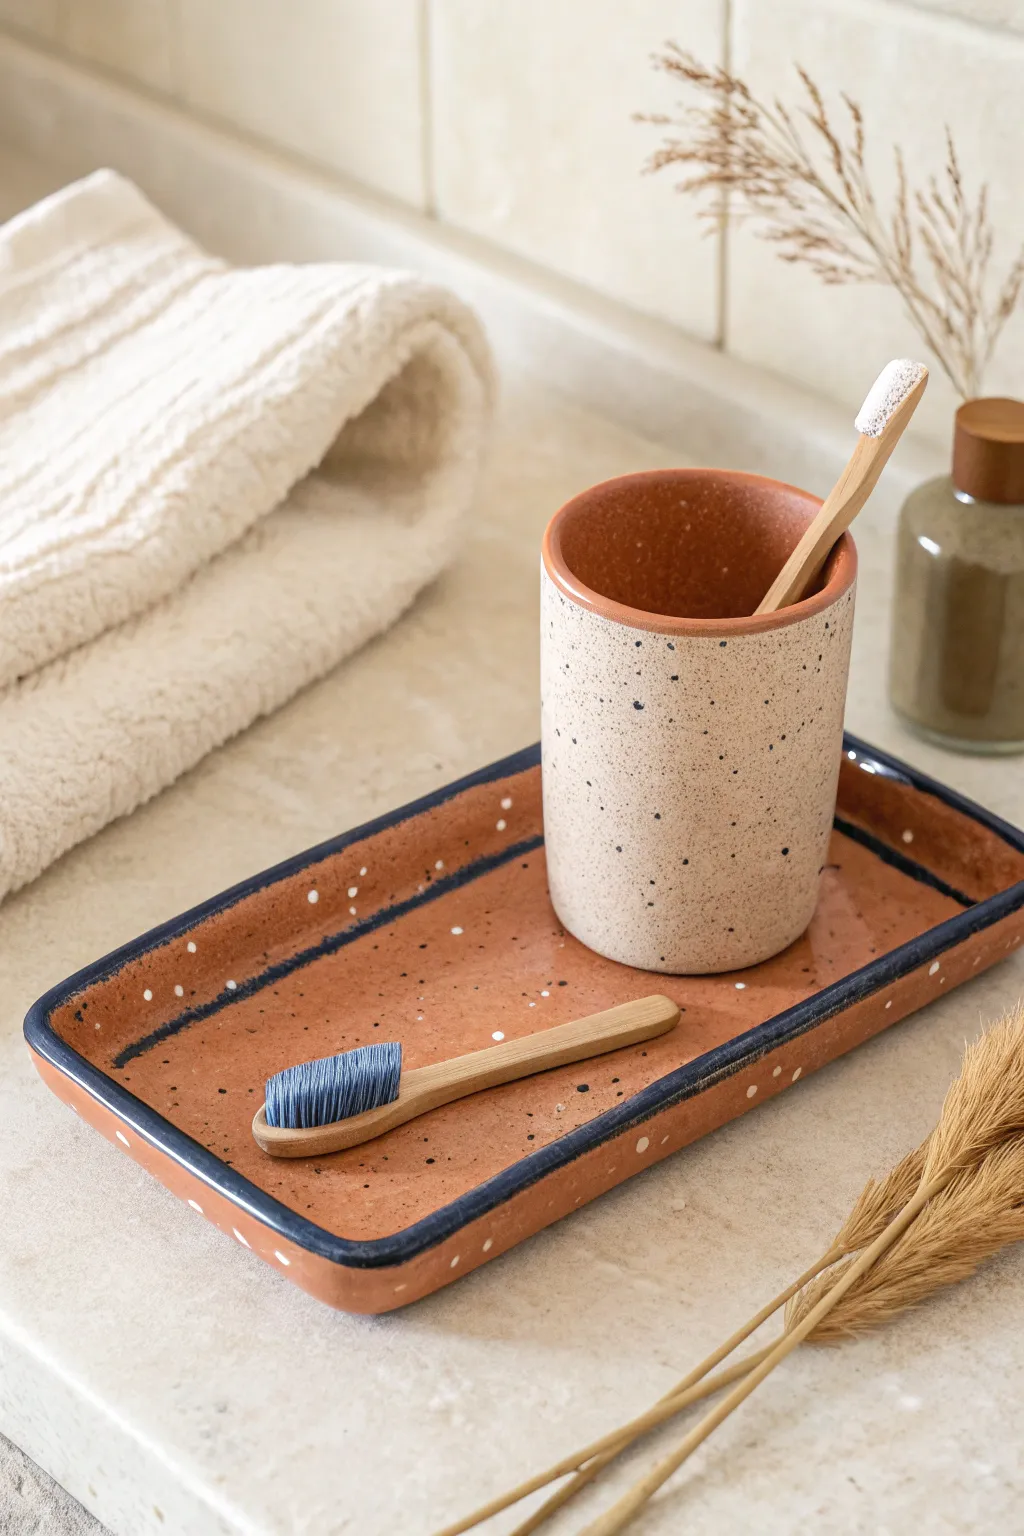
Bring an earthy, spa-like atmosphere to your bathroom with this handmade clay vanity set. Featuring a warm terracotta tone, contrasting rim, and a playful speckled finish, these pieces balance rustic charm with modern functionality.
Step-by-Step Tutorial
Materials
- Air-dry clay or polymer clay (terracotta color)
- Air-dry clay (white or cream)
- Rolling pin
- Clay knife or craft blade
- Rectangular template (card stock)
- Slip (clay mixed with water) or liquid clay
- Sponge
- Acrylic paints (dark blue, white, black, dark brown)
- Old toothbrush (for speckling)
- Fine grit sandpaper
- Waterproof varnish or resin (essential for bathroom use)
Step 1: Shaping the Tray
-
Prepare the base:
Roll out a large slab of terracotta-colored clay to an even thickness of about 1/4 inch. Place your rectangular template on top and cut around it cleanly with your clay knife. -
Form the rim:
Roll a long coil or ‘snake’ of clay, keeping the thickness consistent. Attach this coil to the top edge of your rectangular base using the score and slip method—scratching both surfaces and applying a bit of clay-water paste. -
Smooth the transition:
Using your thumb or a modeling tool, blend the coil downwards into the base and upwards to smooth the rim. Create a gentle curve rather than a sharp corner for that organic look visible in the photo. -
Refine the edges:
Dip a sponge in water and run it over the rim and surface to erase fingerprints. Ensure the rim height is uniform all the way around.
Warping Woes?
If your tray curls up while drying, place a heavy book on it once it’s ‘leather hard’ (firm but cool). Let it finish drying under the weight.
Step 2: Crafting the Cup
-
Create the cylinder:
Roll out a slab of white or cream clay. Cut a rectangle that matches the desired height and circumference of your cup. -
Join the seam:
Stand the rectangle up and circle it to join the ends. Score and slip the seam, blending the clay together on both the inside and outside until the line disappears. -
Add the base:
Cut a circle from your slab that fits the bottom of the cylinder. Attach it securely using the scoring method, smoothing the clay up the sides of the cup to ensure a watertight seal. -
Color the interior:
Since air-dry clay is rarely found in two tones like this, paint the interior a deep terracotta color now, or line the inside with a thin sheet of terracotta clay before rolling the cylinder if you are experienced. -
Add the terracotta rim:
Roll a very thin coil of terracotta clay. Attach it to the very top edge of the cup, blending it carefully so it looks like a distinct rim.
Pro Sealing Tip
For true waterproofing, use a two-part epoxy resin for the final coat. Standard varnish may eventually peel if water sits in the tray often.
Step 3: Finishing Details
-
Dry completely:
Allow both pieces to dry fully. For air-dry clay, this can take 24-48 hours. Turn the tray occasionally to prevent warping. -
Sand for smoothness:
Once bone dry, lightly sand any rough patches, especially around the rims and bases, using fine-grit sandpaper. -
Paint the tray rim:
Using a small brush and dark blue acrylic paint, carefully paint the top edge of the tray’s rim. A slightly uneven line adds to the handmade aesthetic. -
Create the speckles:
Dilute a small amount of black or dark brown paint with water. Dip an old toothbrush into the mix, hold it over your pieces, and run your thumb across the bristles to flick tiny specks onto the surfaces. -
Add white accents:
Repeat the speckling process with diluted white paint, specifically focusing on the interior of the tray to mimic typical ceramic glazes. -
Seal for protection:
This is crucial for bathroom items. Apply at least two coats of a high-quality waterproof varnish or resin to protect the clay from humidity and water splashes.
Enjoy styling your new vanity set with your favorite bathroom essentials for a refreshing morning routine
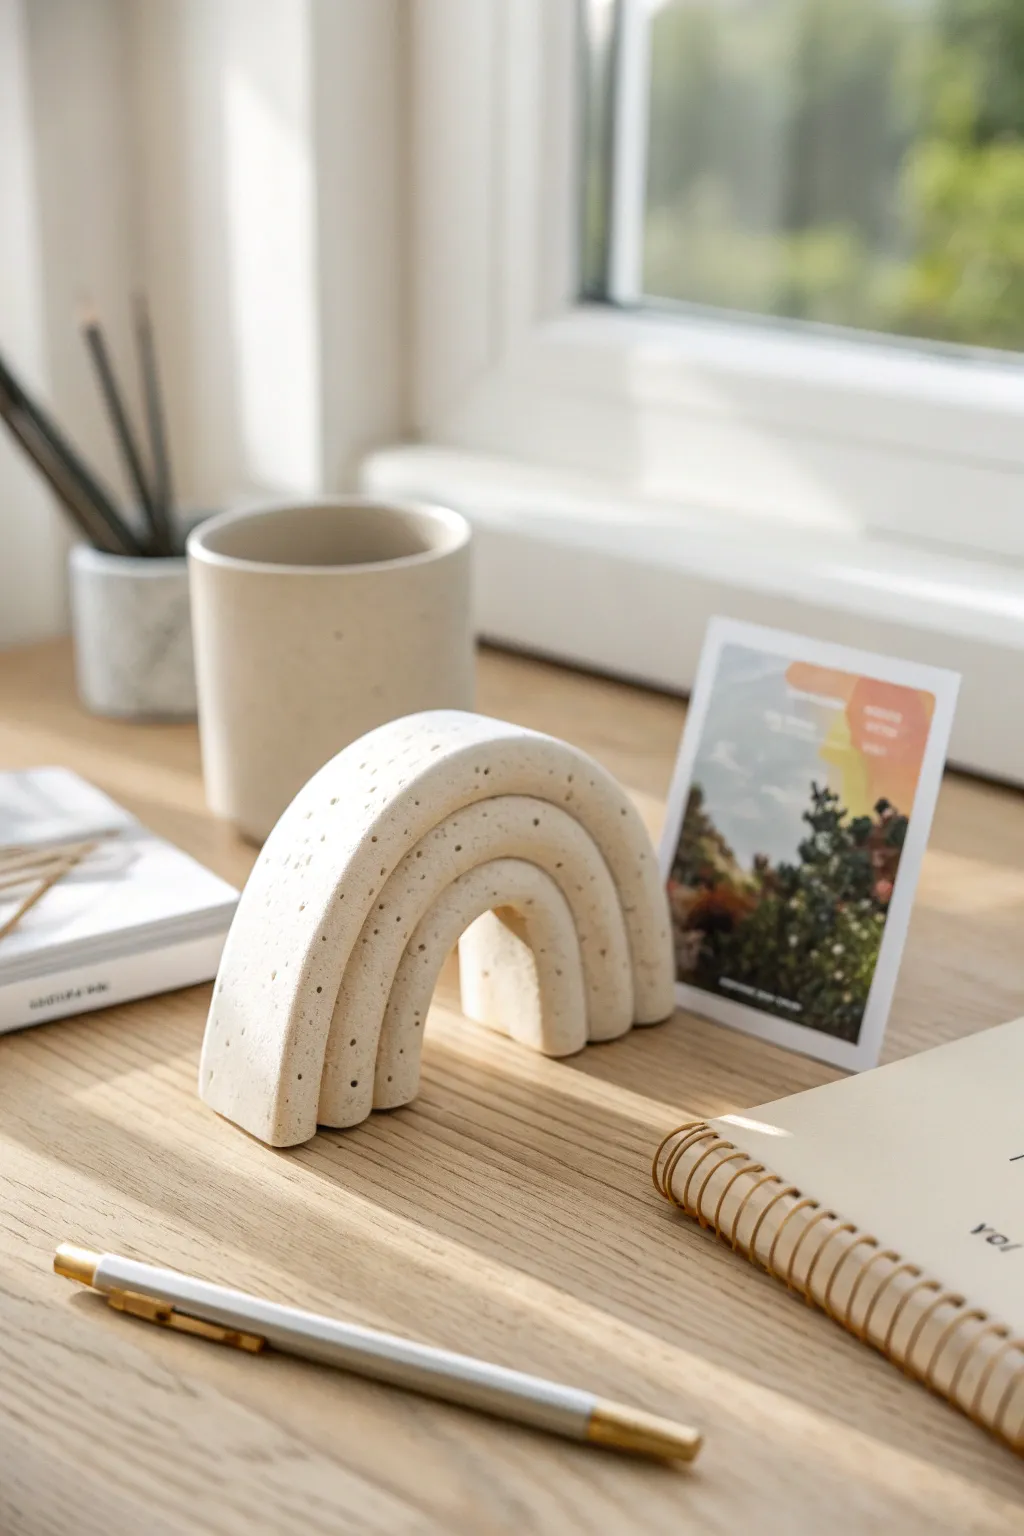
Clay Desk Organizer in Soft Neutrals
Bring a sense of calm to your workspace with this sleek, three-compartment desk organizer made from air-dry clay. Its soft, neutral texture and rounded edges offer a modern, handmade aesthetic that beautifully holds your essential stationery.
How-To Guide
Materials
- White air-dry clay (approx. 1kg)
- Rolling pin
- Sharp craft knife or clay blade
- Ruler
- Small bowl of water
- Sponge
- Fine-grit sandpaper (220 and 400 grit)
- Matte acrylic varnish or sealant
- Flat paintbrush
- Non-stick mat or parchment paper
Step 1: Preparing the Base and Walls
-
Condition the Clay:
Start by kneading a large chunk of air-dry clay until it’s warm and pliable. This removes air bubbles that could cause cracks later. -
Roll the Base Slab:
Roll out the clay on a non-stick surface to a consistent thickness of about 1/4 inch (6mm). This will form the bottom of your organizer. -
Cut the Base Rectangle:
Use your ruler and craft knife to cut a precise rectangle. A size of 4 inches by 8 inches is a good standard, but adjust to fit your desk space. -
Create Wall Strips:
Re-roll the excess clay to the same 1/4 inch thickness. Cut long strips that are approximately 2 inches wide to serve as the outer walls and inner dividers. -
Measure Wall Lengths:
Measure the perimeter of your base rectangle. Cut your clay strips to match the lengths of the four sides, plus two shorter pieces for the internal dividers.
Cracks appeared?
Mix a tiny amount of fresh clay with water to make a paste. Fill the cracks, let dry completely, and sand smooth.
Step 2: Assembly and Shaping
-
Score and Slip:
Score the edges of the base and the bottom of your wall strips with a craft knife (cross-hatching). Dab a little water or liquid clay slip onto the scored areas to act as glue. -
Attach Outer Walls:
Press the outer wall strips firmly onto the base. Join the corners by blending the clay together with your thumb or a modeling tool so no seam is visible. -
Reinforce the Seams:
Roll a very thin snake of clay and press it into the inside corners where the wall meets the floor. Smooth this out entirely to ensure a strong bond. -
Insert Dividers:
Mark where you want your three compartments to be. Score the inside walls at these points, then slide your divider pieces in, using the score-and-slip method to secure them. -
Smooth the Connections:
I find using a slightly damp sponge here works wonders to smooth out all the connection points and erase fingerprints without adding too much water. -
Round the Top Edges:
Gently run your wet finger along the top rim of the walls to create that soft, rounded look seen in the photo. Avoid sharp angles for this specific style.
Add a speckled look
Flick diluted brown or black acrylic paint off a toothbrush onto the piece before sealing for a trendy ceramic effect.
Step 3: Finishing Touches
-
Slow Drying:
Place the organizer in a cool, dry spot away from direct sunlight. Let it dry for at least 24-48 hours. Turn it over gently halfway through to let the bottom breathe. -
Initial Sanding:
Once bone dry, use 220-grit sandpaper to remove any large bumps or uneven edges. Wear a dust mask for safety. -
Refining the Surface:
Switch to 400-grit sandpaper for a polishing pass. This creates that ultra-smooth, high-end ceramic feel on the surface. -
Dust Clean:
Wipe the entire piece down with a barely damp cloth or a dry soft brush to remove every speck of sanding dust. -
Applying Sealant:
Apply a thin coat of matte acrylic varnish. This protects the clay from moisture and stains while keeping the natural look.
Enjoy the satisfaction of organizing your favorite pens in a vessel you sculpted with your own hands
DIY Clay Drawer Knobs and Pulls
Transform a plain dresser into a boho statement piece with these radiating, sunburst-style knobs made from air-dry or polymer clay. Their warm, terracotta hue and gentle fluting add a touch of organic texture that feels both modern and timeless.
Step-by-Step Tutorial
Materials
- Terracotta colored polymer clay (or air-dry clay)
- Acrylic rolling pin
- Round cookie cutter (approx. 2 inches diameter)
- Modeling tool or dull knife
- Small sphere or bead for center (can also be made of clay)
- Standard metal screw and nut (sized for your drawer)
- Strong craft glue (e.g., E6000) or 2-part epoxy
- Baking sheet and parchment paper (if using polymer clay)
- Fine-grit sandpaper
- Matte varnish (optional)
Step 1: Preparation & Base Creation
-
Condition the Clay:
Begin by working a block of terracotta-colored clay in your hands until it becomes soft, pliable, and free of cracks. -
Roll It Out:
Using your acrylic roller, flatten the clay to a consistent thickness of about 1/4 inch. Avoid making it too thin, as the knob needs to be sturdy enough to be pulled daily. -
Cut the Circle:
Press your round cookie cutter firmly into the clay to create a perfect circle. Gently push the clay out if it sticks inside the cutter. -
Smooth the Edges:
Run your finger lightly around the cut edge of the circle to soften any sharp corners left by the cutter.
Keep it Clean
Polymer clay picks up dust easily. Keep a pack of baby wipes nearby to clean your hands and tools often, ensuring your terracotta color stays pure.
Step 2: Sculpting the Design
-
Find the Center:
Lightly mark the exact center of your clay circle with a dull pencil or tool; this will guide your radiating lines. -
Create the Fluting:
Using a modeling tool or the back of a dull knife, press into the clay to create indented lines. Start near the center mark and press outward to the edge. -
Repeat Around the Circle:
Continue making these indented lines all the way around the circle, spacing them evenly like the rays of a sun or the petals of a daisy. -
Round the Ridges:
Between each indented line, use your finger or a smoothing tool to gently round over the raised sections, giving them a soft, pillowy look rather than a sharp ridge. -
Form the Central Cap:
Roll a small ball of clay, roughly the size of a marble or hazelnut, until it is perfectly smooth. -
Attach the Cap:
Press this small ball firmly onto the center of your fluted disk. I like to score the connection points slightly to ensure a better bond during baking.
Screw Loose?
If the screw spins inside the baked clay, pull it out, fill the hole with strong two-part epoxy glue, and re-insert the screw. Let it cure fully before mounting.
Step 3: Hardware Integration & Baking
-
Embed the Screw Head:
Flip the knob over. Carefully press the flat head of your metal screw into the back center of the clay until it sits flush with the surface. -
Secure the Screw:
Take a small scrap of clay, flatten it, and smooth it over the screw head on the back to bury it completely, ensuring the threaded part sticks out straight. -
Check Alignment:
Stand the knob on its side or hold it up to ensure the screw is protruding at a perfect 90-degree angle so it attaches correctly to your drawer. -
Bake:
Place your knob on a parchment-lined baking sheet and bake according to the manufacturer’s instructions for your specific brand of clay—usually around 275°F (135°C) for 15-30 minutes.
Step 4: Finishing Touches
-
Cool Down:
Let the knob cool completely in the oven with the door cracked open to prevent cracking from sudden temperature changes. -
Reinforce with Glue:
If the screw feels at all loose after baking, add a drop of strong epoxy or super glue around the base of the screw where it meets the clay. -
Sand for Texture:
very lightly sand the surface with fine-grit sandpaper if you want a more matte, stonelike texture. -
Seal (Optional):
For extra durability, you can brush on a layer of matte varnish, though leaving the raw clay finish often looks more authentic to the terracotta style.
Once installed, these earthy knobs bring a lovely handmade warmth to your storage furniture
Organic Wavy Mirror Frame

Transform a plain round mirror into a high-end sculptural piece with this textured clay overlay. The organic, wavy ridges mimic carved limestone, bringing a serene, elemental beauty to any entryway or vanity.
Detailed Instructions
Materials
- Plain round frameless mirror (approx. 18-24 inches)
- Air-dry clay (white or off-white, approx. 4-5 kg)
- Plywood backing board (cut 4 inches wider than mirror diameter)
- Strong construction adhesive (e.g., Liquid Nails)
- Rolling pin
- Sculpting tools (loop tool and needle tool)
- Texture sponge or stiff bristle brush
- Water spray bottle
- Sandpaper (medium and fine grit)
- Matte sealant spray
Step 1: Base Construction
-
Prepare the substrate:
Begin by cutting your plywood circle. It needs to be significantly larger than your mirror glass to allow for the wide, scalloped border. Aim for a 4-inch overhang all around the perimeter. -
Mount the mirror:
Clean the back of your mirror thoroughly. Apply construction adhesive liberally and center the mirror onto the plywood circle. Let this cure fully for 24 hours to ensure a rock-solid base before adding weight. -
Prime the surface:
Lightly sand the exposed plywood border to give the clay something to grip. I like to wipe it down with a slightly damp cloth to remove sawdust just before applying clay.
Weight Reduction Tip
To keep the frame lighter, bulk out the thickest parts of the scallops with crumpled aluminum foil first, then cover with a thin layer of clay.
Step 2: Sculpting the Form
-
Apply the inner ring:
Roll out a thick snake of clay, about 1 inch diameter. Press this firmly into the gap where the mirror glass meets the wood. This creates a transition ramp and protects the mirror edge. -
Build the outer volume:
Apply large chunks of clay to the plywood border, building it up until it is flush with or slightly higher than your inner ring. You want a substantial, thick base to carve into later. -
Smooth the foundation:
Use a little water and your fingers to merge the clay chunks into one continuous, smooth doughnut shape around the mirror. Eliminate any air pockets or seams now. -
Mark the scallops:
Using a needle tool, lightly sketch the wavy petal pattern onto the clay surface. Divide the circle into even sections first—like cutting a pizza—to ensure your scallops remain symmetrical. -
Shape the ridges:
Use a loop tool to carve out the valleys between your sketched petals. You want deep, curved depressions that rise up into rounded peaks. -
Refine the edges:
Use your fingers to round over the sharp cut marks. The outer edge of the frame should follow the scalloped pattern, dipping in and out to match the ridges. -
Detail the petals:
Using a modeling tool, gently press striations or lines radiating from the center outward on each petal. This mimics the veining found in natural carved stone or shells.
Repairing Cracks
If a large crack appears during drying, don’t panic. Mix clay with white vinegar to make a potent paste; the vinegar helps the new clay bond to the dry base.
Step 3: Texturing and Finishing
-
Create the stone texture:
Take a stiff bristle brush or a dry texture sponge and dab it aggressively over the entire clay surface. This removes the ‘smooth clay’ look and imitates porous limestone. -
Slow drying process:
This is crucial: cover the frame loosely with plastic wrap. Let it dry very slowly over 3-4 days to prevent cracking. Check daily and mist with water if edges look chalky. -
Inspect for cracks:
Once fully dry, inspect for shrinkage cracks. Fill any fissures with a slip (wet clay slurry), smooth them over, and let dry again. -
Initial sanding:
Use medium-grit sandpaper to knock down any overly sharp spikes from the texturing process, but don’t smooth it out completely—you want to keep that rustic character. -
Dust removal:
Vacuum the frame carefully or use a dry brush to remove all fine clay dust from the deep crevices. -
Sealing the work:
Take the project outside or to a well-ventilated area. Apply two light coats of matte sealant spray to protect the clay from humidity and dust without adding an artificial sheen. -
Final wipe down:
Clean the mirror glass with glass cleaner, being careful not to soak the clay edge. Your organic masterpiece is now ready to hang.
Now you have a stunning, gallery-worthy mirror that brings an organic, earthy atmosphere to your space