If you can make a pinch pot, you can make a seriously lovable clay monster—because that little bowl shape becomes the perfect monster mouth. Here are my favorite ideas to turn that simple form into big personality with easy add-ons like teeth, tongues, and bug eyes.
Classic Gaping-Mouth Monster
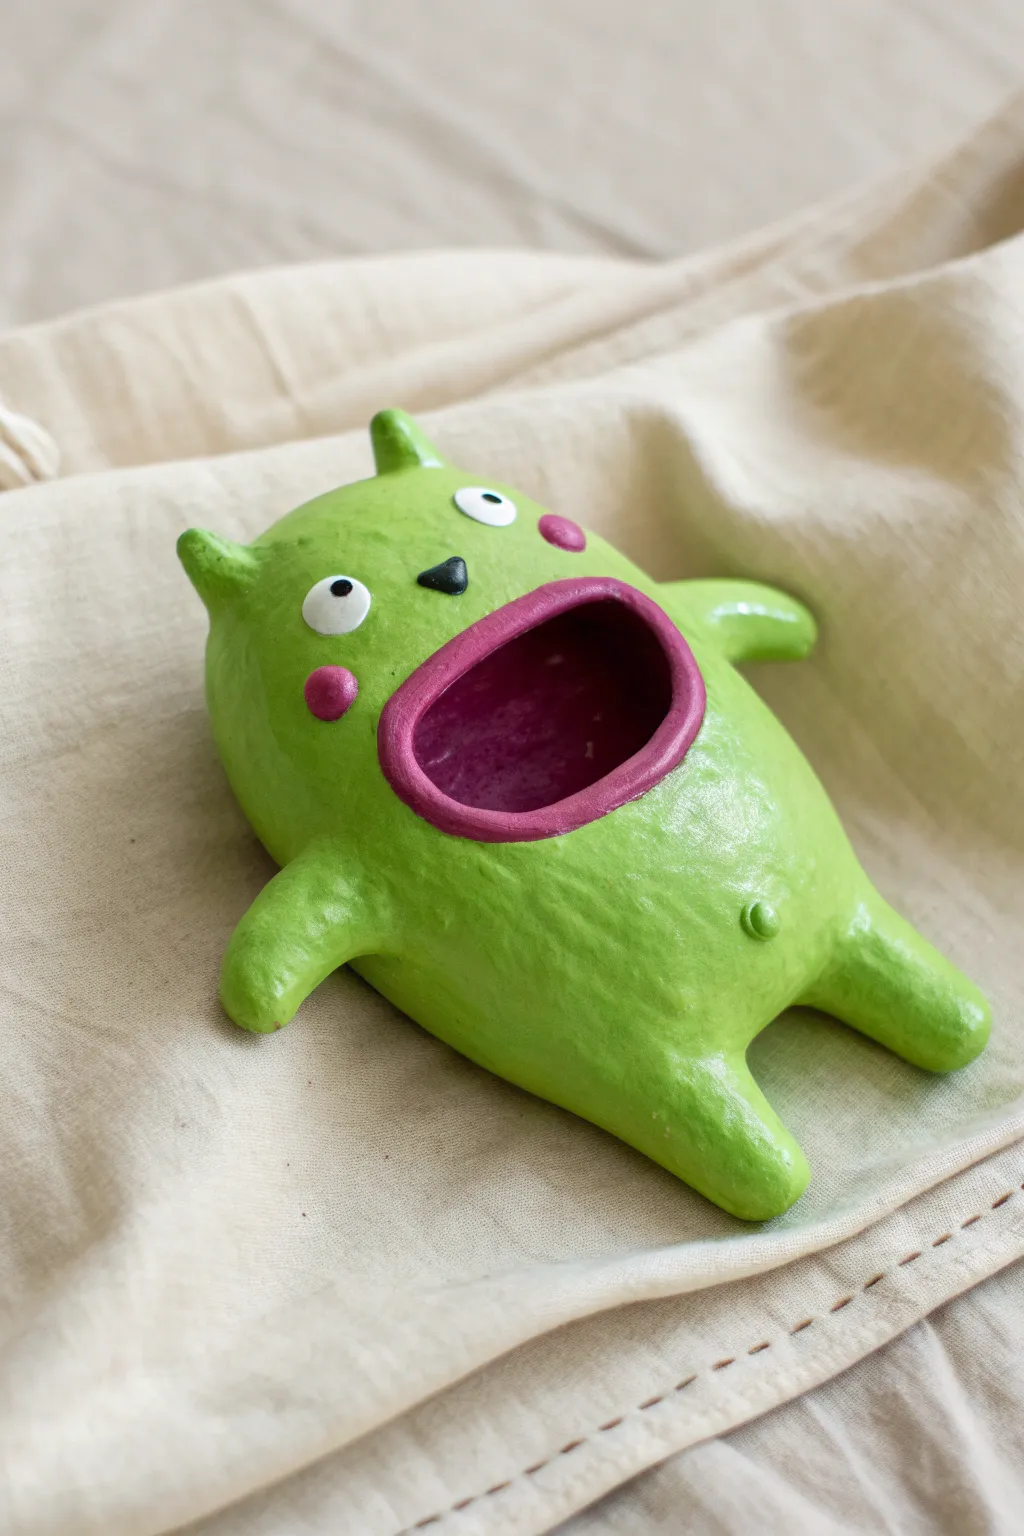
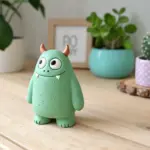
This adorable yet perpetually hungry monster starts as a simple pinch pot ball and transforms into a functional sculpture perfect for holding keys or wrapped candies. Its bright lime green skin and shocked expression give it a whimsical charm that brightens up any shelf.
Step-by-Step
Materials
- Air-dry clay or polymer clay (white is best for painting)
- Acrylic paints: Lime green, bright pink, white, black
- Clear acrylic sealant (glossy)
- Clay sculpting tools (needle tool, smoothing rib)
- Small bowl of water (for smoothing air-dry clay)
- Paintbrushes: Medium flat brush and fine detail brush
Step 1: Forming the Body
-
Prepare the Clay:
Start with a ball of clay roughly the size of a large orange. Condition it by kneading until it is smooth and pliable to prevent cracking later. -
Create the Pinch Pot:
Push your thumb deep into the center of the ball. Gently pinch and rotate the clay between your thumb and fingers, working your way up to create a hollow bowl shape. -
Close the Form:
Instead of leaving the bowl open like a cup, gently curve the top edges inward until they almost meet, creating an enclosed hollow sphere or egg shape. Smooth the seam shut completely so you have a trapped air pocket. -
Shape the Monster:
Gently gently squash and roll the hollow form into an oblong, pill-like shape. Be careful not to press too hard or the walls might collapse.
Lip Definition
Add a thin coil of clay around the mouth opening before blending. This raises the lip area, making it easier to paint distinctly later.
Step 2: Adding Features
-
Attach the Ears:
Roll two small pea-sized balls of clay. Attach them to the top corners of the head. Use a blending tool or your finger to smooth the clay from the ear onto the body so there are no visible seams. -
Make the Limbs:
Create four slightly larger sausage shapes for the arms and legs. Attach the legs to the bottom corners so the monster can sit or lay flat. Attach the arms to the sides, sweeping them slightly upward. -
Blend the Seams:
Score and slip the attachment points if using air-dry clay. Use a rubber rib or wet finger to blend the clay of the limbs smoothly into the main body, ensuring a strong bond. -
Sculpt the Mouth:
For that signature gaping look, determine the center of the belly/chest area. Use a knife tool to cut a wide oval opening. -
Refine the Lips:
Use your fingers to smooth the cut edges of the mouth opening. I sometimes wet my finger to round these edges outward slightly to create a distinct lip rim. -
Add the Button:
Roll a tiny speck of clay into a ball and press it gently onto the lower belly to create an ‘outie’ belly button. -
Final Smoothing:
Before drying, use a slightly damp sponge or finger to smooth out any fingerprints or bumps over the entire surface. Let the clay dry completely according to package instructions (usually 24-48 hours for air dry).
Step 3: Painting & Details
-
Base Coat:
Using a flat brush, paint the entire exterior of the monster with a bright lime green acrylic. You will likely need 2-3 coats for opaque coverage. -
Paint the Interior:
Paint the inside of the mouth cavity with a dark pink or magenta. This adds depth and emphasizes the ‘hungry’ look. -
Detail the Lips:
Carefully paint the rim of the lips in a lighter pink than the interior to frame the mouth. -
Add the Eyes:
Paint two white circles above the mouth. Once dry, use a detail brush or a needle tool dipped in black paint to add tiny pupils in the center. -
Rosy Cheeks:
Dab two small pink circles just below and to the side of the eyes for blushing cheeks. -
The Nose:
With steady hands, paint a tiny inverted black triangle between the eyes for the nose. -
Seal the piece:
Once all paint is visibly dry, apply a coat of glossy acrylic varnish. This gives the monster a wet, ceramic-like finish and protects the paint.
Give it Teeth!
Before baking or drying, attach tiny triangles of clay inside the upper and lower rim of the mouth to give your monster a jagged, toothy grin.
Place your little green friend on a desk to guard your paperclips or simply to make you smile


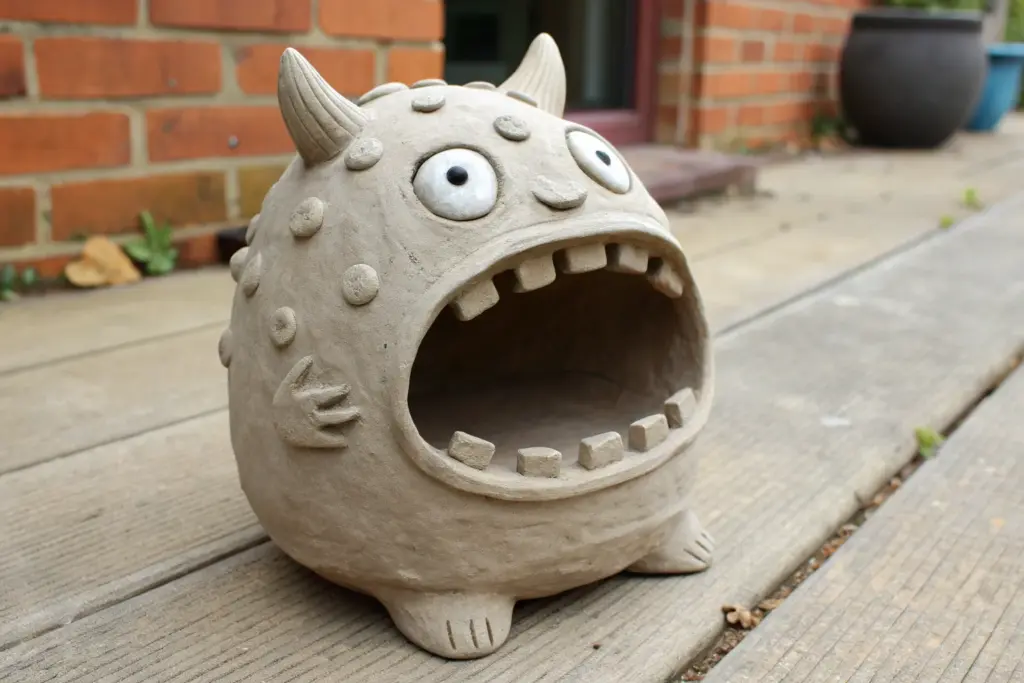
Silly Fangs and Jagged Teeth
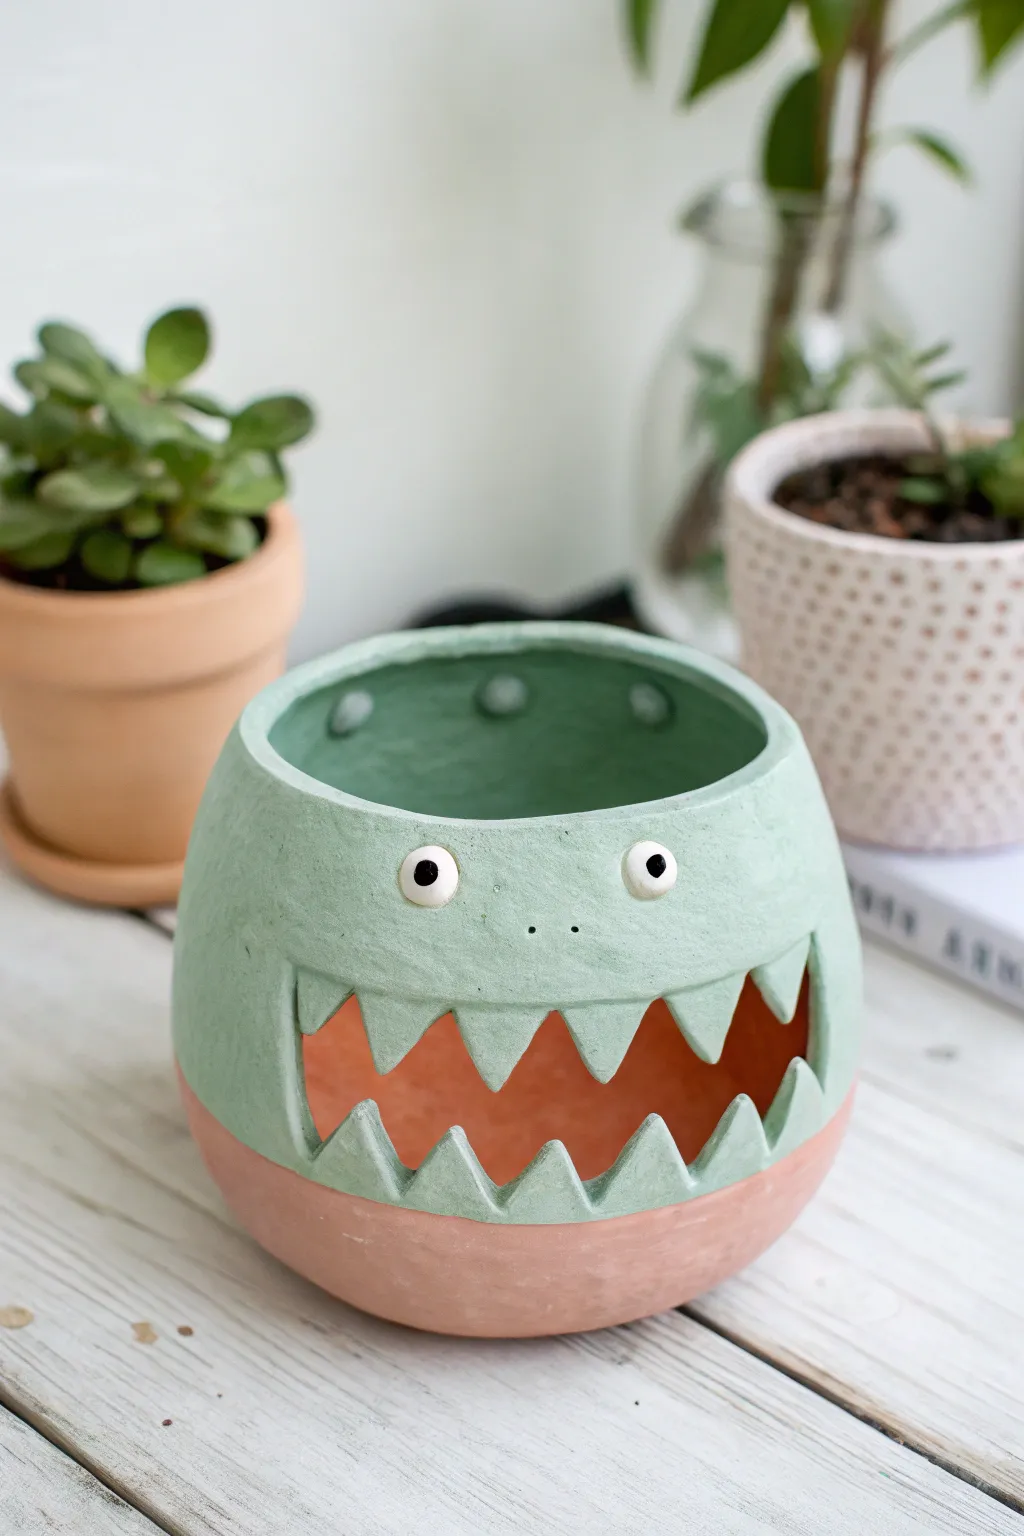
Transform a simple sphere of clay into a goofy, grinning guardian for your favorite plant. This friendly monster features a wide, jagged mouth carved straight through the form, perfect for peeking inside, and a playful two-tone glazed finish.
Step-by-Step Guide
Materials
- Air-dry clay or kiln-fire clay (depending on preference)
- Fettling knife or X-Acto knife
- Loop tool (for hollowing)
- Small sponge
- Slip (clay and water mixture)
- Scoring tool or fork
- Mint green acrylic paint or glaze
- White and black acrylic paint or glaze
- Clear sealant (if using air-dry clay)
- Paintbrushes (medium flat and small round)
Step 1: Forming the Base
-
Create two pinch pots:
Start by dividing your clay into two equal balls roughly the size of a large orange. Push your thumb into the center of one ball and pinch the walls while rotating to create an even bowl shape. Repeat with the second ball. -
Join the halves:
Score the rims of both pinch pots firmly with your scoring tool to create rough texture. Apply a generous amount of slip to these rough edges. -
Seal the sphere:
Press the two scored rims together to form a hollow sphere. Use your thumb or a smoothing tool to drag clay across the seam, blending the two halves until the join is completely invisible from the outside.
Step 2: Sculpting the Monster
-
Cut the opening:
Slice off the very top of your sphere to create the rim of the pot. Determine which side looks best for the face, then use your knife to carefully cut out a wide, oval-shaped mouth opening in the center of the belly. -
Shape the teeth:
I usually hold onto the clay I just cut out of the mouth. Flatten that scrap into a slab about 1/4 inch thick and cut out triangular, jagged teeth shapes. -
Attach the teeth:
Score and slip the flat edges of your triangular teeth and attach them to the inside rim of the mouth opening. Place some pointing down from the top and others pointing up from the bottom for a classic monster grin. -
Smooth the seams:
Use a small modeling tool or your finger to smooth the clay where the teeth attach to the inner wall, ensuring they are securely bonded and won’t pop off later. -
Add the eyes:
Roll two small balls of clay for eyes. Score the area above the mouth and the back of the eyes, add slip, and press them firmly into place. -
Detail the rim:
Roll several tiny pea-sized balls of clay. Attach them around the interior rim of the top opening using the score-and-slip method to add a decorative texture. -
Refine the surface:
Take a slightly damp sponge and wipe down the entire exterior to remove fingerprints and smooth out any rough textures. Let the piece dry completely according to your clay type’s instructions.
Air Pocket Patrol
When joining two pinch pots into a hollow sphere, poke a tiny pinhole somewhere inconspicuous immediately. This lets trapped air escape so your pot won’t crack or explode as it dries
Step 3: Painting and Finishing
-
Mark the paint line:
Once fully dry (and fired, if using ceramic clay), lightly pencil a horizontal line around the lower third of the pot. This will separate your colors. -
Apply the green base:
Paint the upper two-thirds of the pot, including the monster’s face and the rim, with your mint green paint. Apply 2-3 coats for opaque coverage. -
Paint the lower section:
Leave the bottom third unpainted if you want a raw terracotta look, or mix a custom terracotta-colored paint and apply it to the base to match the project image. -
Detail the features:
Using a small round brush, paint the eyes white. Once the white is dry, add small black dots for pupils. Use a tiny brush or a toothpick to add two small black dots for nostrils between the eyes. -
Seal the work:
If you used air-dry clay and acrylics, apply a coat of satin or matte sealant to protect the paint job. If this is for a real plant, ensure you use a waterproof sealer on the inside.
Sagging Teeth?
If the clay teeth droop while wet, prop the mouth open with crumpled newspaper or paper towels. Let the clay stiffen for an hour before removing the support
Pop a succulent inside and enjoy your charming new monster friend


Long Floppy Tongue Drip-Out
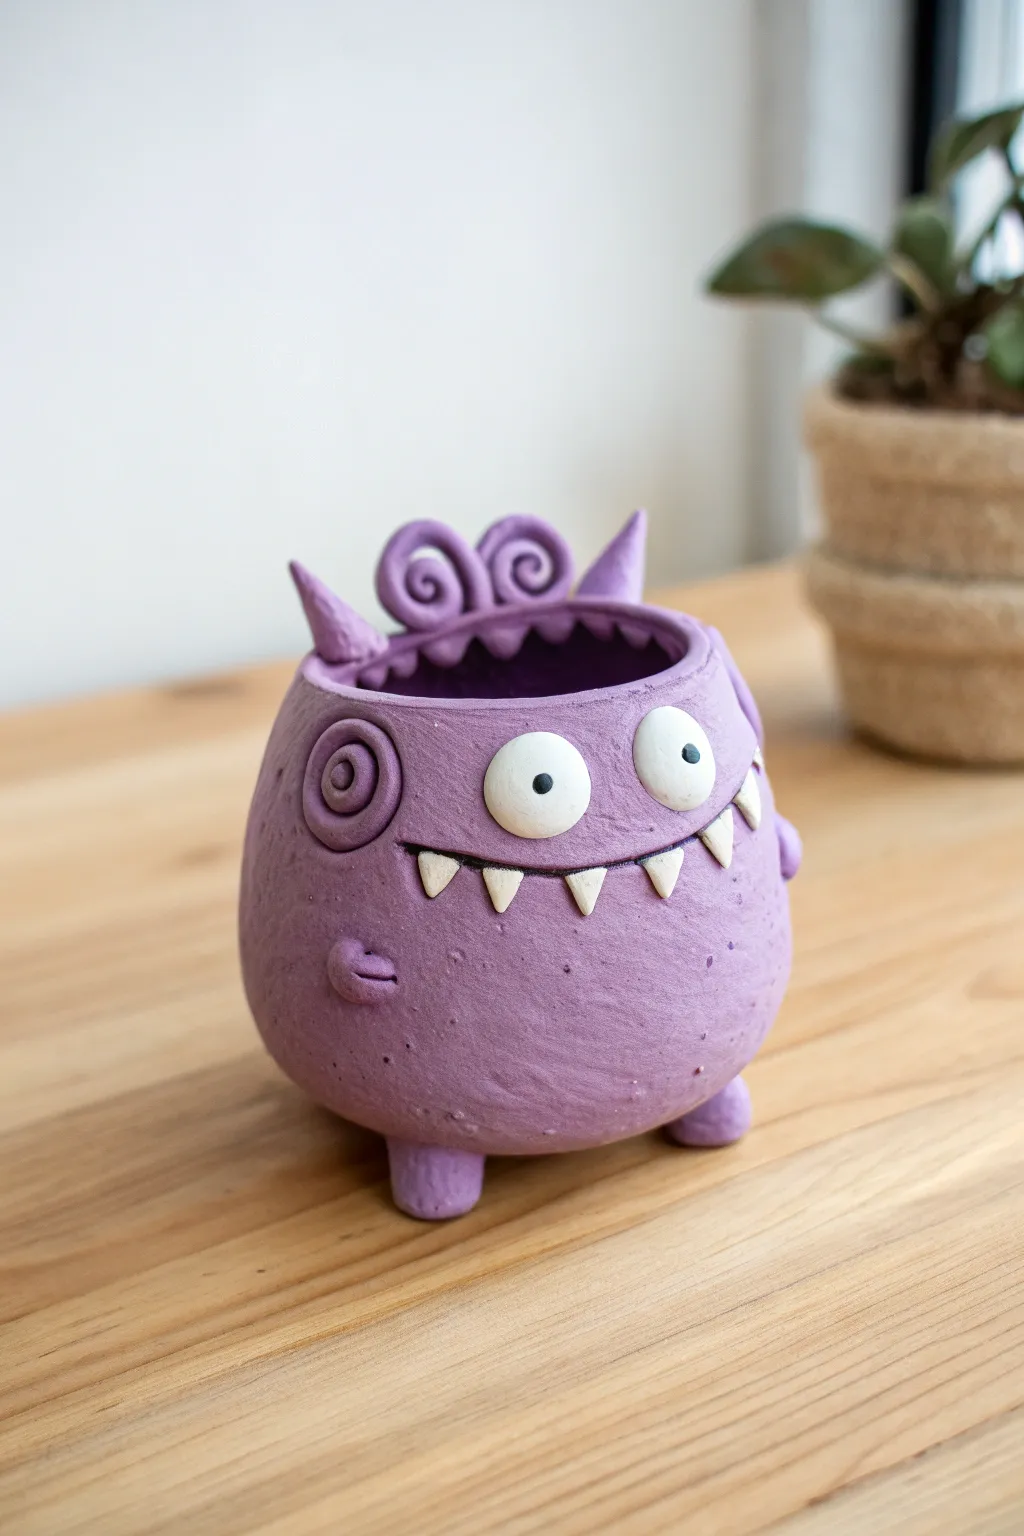
This charming, purple monster pot features a delightful toothy grin, swirly details, and expressive bug eyes that bring instant personality to any shelf. The texture is intentionally rustic, giving it a handmade, organic feel perfect for holding succulents or small treasures.
How-To Guide
Materials
- Air-dry clay or polymer clay (purple, or white to be painted)
- Acrylic paints (purple, white, black) if not using colored clay
- Clay sculpting tools (needle tool, ball tool)
- Small bowl of water (for smoothing)
- Slip (clay and water mixture) for joining
- Rolling pin
- Small paintbrush
- Clear matte varnish (optional)
Step 1: Forming the Base
-
Create the main body:
Start with a ball of clay about the size of a large orange. Insert your thumb into the center and gently pinch the walls while rotating the ball to form a classic pinch pot shape. Keep the walls about 1/4 inch thick for stability. -
Shape the opening:
Gently gently squeeze the rim inward slightly so the pot isn’t perfectly round but curves in at the top, creating a cozy hollow for the monster’s head. -
Add the feet:
Roll four small, equal-sized balls of clay. Flatten them slightly into distinctive stubby cylinders. Score the bottom of your pot and the tops of these feet, add a dab of slip, and press them firmly onto the base so the monster stands level. -
Smooth the exterior:
Use a damp sponge or your finger to smooth out major cracks, but don’t over-polish; the slightly rough texture adds to the creature’s charm.
Step 2: Adding Personality
-
Prepare the mouth:
Roll a thin snake of clay and attach it across the front of the pot in a wide, gentle curve to define the upper lip. Blend the top edge of this snake into the pot body so only the bottom edge protrudes, creating an overbite look. -
Sculpt the teeth:
Form several tiny triangles from white clay (or regular clay to be painted later). Attach these to the underside of that upper lip line, spacing them out unevenly for a goofy expression. I like to vary the sizes to make him look friendlier. -
Make the eyes:
Roll two medium balls of clay and flatten them into thick discs. Score and slip the back, then press them onto the face above the mouth. They should look slightly protruding and bug-eyed. -
Add the horns:
Shape two small cones for horns. Attach one on each side of the head’s rim. Angle them slightly outward for a mischievous silhouette. -
Create the hair swirls:
Roll two small taper snakes of clay. Curl them into tight spirals (like snail shells) and attach them side-by-side on the very top rim, between the horns.
Secure Those Teeth
When attaching the small teeth, use a needle tool to drag a tiny bit of clay from the back of the tooth up into the lip to lock it in place securely.
Step 3: Details & Texture
-
Add side details:
Create a spiral shape similar to the hair, but flatten it against the side of the head like an ear or decorative swirl. Add tiny, stubby arms by attaching small ovals of clay lower down on the body. -
Texturize the skin:
Take a stiff bristle brush or a crumpled ball of aluminum foil and gently tap it all over the purple skin areas. avoid the eyes and teeth. This stippling creates that crucial stone-like monster skin texture. -
Refine the rim:
If you want extra detail, create small indentations or ridges along the top rim of the pot to mimic a spine or ruffled collar.
Cracks Appearing?
If you see hairline cracks while drying, mix a tiny bit of fresh clay with water to make a thick paste and fill them in immediately before painting.
Step 4: Finishing Touches
-
Final smoothing:
Check all your attachments—eyes, horns, feet, and arms—to ensure they are securely joined. Smooth any rough seams with a little water. -
Drying:
Let your monster dry completely. If using air-dry clay, this might take 24-48 hours depending on humidity. Keep it away from direct heat to prevent cracking. -
Painting the base:
If you didn’t use colored clay, paint the entire body a nice matte lavender or purple. Let it dry thoroughly. -
Painting details:
Paint the teeth and eyeballs a crisp white. Once that’s dry, add small black dots for pupils. I usually place the pupils slightly off-center or different sizes to enhance the goofy look. -
Sealing:
Apply a coat of matte varnish to protect the paint and clay, especially if you plan to put a plant inside.
Now you have a quirky little friend ready to guard your desk or hold a tiny plant


Goofy Bug Eyes on Stalks
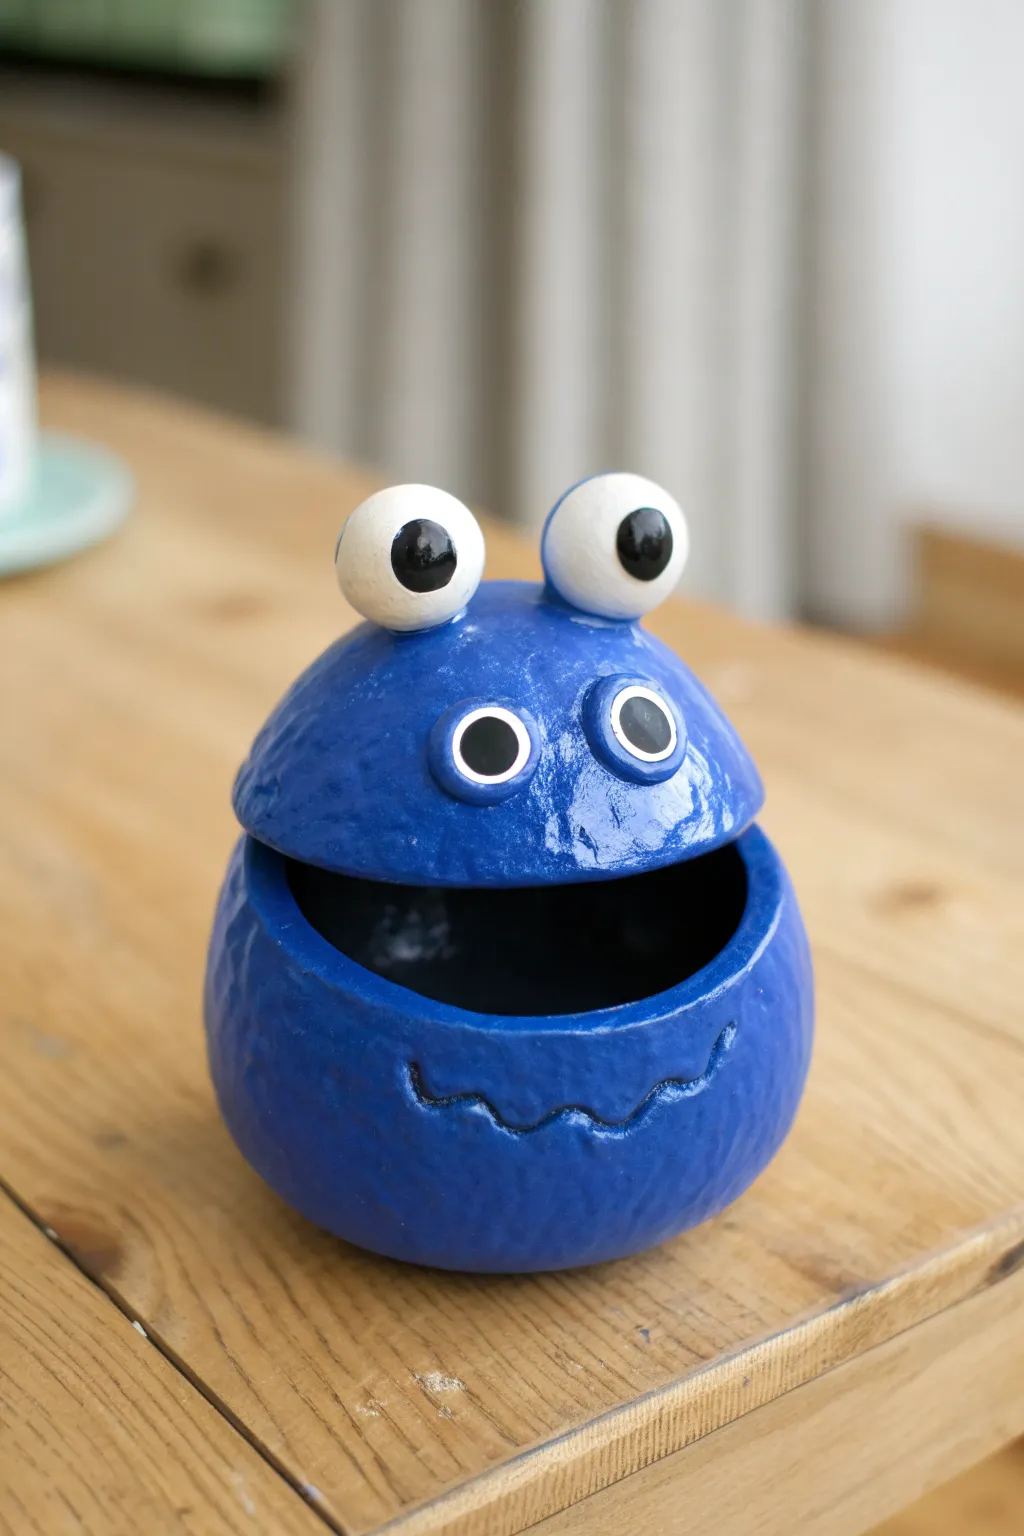
Create a hilarious, two-part clay container that doubles as a friendly monster character. With its double set of eyes—some pop-out, some painted—and a classic wavy smile, this shiny blue pot is perfect for hiding small treasures or just adding whimsy to a shelf.
Step-by-Step Guide
Materials
- Air-dry clay or kiln-fire clay (white body recommended)
- Clay carving tools (needle tool, loop tool)
- Small sponge
- Water slip (clay mixed with water)
- Acrylic paints (bright blue, white, black) or ceramic glazes if firing
- Paintbrushes (medium wash brush, fine detail brush)
- High-gloss varnish (for air-dry clay) or clear glaze
Step 1: Forming the Base and Lid
-
Create two pinch pots:
Start with two balls of clay, one slightly larger than the other. Insert your thumb into the center of each ball and pinch the walls while rotating to create two bowl shapes. -
Shape the body:
Take the larger pinch pot, which will be the body, and gently gently paddle the outside to help round it out. You want a nice, spherical shape that sits flat on the table without wobbling. -
Form the lid:
Take the second, smaller pinch pot and invert it. Check that the rim matches the circumference of your body pot so they can sit flush against each other. -
Refine the rims:
Use a damp sponge or your fingers to smooth the rims of both pots. They don’t need to be perfectly mechanically flat, but they should fit together relatively snugly.
Weight Management
Make the lid pinch pot slightly thinner than the base so the monster isn’t top-heavy. This prevents it from tipping over when the lid is on.
Step 2: Adding the Features
-
Roll eye stalks:
Roll two small balls of clay for the main eyes. I like to keep these round but slightly flattened at the base where they will attach. -
Attach the top eyes:
Score the bottom of the eye balls and the top of the lid (the smaller pot). Apply slip and press the eyes firmly onto the highest point of the lid. -
Make the irises:
Roll tiny balls of clay and flatten them into discs suitable for pupils, pressing them onto the white eye balls, or leave the eye balls smooth if you plan to paint the pupils entirely. -
Sculpt the secondary eyes:
You’ll notice this monster has a second set of eyes on the ‘forehead’ area. Roll two small discs of clay and attach them to the front of the lid using the score-and-slip method. -
Carve the mouth:
On the bottom body pot, use a needle tool or small loop tool to carve a shallow, wavy line into the clay surface. This creates that classic crooked smile texture. -
Smooth the surface:
Dip your sponge in a little water and wipe down the entire exterior to remove fingerprints and crate a slight texture, but don’t smooth away your carved smile.
Step 3: Painting and Finishing
-
Allow to dry:
Let your clay dry completely according to the package instructions. If using kiln clay, this is when you would bisque fire. -
Base coat blue:
Paint the entire exterior of the body and the lid (excluding the big eye balls) with a bright, primary blue. You may need two coats for full opacity. -
Paint the stalk eyes:
Paint the round stalk eyes white. Once dry, add large, solid black pupils in the center, looking slightly off-kilter for a goofy effect. -
Paint the flat eyes:
For the flat disc eyes on the forehead, paint the centers black and outline them with a thin circle of white to make them pop against the blue skin. -
Highlight the smile:
Use a very thin brush with black paint to trace inside the carved wavy mouth line, emphasizing the groove. -
Seal or Glaze:
If using acrylics on air-dry clay, apply a thick coat of high-gloss varnish to mimic the shiny ceramic look. If using ceramic glazes, fire the piece again to get that glassy finish.
Lid Slipping Off?
If the lid slides off easily, add a small ‘flange’ or lip of clay to the underside of the lid that fits inside the rim of the bottom pot.
Pop the lid on and enjoy your goofy new friend sitting on your desk

The Complete Guide to Pottery Troubleshooting
Uncover the most common ceramic mistakes—from cracking clay to failed glazes—and learn how to fix them fast.
One-Eyed Cyclops Grin
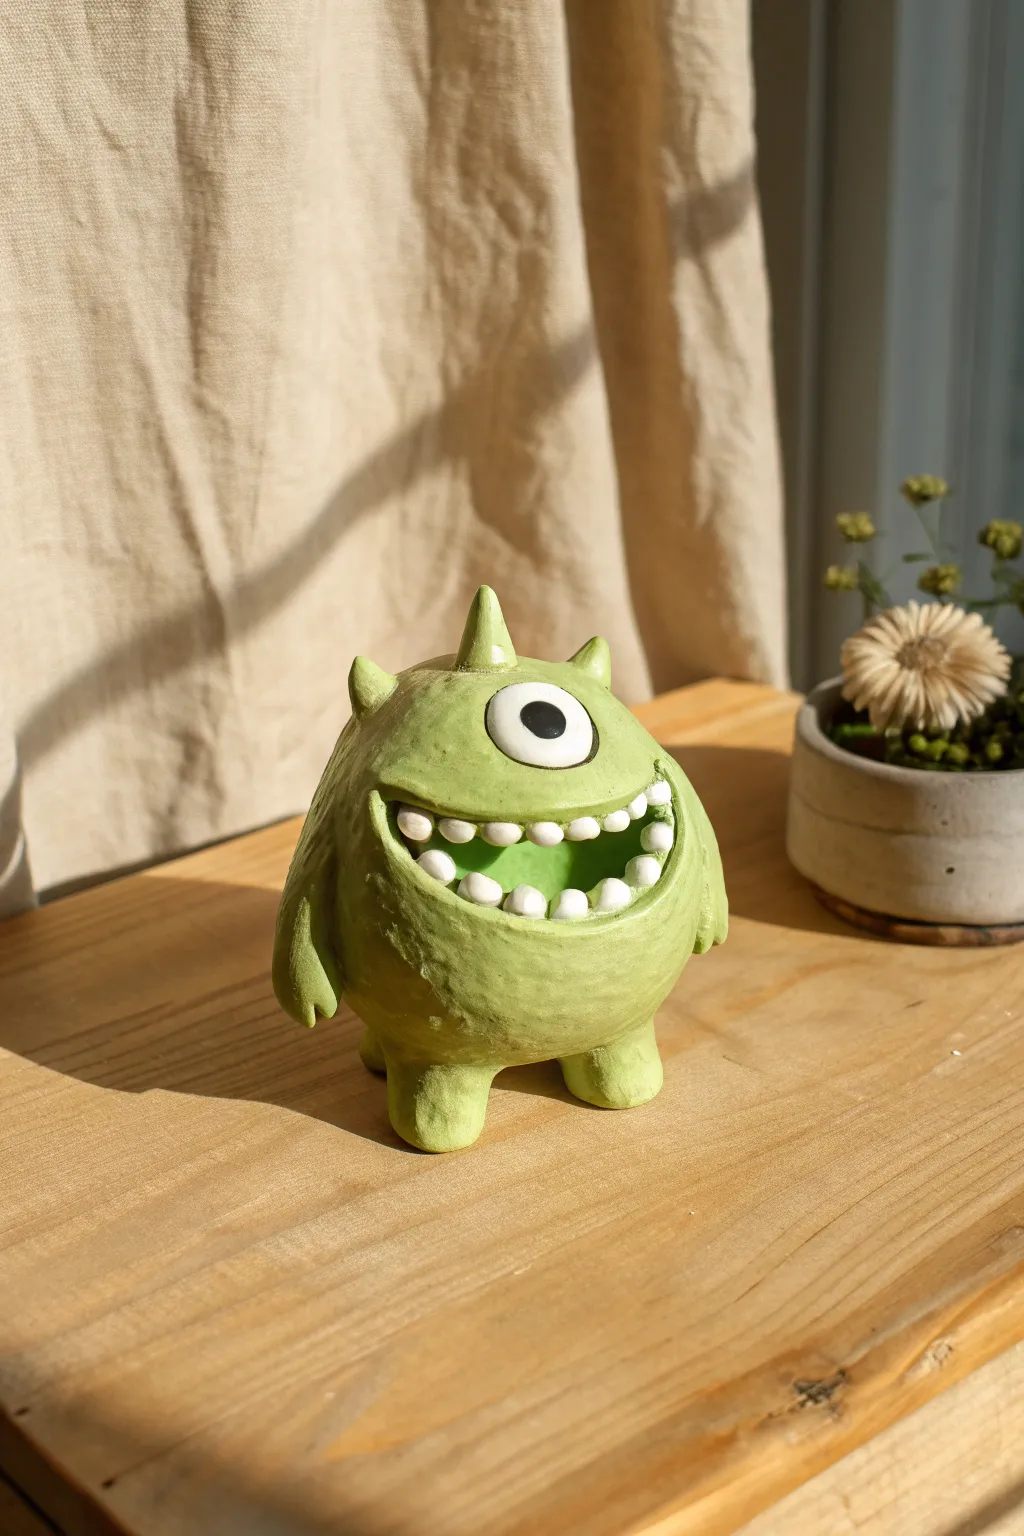
This charming, lime-green creature features a signature single eye and a generously wide, toothy grin that doubles as a functional opening. Its stubby legs and simple horned silhouette make it a perfect beginner-friendly pinch pot project full of personality.
Step-by-Step Tutorial
Materials
- Air-dry clay or polymer clay (white or light grey)
- Acrylic paints (lime green, white, black, dark green)
- Clay sculpting tools (needle tool, small loop tool)
- Bowl of water (for smoothing)
- Sponge
- Small paintbrush
- Clear matte or satin varnish spray
Step 1: Forming the Body
-
Prepare the clay:
Start with a ball of clay roughly the size of a tennis ball. Knead it well to remove air bubbles and ensure it is pliable. -
Create the pinch pot:
Insert your thumb into the center of the ball and gently pinch the walls while rotating the clay. Aim for an even thickness of about a quarter-inch all around, creating a hollow, round sphere shape. -
Close the sphere:
Unlike a bowl, you want this to be mostly closed. Gently curve the top edges inward until they almost meet, creating a slightly flattened spherical body. -
Cut the mouth:
Decide where the face will be. Using a needle tool or craft knife, cut a wide, crescent-shaped opening for the mouth. remove this slice of clay. This opening gives us access to the hollow inside. -
Smooth the edges:
Dip your finger in a little water and smooth the cut edges of the mouth so they are rounded, not sharp.
Smooth Seams Tip
Use the back of a spoon dipped in water to burnish and bond attached parts like legs. This leaves no tool marks.
Step 2: Adding Features
-
Attaching the legs:
Roll two small, stout cylinders of clay. Score (scratch) and slip (wet) the bottom of the body and the top of these legs, then press them firmly into place so the monster stands stable. -
Forming the arms:
Roll two thin tapered sausages of clay for arms. Attach these to the sides of the body, blending the clay smoothly at the shoulder area so they look seamless. -
Adding the horns:
Shape three small cones: one slightly larger for the center top, and two smaller ones for the sides. Attach these to the head using the score and slip method. -
Creating the eye:
Roll a flat, circular disc of clay and place it centrally aove the mouth. Roll a smaller, slightly domed circle and place it on top of the disc to form the eyeball. -
Sculpting the teeth:
Roll tiny balls of clay—roughly the size of peas—for the teeth. You’ll need about 10-12. Attach these inside the upper and lower lips of the mouth opening. -
Refining the surface:
Use a damp sponge to wipe down the entire figure. This removes fingerprints and creates that slightly organic, stone-like texture seen in the photo. -
Drying:
Let the figure dry completely. If using air-dry clay, this might take 24-48 hours. I usually rotate it occasionally so the bottom dries evenly.
Make it a Planter
Before drying, poke a drainage hole in the bottom. Now your mouth opening makes it a perfect mini succulent pot.
Step 3: Painting and Finishing
-
Base coat:
Paint the entire body (except the eye and teeth) with a light lime green acrylic paint. You may need two coats for full coverage. -
Adding depth:
Mix a tiny drop of dark green or black into your lime green. Paint this into the crevices around the arms, legs, and under the horns to create shadows. -
Painting the details:
Paint the teeth and the eyeball pure white. Use a small detail brush to minimize mess. -
The pupil:
Once the white is dry, carefully paint a solid black circle in the center of the eye. Add a thin black outline around the white eyeball to make it pop. -
Dry brushing:
Dip a dry brush into a lighter yellow-green and wipe most of it off. Lightly brush over the textured areas of the skin to highlight the bumps. -
Sealing:
Finish with a spray of clear matte or satin varnish to protect the paint and give it a finished ceramic look.
Place your little green monster on a sunny shelf where his grin can greet you every day
Multi-Eyed “Oops, Too Many” Monster
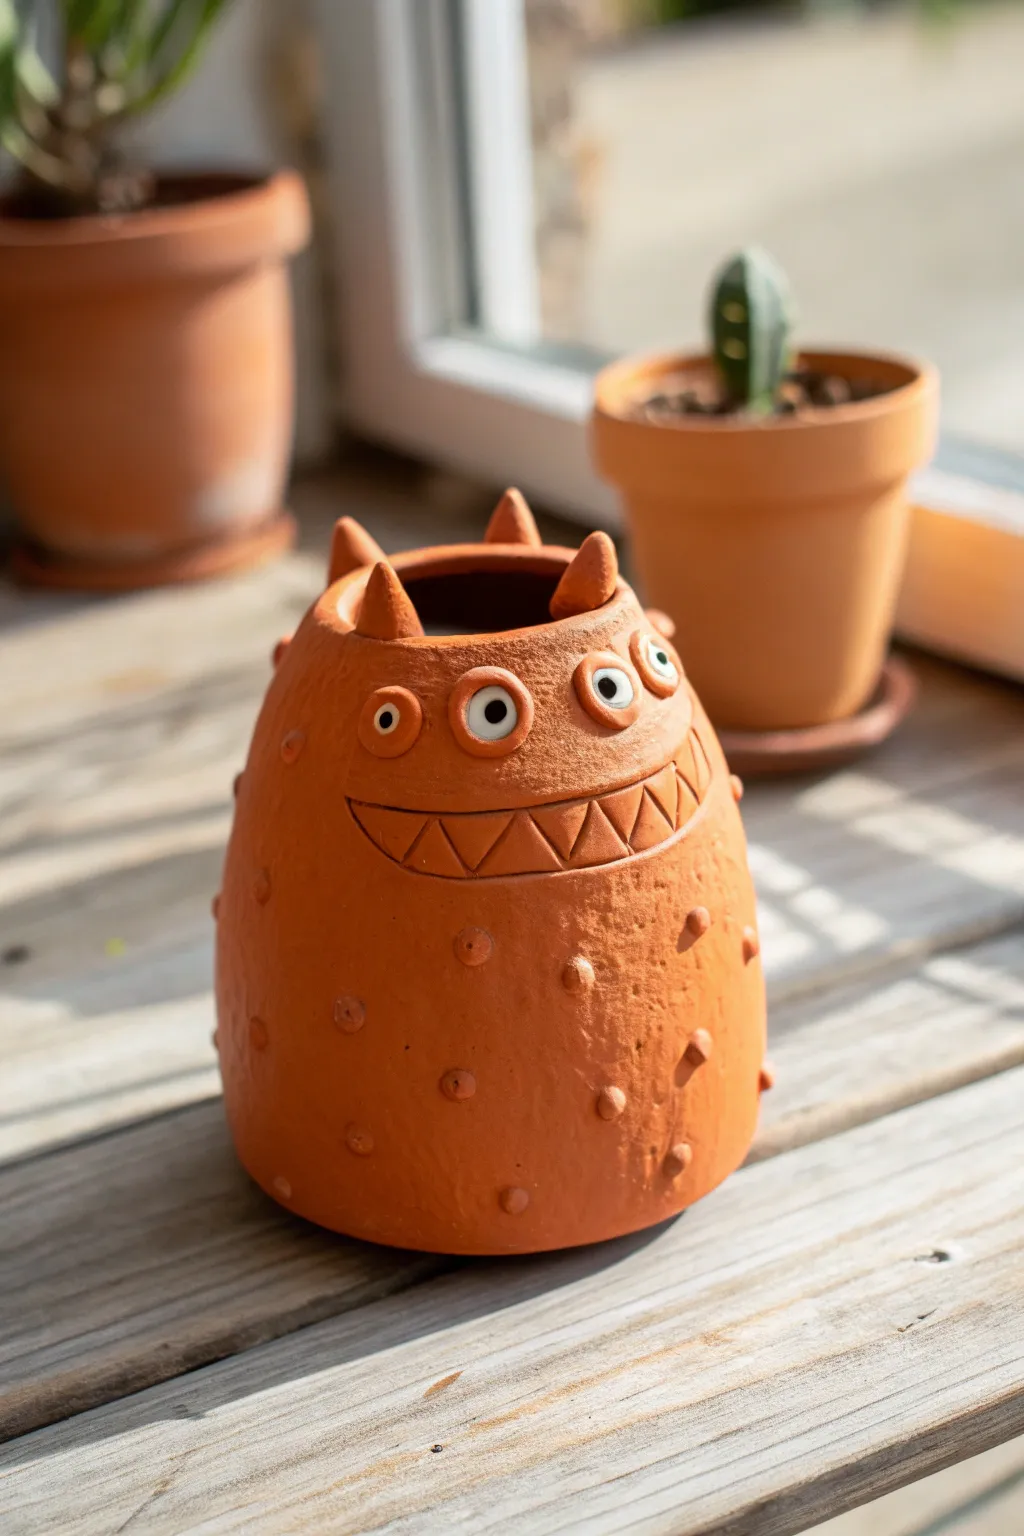
This whimsical planter combines the classic warmth of terracotta with a playful monster design featuring a trio of staring eyes and a toothy grin. Its textured surface and petite horns make it a delightful home for small succulents or cacti.
Step-by-Step
Materials
- Terracotta air-dry clay or firing clay
- Basic sculpting tools (needle tool, loop tool)
- Small bowl or cup (for water)
- Sponge
- Slip (clay worked with water into a paste)
- White acrylic paint (for eyes)
- Black acrylic paint (for pupils)
- Small detail paintbrush
- Rolling pin (optional)
Step 1: Forming the Base
-
Prepare the Clay:
Start with a ball of clay roughly the size of a grapefruit. Wedge it well to remove air bubbles, ensuring the consistency is smooth and pliable. -
Create the Pinch Pot:
Push your thumb deep into the center of the ball. Gently pinch and rotate the clay between your thumb and fingers to open up the pot, aiming for an even wall thickness of about a quarter-inch. -
Shape the Dome:
Instead of flaring the rim out like a bowl, gently curve the walls inward near the top to create a rounded, dome-like shape. Leave an opening at the top wide enough for potting a plant later. -
Flatten the Bottom:
Tap the pot gently on your work surface to create a stable, flat base so your monster won’t wobble.
Slip & Score Secret
Always scratch (score) both surfaces and apply liquid clay (slip) before joining parts. Without this, your horns and eyes will pop off as they dry.
Step 2: Adding the Monster Features
-
Sculpt the Spikes:
Roll four or five small, cone-shaped pieces of clay for the horns. Score both the base of the horns and the top rim of your pot with a needle tool. -
Attach the Horns:
Apply a dab of slip to the scored areas and press the horns firmly onto the rim. Smooth the seams with your finger or a tool so they look like they grew right out of the head. -
Create the Eyes:
Roll three small balls of clay and flatten them slightly into thick discs. Attach these in a horizontal row across the upper third of the pot using the score-and-slip method. -
Define the Eyelids:
Roll very thin coils (snakes) of clay. Wrap these over the top and bottom of each eye disc to create eyelids, blending the outer edges into the main body. -
Carve the Smile:
Use a needle tool or a small loop tool to carve a long, curved horizontal line for the mouth. Make it wide and slightly goofy. -
Detail the Teeth:
Inside the mouth outline, carve a zigzag line to create triangular teeth. Deepen the lines slightly to make the teeth pop.
Step 3: Texturing and Finishing
-
Add Warts and Bumps:
Roll tiny little balls of varied sizes. Attach them randomly all over the body of the monster—some near the base, some near the mouth—to create a fabulous bumpy texture. -
Smooth the Surface:
Take a slightly damp sponge and gently wipe the entire surface. This softens any sharp tool marks and gives the clay that classic, earthy finish seen in the photo. -
Drying:
Let the piece dry slowly away from direct heat. If you used firing clay, it’s now ready for the kiln. If using air-dry clay, wait 24-48 hours until it’s unrelatedly hard. -
Painting the Eyes:
Once fully dry (or fired), dip a small brush in white paint and carefully fill in the round eyeballs. Let this layer dry completely. -
Adding Pupils:
Using the tip of a small brush or a dotting tool, place a black dot in the center of each white eye. Varying the pupil size slightly can give him a funny, dazed expression.
Make it Functional
Poke a hole in the bottom center before drying for drainage, or seal the inside with waterproof varnish if you plan to use it as a pencil holder.
Pop a spiky cactus inside to give your monster a wild new hairstyle


What Really Happens Inside the Kiln
Learn how time and temperature work together inside the kiln to transform clay into durable ceramic.
Curled Horns and Antennae
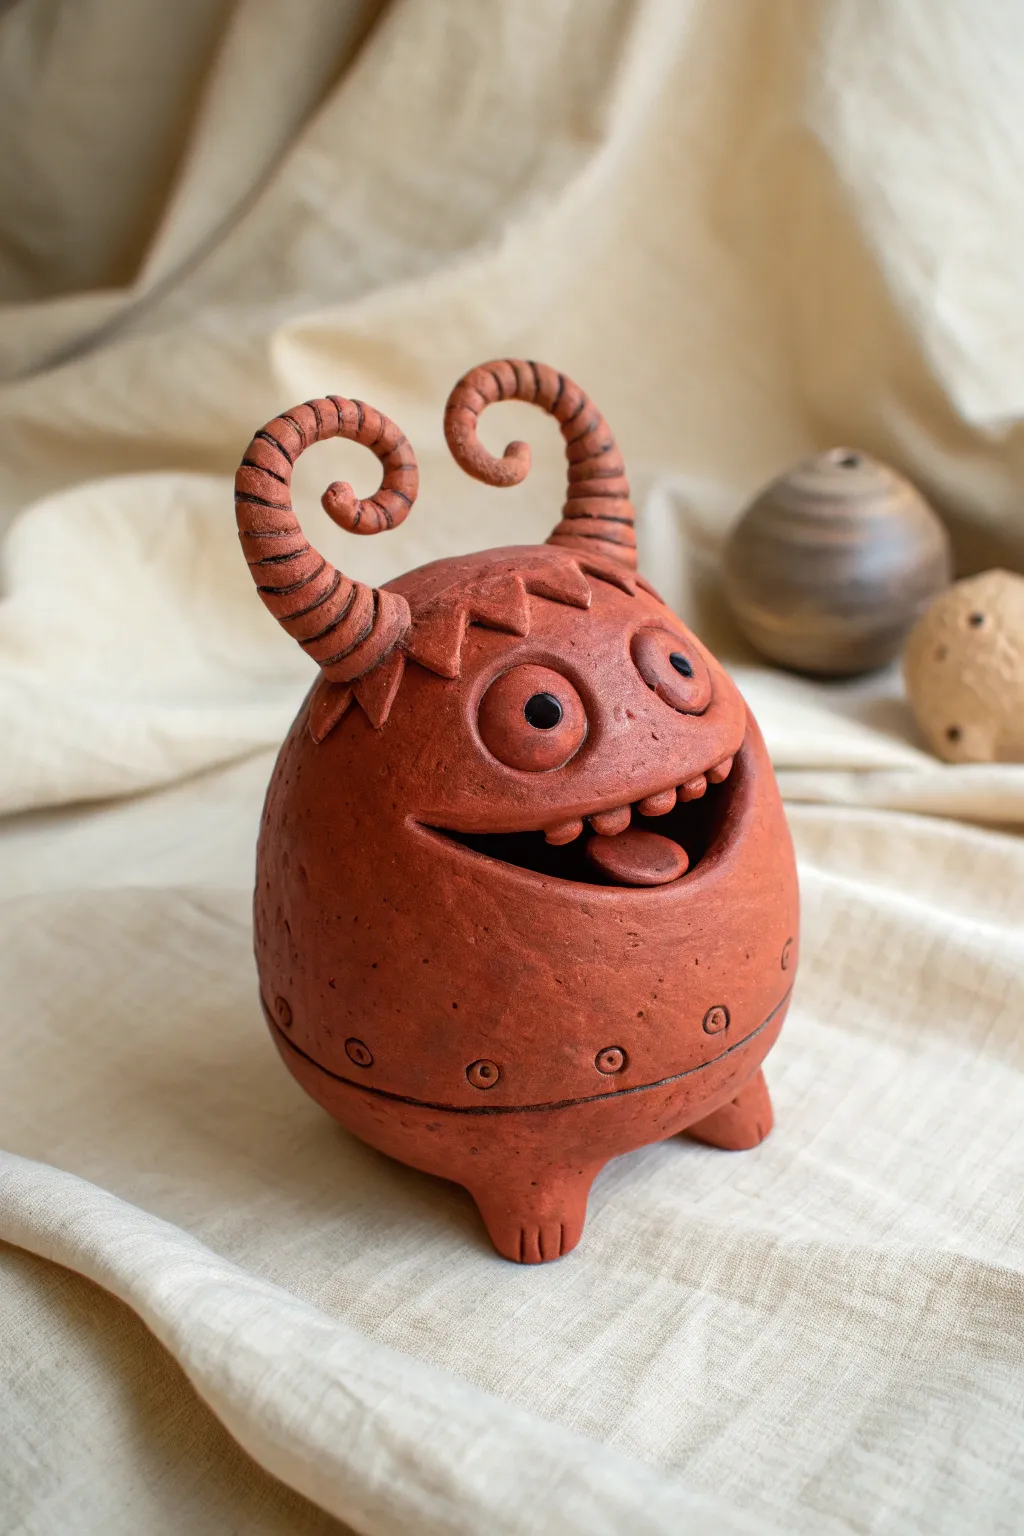
This charming, terracotta-colored monster pinch pot features expressive spiral horns and a gleeful, toothy grin that is perfect for holding trinkets or succulents. Its textured surface and playful details, like the protruding tongue and zig-zag hair, give it a distinctive personality.
How-To Guide
Materials
- Red earthenware clay (or polymer clay in terracotta)
- Clay scoring tool or toothbrush
- Slip (clay and water mixture)
- Wooden sculpting tool
- Needle tool
- Small sponge
- Wire cutter
- Rolling pin (optional)
- Water cup
Step 1: Forming the Base Body
-
Create the Pinch Pot:
Start with a ball of red clay about the size of a large orange. Press your thumb into the center and gently pinch the walls while rotating the ball to create a hollow sphere shape. -
Refine the Shape:
Smooth the walls to be an even thickness, roughly 1/4 inch. Gently tapping the pot on a flat surface will flatten the bottom slightly so it stands on its own. -
Add Foot Stubs:
Roll two small balls of clay for feet. Score and slip the bottom of the pot where you want them, then press the balls into place. -
Sculpt Toes:
Use a wooden tool or needle tool to press vertical lines into the foot stubs, creating the look of small claws or toes. -
Create the Belt Detail:
About one-third of the way up from the bottom, use a needle tool to drag a horizontal line all the way around the body. -
Add Bolt Patterns:
Use the open end of a small straw or a circular stamp tool to press small rings evenly spaced just above that horizontal line, mimicking rivets or bolts.
Step 2: Sculpting the Face
-
Cut the Mouth:
Using a needle tool or fettling knife, carefully cut a wide, curved crescent shape into the upper half of the the sphere to create an open mouth. Removing this clay reveals the hollow interior. -
Form the Tongue:
Flatten a small oval of clay. Attach it inside the lower lip area so it flops slightly forward, giving the monster a lively expression. -
Add Teeth:
Roll tiny balls of clay and shape them into little rectangles. Score and slip them to the upper lip of the mouth opening. -
Make the Eyes:
Roll two medium-sized balls for eyes. Flatten them slightly and attach them above the mouth. Use a smaller tool to press a deep pupil into each center. -
Sculpt Eye Details:
Roll very thin coils of clay to wrap around the eyes as eyelids, blending the edges into the head for a seamless look.
Fixing Saggy Horns
If horns droop: insert a bent toothpick or wire into the horn and head for internal support, or prop them up with crumpled paper towels until the clay stiffens.
Step 3: Horns and Finishing Touches
-
Roll the Horn Coils:
Roll two tapered coils of clay, thicker at the base and pointed at the tip, about 3-4 inches long. -
Texture the Horns:
I prefer to add texture while the coils are straight. Use a needle tool to score horizontal rings all the way up the horn. -
Curve the Horns:
Gently curl the tips of the horns inward into a spiral shape. Be careful not to smudge your texture lines. -
Attach the Horns:
Score and slip the top of the monster’s head heavily. Press the wide base of the horns firmly onto the head, smoothing the seam with a wooden tool. -
Create the Hair:
Flatten a strip of clay and cut triangles out of one side to make a jagged, zig-zag fringe. Attach this strip across the forehead, just below the horns. -
Final Surface Texture:
Using a stiff bristled brush or a crumpled ball of foil, gently dab the skin of the monster (avoiding the eyes and horns) to create a pitted, skin-like texture. -
Dry and Finish:
Allow the piece to dry slowly under plastic to prevent the horns from cracking off. Once bone dry, fire or bake according to your specific clay instructions.
Glaze It Up
After bisque firing, apply a wash of black iron oxide before glazing. Wipe it back with a sponge to leave dark color deep in the textures while keeping the high points bright.
Now you have a delightfully mischievous creature ready to guard your desk
Spiky Back and Tail Monster
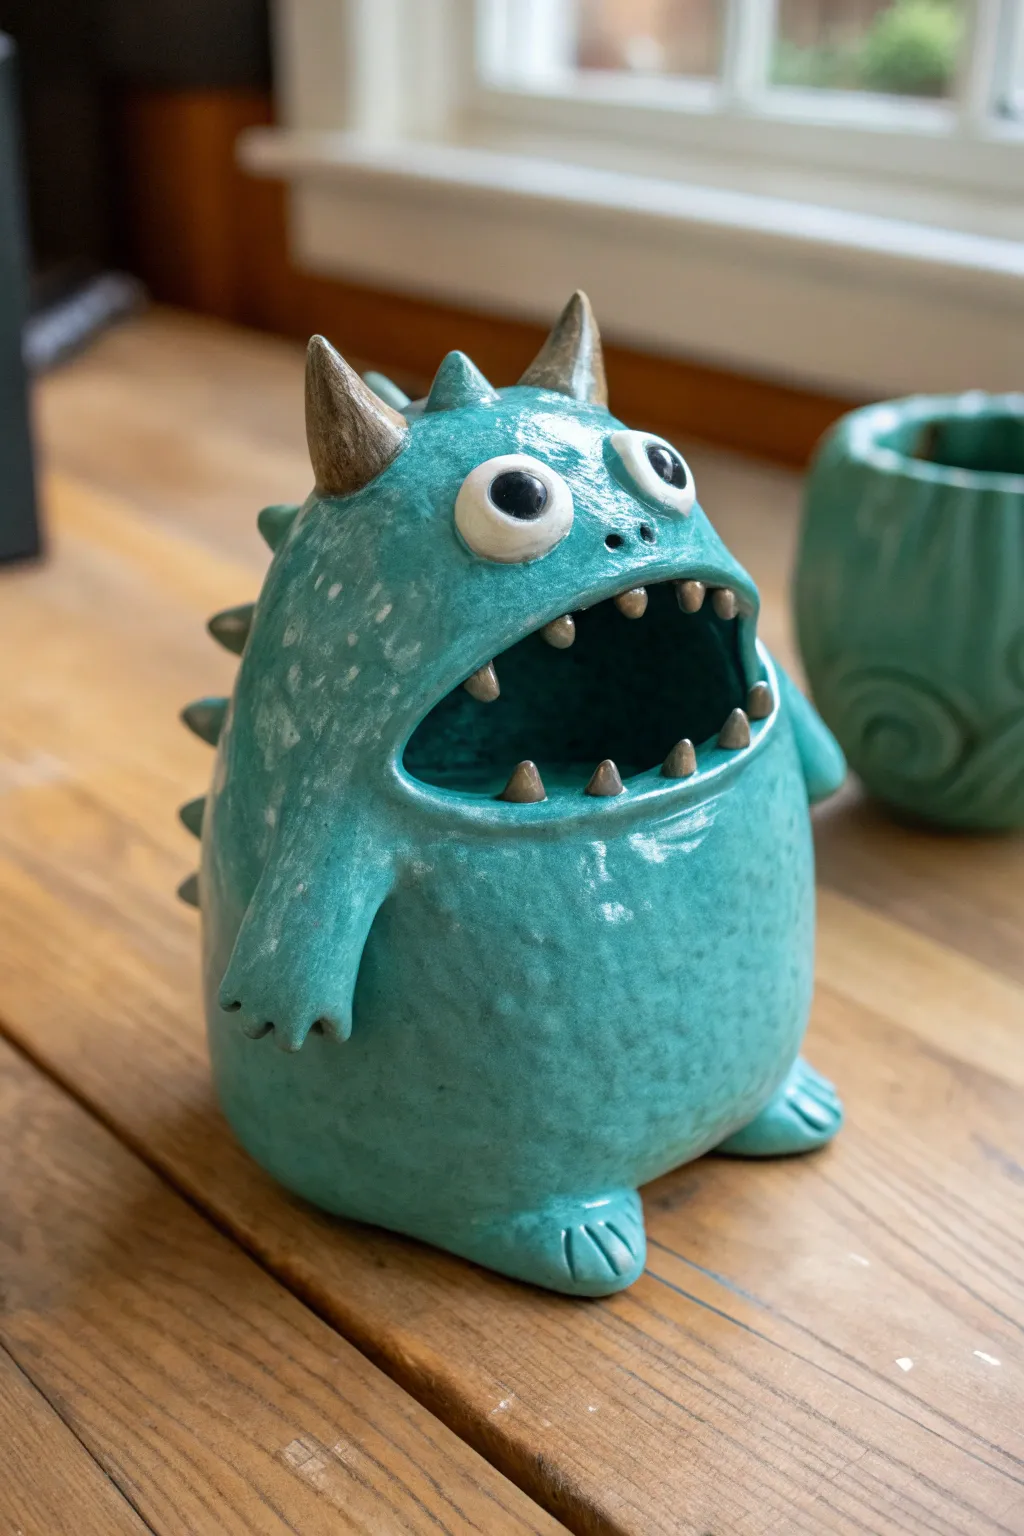
This charming, wide-mouthed monster features a vibrant turquoise glaze and a row of playful spikes running down its back. With its expressive eyes and jagged little teeth, this pinch pot creature is perfect for holding sponges, candy, or just keeping you company on a shelf.
Step-by-Step
Materials
- White or light-colored stoneware clay
- Turquoise stoneware glaze (e.g.,Mayco or Amaco)
- Small amount of brown/bronze glaze for horns and teeth
- Clear gloss glaze (optional, for eyes)
- Black underglaze (for pupils)
- Needle tool
- Scoring rib or serrated kidney tool
- Small sponge
- Paintbrushes (soft bristle for glaze, fine tip for details)
Step 1: Forming the Body
-
Create the base pinch pots:
Start by dividing your clay into two equal balls, roughly the size of tennis balls. Push your thumb into the center of each to open them up, pinching the walls evenly as you rotate the clay until you have two distinct bowl shapes. -
Join the pots:
Score the rims of both pinch pots thoroughly with your serrated tool and apply a little water or slip. Press the rims together firmly to trap a pocket of air inside, creating a hollow egg shape. -
Secure the seam:
Using your thumb or a modeling tool, smooth the clay across the seam where the two pots joined. Do this in multiple directions until the seam is completely invisible and the surface is smooth. -
Shape the standing base:
Gently tap the bottom of your hollow egg onto your work surface to flatten it slightly. This ensures your monster will sit upright without wobble. -
Cut the mouth:
Decide where you want the face to be. Using a needle tool, cut a wide, horizontal oval shape out of the upper middle section to create the gaping mouth opening. This also releases the trapped air pressure.
Step 2: Adding Features
-
Smooth the lips:
The cut edge of the mouth will be sharp. Use a damp sponge or your finger to round over and smooth the lips, giving them a finished, organic look. -
Create the arm nubs:
Roll two small carrot-shaped coils of clay. Attach these to the sides of the body using the score-and-slip method, blending the clay downward so the arms look like they are growing out of the torso. -
Add fingers and toes:
Use a needle tool or small knife to press indentations into the ends of the arms to suggest claws. For the feet, attach two flattened balls of clay to the base and carve similar toes into them. -
Sculpt the spikes:
Roll out a series of small cones, graduating in size from large to small. Score and slip them in a line down the center of the monster’s back, starting at the top of the head. -
Attach the horns:
Make two slightly larger, curved cones for the horns. Attach these firmly to the top of the head, just in front of the first back spike.
Collapsing Mouth?
If the mouth sags after cutting, stuff a small ball of newspaper or paper towel inside the cavity to support the roof of the mouth while the clay firms up to leather hard.
Step 3: The Finicky Details
-
Form the eyes:
Roll two balls of clay for the eyeballs and flatten the backs. Score the area above the mouth and press the eyes in place. I find that placing them slightly close together makes the expression goofier. -
Refine the eyelids:
Roll tiny, thin coils of clay and wrap them around the base of the eyeballs to create eyelids. Blend the outer edges onto the head to seamless them. -
Install the teeth:
Roll tiny, rice-grain sized bits of clay. Carefully score the inside of the lips and attach the teeth to the upper and lower jaw, pointing inward. -
Texture the skin:
Take a stiff-bristled brush or a texture tool and gently stipple the surface of the greenware skin (avoiding eyes, horns, and teeth) to give it a rough, monster-hide texture. -
Bisque fire:
Allow the piece to dry slowly and completely before firing it in the kiln to cone 04 (or your clay body’s specifications).
Pro Tip: Eye Shine
Leave a tiny dot of unpainted white space within the black pupil when painting underglaze. This ‘catchlight’ brings the character to life instantly.
Step 4: Glazing
-
Wax resist:
Apply wax resist to the bottom of the feet and the very tips of the toes to prevent them from sticking to the kiln shelf. -
Apply the main color:
Brush three even coats of your turquoise glaze over the entire body and the back spikes. Be careful to work around the eyes, horns, and teeth. -
Detail glaze:
Use a small brush to apply the brown or bronze metallic glaze to the horns and the individual teeth. Leave the eyes bare white clay for now. -
Pupils:
Dip a fine-point brush into black underglaze and paint the pupils. Once dry, you can add a dab of clear gloss over the entire eyeball to make it shine. -
Final fire:
Fire the piece again to the appropriate temperature for your glaze (likely cone 5 or 6 for stoneware).
Enjoy finding the perfect spot for your new jagged-toothed friend to hang out

TRACK YOUR CERAMIC JOURNEY
Capture glaze tests, firing details, and creative progress—all in one simple printable. Make your projects easier to repeat and improve.
Hairy Texture “Fuzzball” Monster
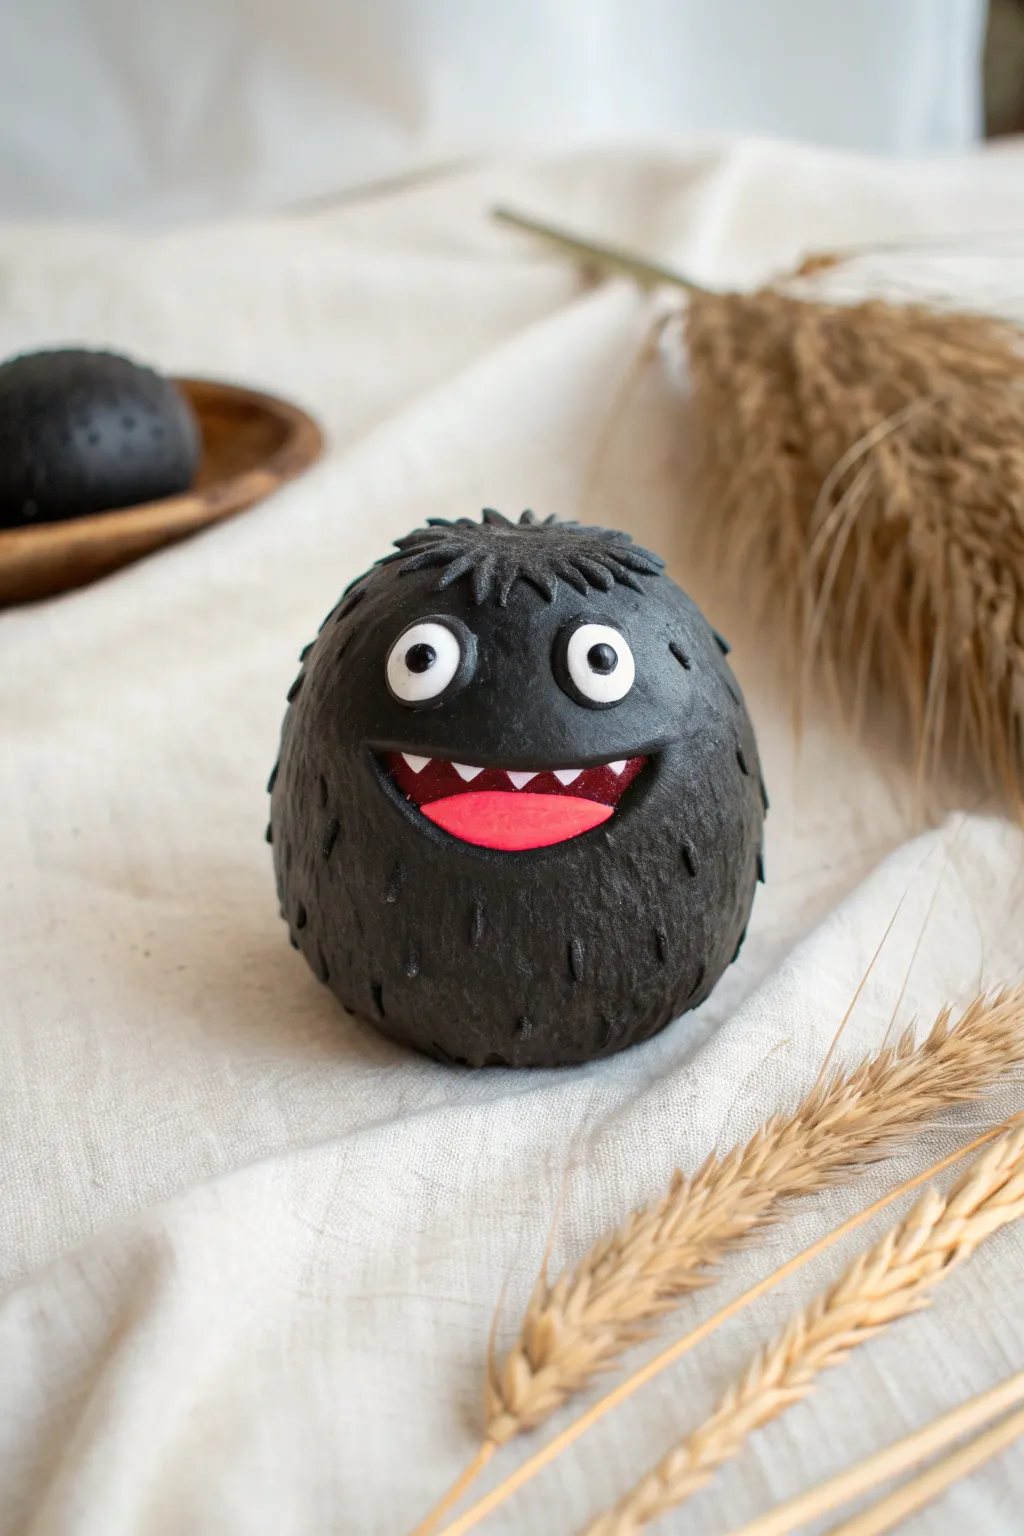
This adorable creature is all about creating texture without getting overly complicated. With its round, pinch-pot body and a clever scoring technique, you can craft a soot-sprite-inspired friend that looks surprisingly soft to the touch.
Step-by-Step Guide
Materials
- Air-dry clay or polymer clay
- Acrylic paint (Black, White, Red)
- Small clay loop tool or needle tool
- Detail paintbrush
- Rolling pin
- Plastic knife (optional)
- Water cup (for smoothing)
Step 1: Shaping the Base
-
Create the core shape:
Start with a ball of clay about the size of a tennis ball. Gently push your thumb into the center to begin forming a pinch pot, rotating the ball as you pinch the walls to an even thickness. -
Close the form:
Instead of leaving the pot open, gently curve the top edges inward until they touch. Pinch and smooth the seam completely so you have a sealed, hollow sphere. -
Refine the sphere:
Roll the hollow ball gently on your work surface to smooth out any lumpy fingerprints. I like to tap the bottom lightly against the table to create a flat base so the monster stands up straight. -
Carve the mouth:
Using a clay knife or modeling tool, carefully cut a shallow crescent shape into the middle of the sphere. Remove the excess clay to create an indented mouth cavity.
Step 2: Adding Features
-
Form the eyes:
Roll two small, pea-sized balls of white clay (or regular clay to be painted later). Press them flat into discs and attach them above the mouth using a little water and scoring. -
Add pupils:
Roll two tiny dots of clay for the pupils. Press them into the center of the white eye discs. -
Sculpt the tongue:
Create a small, flat oval of clay for the tongue. Press this gently into the bottom of the mouth cavity. -
Create the teeth:
Roll a very thin snake of clay. Cut tiny triangles from it and attach them to the upper lip inside the mouth to form a jagged row of teeth.
Clay cracking?
If small cracks appear while the clay dries, mix a tiny bit of fresh clay with water to make a paste (slip) and fill the crack, then smooth it over with your finger.
Step 3: Texturing the Monster
-
Map out the hair:
Before texturing, visualize the direction the hair should flow. It should generally flow downward from the top of the head. -
Create the top tuft:
Using a needle tool or small knife, make short, flicking motions at the very top of the head to create a spiky ‘bedhead’ look. The clay should be raised slightly. -
Texture the body:
Work your way down the body using a needle tool. Press in and drag down slightly to create short, dashed grooves. Don’t worry about being perfectly uniform; random placement looks remarkably more like natural fur. -
Refine the texture:
Add smaller tick marks between the larger ones to fill in bald spots, but leave the eye and mouth areas smooth.
Texture Pro Tip
For a fluffier look, try using a toothbrush or stiff bristle brush to tap texture into the clay surface before you carve the deeper hair lines.
Step 4: Finishing Touches
-
Let it dry:
Allow your clay monster to dry completely according to package instructions. This usually takes 24-48 hours for air-dry clay. -
Base coat painting:
Paint the entire body black, using a small brush to get the paint into all those textured grooves. Avoid painting over the eyes or inside the mouth if possible. -
Paint the mouth:
Paint the inside of the mouth a deep red and the tongue a brighter pinkish-red. -
Detail the teeth and eyes:
Carefully paint the teeth and eye whites with pure white. Once dry, add a small black dot for the pupil and a tiny white reflection dot to make the character look alive. -
Dry brush highlight (Optional):
If parts of the texture are lost in the black paint, lightly dry brush a dark grey over the raised areas to bring the fur detail back out.
Place your finished fuzzball on a shelf to keep watch over your other creations
Scaly Skin Reptile Monster
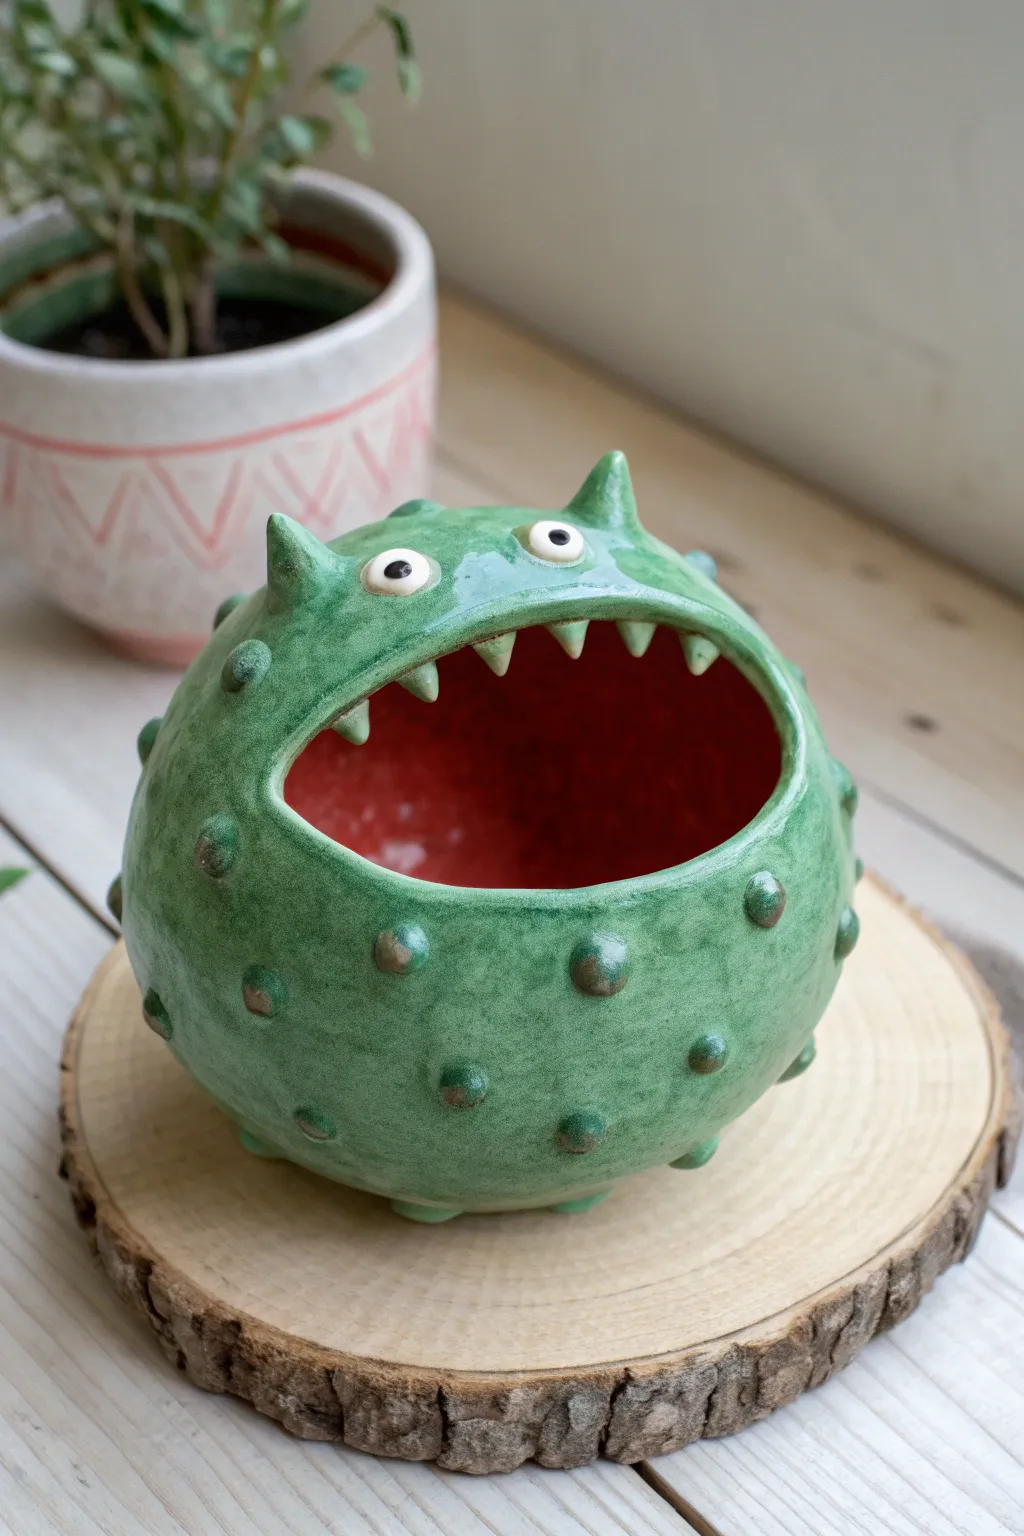
This whimsical ceramic monster pot features a delightful scaly texture, bulging eyes, and a wide-open red mouth filled with snaggle-teeth. It makes for an adorable planter or a quirky desktop container for bits and bobs.
Detailed Instructions
Materials
- White or light-colored clay (earthenware or stoneware)
- Potter’s needle tool
- Small loop tool or modeling tool
- Slip (liquid clay)
- Scoring tool or old toothbrush
- Sponge
- Green underglaze or glaze (speckled or textural works well)
- Red underglaze or glaze
- White and black underglaze (for eyes)
- Clear glaze (optional, if using underglazes)
- Paintbrush (soft round brush)
- Kiln (or air-dry clay alternatives if not firing)
Step 1: Forming the Base
-
Wedge the clay:
Begin by wedging a baseball-sized amount of clay to remove air bubbles and ensure an even consistency. -
Create the sphere:
Roll your clay into a smooth, round ball between your palms. -
Start the pinch pot:
Push your thumb deep into the center of the ball, stopping about half an inch from the bottom. -
Pinch the walls:
Gently pinch and rotate the clay between your thumb and fingers, working your way up the walls to thin them out and widen the interior space. -
Shape the enclosure:
Instead of opening the pot wide like a bowl, gently curve the upper walls inward slightly to maintain a more spherical, enclosed shape, leaving the top open.
Step 2: Sculpting the Monster Features
-
Define the mouth:
The opening of your pinch pot is the mouth. Use your fingers to smooth and slightly manipulate the rim into an irregular, expressive oval shape. -
Roll the teeth:
Create several small, triangular cones of clay for the teeth. Vary their sizes slightly for a jagged, monstrous look. -
Attach the teeth:
Score the underside of the upper rim and the base of each tooth. Apply a dab of slip, then firmly press the teeth onto the upper lip, pointing downward. -
Smooth the connections:
Use a small modeling tool to blend the clay at the base of the teeth into the gum line so they are securely attached. -
Make the eyes:
Roll two small spheres for eyeballs. Create shallow indentations on the top of the head where you want them to sit. -
Attach the eyes:
Score and slip the indentations and the eyes, then press them into place. Additionally, fashion two small triangular horns and attach them behind the eyes. -
Create the warts:
Roll many tiny balls of clay—around 20 to 30—of varying small sizes to act as the scaly warts. -
Attach texture bumps:
Score and slip tiny spots all over the exterior skin of the monster and press the little clay balls on random spots, spacing them out evenly.
Pro Tip: Hollow Horns
If you make the horns or any added features larger than your thumb, poke a small hidden hole in them connecting to the main cavity. This prevents air pockets from exploding in the kiln.
Step 3: Glazing and Finishing
-
Bisque fire:
Allow the piece to dry completely (bone dry) and then bisque fire it in the kiln according to your clay’s specifications. -
Paint the interior:
Apply 2-3 coats of bright red glaze or underglaze to the entire interior of the mouth. -
Glaze the skin:
Brush a variegated or speckled green glaze over the entire exterior, carefully working around the eyes and teeth. -
Detail the warts:
I like to wipe the glaze back very slightly on the tips of the warts with a sponge, or let the glaze pool around them to emphasize the texture. -
Paint facial details:
Use a fine brush to paint the eyes white with black pupils. Leave the teeth the natural clay color or glaze them a creamy white. -
Final fire:
Glaze fire the piece to the temperature recommended for your specific glaze.
Troubleshooting: Falling Teeth
If teeth detach as the clay dries, your clay was likely too dry when attaching. Wrap the pot in plastic for a day to rehydrate slightly, then re-score and slip with extra vinegar slip.
Now you have a hungry little friend ready to protect your succulents
Warty Bumps and Pores Monster
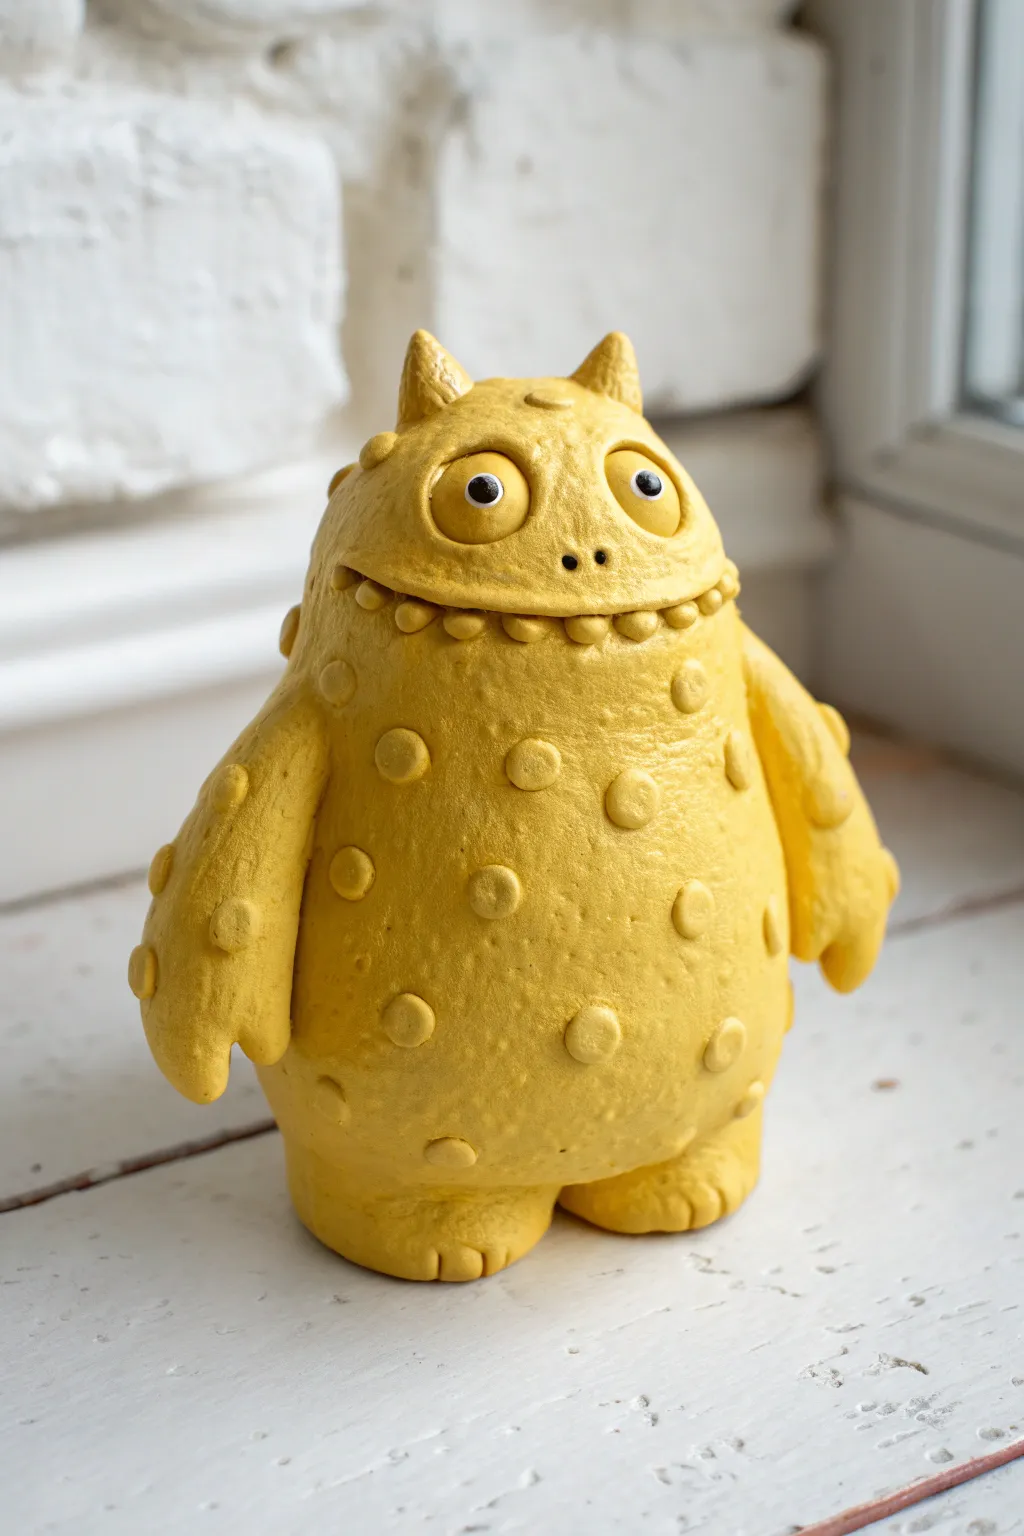
This cheerful little creature gets its charm from a simple pinch pot base that evolves into a plump, textured body. With its bright sunshine-yellow finish and expressive googly eyes, this monster proves that having warts can actually be adorable.
Step-by-Step Tutorial
Materials
- Air-dry clay or polymer clay (white or neutral color)
- Clay tools (needle tool, modeling tool with a ball end)
- Water and a small sponge (for smoothing)
- Acrylic paints (bright yellow, white, black)
- Paintbrushes (medium flat, small detail)
- Clear varnish or sealant (matte or satin)
- Slip (clay and water mixture, if using air-dry clay)
Step 1: Sculpting the Base Body
-
Form two pinch pots:
Start by rolling two equal balls of clay, roughly the size of a tangerine. Insert your thumb into the center of each and pinch the walls while rotating to create two even bowl shapes. -
Join the pots:
Score the rims of both pinch pots (scratch them up with a needle tool) and add a little slip or water. Press the rims together firmly to trap a pocket of air inside, creating a hollow sphere. -
Shape the torso:
Gently paddle and roll the sphere on your work surface to elongate it slightly into an egg shape. The bottom should be slightly wider to help the monster stand securely. -
Smooth the seam:
Use your thumb or a modeling tool to drag clay across the seam where the two pots joined. I find using a slightly damp sponge here really helps to erase the line completely.
Step 2: Adding Features and Limbs
-
Create the legs:
Roll two short, thick logs of clay. Attach them to the bottom of the body, blending the clay upwards so there are no seams. Use a knife tool to press in little indentations for toes. -
Attach the arms:
Form two tear-drop shapes for arms. attach them to the sides of the body, just below the midpoint. Curve them slightly forward and blend the shoulders smoothly into the body. -
Make the mouth:
Roll a long, thin snake of clay. Attach it across the upper third of the face in a wide, U-shaped smile. Blend the top edge of the snake into the face, but leave the bottom edge distinct to create an overbite look. -
Add teeth details:
Using a small tool, press little vertical lines along the bottom edge of the mouth snake you just attached. This creates the illusion of a row of rounded teeth or a textured lip. -
Sculpt the eyes:
Roll two small balls of clay for the eyeballs and press them onto the face above the mouth. Add tiny clay eyelids over the top half of each eye for a sleepy or relaxed expression. -
Add the horns:
Form two small cones and attach them to the very top of the head, blending the base of the horns down onto the scalp so they don’t pop off later.
Keeping it Hollow
Since you trapped air inside the pinch pots, poke a tiny, hidden hole in the bottom before baking or drying. This lets air escape and prevents cracking.
Step 3: Creating the Texture
-
Prepare the warts:
Roll out many small balls of clay in varying sizes—some as small as a pea, others tiny like a pinhead. Flatten them slightly with your finger. -
Apply the bumps:
Score and slip (or water) the back of each flattened dot and press them randomly all over the monster’s body. Don’t be afraid to put some on the arms and back. -
Refine the surface:
For a ‘porous’ skin texture similar to the image, gently tap the spaces between the warts with a stiff-bristled toothbrush or a crumpled ball of aluminum foil. -
Poke the nose:
Use a needle tool or a small stick to poke two distinct holes right in the center of the face for nostrils. -
Dry or bake:
If using air-dry clay, let the monster dry for 24-48 hours. If using polymer clay, bake according to the package instructions.
Bumps Falling Off?
If your warts fall off as they dry, your clay was likely too dry when attaching. Use plenty of slip (clay glue) and really press them firmly onto the body.
Step 4: Painting and Finishing
-
Base coat:
Paint the entire monster with a solid coat of bright yellow acrylic paint. You may need two coats to get full, opaque coverage over the bumps. -
Detail the eyes:
Paint the round eyeballs white. Once dry, use a small detail brush to add black pupils. Adding a tiny white dot reflection in the black pupil brings the character to life. -
Seal the work:
Once the paint is fully dry, apply a matte or satin varnish to protect the finish and give the skin a slight sheen.
Place your sunny new friend on a shelf where its goofy smile can greet you every day
Stitched Patchwork Monster Face

This charmingly spooky monster is built from a simple sphere but gains tons of personality through exaggerated stitching details and wide, staring eyes. The texture mimics a patchwork doll, making it a perfect project for beginners looking to practice their additive and subtractive sculpting skills.
Detailed Instructions
Materials
- Cone 04-06 stoneware or air-dry clay (approx. 1 lb)
- Needle tool or toothpick
- Scoring tool (or serrated rib)
- Small bowl relative to hand size (for water)
- Slip (clay mixed with water)
- Wooden modeling tool
- Sponge
Step 1: Forming the Body
-
Create two pinch pots:
Start by dividing your clay into two equal balls, reserving a small golf-ball-sized chunk for features later. Press your thumb into the center of one ball and pinch the walls evenly while rotating it, creating a bowl shape. Repeat with the second ball to make a matching pair. -
Score and slip edges:
Take your scoring tool or a fork and rough up the rim of both pinch pots. Dab a generous amount of slip onto these roughed-up areas. This glue-like clay paste is essential for a strong bond. -
Join into a sphere:
Press the two rims together firmly to form a hollow sphere. Wiggle them slightly to lock the scored clay together. Trapped air is good here; it holds the shape while you work. -
Smooth the seam:
Using your thumb or a wooden tool, drag clay from one half across the seam to the other until the join line disappears completely. Smooth the entire surface with a slightly damp sponge, but don’t seal it perfectly—a little texture adds character. -
Shape the head:
Gently paddle the sphere on your work surface to create a flat bottom so it stands up straight. You can press the sides slightly to make the shape more oval or keep it perfectly round.
Step 2: Adding the Patchwork Features
-
Make the eyes:
Roll two small balls of the reserved clay and flatten them into thick discs. Score and slip the back of these discs and press them securely onto the upper half of the face. -
Detail the pupils:
Use the back of a paintbrush or a small loop tool to remove a divot from the center of each eye. This creates a deep shadow for the pupil. -
Outline the eyes:
Take a needle tool or toothpick and deeply trace a circle around the clay eyes. Go over this line a second time to widen it, creating a distinct separation between the eye and the skin. -
Form the horns:
Roll two tapered cones from your remaining clay. Curve them slightly at the tips. Score and slip the base of each horn before attaching them to the top of the head, blending the clay at the base downward onto the skull for a seamless transition. -
Add horn texture:
Draw horizontal lines up the length of the horns with your needle tool to simulate growth rings or texture. -
Create the nose:
Add a tiny, oval lump of clay between the eyes. Use the rounded end of a tool to press two small nostrils into it, flaring the sides slightly.
Air Trap Issues?
If the sphere collapses while smoothing, the air trapped inside has leaked. Patch any holes immediately. If it bulges out, poke a tiny pinhole to release pressure, then patch it.
Step 3: Stitching the Smile
-
Carve the mouth line:
Decide where you want the smile. Drag your needle tool deeply across the lower face. I usually like to curve the ends upward slightly to make him look friendly. -
Add the vertical stitches:
Along the mouth line, press the needle tool vertically across the cut every half-inch. Press deep enough to create a ‘stitch’ mark that bridges the top and bottom lip. -
Detail the forehead seam:
Trace a zig-zag line across the forehead area, imagining where fabric might be sewn together. Use the needle tool to add small hatch marks across this line, mimicking thread. -
Refine and vent:
Check over your monster for any sharp crumbs of clay and smooth them away. Finally, poke a hidden hole in the bottom of the piece to let expanding air escape during firing.
Texture Up!
Before adding features, roll the clay ball gently over a piece of burlap or canvas. This imitates fabric texture, making the ‘stitched’ concept look even more realistic.
Let your monster dry slowly under loose plastic to ensure the horns stay securely attached
Monster With Braces and Big Lips
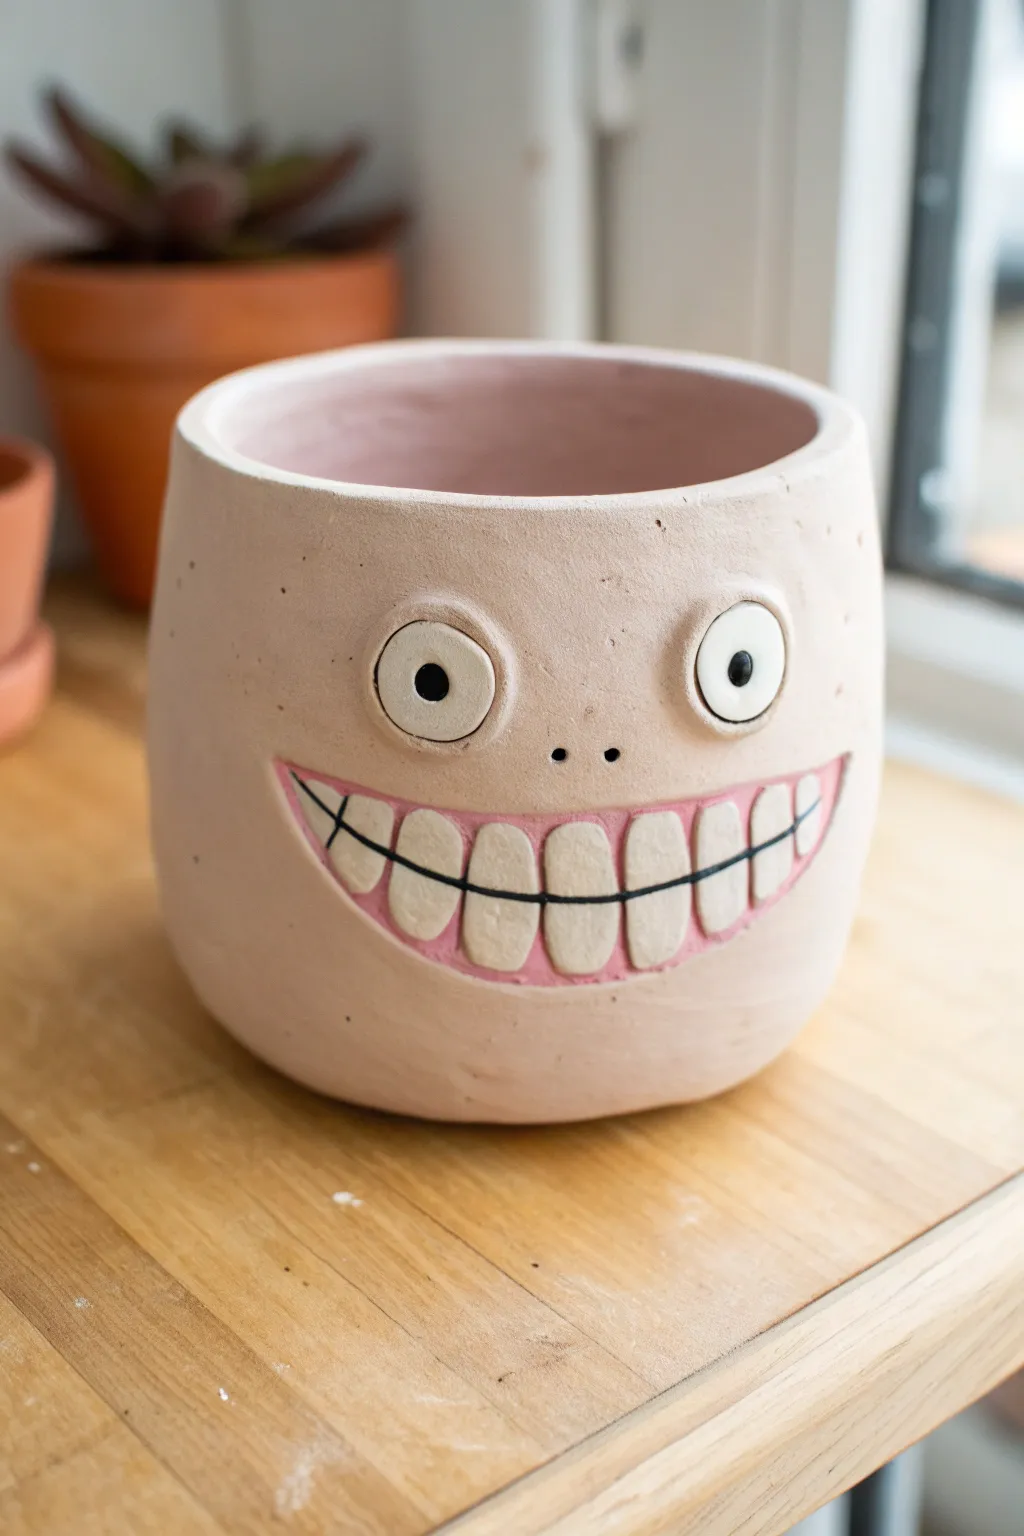
This quirky planter brings a big dose of personality to your windowsill with its wide, toothy smile and slightly startled expression. The pale pink clay body and exaggerated features make it a playful home for succulents or small houseplants.
Step-by-Step
Materials
- Light pink or buff stoneware clay
- Underglaze (black, white, rose pink)
- Clear matte glaze
- Needle tool
- Scoring tool or serrated rib
- Small paintbrush
- Sponge
- Slip (liquid clay)
- Knife or fettling tool
- Rolling pin
Step 1: Forming the Base
-
Create the heavy pinch pot:
Start with a ball of clay roughly the size of a grapefruit. Push your thumb into the center and pinch the walls upwards, aiming for a consistent thickness of about 3/8 inch. Keep the form slightly rounded at the bottom but flatten the base so it sits widely and securely. -
Smooth the walls:
As you pinch, bring the walls straight up to create a cylindrical shape that curves slightly inward at the bottom. Use a metal rib or your fingers to smooth out major lumps, but don’t worry about perfection; a little texture adds character. -
Level the rim:
Once you have your desired height (about 4-5 inches), use a needle tool to trim the rim so it is level. Smooth the cut edge with a damp sponge or a piece of chamois leather to make it soft and rounded.
Clean Lines Pro-Tip
For the crisp black lines between the teeth, use an underglaze applicator bottle with a needle tip instead of a brush. It gives you much steadier control for straight lines.
Step 2: Sculpting the Expression
-
Mark the face features:
Lightly trace where you want the eyes and the large mouth to go using a needle tool. The mouth should take up the lower two-thirds of the pot, stretching almost ear-to-ear in a wide curve. -
Make the gum slab:
Roll out a thin slab of clay (about 1/4 inch thick). Cut out a large crescent shape that matches your traced mouth outline. This will form the gums and background for the teeth. -
Attach the mouth base:
Score the pot surface where the mouth goes, and score the back of your clay crescent. Apply slip and firmly press the crescent onto the pot, smoothing the edges so it feels integrated but slightly raised. -
Creating the teeth:
Roll out another small slab, slightly thinner this time. Cut out rectangular shapes for the teeth—make the two front teeth slightly larger for a goofy look. You will need about 10-12 teeth total. -
Attach the teeth:
Score and slip each tooth individually. Press them onto the ‘gum’ crescent you attached earlier. Arrange them in two rows (top and bottom) with a slight gap between the rows to define the bite. -
Form the eyes:
Roll two equal balls of clay, then flatten them into thick discs. These should be fairly large to give that wide-eyed look. Score and slip the back of these discs and press them high up on the pot’s face. -
Add pupils:
For the pupils, you can either create tiny balls of clay and attach them to the center of the eyes, or keep the eyes flat to paint the pupils on later. The example uses slightly raised pupils for dimension. -
Make the nostrils:
Using a small, round tool or the back of a paintbrush, poke two small holes between the eyes and the mouth to serve as nostrils. Don’t poke all the way through the wall—just deep enough to create a shadow.
Step 3: Painting and Finishing
-
Initial drying:
Let the piece dry slowly to the bone-dry stage. This usually takes a few days. Cover it loosely with plastic for the first day to ensure the thick added features don’t pull away from the body. -
Bisque fire:
Fire the piece in a kiln to cone 04 (or your clay’s specific bisque temperature). Once cool, wipe it down with a damp sponge to remove any kiln dust. -
Paint the gums:
Using rose pink underglaze, carefully paint the area around the teeth. You want this to look like exaggerated gum tissue, so get the color right into the crevices between the teeth. -
Line the teeth:
Use a very fine brush and black underglaze to outline the teeth. Paint a horizontal line separating the top and bottom row, and vertical lines between each tooth. This makes the grin pop. -
Detail the eyes:
Paint the main eye discs with white underglaze (2-3 coats for opacity). Once dry, carefully dot the pupils with black underglaze. Adding a tiny white reflection dot in the black pupil brings it to life. -
Glazing:
Apply a clear matte glaze over the entire interior to make it waterproof. For the exterior, you can either leave the raw clay body (if vitrified) or apply a thin coat of clear matte glaze to seal the underglaze work without making it too shiny. -
Final wipe:
Check the bottom of the pot to ensure no glaze is on the foot. Wipe it clean with a sponge if necessary. -
Final firing:
Fire the piece again to your clay top temperature (likely cone 5 or 6). Once cool, your monster forms a permanent grin.
Level Up: Hair Texture
Before firing, try using a garlic press to extrude clay ‘spaghetti’ and slip/score it onto the top rim for crazy monster hair that trails down the back.
Pop a spiky aloe or succulent inside to give your smiling monster a wild, green hairstyle.
Toothbrush Holder Mouth Cup Monster
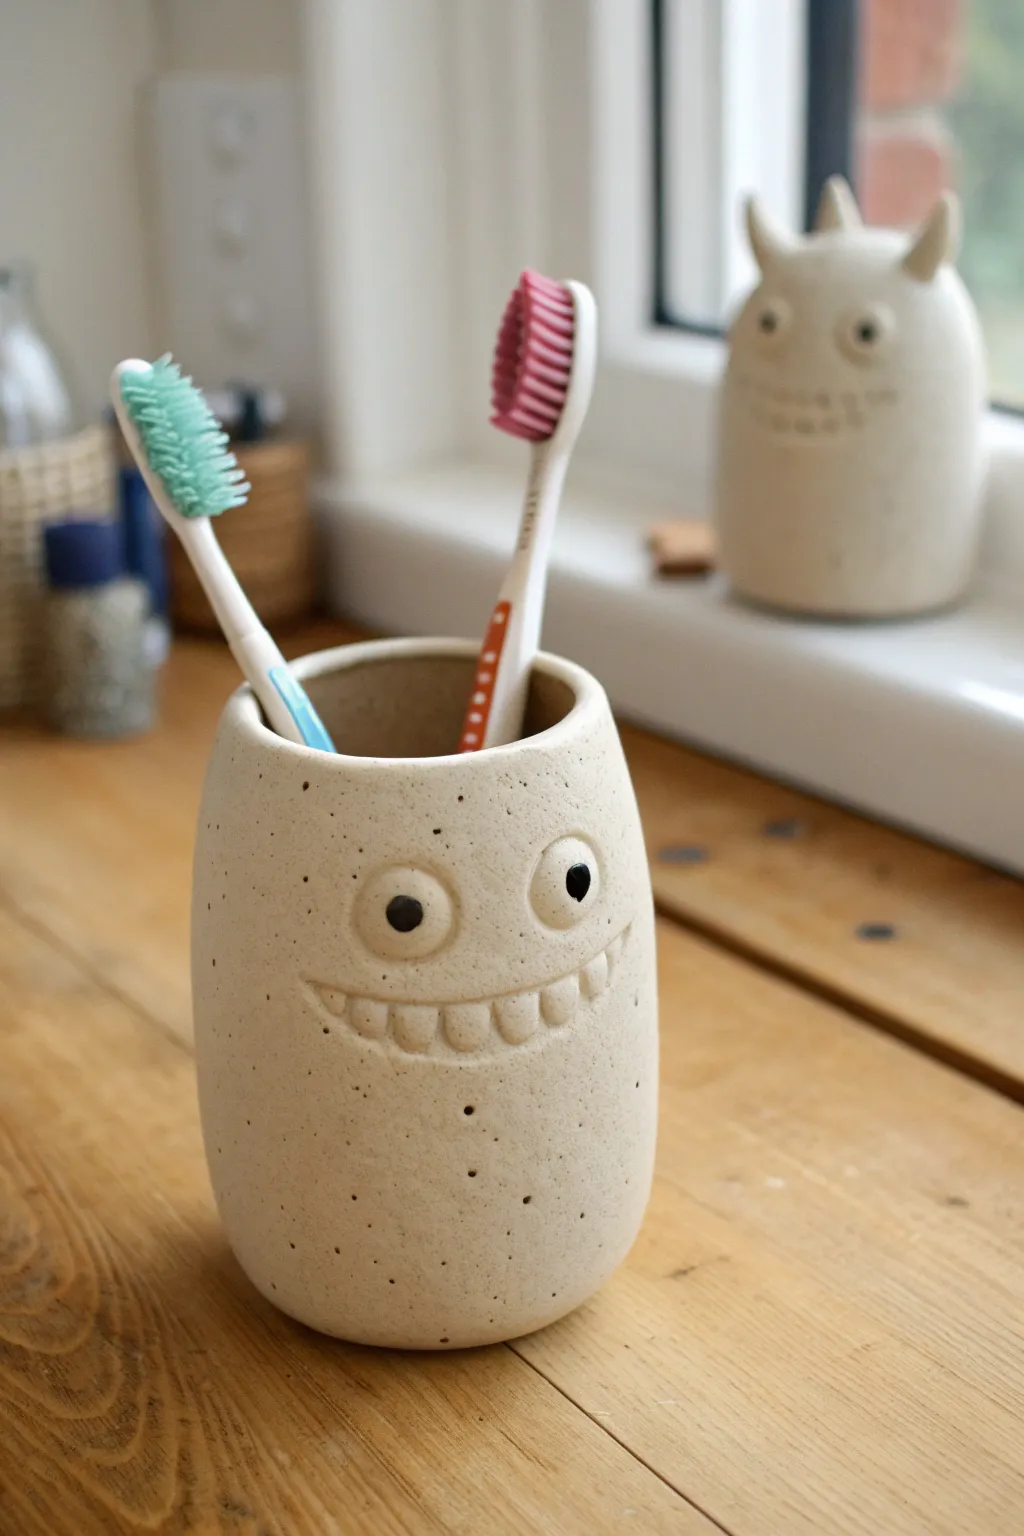
Transform your morning routine with this adorable, grinning monster cup made from speckled clay. This functional piece features a simple pinch pot construction with a charmingly carved smile and expressive eyes that double as grips.
Detailed Instructions
Materials
- Speckled stoneware clay (white or buff)
- Pottery tools (needle tool, rib tool, loop tool)
- Small sponge
- Water slip or vinegar
- Black underglaze
- Fine detail brush
- Clear matte or satin glaze
- Kiln (or access to a firing service)
Step 1: Forming the Body
-
Prepare the Clay:
Start with a ball of well-wedged speckled clay about the size of a large orange. Pat it into a smooth sphere to remove any major bumps. -
Open the Pinch Pot:
Push your thumb into the center of the ball, stopping about a half-inch from the bottom. This base thickness is crucial for stability. -
Pinch the Walls:
Gently pinch the clay between your thumb and fingers, rotating the ball as you go. Work from the bottom up to thin the walls evenly to about 1/4 inch thickness. -
Extend the Height:
Since a toothbrush holder needs height, gently pull the clay upward as you pinch. You can add a coil of clay to the rim if your pinch pot isn’t tall enough, smoothing it down thoroughly. -
Shape the Cylinder:
Use a wooden rib tool on the exterior while supporting the interior with your other hand. Smooth the sides to create a taller, straighter cylindrical shape rather than a round bowl. -
Refine the Rim:
I like to gently tap the pot upside down on the table to flatten the rim slightly, then use a damp sponge to round off any sharp edges.
Cracking Smiles?
If small cracks appear around the added eyes or mouth while drying, compress the clay with a rib tool or smooth it with a tiny bit of vinegar water immediately.
Step 2: Adding the Monster Features
-
Position the Face:
Decide where the face will go. The eyes should be placed roughly in the middle of the upper half of the cup. -
Make the Eye Sockets:
Roll two small balls of clay for the eyes. Score the back of the eyes and the spot on the cup where they will sit. Apply a little slip and press them firmly into place. -
Detail the Pupils:
Press a small indentation into the center of each clay eye ball using the back of a paintbrush or a small modeling tool to create the pupil area. -
Sculpt the Eyelids:
Roll tiny, thin coils of clay and attach them over the top and bottom of the eyeballs to create eyelids. Blend the clay into the main body so it looks seamless, not stuck on. -
Carve the Smile:
Use a needle tool to lightly sketch a wide, U-shaped mouth below the eyes. Once you are happy with the curve, carve slightly deeper. -
Create the Teeth:
Instead of adding teeth, carve the negative space. Use a small loop tool to carve away a thin layer of clay *inside* the mouth outline, leaving raised squares for the teeth. -
Refine the Teeth:
Use a needle tool to define the vertical lines between the teeth, rounding the corners of each tooth slightly so they look friendly, not sharp. -
Smooth the Features:
Take a slightly damp brush (not dripping) and run it over the carved teeth and eye areas to remove any clay burrs or crumbs.
Step 3: Finishing and Firing
-
Slow Drying:
Let the piece dry slowly under plastic for a day, then uncover it to dry completely to the ‘bone dry’ stage. -
Bisque Fire:
Fire the piece in a kiln to cone 04 (or according to your clay’s instructions) to harden it for glazing. -
Paint the Pupils:
Using a fine detail brush, paint just the indented pupil dots with black underglaze. Keep the hand steady to avoid smudging onto the white of the eye. -
Glazing:
Dip or brush the entire piece in a clear matte or satin glaze. This seals the clay and makes it waterproof for bathroom use while letting the natural speckles show through. -
Final Fire:
Fire the piece again to the maturity temperature of your clay (usually cone 5 or 6 for stoneware) to finish the piece.
Make it a Set
Create a shorter, wider version with a different expression to hold bar soap, or add little clay horns to the rim for a more mischievous monster look.
Place your finished monster on the sink edge to bring a daily grin to your brushing routine
Candy Bowl “Snack Chomper” Monster
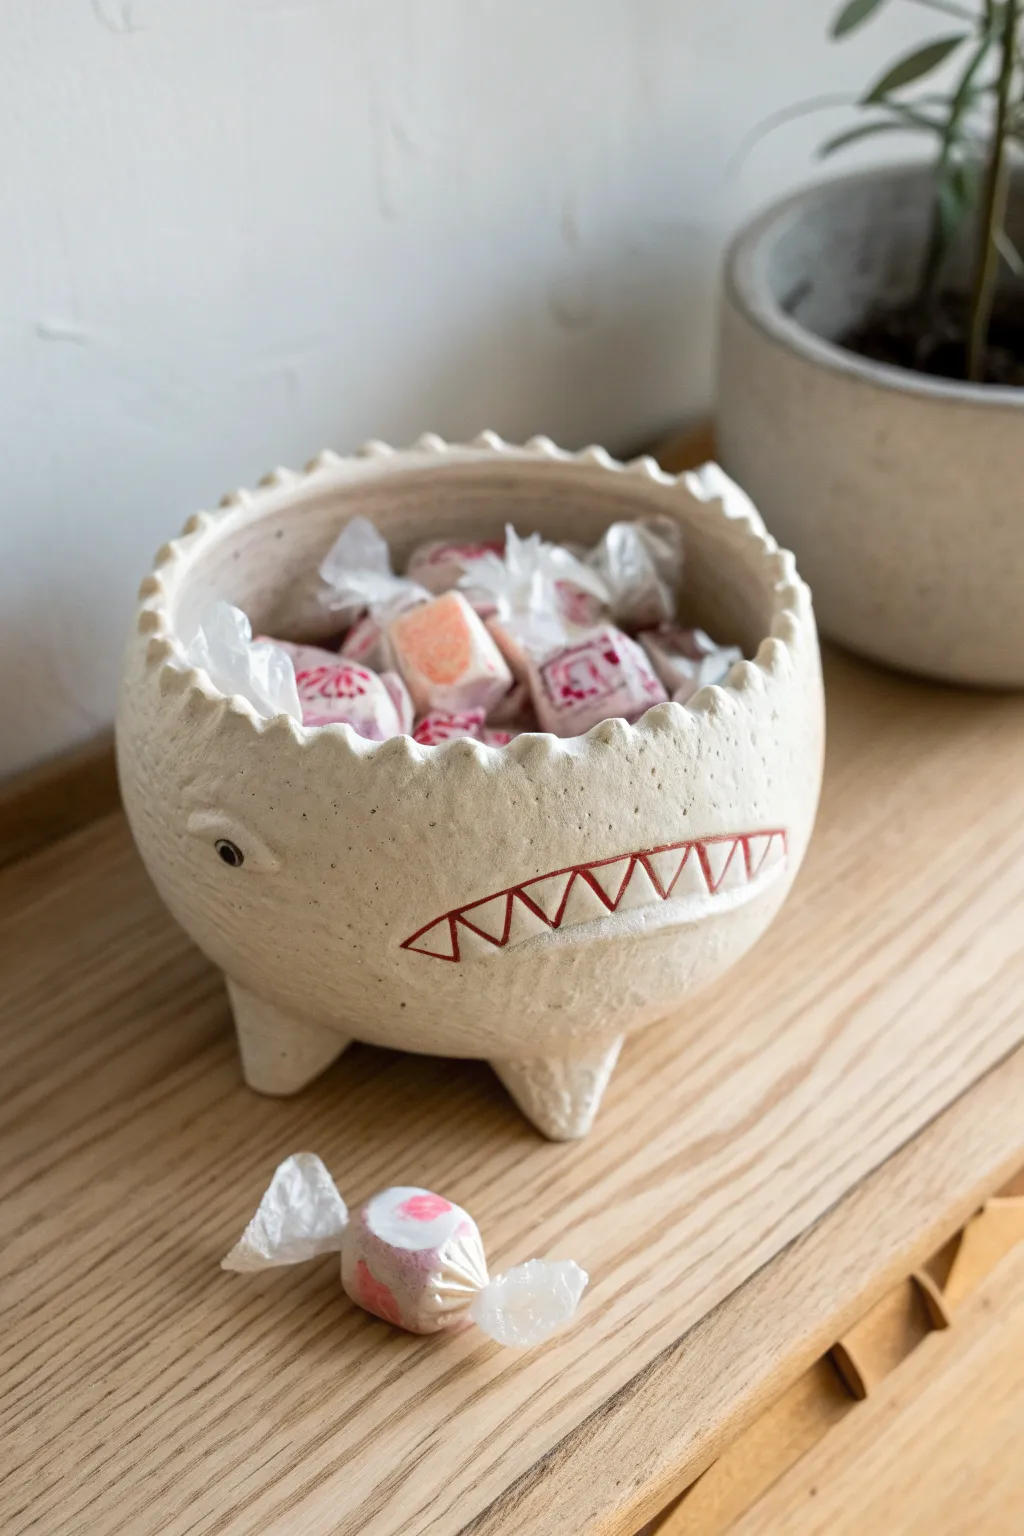
This whimsical ceramic candy bowl looks like a hungry little creature ready to guard your sweets. With its jagged saw-tooth rim and wide, toothy grin painted on the side, it adds a playful personality to any coffee table while keeping your salt water taffy within reach.
How-To Guide
Materials
- Speckled stoneware clay (white or cream)
- Pottery wheel or rolling pin (if not pinching)
- Needle tool
- Fettling knife
- Rib tool (wooden or silicone)
- Sponge
- Underglaze (red)
- Underglaze detail brush
- Clear transparent glaze
- Kiln
Step 1: Forming the Body
-
Wedging the Clay:
Start by taking a grapefruit-sized ball of speckled stoneware clay. Wedge it thoroughly to remove air bubbles and ensure the consistency is even, which is crucial to preventing explosions in the kiln later. -
Creating the Pinch Pot:
Press your thumb into the center of the ball, stopping about half an inch from the bottom. Gently pinch and turn the clay in your hand, working the walls outward and upward. -
Shaping the Sphere:
Aim for a spherical, slightly closed shape. You want the opening to be somewhat narrower than the widest part of the belly to give it that round, creature-like appearance. -
Smoothing the Walls:
Use a rib tool on the exterior while supporting the interior with your other hand. Smooth out your finger marks to create a clean, uniform surface, but don’t worry about making it perfectly machine-smooth; a little texture adds character.
Keep it clean
When painting the red teeth gaps, use a slightly dry brush. If the underglaze is too watery, it will bleed into the tiny carved lines of the teeth and ruin the definition.
Step 2: Adding Character Features
-
Cutting the Rim:
Once the clay has stiffened slightly to leather-hard, use a fettling knife or needle tool to cut a jagged, zig-zag pattern around the entire top rim. These are the monster’s ‘upper teeth.’ -
Smoothing the Edges:
Dip a small sponge in water and gently run it over the cut zig-zags. Sharp clay edges can become razor-sharp after firing, so rounding them off now creates a safer finished piece. -
Forming the Feet:
Roll three small, equal-sized cones of clay. Score and slip the wider ends of the cones and the corresponding spots on the bottom of the bowl. -
Attaching the Feet:
Press the bowl firmly onto the feet. I like to tap the whole pot gently on the table to flatten the bottom of the feet slightly, ensuring the monster stands stable and doesn’t wobble. -
Sculpting the Eye:
Identify the ‘front’ of your monster. Use a small loop tool or the back of a paintbrush to carve out a shallow circular recess for the eye. Add a tiny ball of clay in the center for the pupil. -
creating the Mouth Detail:
Lower down on the belly, sketch a long, horizontal almond shape for the mouth. Inside this shape, lightly carve a zig-zag line to represent the clenched teeth, mirroring the rim pattern.
Step 3: Glazing and Finishing
-
Bisque Fire:
Allow your monster to dry completely. This usually takes several days depending on humidity. Once bone dry, fire the piece to bisque temperature (usually cone 04). -
Applying Underglaze:
using a fine detail brush and red underglaze, carefully paint the triangular spaces between the carved teeth in the mouth area. You want the teeth to remain the raw clay color, while the red emphasizes the gaps. -
Detailing the Eye:
Use a tiny dot of black underglaze or a dark clay slip to paint the pupil of the eye, giving the monster a focused gaze. -
Clear Glazing:
Dip the entire piece into a clear, transparent glaze. Shake off any ribbons of excess glaze to ensure an even coat. -
Final Fire:
Wipe the bottoms of the feet clean with a sponge so they don’t stick to the kiln shelf. Fire the piece again to the maturation temperature of your specific clay body (likely cone 5 or 6). -
Cooling:
Let the kiln cool completely before retrieving your new friend. The speckles in the clay will now be visible through the clear glaze, giving the skin a nice texture.
Wobbly Monster?
If the feet cause the bowl to rock after attaching, set the pot on a wooden board and slide it back and forth gently. This sanding motion levels the feet perfectly before drying.
Fill your new ceramic buddy with colorful candies and place it where everyone can admire its goofy grin
Two-Mouth Double-Headed Pinch Pot Monster

These adorable little beasts are practically begging to hold your trinkets or a tiny succulent. With their speckled ceramic finish, oversized mouths, and goofy expressions, this project transforms simple pinch pot techniques into character-filled desk companions.
Detailed Instructions
Materials
- Light-colored stoneware or polymer clay
- Ceramic glazes (pink and teal) or acrylic paints if using polymer
- Black underglaze (for speckles) or diluted black paint
- Small pottery carving tools or a wooden skewer
- Needle tool
- Slip and scoring tool (if using ceramic clay)
- Small paintbrush
Step 1: Farming the Base Body
-
Creating the Pinch Pot:
Start with a ball of clay about the size of a tennis ball. Push your thumb into the center, stopping before you break through the bottom, and gently pinch the walls while rotating the ball to create an even, cup-like shape. -
Closing the Form:
Instead of leaving the top open like a bowl, gently curve the walls inward until they meet at the top, creating a hollow egg shape. Smooth the seam completely so no trapped air can escape unexpectedly later. -
Shaping the Character:
Gently tap the bottom of your egg shape on the table to flatten it so it stands upright. You can squeeze the sides slightly to make the monster look a bit more oval or lumpy, giving it personality.
Mouth Collapse?
If the mouth opening sags while cutting, the clay is too wet. Stuff the inside lightly with crumpled newspaper or paper towels to support the roof of the mouth until it stiffens up.
Step 2: Sculpting the Monster’s Face
-
Carving the Mouth:
Decide where the mouth will go—aim for the bottom two-thirds of the body for a dramatic look. Use a needle tool to lightly outline a large, oval-shaped opening. -
Opening the Maw:
Cut out the marked oval shape carefully. Smooth the cut edges with a damp sponge or your finger to remove any sharp burrs, rounding the lip of the mouth outward slightly. -
Making the Tongue (Optional):
If you want a tongue floor like the pink monster, smooth a small slab of clay inside the bottom of the mouth to create a flat surface for placing things later. -
Adding Teeth:
Roll tiny little cubes or rounded chiclet shapes for teeth. Score and slip (scratch and wet) both the mouth rim and the back of each tooth before pressing them firmly onto the upper or lower gums.
Pro Tip: Eye Direction
Make your monster look crazier by placing the pupils asymmetrically—have one look up and one look down. It instantly adds a goofy, confused personality to the sculpture.
Step 3: Adding Details and Features
-
Attaching the Eyes:
Roll two small spheres of clay for the eyes. Flatten the back of each sphere and attach them above the mouth using the score and slip method. -
Poking Pupils:
Take a small tool or the end of a paintbrush and press a tiny indentation into the center of each eyeball to create pupils. This gives them a focused, goofy stare. -
Adding Ears or Horns:
Pinch two small triangles of clay. Attach them to the very top of the head for horns (like the green monster) or slightly to the sides for ears (like the pink one). -
Tiny Feet:
Roll four tiny balls of clay for feet. Squish them slightly and attach them to the underside of the body so they peek out, helping stabilize the pot. -
Surface Texture:
Before firing or drying, I like to gently sponge the entire surface to ensure it’s smooth, removing any fingerprints.
Step 4: Finishing and Glazing
-
Bisque Firing:
If using ceramic clay, let the piece dry completely (bone dry) and bisque fire it according to your clay’s instructions. -
Base Color:
Apply your main color glaze—a soft pastel teal or light pink works beautifully. Avoid getting glaze on the bottom of the feet so it doesn’t stick to the kiln shelf. -
Painting the Teeth and Eyes:
Use a small brush to apply white glaze to the eyeballs and teeth. Be precise here to keep the expression clean. -
Creating the Speckles:
Dip a stiff toothbrush or bristle brush into a dark iron oxide or black underglaze. Flick the bristles with your thumb to splatter tiny dots over the monster’s skin for that stone-like texture. -
Final Firing:
Fire the piece again at the recommended temperature for your glaze.
Once fired, these little gaping monsters are ready to devour your spare change or hold a tiny air plant on your windowsill