When I’m stuck for what to make next on the potter’s wheel, I go back to a handful of reliable forms and then start tweaking one detail at a time. Here are my favorite clay throwing ideas—from classic, feel-good projects to a few playful challenges that’ll stretch your skills without stressing you out.
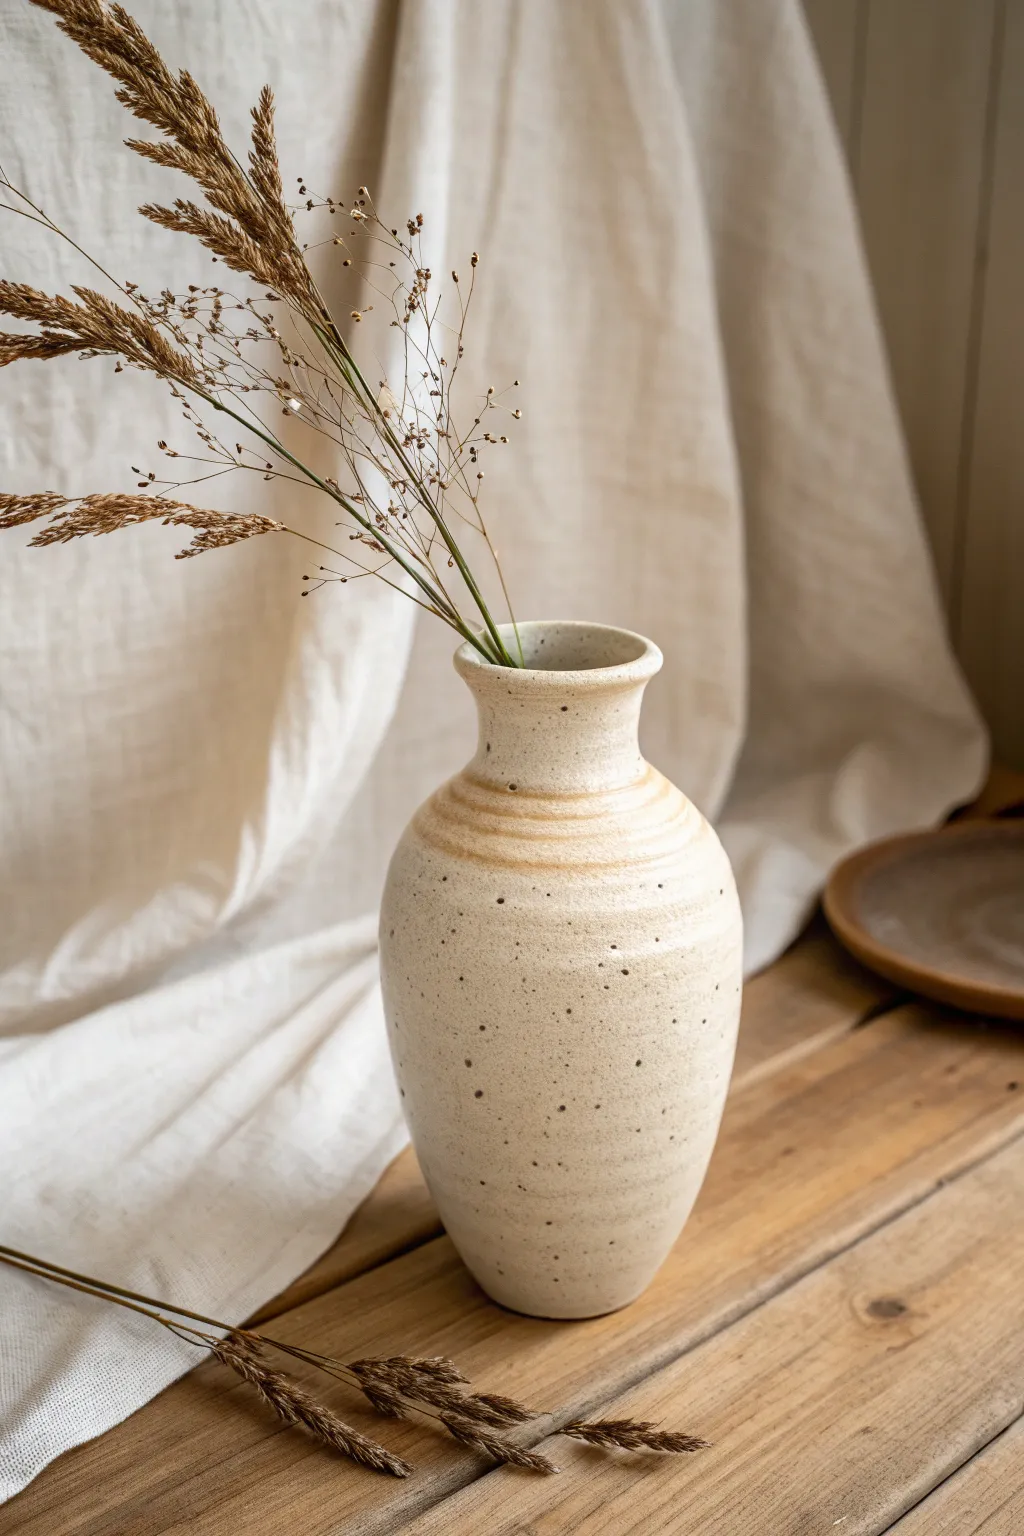
Basic Cylinders You Can Build On
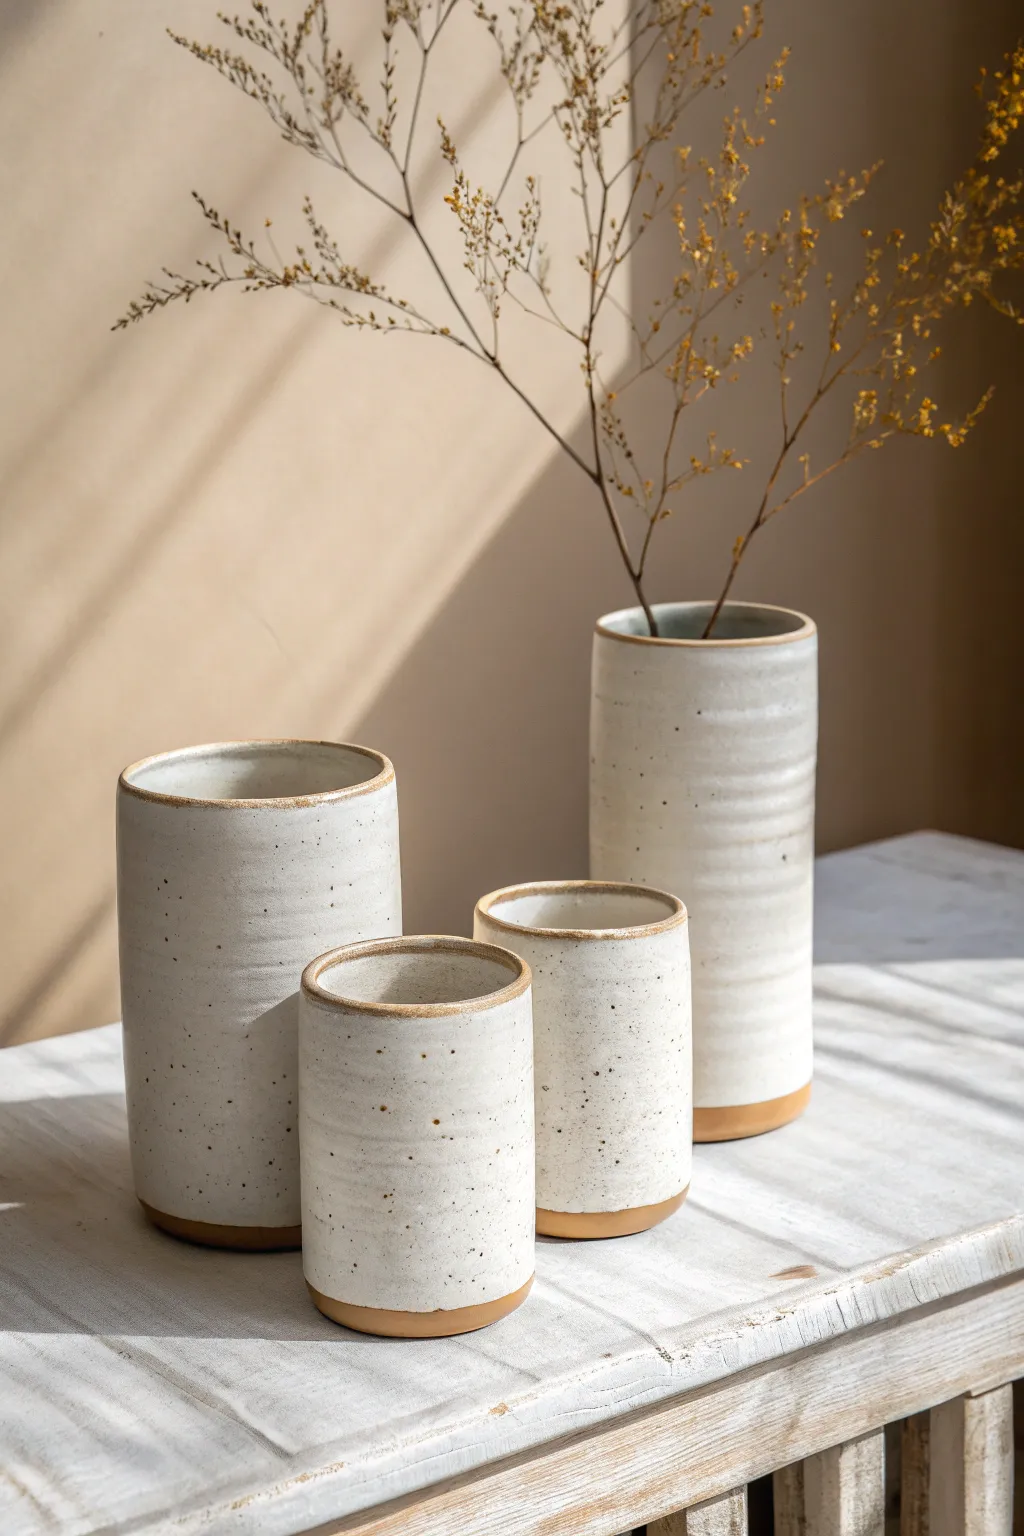
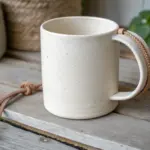
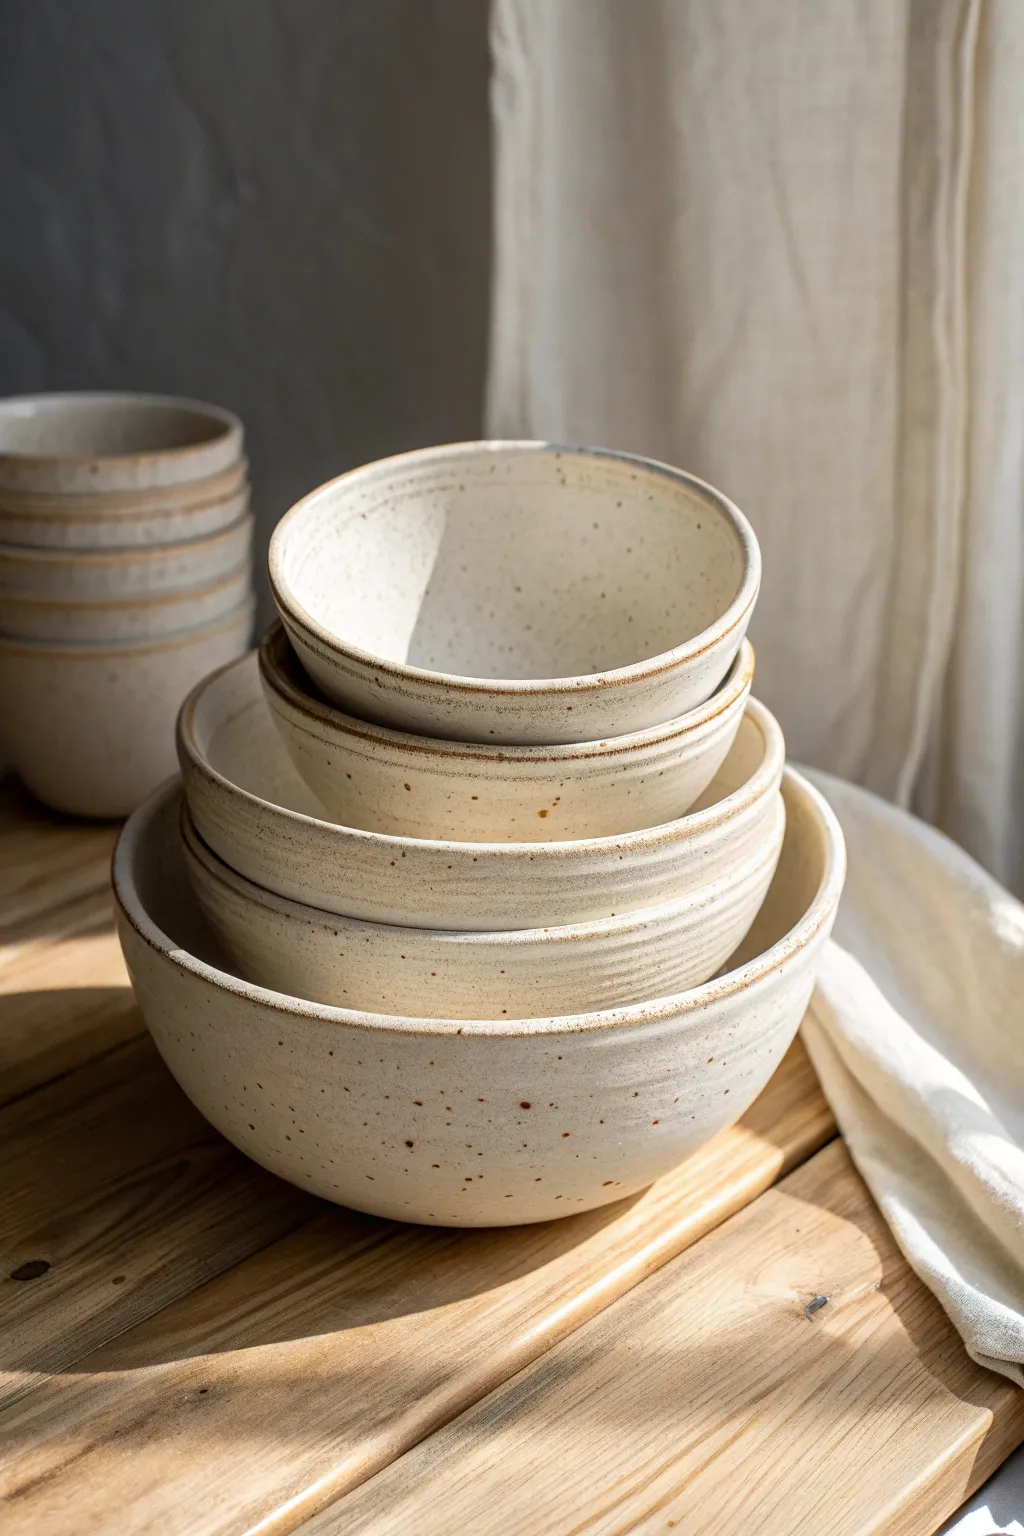
Master the fundamental shape of pottery with these elegant, minimalist cylinders. Featuring a warm, sandy clay body peeking through a speckled cream glaze, this set demonstrates how subtle variations in height and width can create a cohesive and sophisticated collection.
Step-by-Step Tutorial
Materials
- Speckled stoneware clay (buff or light brown)
- Pottery wheel
- Throwing tools (sponge, metal rib, wooden knife, wire tool)
- Trimming tools
- Satin matte white or cream glaze
- Wax resist
- Kiln
Step 1: Throwing the Form
-
Wedge and Center:
Begin by wedging your speckled stoneware clay thoroughly to remove air bubbles. For the smallest cylinder, start with about 1lb of clay; use up to 2-2.5lbs for the tallest vase. Center the clay firmly on the wheel head. -
Open the Floor:
Drill your thumbs into the center to open the clay, leaving about a quarter-inch of thickness for the base. Pull the floor out flat to establish your desired width—make some narrow and some wider for variety. -
Pull the Walls:
Slow the wheel down slightly. using water or slip, pinch the clay at the bottom and pull the walls upward. Keep your finger placement consistent to ensure even thickness from bottom to top. -
Create the Cylinder:
Perform 2-3 pulls to gain height. The goal is a straight vertical wall. If the rim starts to flare out, gently collar it back in with both hands to maintain that perfect tubular shape. -
Refine the Surface:
Use a metal rib on the outside while supporting the inside with your hand. Run the rib up the side to remove throwing lines and compress the clay, giving it that smooth, modern profile seen in the photo. -
Compress the Rim:
Use a damp sponge or a strip of chamois to compress and round the rim. A slightly thickened, rounded rim adds visual weight and durability. -
Wire Off:
Run a wire tool under the base to separate the pot from the wheel head. Carefully lift it off and set it aside to dry to a leather-hard state.
Wobbly Walls?
If walls wobble during pulls, you’re likely pulling too fast or your clay usage is uneven. Slow your upward movement and ensure steady, even pressure.
Step 2: Trimming and Finishing
-
Centering for Trim:
Once leather hard, flip the cylinder upside down on the wheel. Center it perfectly and secure it with clay lugs. -
Define the Foot:
Trim away excess weight from the bottom edge. Create a clean, sharp angle where the wall meets the foot, leaving a small band of unglazed clay area exposed later. -
Smooth the Texture:
I like to run a smooth metal rib over the trimmed area to burnish the grog back into the clay, ensuring the unglazed raw clay feels pleasant to the touch. -
Bisque Fire:
Allow the cylinders to bone dry completely before loading them into the kiln for a bisque firing (usually cone 04 or 06).
Step 3: Glazing
-
Wax the Foot:
Apply wax resist to the bottom and slightly up the side of the cylinder (about 1/4 inch). This creates that distinct line where the raw clay meets the glaze. -
Wax the Rim (Optional):
To recreate the specific look in the photo, careful observe the rim. If you want that exposed clay lip, carefully wax the very top edge of the rim as well. -
Apply Glaze:
Dip the cylinder into a satin matte white or cream glaze. If your clay doesn’t have natural speckles, choose a glaze with iron speckles included. -
Clean Up:
Immediately wipe away any glaze droplets that may be sitting on the waxed areas with a damp sponge to ensure a crisp, clean line. -
Final Fire:
Load the glazed pieces into the kiln and fire to the maturity temperature of your clay and glaze combination (typically cone 5 or 6 for stoneware).
Add Subtle Texture
Before the glaze firing, lightly drag a serrated rib up the sides during throwing for faint horizontal grooves that the glaze will break over beautifully.
Once fired, group your cylinders together to appreciate how the simple variance in scale creates a stunning architectural display


Straight or Tapered Tumblers
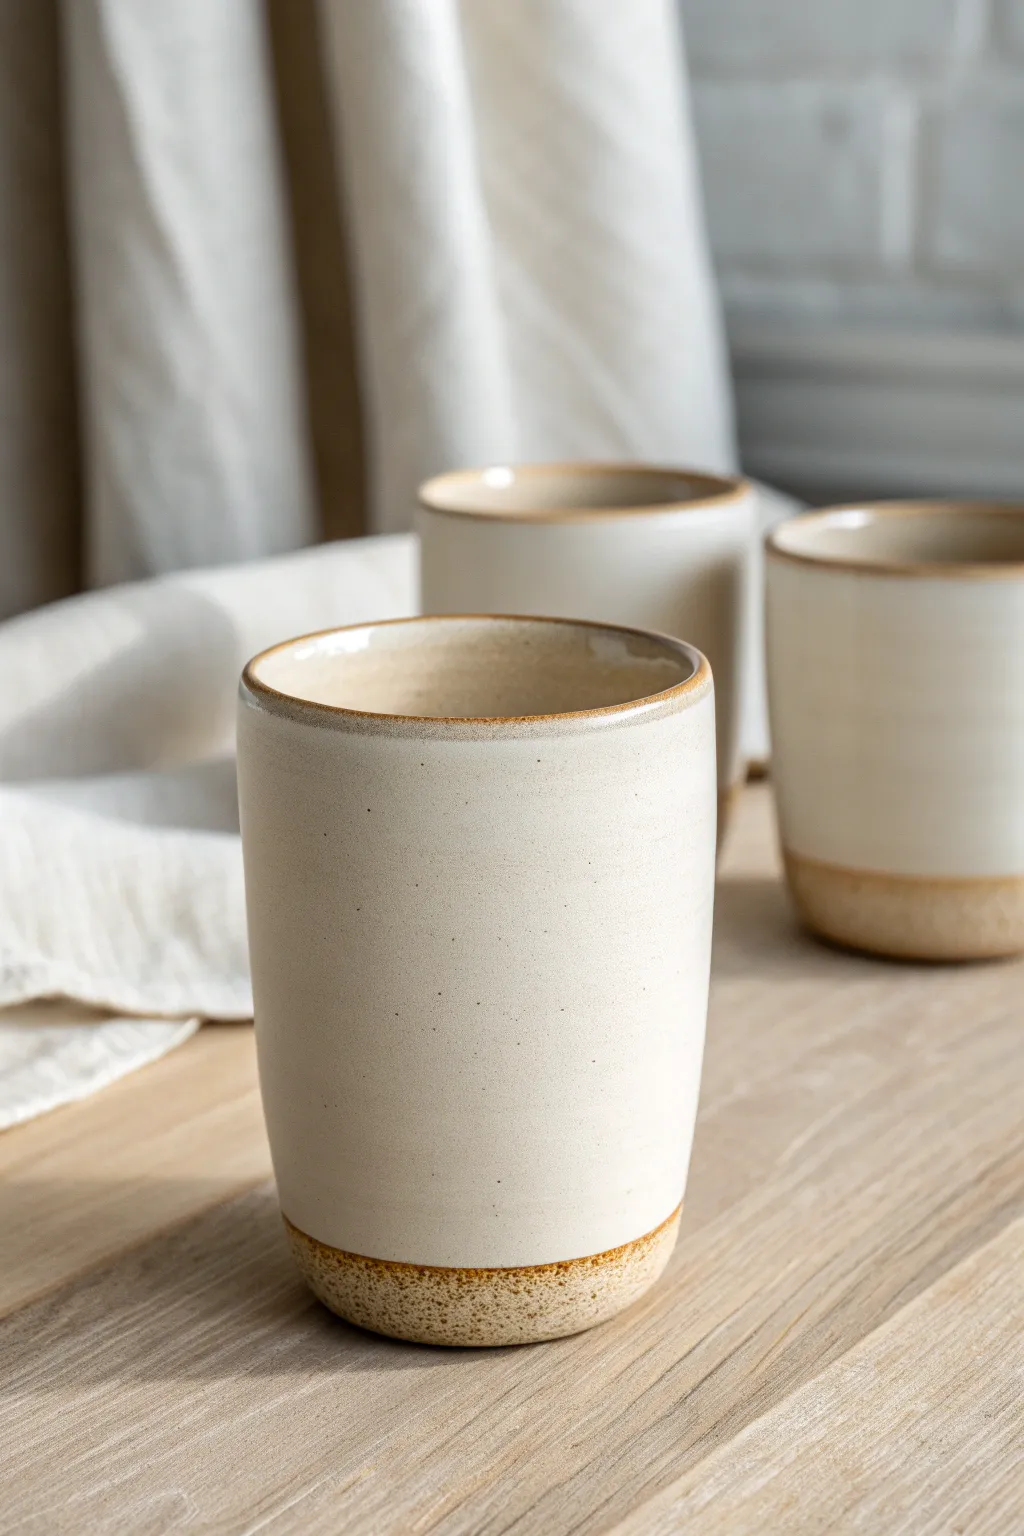
These elegant, handleless tumblers feature a soothing balance of smooth, creamy glaze and raw, textured stoneware. Their gently tapered form fits perfectly in the hand, making them ideal for morning coffee or an evening herbal tea.
Step-by-Step
Materials
- Speckled buff stoneware clay (approx. 400-500g per cup)
- Pottery wheel
- Throwing sponge
- Needle tool
- Wire cutter
- Wooden rib or metal rib
- Chamois strip
- Trimming tools (loop tool)
- White matte or satin glaze
- Wax resist (liquid wax)
- Brush for waxing
- Kiln
Step 1: Throwing the Cylinder
-
Prepare the clay:
Begin by thoroughly wedging about 450 grams (1 lb) of speckled stoneware clay to remove air bubbles. Form it into a uniform ball and slam it onto the center of your wheel head. -
Center the clay:
With the wheel spinning at high speed, use wet hands to cone the clay up and push it back down until it runs perfectly smooth and center. Establishing a strong center now is crucial for even walls later. -
Open the form:
Press your thumbs into the center of the mound, diving down until you are about 1 cm from the wheel head. Pull firmly outward to establish the floor width—aim for about 7-8 cm diameter. -
Establish the floor:
Compress the floor by running your fingers from the center out to the wall multiple times. This prevents S-cracks during drying. -
First pull:
Slow the wheel down slightly. Create a groove at the base with your fingertips and gently pull the clay upward, keeping your hands steady and moving together. -
Shape the taper:
As you continue to pull the walls higher, apply slightly uneven pressure—more inside pressure—to allow the rim to flare just a tiny bit, or keep your hands moving slightly outward as you rise. The goal is a subtle V-shape, not a bowl. -
Compress with a rib:
Clean the slip off the outside using a wooden or metal rib. Hold the rib against the exterior while pushing gently from the inside to straighten the profile and remove throwing lines for that smooth, modern look. -
Refine the rim:
Use a chamois strip or a wet sponge to gently compress and round the rim. A rounded rim is much pleasant to drink from than a sharp one. -
Cut underneath:
Use a wooden knife tool to trim away the excess skirt of clay at the base of the pot, creating a clean undercut. -
Wire off:
Pull the wire cutter taut and slice through the base of the pot. Carefully lift the tumbler off the wheel with dry hands or pot lifters and set it aside to dry to leather-hard.
Wobbly Rims?
If the rim goes uneven during throwing, you likely released pressure too quickly. Always hold steady at the top for a full rotation before gently letting go.
Step 2: Trimming and Glazing
-
Center for trimming:
Once the cup is leather-hard (firm but can be dented with a fingernail), center it upside down on the wheel. Secure it with small coils of clay. -
Trim the foot:
Use a sharp loop tool to trim the excess weight from the base. Carve a gentle curve that meets the exposed clay texture show in the photo. I usually aim to leave the bottom 1.5 cm unglazed, so smooth this area intentionally. -
Clean and dry:
Smooth out any rough trimming marks with a damp sponge or a rubber rib. Allow the tumbler to dry completely until bone dry before bisque firing it to cone 04 (or your clay’s specific bisque temperature). -
Apply wax resist:
After bisque firing, wipe the pot with a damp sponge to remove dust. Paint a band of liquid wax resist along the bottom 2 cm of the exterior and the entire underside. This creates the crisp line between the glaze and the raw clay. -
Glaze interior:
Pour a creamy white satin or matte glaze into the cup. Swirl it quickly to coat the entire interior and pour out the excess immediately. -
Dip exterior:
Holding the base (where you applied wax), dip the tumbler upside down into the glaze bucket. Submerge it until the glaze reaches your wax line. Hold for three seconds and lift straight up. -
Clean the foot:
Even with wax resist, little droplets of glaze remain. Use a damp sponge to wipe the waxed area perfectly clean to ensure the raw, speckled clay is fully visible. -
Final firing:
Load the glazed tumbler into the kiln and fire to the maturity temperature of your clay and glaze (this look is often achieved at cone 5 or 6 oxidation).
Make It a Set
Use a pair of calipers to measure the rim diameter and height of your first successful cup. Keep these measurements handy to throw subsequent cups to match.
Once cooled, the contrast between the warm, gritty clay and the smooth glaze makes these tumblers a tactile delight.


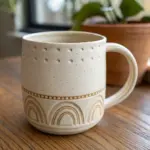
Everyday Mugs With Comfy Handles
These sturdy, comforting mugs feature a beautiful contrast between raw, toasted clay and a soft, speckled cream glaze. Designed with generous handles and a stable base, they are perfect for your daily coffee ritual.
How-To Guide
Materials
- Stoneware clay (speckled or brown body)
- Pottery wheel
- Throwing tools (sponge, wooden rib, wire cutter)
- Trimming tools
- Bucket of water
- Serrated rib or scoring tool
- Slip
- Satin matte cream glaze (speckled optional)
Step 1: Throwing the Cylinder
-
Center the clay:
Start with about 1 lb (450g) of well-wedged clay. Slam it onto the wheel head and center it using steady pressure and water for lubrication. -
Open the vessel:
Drill your thumbs into the center, stopping about a half-inch from the bottom to ensure a sturdy foot later on. Open the floor to your desired width, compressing it well to prevent cracks. -
Establish the height:
Pull the walls up slowly, maintaining an even thickness. These mugs have a straight, cylindrical profile with very subtle curves, so focus on vertical height rather than flaring out. -
Refine the shape:
Use a wooden rib on the outside against your inside hand to remove throwing lines and straighten the walls. I like to leave the rim slightly thickened for a comfortable drinking experience. -
Cut underneath:
Use a wooden tool to trim away excess clay at the base of the wall, creating a slight undercut. Wire the mug off the wheel and set it aside on a ware board to firm up to leather-hard.
Fixing Handle Cracks
If hairline cracks appear at the join during drying, score the area lightly, pack in a tiny bit of soft clay, smooth over related seams, and wrap tightly to re-hydrate.
Step 2: Trimming & Handle Making
-
Trim the foot:
Once leather-hard, center the mug upside down on the wheel. Trim away excess weight from the bottom, creating a clean, flat foot ring. Smooth the trimmed area with a damp sponge. -
Pull a blank:
For the handle, start with a carrot-shaped lump of clay. Holding the thick end, pull downward with wet hands to elongate the clay into a strap shape. It should be wide enough for a thumb to rest comfortably. -
Shape the curve:
Curve the pulled strap into a ‘C’ shape or ear shape and let it stiffen slightly on a board until it holds its form but is still flexible. -
Attach the handle:
Score the mug body and the handle endpoints deeply. Apply slip generously. Press the handle firmly onto the mug, ensuring the top attachment is just below the rim. -
Refine the connection:
Smooth the seams where the handle meets the mug using a small wooden tool or your thumb. Wipe away excess slip with a damp sponge for a seamless look. -
Slow drying:
Cover the mugs loosely with plastic to let the handle and body dry at the same rate. This prevents cracking at the attachment points.
Step 3: Glazing & Firing
-
Bisque fire:
Once bone dry, load the mugs into the kiln for a bisque firing (usually around Cone 04) to prepare them for glazing. -
Wax resist:
Apply wax resist to the bottom inch of the mug’s exterior and the entire foot. This creates the signature two-tone look where the raw clay remains visible. -
Interior glazing:
Pour your cream glaze into the mug, swirl it quickly to coat the entire inside, and pour it out. Wipe any drips off the rim immediately. -
Exterior glazing:
Hold the mug by the foot (or use glazing tongs) and dip the exterior into the speckled cream glaze, stopping right where the wax line begins. The wax should repel the glaze, but tidy up the edge with a damp sponge if needed. -
Rim distinctness:
Ensure the glaze breaks slightly over the rim to highlight the clay color underneath, matching the aesthetic of the sample photo. -
Final wipe:
Flip the mug over and ensure the bottom is completely free of glaze before firing. -
Glaze fire:
Fire the mugs to the maturation temperature of your clay and glaze (typically Cone 5 or 6 for stoneware) to finish the piece.
Make It Yours
Try using a dark brown or chocolate clay body. The contrast between the dark unglazed bottom and the creamy white glaze creates a striking, modern rustic effect.
Enjoy your warm beverage in a mug that feels just right in your hands


Cereal Bowls With Soft Curves
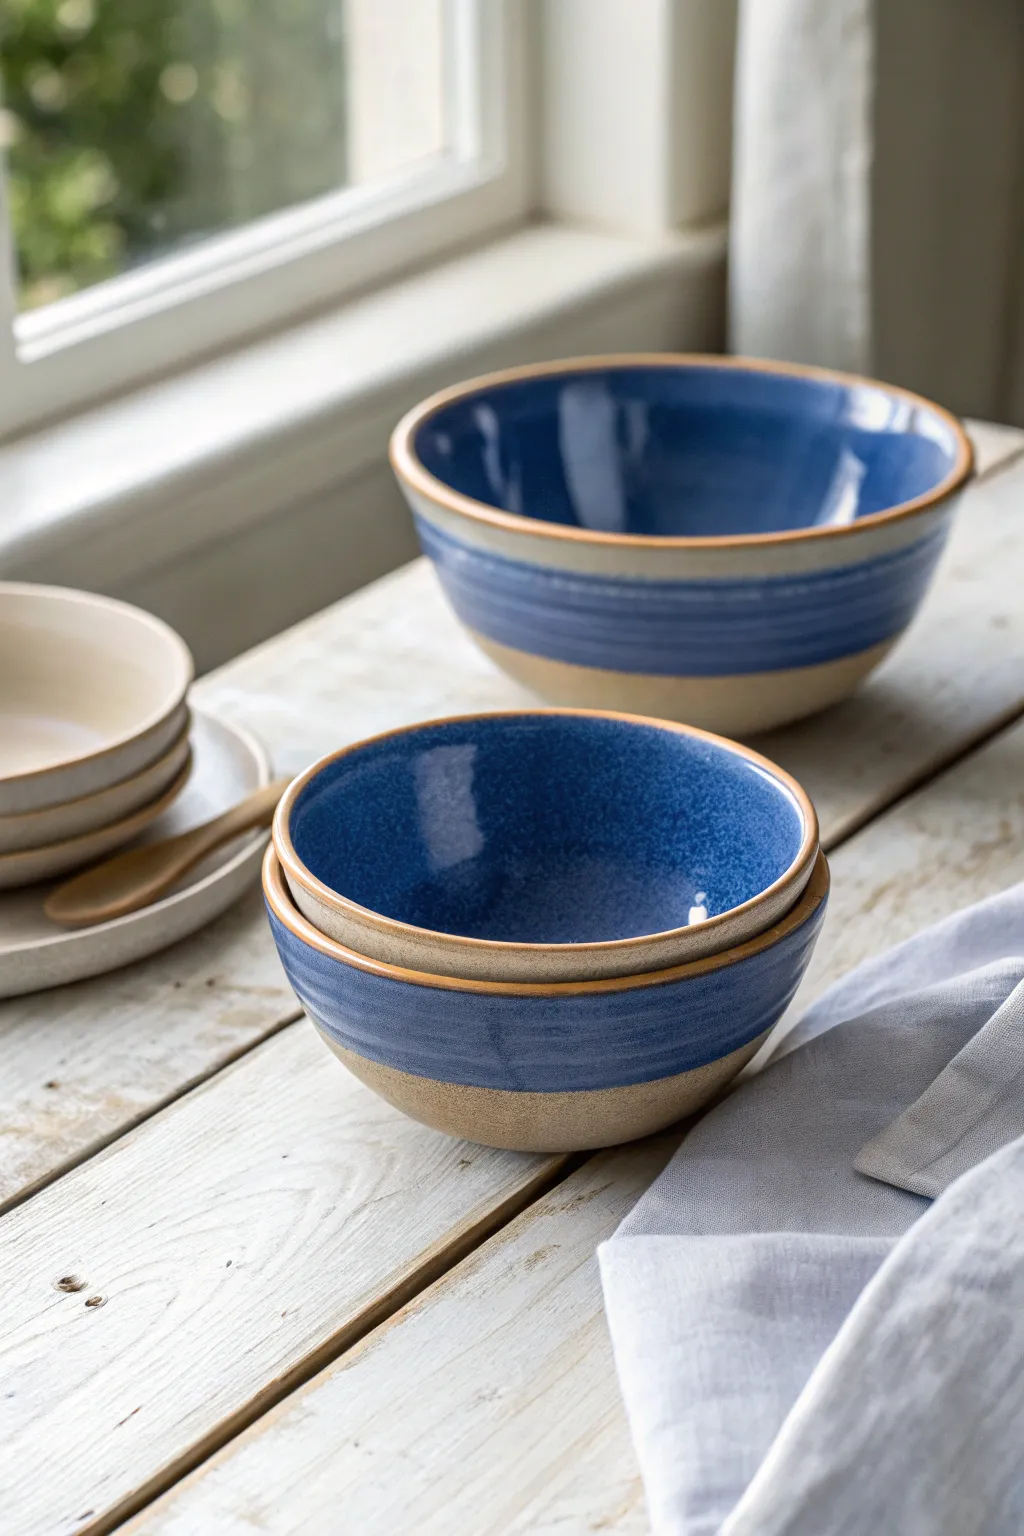
These inviting cereal bowls feature a classic silhouette with gently curving walls and a distinct two-tone finish. The deep cobalt interior spills over the rim to meet earthy, exposed stoneware at the base, creating a cozy and rustic aesthetic perfect for your morning routine.
Step-by-Step Guide
Materials
- Stoneware clay body (buff or speckled)
- Pottery wheel
- Throwing sponge
- Needle tool
- Rib tool (wooden or metal)
- Wire cutting tool
- Trimming tools
- Cobalt blue glaze suitable for stoneware
- Wax resist (brush-on or emulsion)
- Glazing tongs
Step 1: Throwing the Forms
-
Prepare the Clay:
Begin by wedging about 1.5 lbs of stoneware clay for each bowl. This weight is ideal for a standard cereal bowl size, allowing enough material for lifting the walls without ending up too heavy. -
Center on the Wheel:
Slam the clay onto the wheel head and center it using steady pressure and water. Ensure the mound is perfectly centered before proceeding to open it. -
Open and Establish the Base:
Open the clay down to within a 1/2 inch of the wheel head. Instead of creating a flat, sharp corner at the bottom, try to curve the interior slightly from the center out to the walls to match the ‘soft curve’ aesthetic. -
Pull the Walls:
Slow the wheel down slightly and begin your first pull. Using a knuckle or sponge, lift the clay upward. Focus on creating a shape that flares outward gently as it rises, rather than a straight cylinder. -
Refine the Curve:
On your subsequent pulls, use a rib tool on the interior to define that smooth, continuous curve from the floor to the rim. The bowl should feel open but deep enough to hold milk without sloshing. -
Finish the Rim:
Compress the rim with a piece of chamois leather or your sponge to round it off. This ensures it’s pleasant to drink from directly, which is crucial for a cereal bowl. -
Undercut and Wire Off:
Use a wooden knife to undercut the base, removing excess clay. Run your wire tool underneath the pot and set the bowl aside on a ware board to dry to leather-hard.
Step 2: Trimming and Bisque
-
Center for Trimming:
Once leather-hard, invert the bowl on the wheel. Secure it with clay lugs or a Giffin Grip. Tap it lightly to ensure it’s perfectly centered. -
Define the Foot Ring:
Trim away the excess weight from the lower third of the bowl. Carve out a distinct foot ring that mirrors the curve of the bowl’s interior. -
Smooth the Exterior:
I like to use a smooth metal rib at this stage to burnish the raw clay slightly on the lower exterior, as this part will remain unglazed and tactile. -
Bisque Fire:
Allow the bowls to dry completely (bone dry). Load them into the kiln for a bisque firing to cone 04 (or your clay body’s specific bisque temperature).
Clean Lines
To get that super crisp line between the bare clay and the blue glaze, define the separation point with a trimming tool while the pot is spinning on the wheel before you apply the wax resist.
Step 3: Glazing Technique
-
Clean the Bisque:
Wipe the fired bowls with a damp sponge to remove any kiln dust, which can prevent glaze from adhering properly. -
Apply Wax Resist:
This is the signature step for this look. Paint a line of wax resist around the exterior of the bowl, roughly one-third of the way up from the foot. Fill in everything below this line, including the foot ring and bottom, with wax. -
Glaze the Interior:
Pour your cobalt blue glaze inside the bowl. Swirl it quickly to coat the entire interior surface and pour the excess back into your bucket. -
Dip the Exterior Rim:
Holding the bowl by the foot (which is waxed), perform a quick dip into the glaze bucket, submerging the bowl just past the rim but stopping before you hit the wax line if possible. If you dip over the wax, the glaze will bead up. -
Clean the Line:
Use a damp sponge to wipe away any glaze beads that formed on the waxed area. You want a crisp transition between the blue glaze and the bare clay body. -
Final Firing:
Load the glazed bowls into the kiln. Since the bottoms are unglazed, they can go directly on the shelf, but cookies are always safer. Fire to the maturity temperature of your clay and glaze (likely Cone 6 or 10).
Uneven Glaze?
If your exterior dip looks streaky or uneven, your glaze might be too thick. Add a small amount of water and mix thoroughly, or hold the dip for a split second longer to allow even coverage.
Once cooled, these bowls are ready to add a touch of handmade warmth to your breakfast table

The Complete Guide to Pottery Troubleshooting
Uncover the most common ceramic mistakes—from cracking clay to failed glazes—and learn how to fix them fast.
Nesting Bowl Sets
Create a stunning focal point for your kitchen with this set of graduated nesting bowls, featuring a warm, speckled oatmeal glaze that highlights the natural beauty of hand-thrown pottery. The subtle throwing rings and organic specks give these functional pieces a rustic yet modern charm.
Detailed Instructions
Materials
- Speckled Stoneware Clay (e.g., Laguna Speckled Buff or similar)
- Pottery Wheel
- Throwing Tools (sponge, rib, needle tool, wire tool)
- Calipers or Ruler
- Trimming Tools
- Satin White or Oatmeal Glaze (food safe)
- Kiln
- Batts (various sizes)
Step 1: Planning and Weighing
-
Calculate clay weights:
To achieve a perfectly nesting set, you need precise graduation in clay weight. Start with 4 lbs for the largest bowl, then decrease by roughly 30-40% for each subsequent bowl (e.g., 4 lbs, 2.5 lbs, 1.5 lbs, 1 lb, 0.5 lb). -
Wedge the clay:
Thoroughly wedge each ball of clay to remove air bubbles and ensure the speckles are evenly distributed. Form them into uniform spheres before bringing them to the wheel.
Shrinkage Check
Remember clay shrinks! When checking if bowls nest, leave extra room (approx 10-15%) during the throwing stage compared to the finished look.
Step 2: Throwing the Set
-
Throw the largest bowl first:
Center your largest clay ball on the wheel. Open wide to establish the base width. When pulling up the walls, aim for a continuous, gentle curve rather than straight vertical sides. -
Define the rim:
Compress the rim with a chamois or sponge. Keep the rim slightly thickened for durability, echoing the rustic aesthetic shown in the photo. -
Measure the interior:
Before cutting the bowl off the hump or batt, measure the interior diameter and height with calipers. Write these dimensions down; your next bowl’s *exterior* must be smaller than this measurement to nest. -
Leave throwing lines:
Only lightly rib the exterior. I like to leave faint finger ridges or ‘throwing rings’ on the lower half of the bowl to catch the glaze beautifully later. -
Throw the subsequent bowls:
Proceed with the smaller weights. For each new bowl, check its exterior width against the previous bowl’s interior measurement, allowing about 1/2 inch of clearance for easy nesting. -
Refine the curve:
Ensure the curve of the walls is consistent across all bowls. A template rib can be very helpful here to match the curvature from the smallest to the largest vessel.
Rim Variation
Leave the rims unglazed or wipe the glaze back significantly to create a raw clay halo that defines each layer when the bowls are stacked.
Step 3: Trimming and Finishing
-
Dry to leather hard:
Allow the bowls to dry slowly under plastic until they are leather hard. The rims should be firm enough to support the weight of the bowl during trimming. -
Trim a defined foot:
Center each bowl upside down on the wheel. Trim away excess weight from the bottom, creating a clean, distinct foot ring that lifts the form slightly off the table. -
Smooth the surface:
Use a damp sponge to smooth any sharp trimming marks, but be careful not to erase the subtle throwing rings on the main body. -
Bisque fire:
Load the bone-dry bowls into the kiln and bisque fire to Cone 04 (or your clay body’s specific recommendation).
Step 4: Glazing
-
Prepare the glaze:
Mix a satin matte white or oatmeal glaze. Ensure it is well-sieved to avoid clumps, as you want a smooth, creamy application. -
Wax the feet:
Apply wax resist to the foot ring and the very bottom center of each bowl to prevent glaze from sticking to the kiln shelf. -
Dip and pour:
Pour glaze inside the bowl, swirl to coat, and pour out. Wait a moment for it to dry, then hold the bowl by the foot and dip the exterior into the glazes bucket. -
Clean the rim:
If the glaze looks too thick on the rim, gently sponge it back slightly to let the speckled clay body peek through, enhancing the definition between stacked bowls. -
Fire to maturity:
Glaze fire to Cone 5 or 6 (depending on your clay/glaze combo). The heat will draw the iron speckles in the clay through the white glaze, creating that signature spotted look.
Stack your finished set on a wooden board or open shelf to display the harmonious curves and beautiful speckling
Wheel-Thrown Plates With Clean Rims
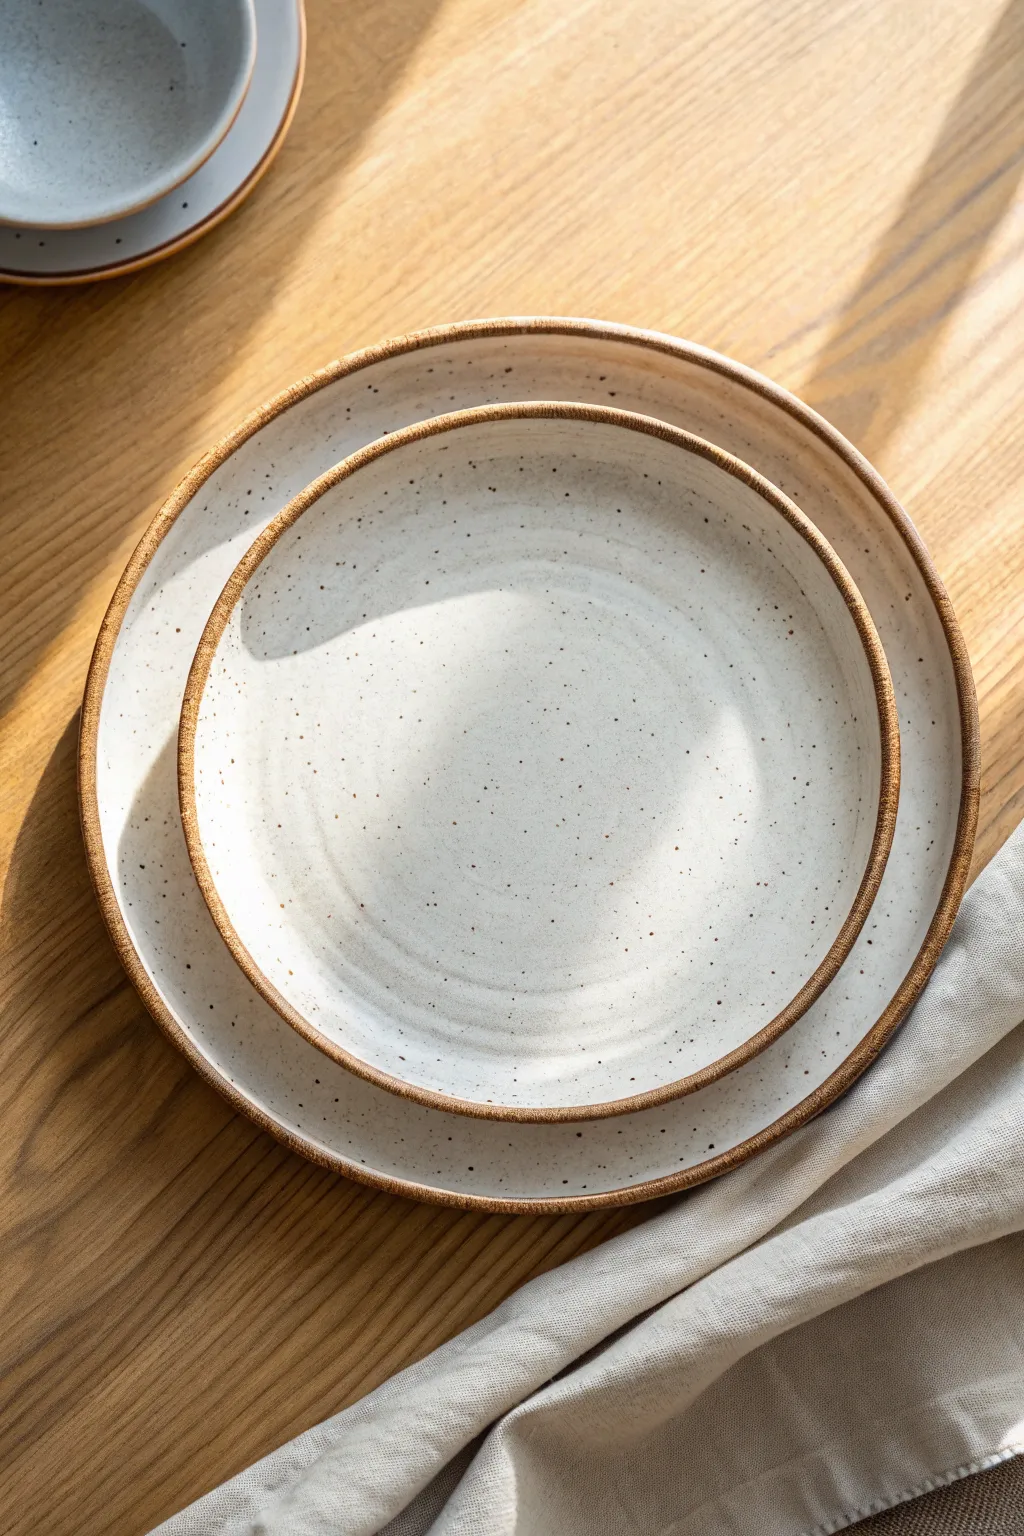
These wheel-thrown nesting plates combine the warmth of exposed raw clay with a creamy, speckled glaze for a timeless table setting. The defining feature is the crisp, unglazed rim that frames food beautifully while highlighting the natural character of the stoneware.
Step-by-Step
Materials
- Speckled stoneware clay (roughly 2-3 lbs depending on plate size desired)
- Pottery wheel
- Throwing sponge
- Wooden throwing rib
- Metal kidney rib
- Wire cutter
- Pin tool
- Trimming tools (large and small loop tools)
- Chamois strip
- Wax resist (liquid wax)
- Creamy white matte or satin glaze
- Soft glaze fan brush (if brushing) or tongs (if dipping)
- Clean sponge for cleanup
Step 1: Throwing the Plates
-
Prepare the clay:
Begin by thoroughly wedging about 1.5 lbs of speckled stoneware clay for the dinner plate and 1 lb for the salad plate. Ensure there are no air bubbles, as these will ruin the flat surface of your plates. Center the larger ball of clay on the wheel head, keeping a low, wide profile rather than a tall cone. -
Open the form:
Open the clay wide, leaving about 1/4 to 3/8 inch of clay at the bottom for the floor. Compress the floor thoroughly by moving your fingers from the center out to the wall several times; this compression is crucial to prevent S-cracks during firing. -
Pull the walls:
Establish the wall by pulling the clay outward and slightly upward. For these plates, you want a shallow, gradual curve rather than a steep bowl shape. Aim for a rim that sits about 1 inch high for the smaller plate and 1.5 inches for the larger one. -
Define the rim:
Because the rim will remain unglazed, it needs to be substantial and smooth. While the wheel is spinning slowly, gently pinch the very edge of the rim to round it off. I like to use a small strip of chamois leather held over the rim to compress it and make it ultra-smooth. -
Refine the interior curve:
Using a flexible metal or wooden rib, smooth the interior curve of the plate. Start from the center and sweep outward in a continuous motion to remove finger ridges and create that seamless, modern surface seen in the photo. -
Cut and dry:
Run a wire cutter under the base to release it from the wheel head. Carefully slide the plate onto a ware board. Repeat the process for the smaller nesting plate. Allow both to dry to a leather-hard state (firm enough to handle but still carved easily).
Clean Lines Pro-Tip
For the sharpest line between glaze and raw clay, finish the trimming phase by burnishing the rim with a soft stone or spoon. This closes the clay pores, making the raw section smoother after firing.
Step 2: Trimming the Foot
-
Center specifically for trimming:
Place the leather-hard plate upside down on the wheel. Use small lugs of damp clay or a Giffin Grip to secure it. Tap the plate gently while the wheel spins slowly to ensure it is perfectly centered. -
Carve the foot ring:
Using a sharp loop tool, carve away the excess clay from the bottom. Define a clear foot ring that elevates the plate slightly. The foot ring should be wide enough to support the plate’s flat center so it doesn’t slump in the kiln. -
Clean up the exterior:
Smooth out any trimming marks on the exterior wall with a damp sponge or a soft rib. The exterior clay texture should feel refined to the touch, matching the quality of the interior. -
Bisque fire:
Allow the plates to dry completely to bone dry (usually several days). Fire them in a bisque kiln according to your clay body’s specifications (usually Cone 04).
Step 3: Glazing for the Clean Rim
-
Wipe down:
Once the bisque firing is complete and the kiln has cooled, wipe the plates with a damp sponge to remove any dust, which can cause crawling or pinholes in the glaze. -
Apply wax resist:
This is the most critical aesthetic step. Dip a brush in liquid wax resist and carefully paint the very top edge of the rim. You want a consistent line of wax about 1/8th of an inch wide. Also, wax the foot ring on the bottom to prevent sticking to the kiln shelf. -
Wait for wax to set:
Let the wax resist dry for about 15-20 minutes until hard. If you touch it too soon, it might smear onto the areas you want glazed. -
Glaze the interior:
Pour your creamy white speckled glaze into the interior of the plate, swirl it to coat the entire surface, and pour the excess out quickly. Alternatively, if you have a large bucket, dip the entire plate. The wax on the rim will repel the glaze. -
Clean the rim:
Immediately after glazing, use a damp sponge to wipe any tiny beads of glaze that may be sitting on top of the waxed rim. The line between the white glaze and the brown clay should be crisp and sharp. -
Glaze fire:
Load the plates into the kiln for the final glaze firing (e.g., Cone 5, 6, or 10 depending on your clay/glaze combo). Ensure plates are not touching each other.
Uneven Drying Troubleshoot
Plates warp easily! Dry them very slowly by covering the rims lightly with plastic while leaving the centers exposed, or flip them frequently while drying to ensure even tension.
Set your table with your new handmade plates and enjoy the beautiful contrast between the smooth glaze and the earthy clay rim.


What Really Happens Inside the Kiln
Learn how time and temperature work together inside the kiln to transform clay into durable ceramic.
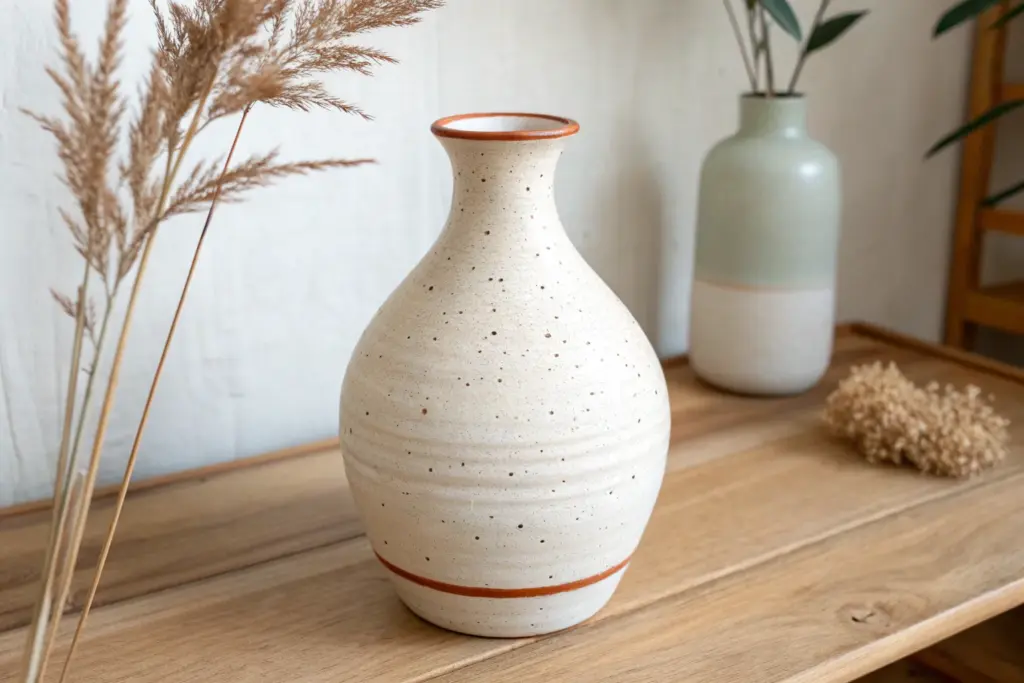
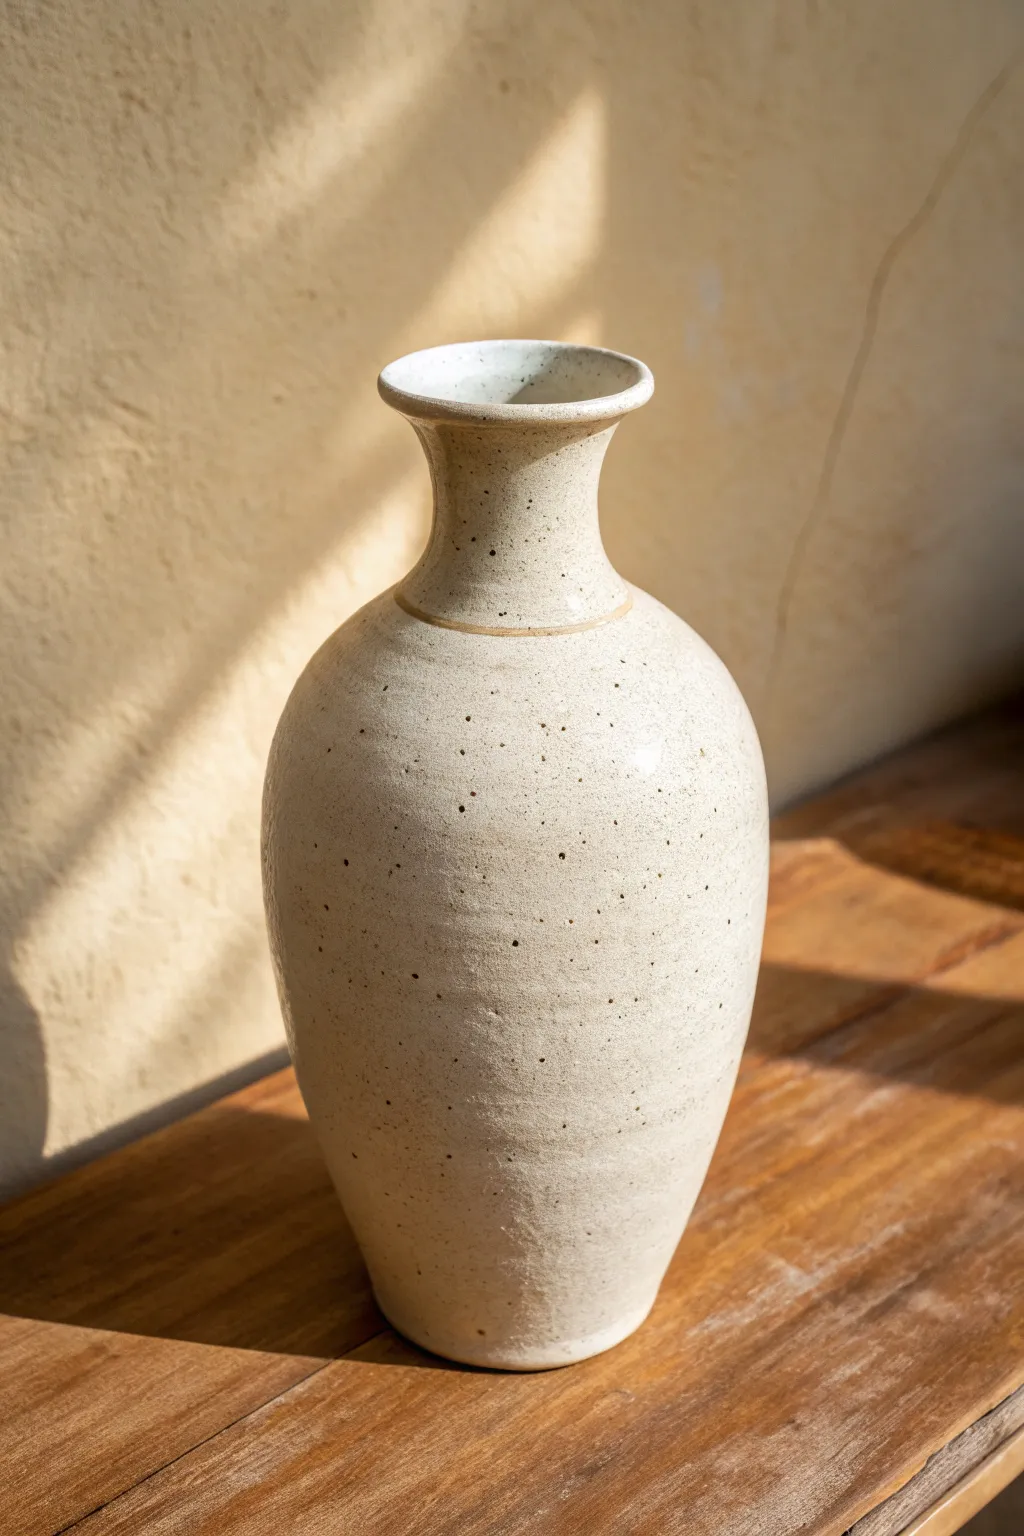
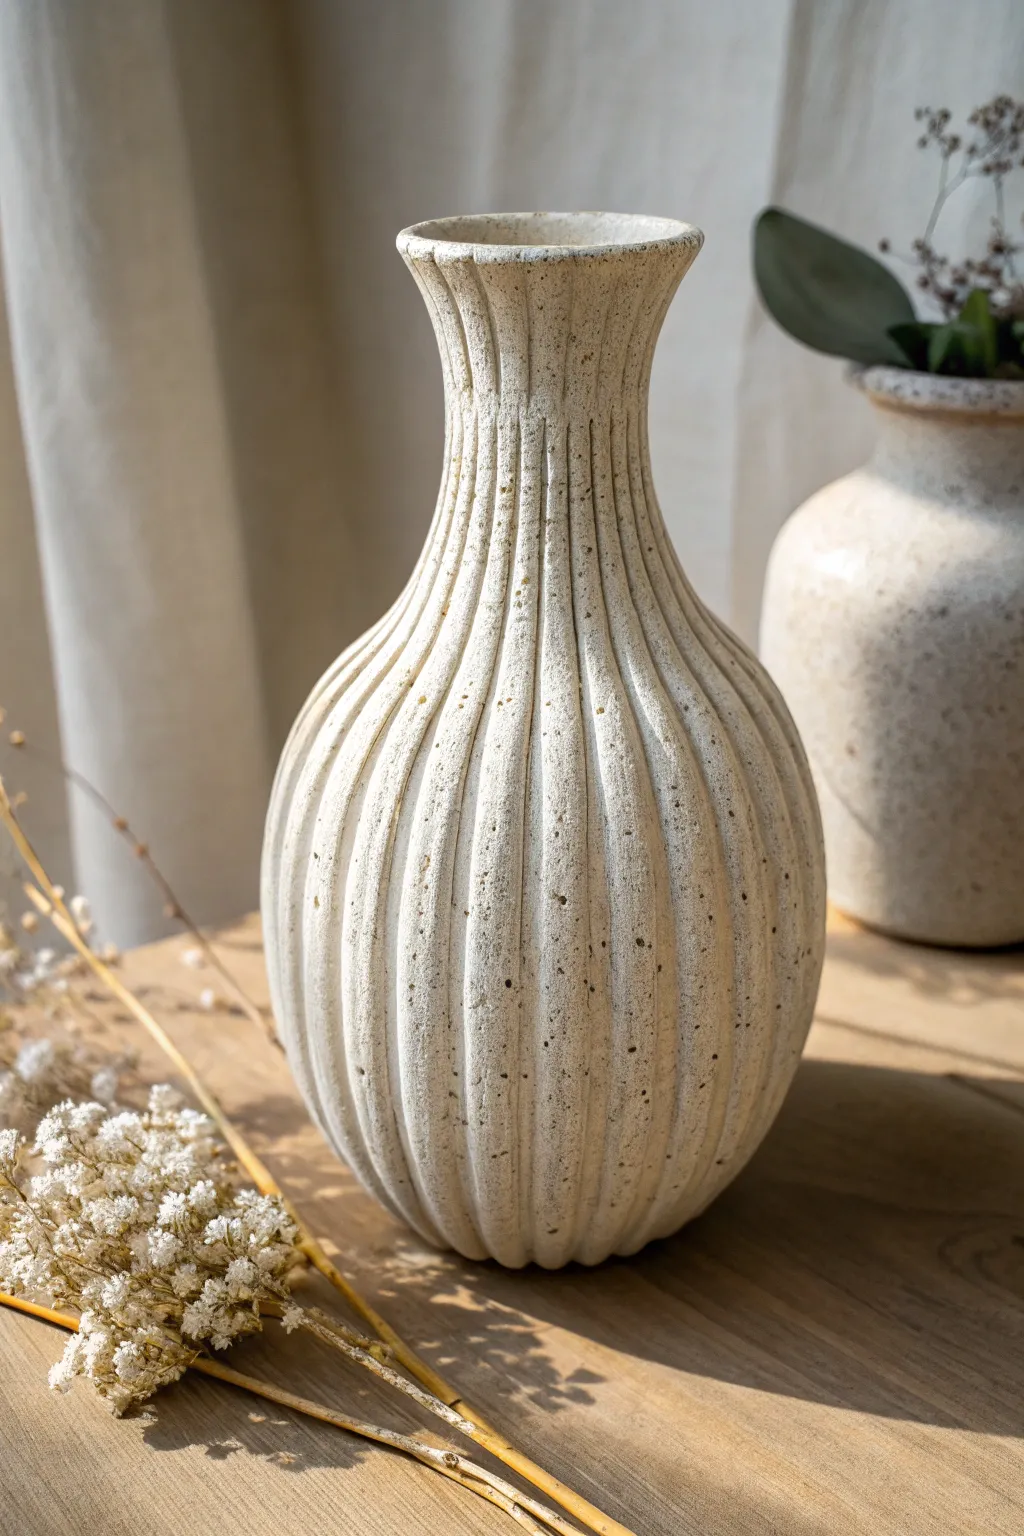
Bud Vases With Narrow Necks
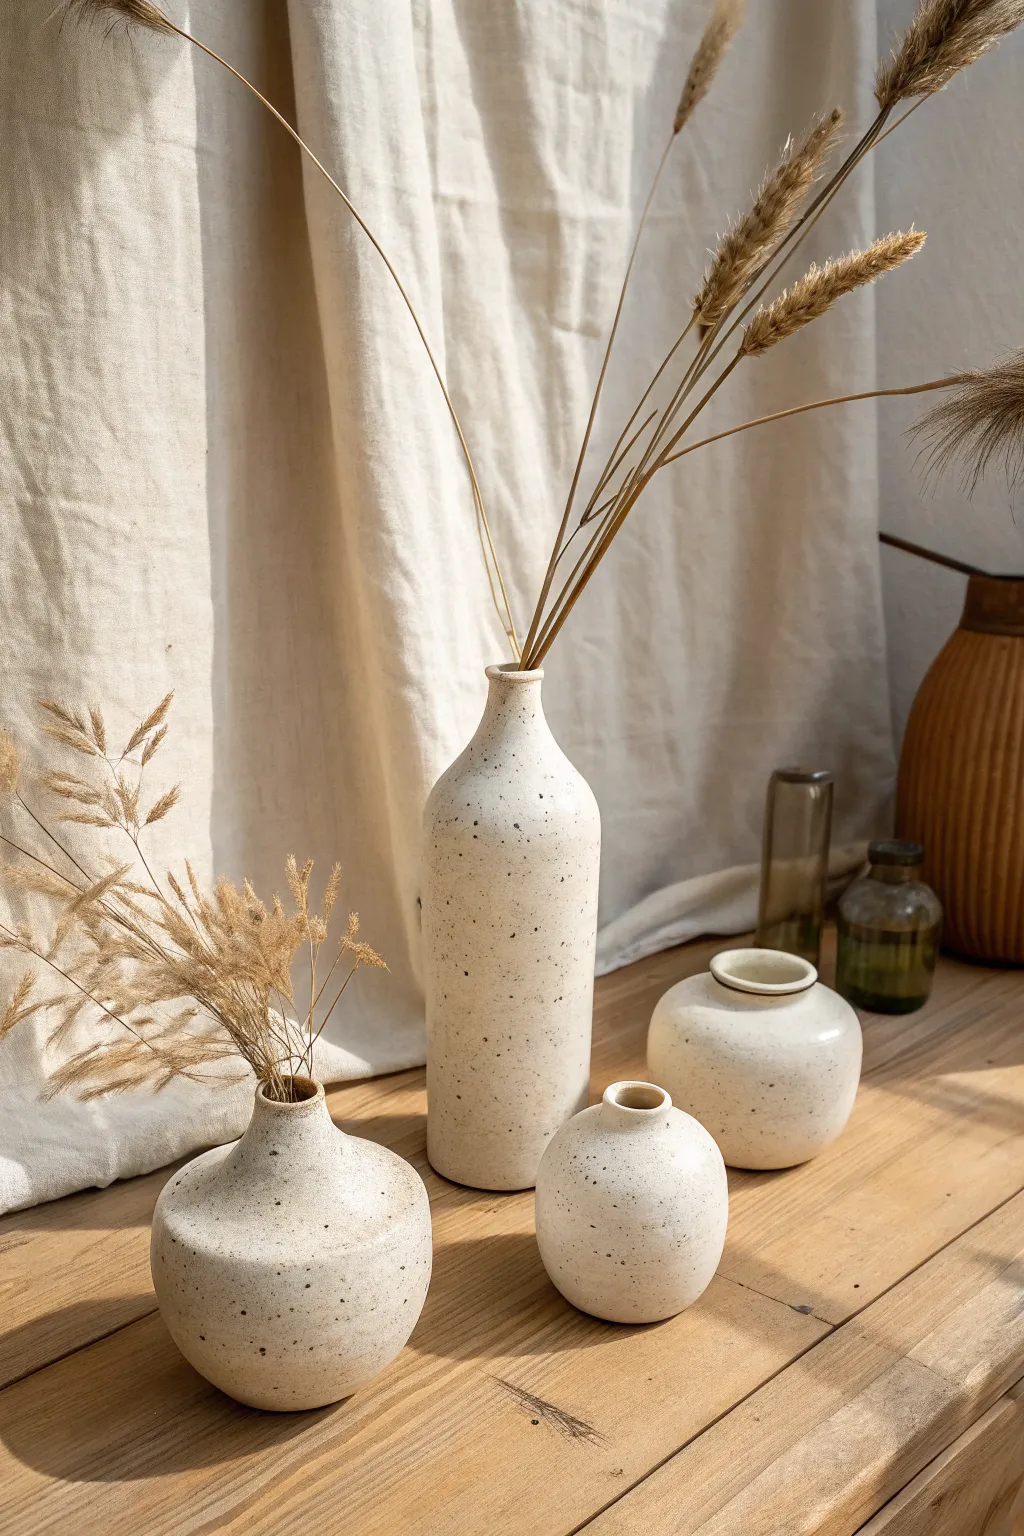
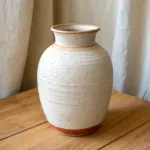
Capture the essence of minimalist ceramics with this tutorial for a set of speckled bud vases. These wheel-thrown forms feature creamy white clay bodies with signature iron flecks, perfect for displaying dried grasses or single stems.
Detailed Instructions
Materials
- Speckled clay body (e.g., stoneware with iron flecks)
- Pottery wheel
- Throwing sponges
- Pin tool or needle tool
- Wire cutter
- Wooden throwing ribs
- Metal kidney rib
- Chamois leather strip
- Trimming tools
- Matte white or clear glaze (depending on clay body)
Step 1: Throwing the Tall Bottle Vase
-
Center the clay:
Start with about 1.5 to 2 pounds of speckled clay. Wedge it thoroughly to remove air bubbles, then slam it onto the center of your wheel head. Use coning techniques to center the clay perfectly. -
Open and pull:
Open the clay down to the bat, leaving about a half-inch for the base. Widen the floor slightly, then begin your first pull, bringing the walls up into a generic cylinder shape. Keep the walls even. -
Collar the neck:
As you gain height, start collaring the top third of the cylinder inward. Use both hands to gently squeeze the clay in, compressing as you go to prevent buckling. I like to keep the wheel speed medium-slow for this. -
Refine the belly:
Use a wooden rib on the outside and your hand on the inside to gently push the bottom two-thirds out, creating a slight belly while keeping the shoulder sloping upward. -
Finish the lip:
Trim the rim with a needle tool to make it even. Use a piece of chamois to compress and smooth the lip until it is rounded and soft.
Step 2: Throwing the Squat Bulb Vases
-
Center smaller amounts:
For the three smaller vases, prepare balls of clay ranging from 0.75 to 1.25 pounds. Center the first ball for the medium bulb vase. -
Create a sphere:
Open the clay and pull the walls up. Focus on expanding the belly outward immediately after lifting the clay from the bottom. You want a distinct spherical shape. -
Narrow the opening:
Aggressively collar the neck in until the opening is quite small—just large enough for a few stems. This captures that classic bud vase silhouette. -
Form the mini vases:
Repeat the process with the smallest balls of clay to create the two tiny squat vases. For these, keep the height low and focus on a wide, stable bottom and a very short neck. -
Smooth the surfaces:
Before cutting them off the wheel, use a metal rib to remove all throwing lines. The surface should be smooth to let the speckles shine through later.
Collaring Tip
When collaring the tall neck, always speed up the wheel slightly and keep the clay well-lubricated to prevent torque ripple or twisting.
Step 3: Trimming and Finishing
-
Dry to leather hard:
Cover the pots loosely with plastic and let them dry slowly to a leather-hard state. The tall bottle, especially, needs to be firm enough to handle without warping. -
Trim the bases:
Place each vase back on the wheel, secure it with clay lugs or a chuck, and trim the bottom. Create a clean foot ring or a flat bottom depending on your preference. -
Sponge smooth:
Use a slightly damp sponge to wipe down any rough trimming marks, ensuring the transition from wall to foot is seamless. -
Bisque fire:
Once fully bone dry, load the vases into the kiln for a bisque firing (usually cone 04 or 06). -
Glaze application:
Dip the vases into a matte white glaze. If your clay is naturally dark with speckles, a semi-transparent white works best. If using a pre-speckled white clay, a clear matte glaze is ideal. -
Final firing:
Fire the glazed pieces to the maturity temperature of your clay (typically Cone 5 or 6 for stoneware). Allow the kiln to cool completely before unloading.
Make It a Set
Create a unified look by using different colored clays (like dark brown or black) for the lower third of each vase for a dipped, two-tone effect.
Arrange your finished set with dried grasses for a timeless, organic display
Planters With a Thrown Tray
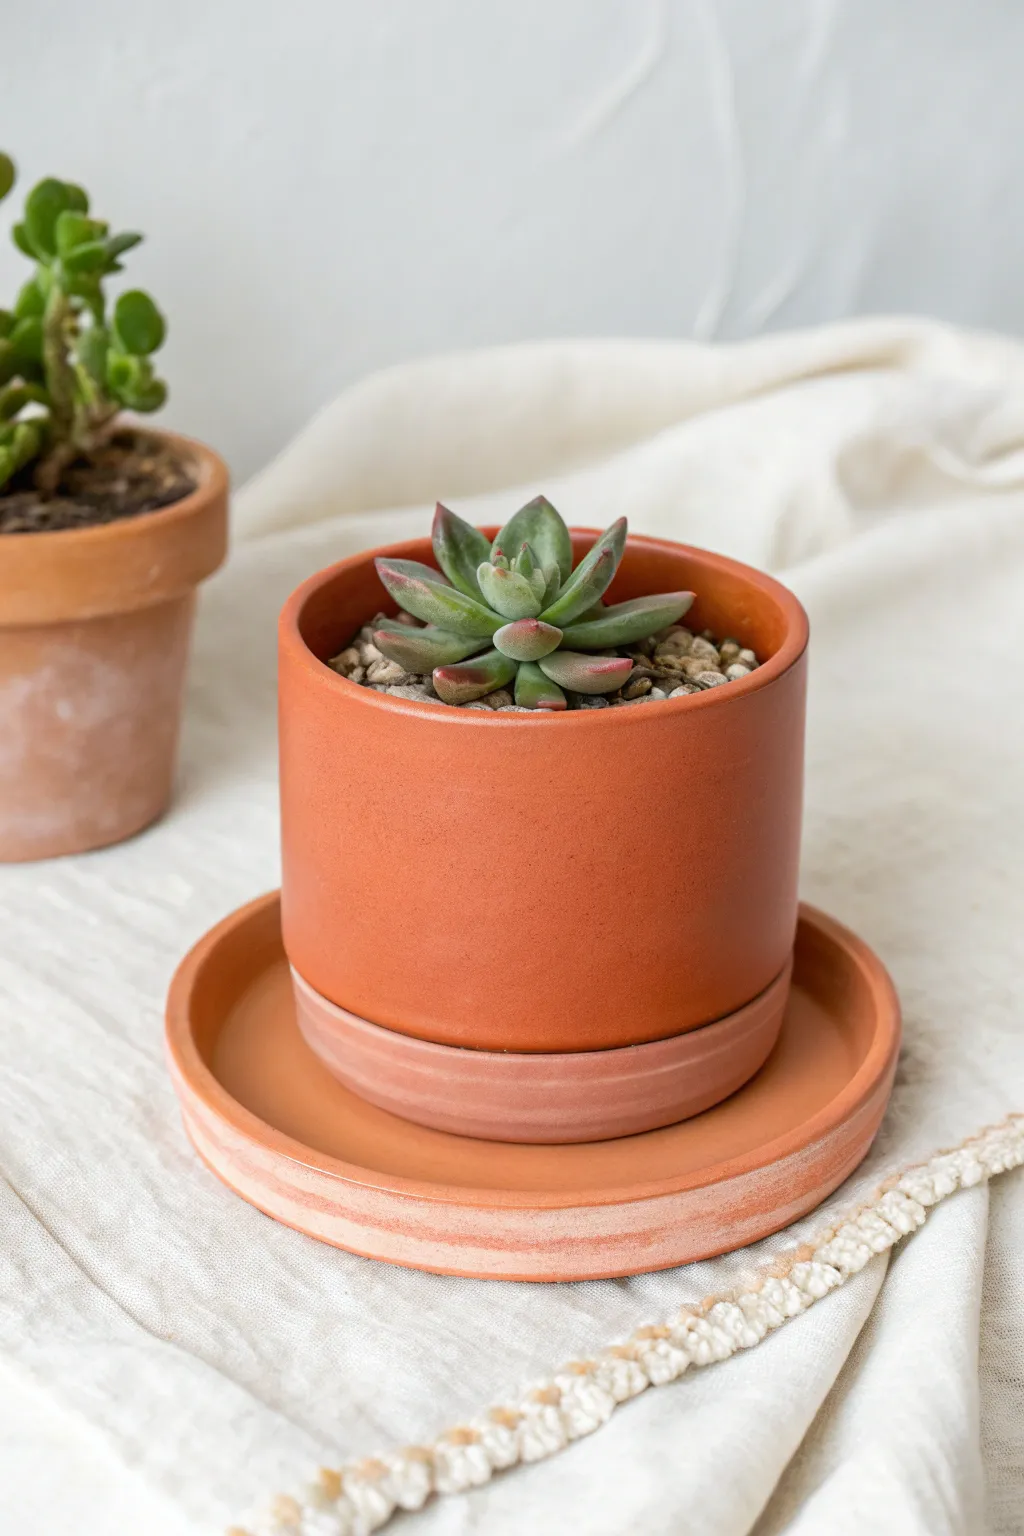
This classic project combines a sleek, cylindrical planter with a perfectly fitted saucer, creating a cohesive set that elevates any succulent. The clean lines and warm terracotta tones offer a timeless look that blends seamlessly with modern decor.
Step-by-Step
Materials
- Terracotta clay (or similar earthenware)
- Potter’s wheel
- Throwing sponge
- Needle tool
- Wire cutter
- Wooden throwing ribs
- Loop styling tool (for trimming)
- Calipers (optional but recommended)
- Bat (for the wheel)
Step 1: Throwing the Planter Body
-
Center the clay:
Start with a ball of clay roughly the size of a large grapefruit. Secure it firmly to the center of your wheel bat and begin centering. Ensure the clay is smooth and perfectly conical before proceeding. -
Open the form:
Press your thumbs into the center to open the clay, leaving about a half-inch of thickness at the bottom for the base. Widen the floor to your desired diameter, keeping it flat. -
Pull the walls:
Begin pulling up the walls. For this modern cylinder shape, focus on pulling straight upward rather than flaring out. Keep your hands steady and apply even pressure to maintain a consistent wall thickness. -
Straighten the sides:
Use a wooden rib against the exterior while supporting the interior with your other hand. Run the rib vertically up the side to remove throwing lines and create that perfect cylindrical profile. -
Refine the rim:
Compress the rim gently with a sponge or chamois to ensure it is smooth and durable. A squared-off or slightly rounded rim works best for this clean aesthetic. -
Measure the base:
Before removing the pot, use calipers to measure the diameter of the base. Lock the calipers in place; you will need this measurement for the tray. -
Cut and remove:
Run a wire cutter underneath the pot to separate it from the bat. Slide it onto a ware board to firm up to leather-hard.
Uneven Drying?
If the rim dries faster than the base, cover the rim loosely with plastic wrap while the bottom firms up. This prevents warping and ensures the cylinder stays perfectly round.
Step 2: Creating the Matching Tray
-
Prep the saucer clay:
Take a smaller amount of clay—about a third of what you used for the pot. Center it low and wide on the wheel, almost like a hockey puck. -
Open shallowly:
Open the clay, ensuring you leave a slightly thicker floor than usual to account for trimming later. Widen the floor until it matches the measurement on your calipers plus a little extra for shrinkage and clearance. -
Raise the rim:
Pull up a very short wall, about an inch high. Flaring it slightly outward can help catch water, but a vertical wall matches the pot’s style better. Keep the transition from floor to wall sharp. -
Smooth the interior:
Use a sponge or a flexible rib to smooth the interior floor of the tray perfectly flat. Any bumps here will make the pot wobble.
Step 3: Trimming and Finishing
-
Check for leather-hardness:
Wait until both pieces are leather-hard—firm enough to handle without deforming but soft enough to carve. I usually check if I can make a thumbprint without sticking. -
Secure the pot for trimming:
Invert the cylinder onto the wheel head. Use small lugs of soft clay to secure it in place. Center it perfectly. -
Trim the pot’s base:
Use a loop tool to trim away excess weight from the bottom edge. Create a slight bevel at the foot to create a shadow line, giving the pot a ‘floating’ appearance. -
Drill a drainage hole:
While the pot is inverted, use a hole cutter or drill bit to create a central drainage hole. Smooth out any rough burrs around the exit point. -
Trim the saucer:
Invert the saucer and center it. Trim the underside to create a clean, defined foot ring that mirrors the pot’s diameter. -
Final smoothing:
Wipe down both pieces with a damp sponge to remove any crumbs or sharp edges. Allow them to dry slowly and evenly before firing.
Snug Fit
Make the saucer’s interior diameter about 1/4 inch larger than the pot’s base. Clay shrinks during firing, and you want room for movement so the pot doesn’t get stuck.
Once fired, the warmth of the terracotta will provide a beautiful, natural home for your favorite plants

TRACK YOUR CERAMIC JOURNEY
Capture glaze tests, firing details, and creative progress—all in one simple printable. Make your projects easier to repeat and improve.
Lidded Jars That Actually Fit
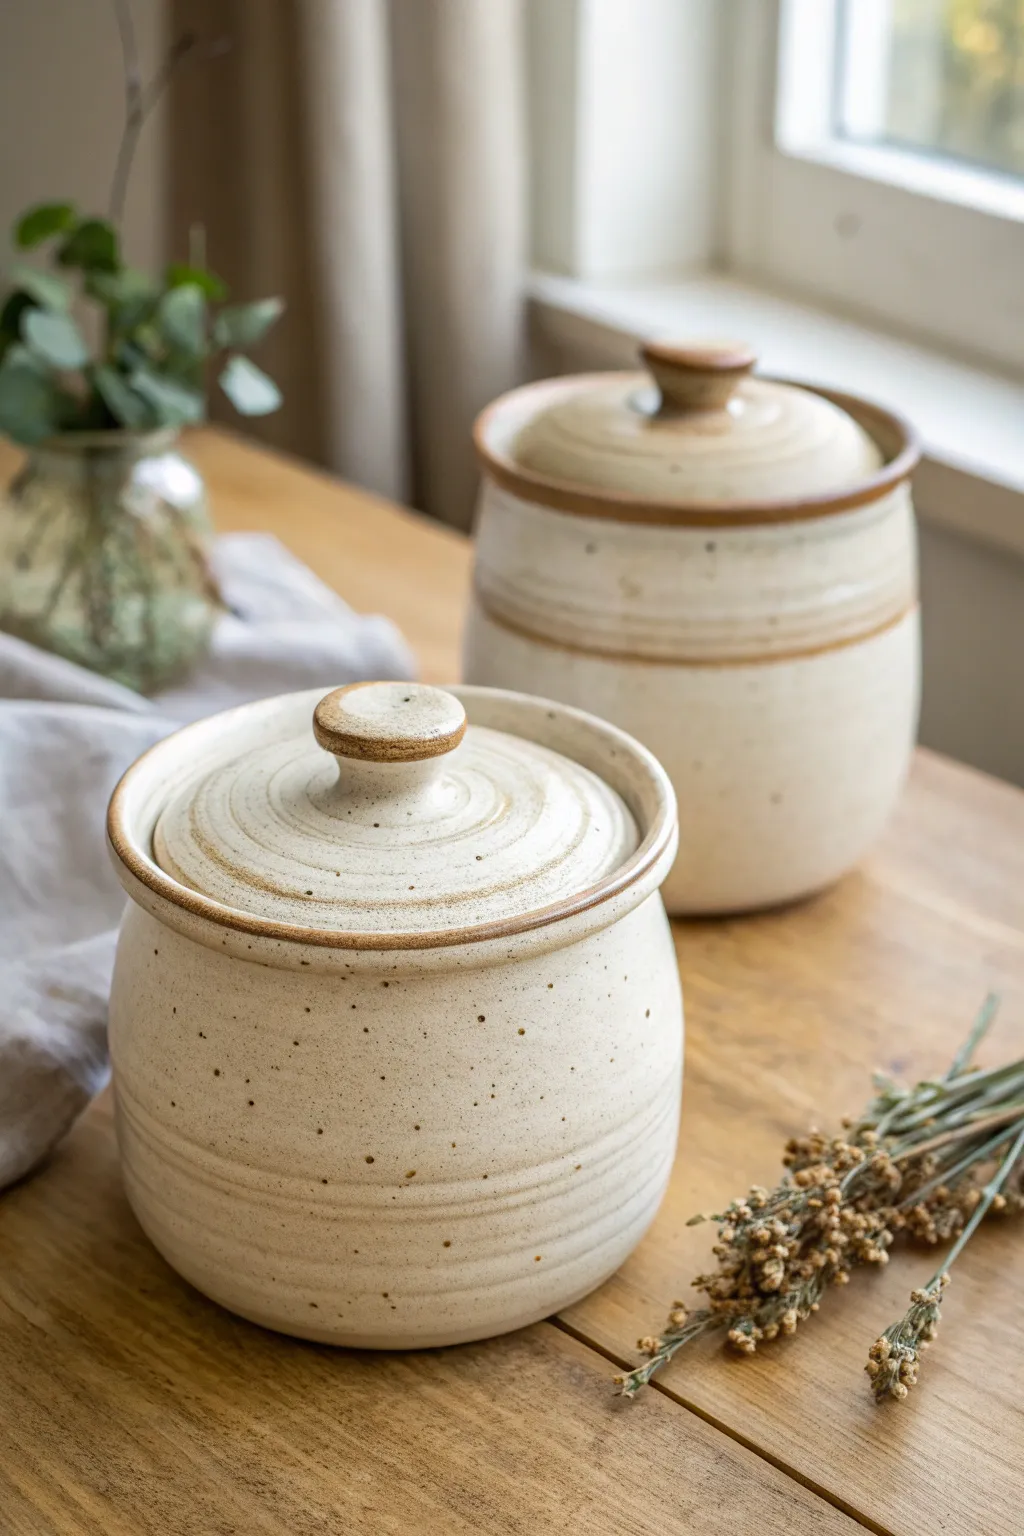
These charming, rustic jars feature a classic speckled stoneware look with warm brown accents that highlight the natural throwing lines. Their snug-fitting lids and ample volume make them perfect for storing kitchen staples or simply adding an artisanal touch to your shelves.
Step-by-Step Tutorial
Materials
- Speckled buff stoneware clay (approx. 3-4 lbs per jar)
- Pottery wheel
- Throwing sponges and water bucket
- Wire cutter
- Wooden throwing ribs
- Needle tool
- Trimming tools (loop tools)
- Calipers
- Creamy matte white glaze
- Iron oxide wash (optional, for rim accents)
Step 1: Throwing the Jar Body
-
Center and open:
Start with about 2 pounds of well-wedged clay. Center it firmly on the wheel, then drive your thumbs down to open the floor, leaving it about 3/8-inch thick for trimming later. -
Pull the cylinder:
Begin pulling up the walls. Aim for a slightly bulbous shape rather than a straight cylinder; push gently from the inside as you pull up to create that nice, full belly seen in the reference image. -
Shape the gallery:
This is crucial for a fitting lid. At the rim, split the clay thickness. Press the inner half down and outward to create a flat shelf (the gallery) inside the rim. Ensure this shelf is perfectly flat and defined. -
Refine the surface:
Using a wooden rib or just your fingertips, gently emphasize the throwing rings on the lower third of the pot. These ridges will catch the glaze beautifully later. -
Measure immediately:
Before removing the pot from the wheel, use your calipers to measure the exact width of the gallery opening where the lid will sit. Lock the calipers in place. -
Cut and set aside:
Wire the pot off the bat and set it aside to stiffen to leather hard.
Wobbly Lid Syndrome?
If the lid rattles or rocks, apply a small dab of grinding paste (valve grinding compound) to the gallery, put the lid on, and twist back and forth to sand them into a perfect match.
Step 2: Creating the Lid
-
Throw the lid right-side up:
Using about 1 pound of clay, center a low mound. Open it slightly, keeping the floor thicker than usual as this will become the knob later. -
Measure the flange:
Flatten the rim area. Using the locked calipers from the jar body, measure the outer edge of your lid’s flange. It should match the gallery measurement perfectly. -
Shape the dome:
Gently curve the clay upward from the flange to the center to create a subtle dome shape. -
Form the knob:
In the center of the hump, isolate a small knob of clay. Shape it into a flat button style, smoothing the edges so it feels comfortable to grip. -
Check the fit:
I usually do a quick visual check with the calipers again to ensure I haven’t distorted the width while shaping the knob. -
Dry properly:
Wire off the lid. Place the lid directly onto the jar rim to dry together—this ensures they warp together (if at all) and maintain a perfect fit.
Step 3: Trimming and Finishing
-
Trim the foot:
Once leather hard, flip the jar body over on the wheel (use a chuck or secure with lugs). Trim a clean, defined foot ring, removing excess weight from the bottom corners. -
Clean up the lid:
If the underside of the lid is rough, center it upside down and lightly trim the underside curve for a finished look. -
Bisque fire:
Fire both pieces to cone 04 (or your clay’s specific bisque temperature). -
Glaze application:
Dip the entire jar and lid into a creamy matte white glaze. This semi-opaque choice allows the natural speckles of the clay body to bleed through. -
Accent the rims:
Wipe the glaze off the very edge of the rim, the gallery, and the edge of the knob. Lightly sponge a diluted iron oxide wash onto these exposed clay areas to enhance the toasted brown color. -
Final wipe:
Ensure no glaze is on the contact points (where lid meets jar) or the foot ring. Place the lid on the jar and fire to cone 6 oxidation.
Add Texture
Before the clay dries, use a dull pencil or carving tool to incite two parallel horizontal lines around the belly of the jar. This adds visual weight and breaks up the form.
Fill your new stoneware canisters with coffee beans or flour and enjoy the satisfaction of that perfect lid fit every morning
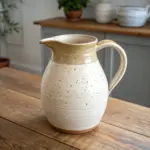
Small Pitchers and Creamers
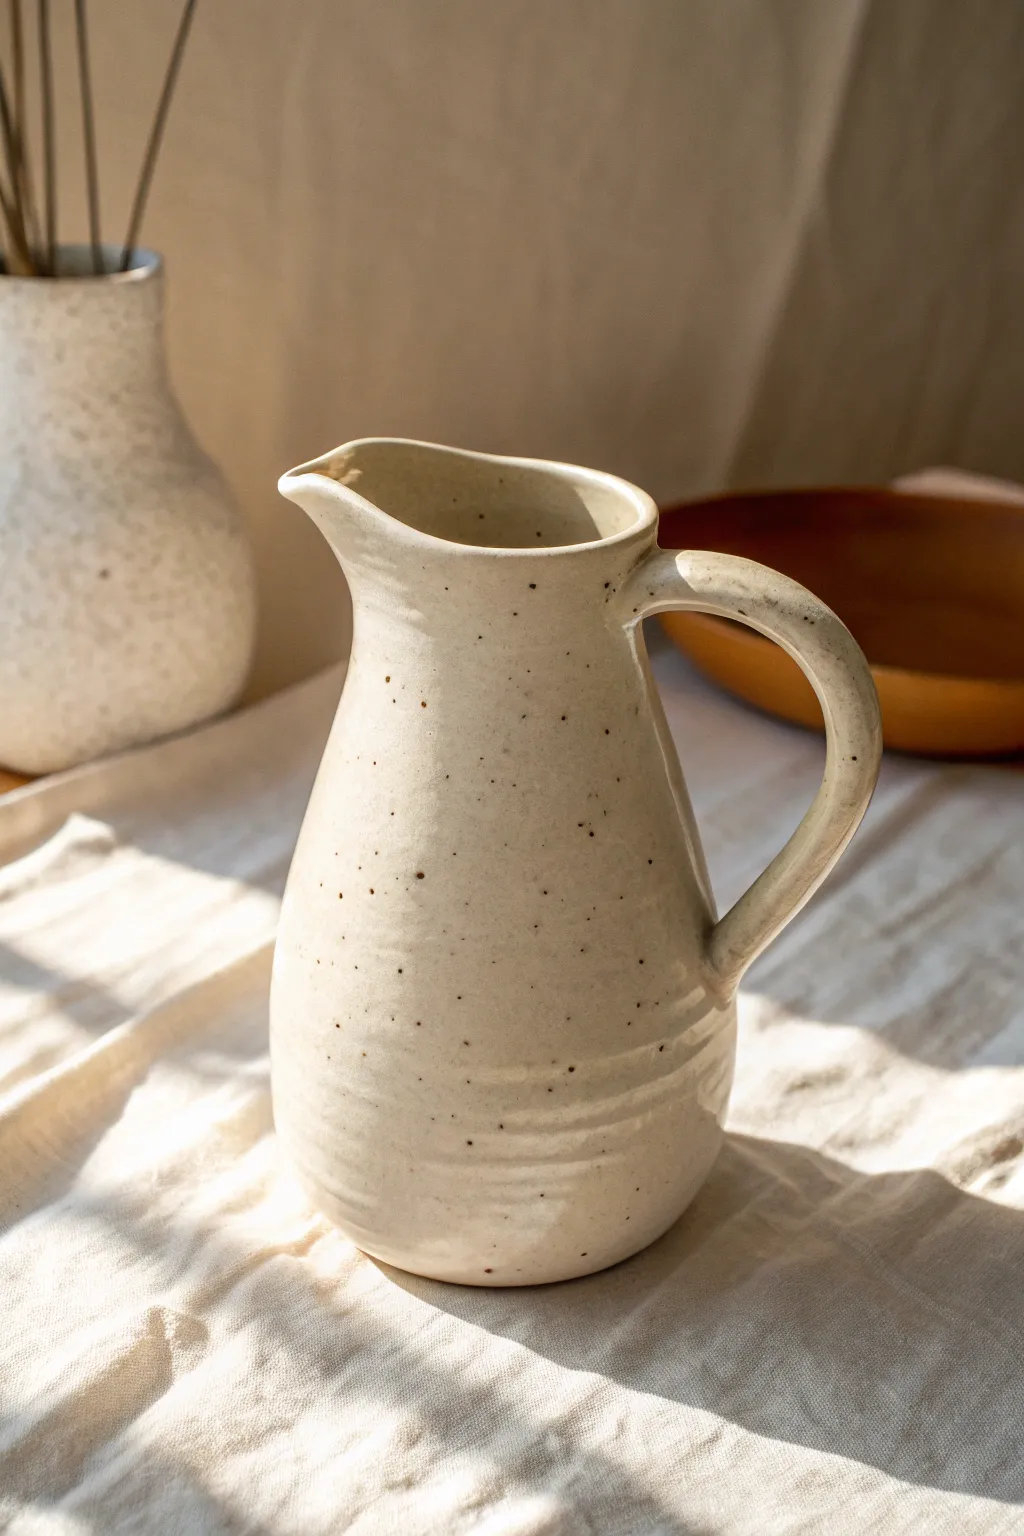
This charming little pitcher features a creamy, speckled glaze that embraces the warmth of rustic stoneware. Its gentle bellied form and hand-pulled handle make it perfect for serving cream alongside your morning coffee or displaying a small bundle of dried flowers.
How-To Guide
Materials
- Speckled stoneware clay (approx. 1-1.5 lbs)
- Potter’s wheel
- Throwing sponge
- Needle tool
- Wooden throwing rib
- Wire cutter
- Water bucket
- Sponge for smoothing
- Cream/White speckled glaze
Step 1: Throwing the Body
-
Center the clay:
Start with a well-wedged ball of speckled stoneware clay. Secure it firmly to the bat and center it using even pressure, keeping your elbows tucked into your body for stability. -
Open the vessel:
Create the opening by pressing your thumbs into the center, leaving about a half-inch of clay at the bottom for the base. Widen the floor to about 2.5 to 3 inches. -
Compress the floor:
Run your fingers or a sponge back and forth across the floor of the pot. This compression is crucial to prevent S-cracks during drying. -
Lift the walls:
Slow the wheel down slightly. Perform your first pull, bringing the clay up into a straight cylinder. Keep your hands steady and move upward at a consistent pace. -
Belly out the form:
On your next pulls, apply gentle pressure from the inside hand to push the clay outward, creating a wider belly near the bottom third of the pot while keeping the top slightly tapered inward. -
Collar the neck:
Gently squeeze the clay at the rim and neck with wet hands (collaring) to narrow the opening. This creates the elegant, tapered neck shape seen in the photo. Be careful not to let the clay buckle. -
Refine the surface:
Use a wooden rib or your fingertips to lightly define the throwing lines on the lower belly. These subtle ridges will catch the glaze beautifully later. -
Create the spout:
While the clay is still wet, support the outside of the rim with two fingers in a V-shape. Use a wet finger from your other hand to gently pull the clay between them outward to form a pouring spout.
Uneven Spout?
If the spout twists while pulling, your wheel speed might be too high or your pull too aggressive. Slow down and support the rim firmly with both hands to keep it symmetrical.
Step 2: Handle and Finishing
-
Trim the base:
Once leather hard, trim away any excess weight from the bottom and create a clean foot ring. Smooth any rough edges with a damp sponge. -
Pull a carrot shape:
Take a separate small lump of clay and roll it into a thick coil or carrot shape. Hold the thick end and wet your hand, pulling downward to elongate and thin the clay into a strap. -
Attach the handle top:
Score and slip the attachment point just below the rim. Press the thick end of your pulled handle firmly onto the scored area so it bonds completely. -
Shape the arch:
Examine the profile. Curve the handle in a graceful ‘ear’ shape. I like to check the negative space between the handle and the pot to ensure it looks balanced. -
Secure the bottom:
Score and slip the lower attachment point on the belly. Press the bottom of the handle onto the pot, smoothing the clay downward to create a seamless transition. -
Dry slowly:
Cover the pitcher loosely with plastic. Because the handle dries faster than the body, slow drying prevents cracks where they join. -
Bisque fire:
Fire the piece to cone 04 (or your clay body’s bisque temperature) once completely bone dry. -
Glaze application:
Pour a cream-colored glaze inside the pitcher, coat the interior, and pour out. Then, dip or brush the exterior. Ensure the glaze isn’t too thick, or it might obscure the throwing lines. -
Final firing:
Load into the kiln for the final glaze firing to the maturation temperature of your specific stoneware clay.
Handle Comfort
Before the handle dries, hold it (gently!) as if pouring. Ensure there is enough clearance for your knuckles against the warm body of the pitcher so you don’t burn them later.
Once fired, this piece will bring a lovely touch of handmade warmth to your breakfast table
Matching Tableware Mini Sets
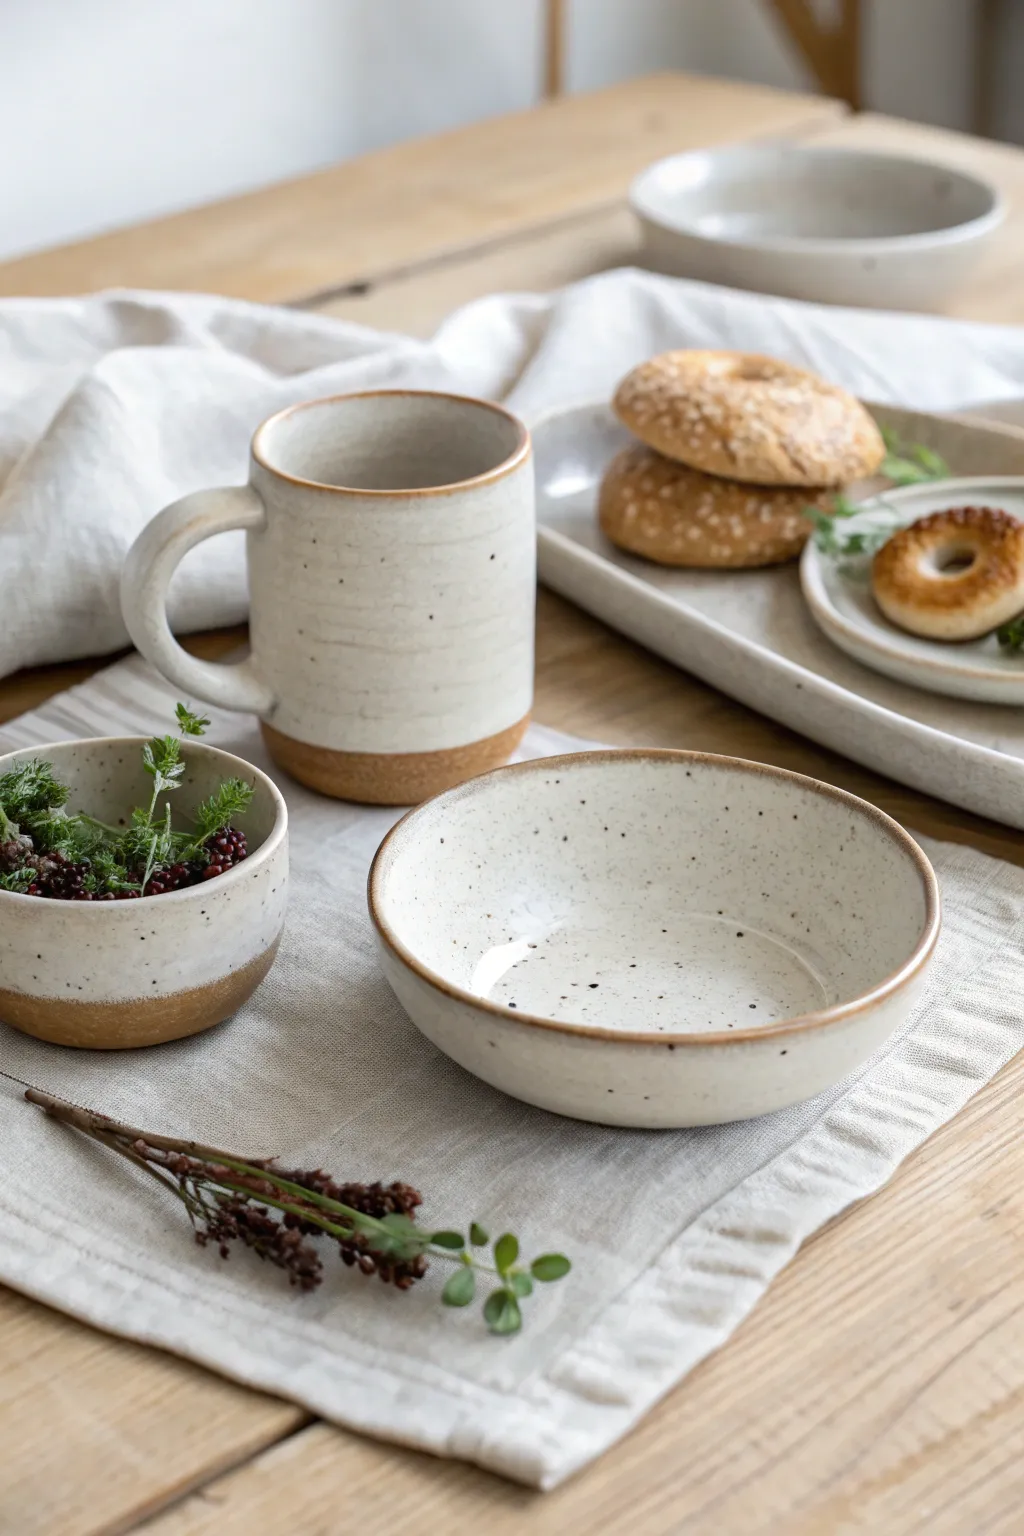
Embrace the rustic charm of this matching tableware set, featuring a cozy mug, a versatile shallow bowl, and a petite side dish. The magic lies in the exposed raw clay base contrasting with a creamy, speckled white glaze that feels both modern and timeless.
Detailed Instructions
Materials
- Speckled buff stoneware clay (e.g., Laguna Speckled Buff or similar)
- Pottery wheel
- Throwing tools (sponge, needle tool, rib, wire cutter)
- Trimming tools
- Satin matte white glaze
- Wax resist (liquid wax)
- Glazing brushes or dipping tongs
- Kiln
Step 1: Planning and Preparation
-
Wedge your clay:
Begin by wedging roughly 3 pounds of speckled buff clay to remove air bubbles. Divide this into three distinct balls: 1 pound for the mug, 1.5 pounds for the shallow bowl, and 0.5 pounds for the small dip bowl. -
Center the first ball:
Start with the 1-pound ball for the mug. Secure it firmly to the wheel head and use consistent pressure to center the clay until it spins without wobbling.
Iron Speckle Pop
To enhance speckles, hold the glaze firing at peak temperature for 15 minutes. This ‘soak’ allows the iron in the clay to bleed through the white glaze more effectively.
Step 2: Throwing the Mug
-
Open and pull the cylinder:
Open the hole, leaving about a half-inch floor. pull the walls straight up into a cylinder. Keep the walls slightly thicker at the rim for durability. -
Shape the profile:
Using a rib on the outside, gently shape the cylinder to be slightly wider at the base than the top, creating a subtle taper. Compress the rim with a chamois or sponge. -
Create the texture:
While the wheel is spinning slowly, hold a tool or your finger against the side and move it up and down slightly to create the subtle horizontal ridges seen in the reference mug. -
Cut and set aside:
Use your wire tool to undercut the mug and slide it onto a ware board to firm up to leather-hard.
Handle Cracking?
If your handle cracks where it joins the mug, wrap the joint in plastic while drying. This slows moisture loss, allowing the handle and body to shrink at the same rate.
Step 3: Throwing the Bowls
-
Throw the shallow bowl:
Center your 1.5-pound ball. Open it wider than the mug, pulling the walls out rather than just up. Aim for a curve that is deep enough for soup but wide enough for pasta. -
Throw the dip bowl:
Center the smallest ball. This is a quick throw; open and pull a small, vertical wall. It should look like a miniature version of the mug’s bottom half. -
Dry to leather hard:
Allow all pieces to dry evenly. I like to cover the rims lightly with plastic if they are drying too fast compared to the bases.
Step 4: Trimming and Handles
-
Trim the bases:
Once leather hard, trim a clean foot ring on the shallow bowl. For the mug and dip bowl, trim a flat bottom, removing excess weight but leaving a sharp, defined line where the wall meets the floor. -
Pull the handle:
Pull a strap of clay for the mug handle. Let it curve naturally into a ‘C’ shape and allow it to stiffen slightly. -
Attach the handle:
Score and slip the contact points on the mug and handle. Attach firmly, blending the clay for a seamless connection. Ensure the handle loop is large enough for two fingers. -
Bisque fire:
Let all pieces dry strictly to bone dry. Fire them in the kiln to bisque temperature (usually Cone 04 or 06).
Step 5: Glazing
-
Wax the bottoms:
Apply wax resist to the bottom inch of the mug and dip bowl, and the foot ring of the shallow bowl. This creates that distinct line between the glaze and raw clay. -
Clean the bisque:
Wipe the bisque ware with a damp sponge to remove any dust, which ensures the glaze adheres without pinholing. -
Apply the glaze:
Dip each piece into the satin matte white glaze. Hold it for 3 seconds to get a nice opacity. Shake off excess gently. -
Clean the edges:
Use a damp sponge to clean up any glaze drips that may have run onto the waxed areas to ensure a crisp line. -
Glaze fire:
Load the kiln carefully and fire to the glaze’s maturity temperature (likely Cone 5 or 6 depending on your clay body).
Unload your kiln to reveal a perfectly matched set ready for your morning coffee and breakfast
Bottle Forms With Tiny Openings
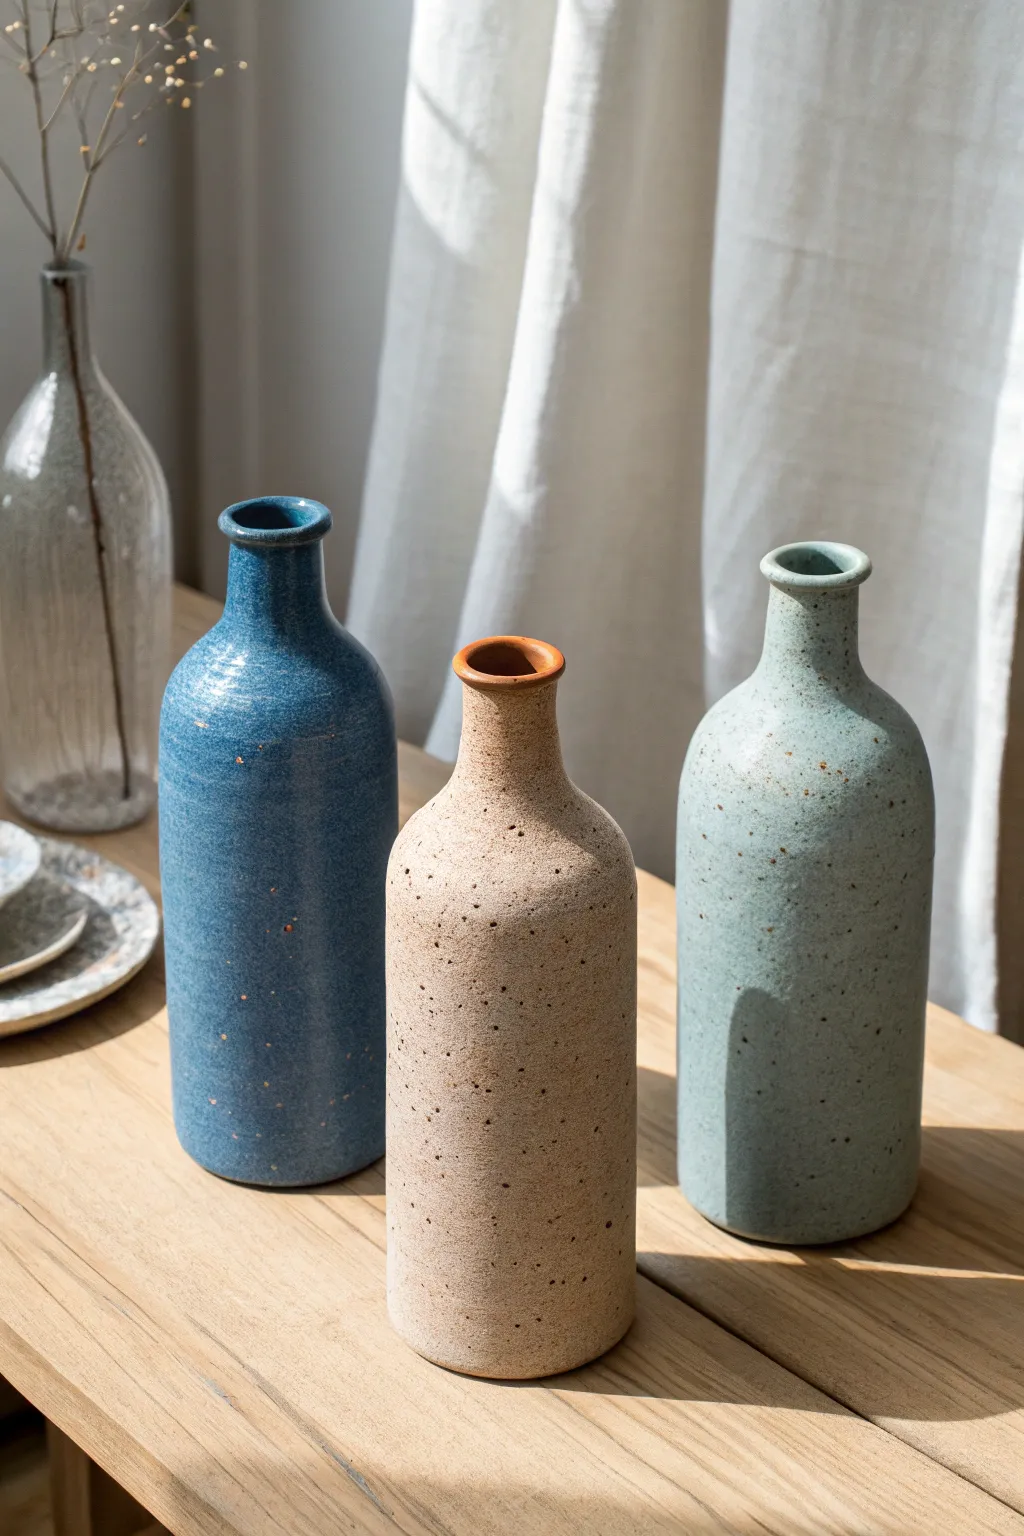
These elegant, minimalist bottles feature a tall, cylindrical body that gently transitions into a narrow, refined neck and rim. The finished pieces showcase a beautiful speckled stoneware clay body, highlighted by soft matte glazes in blue, beige, and seafoam green.
Step-by-Step Guide
Materials
- Speckled stoneware clay (approx. 2-3 lbs per bottle)
- Pottery wheel
- Throwing sponge
- Needle tool
- Wire cutter
- Rib tool (metal and wooden)
- Trimming tools
- Chamois leather strip
- Calipers (optional)
- Matte glazes (denim blue, oat beige, sage green)
Step 1: Throwing the Cylinder
-
Center the clay:
Start by wedging your speckled clay thoroughly to remove air bubbles. Place it on the wheel head and center it into a medium-width puck shape, ensuring it spins perfectly smooth without wobbling. -
Open the form:
Create an opening in the center, leaving about a half-inch of clay at the bottom for the foot. Pull the floor flat and compress it well with your sponge to prevent S-cracks later. -
Pull the walls:
Begin pulling the walls upward into a tall cylinder. Focus on keeping the walls even from bottom to top. It doesn’t need to be super narrow yet; a standard 4-5 inch width is a good starting point for this height. -
Refine the shape:
Use a metal rib on the outside and your hand on the inside to compress the clay and remove throwing lines. Ensure the cylinder is straight and the walls are of uniform thickness.
Neck Twisting?
If the neck starts twisting while collaring, the clay is dry or the wheel is too slow. Add water and speed up the wheel slightly to reduce friction.
Step 2: Collaring the Neck
-
Begin collaring:
With the wheel spinning at a moderate speed, gently squeeze the upper third of the cylinder with wet hands to narrow it. -
Establish the shoulder:
Define where the shoulder curves into the neck. This transition should be smooth but distinct. I like to use a wooden rib here to keep the shoulder profile crisp as I narrow the clay above it. -
Pull the neck:
After collaring, the clay in the neck will thicken. Perform small, careful pulls on just this upper section to thin it out and gain a bit more height. -
Repeat the process:
Continue alternating between collaring in and pulling up until the opening is roughly 1 inch in diameter. Keep plenty of water or slip on the neck to prevent friction from twisting the clay.
Revealing the Speckles
Choose a semi-opaque or matte glaze rather than a thick opaque gloss. This transparency allows the dark clay speckles to show through clearly.
Step 3: Finishing the Rim and Surface
-
Form the rim:
Thicken the very top edge slightly by compressing it downward. Use a piece of wet chamois leather wrapped over the rim to smooth it perfectly round and soft. -
Final ribbing:
Run a metal rib over the entire exterior one last time to remove any remaining finger marks and highlight the groggy texture of the speckled clay. -
Cut off:
Use your wire tool to slice under the pot, separating it from the wheel head. -
Trimming:
Once the bottle is leather hard, trim the bottom to create a neat foot ring. This lifts the form visually and gives it a finished look.
Step 4: Glazing and Firing
-
Bisque fire:
Fire the bone-dry bottles in a bisque kiln according to your clay body’s specifications (usually Cone 04 or 06). -
Wax the foot:
Apply wax resist to the bottom foot ring and slightly up the side to prevent glaze from running onto the kiln shelf. -
Apply glaze:
Pour glaze inside the bottle, swirl, and pour out to coat the interior. Then, dip the exterior into your chosen matte glaze (blue, beige, or green). For the beige bottle shown, leave the rim unglazed or wipe the glaze back to reveal the raw clay accent. -
Final firing:
Fire to the maturity temperature of your clay and glaze (likely Cone 5 or 6 for stoneware). The heat will interact with the iron specks in the clay, melting them slightly so they bleed through the glaze.
Group these bottles together on a mantle or table for a serene, textural display
Collared Vases With Strong Shoulders
This project explores the elegance of form with a vase that features a swelling body, distinctly strong shoulders, and a gently flared rim. The speckled clay body adds warmth and texture, creating a piece that feels both rustic and modern.
Step-by-Step
Materials
- 2-3 lbs speckled stoneware clay
- Potter’s wheel
- Bucket of water and sponge
- Wooden throwing ribs (rounded and straight)
- Needle tool
- Wire cutter
- Chamois leather strip
- Bat
Step 1: Preparing and Centering
-
Wedge the clay:
Begin by thoroughly wedging your speckled stoneware clay. Since we are throwing tall, air bubbles will cause significant structural issues later, so ensure the clay is homogenous and dense. -
Center on the wheel:
Slam the clay onto the bat and center it using high wheel speed. Cone the clay up and push it back down two or three times to align the clay particles, which helps when pulling up tall walls. -
Open the form:
Open the clay to create a flat floor, leaving about a half-inch thickness at the bottom. Compress the floor well with your fingertips or a flat rib to prevent S-cracks during drying.
Collaring Collapse?
If the neck twists or ripples while collaring, the clay is too dry or you’re squeezing too hard. Wet the surface, speed up the wheel slightly, and collar in smaller increments.
Step 2: Pulling the Cylinder
-
First pull:
Use your knuckle or sponge to perform the first pull, bringing the clay up into a thick cylinder. Don’t worry about the shape yet; focus entirely on gaining height and keeping the walls even. -
Subsequent pulls:
Continue strictly pulling vertically. For a vase of this proportion, you want a tall, narrow cylinder (about 3-4 inches wide) before you begin shaping. Keep the rim slightly thicker than the walls to support the upcoming collaring process. -
Remove excess slip:
Before shaping, remove all water from the inside bottom of the pot. Water left inside will weaken the base as the walls expand outward.
Accentuate the Speckles
Use a transparent or semi-opaque white glaze. This allows the natural iron speckles in the clay body to bleed through, creating the organic texture seen in the photo.
Step 3: Shaping the Belly and Shoulders
-
Belly expansion:
From the inside, gently push the clay outward starting from the bottom third to create the volume. Use a flexible rib on the outside to refine the curve as you push, creating that smooth, speckled surface. -
Defining the shoulder:
As you reach the top third of the form, stop pushing outward. Instead, gently curve the clay back inward. This transition point is crucial—it creates the ‘strong shoulder’ characteristic of this style. -
Collaring the neck:
Place your hands around the outside of the rim and neck area. With the wheel spinning at a medium speed, gently squeeze inward and move your hands upward to narrow the neck. I usually do this in several small passes rather than one aggressive squeeze to prevent buckling. -
Refining the neck height:
Once collared, do a small pull on just the neck section to regain height and thin out the walls, which thicken naturally during collaring.
Step 4: Finishing the Rim and Surface
-
Flaring the rim:
At the very top, apply gentle pressure from the inside to flare the rim outward slightly. This creates the classic trumpet shape that balances the heavy bottom. -
Compression:
Use a damp chamois strip over the rim to compress and smooth it. This ensures it’s comfortable to touch and resistant to chipping. -
Defining the detail line:
Using the corner of a wooden rib or a specialized tool, press a subtle groove right at the base of the neck where it meets the shoulder. This decorative line highlights the transition between the two forms. -
Final ribbing:
Give the entire exterior one last pass with a metal or wooden rib to remove throwing lines if you prefer a smoother look, or leave them for texture. Remove excess clay from the base with a wooden knife. -
Cut and dry:
Wire the pot off the bat. Let it dry slowly under loose plastic to ensure the thinner neck and thicker belly dry at similar rates.
Once fired, fill your new vase with dried grasses or let it stand alone as a sculptural object along a sunny wall
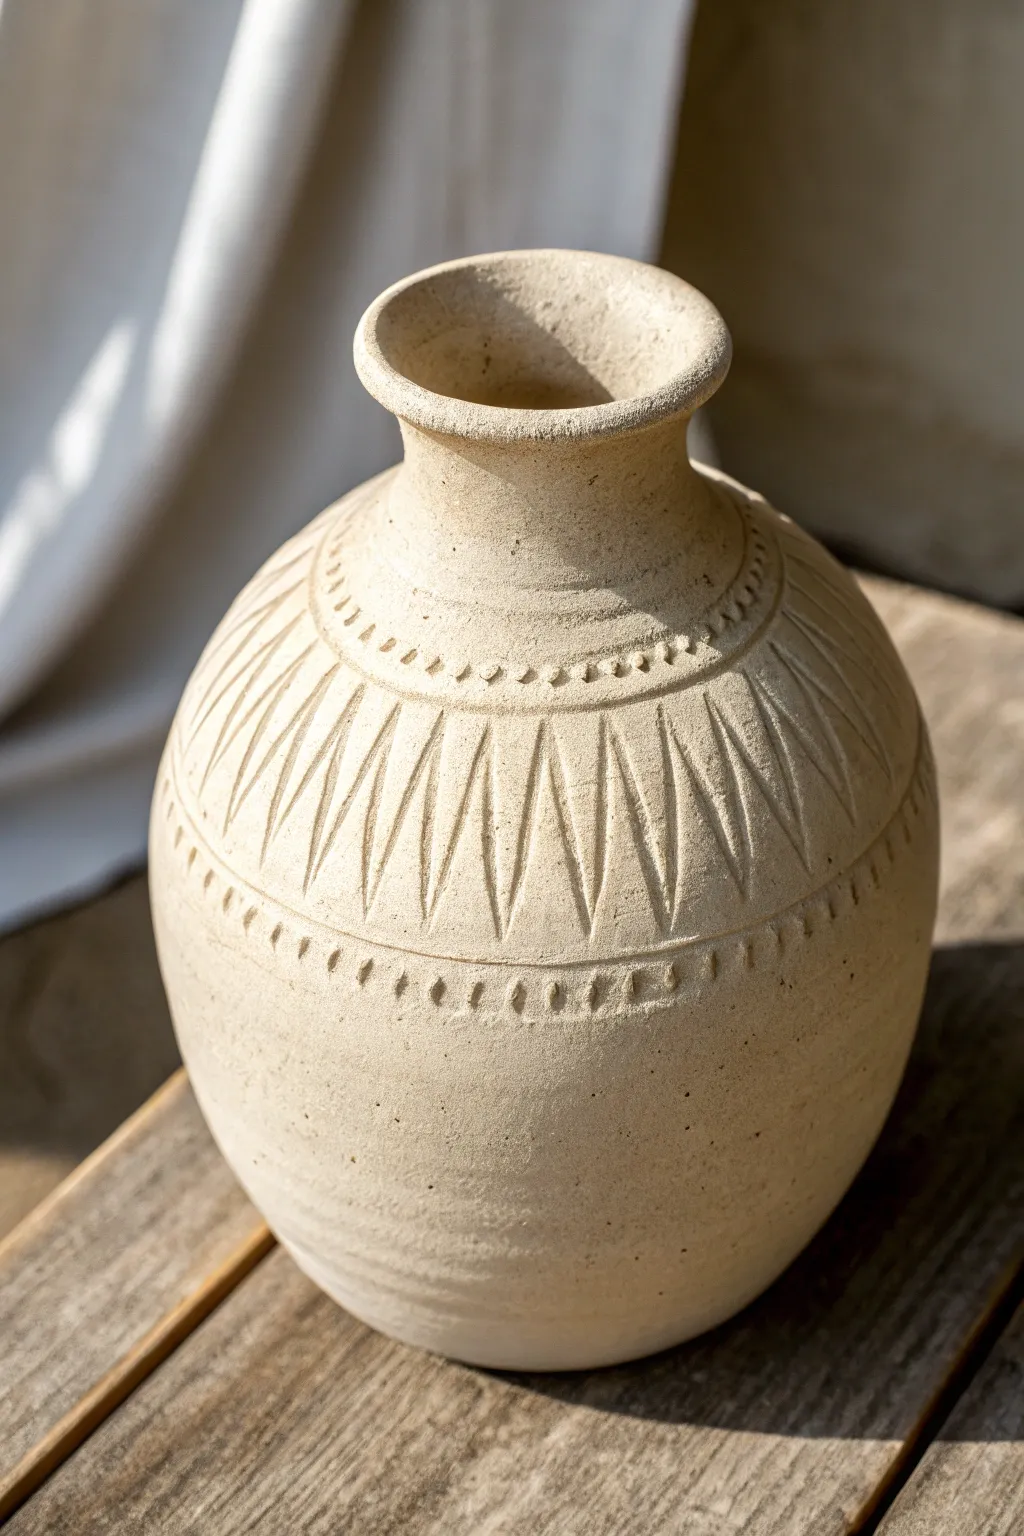
Altered Ovals From a Soft Cylinder
This rustic bottle vase showcases the natural beauty of speckled clay with its organic bulbous shape and gentle throwing lines. It features a graceful, narrow neck that flares slightly at the rim, perfect for holding dried grasses or minimal bouquets.
Step-by-Step Tutorial
Materials
- Speckled Stoneware Clay (2-3 lbs)
- Pottery Wheel
- Bucket of Water
- Sponge
- Pin Tool
- Wooden Rib
- Metal Kidney Scraper
- Wire Clay Cutter
- Chamois Leather (optional)
- Clear Matte Glaze
Step 1: Throwing the Base Form
-
Center the clay:
Start by wedging your speckled clay thoroughly to remove air bubbles. Slam the clay onto the wheel head and use water to center it, focusing on creating a tall, narrow cone rather than a wide puck. -
Open the clay:
Press your thumbs into the center to open the well, leaving about a half-inch of thickness at the bottom for trimming later. Pull the floor out slightly, but keep it relatively narrow since we are making a vertical form. -
Pull the first cylinder:
Begin your first pull, bringing the clay up into a tall cylinder. Keep your hands steady and apply even pressure. Don’t worry about the curve yet; height is your priority right now. -
Refine the cylinder walls:
Continue pulling the walls up until they are thin and even. I usually aim for a height that is roughly two to three times the width of the base. -
Shape the belly:
Using a wooden rib on the outside and your hand on the inside, gently push the clay outward from the inside to create a bulbous belly. Leave the top third of the cylinder straight for now.
Step 2: Creating the Bottle Neck
-
Collar the clay:
Wet your hands and gently encircle the top third of the form. Squeeze slowly while the wheel spins to ‘collar’ or choke the clay inward, narrowing the diameter significantly. -
Pull the neck:
After collaring, the clay at the neck will be thicker. Perform a small, careful pull on just this neck section to thin it out and add vertical height. -
Repeat collaring:
Repeat the collaring and pulling process until the neck is the desired narrowness. Be careful not to torque the clay too much, as this can cause twisting. -
Flare the rim:
At the very top of the neck, use your index finger to gently gently flare the rim outward, creating a small lip that echoes the curve of the body below. -
Refine the shoulder:
Use your wooden rib to smooth the transition between the bulbous belly and the narrow neck. Leave the subtle throwing rings visible near the shoulder for texture. -
Clean up:
Use a sponge to remove excess water from inside the vase. Use a wooden tool to undercut the base, creating a bevel that lifts the form visually.
Don’t Overtouch
To keep those rustic rings on the shoulder seen in the photo, avoid using a metal rib to smooth the outside completely. Let your finger marks tell the story of the making.
Step 3: Finishing and Glazing
-
Trim the foot:
Once the piece is leather hard, center it upside down on the wheel. Trim a clean foot ring, mirroring the curve of the vase’s shoulder. -
Bisque fire:
Allow the vase to dry completely, which is crucial for a bottle shape to avoid cracking. Fire the piece in a bisque kiln according to your clay body’s specifications. -
Apply clear glaze:
Pour a clear matte or satin glaze inside the vase first, swirl it to coat, and pour out. Then, dip the exterior or spray the glaze evenly. -
Wipe the foot:
Clean the foot ring thoroughly with a damp sponge to prevent it from sticking to the kiln shelf. -
Final firing:
Glaze fire the piece. The clear glaze will reveal the natural iron speckles in the stoneware, creating that beautiful toasted look.
Adding Warmth
If you don’t have speckled clay, use regular white stoneware and flick iron oxide wash onto the pot with a toothbrush before bisquing to mimic the effect.
Place your favorite dried stems inside and enjoy the organic warmth this piece brings to your space
Fluted Forms With Finger Grooves
This rustic, elegant vase combines a softly swelling belly with a slender neck, defined by deep vertical fluting that mimics natural forms like cacti or seed pods. The speckled, matte finish highlights the tactile ridges, making it a stunning centerpiece that feels as good as it looks.
How-To Guide
Materials
- Speckled stoneware clay (approximately 3-4 lbs)
- Pottery wheel
- Throwing sponge
- Wooden modeling tool or finger
- Pin tool
- Metal kidney rib
- Wire cutter
- Cutting wire
- Matte white or transparent glaze (optional)
Step 1: Throwing the Form
-
Center the clay:
Begin by slamming your ball of speckled stoneware onto the wheel head. Cone the clay up and down several times to ensure the particles are aligned and the clay is perfectly centered before opening. -
Open and pull the floor:
Drill your thumb into the center, leaving about half an inch for the base. Pull the floor out toward you until it’s about 4 inches wide, compressing deeply to prevent S-cracks later on. -
Establish the cylinder:
Start pulling your walls upward. Focus on gaining height first rather than shaping. You need a tall, even cylinder to work with, aiming for walls roughly 1/4 inch thick. -
Belly out the form:
Using a rib on the outside and your hand on the inside, gently push the clay outward from the inside to create a voluminous belly. Keep the movement fluid so the curve is continuous. -
Collar the neck:
As you move past the belly, begin collaring the clay inward. Use both hands to squeeze gently and lift, narrowing the form significantly to create the slender neck seen in the image. -
Flare the rim:
Once the neck is narrow and tall, gently press the rim outward with your fingertip to create a slight flare. Use a chamois or sponge to smooth the lip so it’s pleasant to the touch. -
Refine the surface:
Before adding texture, run a metal kidney rib up the exterior. This removes throwing lines and excess slurry, providing a clean canvas for your fluting.
Step 2: Creating the Flutes
-
Mark your spacing:
While the clay is still soft but stable, you can lightly mark the rim where your lines will start to ensure even spacing, though a freehand approach adds organic charm. -
Drag vertical grooves:
Using the rounded end of a wooden modeling tool or your index finger, start at the very bottom of the vase. Drag the tool vertically upward all the way to the rim in a single, confident motion. -
Maintain pressure:
Support the wall from the inside with your other hand directly behind where you are grooving. This prevents the wall from collapsing under the pressure of the tool. -
Repeat around the circumference:
Continue making vertical grooves around the entire pot. Place them close together so the ridges between them become sharp and defined. -
Accentuate the curve:
Allow the lines to follow the swell of the belly naturally. They will widen slightly at the widest part of the pot and converge tightly at the neck. -
Softening the edges:
Once all grooves are cut, I like to gently run a damp sponge over the surface. This softens any sharp burrs of clay without erasing the definition of the flutes.
Twisted flutes?
If your vertical lines start looking twisted, your wheel might still be spinning too fast or your hand is dragging diagonally. Stop the wheel completely to carve straight lines.
Step 3: Finishing and Firing
-
Trimming the foot:
Let the piece dry to leather hard. Flip it over and trim a neat foot ring, echoing the curve of the vase. This lifts the form and gives it a professional finish. -
Bisque fire:
Once bone dry, bisque fire the vase to Cone 04 (or your clay’s specific recommendation). -
Glazing:
To achieve the look in the photo, use a very thin matte white glaze or a transparent matte wash. The goal is to let the speckles of the clay body show through. -
Wiping back:
If your glaze is too thick, wipe it back with a sponge so it mostly settles in the deeper grooves, highlighting the texture while leaving the ridges bare. -
Final firing:
Glaze fire to the maturity temperature of your clay (likely Cone 5/6 or 10).
Consistent depth
Use a tool with a consistent width, like a loop tool or a rounded stick, rather than just a finger. This ensures every groove is the exact same depth and width for a uniform look.
Place your finished vase near a window where the light can catch those beautiful ridges and cast dramatic shadows
Ribbed Texture With Bold Rings
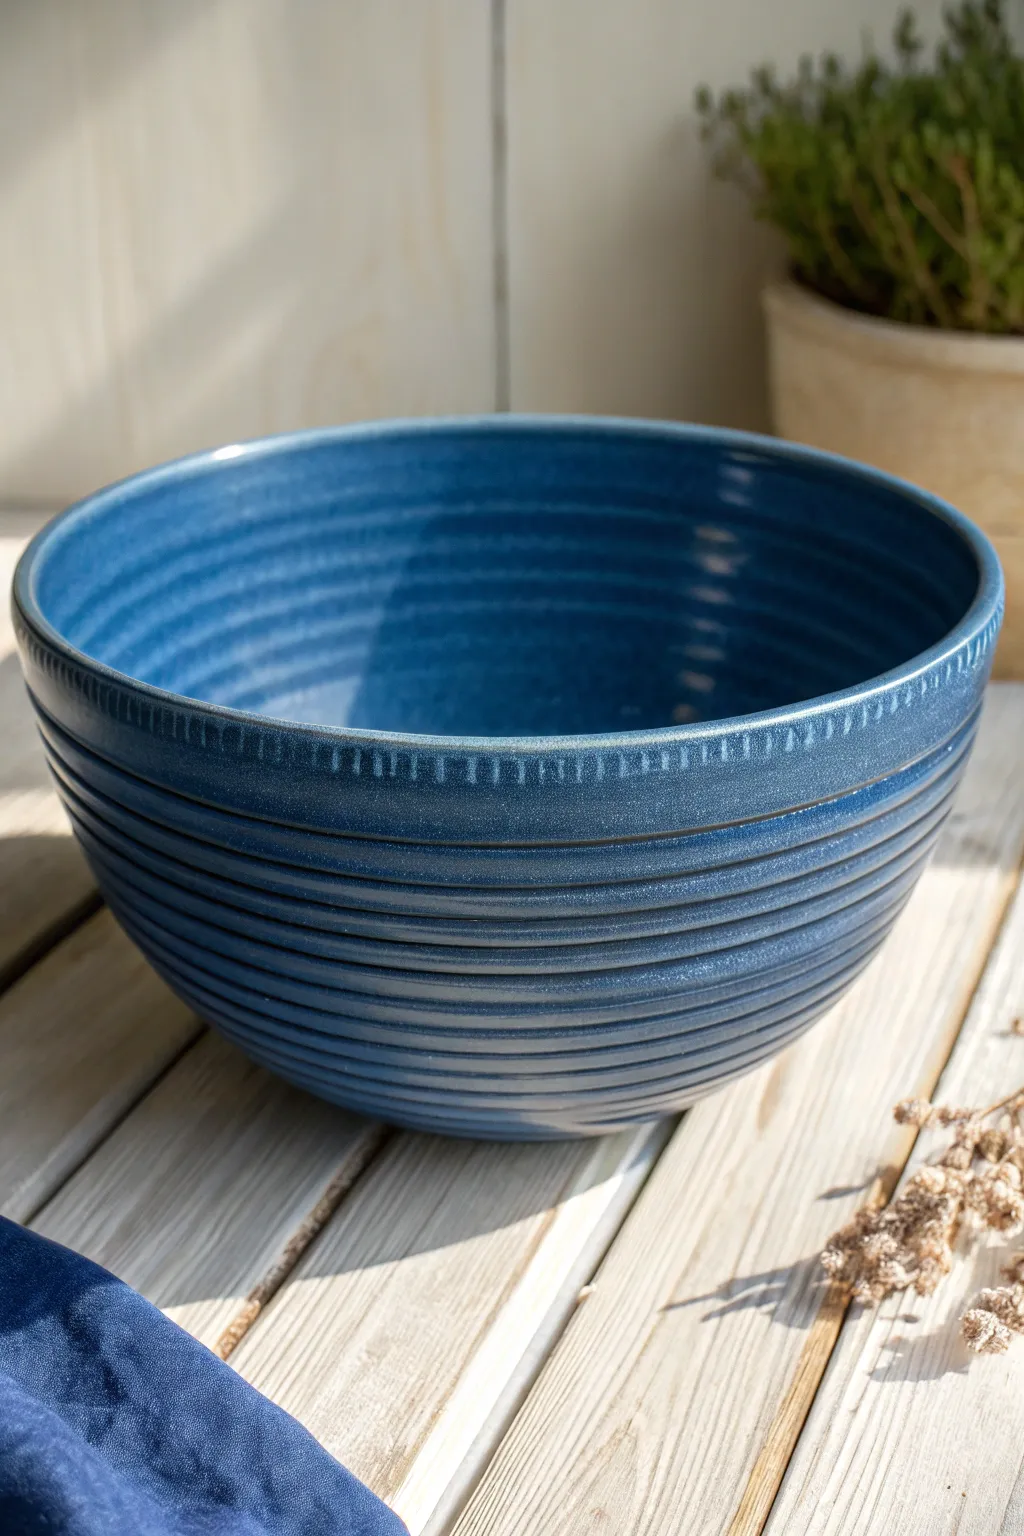
This deep, resonant blue bowl features a bold, ribbed texture that spirals from base to rim, offering both tactile interest and a stunning visual rhythm. The piece combines a classic form with a distinct, carved rim detail that catches the glaze beautifully.
Step-by-Step
Materials
- Stoneware clay (smooth or light grog)
- Pottery wheel
- Throwing sponge
- Wire cutter
- Wooden throwing rib (square or rounded edge)
- Metal kidney rib (serrated and smooth)
- Trimming tools
- Needle tool
- Deep blue reactive glaze
- Small carving tool or texture roller (for rim)
Step 1: Throwing the Form
-
Center the clay:
Begin with about 2-3 pounds of wedged clay. Slam it onto the center of the wheel head and use water and consistent pressure to center the clay into a smooth dome. -
Open the mound:
Press your thumbs into the center of the dome, opening the clay down until you leave about a half-inch floor. Pull the clay outward to establish the flat curve of the bowl’s bottom. -
Pull the walls:
Perform your first pull to gain height. Keep the walls relatively thick for now, as you’ll need material to press into for the texture. Aim for a distinct V-shape or a steep U-shape profile. -
Shape the curve:
Using a rib on the inside and a sponge on the outside, belly the bowl out slightly. Ensure you maintain a consistent curve without letting the rim flare out too wide just yet. -
Create the base texture:
While the wheel is spinning at a medium-slow speed, take a wooden tool or the corner of a rib. Starting from the bottom, press gently but firmly into the clay wall. -
Spiral upwards:
Slowly move your tool upward as the wheel turns. Maintain steady pressure to create a continuous, deep groove that spirals all the way to the rim. It’s crucial to move your hand slower than the wheel speed to get tightly packed rings. -
Refine the interior:
I like to gently run a soft sponge along the inside wall to smooth any sharp ridges while leaving the ghost -
Detail the rim:
Flatten the rim slightly with your finger. Using a small carving tool or a texture wheel, gently press a pattern of small vertical notches along the exterior edge of the rim lip.
Rib Consistency
Keep your elbows tucked firmly into your body while creating the rings. If your arms float, the pressure varies, making the texture uneven.
Step 2: Trimming and Finishing
-
Wire off:
Once satisfied with the shape and texture, use your wire tool to slice cleanly under the base. Leave the bowl on the bat until it is leather-hard. -
Flip and center:
Invert the leather-hard bowl onto the wheel head. Secure it with small coils of clay or a gripping chuck. -
Trim the foot:
Using a sharp loop tool, carve away excess clay from the bottom to create a defined foot ring. This lifts the bowl and gives the ribbed texture a clean starting point. -
Smooth the transition:
Blend the trimmed area into the bottom-most rib so the texture feels intentional all the way down. -
Bisque fire:
Allow the bowl to dry completely. Fire it to cone 04 (or your clay body’s bisque temperature) in the kiln.
Glaze Crawling
If glaze pulls away from the deep crevices during firing, your application was likely too thick. Thin your glaze slightly with water for textured pieces.
Step 3: Glazing
-
Wax the foot:
Apply a coat of wax resist to the foot ring and the very bottom of the bowl to prevent glaze from fusing it to the kiln shelf. -
Mix the glaze:
Ensure your deep blue glaze is well-mixed. If you want the speckled look seen here, choose a glaze with iron filings or a ‘floating’ glaze recipe. -
Dip the bowl:
Using glazing tongs, dip the entire bowl into the bucket for 3-5 seconds. Lift it out and let the excess drip off. The ribs will naturally hold more glaze in the recesses, creating depth. -
Clean the rim:
Check the textured rim for any air bubbles or overly thick drips. Rub them smooth with your finger. -
Final firing:
Fire the piece to the glaze’s maturity temperature (likely Cone 5 or 6 for stoneware). The heat will break the glaze over the ribs, highlighting your texture work.
This technique yields a bowl that feels as good as it looks, perfect for daily use or display
Chattered Trim for Playful Marks
This rustic, sand-colored vessel features a satisfying, bulbous shape adorned with precise geometric carvings. The interplay of smooth throwing lines and sharp, incised triangles creates a beautiful tactile contrast that mimics desert textures.
Step-by-Step Guide
Materials
- Stoneware clay (buff or sand-colored body)
- Pottery wheel
- Throwing tools (sponge, wooden rib, needle tool)
- Wire cutter
- Loop tool or sharp carving tool
- Ball stylus tool or blunt wooden pencil
- Bat
- Plastic sheet
Step 1: Throwing the Form
-
Center the clay:
Start by firmly slamming a medium sized ball of clay onto your wheel head. Center it well, ensuring you have a solid, wide base to support the bulbous body later. -
Open and pull:
Open the clay and begin pulling your walls. Focus on pulling the clay upward and slightly outward to create height before you start shaping the belly. -
Belly out the form:
Using a rib on the outside flexibility, gently push the clay outward from the inside to create a round, spherical body. Keep the walls even to prevent collapse. -
Collar the neck:
Slowly collar the top third of the clay inward to create a distinct shoulder and a narrower neck. Use water sparingly here to keep the walls strong. -
Refine the rim:
Pull the remaining clay at the top into a flared rim. Soften the edge with a chamois or sponge so it feels pleasant to the touch. -
Smooth the surface:
While the wheel spins slowly, run a metal or rubber rib over the exterior to remove throwing lines and create a smooth canvas for your carving. Leave the pot to dry to a leather-hard state.
Uneven Spacing?
If your triangles aren’t meeting up perfectly at the end of the round, slightly adjust the width of the last three or four cuts to hide the discrepancy.
Step 2: Carving the Patterns
-
Mark your bands:
Once leather hard, place the pot back on the banding wheel. Lightly etch two horizontal guide lines around the shoulder: one for the top of the pattern and one for the bottom. -
Carve the triangles:
Using a sharp carving tool or loop tool, carve vertical, elongated triangles between your guide lines. Press deeper at the base of each triangle and lift out as you reach the top point. -
Create spacing:
Leave a small, equal gap of uncarved clay between each triangle. I find that keeping this negative space consistent is key to the pattern’s rhythm. -
Add the upper dots:
Use a ball stylus or a blunt tool to press a row of small, circular indentations just above your top guide line. -
Add the lower dots:
Repeat the dotting process just below the bottom guide line, ensuring the spacing mimics the rhythm of the triangles above. -
Clean up burrs:
Wait for the clay to dry slightly more (stiff leather hard), then gently brush away any crumbs or burrs created by the carving tools. -
Smooth the rim texture:
Use a damp sponge to slightly soften the sharp edges of your carvings without erasing the crispness of the design.
Step 3: Finishing
-
Slow drying:
Cover the pot loosely with plastic to allow it to dry slowly and evenly, preventing cracks around the neck. -
Bisque fire:
Once bone dry, bisque fire the piece to prepare it for glazing. -
Glazing approach:
To maintain the look in the image, you can leave the exterior unglazed to show off the raw clay body, or apply a very matte, transparent wash. Glaze the interior for functionality. -
Final firing:
Fire the piece to the maturation temperature of your specific clay body.
Detailed Twist
Apply an iron oxide wash into the carved grooves and wipe it back with a sponge. This darkens the recesses and makes the geometric texture pop.
Now you have a stunning, textured vessel that celebrates the natural beauty of the earth
Underglaze Banding While It Spins
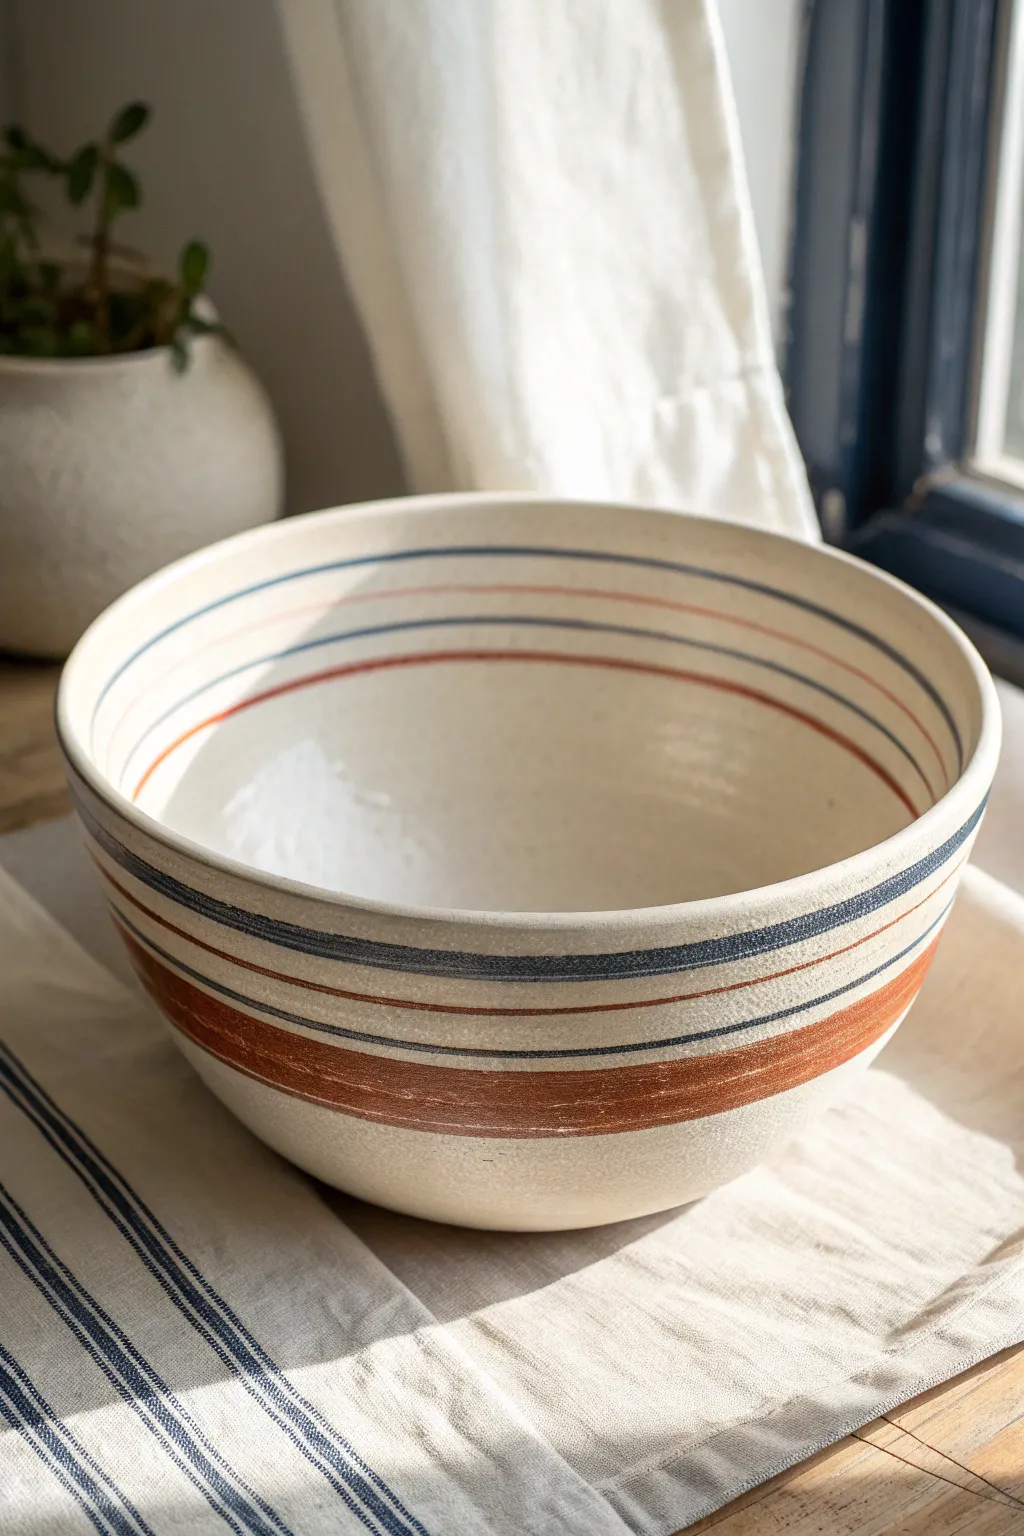
This classic stoneware bowl achieves a timeless, farmhouse look through simple yet precise banding. By applying underglaze while the wheel spins, you create crisp, concentric lines that contrast beautifully with the creamy white clay body.
Step-by-Step Tutorial
Materials
- Light-colored stoneware clay (buff or white)
- Pottery wheel
- Throwing tools (sponge, rib, wire cutter)
- Trimming tools
- Giffin Grip or clay lugs (for centering)
- Small synthetic brushes (various sizes)
- Underglazes: Navy Blue and Rust/Terracotta
- Clear transparent glaze
- Clean water in a container
- Banding wheel (optional, if not glazing on the pottery wheel)
Step 1: Throwing and Shaping
-
Center the clay:
Start with a well-wedged ball of stoneware clay. Center it firmly on your wheel head, ensuring there is no wobble before opening. -
Open and pull:
Open the clay and pull the walls up and out to form a wide, deep bowl shape. Aim for a consistent wall thickness of about 1/4 inch. -
Refine the curve:
Use a flexible metal or rubber rib to smooth the interior curve, removing throwing lines if desired, and compressing the clay particles. -
Define the rim:
Compress the rim with a chamois or sponge. For this specific look, keep the rim slightly rounded but substantial. -
Dry to leather hard:
Wire the bowl off the bat and let it dry slowly until it reaches a sturdy leather-hard stage. It should be firm enough to handle without deforming.
Wobbly Lines?
If your hand shakes, try using a throwing stick or a mahlstick braced against the splash pan to steady your wrist. Breathe out slowly as you touch the brush to the clay.
Step 2: Trimming the Foot
-
Secure for trimming:
Center the bowl upside down on the wheel. Use damp clay lugs or a Giffin Grip to secure it tightly. -
Trim the exterior:
Trim away excess clay from the bottom third of the bowl to match the interior curve. This reduces weight and refines the silhouette. -
Carve the foot ring:
Carve out a distinct foot ring. A defined foot gives the bowl lift and provides a clear stopping point for your glaze later. -
Smooth the surface:
Run a smooth rib or the back of a spoon over the trimmed areas to burnish the surface slightly, removing any grog or roughness.
Add Texture
Before painting, use a trimming tool to carve shallow grooves where the bands will go. The underglaze will pool in the recesses, creating depth.
Step 3: Applying Underglaze Bands
-
Re-center upright:
Flip the bowl right-side up and center it perfectly on the wheel again. Centering is crucial here; if it’s off, your bands will wobble. -
Prepare your brushes:
Load a medium round brush with navy blue underglaze. Ensure the consistency is creamy—not too watery, but fluid enough to flow off the brush. -
Establish spinning speed:
Get the wheel spinning at a steady, medium pace. Too fast and the glaze sprays; too slow and the line becomes shaky. -
Paint the exterior blue band:
Bracing your hand against your leg or a splash pan for stability, gently touch the loaded brush to the leather-hard clay about mid-way up the exterior. Hold steady to create a solid blue ring. -
Add the rust band:
Switch to the rust/terracotta color. Paint a thicker band directly below the blue one, allowing the brush to deposit more pigment for that rich, earthy tone shown in the photo. -
Paint interior bands:
Move to the inside of the bowl. Create two thin blue lines near the rim and two reddish lines further down. The spinning wheel does the work—you just hold the position. -
Check opacity:
If the bands look streaky or thin, gently apply a second coat while the wheel is spinning, being careful to stay exactly within the existing lines.
Step 4: Finishing and Firing
-
Bisque fire:
Once the underglaze is fully dry, load the bowl into the kiln for a bisque firing (typically Cone 04 or 06 depending on your clay). -
Apply clear glaze:
After the bisque fire, dip or brush a clear transparent glaze over the entire piece. This will make the underglaze colors pop and make the bowl food-safe. -
Wipe the foot:
Use a damp sponge to meticulously wipe all glaze off the bottom foot ring to prevent it from sticking to the kiln shelf. -
Glaze fire:
Fire the piece to your clay body’s maturity temperature (e.g., Cone 6 or Cone 10).
Enjoy using your new banded bowl for salads or fruit displays, knowing those crisp lines were made by your own steady hand
Colored-Clay Swirls Thrown Into the Form
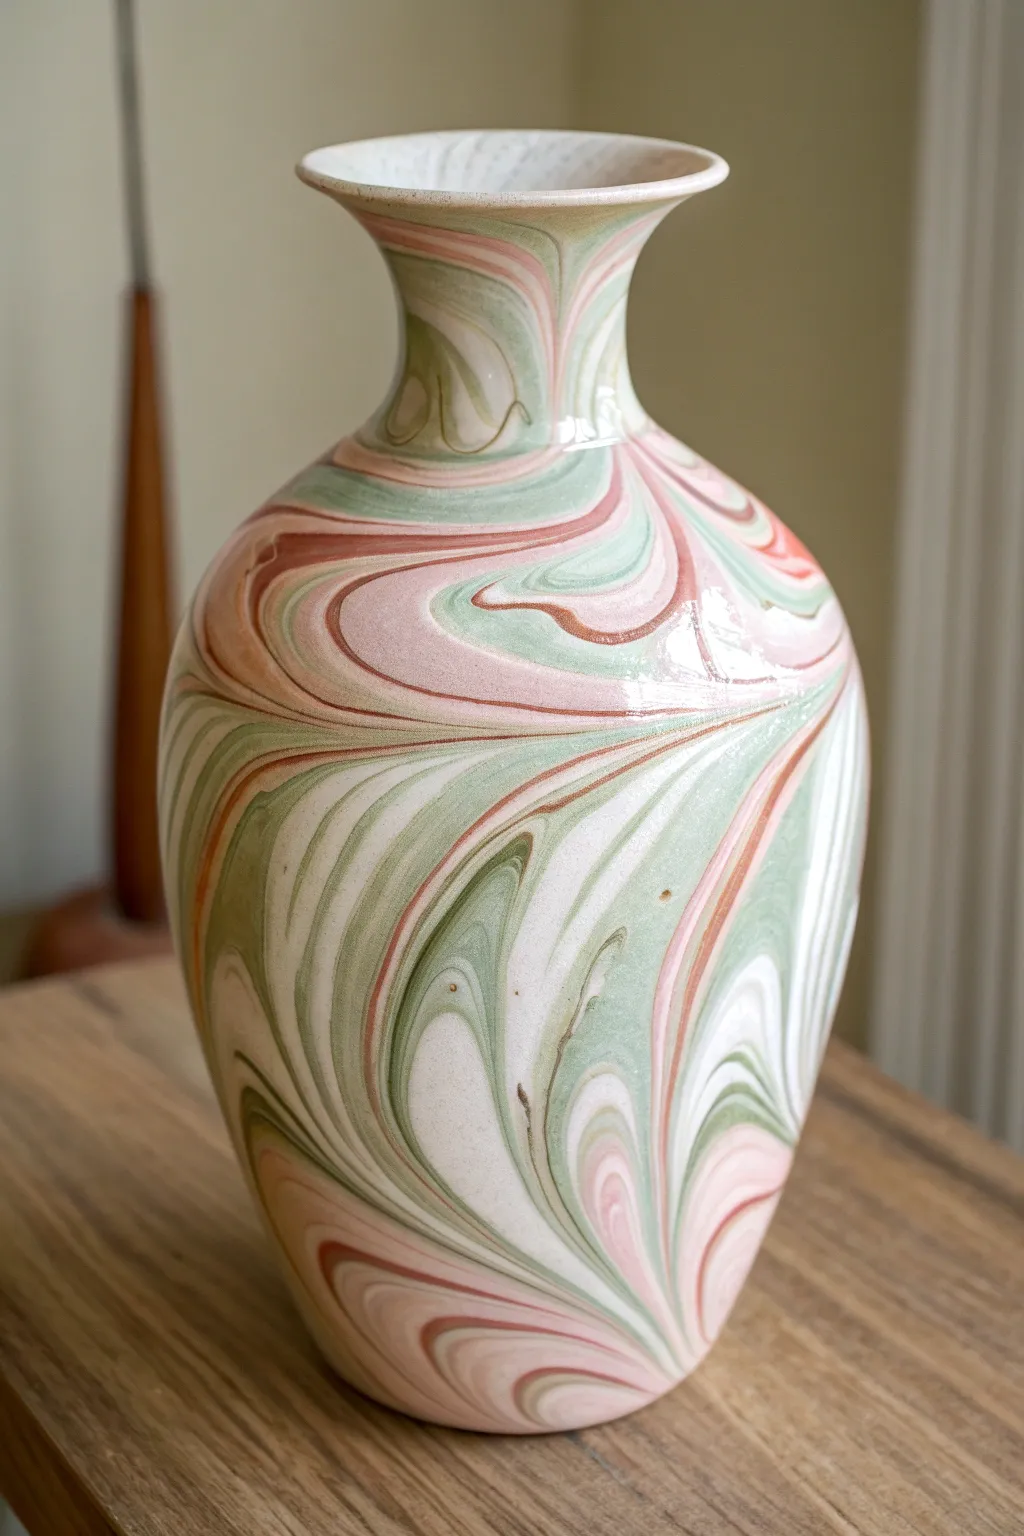
This elegant vase showcases the mesmerizing beauty of agateware, where colored clays dance together to form organic, swirling patterns reminiscent of natural stone. The soft palette of sage green, dusty pink, and creamy white creates a sophisticated, fluid design that is built directly into the structure of the piece, not just painted on the surface.
Step-by-Step Guide
Materials
- White stoneware or porcelain clay body (approx. 3-4 lbs total)
- Mason stains (Sage Green, Dusty Rose/Pink, Dark Green)
- Pottery wheel
- Wire cutter
- Rib tools (metal and wood)
- Sponge
- Clear glaze (zinc-free recommended for best color)
- Trimming tools
- Kiln
Step 1: Preparing the Colored Clay
-
Divide and conquer:
Start by dividing your white clay into four unequal portions. You’ll want the white portion to be the largest (about 40%), followed by the light green and pink portions (about 25% each), and a smaller portion for the darker green accent (10%). -
Wedging in color:
Take your Mason stains and wedge them thoroughly into their respective clay balls. Wear a mask and gloves for this part. Use a ‘cut and slam’ wedging technique to ensure the pigment is evenly distributed without any streaks. -
Stacking the layers:
Flatten each colored ball into thick slabs or pancakes. Stack them on top of each other, alternating colors to create variety. I like to sandwich the darker green between the white and pink to make it pop. -
Creating the loaf:
Roll the stacked slabs into a thick log or cylinder shape. Then, give the log a gentle twist—just one or two turns—to begin spiraling the colors together inside the mass. -
Final wedge:
Perform a very light wedge on the twisted log. Do not over-wedge, or you will blend the clays into a muddy gray. You want distinct chunks of color to remain separate but adhered.
Step 2: Throwing the Form
-
Centering carefully:
Slam your marbled ball onto the wheel head. When centering, try to move the clay up and down (coning) as little as possible to preserve the swirl pattern, but ensure the mound is stable. -
Opening the floor:
Open the clay as you normally would, compressing the floor well. You might already start to see the striations appearing on the interior walls. -
Pulling the walls:
Begin your pulls. As you lift the clay walls, the colors will stretch and elongate into those beautiful streaks. Keep your pulls steady and consistent to maintain even wall thickness. -
Shaping the belly:
Once you have a cylinder, use inside pressure to belly out the form. The expansion of the clay here will widen the marbling effect, creating broad, sweeping curves of color. -
Collaring the neck:
Gently collar the top third of the pot inwards to create the bottle shape. Use plenty of water or slip to prevent torque/twisting, which can distort the fragile marbled clay connections. -
Refining the rim:
Flare the rim outward slightly, as seen in the image. Use a chamois cloth to compress and smooth the lip for a professional finish. -
Ribbing the exterior:
This is crucial: Take a sharp metal rib and scrape the exterior of the vase while the wheel is turning slowly. This removes the ‘layer of slurry’ on the outside, revealing the crisp, clean lines of the different clays underneath.
Muddy Colors?
If your colors look blurry or gray, you over-wedged the combined ball. Next time, stack the colors and throw them almost immediately with minimal kneading.
Step 3: Finishing and Firing
-
Drying:
Wire the pot off the bat and let it dry slowly under loose plastic. Because different clay bodies (even just stained ones) can have slightly different shrinkage rates, slow drying helps prevent cracks. -
Trimming the foot:
Once leather hard, trim the foot ring. As you trim away excess clay, you’ll reveal entirely new patterns at the base, making the bottom as interesting as the sides. -
Bisque fire:
Fire the piece to bisque temperature designated for your specific clay body (usually Cone 04 or 06). -
Sanding (optional):
After bisque firing, lightly sand the surface with wet sandpaper if needed to make the clay extremely smooth before glazing. -
Glazing:
Apply a clear glossy glaze. Using a clear glaze is essential to magnify intensity of the colored clays without obscuring the pattern. I usually prefer a dipping application for an even coat. -
Final firing:
Glaze fire to maturity (e.g., Cone 5, 6, or 10 depending on your clay). Once cooled, your unique agateware vase is ready.
Carved Texture
Before the clay dries completely, use a fluting tool to carve vertical grooves. This cuts through the layers and creates a fascinating 3D topographic map of the colors.
Now you have a stunning, one-of-a-kind vase where the decoration is an integral part of the clay itself
Double-Walled Cups for a Hidden Wow
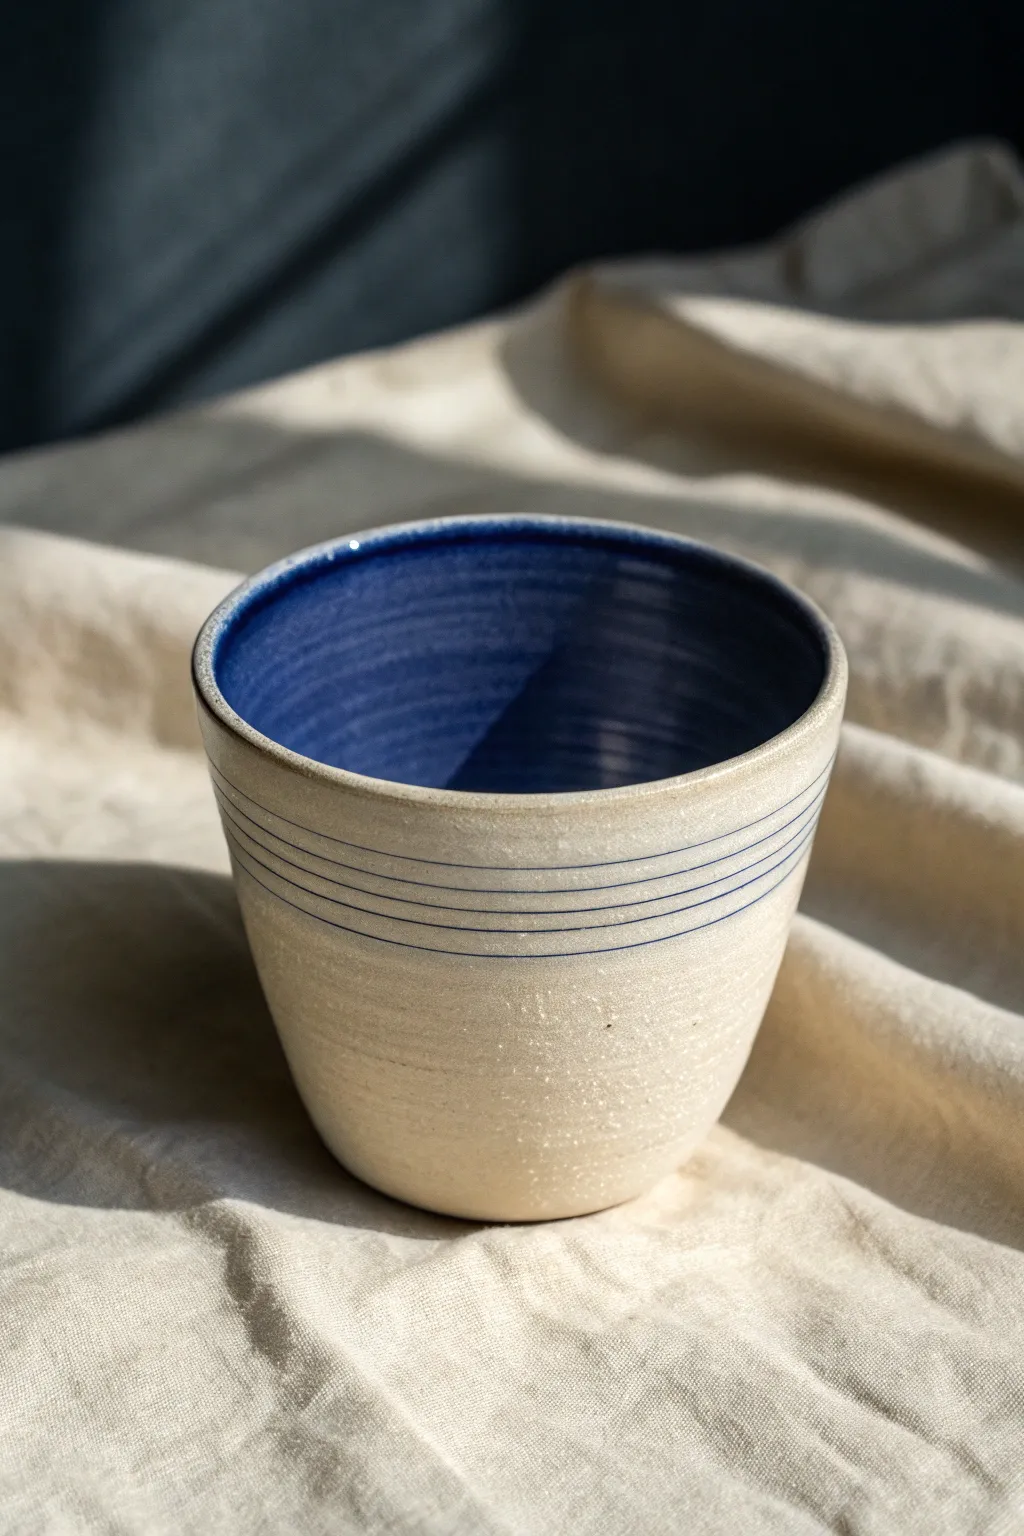
This elegant ceramic cup combines a rustic, speckled oatmeal exterior with a surprise burst of deep indigo on the inside. The simple horizontal banding adds a delicate graphic touch that contrasts beautifully with the organic feel of the clay body.
Step-by-Step
Materials
- Speckled clay body (stoneware recommended)
- Pottery wheel
- Throwing tools (sponge, needle tool, rib, wire)
- Trimming tools
- Deep cobalt blue glossy glaze
- Clear matte or satin glaze
- Underglaze pencil or fine liner brush (cobalt/blue)
- Banding wheel (for glazing/decorating phase)
- Wax resist
Step 1: Throwing the Form
-
Center the clay:
Start with a manageable ball of speckled clay, perhaps 1 to 1.5 lbs. Center it firmly on the wheel head, ensuring it feels stable and smooth under your hands. -
Open and pull:
Open the clay down to the base, leaving about a quarter-inch for the foot properly. Begin pulling the walls upward. Unlike a cylinder, angle your pulls slightly outward to create a gentle V-shape or conical form. -
Define the rim:
Pay careful attention to the rim. It should be slightly thickened and rounded to make it pleasant for drinking. Compress it well with your chamois or sponge. -
Refine the curve:
Use a metal or wooden rib on the exterior while supporting the inside with your hand. Smooth the walls to remove throwing lines just enough to create a clean canvas, but keep the subtle texture if you like the handmade feel. -
Cut and dry:
Wire the pot off the wheelhead carefully. Let the piece dry to a firm leather-hard stage. It needs to be sturdy enough to handle trimming but soft enough to carve.
Uneven Exterior Lines?
If your hand shakes while painting lines, rest your elbow on a stack of bricks or a steady table surface to lock your arm height while the banding wheel spins.
Step 2: Trimming and Refining
-
Secure for trimming:
Center the leather-hard cup upside down on the wheel. Secure it with clay lugs or a chuck if necessary. -
Trim the profile:
Trim away the excess weight from the bottom third of the cup, following the gentle conical curve you established during throwing. I like to run my finger along the curve to ensure there are no abrupt angles. -
Carve the foot ring:
Define a shallow foot ring. This lifts the form slightly and gives the piece a finished, professional look. -
Smooth the surface:
Burnish the exterior slightly with a soft rib or the back of a spoon if you want that extra smooth finish over the speckled clay.
Double-Wall Illusion
To mimic the double-walled look without the work, ensure your rim is slightly thicker and rounder; this creates a visual separation between inner and outer glazes.
Step 3: Bisque and Decoration
-
Bisque fire:
Fire the piece in the kiln to cone 04 (or your clay’s bisque temperature). Once cool, wipe it down with a damp sponge to remove dust. -
Apply the exterior lines:
Place the cup on a banding wheel. Using a cobalt underglaze pencil or a very fine liner brush dipped in blue underglaze, hold your hand steady and spin the wheel. Create 4-5 thin, parallel lines just below the rim. -
Wax the decoration:
Let the lines dry completely. Carefully apply wax resist over the lines if you are worried about the outer glaze blurring them, though a transparent glaze handles this well without wax.
Step 4: Glazing
-
Glaze the interior:
Pour your deep cobalt blue glossy glaze into the cup. Roll it around to coat the entire interior surface up to the rim edge, then pour the excess back out swiftly. -
Clean the rim:
Wipe any interior glaze drips off the very top edge of the rim with a damp sponge so the transition is crisp. -
Glaze the exterior:
Dip the exterior into a clear satin or matte glaze. This will seal the clay and make the speckles pop without obscuring the blue lines. Alternatively, you can brush on a clear glaze. -
Wipe the foot:
Thoroughly wipe all glaze off the foot ring to prevent it from fusing to the kiln shelf. -
Final fire:
Load the kiln and fire to the maturation temperature of your glaze and clay body (typically Cone 5 or 6 for stoneware).
Enjoy using your new cup, where the deep blue interior makes every drink feel like looking into a calm ocean