There’s something ridiculously satisfying about taking a plain small clay pot and turning it into a tiny piece of decor with real personality. These ideas are all about playful transformations—paint, patterns, stacking, and simple add-ons that make a mini pot feel anything but basic.
Color-Blocked Small Clay Pots
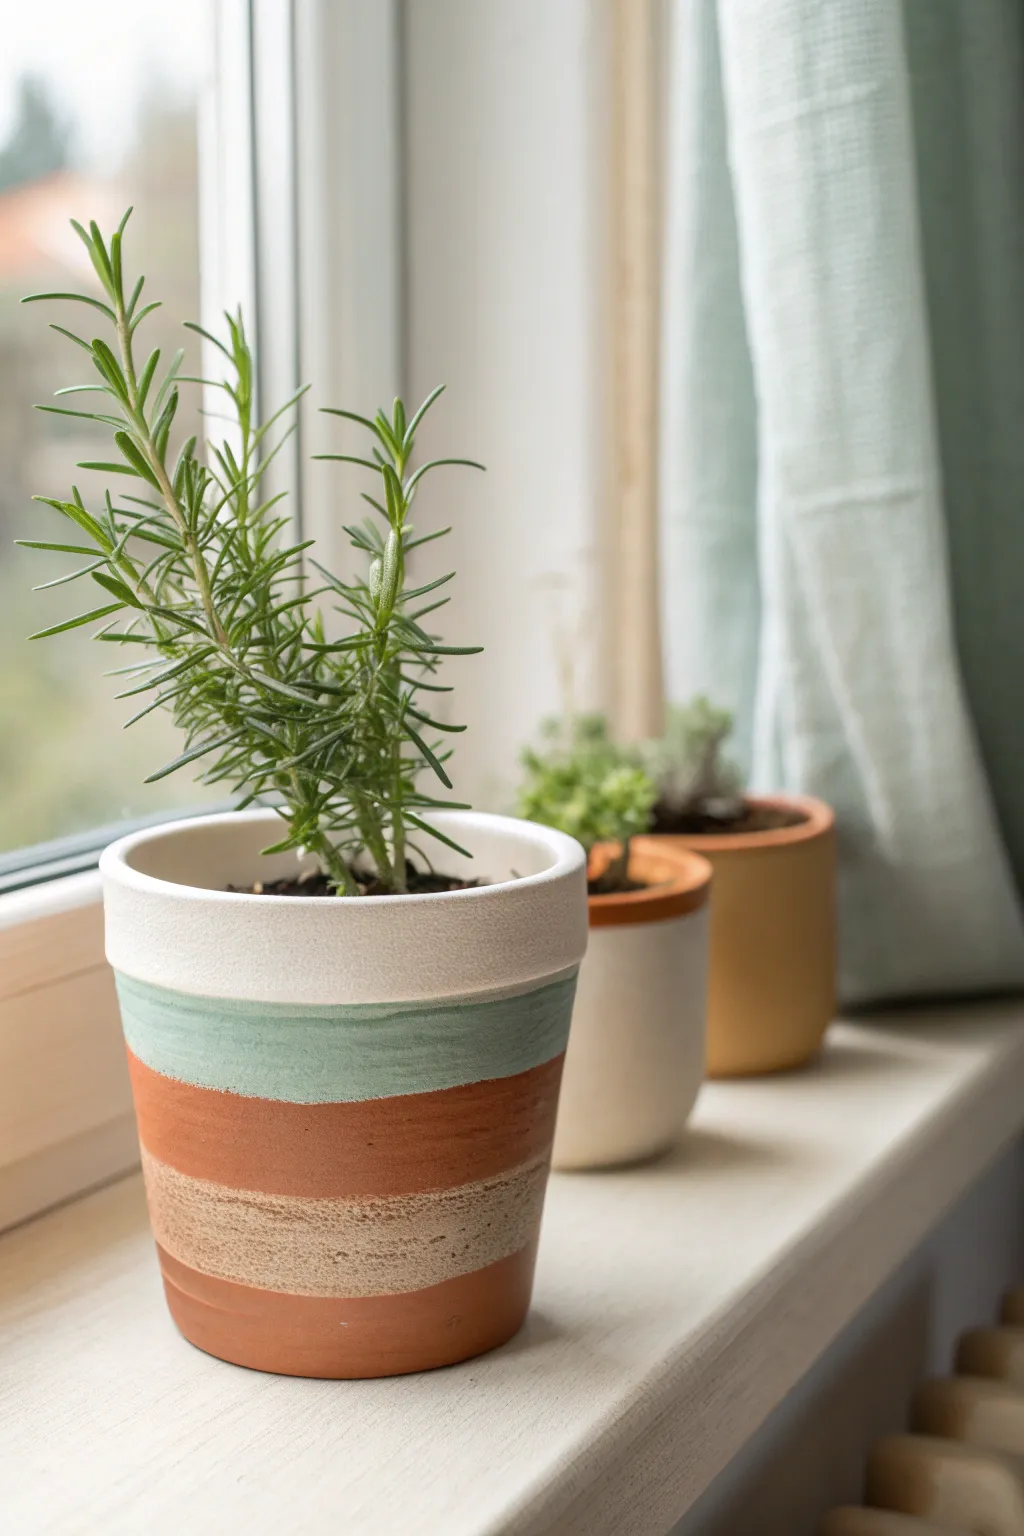
Transform a plain gardening staple into a coastal chic accent piece with this layered painting technique. The soothing palette of sage, cream, sand, and terra cotta creates a relaxed, earthy vibe perfect for your favorite herbs.
How-To Guide
Materials
- Small terra cotta pot (clean and dry)
- Painter’s tape (various widths if available)
- Acrylic craft paints: Creamy White, Sage Green, Warm Terra Cotta/Rust, Sand/Beige
- Flat paintbrush (medium width)
- Small sponge brush or stippling brush
- Paper palette or plate
- Water cup
- Clear matte sealer spray (optional)
Step 1: Preparation
-
Clean surface:
Ensure your terra cotta pot is free of dust and completely dry. If it’s an old pot, scrub it well and let it dry in the sun for several hours. -
Tape the rim line:
Apply a strip of painter’s tape horizontally around the pot, about one inch down from the top rim. Press the edges down firmly with your fingernail to prevent paint bleed.
Seal Before You Begin
Spray the inside of the pot with a clear sealer first. This prevents moisture from seeping through the porous clay and bubbling your exterior paint job.
Step 2: Painting the Upper Bands
-
Paint the top band:
Load your flat brush with the Creamy White acrylic paint. Paint the entire area above the tape line, covering the rim and slightly inside the top edge for a finished look. -
Apply a second coat:
Once the first coat feels dry to the touch, apply a second layer of white to ensure the orange clay doesn’t show through. -
Remove tape:
Carefully peel off the painter’s tape while the second coat is still slightly tacky to get a crisp line. -
Tape the next section:
Wait for the white paint to cure completely (about 20-30 minutes). Place a new line of tape directly over the bottom edge of your white paint band to protect it. -
Define the green band:
Place another strip of tape approximately 3/4 of an inch below your first tape line to create a channel for the green stripe. -
Paint the sage stripe:
Fill in the space between the two tape lines with your Sage Green paint. Use horizontal strokes that follow the curve of the pot.
Mix In Baking Soda
For the sandy beige stripe, mix a pinch of baking soda into your acrylic paint. This creates a gritty, 3D texture that looks like real stone or sand.
Step 3: Creating Texture and Depth
-
Reveal the green:
Remove both strips of tape gently. You should now have a white top band and a sage green middle band. -
Freehand the rust band:
For a more organic, handcrafted feel, I prefer to skip the tape for the lower sections. Load your brush with Warm Terra Cotta paint and create a wide band below the green stripe. -
Soften the edges:
Don’t worry if the line isn’t ruler-straight; the slight unevenness adds to the ceramic charm shown in the photo. -
Mix the texture color:
Mix a small amount of Sand/Beige paint with a tiny drop of white. It should look like dry beach sand. -
Sponge texture:
Using a sponge brush or a dry stippling brush, lightly dab this sandy color below the rust band. Use very little paint to create a porous, stone-like texture. -
Blend the transition:
While the sandy texture is wet, lightly drag your brush horizontally to smudge it slightly, mimicking natural sedimentary layers. -
Finish the base:
Leave the very bottom of the pot natural clay, or paint it with a thin wash of the Rust color to deepen the natural tone.
Step 4: Finishing Touches
-
Clean up lines:
If any paint bled or lines look too messy, use a small detail brush with the appropriate background color to touch up the edges. -
Dry completely:
Let the pot sit for at least an hour until all paint layers are fully dry. -
Seal the work:
If you plan to water real plants in this pot, take it outside and apply a create matte sealer spray to protect your paint from moisture damage.
Now you have a beautifully layered home for your favorite rosemary or succulent


Ombre Mini Pot Set
Give your tiny succulents a modern, earthy home with this simple surface treatment that mimics the look of high-end speckled stoneware. By combining the natural warmth of terracotta with a textured, creamy glaze effect, you can create a beautiful ombre-like contrast.
Step-by-Step Tutorial
Materials
- Small terracotta pots (2-3 inches)
- Beige or cream acrylic paint (matte finish)
- Baking soda or plaster of paris (for texture)
- Dark brown or black acrylic paint (for speckles)
- Old toothbrush
- Medium flat paintbrush
- Painter’s tape (optional)
- Water cup and paper towels
- Clear matte sealant spray
Step 1: Preparation and Base Coat
-
Clean the pots:
Start by wiping down your terracotta pots with a damp cloth to remove any warehouse dust or loose clay particles. Let them dry completely before applying any paint. -
Mix the textured paint:
In a small container, mix your beige or cream acrylic paint with a teaspoon of baking soda. Aim for a ratio of roughly 1 part baking soda to 2 parts paint. -
Check consistency:
Stir the mixture until the baking soda is dissolved but the paint feels thick and slightly gritty. If it’s too thick to spread, add a drop or two of water. -
Decide on the split line:
Determine where you want the two tones to meet. For this project, we are painting the top half. You can eyeball this for an organic look or use painter’s tape for a crisp edge. -
Apply the first coat:
Using your flat brush, paint the top rim and the upper exterior of the pot with your textured beige mixture. Don’t worry about perfect smoothness; the texture is part of the charm. -
Paint the inside rim:
Don’t forget to paint about an inch down into the inside of the pot so the soil line looks finished. -
Let it dry:
Allow this first heavy coat to dry for about 20-30 minutes. The baking soda addition tends to dry faster than standard paint. -
Apply a second coat:
Add a second layer of the textured beige paint to ensure the orange terracotta doesn’t show through the top section.
Clean Lines
For a super crisp line between the paint and clay, burnish the edge of your painter’s tape with a spoon before painting to stop any bleed-through.
Step 2: Speckling and Finishing
-
Prepare the splatter paint:
Take a tiny amount of dark brown paint and water it down significantly. You want an inky, fluid consistency, almost like watercolor. -
Load the toothbrush:
Dip just the tips of the bristles of an old toothbrush into this watery brown mixture. Tap off any huge drips on a paper towel. -
Protect the bottom:
If you want the bottom section to remain pure terracotta, wrap a loose piece of paper or masking tape around the unpainted base. -
Create the speckles:
Hold the toothbrush about 6 inches away from the pot. Run your thumb across the bristles to flick tiny droplets of paint onto the beige section. -
Rotate and repeat:
Turn the pot slowly, flicking paint as you go to ensure even coverage. I like to do a test spray on paper first to check the size of the dots. -
Check density:
Add more speckles if you prefer a heavily stoned look, or keep it sparse for a subtle effect. -
Remove tape:
Carefully peel away any tape you used while the paint is still slightly tacky to avoid pulling up chips of the textured paint. -
Seal the work:
Once everything is bone dry (give it an hour), spray the entire pot—inside and out—with a clear matte sealant. This protects the paint from water damage when you water your plants.
Rustic Variation
Swap the beige paint for a soft sage green or muted terracotta pink. The baking soda texture works with any color for that stoneware feel.
Pop in your favorite succulents and line them up on a windowsill to enjoy your new handcrafted collection

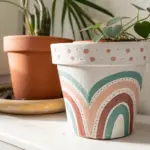


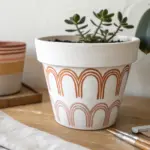
Simple Stenciled Tiny Pots
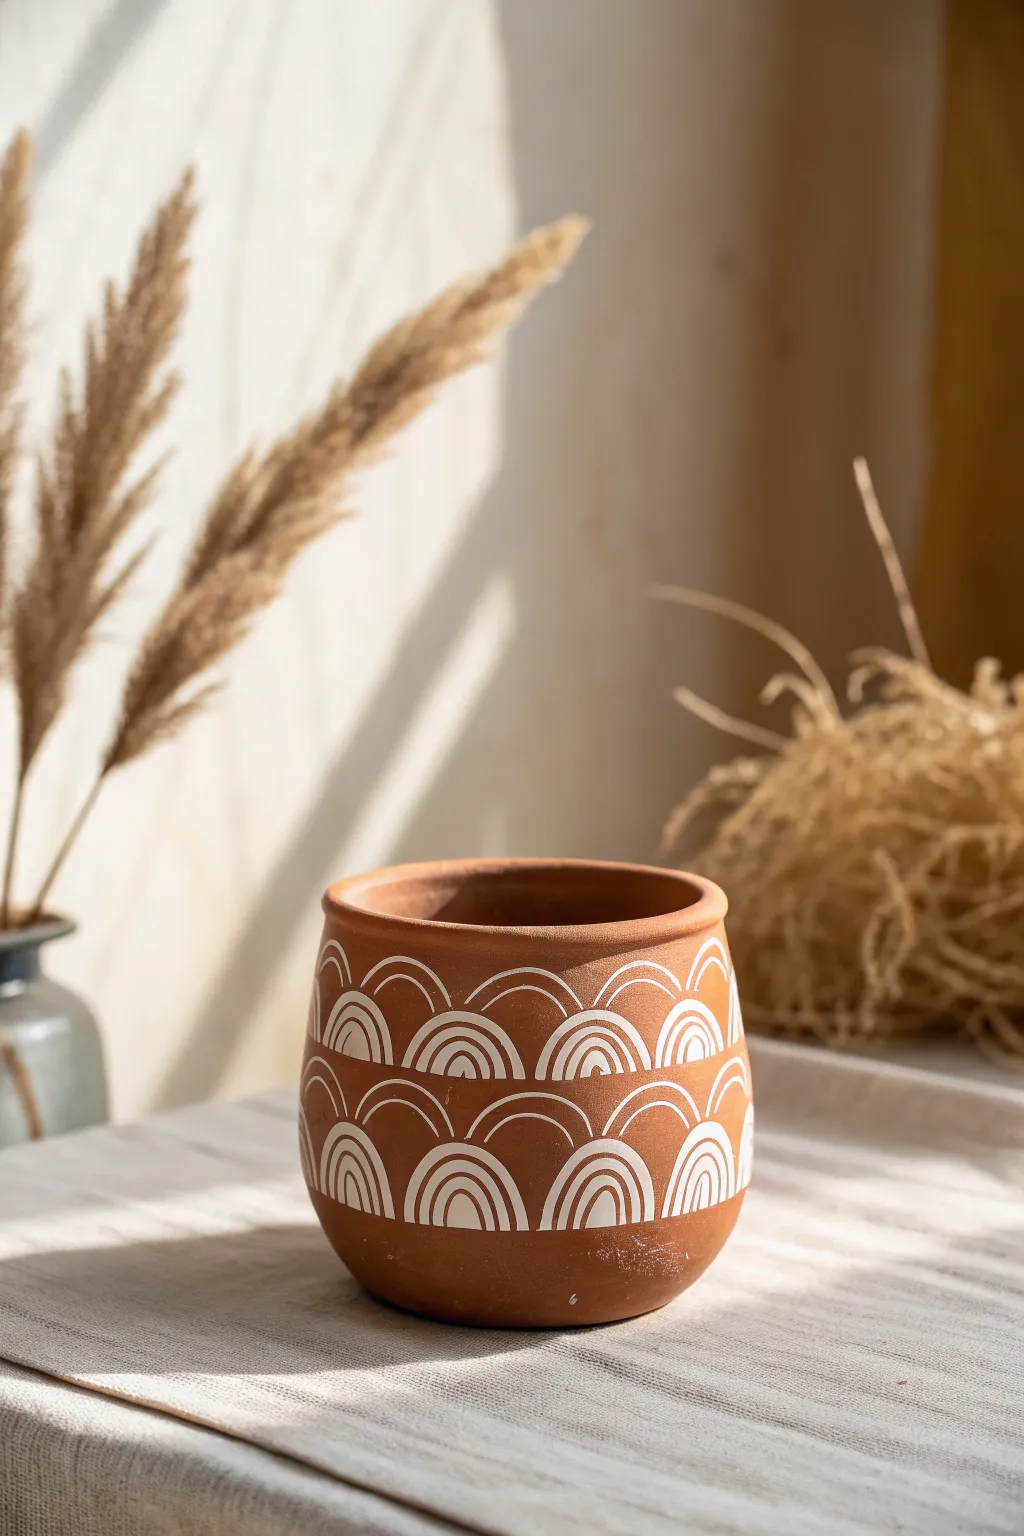
Transform a plain terracotta vessel into a modern boho statement piece using simple geometric patterns. This design features crisp white arches that pop beautifully against the natural clay background, creating a cozy and earthy aesthetic.
Detailed Instructions
Materials
- Small terracotta clay pot
- White acrylic paint (matte finish)
- Fine detail paintbrush (size 0 or 1)
- Pencil
- Adhesive stencil (arch/rainbow pattern)
- Stencil brush or sponge dabber
- Palette or paper plate
- Clear matte sealer spray
- Damp cloth
Step 1: Preparation & Planning
-
Clean surface:
Begin by wiping down your terracotta pot with a damp cloth to remove any dust or manufacturing residue. Let it dry completely so the paint adheres properly. -
Mark guidelines:
Lightly sketch a horizontal line around the circumference of the pot using a pencil. This will serve as the baseline for your bottom row of arches to ensure they stay straight. -
Measure spacing:
If you are stenciling, plan where your pattern repeats will fall so you don’t end up with an awkward half-arch at the end. A quick dry run holding the stencil against the pot helps visualize the layout.
Fixing Paint Bleed
If paint bleeds under the stencil, wait for it to dry completely. Then, gently scrape the excess off with a craft knife or toothpick.
Step 2: Applying the Pattern
-
Position first stencil:
Adhere your arch stencil firmly to the pot, aligning the bottom edge with your pencil guideline. Rub the edges down well to prevent paint bleed. -
Load the sponge:
Dip your stencil sponge or dabber into the white acrylic paint. Offload most of the paint onto your palette until the sponge is almost dry—this is crucial for crisp lines. -
Stipple the paint:
Gently dab the paint over the stencil using an up-and-down motion. Avoid brushing side-to-side, as this can push paint under the stencil edges. -
Lift and repeat:
Carefully peel back the stencil while the paint is still slightly wet. Move to the next section, aligning it with the distinct edge of the previous arch, and repeat the process around the entire pot. -
Create the second row:
Once the bottom row is dry to the touch, position your stencil for the top row. Offset the arches so they sit in the ‘valleys’ between the bottom arches for a balanced, scalloped look. -
Stipple top row:
Repeat the stippling process for the upper row, maintaining consistent spacing and paint density.
Reverse Colors
Paint the entire pot white first, let it dry, and then stencil the arches using a terracotta-colored paint for a negative space effect.
Step 3: Refining Details
-
Clean up edges:
Inspect your work for any bleeds or fuzzy lines. Use a damp cotton swab or a fine detail brush dipped in water to gently correct mistakes while the paint is fresh. -
Hand-paint corrections:
If I notice any gaps where the stencil didn’t quite catch the texture of the clay, I grab a fine detail brush (size 0) with a tiny bit of white paint to connect the lines manually. -
Connect the pattern:
Pay special attention to where the pattern meets at the back of the pot. You may need to hand-paint a partial arch to bridge the gap seamlessly. -
Erase guidelines:
Wait until the paint is absolutely bone dry, then gently erase any visible pencil marks with a soft eraser.
Step 4: Finishing Up
-
Let it cure:
Allow the paint to cure for at least 24 hours. Terracotta is porous, and giving it time ensures the paint bonds well with the clay surface. -
Seal the design:
Take the pot to a well-ventilated area and apply a light coat of clear matte sealer spray. This protects your design from water damage when you water your plant. -
Final check:
Once the sealer is dry, inspect the finish. If you want extra durability, apply a second light coat of sealer.
Now your custom planter is ready to hold your favorite succulent or dried grass bundle


Napkin-Decoupage Small Clay Pots
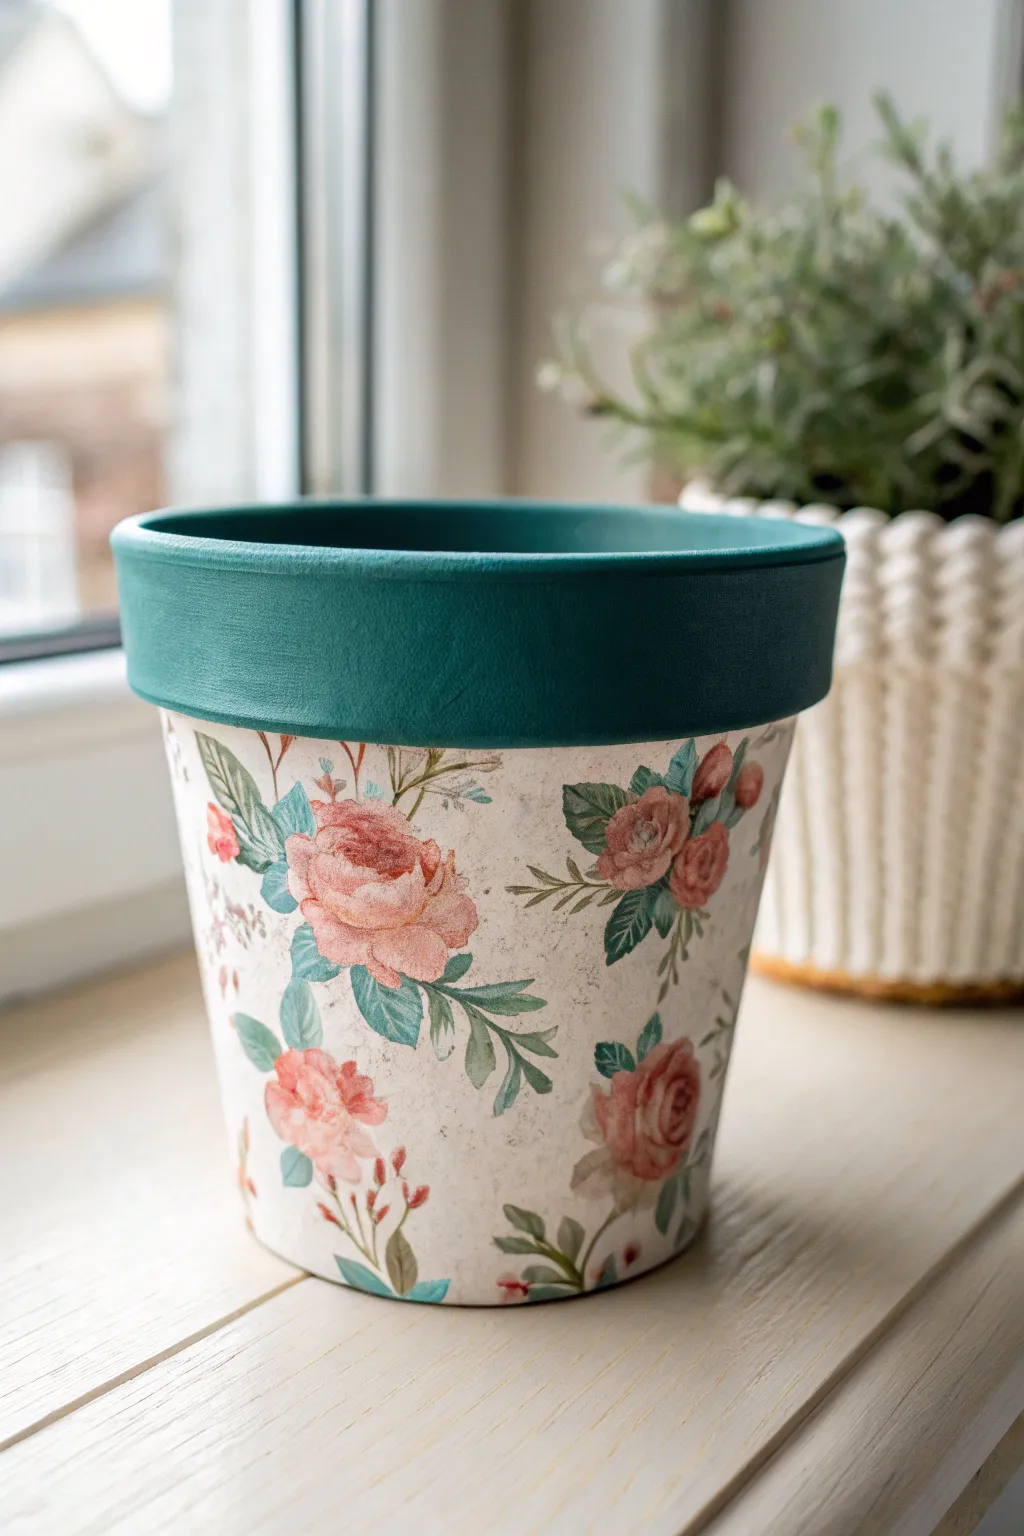
Transform a plain terracotta pot into a romantic vintage-style piece using the magic of paper napkins. This project combines a soft cream base with a deep teal rim to perfectly frame the delicate rose and foliage design.
Step-by-Step
Materials
- Small terracotta pot (cleaned and dry)
- White acrylic paint or gesso (for priming)
- Cream or off-white acrylic paint
- Deep teal or emerald green matte acrylic paint
- Decorative paper napkin with rose/floral print
- Decoupage glue (e.g., Mod Podge Matte)
- Flat synthetic paintbrush (medium size)
- Small angled brush (for cutting in the rim)
- Scissors
- Clear matte sealer spray
Step 1: Preparation & Base Coat
-
Clean surface:
Ensure your terracotta pot is completely free of dust and dirt. Wipe it down with a damp cloth and let it dry fully before starting so the paint adheres properly. -
Prime the surface:
Apply a coat of white acrylic paint or gesso to the entire exterior of the pot, including the rim. This white underlayer prevents the orange clay from dulling your napkin colors later. -
Dry and repeat:
Allow the primer to dry completely. If the terracotta color is still showing through strongly, add a second coat of white for a solid, bright base. -
Apply the cream base:
Once the primer is dry, paint the body of the pot (below the rim) with a soft cream or off-white acrylic paint. This provides a warm background for the vintage floral design.
Wrinkle Rescue
If you get a large crease in the napkin while gluing, dip your finger in water and gently pat it down. The moisture relaxes the paper fibers, making it easier to flatten out.
Step 2: Decoupage Application
-
Prepare the napkin:
Take your floral napkin and carefully separate the plies. You only want the very top, printed layer—discard the white backing layers. -
Cut the design:
Cut your napkin to size. You can either cut out individual flower clusters or measure a strip to wrap around the pot. For this look, a wraparound technique works well, leaving the top edge straight. -
Apply glue to the pot:
Working in small sections, brush a thin, even layer of decoupage glue onto the cream-painted area of the pot. -
Place the napkin:
Gently lay the napkin onto the wet glue. Start from the center and smooth it outwards with your fingers or a soft dry brush to remove air bubbles. -
Handle wrinkles:
Don’t worry about tiny wrinkles; they add to the aged, vintage texture. Just be gentle so the thin paper doesn’t tear. -
Wrap and trim:
Continue applying glue and smoothing the napkin around the pot. If your napkin overlaps at the back, carefully tear the edge for a seamless join. -
Seal the paper:
Once the napkin is positioned, apply another coat of decoupage glue over the top of the design to seal it. Let this dry completely until it’s clear and hard.
Step 3: The Detail Work
-
Paint the rim:
Using a small angled brush, carefully paint the top rim of the pot with deep teal or emerald green paint. I find steadying my hand against the table helps get a crisp line where the rim meets the floral body. -
Paint the inner rim:
Extend the teal paint just over the top edge and down about an inch into the inside of the pot for a finished professional look. -
Second coat:
Let the first coat of teal dry, then apply a second coat to ensure simple, opaque coverage without brushstrokes. -
Clean up edges:
If any green paint smudged onto your floral area, wait for it to dry and then carefully touch it up with a tiny bit of cream paint. -
Final seal:
Take your clear matte sealer spray and give the entire pot a light coat. This protects both the paint and the delicate paper from moisture and handling.
Age It Up
For an antique look, lightly sponge some diluted brown paint or antiquing medium over the dried decoupage to simulate an aged parchment effect.
Now your custom vintage pot is ready to house a lovely succulent or small fern

The Complete Guide to Pottery Troubleshooting
Uncover the most common ceramic mistakes—from cracking clay to failed glazes—and learn how to fix them fast.
Chalkboard Label Herb Pots
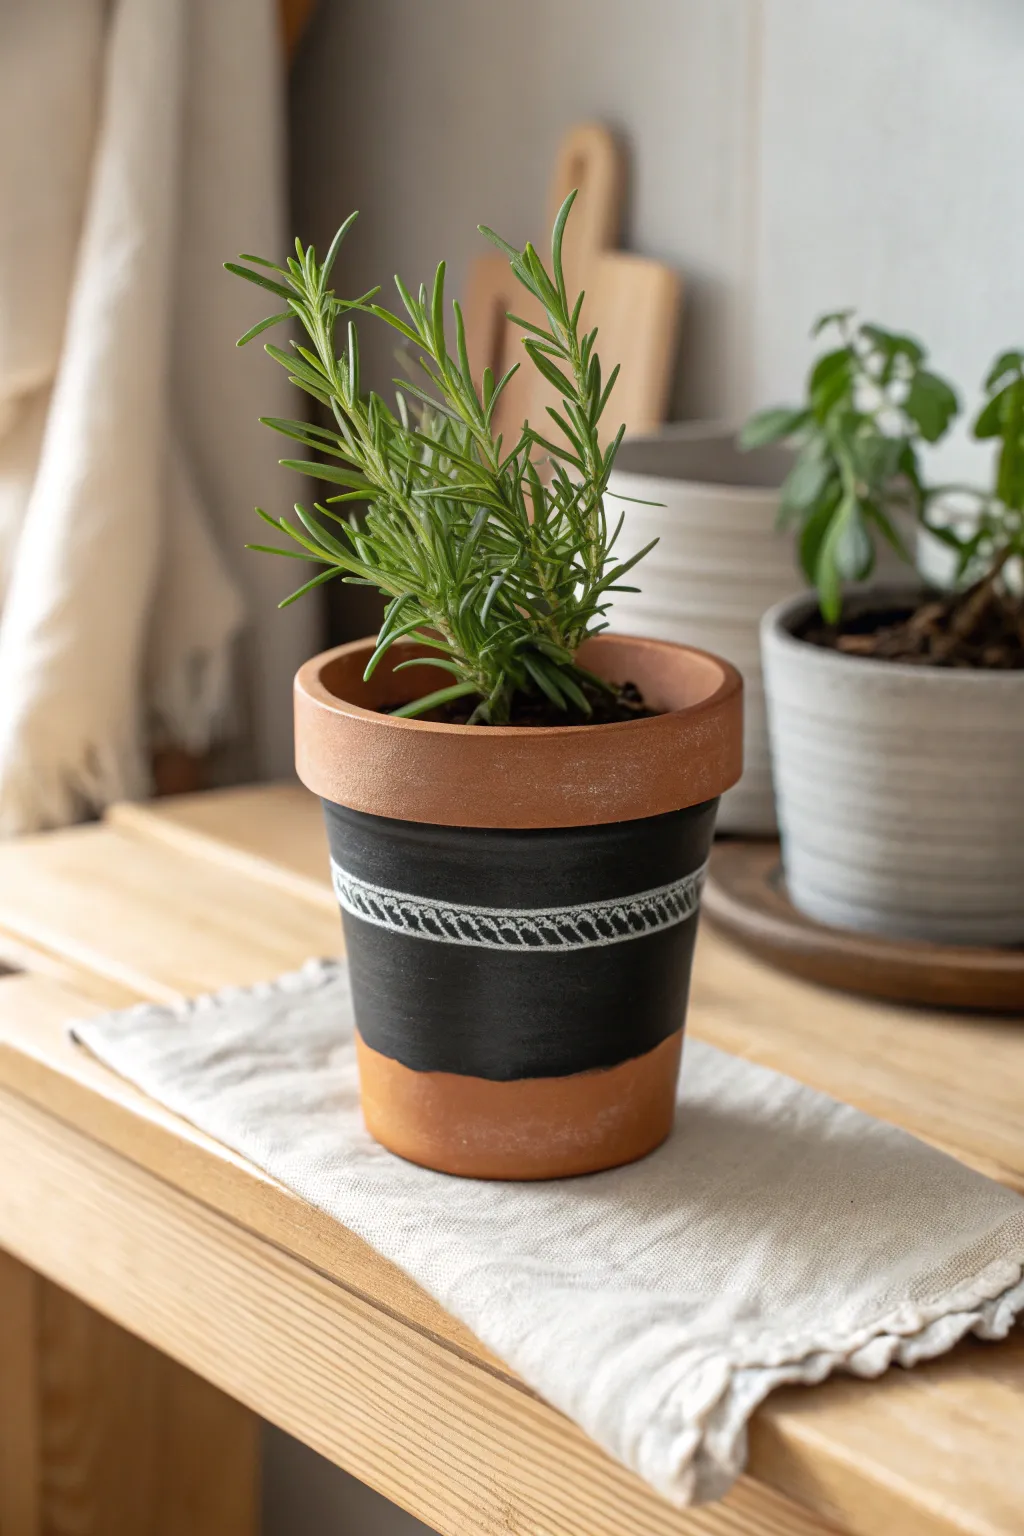
Transform a plain terracotta pot into a stylish, labeled home for your herbs with this simple chalkboard paint project. The matte black finish contrasts beautifully with the warm clay and provides a perfect surface for decorative chalk designs.
How-To Guide
Materials
- Small terracotta pot (clean and dry)
- Painter’s tape or masking tape (1 inch wide)
- Black chalkboard paint
- Flat paintbrush (medium size)
- White paint pen (fine tip) or sharpened white chalk
- Newspaper or drop cloth
- Rosemary or other herb plant
- Potting soil
Step 1: Preparation & Taping
-
Clean surface:
Ensure your terracotta pot is completely free of dust and dirt. Wipe it down with a damp cloth and let it dry fully, as moisture can prevent the paint from adhering properly. -
Mask the rim:
Apply a strip of painter’s tape around the pot, just beneath the protruding rim. Press the edges down firmly with your thumbnail to create a tight seal and prevent paint bleed. -
Define bottom edge:
Decide how wide you want your black band to be. Apply a second strip of painter’s tape around the lower portion of the pot, leaving a generous band of exposed clay in the middle for your chalkboard section. -
Check alignment:
Spin the pot slowly to check that your tape lines remain relatively parallel to the top and bottom edges. Adjust if the band looks uneven or tilted.
Step 2: Painting the Band
-
First coat:
Stir your chalkboard paint thoroughly. Using the flat paintbrush, apply an even coat of black paint to the exposed terracotta between your tape lines. Paint horizontally, following the curve of the pot. -
Dry time:
Allow the first coat to dry according to the manufacturer’s instructions, usually about an hour. It should feel dry to the touch before proceeding. -
Second coat:
Apply a second coat of chalkboard paint for full opacity. I find that painting this layer using vertical strokes helps hide brush marks and creates a smoother texture for writing later. -
Remove tape:
While the second coat is still slightly tacky (but not wet), carefully peel away the painter’s tape. Pulling the tape at a 45-degree angle helps ensure a crisp, clean line. -
Curing:
Let the pot sit undisturbed for at least 24 hours to allow the chalkboard paint to cure completely. This durability is crucial for a pot that will hold soil and moisture.
Bleeding Lines?
If paint seeped under your tape, wait for it to dry fully. Then, gently scrape the excess paint away with a craft knife or the edge of a credit card to restore a sharp line.
Step 3: Decorating & Planting
-
Prime the surface:
Once fully cured, gently rub the side of a piece of chalk over the black painted area and wipe it off with a dry tissue. This ‘seasons’ the surface so your future marks erase cleanly. -
Draw the border:
Using a white paint pen for permanence or sharp chalk for a temporary look, draw two parallel horizontal lines across the middle of the black band. -
Add detail:
In the space between your parallel lines, draw small diagonal hatch marks all the way around. This creates a rope-like or braided pattern that adds a nice decorative touch. -
Refine the pattern:
If using real chalk, use a slightly damp cotton swab to tidy up any smudges or uneven lines in your pattern. -
Prepare for planting:
Add a small layer of potting soil to the bottom of your dry, finished pot. -
Pot the herb:
Remove your rosemary or chosen herb from its nursery container. Gently loosen the root ball and place it into the pot. -
Fill and settle:
Fill in the sides with more potting soil, pressing down gently to remove air pockets. Water lightly, being careful not to soak the fresh paint right away.
Chalk Pen vs. Real Chalk
Use a white paint pen if you want the braided design to be permanent and waterproof. Use real chalk if you want to change the label or design later.
Place your new custom pot on a sunny windowsill and enjoy having fresh herbs right at your fingertips
Terrazzo-Speckled Tiny Pots
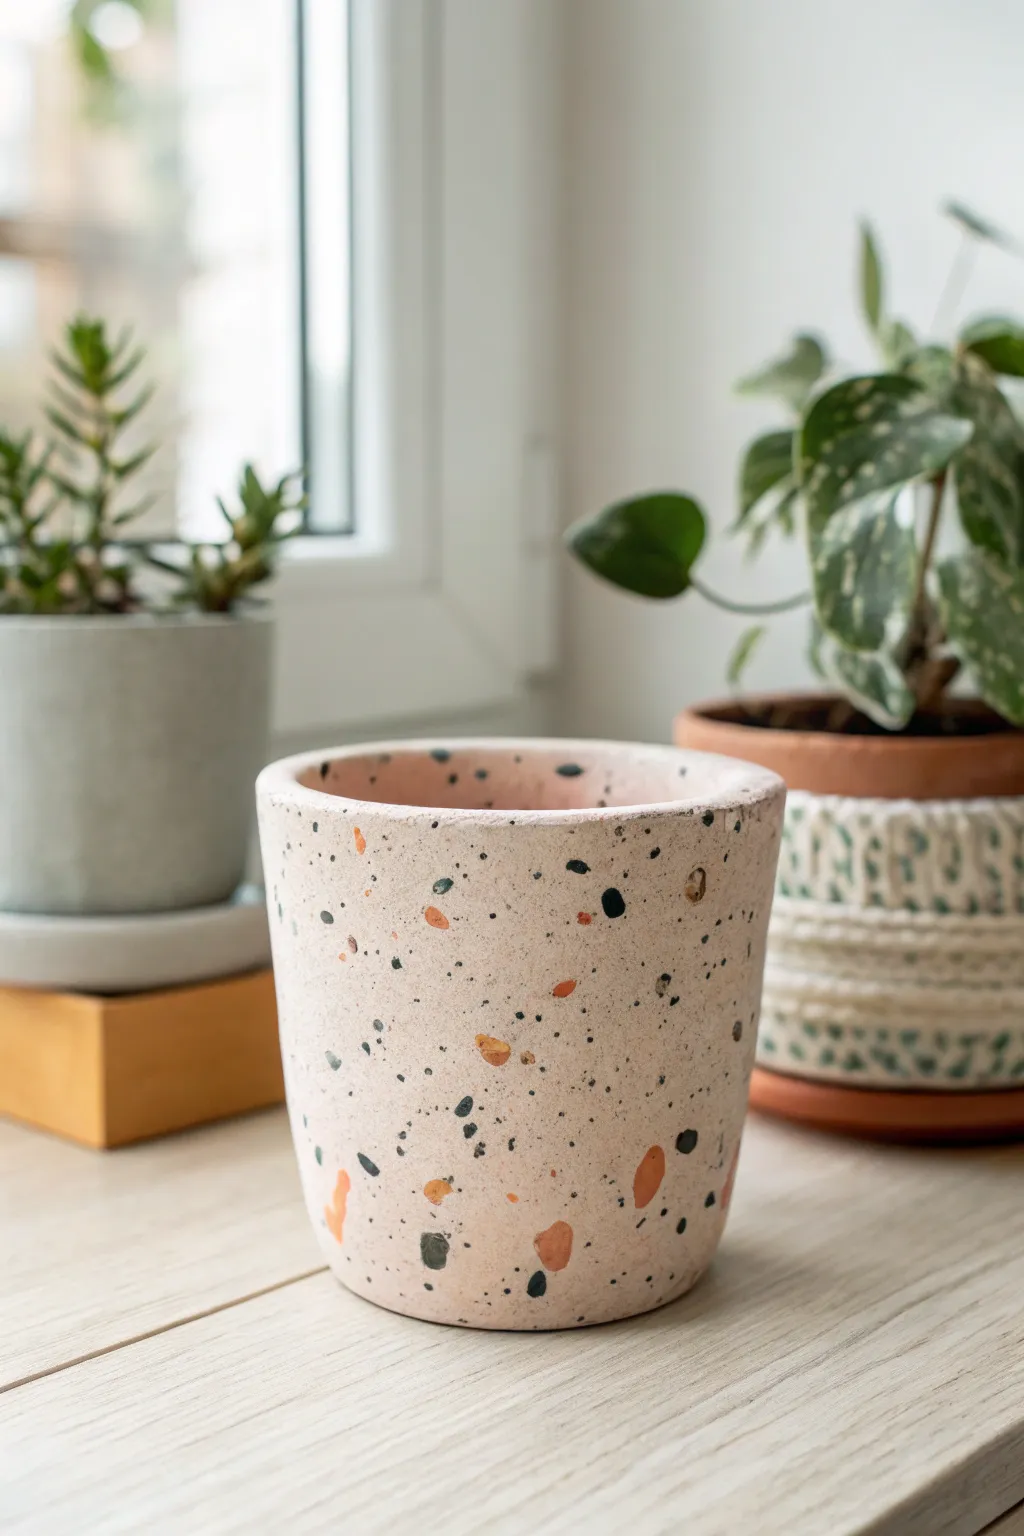
Transform a plain planter into a trendy, high-end looking piece with this simple faux terrazzo painting technique. The blush pink base combined with organic speckles creates a warm, modern aesthetic perfect for small succulents.
How-To Guide
Materials
- Small clay or terracotta pot
- Sandpaper (fine grit)
- White primer spray paint
- Acrylic paint: Blush pink (base)
- Acrylic paint: Burnt orange
- Acrylic paint: Black or charcoal
- Acrylic paint: Teal or dark green
- Small flat paintbrush
- Fine detail paintbrush or toothpick
- Matte clear sealant spray
Step 1: Preparation & Base Coat
-
Smooth the surface:
Take your fine-grit sandpaper and gently rub down the exterior of the clay pot. Focus on removing any rough ridges or bumps to create a smooth canvas for your paint. -
Clean the pot:
Wipe the entire pot with a slightly damp cloth to remove all pottery dust. Let it dry completely for about 10 minutes. -
Apply primer:
Spray an even coat of white primer over the outside and the inner rim of the pot. This prevents the terracotta from soaking up your colored paint and ensures the pink base coat looks vibrant. -
Mix the base color:
If you don’t have the perfect shade, mix white acrylic with a drop of red and a tiny touch of yellow to achieve a soft, warm blush pink. -
Paint the first coat:
Apply the blush pink paint generously over the primed areas. Use smooth horizontal strokes to minimize brush marks. -
Let it dry & repeat:
Allow the first coat to dry for at least 20 minutes. If the white primer still shows through, apply a second coat for full opacity.
Step 2: Creating the Terrazzo Effect
-
Prepare your palette:
Squeeze small dollops of your accent colors—burnt orange, black, and teal—onto a palette or paper plate. You want these ready to go. -
Start with the largest shapes:
Using the small flat brush, paint random, irregular geometric shapes using the burnt orange color. Think jagged triangles or lopsided trapezoids rather than perfect circles. -
Space them out:
Scatter these orange shapes sparsely around the pot. I like to rotate the pot constantly to ensure they aren’t clustering in just one area. -
Add the dark accents:
Switch to your black or charcoal paint. Paint slightly smaller, angular shapes in the empty spaces between the orange ones. -
Layering the look:
It’s okay if a black speck lightly touches an orange one, but mostly try to keep them separate to mimic stone chips set in concrete. -
Introduce the teal:
Add a few medium-sized teal or dark green shapes. Use these to fill in any glaringly empty zones on the pot face. -
Create fine texture:
This is the secret to realism: dip a fine detail brush or a toothpick into the black paint and add tiny dots or ‘sand’ specks in the background areas. -
Add colored grit:
Repeat the tiny dot technique with the orange paint as well. These microscopic dots make the finish look like authentic poured terrazzo. -
Check the rim:
Don’t forget to carry the pattern over the top rim of the pot and just slightly down the inside, so it looks finished even when filled with soil.
Smudged Paint?
If you accidentally smear a wet speck, don’t wipe it! Let it dry completely, paint over it with a dab of the base pink, then repaint the speck.
Step 3: Finishing Touches
-
Dry completely:
Let your artistic speckles dry fully. This usually takes about an hour depending on how thick your paint application was. -
Seal the deal:
Take the pot to a well-ventilated area and spray it with a matte clear sealant. This protects your design from water damage when you water your future plant.
Add Some Shine
For a luxe twist, add a fourth accent color of metallic gold or copper. Use these sparingly for little glints that catch the light.
Now your little pot is ready for a succulent and a sunny spot on your windowsill


What Really Happens Inside the Kiln
Learn how time and temperature work together inside the kiln to transform clay into durable ceramic.
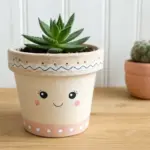
Mini Face Pots With Blush Cheeks
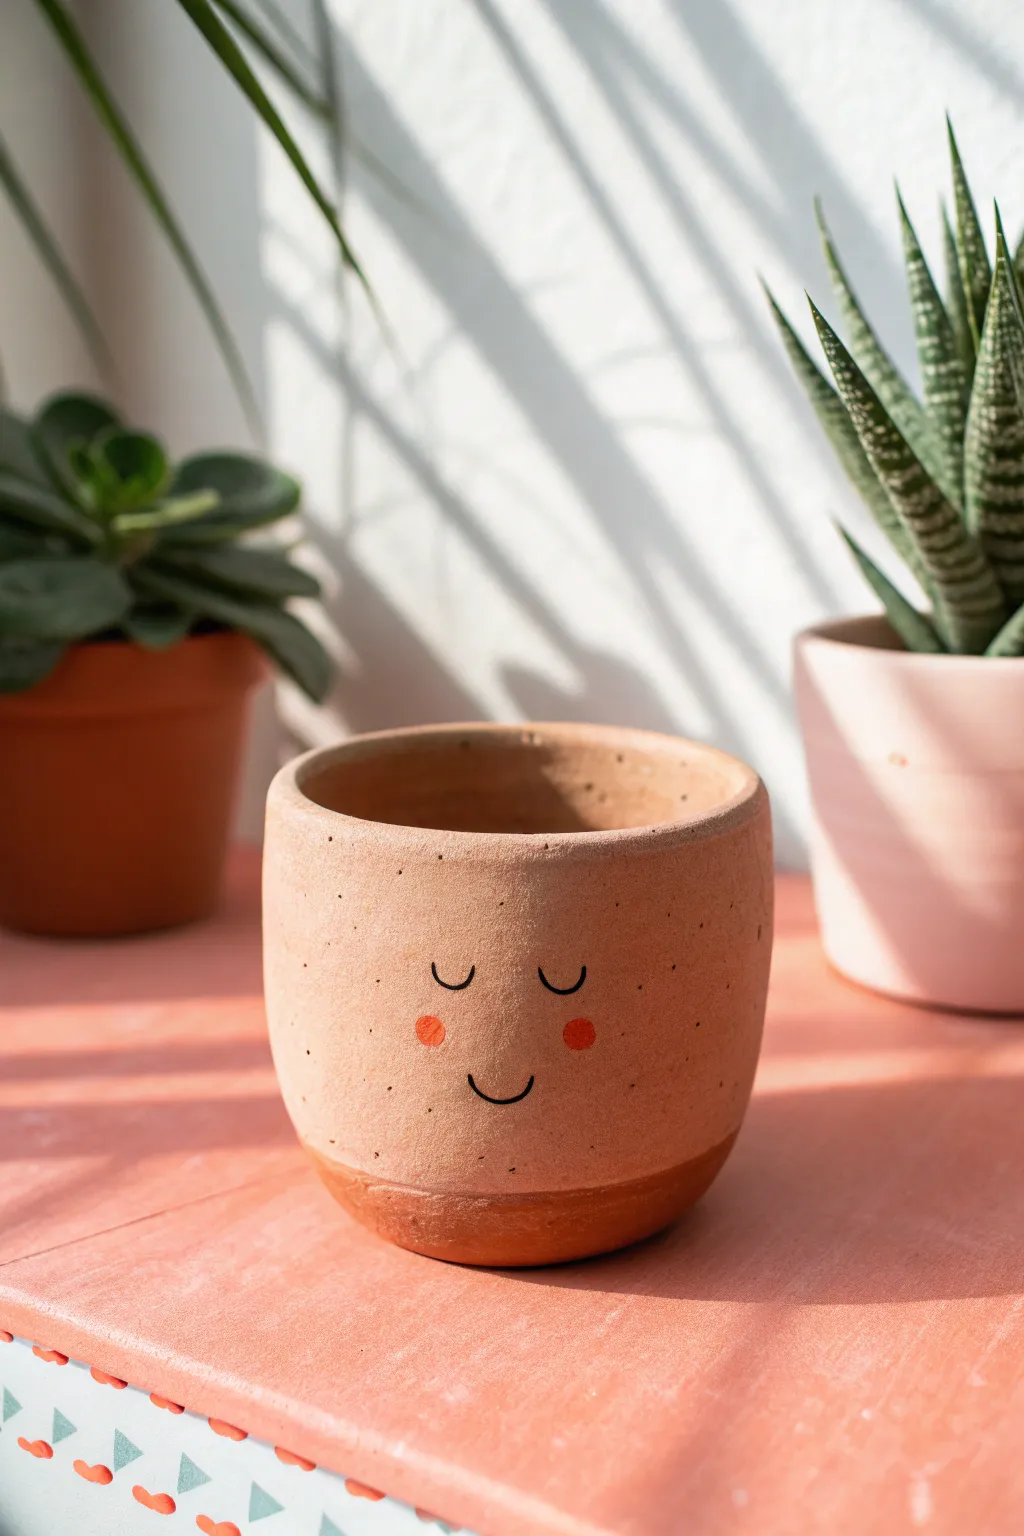
Give your houseplants a friendly personality with this adorable mini face pot project. By combining the raw texture of terracotta with a smooth, matte finish and a sweet expression, you create a charming home for your succulents that feels both modern and handmade.
Step-by-Step Tutorial
Materials
- Small terracotta pot (3-4 inch)
- Acrylic craft paint (light peach or soft tan)
- Acrylic craft paint (coral or bright pink)
- Black paint marker (fine point) or black acrylic paint with a detail brush
- Medium flat paintbrush
- Small round paintbrush or foam dauber
- Painter’s tape
- Matte sealer (spray or brush-on)
- Water cup and paper towels
Step 1: Preparation and Base Coat
-
Clean the surface:
Begin by wiping down your terracotta pot with a damp cloth to remove any dust or debris. Let it dry completely so the paint adheres properly. -
Tape the base:
Apply a strip of painter’s tape around the bottom circumference of the pot, leaving about 1/2 to 3/4 of an inch of the raw clay exposed at the base. Press the tape edge down firmly to prevent paint bleeding. -
Apply the first coat:
Using your medium flat brush, apply the light peach or tan acrylic paint to the entire area above the tape line, including the rim. Use long, horizontal strokes for a smooth finish. -
Paint the inside rim:
Don’t forget to paint the inner rim of the pot—usually down to the first ridge inside—so the raw clay doesn’t show when you add soil. -
Let it dry:
Allow the first coat to dry partially; acrylics on terracotta dry quickly because the clay is porous. -
Add a second coat:
Apply a second layer of the base color to ensure opaque coverage where no terracotta orange shows through. I like to let this dry thoroughly for at least 30 minutes before handling again. -
Remove the tape:
Carefully peel off the painter’s tape while the paint is still slightly tacky or fully dry to reveal the crisp line between the painted body and the raw clay base.
Bleeding Lines?
If paint bleeds under your tape, wait for it to dry, then use a damp Q-tip or a scrap of fine-grit sandpaper to gently buff the unwanted paint off the raw terracotta band.
Step 2: Adding the Expression
-
Sketch the face:
Lightly sketch the face placement using a pencil. You want the eyes about halfway down the pot and spaced widely apart for that cute ‘kawaii’ look. -
Draw the eyes:
Using a fine-point black paint marker, draw two small ‘U’ shapes for the closed eyes. Ensure the arch of the ‘U’ is smooth and consistent. -
Add the smile:
Draw a small, simple curve for the mouth perfectly centered between and below the eyes. Keep the line thin for a delicate appearance. -
Mix the blush color:
If your pink paint is too bright, mix a tiny dot of your base skin tone color into the coral paint to soften it slightly. -
Paint the cheeks:
Dip a small round brush, a Q-tip, or a foam dauber into the pink paint. Blot excess paint onto a paper towel first—you want a stamped effect, not a glob. -
Apply the blush:
Gently press the pink color just below and slightly outside the eyes to create the rosy cheeks. A single dab is usually perfect. -
Add speckles (optional):
To mimic the speckled texture seen in ceramic glazes, you can load a toothbrush with watered-down brown paint and flick tiny droplets onto the pot, or simply leave the matte paint finish as is.
Step 3: Finishing Touches
-
Dry completely:
Allow the face details to dry completely to avoid smudging the black lines. -
Seal the pot:
Apply a coat of matte spray sealer or brush-on varnish over the painted areas. This protects the face from water damage when you water your plant. -
Pot your plant:
Once fully cured, add your soil and a cute succulent like a Haworthia or Echeveria to complete the look.
Pro Tip: Marker Choice
Use an oil-based paint marker rather than a standard permanent marker. Standard ink can turn purple or bleed when you apply the final sealer over the top.
Now you have a cheerful little companion ready to brighten up your windowsill
Small Clay Pot Brush And Pencil Cup
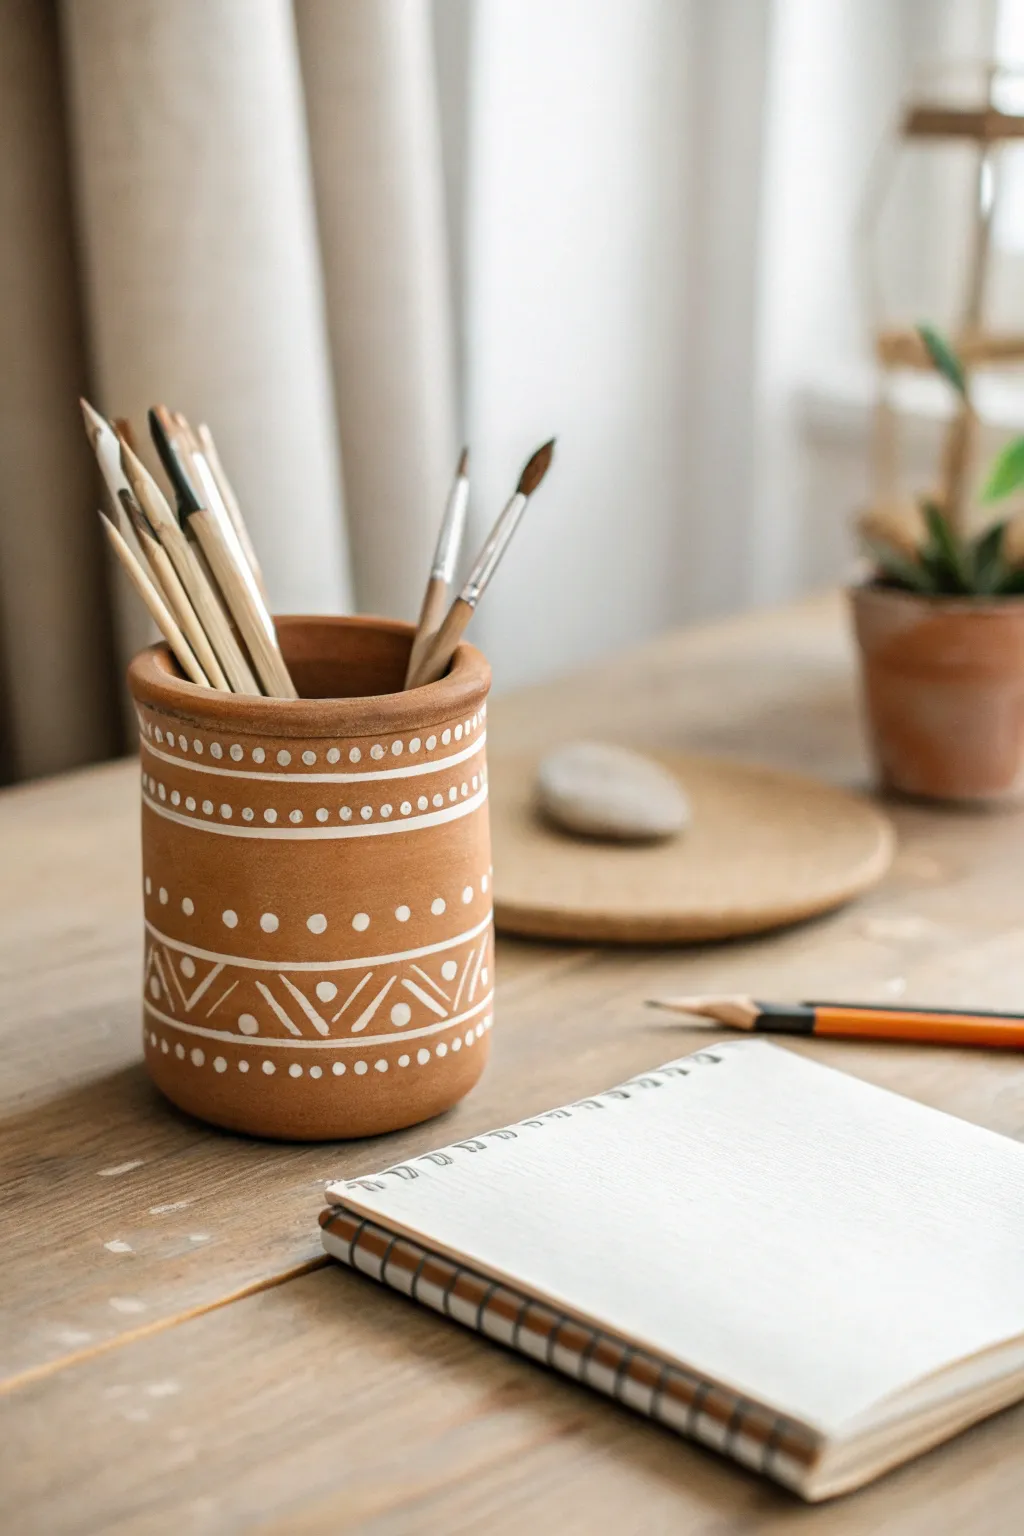
Transform a plain terracotta pot into a charming desk organizer with simple geometric patterns. The contrast of crisp white paint against the warm clay creates a beautifully earthy, bohemian look for storing your brushes and pencils.
Step-by-Step
Materials
- Small terracotta pot (clean and dry)
- White acrylic paint (craft paint or paint pen)
- Small round paintbrush (size 0 or 1)
- Detail brush or dotting tool (optional)
- Pencil for sketching
- Matte spray sealer (optional)
- Water cup and paper towels
Step 1: Preparation
-
Clean surface:
Ensure your terracotta pot is completely clean and dry. If there’s any dust or sticker residue, wash it off with warm soapy water and let it air dry fully, preferably for a few hours, as terracotta absorbs moisture easily. -
Plan spacing:
Visualize the three distinct bands of patterns shown in the image: a top rim border, a middle dot section, and a lower chevron band. You can lightly mark horizontal guidelines with a pencil to keep your bands straight.
Step 2: Painting the Upper Rim
-
Top solid line:
Dip your small round brush into the white acrylic paint. Paint a thin, continuous horizontal line just below the lip of the pot. Turn the pot slowly as you paint to maintain a steady hand. -
Initial dot row:
Directly below your top line, add a row of small, evenly spaced dots. A dotting tool or the wrong end of a paintbrush handle works perfectly for getting uniform circles here. -
Second solid line:
Paint another thin horizontal line beneath the first row of dots to enclose them. -
Secondary dot row:
Create a second row of dots below this new line, mirroring the first row. -
Closing rim line:
Finish the upper section by painting a third horizontal line just below the second row of dots.
Clean Lines Hack
For perfectly straight horizontal lines around the curved surface, place a thick rubber band around the pot and use its edge as a painting guide.
Step 3: Creating the Central Pattern
-
Mid-section spacing:
Leave a gap of about half an inch of bare terracotta below your rim design. This negative space is crucial for the design to breathe. -
Larger dots:
Paint a row of slightly larger, prominent dots around the middle of the pot. Space them out more generously than the rim dots. -
Framing lines:
Paint two horizontal lines beneath these larger dots to create a border for the upcoming chevron section.
Make It Custom
Try swapping the white paint for a metallic gold or copper acrylic. The metallic sheen looks incredible against the matte terracotta background.
Step 4: The Chevron Base
-
Zig-zag outlines:
Paint a continuous zig-zag or chevron line around the lower third of the pot. Keep the peaks and valleys consistent in height. -
Inner triangles:
Inside each upward-pointing triangle formed by your zig-zag, paint a smaller, inverted ‘V’ shape. This creates a nested look. -
Accent dots:
Place a single small dot inside each of the downward-pointing triangles to balance the design. -
Bottom framing:
Paint two final horizontal lines below the chevron pattern, near the base of the pot. -
Final border:
Finish the design with one last row of small dots around the very bottom edge.
Step 5: Finishing Touches
-
Clarity check:
Look over your design. If any white lines look too faint, carefully go over them with a second coat once the first layer is dry to make the white pop. -
Cleanup:
I like to use a damp cotton swab to gently wipe away any stray paint marks or wobbly edges before the paint fully cures. -
Sealing:
Once the paint is completely dry (wait at least an hour), spray the entire exterior with a clear matte sealer to protect the design from chipping or smudging.
Now your desk has a stylish new organizer ready to hold your favorite tools

TRACK YOUR CERAMIC JOURNEY
Capture glaze tests, firing details, and creative progress—all in one simple printable. Make your projects easier to repeat and improve.
Tiny Gift Pots As Favor Containers
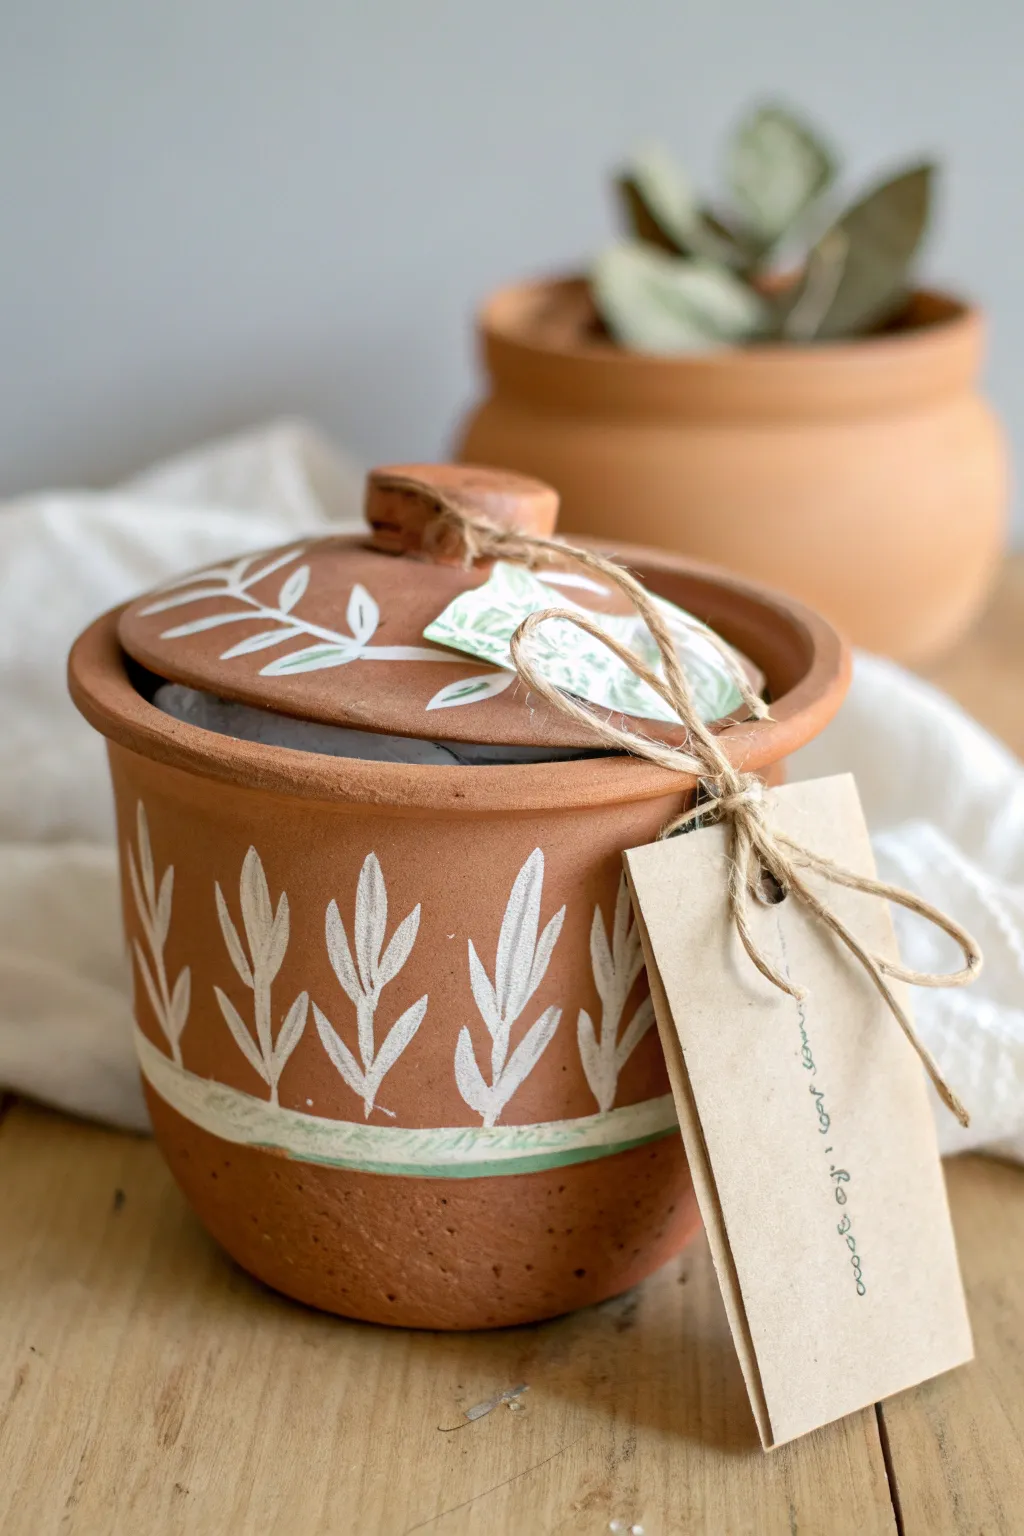
Transform a simple terracotta jar into a charming, nature-inspired favor container with delicate white leaf motifs and rustic twine accents. This project combines raw clay texture with crisp white paint for a trendy, artisanal look perfect for gifting.
Step-by-Step Guide
Materials
- Small terracotta pot with lid (jar style)
- White acrylic paint (matte finish)
- Sage green acrylic paint
- Fine round paintbrush (size 1 or 2)
- Flat paintbrush (small)
- Jute twine
- Cardstock or kraft paper for tag
- Hole punch
- Black fine-liner pen
- Water cup and paper towels
- Pencil (optional)
Step 1: Preparation and Base Design
-
Clean the pot:
Wipe down your terracotta pot and lid with a slightly damp cloth to remove any dust or pottery residue. Let it dry completely so the paint adheres properly. -
Plan the dividing line:
Identify the section near the bottom of the pot where the curve begins to tuck underneath. This will be the placement for your horizontal border band. -
Paint the base band:
Using your flat paintbrush and white acrylic paint, create a horizontal stripe around the lower circumference of the pot. Don’t worry about making the edges razor-sharp; a slightly brushed, organic edge adds character. -
Add the green accent:
Once the white band is dry to the touch, mix a watered-down sage green or use it straight from the tube. Paint a thinner, subtle line horizontally through the center of the white band to add a pop of color.
Step 2: Painting the Foliage
-
Sketch the pattern (optional):
If you are nervous about freehanding, lightly sketch vertical stems evenly spaced around the pot’s main body using a pencil. -
Paint the stems:
Load your fine round brush with white paint. Paint thin vertical lines starting from the white band and reaching up towards the rim. I like to vary the heights slightly for a more natural look. -
Add alternate leaves:
Starting at the bottom of a stem, paint small, elongated almond-shaped leaves branching off. Angle them upwards and alternating left and right as you move up the stem. -
Detail the lid:
Repeat this leaf motif on the top of the lid. Paint a curved stem that follows the circular shape of the lid, adding leaves that flow in the same direction. -
Create a second coat:
Terracotta is very porous and absorbs paint quickly. Go over your white leaves a second time to make the white bright and opaque against the dark clay. -
Touch up accents:
Add a few small dots or tiny dashes of white near the green band or between the leaves if the design feels too empty, though keeping it simple is often best.
Paint Consistency Pro-Tip
Terracotta drinks moisture. Slightly water down your first coat of paint to act as a primer, then apply a thicker, undiluted second coat for crisp, bright lines.
Step 3: Finishing Touches
-
Prepare the tag:
Cut a small rectangle from kraft paper or cardstock. Snip the top two corners to create a tag shape. -
Add a message:
Using a fine-liner pen, write a vertical message or name on the tag. Punch a hole centered at the top of the tag. -
Fill the pot:
Place your gift inside the pot—whether it’s candies, seeds, or a small trinket—and place the lid on top. -
Tie the twine:
Cut a generous length of jute twine. Wrap it around the knob of the lid several times to secure it, leaving long tails. -
Attach garnish:
If you have a decorative paper leaf or a dried flower, tuck it under the twine wrapping on the lid. -
Secure the tag:
Thread one tail of the twine through your paper tag. Tie the two twine ends together in a simple bow, letting the tag hang down the side of the pot.
Level Up: Wax Finish
Rub a clear antique wax over the unpainted clay areas after the paint dries. This deepens the color to a rich brown and protects the porous surface.
You now have a beautifully handcrafted vessel that makes even the smallest token feel special and thoughtful
Upside-Down Mushroom Pot Decor
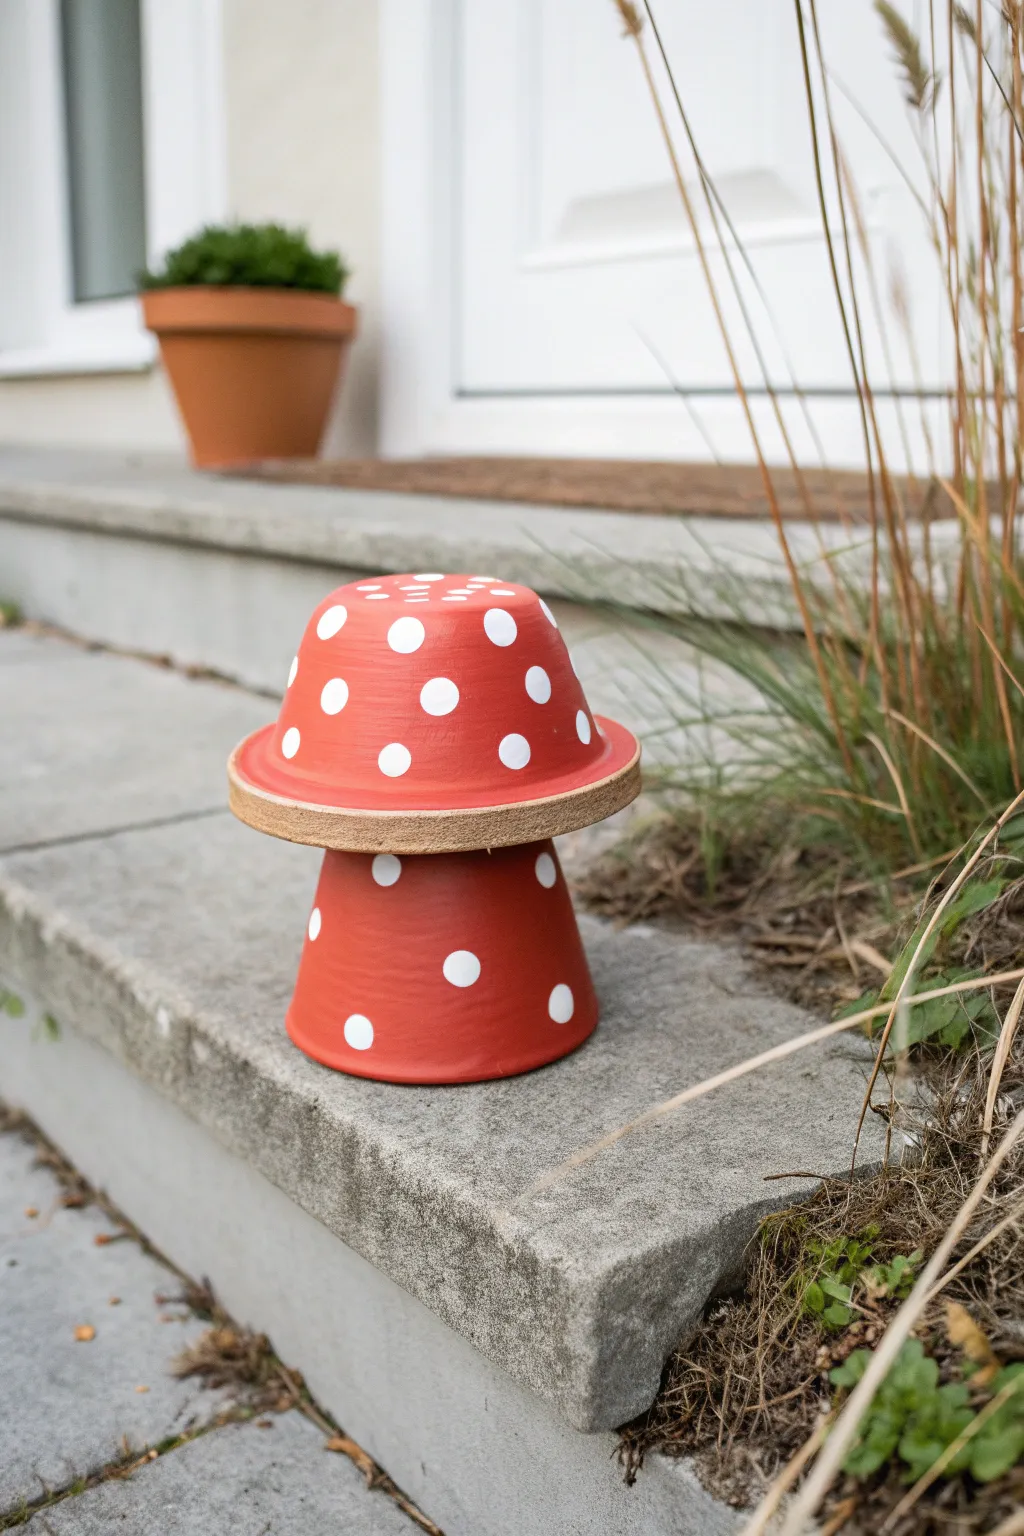
Transform a basic garden staple into a charming storybook accent for your porch or flowerbed. This adorable red and white mushroom is crafted simply by stacking and painting standard terracotta pots and saucers.
Step-by-Step
Materials
- Small terracotta pot (standard shape)
- Terracotta saucer (slightly wider diameter than the pot’s base)
- Red acrylic craft paint or outdoor patio paint
- White acrylic craft paint
- Flat paintbrush (medium size)
- Small round paintbrush or foam pouncer
- Strong craft adhesive (e.g., E6000) or hot glue gun
- Clear acrylic sealer or varnish (spray or brush-on)
- Newspaper or drop cloth
Step 1: Preparation & Base Coat
-
Clean the terracotta:
Begin by thoroughly wiping down your terracotta pot and saucer with a damp cloth to remove any dust or nursery grit. Let them dry completely, as moisture will prevent the paint from adhering properly. -
Flip the pot:
Set up your workspace with newspaper. Turn the pot upside down so the wider opening is on the table; this will be the mushroom’s stem. -
Flip the saucer:
Place the saucer upside down as well. This will become the mushroom cap. -
Paint the stem red:
Using your flat brush, apply a coat of red paint to the exterior of the upside-down pot. Don’t worry about perfect opacity yet; terracotta is porous and soaks up the first layer. -
Paint the cap red:
Paint the bottom and sides of the upside-down saucer red. Leave the very bottom rim (the unglazed ring) unpainted for a nice textural contrast, as seen in the photo. -
Apply a second coat:
Once the first layer is dry to the touch (usually 15-20 minutes), apply a second coat of red paint to both pieces to achieve a vibrant, solid color.
Step 2: Adding Details
-
Plan the polka dots:
Visualize where you want your white spots to go. It helps to space them somewhat randomly rather than in a perfect grid for a more natural look. -
Paint dots on the cap:
Dip a small round brush or a foam pouncer into white paint. gently press onto the red saucer to create circular dots. I find twisting the brush slightly helps keep the edges crisp. -
Paint dots on the stem:
Repeat the process on the red pot stem. Make these dots slightly more sparse than on the cap. -
Let the dots dry:
Allow the white paint to dry completely. If the white looks a bit sheer against the red background, carefully dab a second layer over the existing dots.
Uneven Dots?
If painting perfect circles is tricky, dip the eraser end of a pencil into the white paint and use it as a stamp for uniform, perfectly round dots every time.
Step 3: Assembly & Fishing
-
Seal the paint:
Before assembling, spray or brush a clear acrylic sealer over the painted surfaces. This is crucial if the mushroom will live outdoors to protect it from rain and sun fading. -
Prepare the glue:
Once the sealer is dry, ready your adhesive. A strong glue like E6000 is best for durability, though hot glue works for temporary indoor display. -
Apply adhesive:
Squeeze a generous ring of glue onto the bottom of the upside-down pot (the surface that is currently facing up). -
Attach the cap:
Carefully center the upside-down saucer on top of the glue-covered pot base. Press down firmly to secure the bond. -
Cure time:
Leave the mushroom undisturbed for the time recommended on your glue bottle (usually 24 hours for maximum strength) before moving it to the garden.
Outdoor Longevity
Terracotta absorbs moisture from the ground. Place your mushroom on a flat stone or paver rather than directly on soil to prevent paint peeling at the base.
Now you have a cheerful pop of color ready to brighten up your front steps or garden beds
Mini Owl Small Clay Pot
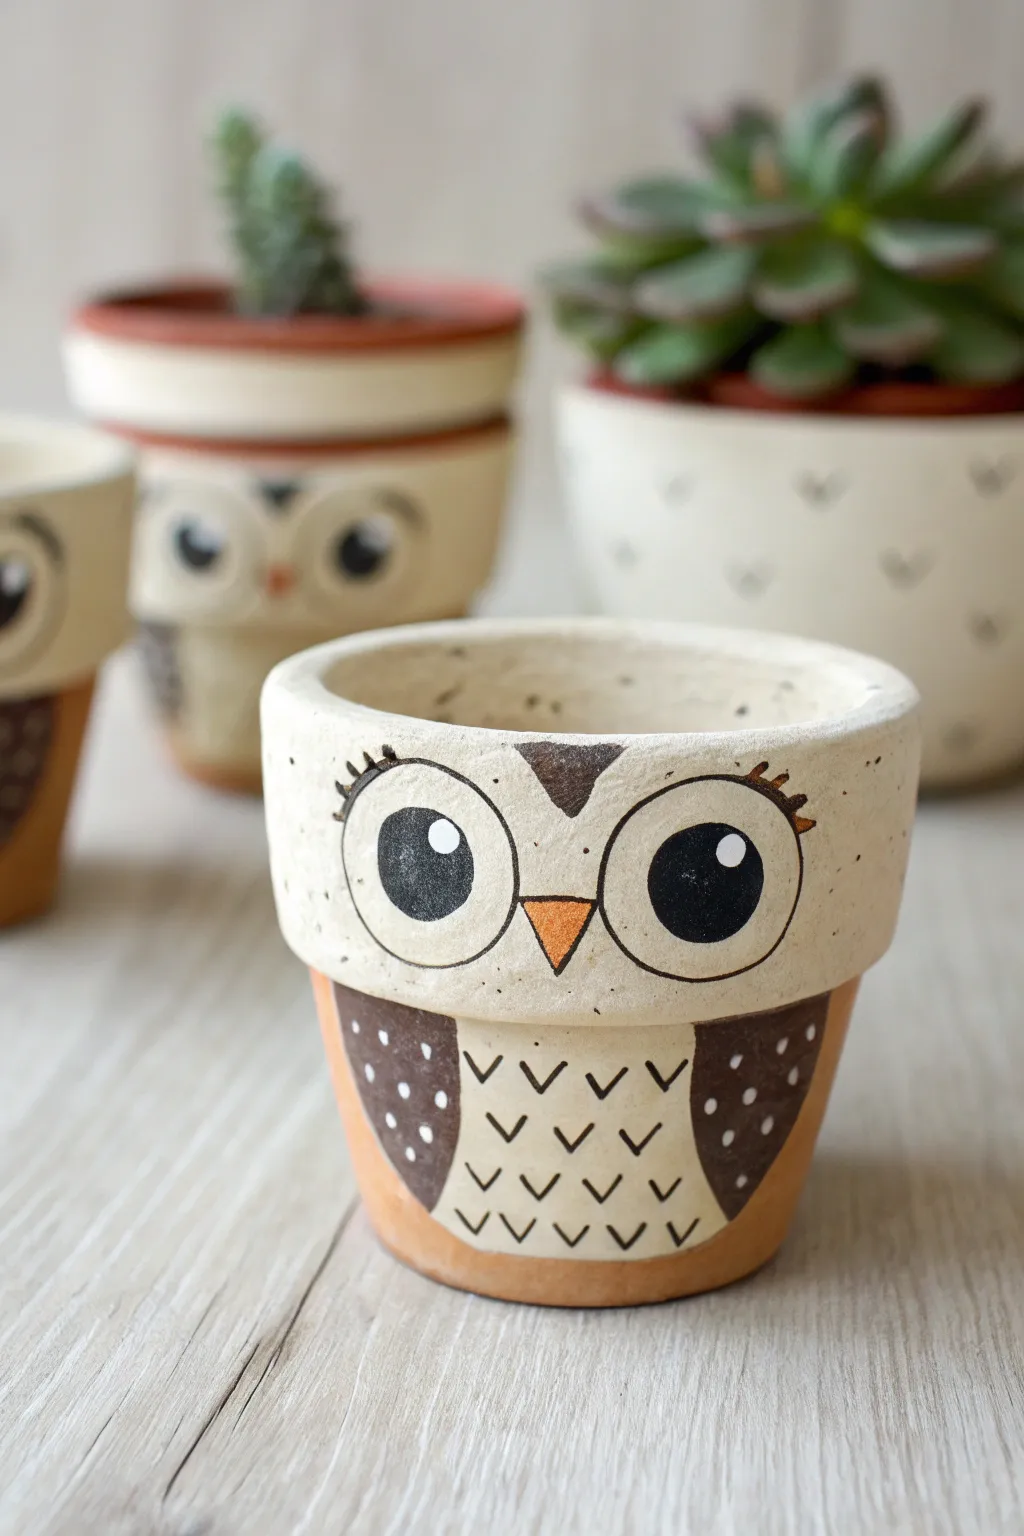
Transform a mini terracotta pot into a charming woodland creature with just a few strokes of paint. This project turns the natural rim of the pot into a quirky owl face, complete with wide eyes and patterned feathers, perfect for housing your tiniest succulents.
How-To Guide
Materials
- Small terracotta pot (approx. 2-3 inches)
- White acrylic paint (matte or satin)
- Brown acrylic paint
- Orange acrylic paint
- Black acrylic paint
- Flat paint brushes (small and medium)
- Fine detail brush or liner brush
- Pencil
- Sealer (optional, matte finish)
Step 1: Base Coating
-
Clean surface:
Begin by wiping down your terracotta pot with a damp cloth to remove any dust or debris. Let it dry completely so the paint adheres properly. -
Paint the rim:
Using a medium flat brush, apply a coat of white acrylic paint to the entire rim of the pot. You want this to look slightly textured, so don’t worry if it’s not perfectly smooth. -
Add a second coat:
Once the first layer is dry to the touch, add a second coat of white to the rim to ensure opacity. The natural orange of the clay shouldn’t peek through here. -
Create the chest:
Paint a curved ‘bib’ shape on the front body of the pot using the same cream or white paint. This should start right under the rim and curve downwards, leaving the sides and back unpainted to show the natural terracotta.
Step 2: Adding Features
-
Sketch the face:
Once the white paint is completely dry, lightly use a pencil to sketch two large circles for eyes on the rim and a small triangle for the beak in between them. -
Outline the eyes:
Take your fine detail brush and black paint to carefully trace the pencil circles. Add small eyelash details—three little flicks—at the top outer corners of each eye. -
Fill the pupils:
Inside each eye circle, paint a large black circle for the pupil. Leave a tiny white dot unpainted near the top right of each pupil for a ‘glint’ of life, or add it later with white paint. -
Paint the beak:
Fill in the small triangle between the eyes using orange acrylic paint. A small flat brush works best for getting sharp corners. -
Outline the beak:
Once the orange is dry, use the thin liner brush and black paint to outline the triangle, making it pop against the white background. -
Add the forehead:
Paint a small, inverted brown triangle right at the top edge of the rim, centered above the beak. This suggests the owl’s forehead feathers.
Smooth Circles
Struggling to paint perfect circles for the eyes? Find a bottle cap or large coin that fits the rim size and trace lightly around it with a pencil first.
Step 3: Feather Details
-
Paint the wings:
On the body of the pot, paint two curved brown shapes on either side of the white chest area. These should look like folded wings hugging the sides. -
Detail the wings:
Dip the handle end of a paintbrush into white paint and dot it onto the brown wings to create a spotted feather pattern. -
Create chest feathers:
Using your fine detail brush and black paint (or a black paint pen if you have a shaky hand), draw small ‘V’ shapes in staggered rows across the white chest area. -
Define the bottom edge:
If you want a cleaner look, you can paint a thin brown band around the very bottom edge of the pot, or simply leave the natural clay exposed as shown in the inspiration. -
Final touch-ups:
Check your black outlines. If any lines look too faint, carefully go over them one last time to make the cartoon style bold and crisp. -
Seal the pot:
If you plan to put a real plant inside, apply a coat of matte geometric sealer over the painted areas to protect your design from water damage.
Sleepy Owl
Instead of open circles for eyes, paint two downward curving semi-circles with eyelashes to create a sleeping owl version for a calm, dreamy look.
Pop in a spiky cactus or succulent to give your new feathered friend a fun hairstyle
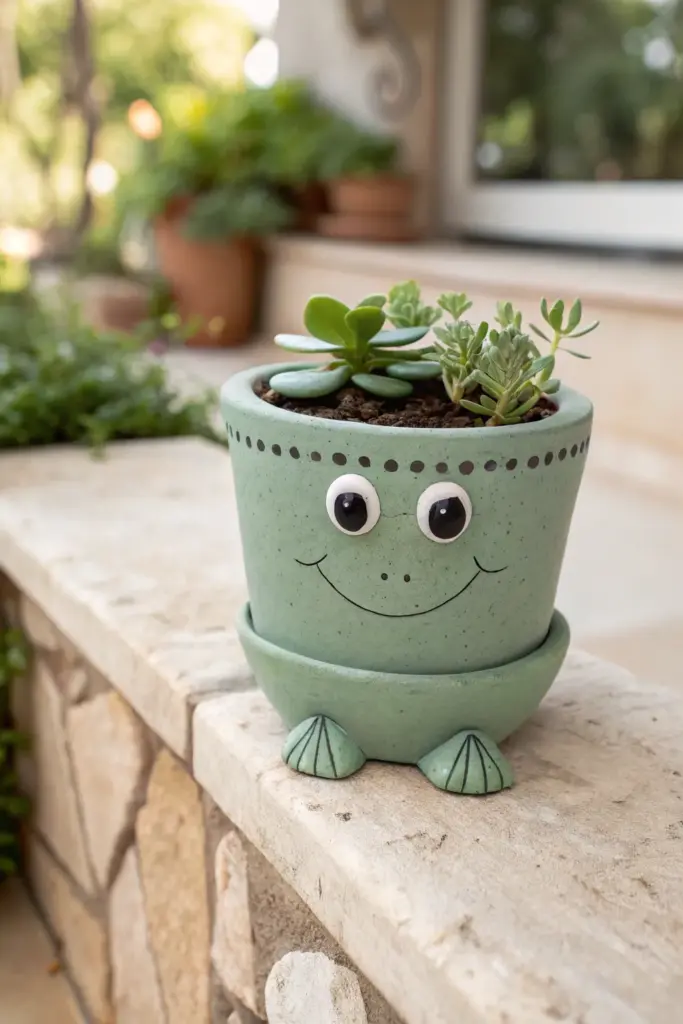
Frog Buddy From A Small Clay Pot

Transform a simple terracotta pot into an adorable, wide-smiling frog companion for your succulents. This cheerful planter features big googly eyes and custom-made clay feet that give it personality and charm.
Detailed Instructions
Materials
- Small terracotta pot (approx. 4-inch)
- Matching terracotta saucer
- Air-dry clay or polymer clay
- Sage green acrylic paint
- White acrylic paint
- Black acrylic paint or fine-point marker
- Large googly eyes
- Strong craft glue (e.g., E6000)
- Paintbrushes (flat and fine liner)
- Matte sealant spray or Mod Podge
- Sandpaper (optional)
- Succulents and potting soil
Step 1: Sculpting the Feet
-
Prepare the clay:
Take two equal walnut-sized pieces of air-dry clay. Roll them into smooth balls in your palms to remove any cracks or lines. -
Shape the flippers:
Flatten each ball slightly into a thick disc shape, then pinch one side to create a subtle heel, fanning out the front part to look like a webbed foot. -
Add toe details:
Using a modeling tool or the back of a butter knife, gently press three indented lines into the front of each foot to define the toes. -
Attach to the saucer:
Position the feet under the front edge of your terracotta saucer to check the fit. If you are using air-dry clay, adhere them directly to the saucer now with a dab of water or glue, pressing firmly so they contour to the rim. -
Let it cure:
Allow the clay feet to dry completely according to the package instructions. I find waiting overnight ensures they are rock-hard and ready for paint.
Step 2: Painting the Base
-
Clean surface:
Wipe down your terracotta pot and the saucer assembly with a damp cloth to remove any dust that might interfere with paint adhesion. -
Mix the green:
Squeeze out your sage green acrylic paint. If the color is too bright, mix in a tiny drop of white or grey to achieve that soft, matte earthy green seen in the photo. -
Base coat:
Apply the first coat of green paint to the entire exterior of the pot, the saucer, and the clay feet. Don’t worry about streakiness yet. -
Dry and repeat:
Let the first coat dry completely, then apply a second layer for opaque, smooth coverage. Ensure you get paint into the crevices of the sculpted toes. -
Add speckles:
To create the stone-like texture, dip an old toothbrush or stiff brush into black paint diluted with a little water. Using your thumb, flick the bristles to splatter tiny specks across the green surface.
Sticky Situation
If using air-dry clay on terracotta, score or scratch the saucer surface slightly before attaching the wet clay. This creates a rougher texture for a stronger bond.
Step 3: Adding the Face
-
Paint the rim detail:
Using the handle end of a paintbrush, dip it into black paint and dot a decorative border just under the rim of the pot. Space the dots evenly all the way around. -
Position the eyes:
Take your large googly eyes and test their placement. They should sit fairly high on the pot, leaving plenty of room for the smile. -
Glue the eyes:
Apply a strong craft glue to the back of the eyes and press them firmly onto the pot. Hold them in place for a moment so they don’t slide down before the glue tack sets. -
Draw the nose:
With a fine-point black marker or a very thin liner brush, place two small dots between and slightly below the eyes for the nostrils. -
Create the smile:
Start the mouth by drawing a wide, shallow U-shape. Add small, upward-curving cheek lines at the ends of the smile to make the expression extra friendly. -
Define the toes:
Use your fine liner brush or marker to trace the indented lines you made on the clay feet earlier, making the webbed details pop.
Make It Glossy
Instead of a matte finish, apply a high-gloss varnish over just the eyes after sealing. This mimics the wet look of real amphibian eyes and makes them shine.
Step 4: Finishing Touches
-
Seal the work:
Once all paint and ink are bone dry, spray the entire pot and saucer with a matte sealant. This protects your design from water damage when you water your plants. -
Assemble the pot:
Place the pot onto the saucer. I like to glue the pot directly to the saucer for stability, but you can leave them separate for easier drainage. -
Plant:
Fill the pot with succulent soil and gently nestle a few small succulents, like a jade plant or sedum, into the top to serve as the frog’s hair.
Now you have a charming green friend ready to brighten up your windowsill or garden shelf