If you’ve got a plain mug and a few colors, you’re already halfway to something you’ll actually want to reach for every morning. These clay mug painting ideas are the same kinds of designs I suggest in my studio—easy to start, super forgiving, and so satisfying once they’re finished.
Simple Polka Dot Wrap
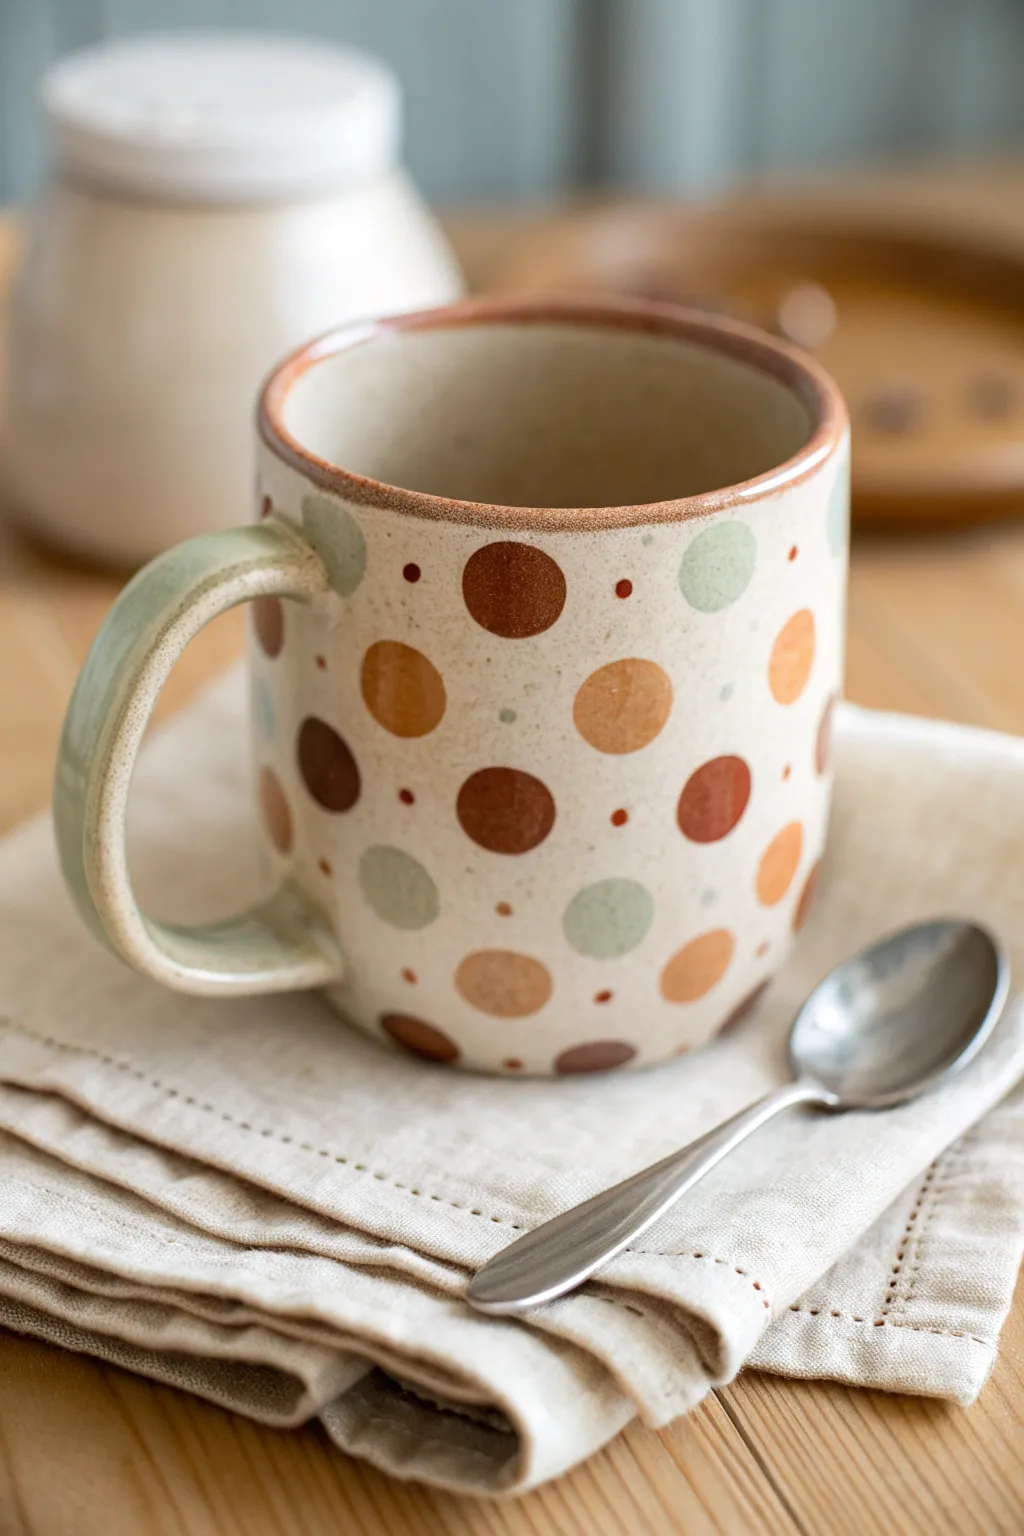
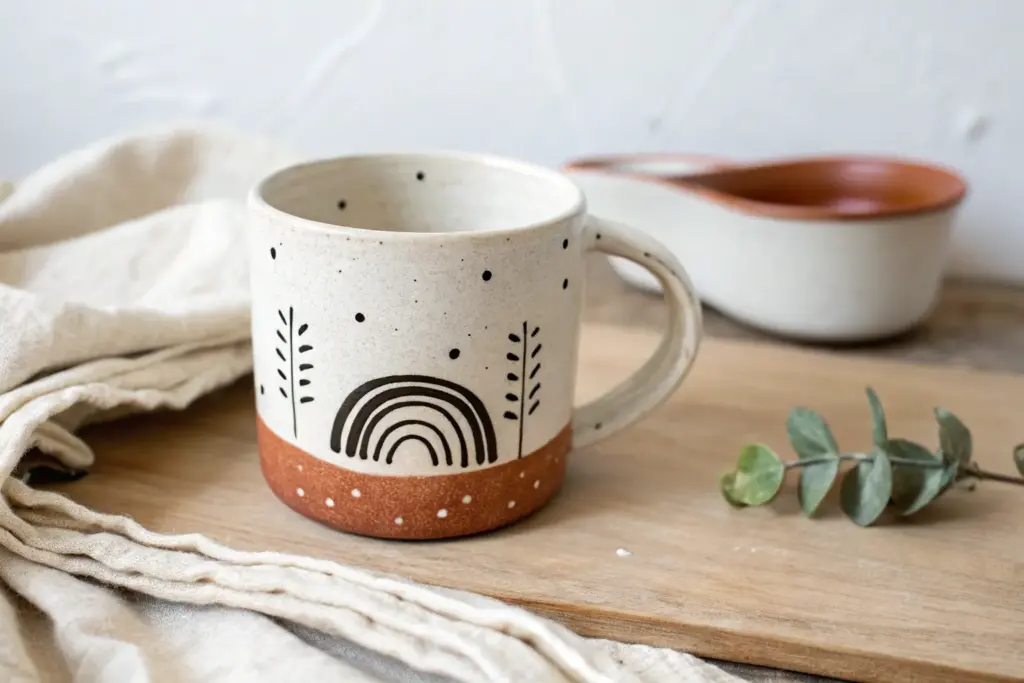
Embrace the cozy charm of this rustic mug design, featuring a warm palette of caramel, cocoa, and sage green dots on a speckled cream base. This simple yet sophisticated pattern wraps around the vessel, creating a timeless look that feels perfectly at home in a cottage kitchen.
Step-by-Step Guide
Materials
- Bisque-fired ceramic mug (wheel-thrown or slip-cast)
- Underglaze in ‘Speckled Cream’ or ‘Sand’ (base)
- Underglazes in: Deep Rust/Cocoa, Terracotta/Caramel, and Sage Green
- Clear dipping glaze (transparent)
- Round foam sponge pouncers (small and medium sizes)
- Fine detail paintbrush
- Fan brush or wide soft glaze brush
- Damp sponge for cleanup
- Kiln access (for firing)
Step 1: Base Preparation
-
Clean the Bisque:
Before any paint touches the clay, wipe down your entire bisque mug with a slightly damp sponge. This removes any dust that could prevent the glaze from adhering properly. -
Apply the Base Coat:
Using a wide fan brush, apply a coat of the speckled cream underglaze to the entire exterior of the mug. Ensure your strokes are long and even to minimize texture. -
Layering Up:
Allow the first coat to dry until it’s chalky to the touch. Apply a second and third coat to ensure full opacity, alternating the direction of your brushstrokes each time. -
Handle Check:
Don’t forget the handle. I like to carefully brush the inside curves of the handle first to make sure no bare spots are left behind.
Smudged Circle?
If a foam pouncer slides and smears a dot, wait for it to dry completely. Gently scrape the error off with a craft knife, then re-dab the base color over the spot before trying again.
Step 2: Dotting the Design
-
Prepare the Palette:
Pour small puddles of your accent colors—Deep Rust, Terracotta, and Sage Green—onto a palette or tile. Having them ready makes the stamping process smoother. -
Start with Large Dots:
Dip a medium-sized foam pouncer into the Deep Rust color. Press it gently onto the mug surface, twisting slightly as you lift to create a crisp circle. Place these randomly but sparsely around the mug. -
Add Terracotta Tones:
Switch to a clean medium pouncer and the Terracotta/Caramel shade. Stamp these circles in the open spaces between the rust dots, keeping the spacing organic. -
Introduce Sage Green:
Using the Sage Green and a medium pouncer, fill in remaining large gaps. The green acts as a cool visual break from the warm brown tones. -
Fill with Tiny Dots:
Switch to a small detail brush or the handle end of a paintbrush. Dip it into the Deep Rust paint and create tiny accent dots in the negative spaces between the larger circles. -
Handle Accent:
For a cohesive look, paint the top surface of the handle with a wash of the Sage Green. You can water it down slightly for a more translucent, watercolor effect that blends into the cream base. -
Rim Detail:
Load a fine liner brush with the Deep Rust color. Carefully run the brush along the very rim of the mug to create a thin, defining lines that frames the design.
Step 3: Finishing & Firing
-
Dry Completely:
Let the underglaze design dry completely, preferably overnight. The dots are thicker than the base coat and need extra time to ensure no moisture remains. -
Clear Glazing:
Once bone dry, dip the entire mug into a clear transparent glaze. Shake gently to remove excess drips, then let the glaze set. -
Stilt and Clean:
Wipe the bottom of the mug (the ‘foot’) completely clean with a sponge so it doesn’t stick to the kiln shelf. -
Final Fire:
Fire the mug in the kiln according to the clay and glaze manufacturer’s instructions (usually Cone 5 or 6 for stoneware).
Clean Rims
To get a varied, rustic line on the rim like the photo, dip a small piece of sponge in the rust color and lightly drag it along the edge instead of using a brush.
Enjoy your morning coffee in this beautifully handmade piece of functional art


Classic Horizontal Stripes
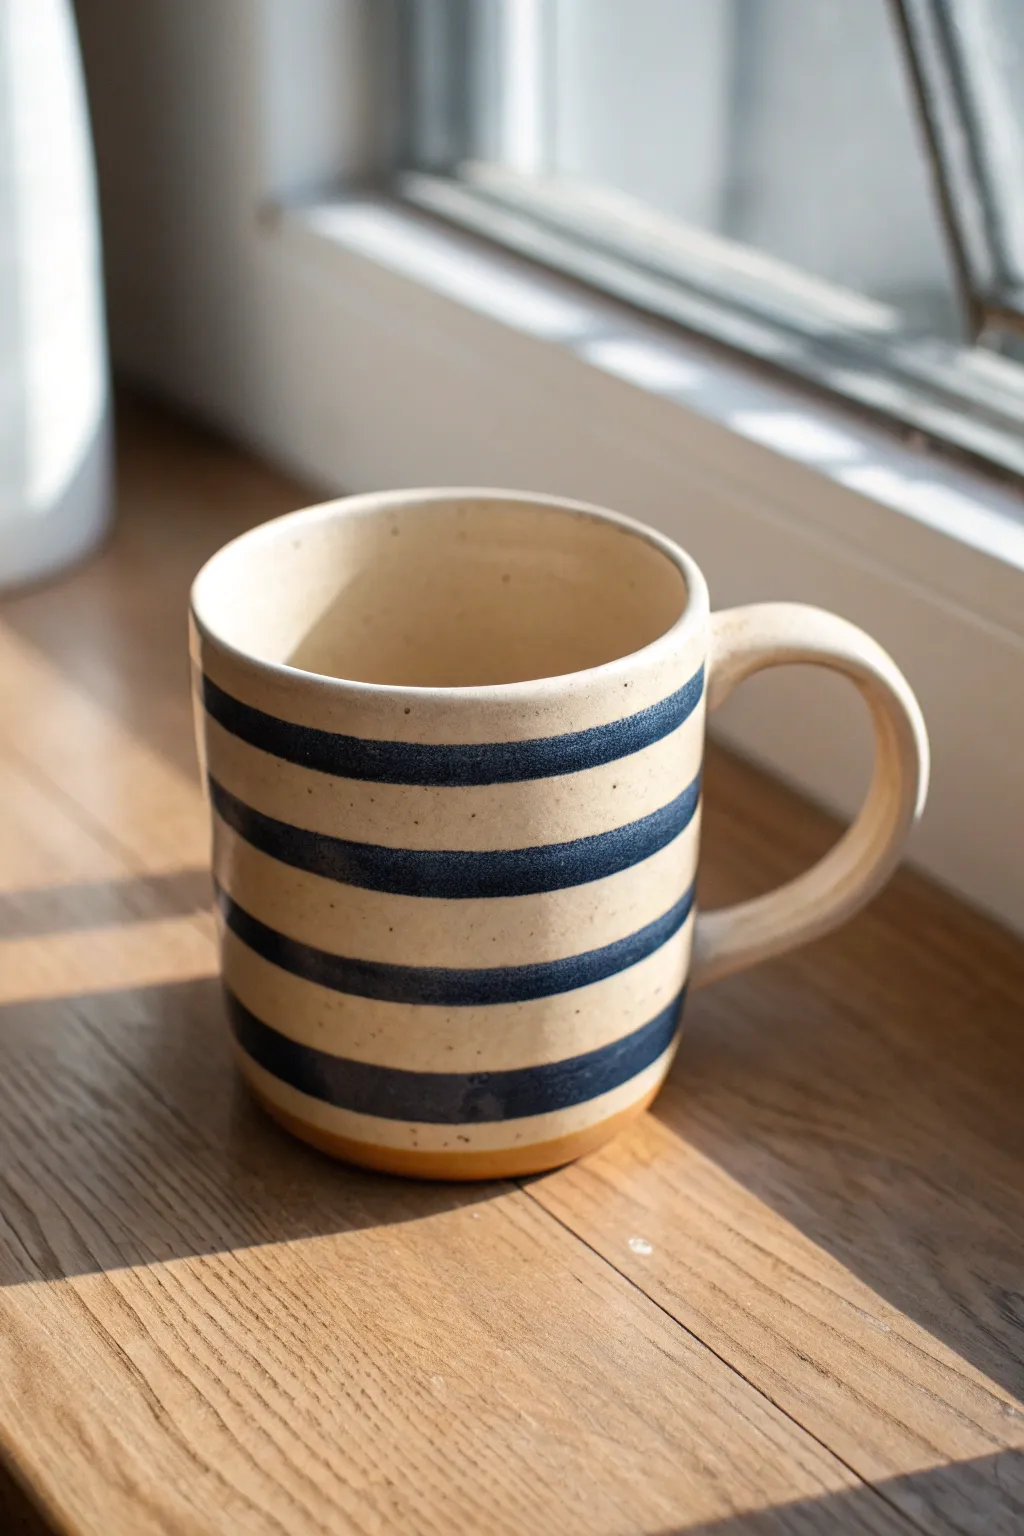
Achieve a timeless, nautical look with this surprisingly simple horizontal stripe design. The speckled cream base contrasts beautifully with deep indigo bands, creating a mug that feels both rustic and refined.
Step-by-Step Tutorial
Materials
- Bisque-fired ceramic mug (preferably speckle clay)
- Underglaze (Cream or Oatmeal)
- Underglaze (Navy or Indigo Blue)
- Wide flat shader brush (1 inch)
- Medium round brush (size 6 or 8)
- Potter’s wheel or banding wheel
- Clear transparent dipping glaze
- Damp sponge
- Wax resist (emulsion)
Step 1: Base Preparation
-
Clean the Bisque:
Start by wiping down your bisque-fired mug with a slightly damp sponge to remove any dust or oils from handling. This ensures the underglaze adheres properly without crawling. -
Initial Cream Layer:
Using your wide flat shader brush, apply a coat of cream or oatmeal-colored underglaze to the exterior. If your clay body is already a nice speckled white, you can skip this, but painting a base layer adds depth. -
Smooth the Strokes:
While the first coat is still damp, lightly brush over it in one direction to smooth out any texture. I like to keep the strokes horizontal to match the spin of the wheel later. -
Apply Second Coat:
Once the first layer is touch-dry, apply a second coat of the cream base color for full opacity. Let this dry completely before moving on to the stripes. -
Protect the Foot:
Apply a band of wax resist to the bottom half-inch of the mug and the underside foot. This creates that lovely exposed clay line at the bottom, just like in the photo.
Step 2: Painting the Stripes
-
Set Up the Wheel:
Center your mug carefully on a banding wheel or potter’s wheel. Getting it perfectly centered is crucial for straight, continuous bands. -
Load the Brush:
Load your medium round brush generously with the navy or indigo underglaze. You want enough paint to make a full rotation but not so much that it drips. -
Position Phase:
Decide on the spacing. For this look, we want four distinct bands. Hover your hand to find a stable bracing position against the table or wheel basin. -
Paint the Top Stripe:
Start the wheel spinning at a slow, steady speed. Touch the brush tip gently to the mug just below the rim. Hold your hand rigid while the mug rotates to create the first ring. -
Add Middle Stripes:
Move the brush down about an inch and repeat the process for the second and third stripes. Don’t worry if the edges have a slightly organic wobble; that’s part of the charm. -
Final Lower Stripe:
Paint the final stripe approximately an inch above the waxed bottom section. The wax acts as a guide, preventing you from painting too low. -
Refine Density:
While the wheel is spinning, you can lightly re-trace the stripes to deepen the color if the first pass looks a bit translucent. Indigo often needs two passes.
Wobbly Stripes?
If your lines aren’t straight, check your centering. A slightly off-center mug creates waves. Brace your elbow firmly against your ribs for a steadier hand.
Step 3: Finishing Glaze
-
Dry Time:
Allow the underglaze stripes to dry completely. They should look chalky and matte. If you rush this, the final clear glaze might smear your crisp lines. -
Bisque Fire (Optional):
At this stage, some potters prefer to do a second bisque fire to set the underglaze. If you are dipping directly, proceed carefully. -
Prepare Clear Glaze:
Stir your clear transparent glaze thoroughly. It should be the consistency of heavy cream to ensure a glossy finish without clouding the stripes. -
The Dip:
Using glazing tongs or a firm grip on the foot, dip the entire mug into the clear glaze for about 3 seconds. Pull it out straight to avoid drips collecting on one side. -
Clean the Foot:
Turn the mug over and immediately wipe any glaze beads off the waxed bottom area with a sponge. The wax helps, but a quick wipe ensures a clean kiln shelf. -
Final Fire:
Fire the mug to the temperature recommended for your specific clay and glaze (usually Cone 5 or 6). This melts the glaze into that beautiful shiny surface.
Make it Yours
Try varying line thickness. Use a thinner brush for three lines and a thicker brush for one accent line to create a modern graphic variation.
Once cooled from the kiln, your new favorite mug is ready for a warm cup of coffee by the window


Two-Tone Color Block Mug
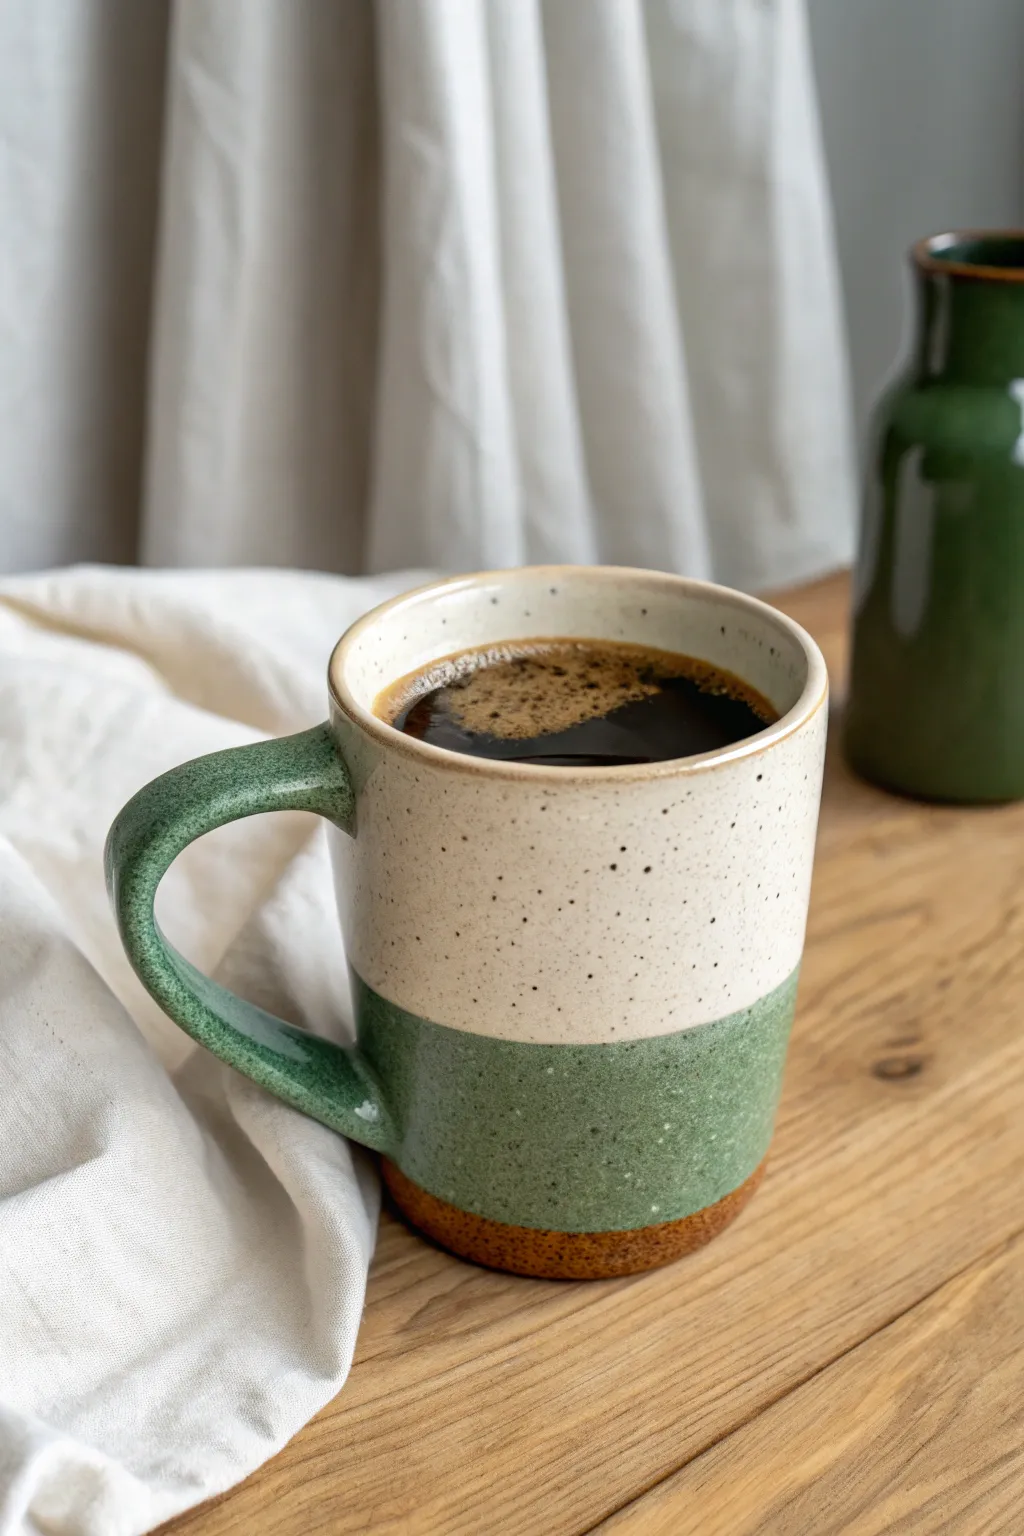
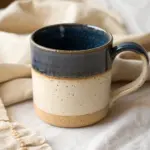
Embrace the beauty of simplicity with this rustic, nature-inspired design that perfectly captures the charm of handmade pottery. By combining a creamy oatmeal glaze with a deep sage green and an unglazed base, you’ll create a cozy mug that feels as good in the hand as it looks on the table.
Step-by-Step Guide
Materials
- Bisque-fired ceramic mug (blank)
- Oatmeal or speckled cream ceramic glaze
- Sage green or moss green ceramic glaze
- Pencil
- Masking tape or painters tape (optional)
- Fan brush or soft glazing brush
- Clean sponge
- Bowl of water
- Kiln for firing
Step 1: Preparation & Design
-
Clean the bisque:
Start by wiping down your bisque-fired mug with a slightly damp sponge. This removes any dust that might prevent the glaze from adhering properly. -
Mark the base line:
Decide how much of the raw clay body you want exposed at the very bottom. Lightly mark a line about 1/4 inch from the bottom edge with a pencil. This unglazed ‘foot’ adds a lovely textural contrast. -
Mark the horizon line:
Draw another faint line around the middle of the mug effectively splitting the body into two zones. The handle should fall below this line to integrate seamlessly with the bottom color. -
Isolate the base:
Apply a strip of masking tape along your bottom pencil line to protect the raw clay foot, ensuring that no glaze drips onto the area you want to keep natural.
Glaze Tip
Glazes with ‘floating’ properties often break beautifully over texture. Use a clay body with some grit or grog to encourage the speckles in the glaze to pop even more.
Step 2: Applying the Green Glaze
-
Mix the green glaze:
Stir your sage green glaze thoroughly. If it’s a bottled glaze with suspended textural specks, ensure they are well-distributed so you get that organic, spotted look. -
Glaze the interior (optional):
If you want the inside to match the handle, pour the green glaze inside, swirl it to coat entirely, and pour out the excess. Alternatively, you can use the cream color for the inside. -
Paint the handle:
Using a soft brush, carefully apply the first coat of green glaze to the entire handle. Work closely to the mug body where the handle attaches. -
Coat the bottom section:
Paint the bottom half of the mug exterior with the green glaze, stopping exactly at your middle pencil line. Don’t worry about being perfectly straight; a slight wave adds character. -
Apply second and third coats:
Let the first layer dry until it’s chalky to the touch. Apply two more coats to the green sections (bottom and handle) to ensure a rich, opaque color after firing.
Design Up
Try dipping the rim in the green glaze as a final step. It will create a third stripe at the top that drips slightly into the cream for a fluid, dynamic look.
Step 3: Applying the Cream Glaze
-
Load the cream glaze:
Clean your brush thoroughly or switch to a new one. Stir your speckled oatmeal glaze well. -
Glaze the top section:
Apply the first coat of cream glaze to the top half of the mug exterior. Be very careful where it meets the green line. -
Create the overlap:
For a seamless transition, I find it helpful to slightly overlap the cream glaze over the very top edge of the green glaze. This prevents a gap of raw clay from showing through after firing. -
Finish the rim:
Bring the cream glaze up and slightly over the rim. If you glazed the interior green, stop at the apex of the rim; otherwise, continue continuously into the interior. -
Build opacity:
Apply two additional coats of the cream glaze, allowing sufficient drying time between each layer.
Step 4: Finishing Touches
-
Remove tape:
Once the glaze is dry but not powdery, carefully peel away the masking tape from the bottom foot. -
Clean the foot:
Use a damp sponge to wipe the bottom 1/4 inch and the very underside of the mug perfectly clean. Any glaze left here will fuse the mug to the kiln shelf. -
Smooth imperfections:
Gently verify the transition line between the green and cream colors with your finger to smooth down any high ridges where the glazes overlap. -
Check for speckles:
If your glaze doesn’t have built-in speckles, you can splatter a tiny bit of iron oxide wash or brown glaze over the cream section using a toothbrush now. -
Fire the piece:
Place your mug in the kiln and fire it according to the glaze manufacturer’s instructions (usually Cone 5 or 6 for stoneware) to melt the glass and seal the clay.
Once cooled, your mug is ready to be filled with hot coffee and cradled in your hands

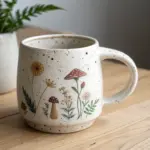

Tiny Daisies for Beginners
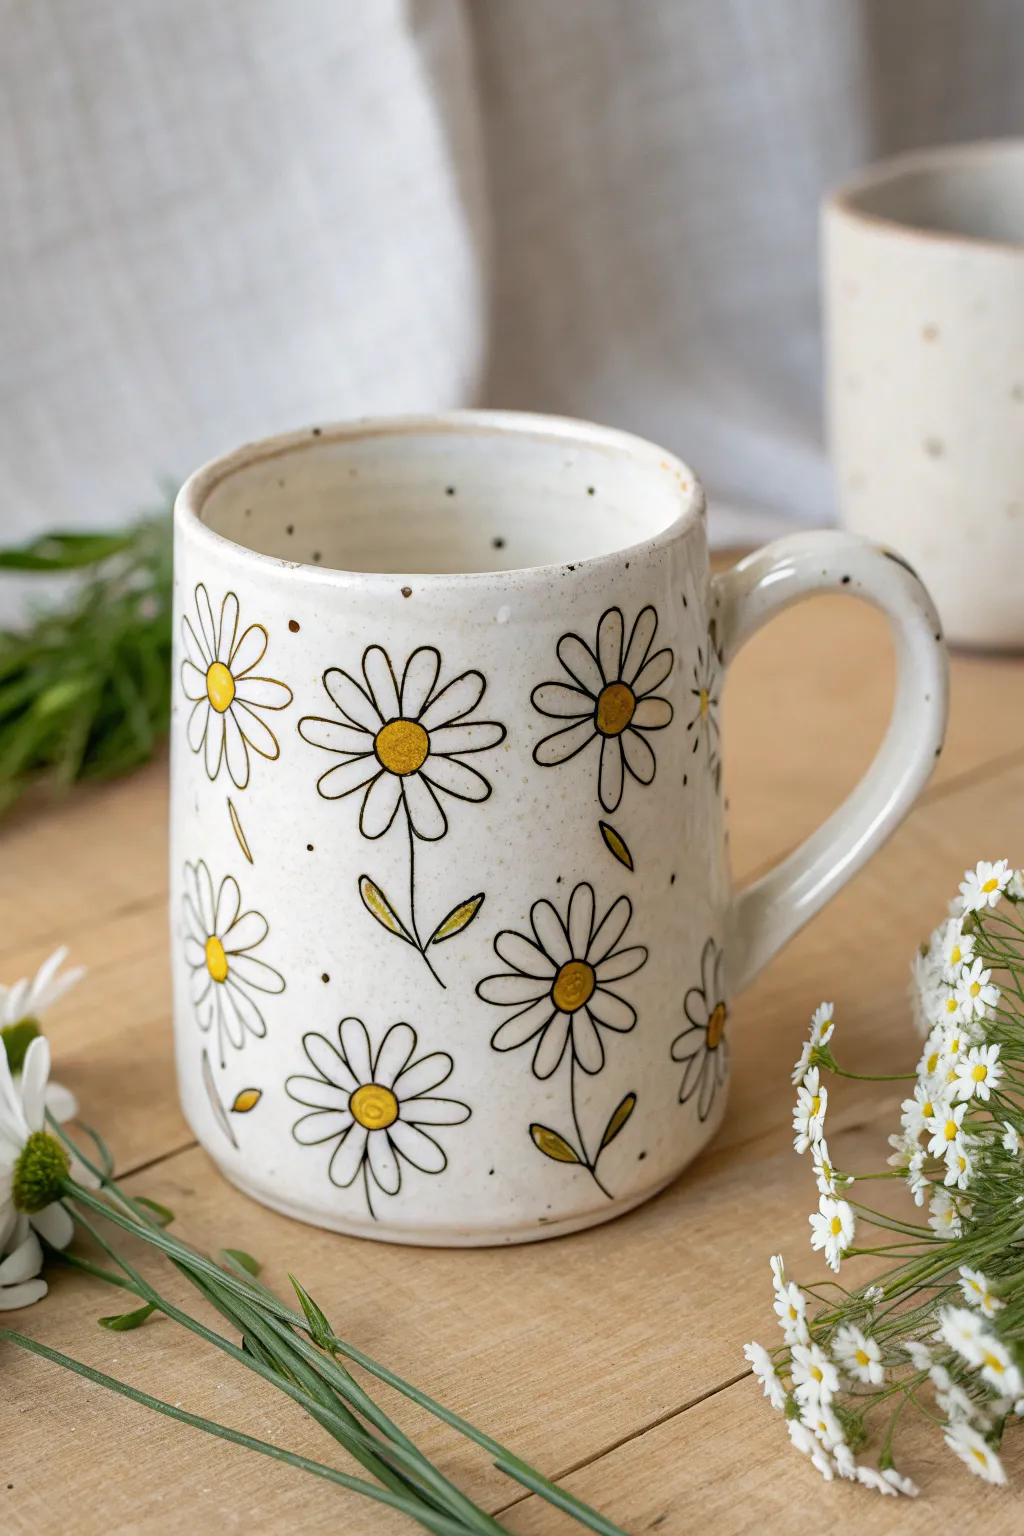
Brighten up your morning coffee with this cheerful, rustic mug design featuring scattered daisies. This beginner-friendly project uses simple outline techniques and subtle glazing to create a cozy, hand-painted aesthetic on your ceramic ware.
How-To Guide
Materials
- Bisque-fired ceramic mug
- Underglaze pencil or fine liner brush (black/dark brown)
- Underglaze (bright yellow)
- Speckled white glaze (matte or satin finish)
- Detail brush (size 0 or 00)
- Small round brush (size 2)
- Clear dipping glaze (if not using a glossy speckled glaze)
- Damp sponge
- Needle tool or toothpick (optional)
Step 1: Preparation & Base
-
Clean the Bisque:
Start by wiping down your bisque-fired mug with a damp sponge. This is a crucial first step to remove any kiln dust or oils from your hands that might resist the glaze. -
Map Out Placement:
Visualize where your main daisy clusters will go. You want them scattered randomly but evenly. I like to lightly mark center dots with a regular pencil first; the graphite will burn off in the kiln.
Keep it Loose
Don’t rest your hand too heavily on the mug while drawing outlines. A hovering hand creates more fluid, natural lines that mimic wildflower stems better.
Step 2: Painting the Daisies
-
Outline the Flower Centers:
Using your fine detail brush and black (or dark brown) underglaze, paint small, imperfect circles for the flower heads. Keep the lines thin and slightly wobbly for that organic look. -
Draw the Top Petals:
Starting from the center circle, paint U-shaped loops extending outward. Paint the petals that are ‘behind’ or at the top of the flower first. -
Complete the Petal Ring:
Continue painting U-shapes around the entire center until you have a full flower. Don’t worry about identical sizes; variation adds charm. -
Add Stems and Leaves:
For some of the flowers, drag a thin line downward to create a stem. Add simple, oval-shaped leaves branching off the stem or floating nearby as ‘falling’ petals. -
Color the Centers:
Dip your size 2 brush into the bright yellow underglaze. Dab a generous amount into the center of each flower outline. -
Add Leaf Accents:
If you want a hint of color on the leaves, you can add a tiny dash of yellow or muted green inside the leaf outlines, or leave them uncolored for a minimalist look. -
Create Depth:
Once the underglaze is touch-dry, go back with your fine liner brush and add small accent lines near the base of the petals to give them dimension. -
Add Background Specks:
For extra texture, dip a stiff brush or toothbrush into diluted dark underglaze and flick a few subtle specks onto the mug.
Step 3: Glazing & Finishing
-
Wax Resist (Optional):
If you want the flowers to remain raw or have a very specific texture, you can apply wax resist over the painted daisies. However, for the look in the image, we will glaze over them. -
Apply Speckled Glaze:
Stir your speckled white glaze thoroughly. Pour it into the mug, swirl to coat the inside, and pour out the excess. -
Glaze the Exterior:
For the outside, you want a glaze that is translucent enough to show your underglaze work. Dip the mug or brush on a thin coat of the speckled white glaze. -
Check Transparency:
Ensure the glaze application isn’t too thick over your drawings, or the black lines might get obscured. One or two thin coats usually suffice. -
Wipe the Foot:
Use a damp sponge to completely wipe any glaze off the bottom ‘foot’ of the mug to prevent it from sticking to the kiln shelf. -
Rim Detail:
If you like a rustic edge, gently sponge away a tiny bit of white glaze from the rim to expose the clay body, or add a thin line of iron oxide wash. -
Final Inspection:
Check for any pinholes or thick drips and smooth them out with your finger. -
Fire:
Place the mug in the kiln for a glaze firing according to the temperature requirements of your chosen clay and glaze (usually Cone 5 or 6).
Golden Textures
For a 3D effect, use a slip trailer to pipe the yellow centers instead of painting them flat. This creates a tactile bump for each flower heart.
Enjoy sipping from your new favorite mug, knowing every imperfect petal was placed by hand

The Complete Guide to Pottery Troubleshooting
Uncover the most common ceramic mistakes—from cracking clay to failed glazes—and learn how to fix them fast.
Botanical Vine Around the Rim
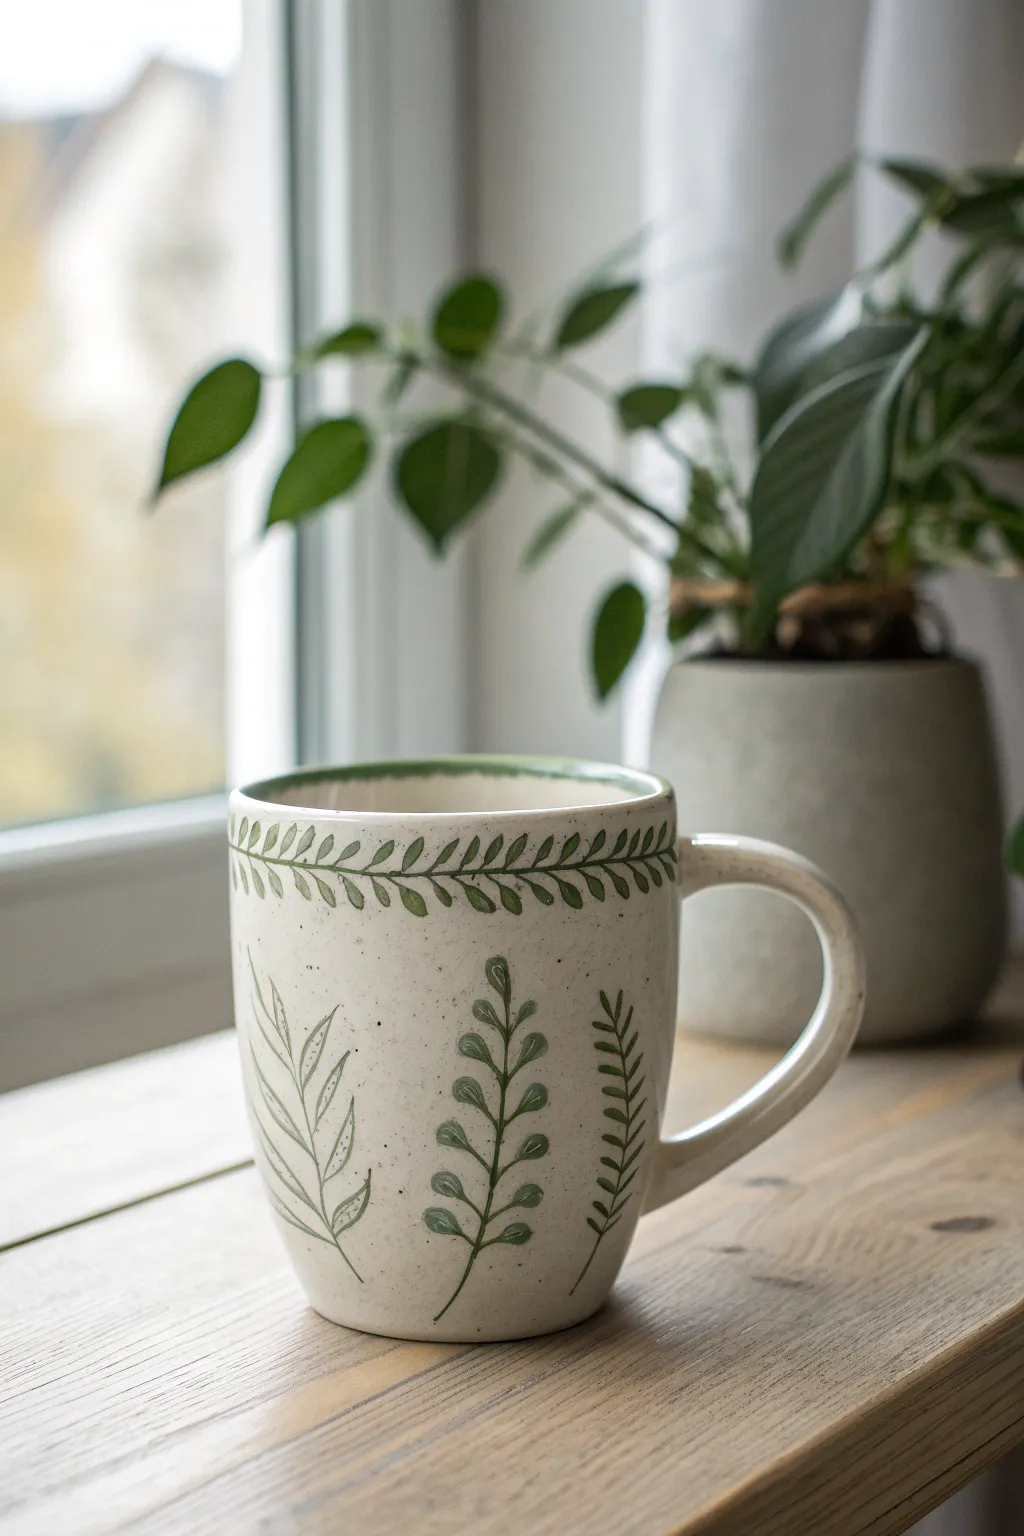
This project transforms a plain ceramic mug into a nature-inspired piece with delicate vine details. The design features a continuous leafy vine hugging the rim and distinct sprigs of foliage rising from the base, all painted in earthen greens on a speckled cream background.
Step-by-Step Tutorial
Materials
- Bisque-fired ceramic mug (speckled clay body preferred)
- Underglaze (Forest Green or Sage Green)
- Fine liner brush (size 0 or 00)
- Small round brush (size 2)
- Pencil (for sketching)
- Clear dipping glaze
- Damp sponge
- Water cup
- Palette or small dish
Step 1: Preparation and Sketching
-
Clean the bisque:
Start by wiping down your bisque-fired mug with a damp sponge. This removes any dust or oils from handling that might repel the underglaze. -
Sketch the rim vine:
Using a light pencil, draw a continuous horizontal line about half an inch below the rim. This will render the main stem for your upper vine border. -
Mark the vertical sprigs:
Lightly sketch three or four vertical stems rising from the bottom of the mug. Vary the heights slightly for a natural look, but keep them generally centered between the handle placement. -
Plan leaf placement:
On the rim vine, mark small ticks where the leaves will go—these should angle forward in a repeating pattern. For the vertical sprigs, sketch different leaf styles: one with long, thin leaves, one with rounded clustered leaves, and one with fern-like fronds.
Smudged Lines?
If you smudge a line, don’t wipe it while wet! Let it dry completely, then gently scratch the mistake off with a wooden toothpick to avoid staining the clay.
Step 2: Painting the Rim Border
-
Load the liner brush:
Thin your green underglaze slightly with water until it has an ink-like consistency. fully saturate your fine liner brush. -
Paint the main stem:
Trace over your pencil line around the rim in a single, smooth motion if possible. If you need to stop, lift the brush gently to taper the line, then overlap slightly when you restart. -
Paint the rim stripe:
Carefully run your loaded brush along the very top edge of the mug rim to create a coordinating green band. -
Add vine leaves:
Using the small round brush, press down and lift up quickly to create tear-drop shaped leaves along the vine stem. I find it easiest to paint all the top leaves first, then flip the mug upside down to paint the bottom leaves symmetrically.
Step 3: Painting the Vertical Foliage
-
Outline the stems:
Switch back to the fine liner brush to paint the central stems for your vertical plants, starting thick at the base and tapering as you go up. -
Paint the fern fronds:
For the fern-style plant (the one on the right in the image), use short, quick strokes angling upward from the stem. Keep these strokes somewhat stiff and uniform. -
Create rounded leaves:
For the center plant, paint small oval shapes attached to the stem by tiny petioles. Use the round brush but don’t press fully; keep the shapes delicate. -
Paint long leaves:
For the leftmost plant, use long, sweeping strokes that start at the stem and curve outward and upward. These should look like blades of grass or willow leaves. -
Add interior details:
Once the long leaves are dry to the touch, use your finest brush with slightly darker or thicker underglaze to add a central vein line down the middle of the larger leaves.
Pro Tip: Leaf Shape
Vary the pressure on your brush to change leaf width. Press down hard for the belly of the leaf and lift up sharply to create a perfect pointed tip.
Step 4: Finishing Touches
-
Clean up smudges:
Check the mug for any stray paint marks. You can gently scratch these off with a needle tool or wipe them with a damp precision aesthetic sponge. -
Burn out pencil lines:
Don’t worry about erasing your sketch marks; the graphite will burn away completely in the kiln. -
Glaze application:
Once the underglaze is completely dry, dip the entire mug into a clear transparent glaze. Ensure an even coat and shake off excess drips. -
Fire the mug:
Fire the mug in the kiln according to the clay and glaze manufacturer’s instructions (usually cone 5 or 6 for stoneware).
Now you have a stunning botanical mug ready for your morning coffee
Speckled Stoneware Look
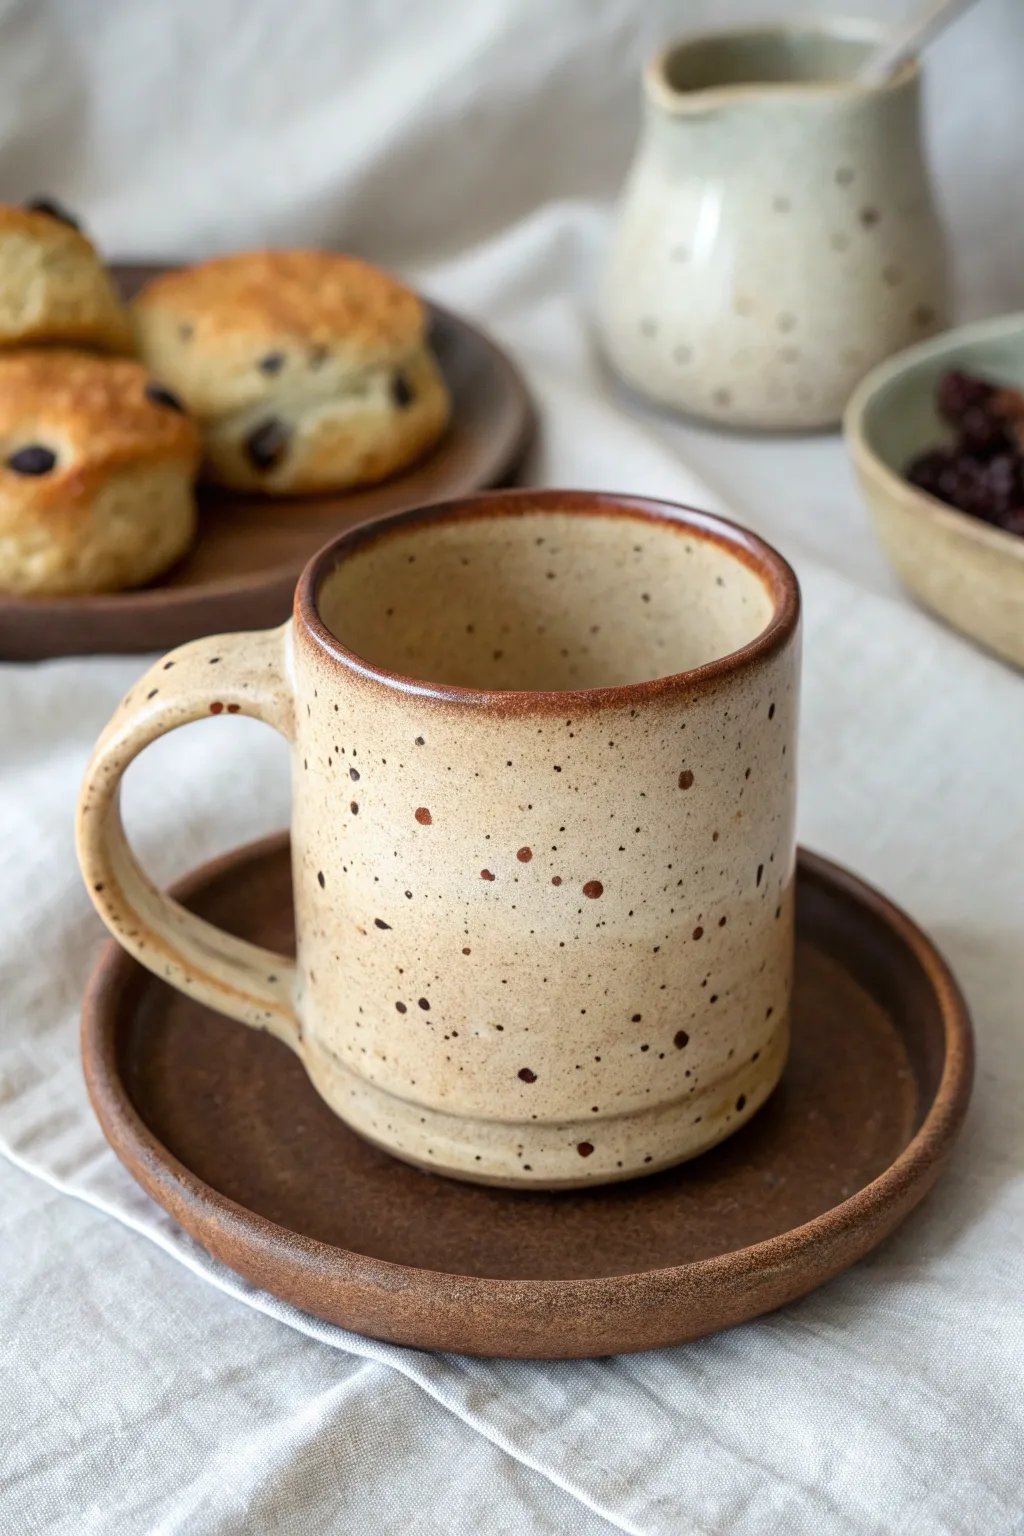
Achieve the rustic charm of pottery-studio stoneware without needing a kiln. This project uses clever painting techniques to transform a basic ceramic mug into a cozy, speckled vessel perfect for your morning brew.
How-To Guide
Materials
- Plain white or cream ceramic mug
- Ceramic or multi-surface acrylic paint (Cream/Oatmeal)
- Ceramic or multi-surface acrylic paint (Dark Brown/Espresso)
- Ceramic or multi-surface acrylic paint (Burnt Sienna/Rust)
- Soft synthetic paintbrush (medium flat)
- Old toothbrush or stiff bristle brush
- Detail brush (small round)
- Rubbing alcohol
- Paper towels
- Gloss or satin clear sealant (dishwasher safe, if possible)
Step 1: Preparation and Base Coat
-
Clean the Surface:
Before you begin, wipe down the entire mug with rubbing alcohol to remove any oils or residue. This ensures the paint adheres perfectly to the glazed surface. -
Mix Your Base Color:
Create a warm, earthy base tone. If you don’t have a premixed oatmeal color, mix a generous amount of white with a drop of yellow oxide and a tiny touch of brown. -
Apply the First Layer:
Using your flat synthetic brush, apply an even coat of the oatmeal paint over the entire outside of the mug. Don’t worry if it looks slightly streaky; this adds to the organic texture. -
Let it Dry:
Allow this initial coat to dry completely. This usually takes about an hour, depending on the paint brand. -
Second Coat Application:
Apply a second layer of the oatmeal paint to ensure solid coverage. For a more hand-thrown look, I like to use slightly varied brushstrokes here rather than painting in perfectly straight lines. -
Lower Third Detail:
Notice the subtle ridge near the bottom of the mug? If your mug has one, highlight it gently with a slightly lighter shade of your base color to create dimension.
Step 2: Creating the Speckles
-
Prepare the Speckle Paint:
Dilute a small amount of dark brown paint with a few drops of water. You want an inky consistency—runny enough to flick, but pigmented enough to show up opaque. -
Test Your Splatter:
Dip your old toothbrush into the thinned brown paint. Test the splatter technique on a piece of paper towel first by running your thumb across the bristles. -
Splatter the Mug:
Hold the toothbrush about 6 inches from the mug and gently flick the bristles to create a fine mist of speckles. Rotate the mug as you go to ensure even coverage. -
Vary Droplet Sizes:
For a natural clay look, vary your distance slightly. Move closer for denser clusters and further away for a light dusting. -
Add Large Spots:
Using a small detail brush or the end of a toothpick, manually add a few larger, distinct brown spots scattered randomly. This mimics the larger iron deposits found in real stoneware. -
Add Rust Accents:
Mix a tiny bit of burnt sienna paint. Randomly dot a few speckles with this reddish tone among the brown ones to add warmth and depth to the ‘clay’ body.
Splatter Control
Place your hand inside the mug to hold it while splattering. This prevents paint from getting inside the rim where you drink.
Step 3: Finishing Touches
-
Paint the Rim:
Mix dark brown with the burnt sienna to create a rust-colored rim shade. Use a small round brush to paint a thin, organic line along the very top edge of the mug. -
Soften the Rim Edge:
While the rim paint is still wet, gently tap the bottom edge of the line with your finger or a dry brush to feather it downward slightly, so it doesn’t look like a harsh stripe. -
Handle Details:
Don’t forget the handle! Ensure the speckles wrap around the curve, and check inside the handle loop for any missed bare spots. -
Dry Time:
Let the paint cure for at least 24 hours. This patience is crucial for durability. -
Seal or Bake:
Follow the instructions on your specific paint. Some require baking in a home oven to set, while others need a clear, food-safe sealant applied over the top.
Bottom Detail
Leave the bottom ½ inch unpainted or wipe it back to show the raw ceramic, mimicking a ‘wax resist’ pottery foot.
Enjoy your cozy new mug that looks like it came straight from a potter’s wheel


What Really Happens Inside the Kiln
Learn how time and temperature work together inside the kiln to transform clay into durable ceramic.
Easy Checkerboard Pattern
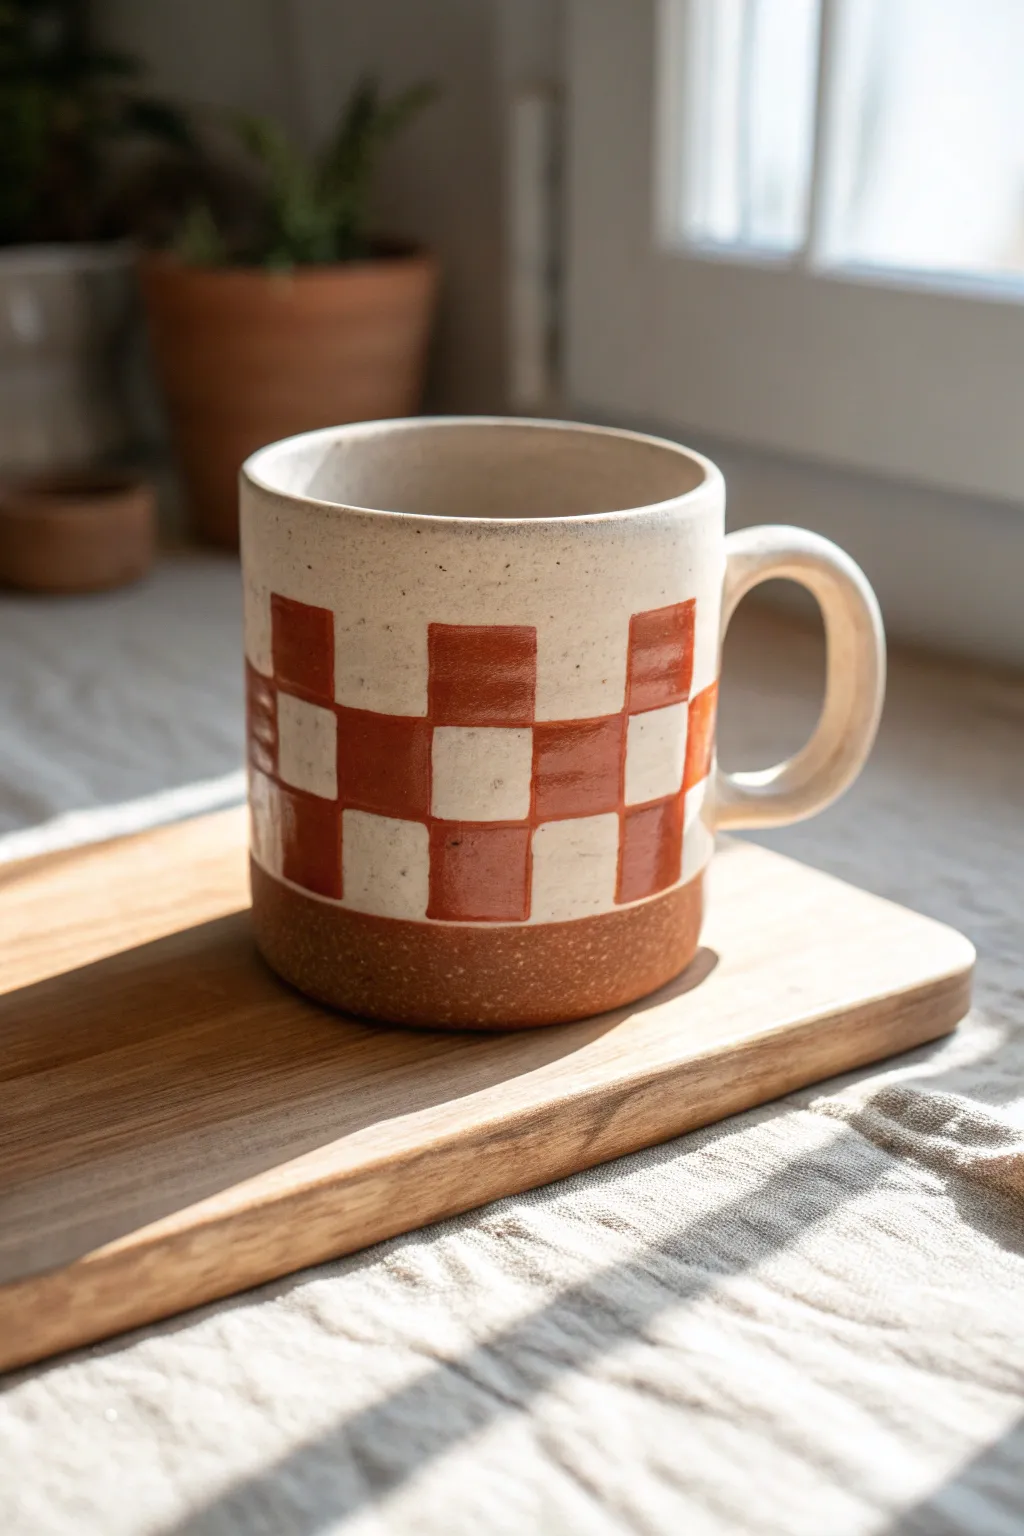
This charming mug brings a touch of seventies warmth to your morning coffee with its earthy, rust-colored checkerboard design. The beauty of this project lies in its imperfection, combining a speckled cream glaze with raw clay textures for a cozy, handmade feel.
Detailed Instructions
Materials
- Bisque-fired ceramic mug (stoneware clay body)
- Speckled cream or matte white glaze
- Rust or terracotta colored underglaze
- Wax resist (liquid emulsion)
- Flat shader brush (size 4 or 6)
- Soft fan brush or dipping tongs
- Pencil
- Ruler or measuring tape
- Small sponge
Step 1: Planning and Surface Prep
-
Clean the bisque:
Begin by wiping down your bisque-fired mug with a slightly damp sponge to remove any kiln dust or oils from handling, which can prevent glaze adhesion. -
Mark the raw clay line:
Decide how much of the raw clay base you want exposed. Measure about 1 to 1.5 inches up from the bottom and lightly mark a line all the way around the circumference with a pencil. -
Apply wax resist:
Using a dedicated brush, carefully apply liquid wax resist to the bottom of the mug and up the sides, stopping exactly at your pencil line. This will keep the base raw and unglazed.
Use Tape for Crisper Lines
For sharper squares, use thin automotive detailing tape (1/4 inch) to grid off the mug before painting. It flexes around curves better than standard masking tape.
Step 2: Painting the Grid
-
Sketch the grid:
Lightly sketch your checkerboard grid directly onto the bisque using a pencil. Don’t worry about graphite marks; they will burn off in the kiln. aim for squares that are roughly 1 inch wide. -
Outline the squares:
Dip your flat shader brush into the rust-colored underglaze. Carefully outline the alternating squares that you intend to fill in. -
First coat of color:
Fill in the outlined squares with the rust underglaze. Apply the strokes in one direction (horizontal) to keep the texture consistent. -
Let it dry:
Allow the first coat to dry until it is chalky and muted in color, which usually takes about 10-15 minutes. -
Second coat:
Apply a second layer of rust underglaze to the same squares. I like to paint these strokes vertically, crossing the first layer, to ensure solid, opaque coverage. -
Check opacity:
If your underglaze looks streaky or thin, apply a third coat. Ideally, you want a rich, solid block of color for that bold retro look. -
Clean up edges:
If you painted outside the lines, use a damp stiff brush or a clay scraping tool to gently scratch or wipe away the excess underglaze to keep your squares crisp.
Step 3: Glazing and Finishing
-
Apply wax over the pattern:
Once the underglaze is bone dry, carefully paint wax resist strictly over the rust-colored squares. This technique involves wax resist over underglaze, ensuring the rusty color shows through the top glaze clearly. -
Wait for wax to cure:
Let the wax resist dry completely. It should feel tacky or hard to the touch, not wet, before you proceed to dipping. -
Prepare the dipping glaze:
Stir your speckled cream glaze thoroughly. You want to ensure the speckles are suspended evenly throughout the bucket so you get that lovely texture. -
Dip the mug:
Using dipping tongs or your hand (if wearing gloves), dip the entire mug into the speckled cream glaze. Hold it for 1-2 seconds, then lift it out in a smooth motion. -
Wipe the resist:
Immediately after the glaze loses its sheen, use a damp sponge or your finger to gently wipe any beads of cream glaze off the waxed squares and the waxed bottom section. -
Check the rim:
Ensure the rim is fully coated and smooth. If dipping missed a spot near your fingers, touch it up with a brush loaded with the cream glaze. -
Final wipe:
Give the bottom raw clay section one last wipe to ensure no stray glaze drops adhere to the wax, as these can stick to the kiln shelf.
Glaze Beading Up?
If glaze stays stubbornly on the wax resist, your sponge is too dry. Used a wetter sponge to wipe the wax areas clean so the underglaze reveals perfectly.
Once fired, the speckled glaze will melt around your geometric pattern, creating a beautiful contrast between the smooth finish and the earthy, raw clay base
Modern Geometric Triangles
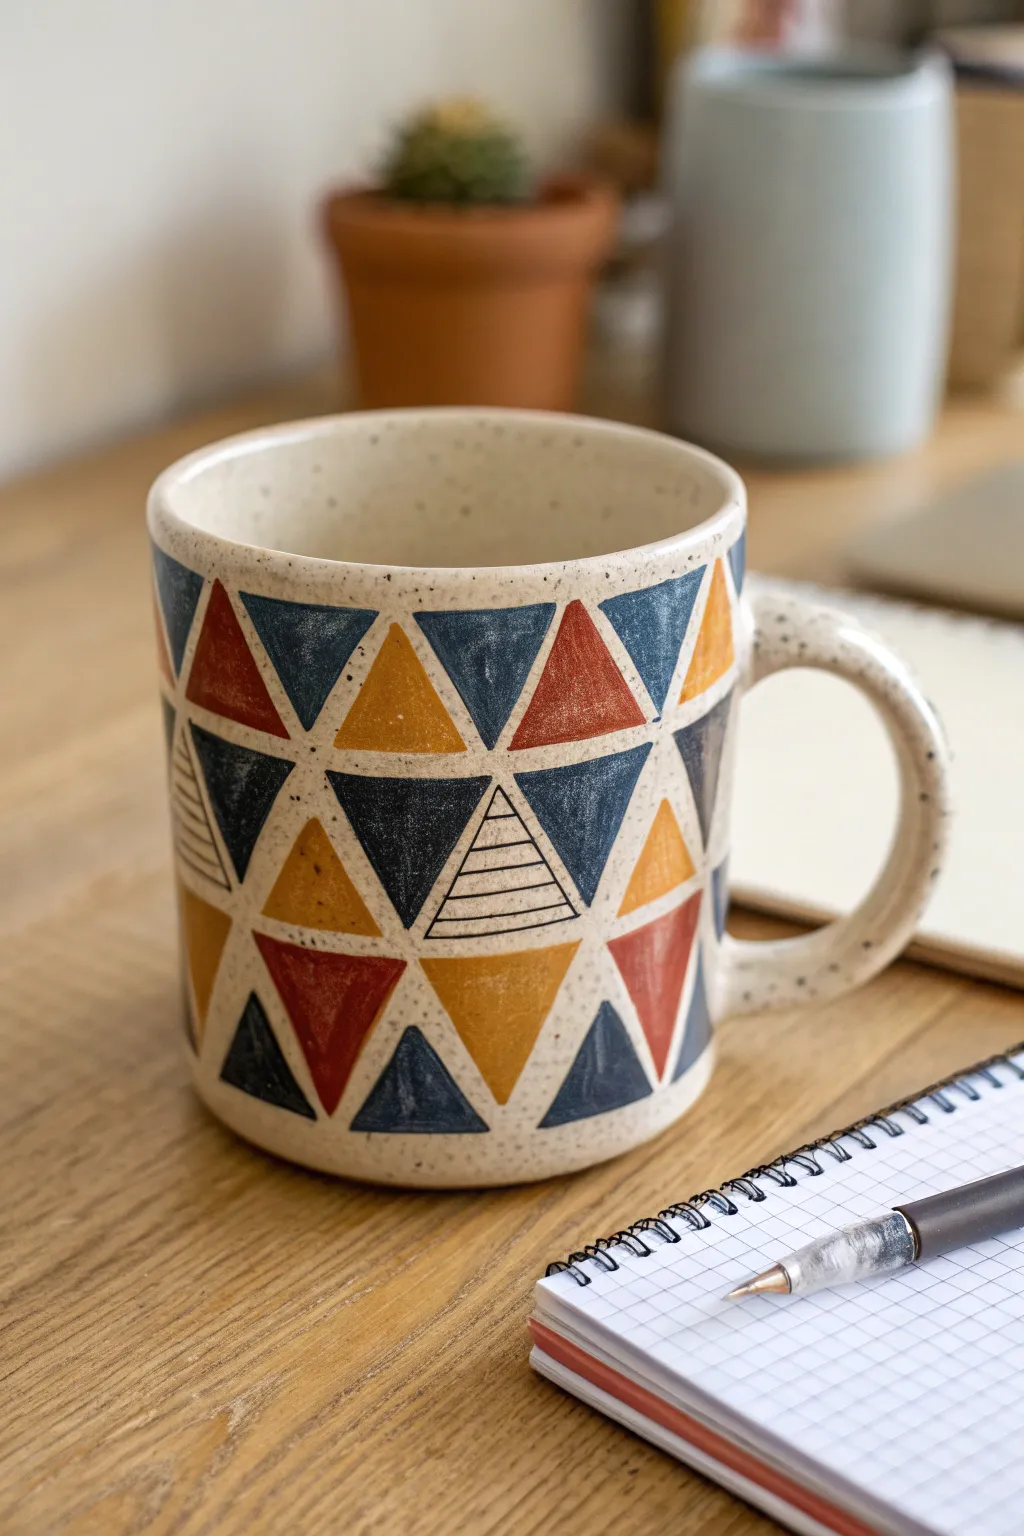
Transform a plain ceramic mug into a piece of modern art with this geometric triangle design. The warm, earthy palette of mustard, rust, and navy blue against a speckled cream background creates a cozy, handmade feel perfect for your morning coffee.
Step-by-Step Guide
Materials
- Bisque-fired ceramic mug (preferably speckle clay body)
- Underglazes: Navy Blue, Rust Red/Terracotta, Mustard Yellow
- Fine liner brush (size 0 or 00)
- Small flat shader brush (size 2 or 4)
- Pencil (HB or lighter)
- Ruler or flexible measuring tape
- Clear dipping glaze (or brush-on clear glaze)
- Black underglaze pencil or fine brush with black underglaze
Step 1: Preparation & Mapping
-
Clean the surface:
Wipe your bisque mug down with a slightly damp sponge to remove any kiln dust or oils from your hands. This ensures the underglaze adheres properly to the clay body. -
Measure the circumference:
Using a flexible tape measure, wrap around the mug to find the total circumference. Divide this number by how many triangles you want per row (e.g., if the mug is 24cm around, 6 triangles would make each base 4cm). -
Mark horizontal guides:
Lightly sketch three or four parallel horizontal lines around the mug with a pencil to serve as the top and bottom boundaries for your triangle rows. I find it helps to rest my hand on a stack of books to keep the pencil steady while rotating the mug. -
Sketch the grid:
Mark the triangle points along your horizontal lines. Remember that the triangles should tessellate, meaning the point of one triangle sits in the middle of the base of the triangle above it. -
Draw the triangles:
Connect your dots with the pencil to form the final triangular grid. Don’t press too hard; graphite burns off in the kiln, but deep grooves in the clay remain.
Straight Lines Made Easy
Use thin automotive masking tape (1/8 inch) to tape off your triangle grid before painting. Peel it off when the paint is semi-dry for crisp edges.
Step 2: Applying Color
-
Start with Navy Blue:
Shake your Navy Blue underglaze well. Using the small flat brush, fill in scattered triangles. Aim for a random distribution, ensuring no two blue triangles touch directly. -
Apply the second coat:
Once the first layer of blue is dry to the touch, apply a second coat for solid, opaque coverage. If you let the brush strokes show slightly, it adds a nice painterly texture. -
Add the Rust accents:
Rinse your brush thoroughly. Paint selected triangles with the Rust Red or Terracotta shade, following the same two-coat process. Leave some triangles empty for the next color and the negative space. -
Fill in the Mustard:
Paint the remaining assigned triangles with Mustard Yellow. The combination of these three earthy tones creates that retro-modern vibe. -
Leave negative space:
Assess your pattern. You can choose to leave some triangles unpainted (showing the raw speckled clay) or paint them white if your clay body is dark. -
Clean up edges:
Use a damp, clean brush or a needle tool to gently scratch away any paint that has gone outside your pencil lines to keep the geometric shapes sharp.
Smudged Paint?
If you accidentally smear a dark color onto the raw clay, wait for it to dry completely, then gently scrape it off with an X-Acto knife rather than wiping.
Step 3: Detailing & Glazing
-
Create the striped texture:
Select one or two empty triangles to be ‘feature’ shapes. Using a very fine liner brush and black underglaze, paint thin, horizontal parallel lines inside these specific triangles. -
Outline options:
If you want a bolder look, you can outline the colored triangles with a black underglaze pencil, or leave them soft-edged as shown in the inspiration image. -
Final drying:
Allow the mug to dry completely, ideally overnight. The underglaze should look chalky and matte. -
Apply clear glaze:
Dip the mug into a clear transparent glaze. If brushing, apply 2-3 coats in alternating directions to prevent streaks. -
Fire the piece:
Fire the mug in the kiln according to the clay and glaze manufacturer’s instructions (usually Cone 5 or 6 for stoneware).
Enjoy your morning brew in this stylish, custom-crafted vessel that feels uniquely yours

TRACK YOUR CERAMIC JOURNEY
Capture glaze tests, firing details, and creative progress—all in one simple printable. Make your projects easier to repeat and improve.
Scattered Hearts in Mixed Sizes
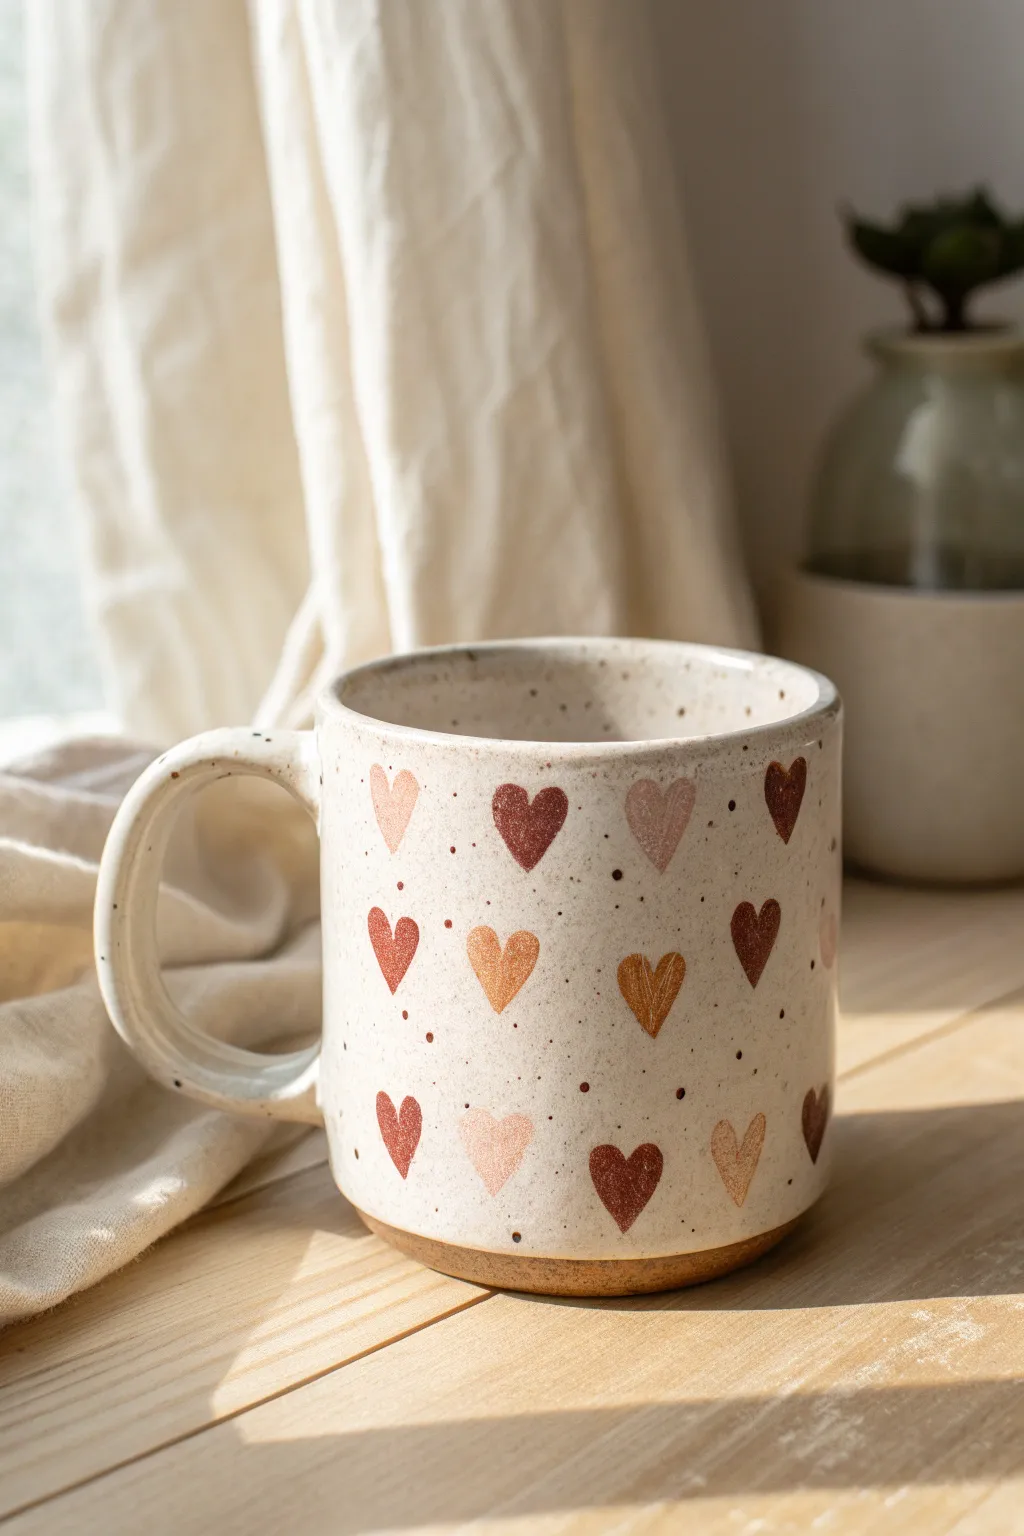
Embrace the warmth of handmade ceramics with this charming mug project featuring an array of earth-toned hearts. The speckled clay body and soft, inviting color palette create a cozy aesthetic perfect for your morning coffee ritual.
Step-by-Step Tutorial
Materials
- Bisque-fired speckled stoneware mug
- Creamy white dipping glaze (semi-opaque)
- Underglazes in earthy tones: rust, terra cotta, burnt orange, brown, beige
- Small round synthetic brush (size 2 or 4)
- Tiny detail brush (size 00)
- Damp sponge
- Wax resist (emulsion)
- Clean water for rinsing
- Clear transparent glaze (optional, depending on finish desired)
Step 1: Preparation & Base Glazing
-
Clean surface:
Begin by wiping down your bisque-fired mug with a damp sponge. This removes any kiln dust or oils from your hands that might prevent the glaze from adhering properly. -
Wax the foot:
Flip the mug over and carefully apply wax resist to the bottom foot ring and about 1/4 inch up the side of the mug. This creates the raw clay band seen at the base. -
Dry the wax:
Allow the wax resist to dry completely. It should feel tack-free to the touch before you proceed to dipping. -
Apply base glaze:
Dip the entire mug into a bucket of creamy white glaze. Hold it submerged for about 3 seconds to ensure an even coat inside and out. -
Clean the foot:
Once the glaze is dry to the touch, use a damp sponge to wipe any excess glaze off the waxed foot. The wax helps, but a quick wipe ensures crisp lines.
Smudged Hearts?
If underglaze smears on the base glaze, let it dry completely. Then, gently scratch the mistake off with a needle tool or stiff brush rather than wiping, which spreads the pigment
Step 2: Painting the Hearts
-
Plan your palette:
Squeeze out small amounts of your earth-toned underglazes onto a palette. You want a gradient of warm colors ranging from deep brown to pale beige. -
Map the pattern:
Visualize a loose grid around the mug. The hearts are arranged in staggered rows, almost like a brick pattern, but keep the spacing organic rather than rigid. -
Paint the first row:
Dip your round brush into a medium terra cotta shade. Paint the first heart by making two small, connected tear-drop shapes. I find starting at the top point of the heart and pulling down works best. -
Alternate colors:
Move horizontally to paint the next heart, switching to a darker rust color. Continue around the mug, changing colors for each heart to create a random, scrappy look. -
Start the second row:
Begin the next row down, positioning these hearts in the spaces between the hearts above. Use a lighter beige or peach tone here to maximize contrast. -
Vary sizes slightly:
While keeping the hearts mostly uniform, allow slight variations in size. Some can be a bit plumper or taller to enhance the hand-painted feel. -
Fill the surface:
Continue this alternating pattern until you reach the bottom waxed line. Don’t worry if a heart overlaps the bottom edge slightly; the unglazed clay will frame it nicely. -
Second coats:
Depending on the opacity of your underglaze, apply a second coat to each heart once the first layer is dry. This ensures the colors pop against the white background.
Step 3: Speckling & Finishing
-
Mix speckle wash:
Dilute a small amount of dark brown underglaze with water until it has an inky consistency. -
Flick the specks:
Load a stiffer brush (or even a toothbrush) with the wash. Use your finger to flick the bristles, spraying tiny dots over the mug to enhance the speckled clay effect. -
Add tiny dots:
Using your detail brush or the end of a paintbrush handle, add a few deliberate, slightly larger brown dots in the empty spaces between hearts to balance the composition. -
Final drying:
Let the mug dry completely overnight. Any moisture left in the clay can cause issues during the final firing. -
Final fire:
Fire the mug in the kiln according to the temperature guidelines for your specific clay and glaze combination (typically Cone 5 or 6 for stoneware).
Carved Texture
Instead of painting flat hearts, try sgraffito. Paint a square of color, let it dry, then effortlessy carve the heart shape out to reveal the white glaze underneath
Enjoy sipping from your new favorite mug that perfectly balances rustic charm with modern design
Monogram Initial on One Side
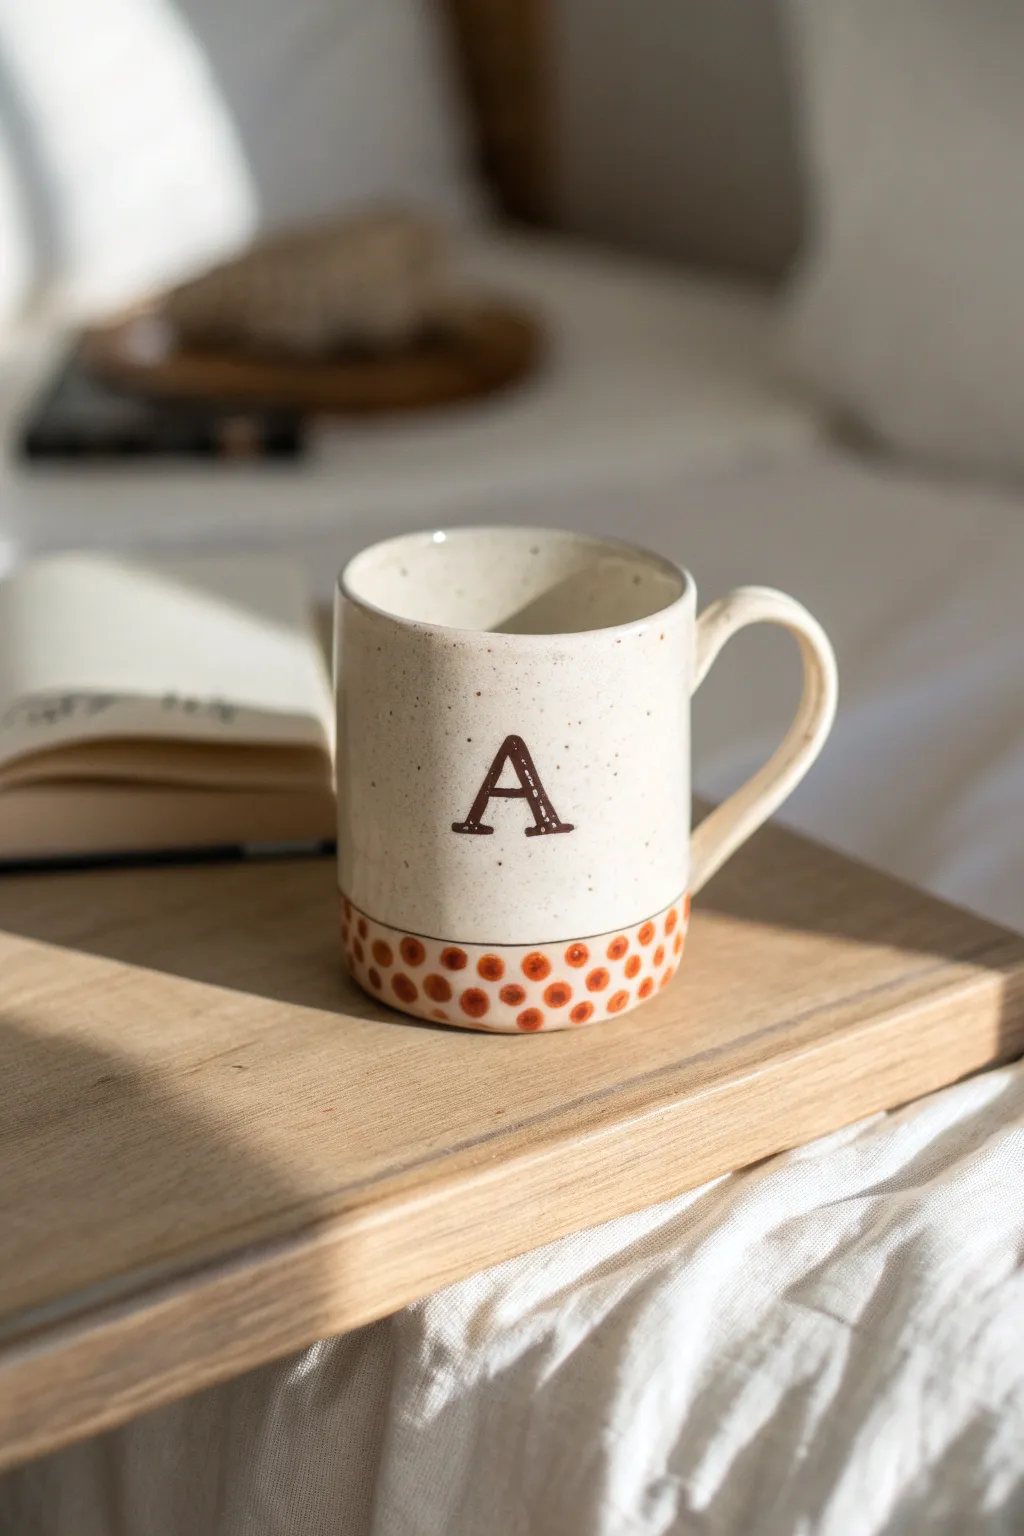
Create a cozy, personalized piece with this timeless design featuring a bold serif initial and a playful polka-dot base. The combination of the creamy speckled finish and warm earth tones gives this mug a sophisticated yet handmade farmhouse feel.
Step-by-Step Guide
Materials
- Bisque-fired ceramic mug
- Cream or off-white speckled glaze (underglaze safe)
- Dark chocolate brown underglaze
- Terracotta or rust orange underglaze
- Small flat shader brush
- Fine liner brush (size 0 or 00)
- Round sponge applicator or cotton swab
- Clear dipping glaze
- Pencil
- Printed letter stencil (optional)
Step 1: Preparation & Base Coat
-
Clean the bisque:
Begin by wiping down your bisque mug with a slightly damp sponge to remove any kiln dust. This ensures the glaze adheres properly without crawling. -
Apply the speckled base:
Using a soft fan brush or dipping method, apply 2-3 coats of your cream speckled glaze to the entire mug. Allow each coat to dry until it loses its sheen before applying the next. -
Let it dry completely:
Before moving on to the detailed painting, ensure the base glaze is bone dry to touch. This prevents the colors from bleeding into the background.
Step 2: Painting the Monogram
-
Draft the letter:
Lightly sketch your chosen initial onto the center of the mug using a pencil. Don’t worry about marks; the graphite will burn off in the kiln. -
Outline the serif font:
For that classic look, add the ‘feet’ or serifs to the ends of your letter strokes during the sketching phase. -
Start the brown outline:
Load your fine liner brush with dark chocolate brown underglaze. Carefully trace the outline of your letter, keeping your hand steady. -
Fill the letter:
Switch to a small flat shader brush for better coverage. Fill in the body of the letter with the brown underglaze. -
Second coat for opacity:
Once the first layer of brown is dry, I usually add a second coat to ensure the dark color is rich and solid against the light background. -
Refine the edges:
Use the liner brush again to sharpen any corners or serifs that might have gotten rounded during the filling process.
Bleeding Lines?
If your brown letter edges look fuzzy, your base glaze was too wet. Let the base dry for at least an hour longer, or gently scrape the fuzzy edge away with a specifically designed clean-up tool.
Step 3: The Polka Dot Border
-
Mark the border line:
Lightly sketch a horizontal line about an inch up from the bottom of the mug to guide your pattern placement. -
Prepare the orange glaze:
Pour a small amount of terracotta or rust orange underglaze onto your palette. -
Start the top row:
Using a round sponge dabber or the back end of a paintbrush, dip into the orange glaze and press a row of dots just below your guide line. -
Create the second row:
Stamp a second row of dots below the first, offsetting them so each dot sits in the gap between the two above it (brick formation). -
Fill to the bottom:
Continue this alternating pattern until you reach the very bottom edge of the mug. -
Check consistency:
Look over your dots. If any look thin or transparent, carefully dab a second layer of orange glaze over them.
Perfect Circles
For uniform polka dots without a steady hand, use the eraser end of a standard pencil as a stamp. It creates perfectly sized circles for this scale of border design every time.
Step 4: Finishing Touches
-
Clean up smudges:
Inspect the mug for any accidental smudges of brown or orange. Gently scratch them off with a toothpick or wipe with a damp clean brush. -
Apply clear glaze:
Once all decoration is thoroughly dry, dip the entire mug into a clear transparent glaze to seal the design and make it food safe. -
Clean the foot:
Wipe the bottom foot ring of the mug completely clean of glaze with a wet sponge to prevent it from sticking to the kiln shelf. -
Fire the piece:
Place the mug in the kiln and fire to the temperature recommended by your clay and glaze manufacturer (typically Cone 5/6).
Enjoy sipping your morning coffee from a mug that is uniquely yours
Handwritten Quote With Simple Icons
Embrace the warmth of your morning routine with this beautifully understated mug design featuring simple line art and comforting typography. The combination of black ink-like strokes against a speckled cream background creates a modern yet rustic farmhouse aesthetic that’s perfect for chilly days.
Step-by-Step Tutorial
Materials
- Bisque-fired ceramic mug (cream/white clay body)
- Speckled clay glazes (cream or oatmeal with iron specks)
- Black underglaze pencil or fine liner bottle
- Soft fan brush
- Clear dipping glaze (if not using a glossy speckled glaze)
- Pencil (standard graphite)
- Damp sponge
- Kiln (or access to a firing service)
Step 1: Base Preparation
-
Clean surface:
Begin by wiping down your bisque-fired mug with a damp sponge. This is crucial as it removes any kiln dust or oils from your hands that could resist the glaze application. -
Establish the background:
Apply your base color. To replicate the look in the image, use a speckled cream or ‘oatmeal’ glaze. Brush on three even coats, allowing each layer to dry until it loses its sheen before applying the next. -
Check consistency:
Ensure the glaze application isn’t too thick near the rim or handle joints, as this can cause running during firing. Smooth out any drip marks with your brush while the glaze is still damp.
Smudged the glaze?
Don’t moisten it! Wait for the underglaze mistake to dry completely, then gently scrape it off with an X-ACTO knife or needle tool.
Step 2: Typography Layout
-
Light sketching:
Once the base glaze is completely dry to the touch, lightly sketch your quote using a standard graphite pencil. Don’t worry about the graphite marks; they will burn off completely in the kiln. -
Drafting ‘Stay’:
Write the word ‘Stay’ in a loose, cursive script. Position it slightly above the center line of the mug face. Extend the tail of the ‘y’ slightly for a relaxed feel. -
Drafting ‘COZY’:
Below the cursive script, block out the word ‘COZY’ in tall, narrow serif capital letters. Leave extra space inside the ‘O’ for a decorative star later. -
Centering check:
Step back and look at the alignment. The ‘COZY’ should anchor the lighter script above it. If it looks off, simply rub the pencil marks gently with your finger and re-sketch.
Step 3: Botanical Details
-
Side vines:
Sketch two main vertical vines framing the text. On the left, draw a vine curving slightly inward. On the right, mirror this curve. Add almond-shaped leaves branching off the stems in alternating patterns. -
Bottom flourish:
Underneath the text, sketch a small cluster of wildflowers. Draw three thin intersecting stems, topping the center one with a small rosebud shape and the side stems with tiny leaves. -
Star accents:
Draw small 4-point and 6-point stars scattered around the negative space. Place a prominent 6-point star directly inside the ‘O’ of COZY for a whimsical touch.
Level Up: Hidden Gems
Continue the design by painting a small matching star or single leaf on the interior rim or the bottom of the handle for a surprise detail.
Step 4: Inking the Design
-
Tool selection:
For the black lines, distinct tool choices give different results. I prefer using a fine-tip underglaze applicator bottle for the boldest black lines, but an underglaze pencil works well for a sketchier, crayon-like texture. -
Outline the script:
Trace over your pencil lines for the word ‘Stay.’ Keep your hand steady but allow for natural variation in line thickness to mimic handwriting. -
Fill the capitals:
Trace the ‘COZY’ letters. Go over the lines a second time to thicken them slightly, giving them more visual weight than the script above. -
Trace botanicals:
Carefully ink over your leaf and vine sketches. Use a lighter touch here; delicate lines look better for the floral elements than heavy, thick strokes. -
Final accents:
Dot the background with tiny specks of black underglaze to enhance the speckled clay effect if your base glaze needs a boost. Ink the stars, making sure the points are sharp.
Step 5: Finishing
-
Clean up:
If you made any smudges with the black underglaze, gently scratch them away with a toothpick or a clean, stiff brush once the underglaze is dry. -
Clear glaze (optional):
If your base speckled glaze is matte and you want a glossy finish, or if you used underglaze on bare clay, dip the entire mug into a clear transparent glaze. -
Fire:
Load the mug into the kiln for the glaze firing suitable for your specific clay and glaze cone rating (typically Cone 5 or 6 for this type of stoneware).
Once fired, you’ll have a delightful custom mug ready to cradle your favorite warm beverage.
Minimal Line Art Face
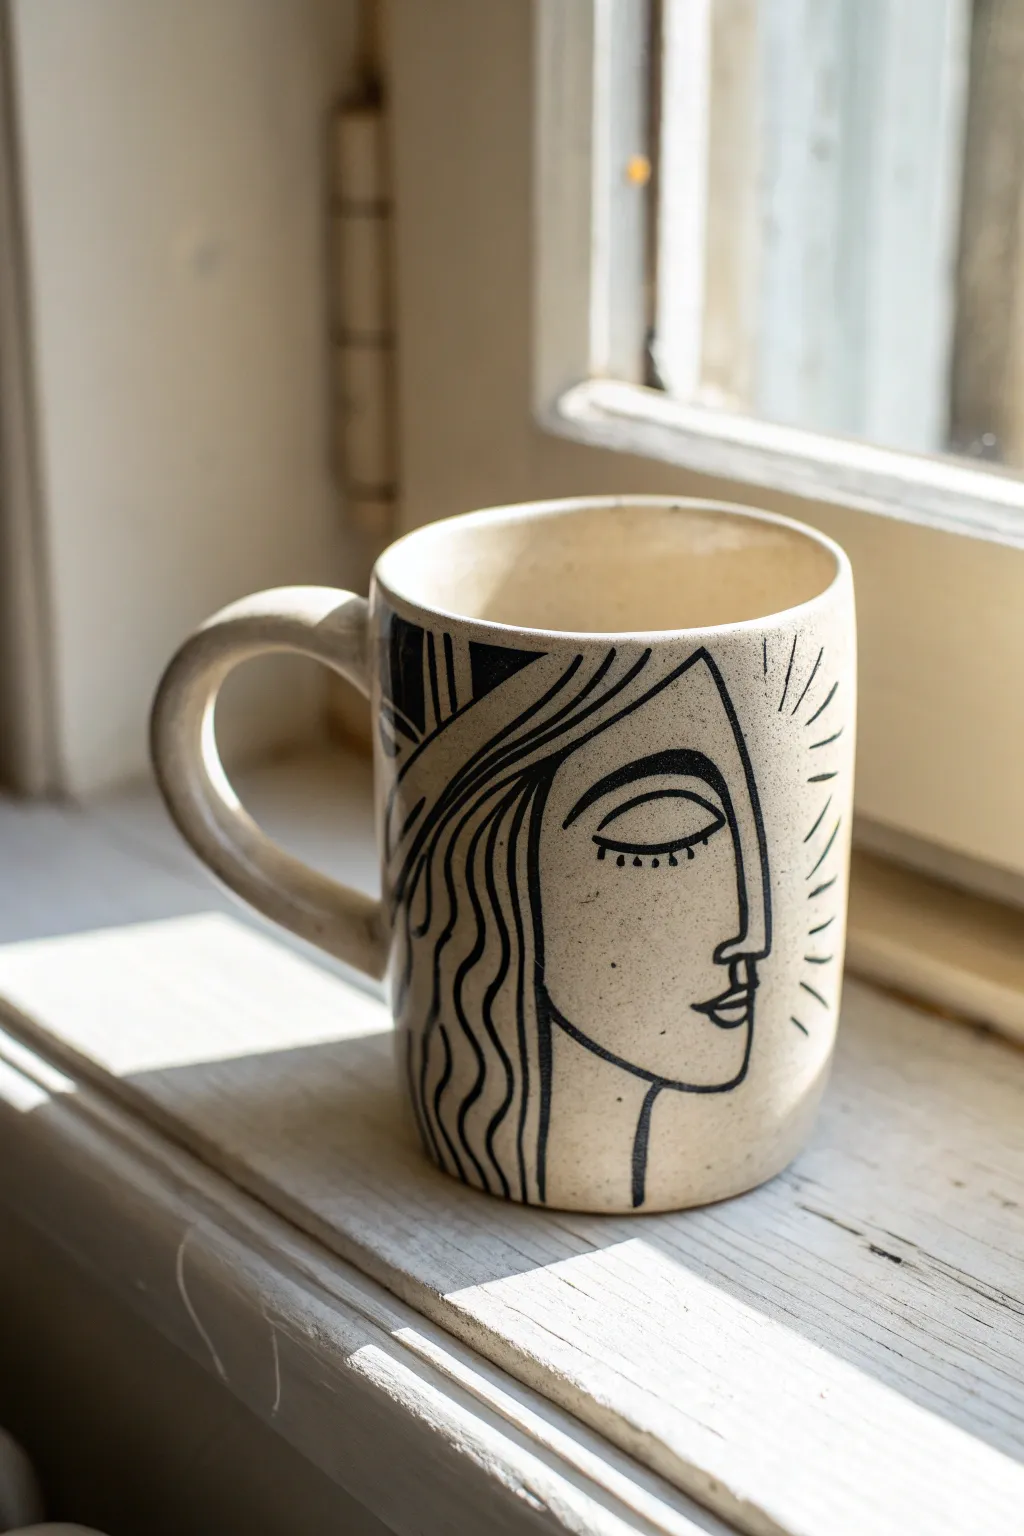
Capture the calm beauty of minimalist line art with this elegant mug design, featuring a flowing profile of a woman’s face. Using simple black strokes against a creamy ceramic background creates a modern, artistic piece perfect for your morning coffee.
Step-by-Step
Materials
- Bisque-fired ceramic mug (cream/beige clay body)
- Black underglaze (or ceramic paint if not firing)
- Fine liner brush (size 00 or 0)
- Pencil (for sketching)
- Damp sponge
- Clear dipping glaze (if firing)
- Container of water
- Paper towels
Step 1: Preparation and Sketching
-
Clean surface:
Begin by wiping down your bisque mug with a slightly damp sponge. This removes any dust that might prevent the glaze from adhering properly. -
Visualize placement:
Hold the mug in your hand to decide where the face should sit. The curve of the mug works beautifully with the profile, so pick the side facing outward when held. -
Light sketch:
Using a pencil, very lightly sketch the outline of the face profile. Don’t worry about mistakes; graphite burns off in the kiln, leaving no trace. -
Reference points:
Mark key points: where the nose ends, the chin curves, and the hairline starts. This helps keep your proportions balanced before you commit to paint.
Step 2: Painting the Profile
-
Prepare your brush:
Load your fine liner brush with black underglaze. You want the consistency to be like ink—add a tiny drop of water if it feels too thick and tacky. -
Nose and forehead:
Starting near the top, paint a single, confident line down to form the forehead and the bridge of the nose. Keep your hand steady and let the brush glide. -
Lips and chin:
Continue the line from the nose, dipping in slightly for the upper lip, bumping out for the lower lip, and curving smoothly down and back to form the chin and jawline. -
Neckline:
Extend a simple, straight line down from the jaw to suggest the neck. This grounds the floating head design. -
The eye:
Paint an almond-shaped curve for the closed eye. Add a straight line underneath for the lower lid, and tiny, delicate dashes for the eyelashes. -
The eyebrow:
Above the eye, paint a bold, arched line for the eyebrow. I like to make the start of the brow slightly thicker and taper it off toward the ear area.
Brush Control Trick
Rest your pinky finger on the mug surface while painting. This anchors your hand, reducing shakiness and giving you smoother, more confident lines.
Step 3: Adding Details
-
Hair outline:
Draw a large, sweeping curve starting from the forehead and going around the back of the ‘head’ area to define the hair’s volume. -
Wavy strands:
Fill the hair area with long, wavy vertical lines. These organic shapes contrast nicely with the sharper profile of the face. -
Radiating lines:
On the open side of the face (to the right of the nose), paint short, straight lines radiating outward like sun rays. Keep them spaced somewhat evenly. -
Refining lines:
Go back over any areas where the black underglaze looks thin. A second coat on the lines ensures a solid, opaque black after firing. -
Clean up:
If you made any stray marks or smudges, gently scrape them away with a clean, damp brush or a specialized cleanup tool once the underglaze is dry.
Lines look scratchy?
Your brush is too dry. Mix a drop of water into your underglaze on a palette until it flows like melted ice cream—smooth but opaque.
Step 4: Finishing
-
Drying:
Allow the underglaze design to dry completely. It should look matte and chalky when it’s ready for the next step. -
Clear glaze application:
Dip the entire mug into a clear transparent glaze. Ensure you get an even coat inside and out to make it food-safe and glossy. -
Final wipe:
Wipe the bottom foot of the mug with a sponge to ensure no glaze is left there, or it will stick to the kiln shelf. -
Firing:
Fire the mug in a kiln according to the clay and glaze temperature specifications (usually cone 06 to cone 6 depending on your materials).
Once fired, you’ll have a stunning, gallery-worthy mug ready for your favorite warm drink
Sunset Ombre Fade
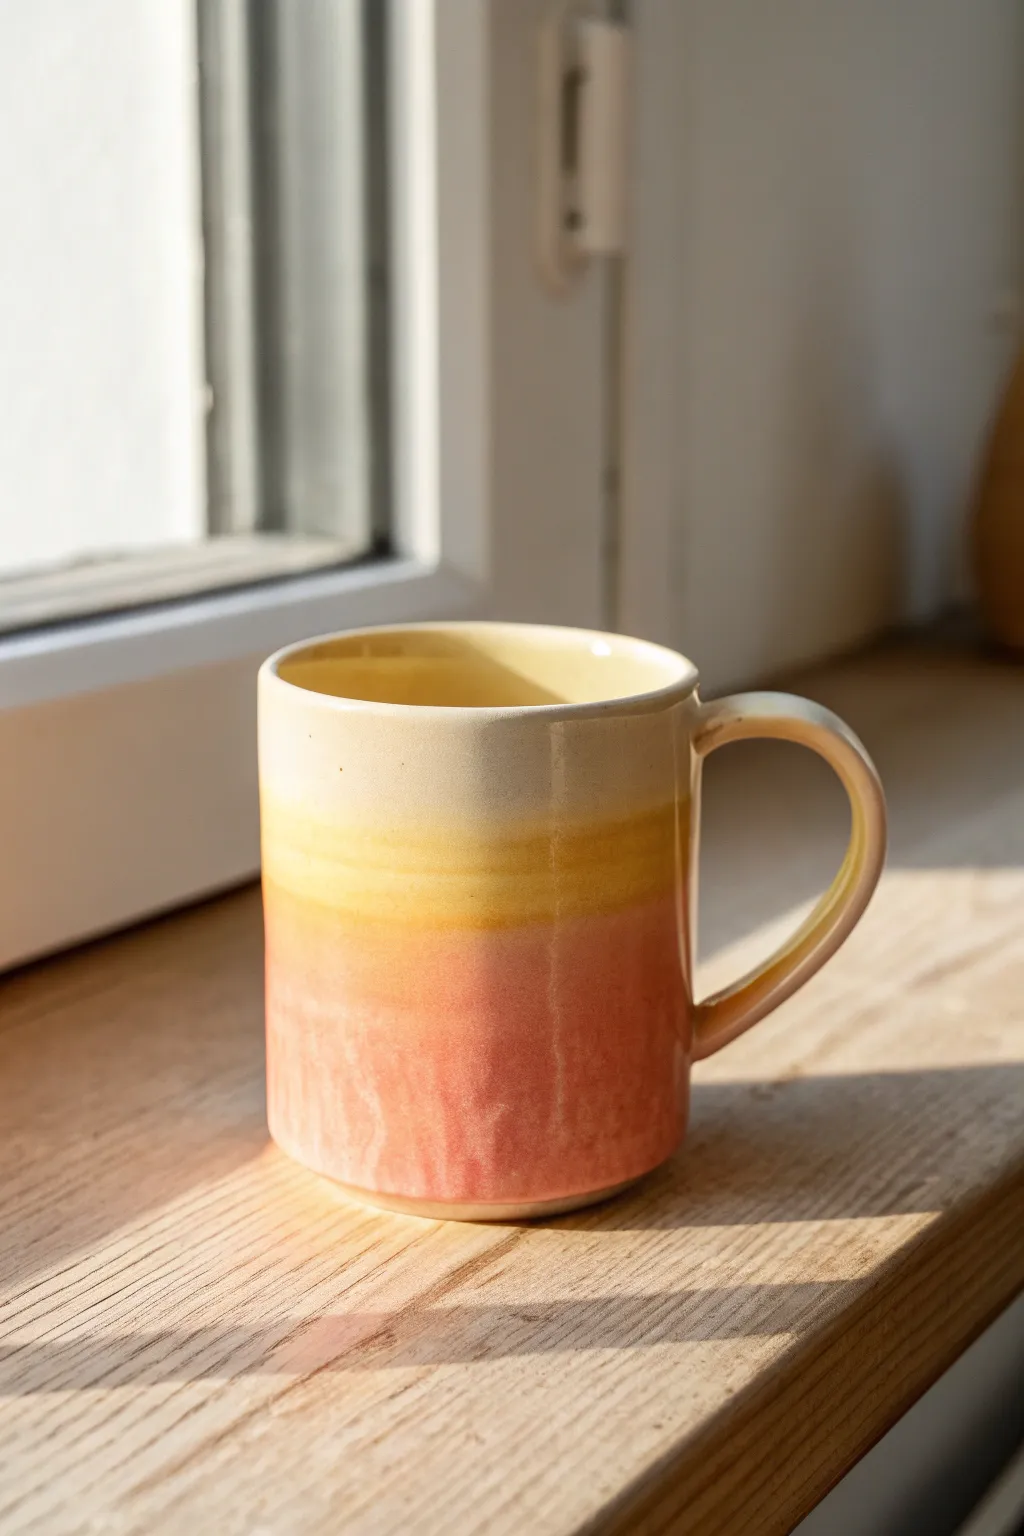
Capture the warmth of a setting sun with this dreamy ombré glaze technique. By layering liquid glazes in soft cream, honey yellow, and dusty rose, you’ll create a comforting transition of colors that glows in the light.
Detailed Instructions
Materials
- Bisque-fired ceramic mug
- Cream or off-white dipping glaze
- Golden yellow glaze (brush-on)
- Dusty pink or coral glaze (brush-on)
- Wide fan brush
- Soft round brush
- Sponge
- Bowl of water
- Kiln access
Step 1: Preparation and Base Coat
-
Clean surface:
Wipe down your bisque mug with a damp sponge to remove any dust or kiln debris, ensuring a clean surface for adhesion. -
Base glazing:
Pour your cream glaze into a container deep enough to dip the mug. Hold the mug by the foot and dip the entire piece in quickly and evenly, coating both the inside and outside. -
Drip management:
Hold the mug upside down for a few seconds to let excess glaze drip off, then gently shake it to level the coat. Smooth any drips on the rim with a finger. -
Base dry time:
Allow this base layer to dry until it is powdery to the touch, usually about 15-20 minutes.
Fixing drips
If you apply the glaze too thickly and it runs, gently scrape off the excess with a fettling knife once dry, then sponge smooth before firing.
Step 2: Creating the Sunset Gradient
-
Prepare secondary colors:
Pour a small amount of the golden yellow and dusty pink glazes onto a palette. Sometimes I like to thin them slightly with water to make blending easier. -
Applying the bottom band:
Using a wide fan brush, apply the dusty pink glaze around the bottom third of the mug. Use broad, horizontal strokes. -
Building opacity:
Let the first pink coat dry for a moment, then apply a second coat to the same area to ensure the color will be rich after firing. -
Applying the middle band:
Load your brush with the golden yellow glaze. Paint a band directly above the pink, covering the middle third of the mug. -
Blending the intersection:
While the yellow glaze is still wet, gently drag your brush down into the pink area slightly to create a soft overlap. -
Top transition:
Clean your brush, then slightly dampen it. Feather the top edge of the yellow band upward into the cream base to avoid a harsh line. -
Smoothing the gradient:
Use a soft, barely damp sponge to gently pat the transition zones where the pink meets yellow and yellow meets cream. This helps meld the particles together. -
Uneven texture:
Don’t worry about perfect straight lines; a slightly wavy application adds to the organic, handmade feel seen in the reference.
Add some speckle
Mix a tiny amount of iron oxide wash into the yellow layer or flick it on with a toothbrush to give the mug a rustic, speckled pottery look.
Step 3: Handle and Finishing Touches
-
Glazing the handle:
Use a smaller round brush to paint the handle. Start with cream at the top join and blend yellow into pink as you move down the curve. -
Clean the foot:
Use a damp sponge to wipe any glaze off the very bottom (foot ring) of the mug. This is crucial so it doesn’t fuse to the kiln shelf. -
Final inspection:
Check the interior rim for any stray marks of color and wipe them away if you want a clean interior finish. -
Firing:
Place the mug in the kiln and fire according to the glaze manufacturer’s instructions (typically Cone 5 or 6 for stoneware). -
Cooling:
Allow the kiln to cool completely before opening to prevent thermal shock and crazing.
Enjoy your morning coffee in a mug that carries the peaceful colors of early evening light
Mountain Silhouette Band

Capture the serene beauty of a sunrise over pine-covered peaks with this layered ceramic painting project. The design uses negative space and overlapping glazes to create a stunning sense of depth on a simple cylindrical form.
Step-by-Step Tutorial
Materials
- Bisque-fired ceramic mug (cylindrical shape preferred)
- Wax resist emulsion
- Sponge or wax applicator
- Underglaze (Cream or Speckled White)
- Underglaze (Slate Blue or Grey)
- Underglaze (Black)
- Clear dipping glaze
- Fan brush
- Small fine-liner brush (size 0 or 00)
- Medium round brush
- Pencil
Step 1: Preparation and Base
-
Clean surface:
Begin by wiping down your bisque mug with a damp sponge to remove any kiln dust or oils from your hands that might resist the glaze. -
Mark the raw base:
Decide how much of the raw, speckled clay you want visible at the bottom. Lightly mark a line around the base about 3 inches up from the bottom if you want a guide, or trust your eye for an organic look. -
Apply wax resist:
Using a sponge or dedicated wax brush, carefully apply wax resist to the bottom inch of the mug (the ‘footer’ area). This prevents glaze from sticking and creates that beautiful contrast between the painted scene and the raw clay texture. -
Wax the handle base:
Don’t forget to apply a small amount of wax where the handle meets the bottom of the mug if you want that raw clay aesthetic to continue seamlessly.
Smudged Skies?
If your blue mountain paint bleeds into the white sky, wait for it to dry, then gently scrape the mistake away with an X-Acto knife before retouching with white.
Step 2: Painting the Sky and Mountains
-
Apply the sky base:
Using a fan brush, apply 2-3 coats of Cream or Speckled White underglaze to the top half of the mug, including the interior if desired. Let each coat dry until it’s chalky to the touch before adding the next. -
Sketch the mountain line:
Once the cream base is fully dry, lightly sketch a jagged, undulating mountain range line with a pencil directly onto the cream underglaze. The graphite will burn off in the kiln. -
Block in the mountains:
Switch to your Slate Blue underglaze and a medium round brush. Paint the area below your pencil line, filling it in down to where the tree line will start. I find it helps to keep the bottom edge of this blue section uneven. -
Create texture:
While the blue layer is still slightly damp, dry-brush a tiny amount of the cream color back over the peaks to suggest snow or light hitting the ridges. -
Refine the peaks:
Use a finer brush to sharpen the peaks of the mountains, ensuring crisp lines against the cream sky.
Starry Night Effect
Before the clear glaze, spatter a diluted white underglaze over the black tree section using an old toothbrush for a magical, snowy, or starry effect.
Step 3: Adding the Forest Silhouette
-
Paint the forest floor:
Load a medium brush with Black underglaze. Paint a solid band around the mug starting just below your blue mountains and ending right at your wax resist line at the bottom. -
Start the tree shapes:
Using the tip of the brush, pull upward vertical lines from the black band into the blue mountain area to establish the trunks of your tallest pines. -
Detail the branches:
Switch to your smallest fine-liner brush. Starting at the top of each trunk line, use tiny, short horizontal strokes that get wider as you move down to create the pine bough silhouette. -
Vary the heights:
Ensure your trees are different heights. Some should barely peek over the black base, while others should stretch high into the mountain section to create variety. -
Fill the gaps:
Add smaller, shorter tree indications between the large ones to make the forest look dense and thick. -
Clean the foot:
If any glaze dripped onto the waxed bottom area, use a damp sponge to wipe it away cleanly. The wax makes this easy.
Step 4: Finishing
-
Dry thoroughly:
Allow the entire piece to dry completely, preferably overnight, to ensure no moisture is trapped in the clay. -
Glaze dip:
Dip the entire mug into a clear transparent glaze. This will seal the underglaze design and make the mug food safe and glossy. -
Wipe the foot again:
One final check—use a sponge to wipe the bottom foot ring completely clean of clear glaze so it doesn’t fuse to the kiln shelf. -
Final fire:
Fire the mug to the temperature appropriate for your specific clay body and clear glaze (typically Cone 5 or 6 for stoneware).
Once fired, you’ll have a durable piece of art perfect for your morning coffee routine
Pine Forest Panorama
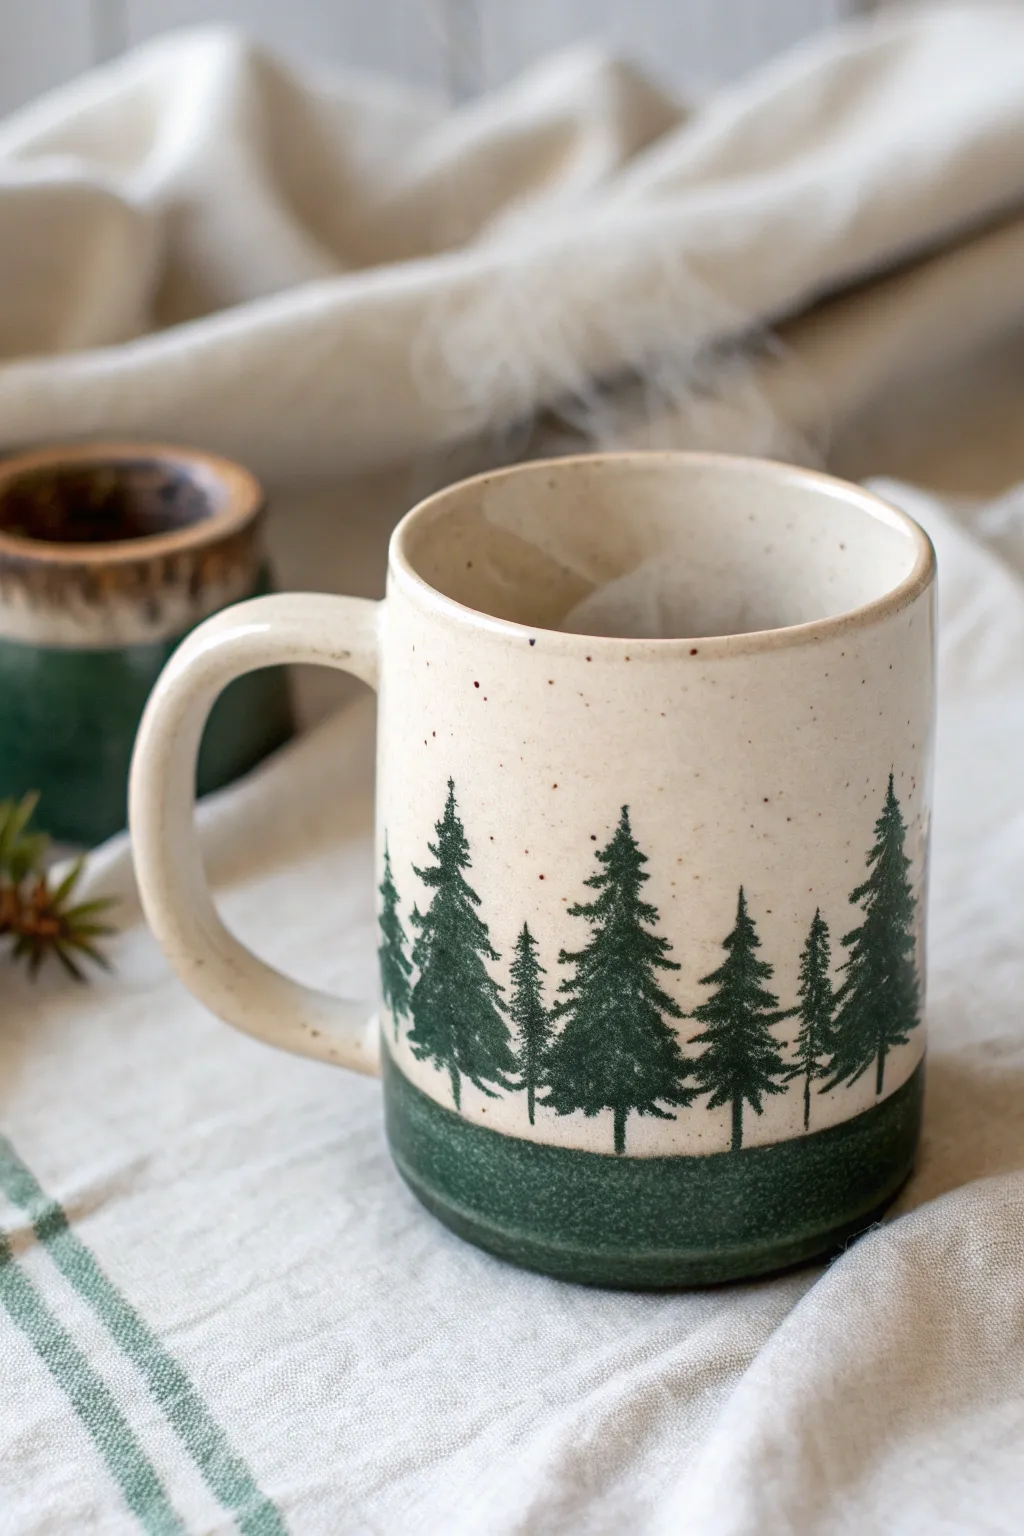
Capture the serene silence of a winter woodland with this forest-themed mug design. Using simple brushstrokes and glaze layering, you can create a depth-filled panorama of evergreen trees that contrasts beautifully against a speckled cream background.
Detailed Instructions
Materials
- Bisque-fired ceramic mug (wheel-thrown or hand-built)
- Speckled Cream or White glaze (underglaze compatible)
- Dark Forest Green underglaze
- Clear transparent glaze (if cream glaze is matte)
- Fan brush or wide flat brush
- Fine liner brush (size 0 or 00)
- Small round brush (size 2)
- Wax resist (optional)
- Sponge and water bucket
Step 1: Base Preparation
-
Clean surface:
Begin by wiping down your bisque-fired mug with a slightly damp sponge. This removes any kiln dust or oils from your hands that might prevent the glaze from adhering properly. -
Apply base glaze:
Using a fan brush, apply two to three even coats of your speckled cream glaze to the entire interior and the upper three-quarters of the exterior. Leave the bottom quarter of the mug bare for now. -
Feather the edge:
While the cream glaze is still slightly damp, gently feather the bottom edge where it stops on the exterior to avoid a harsh ridge line later. -
Dry completely:
Allow the base glaze to dry until it is powdery to the touch. This provides a stable canvas for painting the trees without the colors muddying together.
Step 2: Painting the Forest Floor
-
Define the ground line:
Load a small round brush with Dark Forest Green underglaze. Paint a continuous horizontal band around the bottom quarter of the mug, slightly overlapping the edge of your cream base glaze. -
Fill the base:
Fill in the rest of the bottom section with the green underglaze, ensuring solid coverage all the way down to the foot of the mug. -
Create texture:
Before the green band dries completely, I like to dab it lightly with a dry sponge or stiff brush. This adds an organic, mossy texture rather than a perfectly smooth unnatural finish.
Fixing Smudges
If you smudge green underglaze onto the cream sky, wait for it to dry completely. Then, gently scratch the green speck away with a needle tool or toothpick before smoothing it over.
Step 3: Creating the Trees
-
Plan tree placement:
Visualize where your tallest trees will go. You want a mix of tall, medium, and short trees to create a natural rhythm around the mug. -
Paint center trunks:
Using your fine liner brush and the same Forest Green underglaze, draw thin vertical lines extending upward from the green ground band. These will serve as the spines for your trees. -
Start the tops:
Starting at the very tip of a trunk line, use the very point of your brush to make tiny, downward-angled dashes. These should be very narrow at the top. -
Widen the branches:
As you move down the trunk, gradually widen your strokes. Use a stippling or dab-and-pull motion to mimic the irregular texture of pine boughs. -
Overlap for depth:
Don’t be afraid to let branches from neighboring trees touch or overlap slighty. This connectivity makes the forest feel dense and realistic. -
Add background trees:
To create depth, paint smaller, thinner trees in the gaps between the larger ones. You can dilute the underglaze slightly with water for these to make them appear further away. -
Ground the trees:
Ensure the bottom branches merge seamlessly into the green ground band you painted earlier so the trees don’t look like they are floating.
Winter Texture
Splatter a tiny amount of diluted white underglaze over the finished green trees using a toothbrush to create a subtle falling snow effect before the final firing.
Step 4: Finishing and Firing
-
Check for thick spots:
Inspect your work for any heavy globs of underglaze on the trees, which could crawl during firing. Gently sand them down if needed once fully dry. -
Clear glaze application:
If your cream base glaze acts as its own glossy finish, you can skip this. If you used underglaze extensively over raw bisque or a matte base, apply a thin coat of clear transparent glaze over the painted trees to seal them. -
Clean the foot:
Wipe the very bottom foot ring of the mug completely clean with a wet sponge to prevent it from sticking to the kiln shelf. -
Final fire:
Fire the mug in the kiln according to the temperature guidelines for your specific clay and glaze combination (usually Cone 5 or 6 for stoneware).
Once cooled, your mug is ready to hold your favorite warm beverage surrounded by a permanent evergreen forest
Ocean Waves and Foam Strokes
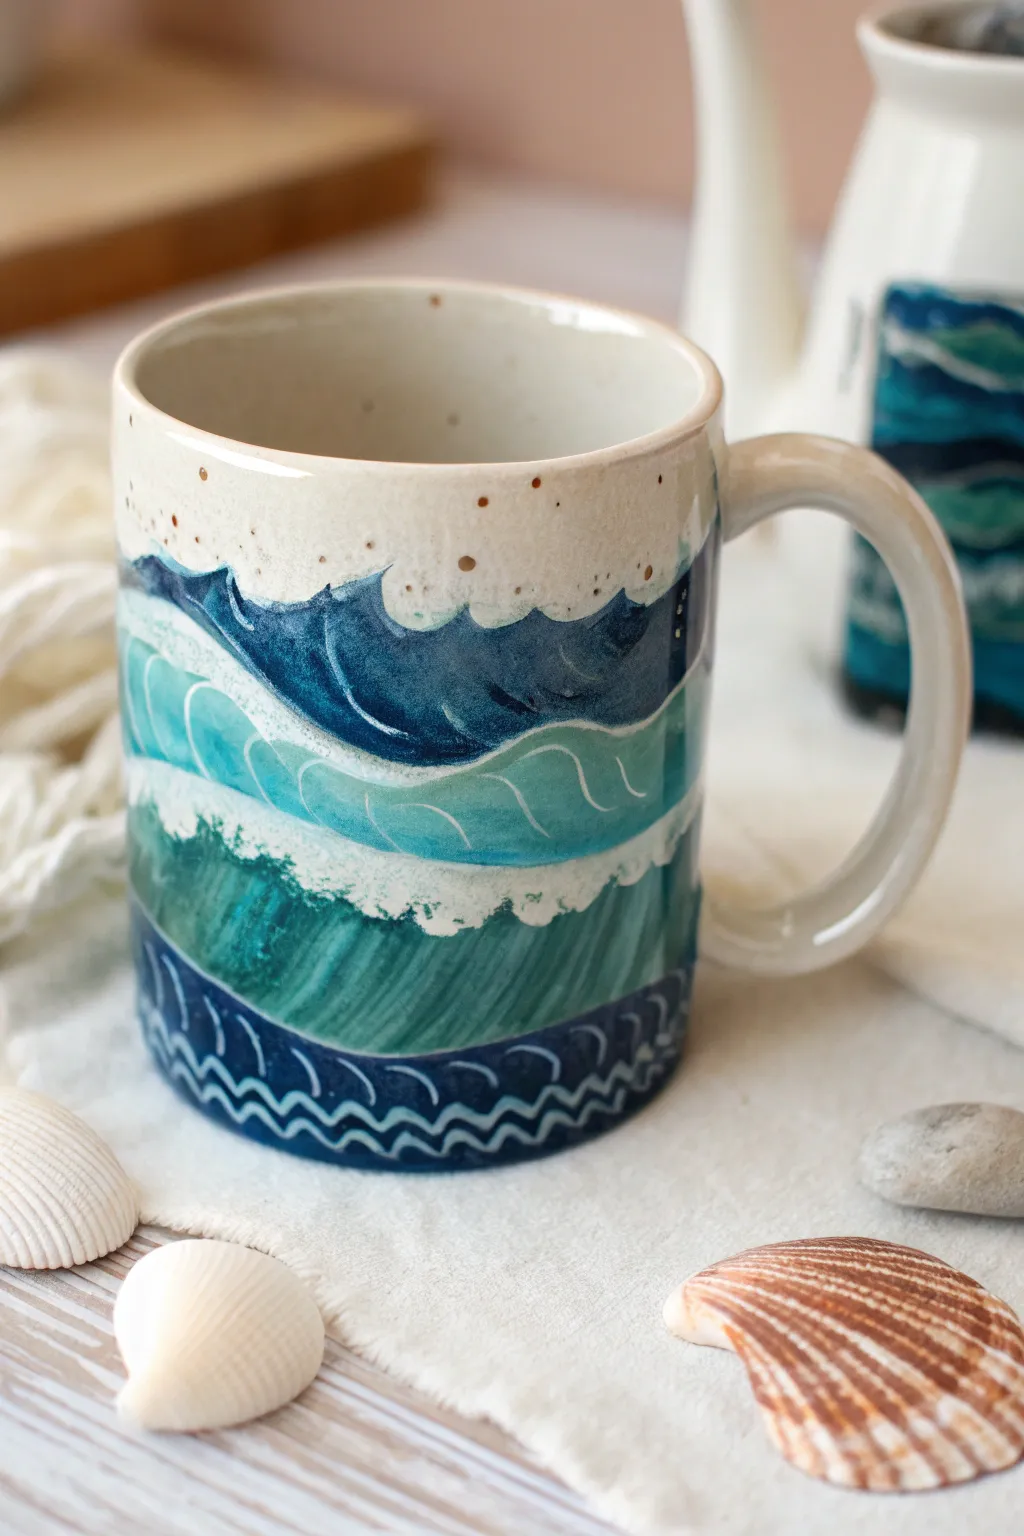
Capture the rhythm of the tides with this beautifully layered ocean mug design. By stacking distinct bands of turquoise, teal, and navy, you’ll create depth and movement that mimics crashing waves and sea spray.
How-To Guide
Materials
- Bisque-fired ceramic mug (stoneware preferred)
- Underglazes: Navy Blue, Teal, Turquoise, White
- Clear dipping or brushing glaze
- Assorted brushes: medium flat brush, fine liner brush, small round brush
- Old toothbrush (for spattering)
- Palette for mixing
- Sponge and water bowl
Step 1: Planning and Base Work
-
Clean surface:
Begin by wiping down your bisque mug with a damp sponge. This removes any dust that could prevent the glaze from adhering properly to the clay body. -
Mark horizons:
Using a pencil, very lightly sketch four horizontal wavy lines around the mug. These will serve as guides for your different ocean layers, but don’t worry about being perfect—the pencil marks will burn off in the kiln.
Step 2: Painting the Wave Layers
-
Deep ocean bottom:
Start at the very bottom band. Use your medium flat brush to apply a solid coat of Navy Blue underglaze. Ensure you cover the area just up to your lowest pencil line. -
Mid-ocean currents:
Mix a small amount of Navy Blue with Teal to create a transition shade. Apply this to the second band up from the bottom. Paint with vertical, sweeping strokes to mimic the flow of water under the surface. -
Teal rolling waves:
For the third band, use pure Teal underglaze. Instead of flat strokes, use a round brush to create curved, scalloped shapes along the top edge of this section, resembling the cresting of a wave. -
Upper wave crests:
The fourth and highest colored band should be your lightest blue—Turquoise. Paint this section similarly to the teal one, emphasizing the scalloped top edge where the wave ‘breaks’. -
Apply second coats:
Let the first layers dry until they are chalky to the touch. Apply a second coat to each band to ensure solid, opaque color coverage, which is crucial for the depth of the final piece. -
Connect the bands:
Where the bands meet, you don’t need to blend them perfectly. The distinct separation adds to the illustrative style, but ensure there are no bare bisque gaps between colors.
Uneven Coverage?
If underglaze looks streaky after drying, apply a third thin coat. It’s better to do multiple thin layers than one thick, gloppy one which might flake off during firing.
Step 3: Adding Details and Foam
-
Create wave definition:
Once the base layers are dry, load a fine liner brush with White underglaze. Carefully outline the scalloped top edges of your Blue and Turquoise waves to separate them visually. -
Add internal movement:
Within the light Turquoise band, paint thin, white curved lines. These should look like the internal movement of water inside a breaking wave. -
Bottom wave pattern:
For the dark bottom Navy band, use your liner brush and a lighter blue (or white) to paint a repetitive pattern of small half-circles or scallops along the bottom edge, creating a stylized seabed texture. -
Foamy textures:
Use a small, dry round brush or a sponge tool dipped in thick White underglaze. Dab this along the transition lines between your wave layers to create the look of sea foam and crashing water. -
Top foam cap:
Paint the remaining top section of the mug (up to the rim) with a wash of White or a very pale cream underglaze. Let the bottom edge of this white section impinge slightly on the blue waves below. -
Speckled finish:
Dilute a tiny amount of brown or dark bronze underglaze with water. Dip an old toothbrush into it and run your thumb across the bristles to lightly spatter the top white section, mimicking sand or sea spray.
Foam texture tip
For realistic, bubbly sea foam, try dabbing the white glaze on with a small piece of natural sea sponge rather than a brush. The uneven pores create perfect bubbles.
Step 4: Finishing Up
-
Rim cleanup:
Wipe any stray underglaze off the rim if you prefer a clean clay edge, or paint a thin coordinating line around the lip for a finished look. -
Final drying:
Allow the mug to dry completely, preferably overnight. Any moisture left in the underglaze can cause issues during the glazing phase. -
Clear glaze application:
Dip the entire mug into a clear glaze. This will seal the design and make it food-safe and glossy after firing. Ensure you shake off excess glaze gently. -
Kiln firing:
Fire the mug in a kiln according to the clay and glaze manufacturer’s instructions (typically Cone 5 or 6 for stoneware) to melt the glass and fuse the colors.
Once fired, sit back with a warm drink and enjoy the calming coastal vibes of your handmade creation
Constellation Star Map

Capture the magic of a starry evening on your favorite ceramic ware with this deep indigo and gold constellation design. The combination of a speckled dark background and metallic star charts creates a dreamy, cosmic effect perfect for cozy warm drinks.
Detailed Instructions
Materials
- Bisque-fired ceramic mug (or a plain glazed dark blue mug)
- Deep indigo or midnight blue ceramic glaze (like Mayco Stroke & Coat)
- Gold or bronze overglaze luster or ceramic paint pen
- Small fine-point detail brush
- Medium flat brush
- Toothbrush (for speckling)
- White or light blue glaze (optional, for background stars)
- Pencil
- Clear dipping glaze (if using bisque)
Step 1: Base Coat Application
-
Clean surface:
Begin by wiping down your bisque mug with a slightly damp sponge to remove any dust, which ensures the glaze adheres perfectly. -
Apply first layer:
Using the medium flat brush, apply a smooth, even coat of your deep indigo glaze to the entire exterior of the mug, leaving the bottom rim unglazed for a nice contrast. -
Layer up:
Allow the first coat to dry until it loses its sheen, then apply a second and third coat. This depth is effectively what creates that rich, midnight sky look.
Smudged Lines?
If your gold lines smear, don’t wipe immediately. Let the mistake dry completely, then gently scrape it off with a toothpick or craft knife before reapplying.
Step 2: Creating the Galaxy
-
Prepare the speckle:
Dilute a tiny amount of white or very light blue glaze with water until it has a milky consistency. -
Apply background stars:
Dip your toothbrush into the diluted mixture. Hold it near the mug and run your thumb across the bristles to flick tiny speckles onto the dark blue surface. -
Control the spread:
Rotate the mug as you flick to ensure an even distribution of ‘distant stars’ without clustering too many in one spot. -
Initial firing (if applicable):
If you are using traditional ceramic glazes, you would typically fire the mug now to set the dark blue base before adding metallic luster. If using bake-at-home paints, let this layer dry completely (at least 24 hours).
Zodiac Touch
Personalize the mug by painting the specific zodiac constellation of the person you are gifting it to on one side, and their name on the bottom.
Step 3: Mapping the Constellations
-
Plan your design:
I find it helpful to look up real star charts (like Cassiopeia or Ursa Major) or lightly sketch your design with a pencil directly on the dry surface. -
Paint major stars:
Using your gold luster or metallic paint pen, draw small five-pointed stars at the key anchor points of your constellation. -
Connect the dots:
With a very steady hand and a fine liner brush, paint thin, dashed lines connecting your main stars. The dashed effect gives it that vintage map aesthetic. -
Add variance:
Paint a few solid circles in gold of different sizes scattered around the main constellation to add depth. -
Highlight the rim:
Carefully run a thin line of gold paint or luster along the inside edge of the handle or the top rim for a subtle pop.
Step 4: Finishing Touches
-
Clean up:
Check the unglazed bottom rim; if any blue glaze dripped down, scrape it off gently with a crafting knife or wipe with a sponge. -
Final cure:
If using ceramic luster, the mug will need a third, low-fire kiln run. If using home-oven paints, follow the manufacturer’s baking instructions to cure the paint permanently.
Enjoy sipping your morning coffee while holding the entire universe in your hands
Galaxy Nebula Sponge Effect

Transform a plain ceramic mug into a piece of the cosmos with this stunning galaxy nebula effect. By layering sheer washes of color over a dark base, you will create depth that mimics deep space, finished with crisp white stars.
Step-by-Step Guide
Materials
- Bisque fired ceramic mug
- Underglaze (Black, Deep Blue, Purple, Magenta/Pink, White)
- Small sea sponge or cosmetic wedge sponge
- Small stiff paintbrush
- Fine liner brush (size 0 or 00)
- Glazed palette or tile
- Water cup
- Clear dipping glaze (if firing) or glossy sealant
Step 1: Setting the Abyss
-
Base Coat Application:
Begin by painting the entire exterior and interior of the mug with three solid coats of black underglaze. Ensure you let each coat dry until it’s chalky to the touch before adding the next to avoid lifting the previous layer. -
Interior Spattering:
While the outside is the main focus, don’t forget the inside. We want the galaxy to feel all-encompassing. Dip a stiff brush into slightly watered-down white underglaze/paint. -
Flicking Technique:
Hold the brush inside the mug and run your thumb across the bristles to flick tiny speckles onto the black interior walls. This creates a distant star field inside your cup.
Muddy Nebula?
If colors merge into grey, let the layers dry fully between sponging. Use a clean sponge piece for every new color to keep hues distinct.
Step 2: Creating the Nebula
-
Prepping Sponges:
Tear off small chunks of your sponge. Rugged, uneven edges on the sponge create more natural-looking clouds than a flat, cut edge. -
First Nebula Layer:
Pour a small amount of deep blue onto your palette. Dab the sponge into the paint, then blot the excess onto a paper towel until the texture is almost dry. Gently dab cloud-like shapes onto the dried black base. -
Building Purple Depth:
Switch to a fresh piece of sponge and pick up your purple hue. Using the same blotting technique, overlap the purple slightly with the blue areas, leaving some black space visible between the ‘clouds’ for contrast. -
Adding Highlights:
Use the magenta or pink shade sparingly. Sponge this color into the center of your existing purple and blue clouds. This creates a ‘glowing center’ effect typical of nebulae images. -
Softening Edges:
If any sponge marks look too harsh or square, take a clean, slightly damp sponge and gently pat the edges to blur the colors together. I tend to do this quickly before the paint sets completely. -
Handle Detail:
Run a very light sponging of purple along the ridge of the mug handle, keeping the underside mostly black to maintain that shadowed, 3D appearance.
Step 3: Stargazing Details
-
Mixing Star Paint:
Prepare a small puddle of white underglaze. It should be the consistency of heavy cream—thick enough to be opaque, but fluid enough to leave the brush easily. -
Painting Major Stars:
Using your fine liner brush, paint small four-pointed stars (cross shapes) in the open black spaces or right on top of the nebula clouds. Vary the sizes; make one or two quite large for focus. -
Elongating the Rays:
For the largest stars, gently drag the tip of the brush outward from the center of the cross to taper the points, making them look like they are twinkling. -
Adding Planets:
Dot a few larger circles here and there using the back end of a paintbrush handle. These represent closer planets or larger celestial bodies. -
The Milky Way:
Use the stiff brush spatter technique again on the exterior. Mask off the handle if you want it clean, then flick fine white mist over the nebula sections to create distant clusters of stars.
Cosmic Sparkle
Mix a pinch of food-safe mica powder into your clear glaze or final varnish coat for a subtle, iridescent shimmer that catches the light.
Step 4: Finishing
-
Drying Time:
Allow the mug to dry completely. The nebula layers are thin, but the dots of white paint might take a little longer to set. -
Glazing:
If using ceramic glazes, dip the entire mug into a clear glossy glaze. This is crucial as it will deepen the black background and make the nebula colors pop vibrantly. -
Final Firing:
Fire the mug in the kiln according to the clay and glaze specifications (usually cone 06 or cone 6 depending on your materials chosen).
Your morning coffee will now feel like an interstellar adventure with your new handmade mug
Citrus Slice Border
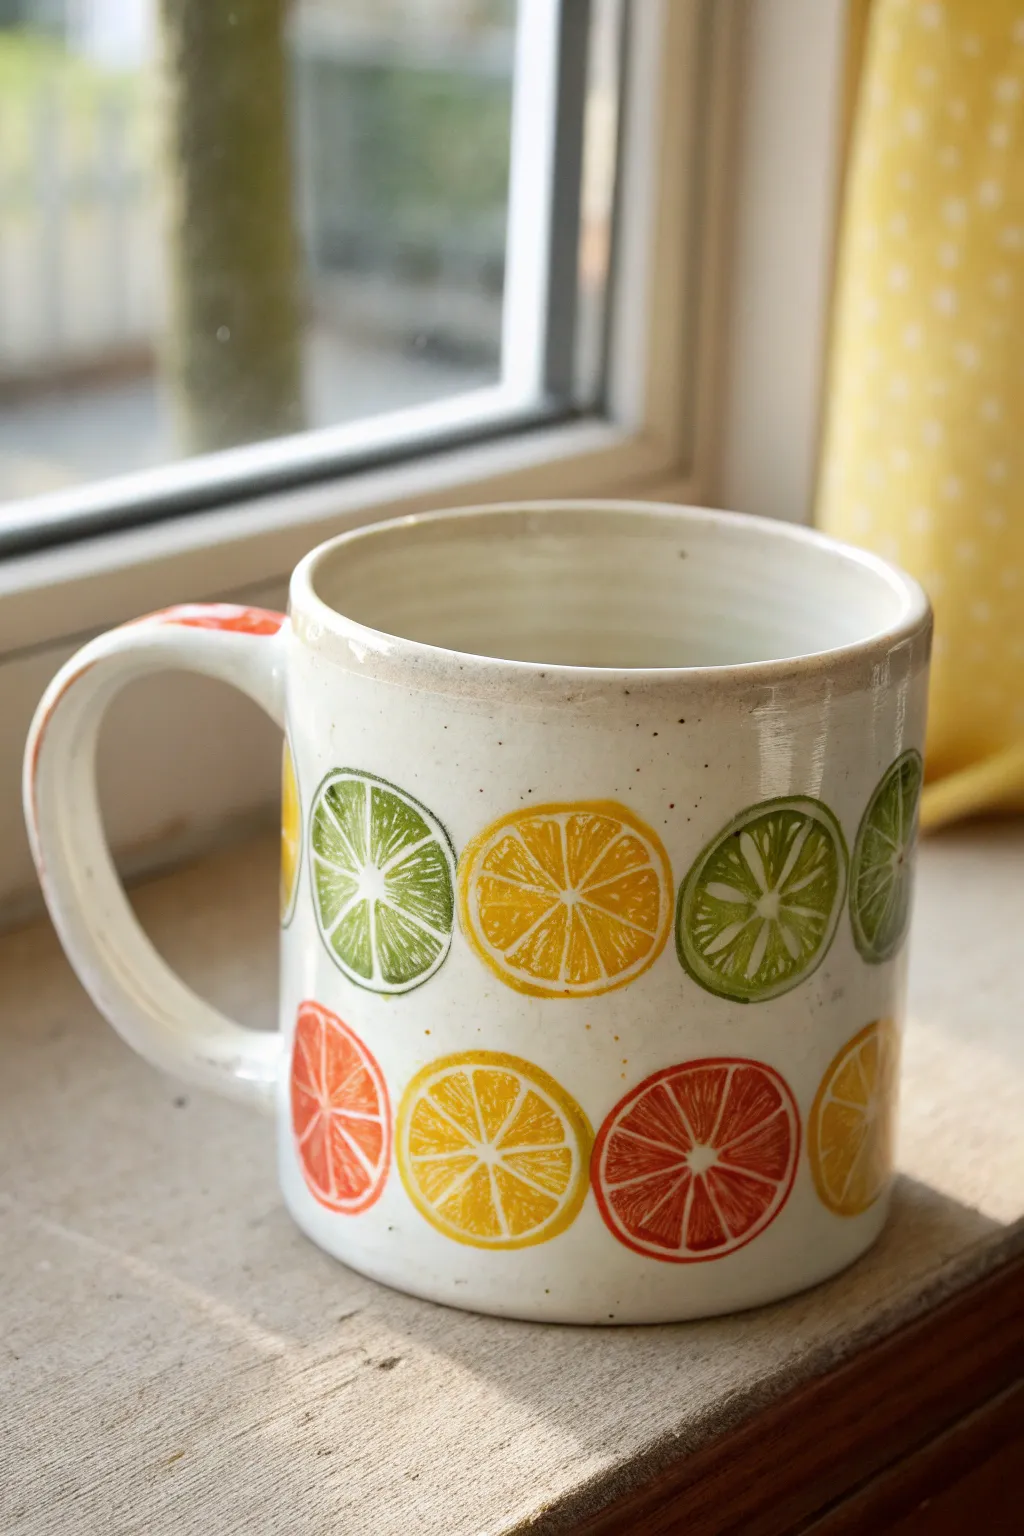
Brighten up your morning coffee routine with this ceramic mug featuring vibrant, hand-painted citrus slices. The refreshing pattern of lemons, limes, and grapefruits creates a cheerful, summery vibe that looks great in any kitchen.
How-To Guide
Materials
- Bisque-fired ceramic mug
- Underglaze paints (Yellow, Orange, Lime Green, Red-Orange)
- Small round sponge stamper (approx. 1-1.5 inch diameter)
- Fine liner brush (size 00 or 0)
- Flat shader brush
- Clean water and sponge
- Clear dipping glaze
- Kiln (or access to a pottery studio)
Step 1: Preparation
-
Clean the Bisque:
Start by wiping down your bisque-fired mug with a damp, clean sponge. This removes any dust or oils from handling that might repel the glaze. -
Plan the Layout:
Visualize two horizontal rows for your fruit slices. The top row should sit about an inch below the rim, and the bottom row should stagger slightly below the gaps of the top row, like a brick pattern.
Step 2: Creating the Citrus Base
-
Load the Sponge:
Pour a small amount of yellow underglaze onto a palette. Dip your round sponge stamper into the paint, ensuring it’s coated evenly but not dripping. -
Stamp the Lemons:
Press the sponge gently onto the mug surface to create perfect circles. Space them out to leave room for other colors. I like to do all one color at a time to keep the process efficient. -
Add Limes and Oranges:
Clean your sponge thoroughly or use a fresh one. Repeat the stamping process with lime green and orange underglazes, filling in the gaps in your top row. -
Start the Second Row:
Begin the bottom row using red-orange for grapefruit slices and mixing in yellow and orange circles. Remember to offset these circles slightly from the ones above for that dynamic look shown in the photo. -
Touch Ups:
If any stamped edges look rough or too transparent, use a flat shader brush to gently smooth out the colored circles and ensure solid coverage.
Smudged Lines?
If your ‘carved’ lines look blurry, let the underglaze dry longer. It needs to be firm so the water removes only the line you draw, not the surrounding paint
Step 3: Detailing the Fruit
-
Dry Time:
Let the colorful circles dry until they are matte and cool to the touch. This usually takes about 10-15 minutes. -
Sgraffito Technique Prep:
For the crisp white lines, we are going to use a sgraffito-style removal method. Slightly dampen your fine liner brush with clean water—it should be moist, not dripping. -
Carve the Center:
Press the damp brush firmly into the center of a fruit circle and lift up the underglaze to reveal the white clay body beneath. This creates the central hub of the fruit. -
Create Segments:
Using the same damp brush technique, draw radiating lines from the center to the outer edge, dividing the circle into 8 distinct triangular segments. Rinse your brush frequently to keep the lines clean. -
Define the Rind:
Carefully run the clean, damp brush around the very outer perimeter of the circle, just inside the painted edge. This creates the separation between the colored peel and the pulp. -
Check Consistency:
Repeat this removal process for every fruit slice. If the underglaze has dried too hard, you may need to scrub slightly harder with the brush, but be gentle enough not to gouge the clay.
Zesty Twist
Paint the handle with small green leaves or tiny citrus blossoms to add an organic connection between the geometric fruit slices
Step 4: Finishing
-
Clean Up:
Inspect the mug for any stray smudges of underglaze outside the fruit designs and wipe them away with a clean sponge. -
Clear Glaze Application:
Once all underglaze design work is bone dry, dip the entire mug into a clear transparent glaze. Ensure an even coat and shake off excess drips. -
Final Fire:
Fire the mug in the kiln according to the specific temperature requirements of your clay and glaze (typically Cone 5 or 6)
Now you have a refreshing piece of drinkware perfect for enjoying your favorite hot beverage
Faux Mosaic Patchwork Illusion
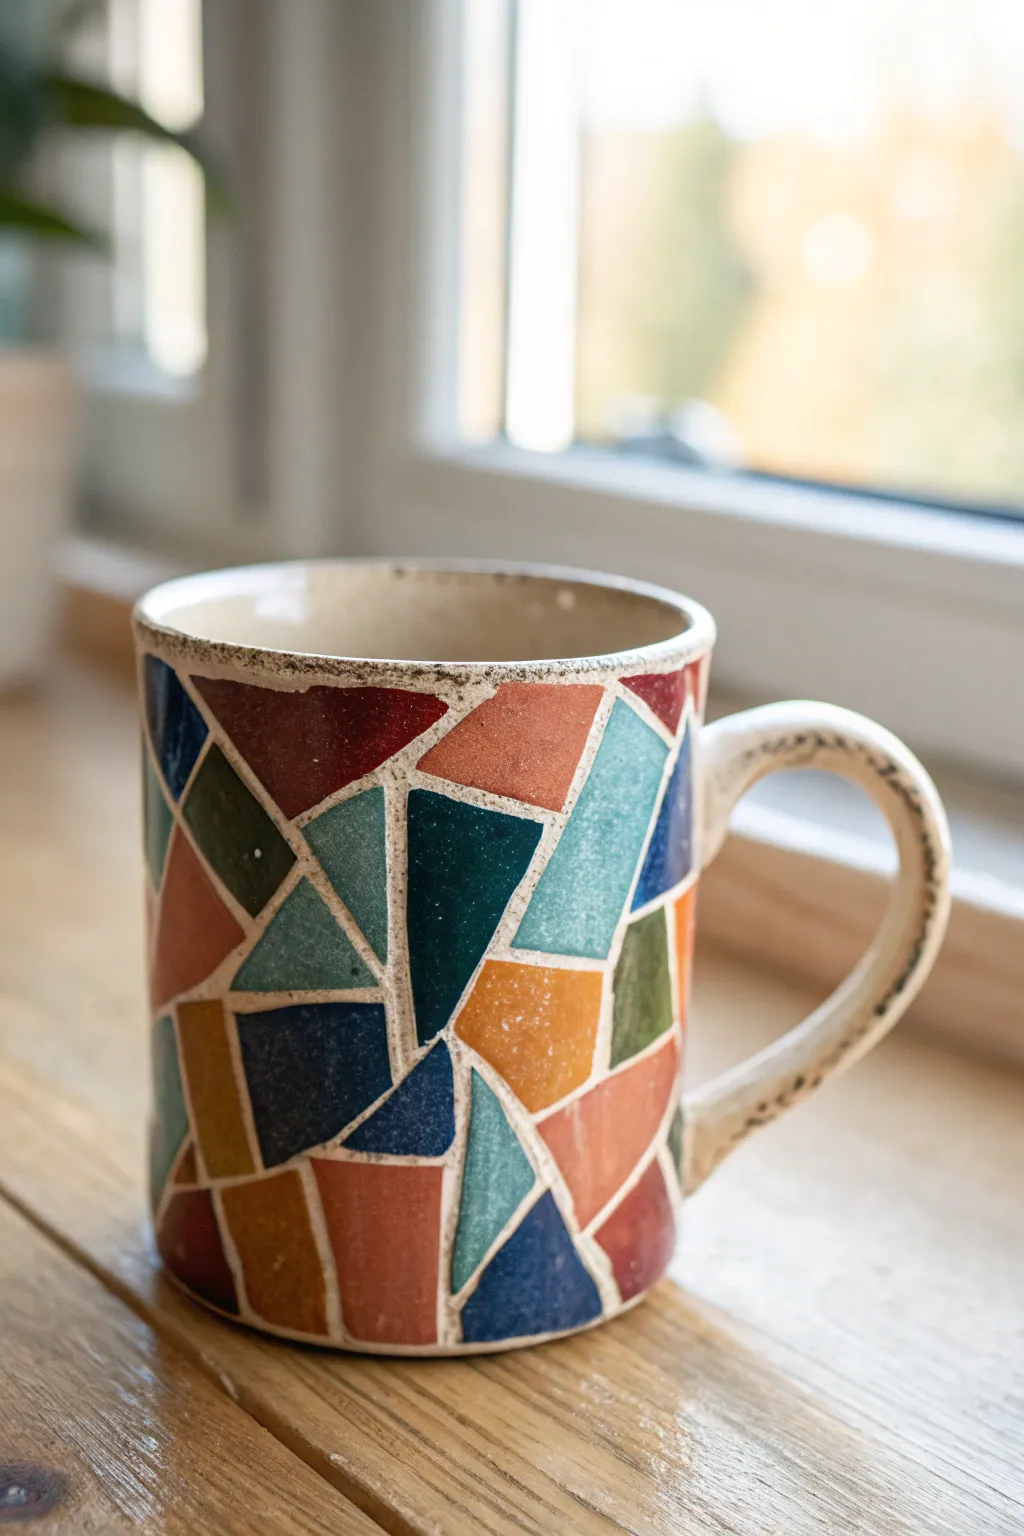
Transform a plain ceramic mug into a piece of faux-mosaic art without laying a single tile. This technique uses masking fluid or careful brushwork to reveal the raw clay body between vibrant, geometric blocks of glaze, creating a stunning patchwork illusion.
Step-by-Step Tutorial
Materials
- Bisque-fired ceramic mug (stoneware or earthenware)
- Underglazes (red, orange, teal, navy, dark green, yellow-ochre)
- Liquid wax resist or painter’s tape (optional)
- Fine liner brush (size 0 or 00)
- Small flat shader brush (size 2 or 4)
- Pencil
- Clear dipping glaze or brushing clear glaze
- Kiln access (appropriate for your clay body)
Step 1: Drafting the Pattern
-
Clean surface:
Begin with a clean, dust-free bisque mug. Wipe it down with a slightly damp sponge to remove any firing dust that might interfere with adhesion. -
Sketch the grid:
Using a light pencil, sketch your geometric design directly onto the bisque. The lines will burn off in the kiln, so don’t worry about being messy. -
Vary the shapes:
Draw a mix of triangles, trapezoids, and irregular polygons. Aim for a ‘crazy quilt’ look rather than a perfect uniform grid. Ensure you leave a consistent gap of about 2-3mm between every shape to simulate grout lines.
Step 2: Creating the Resist Lines
-
Apply wax resist:
This is the most crucial step for crisp lines. Dip your fine liner brush into liquid wax resist. Carefully trace over the ‘grout’ lines—the gaps you left between your pencil shapes. -
Protect the rim:
Run a line of wax resist along the very top rim and the handle where you want the raw speckled clay to remain visible. Let the wax dry completely; it usually takes about 15-20 minutes to become touch-dry.
Messy Lines?
If your underglaze bleeds under the wax, scratch the excess paint off the raw clay gently with a wooden skewer or needle tool before applying the clear glaze.
Step 3: Applying Color
-
Select your palette:
Choose a warm, earthy palette mixed with cool accents. The image uses deep reds, terracotta oranges, dark teals, and navy blues. -
First coat:
Using your small flat shader brush, fill in the first shape with color. The wax resist lines act as a barrier, making it easier to stay inside the lines, but try not to flood the wax too heavily. -
Distribute colors:
Work one color at a time. Paint several non-adjacent shapes with your red underglaze, then switch to teal. Scattering the colors randomly creates that authentic mosaic fee. -
Build opacity:
I usually find that one coat isn’t enough for solid coverage. Let the first layer dry until matte, then apply a second coat to ensure the colors pop after firing. -
Third coat (optional):
For lighter colors like the yellow-ochre or pale teal, a third coat might be necessary to avoid brushstrokes showing through. -
Clean up splatters:
Once all shapes are filled and dry, inspect the wax lines. If any underglaze has pooled significantly on top of the wax, gently scrape it away with a craft knife or wipe with a damp clean brush so it doesn’t flake onto the paint during firing.
Textured Touch
Use a matte clear glaze over the shapes but leave the ‘grout’ lines completely unglazed (mask them off again) for a tactile, varying texture difference.
Step 4: Finishing and Firing
-
Bisque fire (optional):
Some artists prefer to do a second bisque firing here to set the underglaze, but it’s not strictly necessary if you are careful with the clear glaze application. -
Clear glazing:
Apply a clear glaze over the entire exterior (and interior) of the mug. If dipping, do it in one smooth motion. If brushing, apply 2-3 coats as per manufacturer instructions. -
Wipe the foot:
Thoroughly sponge off any glaze from the bottom foot ring of the mug so it doesn’t fuse to the kiln shelf. -
Final fire:
Fire the mug to the temperature required by your specific clay and glaze combination (likely Cone 5 or 6 for stoneware). The wax will burn away completely, leaving the raw, speckled clay lines separating your glossy colors.
Once cooled, you’ll have a durable, functional mug that looks like a carefully pieced-together puzzle