If you’re craving that relaxed, free-spirited look, boho clay bead bracelets are one of my favorite quick wins in the studio. I love how a few heishi clay beads, some texture, and a little charm-y detail can turn into a whole vibe on your wrist.
Classic Earth-Tone Heishi Stack
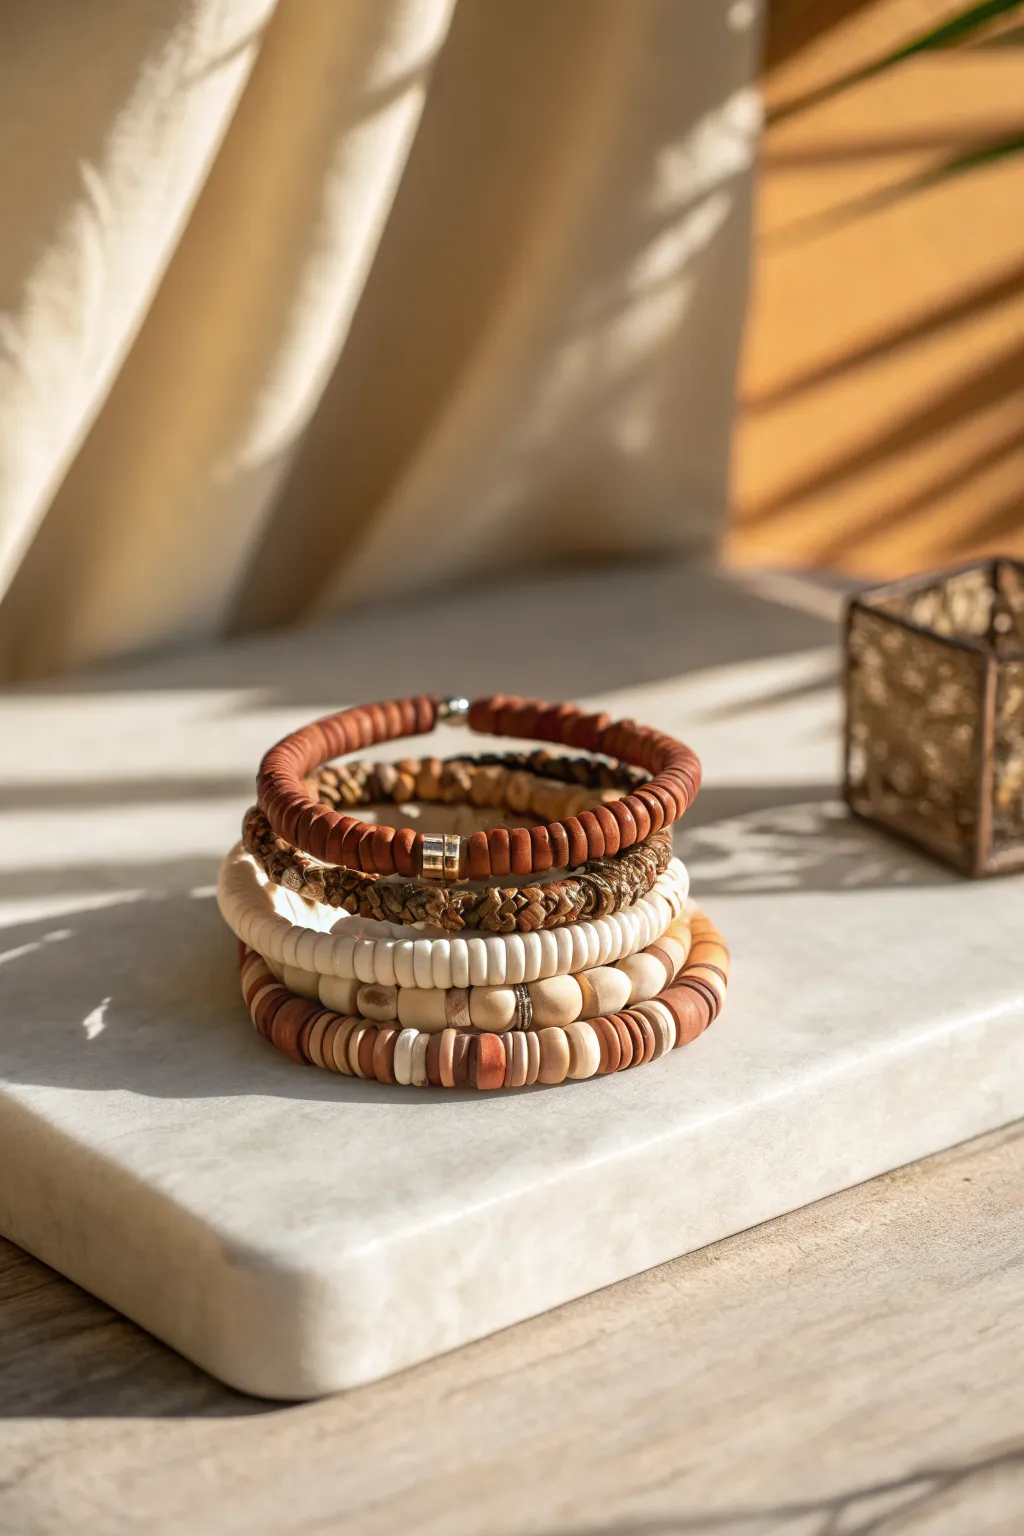
Capture the warmth of sun-baked earth with this stack of four complementary bracelets, blending clay discs, natural wood, and woven hemp for a perfectly curated boho look. This project mixes distinct textures—smooth ceramic, grainy wood, and soft fiber—into a cohesive set that feels effortlessly collected.
Step-by-Step Tutorial
Materials
- Polymer clay heishi beads (6mm or 8mm) in warm earth tones: rust red, cream, tan, and chocolate brown
- Natural wood beads (8mm and 10mm round)
- Hemp cord or leather cord (1mm thickness) in dark brown
- Strong elastic bead cord (0.8mm or 1mm transparent)
- Gold spacer beads, specifically a tube or cylindrical style
- Gold crimp covers or small knot covers
- Jewelry glue (optional)
- Scissors
Step 1: The Rust Heishi Strand
-
Prepare the Elastic:
Cut a length of elastic cord about 10-12 inches long. Giving yourself this extra room makes tying the final knot much easier than struggling with short ends. -
Pre-stretch the Cord:
Before stringing a single bead, give your elastic piece several firm tugs. This pre-stretching prevents the bracelet from drooping or loosening immediately after you wear it. -
String the Base:
Begin threading your rust-red polymer heishi beads. I like to continuously check the length against my wrist, aiming for about 6.5 to 7 inches of beads for a standard fit. -
Add the Focal Point:
Once you have strung about half the desired length, slide on three gold cylinder spacer beads. These act as the metallic highlight of this top bracelet. -
Finish the Loop:
Continue stringing the rust beads until the strand reaches your total desired length. -
Secure the Knot:
Tie off the bracelet using a surgeon’s knot (right over left, left over right twice). Pull tight, distinctively stretching the elastic, dab with a tiny drop of glue, and trim the excess.
Knot Hiding 101
If the knot won’t fit inside a bead, cover it with a gold crimp cover. Gently squeeze it shut over the knot with pliers for a professional finish.
Step 2: The Braided Hemp Band
-
Cut the Cords:
Cut three strands of your dark brown hemp or leather cord, each about 15 inches long to accommodate the braiding process. -
Anchor the End:
Knot the three strands together at one end, leaving a 2-inch tail. Tape this end down to your table for tension while you work. -
Braid Tightly:
Create a classic three-strand braid. Keep the tension high so the braid looks dense and intricate, resembling the texture in the photo. -
Measure and Finish:
Braid until the length matches your first heishi bracelet. Tie an overhand knot to secure the end, then join the two ends using a sliding knot closure or a crimp clasp for a seamless look.
Level Up: Scent Diffuser
Use unfinished wood beads on the bottom strand. They act as natural diffusers—add a drop of essential oil to the wood for all-day aromatherapy.
Step 3: The Cream Gradient
-
Select Your Palette:
For the third bracelet, gather your cream and light tan heishi beads. This layer acts as the bright neutral balance to the darker tones. -
Create the Pattern:
String the beads onto a new piece of pre-stretched elastic. Instead of a random mix, group 10-15 cream beads followed by a single tan bead to create subtle variation without breaking the light color block. -
Close the Loop:
Tie off this strand with a surgeon’s knot, secure with glue, and trim like the first bracelet.
Step 4: The Mixed Texture Bottom
-
Prepare the Mix:
This final bracelet combines everything. Gather round wood beads, a few heishi discs in mixed colors, and one gold spacer. -
Establish the Pattern:
Start with a section of round wood beads (about 2 inches). Transition into a block of heishi beads in a variegated pattern—alternating thin slices of rust, tan, and cream. -
Incorporate Wood Accents:
Intersperse individual round wood beads between sections of heishi discs. This creates the bumpy, organic texture seen at the bottom of the stack. -
Final Assembly:
Double-check that the length matches the other three. Tie your final surgeon’s knot, apply glue, and hide the knot inside one of the larger wood beads if possible.
Stack them all together on your wrist for an instant, layered boho statement that feels grounded and earthy


Turquoise Pop on Warm Neutrals
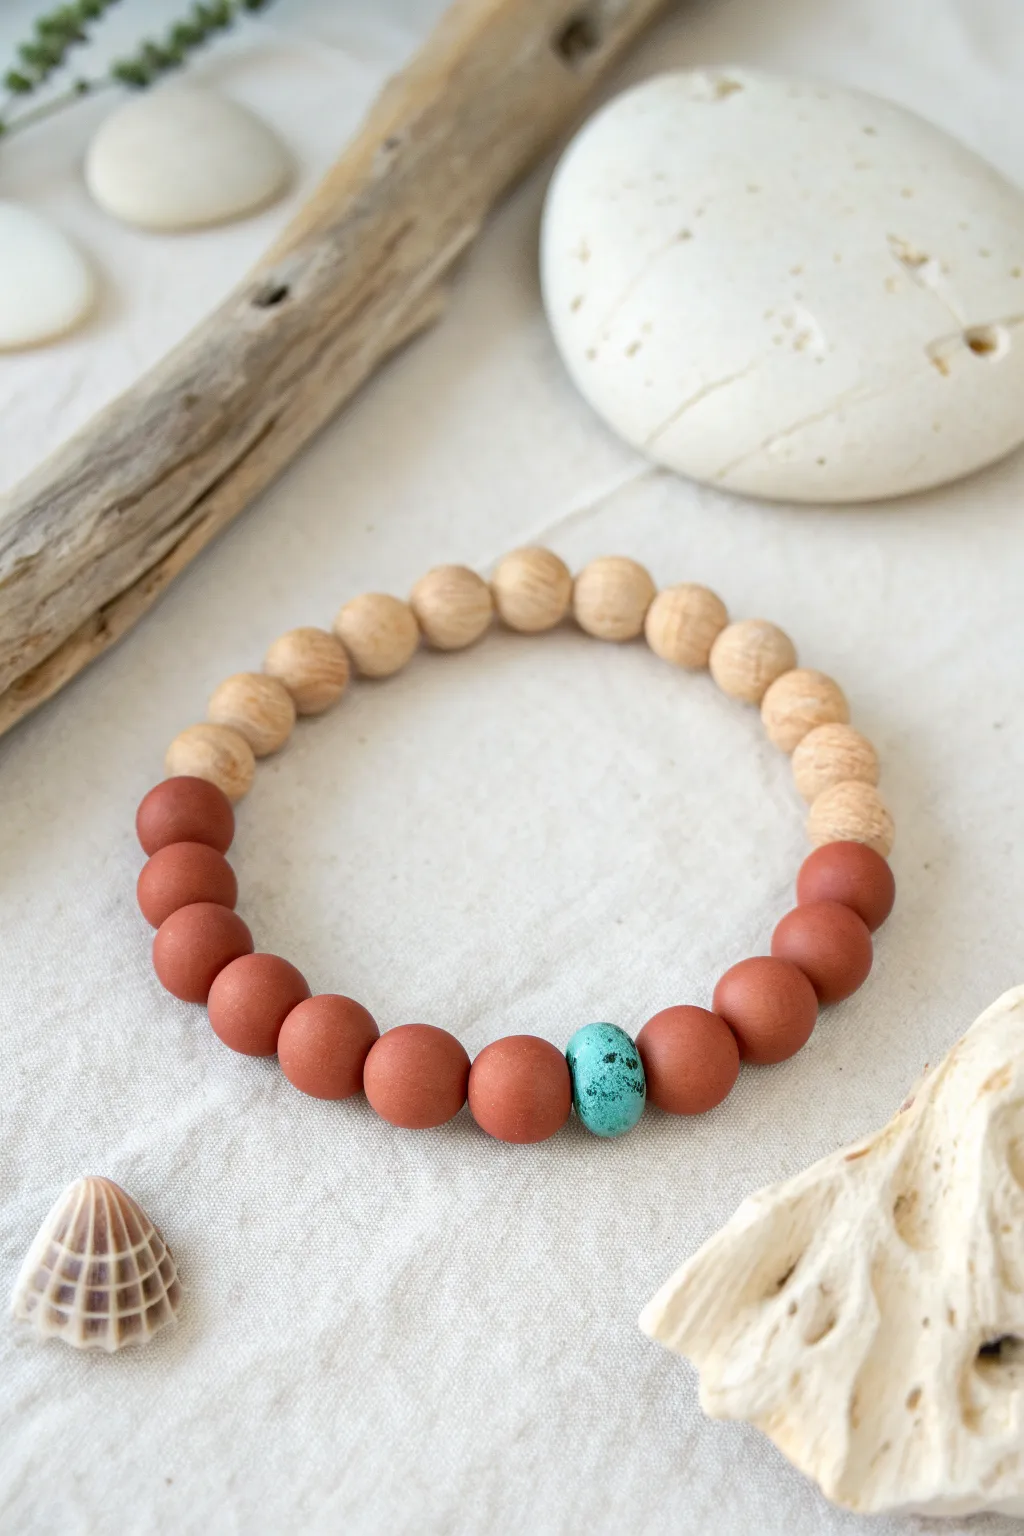
This simple yet striking bracelet balances the rustic warmth of terracotta and unfinished wood with a single, vivid pop of turquoise. Its split design creates a modern aesthetic that feels perfectly at home with beachcombed treasures.
Detailed Instructions
Materials
- Polymer clay (Terracotta or Burnt Sienna color)
- Polymer clay (Turquoise color)
- Black acrylic paint (optional, for turquoise speckling)
- Paintbrush or old toothbrush
- Light unfinished wood beads (approx. 8mm-10mm)
- Bead reamer or toothpick
- Elastic cord (0.8mm or 1mm clear)
- Super glue or jewelry cement
- Scissors
- Oven for baking clay
Step 1: Crafting the Clay Beads
-
Condition the terra cotta clay:
Begin by taking your reddish-brown polymer clay and kneading it in your hands until it becomes soft and pliable. This warmth prevents cracking later. -
Form uniform spheres:
Roll the clay into a log and cut it into equal-sized segments. Roll each segment between your palms to create smooth, round spheres approximately 10mm in diameter. You will need about 11-12 of these beads. -
Create the focal bead:
Repeat the process with a small amount of turquoise clay. Form a single bead that is roughly the same size as your terracotta ones, perhaps slightly flatter or more organic in shape if desired. -
Add texture (optional):
To mimic the look of real turquoise stone, you can gently flick tiny specks of watered-down black acrylic paint onto the turquoise bead using an old toothbrush. Let this dry before handling. -
Create the holes:
Using a toothpick or a piercing tool, carefully bore a hole through the center of each clay bead. Twist the tool gently as you push through to avoid deforming the sphere. -
Bake the beads:
Arrange your clay beads on a baking sheet or foil. Bake them according to the specific temperature and time instructions on your polymer clay package (usually around 275°F for 15-30 minutes). -
Cool down:
Once baked, turn off the oven and let the beads cool down completely before moving them. This ensures they harden properly without becoming brittle.
Hole Hiding Tricks
If the knot won’t fit inside a bead, use a bead reamer to gently widen the hole of the bead adjacent to the knot. Careful not to crack the wood.
Step 2: Assembly
-
Prepare the cord:
Cut a length of elastic cord about 10-12 inches long. I like to prestretch the cord by pulling on it gently a few times; this helps prevent the bracelet from sagging after you wear it. -
Secure the end:
Place a piece of tape or a bead stopper on one end of the cord so your beads don’t slide off while you are working. -
Begin with the wood:
Thread approximately 11 light wood beads onto the elastic. These should take up roughly half the circumference of your wrist. -
Transition to clay:
Start adding your cooled terracotta clay beads. Thread about 5 or 6 of them after the wood beads. -
Add the focal point:
Slide on your single turquoise bead. This should sit right in the middle of the clay section. -
Finish the pattern:
Add the remaining 5 or 6 terracotta beads to complete the circle, ensuring the turquoise bead is centered within the red clay section. -
Check the fit:
Wrap the unfinished strand around your wrist to check the size. If it’s too tight or loose, add or remove a wood bead or a clay bead from the ends to adjust. -
Tie the knot:
Remove the tape and bring the two ends of the cord together. Tie a strong surgeon’s knot (right over left twice, then left over right). -
Secure and trim:
Apply a tiny dab of super glue or jewelry cement to the knot for extra security. Once dry, trim the excess cord ends close to the knot. -
Hide the knot:
Gently pull the elastic until the knot slides inside the hole of the nearest wood bead to conceal it.
Smooth Moves
To get rid of fingerprints on your unbaked clay beads, lightly brush them with a drop of baby oil or cornstarch before putting them in the oven.
Enjoy wearing your new bracelet stacked with other textures or as a standalone statement of earthy elegance


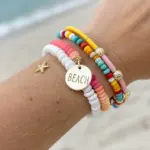

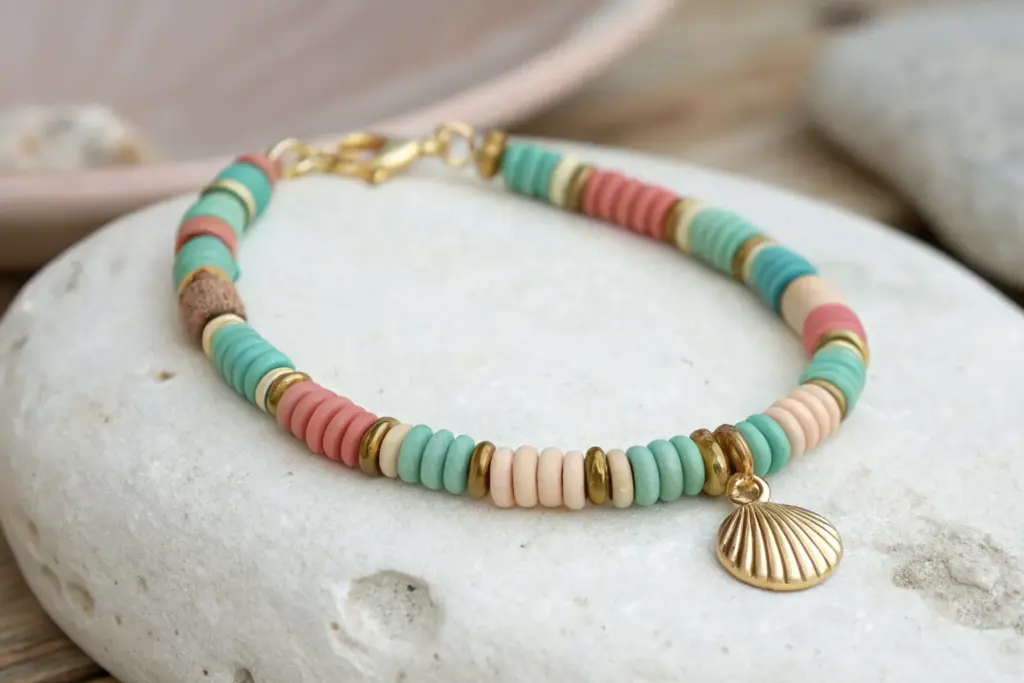
Shell-Center Beach Boho Bracelet
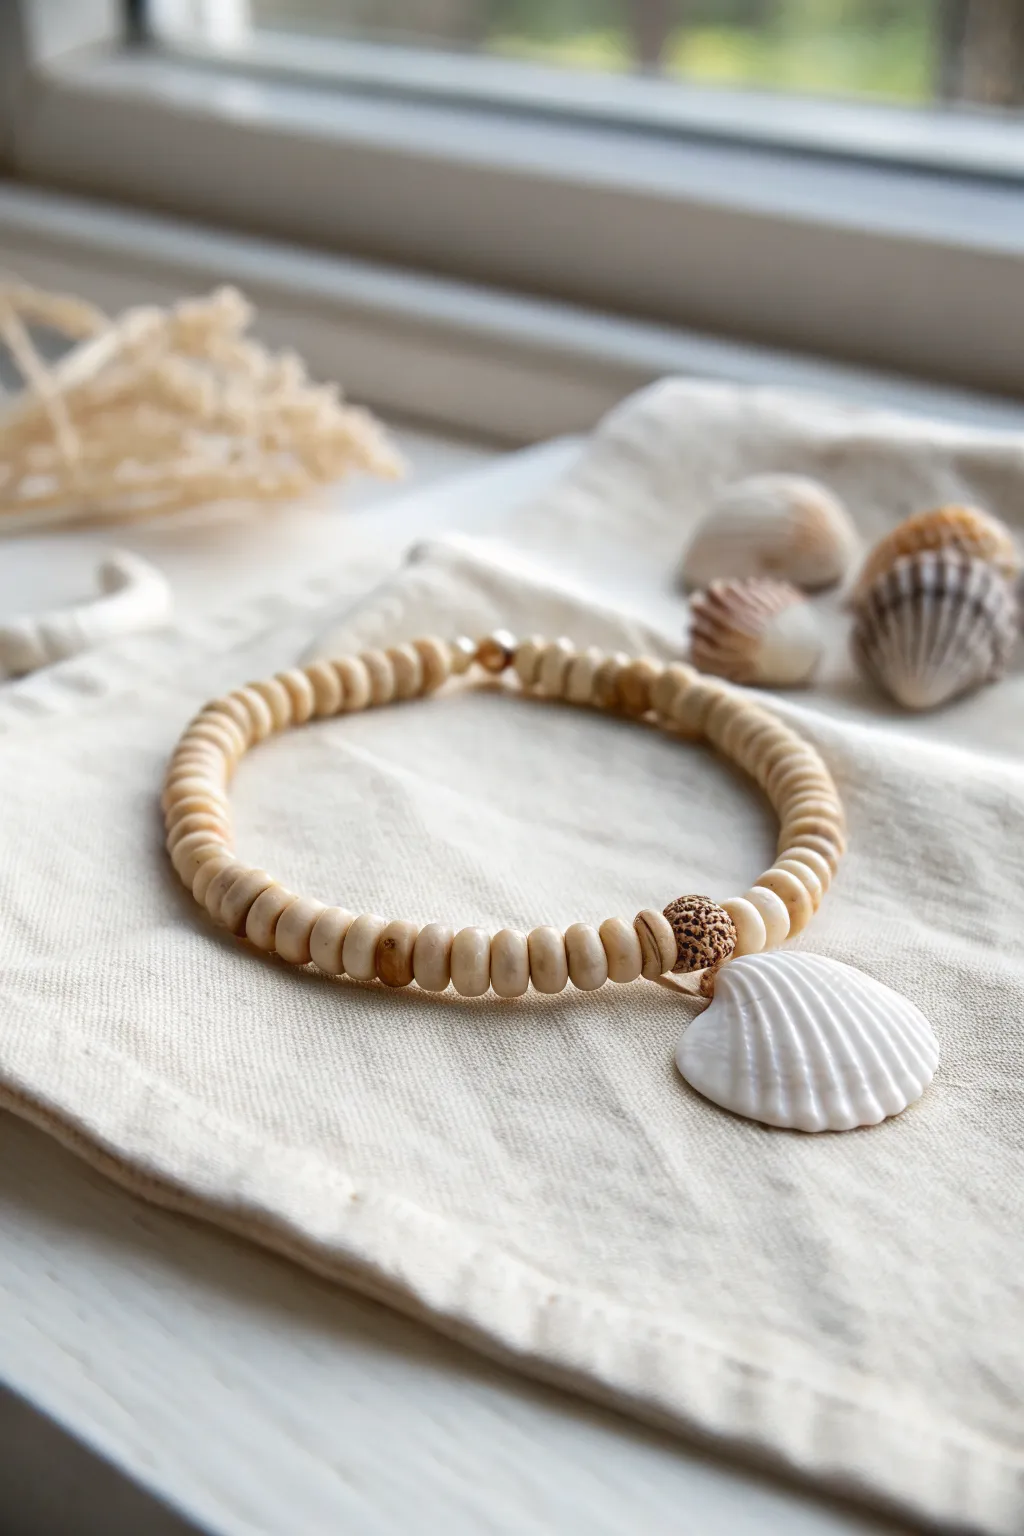
Capture the essence of a tranquil beach day with this minimalist boho bracelet. Featuring rustic clay heishi beads and a striking scallop shell centerpiece, this accessory brings a touch of organic coastal charm to any outfit.
How-To Guide
Materials
- Cream or off-white polymer clay heishi beads (approx. 6-8mm)
- One medium-sized white scallop shell pendant (drilled or with a bail)
- One textured accent bead (wood, cork, or patterned clay sphere)
- Elastic stretch cord (0.8mm clear)
- Jewelry glue or clear nail polish
- Scissors
Step 1: Preparation
-
Measure your wrist:
Start by wrapping the elastic cord loosely around your wrist to determine the comfortable length. Add about 3-4 inches of extra cord to each end to make knotting easier later on. -
Pre-stretch the cord:
Hold a section of the elastic cord and give it several firm tugs. Pre-stretching prevents the bracelet from sagging or becoming loose after you wear it a few times. -
Secure the end:
Attach a piece of tape or a bead stopper to one end of your cut cord. This essential safety measure ensures your beads won’t slide right off the other side while you work.
Knot Security
Don’t trim the ends immediately after gluing! Let the glue dry (cure) fully for 24 hours before cutting tails to ensure the knot doesn’t snap open.
Step 2: Creating the Centerpiece
-
Thread the textured bead:
Locate your textured accent bead—the sphere with the rustic, pitted surface. Slide this onto the cord first; it will sit directly next to the shell. -
Add the shell charm:
Thread the cord through the hole of your white scallop shell pendant. The shell should nestle against the textured bead. -
Check the orientation:
Ensure the concave side of the shell (the inside) is facing the direction you want, though generally, these charms look best when swaying freely.
Layer Up
Create a stacked look by making two companion bracelets using smaller 4mm gold spacer beads mixed with the cream clay beads.
Step 3: Stringing the Beads
-
Inspect the clay beads:
Sort through your cream heishi beads. Discard any that are broken or drastically uneven, though a little variation adds to the boho charm. -
Begin the first side:
Start threading the cream heishi beads onto the cord on on the right side of your centerpiece cluster. -
Check length frequently:
Continue adding beads until you’ve covered about half of your required wrist circumference. -
Balance the other side:
Remove your tape or bead stopper from the other end. Now, thread an equal number of heishi beads onto the left side of the centerpiece. -
Verify symmetry:
Hold the bracelet up by the shell charm to ensure both sides of the beaded strand hang evenly. Adjust the bead count if one side looks longer. -
Final fit test:
Wrap the unfinished strand around your wrist one last time. It should feel snug but not tight, as the knot will take up a tiny amount of space.
Step 4: Finishing Touches
-
Tie the first knot:
Bring both ends of the elastic cord together. Tie a simple overhand knot and pull it tight to bring the beads together. -
Secure with a surgeon’s knot:
For extra security, tie a surgeon’s knot. This is just like a standard square knot, but you loop the cord through twice before pulling tight. -
Apply adhesive:
I like to place a tiny drop of jewelry glue or clear nail polish directly onto the knot. This fuses the fibers and prevents slipping. -
Hide the knot:
While the glue is still slightly tacky, gently tug the cord so the knot slides inside the hole of the nearest heishi bead. -
Trim the excess:
Once dry, use your small scissors to clip the remaining tail ends of the elastic cord as close to the bead as possible without nicking the knot.
Slip on your new bracelet and enjoy that effortless connection to the sea


Gold Spacer Glow Between Clay Beads
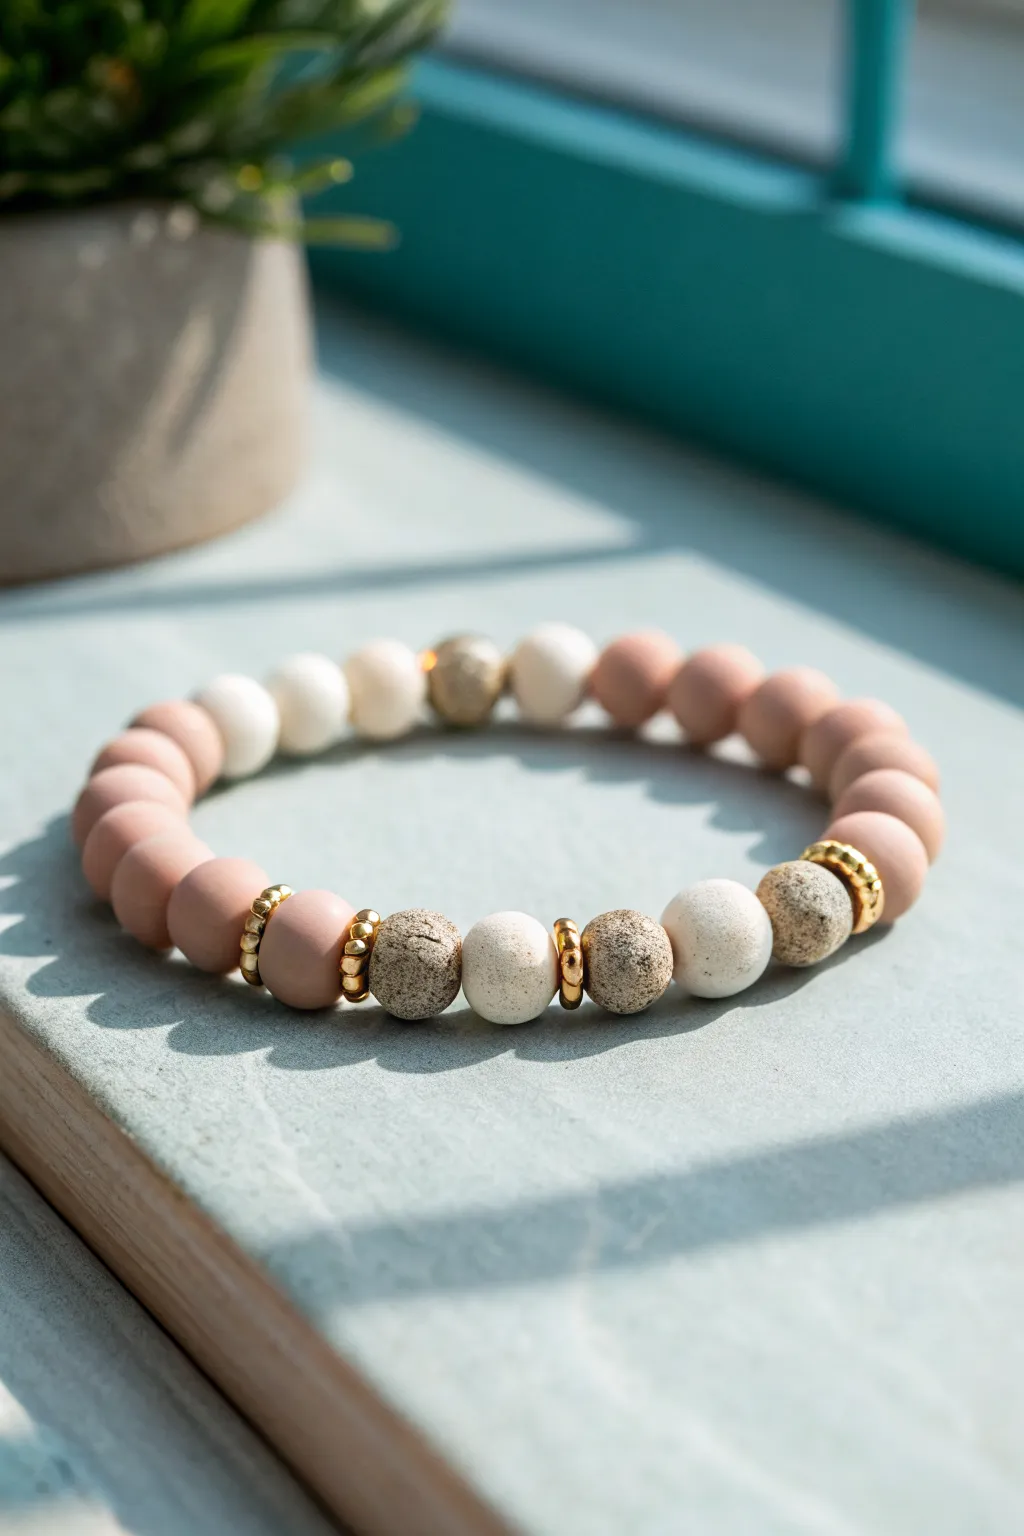
Achieve a sophisticated balance of textures with this bracelet that pairs velvety matte clay beads with rustic stone and gleaming gold accents. The subtle interplay between the soft rose tones and the rugged texturing creates a jewelry piece that feels both grounded and elegant.
Step-by-Step Tutorial
Materials
- Matte polymer clay beads (10mm, dusty rose/blush pink)
- Matte polymer clay beads (10mm, off-white/cream)
- Textured stone or lava rock beads (10mm, speckled beige/grey)
- Gold tone metallic spacer beads (rondelle or disc shape)
- Small gold seed beads or tiny gold discs (optional, for flanking)
- Strong elastic stretch cord (0.8mm or 1mm thickness)
- Jewelry adhesive (e.g., E6000 or specialized knot glue)
- Scissors or jewelry nippers
- Bead stopper or tape
- Ruler
Step 1: Planning Your Pattern
-
Measure your wrist:
Wrap the stretch cord loosely around your wrist to determine the comfortable length, adding about 3 inches of extra slack for easier tying later. -
Secure the end:
Place a bead stopper or a simple piece of masking tape on one end of your cut cord so the beads don’t slide off while you work. -
Lay out the design:
Before threading, lay your beads on a flat surface or bead board. The design featured here uses blocks of color rather than a simple 1-2-1 pattern. -
Create the pink section:
Select about 12-14 of your dusty rose matte beads. This will form the back and sides of the bracelet. -
Create the focal section:
Arrange the front ‘feature’ section. Lay out the pattern: Gold Spacer – Pink Bead – Gold Spacer – Textured Stone – White Bead – Gold Spacer – Textured Stone – White Bead – Textured Stone – Gold Spacer.
Knot Slipping?
If your elastic is too slick and the knot won’t hold, try sanding the last inch of the cord ends lightly with an emery board before tying to create friction.
Step 2: Stringing the Beads
-
Start strong:
Begin threading with a single matte pink bead. This hides the knot better than a metal spacer later on. -
Thread the main color block:
String the remaining dusty rose beads you set aside for the back section. -
Insert the white transition:
Add 2-3 white matte beads followed by a gold rondelle or textured focal bead to transition from the solid pink block. -
Build the focal pattern:
Now, thread your planned intricate pattern. Slide on a gold spacer, followed by a pink bead, then another gold spacer. -
Add texture:
Thread a textured stone bead. These often have slightly rougher holes, so check that it slides smoothly over the elastic. -
Alternate elements:
Add a white matte bead, then a gold spacer ring, and another textured stone bead. Repeat until your focal section is complete. -
Check the spacing:
Ensure the gold spacers sit flush against the clay and stone beads. I find that giving them a gentle spin sometimes helps them nestle in perfectly. -
Review the full length:
Wrap the strand around your wrist to check the fit. If it’s too tight, add one more pink bead to the back section; if loose, remove one.
Scents of Nature
Use unfinished wood or porous lava stone for the textured beads. You can add a drop of essential oil to these beads, turning your bracelet into a diffuser.
Step 3: Finishing Touches
-
Pre-stretch the cord:
Gently pull tightly on both ends of the elastic cord a few times. This prevents the bracelet from stretching out permanently the first time you wear it. -
Tie the knot:
Remove the bead stopper. Tie a surgeon’s knot (right over left and under, then left over right and under) to secure the loop. -
Tighten securely:
Pull the cords firmly to tighten the knot without snapping the elastic. You want the beads to touch but not buckle. -
Apply adhesive:
Dab a tiny amount of jewelry glue directly onto the knot. Let it tack up for a moment to ensure it holds. -
Hide the mechanics:
While the glue is still slightly wet, slide the nearest large-hole matte bead over the knot to conceal it completely. -
Trim excess:
Once the glue is fully cured (check your glue instructions), trim the excess cord tails close to the bead.
Now you have a stunning, tactile accessory ready to stack or wear solo

The Complete Guide to Pottery Troubleshooting
Uncover the most common ceramic mistakes—from cracking clay to failed glazes—and learn how to fix them fast.
Modern Boho Black-and-White Mix
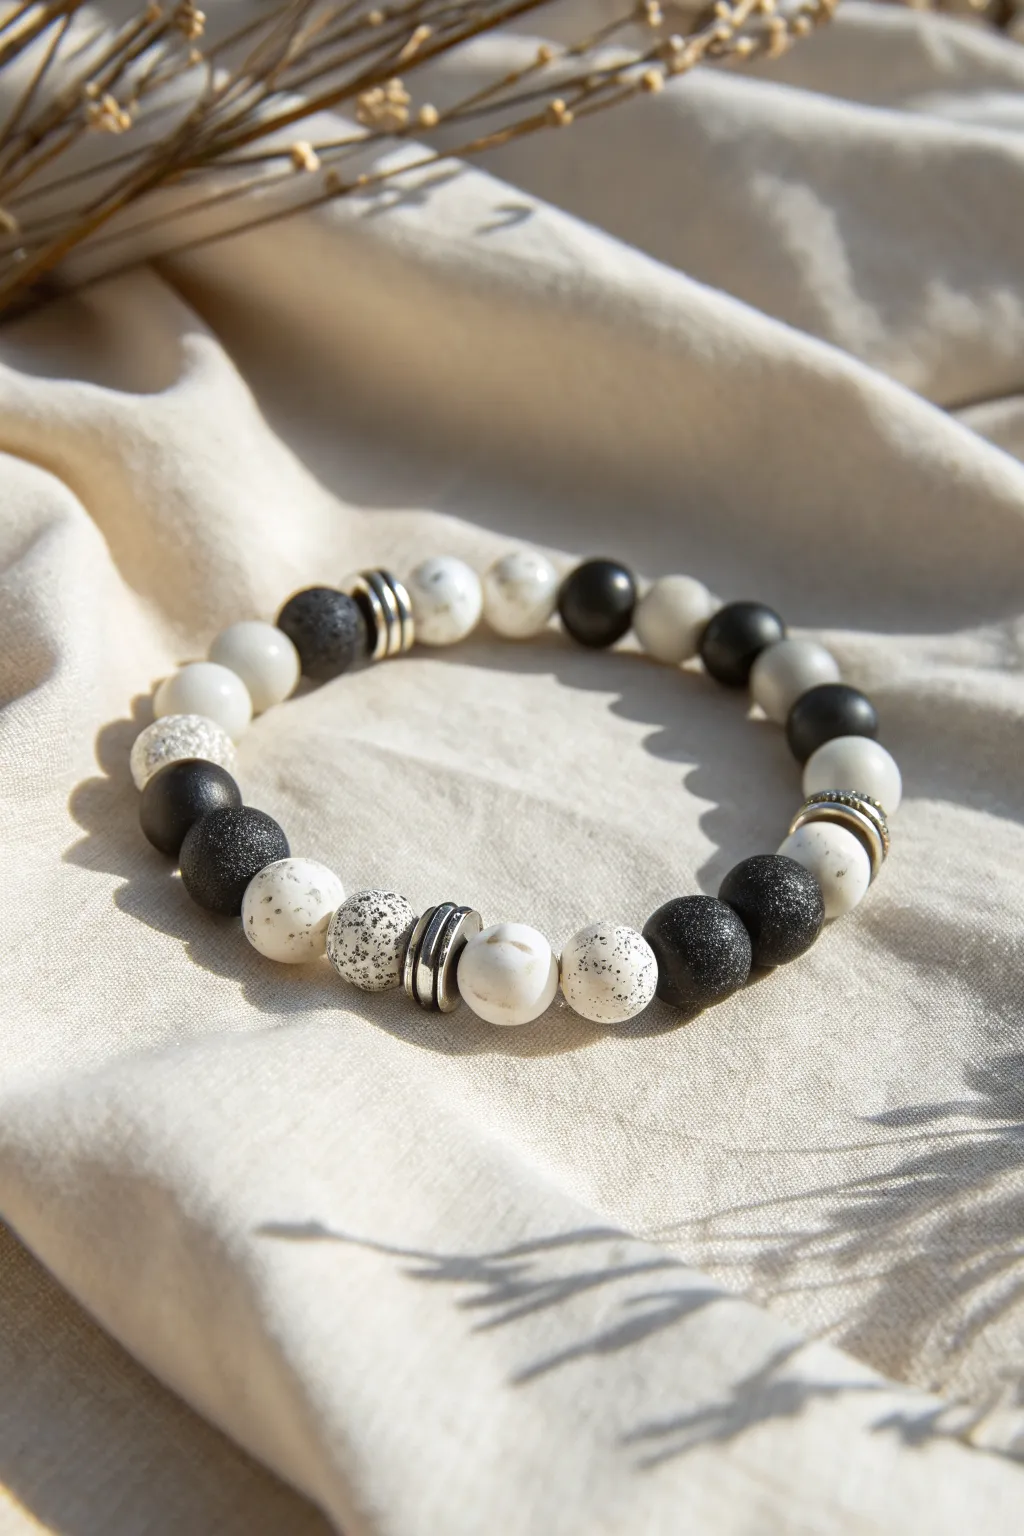
Embrace the sleek side of bohemian style with this striking black and white beaded bracelet. By mixing matte textures, speckled finishes, and high-shine silver accents, you create a piece that feels both earthy and sophisticated.
How-To Guide
Materials
- Stretch cord (0.7mm or 0.8mm clear elastic)
- White matte beads (8mm or 10mm)
- Black matte beads (8mm or 10mm)
- Speckled ‘dalmatian’ style white beads with black spots
- Textured black beads (lava stone or stippled clay)
- Stainless steel or silver-tone spacer discs (flat heishi style)
- Jewelry glue (optional)
- Scissors
- Bead stopper or tape
Step 1: Planning Your Pattern
-
Measure your wrist:
Before stringing, loosely wrap the elastic cord around your wrist to gauge the size. Add about 3 inches of extra length to both ends to make tying the final knot easier. -
Prepare the cord:
Cut your length of elastic cord. To prevent beads from sliding right off while you work, place a bead stopper on one end or simply tape it securely to your table. -
Sort your beads:
Lay out your beads on a design board or a piece of felt. This particular design relies on asymmetry, so separate your solids, speckles, and textured beads into distinct piles to visualize the mix. -
Pre-stretch the cord:
Give your elastic a few gentle tugs. Pre-stretching helps prevent the bracelet from sagging or losing its shape after the first time you wear it.
Loose Spacer Fix
If your silver spacers wobble too much or sit crookedly, add a tiny seed bead on either side of the spacer stack to stabilize them on the cord.
Step 2: Stringing the Design
-
Start the sequence:
Begin by stringing a single smooth white matte bead followed by one speckled white bead. This creates a soft transition into the pattern. -
Add metal accents:
Slide on three silver spacer discs. These metallic flashes act as visual ‘punctuation’ marks that break up the stone and clay textures beautifully. -
Introduce texture:
Follow the spacers with a speckled white bead, then a smooth white bead. Now, create contrast by adding a textured black lava-style bead or a stippled black clay bead. -
Build the dark section:
String two smooth black matte beads. Adding these solid dark tones anchors the design and prevents it from looking too busy. -
Create a focal point:
Add another set of three silver spacers. Immediately follow this with a textured black bead to mirror the earlier section. -
Continue the pattern:
From here, string beads in a random but balanced mix: a smooth white, a smooth black, a speckled white, and a smooth black. I like to continuously check the length against my wrist as I go. -
Check the fit:
Wrap the unfinished strand around your wrist. The beads should touch comfortably without gaps, but shouldn’t feel tight enough to leave indentations on your skin.
Step 3: Finishing Touches
-
Prepare the knot:
Remove the bead stopper or tape. Bring both ends of the elastic together, ensuring there is no slack between the beads. -
Tie a surgeon’s knot:
Cross the ends like a normal knot, but loop the top tail through the bottom loop twice before pulling tight. This extra friction holds elastic much better than a standard square knot. -
Secure the bond:
While holding the knot taut, apply a tiny drop of jewelry glue directly onto the knot. Be careful not to get glue on the neighboring beads if possible. -
Hide the knot:
Ideally, slide the adjacent bead (hopefully one with a larger hole, like the lava bead) over the knot while the glue is still slightly tacky to hide it inside. -
Wait for setting:
Let the bracelet sit undisturbed for at least 15 minutes to allow the glue to cure fully. Pulling on it too soon is the most common reason for breakage. -
Trim excess cord:
Once the glue is dry, use sharp scissors to trim the excess elastic tails as close to the knot (or the bead hiding the knot) as possible.
Pro Tip: Textural Balance
Don’t clump textures! Alternate smooth matte beads with rough lava or speckled beads. This tactile variety is what gives the bracelet a high-end feel.
Slip on your new monochrome accessory and enjoy the effortlessly cool vibe it adds to your outfit
Desert Sunset Ombre Strands
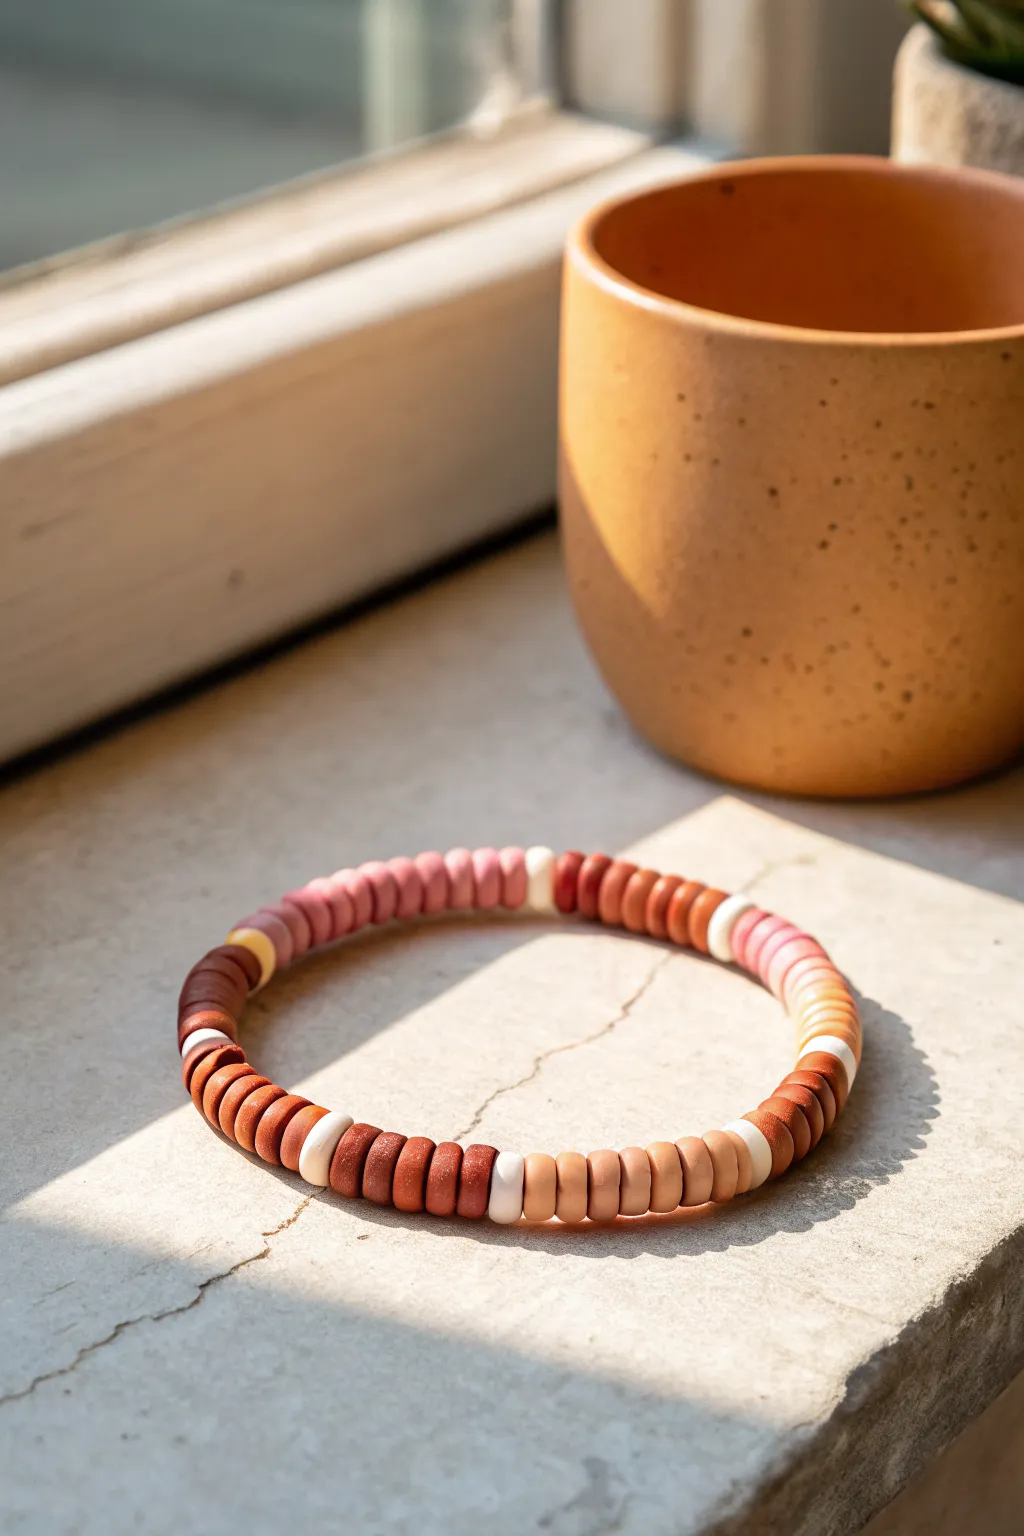
Capture the warmth of a desert landscape with this understated boho bracelet featuring a soothing palette of clay heishi beads. The design relies on careful color blocking in warm earth tones, separated by crisp white spacers for a modern, minimalist finish.
Detailed Instructions
Materials
- Polymer clay heishi beads (6mm flat disc style) in: dark terracotta/brick red, warm tan, light beige/sand, and dusty rose pink
- Polymer clay heishi beads in matte white (for spacers)
- Stretch elastic cord (0.8mm or 1mm thickness)
- Jewelry glue or clear nail polish
- Scissors
Step 1: Planning and Setup
-
Measure your wrist:
Wrap a piece of string around your wrist to find your size, then add about half an inch for a comfortable fit. Cut a length of elastic cord about 10-12 inches long to give yourself plenty of room for tying knots later. -
Pre-stretch the cord:
Give your cut elastic cord a few firm tugs. This is a crucial step that prevents the bracelet from drooping or stretching out permanently after the first time you wear it. -
Secure the end:
Tape one end of the cord to your work surface or clamp it with a binder clip. This simple precaution saves you the heartache of beads sliding right off the end as you work.
Gaps showing string?
If you see cord between beads, your elastic isn’t totally recovered. Gently massage the beads around the loop to distribute tension evenly, or you may need to re-tie tighter.
Step 2: Beading the Pattern
-
Start the first color block:
Begin threading the dark terracotta/brick red beads. String about 8 to 10 of these beads to create a solid block of color roughly 1 inch long. -
Isolate with a spacer:
Add a single white bead. This high-contrast spacer acts as the divider between your color sections, giving the bracelet its structured look. -
String the tan section:
Switch to your warm tan or caramel-colored beads. Add another block of 8 to 10 beads, aiming to keep the section length consistent with your first block. -
Add the next spacer:
Slide on another single white bead to border the tan section. -
Add the beige section:
Thread on your light beige or sand-colored beads. I find creating a slight gradient by moving from dark to light creates a really pleasing visual flow. -
Separate again:
Place a single white spacer bead next. -
Create the pink section:
Add your block of dusty rose or muted pink beads. This adds a soft touch of color that complements the earth tones perfectly. -
Close the pattern loop:
Add a final white spacer bead. -
Repeat until full:
Repeat the entire color sequence (Terracotta -> White -> Tan -> White -> Beige -> White -> Pink -> White) until the beaded portion reaches your measured wrist length.
Step 3: Finishing Touches
-
Check the fit:
Carefully wrap the strand around your wrist to ensure the size is correct. Add or remove a few beads from the final section if you need to adjust the sizing. -
Tie the knot:
Tie a square knot (right over left, left over right) and pull it tight. Follow this with a surgeon’s knot for extra security. -
Secure with glue:
Dab a tiny drop of jewelry glue or clear nail polish directly onto the knot. Let this dry completely before moving on. -
Hide the knot:
Depending on your bead hole size, try to gently tuck the knot inside one of the adjacent beads for a seamless finish. -
Trim the excess:
Snip the excess elastic cord close to the knot, being careful not to cut the knot itself or the main bracelet cord.
Pro Tip: Bead Texture
Mix smooth vinyl heishi beads with one section of polymer clay beads that have a slightly rougher, matte texture. The subtle contrast makes the piece feel more high-end and artisanal.
Slip on your new bracelet and enjoy the earthy, handmade vibe it adds to your daily outfit


What Really Happens Inside the Kiln
Learn how time and temperature work together inside the kiln to transform clay into durable ceramic.
Coastal Color-Block Bands
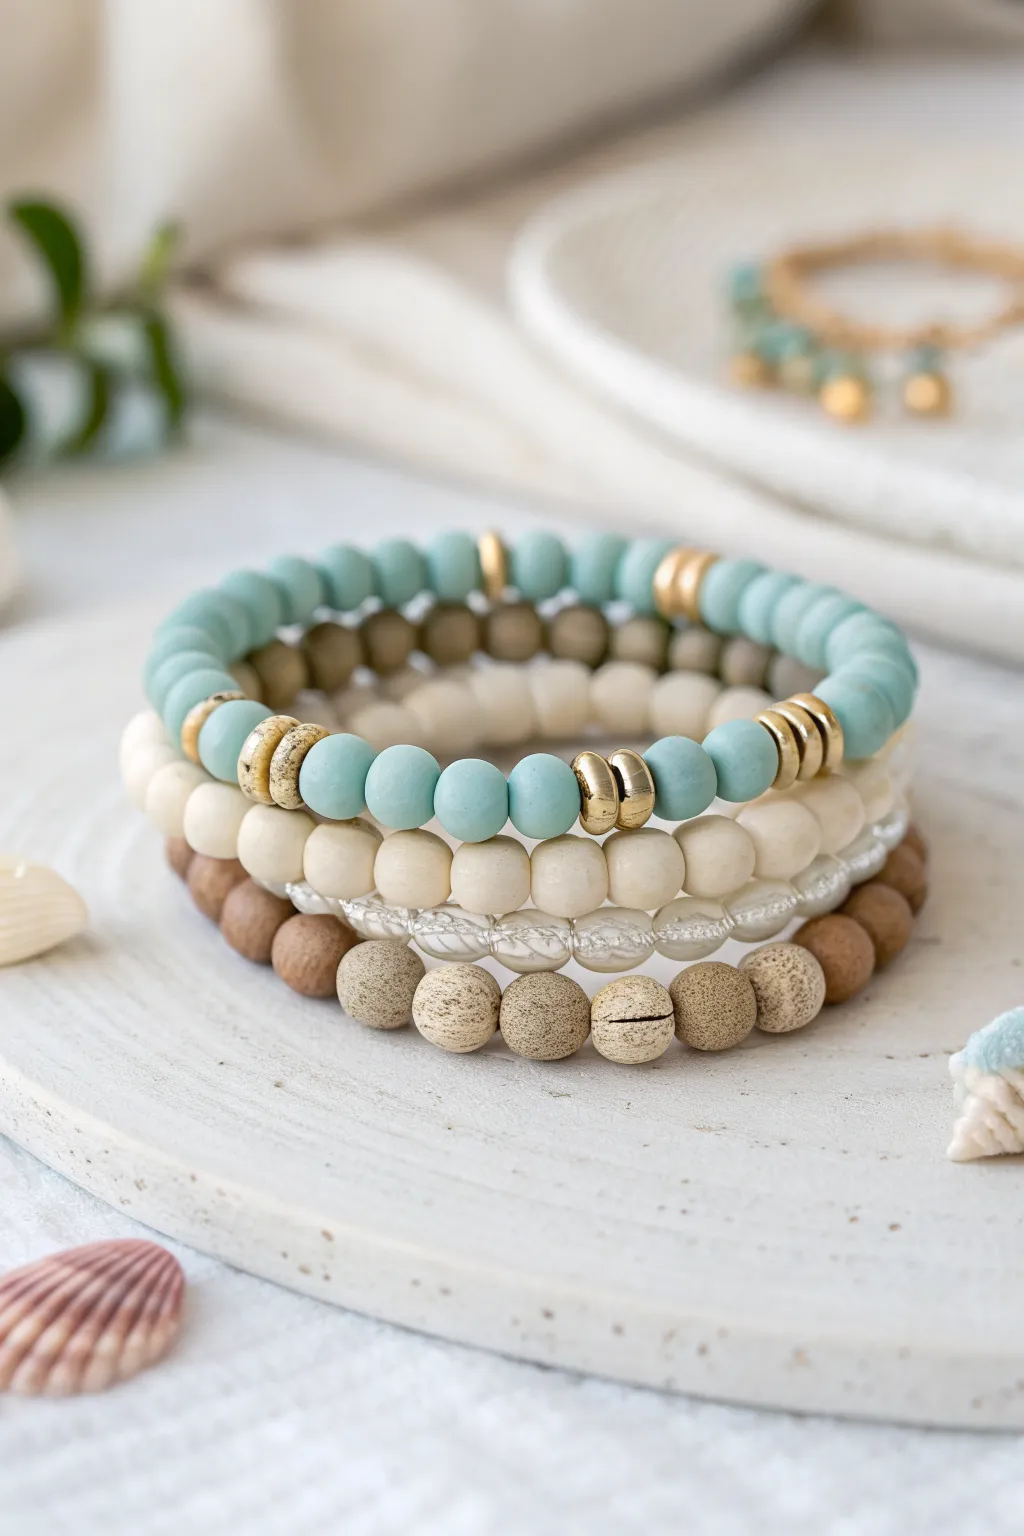
Capture the essence of a breezy beach day with this coordinated stack of polymer clay and wooden bead bracelets. The mix of matte aqua, creamy white, and textured sandstone hues creates a sophisticated coastal palette that pairs perfectly with summer linens.
How-To Guide
Materials
- Matte polymer clay disc beads (heishi) in aqua blue (6mm)
- Round polymer clay beads in cream/off-white (8mm)
- Textured wooden beads in light natural brown (8-10mm)
- Textured wooden beads in dark brown (8mm)
- Spacers: Gold disc spacers and flat gold washer beads
- Focal detail: A few clear or slightly iridescent seed beads (optional for inner strand)
- Strong elastic cord (0.8mm or 1mm depending on bead hole size)
- Jewelry glue or clear nail polish
- Scissors
Step 1: The Aqua Accent Bracelet
-
Measure your cord:
Cut a piece of elastic cord about 10-12 inches long. This gives you plenty of extra room for tying knots without struggling against tension. -
Pre-stretch the elastic:
Before adding any beads, give the elastic a few firm tugs. This pre-stretching prevents the bracelet from drooping or loosening after the first few wears. -
Begin the pattern:
Thread on approximately 10-12 of the aqua matte clay beads to start the base color section. -
Add gold highlights:
Slide on a gold washer bead or a thick gold disc spacer. These metallic touches add that chic ‘boho’ element to the simple clay. -
Continue the sequence:
Add another small section of 3-4 aqua beads, then another gold spacer. Varying the distance between gold beads creates a more organic, relaxed look. -
Finish and tie:
Once the strand is long enough to fit your wrist comfortably (usually 6.5-7 inches), tie a secure surgeon’s knot—looping the elastic through twice before pulling tight.
Knot Slipping?
If your elastic knots keep unravelling, try a surgeon’s knot (looping through twice) and add a drop of Hypo Cement glue. Let it dry for 24 hours before wearing.
Step 2: The Creamy White Strand
-
Prepare the base:
Cut and pre-stretch another length of elastic cord, just like the first bracelet. -
String the cream beads:
Thread the smooth, round cream polymer beads onto the cord. Since these are larger (8mm), the bracelet creates a nice textural contrast to the flatter heishi beads. -
Add subtle texture:
I occasionally sneak in a slightly imperfect bead or a translucent spacer hidden between the solids to break up the uniformity, though a solid cream strand is classic. -
Secure the ends:
Tie off this strand with a strong knot. Dab a tiny drop of jewelry glue on the knot for extra security before trimming the excess cord.
Step 3: The Textured Wood Bracelet
-
Select your beads:
Sort through your wooden beads. Ideally, you want round beads that have a slightly rough, ‘sandstone’ texture or visible wood grain. -
Create the gradient:
Start threading the lighter, sandstone-colored wooden beads first. These mimic the color of wet sand. -
Mix in darker tones:
If you have darker brown wooden beads, intersperse them on the bottom half of the strand, or create a separate darker bracelet to sit at the very bottom of the stack. -
Check the fit:
Wrap this strand around your wrist alongside the aqua and cream ones. Because wooden beads are bulkier, you might need slightly more length than the flat bead bracelet. -
Finalize the stack:
Tie the final knot securely. Tuck the knot inside the hole of the nearest wooden bead if possible to hide it completely.
Elevate the Look
Add a single seashell charm or a small pearl dangling from a gold jump ring on the aqua bracelet to really emphasize the coastal theme.
Slip on your new stack and enjoy the immediate beach vibes they bring to any outfit
Tiny Charm Dangle on a Clay Stack
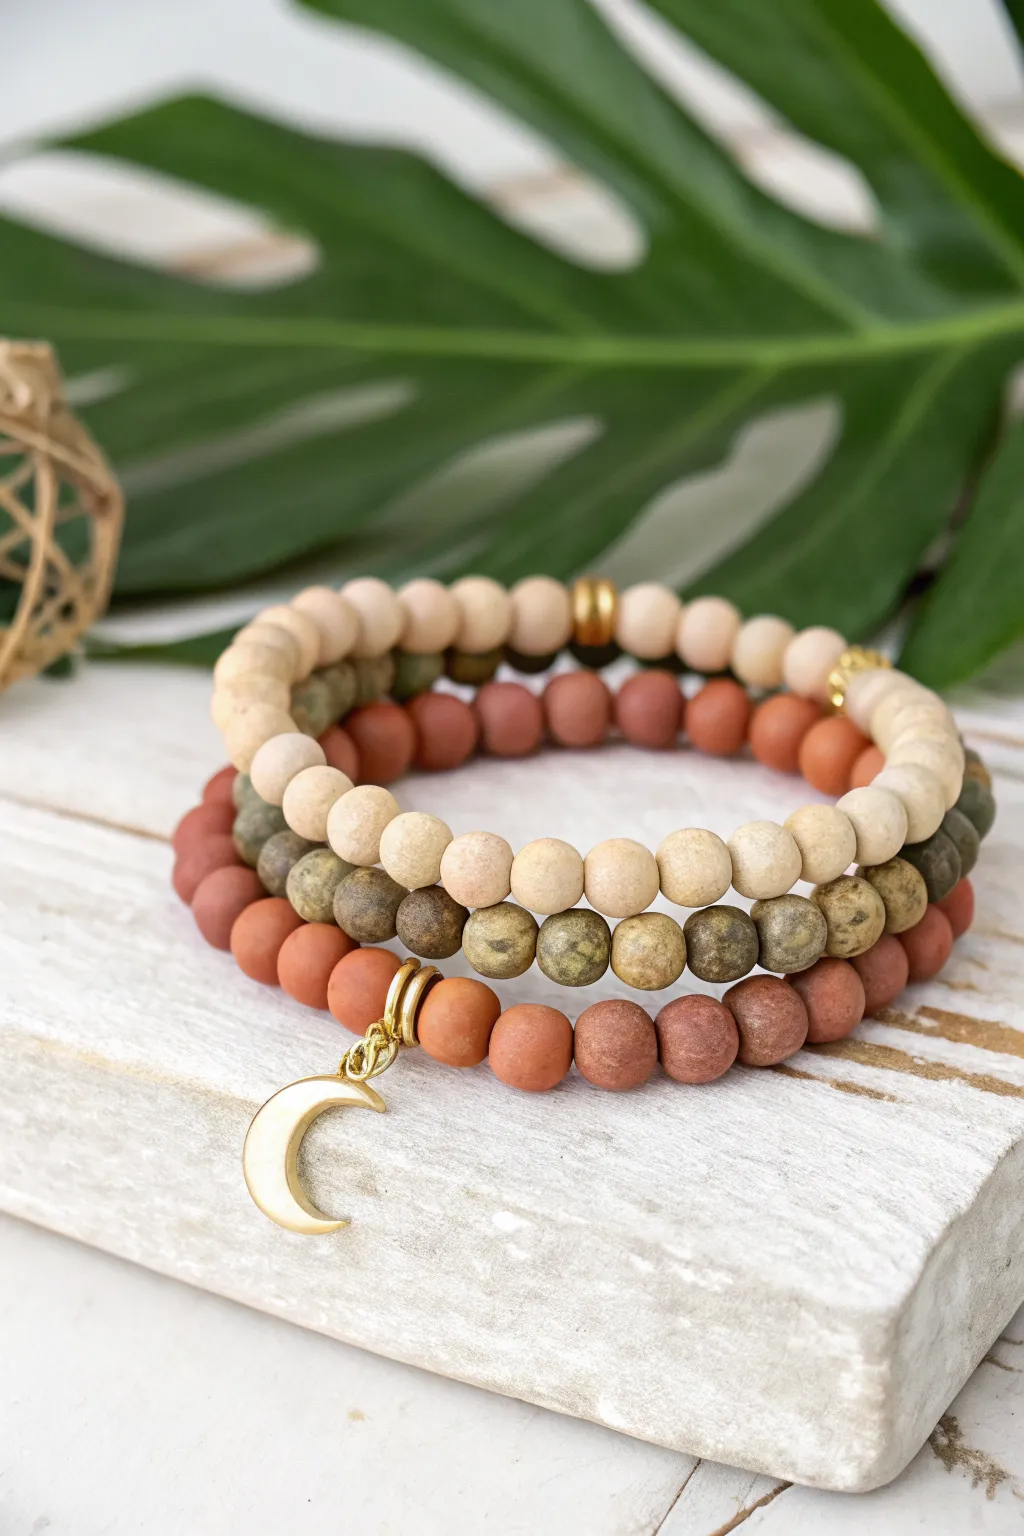
Capture the spirit of bohemian elegance with this trio of stretch bracelets featuring varied textures and rich, earthy tones. The combination of matte clay-style beads, mossy jasper-like accents, and a delicate golden crescent moon creates a look that is both grounded and celestial.
Detailed Instructions
Materials
- Matte round beads in beige/cream (6mm or 8mm)
- Matte round beads in terracotta/rust (8mm)
- Mottled green/brown stone or clay beads (8mm)
- Small gold spacer beads (disc or round)
- Gold crescent moon charm with a jump ring
- Gold bail or large jump ring (to attach the charm)
- Strong elastic beading cord (0.8mm or 1mm)
- Jewelry glue or clear nail polish
- Scissors
Step 1: Planning and Preparation
-
Measure your wrist:
Before cutting any cord, wrap a measuring tape around your wrist comfortably. Add about half an inch to this measurement to ensure the bracelets aren’t too tight. -
Cut the elastic:
Cut three pieces of elastic cord, making each one about 4 inches longer than your final desired length. This extra length is crucial for tying secure knots later. -
Pre-stretch the cord:
Hold each piece of elastic by the ends and give it a few firm pulls. Pre-stretching prevents the bracelets from stretching out and becoming loose after you wear them a few times. -
Secure the ends:
Place a piece of tape or a bead stopper on one end of each cord to stop beads from sliding off while you work. I find a simple piece of masking tape works perfectly.
Step 2: The Cream Accent Bracelet
-
String the foundation:
Begin threading your beige/cream matte beads onto the first cord. Continue until you have filled about half the length required for your wrist size. -
Add the focal point:
Slide on a gold spacer bead. If you like the look in the photo, you can add a single gold bead or a small cluster of 2-3 for more shine. -
Complete the strand:
Finish stringing the rest of the beige beads until the strand reaches the correct length. Wrap it around your wrist to check the fit before tying. -
Knot the ends:
Tie a surgeon’s knot (right over left, left over right twice). Pull the elastic tight so the knot is snug against the beads.
Knot Slipping?
If your elastic knot feels insecure, try ‘sanding’ the very ends of the elastic with an emery board slightly before tying. The rougher texture helps the knot grip tightly.
Step 3: The Mixed Texture Bracelet
-
create the pattern:
For the middle bracelet, you will alternate between the beige beads and the mottled green/brown beads. A simple pattern works best here. -
String the mixed beads:
Thread five beige beads, followed by five or six mottled green beads. Repeat this blocking pattern around the entire length of the cord. -
Adjust the pattern:
If the pattern doesn’t end perfectly evenly, don’t worry—the varied textures make irregularities look intentional and organic. Just ensure the total length matches the first bracelet. -
Tie off the second bracelet:
Secure this strand with another surgeon’s knot, pulling firmly to secure the tension.
Pro Tip: Hole Sizes
Check your bead hole sizes before buying cord. 1mm cord is strong but might not fit through smaller gemstone beads; 0.8mm is usually the safest universal bet.
Step 4: The Terracotta Moon Bracelet
-
Prepare the charm:
Using pliers, open a jump ring and attach your gold crescent moon charm to a bail or a larger jump ring that fits over the elastic. -
Start the third strand:
String the matte terracotta/rust beads onto the final piece of cord. Pause when you reach the halfway point of the strand. -
Insert gold spacers:
Add two flat gold spacer beads. These will frame the charm and add a professional metallic touch to the focal point. -
Attach the charm:
Slide the bail holding your moon charm onto the cord, nestling it right between the two gold spacers you just added. -
Finish and knot:
Continue adding the rest of the terracotta beads until the bracelet matches the size of the others. Tie your secure surgeon’s knot.
Step 5: Final Assembly
-
Secure knots with glue:
Apply a tiny dot of jewelry glue or clear nail polish to each knot. Let this dry completely before moving on. -
Hide the knots:
Once dry, gently tug on the elastic to pull the knot inside the hole of a neighboring bead. If the hole is too small, simply trim the tails very close to the knot. -
Trim excess cord:
Use sharp scissors to snip off any remaining long tails of elastic, being careful not to cut the knot itself.
Stack your new creations together for a textured, boho-chic look that goes with everything.

TRACK YOUR CERAMIC JOURNEY
Capture glaze tests, firing details, and creative progress—all in one simple printable. Make your projects easier to repeat and improve.
Knotted Cord and Clay Bead Combo
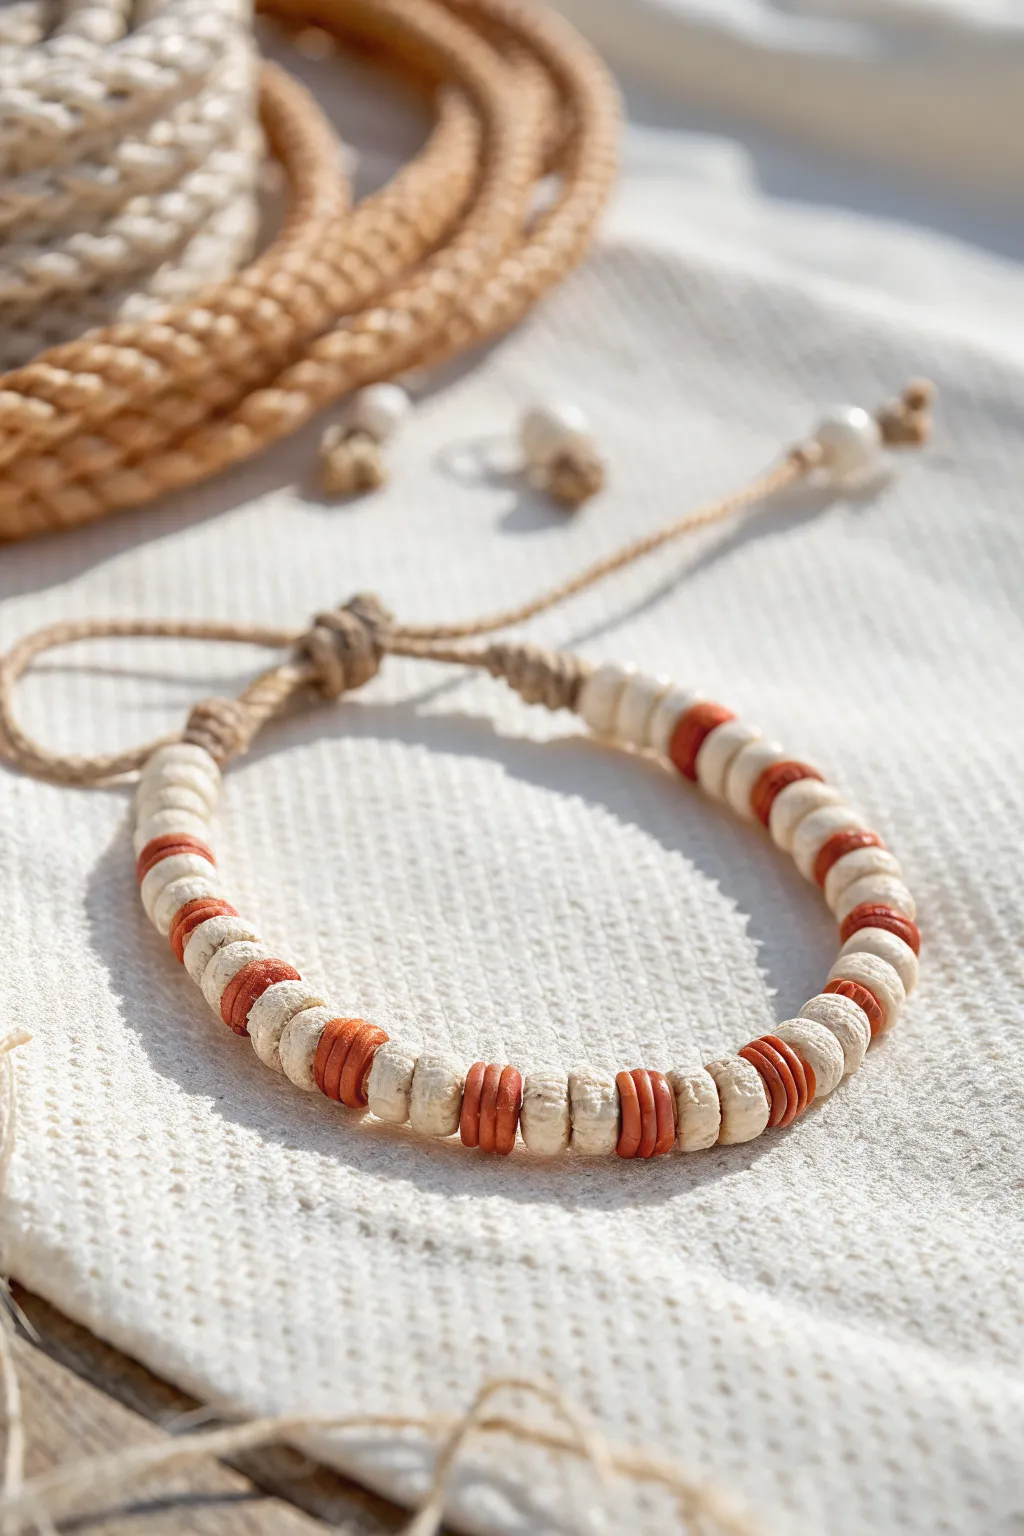
Embrace earthy textures with this simple yet striking bracelet that pairs natural hemp cord with matte clay beads. The alternating pattern of cream and rust tones creates a warm, bohemian aesthetic perfect for stacking or wearing solo.
How-To Guide
Materials
- Natural hemp or jute cord (1mm thickness)
- Cream/off-white polymer clay heishi beads (6mm)
- Rust/terracotta polymer clay heishi beads (6mm)
- Scissors
- Tape or clipboard (to hold cord while working)
- Clear jewelry glue (optional)
Step 1: Preparation
-
Measure the cord:
Cut a length of natural hemp cord approximately 24 inches long. This generous length accounts for the knots and allows plenty of room for tying the adjustable closure later. -
Secure the base:
Fold the cord in half to create a loop at one end. This loop will be part of your closure mechanism. Tie an overhand knot about 0.5 inches down from the fold to secure the loop. -
Anchor your work:
Tape the loop securely to a table or clip it into a clipboard. Keeping the cord taut makes threading the slightly rough hemp through the beads much easier.
Fraying Cords?
If the hemp cord ends fray and won’t fit through the beads, apply a little white glue or clear nail polish to the tips. Twist them into a needle-like point and let dry before stringing.
Step 2: Beading and Patterning
-
Begin with cream:
Thread both loose ends of the hemp cord through your first bead. Start with a section of cream beads. Add about 5-6 cream beads to establish the base color. -
Add color accent:
Switch to the rust-colored beads. Thread 2-3 rust beads onto the double cord creates a thin stripe of color. -
Establish the rhythm:
Return to the cream beads. Thread another set of 5-6 cream beads, followed by another small group of rust beads. I find that keeping the cream sections about double the width of the rust sections creates the most balanced look. -
Continue beading:
Repeat this alternating pattern until the beaded section wraps comfortably around your wrist, leaving about an inch of gap for the closure. -
Secure the beads:
Once you are happy with the length, push all beads snugly towards the top loop. -
Tie the end knot:
Tie a tight overhand knot with both cords immediately after the last bead. Ensure this knot is flush against the beads to prevent them from sliding around.
Step 3: Finishing the Closure
-
Create the toggle knot:
Move down about 1.5 inches from the knot you just made. Tie a large, bulky decorative knot here. A double overhand knot or a figure-eight knot works well. -
Test the fit:
Try passing this large knot through the starting loop you made in step 2. It should fit through snugly but stay secure once through. -
Trim the tails:
Leave about 2 inches of cord extending past the large knot. You can separate the two strands here for a tassel effect. -
Add end details:
Tie a small, simple overhand knot at the very tip of each individual cord tail. This prevents fraying and adds a finished look. -
Trim excess:
Snip off any scraggly bits of hemp sticking out from your final knots. -
Final security:
Dab a tiny drop of clear jewelry glue on the main structural knots if you want extra durability, though hemp usually grips itself very well.
Level Up: Pattern Play
Make the pattern asymmetrical by gradually increasing the number of rust beads as you reach the center of the bracelet, then decreasing them again towards the end.
Slide the knot through the loop and enjoy your handmade slice of boho style
Wood-and-Clay Earthy Layering
Embrace the warmth of nature with this textured clay bead bracelet, featuring an organic mix of ribbed terracotta discs, speckled sage rounds, and smooth sandy spacers. This earthy accessory brings a grounded, artisanal feel to any outfit, perfect for stacking or wearing as a solo statement piece.
Detailed Instructions
Materials
- Polymer clay in Terracotta (rust/brown)
- Polymer clay in Sage Green
- Polymer clay in Beige/Sand
- Black pepper or dried herbs (for speckling)
- Beading elastic cord (0.8mm or 1mm)
- Gold crimp beads
- Gold jump rings
- Gold lobster clasp
- Small circle cutter or straw (approx 8-10mm)
- Toothpick or needle tool
- Rolling pin or pasta machine
- Modeling tool or knife for creating ridges
- Pliers (chain nose and flat nose)
- Oven for baking clay
Step 1: Prepping and Shaping the Beads
-
Mix the Sage Clay:
Begin by conditioning your sage green clay until soft. To achieve that organic, speckled look, knead in a pinch of coarse black pepper or finely ground dried herbs. Roll the clay into several small spheres, aiming for about 8mm in diameter. -
Form the Sand Spacers:
Condition the beige clay and roll it into a smooth, even log. Slice the log into equal segments and gently flatten each slice into a thick, rounded disc shape, resembling a smooth river stone or a thick washer. -
Create the Terracotta Texture:
Roll your terracotta clay into a long snake, slightly thinner than the other beads. Use a knife to cut small, consistent disc shapes. Instead of smoothing them perfectly, I like to use a modeling tool to press subtle grooves around the edges, mimicking the ribbed texture seen in ancient pottery. -
Pierce the Beads:
Using a toothpick or a needle tool, carefully pierce a hole through the center of every bead. Use a gentle twisting motion to avoid distorting the clay shapes you’ve just perfected. -
Bake the Clay:
Arrange all your beads on a baking sheet lined with parchment paper. Bake them according to the manufacturer’s instructions for your specific brand of polymer clay (usually around 275°F/135°C for 15-30 minutes). Let them cool completely before handling.
Fixing Distortion
If beads squash while piercing, bake them on a bed of cornstarch or baking soda. It supports the shape without leaving flat spots.
Step 2: Assembling the Bracelet
-
Plan Your Pattern:
Lay out your beads on a specialized bead board or a soft towel to stop them from rolling away. Create a repeating pattern: try grouping three terracotta discs, followed by one sage sphere, and then three sand spacers. -
Cut the Cord:
Cut a piece of elastic cord about 10 inches long. This gives you plenty of extra slack to tie knots without struggling. -
Attach the First Clasp Part:
Although this is elastic, adding a clasp gives a professional finish. Thread a crimp bead onto one end, loop the cord through a small jump ring attached to the lobster clasp, and thread it back through the crimp bead. Flatten the crimp bead securely with pliers. -
String the Beads:
Begin threading your beads onto the cord, following the pattern you laid out. Pay attention to the mix of textures, ensuring the ribbed terracotta beads contrast nicely with the smooth spheres. -
Check the Fit:
Once you have strung enough beads to go around your wrist (usually 6.5 to 7 inches for an average fit), wrap it around your wrist to double-check the sizing. Add or remove spacers as needed. -
Close the Loop:
Thread a crimp bead onto the open end of the cord. Pass the cord through a jump ring (for the clasp to hook onto) and back through the crimp bead. -
Secure the End:
Pull the cord taut so there are no gaps between beads, but not so tight that the bracelet becomes stiff. Flatten the crimp bead with your pliers to lock everything in place. -
Hide the Tails:
Trim the excess elastic cord close to the crimp bead. If possible, tuck the short tail end back inside the hole of the nearest bead for a seamless look. -
Final Polish:
Give the bracelet a gentle stretch to ensure everything is secure. Verify that the clasp opens and closes smoothly.
Natural Texture
Before baking, lightly roll the ‘sand’ colored beads over a piece of coarse sandpaper or concrete to give them a true stone-like surface.
Enjoy wearing your handcrafted piece of earth-toned art
Seed Bead Edges for Soft Sparkle

Embrace a grounded, bohemian aesthetic with this trio of polymer clay heishi bead bracelets. Featuring a soft palette of teal, rust, and sandy beige accented by textured gold spacers, these stretchy bangles offer a perfect everyday stack that feels both casual and curated.
How-To Guide
Materials
- Polymer clay heishi disc beads (6mm or 8mm) in dark teal/forest green
- Polymer clay heishi disc beads in terracotta/rust
- Polymer clay heishi disc beads in beige/sand
- Elastic stretch cord (0.7mm or 0.8mm)
- Gold tone rhinestone pave rondelle spacer beads (approx 8mm)
- Small gold disc spacer beads (heishi style)
- Mustard yellow accent beads (optional, seen on the beige strand)
- Super glue or jewelry cement
- Scissors or jewelry snips
- Bead stopper or tape
- Ruler or measuring tape
Step 1: Planning the Palette
-
Measure your wrist:
Wrap a measuring tape comfortably around your wrist to determine your size. Add about 1/2 inch to this measurement to ensure the elastic bracelets won’t fit too tightly or leave marks. -
Select your color themes:
For this specific look, you act as the curator of an earth-tone palette. Separate your beads into three piles: the dark teal for the top bracelet, the sandy beige for the middle, and the warm rust for the bottom. -
Cut the cord:
Cut three lengths of elastic cord, each about 10-12 inches long. This generous length makes tying the final knots much easier than struggling with short ends. -
Secure the ends:
Attach a bead stopper or simply place a piece of tape folded over one end of each cord. This simple precaution saves you from the frustration of beads sliding right off as you work.
Knot Slipping?
If your elastic knots won’t hold, try a ‘surgeon’s knot’: loop the elastic through twice on the first pass instead of once before pulling tight.
Step 2: The Teal & Gold Strand
-
Start the pattern:
Begin threading the dark teal clay discs onto your first cord. Thread enough clay beads to cover about 1.5 inches of the cord. -
Add a gold accent:
Slide on one of the larger, textured gold pave rondelle beads. These act as the focal points and add that essential ‘soft sparkle’ mentioned in the style guide. -
Repeat the rhythm:
Continue adding sections of teal clay beads separated by the gold pave spacers. Aim for 3 or 4 gold accents evenly spaced around the bracelet. -
Check the fit:
Once you think you’ve reached the right length, wrap it around your wrist to check. The ends should meet comfortably without stretching the elastic.
Charm It Up
Add a single dangling charm, like a small gold coin or a tassel, to one of the bracelets for extra movement and personalization.
Step 3: The Beige & Mustard Strand
-
Base layer:
For the middle bracelet, start with your sandy beige heishi beads. This layer is lighter, so it provides great contrast. -
Introduce contrast:
Instead of just gold, this strand uses color blocking. After about an inch of beige beads, thread on a pop of color—like the mustard yellow bead visible in the reference—followed by a beige section, then a gold spacer. -
Vary the gold:
Mix it up by using plain gold disc spacers here alongside the textured ones if you wish, or stick to the textured rondelles for consistency. I find mixing metals textures adds depth. -
Finish the strand:
continue the pattern until the beige bracelet matches the length of the teal one.
Step 4: The Rust Red Strand
-
Thread the warm tones:
Take your final cord and begin threading the rust/terracotta clay beads. This warm color anchors the stack visually. -
Insert focal beads:
Replicate the pattern from the first teal bracelet: thread a segment of clay beads, then a gold pave spacer. Try to ensure the gold beads on this bracelet will sit slightly offset from the ones on the other bracelets when worn together. -
Final sizing check:
Ensure all three bracelets are roughly the same circumference so they stack neatly without one drooping lower than the others.
Step 5: Finishing Touches
-
Pre-stretch the cord:
Before tying, give each bracelet a gentle tug to ‘pre-stretch’ the elastic. This prevents the cord from loosening up later and leaving gaps between your beads. -
Tie the knot:
Remove the bead stopper. Typ a surgeon’s knot (right over left, left over right, and loop through an extra time) for maximum security. Pull it tight. -
Glue and hide:
Dab a tiny drop of super glue or jewelry cement onto the knot. Let it dry for a minute, then trim the excess cord ends close to the knot. -
Concealment:
If the hole of one of your beads is large enough, gently tug the knot inside a neighboring bead to hide it completely.
Slip on your new stack and enjoy the satisfying click of clay beads as you move through your day
Hand-Stamped Textured Clay Discs
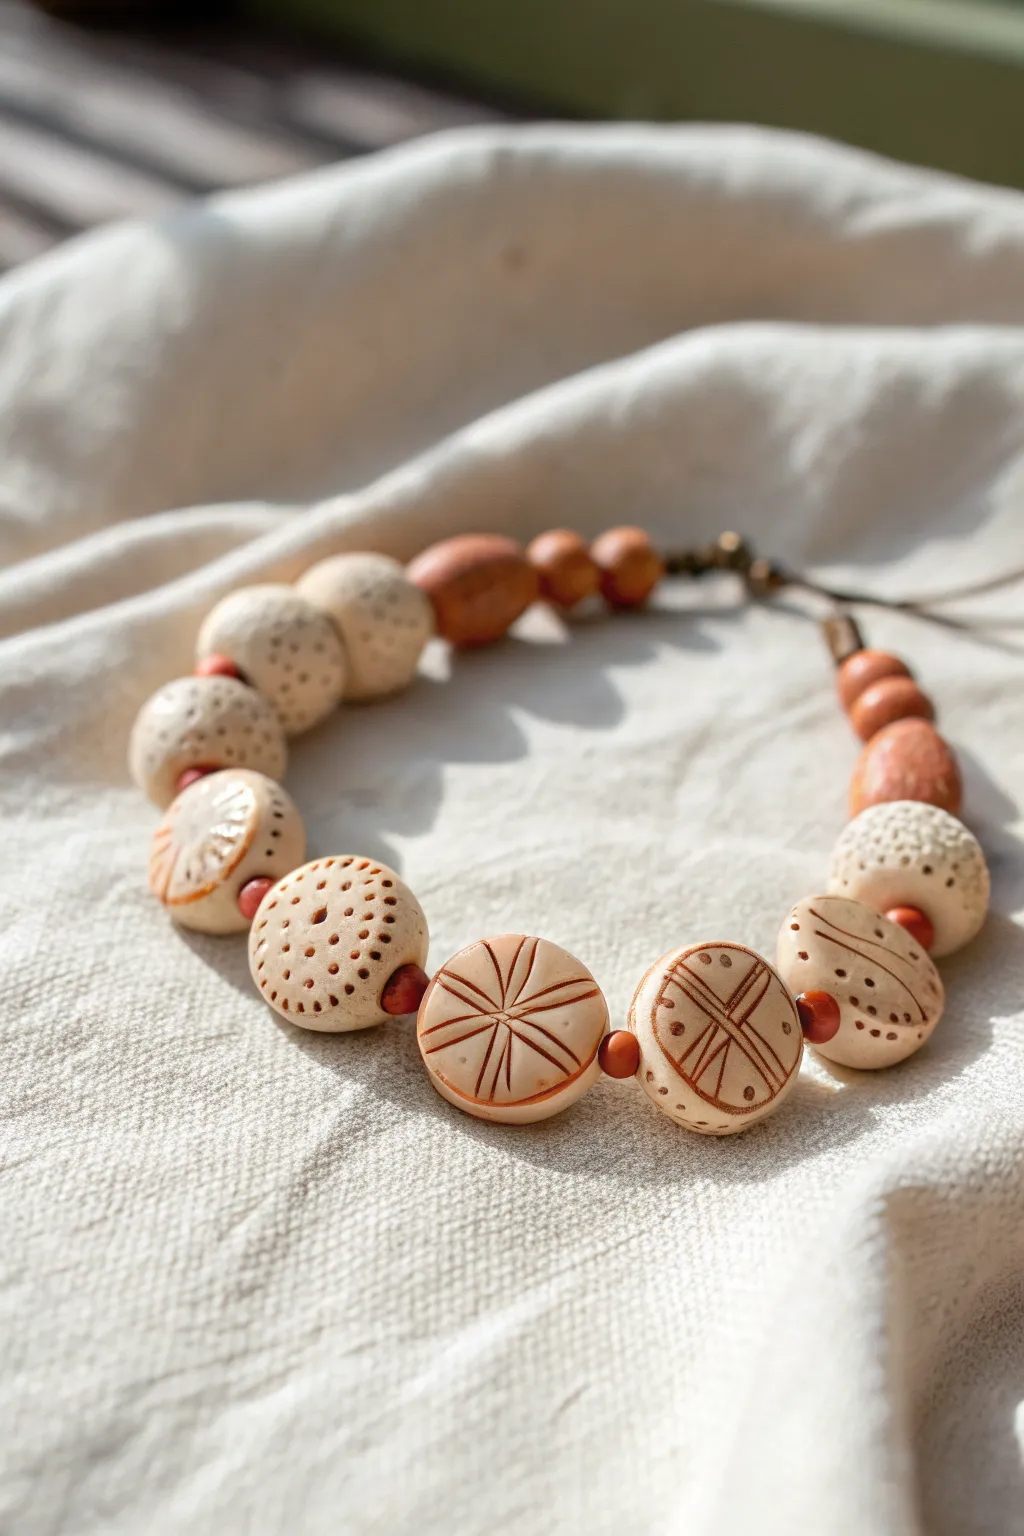
Embrace the rustic charm of boho aesthetics with these hand-stamped clay beads. Featuring a mix of geometric discs and textured rounds in natural cream and terracotta tones, this project combines simple stamping techniques with an organic finish.
Step-by-Step Tutorial
Materials
- Polymer clay (cream or beige color)
- Polymer clay (terracotta or reddish-brown color)
- Small round cookie cutters or bottle caps (approx. 1 inch)
- Needle tool or toothpick
- Brown acrylic paint (burnt umber or similar)
- Paper towels or wet wipes
- Elastic cord or beading wire
- Jewelry clasp and crimp beads (if using wire)
- Clear matte varnish (optional)
- Small carving tools or kitchen utensils for texture
- Oven for baking
Step 1: Shaping the Beads
-
Condition the clay:
Start by warming the cream-colored polymer clay in your hands until it becomes soft and pliable. This conditioning step is crucial to prevent cracks later on. -
Roll the sheet:
Roll out the cream clay into a slab approximately 1/4 inch thick. You want these beads to feel substantial, so don’t go too thin. -
Cut the discs:
Using your small round cutter, punch out several circles for your main focal beads. Smooth the edges gently with your finger to remove any harsh cut lines. -
Create round beads:
Take the remaining cream clay and roll several medium-sized balls between your palms. These will become the supportive textured beads. -
Make the spacers:
Condition the terracotta-colored clay and roll small, pea-sized spheres. These will serve as the contrasting spacer beads between the larger elements. -
Pierce holes:
Carefully insert a needle tool or toothpick through the center of every bead. For the flat discs, ensure the hole goes through the side (edge-to-edge) rather than front-to-back, so they lay flat against the wrist.
Hole distortion?
If piercing the clay distorts the bead’s shape, let the clay rest for 10 minutes to firm up first, or re-shape gently after the tool is inserted.
Step 2: Adding Texture & Pattern
-
Stamp the starbursts:
On a few flat discs, use a dull knife or clay tool to press a star or flower pattern. Start with a central cross, then add diagonal lines intersecting the center. -
Add geometric details:
For other discs, try a geometric look. Press two parallel lines across the face, then add small ‘X’ marks or dots within the sections to create variety. -
Texture the rounds:
Take your round cream beads and prick the surface repeatedly with a needle tool to create a porous, sponge-like texture. Alternatively, roll them over sandpaper for a subtle grain. -
Bake the clay:
Arrange all your beads on a parchment-lined baking sheet. Bake according to the manufacturer’s instructions for your specific brand of polymer clay, usually around 275°F (135°C). -
Cool completely:
Once baked, remove the tray from the oven and allow the beads to cool fully before handling. They are fragile while hot.
Use Nature’s Stamps
Press dried flower heads, seed pods, or seashells into the raw clay to create organic, unpredictable textures instead of drawing lines.
Step 3: Finishing & Assembly
-
Apply the wash:
Dilute a small amount of brown acrylic paint with water. Brush this mixture generously over the cream beads, ensuring it gets into all the stamped crevices. -
Wipe back:
Immediately wipe the surface of the beads with a damp paper towel. The paint will stay in the recessed lines and textures, highlighting the patterns while leaving the raised areas clean. -
Seal (Optional):
If you want extra durability, apply a thin coat of matte varnish. I find this helps protect the paint wash from wearing off over time. -
Arrange the pattern:
Lay out your beads on a bead board or towel. Alternate between the large patterned discs, the textured rounds, and the small terracotta spacers to find a balanced innovative layout. -
String the beads:
Thread your chosen cord through the beads, following your layout. Check the length against your wrist as you go. -
Secure the ends:
Tie a strong surgeon’s knot if using elastic, or attach crimp beads and a clasp if using wire. Trim any excess cord to finish.
Your wrist now features a truly one-of-a-kind piece of wearable art that celebrates natural textures
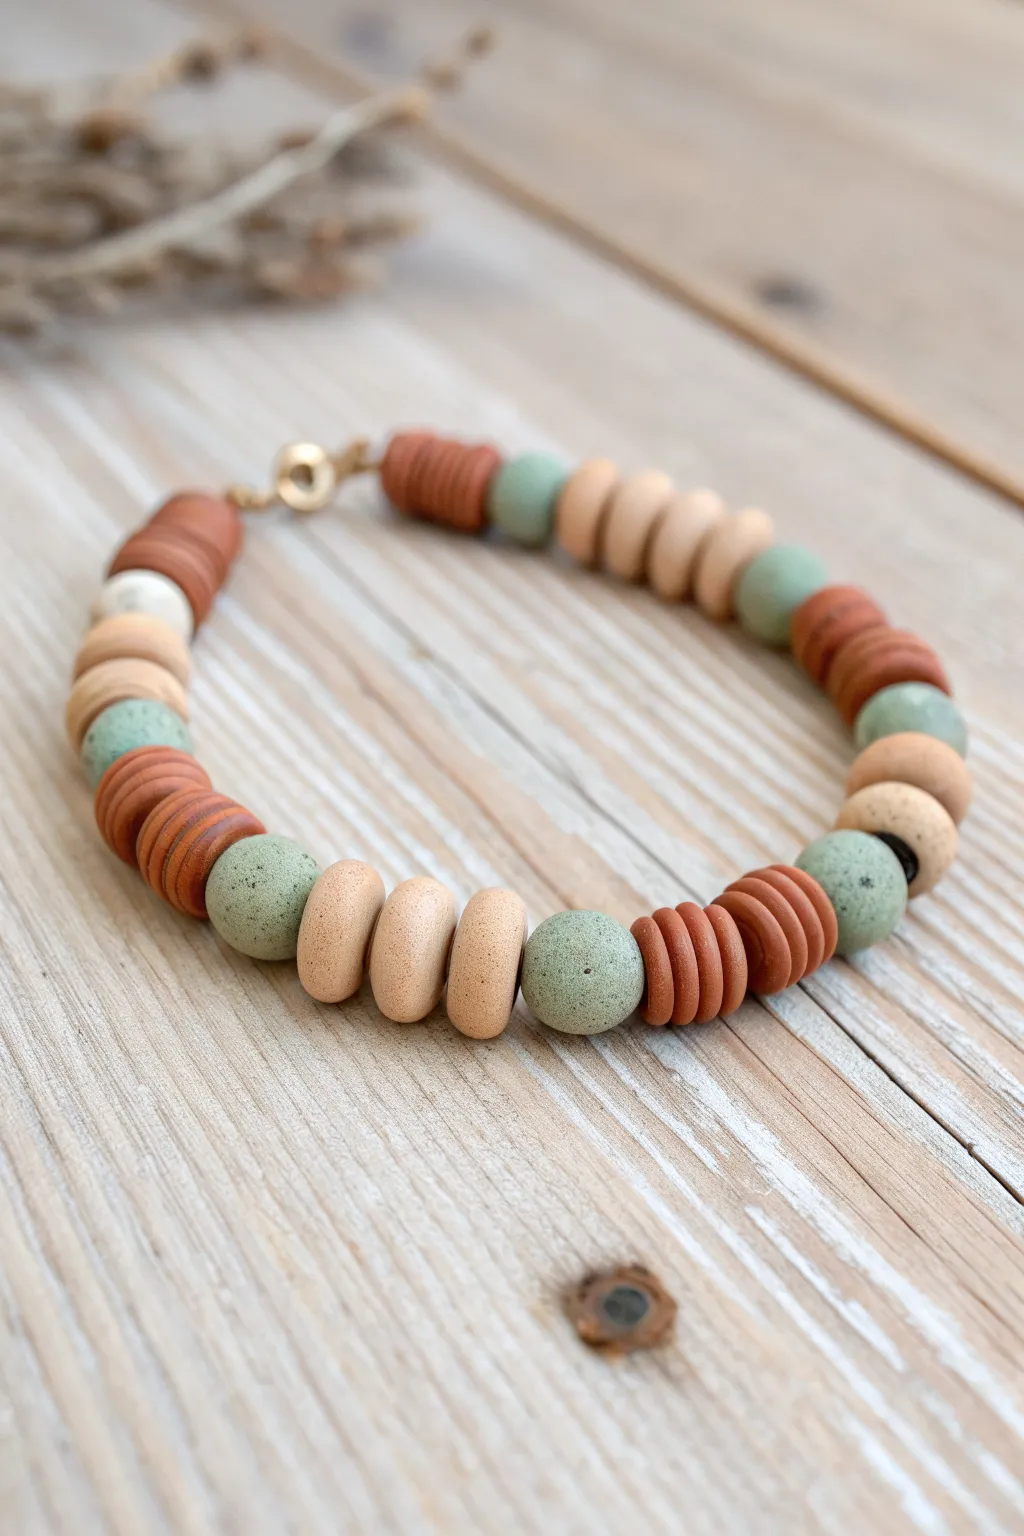
Marbled Clay Beads in Stone Colors
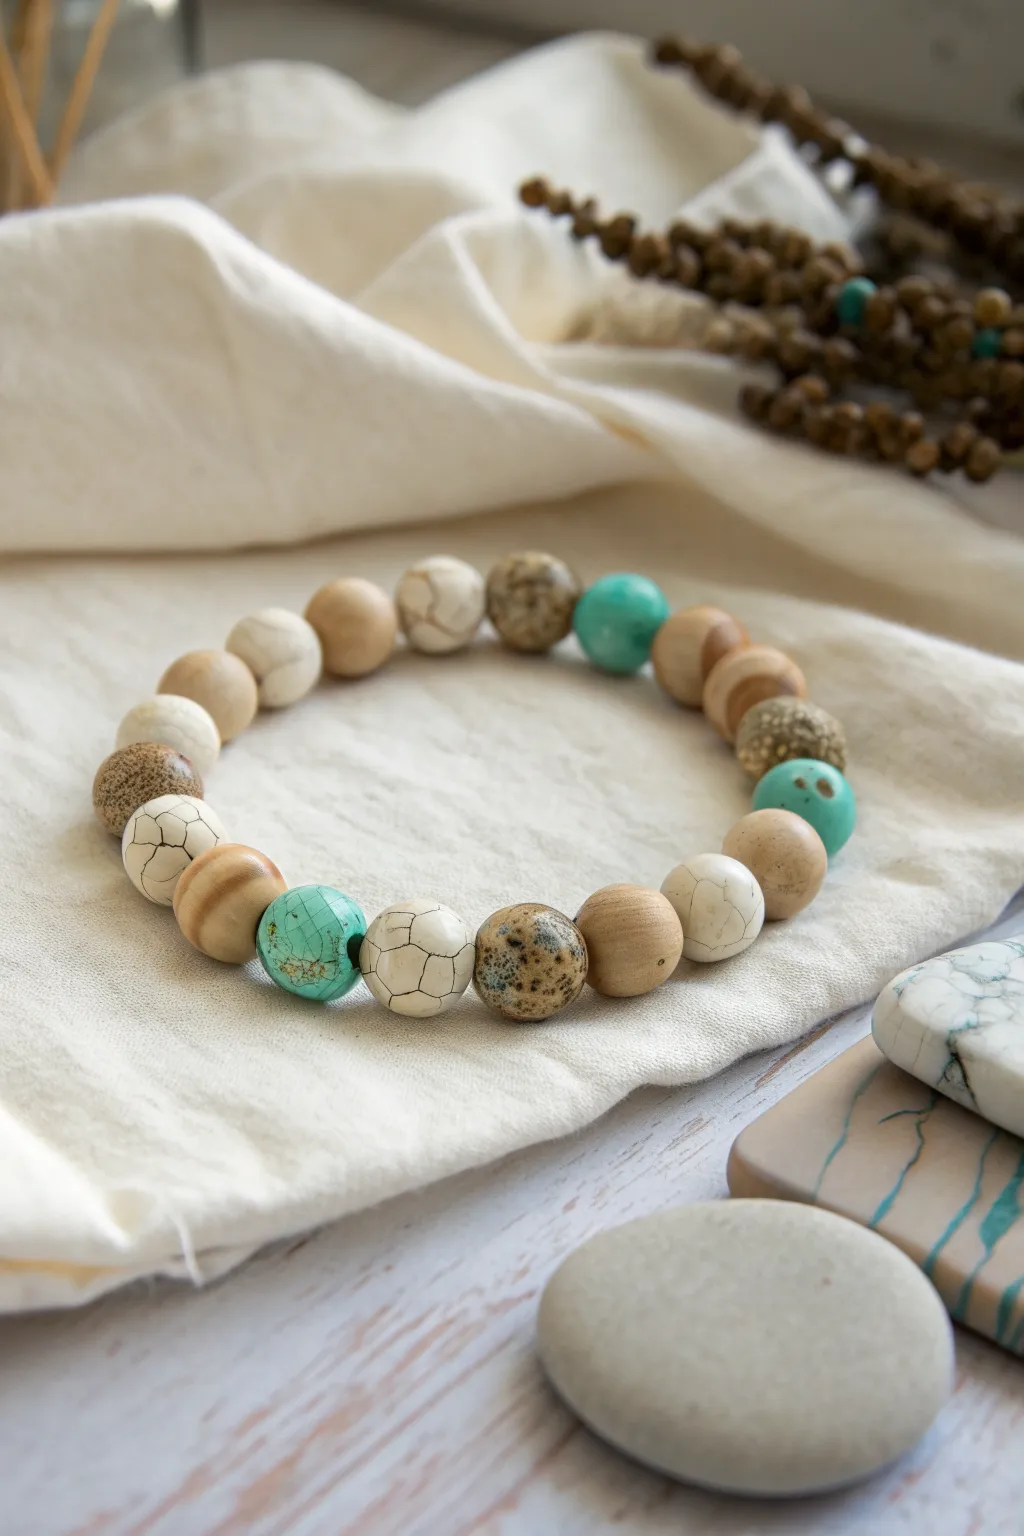
Achieve a sophisticated, natural aesthetic with this beaded bracelet that mimics the look of turquoise, howlite, and speckled sandstone. By mastering a few simple marbling and speckling techniques, you can transform plain polymer clay into convincing faux-stone beads that are perfect for a bohemian stack.
Detailed Instructions
Materials
- Polymer clay (white, beige/tan, turquoise/teal, brown, black)
- Acrylic paint (black and brown)
- Bead piercing pins or toothpicks
- Baking sheet and parchment paper
- Sandpaper (various grits from 400 to 1000)
- Elastic stretch cord (0.8mm)
- Old toothbrush
- Gloss or satin glaze (optional)
- Superglue or jewelry, knot cement
Step 1: Creating the Faux Howlite (White) Beads
-
Condition the base:
Start by conditioning a block of white polymer clay until it is soft and malleable. Roll it into a smooth, even log. -
Prepare the veining:
Take a very small amount of black or dark grey clay and roll it into extremely thin, thread-like snakes. -
Apply the veins:
Randomly wrap these thin black threads around your white clay log. It doesn’t need to be neat; irregularity makes it look more natural. -
Roll and twist:
Roll the log on your work surface to embed the black lines. Then, give the log a gentle twist to distort the lines, creating that organic cracked stone look. -
Form the beads:
Cut the log into equal segments and roll each piece between your palms into a round sphere. Pierce each bead with a pin to create the stringing hole.
Pro Tip: Hidden Knots
Drill the hole of one bead slightly larger than the rest. This creates a cavity where you can tuck and hide the final knot for a seamless finish.
Step 2: Creating the Speckled Sandstone (Beige & Brown) Beads
-
Mix the sandstone color:
Blend beige clay with a tiny touch of white to get a soft sand color. Condition well and form into a log. -
Add the speckles:
Grate a small amount of baked brown or black clay into a fine dust using coarse sandpaper or a dedicated clay grater. -
Incorporate the texture:
Roll your beige clay log into this dust so the particles stick to the outside, then fold and knead the clay to distribute the specks throughout the body of the clay. -
Add larger inclusions:
For the darker brown speckled beads, mix chopped-up bits of dried dark clay into a tan base for a chunkier, granite-like texture. -
Shape the earth tones:
Cut your speckled logs into segments. Roll some into smooth spheres for the plain wood-look beads, and others into textured spheres for the granite look.
Level Up: Essential Oil Diffuser
Leave the plain wood-colored clay beads unglazed and un-sanded. The porous clay can absorb essential oils, doubling your jewelry as a mobile diffuser.
Step 3: Creating the Faux Turquoise Beads
-
Create the base color:
Mix turquoise clay with a pinch of green and white to get a natural, slightly muted stone hue rather than a bright synthetic blue. -
Form and bake:
Roll this mixture into spheres and pierce them. For the turquoise specifically, the cracking effect is applied after baking, so arrange all your beads (white, earth tone, and turquoise) on a parchment-lined sheet. -
Bake the beads:
Bake according to the manufacturer’s instructions for your specific brand of clay, usually at 275°F (135°C) for about 30 minutes to ensure durability. -
Antique the turquoise:
Once cooled, take your turquoise beads and lightly crack the surface paint using a technique called ‘antiquing.’ Dilute black or dark brown acrylic paint with water. -
Apply the wash:
Brush the paint wash over the turquoise beads, letting it seep into any tiny imperfections. Wipe away the excess with a damp paper towel effectively leaving dark paint only in the crevices to mimic matrices.
Step 4: Assembly and Finishing
-
Sand for finish:
For a truly professional look, I suggest wet-sanding the beads starting with 400 grit and moving up to 1000 grit. This removes fingerprints and makes the ‘stone’ feel smooth. -
Buff or glaze:
Buff the beads with a denim cloth for a natural sheen, or apply a satin glaze if you prefer a polished stone look. -
Plan the pattern:
Lay out your beads on a bead board or towel. Alternate the textures: place a smooth beige bead next to a cracked white one, followed by a speckled brown and a pop of turquoise. -
String the bracelet:
Cut a piece of elastic cord about 10 inches long. Pre-stretch it by pulling gently on both ends to prevent it from loosening later. -
Secure the knot:
Thread all beads onto the cord. Tie a surgeon’s knot (looping twice instead of once), pull tight, add a dot of glue to the knot, and trim the excess cord once dry.
Now you have a stunning set of faux-stone beads that look like they came straight from nature
Terrazzo Speckle Festival Stack
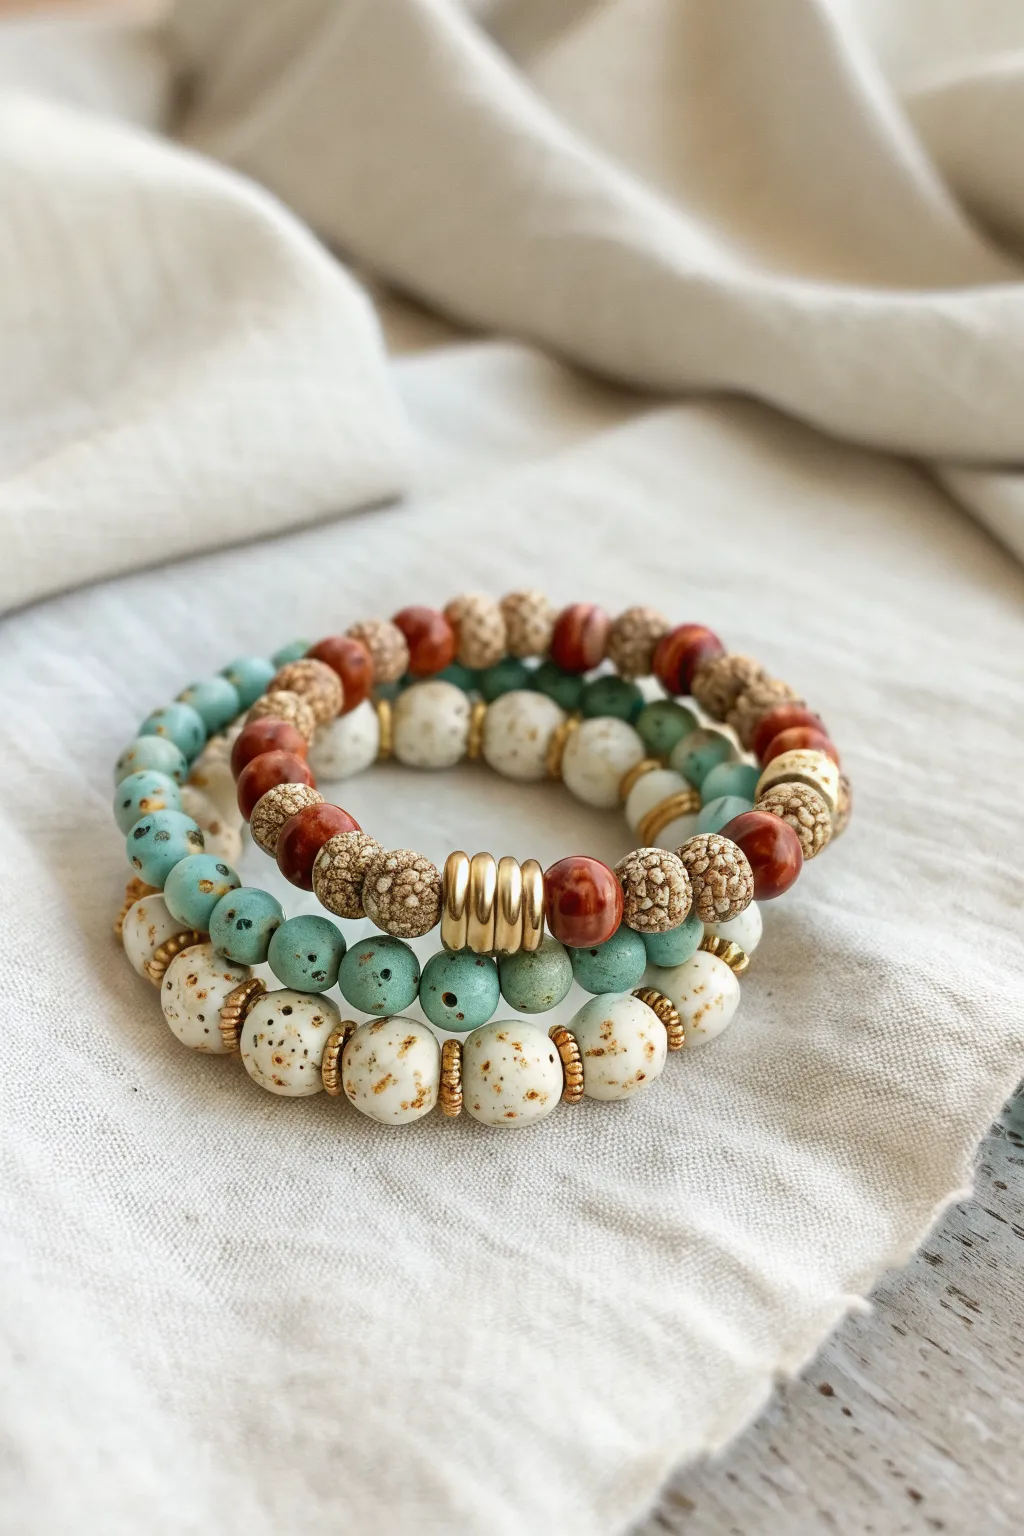
Bring the effortless vibes of festival season to your wrist with this trio of textured clay bracelets. Combining earthy terracotta tones, cool turquoise, and speckled cream finishes, this stack creates a harmonious blend of natural colors perfect for everyday wear.
Step-by-Step Guide
Materials
- Polymer clay (terracotta, turquoise, cream, and brown/black colors)
- Stretch cord (0.8mm or 1mm)
- Black acrylic paint or brown ink (for speckling)
- Old toothbrush or stiff bristle brush
- Gold spacer beads (heishi style)
- Gold tube focal bead or stacked gold rings
- Bead roller or acrylic sheet
- Needle tool or toothpick
- Jewelry glue (GS Hypo Cement recommended)
- Oven for baking
- Baking sheet with parchment paper
- Texture sponge or sandpaper (optional)
Step 1: Prepping the Clay Colors
-
Mix the turquoise shade:
Start by conditioning your turquoise polymer clay. To get that natural stone look seen in the middle bracelet, mix in a tiny pinch of black or brown clay—don’t blend it fully; leave faint swirls to mimic matrix lines. -
Create the terracotta blend:
For the top bracelet, use a rich terracotta clay. If it’s too bright, mute it with a touch of brown. You will also need a secondary tan or beige color for the alternating beads. -
Prepare the cream base:
Condition a large block of cream or white clay for the bottom bracelet. This needs to be a solid, clean color as we will add the heavy speckling later.
Uneven Spatter?
If your paint blobs rather than speckles, your paint is too thick. Add more water. Test the flicking motion on a scrap piece of paper first to gauge the spray pattern.
Step 2: Forming the Beads
-
Roll spherical beads:
Roll your clay into varying sizes of round beads. The turquoise beads should be roughly 6mm, while the cream beads for the bottom bracelet look best slightly larger, around 8mm. -
Texture the terracotta beads:
For the top bracelet beads, roll them quickly against a piece of sandpaper or a rough sponge before piercing. This gives them that organic, pitted surface texture. -
Pierce the holes:
Use your needle tool to carefully pierce a hole through the center of every bead. I like to twist the bead slightly as I push the needle through to prevent squashing the shape. -
Bake the beads:
Arrange all your beads on a parchment-lined baking sheet. Bake according to your specific brand of clay’s instructions (usually 275°F/135°C for 15-30 minutes). Let them cool completely.
Mix & Match Metals
Swap the gold spacers for antique brass or rose gold for a different warmth. Try adding a single wood bead into the mix for an even earthier, more grounded texture.
Step 3: Adding the Terrazzo Effect
-
Prepare the speckle paint:
Dilute a small drop of brown or black acrylic paint with water until it’s quite thin and runny. -
Spatter the cream beads:
Dip an old toothbrush into the paint, then run your thumb across the bristles to flick tiny droplets onto the cooled cream beads. Aim for heavy coverage to get that terrazzo look. -
Speckle the turquoise:
Repeat the process for the turquoise beads, but use a much lighter hand. You want subtle dots to look like natural stone imperfections. -
Seal the beads:
Once the paint is fully dry, you can coat the beads with a matte varnish if you want extra durability, though leaving them raw keeps the natural clay feel.
Step 4: Assembly
-
String the turquoise strand:
Cut a piece of stretch cord about 10 inches long. String the turquoise beads until the strand measures about 6.5-7 inches (or your wrist size). -
Assemble the cream terrazzo strand:
String the large cream beads, placing a thin gold heishi spacer between every single bead. This subtle gold separation elevates the look instantly. -
Design the focal bracelet:
For the terracotta bracelet, alternate between the dark terracotta and tan textured beads. In the center, add your gold tube bead or stack 4-5 gold rings together to create the focal point. -
Tie the knots:
Pre-stretch your filled cords slightly to prevent later sagging. Tie a surgeon’s knot (right over left twice, then left over right) to secure each bracelet. -
Secure with glue:
Place a tiny dot of jewelry glue on the knots. Let it dry before trimming the excess elastic close to the knot. Hide the knot inside a bead hole if possible.
Wear your new stack together for maximum impact or share them with friends for a matching boho look
Crescent and Sun-Inspired Clay Beads
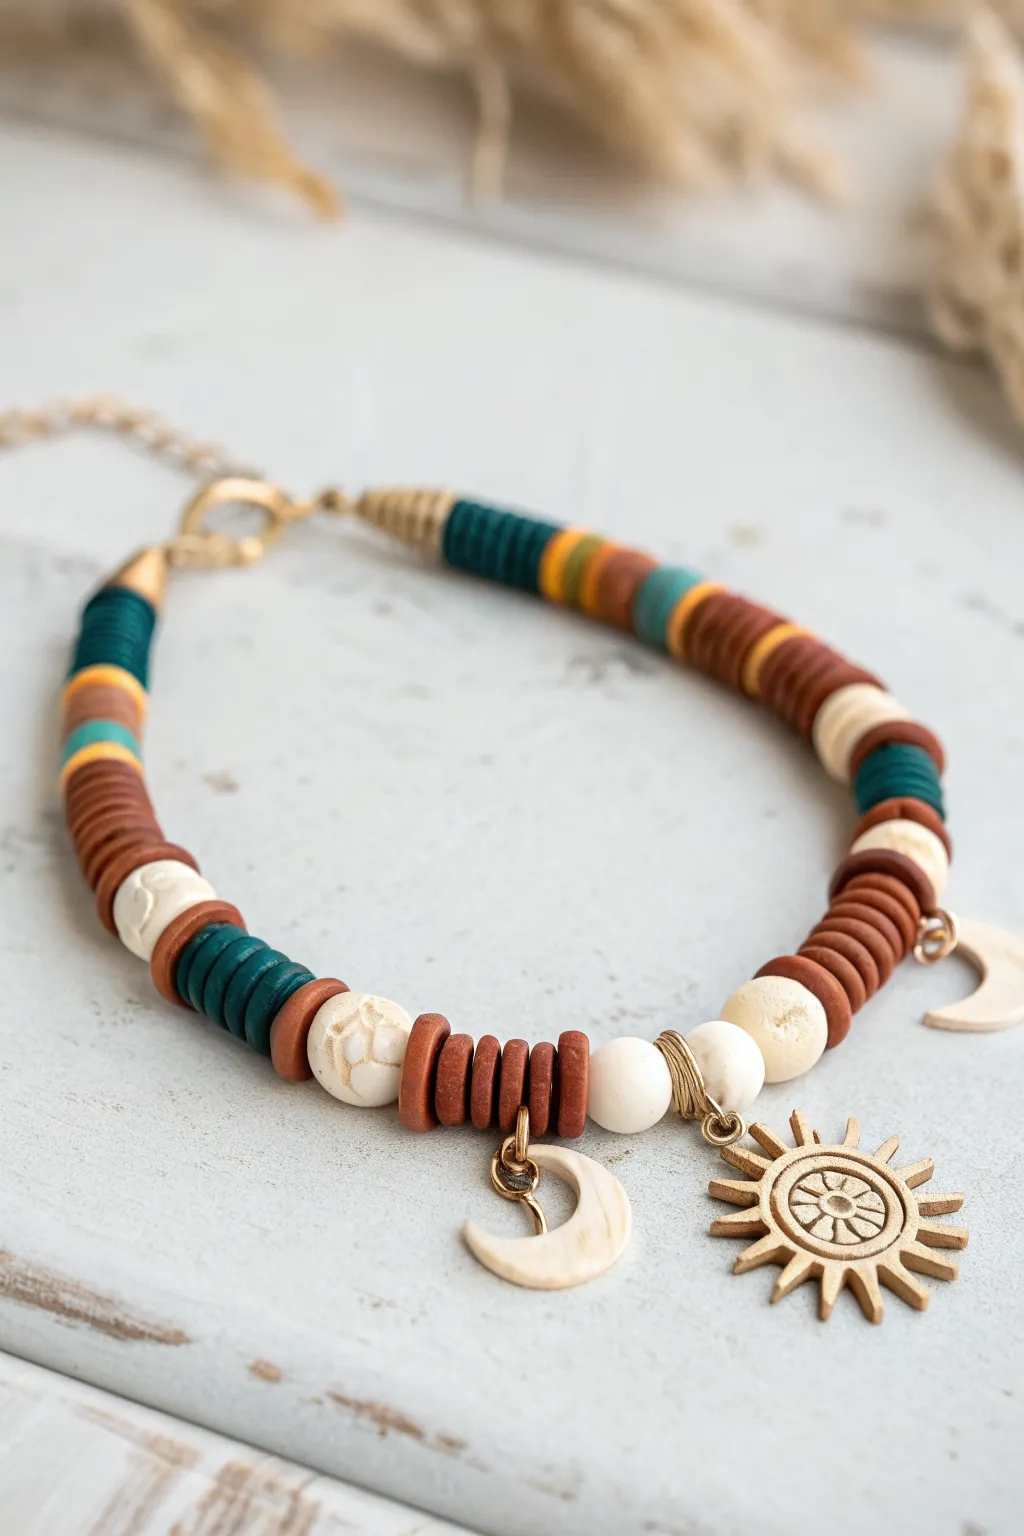
Capture the magic of the sun and moon with this earthy, bohemian-style bracelet featuring flat clay heishi beads and carved accents. The warm terracotta and cool teal palette, combined with celestial charms, makes this a perfect everyday accessory with a mystical touch.
Step-by-Step
Materials
- Polymer clay heishi disc beads (6mm or 8mm) in: dark teal, rust/terracotta, mustard yellow, and cream/beige
- Carved round bone or ceramic beads (approx. 8mm-10mm) in cream/off-white
- Gold tone sun charm (metal)
- Two crescent moon charms (carved bone, shell, or acrylic)
- Beading wire (flex wire, 0.38mm or 0.45mm)
- Gold crimp beads and crimp covers
- Gold wire guards (optional but recommended)
- Gold tone lobster clasp and extension chain
- Gold jump rings (approx. 5mm or 6mm)
- Jewelry pliers (chain nose and flat nose)
- Wire cutters
- Crimping pliers
Step 1: Planning and Prep
-
Measure your wrist:
Before cutting any wire, measure your wrist and add about an inch to account for the thickness of the beads and the clasp. This ensures a comfortable fit. -
Lay out the pattern:
Visualize your design first. The focal point is the sun charm, so arrange the pattern symmetrically from the center outward. I like to use a bead board for this to keep everything from rolling away. -
Identify the segments:
Notice the repeating pattern: sections of stacked heishi discs separated by larger round focal beads. Group your heishi beads by color for easy grabbing. -
Prepare the charms:
Attach a gold jump ring to your sun charm and the two moon charms. Open the jump rings by twisting them sideways with two pliers, slide on the charm, and twist back to close.
Wire Guard Wisdom
Using wire guards at the ends protects your beading wire from friction against the clasp, preventing breakage and giving your piece a professional, high-end jewelry finish.
Step 2: Stringing the Center
-
Start the wire:
Cut a length of beading wire (about 10-12 inches). Tape one end to your table so beads don’t slide off. -
Create the central focal point:
Thread on the gold sun charm so it sits right in the middle of your wire. -
Add flanking beads:
On either side of the sun charm, string one large cream carved bead. These frame the main charm beautifully. -
Place the moon charms:
Next to each carved bead, string about 4–5 rust-colored heishi beads. Then, slide on a crescent moon charm on each side. The moons should effectively hang between sections of rust beads.
Step 3: Building the Sides
-
Create the first color block:
Working outward from the moons, add another small stack of rust heishi beads (about 4-5 beads), followed by a carved cream bead. -
Transition to cool tones:
String a section of teal beads. Aim for a block of about 8–10 discs to create a solid strip of color. -
Add a contrasting accent:
Slide on a carved cream bead, followed by a smaller stack of heishi beads in a mixed pattern—try alternated rust, mustard, and teal for a striped look. -
Repeat for symmetry:
Whatever you do on the left side, repeat exactly on the right side to maintain that balanced, symmetrical aesthetic. -
Check the length:
Wrap the unfinished strand around your wrist to check the fit. Add more heishi discs near the ends if you need extra length.
Natural Texture
Swap the carved bone beads for lava stone or raw wood beads to act as essential oil diffusers. A drop of sandalwood oil on the porous beads adds a sensory layer to your jewelry.
Step 4: Finishing Touches
-
Prepare the crimp:
Thread a crimp bead onto one end of the wire, followed by a wire guard (if using) and one half of your clasp assembly (either the lobster claw or the ring). -
Loop back:
Feed the wire back through the crimp bead and pull tight, leaving a small loop but ensuring the clasp can move freely. -
Secure the crimp:
Use your crimping pliers to flatten the crimp bead securely. Give it a gentle tug to make sure it holds. -
Hide the crimp:
Place a crimp cover over the flattened bead and gently close it with pliers so it looks like a round gold bead. -
Finish the second side:
Repeat the crimping process on the other end with the extension chain. Be sure to pull the wire taut so there are no gaps between beads, but not so tight that the bracelet becomes stiff. -
Trim excess wire:
Snip off the excess wire tail close to the bead, or tuck the tail into the first few beads if possible.
Now you have a stunning piece of wearable art that channels celestial energy and earthy vibes all at once
Mixed “Found” Charm Cluster Bracelet
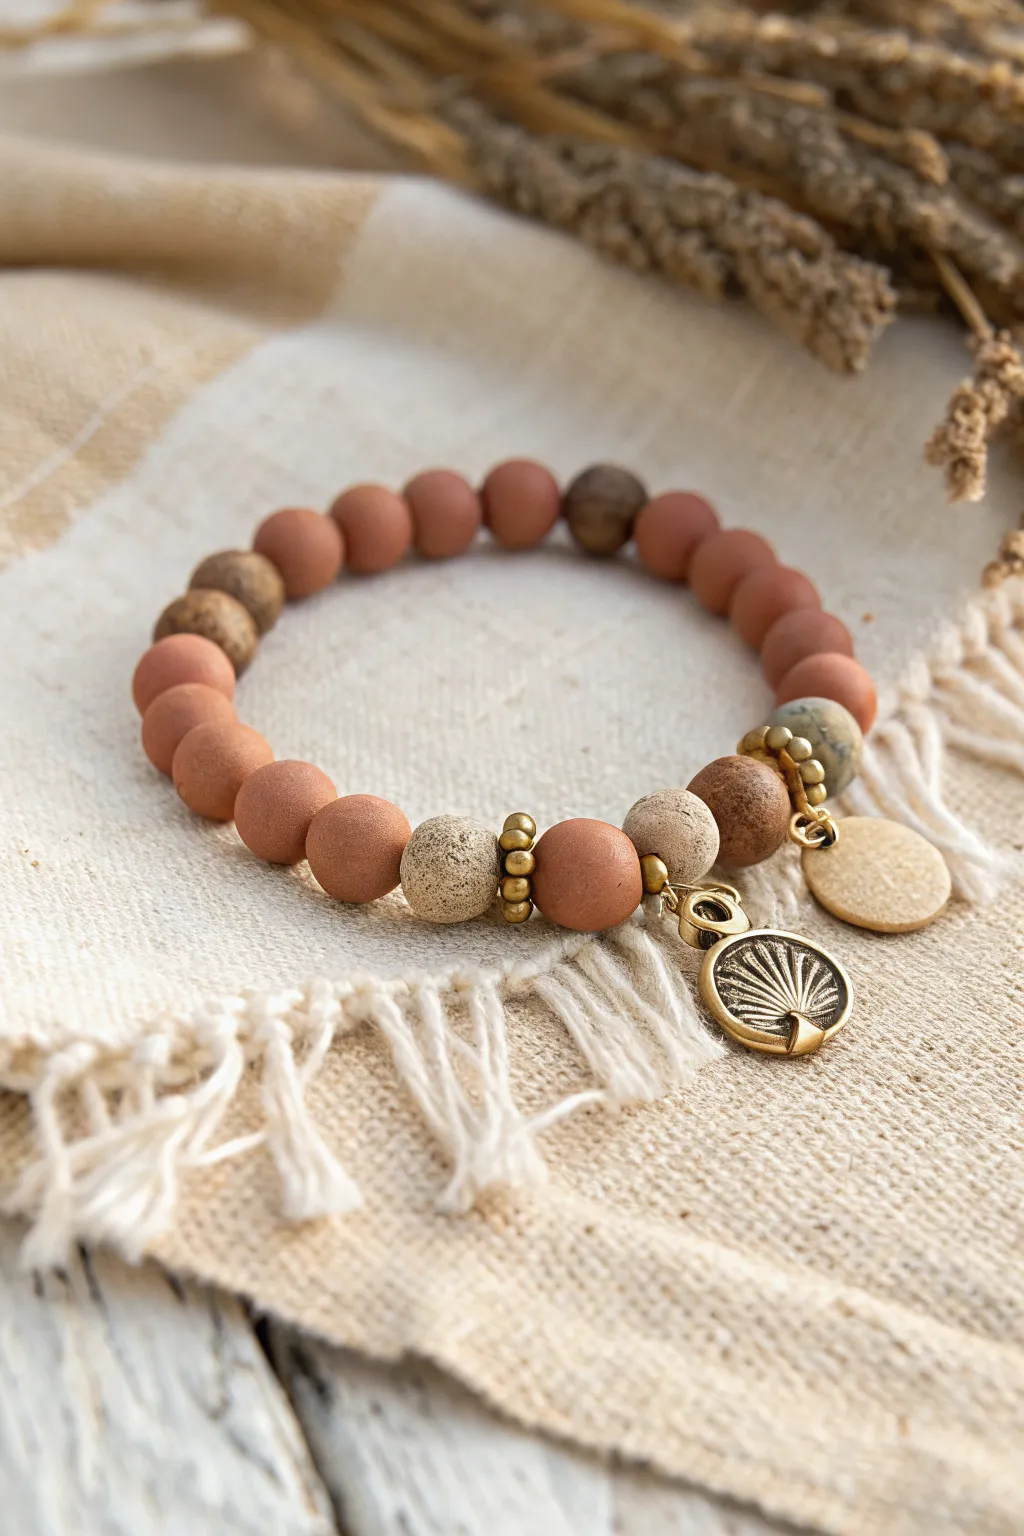
Embrace a warm, natural aesthetic with this textured charm bracelet that combines matte clay tones with rustic metallic accents. The mix of smooth rounds, porous lava stones, and clustered brass charms creates a piece that feels both curated and effortlessly bohemian.
Step-by-Step Guide
Materials
- Terracotta-colored polymer clay beads (8mm round, matte finish)
- Beige/sand-colored lava stone beads (8mm round)
- Brown speckled jasper or wood beads (8mm round)
- Gold or antique brass spacer beads (small rondelle or daisy shape)
- Stretch elastic cord (0.8mm or 1mm thickness)
- Gold or brass jump rings (6mm and 8mm)
- Gold or brass palm leaf charm (coin style)
- Hammered gold or brass disc charm
- Jewelry glue (optional but recommended)
- Scissors
Step 1: Planning the Design
-
Measure your wrist:
Wrap a flexible measuring tape around your wrist to find your size. Add about half an inch to this measurement to ensure the bracelet sits comfortably without pinching. -
Lay out the primary beads:
On a bead board or a soft cloth, lay out your terracotta clay beads. These will form the majority of the bracelet’s circumference, creating a solid color base. -
Select accent beads:
Choose 2-3 beige lava stones and 2-3 brown speckled beads to act as focal points. I like to group these opposite the main stretch of solid color to create visual balance.
Knot Hider Trick
Use a bead closely matching the hole size of a larger lava stone next to your knot. The larger pore of the lava stone makes hiding the elastic knot significantly easier.
Step 2: Stringing the Beads
-
Prepare the elastic:
Cut a piece of elastic cord about 10-12 inches long. Pre-stretch it by pulling firmly on both ends a few times; this prevents the bracelet from stretching out later. -
Start the sequence:
Begin stringing your terracotta beads. Thread about 12-15 of these beads first to create the back section of the bracelet. -
Add texture transition:
Slide on one of the brown speckled beads, followed by a terracotta bead, then another brown speckled bead. This subtle variation breaks up the solid color. -
Create the focal section:
Thread on a beige lava stone, followed by a gold spacer bead. These spacers add a necessary touch of shine between the matte textures. -
Continue the focal pattern:
Add a terracotta bead acting as a centerpiece, followed by another gold spacer. -
Finish the stone sequence:
Add your final beige lava stone and potentially one more brown speckled bead to mirror the other side of the focal section. -
Check the fit:
Wrap the strand around your wrist. If it’s too tight, add another terracotta bead to the back section; if too loose, remove one.
Scent Infusion
Since lava stones are porous, add a drop of essential oil (like sandalwood or patchouli) to the beige beads to turn your bracelet into a personal diffuser.
Step 3: Adding the Charms
-
Prepare the charm cluster:
Open a large jump ring using two pliers, twisting the ends apart rather than pulling them effectively. Slide on your palm leaf charm. -
Add secondary charms:
Slide the hammered disc charm onto the same jump ring, or attach it with a smaller separate ring for a layered effect. -
Attach to the bracelet:
Before closing the jump ring, hook it onto the bracelet cord directly between two of the metal spacer beads in your focal section. -
Secure the jump ring:
Twist the jump ring closed tightly, ensuring there is no gap where the cord could slip out.
Step 4: Finishing Touches
-
Tie the knot:
Bring the two ends of your elastic cord together. Tie a standard surgeon’s knot: cross right over left and loop under, then left over right and loop under twice. -
Tighten securely:
Pull the elastic ends firmly to tighten the knot. You want the beads to touch snugly but not bunch up. -
Apply adhesive:
Apply a tiny dot of jewelry glue to the knot. Let it dry for a distinct moment to ensure the elastic doesn’t slip. -
Hide the knot:
Trim the excess cord close to the knot, then carefully pull the bracelet so the knot slides inside the hole of a neighboring bead.
Wear your new charm bracelet solo for a delicate touch or stack it with other earthy textures to complete the look