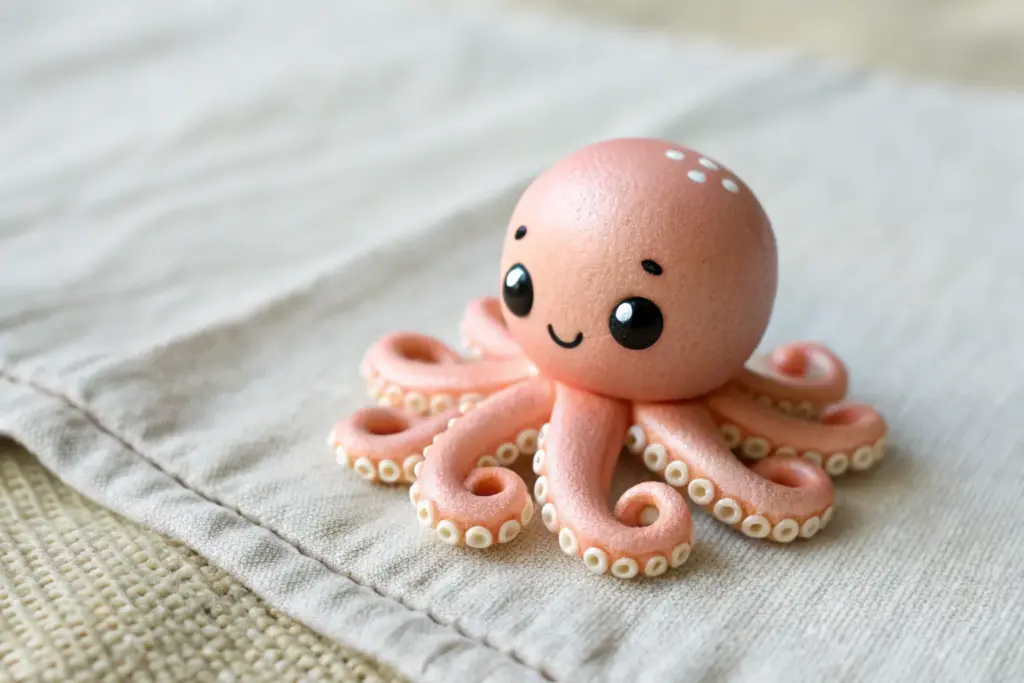
If you can roll a few clay balls, you can make an adorable little octopus—promise. Here are my favorite easy cute clay ideas that keep the shapes simple but the personality turned all the way up.
Classic Kawaii Octopus Buddy
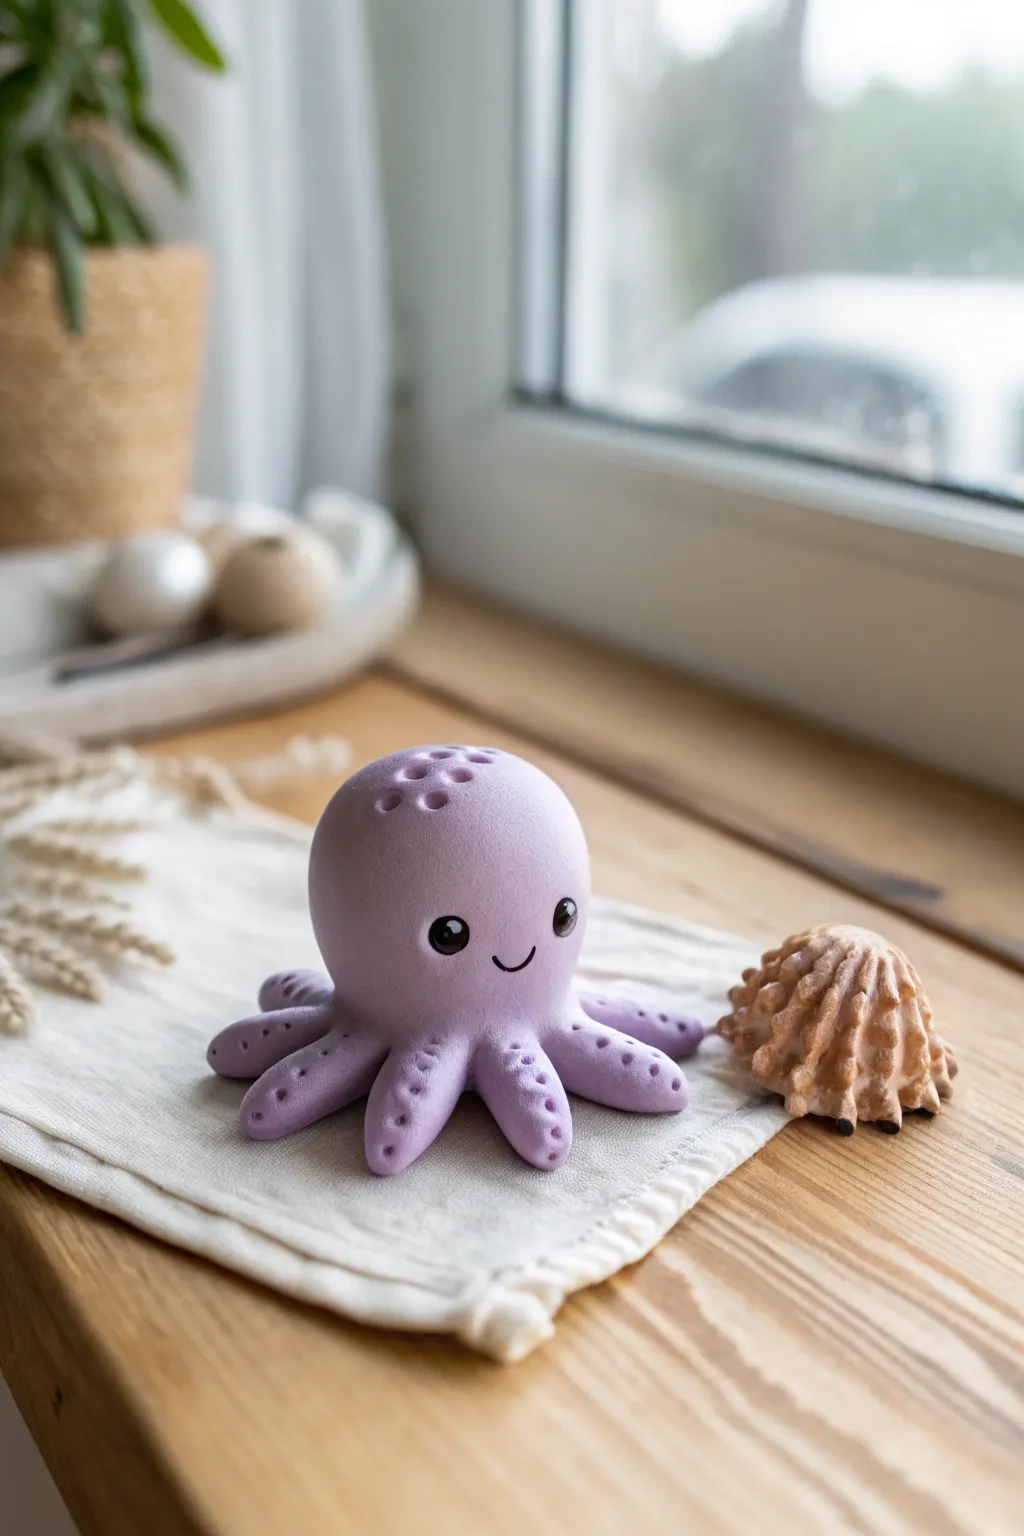
This charming little sea creature features a soft matte purple finish and delightful textural details that make it stand out from typical smooth clay figures. With its simple smiling face and textured tentacles, it adds a perfect touch of whimsy to any desk or shelf.
Detailed Instructions
Materials
- Polymer clay (lilac or light purple)
- Black polymer clay (tiny amount for eyes)
- Needle tool or toothpick
- Ball stylus tool (small)
- Dotting tool (medium)
- Clay roller or pasta machine
- Blade or craft knife
- Oven
- Baking sheet/tile
Step 1: Forming the Base
-
Condition the Clay:
Begin by taking a chunk of your lilac polymer clay and kneading it thoroughly in your hands until it becomes soft, pliable, and warm. -
Shape the Head:
Roll the main portion of the clay into a smooth ball about the size of a golf ball or slightly larger, depending on your desired final size. -
Refine the Dome:
Gently press the ball onto your work surface to flatten the bottom, then shape the top into a tall, rounded dome, smoothing out any fingerprints as you go. -
Prepare Tentacles:
I like to roll out eight small, sausage-like logs of purple clay, each roughly an inch long and tapering slightly at one end.
Clean Texture
To keep the dot indentations clean and uniform, dip your tool in cornstarch or water before pressing it into the clay. This prevents sticking.
Step 2: Assembly & Details
-
Attach the Tentacles:
Press the thicker end of each tentacle under the base of the head, arranging them radially so they fan act out like a star. -
Blend the Seams:
Use a modeling tool or your finger to smooth the clay where the tentacles meet the body, ensuring a seamless transition so they look like one solid piece. -
Pose the Legs:
Gently curve the tips of the tentacles slightly upward or to the side to give the octopus a sense of movement and life. -
Create Head Texture:
Using a small ball stylus or a blunt dotting tool, press several shallow indentations into the top right side of the head to mimic pores or spots. -
Texture the Tentacles:
Press a vertical line of small dots down the center of each tentacle using a smaller tool, creating that classic sucker-cup look.
Step 3: The Face & Finishing
-
Mark Eye Sockets:
Determine the front of your octopus and use a large ball tool to press two significant indentations where the eyes will sit. -
Insert the Eyes:
Roll two tiny balls of black clay and press them firmly into the eye sockets you just created; flatten them slightly so they don’t bulge out too much. -
Add Highlights:
Take microscopic specks of white clay (or use white paint after baking) and add a tiny reflection dot to the top corner of each black eye. -
Carve the Smile:
Use a needle tool or a very thin blade to carefully press a curved line into the clay between the eyes for a simple, happy smile. -
Final Smoothing:
Do a final check for fingerprints. You can lightly brush the surface with a tiny bit of baby oil or cornstarch if needed to remove unwanted texture. -
Bake:
Bake the figure according or the manufacturer’s instructions on your specific package of clay—usually around 275°F (130°C) for 15-30 minutes. -
Cool Down:
Let the octopus cool completely in the oven with the door cracked open to prevent thermal shock cracks.
Sticky Dust?
If dust gets stuck in your purple clay, use a cotton swab dipped in rubbing alcohol or acetone to gently wipe the surface clean before baking.
Once cooled, your purple octopus is ready to bring a dash of cute ocean charm to your space


Sphere Head and Ball Tentacles
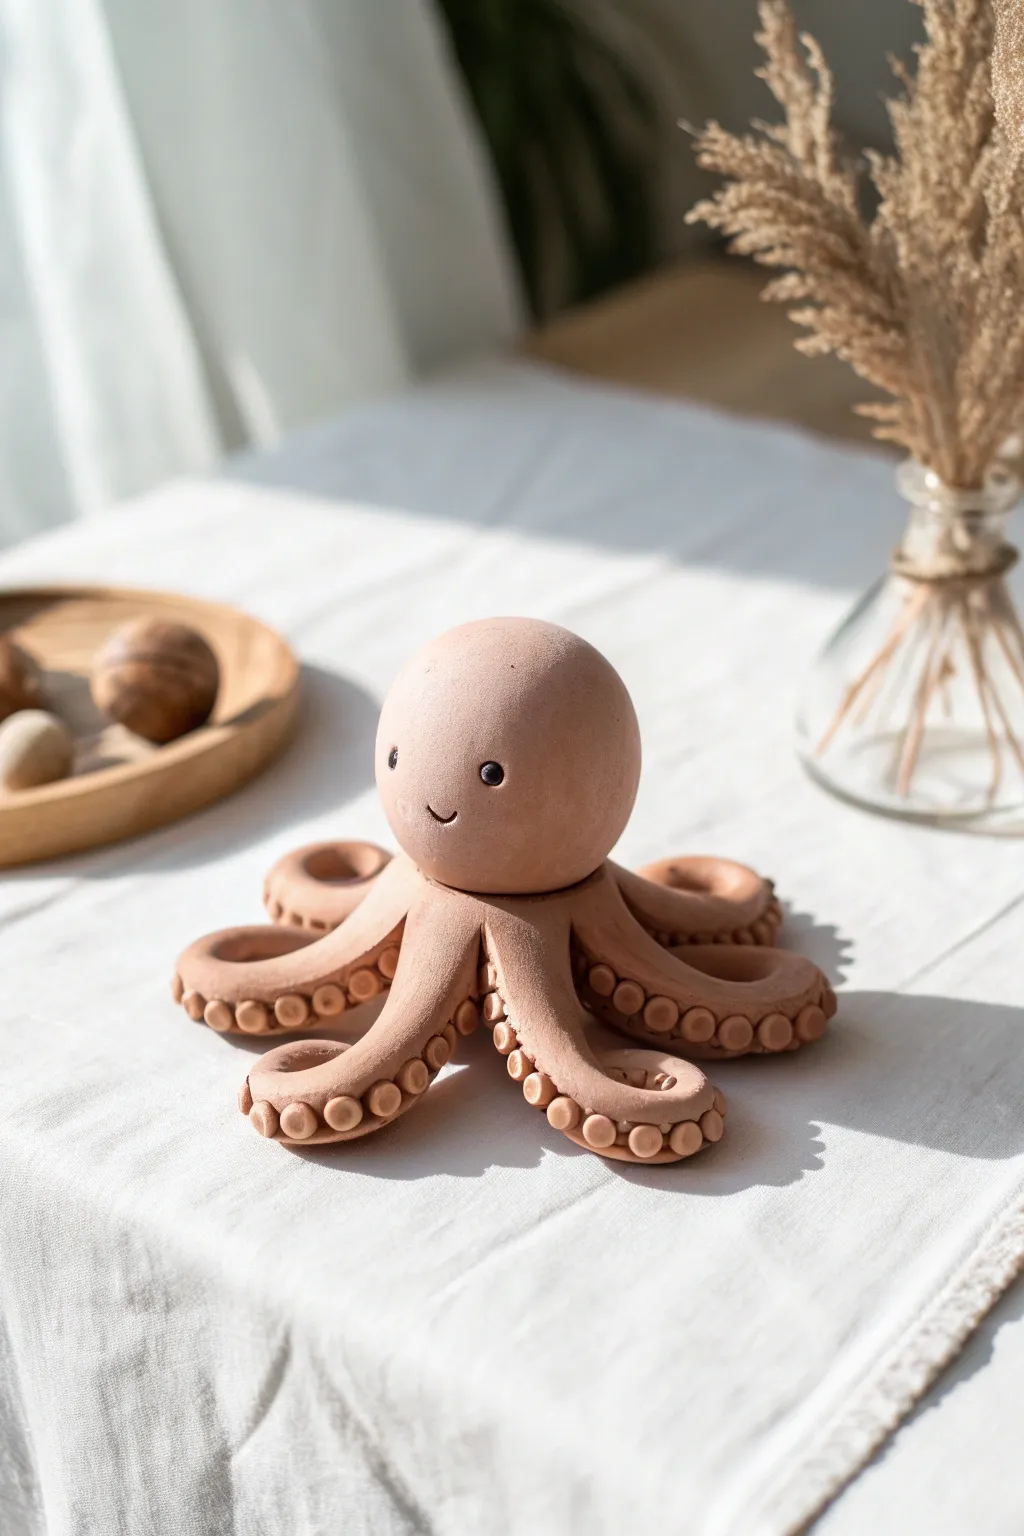
Create a charmingly minimalist octopus sculpture that brings a touch of oceanic whimsy to your desk. This project features a smooth, perfectly round head and eight playfully curled tentacles detailed with tiny, repetitive suction cups.
How-To Guide
Materials
- Terracotta-colored polymer clay (or air-destroy clay)
- Small ball stylus tool
- Pointed sculpting tool or toothpick
- Rolling pin (acrylic or wooden)
- Black clay (tiny amount for eyes)
- Needle tool
- Smooth work surface
Step 1: Sculpting the Base
-
Form the head:
Start by conditioning a large chunk of your terracotta clay until it’s soft and pliable. Roll it into a perfect sphere, roughly the size of a tangerine (about 2-3 inches in diameter). Ensure the surface is completely smooth and free of fingerprints. -
Prepare the tentacle clay:
Take a second portion of clay, slightly larger than the amount used for the head. Divide this into eight equal portions to ensure your tentacles will be symmetrical. -
Roll the tentacles:
Roll each of the eight portions into a tapered log or ‘snake’ shape. One end should be thicker (where it attaches to the body) and the other should taper to a gentle point. -
Join the tentacles center:
Arrange the eight tentacles in a starburst pattern on your work surface, connecting all the thick ends together in the center. Press them gently to join them into a single flower-like shape.
Step 2: Shaping and Detailing
-
Attach head to body:
Place your spherical head firmly onto the center of the joined tentacles. Gently blend the clay from the underside of the head into the top of the tentacle junction to secure it, but keep the visible seam clean. -
Curl the limbs:
Lift each tentacle and give it a unique curl. Twist the ends upward or spiral them slightly inward to create dynamic movement, making it look like the octopus is resting on the seabed. -
Make suction cup balls:
This is the meditative part. Roll dozens of tiny, pea-sized balls of clay. You will need about 10-12 for each tentacle. -
Apply the suction cups:
Press the tiny balls onto the underside and sides of each tentacle in a single row. Start with larger balls near the body and use progressively smaller ones as you reach the tapered tips. -
Indent the cups:
Using a small ball stylus or the round end of a paintbrush, press gently into the center of each tiny ball. This transforms the spheres into ring-shaped suction cups. -
Add the smile:
Use a needle tool or a bent piece of wire to impress a small, curved smile into the lower half of the sphere head. I like to make it slightly asymmetrical for a quirky look. -
Create the eyes:
Roll two extremely small balls of black clay. Press them onto the face, wide-set and level with the top of the smile. -
Highlight the eyes:
For a spark of life, add a tiny white clay speck to the black eyes if desired, though the matte black alone works well for a minimalist style. -
Final smooth:
Looking over the whole piece, gently smooth away any accidentally created fingerprints with a drop of baby oil on your finger. -
Bake or Dry:
If using polymer clay, bake according to the package instructions (usually 275°F for 15-30 minutes). If using air-dry clay, leave it in a dry spot for 24-48 hours.
Drooping Tentacles?
If tentacles sag before baking, prop them up with crumpled aluminum foil or tissue paper. This supports the curls and maintains the playful shape while the clay hardens.
Seamless Blending
To ensure the head doesn’t pop off later, score the bottom of the head and the tentacle junction (cross-hatching) before joining them together for a stronger mechanical bond.
Place your finished cephalopod on a sunny shelf or use it as a cheerful paperweight on your desk


No-Carve Chubby Tentacle Style
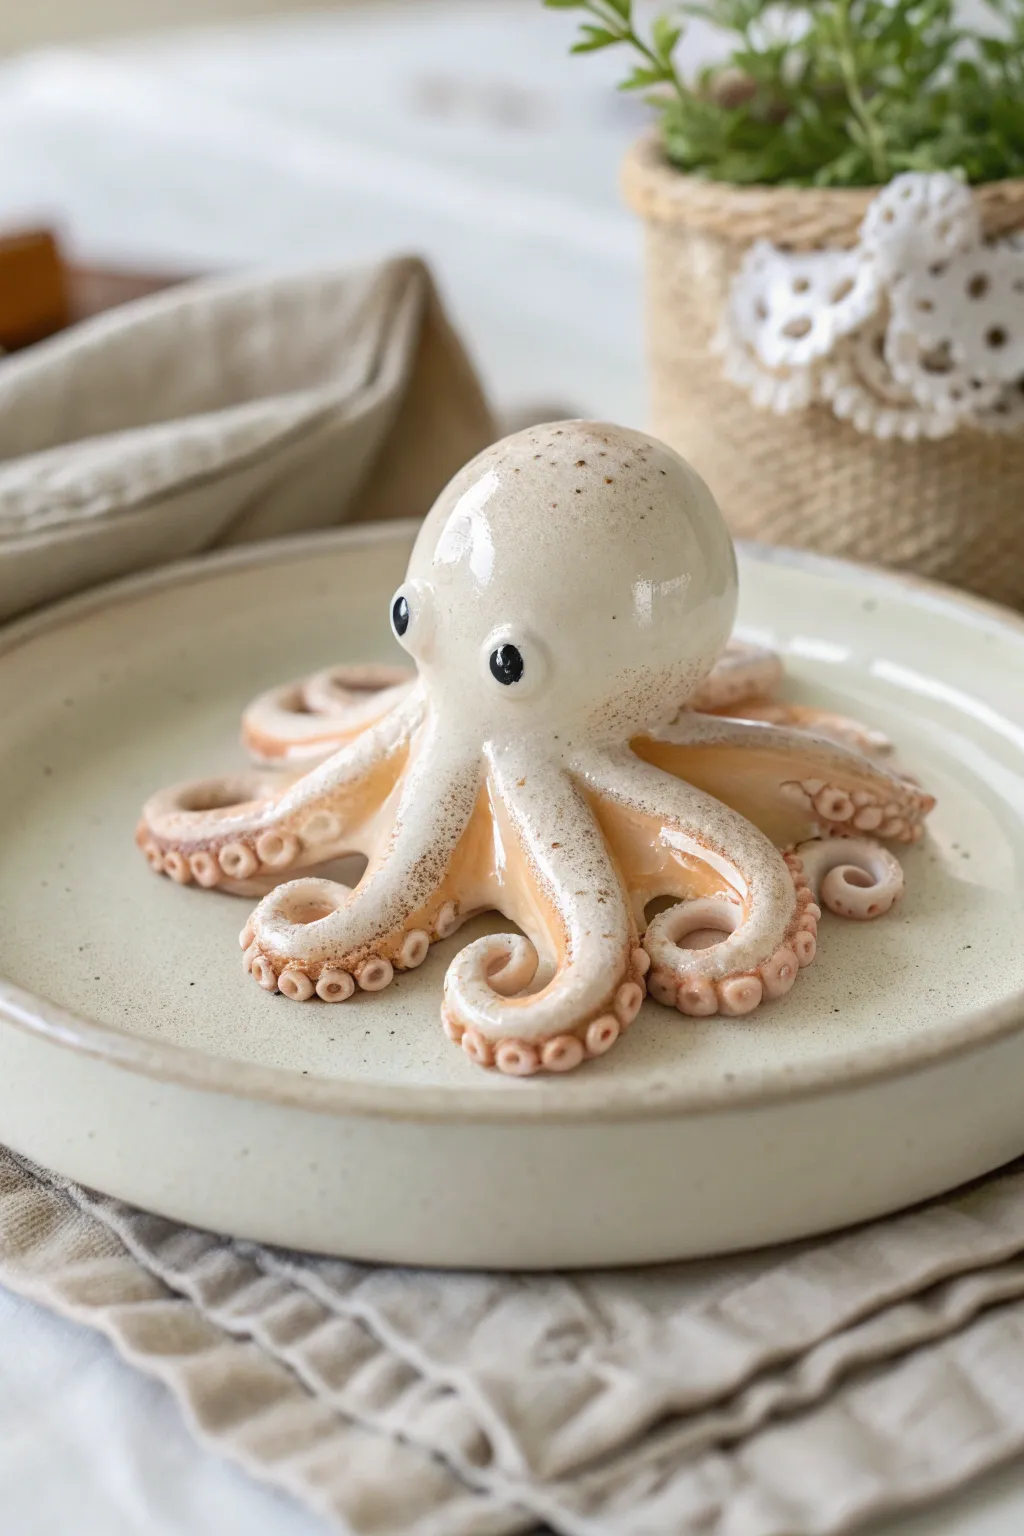
This charming little octopus features a high-gloss glaze finish that mimics professional ceramics perfectly. With its chubby, curled tentacles and simple dotted eyes, it creates a whimsical ocean touch without needing a kiln.
Step-by-Step Tutorial
Materials
- White polymer clay (approx. 2 oz)
- Translucent liquid clay or bakeable adhesive
- Glossy polyurethane varnish or UV resin
- Acrylic paints (pale creamy beige, light peach, brown, black)
- Small dotting tool or toothpick
- Fine grit sandpaper (400-600 grit)
- Small round paintbrush
- Sculpting tool with a rounded tip
- Aluminum foil (for armature)
Step 1: Forming the Base
-
Prepare the foil core:
Crumple a small piece of aluminum foil into a tight ball, about the size of a walnut. This reduces the weight and saves clay while ensuring even baking. -
Condition the clay:
Knead your white polymer clay until it is soft and pliable. Roll a portion into a smooth sheet about 1/4 inch thick. -
Cover the armature:
Wrap the clay sheet around your foil ball, smoothing the seams completely until you have a perfect sphere for the head. Shape it slightly into a teardrop, tapering slightly at the neck area.
Step 2: Sculpting the Tentacles
-
Roll the logs:
Taking the remaining white clay, roll out eight tapered logs approximately 3-4 inches long each. One end should be thicker (where it attaches to the body) and the other end pointed. -
Attach the legs:
Flip the head upside down. Press the thick ends of the tentacles onto the underside of the head base. Blend the clay seams upward onto the body using a rounded sculpting tool so the connection is invisible. -
Curl the tips:
Flip the sculpture right-side up. Arrange the tentacles in a radial pattern. Gently curl the tips of the tentacles upward or inward to create movement; varying the curls makes it look more organic. -
Add suckers:
Roll tiny balls of clay—you will need dozens. Flatten them slightly and press them in rows along the bottom edge of each tentacle. Use a small dotting tool to press an indentation into the center of each disc to create the sucker shape.
Sticky Situation?
If the clay gets too soft and sticky while sculpting fine suckers, pop the sculpture in the freezer for 5 minutes to firm it up before continuing detail work.
Step 3: Refining and Baking
-
Smooth the surface:
Before baking, use a drop of baby oil on your finger to gently buff away any fingerprints on the smooth head dome. Texture here would ruin the ceramic illusion. -
Create eye sockets:
Use a rounded tool to press two small, shallow indentations where the eyes will go. Placing them slightly wide apart adds to the cute factory. -
Bake the piece:
Bake according to your clay manufacturer’s instructions, usually at 275°F (130°C) for about 30 minutes. Let it cool completely.
Gloss Like a Boss
For the ultimate faux-ceramic finish, use UV resin instead of varnish. Cure it under a UV lamp for 2 minutes for a finish that is hard, durable, and indistinguishable from glass.
Step 4: Painting and Glazing
-
Base wash:
Mix a very watery wash of pale creamy beige acrylic. Brush it over the entire octopus and immediately wipe most of it off with a paper towel, leaving just a hint of warmth in the crevices. -
Accent the suckers:
Mix a light peach or coral color. Carefully paint the sucker discs and the underside of the tentacles. Blend this color slightly up the sides for a soft gradient. -
Add speckling:
Load a stiff brush or toothbrush with thinned brown paint. Flick the bristles to spatter tiny speckles across the top of the head and the tops of the tentacles. -
Paint the eyes:
Paint the inside of the eye sockets black. Once dry, add a tiny white dot for a highlight using a toothpick. -
Apply the high gloss:
To achieve the ceramic look, apply 2-3 coats of high-gloss polyurethane varnish or a layer of UV resin. Ensure the coat is thick enough to look like glass but not so thick it drips.
Place your shiny new friend on a shelf or use it as a whimsical paperweight to brighten your desk


Tiny Dot-Eyes and U-Smile Face
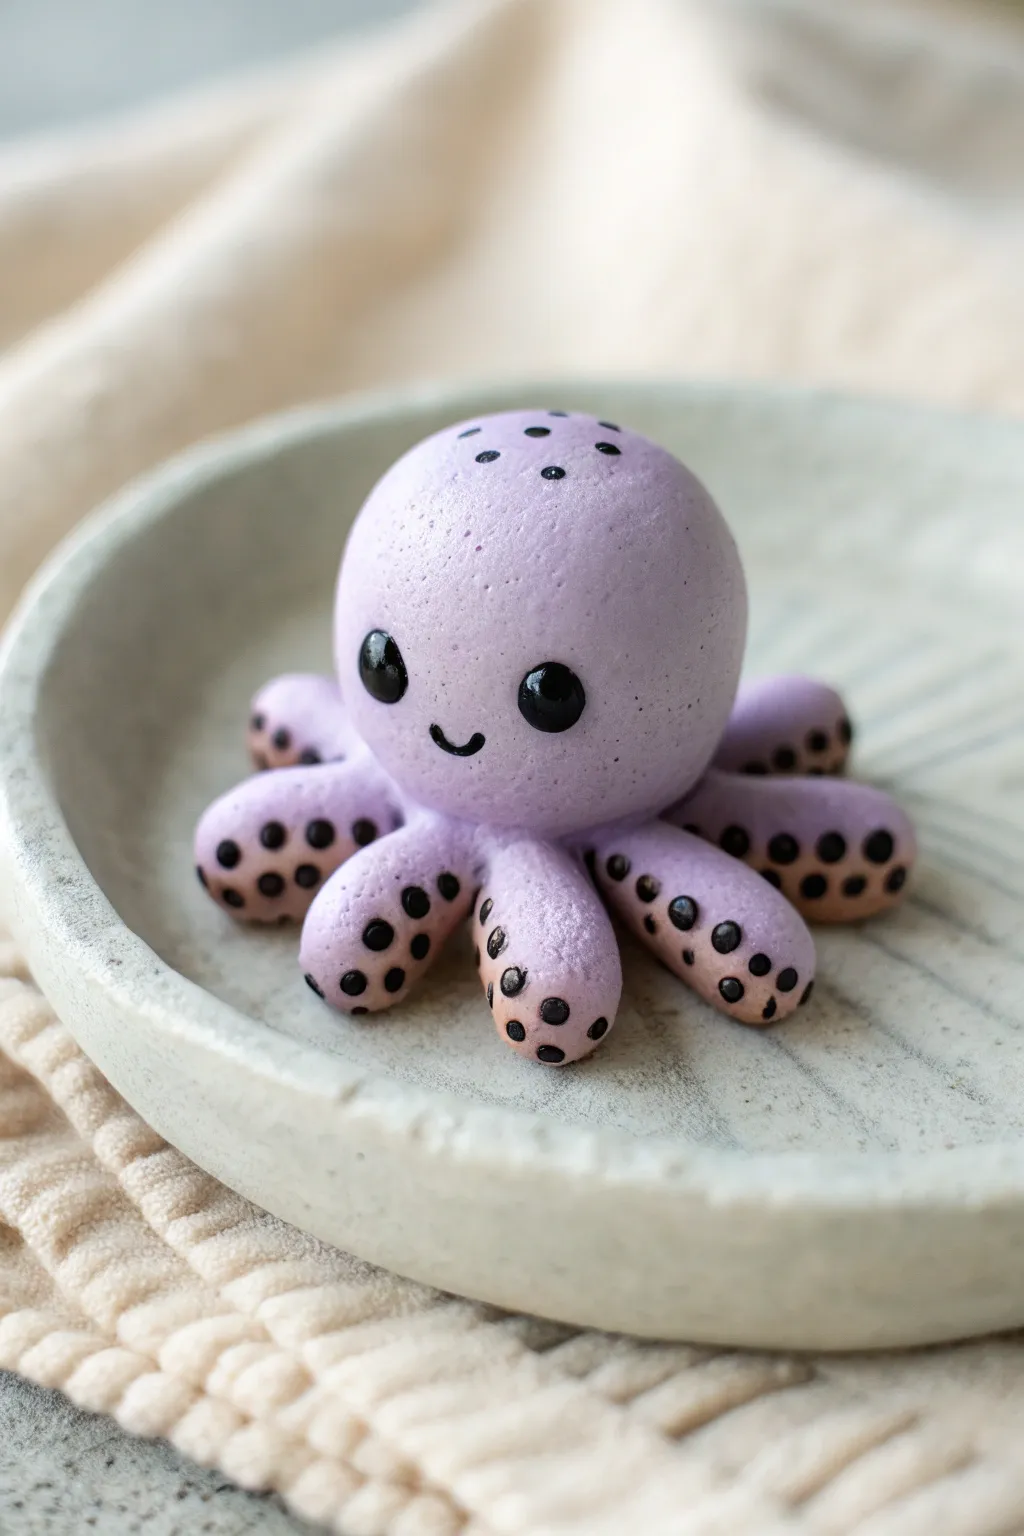
This adorable little sea creature features a smooth lavender head and eight delightfully chubby tentacles. It’s finished with simple black painted details for a charming, minimalist look that is perfect for beginners.
How-To Guide
Materials
- Light purple polymer clay (or white clay mixed with purple)
- Black acrylic paint
- Small dotting tool or toothpick
- Fine-point paintbrush
- Clean work surface (ceramic tile or silicone mat)
- Oven (if using polymer clay)
Step 1: Shaping the Head
-
Prepare the clay:
Start by conditioning your light purple clay in your hands until it becomes soft and pliable. If the color feels too dark, I often knead in a bit of white clay to get that soft pastel lavender hue. -
Roll the main sphere:
Roll a ping-pong ball sized amount of clay into a smooth sphere. This will become the octopus’s head. -
Form the dome:
Gently press the sphere onto your work surface to flatten the bottom slightly, creating a stable dome shape rather than a perfect ball. -
Creating texture (optional):
The example image has a slightly porous texture. You can gently tap the surface with a stiff toothbrush or a textured sponge if you want to mimic this, or leave it smooth.
Step 2: Forming the Tentacles
-
Divide the clay:
Take a new piece of purple clay and divide it into eight equal, small portions. These will be the arms. -
Shape the logs:
Roll each small portion into a short, thick log or sausage shape. Try to keep them rounded at the ends rather than pointy. -
Attach the first arm:
Place one log at the base of the head. Press it gently so it adheres to the underside of the main dome. -
Arrange remaining arms:
Continue attaching the other seven arms in a circle around the base. They should radiate outward like the petals of a flower. -
Blend the seams:
Use your finger or a clay tool to gently smooth the clay where the arms meet the head, ensuring a secure bond. -
Curve the tips:
Gently curl the ends of a few tentacles slightly upward or to the side to give the octopus a sense of movement.
Clean Hands, Clean Clay
Light-colored clay picks up dust easily. Keep rubbing alcohol or baby wipes nearby to clean your hands and tools often while sculpting.
Step 3: Details and Finishing
-
Bake or dry:
Follow the instructions for your specific clay. If using polymer clay, bake it on a dedicated baking sheet. If using air-dry clay, let it sit for 24-48 hours. -
Prepare the paint:
Once the sculpture is completely cool and dry, squeeze a small amount of black acrylic paint onto a palette. -
Create the eyes:
Dip a large dotting tool or the handle end of a paintbrush into the black paint. Press two confident dots onto the center of the face for the eyes. -
Add reflection (optional):
While the black paint is wet, adding a tiny speck of white creates a ‘shiny’ look, although solid black is also very cute. -
Paint the smile:
Using your finest brush, paint a very small, thin ‘U’ shape between the eyes for the mouth. -
Head spots:
Use a smaller dotting tool to add a few random black dots on the top of the head for texture. -
Tentacle spots:
Add pairs of black dots running down the length of each tentacle. These represent the suckers. -
Seal (optional):
To protect your paint job, you can apply a thin layer of matte or satin varnish over the entire piece once the paint is fully dry.
Uneven Tentacles?
If your arms aren’t the same size, roll a long ‘snake’ of clay first, then cut it into 8 equal segments before shaping them into logs.
Now you have a charming little desk buddy to keep you company while you work

The Complete Guide to Pottery Troubleshooting
Uncover the most common ceramic mistakes—from cracking clay to failed glazes—and learn how to fix them fast.
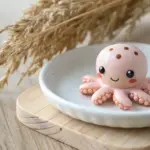
Blush Cheeks for Extra Cuteness
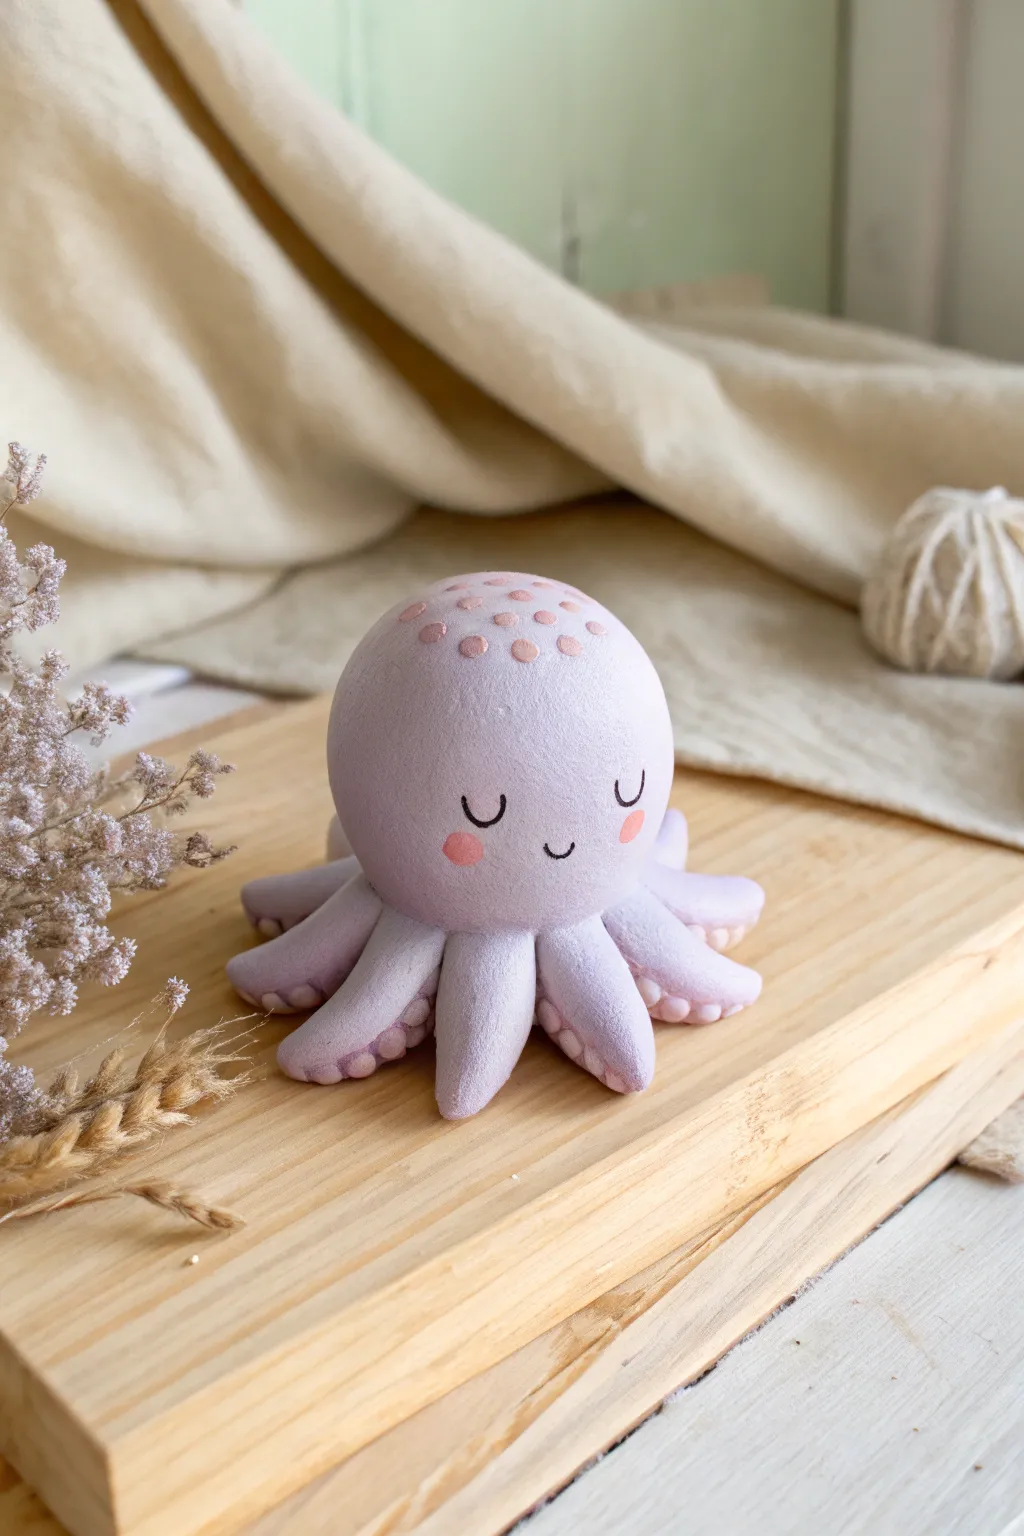
Create this adorable purple octopus sculpture with charming blush cheeks and whimsical dotted details. Its soft matte finish and serene expression make it a perfect little companion for your desk or shelf.
Step-by-Step Tutorial
Materials
- Polymer clay (light lavender/purple)
- Polymer clay (pale pink)
- Acrylic paint (black and pink)
- Fine detail paintbrush
- Ball stylus tool or rounded toothpick
- Clay knife or plastic sculpting tool
- Smooth work surface
- Oven (for baking according to clay package)
- Aluminum foil
Step 1: Shaping the base
-
Prepare the clay:
Begin by conditioning your light lavender polymer clay. Knead it in your hands until it becomes soft, pliable, and easy to shape without cracking. -
Form the head:
Roll a large portion of the purple clay into a smooth, seamless ball. This will be main body and head of the octopus. Gently flatten the bottom slightly so it sits upright. -
Create tentacle logs:
Roll out eight smaller, equal-sized logs of purple clay. Each should be slightly thicker at one end and taper down to a rounded point at the other. -
Attach the tentacles:
Turn the main head ball upside down. Carefully press the thicker ends of your eight tentacles onto the bottom center of the body, arranging them in a radial starburst pattern. -
Blend the seams:
Use a clay modeling tool or your fingertip to smooth the clay where the legs meet the body. The goal is to make the tentacles look like they are naturally growing out of the head rather than just stuck on. -
Fan out the legs:
Flip the octopus right-side up. Gently arrange the legs so they splay out evenly on your work surface, curving the tips slightly to give them a bit of movement.
Step 2: Adding Details
-
Create suction cups:
Roll tiny spheres of pale pink clay. Flatten them slightly and press them onto the underside of the tentacles, focusing on the visible parts near the tips. -
Indent the suckers:
Take a small ball stylus tool and press into the center of each pink dot to create a little cup shape, giving the suction cups realistic dimension. -
Top decoration:
Roll very small, flat discs of the same pale pink clay. Press these randomly onto the very top of the octopus’s head to create a cute speckled pattern. -
Texture check:
Before baking, give the finish a once-over. Lightly smooth away any fingerprints with a drop of baby oil or water, as sanding this shape later would be difficult. -
Bake the figurine:
Bake your creation according to the specific temperature and time instructions on your package of polymer clay. I recommend tenting it with aluminum foil to prevent scorching the light purple color. -
Cool down:
Allow the octopus to cool completely inside the oven or on the counter before moving to the painting stage. The clay is strongest when fully cool.
Keep it Clean
Light purple clay attracts dust like a magnet. Wipe your hands and work surface with a baby wipe before starting to ensure your color stays pristine.
Step 3: Painting the Face
-
Paint the eyes:
Using a very fine detail brush and black acrylic paint, draw two small ‘U’ shapes for closed, sleepy eyes. Add a tiny lash flick to the outer corner of each. -
Add the smile:
Paint a tiny, subtle curve between the eyes for the mouth. Keep the line thin and delicate for the cutest expression. -
Apply the blush:
Dip a round tool or the back of a paintbrush into pink acrylic paint. Dab two generous circles onto the cheeks, placing them slightly lower than the eyes. -
Dry thoroughly:
Let the paint dry completely. If you want extra protection, you can apply a matte varnish, though the bare clay look (as shown in the image) has a lovely natural texture.
Legs Falling Off?
If tentacles don’t stick, use liquid Sculpey or ‘Bake and Bond’ as a glue between the raw clay pieces before smoothing the seams.
Place your little octopus on a shelf to bring a calm and cheerful vibe to your room
Octopus Couple in Matching Pastels
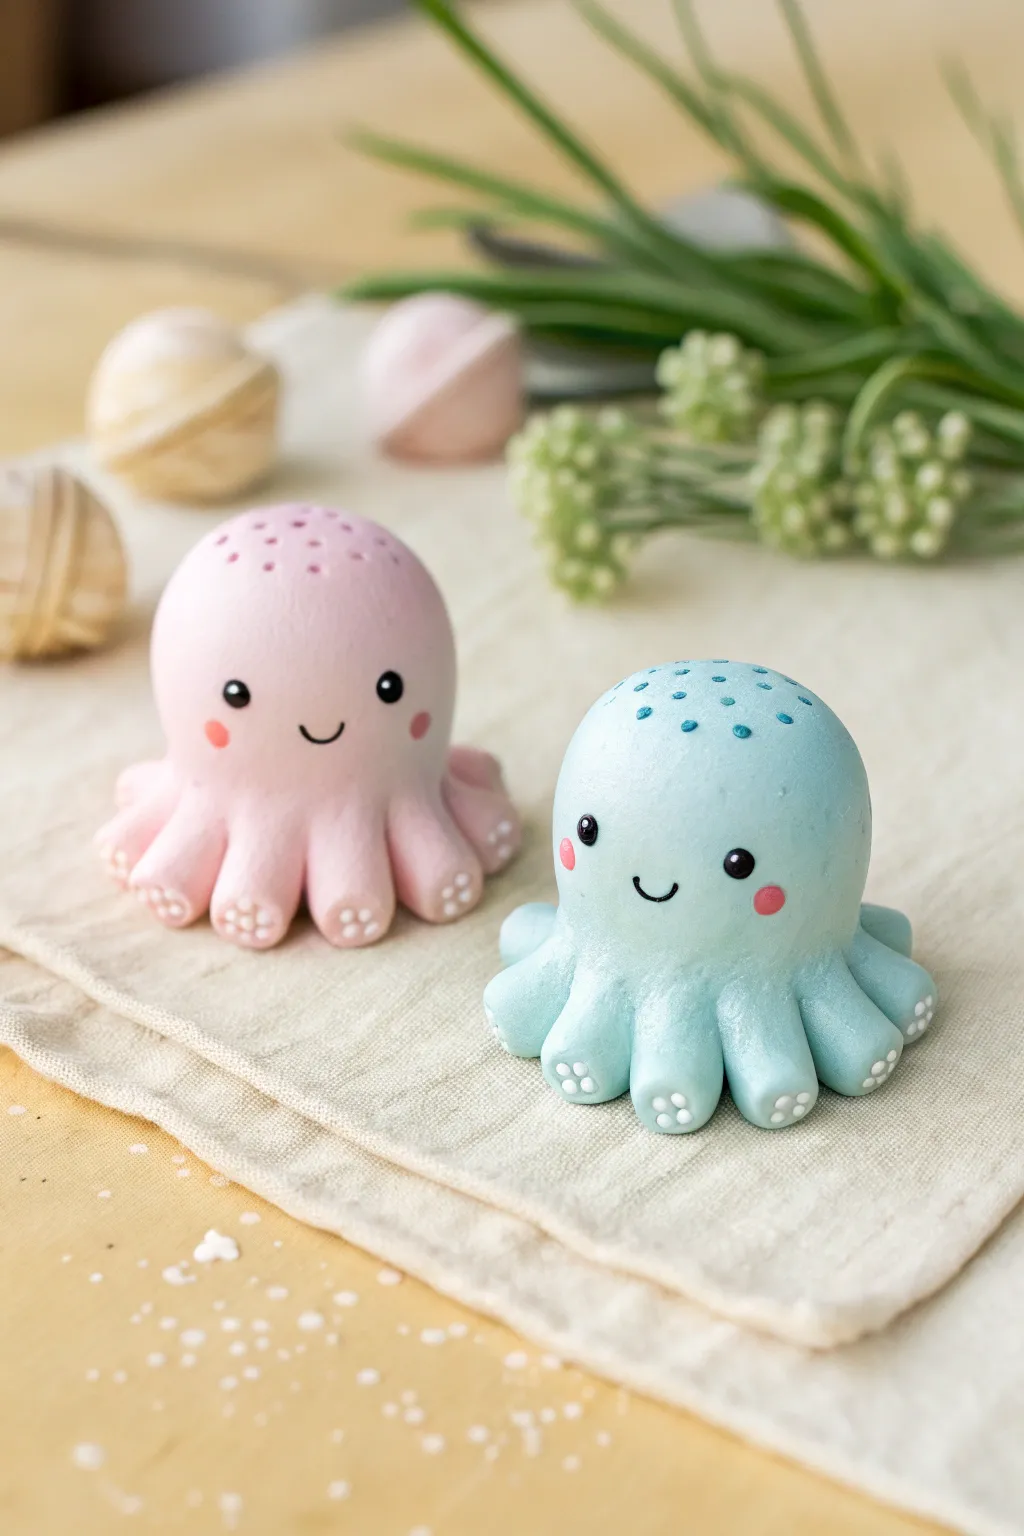
Create this adorable duo of matching pastel octopuses using polymer or air-dry clay. These charming sea creatures feature sweet smiling faces, speckled heads, and detailed tentacle suckers, making them perfect little desk companions or handmade gifts.
How-To Guide
Materials
- Polymer clay or air-dry clay (Light Pink and Baby Blue)
- Black clay (tiny amount for eyes and mouth)
- White clay or acrylic paint (for details)
- Pink acrylic paint or chalk pastel (for cheeks)
- Clay carving tools (needle tool, small ball tool)
- Smooth work surface
- Rolling pin (optional)
- Aluminum foil (optional, for armature core)
Step 1: Forming the Body
-
Create the core shape:
Start by conditioning your light pink clay until it is soft and pliable. Roll it into a smooth, seamless ball about the size of a golf ball or slightly larger, depending on your desired final size. -
Shape the dome:
Gently press the ball onto your work surface to flatten the bottom. Use your palms to smooth the sides, creating a rounded dome shape that is slightly taller than it is wide. -
Repeat for the partner:
Repeat the exact same process with the baby blue clay to create the second octopus body, trying to keep them roughly the same size for a matching set look.
Tentacles Falling Off?
If the tentacles won’t stick, score the attachment points (scratch hatching lines) and use a dab of liquid clay or water (for air-dry types) as glue before pressing them on.
Step 2: Creating Tentacles
-
Make the tentacle logs:
For the pink octopus, roll out eight small, equal-sized balls of pink clay. Roll each one into a short, thick log about 1 inch long. -
Attach the tentacles:
Press these logs onto the bottom edge of the dome body, spacing them evenly around the circumference. You can blend the clay upwards into the body using a smoothing tool or your finger to make the seam disappear. -
Curl the ends:
Gently curl the tip of each tentacle slightly outward and upward to give them a dynamic, wiggly look. -
Add suction cups:
Roll tiny distinct balls of white clay. Press three small white dots onto the underside/tip of each tentacle to simulate suction cups. -
Create the blue set:
Follow these same steps for the blue octopus, attaching eight blue tentacles and adding the white suction cup details to each one.
Step 3: Adding Facial Details
-
Position the eyes:
Use a ball tool to make two small indentations on the front of the face where the eyes will sit. This helps them stay secure. -
Insert the eyes:
Roll two tiny balls of black clay and press them into the indentations. Flatten them slightly so they aren’t bulging out too much. -
Add the cute sparkle:
Take a microscopic amount of white clay (or use white paint later) and add a tiny reflection dot to the upper corner of each black eye. -
Create the smile:
Roll a very thin ‘snake’ of black clay for the mouth. Curve it into a gentle ‘U’ shape and press it onto the face centered between the eyes. -
Apply rosy cheeks:
For the cheeks, dip a finger or Q-tip into pink chalk pastel dust or a tiny dab of paint and gently rub a circular spot below each eye. I find building the color slowly looks more natural.
Pro Tip: Clean Clay
Keep wet wipes nearby to clean your hands when switching colors. Even a tiny speck of black or blue will show up instantly on that light pastel pink clay.
Step 4: Finishing Touches
-
Add head speckles:
Using a needle tool or toothpick, gently poke small, shallow holes in a random pattern on the very top of each octopus’s head. -
Highlight the speckles:
If you want the dots to stand out like the blue octopus in the example, you can use a slightly darker shade of blue clay or paint to fill these tiny indents. -
Smooth everything out:
Do a final check for fingerprints. Use a drop of baby oil on your finger to lightly glide over the clay to remove any unwanted texture before curing. -
Bake or dry:
If using polymer clay, bake according to the package instructions (usually 275°F for 15-30 minutes). If using air-dry clay, leave them in a dry, safe spot for 24-48 hours.
Now you have a sweet pair of aquatic friends ready to brighten up your shelf


What Really Happens Inside the Kiln
Learn how time and temperature work together inside the kiln to transform clay into durable ceramic.
Bow-Topped Octopus Cutie
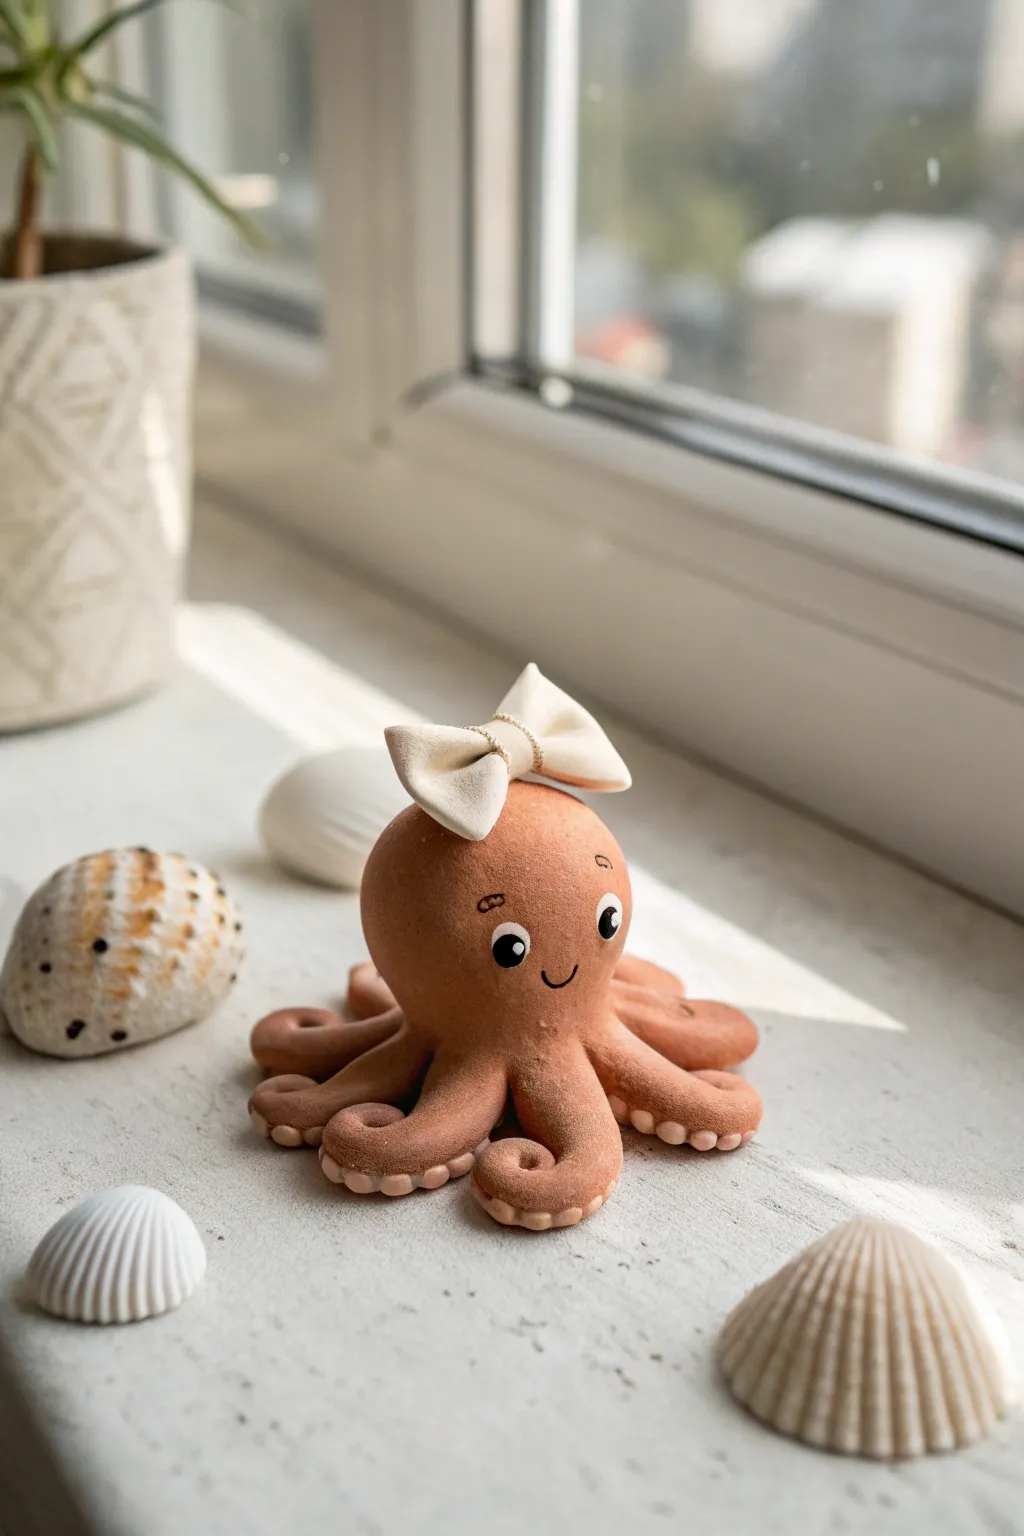
This charming little cephalopod combines a warm, earthy terracotta tone with an elegant cream bow for a sweet, finished look. It’s a perfect beginner sculpture that focuses on simple shapes to create character.
Step-by-Step Tutorial
Materials
- Polymer clay (terracotta or reddish-brown color)
- Polymer clay (cream or off-white for the bow)
- Polymer clay (black and white for eyes)
- Clay sculpting tools (needle tool, small ball tool)
- Rolling pin or pasta machine
- Aluminum foil (optional, for armature)
- Work surface (ceramic tile or glass mat)
- Oven (for baking polymer clay)
Step 1: Sculpting the Body
-
Prepare the clay:
Begin by conditioning the terracotta clay until it is soft and malleable. Roll it into a smooth, crack-free ball about the size of a golf ball to form the main head and body. -
Shape the head:
Gently press the ball onto your work surface to flatten the bottom slightly for stability. Use your fingers to smooth out any fingerprints, keeping the dome shape rounded and high. -
Form the tentacles:
Roll out eight small, equal-sized snakes of terracotta clay, each about 1.5 inches long. Taper one end of each snake to a dull point. -
Attach the legs:
Arrange the eight tentacles in a starburst pattern under the head or around the base. Gently blend the thicker end of each tentacle into the underside of the main body so no seams are visible. -
Pose the tentacles:
Give the octopus movement by curling the ends of the tentacles. I like to spiral a few completely inwards and let others wave gently to the side for a natural look.
Step 2: Adding Details
-
Create the suckers:
Roll tiny balls of the cream or lighter terracotta clay. Flatten them slightly and press them in rows along the underside of the curled-up tentacles using a small ball tool to create the indent. -
Make the eyes:
Roll two small circles of white clay and flatten them onto the face area. Add two slightly smaller black circles on top, positioning them to look off to the side for a cute expression. -
Add eye highlights:
Place a minuscule dot of white clay on the upper corner of each black pupil to bring the character to life. -
Sculpt the eyebrows:
Using a needle tool or a very fine brush, paint or etch tiny, thin eyebrows just above the eyes to add expression. -
Create the smile:
Use the edge of a small circular cutter or a needle tool to impress a small, curved smile right between the eyes.
Smooth Surface Secret
Before baking, lightly brush the clay with a tiny amount of baby oil or clay softener on your finger. This removes fingerprints and creates a professional finish.
Step 3: The Finishing Touch
-
Form the bow loops:
Flatten a strip of cream clay. Fold the ends toward the center to create two loops, pressing them gently together in the middle. -
Add the center knot:
Roll a very thin, small strip of cream clay and wrap it vertically around the center of the loops to hide the join and create the bow’s knot. -
Texture the bow center:
Use a needle tool to add tiny vertical indents or stippling to the center knot, giving it a fabric-like texture. -
Attach the bow:
Place the finished bow on top of the octopus’s head, slightly off-center. Press down gently to secure it without squashing the loops. -
Final inspection:
Check the sculpture from all angles to ensure the clay is smooth and free of lint before baking. -
Bake the project:
Bake the octopus according to the manufacturer’s instructions on your specific package of clay (usually 275°F/135°C for 15-30 minutes). -
Cool down:
Allow the piece to cool completely in the oven or on the tray before handling it to ensure durability.
Make it a Keepsake
Insert a looped eye pin into the top of the head (behind the bow) before baking to turn this cute octopus into a custom ornament or keychain.
Place your new friend on a shelf or desk where its warm colors will brighten your day
Little Top Hat Octopus Character
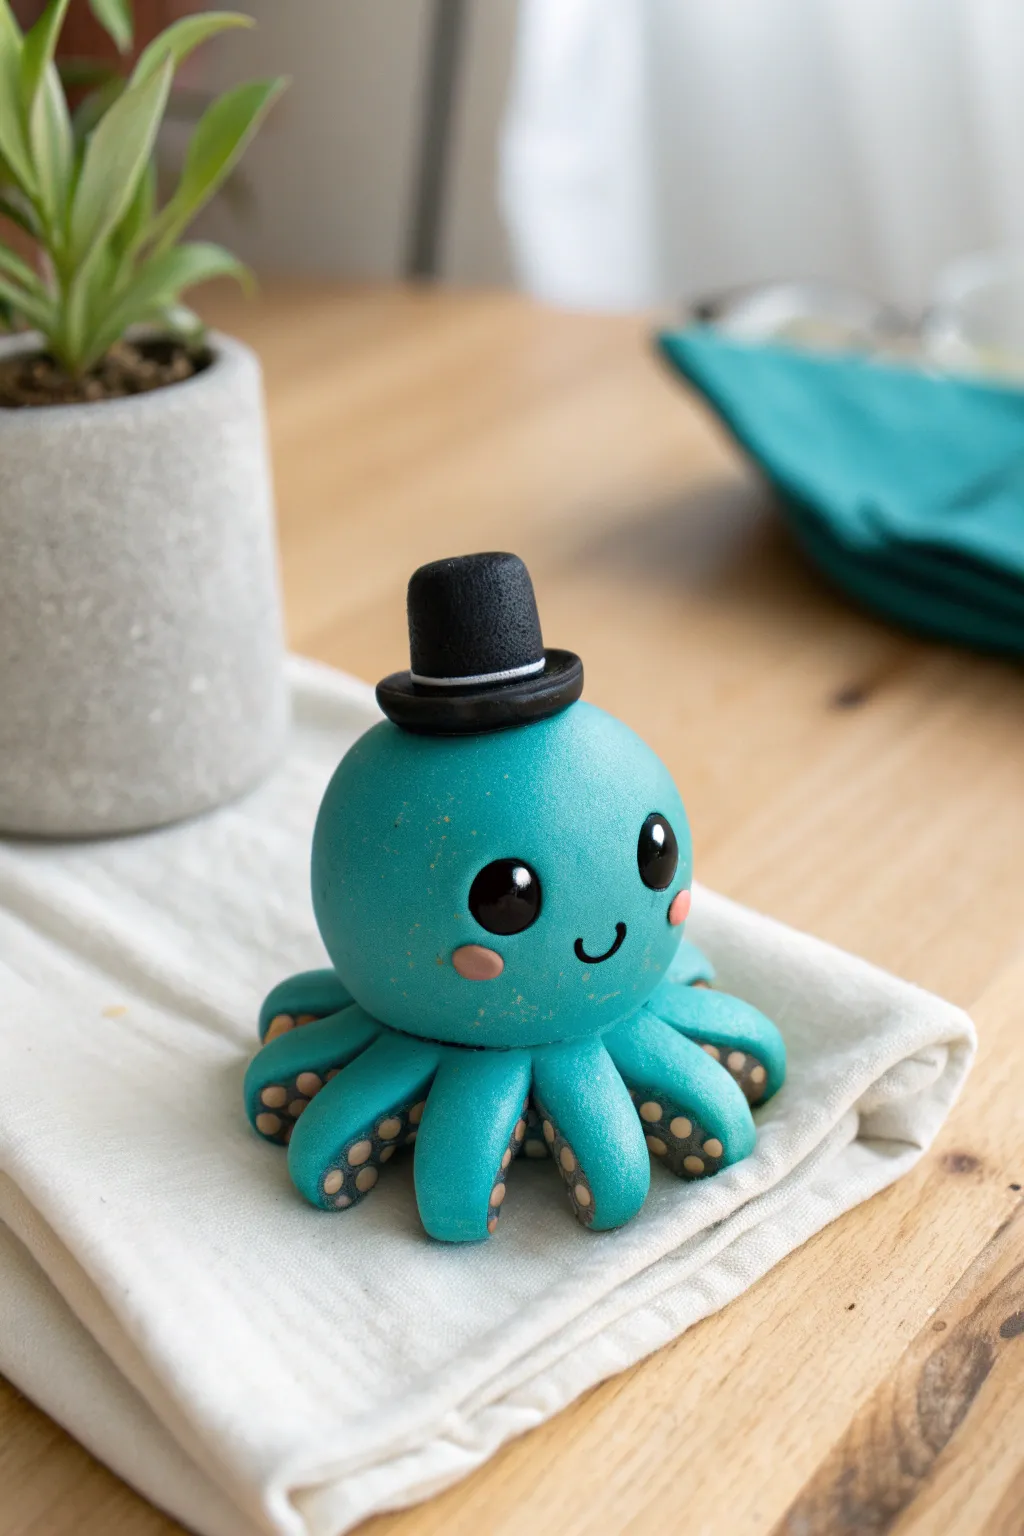
This charming little gentleman is sculpted from vibrant teal clay and topped with a dashing formal hat. With his sweet rosy cheeks and curled tentacles showing off detailed suckers, he makes for a delightful desk companion or figurine.
Step-by-Step
Materials
- Polymer clay (Teal/Aquamarine, Black, White, Soft Pink, Tan/Beige)
- Clay sculpting tools (ball tool, needle tool)
- Clean work surface (ceramic tile or glass mat)
- Oven for baking
- Aluminum foil (for armature core, optional)
- Gloss glaze (optional, for eyes)
Step 1: Sculpting the Head and Body
-
Prepare the teal clay:
Begin by conditioning a generous amount of teal or aquamarine clay. It’s important to knead it until it’s soft and pliable to prevent cracks later. Roll it into a large, smooth sphere, roughly the size of a golf ball or slightly larger. -
Shape the main form:
Gently press the sphere onto your work surface to flatten the bottom slightly so it sits stable without rolling. This will become the combined head and body of the octopus. -
Form the basic tentacles:
Roll eight small logs of the same teal clay. Try to taper them at one end so they look like teardrops. These should be proportional to the head, roughly 1-1.5 inches long. -
Attach the tentacles:
Press the thicker end of each tentacle underneath the main body sphere. Arrange them evenly in a radial pattern so they splay out from the center. -
Blend the seams:
Using a blending tool or your fingertip, gently smooth the clay where the tentacles meet the body. You want this connection to look seamless, like one continuous piece of clay.
Step 2: Adding Details and Tentacles
-
Shape the tentacle ends:
Gently curl the tapered ends of the tentacles upwards. This creates movement and exposes the underside where we will add the sucker details. -
Create the suckers:
Roll tiny balls of tan or beige clay. Flatten them into small discs and press them onto the underside of the curled-up tentacles. I find it helps to use different sizes, putting larger discs near the body and smaller ones toward the tips. -
Texture the suckers:
Take a small ball tool or the rounded end of a paintbrush and press an indentation into the center of each beige disc to create the suction cup look. -
Make the eyes:
Roll two small balls of black clay. Flatten them slightly and press them firmly onto the face area. Place them relatively wide apart to achieve that cute ‘kawaii’ look. -
Create the cheeks:
Take extremely small amounts of soft pink clay and flatten them into tiny ovals. Place these just below and slightly to the outside of the black eyes. -
Add the mouth:
Roll a very thin, tiny snake of black clay. Shape it into a small ‘U’ curve and press it gently between the eyes to create a happy smile.
Keeping Light Colors Clean
Work with the darkest colors (black) last. If you must switch back to the teal or pink clay, wash your hands thoroughly or use baby wipes to avoid transferring dark clay residue.
Step 3: Fashioning the Top Hat
-
Form the hat brim:
Condition some black clay and roll it into a flat, circular disc. This will serve as the brim of the top hat. -
Create the hat crown:
Roll a cylinder of black clay. It should be slightly taller than it is wide. Place this cylinder directly in the center of the brim disc and press them together gently. -
Add the hat band:
Roll a very thin string of white clay. Wrap this around the base of the cylinder where it meets the brim, trimming any excess at the back for a clean join. -
Attach the hat:
Place the finished hat on top of the octopus’s head. You can set it slightly askew for a jaunty, character-filled expression. Press down gently to secure it. -
Final inspection:
Check the sculpture for fingerprints. You can smooth these away with a tiny bit of baby oil or rubbing alcohol on your finger before baking. -
Bake the project:
Bake the octopus according to the temperature and time instructions on your specific brand of polymer clay packaging. Allow it to cool completely before handling. -
Add shine (Optional):
For an extra pro finish, apply a coat of gloss glaze specifically to the black eyes once the piece is cooled. This gives them a lifelike struggle sparkle.
Pro Tip: Seamless Joins
If the hat or tentacles don’t want to stick, create ‘liquid clay’ by mixing a tiny scrap of raw clay with a drop of baby oil. Use this paste as glue between the parts before baking.
Once baked and cooled, your dapper little octopus is ready to bring a touch of class to any shelf or desk

TRACK YOUR CERAMIC JOURNEY
Capture glaze tests, firing details, and creative progress—all in one simple printable. Make your projects easier to repeat and improve.
Mustache Octopus Pal

This charming little gentleman brings a touch of whimsy to any desk or shelf with his sleepy expression and distinguished facial hair. The project features a soft, speckled beige finish with warm orange accents, giving it a delightful handcrafted pottery feel.
Detailed Instructions
Materials
- Polymer clay (beige or light tan)
- Acrylic paints (burnt orange, dark brown, black)
- Fine-grit sandpaper (optional)
- Sculpting tools (ball styluses, needle tool)
- Old toothbrush or stiff bristle brush
- Clear matte varnish
- Oven for baking
Step 1: Sculpting the Base Form
-
Create the head:
Start with a ball of beige polymer clay roughly the size of a golf ball or tangerine. Roll it between your palms until it is perfectly smooth, then gently press the bottom onto your work surface to create a flat base while keeping the top domed. -
Form the tentacle base:
Roll eight small balls of clay of equal size, each about the size of a marble. Flatten them slightly into distinctive oval shapes. -
Attach the tentacles:
Position the eight ovals in a circle around the bottom edge of your main body dome. Press them gently upward so they merge with the body. -
Blend the seams:
Use a silicone smoothing tool or your finger to carefully blend the clay where the tentacles meet the body. You want a seamless transition while keeping the tentacles distinct and puffy at the bottom. -
Add texture:
To mimic the speckled stoneware look in the photo, take an old toothbrush and gently tap the entire surface of the unbaked clay. This adds a subtle, organic texture. -
Shape the mustache:
Take a tiny amount of clay and roll it into a thin log, tapering both ends to points. Curl the ends upward to create a handlebar shape. -
Attach the mustache:
Press the mustache firmly onto the center of the ‘face’ area. Since we will paint it later, you don’t need colored clay for this part, just the shape. -
Initial Bake:
Bake the clay according to the manufacturer’s instructions for the brand you are using. Let it cool completely before moving to the painting phase.
Uneven Tentacles?
If your tentacles look different sizes after attaching, gently pinch the larger ones to lengthen them, then trim the excess clay from the bottom with a blade.
Step 2: Painting and Detailing
-
Create the speckled base:
Mix a very watery wash of brown acrylic paint. Dip your toothbrush in it, hold it near the octopus, and run your thumb over the bristles to fleck tiny brown spots all over the body. Let this dry fully. -
Paint the tentacle tips:
Using a soft brush and burnt orange paint, color the bottom third of each tentacle. Fade the edge slightly upward so there isn’t a harsh line. -
Add cheek blush:
Paint two small, soft circles on the cheeks using the same burnt orange color. I find using a dry brush technique helps keep these looking soft and powdery. -
Decorate the head:
Using the handle end of a paintbrush, dot a circle of small orange spots on the very top of the head. -
Paint the mustache:
Carefully paint the raised mustache area with a dark brown acrylic paint. Use a very fine brush to ensure clean edges against the beige skin. -
Draw the eyes:
With a fine-point black paint pen or a liner brush, paint two ‘U’ shapes for the closed, sleeping eyes just above the mustache level. -
Add head vent detail:
Paint a small, open circle in the center of the orange dots on top of the head to look like the octopus’s siphon or just a decorative hollow. -
Seal the piece:
Once all paint is perfectly dry, coat the entire figurine with a matte varnish. This protects the paint and enhances the ceramic-like appearance.
Glossy Finishes
Make the eyes and mustache pop by using a high-gloss varnish just on those specific details after the matte coat has dried completely.
Place your distinguished little friend on your desk to keep you company while you work
Mini Octopus Keychain Charm Shape
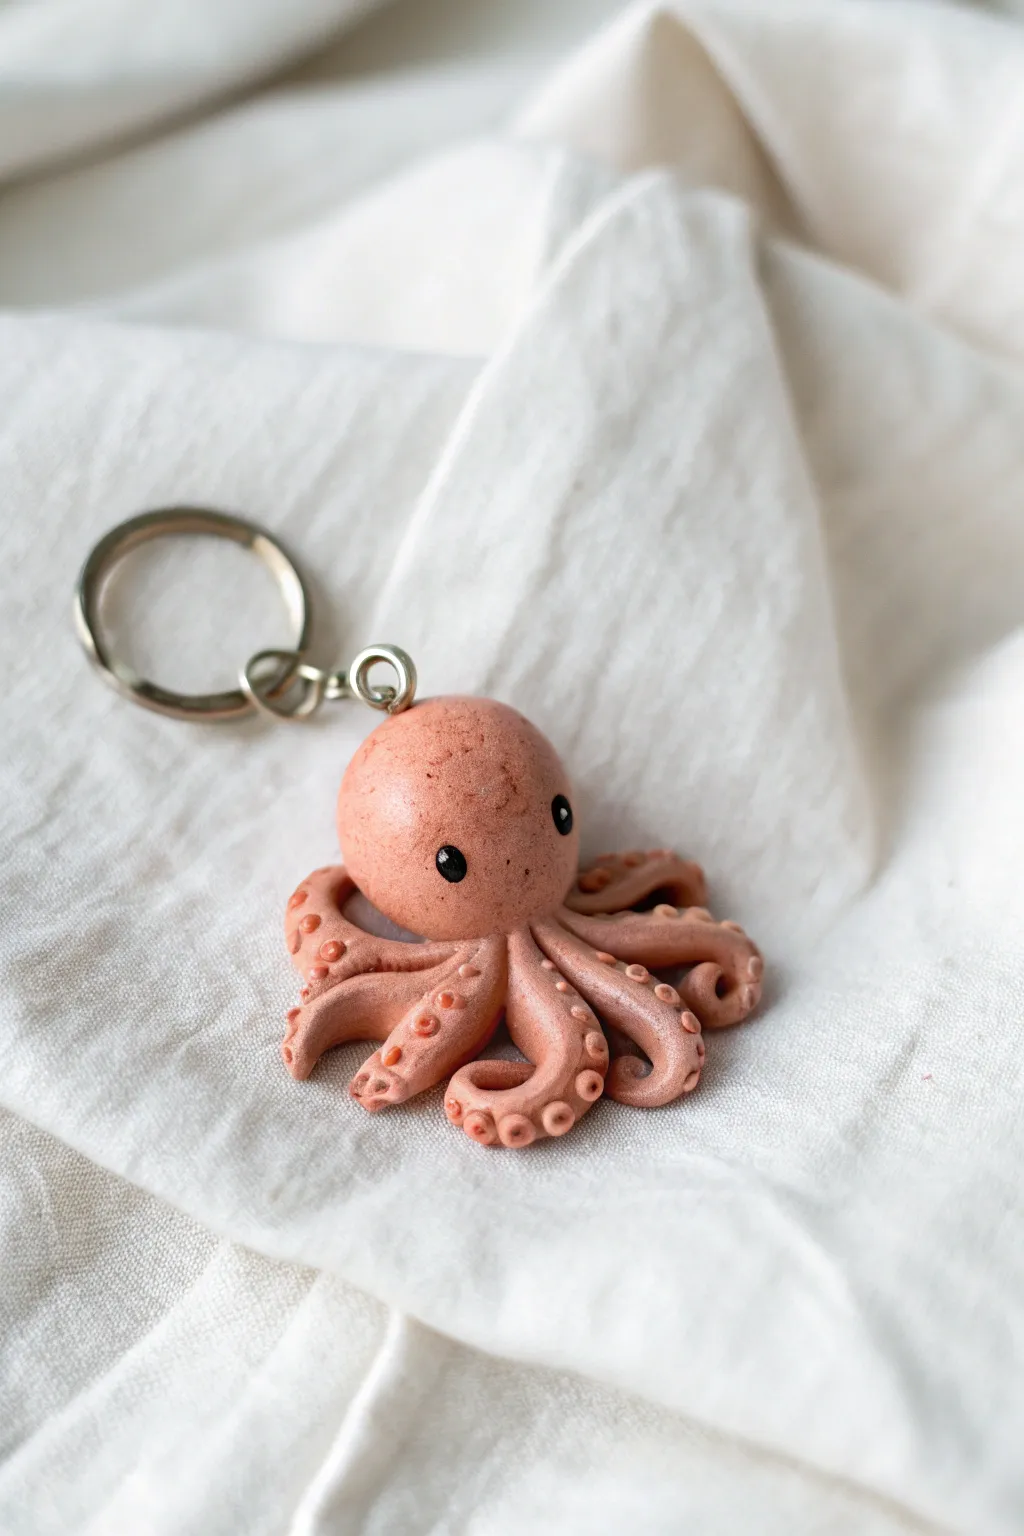
Craft a charming little sea creature that can tag along on all your adventures with this polymer clay octopus keychain. This project features adorable textured tentacles and a dusty peach finish that gives it a sophisticated yet cute look.
How-To Guide
Materials
- Polymer clay (peach/flesh tone)
- Small amount of black polymer clay
- Ball stylus tool (small and medium sizes)
- Keychain finding with screw eye pin
- Translucent liquid clay or bake and bond (optional)
- Clear matte or gloss glaze (optional)
- Oven for baking
Step 1: Forming the Body
-
Mix the base color:
Begin by conditioning your peach-colored polymer clay. If you want the slightly speckled, organic look seen in the photo, you can mix in a very tiny pinch of brown or translucent clay, but don’t blend it fully to keep some subtle marbling. -
Shape the head:
Roll a medium-sized ball of clay (about the size of a large grape) until it is perfectly smooth and round. Gently flatten the bottom slightly so it will sit on top of the legs later. -
Prepare the legs:
Roll out a separate log of clay into a snake shape, roughly equal in thickness. Cut this log into eight equal segments to ensure your tentacles are uniform. -
Taper the tentacles:
Roll each of the eight segments into a teardrop or cone shape, keeping one end thicker for the base and tapering the other end into a gentle point. -
Assemble the base:
Arrange the eight tentacles in a starburst circle, pressing the thicker ends together in the center. Gently press the seams together so they fuse into a single base unit.
Step 2: Adding texture and details
-
Attach the head:
Place your round head onto the center of the ring of tentacles. I find that pressing down firmly—but carefully—helps bond the two parts without needing excessive glue, though a drop of liquid clay adds security. -
Curl the tentacles:
Lift the tips of the tentacles and gently curl them upwards or twist them sideways. Give each one a slightly different curve to create a sense of movement, like the octopus is swimming. -
Add sucker texture:
Using a small ball stylus tool, press small indentations into the underside of the curled tentacles. Create rows of tiny dots to mimic the look of suckers. -
Refine the suckers:
For extra detail, you can roll minuscule balls of clay, place them on the tentacles, and then press the stylus into the center of each ball. This creates raised suckers rather than just indented ones. -
Create eye sockets:
Use a medium ball tool to make two small indents on the front of the head where you want the eyes to sit. Spacing them widely apart makes the face look cuter. -
Insert the eyes:
Roll two tiny, equal-sized balls of black clay. Place them into the sockets you just made and press gently to secure them. -
Smooth fingerprints:
Before baking, look over the model for any accidental fingerprints. You can smooth these away with a drop of baby oil on your finger or a soft brush.
Clean Look Hack
Keep wet wipes or baby wipes nearby to clean your hands before handling the light peach clay. Dark lint shows up easily on light colors, so clean hands are crucial.
Step 3: Finishing Up
-
Insert hardware:
Take the screw eye pin from your keychain assembly. Screw it gently into the top center of the head while the clay is still raw. This ensures a tight fit after baking. -
Remove hardware:
Carefully unscrew the eye pin and set it aside. We do this to avoid melting the metal coating or discoloring the clay around the metal during baking. -
Bake carefully:
Bake the octopus according to your clay package instructions. Since the tentacles are thin, watch carefully to prevent burning. -
Cool down:
Let the piece cool completely before handling it, as warm clay is fragile. -
Final assembly:
Place a dab of superglue or heavy-duty craft glue on the tip of the screw eye pin and screw it back into the pre-made hole.
Make it Sparkle
Before baking, lightly brush the head with pearl ex powder or metallic mica powder in a gold or copper tone. This gives the octopus a magical, shimmering underwater sheen.
Now you have a sturdy little sea friend to guard your keys
Octopus Stud Earrings Pair
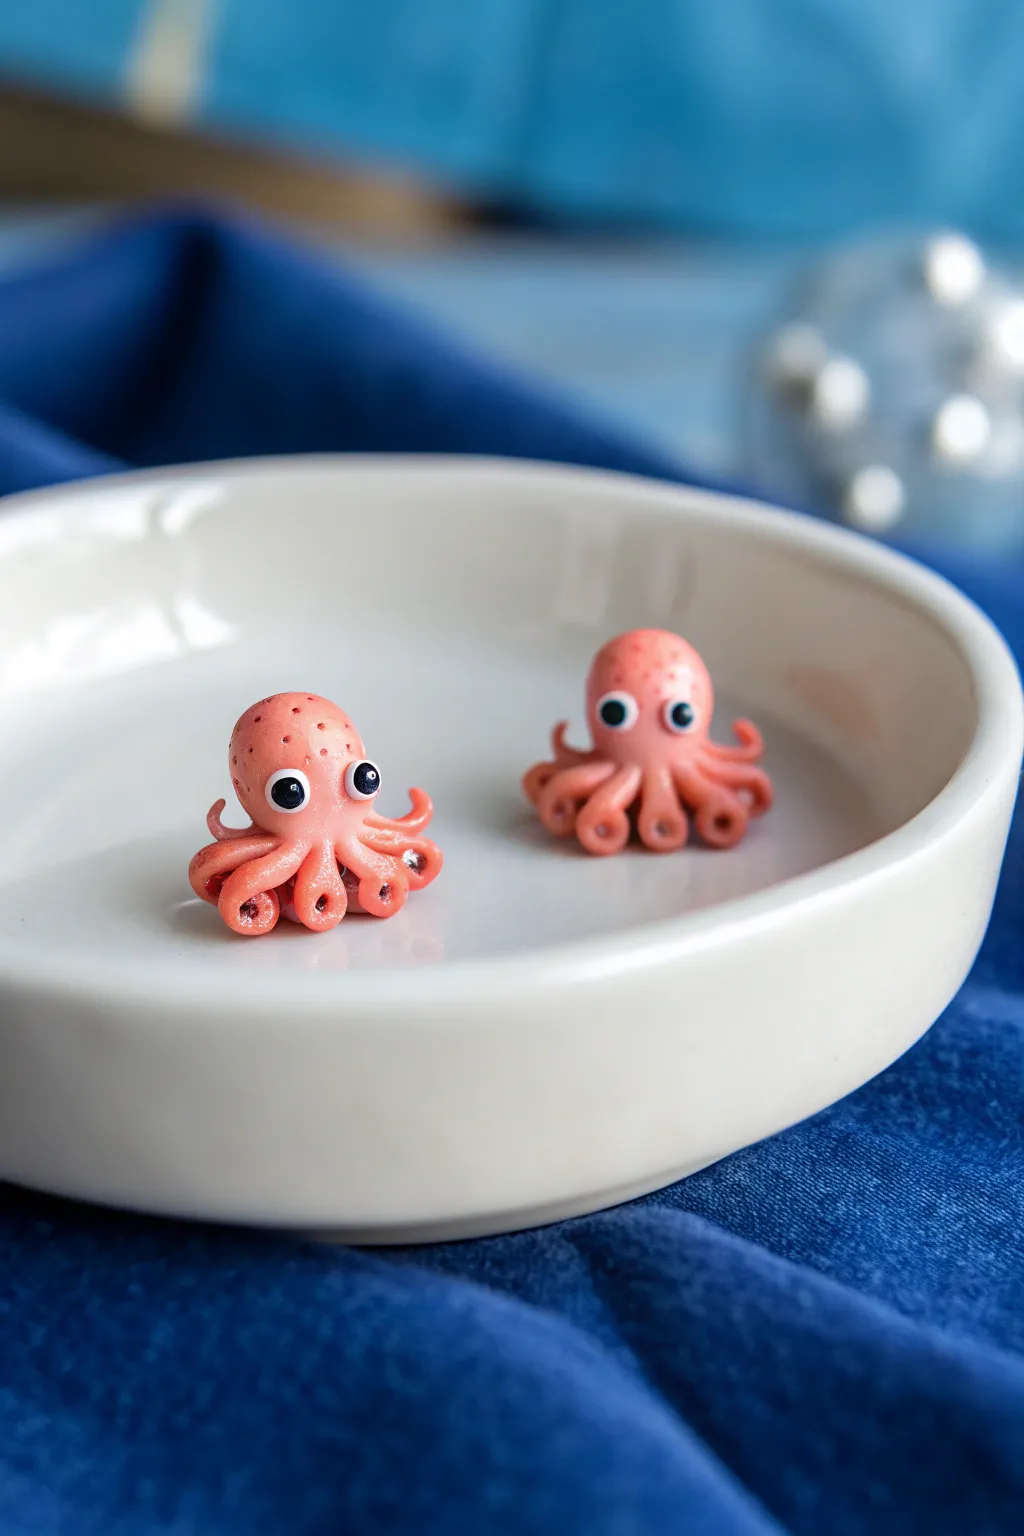
These adorable little octopus studs are a perfect beginner project for polymer clay enthusiasts, featuring tiny textured tentacles and expressive eyes. With their soft salmon-pink hue and petite size, they make for charming, quirky jewelry that adds a splash of fun to any outfit.
Detailed Instructions
Materials
- Salmon or coral pink polymer clay
- White polymer clay
- Black polymer clay
- Earring stud posts (flat pads)
- Strong jewelry glue (e.g., E6000)
- Needle tool or toothpick
- Small ball stylus tool
- Clean ceramic tile or baking sheet
- Gloss glaze (optional)
Step 1: Shaping the Octopus Body
-
Prepare the Clay:
Condition your salmon pink polymer clay by kneading it in your hands until it is soft, pliable, and free of cracks. If the clay is too hard, you can mix in a tiny drop of clay softener or baby oil. -
Form the Base Size:
Pinch off two equal pea-sized amounts of the pink clay to ensure your earrings will be symmetrical. Roll each piece into a smooth, seamless ball between your palms. -
Create the Head Shape:
Gently shape the top 2/3 of each ball into a slightly rounded dome for the head, leaving the bottom 1/3 a bit wider to form the base where the tentacles will attach.
Step 2: Forming the Tentacles
-
Make Tiny Snakes:
For each octopus, roll out eight very tiny, thin snakes of pink clay. These should be tapered at one end to look like little tails. -
Curling the Ends:
Take each little tentacle snake and gently curl the tapered end upwards or sideways. I like to vary the direction of the curls slightly so the octopus looks like it’s in motion. -
Attaching the First Tentacles:
Press the thicker end of four tentacles onto the underside of the body, spacing them out evenly around the perimeter. Blend the seams gently with a silicone tool or your finger so they look like they grow from the body. -
Adding Volume:
Attach the remaining four tentacles in the gaps between the first layer, either slightly above or below, to create a full skirt of legs. -
Detailing the Suckers:
Using a needle tool or a very small ball stylus, gently press small indents into the curled-up undersides of the tentacles to mimic sucker details. -
Texturing the Head:
Lightly stipple the top of the octopus head with your needle tool to give the skin a realistic, slightly porous texture.
Sticky Tentacles?
If the tiny tentacles stick to your fingers while rolling, lightly dust your fingertips with cornstarch before handling the clay.
Step 3: Adding the Face
-
Create Eye Sockets:
Press a medium-sized ball stylus into the front of the face to create two shallow indentations where the eyes will sit. -
Place the Whites:
Roll two tiny balls of white clay. Press them gently into the sockets you just created, flattening them slightly so they bulge out just a bit. -
Add the Pupils:
Roll two even tinier balls of black clay. Carefully place these onto the white clay circles to complete the eyes.
Mix It Up
Try using translucent clay for the body or mix in fine glitter to mimic the natural iridescence found on some deep-sea creatures.
Step 4: Baking and Assembly
-
Prepare for Baking:
Place your finished octopuses on a clean ceramic tile or baking sheet lined with parchment paper. -
Bake the Clay:
Bake the pieces according to your specific brand of polymer clay’s instructions (usually around 275°F or 130°C for 15-30 minutes). Let them cool completely before handling. -
Glazing (Optional):
If you want a wet look, brush a thin layer of gloss glaze over the cooled clay pieces and let it dry. -
Attaching the Posts:
Apply a small dab of strong jewelry glue to the flat pad of an earring post. -
Final Bond:
Press the glued post firmly against the flat underside of the octopus. Allow the glue to cure fully (often 24 hours) to ensure a secure hold.
Once the glue is dry, your tiny sea creatures are ready to be worn or gifted
Octopus Ring Topper Buddy
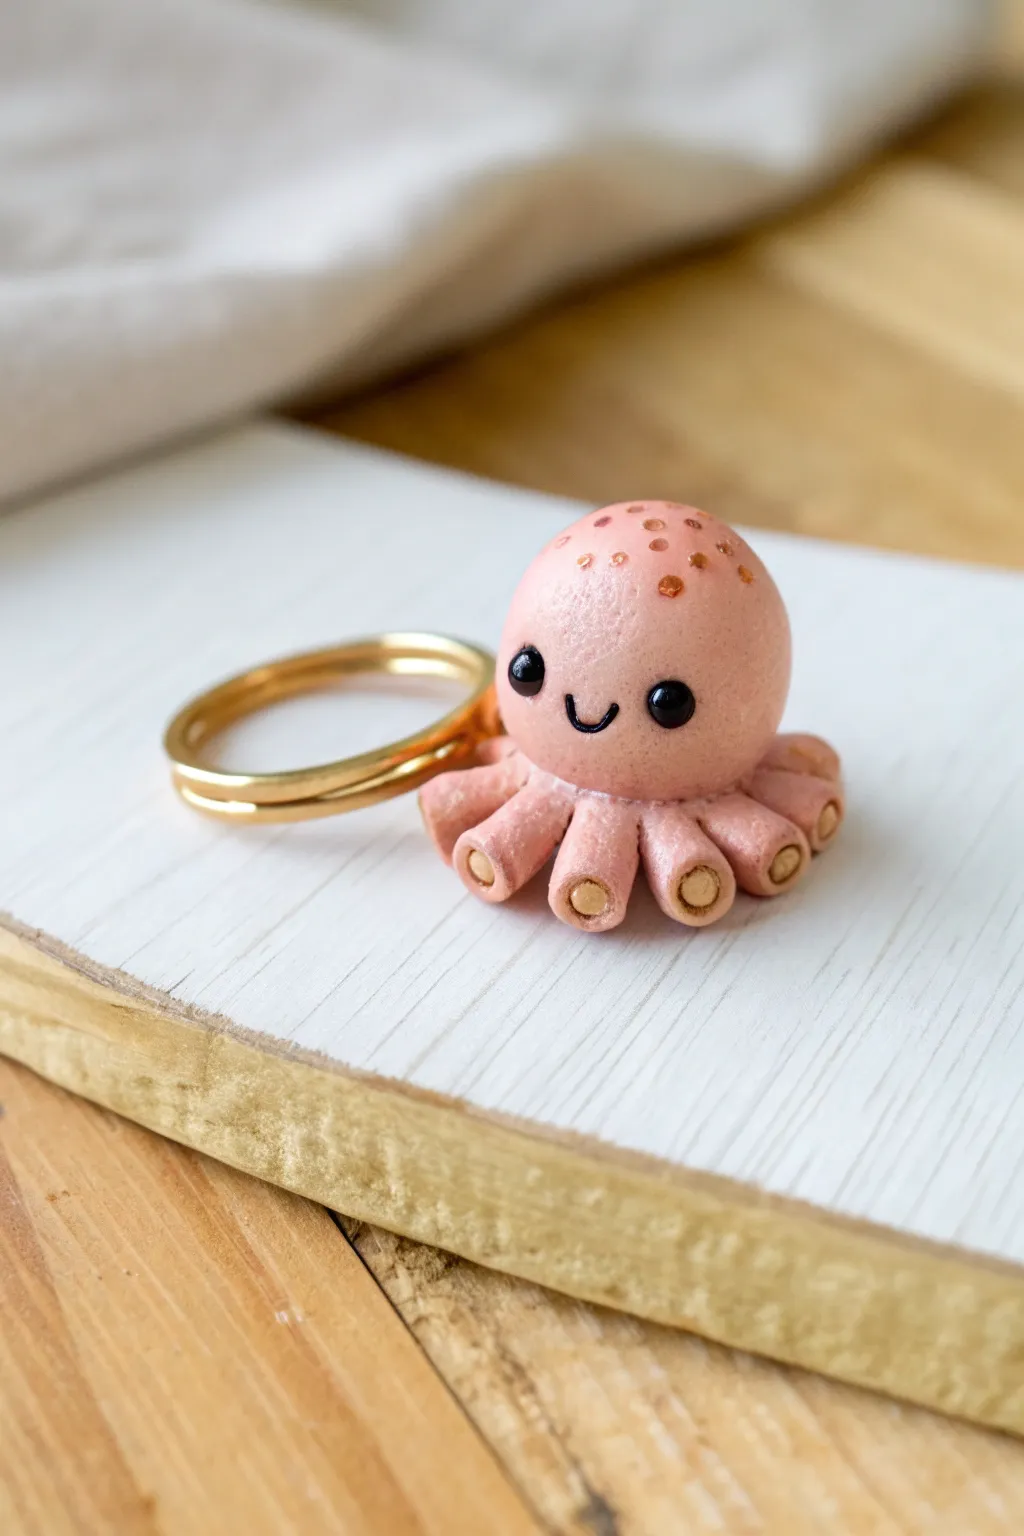
Create a tiny, cheerful companion to sit atop your finger with this adorable polymer clay octopus ring. Its soft pink body features sweet suction cup details and a dusting of golden speckles on its head.
How-To Guide
Materials
- Light pink polymer clay
- Tan or beige polymer clay
- Gold ring base (blank ring finding)
- Two small black seed beads (for eyes)
- Black acrylic paint
- Fine-grit copper or gold glitter
- Gloss glaze (optional)
- Needle tool or toothpick
- Dotting tool or small ball tool
- Strong craft glue (like E6000)
- Oven for baking polymer clay
Step 1: Shaping the Body
-
Condition the Clay:
Begin by kneading your light pink clay until it is soft and pliable, which prevents cracking later on. -
Form the Head:
Roll a smooth ball of pink clay about the size of a marble; this will serve as the main body and head of your octopus. -
Create Tentacles:
Roll eight small, equal-sized logs of pink clay. These should be slightly thicker at one end and tapered at the other. -
Attach Tentacles:
Press the thicker ends of the tentacles onto the underside of the head, arranging them in a circle so they flare outwards. -
Blend Seams:
Using a silicone tool or your finger, gently smooth the clay where the tentacles join the head so it looks like one solid piece.
Sticky Situation?
If your clay gets too soft and fingerprints are showing, pop it in the fridge for 10 minutes. The firmer clay will be easier to smooth out before baking.
Step 2: Adding Details
-
Make Suction Cups:
Roll tiny balls of tan or beige clay. You’ll need one for nearly every tentacle visible from the front. -
Attach Suction Cups:
Press a tan ball onto the end of each tentacle, flattening it slightly against the pink clay. -
Detail Suction Cups:
Use a small dotting tool to press an indentation into the center of each tan circle to mimic a suction cup shape. -
Insert Eyes:
Press two small black seed beads into the face area. Push them in securely so they don’t fall out after baking. -
Paint the Smile:
Using a very fine detail brush or a needle tool dipped in black paint, carefully draw a small ‘U’ shape between the eyes for a smile. -
Add Speckles:
Lightly press a pinch of copper or gold glitter onto the very top of the head. I find pressing gently with a fingertip helps embed the glitter into the raw clay.
Make It a Keychain
Skip the ring base! Insert an eyepin into the top of the head before baking to easily attach your octopus to a keychain or necklace chain later.
Step 3: Assembly
-
Baking:
Bake the clay piece according to the manufacturer’s instructions on your package (usually 275°F/130°C for 15-30 minutes). -
Cooling:
Allow the octopus to cool completely before handling, as warm clay is still fragile. -
Glazing (Optional):
If you want a shiny, wet look, brush a coat of gloss glaze over the cooled octopus. -
Prepare the Ring:
Rough up the flat pad of the ring finding slightly with sandpaper to help the glue adhere better. -
Final Attachment:
Apply a dab of strong adhesive like E6000 to the ring base and press the octopus firmly in place. Let it cure fully before wearing.
Now you have a charming little sea creature ready to accompany you everywhere you go
Octopus Desk Buddy Set
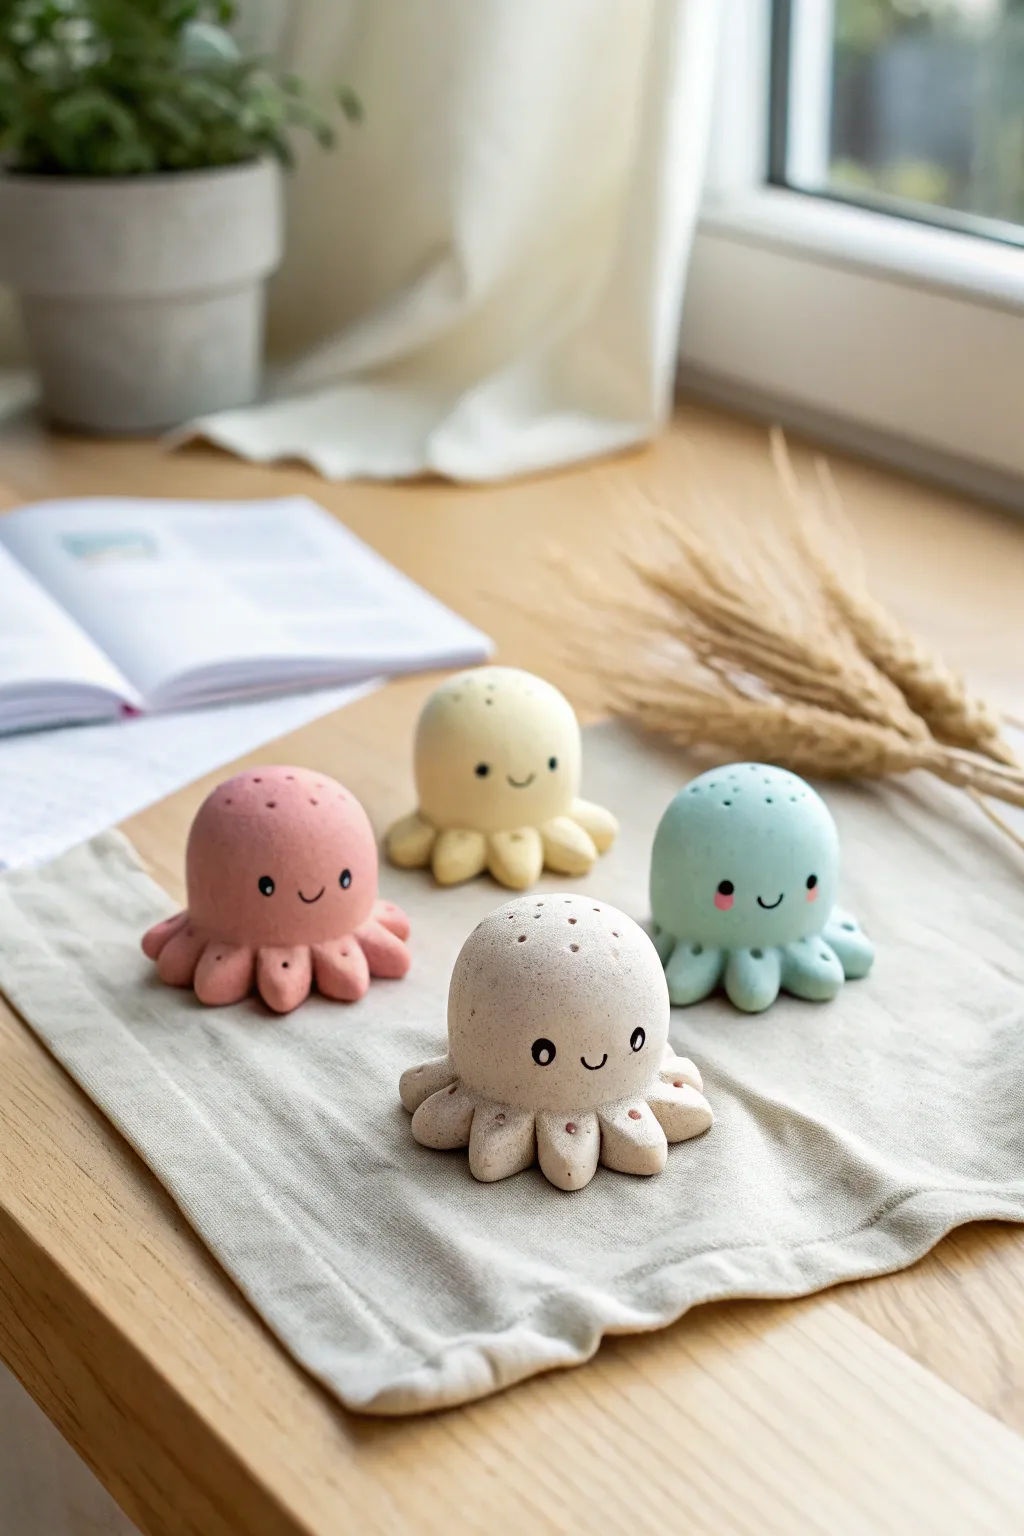
Brighten up your workspace with this adorable set of four minimalist clay octopuses in soft pastel shades. These smooth, rounded desk buddies feature sweet painted expressions and a distinctive speckled texture that gives them a charming, handcrafted stone look.
Step-by-Step
Materials
- Polymer clay (white, beige, pink, yellow, mint green)
- Acrylic rolling pin
- Small round cutter or measuring spoon (for consistent sizing)
- Needle tool or toothpick
- Ball stylus tool (medium size)
- Black acrylic paint
- Fine detail paintbrush (size 000)
- Speckled clay mix (or cinnamon/black pepper to mix in)
- Soft blush or pink pastel chalk (for cheeks)
- Matte varnish (optional)
Step 1: Preparing the Clay
-
Creating the speckled effect:
To achieve the stone-like texture seen in the photo, take your base colors (pink, yellow, mint, and beige) and knead a tiny pinch of ground black pepper or faux granite clay inclusions into each ball. Knead thoroughly until the specks are evenly distributed. -
Portioning the bodies:
Divide your clay into four equal portions, one for each color. Each portion should be roughly the size of a golf ball. Roll them between your palms until they are perfectly smooth spheres with no cracks. -
Shaping the dome:
Gently press the bottom of each sphere against your work surface to flatten it slightly. You want a tall, rounded dome shape for the head, not a flat pancake.
Sticky Fingerprints?
If your clay is getting too soft and showing prints, pop it in the fridge for 10 minutes. Use a mesmerizing circular motion with a damp wipe to erase prints before baking.
Step 2: Forming the Tentacles
-
Creating the base roll:
For each octopus, roll a separate, smaller snake of matching clay. It should be long enough to wrap around the base of your dome. -
Attaching the skirt:
Wrap the clay snake around the bottom edge of the dome. Blend the seam where the snake meets the head using your thumb or a modeling tool so it looks like one continuous piece. -
Dividing the legs:
Use a dull knife or clay tool to make vertical indentations around this bottom ring, creating 8 rounded sections. These don’t need to be separated completely; just defined enough to look like distinct little legs. -
Rounding the tips:
Use your finger to gently smooth and round off the bottom of each leg section so they look like soft, chubby protrusions rather than sharp cuts.
Pro Tip: Pepper Trick
Don’t have specialty granite clay? Mix ordinary ground black pepper or dried herbs into your clay to mimic the organic speckles shown in the image instantly.
Step 3: Adding Details
-
Texturing the top:
Using a needle tool, poke a pattern of small holes into the very top of the head. Create a central hole surrounded by a ring of 5-6 others, resembling a traditional shaker top. Keep the holes shallow and clean. -
Refining the surface:
Before baking, do a final check for fingerprints. I find that lightly brushing the clay with a tiny bit of baby oil on my finger smooths out any accidental textures beautifully. -
Baking:
Bake the figures according to your specific polymer clay’s package instructions. Usually, this is around 275°F (135°C) for 15-20 minutes. Let them cool completely before painting.
Step 4: Painting the Faces
-
Drafting the face:
Use a pencil to very lightly mark where the eyes and mouth will go. Position them low on the face—right above the tentacles—to maximize the cuteness factor. -
Painting the eyes:
Dip your smallest dotting tool or the handle end of a paintbrush into black acrylic paint. Dot two wide-set eyes onto the face. They should be solid black circles. -
Adding the sparkle:
Once the black paint is dry, add a tiny white dot in the upper corner of each eye. This ‘catchlight’ brings the character to life. -
Drawing the smile:
Using your size 000 brush and black paint (thinned slightly with water for better flow), paint a tiny, shallow ‘U’ shape between the eyes for a simple, happy smile. -
Blushing the cheeks:
Scrape a little pink pastel chalk into a powder. Use a dry, soft brush to gently dust rosy cheeks right next to the eyes. This soft, airbrushed look creates a sweeter effect than paint. -
Sealing:
Finish by applying a thin coat of matte varnish over the entire piece to protect the paint and pastel blush from rubbing off.
Set these little buddies on your desk or shelf for an instant mood boost whenever you look their way.
Pearl or Glitter Finish Octopus
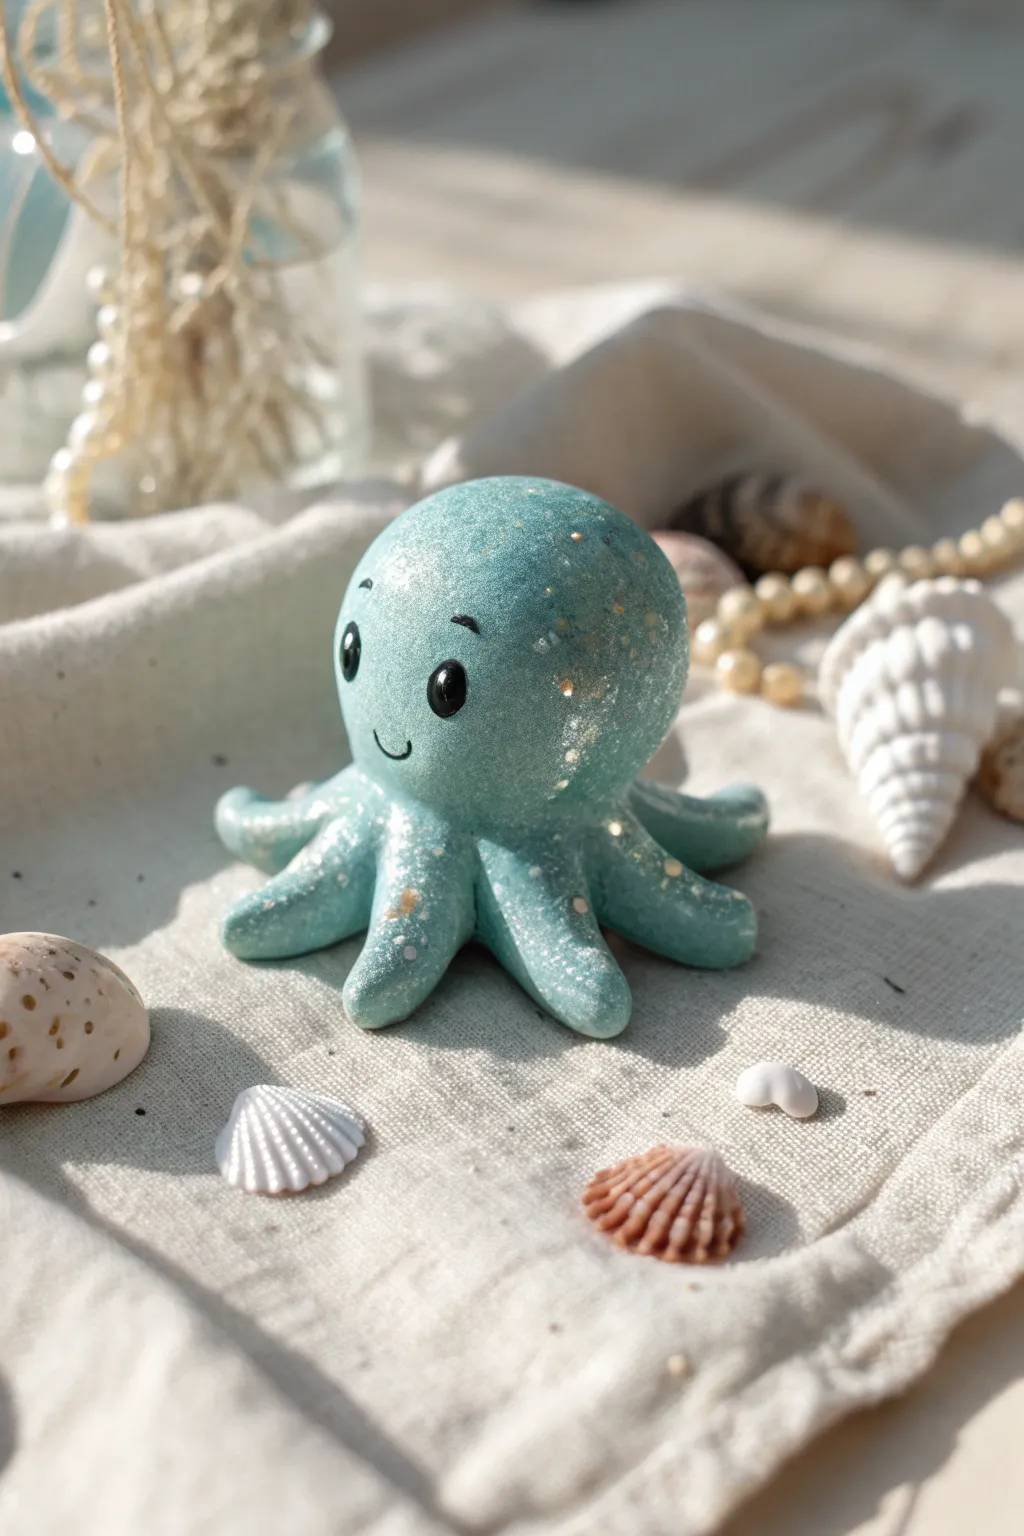
Create a magical underwater companion with this tutorial for a teal octopus that sparkles in the light. Its gentle smile and glittery finish make it a perfect desktop buddy or a charming seaside decoration.
Step-by-Step Tutorial
Materials
- Teal polymer clay (or white clay mixed with turquoise)
- Fine iridescent glitter (gold or silver)
- Chunky gold glitter flakes
- Glossy clay glaze or varnish
- Black acrylic paint
- Small dotting tool or toothpick
- Fine detail paintbrush
- Sculpting tools (or a plastic knife)
- Aluminum foil (optional, for armature)
- Oven (if using polymer clay)
Step 1: Prepping the Clay
-
Mix your base color:
Start by conditioning your teal polymer clay until it is soft and pliable. If you don’t have the perfect shade, try mixing white clay with a small amount of turquoise and a tiny dot of green. -
Add the sparkle:
Flatten your clay into a pancake shape. Sprinkle a generous amount of fine iridescent glitter into the center. Fold the clay over and knead it repeatedly until the glitter is evenly distributed throughout the entire batch. -
Incorporate texture:
For that extra magical look seen in the photo, take a pinch of chunky gold glitter flakes and gently knead them in as well. You want these to be visible on the surface, so don’t over-mix them completely.
Step 2: Sculpting the Body
-
Form the head:
Roll about two-thirds of your clay into a smooth, round ball. This will be the main head and body. Gently press it onto your work surface so it has a slightly flat bottom to sit on. -
Create tentacle logs:
With the remaining clay, roll out a long, even rope about the thickness of a pencil. Cut this rope into eight equal segments. -
Shape the tentacles:
Take one segment and roll it into a cone shape, tapering one end to a gentle point. Repeat this for all eight pieces. -
Attach the legs:
Turn your main body ball upside down. Arranging the tentacles in a circle around the base of the ball, press the thicker ends into the underside of the body. You can use a blending tool to smooth the seams so they connect seamlessly. -
Pose the octopus:
Flip the octopus back upright. Gently curl the tips of the tentacles outward and upward to give them a lively, wavy motion. I like to lift a few slightly off the surface to make it look like it’s swimming.
Sparkle Secret
Mix mica powder into your clay before baking instead of just glitter. It creates a pearlescent shimmer that looks like the creature is glowing from within.
Step 3: Adding Details
-
Indent the eyes:
Using a medium-sized balled tool or the rounded end of a paintbrush, press two shallow indentations into the face where the eyes will go. Place them wide apart for a cuter look. -
Sculpt the mouth:
Use a small clay tool or the edge of a credit card to press a tiny, curved ‘U’ shape between the eyes for a happy smile. -
Insert eyebrows:
With a needle tool or toothpick, gently scratch two tiny arches above the eye sockets to create expression lines.
Make it a Scene
Create a base using white clay textured with an old toothbrush to look like sand. Glue small real shells or beads around your octopus for a complete ocean vignette.
Step 4: Finishing Touches
-
Bake the clay:
Place your octopus on a baking sheet lined with parchment paper. Bake according to your clay manufacturer’s instructions (usually around 275°F or 130°C for 15-30 minutes). -
Cool down:
Let the sculpture cool completely before painting. It will be fragile while still warm. -
Paint the eyes:
Dip a fine detail brush or a larger dotting tool into black acrylic paint. Carefully fill in the eye indentations you made earlier to create solid black eyes. -
Highlight the eyes:
Once the black paint is dry, use a toothpick to add a tiny white dot in the upper corner of each eye. This ‘catchlight’ brings the character to life. -
Define the face:
Use a very fine liner brush with thinned black paint to carefully trace the smile line and the eyebrows. -
Add surface glitter:
For extra dimension, you can dab a tiny bit of gloss varnish mixed with gold glitter on the high points of the head and tentacle tips. -
Seal the project:
Finish by applying a coat of glossy varnish over the entire octopus. This will deepen the teal color and make the embedded glitter sparkle brilliantly.
Place your shimmering octopus near a window to watch it catch the sunlight all day long
Two-Tone Swirl Octopus
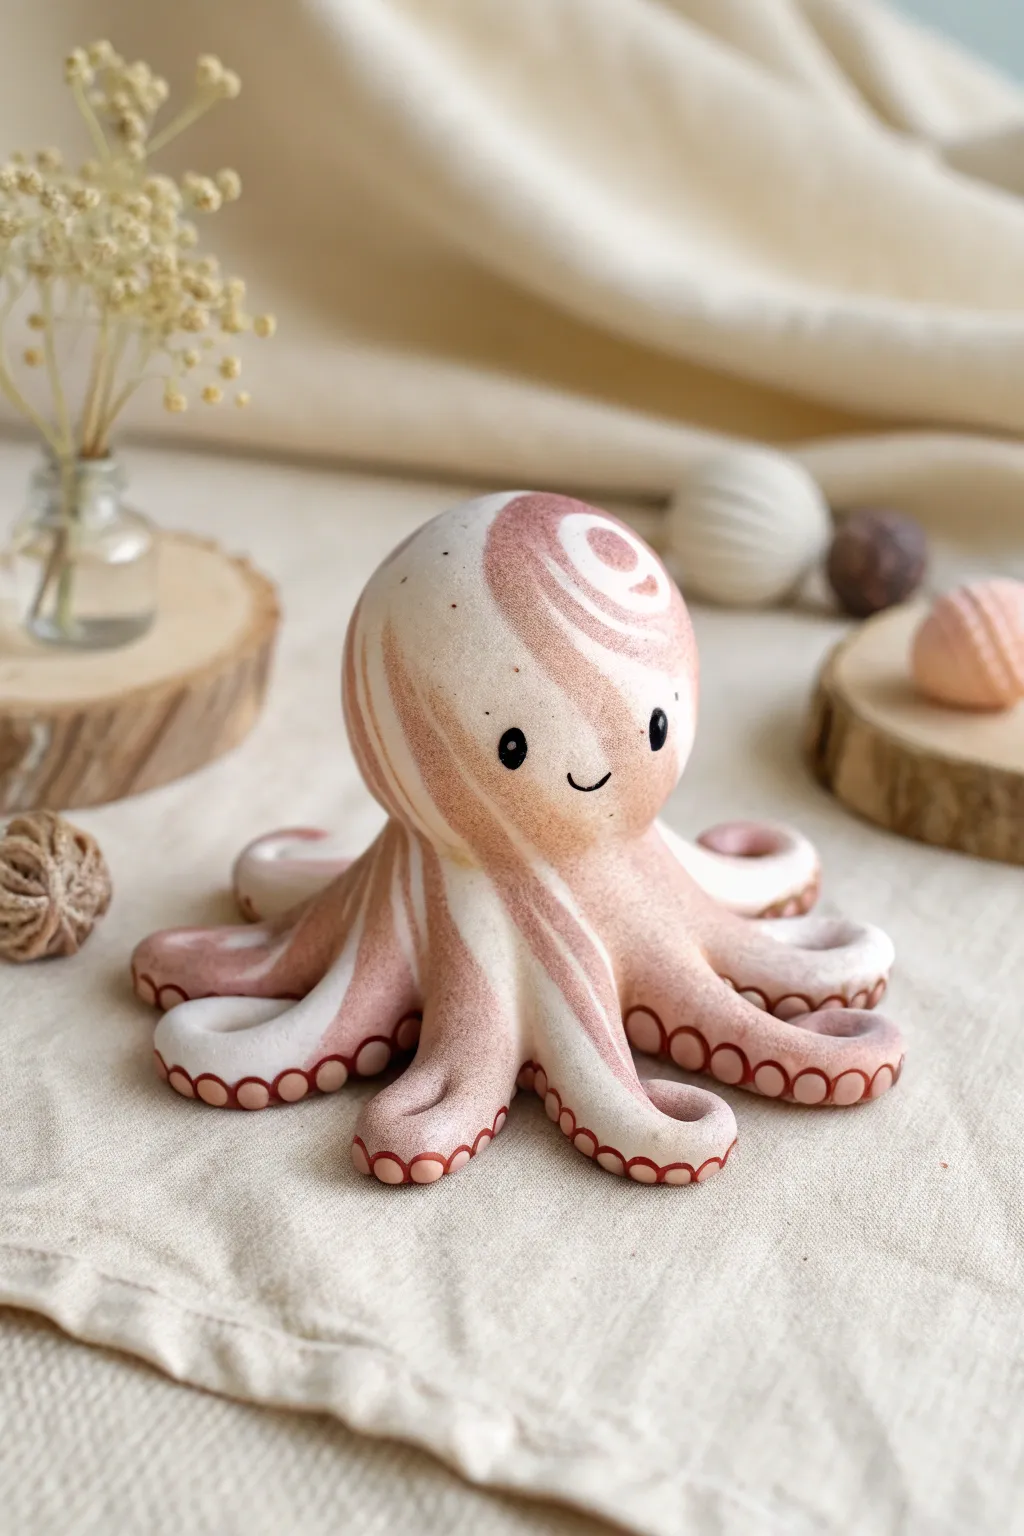
Achieve a sophisticated marbled look with this adorable two-tone octopus design. The swirling technique creates a beautiful, organic pattern that makes every single creation uniquely beautiful while maintaining a sweet, friendly expression.
Step-by-Step Guide
Materials
- Polymer clay (dusty rose/terracotta)
- Polymer clay (cream or off-white)
- Black polymer clay (tiny amount for eyes)
- Black acrylic paint (for mouth)
- Fine detail paintbrush
- Ball stylus tool (medium size)
- Clay knife or blade
- Smooth work surface (ceramic tile or glass)
- Oven (for baking according to package)
Step 1: Marbling the Clay
-
Condition the clay:
Start by warming up both your dusty rose and cream clay in your hands separately until they are soft and pliable. This conditioning step is crucial to prevent cracking later on. -
Create logs:
Roll each color into a long, snake-like log of equal thickness, about 4 inches long each. -
Twist together:
Place the two logs side-by-side and twist them around each other like a candy cane. Roll this twisted log on your table to smooth it back into a single cylinder. -
Fold and roll:
Fold the cylinder in half, twist it again, and roll it out one more time. Stop here to keep thick, distinct stripes like the photo—if you over-mix, the colors will blend into a muddy solid color rather than a swirl.
Step 2: Shaping the Octopus
-
Separate the parts:
Cut off about one-third of your marbled clay log and clear it aside—this will be for the tentacles. Take the larger remaining piece and roll it into a smooth ball for the head. -
Form the head shape:
Gently press the ball onto your work surface so the bottom flattens slightly, creating a dome shape. Smooth out any fingerprints with a light touch. -
Prepare tentacle sections:
Take the reserved smaller piece of clay and divide it into 8 equal portions. Roll each portion into a small tapered log, slightly thicker at one end and pointy at the other. -
Attach the legs:
Turn the head upside down. Press the thick ends of the 8 tentacles onto the bottom center of the head, arranging them in a circle like spokes on a wheel. Blend the seams with your thumb or a smoothing tool. -
Pose the tentacles:
Flip the octopus back upright. Gently curl the tips of the tentacles outward and upward to give them movement, as if the octopus is wiggling across the sea floor.
Clean Swirls Tip
To keep the white clay from looking dirty, wipe your hands and work surface with a baby wipe or alcohol swab immediately after handling the darker rose clay but before touching the white.
Step 3: Adding Details
-
Create sucker indentations:
Using your medium ball stylus, gently press a line of small circles into the bottom edge of the two front-most tentacles. This gives the suggestion of suckers without needing to sculpt every single one underneath. -
Highlights the suckers:
For the distinct ring look seen in the photo, take tiny dots of the darkest rose clay (or mix a slightly darker shade) and press them into those indentations, flattening them flush with the tentacle surface. -
Add the eyes:
Roll two extremely tiny balls of black clay. Press them onto the face area, spacing them wide apart to create that ‘kawaii’ look. Flatten them slightly against the rounded head. -
Bake the project:
Place your octopus on a baking sheet or tile. Bake according to the specific temperature and time directions on your package of polymer clay. Let it cool completely before handling. -
Paint the smile:
Once cool, use a very fine detail brush and a tiny amount of black acrylic paint to draw a small, simple ‘U’ shape smile centered between the eyes. -
Seal (Optional):
If you want a matte finish like the image, the clay is fine as is. If you prefer durability, apply a thin coat of matte water-based polyurethane varnish.
Glossy Eyes Upgrade
After baking, apply a tiny drop of UV resin or glossy dimensional glaze (like Mod Podge Dimensional Magic) just to the black eyes. It makes them look wet and alive against the matte skin.
Place your new marbled friend on a shelf or desk where its soothing colors can brighten your day
Polka-Dot Pattern Octopus
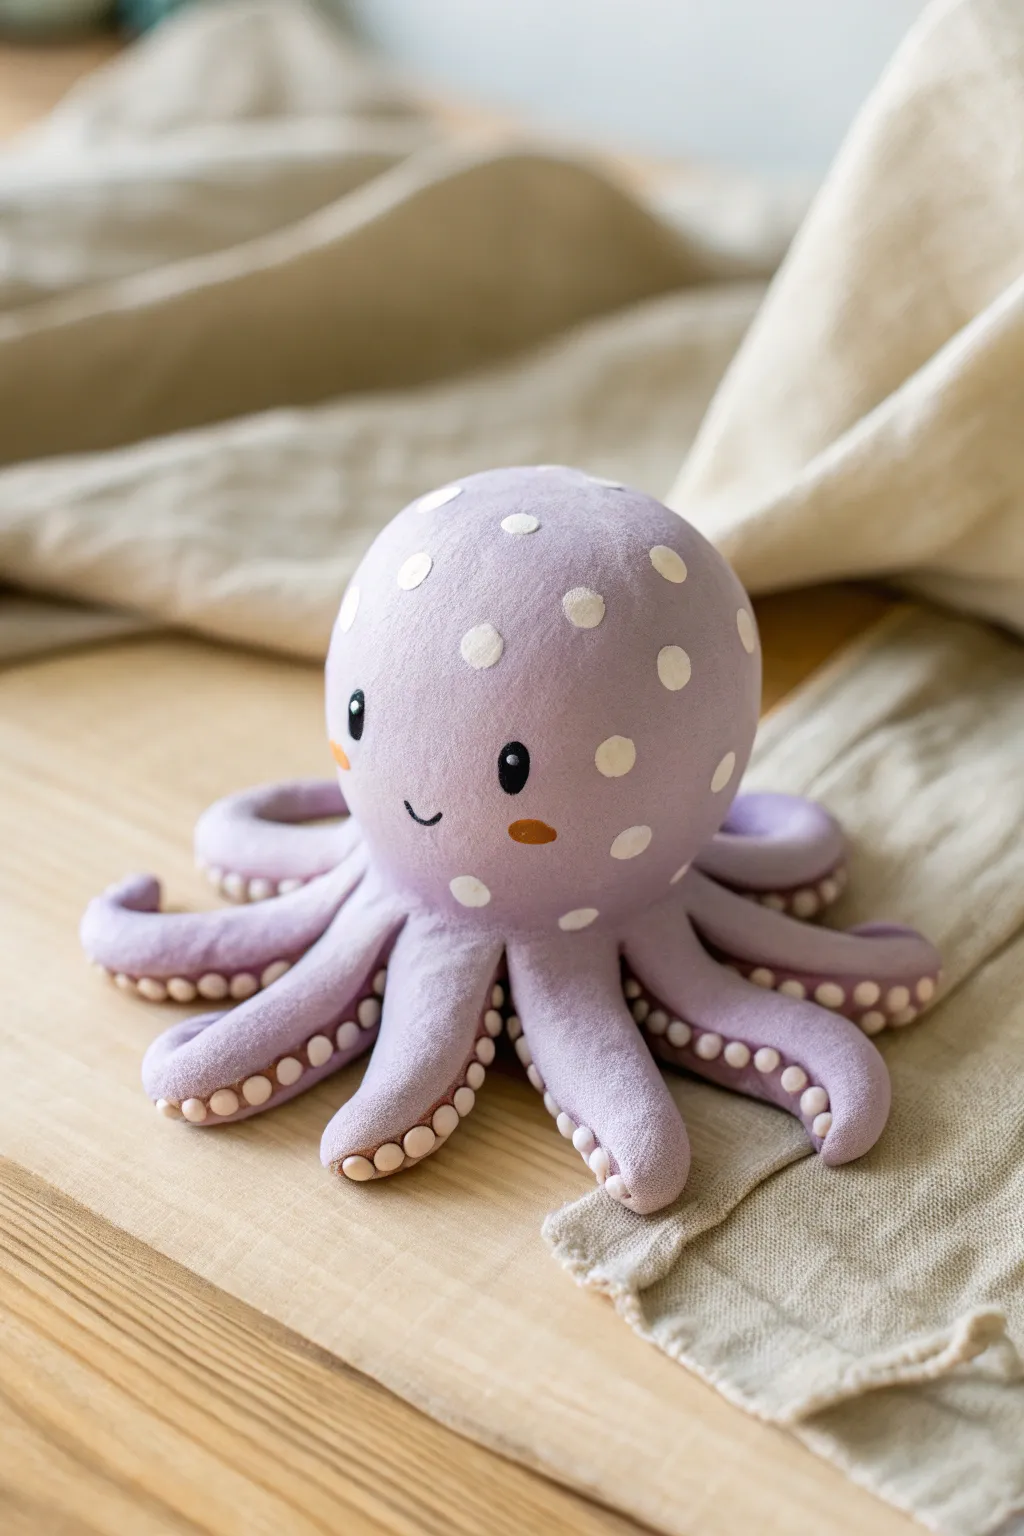
This adorable polymer clay octopus features a smooth lavender body speckled with playful white dots and a sweet, smiling face. Its curled tentacles reveal tidy rows of suction cups, making it a charming desk companion or a cute gift.
Step-by-Step Tutorial
Materials
- Polymer clay (Lavender/Light Purple, White, Black, Burnt Orange)
- Clay sculpting tools (needle tool, ball tool)
- Acrylic rolling pin
- Aluminum foil (for armature)
- Baking sheet and parchment paper
- Oven
Step 1: Shaping the Head
-
Create the core:
Start by crumpling a small piece of aluminum foil into a tight ball, roughly the size of a golf ball. This saves clay and keeps the figurine lightweight. -
Condition the clay:
Take your lavender polymer clay and warm it up in your hands, kneading until it is soft and pliable. I like to roll it into a smooth snake and fold it over a few times to ensure there are no air bubbles. -
Cover the foil:
Flatten a portion of the lavender clay into a thick pancake. Wrap this around your foil ball, smoothing the seams together until you have a perfect sphere. Roll it gently between your palms to erase any fingerprints.
Step 2: Forming the Tentacles
-
Roll the logs:
Create eight equal-sized balls of lavender clay, then roll each one into a tapered log shape. One end should be thicker (to attach to the body) and the other should taper to a rounded point. -
Flatten the underside:
Gently press the bottom of each tentacle log against your work surface to flatten it slightly. This flat surface is where we will attach the suction cups later. -
Position the tentacles:
Arrange the eight tentacles in a starburst pattern on your work surface or baking tile. Join them together in the center where the head will sit. -
Attach the head:
Place the lavender head sphere onto the center of the starburst. Use a modeling tool to blend the clay from the base of the head down into the tops of the tentacles so they are securely connected. -
Pose the arms:
Gently curl the tips of the tentacles upward or to the side to give the octopus a dynamic, playful look. Varying the curls makes it look more organic.
Uneven Dots?
If your polka dots look lumpy, place a piece of parchment paper over the head and gently rub with a spoon. This smooths the dots into the surface without leaving fingerprints.
Step 3: Adding Details
-
Make the suction cups:
Roll a very thin snake of white (or very pale pink) clay. Slice off many tiny, equal-sized discs. -
Apply suction cups:
Press two rows of these tiny discs along the flattened underside of each tentacle. Start with larger discs near the body and use smaller ones as you get closer to the tips. -
Indent the cups:
Use a small ball tool to gently press into the center of each white disc. This cups the clay and makes them look like real suckers. -
Apply polka dots:
Roll small balls of white clay in varying sizes. Flatten them into thin circles and press them randomly all over the top of the octopus’s head. Gently roll over them with your finger to make them flush with the purple surface.
Level Up: Glossy Finish
After baking and cooling, brush a glossy polyurethane varnish over just the eyes and the suction cups. This makes them look wet and realistic against the matte body.
Step 4: The Face & Finishing
-
Add the eyes:
Roll two small balls of black clay. Press them onto the face area, spacing them widely apart for a cute ‘kawaii’ look. Flatten them slightly. -
Highlight the eyes:
Add a microscopic dot of white clay to the upper corner of each black eye to give it a sparkle of life. -
Create the cheeks:
Take two tiny pieces of burnt orange clay and flatten them into ovals. Place these horizontally just below the outer edges of the eyes. -
Form the smile:
Roll an impossibly thin thread of black clay. Cut a tiny segment and curve it into a ‘U’ shape. Press this gently between the eyes using a needle tool. -
Bake:
Bake the figurine according to your clay package instructions (usually 275°F/135°C for 15-30 minutes). Let it cool completely before handling.
Enjoy your charming little sea creature sitting on your shelf
Sleepy Octopus With Closed Eyes
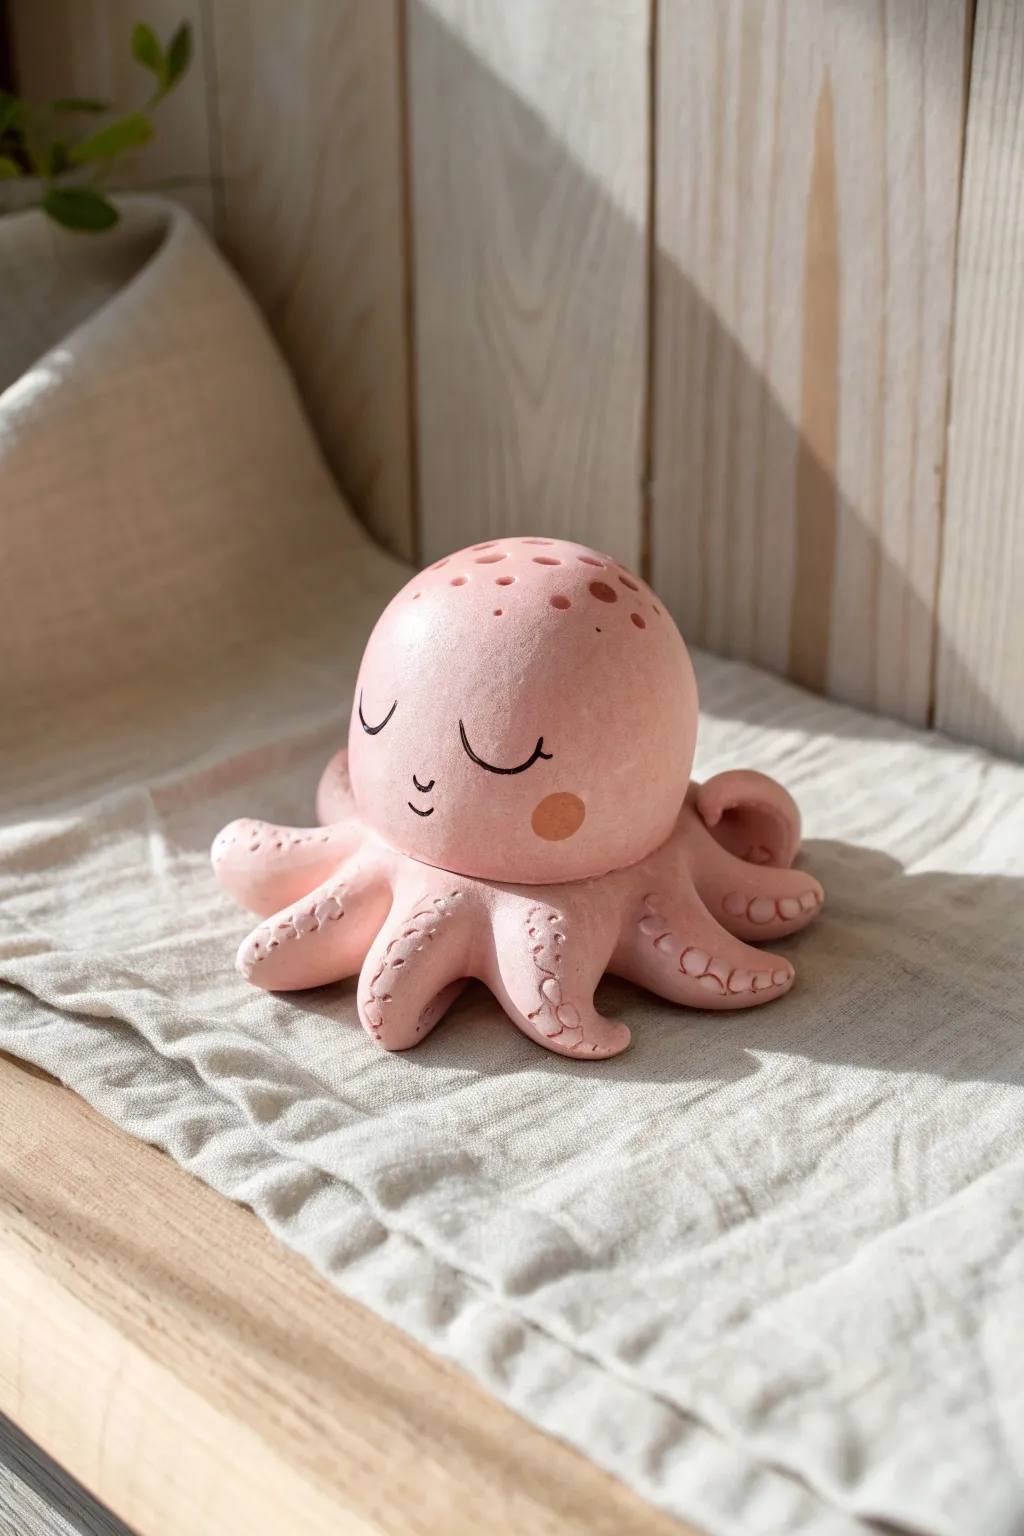
This adorable, drowsy cephalopod features a smooth, rounded head and gently curled tentacles decorated with tiny suction cups. With its serene expression and soft pink hue, it makes for a calming desk companion or a sweet handmade gift.
How-To Guide
Materials
- Polymer clay (air-dry or oven-bake) in soft pink
- Acrylic paint (black and warm orange/terracotta)
- Small detail paintbrush
- Ball stylus tool or the rounded end of a small paintbrush handle
- Rolling pin or smooth glass jar
- Needle tool or toothpick
- Clay varnish or matte sealer (optional)
Step 1: Sculpting the Base
-
Prepare the Clay:
Start by conditioning your pink clay in your hands until it is soft, warm, and pliable. This prevents cracks later on. -
Shape the Head:
Roll a smooth sphere of clay about the size of a tangerine (or your preferred size). Gently flatten the bottom so it can sit securely while you work. -
Form the Tentacles:
Take a separate piece of clay and roll it into a thick sausage shape. Divide this into eight equal segments to ensure your octopus has symmetrical legs. -
Shape Individual Legs:
Roll each segment into a tapered log, making them thicker at one end (where they attach to the body) and slightly pointy at the tip.
Step 2: Assembling the Body
-
Attach the Tentacles:
Flip the head upside down or work from the bottom. Attach the thick ends of the tentacles in a circle underneath the head, blending the clay seams upward until smooth. You want the head to look like it’s resting on top of the legs. -
Position the Legs:
Set the octopus down on your work surface. Gently wiggle and curve the tentacle tips outward and upward to give them a lively, organic movement. -
Add Suction Cups:
Using a small ball stylus or a blunt tool, press faint rows of small circles into the top surface of each tentacle. I like to vary the pressure slightly so some look deeper than others, adding nice texture. -
Texture the Head:
In the reference image, the top of the head has some texture. Use a larger stylus tool to poke semi-deep holes randomly across the top third of the head, simulating little barnacles or sea spots.
Seamless Blending
When attaching legs, use a silicone clay shaper tool to drag clay across the seam. This creates a stronger bond than just pressing pieces together.
Step 3: Finishing Details
-
Smooth Everything Out:
Before baking or drying, do a final check for fingerprints. A tiny bit of baby oil on your finger can help buff them away perfectly. -
Cure the Clay:
Bake your piece according to the clay package instructions (or let it air dry completely if using air-dry clay). Ensure it cools down fully before painting. -
Paint the Face:
Using a very fine detail brush and black acrylic paint, carefully draw two U-shapes for the closed eyes. Add small eyelashes flicking outward. -
Add the Smile:
Paint a tiny, subtle ‘u’ shape between the eyes for the mouth. -
Add Rosy Cheeks:
Take your warm orange or terracotta paint. Create a solid circle on the right cheek and perhaps some smaller dots near the top holes for character. -
Highlight the Texture:
You can lightly dry-brush a darker pink into the suction cup indentations to make the texture pop, though keeping it simple works too. -
Seal the piece:
To protect that cute face, apply a thin coat of matte varnish over the entire octopus.
Glow-in-the-Dark
Mix a small amount of glow-in-the-dark pigment powder into your pink clay before sculpting. The octopus will look sweet by day and magical by night.
Once that varnish is dry, find a sunny spot on your shelf for your new sleepy friend to nap
Octopus in a Tiny “Sea” Base
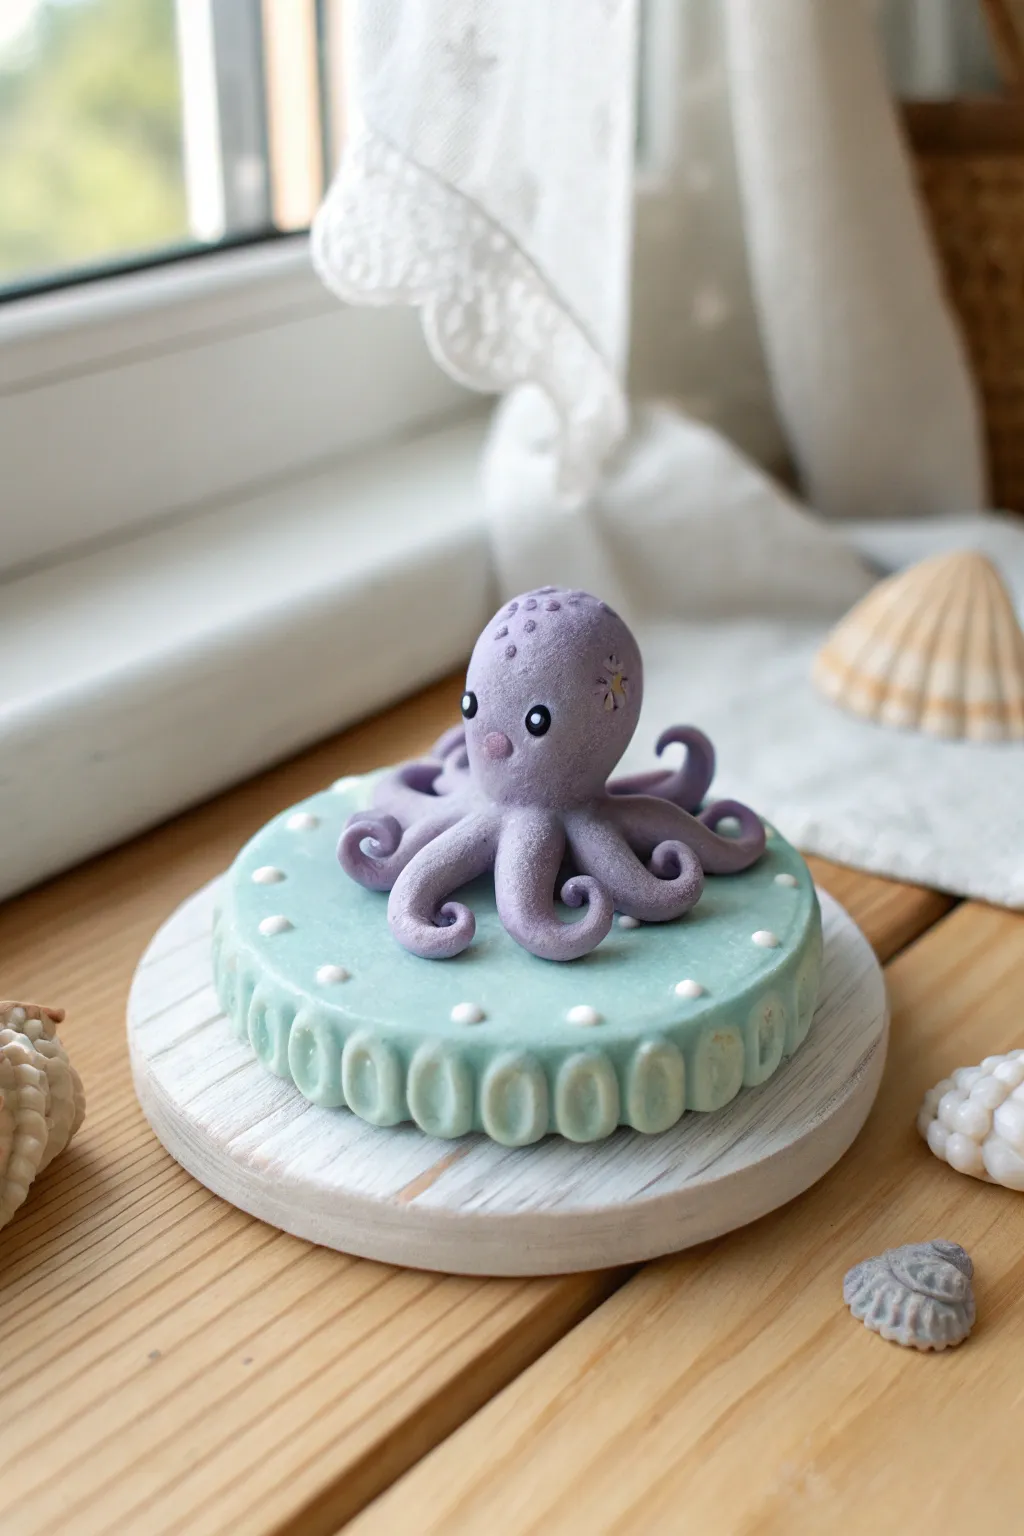
This adorable purple octopus sits proudly atop its own textured sea-green pedestal, making for a charming desk companion or gift. The soft matte finish and simple shapes make this an accessible project for clay enthusiasts of all levels.
Step-by-Step
Materials
- Polymer clay (light purple, pastel teal/mint, white, black, pink)
- Round clay cutter (approx. 3-4 inches diameter)
- Modeling tools (ball tool, needle tool)
- Small wooden base or coaster
- Gold or silver mica powder (optional for sparkles)
- Texturing sponge or toothbrush
- Baking sheet and parchment paper
Step 1: Crafting the Sea Base
-
Prepare the Teal Clay:
Begin by conditioning a large ball of pastel teal or mint green clay until it is soft and pliable. Flatten it into a thick disc, roughly 3/4 of an inch high. -
Cut the Base Shape:
Use your round cutter to punch out a perfect circle from the thick disc. If the clay sticks to the cutter, I find dusting it lightly with cornstarch helps it release cleanly. -
Add Edge Texture:
To create the scalloped texture along the side of the base, use the side of a small modeling tool or a rounded brush handle. Press gentle vertical indentations all around the circumference at regular intervals. -
Detail the Sides:
Inside each vertical indentation, press a smaller oval shape to create a decorative, carved relief look. -
Create White Accents:
Roll tiny spheres of white clay. Press these gently onto the top surface of the base in a circular pattern near the edge to mimic sea foam or pearls.
Sticky Situation?
If your purple clay is staining the teal base while you position the tentacles, wipe your hands with a baby wipe frequently or use a piece of plastic wrap as a barrier while pressing down.
Step 2: Sculpting the Octopus
-
Form the Body:
Take a portion of purple clay and roll it into a smooth, egg-shaped ball. This will serve as the octopus’s head and body combined. -
Create the Tentacles:
Roll out eight tapered sausage shapes from the same purple clay. They should be thicker at one end and curl into a fine point at the other. -
Attach Tentacles:
Flip the head body upside down and press the thicker ends of the tentacles onto the bottom center. Blend the clay seams smooth with a sculpting tool so they look like one continuous piece. -
Position the Octopus:
Place the octopus onto the center of your teal base. Arrange the tentacles artistically, curling the tips upward or sideways to give the creature a sense of movement. -
Add Facial Features:
For the eyes, press two tiny balls of black clay into the head, then add minuscule white dots for highlights. Add a small pink oval between them for a cute blushing cheek or mouth area. -
Texture the Skin:
Gently tap the surface of the octopus with a clean toothbrush or piece of textured sponge. This removes fingerprints and gives the clay a soft, stone-like skin texture. -
Head details:
Add tiny flattened dots of slightly darker purple clay to the top of the head for spots, and a small flower or star shape on the side for character.
Ocean Sparkle
Before baking, brush a tiny amount of pearl or color-shifting mica powder over the purple octopus’s head and the white dots on the base to give it a magical, wet-look shimmer.
Step 3: Finishing Touches
-
Mount and Bake:
Place the clay base onto the wooden coaster if you intend to bake them together (ensure the wood is oven-safe), or bake the clay separately on parchment paper according to your package instructions. -
Cool Down:
Allow the piece to cool completely in the oven before moving it to prevent cracking. -
Final Assembly:
If you baked the clay separately from the wooden base, use a strong craft glue to attach the sea pedestal to the wood now.
Now you have a charming little sea creature to brighten up your shelf
Stacked Baby Octopuses Totem
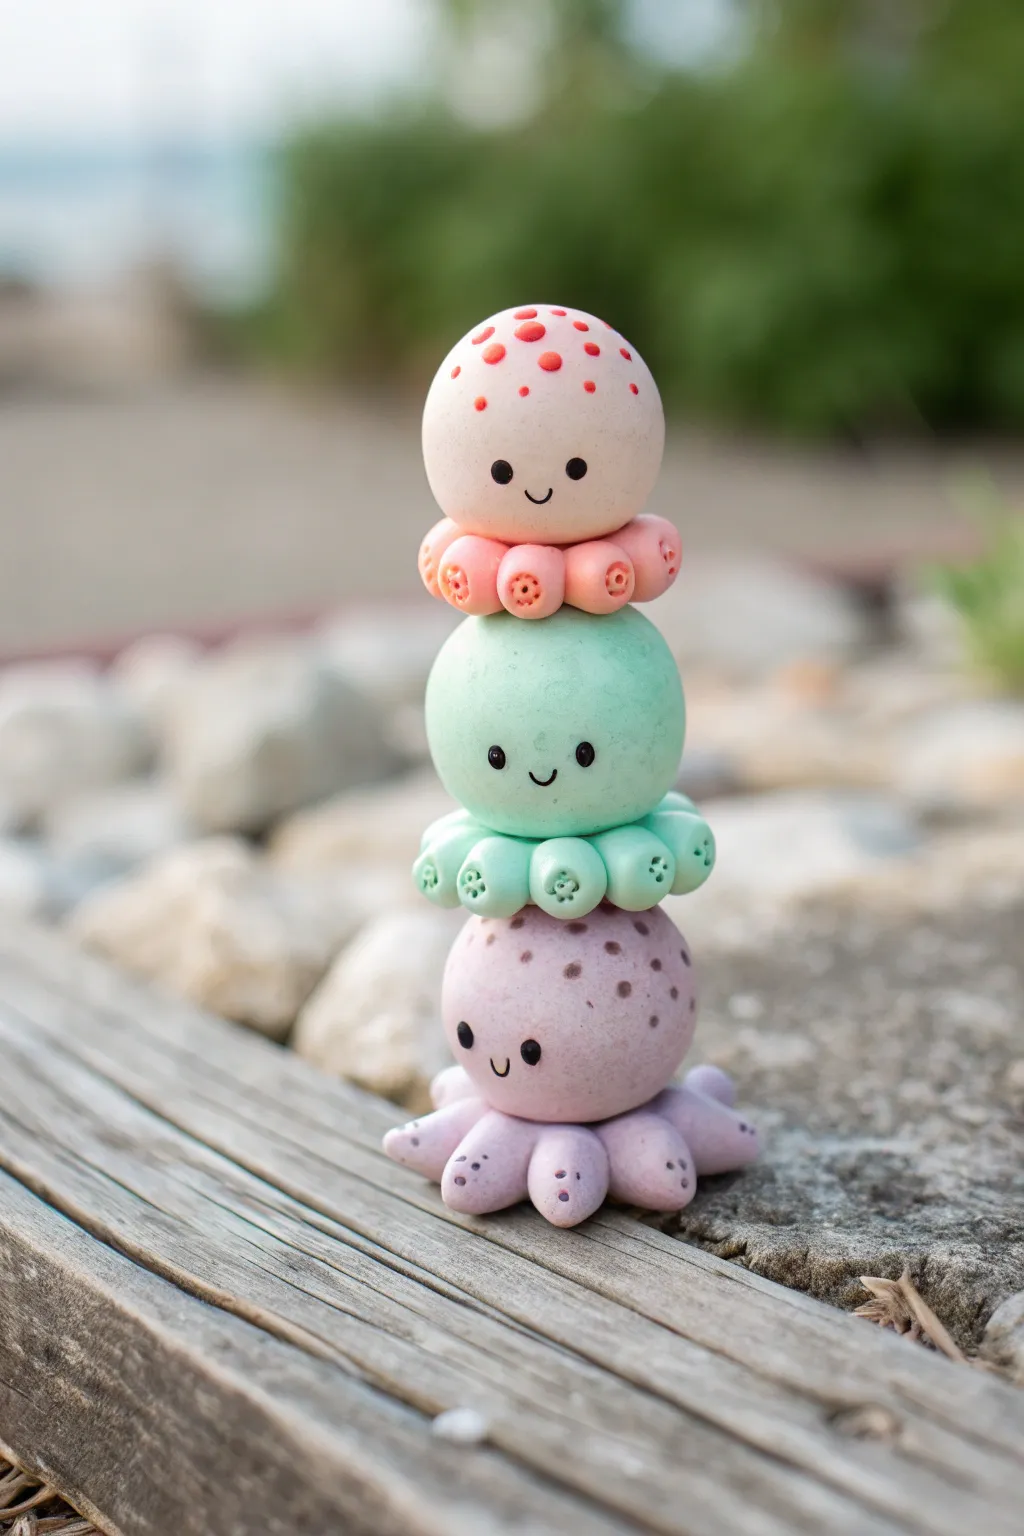
This whimsical project features a delightful stack of three chubby baby octopuses, each with its own pastel personality and dotted details. The smooth, matte finish creates an adorable desktop totem that perfectly balances cuteness with artistry.
Detailed Instructions
Materials
- Polymer clay in pastel pink/cream, mint green, and lavender
- Polymer clay in slightly darker shades for details (red, darker green, purple)
- Black polymer clay for eyes (or black acrylic paint)
- Clay sculpting tools (needle tool and ball stylus)
- Small rolling pin
- Blade or craft knife
- Baking sheet and parchment paper
- Oven (for curing)
- Liquid clay (optional, for bonding)
- Eye pin (optional, if making into an ornament)
Step 1: Sculpting the Bottom Octopus
-
Prepare the base color:
Start by conditioning a chunk of lavender polymer clay until it is soft and pliable. Roll roughly two-thirds of it into a smooth, seamless ball for the head. Slightly flatten the bottom so it sits stably. -
Form the tentacles:
Take the remaining lavender clay and divide it into eight small, equal portions. Roll each piece into a teardrop shape. -
Assemble the base:
Arrange the eight teardrops in a circle, pointing outward, pressing them gently together at the center. Place the head ball firmly onto the center of this ring. Use a blending tool to smooth the connection underneath if needed. -
Add texture:
Using a small ball stylus or a needle tool, gently press into the tips of the tentacles to create small indentations representing suction cups or texture. -
Create the spots:
Roll tiny, microscopic balls of darker purple clay. Press these randomly onto the head and the tips of the tentacles to mimic the speckled pattern shown in the photo.
Step 2: Creating the Middle & Top Tiers
-
Form the middle head:
Condition your mint green clay. Roll a ball similar in size to the first head, perhaps just a fraction smaller to help with balance. Flatten the top of the lavender head slightly to prepare a nesting spot. -
Sculpt the middle tentacles:
Instead of separate teardrops, try rolling a thick snake of mint green clay and curling the ends under, or stick with the teardrop method if you prefer uniformity. Arrange them in a ring on top of the lavender octopus’s head. -
Stack the middle layer:
Place the mint green head onto its ring of tentacles. Use a drop of liquid clay between layers here to ensure the stack doesn’t topple during baking. -
Add suction cup details:
For this middle green octopus, use a small tool to press distinct circular indentations into the front of the curled tentacles, looking like little buttons. -
Form the top octopus:
Repeat the process with the cream or light pink clay. This top octopus should be the smallest. Create the ring of pink tentacles and place them on the green head, followed by the cream head ball. -
Detail the top crown:
Roll very small balls of reddish-pink clay. Flatten them onto the very top of the cream head to create a cute, spotted crown pattern. -
Refine the top tentacles:
Using a needle tool, prick tiny holes into the center of the pink tentacle suckers to give them extra definition.
Balance Booster
Insert a toothpick or a piece of crumpled foil wire through the center of all three heads before baking. This acts as an internal spine to keep your stack perfectly upright.
Step 3: Faces and Finishing
-
Add the eyes:
Roll six tiny balls of black clay. Gently press two onto each head, spacing them widely apart for that ‘kawaii’ look. Embed them slightly so they don’t pop off. -
Create the smiles:
Use a needle tool or a very small U-shaped cutter to impress a tiny, happy smile between the eyes on each octopus. -
Final structural check:
Look at your totem from all sides. Ensure it is standing straight and not leaning. If the clay is soft, you can gently squish the stack down vertically to improve the bond between the tiers. -
Bake the project:
Preheat your oven according to the manufacturer’s instructions on your specific brand of clay. I usually bake slightly longer at a lower temp to prevent scorching light colors. -
Cool and seal:
Allow the stack to cool completely in the oven before moving it. Once cool, the finish is naturally matte, but you can add a matte varnish if you want extra protection for the tiny spots.
Dust Patrol
Pastel clay shows every speck of dust. If you see lint on your light clay, wipe it away gently with a cotton swab dipped in a tiny bit of rubbing alcohol or baby oil before baking.
Now you have a charming little tower of sea creatures to keep you company on your desk