Clay coasters are one of my favorite little projects because they’re quick, super customizable, and instantly make your coffee table feel more intentional. Here are my go-to clay coaster design ideas—from classic, beginner-friendly looks to the kind of creative twists that make people ask, “Wait… you made those?”
Botanical Leaf Imprint Coasters
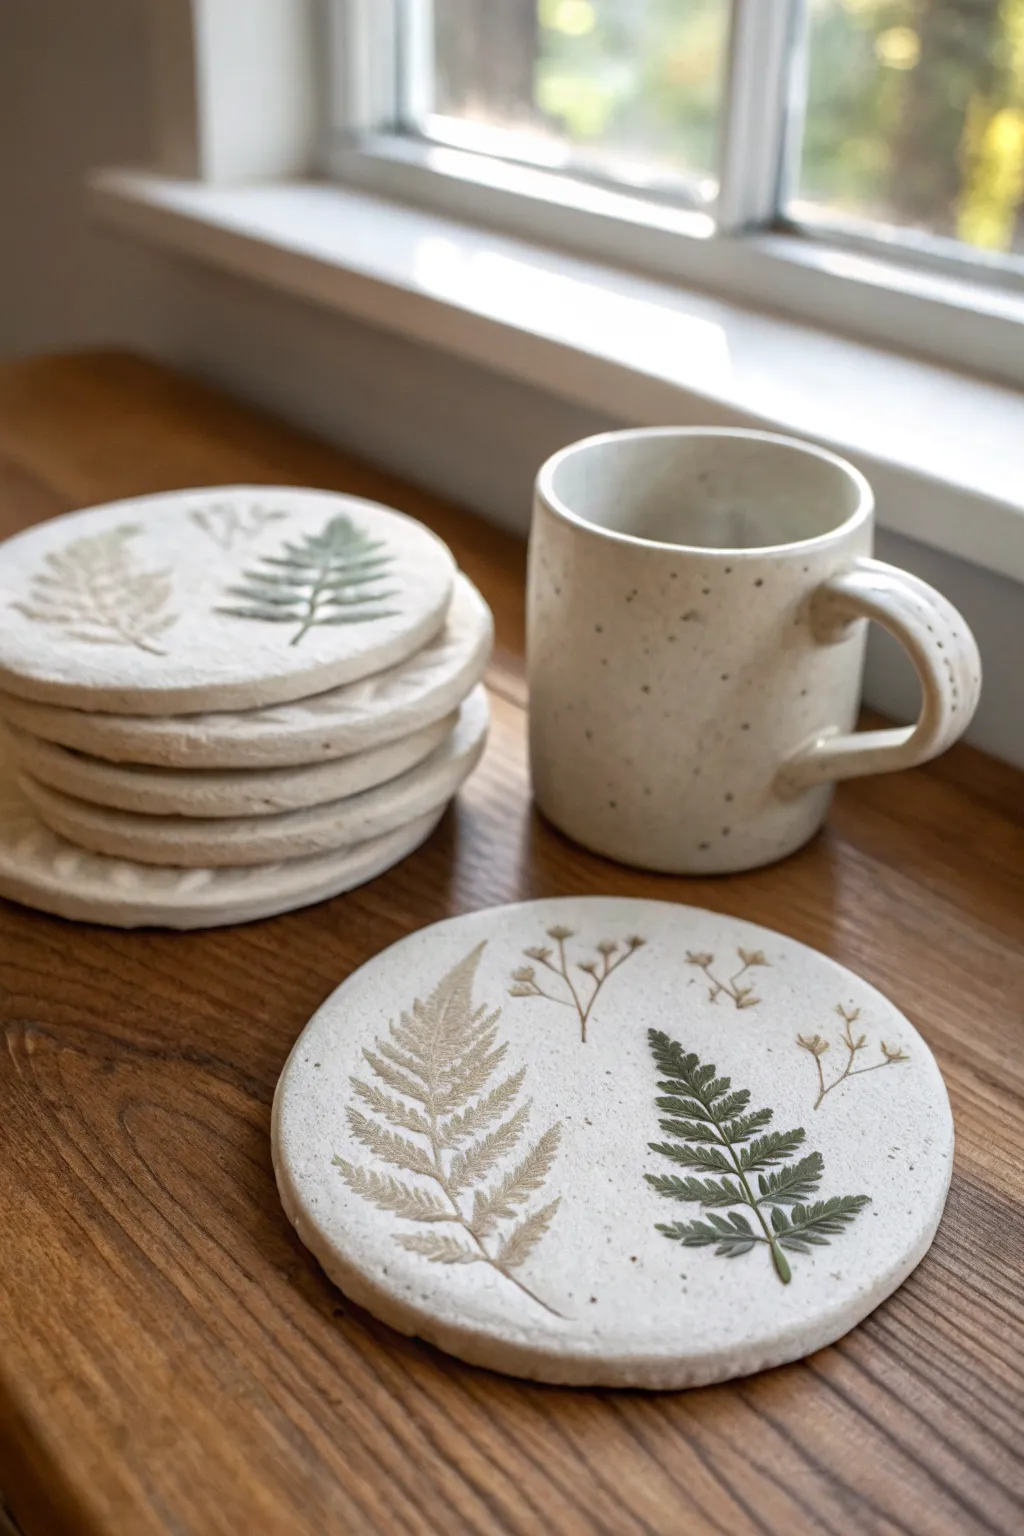
Capture the delicate beauty of nature with these charming clay coasters featuring real fern impressions. The soft, speckled finish and subtle earth-toned tints give them a rustic, organic look perfect for any coffee table.
Step-by-Step Guide
Materials
- White or cream air-dry clay (or polymer clay)
- Dried speckled clay inclusions (like ground coffee or black pepper)
- Rolling pin
- Circle cookie cutter (approx. 4 inches)
- Fresh or pressed fern leaves and small botanical sprigs
- Acrylic paints (moss green, warm tan/brown)
- Small fine-tip paintbrush
- Clear matte varnish or sealant
- Sandpaper (fine grit)
- Parchment paper or smooth work surface
- Bowl of water
Step 1: Preparation & Shaping
-
Prepare the clay:
Begin with a lump of white air-dry clay. To achieve that stony, speckled look seen in the photo, kneed in a very small pinch of dried coffee grounds or coarsely ground black pepper. Mix thoroughly until the speckles are evenly distributed. -
Roll out the slab:
Place your clay onto a sheet of parchment paper to prevent sticking. Use a rolling pin to flatten the clay into an even slab, aiming for a thickness of about 1/4 to 1/3 inch. Don’t go too thin, or the coasters might warp. -
Cut the shapes:
Using a large circle cutter or a bowl as a guide, cut out your coaster rounds. Carefully peel away the excess clay. -
Smooth the edges:
Dip your finger in a little water and run it along the cut edges of each circle to smooth out any roughness or sharpness from the cutting tool.
Sticky Situation?
If leaves are sticking to the clay and won’t lift cleanly, lightly dust them with cornstarch before pressing. This acts as a release agent for cleaner removal.
Step 2: Impressing Botanicals
-
Select your greenery:
Choose small fern fronds and delicate sprigs. Fresh leaves work well for deep impressions, but stiff, pressed leaves can also offer crisp lines. Make sure they fit nicely within the circle without overcrowding. -
Arrange the composition:
Lay your chosen leaves gently onto the surface of a clay circle. I like to angle two different types of leaves towards each other for a balanced, natural look. -
Press the design:
Once you are happy with the placement, use the rolling pin to gently roll over the leaves once. Apply firm, even pressure to embed them into the clay surface. -
Remove the leaves:
Carefully find the stem of the leaf and use tweezers or a craft knife tip to lift it up. Peel the leaf away slowly to reveal the detailed imprint underneath. -
Dry the coasters:
Place the coasters on a flat wire rack or a piece of cardboard to dry. Air-dry clay usually takes 24-48 hours. Flip them occasionally to ensure they dry evenly and stay flat.
Step 3: Finishing Touches
-
Sand for smoothness:
When the coasters are fully dry and hard, take a piece of fine-grit sandpaper and lightly sand the edges and the surface to remove any imperfections or fingerprints. -
Prepare the colors:
Dilute a small mount of moss green paint and warm tan paint with water. You want a consistency similar to watercolor, which will act as a wash rather than a thick opaque layer. -
Paint the ferns:
Using a fine-tip brush, carefully fill in the depressed areas of the leaf imprints. Use the green wash for one fern and the tan wash for the other, allowing the color to pool slightly in the deeper veins. -
Let the paint set:
Allow the paint to dry completely. Because it is a wash, this should only take 15-20 minutes. -
Seal the surface:
To protect your coasters from moisture and stains, apply a coat of clear matte varnish. Brush it over the entire top surface and the sides. -
Add protective backing:
Once the sealant is cured, you can glue a circle of felt or cork to the bottom of each coaster to protect your wooden surfaces.
Pro Tip: Vein Detail
Place the leafy side facing down into the clay, not the smooth top side. The underside of a fern usually has more prominent veins, creating a much sharper impression.
Now you have a set of handcrafted coasters ready to hold your morning coffee with style


Pressed Flower Relief Coasters

Capture the delicate beauty of a garden with these handcrafted clay coasters, featuring intricate floral reliefs and soft, muted tones. Their organic, speckled finish and wildflower motifs make them a perfect rustic addition to any coffee table.
Detailed Instructions
Materials
- White or speckled air-dry clay (or polymer clay)
- Rolling pin
- Circular cookie cutter or jar lid (approx. 4 inches)
- Fresh or dried wildflowers and ferns (small varieties)
- Fine-grit sandpaper
- Acrylic paints (muted pink, sage green, brown)
- Fine-point detail paintbrush
- Matte spray varnish or sealant
- Parchment paper
Step 1: Shaping the Base
-
Prepare your clay:
Begin by kneading a generous amount of your chosen clay until it is soft and pliable. If you want that speckled look shown in the photo but have plain clay, you can knead in some coarse black pepper or dry tea leaves for faux texture. -
Roll out the slab:
Place the clay between two sheets of parchment paper to prevent sticking. Roll it out into an even slab, aiming for a consistent thickness of about 1/4 inch so the coasters feel substantial but not clunky. -
Cut the rounds:
Using your circular cutter or a jar lid, press firmly into the clay to cut out your coaster shapes. Create a stack of 4-6 coasters. -
Smooth the edges:
Dip your finger in a little water and gently run it along the cut edges of each circle to soften any sharp ridges or burrs left by the cutter.
Step 2: Creating the Design
-
Arrange the botanicals:
Select your small flowers and leaves. Lay them gently onto the surface of the wet clay circles arrangements that flow naturally across the center. -
Press the relief:
Place a piece of parchment paper over the botanicals. Using your rolling pin, roll gently but firmly over the top once to press the plant material into the clay surface. -
Reveal the imprint:
Carefully peel back the parchment and use tweezers to lift the plant material out of the clay. This will leave behind a beautiful, subtle relief impression. -
Initial drying:
Set the coasters aside on a flat surface to dry completely. For air-dry clay, flip them over every 12 hours to prevent curling. This usually takes 24-48 hours. -
Refining the surface:
Once fully cured and hard, use fine-grit sandpaper to buff away any uneven spots on the edges or surface, ensuring they sit flat.
Clean Lines Pro-Tip
To fix small mistakes when painting the fine details, use a barely damp cotton swab to gently wipe away excess acrylic paint before it dries completely.
Step 3: Painting and Finishing
-
Prepare the palette:
Mix a diluted wash of your acrylic colors. You want the paint to be slightly translucent to mimic a watercolor or glazed pottery look, rather than opaque blocks of color. -
Detail the stems:
Using your finest brush and sage green paint, carefully trace the impressed lines of the stems and leaves. I like to keep my hand loose here so the lines don’t look too rigid. -
Add floral color:
Dab the muted pink paint into the flower impressions. Don’t worry about staying perfectly inside the lines; a little bleed adds to the handmade charm. -
Add depth:
With a tiny amount of brown paint, add very small dots or thin lines near the base of the petals and leaves to create shadows and dimension. -
Seal the work:
Since these are coasters, protection is key. Apply 2-3 coats of a matte varnish or sealant, allowing full drying time between coats to make them water-resistant. -
Adding felt feet:
Optionally, cut small circles of felt or cork and glue them to the bottom of each coaster to protect your furniture surfaces.
Level Up: Matching Set
Use a taller cylindrical object (like a juice can) as a mold to create a matching clay vase using the same slab-building and pressing technique.
Now you have a charming set of botanical coasters ready for your next tea time


Classic Faux Marble Swirl Coasters
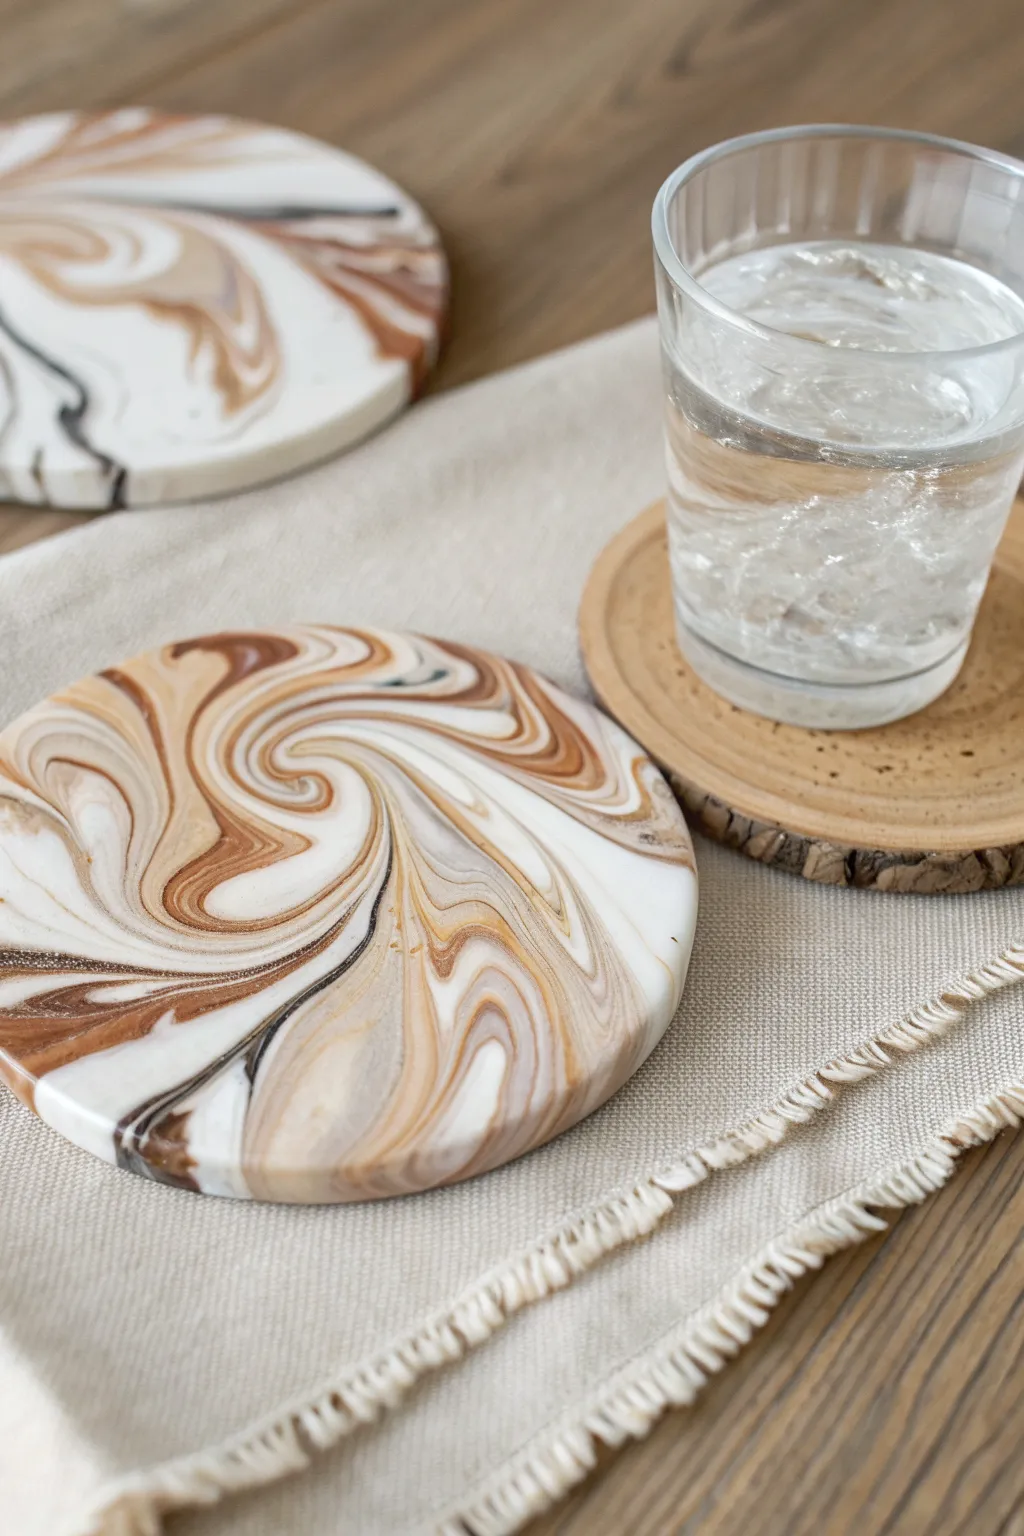
These sophisticated coasters mimic the organic elegance of natural stone with swirling veins of caramel, mocha, and cream. With just a few colors of polymer clay and a rolling pin, you can create a high-end home accessory that looks far more expensive than it is to make.
Step-by-Step Guide
Materials
- Polymer clay (white, beige/tan, dark brown, black)
- Acrylic roller or rolling pin
- Circle cookie cutter (approx. 4 inches) or a craft knife and template
- Parchment paper or baking mat
- Ceramic tile or baking sheet
- Sandpaper (various grits: 400, 600, 1000)
- Gloss or satin polyurethane varnish (optional)
- Soft paintbrush
Step 1: Preparing the Clay
-
Condition the white clay:
Begin by conditioning a large block of white polymer clay. Knead it in your hands until it becomes soft, pliable, and warm. This will serve as your base color, so you need significantly more of this than the other shades. -
Prepare accent colors:
Condition the beige, dark brown, and black clays separately. You need much smaller amounts of these—think of them as spices in a recipe. -
Roll into snakes:
Roll each color into long, thin snakes. The white snake should be the thickest (about 1 inch diameter), while the colored snakes should be much thinner, ranging from spaghetti-thin to pencil thickness.
Step 2: Creating the Marble Pattern
-
Combine the snakes:
Lay the colored snakes lengthwise onto the thick white cylinder. Arrange them sporadically, grouping a thin black line next to a thicker beige one for variety. -
Twist the clay:
Grip the ends of the combined clay log and twist them in opposite directions. Keep twisting until the lines look like candy stripes, spiraling tightly around the log. -
Fold and roll:
Fold the twisted log in half, bringing the two ends together. Roll this doubled log on your work surface to smooth it back into a single cylinder. This begins to marble the colors together. -
Repeat the twist:
Twist the new log again. I find doing this twist-fold-roll process two or three times is the sweet spot; too much mixing creates a muddy brown color, while too little leaves the stripes too distinct. -
Form a ball:
Once you are happy with the intricacy of the veins, roll the entire log into a smooth ball. Check the surface to see if you like the distribution of colors.
Stone Cold Tip
Add a tiny pinch of translucent clay into your white mix. When baked, this creates a confusing depth that mimics the semi-opaque quality of real natural marble remarkably well.
Step 3: Shaping and Baking
-
Flatten the ball:
Place the ball on a piece of parchment paper. Use your acrylic roller to flatten it into a slab. Roll in multiple directions to ensure an even thickness, aiming for about 1/4 inch. -
Check the swirl:
Examine your slab. Looking for that perfect ‘swirl’ center? If the pattern is too linear, gently twist the clay slightly as you flatten it to encourage circular movement in the veins. -
Cut the shape:
Firmly press your circle cutter into the clay to cut out the coaster shape. If you don’t have a cutter, trace a circle template with a needle tool or craft knife. -
Smooth the edges:
Gently rub the cut edges with your fingertip to remove any harsh lines or loose bits of clay. Smooth edges now save you sanding time later. -
Bake securely:
Transfer the clay (still on parchment paper) to a ceramic tile or baking sheet. To prevent air bubbles, you can place a piece of plain paper on top and weigh it down with another tile. -
Bake the coasters:
Bake according to your specific polymer clay manufacturer’s instructions, typically around 275°F (135°C) for 30 minutes. Let them cool completely before handling.
Level Up: Gold Veins
Before baking, gently press loose gold leaf flakes into the prominent cracks or veins of the clay. The gold integrates into the surface for a luxurious Kintsugi-inspired look.
Step 4: Finishing Touches
-
Sand for smoothness:
Once cool, wet-sand the edges and surface. Start with 400 grit to remove imperfections, then move to 600 and 1000 to buff the clay to a silky texture. -
Wash and dry:
Rinse the coasters under water to remove any sanding dust and dry them thoroughly with a lint-free cloth. -
Seal the surface:
For a glossy, stone-like appearance like the photo, apply a thin coat of polyurethane varnish. Let it dry completely. -
Add backing:
If desired, glue a circle of cork or felt to the bottom to protect your furniture and give the coaster a finished, professional feel.
Now you have a stunning set of faux stone coasters ready to protect your table in style


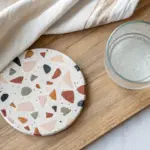
Terrazzo Chip Clay Coasters
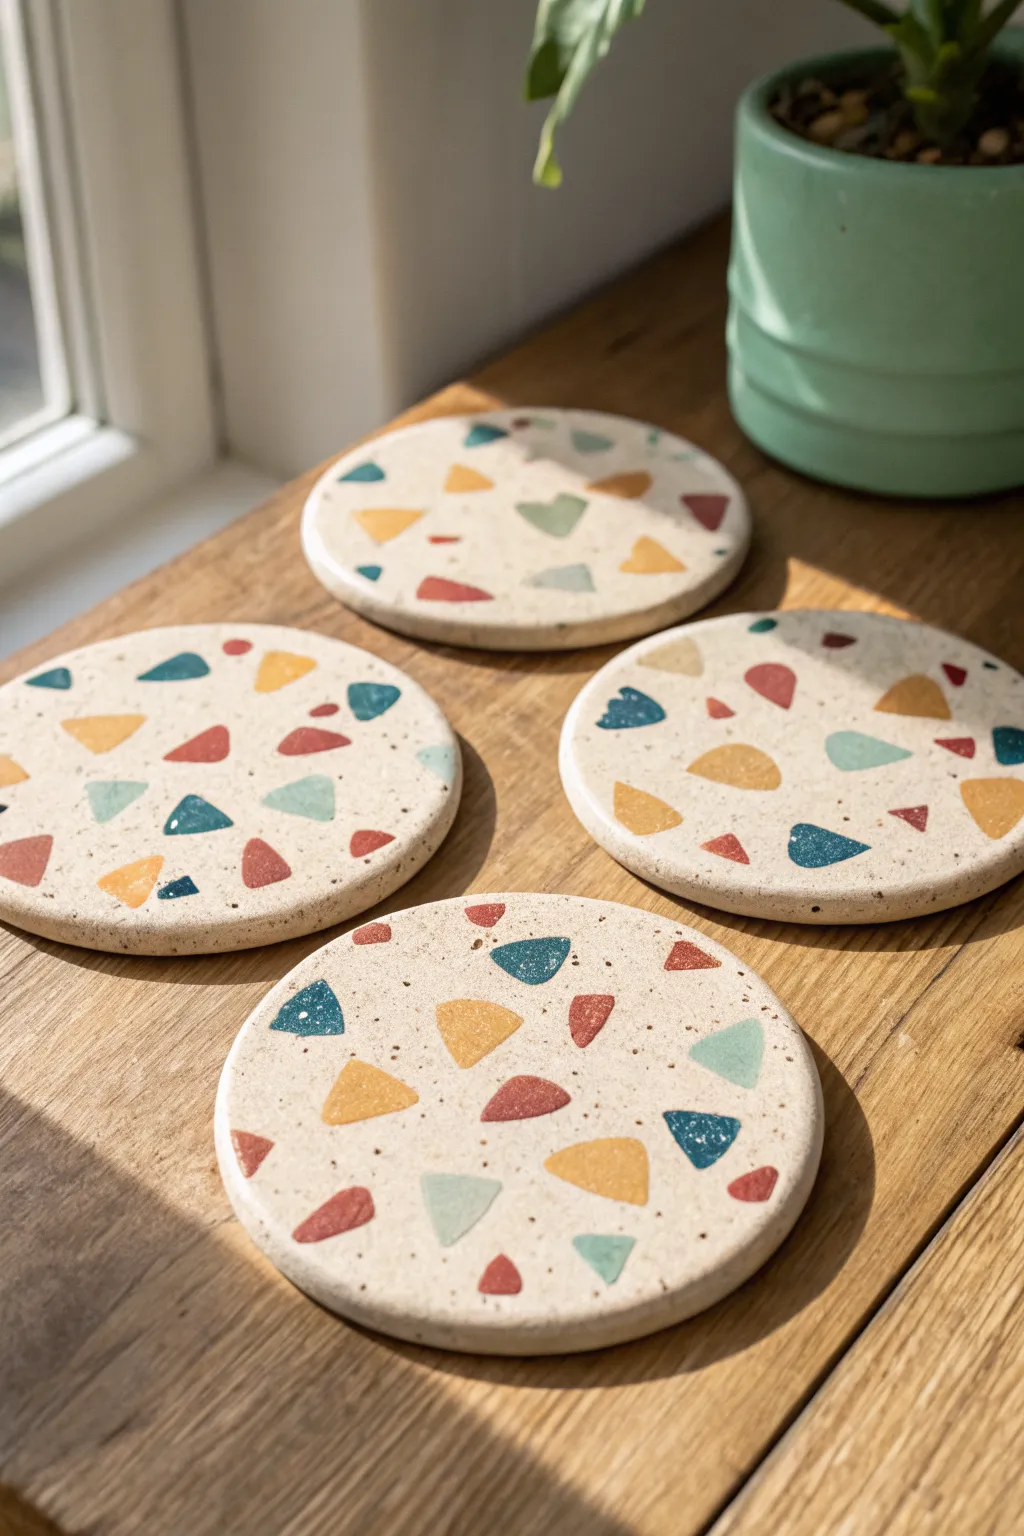
Bring the timeless elegance of Italian flooring to your coffee table with these charming terrazzo-style coasters. By mixing colorful clay fragments into a creamy base, you’ll create a durable and uniquely patterned set perfect for protecting surfaces in style.
How-To Guide
Materials
- Polymer clay (white or beige for the base)
- Polymer clay (various colors: teal, mustard yellow, rust red, terracotta)
- Acrylic roller or rolling pin
- Circle cookie cutter (approx. 3.5 – 4 inches)
- Craft knife or tissue blade
- Parchment paper or baking mat
- Fine-grit sandpaper (400 to 1000 grit)
- Oven
- Matte polyurethane varnish (optional)
- Black pepper or sand (optional, for speckling)
Step 1: Preparing the ‘Chips’
-
Condition the colored clay:
Start by warming up your colored clays (teal, mustard, rust, etc.) in your hands until they are soft and pliable. Roll each color flat into a very thin sheet, roughly 1-2mm thick. -
Bake the thin sheets:
Place your thin colored sheets onto parchment paper and bake them for about 10-15 minutes according to the package instructions. You want them to be partially cured so they are firm enough to chop but not fully hardened. -
Cool and chop:
Once the sheets have cooled completely, use your craft knife to chop them into irregular geometric shapes. Aim for varied triangles and shards rather than perfect squares to mimic the authentic look of stone chips found in terrazzo flooring.
Stone Texture Trick
Mix ground black pepper or dried used coffee grounds into your white base clay before rolling. This simple addition creates incredibly realistic granite-like speckles.
Step 2: Creating the Base
-
Condition the base clay:
Take a large block of your white or beige clay. Condition it thoroughly until soft. I like to mix in a tiny pinch of black pepper or real sand at this stage; this creates that subtle, speckled faux-stone texture seen in the photo. -
Roll out the slab:
Roll your base clay into a thick, even slab, approximately 1/4 inch thick. Make sure the surface is smooth and free of air bubbles or fingerprints. -
Apply the chips:
Scatter your chopped colored clay chips onto the surface of the raw base slab. Arrange them intentionally but randomly, ensuring good color distribution without clustering too many of the same shade together. -
Embed the pattern:
Place a sheet of parchment paper over the slab to prevent sticking. Use your acrylic roller to firmly press the colored chips down into the base clay until the surface is flush and smooth again. -
Smooth the surface:
Remove the parchment paper and run the roller over the clay one more time to ensure everything is tightly bonded. The surface should be completely flat with the chips integrated into the clay, not sitting on top.
Metallic Luxe
Add gold leaf flakes alongside your colored clay chips before the final rolling step. The gold creates a stunning, chic contrast against the matte stone texture.
Step 3: Cutting and Finishing
-
Cut the shapes:
Using your large circle cutter, press firmly into the slab to cut out your coasters. If the clay sticks to the cutter, you can dust the cutter rim with a little cornstarch first. -
Refine the edges:
Gently lift the circles deeply and smooth the edges with your fingertip to remove any sharp ridges left by the cutter. This gives the final piece a more polished, professional ceramic look. -
Final bake:
Place your raw coasters on a baking sheet lined with parchment paper. Bake according to the clay manufacturer’s full instructions (usually 30-45 minutes at 275°F/130°C for this thickness) to ensure they are durable and fully cured. -
Sand for stone effect:
Once fully cooled, wet-sand the surface using fine-grit sandpaper under running water. This crucial step reveals the crisp edges of your colored chips and removes any haziness, making the design pop. -
Clean and seal:
Rinse off any sanding residue and dry the coasters thoroughly. While polymer clay is waterproof, you can apply a thin layer of matte varnish if you want extra protection against coffee stains.
Place these lovely handmade coasters around your home to enjoy a splash of modern art every time you set down your drink

The Complete Guide to Pottery Troubleshooting
Uncover the most common ceramic mistakes—from cracking clay to failed glazes—and learn how to fix them fast.
Clean Color-Block Coaster Sets
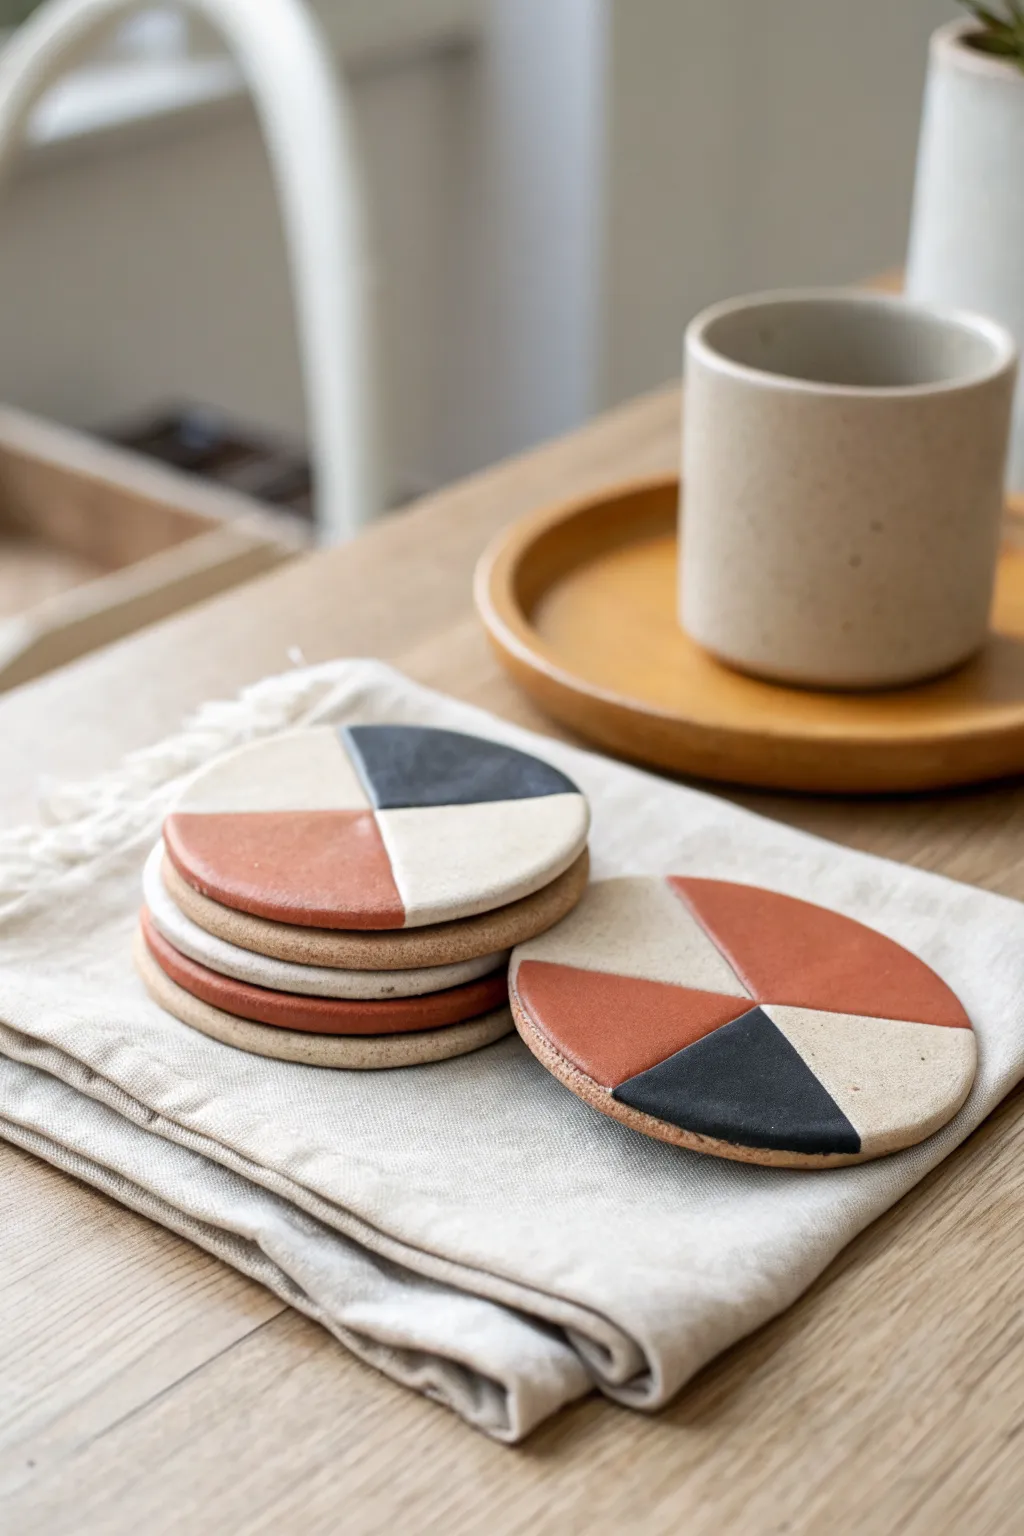
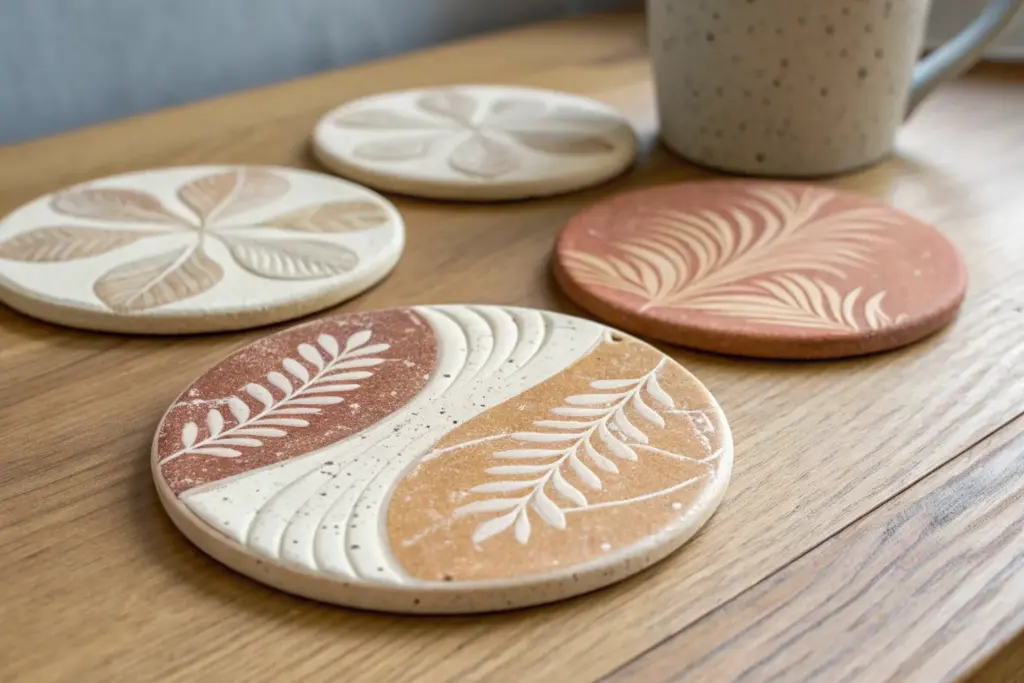
Bring a touch of desert modernism to your coffee table with these geometric clay coasters. Featuring a striking four-quadrant design with earthy tones of terracotta, black, and cream, they strike the perfect balance between rustic texture and clean, contemporary lines.
Step-by-Step Guide
Materials
- Polymer clay (speckled beige or tan)
- Acrylic rolling pin
- Circular cookie cutter (approx. 3.5 – 4 inches)
- Parchment paper
- Sandpaper (fine grit)
- Painter’s tape or washi tape
- Acrylic paints (Terracotta, Black, Cream)
- Small flat paintbrush
- Matte sealant or varnish (polyurethane or Mod Podge)
- Felt backing sheet or small cork pads (optional)
- Craft knife
Step 1: Shaping the Clay Base
-
Condition the Clay:
Begin by taking a chunk of your speckled polymer clay and kneading it in your hands until it is soft and malleable. This is crucial to prevent cracking later. -
Roll It Out:
Place the clay on a sheet of parchment paper. Use your acrylic rolling pin to roll the clay out to an even thickness of about 1/4 inch. Try to keep the thickness consistent so your mugs sit flat. -
Cut the Rounds:
Press your circular cutter firmly into the rolled clay to create your coaster shapes. If you don’t have a cutter, you can trace around a large mug with a craft knife. -
Smooth the Edges:
Gently run your finger around the circumference of each circle to smooth out any rough edges left by the cutter. A little water on your fingertip helps here. -
Bake the Clay:
Transfer the clay discs (still on the parchment paper) to a baking sheet. Bake according to your clay package instructions—usually around 275°F (135°C) for 15-30 minutes depending on thickness. -
Cool and Sand:
Allow the coasters to cool completely on a flat surface. Once cool, use fine-grit sandpaper to lightly buff the edges or surface if any imperfections remain.
Crisp Lines Secret
Before painting your color, paint a thin layer of clear matte medium over the tape edge. This seals the gap so no color bleeds under.
Step 2: Painting the Design
-
Mark the Quadrants:
Using a pencil and a ruler, lightly mark a cross in the center of each coaster to divide it into four equal pie slices. -
Tape the Lines:
Apply painter’s tape along your pencil lines to mask off the first two opposite quadrants. Press the tape edges down firmly to prevent paint bleed. -
Apply the First Color:
Paint one of the exposed quadrants with your terracotta acrylic paint. Use smooth outward strokes. -
Apply the Second Color:
Paint the opposite exposed quadrant with your black paint. Let these dry completely before removing the tape. -
Retape for Remaining Sections:
Once dry, carefully peel off the tape. Now, apply new tape over the painted sections to protect them, exposing the remaining two unpainted quadrants. -
Different Configurations:
You can play with the pattern here—paint one of the remaining sections cream and leave the fourth raw clay, or paint both remaining sections in contrasting colors like the image shows. -
Final Touch-ups:
Remove the second round of tape. Use a very fine brush to touch up any lines where the colors meet in the center if they aren’t perfectly crisp.
Step 3: Finishing and Sealing
-
Seal the Surface:
Apply a thin coat of matte varnish or sealant over the entire top surface. This protects the paint from moisture and heat from your mugs. -
Let it Cure:
I like to let this dry briefly, then apply a second coat for extra durability. Allow the sealant to cure fully for 24 hours before use. -
Add Backing (Optional):
Trace the coaster shape onto felt or cork, cut it out slightly smaller than the coaster, and glue it to the bottom to protect your furniture.
Mix Up the Pattern
Divide the circle into three unequal sections instead of four regular quadrants for an asymmetrical, modern art look.
Now you have a stylish set of durable coasters ready to protect your surfaces and impress your guests
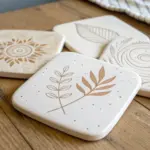
Minimalist Stamped Pattern Coasters
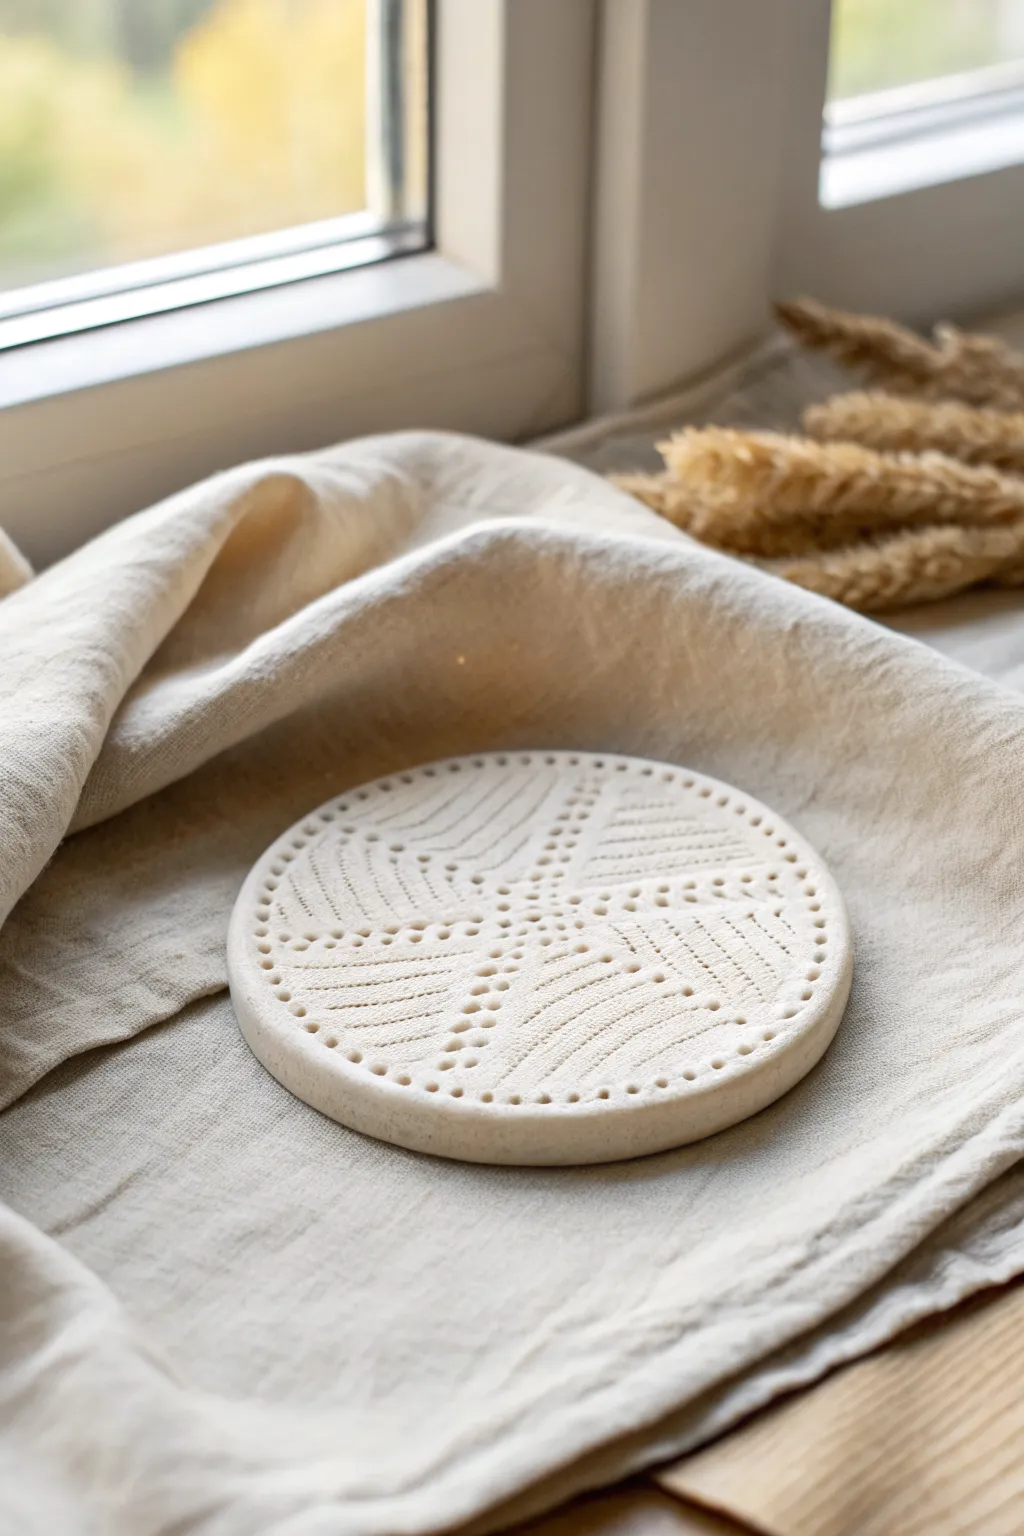
Embrace the beauty of simplicity with this minimalist clay coaster featuring an intricate geometric pattern. The design relies on delicate dots and lines to create a textural, woven appearance that feels both modern and artisanal.
Detailed Instructions
Materials
- Air-dry clay (white or off-white)
- Round cookie cutter (approx. 4-5 inches)
- Acrylic rolling pin
- Two wooden guide slats (1/4 inch thick) or chopstick guides
- Sandpaper (fine grit)
- Small needle tool or toothpick
- Clay sculpting tool with a blunt point (for dotting)
- Canvas mat or parchment paper
- Small bowl of water
- Matte acrylic sealant (spray or brush-on)
- Ruler
Step 1: Preparation & Base Form
-
Prepare your workspace:
Lay down your canvas mat or parchment paper on a flat, stable surface. This prevents the clay from sticking and picking up unwanted textures from your table. -
Condition the clay:
Take a handful of air-dry clay and knead it in your hands until it feels warm, pliable, and free of cracks. If it feels too stiff, dip your fingers in water and work the moisture in. -
Roll the slab:
Place your wooden guide slats on either side of the clay ball. Using the acrylic rolling pin, roll the clay out until the pin rests on the guides, ensuring an even quarter-inch thickness across the entire slab. -
Cut the circle:
Press the round cookie cutter firmly into the center of your rolled clay slab. Give it a gentle twist to release the shape, then carefully remove the excess clay from around the circle. -
Smooth the edges:
Dip your finger lightly in water and run it along the cut edge of the circle. This rounds off the sharp 90-degree angle left by the cutter, giving it a more finished, stone-like look.
Depth Control Tip
Wrap a piece of masking tape around your needle tool about 2mm from the tip. This acts as a depth stop, ensuring all your scored lines stay consistent without cutting too deep.
Step 2: Designing the Pattern
-
Mark the center:
Using your needle tool, make a tiny, barely visible prick in the exact center of the coaster. I find this reference point crucial for keeping the geometric pattern symmetrical. -
Create the central cross:
Imagine a ‘plus’ sign dividing the circle into four equal quadrants. Using your blunt dotting tool, press a line of dots radiating from the center out to the edge in four directions: North, South, East, and West. -
Divide into eighths:
Now, bisect each quadrant with another line of dots, effectively creating an eight-spoke wheel shape. Keep your spacing consistent between dots. -
Add the perimeter dots:
Carefully press a ring of dots around the entire outer circumference of the coaster, about 1/8th inch from the edge. This frames the design perfectly.
Fixing Cracks
If tiny cracks appear while drying, mix a small amount of clay with water to create a paste (slip). Rub this into the crack with your finger and let it dry again.
Step 3: Adding Texture Details
-
Score the first quadrant:
Focus on one triangular section between your dotted lines. Use the needle tool to gently drag lines perpendicular to the dotted divider. Do not cut through; just create surface texture. -
Alternate the direction:
Move to the next triangular section immediately to the right. Instead of continuing the same direction, change the angle of your lines so they meet the previous section in a chevron or ‘V’ pattern. -
Repeat the pattern:
Continue around the circle, alternating the direction of your scored lines for each section. This creates the illusion of a woven or knitted fabric. -
Refine the border:
Check the connection points where your scored lines meet the dotted dividers. If the clay has pushed up slightly, gently tap it down with the flat side of a tool. -
Add accent dots:
For extra detail, add a single larger dot impression at the widest part of each triangular section, near the outer border.
Step 4: Finishing
-
Initial drying:
Let the coaster sit untouched for about 24 hours. Placing a light book or flat board on top (sandwiched between paper towels) can help prevent the edges from curling up as moisture evaporates. -
Flip and dry:
After the first day, carefully flip the coaster over to let the underside breathe. Allow it to dry for another 24-48 hours until it is bone dry and chalky white. -
Sand imperfections:
Take your fine-grit sandpaper and very gently buff the edges and the underside. Avoid sanding the top heavily so you don’t erase your delicate texture. -
Seal the piece:
Apply a coat of matte acrylic sealant. This protects the clay from moisture, which is essential for a coaster. Ensure you get the sealant into the recessed dots and lines. -
Final coat:
Once dry, apply a second coat of sealant for durability. Let it cure fully according to the bottle instructions before placing a drink on it.
Now you have a stunning piece of functional decor ready for your coffee table


What Really Happens Inside the Kiln
Learn how time and temperature work together inside the kiln to transform clay into durable ceramic.
Lace and Doily Texture Coasters
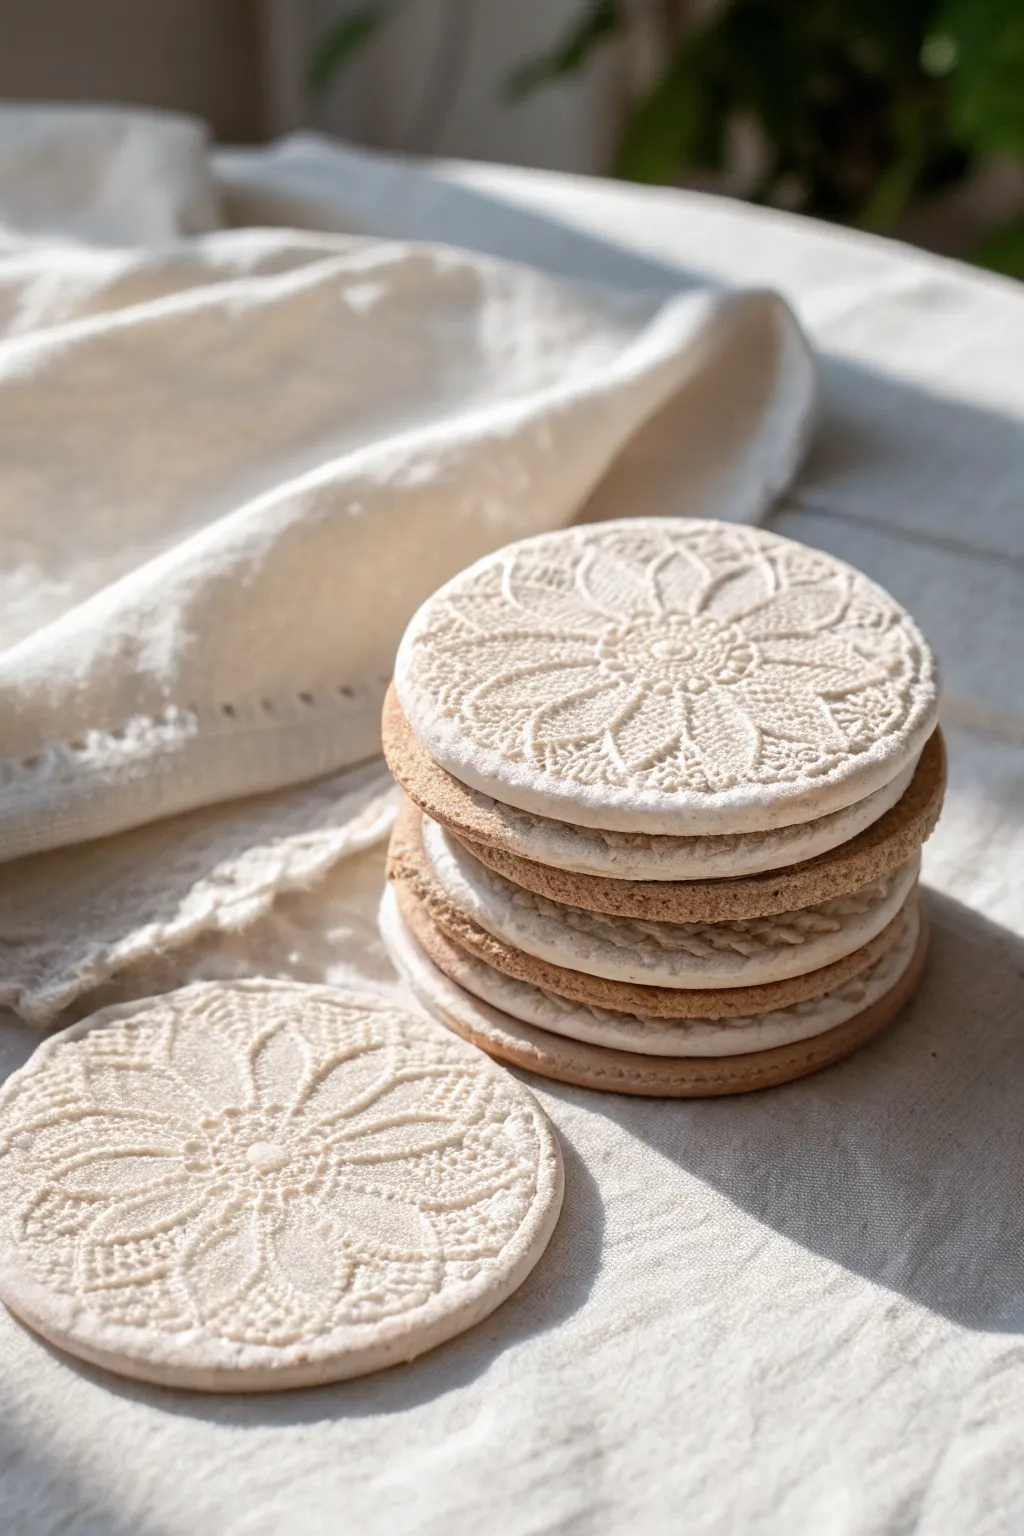
Capture the delicate beauty of antique textiles in permanent form with these elegant lace-impressed coasters. By layering contrasting clay tones, you’ll create a sophisticated sandwich effect that highlights the intricate doily textures.
How-To Guide
Materials
- Air-dry clay (white and terracotta/natural)
- Small vintage crochet doilies or lace scraps
- Rolling pin
- Round cookie cutter (approx. 4 inches)
- Canvas mat or parchment paper
- Small bowl of water
- Fine-grit sandpaper
- Matte acrylic sealer or varnish
- Butter knife or clay crafting tool
Step 1: Preparing the Clay Base
-
Condition the Clay:
Begin by taking a handful of the terracotta-colored clay and kneading it in your hands until it becomes warm, pliable, and free of cracks. -
Roll the Base Layer:
Place the terracotta clay on your canvas mat or parchment paper. Use your rolling pin to flatten it into an even sheet, aiming for about 1/4 inch thickness. -
Cut the Bottom Circles:
Press your round cookie cutter firmly into the terracotta sheet to create your base circles. I like to give the cutter a little wiggle before lifting to ensure a clean cut. -
Smooth the Edges:
Dip your finger in a little bit of water and run it along the edges of the terracotta circles to smooth out any roughness from the cutter.
Fixing warped discs
If coasters curl while drying, slightly dampen the concave side and place under a heavy book between parchment paper sheets overnight to flatten them back out.
Step 2: Creating the Lace Layer
-
Condition White Clay:
Repeat the kneading process with the white air-dry clay. Ensure your hands are clean first so you don’t transfer the darker clay color to the white. -
Roll Top Sheet:
Roll out the white clay, but slightly thinner than the base layer—aim for slightly less than 1/4 inch thickness since this will sit on top. -
Position the Lace:
Lay your chosen doily or lace scrap directly onto the smooth white clay sheet. Press it down lightly with your fingers to tack it in place. -
Impress the Pattern:
Take your rolling pin and roll firmly over the doily. You need enough pressure to push the fabric strands deep into the clay, but not so much that you warp the clay’s thickness intensely. -
Reveal the Texture:
Find the edge of the doily and peel it back slowly and carefully. This is the most satisfying part, revealing the raised ’embroidery’ look on the clay. -
Cut Top Circles:
Position your round cutter over the most interesting parts of the lace pattern. Cut out circles that match the size of your terracotta bases.
Antique wash effect
Dilute brown acrylic paint with water (1:5 ratio) and brush over the dried white clay. Wipe off immediately with a rag to leave dark color only in the lace crevices.
Step 3: Assembly and Finish
-
Score the Surfaces:
Using a knife or clay tool, gently scratch cross-hatch patterns onto the top of a terracotta circle and the bottom of a lace-textured white circle. -
Apply Slip:
Dab a small amount of water or liquid clay (slip) onto the scratched areas to act as a glue. -
Stack and Align:
Place the white lace circle directly on top of the terracotta circle. Gently press them together, being careful not to squash the delicate lace texture on top. -
Refine the Seam:
Check the side profile of the coaster. If the layers are sliding apart, gently nudge them back into alignment so they form a perfect cylinder. -
Slow Drying:
Move the coasters to a drying rack or a flat, wire mesh surface. Let them air dry for 24-48 hours away from direct sunlight to prevent curling. -
Sand Imperfections:
Once fully dry and hard, use fine-grit sandpaper to gently smooth the outer rim of the coaster, blending the two clay layers visually if desired. -
Seal the Coaster:
Apply a thin coat of matte acrylic sealer to the top and sides. This protects the textured surface from moisture and stains without making it look glossy or plastic.
Stack your finished coasters and enjoy the beautiful, tactile contrast of the lace patterns against the earthy clay tones
Gilded Rim Statement Coasters
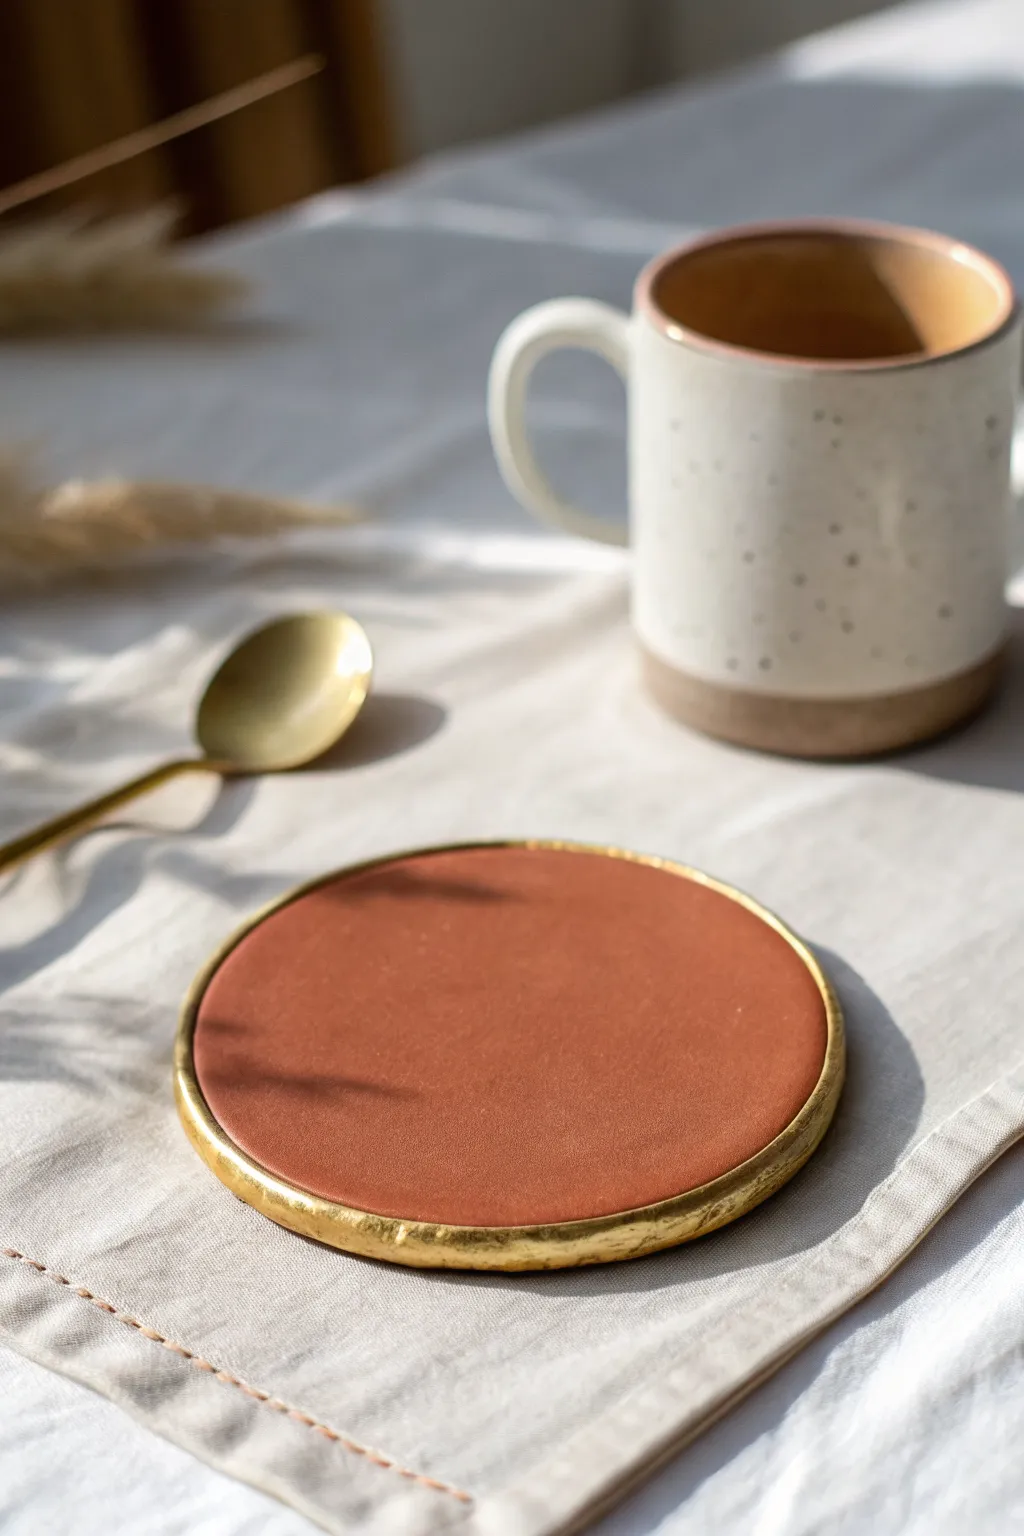
Elevate simple clay coasters into luxurious home accents with this striking gold-rim design. The warmth of the terracotta tone paired with the irregular, organic gold leaf edge creates a modern yet timeless aesthetic perfect for any coffee table.
Detailed Instructions
Materials
- Terracotta-colored polymer clay (or air-dry clay)
- Circular clay cutter (approx. 4 inches) or a bowl to trace
- Acrylic rolling pin
- Parchment paper or baking mat
- Gold leaf sheets
- Gilding size (adhesive for gold leaf)
- Small, soft paintbrush for gilding
- Stiff bristle brush for removing excess leaf
- Fine-grit sandpaper (400-600 grit)
- Gloss or satin varnish (optional, for sealing)
Step 1: Shaping the Base
-
Prepare the Clay:
Start by conditioning your terracotta polymer clay in your hands until it becomes soft and pliable. If you are using air-dry clay, knead it briefly to remove air bubbles. -
Roll It Out:
Place the clay between two sheets of parchment paper or directly on your craft mat. Using the acrylic rolling pin, roll the clay out to an even thickness of about 1/4 inch (6mm). I like to use depth guides or popsicle sticks on either side to ensure it’s perfectly level. -
Cut the Shape:
Press your circular cutter firmly into the clay to create a clean circle. If you don’t have a cutter, trace around a bowl or mug with a needle tool or craft knife. -
Smooth the Edges:
Dip your finger in a tiny bit of water (for air-dry clay) or baby oil (for polymer clay) and gently run it along the cut edge to soften any sharp corners, giving it a more finished, ceramic look. -
Cure or Dry:
For polymer clay, bake according to the manufacturer’s package instructions (usually around 275°F for 15-30 minutes). For air-dry clay, let it sit undisturbed for 24-48 hours until fully hardened and light in color.
Step 2: Creating the Surface
-
Sand for Smoothness:
Once the coaster is fully cooled or dry, lightly sand the top surface and edges with fine-grit sandpaper. This ensures a professional, high-end finish and removes any fingerprints. -
Clean the Surface:
Wipe away all sanding dust with a slightly damp cloth or paper towel. The surface must be completely dust-free for the gilding size to adhere properly.
Uneven Gold?
If your gold leaf looks patchy, wait until the first layer is dry, dab a tiny bit more adhesive onto the bald spots, wait for tackiness, and apply fresh leaf scraps.
Step 3: Gilding the Rim
-
Apply Gilding Adhesive:
Using a small paintbrush, carefully apply a thin layer of gilding size along the outer rim of the coaster. Extend the adhesive slightly onto the very edge of the top surface to create that visible gold border seen in the photo. -
Wait to Tack:
Allow the adhesive to sit until it becomes tacky. It should feel sticky to the touch but not wet. This usually takes about 10-15 minutes, depending on the brand. -
Apply Gold Leaf:
Gently lift a sheet of gold leaf and press it against the tacky rim. Don’t worry about being neat; let the gold leaf wrap around the side and slightly onto the top and bottom surfaces. -
Burnish the Gold:
Use a soft, dry brush to gently pat the gold leaf down, ensuring it makes full contact with all the adhesive areas. -
Brush Away Excess:
Once the gold is secure, take your stiff bristle brush and vigorously brush away the loose flakes of gold leaf that aren’t stuck to the adhesive. This reveals the clean, metallic edge. -
Seal the Coaster:
To protect your work from moisture and cup rings, apply a coat of varnish over the entire coaster. Pay special attention to the gold rim to prevent it from tarnishing over time.
Texture Twist
Before baking, gently press a linen cloth onto the clay surface to imprint a subtle fabric texture that contrasts beautifully with the smooth gold rim.
Now you have a stunning, boutique-style coaster ready to hold your morning coffee

TRACK YOUR CERAMIC JOURNEY
Capture glaze tests, firing details, and creative progress—all in one simple printable. Make your projects easier to repeat and improve.
Monogram Letterpress Coasters
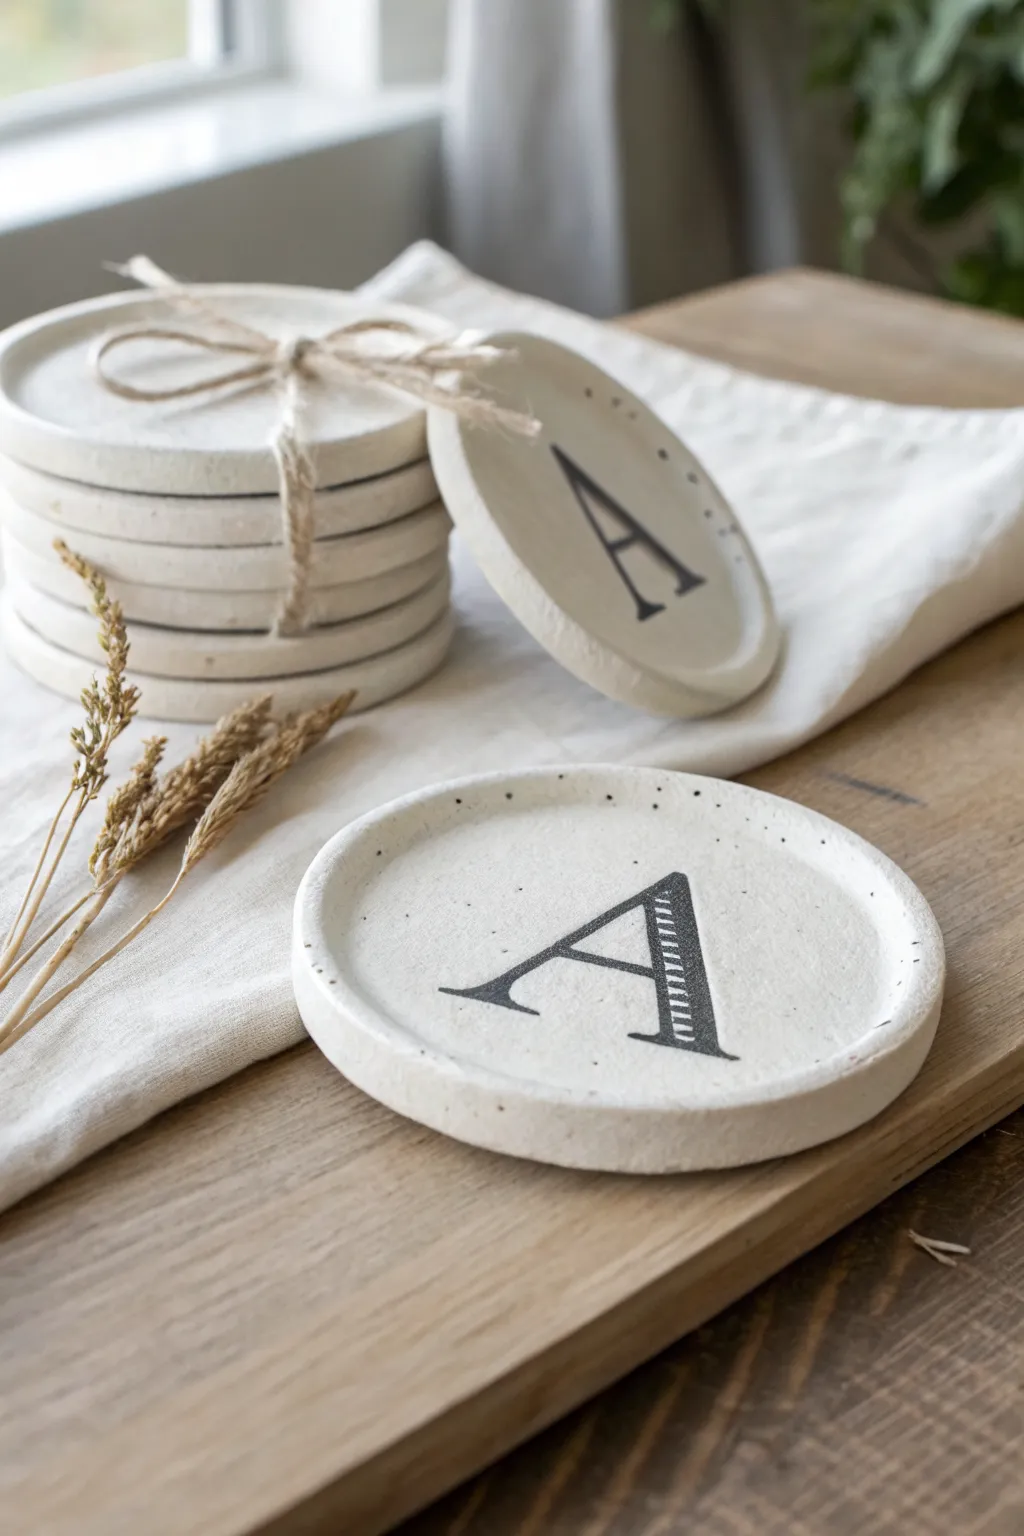
These elegant coasters combine a raw, earthen texture with the sophistication of classic typography. The slightly distressed finish and stamped monogram give them a timeless, letterpress-style appearance that looks beautiful on any coffee table.
Step-by-Step Tutorial
Materials
- White or cream air-dry clay (approx. 500g)
- Rolling pin
- Circle cutter (approx. 4 inches) or a large glass rim
- Large rubber letter stamp (your chosen initial)
- Black stamping ink pad (permanent/archival)
- Sandpaper (fine-grit being 220+)
- Small bowl of water
- Sponge or smoothing tool
- Matte finish sealant spray or Mod Podge
Step 1: Shaping the Base
-
Prepare the Clay:
Cut off a chunk of air-dry clay and knead it in your hands for a minute until it is soft, pliable, and free of cracks. -
Roll it Out:
Place the clay on a smooth surface or craft mat. Use your rolling pin to flatten the clay to an even thickness of about 1/4 inch. -
Cut the Circles:
Press your circle cutter or the rim of a large glass firmly into the clay to cut out your coaster shape. Repeat for as many coasters as you plan to make. -
Create the Lip:
This step adds the dimensional edge. Gently press your thumb into the center of the clay circle and pinch the outer edges slightly upwards to create a raised rim. -
Refine the Rim:
Use your fingertips to smooth the raised edge, ensuring it’s relatively uniform around the perimeter but keeping that organic, handmade feel.
Step 2: Creating the Design
-
Load the Stamp:
Take your large monogram stamp and press it firmly onto the black ink pad. Ensure the entire letter surface is evenly coated with ink. -
Test the Impression:
I always recommend doing a quick test stamp on a scrap piece of clay first to gauge how much pressure you need. -
Stamp the Coaster:
Center the stamp over your clay circle and press down straight and firm. You want to press hard enough to embed the ink and slightly deboss the clay, but not so hard that you deform the coaster. -
Add Speckling (Optional):
To mimic the speckled look in the photo, you can flick a tiny bit of diluted black paint or ink from a toothbrush onto the wet clay, or gently poke diverse tiny holes with a needle tool. -
Smooth Imperfections:
Dip your finger or a small sponge into water and gently run it over rough edges or cracks on the rim to smooth them out before drying.
Clean Impressions
If your stamp gets clay stuck in the grooves, dust the stamp surface lightly with cornstarch or baby powder before inking. This acts as a release agent.
Step 3: Finishing Touches
-
Let it Dry:
Place your coasters on a wire rack or flat surface to dry. This usually takes 24-48 hours depending on humidity. Flip them over halfway through to ensure even drying. -
Check for Warping:
If the edges start to curl up while drying, place a light book on top of them (once the surface is dry to the touch) to keep them flat. -
Sand the Edges:
Once fully cured, take your fine-grit sandpaper and lightly buff the rim and sides to remove any sharp bits or burrs. -
Seal the Project:
To protect against moisture from drinks, apply 1-2 coats of a matte sealant spray or a brush-on varnish. Allow the sealant to dry completely between coats. -
Bundle for Gifting:
Stack your finished set and tie them with a piece of rustic twine or jute string for a perfect presentation.
Luxe Gold Edge
Elevate the design by painting just the raised rim with liquid gold leaf or metallic paint after the clay has fully dried but before sealing.
Now you have a charming set of personalized coasters ready to protect your tabletops with style
Geometric Hexagon Clay Coasters
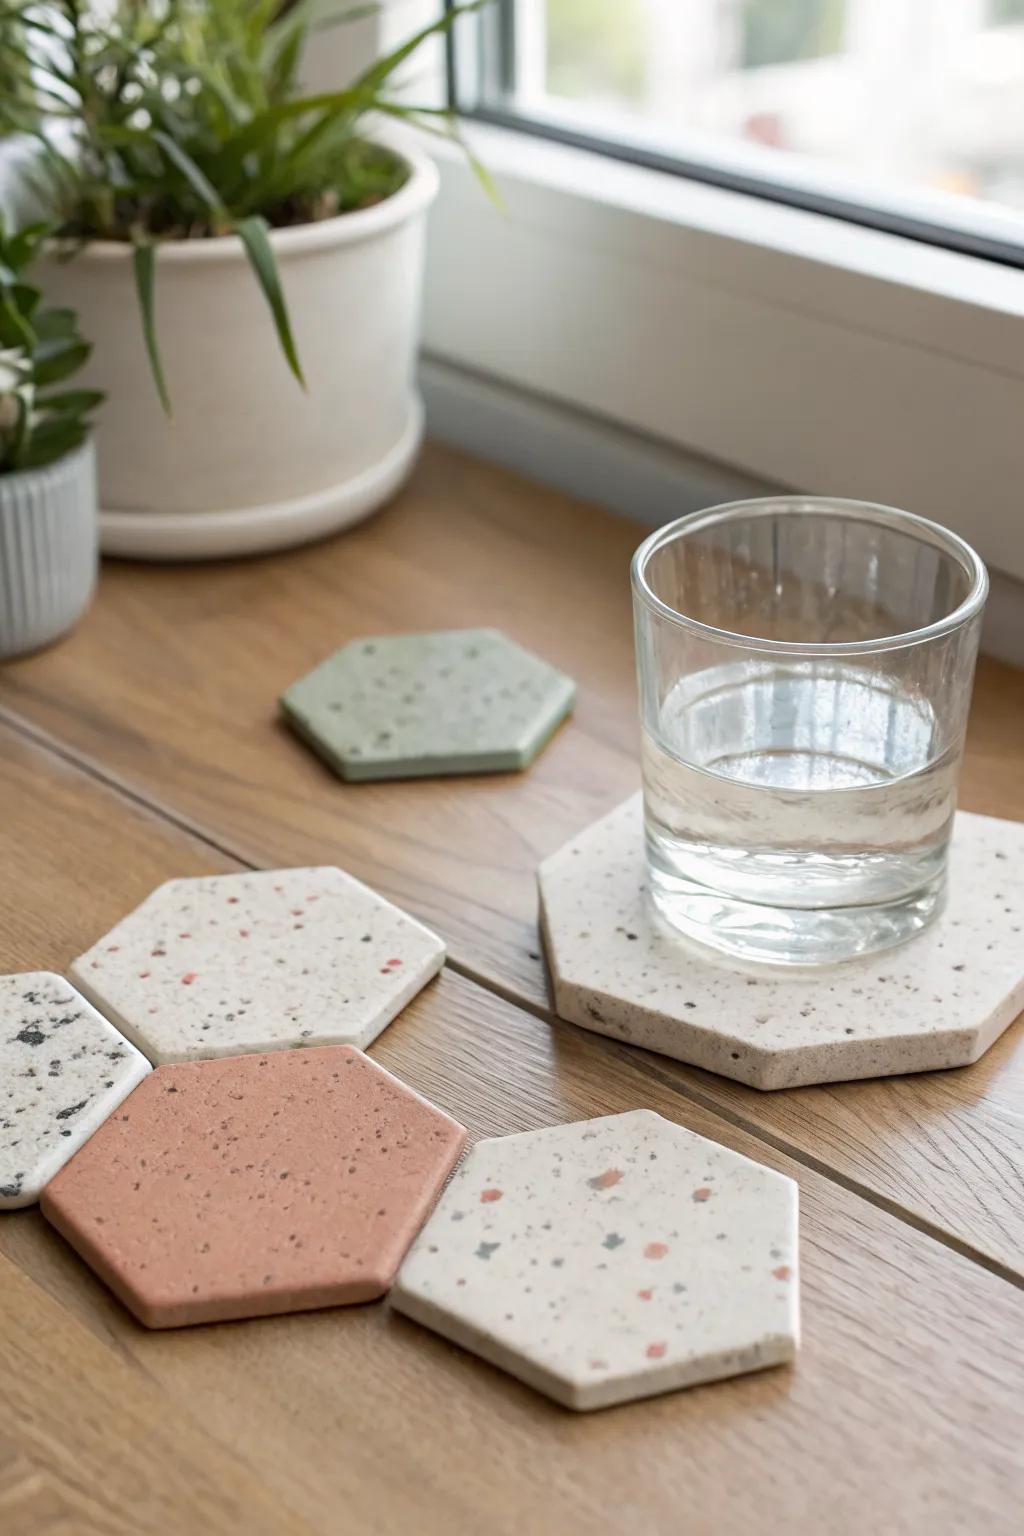
Embrace the modern charm of geometric design with these stylish hexagon coasters featuring a trendy terrazzo effect. The speckled pattern, created with colored clay chips, gives each piece a unique, artisanal look that protects your surfaces in style.
Detailed Instructions
Materials
- Polymer clay (white or cream for the base)
- Polymer clay (various earth tones: terracotta, sage green, gray, black)
- Hexagon cookie cutter (approx. 4 inches wide)
- Acrylic rolling pin or pasta machine
- Parchment paper or baking mat
- Craft knife or tissue blade
- Fine-grit sandpaper (400 to 1000 grit)
- Oven for baking
- Clear matte or satin varnish (optional)
- Soft paintbrush
Step 1: Preparing the Chips
-
Condition the Clay:
Start by conditioning small amounts of your colored clays (terracotta, sage, gray, and black) by kneading them until they are soft and pliable. -
Roll Thin Sheets:
Roll each colored clay piece into a very thin sheet. You want these to be quite delicate, as they will become your terrazzo chips. -
Bake the Sheets (Optional Pre-bake):
For crisper chips, I like to bake these thin sheets for about 10 minutes according to package instructions. Alternatively, you can chop them raw, but baked clay makes for cleaner shards. -
Create the Chips:
Once the thin sheets are cool (or while raw), use your craft knife to chop them into irregular, tiny fragments. Vary the sizes for a natural look, keeping most quite small.
Uneven Surface?
If your rolled surface looks bumpy after adding chips, lay a piece of parchment paper on top and use a flat object, like a heavy book, to press it perfectly flat before cutting.
Step 2: Forming the Coaster Base
-
Condition Base Clay:
Thoroughly knead your white or cream base clay. It needs to be warm and flexible to accept the chips properly. -
Roll the Slab:
Roll the base clay out to a thickness of about 1/4 inch. This provides a sturdy foundation for a coaster. -
Apply the Chips:
Scatter your colored clay chips onto the white slab. Don’t overthink the placement; random scattering creates the best organic pattern. -
Embed the Pattern:
Gently roll over the slab again with your acrylic roller. Apply enough pressure so the chips sink completely into the base clay and the surface becomes level. -
Multi-Directional Rolling:
Roll from different directions to ensure the slab stays even and the chips don’t streak in just one direction.
Pro Tip: Smear Prevention
If using raw clay chips, pop the slab in the fridge for 10 minutes before rolling. Cold chips are less likely to smear or streak into the white base color.
Step 3: Cutting and Finishing
-
Cut the Shapes:
Position your hexagon cutter over an area of the pattern you like best. Press down firmly to cut the shape. -
Release the Shape:
Gently wiggle the cutter to release the clay. If the clay sticks, push it out gently from the edges, not the center, to avoid warping. -
Smooth the Edges:
Run your finger lightly around the rim of the hexagon to soften the sharp cut edge. A little water on your fingertip can help smooth any roughness. -
Bake the Coasters:
Place your cut hexagons on parchment paper and bake according to your clay manufacturer’s instructions. Usually, this is around 275°F (135°C) for 30 minutes. -
Cool and Sand:
Allow the coasters to cool completely. Once hard, wet sand the surface with fine-grit sandpaper to reveal the sharp edges of the chips and create a stone-like texture. -
Buffing:
Use a soft cloth or denim to buff the surface vigorously. This removes sanding dust and gives the clay a subtle, professional sheen. -
Seal (Optional):
If you want extra protection against drink condensation, apply a thin coat of matte varnish with a soft brush and let it dry.
Now you have a set of durable, modern coasters ready to elevate your coffee table display
Hand-Painted Brushstroke Coasters
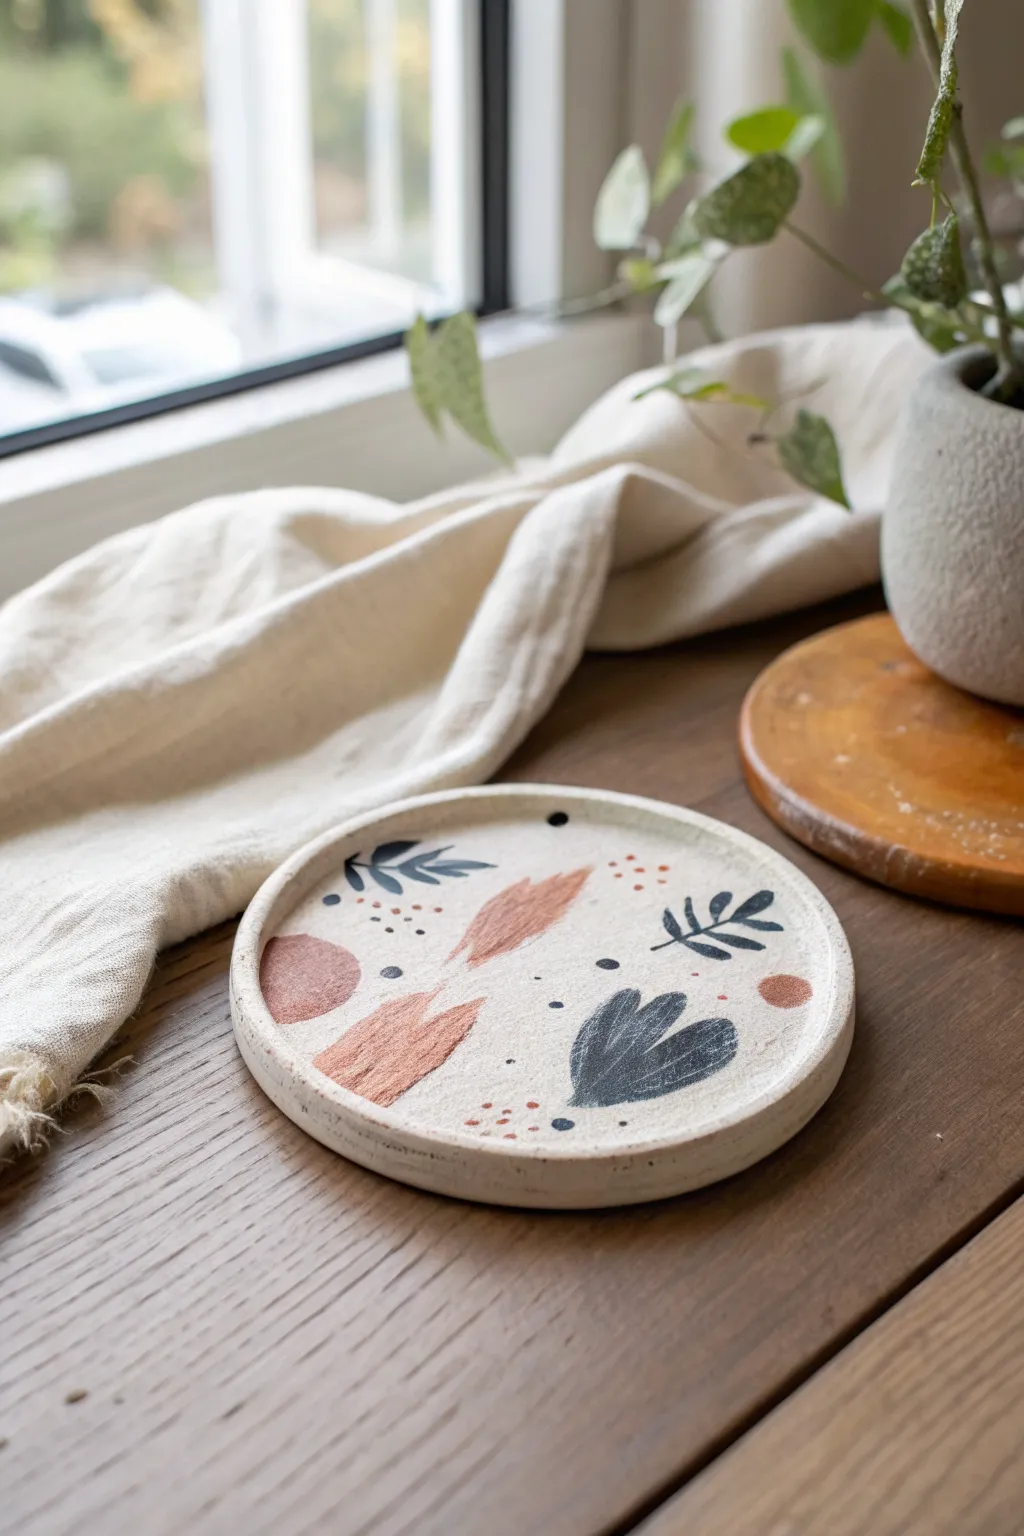
Embrace the beauty of imperfection with this nature-inspired coaster design, featuring loose botanical shapes and warm, earthy tones. The combination of rust-colored brushstrokes and deep indigo leaves creates a modern, organic aesthetic that perfectly complements the speckled clay texture.
How-To Guide
Materials
- Air-dry clay or polymer clay (white or cream)
- Acrylic paints (terracotta/rust, dark navy blue, black)
- Round rolling pin
- Circle cutter or a bowl approximately 4-5 inches in diameter
- Fine-grit sandpaper
- Small round paintbrush (size 2 or 4)
- Detail brush (size 0 or 00)
- Matte or satin varnish/sealant
- Old toothbrush (optional for speckling)
- Small sponge
Step 1: Shaping the Base
-
Condition the clay:
Start by kneading a ball of white or cream clay in your hands until it becomes soft, pliable, and free of cracks. If you want to mimic the speckled look of the original photo, you can knead in a tiny pinch of black pepper or dried coffee grounds. -
Roll out the slab:
Using your rolling pin, flatten the clay ball into an even slab that is roughly 1/4 inch thick. Try to keep the thickness consistent across the entire surface to ensure it dries flat. -
Cut the circle:
Press your circle cutter or an upside-down bowl firmly into the clay to cut out your coaster shape. Lift away the excess clay. -
Form the rim:
Dip your finger in a little bit of water and gently smooth the edges. To create the slight rim seen in the image, pinch the very edge of the circle upwards and smooth the inside curve with your thumb. -
Dry the base:
Place the coaster on a flat surface to dry. If using air-dry clay, let it sit for 24-48 hours, flipping it halfway through to prevent curling. If using polymer clay, bake according to the package instructions. -
Sand for smoothness:
Once fully dry or cured and cooled, use fine-grit sandpaper to gently smooth out any rough edges or fingerprints on the rim and surface.
Step 2: Painting the Design
-
Mix your colors:
Prepare your palette. You’ll need a warm terracotta rust color (mix orange with a touch of brown) and a deep, muted navy blue (add a tiny bit of black to your blue). -
Paint the rust swatches:
Using your small round brush, paint two or three loose, organic swatches of the rust color. I like to start from the center and brush outwards, letting the brush bristles create a feathery, natural texture at the ends. -
Add a solid accent:
Paint a semi-circle or irregular blob shape on the left side using the same rust color to anchor the composition. -
Paint the large leaf:
Switch to the dark navy paint. Paint a large, abstract heart-like leaf shape near the bottom right. Keep the strokes visible and slightly rough to maintain that hand-painted charm. -
Add fine botanical details:
With your detail brush and the navy paint, draw delicate stems with small leaves branching off on the top left and right sides. Keep your wrist loose for fluid lines. -
Create dot clusters:
Using the tip of your detail brush or a toothpick, add clusters of small rust-colored dots near the leaf shapes. Vary the pressure to create different sized dots. -
Add dark accents:
Place a few singular, larger navy or black dots randomly around the empty negative space to balance the design. -
Flick for texture:
If your clay wasn’t pre-speckled, load a toothbrush with watered-down black paint and gently flick the bristles to create a fine mist of speckles over the entire piece.
Natural Texture Hack
To get the bristles texture seen in the rust shapes, don’t overload your brush with paint. A ‘dry brush’ technique highlights the clay’s surface.
Step 3: Finishing Touches
-
Let paint cure:
Allow the painted design to dry completely. This usually takes about an hour, depending on how thick your paint application was. -
Apply sealant:
Apply a thin layer of matte or satin varnish over the entire top surface and rim to protect your artwork from moisture and scratches. -
Seal the bottom:
Once the top is dry to the touch, flip the coaster over and seal the bottom as well to ensure the clay is fully protected.
Wobbly Lines?
If you smudge a leaf or dot, wait for the acrylic to dry completely, then gently scrape it off with an X-Acto knife or sandpaper and repaint.
Now you have a stunning piece of functional art ready to hold your morning coffee or evening tea
Watercolor Wash Texture Coasters
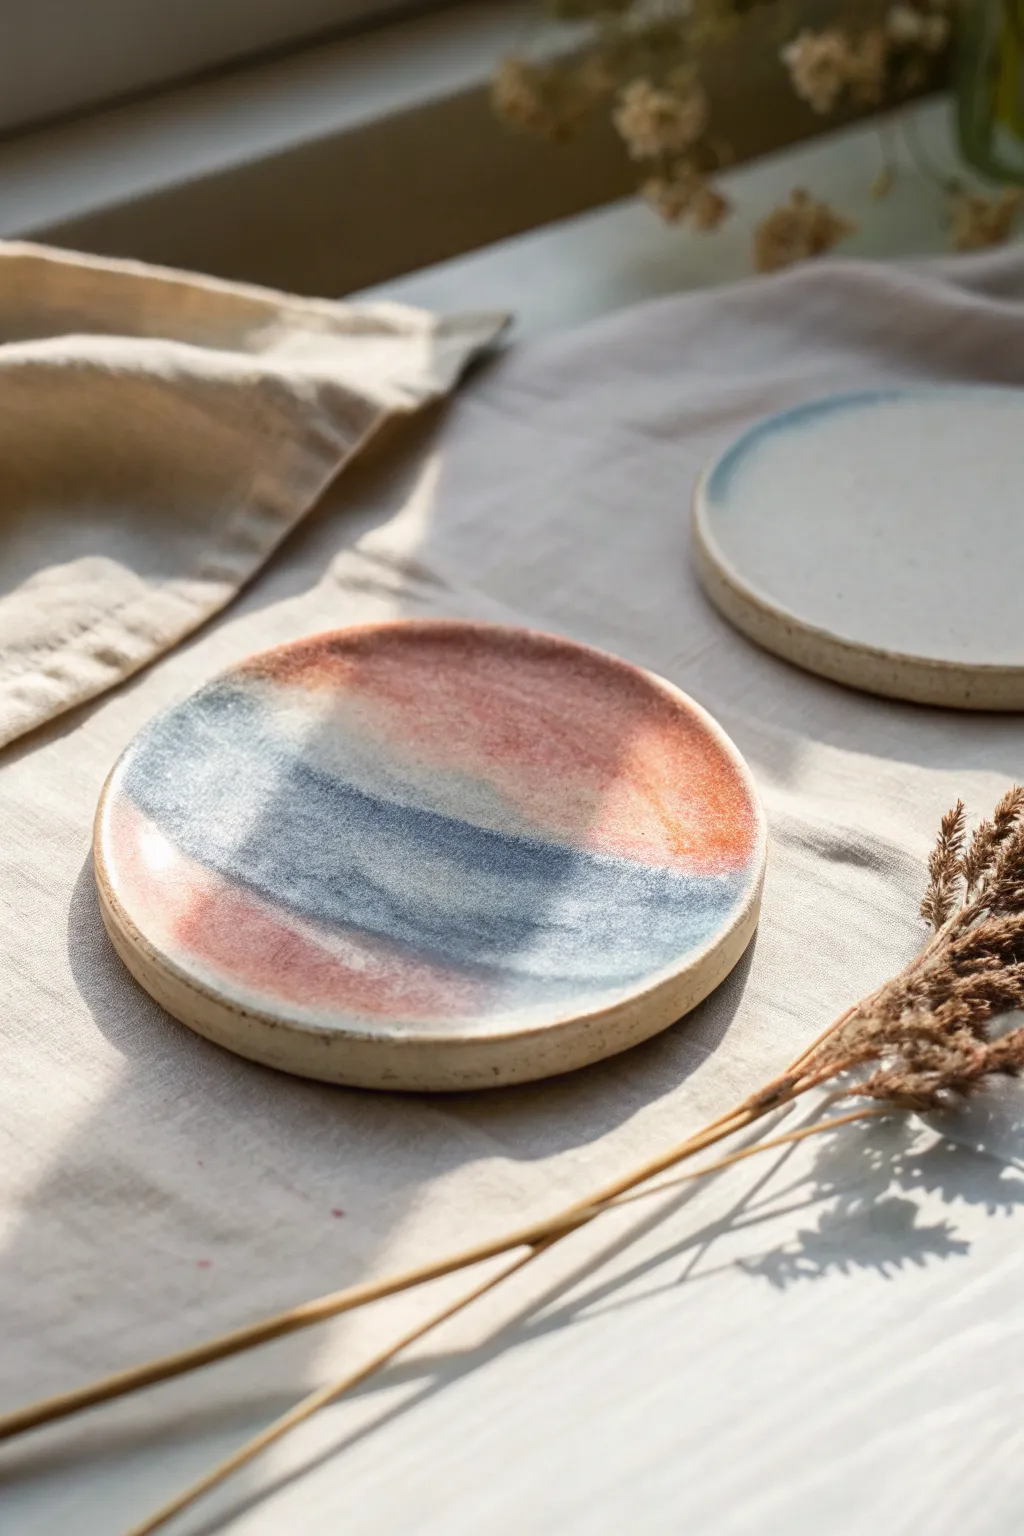
Capture the serene beauty of a sunrise horizon with these stunning clay coasters featuring a watercolor-style glaze wash. By layering soft peach tones against moody blues, you can create a functional piece of art that brings an earthy, organic feel to your coffee table.
Step-by-Step Guide
Materials
- Air-dry clay or polymer clay (white or light beige)
- Rolling pin
- Circular cookie cutter or jar lid (approx. 4 inches)
- Small bowl of water
- Fine-grit sandpaper
- Acrylic paints (peach/terracotta, slate blue, white, grey)
- Wide, flat paintbrush
- Soft sponge
- Glossy varnish or sealant (Mod Podge or resin)
Step 1: Shaping the Clay Body
-
Condition the Clay:
Begin by taking a handful of your chosen clay and kneading it thoroughly until it is soft, pliable, and free of air bubbles. If using air-dry clay, keep your hands slightly damp to prevent cracking. -
Roll out the Slab:
Place the clay on a smooth surface or canvas mat. Use your rolling pin to flatten it into a slab that is roughly 1/4 inch thick, ensuring the thickness is even across the entire surface. -
Cut the Shape:
Press your large circular cutter firmly into the clay slab. If you don’t have a cutter, trace around a jar lid with a craft knife to get a clean circle. -
Create the Rim:
Gently pinch the outer edge of the circle upwards to create a slight lip. This tiny barrier helps contain condensation from cups later on. -
Smooth the Edges:
Dip your finger in a little water and run it along the rim and surface to smooth out any fingerprints or rough textures. A smooth canvas is essential for the watercolor effect. -
Dry Completely:
Set the coaster aside on a flat drying rack. Let it dry according to the package instructions—usually 24 to 48 hours for air-dry clay—turning it over occasionally to prevent warping. -
Sand the It:
Once fully cured, take your fine-grit sandpaper and lightly buff the edges and surface until it feels perfectly smooth to the touch. Wipe away the dust with a barely damp cloth.
Natural Texture
Before the clay dries, gently press a piece of linen fabric onto the surface and peel it off. This leaves a subtle woven texture that looks amazing under glaze.
Step 2: Applying the Watercolor Glaze
-
Prepare the Palette:
Squeeze out your paint colors. Dilute the peach and blue paints with a significant amount of water. You want them to be very translucent, almost like strong tea, rather than opaque paint. -
Wet the Surface:
Take a clean brush and lightly dampen the center of the coaster with plain water. This technique helps the paint bloom and spread naturally. -
Lay the Peach Base:
Using a wide brush, sweep the watery peach or terracotta color across the top and bottom sections of the coaster, leaving the middle section mostly empty. -
Add the Blue Stripe:
While the peach sections are still slightly wet but not soaking, paint a broad stroke of the diluted slate blue across the center. Allow the edges of the blue and peach to touch and bleed into each other slightly. -
Intensify the Grain:
Dip your sponge into a slightly less diluted blue-grey mix. Gently dab it into the center stripe to create texture that resembles stone grain or clouds. -
Clean the Rim:
If any paint has pooled on the raised rim, wipe it back gently with a clean, damp cloth. I find leaving the rim the natural clay color frames the painted design beautifully. -
Dry the Paint:
Let the paint dry completely. Because the washes are watery, this might take about 30 minutes. The colors will lighten slightly as they dry. -
Seal the Project:
Apply a coat of glossy varnish or a thin layer of resin over the entire top surface. This step creates that ceramic-glaze look and waterproofs the coaster against drips.
Gold Accents
Once the watercolor paint is dry, paint a thin line of liquid gold leaf along the very edge of the blue stripe for a modern, luxurious touch.
Now you have a set of unique, painterly coasters ready to protect your surfaces with style
Speckled Stoneware-Inspired Coasters
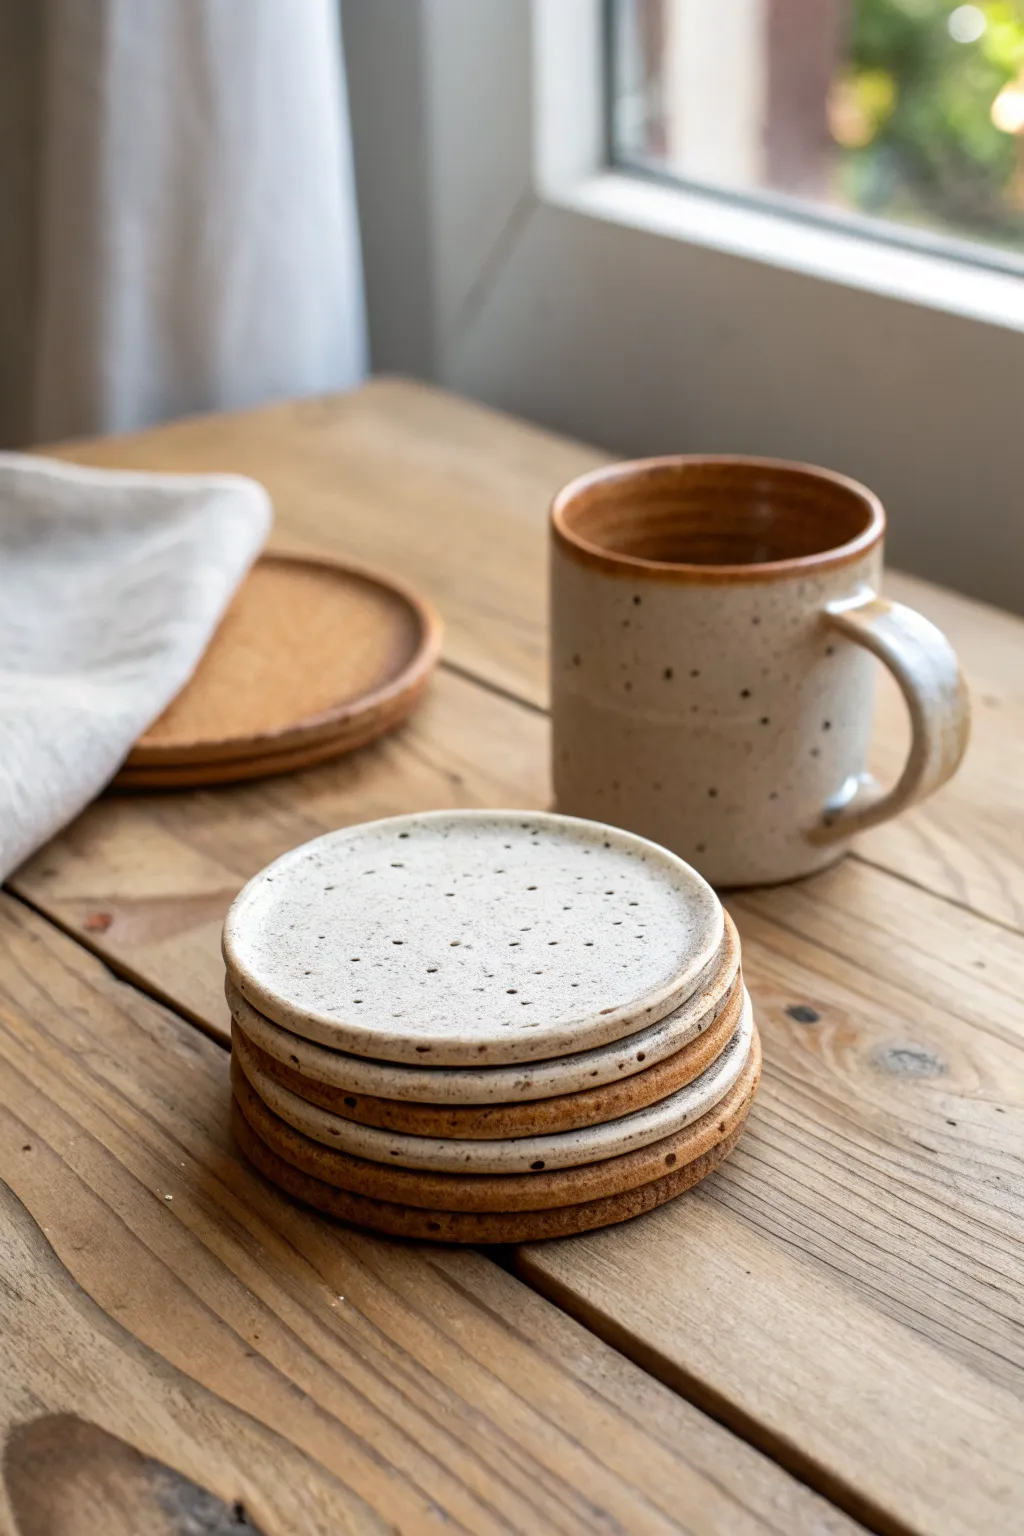
Capture the warmth of a cozy café with these handmade speckled stoneware coasters. This project focuses on achieving that beautiful contrast between raw, toasted clay edges and a creamy, speckled surface glaze.
Detailed Instructions
Materials
- Speckled stoneware clay (e.g., buff or toast with manganese speckles)
- Rolling pin
- Two 1/4 inch wooden guide strips
- Circular cookie cutter (approx. 4 inches diameter)
- Pottery sponge
- Potter’s rib (metal, wood, or silicone)
- Fettling knife or needle tool
- Canvas or slab mat for rolling
- Plastic wrap for slow drying
- Cream or white matte glaze (brush-on or dipping)
- Fan brush (if brushing glaze)
- Kiln (or access to a firing service)
Step 1: Preparing the Clay Slabs
-
Wedge the clay:
Begin by thoroughly wedging your speckled stoneware clay. This removes air pockets and ensures the particles are aligned, which helps prevent warping later during the firing process. -
Set up your workspace:
Lay out a piece of canvas or a slab mat on your table. Place your two wooden guide strips on either side of your working area to ensure an even thickness. -
Roll the slab:
Flatten the clay slightly with your palm, then use the rolling pin to roll it out between the guide strips. Roll in multiple directions to compress the clay platelets, flipping the slab over once or twice. -
Smooth the surface:
Before cutting, take a slightly damp sponge or a soft rib tool and gently compress the surface of the slab. This removes canvas textures and aligns the clay particles for a smoother finish.
Warping Woes?
If coasters curl while drying, flip them over daily and dry them very slowly under loose plastic. Weighting them with a small board helps keep them flat.
Step 2: Cutting and Refining
-
Cut the circles:
Press your circular cutter firmly into the clay slab. I like to twist it slightly before lifting to ensure a clean separation. -
Repeat for a set:
Cut as many coasters as you desire, keeping them close together to minimize waste. A standard set usually includes four to six coasters. -
Refine the edges:
Once the shapes are cut, lift them gently. Use a damp finger or a sponge to smooth the sharp cut edges, rounding them over slightly to make them pleasant to touch. -
Flatten the base:
Place the cut circles on a flat, absorbent board (ware board). Lay a sheet of newspaper or plastic lightly over them and place a light board on top to keep them perfectly flat as they stiffen to leather-hard. -
Bisque fire:
Once bone dry, load the coasters into the kiln for a bisque fire (typically Cone 04 or 06). This prepares them for glazing.
Add a Lip
While the clay is leather hard, gently press the center with the back of a spoon to create a slight depression to catch condensation drips.
Step 3: Glazing and Finishing
-
Clean the bisque:
After the bisque firing, wipe each coaster with a damp sponge to remove any kiln dust. This ensures the glaze adheres properly without crawling. -
Apply wax resist (optional):
If you want the sides and bottom to remain completely raw clay, carefully brush wax resist along the rim and the entire bottom surface. -
Glaze the top:
Dip the top face of the coaster into your cream matte glaze, or apply 2-3 even coats with a soft fan brush. Be careful not to let glaze drip down the sides if you want that clean line. -
Let the speckles show:
Choose a glaze that allows the clay’s natural speckles to bleed through. Many matte white glazes will interact with the iron or manganese in the clay body to create that scattered dot effect. -
Clean up drips:
Use a damp sponge to meticulously wipe away any stray glaze from the vertical edges or the bottom foot. The contrast between glazed top and raw side is key to this look. -
Dry completely:
Allow the glaze to dry completely before handling again to avoid smudging the surface. -
Glaze fire:
Load the coasters into the kiln for the final glaze firing (usually Cone 5 or 6 for stoneware). Ensure they are placed flat on a kiln shelf that has been washed with kiln wash. -
Final sand:
After firing and unpacking, check the bottoms. If the raw clay feels minimal rough, give the bottom a quick sand with 400-grit sandpaper to ensure they won’t scratch table surfaces.
Stack your finished coasters on your coffee table and enjoy the organic, earthy charm they add to your home.
Scalloped Edge Clay Coasters
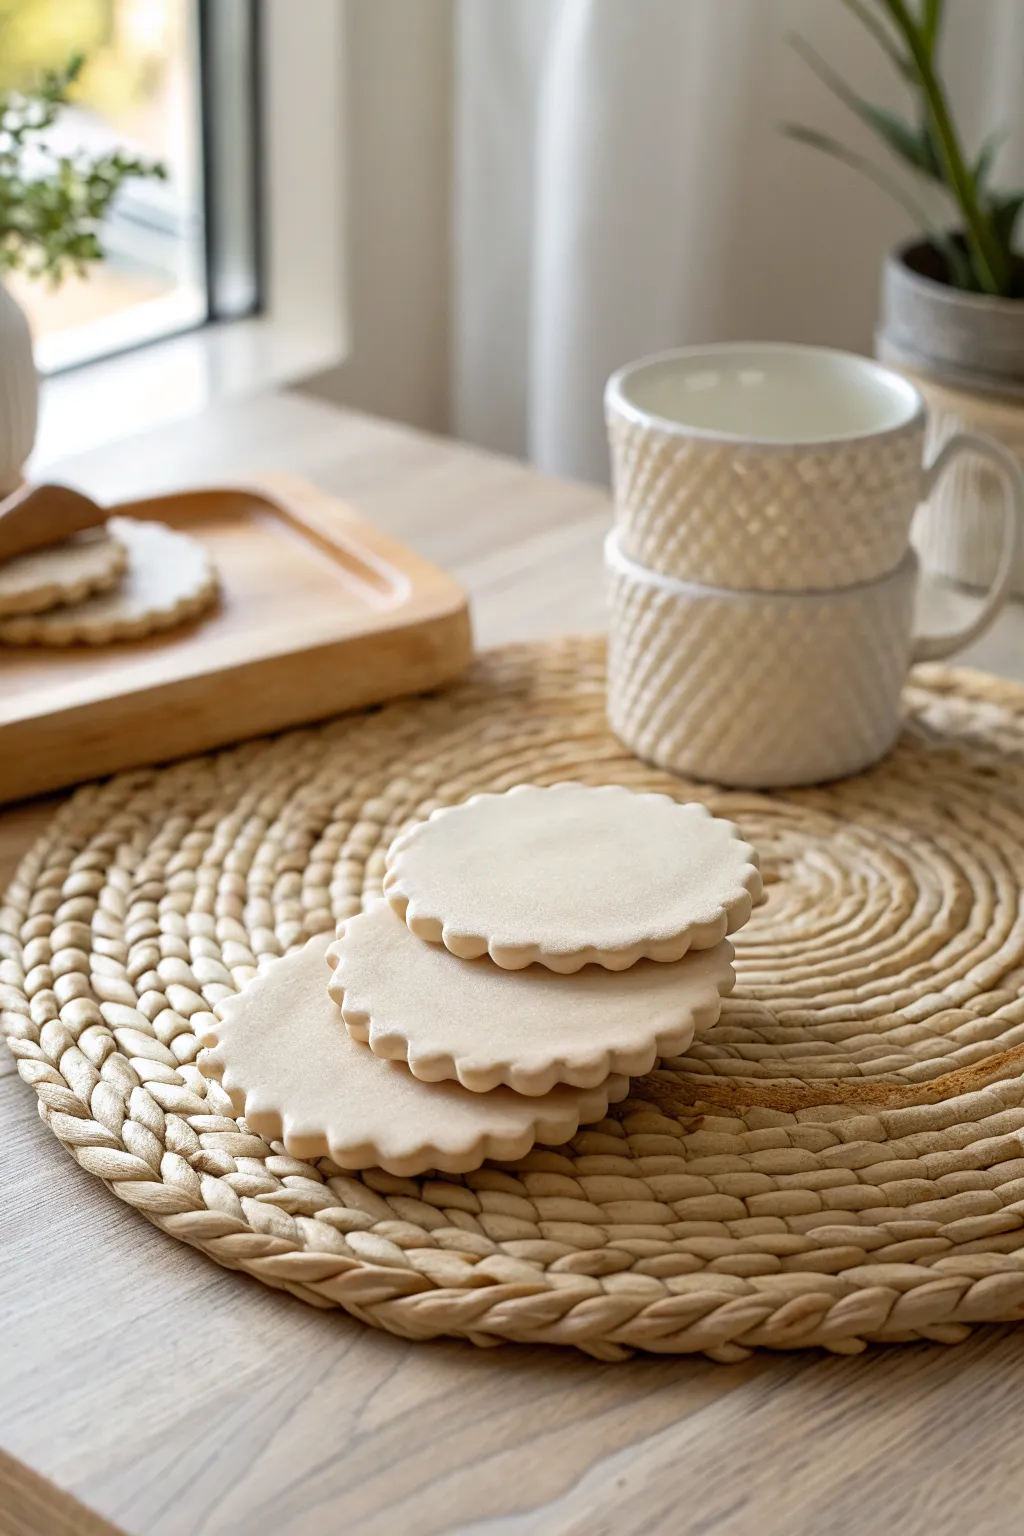
These elegant, understated coasters feature a delicate fluted edge that adds a touch of sophistication to any table setting. The smooth, matte finish mimics the look of high-end bisque ceramics, making them a beautiful yet functional addition to your home decor.
Step-by-Step Tutorial
Materials
- White polymer clay (or air-dry clay)
- Acrylic rolling pin
- Parchment paper or baking mat
- Round cookie cutter (approx. 3.5 – 4 inches)
- Small round cutter or specialized scalloped cutter (approx. 0.5 inch)
- Fine-grit sandpaper (400-600 grit)
- Oven (if using polymer clay)
- Matte sealant or water-based polyurethane varnish
Step 1: Preparation & Rolling
-
Condition the clay:
Begin by taking a generous amount of your white clay and kneading it thoroughly in your hands. You want the clay to be warm and pliable to prevent cracks later on. -
Set up your workspace:
Lay down a sheet of parchment paper or a silicone baking mat to protect your work surface and ensure the clay doesn’t stick. -
Roll out the slab:
Place the clay ball in the center and use your acrylic rolling pin to flatten it. Aim for an even thickness of about 1/4 inch (6mm) to ensure the coaster is sturdy enough for a mug. -
Smooth the surface:
Inspect the clay slab for any air bubbles or lint. Gently smooth them out with your fingertips or lightly roll over them again to get a pristine surface.
Depth Guide Trick
Place two wooden stir sticks or rulers on either side of your clay while rolling. Resting the rolling pin on these guides ensures perfectly even thickness.
Step 2: Cutting & Shaping
-
Cut the base circles:
Press your large round cookie cutter firmly into the clay to create the main coaster shape. Lift the cutter straight up to avoid warping the circle. -
Remove excess clay:
Peel away the scrap clay from around your circles. You can ball this up to use for the next coaster. I find it easiest to work on one coaster at a time from this point. -
Create the scalloped edge:
Using the small round cutter, press gently into the very edge of the large circle to cut out small semi-circles. Continue this process all the way around the perimeter. -
Space the cuts evenly:
Try to space your cuts so that the points where they meet correspond with the previous cut. If you don’t have a small cutter, you can use the rounded end of a modelling tool to push indentations instead. -
Refine the edges:
Once the scalloping is done, use your finger to very gently smooth the sharp edges created by the cutter. This softens the look and makes the finished coaster nicer to touch. -
Final smoothing:
Give the surface one last check. If you have any fingerprints, lightly buff them away with a tiny bit of cornstarch on your finger or a baby wipe.
Sticky Clay Issues?
If your clay is sticking to the cutter, lightly dust the clay surface with cornstarch or dip your cutter into water before pressing down.
Step 3: Baking & Finishing
-
Transfer to baking sheet:
Carefully move the parchment paper with the clay circles onto a flat baking sheet. Do not try to lift the raw clay circles individually as they might stretch. -
Bake the clay:
Bake according to your specific clay package’s instructions. Usually, this is around 275°F (135°C) for 15-30 minutes, but check your brand’s label. -
Allow to cool:
Once baked, remove the tray from the oven and let the coasters cool completely on a flat surface. They will harden fully as they cool down. -
Sand the imperfections:
Take your fine-grit sandpaper and gently sand the edges and surface. Focus on the curves of the scallops to ensure they are perfectly smooth. -
Wipe clean:
Use a slightly damp cloth to wipe away all the sanding dust. The surface needs to be completely clean before sealing. -
Seal the coaster:
Apply a thin, even coat of matte sealant or polyurethane varnish. This protects the clay from moisture and coffee stains while maintaining that natural, unglazed look. -
Dry and cure:
Let the sealant dry fully according to the bottle instructions—usually 24 hours—before placing any cups on your new creations.
Set your table with these custom coasters and enjoy the sophisticated charm they bring to your coffee break
Embedded Texture Collage Coasters
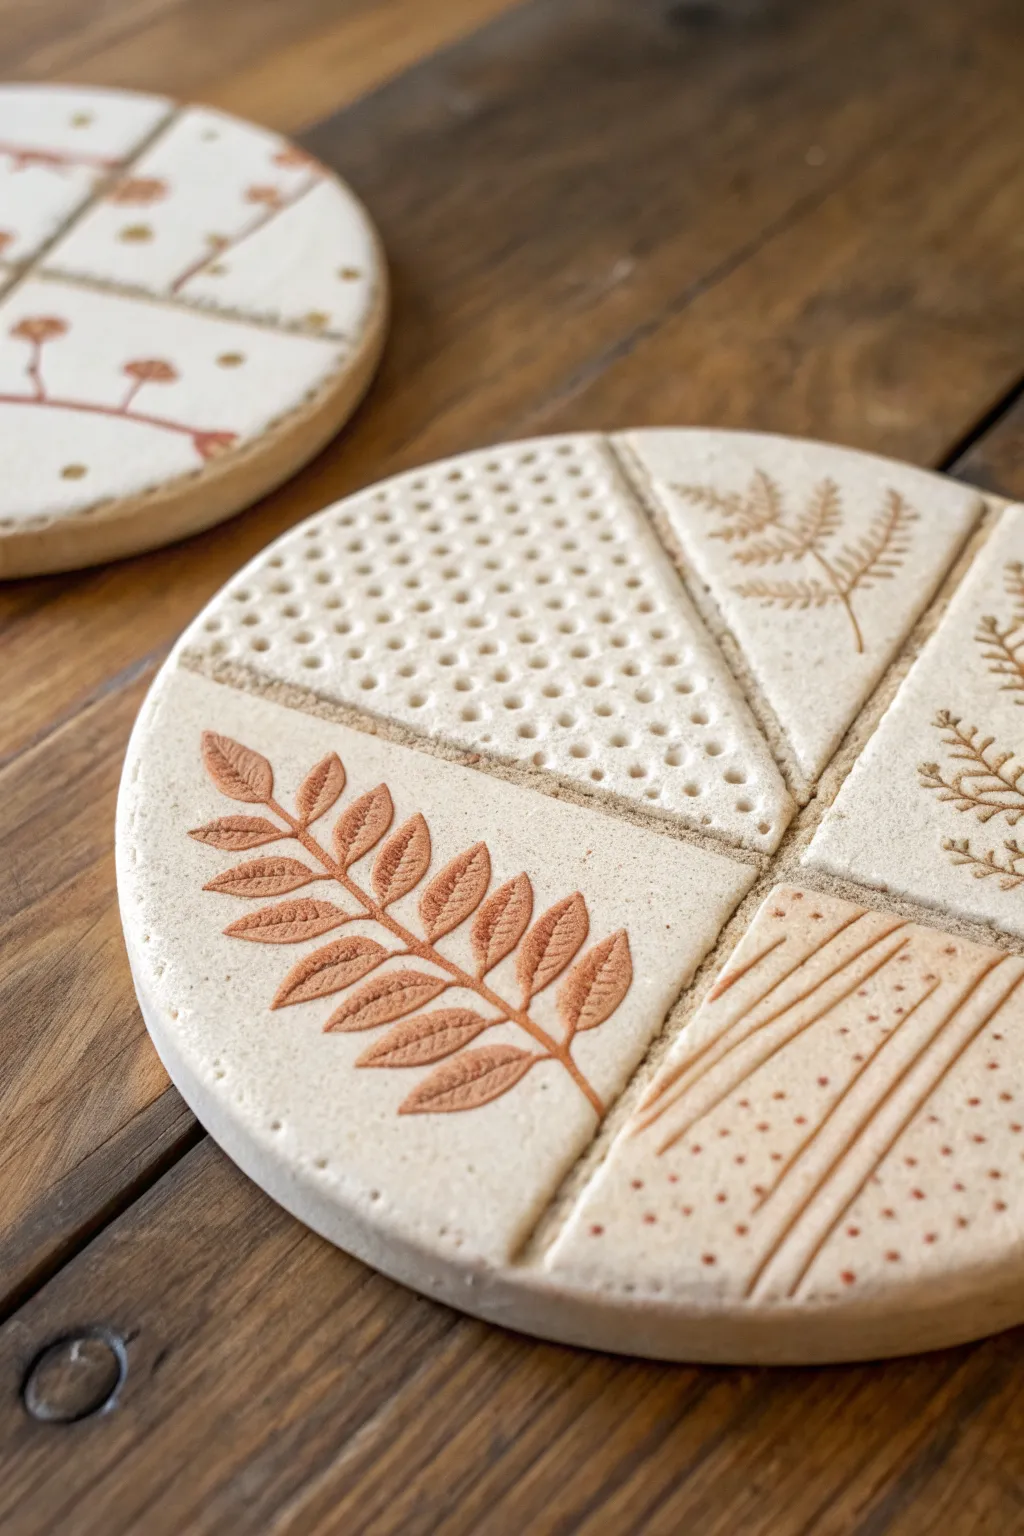
Bring a touch of organic warmth to your tabletops with these segmented clay coasters. By dividing the circular surface into geometric sections and stamping in contrasting textures like dots, lines, and botanical prints, you create a sophisticated yet earthy piece of functional art.
Detailed Instructions
Materials
- White or cream-colored air-dry clay (fine grain)
- Rolling pin with guide rings (or two slats for even thickness)
- Round cookie cutter (approx. 4-5 inches diameter)
- Modeling knife or clay needle tool
- Various texture tools: mesh, burlap, fern leaves, rubber stamps
- Red-brown acrylic paint or ceramic oxide wash
- Small paintbrush
- Damp sponge
- Fine-grit sandpaper (220-400 grit)
- Clear matte varnish or sealant
Step 1: Shaping the Base
-
Condition the clay:
Begin by taking a handful of air-dry clay and kneading it in your hands until it becomes warm, soft, and pliable. This prevents cracks later on. -
Roll the slab:
Place the clay on a smooth work surface or canvas mat. Use your rolling pin to flatten it into an even slab about 1/4 inch thick; guide rings are fantastic here to ensure uniformity. -
Cut the circle:
Press your large round cookie cutter firmly into the clay slab. If you don’t have a cutter large enough, trace a bowl with a needle tool. -
Smooth the edges:
Dip your finger in a little water and run it gently along the cut edge to smooth out any ragged bits or roughness.
Clean Lines Pro Tip
When pressing textures near the dividing lines, hold a ruler or piece of cardstock against the groove. This acts as a shield, keeping your stamping perfectly contained within its designated section.
Step 2: Creating the Collage Layout
-
Mark the segments:
Using a ruler and a needle tool, very lightly score lines across the surface to divide your circle into random geometric shards. Think of it like a puzzle or a broken mosaic pattern. -
Deepen the dividers:
Once you like the layout, use a modeling tool to press deeper grooves along those score lines. This creates distinct physical borders between your different texture zones. -
Texture Zone 1: The Dots:
For one triangular section, use a small, round tool—like the end of a paintbrush handle or a stylus—to press rows of uniform holes. Keep your pressure consistent. -
Texture Zone 2: The Botanical:
Select a larger section for your focal point. Place a real fern leaf or a botanical rubber stamp onto the clay and roll over it gently with a pony roller or press firm with your fingers. -
Texture Zone 3: Stripes:
In another section, use a sculpting tool or a dull knife blade to impress parallel lines. Vary the width or combine them with tiny dots for visual interest. -
Refine the borders:
After texturing, go back over your dividing groove lines to clean them up, ensuring the textures don’t bleed into each other.
Level Up: Gold Fill
Instead of a brown wash, try an inlay technique. Fill the deep grooves (the dividing lines) with liquid gold leaf or metallic paint after the main piece is sealed for a Kintsugi-inspired look.
Step 3: Finishing and Coloring
-
Allow to dry:
Let the coaster dry completely on a wire rack for at least 24-48 hours. I usually flip mine halfway through so the bottom dries evenly. -
Sand the surface:
Once bone dry, take your fine-grit sandpaper and lightly buff the surface and edges to remove any sharp peaks created during texturing. -
Apply the wash:
Mix a small amount of red-brown acrylic paint with water to create a thin wash. Brush this liberally over the textured areas, ensuring it gets into all the crevices. -
Wipe back:
Immediately take a damp sponge and wipe the surface of the clay. The paint will stay trapped in the depressed textures (leaves, dots, lines) but wipe clean off the smooth high points. -
Seal the coaster:
To make them functional and water-resistant, apply 2-3 coats of a matte varnish or sealant, letting each coat dry before applying the next.
Your textured coasters are now ready to protect your table with style