
Making something for your boyfriend with air dry clay hits that sweet spot between sweet and actually useful. I love projects that feel personal—little daily reminders of you two—without being overly fussy or complicated.
Personalized Catch-All Tray for His Nightstand

Achieve a trendy, industrial-chic look without the heavy lifting of concrete pouring by crafting this sleek catch-all tray. With its minimalist shape, personalized stamped initials, and faux-stone speckled finish, it’s the perfect masculine accessory for organizing keys and coins on a nightstand.
How-To Guide
Materials
- White air dry clay (approx. 500g)
- Black pepper or dried coffee grounds (for speckled effect)
- Rolling pin
- Sharp craft knife
- Ruler
- Small bowl with water
- Alphabet stamp set
- Fine grit sandpaper (200-400 grit)
- Matte spray varnish or sealant
- Two wooden guide strips (approx. 0.5cm thick)
Step 1: Preparing the Clay
-
Condition the Clay:
Begin by taking a substantial chunk of white air dry clay and kneading it in your hands until it becomes soft, warm, and pliable. This conditioning step prevents cracks later on. -
Add Texture:
To create that realistic stony look, flatten your clay slightly and sprinkle a pinch of coarse black pepper or dried coffee grounds onto the surface. -
Incorporate the Speckles:
Fold the clay over the speckles and knead it thoroughly again. Continue folding and kneading until the dark flecks are evenly distributed throughout the white clay.
Stone Effect
Mix in different spices like dried crushed basil or oregano alongside the pepper for a varied, earthy terrestrial look.
Step 2: Shaping the Tray
-
Roll It Out:
Place your wooden guide strips on either side of the clay ball to ensure even thickness. Using your rolling pin, roll the clay out into a flat slab about 0.5cm (1/4 inch) thick. -
Cut the Rectangle:
Use a ruler and a sharp craft knife to cut a precise rectangle. A size of roughly 15cm x 20cm works well for a nightstand tray, but feel free to adjust based on his space. -
Create the Sidewalls:
From the leftover clay, roll a long, even coil (snake) that is roughly the thickness of a pencil. -
Score and Slip:
Use your knife or a needle tool to scratch up the outer edges of your rectangular base and one side of your clay coil. Apply a little water to these scratched areas to create a ‘slip’ glue. -
Attach the Walls:
Place the coil on top of the edges of the rectangle base to form the rim. Gently press it down to adhere it securely.
Step 3: Refining and Personalizing
-
Merge the Seams:
Using your thumb or a modeling tool, smooth the clay coil downwards onto the base on the inside, and downwards on the outside, until the seam completely disappears and the wall looks like one solid piece with the base. -
Shape the Walls:
Pinch the walls gently to straighten them upwards. I like to keep the corners slightly rounded rather than sharp 90-degree angles for a softer, modern look. -
Smooth the Surface:
Dip your finger in water and run it over the entire tray—walls, floor, and rim—to smooth out any fingerprints or bumps. Ensure the rim is level. -
Stamp Initials:
While the clay is still wet, gently press your alphabet stamps into the center or corner of the tray floor to emboss his initials or a special date. Don’t press too hard; just enough to leave a clear impression.
Level Up: Leather Tab
Glue a small loop of tan leather to one of the short sides after drying to mimic a handle for an upscale texture contrast.
Step 4: Finishing Touches
-
Slow Drying:
Place the tray on a wire rack or piece of parchment paper to dry. Let it dry slowly away from direct heat or sunlight for 24-48 hours to prevent warping. Flip it gently halfway through if the bottom feels damp. -
Sanding:
Once fully bone dry, take your fine-grit sandpaper and gently sand the entire piece. Focus on the rim and corners to make them buttery smooth. The sanding will also help reveal more of the speckled texture. -
Dusting Off:
Wipe the tray down with a slightly damp cloth or a dry paintbrush to remove all the sanding dust. -
Sealing:
Take your tray to a well-ventilated area. Apply two light coats of matte spray varnish, allowing drying time between coats. This protects the clay from moisture and gives it that finished ceramic feel.
Wrap this stylish tray in some sleek tissue paper for a handmade gift that looks professionally designed


Matching Half Keychains You Split Between You
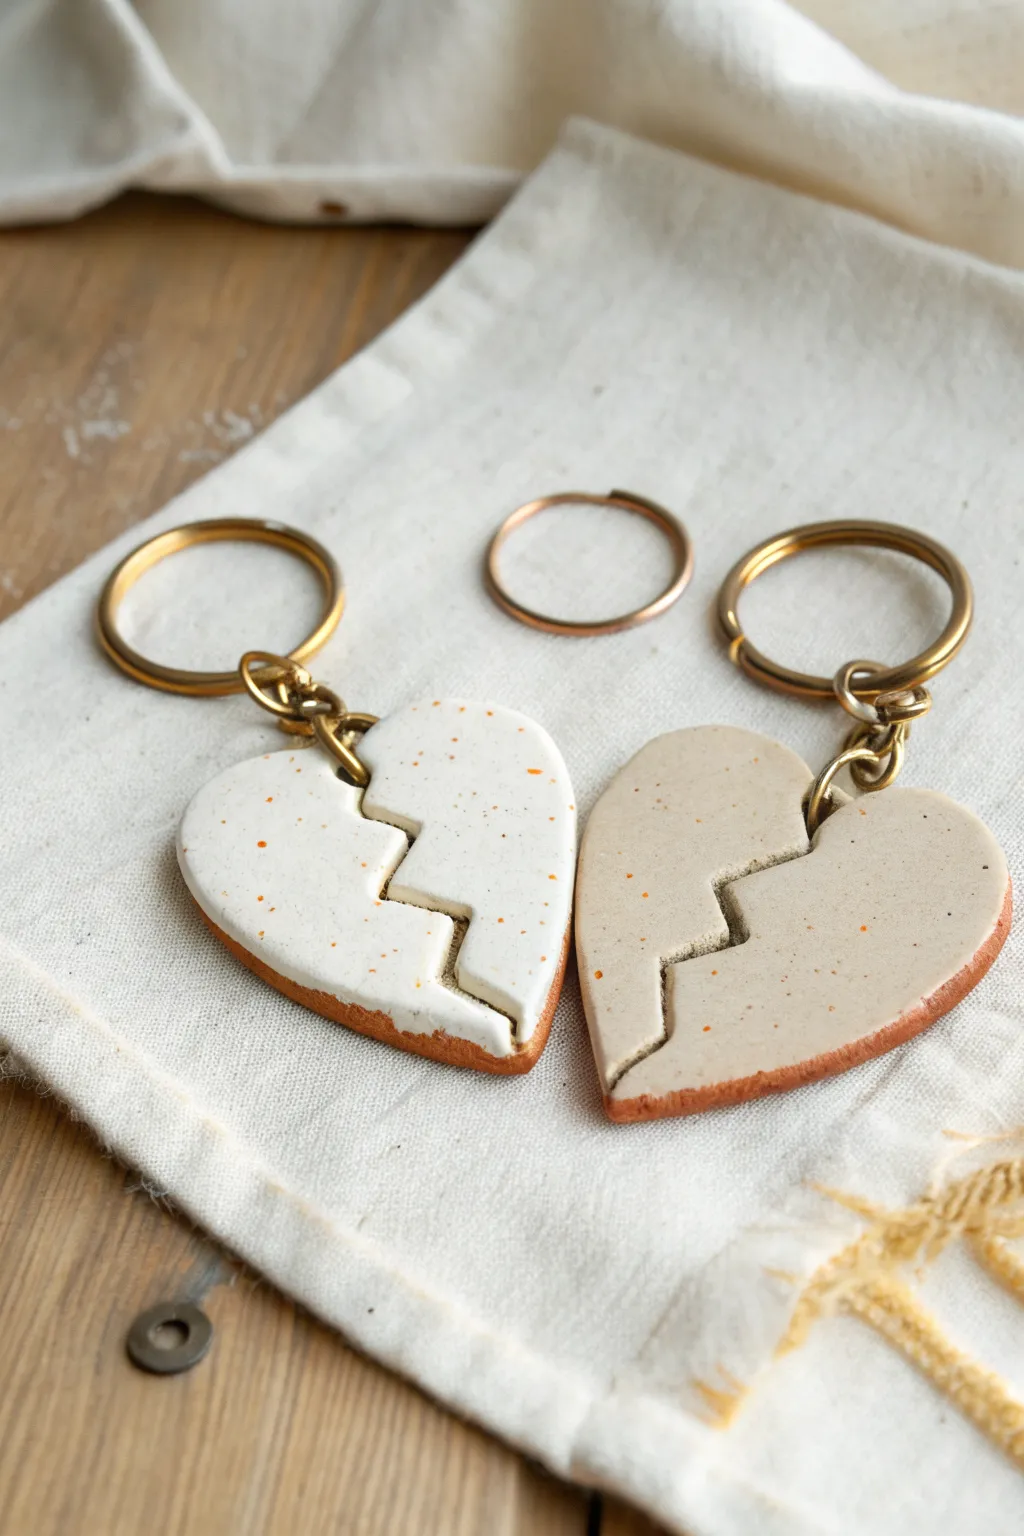
These charming rustic keychains are a classic symbol of connection, designed to fit perfectly together just like you and your partner. We’ll use air-dry clay and a simple glazing technique to achieve that speckled, handmade ceramic look without needing a kiln.
Detailed Instructions
Materials
- White polymer or air-dry clay
- Rolling pin
- Heart-shaped cookie cutter (medium size)
- Craft knife or X-Acto blade
- Sandpaper (fine grit)
- Two gold key rings with small jump rings
- White acrylic paint
- Beige or light tan acrylic paint
- Burnt orange or terracotta acrylic paint
- Old toothbrush (for splattering)
- Two small eye screws (gold)
- Glossy varnish or sealant
- Paintbrushes
- Pliers
Step 1: Shaping the Clay
-
Condition and roll:
Begin by kneading a ball of your white clay until it is soft and conditioned. Roll it out on a smooth surface until it’s about 1/4 inch thick. You want it sturdy enough to be handled daily as a keychain. -
Cut the heart:
Press your heart-shaped cookie cutter firmly into the clay slab to create your main shape. Remove the excess clay from around the edges. -
Create the fracture:
Using your craft knife, carefully cut a jagged, zig-zag line down the center of the heart. Try to make distinct ‘teeth’ so the two halves puzzle-piece together clearly. -
Smooth the edges:
Dip your finger in a little bit of water and gently run it along the cut edges of both halves. You want to soften any sharp burrs while keeping the zig-zag shape defined. -
Insert hardware:
Take a small gold eye screw and gently twist it into the top curved lobe of the left half. Repeat this for the right half. Ensure they are centered on the lobe so the keychain hangs straight. -
Initial drying:
Set both halves aside to dry completely. For air-dry clay, this usually takes 24-48 hours depending on humidity. Flip them over halfway through to ensure even drying.
Keep it Clean
To get that super-smooth professional surface, wipe your clay with a baby wipe or a tiny bit of baby oil before drying. This removes fingerprints instantly.
Step 2: Refining and Painting
-
Sanding:
Once fully dry and hard, use fine-grit sandpaper to buff away any remaining roughness on the edges or surface. Wipe away the dust with a slightly damp cloth. -
Base coat:
Paint the front and back of the left half with your white acrylic paint. For the right half, mix a little beige into your white to create a creamy, off-white tone as seen in the photo. Apply two coats if necessary for opacity. -
Terracotta edging:
Dip a small detail brush into the burnt orange or terracotta paint. Carefully paint the side edges of the hearts to mimic the look of raw terracotta clay. Allow a tiny bit of this color to overlap onto the front face for a rustic border. -
The speckled effect:
This is my favorite part: water down a small amount of the burnt orange paint. Dip an old toothbrush into it, then run your thumb across the bristles to flick tiny speckles onto the surface of both hearts. -
Drying:
Let the paint dry completely before moving on to the sealing step.
Hardware Loose? No Prob!
If the eye screw feels loose after the clay dries, unscrew it, add a dab of superglue to the threads, and screw it back in for a permanent hold.
Step 3: Assembly
-
Seal the deal:
Apply a coat of glossy varnish or sealant over the entire surface of the hearts. This protects the paint from scratching and gives it that polished ceramic shine. -
Clean the hardware:
If any varnish got onto the metal eye screw, wipe it off quickly before it hardens. -
Attach rings:
Using your pliers, open the small jump ring attached to the main keyring. Loop it through the eye screw on the clay heart. -
Close and secure:
Use the pliers to twist the jump ring closed tightly so the clay piece doesn’t slip off. -
Final test:
Bring the two keychains together to make sure they still fit perfectly. The varnish adds a tiny bit of thickness, but they should still lock together beautifully.
Give one half to your favorite person and keep the other close as a reminder of your bond


Desk Photo Holder With a Tiny Heart Detail
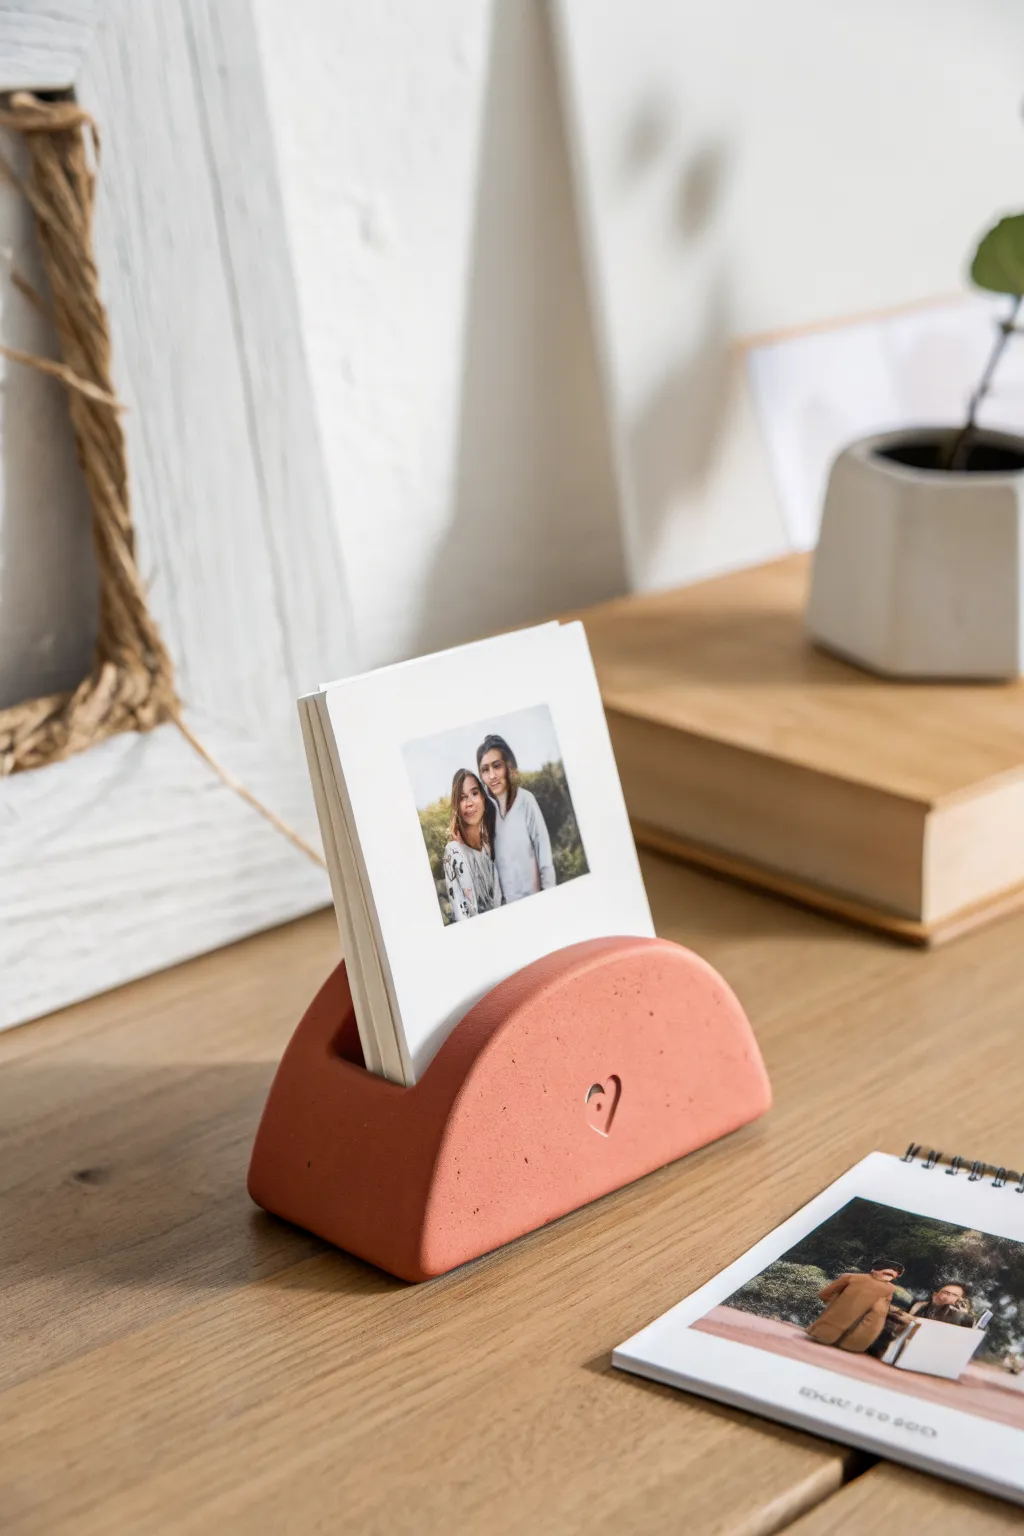
This sleek, semi-circular photo holder brings a touch of modern warmth to any desk with its rich terracotta tone and minimalist design. The wide slot perfectly accommodates a stack of favorite memories, while a tiny, stamped heart adds a subtle romantic detail without being overwhelming.
Step-by-Step Guide
Materials
- Air dry clay (white or terracotta colored)
- Acrylic paint (burnt sienna or terracotta)
- Rolling pin
- Sharp craft knife or clay slider
- Ruler
- Fine-grit sandpaper (200-400 grit)
- Small heart-shaped stamp or tool
- Cardboard or stiff cardstock (for the slot placeholder)
- Water in a small cup
- Matte spray varnish
Step 1: Shaping the Base
-
Prepare your workspace:
Lay down a non-stick mat or parchment paper to work on. Tape down the corners so the paper doesn’t shift while you are rolling out the clay. -
Condition the clay:
Take a large handful of air dry clay and knead it thoroughly. You want to work out any air bubbles and ensure the consistency is smooth and pliable. -
Form the initial block:
Shape the clay into a thick rectangular block. You are aiming for a shape that is roughly 4-5 inches long, 2 inches high, and about 1.5 inches deep to ensure stability. -
Refine the semi-circle:
Stand the block on its long edge. Use your hands to gently curve the top corners down, forming a smooth arch or semi-circle shape. Keep the bottom perfectly flat so it sits squarely on a desk. -
Smooth the surfaces:
Dip your finger in a little water and run it over the entire surface of the arch to smooth out bumps or fingerprints. The finish should look clean and modern.
Clean Slot Secret
To get a perfectly sharp photo slot, lightly sand a folded piece of sandpaper back and forth inside the groove after the clay is fully dry.
Step 2: Creating the Features
-
Create the slot placeholder:
Cut a piece of cardboard or stiff cardstock to the length of your holder. I usually wrap this piece in plastic wrap or parchment paper so it doesn’t stick inside the wet clay. -
Insert the slot:
Press the wrapped cardboard deeply into the top center of the arch. It should go down about halfway into the block to securely hold photos later. Wiggle it slightly to ensure the gap is wide enough for a few prints. -
Clean up the edges:
The clay may bulge slightly when you insert the card. Use your knife or a flat tool to gently press the sides back into shape, keeping the walls straight. -
Stamp the heart:
Using a small heart stamp or a carving tool, gently press a small heart indentation into the lower center of the front face. Keep it subtle—just an impression, not a hole.
Add Texture
Before drying, gently tap the surface with a stiff toothbrush or crumpled foil. This gives it a realistic ‘stone’ or concrete texture which looks great painted.
Step 3: Finishing Touches
-
Initial drying:
Let the piece dry for about 2-3 hours until the outside feels firm. Carefully remove the cardboard placeholder so the inside of the slot can dry properly. -
Full cure:
Allow the holder to dry completely in a cool, dry place for 24-48 hours. Rotate it occasionally to ensure even airflow. -
Sand for perfection:
Once bone dry, use fine-grit sandpaper to smooth out any rough edges, especially around the rim of the photo slot and the bottom corners. -
Mix your paint:
If you didn’t start with terracotta clay, mix burnt sienna acrylic paint with a tiny dot of white or yellow to get that warm, earthy clay tone. -
Apply color:
Paint the entire holder with an even coat. Use a smaller brush to get inside the heart indentation without pooling paint there, preserving the crisp shape. -
Seal the project:
Finish with a light coat of matte spray varnish to protect the surface from scratches and give it a professional, store-bought look.
Slide a favorite memory into the slot and you have a thoughtful, handmade gift ready for distinct display


Ring or Watch Dish With a Hidden Message
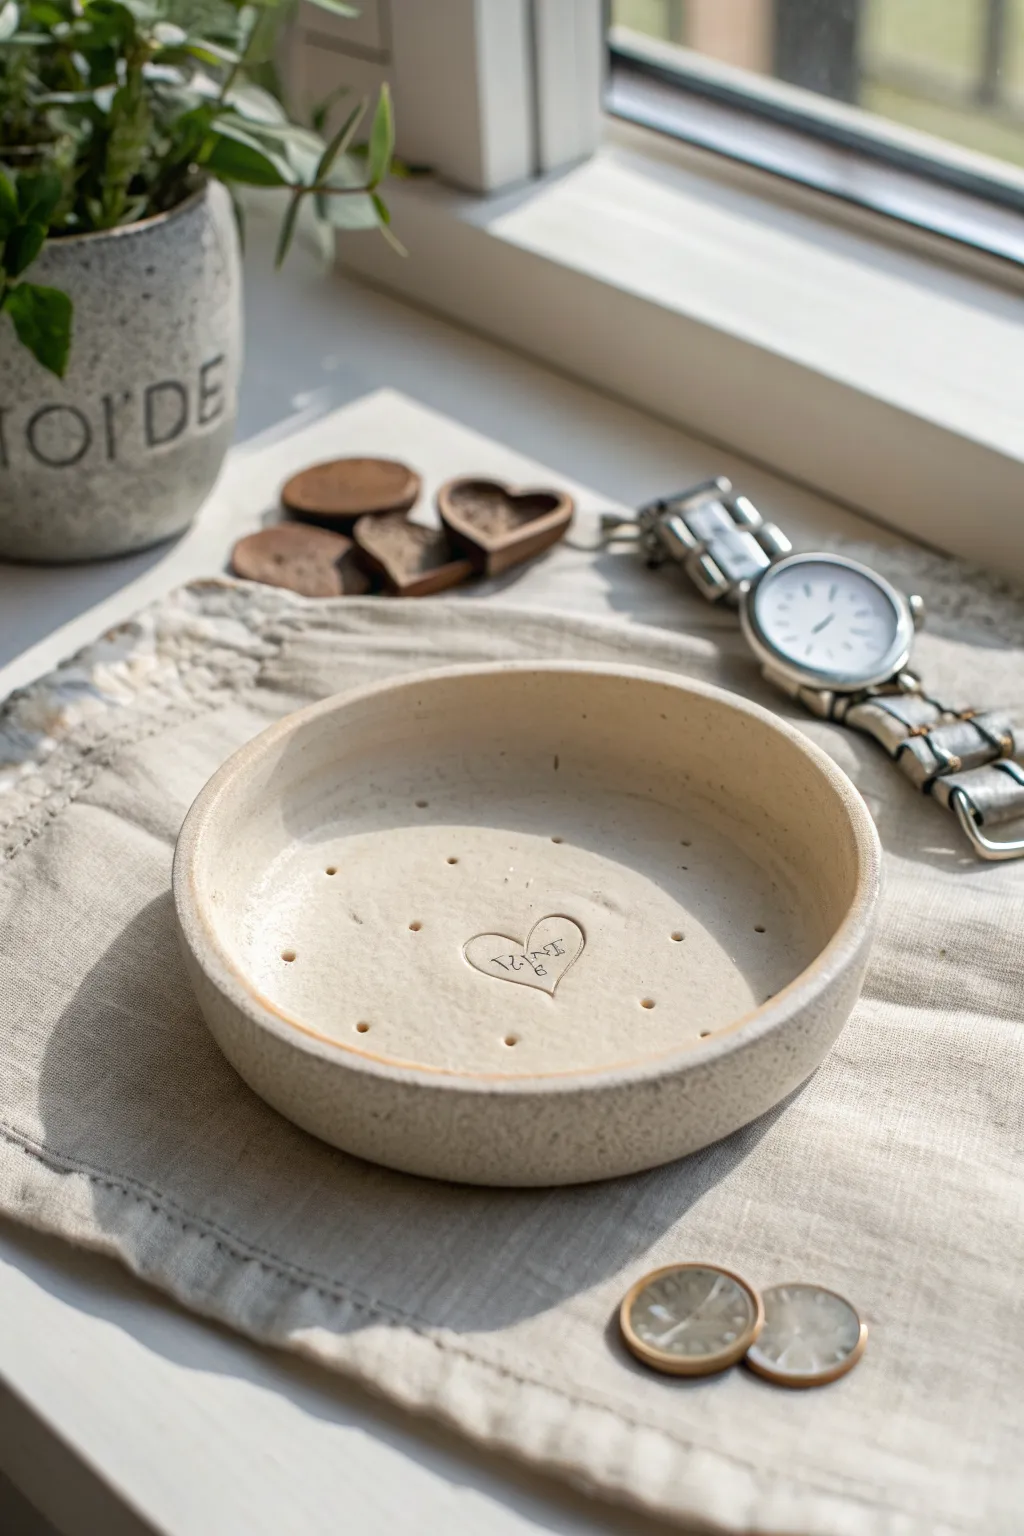
Create a heartfelt and functional gift with this minimalist trinket dish, perfect for holding his watch, keys, or loose change. The speckled finish and stamped heart hiding at the bottom add a subtle, personalized touch that he’ll see every time he grabs his accessories.
How-To Guide
Materials
- Air dry clay (white or cream)
- Flecked clay additive (coarse sand, dried basil, or pre-speckled clay)
- Small heart stamp
- Letter stamp set (miniature size)
- Rolling pin
- Circular cutter or bowl (approx 4-5 inches diameter)
- Small bowl or dish for shaping
- Sandpaper (fine grit)
- Small dowel or toothpick
- Needle tool or knife
- Sponge and water
- Clear matte varnish or sealant
Step 1: Preparing the Base
-
Condition the Clay:
Begin by kneading a fist-sized ball of white air dry clay until it is warm and pliable. If you want to achieve the speckled look shown in the photo, knead in a small pinch of dried basil, ground pepper, or fine sand now to mimic stoneware texture. -
Roll it Out:
On a clean, flat surface, roll the clay out to an even thickness of about 1/4 inch. Try to keep the pressure consistent so one side isn’t thicker than the other. -
Cut the Circle:
Place your circular cutter or an upside-down bowl over the clay. Cut around it with a needle tool or knife to create a perfect circle base. -
Smooth the Edges:
Dip your finger in a little bit of water and run it along the cut edge of the circle. This rounds off the sharp rim and prevents cracking later.
Step 2: Adding the Message
-
Stamp the Heart:
Locate the exact center of your clay circle. Gently press your heart outline stamp into the clay. You want a distinct impression, but don’t push all the way through. -
Stamp the Initials:
Using your miniature letter stamps, carefully press initials or a short message like ‘LOVE’ inside the heart outline. If you don’t have stamps, you can lightly carve this with a needle tool. -
Add Decorative Dots:
Take a small dowel, toothpick, or the back of a paintbrush. Gently press small indentations randomly around the heart to create the polka-dot texture seen in the image.
Fixing Cracks
Mix a tiny amount of clay with water to make a paste (slip). Fill any cracks that appear during drying, then smooth over.
Step 3: Shaping and Finishing
-
Create the Wall:
To give the dish its depth, you need to lift the edges. Gently curve the outer rim of the clay upward with your fingers. -
Use a Form:
For a consistent shape, place your clay circle inside a slightly larger shallow bowl. Press it gently against the bottom and sides so it adopts the bowl’s curve. -
Refine the Rim:
Once shaped, go back around the top rim. I like to dampen a sponge and tap the rim lightly to ensure it looks organic and soft rather than sharp. -
Slow Drying:
Leave the dish in the drying bowl for the first 12–24 hours so it holds its shape. Keep it away from direct heat sources to prevent warping. -
Flip and Dry:
Once the clay is firm enough to handle, remove it from the mold and flip it upside down on a wire rack to let the bottom dry completely. This creates airflow. -
Sand Imperfections:
When bone dry (after 24–48 hours), take a piece of fine-grit sandpaper and gently smooth any rough spots on the rim or outside walls. -
Dust Off:
Wipe the entire piece down with a dry cloth or soft brush to remove all sanding dust. -
Seal for Protection:
Apply two thin coats of clear matte varnish. This will protect the clay from moisture and stains without making it look glossy or plastic.
Make it Luxe
After the clay dries, paint just the stamped heart or the very top rim with liquid gold leaf for an elegant, high-end accent.
Now you have a custom, handmade spot for him to keep his daily essentials safe and organized

The Complete Guide to Pottery Troubleshooting
Uncover the most common ceramic mistakes—from cracking clay to failed glazes—and learn how to fix them fast.
Pen Cup That Looks Clean, Not Crafty
For the boyfriend who appreciates clean lines and modern office decor, this two-toned pen cup is the perfect addition to his desk. By using speckling techniques and a faux-concrete finish, you can transform simple air dry clay into something that looks high-end and store-bought rather than homemade.
Detailed Instructions
Materials
- White air dry clay (approx. 500g)
- Clean rolling pin
- Empty can or specific cylindrical cutter (for base)
- Rigid cylinder (like a PVC pipe or large vitamin bottle) to use as a forming mold
- Craft knife or clay cutter
- Cup of water and sponge
- Acrylic paints: warm grey, white, black, and beige
- Stiff-bristled toothbrush (for speckling)
- Fine grit sandpaper (220-400 grit)
- Matte clear sealant/varnish
Step 1: Faux-Stone Clay Preparation
-
Condition the clay:
Start by kneading your white air dry clay until it is warm, pliable, and free of air bubbles. If the clay feels too stiff, dip your fingers in water and work the moisture in. -
Add texture early:
To achieve that speckled granite look from the start, mix a tiny amount of black pepper or dried coffee grounds into the raw clay. This embeds texture inside the wall, not just on the surface. -
Roll out a slab:
Roll the clay out onto a non-stick surface or canvas cloth. Aim for a distinct thickness of about 5-6mm to give the cup a substantial, weighty feel similar to ceramic or concrete.
Step 2: Forming the Cylinder
-
Cut the base:
Using your cylindrical mold (like the vitamin bottle) as a guide, cut a circle for the base. Make sure the circle is slightly larger than the mold to account for the wall thickness. -
Measure the wall:
Wrap a piece of paper around your forming mold to measure the exact circumference needed, then add about 1cm for the seam overlap. -
Cut the rectangular wall:
Use the paper template to cut a perfect rectangle from your rolled clay slab. A ruler and craft knife are essential here to ensure the top edge is perfectly straight. -
Attach the wall:
Wrap the rectangular slab around your forming mold. Score (scratch) and slip (wet) the vertical edges where they meet, then press them together firmly to create a seam. -
Smooth the seam:
I prefer to use a slightly damp sponge to blend the vertical seam until it is completely invisible. The goal is a continuous, seamless cylinder. -
Attach base to wall:
Score and slip the bottom edge of your cylinder and the outer edge of your base circle. Place the cylinder on top of the base and use a sculpting tool to blend the clay across the joint on both the inside and outside. -
Refine the rim:
While the clay is still on the mold, gently smooth the top rim with a wet finger. It should look flat and substantial, not sharp or pinched.
Clean Edges Only
To get that super crisp, flat rim seen in the photo, wait until the clay is ‘leather hard’ (firm but cool) and flip the cup upside down on a table. Gently press down to flatten the top edge perfectly.
Step 3: Finishing and Painting
-
Slow drying process:
Remove the forming mold if possible, or let it dry on the mold if it’s non-porous. Allow the piece to dry slowly away from direct heat for 24-48 hours. Turn it occasionally to ensure even drying. -
Sanding for crispness:
Once bone dry, sand the entire piece. Focus heavily on flattening the top rim and ensuring the bottom sits perfectly flat on the table. Sand away any fingerprints to get that manufactured look. -
Base coat painting:
Mix a warm, light grey acrylic paint (white with a drop of black and a tiny drop of brown). Paint the specific bottom section (about the bottom 1/5th) with a slightly darker, brownish-grey to create the two-tone dipped effect shown in the image. -
Masking the line:
For a really crisp line between the two tones, use painter’s tape once the first color is fully dry. However, a steady hand and a slight soft transition can look more organic and stone-like. -
Creating the speckle:
Dilute some black and dark grey paint with water. Load a stiff toothbrush with the mixture, hold it near the cup, and flick the bristles with your thumb to spray fine speckles over the light upper section. -
Add variation:
Repeat the speckling process with a diluted white paint to add depth to the faux-stone texture. Let the speckles dry completely. -
Seal:
Finish with two coats of matte varnish. Avoid glossy finishes, as they will ruin the raw concrete aesthetic.
Level Up: Functional Weight
Before attaching the base, press a large metal washer or a few coins into the clay of the bottom disc. This adds heft so the cup won’t tip over when holding heavy pens.
Now you have a sleek, modern desk accessory that looks incredibly professional and makes a thoughtful, practical gift
Yin-Yang Pair Charms for Balance Vibes
Embrace the harmony of opposites with these rustic, handmade clay charms for you and your partner. These pendants feature a beautifully textured, speckled finish and the classic taijitu symbol, representing how two forces can create a perfect whole.
Step-by-Step Tutorial
Materials
- White air-dry clay
- Rolling pin or smooth glass jar
- Round cookie cutter (approx. 2-3 inches)
- Small round cutter or straw (for cord hole)
- Craft knife or needle tool
- Sponge or fine-grit sandpaper
- Black acrylic paint
- Cream or off-white acrylic paint
- Speckled brown paint or watered-down brown acrylic
- Paintbrushes (small detail brush and medium flat brush)
- Matte sealant or varnish
- Two lengths of brown twine or jewelry cord
Step 1: Shaping the Clay Base
-
Roll out the clay:
Take a chunk of white air-dry clay and condition it in your hands until it’s pliable. Roll it out on a smooth surface to an even thickness of about 4-5mm. -
Cut the circles:
Using your medium round cookie cutter, punch out two identical circles. If edges are rough, dip your finger in a little water and smooth them gently. -
Trace the ‘S’ curve:
On each circle, lightly scribe a curved ‘S’ line down the center using a needle tool. Allow the line to curve naturally to effectively divide the circle into two teardrop shapes. -
Deepen the groove:
Go back over your scribed line with the tool to create a deeper, more defined groove. This physical texture separates the two colors later. -
Create the holes:
Use a straw or a small round cutter to punch a hole at the top of each pendant for the cord. Then, punch a purely decorative hole in the center of the bottom ‘tear drop’ section of each yin-yang. -
Initial drying:
Let the pieces sit until they are leather-hard—firm but still slightly cool to the touch. This usually takes a few hours.
Step 2: Refining and Painting
-
Smooth the edges:
Once fully dry (usually 24-48 hours), use fine-grit sandpaper or a damp sponge to smooth out any rough perimeter edges. Wipe away any dust with a dry cloth. -
Base coat the light pendant:
For the ‘light’ pendant (Yang), paint the entire surface with a cream or off-white acrylic paint. You may need two thin coats for opaque coverage. -
Paint the dark section:
For the ‘dark’ pendant (Yin), paint the top teardrop shape black. Use a small detail brush to get perfectly crisp lines along the central groove. -
Paint the light section:
Paint the bottom teardrop section of the Yin pendant with the same cream color used on the other charm. -
Adding the rustic speckles:
To achieve that stony look, dip an old toothbrush or stiff brush into watered-down brown paint. I like to test on a paper towel first, then flick the bristles to spatter tiny dots over both dried pendants. -
Seal the work:
Once all paint is completely dry, apply a coat of matte varnish. This protects the clay from moisture and gives it a professional, finished feel without being too glossy.
Stone Texture Trick
Before drying, gently press a crumpled ball of aluminum foil onto the clay surface. This imitates natural stone texture instantly.
Step 3: Assembly
-
Measure the cord:
Cut two lengths of brown twine or jewelry cord, considering how low you want the pendants to hang. -
Loop the knot:
Fold one cord in half. Push the folded loop through the top hole of a pendant from front to back. -
Secure the charm:
Pull the loose ends of the cord through the loop and tighten it down to create a lark’s head knot. -
Tie the ends:
Finish by tying the two loose ends of the cord together with a simple overhand knot or a sliding knot if you want adjustable length.
Magnetic Connection
Glue small magnets into the straight edges where the two halves would meet, so they snap together when you are close!
Wear your matching halves together or apart as a reminder of your connection.


What Really Happens Inside the Kiln
Learn how time and temperature work together inside the kiln to transform clay into durable ceramic.
Mini Couple Figurines in Your Everyday Outfits
Capture your signature style with this adorable pair of stylized figurines rocking cozy hoodies and denim. The clean lines, pastel tones, and simple facial features give them a modern, whimsical look perfect for a bookshelf display.
How-To Guide
Materials
- High-quality air dry clay (smooth texture)
- Acrylic paints (sage green, taupe, denim blue, white, skin tone)
- Sculpting tools (needle tool, smoothing tool, small blade)
- Armature wire or toothpicks (for internal support)
- Fine grit sandpaper
- Matte varnish or sealant
- Fine detail paintbrushes
- Water cup
Step 1: Building the Base Structure
-
Prepare the armature:
Start by creating a simple internal skeleton using twisted wire or toothpicks. You’ll need two vertical posts for the legs leading up to a torso section to ensure your figurines stand upright without leaning. -
Form the legs:
Roll two equal cylinders of clay for the legs. Insert your armature into them and smooth them together at the top to form the hips. Keep the shape straight and tubular to mimic the look of straight-cut jeans. -
Shape the torso:
Add a block of clay for the torso. Since they are wearing hoodies, keep this shape slightly boxy rather than tapered at the waist. Blend the clay seamlessly into the hip area using a smoothing tool and a little water. -
Position the head:
Roll a smooth sphere for the head. Insert a small piece of wire or toothpick into the neck area of the torso and press the head onto it. I like to keep the head slightly oversized for that cute, illustrative style.
Step 2: Sculpting the Outfit Details
-
Create the hoodie body:
Roll a thin sheet of clay and drape it over the torso to create the sweatshirt bulk. Use a blade to trim the bottom edge, creating a distinct ‘hem’ looking sculpted band around the hips. -
Add the hood:
Fashion a small, curved triangular piece or a hollowed-out half-sphere of clay. Attach this to the back of the head and wrap the sides forward around the face, blending the seam at the back of the neck. -
Attach the arms:
Roll two tapered cylinders for arms. Attach them at the shoulders, concealing the join under the ‘fabric’ of the hoodie. Let them hang naturally at the sides, as seen in the reference. -
Sculpt the finishing touches:
Roll two very thin snakes of clay for the hoodie drawstrings and attach them near the neck. Add tiny cuffs to the sleeves and the bottom hem by scoring vertical lines with a needle tool to mimic ribbing. -
Form the sneakers:
Shape two small ovals for shoes. Flatten the bottoms so the figure stands stably. Add a tiny sole layer and a small tongue piece for detail. Attach these firmly to the bottom of the pant legs. -
Smooth and dry:
Use a damp brush to smooth out any fingerprints or harsh tool marks. Let the figures dry completely, which may take 24-48 hours depending on thickness.
Cracks Appearing?
If tiny cracks appear while drying, don’t panic. Create a ‘slip’ by mixing a small amount of clay with water until it’s a paste, fill the crack, smooth it over, and let dry again.
Step 3: Painting and Refining
-
Sand imperfections:
Once fully dry, gently sand any rough spots or unintentional bumps using fine-grit sandpaper to achieve a porcelain-like finish. -
Paint the jeans:
Mix a muted dark blue paint. Apply it to the legs, perhaps dabbing slightly with a dry brush or sponge to give it a textured, denim-like appearance. -
Color the hoodies:
Paint the hoodies in soft, matte pastel shades—sage green for one and taupe for the other. Use two thin coats for opaque coverage. Don’t forget to paint the tiny drawstrings in the same color. -
Detail the faces:
Paint the skin tone on the face. For the hair, paint the visible area inside the hood. Use a fine-point brush or a toothpick to add two simple black dots for eyes and a tiny curved line for a smile. -
Finish the sneakers:
Paint the shoes crisp white. You can add very subtle grey lines for laces or stitching if you have a steady hand. -
Seal the work:
Apply a coat of matte varnish to protect the paint and give the figures a unified, professional finish.
Texture Trick
To make the hoodie look like real fabric, gently press a piece of old t-shirt or fabric onto the wet clay surface before painting to imprint a subtle weave texture.
Place your mini couple on a wooden shelf or next to a small vase to complete the cozy aesthetic
Tiny Pet Sculpture for Your Shared Fur Baby
Immortalize your favorite furry friend with this charming, stylized terracotta-colored clay sculpture. With its sweet upturned snout and simple painted details, this seated pup makes for a heartwarming desk companion or sentimental keepsake.
Step-by-Step
Materials
- Terracotta-colored air-dry clay (or white clay mixed with brown/orange acrylic)
- Small sculpting tools (needle tool, modeling tool)
- Water in a small cup
- Aluminum foil (for armature)
- White acrylic paint
- Black acrylic paint
- Fine detail paintbrush (size 0 or 00)
- Small jewelry wire or thick thread
- Small silver bead or tiny bell
- Gloss or matte varnish (optional)
Step 1: Shaping the Base Form
-
Prepare the core:
Crumple a small piece of aluminum foil into a vague pear shape. This will serve as the inner armature for the body, saving clay and reducing drying time. -
Cover the body:
Roll a ball of terracotta clay and flatten it slightly. Wrap it around your foil armature, smoothing the seams together until you have a seamless, pear-shaped body that sits flat on your work surface. -
Shape the head:
Roll a smaller ball of clay for the head. Gently pinch one side to pull out a muzzle shape, keeping the nose slightly upturned for that happy, attentive expression. -
Attach the head:
Score the top of the body and the bottom of the neck area with a needle tool. Apply a dab of water (slip) and press the head firmly onto the body. Smooth the clay across the join with a modeling tool or your finger so the neck flows naturally into the shoulders.
Cracking Up?
If you see hairline cracks while drying, mix a tiny bit of fresh clay with water to make a paste (slip) and fill them in. Smooth deeply with a damp finger.
Step 2: Adding Limbs and Ears
-
Form the hind legs:
Create two tear-drop shapes for the hind legs. Flatten them slightly and press them onto the sides of the body near the bottom. The wider part should be the thigh, curving down to a small foot. -
Create the front legs:
Roll two thick coils or cylinders for the front legs. Attach these to the front of the chest, blending the top of the legs into the body so they look unified. Ensure the paws sit flush with the surface. -
Add the ears:
Shape two flat, oval pieces of clay. Attach them to the sides of the head, letting them flop downwards. You can curve them slightly to frame the face. -
Sculpt the tail:
Roll a small, tapered snake of clay. Attach it to the back of the base, curling it around the side of the haunches so it’s visible from the front. -
Refine the paws:
Use a needle tool or small knife to gently press indents into the front and back paws to suggest toes.
Step 3: Refining and Drying
-
Smoothing the surface:
Dip your finger in a little water and run it over the entire sculpture to remove fingerprints and bumps. I like to be very gentle here to avoid distorting the features. -
Define the face:
Use a modeling tool to verify the muzzle shape is distinct and the ears are securely attached. Create a very subtle indented line for the mouth. -
Painting the eyes and nose:
Before painting, allow the sculpture to dry completely (24-48 hours). Once dry, use black paint to create a small dot for the nose and two slightly curved, happy eyes. -
Adding signature markings:
Dip the back end of a paintbrush into white paint to stamp perfect little circular dots. Create a flower-like cluster on the haunch or shoulder to mimic spots.
Make It Personal
Customize the clay color to match his dog, or paint specific markings like an eye patch or socks to make it a true portrait of his own pet.
Step 4: Final Touches
-
Create the collar:
Take a piece of white jewelry wire or thick thread. Wrap it snugly around the neck of the dog. -
Add the bell:
Thread a small silver bead or miniature bell onto the collar wire before twisting or tying it closed at the front. -
Seal the piece:
Apply a coat of varnish if you want to protect the paint and give the dog a finished sheen, though leaving it matte preserves the natural clay look.
Now you have a sweet, handmade guardian ready to sit loyally on his desk

TRACK YOUR CERAMIC JOURNEY
Capture glaze tests, firing details, and creative progress—all in one simple printable. Make your projects easier to repeat and improve.
Mini “Our Place” Ornament of Your Home
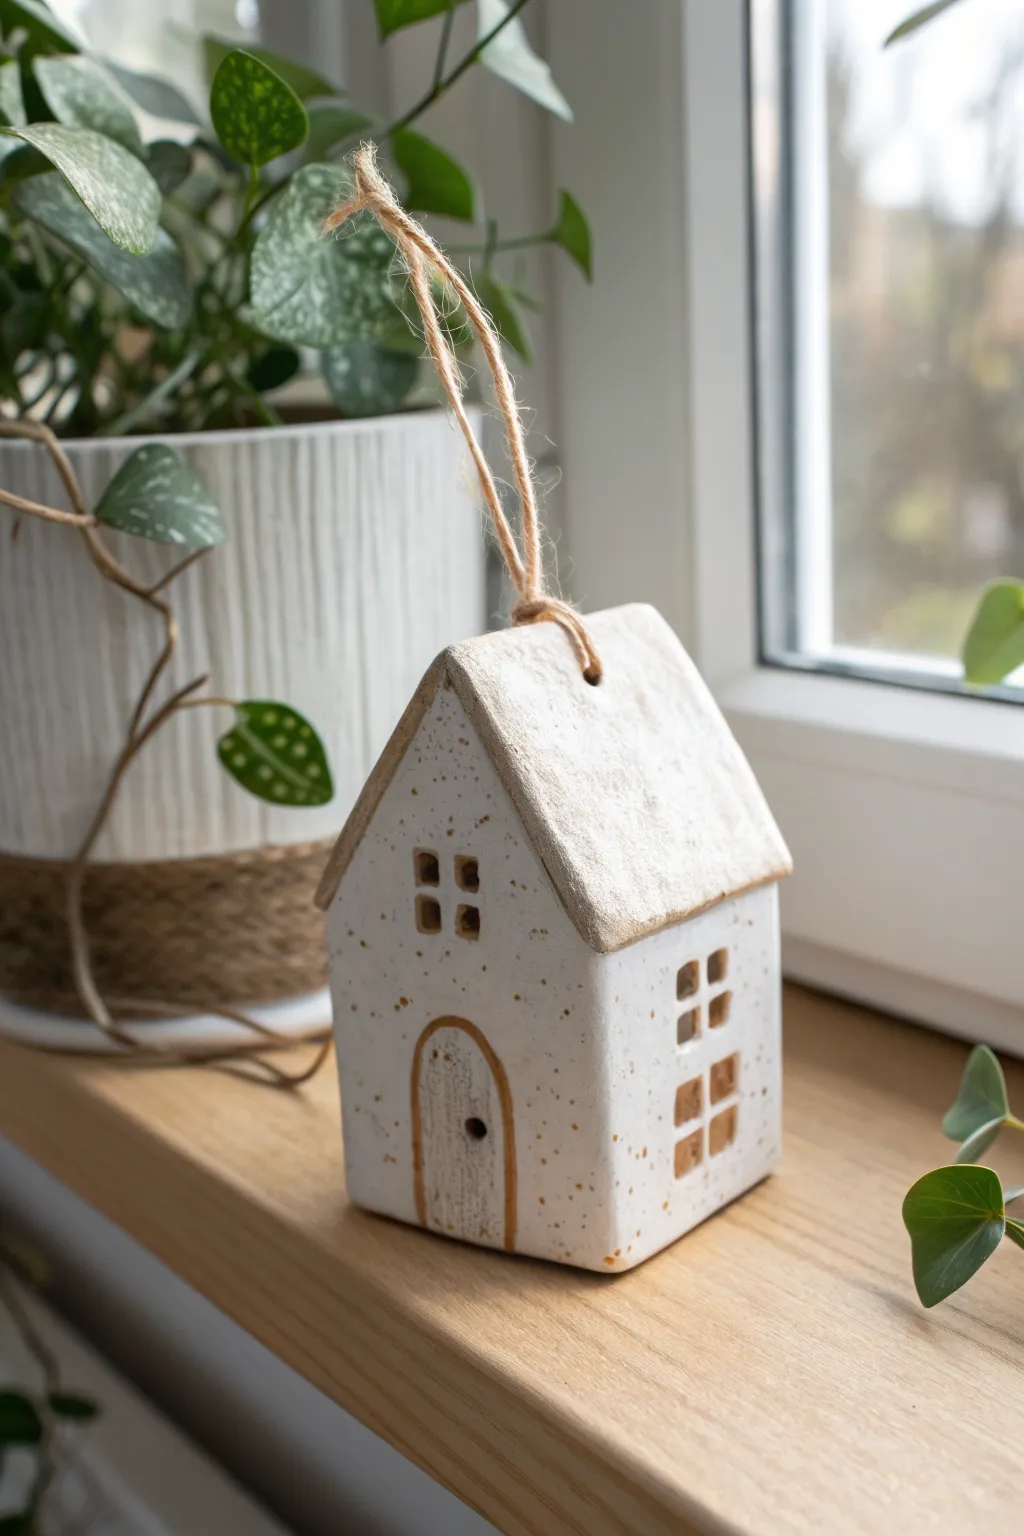
Capture the charm of your shared home with this adorable, speckled clay house ornament. With its simple geometric shape, rustic twine loop, and arched doorway, it makes a thoughtful keepsake that celebrates where your love lives.
Detailed Instructions
Materials
- Air dry clay (white or stone effect)
- Rolling pin
- Sharp craft knife or scalpel
- Ruler
- Clay slip (water mixed with a little clay)
- Sandpaper (fine grit)
- Brown speckled paint or splatter tool (optional)
- Metallic gold or bronze paint
- Fine detail paintbrush
- Jute twine
- Toothpick or skewer
- Clear matte varnish (optional)
Step 1: Shaping the Structure
-
Roll the clay slab:
Begin by rolling out your air dry clay on a flat, non-stick surface until it is approximately 1/4 inch thick. Aim for an even thickness to ensure the walls stand up straight later. -
Cut the walls:
Using a ruler and craft knife, cut out two matching pentagon shapes for the front and back of the house. The bottom part should be a square, transitioning into a triangle at the top for the roof peak. -
Cut the sides:
Cut two rectangular pieces for the side walls. Their height should match the height of the square portion of your front and back pieces. -
Cut the roof panels:
Cut two rectangular slabs for the roof. These need to be slightly longer than the side walls to create a slight overhang. -
Carve the windows:
Before assembling, use your craft knife to carefully cut out small square windows on the front and side pieces. For the front, create a four-pane window near the peak; for the side, try a six-pane vertical window. -
Details the door:
Use a needle tool or the tip of your knife to lightly etch an arched door shape on the front panel. Don’t cut all the way through; just create the outline and etched vertical lines for wood texture. -
Create a hanging hole:
If you plan to hang this, use a skewer to poke a hole through the very top point of the front and back roof peaks, or through the roof panel itself depending on where you want it to balance.
Clean Cuts Hack
Let the clay dry for about 15-20 minutes after rolling it out but before cutting the walls. Slightly firmer clay cuts cleaner and drags less under the knife.
Step 2: Assembly and Refining
-
Score and slip edges:
Score (scratch) the edges of the walls where they will connect. Apply a dab of clay slip to these roughed-up areas to act as glue. -
Erect the walls:
Stand the four wall pieces up and press the seams together firmly. Use your finger or a modelling tool to smooth the clay over the seams on the outside so the joints disappear. -
Attach the roof:
Score and slip the top edges of the walls and the underside of the roof panels. Press the roof panels gently onto the structure, ensuring they meet at the peak. -
Smooth the imperfections:
I always take a moment here to dip a finger in water and gently smooth out any fingerprints or rough edges while the clay is still wet. -
Add texture holes:
To mimic the porous look in the photo, you can lightly poke the surface with a stiff brush or a needle tool in random spots. -
Let it dry completely:
Set the house aside in a dry, cool place for at least 24-48 hours. Ensure it is fully hardened before moving to the next step. -
Sand for smoothness:
Once bone dry, lightly sand any sharp corners or uneven areas with fine-grit sandpaper.
Step 3: Decorating
-
Create the speckled effect:
If your clay wasn’t pre-speckled, dilute some brown paint with water. Load a toothbrush with the mixture and run your thumb over the bristles to flick tiny specks across the entire white surface. -
Paint the roof:
Paint the roof panels with a light wash of beige or cream paint to differentiate them slightly from the walls, giving it a subtle weathered look. -
Highlight the details:
Using a very fine brush and metallic gold or bronze paint, carefully outline the arched door and fill in the etched ‘wood’ lines. This adds a warm, elegant touch. -
Add the doorknob:
Use the back of a small paintbrush dipped in black or dark brown paint to dot a tiny doorknob onto the door. -
Seal the piece:
Protect your work with a coat of clear matte varnish. -
Attach the twine:
Thread a piece of rustic jute twine through the hole in the roof or loop it under the roof overhang if you created side holes, and tie a secure knot to finish.
Make It Personal
Carve the initials of you and your boyfriend into the bottom of the house or paint your actual house number above the tiny door for a custom touch.
Now you have a miniature version of home to gift to your favorite person
Gaming Night Tic-Tac-Toe Set With Couple Pieces
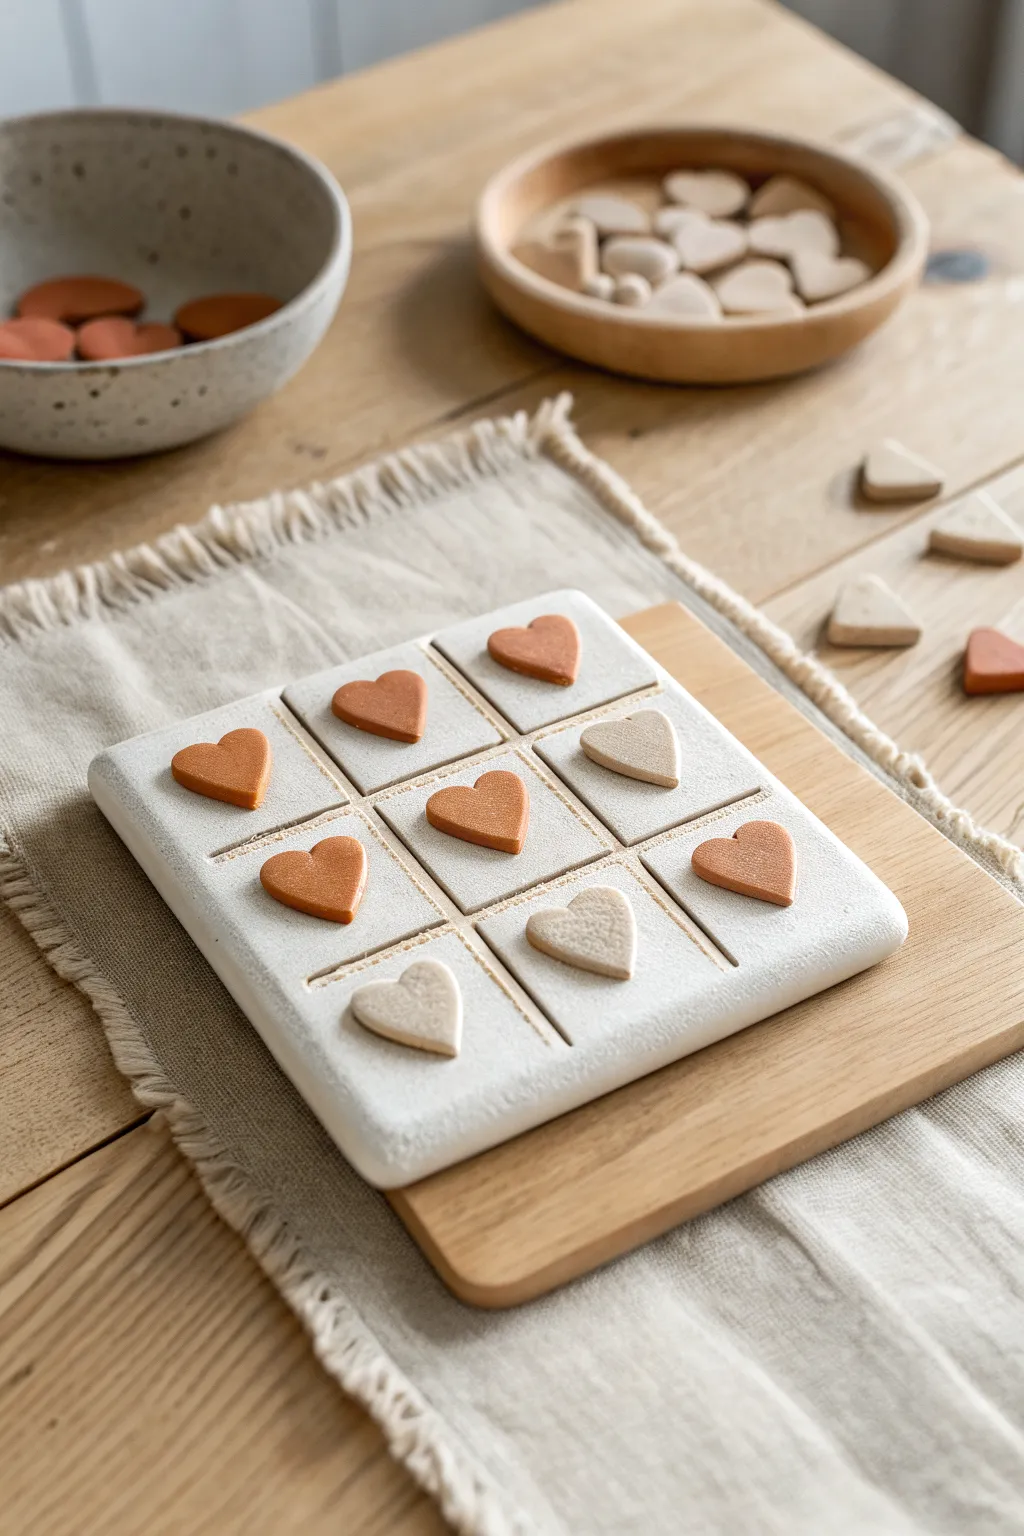
For a game night that feels a little more personal, this handmade Tic-Tac-Toe set replaces the traditional X’s and O’s with charming terracotta and cream-colored hearts. It has a modern, minimalist aesthetic with a clean white game board that fits beautifully on any coffee table.
Step-by-Step Guide
Materials
- White or light grey air dry clay
- Terracotta colored air dry clay (or white clay to paint later)
- Small heart-shaped cookie cutter (approx. 1 inch)
- Rolling pin or smooth glass jar
- Rolling guides or wooden slats (approx. 1/4 inch thick)
- Ruler
- Clay knife or X-Acto blade
- Modeling tool or dull butter knife for scoring
- Fine-grit sandpaper (220-400 grit)
- Matte sealant or varnish
- Parchment paper
- Bowl of water
Step 1: Creating the Game Board
-
Prepare the workspace:
Lay down a sheet of parchment paper to prevent sticking. Knead a large ball of white air dry clay until it’s smooth, pliable, and free of air bubbles. -
Roll out the slab:
Using rolling guides or slats on either side of your clay, roll out the white clay into a thick, even square slab. Aim for a thickness of about 1/2 inch to ensure sturdiness. -
Cut the square:
Use a ruler and a sharp clay knife to cut a perfect square. A size of 5×5 inches or 6×6 inches works well for this project. Remove the excess clay. -
Soften the edges:
Dip your finger in a little water and gently run it along the cut edges of the square to round them off slightly. You want a soft, pillowy look rather than sharp, geometric corners. -
Measure the grid:
Using your ruler, lightly mark the slab into a 3×3 grid. Measure equal distances so you have nine squares of the same size. -
Score the lines:
Take a modeling tool or the back of a butter knife and press firmly into the clay along your marked lines to create the grid grooves. I find it helpful to press straight down rather than dragging to keep the lines clean. -
Smooth the grooves:
Run a damp finger or a wet paintbrush along the grooves you just made to ensure there are no jagged clay bits inside the lines.
Warping Board?
If the main board curls while drying, place a heavy book on top of it (with parchment paper in between) during the final stages of drying to flatten it out.
Step 2: Sculpting the Heart Pieces
-
Roll the terracotta clay:
Roll out your terracotta-colored clay to a thickness of about 1/4 inch. If you are using white clay to paint later, roll that out instead. -
Cut the first team:
Use the heart-shaped cookie cutter to punch out five heart pieces. These will serve as the ‘X’ pieces for the game. -
Roll the contrast clay:
Clean your rolling pin and surface, then roll out a fresh batch of white or light beige clay to the same thickness. -
Cut the second team:
Punch out five more hearts from this lighter clay. These will serve as the ‘O’ pieces. -
Refine the shapes:
Gently tap the edges of each heart to remove any flashing or sharp bits left by the cutter. You want them to look smooth and uniform.
Step 3: Finishing Touches
-
Slow drying:
Place the board and all ten hearts on a clean sheet of parchment paper in a cool, dry place away from direct sunlight. To prevent the board from warping, gently flip it over every 12 hours. -
Wait time:
Allow everything to dry completely. This usually takes 24-48 hours depending on humidity and thickness. -
Sand for smoothness:
Once fully dry, take your fine-grit sandpaper and very gently sand the edges of the board and the hearts to achieve a professional, stone-like finish. -
Seal the set:
Apply a coat of matte varnish or sealant to all pieces. This protects the clay from moisture and gives it a nice finished feel without being too glossy. -
Optional painting:
If you used only white clay, paint five of the hearts with terracotta acrylic paint before sealing.
Level Up: Magnetize It
Embed small magnets into the bottom of the hearts and the center of each grid square while the clay is wet for a travel-friendly magnetic version.
Once sealed and dried, set it up on a wooden serving board or tray for a stylish round of gaming
Adventure Token With a Tiny Map or Mountain
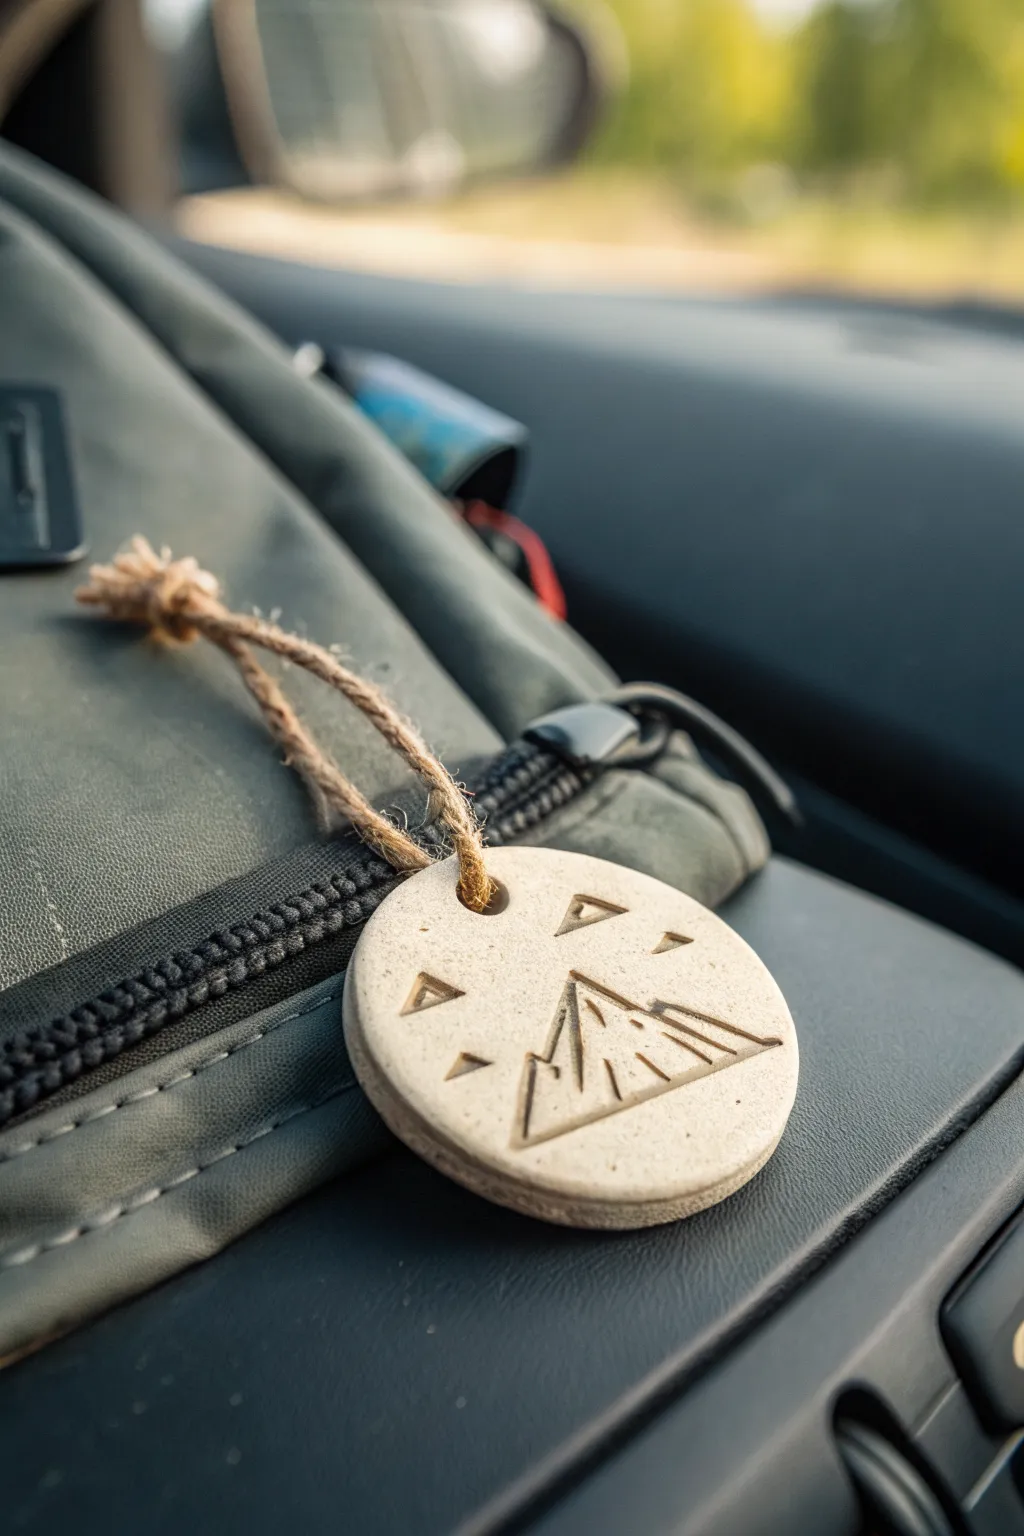
Capture the spirit of the outdoors with this rugged, stone-effect clay token featuring a minimalist mountain range. Perfect for hanging on a rearview mirror or backpack, this simple yet meaningful gift acts as a daily reminder of shared adventures.
Detailed Instructions
Materials
- White or stone-colored air dry clay
- Rolling pin
- Circle cookie cutter (approx. 2-3 inches)
- Needle tool or toothpick
- Small carving tool or X-Acto knife
- Dark brown acrylic paint
- Old toothbrush
- Fine-grit sandpaper
- Jute twine
- Straw or paintbrush handle (for the hole)
- Matte sealant spray
Step 1: Shaping the Token
-
Condition the Clay:
Begin by taking a small handful of air dry clay and kneading it in your hands until it becomes pliable and warm. If you want that stone-like speckled look shown in the photo, you can mix in a tiny pinch of cracked black pepper or dried coffee grounds at this stage. -
Roll the Slab:
Roll out the clay onto a smooth surface to a thickness of about 1/4 inch. Avoid making it too thin, as a thicker token feels more substantial and durable. -
Cut the Circle:
Using your circular cutter, press firmly into the clay to create a clean shape. If you don’t have a cutter, trace around a small jar lid with a knife. -
Smooth the Edges:
Dip your finger in a little bit of water and gently run it along the cut edges of the circle to remove any sharpness or burrs.
Cracking Issues?
If small hairline cracks appear while drying, don’t panic. Mix a tiny bit of fresh clay with water to make a paste (slip) and fill the cracks. Smooth over and let redry.
Step 2: Designing the Mountain
-
Create the Hole:
Near the top edge of the circle, use a straw or the handle of a paintbrush to punch a hole for hanging. Twist the tool as you pull it out to keep the hole clean. -
Sketch the Outline:
Very lightly trace your design onto the wet clay using a needle tool. Draw a central triangle for the main peak, flanking lines for the slopes, and four small triangles floating above for a stylized sky. -
Carve the Lines:
Go back over your sketched lines with a carving tool or X-Acto knife. Press deeper this time to create distinct grooves. Remove any little bits of clay that peel up so the lines remain sharp. -
Refine the Details:
Add the inner detail lines to the mountain peak to give it dimension. Ensure the grooves are wide enough that they won’t disappear if the clay shrinks slightly.
Step 3: Finishing Touches
-
Drying Time:
Place the token on a flat surface away from direct heat to dry. This usually takes 24-48 hours. I like to flip it over halfway through the process to ensure both sides dry evenly. -
Sand and Polish:
Once fully cured, use fine-grit sandpaper to smooth out any rough texture on the flat surfaces and edges, being careful not to sand down your carved details. -
Apply the Stone Texture:
Dilute a small drop of dark brown acrylic paint with water. dip an old toothbrush into it and run your thumb across the bristles to flick tiny speckles onto the clay surface. -
Highlight the Grooves:
Paint the inside of the carved mountain lines with the brown paint. Quickly wipe the surface with a damp paper towel or rag, leaving the paint only inside the deep grooves to make the design pop. -
Seal the Piece:
Spray the entire token with a matte sealant. This protects the clay from moisture, which is especially important if it will be hanging in a car or on a bag. -
Attach the Cord:
Cut a length of jute twine. Fold it in half, push the loop through the hole, and pull the loose ends through the loop to create a lark’s head knot. -
Secure the Knot:
Tie a simple overhand knot at the loose ends of the twine to finish the rustic look.
Add a Scent
Turn this into a passive air freshener by adding a few drops of cedarwood or pine essential oil to the unfinished back of the clay. Reapply whenever the scent fades.
This rugged little token is ready to accompany him on every journey
Hidden Locket-Style Keepsake With a Secret Note
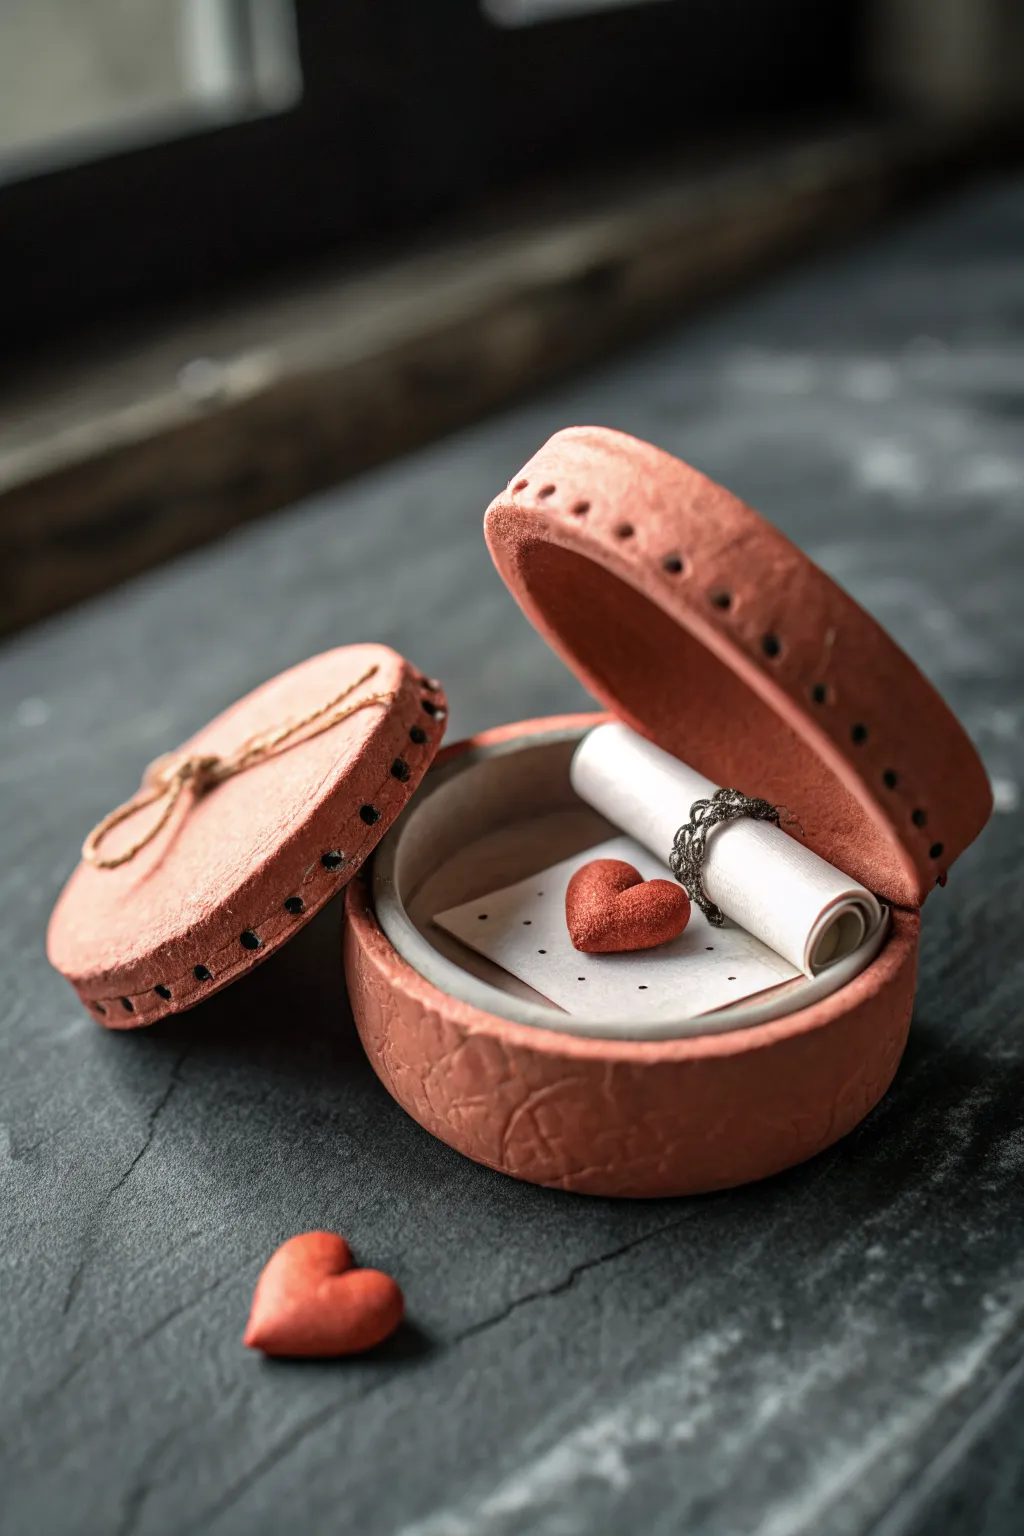
This rustic, locket-style keepsake box mimics the look of stitched leather but is entirely sculpted from clay. With its warm terra-cotta tones and hidden scroll, it offers a deeply personal way to present a love note or tiny trinket.
Step-by-Step
Materials
- Air-dry clay (terra-cotta color or white)
- Rolling pin
- Circle cutters (two sizes, one slightly smaller than the other)
- Modeling tool or toothpick
- Acrylic paints (burnt sienna, pink, coral)
- Piece of textured fabric or leather scrap (for texturing)
- Small piece of paper (for the scroll)
- Waxed cord or thin chain
- Sandpaper (fine grit)
- Craft knife
- Water and brush (for joining)
Step 1: Creating the Base and Lid
-
Roll the clay:
Begin by conditioning your clay until it is smooth and pliable, then use a rolling pin to flatten a portion to about 1/4 inch thickness. I maintain an even pressure to avoid lumpy spots. -
Cut the circles:
Using your larger circle cutter, punch out two identical circles. These will become the base of the box and the top of the lid. -
Add texture:
Before the clay hardens, gently press a piece of crumbled fabric or a leather scrap onto the surface of both circles to create a subtle, organic texture akin to worn leather. -
Form the walls:
Roll out a long, rectangular strip of clay, roughly 3/4 inch wide. Measure the circumference of your base circle and trim the strip to match. -
Attach the walls:
Score the edge of the base circle and the bottom edge of your clay strip. Apply a little water to create ‘slip’ and wrap the strip around the base, smoothing the seam where the ends meet.
Cracking Clay?
If small cracks appear while drying, mix a tiny amount of fresh clay with water to make a paste and fill them in before painting.
Step 2: Detailing and Lid Fit
-
Create the inner lip (optional):
To make the lid sit securely, you can roll a thinner strip of clay and attach it to the inside rim of the lid, creating a notch that fits inside the box base. -
Simulate stitching:
Using a toothpick or a small, pointed tool, poke evenly spaced holes around the top rim of the lid and the bottom rim of the box. Pierce slightly inwards to mimic the needle holes of leather stitching. -
Smooth the edges:
Dip your finger in water and run it along the top rim of the box wall to ensure it is smooth and level, which guarantees the lid will sit flat. -
Sculpt the hearts:
With leftover clay, shape two or three tiny, puffy hearts. Texture them with the same fabric method used on the box for consistency. -
Dry thoroughly:
Allow all pieces to dry for at least 24-48 hours. Turn them over occasionally to ensure even drying and prevent warping.
Stitch Realism
After painting, dry brush a lighter peach color lightly over the textured surface to highlight the bumps and make the ‘leather’ look aged.
Step 3: Finishing Touches
-
Sand imperfections:
Once fully cured, use fine-grit sandpaper to gently smooth any rough seams on the side of the box, being careful not to sand away your leather texture. -
Painting base coat:
Mix burnt sienna with a touch of pink or coral to achieve a warm, clay-pot hue. Paint the entire exterior of the box and lid. -
Dry styling:
To enhance the ‘stitched’ look, you can use a very dark brown paint inside the poked holes, or actually thread a thin piece of twine through them if the clay is sturdy enough. -
Create the scroll:
Cut a small strip of paper and write your secret message. Roll it tightly and secure it with a small metal chain or piece of distinctive twine. -
Final assembly:
Place one of the tiny clay hearts inside the box, nestled next to the scroll, and keep the other loose as a matching token. Tie a small bow around the lid if desired for extra flair.
This charming little vessel turns a simple note into a treasured artifact he can keep on his desk