If you’re in the mood to make something cute and wearable for Thanksgiving, a clay bead bracelet stack is my go-to every single time. I pulled together my favorite theme-forward ideas that lean hard into heishi beads, cozy fall color palettes, and those irresistible little letter bead words.
Classic Thankful Word Bracelet
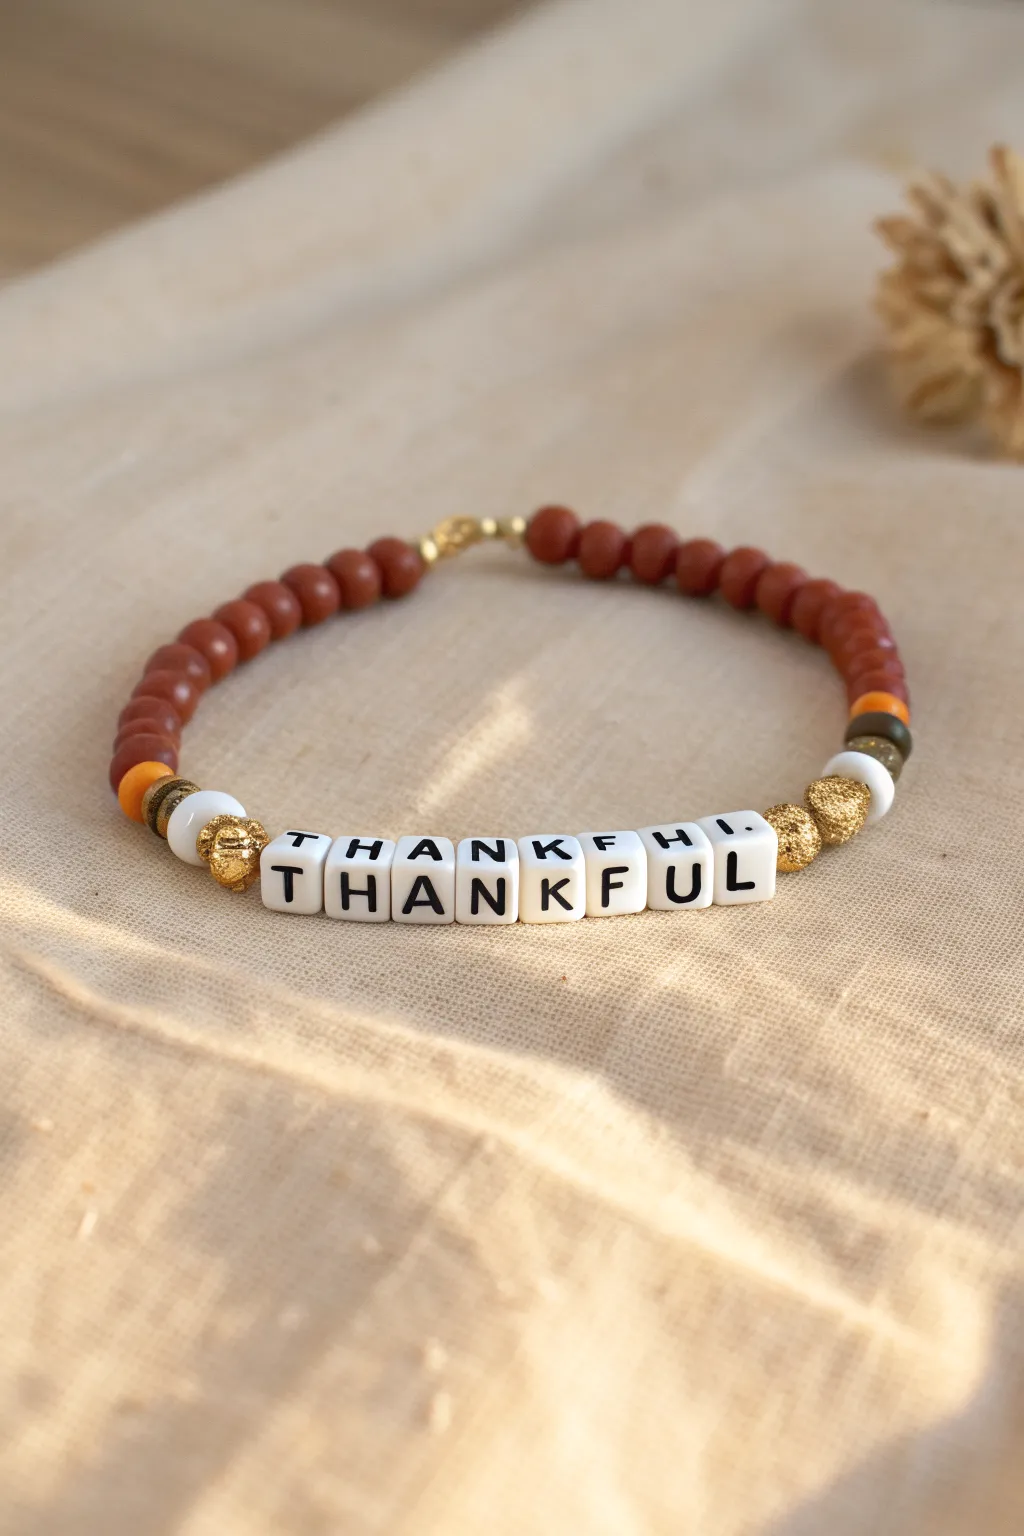
Capture the essence of the season with this warm, personalized accessory that pairs rich terracotta tones with gold accents. This simple stringing project creates a sophisticated reminder of gratitude perfect for your Thanksgiving table setting or everyday wear.
Step-by-Step
Materials
- Terracotta brown round beads (approx. 6mm, matte finish)
- White alphabet cube beads spelling ‘THANKFUL’
- Metallic gold textured spacer beads (round)
- Small white rondelle beads
- Mustard yellow or amber rondelle beads
- Olive green or bronze rondelle beads
- Elastic beading cord (0.8mm clear)
- Gold tone crimp bead or knot cover (optional)
- Jewelry glue (GS Hypo Cement recommended)
- Scissors
- Bead stopper or tape
Step 1: Preparation & Planning
-
Measure the cord:
Cut a length of elastic cord about 10-12 inches long. This generous length gives you plenty of room to knot comfortably later without beads sliding off. -
Secure the end:
Attach a bead stopper to one end of your cord, or simply use a piece of tape to secure it to your work surface so your hard work doesn’t scatter. -
Sort your letters:
Find your ‘T-H-A-N-K-F-U-L’ beads and lay them out in order. Double-check the spelling now to save frustration later.
Knot Security
When hiding the knot inside a bead hole, choose one of the terracotta beads rather than the letter beads, as the clay beads usually accommodate the knot bulk better.
Step 2: Creating the Focal Point
-
Start the center sequence:
This design centers the word, so we’ll build the focal section first. Locate your gold textured spacer beads. -
Add the first accent:
Thread on one gold textured bead, followed by your first letter bead, ‘T’. -
String the word:
Continue threading the remaining letters ‘H-A-N-K-F-U-L’ onto the cord. Ensure they are all facing the same direction immediately. -
Finish the focal point:
Cap off the word by adding the second gold textured bead after the ‘L’.
Step 3: Building the Shoulders
-
Add right side accents:
On the right side of your word sequence (after the gold bead), thread one white rondelle bead. -
Add color definition:
Before moving to the main color, add a decorative stack: one mustard yellow spacer, one olive bronze spacer, and then another mustard yellow or similar warm-toned spacer. -
Repeat on the left:
Mirror this exact pattern on the left side of the bracelet: one white rondelle, followed by the small stack of mustard and bronze spacers to frame the word symmetrically.
Level Up: Texture Mix
Swap the matte terracotta beads for real wooden beads or lava stones. Lava stones allow you to add essential oils like cinnamon or clove for a scented accessory.
Step 4: Completing the Loop
-
Add the main color:
Fill the rest of the bracelet with the terracotta brown round beads. I like to add 8-10 beads to one side first. -
Balance the sizing:
Add terracotta beads to the other side until the bracelet reaches your desired length (usually around 6.5 to 7 inches for an average wrist). -
Check the fit:
Wrap the unfinished strand around your wrist to ensure it sits comfortably. Remember, the knot will take up a tiny bit of space.
Step 5: Finishing Touches
-
Pre-stretch the cord:
Gently pull on both ends of the elastic cord slightly. This pre-stretching prevents the bracelet from growing loose after the first few wears. -
Tie the knot:
Remove the bead stopper and tie a strong surgeon’s knot (right over left, left over right twice) to secure the circle. -
Secure with glue:
Apply a tiny dot of jewelry glue directly onto the knot. This is crucial for longevity with elastic cord. -
Hide the knot:
If hole sizes permit, gently pull the knot inside one of the adjacent terracotta beads to hide it. If using a gold crimp cover, attach it over the knot now. -
Trim excess:
Once the glue is tacky or dry, trim the excess cord tails close to the bead or knot.
Enjoy wearing your handcrafted reminder of gratitude throughout the holiday season


Burnt Orange and Cream Stack
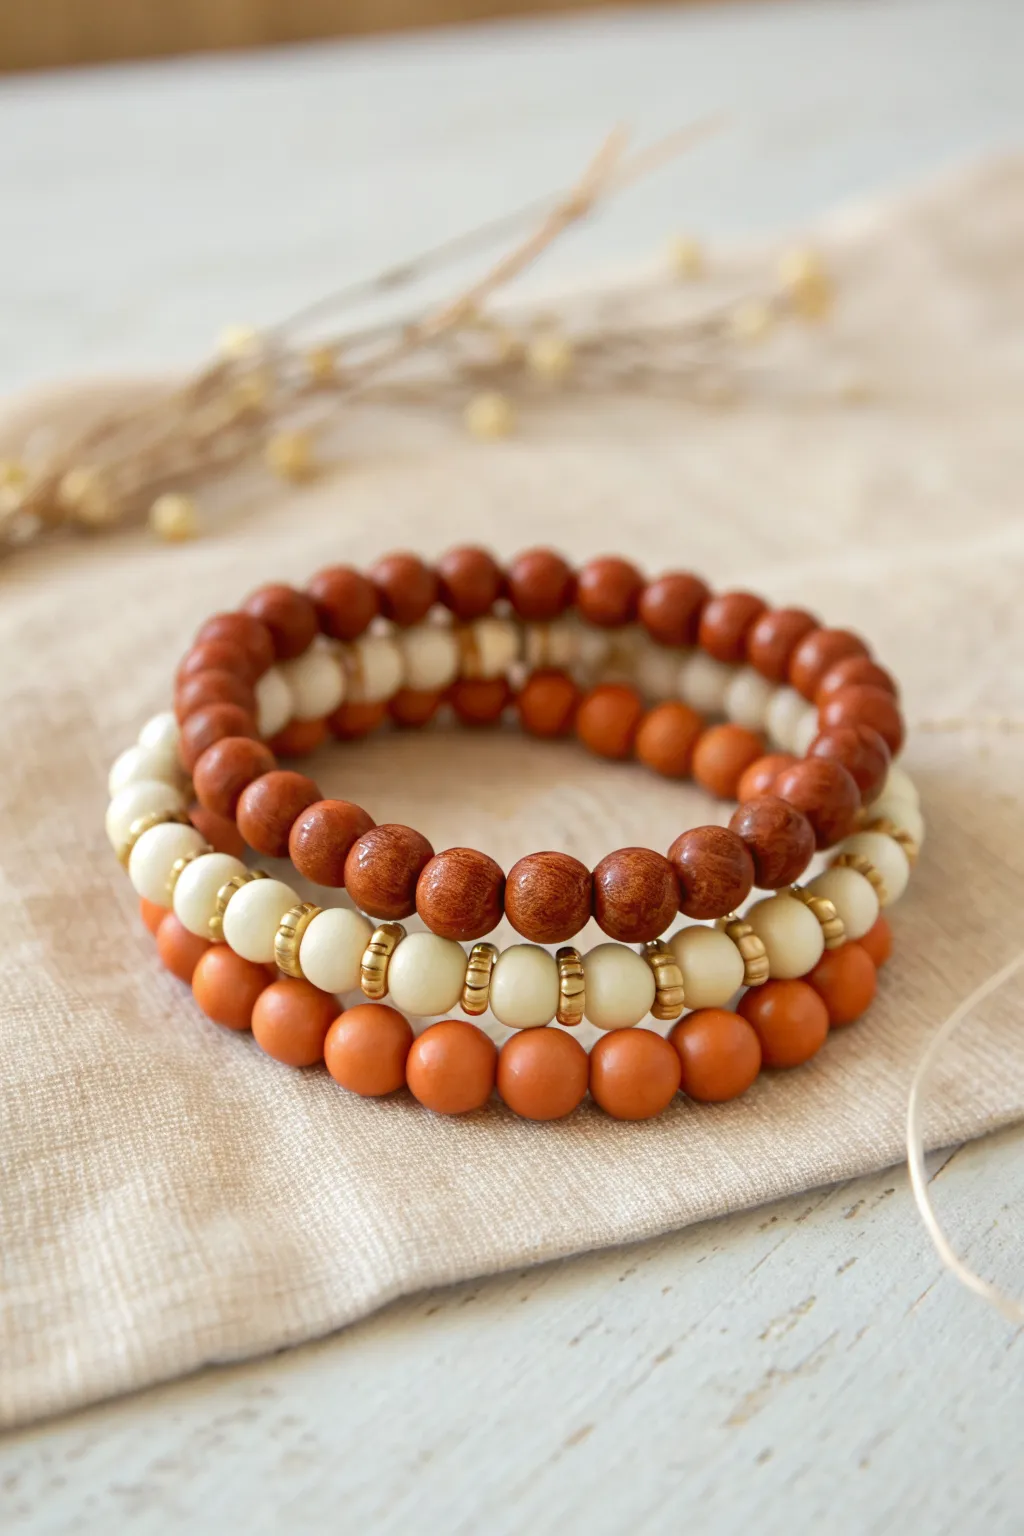
Capture the warm, cozy essence of fall with this trio of stretch bracelets featuring varied textures and rich autumnal hues. The blend of glossy clay, matte wood, and metallic gold accents creates a polished look perfect for your Thanksgiving table.
Detailed Instructions
Materials
- Burnt orange polymer clay beads (round, approx. 8mm)
- Cream or off-white wooden beads (round, approx. 8mm)
- Mahogany or dark wood beads (round, approx. 10mm)
- Gold tone spacer discs or heishi beads (approx. 4-5mm)
- Strong elastic cord (0.8mm or 1mm thickness)
- Jewelry glue or clear nail polish
- Scissors
Step 1: Planning and Preparation
-
Measure your wrist:
Before cutting any cord, wrap a piece of string around your wrist to find your comfortable size. Add about 1/2 inch to this measurement, which is usually around 7 inches for an average adult wrist. -
Prepare the elastic:
Cut three lengths of elastic cord, making each one roughly 10-12 inches long. This extra length gives you plenty of room to tie secure knots without struggling. -
Pre-stretch the cord:
Give each piece of elastic a rigorous tug a few times. This pre-stretching prevents the bracelets from stretching out and becoming loose after only a few wears. -
Secure the ends:
Attach a piece of tape or a binder clip to one end of each cord. This simple trick stops your beads from sliding right off while you are stringing them.
Step 2: Stringing the Burnt Orange Bracelet
-
Begin the orange strand:
For the simplest bracelet in the stack, pick up your burnt orange polymer clay beads. These should have a slight sheen to them. -
String completely:
Thread the orange beads onto your first cord one by one until you reach your determined wrist length. Aim for a solid block of color without any spacers for this specific strand. -
Check fit:
Wrap the strand around your wrist to double-check the sizing. Add or remove a bead if necessary to ensure it sits comfortably without digging in.
Knot Security Trick
If you struggle hiding the knot inside a bead hole, use a bead reamer or a thick needle to gently widen the opening of the bead nearest the knot.
Step 3: Creating the Cream & Gold Accent Bracelet
-
Start the pattern:
Grab your second cord and the cream-colored wooden beads. Slide on one cream bead to start. -
Add gold spacers:
After the first cream bead, thread on three to four gold disc spacers. This creates a metallic ‘ribbed’ look between the wooden elements. -
Continue the sequence:
Repeat the pattern: one cream bead, followed by a stack of gold spacers. I find that using exactly three spacers usually gives the cleanest separation. -
Finish the strand:
Sustain this alternating pattern until you match the length of your first orange bracelet.
Mix Up textures
Swap the smooth orange clay beads for faceted agate or carnelian gemstones. The facets catch the light and add a sophisticated sparkle to the stack.
Step 4: Assembling the Dark Wood Textural Bracelet
-
Select the largest beads:
For the third cord, use the mahogany or dark wood beads. These appear slightly larger and have a varied, natural wood grain texture. -
Check for visual balance:
String these beads continuously. Because these beads might be slightly larger, you may need fewer of them to reach the same physical length as the other two bracelets. -
Verify the trio:
Hold all three un-knotted strands together around your wrist. This is the moment to ensure the dark wood tone complements the orange and cream rather than overpowering them.
Step 5: Finishing Touches
-
Tie the first knot:
Remove the tape or clip from the orange bracelet. Bring the two ends together and tie a standard overhand knot, pulling it tight. -
Secure with a surgeon’s knot:
Follow up with a surgeon’s knot—loop the elastic through twice before pulling tight—for extra security. -
Hide the knot:
Apply a tiny dot of jewelry glue to the knot. Once slightly tacky, pull the knot inside the hole of the nearest bead to conceal it. -
Trim excess:
Once the glue is fully dry, snip off the excess elastic tail close to the bead. -
Repeat for all strands:
Perform the knotting, gluing, and hiding steps for the cream/gold bracelet and the dark wood bracelet to complete your stack.
Slip on your new bracelet trio and enjoy the warmth they bring to your outfit


Maple Leaf Color Pattern
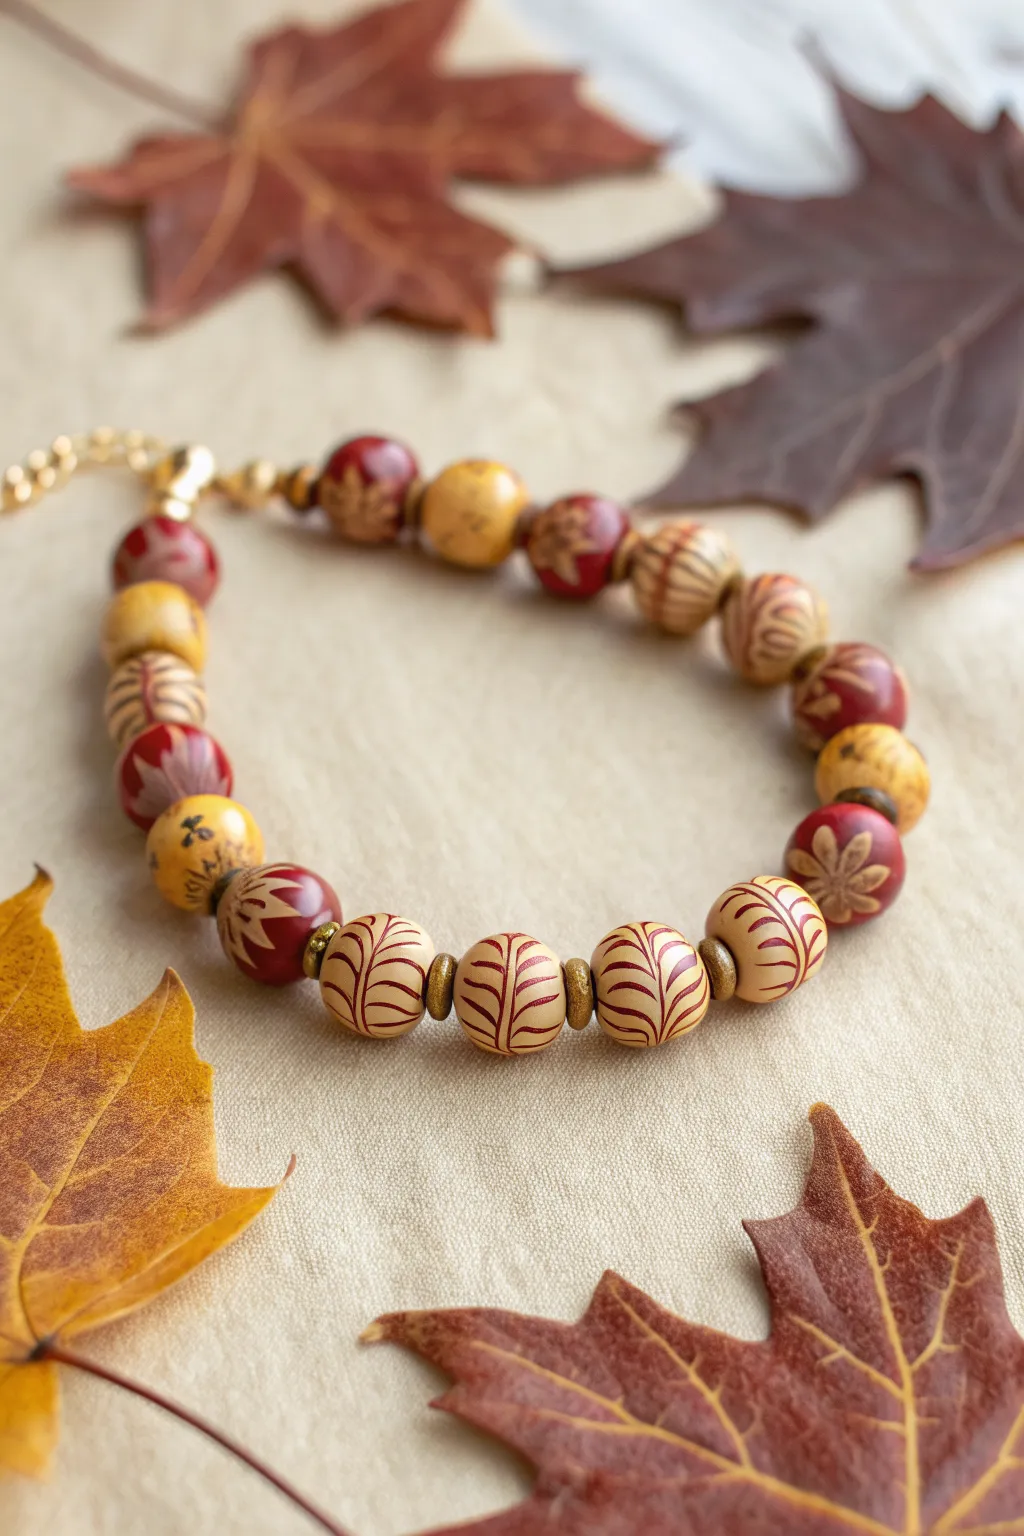
Capture the warmth of autumn with this beautiful artisan-style bracelet featuring beads in rich red, ochre, and tan. The intricate leaf and feather patterns painted on polymer clay create a sophisticated, rustic look perfect for your Thanksgiving table.
Step-by-Step Guide
Materials
- Polymer clay (Deep Red, Golden Ochre, Beige/Tan)
- Acrylic paint (Dark Brown, Deep Red, Gold)
- Fine detail paintbrush (size 0 or 00)
- Small bead roller (round)
- Toothpicks or bead pins
- Baking sheet and parchment paper
- Gloss or matte varnish (optional)
- Antique gold spacer beads (small rings)
- Elastic cord (0.8mm) or beading wire with clasp
- Super glue (if using elastic)
- Crimp beads and crimping tool (if using wire)
- Gold jewelry chain and lobster clasp (optional)
Step 1: Preparing the Clay Beads
-
Condition clay:
Start by conditioning your three colors of polymer clay—Deep Red, Golden Ochre, and Beige—until they are soft and pliable in your hands. -
Portion the clay:
Pinch off equal-sized pieces of clay to ensure your beads are uniform. For this bracelet, you will need approximately 15-20 portions, depending on your wrist size. -
Roll the spheres:
Roll each portion between your palms or use a bead roller to create smooth, perfect spheres. Aim for beads that are about 10-12mm in diameter. -
Pierce holes:
Carefully pierce the center of each bead with a toothpick or bead pin. Rotate the bead gently as you push through to avoid distorting the round shape. -
Smooth the edges:
Check the entry and exit points of the holes. If the clay has puckered, gently smooth it back down with your fingertip.
Smudged Paint?
If you make a mistake while painting the details, quickly dip a cotton swab in water (for acrylics) and gently wipe away the wet paint without disturbing the clay underneath.
Step 2: Painting the Designs
-
Initial bake (optional):
I sometimes like to bake the beads for 10 minutes first to harden the surface before painting, which prevents fingerprints, though painting on raw clay works too if you have a steady hand. -
Mount for painting:
Place your beads on toothpicks stuck into a block of styrofoam or foil to hold them steady while you work. -
Paint feather patterns:
On the beige beads, use a fine brush dipped in Deep Red acrylic paint. Paint a central vertical line, then add curved strokes radiating outward on both sides to mimic a stylized feather or fern leaf. -
Create leaf motifs:
For the red beads, switch to a Gold or Ochre paint. Paint simple, five-pointed star shapes or radiating lines to represent falling maple leaves. -
Add abstract details:
On the ochre/yellow beads, use Dark Brown paint to create organic, swirling lines or small fern patterns similar to the beige beads. -
Let paint dry:
Allow the paint to dry completely. If the design looks transparent, carefully apply a second coat for richness. -
Final bake:
Bake the beads according to your polymer clay package instructions (usually 275°F/135°C for 15-30 minutes). Let them cool completely before handling. -
Seal the beads:
Apply a thin coat of matte or satin varnish to protect the painted designs, especially if the bracelet will see a lot of wear.
Use A Template
Unsure about freehanding leaves? Draw your pattern lightly on the bead with a pencil first. It acts as a guide and will be covered by paint or disappear during baking.
Step 3: Assembly
-
Plan the pattern:
Lay out your bead sequence on a bead board or towel. Alternating colors creates a balanced rhythm—try Red, Ochre, Beige, Red, Ochre, Beige. -
Insert spacers:
Place a small antique gold spacer ring between every bead; this metal accent elevates the rustic look significantly. -
String the beads:
Cut a length of elastic cord about 10 inches long so you have plenty of room to tie knots. Thread your beads and spacers onto the cord. -
Check the fit:
Wrap the strung beads around your wrist to check the size. Add or remove beads as necessary for a comfortable fit. -
Secure the knot:
Tie a strong surgeon’s knot with the elastic. Add a tiny drop of super glue to the knot for extra security. -
Hide the knot:
Once dry, trim the excess cord and gently tug the knot inside the hole of one of the larger clay beads to hide it. -
Add clasp (Optional):
For a non-stretchy version like the one pictured, use beading wire, crimp beads, and attach a gold lobster clasp and extension chain at the ends.
Wear your handcrafted autumn bracelet with pride as you gather for the holiday feast


Cornucopia Color-Block Set

This charming stack of four stretch bracelets captures the essence of a Thanksgiving cornucopia with warm oranges, rich maroons, and creamy neutrals. The varying textures—from smooth clay squares to textured spacer beads—add a sophisticated touch to this festive accessory set.
Step-by-Step
Materials
- Polymer clay heishi beads (square shape) in cream/off-white
- Polymer clay heishi beads (square shape) in burnt orange
- Polymer clay heishi beads (square shape) in dark brown/maroon
- Polymer clay heishi beads (square shape) in maroon/burgundy
- Round wooden beads (approx. 8mm) in dark brown
- Textured gold or woven-look spacer beads (round, approx. 6-8mm)
- Elastic cord (0.8mm or 1mm thickness)
- Scissors
- Jewelry glue or clear nail polish
- Tape or bead stopper
Step 1: Preparation
-
Measure your wrist:
Wrap a piece of string around your wrist to find your comfortable size. Add about half an inch to this measurement to ensure the bracelets aren’t too tight. -
Cut the cord:
Cut four pieces of elastic cord, each about 10-12 inches long. This extra length makes tying the knots much easier later on. -
Secure the ends:
Place a piece of tape or a bead stopper on one end of each cord to prevent your hard work from sliding off while you design.
Step 2: Bracelet 1: The Mixed Pattern
-
Start the sequence:
For the top bracelet in the stack, begin threading the square clay beads onto your first cord. -
Create the repeating pattern:
Thread beads in a specific color block pattern: use about 5-6 cream beads, followed by one singular burnt orange bead, then one dark brown bead, and finish the segment with another burnt orange bead. -
Continue the pattern:
Repeat this sequence—cream section, orange, brown, orange—until you reach your desired wrist length. The alternating colors create a playful, segmented look.
Knot Slipping?
If your knot slips out of the bead hole, try enlarging the hole of the bead covering the knot slightly with a bead ream or a thick needle.
Step 3: Bracelet 2: Creamy Neutral
-
Load the solid color:
For the second bracelet (the white one), simply thread the square cream-colored beads continuously. -
Check for consistency:
Occasionally hold this strand up against your first bracelet to ensure the lengths match perfectly before you stop adding beads.
Style Choice
Mix up the texture by replacing the wooden beads with lava stones. You can add a drop of essential oil to them for a scented aromatherapy bracelet.
Step 4: Bracelet 3: Rich Burgundy
-
Thread the maroon strand:
Take your third cord and fill it entirely with the maroon or deep burgundy square beads. This solid dark layer anchors the lighter colors in the stack.
Step 5: Bracelet 4: Wood & Texture
-
Select your accent beads:
For the bottom bracelet, gather your round wooden beads and the textured gold/woven spacer beads. -
Alternate the textures:
Thread the beads in a simple 1-to-1 pattern: one dark wooden bead followed by one gold textured bead. I find this contrasting texture really elevates the whole set. -
Adjust length:
Since round beads take up space differently than flat clay beads, wrap this one around your wrist to double-check the fit before tying.
Step 6: Finishing Touches
-
Tie the knots:
Remove the tape/stopper. For each bracelet, tie a surgeon’s knot (right over left, left over right, and loop through an extra time) to secure the circle. -
Tighten securely:
Pull all four ends of the cord firmly to tighten the knot. You want it tight enough to hold, but not so tight that the elastic snaps. -
Apply adhesive:
Dab a tiny drop of jewelry glue or clear nail polish onto each knot. Let this dry completely before moving on. -
Trim the excess:
Once the glue is dry, use your scissors to snip the excess cord close to the knot. -
Hide the knot:
Gently tug the beads near the knot so that the knot slips inside the hole of a neighboring bead, making it invisible.
Now you have a stunning, autumn-inspired stack ready to wear at your Thanksgiving gathering

The Complete Guide to Pottery Troubleshooting
Uncover the most common ceramic mistakes—from cracking clay to failed glazes—and learn how to fix them fast.
White Gourd Neutral Bracelet
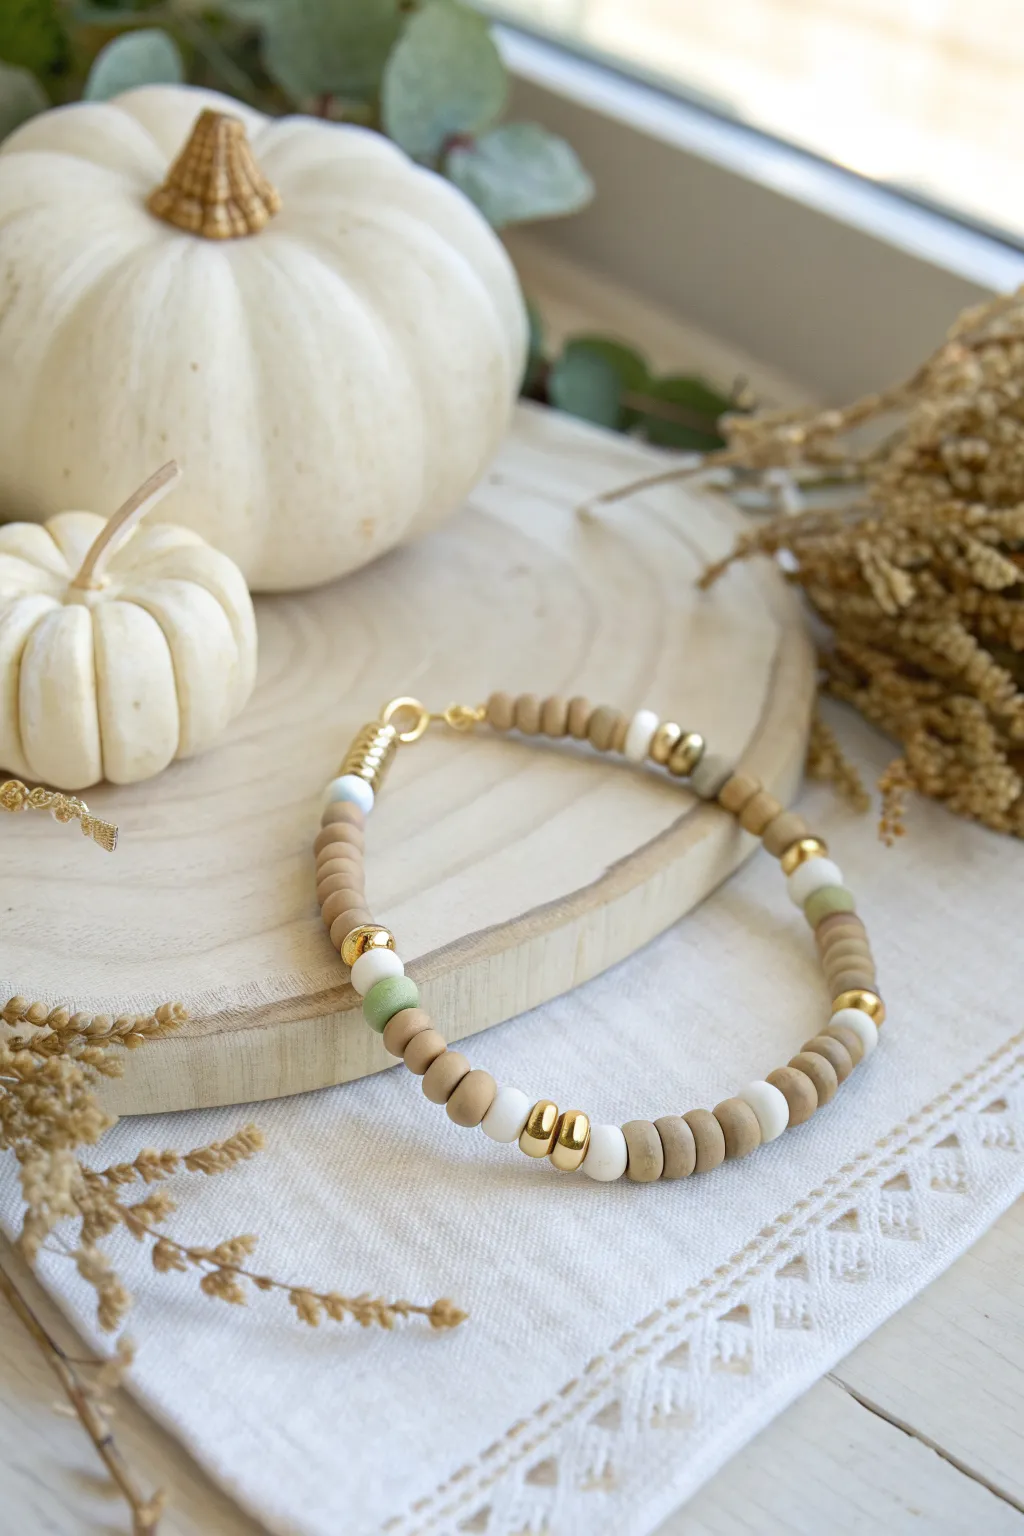
Embrace the muted, earthy tones of autumn with this understated clay bead bracelet. Combining soft beige, crisp white, and sage green with touches of gold creates a sophisticated accessory perfect for Thanksgiving gatherings.
Step-by-Step Guide
Materials
- Polymer clay heishi beads (flat discs) in matte beige/tan
- Polymer clay heishi beads in matte white
- Polymer clay heishi beads in sage green
- Gold tone spacer beads (small rounds or discs)
- Gold tone crimp covers
- Gold tone wire guards (optional but recommended)
- Gold tone lobster clasp
- Gold tone jump ring
- Jewelry beading wire (flexible, coated)
- Crimp tubes (2mm)
- Flat nose pliers
- Wire cutters
- Bead design board or masking tape
Step 1: Design & Preparation
-
Measure your wrist:
Wrap a flexible measuring tape around your wrist to find your size, then add about half an inch to ensure the bracelet isn’t too tight once the beads are on. -
Cut the wire:
Cut a length of beading wire about 10-12 inches long. It’s always better to have too much wire than too little. -
Plan your pattern:
Lay out your beads on a design board. The pattern in this bracelet features segments of beige separated by specific focal points. Start planning for a repeating sequence. -
Understand the sequence:
Break down the pattern visible in the image: It uses about 6-8 beige discs as a spacer, followed by a decorative triplet (one white, one gold, one beige, one gold, one white) or variations involving the sage green discs.
Step 2: Beading the Bracelet
-
Secure the first end:
Thread a crimp tube onto your wire, followed by a wire guard. Loop the wire through the wire guard and back through the crimp tube. -
Attach the clasp:
Before crushing the crimp, hook the lobster clasp onto the wire guard. I like to double-check that the wire is snug but not rigid before using flat nose pliers to flatten the crimp tube securely. -
Add a crimp cover:
Place a gold crimp cover over the flattened crimp tube and gently squeeze it shut with your pliers to make it look like a round gold bead. -
Begin with beige:
Thread on approximately 6 to 8 beige heishi beads to start the neutral base of the bracelet. -
Create the first accent:
Slide on one white bead, followed by a gold spacer, then a sage green bead. This introduces that subtle pop of color. -
Add a gold highlight:
Follow the sage green bead with another gold spacer and a white bead to complete the accent section. -
Return to the base:
Add another segment of 6 to 8 beige heishi beads. -
Create the second accent:
For variety, this section uses double gold beads. Slide on a white bead, then two gold spacers side-by-side, followed by a white bead. -
Continue the pattern:
Repeat these alternating sections—the beige base followed by either a sage/gold combo or a double-gold accent—until you reach your desired length.
Loose Beads?
If your bracelet feels stiff, you likely crimped it too tightly. Always leave a millimeter or two of slack on the wire so the beads can drape naturally.
Step 3: Finishing Touches
-
Check the fit:
Wrap the unfinished strand around your wrist one last time to ensure it feels comfortable and isn’t too loose. -
Prepare the closure:
Thread a new crimp tube onto the end of the wire, followed by a wire guard. -
Loop and secure:
Pass the wire through the wire guard and back down through the crimp tube. Attach a jump ring to the wire guard loop before tightening. -
Tighten the wire:
Pull the wire end so the crimp tube sits snugly against the beads, leaving just a tiny bit of wiggle room for flexibility. -
Final crimp:
Flatten the crimp tube with your flat nose pliers and trim the excess wire tail close to the crimp. -
Cover the hardware:
Place your final gold crimp cover over the crimp tube and gently close it for a seamless, professional finish.
Add Texture
Swap the plain gold spacers for ribbed or faceted gold beads. The texture catches the light differently and adds a more rustic, harvest feel.
This neutral palette seamlessly transitions from your Thanksgiving dinner table to everyday autumn wear
Cranberry and Mustard Pop
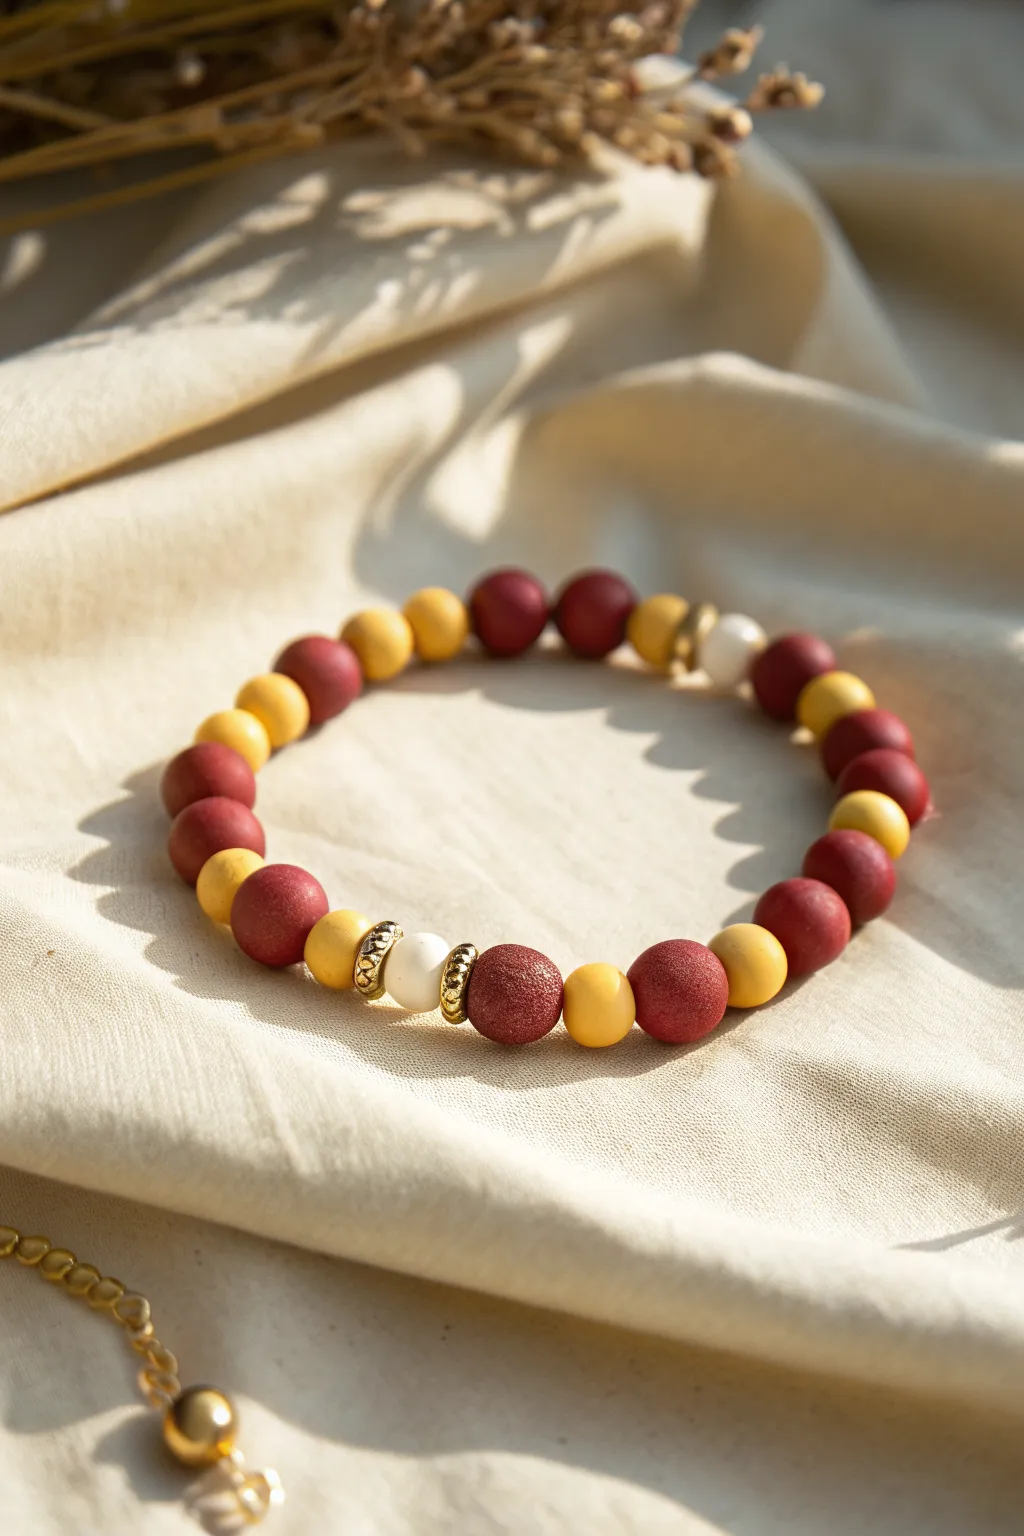
Capture the warmth of autumn with this rich and vibrant design, featuring deep cranberry hues paired with striking mustard yellow accents. The pattern creates a sophisticated visual rhythm by breaking up solid color blocks with alternating sequences and delicate gold and white focal points.
Step-by-Step Guide
Materials
- Polymer clay round beads: Dark cranberry red (matte finish)
- Polymer clay round beads: Mustard yellow (matte finish)
- Polymer clay round beads: White (matte finish)
- Gold tone rhinestone spacer beads (rondelle shape)
- Elastic beading cord (0.8mm clear)
- Beading needle (optional but helpful)
- Scissors
Step 1: Planning the Pattern
-
Measure your wrist:
Cut a length of elastic cord about 10-12 inches long. This generous length gives you plenty of room to tie knots without struggling against tension later. -
Understand the rhythm:
This bracelet relies on a specific pattern rhythm. You will mostly be alternating between small groups of yellow and red beads, broken up by single beads of the opposite color. -
Lay out the focus section:
Identify the main focal point: a white bead flanked by two gold spacers, with a red bead on one side and a yellow on the other. Lay these out on your work surface first.
Step 2: Stringing the Beads
-
Start the stringing:
Thread your elastic through a needle if using one. Begin by sliding on a textured gold spacer ring. -
Add the center white bead:
Next, string one white clay bead followed by a second gold spacer ring. This creates your central metallic highlight. -
Build the first side:
To the right of your gold spacers, add one textured cranberry red bead, followed by a mustard yellow bead, then another cranberry red bead. -
Extend the pattern right:
Follow that with a pattern: one mustard, one cranberry, two mustard, one cranberry. The goal is to make the colors feel organic but balanced. -
Build the second side:
Now, thread onto the other end of the elastic (to the left of your start). Add one mustard yellow bead immediately next to the gold spacer. -
Continue the sequence left:
Add two cranberry beads, then one mustard. The asymmetry here is intentional and adds to the modern look. -
Create color blocks:
Continue adding beads, alternating between grouping two of the same color and single alternating beads. For example, try a sequence like: two red, one yellow, two red, one yellow. -
Check the secondary accent:
In the image, there is a second white bead on the opposite side of the bracelet. String this single white bead roughly halfway through your total strand length to balance the design. -
Fill to length:
Continue the red and mustard alternating pattern until the strand wraps comfortably around your wrist with a little ease.
Pro Tip: Matte Magic
To get the authentic look from the photo, ensure your polymer clay beads have a matte, almost velvet-like texture rather than glossy.
Step 3: Finishing Touches
-
Pre-stretch the cord:
Before tying, give the ends of the elastic a gentle pull. This ‘pre-stretching’ prevents the bracelet from loosening up after you wear it for the first time. -
Tie the knot:
Tie a surgeon’s knot (right over left, left over right, and loop through an extra time). Pull it tight. -
Secure the knot:
I like to add a tiny dab of jewelry glue or clear nail polish to the knot for extra security. Let it dry for a a minute or so. -
Hide the knot:
Trim the excess elastic ends close to the knot, but leave about 1mm. Gently pull the elastic so the knot slides inside the hole of a neighboring bead to hide it.
Level Up: Gold Rush
Mix in small 3mm gold ball beads between every third color change to add more sparkle and holiday glam to the rustic colors.
Slide on your new accessory and enjoy the perfect pop of fall color on your wrist


What Really Happens Inside the Kiln
Learn how time and temperature work together inside the kiln to transform clay into durable ceramic.
Mini Pumpkin Charm Accent
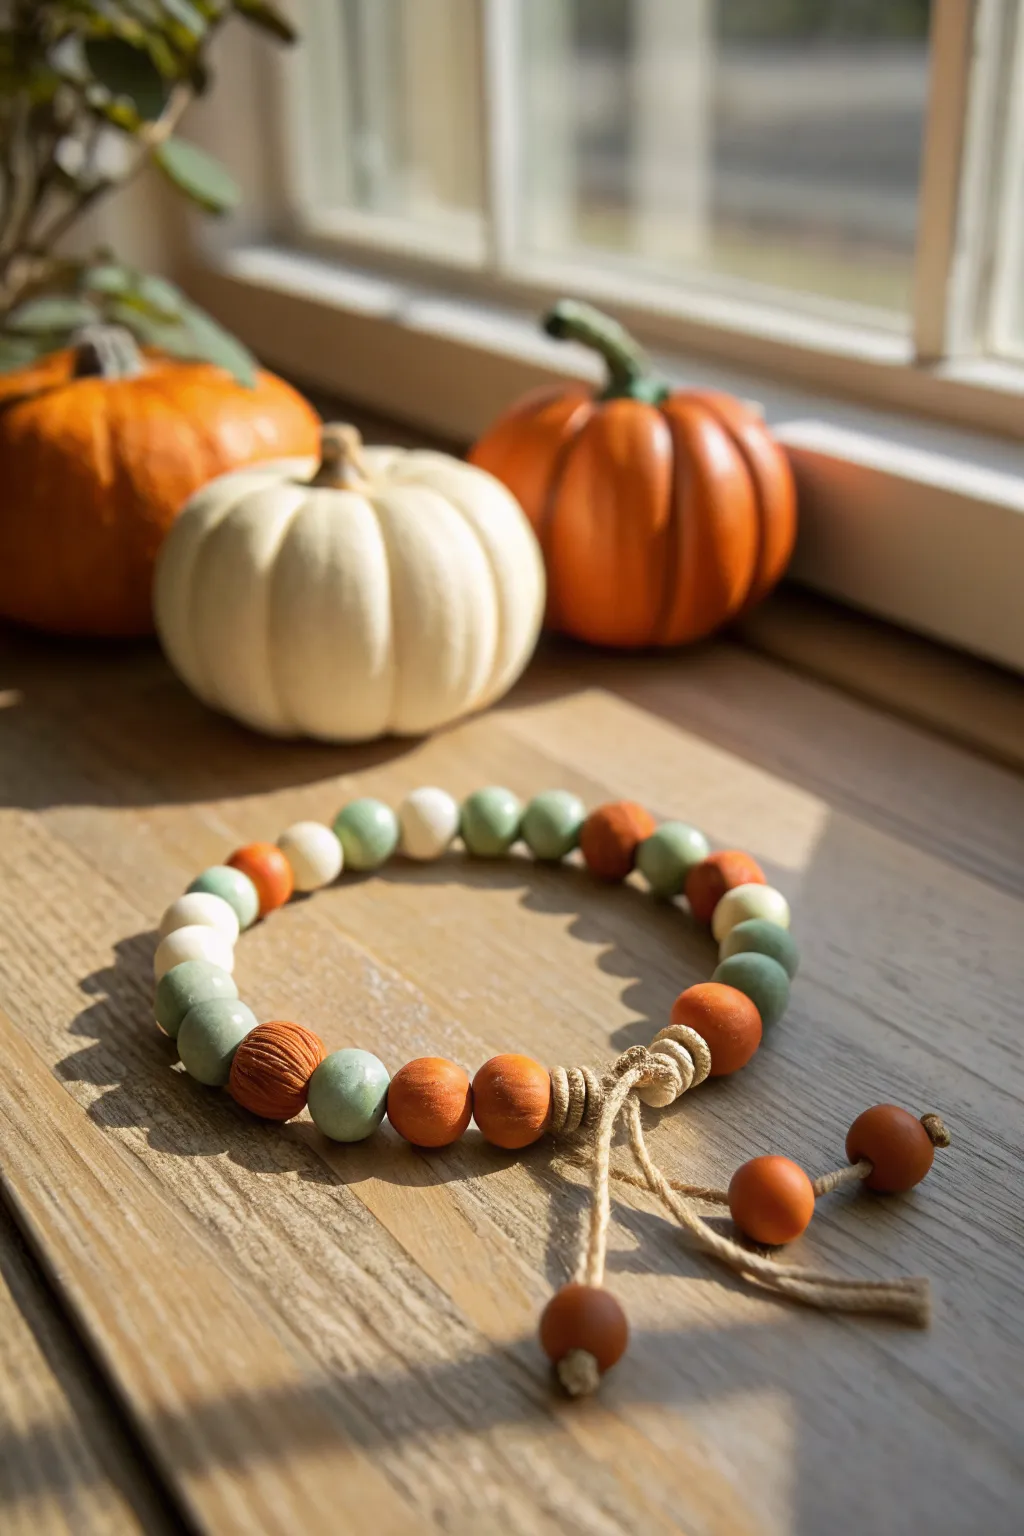
Capture the subtle elegance of autumn with this handcrafted clay bead bracelet, featuring alternating tones of sage, cream, and burnt orange. The standout detail is the textured ‘pumpkin’ bead accent, adding a dimension of rustic charm to your Thanksgiving attire.
Step-by-Step Guide
Materials
- Polymer clay in Burnt Orange, Sage Green, and Cream/White
- Thick jute twine or hemp cord (approx. 1.5mm)
- Bead roller (optional, for uniform roundness)
- Needle tool, toothpick, or awl
- Clay sculpting tool or dull knife (for texturing)
- Baking sheet with parchment paper
- Oven (for baking clay)
- Scissors
Step 1: Crafting the Beads
-
Condition the clay:
Start by warming up your polymer clay in your hands. Knead each color—burnt orange, sage green, and cream—separately until they are soft and pliable. This prevents cracking later. -
Portion the clay:
Pinch off small pieces of clay for your standard beads. Aim for pieces that will roll into balls about 10-12mm in diameter. You’ll need roughly 8-10 of each color depending on your wrist size. -
Roll the smooth beads:
Roll the cream and sage green pieces between your palms to create perfectly smooth spheres. If you have a bead roller, use it here for consistency, but hand-rolling adds a nice organic touch. -
Create the pumpkin beads:
For the special orange accents, roll slightly larger spheres of the burnt orange clay. These will become your textured ‘pumpkin’ beads. -
Add pumpkin texture:
Hold an orange sphere gently. Using a sculpting tool or the back of a dull knife, press vertical indentations from the top hole area to the bottom hole area, mimicking the ribs of a pumpkin. -
Pierce the holes:
Using your needle tool or awl, carefully pierce a hole through the center of every bead. Make sure the hole is wide enough to accommodate your thick jute twine—wiggle the tool a bit to widen it. -
Bake the beads:
Arrange all your beads on a parchment-lined baking sheet. Bake according to the manufacturer’s instructions on your clay package (usually around 275°F for 15-30 minutes). Let them cool completely before handling.
Texturing Tip
For a realistic pumpkin look, gently rub the orange clay with a piece of denim or sandpaper before baking to remove fingerprints and add matte texture.
Step 2: Assembly and Finishing
-
Prepare the cord:
Cut a length of jute twine or hemp cord, approximately 12-14 inches long. This gives you plenty of slack for knotting. -
Start the pattern:
Begin threading your cooled beads onto the twine. I prefer a repeating pattern like: Orange Pumpkin, Sage, Cream, Sage, Orange Smooth. Adjust the pattern based on your bead count. -
Check the fit:
Wrap the strand around your wrist to check the length. Add or remove beads as necessary until it fits comfortably but isn’t too loose. -
Tie the closure knot:
Bring the two ends of the twine together. Create a simple overhand knot with both strands to close the loop, pushing the knot down snugly against the beads. -
Create the decorative ends:
Thread one spare orange bead onto one of the tail ends of the twine. Tie a sturdy knot right below the bead to secure it. -
Finish the second tail:
Repeat the process on the second tail end with another spare bead. Try to stagger the lengths slightly so the tails hang at different levels for visual interest. -
Trim excess twine:
Snip off any fraying ends below your final safety knots for a clean finish.
Scent Infusion
Use porous wood or lava beads as the center ‘cream’ beads. Add a drop of cinnamon or pumpkin spice essential oil to them for a scratch-and-sniff accessory.
Enjoy wearing your cozy, handmade accessory knowing it brings a perfect touch of fall to your outfit
Leaf Charm Cluster Bracelet
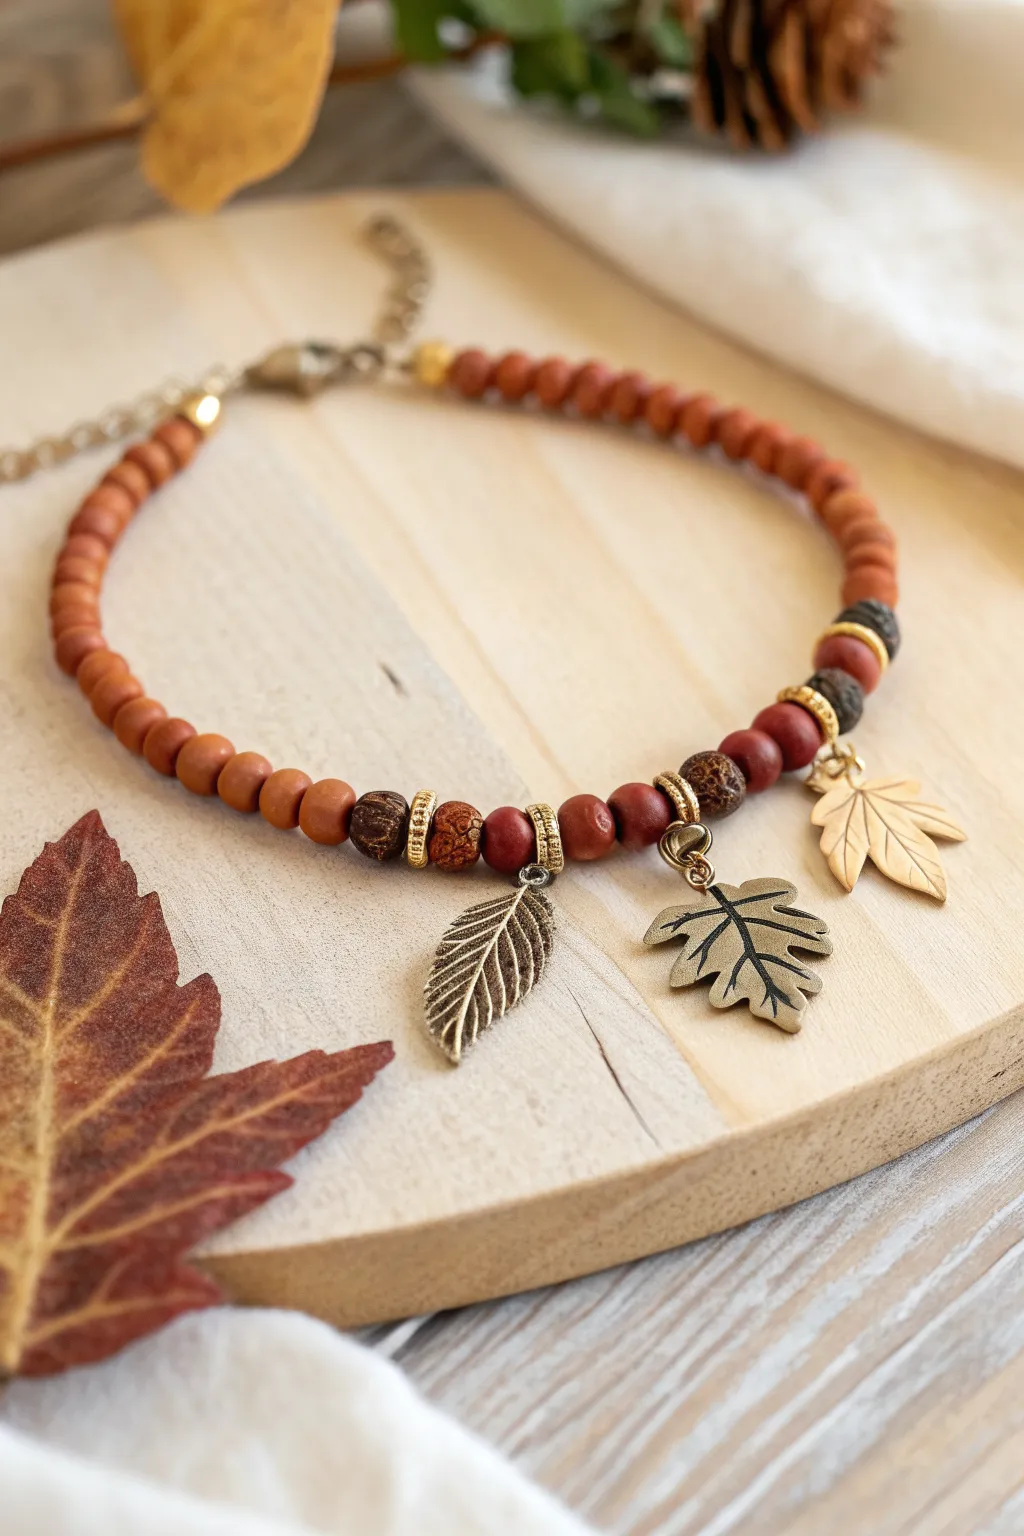
Embrace the warm, earthy tones of autumn with this sophisticated beaded bracelet featuring a trio of metallic leaf charms. The mix of matte terracotta clay beads and textured brown accents creates a rich, harvest-inspired accessory perfect for your Thanksgiving table.
Step-by-Step
Materials
- Terracotta or rust-colored round clay beads (approx. 4-6mm)
- Dark brown textured beads (wood or lava stone, approx. 6-8mm)
- Small gold spacer beads or heishi beads
- Gold tone jump rings (approx. 4-6mm)
- Bronze tone leaf charm (elm or oak shape)
- Gold tone leaf charm (maple shape)
- Silver or antique bronze leaf charm (feathery shape)
- Beading wire (tiger tail or similar flex wire)
- 2 Crimp beads
- 2 Crimp covers (gold tone, optional)
- Lobster clasp and extension chain (antique bronze or gold)
- Wire cutters
- Flat nose pliers
- Crimping tool (optional but recommended)
Step 1: Preparation and Initial Stringing
-
Measure your wire:
Cut a length of beading wire approximately 10-12 inches long. This gives you plenty of extra room to work with the clasps without beads falling off the ends. -
Attach the first clasp:
Thread a crimp bead onto one end of the wire, followed by the end loop of your extension chain. Loop the wire back through the crimp bead to create a secure loop. -
Secure the crimp:
Use your crimping tool or flat nose pliers to flatten the crimp bead tightly. I usually give the wire a gentle tug to make sure it won’t slip out. -
Hide the crimp (optional):
If you are using a crimp cover, place it over the flattened crimp bead and gently close it with pliers to make it look like a seamless gold bead. -
Start the bead pattern:
Begin stringing your terracotta clay beads. Thread approximately 15-20 of these small rust-colored beads to form the first side of the bracelet band.
Loose Leaf Fix
If charms flip over too much, try using smaller jump rings. A snugger fit on the wire keeps them facing forward. Heavier charms naturally stay put better than light ones.
Step 2: Creating the Focal Section
-
Introduce the dark accents:
After your run of rust beads, slide on one gold spacer bead, followed by one of the larger textured dark brown beads, and then another gold spacer. -
Add connecting beads:
Add two or three more terracotta beads to create a small bridge before the charm section begins. -
First charm placement:
Slide on a textured dark brown bead. Before adding the next bead, open a jump ring, attach the silver/bronze feathery leaf charm, and close the ring. Slide this jump ring directly onto the wire next to the brown bead. -
Spacing the charms:
Add a gold spacer bead, then two terracotta beads, and another gold spacer to separate the first charm from the center. -
Center charm assembly:
Slide on a dark brown bead. Attach the central bronze oak leaf charm to a jump ring and slide the ring onto the wire. Follow this immediately with another spacer bead. -
Final charm addition:
Add two terracotta beads and a gold spacer. Slide on the last dark brown bead, followed by a jump ring holding the gold maple leaf charm.
Step 3: Finishing the Bracelet
-
Mirror the accent pattern:
Complete the focal section by adding a gold spacer, two or three terracotta beads, a final gold spacer, and the last large textured dark brown bead. -
Finish the bead strand:
Finish stringing the rest of the bracelet with the same number of terracotta clay beads you used at the very start (approx. 15-20) to ensure symmetry. -
Prepare the final closure:
Thread a crimp bead onto the wire end, followed by the jump ring of your lobster clasp. -
Secure the end:
Pass the wire back back through the crimp bead and pull it tight, ensuring there is no slack in the beads but enough room for the bracelet to flex comfortably. -
Final trim:
Flatten the crimp bead securely. Trim the excess wire tail close to the crimp bead with your flush cutters, tucking the tiny end into the adjacent beads if possible.
Nature’s Palette
Swap the terracotta beads for genuine carnelian or red bright jasper chips to give the bracelet a deeper, semi-precious stone look that elevates the value.
Now you have a charming autumnal accessory ready to wear for the season

TRACK YOUR CERAMIC JOURNEY
Capture glaze tests, firing details, and creative progress—all in one simple printable. Make your projects easier to repeat and improve.
Rustic Wood and Clay Mix
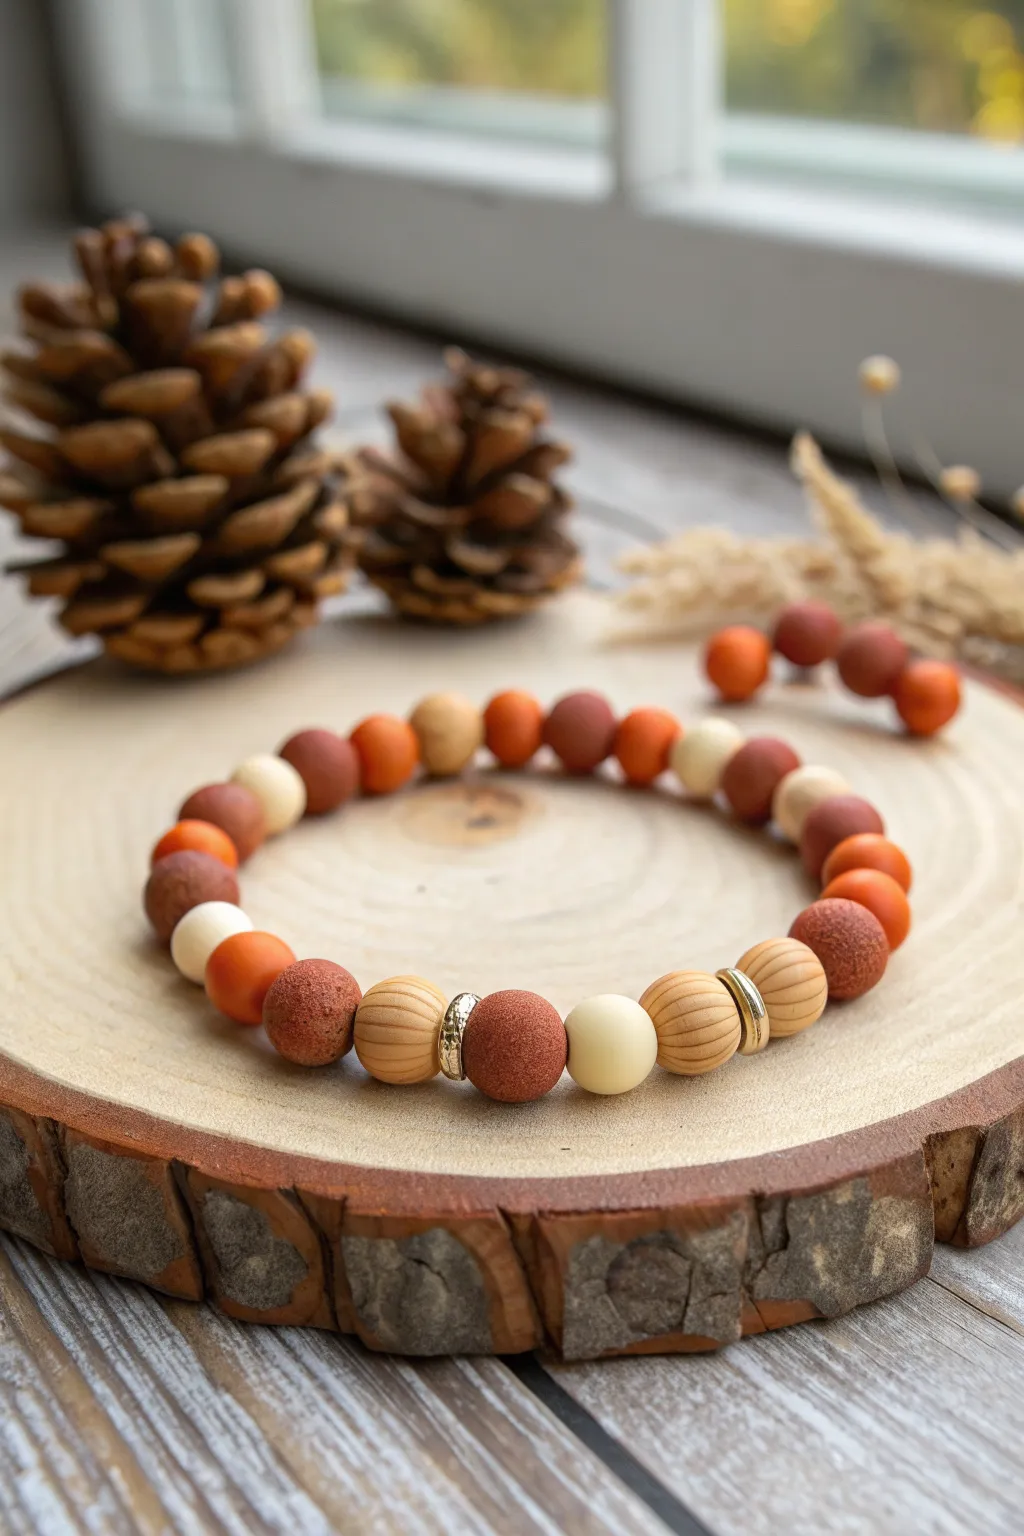
Embrace the textures of autumn by combining smooth polymer clay with the natural warmth of wooden beads. This bracelet mixes earthy terracotta, burnt orange, and cream tones for a cozy accessory that feels like a walk through falling leaves.
How-To Guide
Materials
- Polymer clay (burnt orange, rust/terracotta, cream)
- Round unfinished wooden beads (approx. 10mm)
- Gold or brass spacer disc beads
- Stretchy jewelry cord (0.7mm or 0.8mm)
- Bead reamer or toothpick
- Ceramic tile or baking sheet
- Oven
- Super glue or jewelry cement
- Scissors
Step 1: Crafting the Clay Beads
-
Condition the Clay:
Start by warming up your polymer clay in your hands. Knead the burnt orange, rust, and cream colors separately until they are soft and pliable, which prevents cracking later. -
Portion the Clay:
Roll each color into a long snake about the thickness of a pencil. Cut equal segments from each snake to ensure your beads will be roughly the same size. -
Roll Spheres:
Take each segment and roll it between your palms to create smooth, round spheres. Aim for them to be approximately the same 10mm size as your wooden beads. -
Texturize the Rust Beads:
To mimic the specific look in the photo, take your rust-colored spheres and gently roll them over sandpaper or dab them with a stiff toothbrush to create a stone-like, pitted texture. -
Pierce the Holes:
Using a bead reamer or a toothpick, carefully pierce a hole through the center of each clay sphere. Rotate the tool as you push through to avoid squashing the bead’s shape. -
Bake the Clay:
Arrange your clay beads on a ceramic tile or baking sheet. Bake them according to the package instructions (usually around 275°F for 15-30 minutes). Let them cool completely before handling.
Natural Texture Hack
Roll your unbaked clay beads on a piece of coarse denim or canvas fabric. This transfers a subtle, natural texture that pairs perfectly with the wood grain.
Step 2: Preparing the Wood Accents
-
Select Your Wooden Beads:
Choose unfinished wooden beads that have a nice, visible grain. Identify four specific beads that will serve as the focal points near the metallic spacers. -
Add Decorative Lines (Optional):
If your wooden beads are plain but you want the ribbed look shown in the image, use a small file or the edge of a craft knife to carefully score horizontal lines around the circumference of four beads.
Hole Distortion?
If your beads squish into ovals when piercing them, let the clay sit in the fridge for 10 minutes to firm up before you try making the holes again.
Step 3: Design and Assembly
-
Cut the Cord:
Cut a piece of stretchy cord about 10-12 inches long. This gives you plenty of extra slack for tying the knot later. -
Pre-stretch the Cord:
Give the elastic a few firm tugs. I presume this helps prevent the bracelet from stretching out permanently after the first wear. -
Plan the Pattern:
Lay out your beads on a bead board or towel. The pattern in the image generally alternates colors: rust, cream, orange, wood. Create a symmetrical focal point using the grooved wooden beads. -
Create the Focal Section:
Arrange the focal section: Place a textured rust bead in the center, flanked by a gold spacer on each side, then a grooved wooden bead on each side of those spacers. -
String the Beads:
Thread your beads onto the cord following your planned pattern. Start with the focal section so it ends up centered, then work your way out symmetrically. -
Check the Fit:
Wrap the strung beads around your wrist to check the size. Add or remove the simpler clay beads at the ends until it fits comfortably without gaps. -
Tie the Knot:
Tie a surgeon’s knot (right over left, left over right twice). Pull the cord tight so the beads nestle closely together. -
Secure and Trim:
Apply a tiny drop of super glue or jewelry cement to the knot. Allow it to dry for a few moments, then trim the excess cord ends close to the knot. -
Hide the Knot:
Gently tug the bracelet so the knot slides inside the hole of one of the adjacent wooden beads, hiding it from view.
Slip on your new bracelet and enjoy the warm, rustic touch it brings to your Thanksgiving outfit
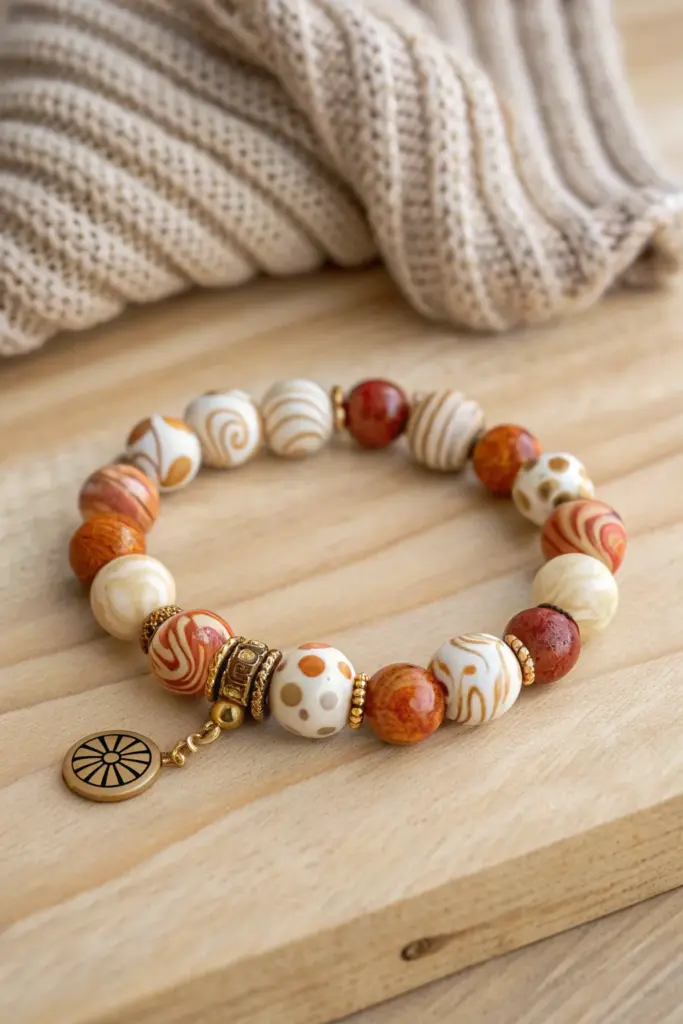
Marbled Fall Swirl Beads

Embrace the cozy warmth of autumn with this handcrafted polymer clay bracelet featuring rich marbles of terracotta, caramel, and cream tones. The mix of hand-rolled patterned beads and gold accents creates a rustic yet sophisticated accessory perfect for Thanksgiving gatherings.
Step-by-Step Guide
Materials
- Polymer clay (white, translucent, burnt orange, terracotta, caramel brown)
- Gold spacing beads (small rondelles and textured cylinders)
- Gold charm (sun or wheel design) with jump ring
- Elastic stretch cord (0.8mm or 1mm)
- Bead piercing tool or toothpick
- Ceramic tile or glass work surface
- Blade for slicing clay
- Oven for baking
- Jewelry pliers
- Super glue (gel type recommended)
Step 1: Creating the Clay Canes
-
Condition the Clay:
Begin by conditioning your polymer clay blocks until they are soft and pliable. You’ll need distinct piles of white, burnt orange, and caramel brown. -
Create the Marbled Mix:
Combine a portion of white clay with small chunks of orange and brown. twist them together into a snake, fold it in half, and twist again. Repeat this ‘twist and fold’ method just until streaks appear—don’t overmix or it will turn muddy. -
Form Swirl Logs:
Roll your marbled clay into a smooth log. For the specific swirl beads seen here, you can also roll thin sheets of white and orange, stack them, and roll them up jelly-roll style before reducing the cane. -
Make Polka Dot Canes:
To create the spotted creamy beads, take a thick log of white clay. Press a small dowel into the sides to make indentations and fill these with small snakes of caramel or orange clay. Roll the entire log smooth to embed the dots.
Smooth Operator
Work with clean hands and wipe them with baby wipes when switching from dark colors (like brown) to light colors (like white) to keep your cream beads pristine.
Step 2: Rolling and Baking Beads
-
Portion the Clay:
Slice your various canes and logs into equal-sized segments. Aim for chunks that are roughly 1/2 inch to 3/4 inch in volume to ensure your beads are consistent in size. -
Roll Spheres:
Roll each segment between your palms using a circular motion. Apply gentle pressure initially, then lighten your touch as the ball becomes perfectly round to smooth out any fingerprints. -
Pierce the Holes:
Holding a bead gently (or letting it rest on your work surface to avoid distortion), press your piercing tool through the center. I find twisting the tool as it enters helps prevent the clay from squishing. -
Refine the Shape:
Once the hole is pierced, you might need to gently re-roll the bead between your fingers to correct any slight flattening that occurred. -
Bake:
Arrange your beads on a baking sheet or tile. Bake according to your clay manufacturer’s instructions (usually 275°F/135°C for 15-30 minutes). Let them cool completely before handling.
Step 3: Assembly
-
Select the Pattern:
Lay out your cooled beads on a bead board or towel. Alternate your swirled beads with the solid shimmering ones and the polka-dot styles to create a balanced rhythm. -
Add Gold Accents:
Insert small gold spacer beads between select clay beads to add sparkle. Place the larger textured gold cylinder beads where you want focal points. -
String the Beads:
Cut a length of elastic cord (about 10 inches). Pre-stretch it by pulling on it firmly a few times. Thread your beads onto the cord in your desired order. -
Attach the Charm:
Slide the gold charm onto a jump ring, and then thread the jump ring onto the cord so it sits next to one of the larger gold cylinder beads for a cohesive look. -
Knot the Cord:
Tie a surgeon’s knot (right over left twice, then left over right). Pull the knot tight, stretching the cord slightly as you secure it. -
Secure and Hide:
Dab a tiny drop of super glue on the knot. Once dry, trim the excess cord and gently tug the knot inside the hole of a neighboring bead to hide it.
Lost the Hole?
If bead holes close up slightly during baking, use a small hand drill or a bead reamer to gently widen them without cracking the hardened clay.
Wear your finished bracelet with your favorite chunky sweater for the ultimate fall look