When it’s hot outside, I love projects that feel light, bright, and doable in one or two relaxed studio sessions—air dry clay is perfect for that. These summer air dry clay ideas pull straight from beaches, gardens, and backyard hangouts, so your finished pieces instantly feel like the season.
Pressed Flower Trinket Dishes
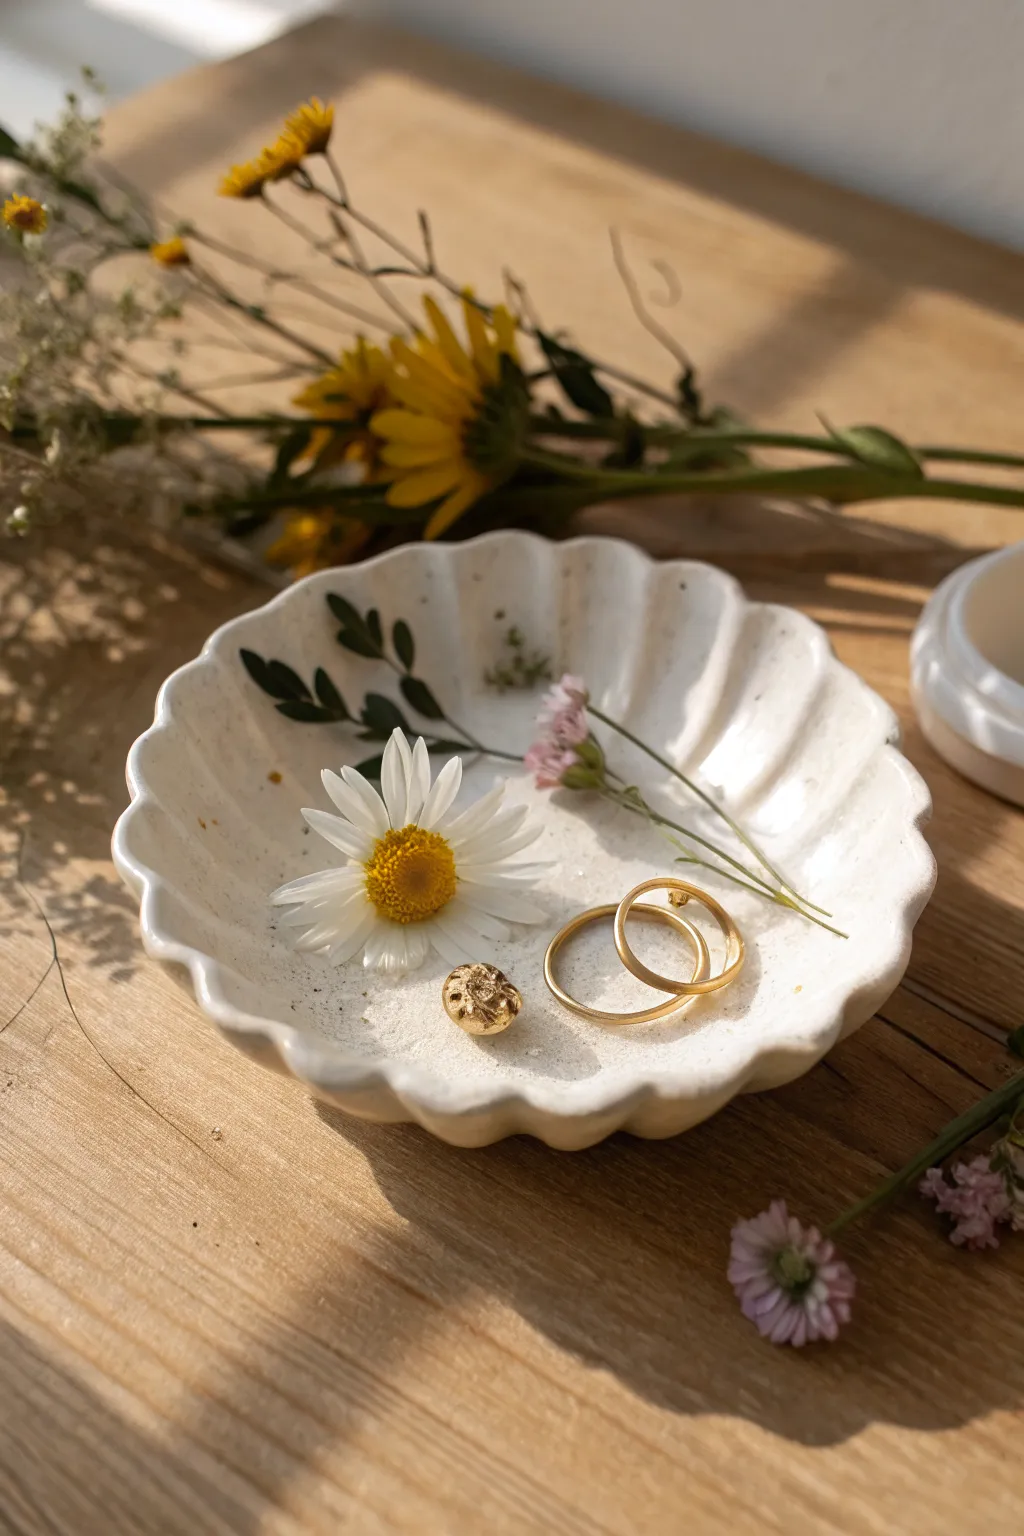
Capture the fleeting beauty of summer blooms with this delicate, scallop-edged jewelry holder. The milky white clay provides a serene canvas for dried florals, creating a functional piece of art that keeps your favorite rings safe.
Step-by-Step Tutorial
Materials
- White stone air dry clay
- Rolling pin or smooth glass jar
- Small bowl (approx. 4-5 inches diameter) for use as a mold
- Parchment paper or canvas mat
- Clay knife or plastic moodling tool
- Sandpaper (fine grit)
- Small sponge
- Pottery sealer or matte varnish
- Small cup of water
Step 1: Shaping the Clay Body
-
Condition the clay:
Begin by grabbing a chunk of white air dry clay about the size of a lemon. Work it warm in your hands, kneading until it feels pliable and free of cracks. -
Roll it out:
Place your clay onto a piece of parchment paper to prevent sticking. Use your rolling pin to flatten the ball into an even circle, aiming for a thickness of about 1/4 inch. -
Cut the circle:
Find a circular object roughly 4-5 inches wide (a large mug or small bowl works well) to use as a template. Place it lightly on the clay and trace around it with your clay knife to get a perfect round shape. -
Smooth the edges:
Dip your finger into a little water and run it along the cut edge of your clay circle. This eliminates any sharpness or rough crumbs left by the knife.
Stamp Before Drying
For added texture close to the image, gently press dried stems into the wet clay before shaping the bowl to leave subtle botanical imprints.
Step 2: Creating the Scalloped Form
-
Mold the curve:
Gently lift your clay circle and lay it inside your small bowl mold. I like to line the bowl with cling wrap first so the clay pops out easily. -
Press into shape:
Use your thumbs to gently press the clay down into the curve of the bowl, ensuring the bottom is flat enough to sit on a table later. -
Form the petals:
Visualize the rim as a flower. Using your thumb and forefinger, gently pinch sections of the rim inward to create soft undulations. -
Refine the scallops:
Continue around the entire rim until you have a consistent wavy pattern. Smooth the ‘valleys’ of the waves with a damp finger to ensure they look organic and soft, like a seashell. -
Initial drying:
Leave the clay inside the bowl mold for about 24 hours. If it dries too fast, it might crack, so keep it away from direct heaters.
Step 3: Finishing and Sealing
-
Remove and dry completely:
After the first day, carefully pop the dish out of the mold. Flip it upside down on a drying rack so the bottom can cure. Let it sit for another 24-48 hours until bone dry and bright white. -
Sand for smoothness:
Take your fine-grit sandpaper and gently buff the edges and surface. Focus on the scalloped rim to make it feel buttery soft to the touch. -
Wipe clean:
Use a barely damp sponge or cloth to wipe away all the clay dust. You want a perfectly clean surface for the sealer. -
Apply the first coat:
Brush on a thin layer of matte varnish or pottery sealer. This protects the clay from moisture and gives it a finished look. -
Second coat:
Once the first coat is dry to the touch, apply a second layer for durability. -
Arranging the florals:
Please note that the flowers in the image are loose decor, not embedded! Once your sealer is fully cured, place your dried pressed flowers inside alongside your jewelry.
Uneven Rims?
If your scallops look wonky, use a bottle cap to gently press indentations into the rim at even intervals while the clay is wet.
Now you have a serene little vessel perfect for holding your daily treasures


Leaf-Imprint Summer Bowls
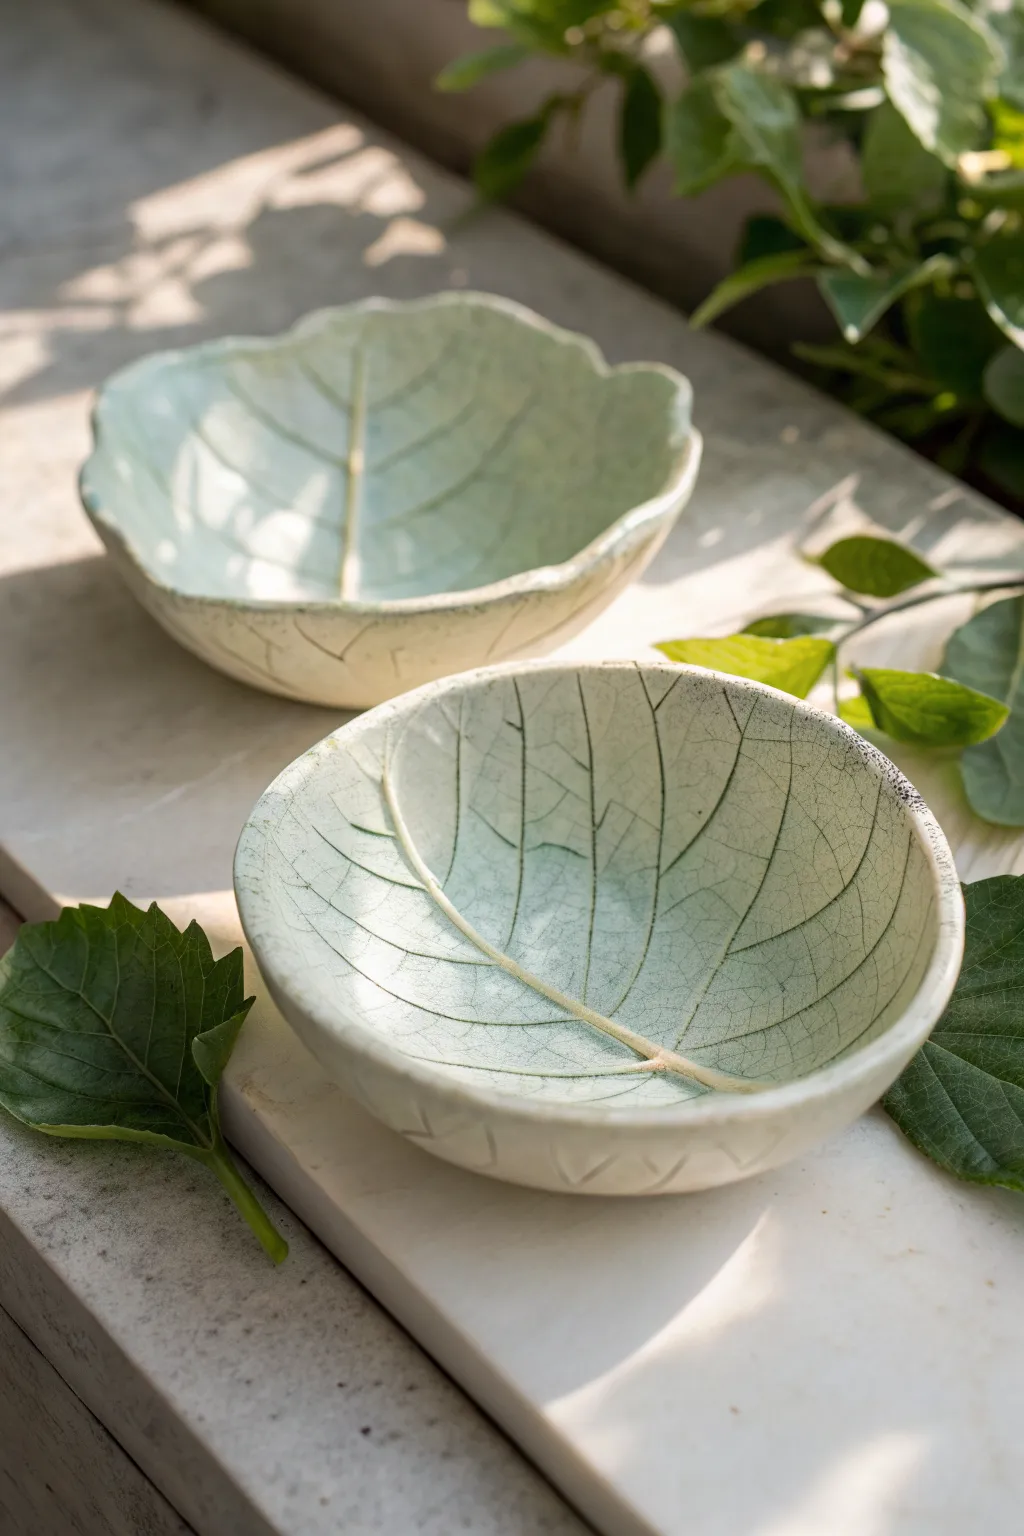
Capture the ephemeral beauty of summer foliage forever with these delicate, organic vessels. By pressing fresh leaves directly into clay, you can preserve every intricate vein and edge, creating functional decor that feels like a fossilized treasure.
Step-by-Step
Materials
- White air-dry clay (approx. 500g)
- Fresh, large leaves with prominent veins (hydrangea or hosta work well)
- Rolling pin
- Parchment paper or canvas mat
- Craft knife or needle tool
- Small bowl (for shaping)
- Plastic wrap
- Water and sponge
- Fine grit sandpaper
- Acrylic paints (pale sage green, dark brown/black)
- Clear sealant or varnish (matte or satin finish)
Step 1: Preparing the Impression
-
Select your foliage:
Choose fresh, turgid leaves that haven’t started to dry out yet. Look for leaves with deep, thick veins on the backside, as these will create the most dramatic texture in the clay. -
Roll the slab:
Take a handful of air-dry clay and knead it briefly to remove air bubbles. Place it on your parchment paper and roll it out into a smooth slab about 1/4 inch thick. Aim for an even thickness throughout. -
Position the leaf:
Place your chosen leaf face-down onto the clay slab. This ensures the prominent veins on the back of the leaf are pressing into the surface. -
Create the imprint:
Gently roll over the leaf with your rolling pin. Press firmly enough to embed the veins, but not so hard that you make the clay paper-thin. Do this in a single direction if possible to avoid shifting the leaf.
Crack Control
If small cracks appear while drying, don’t panic. Make a thick paste of clay and water (slip) and fill the cracks, then smooth over with a damp finger.
Step 2: Shaping the Form
-
Cut the shape:
Using a craft knife or needle tool, trace around the edge of the leaf. I like to leave a tiny border around the leaf edge rather than cutting perfectly flush, which adds to the handmade charm. -
Remove excess clay:
Peel away the extra clay from the outside of your cut line. Carefully lift the leaf off the clay by its stem to reveal the intricate pattern underneath. -
Smooth the edges:
Dip your finger in a little water and run it gently along the cut edges of the clay leaf to soften any sharp or jagged cuts. -
Form the bowl:
Line a small soup bowl with plastic wrap to prevent sticking. Carefully lift your clay leaf and drape it inside the bowl, letting gravity curve it into a concave shape. Press gently at the bottom to ensure it sits flat. -
Dry properly:
Allow the clay to dry undisturbed in the bowl for at least 24-48 hours. Air dry clay shrinks as it dries, so don’t force it out of the mold too early.
Vein Definition
If your leaf has shallow veins, gently trace over the main stems on the back of the leaf with a blunt pencil before rolling to deepen the impression.
Step 3: Finishing and Antiquing
-
Sand imperfections:
Once fully dry and removed from the mold, use fine-grit sandpaper to smooth any rough spots on the rim or underside. Wipe away the dust with a barely damp cloth. -
Apply base color:
Mix a very watery wash of pale sage green acrylic paint. Brush this over the entire bowl, front and back, creating a semi-translucent tint rather than an opaque coat. -
Highlight the veins:
Create a dark wash using watered-down dark brown or black paint. Brush this specifically into the deep vein crevices. -
Wipe back:
Immediately use a damp sponge or paper towel to wipe the surface. This removes the dark paint from the high points but leaves it trapped in the recessed veins, enhancing the detail. -
Define the rim:
For that defined look seen in the photo, lightly dry-brush a tiny amount of the darker paint along the very edge of the rim. -
Seal the piece:
Protect your work with two coats of matte or satin varnish. This seals the porous clay and deepens the colors slightly.
Now you have a stunning, nature-inspired vessel ready to hold trinkets or stand alone as art


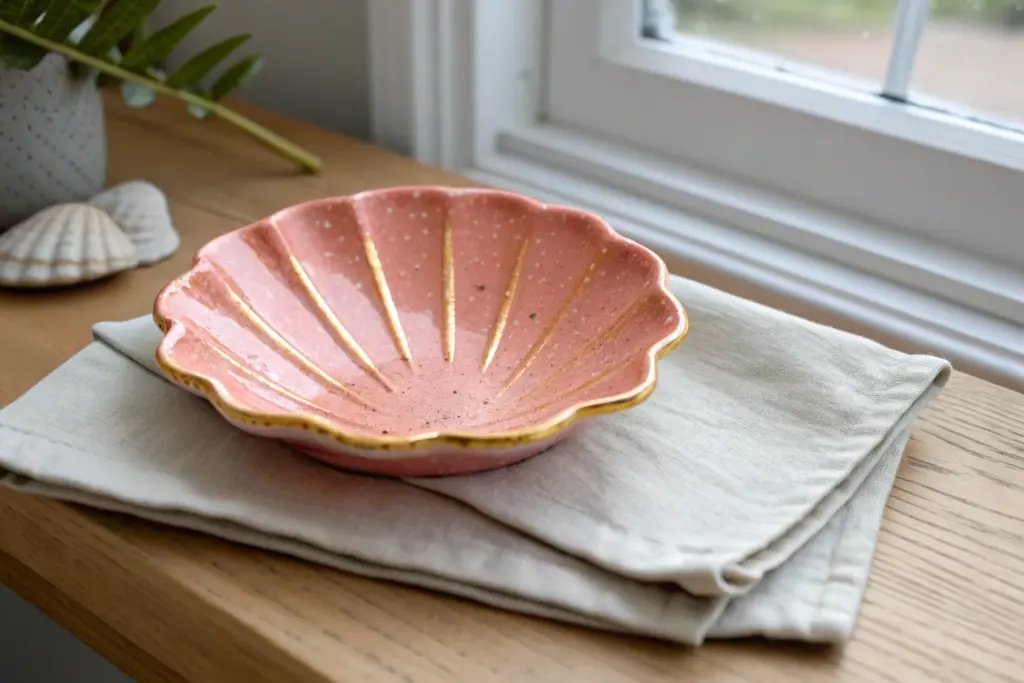
Seashell and Starfish Trinket Trays
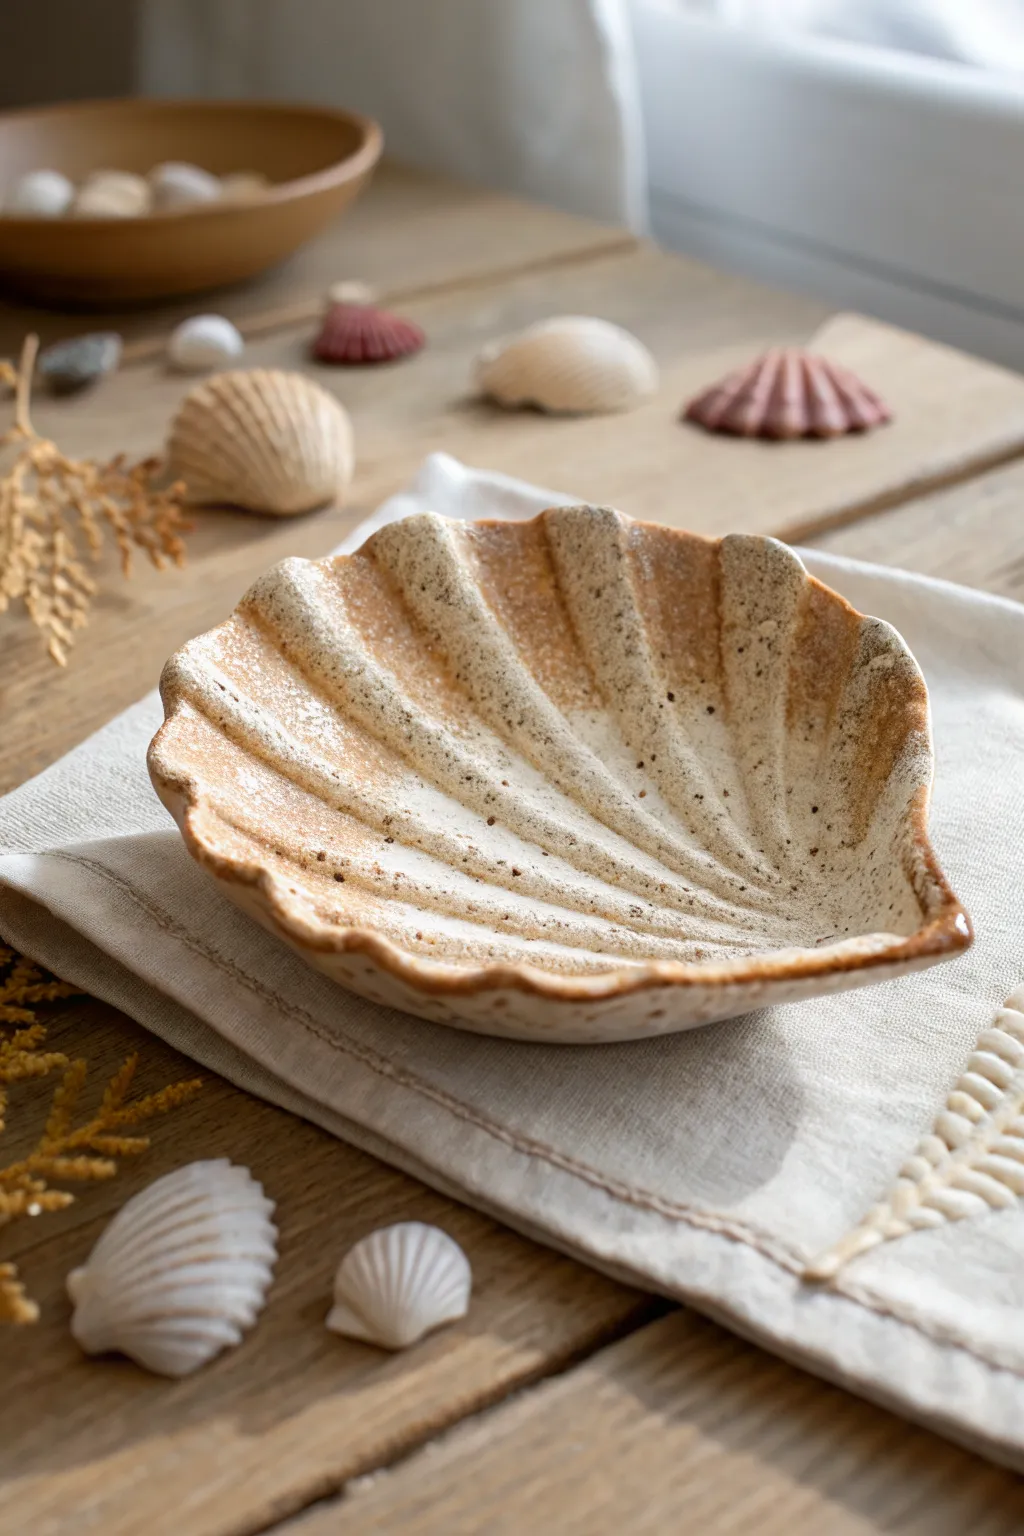
Capture the essence of a beachcombing treasure with this stunningly realistic seashell trinket dish. With its textured, speckled finish and organic scalloped edges, this piece brings a sophisticated slice of the seaside right to your vanity or coffee table.
Step-by-Step Guide
Materials
- Air dry clay (white or light grey)
- Real scallop shell (for templating) or a printed paper template
- Rolling pin
- Clay sculpting tools (specifically a needle tool and a smooth modeling tool)
- Small bowl (for shaping)
- Acrylic paints (White, Burnt Sienna, Raw Umber, Cream)
- Old toothbrush (for speckling)
- Sponge or paper towel
- Fine grit sandpaper
- Gloss or satin varnish
Step 1: Shaping the Clay
-
Condition the clay:
Begin by kneading a fist-sized ball of air dry clay until it feels warm and pliable without any cracks. -
Roll it out:
Roll your clay out on a smooth surface to an even thickness of about 1/4 inch. Avoid making it too thin, or the edges might become brittle later. -
Cut the shape:
Place a large real scallop shell or a paper template gently onto the clay slab. Using a needle tool, trace around the perimeter to cut out the basic fan shape. -
Create the grooves:
Remove the template. Using a modeling tool or the handle of a paintbrush, press radiating lines into the clay, starting from the hinged bottom point and fanning out toward the scalloped edge. These are the deep flutes of the shell. -
Refine the ridges:
Use your fingers to smooth and pinch the clay between the indented lines, creating raised ridges. The clay should curve upward between the grooves to mimic the natural undulation of a scallop shell. -
Detail the rim:
Gently press along the outer edge to embrace the natural wave created by your ridges. If any edges look too sharp or square, dampen your finger slightly to round them off. -
Form the curve:
Carefully lift your clay shell and place it inside a curved bowl. This will ensure it dries in a cupped shape suitable for holding jewelry rather than drying flat. -
Let it dry:
Allow the clay to dry completely in the bowl for at least 24-48 hours. I find flipping it over halfway through helps the bottom dry evenly. -
Sand for smoothness:
Once fully cured, use fine-grit sandpaper to gently smooth out any rough burs on the edges, but don’t over-sand the surface texture.
Cracks happen!
If hairline cracks appear while drying, don’t panic. Mix a tiny bit of fresh clay with water to make a paste (slip) and smooth it into the cracks with your finger.
Step 2: Painting and Finishing
-
Base coat:
Apply a coat of cream or off-white acrylic paint over the entire dish. This neutral base helps the subsequent earthy tones pop. -
Highlight the ridges:
Mix a diluted wash of White and a tiny drop of Raw Umber. Brush this lightly over the raised ridges, leaving the recessed grooves darker to create depth. -
Add warmth:
Using a sponge or dry brush technique, dab Burnt Sienna lightly around the outer rim and the ‘hinge’ area at the bottom. The goal is a sun-baked, toasted look. -
Create the gradient:
Blend the Burnt Sienna inward slightly so it fades into the cream center. The transition should be soft and organic, not a harsh line. -
The speckle effect:
Dilute a bit of dark brown paint with water. Dip an old toothbrush into the mixture, hold it over the tray, and run your thumb across the bristles to flick tiny speckles across the surface. This creates that realistic, sandy texture. -
Seal the deal:
Once the paint is totally dry, apply a coat of gloss or satin varnish. This not only protects the paint but gives the shell a subtle, polished gleam like wet ceramic.
Gilded Edges
For a luxe twist, paint just the very rim of the shell with metallic liquid gold leaf after the varnish stage. It adds a beautiful contrast to the rustic speckles.
Now you have a serene little seaside vessel perfect for holding your favorite rings or simply admiring on a shelf


Citrus Slice Fridge Magnets

Brighten up your kitchen with these incredibly realistic citrus slice magnets made from simple air dry clay. With their vibrant colors, translucent-looking pulp, and crisp white pith, they look good enough to squeeze into a glass of iced tea.
Step-by-Step Tutorial
Materials
- White air dry clay
- Acrylic paints (Lemon Yellow, Orange, Lime Green, White)
- Glossy varnish or resin (for the wet look)
- Round cookie cutters (various sizes)
- Rolling pin
- Parchment paper
- Precision craft knife
- Needle tool or toothpick
- Small flat brush and fine detail brush
- Superglue or heavy-duty craft glue
- Round ceramic magnets
Step 1: Shaping the Base
-
Prepare the Clay:
Begin by conditioning your white air dry clay, kneading it in your hands until it becomes soft, pliable, and free of cracks. -
Roll it Out:
Place the clay on a sheet of parchment paper and roll it out evenly to a thickness of about 1/4 inch (6mm). You want these to be sturdy but not too heavy for the magnets. -
Cut the Circles:
Using round cookie cutters, press firmly into the clay to create perfect circles. Use different sizes to represent lemons (smaller), oranges (medium), and grapefruits (large). -
Smooth the Edges:
Dip your finger in a tiny bit of water and run it along the cut edges of the circles to smooth out any roughness or loose bits of clay.
Tip: Texture Trick
Use a crumpled ball of aluminum foil to press into the ‘flesh’ areas of the clay. It creates an instant, organic pitted texture much faster than a needle tool.
Step 2: Creating the Citrus Segments
-
Mark the Center:
Locate the exact center of your clay circle and make a small dot with your needle tool as a guide. -
Map the Slices:
Use the back of your craft knife or a ruler to lightly impress lines radiating from the center, dividing the circle like a pizza into 8 equal wedges. -
Define the Pith:
This is the crucial step for realism. Roll very thin snakes of fresh white clay. These will serve as the raised white lines—the pith—that separate the fruit segments. -
Apply the Spokes:
Lay the thin clay snakes over the guide lines you marked earlier. Apply a tiny amount of water to help them adhere to the base circle. -
Add the Outer Rim:
Create a slightly thicker snake of clay and wrap it around the entire circumference of the circle to create the rind border. -
Texture the Pulp:
Inside each triangular segment, use a needle tool or toothpick to poke and scratch the clay surface repeatedly. We’re creating a rough, pitted texture that mimics juicy fruit pulp. -
Refining the Lines:
I find it helpful to gently press the white ‘spokes’ down a bit so they are flush with the rim but still raised above the textured pulp areas. -
Add Seeds:
Form tiny teardrop shapes from white clay and press one or two into the center of a few segments for extra realism, particularly for the lemon slices. -
Dry Completely:
Let the shapes dry on a flat surface for 24-48 hours until they are rock hard and pure white.
Level Up: Translucency
Mix clear glue with your acrylic paint for the fruit segments. When it dries inside the texture pits, it mimics the semi-transparent look of real citrus juice.
Step 3: Painting and Finishing
-
Paint the Rind:
Using a flat brush, paint the outer edge (the rim) with your chosen color—yellow for lemons, orange for oranges, or green for limes. -
Fill the Segments:
Carefully paint the textured inner triangles with the matching fruit color. Dilute the acrylic paint slightly with water so it pools into the texture you created. -
Detail the Pith:
Use a very fine detail brush to tidy up the raised white lines (the spokes) with white paint if any color accidentally bled onto them. Keeping these lines crisp is key to the look. -
Create Depth:
Mix a tiny bit of white into your main fruit color and dab it lightly in the center of the segments to create a highlight effect. -
The Glossy Coat:
Once the paint is fully dry, apply a thick coat of high-gloss varnish or UV resin over only the colored fruit flesh segments. Leave the white pith lines matte if possible for contrast. -
Attach the Magnet:
Flip the dried slice over and use superglue to attach a strong round magnet to the center of the back.
Now your fridge has a refreshing pop of color that looks ready for a summer lemonade stand

What Really Happens Inside the Kiln
Learn how time and temperature work together inside the kiln to transform clay into durable ceramic.
Watermelon Picnic Coasters

Capture the refreshing essence of summer with these delightful watermelon slice coasters made from air dry clay. Their textured centers and vibrant rind details make them a cheerful addition to any picnic table or cold drink.
Detailed Instructions
Materials
- Air dry clay (white)
- Acrylic paints (watermelon pink/red, bright green, white, black)
- Round cookie cutter (approx. 3.5 – 4 inches)
- Rolling pin
- Parchment paper or craft mat
- Fine grit sandpaper
- Small round paintbrush (detail brush)
- Medium flat paintbrush
- Toothbrush or texturing tool
- Matte varnish or sealant
Step 1: Shaping the Base
-
Prepare your clay:
Start by kneading a large ball of air dry clay until it is soft, pliable, and free of cracks. If it feels too dry, add a tiny drop of water to your fingers. -
Roll the slab:
Place the clay on a sheet of parchment paper. Use your rolling pin to flatten it into an even slab, aiming for a thickness of about 1/4 inch (6mm) to ensure durability. -
Cut the circles:
Using your round cookie cutter, press firmly into the clay to cut out your coaster shapes. Create as many circles as you need for a set. -
Smooth the edges:
Dip your finger in a little water and run it gently along the cut edge of each circle to smooth out any roughness left by the cutter. -
Texture the center:
Take a clean toothbrush or texturing tool and gently tap the inner area of the circle where the pink ‘fruit’ will be. Leave a smooth rim around the edge for the rind. -
Drying time:
Lay the coasters flat on a clean surface to air dry. Turn them over halfway through the drying process (usually after 24 hours) to prevent curling. Wait until they are completely hard and white.
Anti-Curl Secret
To keep coasters perfectly flat, place a heavy book on top of them while they dry. Sandwich them between parchment paper first to prevent sticking.
Step 2: Painting the Design
-
Sand for perfection:
Once fully dry, use fine-grit sandpaper to briefly buff the edges or any uneven spots on the surface to get a professional finish. -
Base coat the fruit:
Mix a vibrant watermelon pink or light red acrylic paint. Use your medium flat brush to paint the textured center of the circle, leaving a clear border around the edge. -
I like to work in layers:
Apply a second coat of pink if the first looks streaky, ensuring the color gets into all the little texture indentations you made earlier. -
Paint the rind:
Using a bright green paint, carefully paint the very outer vertical edge of the coaster and bring the color just slightly onto the top surface to create the skin. -
Add the white pith:
With a steady hand and a smaller brush, paint a thin white ring between the pink fruit center and the green rind edge. This separates the colors and adds realism. -
Blend slightly:
If the white line looks too harsh, you can use a slightly damp brush to soften the transition where it meets the pink, though a crisp line works well for a graphic look.
Water Damage Fix
If you notice the varnish getting tacky from condensation, you likely need a waterproof sealer like polyurethane instead of standard craft varnish.
Step 3: Details & Sealing
-
Paint the seeds:
Dip a fine detail brush into black acrylic paint. Paint small teardrop shapes in a radial pattern around the pink center to represent watermelon seeds. -
Vary the seeds:
Make some seeds point inward and others slightly angled to look more natural, rather than perfectly symmetrical. -
Let paint cure:
Allow all paint layers to dry completely. The seeds usually dry quickly, but give it an hour to be safe. -
Varnish top coat:
Apply a coat of matte varnish over the entire top and sides of the coaster. This protects the clay from moisture from drinking glasses. -
Seal the bottom:
Once the top is dry, flip the coaster and coat the bottom with varnish as well to ensure the clay is fully sealed against humidity.
Now you have a set of juicy-looking coasters ready to brighten up your next summer gathering
Blue-and-White Nautical Coasters
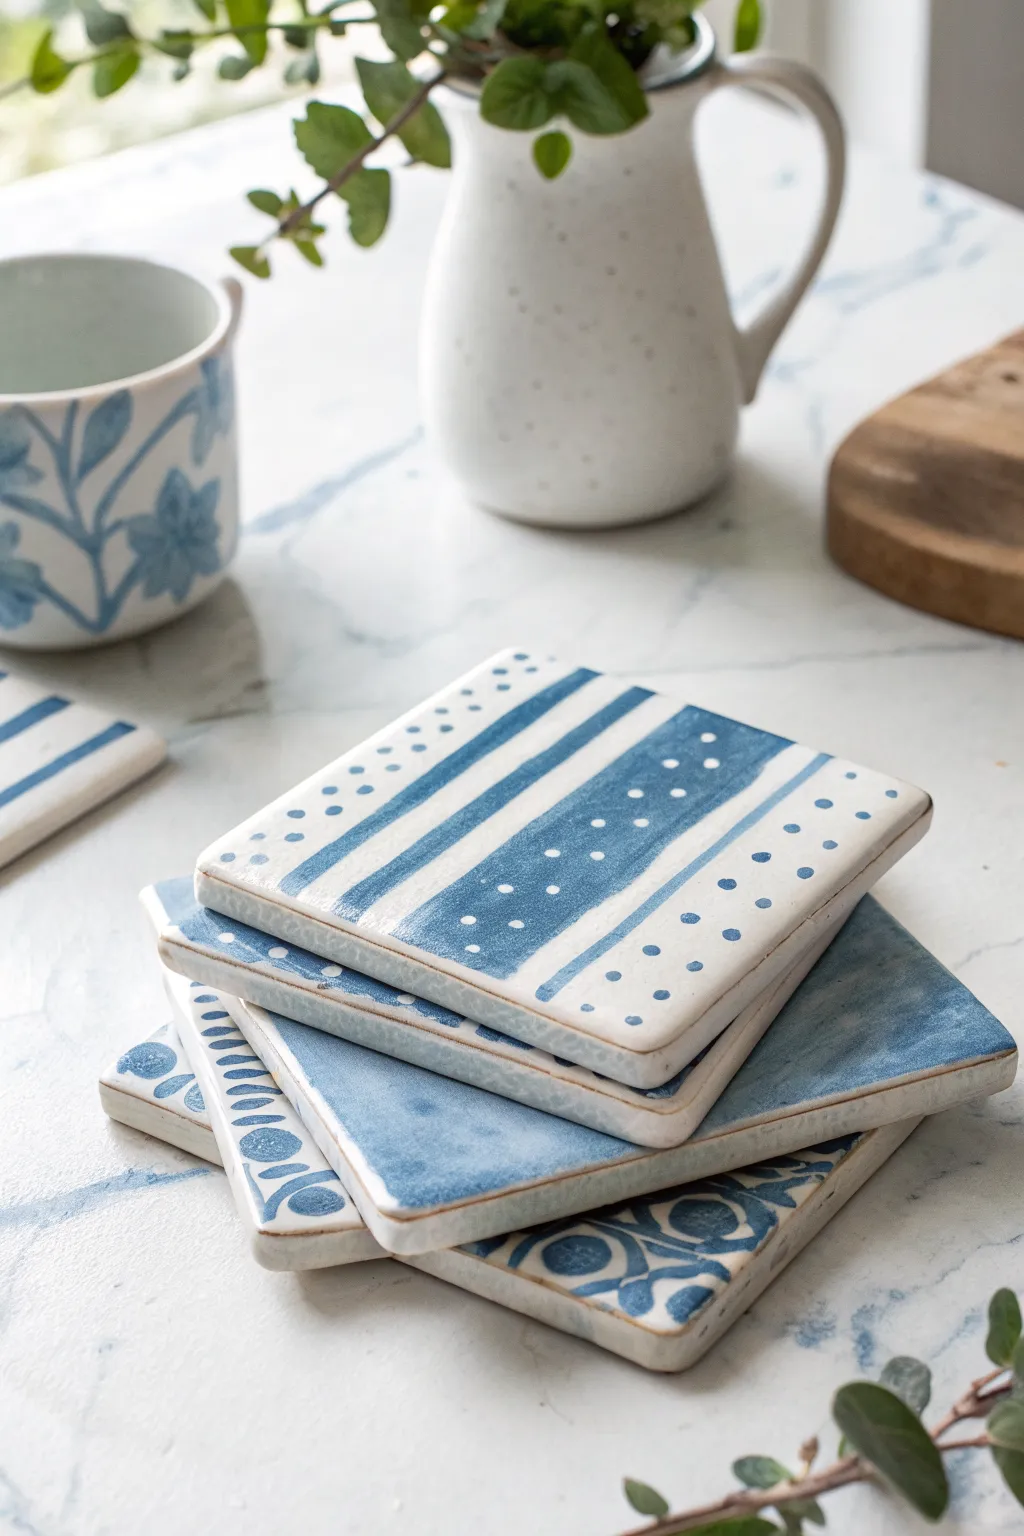
Bring a touch of coastal charm to your table with these easy-to-make air dry clay coasters. Featuring classic nautical stripes and hand-painted dots, they showcase a lovely rustic finish perfect for summer entertaining.
Step-by-Step Tutorial
Materials
- White air dry clay (approx. 500g)
- Rolling pin
- Square cookie cutter (approx. 4 inches) or knife and ruler
- Water and small sponge
- Fine grit sandpaper
- Acrylic paint (Cobalt Blue or Navy Blue)
- Small flat paintbrush
- Fine detail paintbrush or dotting tool
- Clear acrylic sealer or varnish (matte or satin finish)
- Parchment paper or canvas mat for rolling
Step 1: Shaping the Coasters
-
Prepare the Clay:
Take a handful of air dry clay and knead it briefly in your hands to warm it up and make it pliable. This helps prevent cracking later on. -
Roll it Out:
Place the clay on a sheet of parchment paper or a canvas mat. Use a rolling pin to flatten the clay to an even thickness of about 1/4 inch (6-7mm). You want them thick enough to be sturdy but not chunky. -
Cut the Shape:
Press a large square cookie cutter firmly into the clay. If you don’t have a cutter, use a ruler and a sharp knife to cut 4×4 inch squares. Make at least four squares for a full set. -
Smooth the Edges:
Dip your finger or a small sponge in a little water and gently run it along the cut edges of the squares. This softens the sharp corners and removes any burrs for a more refined look. -
Dry Flat:
Carefully transfer the squares to a clean, flat surface to dry. Place a light book or board on top of them after a few hours to prevent curling. Let them dry fully for 24-48 hours until they are hard and white. -
Sand for Smoothness:
Once fully dry, take a piece of fine-grit sandpaper and lightly sand the surface and edges. Wipe away any dust with a damp cloth or paper towel.
Step 2: Painting the Design
-
Mix Your Blue:
Squeeze out your cobalt or navy blue acrylic paint. If the color is too intense, you can mix in a tiny drop of white, but the deep contrast looks best. -
Paint Wide Stripes:
Using the small flat brush, paint a wide stripe diagonally or straight across the center of one coaster. Don’t worry about perfect lines; a slightly organic edge adds to the handmade charm. -
Add Thin Stripes:
On either side of the wide stripe, paint thinner parallel lines. Leave some white space between them to let the clay show through. -
Create the Dots:
Dip the handle end of a paintbrush or a dotting tool into the blue paint. Press gently onto the white spaces or on top of the wide blue stripe to create rows of decorative dots. -
Vary Art Designs:
For the other coasters in the set, try painting the entire surface blue and leaving white edges, or paint a solid blue square and add a floral motif. I like to keep the color palette consistent but change the pattern for each coaster. -
Detail Work:
Use your finest brush to add tiny accents, like small dashes or circles, to fill any empty negative space, mimicking the look of traditional ceramic tiles.
Uneven Drying?
If your coasters warp while drying, lightly mist the concave side with water and weigh it down with a heavy book overnight to flatten it back out.
Step 3: Sealing and Finishing
-
Let Paint Dry:
Allow the painted designs to dry completely to the touch, usually about 30 minutes to an hour. -
Apply Sealer:
Brush on a coat of clear acrylic sealer or varnish. This is crucial for coasters as it protects the clay from moisture/condensation from glasses. -
Second Coat:
Once the first coat is dry, apply a second coat of sealer to ensure a waterproof barrier. Pay special attention to the edges. -
Add Protection:
Optionally, stick small felt pads or cork backing to the bottom of each coaster to protect your furniture from scratches.
Antique Look
For a vintage ceramic feel, lightly sand the painted surface after it dries but before sealing to distress the pattern slightly.
Stack your new set on the coffee table and enjoy a refreshing drink on your handmade creation


The Complete Guide to Pottery Troubleshooting
Uncover the most common ceramic mistakes—from cracking clay to failed glazes—and learn how to fix them fast.
Mini Succulent Pinch Pots
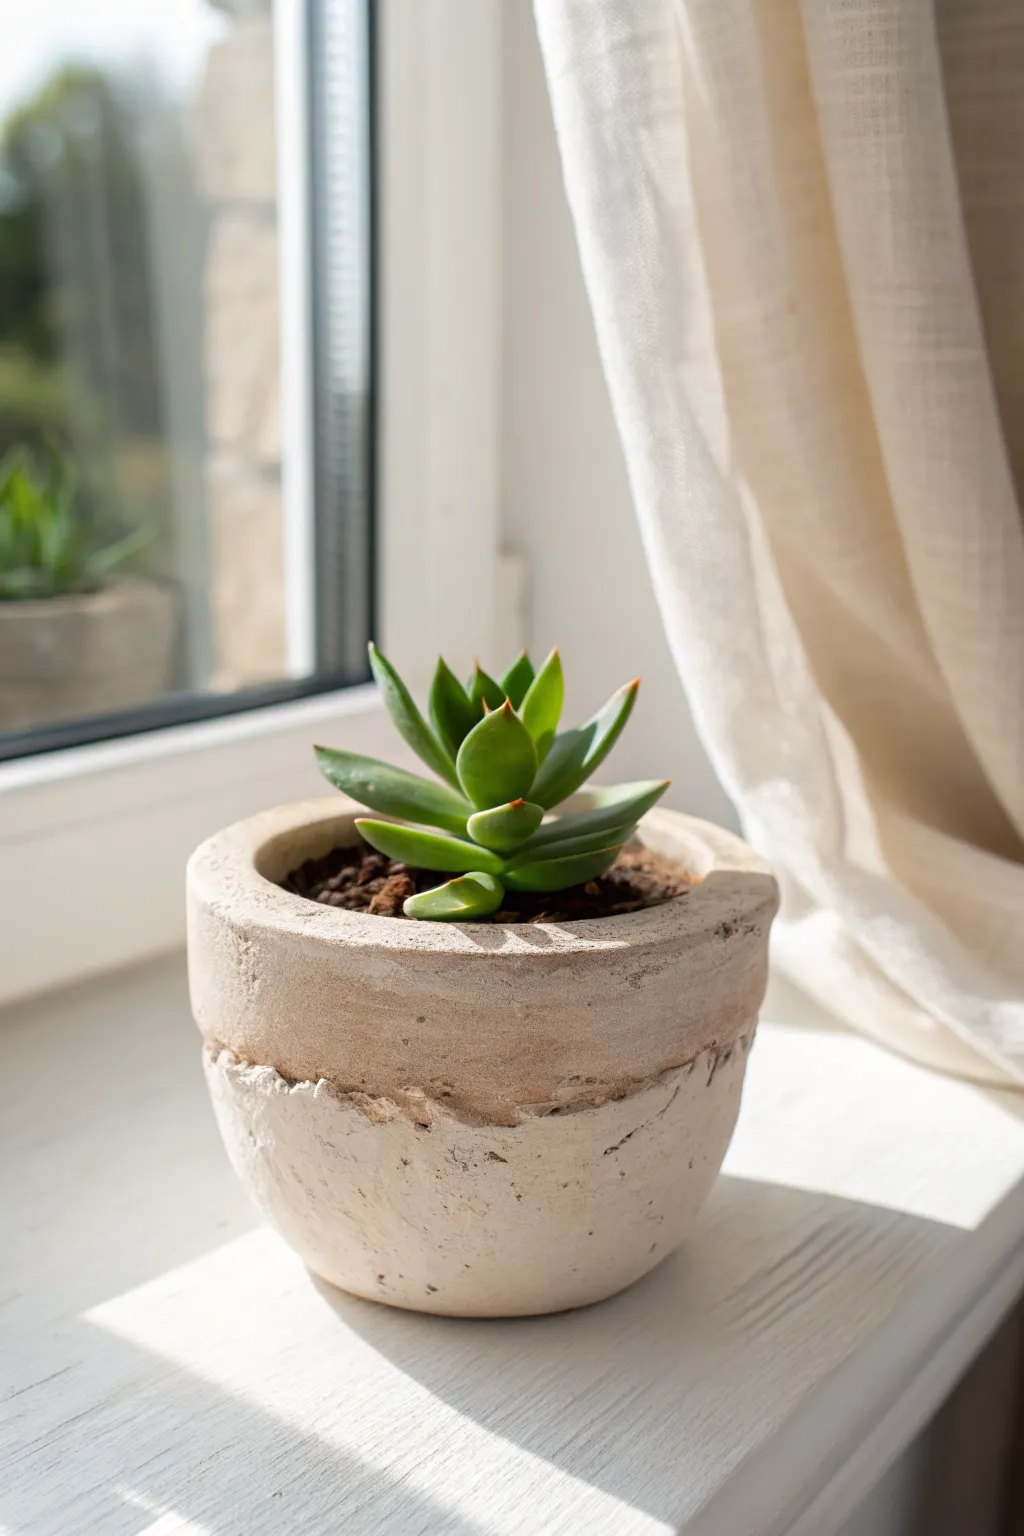
Embrace the imperfect beauty of wabi-sabi with this textured pinch pot, perfect for housing a tiny succulent. Its weathered finish and raw edges give it the look of ancient pottery found on a sunny windowsill.
Step-by-Step
Materials
- White or light grey air dry clay
- Small bowl of water
- Potting soil
- Small succulent or cactus
- Sponge or stiff bristle brush
- Diluted brown acrylic paint (optional for antiquing)
- Matte sealant
Step 1: Shaping the Clay
-
Prepare the ball:
Start by taking a handful of air dry clay and rolling it briskly between your palms. You are aiming for a smooth sphere about the size of a tangerine. -
Create the opening:
Hold the clay ball in your non-dominant hand. Gently press your thumb into the center of the sphere, pushing down until you are about a half-inch from the bottom. -
Pinch the walls:
Begin the pinching motion. Use your thumb on the inside and your fingers on the outside to gently squeeze the clay, rotating the pot as you go. -
Widen and shape:
Continue rotating and pinching to thin out the walls and widen the opening. Aim for an even thickness, but don’t worry about perfect symmetry. -
Create the rough rim:
Unlike traditional pots, we want a raw edge here. Instead of smoothing the top rim, use your fingertips to gently tear or roughen the very edge of the clay for that organic look. -
Add surface texture:
To mimic the weathered look in the photo, scratch horizontal lines or gently press a stiff fabric against the lower half of the pot while the clay is still soft. -
Flatten the base:
Set the pot down firmly on your work surface to create a flat, stable bottom so it won’t tip over.
Step 2: Drying and Finishing
-
Slow drying:
Place your pot in a cool, dry spot away from direct heat. Let it dry for at least 24 to 48 hours until it turns chalky white and feels room temperature to the touch. -
Sand for distress (optional):
Once fully dry, you can use a coarse sanding block to rough up the bottom half further, emphasizing the distinction between the smoother top rim and the textured base. -
Apply a wash:
If you want that aged patina, mix a tiny drop of brown paint into a cup of water. Brush this wash over the textured areas and immediately wipe it back with a rag, leaving darker pigment in the crevices. -
Seal the interior:
Air dry clay dissolves in water, so waterproofing is crucial. Apply 2-3 coats of a waterproof varnish or sealant to the *inside* of the pot to protect the clay from soil moisture. -
Seal the exterior:
Apply a single coat of matte sealant to the outside to preserve the finish without making it look too glossy or plastic.
Crack Control
If you see tiny hairline cracks appearing while drying, don’t panic. Mix a tiny bit of fresh clay with water to make a paste (slip) and smooth it into the cracks with your finger.
Step 3: Planting
-
Add drainage filler:
Since air dry clay pots rarely have drainage holes, put a small layer of gravel or pebbles at the very bottom. -
Fill with soil:
Scoop in a small amount of cactus or succulent potting mix, creating a small well in the center. -
Place the succulent:
Gently remove your succulent from its nursery container, loosen the roots slightly, and nestle it into the pot. -
Top up and clean:
Add soil around the edges to secure the plant. Use a soft brush to sweep away any stray dirt particles from the rim of the pot or the leaves.
Faux-Stone Finish
Mix dried coffee grounds or fine sand into your clay ball before sculpting. This adds speckles and a gritty texture that looks exactly like real stone once dry
Place your new creation in a sunny spot and enjoy the rustic charm it brings to the room
Cactus Tea Light Holders
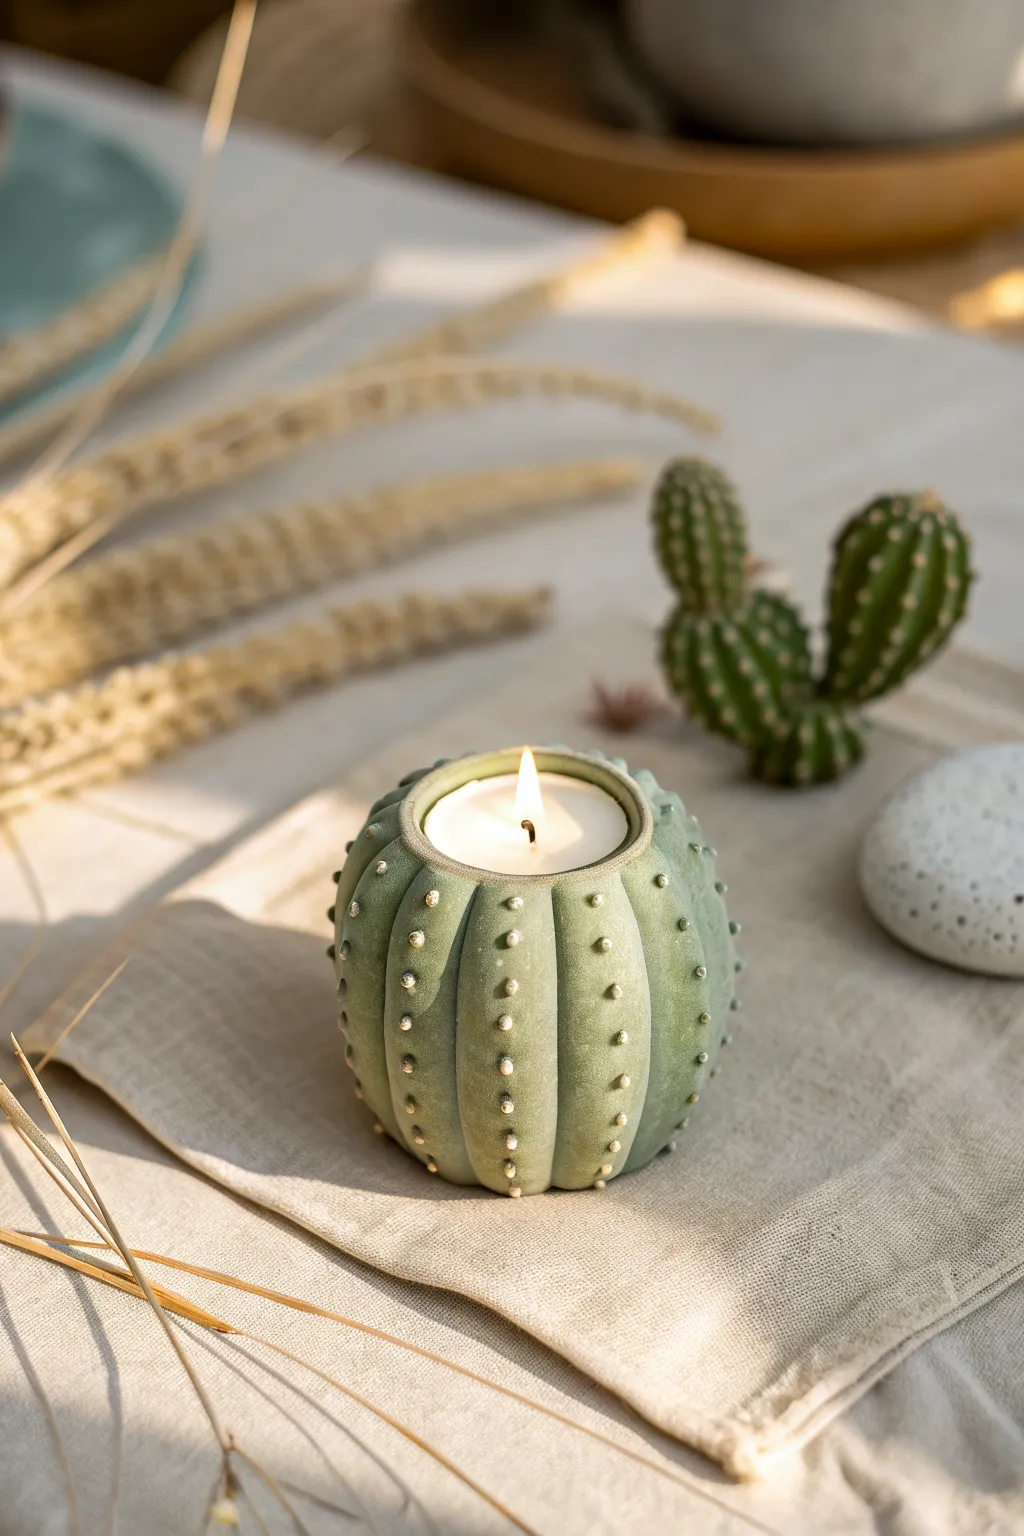
Brighten up your summer table setting with these adorable cactus-shaped tea light holders that look surprisingly realistic. With their ribbed texture and delicate spine details, they add a touch of desert warmth to any room without the prickly danger.
Step-by-Step Tutorial
Materials
- White air-dry clay
- Rolling pin
- Tea light candle (metal or plastic casing)
- Clay knife or modeling tool
- Needle tool or toothpick
- Acrylic paints (Sage green, darker forest green, white, pale yellow)
- Paintbrushes (medium flat brush, fine detail brush)
- Small sponge (optional)
- Water cup
Step 1: Shaping the Base
-
Roll a ball:
Start by conditioning a chunk of air-dry clay in your hands until it’s smooth and pliable. Roll it into a sphere slightly larger than a tennis ball. -
Flatten the bottom:
Gently tap the ball on your work surface to create a flat base so the cactus stands straight without wobbling. -
Create the opening:
Take your separate tea light candle (keep it in its metal or plastic casing) and push it directly into the top center of the clay ball. Press it down until only the top rim is visible. -
Widen the fit:
Wiggle the tea light slightly side-to-side to create a tiny bit of wiggle room. Clay shrinks as it dries, so you need the hole to be slightly larger than the candle to ensure it fits later. -
Smooth the rim:
Remove the candle carefully. Use a bit of water on your fingertip to smooth the upper edge of the opening, rounding over any sharp clay lips.
Step 2: Adding Texture
-
Mark vertical sections:
Using a needle tool, lightly scratch vertical lines from the top rim down to the base, dividing the sphere into about 12-14 equal sections. -
Define the ribs:
Take your modeling tool or the handle of a paintbrush and press firmly into the vertical lines you just marked. This indentation creates the classic ribbed cactus look. -
Round the segments:
Gently smooth the clay between the indented lines with your finger to make each ‘rib’ look puffy and rounded rather than flat. -
Drying time:
Set your cactus aside to dry completely. Depending on the humidity and clay thickness, this usually takes 24-48 hours. Turn it occasionally to ensure the bottom dries too.
Shrinkage Troubles?
If the clay shrinks too much and the candle won’t fit, use sandpaper to gently grind away the inner walls of the opening until the tea light slides in easily.
Step 3: Painting and Finishing
-
Base coat:
Mix a soft sage green acrylic paint. Apply an even coat over the entire exterior and the inner rim of the holder. -
Add depth:
Mix a slightly darker forest green with water to create a wash. Paint this into the deep creases between the ribs, then quickly wipe the high points with a paper towel or sponge. This accentuates the shape. -
Create the spines:
Mix white paint with a tiny drop of pale yellow to make a creamy color. Using a fine detail brush or a toothpick, dot this mixture down the center of each vertical rib. -
Refine the dots:
Try to keep the paint barely raised on the surface for a 3D texture. Space the dots evenly, about a half-inch apart. -
Clean up:
If any green paint got onto the very bottom of the inside where the candle sits, you can clean it up, though the candle will cover it. -
Final dry:
Allow the paint to dry fully before inserting a fresh tea light.
Realistic Texture
Before painting, dab the wet clay gently with a stiff toothbrush. This creates a subtle porous texture that mimics real plant skin better than perfectly smooth clay.
Now you have a charming succulent light to warm up your evenings

TRACK YOUR CERAMIC JOURNEY
Capture glaze tests, firing details, and creative progress—all in one simple printable. Make your projects easier to repeat and improve.
Garden Marker Pot Sticks

Transform a plain ceramic pot into a cheerful home for your seedlings with this sunny, bohemian-inspired relief design. Using air-dry clay directly on the planter creates a charming, textured effect that looks hand-thrown without the need for a kiln.
Step-by-Step
Materials
- Small ceramic planter (white or cream)
- White air-dry clay
- Rolling pin
- Clay sculpting tools (needle tool/knife)
- Water and small sponge
- Sandpaper (fine grit)
- Brown acrylic paint (terracotta shade)
- Gold acrylic paint
- Detail paintbrushes
- Sealant (matte or satin varnish)
Step 1: Sculpting the Sun
-
Prep the surface:
Begin by cleaning your ceramic pot thoroughly to remove any dust or oils. A quick wipe with rubbing alcohol helps the clay adhere better. -
Roll the clay:
Take a small ball of air-dry clay and roll it out until it’s about 1/8 inch thick. You want it thin enough to conform to the pot’s curve but thick enough to have dimension. -
Cut the center circle:
Using a round cookie cutter or a bottle cap, cut out a small circle for the sun’s face. This will be the focal point of your design. -
Attach the face:
Score the back of your clay circle and the spot on the pot where it will go. Apply a little water or slip to both scored areas and press the circle firmly onto the pot. -
Smooth the edges:
Dip your finger in water and gently smooth the edges of the circle so it merges seamlessly onto the ceramic surface, eliminating any gaps. -
Create the sun’s features:
For the sleeping face, roll tiny, thin snakes of clay for the closed eyes and a small nose curve. Attach them gently to the circle using the score-and-slip method.
Clay falling off?
If the dry clay pops off the ceramic, use a strong clear adhesive like E6000 or superglue to reattach it permanently before painting.
Step 2: Adding Rays and Details
-
Paint the basic line work:
Once your clay addition is fully dry (usually 24 hours), sand any rough spots lightly. Now, switch to your terracotta-brown paint. -
Outline the face:
With a fine liner brush, paint a thin brown ring around the raised clay circle. This defines the sun’s face against the white pot. -
Paint the sun rays:
Paint a series of elongated loops or teardrop shapes radiating outward from the face. Keep them loose and hand-drawn for that boho look. -
Add inner details:
Inside the painted rays, add smaller strokes or dots if you like, though the example keeps it simple with open loops. Paint the closed eye lids and nose on the raised clay bump. -
Create the bottom border:
Near the base of the pot, paint a scalloped line that mimics rolling hills or waves, connecting around the circumference. -
Add texture specs:
To give the pot a speckled, pottery-studio vibe, create a splatter effect. You can flick a stiff toothbrush loaded with watered-down brown paint, or hand-paint tiny random dots.
Make it 3D
Instead of just painting the rays, roll thin coils of clay and attach them for 3D sunbeams before you start painting.
Step 3: Finishing Touches
-
Paint the gold accent:
Using your gold acrylic paint, carefully fill in the raised clay circle face. I usually apply two coats to get a really solid, metallic shine. -
Clean up lines:
If any paint lines feel too thick or wobble too much, you can gently scratch away excess dried acrylic with a toothpick. -
Seal the work:
Since this pot will hold soil and moisture, sealing is crucial. Apply two to three coats of waterproof varnish over the painted areas and the clay relief to protect your artwork.
Now your planter is ready to add a warm, handmade glow to your windowsill garden
Tiny Bud Vase Summer Set
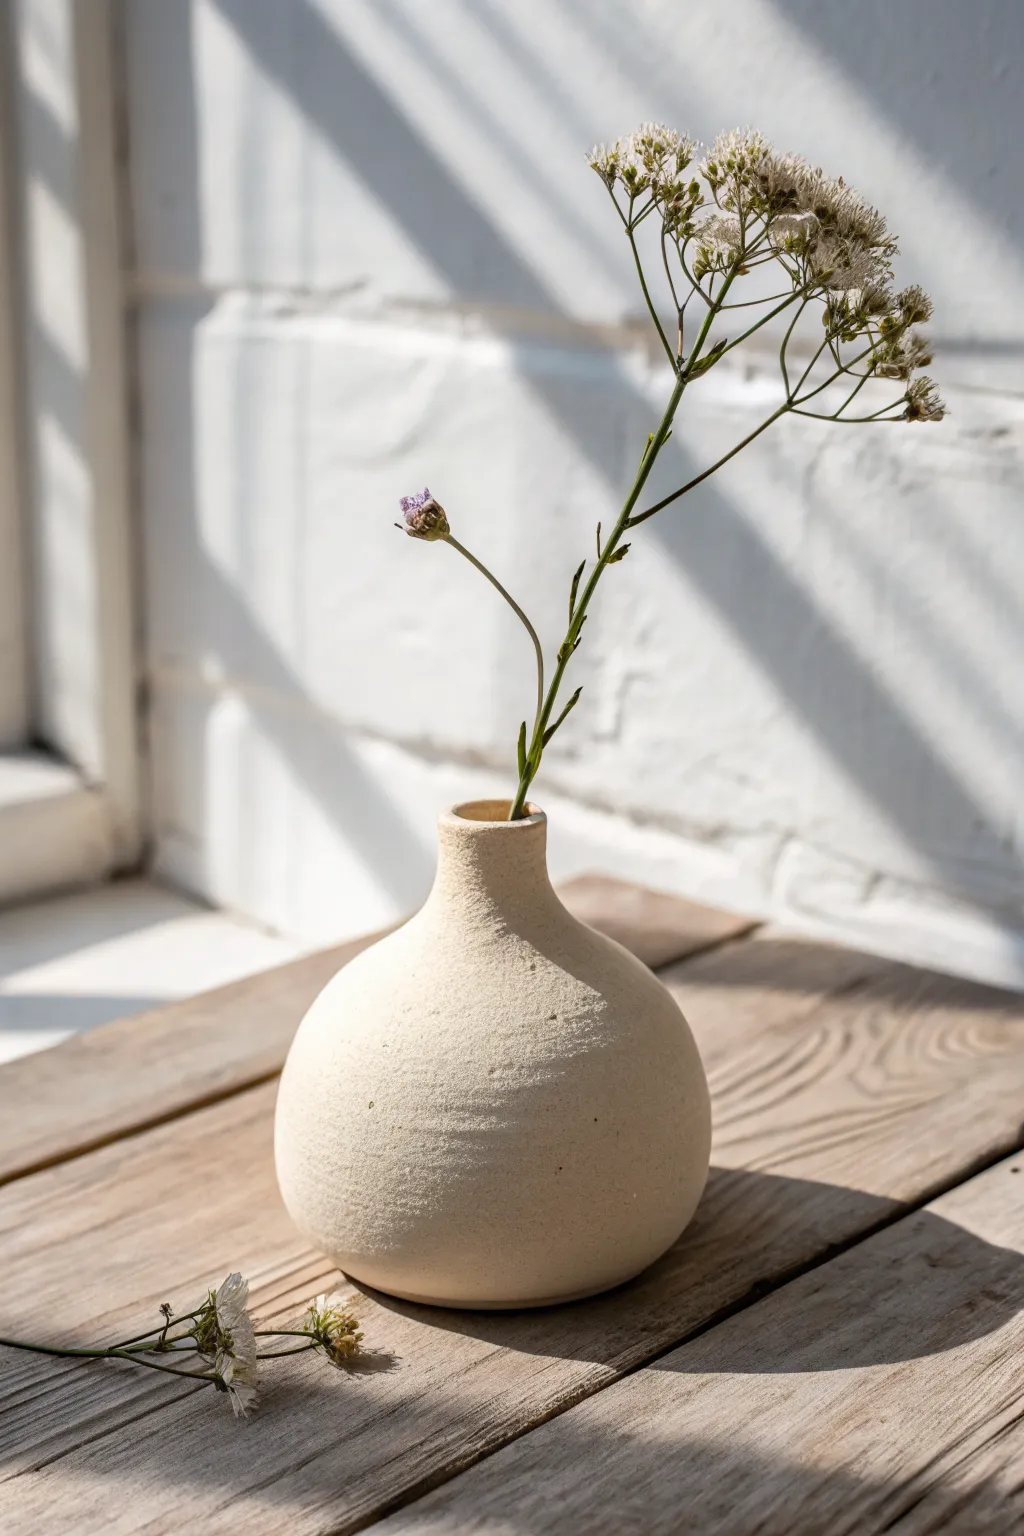
Capture the warmth of summer with this organic, stone-like bud vase that looks freshly spun from the potter’s wheel. Using humble air dry clay and a simple texturing technique, you’ll sculpt a vessel perfect for holding dried wildflowers or dainty stems.
How-To Guide
Materials
- Air dry clay (white or cream)
- Fine grit sandpaper
- Small bowl of water
- Rolling pin
- Clay knife or craft knife
- Sponge or textured cloth
- Acrylic paint (cream/beige) – optional
- Baking soda – optional (for texture)
- Matte varnish
Step 1: Forming the Base
-
Prepare the clay:
Start by grabbing a handful of air dry clay, roughly the size of a tennis ball. Knead it thoroughly in your hands to warm it up and remove any air bubbles, which helps prevent future cracking. -
Roll a sphere:
Roll the clay between your palms or on a clean surface until you have a smooth, even ball. Don’t worry about perfection yet; stick with a general spherical shape. -
Create the opening:
Hold the sphere in your non-dominant palm. Take your thumb and gently press into the center of the ball, pushing down about three-quarters of the way through, leaving a thick base at the bottom. -
Pinch the walls:
Using your thumb and fingers, begin pinching the walls of the clay from the bottom up. Rotate the ball incrementally as you pinch to ensure an even thickness all around the sphere.
Step 2: Sculpting the Bottle Shape
-
Narrowing the neck:
As you work your way up toward the opening, change your motion. Instead of pinching outward, start gently collaring the clay inward. Use a cupping motion with both hands to encourage the opening to shrink. -
Define the neck:
Focus solely on the top inch of the clay now. Squeeze gently to extend the clay upward to creating a short, vertical neck distinct from the round body. -
Smooth the lip:
Dip your finger in a tiny bit of water and run it around the rim of the vase to smooth out any cracks or uneven edges. Aim for a slightly thickened, rounded lip as seen in the photo. -
Refine the silhouette:
Set the vase down on your work surface. Tap the bottom gently against the table to create a small, flat base so it stands securely. Step back and look at the profile; use wet fingers to smooth out any major bumps while keeping that charming, handmade asymmetry.
Stone Effect Secret
Mix used coffee grounds directly into the wet clay while kneading. Once dry, the dark speckles create a stunning, natural granite look without painting.
Step 3: Texturing and Finishing
-
Initial drying:
I like to let this firm up for about 30 minutes before adding texture so I don’t crush the shape. It should still be damp but hold its form well. -
Add texture:
To achieve that stony look, verify your surface is still slightly moist. Gently pat the exterior with a coarse sponge or a crumpled piece of linen cloth to imprint a subtle, sandy texture. -
Dry completely:
Allow the vase to dry fully. This usually takes 24-48 hours depending on humidity. Flip it upside down halfway through to let air reach the bottom center. -
Sand for finish:
Once bone dry, take fine sandpaper and lightly buff the surface. You aren’t trying to remove the texture you made, just knocking down any sharp ridges or burrs. -
Paint preparation:
If your clay dried too white or grey, mix a warm beige acrylic paint. To replicate the texture in the photo perfectly, mix a teaspoon of baking soda into your paint. -
Apply the color:
Dab the paint onto the vase using a sponge rather than brushing it on. This dabbing motion enhances the grainy, stone-like appearance. -
Seal the work:
Since this is for dried flowers, a heavy waterproof sealant isn’t strictly necessary, but a coat of matte varnish will protect the finish and keep the ‘unvarnished’ look intact.
Waterproofing
Air dry clay dissolves in water! To use fresh flowers, insert a small glass test tube or plastic vial inside your clay vessel to hold the water safely.
Place a single delicate stem in your new vase and enjoy the quiet beauty it brings to your space
Summer Charm Bead Jewelry
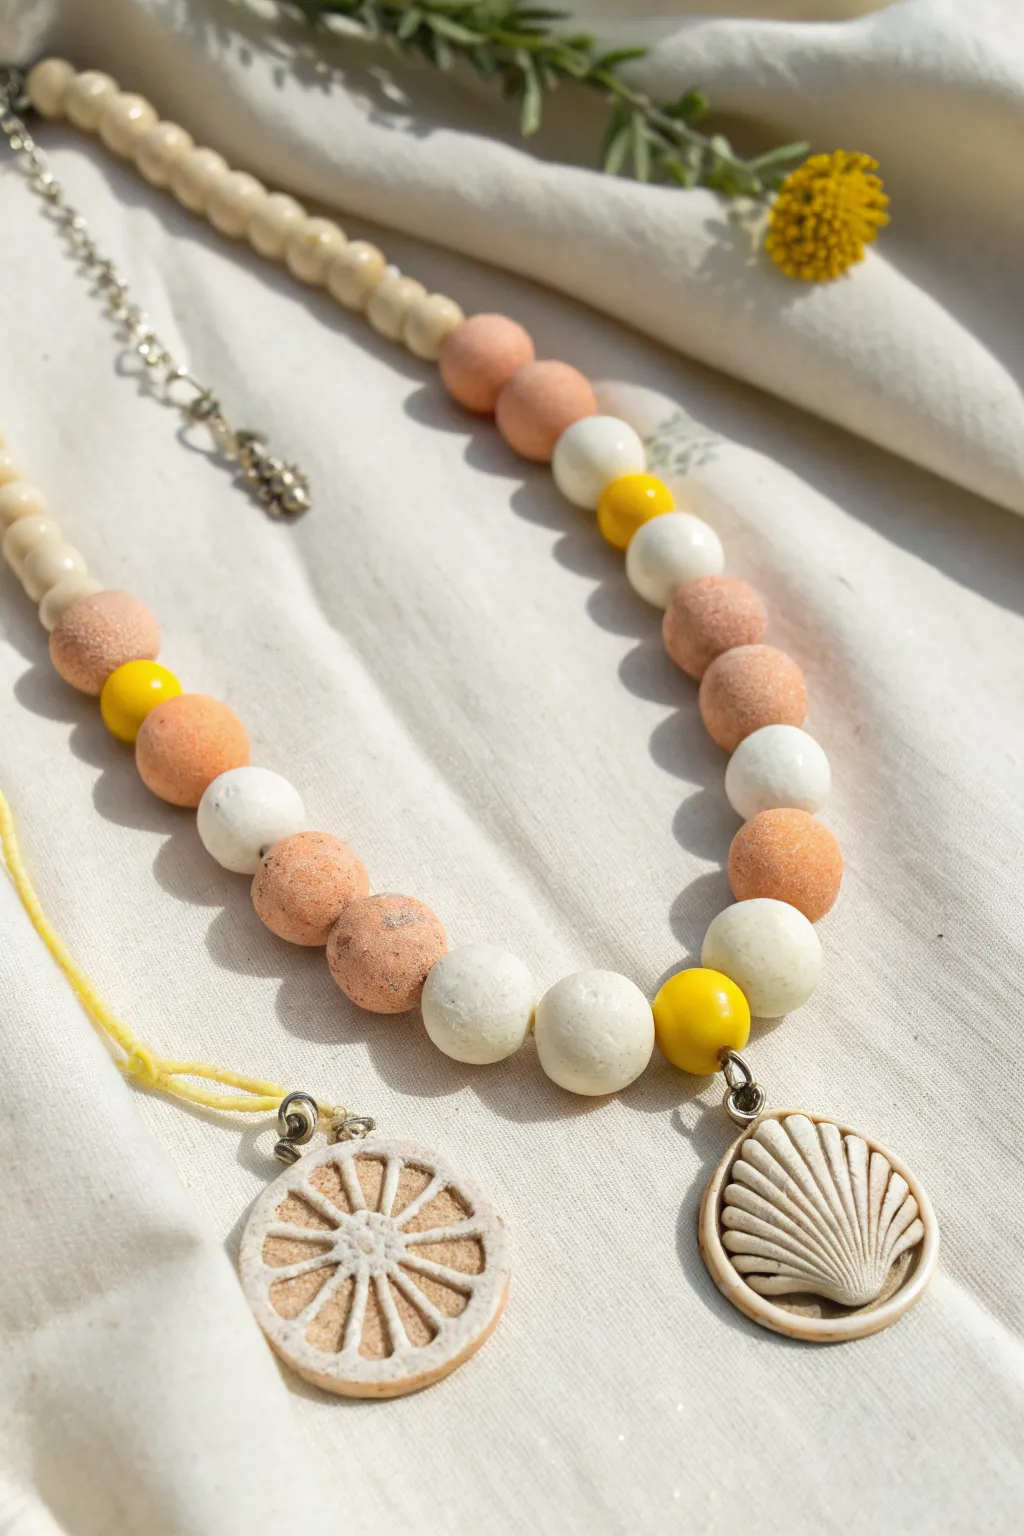
Capture the warmth of a sun-drenched beach with this handmade jewelry piece featuring textured air-dry clay beads and summery pendants. The mix of sandy terracotta tones, crisp white, and bright yellow creates a cheerful accessory perfect for seaside adventures.
Step-by-Step Tutorial
Materials
- White air-dry clay
- Acrylic paints (terracotta/peach, bright yellow, antique white)
- Small round bead roller (optional, hands work fine)
- Toothpicks or a bead piercing tool
- Jewelry eye pins or head pins
- Jump rings (silver tone)
- Silver chain necklace with clasp
- Small seed beads or spacer beads (yellow)
- Fine grit sandpaper
- Old toothbrush or stiff bristle brush
- Sculpting tools or a needle tool
- Matte varnish or sealant
Step 1: Sculpting the Clay Elements
-
Prepare the clay:
Begin by conditioning a chunk of white air-dry clay until it is soft and pliable. Divide it into small portions for the different bead sizes you see in the photo. -
Create the terracotta spheres:
Roll about 10-12 medium-sized spheres. While the clay is still wet, gently tap the surface with an old toothbrush or a stiff bristle brush to create that sandy, pitted texture. -
Form the white spheres:
Roll about 6-8 slightly smaller spheres for the white accents. Keep these as smooth as possible, using a drop of water on your finger to polish away any cracks. -
Sculpt the shell pendant:
Flatten a small ball of clay into a teardrop shape. Use a sculpting tool or a dull knife to press radiating lines from the wider bottom edge toward the narrow top point to mimic a scallop shell. -
Create the citrus slice pendant:
Flatten a round disk of clay. Press a slightly smaller circle into the center to create a rim. Use a knife to maximize the negative space, cutting out wedges to leave behind the ‘spokes’ of the citrus slice. -
Add texture to the pendant:
If you want the citrus slice to look realistic, use your toothbrush again to stipple the inner sections between the spokes before they dry. -
Pierce holes:
Carefully insert a toothpick through the center of each bead. For the pendants, poke a small hole near the top edge for the jump ring. Wiggle the toothpick slightly to ensure the hole is wide enough for your hardware. -
Dry completely:
Set all your pieces aside on a clean surface. Allow them to dry for at least 24-48 hours, turning them occasionally to ensure even drying.
Fixing Cracks
If small cracks appear as your beads air dry, don’t panic. Mix a tiny bit of fresh clay with water to make a paste (slip) and fill in the cracks, then smooth over.
Step 2: Painting and Finishing
-
Paint the textured beads:
Mix a warm terracotta or peach acrylic paint. Dab this onto your textured beads, ensuring the paint gets into all those little toothbrush dimples. -
Paint the smooth beads:
Give the smooth spherical beads a coat of antique white or plain white if they look gray after drying. -
Highlight the citrus:
Paint the rim and spokes of the citrus slice with the antique white. For the textured inner wedges, wash over them with a diluted brown or dark peach paint to make the texture pop. -
Detail the shell:
Paint the shell pendant white. Once dry, lightly brush a very small amount of diluted brown paint into the grooves to emphasize the ridges. -
Seal the clay:
Apply a coat of matte varnish to all clay pieces. This protects them from moisture and gives them a finished jewelry look. -
Prepare the yellow beads:
If you aren’t using pre-bought yellow beads, you can paint a few of your smallest clay spheres with bright yellow acrylic paint.
Natural Polish
For a smoother finish on the white beads, try burnishing them. Rub the dry clay briskly with a piece of denim or smooth fabric before sealing to create a soft shine.
Step 3: Assembly
-
String the beads:
Thread your beads onto the necklace chain or cord. Following the image, create a pattern alternating between the large textured peach beads, the smooth white ones, and the small yellow spacers. -
Attach pendant hardware:
Open a jump ring using pliers. Slide it through the hole in your shell pendant and close it securely. -
Link the citrus slice:
Attach a separate jump ring to the citrus pendant. If you want it to hang lower like in the photo, you might chain two jump rings together. -
Final arrangement:
Add the pendants to the necklace. The shell sits nicely as a focal point in the center, while the citrus slice can be added as a secondary charm or on a separate layered cord.
Wear your new seaside creation with a linen shirt to truly embrace the summer vibe
Painted Fish Hanging Decor
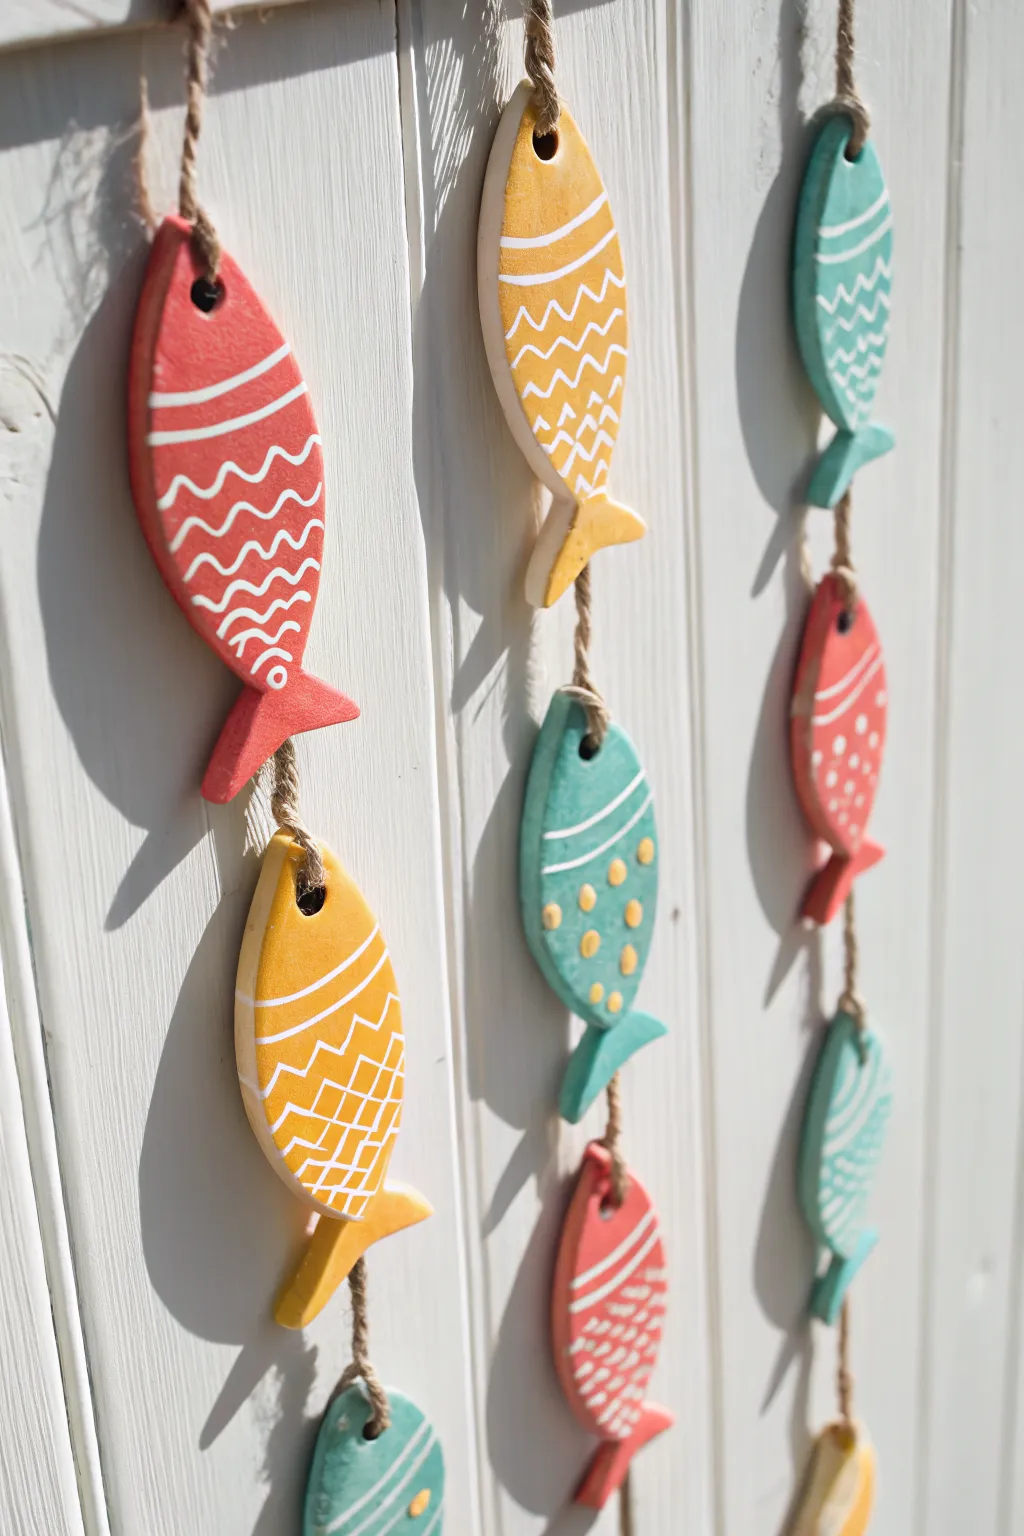
Capture the breezy feel of the coast with these delightful fish ornaments, brimming with color and charm. Strung on rustic twine, their playful patterns and vibrant hues make them a perfect accent for a sunny corner or porch area.
Step-by-Step Guide
Materials
- Air dry clay (white or terracotta)
- Fish-shaped cookie cutter (optional) or cardstock for templates
- Rolling pin
- Parchment paper or craft mat
- Straw or skewer (for holes)
- Sandpaper (fine grit)
- Acrylic craft paints (red, yellow, teal, white)
- Small round paintbrushes (sizes 0 and 2)
- Jute twine or hemp cord
- Matte finish sealant spray or Mod Podge
- Scissors
Step 1: Shaping the Catch
-
Roll the clay:
Begin by kneading a handful of air dry clay until it is soft and pliable. Place it on a sheet of parchment paper and use your rolling pin to flatten it to an even thickness of about 1/4 inch. -
Cut the shapes:
If you have a fish-shaped cookie cutter, press it firmly into the clay. Alternatively, sketch a simple fish silhouette on cardstock, cut it out, place it on the clay, and trace around it with a craft knife. -
Smooth the edges:
Dip your finger in a little water and run it gently along the cut edges of each fish to soften any roughness or jagged bits left by the cutting tool. -
Create the hanging hole:
Using a straw or a wooden skewer, punch a clean hole through the mouth area of each fish. Make sure the hole isn’t too close to the edge to prevent the clay from cracking later. -
Dry completely:
Set your clay fish aside on a flat surface to dry. Depending on humidity and thickness, this usually takes 24-48 hours. FLip them over halfway through so the backs dry evenly.
Clay Cracking?
If you notice small hairline cracks as the clay dries, don’t panic. Mix a tiny bit of fresh wet clay with water to make a paste and fill the cracks, then smooth over.
Step 2: Adding Color & Pattern
-
Sand the surface:
Once fully cured, lightly sand any rough spots, especially around the edges and the hanging hole, using fine-grit sandpaper. This creates a professional, smooth canvas for your paint. -
Base coat:
Paint the entire front surface of each fish in a solid color. Create a mix of warm reds, sunny yellows, and sea-glass teals. I find two thin coats often look better than one thick one. -
Dry the base:
Allow the base colors to dry completely before attempting any detail work. Wet base paint will cause your white lines to smudge and turn pink or light blue. -
Paint the head stripes:
Using a size 0 detail brush and white acrylic paint, draw a curved line to separate the fish head from the body, then add a simple stripe across the gill area. -
Add body patterns:
Get creative with the body designs. For the red fish, paint wavy lines resembling scales. For the yellow ones, try angular zig-zags or cross-hatching. The teal fish look great with simple dots or curved stripes. -
Detail the tails:
Don’t forget the fins! Add small white strokes or dots to the tail section to balance the design. -
Seal the work:
To protect your paint from chipping or fading, apply a coat of matte sealant or Mod Podge over the entire fish once the paint is bone dry.
Beachy Driftwood
Instead of stringing them vertically, tie each fish individually to a horizontal piece of driftwood for a beautiful mobile-style wall hanging.
Step 3: Stringing It Up
-
Prepare the twine:
Cut a long length of jute twine, deciding how long you want your final garland or vertical hanger to be. Leave plenty of extra length at the top for a hanging loop. -
Create a top loop:
Fold the top end of the twine over and tie a sturdy knot to create a loop for hanging on a hook or nail. -
Attach the first fish:
Thread the bottom end of the twine through the hole in your first fish. Slide it up to your desired position. -
Secure with knots:
Tie a simple overhand knot in the twine right above the fish hole to keep it from sliding up, and another knot right below the hole to keep it from sliding down. -
Continue stringing:
Repeat this process for the remaining fish, spacing them out evenly—about 3 to 4 inches apart looks nice. Alternate colors as you go for a vibrant look. -
Final trim:
Once the last fish is secured at the bottom, trim any excess twine, leaving a small tail below the knot for a rustic finish.
Hang your colorful school of fish near a window and enjoy the summer vibes all year round
Sand-Texture Candle Holders
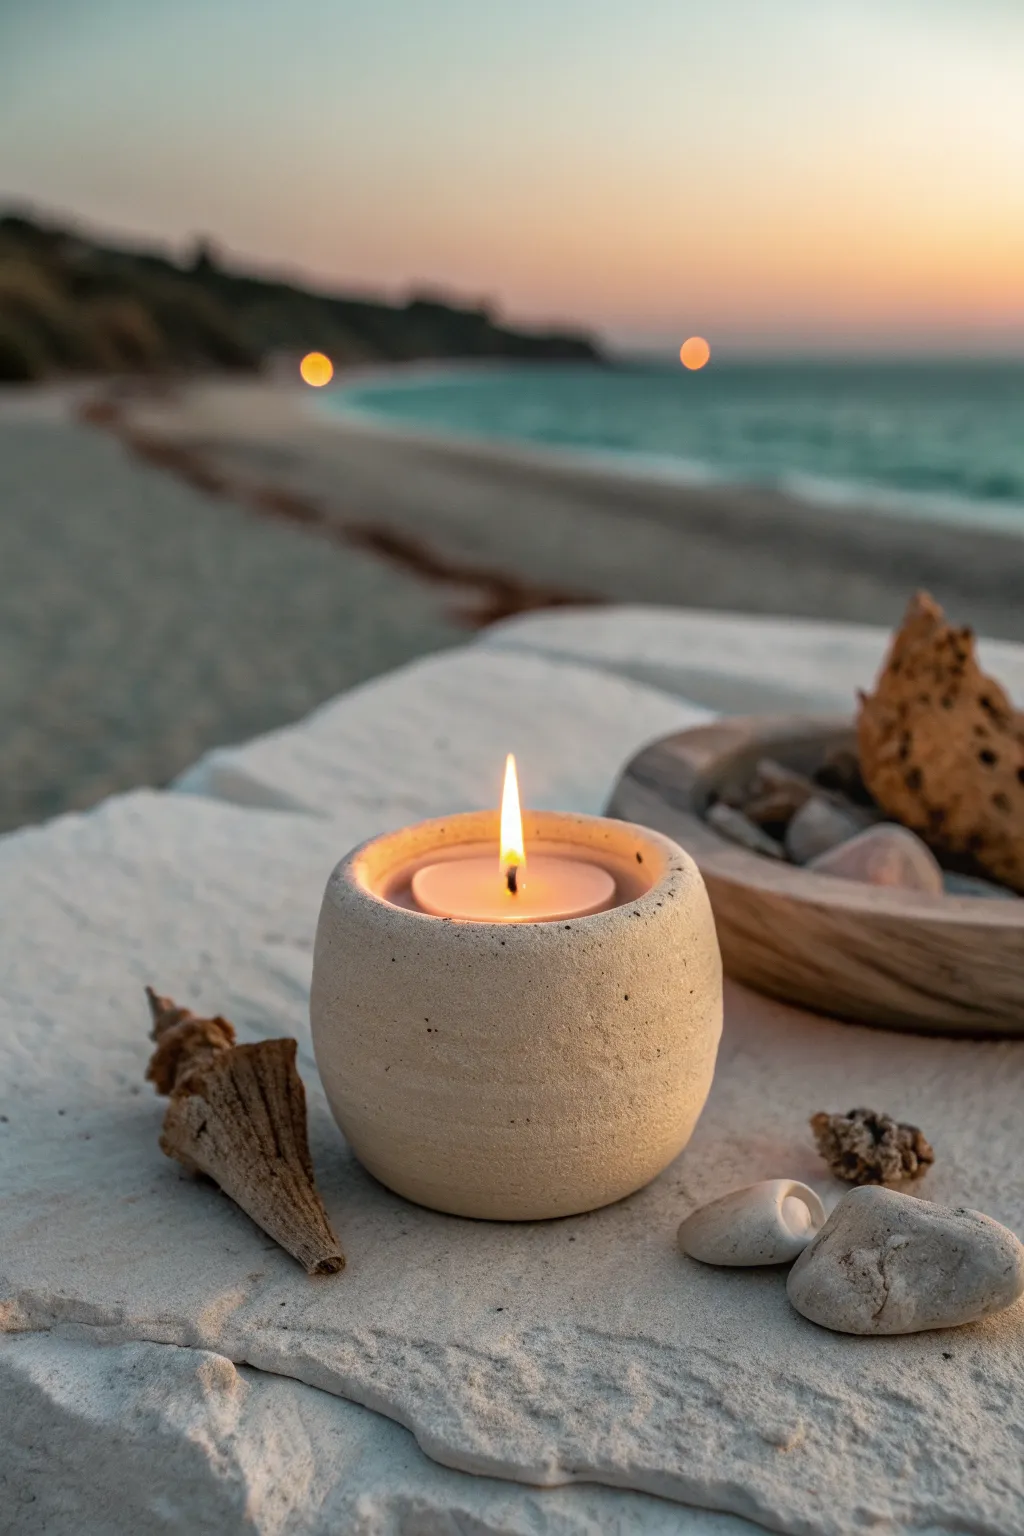
Bring the serene feeling of a beach sunset into your home with these uniquely textured candle holders that mimic the look and feel of natural sandstone. Using a simple air dry clay base mixed with actual sand, you’ll create a rustic vessel perfect for holding tea lights and casting a warm, flickering glow.
Step-by-Step Guide
Materials
- White or beige air dry clay
- Fine beach sand (clean and dry)
- Small bowl for mixing
- Rolling pin
- Tea light candle (for sizing)
- Small pottery sponge
- Water
- Sandpaper (fine grit)
- Matte clear acrylic sealer (optional)
- Speckled tan or beige acrylic paint (optional for extra effect)
Step 1: Preparing the Sand Clay
-
Portion the clay:
Start by pinching off a ball of air dry clay about the size of a tennis ball. This amount will be sufficient for a standard tea light holder with thick, sturdy walls. -
Create a well:
Flatten the ball slightly into a thick disc and press your thumb into the center to create a deep indentation or well. -
Incorporate sand:
Pour a generous tablespoon of fine, clean sand into the well you created. If you want a more speckled look, you can add a pinch of darker sand or even coffee grounds at this stage. -
Knead thoroughly:
Fold the edges of the clay over the sand and begin kneading. It’s crucial to work the sand evenly throughout the entire clay body so the texture is consistent. -
Assess the texture:
If the clay feels too sticky, add more sand. If it starts cracking excessively, dip your fingers in water and knead it back to a pliable consistency.
Step 2: Shaping the Vessel
-
Form the base ball:
Roll your textured clay back into a smooth, tight sphere. Roll it between your palms to erase any major creases. -
Start the pinch pot:
Hold the sphere in your non-dominant hand. Push your thumb gently into the center, stopping about a half-inch from the bottom to ensure a solid base. -
Pinch the walls:
Using your thumb on the inside and fingers on the outside, gently pinch and rotate the clay. Work from the bottom up to thin the walls evenly. -
Check the fit:
Insert your tea light periodically. I prefer to leave a little extra wiggle room around the candle since the clay will shrink slightly as it dries. -
Create the rounded profile:
Instead of flaring the rim out, gently curve the upper walls inward slightly to create that cozy, enclosed orb shape seen in the photo. -
Flatten the bottom:
Press the pot firmly onto your work surface to create a flat, stable bottom so it won’t rock.
Cracking Up?
If the sand dries out the clay too fast causing cracks during shaping, add a few drops of water and smooth with a damp sponge immediately.
Step 3: Validating the Texture
-
Smooth the lip:
Dip your finger in water and run it along the top rim to smooth out any sharp or jagged edges, but don’t over-smooth the body. -
Enhance surface grit:
For that ultra-sandy look, lightly dampen the outside of the pot with a sponge, then roll the entire outside surface in a shallow dish of loose sand. -
Press perfectly:
Gently press this outer layer of sand into the clay so it adheres well and doesn’t just brush off later. -
Refine the shape:
Give the pot one final check to ensure the opening is circular and the walls are symmetrical before setting it aside.
Beachcomber Style
Press a small shell or piece of sea glass into the wet clay near the rim for a subtle, personalized coastal hidden detail.
Step 4: Drying and Finishing
-
Slow drying:
Place the finished piece in a cool, dry area away from direct sunlight. Let it dry for at least 24-48 hours. Turn it over halfway through to help the bottom dry. -
Sand for finish:
I like to gently sand the rim once it’s bone dry to ensure a professional finish, though the rough body texture should remain. -
Add speckles (optional):
If your sand didn’t provide enough contrast, you can flick a toothbrush with watered-down dark brown paint over the surface for extra speckling. -
Seal the piece:
Apply a coat of matte acrylic sealer. This protects the sand from shedding and ensures the clay doesn’t soften if it gets slightly damp.
Light your candle and enjoy the warm, beachy atmosphere you have created
Mini Coastal House Shelf Village
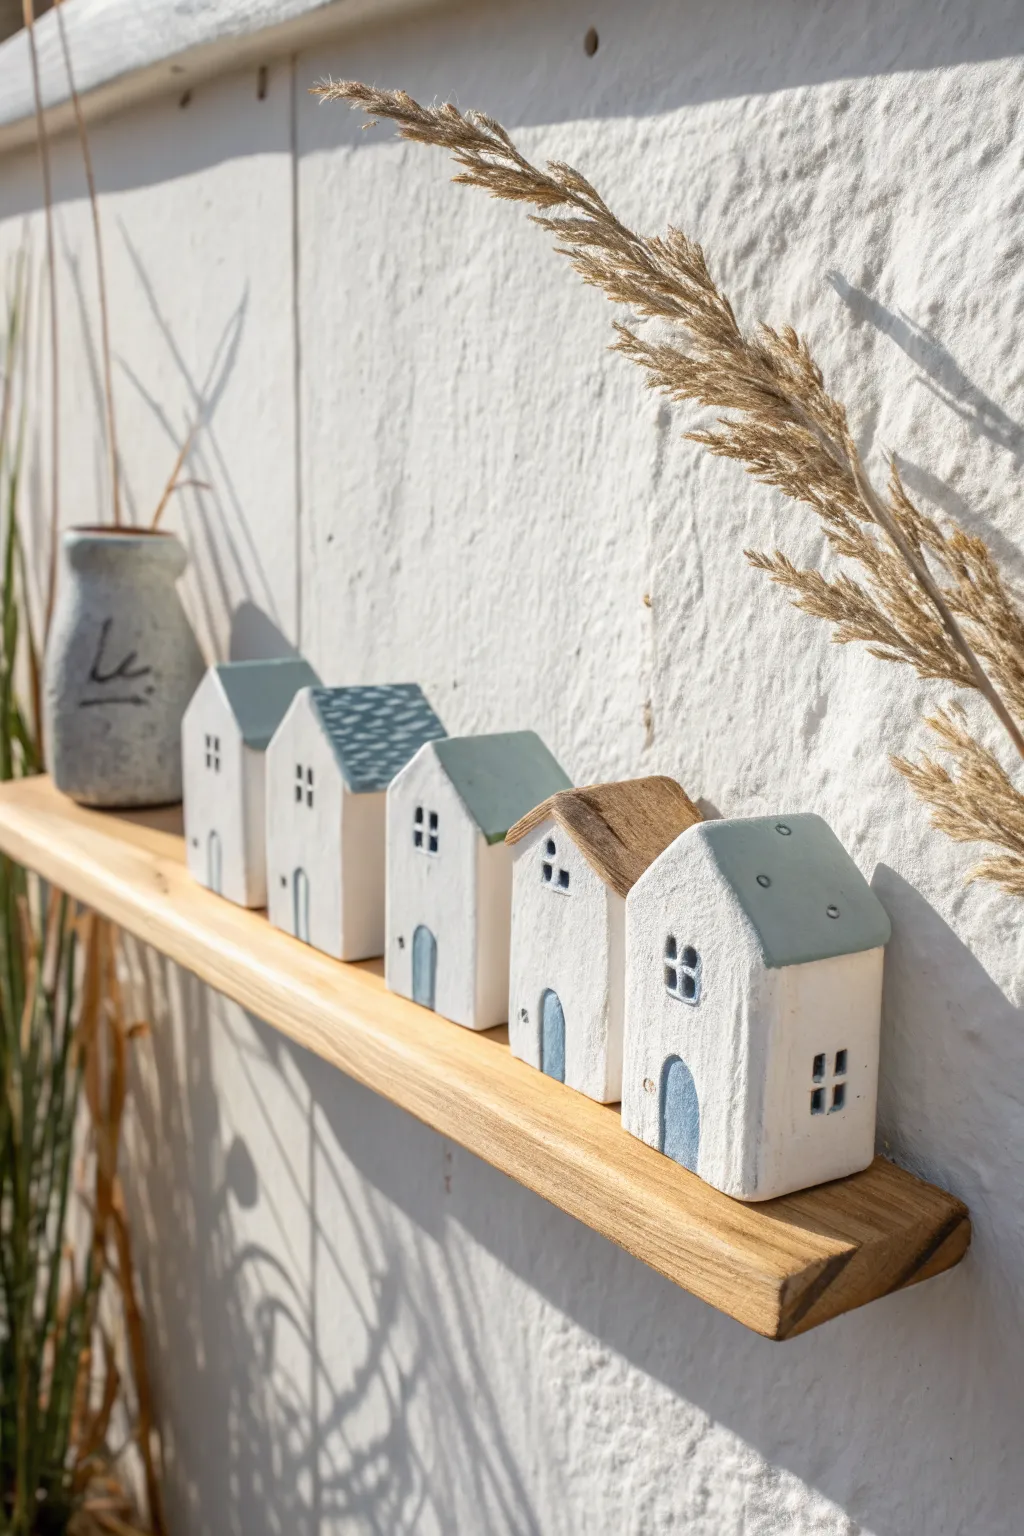
Bring the breezy charm of a seaside town into your home with this simple yet stunning shelf display. These minimalist white houses, accented with soft blues and natural textures, capture the essence of coastal living in miniature form.
How-To Guide
Materials
- Air dry clay (white)
- Small rolling pin
- Sharp craft knife or clay slicing tool
- Ruler
- Sandpaper or sanding block (fine grit)
- Acrylic paints (white, dusty blue, slate grey)
- Detail paintbrush
- Water cup
- Wooden craft stick or sculpting tool (for texture)
- Clear matte varnish (optional)
Step 1: Shaping the Houses
-
Condition the clay:
Begin by taking a handful of air dry clay and kneading it in your hands until it becomes warm, pliable, and free of cracks. -
Roll into a block:
Shape the clay into a thick, rectangular block. I like to gently tap the block against my work surface to flatten the bottom and sides, creating sharp, 90-degree angles. -
Set the height:
Decide on the height for each house. Roll or cut your block to about 1.5 to 2 inches thick—you want them substantial enough to stand stably. -
Cut the roof pitch:
Using a sharp craft knife, slice the top of your block at an angle to create the roof. For variety, create different roof styles: some symmetrical peaks, some single-slope ‘shed’ roofs, and varied steepness. -
Smooth the edges:
Dip your finger in a little water and run it along the cut edges to soften any harsh sharpness or burrs left by the knife. -
Repeat for the village:
Repeat this process to make 4-5 houses of varying widths and heights to create a dynamic skyline.
Keep it Sharp
To get super clean lines on your windows, utilize a square-headed clay cutter or stamp rather than free-handing every line with a knife.
Step 2: Adding Details
-
Design the windows:
While the clay is still wet, use the tip of a small knife or sculpting tool to gently impress square or rectangular outlines for windows. Don’t cut all the way through; just create an indentation. -
Create doors:
Press an arched shape into the bottom center of the front face for a door. Depth is key here to catch the paint later. -
Add roof texture:
For one or two houses, use a tool to press patterns into the roof slope. Small dashes or scallops can mimic shingles. -
Dry thoroughly:
Set the houses aside to dry completely. Depending on humidity and thickness, this usually takes 24-48 hours. Turn them occasionally to ensure even drying. -
Sand for finish:
Once fully dry and hard, use fine-grit sandpaper to smooth out the main white surfaces, but leave a little texture to maintain that rustic, handmade look.
Step 3: Painting & Decoration
-
Base coat:
Paint the main body of the houses with white acrylic paint. You may need two coats for a solid, crisp finish. Let this dry completely. -
Painting the roofs:
Mix a dusty blue or sage green color. Paint the roof slopes of specific houses, leaving others white or natural for contrast. -
Detailing the windows:
Using your finest detail brush and a dark grey or slate blue, carefully paint inside the window indentations. Add crossbars (muntins) if your windows are large enough. -
Painting the doors:
Fill in the arched door indentations with flexible colors—try a medium blue or leave one natural clay color if you prefer an earthy touch. -
Adding texture details:
For the shingled roof, you can lightly dry-brush white paint over the blue to highlight the raised texture you stamped earlier. -
Final touches:
Add tiny details like small dots for doorknobs or extra little windows near the roof peak using the tip of a toothpick dipped in paint.
Natural Texture
Instead of painting a roof, create a faux-wood look by pressing actual wood grain into the wet clay roof, then washing it with diluted brown paint.
Arranging your new village on a raw wood shelf creates a peaceful, artistic focal point for any room