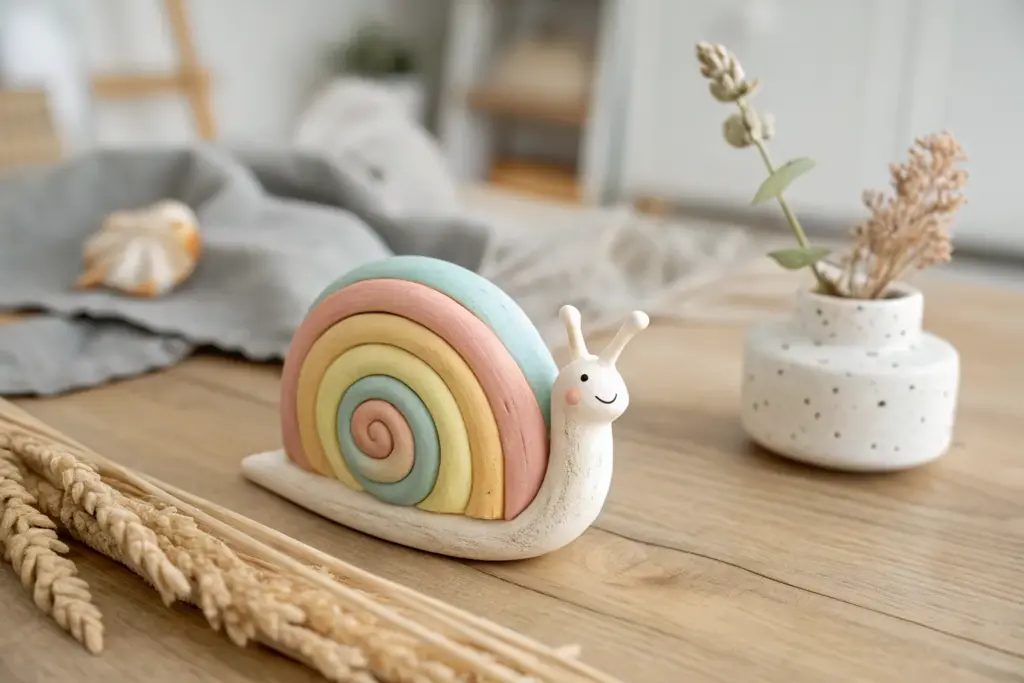
Whenever I’m teaching kids, air-dry clay is my go-to because it’s forgiving, low-stress, and turns little ideas into real keepsakes. Here are my favorite kids dry clay projects that stay simple and playful, but still feel like a big creative win.
Simple Pinch Pot Treasure Bowl
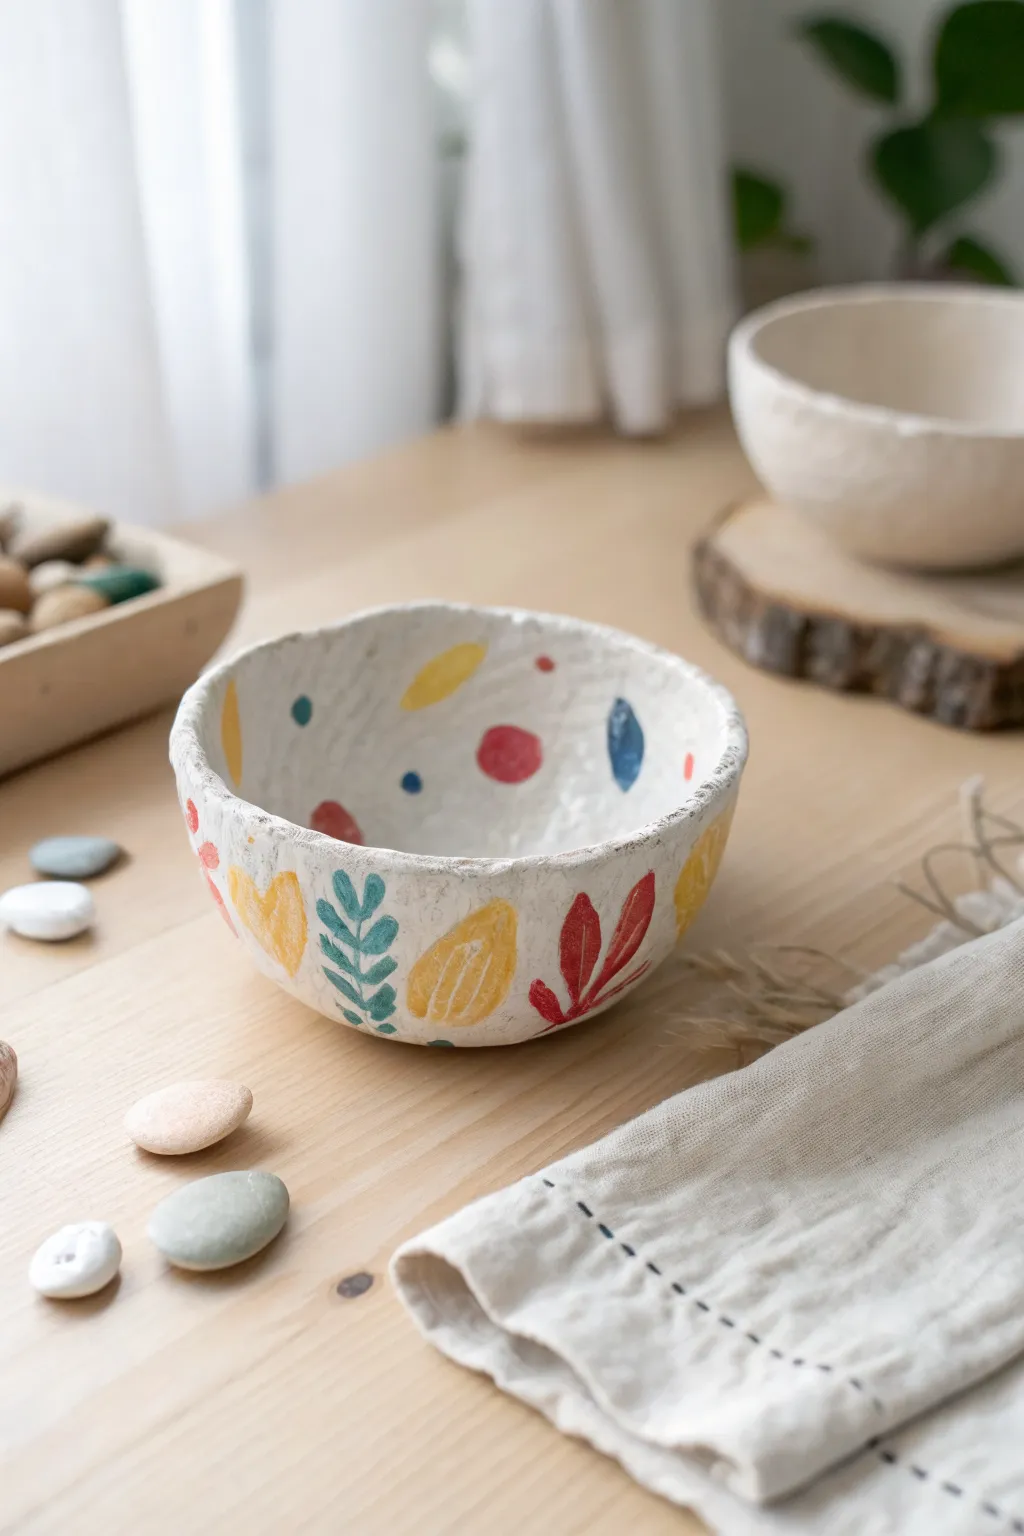
This charming, imperfectly shaped bowl is perfect for holding tiny treasures like pebbles or beads. It features a rustic, textured finish adorned with folk-art style leaves and colorful abstract shapes.
Step-by-Step Tutorial
Materials
- White coloring air-dry clay (or polymer clay)
- Acrylic paints (primary colors plus green)
- Small round paintbrush
- Fine detail paintbrush
- Cup of water
- Small sponge or sandpaper (optional)
- Matte or satin varnish (optional for sealing)
Step 1: Shaping the Clay
-
Prepare the clay ball:
Start by taking a handful of white air-dry clay. Knead it in your hands for a minute to warm it up and make it pliable, then roll it into a smooth, tight sphere about the size of a tennis ball. -
Start the pinch method:
Hold the ball in one hand and gently press your thumb of the other hand into the center. Push down until you are about a half-inch from the bottom, being careful not to push all the way through. -
Form the walls:
With your thumb still inside, use your fingers on the outside to gently pinch and turn the clay. Work your way around the ball, gradually thinning the walls and moving upward from the base. -
Refine the shape:
Continue pinching until the walls are roughly 1/4 inch thick. Don’t worry about perfect smoothness; the goal is a rustic, organic shape. If the rim creates a wavy, uneven line like the example, leave it—it adds character. -
Smooth the texture:
Dipper your finger in a tiny bit of water and rub it over any deep cracks. I find that leaving some of the smaller finger marks and texture creates that lovely handmade look shown in the photo. -
Dry the bowl:
Set the bowl aside to dry completely. For air-dry clay, this usually takes 24-48 hours depending on humidity. Rotate it occasionally so the bottom receives air flow.
Use A Damp Sponge
Before the clay dries, lightly tap a damp sponge over the surface. This softens distinct fingerprints while keeping that nice, bumpy handmade texture intact.
Step 2: Painting and Decoration
-
Mix your palette:
Prepare your acrylic paints. You will need a mustard yellow, a deep teal green, a bright red, and a navy blue. Mixing a little white into your colors can give them the soft, opaque look seen here. -
Paint the yellow ovals:
Using a small round brush, paint simple oval shapes around the exterior of the bowl. These are the base for your yellow leaves. Leave plenty of white space between them. -
Add red botanicals:
With the red paint, add organic leaf shapes. Start with a central stem line and dab small, elongated brushstrokes coming off either side to form a fern-like leaf. -
Create teal sprigs:
Switch to your teal green color. Paint vertical stems with pairs of small, rounded leaves branching off. Try to vary the direction slightly so they look like they are swaying. -
Paint the interior details:
Don’t forget the inside! Replicate similar shapes inside the bowl—a yellow oval here, a red dot there. The interior painting creates a wonderful surprise when you look inside. -
Add floating shapes:
Fill the gaps between your leaves with abstract elements. Paint small blue circles, red dots, or solid blue almond shapes. These shouldn’t touch the leaves but rather float in the white space. -
Outline the yellow leaves:
Once the yellow ovals are fully dry, use a very fine detail brush with white paint (or a white paint pen) to draw veins or simple lines on top of the yellow shapes for added texture. -
Final touches:
Inspect your bowl for any areas that need a second coat of paint to be fully opaque. The colors should pop against the white clay background. -
Seal the project:
Allow the paint to cure completely. To protect your treasure bowl from chipping, apply a thin coat of matte or satin varnish over the entire surface, inside and out.
Cracks Appearing?
If small cracks form while drying, mix a tiny bit of fresh clay with water to make a ‘slip’ paste. Rub this paste into the cracks and smooth it over.
Your unique little bowl is now ready to hold all your favorite small keepsakes safely


Handprint Keepsake Dish
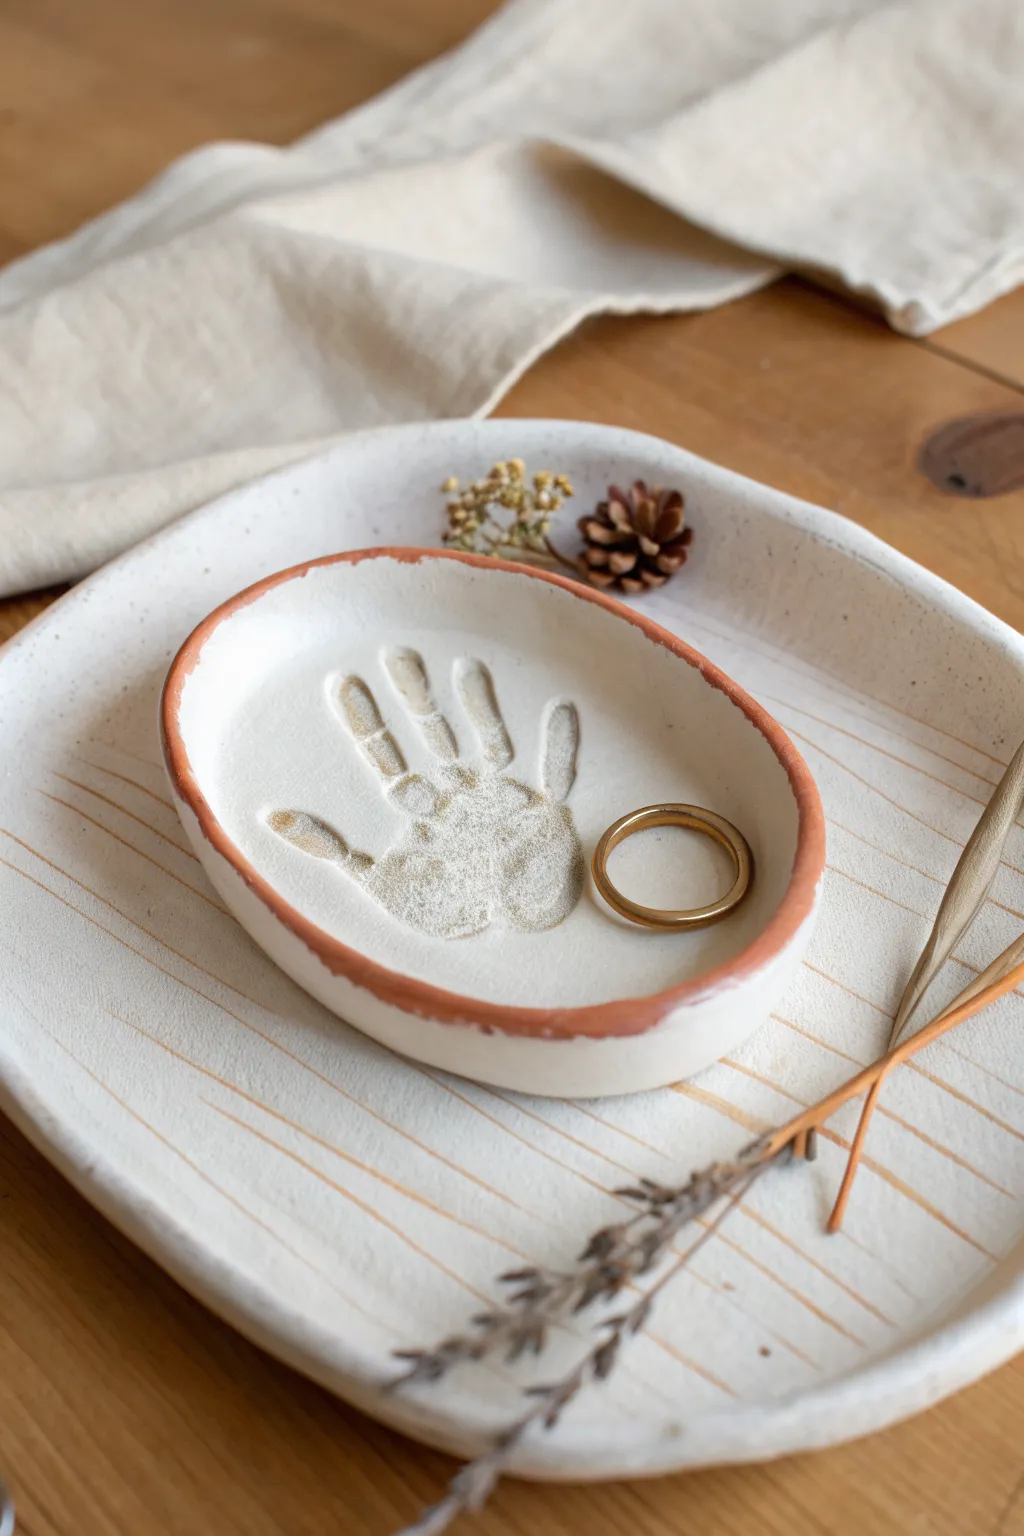
Capture a moment in time with this charming, rustic keepsake dish featuring a delicate child’s handprint. The piece combines a creamy white base with an earthy terracotta rim, making it a perfect functional tray for jewelry or a sentimental shelf decoration.
Detailed Instructions
Materials
- White air-dry clay (or polymer clay)
- Small rolling pin
- Oval cookie cutter or craft knife
- Small bowl or sponge (for drying)
- Fine-grit sandpaper
- Terracotta or rust-colored acrylic paint
- Small round paintbrush
- Clear matte varnish or sealant
- Parchment paper
Step 1: Shaping the Clay
-
Prepare your workspace:
Lay down a sheet of parchment paper on a flat surface to prevent sticking. Take a ball of white air-dry clay—about the size of a tennis ball—and knead it in your hands until it is soft, pliable, and free of cracks. -
Roll out the slab:
Using your rolling pin, roll the clay out to an even thickness of approximately 1/4 inch. Try to keep the surface smooth and bubble-free. -
Create the handprint:
Gently guide your child’s hand onto the center of the clay slab. Press down firmly on the palm and each finger to ensure a deep, clear impression. -
Reveal the print:
Carefully lift the hand straight up to avoid smudging the edges of the print. If the impression is too shallow, simply roll the clay into a ball and try again. -
Cut the oval shape:
Using an oval cutter or a craft knife, cut a clean oval shape around the handprint. Leave about a half-inch border around the fingers and palm for a balanced look. -
Smooth the edges:
Dip your finger in a tiny bit of water and run it along the cut edge of the oval to smooth out any roughness or sharp corners.
Clean Impressions
Apply a tiny amount of lotion to the child’s hand before pressing it into the clay. This prevents sticking and ensures the skin pulls away cleanly without dragging the clay.
Step 2: Forming the Dish
-
Lift the edges:
Gently lift the sides of the clay oval upwards to create a shallow bowl shape. You can do this by pinching the edges slightly or resting the clay inside a shallow bowl lined with plastic wrap. -
Refine the curve:
Ensure the curve is gradual and natural. The goal is a slight lip that will hold small items like rings, rather than a steep wall. -
Allow to dry:
Place the formed dish in a safe, dry spot. Let it air dry completely for 24-48 hours. I find flipping it over carefully halfway through helps the bottom dry evenly.
Step 3: Finishing Touches
-
Sand for smoothness:
Once fully dry and hard, use fine-grit sandpaper to gently buff away any remaining rough spots on the rim or the back of the dish. -
Dust off debris:
Wipe the dish down with a dry cloth or a soft brush to remove all clay dust before painting. -
Paint the rim:
Dip a small round brush into terracotta or rust-colored acrylic paint. Carefully paint just the top edge of the rim. -
Create the rustic look:
Don’t worry about making the line perfectly straight; a slightly uneven, organic line adds to the handmade charm shown in the photo. -
Seal the piece:
Once the paint is dry, apply a coat of clear matte varnish over the entire dish to protect the clay from moisture and give it a finished look. -
Let it cure:
Allow the varnish to cure fully according to the bottle instructions before placing any jewelry or trinkets inside.
Cracking Clay?
If small cracks appear while drying, mix a tiny bit of fresh clay with water to make a paste (slip) and smooth it into the cracks with your finger, then let dry again.
Now you have a timeless treasure that preserves a tiny moment forever


Nature-Print Clay Medallions
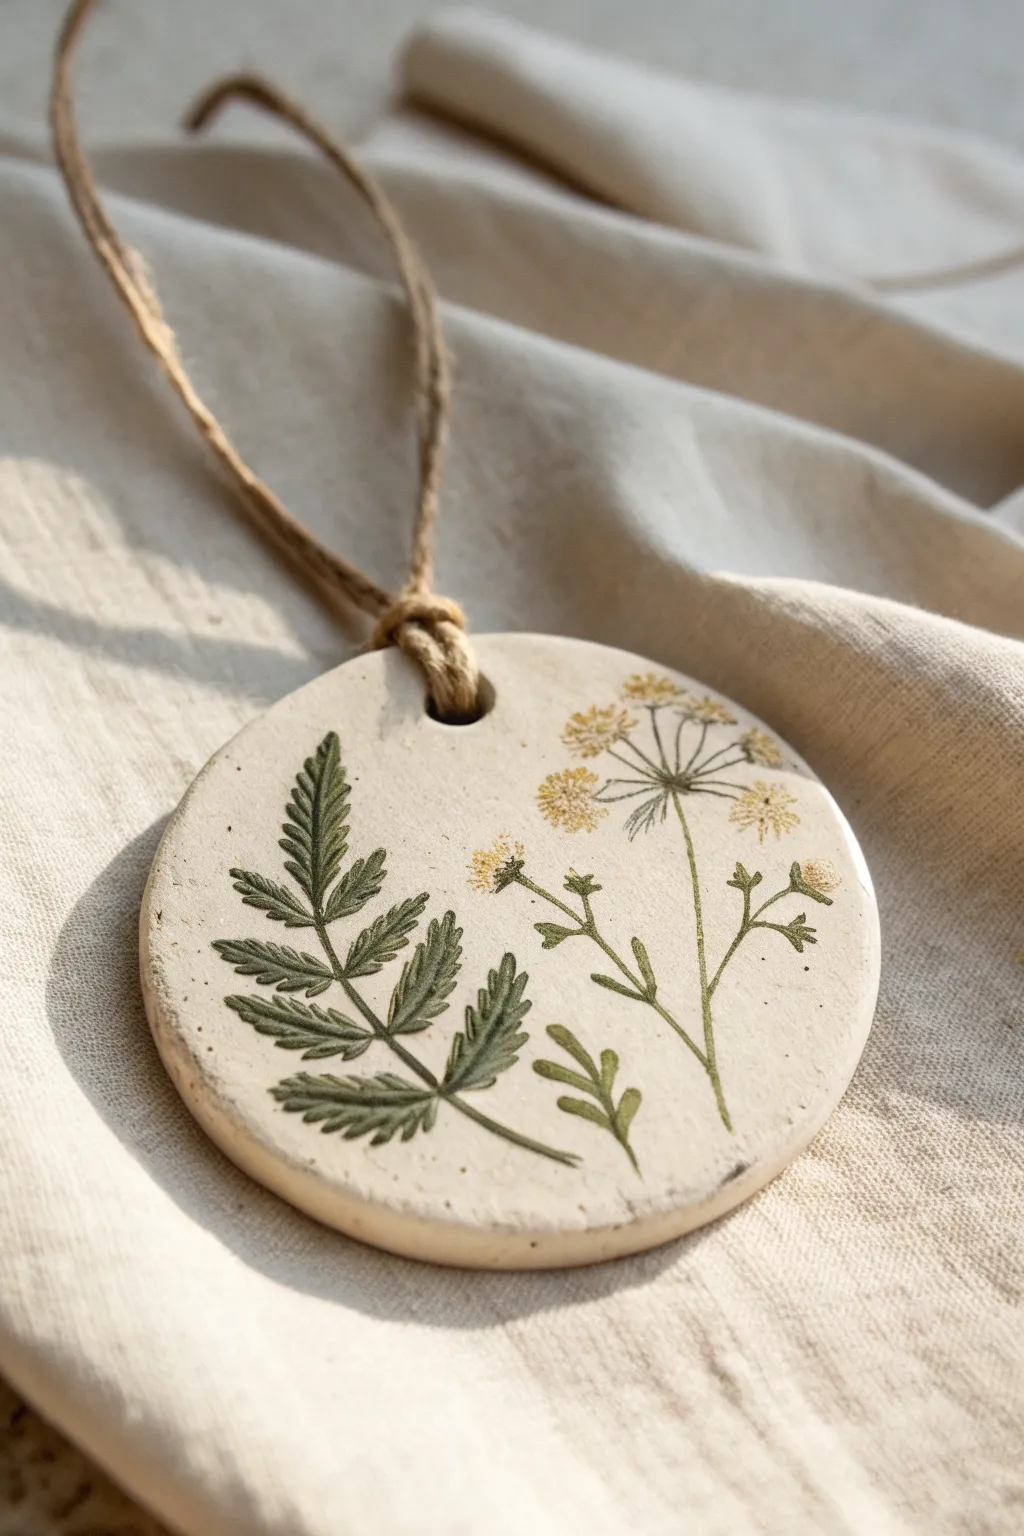
Transform gathered bits of nature into timeless art with these rustic floral medallions. The smooth, matte finish of the clay perfectly highlights delicate fern fronds and wildflowers for an organic, artisanal look.
Step-by-Step Guide
Materials
- White air-dry clay (or polymer clay for durability)
- Small rolling pin
- Round cookie cutter or drinking glass
- Fresh or pressed botanical specimens (ferns, Queen Anne’s lace)
- Green and yellow acrylic craft paint
- Fine-point paintbrush (size 0 or 00)
- Jute twine or hemp cord
- Clear matte varnish (optional)
- Small straw or skewer
- Parchment paper
Step 1: Shaping the Canvas
-
Prepare your workspace:
Lay down a sheet of parchment paper to prevent sticking. Take a handful of air-dry clay and knead it briefly until it feels soft and pliable without any cracks. -
Roll the slab:
Place the clay ball on the parchment and use your rolling pin to flatten it. Aim for an even thickness of about 1/4 inch; too thin and it might crack, too thick and it will be heavy. -
Cut the shape:
Press your round cookie cutter or the rim of a glass firmly into the clay slab. Wiggle it slightly to ensure a clean cut, then peel away the excess clay from the outside. -
Smooth the edges:
Dip your finger in a tiny bit of water and run it gently around the circumference of the circle to smooth out any rough bits left by the cutter. -
Add a hanging hole:
Using a straw or a wooden skewer, punch a hole near the top edge of the circle. Make sure it’s not too close to the edge, or the clay might break when hung.
Step 2: Creating the Impression
-
Arrange your composition:
Ideally, plan your design before pressing. Lay your fern leaf and flower stem gently on top of the wet clay to see how they fit best together. -
Press the botanicals:
Once satisfied with the placement, use the rolling pin to gently roll *over* the plants once. Apply enough pressure to embed them slightly into the surface but not crush the clay out of shape. -
Remove the plants:
Carefully lift the stems and leaves off the clay. You should see a clean, indented impression of the plant’s veins and structure left behind in the surface. -
Let it dry:
Set the medallion aside on a flat surface to dry completely. Depending on humidity and clay brand, this usually takes 24 to 48 hours. I like to flip it over halfway through to ensure even drying.
Pro Tip: Clearer Prints
Place a piece of cling wrap over your plants before rolling over them. This prevents the roller from getting dirty and helps press the plants down evenly without tearing them.
Step 3: Painting & Finishing
-
Mix your greens:
Squeeze a small amount of forest green paint onto a palette. You might want to mix in a tiny drop of brown to get that earthy, realistic mossy tone seen in the photo. -
Paint the fern:
Using your finest brush, carefully fill in the indented impression of the fern leaf. Use a light hand; the paint should sit inside the textured groove naturally. -
Detail the stems:
Continue painting the stem of the flower using a lighter olive green. Keep your lines very thin for delicate stems. -
Add floral color:
Switch to yellow ochre or a muted mustard yellow. Dab small dots of paint at the ends of the flower stems to mimic the tiny clustered blooms of the wildflower. -
Wait for paint to set:
Allow the acrylic paint to dry fully. This is usually quick, taking only about 15-20 minutes. -
Seal the piece (Optional):
For longevity, especially if this will be handled often, brush a thin layer of clear matte varnish over the entire front surface. -
Attach the hanger:
Cut a length of jute twine, about 8 inches long. Fold it in half to create a loop. -
Tie the knot:
Thread the folded end through the hole in the clay, then pass the loose ends through that loop and pull tight (a lark’s head knot). Secure the open ends with a simple overhand knot.
Troubleshooting: Curling Edges
If your clay circle starts curling up at the edges while drying, gently weigh it down with a heavy book placed on top of a paper towel during the final stage of drying.
Now you have a beautiful piece of nature captured in stone to display anywhere in your home


Cookie-Cutter Ornaments and Name Tags
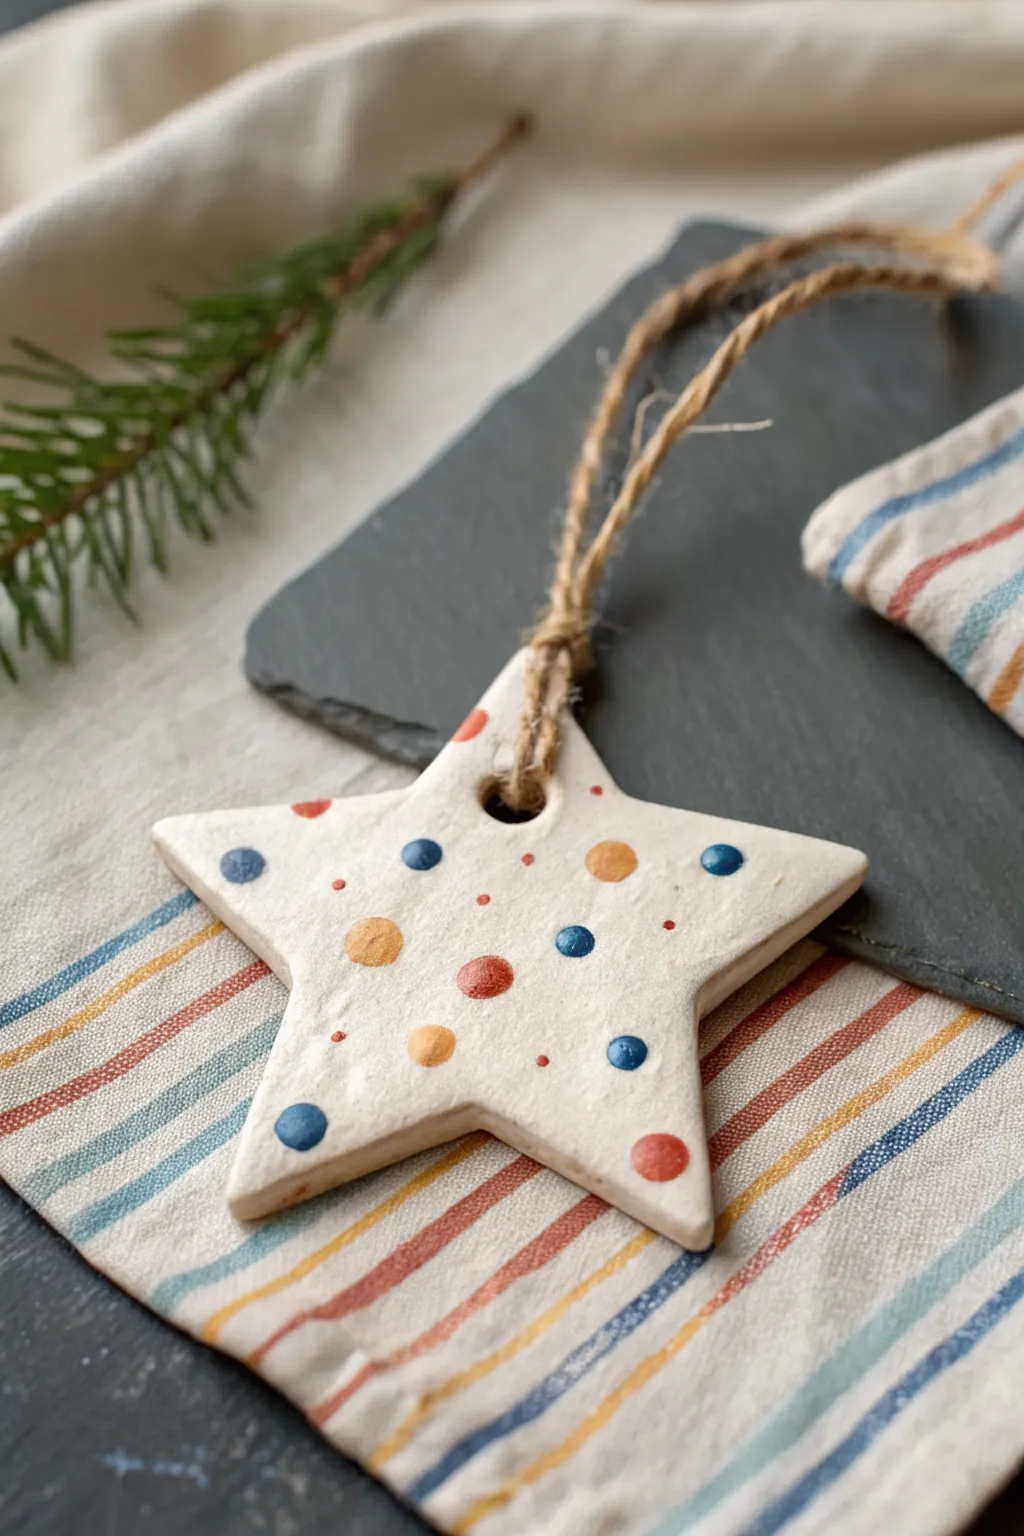
These charming clay stars bring a festive, handmade touch to any tree or gift wrapping. With their creamy white base and cheerful painted dots, they are simple enough for kids to make but stylish enough to treasure for years.
Step-by-Step
Materials
- White coloring air-dry clay (or polymer clay)
- Star-shaped cookie cutter
- Rolling pin
- Parchment paper or non-stick craft mat
- Straw or stirring stick (for creating the hole)
- Fine-grit sandpaper (optional)
- Acrylic paints (navy blue, terracotta red, honey yellow)
- Small round paintbrush or dotting tool
- Jute twine or ribbon
- Clear matte varnish or Mod Podge (optional)
Step 1: Shaping the Clay
-
Prepare your workspace:
Lay down a sheet of parchment paper or a non-stick craft mat to protect your table and prevent the clay from sticking. -
Condition the clay:
Take a handful of air-dry clay and knead it in your hands until it feels soft, warm, and pliable. This helps prevent cracks later on. -
Establish thickness:
Roll out the clay evenly until it is about 1/4 inch thick. If you roll it too thin, the ornaments might be fragile; too thick, and they will take much longer to dry. -
Cut the shape:
Press your star-shaped cookie cutter firmly into the clay. Give it a tiny wiggle to ensure it cuts all the way through, then lift the cutter. -
Release the shape:
Gently peel away the excess clay from around the star. If the star is stuck inside the cutter, gently push it out from the edges, trying not to warp the points. -
Smooth the edges:
Dip your clean finger in a tiny bit of water and run it along the cut edges of the star to smooth down any roughness or loose bits of clay. -
Create the hanging hole:
Use a straw or a stirring stick to poke a hole near the top point of the star. Make sure the hole isn’t too close to the edge, or the clay might break later.
Fixing Cracks
If tiny cracks appear while drying, don’t panic. Mix a small amount of fresh clay with water to make a paste (slip) and smooth it into the cracks with your finger.
Step 2: Drying and Refining
-
Let it dry completely:
Place the star on a flat surface to dry. Air-dry clay usually takes 24-48 hours. I recommend flipping the star over halfway through the process to ensure even drying. -
Sand for smoothness:
Once bone dry, check the edges again. If they feel sharp or rough, lightly sand them with fine-grit sandpaper for a professional finish. -
Dust off debris:
Wipe the star with a dry cloth or a soft brush to remove any clay dust from sanding before you start painting.
Step 3: Decorating and Hanging
-
Prepare your palette:
Squeeze small amounts of navy blue, terracotta red, and honey yellow acrylic paint onto a palette or paper plate. -
Paint large dots:
Dip a small round brush or the flat end of a dotting tool into the paint. Create a random pattern of larger dots across the surface, alternating colors. -
Add tiny accents:
Using a smaller tool, like a toothpick or the very tip of a fine brush, add tiny speckles of red or orange in the empty spaces between the larger dots. -
Dry the paint:
Allow the paint to dry completely. Acrylics dry quickly, so this should only take about 15-20 minutes. -
Seal the surface:
To protect your design, apply a thin coat of clear matte varnish or Mod Podge over the top. This gives the ornament a nice finished look and seals the clay. -
Add the twine:
Cut a length of natural jute twine. Thread it through the hole at the top of the star. -
Secure the loop:
Bring the ends of the twine together and tie a simple overhand knot to close the loop, trimming any excess fuzz from the ends.
Texture Twist
Before cutting the star shape, gently press a piece of lace or a textured fabric into the wet clay to create an embossed pattern background for your painted dots.
Now your festive star is ready to be hung on a branch or tied to a special present

The Complete Guide to Pottery Troubleshooting
Uncover the most common ceramic mistakes—from cracking clay to failed glazes—and learn how to fix them fast.
Cute Animal Fridge Magnets
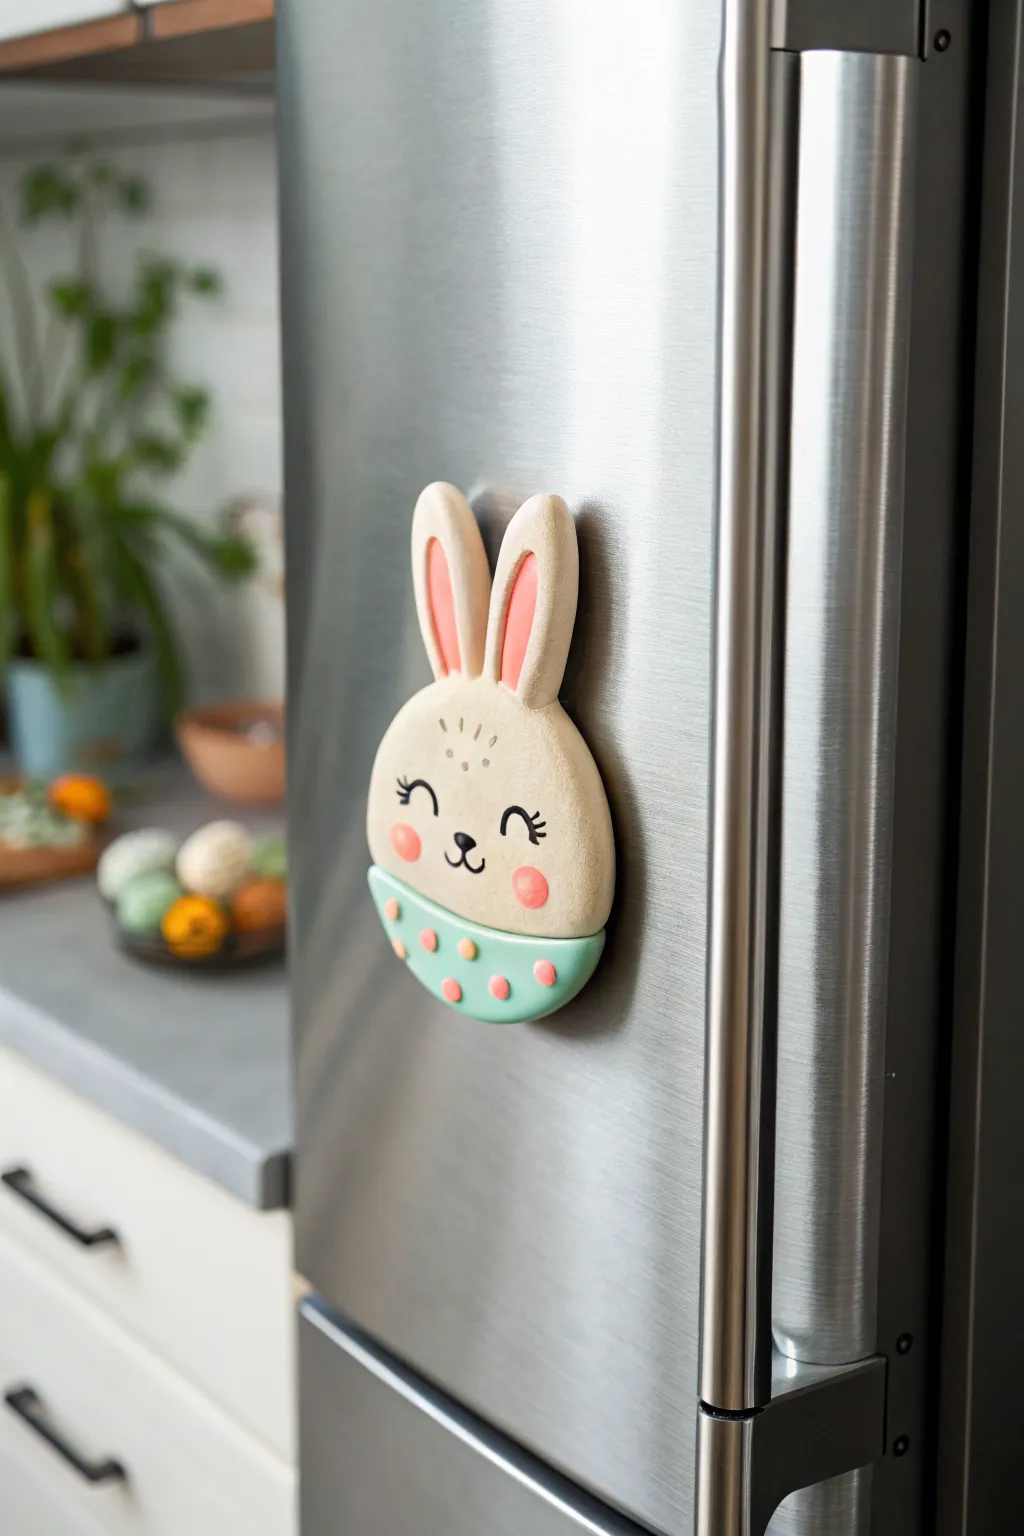
Brighten up your kitchen with this adorable, kawaii-style bunny magnet that seems to be peeking out of an Easter egg. Its smooth, matte finish and soft pastel colors make it a charming addition to any metallic surface.
Step-by-Step Tutorial
Materials
- White coloring air-dry clay (or polymer clay)
- Acrylic paints (cream/beige, mint green, salmon pink, black)
- Fine-grit sandpaper
- Rolling pin
- Circle cookie cutter (approx. 2.5 – 3 inches)
- Modelling tools (needle tool, smoother)
- Strong round craft magnet
- Strong craft glue (E6000 or super glue)
- Small paintbrushes (fine tip for details)
- Matte varnish (optional)
Step 1: Shaping the Base
-
Roll the clay:
Start by conditioning your clay until it’s soft and pliable. Roll it out on a non-stick surface to a thickness of about 1/4 inch (6mm). You want it substantial enough to be durable but not too heavy for the magnet. -
Cut the main circle:
Use your circle cookie cutter to punch out a perfect round shape. This will form the foundation for both the bunny’s head and the patterned body. -
Form the ears:
Roll two small snakes of clay, then flatten them gently to create long, oval ear shapes. Pinch one end of each ear slightly to make it narrower where it will attach to the head. -
Attach the ears:
Score the top of the circle and the bottom of the ears with a needle tool. Apply a tiny amount of water (slipping) and press the ears firmly onto the top back edge of the circle. Smooth the seam with your finger or a tool so they are securely joined. -
Create the body division:
To create the look of the clothing or eggshell, roll a thin strip of clay and flatten it. Attach this horizontally across the lower third of the circle, or simply use a modelling tool to impress a deep groove line to separate the ‘head’ from the ‘body’. -
Dry completely:
Place your bunny on a flat surface lined with parchment paper. Let it dry for at least 24-48 hours. I usually flip it over halfway through the drying process to ensure the back dries evenly. -
Sand for smoothness:
Once fully hard, take fine-grit sandpaper and gently rub away any rough edges, fingerprints, or bumps. Wipe away the dust with a slightly damp cloth.
Step 2: Painting and Details
-
Base coat the head:
Mix a warm cream or light beige color. Paint the entire head area and the outer edges of the ears. You might need two thin coats for opaque coverage. -
Paint the inner ears:
Using a salmon pink shade, carefully paint the elongated oval shapes inside the ears. Leave a nice border of the beige color showing around the edges. -
Color the body:
Paint the lower third of the circle (the body section) with a cheerful mint green or teal acrylic paint. Keep the line between the beige head and green body crisp. -
Add polka dots:
Dip the backend of a paintbrush or a dotting tool into the salmon pink paint. Stamp random polka dots all over the mint green area. -
Paint the face:
Using your finest brush and black paint, draw two curved arches for the closed, happy eyes. Add three tiny eyelashes to the outer corner of each eye. -
Nose and mouth:
Paint a very small, rounded triangle for the nose. Draw a small anchor shape (‘w’) underneath it for the mouth. -
Cheeks and forehead:
Add two round pink circles for blushing cheeks. For extra texture, paint a few tiny white or light brown dots on the forehead area. -
Seal the piece:
Apply a coat of matte varnish over the entire front of the bunny to protect the paint and give it that professional finished look. -
Attach the magnet:
Flip the dry bunny over. Apply a strong dab of heavy-duty craft glue to the center of the back and press your round magnet firmly into place. Let the glue cure completely according to the package instructions.
Smoother Surfaces
Use a tiny bit of water on your fingertip to smooth the clay while it’s wet. This minimizes the need for heavy sanding later.
Curling Edges?
If the clay edges curl up while drying, gently weigh the piece down with a light book after the surface is touch-dry to keep it flat.
Now your cute little bunny is ready to hold up your favorite photos or grocery lists
Rainbow Clay Bead Bracelets
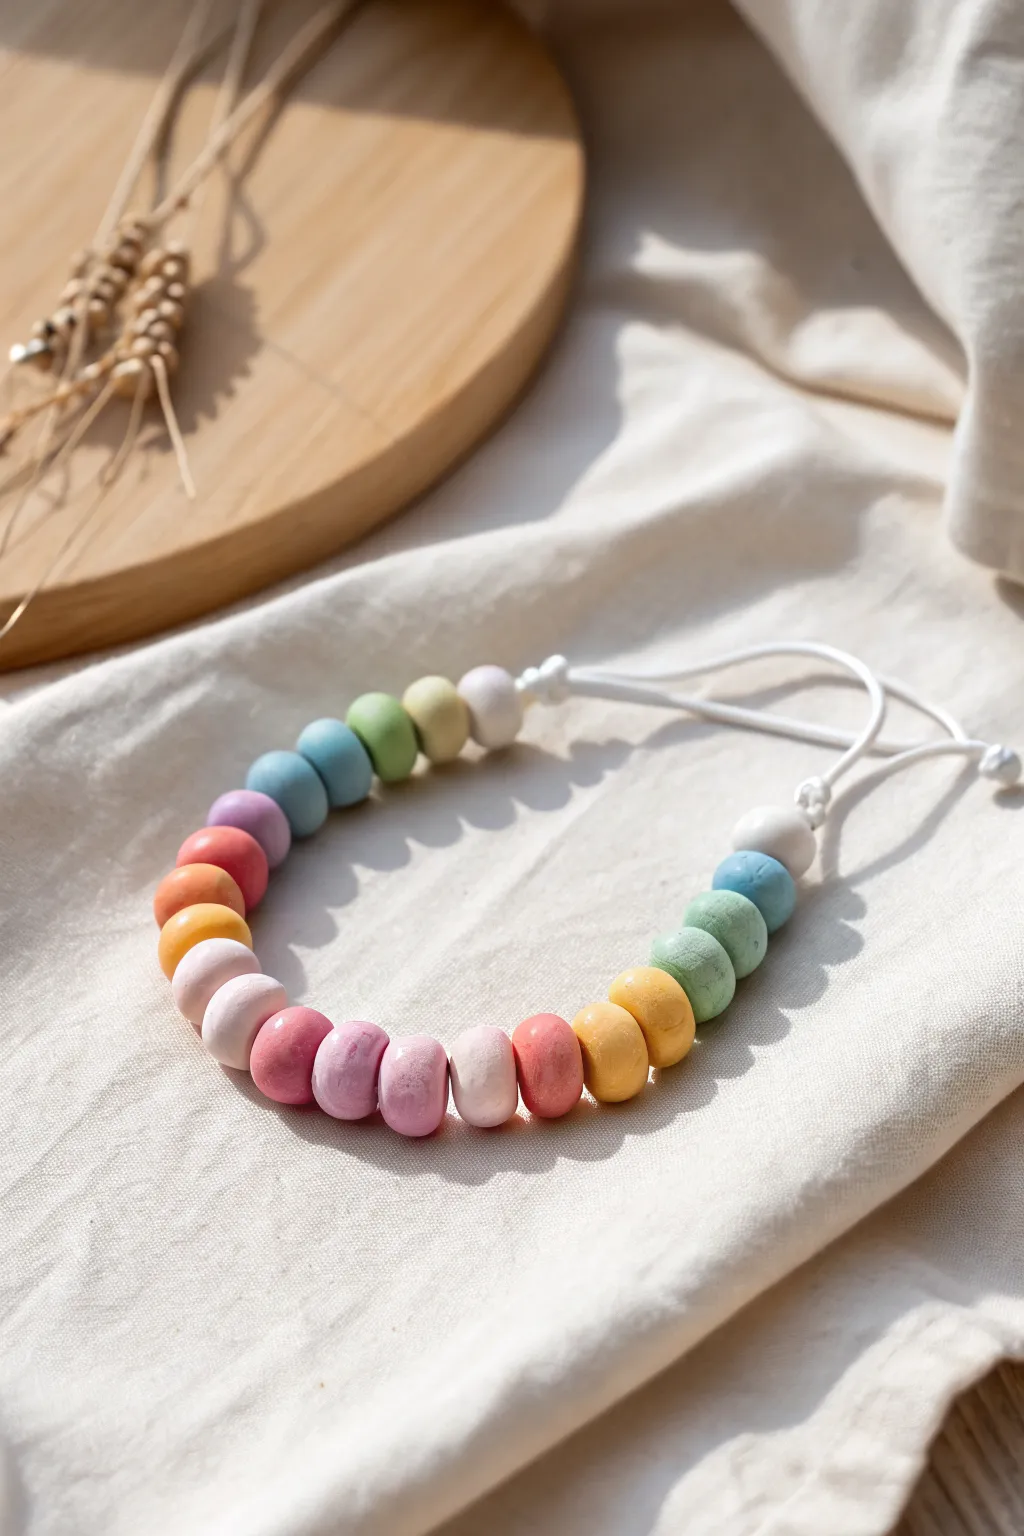
Create a wearable piece of art with these charmingly chunky, hand-rolled clay beads strung on a simple cord. The soft, matte pastel colors and organic shapes give this bracelet a trendy, boutique-style look that kids will love to show off.
Step-by-Step Guide
Materials
- White air-dry clay (or polymer clay)
- Acrylic paints (pastel pink, peach, yellow, mint green, baby blue, lavender)
- Thin wooden skewer or toothpick
- White nylon or cotton cord (1mm thickness)
- Fine-grit sandpaper (optional)
- Clear matte varnish (optional)
- Paintbrushes
- Palette for mixing colors
- Scissors
Step 1: Shaping the Beads
-
Portion the clay:
Pinch off small pieces of white air-dry clay. Aim for pieces about the size of a large marble or a grape to create that chunky look. -
Roll into spheres:
Roll each piece of clay between your palms to form a smooth ball. Don’t worry if they aren’t perfectly round; the organic shape adds character. -
Flatten slightly:
Gently press each ball down onto your work surface with your thumb to create a slightly flattened, wheel-like shape rather than a perfect sphere. -
Pierce the holes:
While holding a bead gently, use a wooden skewer to poke a hole through the center. Twist the skewer as you push to tackle resistance without squishing the bead. -
Smooth the edges:
Check the exit hole for any rough clay bits pushed out by the skewer and smooth them down with a damp finger. -
Dry completely:
Let the beads dry on a piece of parchment paper. Turn them over halfway through the drying process (usually 24 hours total) to ensure even drying.
Step 2: Adding Color
-
Sand imperfections:
Once fully hard, inspect your beads. If there are any sharp ridges from the drying process, lightly buff them away with fine-grit sandpaper. -
Mix pastel shades:
Prepare your palette with pastel acrylic paints. If you only have primary colors, mix them with plenty of white to achieve those soft, chalky tones. -
Paint the gradient:
Paint the beads one by one. I usually place them on a skewer to paint them so I can reach all sides without getting fingerprints on the wet paint. -
Create a pattern:
Paint sets of beads in matching colors to create the rainbow gradient shown: groupings of pinks, peaches, yellows, greens, and blues. -
Let paint dry:
Stand the skewers up in a jar or stick them into a scrap of styrofoam to let the paint dry completely undisturbed. -
Optional matte seal:
To protect the paint without making it shiny, apply a coat of clear matte varnish. This keeps that natural, earthy look intact.
Cracked Beads?
Water acts as glue for clay. If you see tiny cracks forming while rolling, dip your finger in water and smooth over the crack immediately to seal it up.
Step 3: Assembly
-
Measure the cord:
Cut a length of white cord about 12-14 inches long. This gives you plenty of extra room for tying adjustable knots. -
Plan your layout:
Arrange your dry beads in a line on the table to finalize your color pattern before stringing them. -
String the beads:
Thread the cord through the beads. If the cord frays, dip the end in a little glue and let it harden to create a needle-like tip. -
Secure the ends:
Once all beads are strung, center them on the cord and tie a simple overhand knot on each side of the bead cluster to keep them in place. -
Create sliding knots:
Cross the two loose ends of the cord. Tie an adjustable sliding knot (often called a square knot closure) so the bracelet can easily slip on and off the wrist. -
Final trim:
Trim any excess cord sticking out from your knots, leaving a small tail so they don’t slip undone.
Pro Tip: Clean Holes
As the clay starts to dry but isn’t fully hard, gently twist the skewer in the holes again. This ensures the clay doesn’t shrink and close up the opening.
Now you have a custom piece of jewelry that adds a pop of happy color to any outfit


What Really Happens Inside the Kiln
Learn how time and temperature work together inside the kiln to transform clay into durable ceramic.
Tiny Heart and Star Trinket Trays
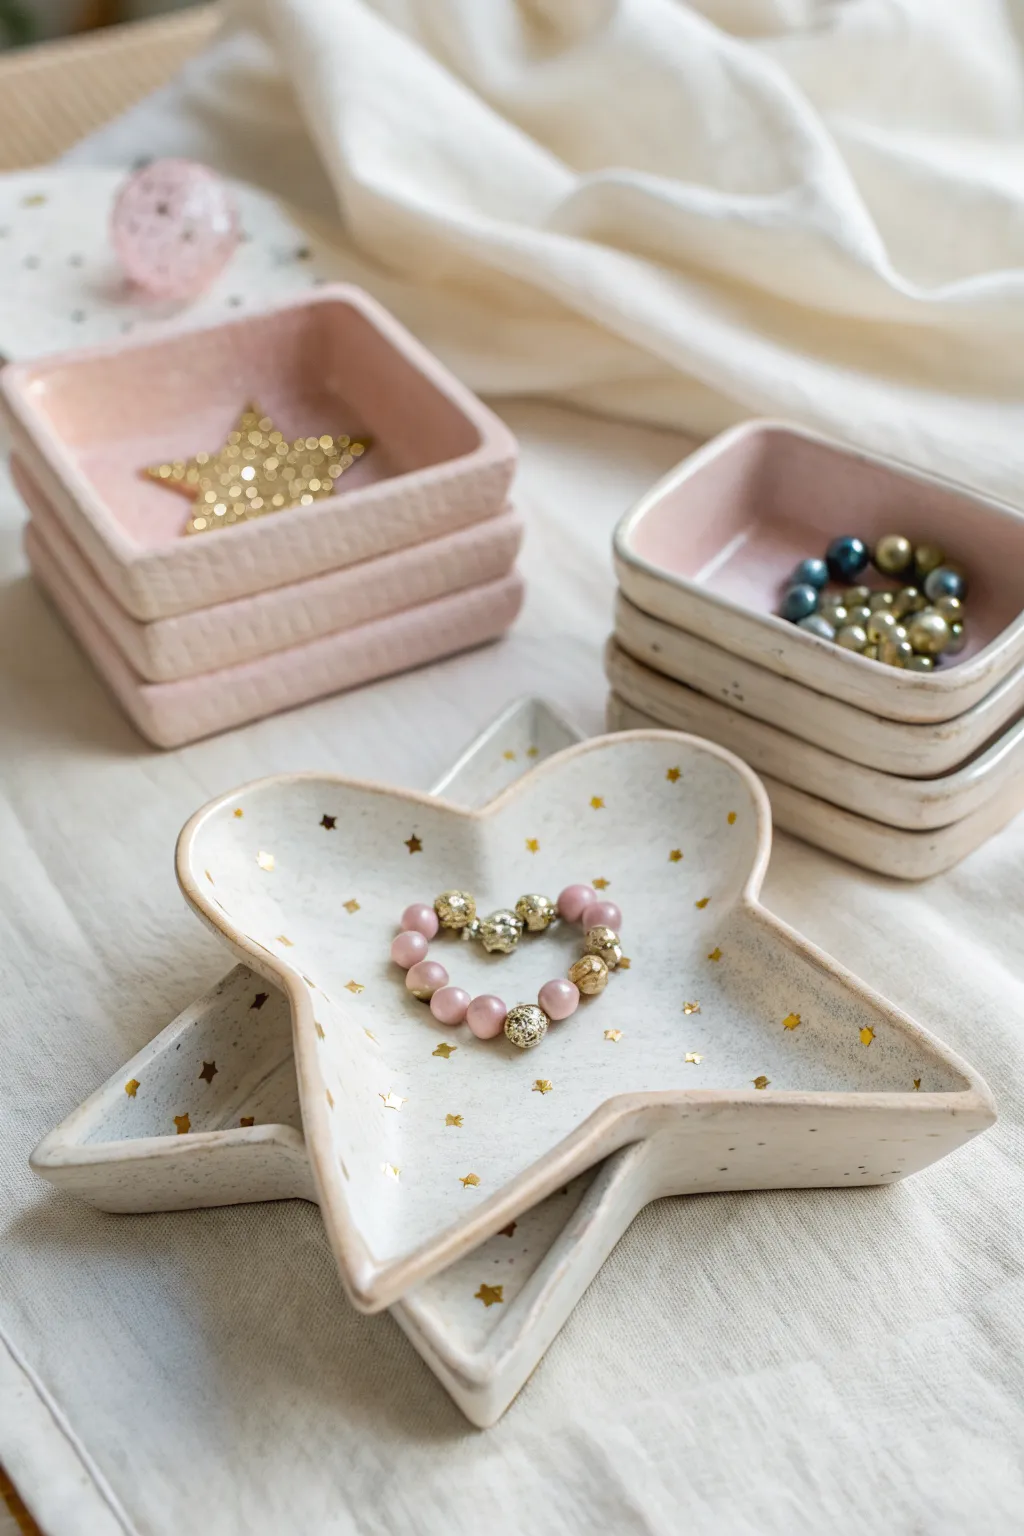
Create a dreamy collection of celestial-inspired organizers perfect for holding precious beads or rings. These handcrafted clay dishes feature soft pink interiors, textured finishes, and a scattering of golden stars for a touch of everyday magic.
Step-by-Step
Materials
- White aesthetics air-dry clay (or polymer clay)
- Small heart and star cookie cutters
- Rolling pin
- Parchment paper or craft mat
- Acrylic paints (soft pink, creamy white, metallic gold)
- Fine-grit sandpaper
- Small detail paintbrush
- Flat shader paintbrush
- Glossy varnish or sealant (optional)
- Clay sculpting tool or butter knife
Step 1: Shaping the Clay
-
Condition the clay:
Begin by taking a handful of air-dry clay and kneading it in your hands until it feels soft, warm, and pliable. This prevents cracking later on. -
Roll out the slab:
Place the clay on parchment paper and use a rolling pin to flatten it into an even sheet, aiming for about 1/4 inch thickness. Rotate the clay occasionally so it doesn’t stick. -
Cut the shapes:
Use your cookie cutters to punch out heart and star shapes. For the square dishes seen in the background, simply cut a square and gently round off the corners with your finger. -
Create the rim:
To turn flat shapes into trays, gently pinch and pull up the edges of each shape with your fingertips. I like to smooth the transition between the base and the wall with a little water on my finger. -
Smooth the edges:
Run a damp finger along the top rim of your tray to erase any sharp edges left by the cutter or accidental fingerprints. -
Add texture (Optional):
For the square pink trays shown, you can gently press a piece of burlap or textured fabric against the outside walls before the clay dries to give it that woven look. -
Dry thoroughly:
Set your trays aside in a safe spot to air dry for 24-48 hours. Turn them over halfway through the drying process to ensure the bottom dries evenly.
Step 2: Painting and Finishing
-
Sand imperfections:
Once fully dry and hard, use fine-grit sandpaper to gently smooth out any rough spots on the rim or surface. Wipe away the dust with a barely damp cloth. -
Base coat interior:
For the square trays, paint the inside base a soft, pastel pink. Use a flat brush for even coverage, leaving the rim and exterior unpainted for a natural clay look. -
Base coat exterior:
If you want the white speckled look of the star tray, paint the entire piece a creamy white first if your clay isn’t already that color. -
Paint the rim:
On the star tray, use a small brush to paint a thin, tan or gold line along the very top edge of the rim to define the shape. -
Add gold stars:
Dip a very fine detail brush into metallic gold paint. Carefully dab tiny star shapes or simple dots onto the interior of the white star tray. -
Create speckles:
To get that speckled pottery effect, load an old toothbrush with diluted brown or gold paint and gently flick the bristles over the tray for a random splatter pattern. -
Add glitter accents:
For the pink trays, you can paint a wooden or clay star with gold glitter paint and glue it to the center, or simply paint a gold star directly on the pink base. -
Apply varnish:
Once all paint is completely dry, apply a coat of glossy varnish to seal the clay and give it a finished, ceramic-like shine.
Cracked Clay?
If you see small cracks forming as it dries, mix a tiny bit of fresh clay with water to make a paste and fill the cracks, then smooth it over.
Make it a Set
Try nesting different sizes! Make a large star tray and a smaller matching heart tray that can fit inside or sit beautifully beside it.
Let your new jewelry holders cure fully before filling them with your favorite little treasures
Pencil Toppers With Silly Faces
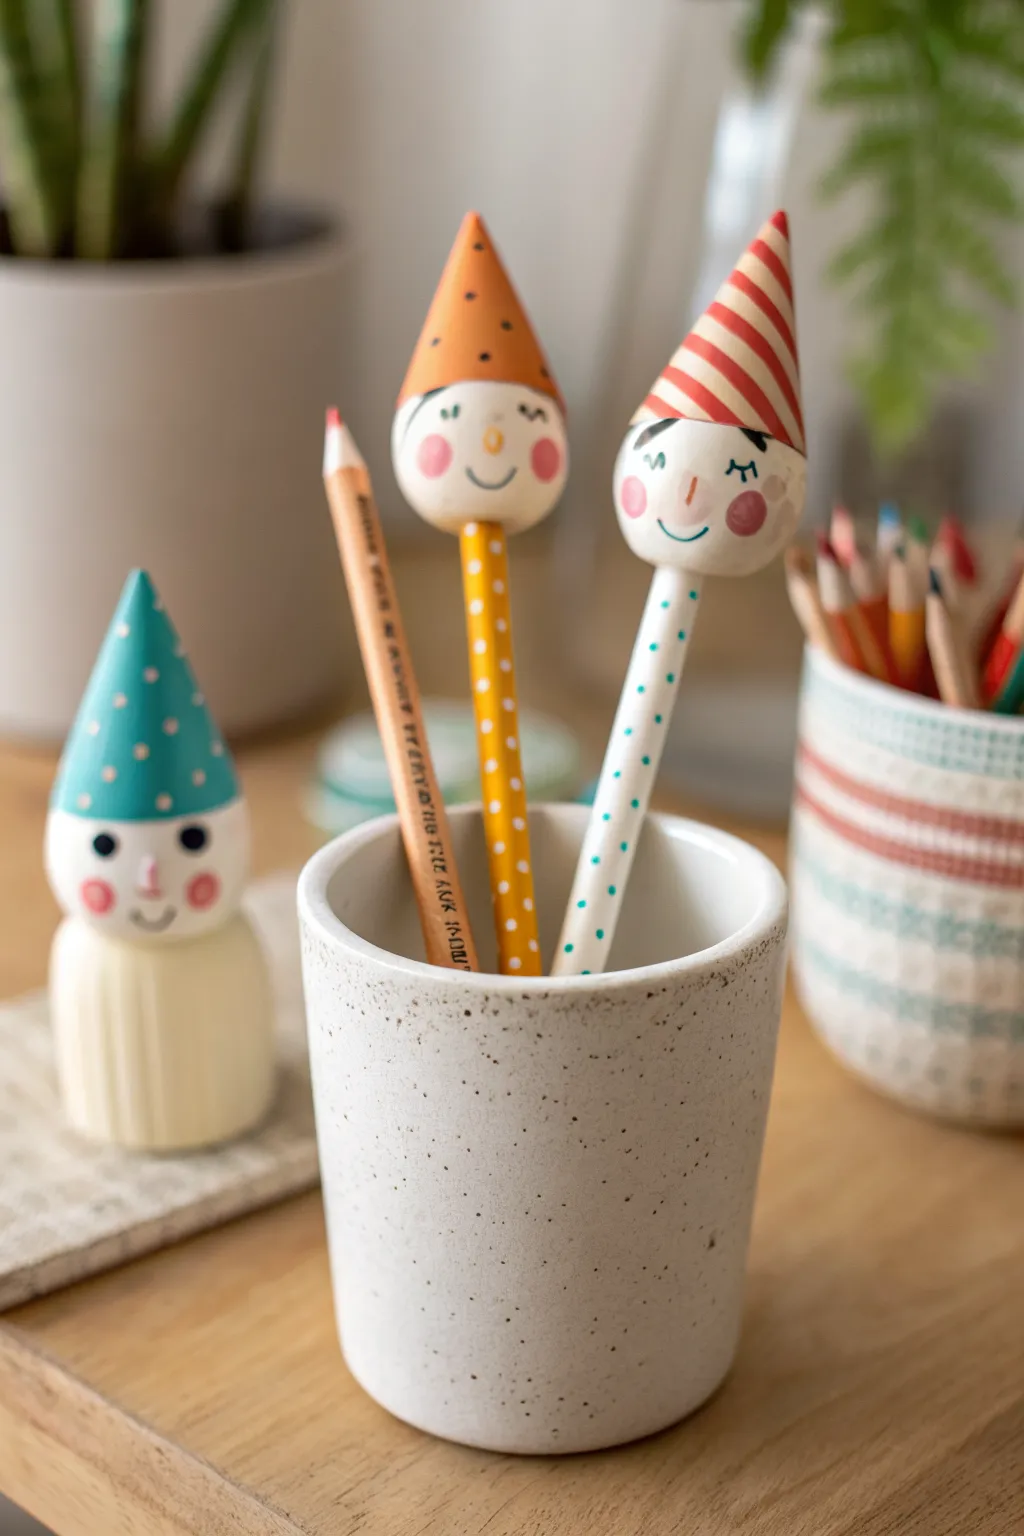
Transform ordinary writing utensils into cheerful companions with these charming pencil toppers featuring painted wooden beads and jaunty clay hats. This project combines simple bead painting with easy clay sculpting to create personalized characters that make homework just a little bit more fun.
Detailed Instructions
Materials
- Large round wooden beads (approx. 25-30mm)
- Air-dry clay (white)
- Standard pencils (patterned or plain)
- Acrylic craft paints (white, skin tone, orange, red, blue, green)
- Fine detail paintbrushes
- PVA glue or strong craft glue
- Sandpaper (fine grit)
- Black fine-tip permanent marker or paint pen
- Water cup and paper towels
- Optional: Toothpick (for detail work)
Step 1: Prepping the Pencils and Beads
-
Check the fit:
Before you start painting, take your large wooden bead and slide it onto the end of your pencil. It should fit snugly. If the hole is too small, use sandpaper to carefully widen it. If it’s too loose, you can wrap a small piece of masking tape around the pencil end later for a tighter grip. -
Prime the bead:
Paint the entire wooden bead with a layer of white acrylic paint. This creates a bright base so your colors pop later. -
Paint the face base:
Once the white primer is dry, mix a soft skin tone suitable for your character. Paint the entire bead with this color, ensuring smooth, even coverage. Set it upright on a spare pencil to dry completely.
Use a skewer stand
To paint beads without mess, place them on bamboo skewers stuck into a floral foam block or cardboard box. This lets you paint 360 degrees easily.
Step 2: Sculpting the Hats
-
Form a cone:
Take a walnut-sized ball of white air-dry clay. Roll it into a smooth ball first to remove cracks, then gently roll one side against your table to taper it into a cone shape. -
Hollow the base:
Press your thumb into the wider flat bottom of the cone to create an indentation. This indented area needs to be wide enough to cup the top of your painted wooden bead. -
Test the fit:
Gently place the clay cone onto the painted bead (which should be dry by now). Mold the clay edges slightly so it sits naturally like a hat. Remove it carefully to avoid sticking. -
Smooth and dry:
Dip your finger in a little water to smooth out any fingerprints on the clay cone. I find it helpful to let the clay dry for at least 24 hours until it’s completely hard and white.
Clay shrinking?
Air-dry clay shrinks slightly when drying. If the hat won’t fit the bead later, simply sand the bead top slightly or add more glue to fill the gap.
Step 3: Painting the Details
-
Base coat the hats:
Paint your dried clay cones in solid base colors. For the look in the photo, paint one orange and one white. Let these dry completely before adding patterns. -
Add hat patterns:
Using a fine brush, add details to the hats. For the festive look, paint red spiral stripes on the white hat and small blue or black dots on the orange hat. -
draw the hair:
Back on the wooden bead, lightly sketch a hairline with a pencil if needed. Use black paint or a marker to draw simple hair bangs—scalloped shapes or side-swept lines work perfectly. -
Add rosy cheeks:
Dip a rounded brush or a cotton swab into pink or light red paint. Dab it gently onto the bead to create perfectly round, rosy cheeks. -
Draw the features:
Using your ultra-fine black marker or a detail brush, draw wide-set eyes. You can do simple dots or little curved lines for sleeping eyes. Add a simple U-shape for a smile. -
Add freckles:
For extra charm, add three tiny dots on each cheek or across the nose using a contrasting color like orange or brown.
Step 4: Assembly
-
Glue the hat:
Apply a generous ring of strong craft glue to the top of the wooden bead head. -
Secure the top:
Press the painted clay hat firmly onto the bead. Wipe away any excess glue that squeezes out with a damp brush immediately. -
Attach to pencil:
Put a dab of glue inside the hole of the bead and slide it onto your pencil. If you painted your own pencil patterns (like the polka dots shown), ensure that paint is dry first. -
Final cure:
Stand the pencils upright in a cup or jar and let the glue cure completely, usually overnight, to ensure the heads stay securely attached during writing adventures.
Now you have a set of delightful little characters ready to help you draw or write your next big idea

TRACK YOUR CERAMIC JOURNEY
Capture glaze tests, firing details, and creative progress—all in one simple printable. Make your projects easier to repeat and improve.
Dino Fossil Impression Stones
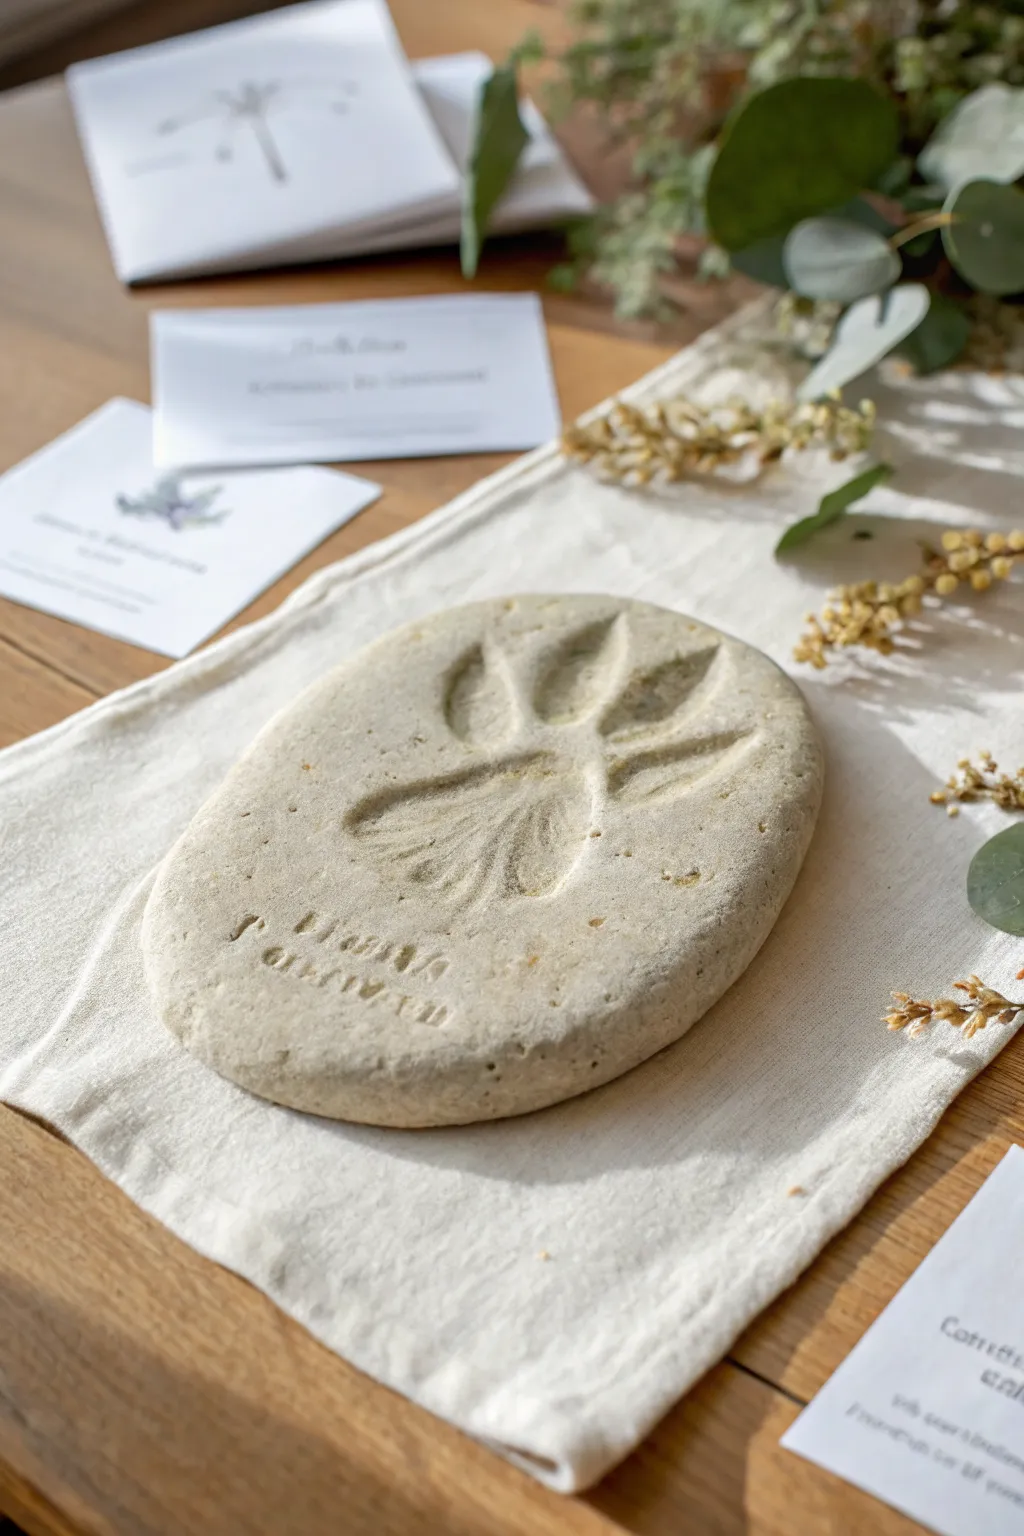
Create your own piece of history with these realistic-looking dinosaur fossil stones. Using simple air-dry clay, you’ll craft an ancient artifact that looks like it was just dug up by a paleontologist, complete with a mysterious footprint and discovery notes.
Step-by-Step Guide
Materials
- White or sandstone-colored air-dry clay (e.g., DAS or Crayola)
- Sand or coffee grounds (for texture)
- Toy dinosaur with distinct feet or a footprint stamp
- Small alphabet stamps
- Rolling pin
- Parchment paper or craft mat
- Small bowl of water
- Sponge or paper towel
Step 1: Preparing the ‘Stone’
-
Texture Mixing:
Begin by taking a handful of air-dry clay, roughly the size of a tennis ball. To achieve that authentic, gritty stone look shown in the image, knead in a teaspoon of sand or dried coffee grounds. This creates little speckles and imperfections typical of real fossils. -
Initial Shaping:
Roll the clay into a smooth ball between your palms to remove major cracks. -
Flattening:
Place the ball on your parchment paper. Use the palm of your hand or a rolling pin to gently flatten it into an oval or egg shape. -
Thickness Check:
Aim for a thickness of about half an inch to three-quarters of an inch. You want it chunky enough to look like a river stone, not a thin pancake. -
Rounding Edges:
Dip your finger in a little water and run it along the outer edges of your oval. Smooth down any sharp ridges so the stone looks worn by time.
Crack Control
If the edges start cracking while you shape it, dip your finger in water and smooth the crack into a paste to seal it back up immediately.
Step 2: Creating the Impressions
-
Centering the Print:
Identify the center of your stone. Take your toy dinosaur or footprint stamp and position it carefully. -
Stamping the Footprint:
Press down firmly and evenly. Depending on the clay’s stiffness, you might need to rock the stamp slightly side-to-side to ensure the toes and heel make a deep, clear impression. -
Lifting:
Pull the stamp straight up to avoid smudging the edges of the print. If the clay pulls up slightly, gently pat it back down. -
Refining the Details:
If the bottom of the footprint looks too smooth, take a small tool or a toothpick and gently scratch the inner surface to add texture. -
Adding Text:
Select your alphabet stamps to label your specimen. In the photo, a name or classification date is stamped near the bottom left curve. -
Stamping Letters:
Press the letters gently into the clay. Don’t press as deep as the footprint; you just want a surface impression that looks like an inscription.
Step 3: Finishing Touches
-
Adding Wear and Tear:
To make the stone look truly ancient, dab the surface lightly with a coarse sponge or crumpled aluminum foil. This removes the ‘manufactured’ smoothness of the clay. -
Final Smoothing:
Check the edges one last time. I prefer to smooth out any unintentional fingerprints with a tiny drop of water so they don’t become part of the fossil record. -
Drying Process:
Leave the stone on a drying rack or mesh screen. Air-dry clay needs good circulation to dry evenly. -
Rotating:
After about 12 hours, flip the stone over carefully to let the underside dry completely. -
Full Cure:
Wait 24 to 48 hours for the stone to harden completely and turn a lighter, chalky color before handling or displaying.
Excavation Dust
Once dry, brush a tiny bit of brown watercolor paint into the footprint crevices, then wipe the top clean to make the details pop.
Now you have a perfect prehistoric specimen ready for your home museum display
Mini Fairy Garden Houses
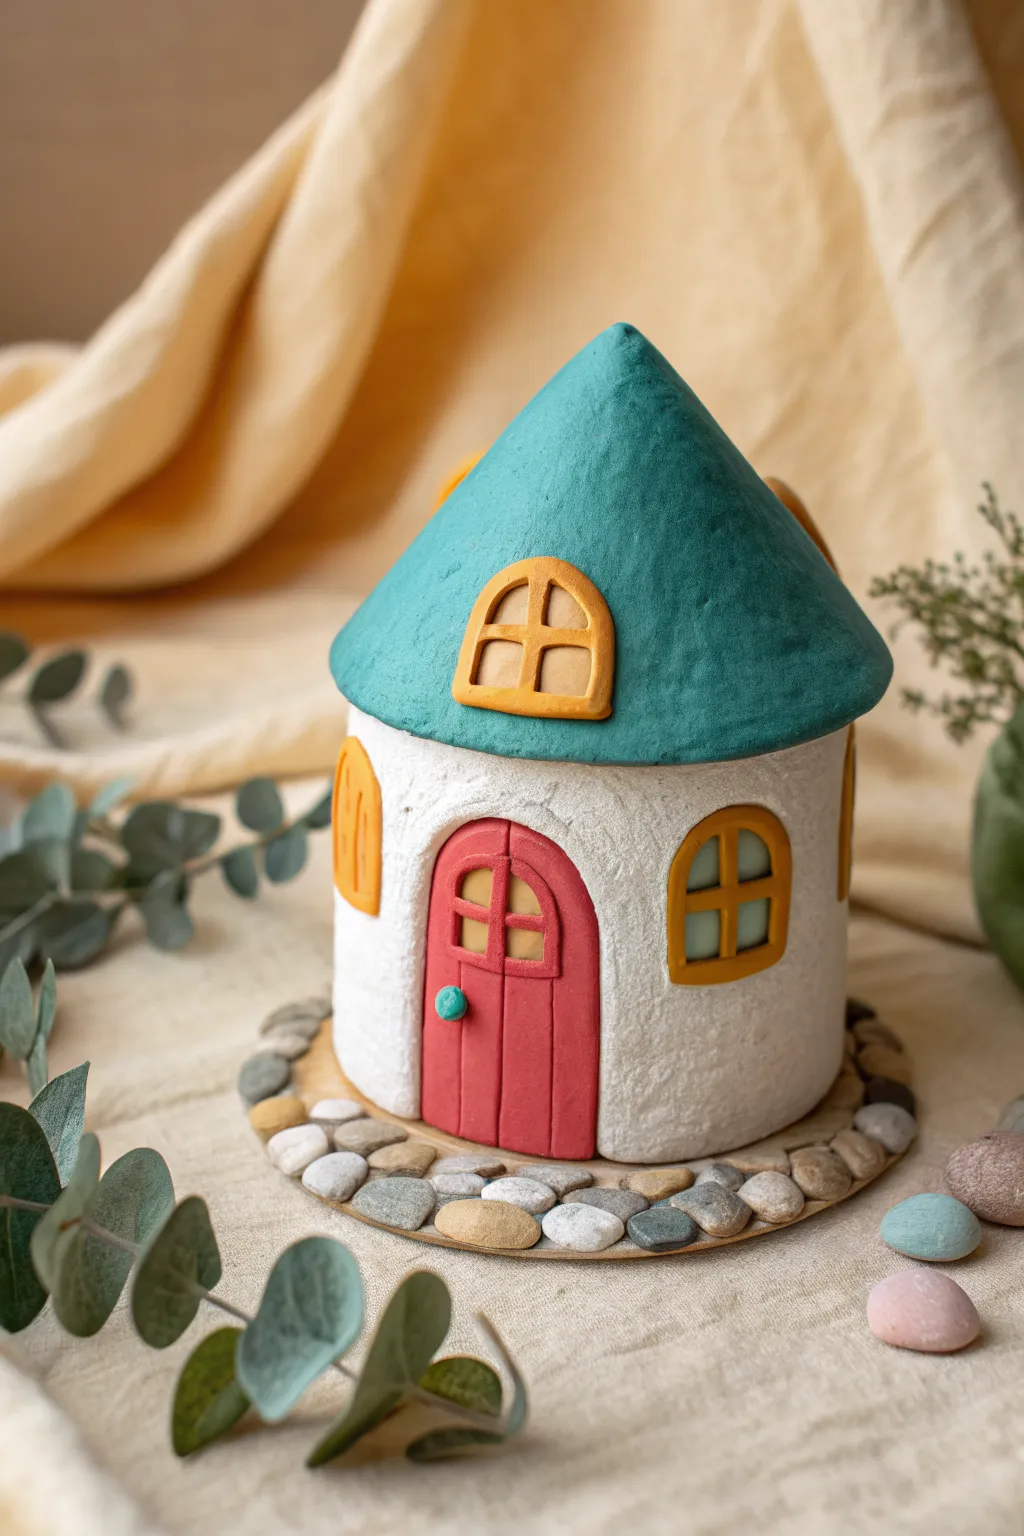
Create a magical miniature abode perfect for inviting fairies into your garden or bookshelf. This project features a charming teal roof, a textured white cottage exterior, and a delightful mosaic stone pathway that brings the whole scene to life.
Step-by-Step Guide
Materials
- Air-dry clay (white)
- Small rolling pin
- Cardboard or wooden circular base (coaster size)
- Acrylic paints (teal, white, coral red, golden yellow, grey)
- Empty toilet paper roll or small cardboard cylinder
- Clay sculpting tools or a butter knife
- Small craft pebbles or dried beans/lentils
- Craft glue
- Fine grit sandpaper
Step 1: Building the Structure
-
Prepare the base form:
Cut an empty toilet paper roll to your desired height, around 3 inches tall. This will act as the support structure for the house walls so they don’t collapse while drying. -
Create the walls:
Roll out a slab of white air-dry clay to about 1/4 inch thickness. Wrap this slab around your cardboard cylinder, cutting off excess clay and smoothing the vertical seam with a little water on your finger. -
Texture the exterior:
Take a stiff bristle brush or a ball of aluminum foil and gently dab it all over the wet clay walls. I like to do this to create a stucco-like, rustic finish. -
Shape the roof:
Form a cone shape from a ball of clay. Hollow out the underside slightly with your thumbs so it sits comfortably on top of your cylinder walls, slightly overhanging the edges. -
Refine the roof texture:
Smooth out the cone shape while keeping a slightly organic, hand-molded look. You don’t want it perfectly geometric; imperfections add charm.
Cracks Appearing?
If small cracks appear as the clay dries, mix a tiny bit of fresh clay with water to make a paste and fill them in. Smooth with a wet finger.
Step 2: Adding Details
-
Sculpt the door:
Roll a small oval of clay and flatten it. Use a sculpting tool to impress vertical lines for wood planks and two arched panels at the top. -
Attach the door:
Score the back of the door and the spot on the house where it will go. Apply a dab of water or slip and press the door firmly onto the wall. -
Make the handle:
Roll a tiny sphere of clay and attach it to the left side of the door for a doorknob. -
Form the windows:
Create small arched shapes from flattened clay for the windows. Use a tool to cut out or impress the pane dividers. Create an arched window for the roof as well. -
Frame the windows:
Roll very thin snakes of clay to create raised frames around the windows and a thicker border around the door if desired. -
Dry thoroughly:
Let the entire structure dry completely. Depending on the thickness of your clay, this usually takes 24 to 48 hours.
Pro Tip: Realistic Roof
For a mossy look, dab a slightly lighter shade of teal or green with a dry sponge onto the roof after the base coat dries.
Step 3: Painting and Assembly
-
Paint the walls:
Once dry, paint the main body of the house with white acrylic paint. You might need two coats to cover any grayness of the clay. -
Paint the roof:
Paint the roof cone in a deep teal color. Use a matte finish paint to keep the clay-like appearance. -
Detail work:
Paint the door a soft coral red and the window frames a warm golden yellow. Use a tiny brush to paint the window panes a light grey-blue. -
Assemble the base:
Take your circular cardboard or wood base. Glue the finished house into the center. -
Lay the stone path:
Apply a generous layer of craft glue to the exposed base around the house. Press small, smooth pebbles into the glue, fitting them tightly together like a puzzle. -
Finishing touches:
Arrange the stones so they create a flat walkway leading to the door. Let the glue set completely before moving your new fairy home.
Place your little cottage on a shelf or near a window to brighten up the room
Plant Marker Stakes Kids Can Paint
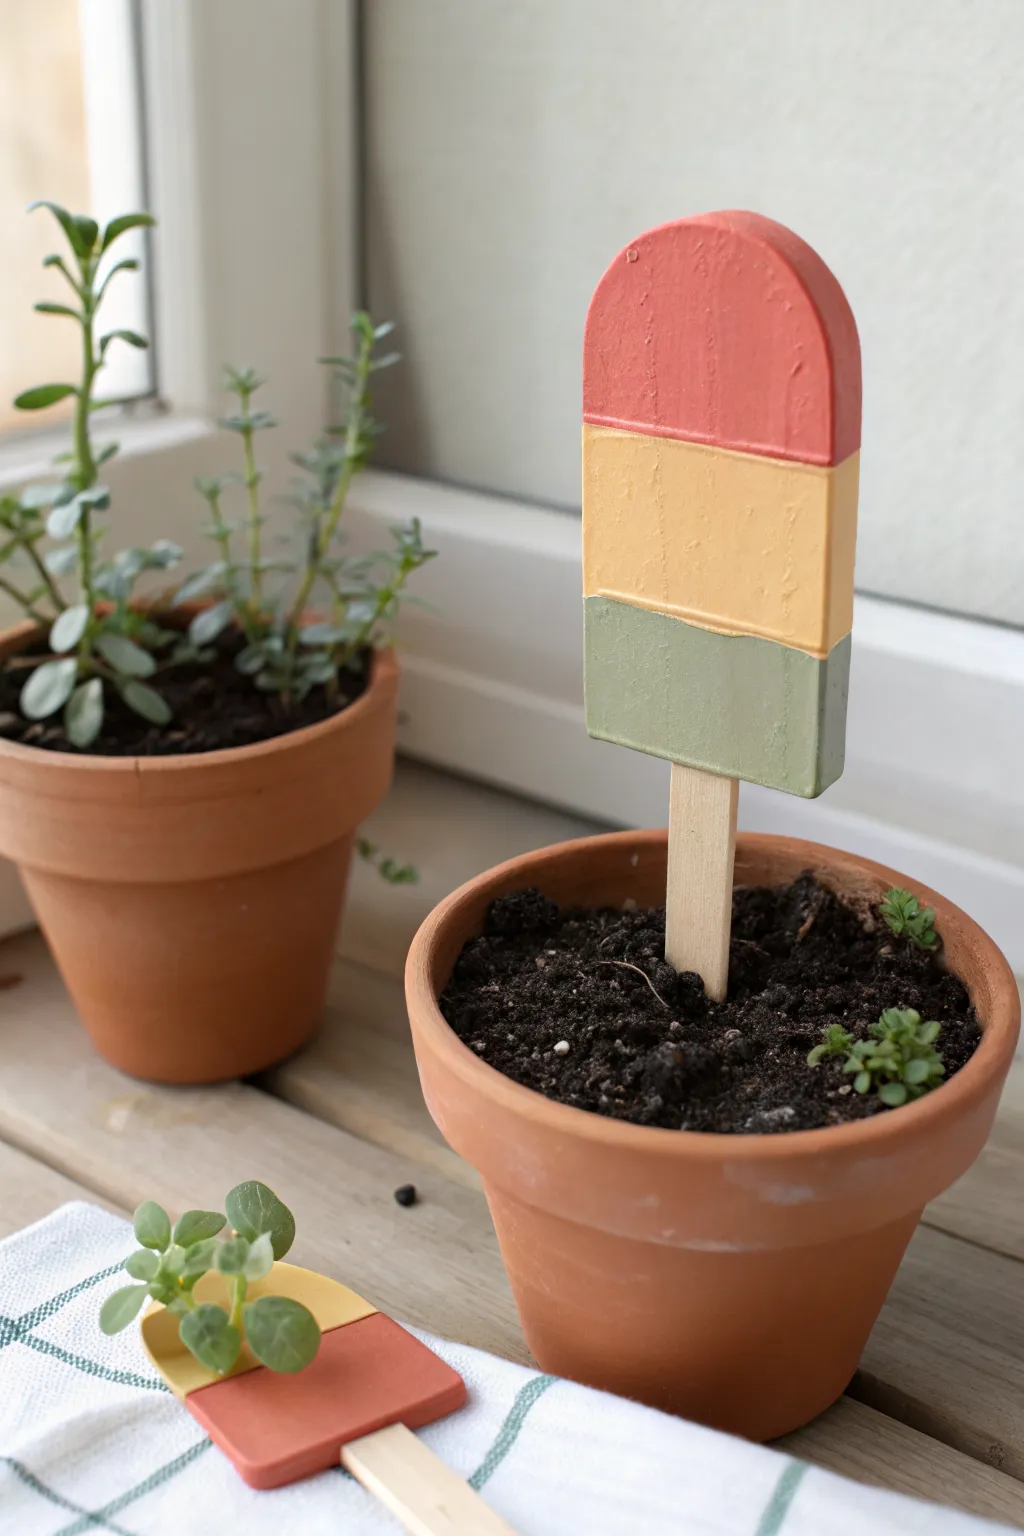
Add a splash of summer fun to your potted plants with these adorable popsicle-shaped garden markers. Made from simple air-dry clay and painted in soft, earthy tones, they are a perfect afternoon craft that doubles as cute decor.
How-To Guide
Materials
- White air-dry clay
- Popsicle sticks (standard size)
- Acrylic paints (terracotta red, mustard yellow, sage green)
- Rolling pin
- Knife or clay cutting tool
- Fine-grit sandpaper
- Paintbrushes (flat and detail)
- Parchment paper or craft mat
- Water cup
Step 1: Shaping the Clay
-
Prepare the Clay:
Take a handful of air-dry clay and knead it in your hands until it becomes soft, pliable, and free of cracks. -
Roll it Out:
Place the clay on a sheet of parchment paper. Use a rolling pin to flatten it into an even slab, aiming for a thickness of about 1/4 to 1/3 inch. -
Cut the Shape:
Using a butter knife or clay tool, cut a rectangular shape with a rounded top to mimic a classic popsicle silhouette. It should be slightly wider than your popsicle stick. -
Smooth the Edges:
Dip your finger in a little water and gently run it along the cut edges of the clay to smooth out any roughness or sharp corners. -
Insert the Stick:
Carefully push a popsicle stick into the straight bottom edge of the clay shape. Insert it at least halfway up into the clay body to ensure it’s sturdy enough to hold the weight. -
Secure the Seal:
Gently pinch the clay around the stick entry point to create a tight seal, smoothing the clay back down so it looks seamless.
Step 2: Drying and Refining
-
Let it Dry:
Lay the marker flat on the parchment paper and let it air dry completely. This usually takes 24-48 hours depending on humidity; flipping it halfway through helps it dry evenly. -
Sand Imperfections:
Once fully hard, check for any rough spots. I like to use a small piece of fine-grit sandpaper to buff the edges and surface until they feel smooth to the touch. -
Dust Clean:
Wipe the clay down with a dry cloth or paper towel to remove any sanding dust before you start painting.
Clay Cracks?
If small cracks appear while drying, don’t panic. Mix a tiny bit of fresh clay with water to make a paste and fill in the gaps, then smooth it over.
Step 3: Painting the Design
-
Zone Planning:
Visualize the popsicle divided into three horizontal sections. You can lightly mark these with a pencil if you want perfectly straight lines. -
Top Layer:
Paint the top rounded third with the terracotta red acrylic paint. Use a flat brush to get a crisp line across the bottom of this section. -
Middle Layer:
Apply the mustard yellow paint to the middle section. Be careful where the yellow meets the red so the colors butt up against each other without muddying. -
Bottom Layer:
Finish by painting the bottom rectangular section in sage green, covering the clay down to where the stick enters. -
Check the Sides:
Don’t forget to paint the sides (the thickness) of the clay to match the front stripes for a polished look. -
Second Coat:
Allow the first layer to dry for about 20 minutes. If the white clay is still showing through, apply a second coat for opaque, solid coverage. -
Final Dry:
Let the paint cure completely. Since these are for indoor plants, sealing isn’t strictly necessary, but a matte varnish will help them last longer.
Clean Lines
For super sharp stripes, place a piece of washi tape or painter’s tape across the dry clay to mask off sections as you paint each color.
Pop these charming markers into your favorite succulents or seedlings for a sweet touch of color
Easy Photo and Place Card Holders

Bring a touch of minimalist charm to your desk with this sculptural rainbow photo holder. Made from simple air-dry clay, its clean arches and smooth white finish create the perfect neutral backdrop for displaying your favorite snapshots or postcards.
Detailed Instructions
Materials
- White air-dry clay (approx. 500g)
- Rolling pin
- Parchment paper or craft mat
- Sharp crafting knife or clay blade
- Ruler
- Small cup of water
- Fine-grit sandpaper (optional)
- Clear matte varnish (optional)
Step 1: Prepping the Clay
-
Condition the clay:
Start by taking a generous joyful handful of air-dry clay from the package. Knead it in your hands for a few minutes to warm it up and make it pliable, which helps prevent cracks later on. -
Roll out a slab:
Place the clay onto a sheet of parchment paper. Using your rolling pin, roll the clay out into a thick, even slab. Aim for a thickness of about 1 inch (2.5 cm) to ensure the holder is stable enough to stand upright. -
Check for bubbles:
Scan the slab for any air bubbles. If you spot one, gently pierce it with a needle tool or the tip of your knife and smooth the area over with your finger.
Keep it Clean
Work on wax paper so you can rotate the piece easily without lifting it, preventing deformation while the clay is soft.
Step 2: Constructing the Rainbow
-
Create the base coil:
Instead of cutting a flat shape, this rainbow is built from coils to give it that dimensional, ribbed look. Roll a long, thick snake of clay, roughly 3/4 inch in diameter. -
Form the smallest arch:
Take your clay snake and curve it into a small arch shape on your parchment paper. This will be the innermost tunnel of your rainbow. Cut the ends flat at the bottom so it stands straight. -
Roll the second coil:
Roll another clay snake of the same diameter. I usually try to keep my hands slightly damp here to keep the clay smooth. -
Attach the second arch:
Score the top curve of your first arch and the underside of your new coil with a jagged tool or toothpick. Dab a little water or slip on the scored areas. -
Press together:
Gently press the second coil over the first one, molding it to fit snugly. Repeat this process with a third and fourth coil, making each slightly longer to wrap around the growing rainbow form. -
Trim the base:
Once you have four arches stacked, use a long blade or a ruler to slice straight across the bottom of all the coils at once. This ensures a perfectly flat base so your holder won’t wobble.
Step 3: Finishing Touches
-
Smooth the seams:
On the back side of the rainbow, use your thumb or a modeling tool to blend the coils together slightly. This reinforces the structure without ruining the ribbed aesthetic on the front. -
Create the card slot:
Using your crafting knife, carefully slice a straight line across the very top center of the outermost arch. Gently wiggle the blade to widen the cut just enough to fit a thick piece of cardstock. -
Refine the surface:
Dip your finger in water and smooth out any fingerprints or rough textures on the coils. Pay special attention to the cut edges at the base. -
Let it dry:
Allow the project to dry slowly in a cool, dry place for 24-48 hours. Turn it over halfway through the drying time to ensure the bottom dries evenly. -
Sand for perfection:
Once fully dry and hard, use fine-grit sandpaper to gently buff away any remaining imperfections or sharp edges for a professional, matte look.
Color Pop
Paint each arch in a different pastel shade or earth tone using acrylics for a fun, personalized twist on the white original.
Place your favorite photo in the slot and admire your handiwork
Mosaic Tile Coasters From Scrap Bits
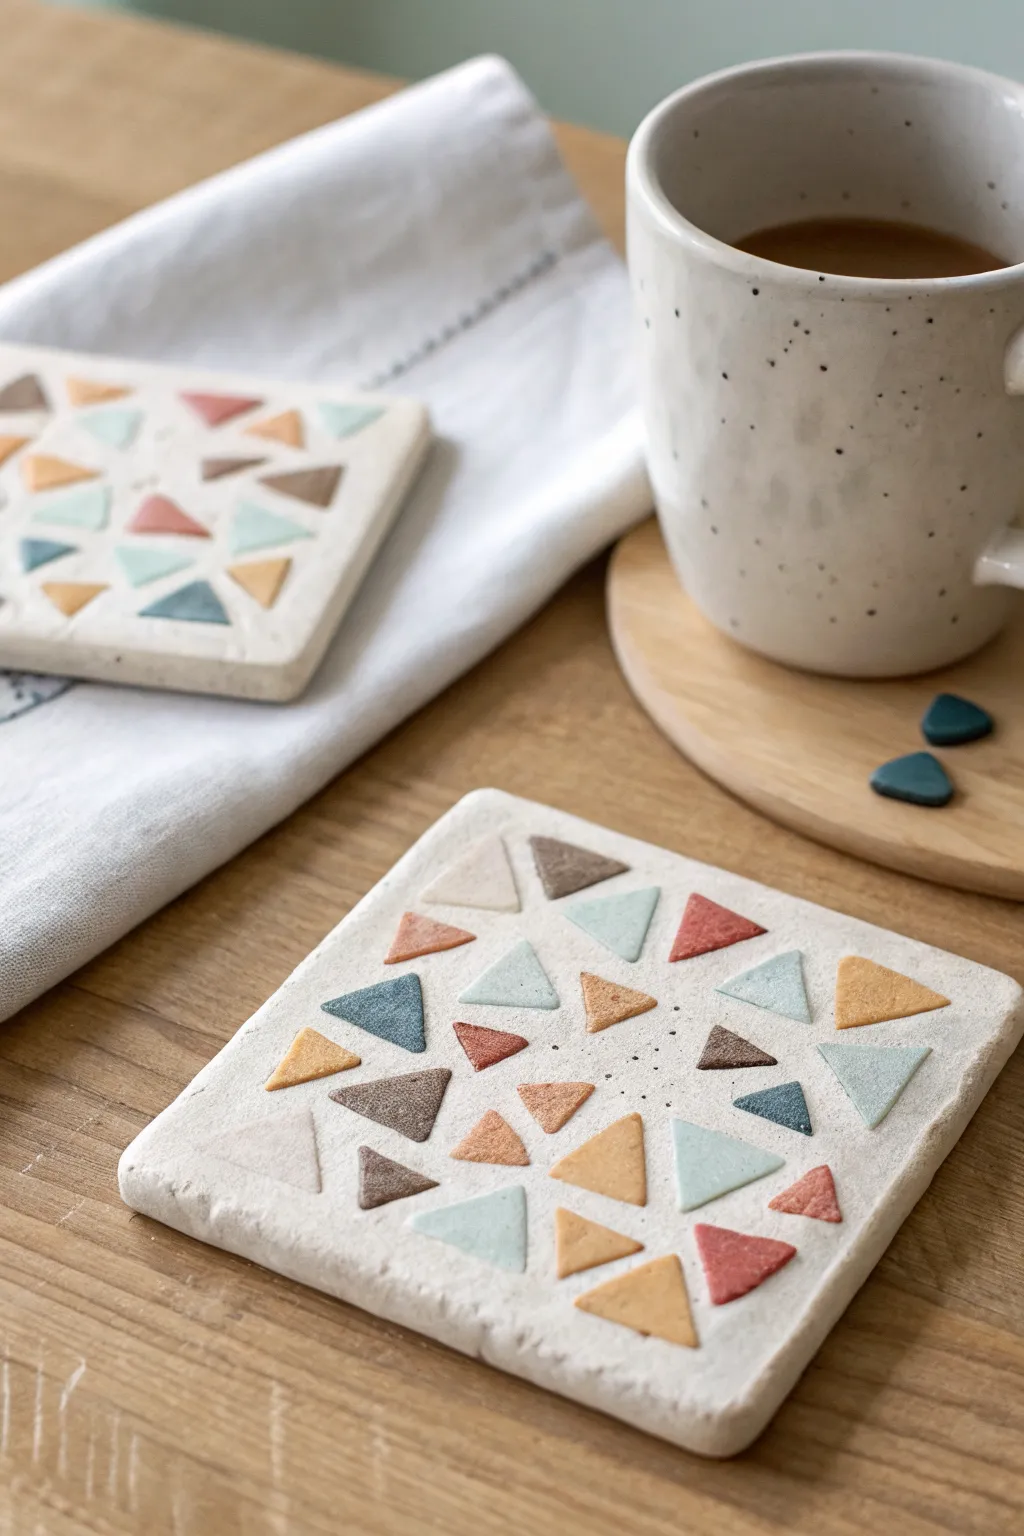
Transform those tiny, leftover bits of colored clay into functional art with these stylish mosaic coasters. The white base provides a crisp, modern backdrop for a scattered geometric pattern that looks much more complicated than it actually is.
Step-by-Step Tutorial
Materials
- Air-dry clay (white)
- Air-dry clay scraps (various muted colors: terra cotta, teal, mustard, sage)
- Rolling pin
- Square cookie cutter (approx. 4 inches) or ruler and knife
- Small sharp knife or clay blade
- Parchment paper
- Small bowl of water
- Fine-grit sandpaper
- Acrylic matte varnish or sealant (waterproof)
Step 1: Preparing the Geometric Bits
-
Gather your scraps:
Collect all your small leftover pieces of colored air-dry clay. For this specific look, aim for an earthy palette including muted blues, burnt oranges, soft yellows, and browns. -
Roll the colors:
Roll each colored scrap out flat until it is about 1/8 inch thick. Uniform thickness is important so your mosaic pieces sit flush with the base later. -
Cut the triangles:
Using a sharp knife or clay blade, cut the flattened colored clay into small triangles. Vary the sizes slightly—some equilateral, some isosceles—but keep them generally under 1/2 inch in width. -
Let them firm up:
Set these little triangles aside on a piece of parchment paper. I like to let them dry just slightly for about 15-20 minutes so they hold their sharp corners when handled, but don’t let them dry completely.
Help, cracks appeared!
Small cracks around the embedded shapes mean the clay shrank differently. Mix a tiny bit of white clay with water to make a paste and fill the cracks, then sand smooth once dry.
Step 2: Creating the Coaster Base
-
Roll the white base:
Take a large ball of white air-dry clay and roll it out onto parchment paper. You want this slab to be thicker than your triangles—aim for about 1/4 inch to 1/3 inch thick for durability. -
Cut the square:
Press your square cookie cutter into the white clay to create a clean shape. If you don’t have a cutter, measure a 4×4 inch square with a ruler and cut carefully with your knife. -
Smooth the edges:
Dip your finger in a little water and run it along the cut edges of the square to soften any sharpness or dragging marks from the knife.
Make it terrazzo style
Instead of distinct triangles, chop your colored scraps into tiny, irregular jagged crumbs. Press them all in at once for a trendy terrazzo granite effect.
Step 3: Assembling the Mosaic
-
Plan your layout:
Before pressing anything down, gently lay your colored triangles onto the white square to test the arrangement. Aim for a randomized ‘confetti’ look, leaving plenty of white space between shapes. -
Embed the first piece:
Pick up a triangle, lightly wet the back of it, and place it back onto the white clay. -
Press into place:
Use the rolling pin to gently roll over the triangle. You aren’t trying to flatten the whole coaster, just pressing the colorful bit down so its surface becomes flush with the white background. -
Continue the pattern:
Repeat this process for all your triangles. Placing and rolling them one or two at a time ensures you don’t distort the square shape too much. -
Check surface level:
Run your finger over the surface. If a triangle is protruding, press it down firmly. The goal is a smooth, continuous surface where the colors look inlaid rather than stuck on top. -
Add texture (optional):
If you want the speckled look seen in the inspiration image, you can gently prick the white space center with a needle tool or toothbrush bristles for subtle texture.
Step 4: Finishing Touches
-
Slow drying:
Place the coaster on a wire rack or leave it on parchment paper to dry. To prevent curling corners, you can place a light book on top (with parchment in between) after the first hour of drying. -
Wait patiently:
Allow the clay to dry fully for at least 24 to 48 hours. The white clay should turn chalky and completely opaque when it is bone dry. -
Sand for perfection:
Once dry, take your fine-grit sandpaper and lightly sand the surface. This reveals the crisp edges of your triangles and removes any haze of white clay that might have smeared over the colors during rolling. -
Seal to protect:
Apply 2-3 coats of a waterproof matte varnish. Since this is a coaster for drinks, sealing is crucial to prevent the clay from softening when it gets wet from condensation.
Now you have a set of unique, modern coasters ready to protect your table in style
Window Suncatchers With Cutout Shapes
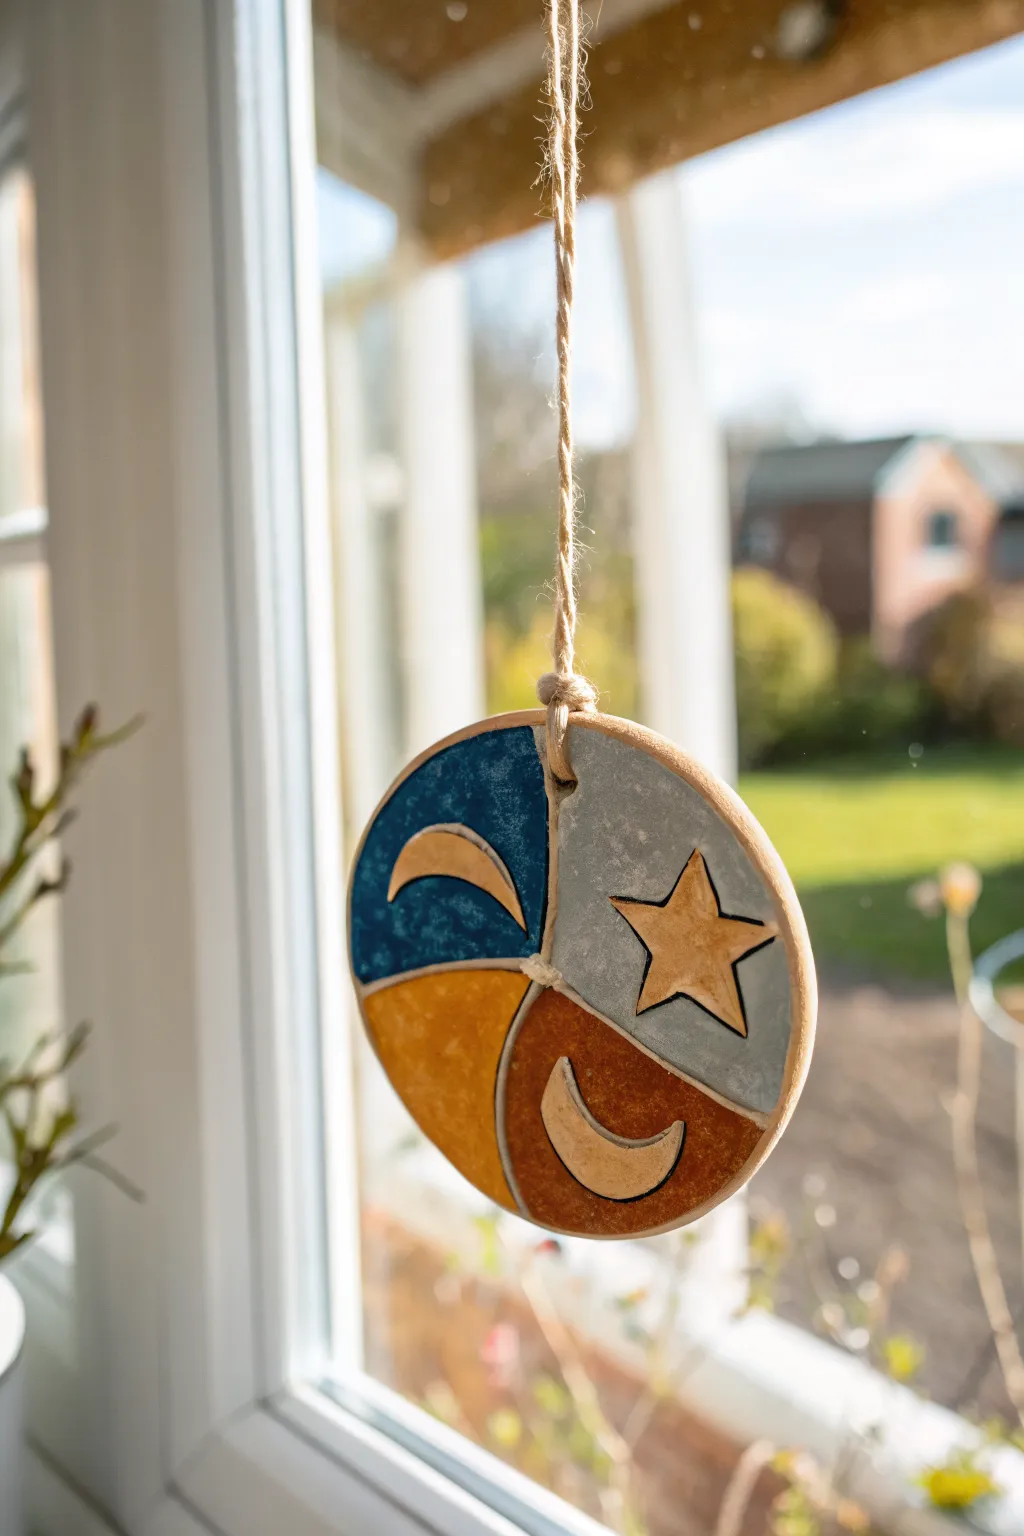
Brighten your view with this charming window ornament that captures the magic of the night sky in daylight. Using air-dry clay and vibrant paints, you’ll create a segmented, rustic disk featuring moon and star motifs perfect for hanging in a sunny spot.
Step-by-Step
Materials
- Air-dry clay (white or terra cotta)
- Rolling pin
- Circle cookie cutter (approx. 3-4 inches) or a glass
- Sculpting tools or a craft knife
- Acrylic paints (navy blue, golden yellow, terra cotta, light grey)
- Small flat paintbrush
- Fine detail paintbrush
- Black fine-liner pen or black acrylic paint
- Twine or jute string
- Straw or skewer (for hole punching)
- Sandpaper (fine grit)
- Matte varnish or sealant (optional)
Step 1: Shaping the Clay Base
-
Prepare your clay:
Take a generous handful of air-dry clay and knead it until it’s soft, pliable, and free of cracks. If it feels too dry, wet your hands slightly. -
Roll it out:
On a smooth, clean surface, roll the clay out to an even thickness of about 1/4 inch (6-7mm). You want it sturdy enough not to break, but light enough to hang. -
Cut the circle:
Use your circle cutter or place a glass upside down on the clay to cut out a perfect round shape. -
Smooth the edges:
Dip your finger in a little water and gently run it around the cut edge of the circle to smooth out any roughness or jagged bits. -
Create the hanging hole:
Using a straw or a skewer, poke a hole near the top edge of the circle. Make sure it goes all the way through and is wide enough for your twine.
Crack Control
If small cracks appear while drying, mix a tiny bit of fresh clay with water to make a paste and smooth it over the crack with your finger.
Step 2: Incising the Design
-
Draft the segments:
Lightly sketch three curved lines radiating from the center to the edge with a sculpting tool, dividing the circle into three equal, swirling sections. -
Carve the lines:
Go over your sketch lines with a carving tool or craft knife to deepen the grooves. These channels will help separate your paint colors later. -
Add the star:
use a small star cutter or freehand a star shape into one of the segments. Press deeply enough to make a clear impression but don’t cut all the way through. -
Add the moons:
In the other two segments, press or carve crescent moon shapes. I like to vary the orientation of the moons for a more playful look. -
Deepen the outlines:
Trace around your star and moon shapes with your tool again to ensure the outlines are distinct and deep. -
Let it dry completely:
Place your clay piece on a wire rack or parchment paper. Allow it to air dry for 24-48 hours until it is hard and turns a lighter color. Flip it halfway through for even drying.
Step 3: Painting and Finishing
-
Sand imperfections:
Once fully dry, gently rub the edges and surface with fine sandpaper to remove any sharp burrs or bumps. -
Paint the segments:
Select your acrylic colors. Paint one segment navy blue, one terra cotta orange, and one a soft grey-blue. Use a small flat brush to stay inside the carved grooves. -
Detail the motifs:
Using a fine detail brush, paint the star and crescent moons. A golden yellow works beautifully against the darker backgrounds, and unpainted clay looks nice on the terra cotta section. -
Define the outlines:
Use a black fine-liner pen or a very steady hand with black paint to trace inside the carved grooves between the sections and around the celestial shapes. This mimics a ‘lead’ stained glass look. -
Seal the piece:
Apply a coat of matte varnish or Mod Podge to protect the paint from fading in the sunlight. -
Add the hanger:
Cut a length of jute twine. Fold it in half, push the loop through the hole, and pull the tails through the loop to create a lark’s head knot. -
Hang it up:
Tie the loose ends of the twine together and hang your artwork in a bright window.
Glassy Glow
For a translucent effect, cut the star and moon shapes completely out and fill the holes with colored resin or melted pony beads.
Now you have a rustic piece of sky to enjoy from inside your home
Small-World Figurines and Mini Foods
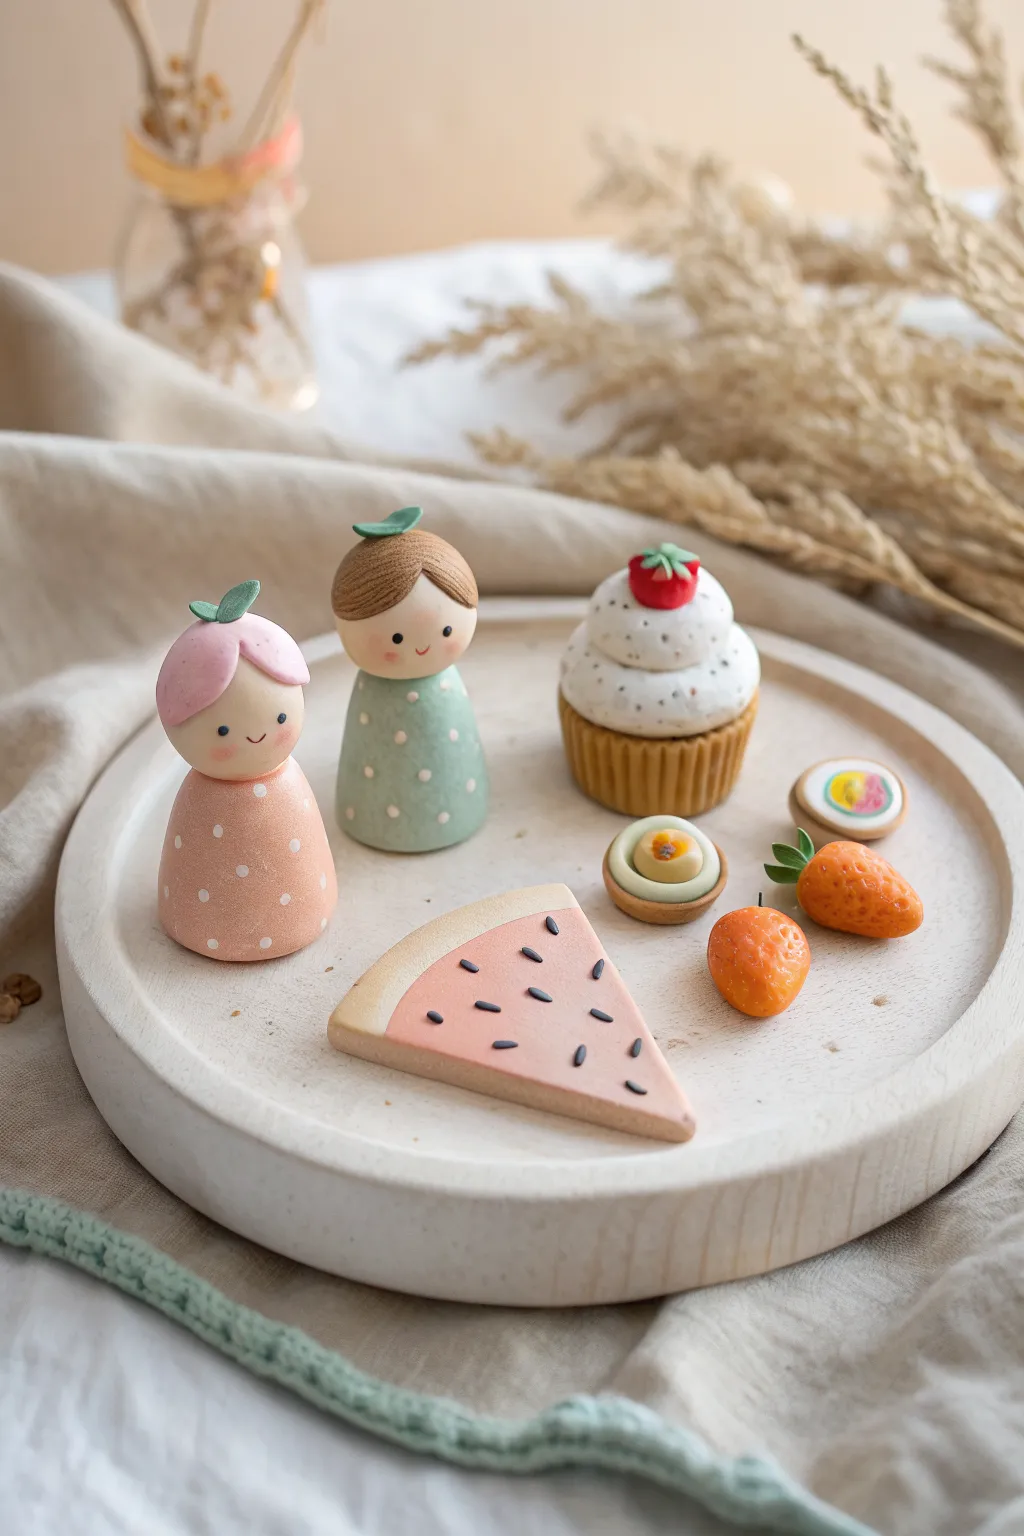
Create a charming miniature picnic scene featuring adorable peg dolls and tiny polymer clay treats. These sweet figurines have a soft, matte finish that makes them perfect for gentle play or as lovely nursery decor.
Step-by-Step Tutorial
Materials
- Wooden peg doll blanks (approx. 2-3 inches tall)
- Air-dry clay or polymer clay (white, beige, pink, green, orange, red)
- Acrylic paints (pink, sage green, white, black, brown)
- Fine detail paintbrushes
- Dotting tool or toothpick
- Mod Podge or matte varnish
- Sculpting tools (needle tool, small blade)
- Texture tool (optional, for cupcake wrapper)
Step 1: Sculpting the Dolls
-
Prepare the bodies:
Start with your plain wooden peg doll bodies. Ensure they are smooth and free of dust before you begin painting or adding clay elements. -
Sculpt the hair:
Roll a small ball of clay (pink for one doll, brown for the other) and flatten it into a disc. Drape this over the head of the peg doll, smoothing the edges down to create a hair shape. For the brown-haired doll, gently press lines into the clay to simulate hair strands. -
Add hair accessories:
Shape tiny, teardrop-sized pieces of green clay to act as leaves. I like to gently press a needle tool into the center of each leaf for a vein detail, then attach them to the top of the dolls’ heads. -
Baking or drying:
If using polymer clay, bake the dolls according to the package instructions (usually 275°F for 15 minutes per 1/4 inch). If using air-dry clay, allow them to cure fully for 24 hours.
Texturing Trick
For realistic cake texture, scrub the surface of unbaked clay with a clean, old toothbrush in a circular motion.
Step 2: Crafting the Mini Foods
-
Create the cupcake base:
Roll a ball of beige or light brown clay and press it into a small cupcake mold or shape it by hand. Use a ribbed tool or a toothpick to press vertical lines around the sides to mimic a paper liner. -
Frost the cupcake:
Form a mound of white clay for the frosting. Use a toothbrush or a ball of tin foil to gently texture the surface, making it look fluffy. Add tiny black specks if you want a ‘cookies and cream’ look. -
Top with a berry:
Roll a tiny red ball for a strawberry. Poke small indents for seeds and add tiny green clay leaves on top before placing it on the cupcake peak. -
Shape the watermelon slice:
Flatten a piece of pink clay into a thick triangle. Wrap a thin strip of white clay around the two short edges, followed by a strip of beige or light green clay for the rind. Smooth the seams together. -
Make the berries:
Roll orange-red clay into teardrop shapes for strawberries. Use a needle tool to create seed textures all over softly. Add small green clay leaves to the wider end. -
Form the mini tart and cookie:
Create a small beige cup shape for the tart and fill it with a white ball and yellow yolk center. For the cookie, make a simple round disc and press a tiny cane slice or painted detail into the center. -
Final cure:
Bake or air-dry all your food miniatures alongside the dolls if they haven’t been cured yet.
Step 3: Painting and Finishing
-
Paint the dresses:
Paint the wooden body of the pink-haired doll with a soft peach or dusty pink acrylic paint. Paint the brown-haired doll’s body a calming sage green. Apply two thin coats for even coverage. -
Add polka dots:
Dip a dotting tool or the non-brush end of a paintbrush into white acrylic paint. Carefully stamp small, random polka dots all over both dresses. -
Paint the faces:
Using your finest brush or a toothpick, paint two small, wide-set black eyes. Add a tiny curve for a smiling mouth. Keep the features simple for that classic peg doll look. -
Add rosy cheeks:
Mix a very watered-down pink paint or use a pink pastel chalk. Gently dab this onto the cheeks for a soft blush effect. -
Paint food details:
Use black paint to add tiny seeds to the watermelon slice carefully. Ensure the seeds are teardrop-shaped and pointing inwards. -
Seal the project:
Once all paint is completely dry, brush a coat of matte varnish over the wooden parts and the clay foods to protect them and give them a unified, soft finish.
Make it Magnetic
Glue small neodymium magnets to the backs of the food items to turn them into adorable fridge magnets or a playset.
Arrange your tiny figures and feast on a shelf or tray to enjoy your handcrafted miniature world