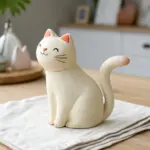
Blue air dry clay is basically an instant vibe—calm, dreamy, and perfect for ocean-y, whimsical projects. Here are my favorite blue air dry clay ideas that feel beginner-friendly but still look special on a shelf or in your everyday space.
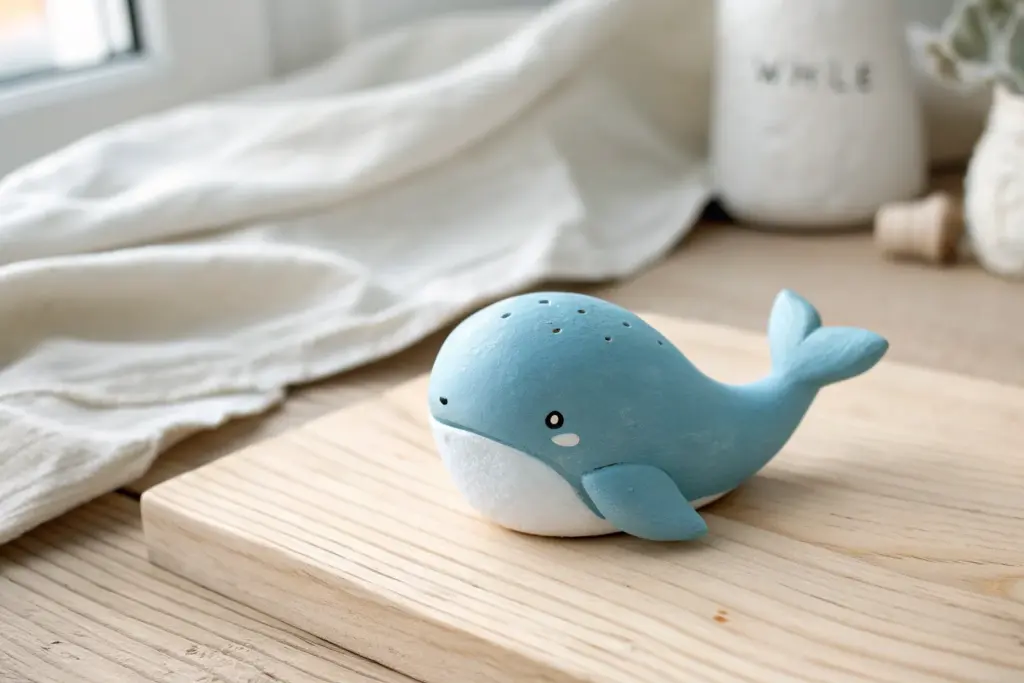
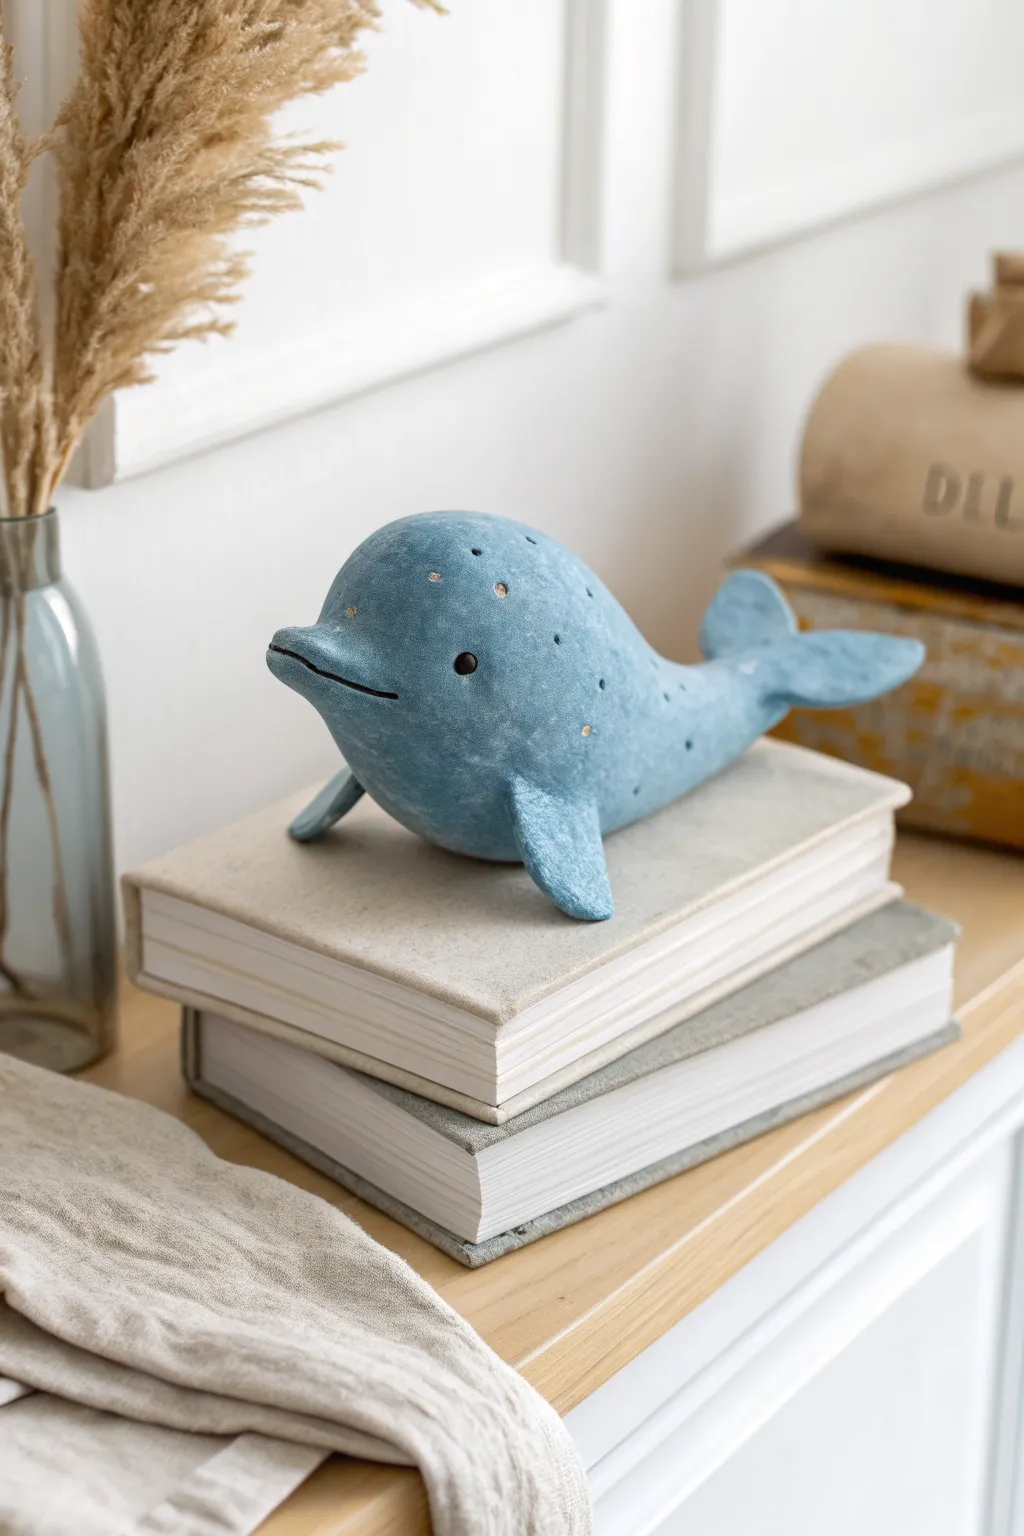
Mini Blue Whale Figurines
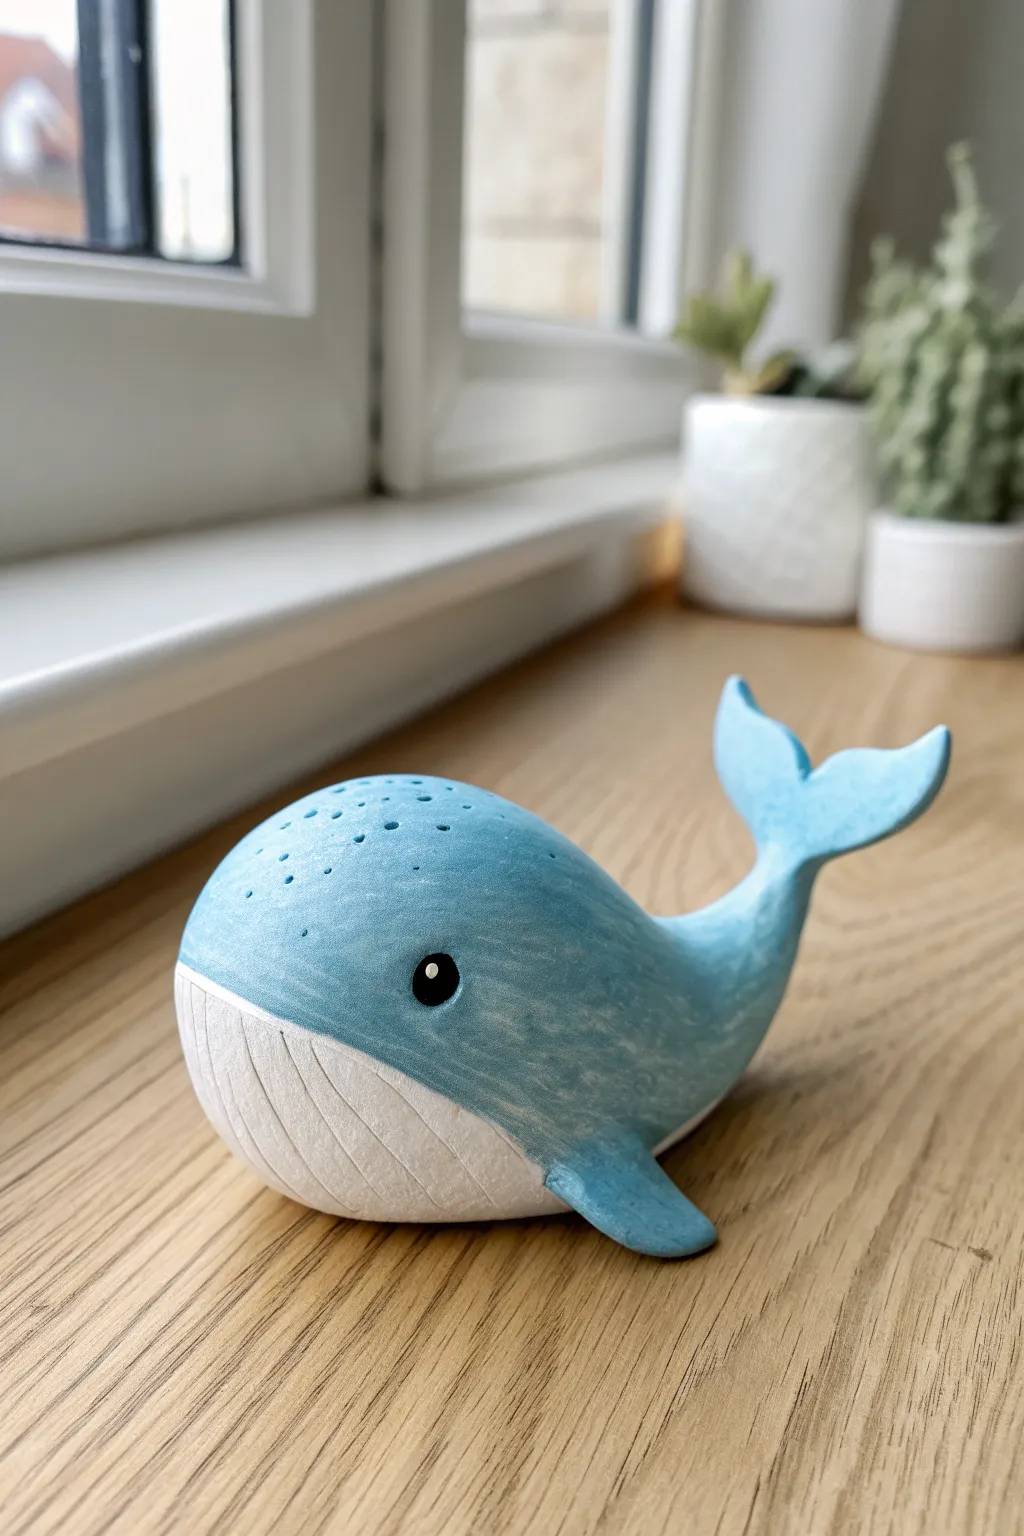
Sculpt a charming miniature whale that brings a touch of the ocean to your windowsill. This project features a stylized, round body with a smooth blue finish and hand-painted details for a breezy nautical look.
Step-by-Step
Materials
- Air dry clay (white or light grey)
- Acrylic paints (light blue, white, black, teal/darker blue)
- Small paintbrush (fine tip)
- Clay sculpting tools (or a toothpick)
- Bowl of water
- Sandpaper (fine grit)
- Matte varnish or sealant
Step 1: Sculpting the Body
-
Form the base shape:
Start with a ball of well-conditioned clay roughly the size of a tangerine. Roll it between your palms until it is smooth and crack-free. -
Create the taper:
Gently roll one side of the ball back and forth to elongate it into a teardrop shape. This tapered end will become the tail section. -
Flatten the base:
Press the rounded, larger end down slightly onto your work surface. You want the bottom to be somewhat flat so the whale sits stably without rolling over. -
Shape the tail flukes:
Pinch a small separate piece of clay into a flat ‘V’ shape for the tail flukes. Attach this to the tapered end of your body using a tiny bit of water to blend the seams perfectly. -
Add curvature:
Gently bend the tail section upward so it looks like the whale is swimming or diving. Smooth out the junction where the tail meets the body with a wet finger. -
Attach the fins:
Shape two small triangles for the side fins. Press them firmly onto the sides of the body, slightly lower than the midline, and blend the edges so they look like they grow naturally from the whale. -
Add texture:
Using a needle tool or toothpick, gently poke a cluster of small holes on the very top of the head to mimic the blowhole. Keep them shallow and random.
Step 2: Refining and Painting
-
Dry completely:
Let your whale dry for at least 24-48 hours. I find it helps to turn it over gently halfway through so the bottom dries evenly. -
Sand for smoothness:
Once bone dry, take fine-grit sandpaper and lightly buff the entire surface. Focus on removing any fingerprints or rough bumps to get that smooth, stone-like finish shown in the photo. -
Base coat the blue:
Mix a soft sky blue acrylic paint. Paint the top 3/4 of the whale, covering the back, tail, fins, and head. Leave the belly area unpainted for now. -
Paint the belly:
Use white acrylic paint for the bottom section. Carefully paint up to meet the blue line, creating a clean curve along the side of the whale. -
Add depth:
While the blue paint is still slightly tacky, you can dry-brush a tiny amount of white or lighter blue over the top curve to create a subtle highlighted texture. -
Detail the belly lines:
Using a very fine brush or a grey fine-liner pen, draw thin, curved lines specifically on the white belly area. These should run lengthwise from the chin toward the tail. -
Paint the eyes:
Dip the back end of a paintbrush into black paint to dot on the eye. It should be placed right near the corner of the mouth area. -
Add the eye sparkle:
Once the black eye dot is dry, use a toothpick to add a tiny white reflection dot. This crucial step brings the character to life. -
Seal the piece:
Protect your paint job with a coat of matte varnish. This will unify the finish and keep the clay safe from moisture.
Cracks while drying?
If small hairline cracks appear as the clay shrinks, mix a tiny bit of fresh clay with water to make a paste (slip) and fill them in before painting.
Turn it into a planter
Before drying, hollow out a deep hole in the top center instead of the blowhole detail. Once sealed, it’s perfect for a tiny air plant or succulent.
Place your finished whale near a sunny window to enjoy its cheerful seaside vibe.


Whale Phone Holder Stand
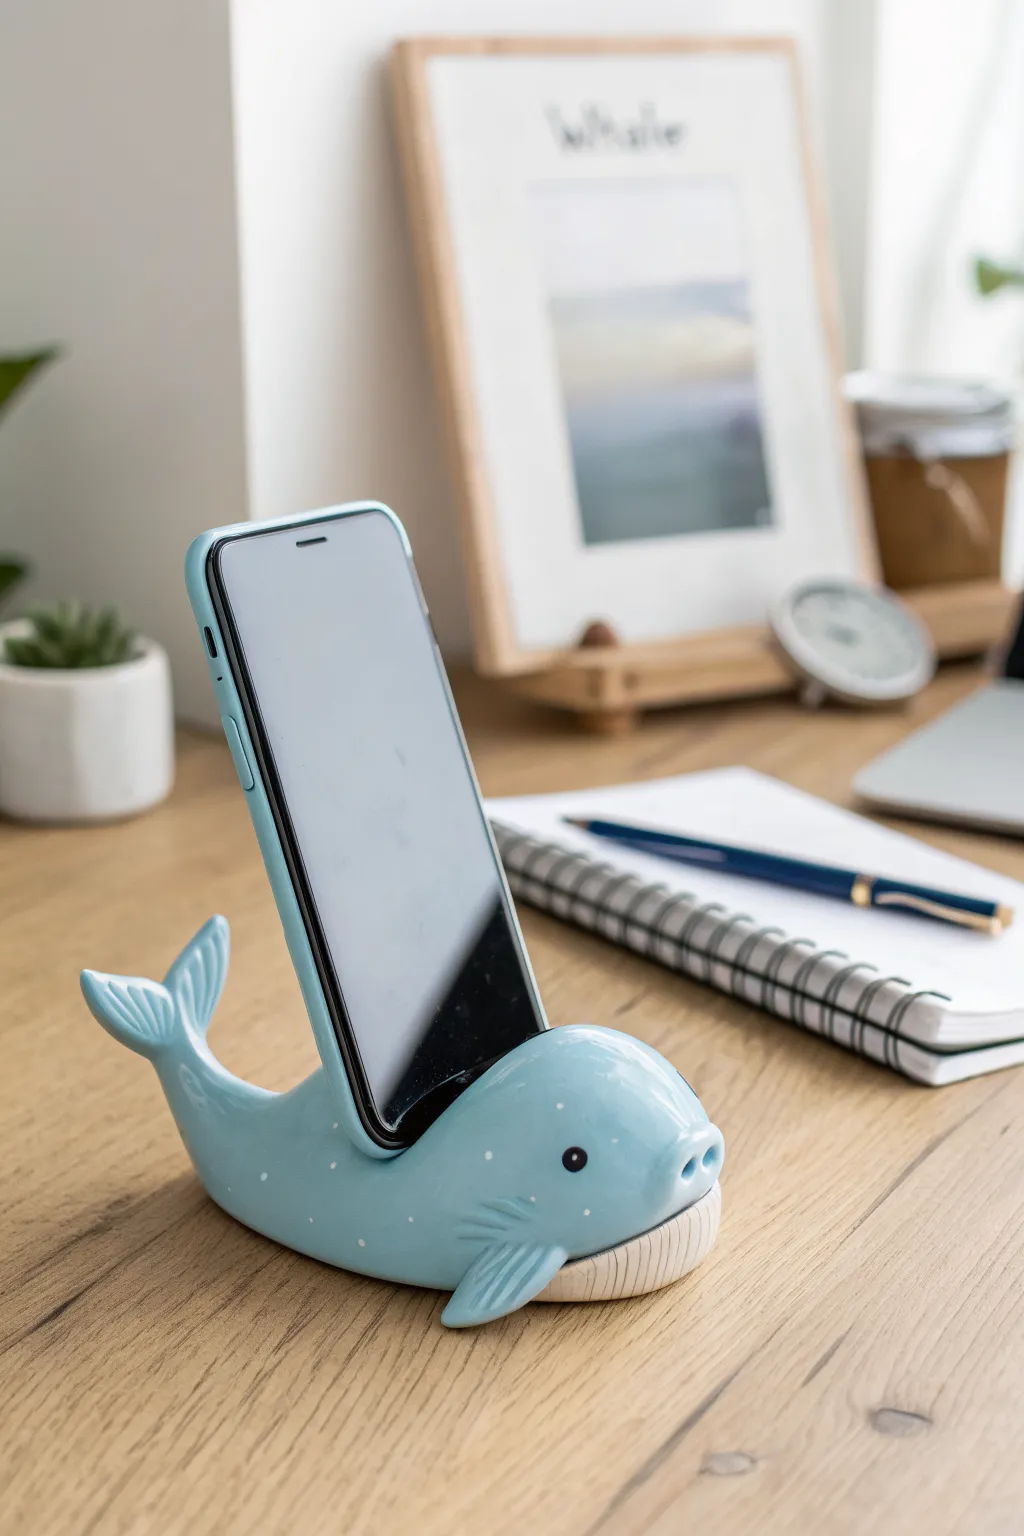
Keep your phone upright and adorable with this charming aquatic desk companion sculpted from smooth air-dry clay. Its gentle curve and sturdy tail provide the perfect resting spot for your device while adding a splash of whimsy to your workspace.
Step-by-Step Tutorial
Materials
- Light blue air-dry clay
- White or beige air-dry clay
- Clay sculpting tools (needle tool, smooth modeling tool)
- Rolling pin
- Water in a small cup
- Black acrylic paint or a fine permanent marker
- White acrylic paint
- Fine detail paintbrush
- Clear varnish or sealant (glossy finish recommended)
Step 1: Shaping the Body
-
Form the base log:
Start with a large ball of light blue clay, roughly the size of a tennis ball. Roll it into a thick log shape that is slightly tapered at one end for the tail. -
Create the curve:
Gently bend the log into a ‘U’ or banana shape. The thicker end will be the head, and the tapered end will curve upward to form the tail support. -
Flatten the base:
Press the bottom of the shape firmly onto your work surface to create a flat, stable base so the whale won’t roll over. -
Sculpt the phone slot:
Using your thumb or a wide modeling tool, make a deep depression or groove across the top of the whale’s back, right where the body curves up toward the tail. This is where your phone will sit. -
Test the fit:
Carefully test the groove with your actual phone (wrapped in plastic wrap to protect it) to ensure the angle is correct and the depth is sufficient to hold it securely.
Slumping tail?
If the tail droops while drying, prop it up with a small ball of crumpled aluminum foil or a sponge until the clay hardens enough to hold its own weight.
Step 2: Adding Details
-
Shape the tail flukes:
At the tip of the tapered tail end, pinch the clay and flatten it out. Use a knife tool to split the end and shape two distinct flukes, curving them slightly backward. -
Texture the tail:
Use a needle tool to gently draw vertical lines along the tail flukes to mimic the texture shown in the reference image. -
Add side fins:
Roll two small teardrop shapes of blue clay. Flatten them and attach one to each side of the whale’s body near the base. Blend the seams smoothly with a bit of water. -
Texture the fins:
Similar to the tail, use your needle tool to score gentle lines into the fins for added realism. -
Create the belly:
Roll out a thin sheet of white or beige clay. Cut an oval shape and attach it to the bottom front of the whale, curving up slightly under the chin. -
Detail the belly pleats:
Use a knife tool or the edge of a ruler to press distinct vertical lines into the white belly patch to create the signature throat pleats of a whale. -
Refine the face:
Smooth out the head area so it is rounded and friendly. Use a small ball tool to indent two tiny nostrils near the front of the snout.
Seamless joining
When attaching the fins or belly, score both surfaces (scratch them up a bit) and add a drop of water before pressing together for a permanent bond.
Step 3: Finishing Touches
-
Smooth everything out:
Dip your finger in water and gently rub over the entire blue surface to remove fingerprints and create a porcelain-smooth finish. -
Let it dry completely:
Allow the sculpture to dry for 24-48 hours. Turn it occasionally to ensure the bottom dries thoroughly. -
Paint the eyes:
Once dry, use a fine brush with black acrylic paint to create small, round eyes on either side of the head. Add a tiny dot of white paint to each eye for a sparkle. -
Add speckles:
I like to dilute a tiny bit of white paint and flick it or carefully dot it over the blue back using a toothpick to create a speckled, starry texture. -
Seal the piece:
Finish by applying a coat of glossy varnish. This not only protects the clay but gives the whale a wet, freshly-surfaced look.
Now your desk has a functional and friendly guardian ready to hold your phone.


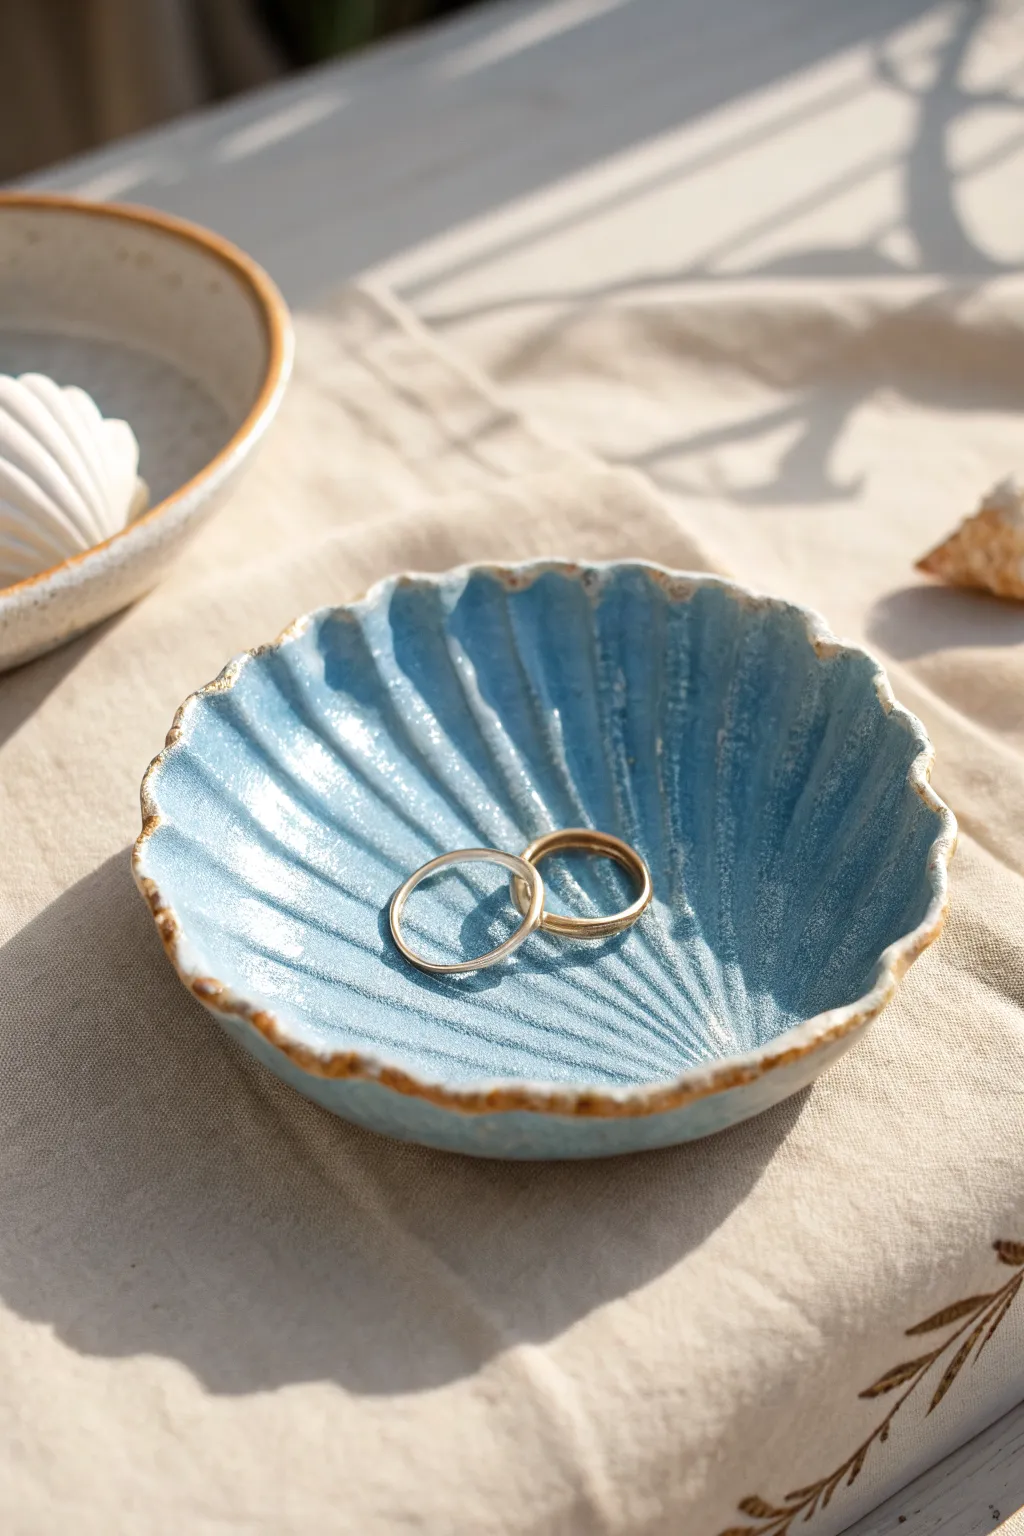
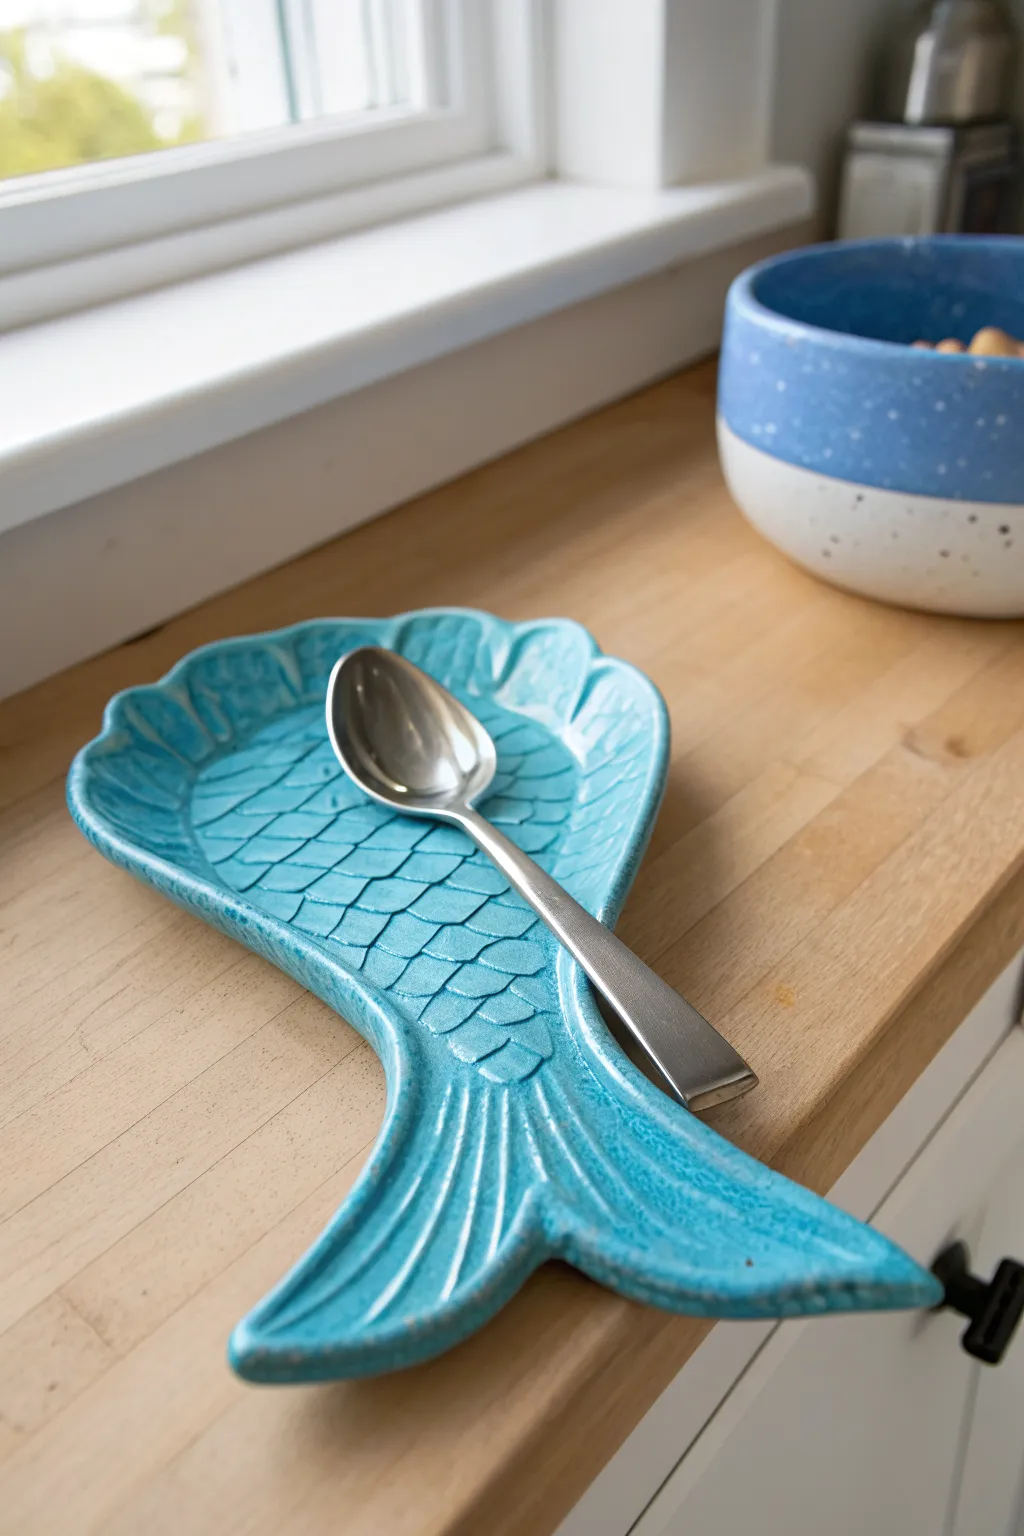
Ocean Wave Trinket Dish
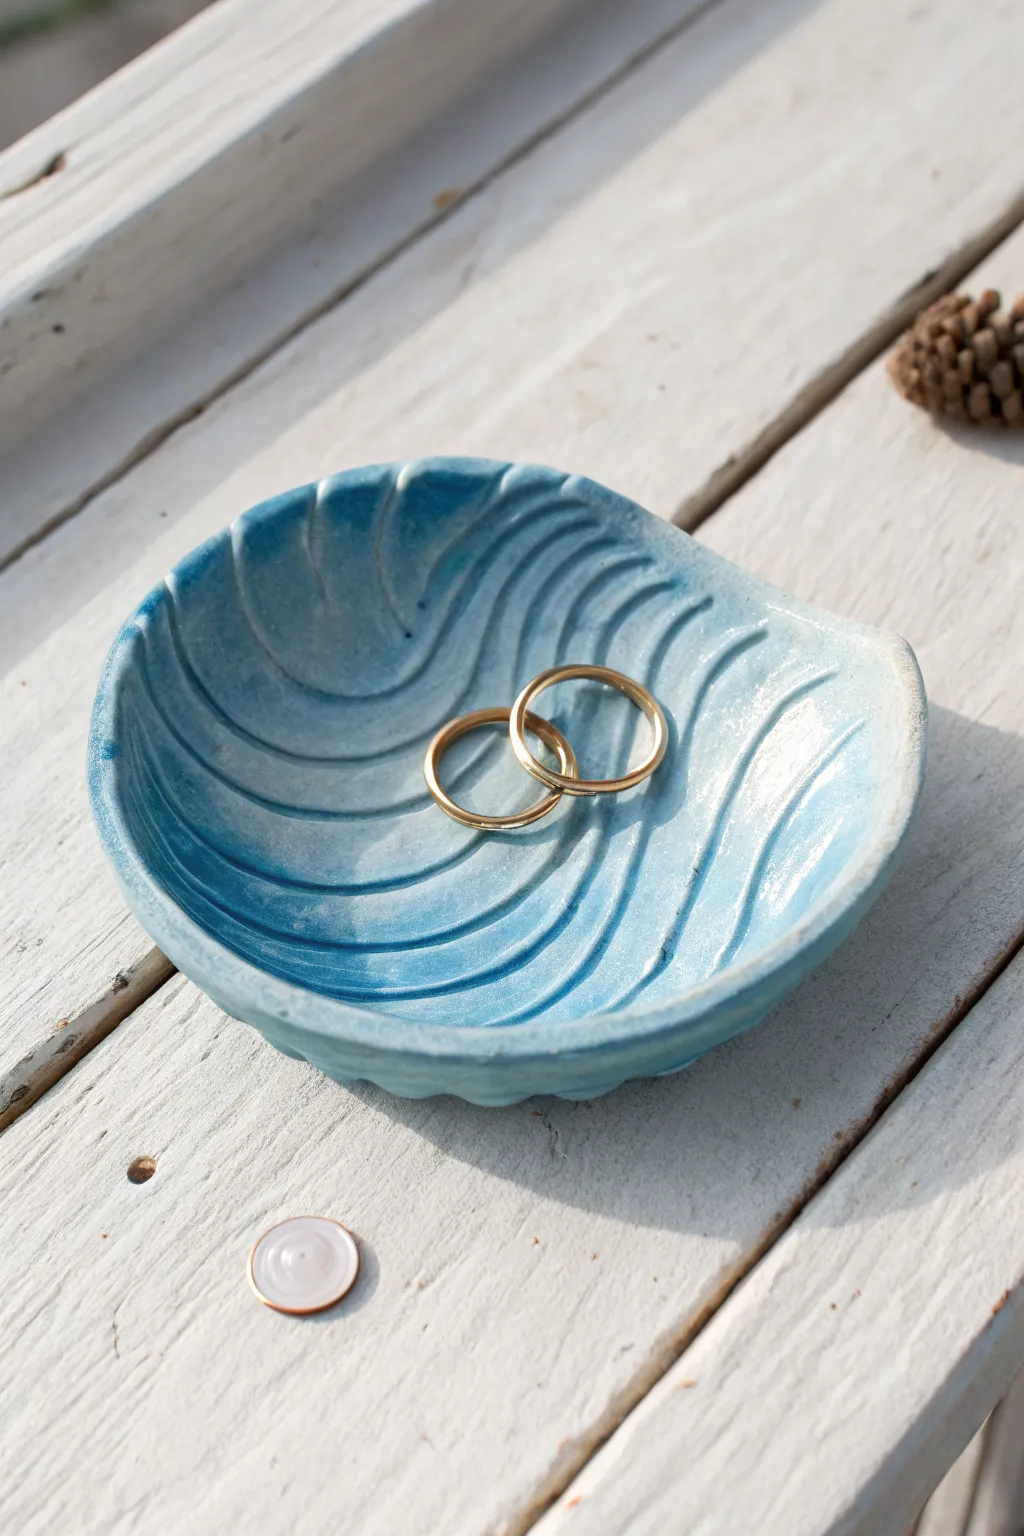
Capture the movement of the sea with this stunning wave-inspired trinket dish. Modeled to look like a rippled seashell or water current, the graduated blue glaze gives it a serene, foamy ocean feel perfect for holding rings.
Detailed Instructions
Materials
- Air dry clay (white)
- Small rolling pin
- Circle clay cutter or bowl to trace
- Modeling tool (curved or ball-ended)
- Small bowl (for shaping)
- Sandpaper (fine grit)
- Acrylic paints (Phthalo blue, Titanium white)
- Gloss varnish or resin
- Paintbrushes
- Small sponge
Step 1: Shaping the Clay
-
Conditioning:
Start by taking a handful of air dry clay and kneading it in your hands until it is warm, soft, and pliable, which helps prevent cracks later. -
Rolling out:
Roll the clay out on a smooth surface to a thickness of about 1/4 inch (6mm). Aim for an even thickness throughout. -
Cutting the circle:
Use a circle cutter (approx. 4-5 inches wide) or trace around a small bowl with a knife to cut out a clean round disc. -
Refining edges:
Dip your finger in a little bit of water and run it along the cut edge of the circle to smooth out any roughness. -
Creating the wave pinch:
Gently pinch one side of the circle to create a small point or ‘handle’ area, similar to the base of a scallop shell.
Fixing Cracks
If tiny cracks appear during drying, make a ‘slurry’ paste by mixing a small lump of clay with water. Smear this into cracks, let dry, and sand smooth.
Step 2: Sculpting the Waves
-
Drafting the lines:
Using a modeling tool, lightly sketch curved lines radiating from your pinched point outward to the opposite edge, mimicking the flow of waves. -
Deepening grooves:
Press a curved modeling tool or the back of a paintbrush handle firmly along your sketched lines to create deep, undulating grooves. -
Softening ridges:
Use a damp sponge or your wet finger to round over the sharp ridges created between the grooves, making them look like rolling water. -
Forming the bowl:
Carefully lift your clay disc and place it inside a small bowel or curved mold to give it a concave, dish-like shape. -
Drying:
Let the piece dry completely in the mold for at least 24-48 hours. I usually flip it over halfway through so the bottom dries evenly.
Gilded Edge
For an extra touch of luxury, paint the very rim of the dish with gold leaf liquid or metallic gold acrylic paint after the blue has dried completely.
Step 3: Painting and Finishing
-
Initial sanding:
Once fully dry, remove the dish from the mold and lightly sand any rough edges or bumps with fine-grit sandpaper. -
Mixing the base color:
Mix a vibrant ocean blue using Phthalo blue with a touch of white. -
Applying the base coat:
Paint the entire inside of the dish with your blue mix, ensuring the paint gets deep into the grooves. -
Creating the gradient:
While the blue is potentially still slightly tacky, mix a very light blue (mostly white with a dot of blue) for the highlight. -
Dry brushing highlights:
Dip a dry brush into the white-blue mix, wipe most of it off, and gently brush across the raised ridges on the right side of the dish. -
Blending the fade:
Continue adding more white toward the ‘open’ edge of the shell shape, creating a soft ombre fade from the dark blue pinched side to the white rim. -
Sealing:
Apply two coats of high-gloss varnish to seal the clay and give it that wet, ceramic-like shine.
Now you have a serene little spot to keep your favorite jewelry safe


Cute Blue Octopus Charm
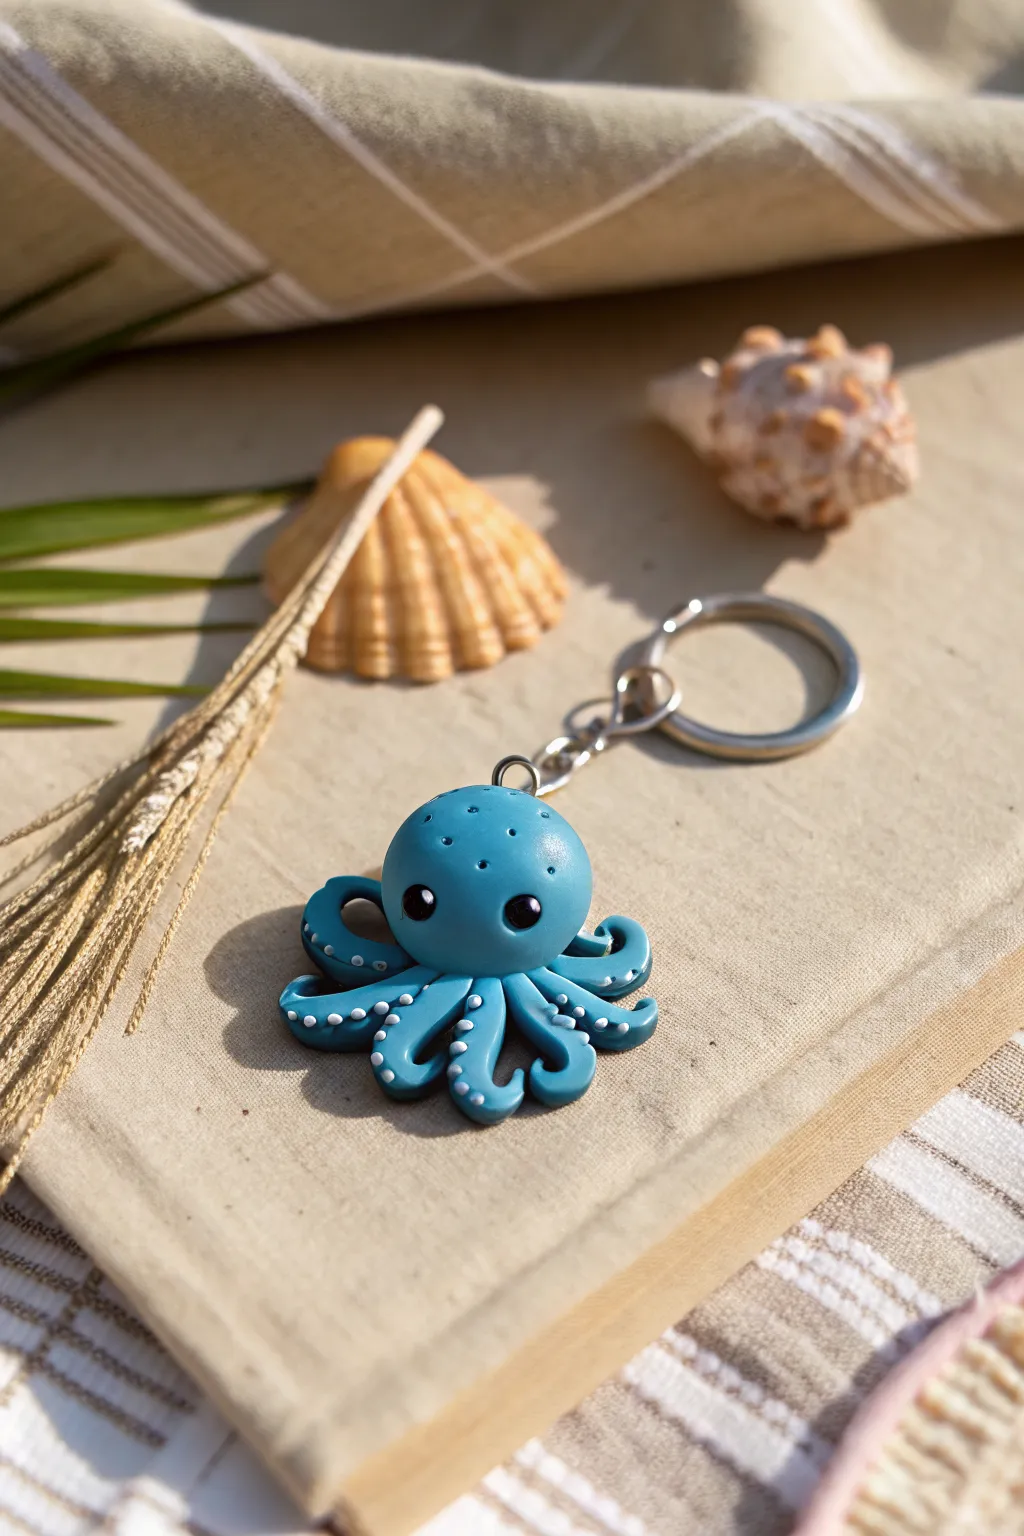
Dive into crafting with this adorable, bright blue octopus charm that’s perfect for holding your keys. With its expressive eyes and delightfully swirly tentacles, this tiny cephalopod adds a splash of ocean fun to your daily routine.
Step-by-Step Tutorial
Materials
- Blue air dry clay (or polymer clay)
- White acrylic paint or clay
- Black acrylic paint or clay
- Metal eyepin
- Keyring and chain attachment
- Needle tool or toothpick
- Dotting tool (small and medium)
- Gloss glaze or UV resin (optional)
- Small rolling pin
- Wet wipes (for smoothing)
Step 1: Shaping the Head
-
Calculate clay amount:
Start by pinching off a piece of blue clay roughly the size of a walnut. Knead it well in your hands to condition it, making sure it is pliable and free of cracks. -
Roll the sphere:
Roll the clay between your palms to create a perfectly smooth ball. This will form the main head and body of your octopus. -
Flatten the base:
Gently press the bottom of the sphere onto your work surface just enough to create a flat base so the head stands up on its own, but keep the top charmingly round.
Step 2: Creating the Tentacles
-
Prepare tentacle coils:
Take a fresh piece of blue clay and roll it into a long, thin snake, about the thickness of a pencil lead. -
Segment the clay:
Cut this long coil into eight equal segments, each about 1.5 inches long. Uniformity helps, but slight variations add character. -
Taper the ends:
Roll one end of each segment between your fingers to create a gentle taper, making the tips pointy like real tentacles. -
Attach the tentacles:
Flip the head upside down and carefully press the thicker ends of the tentacles onto the flat base you created earlier, arranging them in a circle. -
Blend the seams:
Use a silicone tool or your finger to smooth the clay where the tentacles meet the body, ensuring a seamless transition so they don’t fall off later. -
Curl the tips:
Flip the octopus back upright. Gently curl the tapered ends of the tentacles upwards and outwards to create that playful, swirling motion seen in the photo.
Tentacle Twist
To make the tentacles look dynamic rather than stiff, twist the clay slightly as you curl the tips upward. This mimics natural movement better than a simple bend.
Step 3: Adding Details
-
texture the head:
Using a needle tool, poke tiny, shallow holes randomly across the top of the head to create a subtle skin texture. -
Indent eye sockets:
Use a medium-sized dotting tool to press two indentations into the front of the face where you want the eyes to sit. Space them somewhat wide apart for a cuter look. -
Insert the eyes:
Roll two tiny balls of black clay and press them into the sockets. Alternatively, you can paint these black after the clay dries. -
Add eye highlights:
Place a minuscule speck of white clay in the upper corner of each black eye to give it a spark of life. -
Create sucker details:
Roll a very thin snake of white clay (or use white paint later) and cut tiny slices. Press these small white dots onto the curled-up undersides of the tentacles to mimic suckers. -
Secure the hardware:
While the clay is still soft, insert a metal eyepin into the top center of the head. I like to add a tiny dab of glue to the pin’s shaft for extra security.
Cracking Clay?
If you see tiny cracks forming while curling the tentacles, your clay might be too dry. Dip your finger in water and smooth over the crack immediately to heal it.
Step 4: Finishing Touches
-
Smooth imperfections:
Do a final check around the sculpture. Use a slightly damp finger or a wet brush to smooth out any accidental fingerprints or rough textures. -
Allow to dry:
Set your octopus in a safe, dry place. Depending on your brand of clay and humidity, this could take 24 to 48 hours. -
Seal the charm:
Once fully cured, coat the entire piece with a gloss glaze or UV resin. This protects the details and gives it that wet, aquatic shine. -
Attach keyring:
Use pliers to open the jump ring on your keychain hardware, loop it through the eyepin on the octopus, and close it securely.
Now you have a charming little sea creature ready to accompany you on all your adventures

What Really Happens Inside the Kiln
Learn how time and temperature work together inside the kiln to transform clay into durable ceramic.
Blue Seashell Ring Dish
Capture the essence of the ocean with this stunning scalloped ring dish, featuring deep ridges and a vibrant azure glaze. The rustic, gold-rimmed edges elevate this simple clay project into a boutique-worthy piece of decor perfect for holding your favorite jewelry.
How-To Guide
Materials
- Air dry clay (white)
- Rolling pin
- Real scallop shell (large) or seashell silicone mold
- Craft knife or clay needle tool
- Sponge or fine-grit sandpaper
- Small bowl (for shaping)
- Acrylic paint (Light blue, Teal, White)
- Metallic gold or bronze paint
- High-gloss varnish or glaze
- Soft paintbrushes
- Small palette for mixing
Step 1: Shaping the Shell
-
Condition the clay:
Begin by taking a handful of white air dry clay and kneading it in your hands until it becomes warm, pliable, and free of cracks. If it feels too dry, dip your fingers in water and work the moisture in. -
Roll it out:
On a clean, flat surface, roll the clay out to an even thickness of about 1/4 inch (6mm). Aim for a shape slightly larger than the seashell you plan to use as a template. -
Create the texture:
Press your real scallop shell (or mold) firmly into the clay. If using a real shell, I find gently rocking it back and forth ensures the deep ridge details transfer clearly. -
Cut the outline:
With the shell still pressed down or just after removing it, use a craft knife or needle tool to carefully trace around the scalloped edge, cutting away the excess clay. -
Smooth the edges:
Dip your finger in a little water and run it along the cut edges to soften any sharp cuts or rough bits. You want the rim to look organic and worn, not mechanically sliced. -
Form the curve:
Carefully lift your clay shell and place it inside a small bowl. Gently press the center down so the clay takes on a concave, cupped shape suitable for holding rings. -
Dry completely:
Leave the clay in a cool, dry place for at least 24 to 48 hours. Don’t rush this step, as trapped moisture can ruin the painting phase later. -
Refine the surface:
Once fully recognizable as a hard object, remove it from the bowl. Use fine-grit sandpaper to gently smooth the back and rim if any rough spots remain.
Clean Impressions
Dust your real shell or mold with a tiny bit of cornstarch before pressing it into the clay. This acts as a release agent and prevents the clay from sticking inside the deep grooves.
Step 2: Painting & Glazing
-
Mix the base color:
On your palette, mix a primary light blue with a tiny drop of teal and white. You want a fresh, ocean-like hue that isn’t too dark. -
Apply the first coat:
Paint the entire interior of the shell. Use a slightly watered-down paint for this first layer so it seeps into the deep grooves of the ridges. -
Add depth:
While the blue is still slightly wet, wipe the raised ridges very gently with a damp paper towel or sponge. This reveals a bit more of the white clay underneath, highlighting the texture naturally. -
Paint the exterior:
Flip the dish over and paint the underside. A solid white or a very pale wash of the blue looks elegant here. -
Gild the rim:
Dip a small detail brush into your metallic gold or bronze paint. Carefully dab the paint along the uneven, scalloped rim. Don’t be too perfect; an irregular line adds to the organic, washed-up-on-the-beach aesthetic. -
Seal the piece:
Once all paint layers are bone dry, apply a thick coat of high-gloss varnish. This is crucial for mimicking the shiny, wet look of a real seashell. -
Final cure:
Let the varnish cure according to the bottle’s instructions, ensuring it isn’t tacky before placing any jewelry inside.
Cracked Edges?
If you see hairline cracks forming on the rim while drying, mix a small paste of clay and water (slip) and smooth it into the cracks with your finger, then let it dry again.
Now you have a serene little spot to keep your rings safe while evoking memories of sunny days by the sea
Blue Fish Magnet Set
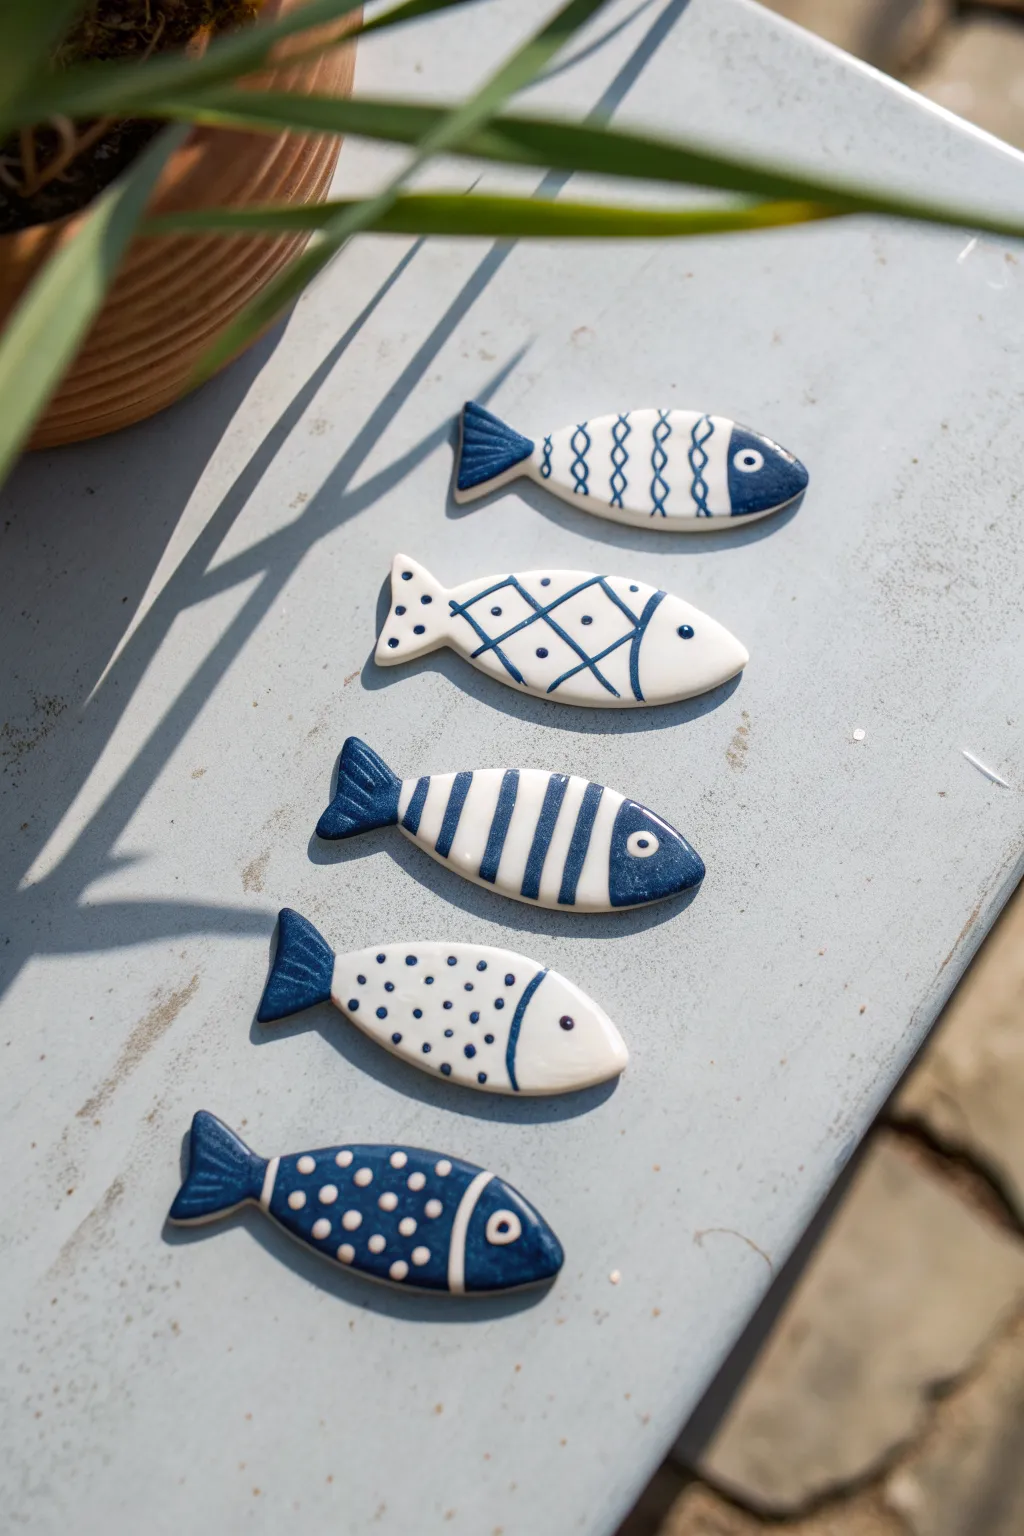
Bring a splash of the seaside into your home with these charming blue and white fish magnets. Featuring five distinct patterns ranging from classic stripes to delicate scales, this set captures the glossy look of ceramic tiles using simple air-dry clay.
Step-by-Step
Materials
- White smooth air-dry clay
- Rolling pin
- Fish-shaped cookie cutter (approx. 2-3 inches) or a craft knife and template
- Sandpaper (fine grit)
- Acrylic paint: Navy Blue and Titanium White
- Fine detail paintbrushes (size 0 and 00)
- Gloss varnish or clear resin
- Strong round magnets
- Superglue or heavy-duty craft glue
- Small cup of water
Step 1: Shaping the Clay Base
-
Roll out the clay:
Take a portion of white air-dry clay and knead it until soft and pliable. Roll it out on a smooth surface to an even thickness of about 1/4 inch (6mm). If you want perfectly uniform thickness, place two wooden rulers on either side of your clay as guides for the rolling pin. -
Cut the shapes:
Use a fish-shaped cookie cutter to punch out five identical shapes. If you don’t have a cutter, sketch a simple fish silhouette on paper, cut it out, place it on the clay, and trace around it carefully with a craft knife. -
Smooth the edges:
Dip your finger in a little water and gently run it along the cut edges of each fish to round them off and remove any jagged bits. This gives them that smooth, fired-ceramic appearance. -
Drying time:
Place the fish on a flat surface lined with parchment paper. Let them dry completely, which usually takes 24-48 hours depending on humidity. Flip them over halfway through the drying process to prevent warping. -
Sand for perfection:
Once fully dry and hard, lightly sand the surfaces and edges with fine-grit sandpaper to remove any fingerprints or bumps. Wipe away the dust with a barely damp cloth.
Uneven Edges?
If your clay edges look rough after cutting, don’t wait for sanding. Dip a paintbrush in water and smooth them immediately while wet for the cleanest ‘ceramic’ contour.
Step 2: Painting the Designs
-
Base coat (optional):
The clay is naturally white, but for a brighter finish, painting a thin layer of Titanium White acrylic over the entire front surface creates a better canvas for the blue designs. Let this dry completely. -
Design 1: The Lattice Scale Fish:
For the top fish, paint the tail navy blue. Paint a curved line for the gill. Then, paint vertical wavy lines down the body and cross them with horizontal wavy lines to create a lattice scale effect. Add a blue eye with a white dot center. -
Design 2: The Diamond Grid Fish:
Leave the tail white. Paint a grid of diamonds across the body using thin blue lines relative to a horizontal centerline. Place a small blue dot inside specific diamonds. The head remains white with a simple blue dot for the eye. -
Design 3: The Striped Fish:
Paint the tail solid navy blue. Paint thick, bold vertical stripes down the body, leaving white spaces in between. Paint the head navy blue, leaving a small white circle exposed for the eye, and add a tiny blue pupil. -
Design 4: The Polka Dot Fish:
Paint the tail navy blue. On the white body, paint small, evenly spaced navy blue dots. Create a curved line separating the head, and paint a simple blue eye. -
Design 5: The Reverse Dot Fish:
This one is the inverse of the previous design. Paint the entire fish navy blue. Once that layer is dry, use a small dotting tool or the back of a paintbrush to add white dots over the body and white lines to define the tail and head.
Level Up: 3D Texture
Before the clay dries, gently press a piece of lace or a textured stamp into the surface of one fish to create actual tactile scales before you paint.
Step 3: Finishing Touches
-
Seal the artwork:
To achieve the glazed ceramic look shown in the image, apply a thick coat of high-gloss varnish. For an even glassier finish, you could use a thin layer of UV resin, curing it under a lamp. -
Attach the magnets:
Once the varnish is fully cured and non-tacky, flip the fish over. Place a drop of superglue or strong craft adhesive on the center of the back. -
Secure the backing:
Press a round magnet firmly into the glue and hold for a few seconds. Let the glue cure according to the package instructions before sticking them to your fridge.
Now you have a school of beautiful faux-ceramic fish ready to organize your notes


The Complete Guide to Pottery Troubleshooting
Uncover the most common ceramic mistakes—from cracking clay to failed glazes—and learn how to fix them fast.
Blue Cloud Jewelry Catch-All
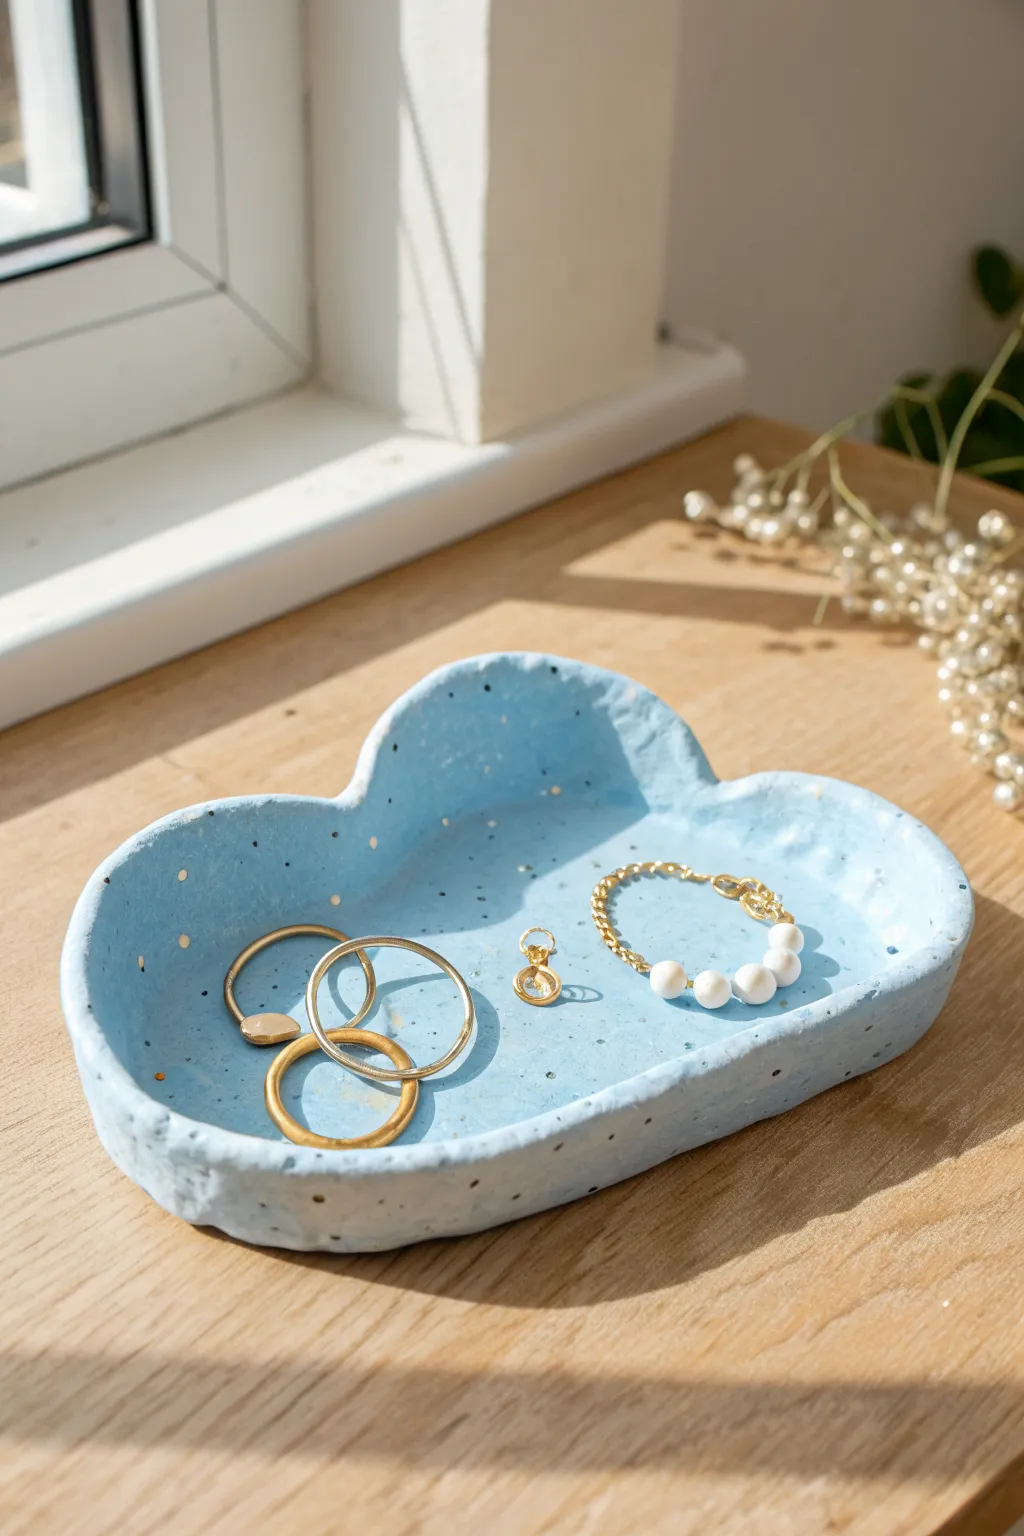
This darling jewelry catch-all brings a piece of the sky down to your dresser with its soft blue hue and playful speckled finish. Shaped like a fluffy cumulus cloud, it offers a perfect spot to corral your daily rings and favorite bracelets.
Step-by-Step
Materials
- White air dry clay
- Rolling pin
- Cloud template (printed on paper) or freehand sketch
- Craft knife or clay tool
- Small bowl or sponge
- Water
- Sandpaper (fine grit)
- Acrylic paint: Light Blue, White, Black, Gold (optional)
- Paintbrushes (flat and fine tip)
- Old toothbrush
- Gloss or matte varnish/sealant
Step 1: Preparation & Shaping
-
Prepare the Clay:
Start with a handful of white air dry clay. Knead it in your hands for a minute or two until it is warm, pliable, and free of any cracks. -
Roll it Out:
Using a rolling pin, flatten the clay into a smooth slab. You want an even thickness of about 1/4 inch (6mm) to ensure it’s sturdy but not chunky. -
Create the Shape:
Lightly sketch a cloud shape directly onto the clay with a needle tool, or place your paper template on top. I find tracing lightly first helps avoid mistakes. -
Cut the Cloud:
Use a craft knife or a sharp clay tool to carefully cut along your cloud outline. Remove the excess clay and set it aside for future projects. -
Initial Smoothing:
Dip your finger in a little water and run it along the cut edges to smooth out any harsh angles or jagged bits left by the knife. -
Form the Dish:
Gently lift the edges of the cloud upwards to create a rim. Pinch and curve the clay slightly with your fingers to form a shallow bowl shape. -
Smooth the Rim:
Continue smoothing the raised rim with a damp finger or a barely wet sponge, ensuring the walls are relatively even in height all the way around.
Smooth Moves
To prevent warping while drying, place a light book on top of the clay (with parchment paper in between) for the first few hours of drying.
Step 2: Drying & Refining
-
Dry Slowly:
Place your cloud dish in a safe, dry spot away from direct sunlight. Let it air dry for 24 to 48 hours. Flip it over halfway through to help the bottom dry evenly. -
Sand for Smoothness:
Once fully cured and hard, use fine-grit sandpaper to buff away any remaining bumps or rough textures on the rim and surface. Wipe away the dust with a dry cloth.
Sky’s the Limit
Try marbleizing blue and white clay together before rolling it out for a natural cloud effect, skipping the base paint step entirely.
Step 3: Painting & Speckling
-
Base Color Mixing:
Mix white acrylic paint with a small drop of blue to achieve a soft, pastel sky blue shade. Adjust the ratio until you have the perfect dreamy tone. -
Apply Base Coat:
Paint the entire dish—top, bottom, and sides—with your blue mixture. Let this layer dry completely, and apply a second coat if the clay white is showing through. -
Prepare Speckle Paint:
Dilute a small amount of black paint with water until it is runny and inky. In a separate spot, do the same with white paint. -
Apply Black Speckles:
Dip an old toothbrush into the watery black paint. Run your thumb across the bristles to flick tiny splatters across the inside of the dish. Practice on paper first to control the spray. -
Add White Speckles:
Repeat the splatter technique with the watered-down white paint to add depth and texture to the pattern. -
Paint Gold Details:
For the larger gold dots seen in the inspiration piece, use a fine-tip paintbrush or the non-brush end of a small stick. Dip it in gold paint and dot it randomly among the speckles. -
Final Seal:
After all paint is bone dry, apply a coat of varnish. This protects the paint from scratching and gives the dish a finished, professional look.
Now you have a dreamy spot to keep your treasures safe and organized
Blue Dolphin Shelf Buddy
Bring the ocean to your bookshelf with this charming, celestial-themed dolphin sculpture. Its speckled blue finish and gentle curves give it a whimsical, stone-like texture that feels both rustic and modern.
Detailed Instructions
Materials
- Air dry clay (white or pre-colored blue)
- Acrylic paints (dusty blue, white, gold, black)
- Sculpting tools (needle tool, smoothing tool)
- Aluminum foil (for armature)
- Fine-grit sandpaper
- Water cup and sponge
- Matte sealant or varnish
Step 1: Forming the Body
-
Create the core:
Crumple a piece of aluminum foil into a teardrop shape. This will be the main body of the dolphin and helps save clay while keeping the sculpture lightweight. -
Cover with clay:
Roll out a slab of clay to about 1/4 inch thickness. Wrap it completely around your foil teardrop, trimming away excess and pinching the seams together. -
Smooth the form:
Wet your fingers slightly and smooth out the clay surface. You want a seamless, organic shape that tapers towards the tail end. -
Shape the head:
Gently push and mold the rounded end to define the dolphin’s forehead (melon). Pinch a small elongated section at the very front to form the snout or ‘beak’.
Seamless Fins
Use a rubber-tipped sculpting tool to blend the clay seams where the fins meet the body. It creates a much smoother transition than fingers alone.
Step 2: Adding Details
-
Attach the tail flukes:
Form two small, flat triangles from fresh clay. Score the back of the body and the attachment points on the fins, add a little water (slip), and press them onto the tapered tail end, blending the clay where they join so the seam disappears. -
Add dorsal and pectoral fins:
Create a curved triangle for the dorsal fin on the back and two smaller curved triangles for the side flippers. Attach them using the score-and-slip method, smoothing the connection points carefully. -
Define the mouth:
Use a needle tool or a thin clay knife to gently carve a long, curving smile line along the snout. Give it a deep enough groove so it remains visible after painting. -
Create the eyes:
Press a small ball tool or the back of a paintbrush into the sides of the head to create sockets for the eyes, or simply mark where you will paint them later. -
Refine the surface:
Dip a sponge in water and give the entire sculpture a final wipe-down to remove fingerprints. Let the piece dry completely for 24 to 48 hours.
Make it a Nightlight
Sculpt the body hollow or use a plastic ball armature that can be removed. Poke holes completely through the ‘stars’ and place an LED tea light inside.
Step 3: Painting & Finishing
-
Sand imperfections:
Once fully dry, use fine-grit sandpaper to gently buff away any rough bumps. Be gentle so you don’t break the fins. -
Base coat application:
Paint the entire dolphin with a dusty blue acrylic paint. You may need two thin coats for opaque coverage. I find mixing a tiny drop of grey into the blue helps achieve that stonewashed look. -
Add texture:
While the blue is still slightly tacky, or using a dry-brushing technique, dab on subtle lighter blue or white patches to give the skin a weathered, clay-like texture. -
Paint the eyes:
Use a detail brush and black paint to fill in the round eyes. A tiny dot of white in the corner can add life to the expression. -
Create the starry speckles:
Using a toothpick or a very fine dotting tool, apply tiny dots of gold and white paint across the back and top of the head to mimic a constellation or freckles. -
Pierce details (optional):
If you want the textured look from the photo, you can use a needle tool to poke tiny, shallow holes along the back before sealing, or simply paint them as dark dots. -
Seal the piece:
Finish with a coat of matte varnish to protect the paint and give it a professional, non-glossy finish.
Now you have a serene little ocean friend ready to watch over your favorite stories

TRACK YOUR CERAMIC JOURNEY
Capture glaze tests, firing details, and creative progress—all in one simple printable. Make your projects easier to repeat and improve.
Blue Mermaid Tail Spoon Rest
Bring a splash of coastal charm to your kitchen with this functional mermaid tail spoon rest. Modeled with tactile scales and finished in a glossy turquoise blue, this charming piece is perfect for catching spills while you cook.
Detailed Instructions
Materials
- Air dry clay (white)
- Small rolling pin
- Baking paper or non-stick silicone mat
- Clay knife or craft knife
- Round bottle cap or small U-shaped clay tool (for scales)
- Needle tool or toothpick
- Bowl with water
- Sponge
- Fine-grit sandpaper
- Acrylic paint (Turquoise/Teal)
- Acrylic paint (White for dry brushing)
- High-gloss varnish or sealant
- Paintbrushes (medium flat and small detail)
Step 1: Shaping the Base
-
Prepare your workspace:
Lay down your baking paper or silicone mat to prevent sticking. Take a large handful of air dry clay and knead it until it’s soft, pliable, and free of cracks. -
Roll out the slab:
Use your rolling pin to flatten the clay into an even slab, aiming for a consistent thickness of about 1/4 inch. If bubbles appear, pierce them with a needle tool and smooth over. -
Outline the shape:
Lightly sketch the outline of a mermaid tail directly onto the clay using a needle tool. You want a wide, rounded top that tapers down into a curved tail shape with flukes at the bottom. -
Cut the form:
Once satisfied with your sketch, use the clay knife to cut out the tail shape. Remove the excess clay and set it aside for future use. -
Smooth the edges:
Dip your finger in a little water and run it along the cut edges of the clay to round them off and remove any sharp angles or burrs.
Smooth Operator
Keep a small bowl of water nearby while sculpting. A wet finger is the best tool for erasing cracks and bonding wet clay seamlessly.
Step 2: Adding Texture & Details
-
Create the scale pattern:
To create the fish scales, press the edge of a small bottle cap or a U-shaped loop tool into the wet clay. Start from the bottom of the ‘body’ section and work your way up toward the wide top edge. -
Layer the scales:
Keep pressing your tool in neat, overlapping rows. Stagger the impressions so each row sits in the gaps of the row below it, just like real fish scales. -
Detail the tail fins:
On the bottom fluke section, use a needle tool or the back of a knife to gently press long, radiating lines that mimic the ribbing of a fin. -
Create the upper rim:
At the very top wide edge of the spoon rest, pinch the clay slightly to form a gentle, scalloped rim. This helps contain any sauce drips later. -
Form the curve:
Carefully lift the sides of the main body slightly to create a shallow bowl shape. I like to prop the edges up with small balls of scrap clay or scrunched paper towels so it holds this concave shape while drying. -
Refine the flukes:
Make sure the tail flukes at the bottom are slightly upturned or shaped dynamically so the piece doesn’t look flat.
Step 3: Finishing Touches
-
Let it dry:
Allow the piece to dry completely in a safe spot. This will take 24–48 hours depending on humidity; turn it over carefully halfway through to ensure the bottom dries evenly. -
Sand for smoothness:
Once fully dry and hard, use fine-grit sandpaper to gently smooth any rough edges on the rim or underside. Wipe away the dust with a slightly damp sponge. -
Apply base color:
Paint the entire top surface with your turquoise acrylic paint. You might need two coats to get a rich, opaque color, letting the first coat dry before adding the second. -
Highlight the texture:
Dip a dry brush into a tiny amount of white paint and wipe most of it off on a paper towel. Lightly brush over the raised scales and fin ridges to catch the high points, giving the piece that weathered, beach-glass look. -
Seal the piece:
Since this will be used in the kitchen, apply 2-3 coats of a waterproof, high-gloss varnish. Allow ample drying time between coats to ensure a durable, glass-like finish.
Ocean Sparkle
Mix a small amount of fine iridescent glitter or mica powder into your final varnish coat to give the wet mermaid tail a magical shimmer.
Now your counter is protected by a beautiful piece of handmade art that is ready for your next culinary adventure
Blue Coral-Inspired Candle Holder
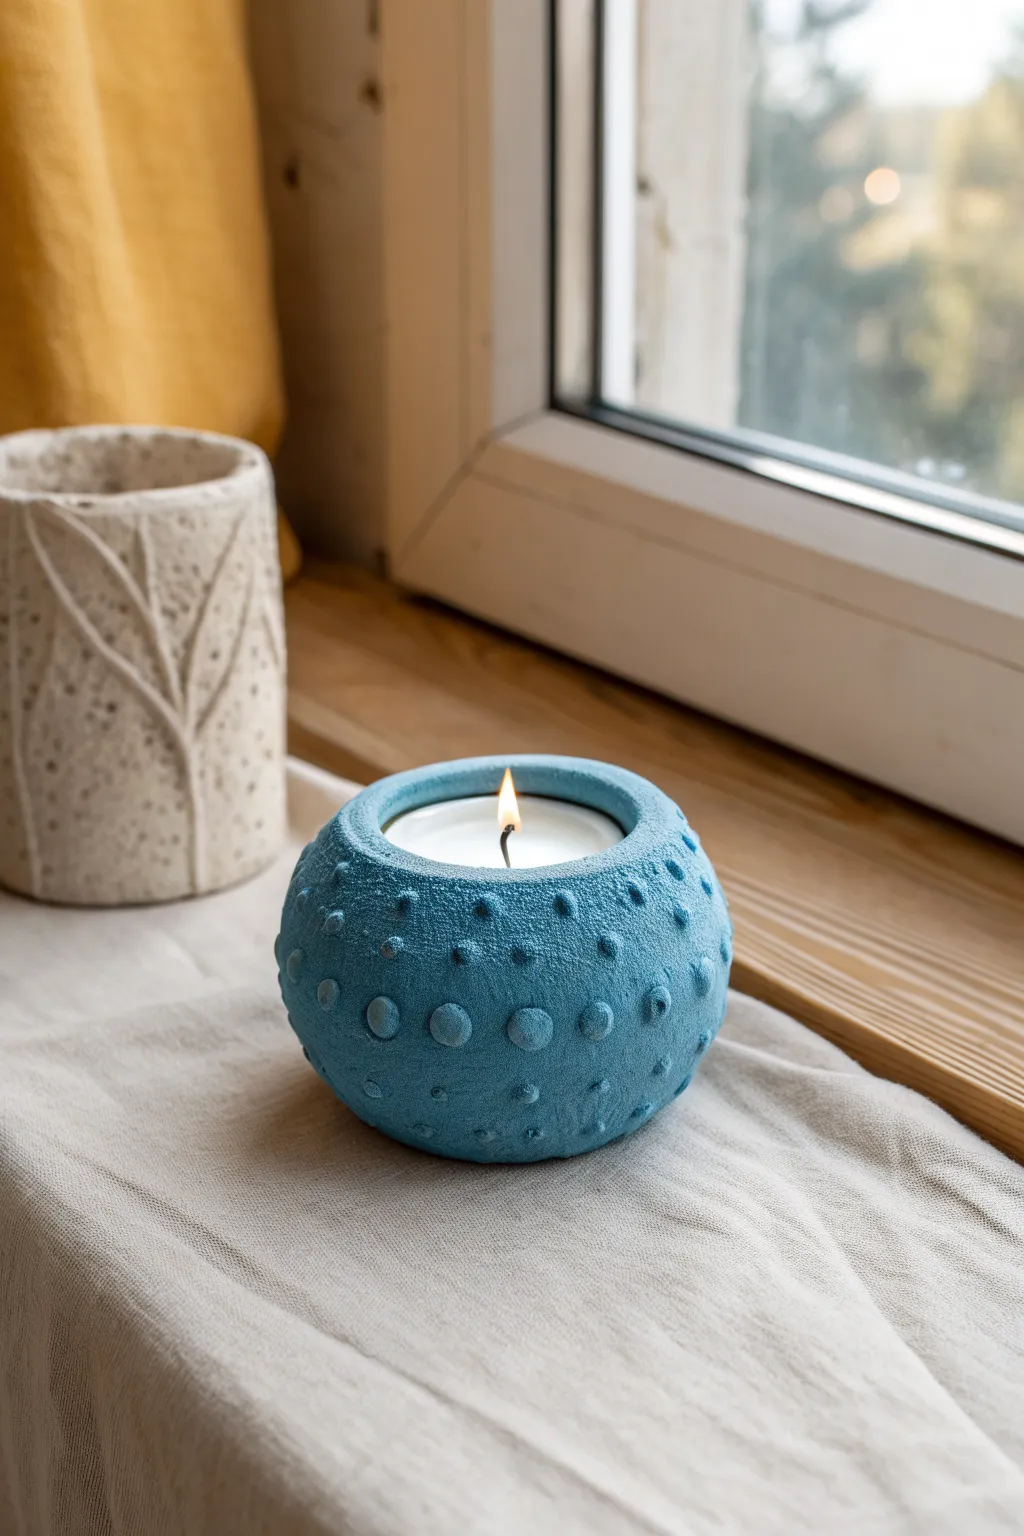
Bring the calming vibes of the ocean into your home with this delightful coral-inspired candle holder. Its unique bumpy texture and soft matte blue finish mimic the organic beauty of sea life while cradling a warm, glowing tealight.
How-To Guide
Materials
- Air dry clay (white or pre-colored blue)
- Acrylic paint (teal blue, white)
- Round tealight candle
- Rolling pin
- Small bowl or sphere for molding (to shape the curve)
- Modeling tools or a dull pencil
- Fine-grit sandpaper
- Water and sponge
- Matte varnish or sealant
Step 1: Shaping the Base
-
Prepare your clay:
Start by kneading a generous amount of air dry clay until it is soft, pliable, and free of cracks. If you are using white clay, you can either paint it later or knead blue acrylic paint directly into the clay now for a base color. -
Create a sphere:
Roll the clay into a smooth ball about the size of a large orange. Ensure the surface is even. -
Form the hollow:
Gently press your thumbs into the center of the ball while rotating it to create a deep, bowl-like hollow. The walls should be thick enough to support the structure, roughly half an inch. -
Check the fit:
Take your tealight candle and press it gently into the opening to ensure the hollow is wide and deep enough to accommodate it comfortably. Remove the tealight before proceeding. -
Refine the shape:
Smooth the outer walls with a bit of water on your fingers. You want a rounded, organic spherical shape that curves inward slightly at the top rim.
Step 2: Adding the Texture
-
Prepare decoration clay:
Pinch off small bits of extra clay to create the textured bumps. You will need roughly 30-40 small pieces in varying sizes. -
Roll tiny balls:
Roll each small pinch of clay into a tiny sphere. Vary the sizes from small peas to slightly larger beads to create a natural, organic look. -
Score and slip:
To ensure these bumps stick, lightly scratch the surface of the main bowl where you want to place a bump, add a drop of water or liquid clay (slip), and press the small ball onto the surface. -
Blend the edges:
Use a modeling tool or your finger to gently smooth the very bottom edge of each small ball so it looks like it’s growing out of the main shape, rather than just stuck on top. -
Distribute the pattern:
Continue adding these bumps all around the exterior. I prefer to space them irregularly rather than in perfect rows to mimic real coral textures. -
Refine the surface:
Once all bumps are attached, dip a sponge in a little water and gently dab over the entire piece to soften any sharp fingerprints or tool marks without losing the texture.
Use baking soda for texture
Mix a teaspoon of baking soda into your paint. This creates a grainy, stone-like texture that makes the clay look more like real coral or ceramic.
Step 3: Finishing and Painting
-
Let it dry:
Allow the candle holder to dry completely. This usually takes 24-48 hours depending on thickness. Flip it occasionally to ensure the bottom dries thoroughly. -
Sand imperfections:
Once bone dry, use fine-grit sandpaper to gently smooth the rim and any rough patches on the bumps. Wipe away the dust with a barely damp cloth. -
Mix your color:
If you didn’t color the clay initially, mix a teal blue acrylic paint with a tiny bit of white to achieve that soft, matte blue hue seen in the reference. -
Apply the base coat:
Paint the entire exterior and interior. Use a stippling motion (dabbing the brush up and down) around the bumps to get paint into all the crevices. -
Add depth (optional):
To enhance the texture, you can dry-brush a slightly lighter shade of blue over just the tops of the bumps. This highlights the coral texture beautifully. -
Seal the piece:
Finish with a coat of matte varnish. This protects the clay from heat and eventual dust, while maintaining that stone-like non-glossy appearance.
Cracks appearing while drying?
Mix a small amount of fresh clay with water to make a paste. Fill the cracks with this slip, smooth it over with a finger, and let it dry again.
Place your favorite scented tealight inside and enjoy the coastal glow you created
Blue Galaxy Planter Cover
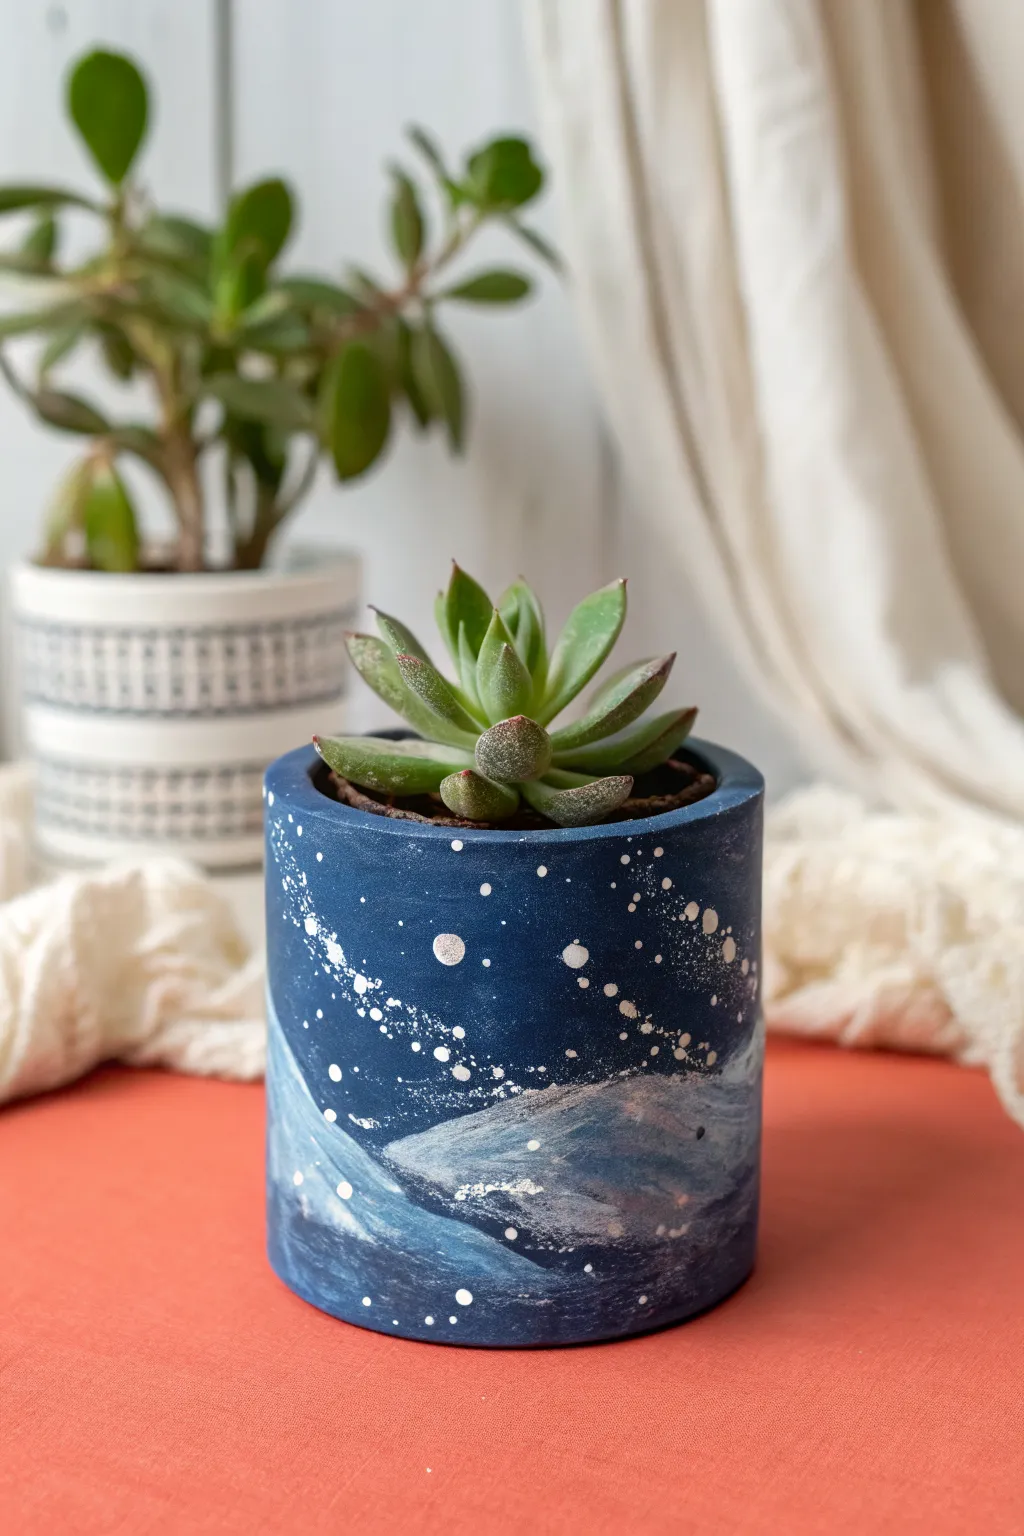
Transform a simple container into a piece of the night sky with this stunning galaxy-inspired project. Using air dry clay and thoughtful painting techniques, you’ll create a textured mountain landscape beneath a canopy of stars.
Step-by-Step Tutorial
Materials
- Air dry clay (white or terracotta)
- Empty can or cylindrical container (as a mold)
- Acrylic paints (Dark Navy Blue, Royal Blue, White, Silver)
- Rolling pin
- Craft knife
- Sandpaper (fine grit)
- Detail brushes and a flat shader brush
- Old toothbrush (for splatter effects)
- Varnish or sealant (matte or satin)
- Water cup and paper towels
Step 1: Sculpting the Base
-
Prepare your clay:
Knead a large ball of air dry clay until it is soft and pliable. If it feels too stiff, dip your fingers in water and work the moisture into the clay body. -
Roll the slab:
Roll the clay out onto a clean, flat surface to a thickness of about 1/4 inch. You want a long rectangular strip that is tall enough to cover your intended container and long enough to wrap around it completely. -
Cut to size:
Using your cylindrical container as a guide, measure the circumference. Use a craft knife and a ruler to cut a clean rectangle of clay that fits perfectly around the container with a slight overlap. -
Form the cylinder:
Wrap the clay strip around your container (using parchment paper between them creates an easier release later). Join the two ends by scoring the edges, adding a dab of water, and smoothing the seam together with your thumb until invisible. -
Add the bottom:
Place your clay cylinder on a flat piece of rolled clay. Cut around the base to create a bottom piece, then blend the bottom into the cylinder walls using a modeling tool or your fingers to ensure it’s watertight. -
Dry thoroughly:
Remove the inner container carefully once the clay can support its own weight, usually after a few hours. Let the pot dry completely for 24-48 hours. I find turning it upside down halfway through helps the bottom dry evenly. -
Sand the surface:
Once bone dry, take your fine-grit sandpaper and gently smooth out any rough patches, fingerprints, or uneven edges on the rim.
Step 2: Painting the Galaxy
-
Base coat:
Paint the entire exterior with a deep, dark navy blue acrylic paint. You may need two coats to get a solid, opaque finish that hides the clay texture. -
Sketch the mountains:
Using a very light pencil or a thin brush with diluted white paint, lightly outline the jagged peaks of a mountain range along the lower third of the pot. -
Paint the mountains:
Fill in the mountain shapes with a mix of royal blue and white to create a lighter, icy blue tone. This creates contrast against the dark sky background. -
Add snow caps:
Take a small amount of pure white paint on a detail brush. Add jagged, sweeping strokes to the tops and sides of your mountain peaks to simulate snow and light reflection. -
Blend the atmosphere:
While the mountain paint is still slightly tacky, use a dry brush to feather some of the lighter blue upwards into the dark navy sky, creating a misty, atmospheric look around the peaks. -
Create the stars:
Dip an old toothbrush into white paint diluted slightly with water. Hold it near the pot and run your thumb across the bristles to splatter tiny white dots across the navy sky area. -
Add distinct stars:
Use a fine point brush or the tip of a toothpick to add a few larger, specific stars or planets. You can even add a tiny cross-shape to make a twinkling star effect. -
Silver highlights:
For a magical touch, dry brush a tiny amount of silver metallic paint over the mountain ridges and lightly amidst the stars. -
Seal the work:
Once the paint is completely dry, apply a coat of matte or satin varnish to protect your artwork from moisture and scratches.
Galaxy Depth Tip
Sponge on tiny patches of purple or black in the navy sky area before splattering the stars. This subtle color variation adds incredible depth to space scenes.
Cracking Issues?
If small cracks appear as the clay dries, mix a tiny bit of fresh clay with water to make a paste (slip) and fill them in just before sanding.
Pop in your favorite succulent or cactus and enjoy your personalized view of the cosmos