If you’ve got a little oven-bake clay and a free afternoon, you can make pieces that look surprisingly polished. I pulled together my favorite polymer clay projects—easy enough for beginners, but still satisfying for those of us who love a clean, modern finish.
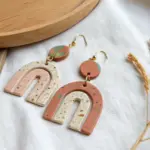
Geometric Statement Earrings
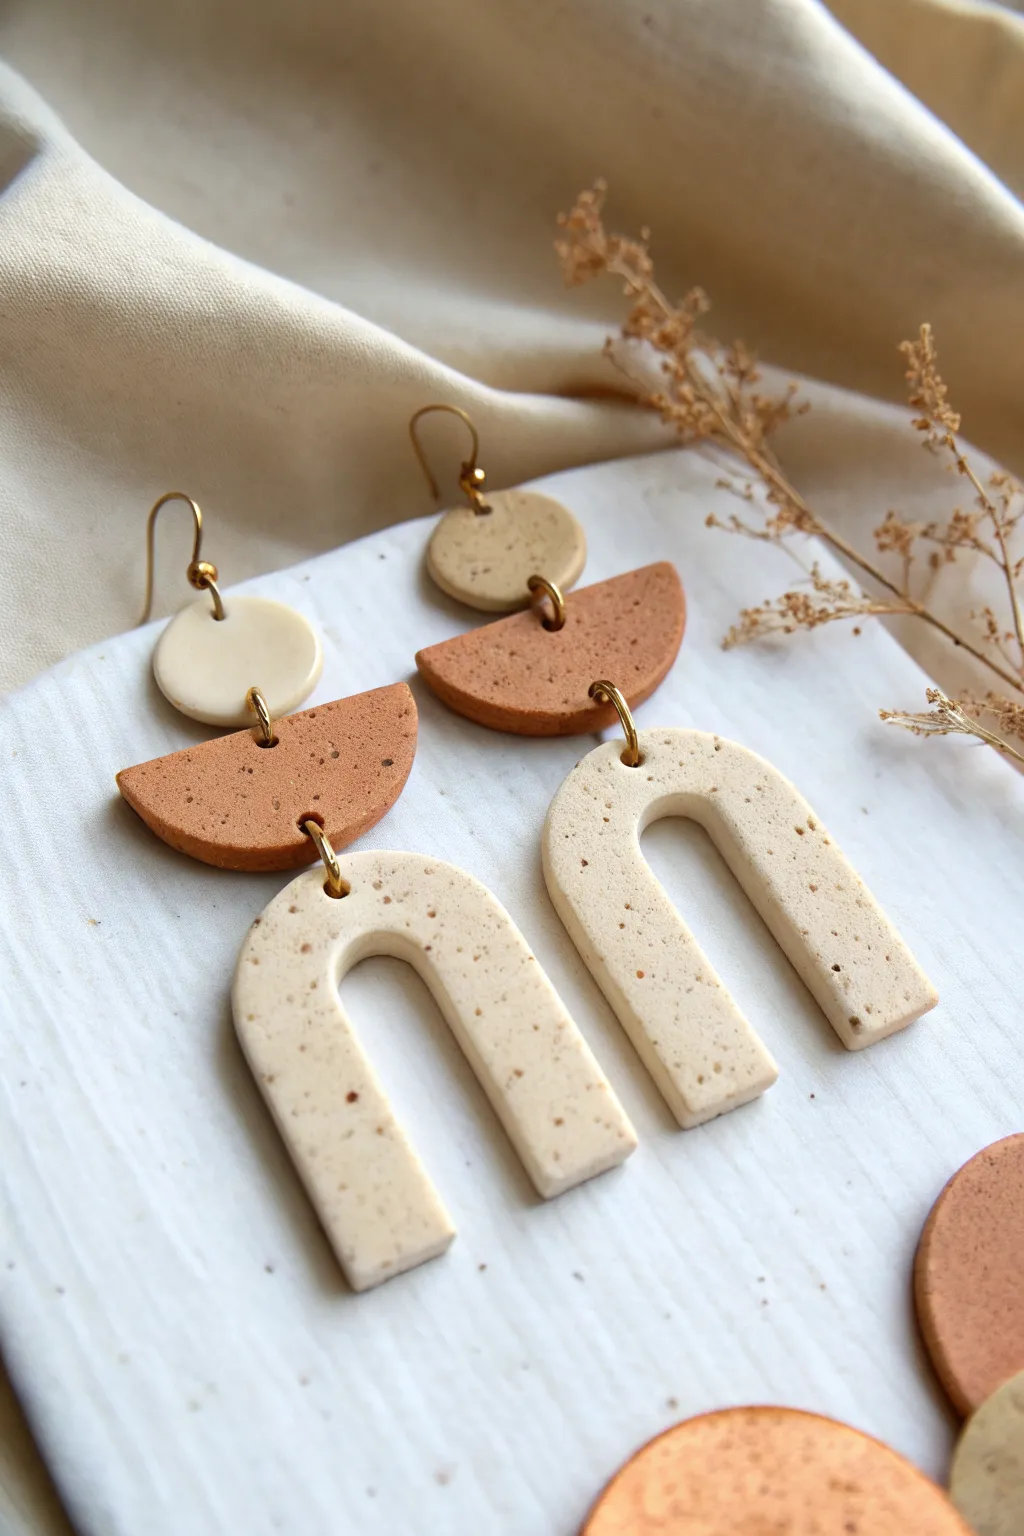
These trendy, bohemian-style earrings combine earthy terracotta tones with creamy speckled beige in a modern geometric design. By linking simple shapes—circles, semi-circles, and arches—you create a statement accessory that feels both artistic and versatile.
How-To Guide
Materials
- Polymer clay in beige (speckled effect) and terracotta/rust
- Coarse black pepper or dried coffee grounds (faking speckles)
- Acrylic rolling pin or pasta machine
- Circle cutters (approx. 10mm and 25mm)
- Arch cutter or long flexible blade
- Jump rings (gold, approx. 6-8mm)
- Earring hooks (gold)
- Needle tool or toothpick
- Jewelry pliers (two pairs)
- Parchment paper and ceramic tile for baking
- Fine grit sandpaper (optional)
Step 1: Prepping the Clay
-
Conditioning:
Start by warming up your beige polymer clay in your hands until it is soft and pliable. -
Creating the Speckle:
If your beige clay isn’t pre-speckled, flatten it out and sprinkle a tiny pinch of coarse black pepper or dried coffee grounds onto it. Fold the clay over and knead until the specks are evenly distributed. -
Rolling:
Roll the beige clay out on a flat surface to an even thickness of about 3mm. Do the same for the terracotta clay.
Step 2: Cutting the Shapes
-
Top Circles:
Using your smallest circle cutter, punch out two circles from the beige speckled clay sheet. These will be the studs or top connectors. -
Middle Semi-Circles:
Cut two circles from the terracotta clay using a medium-sized cutter. Slice each circle strictly in half to create four semi-circles, though you will only need two for this design. -
Bottom Arches:
Use a specialized arch cutter on the beige clay to create the large bottom pieces. If you don’t have a cutter, use a small circle cutter to remove the inner curve first, then use a blade to cut the outer U-shape freehand. -
Refining Edges:
I like to gently smooth the raw edges with my fingertip to remove any stray bits of clay before baking.
Uneven Surfaces?
If you notice fingerprints before baking, lightly brush the raw clay with a little baby oil or cornstarch to smooth the surface perfectly.
Step 3: Assembly Prep & Baking
-
Piercing Holes:
Using a needle tool, poke holes for the jump rings. The top circle needs one hole at the bottom (and one at the top if adding a hook directly). The semi-circle needs holes at both the top and bottom center. The arch needs one hole at the top center. -
Check Alignment:
Ensure your holes are not too close to the edge to prevent breaking, but close enough for the jump rings to reach. -
Baking:
Arrange pieces on a parchment-lined ceramic tile. Bake according to your clay package instructions (usually 275°F/135°C for 15-30 minutes). -
Cooling:
Allow the pieces to cool completely in the oven or on the counter before handling to ensure maximum strength.
Make It Glossy
After baking, apply a layer of UV resin or glassy polyurethane varnish to the terracotta semi-circle for a contrasting shiny texture against the matte beige.
Step 4: Final Assembly
-
Sanding (Optional):
If there are rough spots or fingerprints, lightly wet-sand the edges and surfaces with fine-grit sandpaper. -
Opening Rings:
Use two pairs of pliers to twist (never pull) your gold jump rings open. -
Connecting Pieces:
Loop the open jump ring through the bottom of the beige circle and the top of the terracotta semi-circle, then close it securely. -
Attaching the Arch:
Repeat the process to connect the bottom of the semi-circle to the top of the beige arch. -
Adding Hardware:
Finally, attach the earring hook to the very top of the beige circle using a small jump ring.
Wear your new geometric statement pieces with pride knowing you hand-sculpted every detail


Marble-Swirl Trinket Dishes
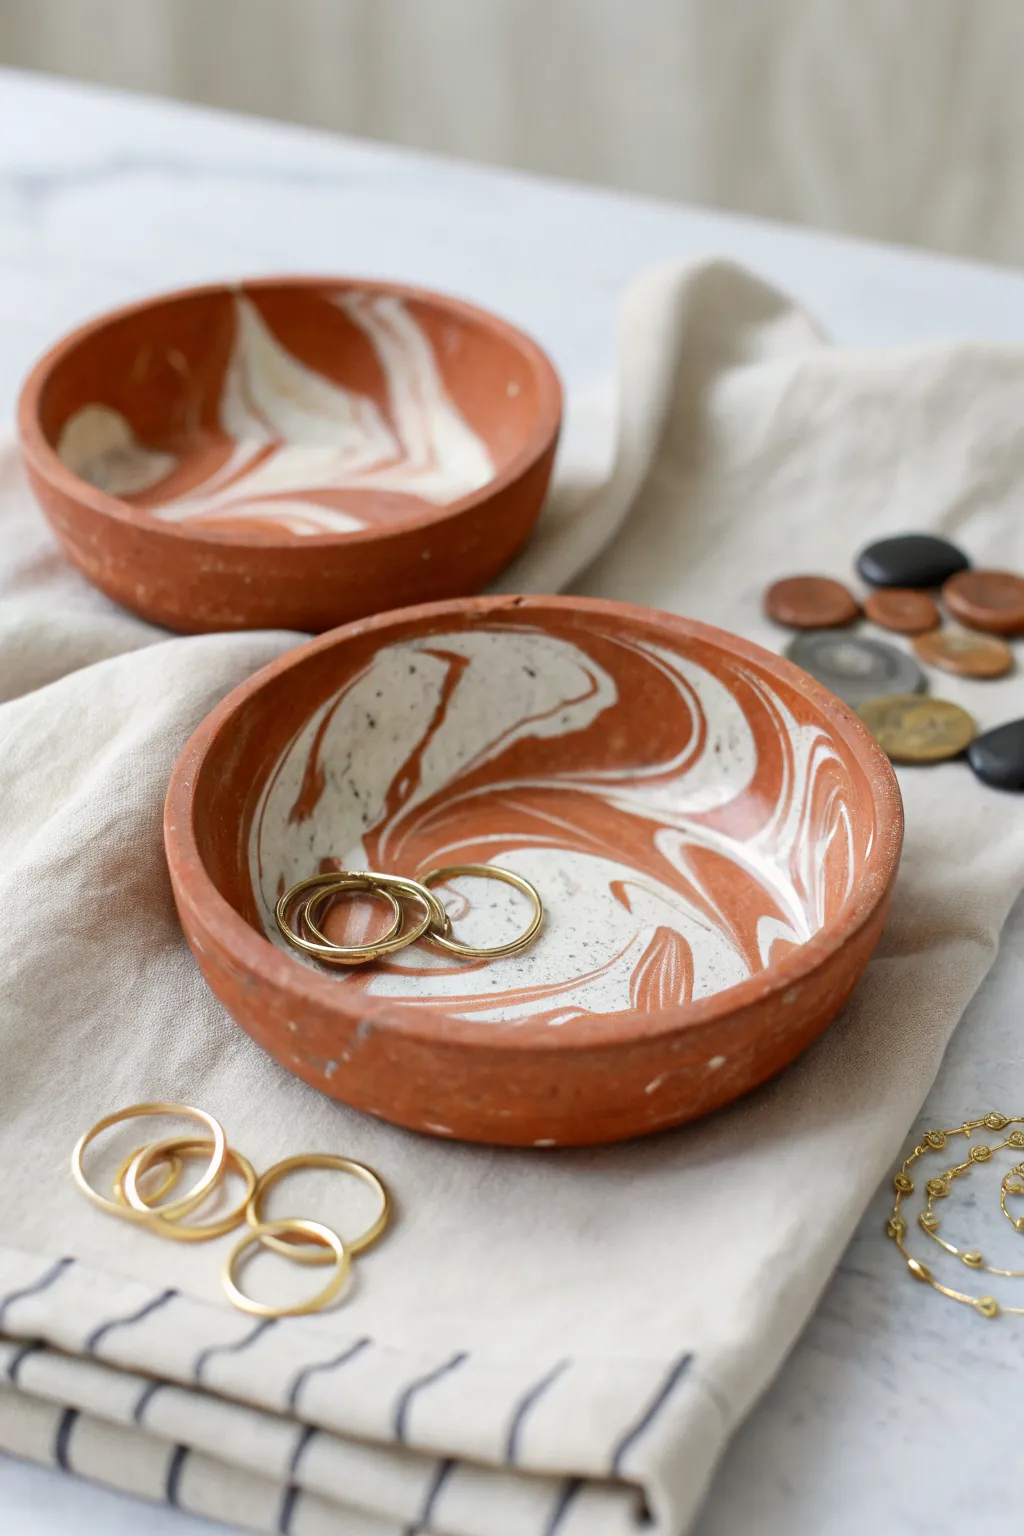
These earthy, sophisticated trinket dishes combine the warmth of terracotta with elegant swipes of white marble. They make the perfect bedside catch-all for your delicate rings and offer a high-end ceramic look without the need for a kiln.
Detailed Instructions
Materials
- Terracotta colored oven-bake clay (e.g., polymer clay)
- White or speckled white oven-bake clay
- Rolling pin or smooth glass jar
- Circle cutter or a bowl to trace around
- Oven-safe bowl (for shaping)
- Craft knife
- Sandpaper (fine grit)
- Matte or satin sealant (optional)
Step 1: Prepping the Clay
-
Condition the clay:
Start by warming up your terracotta clay in your hands. Knead and twist it until it is soft and pliable, which prevents cracking later. -
Prepare the contrast color:
Repeat the conditioning process with a smaller amount of the white clay. You’ll want a ratio of about 4 parts terracotta to 1 part white for the look in the photo. -
Create snakes:
Roll the terracotta clay into a thick log. Then, roll your white clay into several thinner snakes.
Step 2: Creating the Marble Effect
-
Combine the colors:
Lay the thin white snakes lengthwise along the terracotta log. Twist the entire bundle together like a candy cane. -
Fold and roll:
Fold the twisted log in half and roll it out again. Repeat this twist, fold, and roll motion a few times. -
Check the pattern:
Be careful not to over-mix, or the colors will blend into a solid light orange. You want distinct streaks of white remaining. -
Ball it up:
Once you like the striations, roll the clay into a smooth ball. I usually look for the side with the most interesting white veins to face upward.
Muddy colors?
If your white clay turns pink or disappears, you twisted too many times. Stop mixing earlier while the white stripes are still bold.
Step 3: Shaping the Disk
-
Roll out the slab:
Using your rolling pin, flatten the ball into a smooth slab about 1/4 inch thick. Rotate the clay as you roll to keep an even thickness. -
Cut the circle:
Place your circle cutter or a small bowl onto the clay slab to use as a template. Cut around it with a craft knife for a clean edge. -
Soften the edges:
Use your fingertip to gently smooth the sharp cut edge of the clay disk so it looks more organic and finished.
Add some glam
Paint the rim of the finished dish with liquid gold leaf or a gold paint pen for a chic, gilded edge detail.
Step 4: Forming and Baking
-
Shape the bowl:
Gently press your clay circle into the inside of an oven-safe bowl. This form will support the clay while it bakes so it holds a cupped shape. -
Refine the rim:
Press the clay firmly against the bottom and slightly up the sides, ensuring no air bubbles are trapped underneath. -
Bake:
Place the oven-safe bowl with the clay inside into your home oven. Bake according to the specific temperature and time on your clay package instructions. -
Cool down:
Once baked, let the clay cool completely inside the form. Removing it while hot can cause warping.
Step 5: Finishing Touches
-
Pop it out:
Ideally, the clay should pop right out of the form once cool. If it sticks slightly, gently wiggle the edges. -
Sand the rim:
Take a piece of fine-grit sandpaper and lightly buff the top rim to remove any imperfections or sharp spots. -
Seal (Optional):
For a finish closer to the photo, leave the clay raw or apply a very thin layer of matte varnish to protect it from oils.
Place your new dish on a dresser to add a touch of handmade warmth to your daily routine


Leaf-Shaped Ring Trays
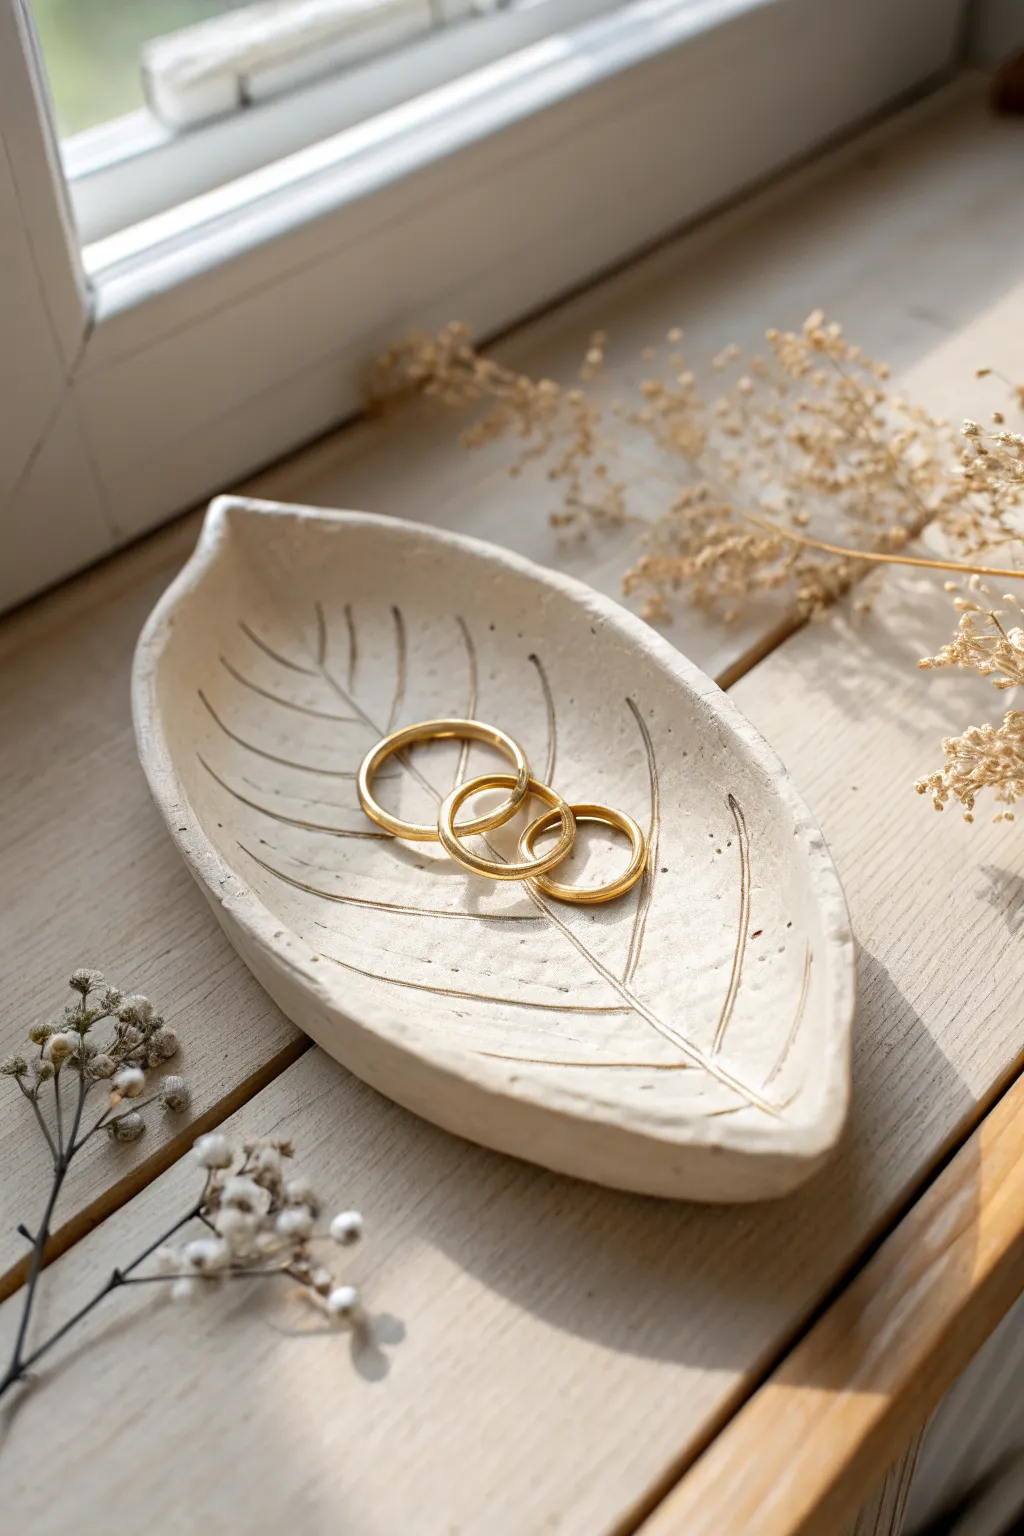
This elegant, minimalist catch-all brings organic beauty to your bedside table with its natural veins and subtle, earthen texture. Modeled after a real leaf shape, the creamy ceramic-like finish makes it the perfect resting spot for your favorite gold jewelry.
Step-by-Step
Materials
- White or ecru oven-bake polymer clay (approx. 2 oz)
- Small rolling pin or acrylic roller
- Leaf template (printed paper or a real leaf)
- Craft knife or scalpel blade
- Needle tool or toothpick
- Small bowl or curved baking surface
- Fine-grit sandpaper (400-600 grit)
- Brown acrylic paint
- Water
- Paper towels
- Paintbrush
- Matte finish varnish (optional)
Step 1: Shaping the Leaf
-
Condition the Clay:
Begin by warming the polymer clay in your hands, kneading it until it becomes soft, pliable, and easy to work with. -
Roll it Out:
Use your rolling pin or acrylic roller to flatten the clay into an even slab. Aim for a thickness of about 1/4 inch (6mm) to ensure the dish is sturdy but elegant. -
Cut the Shape:
Place your leaf template or a real leaf directly onto the clay slab. -
Trace and Cut:
Carefully trace around the edge of the leaf with your craft knife, cutting away the excess clay. Remove the template once finished. -
Smooth the Edges:
Dip your finger in a tiny bit of water or baby oil and gently run it along the cut edges to smooth out any harsh angles or burrs left by the knife.
Step 2: Adding Details & Curing
-
Draw the Midrib:
Using a needle tool or the tip of a toothpick, gently scour a central line down the middle of the leaf shape, stopping just before the tip and the base. -
create the Veins:
Etch angled lines branching out from the center line to create the leaf’s veins. Press firmly enough to leave a visible groove, but be careful not to cut all the way through. -
Add Texture:
To mimic the organic look in the photo, lightly tap the surface of the clay with a crumpled piece of aluminum foil or a stiff bristle brush. -
Form the Curve:
Carefully lift your clay leaf and place it inside a small, oven-safe bowl or draping it over a curved form. This ensures it bakes into a cupped shape suitable for holding rings. -
Bake:
Bake the clay according to the manufacturer’s instructions (usually around 275°F or 135°C for 15-30 minutes). Let it cool completely inside the oven or on a rack before handling.
Clean Cuts Only
Chill your rolled clay slab in the fridge for 10 minutes before cutting. Firm clay cuts much cleaner and drags less under the knife.
Step 3: Finishing Touches
-
Sand for Smoothness:
Once cool, inspect the edges. If there are any rough spots, gently buff them away with fine-grit sandpaper. -
Prepare a Wash:
Mix a small drop of brown acrylic paint with plenty of water to create a very thin, watery wash. -
Apply the Wash:
Brush the watery paint over the entire surface, ensuring it pools into the engraved veins. -
Wipe Away:
Immediately use a paper towel to wipe the surface clean. I like to be fairly aggressive here—the goal is to leave paint only deep inside the crevices to accentuate the design. -
Seal (Optional):
For extra durability, you can apply a thin coat of matte varnish, though leaving it bare creates a lovely raw stone effect.
Gilded Edges
Once the antique wash is dry, paint just the rim of the leaf with liquid gold leaf or metallic paint for a luxurious, high-end finish.
Now your delicate leaf dish is ready to organize your jewelry with a touch of nature-inspired charm


Colorful Clay Beads
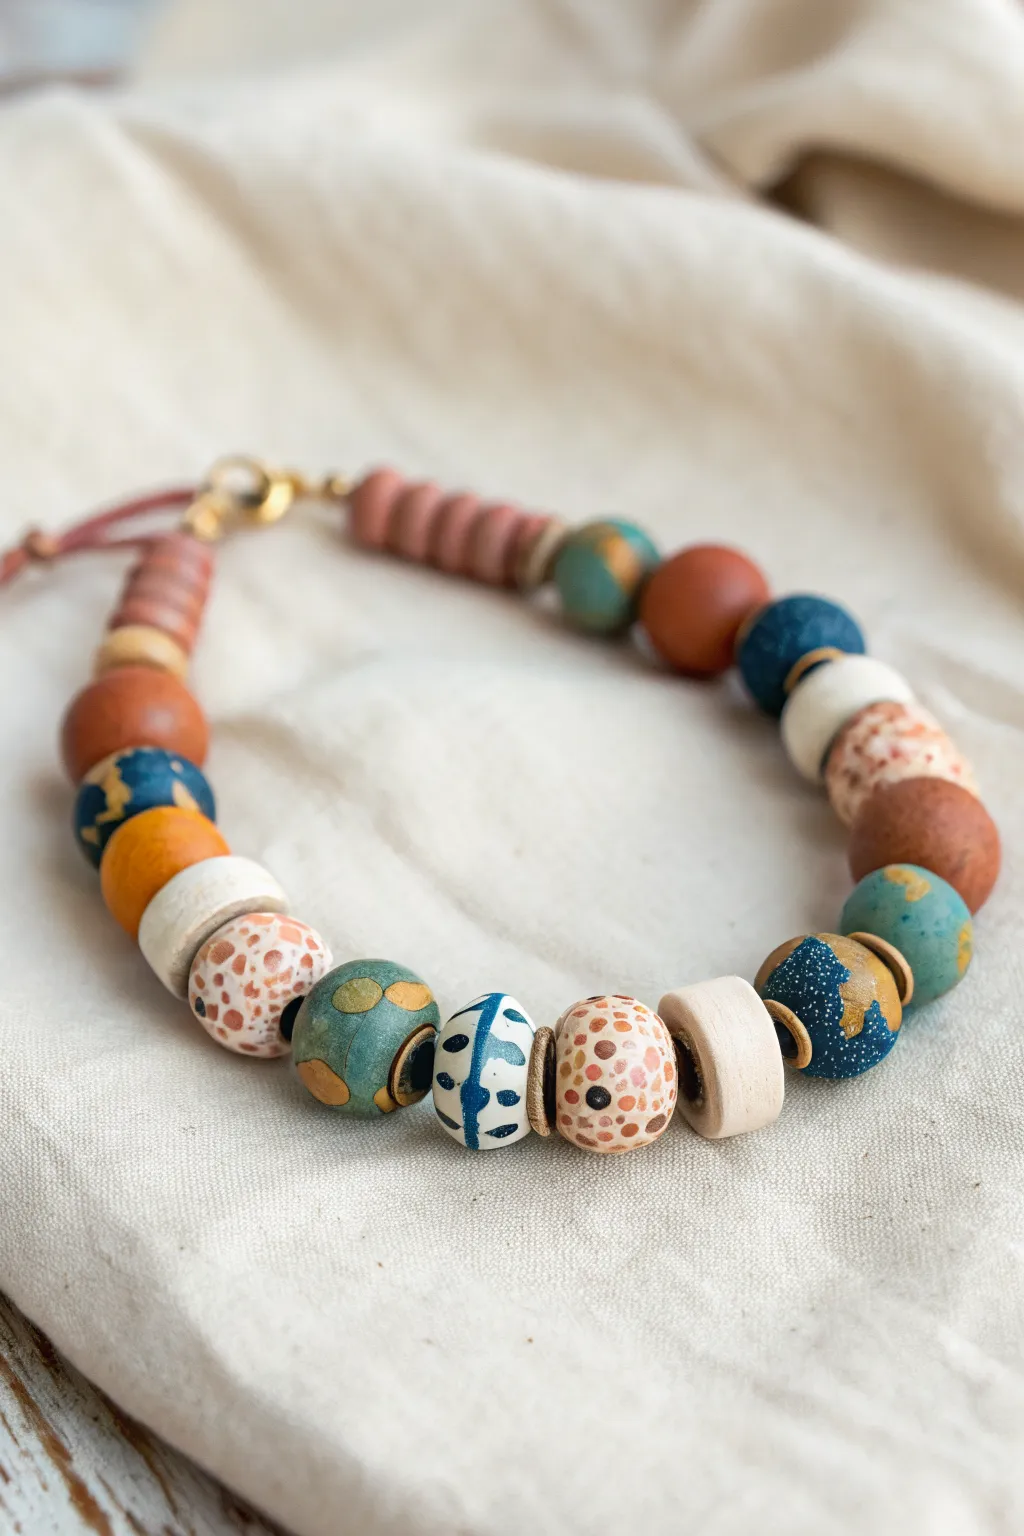
Embrace earthy tones and organic textures with this stunning polymer clay bead bracelet, featuring a mix of speckled, solid, and patterned designs. It’s a perfect beginner-friendly project that results in a high-end, boutique-style accessory.
Step-by-Step Tutorial
Materials
- Polymer clay (white, terracotta, teal, navy blue, ochre yellow)
- Acrylic rolling pin or clay machine
- Bead piercing pins or toothpicks
- Small circle cutter
- Soft-bristled brush or toothbrush (for texturing)
- Acrylic paint (black and brown)
- Sandpaper (fine grit)
- Elastic cord or jewelry wire with clasp
- Oven-safe baking sheet
- Parchment paper
Step 1: Color Mixing and Prep
-
Condition the clay:
Begin by kneading each block of polymer clay in your hands until it becomes soft and pliable. This conditioning step is crucial to prevent cracking later. -
Create custom shades:
Mix a small amount of terracotta into white clay to create a soft peach tone, and blend a touch of black into the teal for a deeper, moodier ocean color. Keep your solids pure for contrast. -
Make the ‘granite’ mix:
To create the faux stone look seen on the white and teal beads, take tiny shavings of hard, dry black clay or use coarse black pepper and knead them into your base colors until distributed.
Step 2: Shaping the Beads
-
Roll spheres:
Pinch off evenly sized portions of clay and roll them between your palms to create smooth, round beads about 1/2 inch in diameter. Make roughly 6-8 of these in various colors. -
Form geometric spacers:
For the flat washer-style beads, roll a snake of cream clay, slice it into thin discs, and gently smooth the edges. Do the same with the terracotta clay but keep the cylinder thicker to create the tube beads seen near the clasp. -
Create the patterned focal bead:
Form a white oval bead. Using a very thin snake of blue clay, press a simple leaf or abstract line design onto the surface and gently roll the bead again to embed the pattern flush with the surface. -
Pierce the holes:
Using a bead piercing pin or finish nail, carefully drill a hole through the center of each bead. I find twisting the pin while pushing helps maintain the bead’s shape better than pushing straight through.
Smooth Operator
To remove fingerprints without sanding later, lightly brush the raw clay beads with a little cornstarch or baby oil before baking to smooth the surface perfectly.
Step 3: Texturing and Design
-
Apply speckles:
Dilute a small amount of brown or black acrylic paint with water. Dip a toothbrush into the mixture and flick the bristles with your thumb to spray fine speckles over the unbaked beads for an organic, pottery look. -
Painted dots technique:
For the specific spotted bead, use the end of a paintbrush handle dipped in metallic gold or contrasting clay paint to make precise dots on a peach-colored bead. -
Gold leaf accents:
If desired, press tiny flakes of gold leaf onto the teal and navy beads before baking to mimic natural mineral veins.
Make it a Set
Save your leftover custom-mixed clay to make a matching pair of drop earrings. Use two disc beads and one round bead on a headpin for a cohesive look.
Step 4: Baking and Assembly
-
Bake carefully:
Arrange the beads on a parchment-lined baking sheet. Bake according to your clay manufacturer’s instructions (usually 275°F for 15-30 minutes). Use an accordion-folded piece of cardstock to hold the beads in the valleys so they don’t roll. -
Cool and finish:
Allow the beads to cool completely. If any fingerprints remain, lightly wet-sand them with fine-grit sandpaper for a professional matte finish. -
Layout the design:
Lay out the beads in your desired order on a bead board or towel. Alternating large round beads with the flat disc spacers creates a nice rhythm. -
Stringing:
Thread your beads onto elastic cord for a simple stretch bracelet, or use jewelry wire and crimp beads to attach a metal clasp like the one in the photo. Double-check the knot security before trimming ends.
Now you have a custom, artisan-style piece of jewelry ready to wear or gift

The Complete Guide to Pottery Troubleshooting
Uncover the most common ceramic mistakes—from cracking clay to failed glazes—and learn how to fix them fast.
Minimal Pendant Necklaces
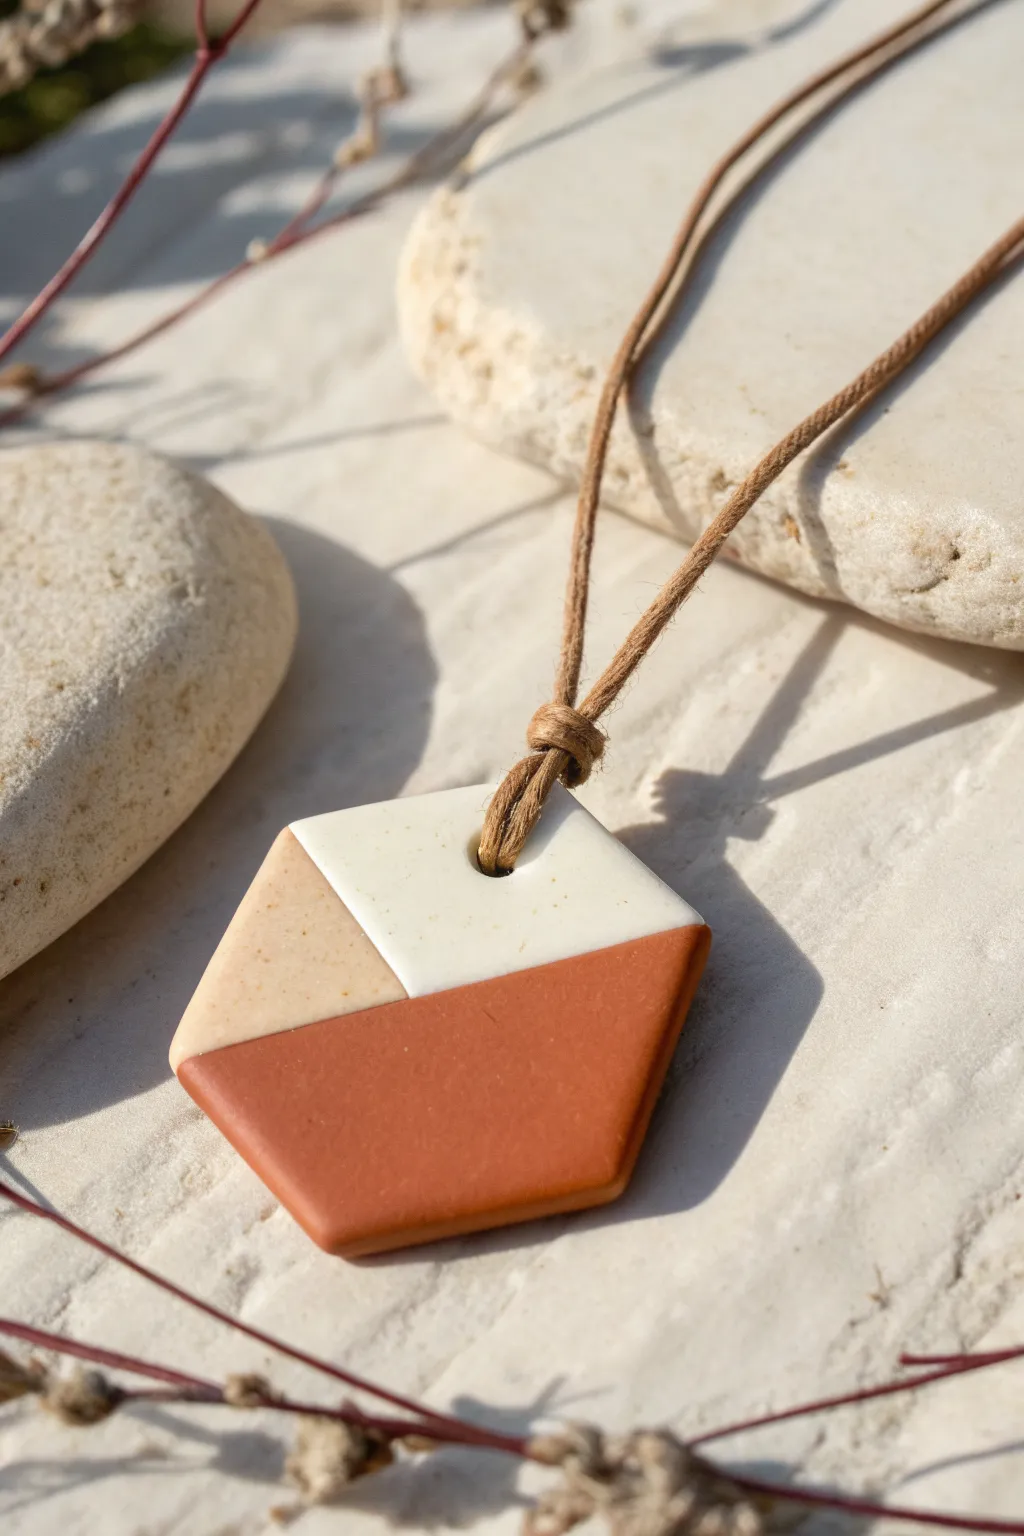
Capture the warmth of earthy tones with this modern, geometric necklace. This hexagonal pendant combines terracotta, sand, and cream clay in a sleek color-block design that’s surprisingly simple to assemble.
Detailed Instructions
Materials
- Oven-bake polymer clay (terracotta/rust, beige/sand with speckles, and cream/white)
- Clay rolling pin or acrylic roller
- Hexagon clay cutter (approx. 1.5 – 2 inches)
- Tissue blade or sharp craft knife
- Needle tool or small straw for piercing
- Parchment paper or ceramic tile (for baking)
- Fine-grit sandpaper (400-800 grit)
- Brown waxed cotton cord or leather cord
Step 1: Preparing the Clay Slab
-
Condition the clay:
Start by kneading each color of clay separately until they are soft and pliable. This step prevents cracking later. For the beige and cream sections, I like to mix in a tiny pinch of black pepper or craft sand to create that lovely speckled stone effect if your clay isn’t pre-speckled. -
Roll out sheets:
Roll each color into a sheet of equal thickness, aiming for about 3mm to 4mm. Using depth guides or playing cards stack on either side of your roller can ensure perfect uniformity. -
Cut the geometric shapes:
You will need to create the puzzle pieces. Using your tissue blade, cut a large trapezoid shape from the terracotta clay—this will be the bottom half of your hexagon. -
Prepare the top sections:
Cut a smaller triangle or trapezoid from the beige clay and another from the cream clay. Don’t worry about them fitting the hexagon cutter perfectly yet; focus on getting straight edges where the colors meet. -
Assemble the block:
On a clean work surface, press the cut edges of your three clay pieces together gently. The terracotta should be at the bottom, with the beige and cream sitting side-by-side on top of it to form a rough sheet that is larger than your cutter. -
Smooth the seams:
Cover the assembled clay with a piece of parchment paper. Use your roller to gently roll over the seams. The goal is to bond the colors together without distorting the straight lines too much.
Clean Edges Trick
Before baking, dip your finger in a little baby oil or cornstarch and rub it lightly over your fingerprints on the clay to smooth them out completely.
Step 2: Cutting and Finishing
-
Cut the hexagon:
Position your hexagon cutter over the clay slab. Adjust it until the seam lines sit exactly where you want them, usually with the horizontal line slightly below the center. Press down firmly to cut the shape. -
Remove excess:
Peel away the scrap clay from outside the cutter before lifting the cutter itself. This helps keep the hexagon edges clean and sharp. -
Create the hole:
Using a needle tool or a small straw, poke a hole near the top center of the hexagon, in the cream section. Make sure the hole is large enough for your cord to pass through twice. -
Soften the edges:
Gently smooth the cut edges of the pendant with your finger to remove any sharpness or stray bits of clay. -
Bake the pendant:
Place the piece on a ceramic tile or parchment-lined baking sheet. Bake according to your clay package instructions (usually 275°F/130°C for 15-30 minutes). -
Cool down:
Allow the pendant to cool completely in the oven or on a wire rack. Do not handle it while hot as polymer clay is fragile until fully cool.
Step 3: Assembly
-
Sand for perfection:
Once cool, use fine-grit sandpaper to briefly sand the edges and back if needed. You can wet-sand (sand under running water) to avoid clay dust. -
Prepare the cord:
Cut a length of brown waxed cotton cord, roughly 24-30 inches depending on how low you want the pendant to hang. -
Attach the pendant:
Thread one end of the cord through the hole from front to back. Then thread it back through from back to front, creating a loop. Wait, actually a simpler cow hitch knot works best: fold the cord in half, push the loop through the hole, and pull the tails through the loop. -
Tie the detailed knot:
To match the image exactly, hold the pendant and create a gathering knot (or a simple overhand knot) with both strands right above the pendant hole. This secures the pendant firmly in place. -
Final touches:
Check that the knot is tight and trim any excess fuzz if you used a fibrous cord. Your necklace is now ready to wear.
Make It Shine
After baking and sanding, apply a thin layer of matte or gloss water-based polyurethane varnish to protect the surface and pop the colors.
Now you have a stylish, custom-made accessory that pairs perfectly with casual everyday outfits
Moon Phase Hair Clips
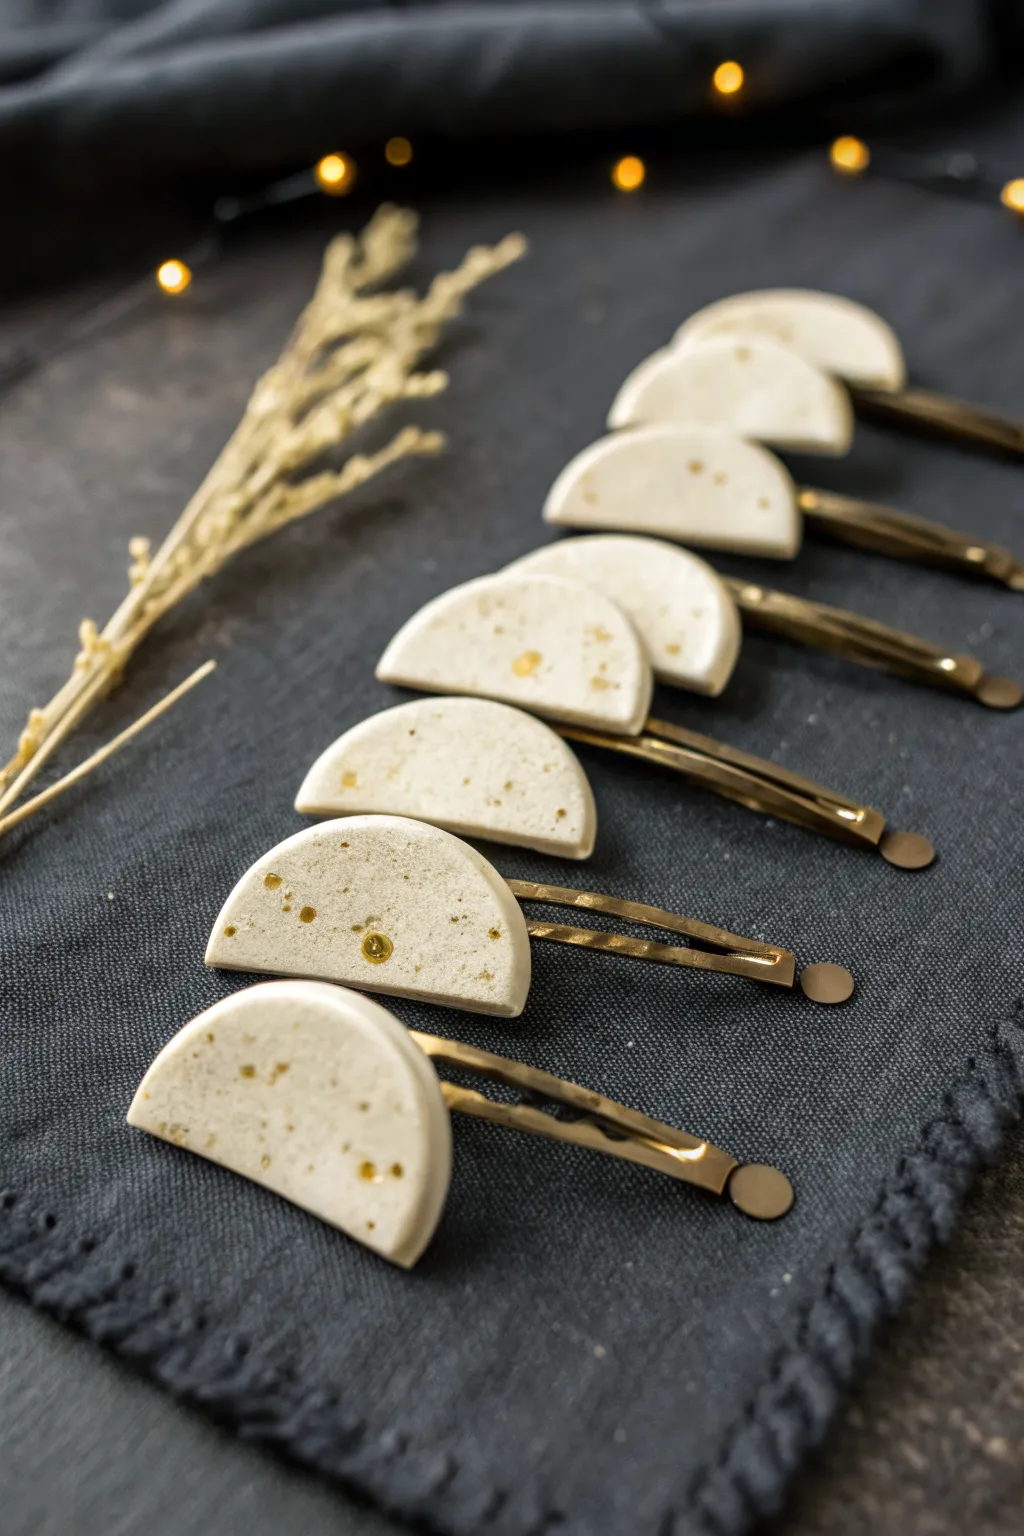
These elegant hair clips combine the minimalist beauty of semi-circles with a touch of glamour thanks to gold leaf detailing. The creamy white clay mimics the look of stone or ceramic, making for a sophisticated accessory perfect for everyday wear or special occasions.
Step-by-Step Guide
Materials
- White or translucent white polymer clay
- Gold leaf flakes or loose gold glitter
- Rolling pin or pasta machine
- Round cutter (approx. 1-1.5 inch diameter)
- Blade or craft knife
- Gold bobby pins or barrette blanks
- Strong craft glue or E6000
- Oven for baking
- Parchment paper
- Gloss varnish or resin (optional)
Step 1: Preparing the Clay
-
Condition the Clay:
Begin by kneading your white polymer clay in your hands until it becomes soft, pliable, and warm. -
Add Texture:
To achieve a stone-like effect, flatten the clay slightly and sprinkle a small pinch of gold leaf flakes or glitter onto the surface. -
Mix Inclusions:
Fold the clay over the inclusions and knead it again to distribute the gold flecks throughout the mixture randomly. -
Roll Out:
Place the clay between two sheets of parchment paper or use a pasta machine to roll it into a flat slab, approximately 3-4mm thick.
Clean Cuts
Chill your rolled clay slab in the fridge for 10 minutes before cutting circles. Cooler clay is firmer and distorts less when sliced.
Step 2: Shaping the Moons
-
Cut Circles:
Using your round cutter, punch out several circles from the rolled clay slab. Lift them carefully to avoid distortion. -
Create Halves:
Take your sharp blade and slice each circle directly down the center to create two perfect semi-circles. -
Smooth Edges:
Gently run your fingertip along the cut edge and the curved edge to soften any sharp corners. -
Check for Imperfections:
Inspect the surface for fingerprints and lightly buff them out before baking.
Step 3: Baking and Assembly
-
Arrangement:
Lay the semi-circles flat on a baking sheet lined with parchment paper or a ceramic tile. -
Bake:
Bake the pieces according to your specific clay brand’s package instructions. Usually, this is around 275°F (135°C) for 15-30 minutes. -
Cool Down:
Once baked, remove from the oven and allow the clay pieces to cool completely before handling them. -
Optional Glaze:
If you want extra shine or protection for the gold flecks, brush a thin layer of gloss varnish over the tops and let dry. -
Prepare Adhesion:
Rough up the flat pad of the bobby pin slightly with sandpaper to help the glue stick better. -
Apply Glue:
Dab a small amount of strong adhesive like E6000 onto the flat pad of the gold hair clip. -
Attach:
Press the cooled clay semi-circle firmly onto the glue, ensuring it is centered. -
Cure:
Leave the clips undisturbed for at least 24 hours to ensure the bond is fully secure.
Celestial Set
Instead of just half-moons, cut different moon phases like crescents and gibbous shapes to create a full lunar cycle set to wear together.
Clip these into a messy bun or braid to add a little celestial shine to your hairstyle


What Really Happens Inside the Kiln
Learn how time and temperature work together inside the kiln to transform clay into durable ceramic.
Personalized Monogram Keychains
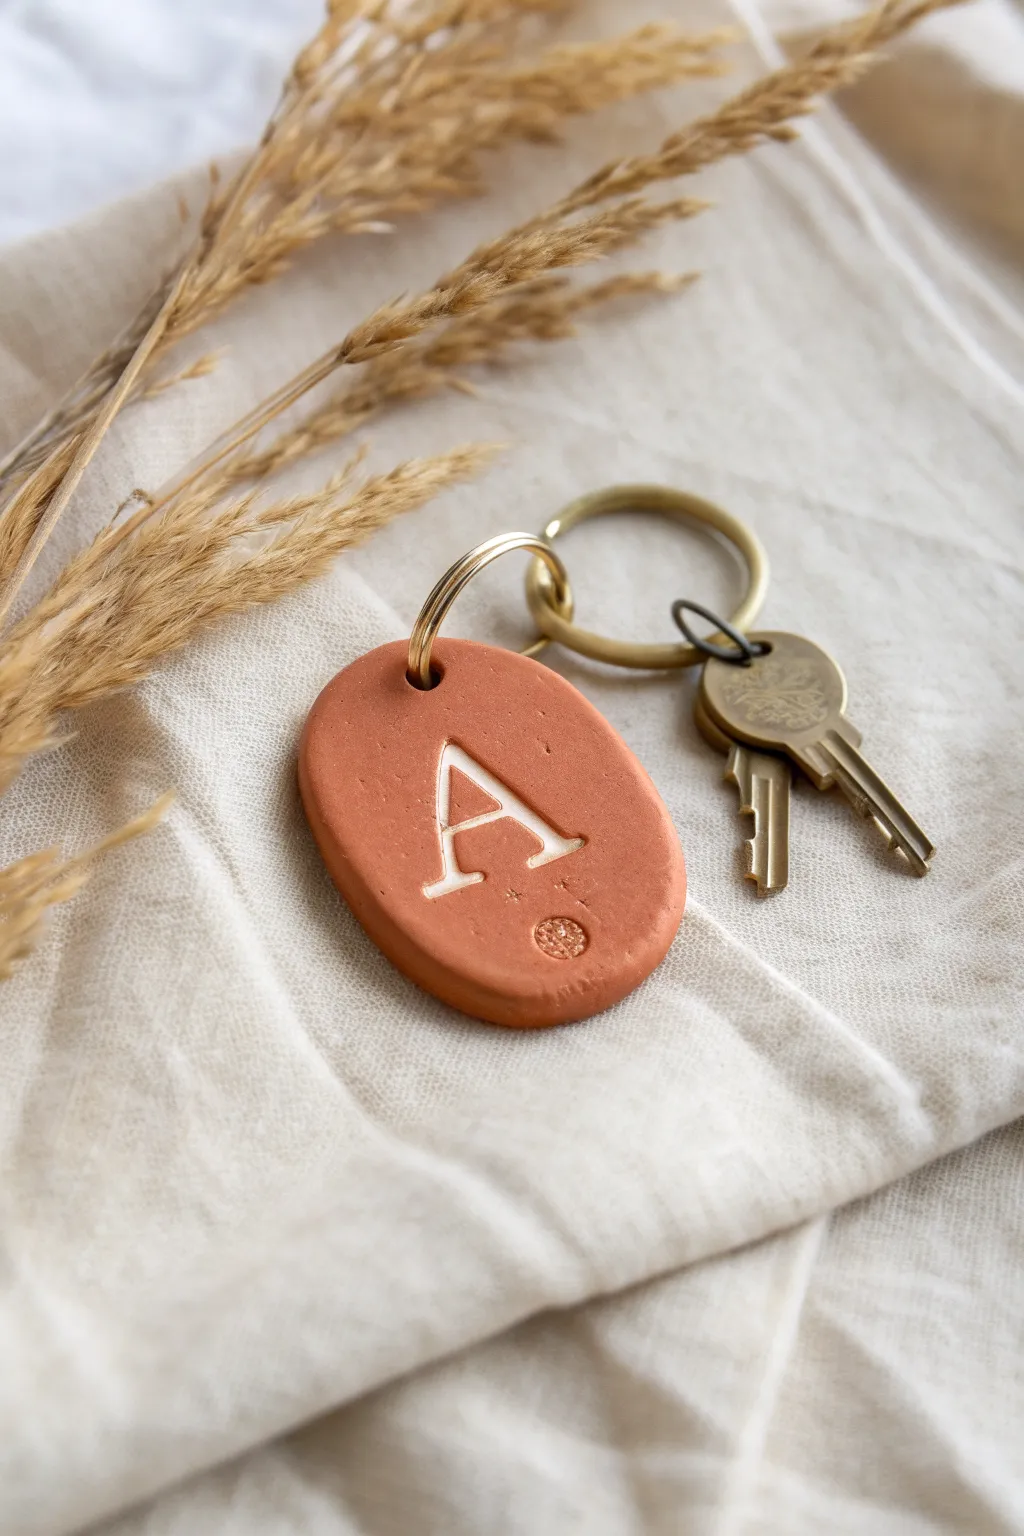
Create a sophisticated, minimalist accessory with this personalized monogram keychain project. The warm terracotta clay paired with crisp white lettering and gold hardware gives it a timeless, artisanal look that serves as a perfect gift or a treat for yourself.
Detailed Instructions
Materials
- Terracotta-colored oven-bake polymer clay (e.g., Fimo Soft or Sculpey Premo)
- Acrylic rolling pin or clay machine
- Oval clay cutter (approximately 1.5 – 2 inches long)
- Letter stamp set (serif font preferred)
- Small round decorative stamp (optional, for the bottom detail)
- White acrylic paint
- Fine-grit sandpaper (400 to 600 grit)
- Small paintbrush or cotton swab
- Paper towel or baby wipe
- Hand drill or a straw (for creating the hole prior to baking)
- Large gold jump ring (approx. 10mm or larger)
- Standard gold split keyring
- Needle nose pliers (two pairs recommended)
- Ceramic tile or baking sheet with parchment paper
- Oven
Step 1: Shaping the Base
-
Condition the Clay:
Begin by taking a chunk of your terracotta polymer clay and warming it up in your hands. Knead it thoroughly until it is soft, pliable, and free of any air bubbles. -
Roll it Out:
Using your acrylic rolling pin on a clean, flat surface, roll the clay out to an even thickness. Aim for about 1/4 inch (6mm) thick—you want it substantial enough to hold the hardware without breaking. -
Cut the Shape:
Press your oval clay cutter firmly into the rolled clay. Give it a tiny wiggle to ensure a clean cut, then lift the cutter. Peel away the excess clay from the outside. -
Smooth the Edges:
Gently pick up your oval. Use your finger to lightly smooth the sharp edges created by the cutter, rounding them slightly for a more finished, stone-like appearance.
Step 2: Stamping and Baking
-
Position the Letter:
Select the letter for your monogram from your stamp set. I always like to test the stamp on a scrap piece of clay first to check the orientation. Align it vertically in the center of the oval. -
Impress the Monogram:
Press the stamp down firmly and evenly into the clay. You want a deep impression to hold the paint later, but be careful not to push all the way through the clay. -
Add Decorative Detail:
If you are adding a small decorative mark at the bottom, like the small textured circle in the photo, press that stamp gently below the letter now. -
Create the Hole:
Using a straw or a tool of the appropriate size, punch a hole at the very top of the oval. Make sure the hole is large enough to accommodate your thick gold jump ring and is centered about 3-4mm from the edge. -
Bake the Piece:
Transfer your clay oval to a ceramic tile or baking sheet lined with parchment paper. Bake according to your customized clay package instructions (usually 275°F/135°C for 15-30 minutes per 1/4 inch). -
Cool Down:
Once the baking time is up, turn off the oven and let the piece cool completely before handling. This ensures the clay hardens to its maximum strength.
Clean Impressions
Dust your stamps lightly with cornstarch or dip them in water before pressing into the clay. This acts as a release agent and prevents the clay from sticking inside the stamp details.
Step 3: Finishing Touches
-
Sand for Smoothness:
If there are any rough spots, fingerprints, or lint on the surface, gently wet-sand the cured piece using fine-grit sandpaper under running water. -
Apply White Paint:
Squeeze a small amount of white acrylic paint onto a palette. Using a small brush, dab paint generously into the impressed letter and symbol. Ideally, you want the paint to fill the crevices completely. -
Wipe Excess Paint:
Wait about 10–20 seconds for the paint to settle, then take a slightly damp paper towel. Wipe flat across the surface of the clay to remove the excess paint on top, leaving only the white paint trapped inside the engraved lines. -
Dry Completely:
Allow the paint to dry fully. If the white looks translucent, you can repeat the paint-and-wipe process for a more opaque, crisp look. -
Open the Jump Ring:
Using two pairs of pliers, twist the large gold jump ring open. Always twist the ends away from each other (front to back) rather than pulling them apart side-to-side, to maintain the circle shape. -
Assemble the keychain:
Slide the open jump ring through the hole in your clay tag. Before closing it, loop the standard split styling keyring onto the jump ring as well. -
Secure Hardware:
Using your pliers again, twist the jump ring back into a closed position, ensuring the ends meet perfectly flush so the clay piece doesn’t slip out.
Paint Smearing?
If acrylic paint smears into the clay pores and stains the surface while wiping, lightly sand the surface again with high-grit sandpaper to remove the stained top layer.
Now you have a chic, custom keychain ready to organize your keys or gift to a friend
Ring Cone Holders
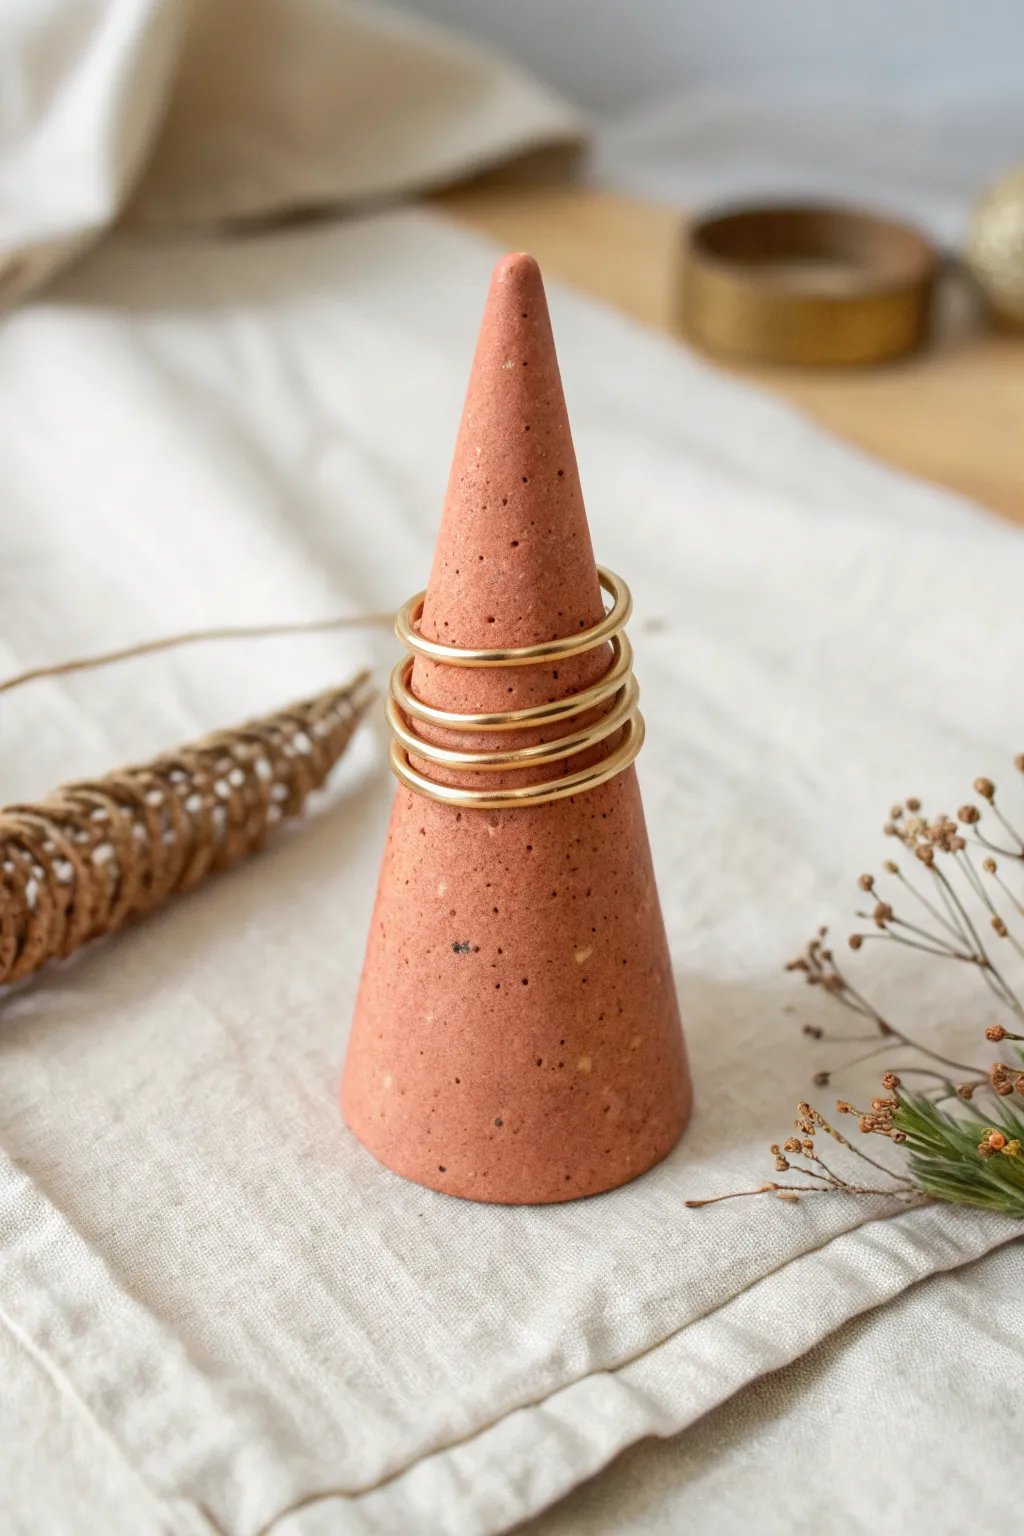
Achieve a stunningly earthy, high-end look with this faux-stone ring cone project. By mixing speckles directly into terracotta-colored clay, you’ll create a functional piece of decor that mimics the texture of natural red granite.
Step-by-Step Guide
Materials
- Terracotta or reddish-brown polymer clay
- Translucent polymer clay
- Ground black pepper or dried coffee grounds
- Sand (fine grain) or beige embossing powder
- Rolling pin or acrylic roller
- Craft knife or tissue blade
- Smooth work surface (ceramic tile or glass)
- Oven (for curing)
- Parchment paper
Step 1: Preparing the Clay Body
-
Condition the base:
Start by taking a block of terracotta-colored clay. Knead it in your hands until it becomes soft, pliable, and easy to work with. -
Add translucency:
Mix in a small amount of translucent clay (about 1 part translucent to 4 parts color). This adds depth and prevents the cone from looking like flat plastic. -
Flatten the mixture:
Roll your conditioned clay mixture out into a thick pancake shape. It doesn’t need to be perfect, just flat enough to sprinkle additives onto. -
Add the ‘granite’ speckles:
Sprinkle a pinch of ground black pepper (or dried coffee grounds) and a pinch of sand over the flattened clay. -
Incorporate the texture:
Fold the clay over to trap the speckles inside. Knead the clay thoroughly again until the pepper and sand are distributed evenly throughout the entire lump. -
Check consistency:
Slice the clay in half to check the inside. If you want a heavier stone texture, add more speckles now and re-knead.
Leaning Tower?
If your cone leans while baking, the clay might be too soft. Pop the raw cone in the fridge for 20 mins before baking to firm it up.
Step 2: Shaping the Cone
-
Form a ball:
Roll your speckled clay into a smooth, tight sphere. Ensure there are no cracks or air bubbles trapped inside. -
Create the basic cone:
Place the ball on your work surface. Using the heel of your hand and a slight rolling motion, apply pressure to just one side of the ball to begin elongating it into a teardrop shape. -
Refine the taper:
Stand the teardrop up on its fat end. Using your palms or a flat acrylic block, gently roll and press the sides to create an even, straight taper toward the top point. -
Flatten the base:
Pick up the cone and tap the bottom firmly against your work surface to create a completely flat base so it stands up straight without wobbling. -
Smooth the surface:
Use your finger pads to gently smooth away any fingerprints. I find a very light touch works best here to avoid denting the clay. -
Final check:
Rotate the cone at eye level. Make sure the tip isn’t bending to one side and that the surface texture looks consistent.
Step 3: Curing and Finishing
-
Prepare for baking:
Place your cone on a baking sheet lined with parchment paper or a ceramic tile. -
Bake the clay:
Bake according to your clay manufacturer’s instructions. Usually, this means 275°F (130°C) for about 15-30 minutes per 1/4 inch of thickness. -
Let it cool:
Allow the cone to cool completely inside the oven with the door slightly ajar. This prevents thermal shock and potential cracking. -
Enhance the texture (Optional):
If the surface looks too shiny after baking, lightly sand it with fine-grit sandpaper to reveal more of the internal speckles and achieve a matte stone finish. -
Clean up:
Wipe the finished cone with a barely damp cloth to remove any sanding dust before displaying your rings.
Avoid Flat Spots
When smoothing the cone, use a flat acrylic block rather than just your fingers. Rolling against the block keeps the sides perfectly straight.
Now you have a chic, modern organizer that makes a perfect home for your favorite stackable rings

TRACK YOUR CERAMIC JOURNEY
Capture glaze tests, firing details, and creative progress—all in one simple printable. Make your projects easier to repeat and improve.
Stamped Pattern Coasters
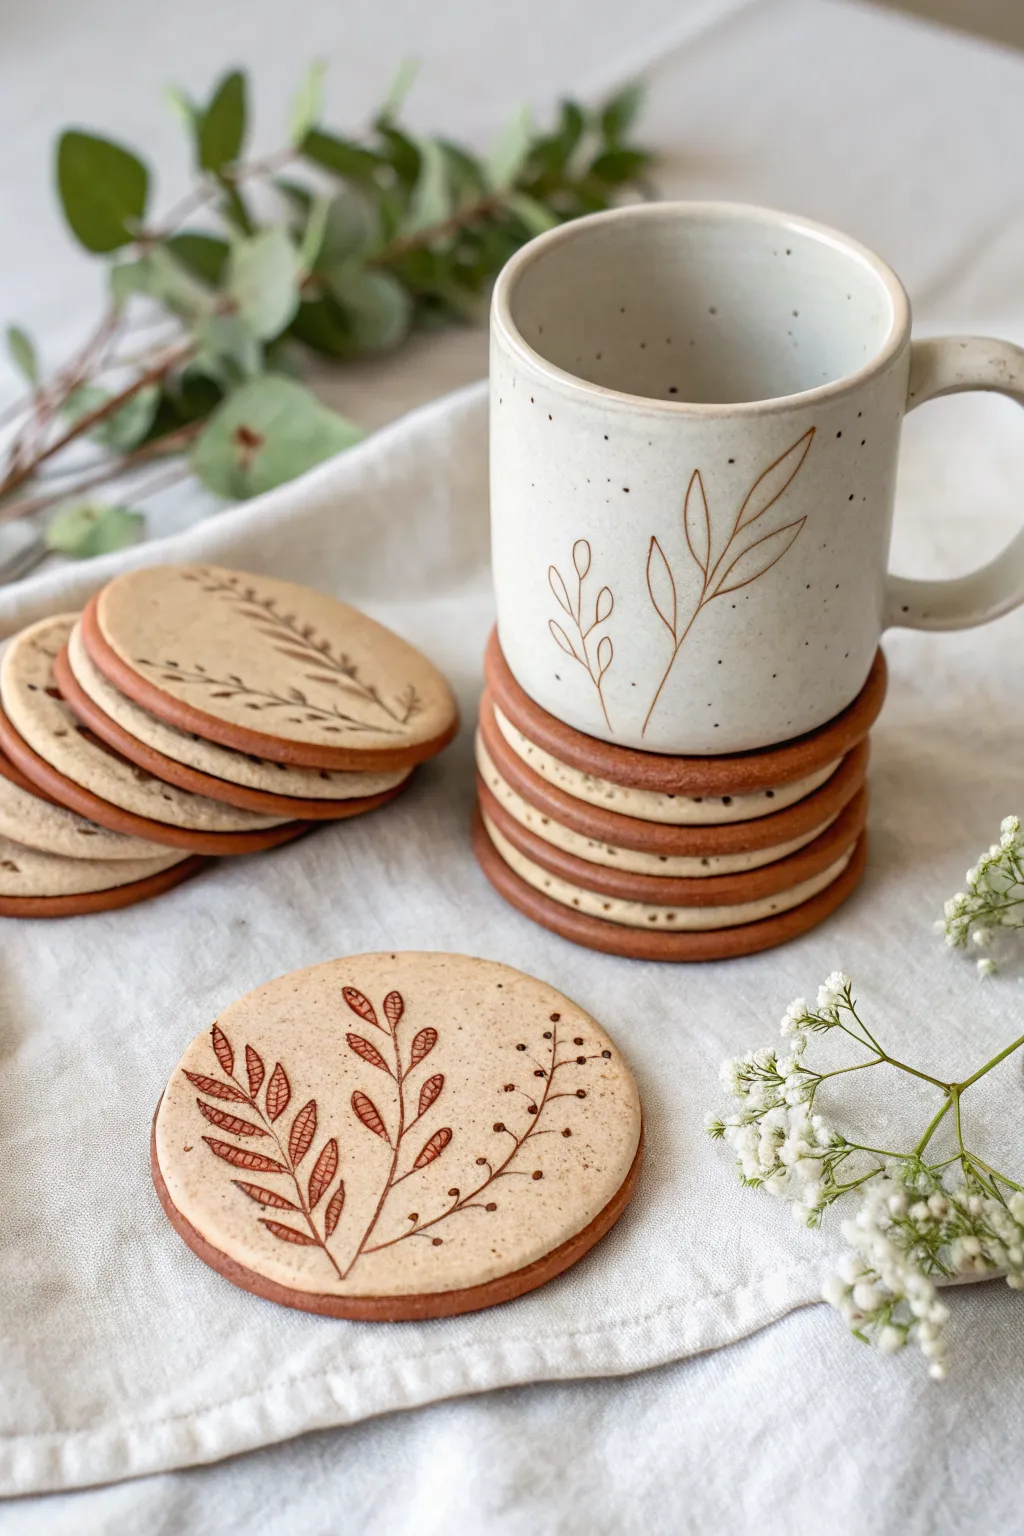
Bring an earthy, handmade touch to your coffee table with these elegant polymer clay coasters. Featuring a lovely two-tone layered effect with terracotta and speckled cream clay, they are finished with delicate, hand-drawn botanical illustrations.
Step-by-Step
Materials
- Terracotta colored polymer clay
- Speckled cream or beige polymer clay
- Acrylic rolling pin
- Large circular cookie cutter (approx. 3.5 – 4 inches)
- Parchment paper or ceramic tile for baking
- Brown waterproof fine-tip pigment pen or dark brown acrylic paint with a fine liner brush
- Oven
- Satin or matte polymer clay varnish
- Small soft paintbrush
- Sandpaper (fine grit, optional)
Step 1: Preparing the Base
-
Condition the terracotta clay:
Start by warming up the terracotta-colored clay in your hands. Knead it thoroughly until it is soft, pliable, and free of any air bubbles. This ensures a strong base for your coaster. -
Roll out the base layer:
Using your acrylic rolling pin, roll the terracotta clay out on a smooth surface or parchment paper. You want an even slab that is about 1/8 inch thick (approx. 3-4mm). -
Cut the base circles:
Press your circular cutter firmly into the clay to create your coaster bases. Gently remove the excess clay and set the circles aside on your baking surface.
Clean Edges Hack
Place a piece of plastic wrap over the clay before using your cutter. This creates a beautifully rounded, domed edge that requires zero sanding later.
Step 2: creating the Top Layer
-
Condition the speckled clay:
Repeat the conditioning process with your speckled cream clay. If you don’t have pre-speckled clay, you can mix a tiny pinch of black pepper or black glitter into plain cream clay for a similar effect. -
Roll the top layer thin:
Roll this cream clay out slightly thinner than the base layer, perhaps around 1/16 inch thick (approx. 2mm). This top layer is purely decorative. -
Cut the top circles:
Using the same circular cutter, cut out an equal number of cream circles. -
Layering the clay:
Carefully lift a cream circle and place it directly on top of a terracotta base circle. Line up the edges as perfectly as possible. -
Bonding the layers:
Gently roll over the stacked circles with your rolling pin just once or twice with light pressure. The goal is to adhere the layers without distorting the round shape. -
Smooth the edges:
Run your finger lightly around the circumference of the coaster to smooth the seam where the two colors meet. This creates that clean, integrated look visible in the photo.
Make a Set
Create a cohesive set by drawing a different stage of plant growth on each coaster—seedling, bud, bloom, and wilting flower.
Step 3: Baking and Finishing
-
Bake the coasters:
Place your clay rounds on a ceramic tile or parchment-lined baking sheet. Bake according to the manufacturer’s instructions for your specific brand of clay—usually around 275°F (135°C) for 30 minutes. -
Cool completely:
Allow the coasters to cool fully in the oven with the door cracked open. This prevents thermal shock and ensures they are perfectly flat. -
Sand edges (optional):
If there are any rough spots on the edges after baking, lightly sand them with fine-grit sandpaper under running water. -
Sketch the design:
Sketching directly on the baked clay can be tricky, so practice your botanical pattern on paper first. Lightly mark the main stem line with a pencil if you need a guide. -
Draw the main stems:
Using a brown waterproof fine-tip pen or a liner brush with acrylic paint, draw the central curved line for your plant stem. Start from the bottom edge and curve upwards. -
Add leaves and details:
Draw small leaves extending from the stem. Vary the shapes—some can be simple outlines, while others can be filled with fine hatch marks for texture. Add tiny dots or ‘berries’ on separate thin stems for variety. -
Seal the artwork:
Once the ink or paint is completely dry, apply a thin coat of satin or matte varnish to the top surface. This protects your drawing from condensation and heat.
Now you have a stunning set of functional art to protect your surfaces in style
Mini Pinch Pot Succulent Planters
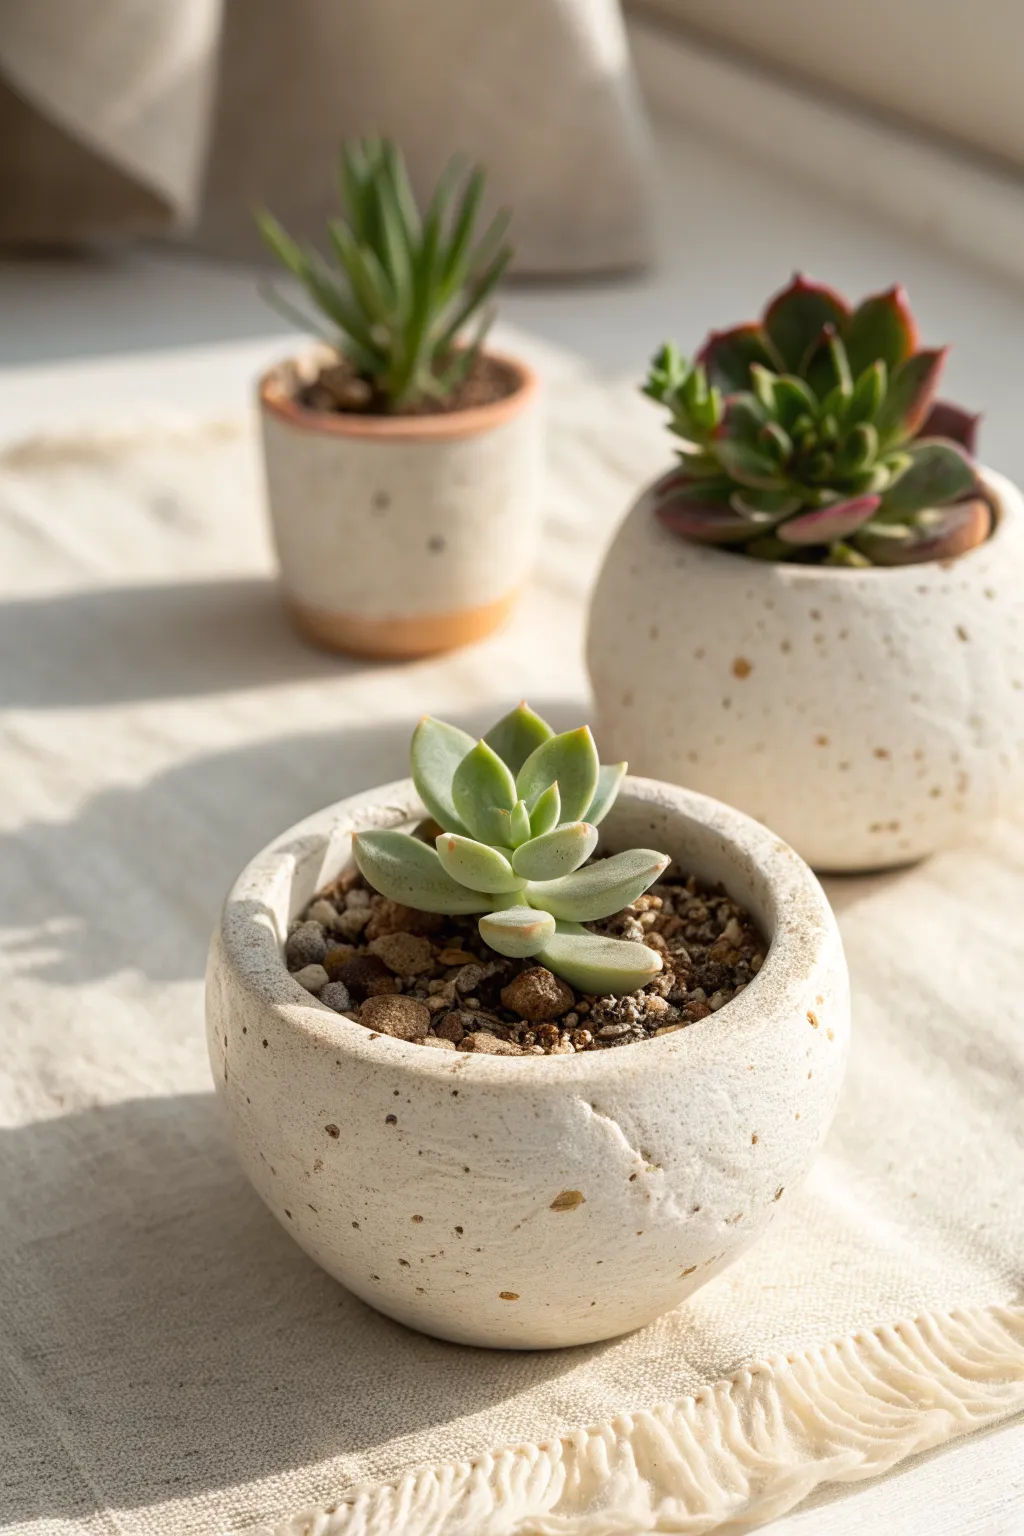
These charming mini planters mimic the look of speckled ceramic or natural stone but are easily crafted from oven-bake clay right in your kitchen. Their organic, rounded shapes and subtle texture make them perfect for housing tiny succulents on a sunny windowsill.
Step-by-Step Guide
Materials
- White or cream oven-bake polymer clay (approx. 2oz per pot)
- Dried coffee grounds or coarse black pepper (for speckling)
- Acrylic rolling pin or glass jar
- Small circle cutter (2-3 inch diameter)
- Sculpting tools or a craft knife
- Baking sheet
- Parchment paper
- Fine-grit sandpaper (optional)
- Matte spray sealant (optional)
- Small succulents and cactus soil
Step 1: Preparing the Faux Stone Clay
-
Condition the clay:
Start by taking a block of white or cream polymer clay and warming it up in your hands. Knead it thoroughly until it is soft, pliable, and free of cracks. -
Add texture material:
Flatten the conditioned clay into a pancake shape. Sprinkle a small pinch of dried used coffee grounds or coarse black pepper onto the surface. I prefer coffee grounds for a warmer, browner speckle. -
Fold and knead:
Fold the clay over to trap the speckles inside and knead again. Continue folding and kneading until the speckles are evenly distributed throughout the batch. -
Check density:
Inspect the clay. If you want a more heavily speckled look, repeat the previous step, adding small amounts until you reach your desired stone effect.
Natural Speckles
Don’t have coffee grounds? Cracked black pepper creates a sharper, high-contrast black speckle, while dried tea leaves offer a subtle, leafy texture.
Step 2: Forming the Pinch Pot
-
Create a sphere:
Divide your speckled clay into portions roughly the size of a golf ball or slightly larger. Roll each portion between your palms to create a smooth, tight sphere. -
Begin the pinch:
Hold the sphere in your non-dominant hand. With your dominant thumb, press gently into the center of the ball, pushing down about three-quarters of the way through, leaving a thick base. -
Widen the opening:
Using your thumb and forefinger, gently pinch the walls of the pot, rotating the clay as you go. Work your way from the bottom up to the rim. -
Even out the walls:
Continue pinching and rotating until the walls are an even thickness, roughly 1/4 inch thick. Avoid making them too thin, as polymer clay needs some bulk for stability. -
Shape the rim:
For the look in the photo, keep the rim slightly rounded and organic rather than sharp. You can tap the rim gently against your work surface if you want it flatter, or smooth it with your finger for a curved edge. -
Create drainage (optional):
If you plan to plant directly into the pot, use a straw or small tool to poke a hole in the center of the bottom for drainage. If using these as cachepots for plastic nursery pots, you can skip this.
Step 3: Refining and Baking
-
Create the texture:
The pots in the image have a slightly rough, matte texture. Gently press a piece of coarse sandpaper or a textured sponge against the outside of the pot to remove fingerprints and add an earthen feel. -
Optional carving:
If you want the subtle vertical crack or detail seen on the front pot, use a sculpting tool to gently impress a shallow, irregular line into the side for added character. -
Prepare for baking:
Place your finished pots on a baking sheet lined with parchment paper. Ensure they aren’t touching each other. -
Bake:
Bake the clay according to the manufacturer’s instructions on your specific package of clay. Typically, this is around 275°F (135°C) for 15-30 minutes per 1/4 inch of thickness. -
Cool down:
Once the baking time is up, turn off the oven and open the door slightly. Let the pots cool completely inside the oven to prevent thermal shock and cracking.
Two-Tone Effect
Before baking, adhere a flattened strip of terracotta-colored clay to the base of your pot to mimic the dipped look seen in the background planter.
Step 4: Finishing Touches
-
Seal (optional):
While polymer clay is water-resistant, a light coat of matte spray sealant can help protect the surface texture and the coffee grounds from moisture over time. -
Planting:
Fill your new stone-look pots with specialized cactus or succulent soil. -
Arranging:
Tuck your small succulents into the soil. Use a soft brush to sweep away any dirt that gets on the clay rim or the plant leaves.
Enjoy arranging your new trio of faux-stone planters in a bright spot to show off their organic texture
Tiny House Planter Pots
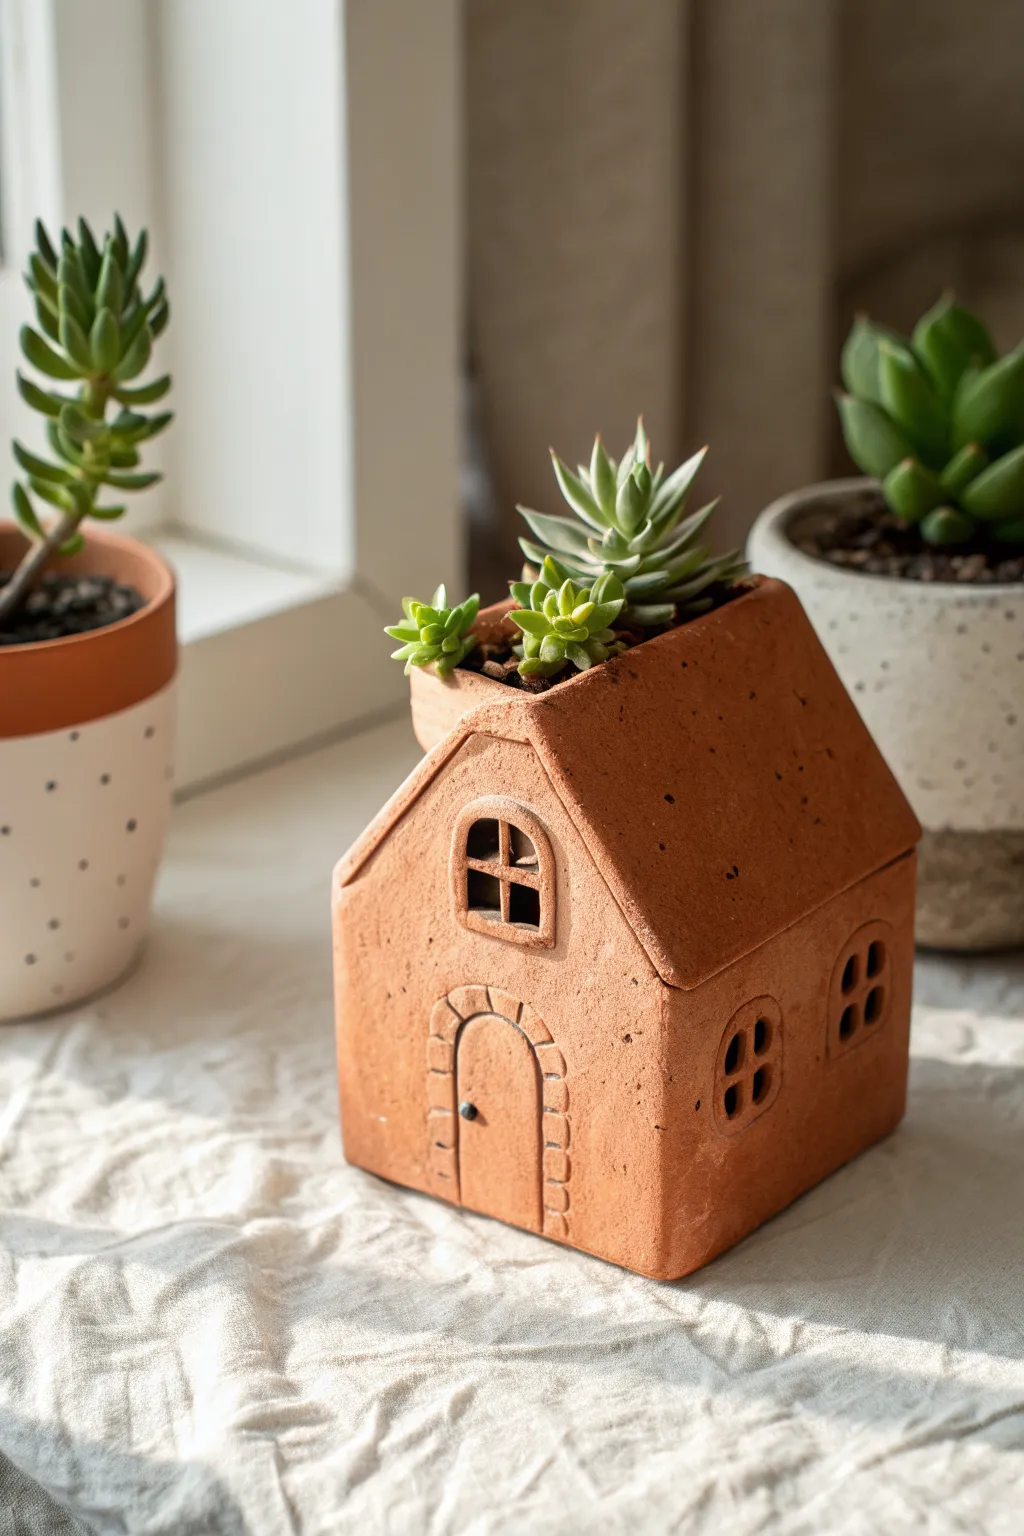
Bring a little architectural whimsy to your windowsill with this adorable house-shaped planter. Crafted from terracotta-colored polymer clay, it features charming details like an arched door and tiny windows, creating the perfect cozy home for your favorite succulents.
Step-by-Step
Materials
- Terracotta-colored polymer clay (approx. 8oz or 2 standard blocks)
- Rolling pin or clay machine
- Sharp craft knife or clay blade
- Needle tool or toothpick
- Ruler
- Small round cutter (optional, for window arches)
- Black clay (tiny amount for doorknob)
- Liquid polymer clay (Bake & Bond) or slip
- Texture sponge or stiff brush
- Oven and baking tray
Step 1: Preparing the Structure
-
Prepare the Clay slab:
Condition your terracotta clay until it’s soft and pliable, then roll it out to a uniform thickness of about 1/4 inch (6mm). Keeping the walls relatively thick ensures the planter is sturdy enough to hold soil later. -
Cut the Base:
Using your ruler and craft knife, cut a square base. A 3-inch by 3-inch square works well for a small succulent, but you can adjust the size based on your specific plant’s needs. -
Create the Front and Back Walls:
Cut two identical pentagon shapes for the front and back walls. These should look like squares (matching the base width) with triangles on top for the roof peaks. Ensure the side edges are straight and the peak is centered. -
Cut the Side Walls:
Cut two rectangular pieces for the side walls. Their height should match the height of the square portion of your front/back walls (before the roof triangle starts). -
Texture the Clay:
Before assembling, I like to gently press a texture sponge or stiff brush over the clay surfaces. This gives it a surprisingly realistic, slightly weathered stone or terracotta pot texture rather than smooth plastic.
Pro Tip: Cardboard Core
Make a temporary cardboard box structure to build your clay slab walls around. It keeps the walls perfectly straight during assembly and removes easily before baking.
Step 2: Assembly & Details
-
Assemble the Box:
Score the edges of the base and the bottom of the walls. Apply a thin line of liquid clay or clay slip. Press the walls onto the base and against each other to form the main box structure. -
Secure the Seams:
Use a modeling tool or your finger to smooth the clay on the *inside* seams to reinforce the bond. The outside seams can be left visible for a rustic look or smoothed out depending on your preference. -
Cut the Roof Panels:
Measure the distance from the roof peak to the side wall edge, add a tiny bit for overhang, and cut two rectangular roof slabs. Remember, you aren’t sealing the roof shut; leave a large rectangular opening in the center top for the plant. -
Attach the Roof:
Place the roof panels on the angled peaks. Press gently to secure them to the front and back peaks. The goal is to make it look like a complete roof but with the top cut away. -
Carve the Door:
On the front panel, use your needle tool to lightly sketch an arched door. Using a small strip of clay, create a raised door frame around the arch. Use the needle tool to press horizontal lines into the frame to mimic brickwork. -
Add Windows:
Roll out a very thin snake of clay. Form small arched window shapes on the front (above the door) and the side wall. Press these gently onto the surface. -
Detail the Windows:
Cut tiny cross pieces from your thin clay snake to create window panes inside the arches. Carefully pierce the clay *inside* the panes to create actual holes, providing ventilation for the soil. -
Add the Doorknob:
Roll a minuscule ball of black clay and press it onto the door to serve as the handle. It’s a tiny detail that adds a lot of character. -
Final Smoothing:
Check the entire piece for fingerprints. Lightly dab your texture tool again if any areas got smoothed down too much during handling.
Step 3: Baking & Finishing
-
Drainage Hole:
Flip the house over carefully and use a round cutter or knife to create a drainage hole in the center of the base. This is crucial for succulent health. -
Bake:
Place your house on a baking sheet. Bake according to your clay manufacturer’s instructions (usually 275°F/135°C for 15-30 minutes depending on thickness). -
Cool Down:
Allow the planter to cool completely in the oven with the door slightly ajar. This gradual cooling helps prevent cracks. -
planting:
Once fully cool and hardened, fill with succulent soil and gently nestle your plants into the roof opening.
Troubleshooting: Sagging Roof
If the roof panels droop while working, prop them up from the inside with crumpled paper towels or batting. You can bake the paper right inside the clay safely.
Now you have a charming little abode ready to welcome its green tenant
Oven-Bake Clay Garden Markers
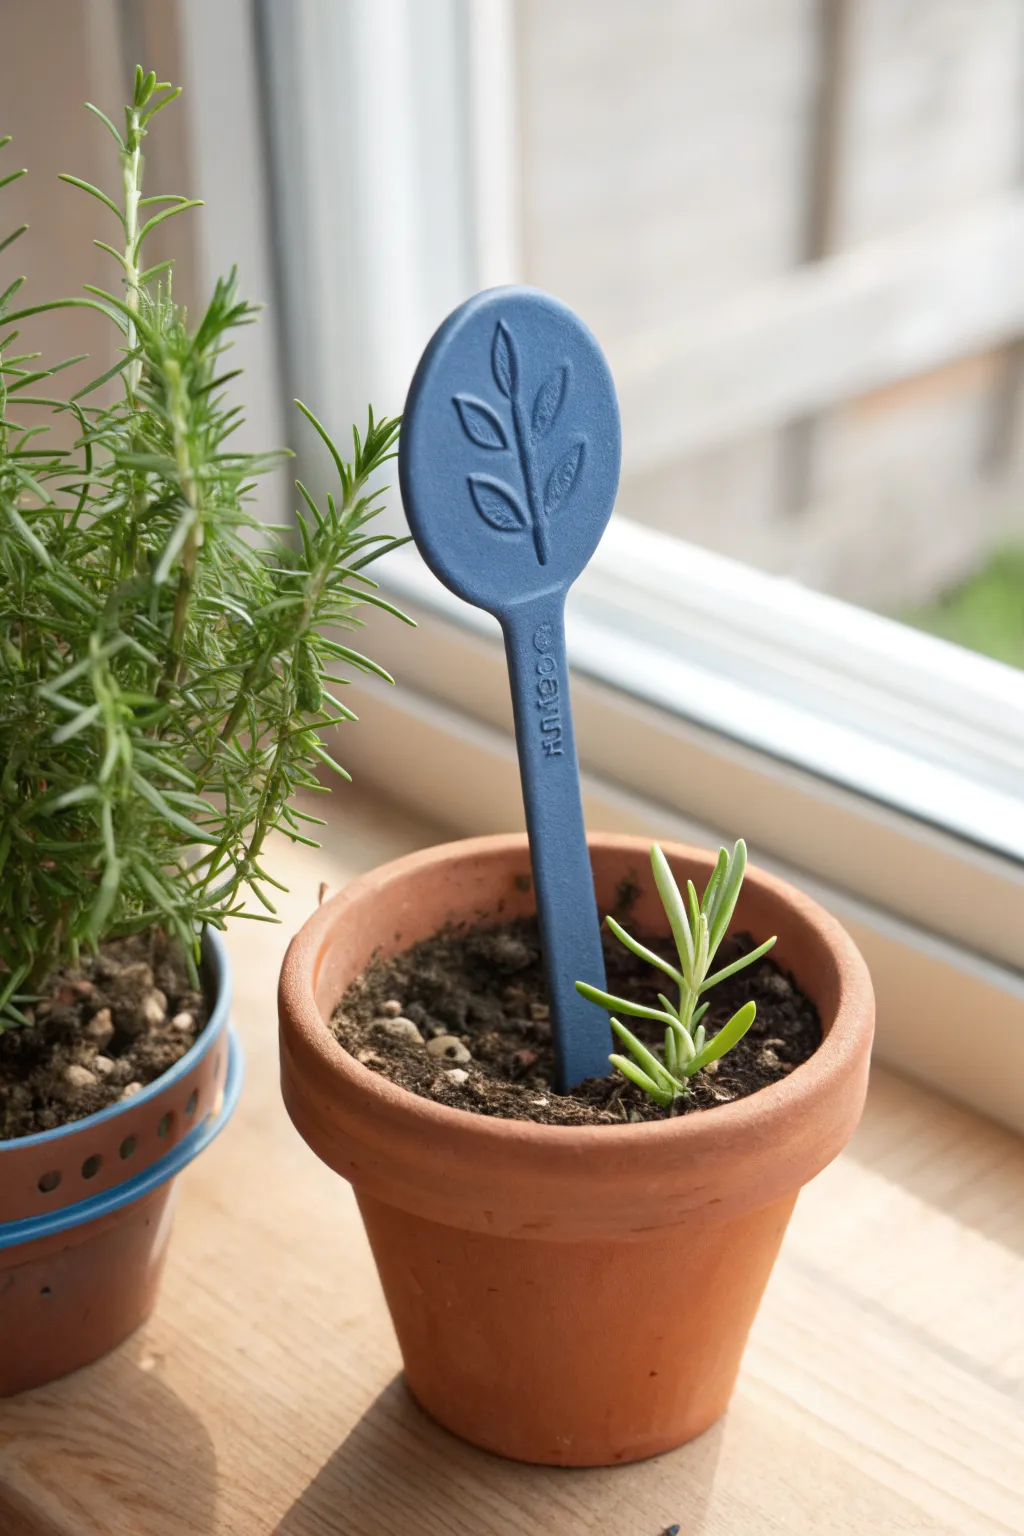
These charming, spoon-shaped garden markers add a pop of color and organization to your indoor herb garden. Crafted from durable oven-bake clay with a lovely embossed leaf design, they are both functional and decorative for your potted plants.
How-To Guide
Materials
- Blue oven-bake polymer clay (e.g., Sculpey or Fimo)
- Acrylic rolling pin or clay roller
- Small oval clay cutter or a knife
- Modeling tool with a fine rounded point (or a dull pencil)
- Small alphabet stamps (optional)
- Parchment paper-lined baking sheet
- Oven (for baking)
- Sandpaper (fine grit)
- Matte or satin varnish (optional for outdoor use)
Step 1: Shaping the Clay
-
Condition the Clay:
Begin by warming a portion of blue polymer clay in your hands. Knead and roll it until it becomes soft, pliable, and free of cracks. -
Roll Out the Base:
Using an acrylic roller, flatten the clay on a smooth work surface or silicone mat. Aim for a thickness of about 1/4 inch (6mm) to ensure the marker is sturdy enough to stand upright. -
Cut the Top Shape:
Use an oval cutter to punch out the main ‘spoon’ head. If you don’t have a cutter, simplify trace an oval shape onto paper, cut it out, place it on the clay, and carefully cut around it with a craft knife. -
Form the Stem:
Cut a long, rectangular strip from your remaining rolled clay. It should be slightly narrower than the base of your oval and about 4-5 inches long. -
Connect the Pieces:
Lay the oval piece slightly overlapping the top of the rectangular strip. Gently press them together. -
Blend the Seam:
Flip the marker over to the back. Use your finger or a clay smoothing tool to drag the clay across the seam, blending the two pieces until they form a single, solid unit. Repeat on the front side if necessary, smoothing until the join is invisible.
Stamp Clarity Tip
Dust your rubber stamps or embossing tools with a tiny bit of cornstarch before pressing them into the clay. This prevents sticking and keeps your lines clean.
Step 2: Adding the Design
-
Outline the Stem:
Using a modeling tool with a rounded tip, draw a vertical line straight up the center of the oval. This will be the main stem of your leaf design. -
Add Leaves:
Press the tool into the clay on either side of the stem line to create oval leaf shapes. Angle them slightly upward. Don’t just draw the outline; press down gently to emboss the entire leaf shape slightly lower than the surface. -
Detail the Veins:
I find that adding a tiny center line inside each small leaf indentation gives it a nice finished look. -
Smooth the Edges:
Run a finger dipped in a little cornstarch or water around the perimeter of the marker to soften any sharp edges left by the cutting process. -
Add Lettering:
If you wish to label the plant, use small alphabet stamps to press the plant name (like ‘SAGE’ or ‘BASIL’) vertically down the handle of the marker. Press firmly enough to be legible but not so deep as to distort the clay.
Make it Pop
After baking, rub white acrylic paint into the impressed leaf lines and letters, then quickly wipe the surface clean. The paint stays in the grooves for high contrast.
Step 3: Baking and Finishing
-
Prepare for Baking:
Carefully transfer your markers to a baking sheet lined with parchment paper. Make sure they are lying perfectly flat so the handles don’t warp. -
Bake the Clay:
Bake according to the manufacturer’s instructions on your specific package of clay. This is typically 275°F (135°C) for about 15-30 minutes depending on thickness. -
Cool Down:
Remove the tray from the oven and let the markers cool completely before handling. They are fragile while still warm. -
Check for Imperfections:
Once cool, inspect the edges. If there are any rough spots, gently buff them away with fine-grit sandpaper. -
Seal the Project:
For extra durability, especially if these will be near water, apply a thin coat of matte or satin varnish to seal the clay and protect the color.
Now you can place your custom markers into your pots and never mix up your cilantro and parsley again
Simple Candle Holders
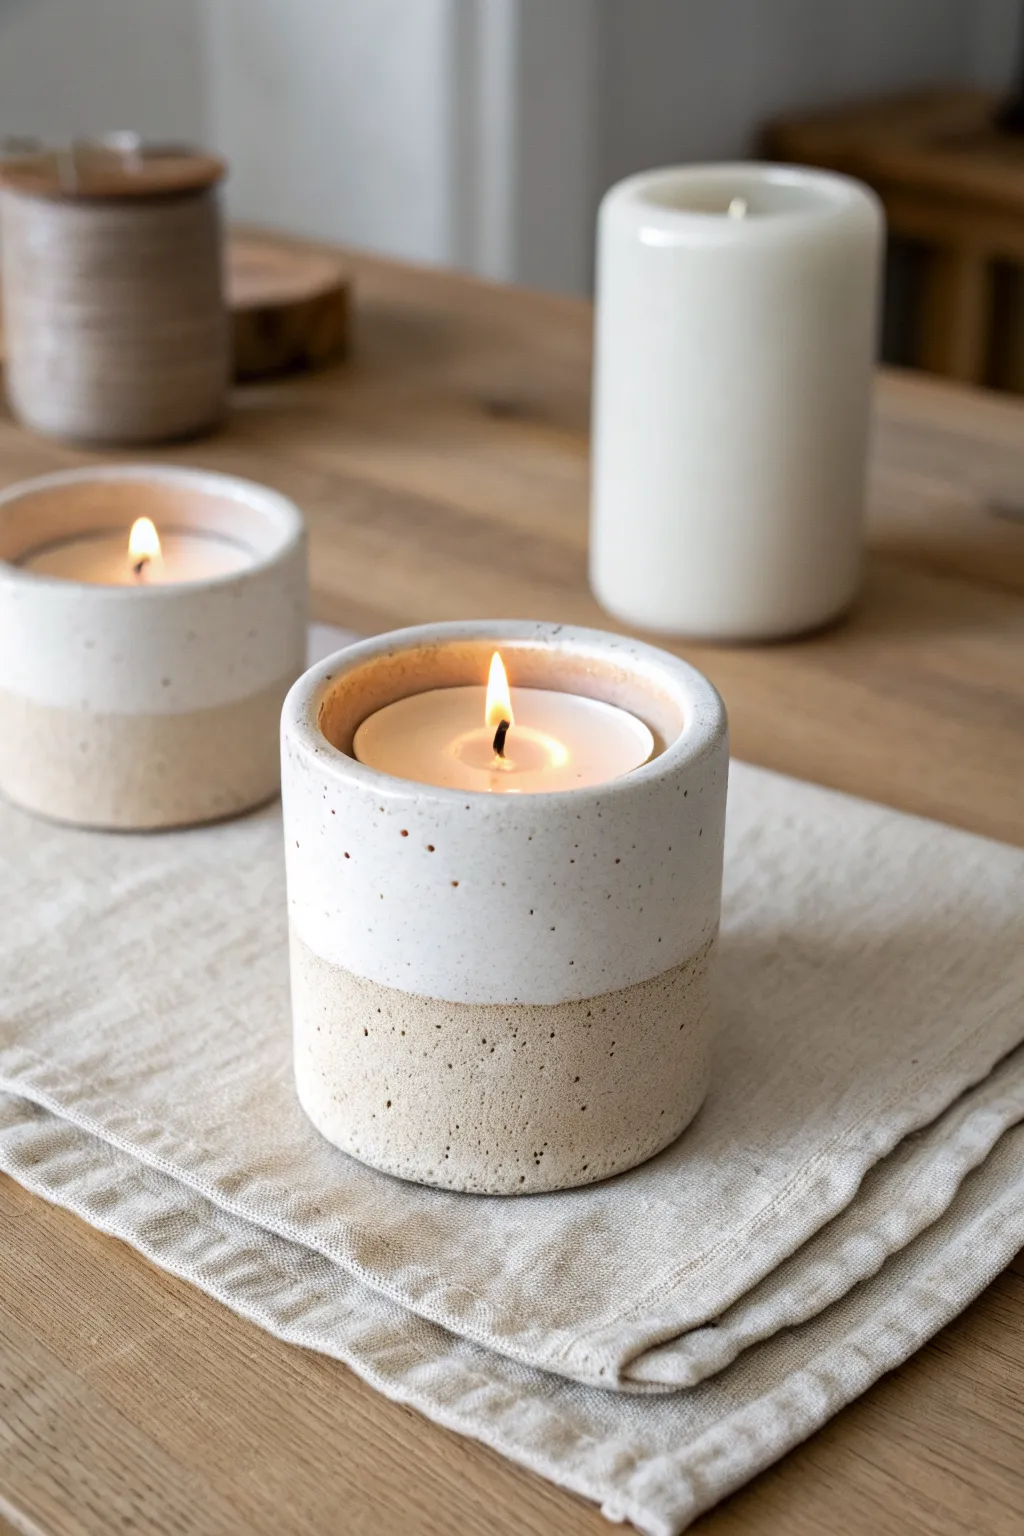
These charming candle holders mimic the sophisticated look of wheel-thrown pottery without the need for a kiln. By combining speckled clay with a clever two-tone texture technique, you’ll create a cozy, minimalist home for your tea lights.
Step-by-Step Guide
Materials
- White or cream oven-bake polymer clay (approx. 4oz per holder)
- Granite or speckled effect polymer clay
- Coarse sandpaper or a stiff bristle brush
- Rolling pin or acrylic roller
- Circle cutters (one large for the base, slightly smaller than the cylinder diameter)
- Glass jar or metal cylinder (heat safe) to use as a form
- Cornstarch (for release)
- Craft knife
- Smooth blending tool or spoon
- Oven
- Matte finish varnish (optional)
Step 1: Preparing the Clay
-
Condition the clay:
Start by warming up your white clay in your hands until it becomes soft and pliable. Do the same for your speckled or granite effect clay. -
Create a custom mix:
To achieve the specific sandy look in the photo, mix about 70% white clay with 30% speckled clay. Knead them together thoroughly until the color is uniform and the speckles are evenly distributed. -
Roll out the slab:
Roll your mixed clay out on a clean surface to about 1/4 inch thickness. You want a substantial wall thickness to mimic that heavy stoneware aesthetic. -
Measure your form:
Take your glass jar or cylinder form and measure the circumference. Cut a rectangular strip of clay slightly longer than this measurement and as tall as you want your holder to be (about 2.5 inches is standard for votives).
Stuck on Form?
If the clay won’t release from the glass jar after baking, don’t force it or the clay might crack. Place the entire piece in the freezer for 15 minutes to shrink the material, then twist gently.
Step 2: Forming the Cylinder
-
Prepare the form:
Lightly dust your glass jar or metal form with cornstarch. This is crucial so the clay doesn’t stick permanently during the shaping process. -
Wrap the clay:
Carefully lift your clay rectangle and wrap it around the form. Bring the two short ends together. -
Create the seam:
Slice through both overlapping layers of clay with a sharp blade to create a perfectly matching seam. Peel away the excess cut-offs. -
Blend the join:
Use a modeling tool or the back of a spoon to gently smooth the seam together on the outside. Roll the form on your work surface gently to help the seam disappear. -
Cut the base:
Using a circle cutter or a knife, cut a circle from your remaining rolled clay that matches the bottom diameter of your wrapped form. -
Attach the base:
Place the cylinder on top of the clay circle. Use your blending tool to merge the clay of the base up into the walls of the cylinder, ensuring a tight seal.
Add Real Sand
For an even more realistic stone texture, roll the bottom third of your unbaked holder in actual fine crafting sand or salt before baking. Press it in gently to secure.
Step 3: Texturing and Finishing
-
Define the two-tone area:
The project features a distinct textural difference between the smooth top and the rough bottom. Lightly mark a line around the circumference about one-third of the way up from the bottom. -
Texturize the base:
Below your marked line, press coarse sandpaper or a stiff brush firmly into the clay. Rotate the piece and repeat until the bottom section looks gritty and stone-like. -
Smooth the top:
For the upper section, use a fingertip dipped in a tiny bit of baby oil or clay softener to buff the clay until it is perfectly smooth, contrasting with the textured bottom. -
Refine the rim:
Gently smooth the top rim with your finger to round off any sharp edges left from cutting. -
Bake the project:
Place the clay (still on the form if it is heat-safe glass or metal) onto a baking sheet. Bake according to your clay package directions—usually 275°F (130°C) for 15-30 minutes per 1/4 inch of thickness. -
Cool and separate:
Let the piece cool completely before attempting to remove the inner form. The clay shrinks slightly as it cools, so if it feels stuck, pop it in the freezer for ten minutes. -
Final touches:
Once cool and removed from the form, inspect the rim. If needed, lightly sand the top edge with fine-grit sandpaper for a polished finish.
Place a tea light inside and enjoy the warm, flickering glow of your handcrafted stoneware replica.
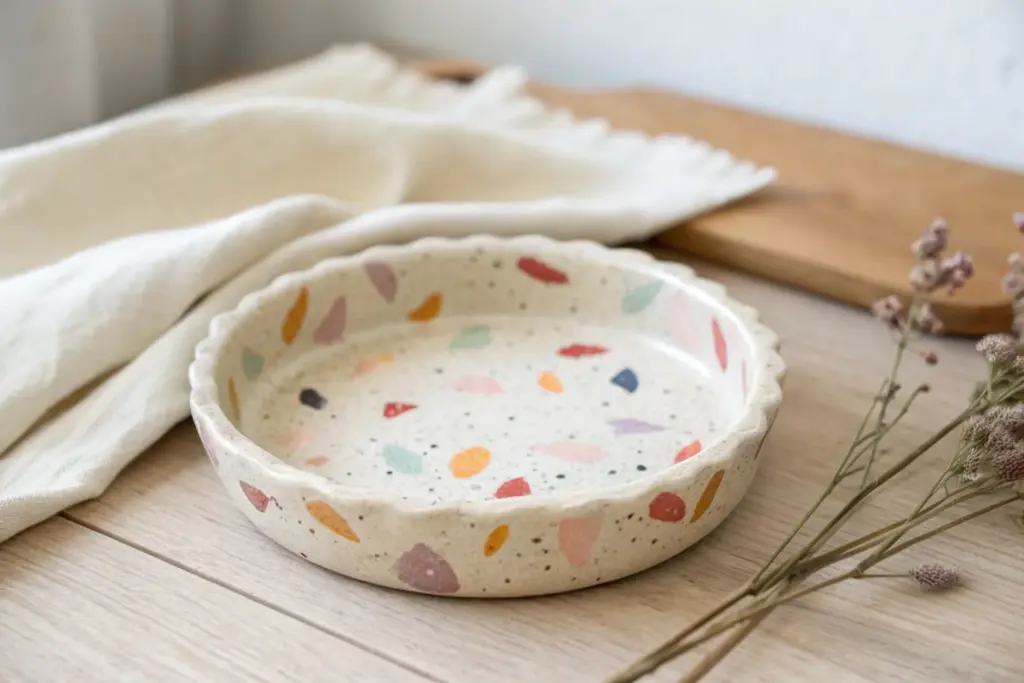
Terrazzo-Style Incense Holders
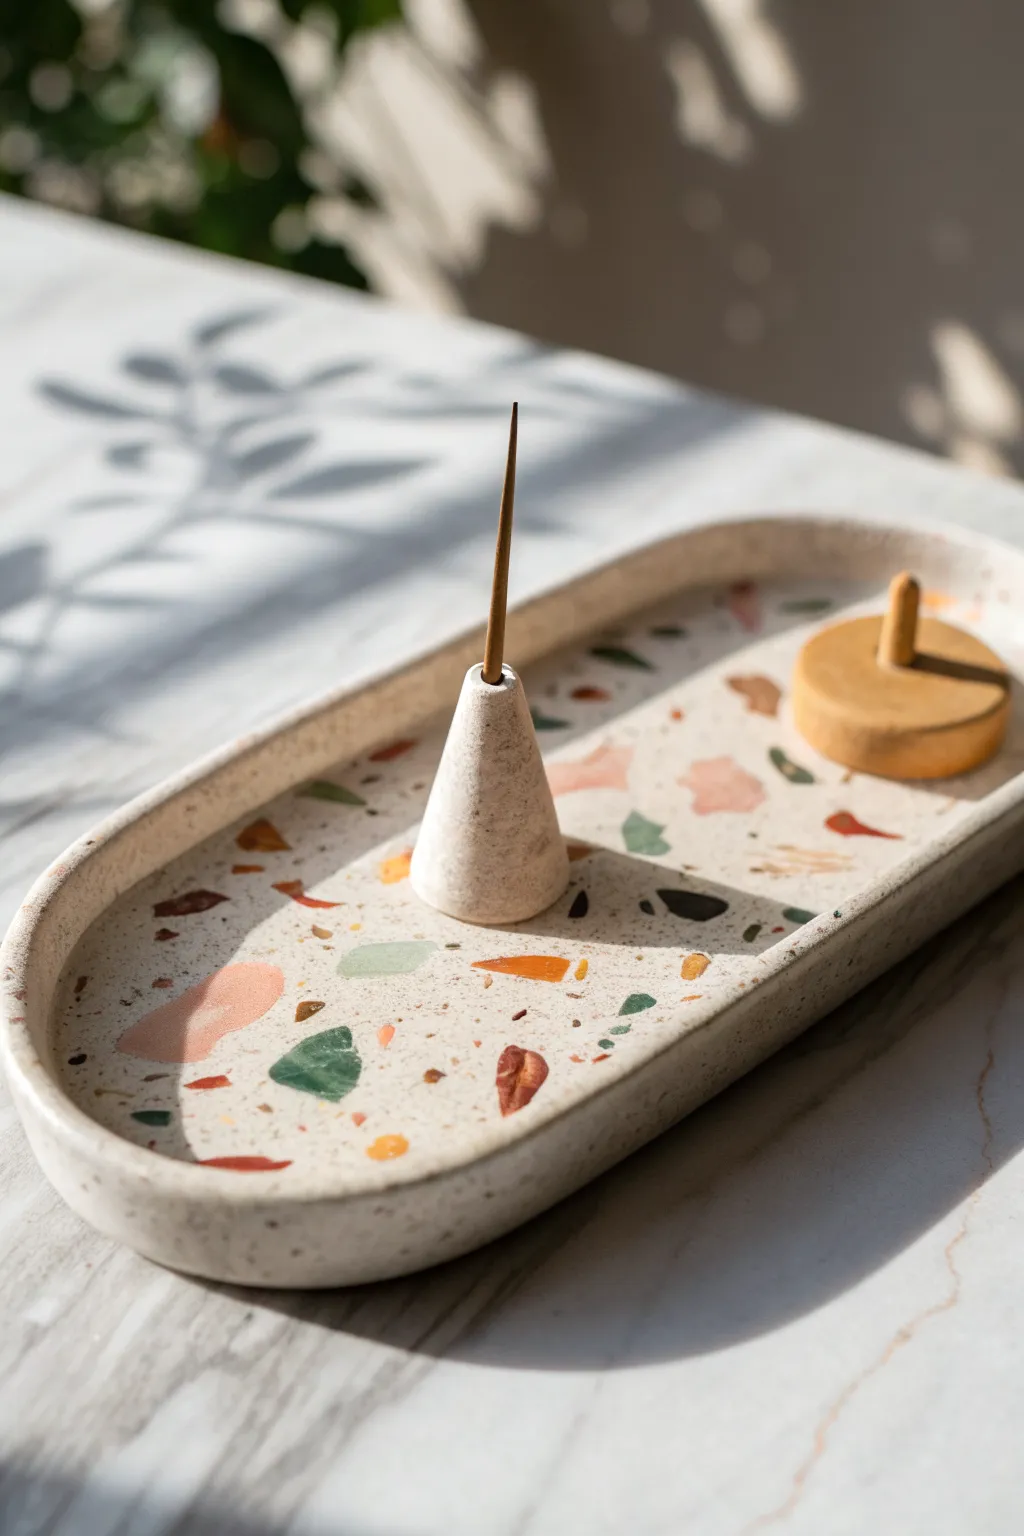
Elevate your home fragrance ritual with this sophisticated faux-terrazzo incense holder. By mixing colorful clay fragments into a neutral base, you will create a beautiful, durable tray that features a matching cone holder and a minimalist storage pot.
Detailed Instructions
Materials
- Oven-bake clay (white/beige for base)
- Oven-bake clay (terracotta, green, black, ochre for chips)
- Rolling pin or acrylic roller
- Clay knife or craft blade
- Oval cutter or paper template
- Sandpaper (various grits from 400 to 1200)
- UV resin or polyurethane gloss varnish (optional)
- Small paintbrush
- Incense stick (for sizing)
Step 1: Preparing the Terrazzo Chips
-
Roll out colors:
Begin by conditioning your colored clays (terracotta, green, black, and ochre). Roll each color into a thin sheet, about 1-2mm thick. -
Bake the sheets:
Place these thin colored sheets on a baking tray and bake them for a short period, about 10-15 minutes, following the temperature instructions on your clay package. They should be hard but not burnt. -
Cool and crush:
Once the colored sheets are completely cool, break them apart. I like to chop them with a rigid blade to get jagged, irregular shards of varying sizes, mimicking real stone chips.
Clean Cuts Only
Chill your clay in the fridge for 10 minutes before cutting the oval shape. Firm clay cuts much cleaner and distorts less when you lift it.
Step 2: Creating the Base Slab
-
Condition the base:
Take a large amount of your white or beige base clay. Condition it thoroughly until it is soft and pliable. -
Incorporate chips:
Sprinkle your chopped colored fragments generously over the conditioned base clay. Fold the clay over the chips and knead gently to distribute them throughout the block. -
Roll the slab:
Roll out the mixed clay into a thick, even slab, approximately 5-6mm thick. You want it substantial enough to form a sturdy tray. -
Surface check:
If the chips are buried too deep, sprinkle a few more shards on top and gently roll over them once more to press them into the surface.
Smearing Chips?
If sanding smears the colors instead of revealing sharp chips, your clay wasn’t baked long enough. Rebake for another 10-15 mins and sand again.
Step 3: Forming the Tray
-
Cut the shape:
Use a large oval cutter or place a paper template on the clay and cut around it with a craft knife to create the tray base. -
Create the rim:
Roll a long snake of the remaining terrazzo mixture. Flatten it slightly to create a strip about 1cm high. -
Attach the rim:
Wrap this strip around the edge of your oval base. Blend the seams on the inside and outside using a modeling tool or your finger to ensure a seamless connection. -
Smooth the edges:
Gently smooth the top lip of the rim with your fingertip to remove any harsh cutting lines.
Step 4: Sculpting the Accessories
-
Shape the cone:
Roll a small ball of the terrazzo mix and shape it into a cone. Press the bottom against a flat surface to ensure it stands upright. -
Make the hole:
While the cone is soft, poke a hole vertically into the top using the end of an incense stick or a needle tool. Wiggle it slightly to ensure the fit isn’t too tight. -
Form the pot lid:
Create a small, flat disc from a contrasting clay color (like the ochre used for chips). Add a tiny cylinder in the center to act as a handle. -
Final bake:
Place the tray, cone holder, and lid on a baking sheet. Bake for the full duration recommended by the manufacturer (usually 30 minutes per 6mm of thickness).
Step 5: Finishing Touches
-
Sanding:
Once fully cooled, wet-sand the pieces. Start with rougher grit sandpaper to reveal the colored chips clearly, then move to finer grits to polish the surface smooth. -
Wash and dry:
Rinse off any sanding dust and dry the pieces thoroughly with a lint-free cloth. -
Seal (Optional):
Apply a thin coat of matte or gloss varnish to protect the surface and make the terrazzo colors pop.
Place your finished set on a side table and enjoy the modern, artisan vibe it brings to your space
Napkin Rings for the Table

Elevate your table settings with this set of rustic, faux-stoneware napkin rings made entirely from oven-bake clay. The modern speckled finish and organic, imperfect edges give them a high-end ceramic look without needing a kiln or potter’s wheel.
Step-by-Step
Materials
- Polymer clay (white, beige, translucent, and sage green)
- Coarse black pepper or dried coffee grounds (for speckling)
- Acrylic rolling pin or clay machine
- Circle cutters (various sizes based on napkin thickness)
- Craft knife or scalpel
- Sandpaper (fine grit, wet/dry)
- Needle tool or toothpick
- Silicone mat or parchment paper
- Cardboard tube or dowel (for baking shape support)
- Matte polymer clay varnish (optional)
Step 1: Mixing the Faux Stone Clay
-
Condition the base:
Begin by thoroughly conditioning your white polymer clay until it is soft and pliable. Warm clay is much easier to mix inclusions into. -
Create the cream mix:
For the cream-colored ring, mix 3 parts white clay with 1 part translucent and a tiny pinch of beige. This adds depth so the clay doesn’t look like flat plastic. -
Add the speckles:
Flatten your clay mixture into a pancake. Sprinkle a pinch of coarse black pepper or dried coffee grounds onto the center. -
Fold and mix:
Fold the clay over the inclusions and knead thoroughly. Continue folding and rolling until the speckles are evenly distributed throughout the batch. I generally check a cross-section to ensure there are no pockets of plain clay. -
Create the sage mix:
Repeat the process for the green ring by mixing sage green clay with a bit of white to soften the tone. Add your speckling agent here as well for continuity. -
Create the terracotta mix:
For the third ring, use a terracotta or warm brown clay, mixing in a little translucent clay to mimic the depth of natural earthenware.
Uneven Seams?
If the seam is visible after baking, don’t worry. Sand it down heavily and rotate that side to the bottom when setting the table. It’s ‘wabi-sabi’
Step 2: Forming the Rings
-
Roll out the slab:
Using your acrylic roller or pasta machine on a thick setting (about 4-5mm), roll your speckled clay into a long, even strip. You want these to have substantial thickness to mimic pottery. -
Cut the strips:
Use a long blade or craft knife to cut a straight strip of clay. Aim for a width of about 1 inch (2.5 cm) for a standard ring, but feel free to vary the widths slightly for an organic look. -
Texture the surface:
Before forming the ring, gently tap the surface with a toothbrush or crumpled foil to remove fingerprints and add a subtle ceramic texture. -
Size the ring:
Wrap the strip around your cardboard tube or dowel to check the size. Mark where the ends overlap, ensuring the interior diameter is about 1.5 inches. -
Join the ends:
Slice through both overlapping layers of clay at a 45-degree angle. Remove the excess bits. This creates a mitered joint that has more surface area for a strong bond. -
Blend the seam:
Gently push the two angled ends together. Use a modeling tool or your finger to smooth the seam completely so it becomes invisible. I like to re-apply a little texture over this area to hide the join. -
Shape the rim:
You can leave the edges sharp for a modern look, or gently tap them with your finger to round them off, mimicking hand-thrown pottery. -
Create size variation:
Repeat these steps for the remaining colors. Consider making one slightly wider or one slightly narrower to create visual interest when they are stacked.
Pro Tip: Liquid Clay
Apply a tiny smear of liquid polymer clay (Bake & Bond) to the angled cuts before joining. This acts as a super-glue for clay and prevents cracking.
Step 3: Baking and Finishing
-
Support the shape:
It is crucial to bake these on a support so they don’t slump. Slide your raw clay rings onto a cardboard tube covered in parchment paper. -
Bake:
Bake according to your clay manufacturer’s instructions (usually 275°F/135°C). Since these are thick, bake for at least 45-50 minutes to ensure durability. -
Cool down:
Allow the rings to cool completely on the support tube. Removing them while warm can warp the shape. -
Sand for realism:
Once cool, use wet/dry sandpaper (start at 400 grit and move to 800) to sand the edges and the outside. This reveals the speckles beautifully and gives the piece a true soft-stone feel. -
Final wash:
Rinse off any sanding dust and dry thoroughly. Your faux-ceramic rings are now ready for the table.
Now you have a stunning set of custom napkin rings that look perfectly at home alongside your favorite dishes
Photo Display Wall Hangers
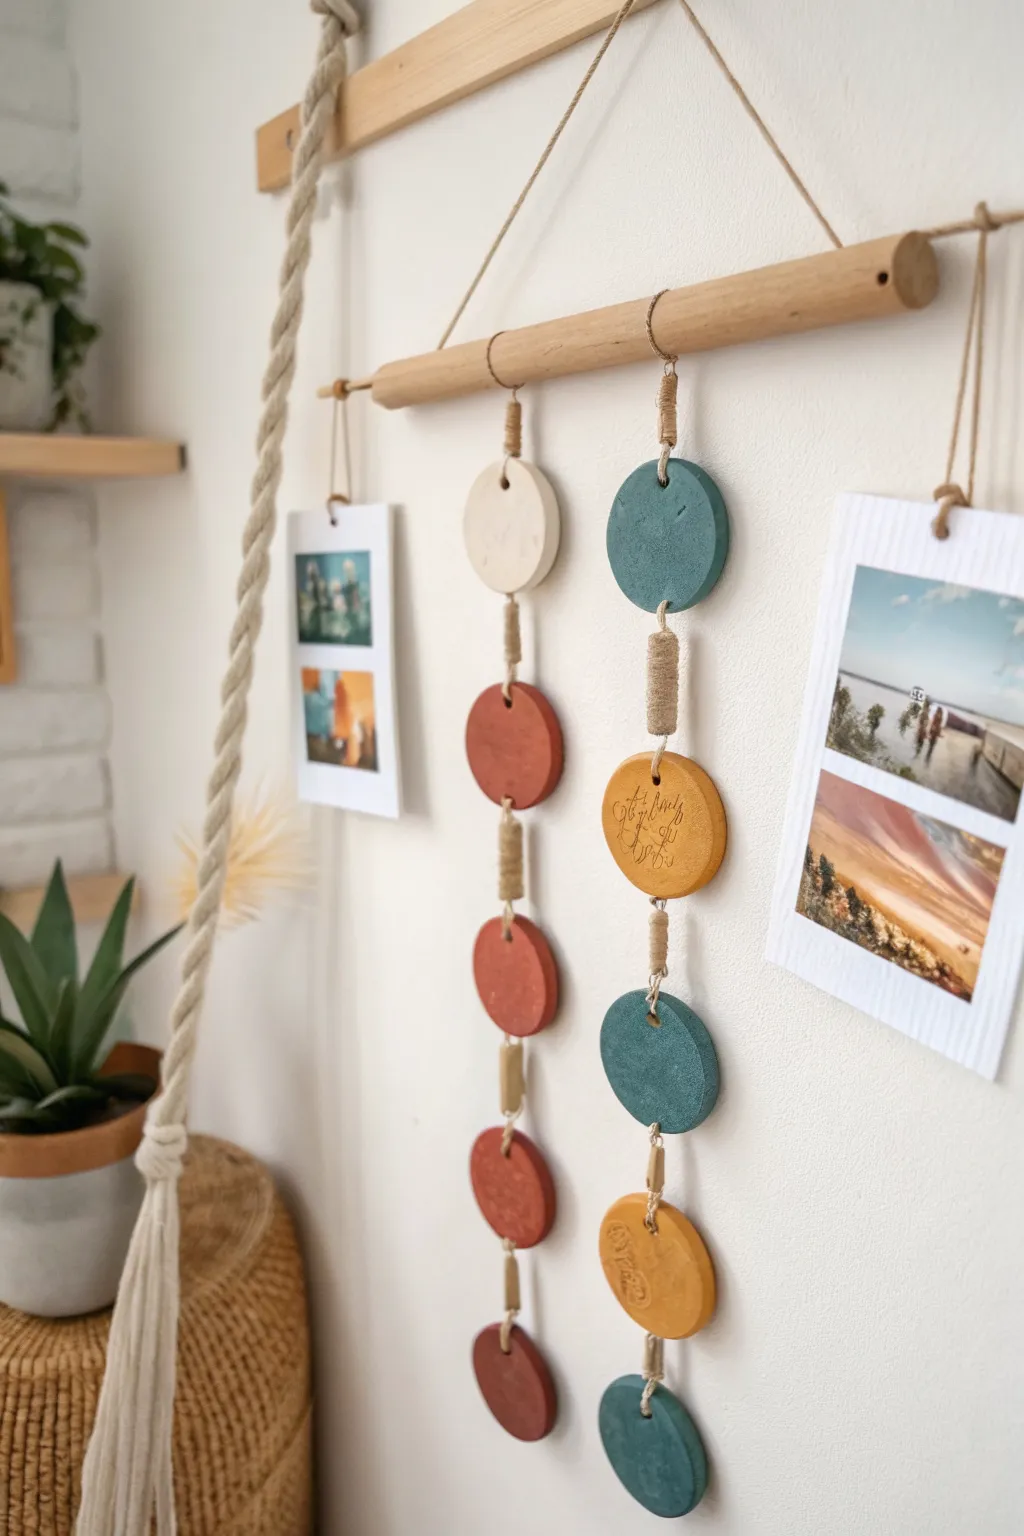
Transform your favorite memories into a stunning wall feature with this textured clay mobile. Combining earthy tones like terra cotta, teal, and mustard with natural wood elements creating a warm, artisanal look that serves as both art and a functional photo display.
Detailed Instructions
Materials
- Oven bake polymer clay (Terra cotta, teal, mustard yellow, and cream/white)
- Rolling pin (acrylic or wooden)
- Circle cookie cutter (approx. 2-3 inches diameter)
- Texture stamps or textured rolling pin (botanical or mandala patterns)
- Wooden dowel (approx. 18-24 inches long)
- Jute twine or natural hemp cord
- Drinking straw or small tube tool
- Baking sheet and parchment paper
- Sandpaper (fine grit)
- Scissors
Step 1: Preparing the Clay Elements
-
Condition the clay:
Start by warming up your clay in your hands, kneading each color separately until it is soft and pliable. You will need four distinct colors to match the photo: cream, terra cotta, mustard, and teal. -
Roll out slabs:
Using your rolling pin, roll the clay out on a smooth surface to an even thickness of about 1/4 inch. I find using playing cards stacked on either side of the roller helps keep the thickness perfectly consistent. -
Add texture:
Press your chosen rubber stamp or textured roller firmly into the mustard and teal clay slabs to create the subtle botanical or mandala impressions seen in the centerpiece. -
Cut the circles:
Use your circle cutter to punch out your shapes. You will need: one cream, four terra cotta, two mustard (textured), and three teal (two plain, one textured). Clean up any ragged edges with your finger. -
Create hanging holes:
Using a straw or small tube tool, punch a hole at the very top and very bottom of every circle, *except* the bottom-most circles of each strand (one terra cotta, one teal), which only need a top hole.
Step 2: Baking and Finishing
-
Bake the clay:
Arrange your circles on a parchment-lined baking sheet. Bake according to the manufacturer’s instructions on your specific package of clay (usually 275°F for 15-30 minutes per 1/4 inch of thickness). -
Cool and sand:
Allow the pieces to cool completely on a flat surface. Once hard, use fine-grit sandpaper to smooth out any rough edges or fingerprints on the sides of the discs.
Uneven Textures?
If your stamped impressions aren’t deep enough, lightly mist the clay with water before stamping. This prevents the rubber from sticking and allows for a sharper, deeper imprint.
Step 3: Assembling the Mobile
-
Cut the cord:
Cut lengths of jute twine. You’ll need short connecting pieces (about 4-5 inches each) to link the circles, and longer pieces to hang the strands from the dowel. -
Create the center strand:
Start with the ‘mustard and teal’ strand. Use a lark’s head knot or a simple double knot to tie the top of the first teal circle to a long cord. Then, connect the bottom of that circle to the top of the mustard circle using a short cord. -
Add the wrapped detail:
To mimic the thick wrapped look in the photo, wrap extra twine tightly around the connecting knots between the circles. Secure the ends with a tiny dot of glue hidden inside the coils. -
Assemble the second strand:
Repeat the process for the ‘terra cotta and cream’ strand. Start with the cream circle at the top, followed by three or four terra cotta circles descending. -
Attach strands to dowel:
Tie your two completed clay strands to the wooden dowel, spacing them slightly apart. Ensure the wrapping at the top near the dowel matches the wrapped style between the circles. -
Prepare photo hangers:
Cut two additional long pieces of twine for the outer edges. Tie them to the dowel on the far left and right. -
Adjust lengths:
Hold the dowel up to check the balance. The photo strings should hang somewhat lower than the clay strands visually, but you can trim them later after attaching photos.
Level Up: Gold Leaf
After baking, brush a small amount of liquid gold leaf into the stamped grooves of the mustard circles. This highlights the texture and adds a subtle metallic shimmer.
Step 4: Final Touches
-
Add the main hanger:
Cut a long sturdy piece of twine for the main hanger. Tie each end securely to the far ends of the wooden dowel so it creates a triangle shape for hanging on the wall. -
Attach photos:
Punch small holes in the top corners of your printed photos or cardstock backings. Thread the outer twine strands through these holes and knot them securely.
Hang your new mobile in a bright spot where the natural light can play across the unique textures of the clay
Mini Food Charms
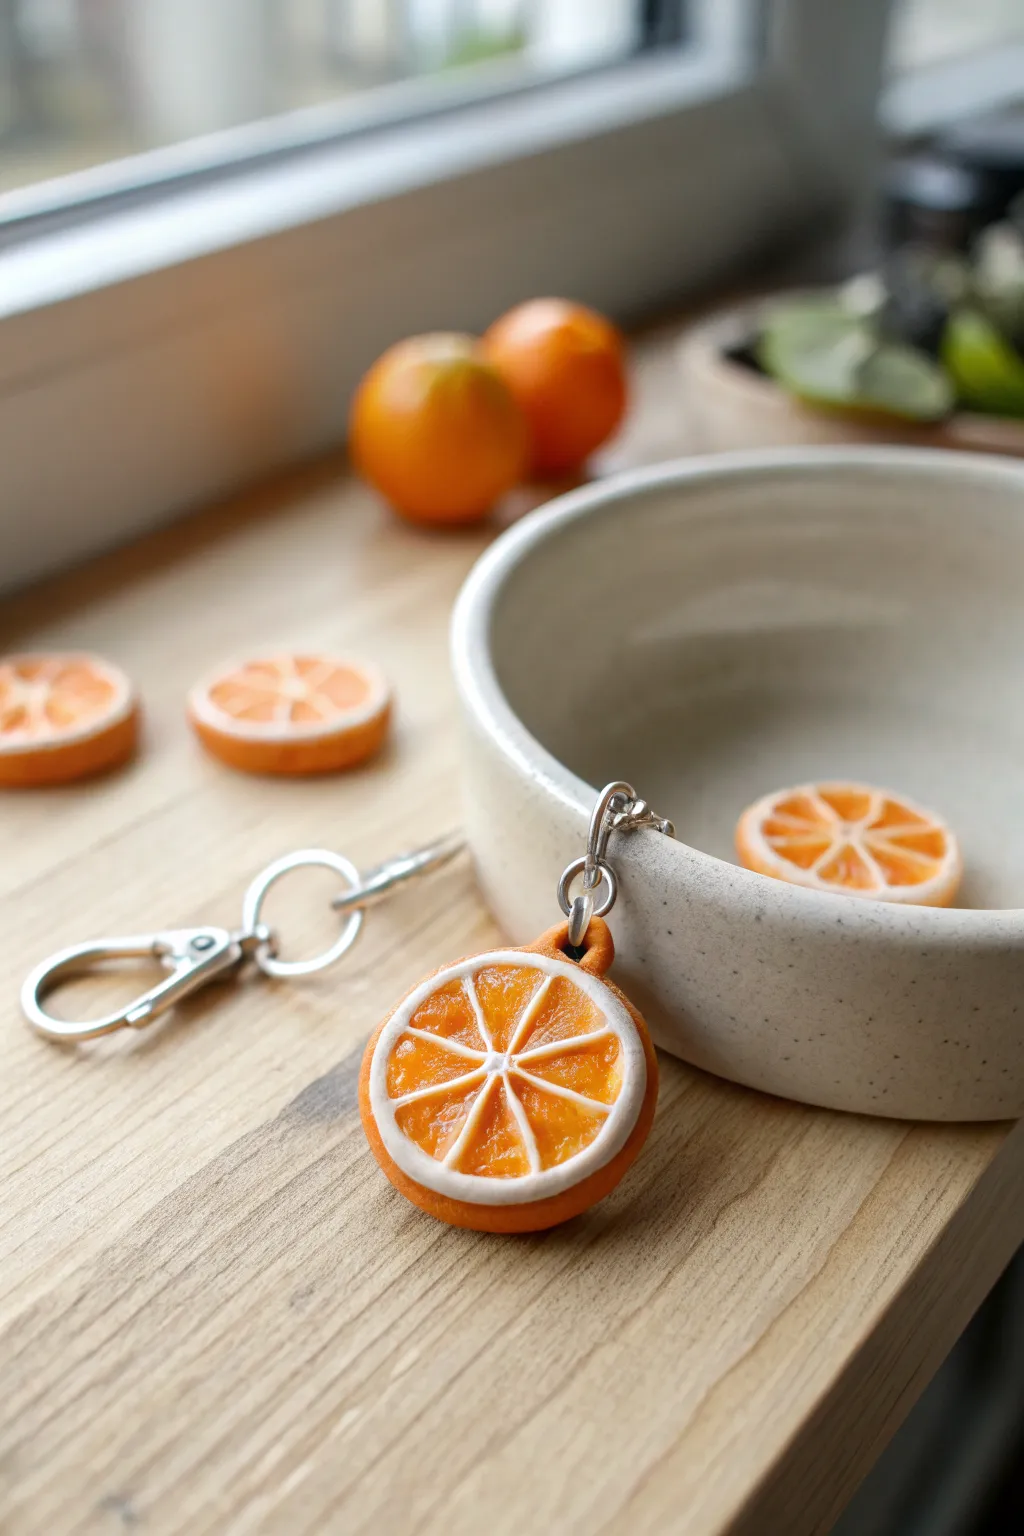
These vibrant orange slice charms capture the juicy texture of citrus fruit in miniature form, perfect for keychains or stitch markers. By layering translucent and opaque clays, you’ll create a realistic pith and pulp effect that looks good enough to eat.
Step-by-Step
Materials
- Translucent orange polymer clay
- Opaque orange polymer clay
- White polymer clay
- Liquid polymer clay (translucent or clear)
- Small circle cutter (approx. 1 inch)
- Needle tool or toothpick
- Clay roller or pasta machine
- Balling tool (small)
- Eyepins (silver)
- Jump rings and keyring hardware
- Jewelry pliers
- Clear gloss varnish (optional)
- Craft knife or tissue blade
Step 1: Creating the Orange Cane
-
Prepare the Colors:
Begin by conditioning all your clays until soft. Mix a small amount of opaque orange into your translucent orange clay; you want a ‘juicy’ look that isn’t completely see-through but still has depth. -
Create the Segment Log:
Roll your custom translucent mix into a thick log, about 1 inch in diameter. Roll out a thin sheet of white clay (the pith) and wrap it smoothly around the orange log, trimming any excess. -
Reduce to a Triangle:
Gently squeeze and stretch the log until it is longer and thinner. Pinch one side of the log along its entire length to form a teardrop or triangular wedge shape—this represents one orange segment. -
Cut and Assemble:
Cut this long triangular wedge into 8 equal lengths. Arrange these wedges in a circle with the pointy tips touching in the center to form the wheel of orange segments. -
Wrap the Wheel:
Roll out a slightly thicker sheet of white clay and wrap it around the assembled segments to form the main white rind. Follow this with a final thin layer of opaque orange clay for the outer skin. -
Reduce the Cane:
Compress the entire cylinder (cane) gently from the center out to remove air gaps. Roll it on your work surface to reduce the diameter until it matches the size of your circle cutter or desired charm size.
Step 2: Texturing and Shaping
-
Slice the Discs:
Let the cane rest in the fridge for 20 minutes to firm up. Using a very sharp tissue blade, slice straight, even discs from the cane, roughly 4-5mm thick. -
Refine the Shape:
If the slicing slightly distorted the circles, use your circle cutter or fingers to gently reshape them back into perfect rounds. Smooth the edges with your fingertip. -
Texture the Pulp:
Now for the realistic detail. Using a needle tool, gently scratch and tease the surface of the translucent orange segments. Creating these tiny divots mimics juice vesicles. -
Additional ‘Juice’:
I like to dab a tiny amount of liquid clay into the textured areas. This helps the texture hold perfectly during baking and adds a wet look. -
Making the Connection Point:
Select a spot on the outer rind for your hardware. If you want the keychain to hang upright, choose the top center. Gently insert a silver eyepin into the rind, pushing it deep enough to differ security. -
Dimple the Rind:
Use a toothbrush or a ball of aluminium foil to gently press texture into the outer orange skin, replicating the porous surface of a real orange peel.
Keeping Whites White
White clay picks up lint instantly. Wipe your hands and work surface thoroughly with a baby wipe before rolling out your white ‘pith’ strips to ensure a clean contrast.
Step 3: Baking and Assembly
-
Baking:
Place your charms on a ceramic tile or baking sheet lined with parchment. Bake according to your clay manufacturer’s instructions (usually 275°F/135°C for 15-30 minutes). -
Cooling:
Allow the charms to cool completely in the oven or on a wire rack. Don’t handle them while warm as the clay is still fragile. -
Adding Shine:
To make the fruit look fresh-cut, apply a coat of gloss varnish only to the juicy orange segments, leaving the white pith and outer rind matte. -
Securing the Hardware:
If the eyepin feels loose after baking, pull it out gently, add a drop of super glue to the shaft, and reinsert it immediately. -
Final Assembly:
Using two pairs of pliers, twist open a jump ring (don’t pull it apart). Loop it through the eyepin and your keychain clasp, then twist it closed securely.
Slicing Distortions?
If your orange segments are smushing while cutting the cane, rotate the log a quarter turn after every slice. This ensures unequal pressure doesn’t flatten one side.
Enjoy the pop of bright color these durable little citrus slices add to your daily carry accessories
Fairy Garden Mushrooms and Minis

Bring a touch of woodland magic indoors with this petite fairy garden scene. Featuring hand-sculpted clay mushrooms and a textured landscape, this project combines sculpture with miniature gardening for a delightful tabletop display.
Detailed Instructions
Materials
- White or beige oven-bake clay
- Aluminum foil
- Acrylic paints (dusky pink, cream, white, brown)
- Small paintbrush and sponge
- Oval wooden or ceramic shallow dish/tray
- Dried moss
- Fine craft sand (beige)
- Small smooth pebbles (flat)
- PVA glue or craft adhesive
- Miniature wooden signpost (pre-made or craft wood)
- Sculpting tools or toothpick
- Clear matte varnish (optional)
Step 1: Sculpting the Mushrooms
-
Prepare the foil armatures:
Crumple aluminum foil into three distinct shapes: two larger tapered cones for the main mushroom stems and a tiny one for the baby mushroom. Compressing the foil tightly helps save clay and adds structural strength. -
Cover the stems:
Roll out sheets of white or beige clay to about 1/4 inch thickness. Wrap these around your foil stems, smoothing the seams with your fingers until the surface looks organic and seamless. I like flat bottoms so they stand easily. -
Shape the caps:
Form two large domes and one small dome from solid clay balls. Gently hollow out the undersides slightly so they can sit securely on top of the stems. -
Attach caps to stems:
Score the top of the stems and the underside of the caps with a toothpick to create texture. Press them together firmly, blending the clay slightly underneath the cap to ensure a strong bond. -
Add texture:
Using a toothbrush or a ball of crinkled foil, gently tap the surface of the caps to give them a natural, pitted texture. Don’t smooth it out perfectly; imperfections make them look real. -
Create the signature spots:
Roll tiny balls of fresh clay and press them randomly onto the mushroom caps. Flatten them slightly so they look like natural growths rather than perfect polka dots. -
Bake carefully:
Place your mushrooms on a baking sheet and bake according to your clay manufacturer’s instructions, usually around 275°F (135°C) for 15-30 minutes. Let them cool completely before handling.
Cracked Clay?
If you notice cracks after baking, fill them with a mix of liquid clay (sculpey bake & bond) and raw clay, then bake again briefly. Sandable filler works too.
Step 2: Painting and Assembling
-
Paint the caps:
Mix a soft, dusky pink acrylic paint. Apply it to the caps, carefully painting around the white raised spots. If you accidentally cover a spot, just retouch it with white later. -
Detail the stems:
Dry-brush the stems with a mix of cream and very light brown. This technique highlights surface texture without making the color too heavy. -
Apply the brown speckles:
For a realistic aged look, dip a stiff brush or old toothbrush into diluted brown paint and flick tiny speckles onto the stems and lower parts of the caps. -
Prepare the base:
Take your oval tray and create a ‘division’ line. Apply a layer of PVA glue to the left side and cover it with fine beige sand to create the pathway. -
Add greenery:
Glue clumps of dried moss on the right side of the tray, building it up slightly higher than the sand to create volume. -
Position the mushrooms:
Nestle your dried clay mushrooms into the mossy area. I like to group the large ones together and place the tiny one slightly apart for balance. Glue their bases down if you want them permanent. -
Lay the path:
Select flat, smooth pebbles in soft pastels or greys. Glue them onto the sandy area in a meandering stepping-stone pattern leading toward the mushrooms. -
Install the signpost:
Tuck the miniature wooden signpost into the moss behind the smaller mushroom. If it’s too tall, trim the post before gluing it into place. -
Final touches:
Add tiny bits of ‘rubble’ or smaller stray moss pieces near the base of the mushroom stems to blend them naturally into the ground.
Weighted Base
To prevent your lightweight mushrooms from tipping over easily, press a small metal washer into the bottom of the stem clay before baking to lower the center of gravity.
Now you have a serene little corner of nature to overlook your desk and brighten your day