I’m obsessed with turning polymer clay into a believable clay cake slice, right down to the crumb texture and glossy frosting. Here are my go-to slice ideas—starting with the cozy classics and ending with some playful, studio-style experiments you’ll have a blast trying.
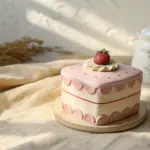
Classic Strawberry Shortcake Slice
Capture the airy elegance of a high-end dessert with this polymer clay project. You will create distinct layers of sponge, mousse, and cream, all topped with hyper-realistic strawberry details.
Step-by-Step Tutorial
Materials
- Polymer clay (white, translucent, ecru/beige, red, light pink)
- Liquid polymer clay (translucent and white)
- Chalk pastels (ochre, brown, red)
- Blade or tissue blade
- Needle tool and dotting tool
- Toothbrush or texturing tool
- Fine grit sandpaper
- Gloss glaze or heavy gel medium
- Small craft brush
Step 1: Creating the Sponge Base
-
Mix the batter color:
Start by mixing ecru clay with a considerable amount of translucent clay and a tiny speck of white. You want a color that mimics baked dough, not raw flour. Condition it well until pliable. -
Form the base layer:
Roll your clay out to a medium thickness (about 4-5mm). Cut a sharp triangle shape for your slice. Keep in mind this is just the bottom crust. -
Texture the sponge:
Use a needle tool to aggressively tease the edges of the triangle. Drag the clay outwards to create crumbs. For the flat side surfaces, press a toothbrush or a ball of aluminum foil against the clay to simulate air pockets. -
Bake effect shading:
Shave some ochre and light brown chalk pastels into a powder. With a soft brush, gently dust the very bottom edge and the textured sides to give it that golden-brown baked look.
Step 2: The Cream and Strawberry Layer
-
First cream layer:
Mix white clay with translucent clay (roughly 1:1) to get a natural cream look. Roll a sheet slightly thinner than your sponge base and cut a matching triangle. Stack this onto your baked sponge base. -
Texture the cream:
Use your needle tool to rough up the sides of this white layer just slightly—cream isn’t perfectly smooth when cut, it has a bit of drag. -
Embed the fruit:
Create small strawberry cross-sections using a red cane or by hand-painting details on tiny red clay discs. Press these deeply into the side of the white cream layer so they look embedded, not just stuck on the surface. -
Fill the gaps:
Smear a tiny bit of white liquid clay over the embedded strawberries to make them look like they are folded into the cream.
Fixing Smudged Layers
If your red strawberry clay smears onto the white cream during cutting or placement, use a Q-tip dipped in a tiny amount of rubbing alcohol or baby oil to wipe the white clay clean before baking.
Step 3: The Mousse and Topping
-
Mixing the mousse:
Create a ‘strawberry mousse’ color by mixing light pink clay with a good amount of translucent. The translucent is key for that airy, gelatinous texture. -
Building the mousse layer:
Roll a thick slab of this pink mix (about twice the thickness of the sponge). Cut your triangle and place it on top of the cream layer. Texture the sides with a stiff brush to mimic the aeration of mousse. -
Top cream finish:
Roll a final, thin layer of your white cream mixture. Place this on the very top of the pink mousse. Smooth the top surface perfectly flat. -
Dusting the top:
To mimic powdered sugar or a velvet spray finish, texture the top surface with incredibly fine sandpaper or a toothbrush. Dust lightly with white pastel powder.
Level Up: Saucy Texture
Mix red chalk pastel with translucent liquid clay. apply minute drops around the embedded strawberries in the cream layer to simulate fruit juices bleeding into the filling.
Step 4: Garnishes and Finishing
-
Sculpting the strawberries:
Form two small strawberry halves from red clay. Use a needle tool to indent seeds all over the curved surface. -
Painting details:
Use acrylic paint or chalk pastel to darken the inside of the seed indentations. Paint the inner white core of the strawberry slice with a fine brush for realism. -
Adding tiny currants:
Roll three microscopic balls of red clay for the red currants. Group them together near the center of the slice. -
Placement:
Arrange the two strawberry halves and the currant cluster on the center-back of the slice. -
Attaching the greens:
If you have tiny green clay or preserved moss, add minuscule leaves to the tops of your strawberries. -
Final glaze:
Once baked and cooled, apply a gloss glaze only to the cut fruit surfaces (the strawberries inside the cake and on top) to make them look juicy.
Display your slice on a miniature ceramic plate to complete this delicious illusion


Lemon Blueberry Layer Slice
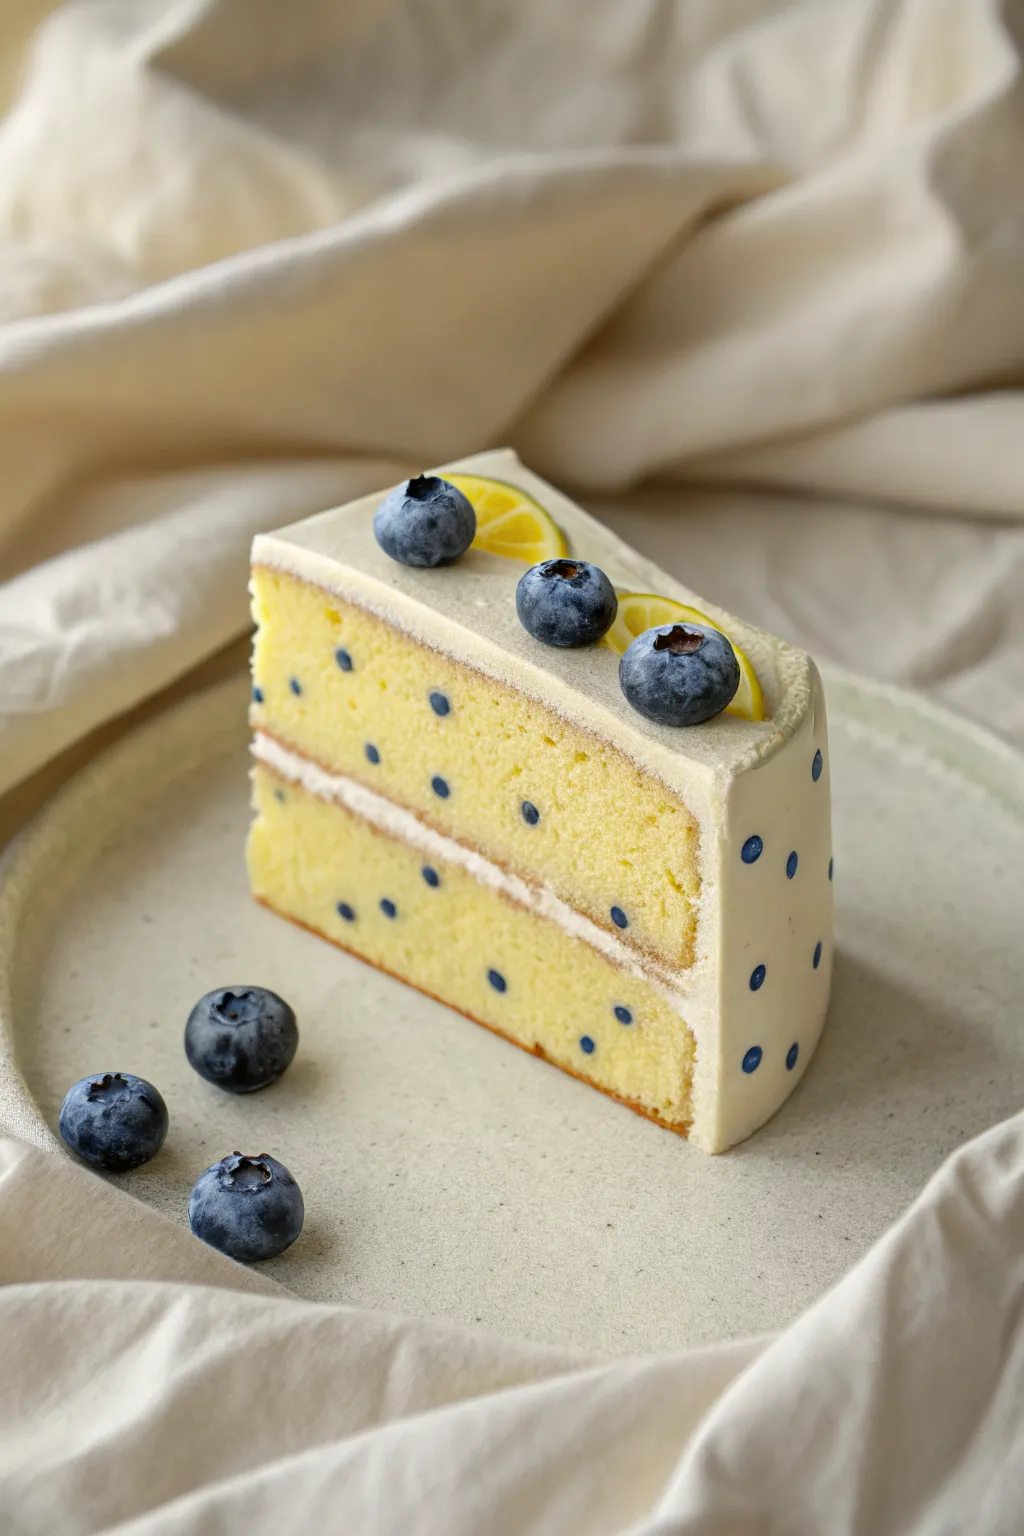
Capture the freshness of summer with this realistic clay cake slice, featuring tender lemon-yellow layers and delicate blueberry speckles. This project focuses on texture and precision to create a mouth-watering replica that looks good enough to eat.
How-To Guide
Materials
- Polymer clay (translucent, white, lemon yellow, navy blue, beige)
- Liquid polymer clay (white and translucent)
- Needle tool or toothpick
- Stiff bristled toothbrush or texture tool
- Soft pastel chalks (golden brown, yellow ochre)
- Blade or X-Acto knife
- Rolling pin or pasta machine
- Small round piping tip (for cutting blueberries)
- Gloss varnish
- Oven for baking
Step 1: Creating the Sponge Layers
-
Mix the perfect batter shade:
Start by mixing translucent clay with white and a tiny amount of lemon yellow. You want an airy, pale yellow color that mimics a fluffy lemon sponge. -
Prepare the blueberry inclusions:
Take a small amount of navy blue clay and chop it into very tiny, irregular bits. These will represent the baked-in blueberries. -
Incorporate the berries:
Gently fold the blue bits into your yellow clay block. Be careful not to over-mix, or the blue will streak and turn the dough green. -
Form the layers:
Roll the clay out into a thick slab, approximately 1cm high. Use your cutter to create two identical triangular wedges for your cake layers. -
Texture the sponge:
This is crucial for realism. Using a needle tool and a stiff toothbrush, rigorously texture the cut sides (the crumb) of the cake. Poke and pull at the clay to create air pockets and crumbs.
Smudged Colors?
If blue clay smears onto the yellow sponge during texturing, use a cotton swab dipped in rubbing alcohol or acetone to gently wipe the surface clean before baking.
Step 2: Frosting and Assembly
-
Whisk the frosting:
Mix white polymer clay with liquid clay (often called ‘clay softener’ or liquid Sculpey) until you have a spreadable consistency similar to buttercream. -
Stack the layers:
Spread a generous layer of your clay frosting on top of the first sponge wedge. Place the second sponge wedge carefully on top, ensuring the points align. -
Frost the exterior:
Coat the top and the curved back of the slice with a smooth layer of the white frosting mixture. Keep the textured sides clean to show off that beautiful sponge. -
Smooth the finish:
Use a flexible clay shaper or a finger dipped in baby oil to smooth the frosting, creating crisp edges where the frosting meets the sponge layers. -
Add polka dots:
Roll tiny balls of navy blue clay and flatten them gently onto the frosting on the back curve and top edge of the cake to replicate the decorative blueberry pattern.
Level Up: Saucy Finish
Mix translucent liquid clay with yellow chalk pastel or alcohol ink. Drizzle this ‘lemon glaze’ over the top of the finished, baked slice for an extra wet look.
Step 3: Toppings and Baking
-
Create fresh blueberries:
Roll small balls of navy blue clay. Use a needle tool to create the star-shaped indentation on top of each berry. -
Dust the berries:
To make them look realistic, brush a tiny amount of white pastel dust over the berries to mimic the natural waxy bloom found on fresh fruit. -
Craft lemon slices:
Make a tiny cane with a translucent yellow center divided by thin white lines, wrapped in a thin yellow rind for zest. Slice this cane thinly into half-moons. -
Arrange the garnish:
Position three blueberries and two lemon slices artistically on top of the cake slice, pressing them gently into the unbaked frosting so they adhere. -
Shade the sponge:
Before baking, use a soft brush to apply golden brown pastel dust to the bottom edge and slightly along the textured sides to simulate a golden-baked crust. I find this creates huge depth. -
Bake the piece:
Bake according to your polymer clay manufacturer’s instructions (usually 275°F/130°C for 15-30 minutes). Let it cool completely. -
Final touches:
Once cool, apply a gloss varnish only to the blueberries and the ‘wet’ part of the lemon slices to make them look juicy.
Display your permanent slice of sunshine on a mini plate or turn it into a delightful fridge magnet to brighten your kitchen


Smooth Fondant-Style Covered Slice

Capture the delicate beauty of a wedding cake tasting with this ultra-realistic clay slice. Featuring smooth white layers, a striking pink jelly insert, and a pearlescent heart topper, this project is perfect for beginners looking to master clean lines.
Step-by-Step Tutorial
Materials
- White air-dry clay (lightweight/soft variety preferred)
- Translucent liquid polymer clay or clear drying craft glue
- Acrylic paints: White, Cream/Yellow Ochre, Deep Pink/Raspberry
- Texture tool (toothbrush or stiff bristle brush)
- Small heart cutter or mold
- Pearl luster dust or shimmer powder
- Rolling pin
- Craft knife or scalpel
- Smooth work surface (glass or tile)
Step 1: Creating the Sponge Layers
-
Mix the sponge color:
Start by taking a large portion of your white air-dry clay. Knead in a tiny dot of cream or yellow ochre acrylic paint. You want a very subtle, baked-goods warmth, not a bright yellow. -
Form the base shape:
Roll the clay out into a thick slab, approximately 1 inch high. Using your craft knife, cut a clean triangle shape to represent your slice. This will be the main body of the cake. -
Texture the sponge:
Because this is a slice, the sides need to look like aerated cake. Use a toothbrush or a stiff brush to tap firmly all along the cut sides of the triangle, creating a realistic crumb texture. Leave the top and bottom smooth. -
Slice the layers:
Carefully cut your thick triangle horizontally into three equal slabs. Separate them gently so they don’t lose their shape, and let them firm up for about 20 minutes.
Clean Cut Tip
For ultra-crisp layers, let the clay dry to a ‘leather hard’ stage (about 1-2 hours) before cutting your final triangle slice shape. This prevents drag.
Step 2: The Filling and Assembly
-
Prepare the cream filling:
Take fresh white clay—no paint added this time—and roll it into a thinner sheet, about half the thickness of your sponge layers. -
Cut cream triangles:
Cut two triangles from this white sheet, matching the size of your sponge layers exactly. -
Create the jelly layer:
Mix a small amount of white clay with deep pink acrylic paint until fully saturated. Roll this out very thinly. Cut one triangle from this pink clay. -
Stack the bottom half:
Place the bottom sponge layer down. Add a very thin smear of glue, then place a white cream layer on top. Repeat with the middle sponge layer. -
Add the jelly insert:
On top of the middle sponge, stack your thin pink jelly layer. It should look crisp and straight. I usually smooth the edges with a finger to ensure it’s flush with the cake sides. -
Final assembly:
Add the second white cream layer on top of the pink one, and finally, top with the last sponge layer. Gently press the whole stack down to bond the layers without squishing them. -
Refine the texture:
Go back over the sides with your texture tool to blend the seams slightly where the sponge meets the cream, making it look like a cohesive slice.
Make it Glossy
After the clay fully dries, coat just the pink berry layer with a high-gloss varnish or UV resin. This makes it look like real fruit jam against the matte cake.
Step 3: The Fondant Finish
-
Roll the fondant:
Clean your workstation thoroughly or use a fresh surface. Roll out a pristine piece of white clay until it is thin and completely smooth, resembling fondant icing. -
Cover the top:
Cut a triangle slightly larger than the top of your cake. Place it on the cake slice, allowing a tiny overhang. -
Smooth the edges:
Gently gently curve the overhanging edges of the ‘fondant’ down over the very top rim of the cake. Use a touch of water on your finger to smooth this edge so it looks seamless and soft. -
Create the heart:
Take a small ball of clay (colored light beige or peach) and press it into a heart mold, or shape it by hand. It should be puffy and rounded. -
Dust and mount:
Once the heart is formed, brush it with pearl luster dust for a sugary shimmer. Attach it to the center of the cake slice with a dab of glue.
Place your finished slice near a sunny window to admire the translucent quality of the layers


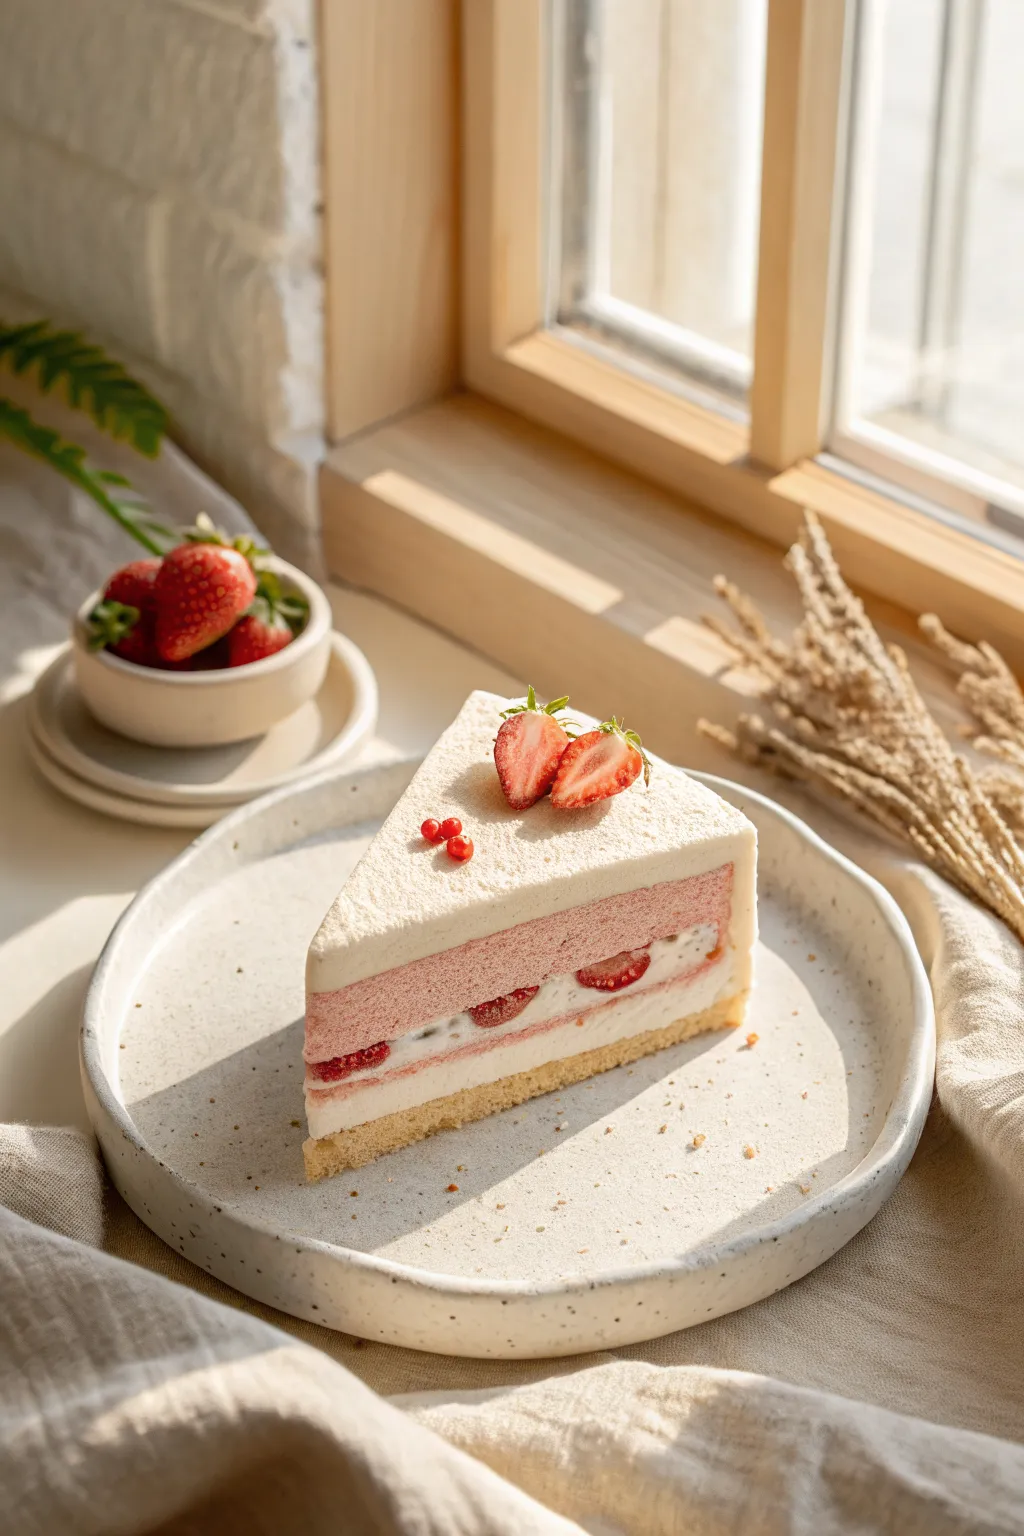
Mixed Berry Topped Slice
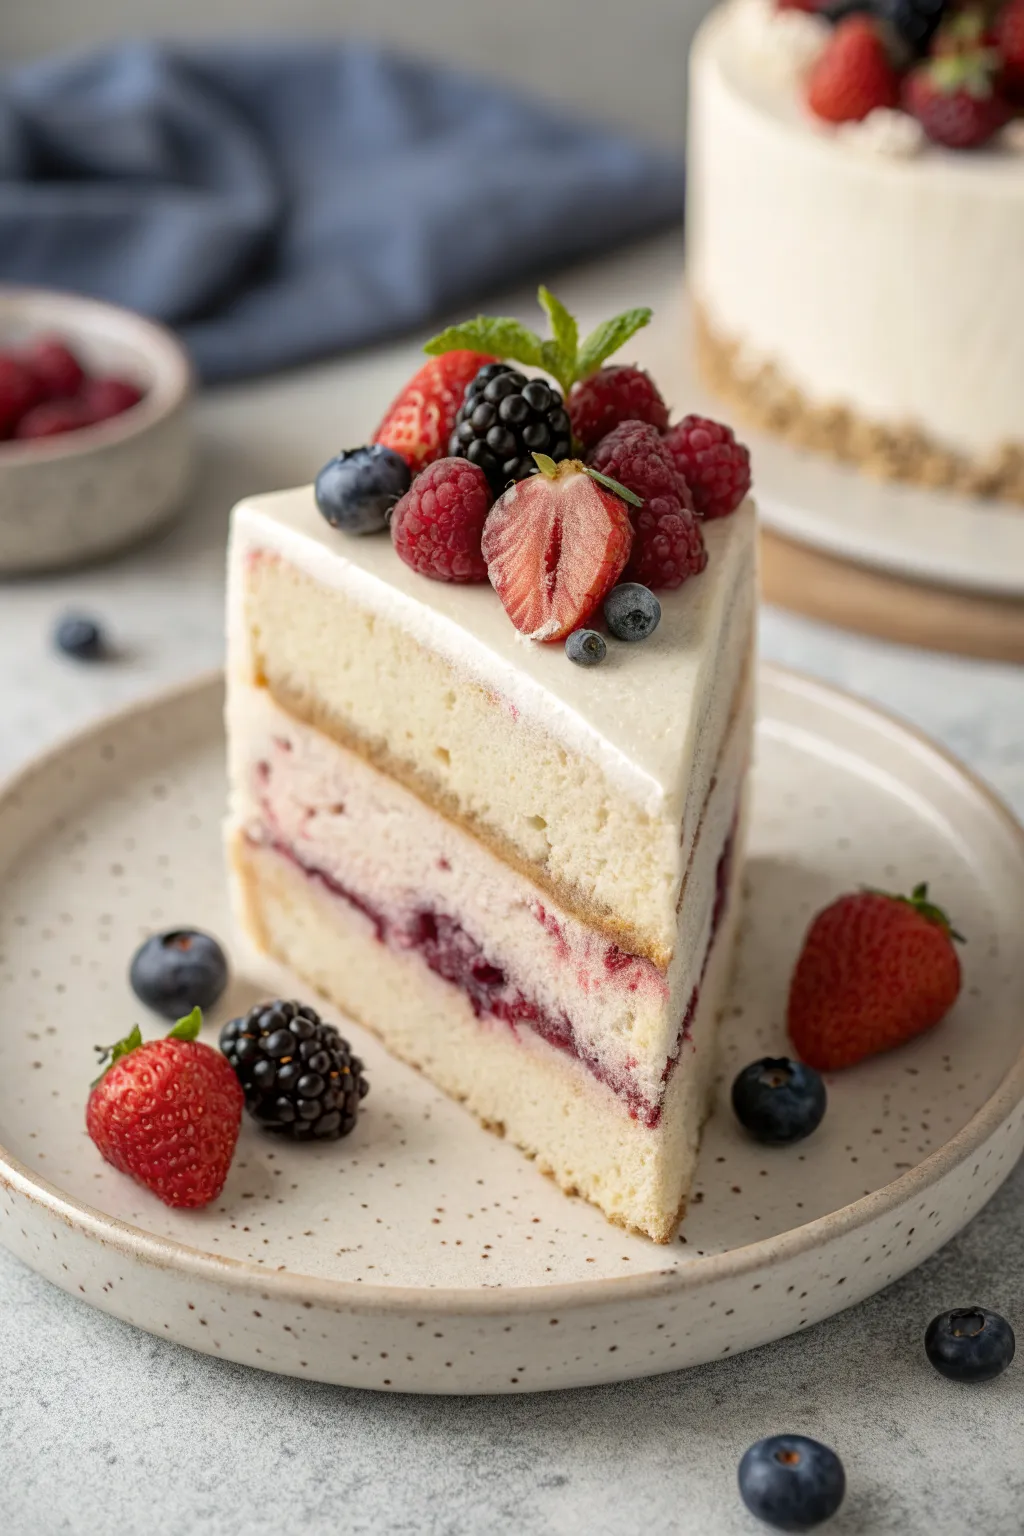
Capture the elegance of a high-end patisserie with this polymer clay slice, featuring airy sponge layers, a luscious jam filling, and an abundance of sculpted berries. The key to this project is texturing the sponge and creating translucency in the fruit for that fresh-picked look.
Step-by-Step
Materials
- Polymer clay (white, translucent, red, blue, purple, yellow, green)
- Liquid polymer clay (translucent and white)
- Chalk pastels (ochre, brown, red)
- Needle tool and dotting tool
- Toothbrush or crumpled foil (for texturing)
- Small round cutter or hobby knife
- Gloss varnish
- Sandpaper 400-grit
- UV resin (optional, for extra juicy berries)
- Small blade
Step 1: Baking the Sponge Layers
-
Mix the Dough:
Start by mixing white polymer clay with a significant amount of translucent clay (about a 1:1 ratio) and a tiny speck of yellow. This creates a realistic, airy cake color rather than a stark white plastic look. -
Form the Shape:
Roll the clay into a thick sheet, roughly 1cm high. Cut out a large circle using a cutter, then slice a triangular wedge from it to define your slice shape. -
Texture the Crumb:
This is the most crucial step for realism. Use a stiff toothbrush or a needle tool to vigorously texture the cut sides of the sponge. Pull the clay outwards slightly to mimic the crumb structure of baked cake. -
Create the Crust:
Shave some ochre and light brown chalk pastel into a fine dust. Use a soft brush to gently shade the top and bottom edges of the sponge wedge, giving it that golden-baked crust appearance. -
Repeat for Top Layer:
Create a second, identical sponge wedge. Texture the sides and shade the edges just like the first one. Set both aside.
Fixing “Plastic” Cake
If your sponge looks too smooth or plastic-like after baking, tear tiny bits off the surface with tweezers to roughen it up, then dust with matte varnish.
Step 2: The Jam Filling
-
Prepare the Jam:
Mix translucent liquid clay with shaved red and purple chalk pastels. You want a deep, rich berry color. Stir in tiny bits of chopped cured red clay to simulate fruit chunks. -
Make the Cream Layer:
Mix white clay with equal parts white liquid clay to create a ‘frosting paste.’ Spread a generous layer of this onto the top of your bottom sponge slice. It should look fluffy, not flat. -
Add the Jam Swirl:
Carve a small trench through the middle of your wet cream layer. Carefully pour your jam mixture into this trench, letting some bleed slightly into the white cream for a natural effect. -
Stack the Cake:
Place the top sponge layer gently onto the cream and jam filling. Don’t press too hard, or you’ll lose the airy texture on the sides.
Level Up: Saucy Drip
Mix translucent liquid clay with red alcohol ink. Carefully drip it over the berry pile so it runs down the white frosting like fresh fruit syrup.
Step 3: Frosting and Sculpting Fruit
-
Frost the Exterior:
Using your white frosting paste, coat the back (curved) side and the top of the cake. Smooth it out with a flexible tool or your finger, but leave slight irregularities—real buttercream isn’t perfectly plastic-smooth. -
Sculpt Raspberries:
Make tiny balls of translucent red clay. Cluster them carefully around a small cone of red clay to form a raspberry shape. Dust lightly with white powder for a ‘bloom’ effect. -
Sculpt Blackberries:
Repeat the raspberry process using dark purple/black clay. The individual drupelets should be tight and shiny. -
Create Blueberries:
Roll small balls of dark blue clay. Poke a tiny, jagged indentation in the top of each. I like to roll them in a tiny bit of white pastel dust to look frosty. -
Slice the Strawberry:
Form a strawberry shape from red clay. Slice it in half. On the flat cut side, use a needle to draw the white/pink fibers radiating from the center. Paint the outside skin red. -
Arrange the Topping:
Press your sculpted berries into the wet frosting on top of the cake. Create a satisfying pile, mixing colors and sizes.
Step 4: Finishing Touches
-
Add Greenery:
Create tiny leaves from green clay for the strawberry calyx and a small mint sprig. Place these amongst the fruit for a color pop. -
First Bake:
Bake the entire piece according to your clay manufacturer’s instructions (usually 275°F/130°C for 15-30 mins). -
Glaze the Fruit:
Once cooled, apply a high-gloss varnish or a thin layer of UV resin specifically to the cut strawberry face and the darkest berries to make them look juicy and wet. -
Powdered Sugar (Optional):
For a final flourish, shave a tiny bit of white chalk pastel into a fluffy brush and tap it over the berries to simulate powdered sugar.
Display your slice on a miniature ceramic plate and enjoy the eternal freshness of your berry creation

The Complete Guide to Pottery Troubleshooting
Uncover the most common ceramic mistakes—from cracking clay to failed glazes—and learn how to fix them fast.
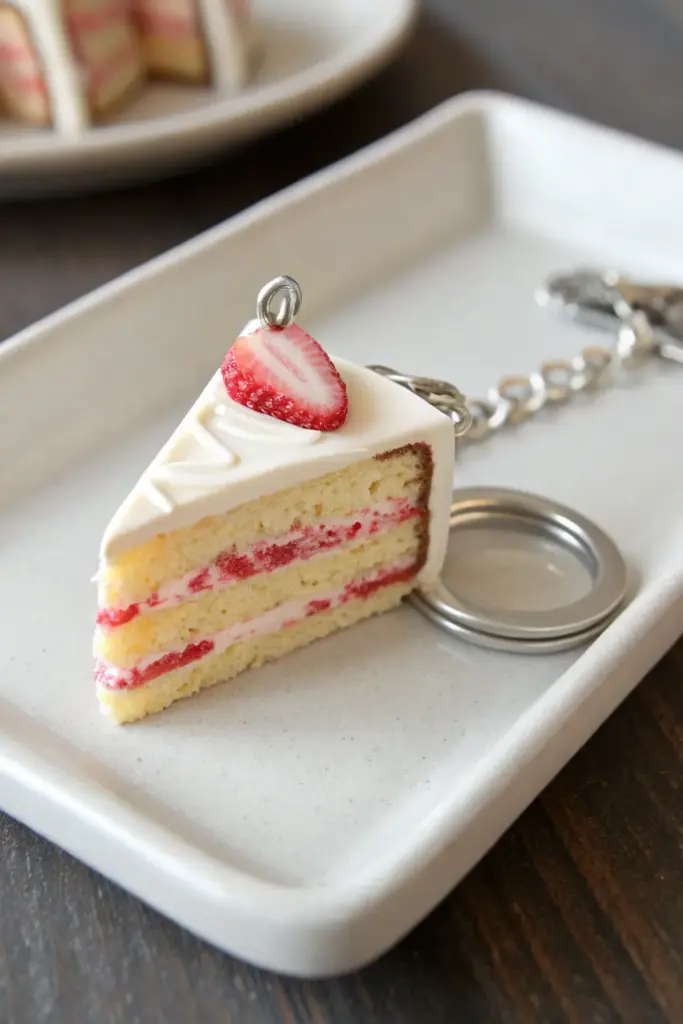
Cake Slice Charm With Hidden Loop

Capture the sweetness of summer with this incredibly realistic polymer clay cake slice charm. Featuring fluffy sponge layers, vibrant jam filling, and a glossy strawberry garnish, this miniature treat looks good enough to eat but is durable enough for your keys.
Detailed Instructions
Materials
- Polymer clay (translucent, white, yellow, red)
- Liquid polymer clay (translucent)
- Chalk pastels (yellow ochre, light brown)
- Texture tools (needle tool, toothbrush, or crumbled foil)
- Blade or X-Acto knife
- Eye screw pin
- Keychain hardware
- Gloss glaze or UV resin
- UV lamp (if using resin)
- Oven for baking polymer clay
- Small paintbrush
Step 1: Baking the Cake Layers
-
Mix the batter color:
Start by mixing translucent clay with a small amount of white and a tiny speck of yellow to create a realistic, slightly off-white sponge cake color. It should look creamy, not stark white. -
Create the sheets:
Roll your mixed clay into a thick sheet, about 3-4mm thick. Using a circle cutter or a template, cut out three identical circles. These will become your cake layers. -
texture the sponge:
Using a needle tool, toothbrush, or a ball of crinkled aluminum foil, vigorously texture the surface of all three clay circles. Don’t be afraid to be rough; real cake has plenty of air pockets and crumbs. -
Pre-bake the sponge:
Bake these textured circles according to your clay package instructions (usually around 275°F/135°C) for just 10-15 minutes to stiffen them up. This ‘par-baking’ step prevents them from squishing during assembly.
Crumb coat secret
Use a toothbrush to texture the cut sides of the sponge after slicing. A circular motion creates the most realistic airy cake texture rather than just poking holes.
Step 2: Filling and Assembly
-
Mix the jam:
While the layers cool, mix translucent liquid clay with scraped red chalk pastel or a tiny bit of red clay to create a thick, sticky ‘jam’ mixture. It should be vibrant red but still slightly translucent. -
Prepare the cream:
Mix white clay with a little translucent clay and some liquid clay to create a soft, spreadable frosting consistency. This is your whipped cream filling. -
Stack the layers:
Take your first baked cake circle. Spread a thin layer of the white cream mixture, followed by a generous swirl of your red jam mixture. -
Build the tower:
Place the second cake circle on top and repeat the cream and jam filling process. Top with the third and final cake circle. -
Cut the slice:
Using your sharpest blade, cut a triangular slice out of your round cake stack. The par-baked layers will resist squishing, giving you that perfect clean cut that reveals the filling. -
Texture the cut sides:
Use your needle tool to gently pick at the cut sides of the sponge layers. This re-establishes the crumb texture that the blade might have smoothed over.
Make it glitter
Before baking the strawberry, dust it lightly with ultra-fine clear glitter or white sand. This mimics the crystalline look of sugar sprinkles or frost.
Step 3: Frosting and Details
-
Frost the exterior:
Roll out a thin sheet of white clay for the fondant or smooth buttercream finish. Carefully drape it over the back curve and top of your slice, trimming the edges flush with the sponge. -
Adding texture to the back:
For the back of the cake (the curved part), mix some brown chalk pastel into liquid clay and dab it lightly on the sponge area to simulate a baked crust color. -
Insert the hardware:
I prefer to add the hardware now for security. Screw a small eye screw directly into the top of the cake, near the back edge. You can dip the screw in liquid clay first to act as glue. -
Pipe the decoration:
Roll a very thin snake of white clay or use extruded clay to create the squiggly piping decoration on top of the slice. -
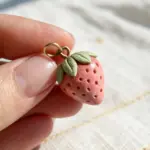
Create the strawberry:
Shape a small teardrop of red clay. Slice it in half to make a flat back. Use a needle tool to press tiny seed indentations into the surface. -
Paint the strawberry core:
Using white acrylic paint or white liquid clay, paint a thin line down the center of the strawberry slice and feather it outwards to mimic the fruit’s interior pattern. -
Place the garnish:
Press the strawberry slice firmly into the frosting on top of the cake, positioning it slightly in front of the eye pin. -
Final Bake:
Bake the entire piece again for the full recommended time (usually 30 minutes). Let it cool completely. -
Gloss the fruity parts:
Apply a coat of gloss glaze or UV resin specifically to the jam layers and the strawberry slice to make them look wet and fresh. -
Attach keychain:
Once everything is dry and set, use pliers to attach your keychain ring and chain to the eye screw.
Now you have a delectable slice of cake that will stay fresh on your keyring forever