
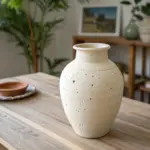
When I’m craving that handmade pottery look without a kiln, air dry clay flower pots and vases are my go-to studio comfort project. Here are my favorite flower pot vase ideas—from classic shapes you’ll use forever to playful, artsy twists that instantly make your shelf feel styled.
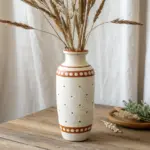
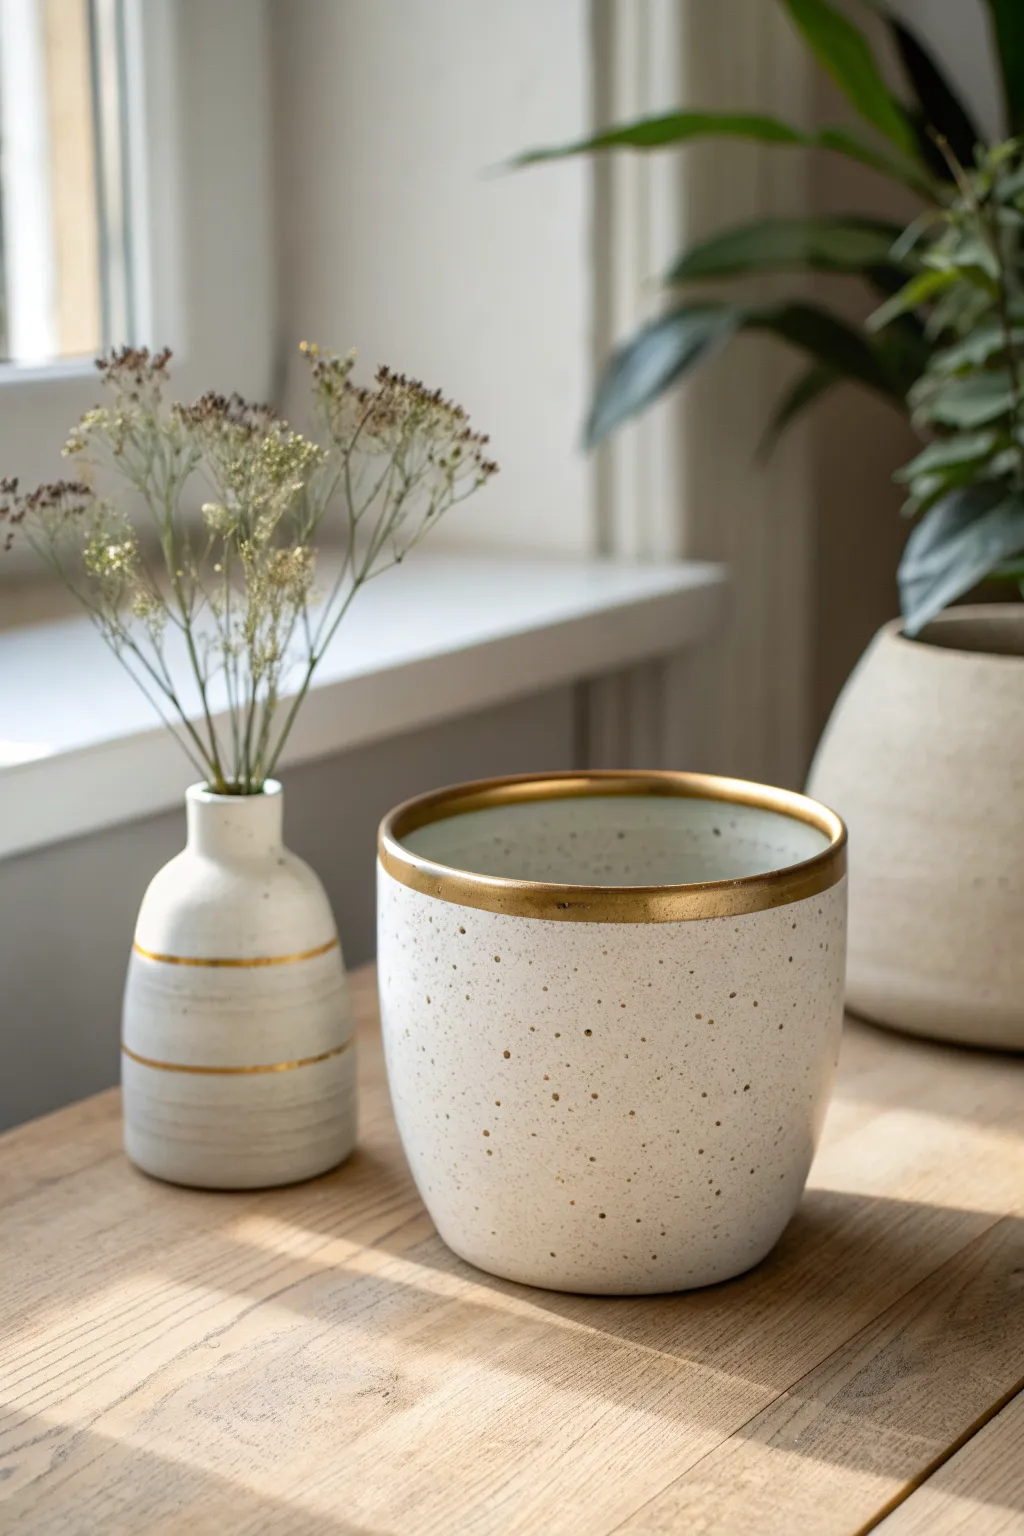
Minimal Cylinder Flower Pot
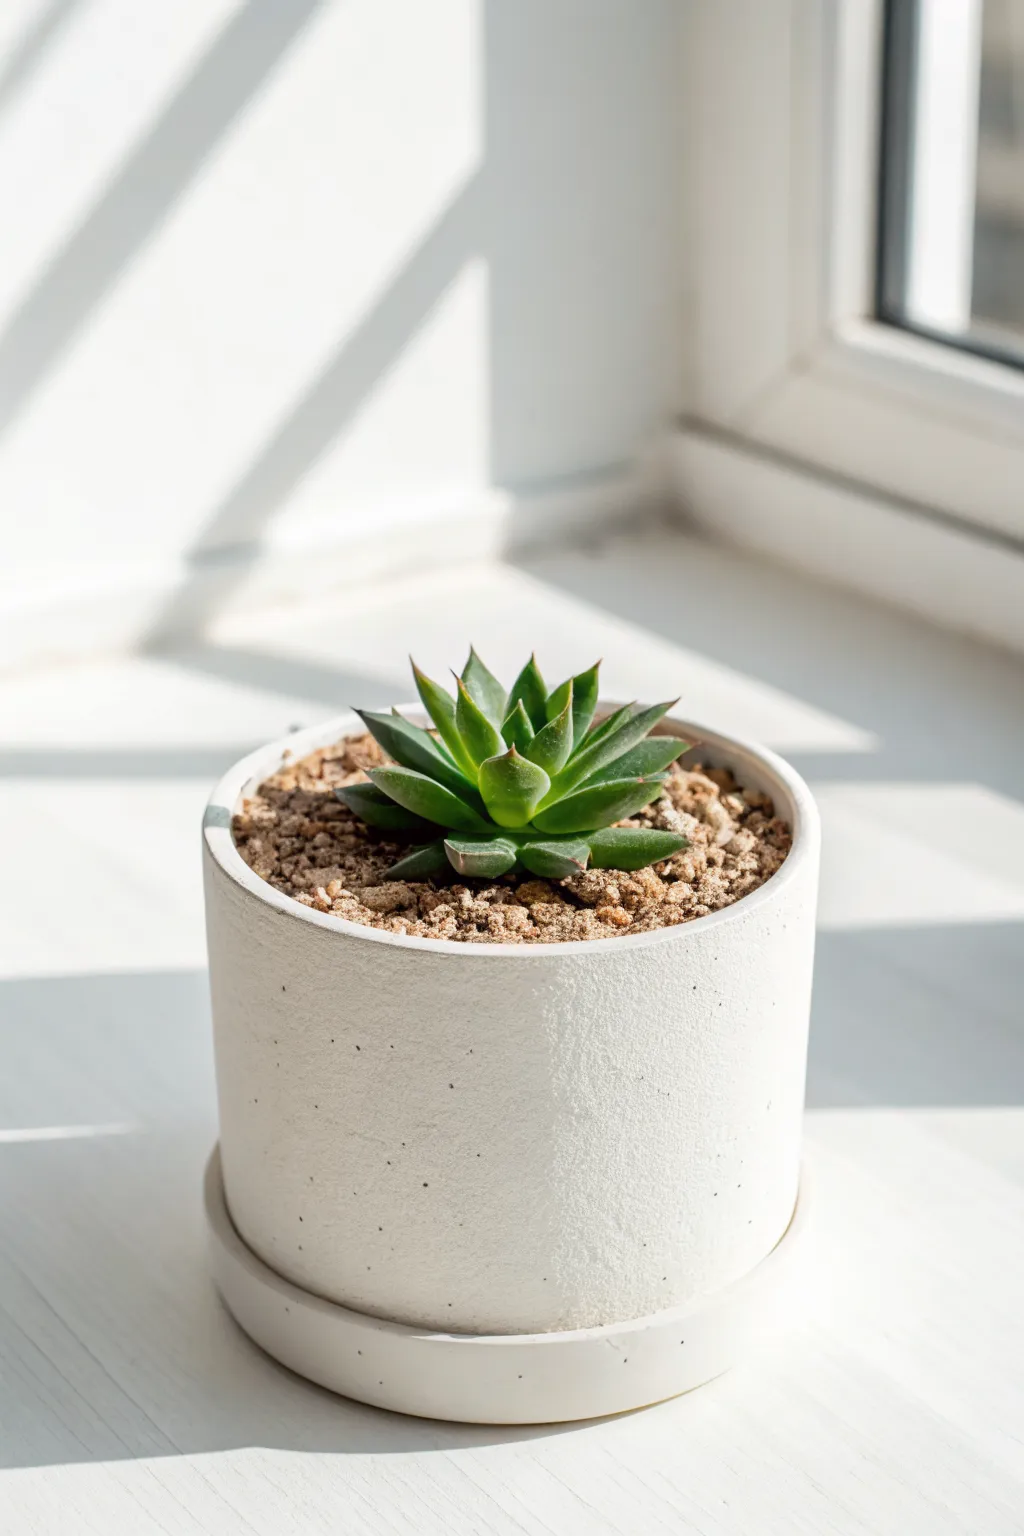
Embrace simplicity with this clean, cylindrical planter that mimics the look of modern ceramic stoneware. The speckled white finish and matching saucer give it a polished, store-bought feel that belies its easy handmade construction.
Step-by-Step Guide
Materials
- White or grey air-dry clay (approx. 500g)
- Rolling pin
- Empty can or cylindrical container (to use as a mold)
- Parchment paper or plastic wrap
- Craft knife or clay cutter
- Ruler
- Small bowl of water
- Sponge
- Sandpaper (fine and medium grit)
- White acrylic paint (matte)
- Black or brown acrylic paint (for speckles)
- Old toothbrush
- Waterproof varnish or sealant
Step 1: Forming the Cylinder Body
-
Prepare your mold:
Find a clean, cylindrical can that matches your desired pot size. Wrap the can tightly in parchment paper or plastic wrap, tucking the excess inside the open end. This prevents the clay from sticking to the metal later. -
Roll the clay slab:
Roll out a portion of your air-dry clay on a flat surface until it is an even thickness, roughly 1/4 inch thick. Try to keep the slab rectangular to minimize waste. -
Measure and cut:
Measure the height of your can. Use your ruler and craft knife to cut a long rectangular strip of clay that is slightly taller than your can and long enough to wrap around it with a slight overlap. -
Wrap the mold:
Carefully lift the clay strip and wrap it around the prepared can. Where the two ends meet, cut through both layers of clay simultaneously with your knife to create a perfect butt joint. -
Seal the seam:
Score the raw edges of the seam with a needle tool or toothpick, apply a little water, and press them firmly together. Use your fingers or a modeling tool to smooth the clay over the seam until it disappears.
Step 2: Creating the Base and Saucer
-
Cut the base:
Roll out a small amount of clay for the bottom. Place your clay-wrapped can on top of this slab and trace around it with a knife. Cut out the circle. -
Attach the bottom:
Score and wet the bottom rim of your cylinder and the edge of the circle base. Press the base onto the cylinder, blending the clay upwards from the base to the walls to secure it tightly. -
Make the saucer:
For the saucer, roll out another slab. Use a slightly larger circular object (like a bowl rim) as a template to cut a circle wider than your pot. Create a low wall by attaching a thin coil of clay to the rim or simply curving the edges up slightly. -
Dry properly:
Allow the pot to dry on the mold for a few hours until it stiffens but isn’t fully hard. Carefully slide the can out. I find removing the mold too late can cause cracking as the clay shrinks, so catch it while it’s leather-hard. -
Final drying:
Let both the pot and saucer dry completely for 24-48 hours away from direct sunlight.
Crack Control
If small cracks appear during drying, make a paste of clay and water (slip) to fill them in immediately. Smooth over with a damp finger.
Step 3: Finishing and Decoration
-
Sand for smoothness:
Once bone dry, use medium grit sandpaper to level out any bumps, uneven rims, or seam marks. Follow up with fine grit sandpaper for a silky smooth finish. -
Base coat:
Paint the entire exterior and interior of the pot and saucer with matte white acrylic paint. You may need two coats for opaque coverage. -
Create the speckles:
Dilute a tiny drop of black or brown paint with water. Dip an old toothbrush into the mixture, aim it at the pot, and run your thumb across the bristles to flick tiny speckles onto the surface. -
Seal the deal:
Since air-dry clay dissolves in water, sealing is critical. Apply 2-3 coats of a high-quality waterproof varnish or polyurethane sealant, paying special attention to the inside.
Faux Stone Look
Mix dried coffee grounds or coarse black pepper directly into your wet clay before rolling. This creates an authentic stone texture without painting.
Pop in your favorite succulent and enjoy this sleek addition to your windowsill.


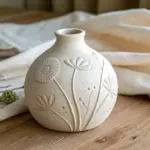
Tiny Pinch-Pot Bud Vase Planters
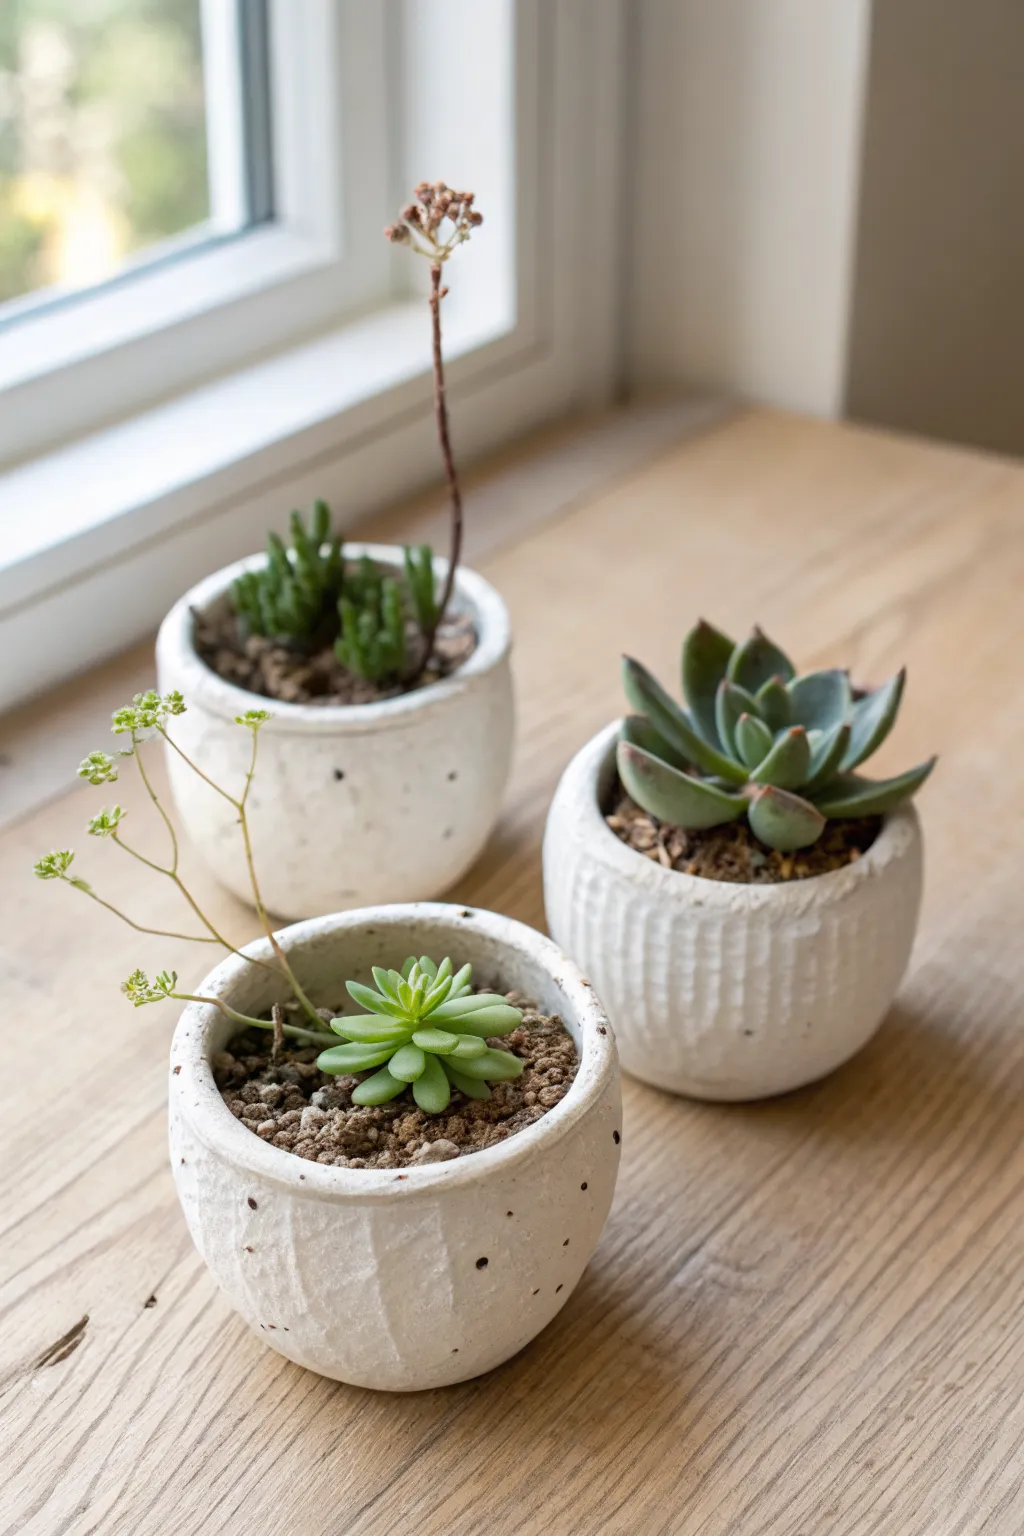
These charming, palm-sized planters rely on the ancient pinch pot technique to create organic, gently textured vessels perfect for small succulents. The finish mimics speckled stoneware, bringing an earthy and modern touch to your windowsill without needing a kiln.
Step-by-Step
Materials
- White air dry clay
- Small bowl or cup of water
- Wax paper or canvas work mat
- Acrylic paint (brown or black)
- Old toothbrush or stiff bristle brush
- Matte spray sealant or waterproof varnish
- Plastic pot liners (optional, cut from small plastic cups)
- Sandpaper (fine grit)
- Modeling tool or butter knife
Step 1: Shaping the Clay
-
Prepare your clay ball:
Start by taking a chunk of white air dry clay, roughly the size of a tangerine. Roll it between your palms until you have a smooth, crack-free sphere. -
Open the form:
Hold the sphere in one hand and gently press your thumb into the center, stopping about a half-inch from the bottom. This establishes your base thickness. -
Pinch the walls:
Using your thumb on the inside and fingers on the outside, gently pinch and rotate the clay ball. Work from the bottom up in a spiral motion. -
Build height:
Continue pinching until the walls are roughly 1/4 inch thick. Aim for a slightly rounded, bowl-like shape rather than a straight cylinder. -
Flatten the bottom:
Tap the pot gently on your work surface to create a flat, stable base so it won’t wobble.
Cracking Up?
If you see cracks forming while shaping, your clay is too dry. Dip your finger in water and smooth over the cracks immediately to rehydrate the spot.
Step 2: Texturing and Refining
-
Create surface texture:
Instead of smoothing the outside perfectly, use the side of a modeling tool or a butter knife to gently press vertical indentations or ridges around the exterior. This mimics the ‘raked’ look seen on the front pot. -
Smooth the rim:
Run a wet finger along the top rim to smooth out any sharp edges or unwanted cracks. The rim should look soft and organic, not surgically sharp. -
Slow drying process:
Place your pots on a piece of wax paper to dry. I find that turning them upside down after the first few hours helps the rim dry evenly. Let them cure for 24-48 hours totally. -
Sand imperfections:
Once fully dry and hard, use fine-grit sandpaper to briefly buff any sharp jagged bits on the rim or base, but leave the textured sides alone.
Step 3: Faux Stoneware Finish
-
Prepare the speckle paint:
Dilute a small drop of brown or black acrylic paint with water until it has an inky, fluid consistency. -
Apply the speckles:
Dip an old toothbrush into the paint mixture. Hold it over the pot and run your thumb across the bristles to flick tiny droplets onto the clay surface. -
Practice first:
Test your splatter technique on a scrap piece of paper first to ensure the drops aren’t too large or gloppy. -
Seal the interior:
Air dry clay dissolves in water, so waterproofing is vital. Apply three coats of a heavy-duty waterproof varnish to the inside, letting each coat dry completely. -
Seal the exterior:
Spray the outside with a matte sealant to protect your speckled design and give the pot a finished, ceramic look without adding high gloss. -
Potting up:
Add a small layer of gravel, then cactus soil, and nestle your succulents inside. If you are worried about moisture, insert a small plastic cup liner before planting.
Make it Metallic
For a luxe twist, paint just the rim of the pot with liquid gold leaf or metallic paint after the speckling step is dry.
Place your trio of planters near a bright window and enjoy the modern, handmade warmth they add to your space


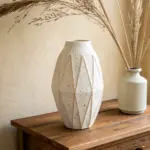
Coil-Built Belly Vase
Embrace the beauty of raw texture with this bulbous, coil-built vase that mimics the warmth of traditional terracotta pottery. The distinctive horizontal ridges give this piece a tactile, handcrafted charm that perfectly complements dried floral arrangements.
Step-by-Step Tutorial
Materials
- Terracotta-colored air dry clay (approx. 1kg)
- Small bowl of water
- Rolling pin
- Needle tool or clay knife
- Sponge
- Potter’s rib or an old credit card
- Acrylic matte varnish or sealant
- Sandpaper (fine grit)
Step 1: Building the Base and Body
-
Prepare the Base:
Begin by rolling out a slab of clay to about 1/4 inch thickness. Use a round cutter or cut a circle freehand with your needle tool, aiming for a diameter of about 3-4 inches to support the bulbous form. -
Score and Slip:
Score the outer edge of your base circle by making small hatched marks with your needle tool. Dab a little water onto the scored area to create a sticky ‘slip’ that will act as glue. -
Roll Your Coils:
Take a chunk of clay and roll it back and forth on your work surface to create a long, snake-like coil. Aim for a consistent thickness, roughly the width of your pinky finger. -
First Layer:
Place your first coil onto the scored edge of the base. Gently press it down to adhere. Cut off any excess length and smooth the two ends of the coil together so the ring is seamless. -
Build Outwards:
Continue adding coils, stacking them one on top of another. For the next several layers, place each new coil slightly to the *outside* of the coil below it. This technique expands the form to create that wide, rounded belly. -
Blend the Inside:
Every 2-3 layers, pause to smooth the *inside* of the vase. Use your thumb or a modeling tool to drag clay from the upper coil down into the lower one. This is crucial for structural integrity, even if the outside remains textured. -
Create the Texture:
As you build, resist the urge to smooth the outside completely. Instead, use a damp sponge to gently soften the coils without erasing their definition, maintaining that ribbed beehive look. -
Close the Curve:
Once you have reached the widest point of the belly, begin placing your coils slightly to the *inside* of the previous ring. This will start tapering the shape inward toward the neck.
Step 2: Neck, Rim, and Finish
-
Form the Neck:
Continue tapering inwards until the opening is about 2 inches wide. Then, stack the next few clay coils directly vertically on top of each other to create the straight, upright neck. -
Flaring the Rim:
For the final coil, gently press it outward slightly with your fingers to create a delicate flared lip at the very top. -
Refine the Ridges:
Take a look at the exterior texture. If any gaps are too deep, fill them with tiny bits of clay. If the ridges are too sharp, run a damp finger along the grooves to soften them into a uniform pattern. -
Smooth the Connection:
I prefer to use a damp sponge to carefully smooth the transition area where the belly meets the neck, ensuring the curve looks natural rather than angular. -
Drying Process:
Place the vase in a cool, dry spot away from direct sunlight. Because air dry clay shrinks, rotate the vase occasionally to ensure it dries evenly. Let it dry for at least 48-72 hours. -
Sanding:
Once bone dry, check for any unintended sharp spikes or rough patches on the bottom or rim. Use fine-grit sandpaper to gently smooth these specific areas only. -
Sealing:
Apply a coat of matte acrylic varnish to the entire piece. This protects the clay and seals the surface, though remember that air dry clay is not waterproof, so this vase is best for dried botanticals.
Cracking Up?
If small cracks appear while drying, mix a tiny bit of fresh clay with water to make a paste. Fill the cracks, smooth over, and let dry again.
Faux Glaze Effect
For a two-tone look, paint just the top rim and neck with a high-gloss clear coat or white acrylic to mimic a dipped glaze finish.
Fill your new creation with tall bunny tails or pampas grass for an instant touch of organic elegance

Color-Dipped Two-Tone Pot Vase
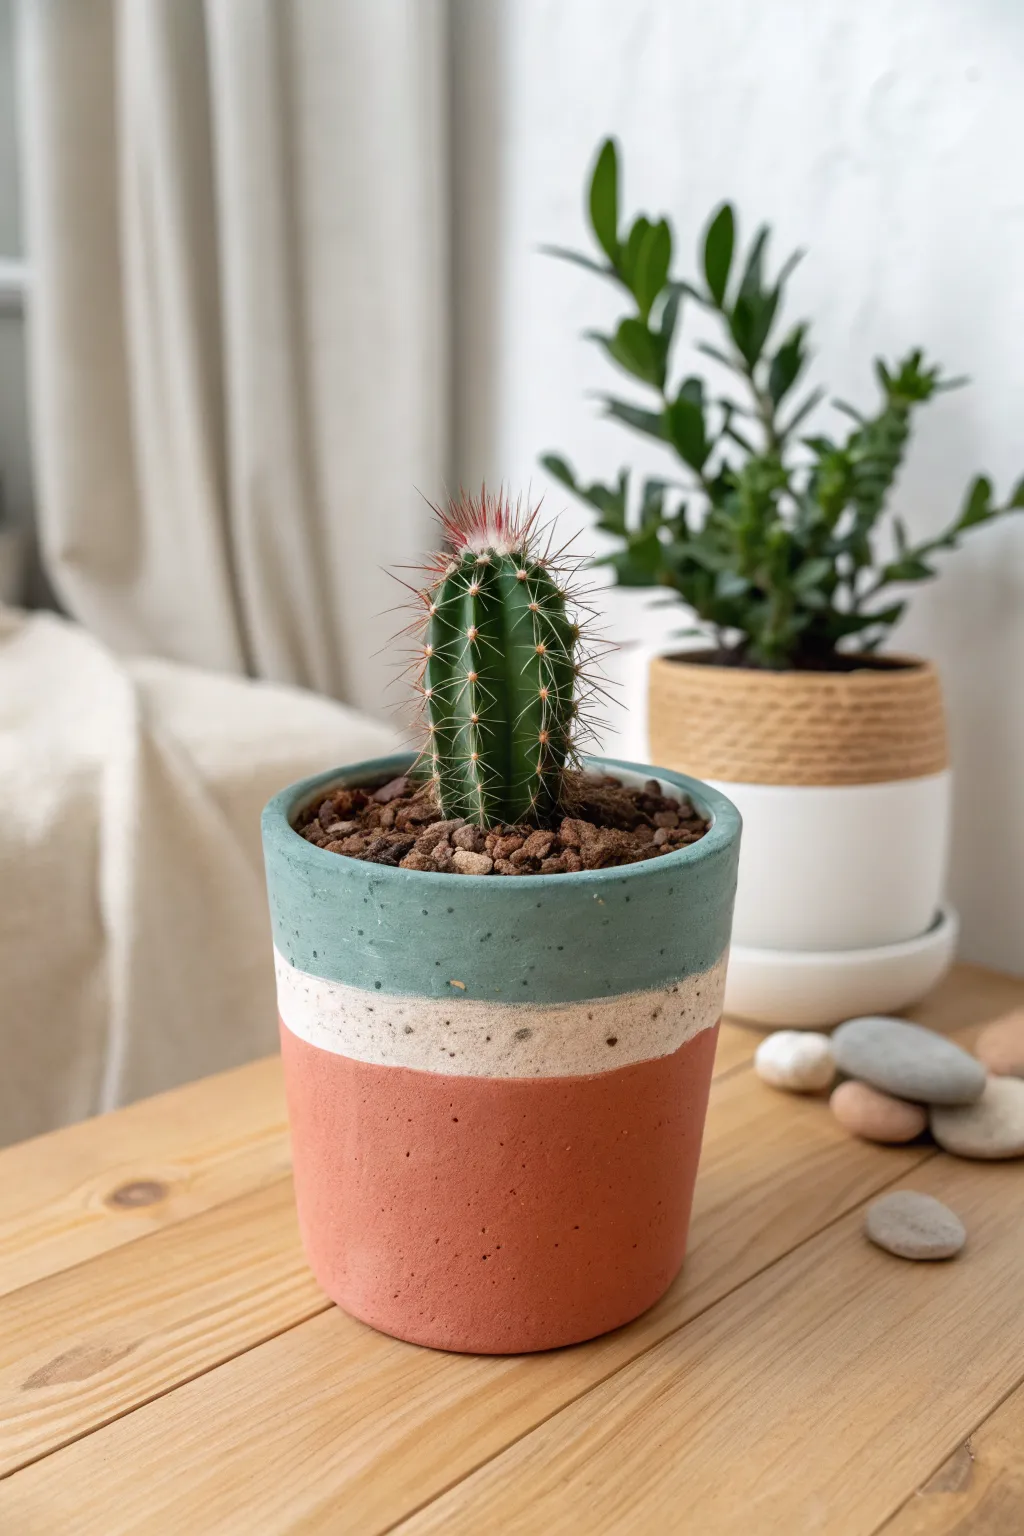
Bring warmth to your plant collection with this cylindrical pot featuring distinct bands of teal, white, and terracotta. This project uses a layering or painting technique to create clean, crisp lines that mimic a serene desert horizon.
Step-by-Step Guide
Materials
- Air-dry clay (white or terracotta)
- Acrylic paints (teal, white, terracotta/burnt orange)
- Rolling pin
- Clay knife or craft knife
- Cylindrical mold (like a can or glass jar)
- Small bowl of water
- Sandpaper (fine grit)
- Masking tape or painter’s tape
- Flat paintbrush
- Clear waterproof sealant (matte or satin)
- Plastic wrap
Step 1: Shaping the Base Vessel
-
Prepare your mold:
Find a cylindrical object to use as a mold, such as a large tin can or a sturdy glass jar. Wrap it fully in plastic wrap to ensure the clay doesn’t stick to it later. -
Roll out the clay:
Take a large chunk of air-dry clay and knead it until soft. Roll it out into a long rectangle approximately 1/4 inch thick. You’ll want it long enough to wrap around your mold with a little overlap. -
Cut the base:
Cut a circle of clay that is slightly larger than the bottom of your mold. Place this circle on your work surface. -
Form the walls:
Wrap the rectangular clay slab around the mold. Slice through the overlapping ends vertically with your knife to create a perfect butt joint where the edges meet. -
Seal the seam:
Score the edges of the seam with cross-hatch marks and dab a little water on them. Press the edges together firmly and smooth the seam with your finger or a modeling tool so it disappears. -
Attach the bottom:
Place the wrapped mold on top of the clay circle base. Blend the clay from the walls down onto the base, smoothing the connection point until it is seamless. Trim away any excess clay from the bottom edge. -
Smooth the surface:
Dip your fingers in water and run them over the entire pot to smooth out imperfections. Air-dry clay often has a lovely organic texture, so don’t worry about making it machine-perfect. -
Initial drying:
Let the pot sit on the mold for a few hours until it is leather-hard. Then, carefully slide the mold out and let the pot dry completely for 24-48 hours until it turns a solid, light color.
Clean Lines
For ultra-crisp lines between colors, seal the edge of your masking tape with a thin layer of the *base* color first. This prevents the second color from bleeding underneath.
Step 2: Painting and Finishing
-
Sand for perfection:
Once fully dry, take fine-grit sandpaper and gently sand the exterior. Focus on the rim and any rough patches to prepare a smooth canvas for your paint. -
Define the first section:
Decide on the proportions for your color blocks. For this look, the bottom section is the largest. Apply a strip of painter’s tape horizontally around the pot, dividing the bottom two-thirds from the top third. -
Paint the base color:
Paint the bottom section with a terracotta or burnt orange acrylic paint. Use horizontal strokes for better coverage. You may need two coats for a solid, opaque look. -
Paint the middle band:
I prefer to freehand the middle section to give it a more organic feel, but you can use tape if you want laser-sharp lines. Paint a band of white or cream directly above your terracotta section. Use a dry brush technique slightly if you want some texture to show through. -
Add the top color:
Paint the top rim section with a muted teal or sage green paint. Carefully meet the white line below it. Don’t forget to paint the inside of the rim for a finished appearance. -
Specle effect (Optional):
To mimic the stone-like texture in the photo, dip a toothbrush into slightly watered-down black or brown paint. Run your thumb over the bristles to flick tiny specks of paint onto the white and teal sections. -
Remove tape and touch up:
If you used tape for the middle section, peel it off gently while the paint is still slightly tacky to avoid chipping. Use a small detail brush to fix any bleeds. -
Seal the pot:
Air-dry clay is not waterproof on its own. Apply 2-3 coats of a waterproof matte sealant inside and out. This is crucial if you plan to put a real plant inside.
Double Potting
Even with sealer, air-dry clay degrades with constant moisture. Use this pot as a decorative cachepot—keep your plant in a plastic nursery pot inside it for longevity.
Pop in a spiky cactus or succulent to complete this calm, earthy display

The Complete Guide to Pottery Troubleshooting
Uncover the most common ceramic mistakes—from cracking clay to failed glazes—and learn how to fix them fast.
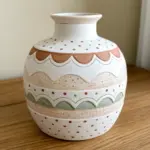
Speckled Stoneware-Look Planter
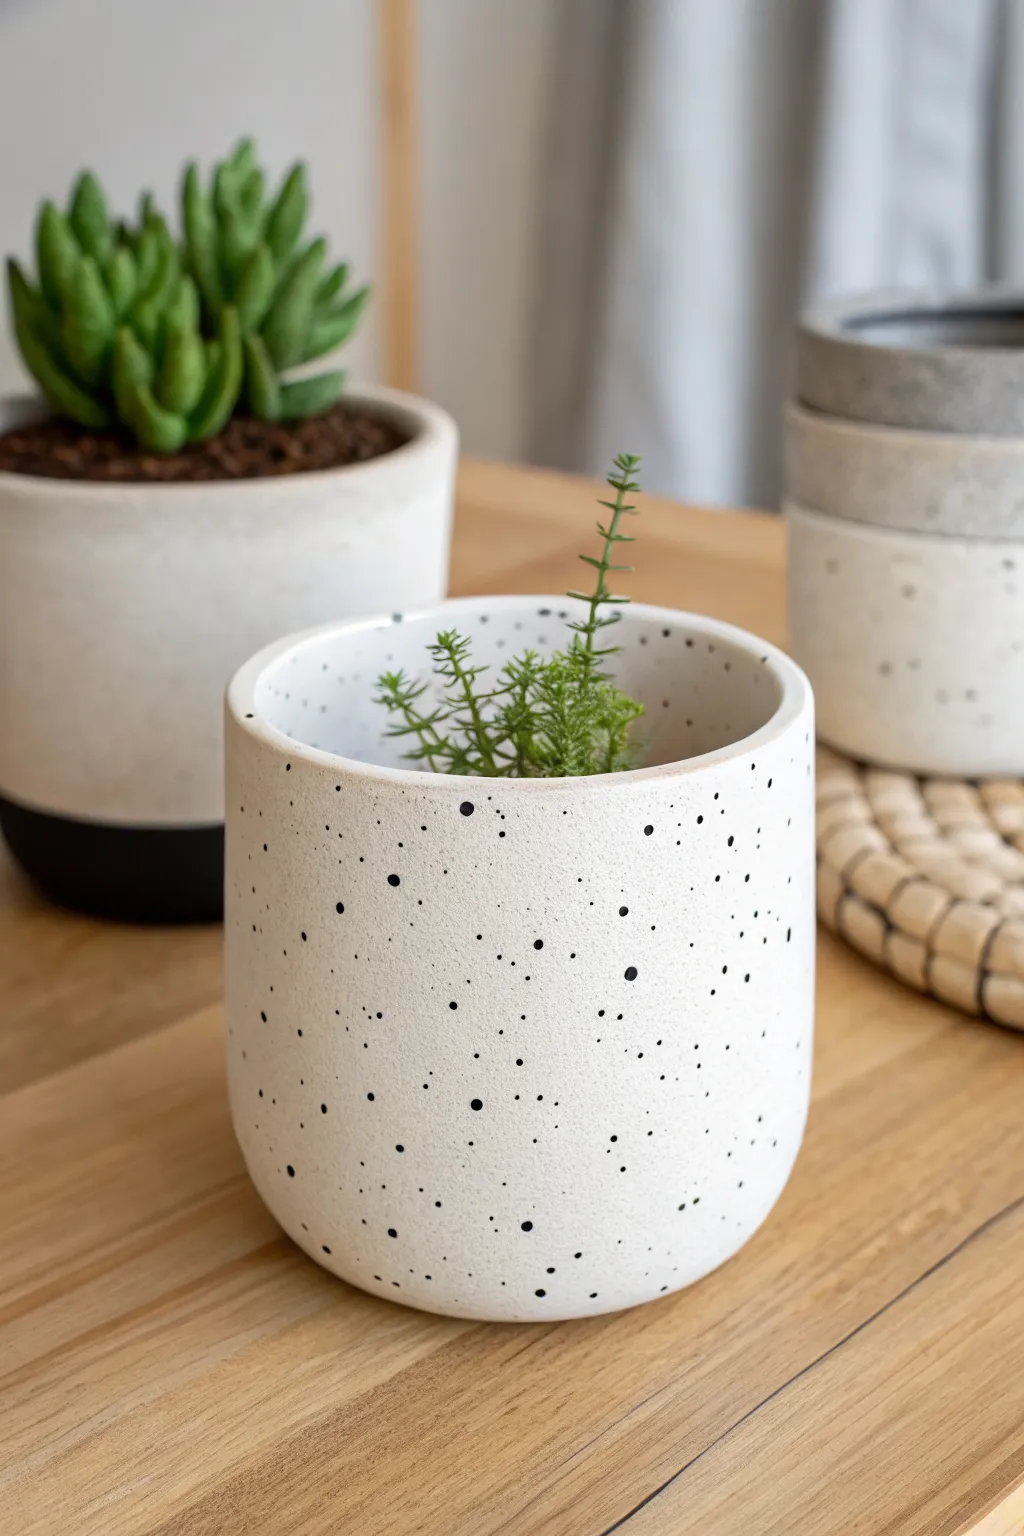
Achieve the high-end look of fired ceramic stoneware without a kiln using this clever air-dry clay technique. The minimalist cylindrical shape combined with organic black speckles creates a modern, trendy vessel perfect for succulents or small houseplants.
How-To Guide
Materials
- White air-dry clay (approx. 500g)
- Acrylic rolling pin
- Craft knife or clay cutter
- Circular template (can use a bowl or lid approx. 4 inches wide)
- Ruler
- Slip (clay mixed with water)
- Sandpaper (fine grit)
- White acrylic paint (matte finish)
- Black acrylic paint
- Old toothbrush or stiff bristle brush
- Matte varnish or sealant
- Water and sponge for smoothing
Step 1: Forming the Cylinder
-
Roll the base:
Begin by conditioning your clay, kneading it until it’s pliable. Roll out a portion of the clay to an even thickness of about 1/4 inch (6mm). Using your circular template and craft knife, cut out a perfect circle for the base of your pot. -
Prepare the walls:
Roll out a larger slab of clay, aiming for the same 1/4 inch thickness. Measure the circumference of your base circle using a flexible tape measure or piece of string. -
Cut the rectangle:
Cut a long rectangular strip from your slab. The length should be your circumference measurement plus a tiny bit for overlapping, and the height depends on how tall you want your pot—for this look, aim for about 3.5 to 4 inches. -
Score and slip:
Using a needle tool or your knife, scratch cross-hatch marks (scoring) along the outer edge of your circular base. Do the same along one long edge of your rectangular strip and the two short ends. -
Assemble the pot:
Apply a dab of slip to the scored areas. Carefully wrap the rectangular wall around the base, ensuring the scored bottom edge sits on top of the base circle. -
Seal the seam:
Where the two ends of the wall meet, press them firmly together. Use your thumb or a modeling tool to blend the clay across the seam on both the inside and outside until the line disappears. -
Secure the base:
Flip the pot gently or work from the inside to smooth the wall clay down onto the base clay, creating a seamless, watertight bond.
Clean Splatter Tip
Perform the splatter painting step inside a large cardboard box or outdoors. The fine mist of black paint travels further than you think and can stain furniture!
Step 2: Refining and Drying
-
Shape the rim:
The rim in the photo is slightly rounded. Use a wet finger to smooth the top edge of the clay, softening any sharp cuts into a gentle curve. -
Surface smoothing:
Dip a sponge in water and wring it out almost completely. Wipe the entire exterior of the pot to remove fingerprints and bumps. I find this step crucial for getting that ‘machined’ ceramic look. -
Slow drying:
Place your pot in a cool, dry area away from direct sunlight. To prevent cracking, you can loosely tent a plastic bag over it for the first 24 hours. Allow it to dry completely for 24-48 hours until it turns bone white. -
Sanding:
Once fully dry, use fine-grit sandpaper to gently buff away any remaining imperfections or rough spots on the rim and walls. Wipe away the dust with a slightly damp cloth.
Step 3: The Stoneware Finish
-
Base coat:
Paint the entire exterior and the inner rim of the pot with matte white acrylic paint. You may need two coats for opaque coverage. Let this dry completely. -
Prepare the speckles:
Squeeze a small amount of black acrylic paint onto a palette and water it down slightly so it’s quite fluid but not dripping like water (think heavy cream consistency). -
Splatter technique:
Dip an old toothbrush into the watered-down black paint. Hold the brush about 6 inches from the pot and use your thumb to drag back the bristles, flicking fine droplets onto the surface. -
Control the pattern:
Rotate the pot as you go. Vary the distance slightly to get a mix of tiny dots and slightly larger spots, mimicking natural stone aggregates. -
Clean up:
If you get a splatter that’s too large, quickly dab it gently with a dry paper towel or paint over it with white once dry. -
Seal and finish:
Once the paint is fully cured, apply 1-2 coats of matte varnish to protect the surface. Note that air-dry clay isn’t waterproof, so always use a plastic liner or nursery pot inside when adding plants.
Two-Tone Level Up
For a ‘dipped’ look like the background pot, paint the bottom third of your dried pot a solid contrasting color like charcoal or terracotta before doing the splatter effect.
Pop in your favorite succulent and enjoy your handmade, modern decor piece
Hand-Carved Vertical Line Vase
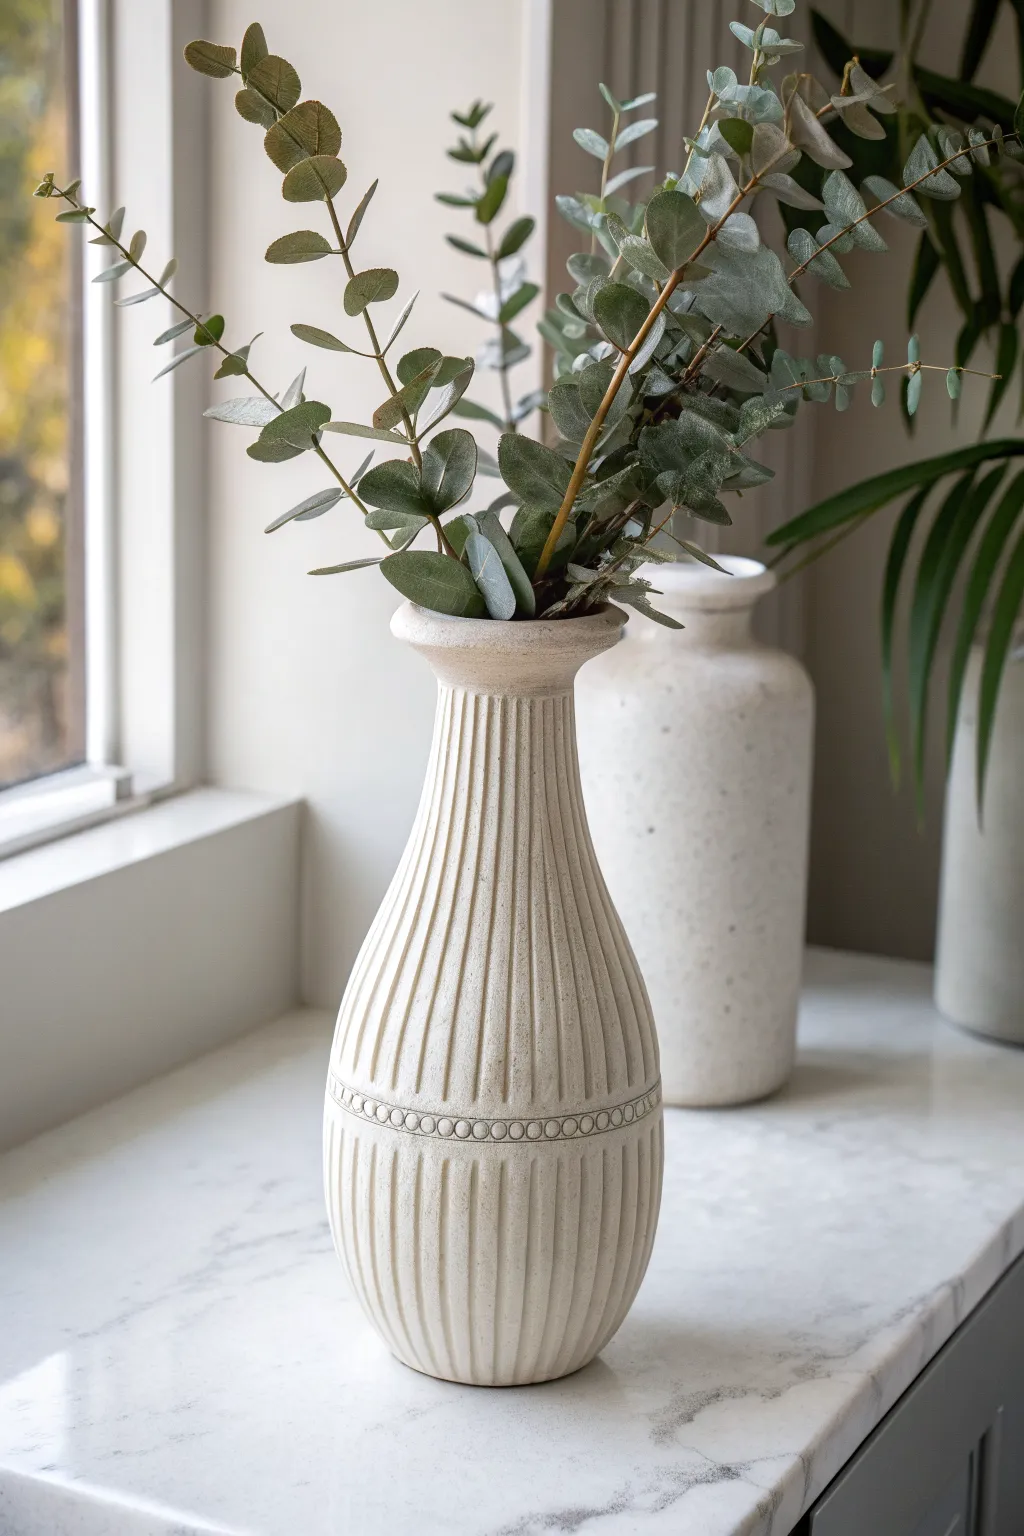
Bring a touch of organic sophistication to your space with this fluted vase, featuring a faux-stone finish and delicate beaded detailing. This air dry clay project mimics the look of high-end ceramic ware without the need for a kiln.
Step-by-Step
Materials
- High-quality white air dry clay (2-3 lbs)
- Glass bottle or tall jar (to use as an armature)
- Rolling pin
- Carving tools (specifically a U-gouge and needle tool)
- Small circular piping tip or straw (for stamping)
- Sponge and water
- Acrylic paints (Cream, Beige, Taupe)
- Baking soda or texture medium
- Matte sealant
- Sandpaper (fine grit)
Step 1: Building the Form
-
Prepare the armature:
Begin by selecting a glass bottle or jar that matches the general height and width you desire. Clean the exterior thoroughly to ensure the clay adheres properly during the shaping process. -
Roll out the slab:
Roll your air dry clay into a large, even slab approximately 1/4 inch thick. You want it large enough to wrap completely around your chosen glass armature with a little overlap. -
Wrap the base:
Carefully lift the slab and wrap it around the glass bottle. Use a little water or slip (clay mixed with water) to join the seam where the clay edges meet, smoothing it out until the line disappears. -
Shape the neck:
Add extra clay to the top portion to create the flared neck. Mold the clay upwards and outwards from the bottle opening, smoothing it seamlessly into the body to create that graceful, trumpet-like flare. -
Refine the silhouette:
Wet your hands slightly and run them up and down the vase to smooth out any bumps. Ensure the transition from the wider belly of the vase to the neck is gradual and organic.
Clean Lines Hack
If your hand shakes while carving vertical lines, rest your carving hand against a stack of books and rotate the vase instead of moving the tool.
Step 2: Carving and Detailing
-
Mark vertical guides:
Before carving, use a needle tool to very lightly mark vertical lines around the vase. This ensures your spacing remains consistent as you carve the fluting. -
Carve the flutes:
Using a U-shaped gouge or a loop tool, carve vertical grooves from the top rim down to about 1/3 from the bottom. I find dragging the tool downward in one steady motion creates the cleanest line. -
Continue the lower flutes:
Skip a small horizontal band (about half an inch wide) where the decorative beads will go, and then continue carving the vertical matching grooves down to the very bottom of the vase. -
Create the beaded band:
In the smooth horizontal band you left uncarved, use a small circular piping tip, a straw, or the back of a drill bit to press small circles into the clay. Press gently to create an embossed ring effect. -
Smooth the edges:
Once all carving is done, use a damp sponge or your finger to soften any sharp jagged edges created by the carving tools. This gives the piece a worn, stone-cast appearance.
Step 3: Finishing the Surface
-
Allow to dry:
Let the vase dry completely. This creates a solid base for painting. Depending on humidity and thickness, this usually takes 24 to 48 hours. -
Sand for texture:
Lightly sand surface imperfections, but don’t over-smooth it; the goal is a rustic, matte texture rather than a glossy porcelain look. -
Mix textured paint:
Mix a creamy white or beige acrylic paint with a teaspoon of baking soda. This creates a chalky, stone-like texture that mimics the reference image perfectly. -
Apply the base coat:
Paint the entire exterior of the vase with your textured mixture. Use a stippling motion (dabbing straight down) to refrain from leaving brush strokes. -
Add dimension:
Once the base is dry, mix a very watered-down wash of taupe or light grey paint. Brush it over the vase and immediately wipe it back with a rag. The darker paint will settle into the carved grooves and beaded circles, highlighting the details. -
Seal the work:
Finish with a spray of matte sealant to protect the paint job while maintaining that dry, stone aesthetic.
Faux Terrazzo
Flick tiny speckles of watered-down grey or black paint onto the finished vase with an old toothbrush to simulate a natural speckled stone or sand finish.
Place your favorite dried stems or faux eucalyptus inside and enjoy the serene, architectural beauty you’ve created


What Really Happens Inside the Kiln
Learn how time and temperature work together inside the kiln to transform clay into durable ceramic.
Soft Scalloped Rim Flower Pot
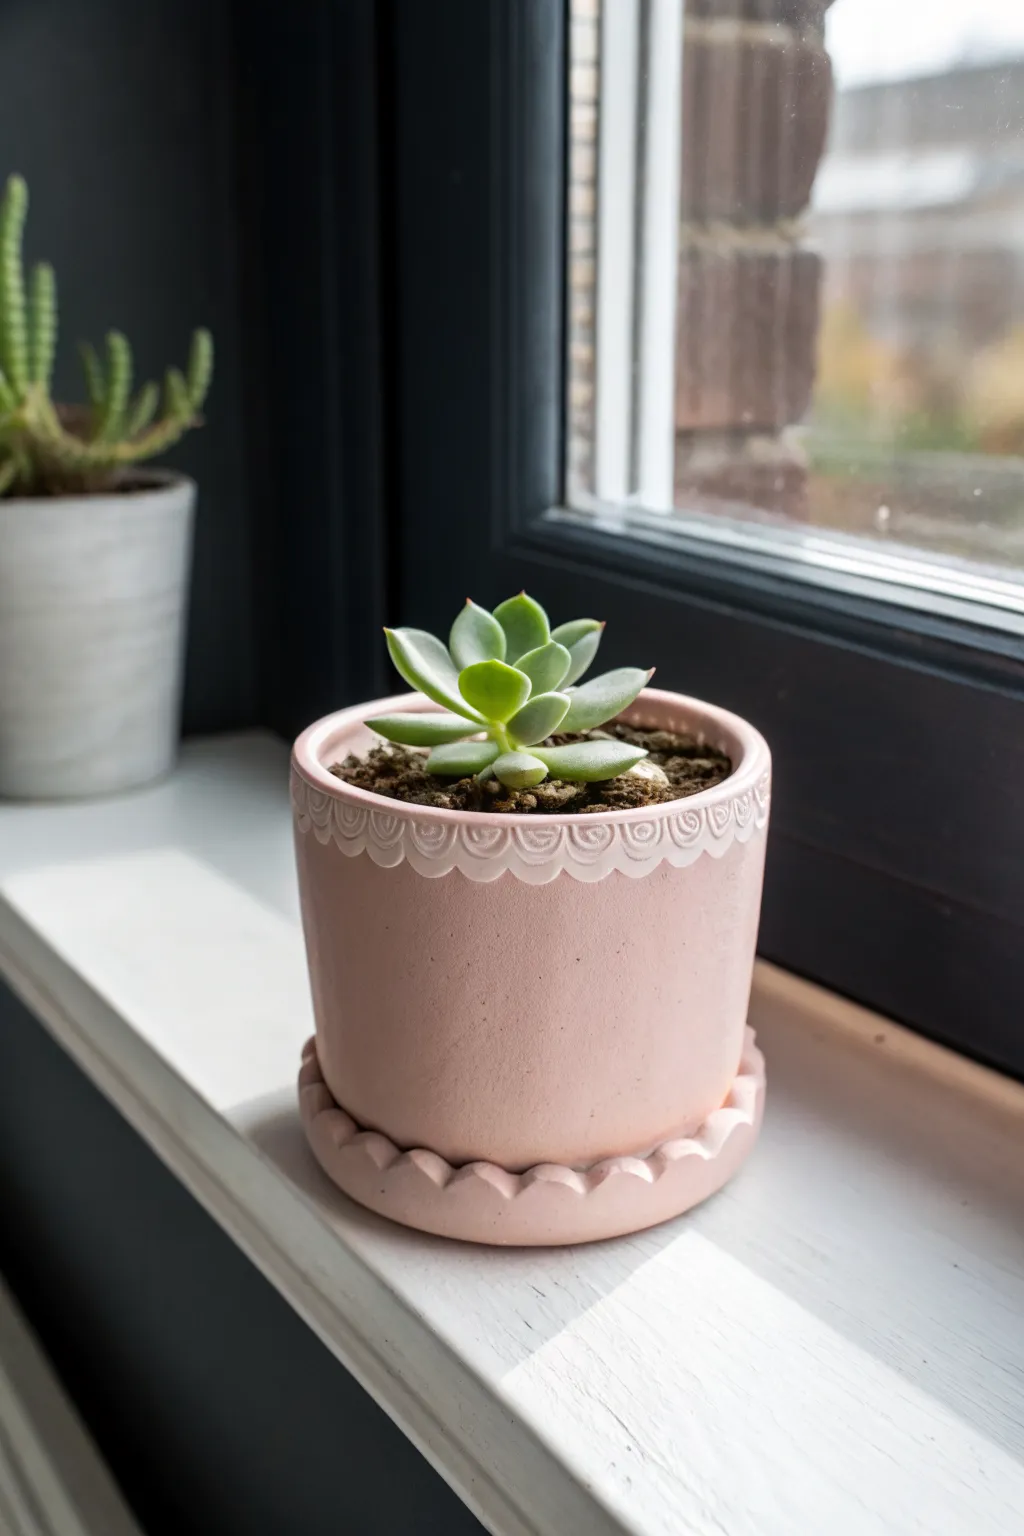
Bring a touch of gentle charm to your windowsill with this pastel pink planter featuring delicate scalloped details. The soft, matte finish and whimsical rim design make it the perfect cozy home for your favorite small succulent.
Step-by-Step Tutorial
Materials
- White air-dry clay (approx. 500g)
- Acrylic rolling pin
- Circle cutter (approx. 10cm diameter) or a bowl to trace
- Ruler and craft knife
- Small round cutter or a bottle cap (approx. 1cm) for scallops
- Slip (clay mixed with water)
- Sponge and bowl of water
- Pastel pink acrylic paint
- Matte varnish or sealant
- Sandpaper (fine grit)
Step 1: Forming the Pot Base
-
Roll the base:
Start by conditioning your clay, kneading it until it’s pliable. Roll out a slab to about 0.5cm thickness and cut a circle for the base of your pot using your large cutter or bowl template. -
Create the walls:
Roll out a long rectangular strip of clay, maintaining that same 0.5cm thickness. The length should be slightly longer than the circumference of your base circle, and the width determines the height of your pot. -
Attach the wall:
Score the edges of your base circle and one long edge of your rectangular strip. Apply a generous amount of slip to the scored areas. -
Seal the seam:
Wrap the strip around the base, pressing the scored edges together firmly. Where the rectangle ends meet, cut through both overlapping layers at a diagonal angle for a seamless join. -
Smooth the surface:
Use your fingers and a damp sponge to smooth out the vertical seam and the join at the base. Support the wall from the inside while smoothing the outside to keep the cylindrical shape true.
Smooth Seams
Use a little vinegar on your finger instead of water while smoothing seams. It breaks down the clay surface slightly, creating a stronger bond and an invisible join line.
Step 2: Adding the Scalloped Details
-
Roll the decorative rim:
Roll out a thinner strip of clay, about 3mm thick. This will become the decorative collar for the rim. -
Cut the scallops:
Using your small round cutter or bottle cap, cut half-circles along one edge of this thin strip to create a repeating scalloped pattern. -
Detail the scallops:
Take a small carving tool or the end of a paintbrush to impress a tiny spiral or circle design into the center of each scallop for that delicate lace-like look seen in the photo. -
Attach the rim:
Score and slip the top edge of your pot. Carefully attach the scalloped strip, ensuring the decorative edge hangs just slightly over the main body. -
Create the saucer foundation:
While the pot sets up slightly, roll out a second circle of clay slightly larger than your pot’s base to form the saucer. -
Add saucer scallops:
Roll a snake or coil of clay. Flatten it slightly, and use your finger or a tool to press indentations at regular intervals, creating a thicker, chunky scalloped edge. -
Assemble the saucer:
Attach this chunky scalloped coil to the perimeter of your saucer base using the score and slip method, blending the clay on the interior side so it’s water-tight.
Step 3: Finishing Touches
-
Let it dry:
Allow your creation to dry completely. This usually takes 24-48 hours depending on humidity. I like to flip the pieces gently halfway through so the bottoms dry evenly. -
Sand for smoothness:
Once fully dry, use fine-grit sandpaper to remove any fingerprints or rough textures, focusing on the main body of the pot to get that sleek look. -
Apply base color:
Paint both the pot and saucer with a matte pastel pink acrylic paint. You may need two or three thin coats to get full, opaque coverage. -
Highlight the rim:
If you want the white detail shown in the image, carefully dry-brush white paint over just the raised scalloped texture on the rim, or simply wipe away the pink paint from that area before it dries if your clay is white. -
Seal the work:
Apply a waterproof matte varnish essentially everywhere. This is crucial for air-dry clay planters to prevent moisture damage when watering your plant.
Waterproofing
For a truly usable planter, line the inside with a plastic cup or coat the interior with resin. Standard varnish allows dampness to seep through eventually.
Place your succulent inside and enjoy the soft glow of your handmade creation on your window ledge
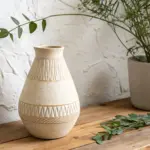
Stamped Pattern Pot Vase

Give your indoor garden a touch of texture with this minimalist arch-patterned planter. The repetitive stamped design creates a beautiful rhythm that mimics high-end ceramic studio pottery without the need for a kiln.
Detailed Instructions
Materials
- Air dry clay (white or natural stone color)
- Rolling pin
- Empty plastic container or tin can (to use as a mold)
- Craft knife or clay cutter
- Metal rib or old credit card
- Small U-shaped clay cutter (or a bent paperclip/wire)
- Small circle cutter (or a straw)
- Cup of water
- Sponge
- Fine-grit sandpaper
- Matte acrylic sealer or varnish
Step 1: Forming the Base
-
Prepare your workspace:
Lay down a piece of canvas or parchment paper to prevent your clay from sticking to the table. -
Roll out the clay:
Take a large chunk of air dry clay and roll it out into a long, rectangular slab. Aim for an even thickness of about 1/4 inch throughout. -
Cut the rectangle:
Measure the height and circumference of your chosen plastic mold container. Cut the clay slab into a rectangle that matches these dimensions, adding just a tiny bit of overlap for the seam. -
Create the base:
Roll a separate, smaller ball of clay and flatten it. Place your mold on top and trace around it to cut out a perfect circle for the bottom of the pot. -
Wrap the mold:
Carefully lift your clay rectangle and wrap it around the plastic container mold. Bring the two short ends together. -
Seal the seam:
Score the edges where the clay meets (scratch cross-hatch marks), dab with a little water, and press them firmly together. Use a modeling tool or your finger to smooth the seam until it disappears. -
Attach the bottom:
Score and wet the edges of your circular base and the bottom of the cylinder. Press them together firmly and blend the clay using a smoothing tool so it becomes one solid piece.
Step 2: Stamping and Finishing
-
Smooth the surface:
Before stamping, use a slightly damp sponge or a metal rib to ensure the outside of your pot is perfectly smooth and free of fingerprints. -
Plan your rows:
Lightly mark horizontal guidelines around the pot using a ruler and a needle tool if you want perfectly straight rows, or eyeball it for a more organic look. -
Stamp the arches:
Take your small U-shaped cutter. Press it gently into the clay to create the outer arch. Do not cut all the way through; you are just making an impression. -
Add the inner detail:
Inside each U-shape impression, use a smaller arch cutter or a small circle cutter presses halfway to create the inner loop or dot detail seen in the reference. -
Continue the pattern:
Repeat this process, creating rows of arches all the way around the pot. I like to offset the rows slightly, like bricks, to create that woven scale effect. -
Refine the rim:
Check the top rim of the pot. If it became distorted during stamping, slice off any unevenness with a sharp blade for a crisp, flat edge. -
Slow drying:
Let the pot sit in a cool, dry place. Remove the inner plastic mold after the clay has stiffened slightly (about 2-4 hours) so the inside can dry too. -
Sand for perfection:
Once fully dry (usually 24-48 hours), use fine-grit sandpaper to gently smooth out any rough burs around the stamped impressions or the rim. -
Seal the clay:
Apply 2-3 coats of a matte acrylic sealer or varnish to protect the clay from moisture and give it a finished ceramic look. -
Final planting:
Since air dry clay isn’t 100% waterproof, place a plastic sizes nursery pot inside your new creation to hold the plant and soil.
Clay Cracking?
Cracks happen if clay dries too fast. Repair small cracks by mixing a tiny bit of clay with water to make a paste (slip) and filling the gap, then sand smooth once dry.
Custom Stamp Tool
Don’t have a U-shaped cutter? Bend a sturdy paperclip or a strip of soda can aluminum into an arch shape. It creates perfect custom impressions for free.
Pop in your favorite leafy plant and enjoy the warm, handmade charm this pot brings to your shelf.

TRACK YOUR CERAMIC JOURNEY
Capture glaze tests, firing details, and creative progress—all in one simple printable. Make your projects easier to repeat and improve.
Leaf-Imprint Wrap Vase
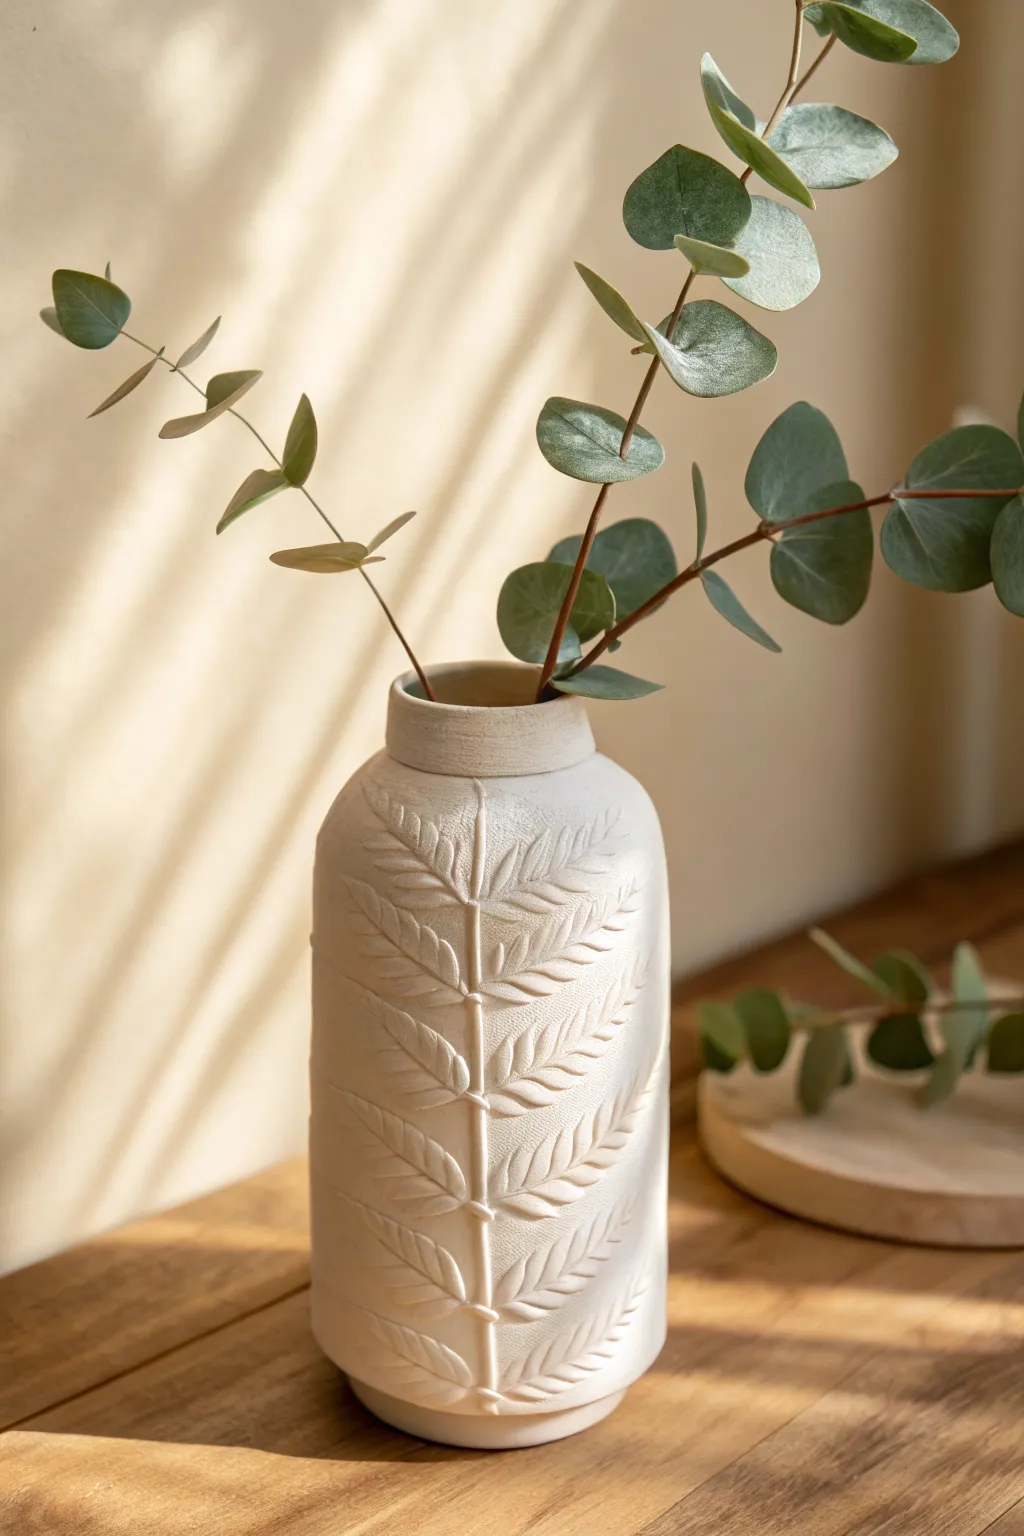
Capture the delicate beauty of botanical textures with this elegant air dry clay vase project. Featuring a raised fern leaf design and a sandy, organic finish, this piece brings a calming, natural element to any shelf or tabletop.
Step-by-Step
Materials
- White or terracotta air dry clay (2-3 lbs)
- Tall cylindrical glass jar or vase (to use as a mold/base)
- Rolling pin
- Parchment paper or canvas mat
- Large, fresh fern frond (or artificial if specifically textured)
- Clay carving tools (needle tool and ribbon tool)
- Small bowl of water
- Sponge
- Slip (clay mixed with water to a paste)
- Sandpaper (fine grit)
- Matte spray sealant or acrylic varnish
- Optional: Texture stamp or rough fabric
Step 1: Preparing the Base Layer
-
Condition the Clay:
Begin by kneading your air dry clay thoroughly to warm it up and remove any air bubbles. I find spending an extra minute here prevents cracks later. -
Roll the Slab:
Roll out the clay onto parchment paper or a canvas mat into a large, rectangular slab. Aim for a consistent thickness of about 1/4 inch. -
Add Surface Texture (Optional):
For that grainy, stone-like background seen in the photo, lightly press a piece of rough fabric or a texture roller onto the clay slab before cutting. -
Size the Slab:
Measure the height and circumference of your glass jar ‘mold’. Cut the clay slab into a rectangle that matches the height and has enough length to wrap around the jar with a slight overlap.
Fresh vs. Faux
Fresh ferns have better veins for imprinting, but sturdy artificial leaves are better if you want to use the leaf itself as a permanent structural element embedded under the clay.
Step 2: Creating the Fern Design
-
Position the Leaf:
Lay your fern frond vertically down the center of your cut clay slab. Press it gently to adhere it temporarily so it doesn’t shift. -
Imprint the Veins:
Use a rolling pin to firmly press the fern into the clay. You want a deep impression of the stem and veins. Carefully peel the leaf away to reveal the negative imprint. -
Sculpt the Relief:
To achieve the *raised* look in the photo rather than just an imprint, roll small, thin coils of clay. -
Build the Stem:
Place a long, thin coil into the center stem indentation. Score the groove first with a needle tool, add a dab of water, and press the coil in, blending the edges slightly. -
Add the Leaflets:
Make small teardrop shapes from clay for the leaves. Press these over the imprinted leaf shapes, building up volume. Use a modeling tool to carve veins back into these new raised leaves for realistic detail. -
Refine the Edges:
Go around the edges of your raised fern design with a damp brush or finger to smooth the transition between the raised motif and the textured background.
Color Wash Effect
Mix a tiny drop of brown acrylic paint into water and brush it over the dried texture. Wipe it back immediately with a rag to leave dark accents in the deep crevices for an antique look.
Step 3: Assembly and Finishing
-
Prepare the Form:
Wrap your glass jar in a layer of parchment paper if you intend to remove it later, or leave the glass as a permanent waterproof liner (recommended for fresh flowers). -
Wrap the Form:
Carefully lift your decorated slab and wrap it around the glass cylinder. This is the delicate part, so take your time. -
Seal the Seam:
Where the clay ends meet at the back, score both sides, apply slip, and press firmly together. Smooth the seam with a wet finger/sponge until invisible. -
Construct the Rim:
Roll a separate, thicker coil of clay. Attach this to the top edge of the cylinder to create a pronounced, rounded rim similar to the image. Blend it downward onto the main body. -
Create the Foot:
Repeat the coil process at the very bottom to create a subtle footed base, giving the vase visual stability. -
Drying Phase:
Let the vase dry slowly away from direct sunlight and heat. This usually takes 24-48 hours. Rotate it occasionally for even drying. -
Sanding:
Once fully dry and white, use fine-grit sandpaper to smooth any sharp ridges on the fern or the rim, but keep the overall rough texture intact. -
Sealing:
Apply a matte varnish or sealant to protect the clay. This steps helps maintain that raw, bisque-ware look while adding durability.
Now fill your beautiful handmade vessel with dried eucalyptus or fresh blooms and enjoy your serene creation
Geometric Appliqué Faceted Planter
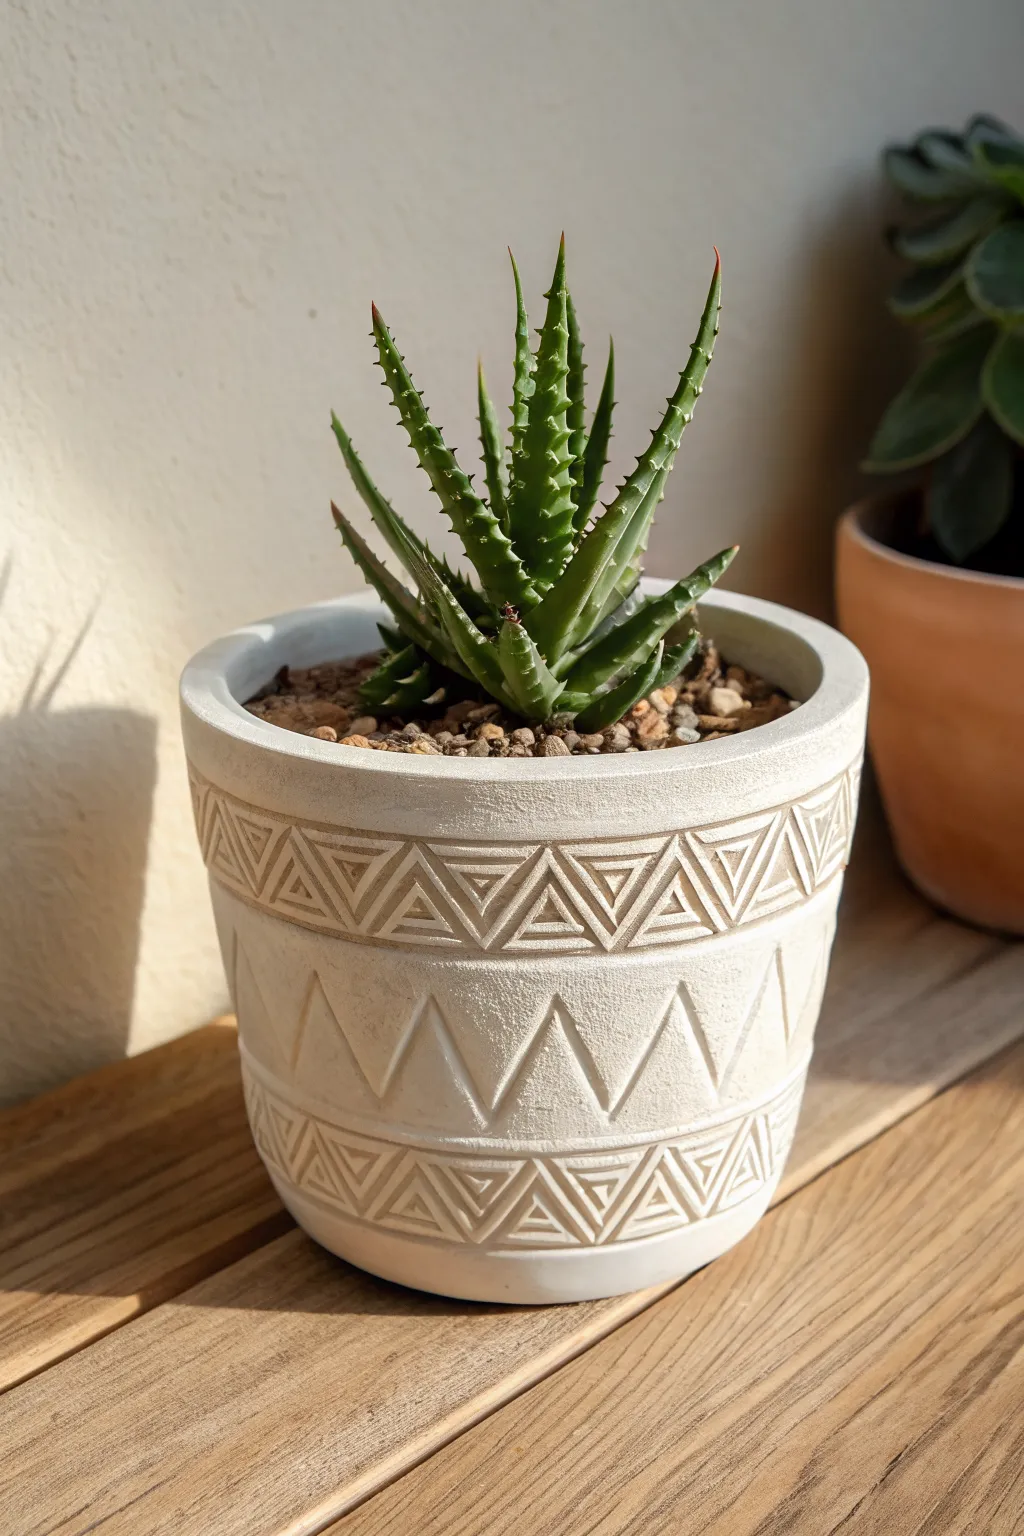
Transform a plain base into a boutique-worthy home for your succulents using air dry clay and precise carving techniques. This project creates a stunning, faceted texture with distinct bands of tribal-inspired triangles that catch the light beautifully.
How-To Guide
Materials
- Plastic or ceramic pot (as a base form)
- White stone-effect air dry clay
- Rolling pin
- Clay carving tools (needle tool, ribbon tool)
- Ruler or measuring tape
- Sponge and water
- Craft knife
- Fine-grit sandpaper
- Matte acrylic sealer
Step 1: Preparing the Base Layer
-
Prepare your clay:
Begin by kneading your stone-effect air dry clay until it is soft and pliable. If the clay feels too dry, mist it lightly with water, but avoid making it sticky. -
Roll out a slab:
Roll the clay out into a long, rectangular slab that is approximately 1/4 inch thick. Ensure the length is sufficient to wrap entirely around your chosen base pot. -
Wrap the pot:
Apply a thin layer of slip (watered-down clay) or craft glue to the exterior of your base pot to help adhesion. Carefully wrap the clay slab around the pot, smoothing it against the surface. -
Create the seam:
Where the two ends of the clay meet, cut through both layers with a craft knife to create a clean flush joint. Score the edges, apply a little water, and blend the seam until it disappears. -
Trim the edges:
Trim any excess clay from the top rim and the bottom edge. Smooth the rim over the lip of the pot with a wet finger for a professional finish.
Clean Lines
For sharper geometric carvings, let the clay dry to a ‘leather hard’ state (firm but cold to the touch) before carving. Mushy clay drags; leather-hard clay carves cleanly.
Step 2: Designing the Geometry
-
Mark your bands:
Use a ruler and a needle tool to lightly score three horizontal guidelines around the pot. You need a top band, a wider middle section, and a bottom band. -
Divide into segments:
Measure the circumference and lightly mark vertical tick marks at even intervals along the top and bottom bands. These will determine the width of your triangles. -
Sketch the triangles:
Connect your tick marks diagonally to create a zig-zag pattern in the top and bottom bands. Inside these large triangles, lightly sketch smaller nested triangles to guide your carving. -
Draft the center diamonds:
In the wider middle section, sketch large, bold zig-zags that mirror the pattern above, creating large triangular voids. Focus on symmetry here.
Step 3: Carving the Relief
-
Carve the outlines:
Using a sharp V-gouge or a small ribbon tool, carve along the lines of your top band pattern. Remove clay to a shallow depth to define the borders of the nested triangles. -
Bevel the edges:
To create the faceted 3D look, use a flat carving tool to slope the clay from the center of each triangle downward toward the carved lines. This beveling creates shadows and depth. -
Carve the middle section:
Repeat the deep carving process for the large middle zig-zag pattern. I find removing slightly more material here makes the central design pop distinctly. -
Detail the bottom band:
Carve the bottom geometric band to match the top one. Ensure your depth is consistent so the pot looks balanced. -
Refine the lines:
Go back over your carved channels with a damp paintbrush or a smoothing tool to remove any clay burrs or crumbs.
Antique Wash
After sealing, brush on diluted brown paint and wipe it off immediately with a rag. The pigment will stay in the carved recesses, emphasizing the tribal pattern.
Step 4: Finishing Touches
-
Texture the surface:
If your clay isn’t naturally stony, gently press a piece of coarse sandpaper or a stiff brush against the uncarved surfaces to add a stone-like texture. -
Let it dry completely:
Allow the pot to dry for at least 24-48 hours. Turn it occasionally to ensure even airflow around all sides. -
Sand for sharpness:
Once fully dry, use fine-grit sandpaper to gently sharpen the geometrical edges and smooth the rim one last time. -
Seal the work:
Apply two coats of a matte acrylic sealer to protect the clay from moisture, especially if you plan to water a real plant inside.
Now you have a chic, textured planter that adds immediate character to any shelf
Abstract Painted Bud Vase Set
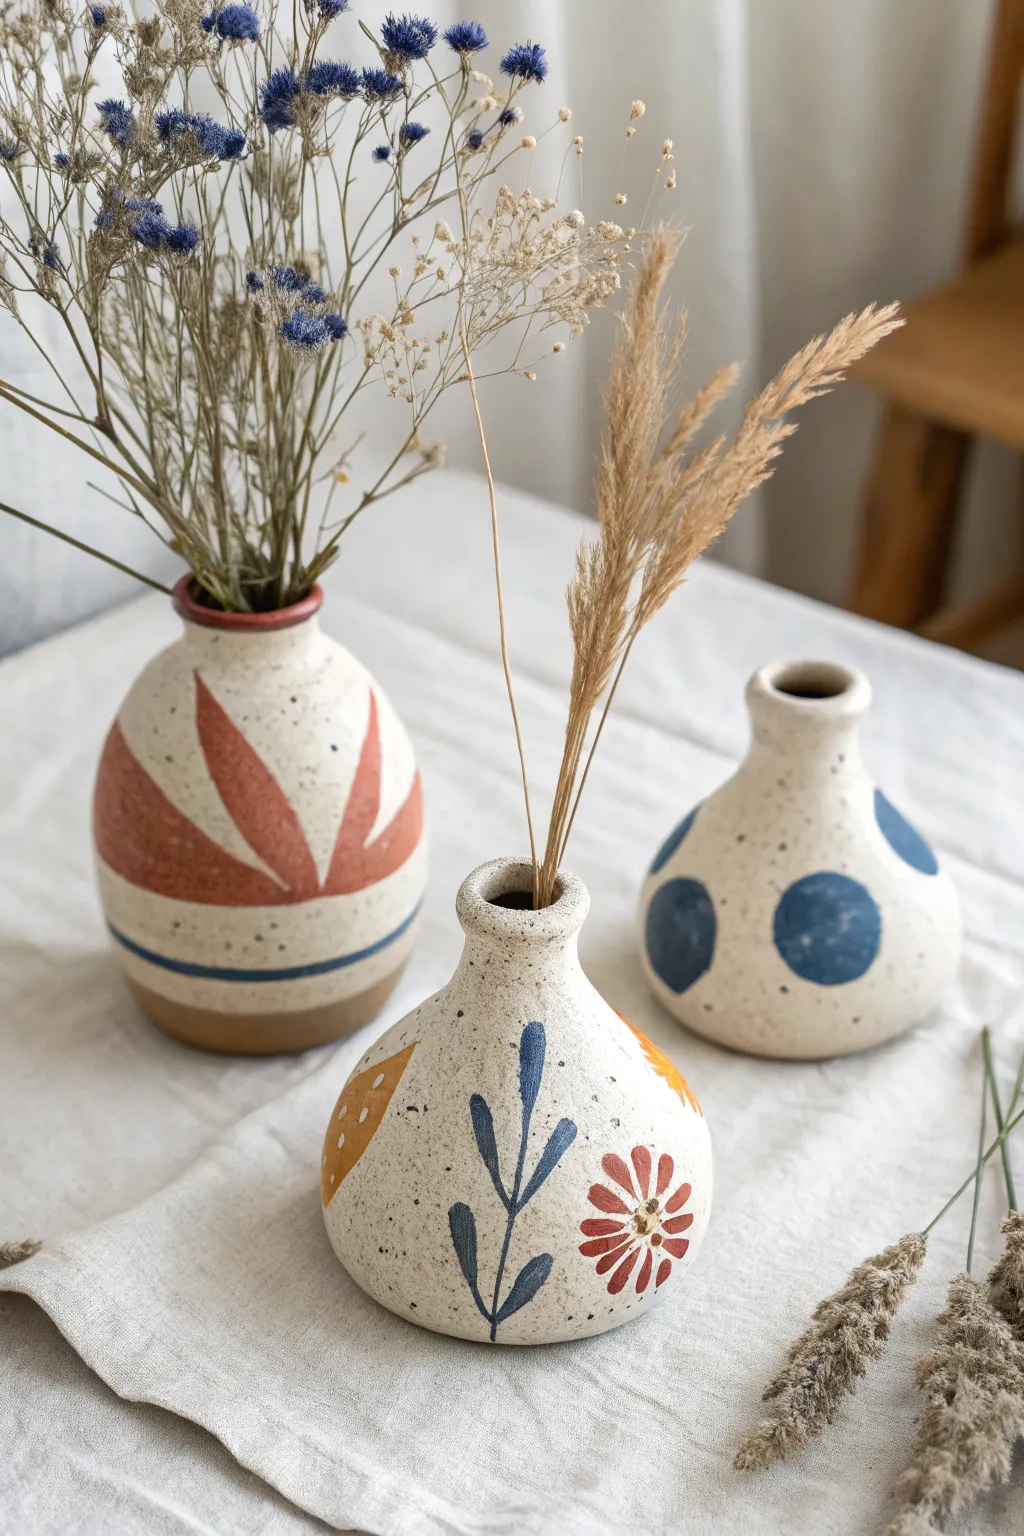
Create a charming trio of miniature bud vases that bring an organic, handmade warmth to any shelf. These speckled, cream-colored vessels feature earthy abstract motifs like leaves, dots, and simple florals, perfect for holding dried stems or grasses.
Detailed Instructions
Materials
- Air dry clay (white or cream)
- Small rolling pin
- Sponge + small bowl of water
- Pottery tools (needle tool, rib tool)
- Acrylic paints (terracotta, navy blue, mustard yellow, cream/beige)
- Fine detail paintbrushes
- Flat, wide paintbrush
- Old toothbrush (for speckling)
- Sandpaper (fine grit)
- Matte spray varnish or sealant
Step 1: Sculpting the Forms
-
Create the base pinch pots:
Start by dividing your air dry clay into three equal balls, roughly the size of a tennis ball. For each vase, push your thumb into the center of the ball and gently pinch the walls while rotating the clay to open up a hollow, round base. -
Shape the bellies:
Gently shape the walls of each pot so they curve outward to form a round ‘belly.’ Keep the walls about 1/4 inch thick for stability. Use a damp sponge to smooth out any cracks as you work. -
Form the necks:
On two of the vases, gently squeeze the upper portion of the clay inward to create a distinct, narrow neck, flaring the lip slightly at the very top. For the third vase (the straighter one), create a shorter, wider opening. -
Refine the surface:
Use a little water on your fingertips or a clay rib tool to smooth the outside surface. You want them to look handmade but polished. If the bottoms aren’t sitting flat, tap the vase gently on your table to flatten the base. -
Let them dry thoroughly:
Place your trio in a safe spot to dry. Allow at least 24-48 hours depending on humidity; the clay should turn pure white and feel room temperature (not cold) to the touch when fully dry. -
Sanding for smoothness:
Once fully dry, take your fine-grit sandpaper and gently buff away any rough fingerprints or bumps. Wipe away the dust with a slightly damp cloth or paper towel.
Step 2: Painting & Decoration
-
Apply the base coat:
Mix a cream or warm beige acrylic paint. I prefer to add a tiny drop of brown to white paint to get that natural pottery look. Paint the entire exterior of all three vases and let them dry completely. -
Add the speckled texture:
Dilute a small amount of dark brown or black paint with water until it’s inky. Dip an old toothbrush into this mixture and flick the bristles with your thumb to spray fine speckles over the vases. This mimics stoneware clay. -
Paint the leafy vase:
For the smallest round vase, use a fine detail brush and navy blue paint to draw a simple vertical stem with leaves. Add a rust-colored flower shape nearby using teardrop strokes, and a few mustard yellow accents. -
Design the large leaf vase:
On the taller vase, mix a terracotta or rust color. Paint large, abstract leaf shapes rising from the center. Add a thin blue horizontal stripe near the bottom for contrast. -
Create the polka dot vase:
For the third vase, use your navy blue paint to create large, imperfect circles spaced randomly around the belly of the pot. The organic shape adds to the charm. -
Seal the artwork:
After all the detailed painting is completely dry, take them outside or to a well-ventilated area and apply a coat of matte spray varnish. This protects the paint and gives the clay a finish that won’t absorb moisture from the air.
Cracks while drying?
If hairline cracks appear as the clay shrinks, make a ‘slip’ paste by mixing a little clay with water. Fill the cracks, smooth it over, and let it dry again before painting.
Waterproof Hack
Air dry clay isn’t waterproof! To use fresh flowers, hide a small glass vial or pill bottle inside the clay form during the sculpting phase to hold the water safely.
Your new vase trio is now ready to display your favorite dried botanicals and add a cozy touch to your home decor
Glossy Faux-Glazed Pot Vase
Transform humble air-dry clay into an elegant vessel that mimics the high-shine finish of kiln-fired ceramics. This project captures the warmth of terracotta with a stunning, glass-like surface that catches the light beautifully.
Step-by-Step Guide
Materials
- Air-dry clay (white or terracotta colored)
- Balloon (round shape)
- PVA glue or clay slip
- Rolling pin
- Pottery sponge
- Sandpaper (medium and fine grit)
- Acrylic paints (pale peach, beige, white, burnt sienna)
- Epoxy resin or high-gloss polyurethane varnish
- Old paintbrush for glazing
- Cardboard or plastic sheet (working surface)
- Bowl (for support)
- Modeling tools or a butter knife
Step 1: Forming the Base
-
Prepare the supports:
Inflate a balloon to the desired size of your pot’s belly. Place it knot-side down into a small bowl so it stays stable while you work. -
Roll out the clay:
Take a large chunk of air-dry clay and condition it by kneading until soft. Roll it out on a non-stick surface to a uniform thickness of about 1/4 inch. -
Cover the balloon:
Drape the clay sheet over the top of the balloon. Gently smooth it down the sides, pressing out air bubbles as you go. You want to cover about two-thirds of the balloon to create that bulbous shape. -
Trim the edges:
Use a knife or clay tool to trim the bottom edge (which is actually the top opening of your vase) to create a clean, even line. Save the scraps for the neck. -
Flatten the base:
While the clay is still pliable on the balloon, gently press a flat object (like a coaster) onto the very top center. This creates a stable foot for the vase to stand on later. -
Initial drying:
Let this form dry on the balloon for 24-48 hours. Once rigid, pop the balloon and remove the rubber skin from the inside.
Step 2: Building the Neck and Rim
-
Create the neck coil:
Roll your leftover clay into a thick snake. Flatten it slightly into a rectangular strip long enough to circle the opening of your dried base. -
Attach the neck:
Score the top edge of your base and apply a little water or slip. Press the clay strip onto the opening, merging the seams together with your fingers or a tool. -
Shape the rim:
Roll a smaller, thinner coil of clay. Attach this to the very top of your new neck section to create a distinct, rounded lip. Smooth it with a wet finger to get that traditional pottery look. -
Blend and smooth:
Where the neck meets the body, use a damp sponge to blur the join line until it is completely seamless. -
Final drying and sanding:
Allow the added neck to dry completely. Once bone dry, sand the entire piece vigorously. Start with medium grit to remove bumps, then move to fine grit for a silky smooth feel.
Smooth Operator
Use a barely damp sponge during the sanding phase. This ‘wet sanding’ reduces dust and creates an incredibly smooth, porcelain-like surface before painting.
Step 3: Painting and Glazing
-
Mix the base color:
Combine white, a touch of beige, and a tiny drop of orange or burnt sienna to create a muted, pale peach terracotta tone. It should look natural and earthy. -
Apply the paint:
Paint the entire exterior of the vase. I prefer using a sponge brush here to avoid bristle marks, stippling the paint slightly to give it a stone-like texture. -
Add subtle variation:
While the base coat is still tacky, mix a slightly lighter version of your color. Lightly dab this onto the rounded parts of the belly to create natural dimension. -
Detail the rim:
Use a slightly darker shade of brownish-orange around the very top rim and the neck seam to mimic how glaze pools on real ceramics. -
The glossy finish:
This is the most crucial step for the ‘faux-glazed’ look. In a well-ventilated area, mix a two-part epoxy resin. -
Pour and coat:
Pour the resin over the vase (placed on a raised can over a drip cloth). Use a gloved finger or brush to ensure even coverage. If using high-gloss varnish instead, apply 3-4 thick coats, waiting for each to dry. -
Removing bubbles:
If using resin, gently pass a culinary torch or heat gun or simply blow through a straw over the surface to pop any micro-bubbles. -
Cure completely:
Let the vase sit undisturbed for the full curing time recommended by your resin or varnish product (usually 24-72 hours) to achieve that glass-hard finish.
Speckled Effect
Before the gloss coat, flick a toothbrush loaded with watered-down brown paint over the vase. This adds tiny speckles that look like iron deposits in real clay.
Place your favorite dried botanicals inside and admire your sophisticated faux-ceramic creation
Metallic Rim Accent Flower Pot
This elegant project combines a modern minimalist shape with the luxurious touch of gold leaf. The subtle speckled texture gives the air dry clay a professional ceramic look without needing a kiln.
How-To Guide
Materials
- White air dry clay (approx. 1kg)
- Rolling pin with guide rings
- Circular template (15cm diameter)
- Rectangular template (48cm x 15cm)
- Clay slip (clay mixed with water)
- Metal rib or old credit card
- Sponge
- Craft knife
- Sandpaper (fine and medium grit)
- White acrylic paint
- Old toothbrush
- Brown or black acrylic paint (watered down)
- Gold leaf sheets
- Gold leaf adhesive size
- Soft gilding brush & sealer
Step 1: Forming the Base Structure
-
Roll the base slab:
Begin by rolling out a portion of your white air dry clay to a uniform 0.5cm thickness. Use your circular template to cut out the base for your pot. -
Prepare the walls:
Roll out a larger slab for the walls, maintaining the same 0.5cm thickness. Using your long rectangular template, cut a clean strip that will wrap around the circumference of your base. -
Score and slip:
Rough up the outer edge of the circular base and the bottom edge of your wall strip using a scoring tool or fork. Apply a generous amount of clay slip to both scored areas to act as glue. -
Assemble the cylinder:
Carefully wrap the wall strip around the base. Where the two ends of the wall meet, cut through both overlapping layers at an angle for a seamless join, then score and slip these edges together. -
Blend the seams:
Using a modeling tool or your finger, drag clay across the seams on both the inside and outside to lock them together. Smoothing this join completely is crucial for structural integrity.
Cracking Up?
If tiny cracks appear while drying, don’t restart. Mix a thick paste of fresh soft clay and water (spackle consistency) and fill the cracks. Let dry again, then sand smooth.
Step 2: Refining and Shaping
-
Create the curve:
To achieve the slightly tapered, rounded bottom look, gently cup the base in your hands and smooth the transition from the wall to the floor. Use a wet sponge to soften the sharp angle at the bottom edge. -
Smooth the surface:
Run a metal rib or stiff card up the sides of the pot to remove fingerprints and even out the surface. I find dipping the tool in a little water helps it glide smoother. -
Thicken slightly at the rim:
Gently compress the top rim with your fingers to ensure it’s slightly rounded and smooth, providing a good surface for the gold leaf later. -
Allow to dry:
Let the pot dry slowly away from direct heat for 24-48 hours. Turn it upside down halfway through to ensure even drying. -
Sand until smooth:
Once bone dry, sand the entire piece. Start with medium grit to remove bumps, then finish with fine grit for a silky porcelain-like finish. Wipe away all dust.
Matching Vase Set
Create a matching bud vase (like the one in the background) using the pinch pot method. add thin gold stripes using metallic paint instead of leaf for variation.
Step 3: Decoration and Finishing
-
Seal and base coat:
Apply a coat of white acrylic paint or a clay sealer to prep the surface. This creates a uniform background for your speckling. -
Create the speckles:
Mix a small amount of brown or black paint with water until it’s very fluid. Dip an old toothbrush into the mixture, then use your thumb to flick the bristles, spraying fine dots across the exterior of the pot. -
Apply sizing:
Paint a band of gold leaf adhesive sizing around the top rim of the pot, extending about 1cm down the outside and just over the lip to the inside. Let it sit until it becomes tacky. -
Apply gold leaf:
Lay sheets of gold leaf over the tacky adhesive. Press it down gently with a soft, clean brush, ensuring it adheres into any tiny textures in the clay. -
Burnish the gold:
Once the gold is set, use a soft brush to sweep away the excess flakes. Gently buff the remaining gold to a shine. -
Final seal:
Protect your work with a clear varnish over the clay body and a specialized metal sealer over the gold rim to prevent tarnishing.
Place your favorite dried botanicals inside and enjoy the sophisticated glow this pot adds to your space
Cute Face Planter Bud Vase
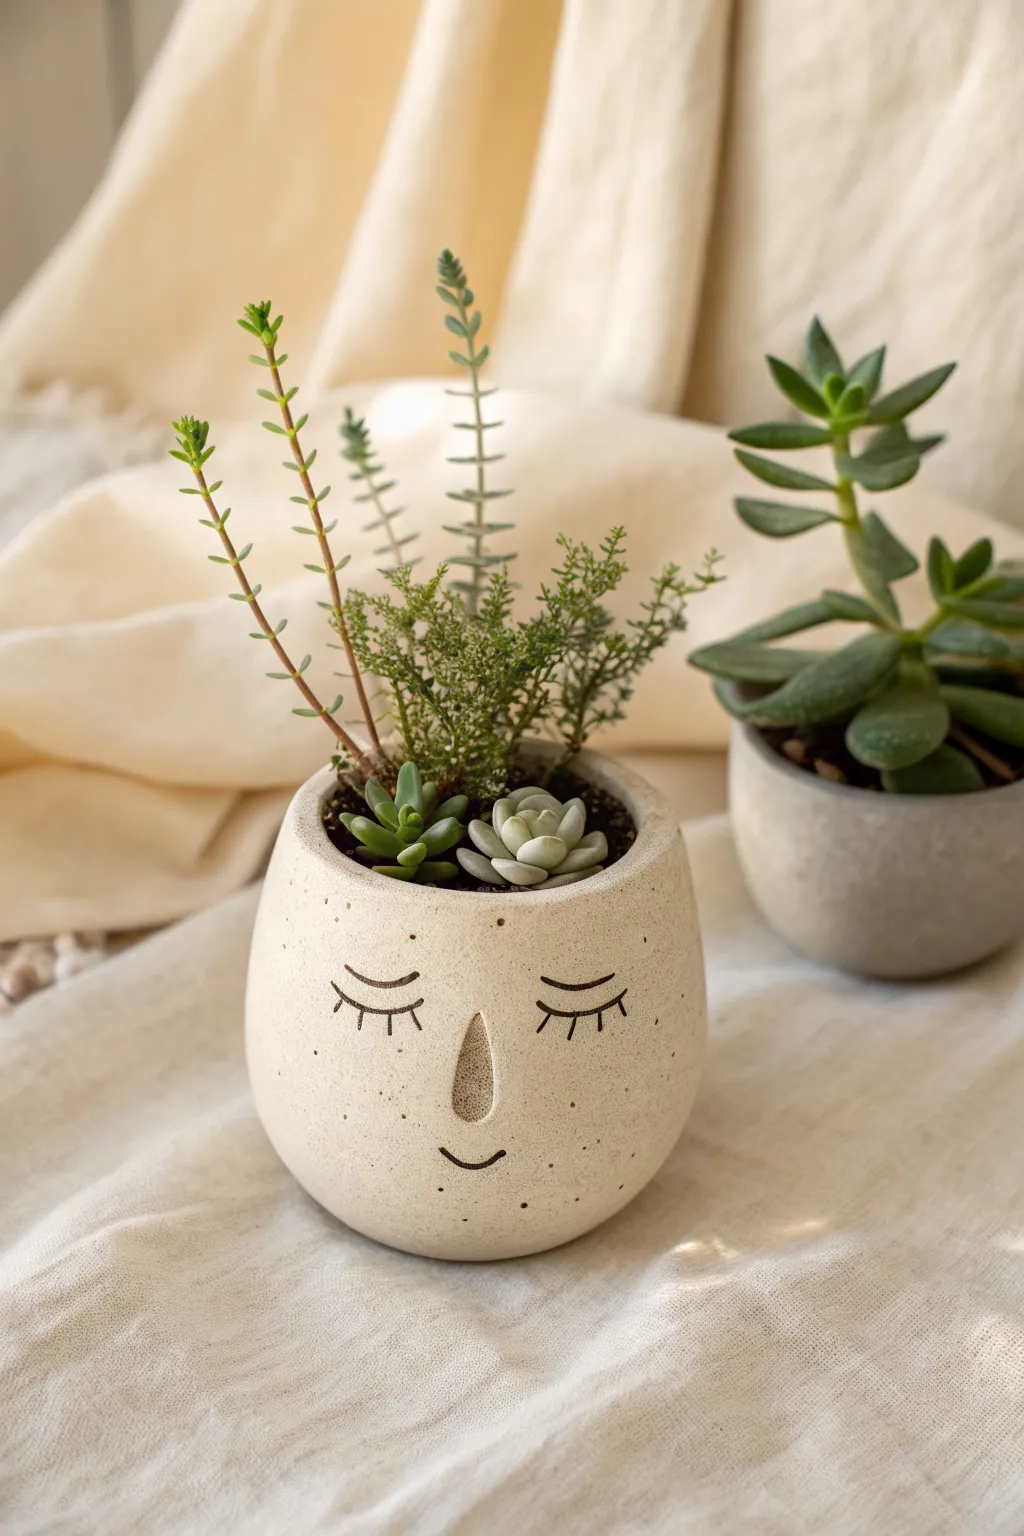
Add a touch of whimsy to your windowsill with this adorable sleeping face planter. Its round, organic shape and peaceful expression make it the perfect cozy home for small succulents or air plants.
Step-by-Step Guide
Materials
- White or cream air dry clay (approx. 500g)
- Small plastic bowl or cup (as a mold)
- Rolling pin
- Small sponge
- Water
- Plastic wrap (cling film)
- Pottery needle tool or toothpick
- Fine-grit sandpaper
- Black acrylic paint or black permanent marker
- Fine detail paintbrush
- Clear matte varnish or sealant (waterproof is best)
- Clay carving tool (loop tool)
Step 1: Shaping the Base
-
Prepare your mold:
Select a small bowl or cup that has the round bottom shape you desire. Wrap the outside of this mold completely in plastic wrap to ensure the clay doesn’t stick to it later. -
Roll out the clay:
Take a large handful of air dry clay and condition it by kneading until pliable. Roll it out on a flat surface to an even thickness of about 1/4 inch. -
Form the pinch pot:
Instead of draping the clay, I prefer to start with a ball of clay and press my thumb into the center, pinching and rotating to create a basic bowl shape. This creates a more organic, handmade feel than rolling a slab. -
Checking the size:
Place your pinched clay bowl over your plastic-covered mold to check the shape. Gently press it to conform to the roundness of the mold, smoothing out any major bumps. -
Refining the walls:
Remove the clay from the mold carefully. With wet fingers, smooth the outside and inside walls, ensuring the thickness is consistent all around. Aim for a nice, round ‘egg’ shape with the top cut off. -
Flattening the bottom:
Gently tap the bottom of your clay pot against your work surface. This creates a small flat spot so the planter will sit stably and won’t wobble.
Stay Dry
Even with sealant, air dry clay can degrade with standing water. Use a small plastic nursery pot inside your vase instead of planting directly into the clay.
Step 2: Sculpting the Features
-
Positioning the nose:
Decide where the center of the face will be. Make a small score mark where you want the nose to sit, roughly in the middle-lower section of the pot. -
Adding the nose clay:
Roll a very small, teardrop-shaped piece of wet clay. Score the back of it and apply a dab of water or slip (clay and water paste) to attach it to your marked spot. -
Blending the nose:
Using a modeling tool or your finger, smooth the edges of the nose into the main pot so it looks seamless. Shape it into a long, slender teardrop similar to the reference photo. -
Creating the nostrils:
If you want extra detail, gently press a small indentation on either side of the nose base, though a smooth, abstract nose works beautifully too. -
Smoothing the surface:
Before drying, give the entire pot one final smoothing with a damp sponge. This removes fingerprints and creates that stone-like texture.
Step 3: Finishing Touches
-
Let it dry:
Allow the pot to dry completely in a safe place away from direct sunlight. This usually takes 24-48 hours depending on humidity. Rotate it occasionally for even drying. -
Sanding imperfections:
Once fully dry and hard, use fine-grit sandpaper to gently buff away any rough spots on the rim or surface. Wipe away the dust with a slightly damp cloth. -
Sketching the face:
Lightly sketch the sleeping eyes and smile with a pencil. Draw two curved ‘U’ shapes for closed eyes with three lashes each, and a small upward curve for the mouth below the nose. -
Painting the details:
Using a very fine paintbrush and black acrylic paint, carefully trace over your pencil lines. Alternatively, a black permanent marker gives excellent control for these fine lines. -
Adding speckles:
To mimic the speckled ceramic look, dilute a tiny bit of brown or black paint with water. Load an old toothbrush, aim it at the pot, and run your thumb over the bristles to flick tiny specks onto the surface. -
Sealing the work:
Since air dry clay isn’t waterproof, apply 2-3 coats of a waterproof varnish or sealant especially on the inside. Let each coat dry fully before adding the next.
Make It Blush
Before sealing, create soft rosy cheeks by lightly dusting a tiny bit of real pink powder blush or chalk pastel onto the ‘cheek’ area with a soft brush.
Pop in your favorite spiky succulent and enjoy your serene new desk companion
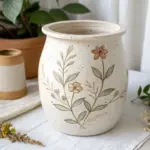
Raised Floral Relief Vase Pot
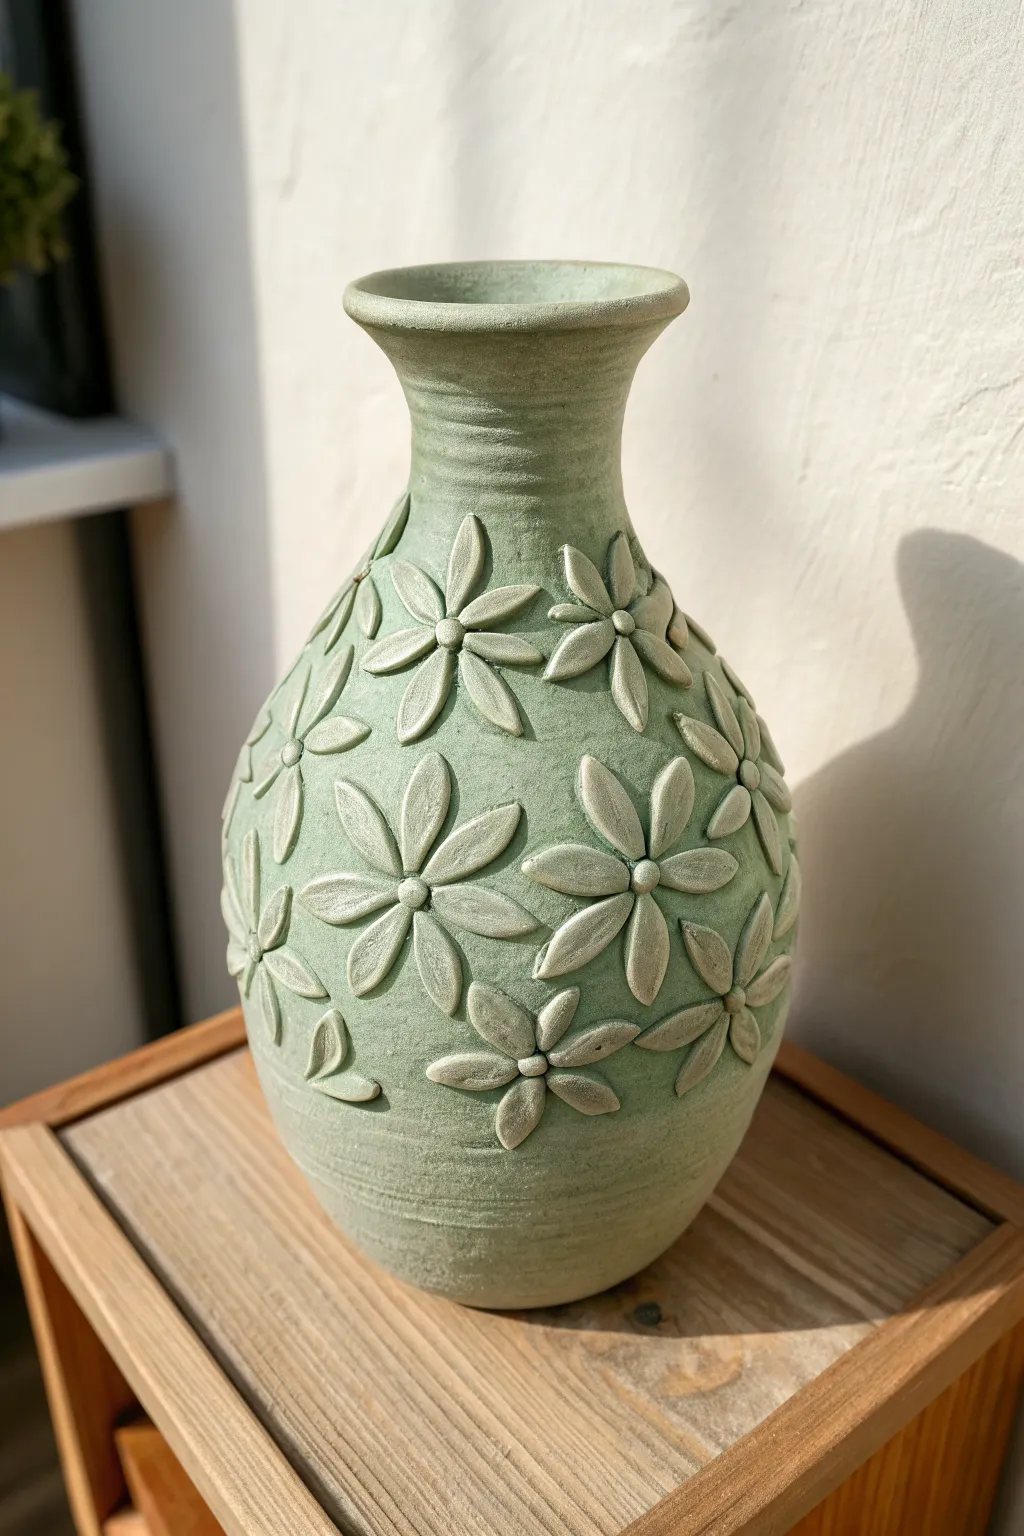
Transform a plain glass vessel into a striking faux-ceramic masterpiece using air dry clay and a subtle relief technique. This project mimics the high-end look of hand-thrown pottery with a beautiful, matte sage finish that highlights the raised floral petals.
Step-by-Step Tutorial
Materials
- Glass vase or jar (clean and dry)
- Air dry clay (white or terracotta)
- Rolling pin
- Clay sculpting tools (or a butter knife)
- Small bowl of water
- Sponge or brush for slip
- Sandpaper (medium and fine grit)
- Sage green acrylic paint (matte finish)
- Cream or white acrylic paint (for dry brushing)
- Baking soda (optional, for texture)
- Paintbrushes (flat brush and small detail brush)
- Mod Podge or matte varnish
Step 1: Base Construction
-
Prepare the vessel:
Begin with a clean glass vase. To help the clay adhere better, I like to lightly sand the glass surface or apply a thin coat of PVA glue and let it dry until tacky before starting. -
Roll out the base layer:
Roll out a large slab of air dry clay to approximately 1/4 inch thickness. Ensure it is large enough to wrap around the circumference of your vase. -
Wrap the vase:
Carefully drape the clay sheet around the glass vase. Trim the excess clay at the seam using a clay knife or sharp blade. -
Smooth the seams:
Dip your fingers in a little water and smooth the vertical seam until it disappears. Mold the clay over the rim of the vase and tuck it under the bottom for a finished look. -
Create surface texture:
Before the clay dries, gently run a damp sponge horizontally around the vase neck and base. This creates the subtle wheel-thrown distinctive lines seen in the reference image.
Step 2: Floral Relief Detail
-
Prepare petal shapes:
Roll out a fresh, thinner slab of clay (about 1/8 inch). Use a small teardrop cutter or cut freehand petal shapes with a knife. You will need dozens of these for the full pattern. -
Score and slip:
To ensure the flowers stick, scratch the back of each petal slightly (scoring) and add a dab of water or clay slurry (slip) before pressing it onto the vase. -
Form the flowers:
Arrange five or six petals in a circle to create a flower. Press the center of the petals firmly onto the vase, but leave the tips slightly raised for dimension. -
Add center details:
Roll a tiny ball of clay for each flower center. Press it into the middle of your petal arrangement, flattening it slightly to secure the petals together. -
Refine the petals:
Use a sculpting tool to press a central indentation line down the middle of each petal. This gives them that distinct carved look depicted in the photo. -
Check spacing:
Continue adding flowers around the main body of the vase. Vary the spacing slightly, placing some occasional loose petals or leaves between the full blooms to fill gaps naturally.
Cracking Clay?
If small cracks appear as the clay dries, don’t panic. Mix a small amount of fresh clay with water to make a paste and fill the cracks, then smooth over with a damp finger.
Step 3: Finishing Touches
-
Dry thoroughly:
Allow the vase to dry completely. This usually takes 24-48 hours depending on humidity. Rotate it occasionally so all sides dry evenly. -
Sand imperfections:
Once bone dry, use fine-grit sandpaper to smooth out any rough fingerprints or sharp jagged edges on the petals. -
Mix textured paint:
Mix sage green acrylic paint with a teaspoon of baking soda. This creates the chalky, ceramic-like texture shown in the final result. -
Apply base coat:
Paint the entire vase, getting into all the nooks and crannies of the relief flowers. Let the first coat dry and apply a second for full opacity. -
Highlight the relief:
Dip a dry brush into a tiny amount of lighter green or cream paint. Wipe most of it off on a paper towel, then lightly brush over the raised petals to accentuate the texture. -
Seal the piece:
Finish with a coat of matte varnish or Mod Podge to protect the paint and seal the clay against minor moisture.
Make it Functional
Air dry clay isn’t waterproof. If you plan to use fresh flowers, ensure the internal glass vessel is watertight and seal the clay rim well so water doesn’t seep underneath.
Place your finished vase in a spot with natural light to really show off the shadows of your relief work
Hanging Air Dry Clay Pot Vase
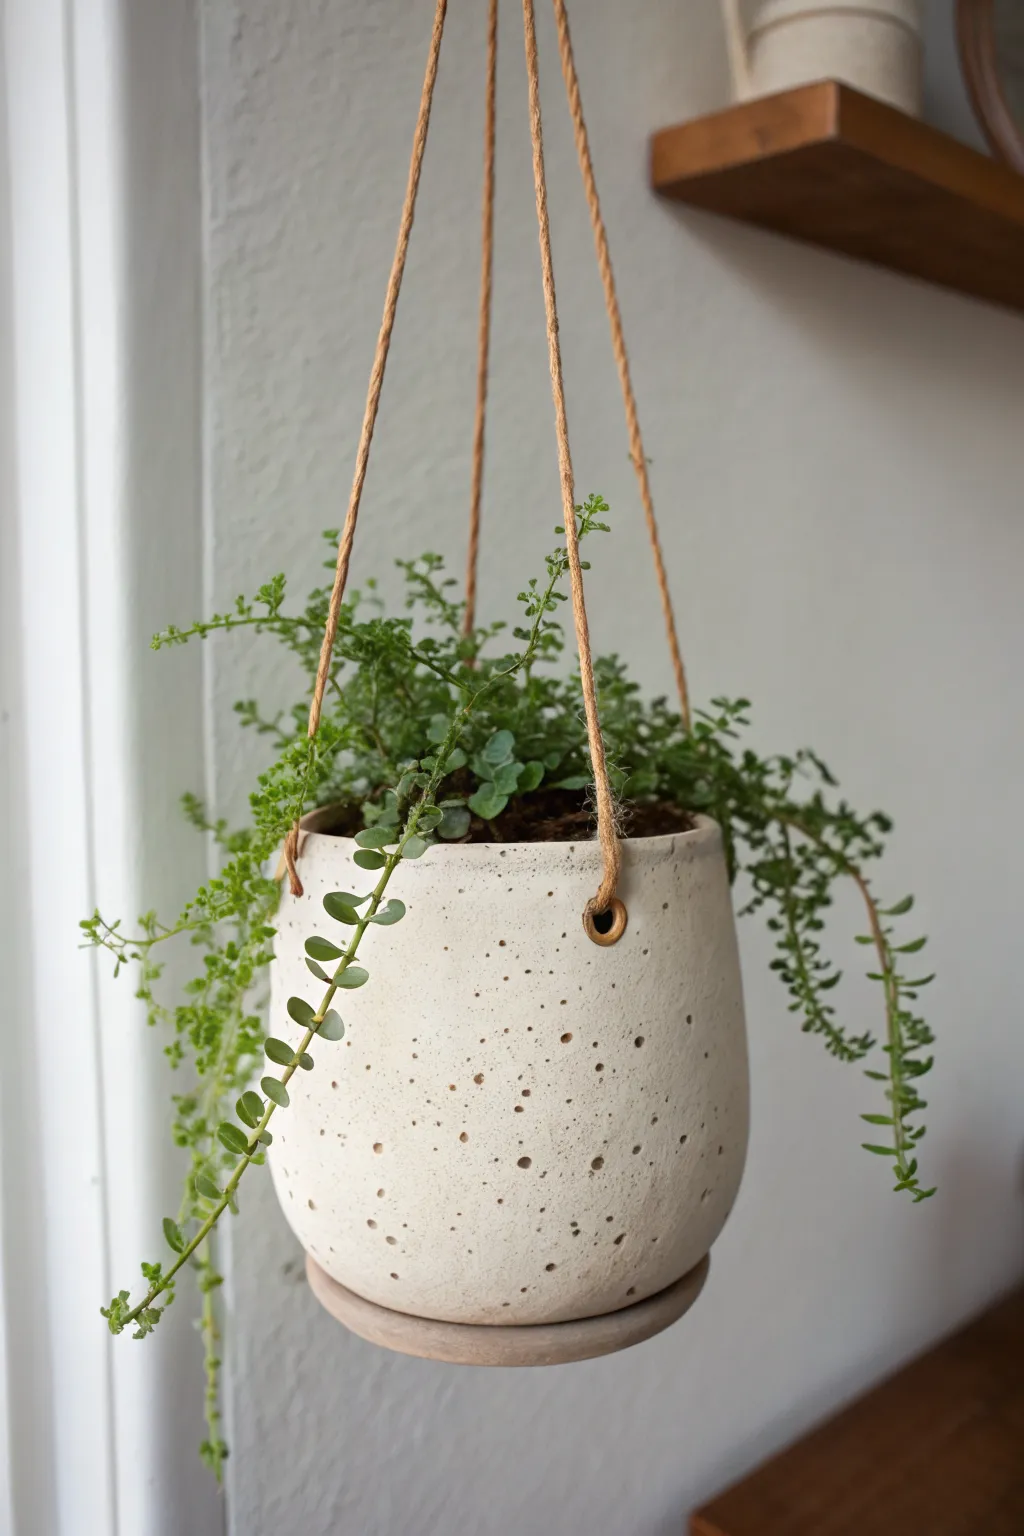
Embrace the beauty of handmade simplicity with this earthy, hanging planter featuring subtle organic speckling. The soft, matte finish and natural twine suspension make it a perfect minimalist home for your trailing succulents or ivy.
Step-by-Step
Materials
- White air-dry clay (approx. 2 lbs)
- Rolling pin
- Canvas mat or parchment paper
- Circle template or bowl (approx. 6 inch diameter)
- Craft knife or needle tool
- Small cup of water
- Pottery sponge
- Wooden skewer or toothpick
- Straw or large drill bit (for cord holes)
- Coarse coffee grounds or sand (optional, for texture)
- Twine or jute cord
- Sealer (polyurethane or acrylic varnish)
- Sandpaper (fine grit)
Step 1: Preparing the Clay Body
-
Add Texture:
Before sculpting, wedge your clay thoroughly. If you want to recreate the specific speckled look from the photo, knead in a small amount of dried coffee grounds or coarse sand. This creates those lovely little dark flecks throughout the white clay. -
Roll the Base:
Roll out a slab of your prepared clay to an even thickness of about 1/4 inch. Use guides or rulers on either side of your rolling pin to keep it uniform. -
Cut the Bottom:
Place your circle template or bowl onto the slab and cut around it cleanly with your craft knife to create the base of the pot. Save the excess clay for the walls.
Step 2: Constructing the Pot
-
Create the Walls:
Roll out a long, rectangular strip for the side walls. The length should match the circumference of your base circle, plus a little extra for overlap. Aim for the same 1/4 inch thickness. -
Score and Slip:
Score the outer edge of your base circle and the bottom edge of your wall strip. Apply a little water or slip (clay mixed with water) to the scored areas to act as glue. -
Join the Seam:
Wrap the wall around the base, pressing firmly. Cut off excess length where the walls meet, score the vertical edges, and join them together. Smoothing this vertical seam is crucial; use your thumb to drag clay across the line until it disappears. -
Shape the Form:
Now, gently bulge the walls outward from the inside to create that rounded, organic ‘bell’ shape. I find cupping the outside with one hand while pushing gently from the inside works best to maintain symmetry. -
Make the Saucer:
Roll out a second, slightly smaller circle for the separate saucer seen at the bottom. Recreate the same process but with a very short wall strip (about 1/2 inch high) to catch drainage.
Reinforce the Rims
When making the holes for the twine, add a tiny extra coil of clay around the hole on the inside of the pot. Smooth it down to create a reinforced ‘grommet’ that prevents the string from slicing through.
Step 3: Detailing and Refining
-
Punch Hanging Holes:
Use a straw to punch three or four evenly spaced holes near the top rim for the hanging cords. Make sure they are at least half an inch down from the edge to prevent tearing under the plant’s weight. -
Add Stippling:
To mimic the porous, stone-like texture in the image, take a wooden skewer or a stiff brush and gently poke shallow dents all over the exterior surface. Vary the depth and spacing for a natural look. -
Smooth the Rims:
Dip a sponge in water and run it along the top rim of the pot and saucer to soften any sharp angles. Air dry clay can be brittle, so rounded edges are more durable. -
Drying Phase:
Let the pot and saucer dry slowly away from direct heat or sunlight. This usually takes 24 to 48 hours. Turn them occasionally so the bottom dries evenly.
Cracks While Drying?
If hairline cracks appear as the water evaporates, mix a tiny bit of fresh clay with water to make a paste. Fill the cracks, smooth over, and let it dry again slowly under plastic.
Step 4: Finishing Touches
-
Sanding:
Once bone dry, lightly sand any rough patches or uneven seams with fine-grit sandpaper. Be careful not to sand away your stippled texture. -
Sealing:
Apply two coats of waterproof sealer inside and out. Since air dry clay isn’t waterproof on its own, this step is vital if you plan to put a live plant inside. -
Attaching the Cords:
Measure three equal lengths of jute twine. Thread one end through each hole from the outside in, and tie a large, sturdy knot on the inside of the pot so it can’t slip through. -
Final Assembly:
Place your pot into the saucer (you can glue them together if you prefer a single unit, or keep separate for drainage) and gather the three strings at the top. Tie them together in a loop for hanging.
Hang your new creation in a sunny window and enjoy the natural warmth it adds to your space
Modern Arch-Shaped Vase Planter
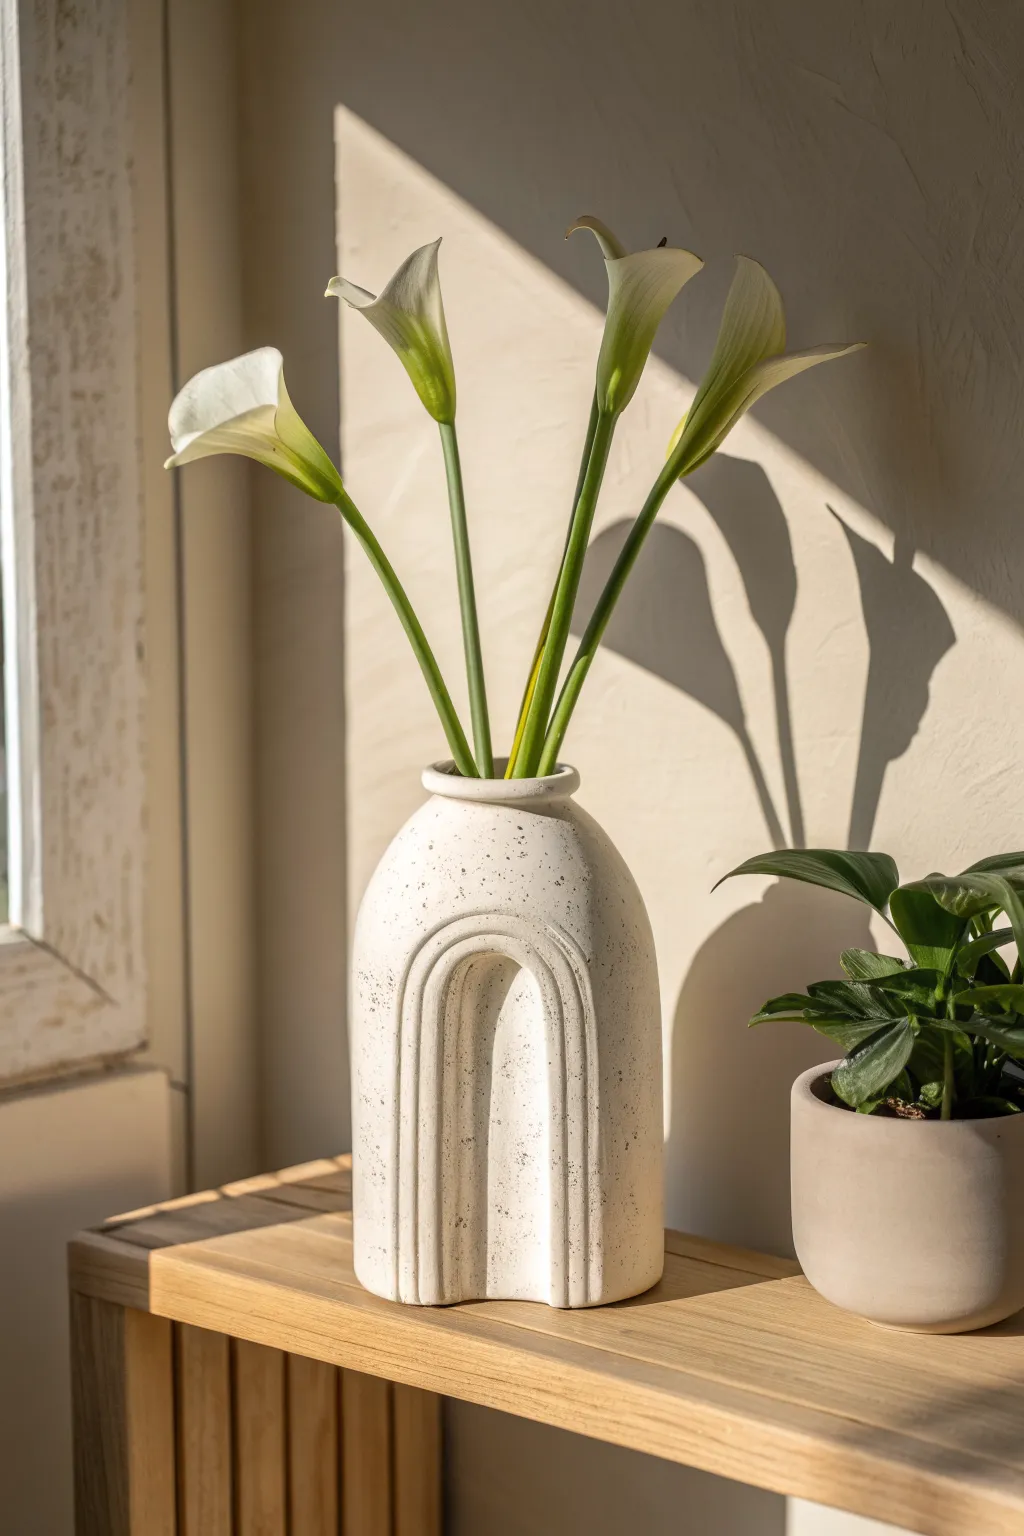
Bring a touch of modern minimalism to your space with this stunning arch-shaped vase. The speckled stone effect and raised relief details give it a high-end ceramic look without the need for a kiln.
How-To Guide
Materials
- High-quality white air dry clay
- Rolling pin
- Sharp craft knife or clay cutter
- Slip (clay mixed with water)
- Small sponge
- Fine-grit sandpaper
- Acrylic sealer (matte)
- Black acrylic paint
- Old toothbrush
- Water
- Cardboard for templates
Step 1: Forming the Base Structure
-
Create templates:
Begin by sketching your vase shape onto cardboard. You will need two identical arch shapes for the front and back (roughly 8 inches tall), carefully rounded at the top. You also need a long rectangular strip for the rounded sides and a flat oval for the bottom. -
Roll the clay:
Roll out a substantial portion of your clay to an even thickness of about 1/4 inch. I find using guide sticks on either side of the rolling pin helps keep the slab perfectly uniform. -
Cut the components:
Lay your cardboard templates onto the clay slab. Using your sharp craft knife, trace around them to cut out the front arch, back arch, the side strip, and the bottom oval. -
Prepare the edges:
Score the edges of the bottom oval and the bottom edge of your side strip using a needle tool or fork. Apply a generous amount of slip to these scored areas to act as glue. -
Assemble the walls:
Wrap the long rectangular strip around the perimeter of the bottom oval base. Stand it up vertically to create the side walls of the vase. Smooth the internal seam where the strip ends meet, blending the clay together securely.
Smoother Seams
Use a slightly damp sponge to wipe over seams while the clay is wet. This blends clay particles better than fingers alone.
Step 2: Building the Arch Facades
-
Attach the front and back:
Score and slip the edges of your standing wall structure. Carefully press the front arch cutout onto one side and the back arch cutout onto the other, enclosing the vase shape. -
Blend the seams:
Use a modeling tool or your finger to smooth the seams where the front and back panels meet the side walls. You want the transition to be seamless, so take your time blending the clay. -
Draft the relief design:
Roll out a fresh, thinner snake of clay or a very thin slab. Cut three long, thin strips to create the rainbow arch relief pattern seen on the front of the vase. -
Apply the raised details:
Score the face of the vase in an inverted ‘U’ shape. Apply slip, then gently press your thin clay strips onto the vase to create the nested arch design. Leave a small gap between the outer and inner relief lines. -
Smooth the relief:
Dip your finger in a little water and gently run it over the raised strips to soften any sharp edges, making them look integrated rather than just stuck on. -
Add the rim:
Create a small, thick coil of clay. Attach this to the top opening of the vase to form a distinct rim. Blend the bottom edge of the coil into the vase neck, but leave the top edge defined.
Step 3: Finishing and Speckling
-
Dry thoroughly:
Let the vase dry slowly away from direct sunlight for 24-48 hours. Turn it occasionally to ensure even drying and prevent warping. -
Sand for smoothness:
Once fully dry and bone-white, use fine-grit sandpaper to buff out any fingerprints, bumps, or rough seams. Wipe away the dust with a slightly damp cloth. -
Create the speckle mix:
Mix a small amount of black acrylic paint with water until it is quite fluid and runny. -
Apply the speckles:
Dip an old toothbrush into the watered-down paint. Hold it near the vase and run your thumb across the bristles to flick tiny droplets of paint onto the surface. Practice on paper first to control the density. -
Seal the surface:
After the paint speckles are dry, apply two coats of a matte acrylic sealer to protect the clay and give it that finished ceramic feel. -
Waterproofing note:
Remember that air dry clay is not waterproof. To display fresh flowers as shown, insert a small glass jar or test tube inside the vase to hold the water.
Faux Stone Texture
Mix dried used coffee grounds into your white clay before rolling it. This naturally creates a textured, speckled stone look.
Now you have a chic, sculptural piece ready to display your favorite dried botanicals or faux stems on any shelf