When I’m making clay pieces, my favorite projects are the ones you actually reach for every day—pretty, yes, but also seriously useful. Here are my go-to practical clay ideas that solve little home and desk problems while still feeling handmade and special.
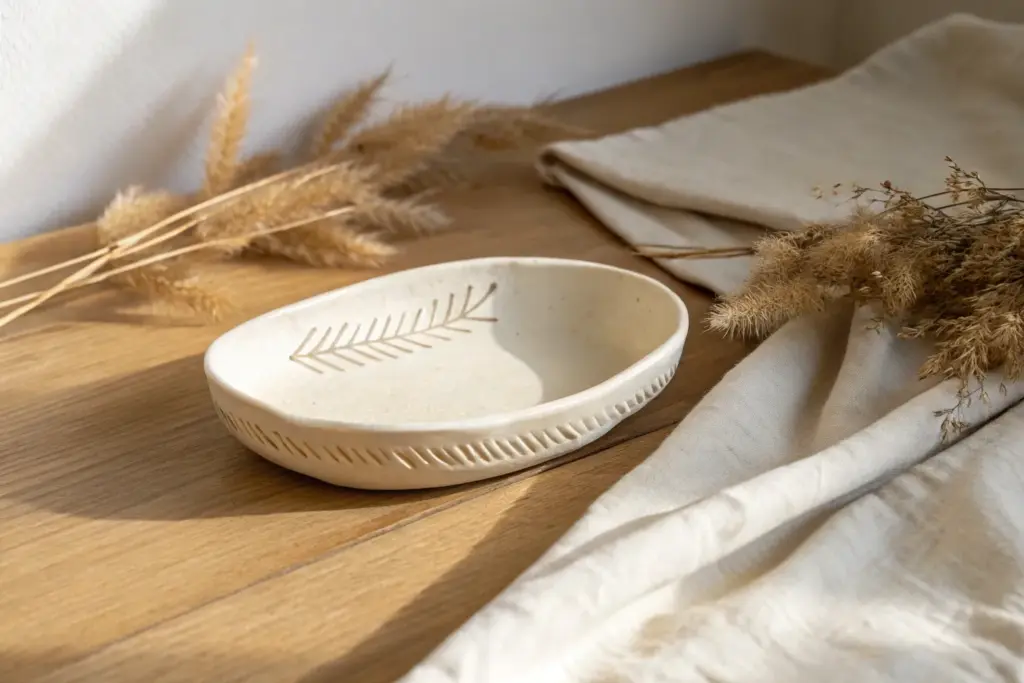
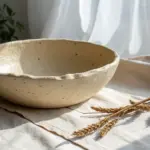
Minimal Trinket Dish
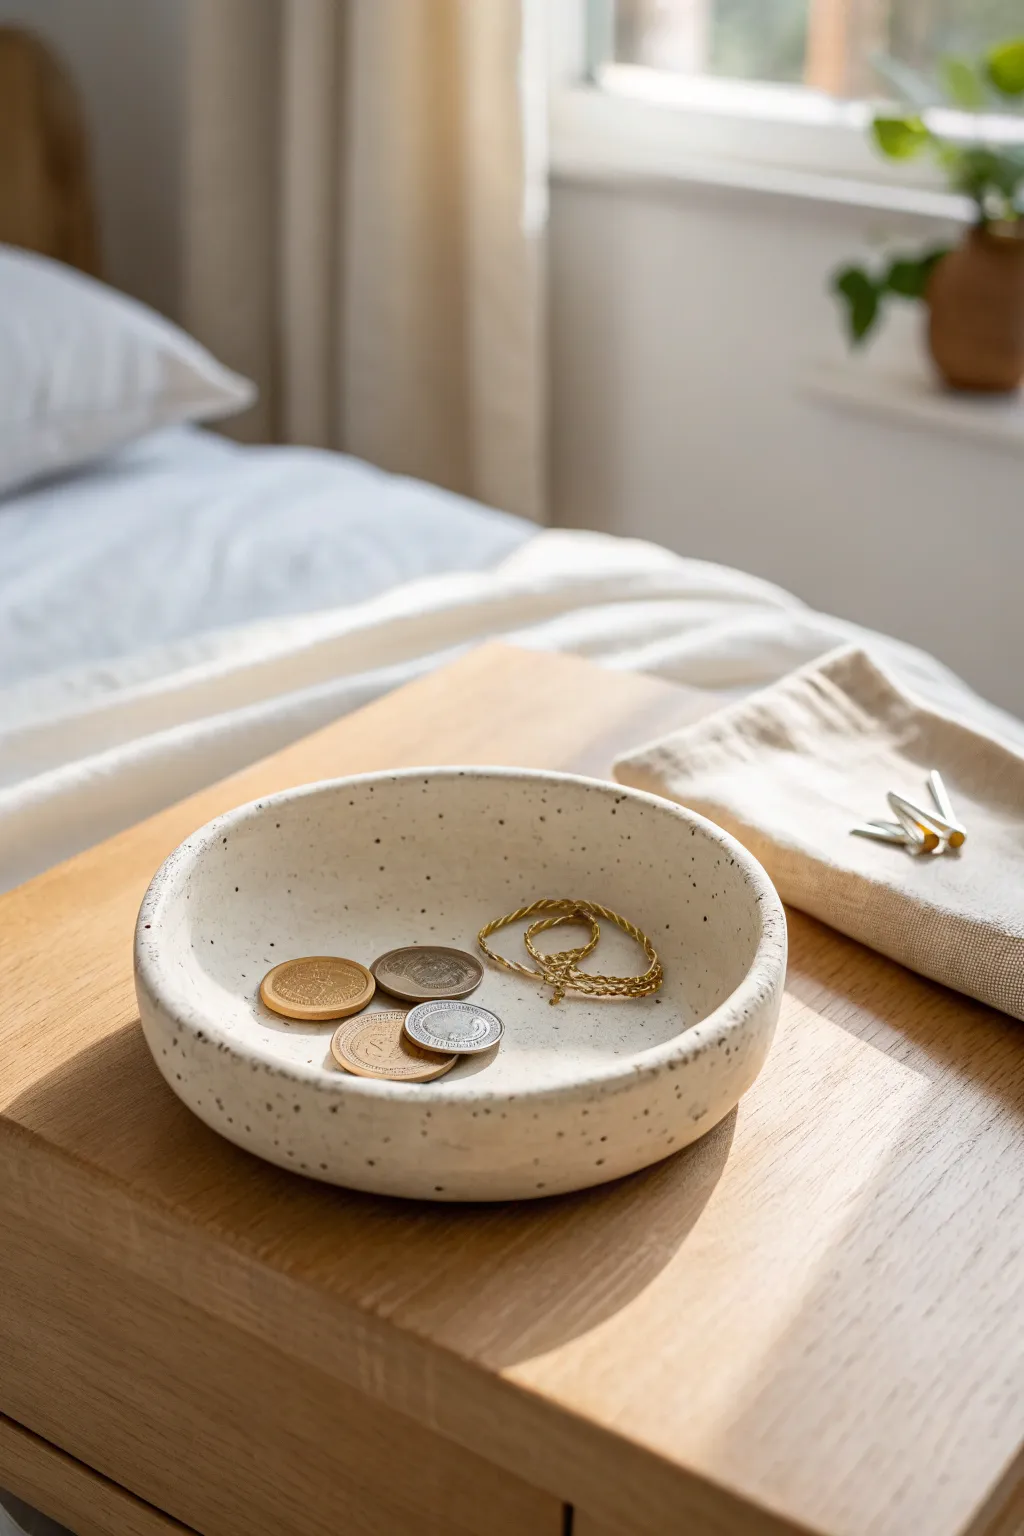
Capture the organic elegance of natural stone with this minimalist trinket dish, perfect for holding your everyday jewelry and coins. The project features a lovely speckled finish that mimics granite or ceramic glaze without needing a kiln.
Step-by-Step
Materials
- White air-dry clay or polymer clay
- Rolling pin
- Rolling guides or two pencils (approx. 5mm thick)
- Bowl or circular object for tracing (approx. 6-7 inches diameter)
- Craft knife or needle tool
- Small bowl or curved form (for drying shape)
- Sandpaper (fine grit, 400-600)
- Acrylic paint (black and brown)
- Old toothbrush or stiff bristle brush
- Matte varnish or sealant
- Water and sponge (for smoothing)
Step 1: Shaping the Base
-
Condition the clay:
Start by kneading a generous handful of white clay until it is soft, pliable, and free of cracks. If using polymer clay, the warmth of your hands is essential here. -
Roll it out:
Place your clay on a smooth work surface. Use rolling guides or place two pencils on either side of the clay to ensure an even thickness of about 5-6mm as you roll. -
Cut the circle:
Place your tracing bowl or circular template onto the flattened clay. Trace around the edge carefully with a craft knife or needle tool to create a perfect circle. -
Smooth the edges:
Dip your finger in a little water (for air-dry clay) or baby oil (for polymer) and run it along the cut edge to soften the sharpness and remove any loose bits.
Splatter Control
Before speckling your actual dish, test your flicking technique on a piece of scrap paper. This prevents large, unintentional globs of paint from ruining your clean surface.
Step 2: Forming the Dish
-
Create the walls:
Gently lift the edges of the clay circle upwards. Instead of pinching, try to curve the clay gradually from the center out to create a shallow, open bowl shape. -
Refine the lip:
Use your thumb to press the rim slightly to flatten and round it off. We want a chunky, substantial look rather than a thin, delicate edge. -
Establish the curve:
Place your clay circle inside a slightly larger bowl that is lined with plastic wrap or cornstarch. This will support the curved walls while the clay sets. -
Smooth the interior:
While it sits in the mold, use a damp sponge to wipe the inside surface perfectly smooth, erasing any fingerprints or dents. -
Drying or Baking:
If using air-dry clay, let it dry for 24-48 hours until completely white and hard. If using polymer clay, bake according to the package instructions (usually 275°F/135°C for 15-30 minutes).
Step 3: Finishing Touches
-
Sand for perfection:
Once fully cured or dry, use fine-grit sandpaper to gently buff the rim and the outside of the bowl. This gives it that varied, handmade stone texture. -
Prepare the speckle mix:
Dilute a small amount of black acrylic paint with water until it is very runny. I sometimes add a tiny drop of brown to soften the contrast. -
Apply the speckles:
Dip an old toothbrush into the paint mixture. Hold the brush over the dish and run your thumb across the bristles to flick tiny splatters onto the surface. -
Control the density:
Apply the speckles sparingly at first. You want a random, organic distribution like natural stone, not a solid covering. Let the paint dry completely. -
Seal the piece:
Apply a coat of matte varnish or sealant to the entire dish. This protects the paint and gives the clay a finish that feels durable and finished.
Cracked Edges?
If you see small cracks forming on the rim while drying, patch them immediately with a slurry of clay and water (slip), then smooth over with your finger.
Place this stylish organizer on your nightstand to keep your treasures safe and sound


Simple Ring Cone
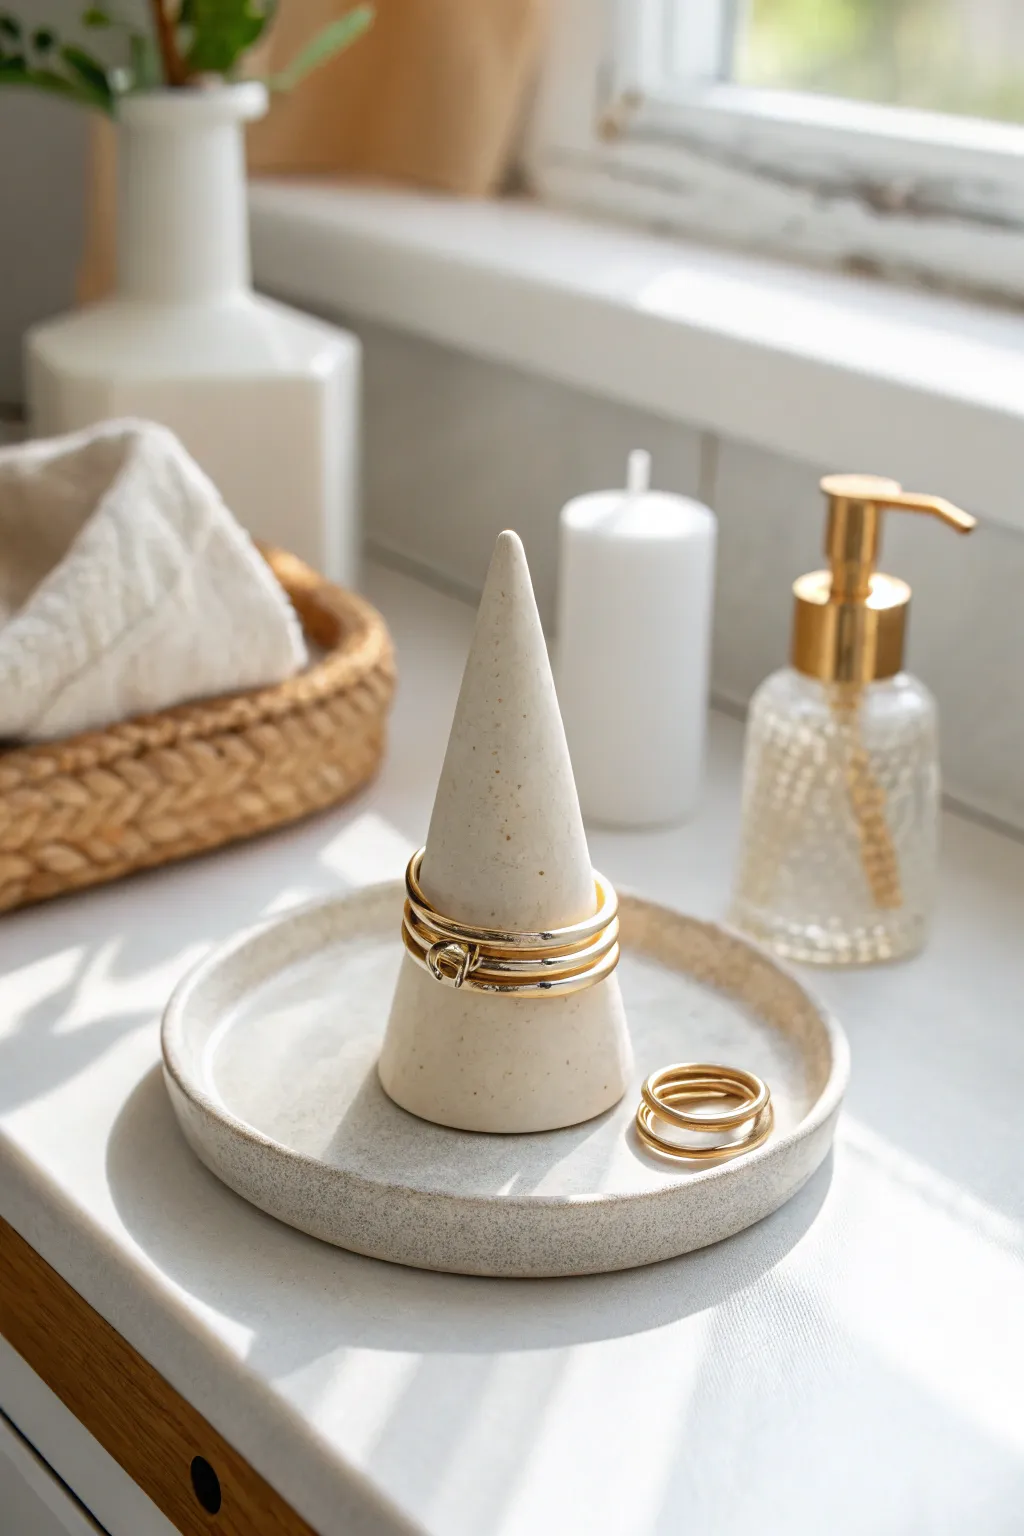
Create a sleek and minimalist vanity accessory with this two-piece ring holder set featuring a natural speckled finish. The combination of a tall central cone and a shallow catch-all dish offers the perfect stylish home for both your stacked bands and loose jewelry.
Step-by-Step Tutorial
Materials
- White polymer clay (cernit or fimo soft)
- Granite or speckled effect polymer clay
- Acrylic roller or pasta machine
- Circle cutter (approx. 4-5 inches diameter)
- Circle cutter (approx. 1.5 inches diameter)
- Flexible cutting blade
- Fine grit sandpaper (400-800 grit)
- Ceramic tile or glass work surface
- Oven for baking
- Matte varnish (optional)
Step 1: Preparing the Speckled Clay
-
Condition the clay:
Start by warming up your white base clay in your hands until it becomes soft and pliable. -
Mix the colors:
To achieve that specific creamy off-white speckled look, mix a large block of white clay with a small amount of granite-effect clay. Using pure granite clay can be too dark, so I prefer a 3:1 ratio of white to granite. -
Blend thoroughly:
Twist and fold the clays together repeatedly until the grey speckles are evenly distributed throughout the white, creating a consistent stone-like appearance. -
Roll out sheets:
Using your acrylic roller or pasta machine on a medium setting, roll out two separate sheets of clay. One should be slightly thicker (about 1/4 inch) for the base tray to give it weight.
Smooth Seams Secret
When blending the rim to the tray base, use a rubber-tipped sculpting tool. It drags the clay smoothly without leaving the harsh fingernail marks that often happen when blending by hand.
Step 2: Forming the Cone
-
Shape the rough cone:
Take a generous ball of your mixed clay and begin rolling it between your palms to smooth out any lines. -
Refine the taper:
Place the ball on your work surface. Using the flat of your hand, roll the clay back and forth while applying more pressure to the top side, naturally creating a tapered cone shape. -
Check the height:
Continue rolling until the cone is roughly 3 to 4 inches tall. It needs to be slender enough to hold rings but wide enough at the base to be stable. -
Flatten the bottom:
Gently tap the wider end of the cone onto your ceramic tile to create a perfectly flat bottom surface so it stands upright without wobbling. -
Smooth the surface:
Run your finger lightly over the cone to remove any fingerprints. If the tip has become too sharp, gently blunt it just a tiny bit to prevent breakage later.
Step 3: Creating the Tray
-
Cut the base:
Take your thicker rolled sheet of clay and use the large circle cutter to stamp out the main base of the tray. -
Create the rim:
Roll a long, thin snake of clay. Place this snake on top of the circle’s outer edge to form the wall of the tray. -
Blend the seams:
Using a modeling tool or your thumb, blend the clay snake downward into the base on both the inside and outside, ensuring a seamless transition. The rim should be raised but integrated. -
Cut the center hole (Optional):
If you want the cone to sit fairly loose, you can leave the tray flat. However, to help center the cone, you can use a small cutter to make a slight indentation or circle in the middle of the tray where the cone will rest.
Make it Luxe
After baking, paint the very rim of the tray or the tip of the cone with liquid gold leaf. This metallic accent contrasts beautifully with the matte speckled texture.
Step 4: Finishing Touches
-
Inspect textures:
Before baking, look over both pieces carefully. Use a little baby oil on your finger to smooth away any remaining lint or fingerprints. -
Bake the clay:
Place your pieces on a ceramic tile and bake according to the manufacturer’s instructions for your specific brand of polymer clay. Usually, this is around 230°F to 265°F for 30 minutes. -
Cool down:
Allow the pieces to cool completely in the oven with the door slightly ajar to prevent thermal shock cracks. -
Sand for stone effect:
Once cool, wet sand the pieces under running water using fine-grit sandpaper. This step is crucial as it reveals the ‘granite’ particles and gives the surface a true matte, stoneware feel. -
Assembly:
Place the cone in the center of the tray. You can glue them together with superglue for a permanent fixture, or leave them separate for easier cleaning.
Now you have a chic, modern display to keep your favorite rings safe and organized


Divided Jewelry Tray
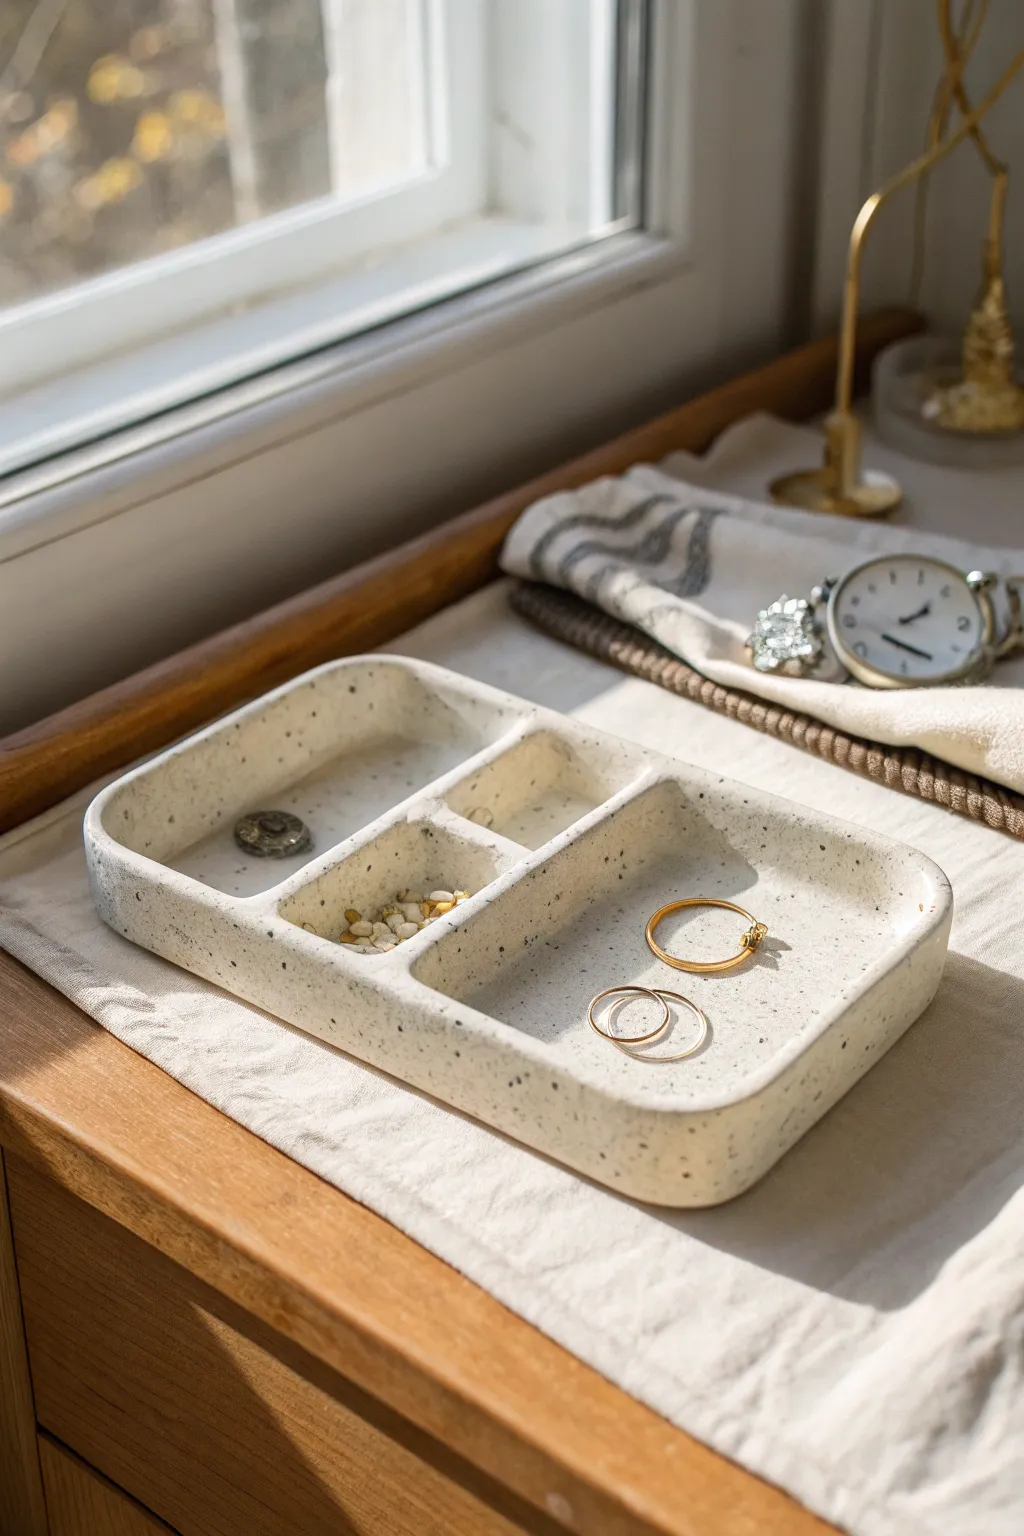
Organize your bedside treasures with this minimalist, multi-compartment tray. With its cream finish and subtle speckling, it mimics the look of high-end ceramic stoneware using accessible air-dry or oven-bake clay.
Detailed Instructions
Materials
- White air-dry clay or polymer clay (approx. 500g)
- Black pepper or dried coffee grounds (for speckling)
- Rolling pin
- Ruler
- Craft knife or clay blade
- Small cup of water (slip)
- Sandpaper (fine grit)
- Gloss or satin varnish (optional for finish)
- Two wooden guide strips (approx. 5mm thick)
Step 1: Preparing the Base
-
Condition the clay:
Start by kneading your white clay until it is soft and pliable. If you want that beautiful speckled stone effect shown in the photo, sprinkle in a generous amount of coarse black pepper or dried coffee grounds while kneading. Keep folding until the specks are evenly distributed. -
Roll the slab:
Place your clay between two wooden guide strips to ensure even thickness. Roll it out into a smooth slab about 5mm thick. This thickness provides enough durability without making the tray too heavy. -
Cut the rectangle:
Using your ruler and craft knife, cut out a clean rectangle. For the size shown, aim for approximately 15cm x 25cm (6 x 10 inches), though you can adjust this to fit your specific space. -
Smooth the edges:
Dip your finger in a little water and run it along the cut edges of your base slab to round them off slightly and remove any sharp drag marks from the knife.
Clean Corners Tip
Use the back of a drill bit or a round paintbrush handle to run along the inside corners. This creates a perfect, uniform radius instead of a messy, sharp angle.
Step 2: Building the Walls
-
Cut wall strips:
From the remaining rolled clay, cut long strips that are the same thickness as your base (5mm) and about 2cm (0.8 inches) tall. These will form the outer rim and the inner dividers. -
Attach the outer rim:
Score the outer edge of your base with a needle tool or knife to create texture. Apply a little water or liquid clay as glue. Place your clay strips along the perimeter, standing them upright. -
Blend the seams:
Use a modeling tool or your thumb to drag clay from the strip down onto the base, seamlessly merging them on the inside. do the same on the outside. Ensure there are no visible gaps. -
Refine the perimeter:
Once the four outer walls are attached, smooth the corners so they are rounded and soft, rather than sharp right angles. This gives it that organic, poured-stone look.
Level Up: Felt Feet
After sealing, glue small circles of cork or velvet to the bottom corners. This protects your furniture and makes the tray feel more substantial and luxurious.
Step 3: Creating Compartments
-
Plan the dividers:
Decide on your layout. The example features one long horizontal divider splitting the tray, intersected by a vertical divider to create the smaller sections. -
Insert the long divider:
Cut a strip to fit the length of the interior. Score and moisten the contact points on the base and the side walls. Place the strip and blend the clay at all connection points to secure it firmly. -
Add the cross-section:
Cut a smaller strip to create the perpendicular divider. Install it using the same scoring and blending technique. I find creating a small clay ‘snake’ to press into the corners helps reinforce these internal joints. -
Smooth the interior:
Use a slightly damp sponge or a soft brush with water to go over every interior corner and surface, erasing fingerprints and tool marks. The goal is a seamless transition between walls and floor.
Step 4: Finishing
-
Dry slowly:
Place the tray away from direct heat or sunlight to dry. If using air-dry clay, loosely cover it with plastic wrap for the first 24 hours to prevent the edges from curling or cracking. -
Sand the surface:
Once completely dry (or baked and cooled), use fine-grit sandpaper to gently smooth the top rim and any rough spots. The speckled texture will really pop as you sand. -
Dust off:
Wipe the piece down with a barely damp cloth to remove all sanding dust. This is crucial before applying any sealant. -
Seal the tray:
Apply a coat of satin or gloss varnish. This not only protects the clay from moisture but also deepens the cream color and highlights the dark speckles, mimicking a ceramic glaze.
Now you have a stylish, custom organizer ready to hold your favorite rings and trinkets


Textured Coasters
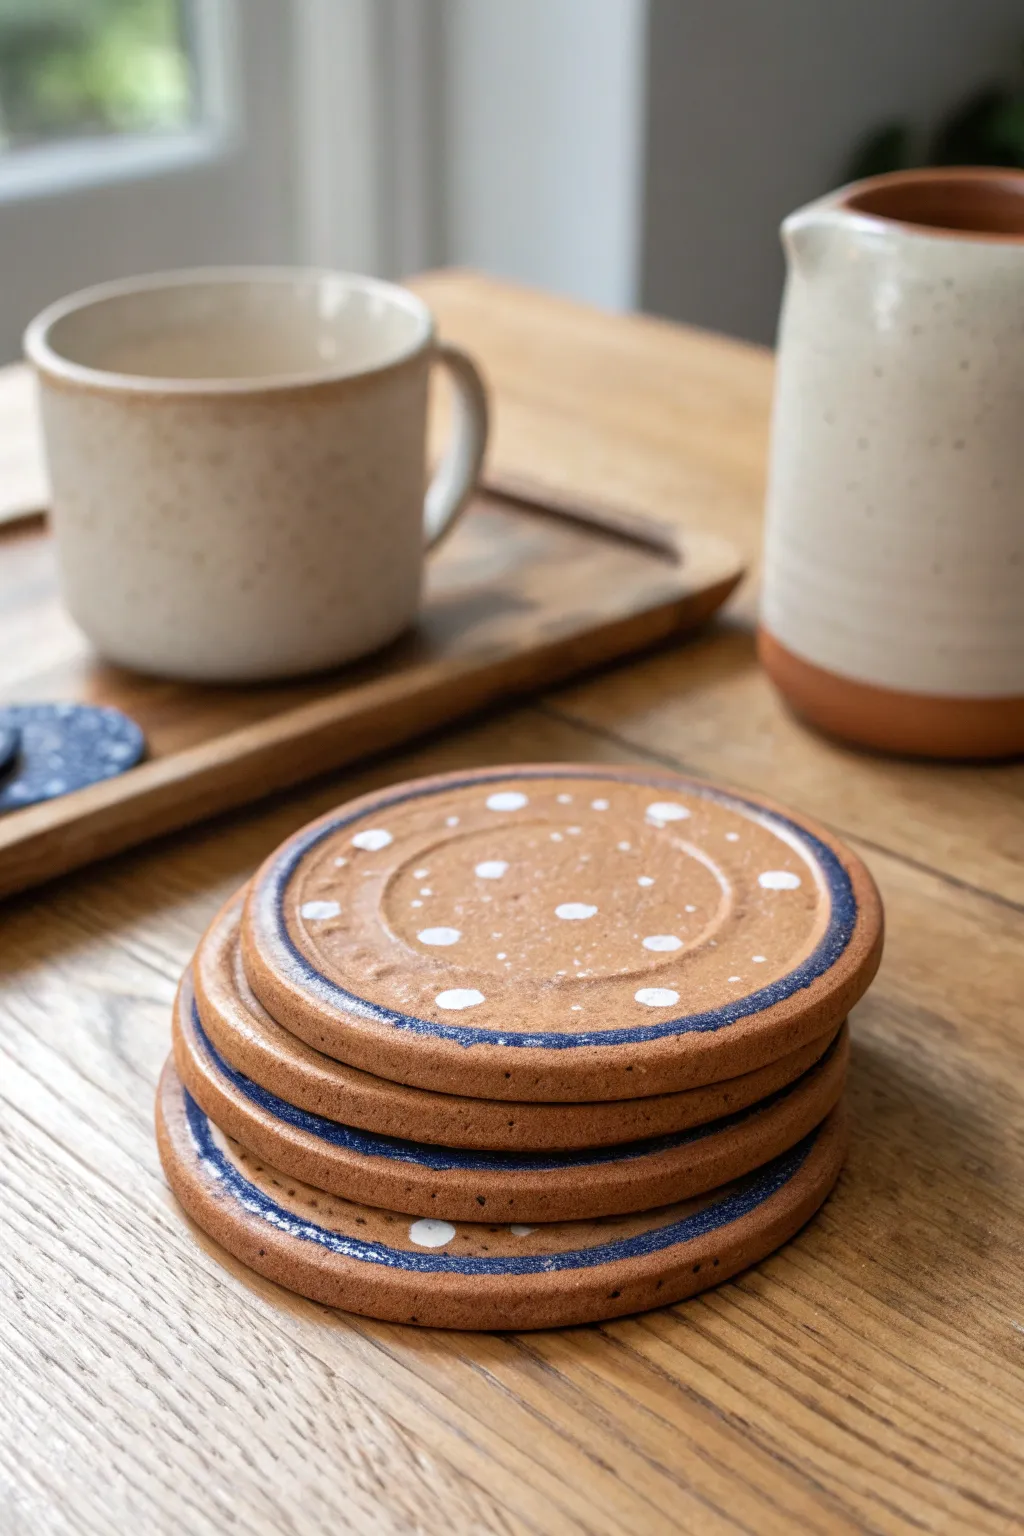
Earthy and rustic, these textured coasters combine warm terracotta tones with playful white specks and a deep blue rim. They feature subtle indented rings that add dimension while keeping your mugs perfectly stable.
How-To Guide
Materials
- Terracotta colored polymer clay or air-dry clay
- Rolling pin
- Circular cookie cutter (approx. 3.5-4 inches)
- Small cup or jar lid (slightly smaller than the cutter)
- Smaller jar lid or circular object (for the inner ring)
- Acrylic paints: White and Navy Blue
- Small round paintbrush
- Sealant or varnish (matte or satin finish)
- Parchment paper or craft mat
- Fine grit sandpaper
Step 1: Prepping the Clay Base
-
Condition the Clay:
Begin by working your terracotta clay in your hands until it is soft, warm, and pliable. This prevents cracking later on. -
Roll It Out:
Place the clay on a sheet of parchment paper. Use your rolling pin to flatten it into an even slab, aiming for a thickness of about 1/4 inch so the coasters feel substantial. -
Cut the Shape:
Press your large circular cookie cutter firmly into the clay to create the main coaster shape. Carefully peel away the excess clay from the edges to reuse later. -
Smooth the Edges:
Dip your finger in a little water (if using air-dry clay) or baby oil (if using polymer) and run it gently around the cut rim to soften any sharp angles.
Warped Clay?
If your air-dry clay curls up at the edges while drying, gently flip the coasters over halfway through the drying process to ensure even evaporation.
Step 2: Adding Texture & Baking
-
Create the Outer Ring:
Find a jar lid or cup that is slightly smaller than your coaster. Center it over the clay circle and press down gently—you want to create an indentation, not cut all the way through. -
Create the Inner Ring:
Take your smallest circular object and press it into the very center of the coaster. This creates that target-like design which catches drips and adds visual interest. -
Dry or Bake:
If using polymer clay, bake according to the package instructions (usually 275°F for 15-30 minutes). If using air-dry clay, let them sit in a cool, dry place for 24-48 hours until fully hardened. -
Sand for smoothness:
Once fully cured and cooled, lightly sand the edges and flat surfaces with fine-grit sandpaper to remove any fingerprints or imperfections.
Step 3: Painting the Details
-
Paint the Rim:
Load a small round brush with navy blue acrylic paint. Carefully paint the thin raised area between the outer edge and the first indented ring. Go slowly to keep the line crisp. -
Add White Dots:
Clean your brush or grab a dotting tool. Dip it into white acrylic paint and dab random, organic spots across the indented central area of the coaster. -
Vary Dot Sizes:
I find the look is more organic if you mix up the sizes, making some dots slightly larger and others tiny distinct specks. -
Let Paint Dry:
Allow the paint to dry completely. Since these are small dots and thin lines, 20-30 minutes should be sufficient.
Make it a Set
Try reversing the color scheme for half the set—paint a white rim with navy blue speckles for a coordinated mix-and-match look.
Step 4: Finishing Up
-
Apply Sealant:
Coat the top and sides of the coaster with a waterproof sealant or varnish. This is crucial for protecting the clay from moisture condensation on cold drinks. -
Second Coat:
Once the first coat is dry, apply a second layer of sealant to ensure durability. -
Add Cork Backing (Optional):
For extra furniture protection, you can cut a circle of adhesive cork or felt and stick it to the underside of your finished coaster.
Now you have a charming set of handmade coasters ready to protect your table in style

The Complete Guide to Pottery Troubleshooting
Uncover the most common ceramic mistakes—from cracking clay to failed glazes—and learn how to fix them fast.
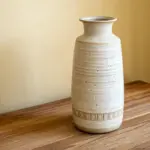
Everyday Candle Holder
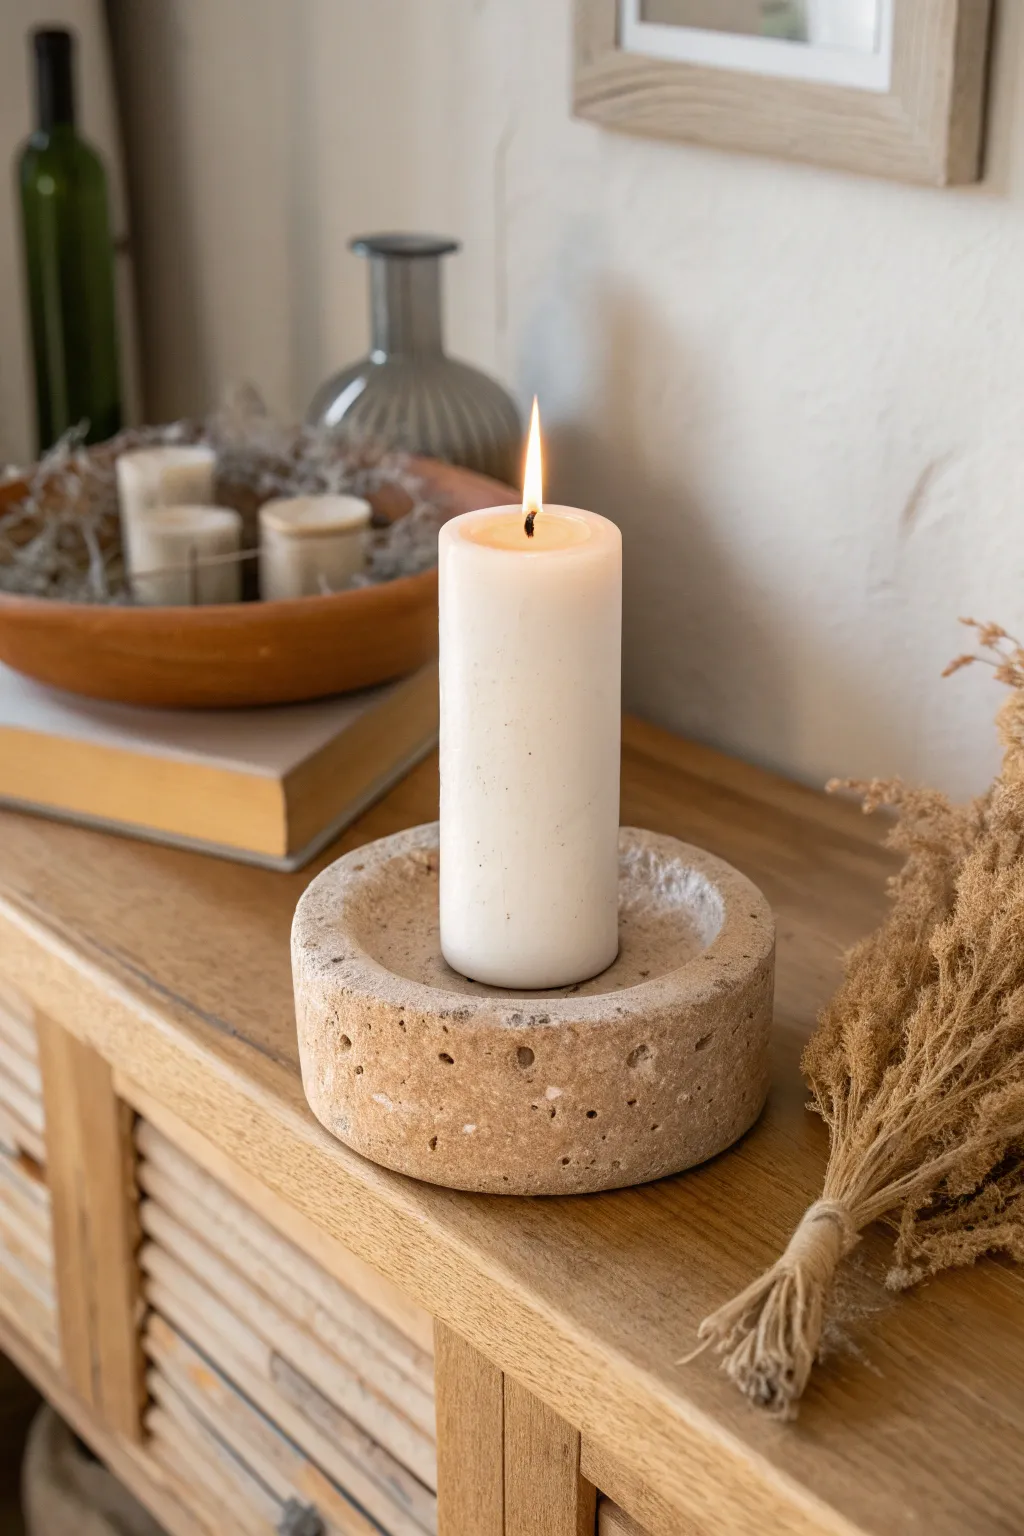
Bring the raw beauty of natural travertine into your home with this substantial, textured candle holder. Using simple clay techniques, you’ll create a porous, organic finish that perfectly mimics weathered stone for a cozy, earthy vignette.
Step-by-Step
Materials
- Air-dry clay (white or light grey)
- Coarse sand or salt (for texture)
- Circular cookie cutter or jar lid (approx. 4-inch diameter)
- Straight-sided glass or small rolling pin
- Pillar candle (for sizing)
- Clay sculpting tool or butter knife
- Old toothbrush
- Acrylic paint (beige, warm grey, white)
- Sponge or paper towel
- Matte finish varnish
Step 1: Shaping the Base
-
Prepare the Clay:
Start with a generous handful of air-dry clay. Knead it until it’s pliable and warm. I find it helpful to mix in a tablespoon of coarse sand directly into the clay body at this stage to build integral texture. -
Roll the Cylinder:
Roll the clay into a thick log, then flatten it slightly with your palm. You want to form a thick, hockey-puck shape that is about 1.5 to 2 inches tall. -
Refine the Shape:
Use your rolling pin or press the side of a straight glass against the outer walls of your puck to create vertical, smooth sides. Keep rotating clearly to maintain a circular shape. -
Check the Diameter:
Place your intended pillar candle on top to ensure the base is wide enough. You want at least a half-inch border of clay extending beyond the candle’s edge. -
Create the Well:
Press the candle gently into the center of the soft clay to mark the spot. Remove the candle and use a spoon or your thumbs to dig out a shallow depression, just deep enough to keep the candle stable. -
Smooth the Rim:
Moisten your fingers lightly with water and run them along the top rim to soften any sharp angles, aiming for a rounded, organic edge rather than a sharp corner.
Cracking Clay?
Thick clay pieces often crack while drying. If hairline cracks appear, fill them with a slurry of fresh clay and water (slip), then smooth over before painting.
Step 2: Creating the Stone Texture
-
Distress the Surface:
This is the fun part where imperfections are key. Use an old stiff toothbrush to tap vigorously all over the exterior and top rim, creating a pitted surface. -
Add Deep Pores:
Take a sculpting tool or the end of a paintbrush and poke random, deeper holes into the sides and top. Vary the size of these holes to mimic natural travertine stone. -
Soften the Texture:
Once you have your holes and pits, lightly brush over the surface again with a damp sponge. This knocks back any sharp clay burrs while preserving the indentations. -
Drying Phase:
Let the piece dry completely. Since this is a thick block of clay, it may take 48 to 72 hours. Flip it upside down halfway through to ensure the bottom dries evenly.
Step 3: Faux Stone Finishing
-
Base Coat:
Mix a warm beige acrylic paint with a tiny drop of grey. Paint the entire holder, ensuring paint gets into all those little textured pits you created. -
Wipe Method:
While the base coat is still tacky, use a damp paper towel to wipe the surface. This removes paint from the high points but leaves the darker color in the holes, emphasizing depth. -
Dry Brushing:
Load a dry brush with off-white or cream paint. Offload most of the paint onto a paper towel, then lightly flick the brush over the raised surfaces to highlight the texture. -
Adding Speckles:
Dilute a dark brown paint with water until it’s very runny. Dip a toothbrush in it and flick the bristles with your thumb to spray tiny, natural-looking speckles onto the holder. -
Seal the piece:
Apply a coat of matte varnish to protect the clay. Avoid glossy finishes, as natural stone usually has a dull, matte appearance.
Make it Weighted
Before drying, press a heavy metal washer or large flat stone into the underside of the base. This adds heft and makes the finished piece feel like real stone.
Now you have a timeless, sturdy accent piece ready to add warmth to any corner of your room
Small Succulent Planter
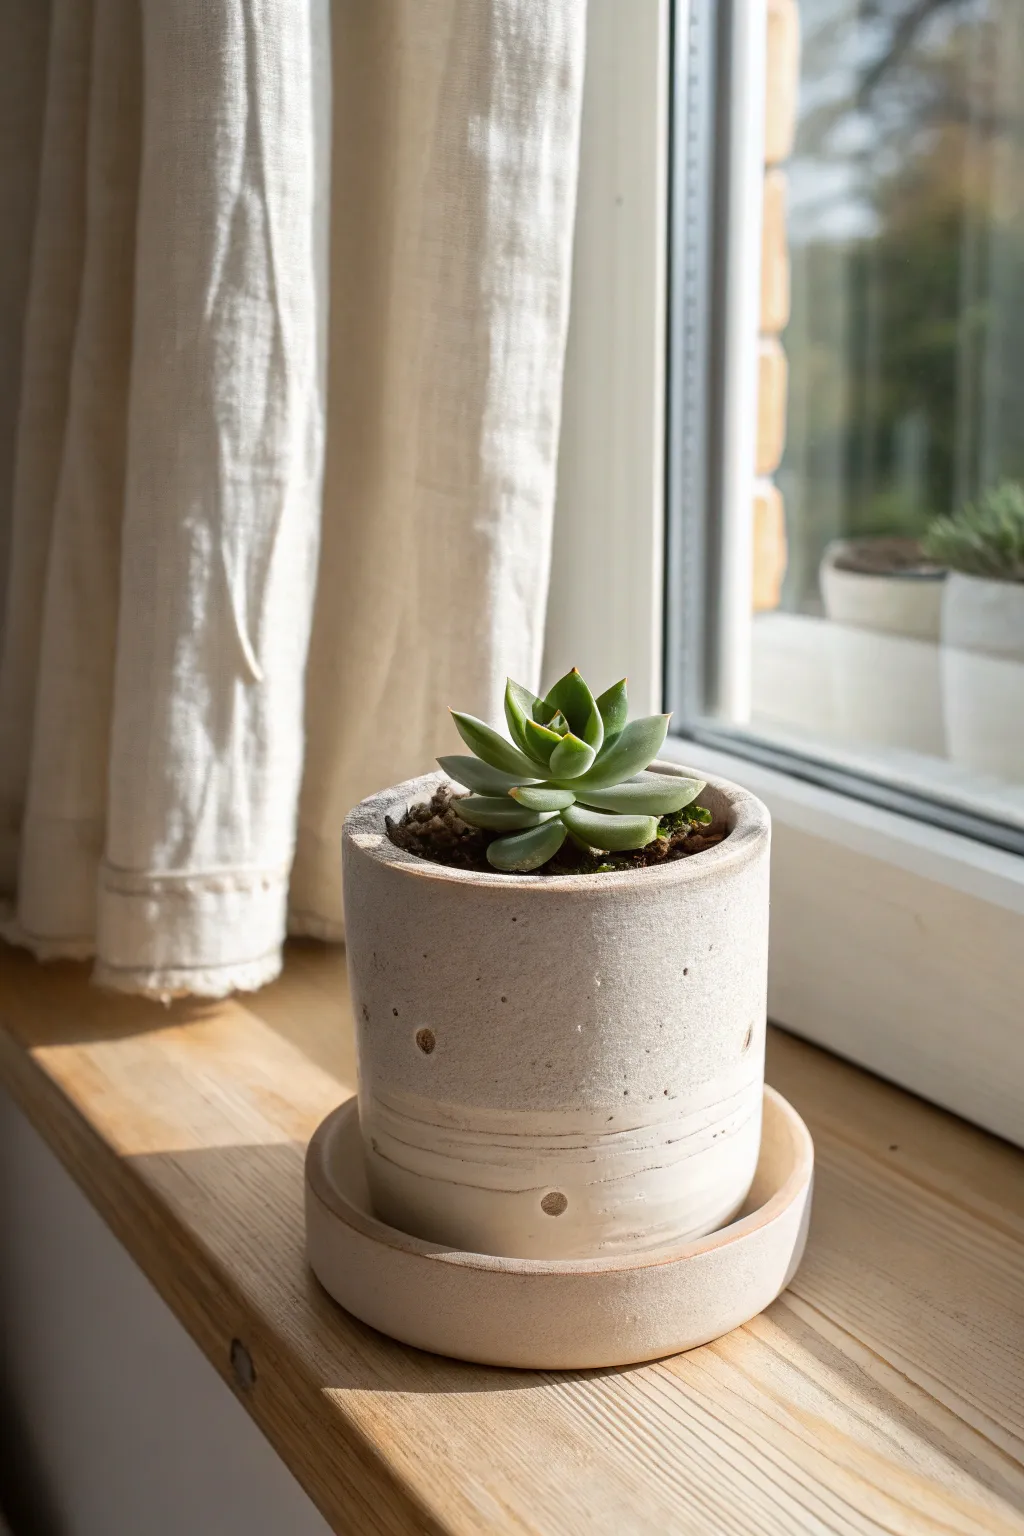
This charming, compact planter features a rustic, hand-built aesthetic with a textured white glaze and subtle horizontal grooves. Its modest size makes it perfect for a single succulent, while the matching saucer ensures your windowsill stays tidy.
Step-by-Step Tutorial
Materials
- Light-colored stoneware clay (approx. 1 lb)
- Potter’s wheel (optional, can be hand-built)
- Fettling knife
- Loop tool for trimming
- Needle tool
- Wooden modeling tool
- Sponge
- Satin matte white glaze
- Kiln
- Small drill bit or hole cutter
Step 1: Forming the Body
-
Throwing the cylinder:
Center a small ball of clay on the wheel and open it up. Pull the walls straight up to form a simple cylinder about 3 inches tall and 3 inches wide. Aim for straight vertical lines rather than curved sides. -
Trimming the rim:
Uses a shammy or a damp sponge to compress the rim gently, keeping it slightly thick and rounded for a soft look. -
Adding texture:
While the wheel is spinning slowly (or while rotating your hand-built pot), use a wooden tool or the dull side of a needle tool to press lightly into the clay near the base. Create 2-3 intentional, slightly uneven horizontal grooves. -
Creating the saucer:
Throw a shallow plate or saucer component separately. It needs to be slightly wider than your cylinder’s base. Keep the walls low, just enough to catch stray water drips. -
Setting up to dry:
Wire both pieces off the wheel and set them aside until they reach leather-hard consistency.
Step 2: Refining and Detail
-
Trimming the base:
Once leather hard, center the pot upside down on the wheel. Use a loop tool to trim the excess weight from the bottom and define a flat foot. -
Adding drainage:
Flip the pot right-side up. Using a hole cutter or drill bit, create a central drainage hole in the bottom of the pot. -
Adding decorative pitting:
To mimic the rustic texture in the photo, use a small, blunt tool to press a few random divots or ‘pockmarks’ into the clay surface. I prefer to keep these sparse to maintain the minimalist feel. -
Trimming the saucer:
Trim the saucer’s underside similarly to the pot, ensuring it sits perfectly flat so it doesn’t wobble on a windowsill. -
Bisque firing:
Let both pieces dry completely (bone dry) before loading them into the kiln for a bisque fire (usually Cone 04 or 06).
Rustic Texture Tip
Add a pinch of sand or grog to your smooth clay body before throwing. When you wipe back the glaze later, the gritty texture will pop through for an earthier feel.
Step 3: Glazing and Finishing
-
Waxing the feet:
Apply wax resist to the bottom of the pot and the saucer to prevent glaze from sticking to the kiln shelf. -
Choosing the glaze:
Select a satin matte white or creamy off-white glaze. The goal is an opaque finish that still allows the texture of the grooves and divots to show through. -
Did-glazing method:
Dip the pot into the bucket using glazing tongs. Hold it under for 3-4 seconds to get a nice, even coat. -
Leave a raw edge:
For the specific look in the photo, wipe away a small band of glaze near the very bottom rim of the pot with a damp sponge, revealing the raw clay body underneath. -
Glazing the saucer:
Dip the saucer as well. Ensure the glaze isn’t too thick inside the saucer, or your pot might sit unevenly. -
Glaze firing:
Load the pieces into the kiln again for the final glaze firing according to your clay and glaze specifications (e.g., Cone 5/6). -
Final assembly:
Once cool, place the pot into the saucer. Add soil and a small Echeveria to complete the look.
Uneven Drying?
If your saucer warps while drying, place a small weight (like a sandbag) in the center as it dries. This keeps the flat bottom specifically flat and prevents wobbling.
Now you have a serene little home for your favorite succulent that brings a touch of handcrafted warmth to any sunny corner


What Really Happens Inside the Kiln
Learn how time and temperature work together inside the kiln to transform clay into durable ceramic.
Classic Pen Cup
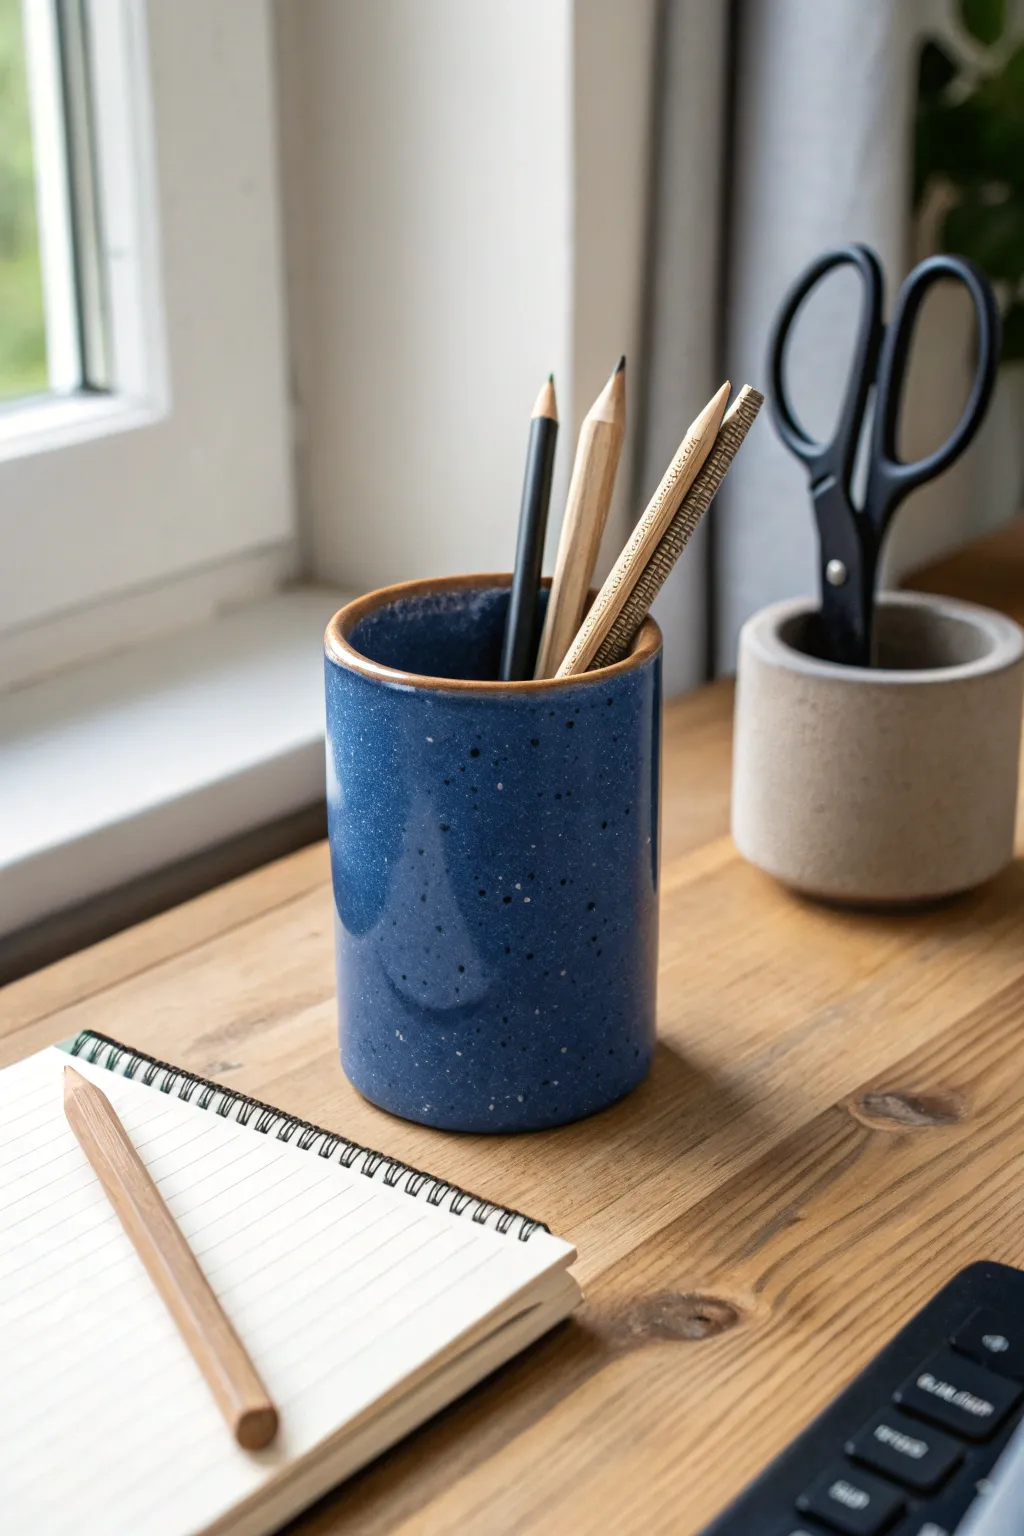
This classic, cylindrical pen holder features a deep, starry-night blue glaze with charming speckles, contrasted by a raw, unglazed rim. It’s a functional piece of art that brings a touch of handcrafted warmth to any workspace.
Detailed Instructions
Materials
- Stoneware clay (buff or speckled)
- Rolling pin
- Canvas working surface
- Fettling knife or needle tool
- Straight edge or ruler
- Slip and scoring tool (or fork)
- Small sponge
- Wax resist
- Deep blue speckled glaze (or plain blue glaze)
- Kiln access
Step 1: Forming the Cylinder
-
Roll the Slab:
Begin by flattening a lump of stoneware clay onto your canvas surface. Use a rolling pin to create an even slab that is roughly 1/4 inch thick throughout. -
Measure and Cut:
Using a ruler and your needle tool, cut out a rectangle that measures approximately 4 inches high and 10 inches long. This will form the body of your cup. -
Cut the Base:
From the remaining clay slab, use a round cookie cutter or trace a circle about 3.5 inches in diameter and cut it out. This will be the floor of your cup. -
Bevel the Edges:
Take your fettling knife and cut a 45-degree angle on the two shorter ends of your rectangular slab. This helps create a seamless join when you roll it. -
Score and Slip:
Rough up the beveled edges with your scoring tool and apply a liberal amount of slip (clay mixed with water) to act as glue. -
Roll and Attach:
Carefully lift the rectangle and curl it into a cylinder, pressing the scored beveled edges together firmly. Smooth the seam inside and out with your thumb or a rib tool so it disappears. -
Attach the Base:
Score the bottom edge of your cylinder and the outer rim of your circular base. Apply slip, set the cylinder on top of the base, and press down gently to seal. -
Reinforce the Inside:
Roll a very thin coil of clay and place it inside the cup where the wall meets the floor. Smear this coil into the corner to ensure a watertight and strong bond. -
Refine the Rim:
Use a damp sponge to smooth the top rim of the cup. I like to slightly round the edges here to make it comfortable to touch later.
Straight Sides Pro-Tip
If your cylinder tends to warp or slump while wet, let the slab firm up to a ‘leather hard’ state before assembling. Stiffer clay holds vertical shapes much better.
Step 2: Glazing and Finishing
-
Bisque Fire:
Allow your piece to dry slowly and completely under a loose plastic sheet for a few days to prevent warping. Once bone dry, fire it in the kiln to cone 04 (bisque). -
Clean the Bisque:
Wipe down the fired piece with a damp sponge to remove any kiln dust, which can prevent the glaze from adhering properly. -
Wax the Rim:
To achieve the raw rim look shown in the image, carefully paint a line of wax resist along the very top edge of the cup. This prevents glaze from sticking to that specific area. -
Prepare the Glaze:
Mix your deep blue stoneware glaze thoroughly. If your glaze doesn’t have speckles built-in, you can omit them or add specific speckling agents. -
Dip or Brush:
Dip the cup into the bucket of glaze for about 3 seconds, or apply 2-3 even coats with a soft brush if you are hand-painting. Avoid the waxed rim. -
Clean the Bottom:
Before the final firing, wipe the bottom of the cup with a sponge to ensure no glaze is touching the foot, otherwise, it will stick to the kiln shelf. -
Final Fire:
Place the cup in the kiln for the final glaze firing, usually to cone 5 or 6 depending on your specific clay and glaze bodies.
Level Up: Texture
Before rolling the cylinder, press a piece of burlap or lace into the wet slab. The glaze will break beautifully over the texture, adding depth to the blue surface.
Now you have a sturdy and stylish organizer ready to tidy up your desk
Stackable Desk Trays
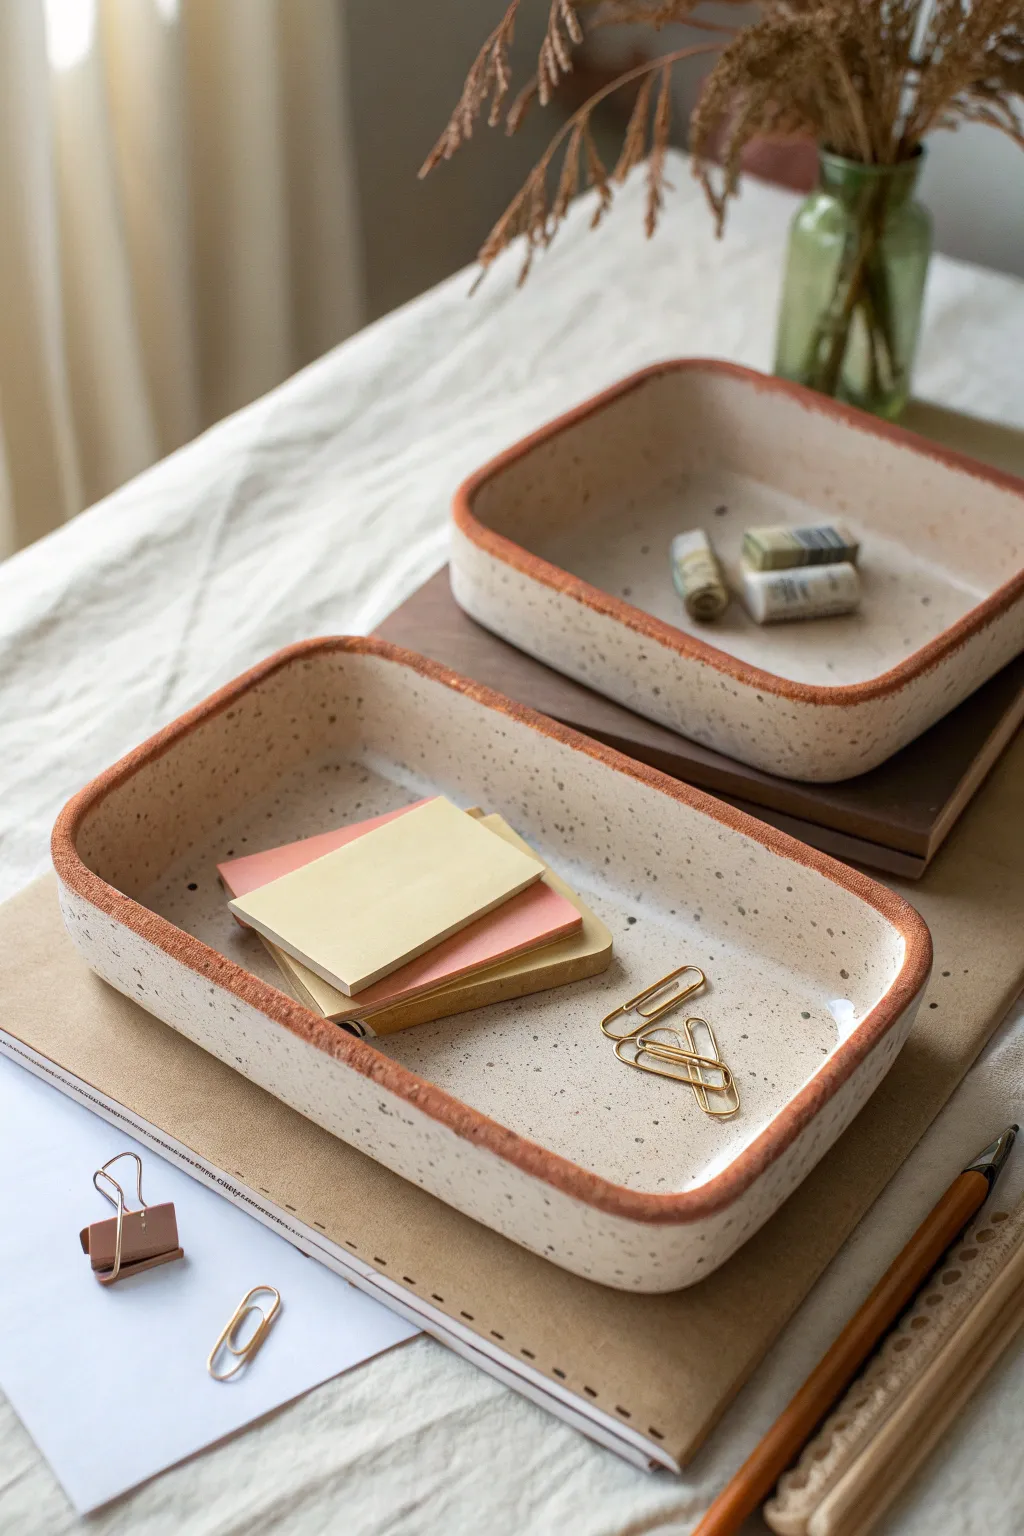
These charming desk organizers combine sleek modern lines quickly formed from slabs with a warm, earthy finish. The exposed terracotta rim frames the milky speckled glaze beautifully, creating a cozy yet functional addition to your workspace.
How-To Guide
Materials
- Red stoneware clay (smooth)
- Speckled matte white glaze
- Rolling pin
- Canvas or slab mat
- Wooden guide strips (1/4 inch thick)
- Fettling knife or needle tool
- Rectangular paper templates (two sizes)
- Scoring tool or serrated rib
- Slip (clay mixed with water)
- Soft rib (rubber or silicone)
- Sponge
- Modeling tool or wooden skewer
- Kiln
Step 1: Preparing the Slabs
-
Wedge the clay:
Begin by thoroughly wedging your red stoneware clay to remove air bubbles and ensure an even consistency. This prevents cracking during the firing process. -
Roll out the slab:
Place the clay on your canvas between two 1/4 inch thick wooden guide strips. Roll the clay out until the rolling pin rests flat on the guides, creating a perfectly even sheet. -
Compress the slab:
Use a soft rubber rib to compress the clay on both sides. Swipe firmly across the surface to align the clay particles, which helps prevent warping later. -
Cut the bases:
Lay your paper templates onto the slab. You’ll need two rectangles for the base of each tray. Trace around them with a fettling knife and remove the excess clay. -
Cut the wall strips:
From the remaining clay, measure and cut long strips for the walls. Aim for a height of about 1.5 inches. Ensure these strips are long enough to wrap around the perimeter of your bases.
Warped Walls?
If walls bow inward while drying, place a block of foam or crumpled newspaper inside the tray to support the shape until it stiffens.
Step 2: Assembling the Form
-
Dry to leather hard:
Let your cut pieces sit until they reach a soft leather-hard state. They should be firm enough to hold their shape when lifted but still flexible enough to bend without cracking. -
Score the edges:
Using a serrated rib or scoring tool, rough up the edges of the base and the bottom edge of your wall strips where they will connect. -
Apply slip:
Dab a generous amount of clay slip onto the scored areas. This acts as the glue for your joinery. -
Attach the walls:
Place the wall strip onto the base. If your strip isn’t long enough to go all the way around, use two pieces. Press firmly to adhere the wall to the base. -
Join the seams:
Where the ends of the wall strip meet, cut them at a 45-degree angle (bevel cut) for a cleaner seam. Score, slip, and press these ends together. -
Reinforce the interior:
Roll a very thin coil of soft clay. Press this into the inside corner where the wall meets the floor. Smear the coil down into the floor and up into the wall with your thumb or a modeling tool to seal the joint. -
Smooth the exterior:
On the outside, use a wooden paddle or a flat tool to gently tap the walls straight and ensure the join is seamless.
Pro Tip
For sharper corners, let the clay firm up more before assembling. Soft clay creates the rounded, organic corners seen here.
Step 3: Refining and Finishing
-
Soften the rim:
Run a damp sponge or a piece of chamois leather over the top rim. I like to round it slightly to make it comfortable to touch and give it that organic look. -
Final drying:
Cover the trays loosely with plastic for a day to equalize moisture, then uncover and let them dry completely to the bone-dry stage. -
Bisque fire:
Fire the pieces in a kiln to cone 04 (or your clay’s specific bisque temperature). -
Wax the rim:
To achieve the look in the image, apply liquid wax resist carefully to the very top edge of the rim. This prevents glaze from sticking there, exposing the raw red clay after firing. -
Apply glaze:
Pour a speckled matte white glaze into the tray, swilling it around to coat the interior, then pour it out. Dip the exterior carefully or brush the glaze on, ensuring you don’t go over the waxed rim. -
Wipe clean:
Use a damp sponge to wipe any stray glaze droplets off the waxed rim and double-check the bottom is clean of glaze so it doesn’t stick to the kiln shelf. -
Glaze fire:
Fire the trays again to the maturity temperature of your clay and glaze combination (typically cone 5 or 6 for stoneware).
Now you have a custom set of organizers ready to tidy up your creative space

TRACK YOUR CERAMIC JOURNEY
Capture glaze tests, firing details, and creative progress—all in one simple printable. Make your projects easier to repeat and improve.
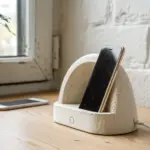
Pocket-Sized Phone Stand
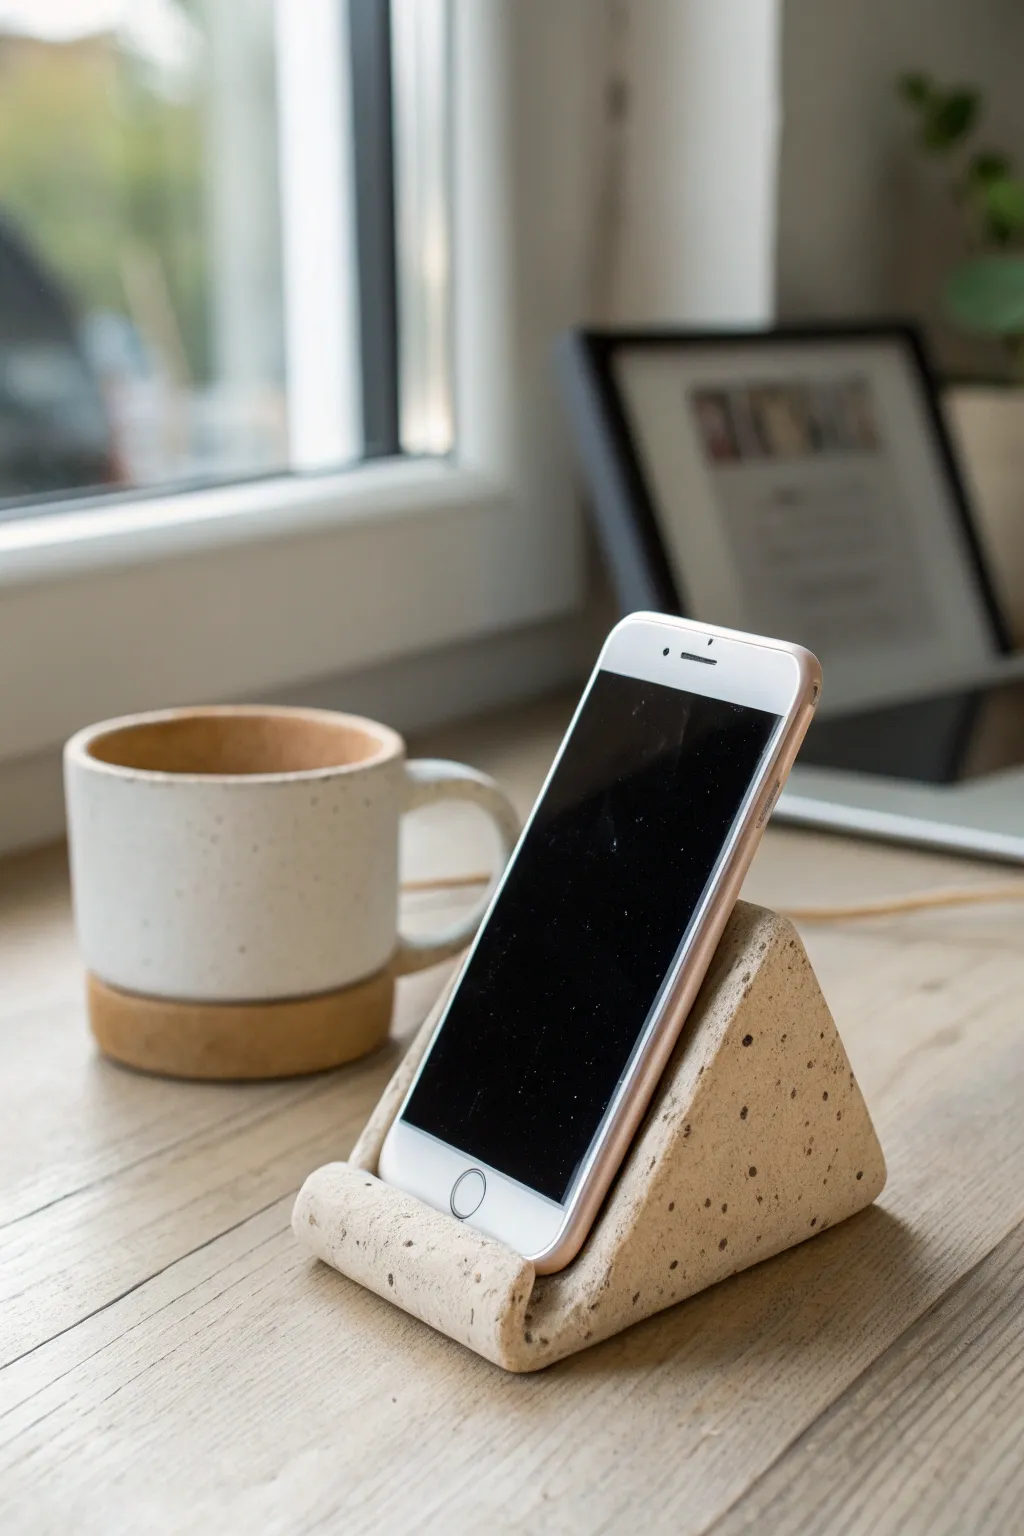
This minimalist phone stand combines functional geometry with a natural aesthetic, featuring a sturdy triangular wedge design with a simple rolled lip to hold your device secure. The speckled clay body gives it a trendy, terrazzo-like finish that looks great on any desk.
Step-by-Step
Materials
- Speckled stoneware clay (or white clay with speckles added)
- Rolling pin
- Fettling knife or clay cutter
- Wooden ruler
- Scoring tool or needle tool
- Slip (liquid clay)
- Sponge
- Smooth wooden rib
- Canvas work surface
Step 1: Forming the Wedge Base
-
Roll the slab:
Begin by rolling out a slab of speckled clay on your canvas to an even thickness of about 1/4 inch. Ensure the slab is large enough to cut out a long rectangle. -
Measure the main strip:
Using your ruler, measure and cut a rectangular strip approximately 3 inches wide and 9 inches long. This singular strip will form the hypotenuse (the slanted face) and the bottom of the stand. -
Create the triangle sides:
From the remaining slab, cut two identical right-angled triangles. These should be roughly 3 inches tall by 3 inches wide to create a sturdy 45-degree angle for the phone. -
Let it stiffen:
Allow your clay pieces to sit out for about 20-30 minutes until they reach a soft leather-hard stage. I find this makes assembling the geometric shape much easier without sagging.
Uneven Wobble?
If the stand rocks after easier assembly, gently tap the bottom against your table while the clay is still leather-hard to level the base.
Step 2: Assembly and Shaping
-
Score the edges:
Score the long edges of your rectangular strip and the corresponding edges of your triangle pieces where they will join. -
Apply slip:
Dab a generous amount of slip onto the scored areas to act as glue. -
Construct the frame:
Stand the two triangles up parallel to each other, spacing them slightly narrower than the width of your long strip. -
Drape the slab:
Lay the rectangular strip over the hypotenuse of the triangles. Gently press the strip onto the triangle edges to seal the seams. -
Form the base:
Continue wrapping the strip around the bottom of the triangles, sealing those seams as well. You should now have a hollow wedge shape. -
Trim excess:
If your rectangular strip extends past the back of the vertical triangle edge, trim it flush with a fettling knife.
Custom Groove
Add a small hole or notch in the back panel before drying so you can thread a charging cable through for a tidy desk setup.
Step 3: The Rolled Lip & Finish
-
Create the lip:
At the bottom front of the slope, you should have excess length from your main strip. Gently curl this upward to create a ‘J’ hook or lip that will catch the phone. -
Reinforce the curve:
Place a small coil of clay underneath the curl if it feels weak, blending it in to support the weight of a phone. -
Smooth the seams:
Use a smooth wooden rib to compress and vanish the seams where the side triangles meet the main strip. The goal is for it to look like one solid block. -
Soften edges:
Run a damp sponge over all sharp corners and edges to soften them, mimicking the organic feel of the reference image. -
Final texture check:
If you lost any speckles during smoothing, gently sponge the surface to reveal the texture again. -
Slow drying:
Cover the piece loosely with plastic to let it dry slowly, preventing the seams from cracking apart. -
Bisque fire:
Once bone dry, fire the piece in a kiln to bisque temperature (usually Cone 04). -
Glaze and final fire:
Apply a clear or transparent matte glaze to let the natural speckles shine through, then fire to the clay’s maturity temperature (e.g., Cone 5 or 6).
Once fired, you will have a stylish, minimalist perch perfect for video calls or checking notifications.
Modern Photo Holder
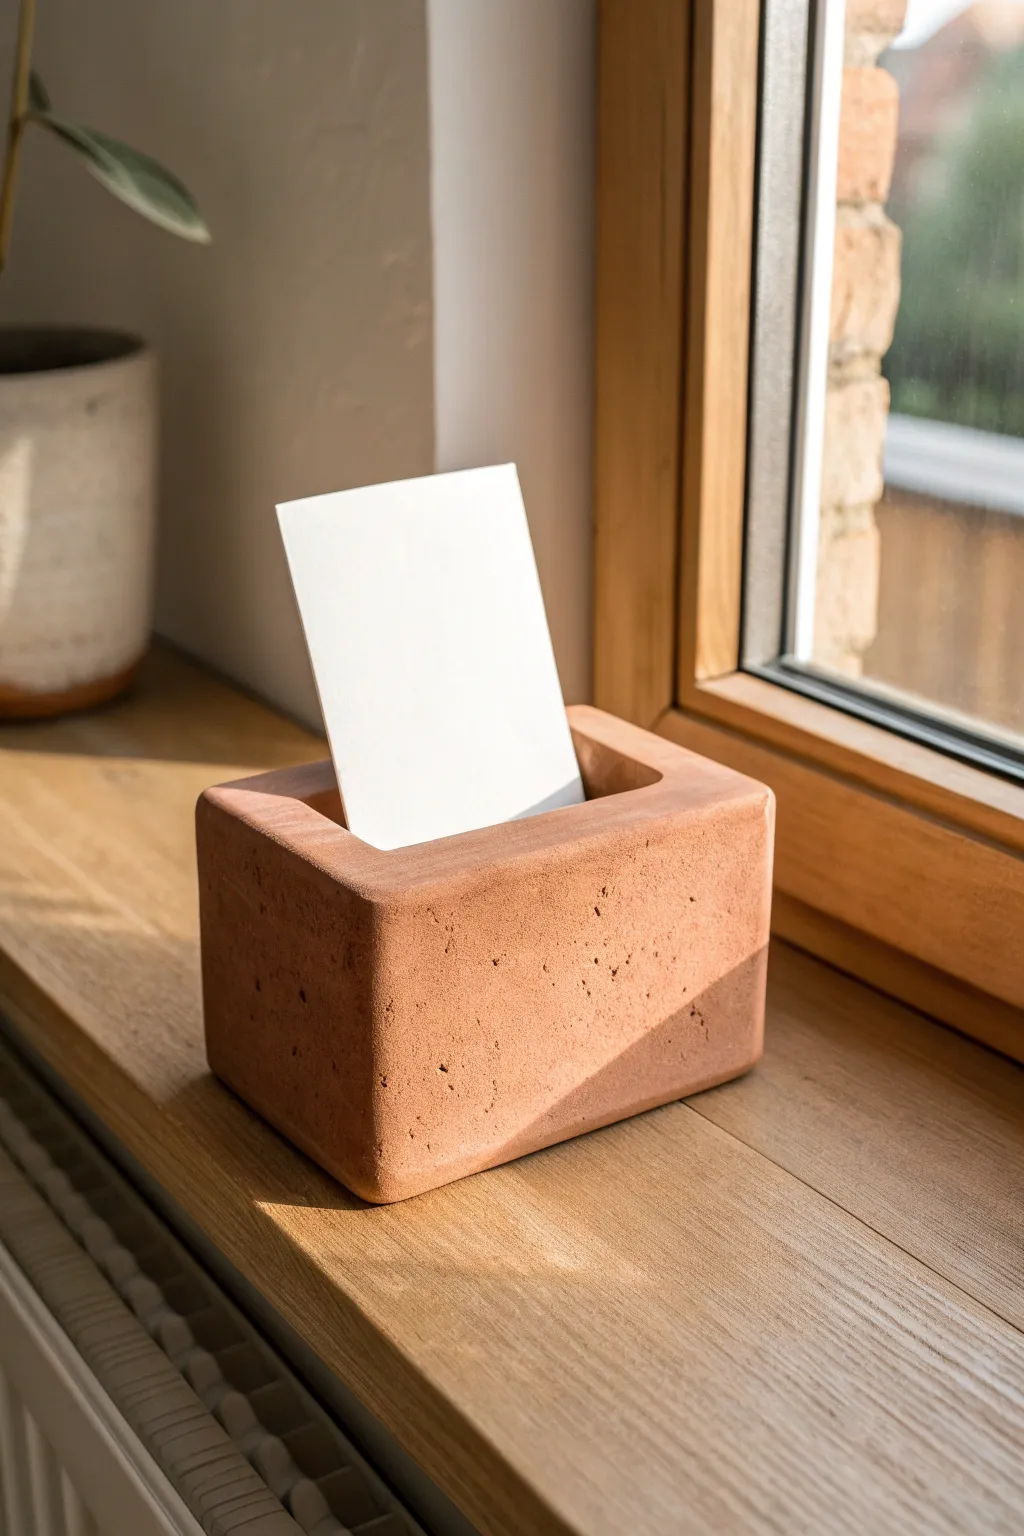
This project transforms simple clay into a sleek, weighty photo stand that combines industrial texture with a warm, earthy tone. The clean rectangular form allows your favorite snapshot or postcard to take center stage without distraction.
Step-by-Step Guide
Materials
- Air-dry clay (terracotta color)
- Rectangular mold (silicone loaf mold or a recycled plastic container)
- Cardboard or foam core sheet
- Cooking spray or petroleum jelly (release agent)
- Ruler
- Craft knife
- Fine-grit sandpaper (220 grit)
- Rolling pin
- Sponge
Step 1: Preparation and Molding
-
Prepare the insert:
Cut a piece of cardboard or foam core that is the same width as your intended photo slot and slightly deeper than you want the slot to be. This will create the negative space for the photo. -
Wrap the insert:
Cover your cardboard piece completely in plastic wrap or tape to prevent the clay from sticking to it and ruining the slot’s interior. -
Condition the clay:
Knead a large block of terracotta air-dry clay until it is warm and pliable. This helps ensure a uniform texture and reduces the chance of internal air pockets. -
Prepare the mold:
Lightly coat the inside of your rectangular container with cooking spray or a thin layer of petroleum jelly to ensure the block releases easily later. -
Fill the base:
Press the clay firmly into the bottom of the mold, creating a layer regarding half the total height. Push particularly hard into the corners to get sharp edges. -
Position the slot:
Place your wrapped cardboard insert into the center of the mold, standing upright. Ensure it is perfectly straight, as a crooked slot will ruin the functionality. -
Fill remaining space:
Pack more clay around the insert until the mold is filled to the top. I like to press down periodically with my thumbs to ensure the layers bond together solidly.
Step 2: Refining and Drying
-
Level the surface:
Use a straight edge or a damp knife to slice off any excess clay from the top of the mold, creating a perfectly flat top surface. -
Initial smoothing:
Run a slightly damp finger along the top edges to soften them just a tiny bit, preventing them from being dangerously sharp once dry. -
Partial drying:
Let the clay sit in the mold for about 24 hours until it has stiffened enough to hold its shape but isn’t fully cured. -
Remove from mold:
Gently flex the sides of the mold and turn the block out. Carefully pull the cardboard insert out of the center slot while the clay is still leather-hard. -
Create texture:
To achieve the pitted, concrete-like look in the photo, gently tap the sides with a stiff-bristled brush or press coarse sandpaper into the surface randomly. -
Full cure:
Place the block on a wire rack to dry completely. This is crucial for thick blocks; allow 3-5 days, turning it occasionally for even airflow.
Crack Control
Thick clay blocks crack easily if dried too fast. Cover loosely with a plastic bag for the first 2 days to slow moisture loss.
Step 3: Finishing Touches
-
Inspect sharpness:
Check the corners and the top of the slot. If any jagged bits remain, gently sand them away. -
Final sanding:
Use fine-grit sandpaper to smooth out any fingerprints or unwanted bumps, but be careful not to remove the intentional texture you added earlier. -
Dust removal:
Wipe the entire block with a barely damp sponge to remove sanding dust and bring out the rich terracotta color. -
Seal (Optional):
If you want to protect the surface, apply a matte varnish. For the raw look shown in the image, you can skip this step entirely.
Two-Tone Design
Tape off the bottom third and paint it white or gold for a dipped effect, or splatter dark paint for a terrazzo look.
Slide your favorite photo into the slot and enjoy your sturdy, handmade display piece
Neat Business Card Holder
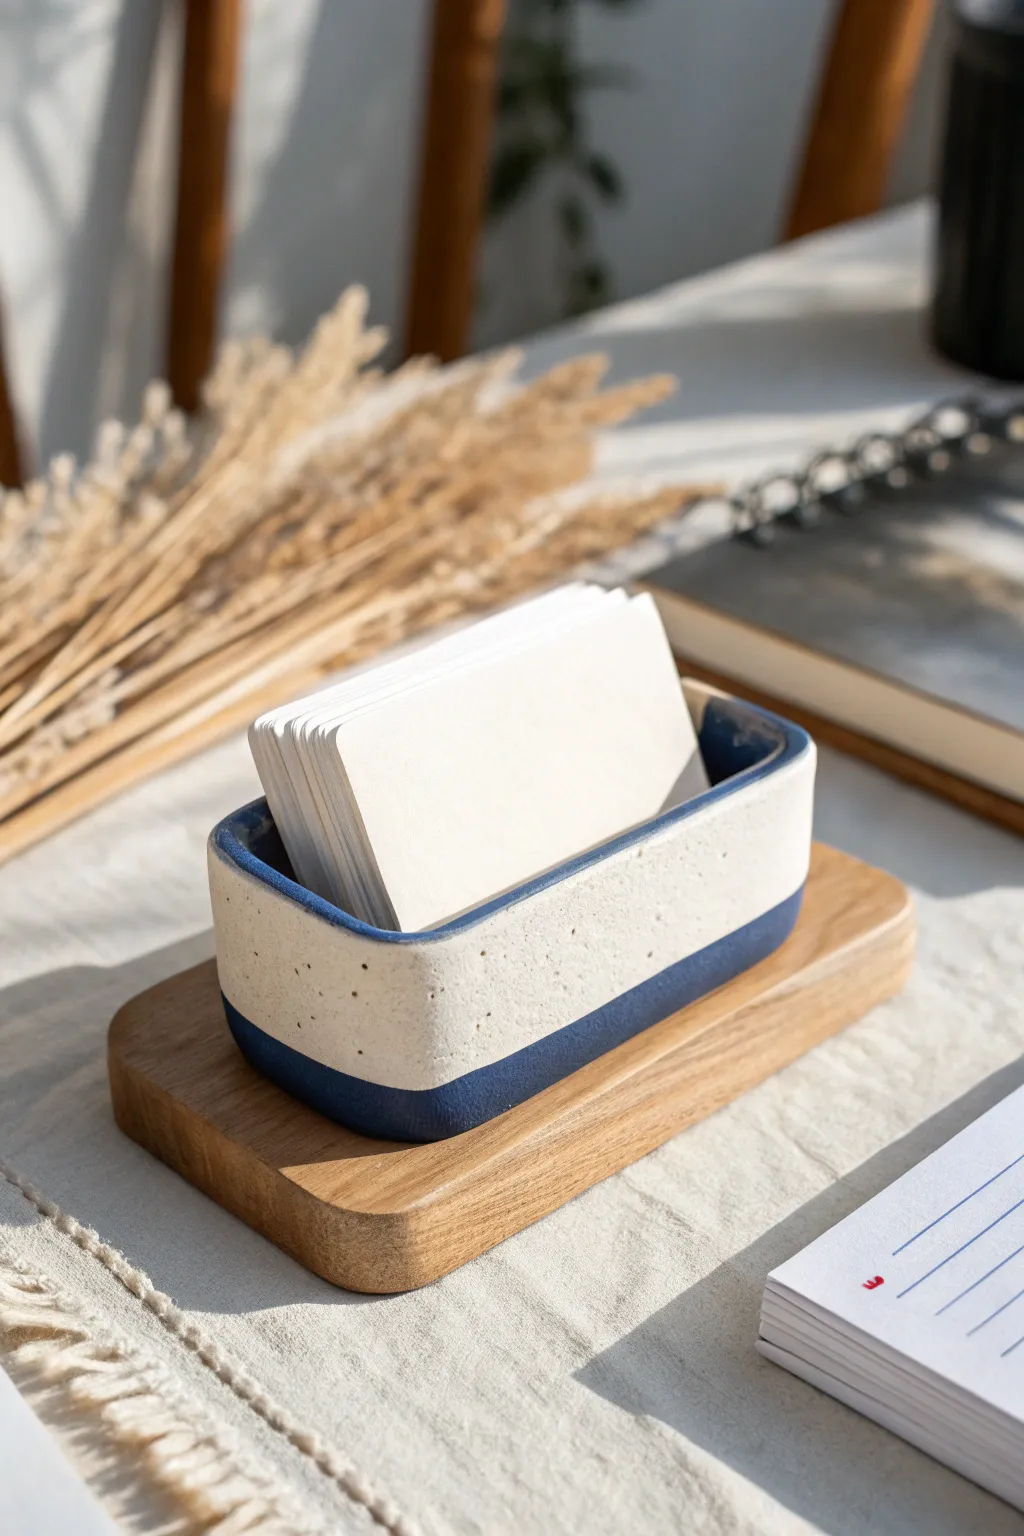
Elevate your desktop organization with this minimalist card holder, blending rustic speckled clay with a sleek modern design. The deep indigo base contrasts beautifully with the creamy white top, creating a professional yet handmade look perfect for displaying business cards.
How-To Guide
Materials
- White stoneware clay with speckles (or plain white clay + sand)
- Cobalt blue underglaze (or dark navy)
- Clear matte glaze
- Rolling pin
- Two wooden guide strips (approx. 5mm thickness)
- Clay knife or fettling knife
- Ruler
- Scoring tool (or serrated rib)
- Slip (clay and water mixture)
- Small sponge
- Sanding block (optional, for post-bisque)
Step 1: Preparation & Slab Building
-
Prepare the slab:
Begin by wedging your speckled clay to remove air bubbles. Place it between your two wooden guide strips on a canvas surface and roll it out into an even slab about 5mm thick. -
Measure and cut:
Using a ruler and your knife, cut out a rectangular base (approx. 4 inches by 1.5 inches). Next, cut two long strips for the sides (same length as your base) and two shorter strips for the ends. -
Refine the edges:
Run a slightly damp finger along the cut edges of your slabs to smooth any sharpness before assembly. This leads to a cleaner join later. -
Score the connection points:
Take your scoring tool and roughen the outer perimeter of your base slab. Do the same to the bottom edge and side edges of your wall pieces.
Warping Walls?
If walls bow inward while drying, place a block of soft foam inside the box to support the shape until it’s leather-hard.
Step 2: Assembly
-
Apply slip:
Dab a generous amount of slip onto all the scored areas. It should be gooey but not dripping wet. -
Attach the long walls:
Press the long side walls firmly onto the base. Use a small wooden tool or your finger to smudge the clay from the wall down onto the base on the inside to seal the seam. -
Add the end pieces:
Slot the shorter end pieces into place. Ensure they fit snugly against the side walls. If there is a gap, you may need to trim them slightly or add a tiny coil of clay. -
Reinforce the corners:
Roll very thin coils of clay and press them into the inside corners and bottom seams. Smooth these out completely so they disappear, strengthening the structure. -
Round the corners:
Once the box is assembled, gently press the outside corners with your thumb to create a soft, rounded radius rather than a sharp 90-degree angle. This matches the organic feel of the reference image.
Step 3: Finishing & Glazing
-
Smooth the lip:
With a damp sponge, carefully even out the top rim. I find that compressing this rim slightly with a wooden rib helps prevent warping during drying. -
Slow drying:
Loosely cover the piece with plastic and let it dry slowly to the leather-hard stage, then uncover to let it become bone dry before bisque firing. -
Bisque fire:
Fire the piece in a kiln to cone 04 (or your clay’s specific bisque temperature). -
Apply masking tape:
Once cooled, stick a line of masking tape or painters tape horizontally around the exterior, about 1/3 of the way up from the bottom. Press the edge down firmly to stop glaze bleeding. -
Glaze the bottom:
Apply three even coats of cobalt blue underglaze to the bottom section (below your tape line) and the entire underside base. -
Remove tape and clear glaze:
Peel off the tape immediately. Once the underglaze is dry, dip the entire piece into a clear matte glaze, or brush it on carefully. This will showcase the raw speckles on the top half. -
Final wipe:
Use a sponge to wipe any glaze off the very bottom of the piece where it will sit on the kiln shelf. -
Glaze fire:
Fire the kiln again to the maturity temperature of your clay (likely Cone 5 or 6 for stoneware).
Custom Base
Don’t stop at the clay! Sand and stain a small rectangular piece of oak or walnut to create a matching wooden tray for the holder to sit on.
Place your finished holder on a wooden plinth and fill it with your cards for an instant desk upgrade
Easy Earring Organizer

Show off your favorite hoops and studs with this sleek, architectural jewelry display. Mimicking the look of natural stone, this project combines simple geometric shapes to create a functional piece of modern decor.
Step-by-Step
Materials
- Polymer clay (white or beige with speckles/granite effect)
- Clay roller or rolling pin
- Sharp craft knife or tissue blade
- Ruler
- Drinking straw or small piping tip (for cutting holes)
- Liquid polymer clay (bakeable adhesive)
- Baking sheet with parchment paper
- Fine-grit sandpaper (optional)
- Two long wooden dowels (optional, for even rolling thickness)
Step 1: Preparing the Slabs
-
Condition the Clay:
Begin by warming up your polymer clay in your hands until it is pliable and smooth. If you’re mixing colors to achieve that speckled stone look, do so now until the marbling is consistent. -
Roll the Base Sheet:
Roll out a slab of clay approximately 1/4 inch thick. I find using wooden dowels on either side of the roller helps keep the thickness perfectly even across the whole sheet. -
Cut the Base Rectangle:
Using your ruler and sharp blade, cut a clean rectangle for the base. A size of roughly 3 inches by 4 inches works well for stability, but adjust based on your needs. -
Roll the Vertical Slab:
Roll out a second slab of clay, aiming for slightly thinner than the base—about 3/16 inch thick is ideal to keep it lightweight. -
Cut the Vertical Rectangle:
Cut a second rectangle that is slightly narrower than your base but taller. Try dimensions around 2.5 inches wide by 5 inches tall. -
Smooth the Edges:
Gently run your finger along all cut edges of both rectangles to soften any sharpness and erase fingerprints.
Clean Cuts Tip
Chill your rolled clay sheet in the fridge for 10 minutes before cutting. The firm clay resists dragging, giving you super sharp, architectural edges.
Step 2: Adding Details & Assembly
-
Mark Hole Placements:
Lay the vertical slab flat. Use the tip of your knife to lightly mark a grid where you want your earring holes to be. Spacing them about 1 inch apart usually provides enough clearance for hoop earrings. -
Punch the Holes:
Using a drinking straw or a small metal piping tip, press firmly straight down into the marked spots to remove small circles of clay. -
Make the Support Wedge:
With your leftover clay scraps, form a thick triangular prism. This wedge will sit behind the vertical slab to hold it upright. -
Initial Baking (Optional):
For easier assembly, you can bake the flat pieces separately according to package directions first. However, assembling raw clay ensures a stronger bond without glue. -
Score the Surfaces:
If assembling raw: lightly scratch the texture (score) onto the bottom edge of the vertical slab and the center of the base where they will meet. -
Apply Liquid Clay:
Apply a thin line of liquid polymer clay to the scored areas. This acts as a strong bonding agent during baking. -
Position the Vertical Slab:
Press the vertical slab firmly onto the base. It might wobble, so support it immediately with the triangular wedge you made earlier, placing the wedge behind the wall. -
Blend the Seams:
Use a modeling tool or your finger to smooth the clay where the wedge meets the back of the wall and the base, blending them so they become one seamless unit. -
Check Alignment:
Double-check that the vertical wall is leaning back slightly or standing perfectly straight, depending on your preference, before the clay sets.
Step 3: Finishing
-
Final Inspecton:
Do a final once-over to smooth any accidental nail marks or fingerprints before the piece goes into the oven. -
Bake the Stand:
Place the assembled structure on a parchment-lined baking sheet. Bake according to the specific temperature and time on your clay package (usually 275°F for 15-30 minutes). -
Cool Down:
Allow the piece to cool completely in the oven with the door cracked open. This prevents thermal shock which could cause cracking. -
Sand for Perfection:
Once fully cool, use fine-grit sandpaper under running water to gently smooth any rough edges on the base or the earring holes.
Wall Keeping Flopping?
If the vertical wall won’t stay up while raw, bake the flat pieces separately first, then glue them together using superglue or heavy-duty epoxy.
Place this on your vanity to keep your daily jewelry rotation organized and beautifully displayed
Entryway Key Catchall
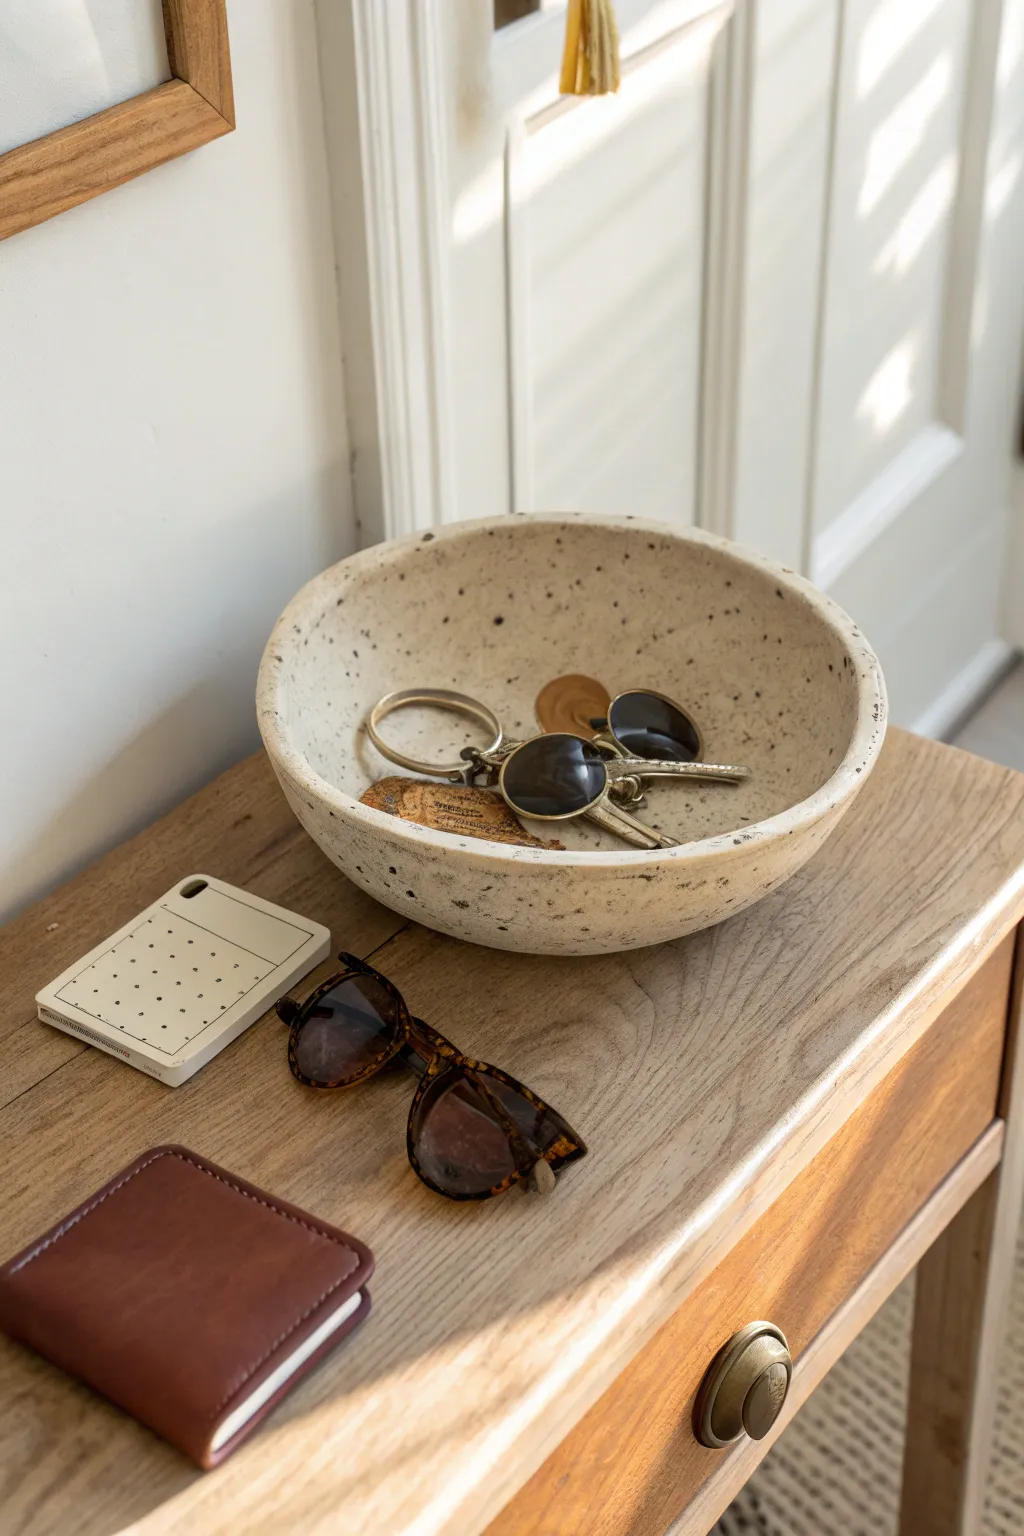
Keep your entryway organized with this rustic, organic catchall bowl that mimics the look of natural speckled stone. Its wide, open shape is perfect for tossing in keys and sunglasses, while the textured finish adds a touch of earthy elegance to any table.
How-To Guide
Materials
- White stoneware clay or air-dry clay
- Rolling pin
- Canvas mat or cloth
- Large serving bowl (to use as a slump mold)
- Potter’s needle tool or knife
- Rubber rib tool or flexible scraper
- Sponge
- Water
- Dried coffee grounds or crushed peppercorns (for texture)
- Clear matte glaze or varnish
- Soft paintbrush
Step 1: Preparing the Clay
-
Wedge the Clay:
Begin by wedging your clay thoroughly to remove air bubbles. This is crucial for structural integrity and ensures a smooth working surface later on. -
Incorporate Texture:
To achieve the speckled ‘stone’ look seen in the photo, flatten your clay slightly and sprinkle a generous amount of dried coffee grounds or crushed peppercorns over it. Fold the clay over itself and wedge again until the speckles are evenly distributed throughout the ball. -
Roll Out a Slab:
Place your wedged clay on the canvas mat. Using your rolling pin, roll the clay out into a large, even slab. Aim for a thickness of about 1/4 inch (6mm) to ensure the bowl isn’t too heavy but remains sturdy.
Natural Texture
Don’t over-clean the surface. Leaving slight finger depressions or natural unevenness adds to the handmade, organic aesthetic.
Step 2: Shaping the Bowl
-
Cut the Circle:
Find a circular template—a dinner plate works nicely—that is slightly larger than your slump mold. Place it on the clay slab and trace around it with your needle tool or knife to cut out a perfect circle. -
Prepare the Mold:
Cover the inside of your large serving bowl with a thin layer of plastic wrap or a piece of cloth. This prevents the clay from sticking to the mold as it dries. -
Slump the Clay:
Gently lift your clay circle and lay it into the prepared bowl mold. Use your fingers to press the clay softly against the bottom and sides, ensuring it takes the shape of the bowl. -
Smooth the Rim:
The rim in the image has a soft, organic feel rather than a sharp cut edge. Use a damp sponge to run along the rim of the clay, rounding off the sharp angles created by the knife cut. -
Refine the Surface:
Take your rubber rib tool and gently compress the inside of the bowl. This smoothes out fingerprints and strengthens the clay particles, which helps prevent cracking.
Step 3: Drying and Finishing
-
Initial Drying:
Allow the clay to dry inside the mold until it is ‘leather hard’—firm enough to hold its shape but still slightly cool to the touch. This usually takes overnight. -
Remove from Mold:
carefully lift the clay bowl out of the mold. Peel away the plastic wrap or cloth. Place the bowl upside down on a flat board to let the bottom dry evenly. -
Sponge Finish:
Once removed, inspect the exterior. If there are marks from the mold, use a slightly damp sponge to smooth them away, maintaining that matte, stone-like texture. -
Reveal the Speckles:
If the surface looks too milky or the clay has covered your added texture, gently wipe the surface with a damp sponge. This washes away a microscopic layer of clay and exposes the coffee grounds or peppercorns for that high-contrast speckled look. -
Complete Drying:
Let the bowl dry completely. If using kiln-fire clay, it must be bone dry before the first firing. For air-dry clay, wait 24-48 hours until it is fully hardened and room temperature. -
Firing (Ceramic Only):
If you are using stoneware, bisque fire the piece in a kiln according to the clay manufacturer’s cone rating. -
Glazing or Sealing:
For the finished look, apply a clear matte glaze (for ceramics) or a matte varnish (for air-dry clay). A matte finish is key here; a glossy finish would ruin the natural stone illusion. -
Final Cure:
If glazing, fire the piece a second time. If varnishing, allow the sealer to cure fully in a well-ventilated area before placing it on your entryway table.
Cracking Up?
If the rim cracks while drying, it’s drying unevenly. Loosely drape a thin plastic sheet over the rim to slow down the evaporation process.
Place your new textured bowl on a console table to catch your keys in simple style
Ridged Soap Dish
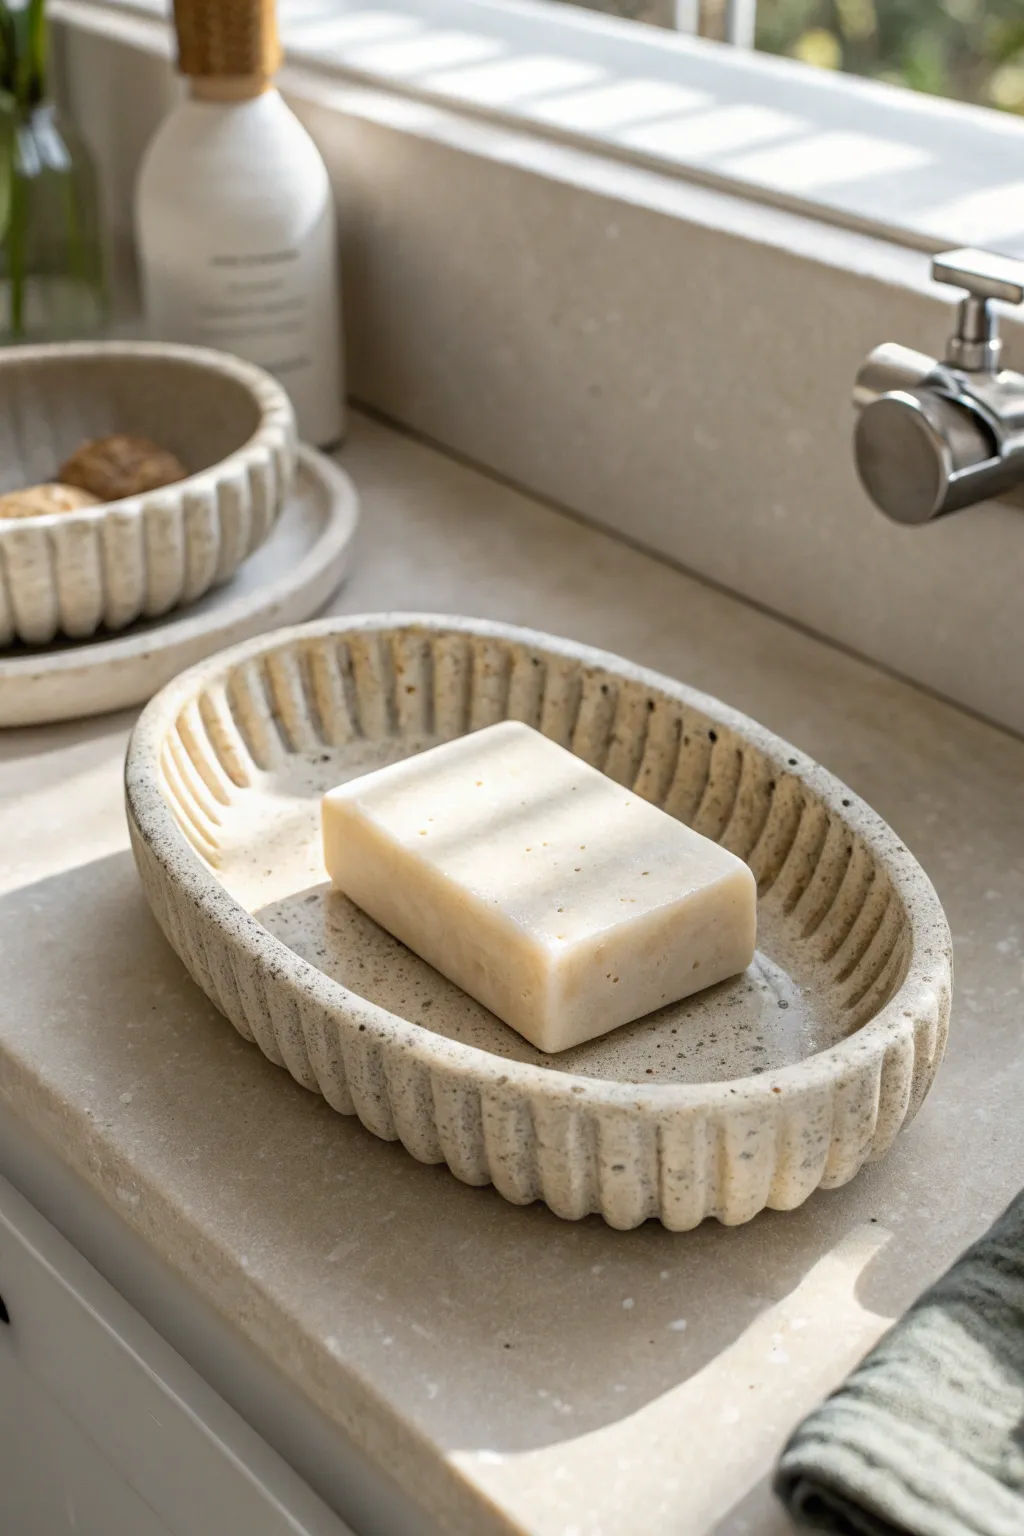
This elegant soap dish combines organic textures with vertical ribbing for a modern, functional piece. Its gentle oval shape and subtle speckled finish make it a perfect addition to any bathroom countertop.
Step-by-Step
Materials
- Speckled tan stoneware clay (approx. 1 lb)
- Oval paper template (approx. 5″ x 3.5″)
- Rolling pin
- Canvas board or cloth
- Fettling knife or needle tool
- Rib tool (metal or rubber)
- Modeling tool with a rounded edge (or chopstick)
- Sponge
- Slip
- Clear matte glaze
Step 1: Forming the Base
-
Roll the slab:
Begin by wedging your clay to remove air bubbles, then roll it out on your canvas into an even slab about 1/4 inch thick. Keep the thickness consistent to ensure even drying later. -
Smooth the surface:
Before cutting anything, take your rubber rib tool and gently compress the clay surface on both sides. This removes the canvas texture and aligns the clay particles. -
Cut the oval base:
Place your oval paper template onto the slab. Using your needle tool or fettling knife, trace around the template to cut out the base of your dish. -
Prepare the rim strip:
From the remaining slab, cut a long rectangular strip that is roughly 1.5 inches tall and slightly longer than the circumference of your oval base.
Smooth Seams
When pressing ridges into the clay, place a finger on the inside wall directly opposite your tool. This supports the wall so it doesn’t collapse.
Step 2: Building the Walls
-
Score the edges:
Take a serrated rib or needle tool and aggressively score the outer edge of your oval base and one long edge of your rectangular strip. -
Apply slip:
Brush a generous amount of slip onto the scored areas. I find it helpful to wait just a moment for the slip to become tacky before joining. -
Attach the wall:
Place the strip onto the base, wrapping it carefully around the oval shape. Press firmly where the scored edges meet to create a preliminary bond. -
Join the seam:
Where the two ends of the wall meet, cut through both layers at a diagonal angle. Remove the excess clay, score and slip the new edges, and press them together to close the loop.
Make it Your Own
Poke small drainage holes in the center of the base before firing to prevent soapy water from pooling, keeping your soap bar drier and lasting longer.
Step 3: Creating the Ribbed Texture
-
Blend the interior coil:
To reinforce the connection between the wall and base, roll a very thin coil of clay. Press it into the interior bottom seam and smooth it out completely with your finger or a tool. -
Mark the spacing:
Using a ruler, lightly mark even intervals (about 1/2 inch apart) around the top rim of the wall. This will guide your vertical ridges. -
Carve the outer ridges:
Using a rounded modeling tool or the back of a paintbrush, press firmly into the exterior wall at your marked points. Drag the tool from the rim down to the base to create deep vertical grooves. -
Refine the rim:
Allow the tool to press slightly over the top lip, creating a scalloped edge effect that mimics the exterior texture on the inside rim as well. -
Soften the edges:
Once the texture is established, use a slightly damp sponge to gently run over the sharp edges created by the carving. You don’t want to erase the texture, just make it smooth to the touch.
Step 4: Finishing
-
Smooth the bottom:
Flip the dish over carefully. Smooth out the connection point where the wall meets the base, and stamp your makers mark if you have one. -
Slow drying:
Cover the dish loosely with plastic. Because the walls vary in thickness due to the ridges, slow drying is crucial to prevent warping. -
Bisque fire:
Once fully dry (bone dry), fire the piece to Cone 04 (or your clay body’s specifications) for the bisque firing. -
Glazing:
Dip or brush the piece with a clear matte glaze. The clear glaze will allow the natural speckles of the clay body to shine through as the primary decorative element. -
Final firing:
Fire the piece to maturity (likely Cone 5 or 6 for stoneware). Ensure the bottom is wiped clean of glaze before loading the kiln.
Place your favorite artisan soap on the dish and enjoy the simple, handmade charm it brings to your space
Kitchen Spoon Rest
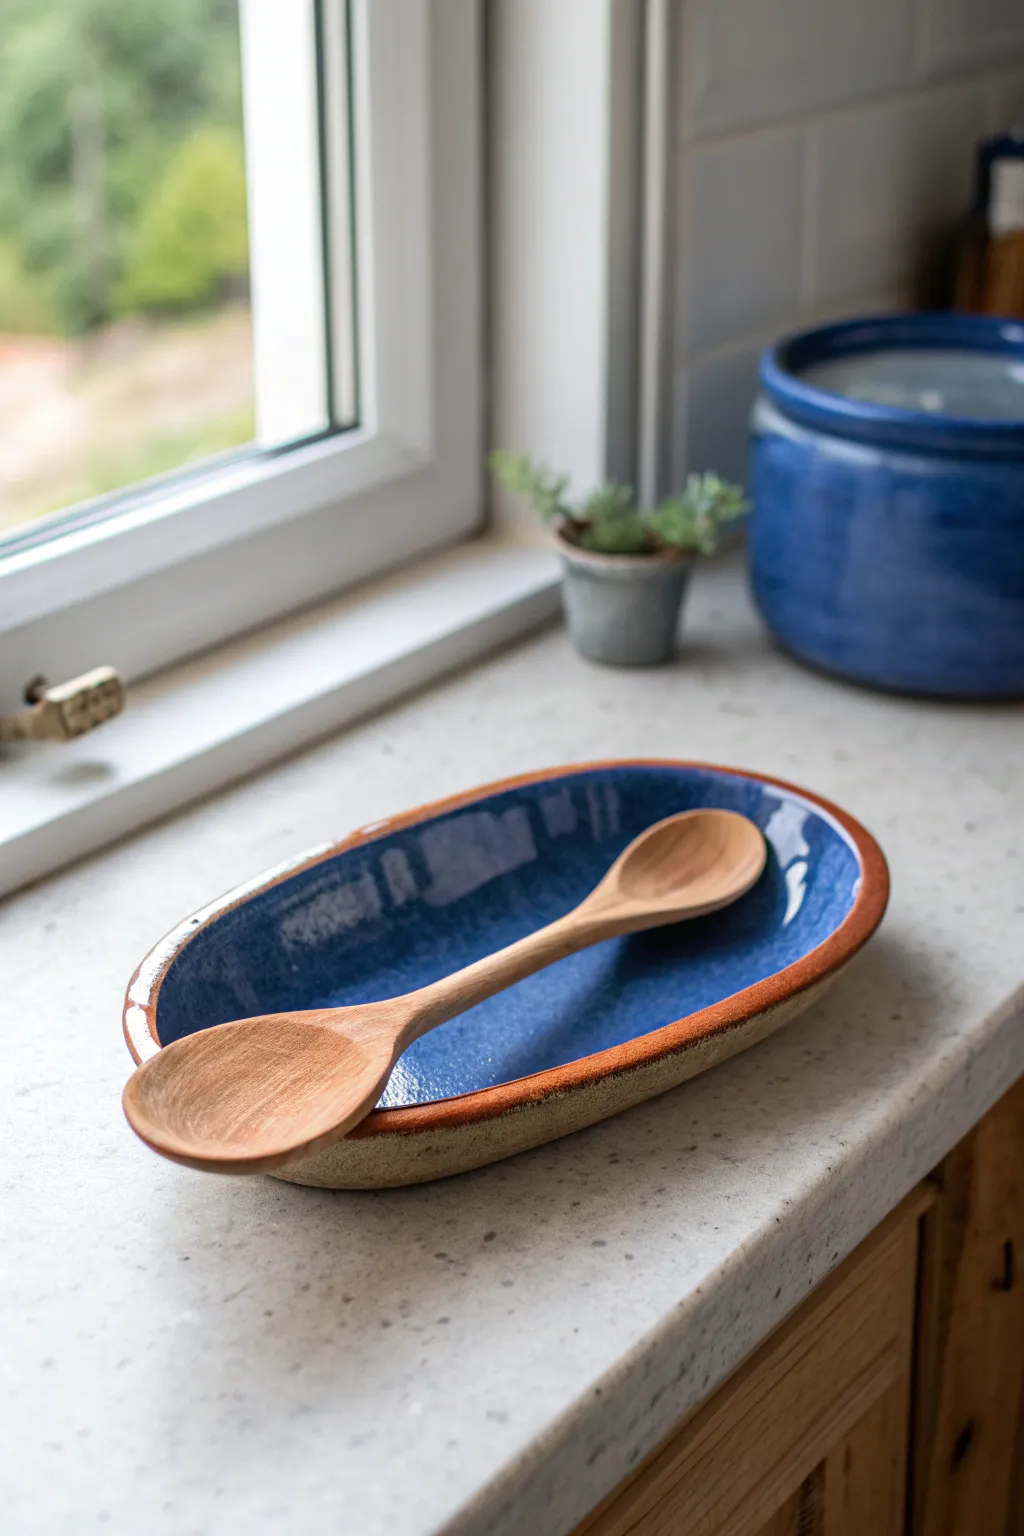
Bring a touch of farmhouse charm to your kitchen counter with this elegant yet sturdy spoon rest. Featuring a deep, glossy cobalt blue interior contrasted against a textured, raw clay exterior, this piece is as functional as it is beautiful.
Detailed Instructions
Materials
- Stoneware clay (speckled or buff)
- Rolling pin
- Canvas work surface or clay mat
- Oval template (paper or craft foam, approx. 8-10 inches long)
- Fettling knife or needle tool
- Rib tool (kidney shaped, wood or rubber)
- Sponge
- Coil of clay (for building up the wall)
- Scoring tool or serrated rib
- Slip (clay and water mixture)
- Cobalt blue glossy glaze
- Wax resist (optional)
- Small paintbrush
Step 1: Forming the Base
-
Prepare your slab:
Begin by wedging your stoneware clay thoroughly to remove air bubbles. Roll it out on your canvas surface into an even slab, approximately 1/4 inch thick. Keep the pressure consistent to ensure the base is flat and won’t warp during firing. -
Cut the oval shape:
Place your paper or foam oval template onto the slab. Using your fettling knife or needle tool, trace around the template to cut out the base shape. -
Smooth the edges:
Using a slightly damp sponge, run it gently along the cut edge of the oval base to soften the sharpness. This prevents chipping later and gives a more professional finish.
Rim Definition Pro-Tip
For that warm brown rim effect, wipe a thin layer of iron oxide wash on the very top edge of the rim before glazing. The blue glaze will break over it beautifully.
Step 2: Building the Wall
-
Roll a coil:
Roll out a separate piece of clay into a long, even coil, roughly the thickness of your pinky finger. This will become the raised rim of your spoon rest. -
Score and slip:
Score the outer perimeter of your oval base using a serrated rib or needle tool. Do the same to one side of your clay coil. Apply a generous amount of slip to the scored area on the base. -
Attach the coil:
Place the coil onto the slipped edge of the base. Press it down firmly but gently to ensure a good bond without squishing the shape completely flat. -
Blend the seams:
Using your thumb or a wooden modeling tool, blend the inside seam where the coil meets the base until the line disappears. Smooth the clay downwards to integrate the two pieces. -
Refine the exterior:
Repeat the blending process on the outside seam. I like to leave a little bit of texture here rather than making it perfectly smooth, as it adds to that rustic, earthy character shown in the photo. -
Shape the rim:
Pinch the wall gently to shape it upwards and slightly outwards. Aim for a height of about 3/4 of an inch—tall enough to contain drips but low enough to maintain a sleek profile.
Step 3: Surface Treatment & Firing
-
Texture the outside:
Before the clay dries, use a slightly rough sponge or a stiff brush to dab against the exterior wall. This creates the gritty, stone-like texture that contrasts so well with the smooth interior. -
Dry slowly:
Loosely cover your piece with plastic and let it dry slowly over a few days to reach the bone-dry stage. This helps prevent the flat base from warping or curling up. -
Bisque fire:
Fire the spoon rest in a kiln to cone 04 (or according to your clay body’s bisque instructions) to turn it into durable ceramic.
Level Up: Double Dip
Make a matching set! Create a smaller circular version for teaspoons or a larger platter version for ladles to create a complete kitchen collection.
Step 4: Glazing
-
Wax the exterior:
Apply wax resist to the bottom and the exterior walls of the bisqued piece. Bring the wax right up to the top edge of the rim, but leave the very top surface of the rim exposed for the glaze to grab. -
Pour the interior:
Pour your cobalt blue glaze into the center of the spoon rest. Pick it up and tilt it carefully so the glaze rolls around and coats the entire interior surface up to the rim. -
Pour out excess:
Quickly pour the excess glaze back into your bucket. Give the piece a little shake to remove final drips and ensure an even interior coat. -
Clean the distinct rim:
Use a damp sponge to wipe away any glaze drips on the outside textured wall. The rim line where the brown clay meets the blue glaze creates that signature separation seen in the photo. -
Glaze fire:
Place the piece back in the kiln for the final glaze firing, typically to cone 5 or 6 for stoneware. This melts the glaze into that deep, liquid-looking blue pool.
Place your finished piece by the stove and enjoy the pop of color every time you cook
Drawer Knobs With Personality
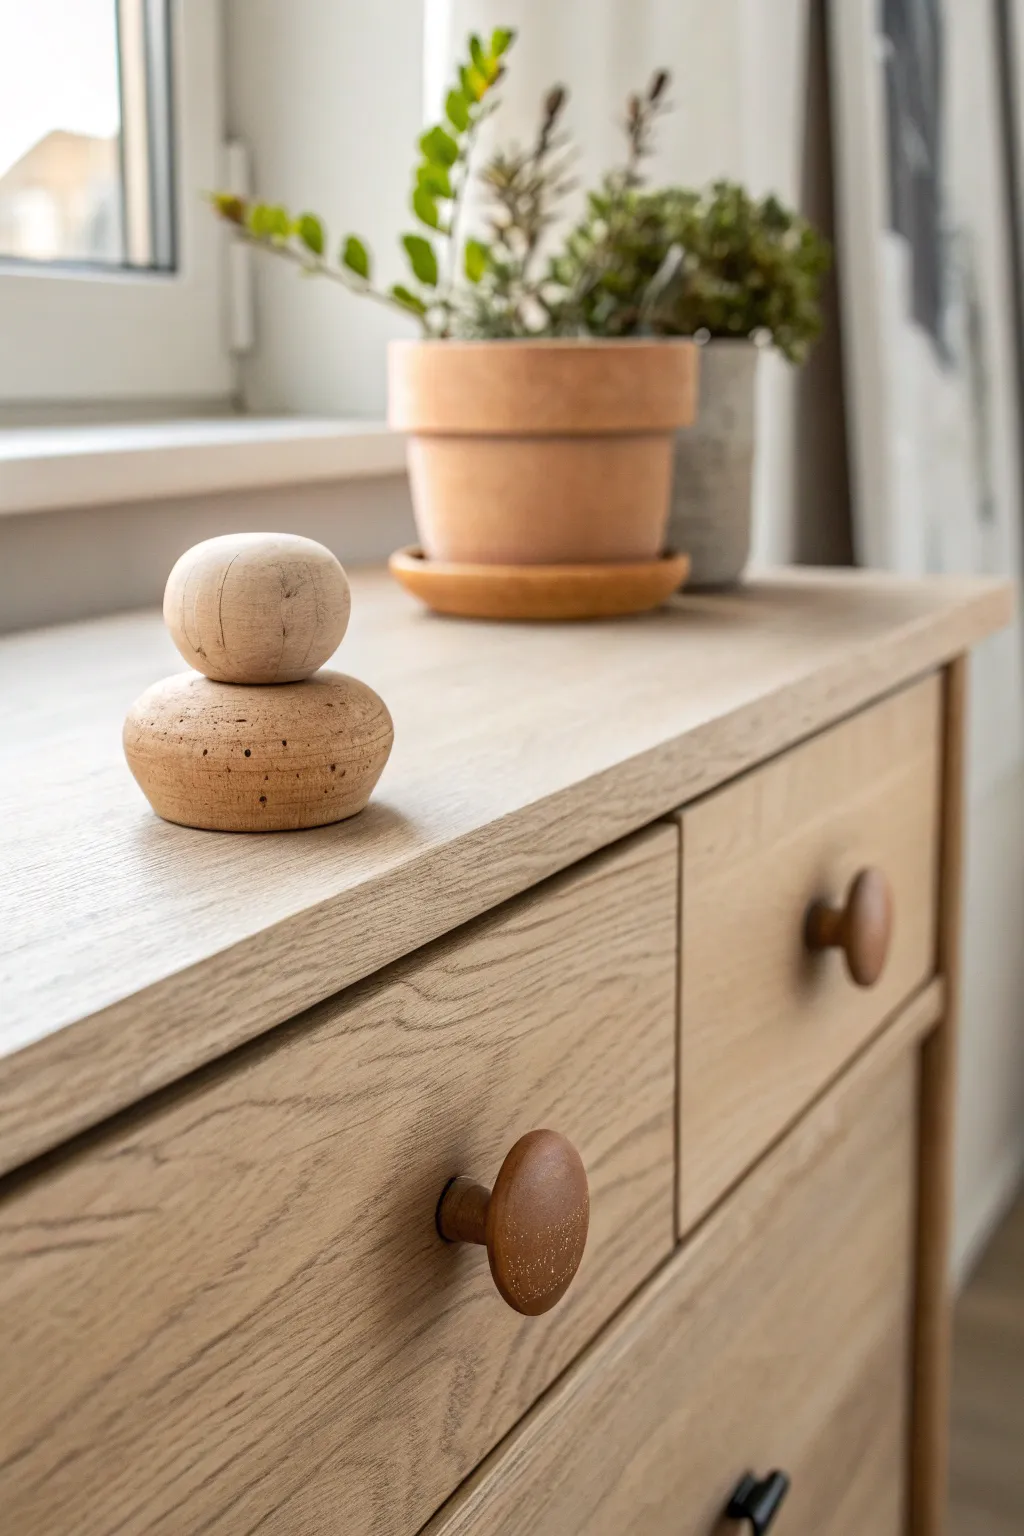
Transform ordinary furniture with these earthy, organic drawer pulls that mimic the look of raw turned wood using polymer clay. The subtle speckled texture and warm brown tones add an understated, handcrafted elegance to any dresser or cabinet.
Step-by-Step Tutorial
Materials
- Polymer clay (light tan/beige)
- Polymer clay (translucent)
- Ground black pepper or dried coffee grounds (fine)
- Acrylic paint (burnt umber)
- Bolts and nuts (sized for your drawer holes, usually M4 or #8-32)
- Super glue (cyanoacrylate)
- Needle tool or toothpick
- Sandpaper (400 and 800 grit)
- Matte spray varnish
- Oven for baking
Step 1: Preparing the Faux-Wood Clay
-
Condition the Base:
Begin by thoroughly conditioning your light tan polymer clay until it is soft and pliable. Warm hands make this process much faster. -
Add Translucency:
Mix in about 20-30% translucent clay. This adds depth to the material so it looks like organic wood grain rather than flat plastic. -
Incorporate Texture:
This is my favorite part: sprinkle a small pinch of ground black pepper or very fine coffee grounds into the clay. Knead it until distributed evenly to mimic wood flecks and pores. -
Portioning:
Divide your clay into equal balls, one for each knob you plan to make. Using a kitchen scale ensures they are exactly the same size.
Bolt Won’t Stick?
If the bolt spins inside the baked clay, remove it, add a drop of heavy-duty epoxy glue into the hole, and re-insert. Let cure for 24 hours before installing.
Step 2: Shaping the Knobs
-
Create the Head:
Roll a portion of clay into a smooth sphere, then gently flatten the front face just slightly to create a comfortable grip surface. -
Form the Neck:
Take a smaller piece of clay—about 1/4 the size of the head—and roll it into a thick cylinder. This will be the spacer between the drawer and the knob head. -
Assembly:
Press the cylinder firmly onto the back of the flattened sphere. Smooth the seam with your finger or a sculpting tool until the two pieces are seamlessly joined. -
Insert Hardware:
Take the head of your bolt and press it deep into the center of the cylinder (neck) side. You want the bolt head embedded, with the threads sticking out straight. -
Secure the Bolt:
Push the clay back around the bolt head to trap it inside. Ensure the bolt is perfectly perpendicular to the knob face so it screws in straight later. -
Refine Shape:
Give the knob a final roll and smooth-over to remove fingerprints. Ensure the profile looks like a mushroom or a classic turned knob.
Step 3: Finishing and Installation
-
Bake:
Place your knobs on a baking sheet, ideally resting on a bed of cornstarch or polyester batting to prevent flat spots. Bake according to your clay package’s specific temperature instructions. -
Cool Down:
Allow the knobs to cool completely in the oven with the door cracked. This prevents thermal shock and cracking. -
Secure Bolt (Optional):
If the bolt feels loose after baking, carefully unscrew it, add a drop of super glue into the hole, and screw it back in tightly. -
Sanding:
Wet sand the surface with 400 grit, then 800 grit sandpaper. This removes any final fingerprints and gives the clay a silky, wood-like feel. -
Simulate Grain:
Dilute a tiny drop of burnt umber acrylic paint with water. Wipe this wash quickly over the knob and immediately wipe it off with a paper towel, leaving pigment only in the microscopic pores. -
Seal:
Spray the knobs with a matte varnish to protect the finish without making them look like shiny plastic. -
Install:
Once fully dry, insert the bolt through your drawer hole and secure tightly with the nut from the inside.
Realistic Grain Trick
Before baking, lightly drag a stiff wire brush or coarse sandpaper in one direction across the clay surface to create convincing deep wood grain groove lines.
Enjoy the custom character these unique handles add to your furniture refresh
Tiny Cord Keeper Clips
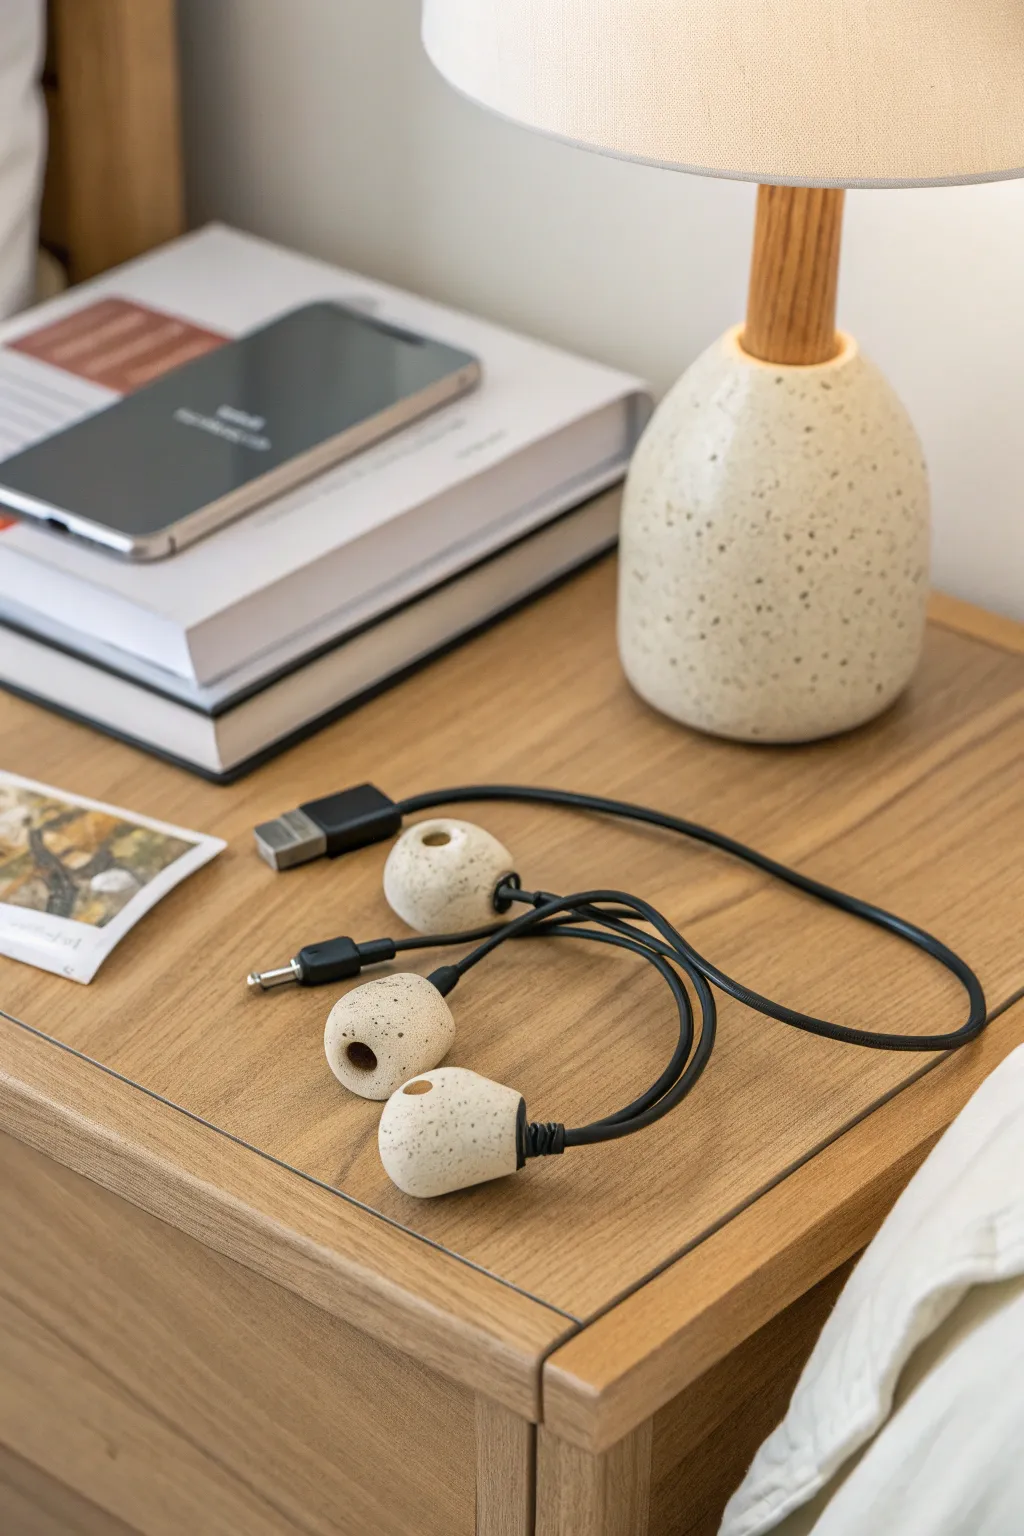
Tame unsightly tangled cords with these minimalist, nature-inspired cable weights. Crafted from speckled clay to mimic river stones, they slide easily onto your charging cables to keep them weighted down on your nightstand or desk.
Step-by-Step
Materials
- White polymer clay with speckled effect (e.g., ‘granite’ or ‘sand’ finish)
- Acrylic rolling pin or clay roller
- Small circle cutter (approx. 1 inch diameter)
- Craft knife or tissue blade
- Drinking straw (standard size)
- Bamboo skewer or toothpick
- Fine-grit sandpaper (400-600 grit)
- Baking sheet
- Parchment paper
- Oven (for curing)
Step 1: Shaping the Stones
-
Condition the Clay:
Begin by warming the speckled polymer clay in your hands. Knead it thoroughly until it is soft, pliable, and free of any air bubbles. -
Divide into Portions:
Break off three equal-sized chunks of clay, each roughly the size of a large grape or a small walnut. -
Roll into Balls:
Roll each chunk between your palms to create smooth spheres. They don’t need to be mathematically perfect; a slight organic irregularity adds to the stone look. -
Form the Cone Shape:
Focus on one side of a sphere and gently roll it back and forth on your work surface with your finger. You want to taper one end slightly to create a soft, rounded cone or teardrop shape, resembling the weights in the photo. -
Flatten the Bottom:
Tap the wider end of your shape gently against the table to create a flat surface. This ensures the keeper sits nicely against the plug head.
Step 2: Creating the Channel
-
Make the Central Hole:
Take your drinking straw and press it into the flat, wide end of the clay shape. Twist gently as you push to core out a hole that goes about halfway deep into the form. -
Remove the Core:
Carefully pull the straw out. If the clay plug stays inside the form, use your skewer to gently hook it out. This creates the cavity where the cable plug will rest. -
Create the Top Exit:
Using a smaller tool, like the narrower end of a chopstick or a large skewer, poke a hole from the top (tapered end) down to meet the larger cavity you just made. -
Connect the Holes:
Ensure there is a clean, continuous passage from the wide bottom to the narrow top. This is the path your main cable wire will travel through. -
Slit the Side:
Using your craft knife, make a single straight cut from the top hole down the side to the bottom opening. This slit allows you to slip the cord in later without threading it. -
Smooth the Edges:
I usually take a moment here to gently rub the cut edges with my finger. You want the slit to be visible but the edges to be soft so they don’t snag your cables.
Slit Too Tight?
If the side slit closes up during baking, carefully run a folded piece of sandpaper through the gap after it’s baked to widen the channel just enough for the cord.
Step 3: Baking and Finishing
-
Prepare for Baking:
Preheat your oven according to the manufacturer’s instructions on your specific package of clay. Line a baking sheet with parchment paper. -
Arrange the Pieces:
Place your clay weights on the baking sheet. Space them out so they aren’t touching. -
Bake the Clay:
Bake the pieces for the recommended time. For pieces of this thickness, allow roughly 20-30 minutes, but check your packaging to be sure. -
Cool Down:
Remove the tray from the oven and let the clay cool completely before handling. The clay hardens fully as it cools. -
Check the Fit:
Once cool, test the slit flexibility. It should be rigid but allow just enough give to pop a cord through. -
Sand for Smoothness:
Take your fine-grit sandpaper and lightly buff the surface of the clay. Focus on the bottom rim and the top hole to remove any fingerprints or sharp edges. -
Final Wash:
Rinse the pieces under cool water to remove any sanding dust and dry them thoroughly with a soft towel.
Pro Tip: Weighted Feel
For a heavier feel that stays put on your table, embed a small metal nut or washer inside the clay body before shaping it, ensuring it doesn’t block the cord path.
Now you have a stylish and functional set of cord keepers to organize your space