If you’ve got a small lump of clay and a few minutes, you’ve got a whole world of tiny projects right in front of you. These easy little clay ideas are my go-tos when you want something cute, quick, and beginner-friendly without needing a ton of tools.
Mini Pinch Pot Trinket Dish

Create a charming, rustic home for your favorite rings with this delicate speckled pinch pot. Its organic shape and hand-painted gold geometric rim give it a warm, artisanal feel that looks straight out of a boutique pottery studio.
Step-by-Step Guide
Materials
- White gloss finish polymer clay (or white air-dry clay)
- Black pepper or dried coffee grounds (for speckles)
- Acrylic rolling pin
- Pointed sculpting tool or toothpick
- Gold metallic acrylic paint or liquid gold leaf
- Fine detail paintbrush
- Fine-grit sandpaper (optional)
- Gloss varnish or glaze (if using air-dry clay)
- Oven (for polymer) or drying space (for air-dry)
Step 1: Shaping the Clay
-
Condition the clay:
Begin by kneading your white clay in your hands until it becomes soft and pliable. If you are using polymer clay, the warmth of your hands is key here. -
Add texture:
To achieve that beautiful ceramic speckled look without a kiln, sprinkle a very small pinch of black pepper or dried coffee grounds onto your conditioned clay. -
Blend the speckles:
Fold the clay over the speckles and knead again until the dark spots are evenly distributed throughout the white ball. -
Form the base ball:
Roll the clay between your palms to create a smooth, seamless sphere about the size of a golf ball or slightly larger. -
Start the pinch:
Hold the sphere in your non-dominant hand. Gently press your thumb into the center of the ball, stopping before you push through the bottom. -
Open the bowl:
Using a pinching motion with your thumb and index finger, slowly rotate the ball while gently squeezing the walls to thin them out. -
Refine the shape:
Aim for an even thickness all around. I usually like to keep the bottom slightly thicker for stability. Don’t worry if the rim is slightly uneven; this adds to the organic charm. -
Smooth the surface:
Use your fingertip, dipped slightly in water (for air dry) or baby oil (for polymer), to smooth out any fingerprints or cracks on the inside and outside.
Uneven Walls?
If your pinch pot walls feel lumpy, gently slap the outside with a flat wooden spatula while rotating it. This paddle technique evens out thickness.
Step 2: Carving & Curing
-
Carve the rim pattern:
With a pointed tool or toothpick, gently scratch a zig-zag line just below the outer rim. Then, carve a straight line beneath the zig-zag to frame it. -
Carve the interior border:
Repeat the previous step on the *inside* of the rim, ensuring the pattern matches or aligns loosely with the exterior design. -
Final smooth:
Run a soft brush or fingertip lightly over the carving to remove any loose clay crumbs without erasing your lines. -
Cure the clay:
For polymer clay, bake according to the package instructions (usually 275°F for 15-30 minutes). For air-dry clay, let it sit in a cool, dry place for 24-48 hours until fully hard. -
Sand edges (optional):
Once fully cured and cooled, you can use fine-grit sandpaper to soften any sharp edges on the rim if desired.
Pro Tip: Liquid Gold
For the most vibrant, realistic metal look, use solvent-based liquid gold leaf instead of standard metallic acrylics. The shine is unmatched.
Step 3: Decoration
-
Prepare the paint:
Shake your liquid gold leaf or metallic acrylic paint well. Pour a tiny drop onto a palette or a scrap piece of paper. -
Paint the exterior pattern:
Using your finest detail brush, carefully fill in the carved zig-zag lines on the outside of the bowl with gold. -
Paint the interior pattern:
Paint the corresponding zig-zag pattern on inside rim. Steady your hand by resting your pinky finger against the table surface. -
Add the rim accent:
Run the side of your brush along the very top edge of the bowl to connect the inside and outside patterns with a thin gold line. -
Seal (Step for Air-Dry only):
If using air-dry clay, apply a coat of gloss varnish over the entire piece to protect it and give it that ceramic shine. Polymer clay is usually durable without sealing, but a glaze adds a nice touch.
Place your new dish on your dresser and enjoy the elegant simplicity it brings to your space


Tiny Ring Holder Cone
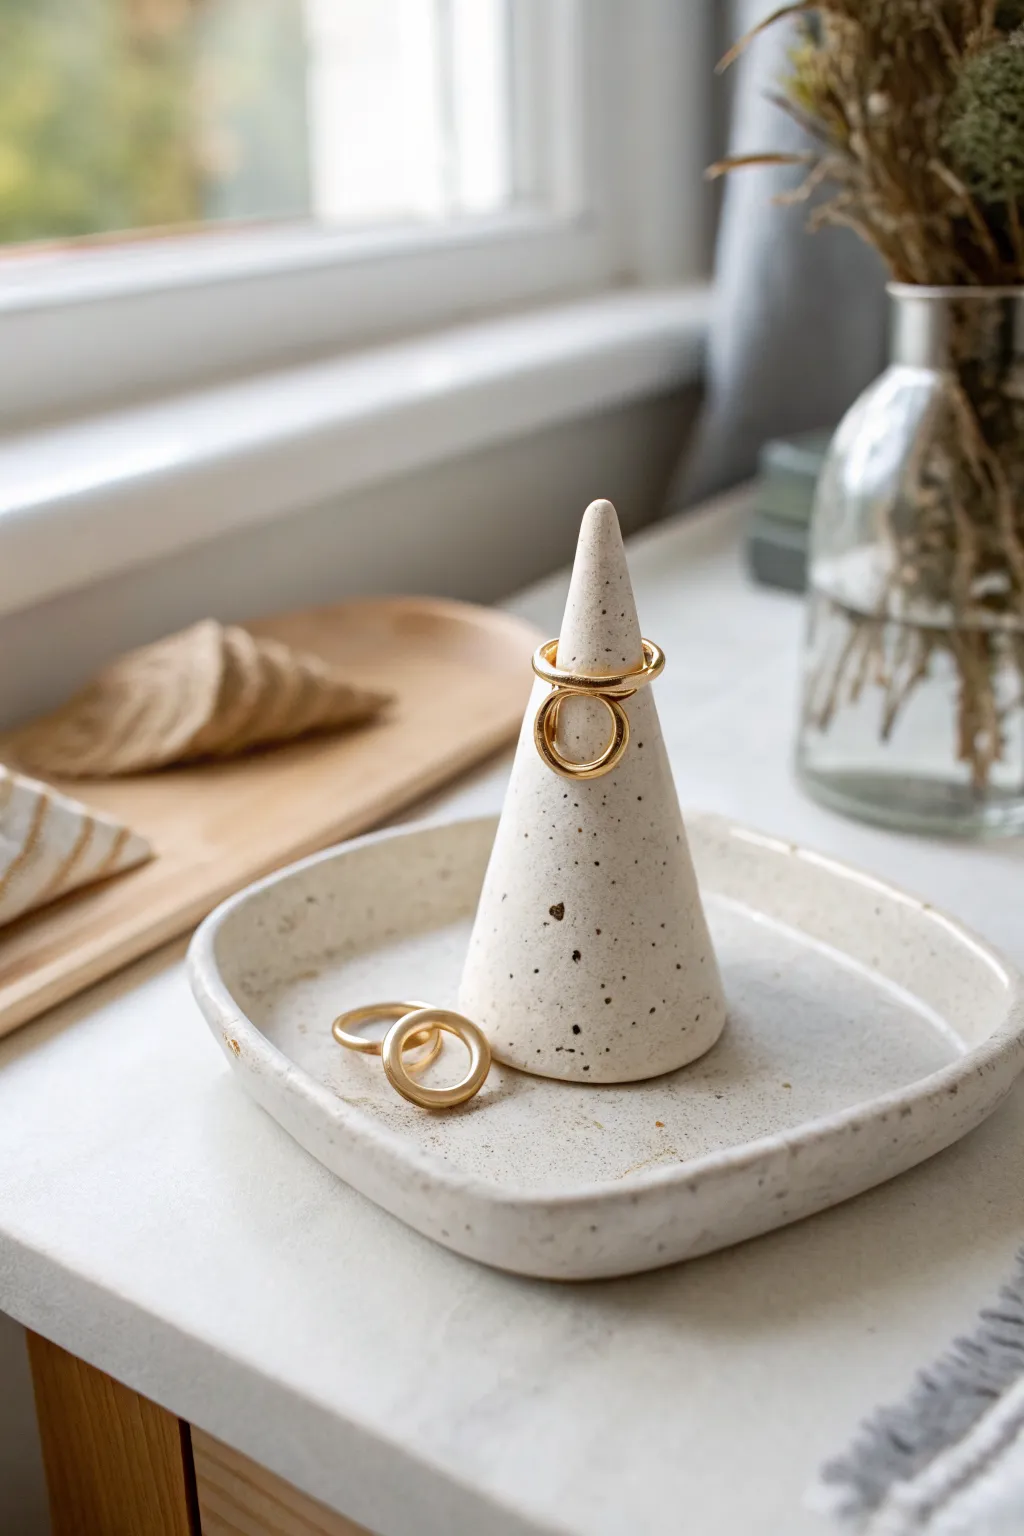
This elegant, minimalist ring holder combines a classic cone shape with a shallow catch-all dish, perfect for keeping your favorite jewelry safe. The faux-stone speckled finish gives it a high-end ceramic look without needing a kiln, making it a stylish addition to any vanity.
Step-by-Step
Materials
- Speckled polymer clay (e.g., Granite or stone effect)
- Acrylic rolling pin
- Clay blade or sharp craft knife
- Small circular cookie cutter (approx. 3-4 inches diameter) or a printed template
- Sandpaper (fine grit, 400-600)
- Oven baking sheet
- Parchment paper
- Smoothing tool or your finger
- Optional: Matte varnish for sealing
Step 1: Preparation & Conditioning
-
Prepare your workspace:
Lay down a clean sheet of parchment paper or work solely on a ceramic tile to prevent the clay from sticking to your table. Ensure your hands are clean to keep the stone effect crisp. -
Condition the clay:
Take a block of your speckled clay and knead it thoroughly in your hands until it becomes soft, pliable, and warm. This prevents cracking later on. -
Divide the clay:
Split your conditioned clay into two portions: a larger piece for the base tray (about 2/3) and a smaller piece for the cone (about 1/3).
Step 2: Forming the Cone
-
Create a ball:
Take the smaller portion of clay and roll it between your palms to form a smooth, crack-free sphere. -
Shape the cone:
Place the ball on your work surface. Using the flat of your palm, roll one side of the ball back and forth while applying pressure to elongate it into a teardrop or cone shape. -
Refine the tip:
Continue rolling, focusing pressure near the top to taper it to a gently rounded point, while keeping the bottom wide and stable. -
Flatten the base:
Pick up the cone and gently tap the wide bottom against your work surface to flatten it completely. It should stand straight without wobbling. I like to smooth the bottom edge with my thumb to ensure it sits flush. -
Check sizing:
Test the cone with one of your rings. Ensure the cone is tall enough (about 2-3 inches) to hold a few rings comfortably without them sliding off the top.
Wobbly Cone?
If the cone leans during baking, insert a toothpick into the center of the cone and push it down into the tray base before baking. It acts as an internal armature for stability.
Step 3: Creating the Tray Base
-
Roll out the slab:
Take the larger portion of clay and use your acrylic roller to flatten it into an even sheet, approximately 1/4 inch thick. -
Cut the shape:
Using a cutter or a knife, cut out a soft square or circle shape. For the look in the image, aim for a rounded square about 4 inches wide. -
Slightly curve the edges:
Gently lift the edges of the slab with your fingers to create a shallow dish shape. You want a subtle lip that will contain loose jewelry. -
Smooth the rim:
Run your finger dipped in a tiny bit of water (if using air dry) or baby oil (if using polymer) along the cut edge to soften any sharp corners.
Speckle Hack
Can’t find granite clay? Mix black pepper or dried used coffee grounds into plain white or beige clay. It creates a convincing faux-stone speckle instantly!
Step 4: Assembly & Baking
-
Join the pieces:
Place the cone in the center of the tray. Press it down firmly. For extra security, you can score the bottom of the cone and the center of the tray with a needle tool before pressing them together. -
Blend the seam (Optional):
If you want a seamless look, use a modeling tool to drag a little clay from the base of the cone onto the tray, smoothing it out so they become one unit. Alternatively, leaving them simply pressed together creates a clean geometric look. -
Final inspection:
Do a final check for fingerprints. Lightly brush them away with a bit of cornstarch or baby oil. -
Bake:
Transfer the piece on parchment paper to a baking sheet. Bake according to your clay package instructions (usually 275°F/130°C for 15-30 minutes per 1/4 inch of thickness). -
Cool down:
Let the piece cool completely in the oven with the door cracked open. This gradual cooling helps prevent thermal shock and cracking.
Step 5: Finishing Touches
-
Sand for smoothness:
Once fully cooled, use fine-grit sandpaper to buff the edges and surface lightly. This removes any final imperfections and gives the clay a professional matte stone feel. -
Seal (Optional):
If desired, apply a thin coat of matte varnish to protect the surface from oils and dust over time.
Now you have a chic, modern organizer ready to display your daily treasures


Easy Polymer Clay Stud Shapes
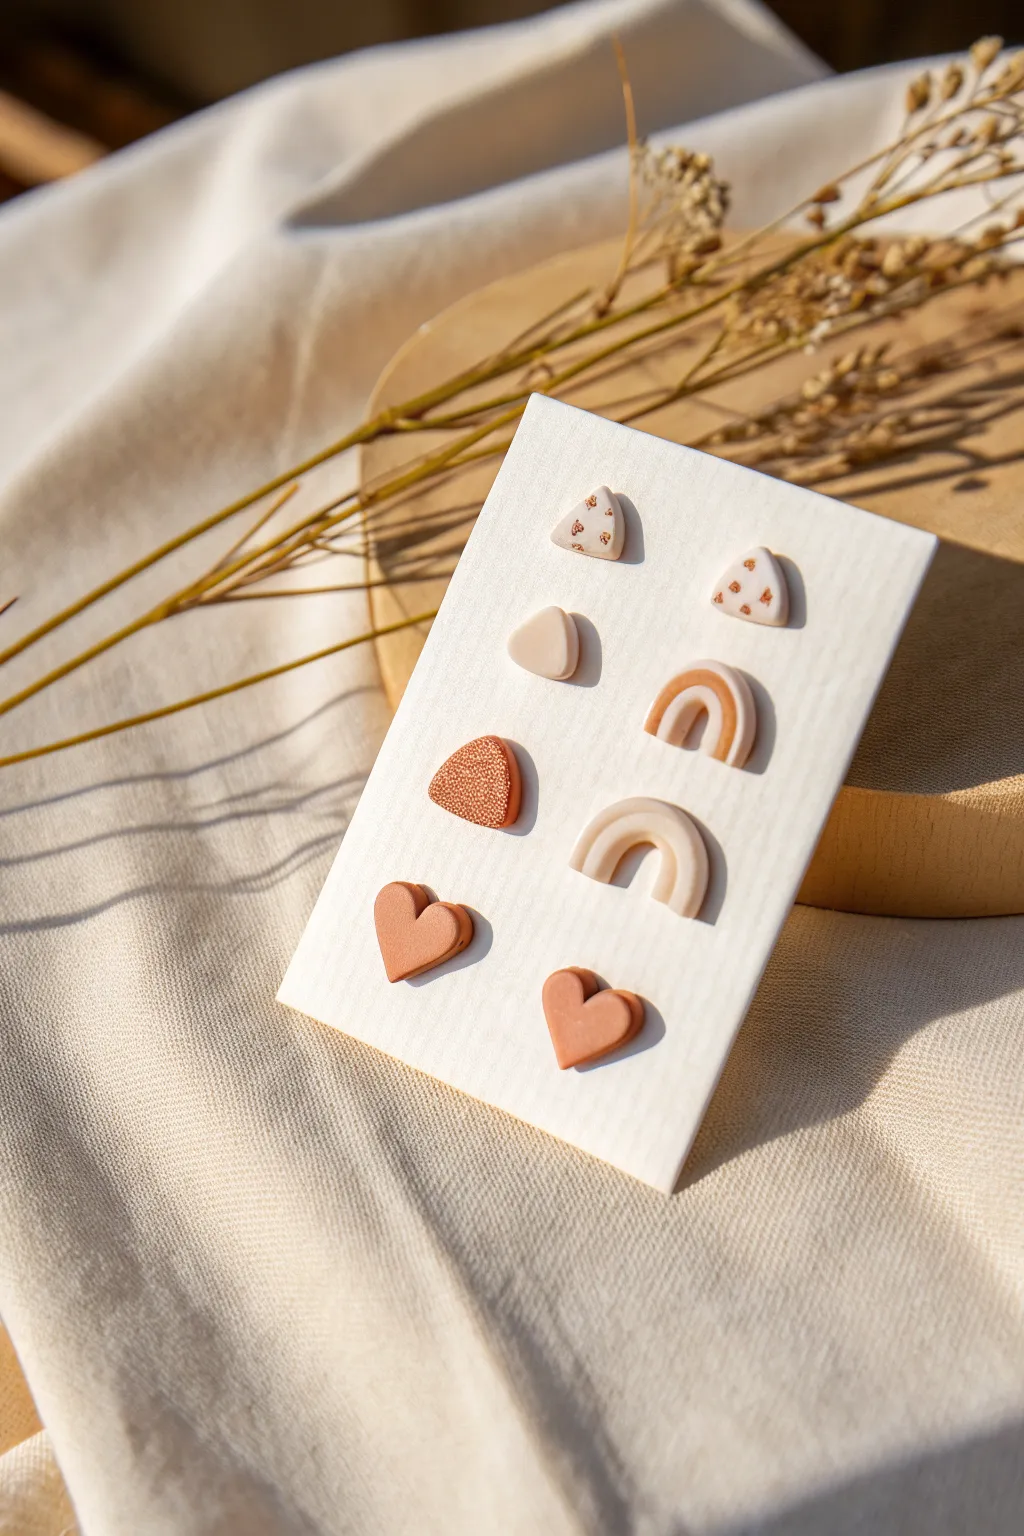
Create a charming set of miniature stud earrings featuring earthy tones of terracotta, cream, and subtle gold speckles. This project covers four distinct shapes—speckled triangles, mini rainbows, textured pebbles, and classic hearts—perfect for mixing and matching.
Step-by-Step Tutorial
Materials
- Polymer clay (white/cream, terracotta/rust orange)
- Gold leaf flakes or gold glitter
- Rolling pin or acrylic roller
- Clay slicer blade
- Small shape cutters (rounded triangle, small heart, circle)
- Texture sponge or sandpaper
- Liquid polymer clay or Bake & Bond
- Earring posts and backs
- Superglue or heavy-duty jewelry glue
- Ceramic tile or baking sheet
- Oven
Step 1: Prepping the Clay
-
Condition the clay:
Start by warming the polymer clay in your hands. Knead both the cream and terracotta colors separately until they are soft, pliable, and free of cracks. -
Create the speckled mix:
Take a portion of the cream clay and mix in a small pinch of gold leaf flakes or glitter. Knead gently to distribute the flecks evenly without completely disappearing into the clay. -
Roll out slabs:
Using your acrylic roller, roll out the plain cream, plain terracotta, and the new speckled cream clay into slabs. Aim for a thickness of about 3-4mm for a sturdy stud.
Step 2: Shaping the Studs
-
Cut the speckled triangles:
Use a small, rounded triangle cutter on your speckled cream slab. If you don’t have a cutter, cut a small triangle with your blade and gently tap the corners with your finger to round them off. -
Form the cream pebbles:
From the plain cream slab, cut two more rounded triangles. Use your fingertip to lightly smooth the top surface, giving them a domed, pebble-like finish. -
Texture the terracotta triangles:
Cut two rounded triangles from the terracotta slab. Before lifting them, gently press a texture sponge or a piece of coarse sandpaper onto the surface to create a pitted, stone-like texture. -
Cut the terracotta hearts:
Using a mini heart cutter, punch out two shapes from the smooth terracotta slab. If edges look sharp, gently pat them down for a softer look.
Clean Cuts
Before cutting shapes, place a piece of plastic cling wrap over the clay. Press the cutter down through the plastic to get beautifully rounded, beveled edges without sanding.
Step 3: Creating the Mini Rainbows
-
Roll thin snakes:
Roll a small amount of terracotta clay and cream clay into thin, even snakes (coils), approximately 2mm thick. -
Form the arches:
Take a terracotta strand and curve it into a small arch. Take a cream strand and fit it snugly inside the terracotta arch. -
Secure the strands:
For the second pair of rainbows shown (the cream ones), you might just use a single thick cream strand or two cream strands together. Apply a tiny amount of liquid clay between strands if they aren’t sticking. -
Trim the bottoms:
Use your sharp blade to cut straight across the bottom of the rainbow legs so they sit flush and even. Repeat to make matching pairs.
Make it Shine
Add a coat of UV resin or glossy polyurethane varnish to just the speckled triangles. This makes the gold flecks pop and contrasts nicely with the matte terracotta shapes.
Step 4: Baking and Assembly
-
Bake carefully:
Arrange all your pieces on a ceramic tile or baking sheet lined with parchment paper. Bake according to your clay manufacturer’s instructions—usually around 275°F (130°C) for 30 minutes. -
Cool down:
Allow the pieces to cool completely inside the oven or on a cooling rack. They are fragile while hot. -
Attach posts:
Apply a small dot of strong jewelry glue to the flat pad of an earring post. Press it firmly onto the back of a baked clay shape. -
Seal the back (optional):
For extra durability, I like to add a tiny dab of liquid clay over the glue dried post base and bake again for 10-15 minutes to encase the metal mechanially. -
Final cure:
Let the glue cure fully (usually 24 hours) before attaching to a card or wearing them.
Arrange your new collection on a card backing to admire your handmade accessory wardrobe


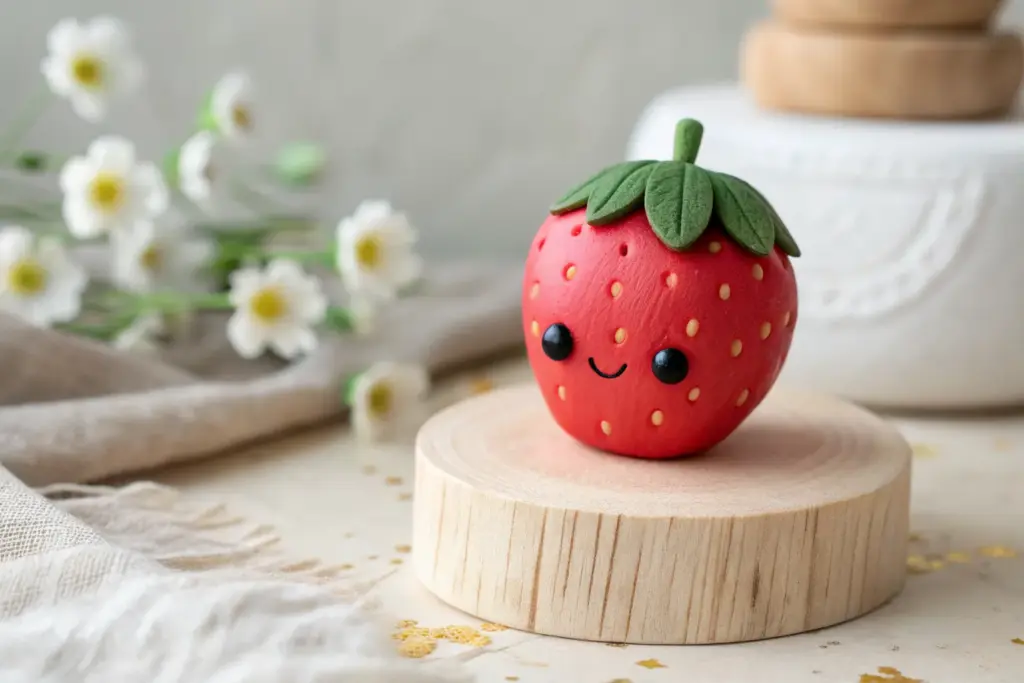
Mini Food Charms With Faces
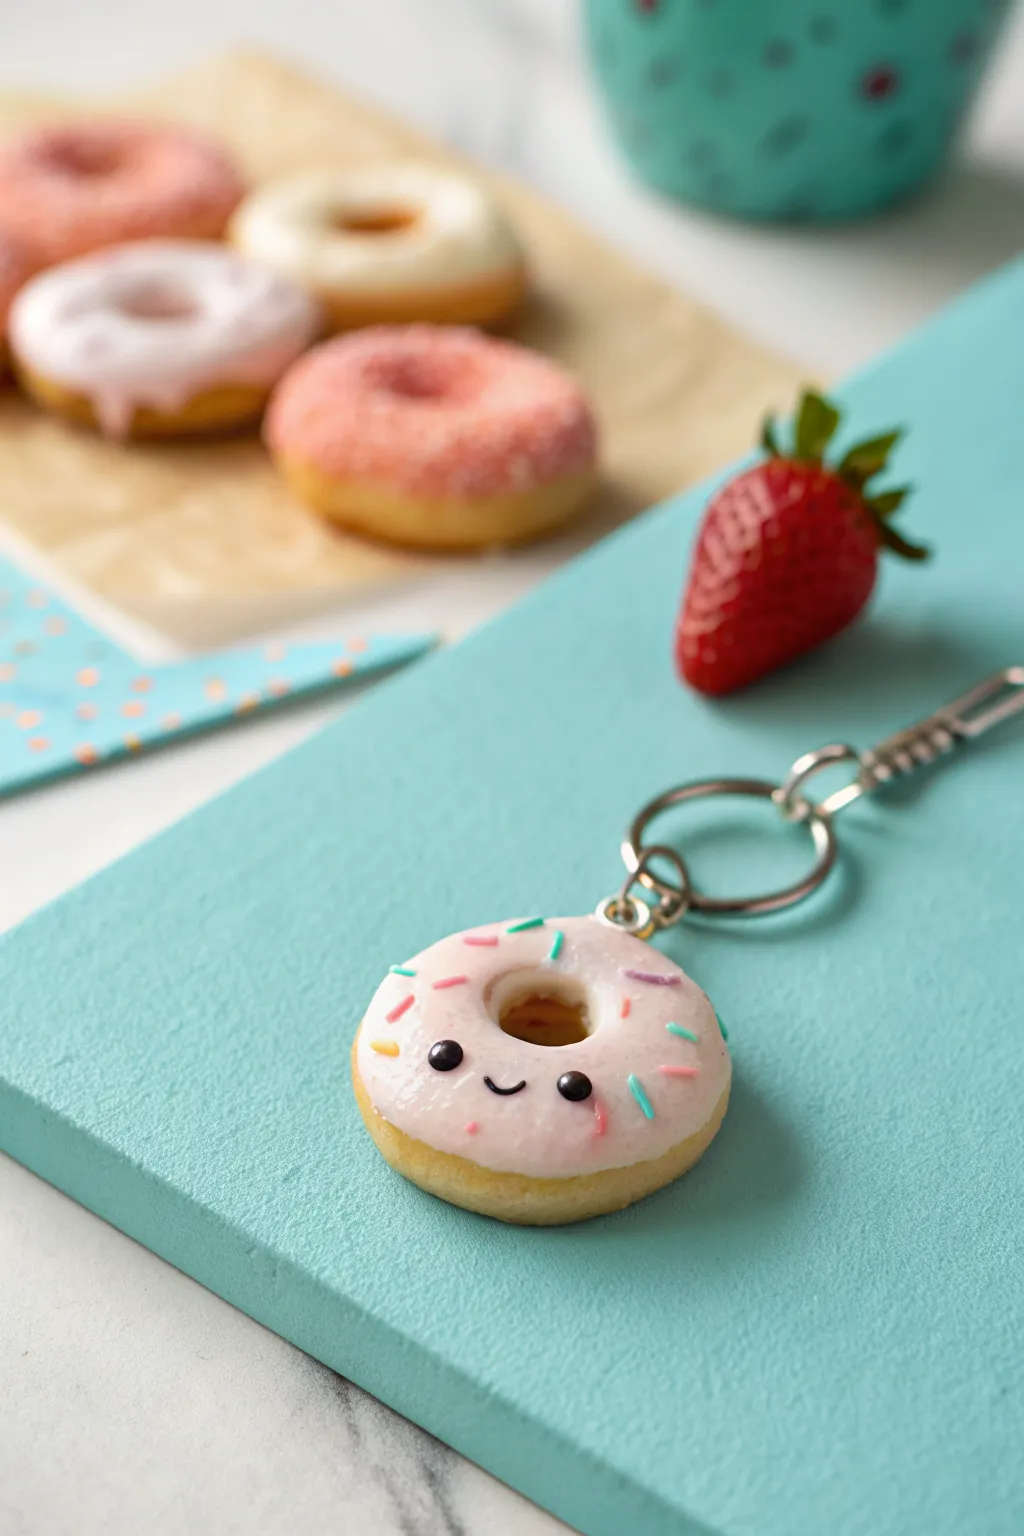
Transform a little lump of polymer clay into this impossibly sweet donut charm, complete with a friendly smile and pastel sprinkles. This project uses basic shaping techniques to create a smooth, glazed finish that looks good enough to eat but is sturdy enough for your keychain.
Step-by-Step
Materials
- Light tan or beige polymer clay (dough color)
- Pale pink polymer clay (liquid clay or softened solid clay)
- Assorted pastel polymer clay scraps (for sprinkles)
- Black polymer clay
- Headpin or eye pin
- Keychain hardware
- Small ball tool or dotting tool
- Needle tool
- Glaze or gloss varnish (optional)
- Small round cutter (optional)
- Liquid sculpey or translucent liquid clay (for the icing mix)
Step 1: Shaping the Dough
-
Condition the Clay:
Start by taking your light tan clay and kneading it thoroughly in your hands until it is warm and pliable. This conditioning step prevents cracks later on. -
Form a Sphere:
Roll the conditioned clay into a smooth, seamless ball about the size of a large marble or a walnut, depending on how big you want your charm. -
Flatten Slightly:
Gently press the ball down against your work surface with the palm of your hand to create a thick, rounded disc. Don’t flatten it too much; you want it to look puffy. -
Create the Hallow:
Use a small round cutter to punch a hole directly in the center of the disc. If you don’t have a cutter, carefully push a large dotting tool or the handle of a paintbrush through the center. -
Refine the Edges:
Soften the sharp edges around the center hole and the outer rim by gently rubbing them with your finger. The goal is a soft, baked-dough appearance. -
Add Texture:
To give the dough a realistic texture, lightly tap the surface with a clean toothbrush or crinkled aluminum foil. Focus on the sides where the actual ‘dough’ would be visible below the icing line.
Step 2: Adding the Glaze & Face
-
Prepare the Icing:
Mix a small amount of pale pink clay with liquid polymer clay until you have a consistency similar to heavy cream or thick honey. I like to do this in a small silicone cup or on a glass tile. -
Apply the Icing:
Carefully dab the pink mixture onto the top of your donut using a needle tool or toothpick. Let it drip naturally down the sides just a little bit, but keep the center hole relatively clear. -
Create Sprinkles:
Roll tiny, thin snakes of your pastel clay scraps (blue, yellow, pink, white). Bake these snakes separately for 5 minutes just to harden them, then chop them into tiny bits with a blade. -
Decorate:
Using tweezers or a slightly damp toothpick, pick up your pre-baked sprinkles and gently press them into the wet pink icing. Scatter them randomly for a natural look. -
Make Eye Sockets:
Use a small ball tool to make two small indents where you want the eyes to sit. This helps the eyeballs stay flush with the surface instead of bulging out. -
Add the Eyes:
Roll two tiny specks of black clay into balls and place them into the indents. Press them gently to secure. -
Create the Smile:
Roll an extremely thin thread of black clay. Cut a tiny u-shaped segment and carefully place it between the eyes to form a smile. Use a needle tool to curve it perfectly.
Sticky Situation?
If your pink icing is too runny and dripping everywhere, let the mixture sit for 10 minutes to thicken slightly, or stir in a tiny pinch of cornstarch.
Step 3: Finishing Up
-
Insert Hardware:
Insert an eye pin into the top of the donut. If the icing is liquidy, insert the pin first, then smooth the icing around it. You can enhance the hold by bending the end of the pin into a slight zig-zag before inserting. -
Bake:
Bake the charm according to your clay manufacturer’s instructions (usually 275°F or 130°C for about 15-20 minutes). Tent with foil to prevent scorching the icing. -
Cool Down:
Allow the donut to cool completely before handling. It will be slightly soft when hot but hardens as it cools. -
Seal:
For a shiny, glazed look, coat the icing part (or the whole donut) with a polymer clay gloss varnish. -
Assemble:
Once dry, use jump rings to attach your loop to the keychain hardware.
Pro Tip
Pre-bake the tiny sprinkle ‘snakes’ before cutting them. Raw clay smushes when you cut it; baked clay snaps cleanly for perfect cylinders.
Now you have a charming little friend to keep your keys company wherever you go

The Complete Guide to Pottery Troubleshooting
Uncover the most common ceramic mistakes—from cracking clay to failed glazes—and learn how to fix them fast.
Chubby Little Penguin Figure
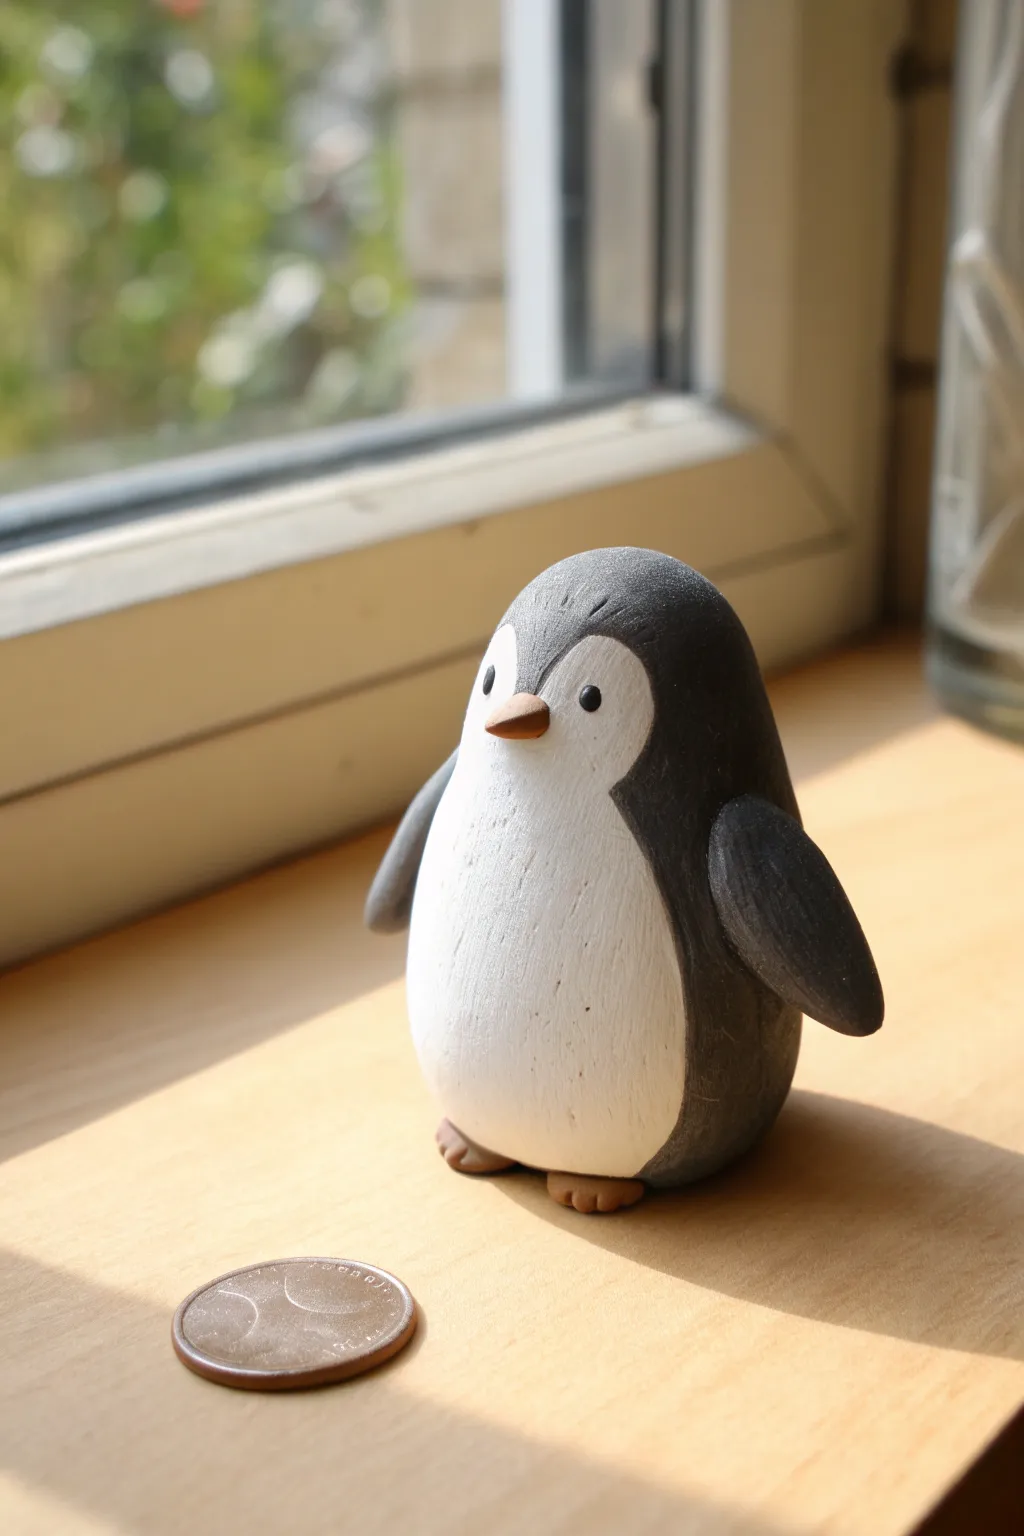
This adorable little penguin figure captures hearts with its simple, rounded form and smooth finish. Perfect for beginners, this project focuses on clean shapes and seamless joining to create a charming desk companion.
Detailed Instructions
Materials
- Black polymer or air-dry clay
- White polymer or air-dry clay
- Small amount of orange or light brown clay
- Clay sculpting tools (specifically a smoothing tool)
- Needle tool or toothpick
- Work surface or baking mat
- Reference photo
Step 1: Forming the Body
-
Create the Core:
Start with a medium-sized ball of black clay, about the size of a golf ball. Roll it firmly between your palms to remove any cracks or air bubbles. -
Shape the Egg:
Gently roll the ball into an egg shape, keeping the bottom wider than the top so it will stand upright easily. This slight taper creates the head area without needing a separate piece. -
Flatten the Base:
Tap the wider end of your egg shape onto your work surface to create a flat, stable bottom. The penguin should stand straight without wobbling.
Step 2: Adding the Belly
-
Prepare the White Clay:
Take a smaller piece of white clay and roll it into a ball, then flatten it into a thin, oval pancake shape using your fingers or a small roller. -
Refine the Belly Shape:
Pinch the top of the white oval slightly to make it narrower, mimicking the curve of the black body shape you created earlier. -
Attach the Belly:
Press the white piece onto the front of the black body. It should start just below where the ‘chin’ would be and extend down to the base. -
Smooth the Edges:
Using a smoothing tool or your finger, gently blend the edges of the white clay into the black clay so it looks like a single seamless surface rather than a sticker on top. -
Add Texture Details:
Using a needle tool, create very faint, tiny vertical scratches or indents on the surface to mimic the texture of feathers, as seen in the reference.
Smudged White Clay?
Black clay stains easily! Clean your hands thoroughly or use baby wipes before handling the white clay belly to keep it crisp and bright.
Step 3: Wings and Features
-
Form the Wings:
Roll two small teardrop shapes out of black clay. Flatten them slightly to create flipper-like wings. -
Attach the Wings:
Press the rounded end of each wing onto the side of the body, just where the white belly creates a curve. Blend the shoulder seam smoothly into the body. -
Make the Feet:
Create two tiny balls of orange or light brown clay. Flatten them slightly and use your needle tool to make two small indentations in each for toes. -
Position the Features:
Tuck the feet under the front edge of the white belly so just the toes are peeking out. -
Create the Beak:
Roll a very tiny cone of orange clay for the beak. Press it gently into the center of the face area, right at the top point of the white belly arch. -
Add the Eyes:
Use a ball tool or the end of a paintbrush to make two small indents for eyes. Roll minimal balls of black clay and press them into these sockets.
Seamless Blending
To erase the seam between the belly and body, drag a tiny amount of clay across the gap with a tool, then smooth over with your finger.
Step 4: Final Touches
-
Check Symmetry:
Look at your penguin from the front and top to ensure the wings are even and the beak is centered. -
Smooth Fingerprints:
I like to use a tiny bit of baby oil on my finger to lightly buff away any stray fingerprints before finishing to get that matte, clean look. -
Bake or Dry:
Follow the specific instructions for your clay type to cure the piece. If using polymer clay, let it cool completely before handling.
Place your finished penguin on a windowsill or shelf to add a touch of handcrafted cuteness to your room
Blob-Style Kitty Magnet
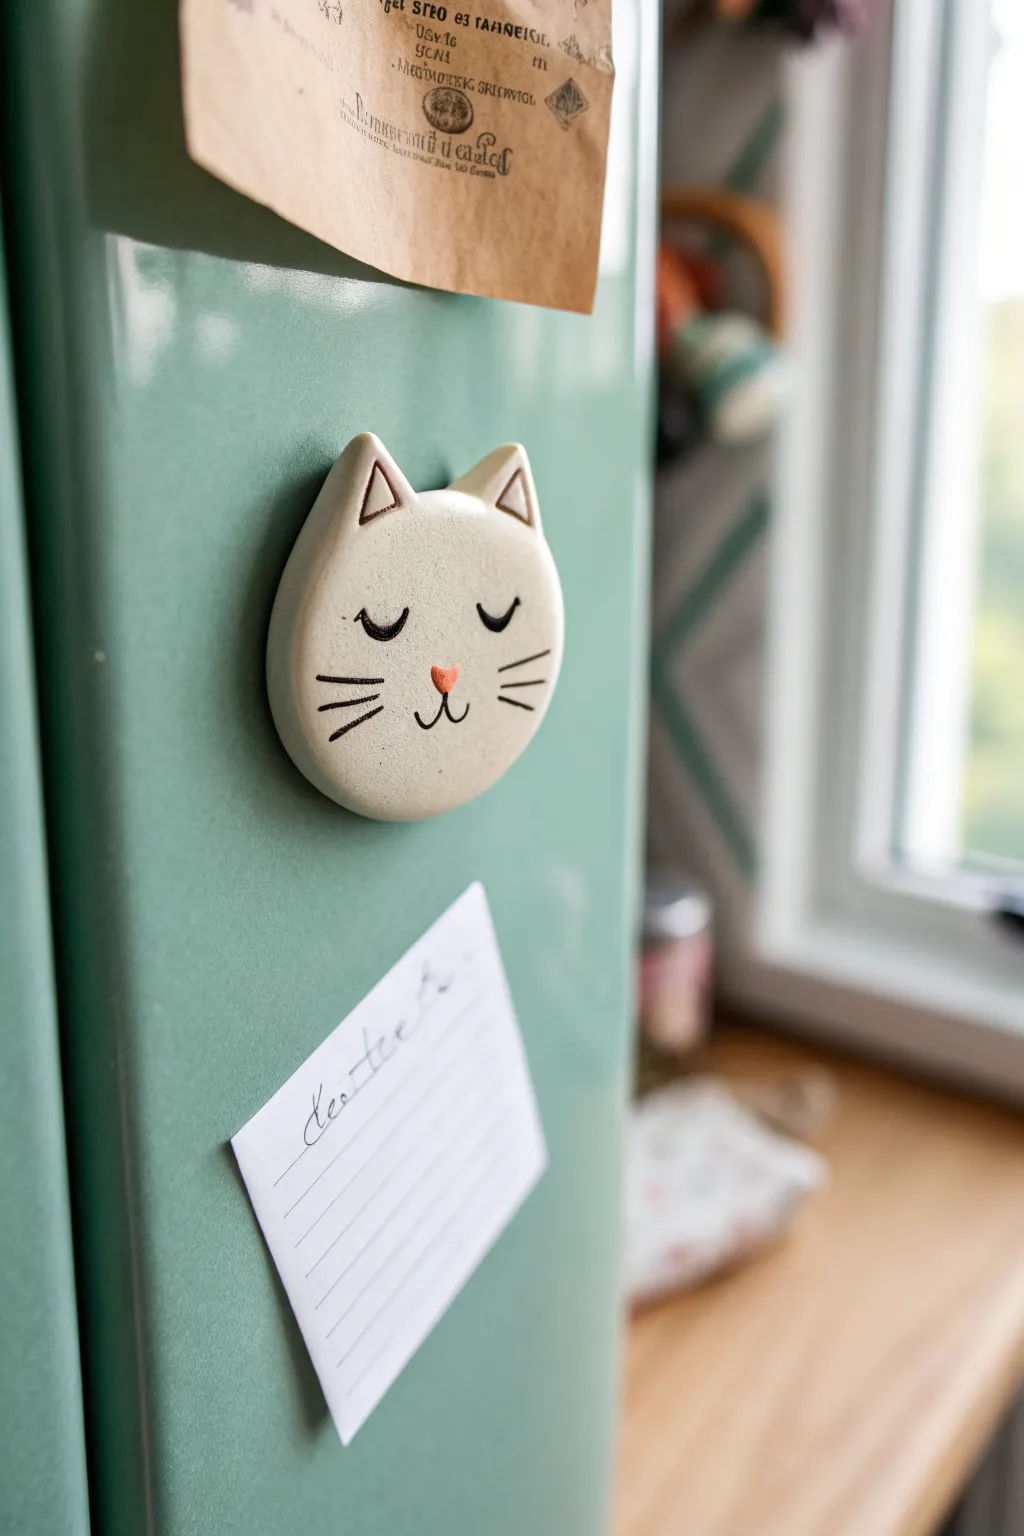
This serene little feline brings a touch of calm to your kitchen with its minimalist design and soft, creamy finish. Perfect for beginners, this project turns a simple ball of clay into a functional piece of art that keeps your grocery list right where you need it.
Step-by-Step Tutorial
Materials
- White polymer clay or air-dry clay
- Rolling pin or smooth jar
- Round cookie cutter (approx. 2 inches)
- Small modelling tool or rounded toothpick
- Black acrylic paint
- Fine-point paintbrush (size 0 or 00)
- Small dotting tool
- Peach or coral rose acrylic paint
- Strong craft magnet (neodymium recommended)
- Superglue or E6000
- Matte finish varnish (optional)
- Smooth work surface/mat
Step 1: Shaping the Base
-
Condition the CLay:
Start by warming up a chunk of white clay in your hands. Knead it thoroughly until it’s soft, pliable, and free of any cracks. -
Roll it Smooth:
Place the clay on your work mat and roll it out to a uniform thickness of about 1/4 inch. You want it sturdy but not too heavy for the magnet. -
Cut the Circle:
Use your round cookie cutter to punch out a perfect circle. If the edges are a bit sharp or rough, gently tap them with your finger to smooth and rounds them off. -
Form the Ears:
Pinch two small triangles of leftover clay. Attach them to the top of the circle, blending the clay at the seam on the back so they are firmly connected. -
Shape the Face:
Gently press the circle slightly into an oval or ‘blob’ shape if you prefer a less geometric look; I like to soften the top edge between the ears just a tiny bit.
Uneven Eyes?
Don’t panic! If the paint is still wet, wipe it away quickly with a damp Q-tip. If dry, carefully scrape it off with a craft knife or paint over with white.
Step 2: Adding Details & Curing
-
Detail the Ears:
Using a needle tool or toothpick, gently press triangular indentations inside the ears. Don’t cut all the way through; just create a recessed outline. -
Smooth the Surface:
Do a final check for fingerprints. A tiny drop of baby oil on your finger can help buff away stray prints before baking. -
Bake or Dry:
If using polymer clay, bake according to package directions (usually around 275°F for 15-20 minutes). If using air-dry clay, let it sit for 24-48 hours until fully hardened. -
Cool Down:
Allow the piece to cool completely before attempting to paint. Painting on warm clay can make the acrylic perform poorly.
Step 3: Painting & Finishing
-
Paint the Inner Ears:
Dilute a tiny bit of brown or taupe paint with water to make a wash. Carefully fill the indented triangles in the ears for a subtle shadow effect. -
Draw the Eyes:
With your fine liner brush and black paint, create two ‘U’ shapes for the sleeping eyes. Keep them spaced widely for that sweet aesthetic. -
Add Whiskers:
Paint three short, horizontal lines on each cheek. Try to keep your hand steady and use quick, light strokes so the lines taper slightly. -
Paint the Mouth:
Paint a small ‘w’ shape directly between the eyes, slightly lower, to form the mouth mouth anchor. -
Add the Nose:
Using a dotting tool or the back of a paintbrush, place a small heart or triangle of peach/coral paint right above the mouth center. -
Seal the Work:
Once the paint is bone dry, apply a thin coat of matte varnish. This protects the paint from chipping and gives it a finished ceramic feel. -
Attach Magnet:
Flip the kitty over. Apply a dab of strong glue to the center and press your magnet firmly into place. Let it cure fully before sticking it to your fridge.
Keep it Clean
White clay picks up dust instantly. Work on a fresh sheet of parchment paper and clean your hands with a wet wipe before shaping the final ball.
Enjoy seeing your little friend every time you grab a snack


What Really Happens Inside the Kiln
Learn how time and temperature work together inside the kiln to transform clay into durable ceramic.
Little Herb Markers
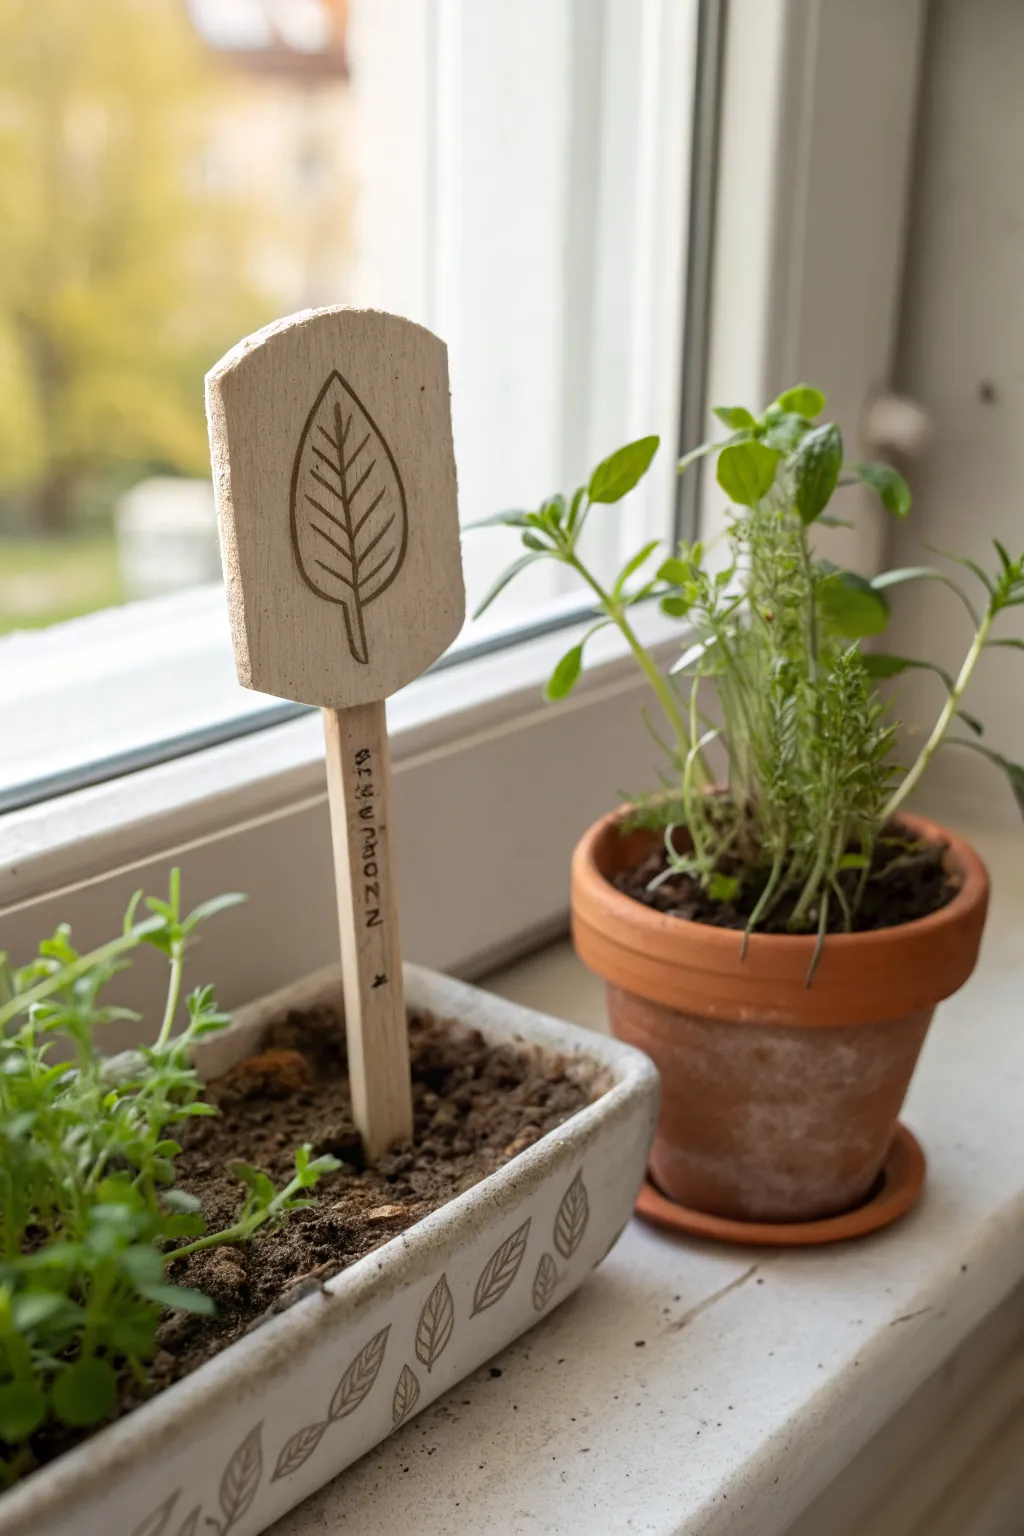
These charming, rustic plant stakes bring a handmade touch to your windowsill garden with their natural clay texture and simple leaf motifs. They are not only practical for identifying your seedlings but also add an earthy, minimalist aesthetic to your indoor pots.
Step-by-Step Guide
Materials
- White original Sculpey or air-dry clay
- Rolling pin or smooth glass jar
- Sharp crafting knife or X-Acto blade
- Cardstock (for making a template)
- Wooden popsicle sticks or crafting dowels
- Stamp with a leaf design (or a Linocut for custom carving)
- Fine-tip permanent marker (black)
- Strong craft glue or epoxy
- Fine-grit sandpaper
- Water-based matte sealant (optional)
Step 1: Shaping the Toppers
-
Prepare your template:
Begin by sketching a simple shield or tag shape on a piece of cardstock. For the design shown, aim for a rectangle with a slightly arched top and angled corners at the bottom. Cut this out to use as your tracing guide. -
Condition the clay:
Take a handful of your white clay and knead it in your hands until it becomes soft, pliable, and free of cracks. If using air-dry clay, keep your hands slightly moist. -
Roll it out:
Roll the clay onto a smooth, non-stick surface until it is universally about 1/4 inch thick. You want it substantial enough to hold the stick but not too heavy. -
Cut the shapes:
Place your cardstock template onto the rolled clay. Using your sharp crafting knife, trace around the template carefully to cut out your marker shapes. -
Smooth the edges:
Dip your finger in a little water (for air-dry clay) or baby oil (for polymer) and gently run it along the cut edges to soften any sharpness or irregularities.
Natural Texture Hack
Don’t possess a stamp? Press a real leaf with prominent veins (like sage or mint) directly into the clay, then carefully peel it away for an organic impression.
Step 2: Adding the Design
-
Stamp the motif:
Press your leaf stamp firmly into the center of the clay shape. Apply even pressure to ensure all the veins of the leaf make an impression, but don’t push so hard that you deform the tag’s overall shape. -
Create the insertion slot:
While the clay is still soft, take one of your wooden sticks and carefully press it into the bottom edge of the clay shape to create a slot or indentation. This ensures a perfect fit later. Remove the stick before drying. -
Dry or bake:
Follow the instructions for your specific clay. If baking polymer clay, place on a parchment-lined sheet and bake at the recommended temperature. If using air-dry clay, leave it flat in a cool, dry place for 24-48 hours, flipping occasionally.
Stick Won’t Stay?
If the clay is too heavy and wobbles on the stick, glue a second small piece of wood or a popsicle stick fragment to the back of the join for extra support.
Step 3: Assembly and Finishing
-
Sand the edges:
Once fully cured and cooled, inspect your clay tags. Use fine-grit sandpaper to buff away any remaining rough spots on the edges for a professional finish. -
Highlight the design:
I like to take a fine brush with diluted brown acrylic paint and wash it over the stamped leaf, then wipe the surface clean. This leaves pigment in the recessed lines, making the leaf pop, though the natural shadow works well too. -
Label the stick:
While holding the wooden stick vertically, use your fine-tip permanent marker to write the herb name (e.g., ‘OREGANO’) down the length of the wood. Keep the letters evenly spaced. -
Decorate the stick:
Add small decorative elements like a tiny star or dot below the text to balance the design. -
Glue the stick:
Apply a dab of strong craft glue or epoxy into the slot you created earlier (or directly onto the back if you skipped the slot). Insert the wooden stick and press firmly. -
Allow to set:
Let the glue cure completely according to the manufacturer’s directions before handling. Keep the creation flat while it dries to ensure the stick stays straight. -
Seal (Optional):
For extra durability against moisture from watering, brush a coat of matte sealant over the clay portion and let it dry.
Pop these finished markers into your pots and enjoy seeing your little garden organized with style
Mini Coil Bowl
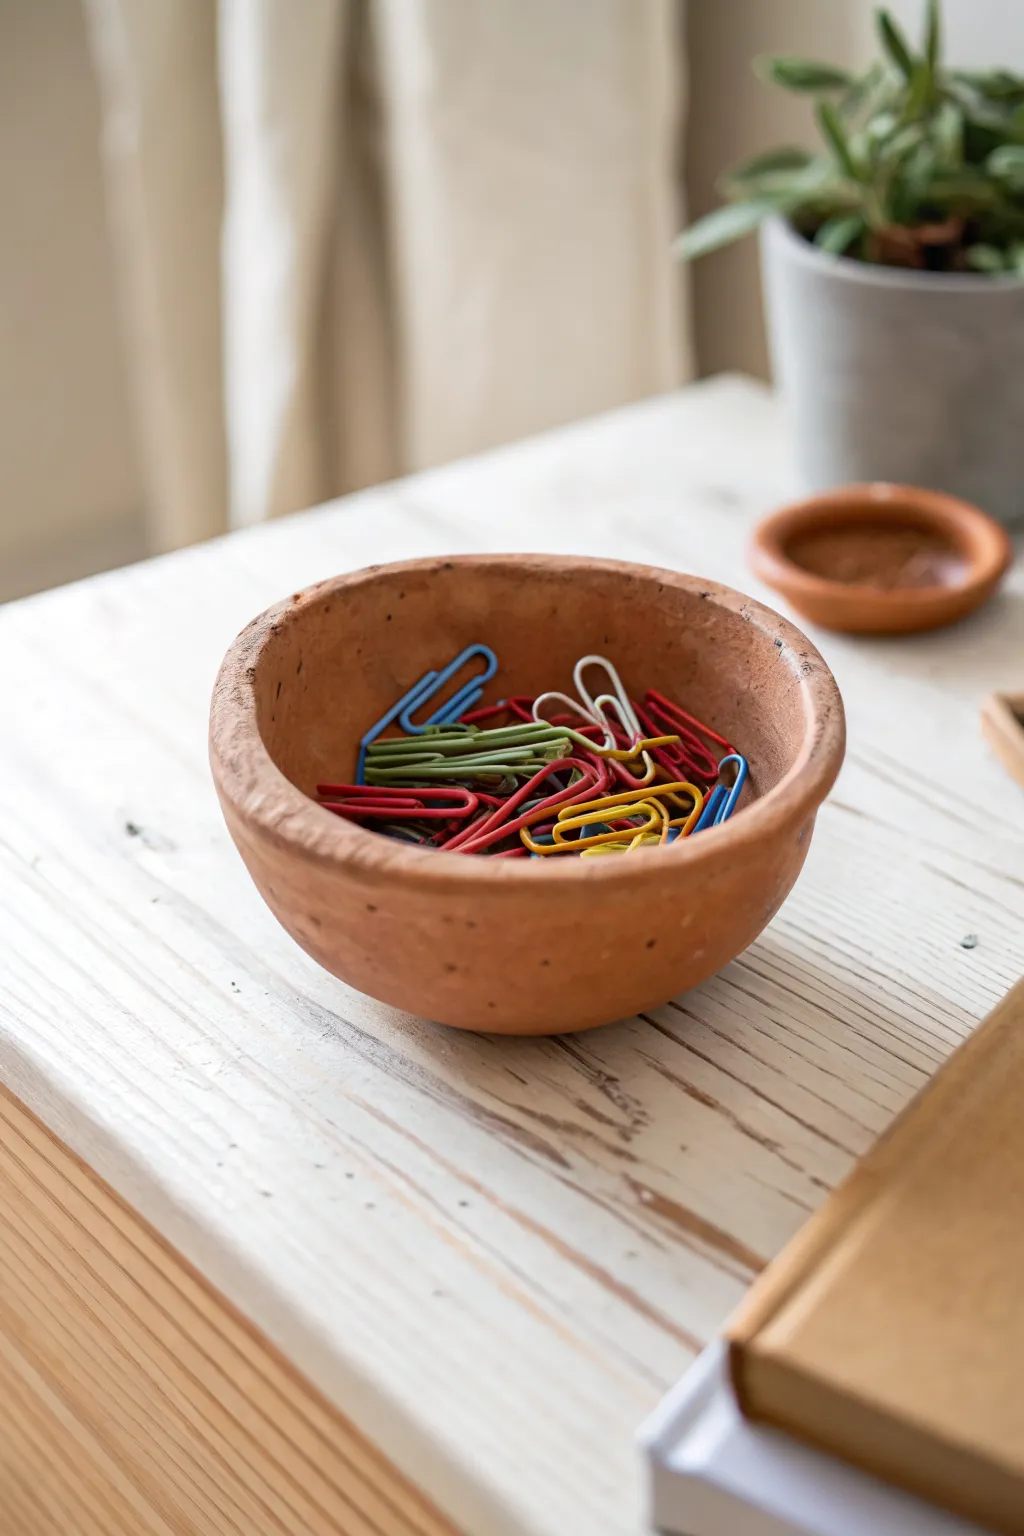
This charming, petite bowl brings a touch of earthy warmth to any workspace, perfect for corralling paperclips or loose change. Its delightfully imperfect texture and rich terracotta color mimic the look of traditional pottery without requiring a kiln.
Step-by-Step Tutorial
Materials
- Air-dry clay (terracotta color)
- Small cup of water
- Potter’s needle tool or toothpick
- Small rolling pin
- Sponge or soft cloth
- Banding wheel or lazy susan (optional)
- Fine-grit sandpaper (220 grit)
- Matte acrylic varnish
Step 1: Forming the Base
-
Prepare the Clay:
Start with a ball of terracotta-colored air-dry clay about the size of a tangerine. Knead it in your hands for a minute or two to warm it up and ensure there are no air bubbles trapped inside. -
Roll the Slab:
Using your rolling pin, flatten half of your clay into a slab that is roughly 1/4 inch thick. This will form the sturdy bottom of your bowl. -
Cut the Base:
Use a round cutter or trace around a small glass (approx. 3 inches diameter) with your needle tool to cut a perfect circle from the slab. Remove the excess clay. -
Score the Edge:
Take your needle tool and make small hatch marks (‘scoring’) all along the top outer edge of your clay circle. Dab a tiny bit of water onto these scratches to act as glue.
Smoother Seams
If you struggle to blend coils with just your thumb, use the back of a spoon. The convex shape helps glide the clay downward without digging in too deeply.
Step 2: Building the Walls
-
Roll a Coil:
Take the remaining clay and roll it on your work surface into a long, even snake shape. Aim for a thickness of about a pencil’s width. -
Attach the First Layer:
Place the coil directly onto the scored edge of the base. Gently press it down as you go to ensure it sticks. Where the ends meet, cut them at an angle and press them together. -
Blend the Seams:
Using your thumb or a modeling tool, smudge the clay from the coil downward onto the base on both the inside and outside. This blending is crucial for strength. -
Build Height:
Add 2-3 more layers of coils on top of the first one, scoring and adding a drop of water between each layer. Stagger the joints so they don’t line up vertically. -
Shape the Bowl:
As you stack the coils, angle them slightly outward if you want a wider opening, or straight up for a steeper wall. The bowl in the inspiration photo has a gentle outward flare.
Step 3: Refining and Finishing
-
Smooth the Walls:
Once you have reached your desired height, use your thumb or a slightly damp sponge to blend all the horizontal coil lines together until the wall is one solid piece. -
Create Texture:
Instead of smoothing it perfectly, leave some gentle finger marks or slight indentations. I typically pat the outside with a flat piece of wood to give it that rustic, hand-built character shown in the photo. -
Level the Rim:
Look at the rim of the bowl. If it is too uneven, gently slice off the high points with your needle tool or pat it flat with your hand for a soft, rounded edge. -
Dry Slowly:
Place the bowl in a cool, dry place away from direct sunlight. Let it dry completely for 24-48 hours. The color will lighten slightly as the moisture leaves the clay. -
Sand Imperfections:
Once bone dry, take your fine-grit sandpaper and very lightly sand any sharp burrs on the rim or base. Wipe away the dust with a barely damp cloth. -
Seal the Bowl:
Apply a thin coat of matte acrylic varnish to the inside and outside. This protects the clay from moisture and gives it a finished look without adding an unnatural shine.
Faux-Glaze Effect
For a two-tone look, paint just the inside of the bowl with a high-gloss white acrylic paint to mimic a ceramic dip-glaze finish.
Fill your new handmade bowl with your favorite small trinkets and enjoy the organic touch it adds to your desk

TRACK YOUR CERAMIC JOURNEY
Capture glaze tests, firing details, and creative progress—all in one simple printable. Make your projects easier to repeat and improve.
Small Bud Vase
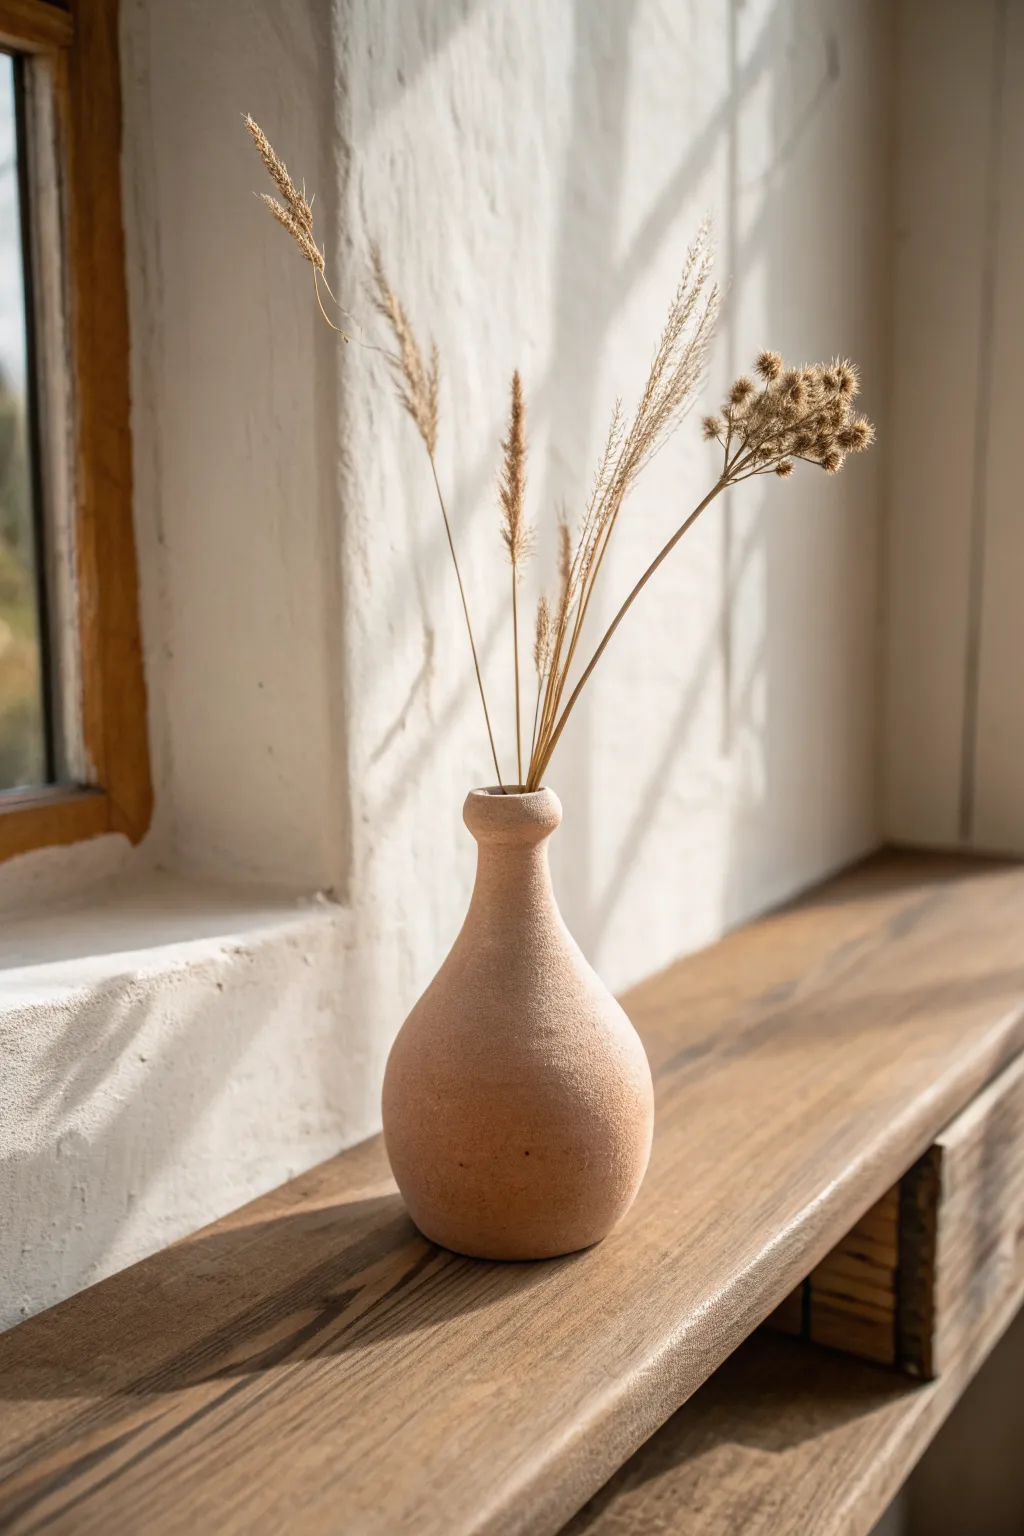
Capture the charm of natural pottery with this simple bud vase, perfect for displaying dried grasses or a few wildflowers. Its teardrop shape and textured, unglazed finish give it a timeless, earthy aesthetic.
Step-by-Step Guide
Materials
- Air-dry clay (terracotta or white)
- Small cup of water
- Rolling pin
- Sponge
- Needle tool or toothpick
- Fine-grit sandpaper
- Acrylic paint (optional: beige or taupe)
- Baking soda (for texturing paint)
- Matte sealant spray
Step 1: Forming the Base
-
Condition the clay:
Start by taking a handful of air-dry clay roughly the size of a tennis ball. Knead it in your hands until it becomes soft, pliable, and free of any air bubbles. -
Roll a sphere:
Roll the clay between your palms to create a smooth, solid ball. I like to tap it gently on the table to create a very small flat spot on the bottom so it stands upright. -
Create the opening:
Using your thumb, press gently into the center top of the ball. Create a hole about two-thirds of the way down, but don’t poke through the bottom. -
Pinch the walls:
Insert your thumb into the hole and use your fingers on the outside to pinch the clay walls. Rotate the ball as you work to ensure an even thickness all around the base.
Cracks Appearing?
If small cracks form while drying, mix a tiny bit of fresh clay with water to make a paste (slip). Fill the cracks with this paste and smooth it over with your finger.
Step 2: Shaping the Neck
-
Draw up the clay:
Begin gently squeezing and pulling the upper portion of the clay upwards to form the neck. You want the base to remain bulbous while the top becomes narrower. -
Refine the shape:
Smooth the transition between the wide belly and the narrow neck using a little water on your fingers. The goal is a seamless, curvy teardrop silhouette. -
Create the rim:
At the very top of the neck, gently flatten the edge with your finger. Flre it out slightly to create a defined lip. -
Round the rim:
Use a damp sponge to smooth over the rim so it looks thick and rounded, like traditional wheel-thrown pottery. -
Smooth the surface:
Dip your finger or a sponge in water and go over the entire exterior. Buff out any fingerprints or harsh dents, but don’t worry about perfection; a little irregularity adds character.
Make it Speckled
For a convincing ceramic look, flick a toothbrush loaded with watered-down brown paint over the vase before sealing. The tiny splatters look like fired clay speckles.
Step 3: Drying and Finishing
-
Let it dry:
Place the vase in a safe spot away from direct heat to dry. This usually takes 24-48 hours depending on humidity. Rotate it occasionally for even drying. -
Sand for texture:
Once fully hard, use fine-grit sandpaper to smooth any sharp ridges, but leave the overall surface slightly rough to maintain that earthy look. -
Mix textured paint:
To mimic the stone-like finish in the photo, mix a teaspoon of baking soda into beige or taupe acrylic paint. The baking soda acts as a texturizing agent. -
Apply the finish:
Dab the textured paint onto the vase using a stiff brush or a sponge. Use a stippling motion rather than dragging strokes to build up a granular surface. -
Seal the piece:
After the paint is completely dry, spray the vase with a clear matte sealant. This protects the finish and prevents the baking soda mixture from flaking off over time.
Fill your new vase with dried grasses for a cozy, organic display
Mini Candle Holder Dish
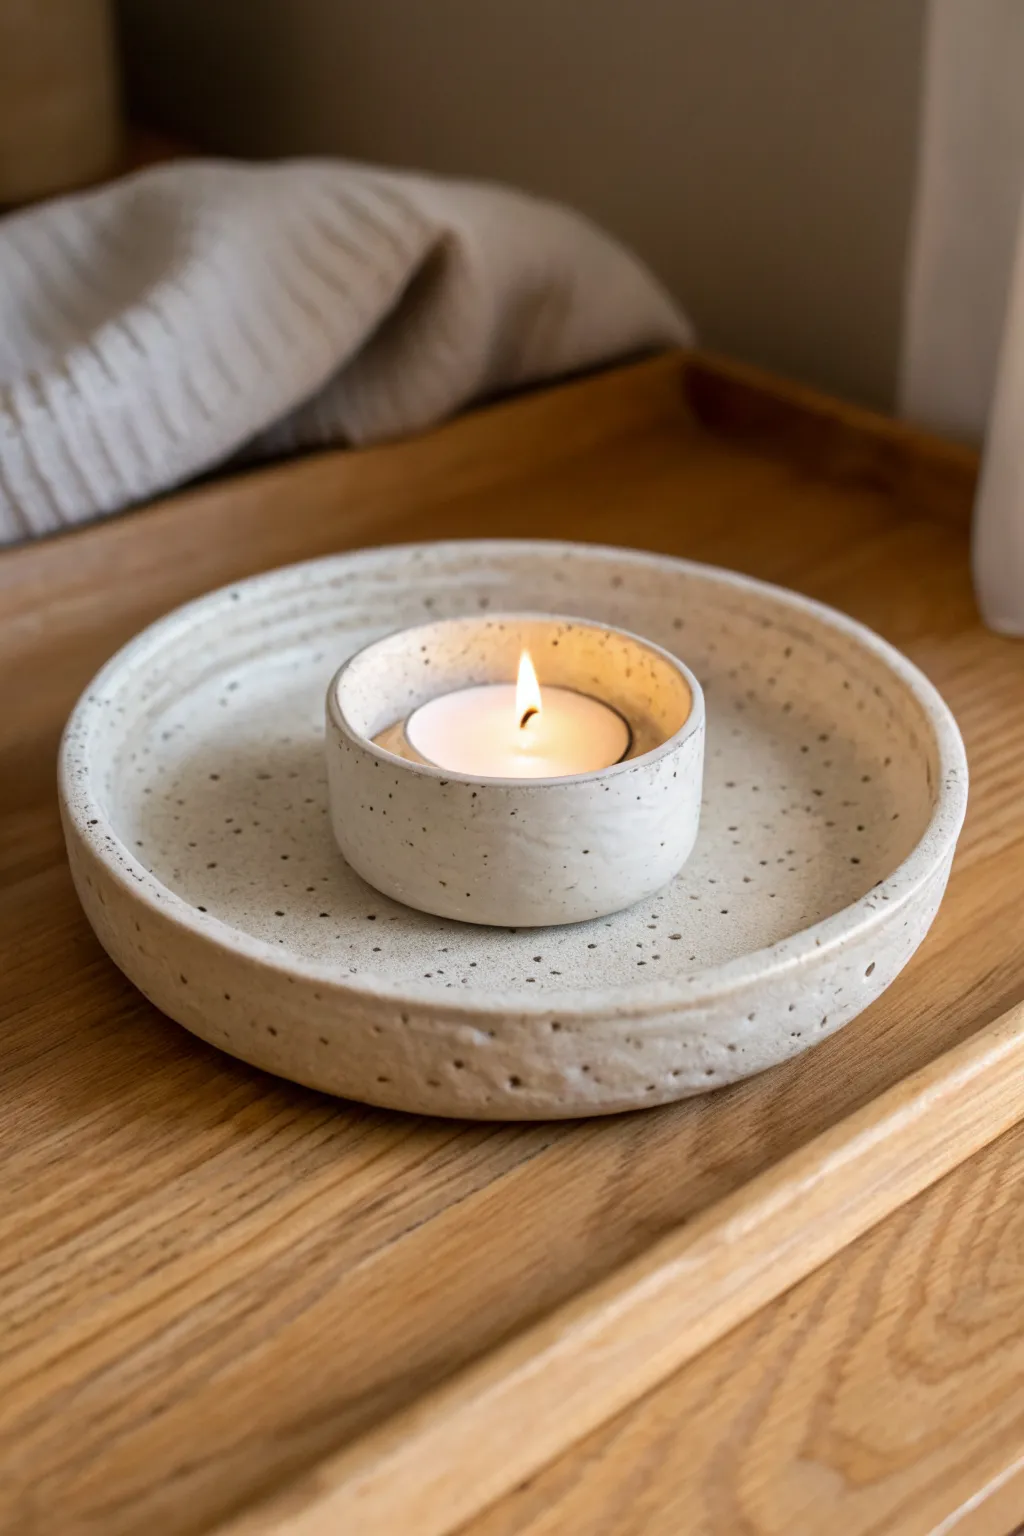
This charming two-piece set features a shallow catch-all dish perfect for holding a matching mini candle pot. The speckled clay finish gives it an organic, modern farmhouse look that adds cozy warmth to any corner.
How-To Guide
Materials
- Air-dry clay (Speckled or Granite finish)
- Rolling pin
- Two round cookie cutters (one approx. 5 inches, one approx. 2.5 inches)
- A tealight candle (for sizing)
- Small bowl or sandpaper sponge (for smoothing)
- Water in a small cup
- Clear matte acrylic sealant or matte varnish
- Canvas mat or parchment paper
Step 1: Creating the Base Dish
-
Prepare the Clay:
Begin by taking a generous handful of speckled air-dry clay. Knead it in your hands for about a minute to warm it up and ensure it is pliable, free of air bubbles. -
Roll the Slab:
Place the clay onto your canvas mat or parchment paper. Using the rolling pin, roll it out into an even slab that is roughly 1/4 inch thick. Try to keep the thickness consistent. -
Cut the Circle:
Use the larger 5-inch round cutter to stamp a perfect circle out of your clay slab. Remove the excess clay and set it aside for the next piece. -
Form the Lip:
Gently pinch the edges of the clay circle upwards to create a raised rim. I like to work my way around the circle twice, slowly lifting the edge to create a straight, vertical wall about half an inch high. -
Refine the Shape:
Once the walls are up, use a little water on your finger to smooth out any cracks that formed during the lifting process. Run your finger along the rim to round it off softly. -
Add Texture:
If your clay isn’t naturally speckled, you can gently press coarse sand or dried coffee grounds into the surface now for that gritty, organic look seen in the photo.
Faux Speckles
Can’t find speckled clay? Mix black pepper or used loose-leaf tea grounds into plain white clay before rolling. It mimics the ceramic look perfectly.
Step 2: Creating the Candle Pot
-
Measure the Core:
Take your actual tealight candle and wrap a small strip of paper around it to gauge the circumference needed, adding a tiny bit of wiggle room. -
Roll a Coil:
Using the leftover clay, roll out a thick snake or coil. Alternatively, roll a small flat strip if you prefer the slab-building method, which often looks cleaner. -
Cut the Base:
Roll a small amount of clay flat and cut your smaller 2.5-inch circle (or slightly smaller, just larger than the tealight) to serve as the floor of the candle holder. -
Build the Walls:
Attach your clay strip or coil to the outer edge of this small base. Score the clay surfaces (scratch them up a bit) and add a drop of water to act as glue before pressing them together. -
Blend the Seams:
Use a modeling tool or your finger to smear the clay across the seam where the wall meets the base, both inside and outside, until the join is invisible. -
Check the Fit:
Gently place your tealight inside (don’t push too hard!) to ensure it fits. The walls should come up just slightly higher than the metal casing of the candle.
Step 3: Finishing Touches
-
Initial Drying:
Place both pieces in a dry area away from direct sunlight. Let them sit for about 24-48 hours until they are bone dry and lighter in color. -
Sanding:
Once fully dry, take a fine-grit sanding sponge and gently sand the rims and outer walls. This removes fingerprints and sharp edges, giving that soft, professional ceramic feel. -
Remove Dust:
Wipe both pieces down with a slightly damp cloth or a dry paintbrush to remove all the ceramic dust from sanding. -
Sealing:
Apply a coat of clear matte varnish or acrylic sealant. This protects the clay and enhances the speckled color without adding a glossy shine. -
Final Cure:
Allow the sealant to cure completely according to the bottle instructions before placing your candle inside and lighting it.
Cracking Issues?
If cracks appear while drying, mix a tiny bit of clay with vinegar to make a paste (slip) and fill the cracks, then sand smooth once dry.
Enjoy the gentle flicker of light from your handmade pottery set
Tiny Face Pot Pencil Cup
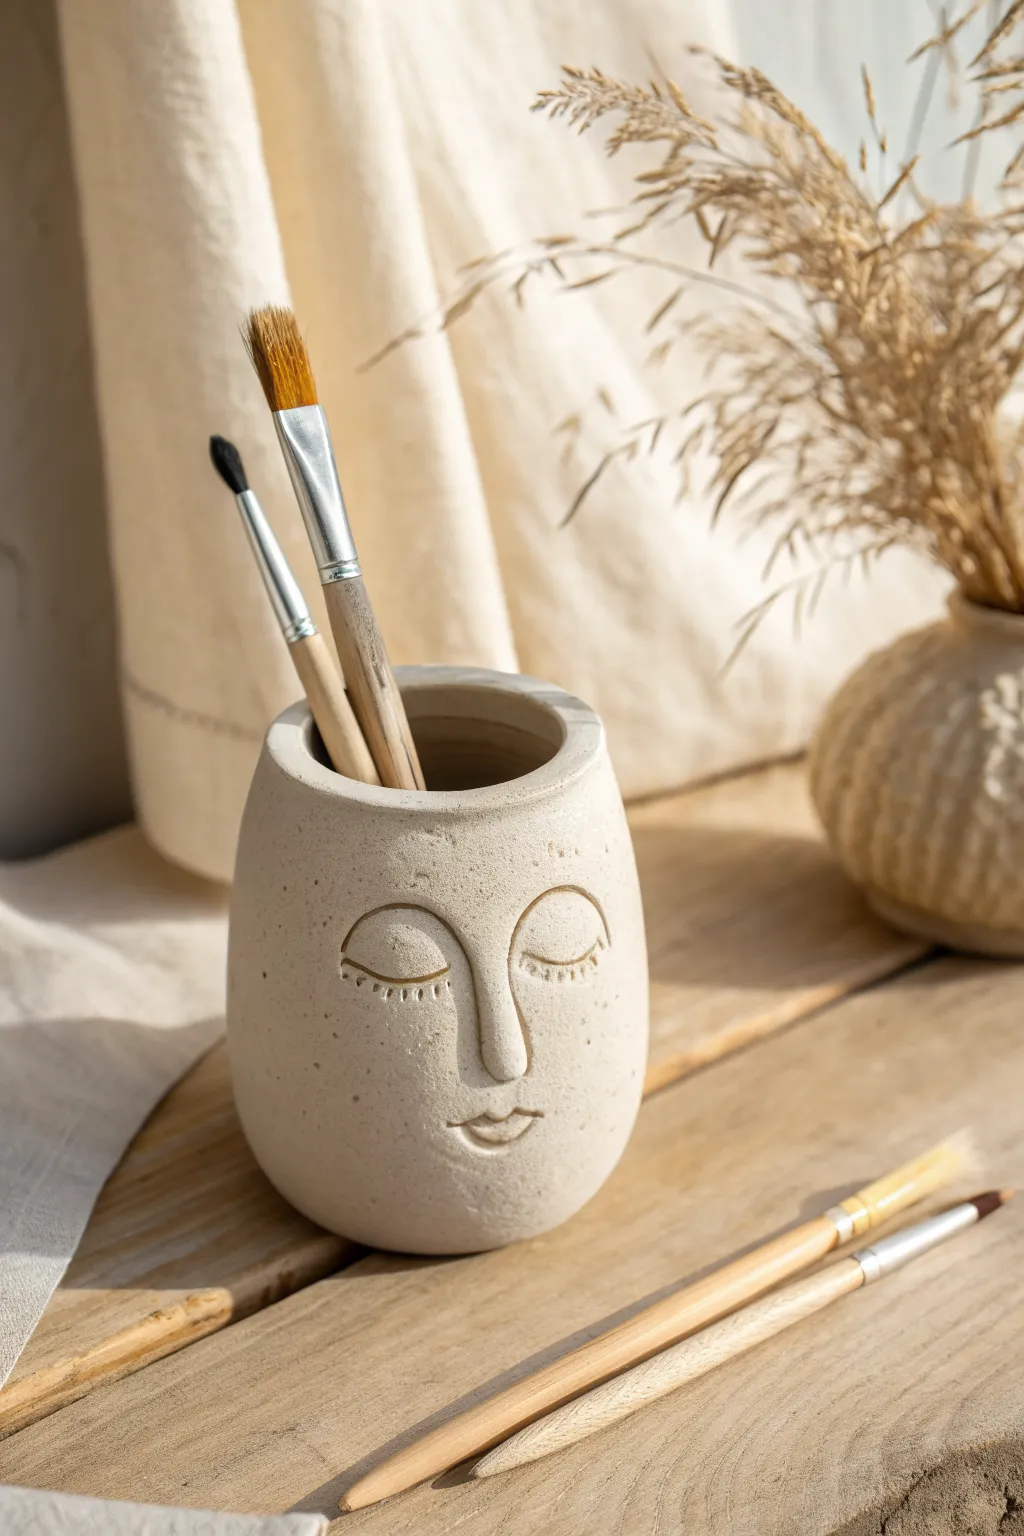
Bring a sense of calm to your workspace with this minimalist pencil cup featuring a gently sculpted face. Its speckled finish mimics the look of high-end raw stoneware, making it a trendy yet timeless addition to any desk.
Step-by-Step Guide
Materials
- Air-dry clay (white or light grey)
- Speckled clay additive (or very coarse sand/black pepper)
- Rolling pin
- Empty glass jar or cylinder vase (for mold)
- Clay knife or butter knife
- Needle tool or toothpick
- Small bowl of water
- Smooth sponge
- Clear matte varnish or sealant
- Sandpaper (fine grit)
Step 1: Preparing and Shaping the Base
-
Mix your speckles:
Before sculpting, we need to create that faux-stoneware look. If your clay isn’t pre-speckled, knead in a small amount of coarse sand or even ground black pepper into your white air-dry clay until it’s evenly distributed. -
Roll out the slab:
Roll your prepared clay into a long, rectangular slab, aiming for an even thickness of about 1/4 inch. Ensure it is long enough to wrap completely around your chosen glass jar mold. -
Cut to size:
Using a ruler and your knife, trim the rough edges of the slab to create a perfect rectangle. The height should match the desired height of your pencil cup. -
Form the cylinder:
Wrap the clay slab gently around your glass jar. I find it easiest to stand the jar up and roll the clay onto it. -
Seal the seam:
Where the two ends meet, score both edges with your needle tool (make cross-hatch marks) and dab with a little water. Press them together firmly. -
Blend the join:
Use your thumb or a modeling tool to smooth the seam until it completely disappears. Do this on the outside; the inside doesn’t need to be perfect since it will hold pencils. -
Create the bottom:
Roll a small ball of clay flat for the base. Place your cylinder on top of it, trace around the edge, and cut out the circle. -
Attach the base:
Score and slip the bottom edge of the cylinder and the edge of the base circle. Press them together and smooth the clay upward from the base onto the walls to secure the bond.
Step 2: Sculpting the Features
-
Position the nose:
Roll a small, elongated tear-drop shape of clay for the nose. Score the back of it and the center of your cup face. -
Attach and blend:
Press the nose onto the cup. Using a damp finger or small tool, blend the edges of the clay into the cup surface, smoothing it out so it looks like it’s emerging from the pot rather than just stuck on. -
Outline the eyes:
Use your needle tool or toothpick to very lightly sketch where the closed eyelids will go. Start with two simple rainbow arches symmetrically placed on either side of the nose. -
Define the eyelids:
Roll two very thin snakes of clay. Lay them over your sketched arches. Gently press them down to flatten them slightly, blending the top edge into the cup face while leaving the bottom edge distinctive to create the eyelid relief. -
Add lashes:
Using the needle tool, carefully press small vertical dashes just below the eyelid line to create the impression of eyelashes. -
Shape the mouth:
Roll a tiny bit of clay for the lips. Press it onto the face below the nose. Use the needle tool to press a horizontal line across the center to separate the upper and lower lip. -
Smooth everything:
Dip your sponge in water (wring it out well so it’s just damp) and gently wipe over the entire piece to soften any sharp tool marks and unify the texture.
Clean Lines Hack
To get super smooth eyelids without rolling snakes, simply carve deep arched lines with a U-shaped loop tool, then soften the sharp edges with a damp soft paintbrush.
Step 3: Finishing Touches
-
Remove the mold:
Let the clay set for about an hour until it’s leather-hard—firm but not dry. Carefully slide the glass jar out. If you leave it in too long, the clay might crack as it shrinks. -
Reshape the rim:
The rim might have warped slightly when removing the jar. Gently pat the top edge to make it round again and smooth the lip with a wet finger. -
Full dry:
Allow the pot to dry completely for 24-48 hours. Keep it away from direct heat sources to prevent cracking. -
Seal:
Once bone dry, apply a coat of clear matte varnish. This brings out the speckled texture and protects the clay from graphite marks.
Character Variation
Try varying the expression! Sculpt open eyes using small oval balls of clay, or add small clay balls to the side of the pot as stylistic ears for a quirky touch.
Now you have a charming artisan vessel ready to organize your creative tools
Little Toothbrush Holder Creature
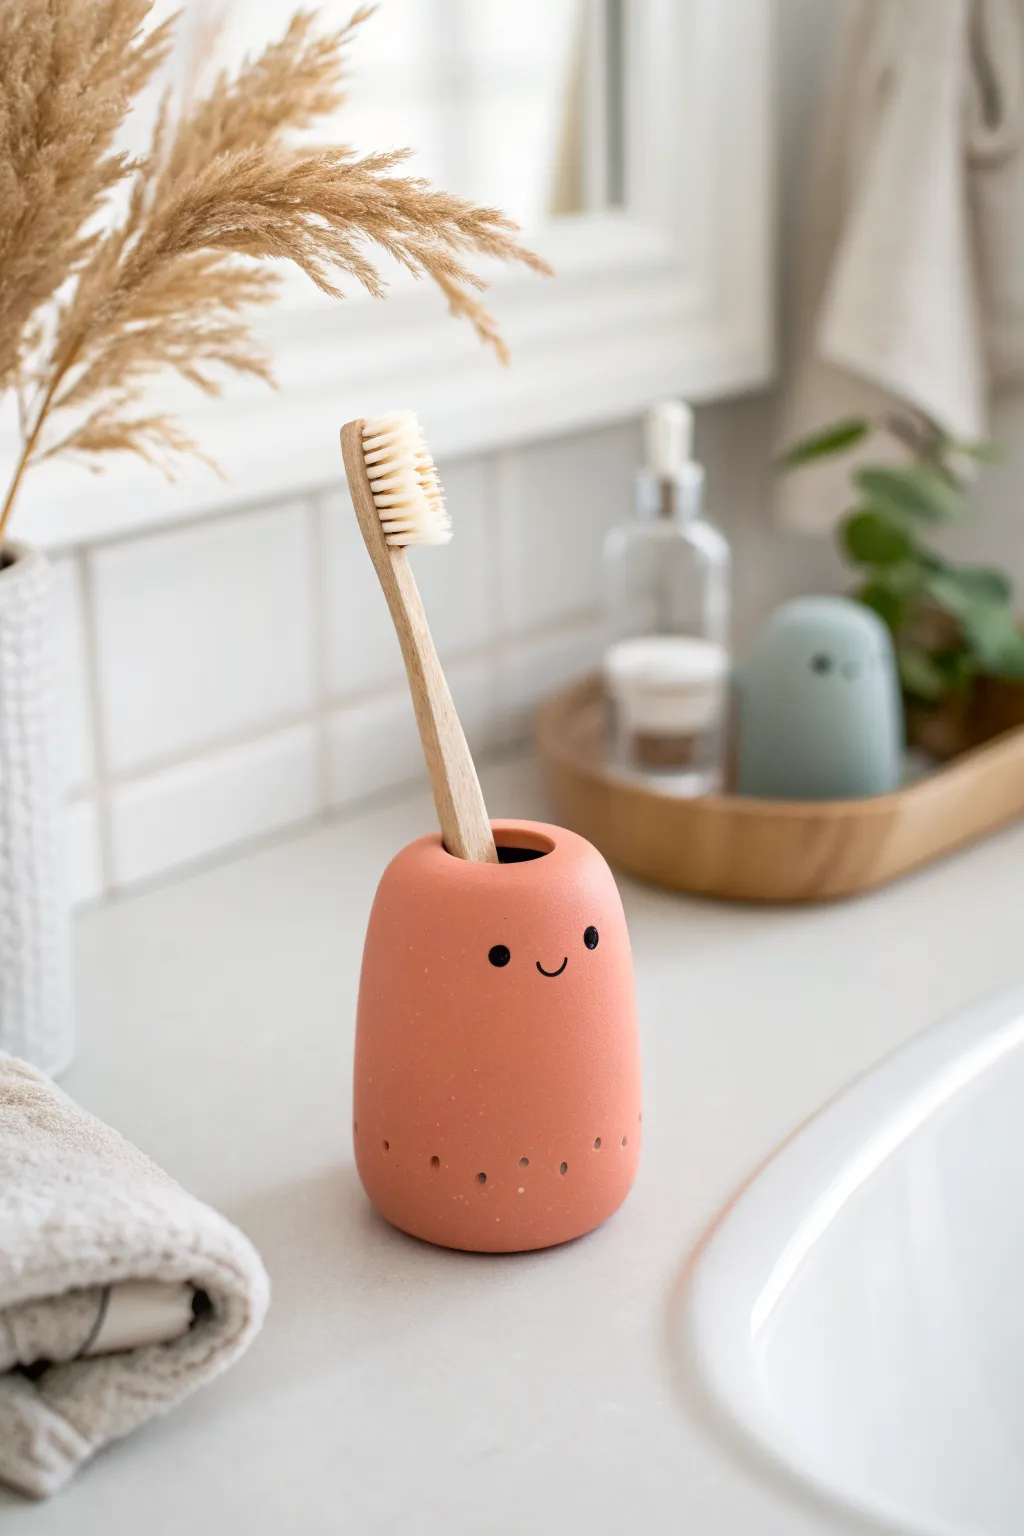
Brighten up your morning routine with this adorable clay toothbrush holder that smiles back at you. Sculpted from warm terracotta-toned clay, this functional little buddy features a sweet painted face and ventilation holes to keep your brush dry and tidy.
How-To Guide
Materials
- Polymer clay (terracotta or salmon color)
- Acrylic rolling pin
- Circle cutter (approx. 2.5 inches)
- Craft knife or clay blade
- Small round piping tip or straw (for vent holes)
- Black acrylic paint
- Fine detail paintbrush or dotting tool
- Smooth work surface (ceramic tile or glass mat)
- Oven (for baking polymer clay)
- Water or rubbing alcohol for smoothing
Step 1: Sculpting the Base
-
Condition the clay:
Begin by warming a large block of your terracotta-colored polymer clay in your hands. Knead it thoroughly until it is soft, pliable, and free of any air bubbles. -
Roll a smooth ball:
Roll the conditioned clay into a large, smooth sphere. Aim for a size slightly larger than a golf ball to ensure enough material for the walls. -
Form the cylinder:
Gently press the ball onto your work surface to flatten the bottom. Using your palms, roll the sides upward to encourage a tall, stout cylinder shape rather than a flat pancake. -
Create the opening:
Press your thumb into the center of the top of the cylinder. Create a deep well, pushing down stopping about half an inch from the bottom to leave a sturdy base. -
Widen the walls:
Use a pinching motion with your thumb inside and fingers outside to gently widen the opening. Rotate the piece constantly to keep the walls an even thickness. -
Shape the taper:
Smooth the outside so the shape is slightly wider at the bottom and tapers gently inward toward the top rim. I like to dampen my finger slightly to erase any fingerprints as I shape.
Smooth Operator
Before baking, wipe the unbaked clay with a little rubbing alcohol on a soft brush. This melts the top layer slightly, removing lint and fingerprints instantly.
Step 2: Refining and Detailing
-
Flatten the rim:
Turn the holder upside down gently and press lightly to flatten the top rim, or slice it carefully with your blade for a crisp, modern edge. -
Round the bottom edge:
Use your palms to cup and curve the very bottom edge of the cylinder so it doesn’t look like a sharp can, but rather a soft, organic stone shape. -
Smooth the surface:
Inspect the entire piece for lumps or uneven texture. Use a drop of baby oil or water on your finger to buff the clay until it has a silky, matte appearance. -
Mark the ventilation holes:
Near the bottom edge of the creature, plan a horizontal line where the vent holes will go. These help with airflow and add a decorative touch. -
Punch the unexpected holes:
Using a small tool or large needle, poke a series of small holes around the bottom circumference. Make them purposeful and evenly spaced.
Make It a Family
Create a whole set in different heights and muted colors (sage green, dusty blue) for razors and makeup brushes to create a unified vanity set.
Step 3: Baking and Finishing
-
Baking time:
Place your creation on a ceramic tile or baking sheet. Bake according to your specific clay package instructions, usually around 275°F (135°C) for 15-30 minutes. -
Cool down completely:
Allow the piece to cool completely in the oven with the door open. This prevents thermal shock and potential cracking. -
Sand for perfection:
Once cool, use fine-grit sandpaper to briefly buff away any sharp edges on the rim or bottom if needed. -
Paint the eyes:
Dip a dotting tool or the sturdy end of a paintbrush handle into black acrylic paint. Press two confident dots onto the upper third of the cylinder for eyes. -
Add the smile:
With an ultra-fine detail brush, paint a tiny, U-shaped smile right between the eyes. Keep the line thin and delicate for that minimalist look. -
Seal (optional):
If you plan to use this in a very wet bathroom environment, apply a matte waterproof varnish to the inside and outside to protect the paint and clay.
Now you have a charming little sink-side companion to start your day with a smile
Mini Photo Holder Arch
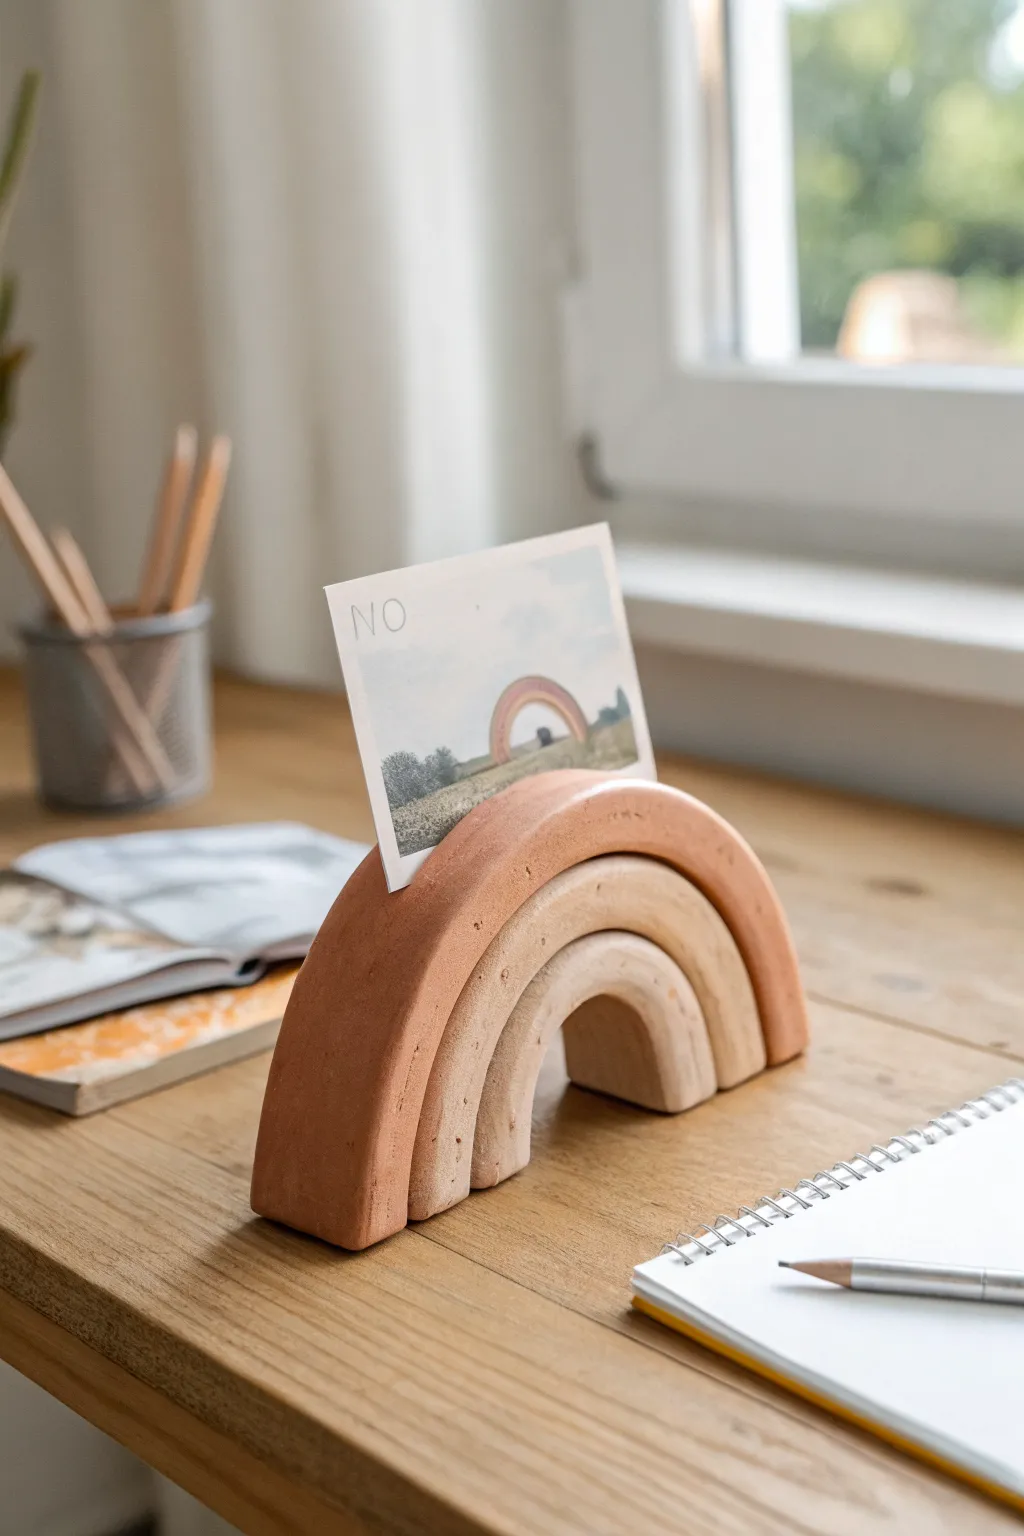
Add a touch of warmth to your desk with this minimalist clay photo holder, crafted in soothing terracotta and cream tones. This sturdy little arch serves as both a sculptural piece and a functional stand to display your favorite postcards or instant photos.
Step-by-Step
Materials
- Air-dry clay (white or natural)
- Acrylic paints (terracotta/burnt orange, beige, cream)
- Rolling pin
- Sharp craft knife or clay slicer
- Circular cutters or bowls of varying sizes
- Fine-grit sandpaper
- Water bowl and sponge
- Matte sealant or varnish
Step 1: Shaping the Arches
-
Roll the slab:
Begin by conditioning a large chunk of air-dry clay until it is pliable and smooth. Roll it out into an even slab that is roughly 3/4-inch to 1-inch thick. You want it quite chunky so it can stand upright securely. -
Cut the outer arch:
Using a large circular cutter or tracing around a bowl, cut a large semi-circle shape from your slab. This will be the outermost layer of your rainbow. -
Create the inner arches:
To create the distinct bands, use progressively smaller circular cutters or bowls to cut nested semi-circles from within your main shape. Alternatively, you can hand-cut these curves with a craft knife for a more organic feel. -
Separate the pieces:
Gently separate the three arch pieces. You should now have three individual semi-circle bands (large, medium, and small) that fit inside one another. -
Smooth the edges:
Dip your finger or a small sponge in water and run it over all the cut edges to smooth out any roughness or jagged bits. Pay special attention to the bottom flat edges so they sit flush. -
Create the slit:
Take the largest arch (the outer one). Using your craft knife, carefully slice a thin, straight line into the very top center of the arch. This slit needs to be deep enough to hold a card securely but not so deep it weakens the structure. -
Widen the gap:
Gently wiggle the blade side-to-side to widen the slit slightly, ensuring a standard postcard or photo fits comfortably. I find testing it with an actual piece of cardstock helps gauge the perfect width. -
Dry partially:
Let the pieces sit separately for about an hour to firm up slightly before assembly. This prevents them from squishing out of shape when you handle them.
Step 2: Assembling and Finishing
-
Score and slip:
Once firm but still damp, scratch up the inner curve of the large arch and the outer curve of the medium arch. Apply a little water or liquid clay (slip) to these roughed-up areas. -
Join the layers:
Press the medium arch gently inside the large arch. Repeat the process to attach the smallest arch inside the medium one. The goal is to stick them together into one solid unit while keeping the defined ‘step’ between layers. -
Full dry time:
Set the assembled rainbow upright on a flat surface to dry completely. This can take 24-48 hours depending on humidity. Rotate it occasionally to ensure even airflow. -
Sanding:
Once fully dry and hard, use fine-grit sandpaper to buff away any fingerprints or uneven bumps. Wipe away the dust with a slightly damp cloth. -
Painting the base tones:
Mix a warm terracotta hue for the outer arch. Paint this section carefully, using a flat brush to keep neat lines where it meets the next layer. -
Painting the middle layer:
Mix a soft beige or sandstone color for the middle band. Paint this section, steadying your hand to avoid overlapping onto the terracotta. -
Painting the center:
Use a creamy white or pale oatmeal shade for the smallest, innermost arch. This gradient effect gives the piece its gentle, organic look. -
Adding texture:
For a stone-like finish, you can dilute a tiny bit of brown paint and strictly ‘splatter’ it on with an old toothbrush, or simply leave the matte paint as is for a clean look. -
Seal the project:
Finish with a coat of matte spray varnish or sealant. This protects the paint from chipping and makes dusting easier later on.
Clean Cuts Hack
If your clay drags when slicing the photo slit, let the clay dry to a ‘leather hard’ state first, then cut. It will slice much cleaner like hard cheese.
Cracking Up?
If small cracks appear while drying, mix a tiny bit of fresh clay with water to make a paste and fill them in. Sand smooth once dry.
Place your favorite memory in the holder and allow the warm earth tones to brighten your workspace
Tiny Incense Holder Pebble
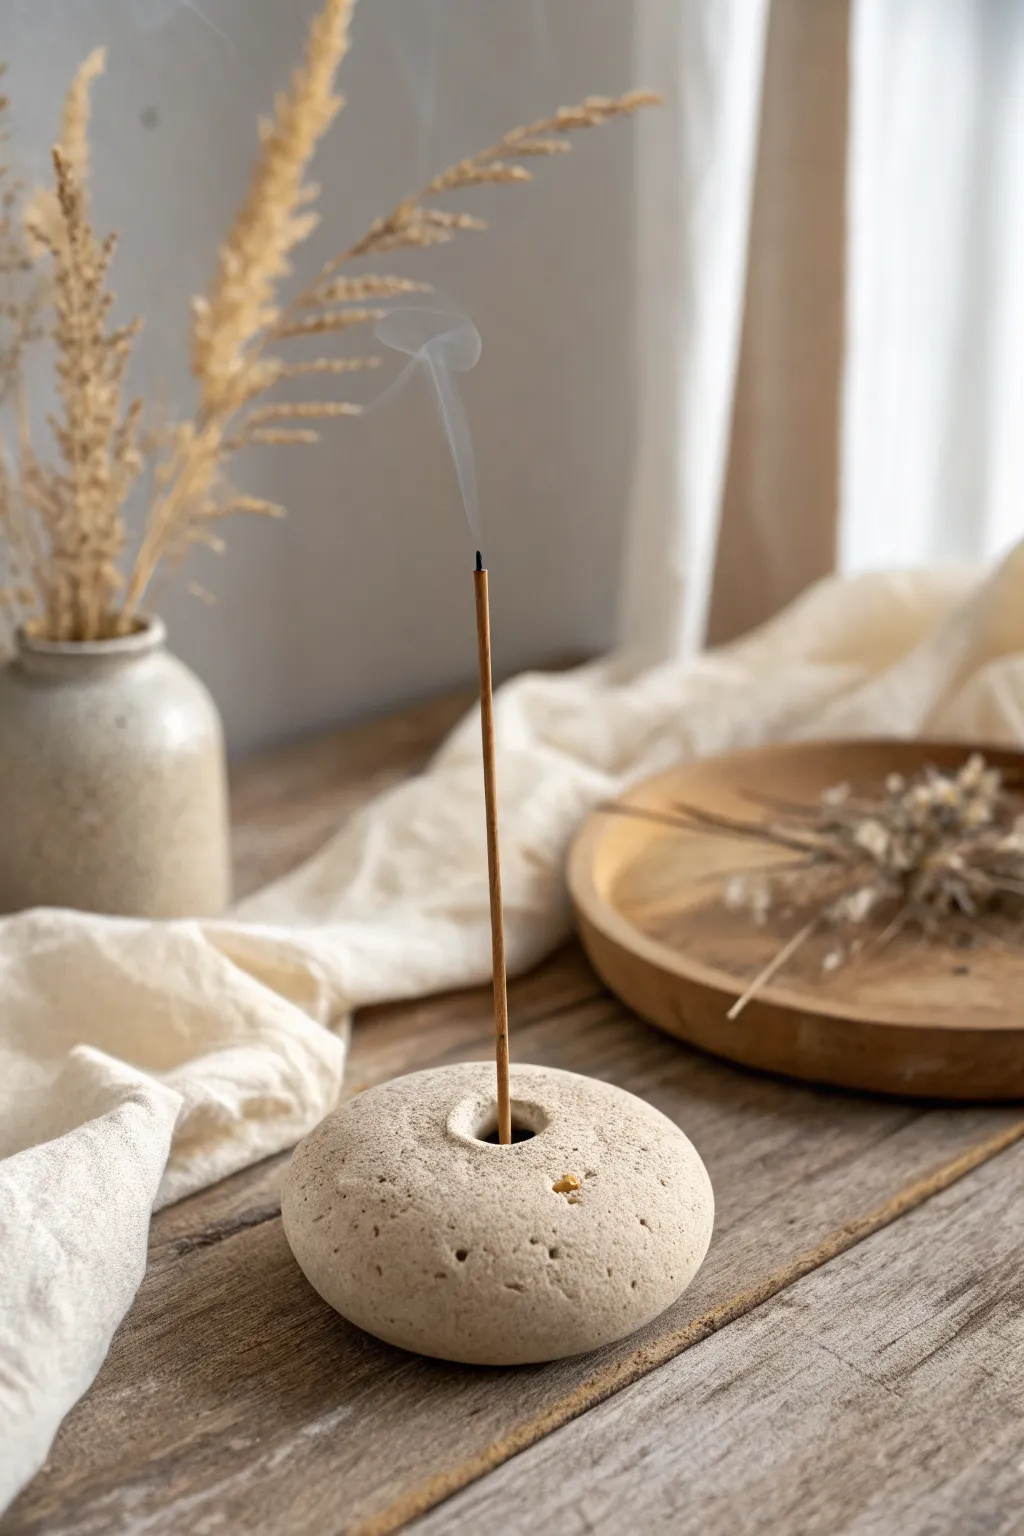
Bring a touch of minimalist serenity to your space with this incredibly simple incense holder that mimics the organic texture of river stones. Using air-dry clay and natural speckling, you’ll sculpt a beautiful, functional object that looks like it was found on a quiet beach.
Detailed Instructions
Materials
- White or light grey air-dry clay
- Used coffee grounds or fine craft sand (for texture)
- Incense stick (for sizing)
- Small bowl of water
- Fine-grit sandpaper (400 grit is ideal)
- Matte spray varnish or acrylic sealer
- Toothpick or skewer
- Rolling pin or smooth jar (optional)
- Sponge
Step 1: Prepping the Clay
-
Condition the clay:
Start by taking a chunk of air-dry clay roughly the size of a golf ball. Knead it in your hands for a minute or two to warm it up and ensure it’s pliable and free of air bubbles. -
Add texture:
To achieve that authentic stony look seen in the photo, flatten your clay slightly and sprinkle in a pinch of dried coffee grounds or fine dark sand. Fold the clay over and knead it again until the speckles are evenly distributed throughout the mass. -
Form the base shape:
Roll the clay between your palms into a smooth, tight sphere. Ensure there are no major cracks or seams on the surface.
Stone Effect Secret
Mix two slightly different shades of clay lightly (don’t over-blend) before forming your ball. This creates subtle marbling that looks incredibly realistic like real geology.
Step 2: Sculpting the Pebble
-
Flatten precisely:
Place your clay sphere on your work surface. Gently press down with the palm of your hand to flatten it into a thick disc. You want it to look like a slightly flattened river stone, not a pancake, so keep some nice height to it. -
smooth the edges:
Dip your finger in a little bit of water and run it around the circumference of the disc. Work out any cracks that formed during flattening. -
Refine the profile:
Pick up the clay and gently tap the edges against the table while rotating it. This helps create that perfectly rounded, soft curve rather than a sharp edge. -
Create the center hole:
Using an actual incense stick (the non-burning end) or a skewer of similar thickness, press directly into the center of the pebble. -
Check the angle:
Push the stick about halfway through the clay, but be careful not to poke through the bottom. Wiggle it ever so slightly to make the hole just a hair wider than the stick, allowing for shrinkage as the clay dries. -
Add surface pits:
For that eroded stone effect, take a toothpick or a stiff bristle brush and gently poke a few tiny, random shallow holes on the surface. Don’t overdo it; just a few clusters look most natural. -
Final smoothing:
Give the piece one last wipe with a barely-damp sponge to soften any sharp ridges around the hole you just made.
Level Up: Mineral Veins
Before drying, press a very thin, jagged line of gold leaf or metallic paint into a crack to mimic Kintsugi or a natural quartz vein running through the stone.
Step 3: Finishing Touches
-
Let it dry:
Place the holder on a drying rack or a piece of parchment paper. Let it air dry completely for 24-48 hours. I find flipping it over halfway through helps the bottom dry evenly. -
Sand for smoothness:
Once fully dry and hard, take your fine-grit sandpaper and lightly buff the surface. Focus on any fingerprints or rough spots, making the clay feel smooth to the touch. -
Dust off:
Wipe away all the sanding dust with a dry cloth or soft brush so the surface is clean. -
Seal the piece:
Apply a coat of matte spray varnish. This protects the clay from ash stains and moisture without making it look glossy or plastic. -
Second coat:
After the first coat is dry, add a modest second coat for extra durability. -
Clear the airway:
Before the varnish fully cures, double-check your center hole with the incense stick one last time to ensure no varnish has clogged the opening.
Place your favorite scent in the holder and enjoy the peaceful atmosphere you’ve crafted by hand
Easy Stamp-Texture Trinket Tiles
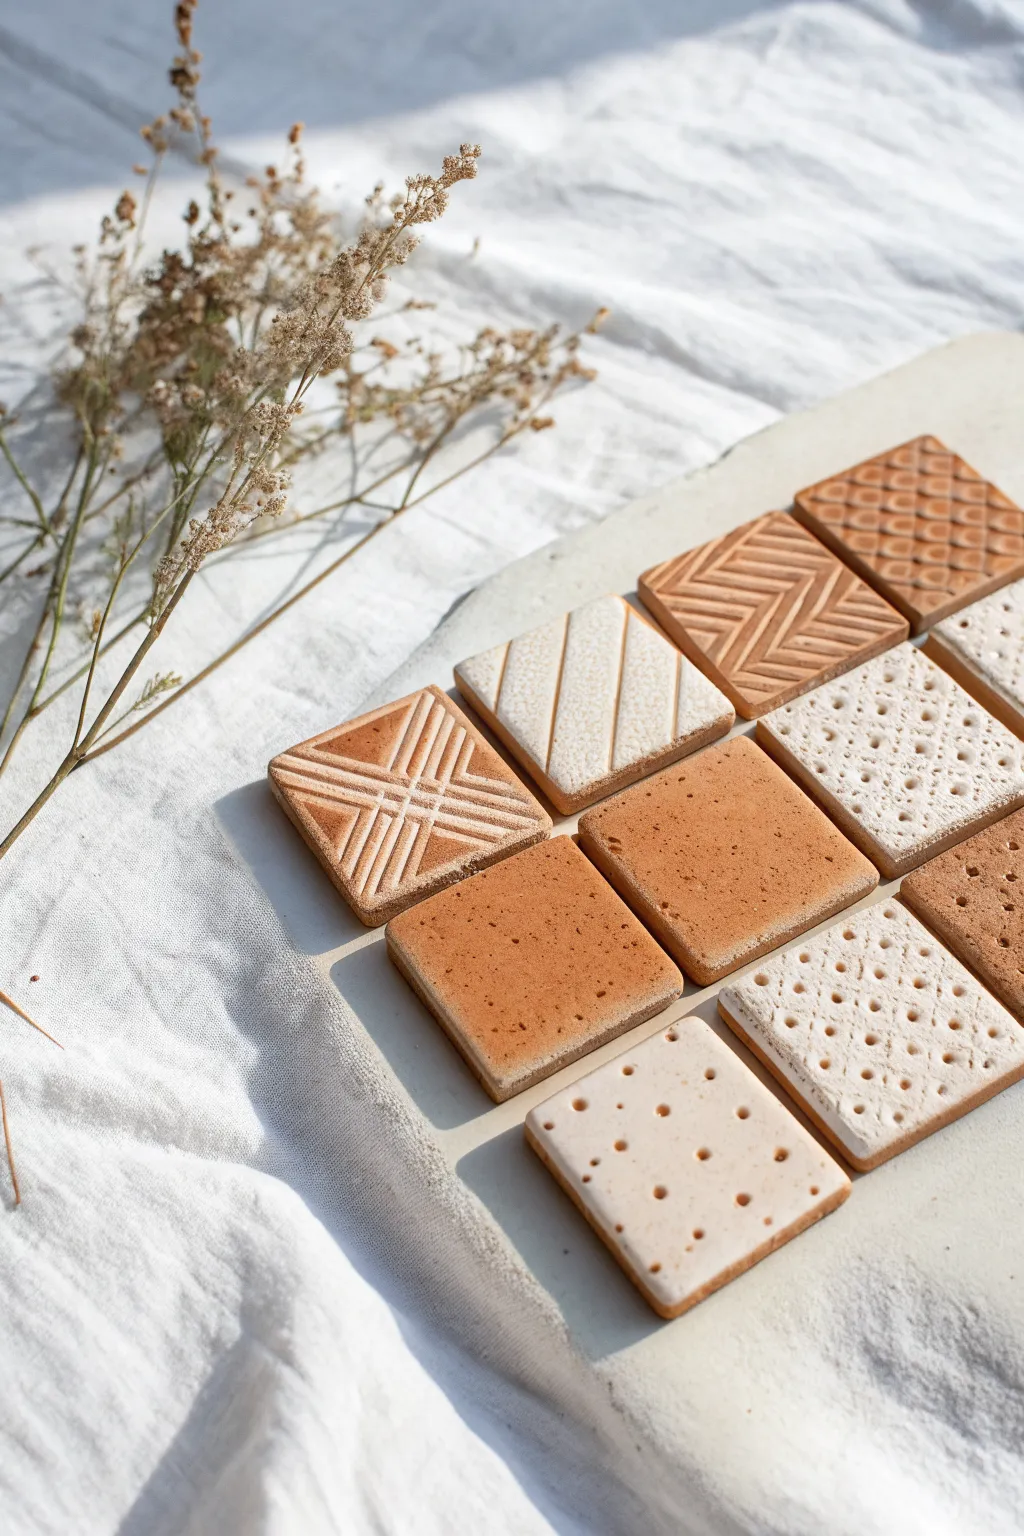
These miniature geometric tiles showcase the beauty of simple patterns and warm, earthy tones. By combining terracotta and white clay with everyday textures, you can create a sophisticated set of decorative trinket coasters or mosaic pieces.
Step-by-Step
Materials
- Terracotta-colored polymer clay
- White or cream polymer clay (or translucent for a softer look)
- Square clay cutter (approx. 1.5 – 2 inches)
- Acrylic rolling pin
- Depth guides or playing cards (to ensure even thickness)
- Texture tools: Toothpicks, clean combs, mesh fabric, or dedicated texture stamps
- Baking sheet lined with parchment paper
- Fine-grit sandpaper (400-600 grit)
- Matte spray varnish (optional)
Step 1: Preparation & Base Creation
-
Condition the terra clay:
Begin by warming the terracotta-colored clay in your hands. Knead and fold it repeatedly until it is soft, pliable, and free of cracks. This ensures the clay will take the texture impressions cleanly. -
Condition the white clay:
Clean your hands or wear gloves to avoid color transfer, then repeat the conditioning process with the white or cream clay. You want both clays to have a similar consistency. -
Roll out the slab:
Place your conditioned clay on a smooth work surface. Use your acrylic roller and depth guides (about 3mm or 1/8 inch thick) to roll out an even sheet of the terracotta clay. -
Roll the second color:
Do the same for the white clay, ensuring it matches the thickness of the terracotta slab perfectly so your final tiles look uniform.
Sticky Situation?
If clay sticks to your texture tools or cutter, dip the tool in a little cornstarch or water before pressing it into the clay. This acts as a release agent for clean lines.
Step 2: Texturing Techniques
-
Create the grid pattern:
For the cross-hatch look shown in the image, gently press a clean wire mesh or a specific grid texture mat into a section of the terracotta clay. Apply even pressure so the lines are distinct but don’t cut all the way through. -
Make the chevron lines:
Use a dull craft knife or a credit card edge to press diagonal lines into the clay. Create a V-shape pattern by alternating the direction of the lines, spacing them closely together. -
Add dotted details:
Switch to the white clay sheet. Take a toothpick or a small dotting tool and press rows of varied depth dots. For the specific look in the photo, create a grid of larger dots and fill the spaces with tiny pin-pricks. -
Try a linear relief:
On a fresh section of white clay, use a needle tool to drag or press parallel diagonal lines. I sometimes like to press a strip of textured fabric here for a more subtle, organic grain. -
Leave some plain:
Don’t texture everything. Save some sections of the rolled clay to be perfectly smooth. These plain tiles act as visual breaks and highlight the speckled nature of the clay itself.
Step 3: Cutting & Refining
-
Cut the squares:
Position your square cutter over your textured areas. Press down firmly and swiftly to cut the shape. Wiggle slightly to separate the cut piece from the surrounding clay, then lift. -
Smooth the edges:
Gently pick up each cut tile. Use your finger to soften the sharp cut edges slightly, removing any loose clay bits without distorting the square shape. -
Create the ‘speckle’ effect (Optional):
If you want the ‘salt and pepper’ look seen on the plain tiles, sprinkle a tiny amount of ground black pepper or dried coffee grounds onto the plain clay and roll over it once more before cutting. -
Transfer to baking sheet:
Carefully move your raw tiles onto a baking sheet lined with parchment paper. Ensure they are flat and not touching each other.
Make It Magnet
Turn these into functional decor by gluing strong neodymium magnets to the back. A cluster of these textured squares looks amazing on a refrigerator or magnetic board.
Step 4: Baking & Finishing
-
Bake the batch:
Bake in a preheated oven according to your polymer clay package instructions (usually around 275°F or 130°C). Bake for at least 30 minutes to ensure durability. -
Cool down:
Allow the tiles to cool completely on the baking sheet. They will harden fully as they return to room temperature. -
Sand the edges:
Once cool, take a piece of fine-grit sandpaper and lightly rub the edges of the tiles to remove any tiny imperfections or sharp corners. -
Seal (Optional):
If you plan to use these as magnets or coasters, a light coat of matte spray varnish will protect them from dirt without making them unnaturally shiny.
Arrange your finished tiles in a grid or stack them up to enjoy the interplay of matte textures and natural colors
Stackable Oval “Bean” Characters
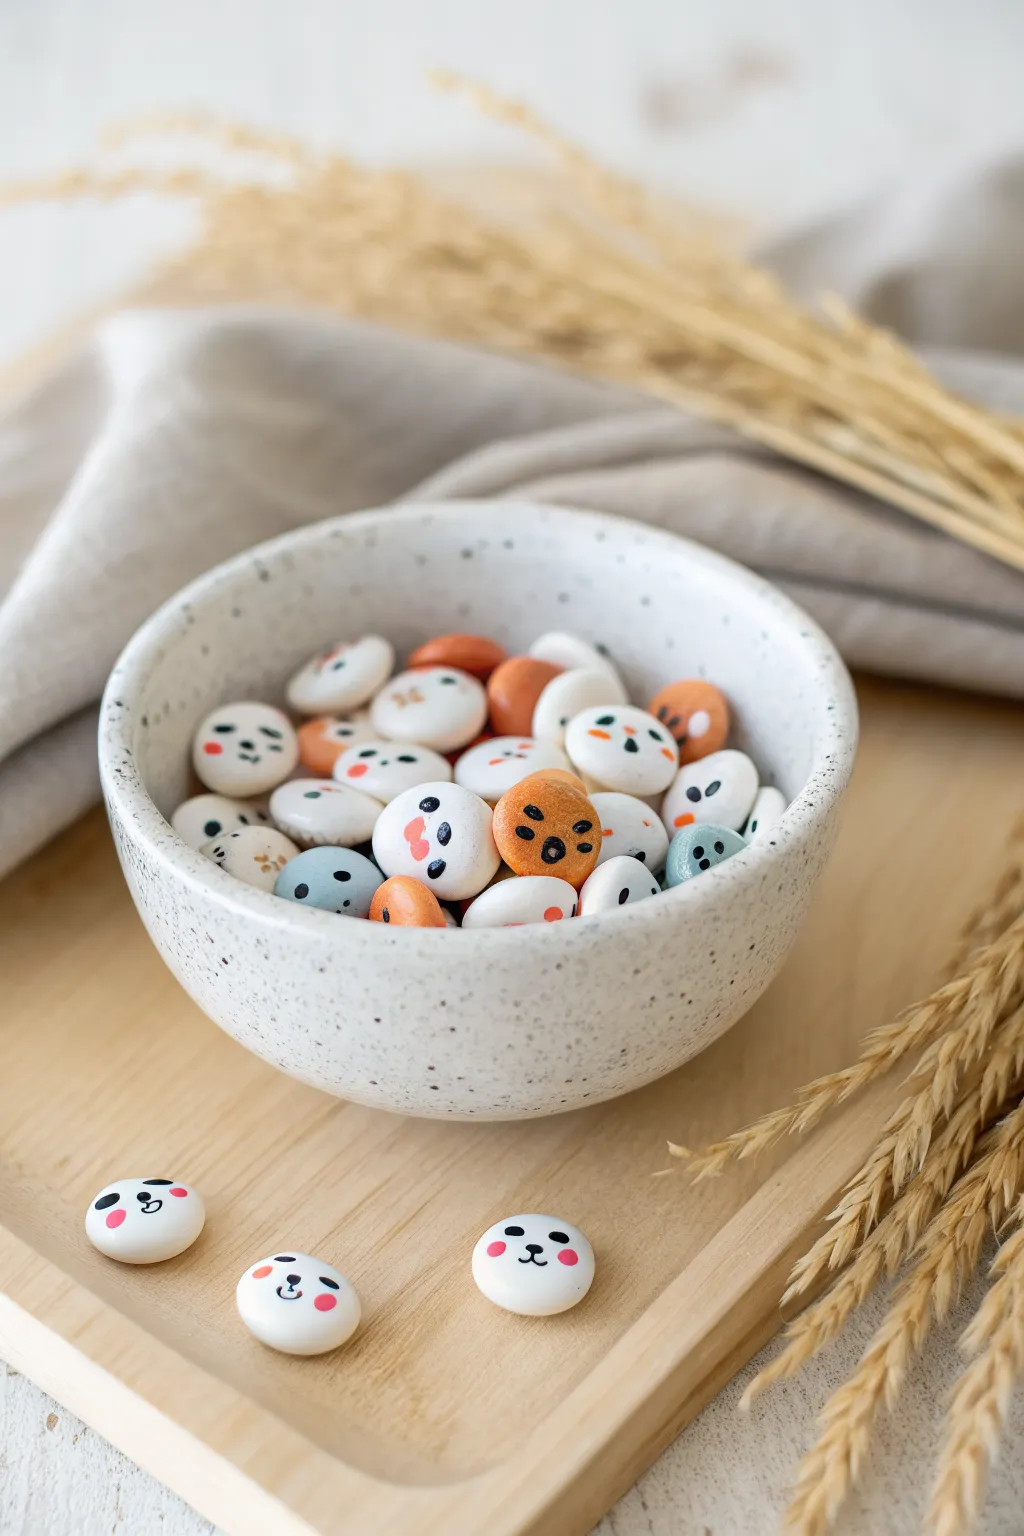
These adorable, smooth little pebbles are bursting with personality and make perfect desk companions or tiny game tokens. With a soft matte finish and simple kawaii expressions, each bean character brings a unique charm to the bowl.
How-To Guide
Materials
- White air-dry clay or polymer clay
- Acrylic paints (orange, dusty blue, soft pink, black)
- Fine-grit sandpaper
- Fine-point detail paintbrush or dotting tool
- Rolling pin or smooth flat object
- Matte sealant or varnish
- Small bowl specifically for clay work
Step 1: Shaping the Base
-
Condition the clay:
Start by kneading your white clay until it is warm, pliable, and free of cracks. If you are using polymer clay, this might take a few minutes to get the perfect consistency. -
Portion the pieces:
Pinch off small pieces of clay, roughly the size of a marble or a large hazelnut. Aim for variety in size to make the group look organic. -
Create the oval shape:
Roll each piece into a smooth ball between your palms first to eliminate seams. Then, gently press and roll slightly back and forth to elongate it into a chubby oval or bean shape. -
Flatten slightly:
To ensure faces can be painted easily and they don’t roll away unpredictably, gently press the bean against your work surface to flatten the ‘face’ side and the back just a tiny bit. -
Refine the edges:
Use your fingertip to smooth out any fingerprints or sharp edges. The goal is a look similar to a tumbled river stone.
Step 2: Coloring and Baking/Drying
-
Divide the batch:
Decide how many beans will remain white and how many will be colored. The example shows mostly white beans with accents of orange and blue. -
Tinting clay (Optional method):
If you prefer solid colored clay, knead a very small drop of acrylic paint into the raw white clay *before* shaping to create pastel orange and blue beans. This keeps the finish very smooth. -
Cure the clay:
If using polymer clay, bake according to the package instructions (usually 275°F/135°C for 15-30 mins). If using air-dry clay, set them aside on a piece of parchment paper for 24-48 hours until fully hard. -
Sand for smoothness:
Once fully cured or dry, lightly sand any rough spots or fingerprints with fine-grit sandpaper. I find this creates the perfect professional canvas for the tiny faces.
Smudged Faces?
If your black paint lines are too thick or smudge, let it dry completely, then gently scratch the mistake off with a craft knife or sandpaper before trying again.
Step 3: Adding Personality
-
Paint base colors:
If you didn’t tint the raw clay, paint your chosen beans with matte acrylic paint now. Use dusty orange and muted blue tones. It may require two thin coats for opacity. -
Draft the faces:
Before committing with paint, you can lightly sketch face placement with a pencil. Keep the features centered or slightly low on the oval for a cute aesthetic. -
Paint the eyes:
Using your finest brush or a toothpick, dip into black paint. Create small dots for eyes. Vary them—some wide set, some close together. -
Add mouths and noses:
Add tiny lines for mouths. Try simple smiles, tiny ‘o’ shapes, or little cat-style ‘w’ mouths. Keep the lines very thin. -
Apply rosy cheeks:
Dip a toothpick or the back end of a brush into soft pink paint. Place two small dots under the eyes. This signature detail brings them to life. -
Let the paint set:
Allow the facial features to dry completely to avoid smearing them during the sealing process. -
Seal the beans:
Apply a coat of matte varnish over each bean. A glossy finish works too, but the matte finish mimics the stone-like texture shown in the image best.
Make them Magnetic
Before the clay dries or bakes, press a small, strong neodymium magnet into the back of each bean to turn them into an adorable fridge magnet set.
Fill a small ceramic bowl with your new friends and enjoy their company on your workspace
Mini Domino Set
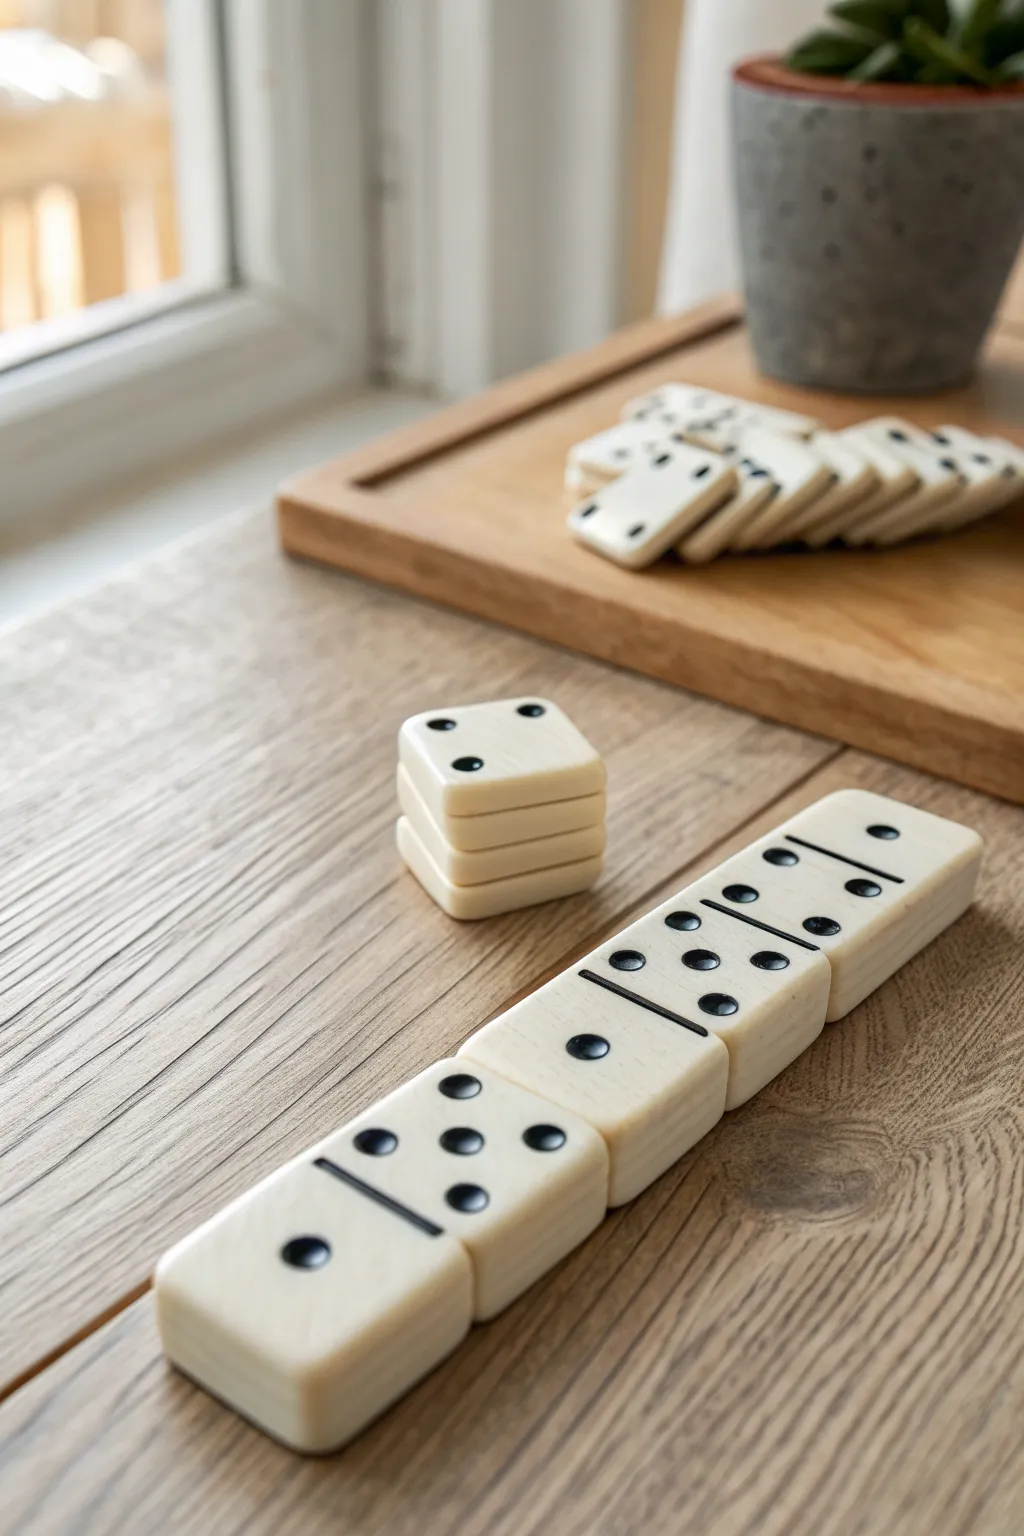
Transform a simple block of clay into a classic tabletop game with this elegant, minimalist project. These smooth, cream-colored tiles feature crisp black dots and a substantial, polished feel that makes gameplay satisfyingly tactile.
Step-by-Step
Materials
- Polymer clay (cream, vanilla, or porcelain color)
- Black acrylic paint
- Rolling pin or clay machine
- Sharp clay blade or X-Acto knife
- Ball stylus tool (small size)
- Fine-grit sandpaper (400-800 grit)
- Ruler
- Parchment paper or ceramic tile (for baking)
- Optional: Gloss or matte varnish
- Small detail paintbrush
Step 1: Shaping the Tiles
-
Condition the clay:
Start by warming the cream-colored polymer clay in your hands. Knead it thoroughly until it is soft, pliable, and free of any air bubbles or cracks. -
Roll a slab:
Roll out the clay on a clean, flat surface to a uniform thickness. You want these to be chunky and durable, so aim for a thickness of about 1/4 inch (6mm). Using a clay machine here ensures perfect uniformity. -
Cut the master strip:
Use your ruler and a sharp blade to cut a long, straight strip of clay. The width of this strip will determine the width of your dominoes, ideally around 1 inch across. -
Measure individual tiles:
Mark off increments along your strip to create rectangular tiles. Standard dominoes are twice as long as they are wide, so if your width is 1 inch, mark every 2 inches. -
Slice the tiles:
Pressing straight down with your blade to avoid dragging the clay, cut along your marks to separate the individual tiles. You will need a standard set of 28 tiles for a double-six set. -
Soften the edges:
Gently tap the cut edges with your finger or the flat side of your blade to round them slightly. This removes the harsh ‘cut’ look and mimics the molded edges of real plastic or bone dominoes.
Step 2: Detailing and Baking
-
Create the dividing line:
Using the back of your knife blade or a straight edge, gently press a shallow indentation across the center of each tile to separate the two number fields. -
Impress the pips:
Use a small ball stylus to press the dots (pips) into the clay. Consult a domino chart to ensure you create the correct number combinations, from double-blank up to double-six. -
Deepen the impressions:
I like to wiggle the tool slightly in a circular motion to make the holes clean and deep enough to hold paint later without overflowing. -
Inspect and refine:
Look over each tile for lint or fingerprints. Smooth away imperfections with a drop of baby oil on your finger if necessary. -
Bake the batch:
Arrange the tiles on parchment paper or a ceramic tile. Bake according to your polymer clay package instructions—usually around 275°F (135°C) for 30 minutes for this thickness. -
Cool down:
Allow the tiles to cool completely in the oven with the door cracked, or remove them and let them sit until hard. Do not handle them while hot, as they can be fragile.
Clean Cuts Pro Tip
Chill your rolled slab of clay in the fridge for 15 minutes before cutting. The firmer clay resists distortion, giving you much sharper, straighter edges on your rectangular tiles.
Step 3: Finishing Touches
-
Sand for smoothness:
Once cool, lightly sand the sides and back of each tile with fine-grit sandpaper to give them a professional, buttery-smooth finish. -
Paint the pips:
Dip a fine detail brush into black acrylic paint. Carefully fill each indented dot and the center dividing line. Don’t worry if go slightly outside the lines. -
Clean up excess paint:
If you got paint on the surface, wait for it to dry slightly, then carefully scrape the excess away with your fingernail or a damp Q-tip for a crisp edge. -
Seal the deal:
For extra durability, apply a thin coat of matte or satin varnish to seal the paint and protect the clay from dirt and oils during gameplay.
Vintage Patina Level Up
Instead of bright black paint, use a dark brown wash and wipe it back. This accumulates in the crevices, giving the dominoes an aged, antique bone or ivory appearance.
Enjoy the satisfying clack of your handmade tiles during your next game night
Tiny Mushroom Shelf Decor
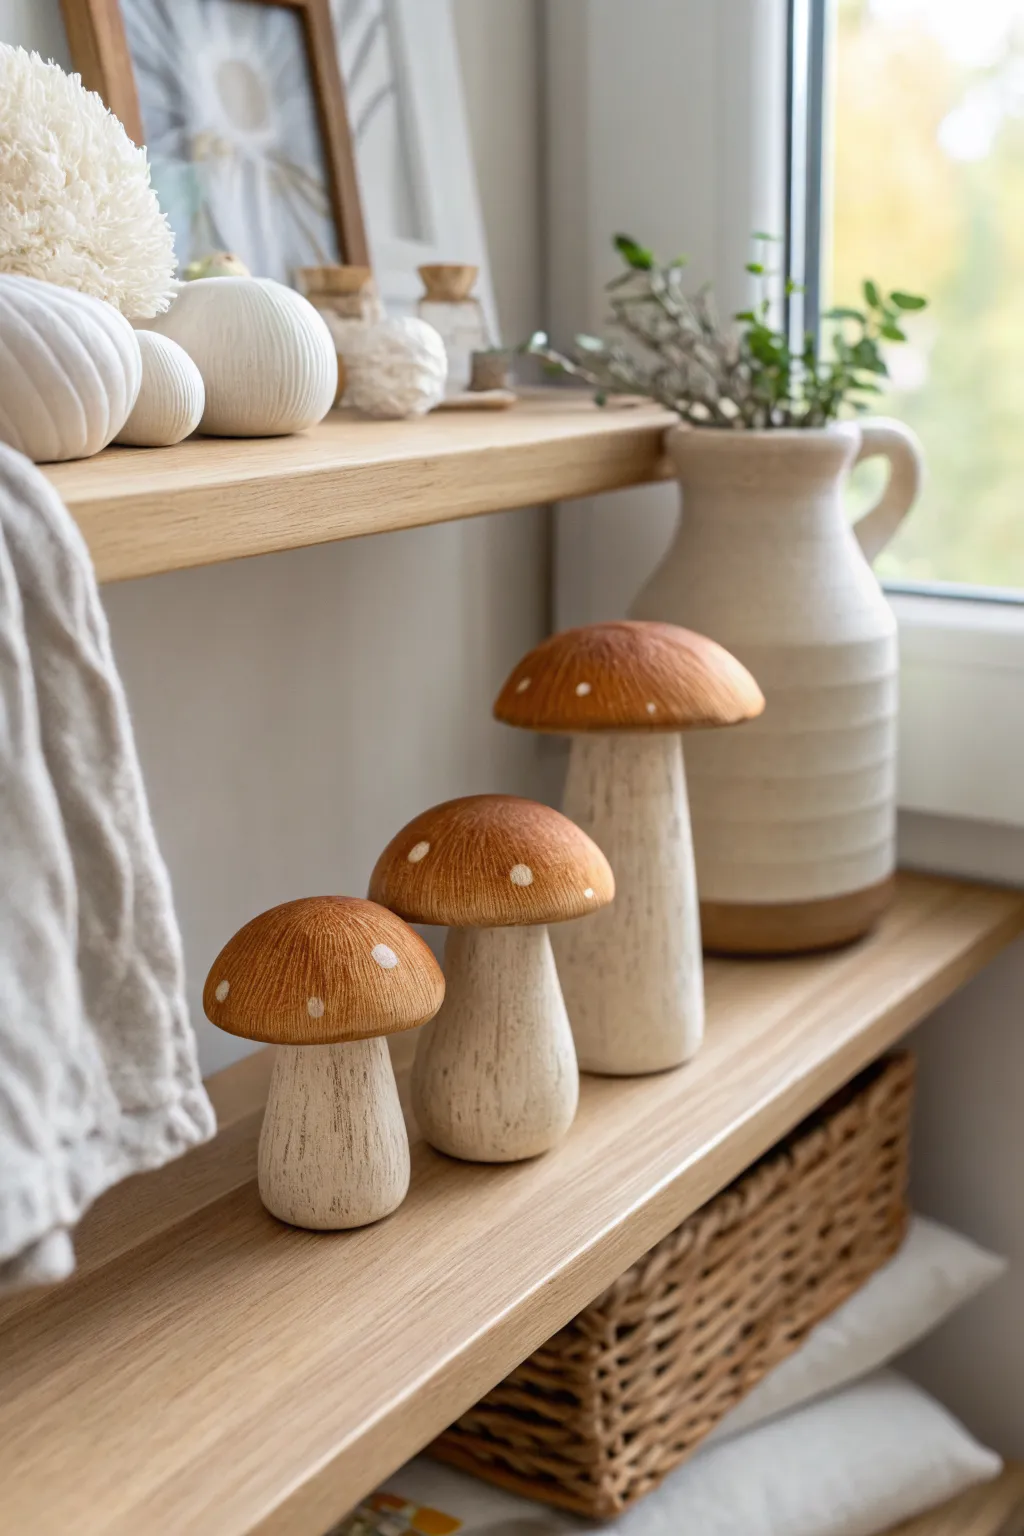
Bring the calming spirit of the autumn woods indoors with this charming trio of clay mushrooms. Featuring textured stems and warm, chestnut-brown caps speckled with white, these decorations add a perfect touch of hygge to any shelf or windowsill.
Step-by-Step Tutorial
Materials
- Air-dry clay (white or terracotta)
- Wooden skewers or toothpicks (for structural support)
- Aluminum foil
- Acrylic paints (Chestnut brown, Off-white/Cream, Dark Grey)
- Stiff bristle paintbrush
- Fine detail paintbrush
- Sculpting tools (or a plastic knife/needle tool)
- Sandpaper (fine grit)
- Matte varnish or sealant
Step 1: Sculpting the Shapes
-
Create the core:
To save on clay and reduce weight, crumple small pieces of aluminum foil into three distinct cone shapes for the stems and three thick pancake shapes for the caps. Make them in graduating sizes—small, medium, and large. -
Prepare the stems:
Cover the foil stems with a layer of clay about 1/4 inch thick. Roll the stems on your work surface to smooth them out, keeping the bottoms slightly wider than the tops for stability. -
Add texture:
Before the clay dries, take a needle tool or a stiff brush and drag it vertically down the length of the stems. This creates the striated, bark-like texture seen in the photo. -
Form the caps:
Cover your foil cap armatures with clay. Smooth the tops perfectly into rounded domes, curving the edges underneath slightly to create a lip. -
Connect the pieces:
Insert a toothpick or shortened skewer halfway into the top of each wet stem. Push the corresponding cap onto the protruding wood carefully. I find adding a dab of water or slip (clay mixed with water) at the join helps it bond securely. -
Refine the underside:
Use a sculpting tool to blend the clay slightly where the stem meets the cap underneath, ensuring there are no large gaps. -
Let it dry:
Allow your mushrooms to dry completely. Since the clay is relatively thick, this may take 24-48 hours. Turn them occasionally to ensure even airflow.
Step 2: Painting and Finishing
-
Base coat the stems:
Paint the stems with a coat of off-white or cream acrylic paint. Don’t worry about perfect coverage; the texture you carved earlier will help create depth. -
Add stem definition:
Mix a very watery wash of dark grey or brown paint. Brush this over the dried cream stems and immediately wipe it back with a paper towel. The dark pigment will stay in the carved grooves, highlighting the wood-like texture. -
Paint the caps:
Apply two coats of chestnut brown acrylic paint to the mushroom caps. Let the first coat dry fully before adding the second for a rich, opaque color. -
Distress the edges:
Once the brown paint is dry, use a piece of fine-grit sandpaper to very lightly sand the rim of the mushroom caps. This reveals a bit of the lighter clay/base underneath for a weathered look. -
Dot the details:
Using a fine detail brush or the wrong end of a paintbrush, dip into your cream paint. Carefully press small, imperfect dots onto the brown caps. -
Vary the pattern:
Place the dots randomly—some near the rim, some near the center—to make them look organic rather than strictly geometric. -
Seal the work:
Finish by applying a layer of matte varnish over the entire piece. This protects the paint and unifies the sheen without making them look like shiny ceramic.
Natural Texture
For even more realistic stem texture, gently press a real piece of dried wood or bark against the wet clay before sculpturing the vertical lines.
Make it Magical
Swap the brown cap color for a classic red with white dots, or go moody with dark purple caps and gold dots for a fall fantasy vibe.
Arrange your finished trio on a bookshelf alongside some dried flowers to complete your cozy autumn display
Mini Desk Calendar Buddy
This adorable mini desk calendar features a chunky, cheerful frog guarding your daily dates. Sculpted from polymer clay with a soft matte finish, it combines the functionality of perpetual date blocks with a cute, speckled amphibian friend.
Step-by-Step Guide
Materials
- Light green polymer clay
- White polymer clay
- Black polymer clay
- Acrylic paint (black and brown)
- Fine-point paintbrush or toothpick
- Clay sculpting tools (needle tool, ball stylus)
- Small square clay cutter (optional)
- Ruler
- Sandpaper (fine grit)
- Matte varnish or sealant
- Oven for baking
Step 1: Sculpting the Calendar Blocks
-
Measure and specific sizing:
Start by conditioning your white polymer clay until it is soft and malleable. Roll the clay into a thick, even slab, aiming for a thickness of about 1.5 cm (approx. 0.6 inches). -
Cut the cubes:
Using a square cutter or a sharp blade and ruler, cut out four identical cubes. The cubes shown are roughly 1.5 cm on all sides, but you can adjust the size as long as they serve as stable building blocks. -
Smoothing the edges:
Gently tap each side of the cubes on your work surface to flatten them. Use your finger to soften the sharp corners slightly so they look like tumbled stone or worn dice. -
Partial bake (optional):
If you are worried about squishing the cubes while working on the frog, you can bake them now for 15 minutes to set their shape. Otherwise, set them aside carefully.
Step 2: Creating the Frog Character
-
Forming the body:
Take a walnut-sized ball of light green clay and roll it into a smooth, slightly flattened teardrop shape. This will be the main body. The base should be wide enough to stand securely on its own. -
Adding the arm:
Roll a small snake of green clay for the arm. Attach it to the side of the body, curving it so the ‘hand’ rests on the belly. Blend the shoulder seam smoothly into the body using a sculpting tool so it looks like one piece. -
Making the other side:
Since the frog is leaning against the heavy blocks in the finished piece, gently flatten the left side of the frog’s body where it will make contact with the calendar cubes to ensure a snug fit later. -
Sculpting the eye sockets:
Roll two small balls of green clay and attach them to the top of the head for the eye mounds. Blend the bottom edges of these mounds onto the head for a seamless transition. -
Adding the eyes:
Press a small indentation into the center of each green eye mound using a ball tool. Roll two tiny balls of white clay, flatten them slightly, and press them into the sockets. Add a minuscule dot of black clay to the center of each for the pupils. -
Carving the mouth:
Use a needle tool or a thin blade to press a long, shallow curve across the face to create the wide mouth. Ensure the cut is clean and slightly upturned at the corners for a subtle smile. -
Adding the speckles:
To create the texture shown, use a needle tool to gently poke shallow, tiny holes or indentations across the frog’s skin. Alternatively, create tiny specks with white acrylic paint after baking.
Wobbly Blocks?
If your cubes aren’t sitting flush, tape a piece of sandpaper to your table and gently rub the bottom of the baked cube against it in a circular motion until perfectly flat.
Step 3: Painting and Finishing
-
Baking the project:
Arrange the frog and the blocks on a baking sheet. Follow the temperature instructions on your clay package carefully. I usually bake for about 30 minutes to ensure durability. -
Cooling and sanding:
Allow everything to cool completely. If your blocks have fingerprints or uneven sides, lightly sand them with fine-grit sandpaper for a matte, stone-like finish. -
Painting the mouth:
Dilute a tiny amount of brownish-red or black acrylic paint. Carefully paint inside the indented line of the mouth to define it. -
Painting the numbers:
Use a fine liner brush and black acrylic paint to write numbers on the blocks. You’ll need digits 0-1-2 on two blocks, and 0-1-2-3 on the others, or simply paint all digits 0-9 distributed across faces to ensure all dates are possible. -
Adding month abbreviations:
On the remaining faces of the blocks, paint standard month abbreviations like ‘Jan’, ‘Feb’, etc., in a small, rough serif font to match the rustic look. -
Simulating the texture:
For the speckled look on the frog, dilute white acrylic paint and spatter it gently with a toothbrush, or dot it on manually with a toothpick. -
Sealing the work:
Once all paint is dry, coat the frog and the blocks with a matte varnish. This removes the plastic sheen of the clay and protects your painted numbers from rubbing off.
Custom Colors
Swap the green frog for a different animal like a pastel bear or cat to match your room aesthetic, or paint the blocks in ombre shades rather than plain white.
Now you have a charming little companion to help you keep track of the days