
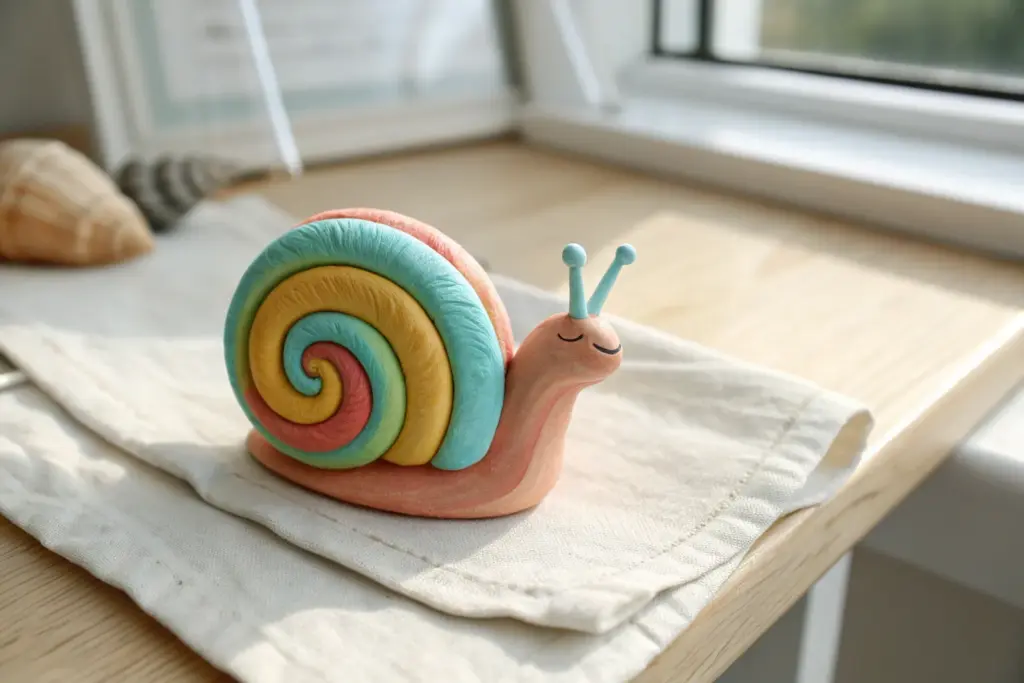
When kids have a little modeling clay, a few simple shapes can turn into a whole world of tiny characters and play things. These ideas stick to easy basics like balls, coils, and “pancake” slabs so you can jump in fast and still end up with something adorable.
Cute Coil Clay Snails
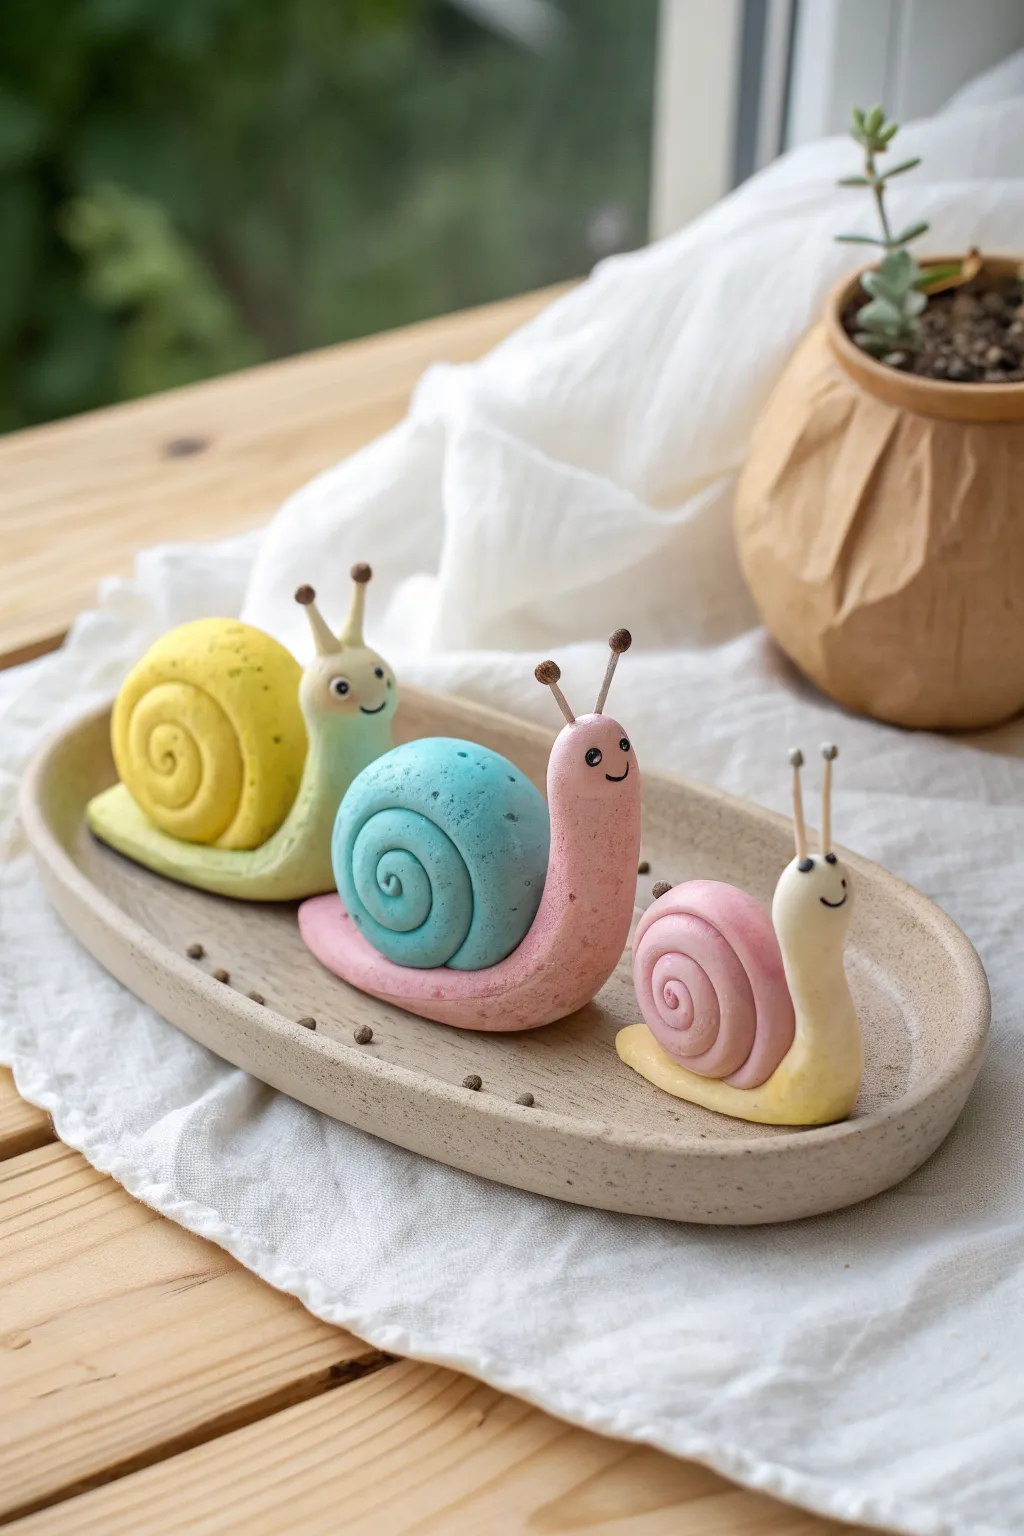
These adorable little gastropods bring a cheerful touch to any shelf with their pastel shells and friendly smiles. The project combines simple rolling and coiling techniques to create a charming trio of snails in varying sizes and sweet candy colors.
Step-by-Step
Materials
- Modeling clay (air-dry or polymer) in pastel yellow, pale green, light blue, pink, and cream
- Small amount of brown or black clay for details
- Short pieces of thin craft wire or flower stamens
- Modeling tool with a ball end
- Smooth work surface or mat
- Needle tool or toothpick
Step 1: Shaping the Bodies
-
Prepare the Base Clay:
Start by selecting your body colors. For the largest snail, Knead a ping-pong ball sized amount of pale green clay until it is soft and pliable. -
Roll the Slug Shape:
Roll the clay into a smooth log that is slightly thicker on one end and tapers to a gentle point at the tail. -
Form the Head:
Gently bend the thicker end of the log upwards at a 90-degree angle to create the neck and head area. Smooth out the crease where the bend happens so it looks organic. -
Flatten the Base:
Press the bottom of the body gently onto your work surface to flatten it slightly, ensuring the snail will sit stably without tipping over. -
Repeat for Friends:
Repeat this process with pink clay for the medium snail and cream clay for the smallest one, making each body progressively smaller than the last.
Shell Slipping Off?
If the shell won’t stick to the body, score both contact surfaces (scratch cross-hatch lines) and add a tiny dab of water or liquid clay glue before pressing them together.
Step 2: Creating the Shells
-
Roll a Long Snake:
Take a contrasting color of clay (like yellow for the green body) and roll it into a very long, even snake about the thickness of a pencil. -
Begin the Coil:
Start at one end of the snake and tightly roll it inward on itself, creating a spiral disk. Keep the coil tight so there are no gaps between the layers. -
Build the Dome:
As you continue coiling, slightly overlap the layers towards the center rather than keeping it perfectly flat. This creates a rounded, shell-like dome shape. -
Smooth the End:
When your shell reaches the desired size, trim the excess clay. Feather the end of the coil into the rest of the shell using your thumb to hide the seam. -
Texture the Shell:
I like to gently press a sponge or texture tool against the shell’s surface to give it a realistic, slightly pitted texture rather than leaving it perfectly smooth. -
Attach Shell to Body:
Place the coiled shell onto the flat back of the body piece. Press down firmly but carefully to bond the clays together without squishing the shapes.
Glitter Trail Upgrade
Mix iridescent glitter into the body clay before shaping so your snails look like they are glistening. Or, paint a trail of clear glitter glue behind them once finished.
Step 3: Adding Faces and Details
-
Make the Eyes:
Use a ball tool or the end of a paintbrush handle to make two shallow indentations on the upright head for eye sockets. -
Insert Eye Beads:
Roll two tiny specks of black or dark brown clay into balls and press them into the sockets. Alternatively, you can use small black beads. -
Carve the Smile:
Use a needle tool or the edge of a credit card to press a small, curved smile just below the eyes. -
Prepare Antennae:
Cut two short pieces of thin wire or sturdy flower stamens for each snail, about half an inch long. -
Tip the Antennae:
Roll tiny balls of the body-colored clay (or brown for contrast) and push them onto the tips of your wires. -
Install Antennae:
Push the bare ends of the wires into the top of the snail’s head. If the clay is soft, you might need to re-shape the head slightly after inserting them. -
Final Surface Check:
Check your snails for any fingerprints. You can smooth these away with a tiny drop of water (for air-dry clay) or baby oil (for polymer clay).
Let your new friends dry completely or bake them according to package instructions before arranging them in a potted plant or on a windowsill

Easy Little Clay Ladybugs
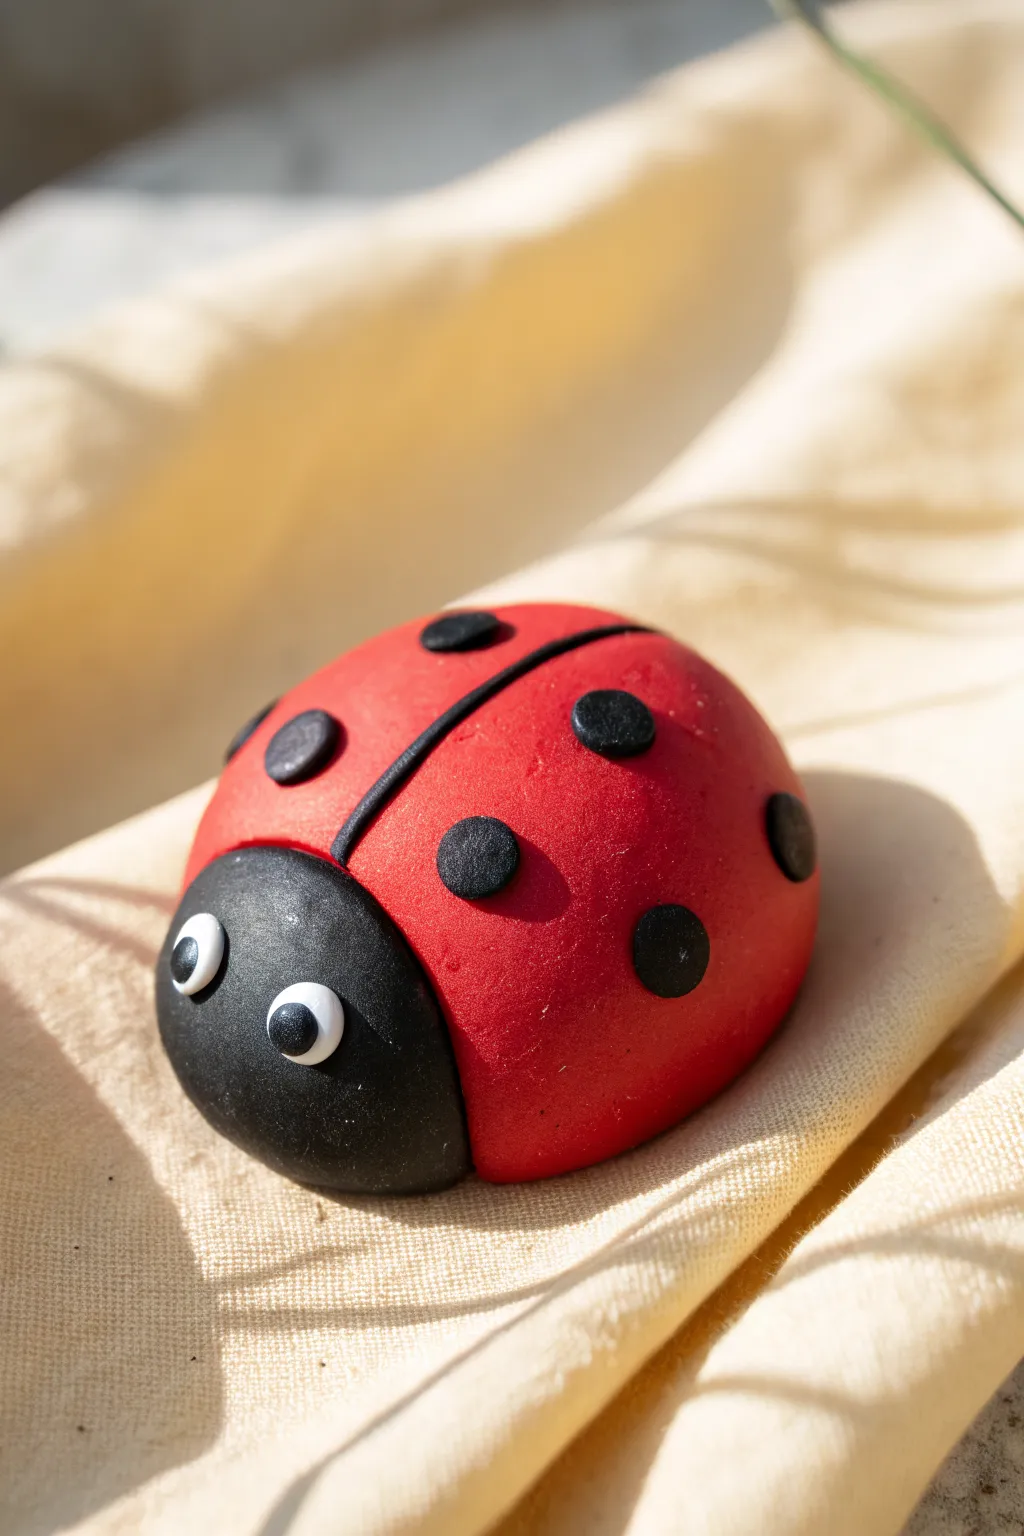
This classic garden friend comes to life with just a few simple shapes and some bright colors. The finished result is a smooth, shiny beetle with a charmingly rotund body that fits perfectly in the palm of your hand.
How-To Guide
Materials
- Red modeling clay (polymer clay, air-dry clay, or plasticine)
- Black modeling clay
- White modeling clay
- Clay sculpting tool or a dull knife
- Works surface (wax paper or silicone mat)
Step 1: Body Basics
-
Roll the main body:
Start by taking a generous chunk of red clay. Knead it in your hands to warm it up, then roll it into a very smooth ball. Gently press it down onto your work surface so the bottom flattens out, forming a dome shape. -
Smooth the surface:
Check the red dome for any cracks or fingerprints. Use the pad of your thumb to gently buff them away until the surface is sleek and even. -
Create the head:
Take a piece of black clay, roughly one-quarter the size of your red piece. Roll this into a ball as well. -
Shape the head:
Flatten one side of the black ball slightly against the table, then press it gently against one side of the red body dome to see how it fits. It should look like a smaller semi-circle attaching to the front. -
Attach the head:
Once you are happy with the size, press the black clay firmly against the red body. You can smudge the clay slightly at the underside seam to help them stick together better.
Red Clay Stains?
Red pigment is strong! Wash your hands thoroughly or use baby wipes before switching to the white clay for the eyes, or your bright white might turn pink.
Step 2: Adding the Details
-
Mark the wings:
Using your sculpting tool or the back of a dull knife, gently press a straight line down the center of the red back. Start right behind the black head and go all the way to the tail end. -
Deepen the line:
Go over the line a second time to make it distinct, creating the illusion of two separate wing cases. -
Make the spots:
Pinch off tiny bits of black clay. Roll each one into a miniature ball between your fingertips. You’ll need about six to eight of these, depending on how spotty you want your ladybug to be. -
Flatten the spots:
Press each tiny black ball flat into a small disc. Try to keep them somewhat consistent in size, though a little variation looks natural. -
Place the spots:
Gently press the black discs onto the red wings. I like to arrange them symmetrically on either side of the center line, but random placement works too. -
Embed the spots:
Press the spots down flat enough that they don’t stick out too much; they should look like part of the shell rather than bumps sitting on top.
Shiny Shell Secret
To make the shell look glossy like a real beetle, lightly brush the finished red parts with a tiny bit of baby oil or a clear gloss glaze.
Step 3: Friendly Faces
-
Make the eye whites:
Take two very small pieces of white clay and roll them into neat little balls. -
Position the eyes:
Press the white balls onto the black head, spacing them out slightly so the ladybug doesn’t look cross-eyed. Flatten them into discs. -
Add pupils:
Roll two microscopic specks of black clay. These will be the pupils. -
Finish the look:
Place the black specks into the center of the white discs. Press them down gently to secure the gaze. -
Final smooth:
Give the whole bug one last look over. If you left any fingerprints while attaching the spots, lightly buff them out now before the clay sets.
Now you have a cute little garden guardian ready to brighten up your desk or shelf



Simple Oval Clay Penguins
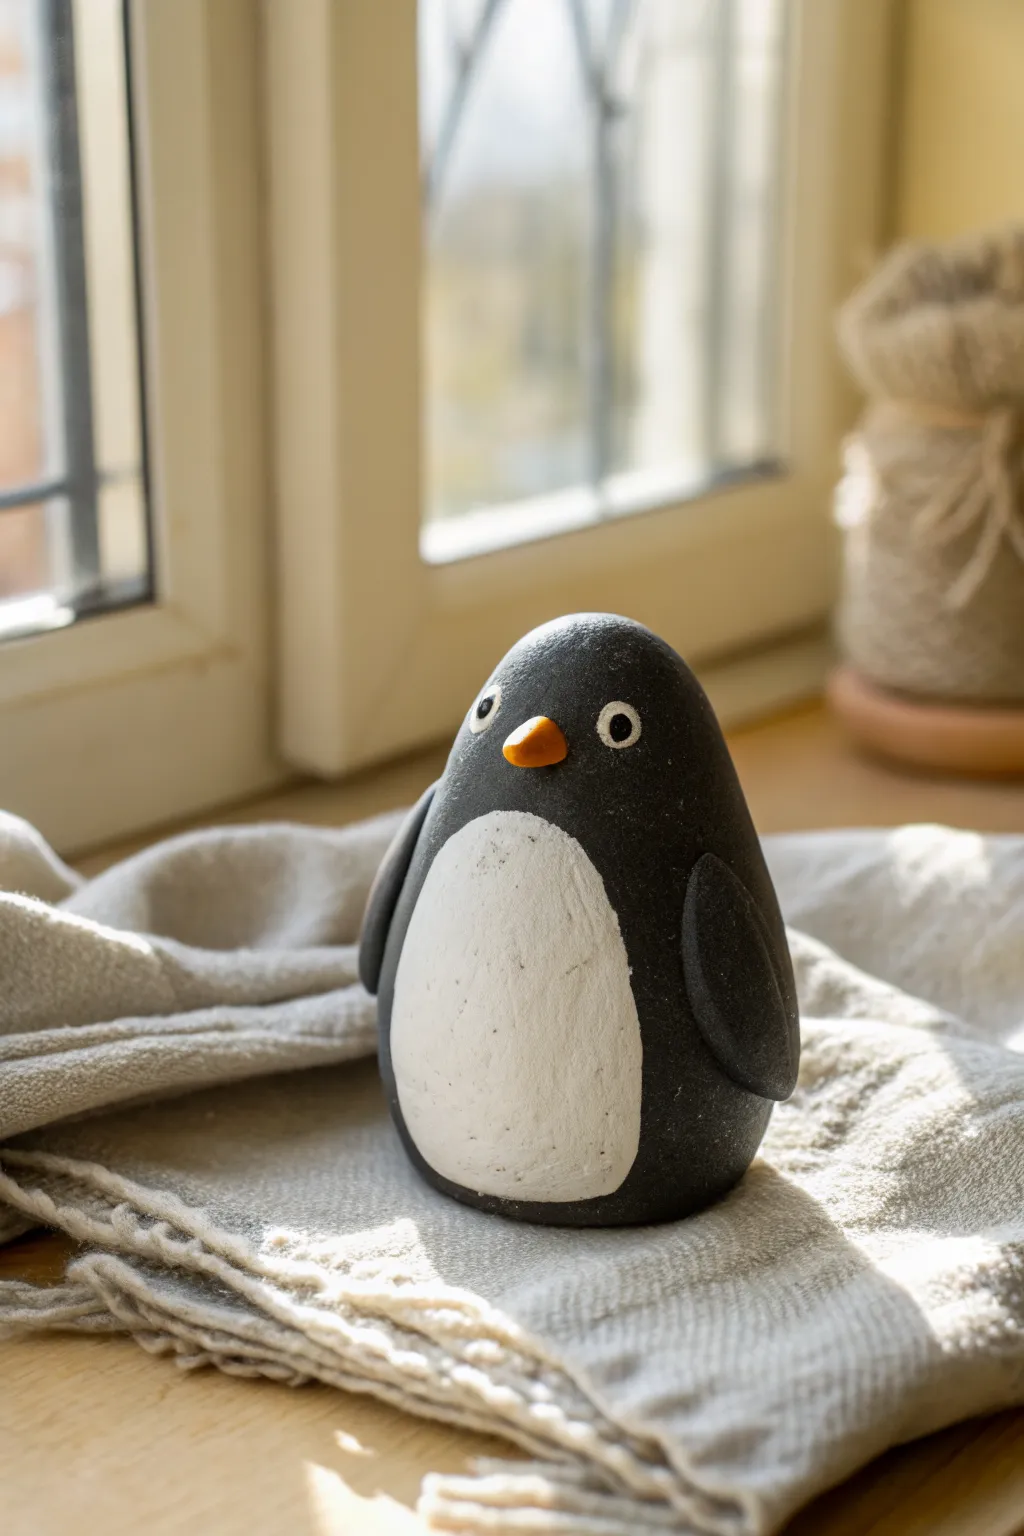
This charming little penguin is all about smooth, rounded shapes that mimic a polished river stone. With its matte black finish and a simple white belly, it makes for a minimalist and adorable decoration that sits perfectly on any windowsill.
Step-by-Step Guide
Materials
- Black modeling clay (air-dry or polymer, depending on preference)
- White modeling clay
- Small amount of orange clay
- Smoothing tool or spoon back
- Rolling pin (optional)
- Small round clay cutter or craft knife
- Dotting tool or toothpick
Step 1: Forming the Body
-
Create the base:
Start with a large chunk of black clay. Roll it firmly between your palms to create a smooth, seamless ball about the size of a tangerine. -
Shape the oval:
Gently gently roll the ball against your work surface to elongate it slightly. You want a smooth, potato-like oval shape that stands upright on its own. -
Flatten the bottom:
Tap the bottom of your oval against the table several times. This creates a stable, flat base so your penguin won’t wobble or roll away. -
Refine the surface:
I like to take a moment here to rub out any fingerprints. Use a smoothing tool or just the pad of your thumb to ensure the black clay looks like a sleek, worn stone.
Smooth as Stone
To get that ultra-smooth ‘river rock’ finish on the black body, dip your finger in a tiny bit of water (or baby oil for polymer clay) and create a final polish.
Step 2: Adding the Belly
-
Prepare the white clay:
Take a smaller piece of white clay and roll it into a ball, then flatten it into a thin pancake using a rolling pin or your fingers. -
Shape the belly patch:
Using a craft knife or just your fingers, shape this flat white piece into a tall oval. It should be narrower at the top and wider at the bottom, mimicking an egg silhouette. -
Attach the belly:
Press the white oval onto the front of the black body. Position it low, so the curve of the white shape matches the curve near the bottom of the penguin. -
Smooth the seams:
Gently smudge the edges of the white clay down so it sits flush against the black body. You don’t want it to look like a sticker; it should look integrated. -
Texture the belly (optional):
For a natural look like the photo, lightly tap the white area with a dry finger to give it a slightly matte, unfinished texture compared to the smooth black body.
Step 3: Wings and Beak
-
Form the wings:
Roll two equal-sized small balls of black clay. Flatten them into elongated teardrop shapes. -
Attach the wings:
Press the wings onto the sides of the body. Angle them slightly backward and downward so they hug the penguin’s round shape. -
Blend the shoulders:
Use your thumb to blend the top part of the wing (the shoulder) seamlessly into the body, leaving the bottom tip of the wing slightly raised. -
Make the beak:
Take a tiny pinch of orange clay and roll it into a small cone or triangle. -
Position the beak:
Place the beak just above the top of the white belly patch. Press it on firmly so the point sticks straight out.
Dust Trouble?
White clay picks up dust easily. Clean your hands thoroughly before switching from the black clay to the white belly, or use baby wipes to clean the white clay after applying.
Step 4: The Eyes
-
Create eye sockets:
Use a dotting tool or the back of a paintbrush to make two shallow indentations where the eyes will go, spaced widely apart. -
Make the whites:
Roll two extremely tiny balls of white clay. Press them flat into the indentations you just made. -
Add pupils:
Roll two even smaller specs of black clay. Place these predominantly in the center of the white circles to create focused, alert eyes. -
Final check:
Walk around your creation to look for any lost symmetry or accidental fingerprints, smoothing them out before the clay begins to set.
Set your finished penguin in a sunny spot to dry or bake according to your clay package instructions



Ball-and-Coil Clay Turtles
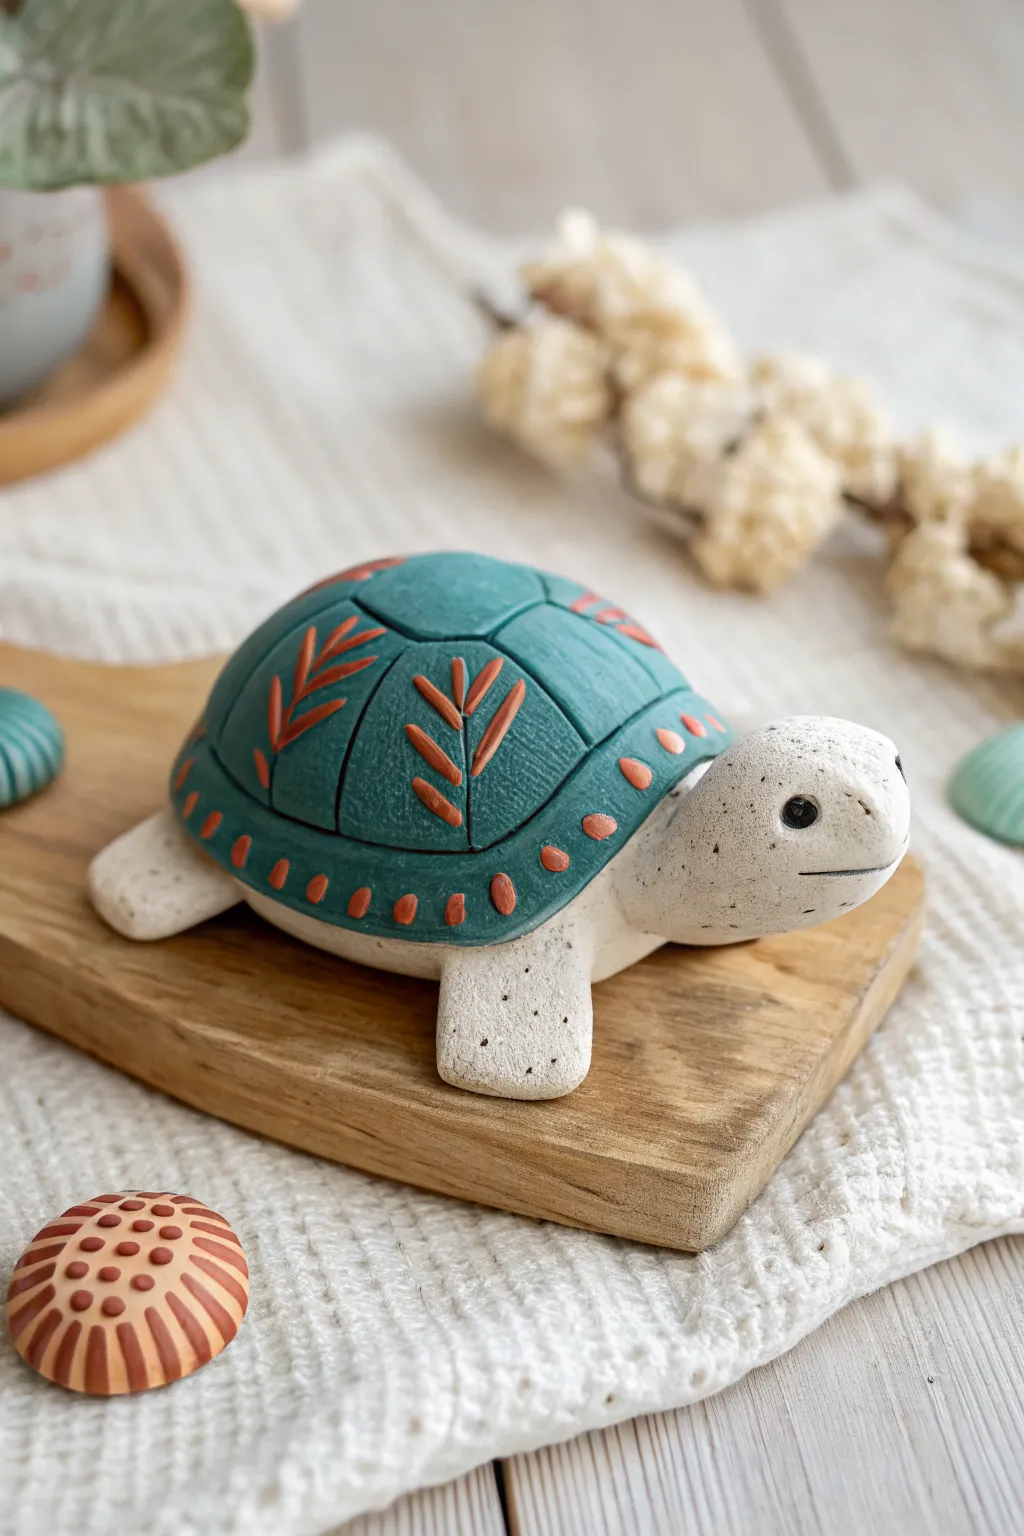
Create a charming turtle friend that brings together earthy textures and delightful patterns. With its speckled cream body and deeply carved teal shell, this stylized figurine is a perfect project to practice shaping and carving details.
How-To Guide
Materials
- White or Beige Polymer Clay (speckled effect optional)
- Black Polymer Clay
- Teal or Turquoise Polymer Clay
- Terracotta or Rust-colored Polymer Clay
- Needle Tool or Toothpick
- Small Clay Knife
- Rolling Pin
- Ball Stylus Tool
- Smooth Wooden Board or Tile (for working)
- Oven (if using polymer clay)
Step 1: Forming the Body
-
Mix the Speckled Clay:
If you don’t have pre-speckled clay, take a large chunk of white/beige clay and mix in a tiny pinch of black clay or black pepper (for air-dry clay). Knead until you have a subtle, grainy texture. -
Shape the Main Base:
Roll a medium-sized ball of your speckled clay into a smooth oval. Check that the bottom is flat so the turtle sits stably. -
Create the Head:
Roll a smaller ball of the same speckled clay. Gently pinch one side to create a slight neck and press it firmly onto one end of the oval body. Blend the seam underneath with your finger or a tool so it’s secure. -
Add the Fins:
Roll four small, equal-sized balls. Flatten them slightly into rounded squares or gentle tab shapes. Attach these to the underside of the body, two near the front and two near the back, ensuring they poke out enough to be seen.
Clean Seams
To get that seamless look where the rust patterns meet the teal shell, roll a rolling pin gently over the shell once the colored bits are inserted. This flattens them perfectly flush.
Step 2: Creating the Shell
-
Prepare the Teal Clay:
Condition your teal clay until it’s soft and pliable. Roll it into a ball slightly smaller than the body base. -
Dome the Shell:
Flatten the teal ball and shape it into a smooth, rounded dome. It needs to be just large enough to cover the mainly oval part of the body, leaving the head and fins exposed. -
Attach the Shell:
Press the teal dome gently on top of the beige body. I like to smooth the edges downwards just a bit so it hugs the body shape.
Step 3: Carving and Details
-
Carve the Central Lines:
Using a needle tool or small knife, carve a large hexagon or circle shape at the very top center of the shell. Don’t cut all the way through; just create deep grooves. -
Divide the Sections:
From the corners of your center shape, carve lines dragging downwards toward the rim of the shell to create the traditional turtle scute divisions. -
Add Leaf Patterns:
In the side panels of the shell, use your needle tool to carve simple fern or leaf shapes. Make a central line with small angled dashes coming off it. -
Create Rim Details:
Along the very bottom edge of the teal shell, press small indentations or carve tiny ovals at regular intervals. -
Fill with Color:
Roll very tiny, thin snakes or small seeds of terracotta/rust-colored clay. Carefully press these into the carved leaf lines and the rim indentations to create the inlaid pattern look.
Make it a Family
Vary the sizes of the initial oval body to create a whole family stack. Try different shell colors like mustard yellow or olive green for variety.
Step 4: Face and Finishing
-
Add the Eyes:
Use a ball tool to make small sockets on either side of the head. Press a tiny bit of black clay into each socket for the eyes. -
Define the Mouth:
Use your knife tool or a thin piece of cardstock to press a long horizontal line across the front of the face for a wide, gentle smile. -
Texture the Skin:
Lightly tap the beige skin areas (head and fins) with a stiff brush or a textured sponge to give it a matte, natural stone look. -
Bake or Dry:
Follow the instructions on your specific package of clay to bake or dry your turtle. If baking, let it cool completely before handling.
Place your finished turtle on a shelf or desk for a sturdy little companion that’s sure to make you smile
The Complete Guide to Pottery Troubleshooting
Uncover the most common ceramic mistakes—from cracking clay to failed glazes—and learn how to fix them fast.
Smiley Clay Fruit Slices
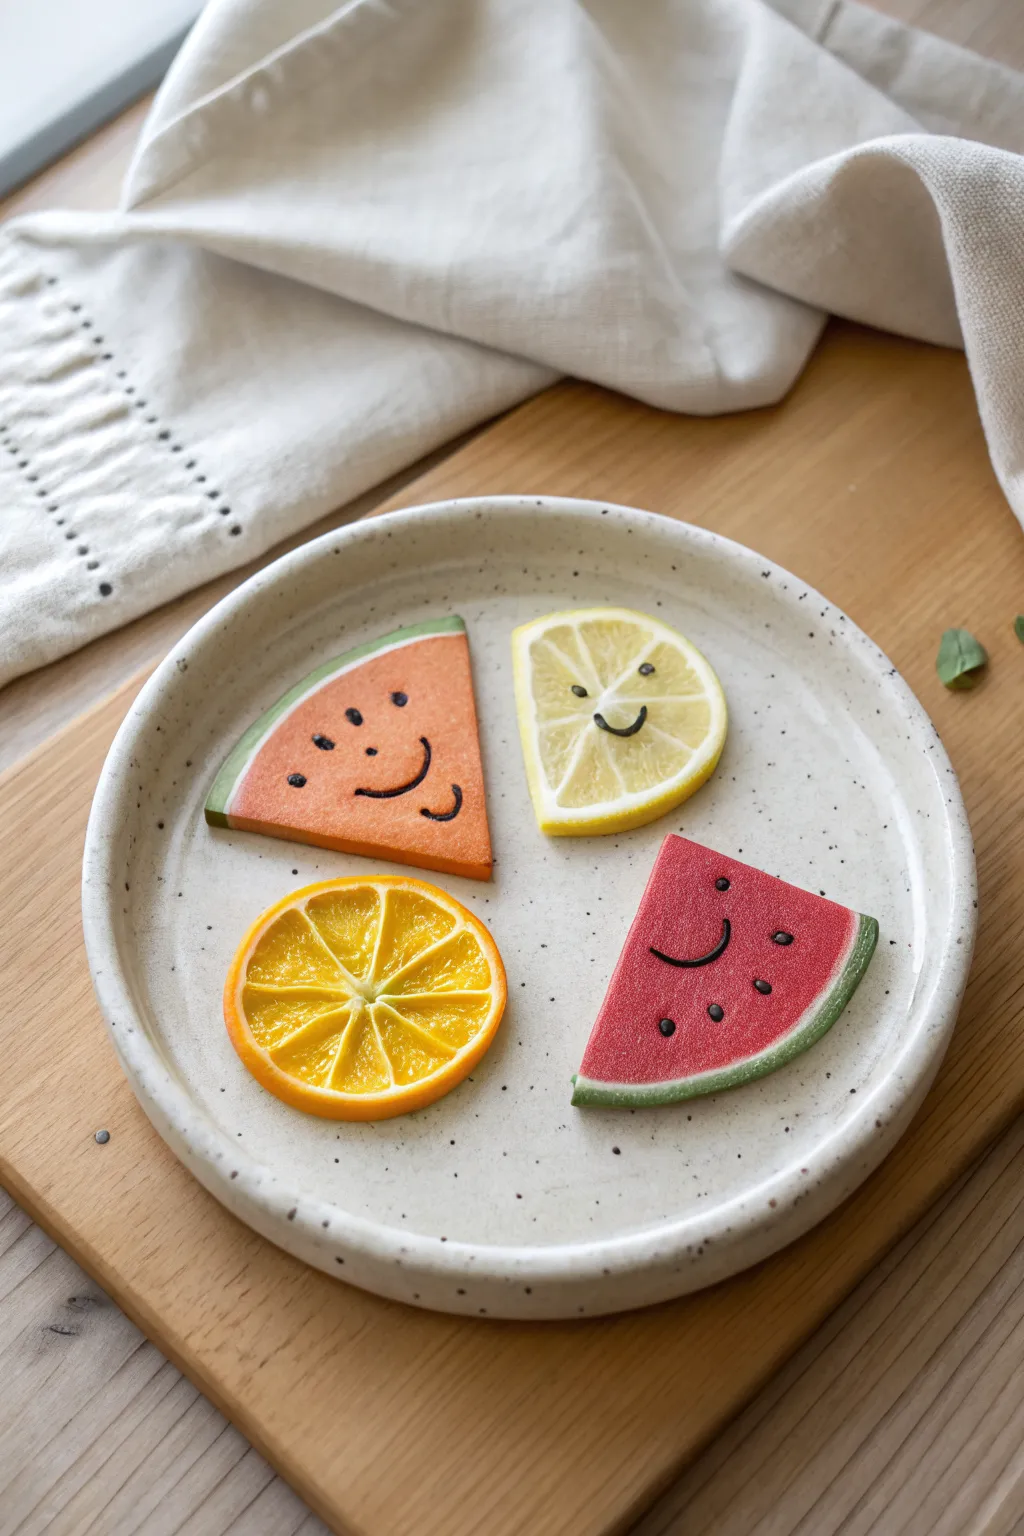
These cheerful fruit slices bring a pop of summer fun to your craft table with their bright colors and sweet expressions. By layering simple shapes and adding tiny details, you can create realistic lemon, orange, and watermelon slices that look almost good enough to eat.
Step-by-Step Tutorial
Materials
- Polymer clay or air-dry clay (Red, Orange, Yellow, Pale Yellow, Green, White)
- Rolling pin or clay roller
- Craft knife or plastic clay tool
- Needle tool or toothpick
- Black acrylic paint or a fine-tip black permanent marker
- Small detail paintbrush (if using paint)
- Clear varnish or glaze (optional)
- Round cookie cutter (approx. 2-3 inches)
Step 1: Crafting the Citrus Slices
-
Create the segments:
Start by rolling 6-8 small teardrop shapes out of your translucent yellow or orange clay. These will be the juicy interior segments of your lemon or orange. -
Add the pith:
Roll out a very thin sheet of white clay. Wrap each teardrop shape individually in this thin white layer to create the pith separating the segments. -
Assemble the center:
Arrange the wrapped teardrops in a circle, pointing the narrow ends inward so they touch in the center, forming a complete wheel shape. -
Wrap the rind:
Roll a long, flat strip of yellow or orange clay (matching your center segments) that is slightly thicker than the white pith. Wrap this strip snugly around the entire circle of segments to form the outer skin. -
Consolidate and slice:
Gently gently roll the cylinder on your work surface to smooth the seams and ensure the layers adhere. Since we want a half-slice, use your craft knife to cut the circle cleanly in half. -
Texture the fruit:
Using a needle tool, gently tap and prick the inner fruit segments to mimic the texture of juice vesicles without distorting the shape.
Fixing Smudges
If you make a mistake painting the face, don’t panic. Use a cotton swab dipped in rubbing alcohol (for polymer clay) or water (for some markers) to gently erase the error before it fully sets.
Step 2: Shaping the Watermelon Slices
-
Form the base:
Roll a ball of red or salmon-colored clay and flatten it into a thick pancake. You can use your round cookie cutter here to get a perfect circle. -
Cut the wedge:
Slice the circle into quarters or thirds to create the classic triangular watermelon wedge shape. -
Add the rind layers:
Roll a thin snake of white clay and flatten it against the focused curved edge of your red wedge. Repeat this with a slightly thicker snake of green clay for the outer skin. -
Blend the edges:
Gently smooth the clay with your finger where the red meets the white, and the white meets the green, so they look like a single fused piece rather than separate blocks. -
Surface texture:
Take a stiff bristle brush or a textured sponge and press it lightly over the red area to give it a slightly sandy, realistic watermelon texture.
Step 3: Adding Personality
-
Bake or dry:
Follow the manufacturer’s instructions for your specific clay. If baking polymer clay, place the pieces on parchment paper; if air-drying, let them sit undisturbed for 24-48 hours. -
Paint the faces:
Once the clay is fully hardened, use a fine detail brush with black acrylic paint or a permanent marker. I find markers give better control for the tiny smiles. -
Draw the eyes:
Place two small dots for eyes wide apart on the fruit flesh. You can make them simple dots or add little eyebrows for expression. -
Add the smile:
Draw a simple, curved U-shape between the eyes. For the watermelon, you might add a few tiny black teardrops nearby to represent seeds. -
Seal (Optional):
To protect the face and give the fruit a wet, juicy look, apply a coat of gloss varnish over the front of the slice.
Make them Magnets!
Glue a small, strong round magnet to the back of your finished, dried fruit slices. They make adorable refrigerator decorations to hold up photos or artwork.
Now you have a refreshing set of fruity friends to brighten up your desk or shelf
Rainbow Coil Arches
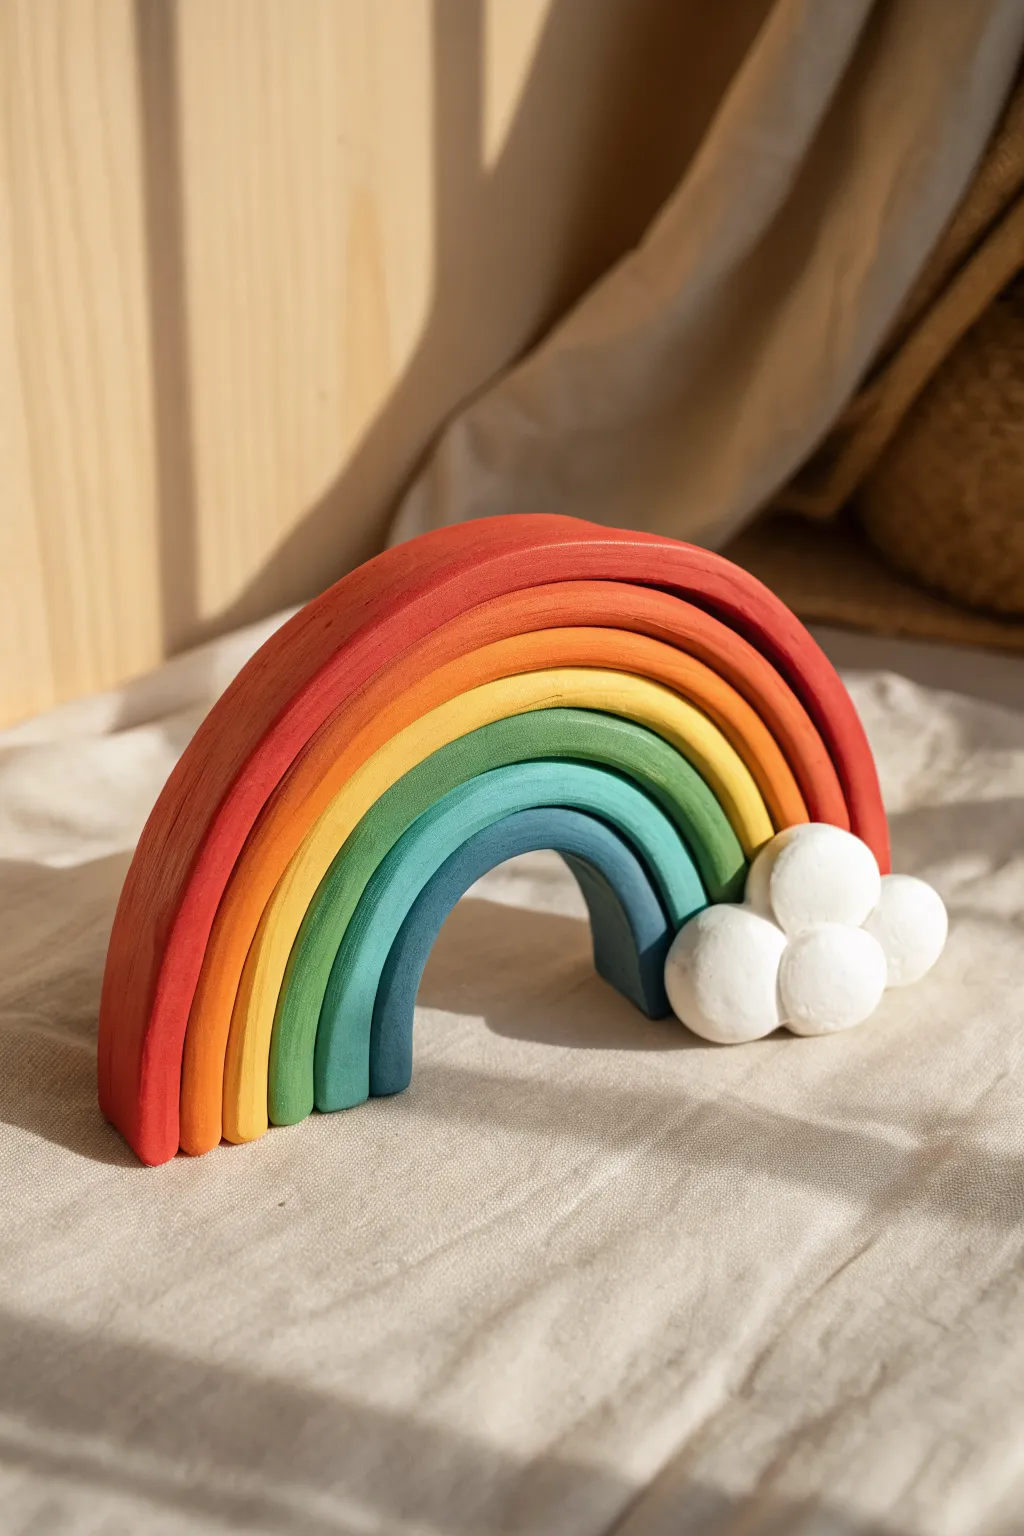
Brighten up any playroom shelf with this deceptively simple modeling clay project that mimics the look of classic wooden stacking toys. By crafting sturdy arches in earthy tones and capping them with fluffy white mounds, you create a charming piece of decor that looks high-end but is entirely handmade.
Detailed Instructions
Materials
- Air-dry clay (white)
- Acrylic paints (Burgundy Red, Terracotta Orange, Mustard Yellow, Sage Green, Robin Egg Blue, Navy Blue)
- Rolling pin
- Sharp craft knife or clay slicer
- Sandpaper (fine grit)
- Matte finish varnish or sealant
- Paintbrushes (flat and detail)
- Water cup
Step 1: Forming the Arches
-
Roll the Base Slab:
Begin by taking a large portion of your white air-dry clay and rolling it out into a flat, even slab. Aim for a thickness of about 1/2 inch to ensure your rainbow can stand upright without wobbling. -
Cut the First Arch:
Using your craft knife, cut a large semi-circle shape from the slab. This will be your largest, red arch. I find it helpful to use a bowl or round object as a cutting guide to get a perfect curve. -
Create Consecutive Layers:
Place the first arch back onto the remaining clay slab and use it as a template. Cut a slightly smaller arch that fits snugly underneath the first one. Repeat this process until you have six nesting arches of decreasing size. -
Refine the Edges:
Dip your finger in a little water and smooth down any rough, cut edges on all your clay pieces. You want them to look like polished wood, so take your time softening the corners. -
Make the Cloud Bubbles:
Roll four small balls of clay in varying sizes. Press them together in a cluster to form a bubbly cloud shape. Make sure the bottom is flat so it sits flush on the table. -
Allow to Dry:
Lay all your rainbow pieces and the cloud cluster flat on a piece of parchment paper. Let them dry completely for 24-48 hours, flipping them occasionally to prevent warping.
Use Nested Templates
Don’t have a steady hand? Use kitchen bowls of descending sizes as cutting templates for perfect, mathematical curves on every arch.
Step 2: Sanding and Painting
-
Sand for Smoothness:
Once bone dry, gently sand the surfaces of the arches with fine-grit sandpaper. This removes any fingerprints or imperfections and gives the clay that smooth, wooden texture. -
Paint the Largest Arch:
Start with the outermost arch. Apply a coat of burgundy or deep red acrylic paint. Use long, smooth strokes following the curve of the arch. -
Apply Warm Tones:
Paint the second arch in a terracotta or burnt orange shade, and the third in a muted mustard yellow. These warm, earthy tones give it a modern nursery aesthetic. -
Apply Cool Tones:
Moving inward, paint the fourth arch sage green, the fifth a light robin egg blue, and the smallest center arch a deep navy blue. -
Paint the Clouds:
Paint the bubble cluster pure white. You might need two layers to make it opaque and bright. -
Double Check Coverage:
Look closely at the edges and backs of your arches. Apply a second coat of paint if the white clay is showing through anywhere. -
Seal the Project:
Once the paint is fully dry, apply a matte varnish over all pieces. This protects the paint from chipping and enhances the colors.
Step 3: Assembly
-
Stack the Rainbow:
Arrange your arches standing up, nesting them one inside the other from largest to smallest. -
Position the Cloud:
Place the white cloud cluster at the base of one side of the rainbow, creating the illusion that the rainbow is emerging from it.
Wood Grain Effect
For realism, drag a dry, stiff brush with slightly darker paint over the dry colored arches to recreate a faux wood grain texture.
Display your beautiful new sculpture on a sunny windowsill where the colors can really pop


What Really Happens Inside the Kiln
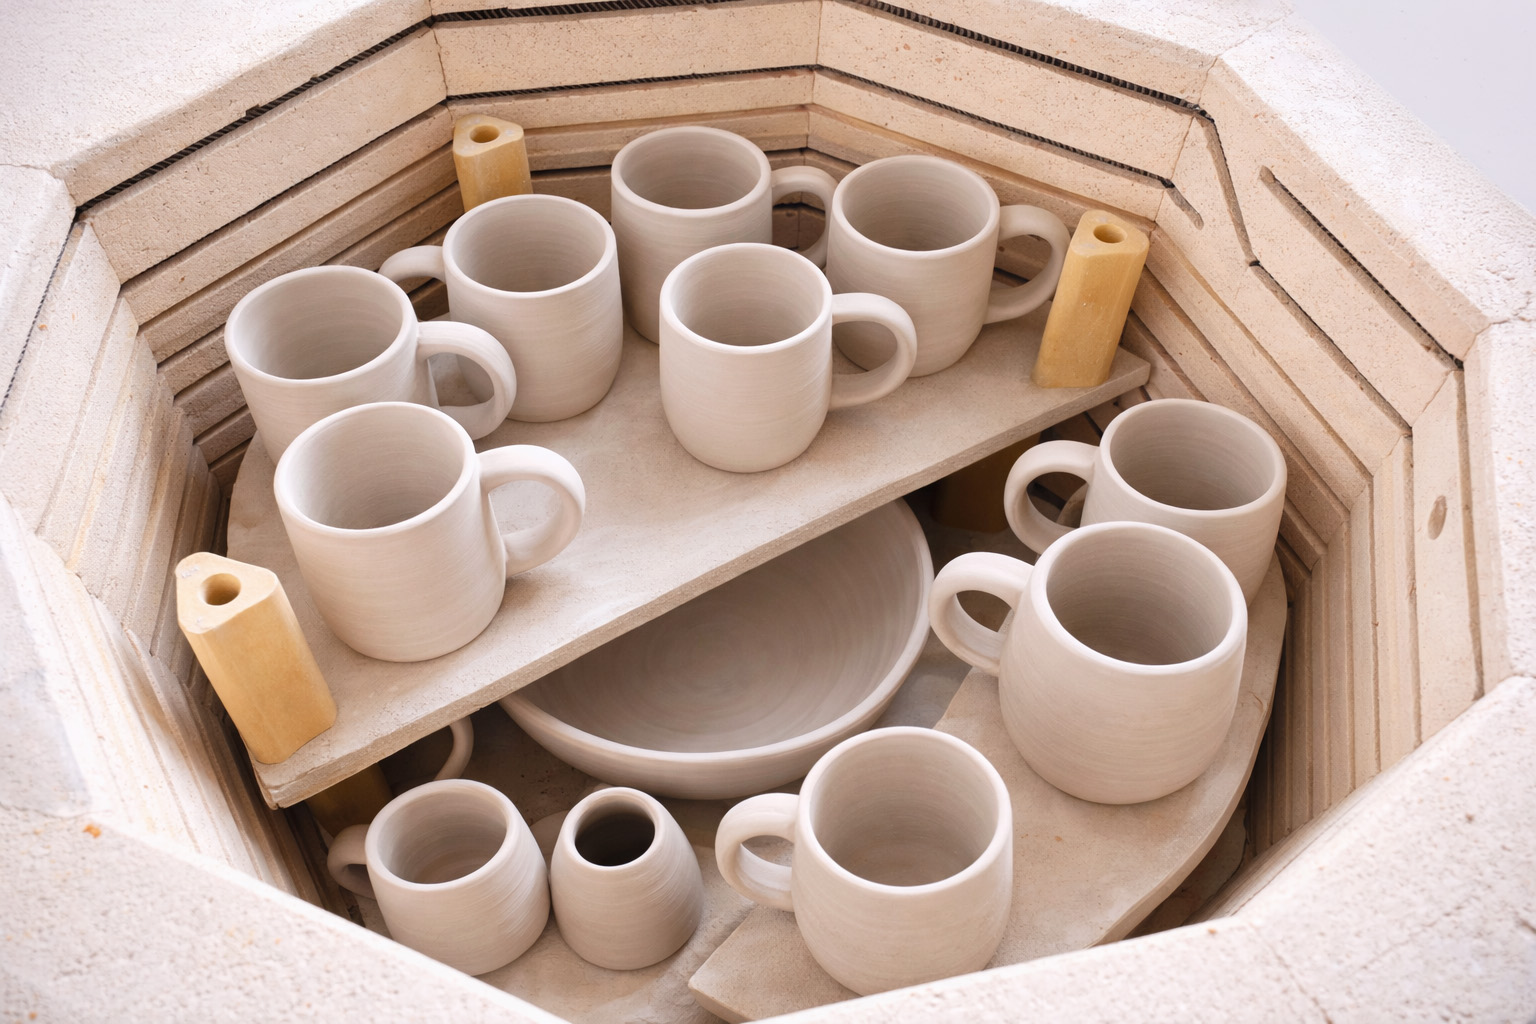
Learn how time and temperature work together inside the kiln to transform clay into durable ceramic.
Silly Pinch-Pot Monsters
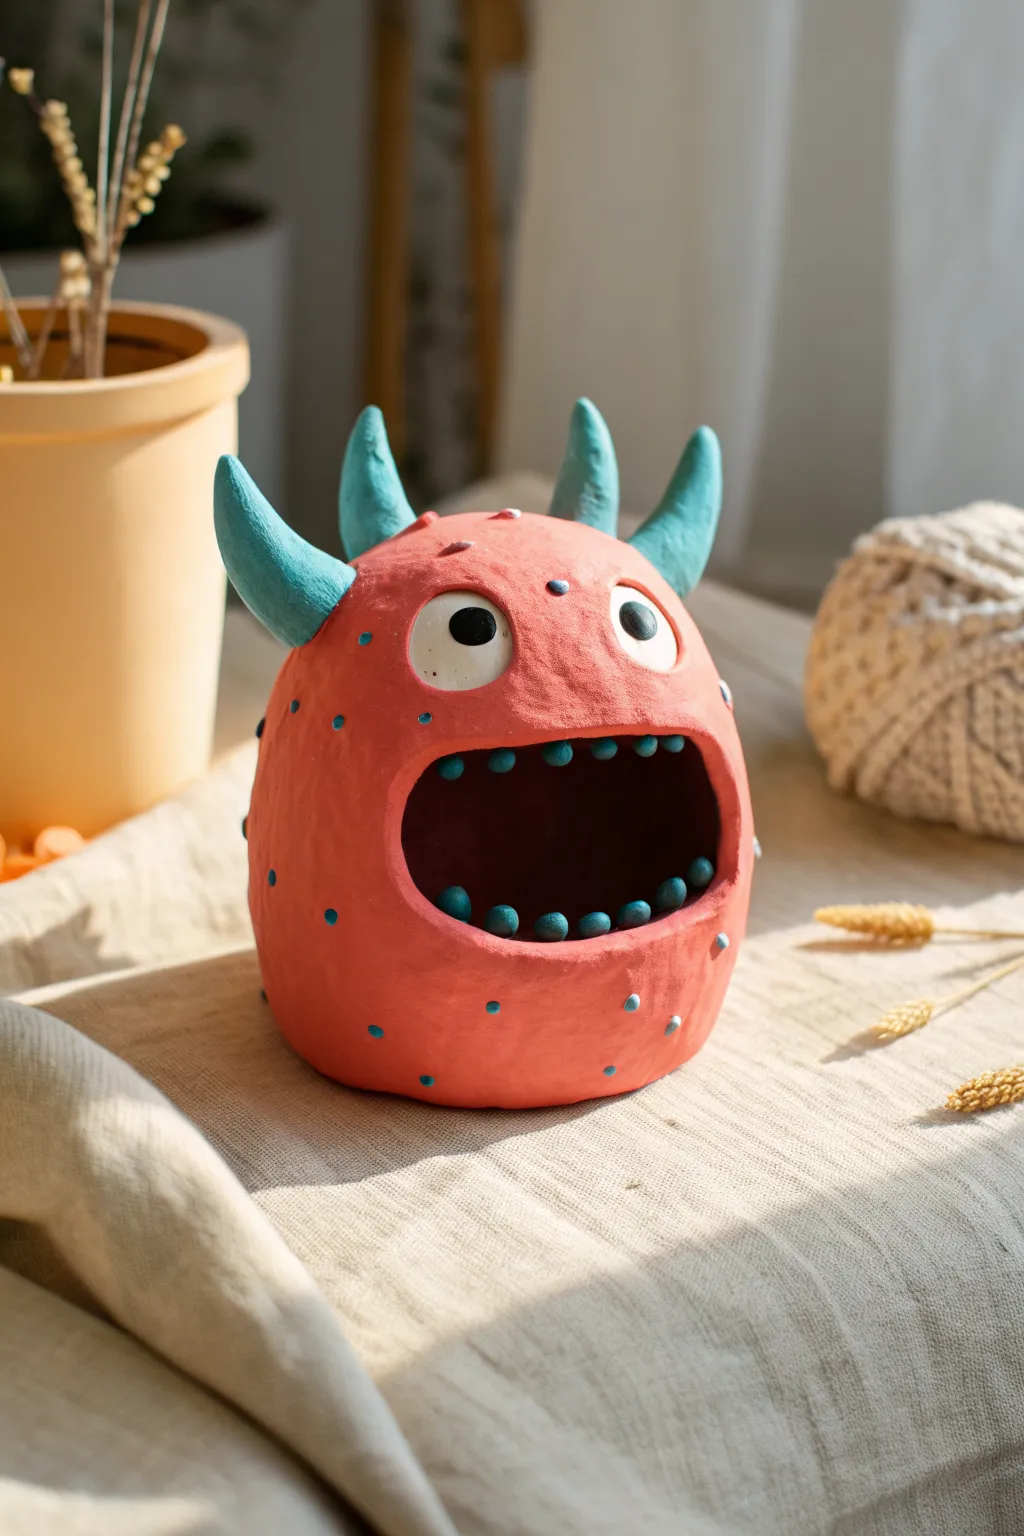
This quirky little monster features a gaping mouth perfect for holding trinkets or just looking silly on a shelf. With its bumpy pink skin, teal horns, and wide-eyed expression, it’s a delightful project that transforms a simple pinch pot into a character full of personality.
Detailed Instructions
Materials
- Air-dry clay (white or terracotta)
- Acrylic paints (coral pink, teal/turquoise, white, black)
- Clay sculpting tools (or a plastic knife and spoon)
- Small bowl of water
- Paintbrushes (medium flat and fine liner)
- Fine-grit sandpaper (optional)
- Protective varnish (matte)
Step 1: Shaping the Monster Body
-
Form the base:
Start with a large ball of clay, roughly the size of a grapefruit. Roll it between your palms until it is smooth and round. -
Create the pinch pot:
Press your thumb deep into the center of the ball, stopping before you break through the bottom. Gently pinch and rotate the clay to widen the opening, creating a hollow, rounded vessel. -
Close the top:
Unlike a bowl, you want this to be a mostly closed sphere. Gently bring the walls of the pinch pot upward and inward, smoothing the clay over the top until you have a closed, egg-like shape. -
Cut the mouth:
Decide where the face will be. Using a sculpting tool or plastic knife, cut a large, wide horizontal oval out of the front lower half of the sphere to create the gaping mouth. -
Smooth the edges:
Dip your finger in a little water and run it along the cut edges of the mouth to soften and round them off so they look organic, not sharp.
Step 2: Adding Features
-
Make the eyes:
Roll two medium-sized balls of clay for the eyes. Score the back of each eye and the spot on the head where they will go, add a dab of water (slip), and press them firmly onto the upper face. I like to flatten them slightly so they look integrated. -
sculpt the horns:
Create four cone shapes for the horns—two slightly larger and two smaller. Curve the tips slightly to give them character. -
Attach the horns:
Score and slip the bottom of the horns and attach them to the top of the head. Place the larger ones behind and the smaller ones slightly forward or to the sides. -
Create teeth:
Roll tiny little balls of clay for the teeth. Press them gently into the upper and lower gums inside the mouth opening. They don’t need to be sharp; rounded nubbins look cuter. -
Add texture:
For the bumpy skin texture, lightly press the side of a tool or a rough sponge against the main body of the monster, avoiding the eyes and horns. Let the clay dry completely for 24-48 hours.
Cracks happen
If small cracks appear while the clay dries, don’t panic. Mix a tiny bit of fresh clay with water to make a paste and fill the crack, then smooth it over with your finger.
Step 3: Painting and Finishing
-
Base coat:
Paint the entire body of the monster with a coral pink or salmon color. You may need two coats for opaque coverage. Avoid painting the horns and eyes for now. -
Paint the interior:
Paint the inside of the mouth deeply dark—a dark purple, maroon, or black works well to create depth. -
Color the horns and teeth:
Use a teal or turquoise paint for the horns. Use the same color for the little round teeth inside the mouth to create a fun contrast. -
Detail the eyes:
Paint the eye mounds white. Once dry, use a fine brush or the handle end of a paintbrush to dot large black pupils in the center. -
Add the spots:
Using the back of a paintbrush dipped in the teal paint, stamp small polka dots randomly all over the pink skin of the monster. -
Seal the work:
Once all paint is fully dry, apply a coat of matte varnish to protect your new friend and give the finish a unified look.
Make it a planter
Turn this into a functional pot for a succulent by creating the mouth opening higher up and poking a drainage hole in the bottom before the clay dries.
Now you have a charmingly grumpy companion to keep you company on your desk
Letter Name Tags in Clay
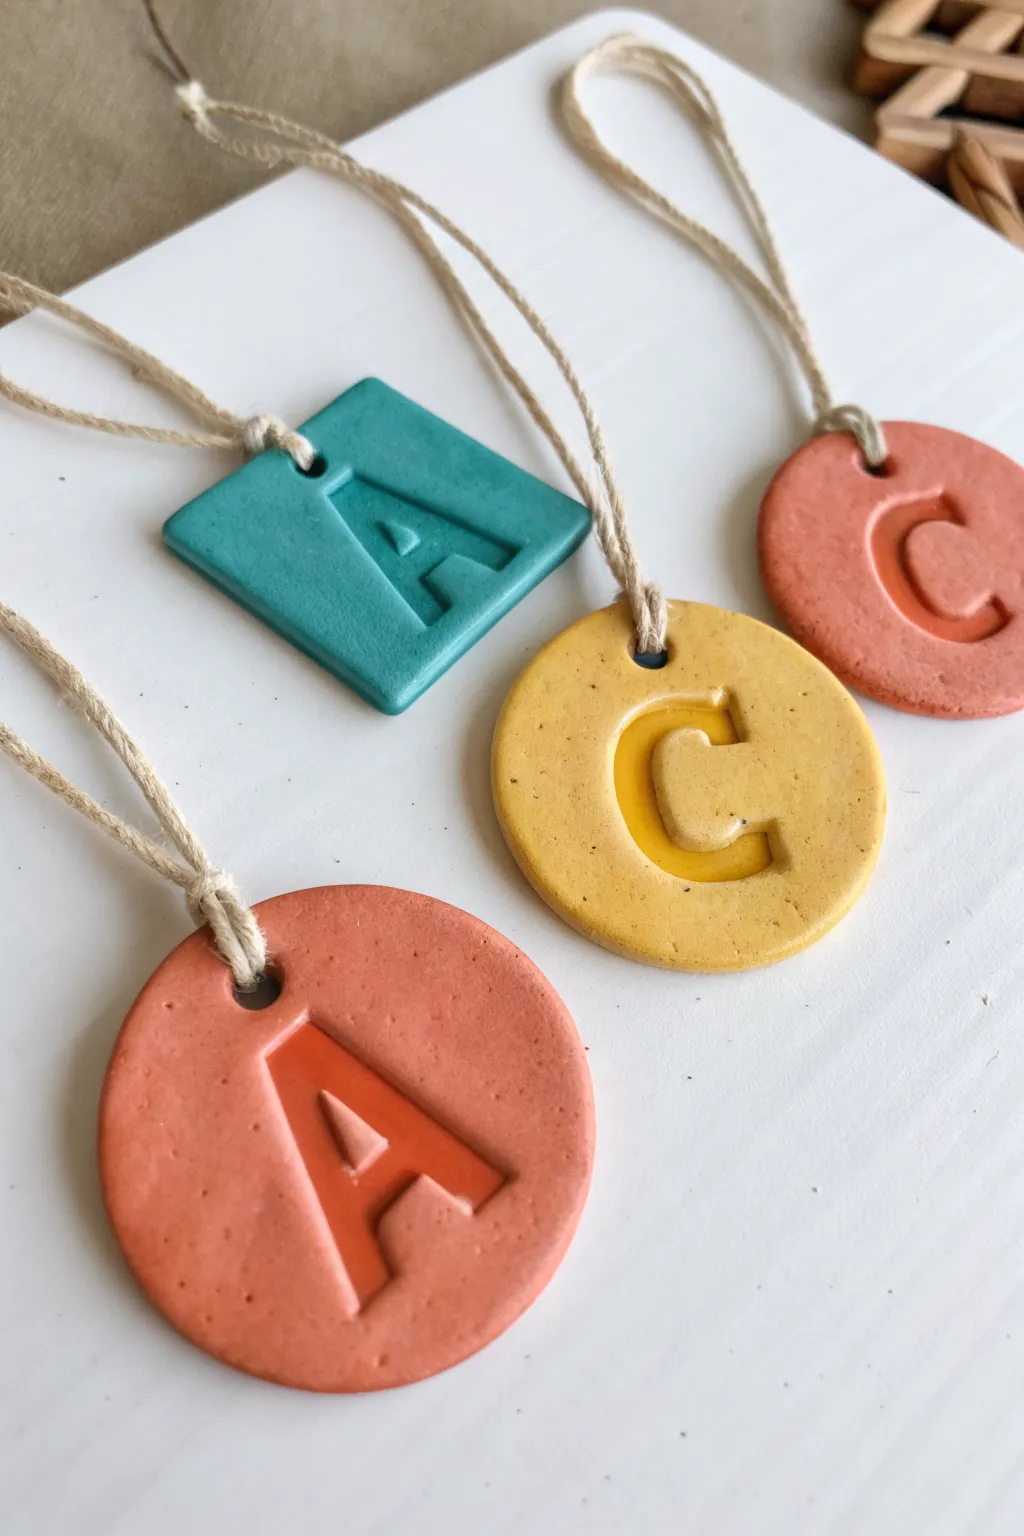
These charming personalized tags add a pop of color to backpacks, gifts, or bedroom doors. Made from simple air-dry or polymer clay, they feature a crisp, indented letter design that looks professionally stamped.
Step-by-Step
Materials
- Air-dry clay or polymer clay (terracotta, yellow, teal, and coral colors)
- Small rolling pin or smooth jar
- Cookie cutters (circle and square shapes)
- Alphabet stamp set (large size) or 3D printed letter molds
- Straw or skewer (for poking holes)
- Fine-grit sandpaper
- Glossy acrylic varnish or clear nail polish
- Small detail paintbrush
- Jute twine or string
- Wax paper or craft mat
Step 1: Shaping the Clay Base
-
Condition the Clay:
Start by taking a chunk of your chosen clay color—let’s say the terracotta or mustard yellow. Knead it in your warm hands for a minute or two until it is soft, pliable, and free of cracks. -
Roll it Out:
Place the ball of clay onto a piece of wax paper or a dedicated craft mat. Using your rolling pin, flatten the clay into an even slab. Aim for a thickness of about 1/4 inch (6mm) so the tag feels substantial but not too heavy. -
Cut the Shape:
Press your chosen cookie cutter firm ly into the rolled clay. You can mix and match shapes like the circles and squares seen here. Wiggle the cutter slightly to ensure a clean separation from the excess clay. -
Smooth the Edges:
Remove the excess clay from around the cutter. Gently lift your shape and use your fingertip, dipped slightly in water if using air-dry clay, to smooth down any rough or jagged edges left by the cutter.
Stamp Release Trick
Dust your letter stamp lightly with cornstarch or brush it with a tiny bit of oil before pressing. This prevents the clay from sticking inside the stamp grooves.
Step 2: Stamping and Detailing
-
Create the Letter Impression:
Select the letter stamp corresponding to the name you want. Center it over your clay shape. Press down firmly and evenly. You want a deep impression, but be careful not to push all the way through the clay slab. -
Remove the Stamp:
Carefully wiggle the stamp upward to release it without distorting the surrounding clay. Inspect the impression to ensure the edges of the letter are distinct. -
Punch the Hanging Hole:
Take a drinking straw or a skewer to create a hole at the very top of the tag. I prefer using a straw because it removes a clean plug of clay rather than just pushing it aside. Ensure the hole is centered and not too close to the edge to prevent tearing. -
Initial Drying:
Lay the tags flat on a clean surface to dry. If using air-dry clay, let them sit for 24-48 hours, flipping them occasionally to prevent curling. If using polymer clay, bake according to the package instructions.
Step 3: Finishing Touches
-
Sand for Smoothness:
Once the tags are completely hard and dry, inspect the edges again. If there are any rough spots, gently buff them away with a piece of fine-grit sandpaper until the tag feels smooth to the touch. -
Apply Gloss Varnish:
Dip a small detail brush into your glossy varnish or clear coat. Carefully paint inside the indented letter area only. This pooling of gloss creates that beautiful ‘enamel’ look that contrasts with the matte clay surface. -
Let the Gloss Cure:
Allow the varnish inside the letters to dry completely. Keep the tags flat during this time so the liquid settles evenly at the bottom of the indentation. -
Cut the Twine:
Cut a length of jute twine, roughly 8 to 10 inches long depending on where you plan to hang the tag. -
Attach the Hanger:
Fold the twine in half to create a loop. Push the folded end through the hole in the tag from front to back. -
Secure the Knot:
Take the loose tails of the twine and thread them through the loop you just pushed through the hole. Pull tight to create a lark’s head knot that sits securely at the top of the tag. -
Final Tie:
Tie the two loose ends of the twine together in a simple overhand knot to close the loop, making it ready to hang.
Fixing Cracks
If small cracks appear as the clay dries, make a paste with a little wet clay (slip) and smooth it into the crack with your finger, then let it dry again.
Now you have a set of personalized, durable tags ready to gift or keep
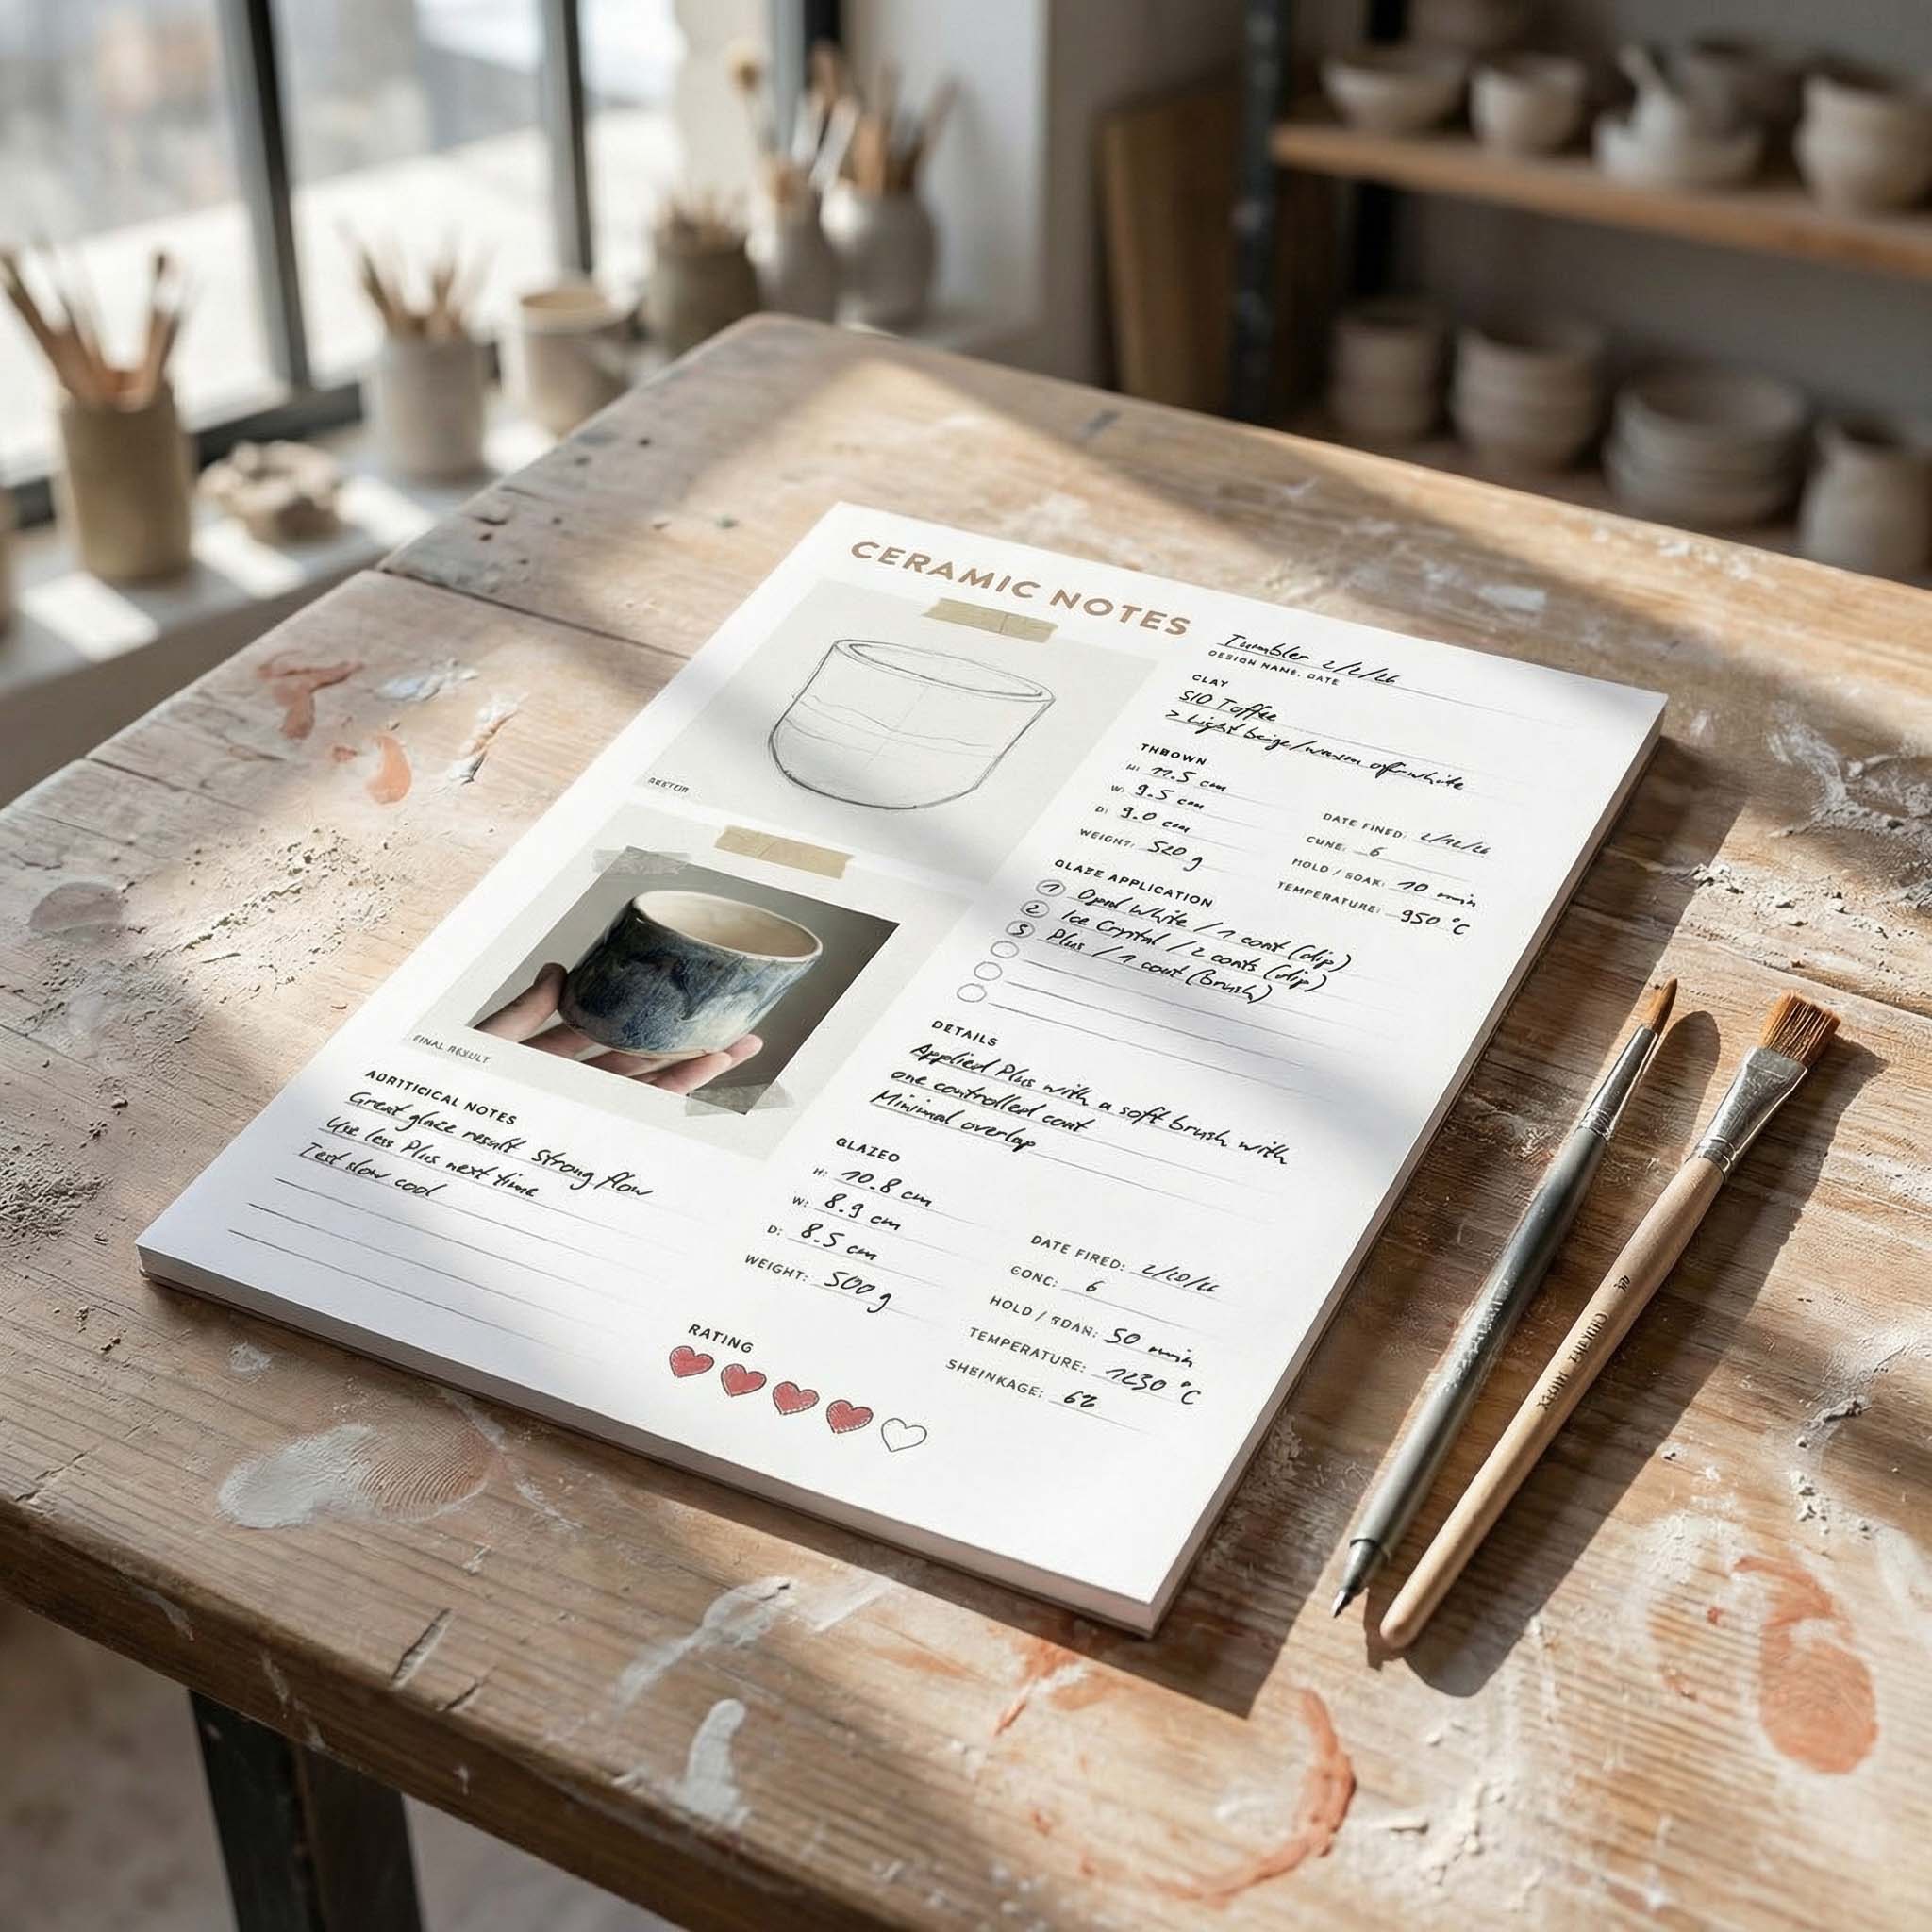
TRACK YOUR CERAMIC JOURNEY
Capture glaze tests, firing details, and creative progress—all in one simple printable. Make your projects easier to repeat and improve.
Tiny Clay Gnomes
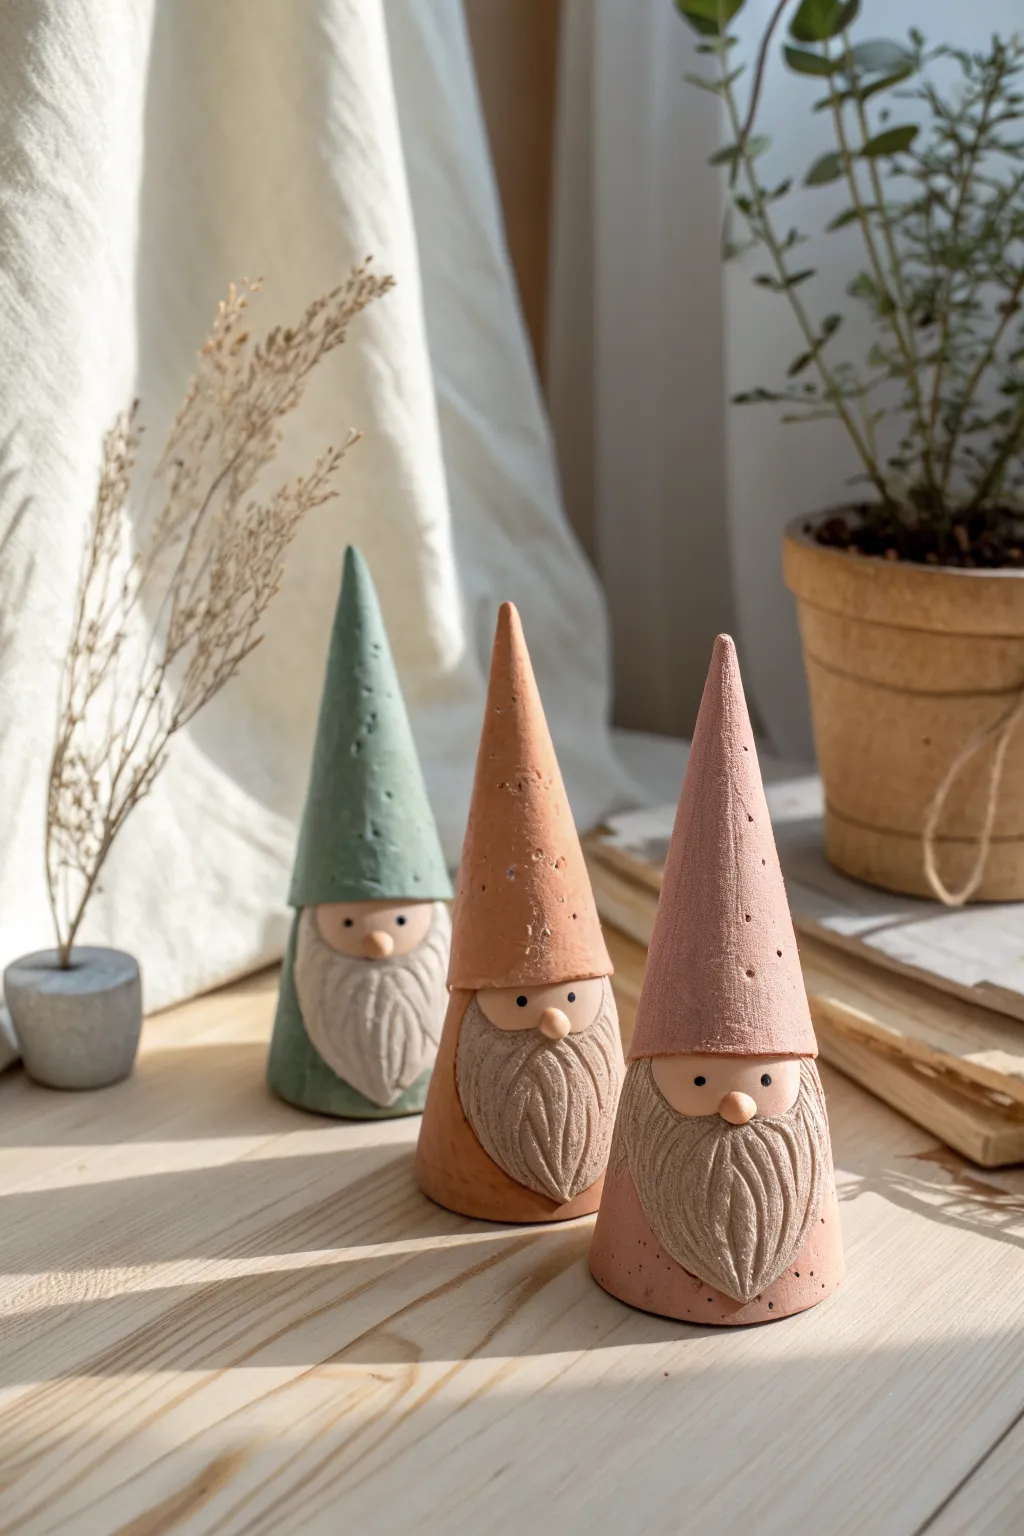
These charming, simplistic gnomes feature clean lines and a matte, stone-like texture that gives them a sophisticated Scandinavian feel. Their sturdy cone shapes make them an exceptionally forgiving structure for beginning sculptors while teaching the basics of attaching clay parts securely.
How-To Guide
Materials
- Air-dry modeling clay (white or terra cotta)
- Acrylic paints (sage green, muted pink, terracotta orange, beige)
- Fine-grit sandpaper
- Small rolling pin
- Sculpting needle tool or toothpick
- Clear matte varnish
- Small cup of water
- Paintbrushes (detail and flat shader)
Step 1: Sculpting the Base
-
Prepare the clay:
Begin by kneading your clay until it is soft, warm, and pliable. Divide the clay into three equal portions, rolling each into a smooth ball to remove any air pockets. -
Form the cones:
Take one ball and roll it on your work surface, applying more pressure on one side to taper it. You want to create a tall, slender cone shape about 4-5 inches high. Tap the bottom firmly on the table to create a flat, stable base. -
Create the face indent:
About one-third of the way up from the bottom, use your thumb to press a gentle, shallow indentation into the front of the cone. This recessed area will house the beard and nose.
Cracking Issues?
If small cracks appear as the clay dries, mix a tiny bit of fresh clay with water to make a paste (slip) and fill the cracks. Smooth it over with your finger.
Step 2: Adding the Details
-
Shape the nose:
Roll a very small pea-sized ball of clay. Score (scratch) the back of the nose and the center of your indented face area with your needle tool. -
Attach the nose:
Dab a tiny drop of water on the scored area and press the nose firmly into place, right in the center of the indentation. Smooth the edges slightly to blend it if you prefer a seamless look. -
Form the beard:
Flatten a small piece of clay into a teardrop shape. Position this below the nose, covering the rest of the indented area. The beard should wrap slightly around the sides of the cone. -
Texture the beard:
Use your needle tool or a toothpick to draw long, flowing lines down the beard clay. Start right under the nose and curve the lines outward toward the bottom to mimic hair. -
The hat brim:
To define where the hat ends and the face begins, carefully smooth the clay above the nose so it slightly overhangs the face area. You can use a modeling tool to create a visible horizontal line separating the hat cone from the face section. -
Add texture:
For that rustic, stone-like appearance seen in the photo, gently poke the hat surface randomly with a toothbrush or a crumpled ball of aluminum foil. This breaks up the perfect smoothness. -
Repeat and refine:
Repeat this process for your other two gnomes. Once finished, run a damp finger over the cones to smooth out any unintentional fingerprints, but leave your purposeful textures intact.
Step 3: Finishing Touches
-
Dry thoroughly:
Allow the gnomes to dry completely. Depending on humidity and clay thickness, I usually let them sit for at least 24 to 48 hours to ensure the core is hardened. -
Sand imperfections:
Once bone dry, use fine-grit sandpaper to gently smooth the bottom and any sharp ridges on the hat. Wipe away the dust with a slightly damp cloth. -
Paint the hats:
Paint the hat section of each gnome a different color—sage green, terracotta, and muted pink work beautifully together. Leave the beard area unpainted for now. -
Paint the details:
Paint the nose a soft beige or skin tone. For the beard, you can either leave it the natural clay color or paint it a light beige/grey, then do a ‘dark wash’ (watered down brown paint) to fill the grooves and wipe the surface clean. -
Add eyes and speckles:
Dip the very tip of a toothpick into black paint and dot two tiny eyes on either side of the nose. To replicate the speckled look, flick a toothbrush loaded with watered-down brown paint lightly over the hats. -
Seal the work:
Finish with a coat of clear matte varnish to protect the paint and give the gnomes a finished, store-bought quality without making them too shiny.
Pro Tip: Weighted Base
To prevent your tall gnomes from tipping over easily, push a small, clean pebble or a heavy coin into the bottom center of the cone while the clay is still wet.
Group your trio together on a shelf or windowsill to enjoy their quiet, whimsical company
Clay Rockets on Cardboard Tubes
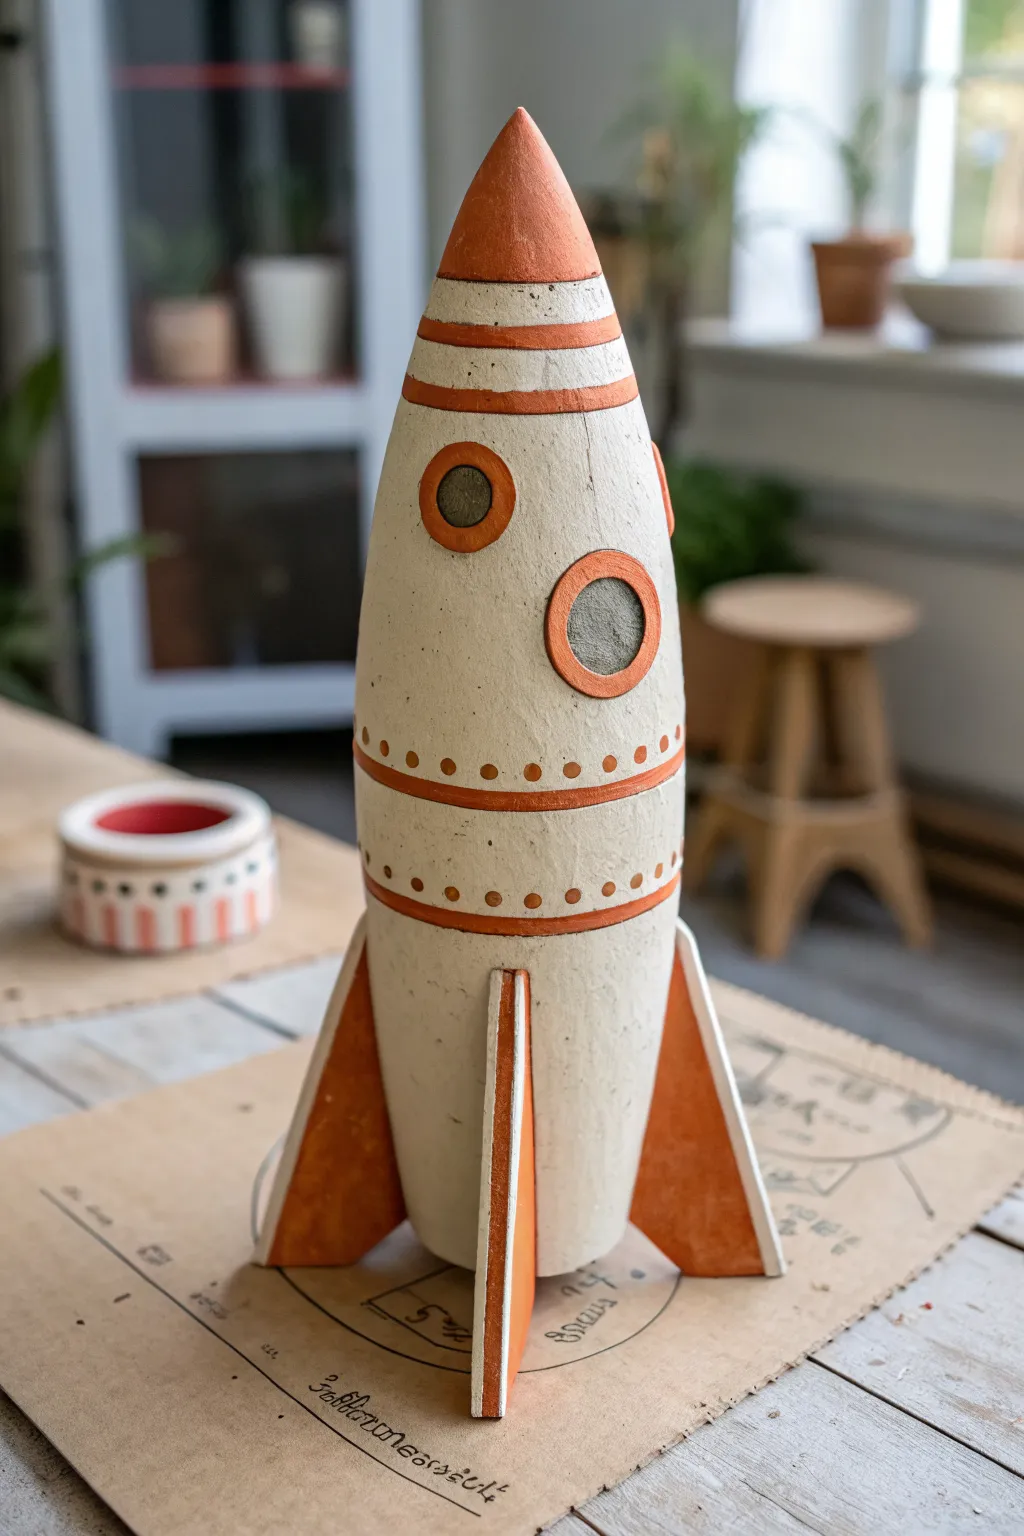
This charming, vintage-style rocket ship combines the sturdiness of a cardboard tube structure with the smooth finish of air-dry clay. With its creamy white body and terracotta accents, it makes for a fantastic shelf decoration or a playful addition to a space-themed room.
Step-by-Step Tutorial
Materials
- Sturdy cardboard tube (paper towel roll or mailing tube)
- White or crème air-dry clay (modeling clay)
- Terracotta or orange acrylic paint
- Cardboard (thick, for fins)
- Craft knife or box cutter
- Rolling pin
- Sandpaper (fine grit)
- Water and a small bowl
- PVA glue or hot glue gun
- Sculpting tools or a dull butter knife
- Dark grey paint or marker (for window interiors)
- Small paintbrush
Step 1: Building the Skeleton
-
Prepare the tube:
Cut your cardboard tube to your desired height; about 8-10 inches works well for a standard rocket. Ensure the bottom cut is perfectly straight so it stands upright on its own. -
Form the nose cone shape:
Crumple a ball of aluminum foil or newspaper into a cone shape that fits the diameter of your tube. Tape it securely to the top of the tube to form the rocket’s point. -
Cut the fins:
Sketch a triangular fin shape on a piece of thick cardboard. Cut out three identical fins. To attach them, I find it easiest to cut three vertical slits at the base of the tube and slide the tabs of the fins inside, securing them with glue.
Seamless Smoothness
Keep a small sponge damp with water nearby. Lightly wiping the clay while it’s wet achieves a smoother finish than fingers alone.
Step 2: Applying the Clay Skin
-
Roll out the clay:
Roll your air-dry clay into a thin, even sheet, approximately 1/4 inch thick. You may need to work in sections if your clay dries quickly. -
Cover the body:
Wrap the sheet of clay around the cardboard tube body. Use a little water on your fingers to smooth out the seam where the clay meets, blending it until it’s invisible. -
Cover the nose cone:
Mold a separate piece of clay over the foil nose cone, smoothing it downwards to join seamlessly with the body clay. -
Refine the fins:
Cover each cardboard fin with a thin layer of clay. Pay special attention to the edges, ensuring they are squared off and sharp, not rounded. -
Smooth the surface:
Dip your finger in water and run it over the entire rocket to remove fingerprints and bumps. Let the sculpture dry completely, which is usually 24-48 hours.
Cracks while drying?
Make a ‘slip’ by mixing clay scraps with water until gooey. Fill any cracks with this paste, let dry, and sand smooth.
Step 3: Detailing and Painting
-
Sand for perfection:
Once fully dry, lightly sand the rocket with fine-grit sandpaper to get that smooth, manufactured look. Wipe away any dust with a damp cloth. -
Add dimensional details:
Roll very thin ‘snakes’ of fresh clay. Wrap two of these around the body to create the raised rings—one near the top and one towards the bottom. Adhere them with a dab of water. -
Create the windows:
Form two small clay rings for the portholes. Attach them to the upper body of the rocket, pressing gently to bond them to the dry surface. -
Paint the nose cone:
Using terracotta or orange paint, carefully paint the entire nose cone section. A flat brush helps create a sharp line where the color meets the white body. -
Paint the accents:
Paint the raised clay rings and the porthole frames in the same terracotta color. Paint the fins in the accent color as well, leaving the vertical edge white if you want that specific look from the photo. -
Add the rivets:
Dip the back end of a paintbrush into the terracotta paint and dot it along the raised body rings to simulate rivets. -
Fill the windows:
Paint the inside circle of the portholes with dark grey or gunmetal paint to look like glass.
Set your rocket on a surface prepared with space maps or blueprints to complete the scene
Easy Clay Domino Tiles
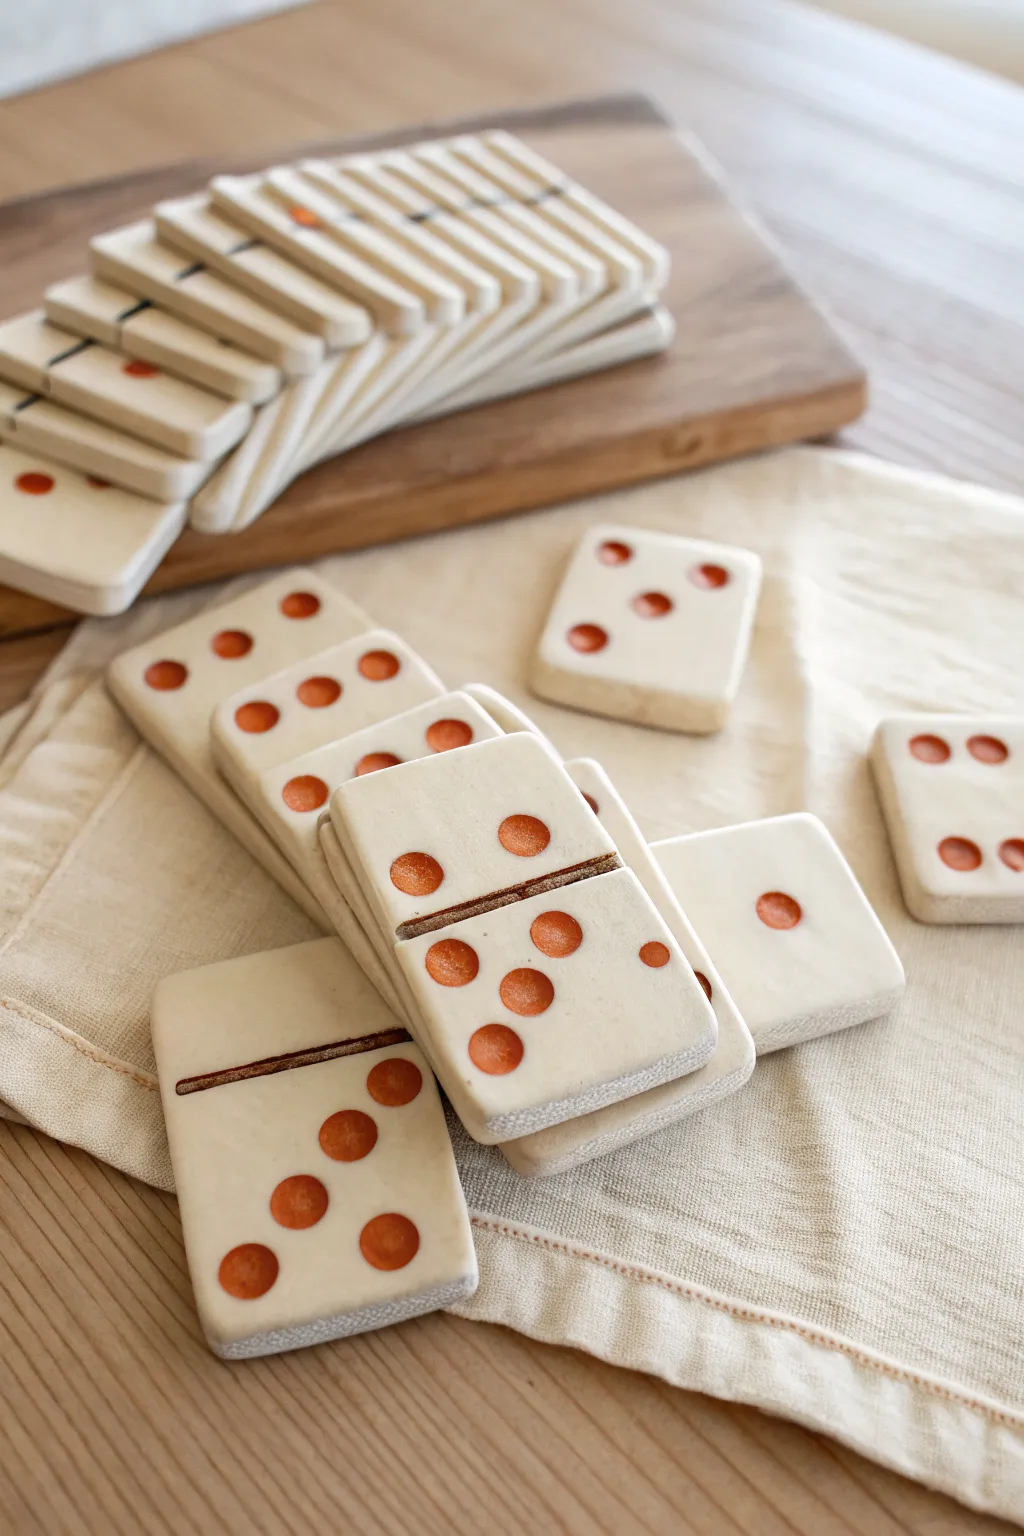
Create a charming, rustic set of dominoes that feel wonderful in the hand and look great on the game table. These clay tiles feature a creamy, natural finish with warm orange pips, making them a perfect beginner-friendly sculpting project.
Detailed Instructions
Materials
- White air-dry clay or polymer clay
- Rolling pin
- Canvas mat or textured fabric
- Sharp craft knife or cookie cutter (rectangular)
- Ruler
- Small round tool (like a paintbrush end or dotting tool)
- Fine-grit sandpaper
- Orange acrylic paint
- Dark brown acrylic paint
- Small detail paintbrush
- Matte sealant or varnish
Step 1: Shaping the Tiles
-
Prepare your workspace:
Lay down a piece of canvas or textured fabric on your work surface. This prevents sticking and adds that lovely, subtle texture to the back of your tiles seen in the photo. -
Roll the clay:
Take a large chunk of white clay and knead it until soft. Roll it out into a flat slab, aiming for a consistent thickness of about 1/4 inch (6mm) to ensure the tiles are durable. -
Measure the tiles:
Using a ruler, lightly score a grid on the clay slab. Standard dominoes are roughly 1 inch by 2 inches, but feel free to adjust the size for smaller hands. -
Cut the shapes:
Use a sharp craft knife to slice along your measured lines. Try to keep the blade vertical to get straight edges, though a little irregularity adds to the handmade charm. -
Soften the edges:
Pick up each rectangle and gently tap the edges on the table to square them up. Then, use your finger to lightly smooth and round off the sharp corners.
Consistent Thickness
Place two popsicle sticks or magazines of equal height on either side of your clay while rolling. The rolling pin will ride on these guides for a perfectly even slab.
Step 2: Detaling and Drying
-
Create the center line:
Press the edge of your ruler or a dull knife gently across the middle of each tile to create the dividing groove. Don’t cut all the way through; just make an indentation. -
Plan your pips:
Before pressing, determine which numbers you need for a standard double-six set (28 tiles total). You might want to lightly mark the positions with a pencil first. -
Indent the dots:
Using the back of a paintbrush or a specialized round tool, press firmly into the clay to create the pips. Twist the tool slightly as you lift it to keep the circle clean. -
Dry completely:
Place all your tiles on a drying rack or parchment paper. If using air-dry clay, let them sit for 24-48 hours, flipping them once halfway through. If using polymer, bake according to package instructions. -
Sand for smoothness:
Once fully cured, use fine-grit sandpaper to buff away any burrs or rough spots on the edges, ensuring they slide easily on a table.
Step 3: Adding Color
-
Paint the center line:
Dip a fine detail brush into dark brown paint. carefully run it through the refreshing center groove you created earlier. Wipe away surface excess immediately with a damp cloth if you spill over. -
Fill the pips:
Load your brush with warm orange paint. Dab a generous amount into each indented dot. -
Clean up overflow:
I like to wipe the surface gently with a slightly damp paper towel while the paint is still wet. This leaves paint deep in the holes but cleans the top surface, creating a neat, inlaid look. -
Seal the deal:
Finish by applying a coat of matte sealant or varnish. This protects the clay from oils and dirt during gameplay and deepens the clay’s natural color.
Cracking Issues?
If air-dry clay cracks while drying, patch it with a tiny bit of fresh wet clay mixed with water (slip), smooth it over, and let it dry slowly away from direct heat.
Gather your family for a game night with your beautiful new custom set
Mini Story Tokens for Pretend Play
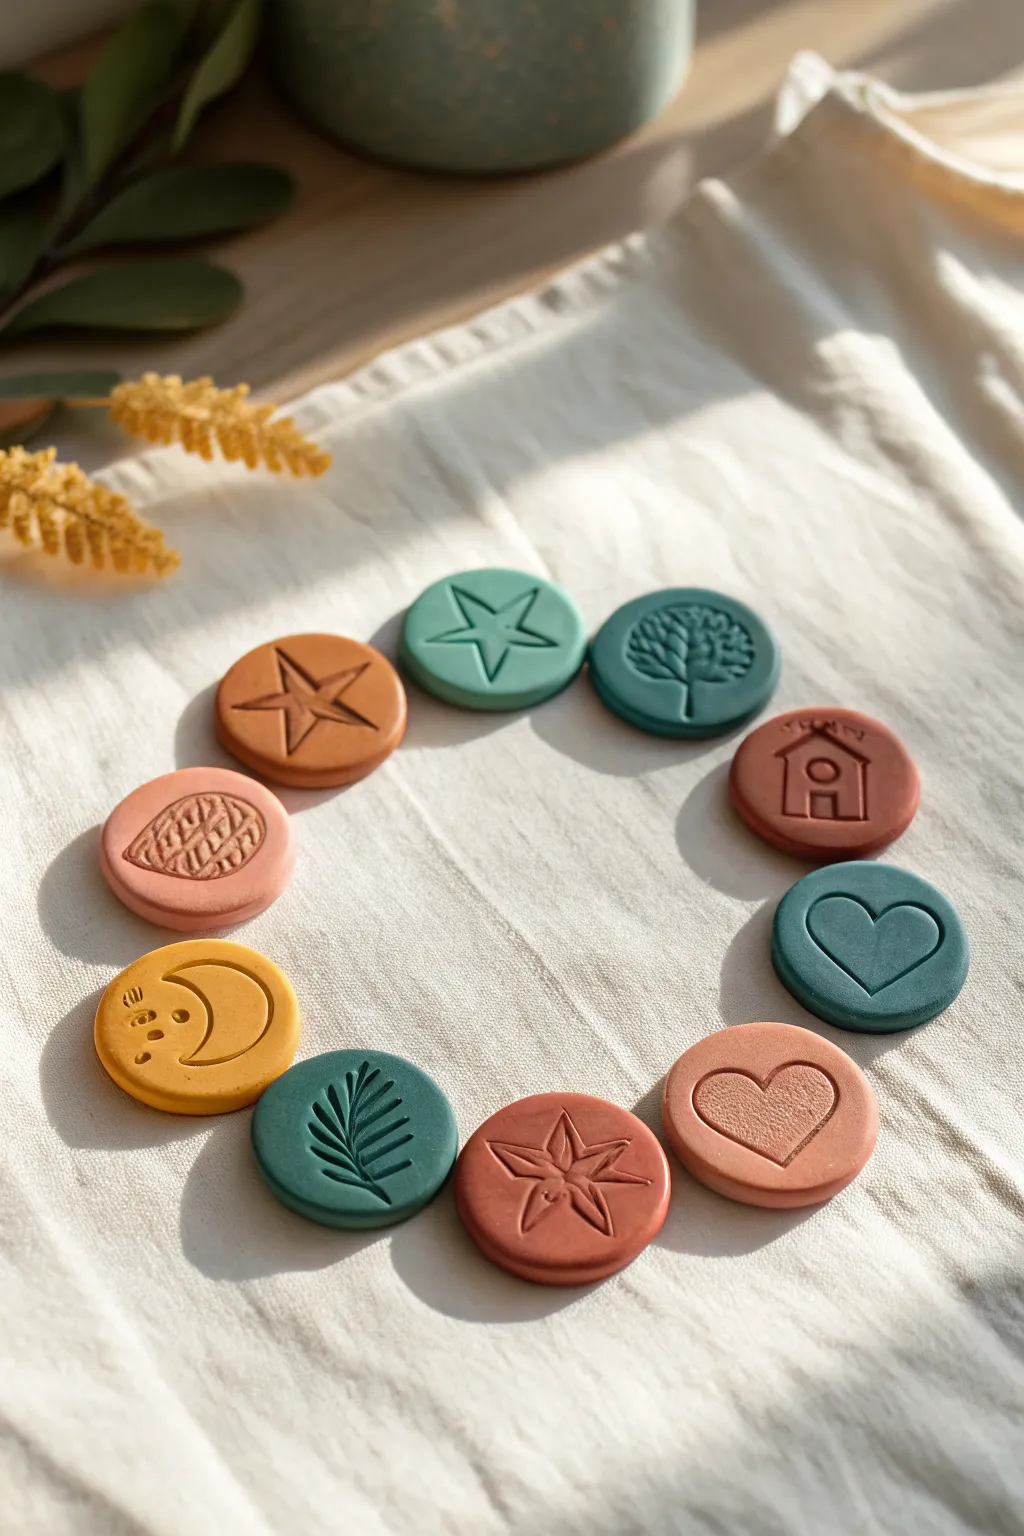
These charming, earthy tokens are perfect for sparking imagination during quiet time or story circles. With simple impressed designs and a muted color palette, they feel like discovered treasures from a magical garden.
Step-by-Step
Materials
- Air-dry clay or polymer clay (white or pre-colored)
- Acrylic paints (terracotta, teal/sage, mustard yellow, dusty pink)
- Small circular cookie cutter (approx. 1.5 – 2 inches)
- Rolling pin
- Parchment paper or craft mat
- Sculpting tool set (needle tool, small ball stylus)
- Deep-texture element stamps (optional but helpful)
- Fine-grit sandpaper
- Matte varnish or sealant
Step 1: Preparing the Base
-
Condition the Clay:
Begin by kneading your clay until it is soft, pliable, and free of cracks. If you are using polymer clay, the warmth of your hands is essential here. -
Roll It Out:
Place the clay on parchment paper and roll it into a smooth, even slab. Aim for a thickness of about 1/4 inch so the tokens feel substantial and durable in little hands. -
Cut the Circles:
Use your small circular cutter to punch out ten discs. Press straight down and lift carefully to keep the edges clean. If the clay sticks, a little cornstarch on the cutter rim helps. -
Smooth the Edges:
Gently run your finger around the perimeter of each circle to soften the sharp cut edge, creating a slightly rounded, stone-like finish.
Sticky Situation
If your clay sticks to the tool while carving, dip the tool tip in a tiny bit of water (for air-dry clay) or baby oil (for polymer clay) to help it glide.
Step 2: Creating the Impressions
-
Sketch the Star:
For the star token, lighter press a needle tool to outline a five-point star. Once you are happy with the shape, retrace the lines deeper to create a grooved channel. -
Sculpt the Tree:
Press a small tree stamp into the teal clay circle, or draw a trunk and dab the ‘leaves’ area with the end of a paintbrush handle to create texture. -
Design the House:
On a terracotta circle, carve a simple house shape—a square with a triangle roof. Add a small circle for a window to give it a cozy feel. -
Form the Hearts:
Create two heart tokens. For one, simply carve the outline. For the other, gently press the center down to make the heart shape recessed, leaving a raised border. -
Carve the Leaf:
Draw an oval spine line, then add diagonal veins branching out. I like to vary the pressure here to make the veins look organic and natural. -
Add the Moon:
On a yellow disc, press a bottle cap or curved tool to make a crescent shape. Use a small stylus to poke tiny dots nearby for stars. -
Imprint the Palm Frond:
On a green disc, drag your needle tool to make a central stem, then flick outward quickly to create the sharp, feathery leaves of a palm branch. -
Make the Starfish:
Create a second star shape but give it slightly curved, organic arms like a starfish. Add a tiny dot in the very center. -
Detail the Feather:
On a pink disc, draw a long oval shape. Inside, draw a central line and fill the sides with tight, diagonal hatching lines to mimic feather barbs.
Make it Magnetic
Before the clay dries or bakes, press a small, strong round magnet into the back of each token. Now your story pieces can live on the fridge!
Step 3: Finishing Touches
-
Initial Drying/Baking:
Follow your specific clay’s instructions. If using air-dry clay, let them sit for 24-48 hours until fully hard. If using polymer, bake according to the package temperature. -
Sand for Smoothness:
Once fully cured and cool, lightly sand the edges with fine-grit sandpaper to remove any rough burrs or fingerprints. -
Painting (If Required):
If you used white clay, now is the time to paint. Mix muted tones—sage green, ochre, terracotta—and apply two thin coats. Wipe excess paint off the raised areas if you want the grooves to appear darker. -
Seal the Work:
Apply a layer of matte varnish to protect the surface from scratches during play. Let it dry completely before handling.
Gather your finished tokens in a small drawstring bag and start weaving magical tales together