If you’ve ever rolled a clay “snake” and wondered what else it could become, you’re in the right place. These clay coil project ideas are all about turning simple coils into sturdy, beautiful forms that feel totally doable at your kitchen table or in the studio.
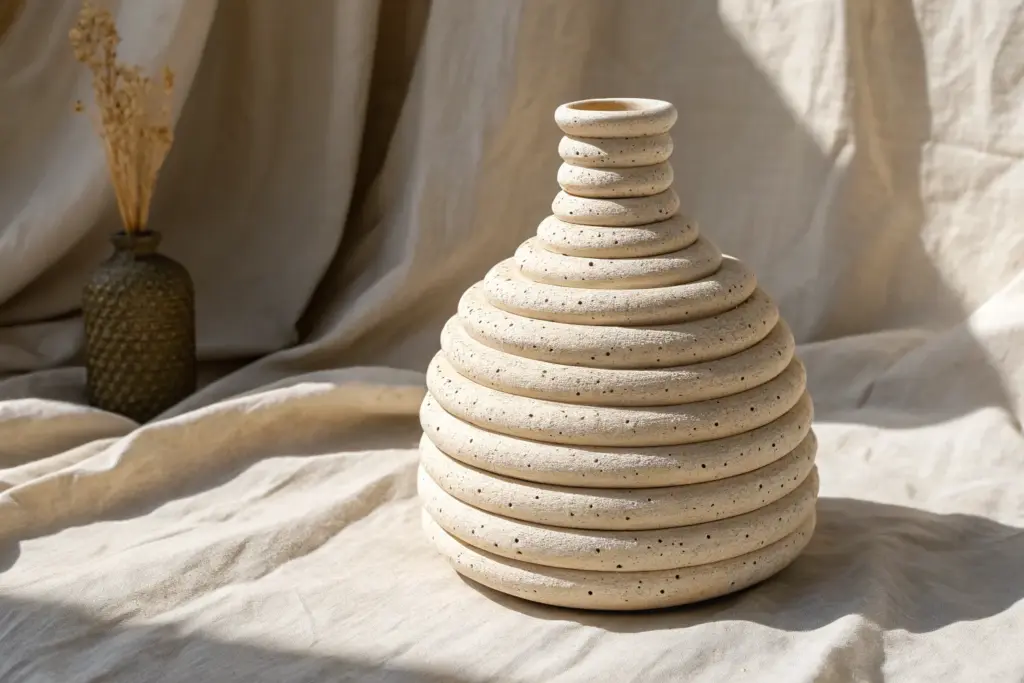
Classic Coil Pot With Visible Ropes
This project embraces the beautiful, natural texture of coil building rather than hiding it. By leaving the coil ridges visible on the upper half and smoothing the base, you create a timeless, tactile vessel perfect for dried arrangements.
Step-by-Step Tutorial
Materials
- Terracotta or earthenware clay (with grog for stability)
- Clay cutting wire
- Rolling pin or slab roller
- Needle tool
- Scoring tool or serrated rib
- Slip (clay and water mixture)
- Wooden modeling tool or spoon
- Flat wooden work board
- Sponge
Step 1: Building the Base
-
Prepare the slab:
Begin by rolling out a circular slab of clay about 1/2 inch thick to serve as your base. Use a needle tool to cut a perfect circle, approximately 4-5 inches in diameter. -
Score and slip:
Score the outer edge of your circular base aggressively with your serrated tool and apply a generous amount of slip. This first connection is crucial for the pot’s integrity. -
Roll your first coils:
Roll out several long ropes of clay (coils). Aim for a thickness similar to a sturdy marker or a finger—thicker coils help build the wall faster and provide more stability. -
Attach the first layer:
Place the first coil directly on the scored edge of the base. Gently press it down to ensure good contact without squashing the round shape of the coil. -
Blend the interior:
Using your thumb or a wooden modeling tool, smear the inside edge of the coil down onto the base floor. This seals the seam. I like to leave the outside un-smoothed for now to gauge the shape better.
Step 2: Creating the Belly
-
Build outward:
Add the next 3-4 layers of coils. For each layer, place the coil slightly toward the outer edge of the previous one. This stacking technique will cause the pot to widen and create that nice round belly shape. -
Smooth the lower exterior:
Once you have built up about a third of the height, pause to smooth the exterior of these bottom coils. Use a wooden rib or your fingers to blend the clay downwards, creating a solid, relatively smooth foundation while the clay is still workable. -
Continue expanding:
Keep adding coils, stepping them outward until you reach the widest point of the pot (the equator). Remember to blend the inside of every single coil completely smooth to prevent cracking. -
Begin tapering in:
After reaching the widest point, reverse your stacking technique. Place each new coil slightly toward the inner edge of the one below it. This will make the walls curve inward, closing the form. -
Check the profile:
Step back frequently to look at the silhouette. If one side looks lopsided, gently pat it back into shape with a flat board or your hands before the clay stiffens.
Pro Tip: Hidden Strength
Even though you want the outside ridges visible, thoroughly blending the coils on the *inside* is non-negotiable. Use a rib tool to compress the inner walls for a watertight seal.
Step 3: Refining the Texture and Rim
-
Preserve the ridges:
As you build the upper half, stop smoothing the exterior. Leave those horizontal coil lines visible to achieve the ribbed texture shown in the photo. Just be extra diligent about blending the glowing interior seams since you can’t rely on exterior smoothing for strength. -
Form the neck:
Once the opening has narrowed to your desired width, stack two or three coils directly on top of each other (vertically) to create a short neck. -
Create the heavy rim:
For the rim, roll a coil that is slightly thicker than the others. Attach it to the top, blending it securely on the inside. -
Flare the lip:
Support the outside of the rim with one hand while using your damp fingers to gently press the rim outward and slightly down. This creates a finished, rolled-lip look. -
Clean up the surface:
Wait until the pot is leather hard. Use a slightly damp sponge to soften any sharp burrs or crumbs on the textured coils, but don’t scrub so hard that you lose the definition. -
Final drying:
Let the pot dry slowly under a loose sheet of plastic for a few days before firing. This slow drying helps prevent the coils from separating.
Level Up: Color Wash
After bisque firing, apply a diluted iron oxide wash or a dark stain over the ribbed section, then wipe it back. The color will stay in the crevices, exaggerating the texture.
Your finished pot will have a lovely blend of organic texture and classic form, ready for display

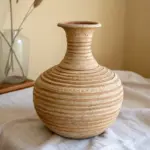
Narrow-Neck Coil Vase
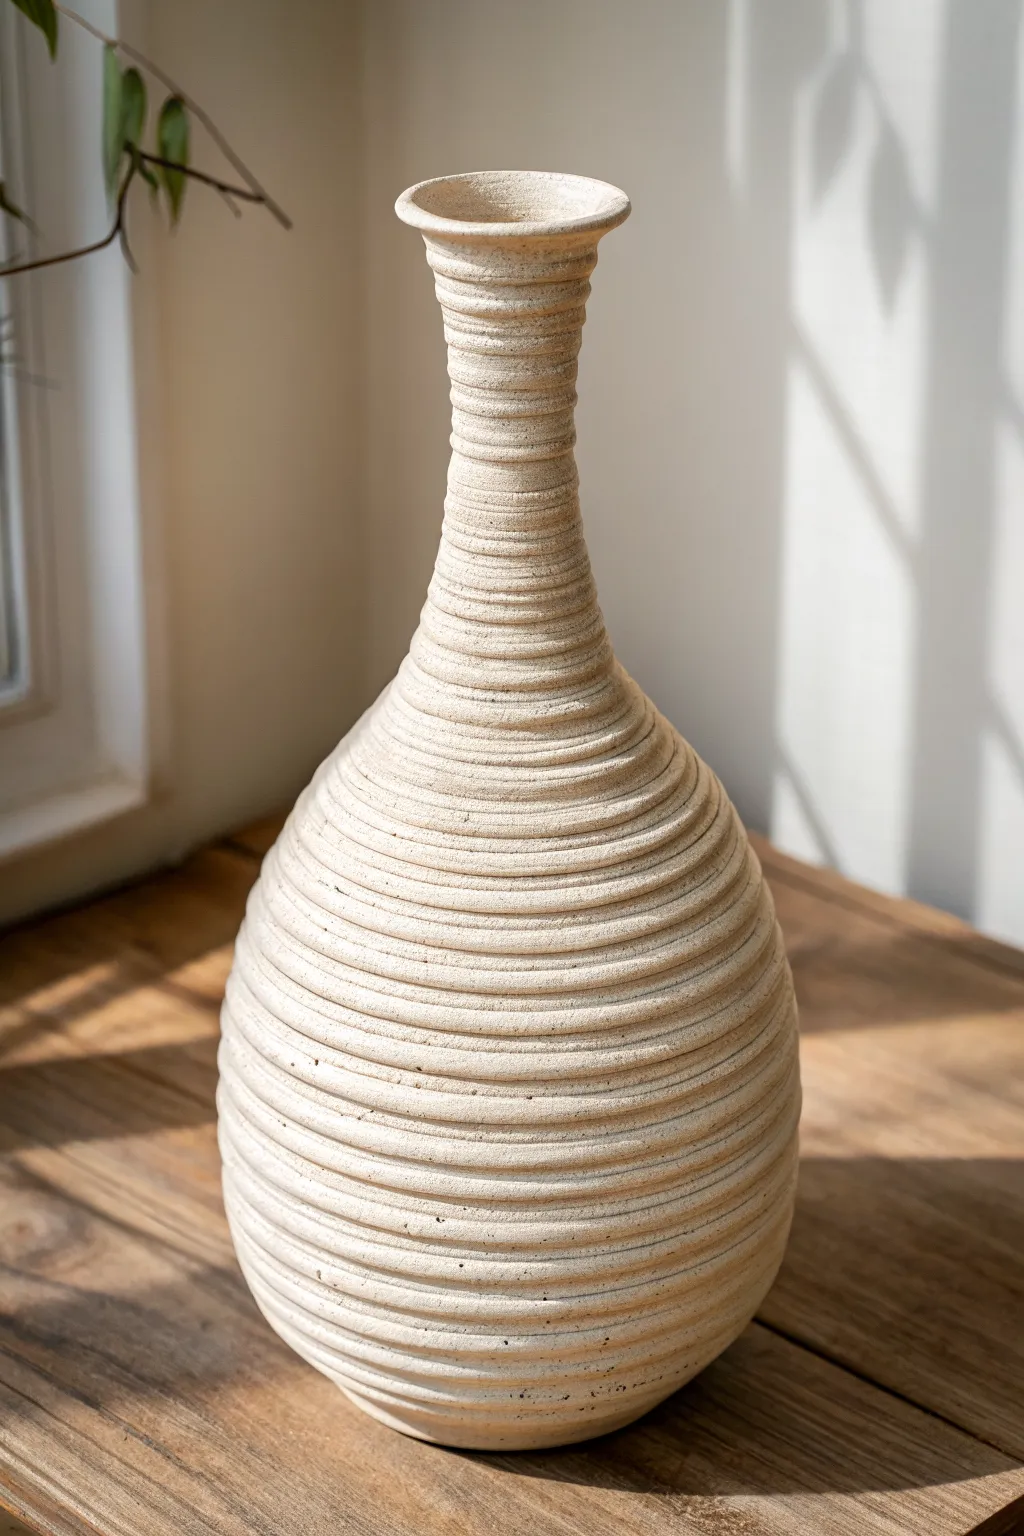
Embrace the rhythmic beauty of exposed coils with this elegant, narrow-neck vase project. The organic, striated texture emphasizes the hand-building process while creating a sophisticated silhouette perfect for dried botanicals.
Detailed Instructions
Materials
- Stoneware clay (with grog for texture)
- Clay scoring tool or fork
- Slip (clay mixed with water)
- Wooden modeling tool or rib
- Sponge
- Cutting wire
- Banding wheel (optional but highly recommended)
- Ruler or calipers
Step 1: Building the Base
-
Create the floor:
Start by rolling out a slab of clay about 1/2 inch thick. Cut a perfect circle, roughly 4-5 inches in diameter, to serve as the sturdy foundation for your vase. -
Prepare the first coil:
Roll out a long, even snake of clay about as thick as your thumb. Try to keep the thickness consistent along the entire length to ensure the walls rise evenly. -
Attach the base coil:
Score the outer edge of your base circle and apply a generous amount of slip. Lay your first coil directly on top of this scored edge, pressing it down firmly. -
Smooth the interior:
Use your thumb or a wooden tool to smear the inside of the coil down onto the base floor. This seals the joint completely.
Keeping it Straight
Step back often! It’s easy to get lost in the coils. viewing the profile from a distance helps ensure your neck isn’t leaning.
Step 2: Building the Body
-
Coil upwards:
Continue adding coils, stacking them directly on top of one another. Score and slip between every single layer to prevent cracking later. -
Blend the inside only:
As you build, thoroughly smooth the interior seams of the pot to create a solid wall. Leave the exterior coils untouched for now to maintain that distinct ribbed look. -
Form the belly:
To create the wide, round bottom section, place each new coil slightly further outward than the one below it. Do this gradually to prevent the walls from collapsing. -
Check symmetry:
Spin your banding wheel frequently. If one side looks lower, gently pinch that section up or use a slightly thicker piece of coil to level it. -
Begin the taper:
Once you’ve reached your desired width for the body, start placing coils slightly inward. This begins the transition toward the narrow neck. -
Support the clay:
As the form narrows, the clay might get tired. I sometimes pause here and let the bottom section stiffen up for an hour under loose plastic.
Step 3: Neck and Finishing
-
Construct the neck:
Continue stacking coils inward until the opening is quite narrow, then stack them vertically to create the elongated neck shaft. -
Flare the rim:
For the very top, add one final coil slightly outward to create a gentle flare for the lip. -
Refine the exterior texture:
Now, address the outside. Using a slightly damp sponge or your finger, run it along the grooves between the coils. You want to soften the sharp edges without erasing the horizontal lines. -
Deepen the grooves:
If the coils blended too much during building, use a wooden modeling tool to gently press back into the seams, re-defining the ribbed pattern. -
Smooth the rim:
Use a damp chamois or sponge to compress and smooth the rim significantly, making it comfortable to the touch. -
Create the foot:
Use a wooden tool to create a slight undercut at the very bottom of the vase, giving it a shadowed ‘lift’ off the table. -
Dry slowly:
Cover the top rim with plastic (it dries fastest) and let the rest dry very slowly to prevent warping.
Surface Variation
Before firing, burnish (rub) just the high points of the coils with a spoon. This creates a subtle shine contrast against the matte grooves.
Once fired with a matte glaze or oxide wash, your vessel will have a timeless, artifact-like quality


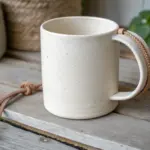
Coil Mug With a Rope Handle

This charming ceramic mug combines traditional coil-building techniques with a clever trompe-l’œil effect. The textured exterior mimics stacked rings, while the handle looks like real twisted rope, creating a cozy vessel perfect for your morning brew.
Step-by-Step Guide
Materials
- Speckled stoneware clay (mid-fire)
- Pottery wheel or banding wheel
- Wooden modeling tool
- Pin tool or needle tool
- Serrated rib or scoring tool
- Slip (clay mixed with water)
- Sponge
- Turquoise or teal glaze (food safe)
- Plastic wrap for drying
Step 1: Building the Mug Body
-
Prepare the base:
Start by rolling out a slab of clay to about 1/4 inch thickness. Use a large circle cutter or a needle tool to cut out a base roughly 3.5 inches in diameter. -
Roll your coils:
Roll out several long, even snakes of clay, aiming for a thickness slightly thinner than your pinky finger. Keeping them consistent is key for an even wall. -
Score and slip:
Score the outer edge of your base discs and the underside of your first coil. Apply a generous amount of slip to the scored areas to act as glue. -
Attach the first layer:
Place the first coil onto the base. Instead of blending the outside, leave the seam visible to create the deeper grooves shown in the photo. Blend the *inside* thoroughly using a wooden tool or your finger to ensure structural integrity. -
Build the walls:
Continue stacking coils one on top of the other. Remember to score and slip between every layer. Gently press them together, but maintain that distinct rounded profile on the exterior. -
Smooth the interior:
After every 2-3 coils, stop to completely smooth the interior wall. I find using a slightly damp sponge helps compress the clay and remove any potential cracks. -
Form the rim:
Once you reach your desired height (usually around 4-5 inches), add a final coil. Gently pinch and round off the top edge with a chamois or sponge for a comfortable drinking lip.
Making It Match
To get the exact speckled look from the photo without buying new clay, wedge 1-2 teaspoons of granular manganese or ilmenite into your standard white clay body.
Step 2: Creating the Rope Handle
-
Roll thin strands:
Roll out two long, thin strands of clay, each about twice the length of the handle you want. Keep them round and even. -
Twist the rope:
Lay the two strands side by side. Twist them around each other tightly to mimic the texture of a nautical rope. Gently tap the finished twist on the table to slightly flatten the side that will attach to the mug. -
Shape the arch:
Curve the twisted clay into a ‘C’ or ear shape. Hold it up to your mug to check proportions—it should be large enough for 2-3 fingers. -
Score attachment points:
Hold the handle against the mug to mark where it will connect. Score deeply on both the mug body and the ends of the rope handle. -
Attach firmly:
Apply slip and press the handle firmly onto the mug. Use a small modeling tool to blend the clay *underneath* the connection points so the rope appears to just emerge naturally from the wall. -
Clean up connections:
Use a small brush with a tiny bit of water to smooth over the attachment seams, ensuring no sharp edges remain where your hand will hold it.
Step 3: Drying and Glazing
-
Slow drying:
Cover the mug loosely with plastic wrap. This is crucial because the handle will dry faster than the body, and uneven drying causes cracks. Let it dry slowly over several days until bone dry. -
Bisque fire:
Fire the mug in a kiln to cone 04 (or your clay’s specified bisque temperature). -
Wax the exterior:
Apply wax resist to the entire exterior of the mug, including the handle and the bottom. We want to keep that beautiful raw speckled clay visible. -
Glaze the interior:
Pour a glossy turquoise glaze inside the mug. Swirl it around to coat every inch of the interior, then pour the excess back out. -
Clean the rim:
Use a damp sponge to wipe any glaze drips off the rim or the exterior wax. The rim should transition cleanly from the interior color to the raw exterior. -
glaze fire:
Fire the mug again to cone 5 or 6 (check your clay specifications) to vitrify the stoneware.
Crack Control
Handle falling off? Always score deeper than you think is necessary. If the clay is leather hard, use vinegar instead of water in your slip for a stronger bond.
Now you have a beautifully textured mug ready for your favorite hot beverage

Corrugated Coil Jar Texture
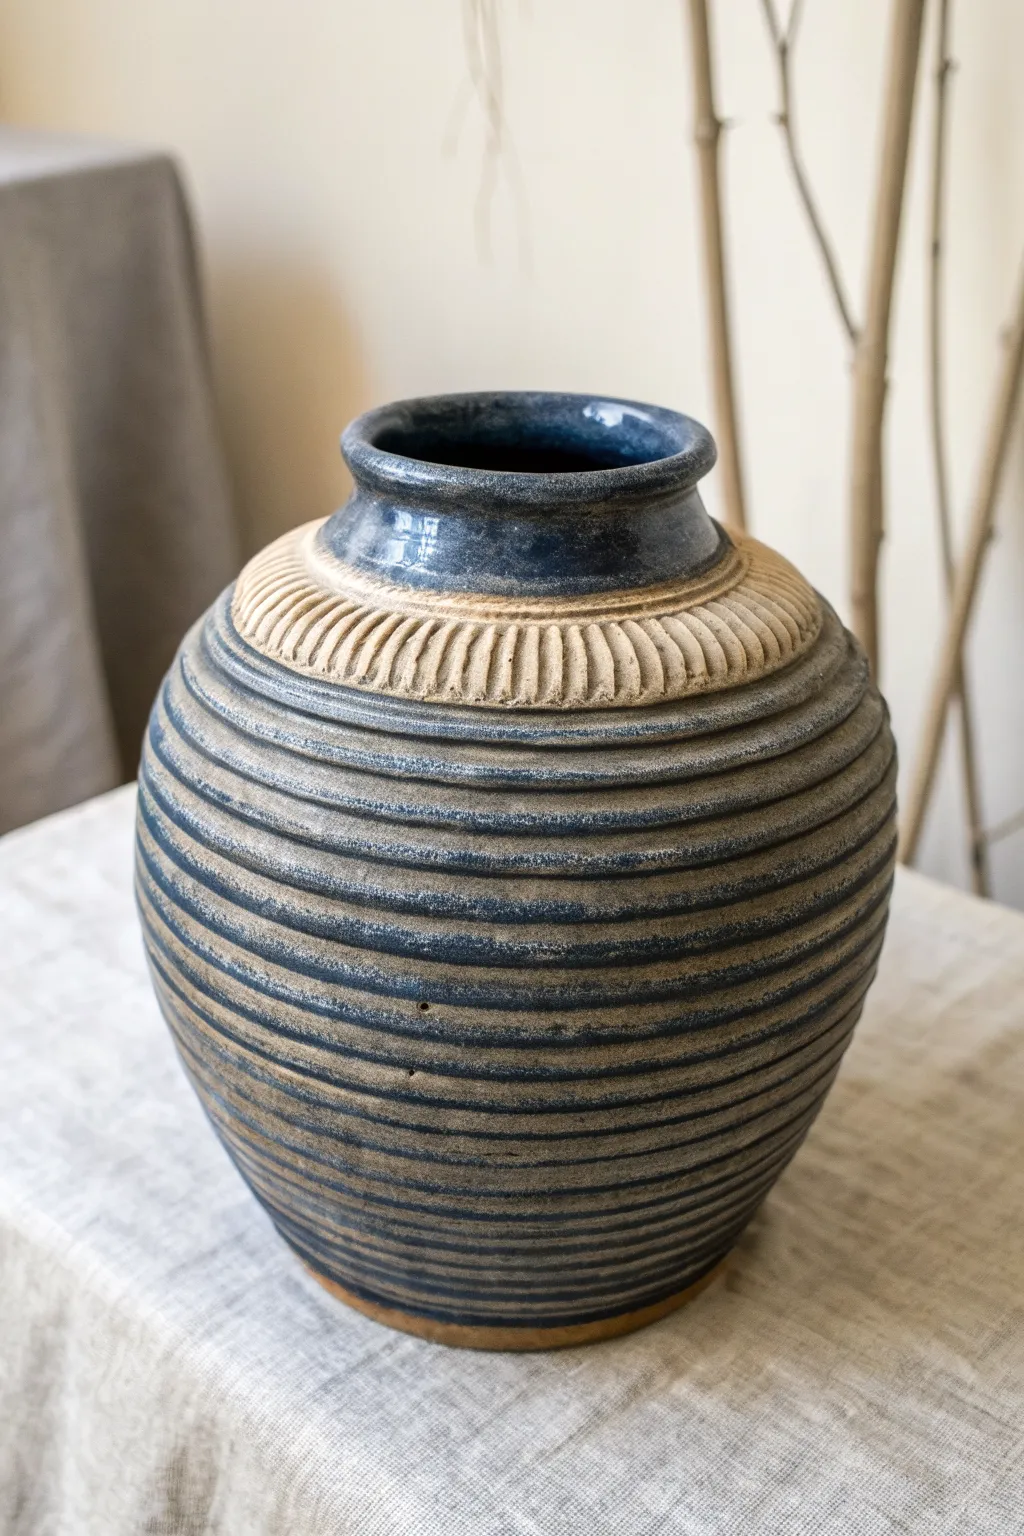
This rustic vessel combines structural integrity with visual rhythm, showcasing the beauty of exposed coil construction. The distinct corrugated effect is achieved by deliberately defining the seams between coils rather than smoothing them away, topped with a decorative stamped shoulder.
Step-by-Step Guide
Materials
- Stoneware clay suitable for coil building
- Scoring tool or serrated kidney
- Slip (clay mixed with water)
- Wooden modeling tool with a rounded tip
- Carving tool or small loop tool
- Sponge
- Potter’s wheel or banding wheel
- Dark blue glaze
- Wax resist (optional)
Step 1: Building the Base Form
-
Create the floor:
Start by rolling out a slab of clay about 1/2 inch thick. Cut a circle approximately 4-5 inches in diameter to serve as the stable base of your jar. Place this on your banding wheel. -
Prepare your coils:
Roll out several long, even coils of clay. For this project, aim for coils that are slightly thicker than a pencil—around 3/4 inch thick—to allow for deep carving later without piercing the wall. -
Establish the first ring:
Score and slip the edge of your base. Attach your first coil, blending the clay downward on the *inside* only to secure it to the base. Leave the outside seam visible for now. -
Build the belly:
Continue adding coils, stacking them slightly outward to widen the form into a bulbous shape. As you stack, blend the interior seams completely smooth for strength, but leave the exterior untouched. -
Close the form:
Once you reach the widest point of the belly, begin stacking coils slightly inward to narrow the form toward the neck. Keep checking your silhouette from a distance to ensure symmetry.
Groove Depth
Don’t crave too deep! Use a needle tool to gauge your wall thickness before carving the horizontal lines. You want at least 1/4 inch of clay remaining behind the groove.
Step 2: Refining and Texturing
-
Smooth the profile:
Before adding the specific texture, gently run a rib tool over the exterior to unify the shape, but don’t smooth it completely flat—you want to keep the ‘memory’ of where the coils sit. -
Carve the corrugation:
Using a rounded wooden tool or a carving loop, deepen the horizontal grooves between each coil layer. I find using a slow spinning banding wheel helps keep these lines continuous and steady. -
Define the shoulder:
Stop the horizontal grooves just before the neck area begins. Leave a band of smooth clay about 1.5 inches wide at the shoulder for the decorative element. -
Add vertical fluting:
On this smooth shoulder band, use a small carving tool to press or carve vertical dashes all around the circumference. Spacing them tightly creates a collar-like texture. -
Construct the neck and rim:
Add smaller coils to build up a short, vertical neck. Finish with a slightly flared, rounded rim that feels substantial to the touch.
Oxide Wash
Instead of glaze, rub black iron oxide into the grooves and wipe it back. Then apply a clear matte glaze for a more subtle, earthy finish that highlights the texture.
Step 3: Finishing and Glazing
-
Dry slowly:
Cover the pot loosely with plastic to let it dry slowly. Uneven drying can cause cracks between coils. -
Bisque fire:
Once bone dry, fire the piece to bisque temperature (usually cone 04-06) to prepare it for glazing. -
Apply wax resist:
Paint a thin layer of wax resist over the vertical fluting on the shoulder and the deep grooves of the body if you want those recessed areas to remain raw clay, or plan to wipe the glaze back. -
Glaze application:
Dip or brush a dark blue glaze over the entire neck and body. The glaze should pool slightly in the deep horizontal grooves, emphasizing the coil structure. -
Wipe back:
Using a damp sponge, gently wipe the glaze off the raised ridges of the horizontal coils and the high points of the shoulder fluting. This exposes the raw clay color and creates the high-contrast horizontal striping seen in the reference. -
Clean the foot:
Ensure the bottom of the pot is completely free of glaze before firing. -
Final firing:
Fire to the maturation temperature of your clay and glaze (likely cone 5/6 or cone 10). The exposed clay will toast to a warm brown, contrasting beautifully with the deep blue recesses.
Once fired, the distinct horizontal ridges will give your jar a wonderful tactile quality that invites touch.

The Complete Guide to Pottery Troubleshooting
Uncover the most common ceramic mistakes—from cracking clay to failed glazes—and learn how to fix them fast.
Coil Pitcher With a Pinched Spout
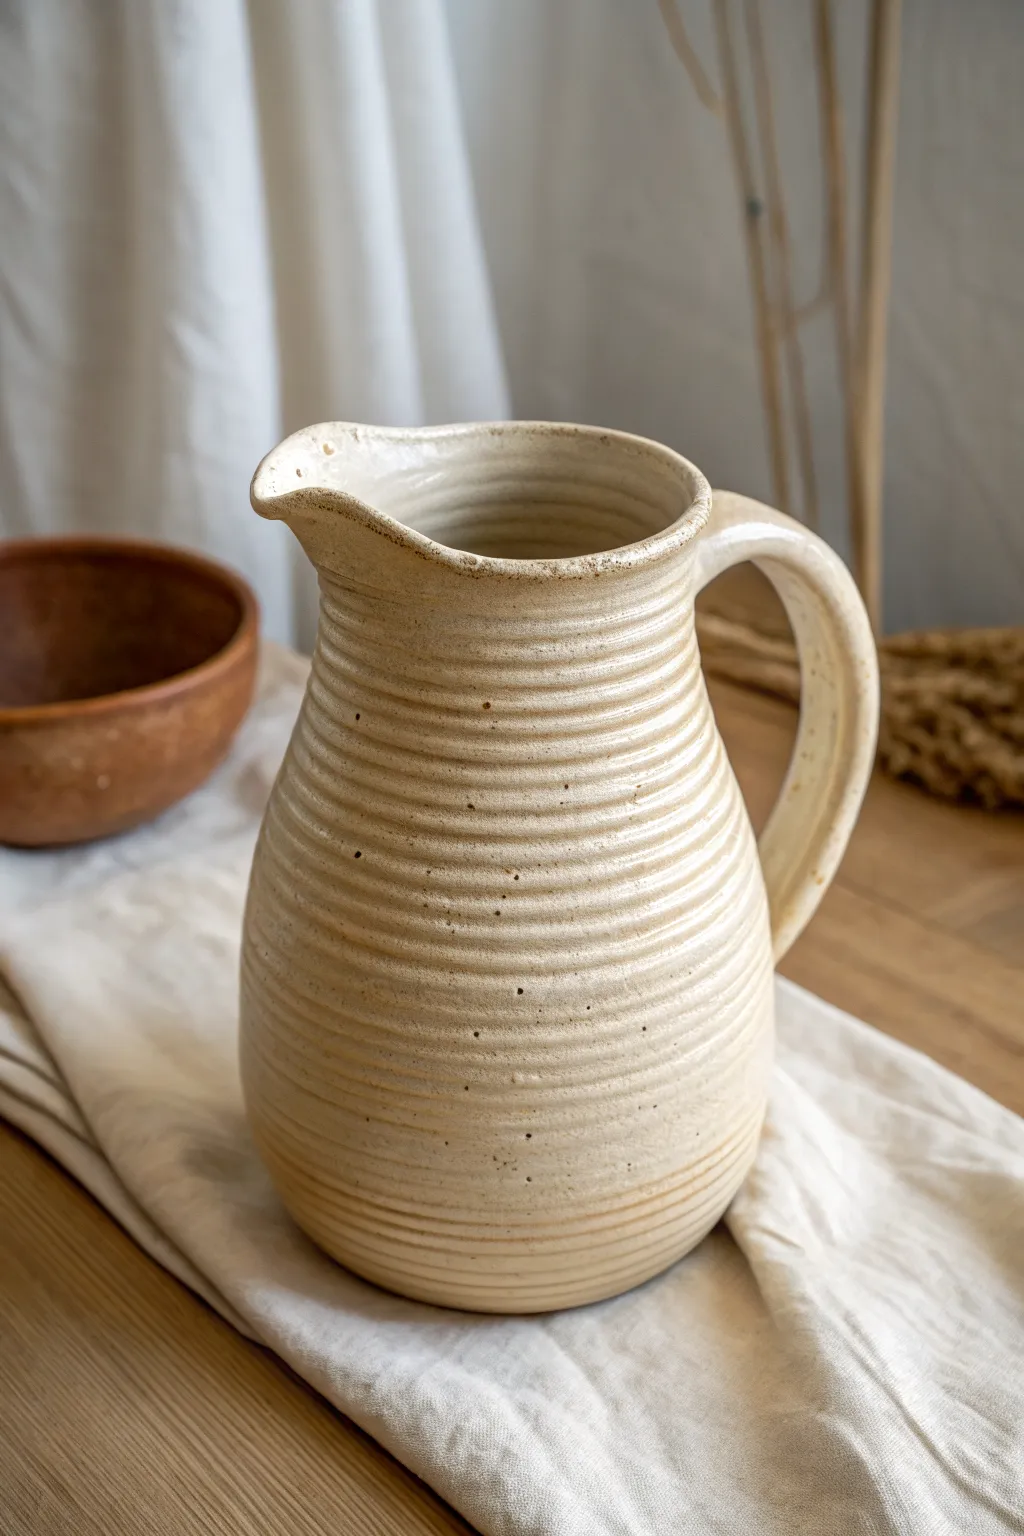
This charming pitcher showcases the organic beauty of coil building by leaving the exterior ribs visible rather than smoothing them away. The subtle horizontal lines create a delightful texture that feels wonderful in the hand, while the creamy glaze makes it perfect for a farmhouse kitchen aesthetic.
Step-by-Step Guide
Materials
- Stoneware clay (smooth or with grog)
- Clay scoring tool or serrated rib
- Slip (clay mixed with water)
- Wooden modeling tool
- Sponge
- Cutting wire
- Rolling pin
- Canvas mat or ware board
- Kiln for firing
- Creamy matte or satin glaze
Step 1: Building the Base and Body
-
Roll the base slab:
Start by rolling out a slab of clay to about 1/4 inch thickness. Use a needle tool to cut a circle approximately 4 inches in diameter for the base of your pitcher. -
Prepare your coils:
Roll out several long, even snakes of clay. Aim for a thickness similar to your pinky finger. Keeping them consistent now ensures even walls later. -
Attach the first coil:
Score and slip the outer edge of your base circle. Place your first coil on top of the scored area, pressing it down gently but firmly to adhere. -
Blend the interior:
Using your thumb or a wooden tool, smear the clay from the coil downward onto the base *on the inside only*. This seals the bottom without ruining the outer texture. -
Build outward for the belly:
Add the next few layers of coils. Place each new coil slightly toward the outer edge of the one below it to widen the form and create the rounded ‘belly’ shape. -
Smooth the interior seams:
As you build up, pause every 2-3 layers to thoroughly smooth the coils together on the inside. Keeping the inside smooth makes the pitcher watertight and easy to clean later. -
Define the outer ribs:
Instead of smoothing the outside, use a damp finger or a round-edged tool to gently compress the groove between coils. This emphasizes the horizontal lines seen in the photo. -
Taper the neck:
Once you pass the widest point of the pitcher, begin placing coils slightly toward the inner edge of the previous one. This brings the form inward to create the neck. -
Create the rim:
For the final 2-3 coils, stack them vertically to create a slight flare at that top rim. Make sure the very top edge is leveled and smooth.
Step 2: Spout, Handle, and Finishing
-
Form the spout:
While the clay is still soft, use your index finger and thumb to gently pinch the front of the rim outward. Support the clay underneath to create a distinct, drip-free pouring channel. -
Refine the rim shape:
Look at the rim from above. It should look like a teardrop now. Smooth the lip with a damp sponge or chamois strip so it’s pleasant to touch. -
Pull a handle:
Take a separate lump of clay and pull a handle using water and wet hands. You want a classic strap shape that is thick enough to support the full pitcher. -
Shape the handle curve:
Bend the handle into a graceful ear shape, similar to a question mark. Let it stiffen slightly on your work table until it can hold its own curve. -
Attach the handle:
Score and slip the attachment points on both the pitcher body and the handle ends. Press firmly to join, blending the clay well at the contact points. -
Clean up the joints:
Use a small brush or tool to clean up any excess slip around the handle attachments. I like to double-check the lower attachment to ensure it hasn’t smeared the coil texture too much. -
Dry slowly:
Loosely cover the pitcher with plastic. Slow drying is crucial here so the handle and body shrink at the same rate to prevent cracking. -
Bisque fire:
Once bone dry, fire the piece to bisque temperature (usually cone 04 or 06, depending on your clay). -
Apply glaze:
Dip or brush on a creamy oatmeal or off-white glaze. Choose a glaze that ‘breaks’ over texture—meaning it thins out on high points (the coil ridges) to reveal the clay body color beneath. -
Final firing:
Fire the piece to maturity (cone 5/6 or 10). The glaze should settle into the grooves, highlighting the hand-built construction.
Uneven Walls?
If your coils are uneven, the pitcher may lean. Fix this mid-build by gently paddling the high side with a flat wooden paddle while supporting the inside wall with your hand.
Don’t Rush the Handle
Wait until the body is ‘leather hard’ before attaching the handle. If the pot is too soft, the weight of the handle will slump the wall and distort your beautiful coil shape.
Once fired, fill your new pitcher with iced water or a bundle of dried wheat to show off its timeless texture
Textured Coil Wall Tile Relief
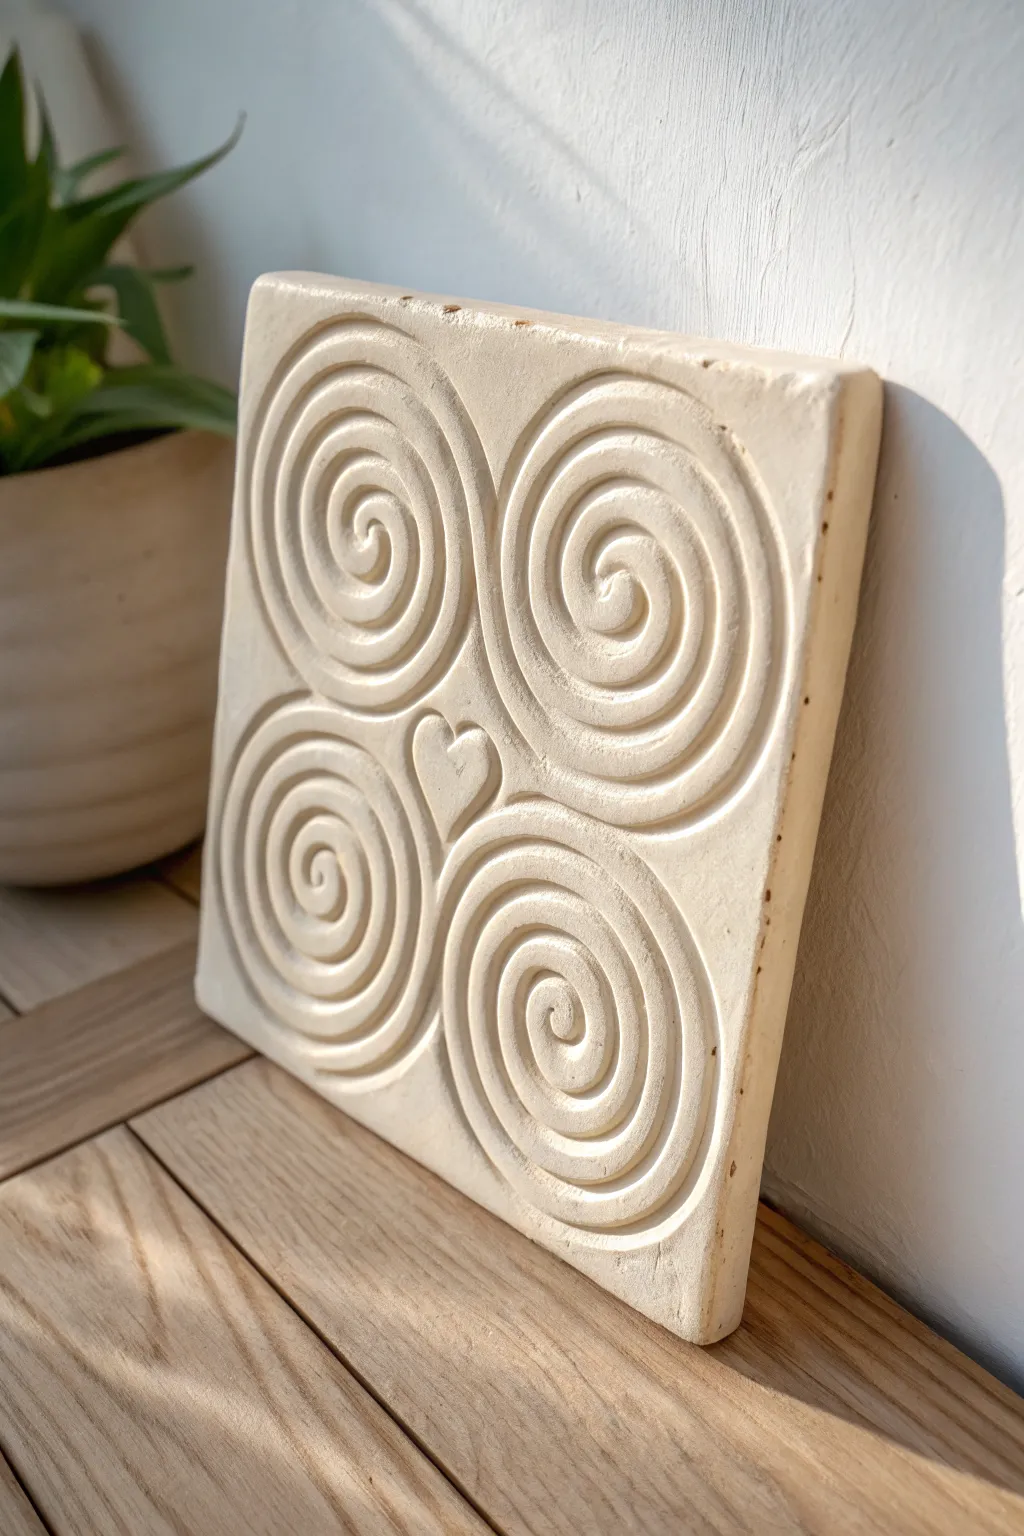
Create a soothing, minimalist piece of wall art with this cream-colored relief tile featuring four mesmerizing spirals centering on a tiny heart. The design relies on the interplay of deep grooves and smooth raised surfaces to catch the light, making it a perfect addition to a modern, rustic space.
Step-by-Step Tutorial
Materials
- White or cream-colored stoneware clay (smooth body)
- Rolling pin
- Two 1/2-inch thickness strips (for rolling guides)
- Square paper template (approx. 6×6 inches)
- Needle tool or fettling knife
- Loop tool (medium round wire end)
- Smoothing rib (rubber or flexible metal)
- Soft sponge
- Ruler
- Pencil
Step 1: Preparing the Slab Base
-
Roll the clay:
Begin by wedging your clay to remove air bubbles, then flatten it slightly with your palm. Place your thickness strips on either side and roll the clay out into an even slab that is at least 1/2 inch thick. -
Cut the square:
Lay your square paper template gently onto the clay surface. Using a needle tool or fettling knife held vertically, cut around the template to create your base tile. -
Smooth the surface:
Remove the excess clay. Take your smoothing rib and gently compress the surface of the tile to remove canvas texture and align the clay particles, which helps prevent warping later. -
Refine the edges:
Run a damp finger or a slightly moist sponge along the sharp cut edges of the square to soften them slightly, giving the tile a more finished, professional look.
Clean Lines Pro-Tip
When carving spirals with a loop tool, keep your wrist locked and move your entire arm. This creates fluid, confident curves rather than shaky, jagged lines.
Step 2: Mapping the Design
-
Find the center:
Using a ruler, lightly mark the exact center of the tile. This will be the anchor point for your heart and the meeting place for the four spirals. -
Sketch the quadrants:
Lightly drag a needle tool to divide the tile into four equal quadrants. These don’t need to be deep cuts, just faint guidelines to help you keep the spirals symmetrical. -
Draw the heart:
In the very center where your quadrants meet, lightly sketch a small, simple heart shape. This ensures you reserve that space before starting the large spirals. -
Sketch the spirals:
Starting from the center near the heart, lightly sketch a spiral moving outward into each quadrant. Aim for about three full rotations per spiral, ensuring they fill the space evenly without touching the edges.
Warping Woes
If your tile corners start to lift while drying, gently weigh them down with small sandbags or weighted pouches for a day to retain that perfect flat shape.
Step 3: Carving the Relief
-
Begin the groove:
Select a loop tool with a rounded wire end. I find it easiest to start at the outer tail of the spiral and work my way inward toward the center. -
Carve the first spiral:
Apply steady, even pressure to drag the loop tool along your sketched line, removing a continuous ribbon of clay. The goal is to create a ‘trench’ that leaves rounded ‘walls’ on either side. -
Repeat for all quadrants:
Continue carving the remaining three spirals. Turn the tile frequently on your work surface (or use a banding wheel) so your hand is always pulling the tool in a comfortable direction. -
Define the heart:
Carefully carve around the outline of the small central heart. You want the heart itself to remain raised (the original slab level), while the area immediately around it drops down into the carved background. -
clean up the crumbs:
Once the main carving is done, you will likely have small clay crumbs or burrs. Wait until the clay stiffens slightly to leather hard, then brush them away with a soft, dry brush.
Step 4: Refining and Finishing
-
Smooth the channels:
Dip a small brush into water (blot it so it’s not dripping) and run it through the carved grooves to smooth out tool marks. This creates that soft, stone-like erosion effect seen in the photo. -
Round the raised edges:
Using your fingertip or a soft sponge, gently round over the top edges of the spiral ‘walls.’ They shouldn’t be sharp; they should look like coiled dough or soft stone. -
Dry slowly:
To prevent the corners from curling up, place the tile on a piece of drywall or wood to dry. Cover it loosely with plastic sheeting for the first 24 hours to ensure even drying. -
Bisque fire:
Fire the tile to bisque temperature (usually Cone 04) once it is bone dry. -
Glaze or wash:
Apply a matte, cream-colored glaze or an oxide wash wiped back to highlight the texture. Avoid thick glossy glazes that might pool in the grooves and obscure the spiral definition.
Once fired, this elegant tile can be displayed on a shelf stand or mounted as part of a larger wall installation


What Really Happens Inside the Kiln
Learn how time and temperature work together inside the kiln to transform clay into durable ceramic.
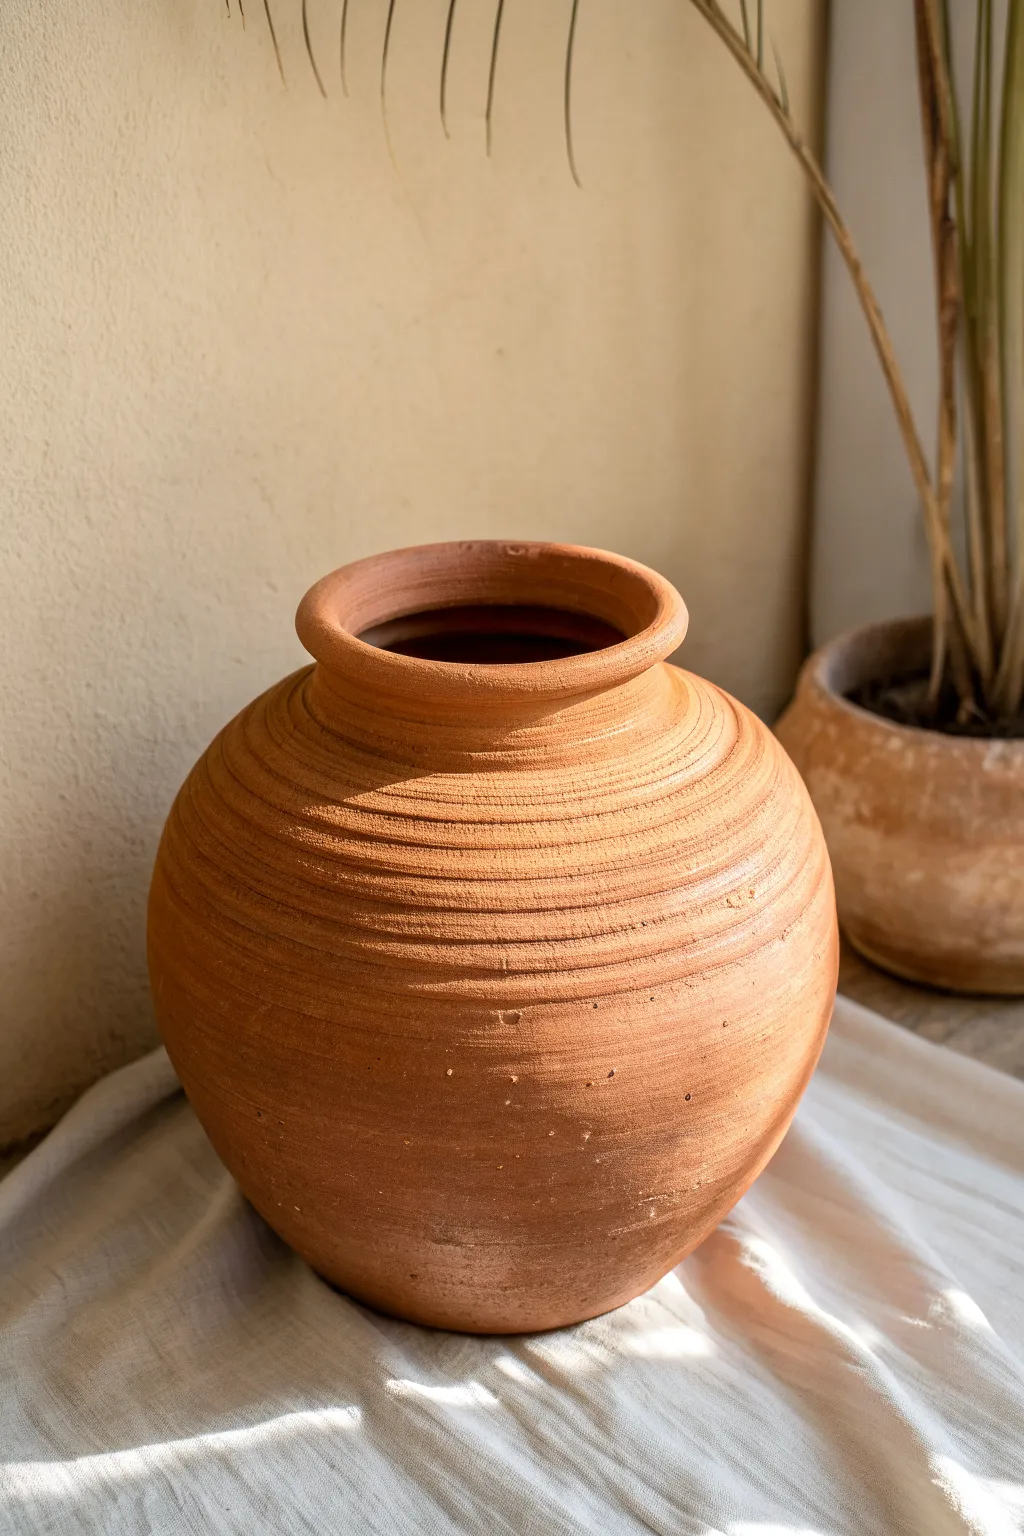
Showstopper Coil Ring Vessel
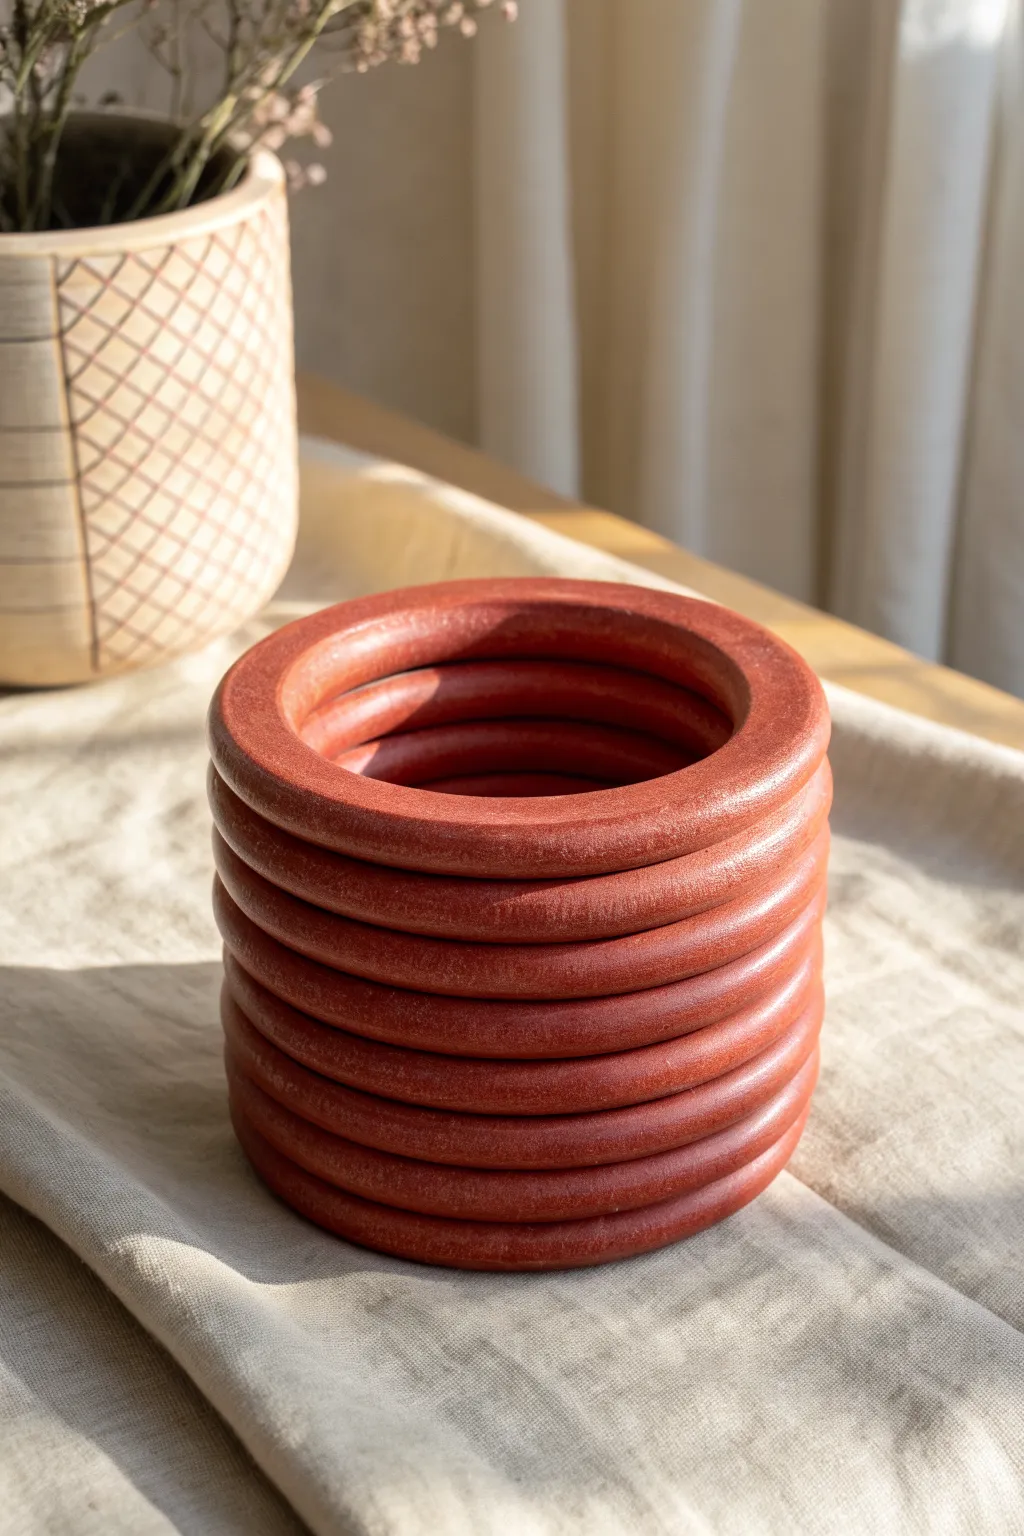
This striking vessel relies on simplicity and rhythm, stacking perfectly uniform coils to build a modern, architectural structure. The exposed coil design and rich terra cotta tone give it a warmth that feels both ancient and contemporary.
Step-by-Step
Materials
- Red earthenware or terracotta clay (low-fire)
- Clay extruder (essential for uniformity)
- Round die for extruder (approx. 1/2 inch)
- Scoring tool or serrated rib
- Slip (clay mixed with water)
- Fettling knife
- Wooden modeling tool
- Small soft sponge
- Clear matte glaze (optional)
- Rolling pin and canvas mat
Step 1: Base Preparation
-
Roll the slab:
Begin by rolling out a small slab of clay on your canvas mat to about 1/4 inch thickness. This needs to be slightly wider than your intended vessel diameter. -
Cut the circle:
Use a circle template or a round household object to trace a circle onto the slab. Cut it out cleanly with your fettling knife to form the floor of your pot. -
Smooth the edges:
Gently run a damp finger or sponge over the cut edge of the base to remove any sharp burrs or crumbs before you start building.
Slumping Walls?
If your coils start to wobble or the pot sags, the clay is too wet. Stop building, cover the rim with plastic, and let the bottom section stiffen for an hour before adding more weight.
Step 2: Extruding and Stacking
-
Prepare the extruder:
Load your clay into the extruder with the round die attached. Ensure the clay is wedged well beforehand to avoid air bubbles in your coils. -
Extrude long coils:
Press out several long, continuous snakes of clay. Lay them gently on a board so they don’t get flattened or distorted. I like to extrude more than I think I’ll need so I don’t have to stop later. -
Score the foundation:
Deeply score the outer perimeter of your clay base and apply a generous amount of slip. -
Place the first ring:
Take your first extruded coil and lay it carefully onto the slipped edge. Imagine you are drawing a perfect circle. -
Cut the join:
Overlap the coil ends slightly, then slice diagonally through both layers at once with your knife. Remove the excess bits and push the cut ends together for a seamless join. -
Blend the interior:
Using your wooden tool or thumb, smear the clay from the coil downward onto the base *only on the inside*. This locks the wall to the floor without ruining the outside texture.
Step 3: Building Height
-
Score and slip next layer:
Score the top surface of the ring you just placed and brush on slip. Do this lightly so you don’t deform the roundness. -
Stack the second ring:
Place the next coil directly on top. Align it perfectly with the one below to ensure vertical walls rather than a bowl shape. -
Offset the seams:
When cutting and joining this second ring, make sure the seam is not directly above the seam of the first ring. Staggering them adds structural integrity. -
Continue upward:
Repeat the process: score, slip, place, cut, and join. Aim for about 8 to 10 rings high to match the reference image’s proportions. -
Vertical check:
Every few layers, pause and look at the pot from eye level. Use a ruler or set square to ensure the sides are rising straight up and not leaning.
Tinted Clay
To get a unique color without glaze, wedge a mason stain (like burnt orange or maroon) directly into white clay before extruding your coils for a solid, matte color throughout.
Step 4: Refining and Finish
-
Smooth the interior:
As the pot grows, keep smoothing the coils together on the inside. You can use a rib tool to make the interior wall completely flat and seamless. -
Clean the exterior:
Take a slightly damp sponge and very gently run it over the exterior coils. You want to smooth out surface grit without erasing the definition between the rings. -
Rim compression:
Pay special attention to the very top ring. Use a piece of soft plastic or a chamois cloth to compress the rim, ensuring it is rounded and smooth. -
Drying:
Cover the vessel loosely with plastic so it dries slowly. This prevents the coils from separating or cracking as they shrink. -
Firing:
Once bone dry, bisque fire the piece. For the look in the photo, glaze only the interior with a clear liner glaze and leave the outside raw to show off the clay color.
Enjoy the rhythmic process of stacking these rings and watching your vessel rise