Coquette clay is all about soft pastels, flirty bows, sweet heart shapes, and that vintage-dessert energy that makes everything feel extra charming. If you’re craving projects that look like they belong on a dainty vanity tray, these ideas will keep your clay table busy in the best way.
Bow-Topped Trinket Dish
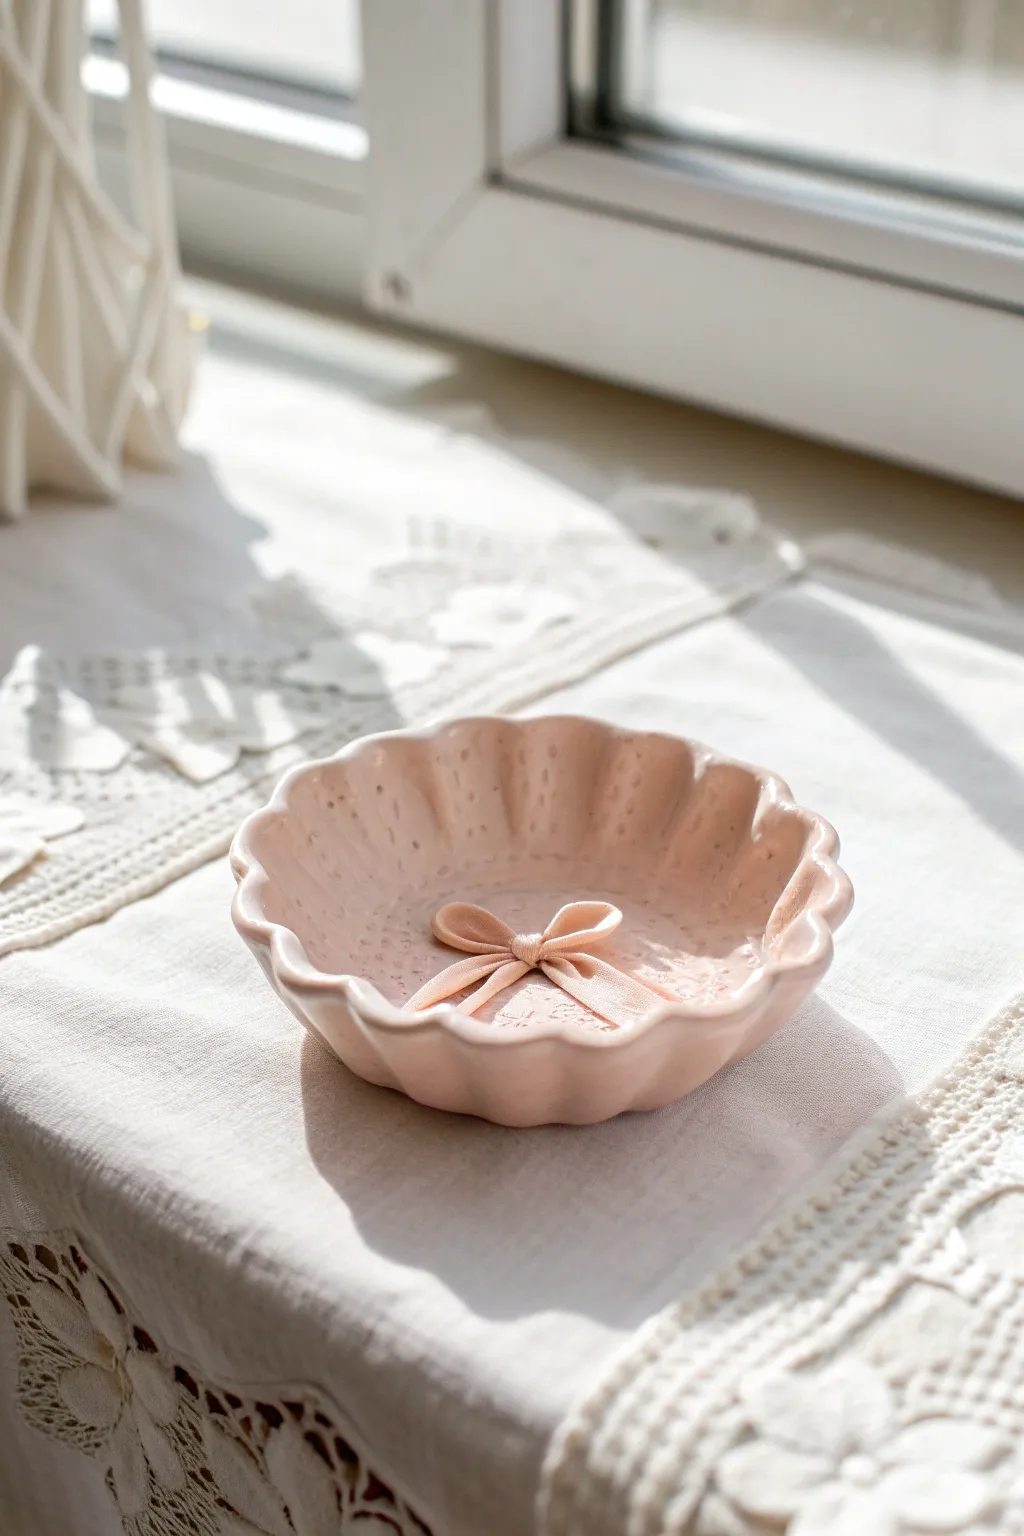
Capture the essence of the coquette aesthetic with this darling pink trinket dish, featuring a delicate bow sculpted directly into the center. Its fluted edges and high-gloss finish make it the perfect resting place for your favorite rings or dainty jewelry pieces.
Step-by-Step Guide
Materials
- Air-dry clay (white) or polymer clay
- Rolling pin
- Round cookie cutter (approx. 4-5 inches)
- Small bowl or sphere (for molding the curve)
- Clay sculpting tools (needle tool and ball tool)
- Water (for smoothing)
- Fine-grit sandpaper
- Acrylic paint (soft baby pink)
- High-gloss varnish or resin
- Paintbrushes (flat and detail)
Step 1: Forming the Base
-
Condition the clay:
Begin by kneading a ball of clay until it is warm, soft, and pliable to prevent cracking later on. -
Roll out the slab:
Use your rolling pin to flatten the clay into an even slab, aiming for a thickness of about 1/4 inch. -
Cut the circle:
Press your round cookie cutter firmly into the clay slab to create a perfect circle, then peel away the excess clay. -
Sculpt the scallops:
Using your thumb and forefinger, gently pinch the edge of the circle at regular intervals to create a fluted, wavy rim all the way around. -
Smooth the edges:
Dip your finger in a little water and run it along the rim to soften any sharp edges or fingerprints left from pinching. -
Shape the dish:
Gently drape your clay circle inside a small bowl or over a sphere to give it a curved, dish-like shape while it holds the scalloped form.
Step 2: Sculpting the Bow
-
Roll thin strips:
Take a small amount of leftover clay and roll it into a thin, flat strip, roughly the width of a fettuccine noodle. -
Form the loops:
Fold the strip ends inward to meet in the middle, creating two loops for your bow. -
Add the center knot:
Place a tiny rectangle of clay over the center where the loops meet, wrapping it around to look like a knotted ribbon. -
Add the tails:
Cut two shorter strips of clay with angled ends and attach them beneath the loops to form the ribbon tails. -
Texture the bow:
I like to use a needle tool to gently press indentation lines into the center knot and fabric folds, making the bow look realistic. -
Attach to the dish:
Score the bottom center of your dish and the back of the bow, apply a dab of water (or slip), and press the bow firmly into place in the center of the bowl.
Cracking Clay?
If you see tiny cracks forming while the clay dries, smooth a slurry of clay and water into the fissures with your finger immediately to patch them.
Step 3: Finishing Touches
-
Dry thoroughly:
Allow the piece to dry completely according to your clay’s instructions; for air-dry clay, this usually takes 24-48 hours. -
Sand imperfections:
Once hardened, gently sand any rough spots on the rim or underside with fine-grit sandpaper until silky smooth. -
Wipe clean:
Use a slightly damp cloth or dry brush to remove all sanding dust before painting. -
Apply base color:
Paint the entire dish, including the bow, with two coats of baby pink acrylic paint, letting the first coat dry before applying the second. -
Seal with gloss:
Finish the project by applying a thick coat of high-gloss varnish or resin to give it that ceramic-like shine and protect the paint.
Pearlescent Pop
Mix a tiny drop of iridescent medium into your pink paint or gloss topcoat to give the dish a dreamy, shimmering pearl finish.
Now you have a charming spot to keep your treasures safe and stylish


Heart-Shaped Ring Catcher Tray
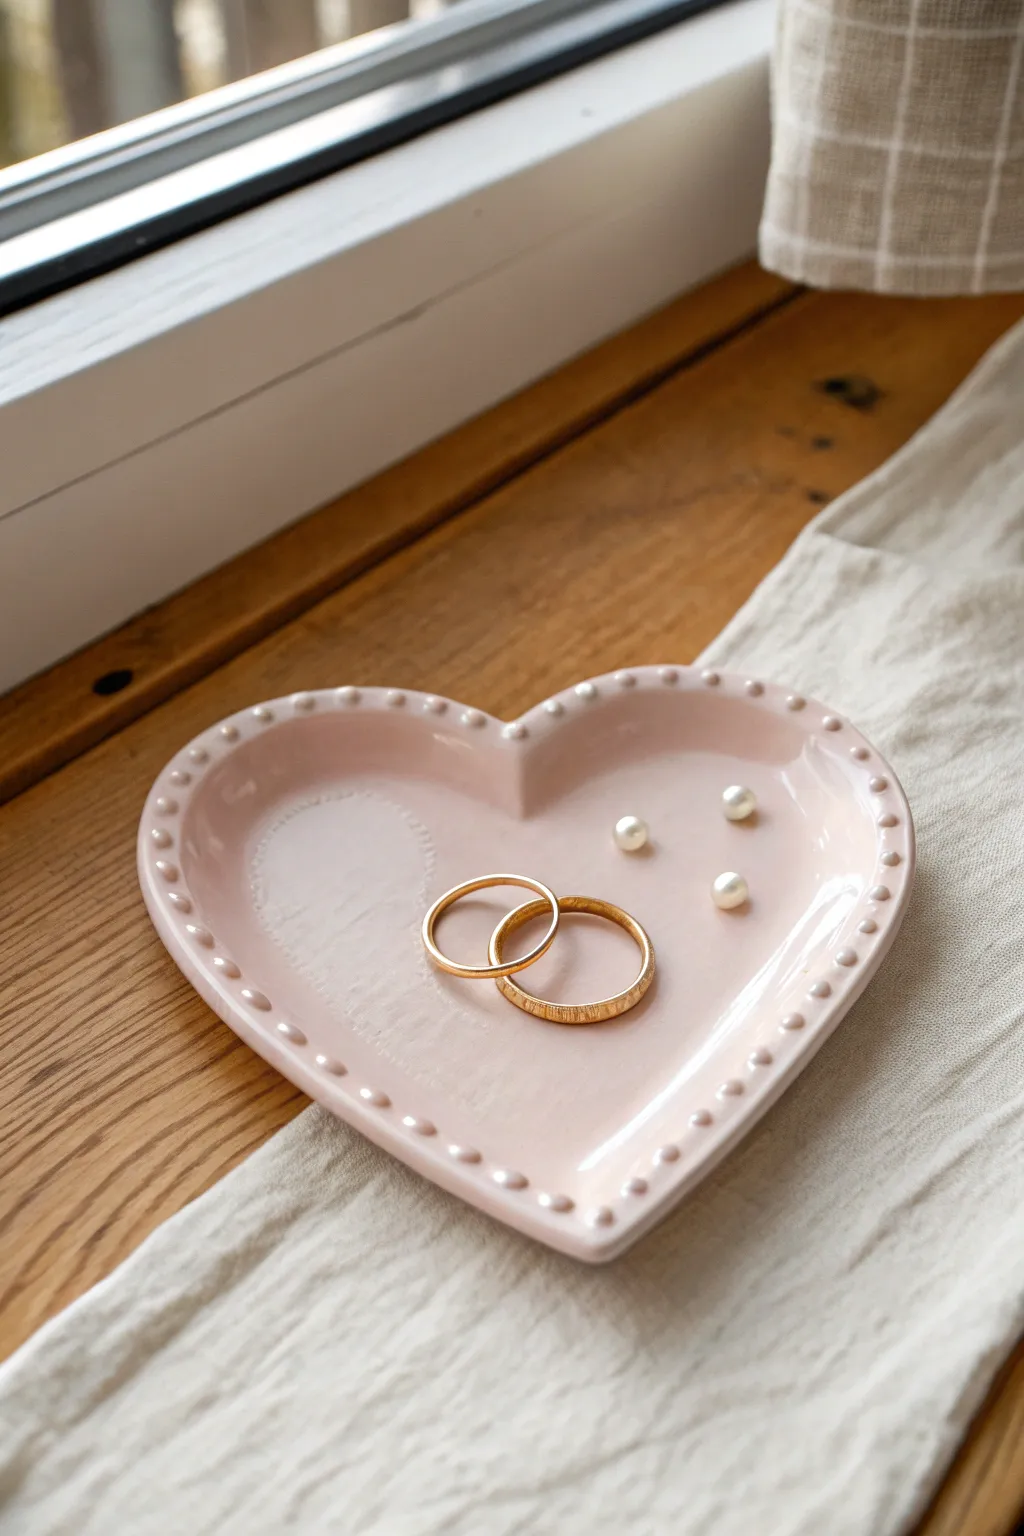
Embrace the soft, romantic coquette aesthetic with this darling heart-shaped trinket dish. Finished in a glossy pale pink glaze and framed by a delicate border of clay pearls, it’s the perfect resting place for your favorite rings.
Step-by-Step Tutorial
Materials
- Polymer clay (white or pre-colored pale pink)
- Heart-shaped cookie cutter (medium size, approx. 4 inches)
- Acrylic rolling pin
- Parchment paper or silicone mat
- Modeling tool (ball stylus or smooth blending tool)
- Pale pink acrylic paint (if using white clay)
- High-gloss glaze or polyurethane varnish
- Soft synthetic paintbrush
- Fine-grit sandpaper (400-600 grit)
- Liquid clay (optional, for adhesion)
Step 1: Shaping the Base
-
Condition the clay:
Start by warming a block of polymer clay in your hands. Knead it thoroughly until it is soft, pliable, and free of any air bubbles. -
Roll the slab:
Place the clay between two sheets of parchment paper. Use your acrylic roller to flatten it into an even slab, approximately 1/4 inch thick. Aim for a consistent thickness to ensure even baking. -
Cut the heart:
Position your heart-shaped cookie cutter over the smoothest part of the slab. Press down firmly to cut out the shape, then gently peel away the excess clay from the outside. -
Smooth the edges:
Dip your finger in a tiny bit of water (or baby oil if the clay is sticky) and run it along the cut edge of the heart to soften the sharp angles left by the cutter. -
Create the curve:
To give the tray its dish shape, carefully lift the clay heart and place it into a slightly curved, oven-safe bowl. Gently press the center down so the edges rise slightly, creating a shallow basin.
Step 2: Adding the Beaded Rim
-
Roll tiny spheres:
Take your leftover clay and roll a long, thin snake. Pinch off small, equal-sized pieces—about the size of peppercorns. Roll each piece into a perfect little sphere between your fingers. -
Apply the beads:
Place the tiny clay spheres along the very edge of the heart tray. They should sit right next to each other, touching slightly. I find it helpful to start at the top ‘V’ of the heart to ensure symmetry. -
Secure the border:
Once all beads are positioned, take a small blending tool or the back of a paintbrush handle and gently press each bead down into the rim just enough so it bonds, without flattening the spherical shape too much. -
Optional bonding:
If the beads aren’t sticking well, you can dab a microscopic amount of liquid clay or translucent bake-and-bond on the rim before placing the spheres. -
Final smooth:
Check the interior surface of the dish one last time for fingerprints. Lightly buff them out with a drop of baby oil on your finger before baking.
Uneven Beads?
Use a clay extruder tool with a small circle die to create a perfectly uniform ‘snake’ of clay first. Cutting equal lengths from this snake guarantees every bead is the exact same size.
Step 3: Finishing Touches
-
Bake the piece:
Bake the clay according to the manufacturer’s instructions (usually 275°F for 15-30 minutes depending on brand), keeping the heart inside the oven-safe bowl to maintain its curved shape. -
Cool down:
Let the piece cool completely before removing it from the bowl. Attempting to move it while warm can cause the clay to warp or crack. -
Sand edges:
Once cool, inspect the edges. If there are any rough spots on the bottom or outside rim, lightly sand them with fine-grit sandpaper for a professional finish. -
Apply paint:
If you used white clay, apply 2-3 coats of pale pink acrylic paint. Use a soft brush to get into the crevices between the tiny beads. Let each coat dry fully. -
Glaze for shine:
To achieve that ceramic-like look, finish the piece with a coat of high-gloss glaze. Be careful not to let the glaze pool in the bottom of the dish; apply thin, even layers. -
Final dry:
Allow the glaze to cure for at least 24 hours in a dust-free area before placing any jewelry inside.
Pearl Finish
Instead of plain pink paint, mix a drop of iridescent medium or pearlescent powder into your glaze. This gives the tray a shimmering, mother-of-pearl effect perfect for the coquette vibe.
Your vanity is now ready for a touch of handmade elegance that keeps your treasures safe


Ruffled Edge Jewelry Plate
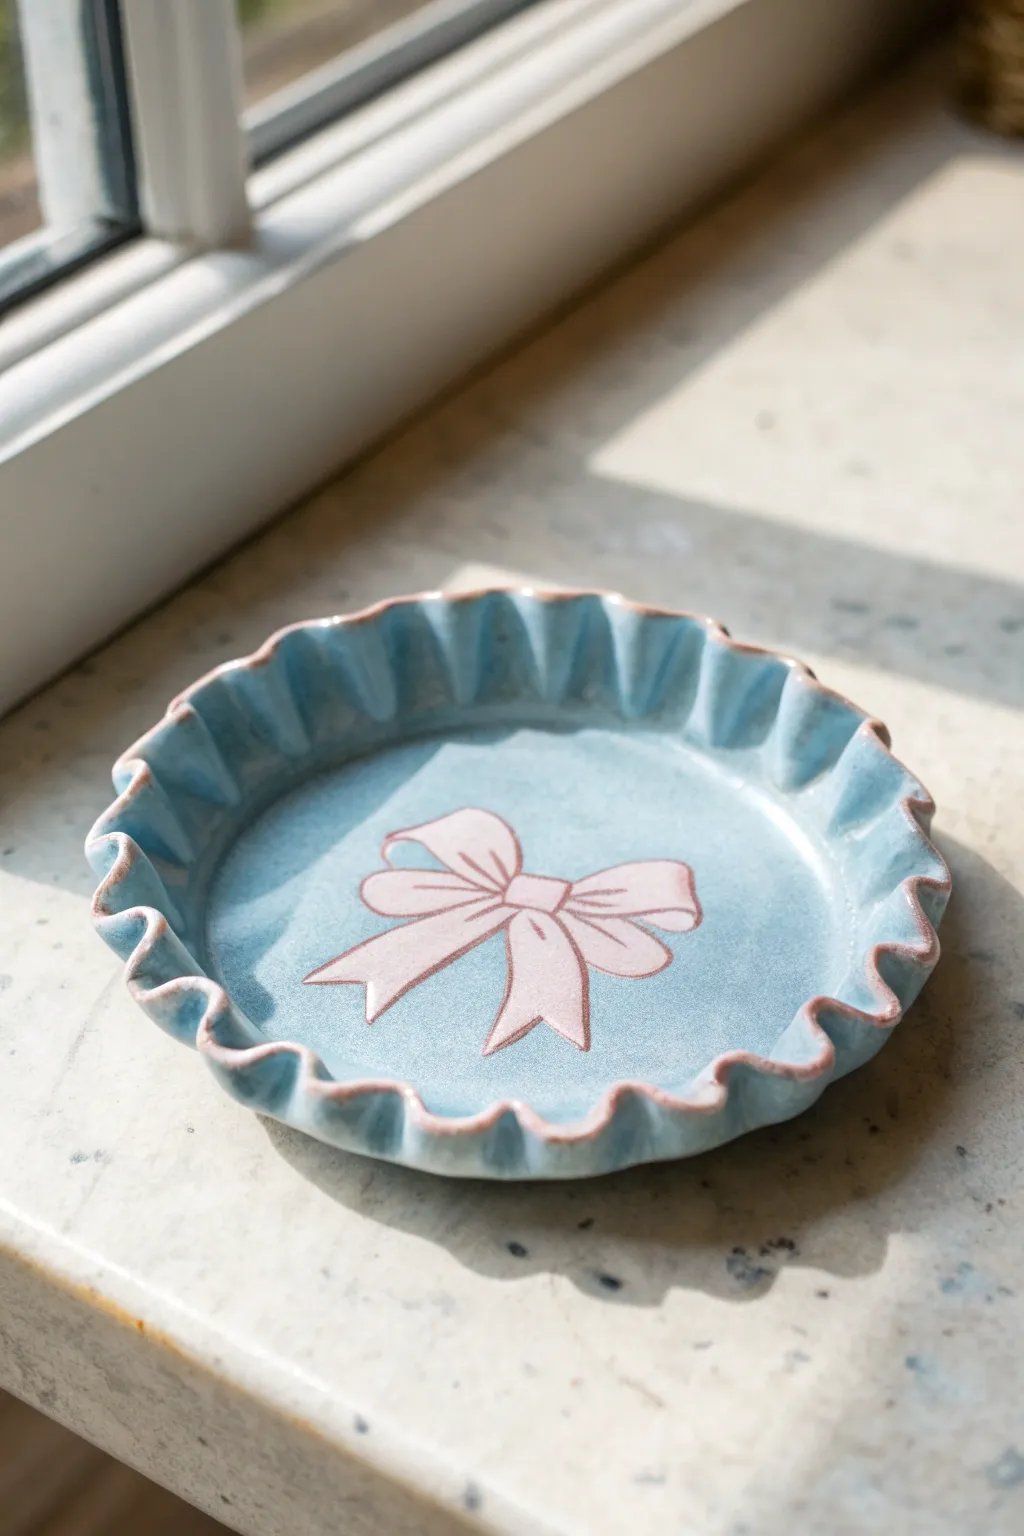
Embrace the coquette aesthetic with this dainty, ruffle-edged trinket dish featuring a hand-painted bow design. Its soft blue glaze and vintage-inspired scalloped rim make it the perfect resting place for your favorite rings and earrings.
Step-by-Step
Materials
- Air-dry clay (white) or polymer clay
- Rolling pin
- Circle cutter (approx. 4-5 inches) or bowl to trace
- Craft knife
- Small bowl (for shaping)
- Acrylic paints (pastel blue, soft pink, brownish-pink, dark brown)
- Fine detail paintbrush
- Medium flat paintbrush
- Glossy varnish or glaze
- Cup of water and sponge
Step 1: Shaping the Base
-
Condition the clay:
Start by kneading a handful of white clay until it is warm, pliable, and free of any air bubbles. -
Roll out the slab:
Roll the clay out on a smooth surface to an even thickness of about 1/4 inch. Turning the clay frequently ensures it doesn’t stick to your work surface. -
Cut the circle:
Place your circle cutter or a small bowl upside down on the clay and cut out a perfect circle using your craft knife. -
Create the ruffles:
Gently pinch the edge of the clay circle between your thumb and forefinger at regular intervals to create a waving, ruffled pattern all the way around the rim. -
Shape the dish:
Carefully transfer your ruffled circle into a slightly larger bowl to give it a concave shape while it dries. Ensure the ruffles stand up nicely and don’t flatten out. -
Smooth the edges:
Dip your finger in a little water and run it along the ruffled edge to smooth out any cracks or jagged cuts for a polished, ceramic-like finish. -
Dry completely:
Allow the clay to dry fully according to the package instructions. This usually takes 24-48 hours for air-dry clay, or bake as directed if using polymer clay.
Smooth Operator
Use a damp sponge to smooth the clay surface before drying. This reduces sanding time later and ensures your paint glides on perfectly smooth.
Step 2: Painting & Glazing
-
Base coat:
Paint the entire dish, front and back, with a pastel blue acrylic paint. You may need two thin coats to get an opaque, even finish. -
Outline the bow:
Once the blue is dry, lightly sketch a bow shape in the center with a pencil. Using a fine brush and dark brown paint, carefully trace the outline of the bow. -
Fill the bow color:
Fill in the loops and tails of the bow with a soft pink paint. I find that leaving a tiny gap between the fill color and the dark outline adds a nice illustrative touch. -
Add bow details:
Paint the center knot and add small crease lines inside the bow loops using the dark brown paint to give the ribbon some dimension. -
Rim detail:
Mix a brownish-pink color to mimic raw clay or a vintage glaze. Use a steady hand to paint just the very top edge of the ruffled rim. -
Dry paint:
Let all paint layers dry completely before moving to the final step to prevent smudging. -
Seal the piece:
Apply a coat of glossy varnish or glaze over the entire top surface of the dish. This protects the paint and gives it that shiny, fired-ceramic look.
Vintage Speckle
Mix a tiny amount of baking soda into your blue paint or splatter faint brown dots with a toothbrush before varnishing to create a retro speckled pottery effect.
Place this charming little dish on your vanity to hold your daily treasures

Mini “Fake Cake” Trinket Box
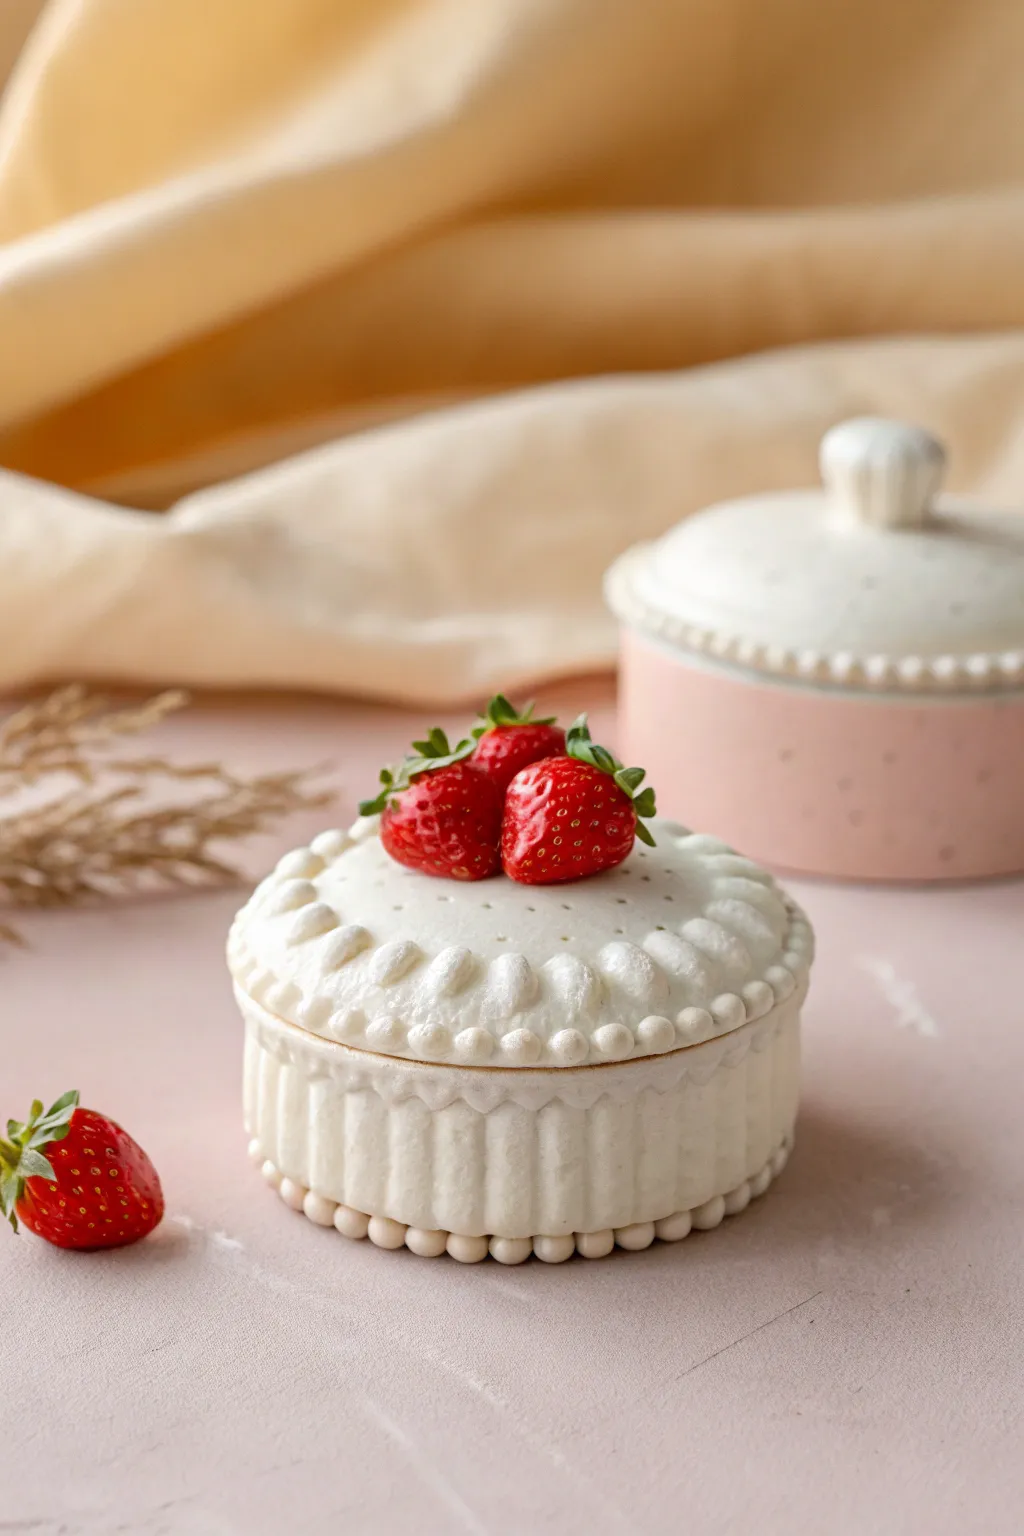
This delightful mini trinket box is almost sweet enough to eat, perfectly mimicking the look of a vintage iced cake. With its delicate piped details and glossy strawberry topper, it’s the ultimate coquette-aesthetic storage for your tiniest treasures.
How-To Guide
Materials
- White polymer clay or air-dry clay (smooth texture)
- Small round box mold or a small jar to use as a base form
- Clay sculpting tools (specifically a ball tool and a needle tool)
- Red polymer clay (for strawberries)
- Green polymer clay (for leaves)
- Liquid clay or ‘bake and bond’ adhesive
- Gloss glaze or UV resin
- Rolling pin
- Round cookie cutters (sized to your jar/mold)
- Texture sponge or toothbrush
Step 1: Creating the Base Structure
-
Roll out the base:
Begin by rolling out a sheet of white clay to about 4mm thickness. Use a circle cutter to cut out the base for your box. -
Form the walls:
Roll out a long rectangle strip of white clay, roughly the same thickness. It needs to be long enough to wrap around the circumference of your base circle. -
Add vertical fluting:
Before attaching the strip, create the vertical indented texture. Lay the strip flat and gently press a thin rod or the handle of a paintbrush vertically into the clay at regular intervals to create the ribbed ‘cupcake liner’ effect shown in the photo. -
Assemble the cylinder:
Wrap this textured strip around the edge of your circular base. Blend the seam on the inside carefully so the outside texture remains undisturbed. Use a little liquid clay at the connection points for a strong bond. -
Add the bottom pearl trim:
Roll tiny spheres of white clay, all uniform in size. Press these around the very bottom edge of your box to create a beaded border.
Step 2: Sculpting the Lid
-
Cut the lid shape:
Cut another circle from your rolled clay, slightly larger than the box opening so it can sit on top comfortably. Create an inner lip underneath so it doesn’t slide off. -
Texture the top:
I like to gently dab the surface of the lid with a texture sponge or coarse brush to give it a realistic ‘cake crumb’ or fluffy frosting texture. -
Create the decorative rim:
Roll a medium-thick snake of white clay. Place it around the top edge of the lid. Using a large rounded tool, press into this snake at intervals to flatten and sculpt it into the scalloped, puff-like frosting border shown. -
Add detail to the scallops:
Use a needle tool to add tiny pores or dots onto the scalloped border for extra realism. -
Pipe the pearl edge:
Just like the base, roll tiny balls of white clay and place them around the outer rim of the lid, right underneath the scalloped frosting layer.
Secret Texture Trick
For ultra-realistic frosting texture, mix liquid clay with your white clay until it’s a pipeable paste, then use a real icing tip to add details.
Step 3: The Strawberry Topper
-
Shape the berries:
Form flexible red clay into three small, somewhat conical strawberry shapes. Make one slightly larger than the others. -
Texture the fruit:
Using a needle tool, gently poke small indents all over the red surface to simulate seeds. Don’t press too deep; just mark the surface. -
Make the calyx leaves:
Roll a tiny amount of green clay deeply thin. Cut out tiny star shapes or individual leaves and press them onto the top of each berry. -
Arrange the cluster:
Group the three strawberries together in the center of the lid. Use liquid clay to secure them tightly to each other and the white lid surface.
Make It a Music Box
Before baking, embed a small wind-up music box mechanism into the base of the cake for a functional, melodic twist on this decor.
Step 4: Finishing Touches
-
Bake or dry:
If using polymer clay, bake according to the package instructions (usually 275°F for 15-30 minutes). If using air-dry clay, allow it to dry for 24-48 hours. -
Glaze the fruit:
Once fully cured and cooled, apply a high-gloss glaze or UV resin specifically to the strawberries. This makes them look fresh and juicy against the matte cake texture. -
Seal the box:
Apply a matte varnish to the white ‘cake’ parts to protect the clay while keeping that soft, powdery sugar look.
Place this charming little faux-confection on your vanity to hold your favorite rings or earrings with a touch of whimsy

The Complete Guide to Pottery Troubleshooting
Uncover the most common ceramic mistakes—from cracking clay to failed glazes—and learn how to fix them fast.
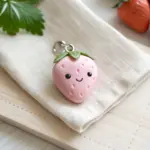
Cherry Charm Keychain Dangles
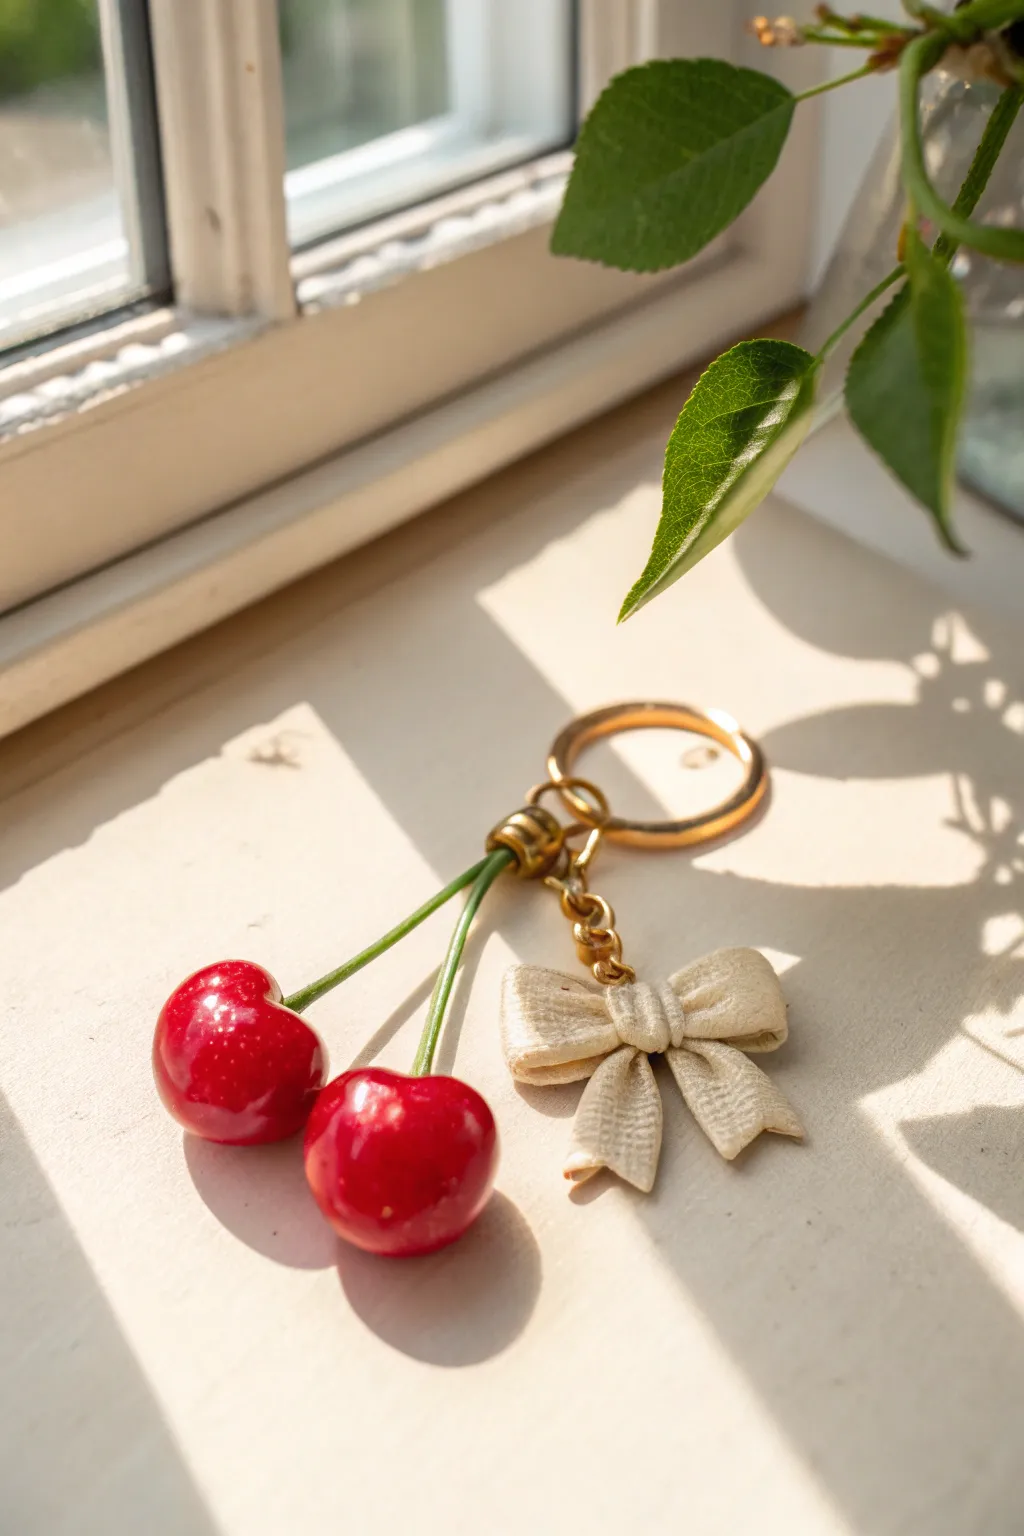
Capture the essence of summer sweetness with this realistic cherry keychain, featuring two glossy red fruits and a delicate textured bow. The combination of vibrant red and soft cream creates a perfect coquette aesthetic that looks lovely dangling from your keys or purse.
Step-by-Step Guide
Materials
- Translucent polymer clay
- Red alcohol ink (or red polymer clay)
- Green polymer clay (leaf green shade)
- Cream or white polymer clay
- Wire (20-22 gauge for stems)
- Gold keychain hardware (ring and chain)
- High-gloss polyurethane varnish or UV resin
- Texturing tool (canvas or fabric texture sheet)
- Needle tool
- Two eye pins (gold)
- Super glue
- Jewelry pliers
Step 1: Creating the Cherries
-
Mix the cherry color:
If you want that realistic, slightly see-through look, mix roughly 1 part translucent clay with a few drops of red alcohol ink. This creates a deeply saturated, jelly-like red. If you prefer opacity, standard red clay works too. -
Shape the fruits:
Condition your red mixture and roll two equal-sized spheres, approximately 1.5 cm in diameter. Roll them between your palms until they are perfectly smooth. -
Indent the top:
Use a ball tool or the rounded end of a paintbrush to gently press an indentation into the top of each sphere where the stem will eventually emerge. -
Refine the shape:
Cherries aren’t perfect spheres. Slightly flatten the bottom and gently tease the round shape so it looks a bit more heart-shaped near the indentation. -
Prepare the wire stems:
Cut two pieces of wire, about 4-5 cm long. I like to make a tiny hook at the bottom end of each wire so it anchors better inside the clay. -
Cover the stems:
Roll your green clay into a very thin snake. Flatten it slightly, then wrap it carefully around your wire pieces, smoothing the seams so the wire is completely concealed. -
Attach stems to fruit:
Insert the hooked end of your green stems into the indentation of your cherries. Smooth the green clay downwards slightly to merge it visually with the red fruit, ensuring a tight seal. -
Link the stems:
Bring the top ends of the two stems together. Twist the exposed wire tips (if any) or mold the green clay together to form a single connection point. Embed a gold eye pin securely into this junction.
Sticky Situation?
If the clay sticks to your texture fabric, lightly dust the clay surface with cornstarch or baby powder before pressing the fabric down. It washes off easily after baking.
Step 2: Sculpting the Textured Bow
-
Prepare the cream clay:
Condition your cream polymer clay until it is pliable. Roll it out into a flat sheet, roughly 2mm thick. -
Add texture:
Before cutting the shape, press a piece of coarse fabric (like linen or canvas) or a texture sheet firmly onto the clay. This imitates the fabric ribbon look seen in the photo. -
Cut the strips:
Cut a rectangular strip for the bow loops (approx. 6cm x 1cm) and a smaller strip for the center knot. -
Form the loops:
Fold the long rectangular strip ends toward the center to create the classic bow shape. Pinch the center gently to create fabric-like folds. -
Add the tails:
Cut two shorter strips for the tails, cutting a ‘V’ notch at the bottom of each. Attach them to the back of the bow loops. -
Wrap the center:
Take your small center strip and wrap it vertically around the pinched middle section, covering the join where the loops meet. Insert an eye pin into the top of the knot. -
Bake everything:
Arrange the cherries and the bow on a baking sheet. Bake according to your clay manufacturer’s instructions (usually around 275°F/130°C for 15-30 minutes).
Glazing Pro-Tip
Apply at least two thin coats of glaze rather than one thick one. Thick glaze tends to drip and pool at the bottom of the cherry, ruining the perfect round shape.
Step 3: Assembly and Finish
-
Gloss the cherries:
Once cool, coat ONLY the red cherry parts with UV resin or a high-gloss varnish. This contrast against the matte ‘fabric’ bow is what makes the piece look realistic. -
Secure the pins:
If any eye pins feel loose after baking, pull them out, add a dab of super glue, and reinsert them for durability. -
Assemble the hardware:
Use a small jump ring to attach the cherry stem eye pin to the bottom of the bow’s eye pin. -
Attach to keychain:
Finally, connect the top of the bow to your gold keychain ring using pliers to close the jump ring securely.
Enjoy styling your new accessory on a bag or gifting it to a friend who loves the coquette aesthetic
Bow Stud Earrings in Pastels
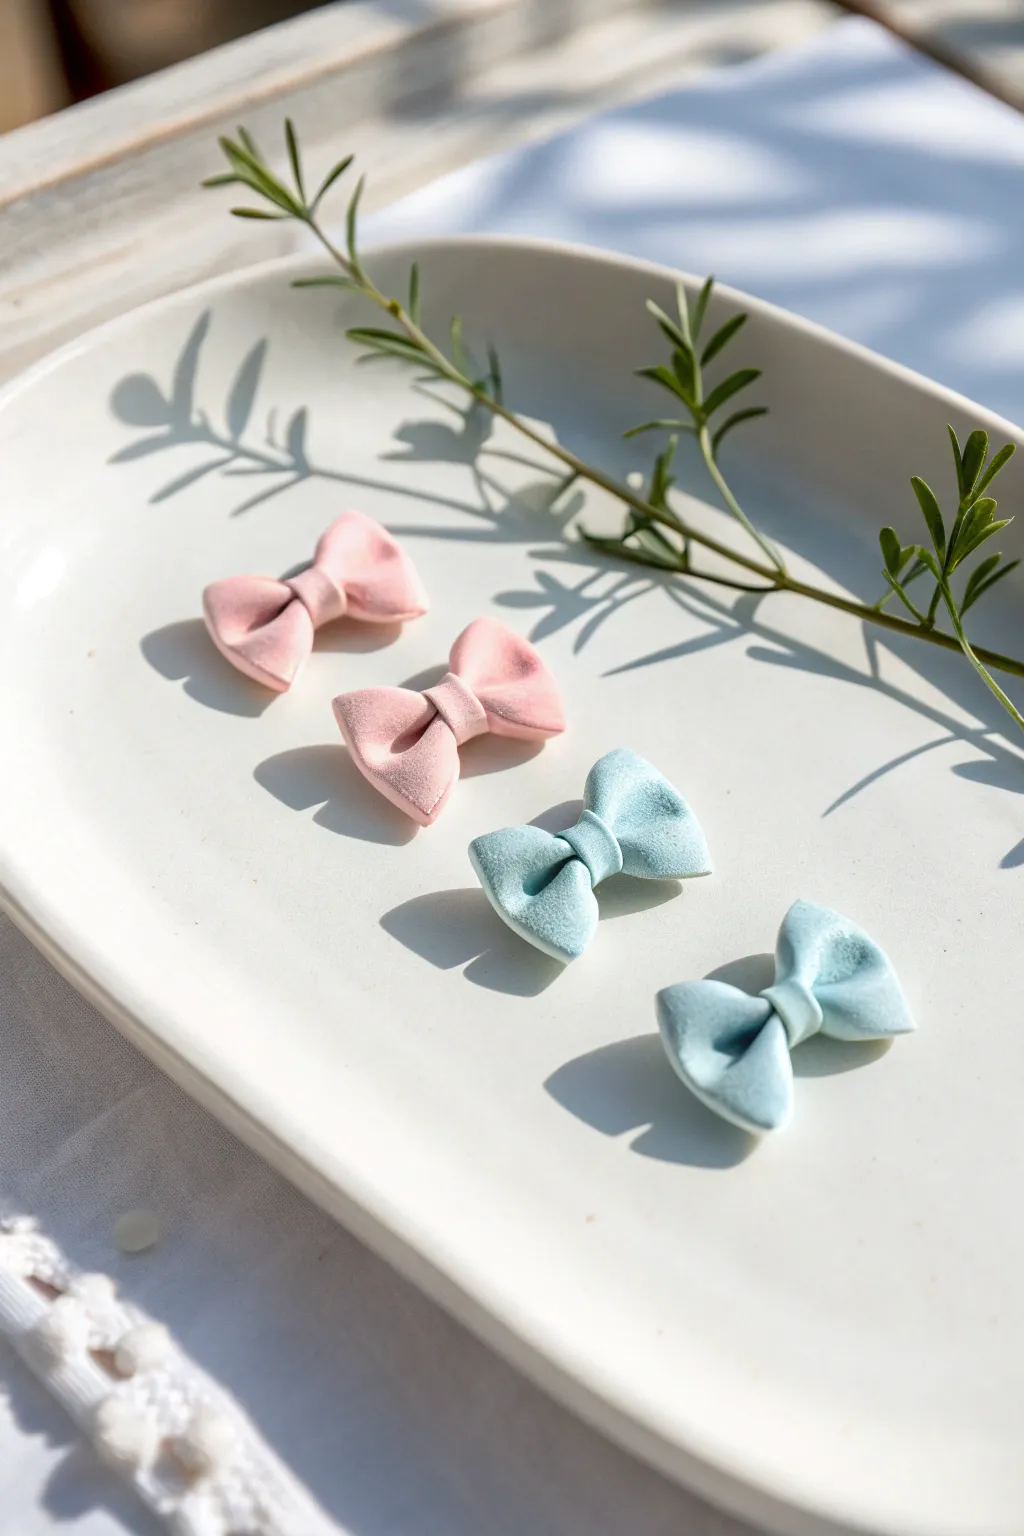
Capture the coquette aesthetic perfectly with these dainty polymer clay bow earrings in soft, dreamy pastels. Their matte finish and gentle curves give them a sophisticated touch that pairs beautifully with spring outfits.
Step-by-Step Tutorial
Materials
- Polymer clay in pastel pink
- Polymer clay in pastel blue
- Ceramic tile or glass work surface
- X-Acto knife or clay blade
- Rolling pin or pasta machine
- Small dotting tool or toothpick
- Earring posts (surgical steel or sterling silver)
- Strong craft adhesive (like E6000) or UV resin
- Cornstarch or baby powder (creates the matte texture)
- Oven for baking
Step 1: Prepping the Clay
-
Condition the clay:
Begin by thoroughly kneading your pastel pink clay until it is soft and pliable. Warm clay is essential for preventing cracks when you fold the bows. -
Roll it out:
Using your acrylic roller or pasta machine, roll the clay into a thin, even sheet. Aim for a thickness of about 1.5mm to 2mm—thin enough to look delicate, but thick enough to hold its shape. -
Cut the strips:
Use your blade to cut a long, straight strip of clay. The width of the strip will determine the height of your finished bow, so aim for approximately 8mm to 1cm wide.
Droopy Loops?
If your loops collapse while baking, tuck a tiny roll of paper or tissue under each loop to support the curve. Remove it after baking.
Step 2: Forming the Bows
-
Cut bow loops:
From your main strip, cut two smaller segments about 2.5cm long for the main loops of the bow. -
Cut center knots:
Cut a much narrower, shorter strip (about 3mm wide) to serve as the center ‘knot’ of the bow. -
Fold the ends:
Take one of the 2.5cm segments and gently fold both ends toward the center so they meet in the middle. Do not press them flat; allow the loops to remain rounded and puffy. -
Pinch the center:
Gently pinch the middle where the ends meet to create that classic cinched bow shape. This pinch creates natural-looking wrinkles in the ‘fabric’ of the clay. -
Add the knot:
Place your narrow center strip over the pinched middle section. Wrap it around to the back and trim any excess clay, blending the seam gently on the reverse side. -
Refine the shape:
Use a dotting tool or your fingertip to gently re-fluff the loops if they got squashed. Ensure the bow looks symmetrical. -
Repeat the process:
Follow the same steps to create the second pink bow, and then repeat the entire process with your pastel blue clay to create the blue pair.
Seamless Finish
Blend the seam of the center knot on the back with a rubber clay shaper to make the attachment point invisible and stronger.
Step 3: Finishing Touches
-
Add texture:
Before baking, I like to lightly dust the raw clay with cornstarch using a soft brush. This prevents fingerprints and ensures that lovely matte, soft-focus finish seen in the photo. -
Bake:
Place your bows on a ceramic tile and bake according to your clay manufacturer’s instructions (usually 275°F/135°C for 15-30 minutes). Use an oven thermometer to ensure precise temperature. -
Cool down:
Allow the bows to cool completely inside the oven or on a wire rack. Polymer clay is fragile when hot, so patience is key here. -
Clean up:
Once fully cooled, brush off any excess cornstarch. If there are any rough edges, gently smooth them with a fine-grit nail buffer. -
Attach posts:
Apply a small dab of strong adhesive or UV resin to the flat back of the bow. Press the earring post into the glue and let it cure fully before wearing.
Now you have a charming set of handmade accessories ready to add a subtle pop of color to your day


What Really Happens Inside the Kiln
Learn how time and temperature work together inside the kiln to transform clay into durable ceramic.
Heart Locket Pendant
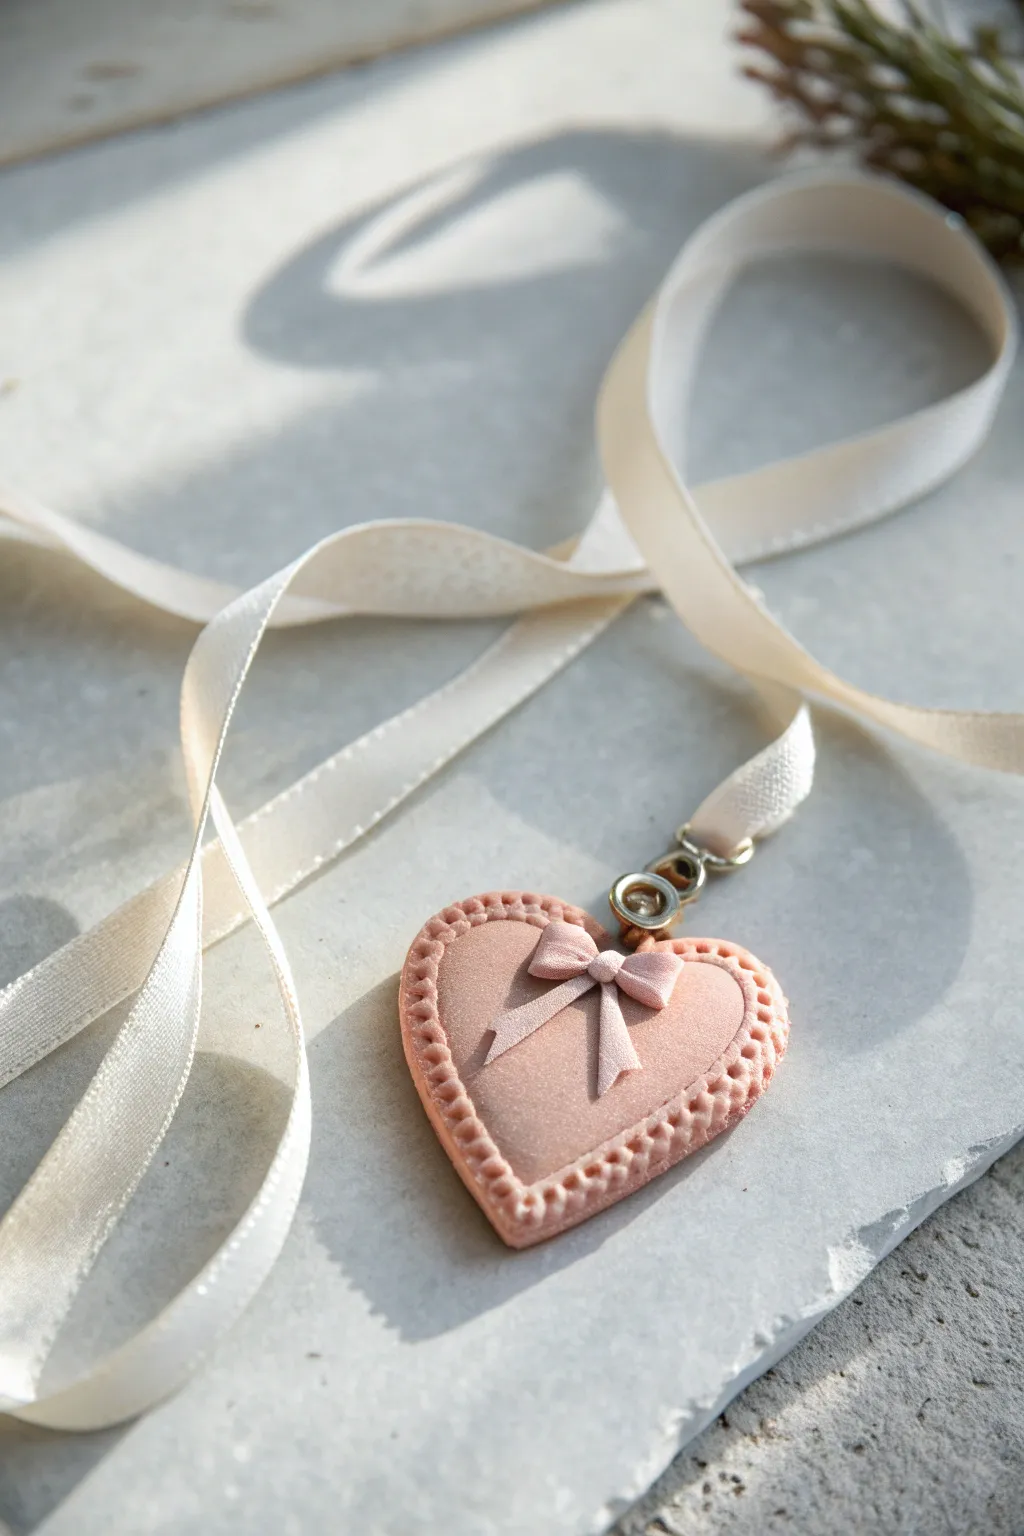
Capture the coquette aesthetic with this delicate heart pendant, featuring a soft pink finish and dainty bow detail. This project combines simple clay sculpting with refined texturing techniques to create a piece that looks like vintage confectionery.
How-To Guide
Materials
- Polymer clay (dusty rose or soft pink)
- Heart-shaped cookie cutter (approx. 2 inches)
- Rolling pin or pasta machine
- Liquid polymer clay or bake-and-bond
- Small needle tool or toothpick
- Small ball stylus tool
- Craft knife or scalpel
- Jump rings and ribbon clamp ends
- Satin ribbon (cream or off-white)
- Cornstarch (to prevent sticking)
- Baking tile or parchment paper
- Oven
Step 1: Base Construction
-
Condition the clay:
Begin by warming the dusty rose polymer clay in your hands, kneading it until it is soft and pliable. If the clay feels too sticky, dust your hands lightly with cornstarch. -
Roll the sheet:
Roll out the clay to a uniform thickness of about 1/4 inch (6mm). You want it substantial enough to look like a locket, not a thin wafer. -
Cut the heart:
Press your heart-shaped cutter firmly into the clay sheet. Lift the cutter away and carefully remove any excess clay from the outside before lifting the heart shape. -
Smooth the edges:
Gently run your finger along the cut edge of the heart to soften the sharp angle left by the cutter, creating a slightly doomed, pillowy edge.
Uneven Texture?
If fingerprints appear on the smooth center, lightly brush the raw clay with baby oil or cornstarch and smooth gently with your fingertip before baking.
Step 2: Adding Details
-
Roll the border coil:
Roll a very thin snake of clay, approximately 2mm in diameter. This will become the scalloped border. -
Attach the border:
Apply a tiny amount of liquid clay along the very edge of your heart base. Place the thin clay snake on top of this adhesive line, framing the entire heart. -
Texture the trim:
Using a small ball stylus or a blunt toothpick, press gentle indentations into the clay snake at regular intervals. This creates the decorative scalloped or beaded look seen in the reference. -
Create the bow loops:
Roll a thin, flat strip of clay. Fold the ends inward to meet in the middle, creating two small loops. Pinch the center to secure them. -
Add the bow tails:
Cut two small strips for the ribbon tails and notch the ends with your craft knife to create a ‘V’ shape. -
Assemble the bow:
Place the tails in the upper center of the heart. Place the loops on top, and wrap a tiny rectangle of clay around the center to hide the join. Secure with liquid clay. -
Insert hardware:
Insert a small eye pin into the top center of the heart, between the lobes. Alternatively, poke a hole now if you plan to use a jump ring directly through the clay.
Pearl Finish
For an extra sheen, dust the raw clay with white mica powder before baking. This gives it a shimmering, pearlescent quality perfect for the coquette look.
Step 3: Finishing
-
Bake:
Place the pendant on a ceramic tile or parchment paper. Bake according to your specific clay brand’s instructions (usually 275°F/130°C for 15-30 minutes per 1/4 inch). -
Cool down:
Allow the piece to cool completely in the oven with the door slightly ajar to prevent thermal shock cracks. -
Attach findings:
Once cool, use pliers to open a jump ring and attach it to the eye pin you baked into the heart. -
Add the ribbon:
Thread your cream satin ribbon through the jump ring. If you are making a shorter choker style, attach ribbon clamps and a clasp to the ends of the ribbon.
Wear your sweet new accessory with a lace blouse to complete the romantic aesthetic
Pearl-Trim Mirror Frame
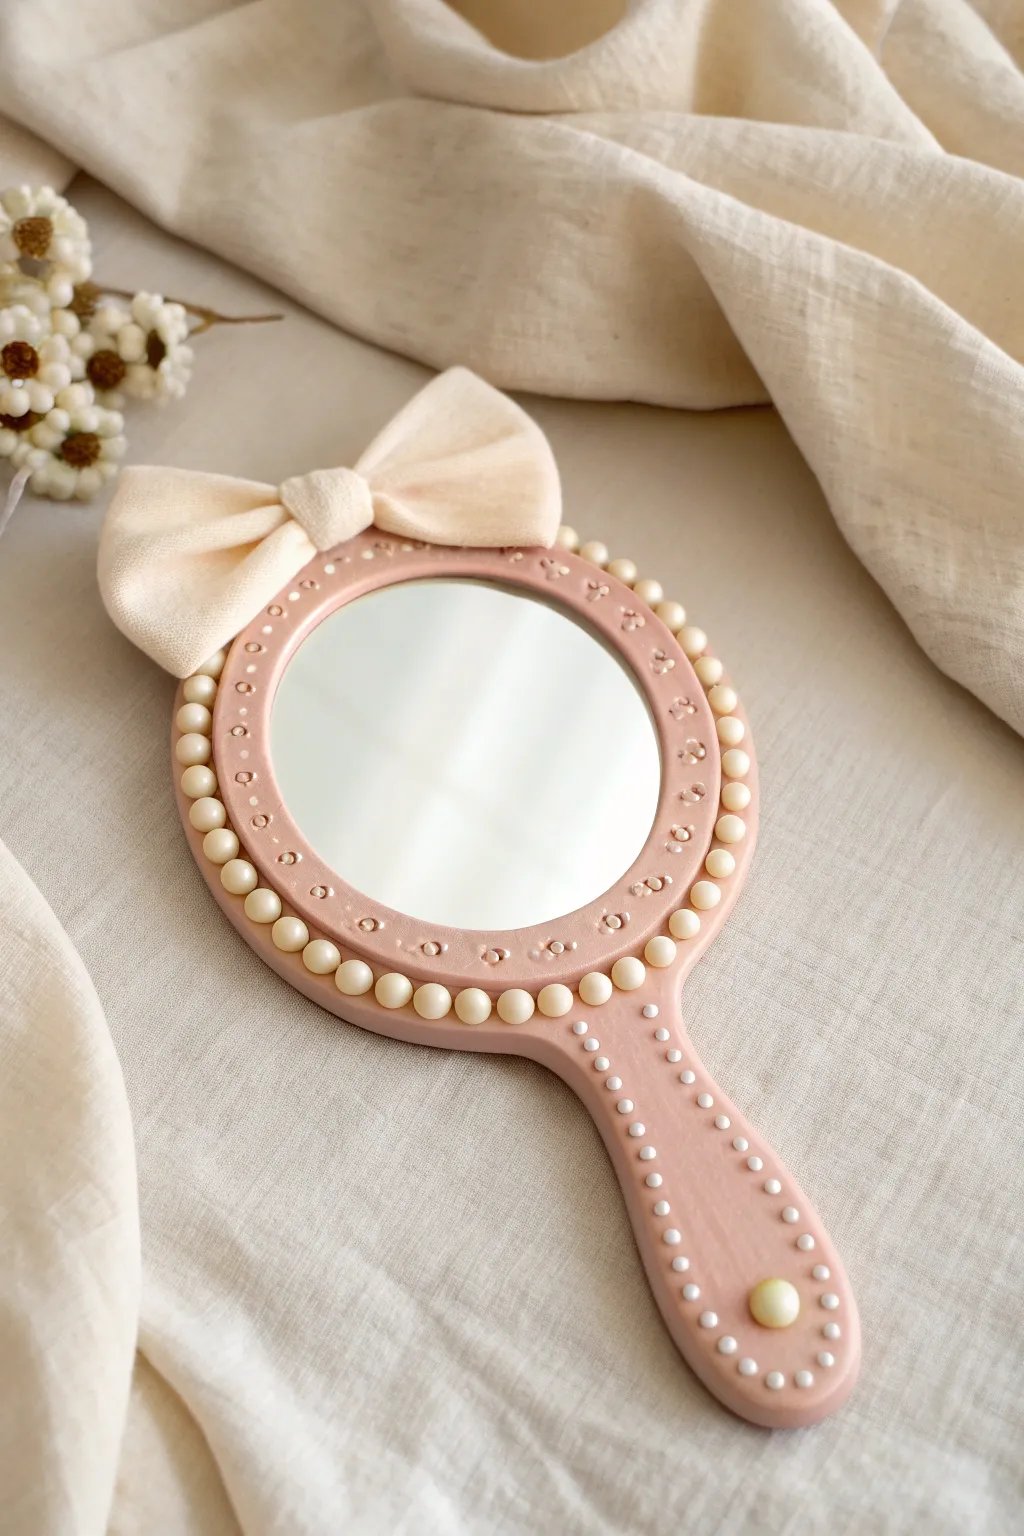
Transform a plain handheld mirror into a coquette dream with this soft pink clay makeover. Featuring a sweet pearl rim, delicate white dot detailing, and a plush cream bow, this piece is the ultimate vanity accessory.
Step-by-Step
Materials
- Handheld mirror (round or oval)
- Light pink polymer clay
- Liquid polymer clay (translucent or white)
- Faux pearl beads (medium size, approx. 6-8mm)
- One large faux pearl cabochon
- Sculpting tools (needle tool, small ball stylus)
- White acrylic paint
- Very fine detailing brush or dotting tool
- Cream or beige fabric/ribbon for the bow
- Strong craft glue (E6000 or similar)
- Gloss glaze (optional)
Step 1: Prepping the Base
-
Clean the surface:
Start by thoroughly cleaning your mirror frame with rubbing alcohol to remove any oils or fingerprints. This ensures the clay adheres properly to the plastic or wood surface. -
Condition the clay:
Take your light pink polymer clay and condition it in your hands until it is soft and malleable. Roll it out into a flat sheet about 3mm thick. -
Cover the frame:
Lay the clay sheet over the frame of the mirror, carefully trimming around the glass. Smooth the clay down the sides and handle, ensuring there are no air bubbles trapped underneath. Blend any seams on the back or sides so the surface looks seamless.
Step 2: Adding Texture & Pearls
-
Create the pearl channel:
Using a modeling tool, gently press a groove around the very outer edge of the circular frame where the pearls will sit. This helps them stay aligned. -
Embed the pearls:
Press the faux pearls into the soft clay around the perimeter of the mirror face. I like to add a tiny drop of liquid clay or strong glue behind each pearl before pressing it in to ensure they survive the baking process. -
Detail the inner rim:
Inside the pearl border, use a small dotting tool to impress a ring of small indentations into the pink clay. Space them evenly for a delicate, textured look. -
Emboss the handle:
Using a needle tool, gently mark small guide points down the center of the handle where you will later paint white dots. -
Add the handle accent:
At the very bottom of the handle, press a large faux pearl cabochon deeply into the clay to act as a decorative end cap. -
Bake the project:
Bake the mirror according to your clay package instructions (usually 275°F/135°C for 15-30 minutes). Be careful not to overheat the mirror glass; you can cover the glass with a piece of cardstock for protection.
Loose Pearl Panic?
If a pearl pops out after baking, don’t worry. Simply add a dab of superglue or E6000 to the indentation in the baked clay and press the pearl back in.
Step 3: Painting & Finishing
-
Cool down:
Allow the mirror to cool completely. The clay will harden fully as it returns to room temperature. -
Paint the dots:
Dip a fine detailing tool or toothpick into white acrylic paint. Carefully place tiny white dots down the handle and inside the indented ring on the mirror face. -
Create tiny flower accents:
Between the painted dots on the mirror face, add minuscule ‘v’ shapes or tiny clusters of dots to mimic delicate embroidery or floral patterns. -
Seal (optional):
If you want extra durability, brush a thin layer of matte or satin varnish over the painted areas, avoiding the pearls and the mirror glass.
Pro Tip: Velvet Touch
Use plush velvet fabric instead of cotton for the bow. The texture contrasts beautifully with the smooth clay and adds an extra layer of luxury.
Step 4: The Bow Assembly
-
Cut the fabric:
Take your cream fabric or wide ribbon. Cut a rectangular piece for the main loops and a smaller strip for the center knot. -
Form the bow:
Fold the large rectangle ends to the center and pinch the middle to create a bow shape. Wrap the smaller strip around the center to secure the pinch and glue it in place at the back. -
Attach the bow:
Once the mirror is fully dry and finished, use a strong adhesive like E6000 to glue the fabric bow to the very top of the mirror frame. Hold it in place for a few minutes until the glue sets.
Enjoy admiring your reflection in this charming, custom-made piece

TRACK YOUR CERAMIC JOURNEY
Capture glaze tests, firing details, and creative progress—all in one simple printable. Make your projects easier to repeat and improve.
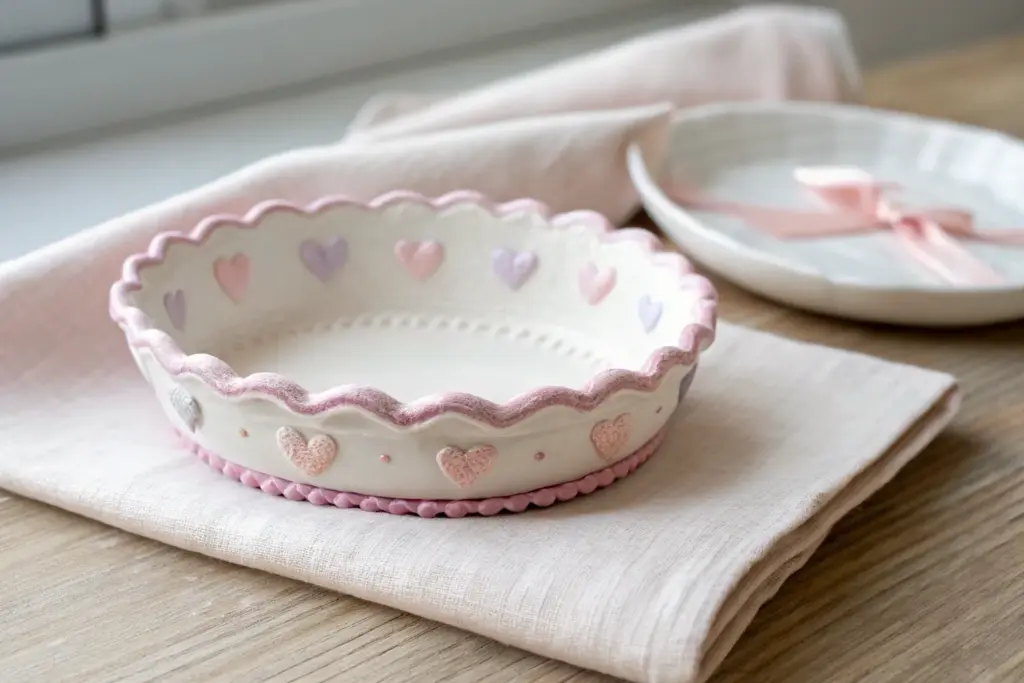
Coquette Candle Holder With Hearts
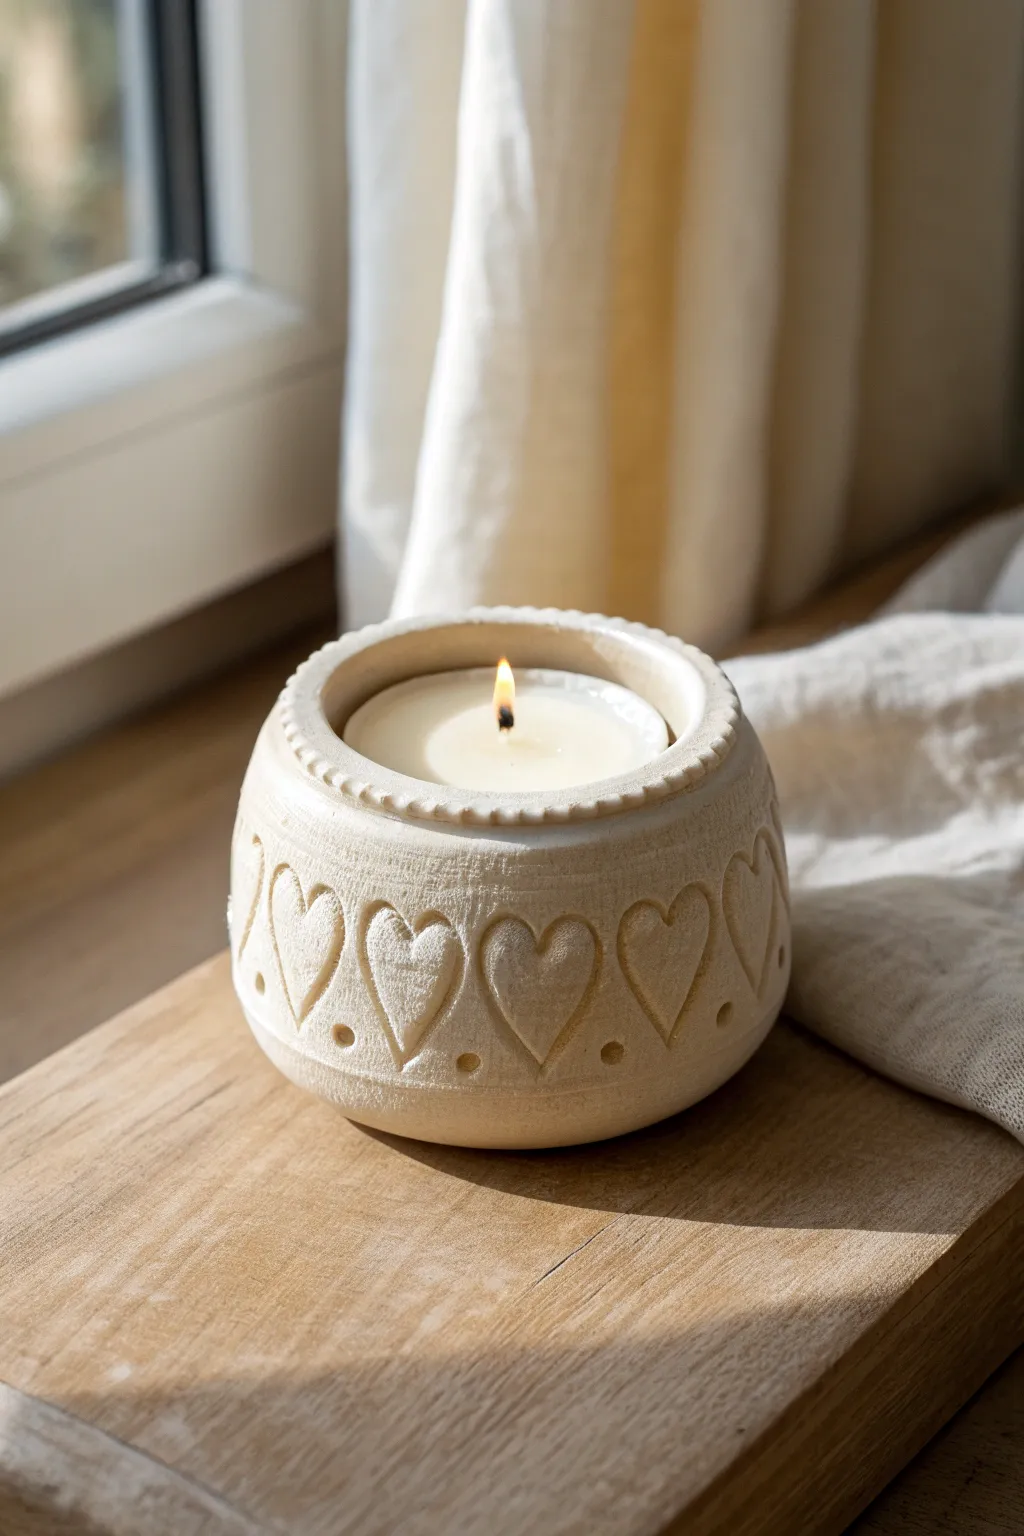
Embrace the soft, romantic coquette aesthetic with this handcrafted clay candle vessel. Featuring a series of deeply imprinted hearts and a delicately scalloped rim, its natural texture creates a warm, vintage-inspired glow perfect for your vanity.
Detailed Instructions
Materials
- Air-dry clay (stone effect or natural white)
- Small glass jar or tea light insert (to mold around)
- Clay rolling pin
- Pointed sculpting tool or toothpick
- Small heart-shaped cutter or stamp (optional)
- Round piping tip or small straw (for scalloped edge)
- Sponge and water
- Sandpaper (fine grit)
- Matte sealant or acrylic varnish
Step 1: Forming the Base
-
Prepare your clay:
Start by conditioning a large ball of air-dry clay. Knead it until it’s pliable and smooth, removing any potential air bubbles that could cause cracks later. -
Roll a slab:
Roll your clay out into a long, even rectangular slab. Aim for a thickness of about 1/4 inch (6mm) to ensure the walls are sturdy enough to be carved later. -
Size the vessel:
Place your glass jar or tea light insert onto the slab to measure the height. Cut a strip of clay slightly taller than your insert and long enough to wrap around the circumference with a little overlap. -
Create the cylinder:
Wrap the clay strip around your glass insert (or just form a cylinder if you plan to remove the insert). Score the overlapping edges with cross-hatching, dab with a little water, and press firmly to seal the seam. -
Attach the bottom:
Cut a circle of clay for the base. Score the bottom edge of your cylinder and the edge of the circle, then press them together. Smooth the clay upwards from the base to the wall to create a seamless join. -
Shape the rim:
Gently curve the top rim of the clay inward slightly to give it that cozy, rounded jar silhouette. I like to smooth the lip with a wet finger to ensure it’s comfortable to touch.
Smooth Seams Tip
If your seam is visible, roll a tiny ‘snake’ of clay, place it over the join, and blend it out completely with a wet finger until invisible.
Step 2: Adding Coquette Details
-
Detailed scalloping:
To create the delicate scalloped texture on the rim, take a small round tool (like the back of a piping tip or a straw). Press it gently into the very top edge of the clay repeatedly to form a beaded or fluted pattern. -
Drafting the hearts:
Using a toothpick, lightly sketch out the placement of your hearts around the center of the vessel. Space them evenly so they wrap all the way around without overcrowding. -
Carving the hearts:
Using a loop tool or a small carving knife, gently scrape away clay inside your heart outlines. You want to create a recessed relief, making the heart concave rather than just an outline. -
Refining the shape:
Go back into each heart indentation with a slightly damp brush or your finger to smooth the interior. The goal is a soft, pillowy indentation rather than sharp, jagged cuts. -
Adding texture:
For that rustic, sandy look seen in the photo, you can gently dab the surface of the clay with a stiff-bristled brush or a crumpled ball of aluminum foil, avoiding the smooth insides of the hearts. -
Decorative dots:
Between or below each heart, use a small dotting tool or the end of a paintbrush to press a single circular indentation. This adds a lace-like rhythm to the design.
Step 3: Finishing Touches
-
Slow drying:
Let the piece dry slowly away from direct heat or sunlight. If you left a glass jar inside, let the clay dry until leather-hard before attempting to remove it, or simply leave it in permanently if it’s heat-safe. -
Sanding:
Once bone dry (usually 24-48 hours), use fine-grit sandpaper to gently buff away any sharp burrs on the rim or the edges of the hearts. -
Dusting off:
Wipe the entire piece down with a dry, soft cloth or brush to remove all the clay dust from the sanding process. -
Sealing:
Apply a coat of matte varnish or sealant. This protects the clay and gives it a finished look without making it too glossy, preserving that natural stone vibe.
Pink Tint Idea
For extra coquette vibes, knead a very small drop of pink acrylic paint into your white clay before rolling it out for a soft blush tone.
Place a tea light inside and watch the flickering shadows dance through the heart carved details
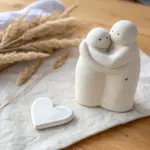
Bunny Figurine With Ribbon Bow
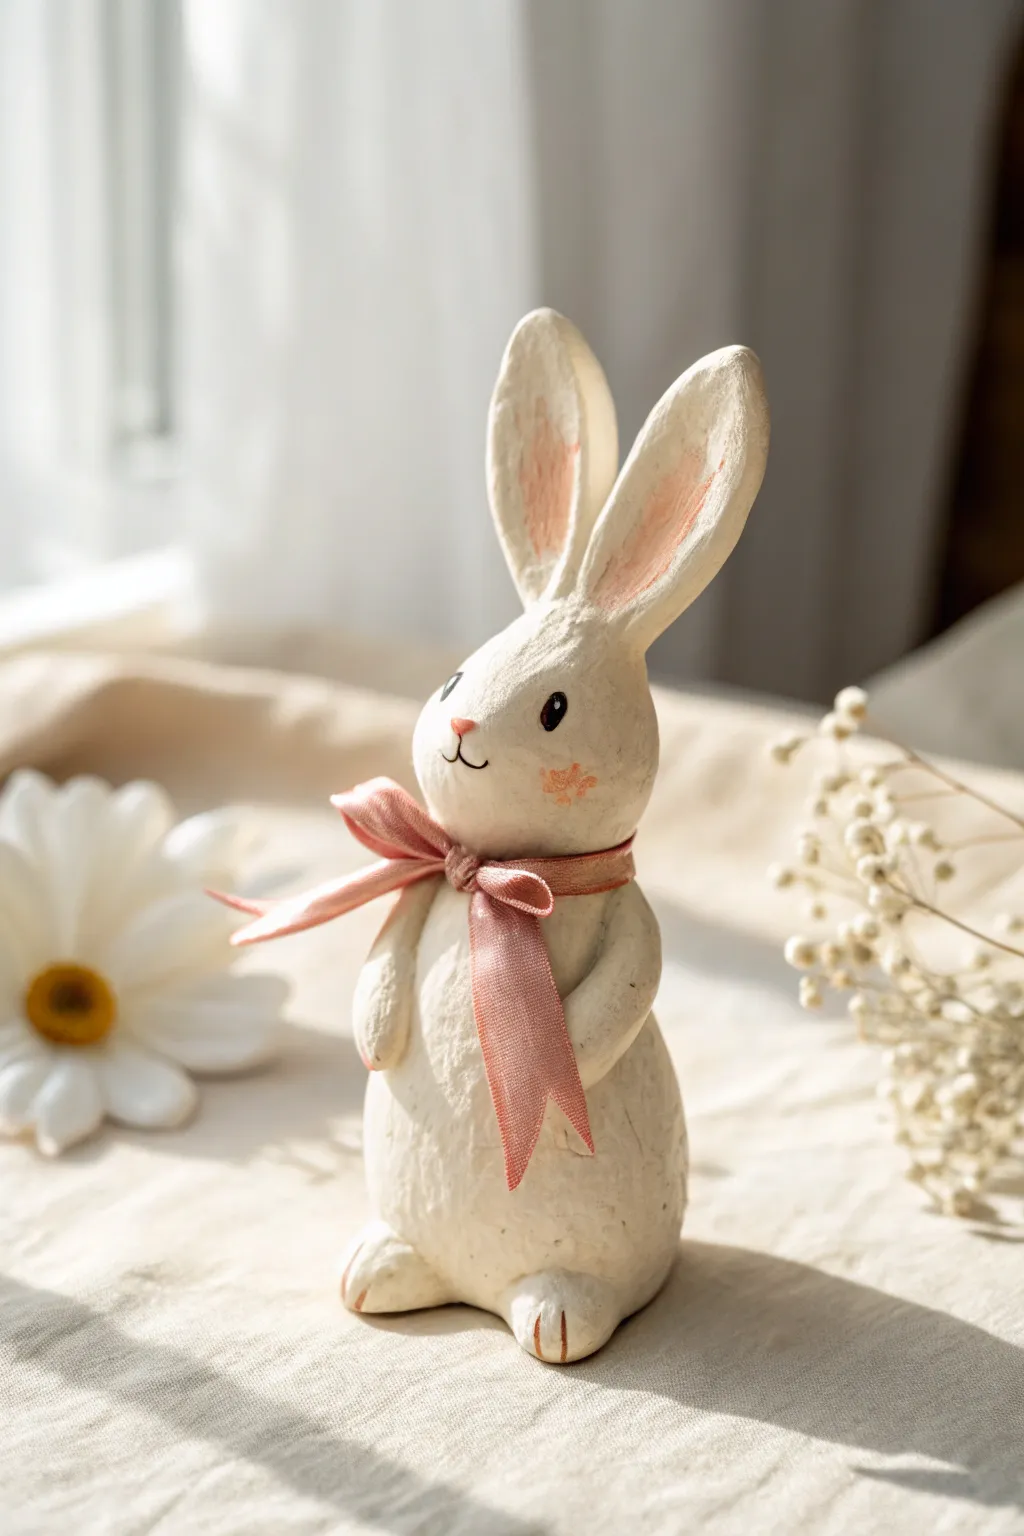
Capture the sweetness of spring with this standing bunny figurine, featuring a textured, rustic finish and delicate pink accents. The soft satin bow adds the perfect coquette touch to this charming, handmade piece.
How-To Guide
Materials
- Air-dry clay (white)
- Aluminum foil
- Wire (for armature/ears)
- Sculpting tools (needle tool, smoother)
- Acrylic paint (cream/off-white, soft pink, black)
- Paintbrushes (flat shader, fine detail brush)
- Texturing tool (old toothbrush or stiff bristle brush)
- Satin pink ribbon (thin)
- Matte varnish or sealant
- Water cup
Step 1: Forming the Body
-
Create the armature:
Crumple aluminum foil into two main shapes: a larger oval for the body (about the size of a large egg) and a smaller round shape for the head. Insert a piece of wire connecting them to keep the head stable. -
Cover with clay:
Roll out a sheet of air-dry clay to about 1/4 inch thickness. Wrap the foil armature completely, smoothing the seams where the clay pieces join with a little water on your finger. -
Shape the silhouette:
Gently mold the clay while it’s soft to refine the bunny’s posture. Make sure the body is slightly pear-shaped, wider at the bottom so it stands securely on its own. -
Add texture:
Before the clay dries, take an old toothbrush or a stiff bristle brush and gently tap it all over the surface. This creates that lovely, soft ‘fur’ texture visible in the reference photo.
Unstable Bunny?
If your bunny keeps tipping over, glue a heavy washer or coin to the bottom of the feet before painting, or create a small clay base for extra stability.
Step 2: Sculpting Details
-
Form the ears:
Cut two pieces of wire for the ears. Cover them with flattened teardrop shapes of clay. Insert the wires into the top of the head, blending the clay at the base seamlessley into the scalp. -
Shape the paws:
Roll two small sausages of clay for the arms. Attach them to the sides of the body, curving them slightly forward. Use a tool to gently indent separation lines for the paws. -
Create the feet:
Form two flattened oval shapes for the feet and attach them to the bottom front of the body. Like the hands, press in small lines to suggest toes. -
Refine the face:
Add a tiny pinch of clay for the nose area to build it up slightly. Use a needle tool to sketch faint guidelines for where the eyes and mouth will be painted later. -
Dry completely:
Let the sculpture dry for at least 24-48 hours. I find that turning it upside down halfway through helps the bottom dry evenly.
Step 3: Painting & Finishing
-
Base coat:
Paint the entire bunny with a warm cream or off-white acrylic paint. You may need two thin coats to get solid coverage. -
Paint the ears:
Mix a watery wash of soft pink paint. Carefully paint the inner section of the ears, letting the color fade slightly as it moves toward the edges for a natural look. -
Add facial features:
Using your finest detail brush and black paint, create two oval eyes and a small ‘Y’ shape for the nose and mouth. Add tiny white dots in the eyes for a life-like sparkle. -
Blush the cheeks:
Dip a dry brush into a tiny amount of pink paint and dab distinct little cheek spots or a flower shape onto the face. Also add tiny pink strokes to the toes on the feet. -
Seal the piece:
Once the paint is fully dry, apply a coat of matte varnish. This protects the finish without making it look plasticky. -
Tie the bow:
Cut a length of thin pink satin ribbon. Tie it snugly around the bunny’s neck in a bow, trimming the ends at an angle to prevent fraying.
Smoother Seams
Keep a small cup of water nearby while sculpting. Dip your finger in water to smooth out cracks instantly, blending the clay joining points invisible.
Place your finished bunny on a shelf or windowsill to add a lovely touch of handmade charm to your room
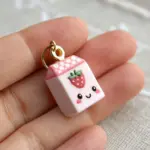
Strawberry Milk Phone Stand
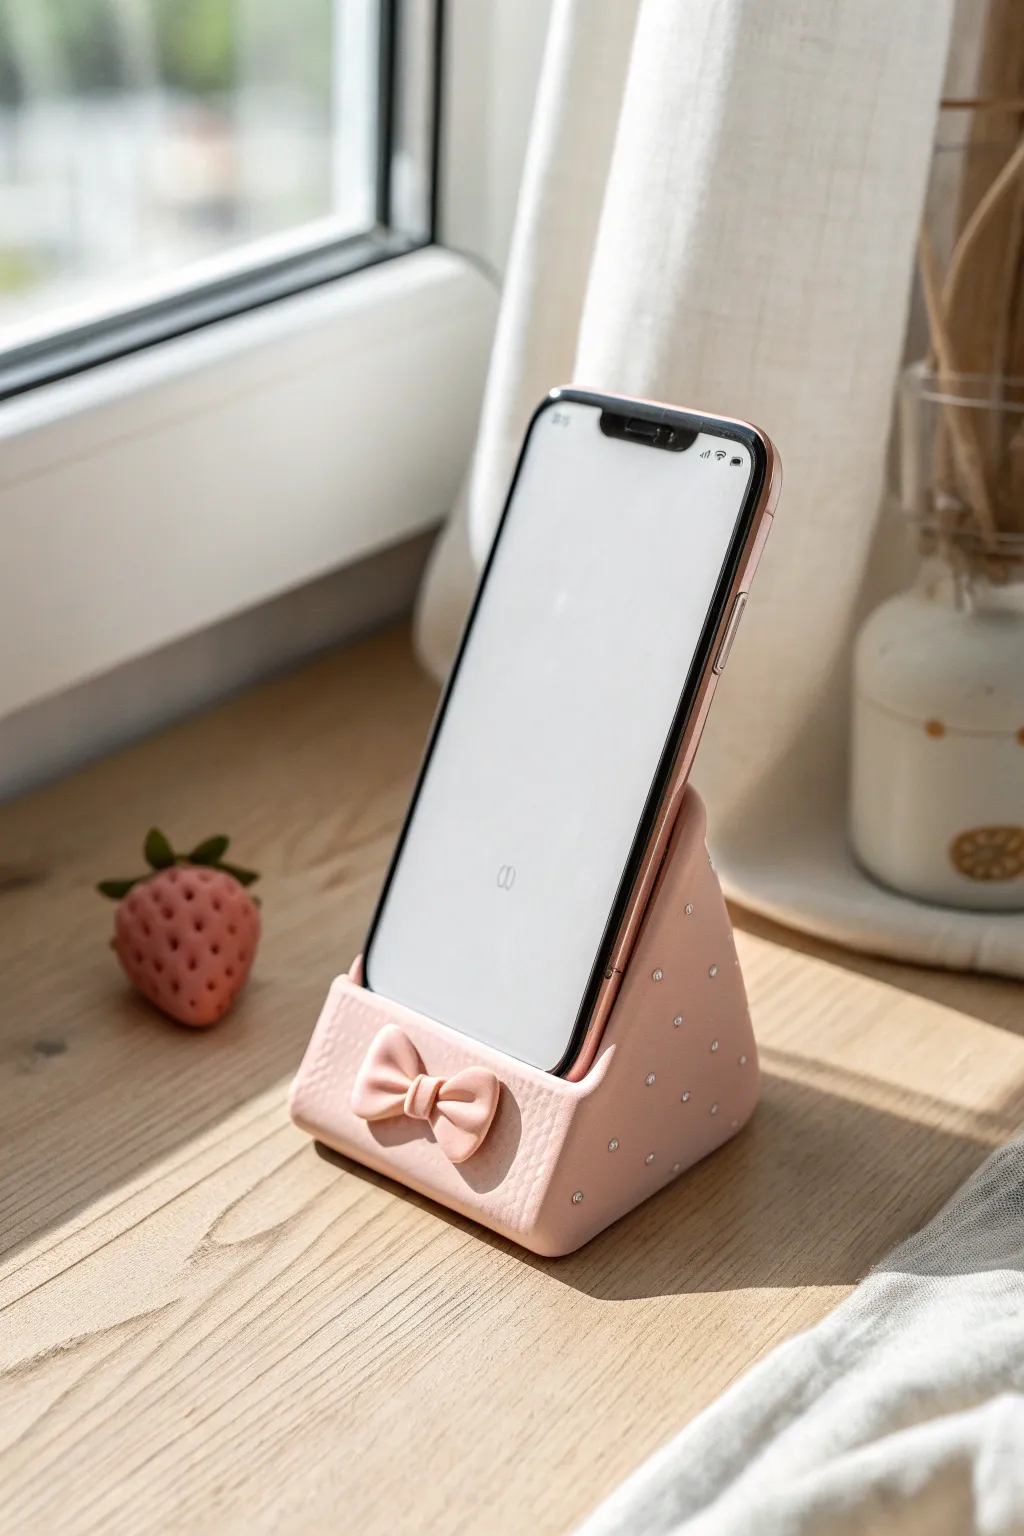
Elevate your desk setup with this darling pastel pink phone stand that perfectly capture the coquette aesthetic. Combining soft, squishy clay textures with a structured wedge shape, this project features a sweet bow detail and tiny rhinestone sparkles for a touch of everyday glamour.
Detailed Instructions
Materials
- Air-dry clay or polymer clay (pastel pink)
- Small rolling pin
- Clay tools (knife, smoothing tool)
- Small rhinestones (silver or iridescent)
- Strong craft glue or E6000
- Cardboard or foam core (for internal structure)
- Ruler
- Scissors
- Gloss varnish or sealant (optional)
Step 1: Building the Structure
-
Create the core form:
Cut a triangular wedge shape from sturdy cardboard or foam core to serve as the internal skeleton. The base should be wide enough to support your phone’s weight, roughly 3 inches by 3 inches, with a sloping back. -
Add a front lip:
Cut a small rectangular strip of cardboard and glue it to the front bottom edge of your wedge. This creates the stopper that will keep your phone from sliding off. -
Prepare the clay:
Condition your pink clay by kneading it until it is soft and pliable. I find that warming it in my hands for a few minutes makes rolling it out much smoother. -
Roll out sheets:
Roll the clay into a flat, even sheet, approximately 3-4mm thick. You want it thick enough to hide the cardboard texture underneath but thin enough to fold around corners.
Don’t Skip Support
Using a cardboard core is crucial! Solid clay is heavy and takes forever to dry or bake. The core saves materials and keeps the phone stand lightweight.
Step 2: Covering and Shaping
-
Wrap the wedge:
Apply a thin layer of glue to your cardboard form. Carefully drape the sheet of pink clay over the structure, smoothing it down gently to avoid trapping air bubbles. -
Trim the excess:
Using a clay knife, trim away any excess clay at the bottom and sides, leaving just enough to fold under for a clean finish. -
Refine the edges:
Use a smoothing tool or your finger dipped in a little water (if using air-dry clay) to soften the seams where the clay pieces join. The edges should look rounded and soft, not sharp. -
Texture the surface:
For that soft leather-like look seen in the photo, gently dab the surface with a textured sponge or crumpled aluminum foil. Use a very light hand here.
Step 3: The Bow Detail
-
Form the bow loops:
Roll a small strip of clay and fold both ends toward the center to create two loops. Pinch the center tightly to create the classic bow shape. -
Add the center knot:
Roll a tiny, flat rectangle of clay and wrap it vertically around the pinched center of your bow to hide the seam and create the ‘knot’ effect. -
Attach the decoration:
Score the back of the bow and the front center of the phone stand lightly. Apply a dab of slip or glue (depending on clay type) and press the bow firmly onto the front lip.
Make It Glossy
Mix pearlescent powder into your varnish for a shimmer finish, or sculpt a tiny clay strawberry to place next to the bow for extra sweetness.
Step 4: Finishing Touches
-
Embed rhinestones:
While the clay is still slightly soft, gently press small silver rhinestones into the sides of the stand in a scattered polka-dot pattern. Pressing them in now creates a divot for better adhesion later. -
Let it cure:
Allow the project to dry completely. If observing air-dry clay, this might take 24-48 hours; for polymer, bake according to package instructions. -
Secure the gems:
Once fully cured or baked, pop the rhinestones out if they are loose, add a tiny dot of strong craft glue, and place them back into their indentations. -
Seal the piece:
Protect your work with a matte or satin varnish to keep the soft look, or go glossy if you prefer a shiny porcelain finish.
Place your phone on its new throne and enjoy the cute aesthetic while you work or watch videos
Scalloped Vanity Catchall Bowl
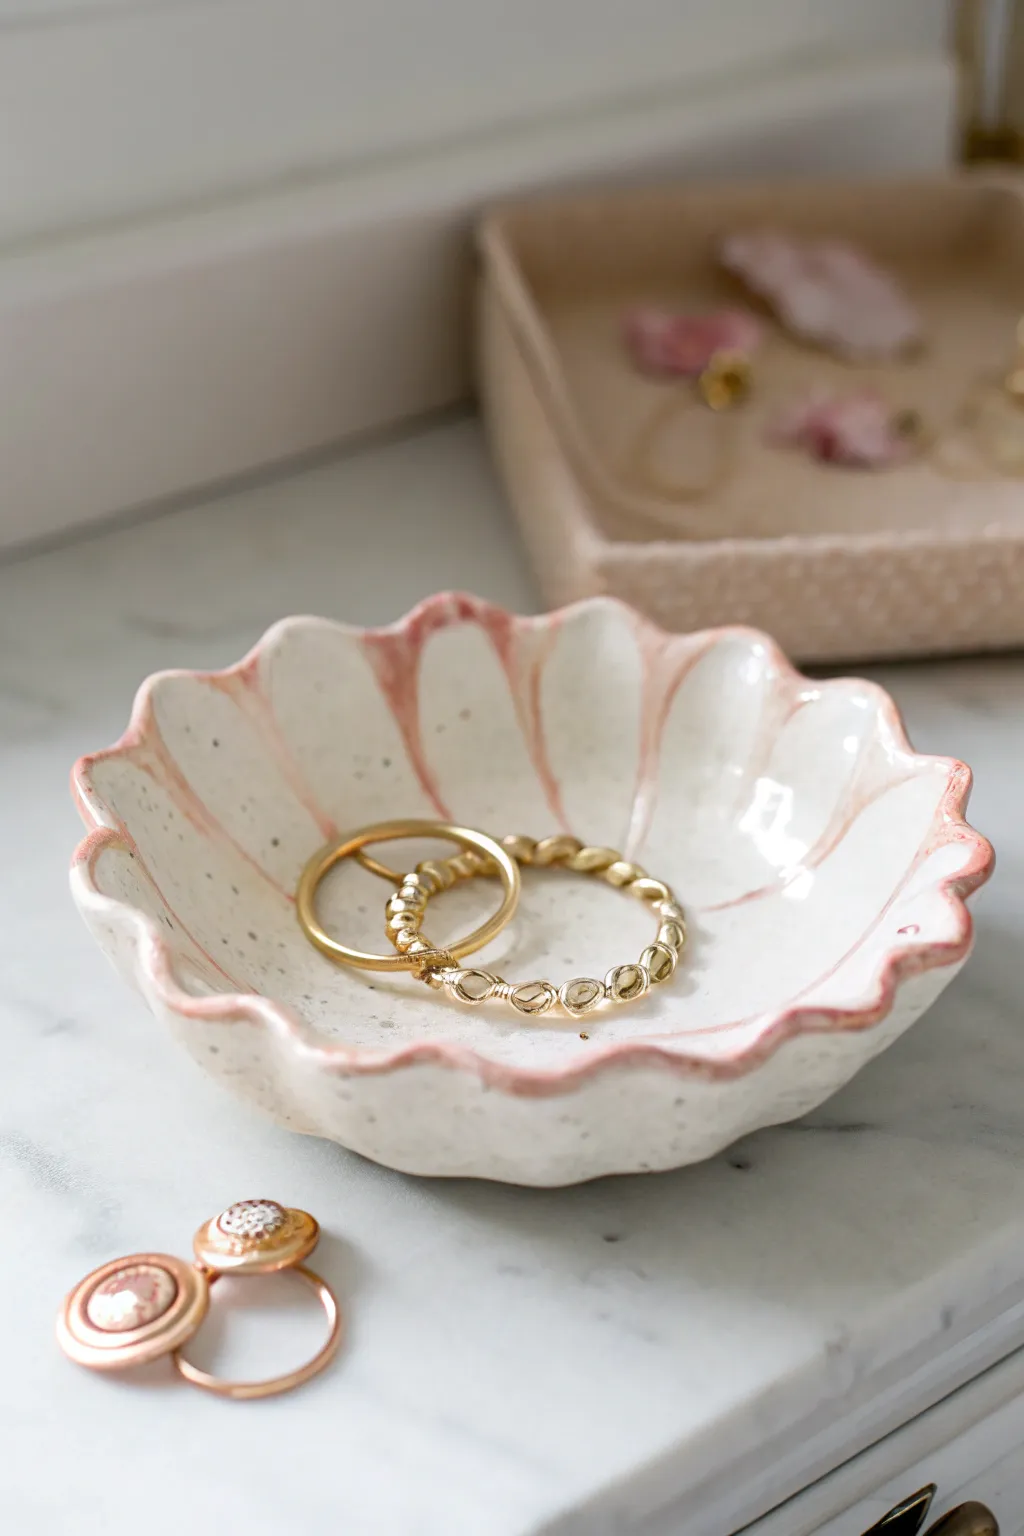
Bring a touch of cottagecore charm to your vanity with this delicate, undulating catchall. Featuring a speckled creamy base and soft pink edges, this hand-formed bowl mimics the organic beauty of a seashell while perfectly holding your favorite rings.
How-To Guide
Materials
- White air-dry clay or polymer clay (oven-bake)
- Rolling pin
- Small bowl or large jar lid (approx. 4-5 inches) for sizing
- Craft knife or clay needle tool
- Small sponge or smoothing tool
- Acrylic paints (Cream/Off-white, Soft Pink)
- Old toothbrush (for speckling)
- Fine grit sandpaper
- Glossy varnish or sealant (polyurethane or resin)
- Small, soft paintbrush
Step 1: Shaping the Clay Base
-
Condition the Clay:
Start by kneading a ball of clay in your hands until it is warm, pliable, and free of cracks. If you’re using air-dry clay, keep your hands slightly damp to prevent drying. -
Roll it Out:
Roll the clay onto a flat surface until it is about 1/4 inch thick. Aim for an even thickness throughout to ensure sturdy edges. -
Cut the Circle:
Place your bowl or jar lid gently onto the clay to act as a template. Trace around it with your craft knife or needle tool to create a perfect circle, then discard the excess clay. -
Smooth the Edges:
Dip your finger in a little water (or clay softener if using polymer) and run it along the cut edge of the circle to round off any sharpness.
Cracks Appearing?
If air-dry clay cracks while drying, mix a tiny scrap of fresh clay with water to make a paste (slip). Fill the cracks, smooth over, and let dry again.
Step 2: Forming the Scallops
-
Create the Pinch Points:
Imagine the circle is a clock face. Gently press your thumb into the center to start curving the bowl shape slightly, lifting the edges. -
Pinch the Ruffles:
Using your thumb and forefinger, pinch the rim of the clay at regular intervals. Push inward gently to create dips and pull outward to create peaks, forming a wavy, scalloped pattern. -
Refine the fluting:
Use the handle of a paintbrush or your pinky finger to press into the ‘valleys’ of the scallops, extending that indentation slightly toward the center of the bowl. This creates the fluted shell look. -
Final Shaping:
Check that the bowl sits flat on the table. If it wobbles, tap the bottom gently against the surface to flatten the base. -
Dry or Bake:
If using air-dry clay, let it sit in a dry, cool spot for 24-48 hours. If using polymer clay, bake according to the manufacturer’s instructions on the packet.
Step 3: Painting and Finishing
-
Sand Imperfections:
Once fully cured or dry, use fine-grit sandpaper to gently buff away any fingerprints or rough spots on the rim. -
Apply Base Color:
Paint the entire bowl with a creamy off-white acrylic paint. You may need two coats for full opacity. -
Add the Speckles:
Water down a tiny bit of darker beige or grey paint. Dip an old toothbrush into it, then run your thumb across the bristles to flick tiny speckles onto the bowl. -
Paint the Stripes:
Mix a watery wash of soft pink and dark cream paint. Using a fine brush, paint subtle, vertical stripes into the valleys of your scallops, fading them out as they reach the center. -
Highlight the Rim:
Using a slightly more opaque soft pink, carefully paint just the very edge of the rim to define the scalloped shape. -
Seal the piece:
Finish with a high-gloss varnish to give it that wet, ceramic glaze look. Apply two thin coats, letting each dry completely.
Make it Luxe
Instead of pink paint, use liquid gold leaf on the very edge of the rim for a sophisticated, vintage-style gilded finish.
Now your delicate trinket dish is ready to hold your most precious rings and studs
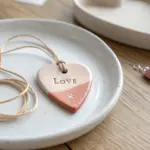
Ribbon-Wrapped Heart Dish
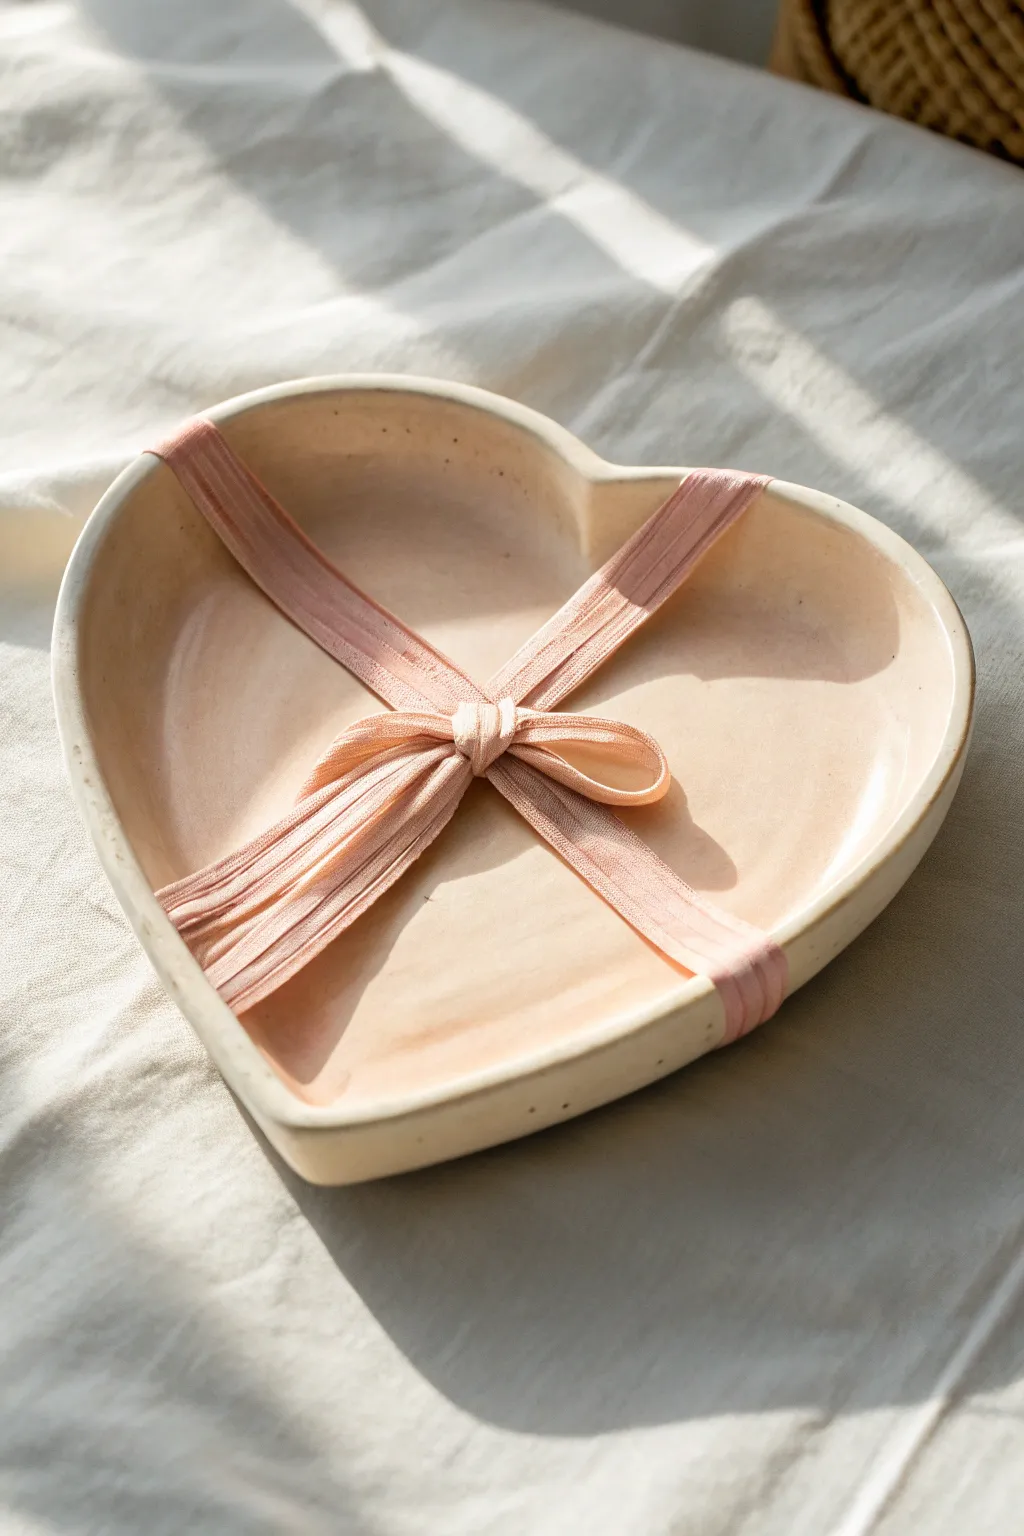
Embrace the coquette aesthetic with this darling heart-shaped trinket dish, featuring a soft, milky finish and delicate speckling. Its organic edges and simple silhouette make it the perfect resting spot for your favorite hair ribbons or jewelry.
Detailed Instructions
Materials
- Air-dry clay (white or cream)
- Rolling pin
- Paper template in heart shape
- Craft knife or clay needle tool
- Small bowl with water
- Sponge
- Fine-grit sandpaper
- Acrylic paints (Titanium White, Unbleached Titanium, Raw Umber)
- Gloss or satin varnish
- Soft paintbrushes
- Optional: Pink ribbon or elastic for styling
Step 1: Shaping the Clay
-
Condition the clay:
Begin by taking a handful of air-dry clay and kneading it in your hands until it becomes warm, soft, and pliable. This prevents cracks later on. -
Roll it out:
Place the clay on a smooth surface or canvas mat. Use a rolling pin to flatten it into an even slab, aiming for a thickness of about 1/4 inch. -
Cut the shape:
Lay your paper heart template gently on top of the slab. Using a craft knife or needle tool, carefully trace around the template to cut out your heart shape. -
Lift the edges:
Remove the excess clay. Gently lift the edges of the heart slab upward with your fingers to create a rim. I find it helpful to cup the clay in my palm to encourage a natural curve. -
Smooth the form:
Dip your finger or a small sponge into water—just a little bit—and run it along the rim and inside surface to smooth out any fingerprints or jagged cuts. -
Refine the rim:
Spend extra time on the top edge of the rim, rounding it over slightly so it doesn’t look sharp or blocky. -
Allow to dry:
Set the dish aside in a safe, dry place. Let it cure completely for 24-48 hours until it feels hard and room temperature to the touch.
Uneven drying?
If the clay curls while drying, gently weigh down the center with a small bean bag or turn the piece over halfway through the drying process.
Step 2: Finishing and Painting
-
Sand for smoothness:
Once fully dry, take a piece of fine-grit sandpaper and gently buff the entire surface, focusing on any uneven spots on the rim. -
Dust off:
Wipe the dish down with a barely damp cloth or dry brush to remove all the sanding dust before painting. -
Mix the base color:
Mix Titanium White with a small touch of Unbleached Titanium to create a warm, creamy off-white shade. -
Apply base coats:
Paint the entire dish, front and back, with your cream mixture. You will likely need two to three thin coats for solid coverage, letting each layer dry in between. -
Create speckles:
Dilute a tiny amount of Raw Umber paint with water until it is very fluid. Load an old toothbrush or stiff brush with the mixture. -
Flick the paint:
Hold the brush over the dish and flick the bristles with your thumb to splatter tiny brown speckles across the surface. Practice on a paper towel first to control the spray. -
Protect the piece:
After the paint is completely dry, apply two coats of gloss or satin varnish to seal the clay and give it that fired ceramic look. -
Style it:
To recreate the photo’s look, tie a soft pink ribbon or elastic band loosely into a bow and place it inside the dish for a sweet finishing touch.
Ceramic Glaze Look
Use a high-gloss resin or a ‘Triple Thick’ glaze as your topcoat. This mimics the shine of kiln-fired pottery much better than standard varnish.
Place this charming dish on your vanity to hold dainty treasures or simply enjoy its sweet aesthetic
Icing-Piped Picture Frame
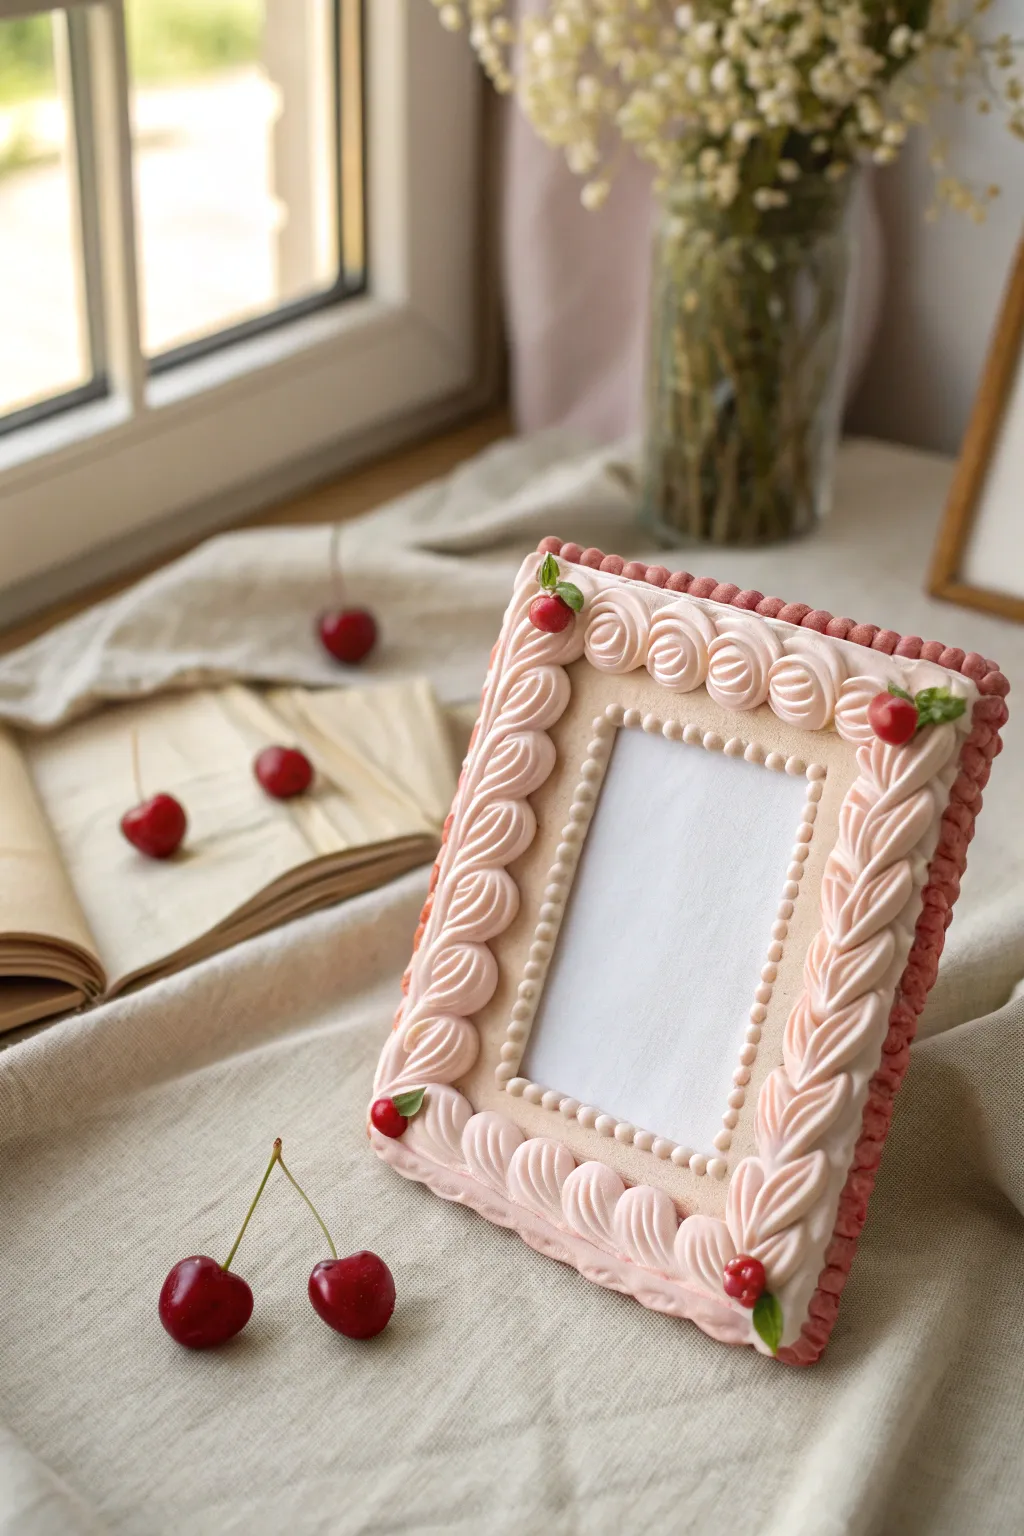
Transform a plain wooden frame into a sweet, patisserie-inspired decor piece that looks good enough to eat. This project uses lightweight clay and piping techniques to create realistic swirls of faux frosting and glossy cherries for that perfect coquette aesthetic.
How-To Guide
Materials
- Flat wooden picture frame (about 5×7 inches)
- Beige or biscuit-colored acrylic paint
- Matte mod podge or matte sealant
- Lightweight clay (air dry, like Hearty or specialized whipped clay)
- Creamy white and baby pink acrylic paint (for coloring clay)
- Piping bag with a large star tip
- Piping bag with a small round tip
- Polymer clay (red and green) for cherries
- UV resin or glossy varnish
- Clay adhesive or heavy-duty craft glue
- Soft texture sponge or toothbrush
Step 1: Creating the Cookie Base
-
Prep the frame:
Remove the glass and backing from your wooden frame. Lightly sand the surface if it has a glossy finish to help the paint measure adhere better. -
Paint the base coat:
Mix a warm biscuit color using beige and a tiny drop of yellow acrylic paint. Apply an even coat to the entire front and sides of the frame to mimic a baked cookie dough color. -
Add texture:
While the second coat of paint is still tacky, stipple the surface gently with a textured sponge or an old clean toothbrush. This creates a realistic, baked porous look rather than smooth wood. -
Seal the base:
Once the paint is fully dry, apply a layer of matte Mod Podge. This protects the ‘cookie’ layer and prepares it for the clay toppings.
Clay Consistency
If your clay ‘frosting’ is cracking as you pipe, it’s too dry. Add water drop by drop. If it slumps and loses definition, let it sit exposed to air for 10 mins to firm up.
Step 2: Whipping the Faux Cream
-
Prepare the clay:
Take your lightweight air-dry clay. If you are using standard clay, you need to soften it into a paste. Mix the clay with a small amount of water and craft glue in a bowl until it reaches a consistency similar to stiff whipped cream. -
Tint the frosting:
Divide your clay mixture. Keep a small amount white (or very pale cream) for the inner dots, and tint the larger batch with baby pink acrylic paint. Mix thoroughly to avoid streaks. -
Fill the bags:
Transfer the pink clay mixture into a piping bag fitted with a large star tip. Put the pale cream mixture into a bag with a small round tip.
Piping Flow Issues
Clay clogging the tip? Don’t force it or the bag might burst. Use a toothpick to clear the blockage from the outside in, or massage the bag to break up hard lumps.
Step 3: Piping and Decorating
-
Test your piping:
Before hitting the frame, pipe a few practice swirls on a scrap piece of paper to ensure your clay isn’t too runny or too stiff. I usually check if the ridges of the star tip hold their shape crisp. -
Pipe the border:
Starting at one corner, pipe a continuous ‘shell border’ pattern around the outer edge of the frame. Squeeze, let the clay billow out, then pull down and release pressure to create the tapered tail, repeating this motion rhythmically. -
Add corner rosettes:
At each of the four corners, instead of the shell pattern, pipe a distinct circular rosette swirl to anchor the design. -
Pipe the inner details:
Using the bag with the small round tip and pale cream clay, pipe tiny, uniform pearls along the inner recessed edge of the frame, right next to where the photo will go. -
Add the outer trim:
If you have leftover pink clay (or a slightly darker shade), pipe very small dots along the extreme outer edge of the frame to hide the wood completely.
Step 4: Adding Cherry Accents
-
Sculpt the cherries:
Roll small balls of red polymer clay (about the size of a pea). Create tiny leaves and stems from green polymer clay and attach them carefully. -
Bake the charms:
Bake your polymer clay cherries according to the package instructions (usually 275°F for 15 minutes) and let them cool completely. -
Glaze the fruit:
Coat each cherry with UV resin or a high-gloss varnish to give them that wet, candied fruit look. -
Attach to frame:
Using strong craft glue, nestle a cherry onto each of the four corner rosettes you piped earlier. Press them gently into the ‘frosting’ if it’s still soft, or glue them on top if dry. -
Final drying time:
Let the entire project sit undisturbed for at least 24-48 hours. The thick clay piping needs significant time to cure completely through to the center.
Place your favorite memory inside and enjoy the sweet charm of your new frame.
Miniature Perfume Bottle Charms
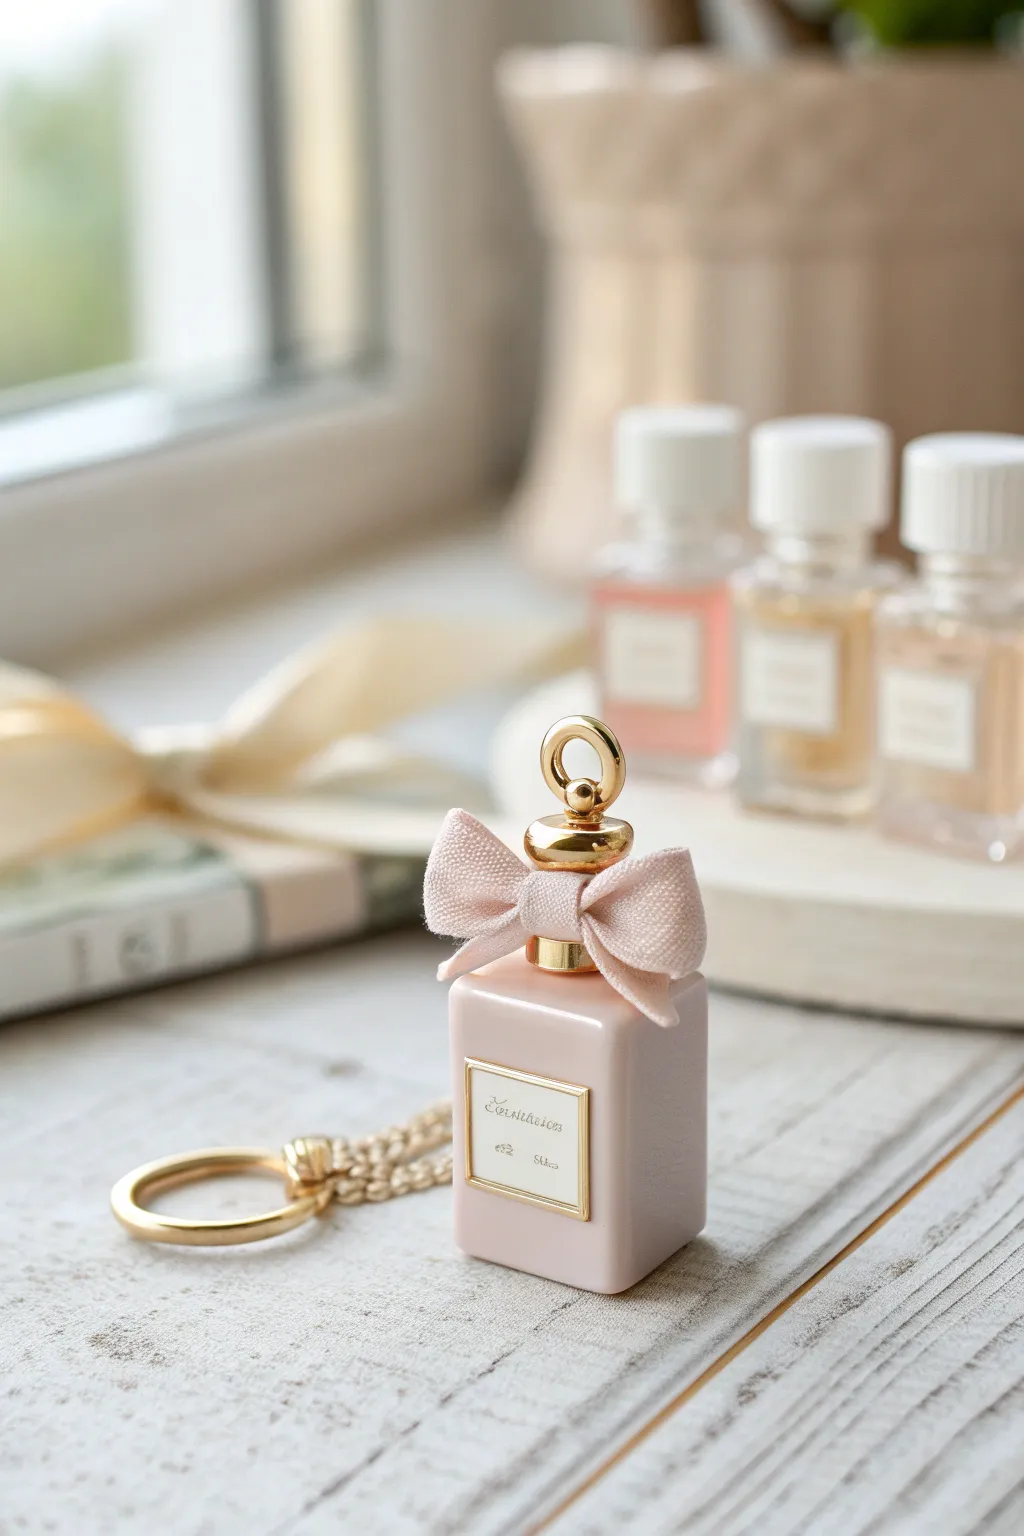
Capture the essence of vintage elegance with this adorable miniature perfume bottle charm. Featuring a soft blush pink body, delicate fabric bow, and gleaming gold accents, it makes for a sophisticated addition to any keychain or purse.
Step-by-Step Guide
Materials
- Polymer clay (blush pink or light rose)
- Polymer clay (translucent or white – optional for mixing)
- Gold polymer clay or metallic gold acrylic paint
- Gold jewelry headpin or eye pin
- Small pink ribbon or fabric scrap
- Super glue or strong craft adhesive
- Gloss glaze (UV resin or polyurethane varnish)
- Clay roller or pasta machine
- Blade or X-Acto knife
- Small square presence cutter (optional)
- Gold jump ring and keychain attachment
- Fine detail paintbrush
- Sandpaper (fine grit)
Step 1: Sculpting the Bottle Base
-
Prepare the Clay:
Condition your blush pink polymer clay until it is soft and pliable. If the color feels too saturated, mix in a small amount of translucent or white clay to achieve that soft, milky pastel look. -
Form the Shape:
Roll the clay into a smooth ball, then gently flatten the sides against your work surface to create a rectangular block. Aim for a shape that is slightly taller than it is wide, roughly 1 inch by 0.75 inches. -
Refine Edges:
Use your flexible blade or a flat tool to sharpen the corners and ensure the sides are perfectly straight. The distinctive look comes from these crisp, clean lines typical of high-end perfume bottles. -
Smooth the Surface:
Check for any fingerprints. Gently rub the surface with a tiny bit of baby oil or cornstarch to smooth them away before baking.
Clean Lines Hack
Chill the rectangle clay block in the fridge for 10 minutes before slicing or refining edges. Firm clay resists fingerprints and holds sharp corners much better.
Step 2: Adding the Hardware & Baking
-
Insert the Pin:
Take your gold eye pin and trim it if it’s too long. Insert the straight end into the center of the top of your clay block. I like to add a tiny dot of liquid clay or translucent sculpey on the wire for extra grip. -
Create the Cap Base:
Roll a very small ball of clay (either gold clay or pink clay you will paint later) and thread it onto the eye pin, pushing it down so it sits flush on top of the bottle. -
Create the Cap Top:
Roll a slightly larger ball of clay for the main cap. Thread this onto the eye pin above the base piece. Flatten it slightly into a disc or mushroom shape. -
Bake:
Place your creation on a ceramic tile or baking sheet. Bake according to your clay manufacturer’s instructions (usually 275°F/135°C for 15-30 minutes). Let it cool completely.
Scent Infusion
Before adding the final glaze, drop a tiny amount of essential oil onto the unbaked clay at the bottom. The porous clay will hold the scent for weeks.
Step 3: Decoration & Assembly
-
Painting Gold Details:
If you didn’t use gold clay, paint the cap sections carefully with metallic gold acrylic paint. You may need two thin coats for opaque coverage. -
Creating the Label:
Roll out a tiny, paper-thin sheet of white clay (or use a scrap of heavy cardstock). Cut a small square or rectangle for the label. -
Gold Trim:
Paint a very fine gold border around the edge of your label piece. Once dry, glue this to the front center of the bottle. -
Adding Text:
Using an ultra-fine tip black pen or a single hair paintbrush, scribble faux cursive text onto the label to mimic branding. -
Glazing:
Apply a coat of gloss glaze or UV resin over the pink bottle body to give it that shiny, glass-like ceramic finish. avoid glazing the fabric areas or the label if you want a matte paper look. -
Making the Bow:
Take your small pink ribbon. Tie a tiny, tight bow. Trim the ends so they are short and neat. -
Attaching the Bow:
Apply a drop of super glue to the neck of the bottle (between the square body and the cap). Press the knot of the bow firmly into the glue. -
Final Assembly:
Open a gold jump ring using two pairs of pliers. Attach your keychain hardware to the loop of the eye pin.
Clip your chic new charm onto your bag and enjoy the touch of luxury it brings
Coquette Wall Flower Tiles
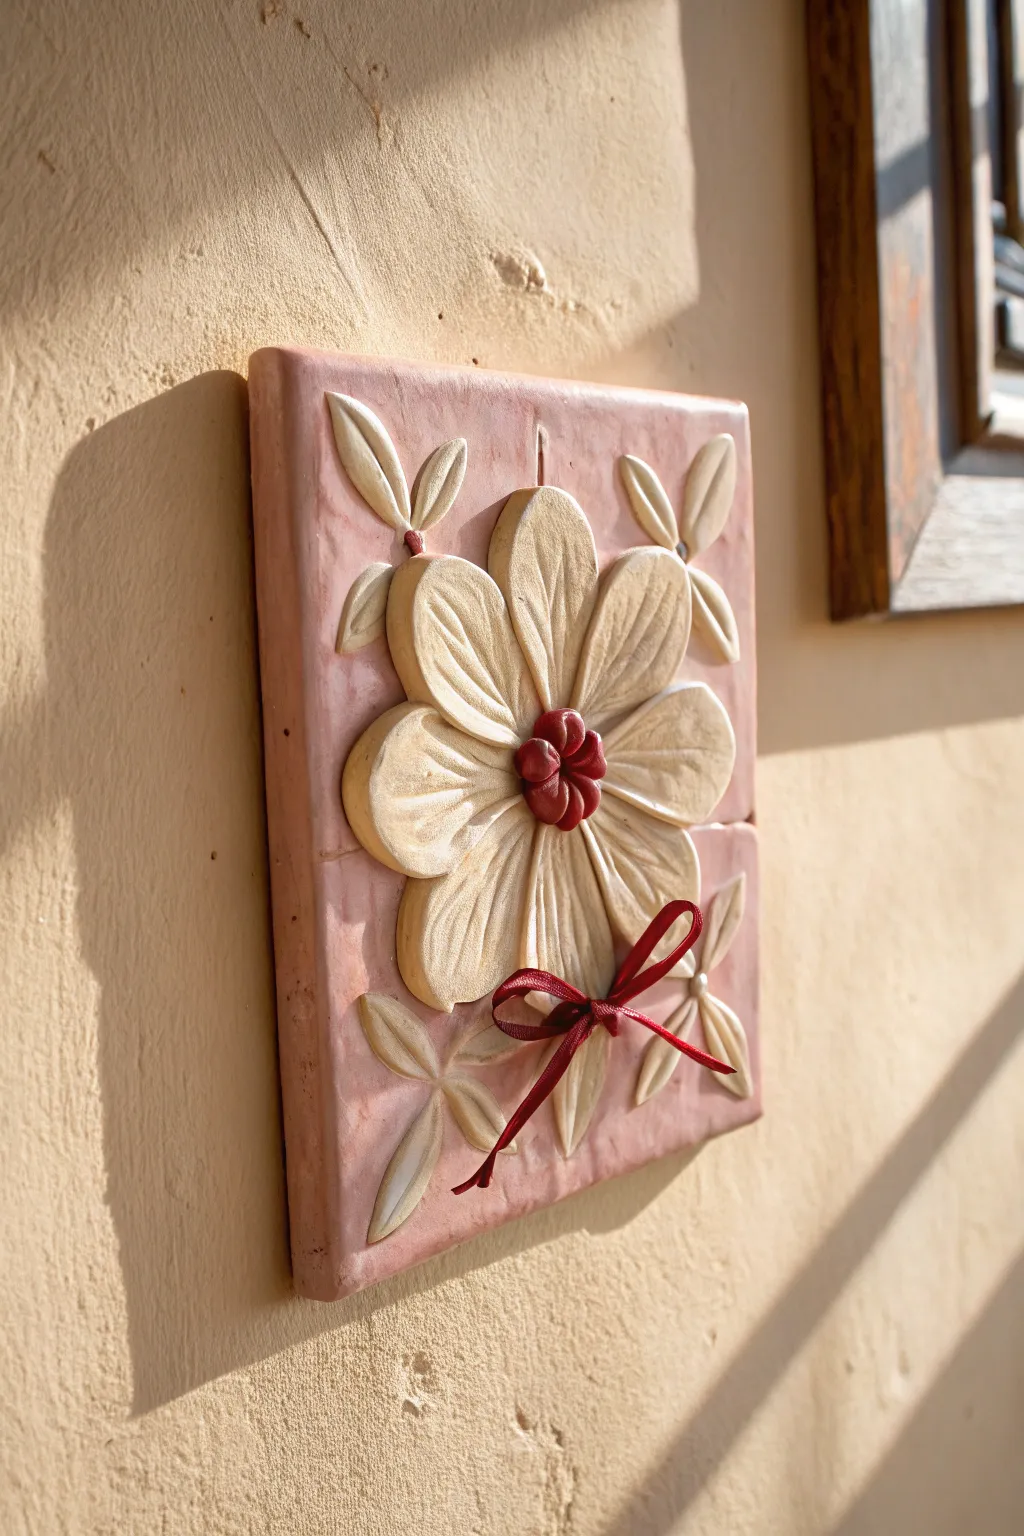
Capture the delicate charm of cottagecore aesthetics with this handmade relief tile, featuring a prominent cream daisy on a soft rose background. The addition of a dainty red ribbon bow brings that essential coquette flair to your wall decor.
Detailed Instructions
Materials
- Air-dry clay or polymer clay (white and pink)
- Rolling pin
- Square clay cutter or craft knife
- Sculpting tools (needle tool, ball stylus)
- Acrylic paints (cream/off-white, dusty rose, deep red)
- Red satin ribbon (1/8 inch width)
- Gloss or satin varnish (optional)
- Strong craft glue
- Sandpaper (fine grit)
- Water and brush (for smoothing)
Step 1: Base Preparation
-
Mix the Base Color:
Start by conditioning your clay. If using polymer, mix white with a tiny amount of red or pink to achieve a marbled, soft dusty rose color. If using air-dry clay, you can either tint it now or paint the background later, though tinting the clay gives a nice depth. -
Roll the Slab:
Roll out a thick slab of your pink-toned clay, approximately 1/4 to 1/2 inch thick. You want it substantial enough to hang on a wall without warping. -
Cut the Square:
Using a square cutter or a ruler and craft knife, cut a clean square shape. Smooth the edges with a bit of water (for air-dry) or baby oil (for polymer) to soften any sharp corners.
Step 2: Sculpting the Floral Relief
-
Form the Petals:
Switch to plain cream or off-white clay. Roll six equal-sized balls, then flatten and pinch them into elongated teardrop shapes to form the main daisy petals. -
Arrange the Flower:
Place the petals in a circle in the center of your square tile. Press them down gently to adhere, overlapping them slightly where they meet in the middle to create volume. -
Texturing Petals:
Use a needle tool or a dull knife to score three deep lines down the length of each petal. This mimic the veining of a real daisy and adds that lovely handcrafted texture. -
Create the Center:
Roll five tiny balls of clay. Arrange four in a tight circle in the center of the petals, and place the fifth one right on top. Press them down to bond. -
Color the Center:
If using polymer clay, these center balls should be a deep red. If using air-dry, sculpt them in white now; we will paint them deep red later. -
Add Corner Leaves:
Create smaller, narrower teardrop shapes for the leaves. Arrange clusters of two or three leaves in the corners of the tile, radiating outward from the center flower. -
Detail the Leaves:
Just like the petals, score a central vein down each small leaf using your needle tool to tie the design together. -
Create Hanging Hole:
Using a straw or a slightly larger tool, punch a hole or carve a notch in the back (or top center) for hanging later.
Clay Texture Tip
For a rustic look, don’t smooth the clay perfectly. Let fingerprints or slight unevenness remain to mimic vintage terracotta.
Step 3: Finishing Touches
-
Drying or Baking:
If using polymer clay, bake according to package instructions. If using air-dry clay, let it dry for 24-48 hours until fully hard and white. -
Painting (Air-Dary Only):
If you used plain white air-dry clay, now is the time to paint. Paint the background square a dusty rose, the petals a warm cream, and the center cluster a deep berry red. I like to dry brush a little white over the pink background to give it that chalky, vintage look. -
Varnishing:
Apply a coat of satin or matte varnish to seal your work. This creates a uniform finish and protects the surface dust. -
The Ribbon:
Take your thin red satin ribbon and tie a very small, tight bow. Trim the tails so they are proportionate to the flower petals. -
Attachment:
Using a dab of strong craft glue, attach the ribbon to the bottom right side of the flower, positioned casually over a petal as if it fell there.
Make it a Set
Create a trio of tiles! Make two more squares featuring just the leaf patterns or smaller buds to hang on either side.
Hang your charming new relief tile in a sunny spot to let the shadows highlight the lovely textures you created
Dessert-Inspired Jewelry Box Drawer
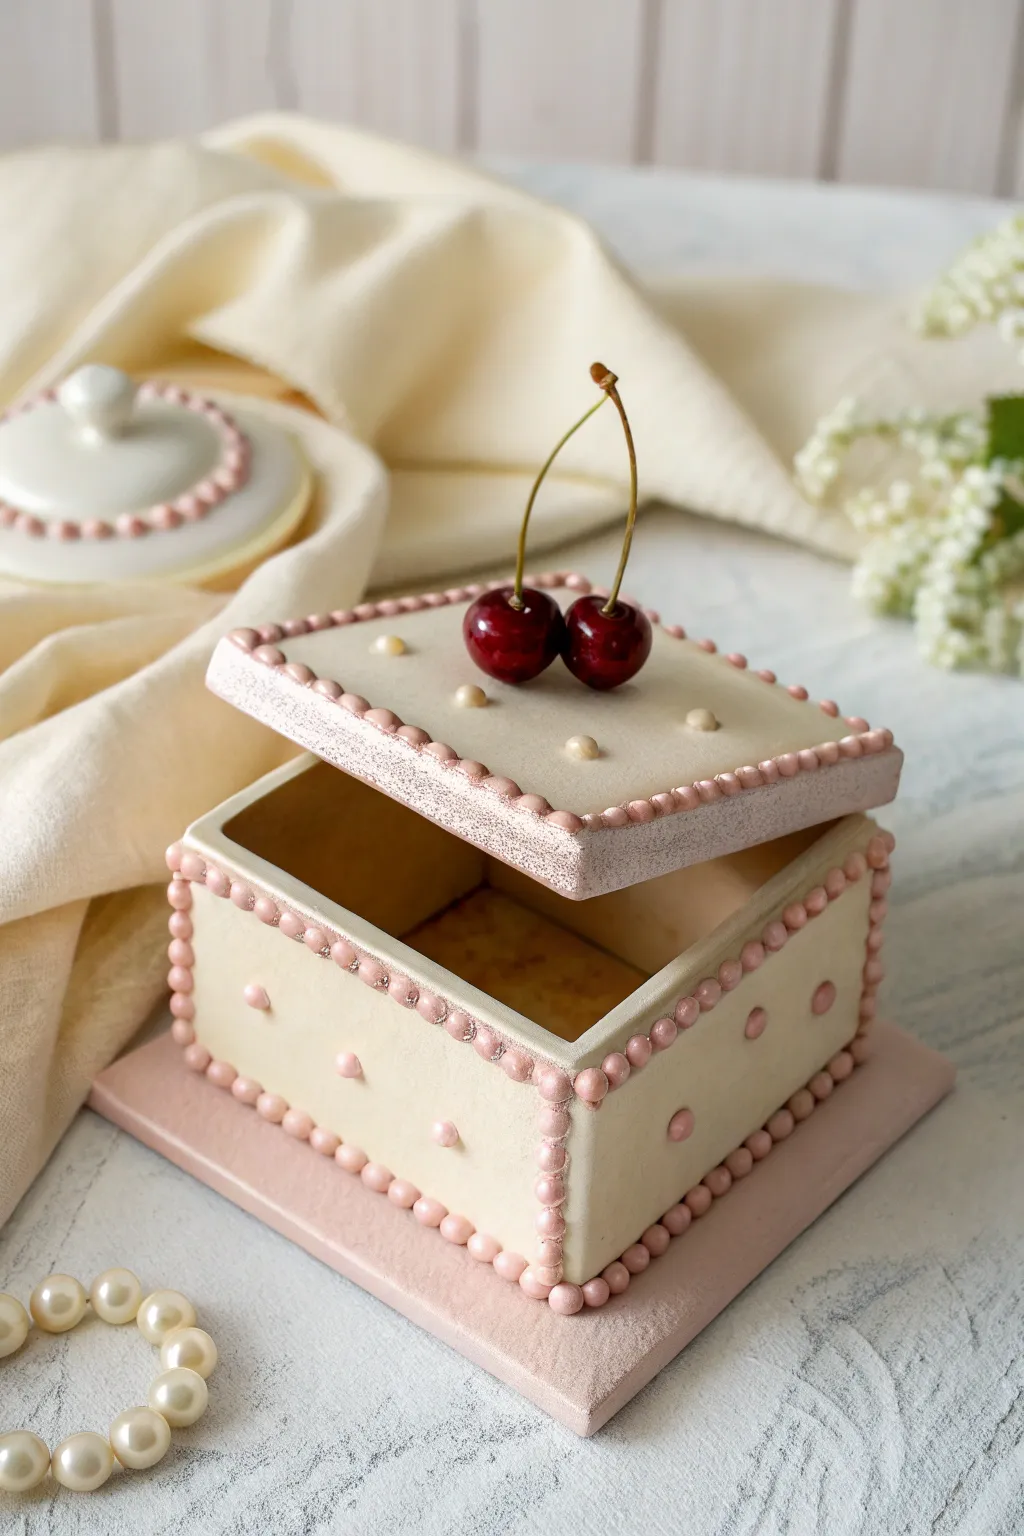
Transform simple clay slabs into this darling vintage-style jewelry box that looks good enough to eat. With its delicate piped borders, pearl accents, and realistic cherry toppers, this piece perfectly captures the sweet and feminine coquette aesthetic.
Step-by-Step Tutorial
Materials
- White or cream polymer clay (approx. 4 blocks)
- Translucent liquid clay
- Soft pink pastel chalk or mica powder
- Pink polymer clay (for piping)
- Red and green polymer clay (for cherries)
- Glossy glaze or UV resin
- Clay blade or craft knife
- Acrylic rolling pin
- Square cookie cutter or template (approx. 3-4 inches)
- Texture sponge or toothbrush
- Needle tool
- Small ball tool
- Baking tile or parchment paper
Step 1: Constructing the Box Base
-
Prepare the Clay:
Condition the white or cream clay thoroughly until it’s pliable. Roll it out into an even slab, approximately 1/4 inch thick. I find using depth guides helps keep the thickness uniform for a sturdy box. -
Cut the Panels:
Using a square cutter or a paper template, cut out five identical squares: one for the base and four for the walls. Cut a slightly larger square for the lid to ensure it sits nicely on top. -
Texture the Surface:
Gently embrace the cake aesthetic by pressing a texture sponge or a clean toothbrush over the exterior surfaces of your cut clay panels. This mimics the porous look of fondant or sponge cake. -
Assemble the Walls:
Apply a thin line of liquid clay or ‘bake and bond’ to the edges of your base square. Place the four wall panels onto the base, joining them at the corners. Use a tool to smooth the interior seams so they are invisible. -
Reinforce and Pre-Bake:
If your clay is soft, you might want to bake this base structure now for 15-20 minutes to harden it before decorating. This prevents the box from sagging while you add details.
Step 2: Adding the Cake Decor
-
Mix the Picing:
Create a ‘piping’ mixture by chopping pink clay into tiny bits and mixing it with liquid clay until it reaches a whipped cream consistency. Alternatively, roll huge numbers of tiny pink clay spheres for a beaded look like the image. -
Apply the Beaded Borders:
Roll tiny spheres of soft pink clay. Place them one by one along every outer edge of the box and the rim of the lid. Gently press them down so they adhere but keep their round shape. -
Dust with Shimmer:
Using a soft brush, gently dust the beaded pink borders with a pearlescent mica powder or shaved pink pastel chalk to give it that sugary, vintage shimmer seen in the photo. -
Create the Side Details:
Add small, flattened dots of pink clay to the sides of the box in a polka-dot pattern. Press a small pearl or a tiny ball of white clay into the center of the lid for extra elegance.
Sagging Walls?
If your box walls bow inward while working, cut a square of cardboard or crumpled foil to place inside as a support structure during the baking process.
Step 3: The Cherry on Top
-
Shape the Fruit:
Roll two balls of dark red clay. Use a needle tool to create a small indentation at the top for the stem and the bottom for realism. Keep them slightly imperfect for a natural look. -
Form the Stems:
Roll out very thin snakes of green or brown clay. Ideally, bake these thin stems on a piece of glass for 10 minutes first so they are rigid and easier to insert into the raw cherries. -
Mount the Cherries:
Apply a dab of liquid clay to the center of the lid. Press your two red cherries into the lid so they stick firmly. Insert your pre-baked stems into the top indentations. -
Final Bake:
Bake the entire assembled project according to your clay package instructions (usually 275°F/135°C for 30 minutes). Let it cool completely in the oven to prevent cracking. -
Glaze:
Once cool, brush a coat of glossy glaze or UV resin specifically onto the cherries to make them look juicy and candied. Leave the box matte to maintain the ‘cake’ texture.
Level Up: Scented Clay
Mix a drop of vanilla or cherry fragrance oil into the clay before sculpting. Your jewelry box will smell like a real bakery treat every time you open it!
Place this beauty on your vanity to hold your favorite rings and enjoy the sweet charm it adds to your room.
Lace-Imprint Coaster Set
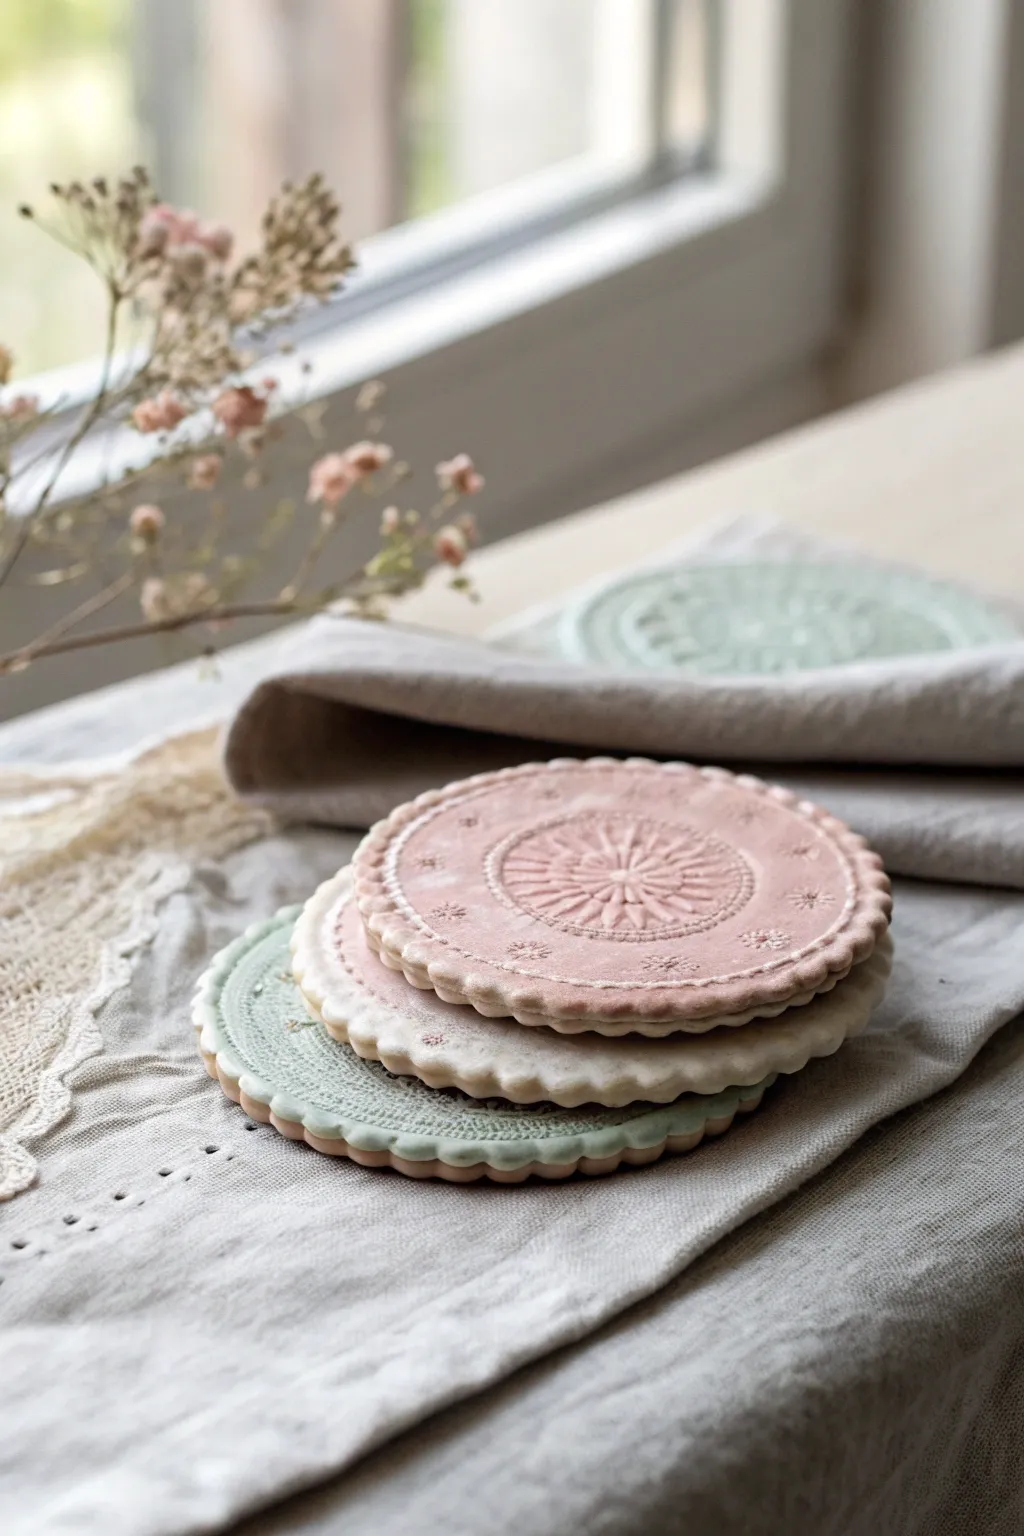
Capture the delicate charm of antique textiles with these lovely, lace-imprinted clay coasters. Their scalloped edges and muted pastel tones create a soft, romantic ‘coquette’ aesthetic perfect for protecting your surfaces in style.
Step-by-Step
Materials
- White air-dry clay or polymer clay
- Rolling pin
- Vintage lace doilies or textured silicone molds
- Round cookie cutter (approx. 4 inches)
- Small scalloped cookie cutter or modeling tool
- Fine-grit sandpaper
- Acrylic paints (pastel pink, sage green, cream)
- Matte sealant or varnish
- Sponge or foam brush
- Parchment paper or non-stick mat
Step 1: Clay Preparation & Imprinting
-
Condition the Clay:
Begin by kneading your white clay until it is soft, pliable, and free of cracks. If using air-dry clay, keep your hands slightly moist to prevent it from drying out too quickly. -
Roll out the Slab:
Place the clay on a sheet of parchment paper. Use your rolling pin to flatten the clay into an even slab, aiming for a consistent thickness of about 1/4 inch. -
Apply the Texture:
Gently lay your lace doily or textured mat over the rolled clay. I find that lightly dusting the lace with cornstarch beforehand helps prevent sticking. -
Impress the Pattern:
Roll over the lace firmly with your rolling pin to embed the design deep into the clay surface. Ensure you press hard enough to capture the fine details. -
Reveal the Design:
Carefully peel back the lace to reveal the embossed pattern underneath. Do this slowly to avoid distorting the clay.
Clean Imprints Only
If your clay is sticky, place a sheet of cling film over the clay *before* cutting your circle. The cutter will press through the plastic, leaving a perfectly rounded, soft edge.
Step 2: Cutting & Shaping
-
Cut the Circle:
Position your large round cookie cutter over the most attractive part of the pattern. Press down firmly to cut out the coaster shape. -
Remove Excess:
Peel away the excess scrap clay from around the circle. You can ball this up to reuse for the next coaster. -
Create Scalloped Edges:
To mimic the crimped edge seen in the photo, use a small scalloped cutter or the side of a modeling tool. Press gently around the rim of the coaster to create evenly spaced indentations. -
Smooth the Rims:
Dip your finger in a little water and run it lightly along the edge to smooth out any harsh cuts or burrs from the shaping process. -
Dry Completely:
Allow the coasters to dry fully according to your clay’s instructions. Air-dry clay usually takes 24-48 hours. Turning them over halfway through helps them dry flat.
Step 3: Refining & Finishing
-
Sand Imperfections:
Once fully cured, use fine-grit sandpaper to gently buff the edges and any rough spots on the surface. Wipe away the dust with a barely damp cloth. -
Mix Pastel Washes:
Prepare your acrylic paints by mixing them with a small amount of water. You want a semi-transparent wash rather than thick, opaque coverage to let the texture shine. -
Apply Base Color:
Using a sponge or foam brush, dab the paint wash over the coaster. Work the color into the crevices of the lace pattern. -
Highlight the Texture:
While the paint is still wet, use a clean cloth to gently wipe the surface. This leaves darker pigment in the deep impressions and lighter color on the raised areas, enhancing the 3D effect. -
Seal the Project:
Finish by applying two thin coats of matte sealant. This is crucial to protect the clay from moisture, especially since these will be used as coasters.
Gilded Edges
For a touch of elegance, use a small brush to apply liquid gold leaf or metallic wax just to the scalloped rim of the finished coaster. It adds a beautiful vintage shine.
Enjoy your beautiful new set of handmade coasters with your next cup of tea
Bow Garland Wall Hangers
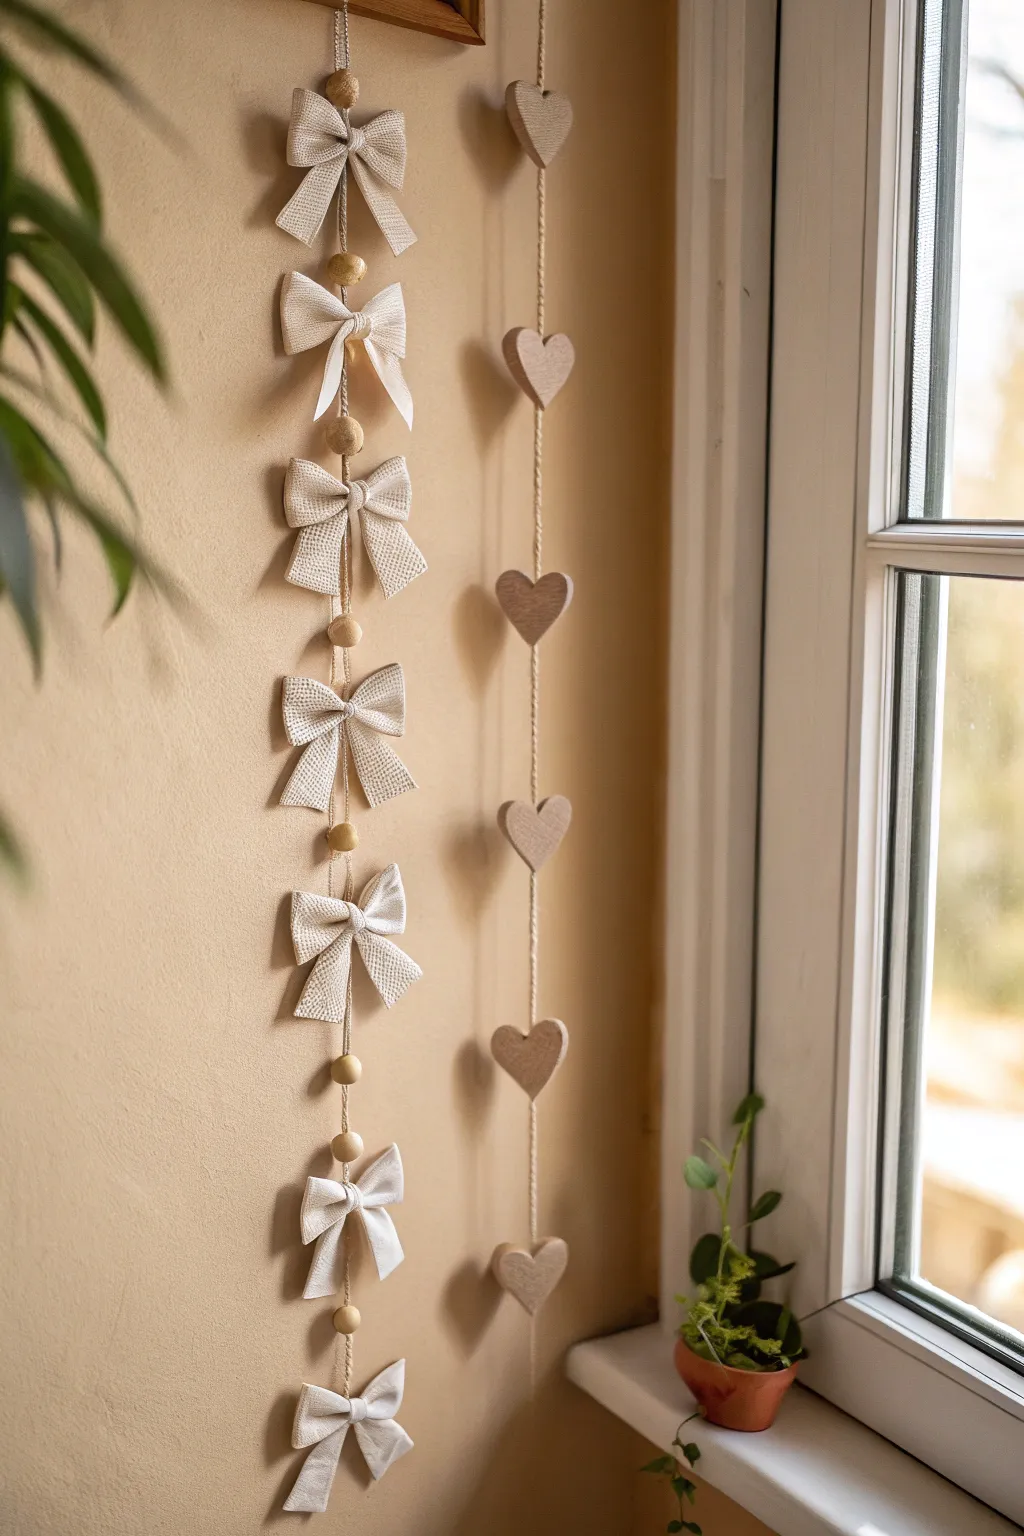
Embrace the coquette aesthetic with this charming, vertically-hanging garland that combines textured clay bows and smooth wooden hearts. The neutral cream palette and natural twine make it a perfect calming accent for any cozy corner or window frame.
Step-by-Step Guide
Materials
- Air-dry clay (white or cream)
- Rolling pin
- Textured fabric (like linen or burlap) for impressing
- Bow cookie cutter or craft knife
- Heart cookie cutter (small/medium)
- Wooden beads (natural finish, approx 10-12mm)
- Jute twine or clear fishing line
- Large needle or toothpick
- Sandpaper (fine grit)
- Strong craft glue (optional)
- Matte sealant spray
Step 1: Shaping the Clay Elements
-
Condition the clay:
Begin by taking a generous chunk of air-dry clay and kneading it in your hands until it’s warm, pliable, and free of cracks. -
Roll out the slab:
On a smooth surface, roll the clay out to a consistent thickness of about 1/4 inch. Try to keep it as even as possible for a professional finish. -
Add texture to the bows:
Before cutting, lay your piece of textured fabric (linen works beautifully here) over the clay slab and roll over it firmly one last time to imprint the weave pattern. -
Cut out the shapes:
Using a bow-shaped cutter (or a template and craft knife), cut out 6-7 textured bows. Then, roll a fresh, smooth slab for the hearts and cut out 5-6 heart shapes. -
Refine the edges:
Dip your finger in a little water and gently smooth the raw edges of your cut shapes to remove any burrs or sharpness. -
Detail the bows:
To make the bows look tied, use a modeling tool or the back of a knife to gently press an indentation in the center ‘knot’ and add slight creases to the ribbon tails. -
Create hanging holes:
Using a toothpick or a large needle, poke a vertical hole straight through the center of every piece. For the bows, go through the knot; for hearts, go from the top dip to the bottom point. Double-check that the hole is wide enough for your twine. -
Dry consistently:
Place all your clay pieces on a wire rack or parchment paper. Let them dry for 24-48 hours, flipping them occasionally to ensure they dry flat.
Bows sliding down?
If knots aren’t holding the heavy clay pieces, add a tiny dab of hot glue inside the hole where the twine passes through to freeze them in place.
Step 2: Assembly and Hanging
-
Safety sand:
Once fully dry, lightly sand any rough spots on the backs or edges of your pieces, being careful not to sand away the fabric texture on the front of the bows. -
Seal the refined pieces:
Apply a light coat of matte sealant spray to protect the clay from humidity and dust, then allow it to dry completely. -
Prepare the main line:
Cut a length of jute twine about 1.5 times the desired length of your finished garland. Tie a secure loop at the very top for hanging. -
Thread the first bead:
Thread your twine onto a large needle. Slide one wooden bead up to the top loop and knot the twine directly underneath it to hold it in place. -
Attach the first bow:
Thread the twine through your first clay bow. I find tying a discreet knot underneath the bow helps keep it from sliding down later. -
Create spacing:
Measure about 2-3 inches of space, tie a knot to act as a stopper, and thread another wooden bead. -
Add the next element:
Thread the next clay piece (either another bow or a heart, depending on which strand you are making) and secure it with a knot underneath. -
Repeat the pattern:
Continue alternating beads, spaces, and clay shapes until you reach the bottom of your garland. -
Finish the end:
Tie a final double knot at the very bottom of the last piece or bead, trim the excess twine neatly, and your garland is ready to hang.
Clean holes
Make the holes slightly larger than you think you need. Clay shrinks as it dries, and a tight hole makes threading heavy twine frustrating later.
Hang your new handcrafted creation near a light source to see that lovely fabric texture catch the shadows