If you’ve ever wanted to make an abstract clay sculpture but didn’t know where to start, I’ve got you. These ideas lean into organic forms, simple silhouettes, and that satisfying mix of “I know what it is” and “I can’t stop looking at it.”
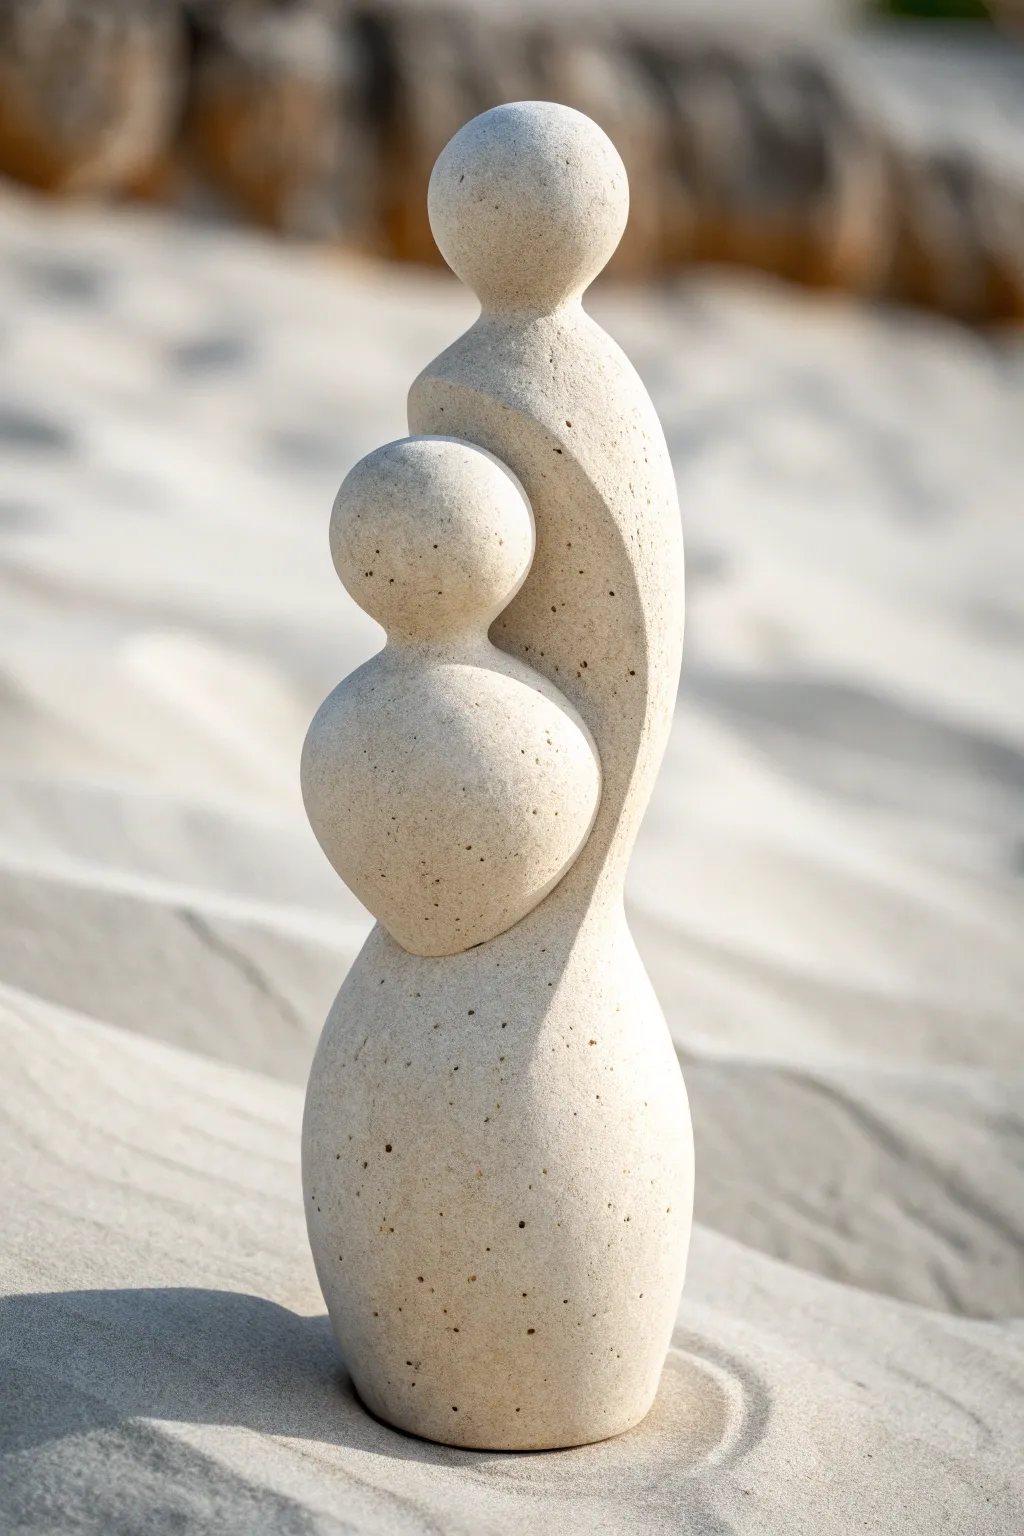
Minimal Couple Embrace
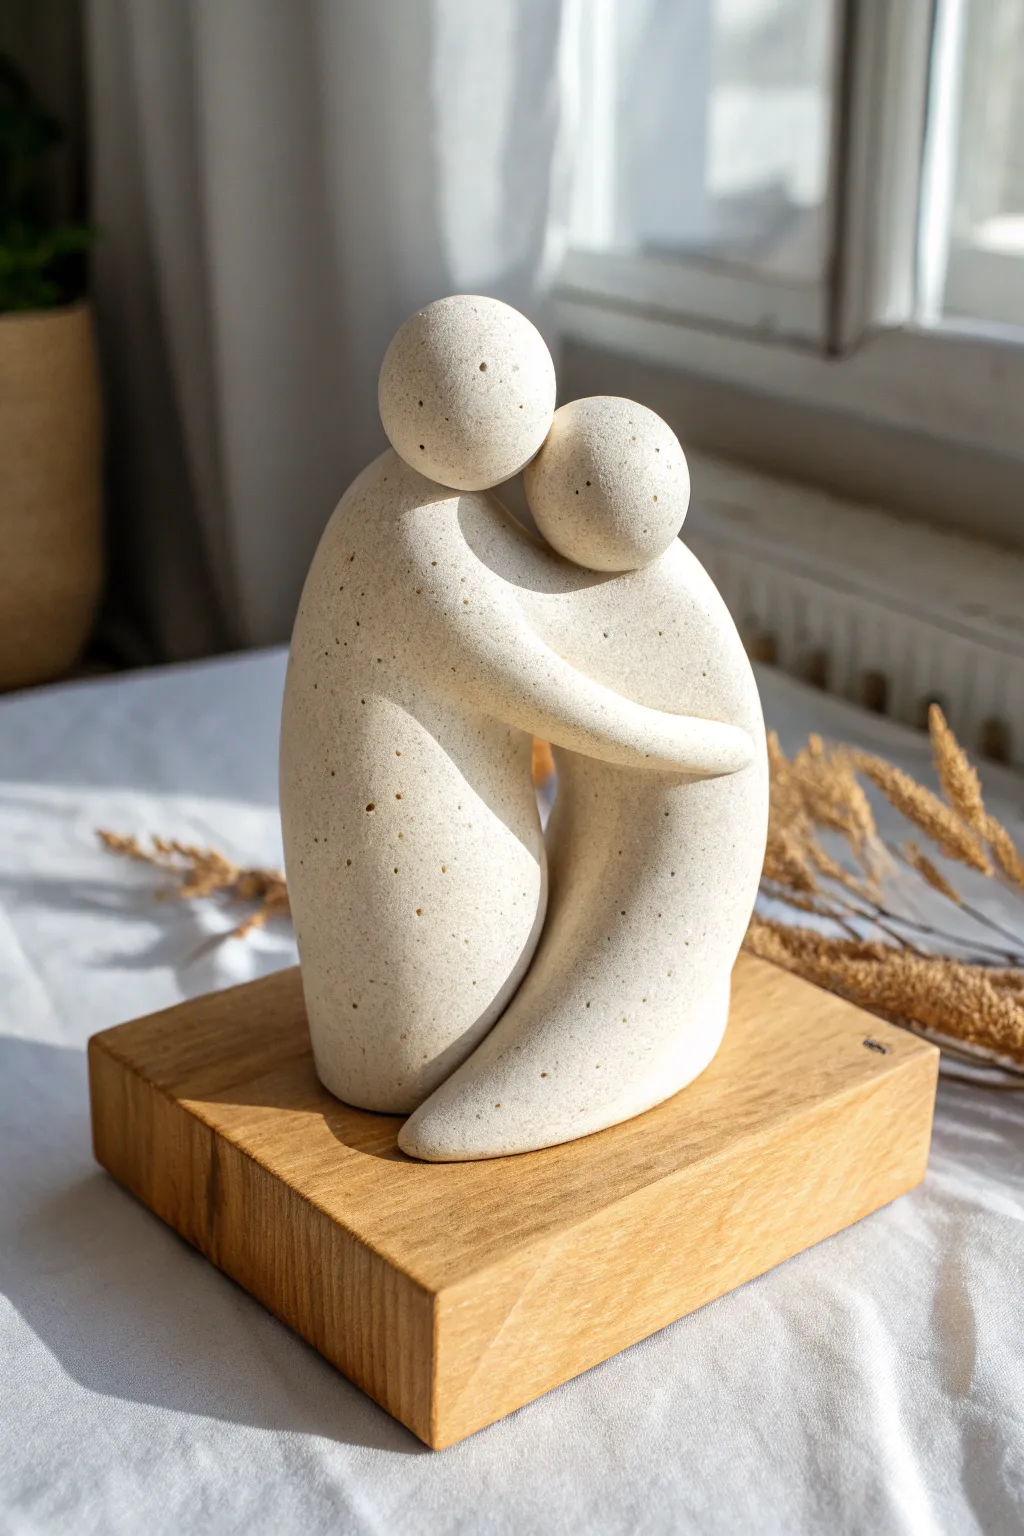
Capture the essence of connection with this elegant, abstract sculpture featuring two figures in a gentle hug. The speckled stone finish and smooth curves create a timeless look that pairs perfectly with a warm wooden base.
Step-by-Step Tutorial
Materials
- White polymer clay (approx. 1 lb)
- Speckled clay inclusions (ground black pepper or faux granite powder)
- Alternatively: Pre-mixed ‘Granite’ or ‘Stone’ effect polymer clay
- Wooden block base (approx. 4×4 inches)
- Strong craft adhesive (E6000 or similar)
- Aluminum foil (for armatures)
- Sculpting tools (smooth rib tool, needle tool)
- Fine-grit sandpaper (400 and 600 grit)
- Matte spray sealant (optional)
- Rolling pin
Step 1: Preparing the Clay
-
Condition the clay:
Begin by warming the polymer clay in your hands, kneading it until it is soft and pliable. If you are using plain white clay, now is the time to knead in your speckling agent—ground black pepper works surprisingly well for an organic stone look. -
Form the core shapes:
Divide your clay into two main portions, one slightly larger than the other. These will become the two figures. -
Shape the torsos:
Roll both portions into thick, elongated teardrop shapes. The bottom of the teardrop should be wider to form the base of the body, tapering gently upwards toward where the head will attach.
Natural Speckles
Mix varying sizes of black pepper and even some dried tea leaves into white clay. This mimics the erratic pattern of real granite better than uniform glitter.
Step 2: Structuring the Embrace
-
Curve the bodies:
Take the larger figure and gently bend the top third slightly forward. Do the same for the smaller figure, creating opposing curves so they will nestle together naturally. -
Create the heads:
Roll two spheres of clay for the heads. The larger figure should have a slightly larger sphere. Ensure these are perfectly round and smooth. -
Attach the heads:
Score the top of the tapered torsos and the bottom of the heads. Press them firmly together, blending the clay at the neck seam slightly so it’s secure but maintains a distinct spherical shape. -
Position the figures:
Stand the figures up on your work surface. Press them together so their torsos touch. The smaller figure should be slightly tucked under the curve of the larger one to establish intimacy.
Step 3: Refining the Hug
-
Form the arms:
Roll out a long snake of clay for the arms. It should be thinner than the torso but substantial enough to look balanced. Cut two lengths tailored to reach around the partner’s back. -
Attach the right arm:
Attach one arm strip to the larger figure’s shoulder area. Wrap it gently around the smaller figure’s back so it looks like a seamless extension of the body. -
Attach the left arm:
Repeat with the second arm on the other side, wrapping it from the smaller figure around the larger one. Seamless blending is key here; use your thumb to smooth the clay where the arm meets the shoulder until no seam is visible. -
Blend the bottom:
At the base where the two figures meet, smooth the clay together so they appear to merge into a single unit at the very bottom. This adds stability and reinforcing the abstract concept. -
Final smoothing:
Dip your finger in a little clay softener or baby oil. Gently rub the entire surface to remove fingerprints and ensure perfectly smooth, stone-like curves.
Sagging Clay?
If the figures start to droop while sculpting, create a core using crumpled aluminum foil. Cover the foil with clay—this adds strength and reduces baking time.
Step 4: Baking and Assembly
-
Bake the sculpture:
Place the sculpture on a ceramic tile or baking sheet. Bake according to your clay manufacturer’s specific time and temperature instructions (usually 275°F for 15-30 minutes per 1/4 inch thickness). -
Cool down:
Allow the sculpture to cool completely in the oven. Removing it while hot can cause cracking or slumping. -
Sanding for texture:
Once cool, lightly sand the surface with wet 400-grit sandpaper, followed by 600-grit. This removes any final imperfections and gives the piece a professional, matte stone texture. -
Seal the piece:
Spray with a light coat of matte sealant if desired to protect the finish, though leaving the raw sanded clay often looks more like natural stone. -
Prepare the base:
Sand your wooden block until smooth. I usually wipe it down with a damp cloth to remove dust before the next step. -
Mount the sculpture:
Apply a generous dab of strong adhesive (like E6000) to the bottom of your clay sculpture and press it firmly onto the center of the wooden block. Let it cure for 24 hours.
Now you have a touching piece of modern art that captures a quiet moment of affection


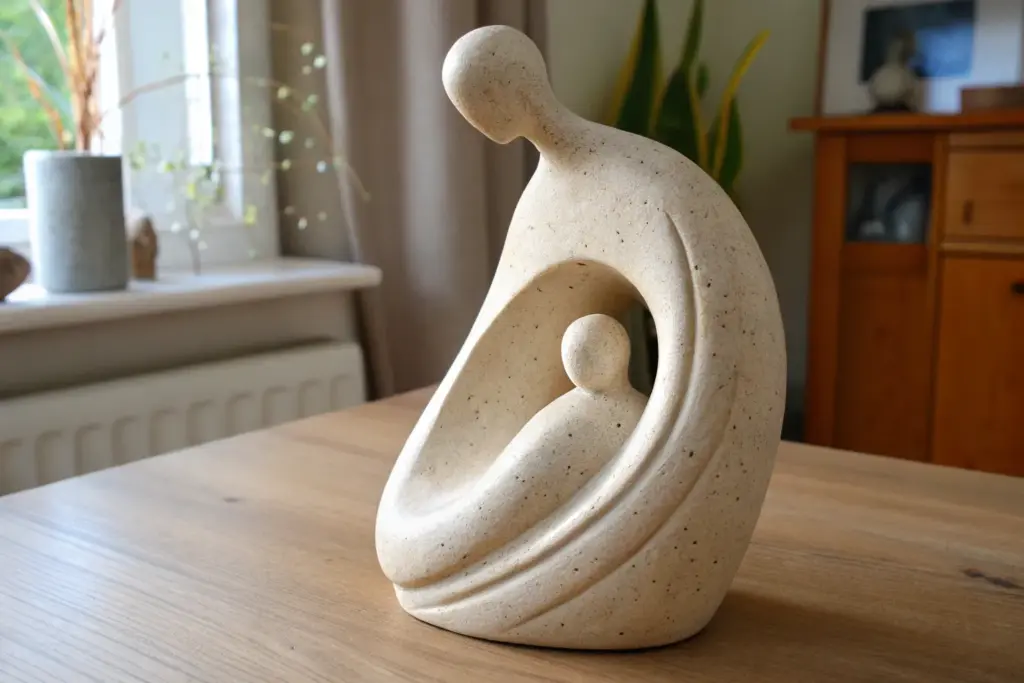
Stacked Family Silhouette
Capture the tender connection of family with this abstract silhouette sculpture that mimics the look of carved sandstone. Though the organic, flowing lines may look complex, the stacked assembly method makes it surprisingly approachable for beginners.
Step-by-Step
Materials
- White or speckled stoneware clay (groggy texture preferred)
- Pottery wire cutter
- Metal kidney scraper
- Wooden sculpting tools
- Loop tool
- Slip and scoring tool
- Sponge
- Spray bottle with water
- Sandpaper (fine grit, for post-firing)
- Matte white or stone-texture glaze (optional for finish)
- Faux stone spray paint (alternative finish for air-dry clay)
Step 1: Forming the Base Components
-
Prepare the Clay:
Begin by wedging your clay thoroughly to remove air bubbles. This is crucial for a thick sculpture like this to prevent cracking during firing. -
Shape the Main Pillar:
Roll a thick, tapered cylinder that will serve as the heavy base and the adult figure’s body. It should be widest at the bottom for stability and taper gently upward. -
Curve the Upper Torso:
Gently bend the top third of the cylinder forward slightly, creating the concave space where the smaller figure will nestle. Use your thumb to create a shallow, smooth depression in the front center. -
Create the Child’s Body:
Roll a medium-sized ball of clay into a teardrop shape for the child’s torso. Flatten the back of it slightly so it sits flush against the main pillar. -
Form the Heads:
Roll two perfect spheres of clay—one larger for the adult, one smaller for the child. Keep them round but not perfectly uniform to maintain an organic feel.
Stone Effect
Mix sand or fine grog directly into your clay body before sculpting. When you sponge it down later, the sand reveals itself for an authentic gritty texture.
Step 2: Assembly and Refining
-
Score and Slip:
Generously score the distinct contact points: where the child’s torso meets the main body, and where the heads will attach. Apply slip to these rough areas. -
Attach the Child Figure:
Press the teardrop shape firmly into the depression you made on the main pillar. I like to wiggle it slightly to ensure a tight bond and eliminate trapped air. -
Blend the Seams:
Using a wooden tool, drag clay from the child’s torso onto the main body at the contact points, then smooth over the join until it looks seamless. -
Mount the Heads:
Attach the larger sphere to the top of the main pillar and the smaller sphere to the top of the child’s torso. Ensure the adult’s head leans slightly forward, visually ‘protecting’ the smaller form. -
Establish the Embrace:
Add a thin, curved coil of clay extending from the adult’s shoulder area down around the child’s side to suggest an arm, if you want extra detail, or simply blend the main pillar forward to cup the smaller shape. -
Smooth the Surface:
Use a slightly damp sponge to wipe down the entire sculpture. This softens tool marks and enhances that weather-worn stone aesthetic.
Step 3: Texturing and Finishing
-
Create Stone Texture:
Take a coarse sponge or a stiff-bristled brush and gently stipple the surface of the clay while it is still leather-hard. This mimics the pitting found in natural sandstone. -
Add Speckling:
If your clay isn’t naturally groggy, you can flick a toothbrush with watered-down dark slip or iron oxide wash over the surface to create random tiny specks. -
Hollow Out (Optional but Recommended):
For large pieces intended for kiln firing, carefully hollow out the base and up into the torso from the bottom once the clay is leather hard to ensure even walls. -
Dry Slowly:
Cover the sculpture loosely with plastic and let it dry very slowly over several days. Sudden drying will cause the neck joints to crack. -
Bisque Fire:
Fire the piece to cone 04 (or according to your clay body’s instructions). -
Final Surface Treatment:
After firing, you can leave the raw clay if it has a nice stone color. Alternatively, apply a matte, stony white glaze or a dry brush of acrylics if you used air-dry clay.
Head Keep Falling Off?
If the neck is too thin to support the head, insert a short piece of toothpick or firm wire (for air-dry clay) or create a deep ‘lock and key’ joint for structural support.
Place your finished piece near a window where natural light can highlight the gentle curves and affectionate silhouette


Abstract Torso with Soft Cutouts
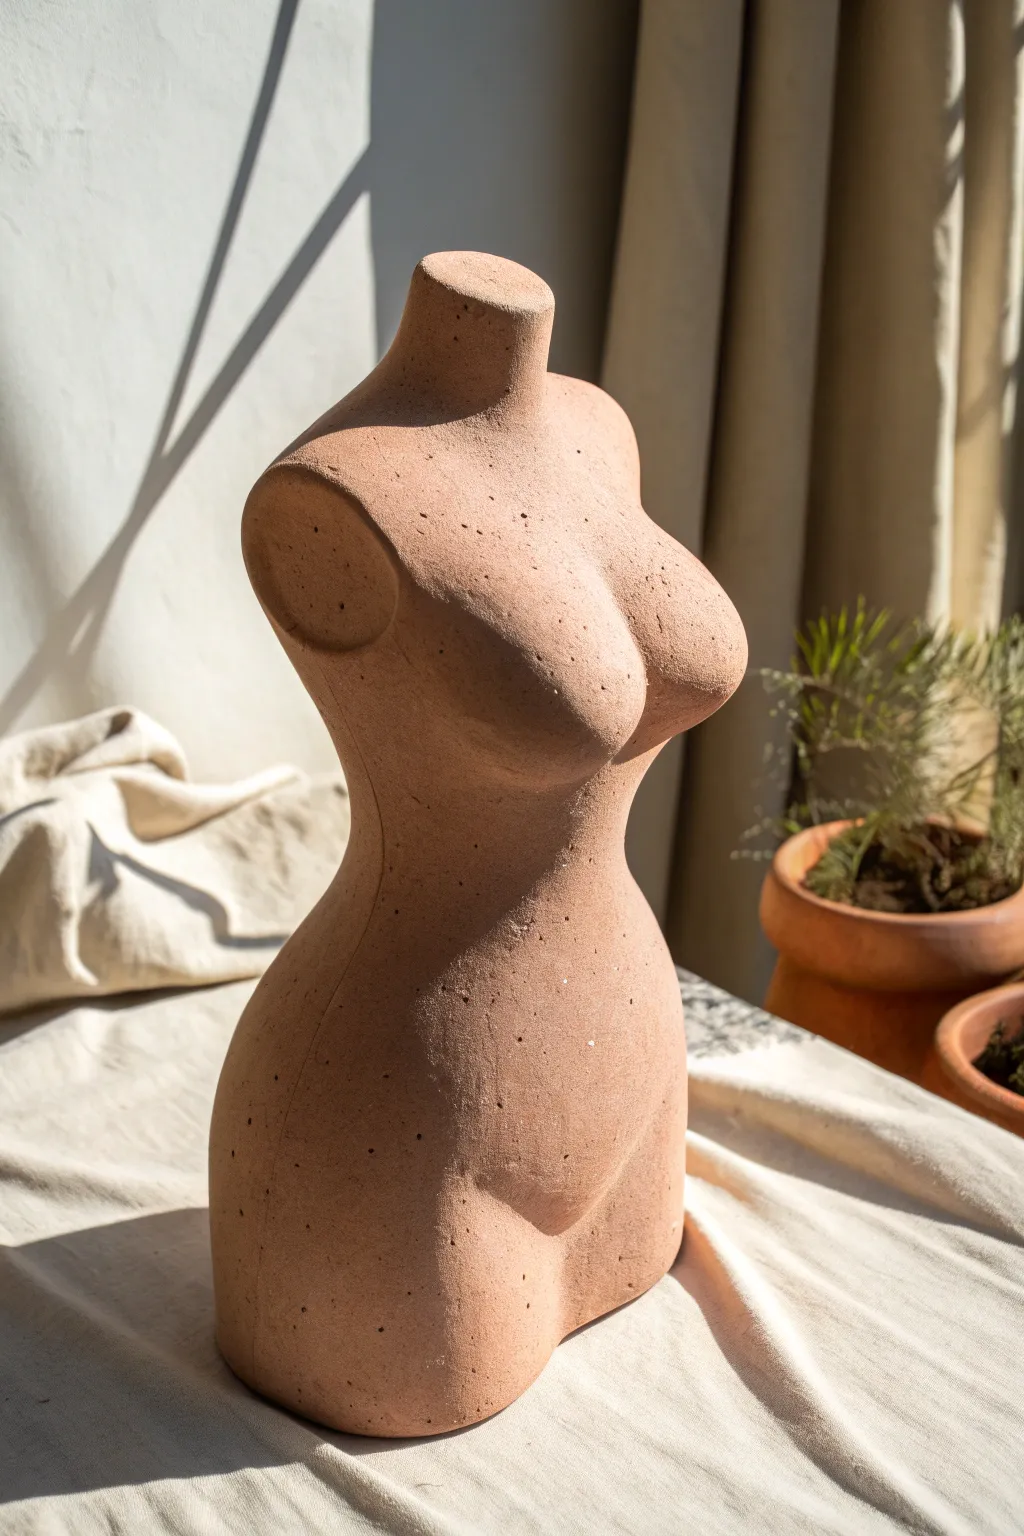
Capture the timeless elegance of the female form with this minimalist torso sculpture. The piece features a warm, earthy terracotta finish with a distinctive speckled texture that mimics the raw beauty of natural stone or weathered concrete.
Detailed Instructions
Materials
- Speckled terracotta air-dry clay (or polymer clay)
- Aluminum foil
- Masking tape
- Armature wire (heavy gauge)
- Wooden base (for working)
- Clay carving tools (loop tool, needle tool)
- Sponge
- Water bucket
- Fine-grit sandpaper
- Steel wool
Step 1: Building the Armature
-
Create the spine:
Begin by twisting a length of heavy-gauge armature wire to create a central spine. Anchor this firmly into your wooden working base so it stands upright without wobbling. -
Bulk out the form:
Crumple aluminum foil into tight balls and shapes. Pack these onto the wire to form the basic mass of the torso. You want to create a rough approximation of the hips, waist, and chest, keeping the foil quite dense. -
Secure the foil:
Wrap the aluminum foil form entirely in masking tape. This smooths out sharp crinkles and gives the clay a surface it can grip onto easily.
Keep it Slick
Use a tiny amount of baby oil on your fingertips during the final smoothing phase. It removes drag and creates a silky, stone-like polish without adding water.
Step 2: Sculpting the Form
-
Apply the base layer:
Condition your speckled clay until pliable. Flatten chunks of clay and press them firmly over the taped armature, ensuring a uniform thickness of about half an inch to create a strong foundation. -
Define the waist:
Add extra clay to the hip area and subtract slightly from the waist to accentuate the hourglass curve. Use your thumbs to blend the new clay into the base layer seamlessly. -
Build the chest:
Roll two equal spheres of clay for the chest. Press them onto the upper torso and blend the edges downward and outward, ensuring the transition looks organic rather than like two distinct attachments. -
Refine the neck and shoulders:
Build up the clay around the top to form the base of the neck and the shoulder slopes. Use a wire cutter to trim the top flat, creating that clean, abstract ‘cut’ look where the head would be. -
Shape the arm sockets:
Instead of building arms, create a smooth, flat oval surface where the shoulder joint would be. Use a modeling tool to slightly recess this area, giving it a definitive ‘statue’ boundary. -
Sculpt the lower finish:
Shape the bottom and thigh area. Depending on your preference, you can cut the thighs off bluntly or smooth them into a rounded, continuous base like the image shows.
Antique Wash
After drying, apply a diluted wash of white acrylic paint and quickly wipe it off. The white pigment settles into the tiny pores, mimicking aged plaster.
Step 3: Refining and Texturing
-
Smooth the surface:
Once the main forms are correct, take a slightly damp sponge and wipe down the entire sculpture. This blends small bumps and erases fingerprints. -
Check symmetry:
Turn your sculpture constantly. Look at it from directly above and all sides to ensure the curves are balanced, particularly around the hips and chest. -
Initial drying phase:
Let the sculpture sit until leather-hard (firm but still cool to the touch). This usually takes a few hours depending on humidity. -
Carve details:
With the clay firmer, use a loop tool to sharpen the definition of the clavicles or the vertical line of the spine if you want more anatomical detail. -
Enhance texturing:
If your clay isn’t naturally speckled enough, I like to take a stiff bristle brush and stipple the surface gently, or flick a little darker watered-down clay onto the surface for that gritty look. -
Dry completely:
Allow the piece to dry fully. For air-dry clay of this thickness, this might take 48-72 hours. Keep it away from direct heat to prevent cracking. -
Sand for finish:
Once bone dry, use fine-grit sandpaper to smooth any roughness. Follow up with steel wool to buff the surface; this really makes the terracotta color pop and brings out the natural speckles.
Place your finished torso near a window where the sunlight can highlight the beautiful, organic curves you have created


Single-Line Loop Form
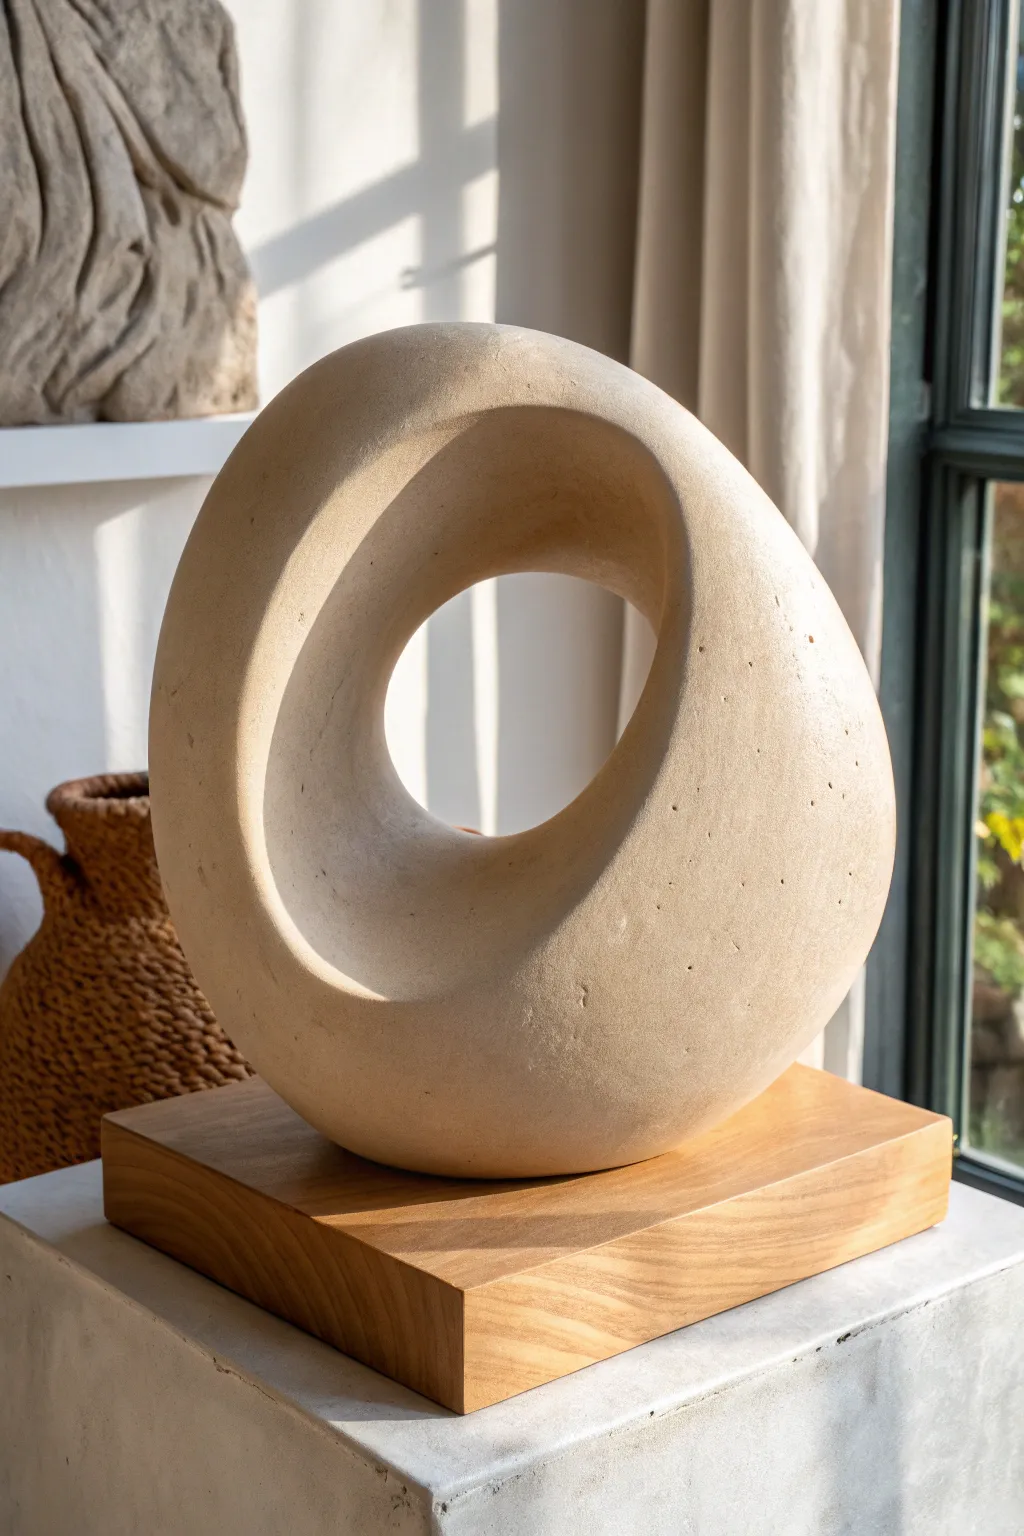
This striking, minimalist sculpture mimics the look of carved sandstone with a flowing, asymmetrical loop shape. The piece focuses on negative space and smooth, continuous curves that catch the light beautifully.
How-To Guide
Materials
- Stoneware clay (groggy or smooth, depending on preference)
- Wooden sculpting base or banding wheel
- Rolling pin
- Bubble wrap or newspaper
- Loop tool
- Flexible metal kidney rib
- Rubber kidney rib
- Sponge
- Needle tool
- Scoring tool (or serrated rib)
- Slip
- Wooden block for final display (optional)
Step 1: Building the Form
-
Prepare the workspace:
Set up your banding wheel and place a wooden board on top to work on. Wedge your clay thoroughly to remove air bubbles, aiming for a medium-soft consistency that holds its shape. -
Create the armatures:
Since this form is hollow and rounded, create two C-shaped cores using tightly bunched newspaper or bubble wrap. These will support the clay from the inside during the initial build. -
Roll slabs:
Roll out two thick slabs of clay, approximately 3/4 inch thick. These need to be substantial enough to support the sculpture’s height without buckling. -
Drape the clay:
Wrap your clay slabs around your paper armatures to create two curved tubes. Overlap the seams slightly, score, slip, and compress them well to seal the tubes. -
Join the tubes:
Stand the two curved tubes upright on their ends to form a rough circle or oval. Score and slip the connecting points heavily to ensure a strong bond. -
Shape the loop:
Gently paddle the clay with a wooden spoon or utilize your hands to refine the overall shape. Push the form so it isn’t a perfect circle; aim for that slightly asymmetrical, organic ‘pebble with a hole’ silhouette. -
Close the form:
Ensure all seams are completely smoothed over. If the shape starts to sag, let it stiffen slightly before proceeding.
Seamless Connections
When joining the two halves, add a thin coil of extra clay to the seam before smoothing. This prevents a depression from forming as the clay shrinks.
Step 2: Refining and Surfacing
-
Define the negative space:
When the clay is leather hard, use a loop tool to carve away excess bulk, specifically focusing on the inner window. The opening should feel fluid, gradually thinning towards the edges. -
Create the ridge lines:
Look closely at the reference image; there is a subtle, sharp ridge line that travels around the face of the sculpture. Use a metal rib to scrape the clay, defining this plane change rather than smoothing it completely round. -
Smooth the surface:
Switch to a rubber kidney rib. Run it over the large outer curves to remove tool marks, but maintain the subtle texture of the clay body. -
Adding texture:
To achieve the stone-like appearance, gently tap the surface with a stiff brush or a coarse sponge. I like to add a few tiny pinholes randomly with a needle tool to mimic natural porosity. -
Remove armature:
Once the piece is firm enough to hold its own weight without support, cut a small, hidden hole in the base and fish out the newspaper or bubble wrap. -
Final drying:
Allow the sculpture to dry very slowly under loose plastic to prevent uneven shrinkage or cracking, especially around the joined areas. -
Bisque fire:
Fire the piece to bisque temperature (usually cone 04-06) once it is bone dry. -
Surface finish:
To replicate the matte, natural look in the photo, apply a matte glaze or a simple oxide wash (like iron oxide reversed) and wipe it back. Alternatively, leave the raw clay if using a high-quality groggy stoneware. -
Display:
Once the final firing is complete, mount or sit the sculpture on a simple block of oak or pine to elevate the piece.
Stone Effects
Mix sand or fine grog directly into your clay body before sculpting. After the final firing, sand the surface lightly to expose the gritty texture.
The result is a timeless, meditative form that brings a sense of calm balance to your shelf

The Complete Guide to Pottery Troubleshooting
Uncover the most common ceramic mistakes—from cracking clay to failed glazes—and learn how to fix them fast.
Wave Fold Sculpture
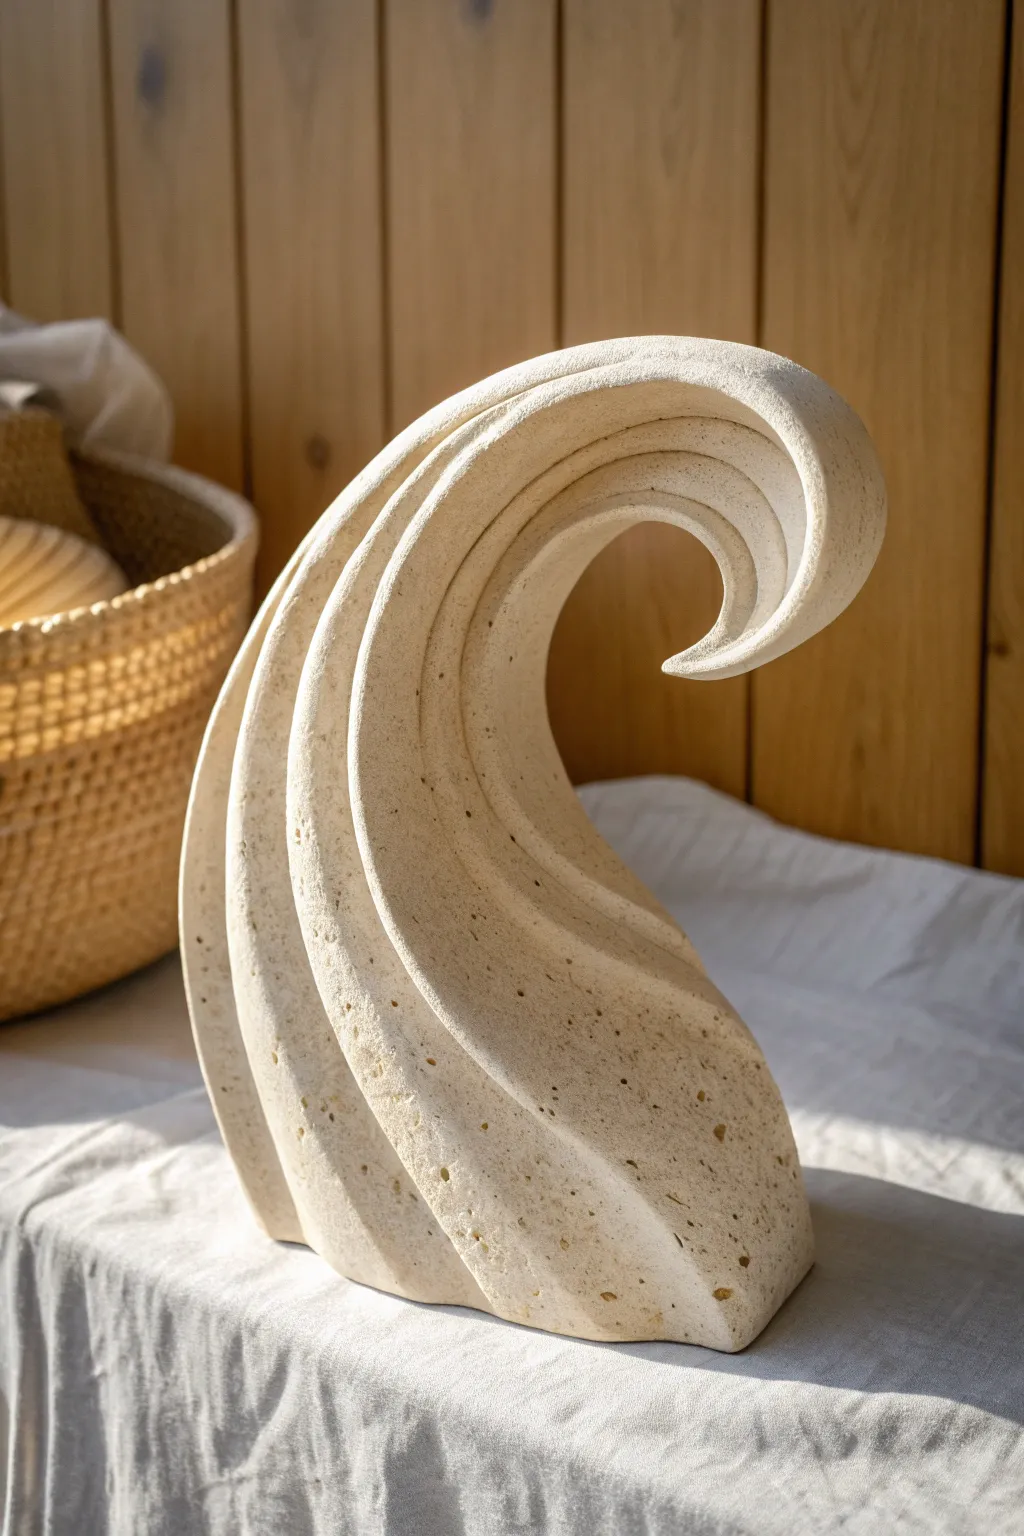
Capture the graceful energy of the ocean in solid form with this abstract wave sculpture. This project focuses on building distinct sweeping curves and achieving a convincing weathered stone texture using standard air-dry or polymer clay.
Detailed Instructions
Materials
- White or cream air-dry clay (approx. 2-3 lbs)
- Strong armature wire (medium gauge)
- Aluminum foil
- Sculpting loop tools
- Wire cutter
- Needle tool
- Coarse sandpaper (60-80 grit)
- Sea sponge or toothbrush
- Small pebbles or coarse salt (for texture impressing)
- Water spray bottle
Step 1: Building the Core
-
Form the skeleton:
Cut a length of armature wire about 16 inches long. Bend it into a large ‘C’ shape that loops back on itself at the top, mimicking the crest of a breaking wave. Bend the bottom few inches into horizontal loops to create a stable base. -
Create volume:
Crumple aluminum foil firmly around your wire armature. Pack it tightly to build the bulk of the shape, tapering it so it’s thicker at the bottom and thinner near the tip of the crest. -
Check the profile:
Before adding clay, look at your foil shape from all angles. The curve should be smooth and continuous, not jagged. If the foil feels loose, wrap it with masking tape to secure the form.
Cracking Up?
If hairline cracks appear while drying, don’t panic. Mix a small amount of fresh clay with water to make a paste (slip) and fill the cracks, then re-texture the area.
Step 2: Sculpting the Form
-
Apply the first layer:
Roll your clay into flat sheets about 1/4 inch thick. Wrap these sheets entirely around the foil core, pressing them firmly together to remove any trapped air pockets. -
Smooth the seams:
Dip your fingers in a little water and smooth out all the join lines where the clay sheets meet. The surface doesn’t need to be perfect yet, but the structure needs to be solid. -
Define the wave crest:
Add a bit more clay to the very tip of the wave to exaggerate the curl. Shape it into a sharp, tapering point that overhangs the ‘hollow’ of the wave. -
Mark the ridges:
Using a needle tool, lightly sketch 3 or 4 sweeping lines along the side of the sculpture. These lines should follow the curve of the spine, starting from the base and fanning out slightly as they reach the top.
Step 3: Refining and Texturing
-
Carve the channels:
Using a loop tool, carve out shallow valleys between the lines you sketched. In this step, I like to work slowly to keep the ridges sharp and prominent. -
Sharpen the edges:
Use a damp sponge or your fingers to smooth the valleys you just carved, but keep the peaks of the ridges relatively crisp. The contrast between the smooth channel and the sharp ridge creates that architectural look. -
Create stone texture:
Take a stiff toothbrush or a coarse sea sponge and stipple the entire surface. Press firmly to mar the perfect clay surface, giving it an organic, weathered feel. -
Add deep pitting:
To mimic the porous look of the reference image, press small pebbles, coarse salt crystals, or the end of a paintbrush into the clay randomly. Focus these deeper pits near the base and along the spine. -
Initial refinement:
Look for any areas that look too ‘manufactured’ or smooth. Break up those areas with more texture. The goal is for it to look like eroded limestone, not plastic.
Salt Texture Hack
If you pressed salt into the clay for texture, wait until the piece is fully dry, then brush with water to dissolve the salt. It leaves incredibly realistic, jagged mini-craters.
Step 4: Finishing Touches
-
Slow drying:
Let the sculpture dry slowly away from direct heat or sunlight. Cover it loosely with a plastic bag for the first 24 hours to prevent cracking, then uncover it to finish drying completely (usually 48-72 hours). -
Dry sanding:
Once bone dry, take your coarse sandpaper and sand the outer faces of the ridges. This will flatten them slightly and create a beautiful contrast with the rougher, textured valleys. -
Dust removal:
Use a large, soft brush to sweep away all the clay dust from the sanding process. Ensure the deep pits are clean. -
Optional wash:
If you want to enhance the shadows, mix a tiny drop of brown acrylic paint into a cup of water. Brush this wash over the sculpture and immediately wipe it off with a rag, leaving pigment only in the deep pores.
Place your finished wave near a window where the light can play across the textured ridges you created
Spiral Gesture Twist
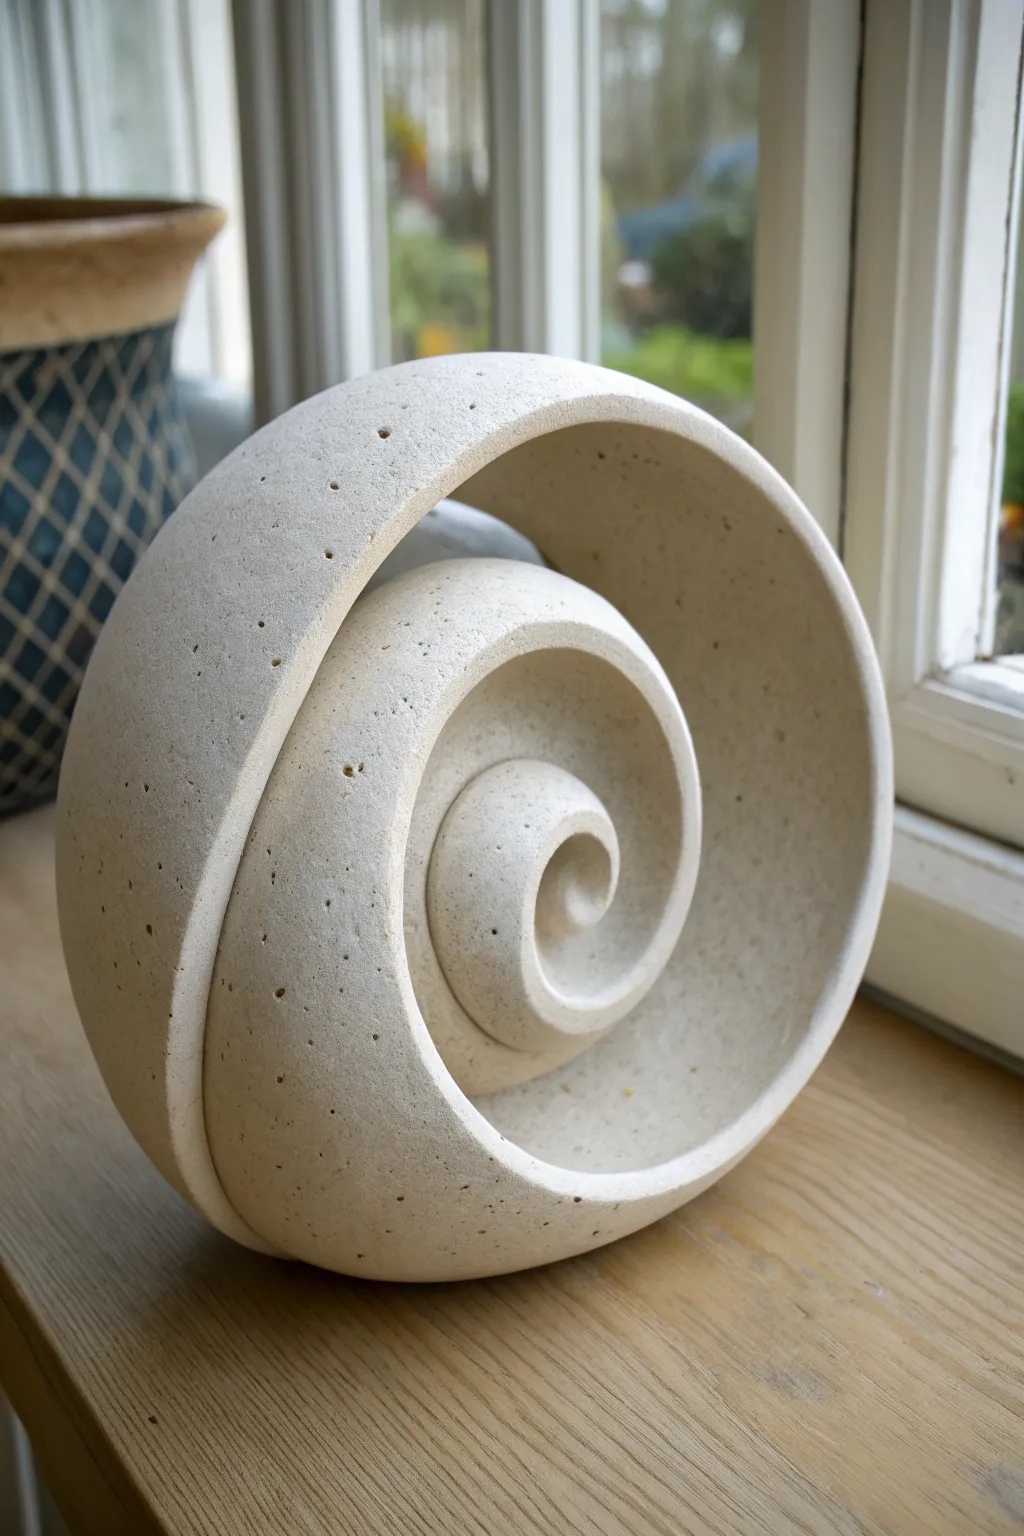
Embrace organic movement with this stunning, shell-like ceramic sculpture that features a continuous, inward-curving spiral. The textured, speckled finish gives it the appearance of carved sandstone, making it a perfect minimalist centerpiece for any windowsill.
Step-by-Step
Materials
- Speckled stoneware clay (with medium-to-coarse grog)
- Pottery wheel (optional, but recommended for the base form)
- Ribs (metal and wooden)
- Needle tool
- Sponge
- Wire cutter
- Rolling pin (if hand-building)
- Modeling tools
- Kiln
Step 1: Forming the Base
-
Prepare the clay:
Start by wedging about 3-4 pounds of speckled stoneware clay to remove any air bubbles. The grog in the clay is essential here, as it provides the structural integrity needed to hold the spiral shape against gravity. -
Throw a thick cylinder:
Center your clay on the wheel and open it up, but don’t pull the walls too thin. Aim for a distinctive, thick-walled shallow bowl or open cylinder shape. The walls should be at least 1/2 inch thick to allow for deep carving and shaping later. -
Alternative: Coil build:
If you don’t have a wheel, roll out thick coils (about 3/4 inch). Score and slip them to build a deep, heavy bowl shape, smoothing the inside and outside thoroughly so the joins disappear completely. -
Detailed shaping:
While the clay is still plastic but firming up, use a metal rib to smooth the exterior into a perfect curve. You want a rounded, semi-spherical bottom that will rest naturally on a table.
Step 2: Sculpting the Spiral
-
Mark the path:
Once the form is leather-hard (it should be firm to the touch but not chalky), set it on a banding wheel. Use your needle tool to lightly sketch the spiral path. Start from the center and draw a continuous line spiraling outward to the rim. -
Define the separation:
Using a sharp fettling knife or a wire tool, begin to carve deeply along your marked line. You aren’t just drawing; you are physically separating the clay to create the illusion that the clay is overlapping itself. -
Relief carving:
Carve away clay from the ‘inner’ side of the spiral line. By removing material here, you create a deep channel that makes the outer band look like it is curling over the inner band. -
Refining the center:
I usually spend extra time on the center ‘eye’ of the spiral. Use a small loop tool to dig this area out deeper, accentuating the tightest part of the curve so it looks like it delves into infinity. -
Rounding the edges:
The cut edges will look sharp and manufactured. Use a damp sponge and your fingers to round over every edge. The separation between the spiral layers should look soft and organic, not sliced.
Crack Control
Deep spirals create tension. Dry incredibly slowly! Drape plastic loosely over the form for at least a week, checking daily, to let moisture equalize before uncovering.
Step 3: Adding Texture & Finishing
-
Enhance the texture:
The image shows a distinct pitted surface. If your clay isn’t groggy enough, take a stiff bristle brush or a needle tool and gently stipple the entire surface. -
Smooth the interior:
Ensure the smooth, swooping interior curve is flawless. Run a flexible rib along the inside of the spiral curves to compress the clay and remove any tool marks. -
Bisque firing:
Allow the piece to dry very slowly under loose plastic for several days to prevent cracking along the deep carvings. Bisque fire to your clay body’s recommended temperature (usually Cone 04 or 06). -
Glazing strategy:
To achieve the raw stone look, leave the exterior unglazed or use a very matte wash. If you want the speckled effect shown, ensure your clay body has manganese speckles, or apply a ‘speckled white’ matte glaze heavily. -
Wiping back:
If you use a glaze, wipe it back with a sponge so it stays primarily in the recesses and pits. This highlights the spiral structure and the artificial stone texture without covering the clay’s natural character. -
Final firing:
Fire to the final maturity temperature of your clay (likely Cone 5 or 6 for stoneware). Place the piece carefully on the kiln shelf to ensure it doesn’t warp out of round.
Color Wash
Enhance the stone look by applying a thin iron oxide wash after bisque firing, then wiping it nearly all off. It will remain in the pores and pits for earthy depth.
Place your finished sculpture in a spot with natural side-lighting to let the shadows accentuate the spiral depth


What Really Happens Inside the Kiln
Learn how time and temperature work together inside the kiln to transform clay into durable ceramic.
Ribbon Twist Knot
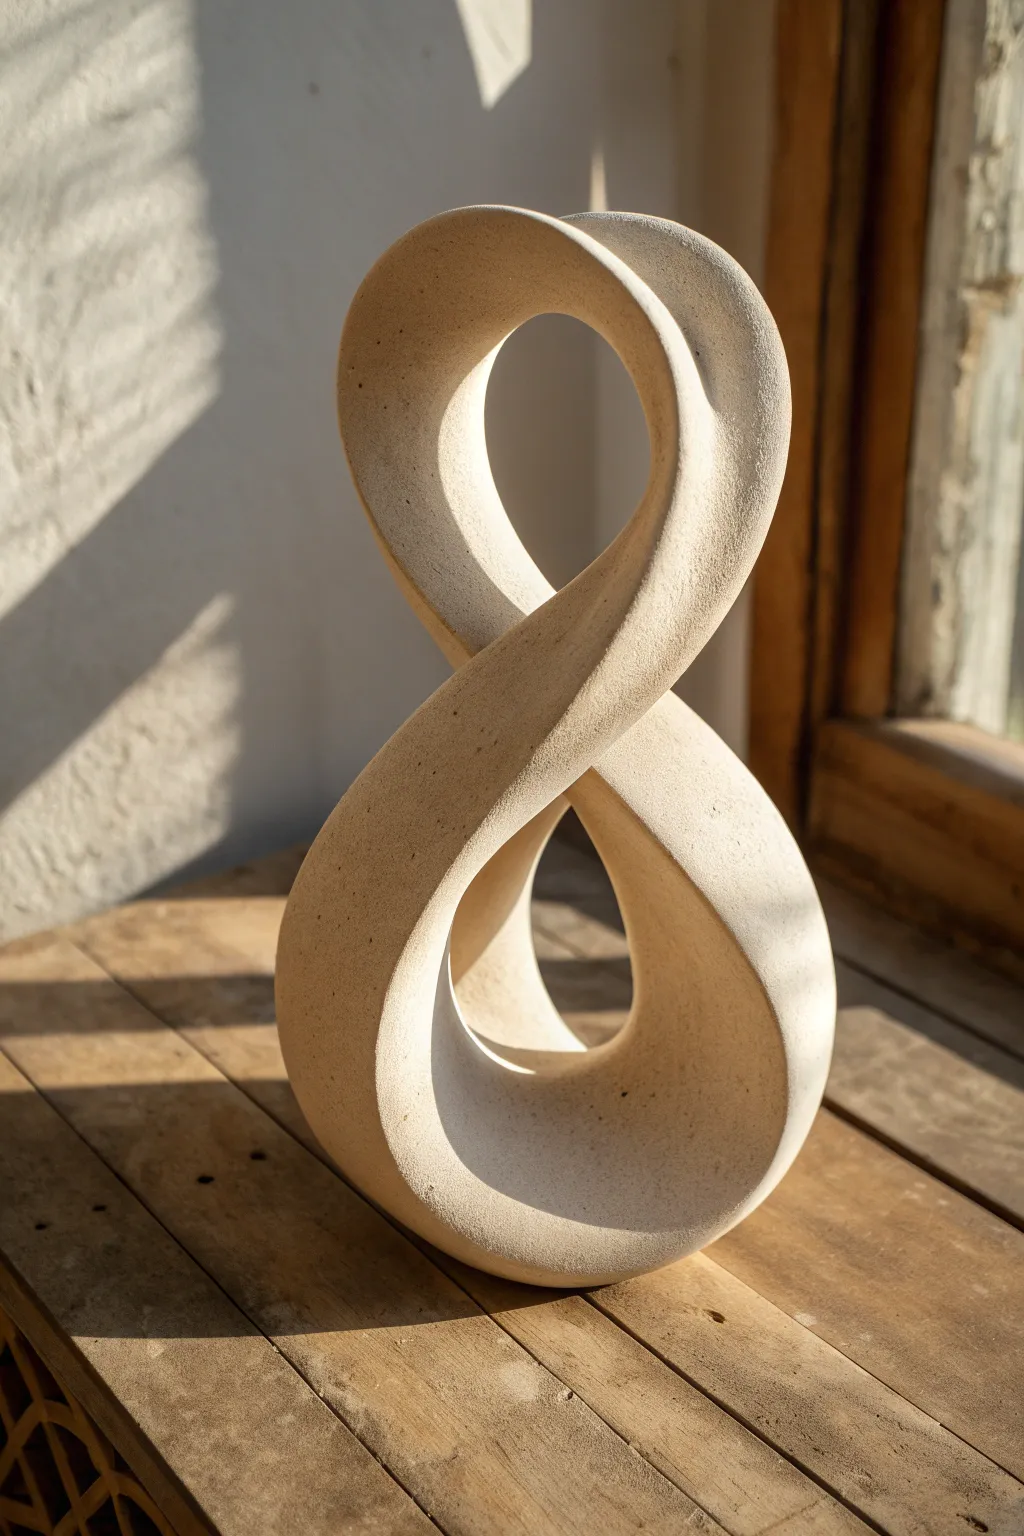
This elegant sculpture captures the fluid motion of a twisted ribbon frozen in time, creating a captivating figure-eight silhouette. Its minimalist form and sandy, matte texture make it a sophisticated centerpiece that looks deceptively complex to achieve.
Detailed Instructions
Materials
- White stoneware clay (groggy for strength)
- Rigid wire (12-14 gauge) for armature
- Aluminum foil
- Rolling pin
- Canvas mat or slab roller
- Scoring tool or serrated kidney
- Slip (clay and water mixture)
- Wooden modeling tools
- Sponge
- Spray bottle with water
- Sandpaper (various grits)
Step 1: Building the Armature
-
Form the wire core:
Cut a length of rigid wire about 24 inches long. Bend it into a figure-eight shape, ensuring the crossover point in the middle doesn’t touch. Twist the wire ends together securely where they meet. -
Add dimension:
Create the 3D twist by gently pulling the top loop forward and pushing the bottom loop backward slightly, establishing the sculpture’s depth. -
Bulk up with foil:
Wrap aluminum foil tightly around the wire frame. Build it up until the form is about 70% of your desired final thickness, compressing the foil firmly so there are no air pockets.
Keep it Hollow
If you plan to fire this, poke a discreet pinhole in the clay somewhere hidden (like the base). This allows hot air inside the foil to escape and prevents the piece from exploding in the kiln.
Step 2: Creating the Clay Surface
-
Roll the slab:
Roll out a consistent slab of white stoneware clay on your canvas mat, aiming for roughly 1/4 inch thickness. I find it helps to periodically lift the clay to prevent sticking. -
Cut clay strips:
Slice the slab into long strips that are wide enough to wrap around the diameter of your foil armature. -
Apply the first strip:
Score the surface of a clay strip and apply a little slip. Lay it over a section of the foil armature, wrapping it around to meet itself. -
Enclose the form:
Continue wrapping clay strips around the entire armature. Where one strip meets another, score and slip the edges thoroughly before pressing them together. -
Seal the seams:
Use a wooden modeling tool to drag clay across the seams, knitting the separate pieces into a single skin. Smooth over these joins with your thumb.
Slumping Issues?
If the top loop starts sagging while the clay is wet, prop it up with crumpled newspaper or a small sponge. Leave these supports in place until the clay reaches the leather-hard stage.
Step 3: Refining the Shape
-
Define the edges:
Using your fingers and a damp sponge, gently pinch the sides of the sculpture to create the ‘ribbon’ effect. You want distinct, almost sharp edges rather than a round tube. -
Correct the curves:
Stand back and look at the negative space (the holes). Ensure the curves flow naturally. If a spot looks lumpy, gently paddle it with a flat wooden tool. -
Smooth the surface:
Once the clay is leather hard, go over the entire piece with a metal rib or kidney tool to remove fingerprints and surface bumps. -
Rest and dry:
Allow the piece to dry very slowly under plastic for several days to prevent cracking, especially at the stress point in the middle twist.
Step 4: Finishing Touches
-
Bisque fire:
Fire the piece in a kiln to cone 04 (or according to your specific clay body’s instructions). -
Sand for texture:
After firing, use medium-grit sandpaper to sand the surface. This removes any final imperfections and enhances the stone-like texture. -
Dust and display:
Wipe the sculpture down with a damp cloth to remove sanding dust. The natural, unglazed finish gives it that raw, modern appeal seen in the photo.
Place your sculpture near a window where shadows can play across the curves throughout the day
Abstract Arch Portal
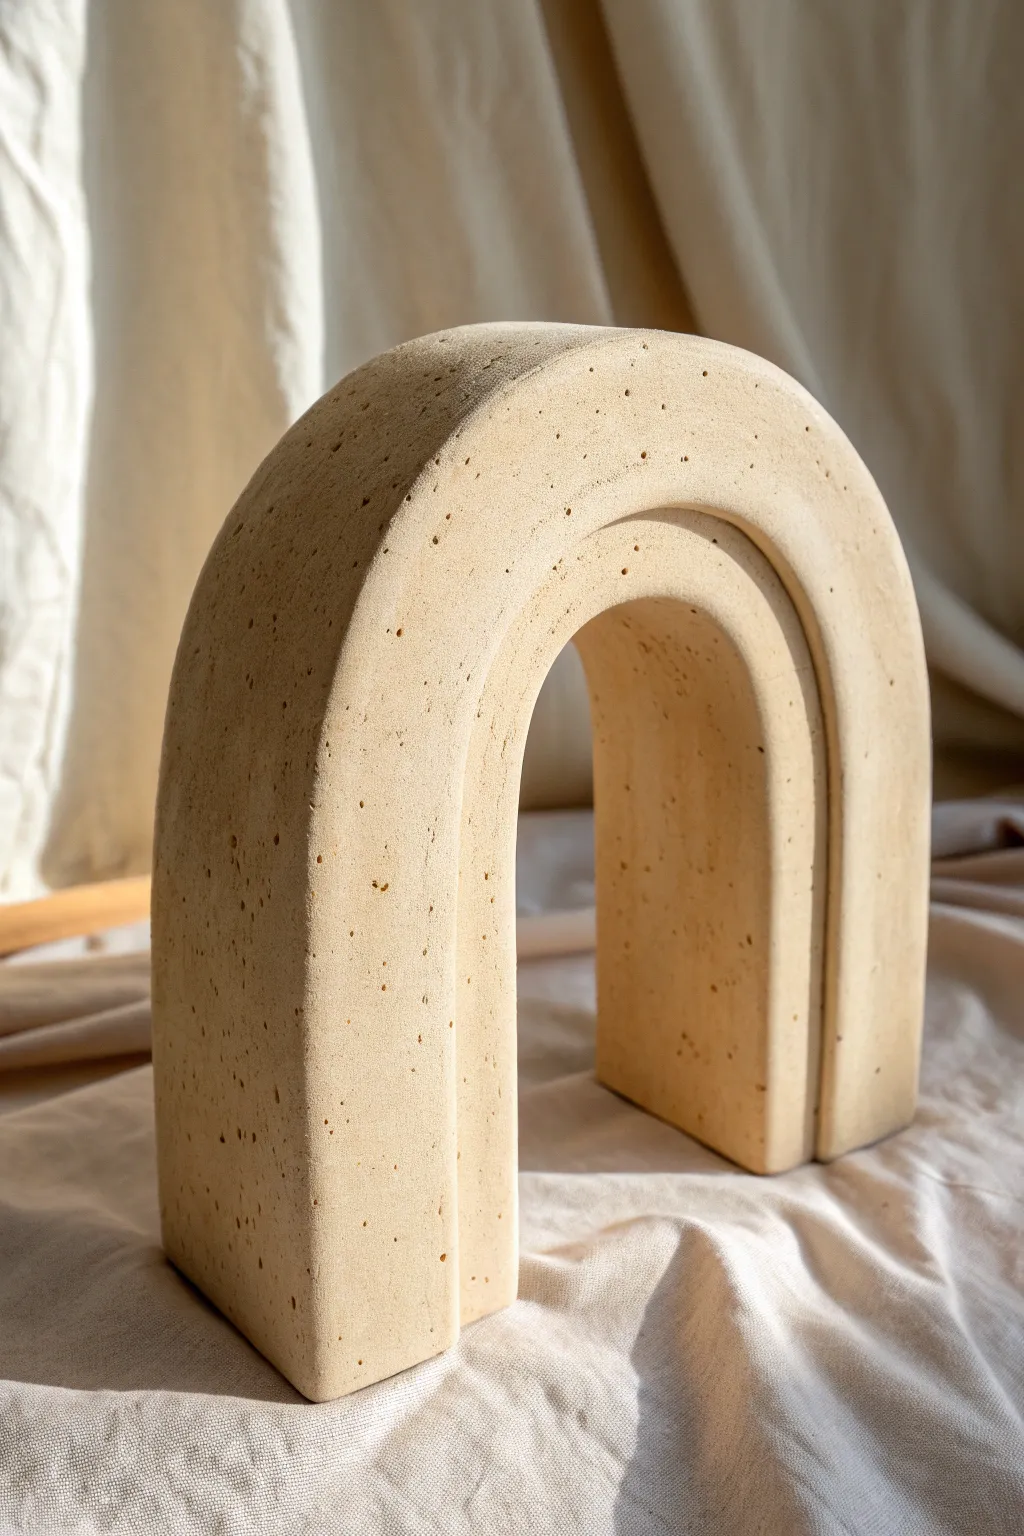
Bring a touch of architectural elegance to your space with this double-tiered arch sculpture. Its organic, stone-like texture and soft beige tones create a calming, modern focal point perfect for bookshelves or mantels.
Step-by-Step Guide
Materials
- Air-dry clay (stone or white color)
- Rolling pin
- Sharp crafting knife or clay wire
- Rectangular plastic container or wooden block (as an arch form)
- Parchment paper
- Cup of water
- Sponge
- Coarse sandpaper (80 grit)
- Fine sandpaper (220 grit)
- Speckled acrylic spray or diluted brown acrylic paint and toothbrush
Step 1: Forming the Base Arches
-
Prepare your workspace:
Lay down parchment paper to prevent sticking. Take a large handful of clay and knead it thoroughly to remove air bubbles and warm it up for pliability. -
Roll out the slab:
Using your rolling pin, flatten the clay into a long, even slab. Aim for a thickness of about 3/4 inch to ensure the sculpture stands upright independently. -
Cut the primary strip:
Using a ruler and your sharp knife, cut a long, rectangular strip from the slab. This strip should be approximately 3 inches wide and long enough to drape over your chosen mold. -
Form the inner arch:
Place your mold (like a plastic container) on its side. Carefully drape the clay strip over it to form a sharp U-shape. Smooth the sides down so they are vertical and flat. -
Cut the secondary strip:
Repeat the rolling process to create a second, slightly narrower strip (about 2.5 inches wide). This will become the outer layer of the arch design. -
Layer the arches:
Drape this second strip directly over the first one while it is still on the mold. Use a little water or slip (clay mixed with water) between the layers to help them adhere.
Step 2: Refining the Shape
-
Trim the base:
Once both layers are draped and joined, use your knife to slice horizontally across the bottom of the ‘legs’ so the arch sits perfectly flat on the table. -
Smooth the seams:
Dip your finger in water and run it along the edges where the two layers meet. You want a distinct stepped look, so don’t blend them completely, but soften any sharp, jagged cuts. -
Refine the surface:
Use a damp sponge to wipe down the entire surface, erasing fingerprints and smoothing out large bumps. I like to let this dry briefly so the clay firms up before the next step. -
Initial drying phase:
Allow the clay to dry on the mold for at least 24 hours. This prevents the arch from sagging or collapsing under its own weight. -
Remove the mold:
Once the outside feels leathery and firm, carefully slide the mold out from the center to allow the inside of the arch to dry evenly.
Crack Control
If hairline cracks appear while drying, mix a small paste of clay and vinegar. Smear this ‘spackle’ into the cracks and smooth it over with a damp finger.
Step 3: Texturing and Finishing
-
Full cure:
Let the sculpture dry completely for another 24-48 hours. The clay should turn a lighter color and feel room temperature, not cold to the touch. -
Create porosity:
Take a needle tool or a stiff wire brush and gently poke random, shallow holes into the surface. Focus on the curves to mimic the look of porous travertine stone. -
Sand for stone effect:
Use coarse sandpaper to scuff the flat surfaces, removing any shine and adding a raw, earthy texture. -
Smooth the edges:
Switch to fine sandpaper to gently round off the sharp corners of your tiered steps, giving it a softer, time-worn appearance. -
Add speckles:
Dip a toothbrush into diluted brown acrylic paint. Run your thumb over the bristles to flick tiny specks of paint onto the sculpture for a realistic stone finish. -
Final wipe:
Wipe away any excess sanding dust with a dry cloth. If you want extra durability, apply a matte varnish, though leaving it raw maintains the authentic stone look.
Level Up: Color Tint
Knead a small amount of yellow ochre or burnt sienna acrylic paint directly into the wet clay before rolling to achieve a warm, integral sandstone color.
Place your finished portal near a window to let the shadows play across the textured curves

TRACK YOUR CERAMIC JOURNEY
Capture glaze tests, firing details, and creative progress—all in one simple printable. Make your projects easier to repeat and improve.
Face Suggestion Mask Form
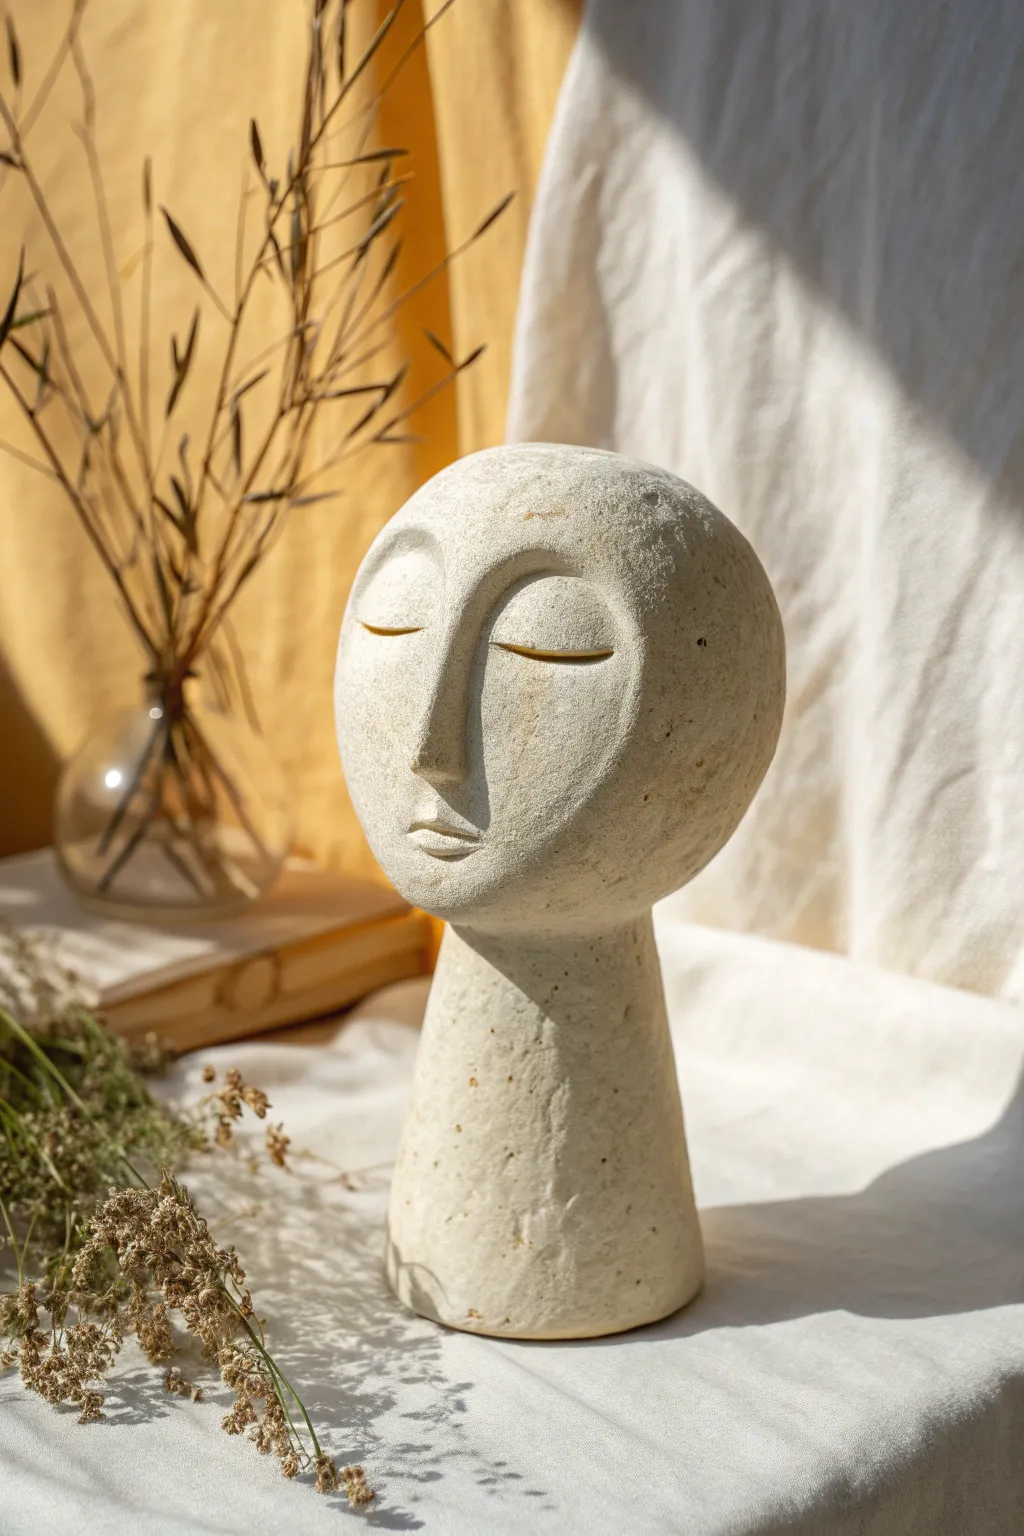
Capture a moment of peaceful contemplation with this minimalist sculpture that mimics the texture of carved limestone. Its simple geometric forms—a spherical head atop a sturdy cylindrical base—create a striking yet tranquil modern art piece perfect for styling shelves.
Detailed Instructions
Materials
- Air-dry stone clay (or paper clay)
- Aluminum foil
- Sturdy wire or wooden dowel (for armature)
- Masking tape
- Rolling pin
- Loop tool for carving
- Needle tool
- Sponge
- Fine-grit sandpaper
- Acrylic paint (cream, beige, or watery white)
- Matte sealant spray
Step 1: Building the Armature
-
Form the core structure:
Begin by crumpling aluminum foil into a tight ball, roughly the size of a grapefruit. This will be the core of the head and helps keep the sculpture lightweight while saving clay. -
Create the neck base:
Crumple a second, larger amount of foil into a wide, sturdy cone or cylinder shape to serve as the neck and base. Ensure the bottom is perfectly flat so it stands on its own without wobbling. -
Connect the pieces:
Pierce the foil ball and the foil cone with a wooden dowel or stiff wire to connect them. Secure the joint firmly with masking tape, wrapping it tightly until the two shapes feel like one solid unit.
Step 2: Applying the Clay
-
Sheet the clay:
Roll out your air-dry clay into a consistent sheet, approximately 1/4 inch thick. I find rolling it on a canvas cloth prevents sticking better than rolling directly on a table. -
Cover the armature:
Drape the clay sheet over the foil head, smoothing it down the sides. Patch pieces together to cover the neck completely, using a little water on your fingers to blend the seams until invisible. -
Smooth the form:
Once covered, wet your hands slightly and glide them over the entire surface. You want to unify the sphere of the head with the cylinder of the neck, creating a sleek transition at the jawline.
Natural Stone Texture
Mix a small amount of sand or dried coffee grounds into your clay before sculpting. When dry, this grit creates an authentic, speckled limestone appearance.
Step 3: Sculpting the Features
-
Add the nose volume:
Roll a small, elongated triangle of fresh clay. Score the center of the face and the back of the nose piece, add a dab of water (slip), and press the nose firmly onto the face. -
Refine the nose bridge:
Use a modeling tool or your thumb to smooth the edges of the nose into the forehead and cheeks. The bridge should be prominent and straight, tapering slightly out from the forehead. -
Carve the eye sockets:
Using a loop tool, gently carve out two shallow, curved recesses on either side of the nose bridge. This creates the brow bone and the cheek plane without needing to add more bulk. -
Shape the eyelids:
Roll two small, flat semi-circles of clay. Attach them inside the recessed eye sockets you just made. Smooth the top edge into the brow bone, leaving the bottom edge defined to look like a closed lid. -
Define the lash line:
Take a needle tool and carefully incise a curved horizontal line across the center of each eyelid patch to represent the meeting of the upper and lower lids. -
Form the lips:
Attach a very small, flattened oval of clay below the nose. Use your needle tool to press a horizontal line across the middle, then gently shape the upper and lower lips to be subtle and protruding slightly.
Cracking Issues?
If small cracks appear during drying, make a paste of clay and water (slip) and fill them in. Smooth with a damp sponge and let dry again before painting.
Step 4: Refining and Finish
-
Add texture:
Instead of smoothing everything perfectly, take a stiff bristle brush or a crumpled ball of foil and tap it gently all over the moist clay. This creates that pitted, stone-like texture visible in the reference. -
Dry thoroughly:
Allow the sculpture to dry completely. Depending on humidity and thickness, this often takes 24 to 48 hours. Rotate it occasionally so the bottom dries evenly. -
Sand for character:
Once bone dry, use fine-grit sandpaper to knock back any sharp ridges or awkward bumps, but leave the texturing intact to maintain the antique look. -
Create a wash:
Mix a cream or beige acrylic paint with water (about 50/50 mix). Brush this wash over the entire piece. The watery paint will settle into the texture pits, accentuating the stone effect. -
Seal the work:
Finish with a spray of matte sealant to protect the clay from humidity and dust without adding an unnatural glossy shine.
Place your finished sculpture near a window where the shifting light can play across its serene features throughout the day.
Leaf-Imprinted Abstract Profile
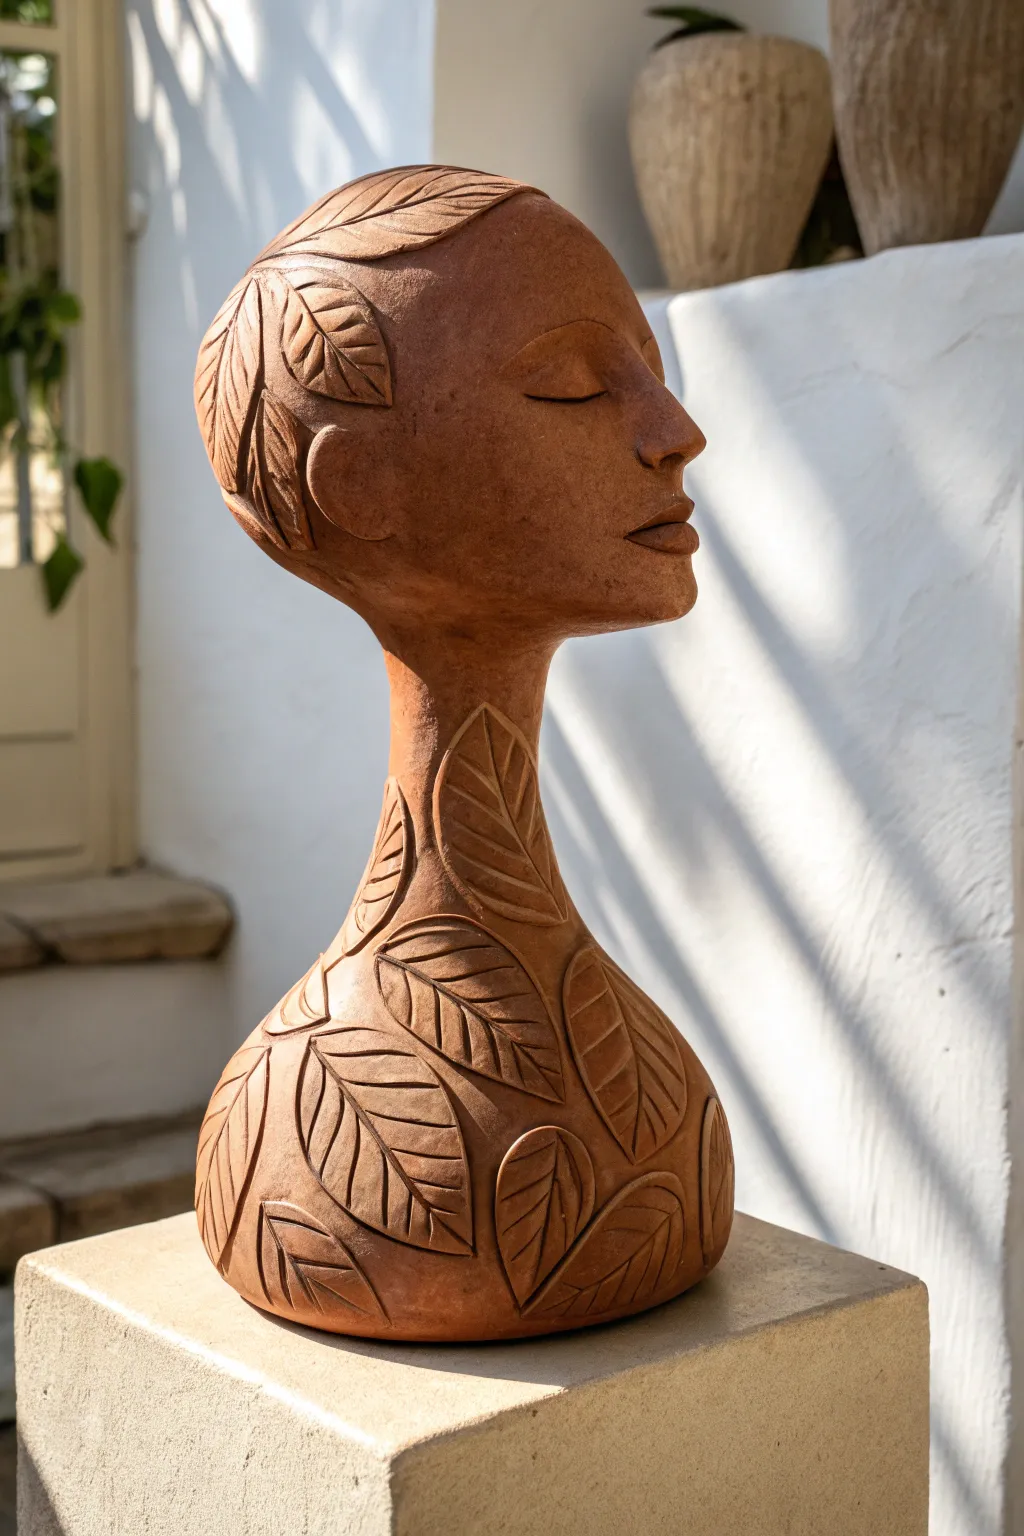
Merge the organic beauty of nature with classical portraiture in this striking terracotta sculpture. This project guides you through building a stylized, elongated bust featuring a distinctive bulbous base and intricate leaf-carving details that celebrate earthy aesthetics.
How-To Guide
Materials
- Terracotta clay (grogged for strength)
- Clay carving tools (loop tools, needle tool)
- Wooden modeling tools
- Sponge and water
- Score and slip tool (or serrated rib)
- Plastic wrap (for slow drying)
- Kiln (or air-dry clay alternative if not firing)
- Pottery wheel (optional, for the base)
- Rolling pin (for slabs)
- Newspaper or armature wire (for internal support)
Step 1: Forming the Base Structure
-
Build the bulbous base:
Start by creating a sturdy, hollow spherical base. You can achieve this by pinching two large pinch pots and joining them together, or throw a closed form on the wheel if you are comfortable. The base should be roughly 6-8 inches wide. -
Elongate the neck:
Using the coil method, build a long, slender neck rising from the center of your bulbous base. Add thick coils, blend them thoroughly inside and out, and taper the form slightly as you go up. -
Prepare the head armature:
Crumple a tight ball of newspaper roughly the size of a grapefruit. This will act as a temporary internal support for the hollow head while you work. -
Construct the head volume:
Wrap a slab of clay around your newspaper core to form an egg shape. Score and slip the connection points firmly to seal the head shape. -
Attach head to neck:
Carefully join the head to the elongated neck. Use generous scoring and slip, reinforcing the joint with a small coil on the outside to ensure stability. The chin should tilt slightly upward.
Clean Lines
When carving the leaves, wait until the clay is ‘leather hard.’ If the clay is too wet, the lines will be messy; if too dry, it will chip.
Step 2: Sculpting the Features
-
Define the facial planes:
Using a wooden modeling tool or your thumbs, press into the clay to define the eye sockets and the bridge of the nose. Keep the features stylized and sleek rather than hyper-realistic. -
Build the nose and lips:
Add small bits of clay to build up a triangular nose and full lips. Smooth the transitions so they emerge organically from the face. -
Refine the profile:
Turn your sculpture to the side. Ensure the forehead slopes gently and the chin has a soft, rounded prominence. I find checking the silhouette against a white wall helps spot irregularities. -
Sculpt the closed eyes:
Roll two tiny, flattened crescent shapes of clay. Attach them where the eyelids should be, blending the top edge to create the look of sleeping eyes. -
Detail the ear:
Add a stylized C-shaped ear on the side of the head. Keep it simple and flat against the skull to match the aesthetic.
Step 3: Carving the Botanical Details
-
Plan the leaf placement:
Lightly trace leaf outlines onto the clay surface using a needle tool. Create a flow where leaves climb up the neck and wrap around the back of the head like hair. -
Carve the outlines:
Using a fine loop tool or a sharp knife, carve deeper into your traceable lines to define the edges of each leaf. -
Sculpt leaf veins:
Inside each leaf shape, carve a central vein line and diagonal offshoot veins. Don’t be afraid to remove clay here to create relief texture. -
Add hair leaves:
Ensure the back of the head is fully covered in overlapping carved leaves, simulating a botanical hairstyle. -
Smooth the negative space:
Use a damp sponge or a smooth wooden tool to burnish the spaces between the leaves. This contrast makes the carving pop.
Verdigris Vibe
After firing, sponge firmly with a teal or turquoise acrylic wash, focusing on the deep recesses of the leaves, to mimic oxidized copper statue effects.
Step 4: Drying and Finishing
-
Create air vents:
If firing in a kiln, use a needle tool to poke a hidden hole in the base and near the ear to allow expanding air to escape during firing. -
Slow drying process:
Cover the piece loosely with plastic wrap. Let it dry very slowly over 1-2 weeks to prevent the neck from cracking due to uneven shrinkage. -
Bisque fire:
Once bone dry, fire the piece to bisque temperature (usually cone 04). The natural terracotta color is the intended finish, so glaze is optional. -
Optional patina:
If using air-dry clay or wanting an aged look, you can apply a dark wax or a watered-down brown acrylic wash and wipe it back to accentuate the leaf carvings.
Place your finished sculpture near a window where the shifting daylight can play across the carved textures.
Coil Scribble Sculpture
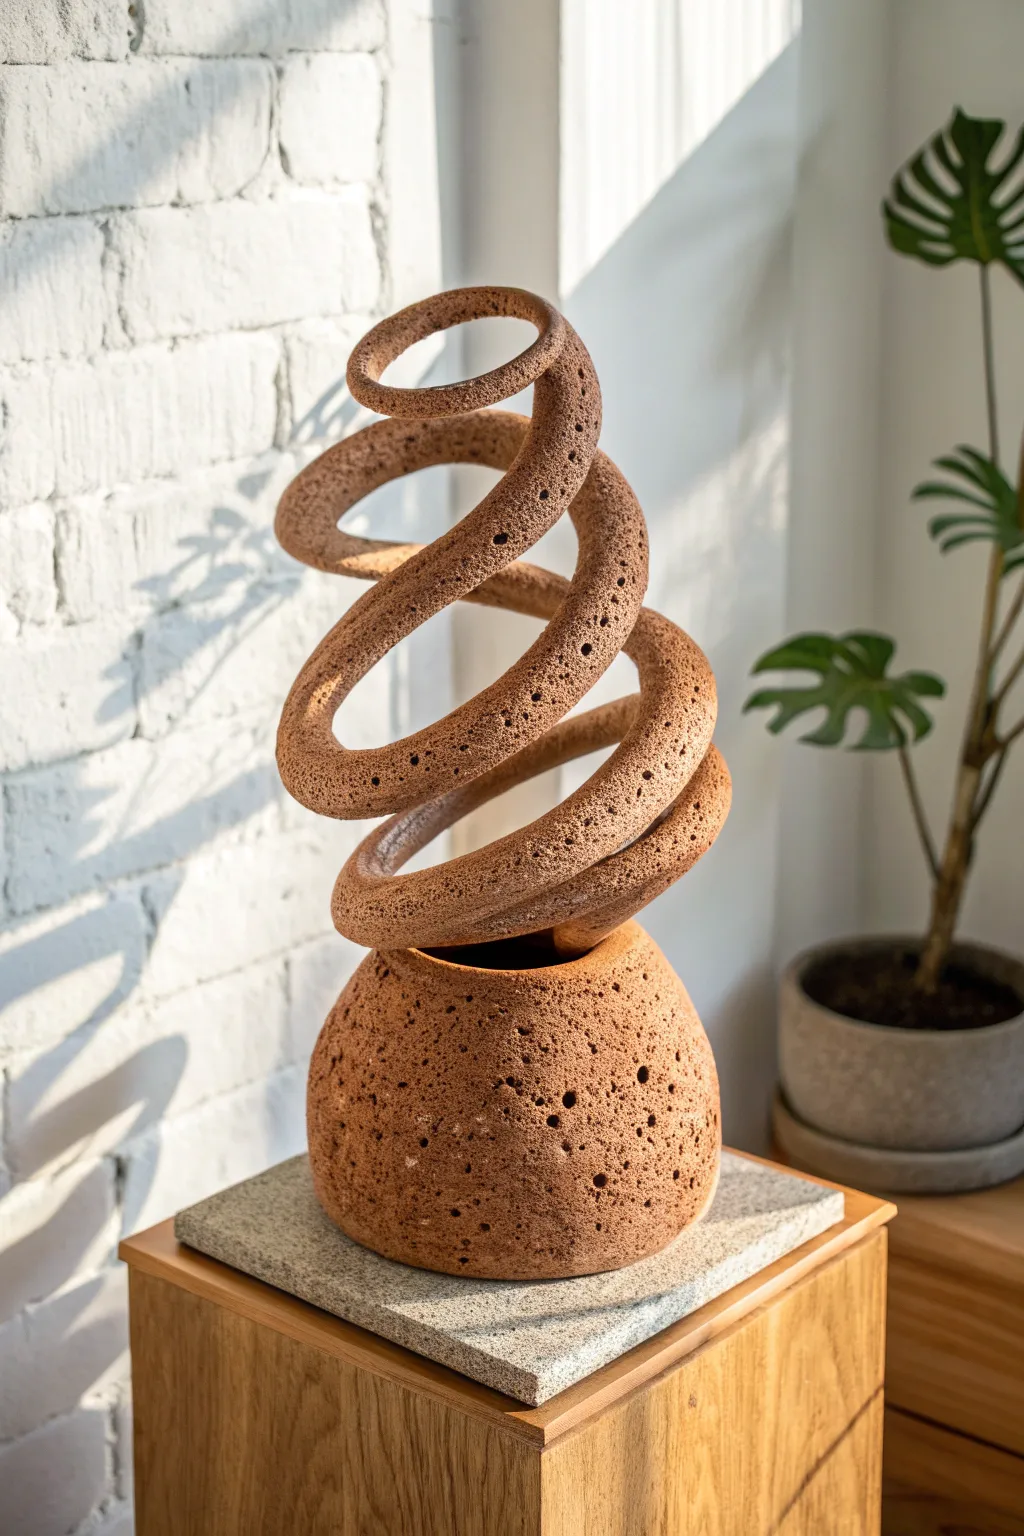
This striking abstract sculpture combines a grounded, rounded vessel with an upward-reaching, gravity-defying coil. Its unique, cavernous texture mimics the raw beauty of volcanic rock, creating a piece that feels both organic and modern.
Step-by-Step Guide
Materials
- coarse stoneware clay (grogged) or air-dry clay mixed with sand
- wooden pottery rib
- sturdy heavy-gauge armature wire
- wire cutters
- scoring tool or serrated kidney
- slip (liquid clay)
- sponge
- paddle tool
- salt or coarse coffee grounds (for texture effect)
- rolling pin (optional)
Step 1: Forming the Base Vessel
-
Prepare the clay body:
Start by wedging your clay thoroughly. To achieve that distinct bubbly, porous texture seen in the photo, knead in a generous amount of coarse material like rock salt or coffee grounds. These will burn out or dissolve later, leaving the signature holes. -
Pinch the base pot:
Take a large grapefruit-sized ball of clay and insert your thumb into the center. Rotate the ball in your hand while pinching the walls to open up a basic bowl shape. -
Shape the rounded bottom:
Gently paddle the exterior of the bowl with a wooden paddle tool to round out any lumps. Aim for a distinct, inverted semi-sphere shape that tapers slightly inward at the rim. -
Thicken the rim:
Ensure the rim of your base vessel is slightly thicker than the walls; this will provide a vital anchor point for the heavy coil structure you will add next. -
Add surface texture:
Before the base dries, use a stiff brush or a scouring pad to stipple the surface, enhancing the porous look created by your additives.
Step 2: Constructing the Spiral
-
Create the armature:
Twist your heavy-gauge wire into a loose, widening spiral shape. This internal skeleton is crucial for supporting the clay against gravity during the drying phase. -
Anchor the wire:
Insert the bottom end of your wire spiral deeply into the thickest part of the base vessel’s wall or floor to secure it firmly. -
Roll the main coil:
Roll out a very long, thick snake of clay. It should be uniform in thickness, roughly 1 to 1.5 inches in diameter. -
Hollow the coil (optional):
If your coil feels too heavy, I sometimes slice it open, hollow it out slightly like a tube, and reseal it. This reduces weight on the lower sections. -
Sheath the armature:
Carefully slice your clay coil lengthwise and wrap it around the wire armature. Pinch the seam closed tightly so the wire is completely hidden inside the clay. -
Smooth the seam:
Use a damp sponge or your thumb to smooth out the seam line where you wrapped the clay, blending it until it disappears. -
Attach to the base:
Score the connection point on the base vessel and the bottom of your spiral coil heavily. Apply slip and press them together firmly to create a seamless transition.
Don’t Rush The Dry
Gravity is the enemy here. Keep supports (like crumpled newspaper or foam blocks) under the spiral curves until the clay represents ‘leather hard’ stage.
Step 3: Refining and Finishing
-
Refine the curve:
Step back and look at the silhouette. Gently nudge the coil to ensure the spiral expands evenly and looks balanced as it rises. -
Enhance texturing:
Return to your texturing tools. Poke small, deep holes randomly across the coil and base using a needle tool or skewer to exaggerate the ‘lava rock’ aesthetic. -
Slow drying:
Cover the sculpture loosely with plastic sheeting. This shape is prone to cracking if it dries unevenly, so let it dry very slowly over several days. -
Firing or sealing:
If using kiln-fire clay, fire to the recommended temperature (the organic additives will burn out here). If using air-dry clay, allow to fully cure and the salt to dissolve with a light misting. -
Apply finish wash:
Mix a diluted brown or iron-oxide wash and brush it over the entire piece. Wipe away the excess with a sponge so the dark color remains only in the pits and holes, highlighting the texture.
Metallic Touch
After the final finish is dry, dry-brush a tiny amount of bronze or gold acrylic paint just on the highest ridges of the texture for a subtle shimmer.
Place your sculpture near a window where natural light can play through the spiral and cast dramatic shadows
Faceted Geometric Pebble
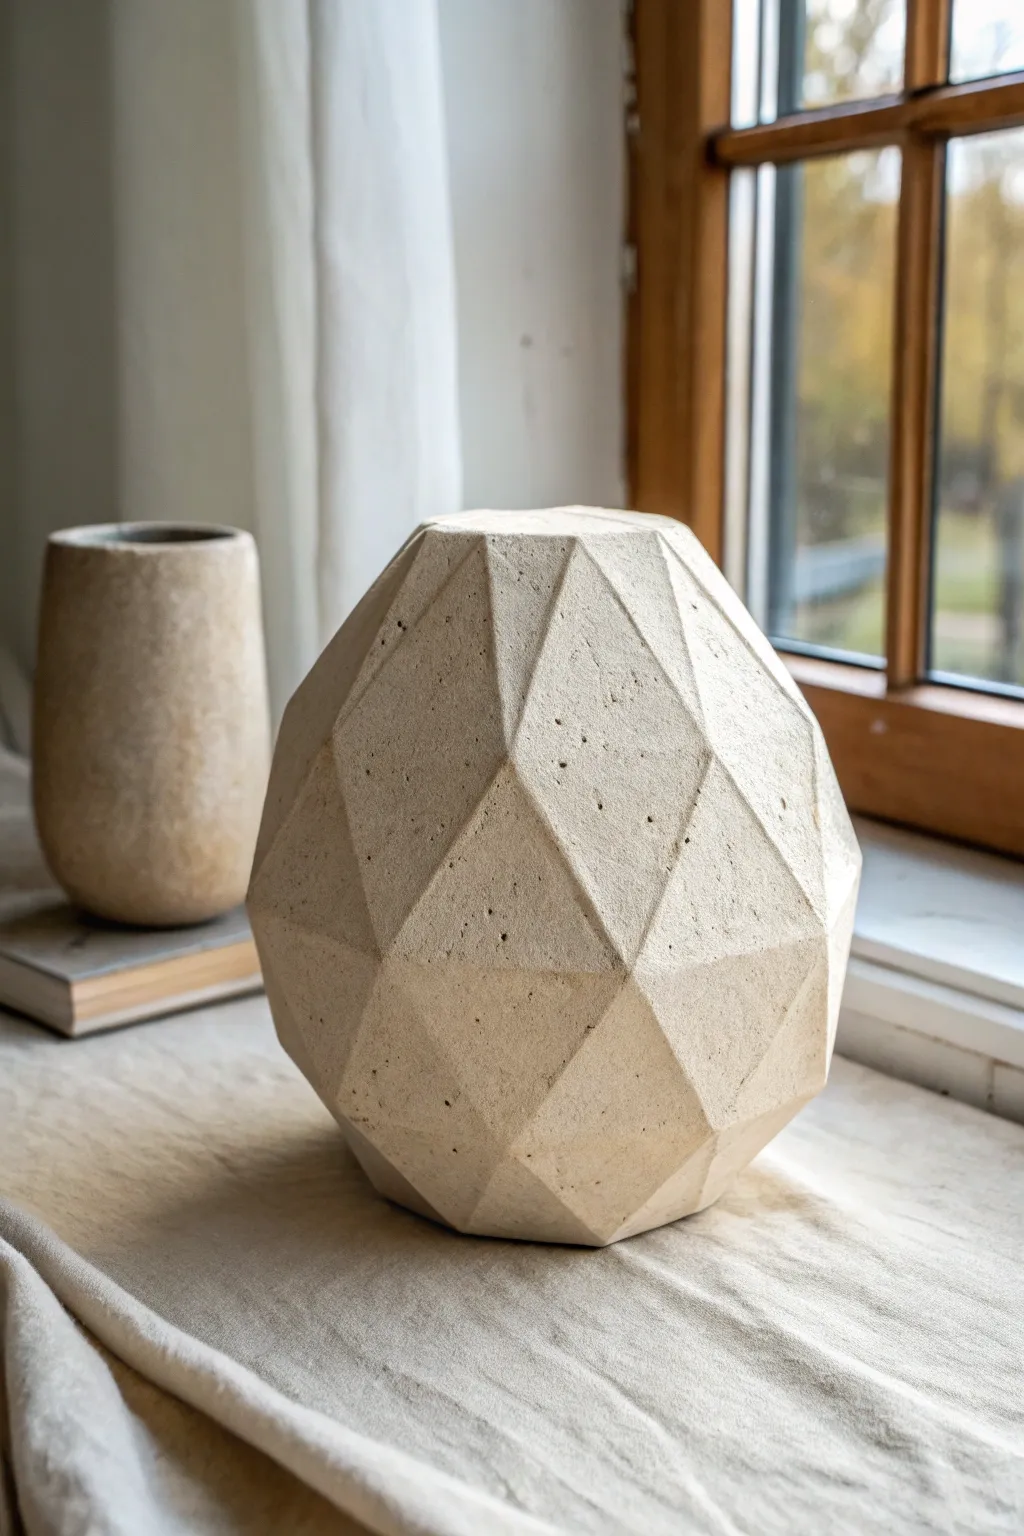
Transform a simple lump of clay into a sophisticated, modern décor piece with this faceted geometric pebble. The sharp, angular planes catch the light beautifully, while the stone-like texture gives it an earthy, grounded presence perfect for any minimalist shelf.
Step-by-Step Tutorial
Materials
- Air-dry clay or polymer clay (stone or granite color)
- Wire clay cutter or sturdy crafting knife
- Rolling pin
- Medium and fine-grit sandpaper (120 and 220 grit)
- Flecked texture spray paint (optional, for stone look)
- Matte sealant spray
- Small bowl of water
- Clean sponge
- Ruler (for checking planes)
Step 1: Preparation and Shaping
-
Condition the Clay:
Begin by taking a substantial chunk of your clay—about the size of two grapefruit. Knead it thoroughly to remove any air bubbles, as trapped air can cause cracks later, especially in thicker pieces. -
Form the Base Sphere:
Roll the clay between your palms or on a work surface to create a smooth, solid ball. It doesn’t need to be perfectly round, but try to get it symmetrical. An organic, slightly elongated egg shape works well too if you prefer. -
Verify Density:
Drop the ball gently onto your work surface a few times to flatten the bottom slightly and ensure the interior is dense and solid. This slight flat spot will serve as the base for stability.
Cracks Appearing?
Thick clay can crack as it shrinks. If you see hairlines during drying, mix a small amount of clay with water to make a paste (slip) and fill the cracks immediately, smoothing it over with a wet finger.
Step 2: Faceting the Form
-
Make the First Cut:
Using your wire cutter or a sharp, long knife, slice off a section of the sphere’s side. The cut should be flat and clean. Don’t worry about measuring angles; the beauty here lies in irregularity. -
Create Adjacent Planes:
Rotate the ball slightly and make another slice next to the first one. Let the edges of the two cuts meet to form a sharp ridge. This is the defining feature of the geometric look. -
Continue Slicing:
Work your way around the sphere, slicing off pieces to create a network of interconnected triangles and polygons. vary the size of your cuts—some large, some small—to create visual interest. -
Refine the Top:
Make sure to slice angles near the top of the form so it tapers inward, giving it a gemstone-like crown rather than a flat plateau. -
Check the Silhouette:
Step back and look at the object from different angles. If any area looks too round or bulky, slice off another thin layer to flatten it out. -
Smooth the Planes:
Dip your finger in a little water and very gently smooth the flat surfaces of the cuts to remove knife drag marks, but be extremely careful not to round over the sharp edges where the planes meet.
Step 3: Finishing Touches
-
Slow Drying:
Set the sculpture in a cool, dry place away from direct sunlight. Because this piece is thick, I recommend letting it dry for at least 48 to 72 hours. Rotate it occasionally so the bottom dries evenly. -
Initial Sanding:
Once bone dry, use medium-grit sandpaper (120) to refine the flat planes. Place the sandpaper on a flat surface and rub the clay facet against it to ensure the plane stays perfectly flat. -
Sharpening Edges:
Use the fine-grit sandpaper (220) to lightly run over the ridges between facets. You want them sharp, but not brittle. This step really makes the geometry pop. -
Adding Texture (Optional):
If your clay is plain white or grey, mist the piece lightly with a ‘stone effect’ spray paint. Hold the can 12 inches away to get a dusting of speckles rather than a solid coat. -
Sealing the Piece:
Apply a coat of matte sealant spray. This protects the clay from moisture and gives the surface a unified, professional finish without making it look like plastic.
Marble Effect
Before shaping the ball, twist two colors of clay together (like beige and white). Don’t over-mix. When you slice the facets, you’ll reveal beautiful, natural-looking stone veins inside.
Now you have a stunning, architectural accent piece ready for display on your windowsill or coffee table
Emotion Gesture Form
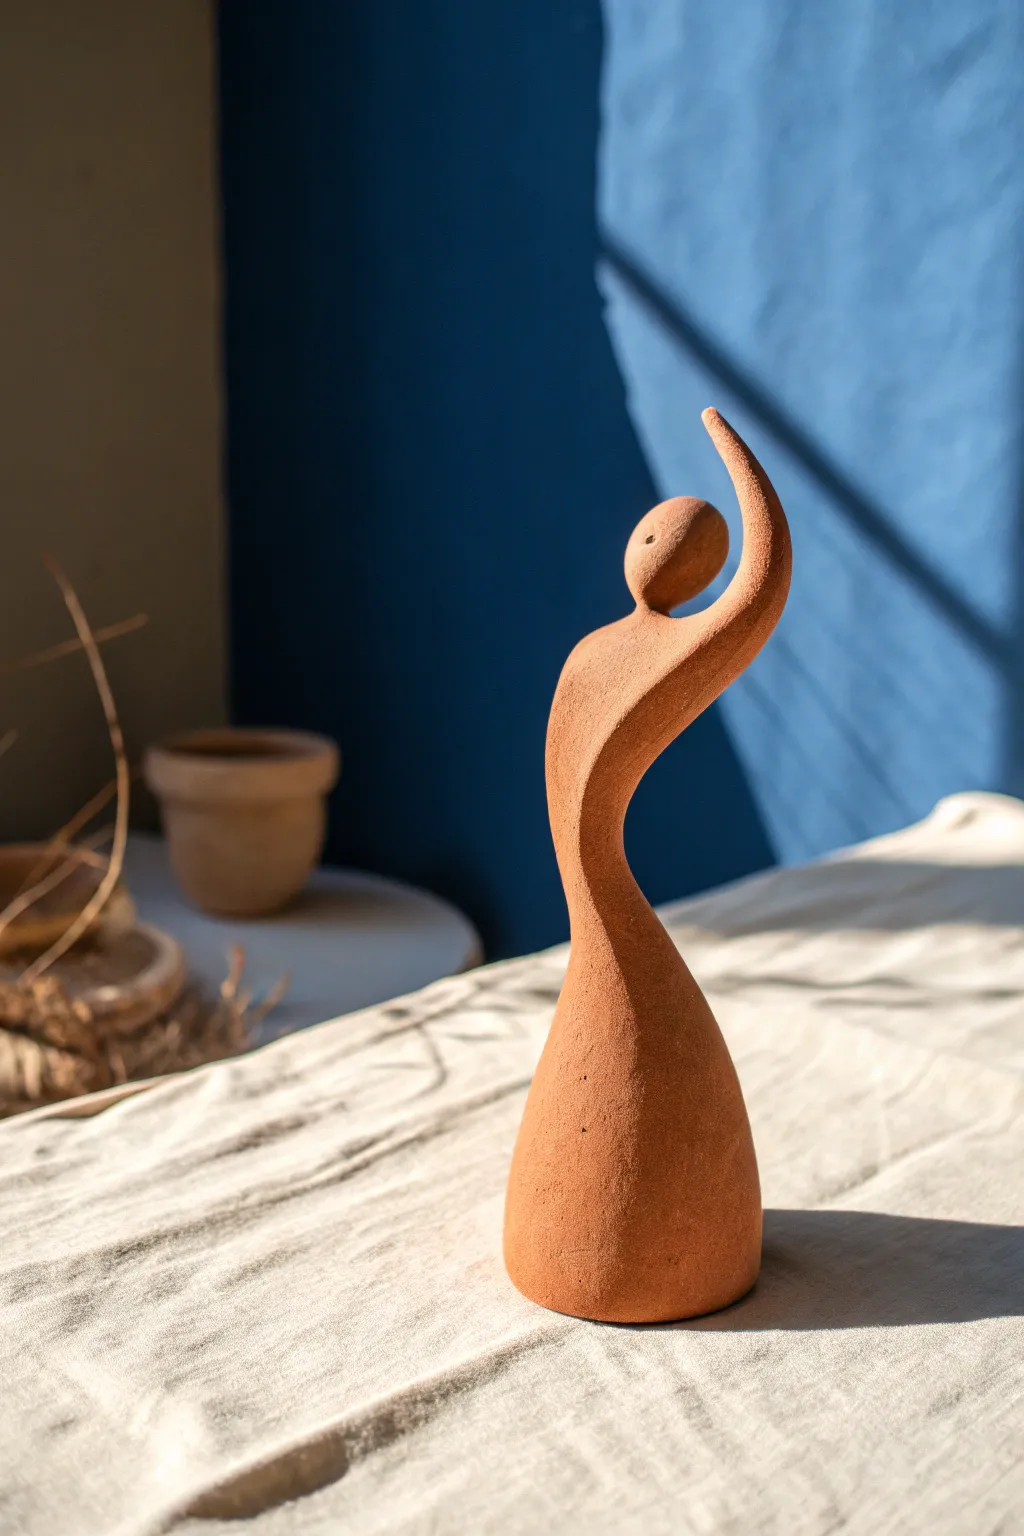
Capture the essence of emotive movement with this minimalist abstract figure. Using warm terracotta clay, this project emphasizes smooth curves and elongated forms to create a sense of elegant upward reach.
Detailed Instructions
Materials
- Terracotta clay (air-dry or kiln-fire)
- Small sculpting sponge
- Wooden modeling tool
- Pointed sculpting knife
- Needle tool
- Small bowl of water
- Fine-grit sandpaper (optional)
- Canvas mat or wooden board (work surface)
Step 1: Forming the Base Structure
-
Prepare the Clay:
Begin with a fist-sized ball of terracotta clay. Knead it thoroughly to remove any air bubbles and ensure a consistent, pliable texture. -
Create the Cone:
Shape the clay into a tall, solid cone. The base should be wide enough to support the sculpture (about 3-4 inches diameter), gradually tapering upwards. -
Elongate the Torso:
Gently pull and squeeze the clay upwards from the middle of the cone to form a waist and upper body. You want a smooth, flowing transition from the wider base to a slender torso. -
Establish the Curve:
Press your thumb gently into one side of the ‘waist’ area to create a distinct curve. I like to push the opposite hip out slightly to give the figure a natural, balanced stance.
Keep it Steady
If the arm starts drooping while you work, prop it up with a small piece of crumpled paper towel or foam until the clay stiffens.
Step 2: Sculpting the Gesture
-
Split the Upper Section:
At the top of your elongated form, visually separate the clay into two sections: a smaller amount for the head/neck and a larger section for the raised arm. -
Define the Neck and Head:
Pinch the smaller section to form a distinct neck area, then shape the very top into a smooth, oval-shaped head. Tilt the head slightly upward to follow the line of movement. -
Extend the Arm:
Take the remaining clay at the top shoulder alongside the head and gently pull it upwards. -
Curve the Limb:
Bend this extended piece of clay inward over the head. The arm should look like a continuous, fluid extension of the body’s main curve, resembling a crescent moon shape. -
Refine the Negative Space:
Pay attention to the empty space between the raised arm and the head. Use your wooden tool to smooth the interior curve so the arm frames the face without touching it.
Make it a Pair
Create a second, mirrored figure with the opposite arm raised. Displaying them facing each other creates a beautiful ‘dancing’ interaction.
Step 3: Smoothing and Finishing
-
Unify the Surface:
Check the sculpture from all angles. The back should have a concave arch that mirrors the front’s convex curve. -
Remove Tool Marks:
Dip your finger in a little water and run it over the entire surface to erase fingerprints and lumps. The goal is a uniform, matte texture. -
Refine the Head Shape:
Ensure the face is completely featureless and abstract. Smooth it into a perfect egg shape that blends seamlessly into the neck. -
Final Sponge Wipe:
Use a barely damp sculpting sponge to wipe down the piece one last time. This removes coarse particles and brings the fine clay to the surface. -
Drying:
Let the sculpture dry slowly away from direct heat or drafts to prevent cracking. Place a plastic bag loosely over it for the first 24 hours. -
Optional Sanding:
Once fully dry (and before firing if using kiln clay), you can gently sand any rough spots with fine-grit sandpaper for an ultra-smooth finish.
Place your finished sculpture near a window where shadows can play across its curved surface