Whenever I’m stuck in a creative rut, abstract sculpture is my favorite way to loosen up because it’s all about shape, rhythm, and negative space—not perfection. Here are some approachable abstract sculpture ideas you can try in clay (air-dry, ceramic, or polymer) to get those forms flowing.
Biomorphic Curves and Blobs
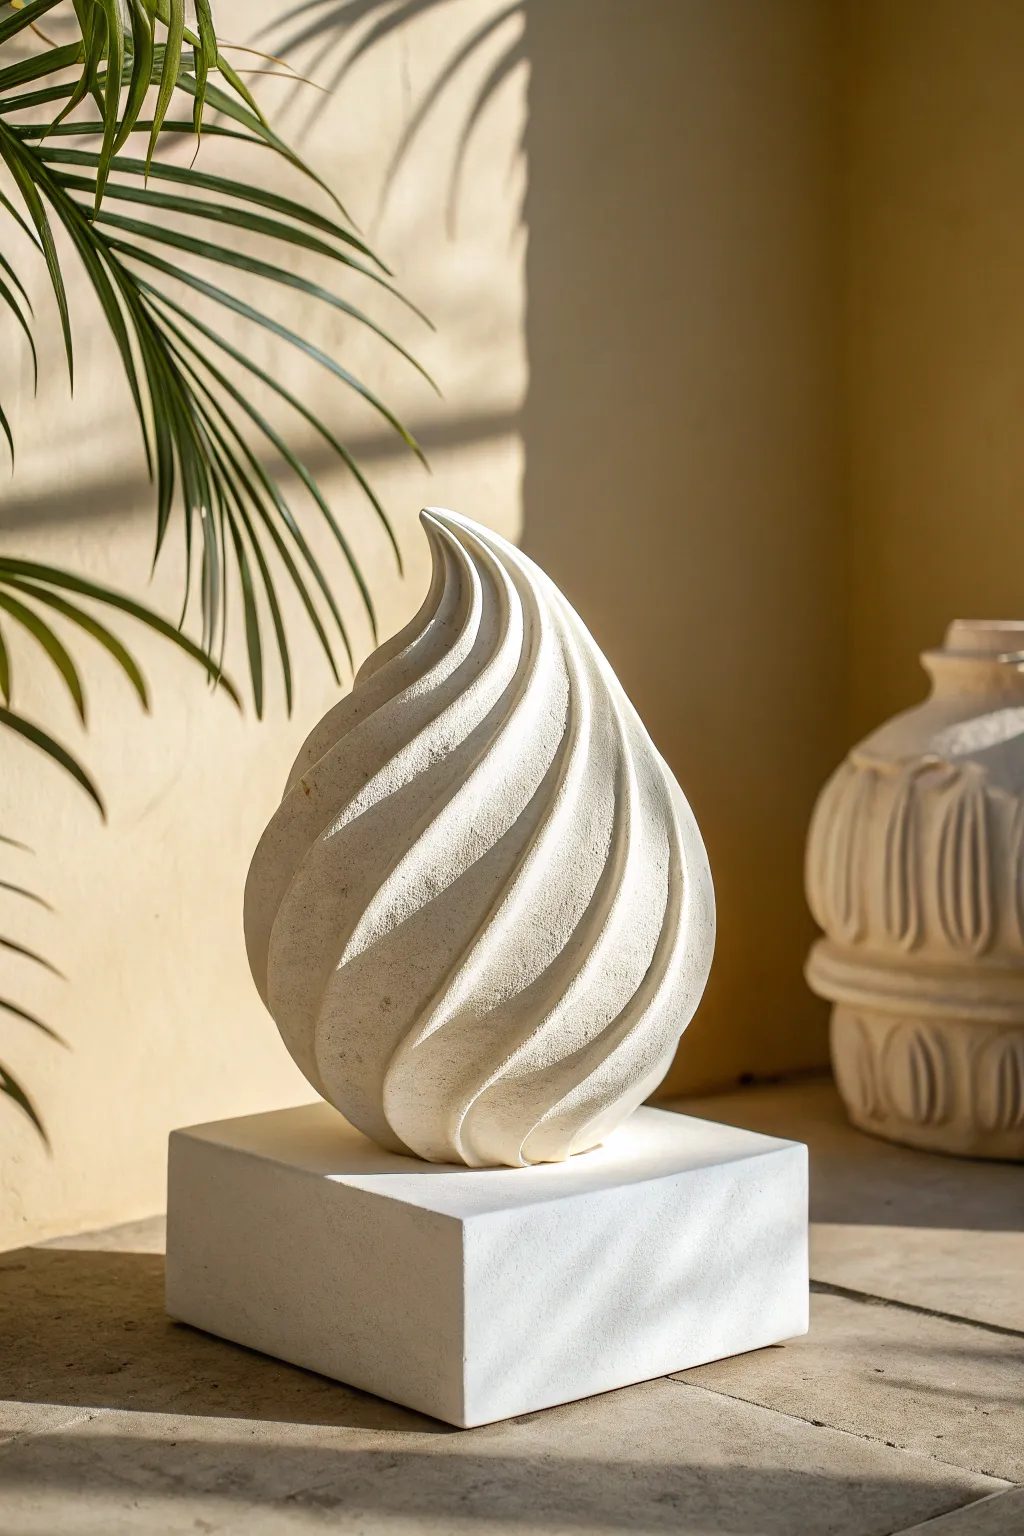
This elegant sculpture mimics the organic flow of a meringue peak or a twisting flame, capturing light and shadow in its deep, spiraling grooves. The project creates a sophisticated, stonelike finish using accessible carving foam and plaster techniques.
Step-by-Step Tutorial
Materials
- High-density floral foam or carving foam block (approx. 8″ x 8″ x 12″)
- Plaster of Paris or casting stone powder
- Wooden sculpting tools or loop tools
- Coarse and fine grit sandpaper (80, 150, 220 grit)
- Square wooden mounting block (for the base)
- White or cream matte spray paint (optional)
- Small basin for mixing plaster
- Butter knife or rasp
- Dust mask
Step 1: Shaping the Core Form
-
Prepare the foam block:
Start with a rectangular block of high-density carving foam. If you need more height, you can glue two blocks together using a foam-safe adhesive. -
Rough out the teardrop:
Using a serrated knife or a large rasp, shave away the corners of the block to create a rough cone shape. Taper the top to a point and leave the bottom rounded and wide. -
Refine the silhouette:
Switch to sandpaper or a finer rasp. Smooth the rough cone into a classic teardrop or onion dome shape. As you approach the tip, gently curve it to one side to create that dynamic, windswept look. -
Mark the spiral guidelines:
Take a soft pencil or a marker and lightly draw curved lines starting from the base and swirling up toward the tip. These will guide your carving cuts. Aim for varying widths to make it look organic.
Twist & Turn
Rotate your sculpture constantly while carving the initial spirals. Viewing it from all angles ensures the twist looks continuous and doesn’t become lopsided.
Step 2: Carving the Flutes
-
Initial groove carving:
Using a large loop tool, begin gouging out the foam along your marked lines. Start shallow; it’s easier to deepen a groove than to fix a deep mistake. -
Deepen the spirals:
Continue carving deeper into the channels. The ridges between the channels should remain sharp for now. Follow the curve all the way to the tip, letting the lines converge naturally. -
Smooth the channels:
Wrap a small piece of 80-grit sandpaper around a dowel or your finger. Sand inside the grooves to remove tool marks and round out the bottom of each channel. -
Refine the ridges:
Use fine sandpaper to gently soften the sharp peaks of the ridges. You want them defined but not knife-edged, mimicking the soft erosion of natural stone.
Ancient Artifact Look
Mix a tiny amount of sand or coffee grounds into your final plaster layer. When sanded back, these specks create a convincing natural sandstone appearance.
Step 3: Creating the Faux Stone Finish
-
Mix the plaster:
Mix a small batch of Plaster of Paris with water until it reaches the consistency of heavy cream or pancake batter. -
Apply the first coat:
Brush the plaster over the entire foam shape. Don’t worry about smoothness yet; just ensure full coverage to seal the foam. -
Apply the texture coat:
Once the first layer is tacky but not fully dry, apply a second, thicker layer. I like to dab this layer on with a sponge or a stiff brush to build up a pitted, stone-like texture. -
Carve back detail:
While the plaster is in the ‘leather-hard’ stage (firm but still carveable), use your loop tool to re-define any grooves that got filled in too much. -
Sand for stone effect:
Let the plaster cure completely (usually 24 hours). Sand the entire piece with 150-grit paper. Sanding the high points reveals the texture while leaving the low points rougher. -
Final surfacing:
Finish with 220-grit sandpaper for a honed limestone look. Wipe away all dust with a slightly damp cloth.
Step 4: Mounting and Finishing
-
Prep the base:
Sand your square wooden block or pre-cast plaster base until it is perfectly smooth and geometric. -
Paint the base (optional):
If using wood, paint the base a flat white or very light grey to match the aesthetic of the sculpture. -
Join the pieces:
Apply a strong epoxy or heavy-duty construction adhesive to the bottom of your sculpture and center it on the base. Hold firmly for a minute to set. -
Final seal:
Spray the entire piece with a matte clear coat or a very light mist of cream spray paint to unify the color and protect the surface.
Place your sculpture near a window where natural light can play across the curves you’ve created


Simple Arch With Negative Space
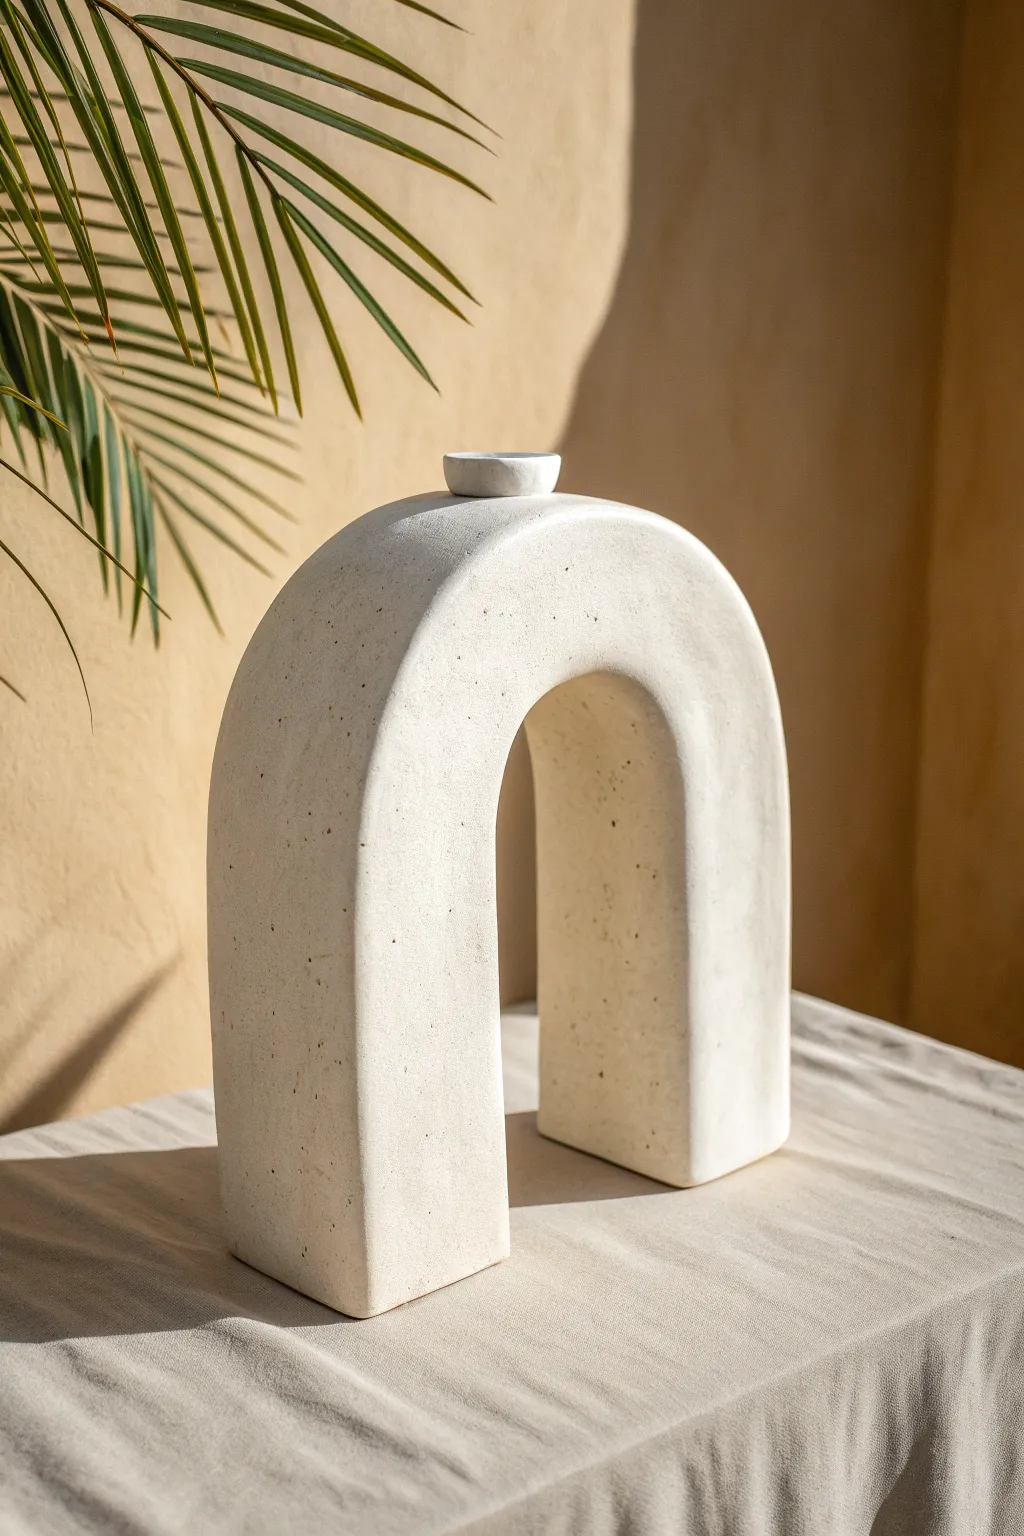
Embrace the beauty of wabi-sabi with this stunningly simple architectural sculpture. The gentle arch shape and textured, stone-like finish create a peaceful, modern focal point that looks far more expensive than the materials required to make it.
Step-by-Step
Materials
- White or grey Portland cement
- Fine sand
- Black oxide pigment or black acrylic paint (optional for speckling)
- Rigid foam insulation board (XPS) or floral foam blocks
- Serrated knife or hot wire cutter
- Sandpaper (coarse and medium grit)
- Mixing bucket and stir stick
- Plastic drop cloth
- Protective gloves and dust mask
- Small plastic cup or container (for the top detail)
- White matte acrylic paint (if needed)
- Baking soda (to add texture to paint)
Step 1: Sculpting the Form
-
Draft the Shape:
Begin by sketching your arch shape directly onto the rigid foam board. For this project, you want a tall U-shape with thick legs. A standard size would be about 12-14 inches tall and 10 inches wide. -
Cut the Basic Form:
Using a serrated knife or a hot wire cutter, carefully cut out the arch. If your foam isn’t thick enough (aim for 3-4 inches deep), cut multiple identical arches and glue them together. -
Refine the Edges:
Use coarse sandpaper or a sanding block to round over the sharp edges of the foam. The goal is a soft, organic curve rather than sharp, geometrical corners. -
Create the Top Detail:
Cut a small, shallow disk or cylinder out of foam to serve as the decorative bowl on top. Adhere this securely to the center apex of your arch using foam-safe glue.
Step 2: Creating the Stone Texture
-
Mix the Base Coat:
In your bucket, mix the cement with sand in a 1:2 ratio. Add water slowly until you achieve a consistency similar to peanut butter or thick frosting. -
Apply the First Layer:
Wearing gloves, apply a thin layer of the cement mixture over the entire foam form. I find using my gloved hands works best to press it into the pores of the foam. -
Add Structural Strength:
If you are worried about durability, you can wrap the wet cement layer with drywall mesh tape now, pressing it into the wet mix before adding more. -
Let it Cure:
Allow this initial scratch coat to dry for at least 24 hours. Keep it slightly covered with plastic to prevent it from cracking due to drying too fast. -
Prepare the Finish Coat:
Mix a second batch of cement, perhaps slightly thinner this time. If you want the subtle speckling seen in the photo, add a literal pinch of black oxide pigment or dry sand. -
Smooth the Surface:
Apply the final layer of cement. Use a flat trowel or a plastic card to smooth the large flat surfaces, but leave enough irregularity to maintain that handmade charm. -
Detail the Top:
Pay special attention to the small bowl shape on top, smoothing the inside curve with a wet finger.
Cracking Up?
If hairline cracks appear while drying, don’t restart. Rub a slurry of water and cement powder into the cracks with your finger, then sand smooth once dry.
Step 3: Finishing Touches
-
Sanding:
Once the final coat is fully cured (another 24-48 hours), gently sand the surface with medium-grit sandpaper to knock down any sharp ridges or loose grit. -
Faux Stone Painting (Optional):
If your dried cement is too dark or grey, mix white acrylic paint with a tablespoon of baking soda. -
Apply Texture Paint:
Stipple this baking soda paint mixture onto the sculpture using a stiff brush. This mimics the porous look of limestone or sandstone perfectly. -
Create Speckles:
Dilute a tiny amount of black or dark brown paint with water. Load a toothbrush with it and flick the bristles to spray tiny, natural-looking speckles across the surface. -
Seal the piece:
Finish with a matte spray sealer to protect the texture and prevent dusting.
Lighter Core Option
For a lighter sculpture, use paper mache over a cardboard armature instead of solid cement. Finish with the baking soda paint technique for the stone look.
Place your sculpture near natural light to let the shadows highlight its beautiful organic texture


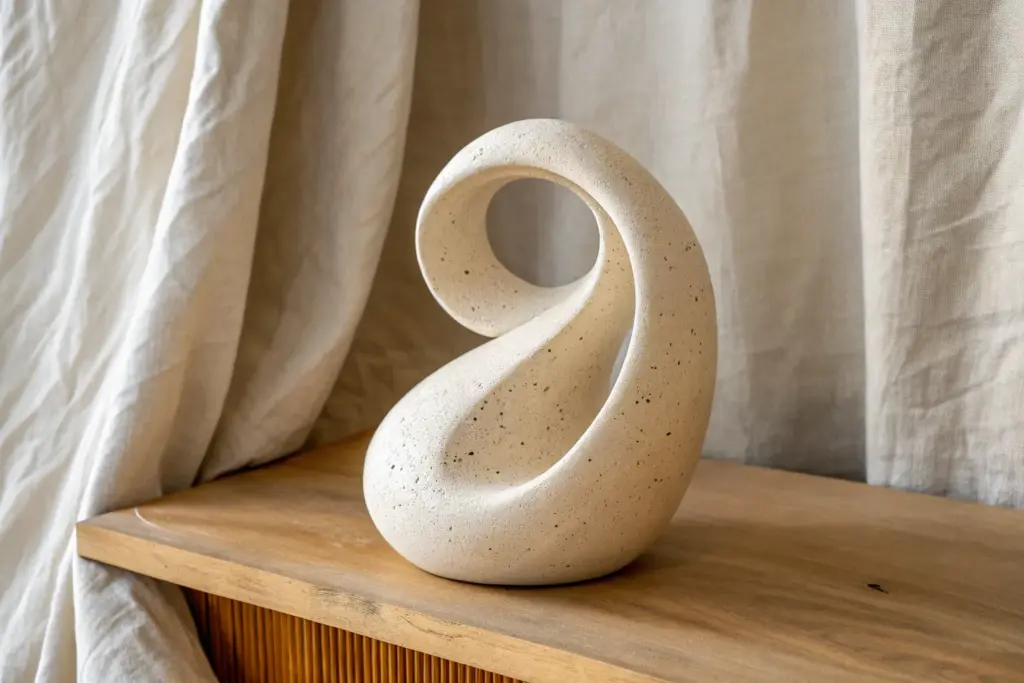
Twisted Ribbon Form
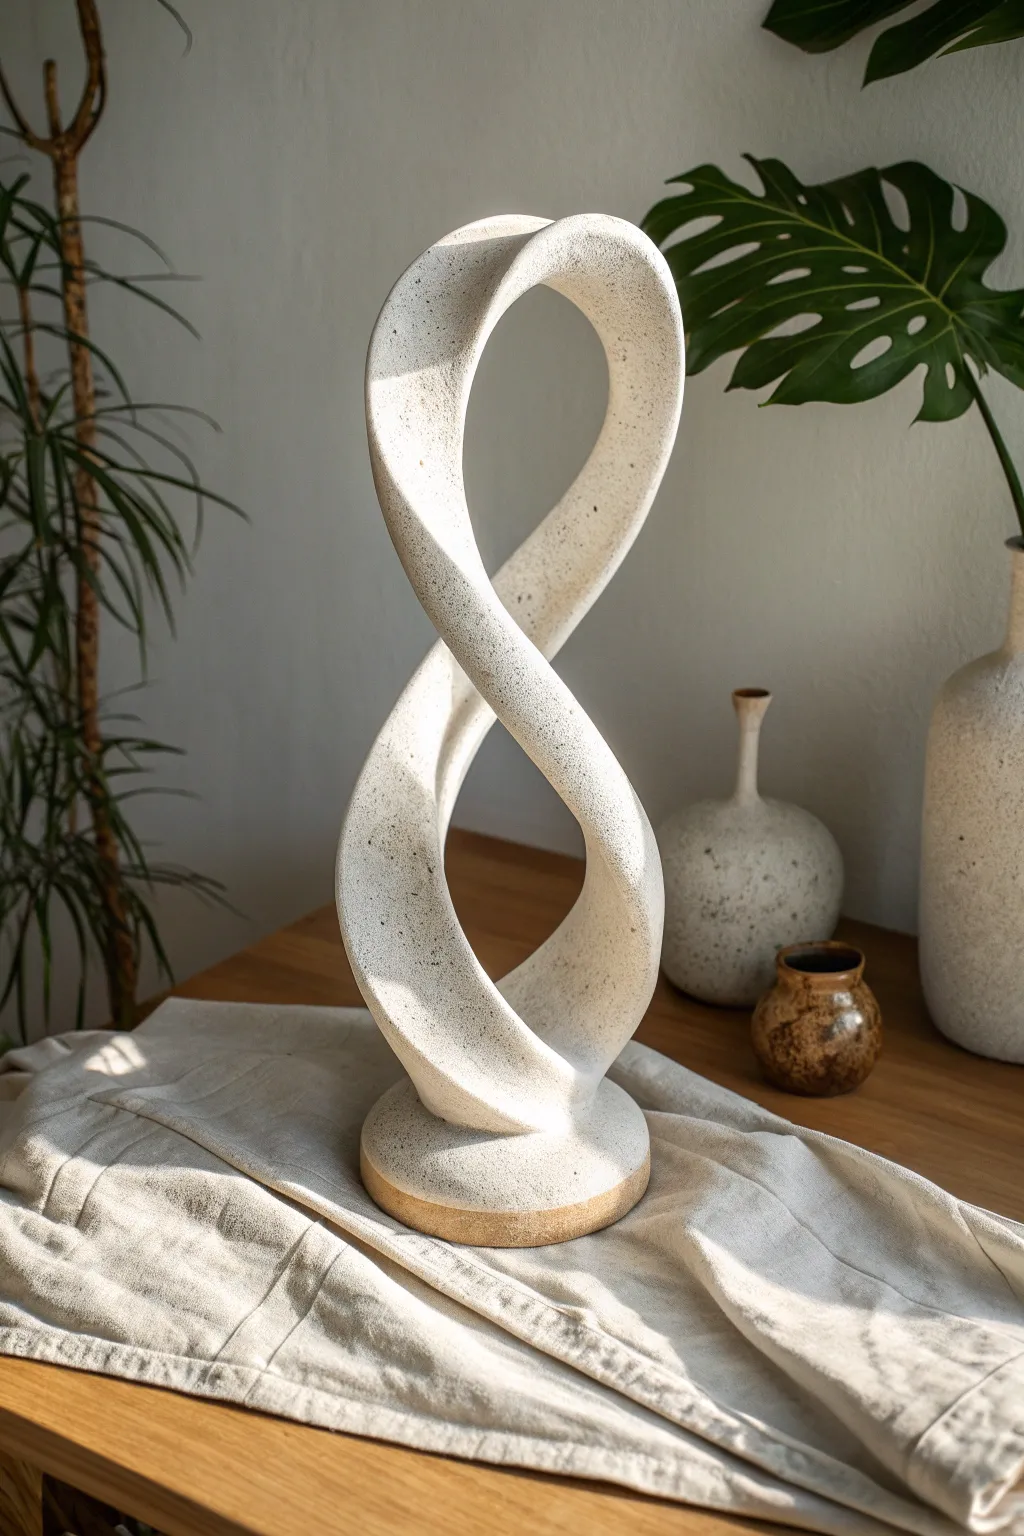
This striking sculpture captures movement and stillness simultaneously, featuring an elegant figure-eight twist with a tactile, speckled stoneware finish. Its minimalist silhouette makes it a perfect centerpiece for modern or Japandi-style interiors.
Detailed Instructions
Materials
- Air-dry clay (stone effect or white)
- Strong armature wire (12-gauge or similar)
- Aluminum foil
- Masking tape
- Wooden sculpting tools
- Sponge and water
- Circular wooden base (optional for internal support)
- Sandpaper (fine and medium grit)
- Speckled granite spray paint or acrylic paint (cream and brown)
- Matte sealant
- Rolling pin
Step 1: Building the Core
-
Form the armature:
Begin by cutting a long piece of heavy-gauge wire. Bend it into a long oval loop, then twist the center once to create a tall figure-eight or infinity shape. -
Secure the base:
Create a circular wire loop at the bottom of your figure-eight to act as the internal foot. If you want extra stability, you can drill holes into a small wooden disc and glue the wire ends into it. -
Bulk up with foil:
Crumple strips of aluminum foil and wrap them tightly around the wire. Aim for a consistent thickness throughout the loop, tapering slightly where the ribbon twists. -
Tape the form:
Wrap the entire foil structure in masking tape. This smooths out sharp foil edges and gives the clay a better surface to adhere to than slick metal.
Keep it Upright
If the sculpture feels top-heavy during the drying phase, lean it gently against a heavy book or jar wrapped in parchment paper to prevent it from sagging.
Step 2: Sculpting the ribbon
-
Prepare the clay:
Roll out your air-dry clay into long, flat strips or snakes, approximately 1/4 inch thick. I find it helpful to keep a damp cloth nearby to keep the clay specific moist while working. -
Apply the initial layer:
Begin pressing the clay onto the armature, starting from the base and working upwards. Ensure you cover all the masking tape completely. -
Refine the shape:
Use your thumbs to merge the seams of the clay strips. The goal is to make the sculpture look like one continuous piece of material. -
Define the edges:
Use a flat wooden modeling tool to sharpen the outer and inner edges of the ribbon. The sculpture should have a slightly squared-off profile, rather than being perfectly round like a tube. -
Smooth the surface:
Dip a sponge in a little water and gently wipe the surface to remove fingerprints and major bumps. Don’t make it too wet, or the clay might crack. -
Create the base:
Add a thick disk of clay at the very bottom to cover the wire foot. Smooth the transition where the twisted ribbon meets this circular base.
Step 3: Finishing Touches
-
Dry thoroughly:
Let the sculpture dry for at least 24-48 hours. Turn it occasionally if possible to ensure airflow reaches all sides. -
Sand for smoothness:
Once bone dry, use medium grit sandpaper to remove any large imperfections. Follow up with fine grit sandpaper to get a silky smooth finish on the curves. -
Wipe down:
Use a slightly damp cloth or a dry brush to remove all sanding dust before painting. -
Create the texture:
Apply a base coat of cream or off-white acrylic paint. If you want that specific stoneware look, use a faux-granite spray paint or splatter dilute brown paint using a stiff toothbrush. -
Seal the work:
Finish with a coat of matte spray sealant. This protects the clay and gives it that professional, unglazed ceramic appearance.
Natural Stone Look
Mix dried coffee grounds or fine sand directly into your white air-dry clay before sculpting. This creates an authentic, built-in texture.
Now you have a sophisticated, organic sculpture that looks like it came straight from a pottery studio


Interlocking Rings
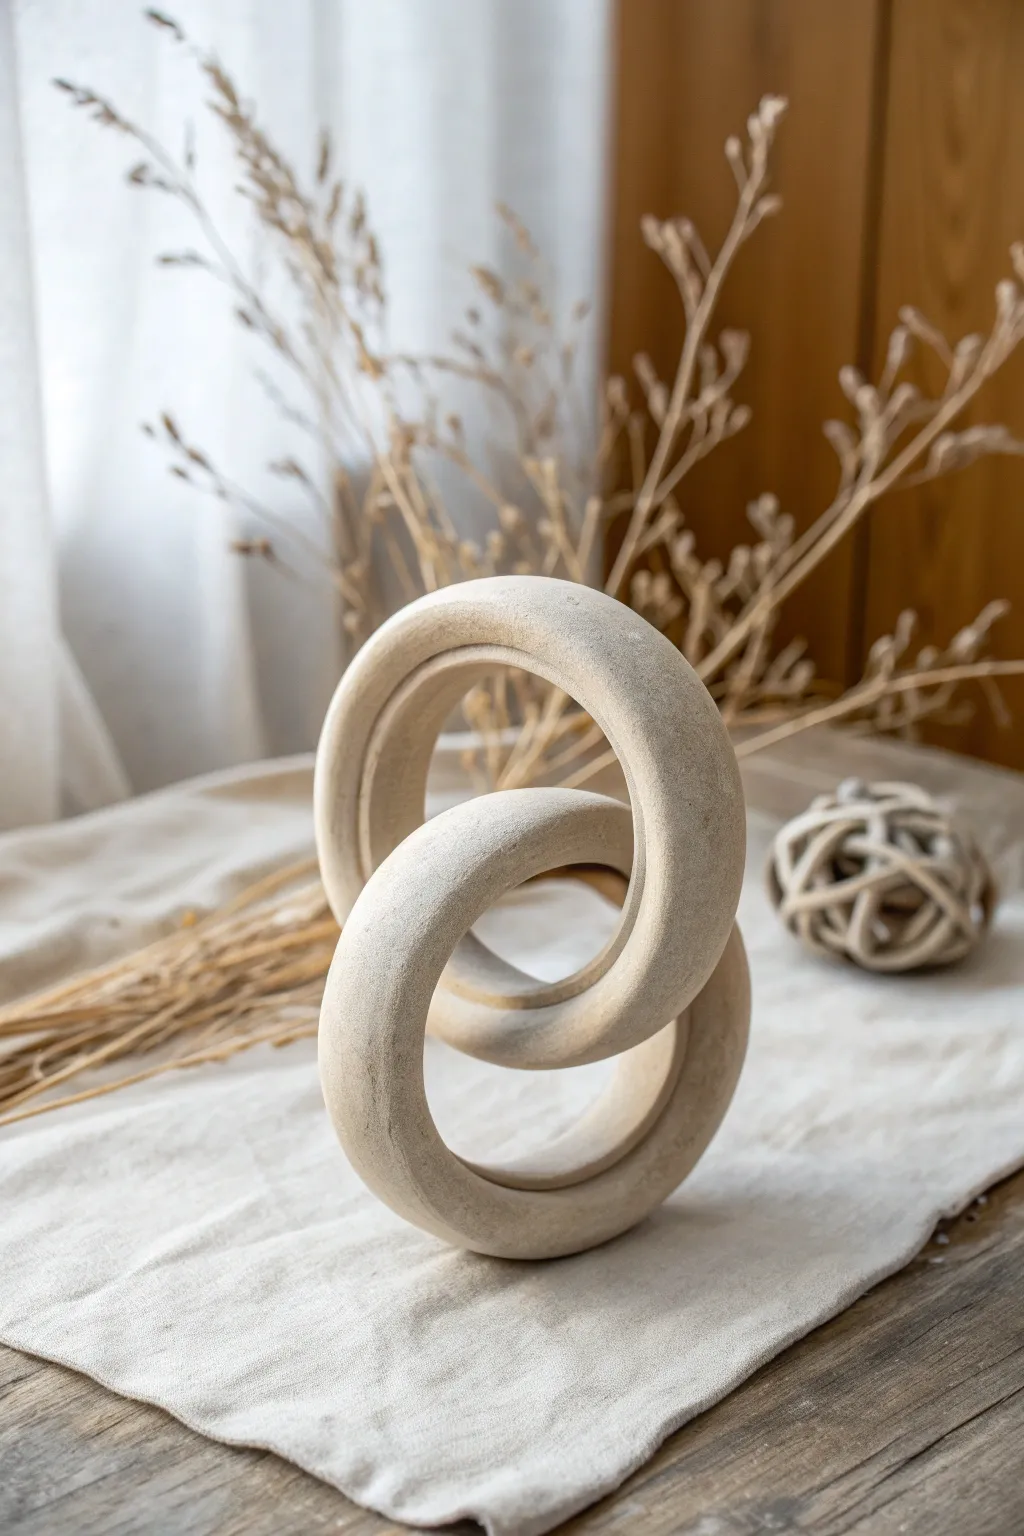
Embrace the beauty of raw simplicity with this chic decorative sculpture featuring two chunky, interlocking loops. The finished piece mimics the look of carved sandstone or limestone, bringing an earthy, organic modern feel to any shelf or tabletop.
Step-by-Step Tutorial
Materials
- Air-dry modeling clay (white or natural stone color, approx. 1kg)
- Aluminum foil
- Rolling pin
- Sculpting tools or a butter knife
- Cup of water
- Fine-grit sandpaper (120 and 220 grit)
- Acrylic paint (beige, cream, stone gray)
- Baking soda or textured medium (optional)
- Matte sealant spray
Step 1: Forming the Base Structure
-
Create the Armature:
Begin by crumpling aluminum foil into two long, thick snake-like ropes. These should be roughly 10-12 inches long and about 1 inch thick. -
Shape the First Ring:
Take one foil rope and bend it into a circle, twisting the ends together tightly to secure the donut shape. This armature saves clay and makes the sculpture lighter. -
Interlock the Second Ring:
Thread the second foil rope through the center of the first foil ring you just created. -
Secure the Connection:
Bend the second rope into a circle to close the loop, twisting the ends securely so you now have two interlocked foil rings.
Crack Control
If cracks appear during drying, mix a small slurry of clay and water (slip) to fill the gaps, then sand smooth once dry.
Step 2: Adding the Clay Body
-
Prepare the Clay:
Knead your air-dry clay until it is soft and pliable. Roll out a large slab of clay to about 1/4 inch thickness. -
Cut Strips:
Cut the clay slab into wide strips that are manageable to work with, roughly 2-3 inches wide. -
Cover the First Ring:
Wrap the clay strips around the first foil ring. Press the clay firmly against the foil to remove air pockets. -
Smooth the Seams:
Wet your fingers slightly and blend the seams where the clay strips meet. The goal is a seamless, continuous surface. -
Cover the Second Ring:
Carefully wrap the second ring with clay strips. This part is tricky; manipulate the rings gently so you can reach the inner curves without distorting the first ring. -
Refine the Shape:
Once fully covered, use your palms to gently roll and shape the rings to ensure they are uniform in thickness. I find it helpful to constantly rotate the piece to spot any lumpy areas. -
Add Texture (Optional):
If you want a rougher look immediately, dab the wet clay with a crumpled ball of foil or a stiff bristle brush. -
First Drying Phase:
Let the sculpture sit in a cool, dry place. Prop parts of the rings up with spare bits of foam or crumpled paper so they don’t flatten under their own weight while wet.
Make It Marble
Twist two colors of clay together before rolling out your strips to create a natural swirled marble effect without painting.
Step 3: Finishing and Painting
-
Sanding:
Once completely dry (allow 24-48 hours), use 120-grit sandpaper to remove major bumps or fingerprints. Follow up with 220-grit for a smoother, stone-like feel. -
Create Textured Paint:
Mix a beige or cream acrylic paint with a teaspoon of baking soda. This creates a grainy, limestone texture. -
Base Coat:
Apply the textured paint mixture all over the sculpture. Use a dabbing motion rather than long strokes to build up that stone effect. -
Adding Depth:
While the base is slightly tacky, dry-brush a very small amount of lighter cream or white paint onto the highest points of the rings to highlight the curves. -
Final Seal:
Spray the entire piece with a matte sealant to protect the paint and prevent the clay from absorbing moisture over time.
Place your sculptural rings on a linen cloth or a wooden sideboard to admire your handcrafted modern art

The Complete Guide to Pottery Troubleshooting
Uncover the most common ceramic mistakes—from cracking clay to failed glazes—and learn how to fix them fast.
Spiral Coil Monument
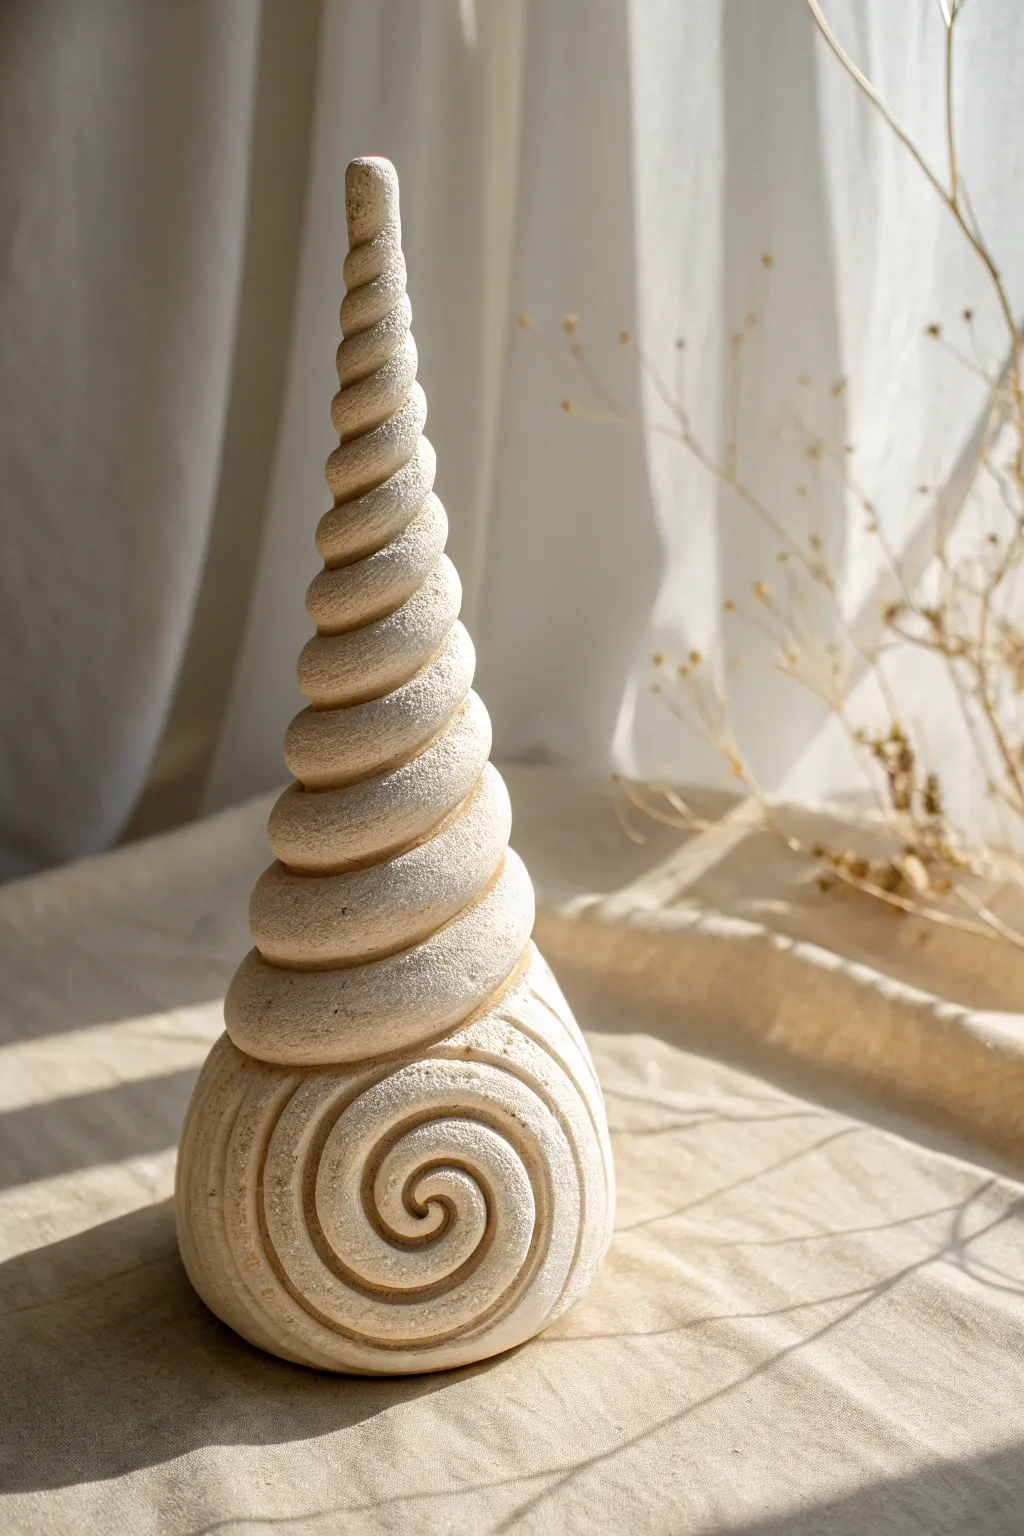
Evoking the natural elegance of a seashell and the mystique of a unicorn horn, this abstract spiral sculpture brings organic beauty to any shelf. Its textured, sandy finish and continuous carved coil create a sense of upward movement and timeless calm.
Step-by-Step
Materials
- Air-dry stone clay (light beige or white)
- Sculpting wire armature (medium gauge)
- Aluminum foil
- Pliers
- Rolling pin
- Sculpting loop tools
- Needle tool
- Sponge
- Fine-grit sandpaper
- Acrylic sealant (matte)
Step 1: Building the Core
-
Wire armature:
Begin by cutting a length of medium-gauge wire approximately 12 inches long. Fold it in half and twist the ends together to create a sturdy central spine for your sculpture. -
Foil bulk:
Crumple aluminum foil tightly around the wire. Shape a bulbous, rounded base at the bottom and taper the foil gradually as you move up, forming a tall, thin cone shape. This saves clay and reduces drying time. -
Base stability:
Ensure the bottom of your foil cone is flat so the sculpture stands upright independently. If it wobbles, press the foil firmly against a hard surface to flatten it out.
Seamless Spirals
Work slowly when connecting the spiral from the base to the vertical shaft. The transition should be fluid, not an abrupt angle change.
Step 2: Applying and Shaping Clay
-
Clay preparation:
Knead your stone clay until it is soft and pliable. I find that warming it slightly in my hands makes it much easier to work with without cracking. -
Covering the form:
Roll out a sheet of clay about 1/4 inch thick. Wrap this sheet completely around your foil armature, smoothing the seams together with a bit of water until the foil is entirely hidden. -
Refining the cone:
Roll the clay-covered form gently on your work surface to ensure it is perfectly round and tapered. The surface should be smooth, but don’t worry about perfection yet, as we will be adding texture.
Step 3: Carving the spirals
-
Mapping the path:
Using a needle tool, lightly sketch a continuous spiral line starting from the very center of the bulbous base. Draw the line spiraling outward on the base, then winding up the entire length of the cone to the tip. -
Base spiral definition:
Use a small loop tool to carve out the groove you just sketched on the round base. Dig deep enough to create a distinct shadow line, emphasizing the snail-shell pattern at the bottom. -
Vertical twisting:
Continue carving the groove up the vertical shaft. As you move higher, the distance between the spiral rings should become evenly spaced, creating that twisted rope effect. -
Rounding the ridges:
Once the main groove is carved, use your fingers or a moist sponge to round off the edges of the ridges between the grooves. You want the coil to look like a soft, organic bulge rather than a sharp screw thread. -
Refining the tip:
Pay special attention to the very top. The spiral should get tighter and smaller until it terminates in a gentle point. Use a delicate touch here to avoid bending the tip.
Ancient Artifact Look
Dilute a tiny drop of brown acrylic paint in water and wash it over the dried piece. Wipe it off immediately to leave dark pigment only in the deep grooves.
Step 4: Texturing and Finishing
-
Adding grit:
To achieve the sandstone look, take an old toothbrush or a stiff-bristle brush and stipple the entire surface of the wet clay. This micro-texture mimics natural stone. -
Initial drying:
Let the sculpture stand in a safe, dry place away from direct heat. Allow it to air dry for at least 24 to 48 hours until it turns a lighter color and feels hard to the touch. -
Sanding:
Once bone dry, take fine-grit sandpaper and very lightly sand the highest points of the spiral ridges. This knocks back any sharp burrs while leaving the stone texture in the recesses. -
Dusting off:
Use a soft, dry paintbrush to sweep away all the clay dust from the grooves and texture pockets. -
Sealing:
Finish by applying a coat of clear matte acrylic sealant. This protects the clay and enhances the natural stone color without adding an artificial glossy shine.
Place your finished coil near a window where shadows can play across the ridges, highlighting your craftsmanship
Folded Slab Sculpture

This elegant structural vase plays with geometry and light, featuring a square profile that gracefully spirals upwards. Built from slabs of speckled clay, its clean lines and subtle twist create a modern, architectural feel that serves as a stunning centerpiece.
Step-by-Step Guide
Materials
- Speckled stoneware clay (mid-fire)
- Rolling pin
- Two long wooden guide strips (1/4 inch thick)
- Ruler
- Fettling knife or X-Acto blade
- Cardboard template (long rectangle)
- Slip and scoring tool
- Wooden paddle
- Sponge
- Straight edge/carpenter’s square
- Newspaper or heat gun (optional)
Step 1: Planning and Rolling
-
Draft your template:
Create a paper template for the four sides. You want a tall trapezoid shape where the top and bottom widths match your desired opening and base size, but the sides are angled. Alternatively, for a simple twist, cut four identical long rectangles (e.g., 3 inches wide by 12 inches tall). -
Roll out the slab:
Wedge your clay thoroughly to remove air bubbles. Place the clay between the two 1/4-inch wooden guide strips and roll it out with your rolling pin until it is perfectly even and smooth. -
Cut the forms:
Lay your template onto the slab. Using the fettling knife and a straight edge, carefully cut out four identical side panels and one square piece for the base. -
Let it firm up:
This is crucial: allow the slabs to dry to a ‘leather hard’ state. They should be stiff enough to hold themselves up without flopping but still soft enough to bend slightly without cracking. I usually leave them uncovered for about an hour, depending on humidity.
Keep it Straight
Use a carpenter’s square while assembling the initial box to ensure your vertical walls are perfectly perpendicular to the base before you start twisting.
Step 2: Assembling the Form
-
Bevel the edges:
Once leather hard, cut a 45-degree angle (miter) along the long vertical edges of all four side panels. This ensures a clean, sharp corner when they are joined. -
Score and slip the first seam:
Score (scratch) the beveled edges of two panels and the corresponding side of the base. Apply clay slip generously. -
Attach the first two walls:
Press two panels together at the corner and down onto the base. Use a small coil of soft clay on the inside seam to reinforce the joint, blending it smooth with your finger or a tool. -
Complete the box:
Repeat the process with the remaining two walls, slipping and scoring every joint. You now have a tall, straight square box. -
Clean the seams:
On the outside, use a wooden rib or paddle to compress the corners, ensuring the seams are tight and invisible.
Step 3: Creating the Twist
-
Prepare for twisting:
Dampen the clay slightly with a sponge if it feels too stiff. You need the clay to accept some tension. -
Initiate the spiral:
Gently grip the base of the vase with one hand (or clamp it softly between heavy books) and grasp the top rim with the other. Very slowly rotate the top clockwise while keeping the base stationary. -
Refine the curve:
Twist only a few degrees at a time. As the flat planes curve, they might want to buckle. Use a long dowel or your hand from the inside to gently push the walls outward, maintaining the volume. -
Sharpen the edges:
The twisting softens the corners. Take your wooden paddle and gently tap the twisted corners to re-define that sharp, geometric edge. -
Level the rim:
The twisting motion will likely make the rim uneven. Use a needle tool or wire cutter to slice the top rim perfectly flat again, then smooth it with a chamois or damp sponge.
Cracking Seams?
If seams split during twisting, the clay was too dry. Score deep, add fresh slip, and press a thin coil into the crack properly. Smooth it out and twist less aggressively.
Step 4: Finishing Touches
-
Smooth the surface:
Once the shape is final, use a barely damp sponge to wipe away any grog or roughness, highlighting the natural speckle of the clay. -
Slow drying:
Cover the vase loosely with plastic. Because of the stress put on the seams during twisting, slow drying is essential to prevent cracks. -
Bisque fire:
Load into the kiln for a bisque firing (typically Cone 04) once the piece is bone dry. -
Glaze application:
Apply a transparent or matte white glaze. A translucent glaze is best here as it allows the speckled clay body to show through, just like in the reference image. -
Final firing:
Fire to the maturity temperature of your clay (likely Cone 5 or 6). Once cooled, sand the bottom if necessary to protect your furniture.
Enjoy the sculptural shadow play this unique vase brings to your space


What Really Happens Inside the Kiln
Learn how time and temperature work together inside the kiln to transform clay into durable ceramic.
Wave Form With Motion Lines
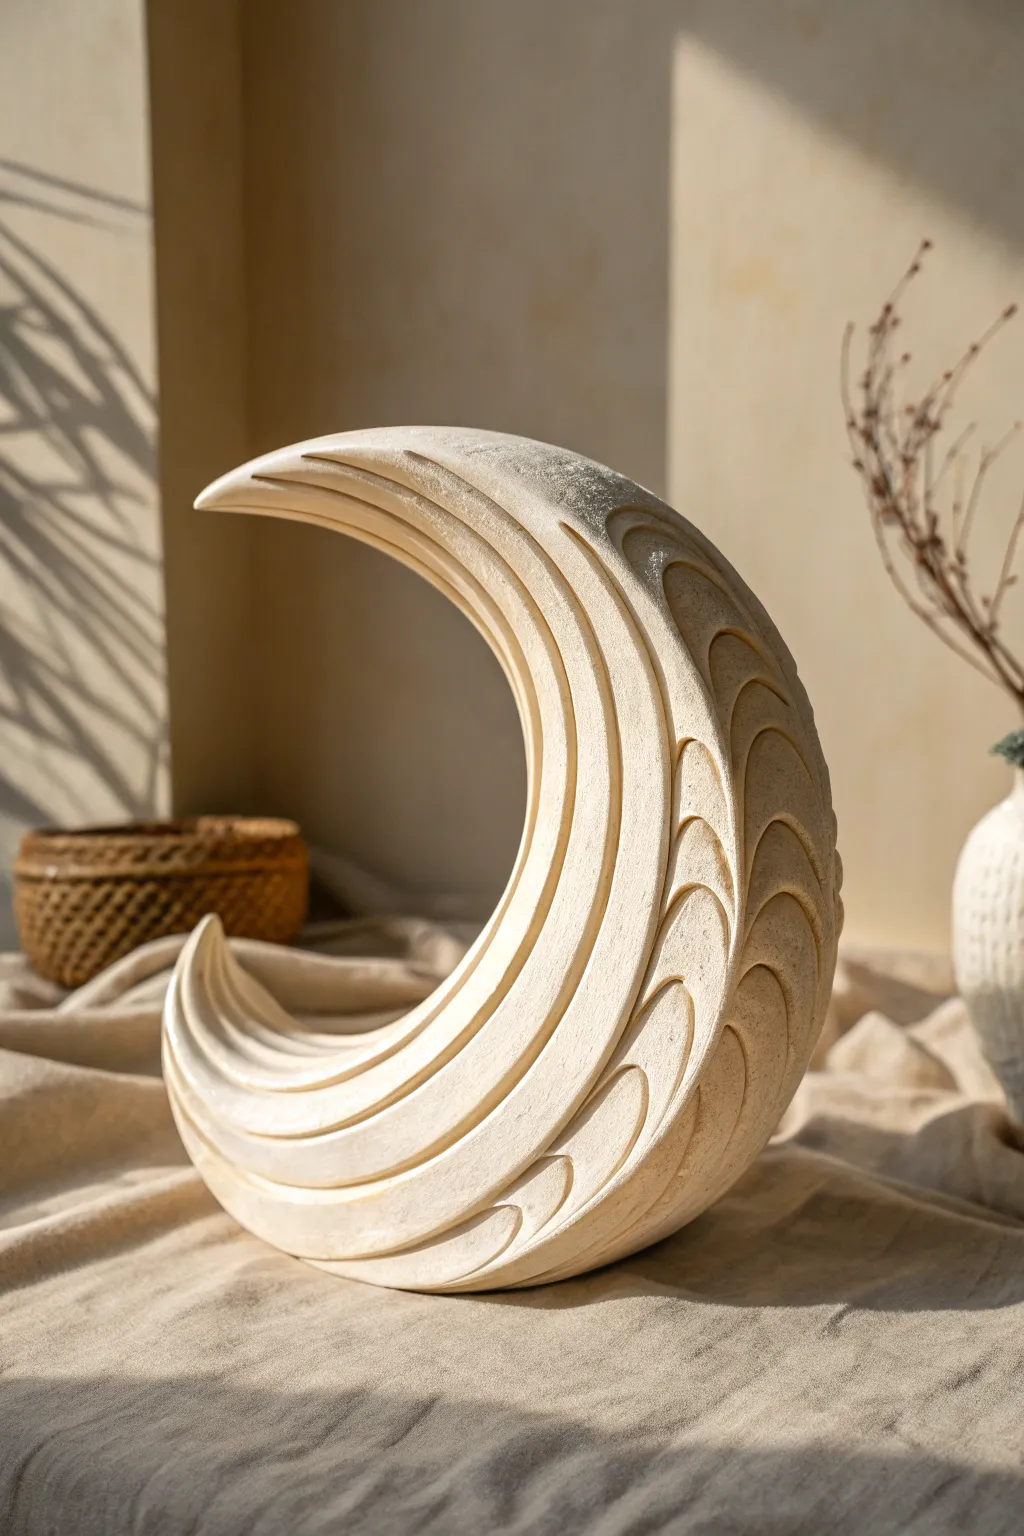
Capturing the fluid motion of water in a solid form, this crescent moon sculpture features deep, concentric ridges that mimic ripples washing onto a shore. The textured, sandy finish gives it an organic, ancient feel perfect for minimal decor.
How-To Guide
Materials
- High-density sculpting foam block or aerated concrete block
- Hand saw or coping saw
- Rasps and rifflers (half-round and varied shapes)
- Medium and fine grit sandpaper (120, 220)
- Small looped clay sculpting tool
- Gesso or texture paste
- Cream and beige acrylic paints
- Sea sponge
- Matte spray sealant
- Pencil/marker for drafting
Step 1: Roughing Out the Form
-
Draft the crescent:
Begin by drawing the outer silhouette of the crescent moon shape onto your sculpting block. Ensure the base curve is wide enough to allow the sculpture to stand freely on its own, or plan for a flattened bottom later. -
Cut the profile:
Using a hand saw or coping saw, cut away the excess material outside your drawn line. Remove large chunks first, leaving yourself about a half-inch buffer around your actual line to refine later. -
Refine the curve:
Switch to a coarse rasp to shave down the saw marks. Work around the outer and inner curves until you have a smooth, clean crescent shape with a consistent thickness. -
Taper the edges:
Gently taper the two points of the crescent so they aren’t blocky. You want the sculpture to feel dynamic, thinning out towards the top tip and the bottom tail.
Lighting Matters
Work under a strong directional light source (like a desk lamp) while carving. The cast shadows reveal surface irregularities you might miss in flat light.
Step 2: Carving the Motion Lines
-
Map the ridges:
With a pencil, lightly draw the concentric swooping lines that will become your ridges. Start from the outer spine and curve them inward toward the hollow of the moon. -
Initial gouging:
Use a small, looped sculpting tool or a V-gouge to carve shallow channels along your pencil lines. This establishes the ‘valleys’ of your wave pattern. -
Deepen the relief:
Widen these channels using a half-round rasp or riffler. I find it helpful to angle the tool so one side of the ridge is steeper than the other, creating a sense of direction like a crashing wave. -
Sculpt the internal waves:
Carve the secondary, smaller curves (the scallop shapes) closer to the spine. These should look like overlapping scales or smaller ripples forming within the larger flow. -
Smooth the valleys:
Wrap sandpaper around a dowel or paintbrush handle to sand inside the grooved channels. This cleans up rough tool marks while pressing the texture in.
Metallic Touch
For a luxe look, apply gold leaf or metallic wax just along the very tip of the highest ridge spines to make the wave form shimmer.
Step 3: Finishing and Texture
-
Apply texture base:
Mix a small amount of sand or fine grit into white gesso or texture paste. Brush this mixture over the entire sculpture to hide the foam or concrete surface and create a stone-like grain. -
Base coat painting:
Once the texture layer is fully dry, paint the entire piece with a creamy off-white acrylic paint. Ensure you get into every deep groove. -
Enhance the shadows:
Mix a diluted beige or light taupe wash.Apply this selectively into the deepest parts of the grooves, then quickly wipe the high points with a rag to leave the shadow color only in the recesses. -
Dry brush highlights:
Dip a dry, stiff brush into pure white paint and off-load most of it on a paper towel. Lightly sweep the brush across the tops of the ridges to catch the texture. -
Sponging for stone effect:
Dab a sea sponge lightly into a warm sandstone color and stipple it randomly across the surface to break up the uniformity. -
Final seal:
Protect your work with a coat of matte spray sealant. This unifies the sheen and ensures the painted texture resembles natural, honed stone.
Place your finished sculpture near a window where the changing daylight can play across the carved ridges throughout the day
Topographic Carved Contours
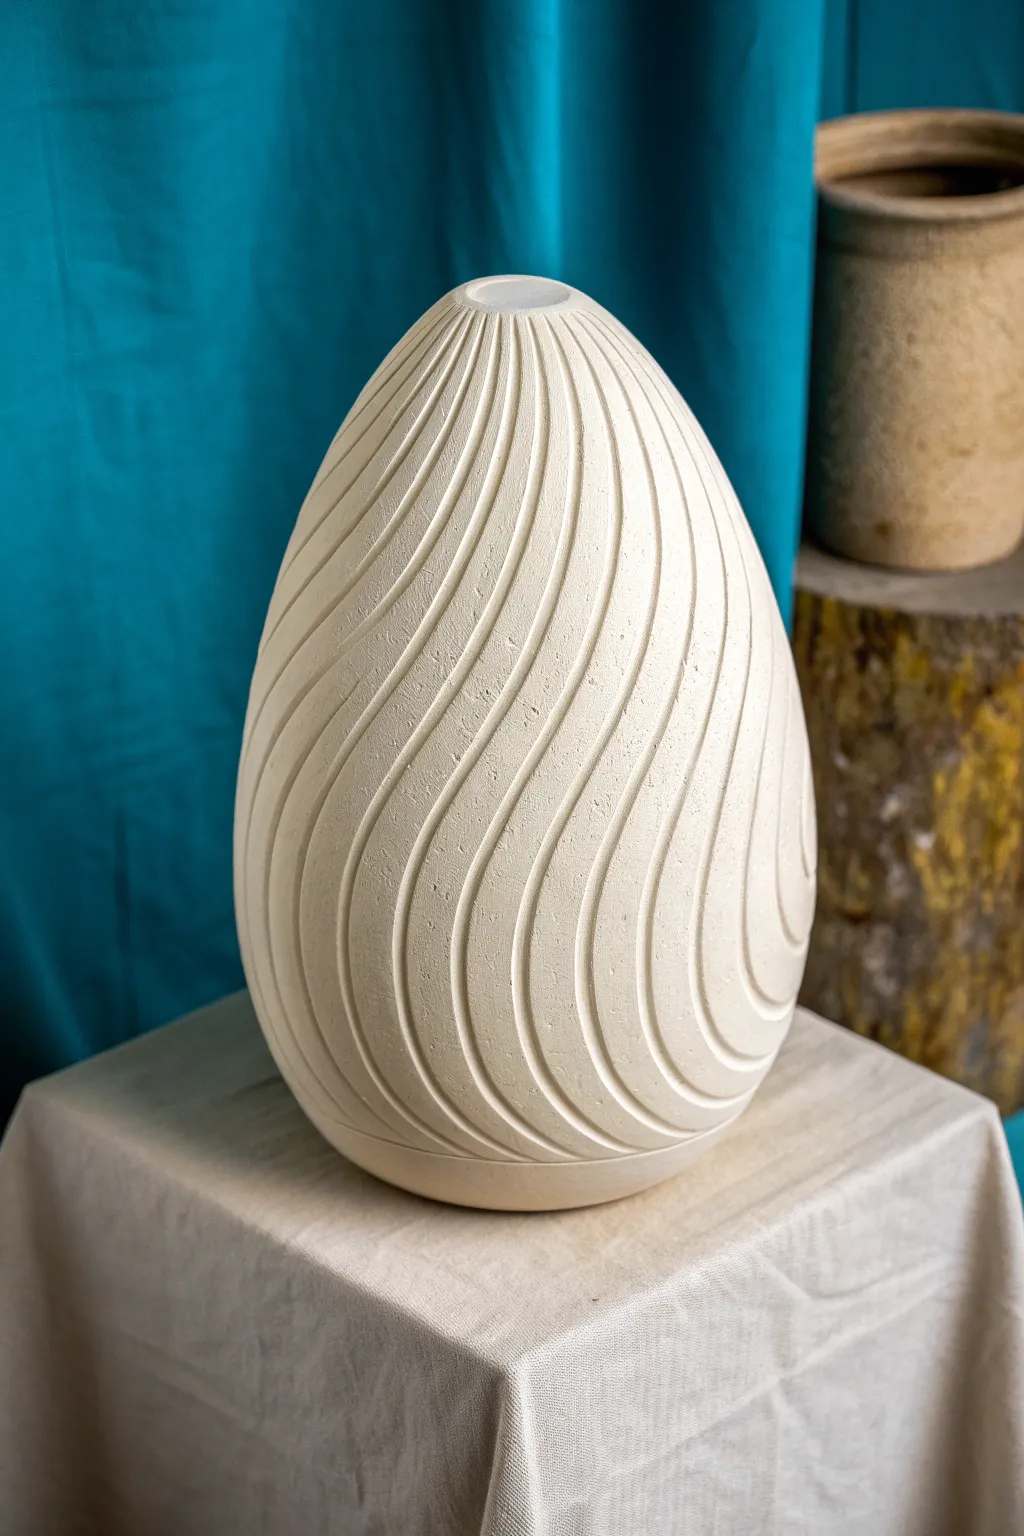
Capture the essence of rhythmic movement in three dimensions using this carved contour technique. The result is a smooth, egg-shaped sculpture featuring satisfyingly deep, swooping topographical lines that catch the light beautifully.
Detailed Instructions
Materials
- High-density sculpting plaster or hydrocal
- Large balloon or pre-made foam egg armature
- Plaster mixing bucket and water
- Loop sculpting tools various sizes
- Surform rasp or sanding screen
- Fine-grit sandpaper (220 and 400 grit)
- Pencil for mapping lines
- Clear matte sealer spray
Step 1: Casting the Form
-
Prepare the Mold:
If using a large balloon, inflate it to your desired teardrop size and suspend it upside down in a bucket to hold it steady. Alternatively, if using a commercial silicon egg mold, ensure it is clean and dusted with a release agent. -
Mix the Plaster:
Mix your high-density plaster or hydrocal according to the package instructions. Aim for a consistency similar to heavy cream—thick enough to pour but fluid enough to fill the void without air pockets. -
Pour and Agitate:
Pour the mixture slowly into your mold. Tap the sides of the mold or bucket firmly and repeatedly to force any air bubbles to the surface, ensuring a smooth final surface. -
Initial Cure:
Allow the plaster to set undisturbed until it feels cool to the touch and hard, which usually takes at least an hour depending on the volume. De-mold carefully. -
Refine the Shape:
Before the plaster fully cures to rock-hard (while it’s still slightly ‘green’ or damp), use a rasp or sanding screen to smooth out any imperfections and perfect the symmetrical egg shape.
Chipped Edges?
If a ridge chips while carving, don’t panic. Mix a tiny paste of fresh plaster and water, spackle it into the break, and let it dry. Sand it back to shape and carry on.
Step 2: Carving the Contours
-
Map the Flow:
Lightly sketch your design directly onto the plaster surface with a pencil. Start at the top point and draw swooping, curved lines that wrap diagonally down the form, mimicking the flow of wind or water. -
Start the Grooves:
Using a small U-shaped loop tool, begin carving along your pencil lines. Don’t try to go deep immediately; make a shallow initial path to establish the direction of the curve. -
Deepen the Cuts:
Switch to a slightly wider loop tool or press harder with the original one. I prefer to carve in long, continuous strokes from top to bottom to prevent jagged stops and starts in the clay. -
Create the Slope:
This isn’t just a line; it’s a topographical step. Angle your tool so one side of the groove is steeper than the other, creating a soft ‘dune’ effect rather than a simple trench. -
Refine the Ridges:
As you deepen the grooves, sharp ridges will form between them. Use a flat modeling tool or your thumb to gently round over these sharp peaks so the sculpture feels organic rather than mechanical. -
Check Consistency:
Rotate the sculpture constantly. Ensure the depth of your carving remains relatively consistent around the circumference so the visual weight is balanced.
Step 3: Finishing Touches
-
Initial Sanding:
Once the carving is complete and the plaster is fully bone-dry (this may take a day or two), gently sand the surface with 220-grit sandpaper. -
Detail Sanding:
Fold a small piece of sandpaper to get inside the grooves. This step is crucial for removing tool marks and creating that untouched, machine-perfect look. -
Dust Removal:
Use a dry paintbrush or compressed air to blast all the white plaster dust out of the deep crevices. Any leftover dust will ruin the finish. -
Final Polish:
Go over the high points lightly with 400-grit sandpaper for a silky finish. -
Seal the piece:
Apply two light coats of clear matte sealer spray. This protects the porous plaster from fingerprint oils and yellowing without changing the raw stone aesthetic.
Keep it Damp
Carving bone-dry plaster is brittle work. Mist the surface with a spray bottle of water occasionally while carving to keep the material softer and reduce dust.
Place your finished sculpture near a window where shadows can play across the grooves throughout the day

TRACK YOUR CERAMIC JOURNEY
Capture glaze tests, firing details, and creative progress—all in one simple printable. Make your projects easier to repeat and improve.
Color-Blocked Planes
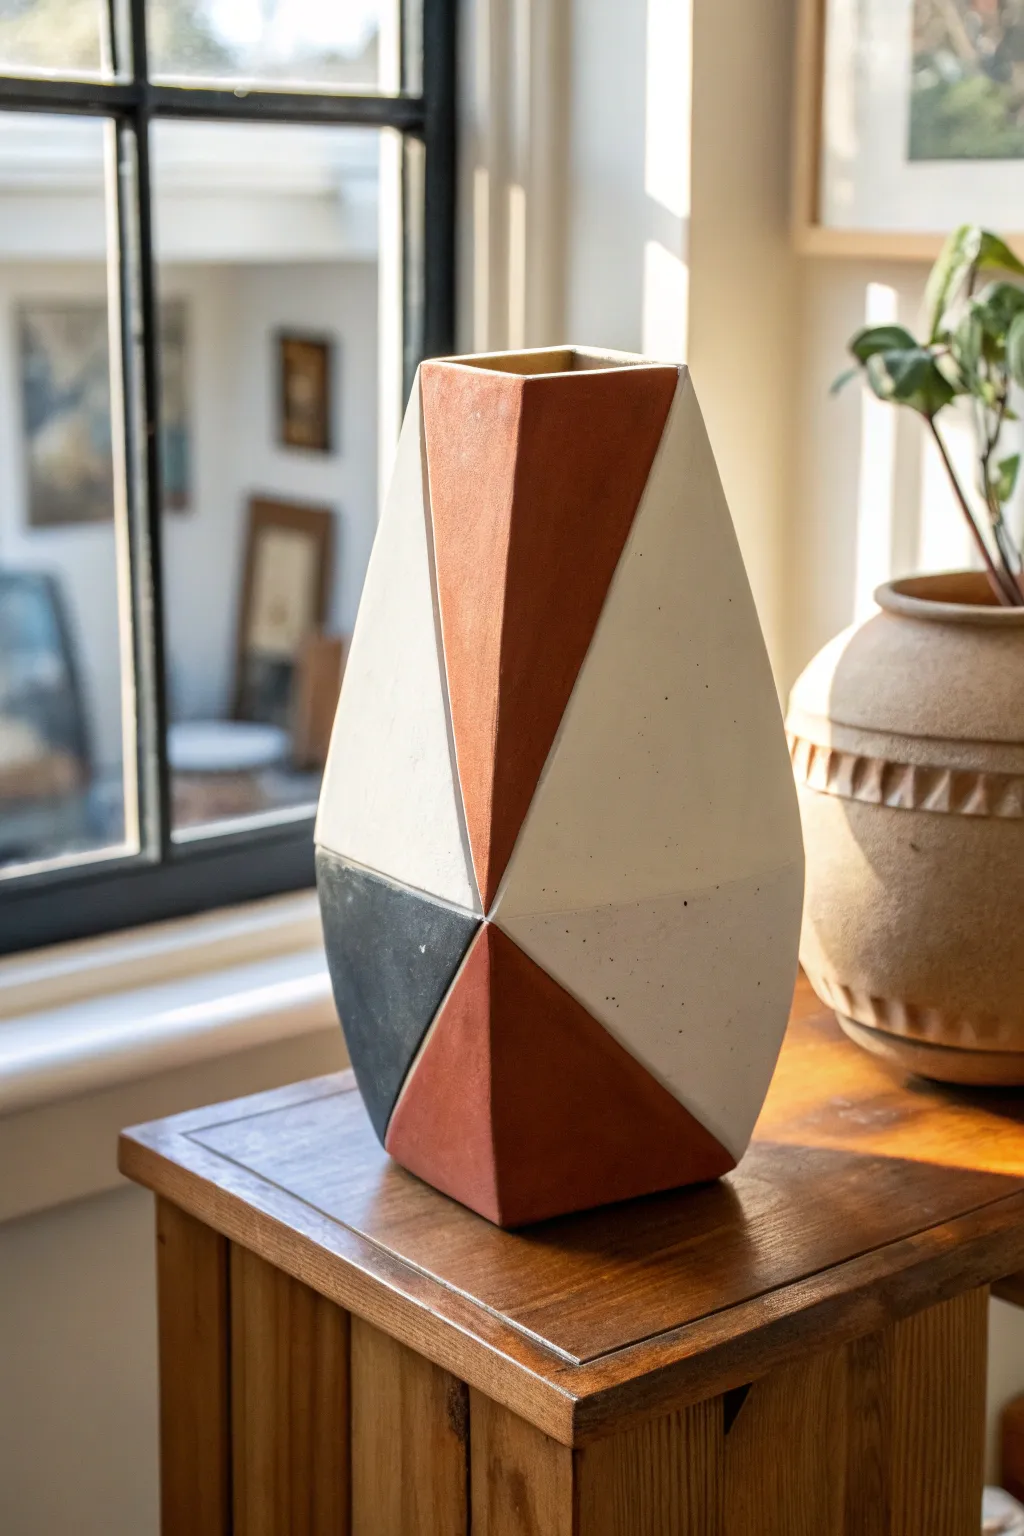
Transform a simple paper mache or cardboard base into a sophisticated, high-end sculptural vessel featuring sharp angles and bold color blocking. This project mimics the weight and texture of ceramic art using accessible materials to create a striking centerpiece.
How-To Guide
Materials
- Corregated cardboard sheets
- Masking tape
- PVA glue or wood glue
- Paper clay or air-dry clay
- Fine-grit sandpaper (220 grit)
- Acrylic paints (terracotta/rust, creamy white, charcoal/black)
- Matte varnish or sealant
- Ruler and craft knife
- Small flat paintbrushes
Step 1: Constructing the Armature
-
Profile sketches:
Begin by sketching the four main side profiles of your vase on a piece of paper. You want an elongated diamond shape that tapers at the top and bottom. Make sure all four sides match in height. -
Cut cardboard panels:
Transfer your measurements to the corrugated cardboard. Cut out four identical tall, tapered panels using a sharp craft knife and a ruler to ensure straight edges. -
Create the base:
Cut a small square of cardboard for the base. This will anchor your four panels. The size of the square determines how wide the bottom of your vase will be. -
Initial assembly:
Tape the four panels to the square base using masking tape. Bring the sides up so they meet; tape the seams securely on both the inside and outside to create a hollow 3D form. -
Refining the shape:
To create the faceted look seen in the photo, you may need to score the cardboard horizontally across the widest point and gently bend it outward. This emphasizes the diamond-like geometry.
Step 2: Sculpting the Surface
-
Apply base layer:
Mix a small amount of water into your paper clay to make it spreadable. Apply a thin, even layer of clay over the entire cardboard structure. -
Build sharp edges:
As you add more clay, focus on building up the corners where the planes meet. Use a flat modeling tool or an old credit card to scrape the clay flat, sharpening the ridge lines. -
Create facets:
Add extra clay to specific triangular sections to raise them slightly, creating distinct geometric planes rather than a smooth curve. -
Dry thoroughly:
Let the sculpture dry completely. This usually takes at least 24-48 hours depending on humidity. Don’t rush this, or cracks may appear later. -
Sand for smoothness:
Once bone dry, use fine-grit sandpaper to smooth out the flat planes. I find using a sanding block helps keep the surfaces perfectly flat while sharpening the angular transitions.
Crisp Paint Lines
Burnish the edge of your painter’s tape with a fingernail, then apply a tiny amount of the base color over the tape edge before adding the new color to prevent bleed.
Step 3: Color Blocking
-
Map the design:
Lightly draw your geometric pattern directly onto the sculpture with a pencil. Use the physical ridges of the form to dictate where colors change. -
Paint the lightest color:
Start with the creamy white paint. Apply two coats to the designated sections, extending slightly over the pencil lines to ensure full coverage. -
Apply masking tape:
Once the white paint is fully dry, use low-tack painters tape to mask off the crisp lines where the darker colors will meet the white. -
Add rust tones:
Paint the terracotta or rust-colored sections. You might want to mix in a tiny bit of baking soda or texture medium to give it that earthy, ceramic feel. -
Paint the dark accents:
Fill in the final geometric sections with charcoal or black paint. This high-contrast element grounds the piece visually. -
Remove tape:
Carefully peel back the tape while the final coat is still slightly tacky to get the cleanest possible lines. -
Seal the work:
Finish with a coat of matte varnish. This protects the paint and unifies the sheen, making the object look more like fired clay and less like painted cardboard.
Surface Texture Fix
If the dried clay looks too bumpy or purely like plaster, lightly stipple the wet paint with a sponge rather than brushing it. This creates a convincing stone-like finish.
Place your new sculpture near a window to let the natural light emphasize the sharp angles and rich colors
Marbled Clay Flow Form

Capture the elegance of fluid motion with this marbled clay sculpture, featuring a graceful, elongated twist. By blending cream and terracotta tones, you’ll create a sophisticated faux-stone finish that looks stunning on any mantle.
Step-by-Step Tutorial
Materials
- Air-dry clay (white and terracotta/brown)
- Acrylic rolling pin
- Clay wire cutter or fishing line
- Sculpting sponge
- Water in a small bowl
- Sandpaper (fine grit)
- Matte spray varnish or sealant
- Wooden dowel or PVC pipe (optional, for internal support)
- Clay carving tools (ribbon tool)
Step 1: Marbling the Clay
-
Prepare your clay:
Start by conditioning two large blocks of air-dry clay—one white and one terracotta. Knead each color separately until they are soft, warm, and pliable to prevent cracking later. -
Form the ropes:
Roll each color into several long, thick snakes or ropes. You want roughly a 60/40 ratio of white to terracotta to maintain that light, airy look. -
Twist and combine:
Gather the ropes into a single bundle, alternating colors. Twist the bundle tightly like a candy cane to begin merging the two tones together. -
Fold and roll:
Fold the twisted log in half and roll it out again. Repeat this process 3-4 times. Stop before the colors blend completely; distinct streaks are essential for the marbled effect.
Cracks happen!
If small cracks appear during drying, make a slip paste (clay + water) and fill them in. Sand smooth once dry.
Step 2: Shaping the Form
-
Create the base cylinder:
Consolidate your marbled clay into a tall, thick cylinder. I find it easiest to roll this vertically on the table to get a uniform thickness before starting the detailed shaping. -
Establish the taper:
Using your hands, gently squeeze and pull the clay upwards to elongate the form. Goal is to create a shape that is wider at the base, narrows significantly in the middle ‘waist’, and flares slightly at the top. -
Add structure (optional):
If you are worried about the height, carefully insert a wooden dowel through the center to act as a spine. This helps keep the sculpture vertical while drying. -
Smooth the surface:
Dip your fingers or a sponge in a little water and smooth out any bumps or fingerprints. The surface should be sleek before you add the spiral details.
Make it functional
Drill a hole roughly halfway down the center to insert a glass test tube. Now it can hold fresh flowers.
Step 3: Carving the Twist
-
Mark the spiral guidelines:
With a needle tool or toothpick, lightly sketch a long, spiraling line that wraps around the vase from bottom to top. This will be your guide for the deep grooves. -
Carve the primary groove:
Using a ribbon tool or a rounded modeling tool, press firmly along your guide line to create a deep, continuous indentation. Follow the natural flow of the marble pattern where possible. -
Deepen and refine:
Widen the groove slightly and smooth the edges with a damp finger. The twist should look organic, like piece of fabric being wrung out. -
Bevel the ridges:
Gently shape the clay between the grooves so it curves outward, creating rounded ridges that emphasize the spiral motion. This light and shadow play is key to the final look. -
Final smoothing:
Give the entire piece a final pass with a damp sponge. Ensure the transitions between the carved grooves and the raised ridges are seamless and soft.
Step 4: Finishing Touches
-
Let it dry completely:
Allow the sculpture to dry for at least 24-48 hours. Place it away from direct heat sources to prevent uneven drying or cracking. -
Sand for perfection:
Once bone dry, use fine-grit sandpaper to gently buff the surface. This removes any lingering texture and makes the clay feel like smooth stone. -
Dust off:
Wipe the sculpture down with a slightly damp cloth or a dry brush to remove all sanding dust. -
Seal the piece:
Finish with a coat of matte spray varnish. This protects the clay and enriches the contrast between the white and terracotta colors without adding unnatural shine.
Place your finished sculpture in a spot with natural light to highlight the beautiful spiral curves