Air-dry clay is my go-to when I want that instant creative hit without a kiln or fancy tools. Here are my favorite air clay art ideas that feel totally doable, but still look like you really know what you’re doing.
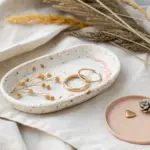
Simple Trinket Dishes With Texture
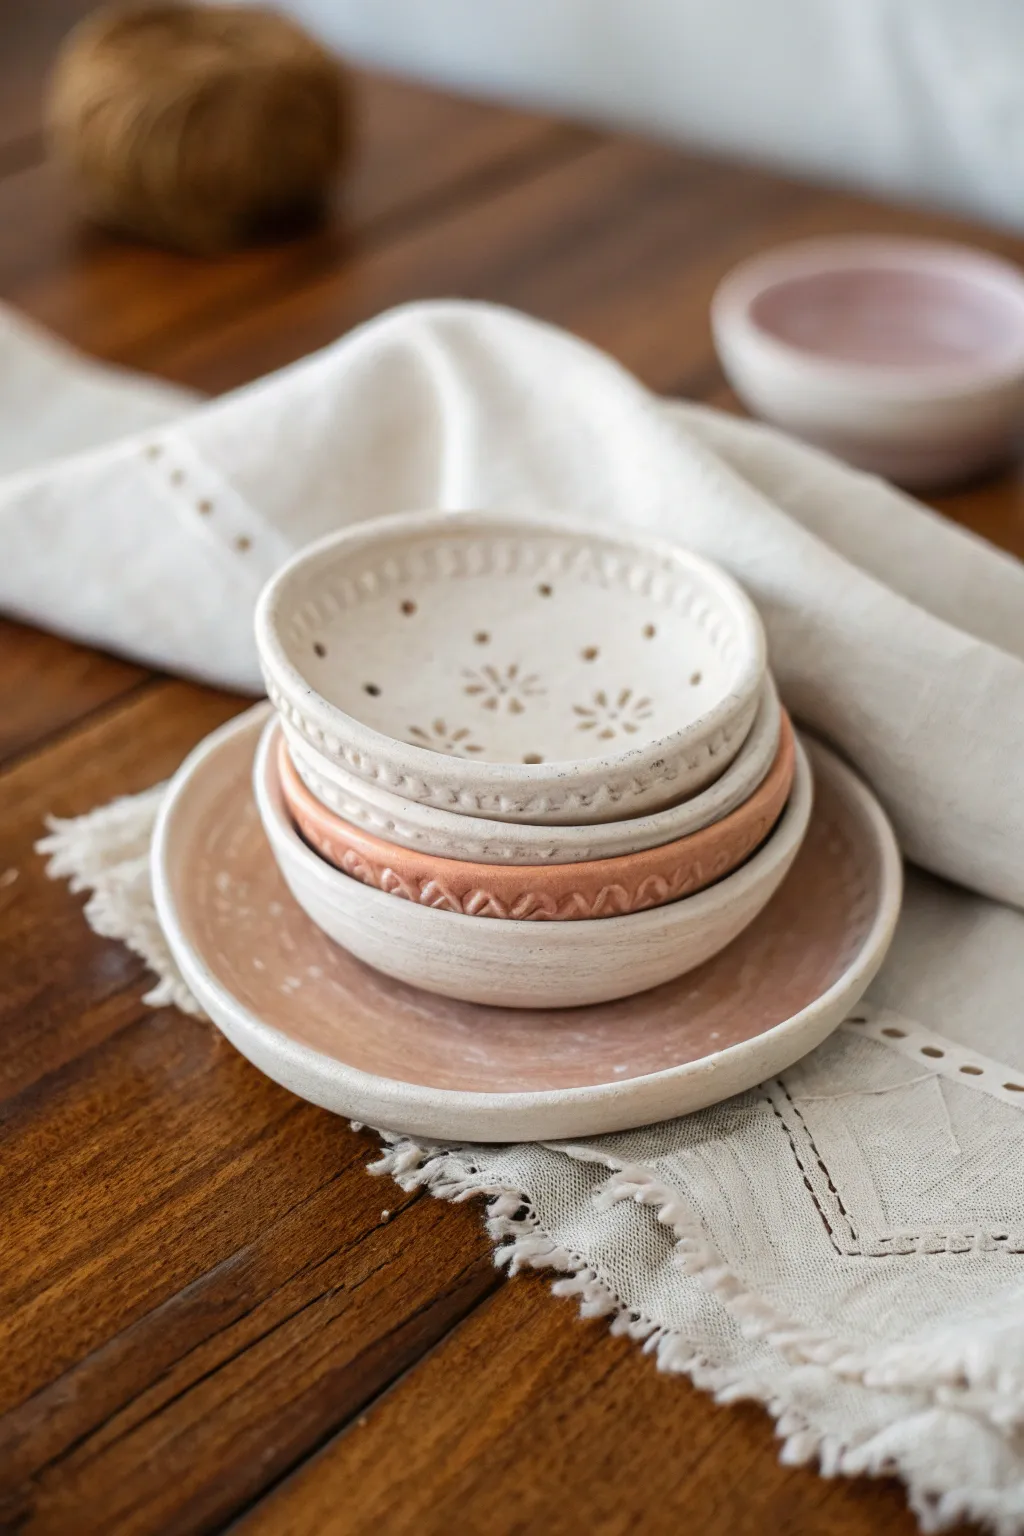
Create a charming set of nested trinket dishes with delicate, lace-like textures and warm, earthy tones. This project captures a rustic, bohemian aesthetic using simple air-dry clay and everyday household items for stamping.
Step-by-Step Guide
Materials
- White air-dry clay (smooth texture)
- Terracotta colored air-dry clay (or acrylic paint to mix in)
- Rolling pin
- Two round cookie cutters (one medium, one small)
- One larger bowl (to use as a template for the bottom plate)
- Lace, doilies, or texture stamps (floral/dots)
- Small wooden skewers or toothpicks
- Sponge
- Sandpaper (fine grit)
- Clear matte varnish or sealant
- Water in a small cup
- Plastic wrap or parchment paper
Step 1: Shaping the Clay Base
-
Prepare your canvas:
Lay down parchment paper on your work surface to prevent sticking. Take a handful of white clay and knead it until it’s soft, pliable, and free of cracks. -
Roll it out:
Use your rolling pin to flatten the clay to an even thickness of about 1/4 inch. Try to keep the pressure consistent so one side isn’t thinner than the other. -
Cut the forms:
Using your medium cookie cutter, press firmly into the clay to cut two circles. Use the smaller cutter for the top bowl. For the bottom plate, trace around your large bowl template with a knife. -
Smooth the edges:
Dip your finger in a little water and run it gently along the cut edges of your clay circles to smooth out any roughness or sharp debris.
Cracking Up?
If you see tiny cracks forming as the clay dries, mix a small amount of clay with water to make a paste (slip) and fill them in, then smooth over.
Step 2: Adding Texture & Detail
-
Create rim patterns:
On the first medium circle, use the dull end of a skewer or a specific clay tool to press small, evenly spaced vertical lines around the very edge of the rim. -
Stamp the center:
Take your floral stamps or even the end of a patterned marker cap. Press gently into the center of the clay circle to create a flower motif. Add small dot accents around the flowers using a toothpick. -
The terracotta layer:
For the second medium bowl (the middle one in the stack), I like to mix a little terracotta paint into the white clay before rolling, or use pre-colored clay. Roll a small coil of clay and press it onto the rim for a raised edge. -
Texture the terracotta:
Press a repeated ‘V’ or chevron pattern into that raised coil rim using a modeling tool or the side of a credit card. -
Detail the large plate:
For the large bottom plate, create a subtle texture by lightly pressing a piece of linen or lace fabric onto the surface before peeling it away.
Gilded Edges
For a luxe touch, paint just the stamped rims with a metallic gold leaf liquid paint after the sealant has completely dried.
Step 3: Drying and Finishing
-
Form the bowls:
To give the flat circles a bowl shape, gently lift the edges and curve them upwards. You can place them inside actual small bowls lined with plastic wrap to help them hold their curved shape while drying. -
Let them dry:
Allow the pieces to dry completely in a safe, dry spot. This typically takes 24-48 hours depending on humidity. Flip them over halfway through so the bottoms dry evenly. -
Sand imperfections:
Once fully dry and hard, take your fine-grit sandpaper and gently buff away any rough fingerprints or jagged edges on the rims. -
Color wash (optional):
To achieve the soft pinkish hue seen on the bottom plate, mix a tiny drop of red paint with water to create a wash. Brush it on quickly and wipe off the excess with a sponge for a stained look. -
Seal the work:
Apply a coat of clear matte varnish to all pieces. This protects the clay from moisture and gives it a finished, professional look.
Stack your beautiful new dishes on a coffee table or nightstand for an instant touch of handcrafted elegance


Ring Cones and Ring Holders
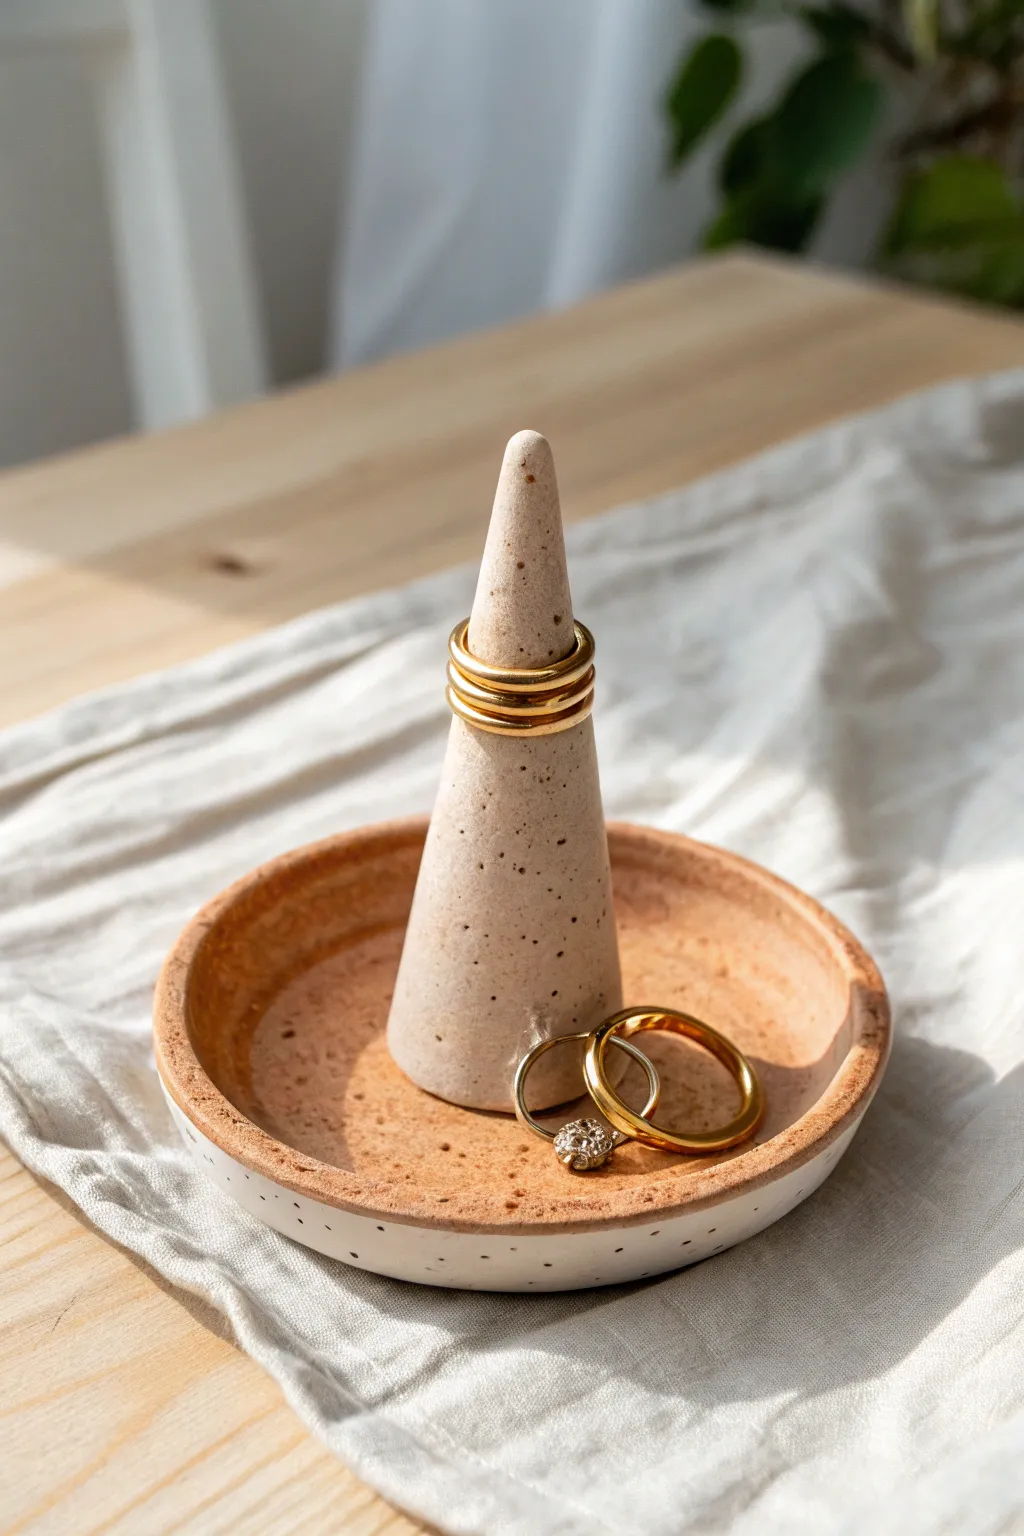
This elegant ring holder combines a classic cone shape with a functional trinket dish base, perfect for organizing your everyday jewelry. The finish mimics high-end speckled stoneware, bringing a warm, organic touch to your dresser without needing a kiln.
Detailed Instructions
Materials
- Air-dry clay (white or cream)
- Faux stone spray paint (speckled effect) or acrylic paint plus a toothbrush
- Rolling pin
- Clay knife or craft blade
- Small bowl or round cookie cutter (approx. 4 inches)
- Small cup of water
- Sponge or fine sandpaper
- Strong craft glue or clay slip
- Clear gloss varnish (optional for a glazed look)
Step 1: Shaping the Base
-
Prepare the Clay:
Start by kneading a handful of air-dry clay until it is soft, pliable, and free of cracks. -
Roll the Slab:
Roll the clay out onto a smooth surface until it is about 1/4 inch thick. Aim for an even thickness to prevent warping as it dries. -
Cut the Circle:
Place your small bowl or round cookie cutter onto the clay slab and press down or trace around it with a knife to cut out a perfect circle. -
Form the Rim:
Gently pinch the outer edge of the circle upwards to create a small rim. You want to create a shallow dish shape that can hold loose earrings or studs. -
Smooth the Edges:
Dip your finger in a little water and run it along the rim and the interior of the dish to smooth out any fingerprints or rough spots.
Stay Smooth
Keep a damp sponge nearby while working. Wiping the clay periodically prevents it from drying out too fast and cracking before you finish.
Step 2: Creating the Cone
-
Form a Cylinder:
Take a new piece of clay, slightly smaller than a golf ball, and roll it into a thick cylinder between your palms. -
Shape the Cone:
Place the cylinder on your work surface. Rolling it back and forth, apply more pressure on one end to taper it into a point, creating a cone shape. -
Check Dimensions:
Stand the cone up next to your dish base. It should be tall enough to hold several rings but proportional to the dish width. -
Flatten the Bottom:
Tap the wide base of the cone firmly against the table to ensure it is perfectly flat and will stand straight.
Natural Texture
Mix dried coffee grounds or black pepper directly into your white clay before sculpting to create an authentic, internal speckled stone texture.
Step 3: Assembly and Finishing
-
Score the Surfaces:
Use your knife to make small hashtag scratches (scoring) on the bottom of the cone and the center of the dish where they will connect. -
Join the Pieces:
Apply a dab of water or clay slip to the scored areas. Press the cone firmly into the center of the dish. -
Blend the Seam:
Use a modeling tool or your finger to smooth the clay where the cone meets the dish, ensuring a seamless, strong bond. -
Dry Completely:
Set the piece aside in a cool, dry place. I usually wait at least 24-48 hours to ensure the core is fully hardened. -
Sand for Smoothness:
Once bone dry, use fine-grit sandpaper to gently buff away any remaining bumps or rough textures. -
Create the Speckled Look:
If you aren’t using speckled clay, mix watered-down brown acrylic paint and use an old toothbrush to flick tiny specks onto the surface. -
Alternative Paint Method:
Alternatively, you can paint the rim area with a terracotta or warm beige color to mimic the raw edge seen in the photo. -
Seal the piece:
Finish by applying a coat of clear varnish or sealer to protect the clay and give it a slight ceramic sheen.
Now you have a chic, modern display piece for your favorite jewelry that looks just like expensive pottery


Clay Coasters With Floral Shapes
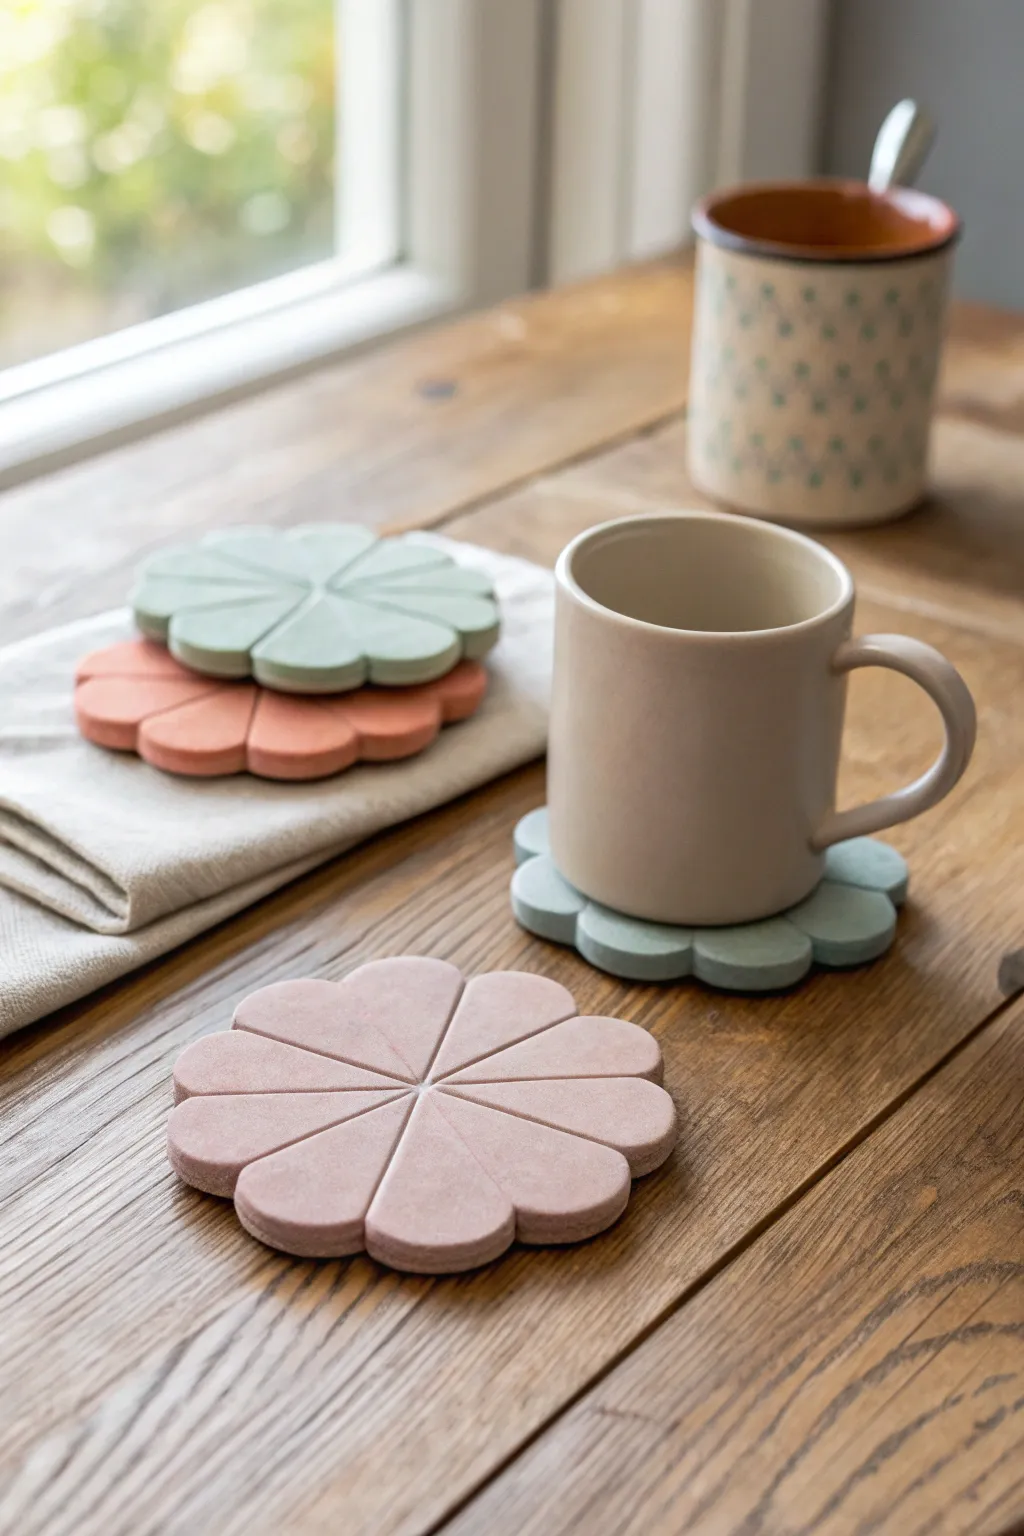
Bring a touch of botanical charm to your coffee table with these minimalist flower-shaped coasters. Their soft matte finish and grooved petal details create a modern, tactile surface perfect for your favorite mug.
Step-by-Step Tutorial
Materials
- White air-dry clay (or polymer clay)
- Acrylic paints (pastel pink, mint green, terracotta/orange)
- Rolling pin
- Circle clay cutter (approx. 3.5 – 4 inches)
- Clay knife or plastic sculpting tool
- Fine-grit sandpaper (220-400 grit)
- Ruler
- Wax paper or silicone mat
- Matte varnish or sealant
Step 1: Planning and Shaping the Base
-
Prepare your workspace:
Lay down a piece of wax paper or a silicone mat on a flat surface to prevent the clay from sticking. Tape the corners down if needed to keep it steady. -
Condition the clay:
Take a handful of air-dry clay and knead it thoroughly until it is soft, pliable, and free of cracks. If you are tinting the clay beforehand, mix your acrylic paint into the raw clay now until the color is uniform. -
Roll out the slab:
Use your rolling pin to flatten the clay into an even slab. Aim for a thickness of about 1/4 inch (6mm) to ensure the coaster is durable enough to hold a heavy mug. -
Cut the circle:
Press your large circle cutter firmly into the clay slab. If you don’t have a cutter large enough, trace around a wide mug or bowl with a needle tool. -
Smooth the edges:
Dip your finger in a little water and run it along the cut edge of the circle to smooth out any roughness or sharp remnants from the cutter.
Keep it Flat
To ensure your coasters dry perfectly flat, place a light book on top of them once they are leather-hard (partially dry but firm).
Step 2: Sculpting the Petals
-
Mark the center:
Gently find the center of your circle and make a tiny indentation with a pin or tool to serve as your guide. This ensures your petals radiate evenly. -
Divide into quarters:
Using a dull knife or the edge of a ruler, gently press a line from the center to the edge to divide the circle into four equal quadrants. Don’t cut all the way through; just create a shallow groove. -
Create the segments:
Divide each clean quadrant into two or three smaller sections, depending on how many petals you want. The example shows roughly 10-12 petals total, so dividing each quadrant into three works well. -
Deepen the grooves:
Go back over your guide lines with a sculpting tool to deepen the grooves significantly. V-shaped grooves look best here to separate the petals visually. -
Shape the outer edge:
Use your finger or a rounded tool to gently push the clay inward at the end of each groove line. This creates the scalloped, flowery silhouette on the outer rim. -
Refine the surface:
Lightly smooth down any raised clay burs created by grooves. I like to use a barely damp sponge for this step to get a pristine finish.
Speckled Stone Effect
Mix dried coffee grounds or cracked black pepper into the clay before rolling to create a trendy faux-stone or terrazzo texture.
Step 3: Finishing Touches
-
Drying time:
Place the coasters on a flat surface away from direct sunlight. Let them dry for 24-48 hours, flipping them over halfway through to prevent curling. -
Sand for perfection:
Once fully cured and hard, use fine-grit sandpaper to buff the edges and surface. Focus on the petal tips to make them soft to the touch. -
Painting (if needed):
If you didn’t pre-tint your clay, apply two coats of matte acrylic paint in your chosen pastel shades. Allow the first coat to dry completely before adding the second. -
Seal the deal:
Apply a coat of waterproof matte varnish. This is crucial as condensation from cold drinks can damage unsealed air-dry clay over time.
Enjoy styling your new pastel garden on your tabletop


Geometric Clay Earrings
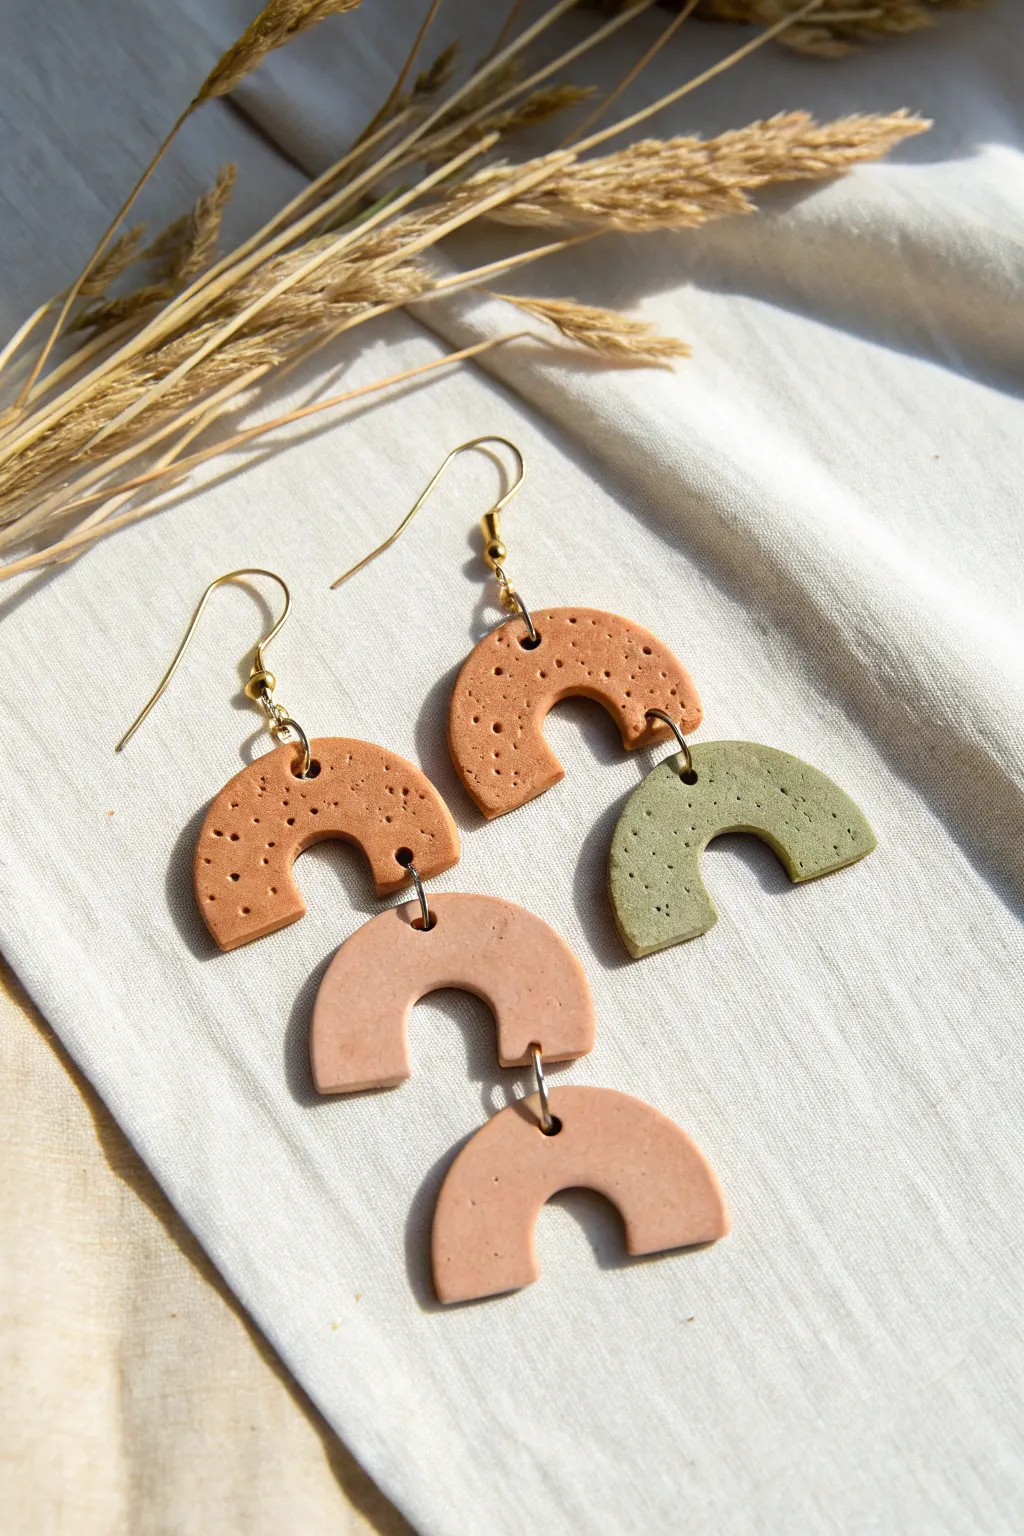
These statement earrings combine earthy terracotta and sage tones with rustic textures and playful geometric shapes. The three-tiered arch design gives them lovely movement, while the speckled finish adds a touch of organic charm perfect for everyday wear.
Detailed Instructions
Materials
- Air-dry clay (terracotta, beige, and sage green colors)
- Rolling pin or clay roller
- U-shaped clay cutters (two sizes: medium and large)
- Texture tool (toothbrush, stiff bristle brush, or needle tool)
- Needle tool or toothpick for creating holes
- Jump rings (gold, approx. 6mm-8mm)
- Earring hooks (gold)
- Jewelry pliers (flat nose and round nose)
- Fine-grit sandpaper
- Wax paper or parchment paper
Step 1: Shaping the Arches
-
Condition the Clay:
Begin by taking small portions of your terracotta-colored clay and sage green clay. Knead them individually until they are soft, pliable, and free of cracks. -
Roll the Base:
Roll out the terracotta clay on a piece of wax paper to an even thickness of about 3mm to 4mm. Do the same for the sage green clay and the lighter beige clay. -
Add Texture:
Before cutting, create the signature rustic texture. Take a stiff toothbrush or a stippling sponge and gently press it repeatedly onto the surface of the terracotta clay sheet to create tiny divots. -
Detail the Surface:
For deeper variation, use a needle tool to poke slightly larger, random indents across the textured terracotta surface, mimicking pitted stone. -
Cut the Top Arches:
Using your medium or large U-shaped cutter, press firmly into the textured terracotta clay to cut two identical arch shapes. These will be the top pieces attached to the ear wire. -
Cut the Middle Arches:
For the asymmetrical look shown, cut one arch from the sage green clay (keep it textured slightly less) and one arch from the textured terracotta clay depending on which earring side you are working on. -
Cut the Bottom Arches:
From the smooth beige or light pink clay, cut two matching arches. I prefer to leave these smoother than the top pieces to create visual contrast. -
Create Connection Holes:
While the clay is still wet, use a needle tool to pierce holes for the jump rings. For the top arch: one hole at the apex for the hook, and one at the bottom of one leg for the next tier. For middle pieces: holes at top and bottom. For the bottom piece: just one hole at the top.
Step 2: Refining and Assembly
-
Dry Completely:
Let your clay pieces air dry on a flat surface for at least 24-48 hours. Flip them halfway through so the undersides dry evenly. -
Sand the Edges:
Once fully cured, use fine-grit sandpaper to gently smooth the rough outer edges or any sharp bits left from the cutter. -
Prepare Jump Rings:
Using two pairs of pliers, twist your gold jump rings open laterally (not pulling them apart) to preserve their shape. -
Connect the Tiers:
Thread an open jump ring through the bottom hole of the top terracotta arch and the top hole of the middle arch. Close the ring securely. -
Attach the Final Tier:
Repeat the process to connect the middle arch to the bottom smooth beige arch using another jump ring, ensuring the shapes dangle freely. -
Add Earring Hooks:
Open the small loop at the base of your ear wire hook using your pliers. -
Final Assembly:
Slide the loop through the top hole of the uppermost terracotta arch and close it tightly. Repeat for the second earring.
Uneven Clay?
If your rolled clay isn’t level, place two stacks of playing cards or craft sticks on either side of your clay as guide rails for your rolling pin.
Go Speckled
Mix black pepper or dried coffee grounds into the wet clay before rolling to add permanent, realistic speckles that mimics stoneware pottery.
Now you have a stunning pair of geometric earrings ready to accentuate any outfit

What Really Happens Inside the Kiln
Learn how time and temperature work together inside the kiln to transform clay into durable ceramic.
Leaf-Imprint Wall Tiles
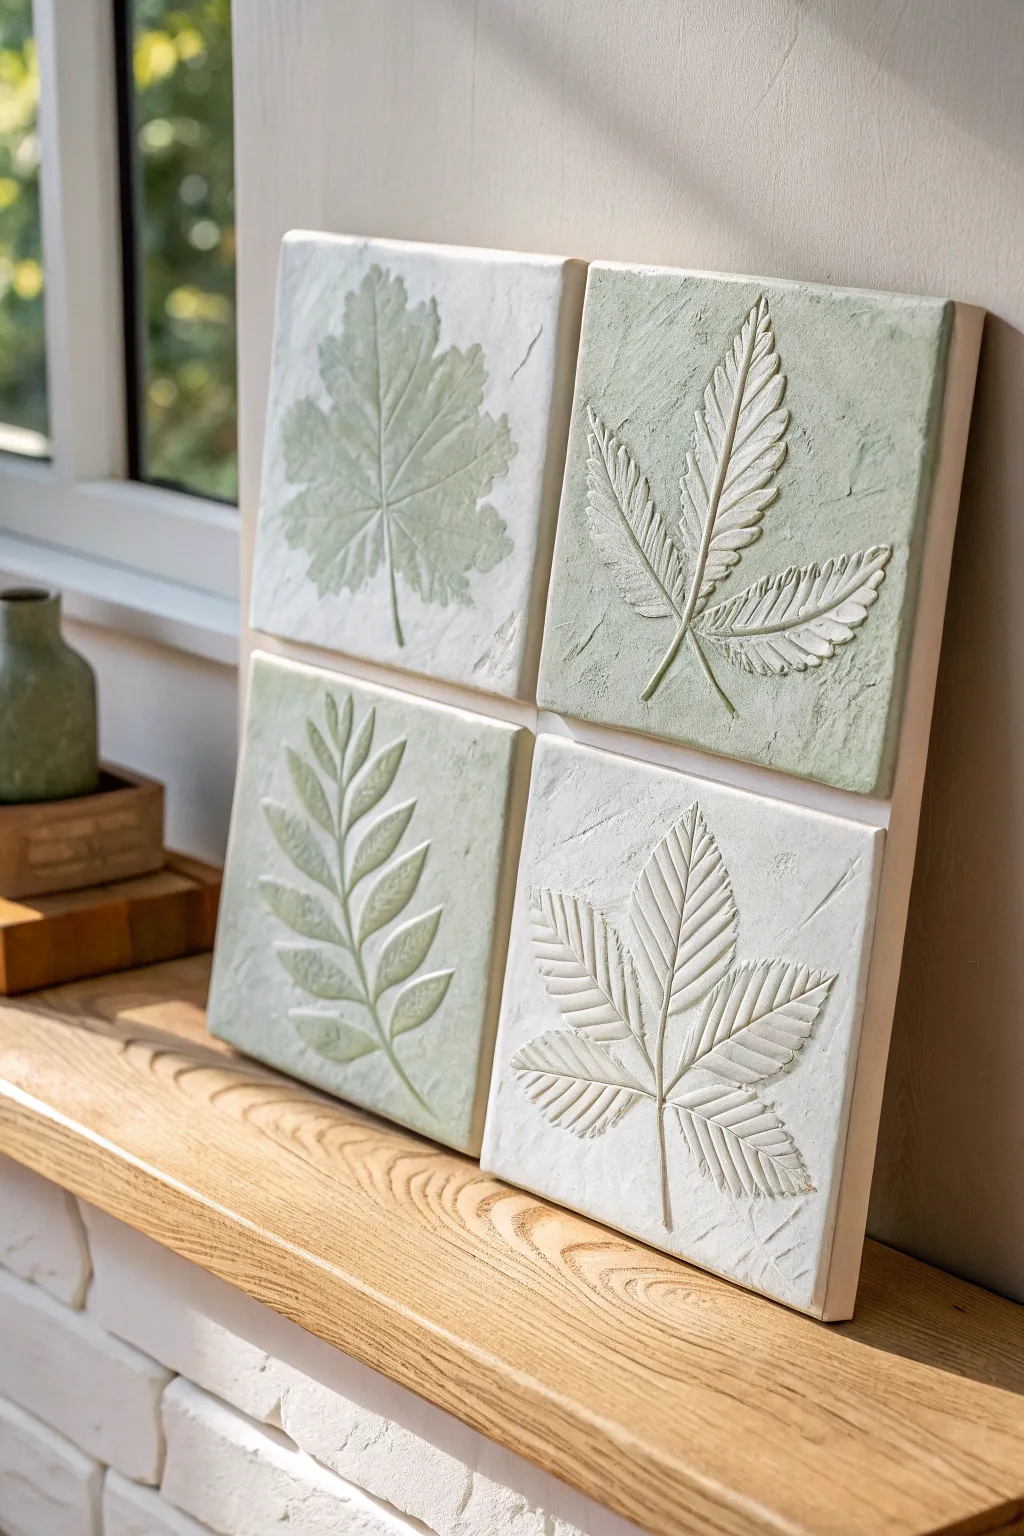
Capture the delicate details of nature with this elegant set of four air-dry clay tiles, featuring raised leaf impressions in soothing tones of sage and cream. The finished piece creates a sophisticated, gallery-worthy wall hanging that brings a touch of organic texture to any room.
Step-by-Step Tutorial
Materials
- White air-dry clay (approx. 1kg)
- Four fresh leaves with distinct veins (e.g., maple, fern, chestnut)
- Rolling pin
- Square cookie cutter or ruler and craft knife (approx. 4×4 inches)
- Parchment paper or non-stick mat
- Fine-grit sandpaper
- Acrylic paints (Titanium White, Sage Green, slight touch of Raw Umber)
- Soft synthetic brush and stiff bristle brush
- Matte spray varnish
- Strong craft glue or mounting adhesive
- Backing board (thin wood or sturdy cardboard) sized to fit all 4 tiles
Step 1: Shaping the Clay Base
-
Prepare your workspace:
Lay down a sheet of parchment paper or a silicone mat to prevent the clay from sticking to your table. This also makes moving the wet tiles much easier later. -
Initial rolling:
Take a large portion of your air-dry clay and knead it briefly to warm it up. Roll it out into a large slab, aiming for an even thickness of about 1/4 to 1/2 inch. Keep it fairly thick to prevent cracking. -
Cutting the squares:
Use your square cutter or a ruler and craft knife to cut four identical squares. If you want the slightly rustic, uneven edges seen in the photo, you can soften the cut edges gently with a damp finger. -
Smoothing the surface:
Dip your finger in a little water and smooth out any major creases or fingerprints on the surface of each square, creating a clean canvas for your leaves.
Pro Tip: Crisp Veins
If your leaves are too soft or flimsy, place them in the freezer for 10 minutes before pressing. The rigid cell structure will create a much sharper impression in the clay.
Step 2: Creating the Impressions
-
Positioning the botanicals:
Select your fresh leaves. Place one leaf in the center of each clay square, vein-side down. The vein side always provides the crispest, deepest impression. -
Rolling the imprint:
Gently roll over the leaf with your rolling pin using firm, even pressure. You want the leaf to embed slightly into the clay surface without distorting the square shape too much. -
Revealing the design:
Carefully lift the stem and peel the leaf away from the clay. Do this slowly to ensure you don’t tear the clay. You should now have a deep, reversed impression. -
Adding texture:
To mimic the background texture in the photo, lightly dab the empty spaces around the leaf imprint with a stiff bristle brush or a crumpled ball of aluminum foil. This creates that stone-like finish. -
Drying phase:
Move the tiles (still on their parchment paper) to a safe spot. Let them air dry for 24-48 hours. I like to flip them over halfway through the drying process to ensure the bottoms dry evenly and stay flat.
Level Up: Deepen the Contrast
Before the final dry brush, apply a watered-down dark grey wash into the deepest veins, then wipe the surface clean. This shadows the crevices for a dramatic 3D effect.
Step 3: Painting and Finishing
-
Sanding edges:
Once fully bone-dry, lightly sand the edges of the tiles with fine-grit sandpaper to remove any sharp burrs or rough spots. -
Base coat mixing:
Mix a pale, creamy off-white color using white acrylic with a tiny dot of raw umber. Apply this base coat to two of the tiles (diagonal from each other), working the paint into the leaf crevices. -
Applying the green tone:
For the other two tiles, mix a muted sage green. Paint the entire surface, ensuring the color gets into the deep veins of the imprint. -
Dry brushing highlight:
This is the secret to the ‘raised’ look. Dip a dry stiff brush into white paint, wipe almost all of it off on a paper towel, and lightly sweep it over the surface of the green tiles. This catches the high points and texture. -
Reverse highlighting:
Repeat the dry-brushing technique on the cream tiles, but use a slightly lighter, pure white shade to enhance the leaf veins and background texture. -
Mounting the art:
Arrange the tiles on your backing board in a 2×2 grid, leaving a very small gap between them for a framed look. Use strong craft glue to secure them in place. -
Sealing:
Finish the piece with a light coat of matte spray varnish to protect the clay from moisture and dust without adding unwanted shine.
Hang your new botanical relief art in a sunny spot to let the shadows play across the textured surface
Rainbow Arch Decor Pieces
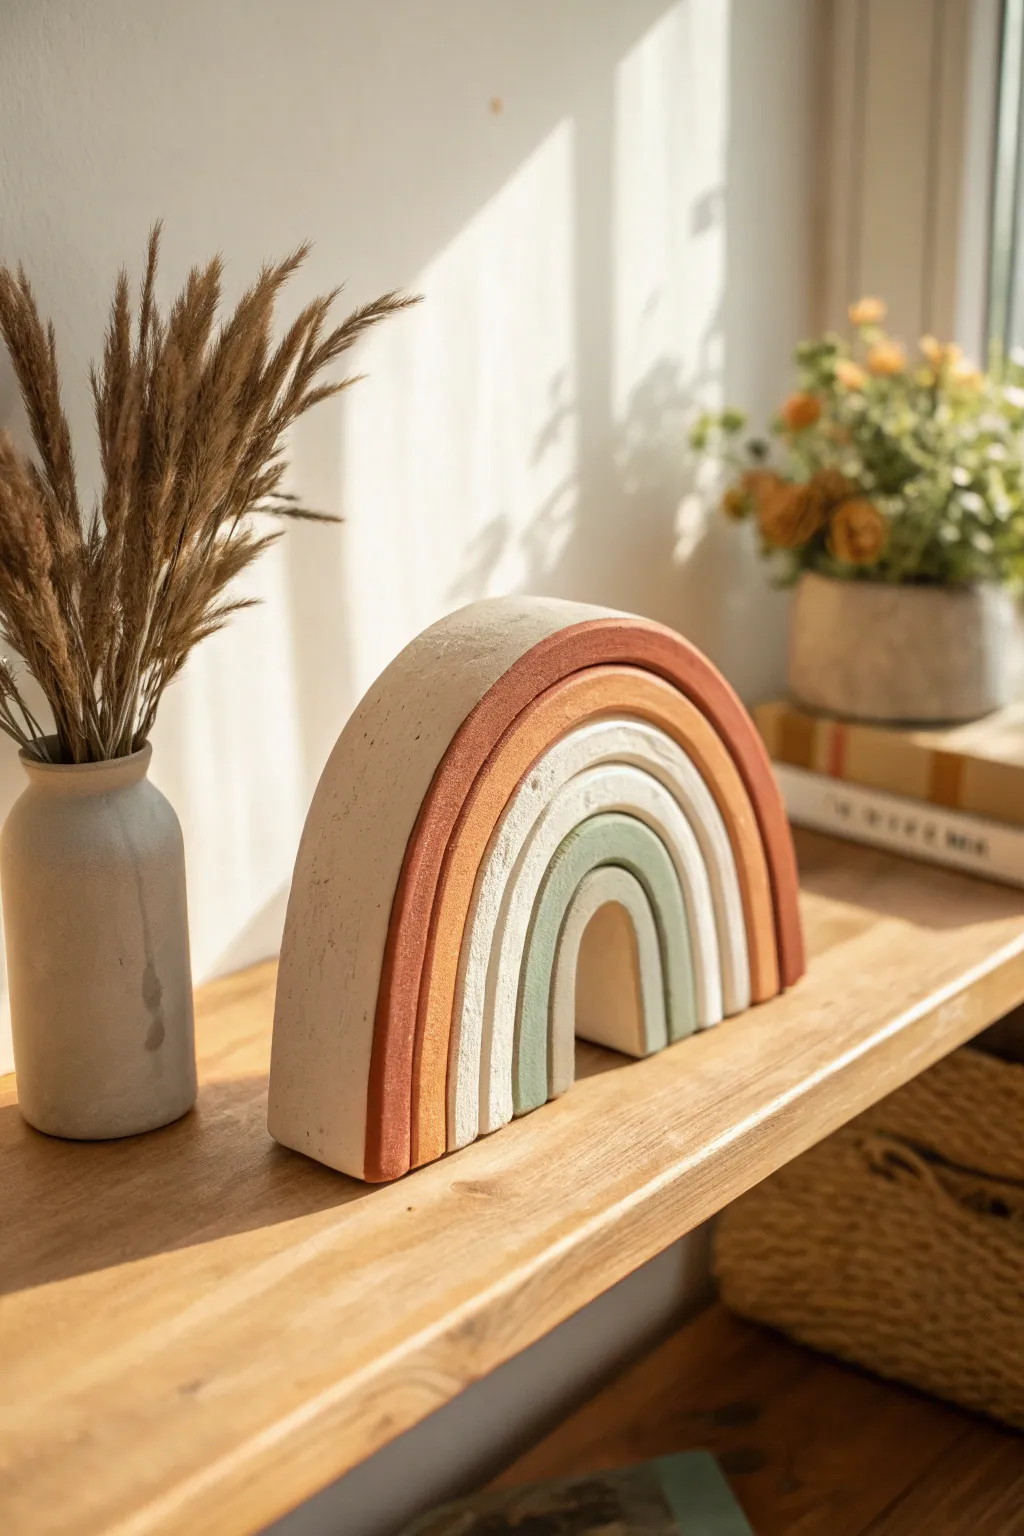
Capture the calm of nature with this minimalist rainbow sculpture featuring textured layers and a soothing earth-tone palette. It’s perfect for adding a touch of modern bohemian warmth to any shelf or nursery decor.
Step-by-Step Guide
Materials
- Air-dry clay (white or stone-effect)
- Acrylic paints (terracotta, burnt orange, sage green, beige, cream)
- Rolling pin
- Sharp craft knife or modeling scalpel
- Ruler
- Sandpaper (medium and fine grit)
- Small paintbrush
- Parchment paper or silicone mat
- Water in a small cup
- Cardboard (for creating a template)
- Matte varnish (optional)
Step 1: Shaping the Arches
-
Prepare your workspace:
Lay down your parchment paper or silicone mat to prevent the clay from sticking. Knead a large chunk of air-dry clay until it is pliable and smooth. -
Roll the clay slab:
Roll out the kneaded clay to a uniform thickness of about 1 inch (2.5 cm). Since this is a chunky, free-standing sculpture, you want significant depth so it stands securely. -
Create a cardboard template:
Sketch a semi-circle arch on cardboard to determine the total size of your rainbow. Draw concentric arches inside it for the individual layers, aiming for equal width for each band. -
Cut the clay strips:
Use your ruler and craft knife to cut long, straight strips of clay from your slab. The width of these strips will become the height/thickness of the arch layers. -
Form the smallest arch:
Take the first clay strip and curve it gently to form the smallest, innermost arch. If the clay cracks slightly, smooth it with a dab of water on your finger. -
Build outward:
Take the next strip and curve it over the first arch. Press them gently together to check the fit, but separate them immediately as they need to dry individually to be painted later. -
Continue layer by layer:
Repeat this process for all layers—outer beige, terracotta, burnt orange, white, and sage green—ensuring each strip is long enough to curve fully around the previous one. -
Trim the bases:
Once all arches are formed, line them up on a flat surface. Use your sharp knife to slice straight across the bottom of the ‘legs’ so every arch sits perfectly flush and level.
Step 2: Drying and Refining
-
Let it dry completely:
Separate the arches slightly so air can circulate. Allow them to dry for 24-48 hours. I find turning them over halfway through helps them dry evenly and prevents warping. -
Sand for texture:
Once bone dry, use medium-grit sandpaper to remove any sharp edges or major bumps. For this specific look, don’t over-sand; leave some surface texture to mimic stone. -
Dust off debris:
Wipe each piece down with a dry cloth or a soft brush to remove clay dust before painting.
Fixing Warp
If arches warp while drying and won’t stand flat, wait until fully dry, then adhere sandpaper to a flat table. Rub the arch bases firmly against it to grind them level.
Step 3: Painting and Assembly
-
Mix your palette:
Prepare your acrylics. You’ll need a muted palette: mix orange with brown and white for the terracotta bands, and green with grey and white for the sage tone. -
Paint the outermost arch:
Paint the largest arch in a creamy beige or raw stone color. Apply two thin coats for opaque coverage, letting the first dry before applying the second. -
Paint the middle layers:
Move inward, painting the second arch terracotta, the third a lighter burnt orange, the fourth a creamy off-white, and the fifth a muted sage green. -
Paint the core:
Paint the smallest, central arch in a neutral beige that matches or slightly contrasts with the outer shell. -
Create the stone effect:
To get the gritty look from the photo, dab a nearly dry stiff brush with a slightly darker shade onto the painted surfaces. This stippling technique adds depth. -
Assemble the structure:
Once the paint is fully dry, nest the arches back together. If you want a permanent sculpture, apply a thin line of strong craft glue between the layers and press firmly. -
Seal the piece:
Finish with a coat of matte varnish to protect the paint without adding unwanted shine, preserving that natural, earthy feel.
Make it Granular
Mix baking soda or used coffee grounds into your acrylic paint before applying. This physically adds grit to the surface, perfectly mimicing the stone texture.
Place your finished sculpture on a sunlit wooden shelf to truly highlight those beautiful organic textures


The Complete Guide to Pottery Troubleshooting
Uncover the most common ceramic mistakes—from cracking clay to failed glazes—and learn how to fix them fast.
Moon Phase Wall Hanging
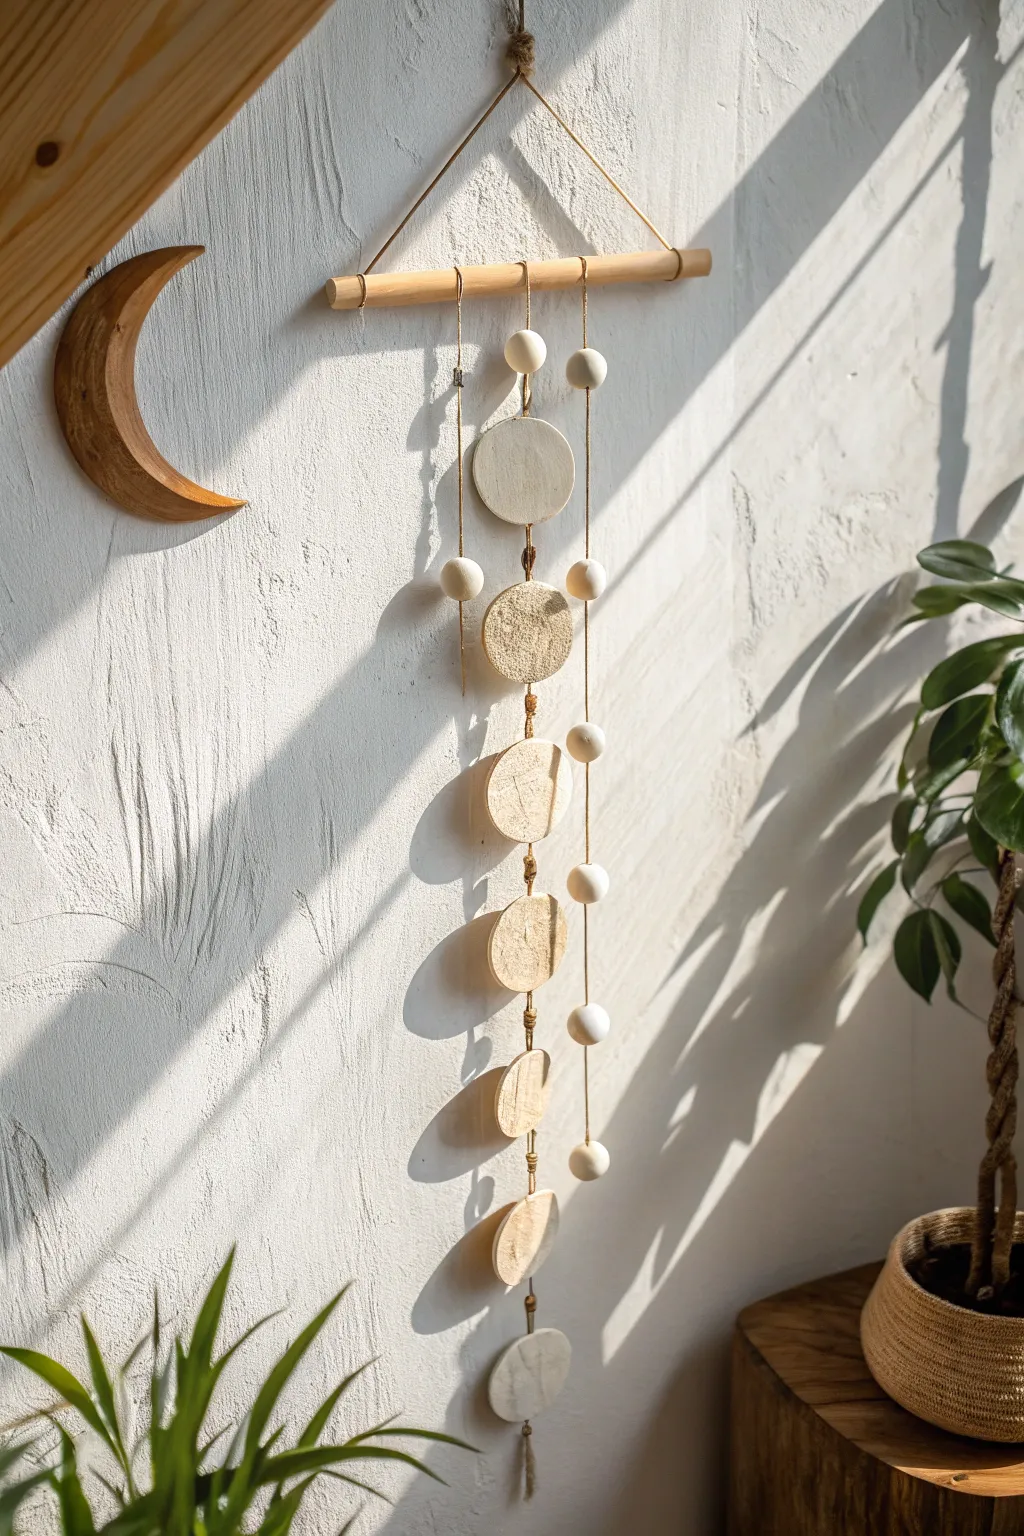
Bring the celestial rhythm of the moon into your home with this tranquil, minimalist wall hanging. Using simple air-dry clay and natural wood elements, you’ll create a textured, vertical mobile that captures the moon’s changing faces in a soft, earthy palette.
Step-by-Step Tutorial
Materials
- White or natural air-dry clay (approx. 500g)
- Rolling pin
- Circle cookie cutter (approx. 2.5 – 3 inches diameter)
- Wooden dowel (12 inches long)
- Jute twine or hemp cord
- Wooden beads (assorted sizes: 10mm, 16mm)
- Sandpaper (fine grit)
- Small straw or skewer (for making holes)
- Acrylic paint (cream, beige, white) – optional
- Sponge or textured fabric (for texture)
- Scissors
- Craft glue
Step 1: Shaping the Moons
-
Prepare your workspace:
Lay down a sheet of parchment paper or a silicone mat to prevent the clay from sticking. Knead a large chunk of air-dry clay in your hands until it becomes soft, pliable, and free of cracks. -
Roll out the clay:
Using your rolling pin, flatten the clay to an even thickness of about 1/4 inch (6mm). Try to keep the pressure consistent so your moon pieces have a uniform weight. -
Cut the circles:
Press your circle cutter firmly into the clay to create seven distinct circles. These will become the base for your entire moon cycle. -
Carve the phases:
Keep one circle full. For the others, use the same cutter to slice away portions of the clay circles to create matching pairs: two gibbous moons, two quarter moons, and two crescent moons. -
Add surface texture:
Before the clay dries, gently press a dry sponge or a piece of coarse fabric onto the surface of each moon. This gives them that lovely, crater-like stone effect seen in the photo. -
Create hanging holes:
Using a straw or skewer, poke a hole through the top and bottom center of each piece, except for the very bottom crescent which only needs a top hole. For the top full moon, you only need one hole at the top if you plan to hang it directly, but the design shows a continuous string, so top and bottom holes generally work best for stability. -
Dry completely:
Lay the pieces flat in a cool, dry place. Let them cure for 24-48 hours, flipping them occasionally to ensure they dry evenly and don’t curl.
Keep it Flat
To prevent curling while drying, place a light book on top of the clay pieces (stuck between parchment paper) once they are semi-dry to press them flat.
Step 2: Finishing and Assembly
-
Sand edges:
Once fully dry, take your fine-grit sandpaper and gently smooth the cut edges of your moon phases. You want them to look refined but still retain that handmade, organic feel. -
Optional painting:
If you want dimension, dry brush a mixture of cream and beige paint over the textured surface. I find this really helps the ‘craters’ pop, though leaving the natural clay color is beautiful too. -
Prepare the center strand:
Cut a long piece of jute twine, roughly 4-5 feet long. Tie a secure knot at one end to hold the bottom-most crescent moon. -
String the bottom moon:
Thread the twine through the hole of the bottom crescent moon. Secure it with a knot on the backside or top side depending on how fixed you want it. -
Add spacing beads:
Slide a wooden bead onto the twine. Tie a knot in the twine a few inches above the bead to create a stopping point for the next moon phase. -
Attach the next phase:
Thread the next moon piece (the slightly fuller crescent) onto the twine. Ensure it rests on the knot you just created so there is even spacing between the clay pieces. -
Continue the pattern:
Repeat the process—knot, bead (optional), moon—working your way up through the cycle: quarter moons, gibbous moons, and finally the full moon at the top. -
Add side strands:
Cut two shorter lengths of twine for the decorative side hangings. Tie a large wooden bead at the bottom of each, followed by a few smaller beads spaced out with knots. -
Attach to the dowel:
Tie the main center strand securely to the middle of your wooden dowel. Tie the two beaded side strands to the left and right of the center strand. -
Create the hanger:
Cut a final piece of twine for the hanger. Tie each end to the far edges of the dowel, forming a triangle shape for hanging. -
Final adjustment:
Hang the piece on a wall and adjust the knots or moon spacing slightly if needed to ensure everything hangs straight and balanced.
Metallic Magic
For a luxe touch, paint just the edges of the clay moons with gold leaf or metallic gold paint to catch the sunlight.
Hang your new celestial artwork near a window to watch the shadows play across the textured surface throughout the day
Magnet Minis With Painted Icons
These charming air-dry clay discs bring a touch of brightness to your fridge or magnetic board with their simple, etched designs. The focal point is a cheerful sun face with distinct rays, created using a mix of carving and staining techniques for a rustic, handmade feel.
How-To Guide
Materials
- Air-dry clay (white or terracotta)
- Rolling pin
- Circle cookie cutter (approx. 2-3 inches)
- Needle tool or toothpick
- Fine-grit sandpaper
- Acrylic paint (brown or dark grey)
- Small paintbrush
- Water
- Paper towel
- Matte sealant or varnish
- Strong adhesive magnets
- Parchment paper
Step 1: Shaping the Base
-
Condition the clay:
Begin by kneading a ball of air-dry clay in your hands to warm it up and remove any air bubbles. If the clay feels too dry, dip your fingers in water and work it in until smooth and pliable. -
Roll the slab:
Place the clay on a sheet of parchment paper. Use a rolling pin to flatten the clay to a consistent thickness, aiming for about 1/4 inch. If you want a perfectly even surface, clear acrylic spacers or wooden dowels on either side can act as depth guides. -
Cut the circles:
Press a circle cookie cutter firmly into the rolled clay. Twist slightly and lift to release the shape. Gently smooth the edges with a wet fingertip to remove any roughness from the cutter. -
Initial drying phase:
Let the clay circles sit for about 30–60 minutes. You want the surface to firm up slightly—known as ‘leather hard’—which makes the carving process much cleaner than working with wet, sticky clay.
Keep it Straight
To ensure your sun rays are evenly spaced, carve the four main directional points (North, South, East, West) first, then fill in the gaps between them.
Step 2: Carving the Design
-
Draft the face:
Use a needle tool or toothpick to very lightly scratch the outline of the sun’s face. Draw a central circle for the face first, ensuring it’s centered on the disc. -
Detail the features:
Add two small arcs for closed eyes or circles for open ones, a small curved nose, and a wide smile. Add rosy cheeks by pressing the rounded end of a paintbrush handle gently into the clay. -
Carve the rays:
For the sun rays, draw triangles radiating outward from the central face circle perfectly matching the style in the photo. Create a second, larger set of points between the first set to give it that burst effect. -
Deepen the lines:
Go back over your shallow draft lines with firmer pressure to create deep, definitive grooves. Clean away any ‘crumbs’ of clay that drag up during this process with a soft brush. -
Texture the surface (optional):
If you want the speckled look seen in the photo, gently tap a clean toothbrush or rough sponge over the surface to create subtle pores and imperfections. -
Full dry:
Allow the clay to dry completely according to the package instructions. This usually takes 24 to 48 hours. Flip the discs halfway through to ensure even drying and prevent warping.
Step 3: Finishing Touches
-
Sand edges:
Once fully dry and hard, take a piece of fine-grit sandpaper and gently smooth the outer rim of the circle to create a polished, stone-like finish. -
Prepare the wash:
Mix a small amount of dark brown or charcoal acrylic paint with water. You are creating a thin ‘wash’ rather than a thick paint layer. -
Apply the wash:
Paint the wash over the entire carved area, ensuring the dark liquid settles deep into the grooves of the sun face and rays. -
Wipe back:
Immediately take a damp paper towel and wipe the surface of the clay. The paint will wipe off the high points but remain in the carved crevices, highlighting the design. -
Seal:
Protect your work with a coat of matte varnish or sealant. This prevents the clay from absorbing moisture over time. -
Attach magnet:
Apply a strong adhesive or super glue to the back of the clay disc and press a magnet firmly into place. Let the glue cure completely before placing it on your fridge.
Warping Woes?
If your clay disc starts curling up at the edges while drying, place a lightweight book or flat board on top of it once it is partially dry but not yet rigid.
Enjoy brightening up your kitchen with these lovely handmade celestial accents

TRACK YOUR CERAMIC JOURNEY
Capture glaze tests, firing details, and creative progress—all in one simple printable. Make your projects easier to repeat and improve.
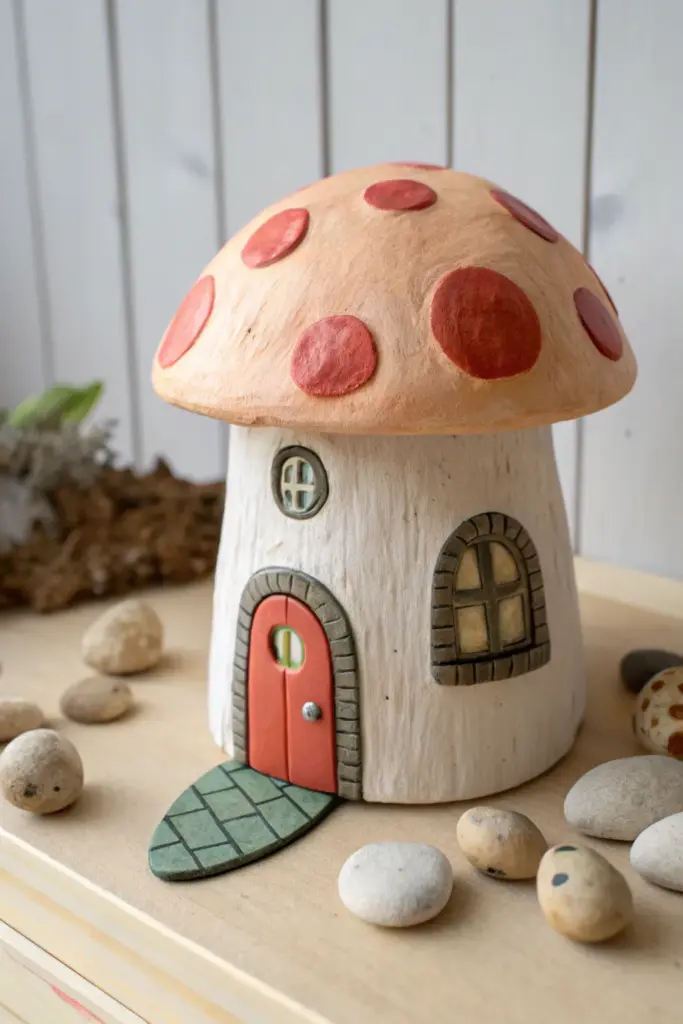
Mushroom Fairy House Sculptures

Bring a touch of woodland magic to your shelf with this charming mushroom fairy house sculpture. Featuring a textured white stalk, a classic spotted cap, and intricate details like a stone archway and path, this project is perfect for imaginative crafters.
Step-by-Step Tutorial
Materials
- Air-dry clay (white)
- Aluminum foil
- Rolling pin
- Clay sculpting tools (needle tool, knife tool)
- Acrylic paints (white, light orange/peach, red, grey, black, brown, green)
- Paintbrushes (various sizes, including fine detail)
- Water cup
- Sandpaper (fine grit)
- Clear matte varnish or sealant
Step 1: Sculpting the Base Structure
-
Create the armature:
Crumple aluminum foil into a cylinder shape for the mushroom stem and a separate dome shape for the cap. This saves clay and keeps the sculpture lightweight. -
Cover the stem:
Roll out a slab of air-dry clay to about 1/4 inch thick. Wrap it around the foil cylinder, smoothing the seam where the clay meets with wet fingers. -
Texture the stem:
Using a needle tool or a stiff bristled brush, drag vertical lines down the length of the wet clay stem to create a bark-like texture. -
Cover the cap:
Roll out another slab of clay and drape it over the foil dome. Trim the excess edges with a knife, leaving a slight overhang where the cap meets the stem. -
Attach cap to stem:
Score (scratch) the top of the stem and the underside of the cap. Add a little water or slip (clay mixed with water) and press them firmly together to join. -
Smooth the cap:
Use a little water on your finger to smooth out the surface of the mushroom cap, removing any fingerprints or bumps.
Cracks happen!
If small cracks appear as the clay dries, don’t panic. Simply mix a tiny bit of fresh clay with water to make a paste and fill the cracks, then smooth over.
Step 2: Adding Architectural Details
-
Form the door:
Roll a small oval of clay and press it onto the base of the stem. Use a knife tool to carve a vertical line down the center and wood grain texture. -
Create the stone archway:
Roll a thin snake of clay and flatten it slightly. Wrap it around the door frame. Use a tool to press indentations every few millimeters to simulate individual stones. -
Add the walkway:
Fashion a flat, tongue-shaped piece of clay extending from the door. Use a knife to lightly carve a grid pattern to look like paving stones. -
Install the windows:
Create two small circles of clay. Press one high on the stem and one lower on the side. Frame them with small clay snakes textured like stone, similar to the door frame. -
Add window panes:
Roll extremely thin threads of clay and cross them over the window openings to create the muntins (window pane dividers). -
Apply the spots:
Flatten small balls of clay into thin discs of varying sizes. Press these onto the mushroom cap to create the raised polka dots. -
Dry completely:
Allow the sculpture to dry for 24-48 hours. I find placing it in a cool, dry spot away from direct sunlight helps prevent cracking.
Pro Tip: Texturing
For realistic stone texture on the pathway and door frame, gently press a real rock or a ball of crumpled foil against the wet clay before painting.
Step 3: Painting and Finishing
-
Base coat the stem:
Paint the stem with an off-white or cream acrylic paint. Let the paint settle into the texture grooves. -
Weather the stem:
Once dry, use a dry-brush technique with a very light brown to highlight the raised textures of the bark. -
Paint the cap:
Paint the main surface of the cap with a soft peach or light orange color. Paint the raised spots a deep, warm red. -
Detail the stonework:
Paint the door frame, window frames, and path with grey paint. Once dry, wash with a watered-down black paint to darken the cracks between stones. -
Paint the door:
Fill in the door with a bright reddish-orange. Add a tiny dot of silver for the doorknob and a touch of green for the small circular window on the door. -
Seal the work:
Finish by applying a coat of clear matte varnish to protect the paint and give the piece a unified finish.
Now you have a magical little dwelling ready to welcome fairies into your home