Whenever I want a low-pressure, actually-fun date night at home, I grab air-dry clay and set up a little “make two” challenge. These ideas are all about creating matching pairs and tiny keepsakes that feel sweet, not stressful.
Matching Trinket Dishes
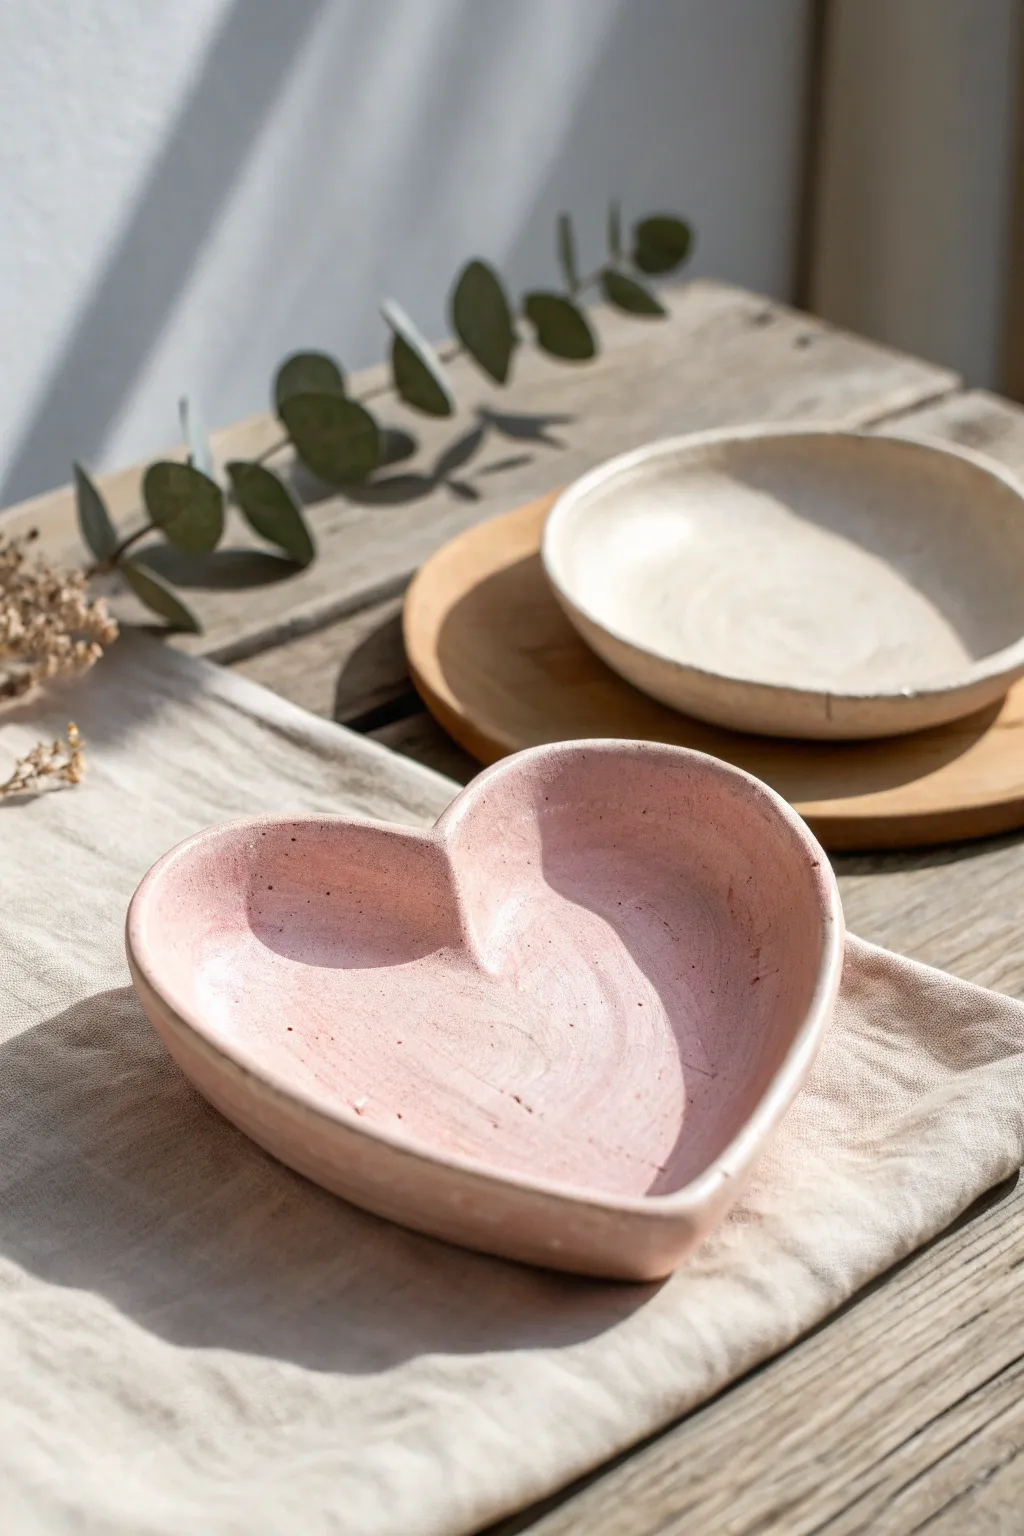
Embrace the imperfect, handcrafted charm of air-dry clay with this sweet duo of trinket dishes. The pairing features a soft pink heart and a classic creamy round saucer, both boasting a lovely organic texture.
Step-by-Step Guide
Materials
- White air-dry clay (approx. 500g)
- Acrylic rolling pin
- Wooden guide strips or two pencils (for even thickness)
- Heart-shaped cookie cutter (large) or paper template
- Circle cutter or small bowl (approx. 4-5 inches)
- Clay carving tool or butter knife
- Sponge and small cup of water
- Fine-grit sandpaper (220 grit)
- Acrylic paints: Pastel pink, warm white/cream, light brown (for speckling)
- Soft synthetic paintbrush
- Stiff bristle toothbrush (for speckle effect)
- Gloss or matte varnish (sealant)
Step 1: Shaping the Dishes
-
Prepare your clay:
Cut a generous portion of air-dry clay from your block. Knead it in your hands for a minute or two until it feels warm and pliable, removing any air bubbles that might be trapped inside. -
Roll out the slab:
Place the clay between two wooden guide strips or pencils on your work surface. Use your acrylic rolling pin to roll the clay out into a smooth slab that is roughly 1/4 inch thick. -
Cut the heart shape:
Press a large heart-shaped cookie cutter firmly into the clay. If you don’t have a cutter, place a paper heart template on the clay and trace around it with a needle tool or knife, then lift away the excess. -
Form the rim:
With the flat heart shape on your surface, gently use your fingertips to pinch and pull the edges upward. Work your way around the entire perimeter, curving the clay up to create a shallow wall. -
Smooth the edges:
Dip your finger slightly in water and run it along the rim you just created. Smooth out any cracks or sharp angles, aiming for that softened, organic look seen in the photo. -
Create the round dish:
Repeat the rolling process with a second piece of clay. Use a circular cutter (or trace around a bowl) to cut your round base. -
Shape the round bowl:
Instead of pinching, gently cup the circular clay in your palm. Press your thumbs into the center while rotating it to create a classic shallow bowl shape. -
Refine the surfaces:
Using a slightly damp sponge, wipe the interior and exterior of both dishes. This smooths out fingerprints but leaves slight undulations for character.
Step 2: Drying and Finishing
-
Let them dry:
Place both dishes on a wire rack or a clean wooden board. Allow them to air dry completely for 24-48 hours. I find flipping them over gently halfway through helps the bottom dry evenly. -
Sand the imperfections:
Once fully bone-dry and white, take your fine-grit sandpaper and gently buff the rims and any rough spots on the surface. Wipe away the dust with a dry cloth. -
Apply base color (Heart):
Mix a soft pastel pink acrylic paint. Apply two thin coats to the entire heart dish, allowing the first coat to dry before adding the second for opaque coverage. -
Apply base color (Round):
Paint the round dish with a warm off-white or cream color. Apply in thin, even strokes to mimic the look of unglazed ceramic. -
Create the speckled effect:
This is the secret to the rustic look. Dilute a tiny amount of light brown paint with water on your palette until it’s inky. Dip an old toothbrush into this mixture. -
Splatter the paint:
Hold the toothbrush over the completely dry dishes and run your thumb across the bristles to flick tiny specks of brown paint onto the surface. Practice on paper first to control the spray. -
Seal the project:
Once the paint is fully dry, apply a coat of varnish. A matte finish looks very natural, while gloss will make them look like glazed ceramic. Ensure every painted surface is covered. -
Final cure:
Let the varnish cure according to the bottle instructions (usually 24 hours) before placing any jewelry or keys inside.
Crack Control
If hairline cracks appear while drying, don’t panic! Create a ‘slip’ by mixing a little clay with water into a paste, fill the crack, let dry, and sand smooth.
Texture Tip
For an even earthier look, gently press a piece of coarse linen fabric onto the wet clay slab before cutting out your shapes to leave a subtle woven imprint.
Enjoy styling these charming dishes on your nightstand or gifting one to your partner


Partner Ring Holder Cones
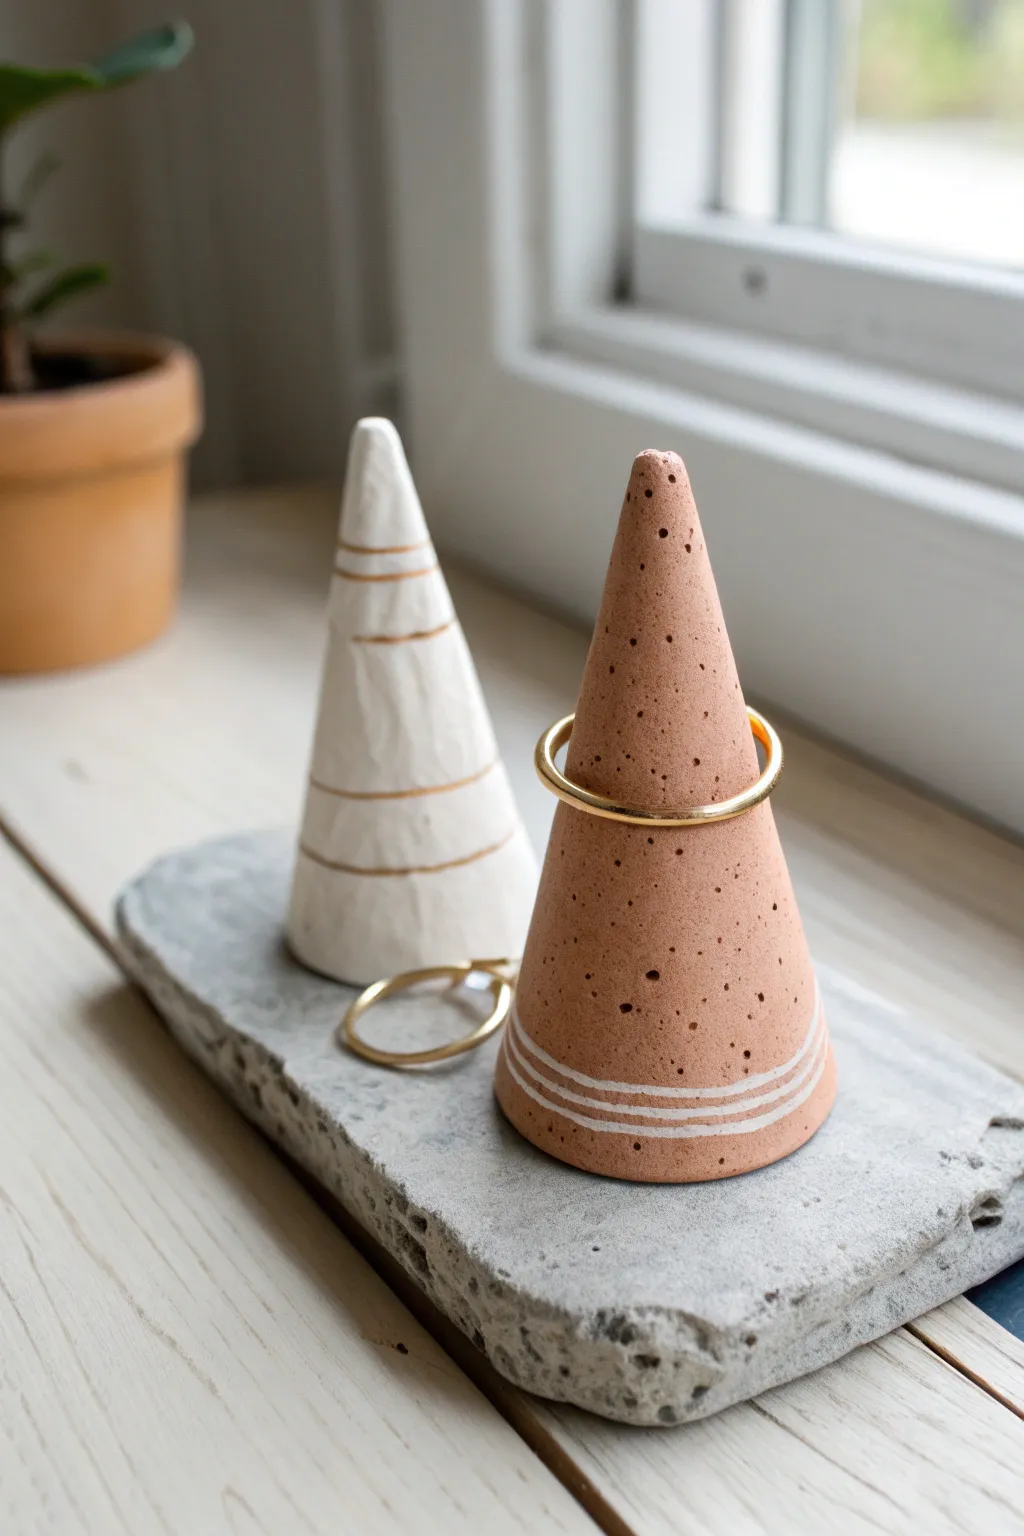
Create a modern, minimalist display for your jewelry with these charming clay cones. The terracotta and white pairing offers a lovely contrast, and the simple geometric shapes are surprisingly forgiving to sculpt.
Step-by-Step
Materials
- Air-dry clay (white and terracotta colored)
- Acrylic rolling pin
- Sharp crafting knife or clay blade
- Cardstock or thick paper (for templates)
- Tape
- Fine-grit sandpaper (400-600 grit)
- Small bowl of water
- Pointed sculpting tool or toothpick
- Fine tip paint brushes
- Gold metallic acrylic paint
- White acrylic paint
- Clear matte sealant spray (optional)
Step 1: Shaping the Cones
-
Prepare your template:
Cut a circle out of your cardstock, roughly 4-5 inches in diameter. Cut a wedge out of the circle (like a slice of pie) – removing about one-third of the circle works well for a standard cone shape. -
Condition the clay:
Take a handful of the terracotta air-dry clay and knead it in your warm hands for a minute until it feels pliable and smooth, removing any air bubbles. -
Roll out a slab:
Using your acrylic rolling pin, roll the clay out evenly until it is about 1/4 inch thick. Try to keep the thickness consistent so the cone stands straight later. -
Cut the shape:
Place your cardstock template onto the clay slab. Using your sharp crafting knife, trace around the template and cut out your clay wedge. -
Form the cone:
Gently lift the clay wedge and bring the straight edges together to form a cone. Overlap them slightly or butt them together, pressing from the inside to secure the seam. -
Smooth the seam:
Dip your finger or a sculpting tool into a little water and rub it along the outside seam until it disappears completely. The finish should look continuous. -
Flatten the base:
Stand the cone upright and verify it sits flat. If it wobbles, gently press it down onto your table or use your knife to trim any unevenness from the bottom rim. -
Repeat for the white cone:
Clean your hands thoroughly to avoid color transfer, then repeat the entire process using the white air-dry clay.
Step 2: Texturing and Refining
-
Add texture (Terracotta cone):
For the speckled look on the terracotta cone, use a toothpick or a small needle tool to poke shallow, random holes all over the surface while the clay is still damp. -
Create lines (White cone):
On the white cone, use your needle tool to gently carve three or four horizontal grooves around the circumference. I find spinning the cone slowly while holding the tool steady helps keep the lines straight. -
Initial drying:
Set both cones aside in a dry, cool area. Let them air dry for at least 24-48 hours. They should turn a lighter color and feel hard to the touch. -
Sanding:
Once fully dry, take your fine-grit sandpaper and lightly buff the surface of the cones to remove any fingerprints or rough spots, being careful not to sand away your carved texture.
Cracks Appearing?
If tiny cracks form while drying, mix a small amount of clay with water to make a paste (slip). Fill the cracks, smooth it out, and let it dry again.
Step 3: Painting and Finishing
-
Paint the white stripes:
On the terracotta cone, paint three thin white rings near the base. You can freehand these for an organic look, or use masking tape if you prefer sharp, crisp lines. -
Add gold accents:
Dip a fine brush into metallic gold paint. Carefully fill in the carved grooves on the white cone, letting the paint settle into the recessed lines. -
Clean up edges:
If any gold paint spills out of the grooves, quickly wipe it away with a slightly damp paper towel, or wait for it to dry and gently scrape it off. -
Final drying:
Allow the paint to dry completely, usually about 30 minutes depending on the brand of acrylics you used. -
Seal (Optional):
To protect your jewelry holders from moisture and dust, give them a light misting of matte clear sealant spray outdoors.
Make it Marble
Before rolling, twist snakes of white and terracotta clay together. Fold and twist repeatedly create a beautiful marbled effect for a third cone.
Place your rings on these elegant peaks and enjoy your organized vanity


Complementary Keychain Charms
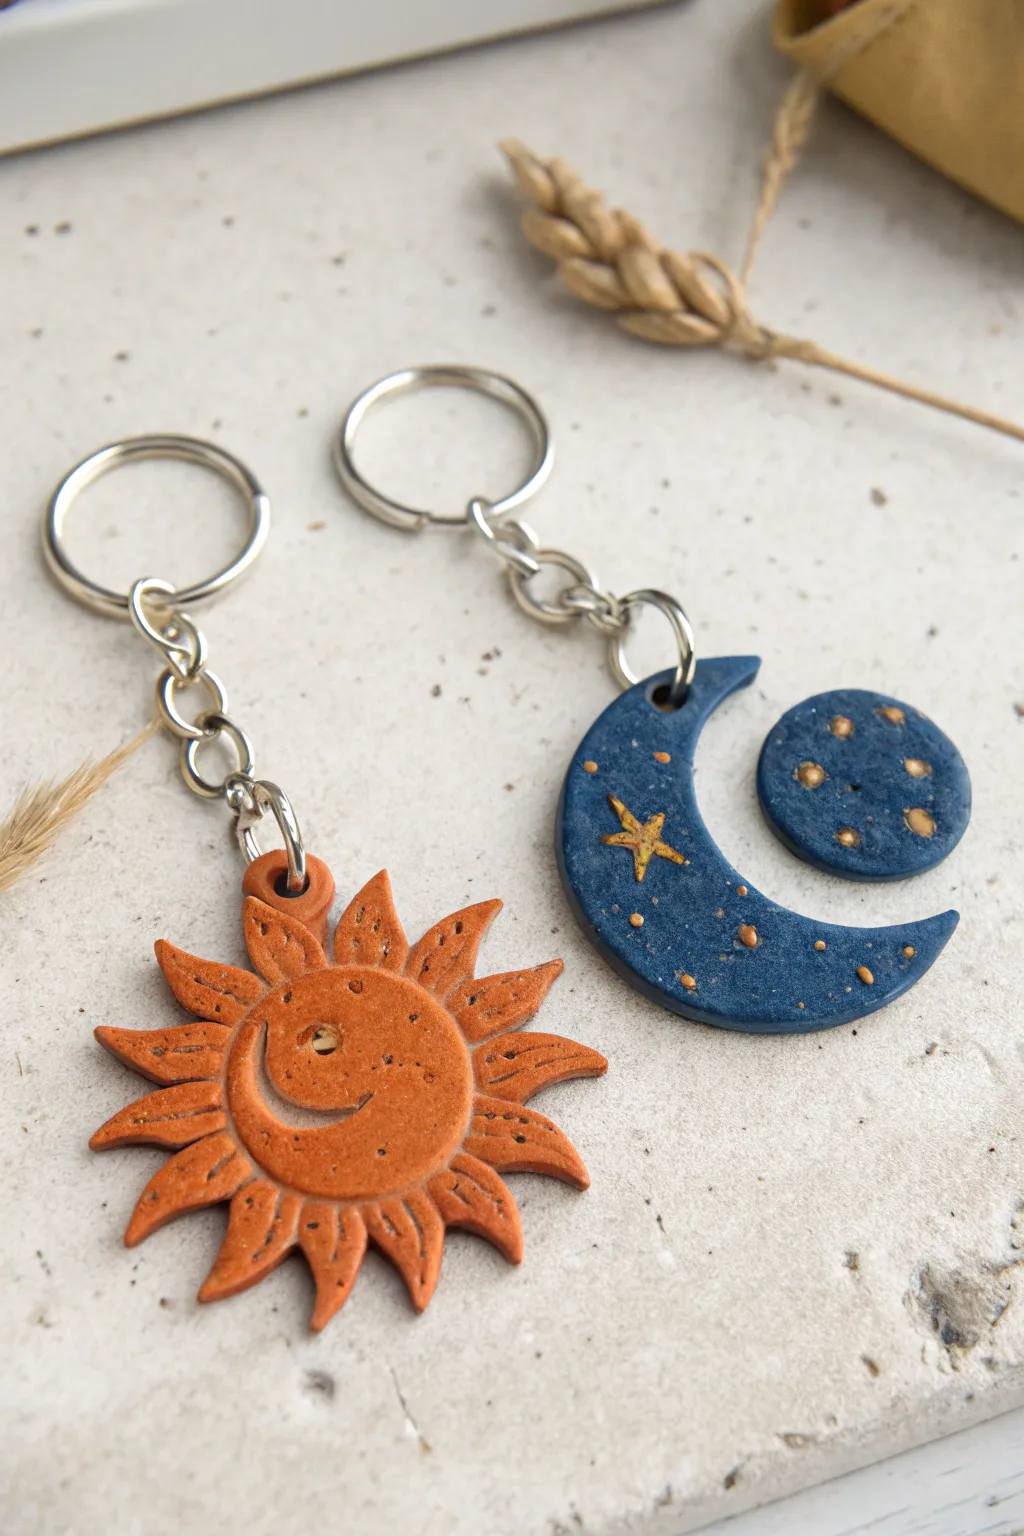
Celebrate your connection with these celestial complementary keychains, featuring a radiant sun in warm terracotta tones and a mystical crescent moon in deep twilight blue. This charming project uses simple shaping and painting techniques to create a textured, artisanal set perfect for gifting or keeping.
Step-by-Step
Materials
- Air-dry clay
- Acrylic paints (terracotta orange, dark navy blue, metallic gold)
- Gloss varnish or sealant
- Rolling pin
- X-Acto knife or clay cutting tool
- Needle tool or toothpick
- Small round piping tip or straw (optional for star cutting)
- Fine detail paintbrush
- Jump rings (silver tone)
- Keychains with chain extensors
- Pliers
- Sandpaper (fine grit)
Step 1: Shaping the Sun
-
Prepare the base:
Roll out a slab of clay to about 1/4 inch thickness. Cut out a perfect circle, roughly 2 inches in diameter, using a round cookie cutter or a small jar. -
Carve the rays:
Using your knife, cut triangular spikes all around the circumference of the circle to form the sun’s rays. Don’t worry about them being perfectly symmetrical; a little irregularity adds to the rustic charm. -
Add dimension:
Gently press a slightly smaller circle onto the center of your sun, just enough to leave an indentation marks where the face will be. -
Sculpt the face:
Roll a very thin snake of clay and form a spiral or a curved ‘C’ shape for the cheek and smile. Press this firmly onto the central face area, blending the edges slightly so it doesn’t fall off. -
Create texture:
Take your needle tool and prick small dots around the smile and on the rays to create a weathered, porous texture. -
Pierce the hole:
Use a straw or a tool to poke a clean hole through the top ray for the jump ring. Ensure it’s not too close to the edge.
Fixing Cracks
If small cracks appear as the clay dries, mix a tiny bit of fresh clay with water to make a paste and smooth it into the cracks with your finger.
Step 2: Shaping the Moon
-
Cut the crescent:
Roll out another slab of clay. Use a large circle cutter, then offset the same circle cutter and cut again to create a crescent moon shape. -
Cut the circle detail:
From the leftover scrap of the crescent cut, or a fresh piece, cut a small circle that fits snugly within the inner curve of the moon, representing a full moon or planet. -
Add the stars:
For the star on the moon, you can either paint it later or, for a 3D effect shown here, cut a tiny star shape and press it onto the crescent surface. Do the same for smaller dots representing distant stars. -
Pierce the holes:
Make a hole at the top tip of the crescent moon. Create a second hole in the small circle charm if you want it to dangle alongside the moon.
Step 3: Decorating and Assembly
-
Drying time:
Let all pieces dry completely for 24-48 hours. I like to flip them halfway through so the back dries evenly. -
Sanding:
Once bone dry, gently sand any rough edges, especially around the rays and the tips of the moon. -
Base coat painting:
Paint the sun charm with a warm terracotta or burnt orange acrylic. Paint the moon and the small circle with a deep, dark navy blue. -
Adding gold details:
Using a very fine brush and metallic gold paint, highlight the star on the moon. Add tiny gold dots to represent stars on the blue background. -
Highlighting the sun:
Use a lighter orange or a dry-brush technique with a tiny bit of gold to highlight the textured dots and the raised spiral on the sun’s face. -
Sealing:
Apply a coat of gloss varnish to protect the paint and give the charms a finished, ceramic-like look. -
Attach hardware:
Open a jump ring with pliers, loop it through the hole in your clay charm, and attach it to the keychain links. Close the ring securely.
Make it Sparkle
Mix a tiny pinch of fine glitter into your gloss varnish before sealing the moon charm to make the night sky truly twinkle.
Clip these onto your keys or backpack and carry a piece of your shared creativity wherever you go


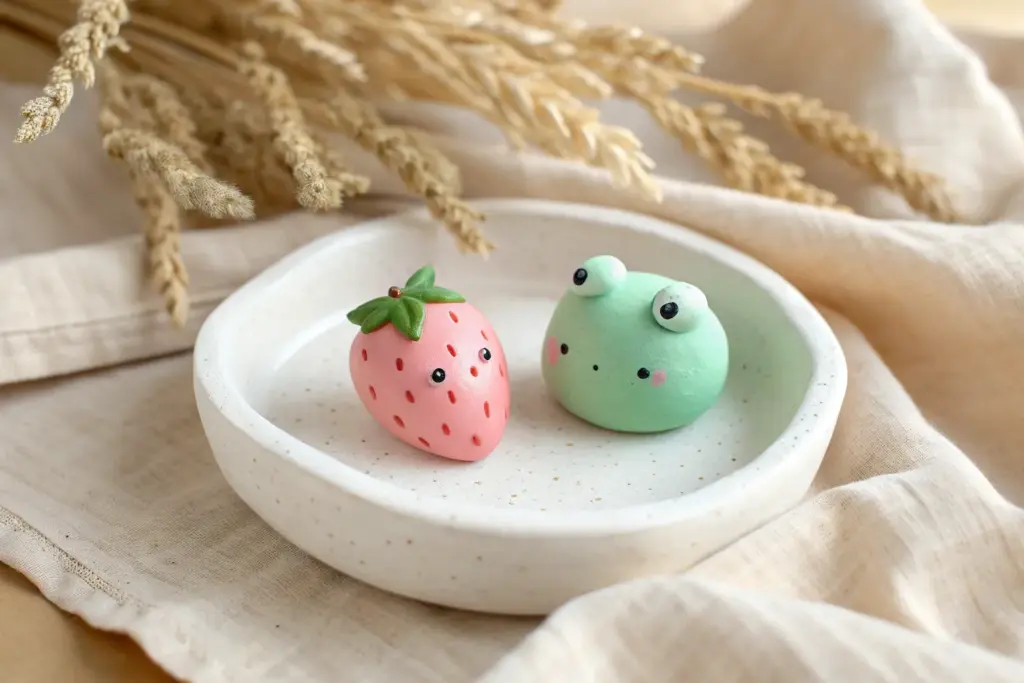
Chibi-Style Animal Pair
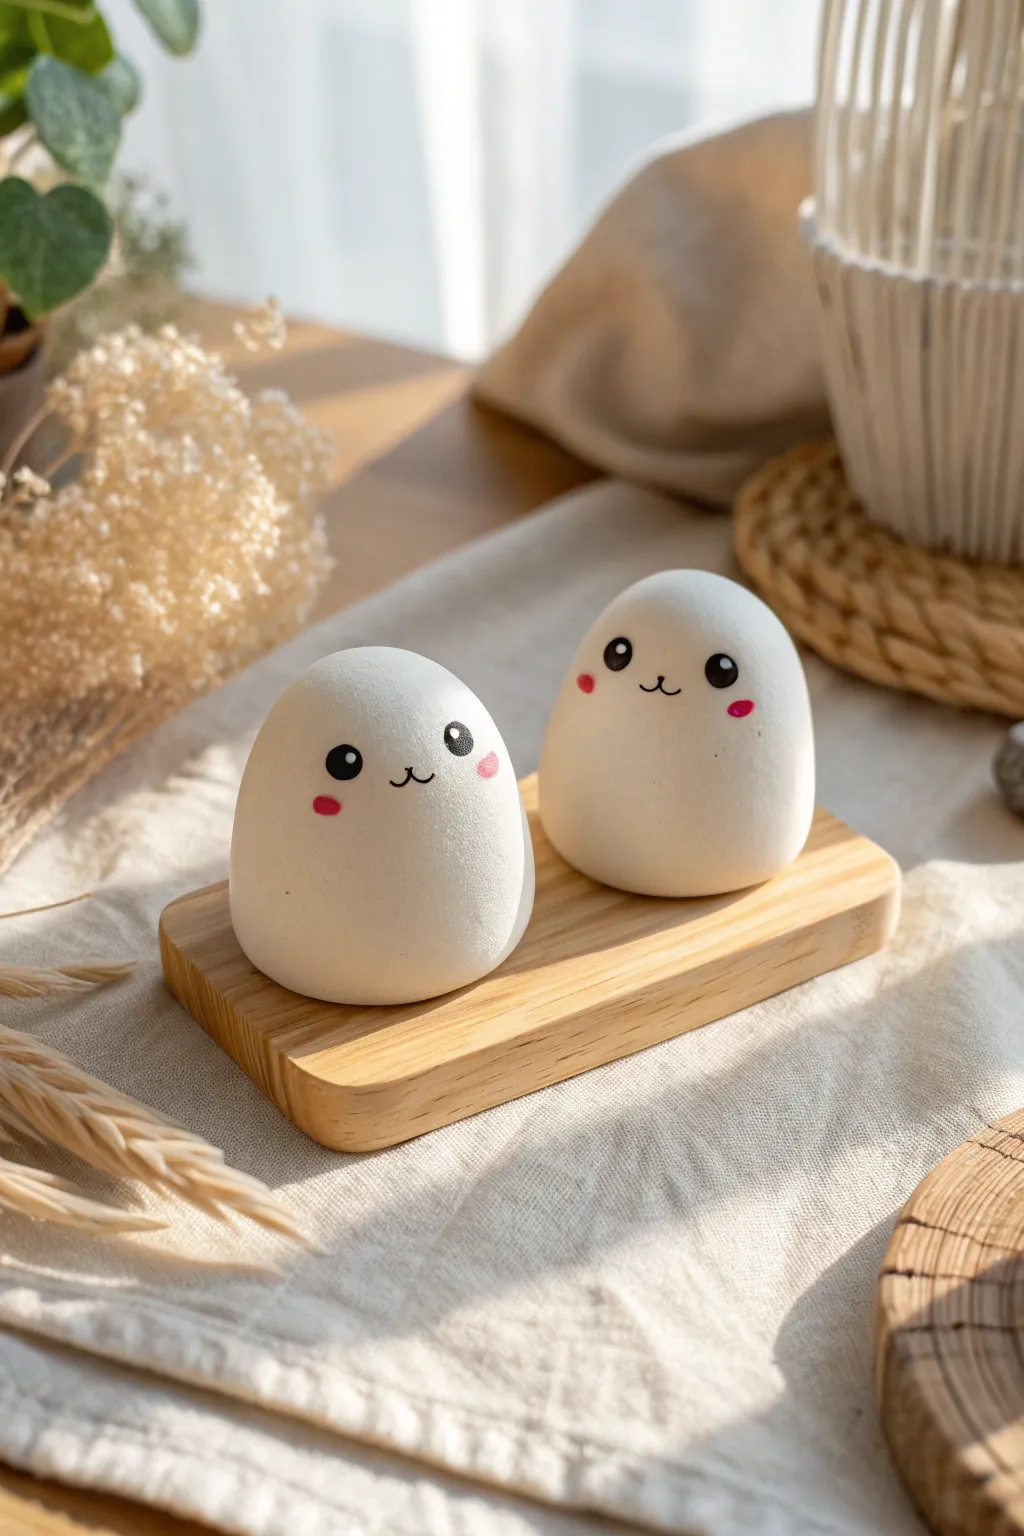
These adorable, minimalist figures are simplicity at its finest, proving you don’t need complex sculpting skills to make something heartwarming. Using basic egg shapes and delicate facial features, you will create a charming pair of desk buddies that radiate pure cuteness.
Detailed Instructions
Materials
- White airy dry clay (lightweight polymer or air-dry)
- Small rectangular wooden base (approx. 3×2 inches)
- Black acrylic paint or extra-fine black permanent marker
- Pink acrylic paint or pink marker/pastel
- Fine detail paintbrush (size 000)
- Water bonding tool or small cup of water
- Fine-grit sandpaper (optional, 400-600 grit)
- Matte varnish or sealant spray (optional)
Step 1: Sculpting the Base Forms
-
Prepare the Clay:
Take a chunk of white air clay roughly the size of a golf ball. Knead it thoroughly in your hands to warm it up and remove any air pockets, which prevents cracking later. -
Roll a Sphere:
Place the clay between your palms and roll it into a smooth, seamless ball. Check for any cracks or lines and smooth them out with a drop of water on your finger if needed. -
Shape the Egg:
Gently taper the top half of the sphere while rotating it to create an egg shape. Keep the bottom wider and heavier so the figure will stand stably. -
Flatten the Bottom:
Press the bottom of the egg shape gently onto your work surface. You want a flat base so it sits flush against the wood later, but don’t press so hard that the sides bulge out unnaturally. -
Create the Second Figure:
Repeat the process with a second piece of clay. I usually try to make this one slightly different in size—perhaps a bit shorter or wider—to give the pair distinct personalities. -
Refine the Surface:
Dip your finger in a tiny bit of water and run it over the entire surface of both shapes. Polish them until they are perfectly smooth like a real eggshell. -
Initial Drying:
Let the clay shapes dry for at least 24 hours. Placing them on a wire rack allows air to circulate underneath, ensuring the bottom dries just as evenly as the top.
Cracks Appearing?
If small hairline cracks appear while drying, mix a tiny bit of fresh clay with water to make a paste (slip). Rub this into the crack, smooth it over, and let it dry again.
Step 2: Adding the Faces
-
Sand for Perfection:
Once fully dry, check for any rough spots. If you find imperfections, lightly sand the surface with fine-grit sandpaper until it feels buttery smooth. -
Draft the Face:
Lightly sketch the position of the eyes and mouth with a pencil. Aim for the center-line of the egg or slightly lower to achieve that ‘chibi’ cute ratio. -
Paint the Eyes:
Using your finest brush and black acrylic paint (or a marker), draw two solid black circles for eyes. Keep them relatively wide apart for maximum cuteness. -
Add Highlights:
Wait for the black paint to dry completely. Then, using the tip of a toothpick or a dotting tool, add a tiny white dot in the upper corner of each eye to bring them to life. -
Draw the Mouth:
Paint a tiny ‘w’ shape between the eyes using the black paint. Keep the lines very thin and delicate; a thick mouth can change the expression entirely. -
Blush the Cheeks:
Mix a very soft pink paint or use a pink marker. Apply small, oval blush marks directly under the outer edge of each eye. -
Seal the Project:
Once the paint is totally set, coat the figures with a matte varnish spray to protect the surface from dust and fingerprints without making them shiny. -
Final Assembly:
Arrange your finished figures on the small wooden base. You can glue them down for permanence or leave them loose to rearrange them whenever you like.
Pro Smoothness
For a truly porcelain-like finish, dip your finger in water and polish the clay continuously for 2-3 minutes before setting it down to dry. The extra time eliminates all fingerprints.
Now you have a sweet pair of minimalist friends to brighten up your shelf

The Complete Guide to Pottery Troubleshooting
Uncover the most common ceramic mistakes—from cracking clay to failed glazes—and learn how to fix them fast.
Tiny “Clay Dinner” Food Set
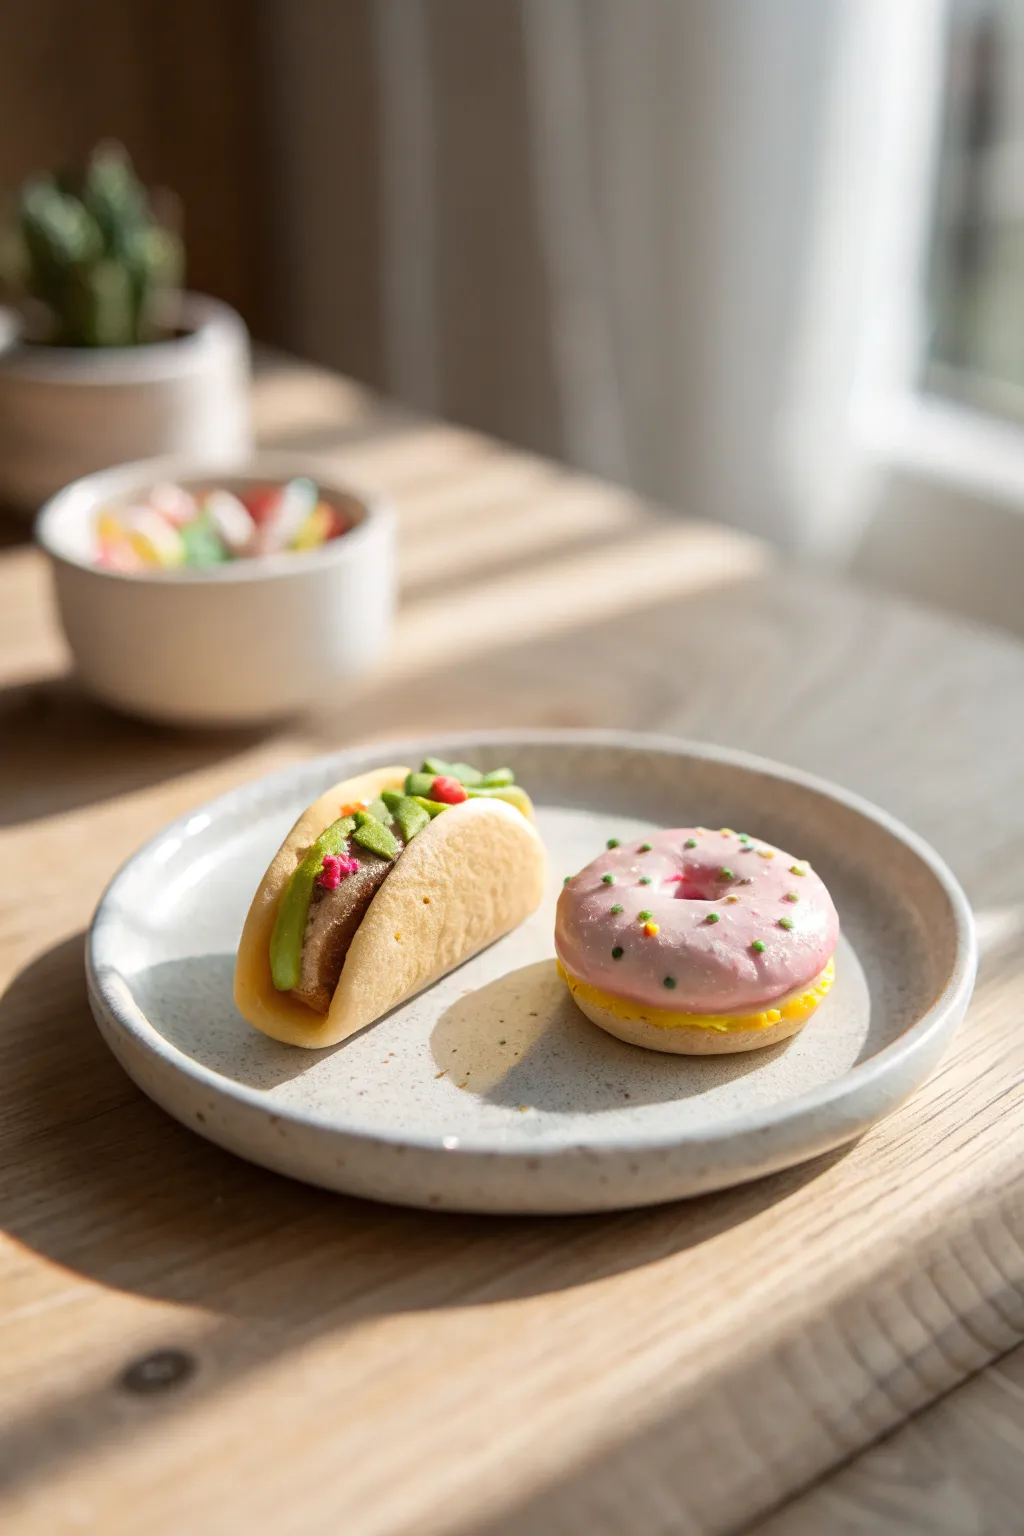
Create an adorable Lilliputian lunch with this tiny air dry clay food set, featuring a realistic little taco and a sprinkle-topped donut. This project is all about capturing savory and sweet textures on a microscopic scale, perfect for a quirky desk accessory or dollhouse display.
How-To Guide
Materials
- White air dry clay
- Acrylic paints (Tan, brown, green, pink, red, yellow, cream)
- Clay sculpting tools (needle tool, ball stylus)
- Rolling pin or smooth jar
- Old toothbrush or aluminum foil ball (for texturing)
- Fine-point paintbrush
- Gloss varnish or clear nail polish
- Parchment paper
Step 1: Sculpting the Taco
-
Mix the tortilla color:
Start by mixing a tiny amount of yellow and brown acrylic paint into a walnut-sized ball of white clay until you achieve a warm, corn-tortilla beige color. -
Shape the shell:
Roll the beige clay into a small sphere, then flatten it into a thin circle about 1.5 inches wide. Gently fold it in half, but don’t crease it—you want a U-shape to hold the fillings. -
Add texture:
Before the shell hardens, lightly tap the exterior with an old toothbrush or a ball of crinkled foil. This mimics the slightly rough texture of a cooked corn tortilla. -
Create the meat filling:
Mix dark brown paint into a smaller bit of clay. Crumble this clay into tiny, irregular bits and pack them into the bottom of your taco shell to resemble ground beef. -
Lettuce and toppings:
Color a small piece of clay bright green. Flatten it extremely thin and tear off jagged strips to look like shredded lettuce, layering them over the meat. -
Final taco details:
Roll tiny specks of red-tinted clay for tomatoes and sprinkle them into the lettuce. Gently press everything together inside the shell so it bonds as it dries.
Step 2: Crafting the Donut
-
Form the base:
Take a piece of plain white or slightly cream-tinted clay and roll it into a smooth ball, then flatten it slightly into a thick disc shape. -
Make the hole:
Use the back of a paintbrush or a large ball stylus to press directly through the center of the disc. Spin the tool gently to widen the hole and smooth the inner edges. -
Texturize the pastry:
Run a needle tool or toothpick horizontally around the middle of the donut’s side to create that classic ‘cut’ line where the dough expands during frying. -
The pastry cream ring:
Roll a very thin snake of yellow clay. I like to wrap this just under where the icing will sit, mimicking a ring of custard or pastry cream peeking out. -
Pink frosting cap:
Mix a soft pink clay color. Flatten a circle slightly larger than the donut, poke a hole in the center, and drape it over the top, letting the edges wobble naturally like melted glaze. -
Adding sprinkles:
Before the pink clay dries, press the tip of a needle tool into the surface to make tiny indents, then fill them with microscopic bits of green and orange clay, or paint them on later.
Cracking Clay?
If your tiny taco shell cracks while folding, the clay is too dry. Dip your finger in water and smooth it over the crack, or knead a drop of water into your clay ball before rolling it out again.
Step 3: Finishing Touches
-
Shading for realism:
Once the taco shell is dry, dry-brush a tiny amount of orange-brown paint onto the edges of the tortilla to make it look toasted and crispy. -
Highlighting the donut:
Dry-brush a very faint golden brown on the exposed bottom half of the donut to give it a ‘baked’ appearance. -
Gloss it up:
Apply a coat of gloss varnish specifically to the pink icing of the donut and the ‘meat’ of the taco to make them look moist and appetizing.
Make it Magnet
Before the clay fully hardens, press a small, strong neodymium magnet into the back of the taco or the bottom of the donut. Now your miniature feast can live on your refrigerator door.
Allow your miniature meal to dry completely for 24 hours before setting up your tiny dining scene
Message Magnets Set
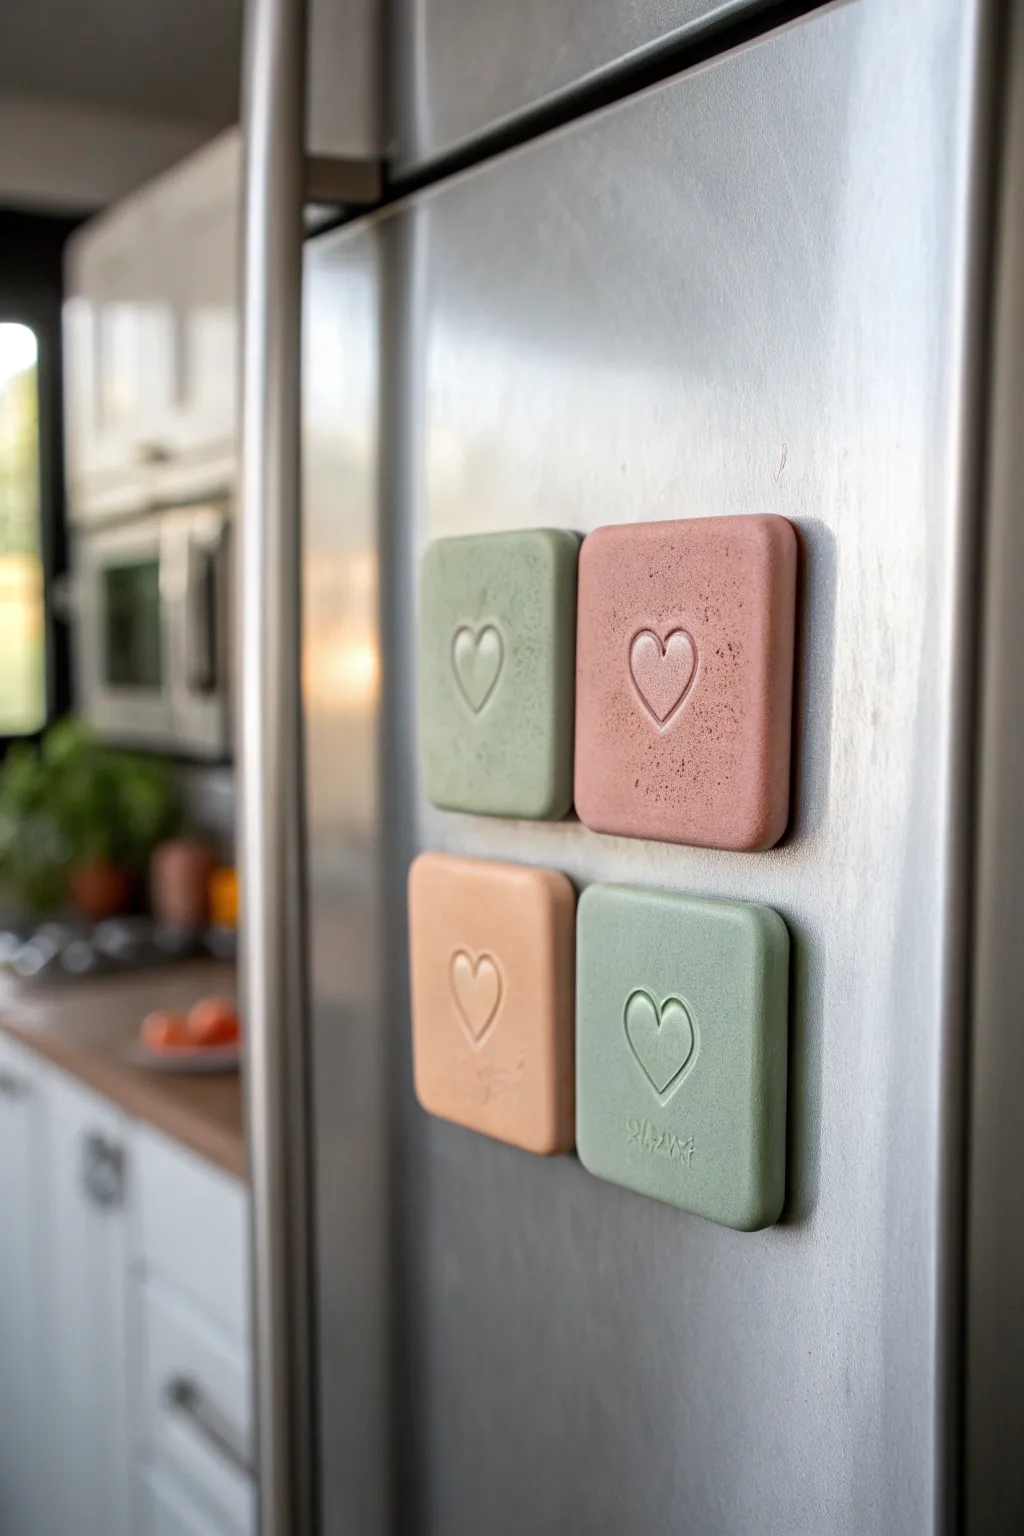
Create a charming set of message magnets that bring a touch of earthy elegance to your kitchen. These pastel, stone-textured tiles feature simple embossed hearts, perfect for holding up your favorite photos or grocery lists.
Step-by-Step Guide
Materials
- Air-dry clay (white or heavily pigmented pre-colored)
- Acrylic paints (pastel mint, terracotta, peach, sage)
- Rolling pin
- Square cookie cutter (approx. 2 inches)
- Small heart-shaped cutter or stamp
- Fine-grit sandpaper
- Strong round magnets
- Super glue or E6000
- Matte sealant spray or matte mod podge
- Parchment paper or silicone mat
- Old toothbrush or sponge (for texturing)
Step 1: Shaping and Stamping
-
Prepare your workspace:
Lay down a sheet of parchment paper or a silicone mat to prevent sticking. Grab a chunk of air-dry clay and knead it until it’s warm and pliable. -
Roll it out:
Using a rolling pin, flatten the clay into an even slab. You want it to be about 1/4 inch thick—sturdy enough not to crack, but not too heavy for a magnet. -
Cut the squares:
Press your square cookie cutter firmly into the clay slab to create clean, uniform shapes. If you don’t have a cutter, measure and cut squares with a craft knife and ruler. -
Smooth the edges:
Dip your finger in a little bit of water and run it gently along the cut edges of each square to soften any sharp corners or clay burrs. -
Stamp the heart:
Take your small heart cutter or stamp and position it perfectly in the center of a square. Press down gently—you want to make a deep impression without cutting all the way through the clay. -
Add texture:
To mimic the stone-like finish seen in the photo, lightly tap the surface of the clay with an old toothbrush or a dry sponge. A crumpled ball of aluminum foil also works wonders here. -
Repeat the process:
Continue cutting squares and stamping hearts until you have your desired number of magnets. It’s always smart to make a couple of extras in case one cracks during drying. -
Let them dry:
Place the squares on a flat surface away from direct heat. Let them air dry for 24-48 hours. I like to flip them over halfway through to ensure the bottoms dry evenly.
Step 2: Finishing and Assembly
-
Sand for perfection:
Once fully dry, use fine-grit sandpaper to gently smooth out any rough spots on the edges or back. Wipe away the dust with a barely damp cloth. -
Mix your colors:
Prepare a palette of muted, earthy pastels. Think sage green, dusty rose, and warm peach. If using acrylics, mix in a tiny bit of white to get that soft, chalky look. -
Apply the base coat:
Paint the top and sides of each square. Use a soft flat brush to get smooth coverage. Avoid letting paint pool inside the heart impression. -
Detail the texture:
For that speckled, concrete effect, dip a stiff brush (or toothbrush) into a darker shade of paint, blot most of it off, and flick a fine mist of speckles over the tiles. -
Seal the surface:
Protect your work with a matte varnish or sealant. This prevents the paint from scratching and keeps that lovely matte finish intact. -
Attach the magnet:
Flip the dried tiles over. Apply a strong dab of super glue or E6000 to the center of the back. -
Secure the backing:
Press a round magnet firmly into the glue. Hold it for 30 seconds to ensure a good initial bond. -
Final cure:
Let the glue cure fully according to the package instructions before placing them on your fridge.
Fixing Warp
If edges curl up while drying, it’s usually uneven moisture loss. While slightly damp, gently press them flat under a heavy book (with parchment paper in between) for the final few hours.
Scented Clay
Add a sensory twist by kneading a few drops of essential oil into the air-dry clay before rolling. Lavender or peppermint oil will release a subtle scent every time you pass the fridge.
Enjoy arranging your new custom message center on the fridge


What Really Happens Inside the Kiln
Learn how time and temperature work together inside the kiln to transform clay into durable ceramic.
Tealight Candle Holders for Two
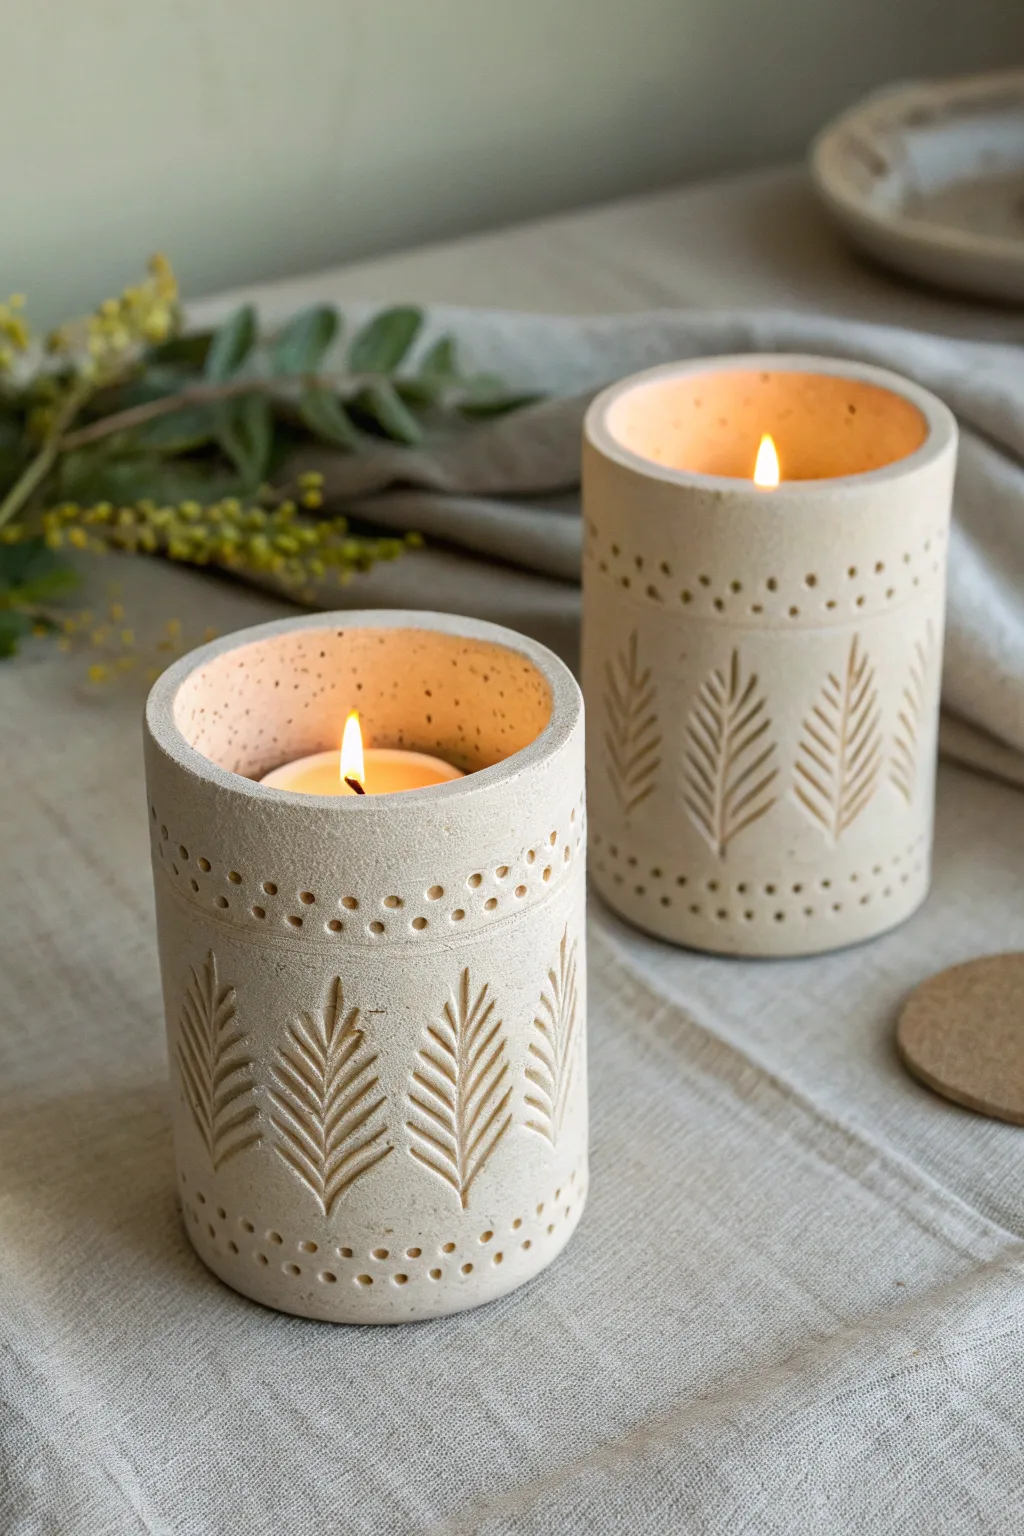
These elegant cylindrical candle holders bring a warm, natural glow to any evening with their fern-leaf impressions and delicate dotted borders. Perfect for a crafting date, this project transforms simple air-dry clay into sophisticated, texture-rich home decor.
How-To Guide
Materials
- White or cream air-dry clay (approx. 500g per holder)
- Small tealight candles or LED votives
- Rolling pin
- Parchment paper or canvas mat
- Rectangular template (paper or cardstock, approx. 4″ x 9″)
- Sharp clay knife or craft knife
- Smooth glass jar or can (to use as a form)
- Small round tool (like a toothpick, chopstick, or small drill bit) for dotting
- Modeling tool with a pointed tip (or a dull pencil)
- Small bowl of water
- Sanding sponge (fine grit)
Step 1: Preparing the Clay Slab
-
Roll out the clay:
Begin by kneading your air-dry clay until it is pliable and smooth. Roll it out on parchment paper to an even thickness of about 1/4 inch (6mm). Try to keep the slab consistent so the light shines through evenly later. -
Cut the rectangle:
Place your paper template onto the rolled clay. Using a sharp craft knife, cut around the template to create a clean, perfect rectangle. Remove the excess clay and set it aside for future use. -
Smooth the edges:
Dip your finger slightly in water and run it along the cut edges of your rectangle to smooth out any sharpness or roughness from the knife cut.
Use Textured Tools
Instead of carving, press real fern leaves or dried flowers into the wet clay, then gently peel them away for an incredibly realistic botanical imprint.
Step 2: Creating the Design
-
Mark the dot borders:
Using a ruler, lightly score two horizontal guide lines: one about an inch from the top edge and another an inch from the bottom edge. These will help keep your dot patterns straight. -
Stamping the dots:
With your round tool (a chopstick works wonders here), press a series of dots along your guide lines. Press firmly enough to create a deep indentation but be careful not to puncture all the way through the clay. -
Add a second row:
For added detail, create a second row of dots slightly closer to the edge than your first row, staggering them between the first set for a honeycomb effect. -
Carving the ferns:
In the central band between your dot borders, use a pointed modeling tool to carve the fern motifs. Start with a vertical center line for the stem, pressing deeper at the bottom and lighter at the top. -
Adding the leaves:
Carve short, angled strokes emanating from the stem to create the leaves. I find it helpful to curve these strokes slightly upward to mimic the natural growth of a fern. Repeat this pattern around the entire length of the clay slab.
Step 3: Forming the Cylinder
-
Prepare the form:
Wrap your glass jar or can in a layer of parchment paper. This prevents the clay from sticking to the glass as it dries. -
Lift the slab:
Carefully lift your decorated clay slab and wrap it around the prepared jar. Bring the two short ends together. -
Score and slip:
Where the ends meet, scratch the overlapping surfaces (scoring) and add a little water (slip). Press the seam together firmly. -
Blend the seam:
Use a modeling tool or your finger to smooth the seam on the outside so it becomes invisible. You may need to re-poke a few dots or touch up a fern leaf if the pattern gets smudged during this process. -
Refine the shape:
Gently roll the jar on the table to ensure the cylinder is perfectly round and the bottom edge is flat so it will stand straight.
Gilded Glow
Once the clay is dry, paint the inside of the cylinder with gold leaf or metallic gold paint. This will reflect the candlelight and add a luxurious, warm warmth to the glow.
Step 4: Finishing Touches
-
Initial drying:
Let the clay sit on the form for about 1-2 hours until it feels leather-hard. This ensures it holds its shape. -
Remove the form:
Carefully slide the glass jar and parchment paper out from the clay cylinder. If you leave the jar in too long, the clay might crack as it shrinks against the unyielding glass. -
Full cure:
Allow the cylinder to dry completely for 24-48 hours in a cool, dry place away from direct sunlight. -
Sand and smooth:
Once fully dry and chalky white, use a fine-grit sanding sponge to gently smooth the top rim and bottom edge for a professional finish.
Place a tea light inside and watch your beautiful fern patterns flicker to life on the table
Hidden Note Pocket Charms
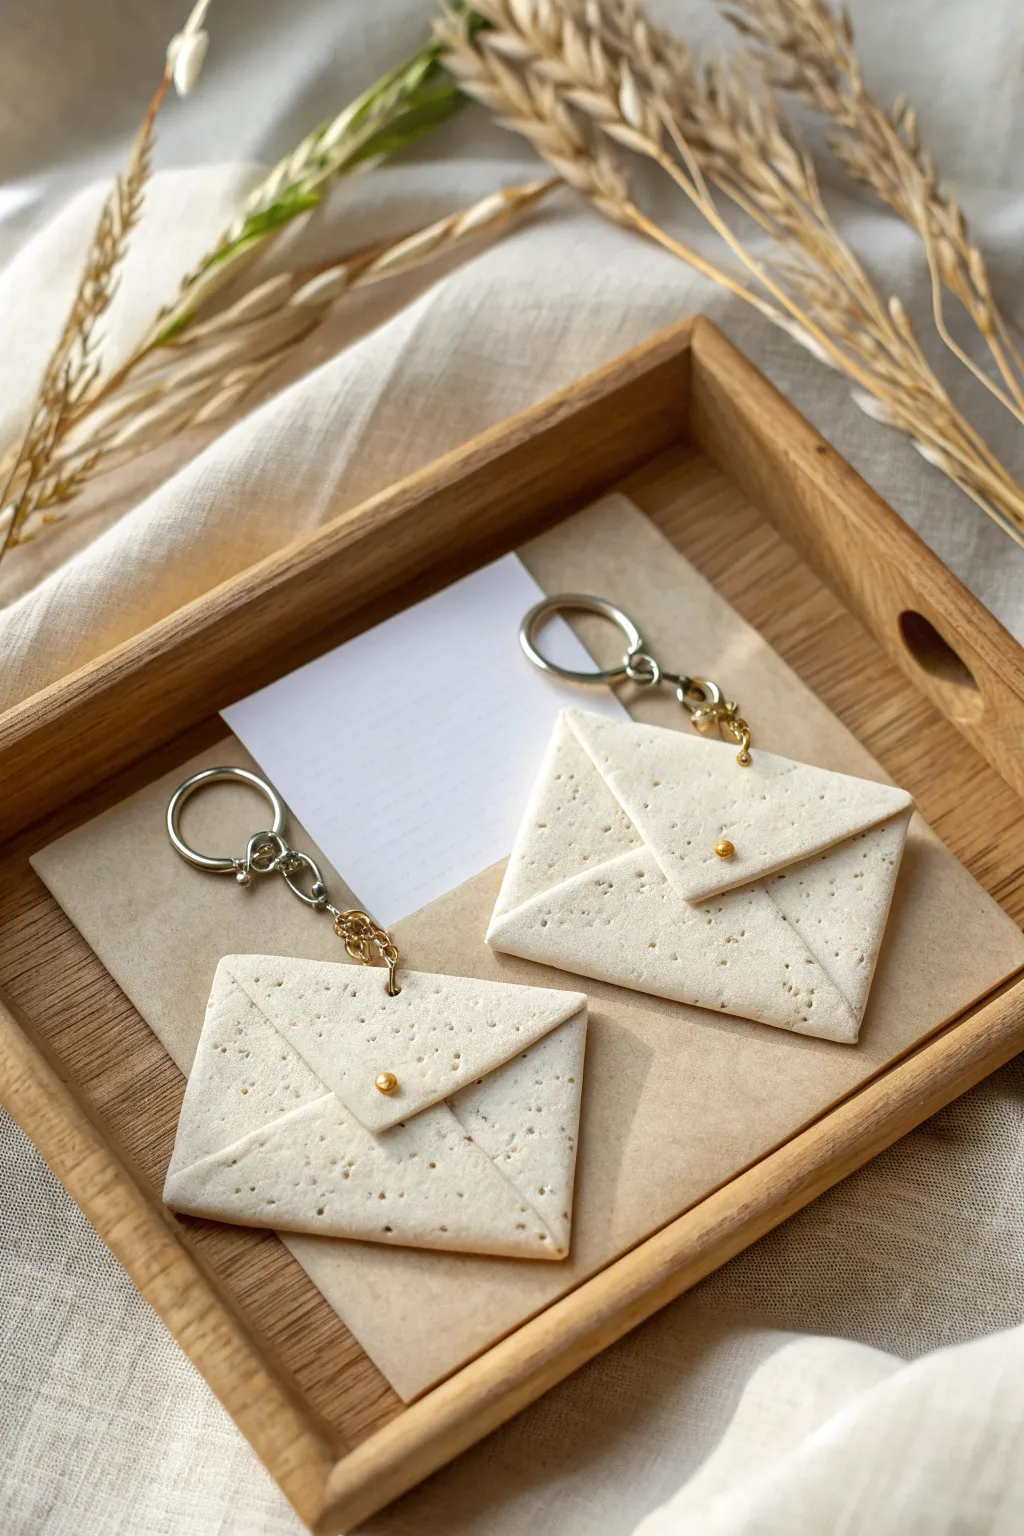
These miniature envelope charms are a sweet way to carry a tiny secret or love note wherever you go. Crafted to look like textured artisan paper or vanilla bean porcelain, they serve as unique keychains or thoughtful gift toppers.
Step-by-Step
Materials
- White air-dry clay or polymer clay (translucent works well for mixing)
- Ground black pepper or dried used coffee grounds (for speckling)
- Rolling pin or acrylic roller
- Craft knife or X-Acto blade
- Paper template (small rectangle)
- Small gold beads or brads
- Gold jewelry wire (24 gauge)
- Round nose pliers and wire cutters
- Keyring hardware and jump rings
- Super glue or strong craft adhesive
- Sandpaper (fine grit)
- Protective matte varnish (optional)
Step 1: Preparing the Clay
-
Condition the base:
Begin by kneading a snowball-sized amount of white clay until it is soft and pliable. If using polymer clay, ensure it’s warm enough to prevent cracking. -
Create the speckled texture:
Sprinkle a tiny pinch of ground black pepper or very finely dried coffee grounds onto the clay. I find that pepper gives a more subtle, ‘recycled paper’ look. -
Incorporating the specks:
Fold the clay over the specks and knead thoroughly until the particles are evenly distributed throughout the white base. -
Roll it out:
Roll the clay flat to a thickness of about 3-4mm. Aim for a consistent thickness so the envelope folds neatly.
Step 2: Shaping the Envelope
-
Cut the base shape:
Using a craft knife and a ruler (or paper template), cut out a distinct diamond shape. If you prefer a rectangular envelope style, cut a rectangle with triangular flaps on all four sides. -
Texture the surface:
Gently tap the surface with a toothbrush or a crumpled ball of aluminum foil to give it a porous, paper-like texture rather than a smooth plastic finish. -
First fold:
Fold the left and right points of your diamond inward so they meet in the center. Press the seams gently to adhere them but don’t smash the texture. -
Bottom fold:
Fold the bottom point up to close the pocket. This flap should overlap the side flaps slightly. Use a tiny dab of water (for air-dry) or liquid clay (for polymer) to seal these seams permanently. -
Top flap position:
Fold the top flap down to see where it lands, but don’t seal it shut yet. You want the envelope to look closed but slightly dimensional. -
Insert the hanging loop:
Cut a short piece of gold wire and twist it into a small U-shape or loop. Push the ends into the top corner of the envelope (inside the fold) before hardening.
Clean Cuts Pro Tip
If your clay drags while cutting, put a piece of plastic wrap over the clay and cut through it. This bevels the edges slightly for a softer, finished look.
Step 3: Details & Finishing
-
Add the hardware button:
Press a small gold bead or the head of a gold pin gently into the point of the top flap to mimic a fastener. If using a bead, press it deep enough to make an indentation, then remove it to glue later. -
Drying or baking:
If using air-dry clay, let the pieces dry on a flat surface for 24-48 hours. If using polymer, bake according to the package instructions (usually 275°F for 15-20 minutes). -
Smoothing edges:
Once fully cured and cooled, use fine-grit sandpaper to gently smooth any sharp edges or rough corners on the sides of the envelope. -
Secure the decorative bead:
Apply a tiny dot of super glue to the indentation you made earlier and permanently attach the gold bead. -
Attach the hardware:
Using pliers, open a jump ring and thread it through the wire loop you embedded in the clay. Attach your keychain ring and a small length of decorative chain. -
Optional protection:
For longevity, especially since keychains get bumped around, coat the clay with a thin layer of matte varnish to seal the specks and protect against dirt. -
The secret note:
Write a tiny message on a slip of paper, fold it small, and tuck it permanently inside before sealing, or leave the pocket functional to hold a tiny trinket.
Level Up: Functional Locket
Don’t glue the top flap! Instead, embed a tiny magnet into the flap and the body of the envelope so it can click open and shut to hold real notes.
Now you have a charming keepsake that carries a hidden sentiment wherever you travel

TRACK YOUR CERAMIC JOURNEY
Capture glaze tests, firing details, and creative progress—all in one simple printable. Make your projects easier to repeat and improve.
Mini Campfire Couple Scene
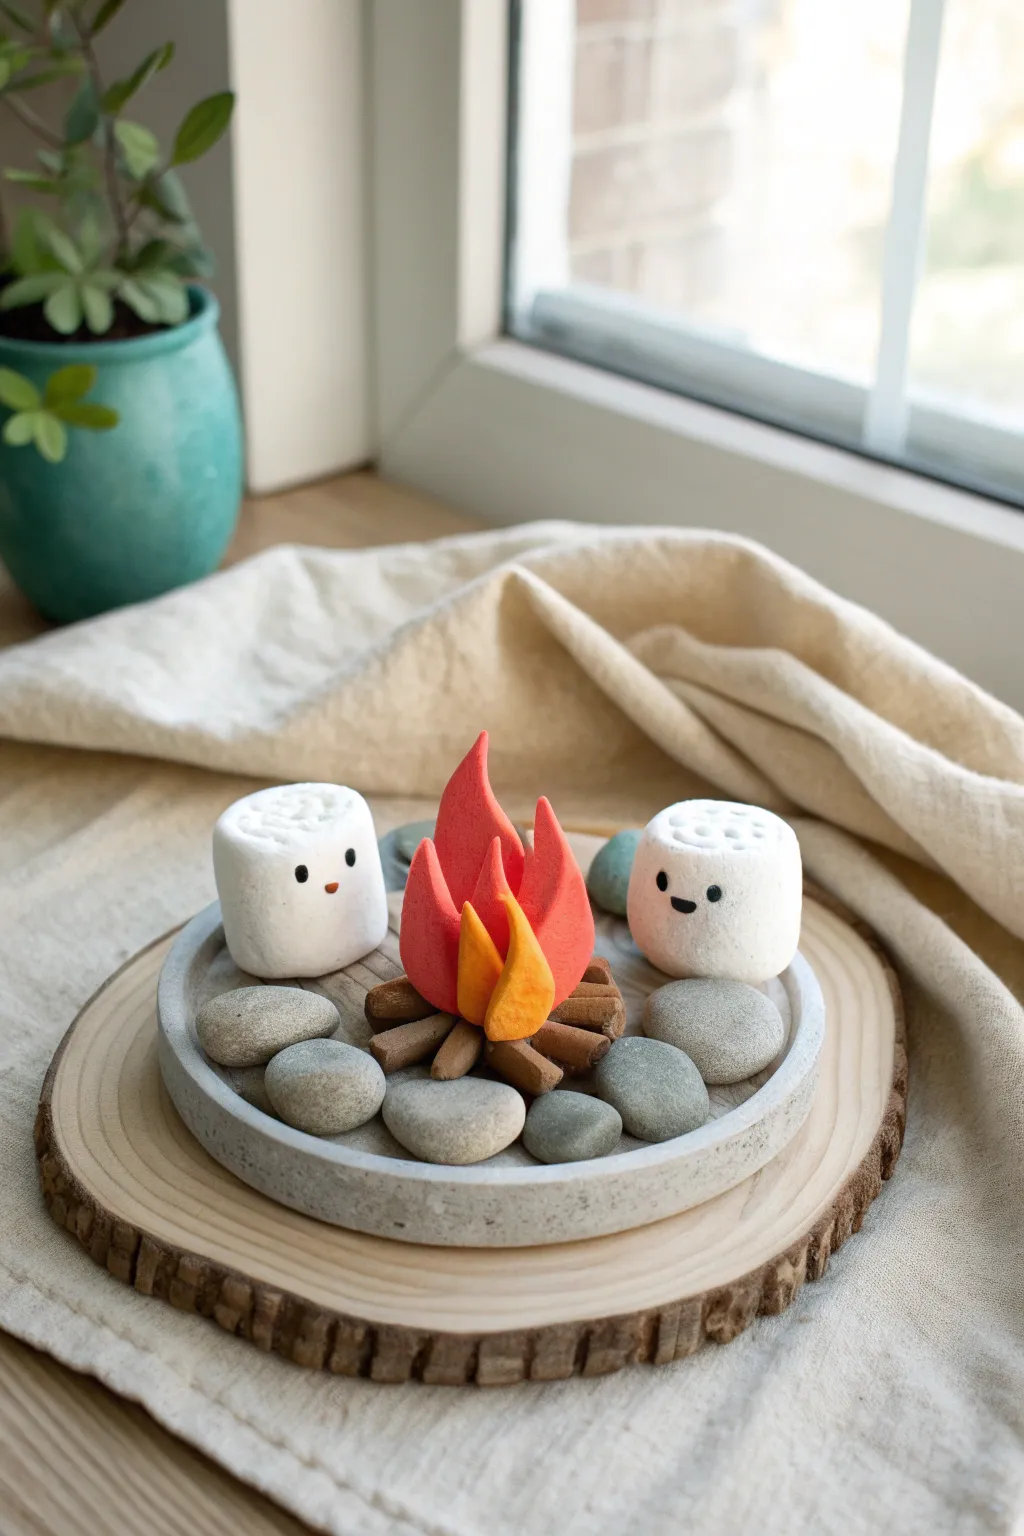
Cozy up with this adorable miniature diorama featuring two happy marshmallows enjoying a warm campfire. This air-dry clay project combines natural textures like stone and wood with cute character sculpting for a heartwarming display piece.
Step-by-Step Tutorial
Materials
- White, red, orange, yellow, and brown air-dry clay
- Small smooth river stones (grey tones)
- Round concrete coaster or grey clay base (approx. 4-5 inches)
- Black acrylic paint
- Fine detail paintbrush or dotting tool
- Sculpting tools (needle tool, small blade)
- Toothbrush (for texturing)
- Water bonding slip (water mixed with a little clay)
- Wood slice base (optional, for display)
Step 1: Setting the Scene Base
-
Prepare the foundation:
Start with your circular base. If you don’t have a pre-made concrete coaster, roll out grey air-dry clay into a 4-inch circle with a slightly raised rim to mimic the stone tray shown in the image. -
Arrange the stones:
Select small, smooth grey stones. Arrange them in a circle near the outer edge of your tray, leaving a clear space in the very center for the fire and two spots on opposite sides for the marshmallows. -
Secure the stones:
Once you are happy with the layout, use a dab of glue or wet clay slip underneath each stone to fix them permanently to the base so they don’t shift later.
Step 2: Sculpting the Campfire
-
Create the logs:
Roll brown clay into thin snakes, about the thickness of a pencil. Cut them into short 1-inch segments. -
Texture the wood:
Before assembling, lightly drag a needle tool down the length of each log to create bark texture. I think this small detail really sells the realism next to the cartoonish marshmallows. -
Stack the fire pit:
Arrange the logs in the center of the tray in a starburst or teepee pattern, stacking them slightly to create height. -
Form the main flames:
Take red clay and flatten it into teardrop shapes. Pinch and twist the tips to look like flickering fire. These will be the largest flames at the back. -
Layer the colors:
Create smaller teardrops from orange and yellow clay. Press these onto the front of the red shapes to create depth and a glowing effect. -
Assemble the fire:
Nestle the flame cluster into the center of your log pile, using a little water or slip to bond the clay parts together if they are dry.
Pro Tip: Glowing Embers
Mix a tiny bit of yellow clay into your brown log ends but don’t blend fully. This marbled look mimics glowing wood embers.
Step 3: Creating the Marshmallow Couple
-
Shape the bodies:
Roll two equal balls of white clay. Gently flatten the top and bottom of each ball against your work surface to create a cylinder shape with rounded edges. -
Add texture:
Lightly tap the tops and bottoms with a clean toothbrush. This mimics the porous, fluffy texture of a real marshmallow. -
Detail the tops:
Use a small circular tool or the end of a straw to verify the iconic ‘marshmallow’ shape, pressing very lightly into the top center. -
Paint the faces:
Using a fine dotting tool and black acrylic paint, add two small eyes set wide apart on each marshmallow. -
Give them expressions:
Paint a tiny smile between the eyes. For one marshmallow, vary the expression slightly—perhaps a side smirk—to give them individual personalities. -
Add blush (optional):
If you want them extra cute, you can dry brush the tiniest amount of pink chalk pastel dust under the eyes for cheeks. -
Position the couple:
Place your finished marshmallows onto the stone tray on opposite sides of the fire, facing slightly toward the viewer so their faces are visible.
Troubleshooting: Cracks
If the marshmallows crack while drying, mix a small amount of white clay with water to make a paste and smooth it over the fissures.
Allow the entire scene to dry for 24 hours before displaying on the wood slice for that perfect rustic touch
Two-Part Puzzle Keepsake
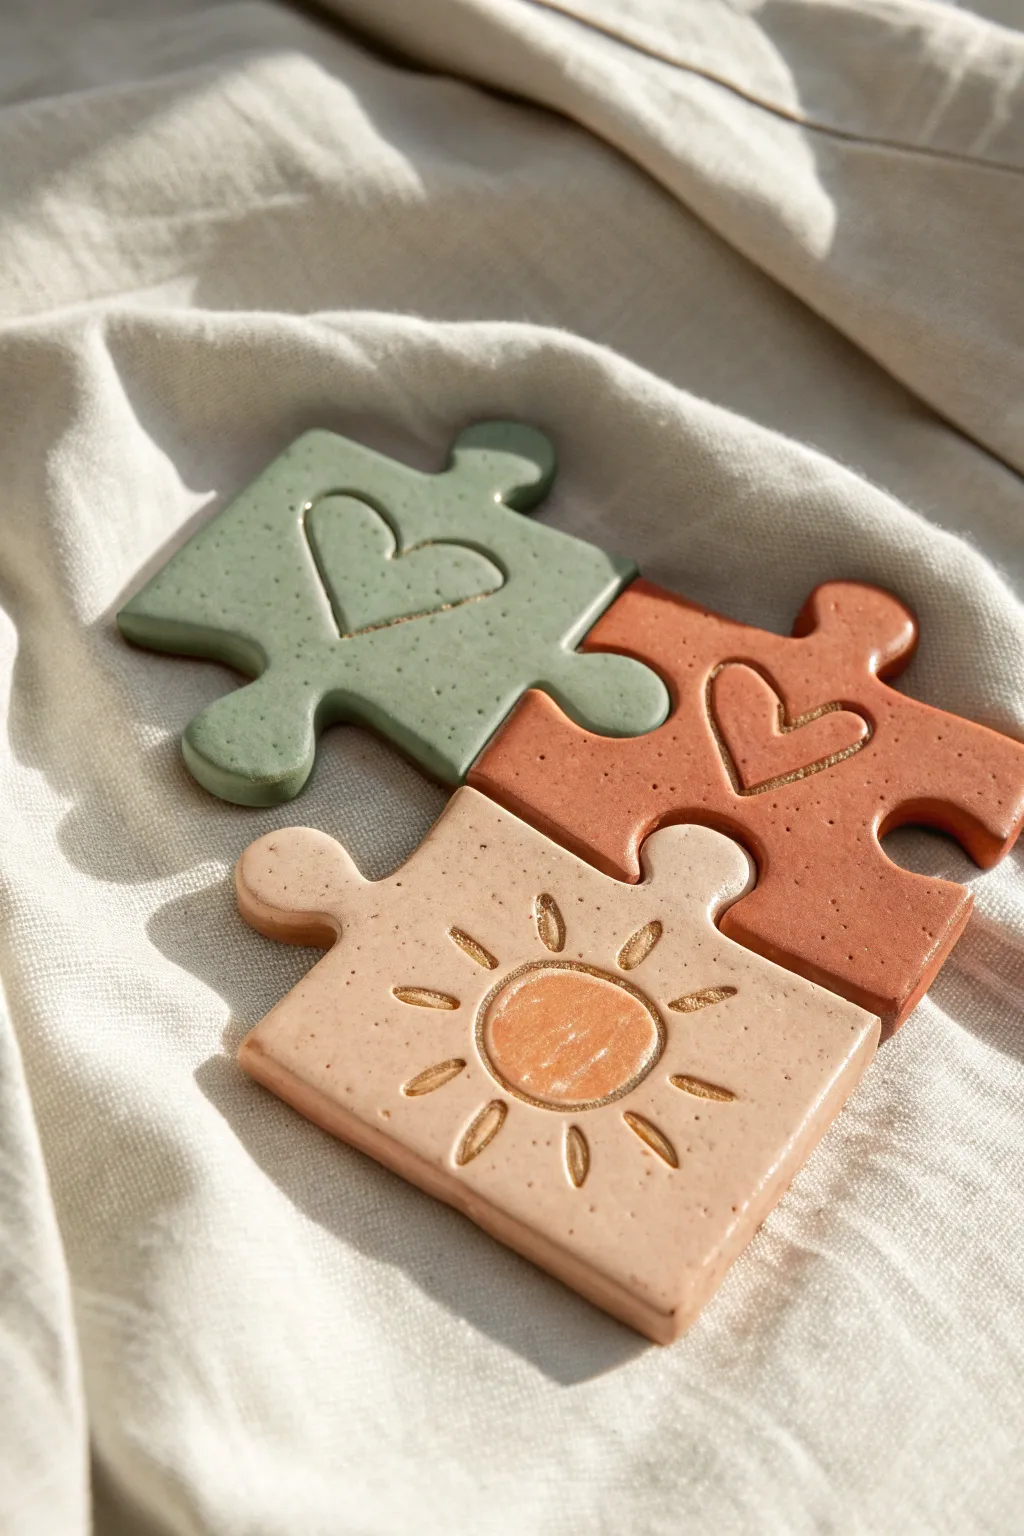
These interlocking clay puzzle pieces are a charming way to symbolise connection, whether it’s between friends, partners, or family members. With their warm, earthy tones and simple impressed designs, they serve as tactile reminders of how perfectly you fit together.
Step-by-Step Guide
Materials
- Air-dry clay (white or natural)
- Acrylic paints (sage green, terracotta rust, light beige/peach, white)
- Gloss varnish or clear sealant
- Rolling pin
- Parchment paper or craft mat
- Craft knife or scalpel (X-Acto)
- Needle tool or toothpick
- Small flat paintbrush
- Fine detail paintbrush
- Sandpaper (fine grit)
- Small bowl or circle cutter (optional for sun)
- Paper and pencil (for template)
Step 1: Shaping the Clay
-
Draft your template:
Start by drawing three puzzle shapes on a piece of paper that interlock perfectly. Sketch the designs you want on them—like hearts or a sun—and cut the paper shapes out with scissors to use as guides. -
Roll out the clay:
Take a generous ball of air-dry clay and knead it briefly to remove air bubbles. Roll it out on parchment paper until you have an even slab, roughly 0.5 cm thick. -
Cut the shapes:
Place your paper templates onto the clay slab. Using a craft knife or scalpel, carefully trace around the perimeter of each puzzle piece. -
Smooth the edges:
Dip your finger in a little water and gently run it along the cut edges of each piece to soften any sharp corners or rough bits left by the knife. -
Impress the designs:
Using a needle tool or the tip of a toothpick, gently carve the outlines of your hearts and sun designs into the surface. Press deep enough to create a distinct groove, but not so deep you cut through. -
Add texture:
For the sun piece, press the center circle slightly deeper to create a recessed area. For the sun’s rays, press the side of the needle tool into the clay to create teardrop-shape indents. -
Refine the surface:
Before setting them aside, check the surface for fingerprints and smooth them away with a barely damp finger or a soft, damp sponge. -
Dry thoroughly:
Place the pieces on a flat surface to dry for 24-48 hours. I find flipping them over halfway through helps prevent curling.
Step 2: Decorating and Finishing
-
Sand imperfections:
Once bone dry, use fine-grit sandpaper to gently smooth down the edges and surface if any rough spots appeared during drying. Wipe away the dust with a dry cloth. -
Mix your colors:
Prepare your palette with a muted sage green, a warm terracotta, and a sandy beige. You may need to mix in a little white or brown to get these earthy, natural tones. -
Base coat painting:
Paint each puzzle piece its respective solid color using a flat brush. Apply thin, even layers, letting the paint dry completely between coats. -
Speckling effect:
To achieve the ceramic look, dip an old toothbrush or stiff brush into diluted brown or black paint. Flick the bristles with your thumb to spray tiny speckles over the pieces. -
Highlight the carvings:
Using a very fine detail brush, carefully paint inside the carved grooves. For the hearts and sun outline, use a slightly lighter or darker shade than the base color to make the design pop. -
Paint the sun accent:
Fill the central circle of the sun with a brighter terracotta or orange shade to differentiate it from the beige background. -
Seal the work:
Once all paint is completely dry, apply a coat of gloss varnish. This gives the pieces that shiny, fired-ceramic appearance and protects the paint.
Check the Fit
Before the clay dries, gently push the damp puzzle pieces together to ensure they still interlock properly. If they distorted while cutting, nudge them back into shape.
Turn Into Magnets
Make these functional by gluing strong ceramic magnets to the back using E6000 or superglue. They make adorable fridge decor that can be separated or kept together.
Now you have a set of handcrafted keepsakes that perfectly capture the bond you share
Swap-and-Finish Figurines

Create a charming pair of minimalist figures that symbolize togetherness with their matching heart motifs and complementary warm tones. This project captures the spirit of collaboration, featuring gentle textures and sweet, simple expressions painted on smooth, round faces.
Step-by-Step Guide
Materials
- Air-dry clay (white)
- Acrylic paints (white, beige, terracotta/burnt orange, dark brown)
- Fine grit sandpaper
- Small rolling pin
- Modeling tools (needle tool, small ball stylus)
- Water in a cup
- Paintbrushes (fine detail brush, flat shader brush)
- Matte sealant/varnish
Step 1: Shaping the Core Bodies
-
Divide the clay:
Start with two equal portions of air-dry clay, each about the size of a lemon. This ensures your figures will be roughly the same height. -
Form the base cylinder:
Roll each portion of clay into a thick cylinder. Gently taper the top so it’s slightly narrower than the base, creating a subtle cone shape for the body. -
Smooth the foundation:
Tap the bottom of your cones on the table to flatten them securely so the figures stand upright without wobbling. Use a slightly damp finger to smooth out any cracks in the clay surface. -
Create the head:
Roll two smaller balls of clay for the heads. These should be proportionate to the bodies, roughly spherical but slightly flattened on the bottom where they will attach to the neck area. -
Attach head to body:
Score the top of the body cone and the bottom of the head sphere with a needle tool. Apply a tiny dab of water (or clay slip) to the scored areas and press the head firmly onto the body. Smooth the seam at the neck for a strong bond.
Step 2: Sculpting Details & Texture
-
Hair cap creation:
Roll out a thin sheet of clay and cut two circles. Drape one over each head to form the ‘hair.’ You can trim the edges with a knife to create bangs or a specific hairline shape. -
Add hair texture:
Take a needle tool and gently poke random, tiny holes across the surface of the hair caps. This stippled texture gives the figures their distinctive, rustic look. -
Carve the heart:
Using a needle tool or a small carving tool, carefully etch a simple heart outline into the center of each figure’s chest. Don’t press too deep; just enough to catch the light. -
Add arm suggestions:
Roll two very thin snakes of clay for the arms. Attach them vertically along the sides of the body, blending the top shoulder area into the main form but leaving the bottom slightly raised to define the sleeve. -
Body texturing:
On the white figure, use an old toothbrush or a stiff bristled brush to gently tap the body area, giving the ‘fabric’ a soft, rough-spun appearance similar to the hair but subtler. -
Drying time:
Set your figures aside in a safe, dry place. Let them cure for at least 24-48 hours. I find turning them upside down halfway through helps the bottoms dry completely.
Pro Tip: Seamless necks
If the head feels wobbly before drying, insert a small piece of toothpick or uncooked spaghetti into the body and slide the head onto it for internal support while the clay bonds.
Step 3: Painting & Finishing
-
Sand for smoothness:
Once fully dry, lightly sand the face area with fine-grit sandpaper. You want the face to be perfectly smooth for painting, contrasting with the textured hair and clothes. -
Base coat the bodies:
Paint the body of one figure in a soft, creamy white. Paint the second figure’s body in a warm terracotta or burnt orange shade. Use two thin coats for opaque coverage. -
Painting the hair:
Contrast the colors: paint the hair of the white-dressed figure in the terracotta tone, and paint the hair of the orange-dressed figure in a soft beige or light brown. -
Skin tone application:
Mix a warm beige for the faces. Apply carefully, keeping the edges clean where the face meets the hair cap. -
Accent the hearts:
Using a very small brush, paint inside the carved heart grooves. Use a slightly darker shade of the body color (dark beige for the white dress, dark brown for the orange dress) to make the carving pop. -
Face details:
With your finest detail brush (or a fine-tip black paint marker), draw two small U-shapes for closed eyes and a tiny curve for a smiling mouth. Keep the features low on the face for a cute, stylized proportion. -
Final seal:
Once all paint is completely dry, coat the entire figure with a matte varnish to protect the paint and unifiy the finish.
Troubleshooting: Cracks
Don’t panic if small cracks appear as it dries! Mix a tiny bit of fresh clay with water to make a paste (slip) and fill the cracks, then smooth it over with your finger.
Place your finished duo on a shelf or desk as a sweet reminder of your shared creative time
Memory Map Trinket Tiles

Immortalize a special memory or favorite walking route with these elegant clay tiles. Featuring delicate dotted trails and earthy accent lines, these coasters combine textured minimalism with a personal cartographic touch.
Detailed Instructions
Materials
- White or cream air-dry clay
- Rolling pin
- Two wooden guide slats (approx. 5-7mm thick)
- Square cookie cutter (approx. 4 inches) or a knife and ruler
- Needle tool or toothpick
- Fine-grit sandpaper
- Terracotta or warm ochre acrylic paint
- Fine liner paintbrush
- Matte spray sealant or clear varnish
- Canvas mat or cloth (for working surface)
Step 1: Shaping the Canvas
-
Prepare your surface:
Lay down a canvas mat or heavy cloth. This not only protects your table but will impress a lovely, subtle fabric texture onto the back of your coasters as you work. -
Condition the clay:
Take a handful of air-dry clay and knead it until it’s pliable and warm. If it feels too dry, dip your fingers in water and work it in, but avoid making it slushy. -
Roll out the slab:
Place your wooden guide slats on either side of the clay ball. Roll the clay out until the rolling pin rests on the slats, ensuring an even, perfectly flat thickness across the entire slab. -
Cut the shapes:
Press your square cutter firmly into the clay. If you don’t have a cutter, use a ruler and craft knife to measure and cut 4-inch squares. I usually cut one or two extras just in case. -
Smooth the edges:
Dip your finger in a little water and run it along the cut edges to soften the sharp corners. You want a slightly rounded, finished look rather than a raw, sharp cut.
Uneven Drying?
If edges start lifting while drying, place a light book on top (with parchment paper in between) once the clay is semi-dry to gently force it back to flat.
Step 2: Mapping the Memory
-
Draft your design:
Using a very light touch with a needle tool, sketch faint wavy lines across the tile. Think of topographic maps or a specific winding path you’ve walked together. -
Create the dotted trails:
Using the blunt end of a toothpick or a small dotting tool, press gently into the clay along your sketched lines. Create double rows of dots that curve and flow across the surface. -
Vary the patterns:
Don’t make every line identical. Leave some open space (negative space) and concentrate the dotted patterns in specific corners or flowing through the center for visual balance. -
Add texture accents:
For extra detail, add random solitary dots scattered in the open areas to mimic varied terrain or starlight. -
Final smoothing:
Check the surface for any unwanted fingerprints. Use a slightly damp sponge to wipe them away without erasing your texture. -
Let it dry completely:
Place the tiles on a wire rack to dry. Flip them over every 6-8 hours to prevent curling. Allow 24-48 hours for full drying, depending on your humidity.
Step 3: Painting and Finishing
-
Sand the imperfections:
Once fully dry and white, use fine-grit sandpaper to buff the edges and surface. Focus on any roughness created where the needle tool exited the clay. -
Dust off:
Wipe the tile thoroughly with a dry cloth or soft brush to remove all clay dust before painting. -
Mix your paint:
Squeeze out a small amount of terracotta or ochre acrylic paint. You want a consistency that flows easily from a thin brush but isn’t watery. -
Paint the river line:
Select one main curve on each coaster to highlight. Using a fine liner brush, paint a solid line following that curve. I suggest painting ‘inside’ a row of dots or parallel to them. -
Clean up edges:
If your line wobbles, quickly wipe it with a damp Q-tip or wait for it to dry and gently scrape the excess paint off with your craft knife. -
Seal the work:
If using as functional coasters, apply 2-3 coats of waterproof varnish or sealer to protect the clay from moisture. Let each coat dry fully before adding the next.
Map It Out
Before impressing the clay, gently trace a real map of your favorite hiking trail or park on tracing paper, then lay it over the clay and trace lightly to transfer the path.
Now you have a set of personalized tiles that map out your shared journey, ready for display or use