Air clay is my go-to when I want that satisfying handbuilt feel without any special equipment, and it’s perfect for quick little models you can finish in a weekend. Here are my favorite air clay model ideas—a mix of cute, functional, and slightly quirky projects you can totally pull off at your kitchen table.
Simple Trinket Dishes
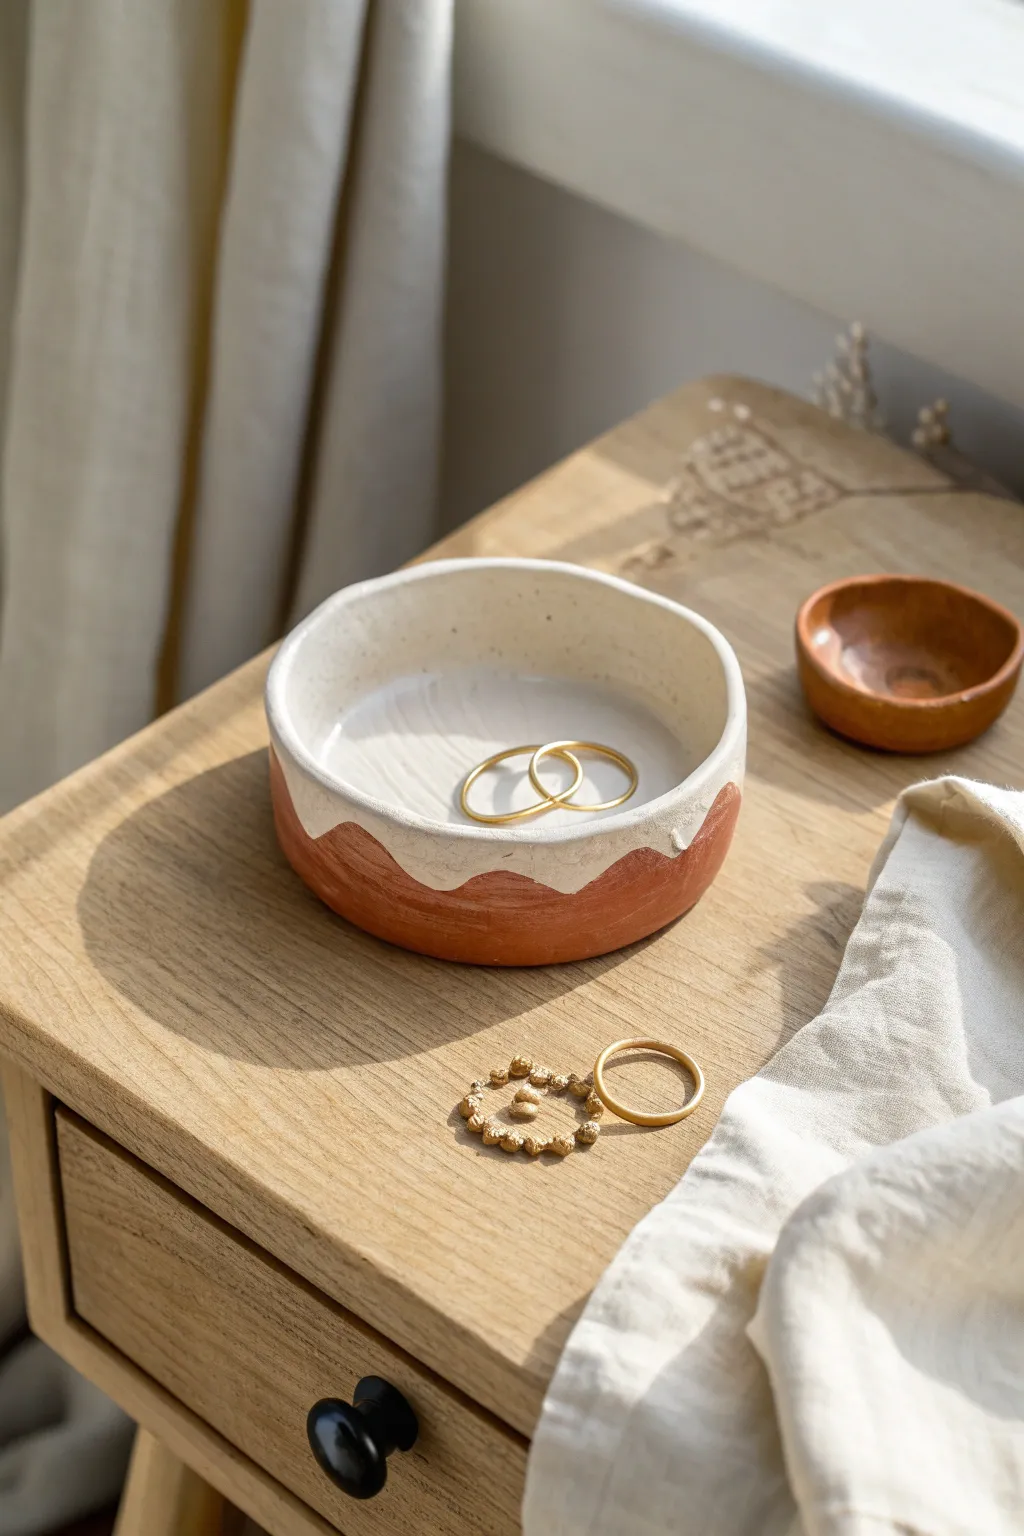
This charming, rustic trinket dish combines the warmth of terracotta-colored clay with a clean, drippy white glaze effect. It’s the perfect beginner project that looks high-end but doesn’t require a potter’s wheel or a kiln.
Step-by-Step
Materials
- Terracotta color air-dry clay
- Rolling pin
- Circle cutter or small bowl (appx. 4 inches)
- Small bowl for molding (slump mold)
- Craft knife or needle tool
- Sponge and water
- White acrylic paint
- Matte or satin sealant
- Paintbrushes (detail and flat)
- Sandpaper (fine grit)
Step 1: Shaping the Clay
-
Prepare the clay:
Begin by kneading a fist-sized ball of terracotta air-dry clay until it is soft, pliable, and free of air bubbles. -
Roll it out:
Use your rolling pin to flatten the clay to an even thickness of about 1/4 inch. If the clay sticks, you can roll it out on a piece of parchment paper. -
Cut the base:
Place your 4-inch bowl or circle template onto the slab and trace around it with a craft knife to cut out a perfect circle. -
Create the walls:
Roll a long snake or coil of clay, keeping it roughly the same thickness as your base slab. -
Attach the coil:
Score the outer edge of your base circle and the bottom of your coil with a needle tool, dab on a little water, and press the coil onto the rim of the base. -
Blend the seams:
Using your thumb or a modeling tool, drag clay from the coil down onto the base on both the inside and outside to merge them seamlessly. -
Refine the shape:
Smooth the walls upwards to create a shallow bowl shape. I find dipping my finger in a tiny bit of water helps smooth out any fingerprints or cracks. -
Create the wave rim:
Gently pinch the top rim of the dish between your fingers to create an uneven, organic waviness rather than a perfectly straight edge. -
Let it dry:
Allow the dish to dry completely in a cool, dry place for 24-48 hours. Turn it over halfway through to ensure the bottom dries evenly.
Smooth Operator
Use a slightly damp sponge to smooth your clay while it’s wet. This reduces the amount of sanding you’ll need to do later and creates a professional finish.
Step 2: Decorating & Finishing
-
Sand imperfections:
Once fully dry, use fine-grit sandpaper to gently smooth any rough patches on the rim or walls, wiping away the dust with a slightly damp cloth. -
Paint the interior:
Apply a coat of white acrylic paint to the entire inside of the bowl. Let it dry, then apply a second coat for opacity. -
Create the drip effect:
Bring the white paint over the top rim and paint a scalloped, wavy line around the exterior upper third of the bowl. -
Refine the edge:
Go back over the bottom edge of your white paint line to make it look intentionally organic, like a glaze that has naturally dripped down. -
Add detail dots:
If you look closely at the interior, there are tiny speckles; you can achieve this by flicking a toothbrush with diluted brown paint inside, or leave it creamy white for a cleaner look. -
Protect the piece:
Apply a layer of matte or satin sealant over the entire dish, including the unpainted terracotta section, to protect it from moisture and wear.
Textured Touch
Before the paint dries, mix a tiny pinch of baking soda into your white acrylic. It creates a ceramic-like texture that mimics real kiln-fired glaze.
Place your new dish on your nightstand to catch your favorite jewelry pieces


Ring Cone Holders
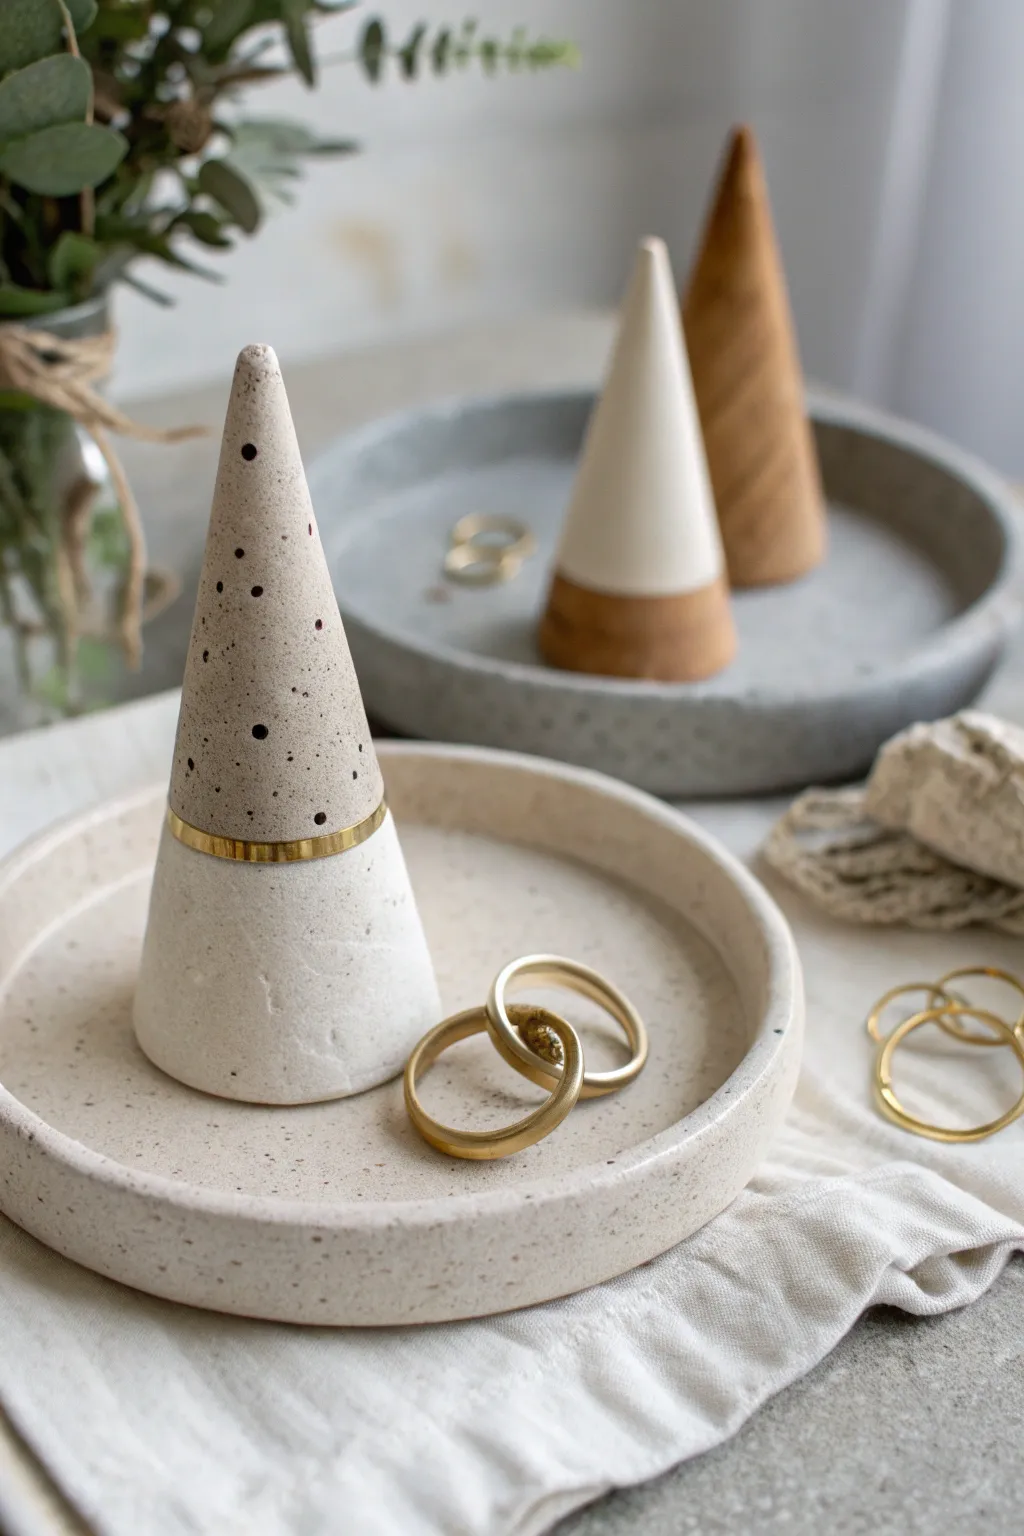
Elevate your jewelry storage with this modern, minimalist ring cone set featuring a sophisticated speckled texture and a striking gold accent band. This project combines geometric simplicity with organic clay finishes to create a functional piece of art that looks like high-end ceramic.
How-To Guide
Materials
- White air-dry clay
- Dried coffee grounds or fine black pepper (for speckling)
- Rolling pin
- Clay knife or craft blade
- Clean work surface or clay mat
- Small cup of water
- Fine-grit sandpaper (220-400 grit)
- Gold metallic acrylic paint or liquid gold leaf
- Fine detail paintbrush
- Masking tape or painter’s tape
- Circular cookie cutter or small bowl (approx. 4-5 inches)
- Sponge or paper towel
Step 1: Preparing the Speckled Clay
-
Divide the Clay:
Start by separating your white air-dry clay into two portions. You will need about two-thirds for the tray and one-third for the cone. Keep the clay for the cone base separate and clean for now. -
Create the Speckle Mix:
Take the portion of clay intended for the tray and the top section of the cone. Flatten it slightly and sprinkle a small pinch of dried coffee grounds or fine black pepper onto the surface. -
Knead and Observe:
Fold the clay over the speckles and knead thoroughly to distribute them evenly. I prefer to add the grounds gradually; stop when you achieve a concrete-like terrazzo look without over-saturating the clay, which could cause cracking.
Fixing Cracks
If small hairline cracks appear during drying, mix a tiny amount of fresh clay with water to make a thick paste (slip). Fill the cracks, let dry, and sand smooth.
Step 2: Forming the Ring Cone
-
Shape the Base:
Take a piece of the plain white (unspeckled) clay and roll it into a smooth ball about the size of a walnut. Flatten the bottom slightly on your work surface to create a stable foundation. -
Form the Cone:
Begin rolling the ball between your palms, applying more pressure at the top than the bottom to taper it. You want a cone shape that is wider at the base and comes to a gentle point. -
Create the Two-Tone Effect:
This step requires precision. Slice your cone horizontally about halfway up using your craft blade. You now have a white bottom half and a white top half. -
Swap the Top:
Discard the white top half (or save specifically for another project). Using your prepared speckled clay, form a small cone that matches the dimensions of the top section you just removed. -
Join the Halves:
Score the top surface of the white base and the bottom surface of the specked top with cross-hatching marks. Dab a little water on both scored areas to create a slip. -
Blend the Seam:
Press the speckled top onto the white base gently. Use your finger or a smoothing tool to drag a tiny bit of clay across the seam to lock them together, then smooth the area perfectly so the transition feels seamless to the touch.
Level Up: Marble Effect
Instead of coffee grounds, gently twist strands of grey or black clay into your white clay before rolling to create a sophisticated marble vein pattern.
Step 3: Creating the Tray
-
Roll the Slab:
Take the remaining speckled clay and roll it out into an even slab, approximately 1/4 inch thick. Rotate the clay frequently to ensure it doesn’t stick to your surface. -
Cut the Circle:
Use a circular cookie cutter or trace around a small bowl to cut a perfect circle from the slab. Remove the excess clay. -
Create the Rim:
Roll a long, thin snake of speckled clay. Place it along the outer edge of your circular base. Score and slip the contact points to ensure a strong bond. -
Smooth the Tray:
Blend the inner and outer seams of the snake coil onto the base until they disappear completely. Use a slightly damp sponge to smooth the rim and the floor of the tray for a professional finish.
Step 4: Finishing Touches
-
Let it Dry:
Allow both pieces to dry completely for 24-48 hours. Keep them away from direct heat sources to prevent warping. Turn the tray over halfway through the process to ensure the bottom dries evenly. -
Sand for Smoothness:
Once bone dry, use fine-grit sandpaper to gently sand the surfaces. Pay special attention to the rim of the tray and the tip of the cone. -
Tape the Cone:
To create the crisp metallic band, place two strips of masking tape around the cone’s circumference. Place one strip just above the seam where the two clays meet and one just below, leaving a thin gap exposing the joint. -
Apply the Gold:
Paint the exposed gap with gold metallic paint or liquid gold leaf. Apply two thin coats rather than one thick one for the best shine. Let it dry partially before peeling the tape for the sharpest line.
Place your favorite rings on your new handmade display and enjoy the organized elegance on your dresser


Cute Animal Mini Figures
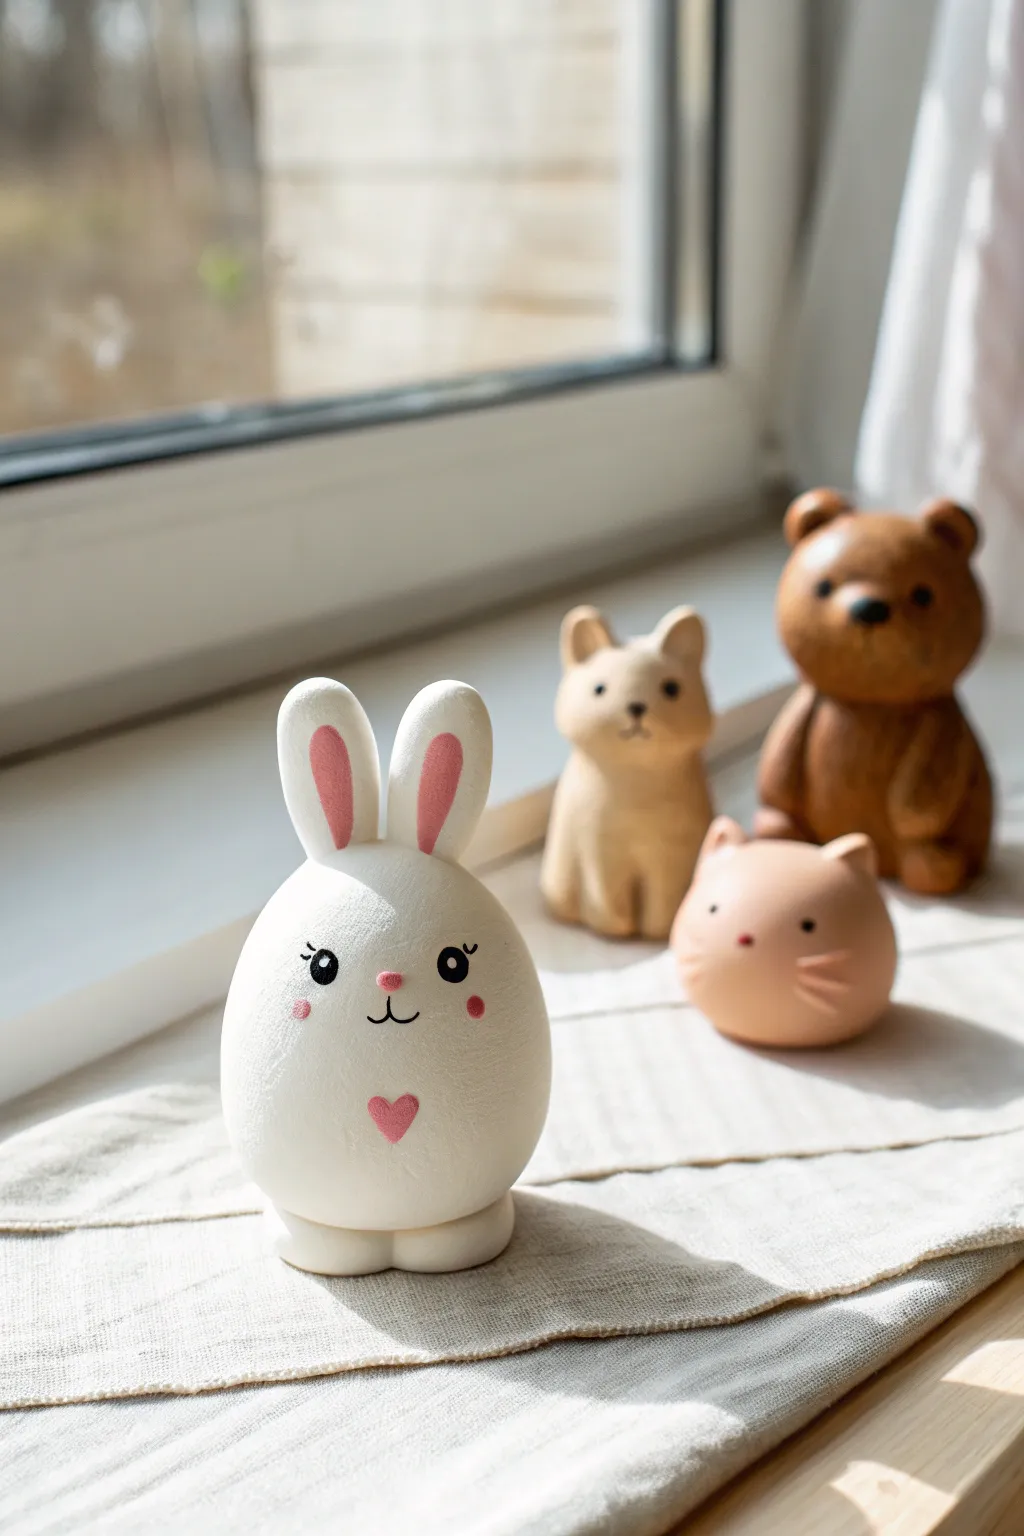
This adorable bunny figurine is the perfect introduction to air clay modeling, featuring a smooth, egg-shaped body and minimal painted details. Its sweet expression and tiny heart accent make it a charming addition to any windowsill or desk display.
Step-by-Step Guide
Materials
- White air-dry clay (smooth texture)
- Pink acrylic paint or soft pastel shavings
- Black fine-point marker or acrylic paint
- Small detail paintbrush
- Water in a small cup
- Smoothing tool or your finger
- Rolling pin (optional)
- Small heart-shaped cutter or toothpick
Step 1: Shaping the Base
-
Condition the clay:
Begin by taking a handful of white air-dry clay and kneading it thoroughly until it is soft, pliable, and free of cracks. -
Form the body:
Roll the clay into a smooth ball between your palms, then gently taper the top half to create a rounded egg shape. This will be the main body of the bunny. -
Flatten the base:
Tap the bottom of your egg shape gently on your work surface to create a flat stand so the figure sits upright without tipping over. -
Create the feet:
Roll two small, equal-sized balls of clay and flatten them slightly into oval discs. -
Attach the feet:
Moisten the underside of the body slightly with water and press the two foot discs onto the bottom front edge, smoothing the seams so they look integrated.
Step 2: Ears and Details
-
Shape the ears:
Roll two medium-sized sausage shapes, creating a tapered point at one end of each for the bunny ears. -
Indent the inner ear:
Use a modeling tool or your pinky finger to gently press a shallow groove down the center of each ear. -
Attach the ears:
Score the top of the head and the base of the ears slightly with a toothpick, add a drop of water, and press the ears firmly onto the head, smoothing the clay downward to blend the join. -
Add the pink inner ear:
Mix a tiny amount of pink paint into a small piece of fresh white clay (or use pre-colored pink clay). Flatten thin strips into the grooves you made in the ears earlier. -
Create the heart:
Using that same pink clay mixture, shape a tiny heart and press it gently onto the center of the bunny’s chest. -
Smooth everything:
Dip your finger in water and run it over the entire figure to remove fingerprints and ensure a porcelain-like finish. -
Dry completely:
Set the figure aside in a clean, dry area for 24-48 hours until it is completely hard and lighter in weight.
Use Water Wisely
Keep a damp sponge nearby. Wiping your fingers often prevents clay buildup and keeps your white clay looking pristine and free of dust or lint.
Step 3: Bringing the Face to Life
-
Sketch the face:
Once fully dry, lightly sketch the eyes, nose, and mouth placement with a pencil to ensure symmetry. -
Paint the eyes:
Using black acrylic paint and a fine detail brush (or a marker), draw two solid oval eyes. Add tiny eyelashes at the outer corners for character. -
Add eye highlights:
I like to wait for the black paint to dry, then use a toothpick dipped in white paint to place a small dot in the upper corner of each eye for a sparkling look. -
Draw the nose and mouth:
Paint a tiny pink oval for the nose, then use a very thin black line to draw a ‘w’ shape directly underneath for the mouth. -
Apply blush:
Dip a Q-tip or dry brush into pink pastel dust or diluted pink paint and gently dab it onto the cheeks to create a soft, rosy glow.
Cracks Appearing?
If small cracks form while drying, mix a tiny bit of fresh clay with water to make a paste (slip) and fill the cracks. Smooth over it and let dry again.
Place your finished bunny alongside other woodland creatures for a delightful scene.


Face Pots With Personality
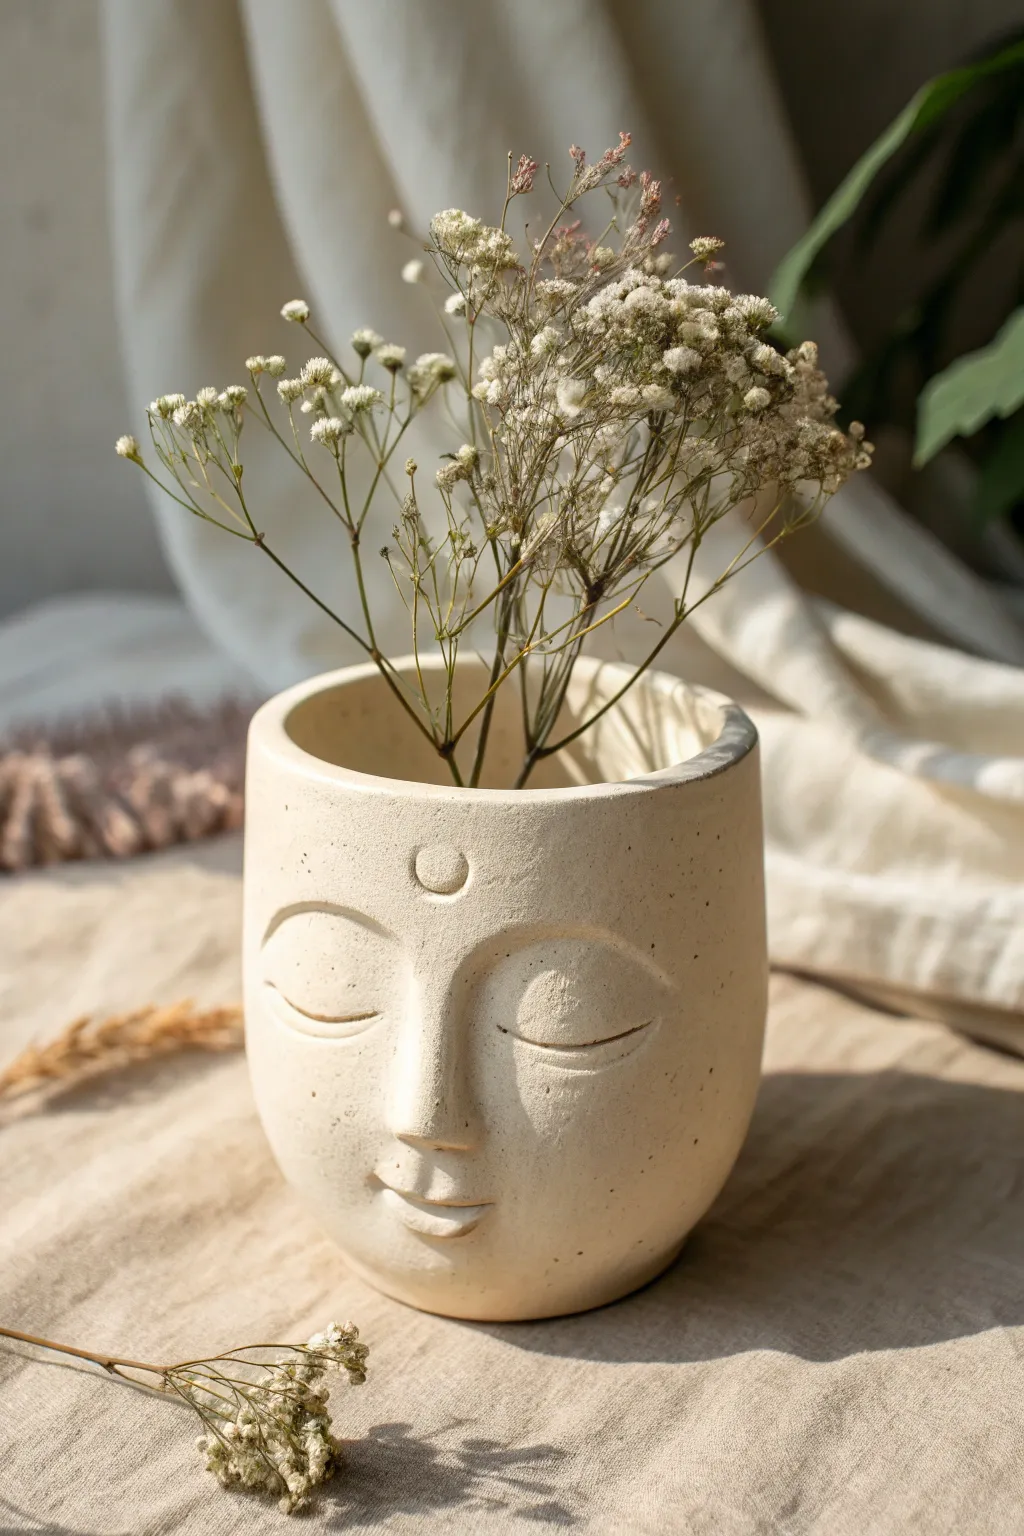
Bring a sense of calm to your space with this meditative face pot, featuring gently closed eyes and a peaceful expression. The textured, stone-like finish and minimalist features make it a perfect vessel for delicate dried botanicals.
Detailed Instructions
Materials
- White air-dry clay (approx. 500g-1kg)
- Rolling pin
- Empty can or jar (to use as a mold/armature)
- Plastic wrap (cling film)
- Clay sculpting tools (needle tool, small loop tool)
- Sponge and water bowl
- Sandpaper (fine grit)
- Acrylic paint (cream or off-white)
- Small stiff paintbrush (for stippling texture)
- Matte sealant or varnish
Step 1: Forming the Base
-
Prepare the Armature:
Begin by wrapping your empty can or jar completely in plastic wrap. This prevents the clay from sticking to the mold and makes removal much easier later on. -
Roll the Slab:
Roll out a substantial portion of your clay until it is uniform and about 1/4 inch thick. You want it sturdy enough to stand on its own once the support is removed. -
Create the Cylinder:
Cut a long rectangular strip from your slab that is tall enough to cover your can. Wrap this strip around the plastic-covered can, joining the ends together. -
Seal the Seam:
Score the edges where the clay meets, add a little water (slip), and press them firmly together. Smooth the seam with your finger or a tool until it is invisible. I find using a slightly damp sponge helps blend everything seamlessly. -
Add the Base:
Cut a circle for the bottom of the pot. Attach it to the cylinder using the same score-and-slip method, smoothing the connection carefully to ensure it’s watertight for dry arrangements.
Fixing Strange Seams
If the back seam cracks while drying, mix a slurry of clay and water (slip) into a thick paste. Fill the crack, smooth it over, and let it dry again before sanding.
Step 2: Sculpting the Features
-
Add the Nose:
Roll a small, elongated triangle of clay. Score the center of the face area and attach the nose, blending the edges smoothly into the cheeks so it looks like it emerges naturally from the surface. -
Define the Brow:
Add small, flat strips of clay above expected eye level to build up the brow bone slightly. Blend these downwards into the nose bridge for a continuous T-zone structure. -
Sculpt the Eyelids:
Roll two small semi-circles or ovals of clay. Press them gently onto the face on either side of the nose. These will form the closed eyelids. -
Carve the Lash Line:
Using a needle tool or a sharp sculpting knife, carefully carve a curved line across the bottom of each eyelid mound to separate the upper and lower lid, creating that peaceful sleeping look. -
Create the Lips:
Add a small, flattened oval below the nose. Use a tool to press an indentation horizontally across the middle to separate the top and bottom lip. Gently shape the corners upwards for a subtle smile. -
Add the Third Eye:
Roll a tiny ball of clay and press it flat into the center of the forehead. Use a loop tool or the end of a brush to impress a small crescent shape into it for the decorative forehead mark. -
Refine and Smooth:
Dip your sponge in water and wring it out well. Gently wipe over the entire face to soften any harsh tool marks and create a consistent, organic texture.
Step 3: Finishing Touches
-
Initial Drying:
Let the pot sit with the can inside for about 2-3 hours until the clay is leather-hard—firm to the touch but not fully dry. -
Remove Armature:
Carefully slide the can or jar out of the clay cylinder. Peel away the plastic wrap gently. If the clay slumps, put the support back in for another hour. -
Full Cure:
Allow the pot to dry completely for 24-48 hours. Keep it away from direct heat sources to prevent cracking. -
Sand Imperfections:
Once bone dry, use fine-grit sandpaper to smooth out the rim and any rough bumps, but leave some texture on the surface to mimic stone. -
Painting the Stone Effect:
Mix a cream acrylic paint with a tiny drop of brown or heavy texture gel if you have it. Apply this using a stippling motion (dabbing vertically) rather than brushing, creating a speckled stone look. -
Adding Speckles:
For the stony details seen in the photo, dilute a tiny bit of dark brown paint. Load a toothbrush and flick the bristles to spray tiny specks onto the pot. -
Seal Protection:
Apply two coats of matte varnish to protect your work and give it a finished, professional appearance.
Make it Waterproof
Air-dry clay isn’t waterproof on its own. To hold fresh flowers instead of dried ones, insert a small glass jar or cut-off plastic bottle inside the finished pot.
Now you have a tranquil piece of art ready to hold your favorite dried blooms

What Really Happens Inside the Kiln
Learn how time and temperature work together inside the kiln to transform clay into durable ceramic.
Flower-Shaped Coasters
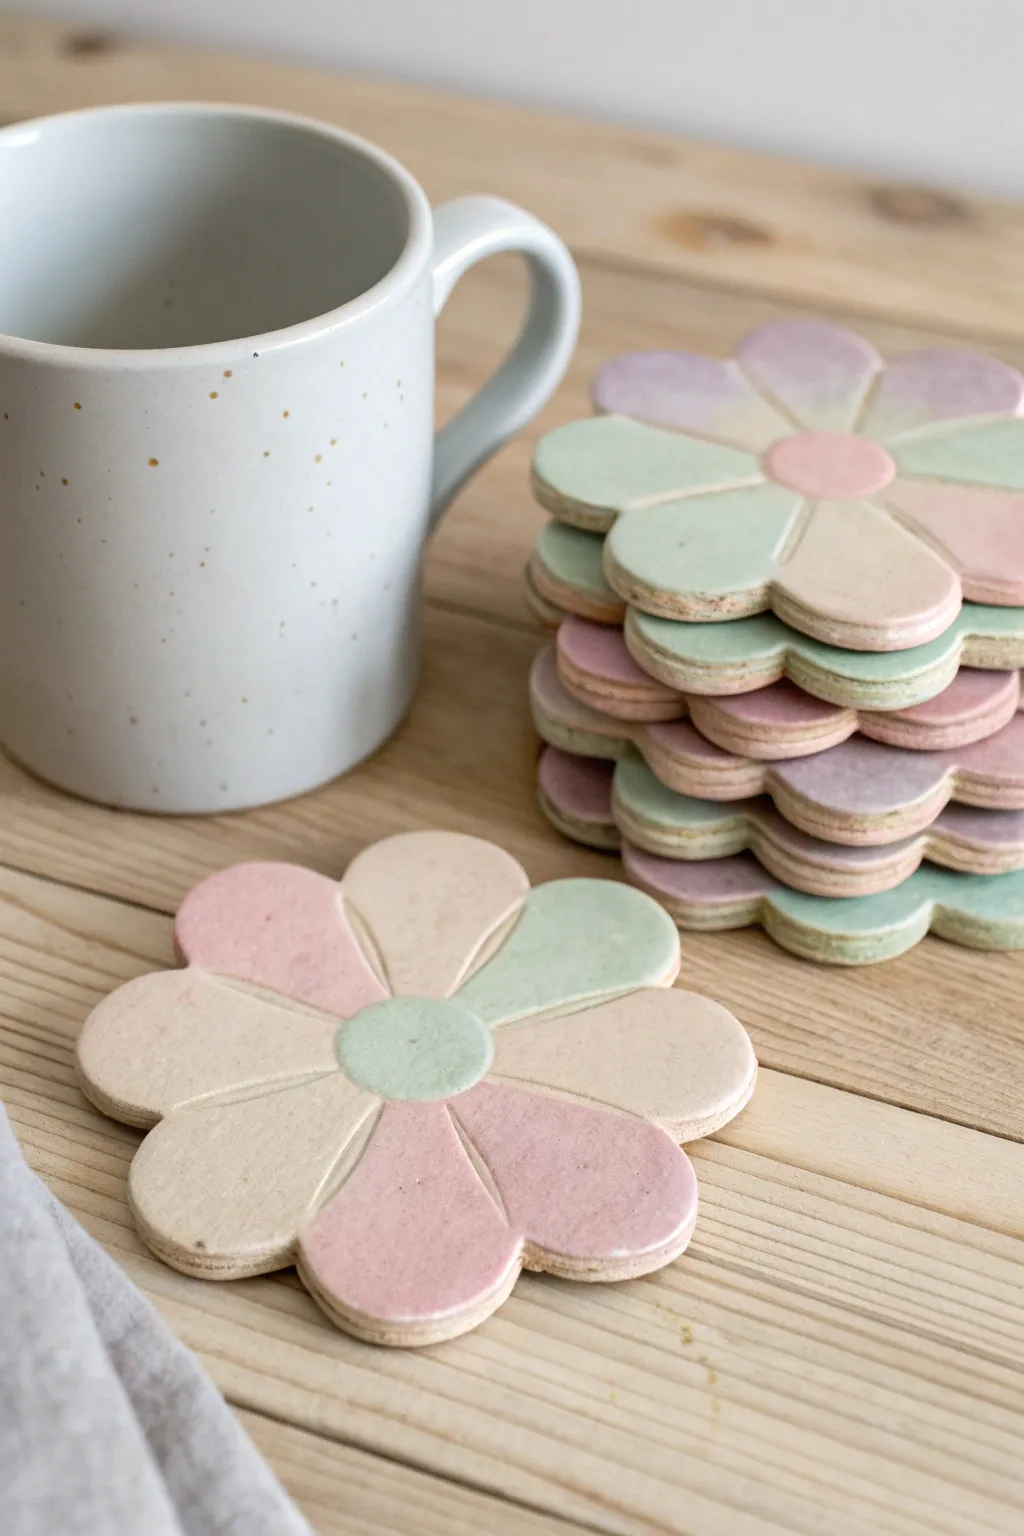
These charming flower-shaped coasters add a soft, whimsical touch to your coffee table with their soothing pastel palette. Made from air-dry clay, they feature gentle indentations that define each petal, creating a lovely textured surface that catches the light.
Detailed Instructions
Materials
- White air-dry clay
- Rolling pin
- Flower cookie cutter (approx. 4 inches) or a paper template with a craft knife
- Pottery needle tool or a dull knife
- Sandpaper (fine grit)
- Acrylic paints (pastel pink, mint green, cream, light lavender)
- Small flat paintbrush
- Small round paintbrush
- Clear acrylic sealant (matte or gloss)
- Parchment paper or a silicone mat
Step 1: Shaping the Clay
-
Condition the clay:
Begin by taking a handful of air-dry clay and kneading it in your hands to warm it up. This conditioning process makes the clay more pliable and less prone to cracking as you work. -
Roll out the slab:
Place your clay on a sheet of parchment paper. Use your rolling pin to flatten the clay to an even thickness of about 1/4 inch. Try to keep the thickness consistent so your coaster sits flat. -
Cut the flower shape:
Press your large flower cookie cutter firmly into the clay slab. If you don’t have a cutter, place a flower template on the clay and carefully trace around it with a craft knife. -
Smooth the edges:
Dip your finger in a little bit of water and run it along the cut edges of the flower to smooth out any roughness or sharp bits left by the cutter. -
Define the center:
Find a small circular object, like a bottle cap or a small round cutter, and press it gently into the absolute center of the flower. Do not cut all the way through; just make a clear indentation. -
Create petal separations:
Using a needle tool or the back of a dull knife, score lines radiating from the center circle out to the divot between each petal. Press firmly enough to create a visible groove without slicing the coaster in half. -
Dry the coasters:
Set the clay flowers aside on a flat surface to dry completely. This usually takes 24-48 hours depending on humidity. I recommend flipping them over halfway through so the bottom dries evenly.
Clean Lines Pro Tip
For the crispest painted lines between petals, use the dull side of a knife to re-trace the indentations *after* painting but before sealing. It removes stray paint.
Step 2: Painting and Finishing
-
Sand for smoothness:
Once fully dry, the clay will be hard and white. Take a piece of fine-grit sandpaper and gently buff the surface and edges to remove any lingering imperfections or bumps. -
Mix your palette:
Prepare your acrylic paints. You want very soft, muted tones, so mix your colored paints with plenty of white to achieve that chalky, pastel look seen in the photo. -
Base coat the petals:
Choose two alternating colors for the petals, such as mint green and cream, or pink and cream. Paint every other petal with your first color using a small flat brush. -
Fill the remaining petals:
Clean your brush and paint the remaining alternating petals with your second color. Keep the paint relatively thin to avoid brushstrokes. -
Paint the center:
Select a contrasting pastel shade for the center circle—like using a soft mint green center for a pink and cream flower. Carefully fill in this circle with a round brush. -
Clean up the grooves:
If paint has pooled in the scored lines between petals, use a clean, slightly damp brush or a needle tool to gently clear it out, ensuring the separation lines remain distinct. -
Let the paint dry:
Allow the paint to dry completely. Acrylics dry fast, so 20-30 minutes should be sufficient. -
Seal the coaster:
Apply a coat of clear acrylic sealant over the entire top and sides of the coaster. This protects the paint from moisture from your mugs and gives it a finished look. -
Final cure:
Let the sealant cure according to the bottle instructions before using your new coasters.
Level Up: Texture
Before the clay dries, gently press a piece of lace or textured fabric into just the center circle or alternating petals for subtle surface detail.
Enjoy your beautiful new set of handmade coasters with your next cup of tea
Moon and Star Incense Holders
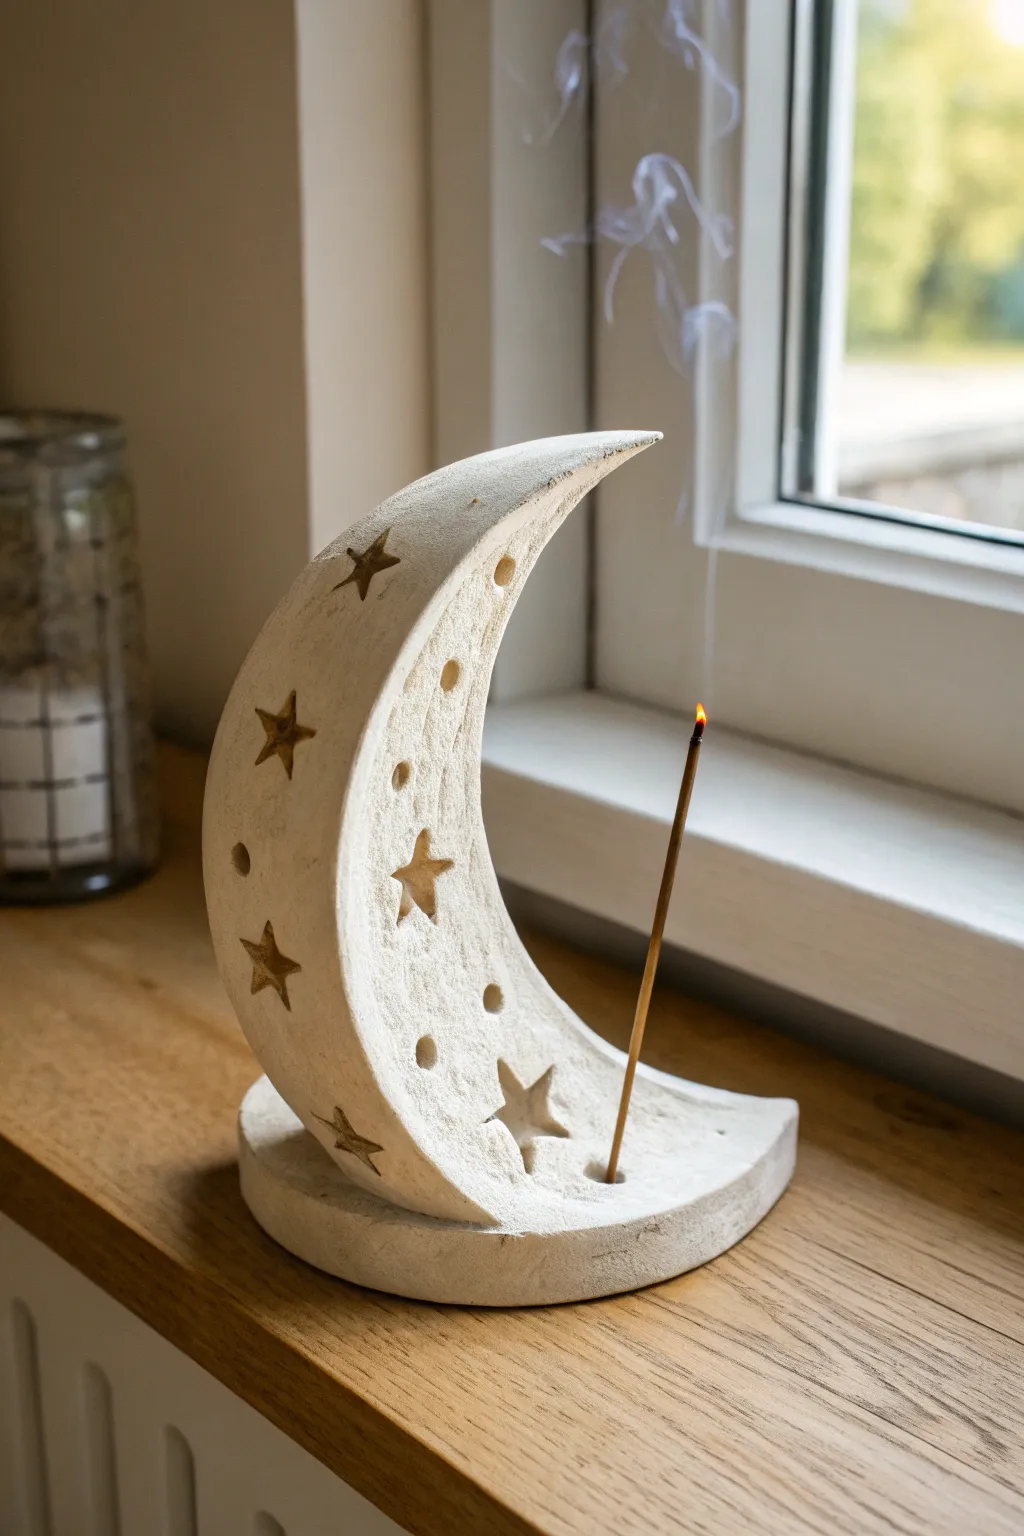
This serene project captures the magic of the night sky with a textured crescent moon rising from a sturdy base. Featuring star-shaped cutouts and a natural, stone-like finish, it’s the perfect functional sculpture to hold your favorite incense.
Detailed Instructions
Materials
- Air dry clay (white or stone effect)
- Rolling pin
- Circle cutter (approx. 4-5 inches)
- Round cookie cutter or jar lid (for the moon curve)
- Craft knife or scalpel
- Small star-shaped fondant plungers or cutters
- Modeling tool or skewer
- Sandpaper (fine grit)
- Small bowl of water
- Texturing tool (old toothbrush or stiff bristle brush)
- Acrylic paint (optional wash)
Step 1: Forming the Base
-
Roll the clay:
Start by conditioning a ball of air dry clay in your hands until it’s pliable. Roll it out on a flat surface to a thickness of about 1/2 inch. You want a substantial thickness for the base to ensure stability. -
Cut the circle:
Using your large circle cutter or by tracing around a bowl, cut out a perfect circle. This will serve as the foundation for your moon. -
Texture the surface:
To achieve that beautiful stone-like finish seen in the photo, gently tap the surface of the clay with a stiff bristle brush or a crumpled ball of aluminum foil. This removes the ‘perfect’ smooth look and adds organic character. -
Smooth the edges:
Dip your finger in a little water and run it along the cut edge of the circle to remove any sharp burs or crumbs left by the cutter.
Stone Texture Trick
Mix dried tea leaves or used coffee grounds directly into your white clay before rolling. This creates instant speckles and a convincing faux-stone appearance.
Step 2: Sculpting the Moon
-
Cut the crescent shape:
Roll out a second slab of clay, slightly thinner than the base (about 1/3 inch). Cut another circle the same size as your base, then use a smaller round cutter to bite into that circle, removing a section to leave a crescent moon shape. -
Refine the points:
Gently shape the tips of the crescent with your fingers. They should be tapered but not razor-sharp, or they might become brittle when dry. -
Add star details:
Use small star-shaped cutters to press designs into the moon. For some stars, press all the way through to create a cutout; for others, press only halfway to create an impression. -
Create circular accents:
Using the back of a paintbrush or a small stylus tool, press random circular indentations into the surface. Varying the depth of these holes adds to the crater-like texture. -
Match the texture:
Just as you did with the base, stipple the surface of the moon with your texturing tool to ensure the finish matches completely.
Step 3: Assembly & Finishing
-
Score and slip:
To attach the moon, score (scratch) the bottom curve of the crescent and the corresponding spot on the base. Apply a little water or liquid clay (slip) to both scratched areas. -
Join the pieces:
Press the moon firmly onto the base. Use a modeling tool to smooth the clay where the two pieces meet, blending the seam so it looks like one solid piece of stone. -
Insert incense hole:
While the clay is still wet, take an incense stick (or a skewer of the same thickness) and poke a hole into the base. Angle it slightly so the ash will fall directly onto the clay catcher. -
Check the angle:
Test the angle by inserting a stick briefly to ensure it doesn’t hit the curve of the moon. I usually wiggle the stick slightly to make the hole just a hair larger than the stick to account for shrinkage. -
Dry slowly:
Place your creation in a cool, dry place away from direct sunlight. To prevent warping, turn the piece occasionally as it dries, which may take 24-48 hours depending on thickness. -
Sand imperfections:
Once bone dry, use fine-grit sandpaper to gently smooth any rough edges on the base or the moon tips, being careful not to sand away your lovely texture. -
Optional antique wash:
If your clay is too bright white, mix a tiny drop of brown paint with lots of water. Brush this wash over the piece and immediately wipe it off with a paper towel. The dark color will settle into the star recesses and texture, highlighting the details.
Make it Shine
After painting, apply a gold leaf pen or metallic gold paint inside the star indentations. The glimmer will catch the light beautifully when the incense is burning.
Light your favorite scent and watch the smoke drift past your handmade moon


The Complete Guide to Pottery Troubleshooting
Uncover the most common ceramic mistakes—from cracking clay to failed glazes—and learn how to fix them fast.
Easy Candle Holders
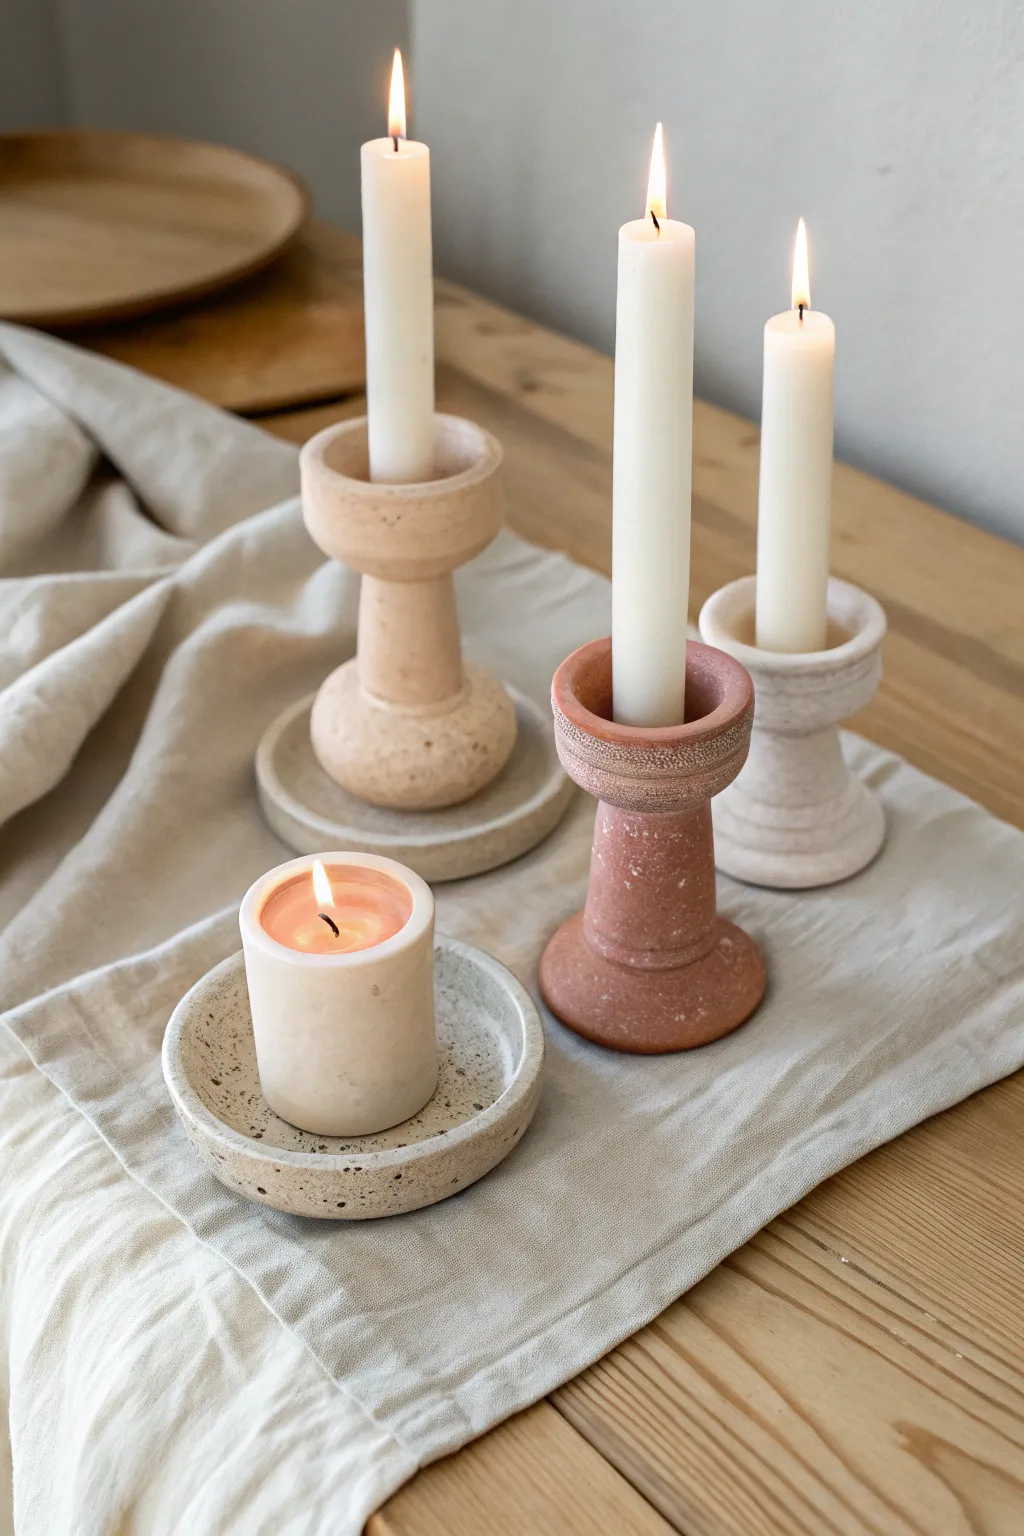
Create a serene, stoneware-inspired vignette with these handmade air-dry clay candle holders. The project features varying heights and rough natural textures that bring an organic warmth to any table setting.
Step-by-Step
Materials
- Air-dry clay (white or terracotta)
- Acrylic paints (beige, terracotta, cream, white)
- Rolling pin
- Clay knife or craft knife
- Small cup with water
- Sponge or brush for smoothing
- Baking soda (for texture)
- Sandpaper (fine grit)
- Candles (tapers and pillar) for sizing
- Cardboard or plastic placemat to work on
Step 1: Shaping the Taper Holders
-
Prepare the base:
Start by rolling a ball of clay roughly the size of a tangerine. Flatten it gently with your palm until it forms a thick disc, about 3 inches wide and 0.5 inches thick. This will be the sturdy foot of your holder. -
Form the stem:
Roll a thick coil or ‘snake’ of clay. For the varied heights seen in the image, you’ll want stems of different lengths. Aim for a thickness of about 1 inch to support the candle cup. -
Attach stem to base:
Score the center of your base and the bottom of your stem with cross-hatching marks. Dab a little water on the scored areas and press them firmly together. Use your finger or a tool to smudge the clay across the seam until it is seamless. -
Create the cup:
Roll another ball of clay, slightly smaller than the base. Press your thumb into the center to create a pinch pot shape. Keep testing with a real taper candle to ensure the hole is the correct diameter. -
Assemble the top:
Score and slip the top of the stem and the bottom of your pinch pot cup. Join them securely. I like to add a tiny coil of clay around the seam and smooth it out to reinforce this connection. -
Refine the shape:
Review the silhouette. The holders in the photo have a sculptural feel; you can use wet fingers to flare the rim of the cup slightly or thicken the neck where it meets the cup for better balance.
Cracks Appearing?
If you see hairline cracks while drying, mix a tiny bit of fresh clay with water to make a ‘slip’ paste. Fill the cracks, smooth over, and let dry again.
Step 2: Crafting the Pillar Dish
-
Roll the slab:
Roll out a slab of clay to about a 1/4 inch thickness. Use a bowl or circle cutter to cut out a round base, approximately 4-5 inches in diameter. -
Build the rim:
Roll a long, even coil of clay. Score the outer edge of your circular base and dampen it. Place the coil on top of the edge to create a raised rim. -
Smooth the walls:
Blend the coil onto the base on both the inside and outside. Use a slightly damp sponge to smooth the rim so it looks uniform and rounded, rather than sharp. -
Create the texture:
Before the clay dries, take an old toothbrush or a stiff bristled brush and gently tap the surface of all your pieces. This mimics the speckled, stone-like texture seen in the reference image.
Add Weight
Air clay is light. For stability, before attaching the stem, embed a heavy washer or coin into the center of the base clay and smooth over it to hide it.
Step 3: Finishing and Painting
-
Dry thoroughly:
Let your pieces dry completely for 24-48 hours. Turn them occasionally to ensure the bottoms dry evenly. They should be bone dry and room temperature to the touch. -
Mix the textured paint:
To achieve that gritty, ceramic look, mix baking soda into your acrylic paint. Try a ratio of 1 part baking soda to 2 parts paint. This creates a thick, paste-like consistency. -
Apply the base coat:
Paint the tallest holder in a creamy off-white. Use the baking soda paint mixture to dab onto the surface, building up texture rather than using long, smooth strokes. -
Terra cotta tones:
For the medium holder, mix a burnt sienna or terracotta color with a touch of white and your baking soda. Paint the entire piece, ensuring the texture looks consistent. -
Creating the speckled effect:
For the shallow dish and the beige holder, apply a base coat of light beige. Once dry, load a stiff brush with watered-down dark brown paint. -
Splatter technique:
Hold the brush near the object and flick the bristles with your finger to spray tiny speckles onto the surface. Practice on a piece of paper first to control the spray size.
Arranging your new collection on a linen runner creates an instantly cozy atmosphere
Modern Photo and Card Holders

This sleek, modern card holder mimics the heavy, porous look of limestone or concrete but is surprisingly lightweight when made with air-dry clay. Its clean rectangular form and subtle textured finish make it the perfect understated display for your favorite postcards or photos.
How-To Guide
Materials
- White air-dry clay (approx. 500g)
- Rolling pin
- Two guide strips (1cm thick) or a ruler
- Sharp craft knife or clay blade
- Cardboard or stiff cardstock (for the core mould)
- Sandpaper (coarse and fine grit)
- Texturing tool (old toothbrush, wire brush, or crumpled foil)
- Ruler
- Water and a small sponge
- Matte white acrylic paint (optional)
- Matte spray varnish
Step 1: Shaping the Base Block
-
Condition the clay:
Begin by kneading your block of air-dry clay until it is warm, pliable, and free of any air bubbles. -
Form the initial shape:
Shape the clay roughly into a rectangular brick shape using your hands, tapping it against your work surface to flatten the sides. -
Refine the rectangle:
Using a rolling pin and guide strips for even thickness, roll the top surface flat. Use a ruler or flat object to press the sides in, ensuring distinct, sharp corners and right angles. -
Measure dimensions:
Aim for a finished block that is approximately 12-15cm long, 5cm wide, and 4-5cm tall. Trim excess clay with a sharp blade for crisp edges.
Fixing Cracks
Using a ‘slip’ works wonders here. Mix a tiny bit of fresh clay with water to make a paste, fill the crack, and smooth it over with a damp finger.
Step 2: Creating the Slot
-
Mark the center:
Use a ruler to lightly mark a centerline along the top length of the block where the card will sit. -
Cut the opening:
Carefully press a thick piece of stiff cardstock or a ruler directly into the clay along your marked line to create the slot. Wiggle it slightly to widen the gap just enough for a postcard. -
Deepen the channel:
Remove the cardstock. If needed, use a clay tool to deepen the slot to about 1.5cm so it can support items securely without them tipping over. -
Smooth the slot edges:
Dip your finger in a little water and gently run it along the rim of the slot to soften any jagged bits from the cutting process.
Step 3: Texturing and Finishing
-
Add surface texture:
To mimic the porous stone look in the photo, gently press a stiff toothbrush or a ball of crumpled foil against the smooth sides of the clay block. -
Create distinct pits:
Use a needle tool or toothpick to poke a few scattered, deeper holes. This replicates the natural air pockets found in cast concrete. -
Let it dry completely:
Set the block aside in a cool, dry place. Allow it to cure for at least 24-48 hours. Turn it over halfway through so the bottom dries evenly. -
Sand for sharpness:
Once fully hard, place a sheet of sandpaper on a flat surface and rub the block’s faces against it. This flattens any bumps and sharpens the geometric profile. -
Enhance the texture (Optional):
If you want a chalkier finish, lightly sponge on a coat of white matte acrylic paint, dabbing rather than brushing to keep the texture visible. -
Seal the piece:
Finish with a matte spray varnish to protect the clay from humidity without adding an unnatural shine.
Level Up: Terrazzo
Mix small colored chips of dried clay into your white clay block before shaping. When you sand it later, the colored flecks will appear.
Enjoy styling your new stone-effect holder on a desk or shelf

TRACK YOUR CERAMIC JOURNEY
Capture glaze tests, firing details, and creative progress—all in one simple printable. Make your projects easier to repeat and improve.
Earring and Jewelry Organizers
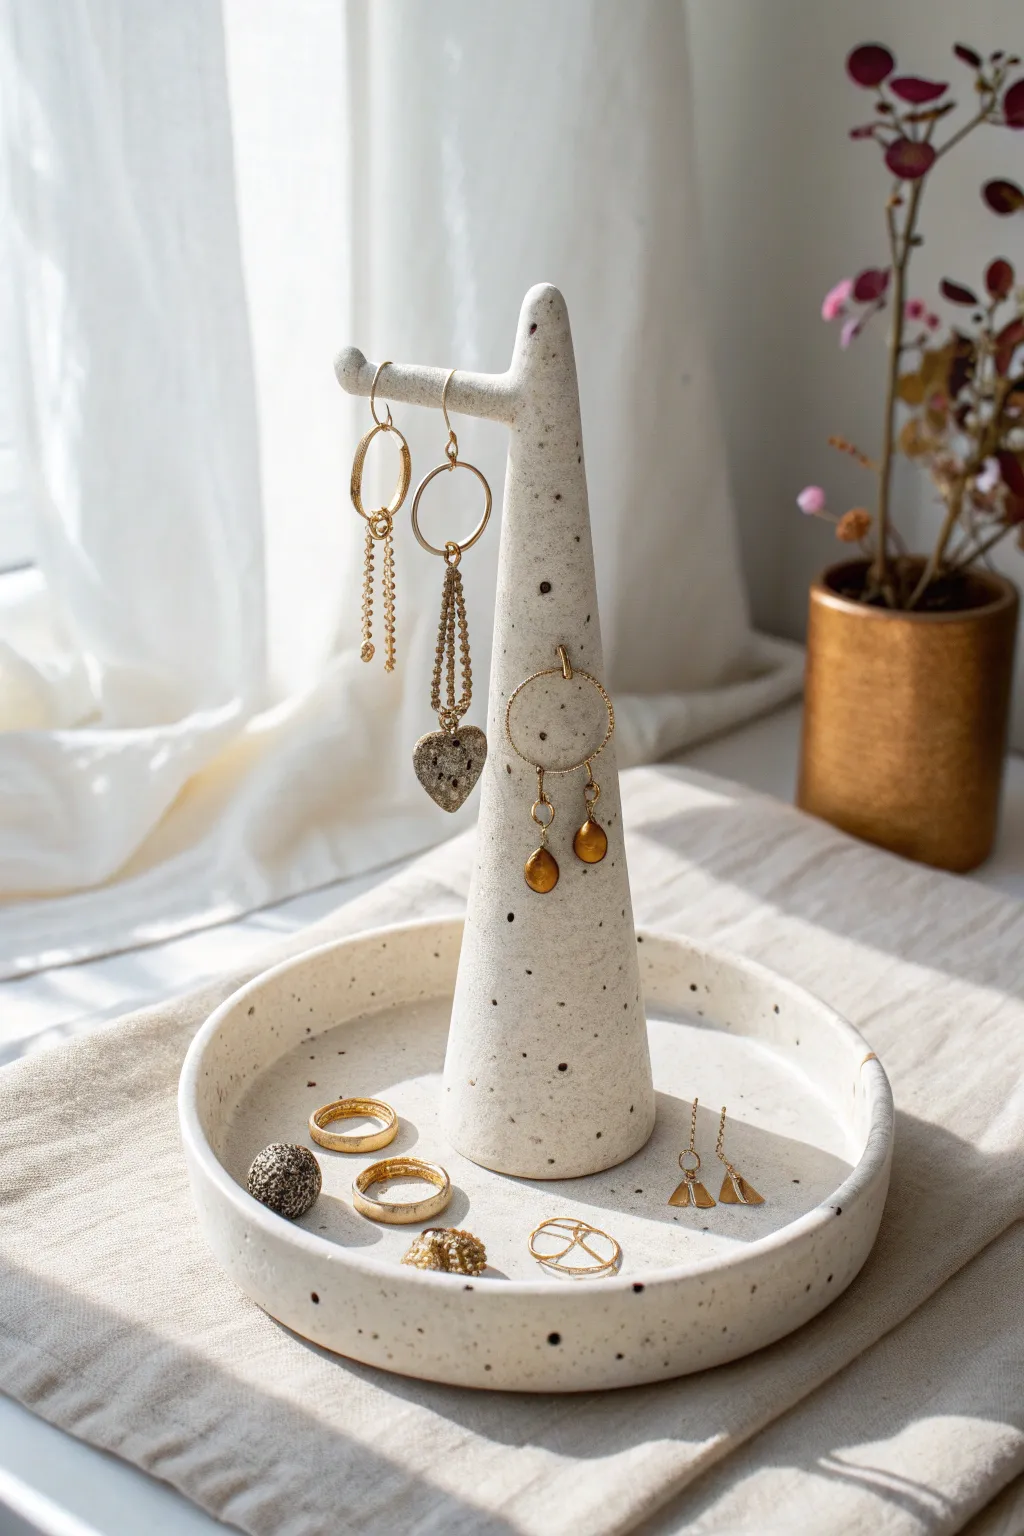
Achieve the high-end look of speckled ceramic pottery without a kiln using this clever air-dry clay technique. This elegant organizer features a sturdy conical trunk with an integrated branch for dangling earrings, all resting in a smooth, shallow catch-all dish for rings and studs.
Detailed Instructions
Materials
- White air-dry clay (approx. 500g)
- Acrylic paint (black or dark brown)
- Rolling pin
- Clay knife or craft blade
- Small bowl or round cutter (approx. 5-6 inches diameter)
- Water and sponge for smoothing
- Sandpaper (fine grit)
- Clear gloss or satin varnish
- Old toothbrush (for the speckle effect)
- Wire or strong toothpick (internal armature, optional)
Step 1: Forming the Base Dish
-
Prepare the clay:
Begin by conditioning about half of your clay, kneading it until it is warm and pliable. Roll it out on a flat surface to an even thickness of approximately 1/4 inch. -
Cut the circle:
Place your bowl or round cutter onto the rolled clay and innovative cut around it with your clay knife to create a perfect circle base. -
Create the rim:
Roll a long, thin snake of clay. Score the outer edge of your clay circle and the underside of the clay snake with a needle tool or toothpick. Apply a dab of water to the scored areas. -
Attach the rim:
Press the snake firmly onto the edge of the circle to form the wall of the dish. Blend the clay downwards on both the inside and outside using your thumb or a modeling tool until the seam disappears completely. -
Smooth the surface:
Dip your sponge lightly in water and run it over the dish to remove any fingerprints or tool marks, ensuring the rim is level and smooth.
Use an Armature
For extra strength, insert a piece of wire or a toothpick into the branch and trunk connection while the clay is wet to act as an internal skeleton.
Step 2: Building the Tree Structure
-
Shape the trunk:
Take a large handful of clay and roll it into a cone shape. It should be wide at the bottom for stability and taper gently towards the top. Check that it fits comfortably in the center of your dish. -
Form the branch:
Roll a smaller cylinder of clay for the horizontal branch. Gently curve it upwards slightly if desired to help hold jewelry securely. -
Attach the branch:
Score the side of the trunk near the top and one end of your branch. Add slip (water/clay mix) and press them together firmly. I like to use a small sculpting tool to drag clay across the seam to reinforce this bond. -
Refine the shape:
Smooth out the connection point so the branch looks like it grew naturally from the trunk. Round off the tips of the branch and the top of the trunk. -
Connect to the base:
Score the center of your dish and the bottom of the trunk. Press the tree firmly into the dish. Blend the clay from the base of the trunk onto the floor of the dish to create a seamless, solid unit.
Cracking at Seams?
If cracks appear while drying, mix a tiny amount of clay with water to make a paste and fill the cracks, then smooth over with a damp finger.
Step 3: Finishing and Speckling
-
Dry thoroughly:
Let the piece dry completely. This usually takes 24-48 hours depending on humidity. Rotate it occasionally to ensure even drying. -
Sand the imperfections:
Once bone dry, use fine-grit sandpaper to smooth out any remaining bumps, focusing on the rim of the dish and the tips of the branches. -
Mix the splatter paint:
Dilute a small amount of black or dark brown acrylic paint with water until it reaches an inky consistency. -
Apply the speckles:
Dip an old toothbrush into the diluted paint. Hold it near the sculpture and run your thumb across the bristles to flick tiny specks of paint onto the clay. Practice on paper first to control the spray. -
Seal the piece:
Allow the paint specks to dry fully. Apply two coats of clear gloss or satin varnish to protect the clay and give it that glazed ceramic shine.
Now you have a stylish, faux-ceramic display piece ready to showcase your favorite earrings and rings.
Leaf and Lace Texture Imprints
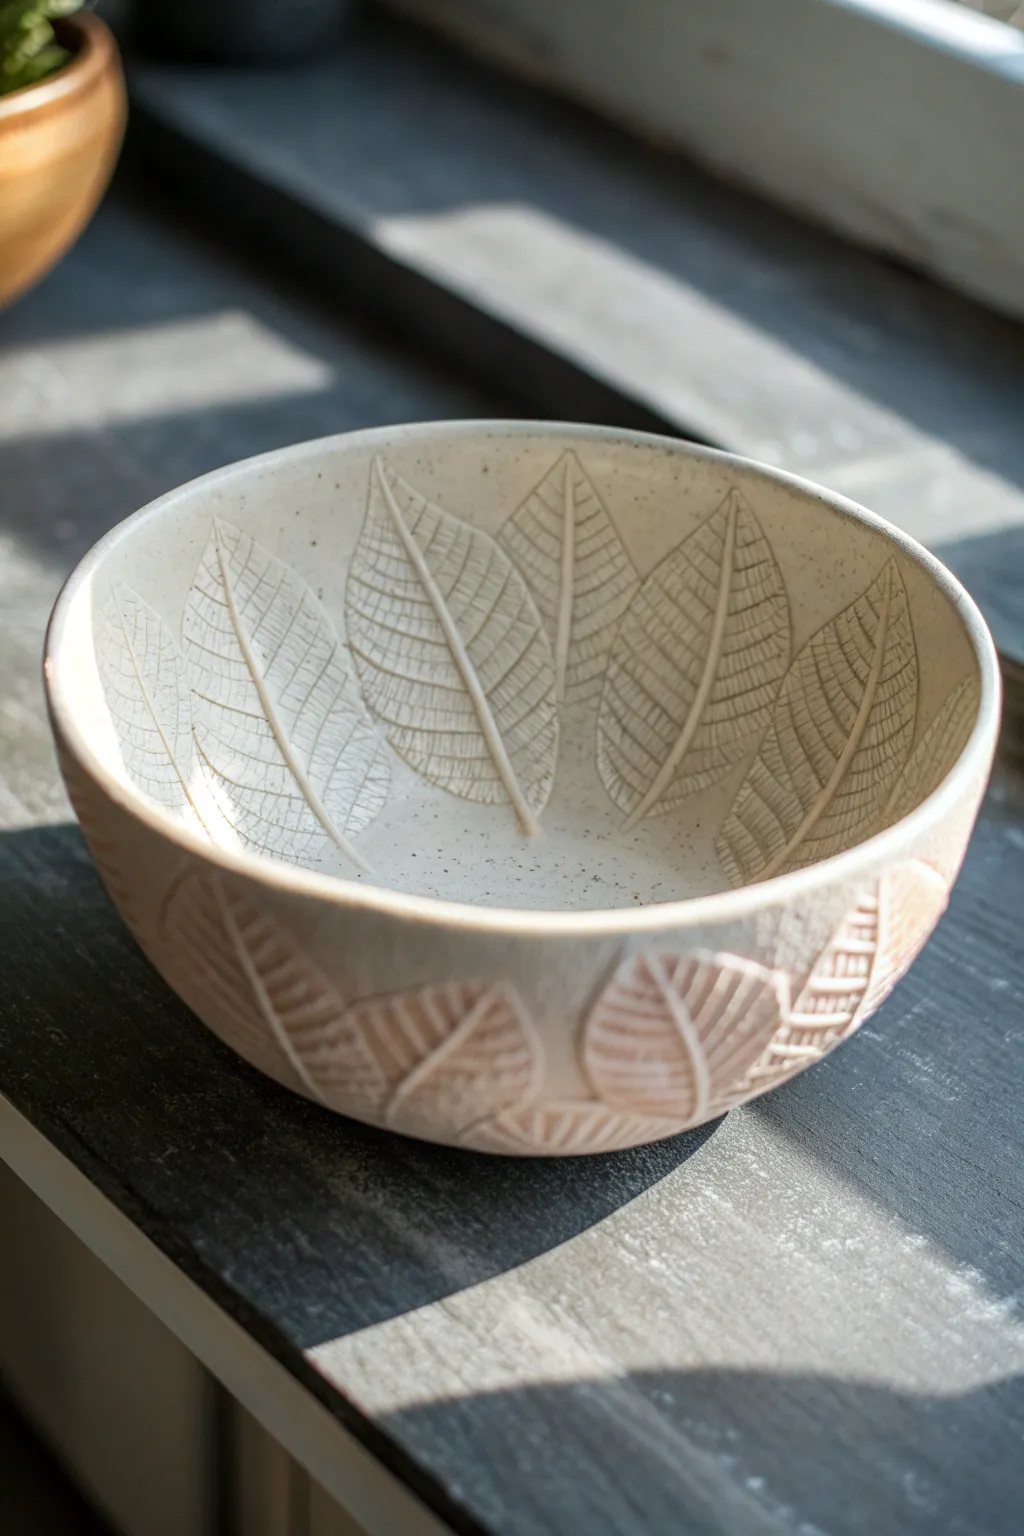
This rustic bowl captures the delicate details of nature using a simple imprint technique, resulting in a piece that looks remarkably like kiln-fired pottery. The design features deeply embossed leaf patterns that wrap around both the interior and exterior, highlighted by a natural, speckled finish and warm earth tones.
How-To Guide
Materials
- White air-dry clay (smooth texture)
- Small rolling pin
- Large, fresh leaves with prominent veins (e.g., hydrangea, viburnum, or crafted rubber stamps)
- Bowl for use as a mold (smooth plastic or glass works best)
- Plastic wrap
- Craft knife or clay trimming tool
- Sponge and water
- Fine-grit sandpaper
- Brown acrylic paint (burnt umber or sienna)
- Cream or off-white acrylic paint
- Matte varnish or sealant
- Paper towels or a rag
Step 1: Preparing the Slab
-
Roll the clay:
Begin by conditioning your air-dry clay until it’s pliable. Roll it out on a flat surface into a large, even slab approximately 1/4 inch thick. You want it wide enough to drape completely over your mold bowl. -
Create leaf impressions:
Arrangement is key here. Place your leaves vein-side down onto the clay slab in a radial pattern (tips pointing inward or outward, depending on your preference). I like to overlap them slightly to create a continuous forest floor effect. -
Press the texture:
Use your rolling pin to firmly press the leaves into the clay. Roll over them several times with even pressure to ensure the veins transfer clearly, but be careful not to make the clay too thin. -
Remove the leaves:
Carefully peel away the leaves to reveal the imprinted texture. If a leaf stem gets stuck, use a needle tool or tweezers to gently lift it out without marring the design.
Clay Cracking?
If small cracks appear while drying, don’t panic. Create a slip by mixing a scrap of clay with water into a paste. Smear this into the cracks with your finger, smooth it out, and let it dry again.
Step 2: Shaping the Bowl
-
Prepare the mold:
Take your separate bowl that will serve as the form. If you want the texture on the inside (like the image), line the *inside* of the mold bowl with plastic wrap. If you want texture on the outside, turn the bowl upside down and cover it with plastic. -
Transfer the clay:
Carefully lift your imprinted clay slab. This can be tricky, so support it with both hands. Gently drape it into (or over) your mold bowl. Let gravity do the initial work, allowing the clay to slump into the curve. -
Smooth and settle:
Starting from the center and working outward, gently press the clay against the mold to remove air pockets. Be extremely gentle to avoid squashing the leaf textures you just created. -
Trim the rim:
Using a craft knife, trim the excess clay around the rim of the bowl to create a clean or slightly organic edge. Run a damp finger along the cut edge to smooth out any sharpness. -
Initial drying:
Let the clay sit in the mold for about 24 hours until it is leather-hard and holds its shape on its own.
Step 3: Defining the Exterior
-
Remove from mold:
Once the clay is firm enough to handle but not bone dry, remove it from the mold and peel off the plastic wrap. -
Exterior texture (Optional):
The image shows texture on the outside as well. Since the clay is still leather-hard, you can gently press smaller leaves or a texture tool against the exterior walls, supporting the bowl from the inside with your hand. -
Final drying:
Allow the bowl to dry completely in a cool, dry place. This usually takes another 24-48 hours. Flip it occasionally to ensure even airflow. -
Refine surfaces:
Once bone dry, use fine-grit sandpaper to gently smooth the rim and any rough patches on the non-textured areas.
Make it Metallic
For a luxe twist, apply gold liquid leaf or gilding wax exclusively to the rim of the bowl or lightly brush it over the highest points of the leaf veins to make them shimmer.
Step 4: Painting and Finishing
-
Base coat:
Paint the entire bowl with a creamy off-white acrylic paint. You might need two coats for opaque coverage. Let this dry completely. -
The antiquing wash:
Mix a small amount of brown acrylic paint with water to create a thin wash. Brush this freely over the leaf textures ensuring it gets into all the deep crevices. -
Wipe back:
Immediately use a damp paper towel or sponge to wipe the brown paint off the raised surface areas. The dark paint will remain in the veins and recesses, highlighting the texture instantly. -
Speckling effect:
To mimic the speckled clay look, dilute a tiny bit of black or dark brown paint. Dip an old toothbrush into it and flick the bristles with your thumb to spray fine specks across the interior and exterior. -
Seal:
Finish with two coats of matte varnish to protect the surface and give it that soft, ceramic sheen. Remember, air dry clay is not food safe, so use this for decorative storage only.
Now you have a stunning, nature-inspired vessel ready to hold your trinkets or simply be admired.
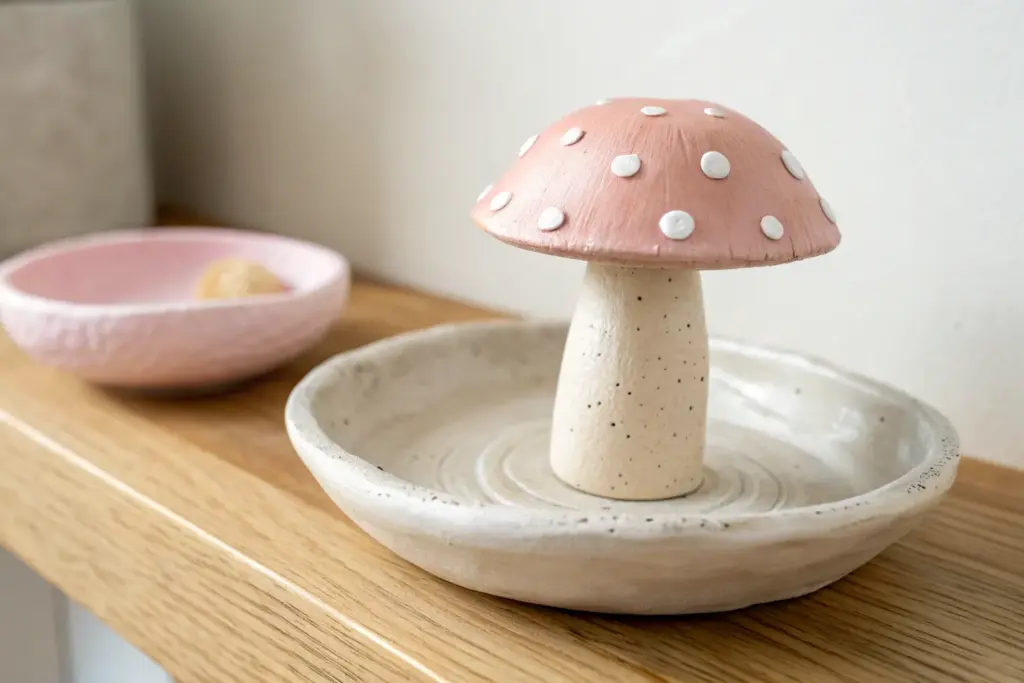
Mushroom Shelf Decor
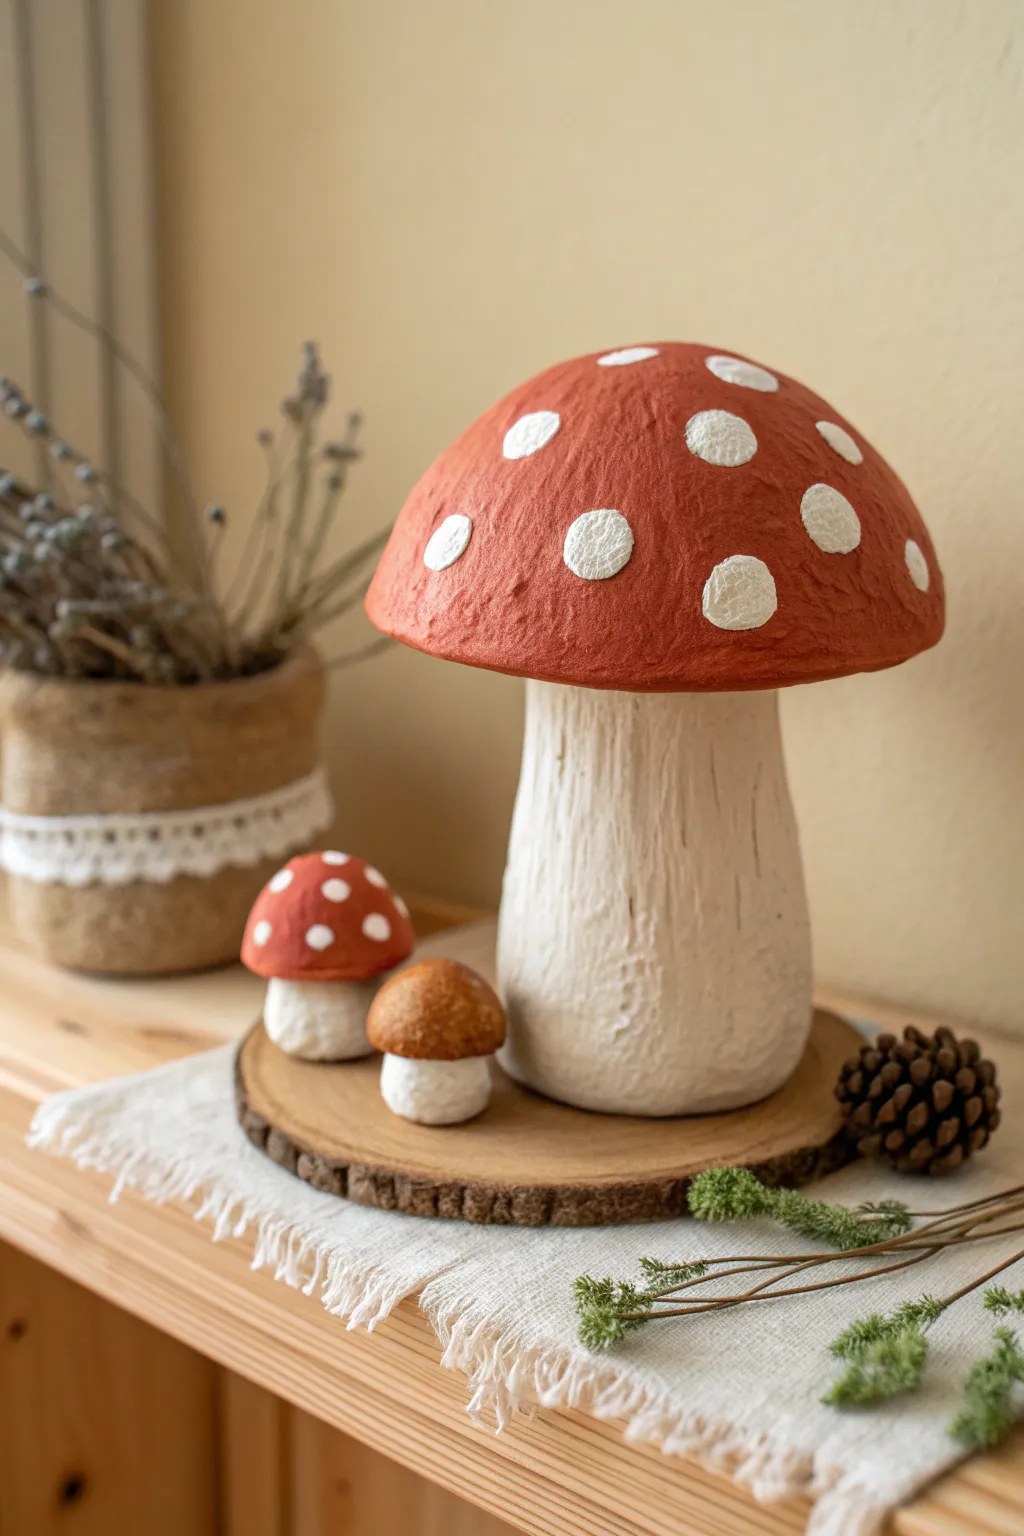
Bring a touch of the forest floor into your home with this charming set of handcrafted mushrooms. With their textured caps and sturdy stems, these rustic fungi make a delightful centerpiece for any shelf or mantle.
Detailed Instructions
Materials
- Air-dry clay (stone or white)
- Aluminum foil
- Cardboard scraps
- Masking tape
- Rolling pin
- Acrylic paints: Burnt Orange/Red, White, Raw Umber
- Sculpting tools or a craft knife
- Texture tool (old toothbrush or stiff bristle brush)
- PVA glue or varnish (matte finish)
Step 1: Armature Construction
-
Form the large stem core:
Crumple a large sheet of aluminum foil into a thick, cylindrical shape for the main stem. It should be wider at the base and slightly tapered at the top. Ensure it stands flat on your work surface. -
Shape the large cap base:
Cut a circle out of cardboard, approximately 5-6 inches in diameter. Cut a slit from the edge to the center, overlap the edges slightly to form a very shallow cone, and tape it securely. -
Bulb out the cap:
Small balls of foil can be taped onto the top of your cardboard cone to create a domed shape. Cover the entire foil mound with masking tape to smooth it out before adding clay. -
Connect cap and stem:
Attach the cap armature to the stem using generous amounts of masking tape. The connection needs to be rigid so the heavy clay cap doesn’t wobble later. -
Make the mini armatures:
Repeat the foil-crumpling process for the two smaller mushrooms. For these tiny versions, simple foil balls shaped into stems and caps are sufficient without the cardboard base.
Cracked Clay Fix
If cracks appear while drying, mix a small amount of fresh clay with water to make a paste (slip). Fill the cracks, smooth with a finger, and let dry again.
Step 2: Applying the Air Clay
-
Roll out the clay:
Roll your air-dry clay into a sheet roughly 1/4 inch thick. I find rolling it on a canvas mat prevents sticking. -
Wrap the large stem:
Cut a piece of clay to wrap around the foil stem. Press it firmly against the armature, smoothing the seam with a bit of water on your finger. -
Add stem texture:
Before the clay dries, use a sculpting tool or knife to drag vertical lines up the stem. These striations mimic the natural fibrous look of a real mushroom stalk. -
Cover the cap:
Drape a large circle of rolled clay over the mushroom head. Trim the excess around the rim, tucking the edges underneath to meet the stem. Smooth the transition area where the cap meets the stem underneath using a sculpting tool. -
Texture the cap surface:
Gently dab a stiff brush or old toothbrush over the wet clay on the cap to create a porous, organic texture. This helps the paint grip later. -
Sculpt the small mushrooms:
Cover the smaller foil armatures with clay. For the brown mushroom, keep the cap smooth and round. For the small red one, match the texture of the large mushroom. -
Dry completely:
Allow all pieces to dry for at least 24-48 hours. Turn them occasionally to ensure airflow reaches the bottom.
Mossy Details
Glue small bits of dried moss or reindeer lichen around the very bottom of the stems to ground them and hide any unevenness in the base.
Step 3: Painting and Finishing
-
Base coat the stems:
Mix a tiny drop of raw umber into white acrylic paint to create an off-white, creamy bone color. Paint the stems of all mushrooms with this mixture, working it into the vertical grooves. -
Paint the red caps:
Paint the caps of the large mushroom and the small spotted mushroom with a muted burnt orange or terracotta red. You may need two coats for full opacity. -
Paint the brown cap:
Use the raw umber paint diluted with a little water to create a glazed look on the third small mushroom cap, letting some of the clay texture show through. -
Add the spots:
Once the red paint is dry, use a small round brush to dab on white circles. Don’t make them perfect circles; rugged, uneven edges look more organic and natural. -
Texture the spots:
To make the spots look raised like the example, you can dab a second layer of thick, un-thinned white paint over the dried spots. -
Seal the work:
Finish with a coat of matte varnish to protect the paint without making the mushrooms look unnaturally plastic or shiny.
Now you have a timeless woodland display that captures the magic of the forest