If you’ve got a little time, a table you don’t mind getting dusty, and some air dry clay, you can make pieces that look way more polished than you’d expect. These beginner-friendly ideas are my go-tos when I want cute results fast—with absolutely no kiln involved.
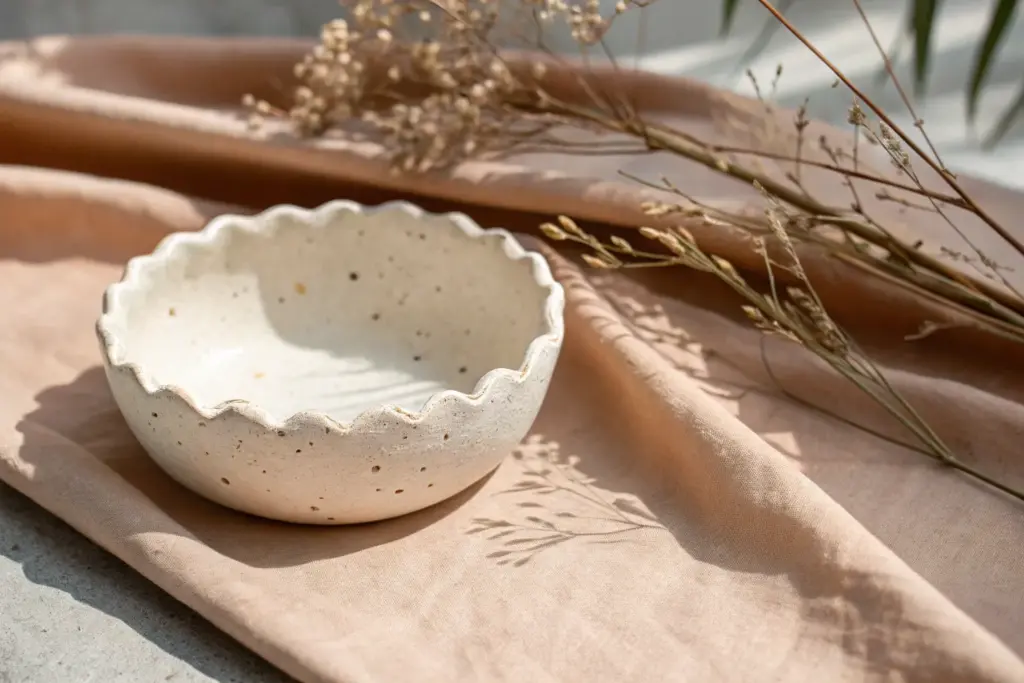
Classic Trinket Dish Catch-All
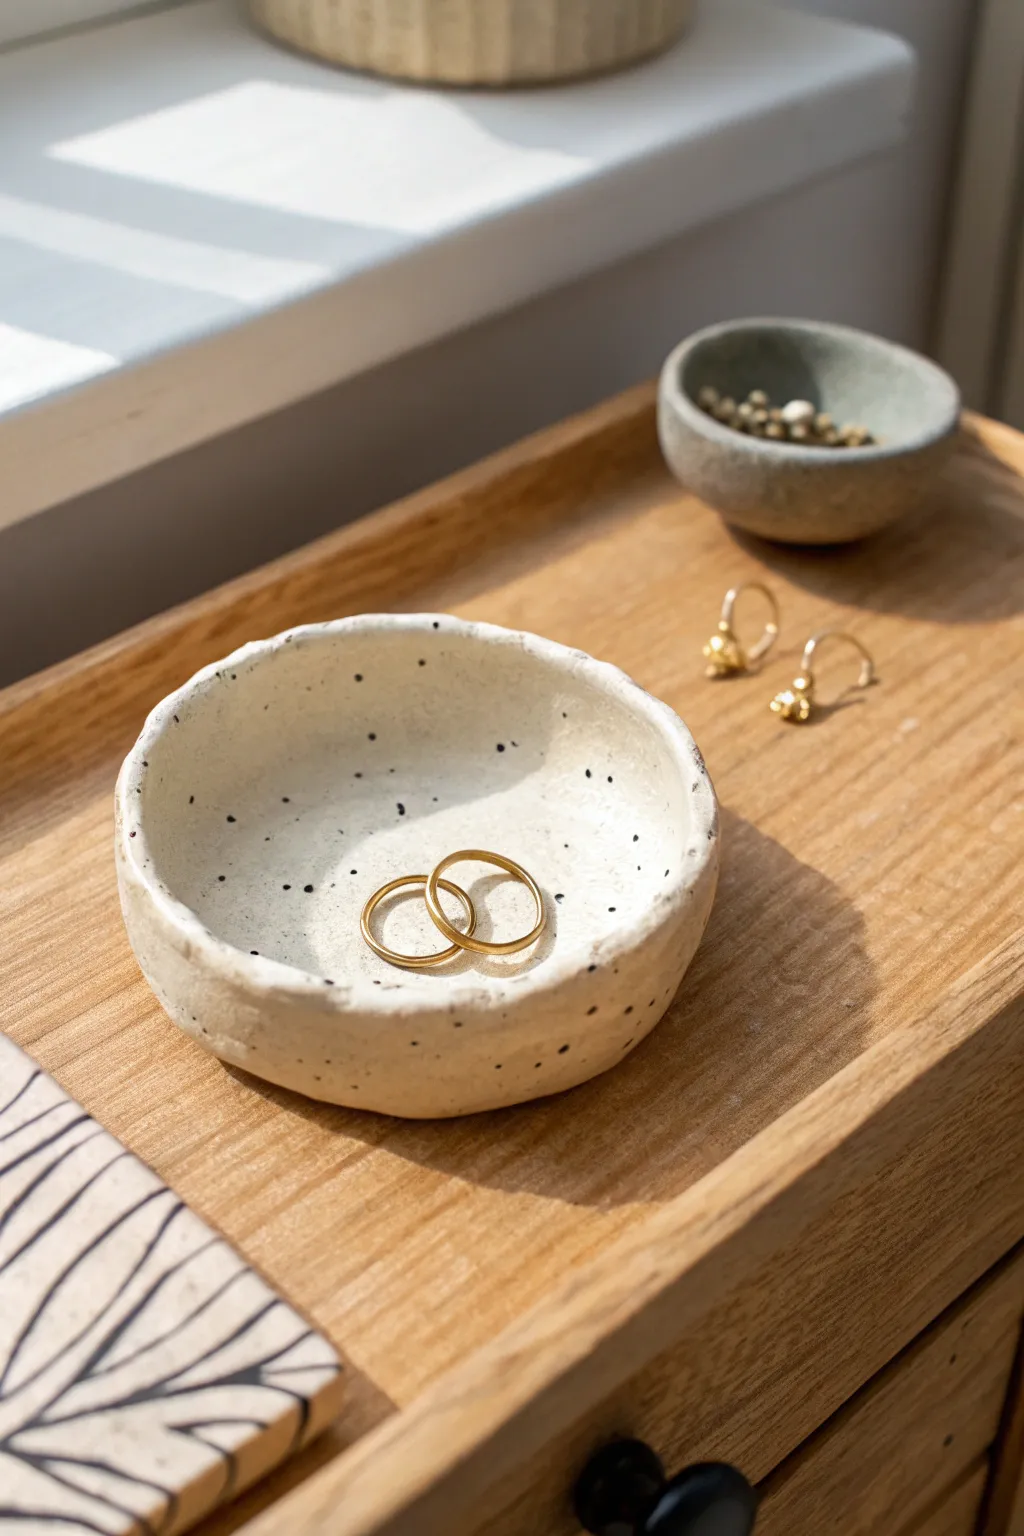
This minimalist catch-all captures the trendy look of speckled stoneware pottery using accessible air-dry clay. Its organic, slightly irregular rim and random black freckles make it a chic home for your favorite everyday rings.
How-To Guide
Materials
- White air-dry clay
- Rolling pin or smooth glass jar
- Small bowl (to use as a mold)
- Black acrylic paint
- Stiff-bristled toothbrush or fan brush
- Glossy varnish or sealant (like Mod Podge or spray acrylic)
- Sandpaper (fine grit)
- Plastic wrap (optional)
- Small sponge and water
Step 1: Shaping the Base
-
Prepare the Clay:
Start by pinching off a lump of white air-dry clay about the size of a golf ball. Knead it in your hands for a minute to warm it up and make it pliable, removing any air bubbles. -
Roll it Out:
Place the clay on a smooth surface or a piece of parchment paper. Use your rolling pin to flatten it into a pancake shape, aiming for an even thickness of about 1/4 inch. -
Cut the Circle:
Find a circular object slightly larger than your desired dish size, like a large mug or a cookie cutter. Press it gently into the clay to mark a guide, then use a craft knife to cut out a clean circle. -
Soften the Edges:
Dip your finger in a little bit of water and run it along the cut edge of the circle. Smooth out any sharpness or crumbles so the rim feels nice and rounded. -
Form the Curve:
Gently lift the clay circle and press it into your small mold bowl. You can line the bowl with plastic wrap first to prevent sticking. Press the clay down into the curve, ensuring the bottom is flat so it won’t tip over later. -
Create the Organic Rim:
Unlike perfect pottery, this look thrives on imperfection. Use your thumb to gently push and warp the rim slightly in a few places, giving it that handmade, wabi-sabi aesthetic.
Flick it Good
For the best splatter control, use an old toothbrush. Drag your thumb back across the bristles rather than pushing forward to direct the spray downward onto the dish.
Step 2: Refining and Drying
-
Initial Dry:
Leave the clay inside the bowl mold for at least 24 hours. Because air flow is restricted, the bottom will take longer to dry. -
Remove and Flip:
Once the exposed top feels leather-hard and holds its shape, carefully pop the dish out of the mold. Flip it upside down on a wire rack to let the bottom dry completely for another 12-24 hours. -
Check for Dryness:
The clay is ready when it feels room temperature to the touch—if it feels cold, there is still moisture inside. -
Sand Smooth:
Using fine-grit sandpaper, gently buff the entire surface. Focus on the rim to ensure there are no sharp bits, and smooth out any fingerprints inside the bowl. -
Wipe Clean:
Use a barely damp sponge or paper towel to wipe away all the sanding dust. The surface needs to be perfectly clean for the paint effect.
Luxe Gold Rim
Elevate the design by painting just the very top edge of the rim with liquid gold leaf or metallic gold paint before you apply the final glossy sealant.
Step 3: The Speckled Effect
-
Prepare Paint:
Squeeze a small amount of black acrylic paint onto a palette. Add a few drops of water to thin it down until it has an inky consistency. -
Load the Brush:
Dip just the tips of your stiff toothbrush or fan brush into the watered-down paint. Test the splatter on a scrap piece of paper first to gauge the density. -
Splatter Technique:
Hold the brush about 6 inches above the dish. Use your thumb to flick the bristles, sending a spray of fine black dots onto the white clay. I find vary the distance slightly creates a more natural mix of small and large speckles. -
Let Paint Dry:
Allow the paint speckles to dry completely. Since the dots are small, this usually only takes 15-20 minutes.
Step 4: Sealing
-
Apply Varnish:
Using a soft brush, apply a coat of glossy varnish or sealant. The gloss finish mimics the look of fired ceramic glaze. -
Second Coat:
Once the first coat is tacky or dry, apply a second thin coat for extra durability and shine. -
Final Cure:
Let the varnish cure for at least 24 hours before placing any jewelry inside to ensure the finish doesn’t react with the metal.
Now you have a stunning, professional-looking piece of faux-pottery to display your treasures


Wavy Rim Jewelry Bowl
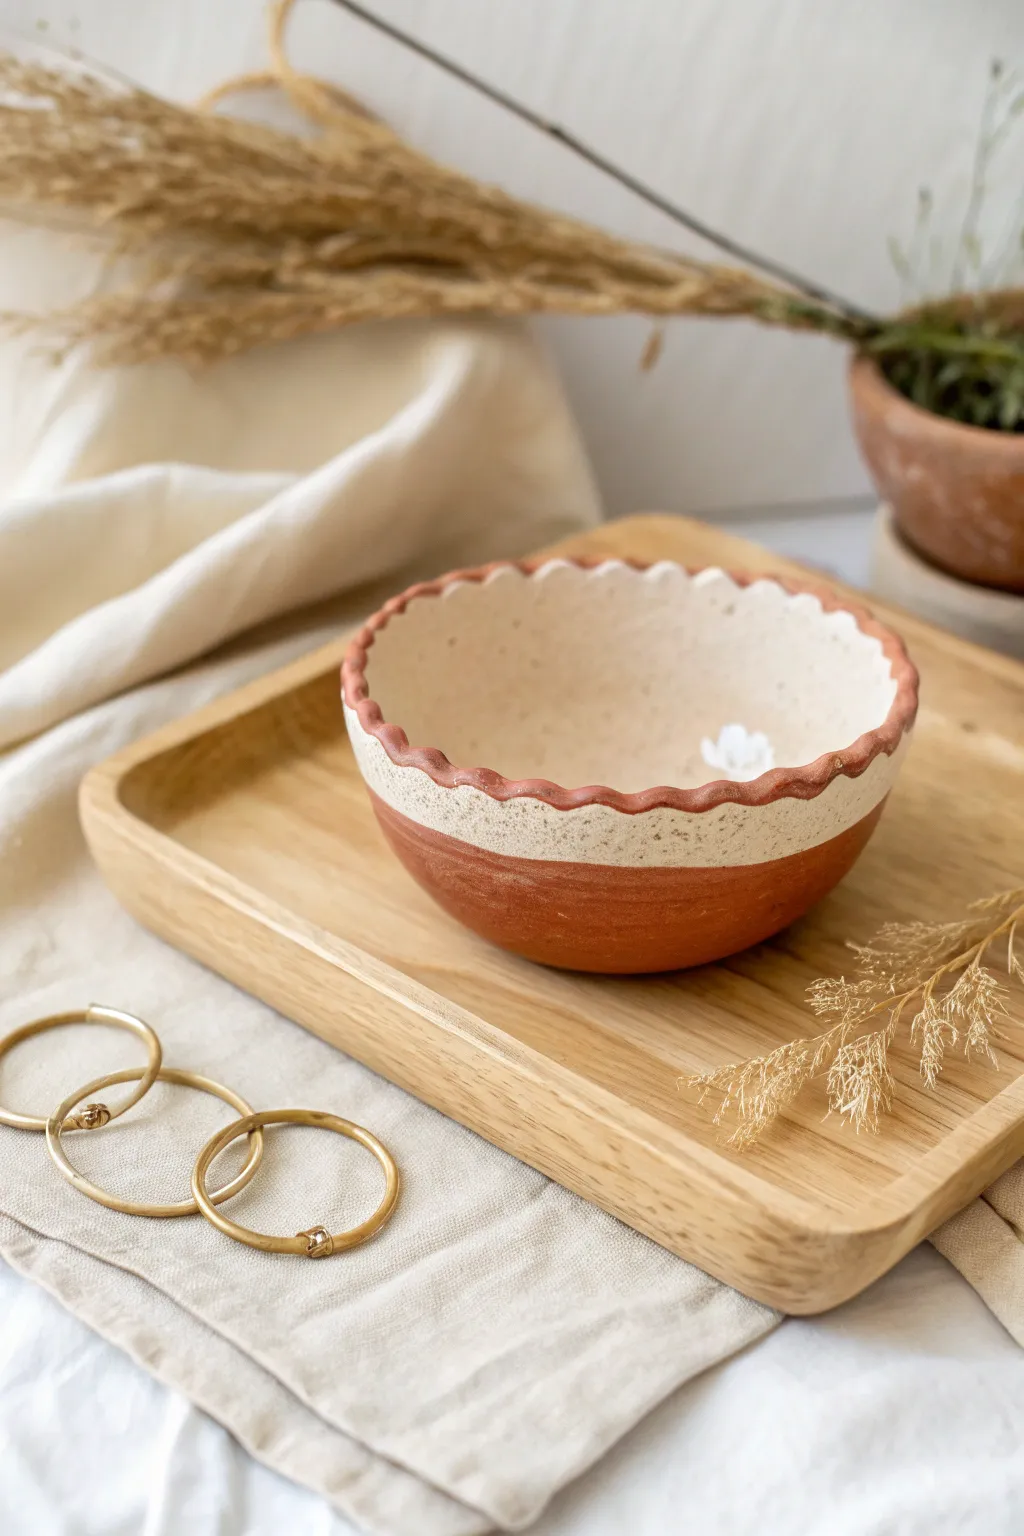
This charming little bowl combines earthy terracotta tones with a creamy, speckled upper glaze for a modern rustic look. The wavy scalloped rim adds a playful, organic touch that’s perfect for holding your favorite rings and trinkets.
Step-by-Step Tutorial
Materials
- Terracotta air-dry clay
- White or cream acrylic paint
- Rolling pin
- Small bowl (to use as a mold)
- Plastic wrap
- Round cookie cutter or drinking glass (approx. 4-5 inches)
- Small circular object (like a pen cap or straw) for scallops
- Fine-grit sandpaper
- Glossy varnish or sealant
- Small paintbrush
- Toothbrush (optional for speckling)
- Brown acrylic paint (optional for speckling)
Step 1: Shaping the Clay
-
Prepare the Clay:
Start by taking a generous handful of terracotta air-dry clay. Knead it in your hands for a minute or two to warm it up and make it pliable. -
Roll it Out:
Place the clay on a smooth surface or canvas mat. Use your rolling pin to flatten the clay into an even slab, aiming for a thickness of about 1/4 inch. -
Cut the Circle:
Using a large round cookie cutter or the rim of a drinking glass, press firmly into the clay to cut out a perfect circle. Remove the excess clay from around the edges. -
Prepare the Mold:
Find a small bowl that has the curvature you want for your dish. Cover the outside of this bowl with plastic wrap to prevent the clay from sticking. -
Form the Bowl:
Gently lift your clay circle and drape it over the upside-down bowl. Smooth the clay down the sides with your fingers to conform to the bowl’s shape. -
Create the Scallops:
With the clay still on the mold, use a small cylindrical object like the side of a pen cap or a wide straw. Press it gently into the rim at regular intervals to create indentations, forming the wavy, scalloped edge. -
Smooth the Edges:
Dip your finger in a tiny bit of water and run it along the scalloped rim to smooth out any harsh lines or cracks that formed during the shaping process.
Step 2: Drying and Refining
-
Initial Dry:
Leave the clay on the mold for about 24 hours until it feels stiff enough to hold its shape without support. -
Remove and Cure:
Carefully pop the clay off the mold and peel away the plastic wrap. Set the bowl right-side up to let the inside dry completely. This usually takes another 24-48 hours depending on humidity. -
Sand for Smoothness:
Once fully dry and hard, take fine-grit sandpaper and gently buff out any fingerprints or rough textures on the surface.
Smooth Seams
Use a damp sponge instead of sandpaper for initial smoothing before the clay dries. It reduces dust and creates a seamless, professional surface.
Step 3: Painting and Finishing
-
Mark the Paint Line:
Decide where you want the white section to end. You can lightly sketch a line around the middle of the bowl with a pencil, or trust your steady hand. -
Apply Base Color:
Paint the upper half of the bowl, including the inside and the scalloped rim, with creamy white acrylic paint. You may need two or three coats for opaque coverage. -
Leave the Base Exposed:
Leave the bottom half of the exterior unpainted to show off that beautiful natural terracotta color. -
Add Speckles:
To get that speckled pottery look, dip an old toothbrush into slightly watered-down light brown paint. Run your thumb over the bristles to flick tiny splatters onto the white painted section. -
Seal the piece:
Once the paint is totally dry, apply a coat of glossy varnish or sealant over the entire bowl. This protects the clay and gives it a kiln-fired ceramic appearance.
Gilded Edge
Add a thin line of gold leaf or metallic gold paint along the very top edge of the scallops for a touch of elegance.
Place your finished bowl on your vanity and enjoy the satisfaction of seeing your handmade creation every day.


Hand-Shaped Ring Holder
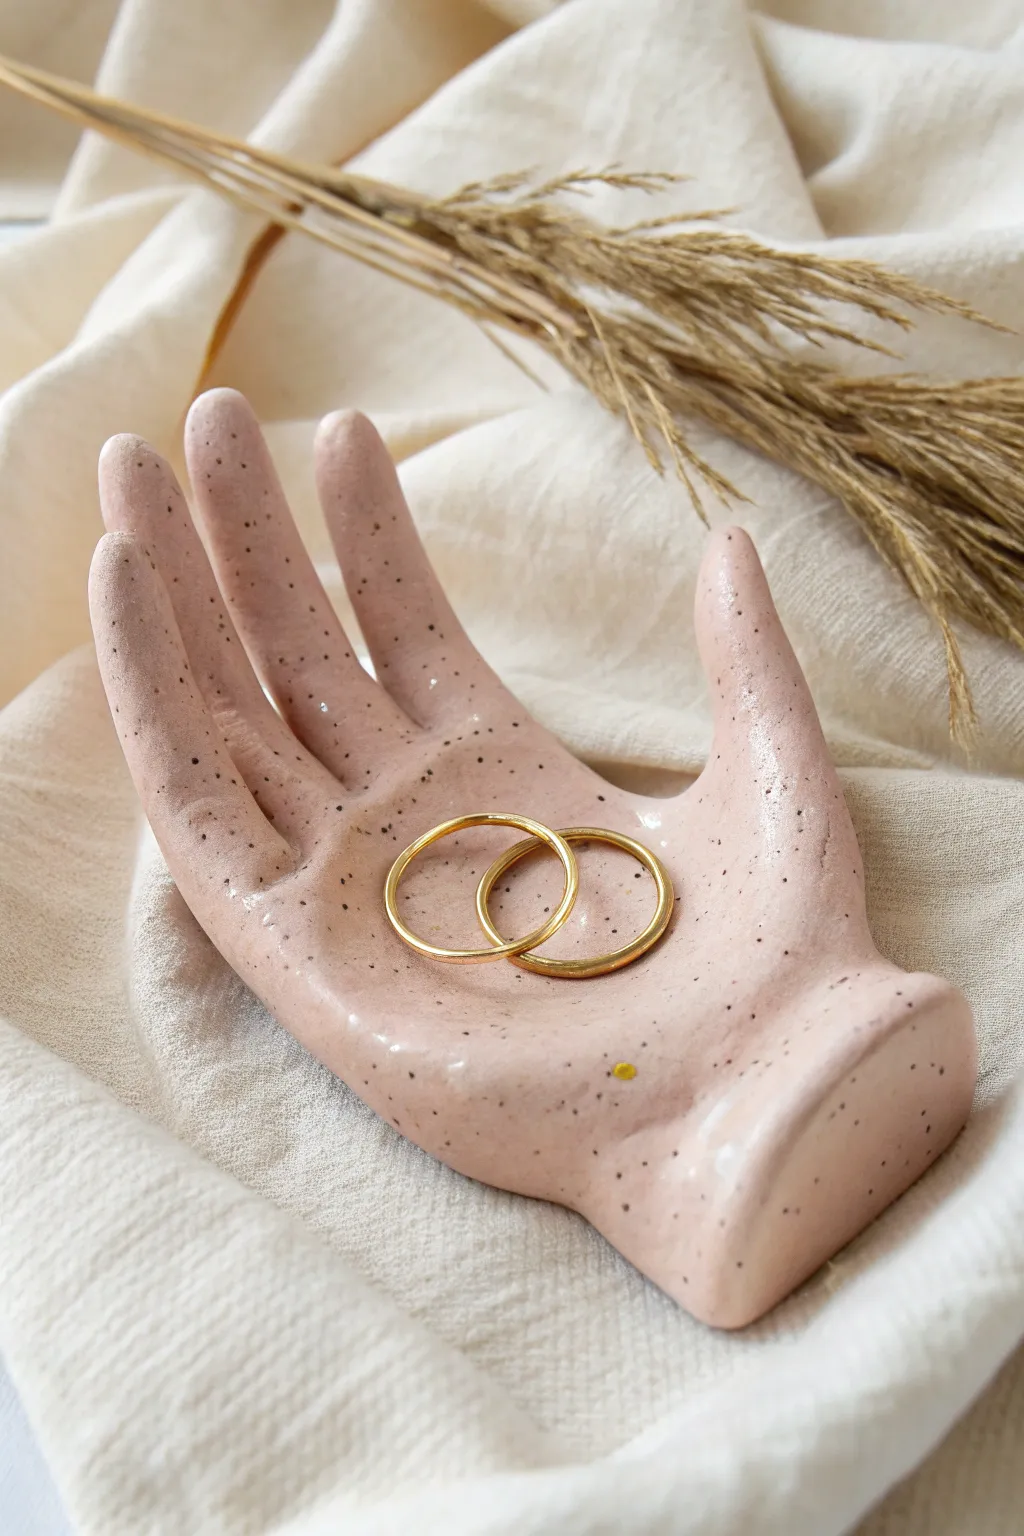
This elegant trinket dish combines a soft, milky-pink hue with charming speckles for a modern ceramic look without the kiln. It’s the perfect size for keeping your favorite rings safe and makes a beautiful sculptural accent for any dresser.
How-To Guide
Materials
- Air dry clay (white)
- Acrylic rolling pin
- Craft knife or clay tool
- Small bowl or curved object (for drying shape)
- Fine grit sandpaper
- Acrylic paint (pale pink, black, brown)
- Your own hand (for tracing) or a printed template
- Old toothbrush
- Glossy varnish or sealant
- Cup of water
- Paintbrushes
Step 1: Shaping the Hand
-
Roll the clay:
Start by conditioning a ball of white air dry clay in your hands until it’s pliable. Roll it out on a smooth surface to an even thickness of about 1/4 inch (6mm). If the clay sticks, you can use a little parchment paper underneath. -
Trace the outline:
Place your hand gently on the clay with your fingers spread slightly apart. Using a needle tool or a dull knife, carefully trace around your fingers and palm. Don’t press too hard; just create a light guide line. -
Cut the shape:
Remove your hand and retrace the lines more deeply with your craft knife to cut out the hand shape completely. Peel away the excess clay. -
Smooth the edges:
Dip your finger in a little water and run it along the cut edges of the clay hand. This rounds off the sharp corners and gives it a more finished, ceramic-like appearance. -
Add details:
If you want realistic details, use a clay tool to gently press in creases at the finger joints and lightly define the palm lines. This adds dimension, though a smooth abstract look works well too. -
Form the curve:
To make it a functional dish, drape the clay hand over a small bowl or a rolled-up towel. Gently press the palm down so it curves slightly inward, and lift the fingers upward. This cupped shape ensures your jewelry won’t slide off. -
Let it dry:
Allow the clay to dry completely in this position. This usually takes 24-48 hours depending on humidity. Flip it over halfway through the drying process to ensure the bottom dries evenly.
Cracking Up?
If small cracks appear while drying, don’t panic! Mix a tiny bit of fresh clay with water to make a paste (slip) and fill the cracks. Smooth it out and let it dry again.
Step 2: Decorating and Finishing
-
Sand for smoothness:
Once fully dry and hard, use fine-grit sandpaper to buff away any rough spots on the edges or surface. Wipe away the dust with a slightly damp cloth. -
Apply base color:
Mix white acrylic paint with a tiny drop of red and perhaps a touch of yellow to achieve the soft, fleshy pink tone seen in the photo. Apply two thin coats to the entire hand, letting the first coat dry before adding the second. -
Prepare the speckles:
Dilute a small amount of dark brown or black acrylic paint with water until it has an inky consistency. It should be runny enough to splatter easily. -
Splatter effect:
Dip an old toothbrush into the diluted dark paint. Hold it over your painted hand dish and run your thumb across the bristles to flick tiny speckles onto the surface. I suggest testing this on a piece of paper first to control the spray. -
Add variety:
Rotate the hand dish as you splatter to ensure the speckles hit the sides of the fingers and the palm evenly. Vary your distance slightly to create speckles of different sizes. -
Seal carefully:
Wait for the paint and speckles to be completely dry. Apply a high-gloss varnish or sealant. This gives the piece that shiny, glazed ceramic look and protects the paint from scratching. -
Final dry:
Let the varnish cure according to the manufacturer’s instructions before placing any jewelry inside.
Make it Gold
For an extra touch of luxury, paint the very rim of the hand or the fingernail areas with liquid gold leaf before sealing. It adds a chic contrast to the pink.
Your personalized ring holder is now ready to display your treasures with a touch of handmade charm


Cone Ring Stand Trio
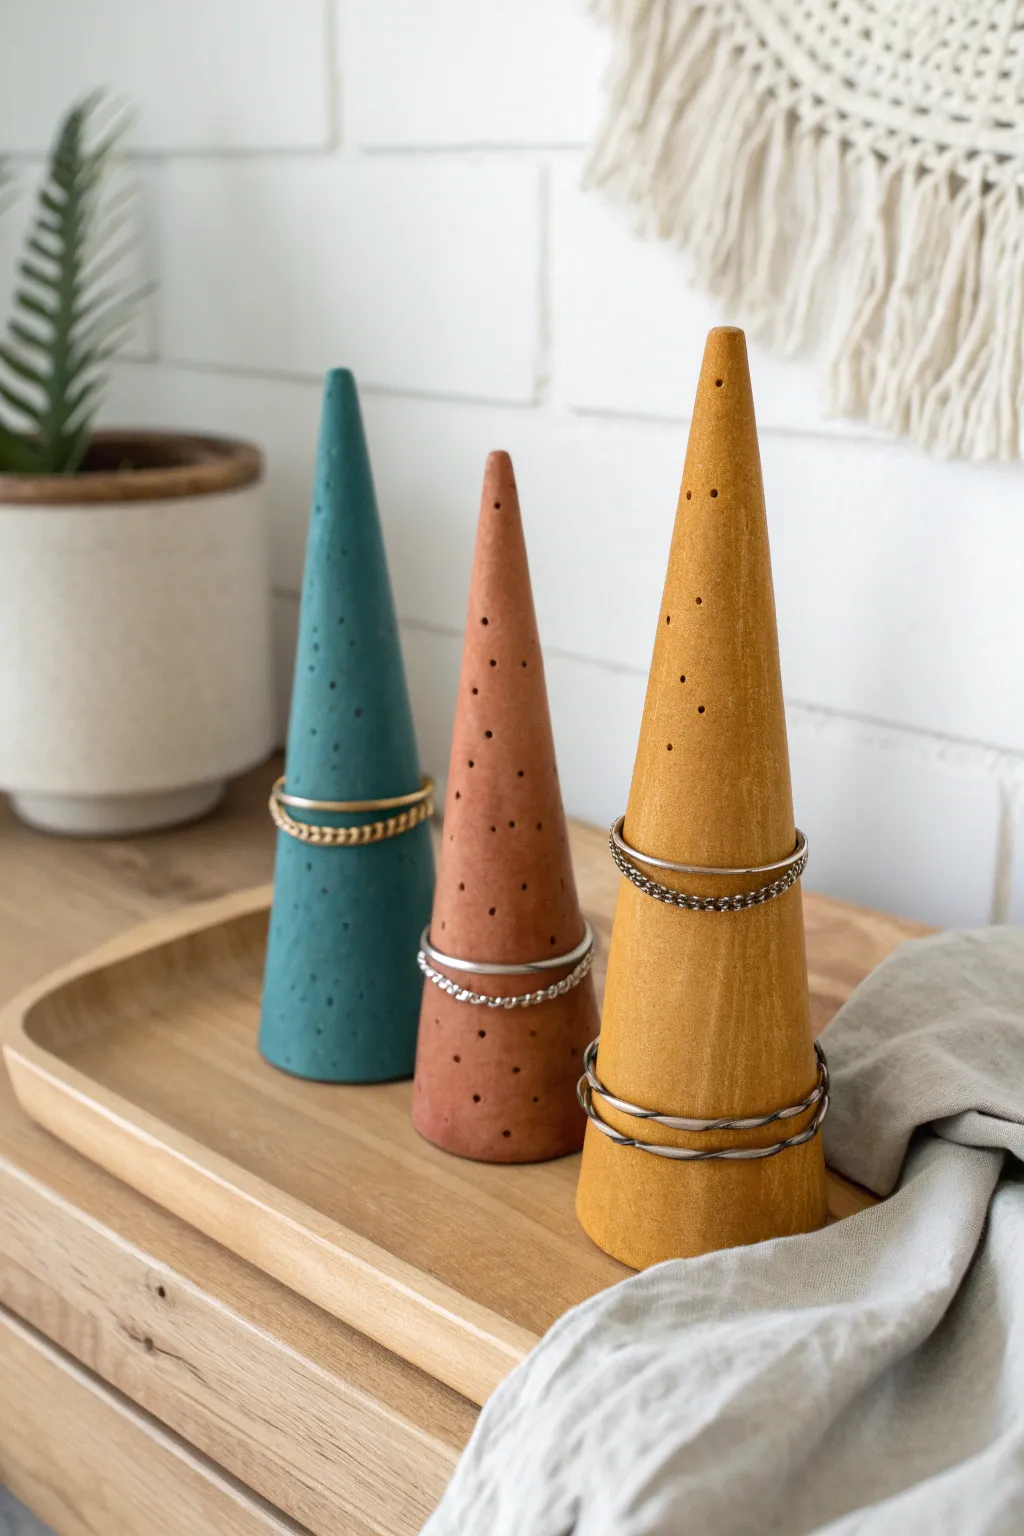
Create a stylish trio of minimalist jewelry displays that look like high-end ceramics but are easily made at home. These matte, speckled cones in earthy tones serve as functional sculptures perfect for organizing your rings and bracelets.
Detailed Instructions
Materials
- Air dry clay (white)
- Acrylic rolling pin
- Cone template (paper or cardstock)
- Craft knife or clay cutting tool
- Small bowl of water
- Sanding sponge or fine-grit sandpaper
- Acrylic paints (Teal, Terracotta/Rust, Mustard Yellow)
- Black acrylic paint (for speckles)
- Old toothbrush or stiff bristle brush
- Matte spray varnish or sealant
- Needle tool or toothpick
Step 1: Shaping the Cones
-
Prepare the clay:
Cut a fist-sized chunk of air dry clay from your block. Knead it in your hands for a minute or two until it is pliable and smooth, working out any air pockets. -
Roll it out:
Place the clay on a smooth surface or craft mat. Using your acrylic roller, roll the clay into an even slab that is roughly 1/4 inch thick throughout. -
Create a template:
To ensure uniform sizing, cut a semi-circle or pie-wedge shape out of cardstock paper. This will be the pattern for your cone walls. -
Cut the shape:
Lay your cardstock template onto the rolled clay slab. Use a craft knife to trace around the edges and cut out the fan shape. Repeat this process three times if you want to make the full trio. -
Form the cone:
Gently lift the clay wedge and curl it around your finger to bring the two straight edges together to form a cone point. -
Score and slip:
Before joining the edges, use a needle tool to scratch up the contact surfaces (scoring). dab a little water on the scratched area (slip) to act as glue. -
Seal the seam:
Press the edges together firmly. Use your finger or a clay modeling tool to smooth the seam on the outside until it disappears completely. You can support the inside with a pencil or chopstick while smoothing. -
Level the base:
Stand the cone upright. If it wobbles, gently press it down onto the table to flatten the bottom, or trim the excess clay with your knife carefully to ensure it stands vertically. -
Refine the surface:
Dip your finger in a tiny amount of water and run it over the entire surface of the cone to smooth out any fingerprints or bumps. Let the cones dry completely for 24-48 hours.
Step 2: Painting and Finishing
-
Sand for smoothness:
Once the clay is bone dry and turns a chalky white, use a fine-grit sanding sponge to gently buff the surface. Focus on the seam area to make it invisible. -
Apply base colors:
Paint each cone a different solid matte color. I used a deep teal, a rust-colored terracotta, and a warm mustard yellow. You may need two coats for full opacity. -
Add texture marks:
The project image features tiny physical divots or painted dots. To replicate the look easily, take a needle tool and gently poke random, shallow holes into the painted surface while the paint is still slightly tacky, or wait until dry and paint them on. -
Create the speckles:
Dilute a small amount of black acrylic paint with water so it’s runny. Dip an old toothbrush into the mixture. -
Splatter technique:
Hold the toothbrush near the cones and run your thumb across the bristles to flick tiny specks of paint onto the surface. Practice on a paper towel first to control the droplet size. -
Seal the project:
Allow the paint to cure completely. Finally, spray the cones with a matte varnish. This protects the paint from scratching when you slide metal rings on and off.
Wonky Point?
If the tip of your cone keeps drooping while shaping, insert a paper cone (made from scrap paper) inside the clay to support the structure while it dries.
Color Harmony
To get that trendy earthy look, mix a tiny dot of brown or dark grey into your bright acrylic colors. It desaturates them just enough to look expensive.
Arrange your completed trio on a bedside table or vanity for an instant decor upgrade that keeps your favorite accessories safe

What Really Happens Inside the Kiln
Learn how time and temperature work together inside the kiln to transform clay into durable ceramic.
Stamped Texture Coaster Set
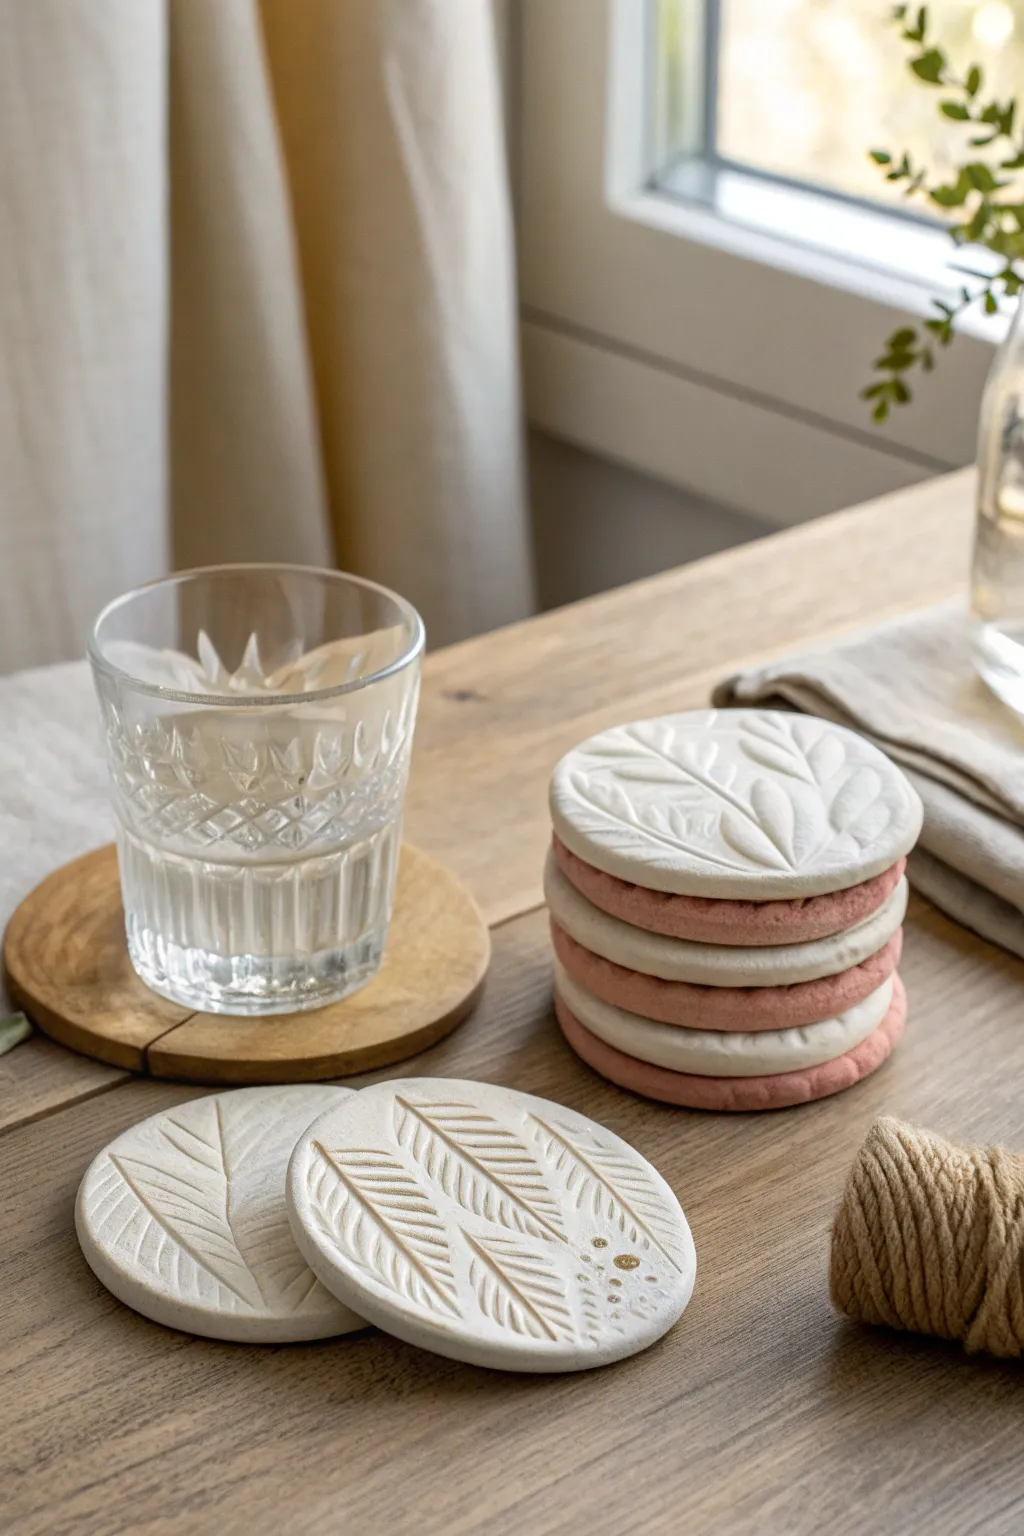
Bring a touch of nature to your table with these elegant, minimalist coasters featuring lovely stamped leaf impressions. This project combines the simplicity of air-dry clay with organic textures to create a functional and beautiful home accessory.
Step-by-Step Guide
Materials
- White air-dry clay
- Terracotta or pink-tinted air-dry clay (or acrylic paint to tint)
- Rolling pin
- Round cookie cutter (approx. 3.5 – 4 inches)
- Real leaves with strong veins or deep-texture rubber stamps
- Sandpaper (fine grit)
- Clear acrylic sealant (matte or satin)
- Gold acrylic paint (optional details)
- Small detail brush
- Wax paper or canvas mat for working surface
- Small sponge
Step 1: Preparation and Forming
-
Prepare your workspace:
Lay down a piece of wax paper or a canvas mat to prevent the clay from sticking to your table. Take a handful of white air-dry clay and knead it in your hands until it becomes soft, pliable, and free of cracks. -
Roll out the base:
Place the clay ball in the center of your workspace. Using a rolling pin, roll the clay out evenly until it is about 1/4 inch thick. Try to keep the thickness consistent so the coaster sits flat. -
Create the color variation:
Repeat the kneading and rolling process with your terracotta or pink-tinted clay. If you don’t have colored clay, you can knead a small drop of acrylic paint into white clay until the color is uniform. -
Cut the shapes:
Use your round cookie cutter to punch out circles from both the white and colored clay slabs. I usually cut one or two extra just in case one decides to curl while drying. -
Smooth the edges:
Dip your finger in a little bit of water and run it gently around the cut edges of the circles to remove any sharpness or rough bits left by the cutter.
Release Agent Trick
If your stamps or leaves are sticking to the clay excessively, lightly dust the clay surface with cornstarch or baby powder before pressing your design.
Step 2: Texturing and Refining
-
Select your botanicals:
Choose leaves with thick veins or use a clean rubber stamp with a leaf pattern. Fresh leaves work best because dry ones tend to crumble into the clay. -
Press the design:
carefully lay the leaf or stamp onto the center of a clay circle. Using your rolling pin, roll gently but firmly over the leaf to press it into the clay. Don’t press so hard that you deform the circle’s shape. -
Reveal the texture:
Slowly peel back the leaf or lift the stamp to reveal the impression. If using a leaf, use a needle tool or tweezers to pick out any tiny organic bits that might have stuck. -
Add decorative details:
For some variety, use a dotting tool or the end of a small paintbrush to add tiny indented dots near the base of the leaf stems on a few of the coasters. -
Initial drying phase:
Place the coasters on a flat, clean surface to dry. To prevent curling, place a light book or a flat board on top of them once they are leather-hard (about 2-3 hours in).
Step 3: Finishing Touches
-
Sand for smoothness:
Once the coasters are completely dry (usually 24-48 hours), take your fine-grit sandpaper and lightly sand the edges and the top surface. Avoid sanding away the texture you created. -
Clean the dust:
Wipe the coasters down with a slightly damp sponge or cloth to remove all clay dust before sealing. -
Add gold highlights:
If you want the subtle gold accent shown in the project, mix a small amount of gold acrylic paint with a drop of water. Dip your finger or a dry brush into the paint and lightly drag it over the raised textures or dab it onto the impressed dots. -
Seal the coasters:
Apply a thin layer of clear acrylic sealant over the entire coaster, including the bottom. This is crucial to protect the clay from moisture since coasters are meant to hold drinks. -
Apply second coat:
Let the first coat of sealant dry completely, then apply a second layer for extra durability. -
Final cure:
Allow the sealant to cure fully according to the bottle instructions before using the coasters with any beverages.
Backing Upgrade
Glue a circle of cork or felt to the bottom of each finished coaster. This prevents them from scratching your table and adds a professional, finished feel.
Enjoy your beautiful new stack of handmade coasters or wrap them up with twine for a thoughtful gift.
Flower Petal Coasters
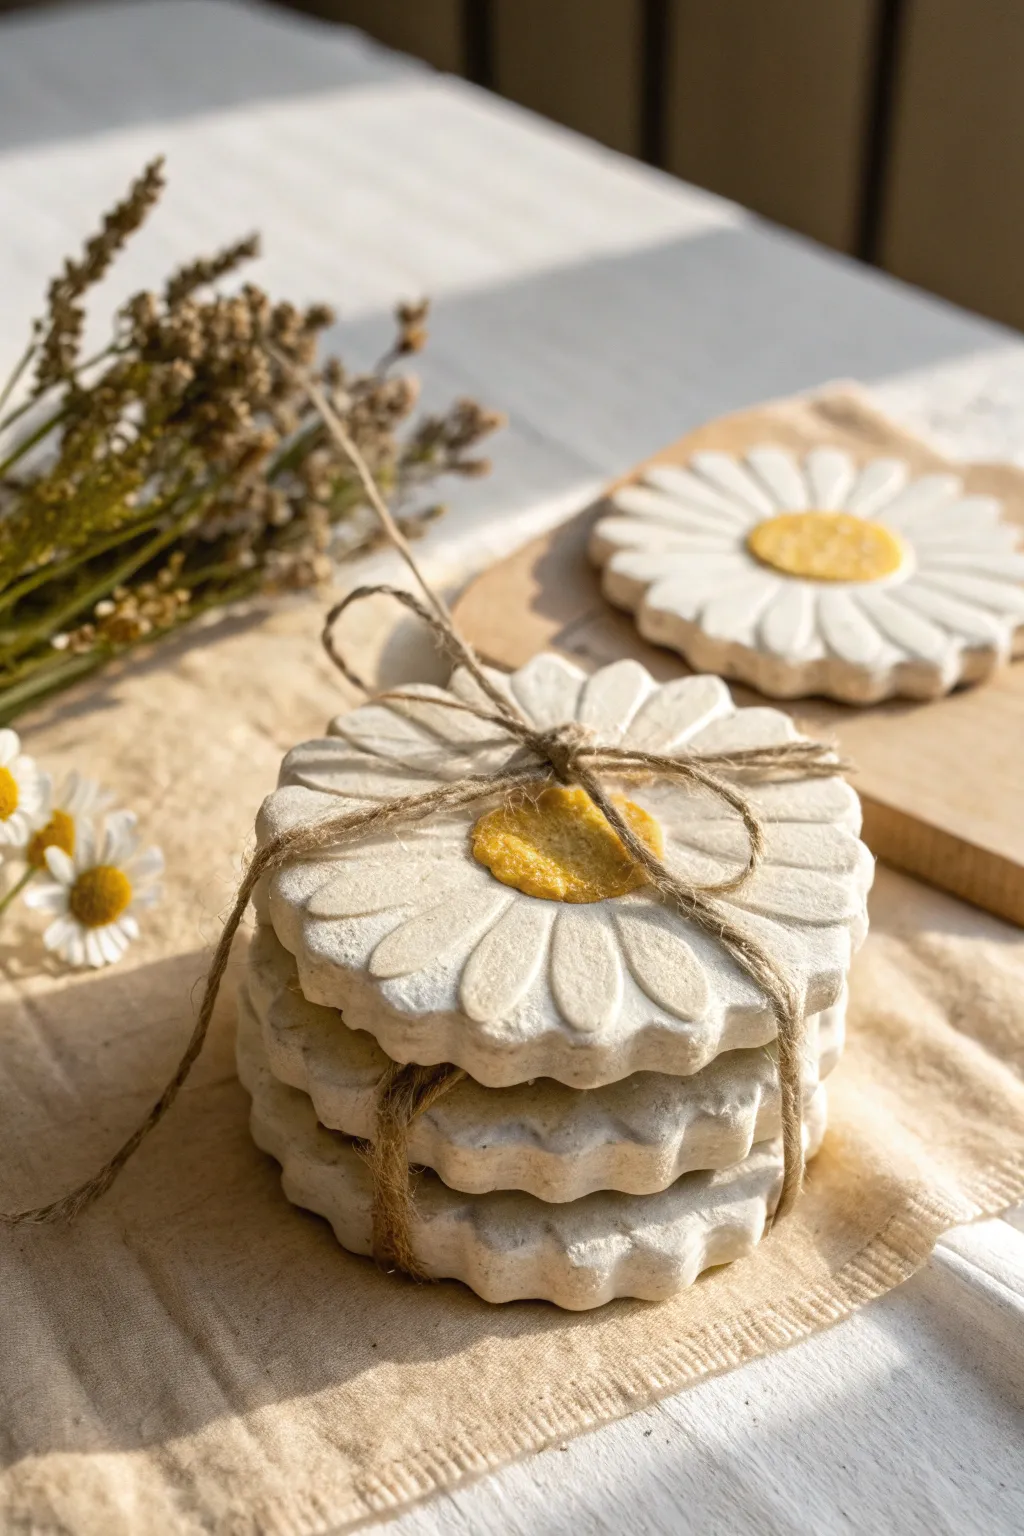
Bring the softness of a summer garden into your home with these charming, daisy-shaped coasters. Their rustic texture and sunny yellow centers add a gentle, handcrafted touch to any coffee table setting.
How-To Guide
Materials
- White air-dry clay
- Rolling pin
- Circular cookie cutter (approx. 4 inches)
- Small circular cutter or bottle cap (approx. 1.5 inches)
- Clay sculpting tools (needle tool and smooth modeling tool)
- Sponge and water
- Acrylic paint (sunny yellow)
- Small paintbrush
- Sandpaper (fine grit)
- Matte varnish or sealant
- Jute twine (for packaging/gifting)
Step 1: Shaping the Clay Base
-
Condition the clay:
Begin by taking a handful of air-dry clay and kneading it in your hands until it becomes warm, soft, and pliable. This prevents cracks later on. -
Roll out the slab:
Place the clay on a smooth surface or canvas mat. Use your rolling pin to flatten it into an even slab, aiming for a thickness of about 1/4 inch to ensure durability. -
Cut the main circle:
Press your large circular cookie cutter firmly into the clay slab to create the coaster’s outer edge. Peel away the excess clay and set it aside for the next coaster. -
Mark the center:
Take your smaller circular cutter or a bottle cap and press it gently into the exact center of your clay circle. Do not cut all the way through; just make a clear indentation to define the flower’s center.
Anti-Warping Trick
To keep coasters perfectly flat while drying, place a lightweight book on top of them once they are leather-hard (dry to touch but still cool).
Step 2: Sculpting the Petals
-
Divide the segments:
Imagine the circle is a clock face. Use a needle tool or knife to make light guide marks at 12, 3, 6, and 9 o’clock on the outer ring. Add two evenly spaced marks between each of these quarters. -
Cut the petal lines:
Using your needle tool, cut straight lines from the outer edge inward, stopping strictly at the border of the center circle distinct indentation you made earlier. -
Round the edges:
Pick up the coaster gently. Use your fingers or a smoothing tool to round off the sharp corners of each individual petal segment, giving them a softer, organic daisy look. -
Add surface texture:
To mimic real petals, use a modeling tool to press a subtle central vein down the middle of each petal. You can also lightly curve the edges upward for dimension. -
Texture the center:
Take a stiff bristle brush or a crumpled ball of aluminum foil and tap it repeatedly onto the center circle. This stippling creates the fuzzy, pollen-like texture of a daisy’s eye. -
Smooth imperfections:
Dip a small sponge or your finger in a little water and gently run it over any rough burrs or sharp clay bits on the edges. I find this step crucial for a professional finish.
Cracked Center?
If hairline cracks appear while drying, mix a tiny bit of fresh clay with water to make a paste (slip) and fill the cracks, then sand smooth once dry.
Step 3: Finishing Touches
-
Dry completely:
Place your coasters on a drying rack or a sheet of parchment paper. Let them dry undisturbed for 24-48 hours, flipping them occasionally to ensure even drying. -
Sand the edges:
Once fully bone dry, inspect the coasters. Use fine-grit sandpaper to gently buff away any remaining sharp spots or unevenness on the rims. -
Paint the center:
Dip a small brush into sunny yellow acrylic paint. Carefully fill in the textured center circle, letting the paint settle into the stippled indentations for depth. -
Seal the piece:
Apply a coat of matte varnish or clay sealant over the entire coaster. This protects the clay from moisture, which is vital for a functional coaster. -
Bundle deeply:
Stack your finished coasters and tie them together with a piece of rustic jute twine to replicate the cozy presentation shown in the photo.
Enjoy using your new floral creations to brighten up your morning coffee routine


The Complete Guide to Pottery Troubleshooting
Uncover the most common ceramic mistakes—from cracking clay to failed glazes—and learn how to fix them fast.
Minimalist Tealight Holder
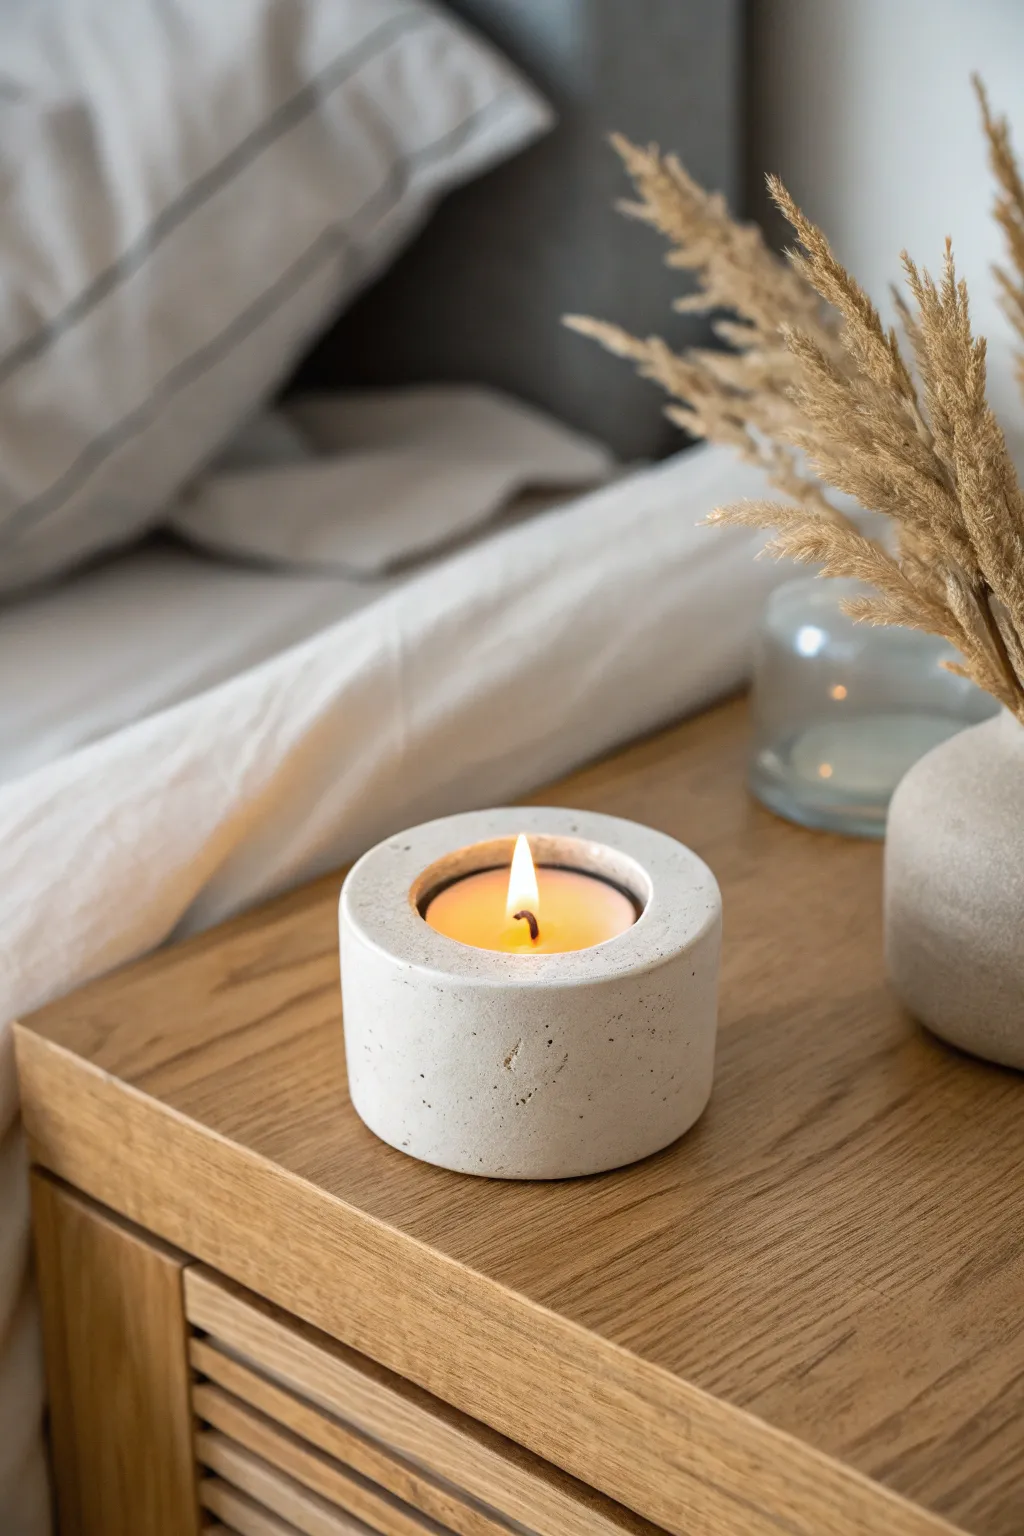
Achieve the high-end look of cast stone using simple air dry clay with this sleek, minimalist candle holder. The resulting piece features a perfectly clean cylindrical shape with a subtle, speckled texture that mimics concrete.
Step-by-Step
Materials
- White air dry clay (approx. 300-400g)
- Standard tealight candle (for sizing)
- Rolling pin
- Two circle cutters (one approx. 8-10cm, one slightly larger than a tealight)
- Smooth work surface (cutting mat or parchment paper)
- Craft knife or scalpel
- Small bowl of water
- Sponge or fine-grit sandpaper
- Acrylic paint (black/dark grey)
- Old toothbrush
- Matt varnish or sealant
Step 1: Forming the Base
-
Prepare the Clay:
Start by conditioning your air dry clay. Knead it in your hands for a few minutes until it is warm, pliable, and free of cracks. -
Roll the Slab:
Roll out a thick slab of clay, aiming for a consistent height of about 4-5cm. You want this to be quite chunky to match the solid look in the photo. -
Cut the Main Cylinder:
Using your larger circle cutter (or a bowl as a template), cut out the main cylindrical shape. If your cutter isn’t deep enough, press it lightly to mark the shape and slice through with a craft knife. -
Smooth the Exterior:
Dip your finger in water and run it along the vertical walls of the cylinder to smooth out any cutting marks or seams. I like to keep the edges slightly crisp rather than fully rounded.
Clean Edges Trick
Use a straight edge or ruler to verify the vertical walls are perfectly straight up and down while the clay is wet.
Step 2: Creating the Recess
-
Mark the Center:
Locate the exact center of your cylinder. This is crucial for a balanced look. -
Insert the Tealight Placeholder:
Take your smaller circle cutter or the tealight itself (wrapped in plastic wrap to prevent sticking) and press it gently into the center. -
Carve the Well:
Press the object down until it sinks about 1.5cm into the clay. If using a cutter, carefully scoop out the clay from the inside using a loop tool or spoon. -
Refine the Inner Edge:
Smoothing the inside rim is often the hardest part. Use a slightly damp brush or your pinky finger to ensure the inner recessed wall is vertical and smooth. -
Check the Fit:
Before the clay starts to dry, do a quick test fit with a real tealight to ensure the hole is wide enough. Remember, clay shrinks slightly as it dries.
Step 3: Finishing and Texturing
-
Slow Drying:
Let the piece dry slowly away from direct heat or sunlight. Flip it occasionally to ensure the bottom dries evenly. -
Sand for Perfection:
Once fully dry (usually 24-48 hours), use fine-grit sandpaper to buff out any fingerprints or uneven spots on the outer walls. -
Create the Speckle Mix:
Dilute a small amount of black or dark grey acrylic paint with water until it has a very runny, ink-like consistency. -
Apply the Faux Stone Effect:
Dip an old toothbrush into the paint mix. Hold it a few inches from the holder and run your thumb across the bristles to flick tiny speckles onto the clay. -
Build the Texture:
Rotate the cylinder and repeat the splattering process until you have a sparse, random pattern that mimics poured concrete. -
Seal the piece:
Finish with a coat of matte varnish to protect the clay from moisture and give it a finished, professional sheen.
Stone Texture
Mix a tiny amount of used coffee grounds or cracked pepper into the wet clay before rolling for embedded, realistic texture.
Place your favorite scented candle inside and enjoy the calm, modern vibe this piece brings to your space
Arched Taper Candle Holder
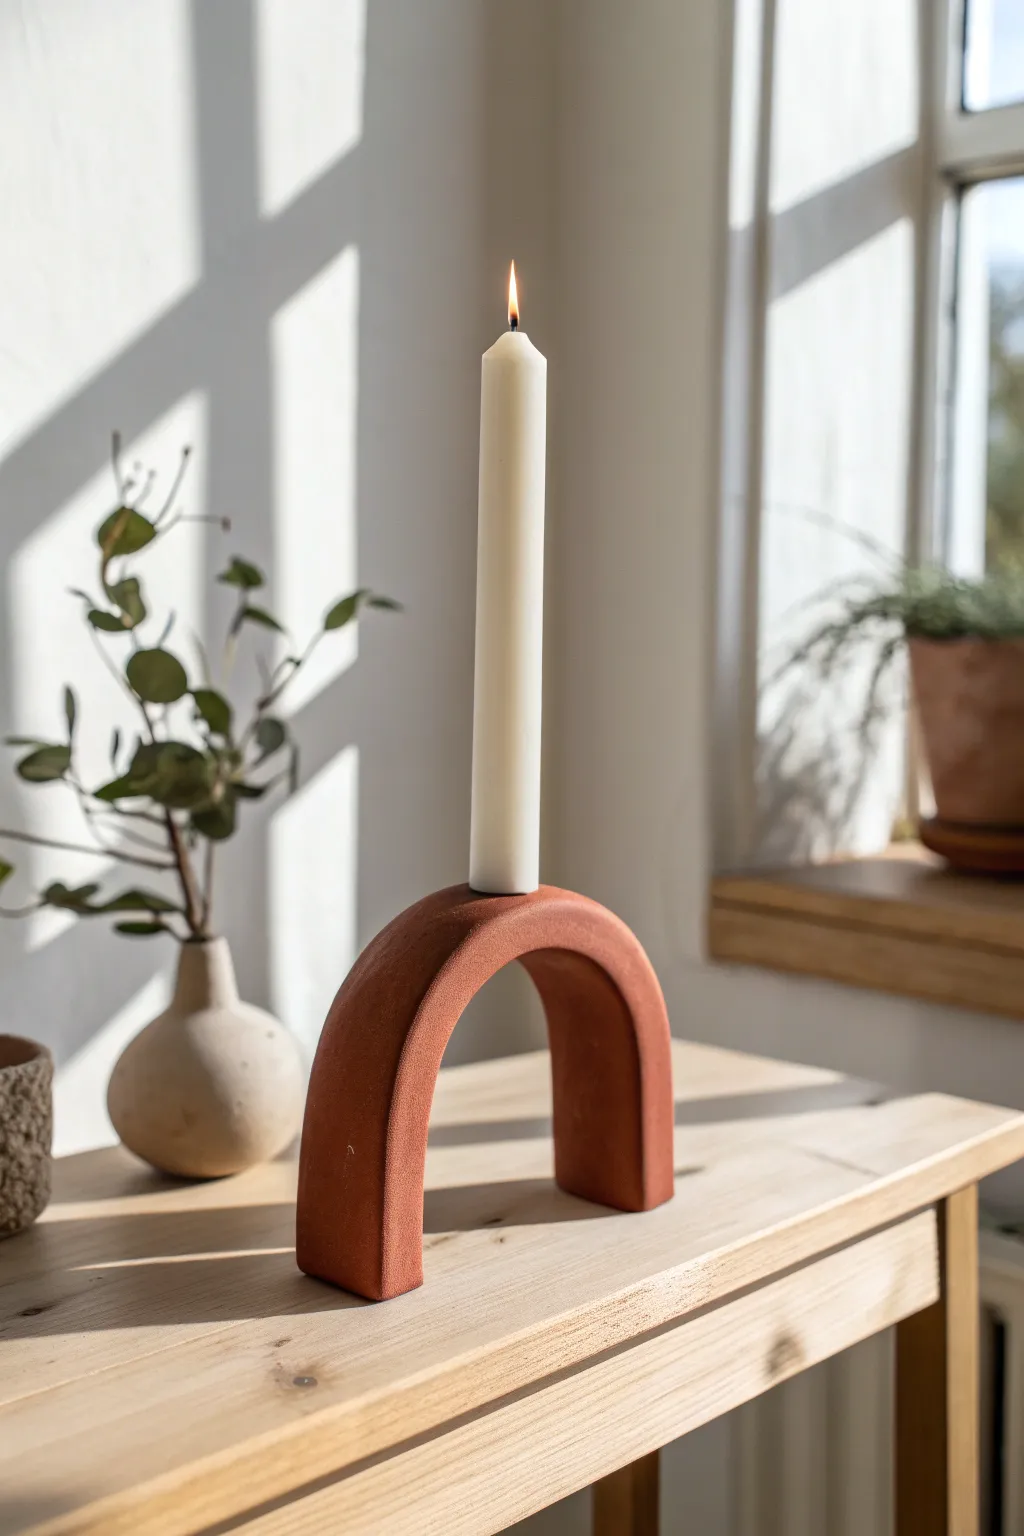
Bring a touch of modern desert warmth to your home with this minimalist arched candle holder. The matte, reddish-brown finish mimics natural terracotta, creating a sophisticated piece that looks far more expensive than simple air dry clay.
How-To Guide
Materials
- Air dry clay (white or terracotta colored)
- Acrylic rolling pin
- Sharp craft knife or clay blade
- Ruler
- Taper candle (for sizing)
- Water in a small cup
- Sandpaper (fine grit)
- Terracotta acrylic paint
- Baking soda (optional for texture)
- Paintbrush
- Matte varnish or sealant
Step 1: Shaping the Arch
-
Condition the Clay:
Start by taking a substantial chunk of air dry clay and kneading it in your hands. You want it to be warm, pliable, and free of any air bubbles before you begin shaping. -
Roll a Log:
Roll the clay on a flat surface into a long, thick snake or log. Aim for a thickness of about 1.5 inches (approx. 4 cm) to ensure the holder is stable enough to support a candle. -
Flatten the Sides:
Instead of leaving the log perfectly round, gently tap it against your work surface on four sides to create a soft rectangular prism shape. This gives the finished arch a more structured, geometric look characteristic of modern decor. -
Form the Arch:
Gently bend the clay log into a U-shape. Stand it up to check the height and symmetry. If the clay cracks slightly during bending, dip your finger in water and smooth the fissures immediately. -
Trim the Base:
Use your sharp craft knife or blade to slice the bottom of each leg. This creates a completely flat surface so the arch stands straight without wobbling. I find using a ruler as a guide helps ensure both legs are cut at the exact same height.
Step 2: Fitting the Candle
-
Find Center:
Locate the exact center of the top of your arch. You can eyeball this or measure lightly with a ruler to be precise. -
Create the Insertion Point:
Take your actual taper candle and press it gently into the top center of the arch. Rotate it slightly back and forth to carve out a socket. Ideally, insert it about an inch deep for stability. -
Widen Slightly:
Clay shrinks as it dries, so you need to make the hole slightly larger than the candle. Wiggle the candle around just a tiny bit more to expand the diameter by a millimeter or two. -
Smooth the Edges:
Remove the candle. Use a splash of water on your finger to smooth the rim of the hole you just made, ensuring there are no sharp ridges or jagged bits of clay.
Shrinkage Woes?
If the candle hole shrank too much during drying, don’t force the candle in! carefully use sandpaper wrapped around a pencil to sand the inside of the hole until it’s wide enough.
Step 3: Refining and Drying
-
Final Smoothing:
Do a final pass over the entire piece with a damp sponge or finger. Focus on the corners of the arch legs to keep them crisp but not sharp. -
Slow Drying:
Place the arch on a clean surface to dry. Rotate it occasionally (lay it on its side, then stand it up) over the next 24-48 hours to ensure even drying and prevent warping. -
Sanding:
Once fully dry and white (or light gray), take your fine-grit sandpaper and buff the entire surface. This removes fingerprints and creates that professional, smooth finish. -
Clean the Dust:
Wipe away all the sanding dust with a slightly damp cloth or a dry paintbrush. The surface needs to be dust-free for the paint to adhere properly.
Pro Tip: Weighted Base
To fix a top-heavy holder, discreetly press a small standard washer or coin into the bottom of each clay foot while wet. Then smooth clay over it so it’s hidden inside but adds weight.
Step 4: Painting the Faux Terracotta
-
Mix the Texture:
To achieve that authentic, stony terracotta feel shown in the photo, mix a teaspoon of baking soda into your terracotta-colored acrylic paint. It will create a fluffy, textured mousse consistency. -
First Coat:
Apply the paint mixture generously. Don’t worry about brush strokes too much; the texture helps hide them. Let this coat dry for about 20 minutes. -
Second Coat:
Apply a second layer of the textured paint to ensure full coverage and a rich, deep color. Check the inside of the candle hole to make sure no white clay is peeking through. -
Seal (Optional):
If you want extra protection, apply a clear matte varnish spray. Avoid glossy sealants, as they will ruin the natural earthenware look. -
Final Fit:
Once the paint is cured, insert your taper candle. If the fit is too tight due to the paint layers, use a craft knife to gently scrape the inside of the hole until the candle fits snugly.
Light your candle and enjoy the warm, earthy atmosphere your new handmade piece creates

TRACK YOUR CERAMIC JOURNEY
Capture glaze tests, firing details, and creative progress—all in one simple printable. Make your projects easier to repeat and improve.
Modern Photo and Card Holder
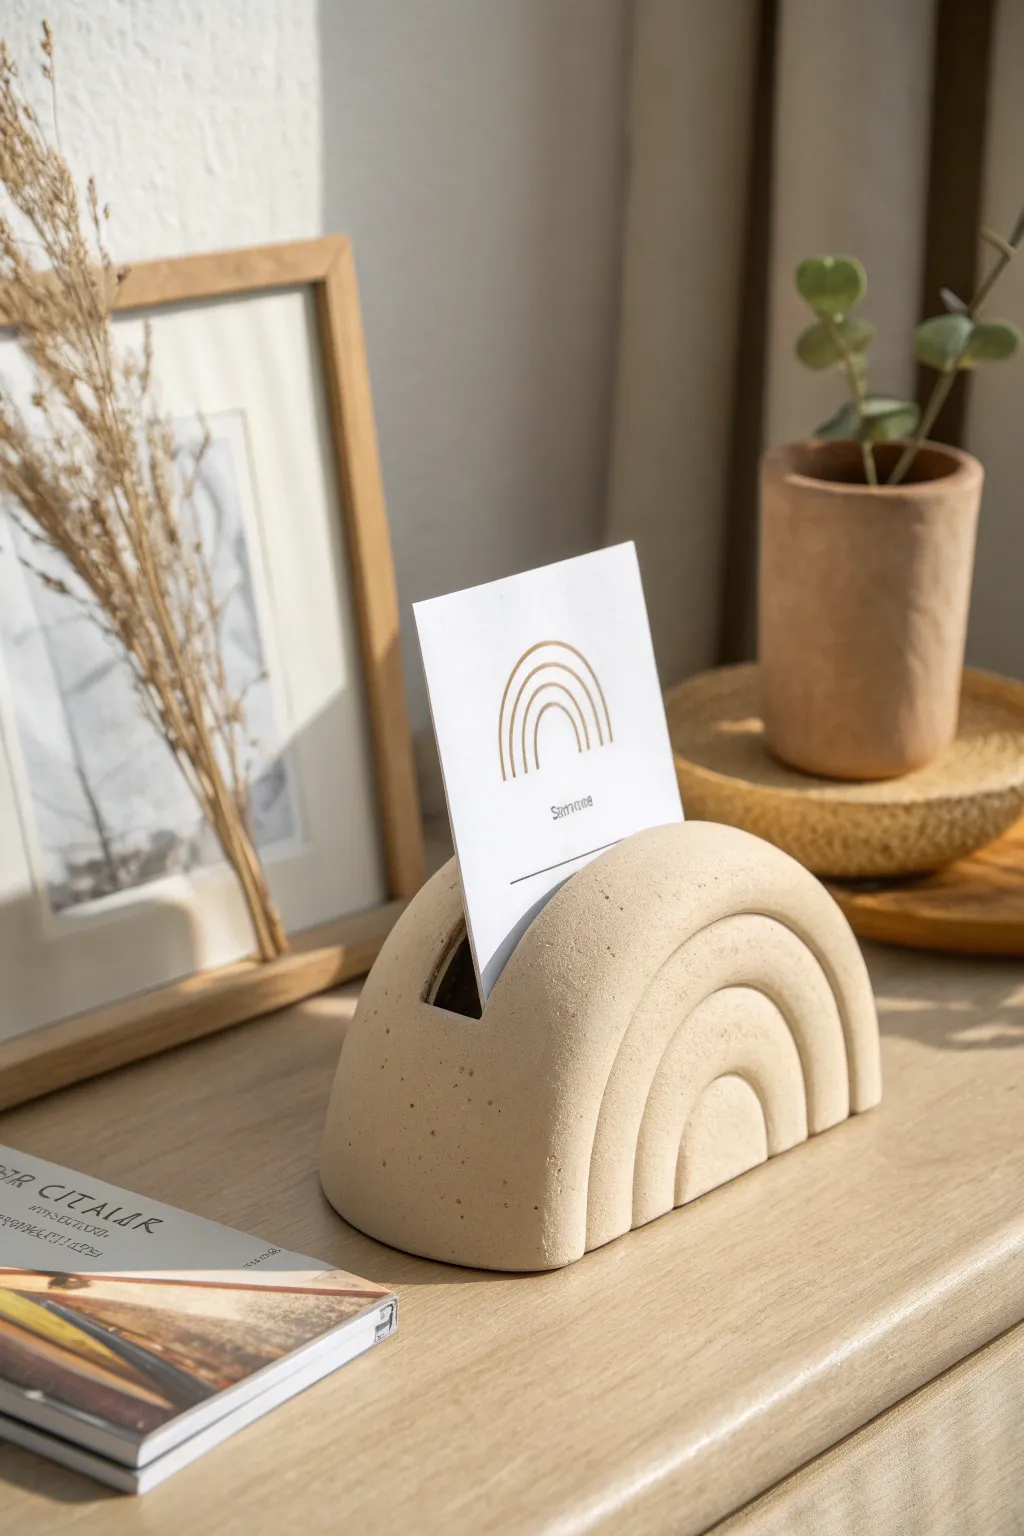
This minimalist card holder brings a touch of modern bohemian style to your desk with its gentle curves and natural texture. The rainbow-inspired arch design is both functional and decorative, perfect for displaying favorite photos or important notes.
Step-by-Step Tutorial
Materials
- White or stone-colored air dry clay
- Rolling pin
- Clay knife or craft blade
- Ruler
- Water in a small cup
- Small piece of cardboard (about credit card thickness)
- Fine-grit sandpaper
- Smoothing sponge
- Acrylic sealer (matte finish)
Step 1: Shaping the Base
-
Prepare the Clay:
Start with a generous handful of clay, kneading it thoroughly until it’s warm and pliable. This conditioning step is crucial to prevent cracks later on. -
Form the Arch Block:
Shape the clay into a thick, semi-circle log. It should be roughly 4-5 inches wide at the bottom and about 3 inches high. -
Flatten the Faces:
Stand the semi-circle upright on your work surface. Use a flat object, like a hardcover book or a block of wood, to gently press against the front and back faces to ensure they are flat and even. -
Smooth the Edges:
Dip your finger in a little water and run it along the top curve to smooth out any bumps or sharp ridges.
Clean Lines Tip
Use a damp Q-tip to smooth inside the carved rainbow grooves. It reaches tricky spots better than your fingers can.
Step 2: Carving the Details
-
Mark the Guidelines:
Using a needle tool or very light pressure with your knife, lightly sketch the rainbow arches onto the front face of the clay block. Aim for equal spacing between the lines. -
Carve the Grooves:
With your carving tool, carefully dig out the lines to create deep grooves. I find it helpful to use a U-shaped loop tool here if you have one, but a steady hand with a knife works too. -
Round the Arches:
Gently round off the edges of each individual ‘rainbow’ section using your wet finger. This gives it that soft, pillowy look rather than a sharp, carved look. -
Create the Card Slot:
Take your ruler and press it directly into the top center of the arch, going down about halfway into the block. Rock it slightly back and forth to widen the slot just enough for a card.
Add Color
Knead a small drop of acrylic paint directly into the raw clay before shaping for a solid, uniform pastel color.
Step 3: Refining and Drying
-
Insert Spacer:
Place your small piece of cardboard into the slot you just made. Leave this in while drying to ensure the clay doesn’t shrink and close the gap. -
Final Smoothing:
Do a final pass with a damp sponge over the entire surface to remove fingerprints and tiny imperfections. -
Slow Drying:
Place the piece in a cool, dry area away from direct sunlight. Let it dry slowly for 24-48 hours. Turn it occasionally to ensure even drying on all sides. -
Sand the Imperfections:
Once fully cured and hard, use fine-grit sandpaper to buff away any remaining roughness, paying special attention to the bottom so it sits flat. -
Stone Effect (Optional):
To mimic the speckled stone look in the photo, dip an old toothbrush in watered-down brown paint and flick droplets onto the surface. -
Seal:
Finish with a coat of matte acrylic sealer to protect the clay from moisture and give it a professional finish.
Now your stylish card holder is ready to organize your desk with a little artistic flair
Boho Clay Picture Frame Trim
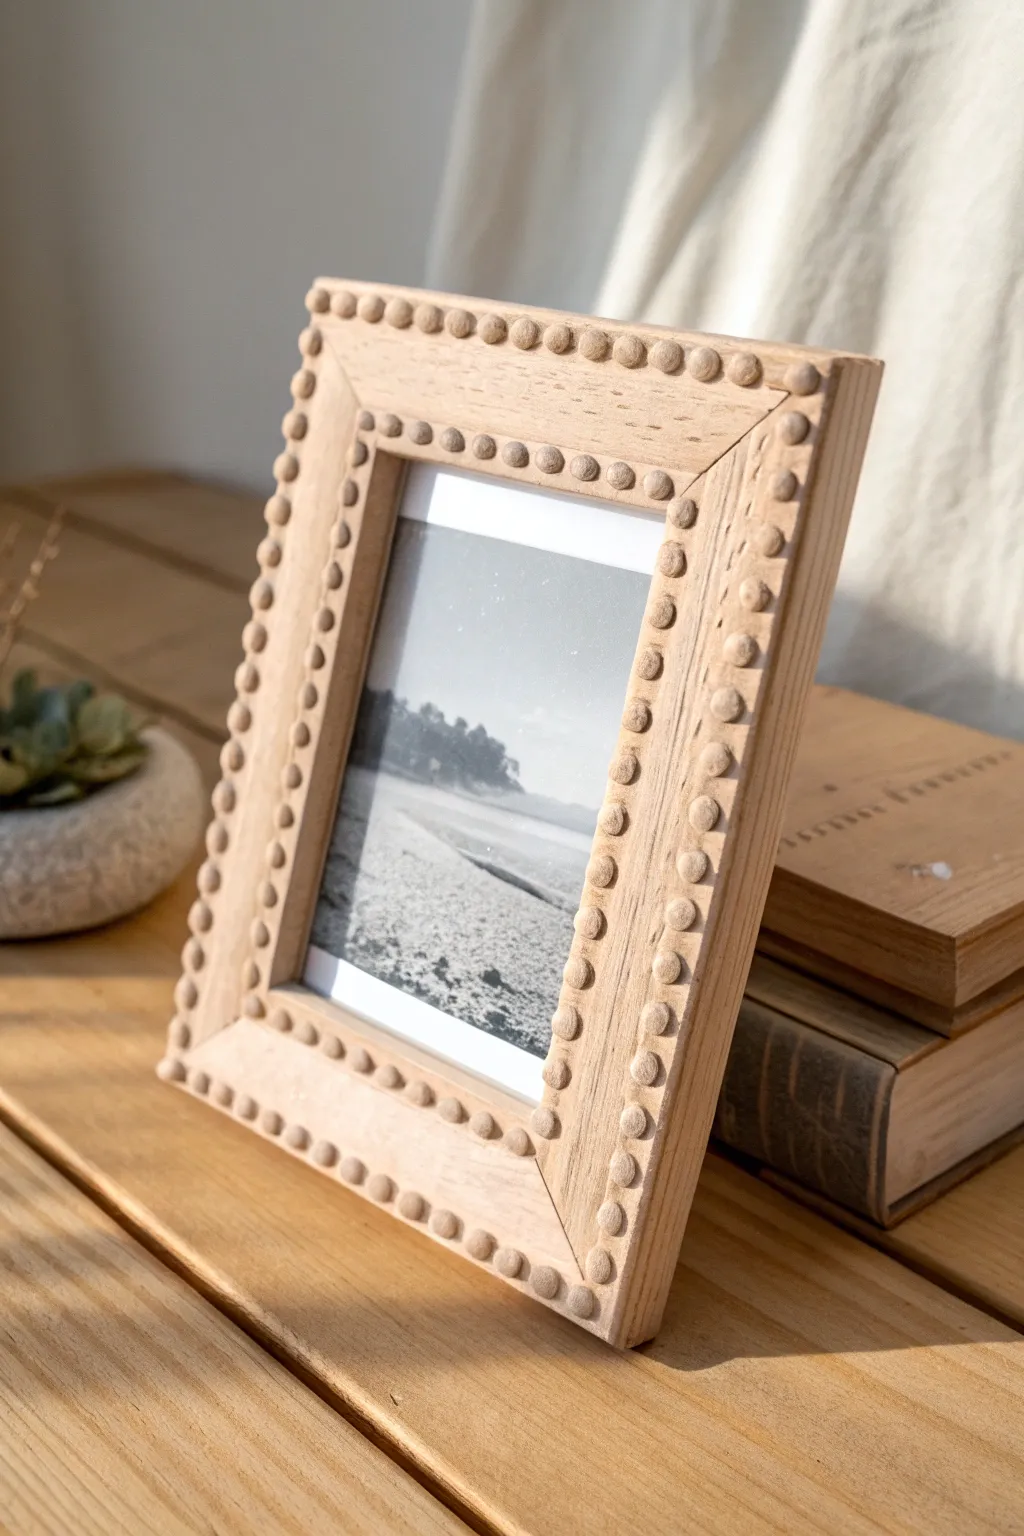
Transform a plain wooden picture frame into a textured bohemian accent piece using nothing but air dry clay and a little patience. The small clay beads add a charming, tactile rhythm that perfectly complements natural wood tones.
Detailed Instructions
Materials
- Flat, wide wooden picture frame (unfinished wood works best)
- White or terracotta air dry clay
- Strong craft glue or wood glue
- Small bowl of water
- Acrylic rolling pin or smooth jar
- Ruler
- Fine-grit sandpaper
Step 1: Prepping the Clay Spheres
-
Condition the clay:
Begin by taking a chunk of air dry clay and kneading it in your hands until it’s warm and pliable. This prevents cracks from forming later as the clay dries. -
Roll a uniform coil:
Roll the clay out into a long, thin snake on a smooth surface. Aim for a thickness of about 1/4 inch (6mm) to ensure all your beads start from the same volume. -
Cut equal segments:
Using a ruler to guide you, slice the clay coil into equal small segments. Keeping these consistent is key to a polished final look. -
Form the beads:
Roll each small segment between your palms or fingers to create a perfect sphere. You will need enough to line both the inner and outer perimeters of your frame. -
Let them firm up:
Set your collection of clay spheres aside on a piece of parchment paper for about 20-30 minutes. I usually let them sit just long enough so they aren’t sticky but are still squishy.
Consistent Size Hack
Use a small circular cutter or a straw to punch out identical circles from a flattened slab of clay, then roll those into balls for perfect uniformity.
Step 2: Applying the Inner Trim
-
Clean the frame:
Wipe down your wooden frame with a barely damp cloth to remove any dust, ensuring a good surface for adhesion. -
Apply glue line:
Run a thin, steady bead of craft glue along one side of the inner edge of the frame, right where the wood meets the photo opening. -
Position the first bead:
Place your first clay sphere gently onto the glue. Do not press down yet; just let it sit in place. -
Complete the row:
Continue placing beads side-by-side along the glue line. Leave a tiny, almost invisible gap between them to allow for expansion or adjustment. -
Flatten slightly:
Once a row is placed, use your thumb or a flat tool to gently press down on each bead. This flattens the bottom for a better grip and creates that uniform ‘button’ look seen in the photo. -
Repeat for inner edges:
Continue this process for the remaining three sides of the inner window, ensuring the corners meet neatly.
Make it Pop
Once dry, paint the tiny clay beads in a contrasting color like sage green or matte black, leaving the wood natural for a modern look.
Step 3: Finishing the Outer Edge
-
Start the outer border:
Now move to the exterior edge of the frame face. Apply a line of glue along one outer side. -
Align the outer beads:
Place your clay spheres along this outer edge. Try to align them so they correspond roughly with the spacing of the inner row for visual harmony. -
Press and secure:
Gently press these beads flat just like the inner row. Ensure they don’t overhang the actual edge of the wood, or they might snap off easily. -
Create the corners:
Pay special attention to the corners. You may need to slightly adjust the spacing of the last few beads in a row so that a bead sits nicely right at the corner point. -
Dry completely:
Allow the entire frame to dry undisturbed for at least 24 hours. The clay will lighten in color as it dries. -
Sand imperfections:
If any beads have rough tops or fingerprints, very lightly buff them with fine-grit sandpaper once fully hard.
Place your favorite black and white photo inside to let the texture of the frame really shine
Moon Phase Wall Hanging Tiles
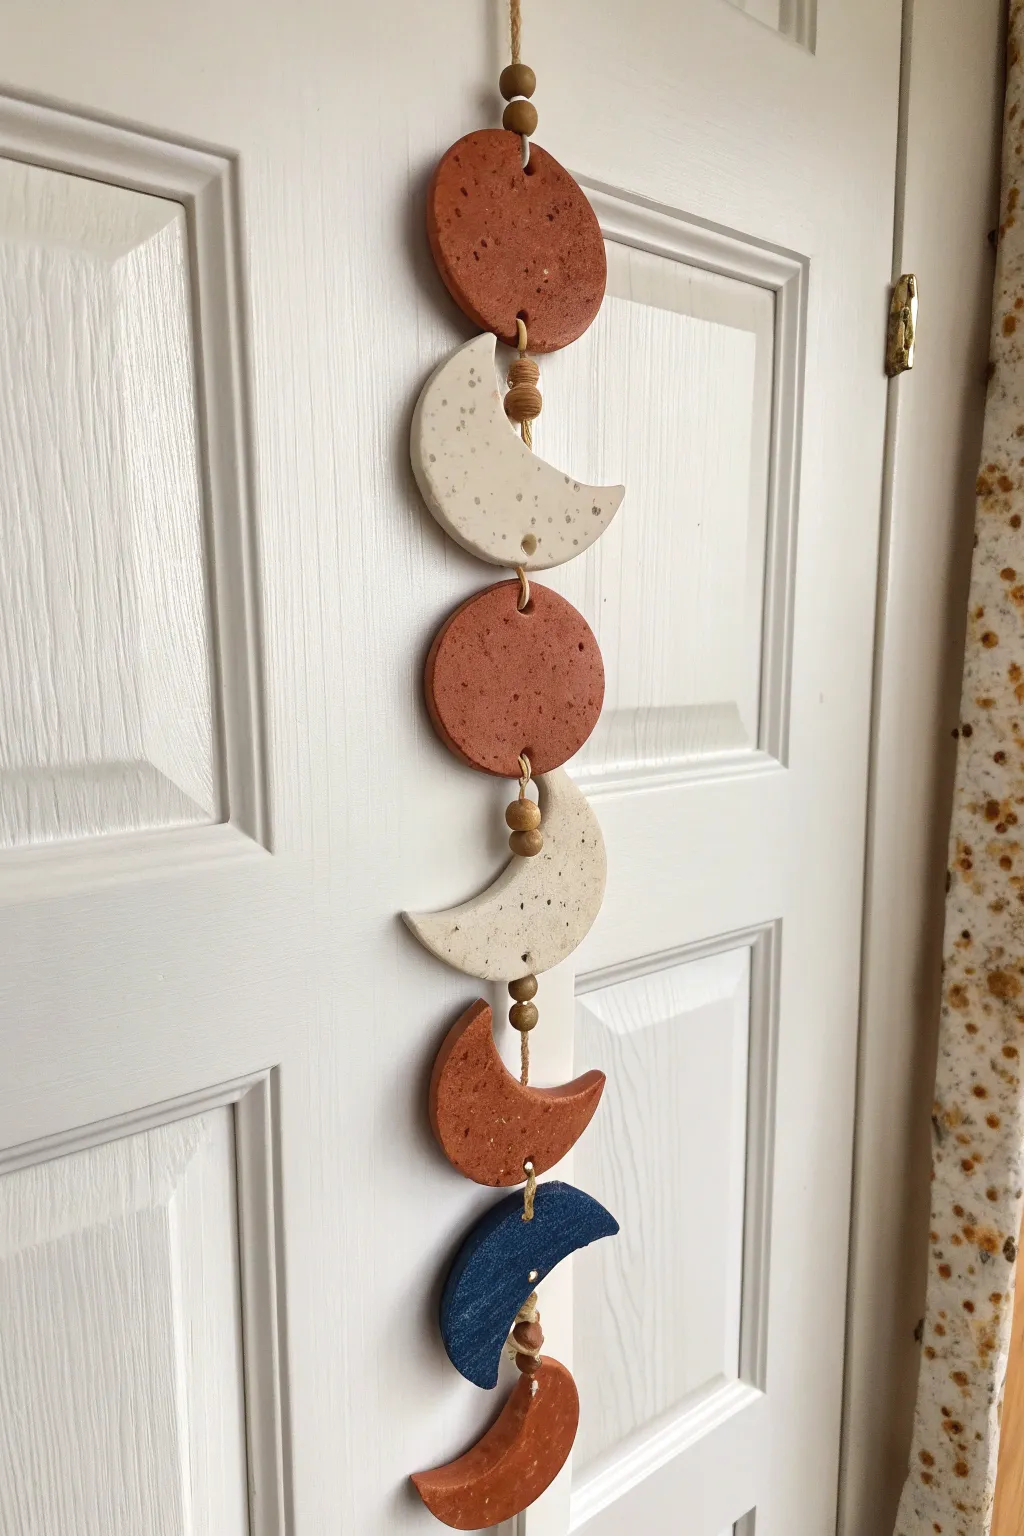
Bring a touch of celestial charm to your home with this lovely earthy moon phase mobile made from air dry clay. Featuring textured terracotta, speckled cream, and deep navy crescent shapes strung together with natural jute, this piece adds a calming, handmade element to any door or wall.
Step-by-Step Tutorial
Materials
- Air dry clay (white or terracotta)
- Acrylic paints (terracotta/burnt orange, cream/off-white, navy blue)
- Brown paint for speckling
- Rolling pin
- Round cookie cutters (various sizes or one size to modify)
- Craft knife or clay tool
- Straw or skewer (for holes)
- Fine grit sandpaper
- Jute twine or hemp cord
- Wooden beads (natural finish)
- Old toothbrush (for speckling)
- Matte varnish or sealant (optional)
Step 1: Shaping the Moons
-
Roll out the clay:
Begin by conditioning your air dry clay until it is pliable. Roll it out on a flat surface to an even thickness of about 1/4 inch. If you want a uniform look, place guide sticks on either side of the clay while rolling. -
Cut the base circles:
Using a large round cookie cutter or a glass rim, cut out seven generous circles. Two of these will remain full circles to represent the full moons in the sequence. -
Form the crescents:
Take the remaining five circles to create your crescent shapes. Use the same round cutter to cut an offset curve out of each circle, leaving behind a crescent moon shape. Vary the thickness slightly for a natural look, or keep them uniform. -
Smooth the edges:
Dip your finger in a little water and gently smooth any rough edges or stray clay bits on the perimeter of your shapes. This saves time on sanding later. -
Pierce holes for hanging:
Using a straw or a skewer, create holes for the twine. For the pieces in the middle of the chain, you will need a hole at the top and bottom. The very bottom crescent only needs a top hole, and the top piece needs a hole at the top and bottom. -
Dry thoroughly:
Lay your shapes on a drying rack or a sheet of parchment paper. Let them dry for 24-48 hours, flipping them occasionally to prevent curling.
Uneven Hanging?
If the pieces twist and don’t lay flat against the wall, check that your twine is centered. You can add a dab of hot glue behind the knot at the back of each moon to lock the string in place.
Step 2: Painting and Texturing
-
Sand imperfections:
Once fully dry and hard, use fine-grit sandpaper to gently buff away any sharp ridges or uneven spots on the edges. -
Paint the terracotta tones:
Select your two full circles, one central crescent, and the bottom crescent. Paint these with a warm burnt orange or terracotta acrylic paint. I usually apply two coats for solid coverage. -
Paint the cream tones:
Paint two of the crescent moons with a creamy off-white color. Ensure the paint gets into the hole openings slightly for a professional finish. -
Paint the navy accent:
Paint the single remaining crescent in a deep navy blue to add a striking contrast to the earth tones. -
Add speckled texture:
To mimic the stone look in the photo, dip an old toothbrush into slightly watered-down brown paint. Run your thumb over the bristles to flick tiny speckles onto the dry cream and terracotta pieces.
Smoother Stone Look
Mix baking soda into your acrylic paint before applying it. This creates a gritty, stone-like texture that looks incredibly realistic on air dry clay without needing special products.
Step 3: Assembly
-
Cut the twine:
Cut a long length of jute twine, about 3-4 feet, to ensure you have enough slack for knotting. -
Start from the bottom:
Thread the twine through the hole of the bottom terracotta crescent and tie a sturdy double knot. Trim the excess tail short. -
Add spacing beads:
Thread two or three wooden beads onto the twine and slide them down until they rest on top of the bottom crescent. -
Attach the next piece:
Thread the twine through the bottom hole of the navy crescent, pull it through the back, and out the top hole. Adjust the spacing so it sits just above the beads. -
Secure the position:
Tie a knot in the twine right above the top hole of the navy crescent to keep it from sliding down. Add another set of wooden beads. -
Continue the pattern:
Repeat the threading and knotting process for the remaining shapes, following the order seen in the image: terracotta crescent, cream crescent, terracotta circle, cream crescent, terracotta circle. -
Create the hanger Loop:
After the final top terracotta circle is secured and topped with a few beads, tie a loop at the very top of the twine for hanging.
Hang your new celestial artwork near a window or door to enjoy how the light catches the textured surfaces.
Planter for Faux Succulents
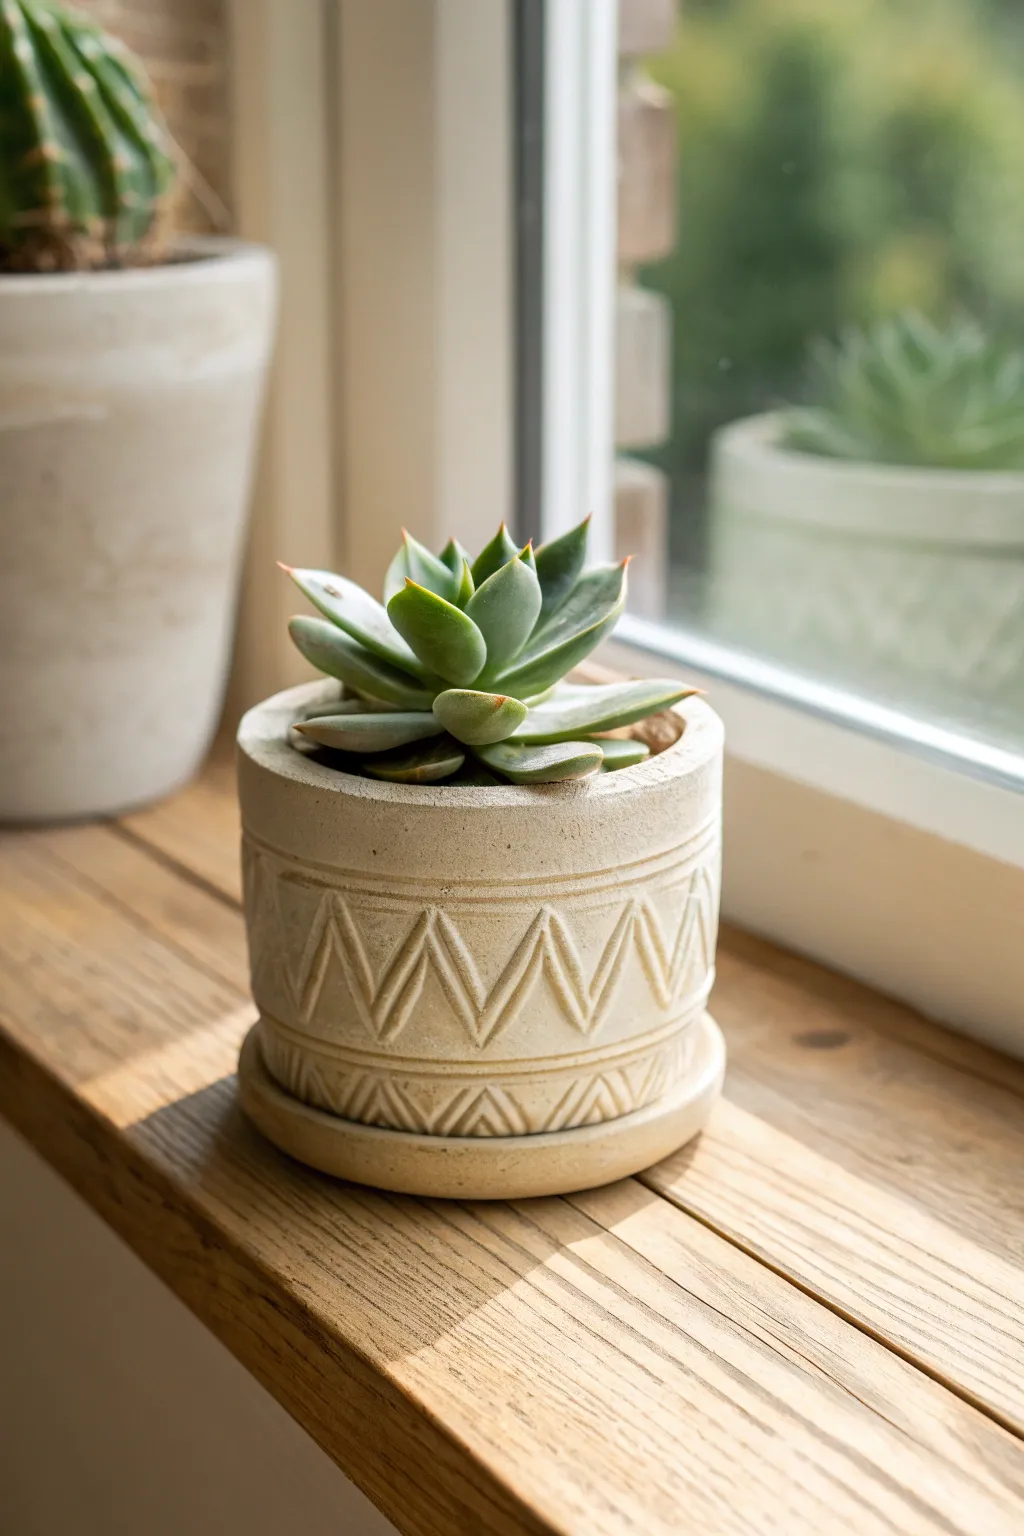
Elevate your faux greenery with this chic, textured planter that mimics the look of high-end ceramic stoneware. Using nothing but air-dry clay and a simple carving technique, you can create a piece with a beautifully natural finish and striking geometric details.
Detailed Instructions
Materials
- White or natural air-dry clay (approx. 500g)
- Rolling pin
- Sharp crafting knife or clay carving tool
- Ruler
- Small bowl or can (for tracing circles)
- Water in a small cup
- Sponge or soft paintbrush
- Fine-grit sandpaper
- Matte clear sealant (spray or brush-on)
- Faux succulent for display
Step 1: Forming the Base Structure
-
Roll the base:
Start by rolling out a portion of your clay to an even thickness of about 1/4 inch. Use a small bowl or large cookie cutter to cut out a perfect circle for the bottom of your pot. -
Create the walls:
Roll out a long, rectangular slab of clay, maintaining that same 1/4 inch thickness. Measure the circumference of your base circle and trim the rectangle to match this length, adding a tiny bit of overlap. -
Assemble the cylinder:
Carefully wrap the rectangular slab around the circular base. Score both contact surfaces with a needle tool or toothpick, apply a little water as slip, and press firmly to join the walls to the base. -
Seam smoothing:
Where the two ends of the wall meet, score and slip the edges. Blend the clay together using your thumb or a modeling tool until the seam disappears completely, both inside and out. -
Create the saucer:
Roll out a second, slightly larger circle of clay for the saucer. Create a small snake of clay and attach it to the rim of this circle to create a shallow raised edge, blending it smoothly.
Crack Control
If small cracks appear while drying, don’t panic. Make a paste of clay and water (slip) and fill the cracks, then smooth over with a finger.
Step 2: Carving the Design
-
Define the borders:
Using a ruler and a carving tool, lightly lightly etching two horizontal lines around the circumference of the pot—one near the top rim and one near the bottom. These will act as the boundaries for your zigzag pattern. -
Mark the zigzags:
To ensure even spacing, I find it helpful to make small tick marks along the top and bottom guide lines before carving. Connect these dots diagonally to create a continuous zigzag pattern. -
Carve the relief:
Using a V-gouge tool or a sharp knife, carefully carve out the clay along your zigzag lines. Deepen the cuts slightly to create a shadow effect, giving the pattern that distinct relief look shown in the photo. -
Double the lines:
Create a second, smaller zigzag line nestled inside the first one. This ‘nested V’ shape adds complexity and mimics the hand-thrown pottery style. -
Adding texture:
Take a rough sponge or a crumpled ball of aluminum foil and gently press it against the entire surface of the pot and saucer. This removes fingerprints and adds a stone-like texture.
Step 3: Finishing Touches
-
Dry slowly:
Let the pot dry slowly away from direct heat or sunlight for 24-48 hours. Turn it occasionally to ensure the bottom dries evenly. -
Sand edges:
Once fully bone dry, use fine-grit sandpaper to smooth out the top rim and soften any sharp ridges in your carved design. -
Apply wash (optional):
To enhance the ‘stoneware’ look, dilute a tiny drop of brown acrylic paint in plenty of water. Brush this wash over the pot and immediately wipe it off with a rag, leaving darker color only in the carved crevices. -
Seal only the outside:
Apply two coats of matte sealant to the exterior and the saucer. Since air-dry clay isn’t waterproof, this project is designed specifically for faux plants. -
Assembly:
Place your pot on its saucer, fill with dry floral foam or pebbles, and arrange your faux succulent inside.
Level Up: Speckled Effect
Mix dried coffee grounds or black pepper into your wet clay before rolling to create a realistic speckled ceramic appearance.
Now you have a stunning, artisanal-style display piece ready to brighten up your windowsill
Desk Organizer Catch Pockets
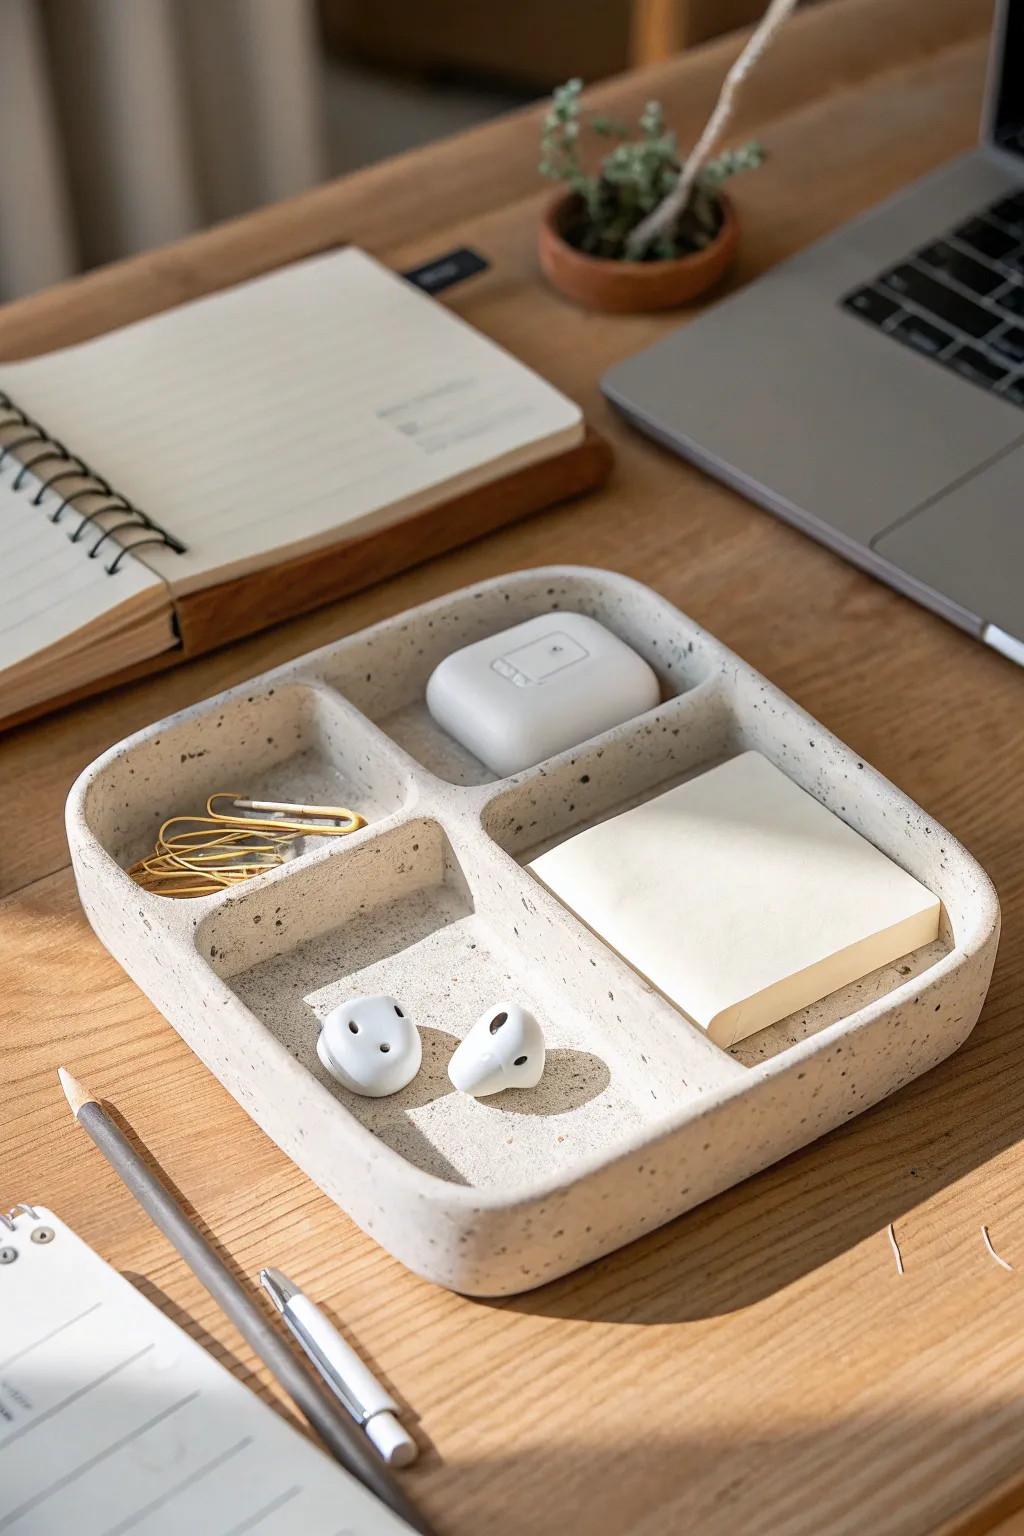
Bring a touch of minimalist elegance to your workspace with this segmented desk organizer that mimics the look of raw speckled stoneware. This functional piece features four distinct compartments perfectly sized for desk essentials like sticky notes, paperclips, and earbuds, combining practical organization with an organic aesthetic.
How-To Guide
Materials
- White air dry clay (approx. 500g)
- Acrylic rolling pin
- Clay knife or craft scalpel
- Ruler
- Small bowl of water
- Sandpaper (medium and fine grit)
- Acrylic paint (beige/cream and black/dark brown)
- Old toothbrush
- Matte varnish or sealant
- Two 5mm wooden slats (optional, for even rolling)
Step 1: Planning and Base Construction
-
Prepare the clay:
Begin by conditioning your air dry clay. Knead it in your hands for a few minutes until it is warm, pliable, and free of cracks. If it feels too dry, dip your fingers in water and work the moisture in. -
Roll out the slab:
Place the clay on a smooth surface. Using an acrylic rolling pin, roll the clay out into a large, even slab approximately 5-7mm thick. Using wooden slats on either side as guides can help ensure a uniform thickness. -
Cut the base:
Using a ruler and your clay knife, cut a square for the base. To match the image, aim for approximately 15cm x 15cm (6×6 inches), though you can adjust this based on your specific desk needs. -
Smooth the edges:
Dip your finger in water and run it along the cut edges of the base to smooth out any sharpness or dragging marks left by the knife.
Pro Tip: Warping Prevention
Drying clay tends to curl up. While drying, place a light book or flat board on top of the walls to gently weigh it down and keep the base perfectly flat.
Step 2: Building the Walls and Dividers
-
Create wall strips:
Gather the excess clay and re-roll it to the same thickness as the base. Cut four long strips for the outer walls, approximately 2.5cm (1 inch) high. -
Attach the outer walls:
Score the edges of the base and the bottom of the wall strips with your knife to create a rough texture. Apply a small amount of water or clay slip to the scored areas. -
Secure the perimeter:
Press the strips onto the base to form the outer box. Use a modeling tool or your thumb to smudge the clay from the wall onto the base on the inside and outside seams, ensuring a seamless bond. -
Shape the corners:
Gently curve the corners where the walls meet to replicate the rounded aesthetic seen in the photo. Smooth these joins with water until no seams are visible. -
Form the dividers:
Cut two internal divider strips of the same height. You will need one long strip to span the width horizontally, and one shorter strip to create the vertical division. -
Position the compartments:
Place the long horizontal strip slightly off-center to create larger back compartments. Then, place the vertical strip in the front section to create the two smaller pockets. Score, slip, and blend these dividers into place just as you did the outer walls.
Troubleshooting: Cracks
If small hairline cracks appear during drying, mix a tiny bit of fresh clay with water to make a paste (slip) and fill the cracks, then sand smooth once dry.
Step 3: Refining and Finishing
-
Smooth the surfaces:
Take a damp sponge or your finger and go over the entire piece. Focus on the top rim of the walls, rounding them off slightly so they aren’t sharp. I prefer to spend extra time here to get that professional finish. -
Controlled drying:
Place the organizer in a cool, dry place away from direct sunlight. Let it dry for 24-48 hours. To prevent warping, flip it over gently halfway through the drying process. -
Sanding:
Once bone dry, use medium-grit sandpaper to level any uneven edges on the rim. Switch to fine-grit paper to smooth the entire surface until it feels like soft stone. -
Base painting:
Mix a beige or cream acrylic paint. Apply two even coats to the entire organizer, allowing the first coat to dry completely before applying the second. -
Creating the speckled effect:
This is the fun part! Dilute a small amount of dark brown or black acrylic paint with water. Dip an old toothbrush into the mixture, aim it at the tray, and run your thumb across the bristles to flick tiny speckles over the surface. -
Sealing the piece:
Protect your work by applying a matte varnish. This will lock in the paint and give the surface a durable, non-shiny finish that mimics the texture of unglazed pottery.
Now you have a custom, boutique-style organizer ready to tidy up your desk essentials
Chunky Color-Block Bookends
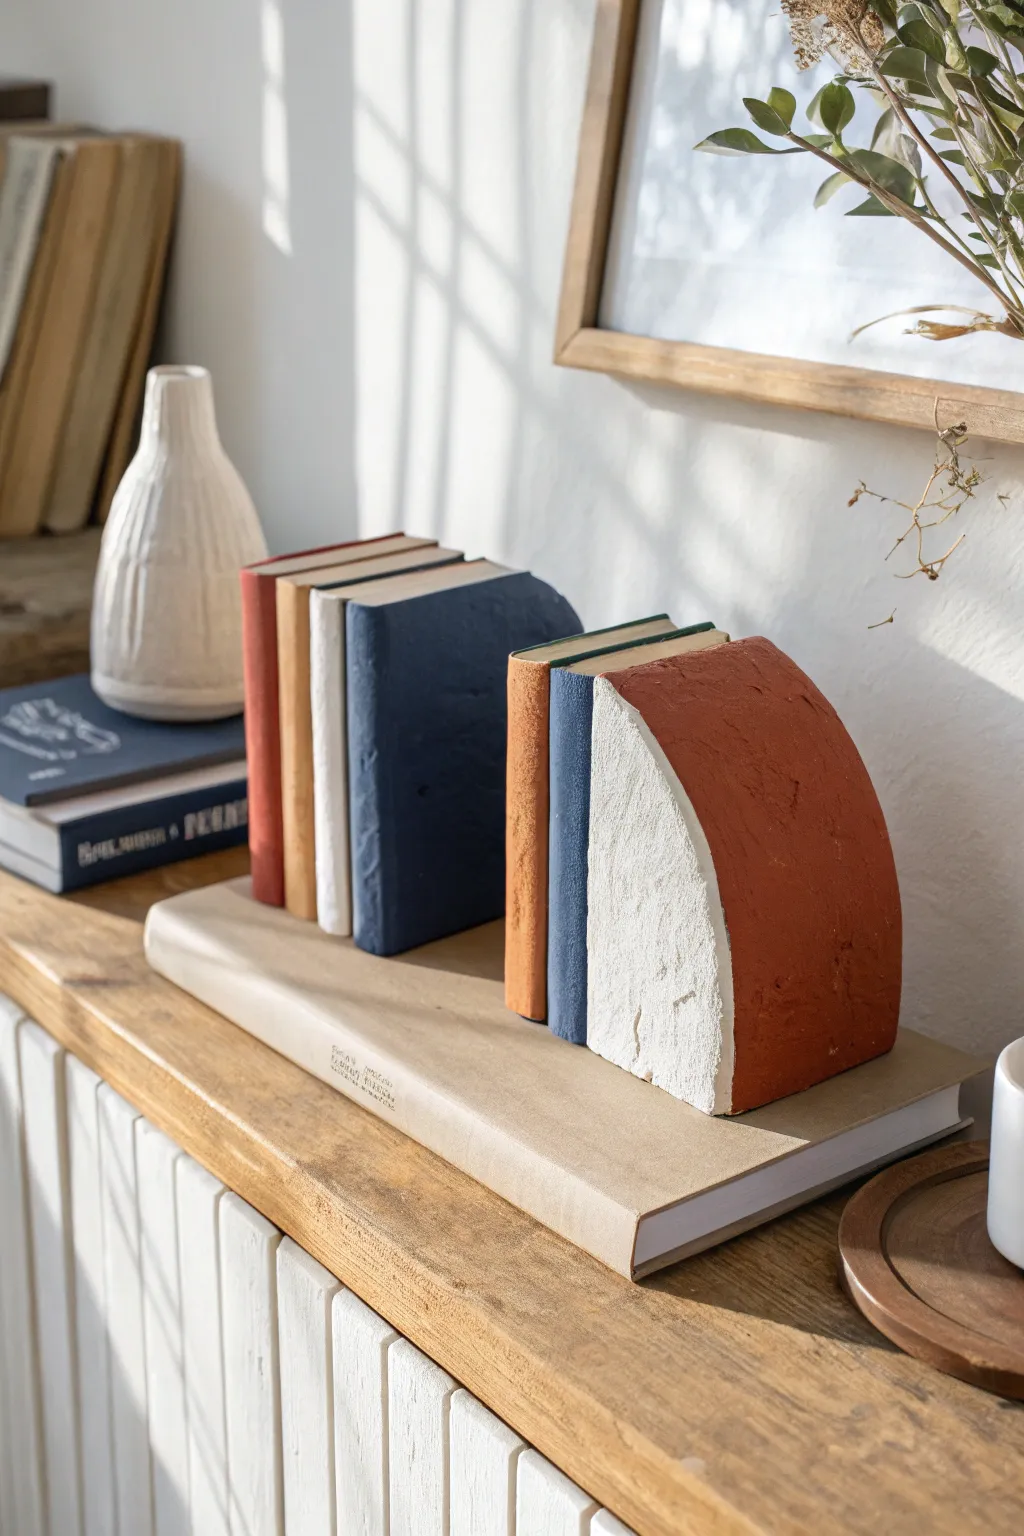
Create the illusion of a heavy stack of vintage books supporting an architectural arch with this clever air dry clay sculpture. This chunky, color-blocked piece serves as a functional bookend while adding a warm, textural element to your shelf decor.
Step-by-Step
Materials
- Air dry clay (white or terracotta, approximately 1-2kg)
- Cardboard (thick, corrugated)
- Painter’s tape or masking tape
- Rolling pin
- Cutting mat
- Craft knife or sharp blade
- Acrylic paints (rust red, mustard yellow, cream/off-white, navy blue)
- Paintbrushes (flat shader brush and a detail brush)
- Fine-grit sandpaper
- Ruler
- Water in a small cup
- Scrap cardboard or wood block (to act as the internal base)
Step 1: Building the Armature
-
Cut the base shapes:
Since air dry clay is heavy and shrinks, you need a lightweight core. Cut several rectangles of corrugated cardboard to the size you want your ‘books’ to be (e.g., 4 inches by 6 inches). You will need enough layers to create a stack about 2-3 inches thick. -
Create the arch:
Cut a few pieces of cardboard into a quarter-circle or arch shape. This will sit on the end of your book stack. Stack these and tape them together to create a chunky form. -
Assemble the core:
Tape your stack of cardboard rectangles together tightly. Then, tape the arch shape securely to the side of the rectangle stack. The goal is to create a solid, blocky armature that mimics the final silhouette. -
Reinforce with tape:
Cover the entire cardboard form completely with masking tape. This prevents the wet clay from soaking into the cardboard and warping it, and gives the clay something to grip.
Step 2: Sculpting the Books
-
Roll out the clay:
Roll your air dry clay out into a large slab, roughly 1/4 inch thick. I find using guides on either side of the rolling pin helps keep the thickness consistent. -
Cover the armature:
Drape the clay slab over your taped cardboard form. Gently press it against the flat surfaces, trimming away excess clay with your knife. Smooth the seams where pieces join using a little water on your finger. -
Define the spines:
Using a ruler and your knife, gently score vertical lines into the ‘book’ section of the clay to delineate separate book spines. Don’t cut all the way through; just create deep indentations. -
add varying heights:
To make it look realistic, the books shouldn’t all be perfectly flush. Add thin strips of clay to the tops of some ‘spines’ to make them slightly taller or shorter than their neighbors. -
Texture the arch:
The arch section should look like stone or terracotta. Dab a crumpled ball of aluminum foil or a stiff bristle brush over this section to give it a pitted, rough texture. -
Refine the edges:
Sharpen the edges of the book spines with your fingers or a flat tool to make them look distinct. Ensure the bottom is perfectly flat so the bookend stands stable. -
Dry thoroughly:
Let the sculpture dry completely. This is a thick piece, so it may take 48-72 hours. Turn it occasionally to ensure even drying and airflow to all sides.
Cracks Appearing?
Mix a small amount of fresh clay with water to create a ‘slip’ paste. Fill any cracks that appear during drying with this paste, smooth it out, and let it dry again before painting.
Step 3: Painting and Finishing
-
Sand imperfections:
Once fully dry, use fine-grit sandpaper to smooth out any unintentional bumps on the book spines. Leave the texture on the arch rough. -
Base coat the arch:
Paint the large arch section with a rust-red or terracotta acrylic paint. Dab the paint into the texture rather than brushing smoothly to highlight the ‘stone’ feel. -
Paint the spines:
Select your color palette for the books. Paint each vertical spine a different color—mustard, cream, navy blue, and a lighter rust. Use a small flat brush to keep the lines between colors crisp. -
Distress the finish:
To enhance the vintage look, you can dry-brush a tiny amount of off-white or light grey paint over the edges and corners of the books and the arch. -
Add spine details:
If you want extra detail, use a very fine brush to paint suggestion lines across the top or bottom of the spines, mimicking titles or decorative binding ridges. -
Seal (optional):
If you plan to use this in a high-traffic area, apply a matte varnish to protect the paint from chipping.
Weight It Down
To make the bookend heavy enough to actually hold books, embed a small, heavy rock or a sealed bag of sand inside the cardboard armature before taping it shut.
Place your sculptural masterpiece on the shelf and enjoy the sophisticated, artisanal vibe it brings to your reading nook
Alphabet and Name Ornaments
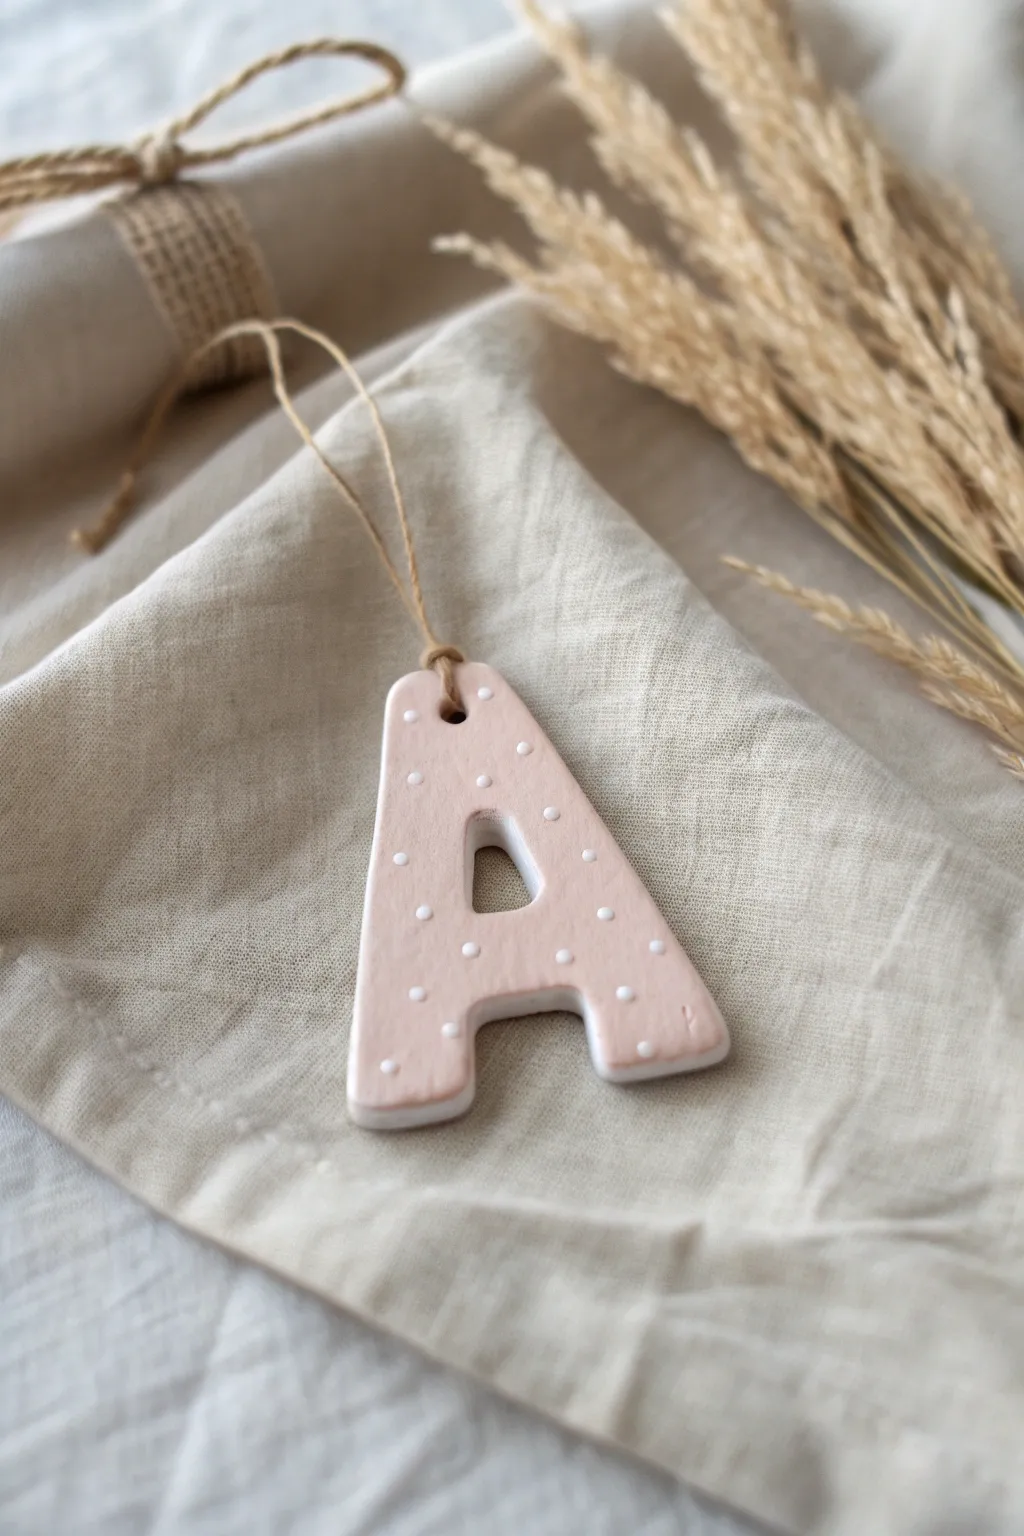
Personalize your holiday decor or gift wrapping with these charming, handcrafted alphabet ornaments. Featuring a soft blush pink glaze and delicate white polka dots, they add a sweet, minimalist touch to any setting.
Detailed Instructions
Materials
- Air dry clay (white)
- Small rolling pin
- Parchment paper or silicone mat
- Letter cookie cutter (or X-Acto knife and printed template)
- Fine-grit sandpaper (220 grit or higher)
- Acrylic paint (blush pink/peach)
- Acrylic paint (white)
- Small flat paintbrush
- Detail brush or dotting tool
- Mod Podge or satin varnish
- Jute twine or thin cord
- Straw or skewer (for the hole)
- Cup of water
Step 1: Shaping the Letter
-
Condition the Clay:
Begin by taking a handful of air dry clay and kneading it in your hands to warm it up. This conditioning process helps prevent cracks later on. -
Prepare the Surface:
Lay down a sheet of parchment paper or a silicone mat to protect your work surface and prevent sticking. -
Roll it Out:
Use your rolling pin to flatten the clay to an even thickness, ideally around 1/4 inch (about 5-6mm). Try to keep the thickness consistent so the letter dries evenly. -
Cut the Letter:
Press your letter cookie cutter firmly into the clay. If you don’t have a cutter, I like to place a paper template on top and carefully trace around it with an X-Acto knife. -
Create the Hanging Hole:
While the clay is still wet, use a straw or a skewer to punch a hole at the top of the letter. Make sure it’s not too close to the edge to prevent breaking. -
Smooth the Edges:
Dip your finger in a tiny bit of water and gently run it along the cut edges of the letter. This smoothes out any rough bits left by the cutter. -
Initial Drying Time:
Place the letter on a clean sheet of parchment paper in a safe spot. Let it air dry undisturbed for 24 to 48 hours. -
Flip for Even Drying:
About halfway through the drying process, gently flip the letter over. This ensures the bottom side gets air exposure and prevents warping.
Smooth Operator
Water is your best friend for smoothing clay, but use it sparingly! Too much water can make the clay disintegrate or crack as it dries.
Step 2: Refining and Painting
-
Sand Imperfections:
Once the clay is bone dry and hard, take your fine-grit sandpaper and lightly sand the edges and surface. Aim for a distinct shape with slightly rounded corners. -
Clean the Dust:
Wipe the ornament with a dry cloth or a soft brush to remove all sanding dust before painting. -
Mix the Base Color:
Mix a small amount of blush pink or peach acrylic paint. You want a soft, pastel tone, so add white if your pink is too vibrant. -
Apply the Base Coat:
Using the flat paintbrush, paint the top surface of the letter. Leave the sides and back unpainted to show the raw white clay for a nice contrast, as seen in the photo. -
Dry the Base Coat:
Let the paint dry completely. Acrylics dry fast, so 15-20 minutes usually does the trick. -
Add the Dots:
Dip a fine detail brush or a dotting tool into white acrylic paint. Carefully press small dots onto the pink surface in a random, scattered pattern. -
Vary the Spacing:
Keep the spacing irregular for a more organic, handmade look, rather than a perfect grid. -
Seal the Ornament:
Once the dots are dry, apply a thin coat of satin varnish or Mod Podge over the painted area. This protects the paint and adds a subtle sheen. -
Attach the Twine:
Cut a length of jute twine, about 8 inches long. Thread it through the hole you created earlier. -
Secure the Loop:
Tie the ends of the twine together in a simple knot to create a hanging loop.
Gift Tag Upgrade
Use these as reusable gift tags! Instead of painting dots, write the recipient’s full name in white paint pen or stamp it into the wet clay.
Now you have a sweet, custom ornament ready to hang on a tree or attach to a special gift
Faux Terrazzo Trinket Tray
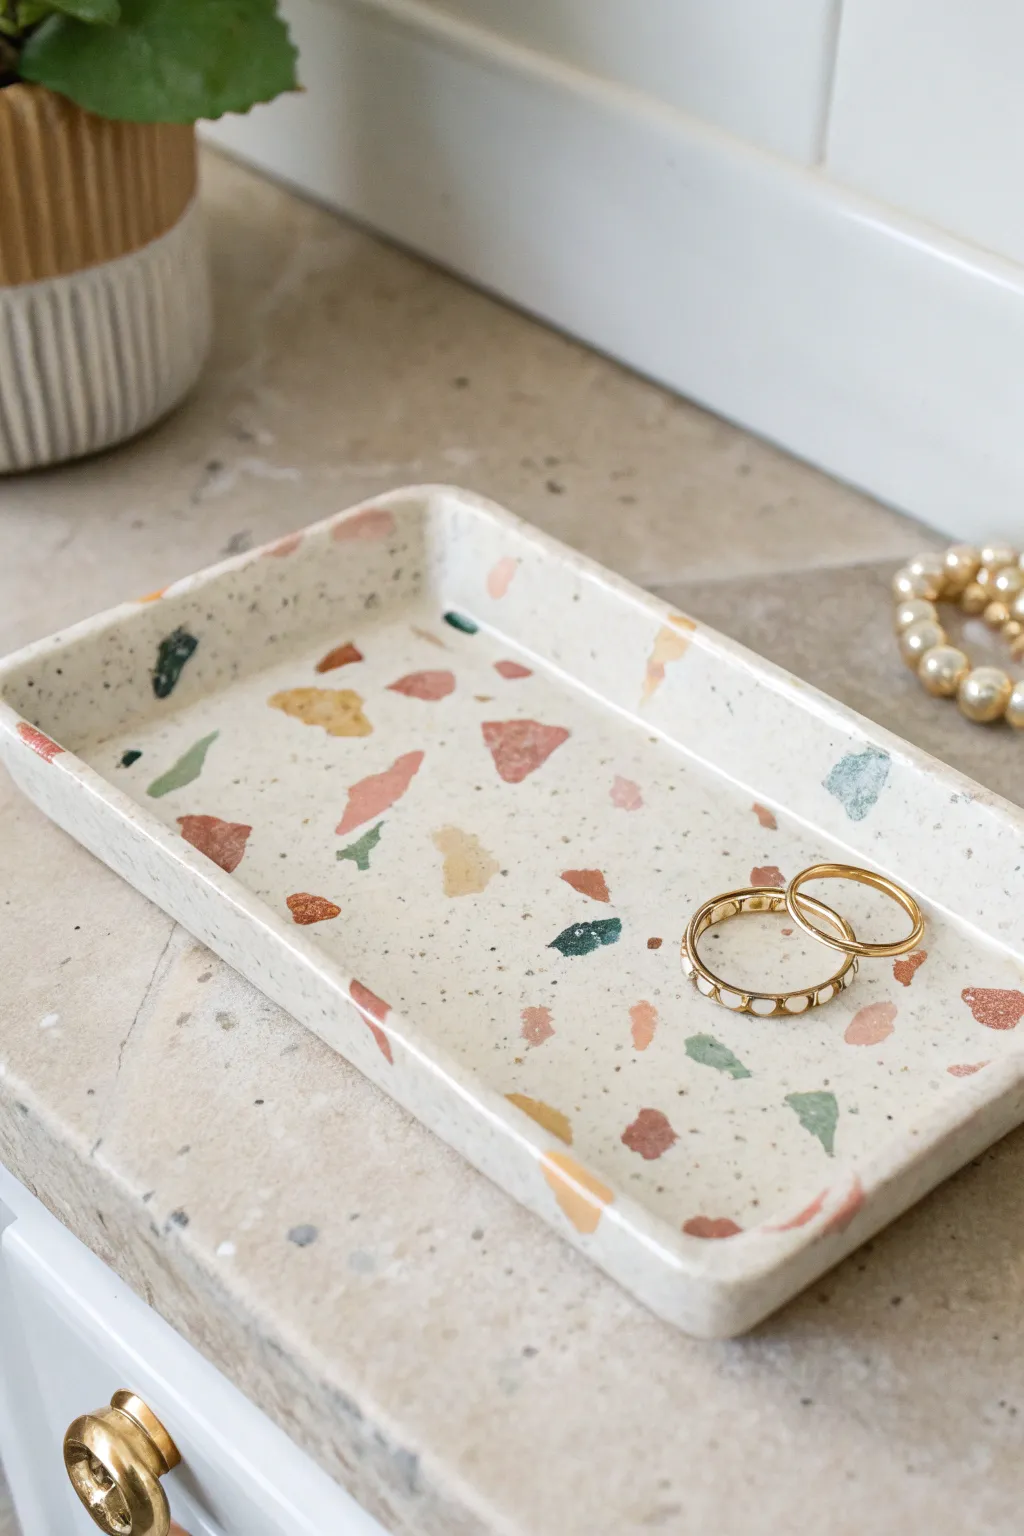
Bring the trendy, speckled look of terrazzo into your home without using concrete or heavy tools. This lightweight trinket tray uses colorful chips of air-dry clay embedded into a white base for a sophisticated, modern finish that is perfect for holding your favorite jewelry.
Step-by-Step Tutorial
Materials
- White air-dry clay (approx. 500g)
- Acrylic paints (terracotta, mustard yellow, sage green, dark teal)
- Rolling pin
- sharp craft knife or X-Acto blade
- Sandpaper (fine grit)
- Glossy varnish or sealant
- Small paintbrush
- Ruler
- Bowl of water
- Parchment paper or non-stick mat
Step 1: Creating the Chips
-
Mix your colors:
Pinch off four small, grape-sized balls of white clay. Mix a different color of acrylic paint into each ball—terracotta, mustard, sage, and dark teal—kneading thoroughly until the color is solid and uniform. -
Flatten the colored clay:
Roll each colored ball out very thinly, about 1-2mm thick, on a piece of parchment paper. The shapes don’t matter here since we will be cutting them up. -
Let them dry:
Allow these thin colored sheets to dry completely. Because they are so thin, this usually takes about 30-60 minutes depending on your humidity. -
Create the terrazzo chips:
Once the colored clay is stiff and dry, use your fingers to snap the sheets into small, irregular shards. Vary the sizes from tiny specks to larger, angular chunks to mimic real stone aggregate.
Clean Cuts
To get super sharp edges on your terrazzo chips, wait until the colored sheets are fully bone-dry before snapping them. If they are damp, they will tear rather than fracture.
Step 2: Forming the Slab
-
Roll the base:
Take a large chunk of fresh white clay and roll it out into a slab approximately 1/4 inch thick. Ensure the surface is smooth and even. -
Distribute the chips:
Scatter the dried colored chips onto the wet white slab. Arrange them randomly, ensuring a nice balance of colors without clustering too many of the same shade together. -
Embed the chips:
Gently verify the chips are positioned where you want them, then use your rolling pin to press them firmly into the white clay. Roll over the surface until the chips are flush with the white base and the surface is smooth again.
Step 3: Shaping the Tray
-
Cut the rectangle:
Use a ruler and your craft knife to cut a clean rectangle from your patterned slab. This will determine the final footprint of your tray. -
Create the walls:
Roll out a separate long strip of plain white clay, about 3/4 inch tall and the same thickness as your base. Alternatively, you can curve up the edges of your slab, but adding a separate rim often gives a sharper 90-degree corner. -
Score and slip:
Score the outer edges of your rectangle base and the bottom edge of your clay strip. Add a little water to create a slip, then attach the strip around the perimeter to form the tray walls. -
Secure the corners:
At the corners where the wall strip meets, blend the clay together smoothly on both the inside and outside so the join is invisible. I usually use a modeling tool or the back of a spoon for this. -
Dry partially:
Let the tray dry until it is leather-hard—firm to the touch but still slightly cool. This prevents warping as it completes the drying process.
Level Up: Gold Rim
For an elegant upgrade, paint the very top edge of the tray walls with liquid gold leaf or metallic gold acrylic paint after the final sanding but before sealing.
Step 4: Finishing Touches
-
Full dry:
Allow the piece to dry completely, which typically takes 24-48 hours. Turn it over occasionally to ensure the bottom dries evenly. -
Reveal the pattern:
This is the most satisfying part: Sand the top surface of the tray and edges vigorously with fine-grit sandpaper. This removes the thin layer of white clay haze over the colored chips and sharpens their appearance. -
Clean off dust:
Wipe the tray down with a slightly damp cloth or paper towel to remove all the sanding dust. -
Apply speckles (optional):
For added texture, dip a toothbrush into diluted black or dark grey paint and flick fine speckles over the tray to mimic granite dust. -
Seal it:
Apply two coats of glossy varnish or sealant to protect the clay and give it that polished, ceramic-like shine shown in the photo.
Now you have a chic, modern place to store your rings and small treasures that looks just like real stone
Miniature Room Shadowbox Scene
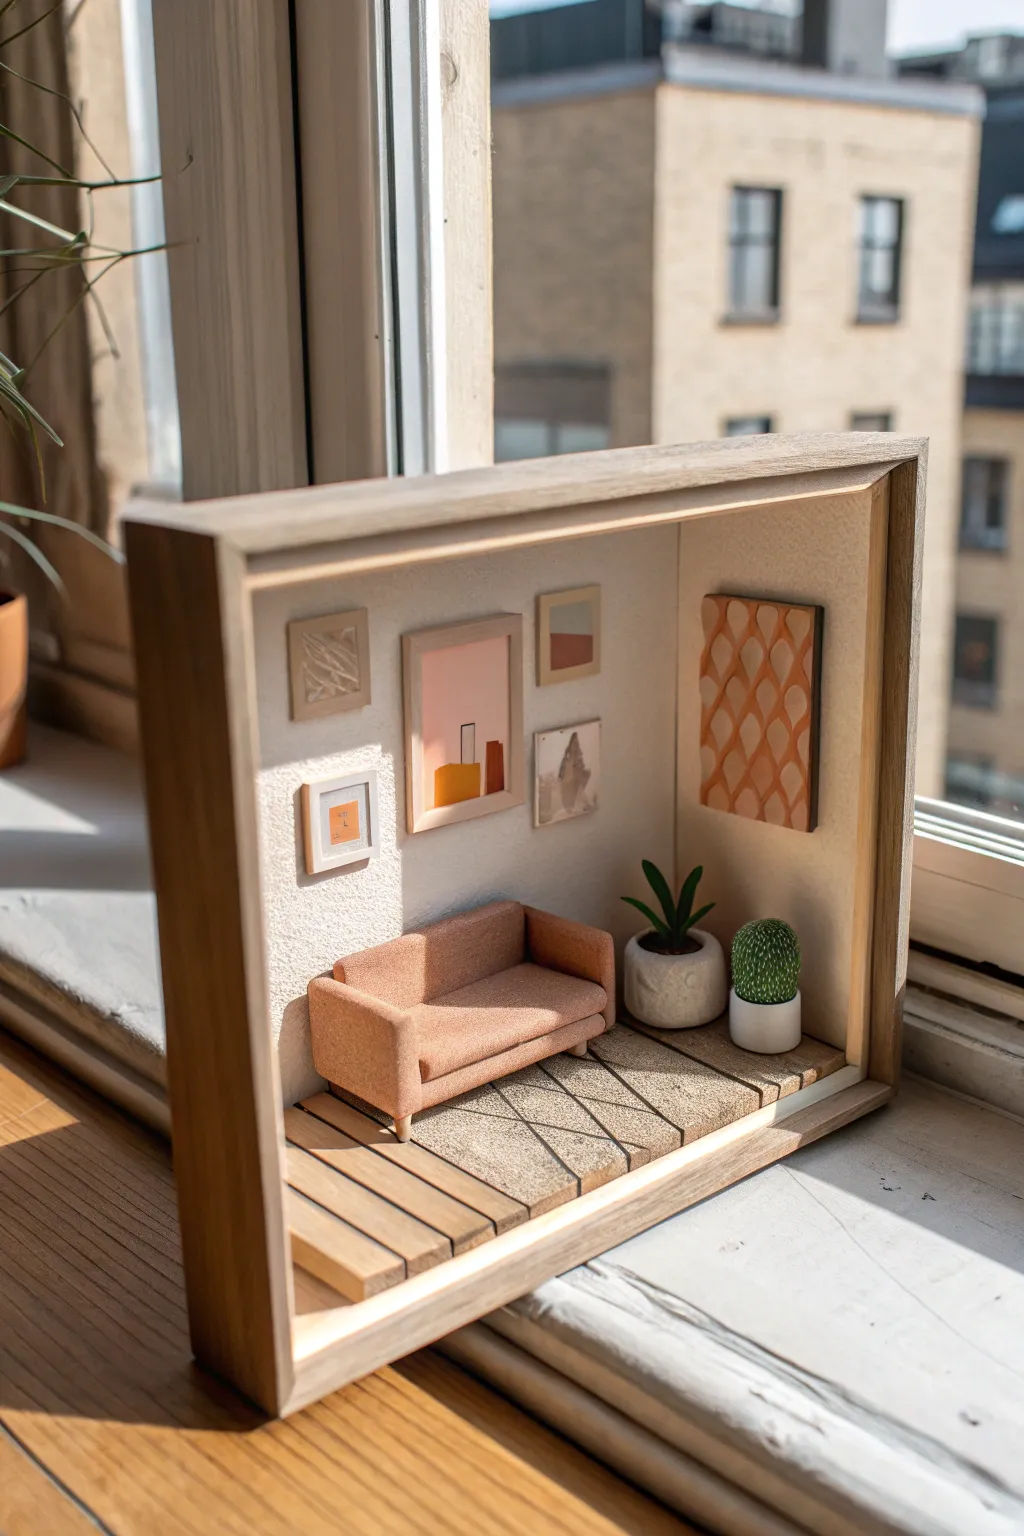
Capture the cozy essence of a scandi-style living room in miniature form with this delightful shadowbox project. Combining air dry clay modeling with wood assembly creates a charming, permanent diorama perfect for shelf display.
Step-by-Step Guide
Materials
- Deep wooden shadowbox frame (approx. 8×8 inches)
- Air dry clay (white or terracotta)
- Balsa wood strips or popsicle sticks
- Cardstock or thick paper
- Acrylic paints (muted earth tones: terrcotta, sage, cream, mustard)
- Detail paintbrushes
- Wood stain (light oak)
- Craft glue
- Sandpaper
- Rolling pin
- Clay sculpting tools (or a toothpick)
Step 1: Constructing the Room Shell
-
Prepare the frame:
Remove the glass from your shadowbox frame. If the interior isn’t already white or cream, give the back panel and side walls a coat of matte cream acrylic paint to serve as your clean, bright walls. -
Create the floorboards:
Cut balsa wood strips to fit the depth of the shadowbox floor. I find it easier to cut them slightly long and sand them down for a snug fit. Stain them with a light oak wood stain and glue them side-by-side to the bottom of the frame.
Step 2: Sculpting the Furniture
-
Form the sofa base:
Knead a generous amount of air dry clay until smooth. Shape a rectangular block for the seat cushion and a larger, taller rectangle for the sofa back. Press them firmly together, smoothing the seam with a little water. -
Add sofa arms:
Roll two smaller rectangles for the armrests and attach them to the sides of the seat. Use a sculpting tool to gently texture the surface to mimic fabric weave. -
Make the legs:
Roll four tiny spheres of clay and flatten them slightly into tapered cylinders. Attach these to the bottom of the sofa. Let the entire sofa dry completely, flipping it occasionally so the bottom dries too. -
Sculpt the planters:
Form two small pots from clay—one rounded bowl shape and one simple cylinder. Use the end of a paintbrush handle to create a depression in the tops for the plants. -
Create the greenery:
For the snake plant, roll very thin, pointed strips of clay. For the cactus, roll a chubby oval and texture it with a needle tool to create prickles. Place these inside the pots, securing with a dot of glue if dry, or blending clay if wet.
Smooth Seams Pro-Tip
Use a wet finger or a damp paintbrush to smooth out fingerprints and join lines on your clay furniture before it starts to dry. This saves tedious sanding later.
Step 3: Decorating the Walls
-
Make the rug texture:
Roll out a thin sheet of clay and cut a rectangle for the rug. Use a ruler to press a geometric diamond pattern into the surface while the clay is soft. Let this dry flat. -
Create picture frames:
Cut tiny squares and rectangles from cardstock. Paint the edges to look like wooden frames using a mix of brown and mustard paint. -
Paint the miniature art:
Inside your cardstock frames, paint simple abstract shapes—arches, circles, and blocks—using your pastel color palette. Keep the designs minimal to match the scale. -
Make the wall hanging:
Cut a rectangular piece of balsa wood or thick cardstock. Paint a repeating scallop pattern in terracotta orange to mimic the large artwork on the right wall.
Level Up: Real Textiles
Instead of clay for the rug, cut a scrap of real linen or felt fabric. Fray the edges with a needle to create authentic miniature fringe.
Step 4: Assembly & Finishing
-
Paint the furniture:
Once the clay sofa is bone dry, paint it a warm muted terracotta or dusty pink. Paint the pots white or stone grey, and paint the plants in deep sage greens. -
Position the rug:
Paint the clay rug a neutral beige, then highlight the indented lines with a slightly darker brown wash. Glue it diagonally across the wood floorboards. -
Install the sofa:
Glue the painted sofa on top of the rug. Ensure the legs are secure. -
Mount wall art:
Arrange the tiny framed art pieces on the back wall in a gallery layout. Use tweezers to place them precisely before the glue sets. -
Add the final touches:
Glue the large scallop art on the side wall and place the two potted plants next to the sofa to complete the cozy scene.
Place your finished shadowbox near a window to let natural light bring the tiny room to life