Whenever I want a quick, satisfying project, I reach for air dry clay and make a little ashtray that feels like a mini sculpture. These air dry clay ashtray ideas are all about taking a simple dish and turning it into something playful, personal, and totally you.
Classic Pinch-Pot Dish Ashtray
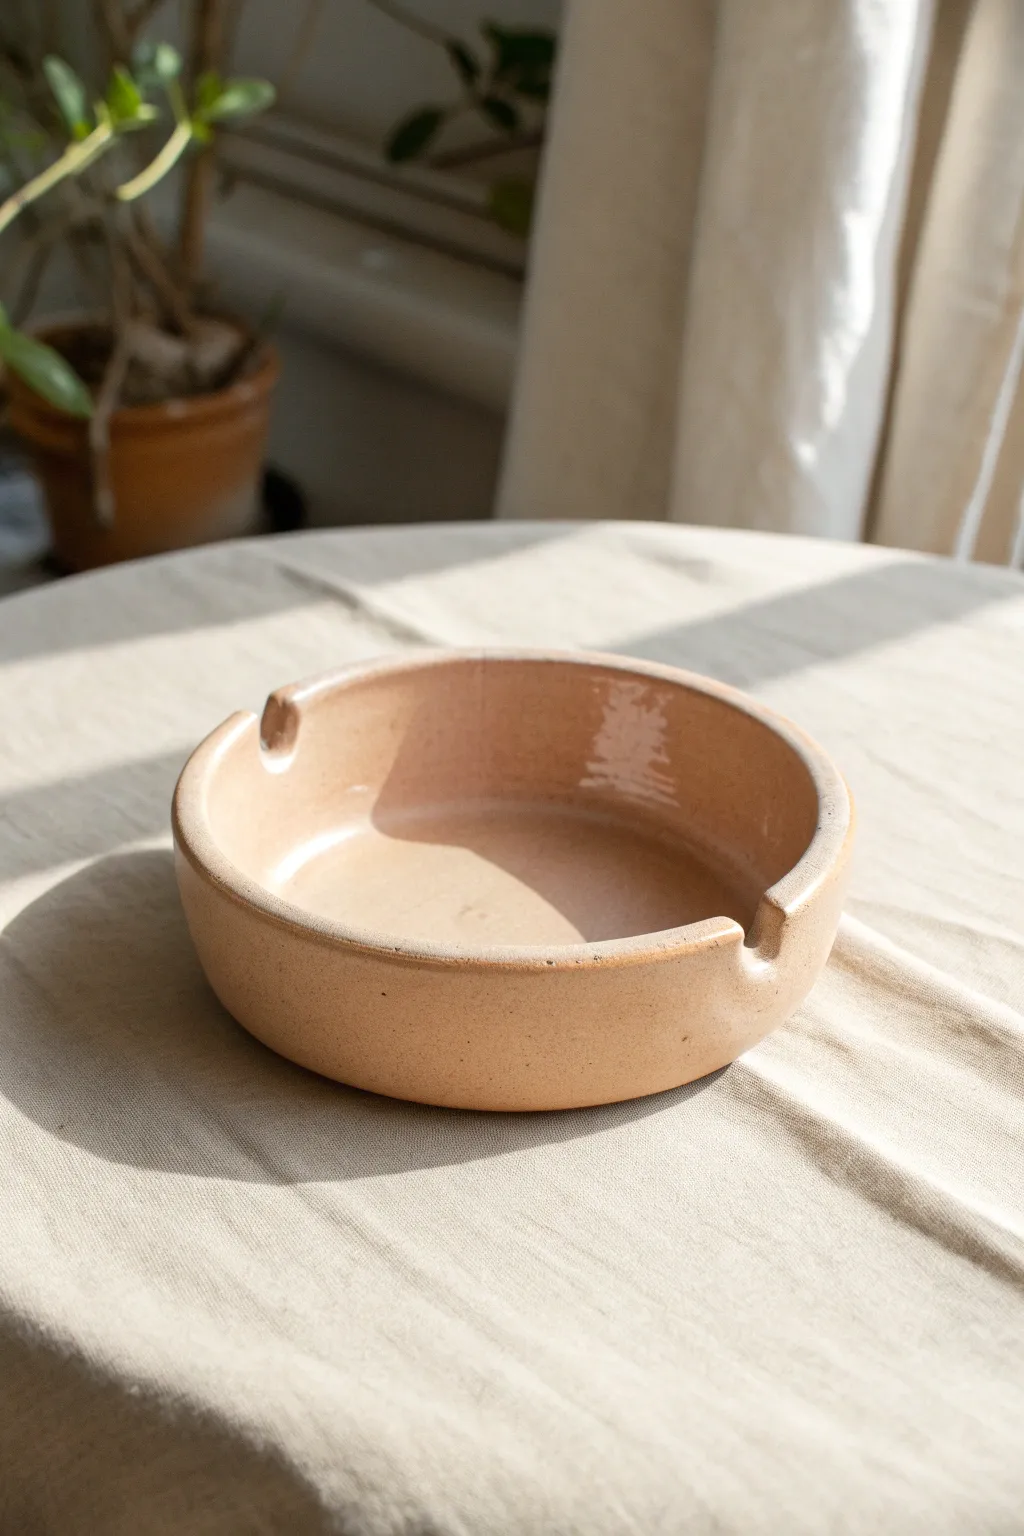
This classic, understated ashtray features smooth walls and a warm, sandy-peach glaze that catches the light beautifully. Its simple form makes it a perfect entry-level project, resulting in a timeless piece of home decor.
Step-by-Step Guide
Materials
- Air-dry clay (terra cotta or white)
- Rolling pin or smooth glass jar
- Small bowl or sponge (for water)
- Pottery sponge or soft cloth
- Modeling tool or butter knife
- Sandpaper (medium and fine grit)
- Acrylic paints (peach, beige, warm brown)
- High-gloss varnish or sealant
- Paintbrushes (flat and round)
Step 1: Shaping the Base
-
Prepare your clay:
Start by taking a handful of air-dry clay, roughly the size of a tennis ball. Knead it in your hands for a minute to warm it up and remove any air bubbles, ensuring it’s pliable and smooth. -
Form the initial ball:
Roll the kneaded clay between your palms or on your work surface until you have a smooth, symmetrical sphere. Try to smooth out any major cracks or lines at this stage. -
Start the pinch pot:
Hold the clay ball in your non-dominant hand. Gently press your thumb into the center, stopping about a half-inch from the bottom. This thickness is important for the base’s stability. -
Pinch the walls:
Using your thumb on the inside and fingers on the outside, gently pinch and rotate the ball. Work your way from the bottom up, gradually thinning the walls as the pot expands outward. -
Flatten the bottom:
Once you have a cup shape, gently tap the bottom of the pot against your table to create a flat, stable base. Check that it sits level without wobbling. -
Refine the wall height:
Continue pinching and smoothing until the walls are roughly 1.5 to 2 inches high while maintaining a consistent thickness of about a quarter-inch throughout.
Cracks while drying?
If small fissures verify appear as the clay dries, mix a tiny bit of fresh clay with water to make a paste (slip) and fill in the cracks. Let it dry again, then sand smooth.
Step 2: Notching and Refining
-
Smooth the rim:
Dip your finger slightly in water and run it along the top rim of the pot to smooth out rough edges. The goal is a rounded, soft lip rather than a sharp edge. -
Mark the cigarette rests:
visualize where you want the notches to be. Typically, two notches opposite each other work well. Use your thumb or a modeling tool to gently mark these spots on the rim. -
Create the indentations:
Using the side of your finger or a thick marker barrel, press down firmly into the marked spots on the rim. Create a smooth, U-shaped depression deep enough to hold a cigarette securely. -
Refine the notches:
Use a little water to smooth the edges of the new indentations so they blend seamlessly into the rest of the rim. Ensure the transition is gentle, not jagged. -
Final smooth over:
Take a slightly damp sponge and wipe down the entire surface of the pot (inside and out) to remove fingerprints and subtle lumps. I like to spend extra time here to get that professional finish. -
Let it dry completely:
Place your ashtray in a cool, dry spot away from direct sunlight. Let it dry for at least 24-48 hours. The clay will lighten significantly in color when it is fully dry.
Speckled finish
For a stone-like effect, load an old toothbrush with dark brown paint and flick the bristles to spray tiny specks over the dried base coat before varnishing.
Step 3: Finishing and Glazing
-
Sand for perfection:
Once bone dry, use medium-grit sandpaper to remove any major bumps. Switch to fine-grit sandpaper for a silky smooth finish, paying attention to the rim and the notches. -
Mix your paint color:
Mix a warm, sandy-peach color using acrylic paints. Combine beige with a tiny drop of orange and brown to achieve that earthy, natural terracotta look shown in the photo. -
Apply the base coat:
Paint the entire ashtray, inside and out. Use smooth strokes to avoid brush marks. Allow the first coat to dry, then apply a second coat for full, opaque coverage. -
Add depth (optional):
To mimic the slight variation seen in pottery, you can water down a slightly darker shade of brown and do a subtle wash over the bottom interior, wiping most of it away immediately. -
Seal with gloss:
Apply a thick coat of high-gloss varnish or sealant. This not only gives it that ceramic-like shine but also protects the paint from ash and heat. -
Final cure:
Let the varnish cure according to the manufacturer’s instructions before using the ashtray. Ensure it is non-tacky and fully hardened.
Now you have a sleek, custom-made ashtray that looks like it came straight from a pottery studio


Wavy Organic Rim Ashtray
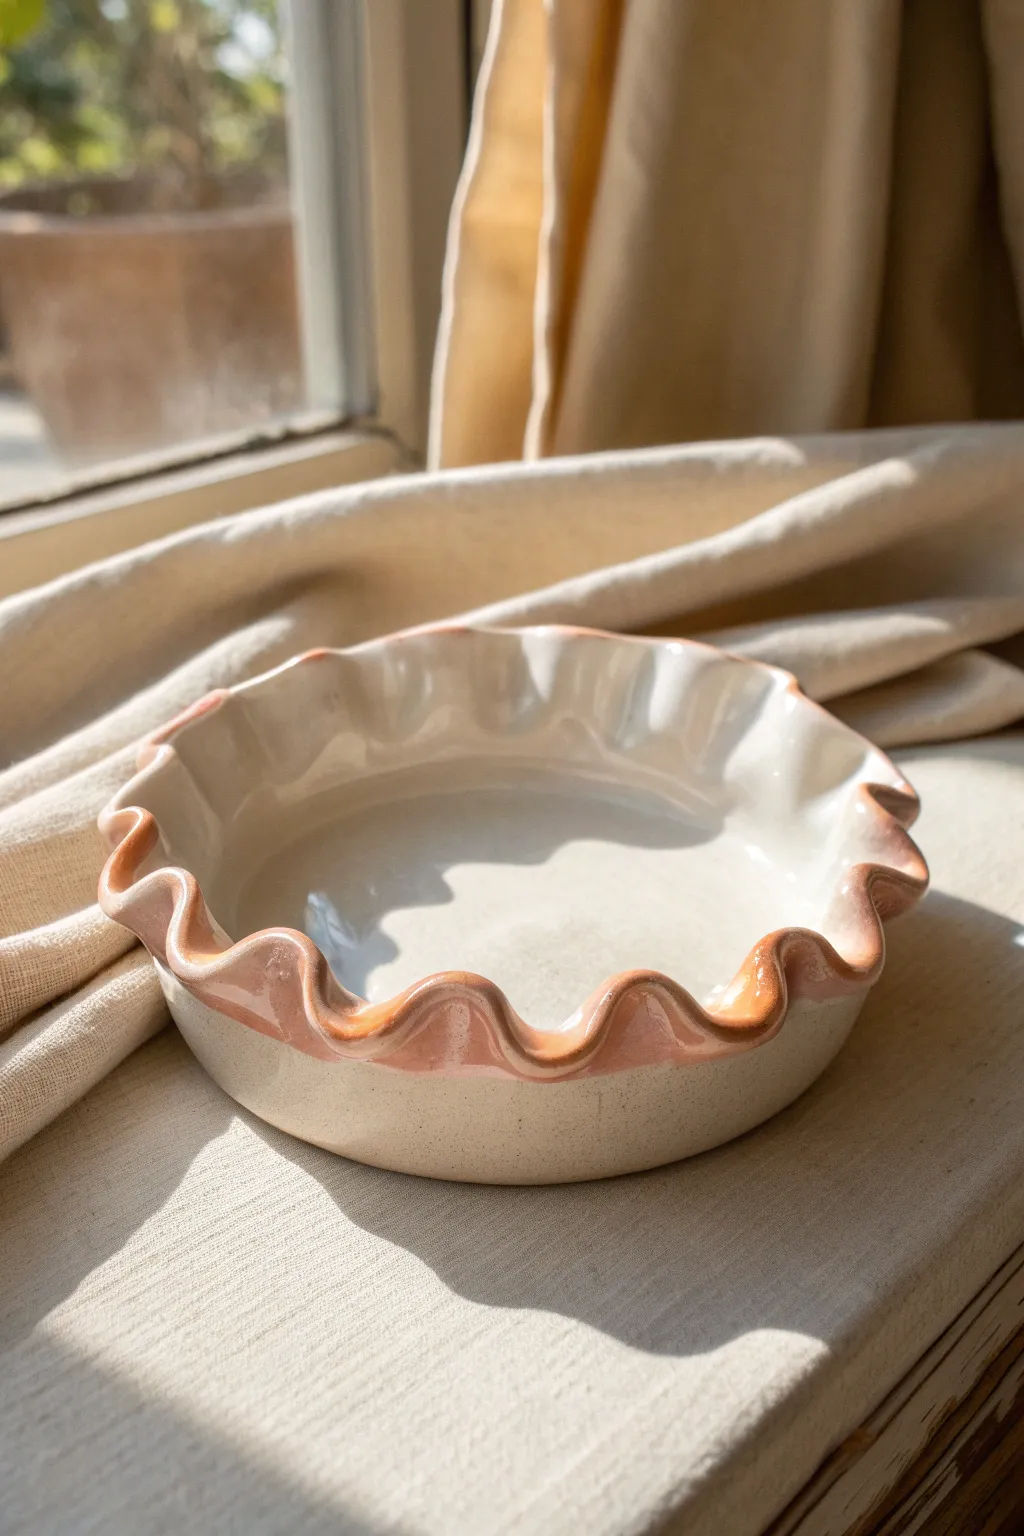
Embrace the imperfect beauty of organic shapes with this wavy-rimmed dish that mimics high-end kiln-fired pottery. Its glossy finish and exaggerated ruffled edges catch the light beautifully, making it a stunning functional accent for any table.
Detailed Instructions
Materials
- Air dry clay (white)
- Acrylic rolling pin
- Circle cutter or bowl (approx. 5-6 inches diameter)
- Craft knife or needle tool
- Small bowl for shaping (mold)
- Plastic wrap
- Sponge and water
- White acrylic paint
- Peach or dusty rose acrylic paint
- High-gloss varnish or UV resin
- Paintbrushes (flat and fine round)
Step 1: Shaping the Base
-
Condition the Clay:
Begin by taking a generous handful of air dry clay and kneading it in your hands until it becomes soft, pliable, and free of cracks. If it feels too dry, add a tiny drop of water. -
Roll out the Slab:
Place your clay on a flat surface or canvas mat. Use your acrylic rolling pin to roll it out into an even slab, aiming for a thickness of roughly 1/4 inch to ensure durability. -
Cut the Circle:
Place your circle cutter or an overturned bowl onto the clay slab to serve as a template. Trace around it with a craft knife or needle tool to create a perfect circle, then peel away the excess clay. -
Prepare the Mold:
Select a small bowl that has a slightly rounded bottom. Cover the interior or exterior (depending on your preference) with plastic wrap to prevent the clay from sticking during the drying process. -
Form the Dish:
Gently lift your clay circle and drape it into (or over) your prepared mold. Press the center down gently so it takes the shape of the bowl, but leave the top edges free.
Rim Cracking?
If small cracks appear while bending the rim, dab the area instantly with water. Smooth a tiny bit of fresh clay paste (slip) into the crack to bond it back together seamlessly.
Step 2: Creating the Wave
-
Pinch the Ruffles:
Using your thumb and forefinger, gently pinch sections of the rim upward and outward. I like to alternate pushing the clay in and pulling it out to establish a rhythmic wave pattern. -
Exaggerate the Curves:
Go back around the rim and deepen the waves by using the side of your finger or a paintbrush handle to support the curves. The waves should look fluid and organic, not perfectly symmetrical. -
Smooth the Edges:
Dip a sponge or your finger into a little water and run it along the rim to soften any sharp angles or rough textures created during the pinching process. -
Refine surfaces:
While the clay is still damp, check the interior basin for fingerprints. Gently smooth them out with your damp sponge for a professional, seamless look. -
Initial Drying:
Let the piece sit in the mold for at least 24 hours until it is firm enough to hold its shape without slumping. -
Flip and Dry:
Once leather-hard, carefully remove the dish from the mold and peel off the plastic wrap. Turn it upside down to allow the bottom to dry completely, which usually takes another 24 to 48 hours.
Smoother Sailing
For the smoothest finish possible, dip your finger in water before the final smoothing pass. This ‘burnishes’ the surface, reducing the need for sanding later.
Step 3: Painting and Glazing
-
Sand Imperfections:
Once fully bone dry, inspect the rim and base for rough spots. Use fine-grit sandpaper to gently buff away any unevenness, then wipe away the dust with a slightly damp cloth. -
Base Coat:
Apply two coats of white acrylic paint to the entire dish, allowing it to dry fully between layers. This creates that clean, ceramic-like foundation. -
Paint the Rim:
Mix a soft dusty rose or peach color. Using a flat brush, carefully paint just the wavy rim, letting the color extend slightly down the inner and outer walls following the curve of the wave. -
Refine the Line:
If your painted rim edge looks shaky, go back with a fine round brush and the original white paint to neaten the transition line where the pink meets the white basin. -
Apply Sealer:
To achieve the glassy, wet look shown in the image, apply a thick coat of high-gloss varnish. For an even more durable, glass-like finish, you can pour a thin layer of UV resin over the piece and cure it.
Place your finished wavy dish on a windowsill to catch the afternoon sun and highlight those glossy curves

Terrazzo Speckle Air Dry Clay Ashtray

Bring the trendy look of Italian terrazzo into your home with this playful air dry clay project. Instead of actual stone chips, you’ll use colorful clay fragments embedded in a creamy base to create a fun, speckled finish that looks incredibly high-end.
How-To Guide
Materials
- White or cream air dry clay (1kg block)
- Acrylic paints (primary colors + muted earthy tones)
- Rolling pin
- Circle cutter or a bowl to trace (approx. 5-6 inches)
- Clay knife or craft blade
- Small cup of water
- Sponge or fine-grit sandpaper
- Gloss varnish or resin (for sealing)
- Paintbrush
Step 1: Creating the Color Chips
-
Mix your colors:
Start by pinching off small, marble-sized balls of your white clay. Mix acrylic paint into each ball to create your desired chip colors—think navy blue, burnt orange, sage green, and mustard yellow. -
Flatten the colored clay:
Roll out each colored clay ball until it is very thin, almost paper-thin. This ensures the chips won’t be too chunky when embedded later. -
Create the fragments:
Tear or cut these thin colored sheets into tiny, irregular jagged pieces. Vary the sizes from tiny specks to larger triangles. -
Let them firm up:
Set these colored fragments aside on a piece of parchment paper to dry slightly for about 20-30 minutes. They shouldn’t be fully hard, just firm enough to hold their shape.
Step 2: Forming the Base
-
Prepare the main body:
Take a large chunk of white clay and roll it into a thick slab, roughly 1/4 inch thick. This will form the main structure of your ashtray. -
Embed the chips:
Scatter your semi-dried colored fragments generously over the surface of the white slab. Press them gently into the clay so they stick. -
Roll to integrate:
Use your rolling pin to roll over the slab again. This forces the colored chips into the white base, creating a uniform, flat surface where the colors are flush with the white clay. -
Cut the base:
Place your bowl or circle cutter onto the terrazzo slab and cut out a perfect circle. Keep the excess clay; you’ll need it for the walls.
Pro Tip: Chip Density
Don’t be shy with the colored chips! The rolling process spreads them out significantly, so pack them densely on the slab initially for the best terrazzo look.
Step 3: Building the Walls
-
Create the strip:
Gather the remaining terrazzo clay scraps, knead them together (this creates a nice marbling effect inside the wall), and roll out a long rectangular strip. Ensure it’s long enough to wrap around the circumference of your base. -
Attach the wall:
Score the edge of the circular base and the bottom edge of your strip with a knife. Apply a little water to create slip, then wrap the strip around the base to form the wall. -
Blend the seams:
Use your fingers or a clay tool to smooth the seam where the wall meets the base, both inside and outside. I find a slightly damp finger works best to erase the join line seamlessly. -
Smooth the rim:
Run a damp sponge along the top rim to round it off and fix any cracks that formed during rolling. -
Carve the notches:
Use a rounded tool or the handle of a paintbrush to press two dipping notches into the rim opposite each other. These are the classic rests for the ashtray.
Level Up: Stone Texture
Mix dried coffee grounds or fine sand into your white base clay before adding color chips. This adds a gritty, realistic stone texture and natural speckling.
Step 4: Finishing Touches
-
Slow drying:
Let the piece air dry slowly away from direct sunlight or heat sources. This usually takes 24-48 hours depending on humidity. -
Sand for exposure:
Once fully dry, sand the entire surface with fine-grit sandpaper. This is the magic step—it removes the top film of white clay and really makes those colorful embedded chips pop vividly. -
Clean dust:
Wipe the ashtray thoroughly with a slightly damp cloth to remove all sanding dust. -
Add speckles (optional):
If you want extra texture like the photo, dip a toothbrush in diluted black or brown paint and flick tiny speckles over the surface. -
Seal heavily:
Apply 2-3 coats of a high-gloss varnish or a layer of resin. Since this is an ashtray, a heat-resistant sealant or resin is preferable to standard acrylic varnish for durability.
Enjoy styling your table with this chic, handmade stone-effect piece


Marbled Swirl Color Ashtray
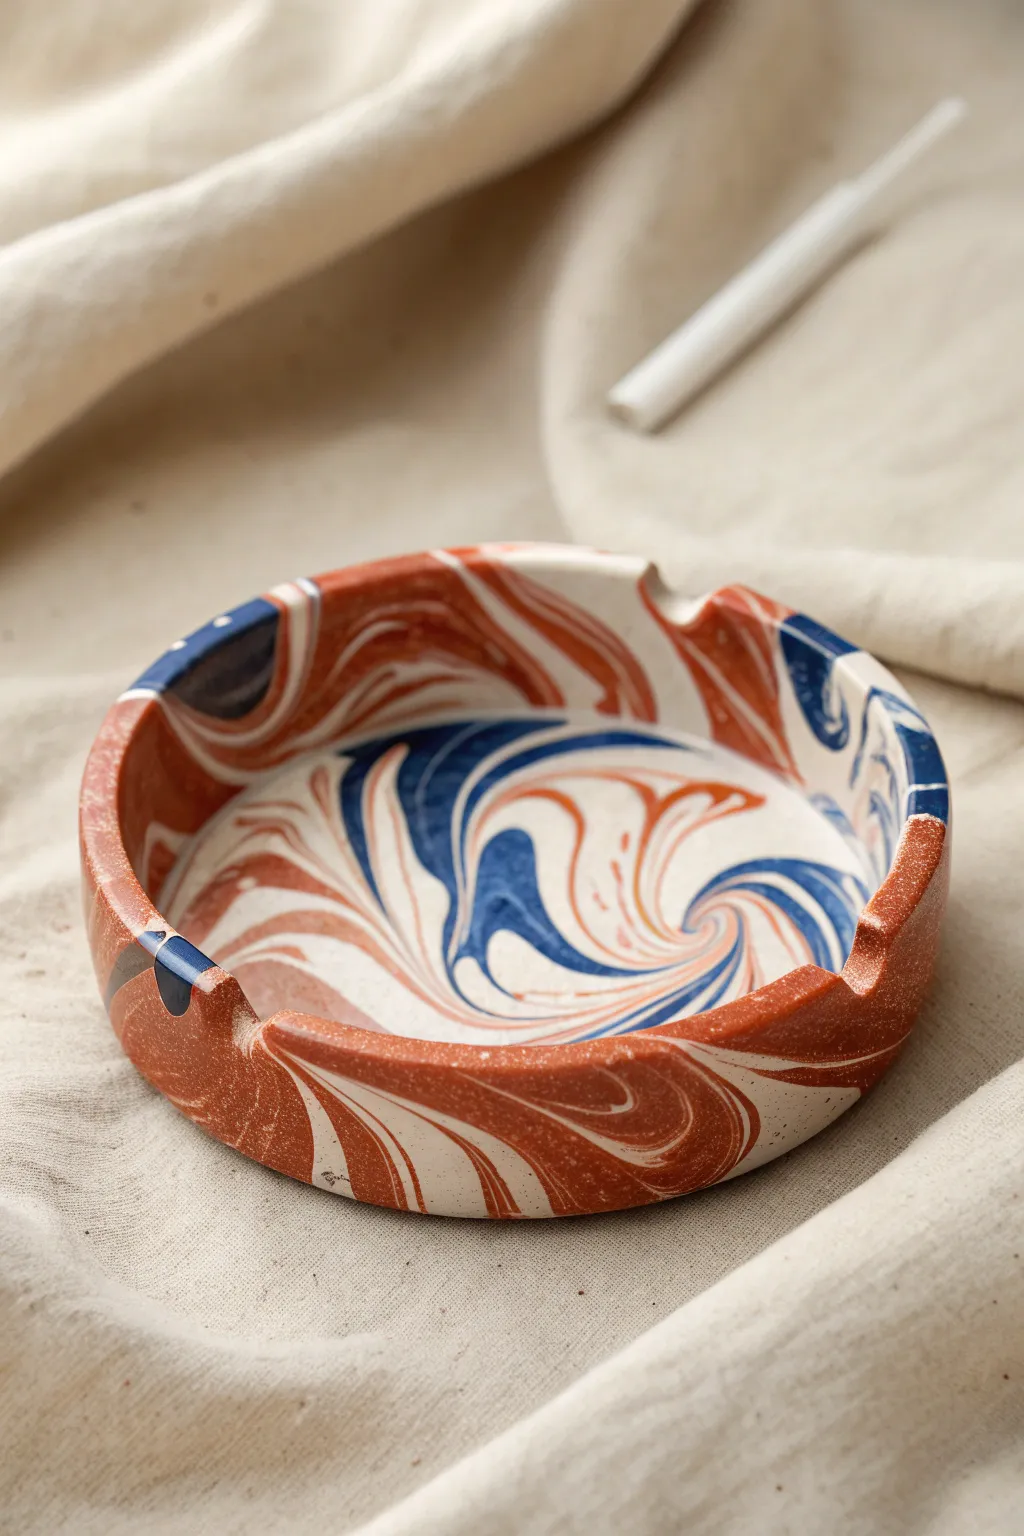
Capture the organic flow of marble with this strikingly patterned ashtray, featuring deep rust-orange and navy blue swirls against a cream base. The random nature of the marbling technique means every piece is a completely one-of-a-kind functional sculpture.
Detailed Instructions
Materials
- White air dry clay (250g)
- Rust/Terracotta acrylic paint
- Navy blue acrylic paint
- Rolling pin
- Clay knife or craft blade
- Small circular bowl or cookie cutter (approx. 4-5 inches diameter)
- Smooth work surface or silicone mat
- Sponge and water
- Gloss varnish or clear sealant
Step 1: Preparing the Clay Colors
-
Divide the clay:
Start by separating your block of white air dry clay into three distinct portions. Keep the largest portion (about 50%) plain white. Split the remaining half into two smaller chunks for coloring. -
Mix the rust tone:
Take one of the smaller chunks and add a generous dollop of rust or terracotta acrylic paint into the center. Knead the clay thoroughly until the color is completely uniform and rich. Wear gloves if you want to avoid staining your hands. -
Create the navy blue:
Repeat the mixing process with the second small chunk, incorporating navy blue acrylic paint. Knead until you achieve a deep, solid blue tone. -
Roll into logs:
Roll each of your three colored clay balls—white, rust, and navy—into long, snake-like logs of roughly equal length. The white log should be thicker than the colored ones.
Marbling Pro-Tip
Stop mixing sooner than you think! The rolling pin will do the final blending. If you knead too much, the distinctive blue and rust streaks will turn into a solid, muddy purple-brown color.
Step 2: Marbling and Shaping
-
Twist the colors:
Gather the three logs together and twist them around each other like a rope. Fold the twisted rope in half and twist it again. Repeat this twist-and-fold motion 3-4 times, but be careful not to over-mix, or the colors will turn muddy instead of distinct. -
ball it up:
Squash your twisted rope back into a single ball. You should already see nice striations of color on the surface. -
Roll out the slab:
Using your rolling pin, flatten the ball into a slab about 1/4 inch thick. Roll in different directions to stretch the marble pattern outward, creating those sweeping swirls. -
Cut the base:
Place your circular bowl or cutter onto the most attractive part of the marbled slab and cut out your base circle. Remove the excess clay but save it. -
Form the walls:
Take the excess marbled scraps and roll them into a long, rectangular strip. Trim the edges to make it a clean, even ribbon that is long enough to wrap around the circumference of your base.
Step 3: Assembly and Refining
-
Attach the wall:
Score the outer edge of your base circle and the bottom edge of your clay strip. Apply a little water or slip to the scored areas. -
Wrap and smooth:
Wrap the strip around the base to create the wall of the ashtray. Where the ends meet, overlap them slightly, cut through both layers for a perfect seam, and blend the clay together with your fingers. -
Blend the seams:
Use a damp sponge or your finger to firmly smooth the inside and outside seams where the wall meets the base. The transition should be seamless. -
Create rests:
Using the handle of a paintbrush or your finger, gently press down on the rim at three or four evenly spaced points to create the curved indentations for holding cigarettes. -
Refine the rim:
I like to run a slightly damp sponge around the top rim to soften any sharp edges created during the shaping process. -
Dry completely:
Let the ashtray dry for at least 24-48 hours. Turn it over halfway through the drying process to ensure the bottom dries evenly. -
Seal the piece:
Once fully dry and hard, apply two coats of gloss varnish or sealant to protect the paint and give the marbling a polished, ceramic-like look.
Level Up: Stone Texture
Mix dried tea leaves or used coffee grounds into the white clay before marbling. This adds a speckled, granitelike texture that mimics the reference image’s organic feel.
Place this beautiful piece on your coffee table and enjoy the modern, artistic touch it brings to your space.

What Really Happens Inside the Kiln
Learn how time and temperature work together inside the kiln to transform clay into durable ceramic.
Scalloped Petal Edge Ashtray
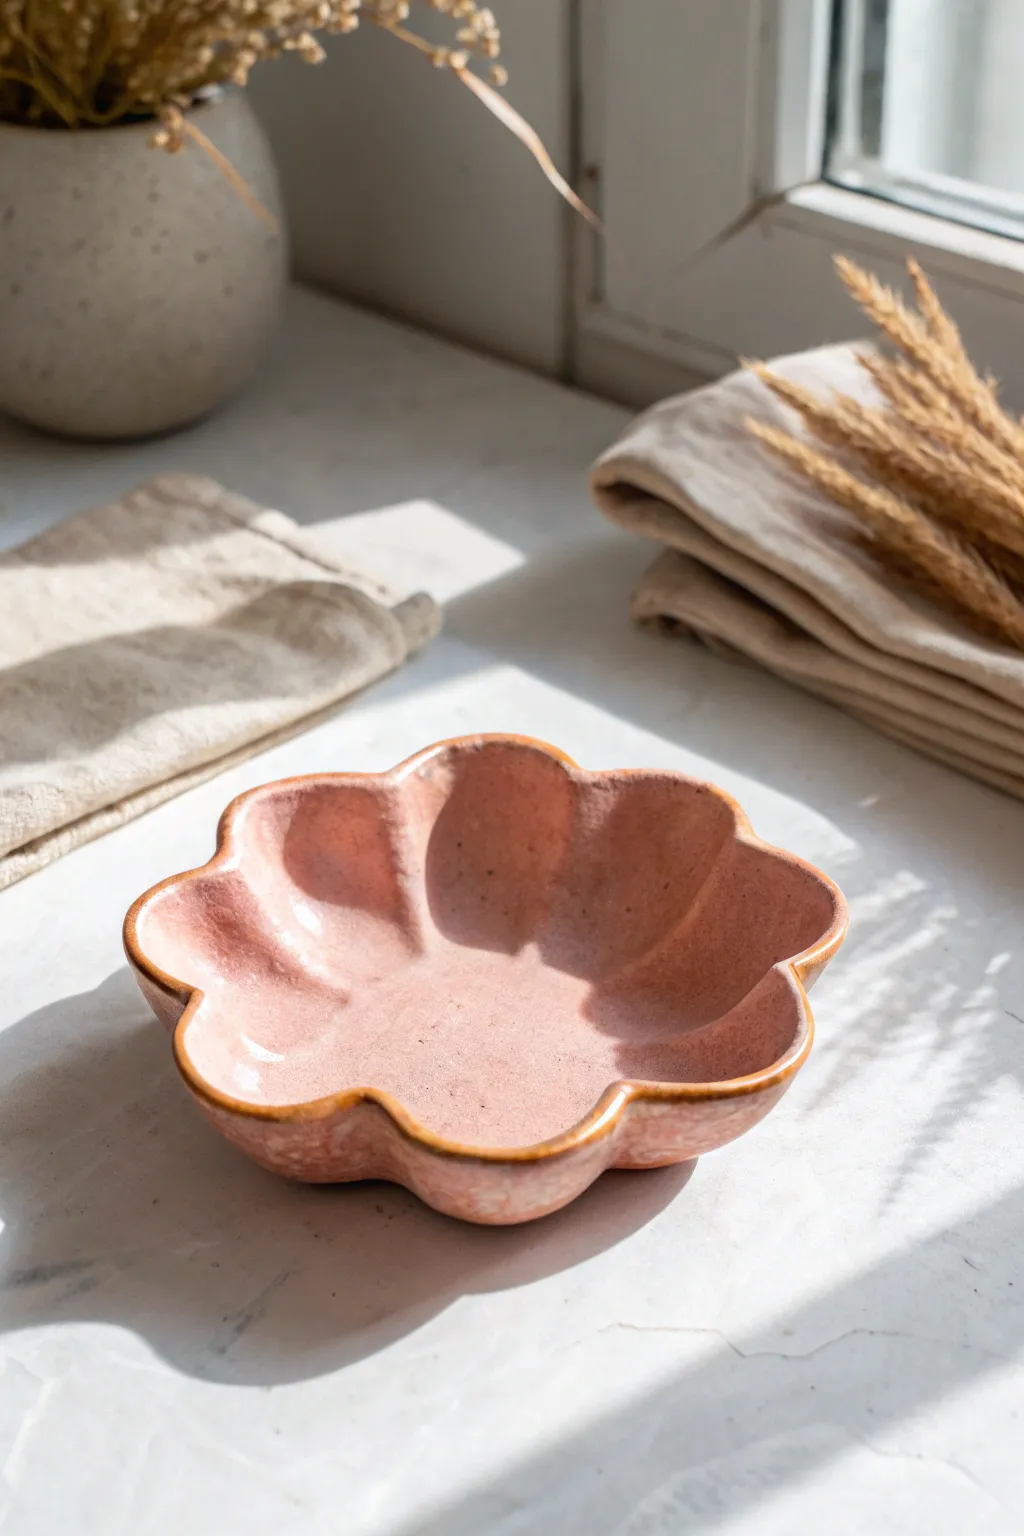
This charming, flower-shaped dish features soft, rounded scalloped edges that mimic the delicate curves of a blooming flower. With its glossy, speckled pink finish and subtle golden-brown rim, it brings a warm, artisanal touch to any table setting.
How-To Guide
Materials
- Air dry clay (white)
- Rolling pin
- Template (paper flower cutout or simple circle)
- Clay knife or craft blade
- Small sponge
- Water based acrylic paint (blush pink)
- Water based acrylic paint (burnt umber or gold/brown)
- Gloss varnish or resin (for that ceramic look)
- Sandpaper (medium and fine grit)
- Small bowl or sphere (as a forming mold)
- Old toothbrush (for speckling)
Step 1: Shaping the Clay
-
Prepare the Clay:
Start by kneading a handful of air dry clay until it is warm, pliable, and free of air bubbles. Roll it into a smooth ball in your palms to ensure even consistency. -
Roll it Out:
Using a rolling pin, flatten the clay ball into an even slab about 1/4 inch thick. If the clay sticks, you can roll it out on a piece of canvas or wax paper. -
Cut the Basic Shape:
You can use a paper flower template or freehand a circle first. Cut out the general round shape using your clay knife. -
Form the Petals:
Using your fingers or a modeling tool, gently press indentations into the edge of the circle to define about 7 or 8 distinct petal shapes. They don’t need to be mathematically perfect; organic variation adds charm. -
Refine the Edges:
Use a little water on your fingertip to smooth down the cut edges of each petal, rounding them off so they aren’t sharp or square. I like to take my time here to ensure a soft transition between petals. -
Shape the Bowl:
Gently lift your clay flower and drape it into a shallow bowl or over a sphere mold to encourage it to curve upwards. Press the center down lightly so it sits flat.
Cracking Up?
If small cracks appear while drying, don’t panic. Mix a tiny bit of fresh clay with water to make a paste (slip) and fill the cracks, then sand smooth once dry.
Step 2: Refining and Drying
-
Smooth the Surface:
While it’s resting in the mold, take a damp sponge and lightly wipe the interior and exterior surfaces to remove any fingerprints or texture from the canvas. -
Initial Drying:
Let the piece dry in the mold for about 24 hours until it holds its shape firmly but isn’t bone dry. -
Remove and Dry Completely:
Carefully remove the dish from the mold and flip it over to let the bottom dry. Allow it to air dry for another 24-48 hours until it is completely hard and turns white. -
Sanding:
Once fully dry, use medium grit sandpaper to even out any major bumps, followed by fine grit sandpaper for a silky smooth finish. Wipe away all dust with a slightly damp cloth.
Step 3: Painting and Finishing
-
Base Color Application:
Paint the entire dish with a soft blush pink acrylic paint. You may need 2-3 thin coats for opaque coverage, letting each coat dry in between. -
Adding Speckles:
Mix a tiny amount of brown paint with water to make it runny. Dip an old toothbrush into it and flick the bristles with your thumb to spray fine speckles across the pink surface. -
Painting the Rim:
using a fine detail brush, carefully paint the very edge of the rim with a burnt umber or brownish-gold paint. This mimics the look of fired stoneware where glaze thins at the edges. -
Sealing the Piece:
Apply a high-gloss varnish to the entire piece to replicate the shiny glazed look in the photo. Two coats usually gives the best depth. -
Final Cure:
Let the varnish cure according to the manufacturer’s instructions before using the dish for holding jewelry or keys.
Pro Tip: High Gloss
For a truly glass-like ceramic finish, use a two-part epoxy resin instead of standard varnish. It’s thicker and self-levels beautifully.
Place your finished scalloped dish near a window to catch the light and show off that glossy, professional-looking surface
Pressed Botanical Texture Ashtray
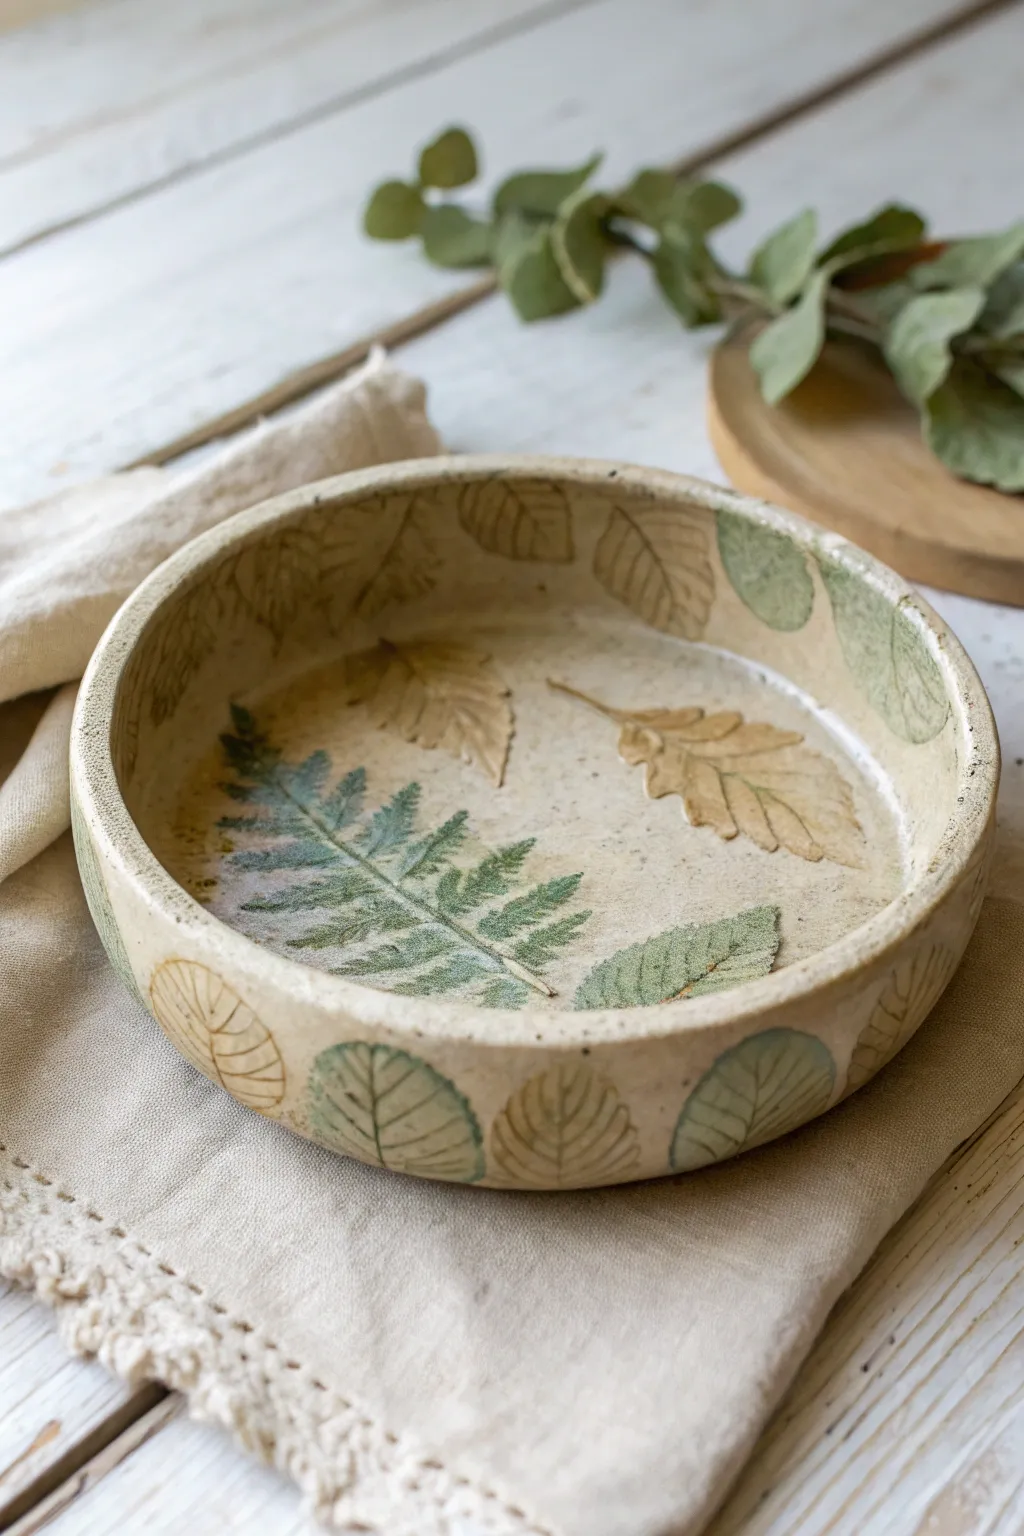
Bring the serene beauty of the woods into your home with this nature-inspired air dry clay ashtray. By pressing real leaves into the clay surface, you’ll capture intricate veins and organic textures for a piece that feels both rustic and refined.
Step-by-Step
Materials
- Air dry clay (white or light grey)
- Fresh or flexible dried leaves (fern, oak, etc.)
- Rolling pin
- Circle template or bowl (approx. 5-6 inches)
- Craft knife
- Small sponge
- Water
- Watercolor paints or watered-down acrylics (greens and browns)
- Fine detail paintbrush
- Matte or satin sealant/varnish
- Sandpaper (fine grit)
Step 1: Shaping the Base
-
Condition the clay:
Begin by taking a handful of air dry clay and kneading it in your hands until it becomes warm, pliable, and free of cracks. -
Roll the slab:
Roll the clay out on a smooth surface or canvas cloth to an even thickness of about 1/4 inch. If you notice air bubbles, poke them with a pin and smooth them over. -
Arrange your botanicals:
Select your leaves. Place a large fern leaf in the center and scatter smaller, rounder leaves around the perimeter. -
Imprint the texture:
Gently roll over the leaves with your rolling pin once firmly. You want to press them deep enough to leave a clear impression of the veins but not so deep that the clay becomes too thin. -
Cut the shape:
Place your circular template over the impressed clay. Using a craft knife, cut vertically around the template to create a clean circle. -
Remove the leaves:
Carefully peel the leaves off the clay. Use the tip of your craft knife or tweezers to lift the stem edge if they are stuck.
Selection Success
Choose leaves with thick, prominent veins on the backside. Ferns, sage, and heavily textured weeds create much crisper impressions than smooth leaves like ivy.
Step 2: Forming the Walls
-
Prepare the side strip:
Roll out a second long strip of clay, also about 1/4 inch thick. This will become the wall of your ashtray. -
Texture the strip:
Press a repeating pattern of small leaves along this strip, similar to how you did the base, then peel them away. -
Cut to size:
Measure the circumference of your base and cut the strip to the correct length and height (about 1 to 1.5 inches tall). -
Score and slip:
Score (scratch) the outer edge of your base circle and the bottom edge of your clay strip. Add a little water or slip (clay mixed with water) to the scored areas. -
Attach the wall:
Wrap the strip around the base, pressing firmly to join them. Smooth the seam on the inside and outside with your finger or a modeling tool. -
Secure the join:
Gently blend the clay where the two ends of the wall meet. You can wet your finger slightly to make this invisible.
Clay Cracking?
If small cracks appear while the wall dries, mix a tiny amount of fresh clay with water to make a paste and fill the cracks immediately, then smooth over.
Step 3: Finishing Touches
-
Refine the edges:
Run a damp sponge along the rim of the dish to soften any sharp angles left by your knife cuts. -
Let it dry:
Allow the piece to dry completely for 24-48 hours. I find flipping it over halfway through helps prevent warping. -
Sand imperfections:
Once bone dry, lightly sand any rough spots or fingerprints with fine-grit sandpaper. -
Paint the impressions:
Using watered-down acrylics or watercolors, paint inside the leaf impressions. Use mossy greens for the fern and soft browns for the oak leaves to mimic the autumnal look in the photo. -
Wipe back excess:
Quickly wipe the surface with a barely damp cloth or paper towel. This leaves the pigment deep in the veins while cleaning the raised surface. -
Seal the piece:
Apply two coats of matte or satin varnish to protect the clay from moisture and ash damage.
Once sealed and dry, your botanical dish is ready to hold small treasures or simply serve as a stunning organic accent piece.


The Complete Guide to Pottery Troubleshooting
Uncover the most common ceramic mistakes—from cracking clay to failed glazes—and learn how to fix them fast.
Geometric Faceted Ashtray
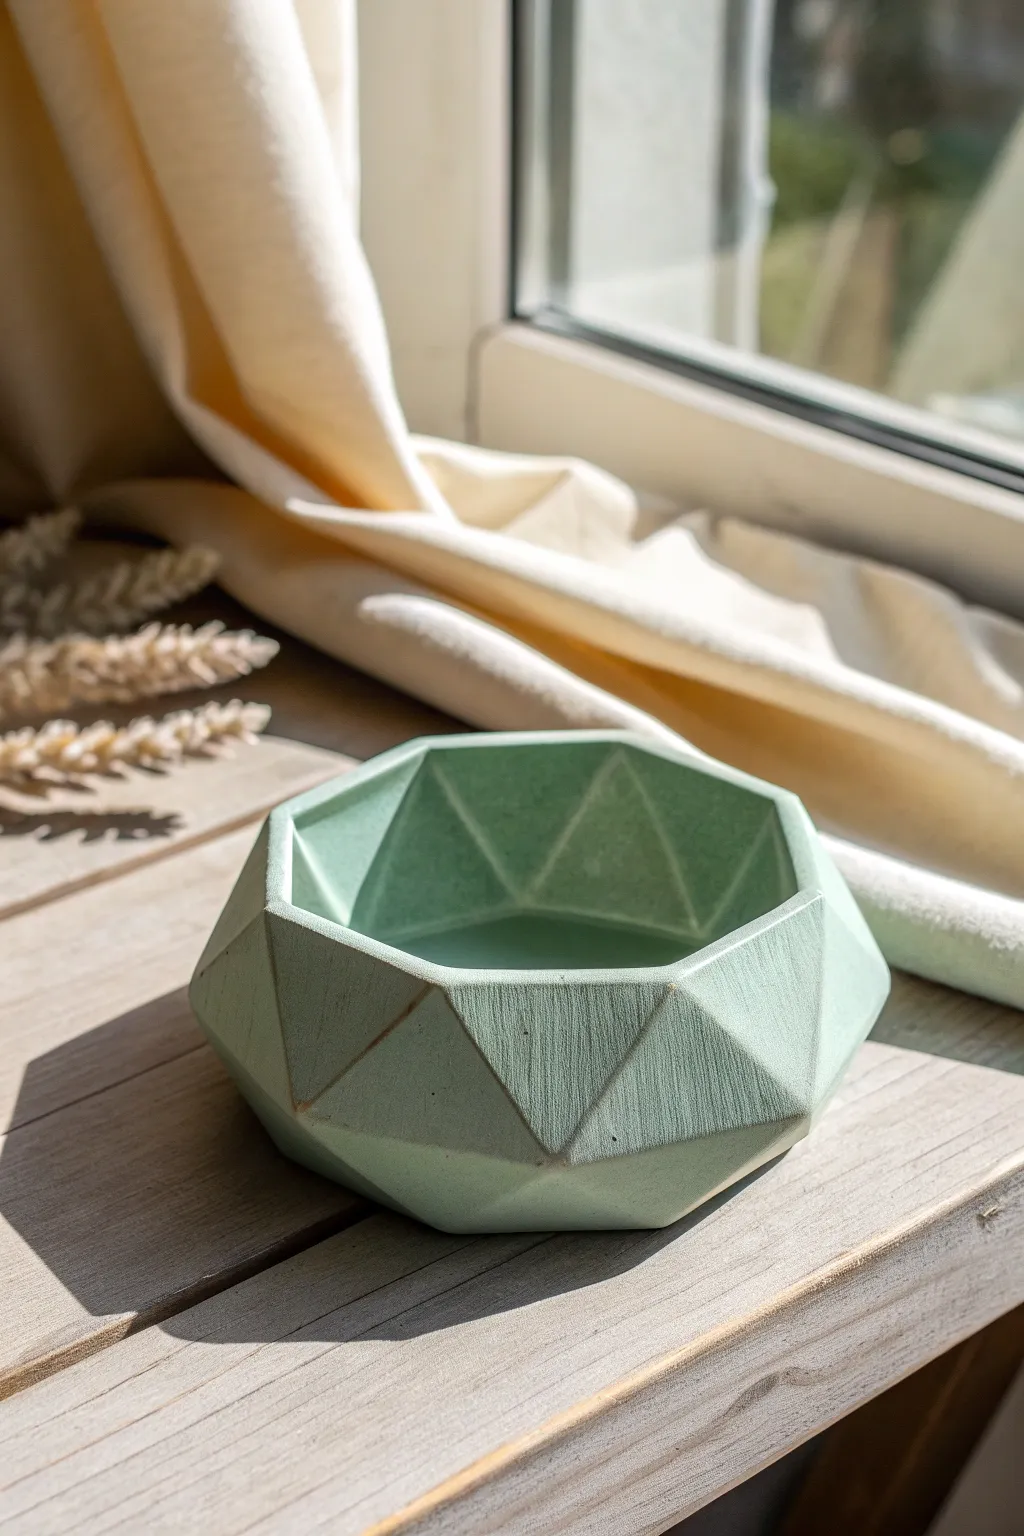
This stunning geometric ashtray features a modern, faceted design that looks complex but is surprisingly achievable with the right technique. The soft sage green tone and matte finish give it a high-end, faux-concrete aesthetic perfect for minimalist decor.
How-To Guide
Materials
- Air dry clay (white or grey)
- Acrylic rolling pin
- Sharp craft knife or X-Acto knife
- Ruler
- Small bowl or cup (for molding the interior)
- Sandpaper (fine grit)
- Acrylic paint (sage green)
- Matte sealant or varnish
- Water and sponge
- Canvas or silicone mat
Step 1: Preparation and Base Shape
-
Condition the clay:
Start by kneading a generous amount of air dry clay until it is warm, pliable, and free of air bubbles or cracks. This prevents structural issues later. -
Roll out a thick slab:
Roll your clay into a uniform slab that is approximately 1/2 inch thick. You need significant thickness to carve out the deep facets without piercing through the walls. -
Cut the base hexagon:
Using a printed template or a ruler, cut out a large, perfect hexagon from your slab. This will serve as the bottom footprint of your bowl. -
Build the walls:
Roll out a long, thick strip of clay (also 1/2 inch thick). Score and slip the edges of your hexagon base, then attach the strip to create vertical walls, smoothing the connection point seamlessly on the inside and outside.
Step 2: Forming the Facets
-
Refine the interior:
While the clay is still workable, press a small bowl into the center to create a perfectly smooth, rounded interior well, or use your fingers to smooth and curve the inside corners. -
Establish the outer shape:
Gently shape the exterior walls so they flare out slightly at the bottom and taper in at the rim, mirroring the general volume of the finished piece. -
Initial drying phase:
Let the clay dry until it is ‘leather hard’—firm to the touch but still holds moisture. This is crucial; if it’s too soft, the knife will drag; too dry, and it will crumble. -
Carve the rim facets:
Using your sharp craft knife, slice angled sections off the top rim. Aim to create a hexagonal opening by slicing flat planes that angle downward toward the interior. -
Carve the lower facets:
Now, slice triangular planes from the lower section of the wall, angling upward. I find it helpful to imagine creating a diamond pattern where the top and bottom cuts meet in the middle. -
Connect the geometry:
Continue carving away the excess clay around the equator of the bowl. You want the planes from the top and bottom to meet at sharp, crisp ridges. -
Refine edges:
Go back over your cuts with the flat of the blade to smooth out any drag marks, ensuring every geometric plane is perfectly flat.
Crumbling Edges?
If the clay drags or crumbles while carving, it is too dry. Mist it lightly with water, wrap it in plastic for 30 minutes, and try carving again.
Step 3: Finishing Touches
-
Full dry:
Allow the piece to dry completely for 24-48 hours. Turn it upside down halfway through so the bottom dries evenly. -
Sand for perfection:
Once bone dry, use fine-grit sandpaper to sharpen the ridges between facets. Be careful not to round them over; you want to maintain that crisp geometric look. -
Mix your paint:
Mix sage green acrylic paint. If you want a more stone-like texture, mix in a tiny pinch of baking soda to thick the paint slightly. -
Apply base coat:
Paint the entire piece, getting into the interior corners. Use a soft brush to avoid leaving visible stroke marks. -
Dry brushing (optional):
To highlight the facets, you can very lightly dry-brush a lighter shade of green or white specifically on the ridges. -
Seal the work:
Finish with two coats of a matte sealant. This is essential for ash trays to make them wipeable and heat resistant.
Use a Wire Tool
For cleaner initial cuts on thick clay walls, use a wire clay cutter or a cheese slicer instead of a knife to remove large chunks of material.
Now you have a stylish, structural piece that looks more like chiseled stone than handmade clay
Extra-Deep Bowl Ashtray With Notches
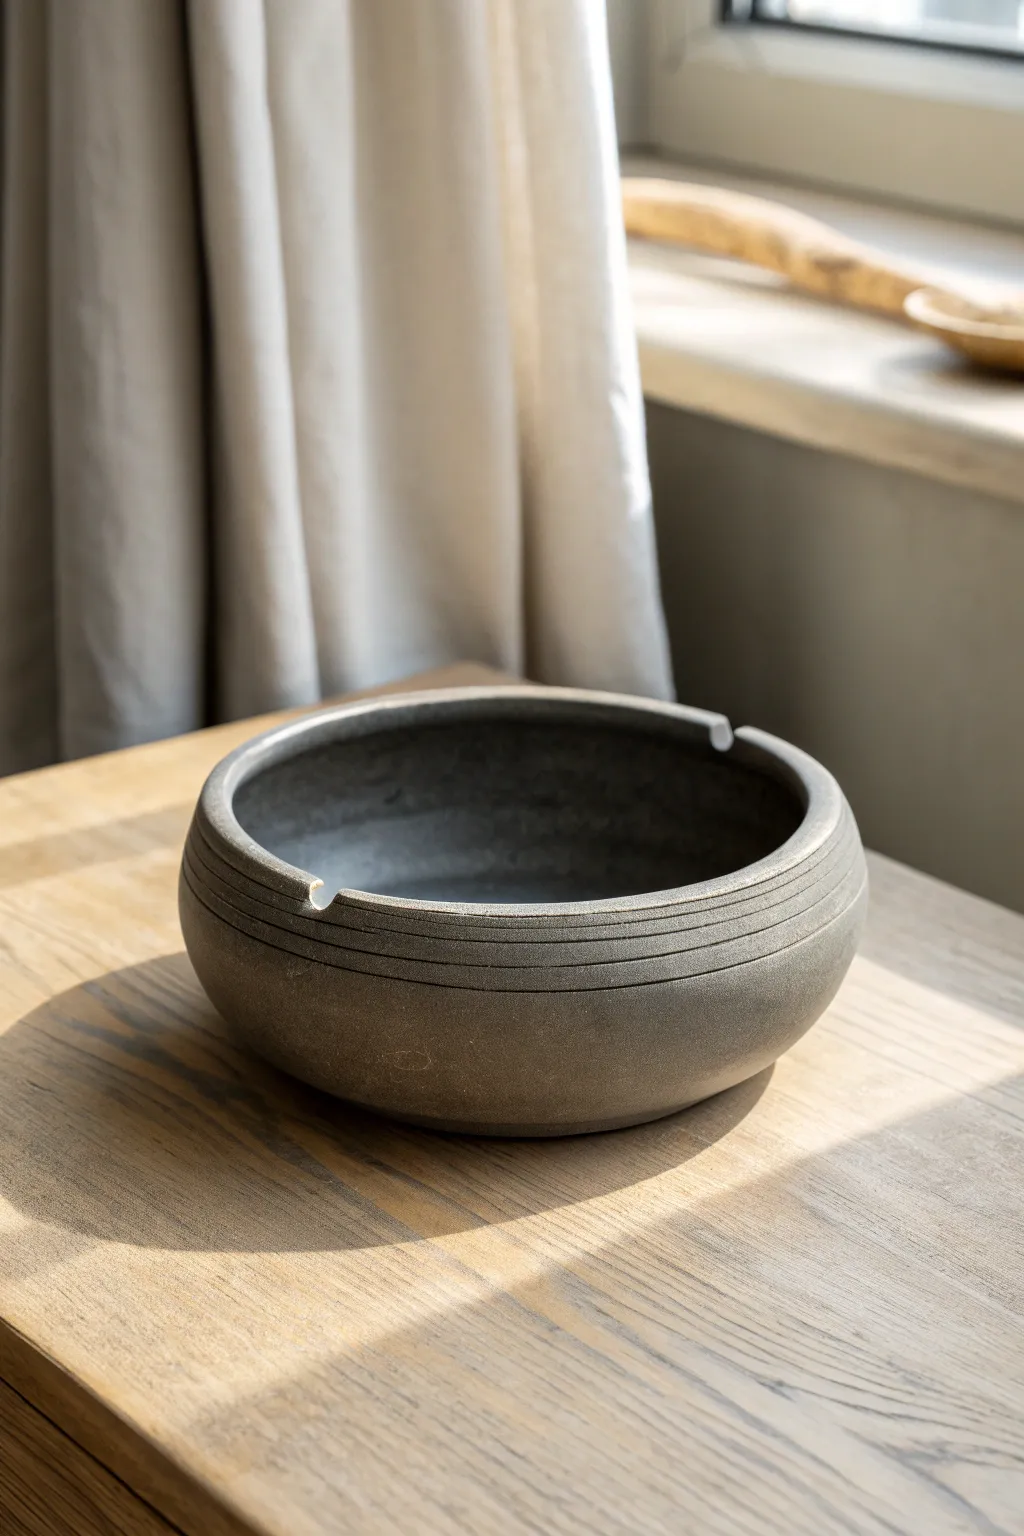
This project creates a substantial, weighty ashtray with an extra-deep reservoir to keep ash contained, featuring a sophisticated matte stone finish and minimalist horizontal carving. The dark charcoal tone gives it a modern, industrial look that fits beautifully into contemporary decor.
Step-by-Step Tutorial
Materials
- Air dry clay (preferably gray or stone-colored)
- Acrylic paint (black, dark gray, and burnt umber)
- Matte varnish or sealant
- Rolling pin
- Circular template (like a bowl or lid approx. 6 inches wide)
- Fettling knife or craft knife
- Needle tool or toothpick
- Carving tool or loop tool
- Sponge
- Sandpaper (fine grit)
- Water
Step 1: Forming the Base Structure
-
Prepare the clay slab:
Begin by kneading a large ball of air dry clay until it is pliable and free of air bubbles. Roll it out into a uniform slab that is about 1/4 to 1/2 inch thick. -
Cut the base:
Use your circular template to cut out a perfect circle for the bottom of the ashtray. Set this aside on a piece of parchment paper. -
Create the walls:
Roll out a long, rectangular strip of clay. This needs to be tall enough for that ‘extra-deep’ look visible in the photo, roughly 3 to 4 inches high, and long enough to wrap around the circumference of your base. -
Attach the wall:
Score the outer edge of your base circle and the bottom edge of your clay strip. Apply a little water or slip (clay mixed with water) to the scored areas. -
Seal the seam:
Wrap the strip around the base, pressing firmly. Where the two ends of the wall meet, cut them at an angle for a cleaner join, score, slip, and blend them together seamlessly. -
Reinforce the interior:
Roll a thin snake of clay and press it into the bottom interior corner, where the wall meets the floor. Smooth this coil out completely to reinforce the join and create a rounded transition.
Step 2: Refining and Carving
-
Shape the rim:
Use your fingers and a damp sponge to slightly curve the upper rim inward. This inward curve helps contain the ash and gives the piece a professional pottery silhouette. -
Create the notches:
Identify two opposite points on the rim. Use a round tool handle or your thumb to gently press down, creating smooth, U-shaped indentations or ‘notches’ for resting cigarettes. -
Smooth the surface:
Before adding texture, use a damp sponge to smooth out any fingerprints or bumps on the exterior and interior walls. -
Carve the grooves:
The defining feature of this piece involves horizontal lines. Using a needle tool or a loop tool, carefully carve 3-4 parallel lines around the upper exterior portion of the bowl. Rotating the bowl on a lazy susan can help keep these straight. -
Initial drying:
Let the piece dry slowly away from direct sunlight or heat to prevent cracking. Cover loosely with plastic for the first 24 hours.
Prevent Cracks
Cracking often happens if the base and walls dry at different rates. Trap moisture by drying the bowl upside down for part of the time.
Step 3: Finishing the Look
-
Sand the surface:
Once fully dry (usually 24-48 hours), use fine-grit sandpaper to smooth any rough edges, particularly around the notches and the rim, but leave the carved grooves distinct. -
Mix the base color:
Mix black acrylic paint with a small amount of dark gray. You want a very dark, charcoal stone color rather than a flat black. -
Apply the first coat:
Paint the entire piece, inside and out. I like to use a stiff brush here to push paint deep into the carved grooves. -
Add dimension:
While the base coat is still slightly tacky, dab a sponge into a mixture of gray and a tiny bit of burnt umber. Lightly sponge the surface to create a natural, stone-like mottling. -
Seal the piece:
Finish with two coats of matte varnish. This is crucial for protecting the paint from heat and ash, and it preserves that dry, stony aesthetic.
Stone Effects
Mix a teaspoon of baking soda or fine sand into your dark gray paint before applying. This adds true grit and realism to the stone texture.
Now you have a sleek, functional piece of decor that mimics the weight and texture of real hewn stone.

TRACK YOUR CERAMIC JOURNEY
Capture glaze tests, firing details, and creative progress—all in one simple printable. Make your projects easier to repeat and improve.
Built-In Lighter Slot Ashtray
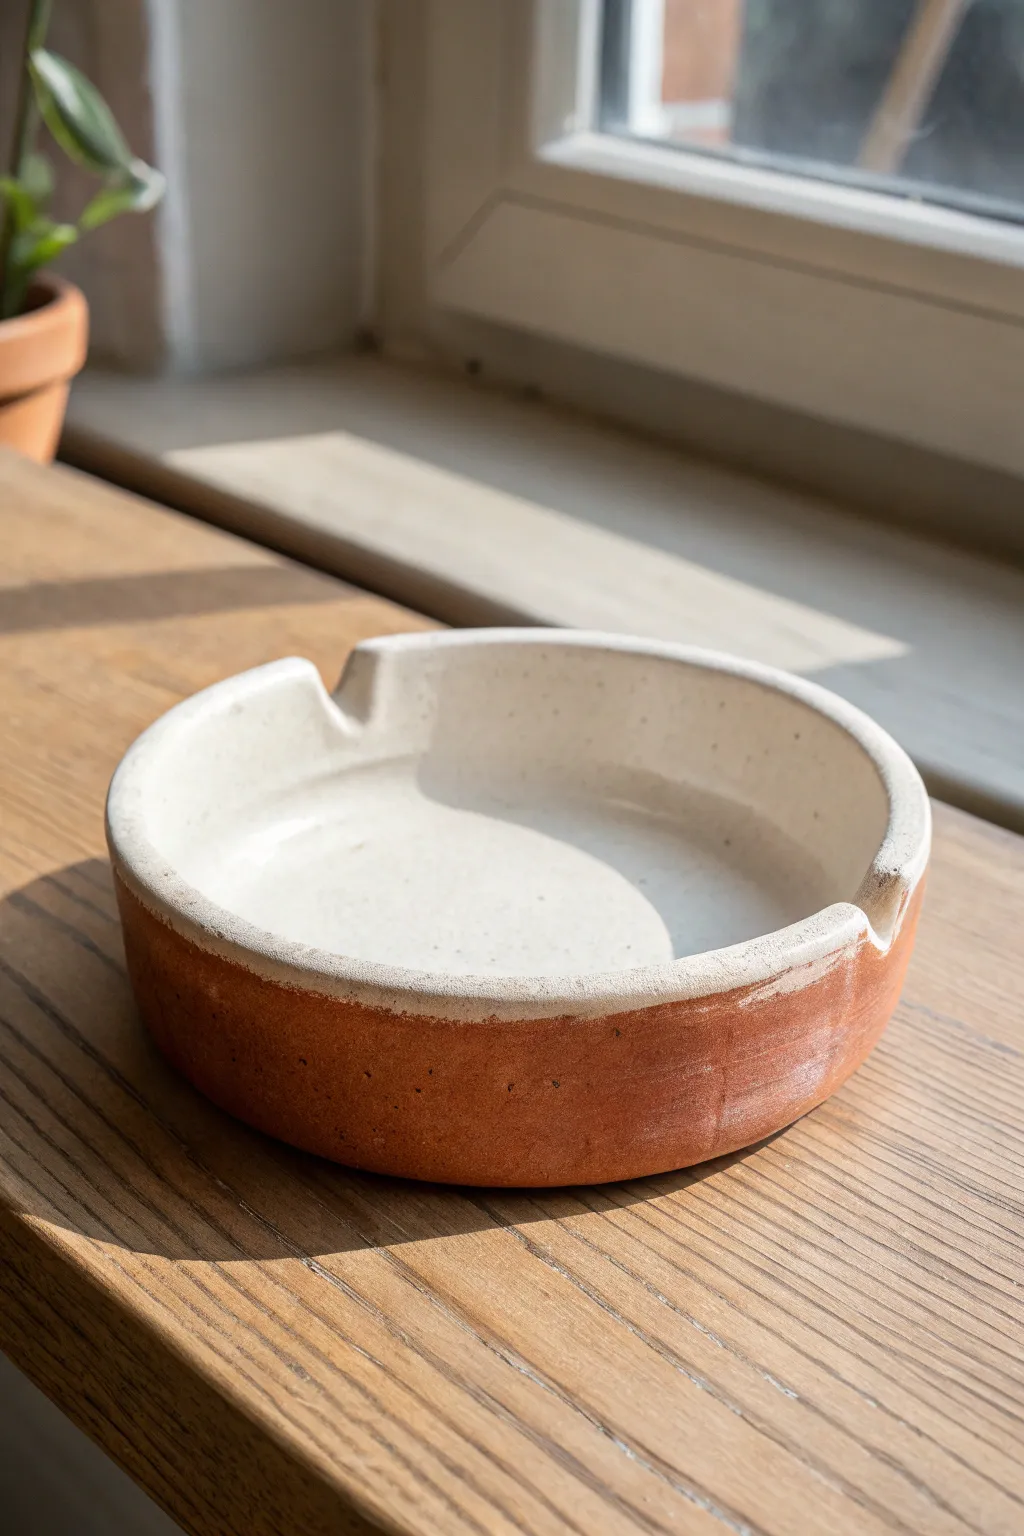
This project combines the rustic charm of exposed reddish clay with a smooth, speckled cream interior for a sophisticated, modern look. The wide, circular design features distinct cigarette rests carved directly into the rim, making it as functional as it is stylish.
Detailed Instructions
Materials
- Red air dry clay (terracotta style)
- Rolling pin
- Circle template or bowl (approx. 5-6 inches diameter)
- Fettling knife or clay craft knife
- Small sponge
- Cup of water
- Sandpaper (medium and fine grit)
- White acrylic paint (creamy off-white shade)
- Brown or black acrylic paint (for speckling)
- Old toothbrush
- Gloss varnish or sealant (waterproof recommended)
Step 1: Shaping the Base
-
Prepare the clay slab:
Begin by taking a substantial chunk of red air dry clay and kneading it briefly to warm it up. Roll it out on a flat surface to an even thickness of about 1/4 to 1/2 inch. You want a solid, sturdy base for this piece. -
Cut the circle:
Place your circle template or an inverted bowl onto the slab. Using your fettling knife, cut vertically around the template to create a perfect clay disc. -
Create the walls:
Roll out a separate long coil or ‘snake’ of clay, thick enough to match the height you want for the sides (about 1 inch thick). Flatten this coil slightly into a long rectangular strip using your rolling pin. -
Attach the wall:
Score the outer edge of your circular base and the bottom edge of your clay strip. Apply a little water or slip to the scored areas. Wrap the strip around the base, pressing firmly to join them. -
Blend the seams:
Use your thumb or a modeling tool to blend the clay from the wall down into the base, both on the inside and the outside. The goal is to make the seam invisible so it looks like one solid piece. -
Smooth everything out:
Dip your small sponge in water (squeeze it out well so it’s just damp) and run it over the rim, walls, and interior. This smooths out fingerprints and refines the shape.
Step 2: Carving & Drying
-
Mark the notches:
Decide where you want your cigarette rests. The image shows two, positioned somewhat opposite each other. Mark these spots lightly on the rim. -
Carve the rests:
Use a rounded tool or the handle of a paintbrush to press down into the rim at your marked spots. Gently rocking the tool back and forth creates a smooth U-shaped indentation. -
Refine the notches:
Smooth the edges of your new notches with a wet finger so there are no sharp burrs. Ensure the indentation is deep enough to hold a cigarette securely. -
Slow drying phase:
Place the ashtray in a cool, dry spot away from direct sunlight. Let it dry for at least 24 to 48 hours. I find flipping it over gently halfway through helps the bottom dry evenly.
Cracks Appearing?
If hairline cracks form while drying, mix a tiny bit of fresh clay with water to make a paste (slip). Fill the crack, smooth it over, and let it dry again before sanding.
Step 3: Finishing & Painting
-
Sand the surface:
Once bone dry, use medium grit sandpaper to level out any bumps on the rim and exterior. Switch to fine grit to get a super smooth finish, especially on the interior. -
Wipe down:
Use a barely damp cloth or dry brush to remove all sanding dust. Dust makes it hard for paint to stick, so be thorough here. -
Paint the interior:
Apply your creamy off-white acrylic paint to the inside of the ashtray and the top of the rim. You’ll likely need 2-3 coats for opaque coverage. Leave the exterior raw red clay for that beautiful two-tone contrast. -
Create the rough edge:
When painting the rim, don’t make a perfect line. Dab the brush slightly down the outside edge to create that organic, slightly rustic transition seen in the photo. -
Add the speckles:
Dilute a tiny drop of brown or black paint with water. Dip an old toothbrush into it, then run your thumb over the bristles to flick tiny specks onto the creamy white painted areas. -
Seal the piece:
Apply a coat of gloss varnish over the entire piece, including the raw clay exterior. This protects the clay and makes it easier to wipe clean.
Pro Tip: Weighted Base
For a more premium feel, make the base slab slightly thicker than the walls. The extra weight prevents the ashtray from sliding around on the table easily.
Once sealed and dried, your custom two-tone ashtray is ready to add a touch of earthy elegance to your space.
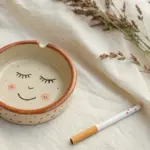
Cute Face Character Ashtray
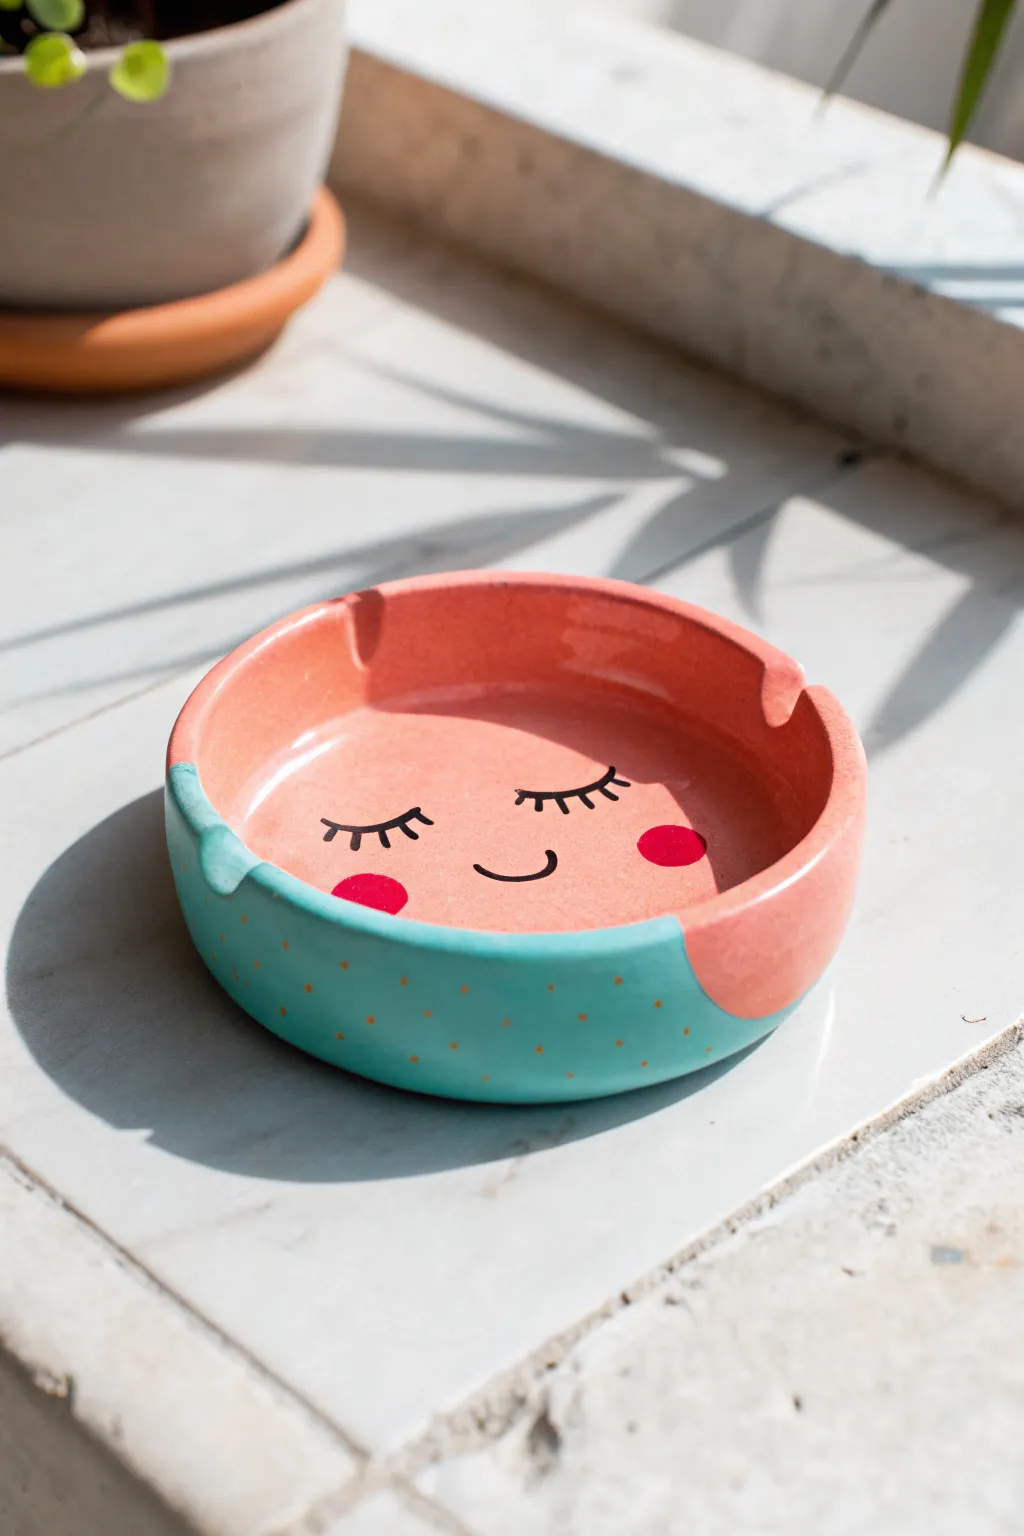
This adorable trinket dish or ashtray features a peaceful sleeping face painted right into the basin, bringing a sense of calm to any tabletop. With its glossy finish and trendy teal-and-peach color palette, it mimics the look of high-end fired ceramics using accessible air-dry clay.
Detailed Instructions
Materials
- Air dry clay (white)
- Acrylic paints (peach/coral, teal/mint, black, red/dark pink)
- Gold paint or gold paint marker
- Rolling pin
- Circle cutter or round bowl template
- Clay sculpting tools (or a knife)
- Fine grit sandpaper
- Small round paintbrush
- Fine detail brush
- High-gloss varnish or sealant (waterproof if used as an ashtray)
- Bowl of water
Step 1: Sculpting the Base
-
Roll out the slab:
Begin by conditioning your air dry clay until it is soft and pliable. Roll it out on a flat surface to an even thickness of about 1/4 inch. -
Cut the circle:
Use a circle cutter or place a round bowl upside down on the clay as a guide to cut out a perfect circle for the base of your dish. -
Form the walls:
Roll out a separate long snake or coil of clay. Flatten it slightly into a long rectangular strip that matches the thickness of your base. -
Attach the walls:
Score (scratch) the outer edge of your base circle and the bottom edge of your clay strip. Add a little water to create slip, then wrap the strip around the base to form the walls. -
Blend the seams:
Using your thumb or a modeling tool, firmly smooth the clay where the walls meet the base, both on the inside and outside, until the seam completely disappears. -
Create the rests:
While the clay is still soft, use a cylinder tool or the handle of a paintbrush to gently press two or three indentations into the top rim of the wall for resting spots. -
Smooth everything out:
Dip your finger in a little water and run it over the entire piece to remove fingerprints and bumps. I like to spend extra time here to get that professional ceramic look. -
Let it dry:
Allow the piece to dry completely for 24-48 hours. Turn it over halfway through the drying process to ensure the bottom dries evenly.
Cracks happen
If small cracks appear during drying, create a ‘slip’ by mixing a bit of clay with water into a paste. Fill the cracks, smooth it out, and let it dry again.
Step 2: Painting & Finishing
-
Sand imperfections:
Once fully dry, use fine-grit sandpaper to buff away any rough edges or uneven spots on the rim and sides. -
Base coat the interior:
Paint the entire interior and the top rim of the dish with a warm peach or coral acrylic paint. You may need two coats for opaque coverage. -
Paint the exterior block:
On the outside, paint a large section in a minty teal color, leaving a rounded, abstract section of the original peach color showing near one side. -
Paint the face:
Using a very fine detail brush and black paint, carefully draw two curved lines for sleepy eyes with little lashes, and a small smile in the center of the peach interior. -
Add rosy cheeks:
Dip a round brush or a dotting tool into red or dark pink paint and stamp two solid circles on the cheeks. -
Add the gold accents:
Once the teal paint is dry, use a gold paint pen or thin brush to add tiny, scattered dots across the teal section for a whimsical pattern. -
Seal the piece:
Apply a coat of high-gloss varnish to the entire piece. If you plan to use this as a functional ashtray rather than just decor, ensure you use a heat-resistant, non-flammable sealant.
Make it 3D
Instead of just painting the face, try sculpting a tiny nose bump in the center before the clay dries to add gentle dimension to the character.
Enjoy your charming new handmade piece on your coffee table or windowsill
Crescent Moon And Stars Ashtray
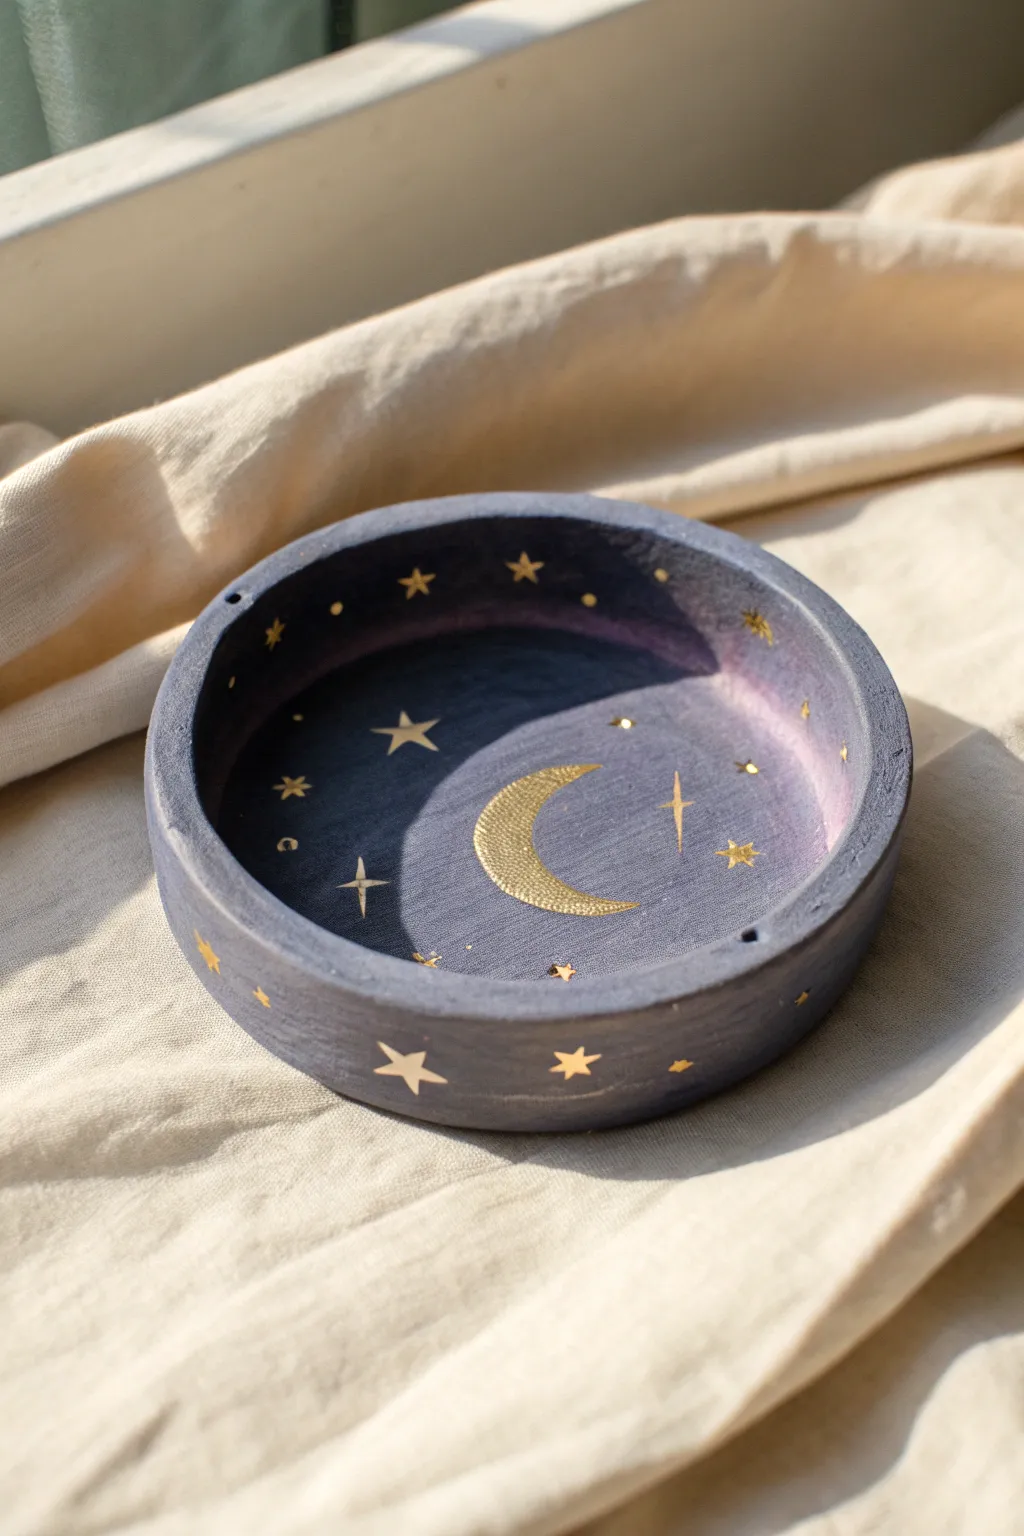
Bring a piece of the cosmos into your home with this dreamy deep purple ashtray featuring flickering gold stars and a crescent moon. Its chunky, textured rim and hand-painted celestial details make it a perfect functional art piece for holding trinkets or incense.
Step-by-Step
Materials
- Air dry clay (white or grey)
- Clay roller or rolling pin
- Circle cutter or circular template (bowl/lid)
- Clay knife or X-Acto knife
- Small bowl of water
- Sandpaper (medium and fine grit)
- Acrylic paints: Deep navy blue, purple, and metallic gold
- Paintbrushes: Flat shader brush and fine detail liner brush
- Gloss or matte varnish for sealing
- Optional: Clay sculpting tools for smoothing
Step 1: Shaping the Base
-
Prepare the clay:
Begin by conditioning a handful of air dry clay, kneading it until it is soft, pliable, and free of cracks. -
Roll the slab:
Roll the clay out onto a flat surface to a thickness of about 1/4 inch. Ensure the thickness is even across the entire slab. -
Cut the base:
Place your circular template on the clay and cut out a perfect circle using your knife. This will be the bottom of your tray. -
Make the walls:
Roll out a separate long snake of clay. Flatten this snake into a long, rectangular strip that is approximately 1 inch tall and thick enough to match your base. -
Attach the rim:
Score the outer edge of your circular base and one edge of your clay strip. Apply a little water to the scored areas to create a slip. -
Seal the join:
Wrap the strip around the base circle. Use your modeling tool or finger to blend the clay together on the inside and outside seams so they disappear completely. -
Smooth everything:
Dip your finger in water and run it over the rim and walls to smooth out any fingerprints or rough textures. Create two small indentations on the rim if you intend to use it as a traditional ashtray. -
Let it dry:
Allow the piece to dry completely for 24-48 hours. I usually flip it over halfway through the drying process to ensure the bottom dries evenly.
Cracks happen
If small cracks appear during drying, make a paste of clay and water (slip) to fill them in, let dry, and sand smooth again.
Step 2: Sanding and Painting
-
Sand the surface:
Once fully dry, use medium grit sandpaper to level out any large bumps, then switch to fine grit for a smooth finish on the rim and interior. -
Base coat:
Paint the entire exterior and rim with a deep, dark navy blue acrylic paint. You may need two coats for full opacity. -
Create the galaxy effect:
For the interior, mix a little purple into your navy blue. Paint the center, blending it outwards into the darker rim color while the paint is still wet to create a subtle gradient. -
Draft the moon:
Once the background is dry, use a very light pencil sketch to outline a crescent moon shape in the center of the tray. -
Paint the gold moon:
Using your fine detail brush and metallic gold paint, fill in the crescent moon. Use tiny, stippling motions to give the moon a slightly textured, shimmering appearance. -
Add larger stars:
Paint five-pointed stars scattered around the interior and exterior walls. Vary the sizes, placing ‘hero’ stars near the moon and on the outer rim. -
Add detail sparkles:
Fill the empty space with tiny gold dots and four-pointed ‘sparkle’ stars to make the sky look full and distant. -
Seal the piece:
Finish by applying two coats of varnish to protect the paint and clay from moisture and ash damage.
Go glossy
Use a high-gloss polyurethane varnish or UV resin for the final coat to make the interior look like wet, reflective glass.
Now you have a stunning handmade piece ready to catch ashes or display your favorite jewelry under the stars
Dice And Card-Suit Ashtray
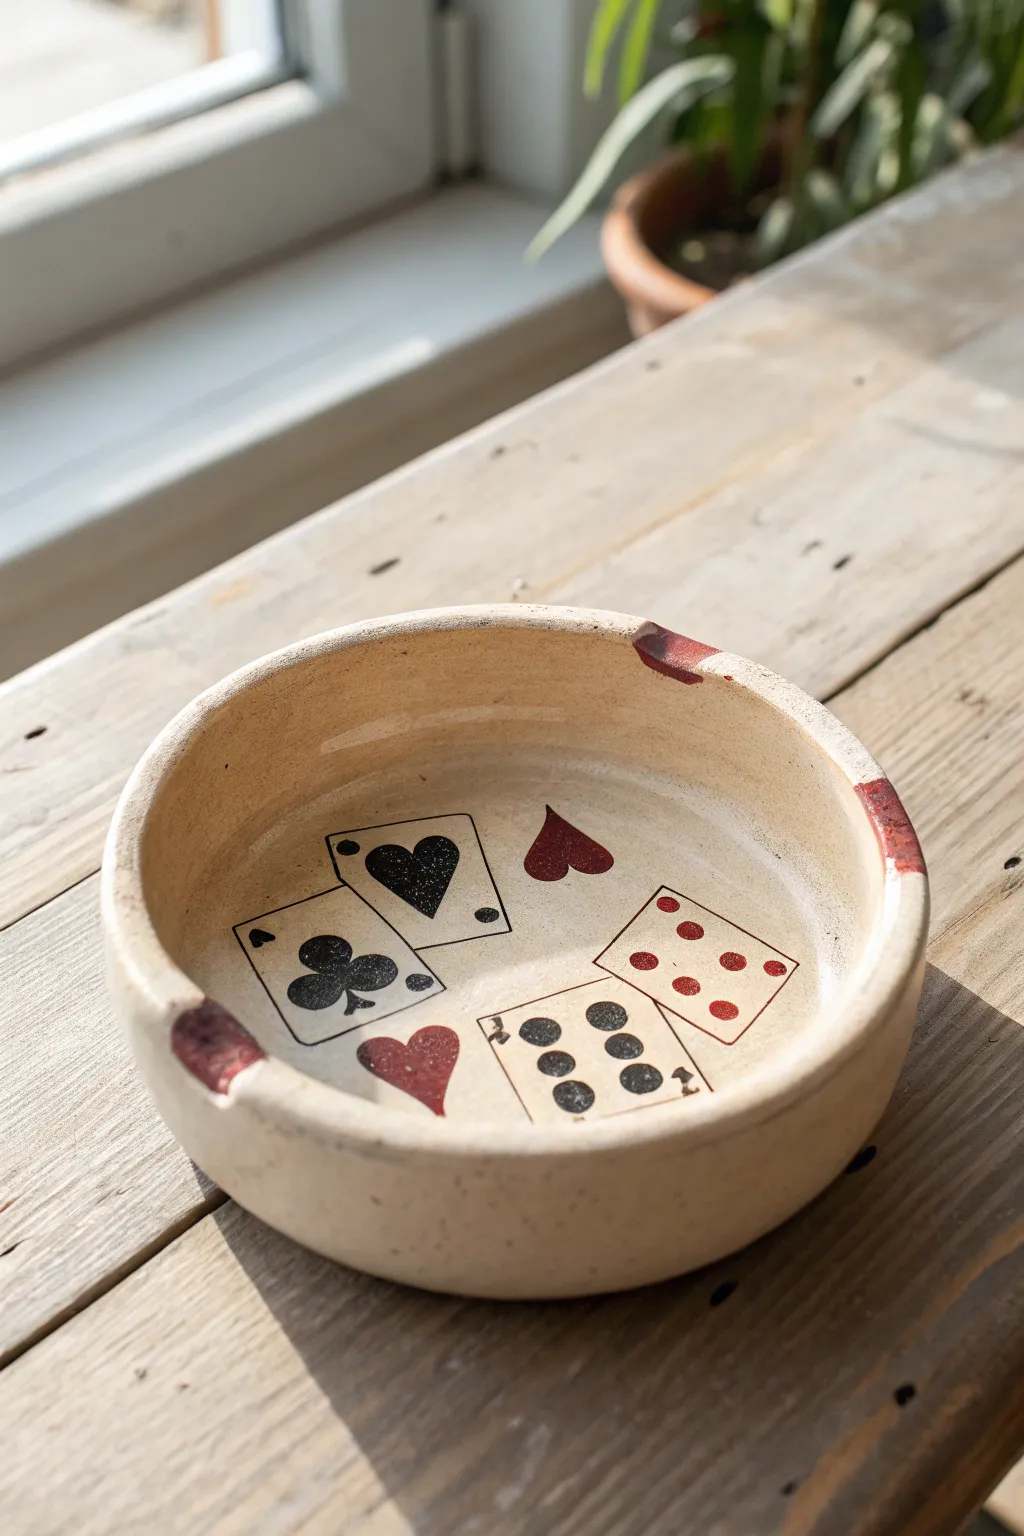
This rustic, casino-inspired ashtray brings a bit of vintage Vegas charm to your coffee table with its hand-painted playing cards and dice. The imperfect, creamy finish gives it a well-loved, handmade feel that beautifully complements the classic red and black card suit motifs.
Step-by-Step Tutorial
Materials
- Air dry clay (white or terracotta)
- Rolling pin
- Circular cutter or bowl (approx. 4-5 inches diameter)
- Small bowl with water
- Clay sculpting tools (or a butter knife)
- Acrylic paints: Cream/Off-White, Black, Deep Red
- Fine detail paintbrushes (size 0 and 00)
- Flat shader paintbrush (size 6 or 8)
- Fine-grit sandpaper (220 grit)
- Gloss or satin varnish/sealant
- A sponge
Step 1: Forming the Base
-
Roll the Slab:
Begin by conditioning your air dry clay until it is soft and pliable, then roll it out into a slab about 1/4 inch thick. Aim for an even thickness to prevent cracking later. -
Cut the Circle:
Place your circular cutter or an upside-down bowl onto the clay slab and cut out a perfect circle to serve as the base of your ashtray. Smooth the edges with a wet finger. -
Create the Walls:
Take remaining clay and roll a long, even coil or ‘snake’ that is slightly thicker than your base slab. Alternatively, you can cut a long rectangular strip if you prefer straighter walls. -
Attach the Walls:
Score (scratch) the outer edge of your base circle and the bottom of your coil. Apply a little water as ‘slip’ to the scored areas. -
Blend the Seams:
Place the coil onto the base and press down firmly. Use your thumb or a sculpting tool to drag clay from the coil down onto the base, blending the seam entirely on both the inside and outside so it looks like one solid piece. -
Shape the Rim:
Using a wet sponge, smooth the walls upwards to create a height of about 1.5 inches. Keep the rim slightly thick and rounded for that sturdy, rustic look. -
Add Resting Notches:
While the clay is still soft, use your finger or the handle of a paintbrush to gently press down three indentations equidistant along the rim. These are the cigarette rests. -
Dry and Sand:
Let the piece dry completely for 24-48 hours. Once lighter in color and hard, sand the entire piece with fine-grit sandpaper to remove rough fingerprints, focusing on smoothing the inside bottom surface for painting.
Stamp Perfection
Make a mini potato stamp or use an eraser carved with an X-acto knife to stamp the card suits perfectly every time, rather than hand-painting each one.
Step 2: Painting the Design
-
Base Coat:
Using the flat shader brush, paint the entire ashtray—inside, outside, and bottom—with the Cream or Off-White acrylic paint. I usually do two thin coats here for solid coverage. -
Sketch the Cards:
Once the base is bone dry, lightly sketch the outlines of two playing cards and a die or two on the inside floor using a mechanical pencil. Don’t press too hard to avoid etching the clay. -
Outline the Cards:
Using your finest detail brush and black paint heavily diluted with a drop of water (inky consistency), carefully paint the thin rectangular outlines of the playing cards. -
Paint the Ace of Spades:
On one card rectangle, paint a large central spade symbol. Add the letter ‘A’ and small spade suit symbols in the top-left and bottom-right corners. -
Paint the Hearts Card:
On the second card, use the Deep Red paint to fill in a heart symbol. Add the corresponding numbers or letters in the corners. -
Paint the Die Face:
For the die (or domino) shape, outline a square or rectangle in black, then use the end of your paintbrush handle dipped in paint to stamp perfect dots for the numbers. -
Floating Suit Details:
Fill any empty negative space on the ashtray floor with loose, floating suit symbols like a red heart or a black club to balance the composition. -
The Rustic Rim:
Dip your finger or a stiff brush into the Deep Red paint and smudge it messily onto the three cigarette resting notches you created earlier. This mimics a worn, vintage ceramic look. -
Speckle Effect:
For a final textured look, dilute some black or brown paint on a toothbrush, and gently flick the bristles to spray tiny speckles across the whole piece. -
Seal:
Protect your artwork with two coats of gloss or satin varnish. This is crucial for an ashtray to make it wipeable and resistant to ash stains.
Level Up: Vintage Aging
After the base coat dries, apply a ‘wash’ of watered-down brown paint and wipe it off immediately with a paper towel. It stays in the crevices for an antique look.
Now you have a charming piece of decor that looks like it came straight from an old-school parlor
Spooky Eyeball Cauldron Ashtray
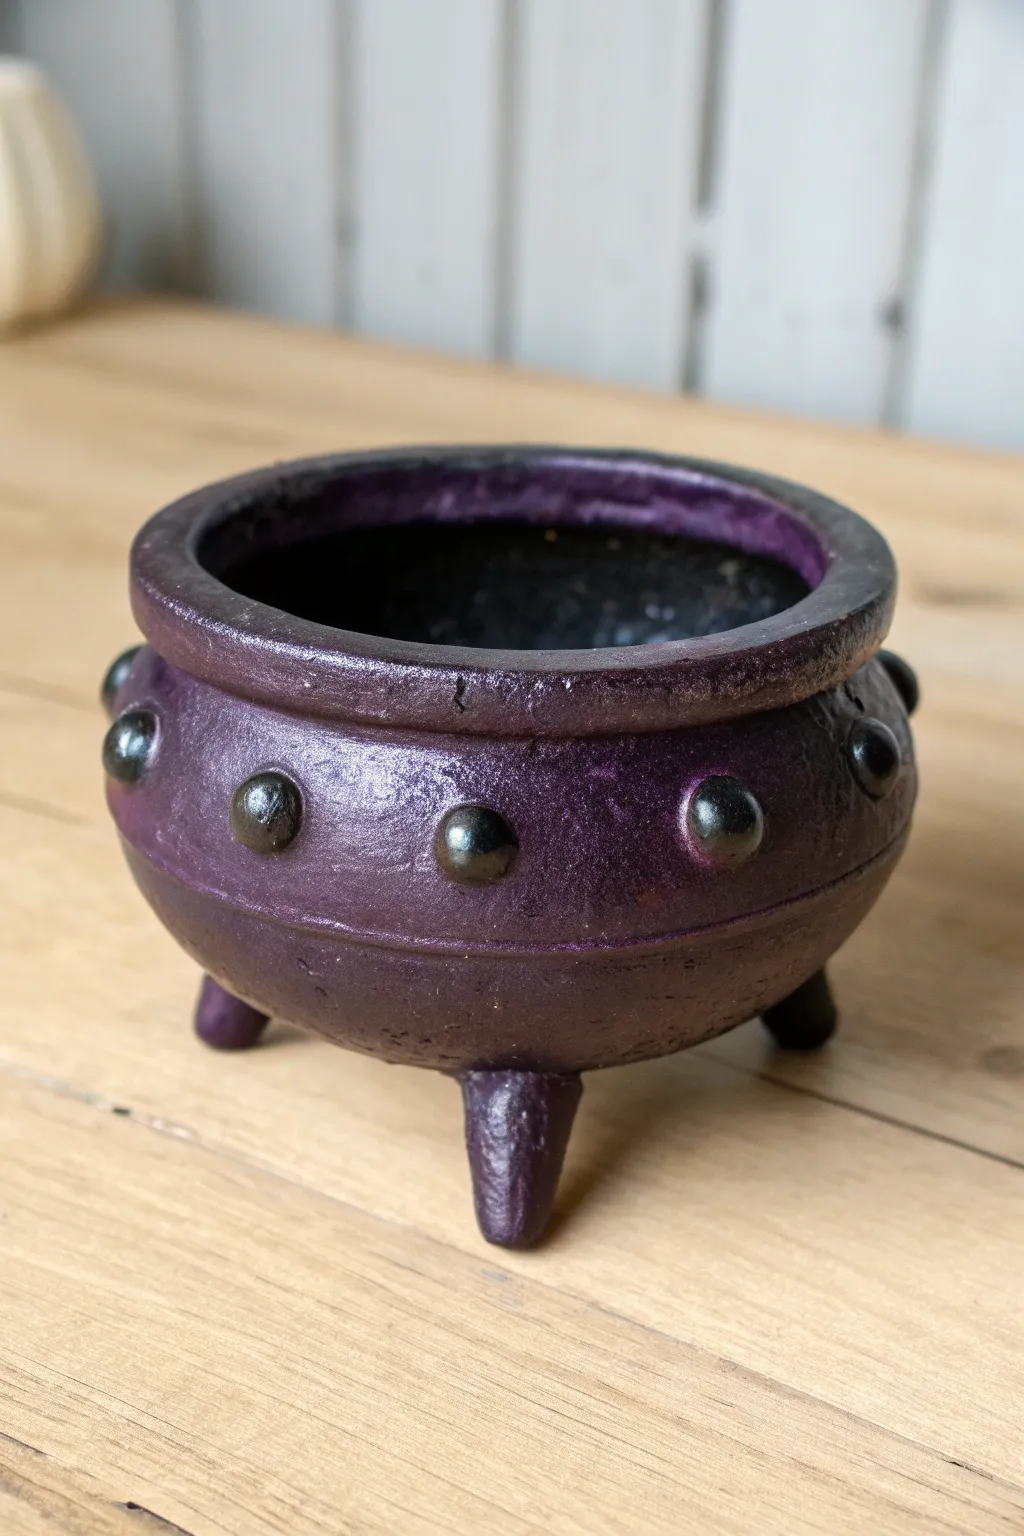
Summon a spooky atmosphere with this miniature cauldron catch-all or ashtray, sculpted from air-dry clay and finished with a mysterious metallic sheen. The deep purple finish, accented by rivet-like studs and tripod feet, makes it a perfect witchy accessory for any season.
Step-by-Step
Materials
- Air dry clay (white or grey)
- Small bowl for water
- Rolling pin
- Clay knife or craft knife
- Smooth work surface or silicone mat
- Acrylic paints (black, dark purple, metallic purple/amethyst)
- Gloss varnish or sealant
- Fine grit sandpaper
- Paintbrushes (medium flat brush and small detail brush)
- A small sphere tool or rounded end of a paintbrush
Step 1: Sculpting the Cauldron Base
-
Form the main ball:
Start by taking a fist-sized chunk of air-dry clay and conditioning it in your hands until it’s pliable. Roll it into a smooth, tight sphere to remove any major air bubbles. -
Create the hollow:
Using your thumbs, gently press into the center of the sphere while rotating it in your hands. Pinch the walls upwards and outwards to form a deep bowl shape, aiming for walls about 1/4 inch thick. -
Shape the rim:
Flatten the top edge of the bowl slightly with your fingers. Roll a thin coil of clay and attach it to the outer rim to create a distinct, thickened lip for the cauldron. -
Smooth the seams:
Dip your finger in a little water and smooth out the seam where you attached the rim coil. Blend the clay downwards so it looks like one solid piece. -
Refine the surface:
Take a moment to smooth the entire exterior and interior with a damp finger or sponge, removing fingerprints and bumps.
Weight it Down
While sculpting the hollow, place a smooth stone or glass marble in the bottom. This helps weigh it down so it won’t tip over easily once the clay dries.
Step 2: Adding Feet and Details
-
Make the tripod feet:
Roll three equal-sized small balls of clay, then slightly elongate them into stubby cones. These will be the cauldron’s feet. -
Attach the feet:
Score the bottom of the cauldron and the flat side of the feet with a needle tool or toothpick. Add a dab of water or clay slip, then press the feet firmly onto the base in a triangle formation. -
Create the rivet studs:
Roll several tiny, pea-sized balls of clay. These will be the decorative rivets (or ‘eyeballs’) around the center. -
Place the studs:
Score and slip the back of each small ball. Press them firmly onto the middle section of the cauldron’s exterior, spacing them evenly around the circumference. -
Dry thoroughly:
Let the cauldron dry completely for 24-48 hours. I usually flip it upside down halfway through to ensure the bottom and feet dry properly. -
Sand for smoothness:
Once bone dry, use fine-grit sandpaper to gently smooth any rough patches on the rim or body, being careful not to knock off the studs.
Step 3: Painting and Finishing
-
Base coat interior:
Paint the entire interior of the pot with solid black acrylic paint. This gives it depth and hides any ash or debris later. -
Base coat exterior:
Apply a coat of dark purple mixed with a touch of black to the exterior. Don’t worry about it being perfectly opaque; a little unevenness adds texture. -
Apply metallic sheen:
Once the base is dry, sponge or brush on a layer of metallic purple paint. Focus on the high points—the belly of the cauldron and the tops of the studs—to create a glowing effect. -
Highlight the rivets:
Use a small brush to add a darker black wash around the base of each stud, and a dot of bright metallic purple or silver on the very center of each stud to make them pop. -
Seal the piece:
Protect your work with a coat of gloss varnish. This mimics the look of cast iron or glazed ceramic and makes the ashtray easier to wipe clean.
Cracks while Drying?
If small cracks appear as the clay shrinks, don’t panic. Mix a tiny bit of fresh clay with water to make a paste (slip) and fill the cracks, then smooth over.
Now you have a wickedly cute cauldron ready for your witchy decor collection